design & operating procedures for membrane contactors
TRANSCRIPT

www.liqui-cel.com
Design & Operating Procedures for Membrane Contactors
Liqui-Cel® Membrane Contactors Design & Operating Procedures
Our MiniModules, 2.5 x 8, 4 x 13, 4 x 28 and 6 x 28 and 10 x 28 Industrial Contactors are manufacturedwith Sound Engineering Practice. Our 10 x 28 high purity and our 14 x 28 products have a productclassification – Category 1 per PED 97/23/EC.
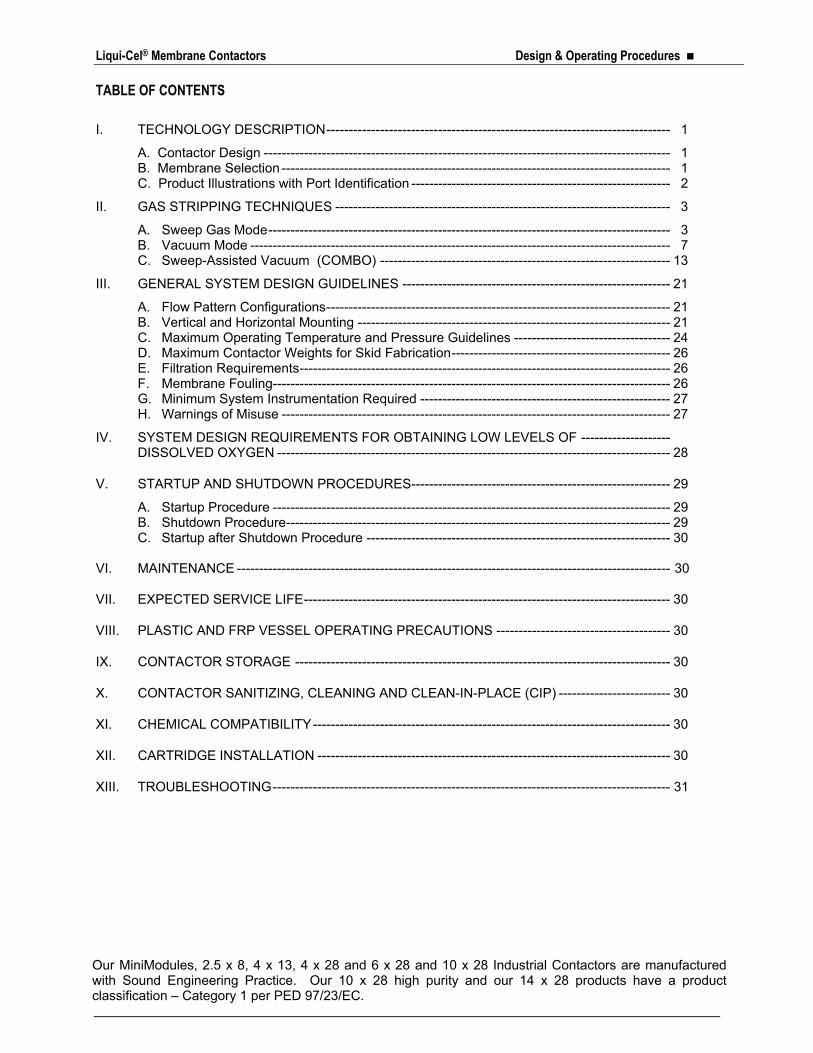
TABLE OF CONTENTS
I. TECHNOLOGY DESCRIPTION----------------------------------------------------------------------------- 1
A. Contactor Design ------------------------------------------------------------------------------------------- 1 B. Membrane Selection --------------------------------------------------------------------------------------- 1 C. Product Illustrations with Port Identification ---------------------------------------------------------- 2
II. GAS STRIPPING TECHNIQUES --------------------------------------------------------------------------- 3
A. Sweep Gas Mode------------------------------------------------------------------------------------------ 3 B. Vacuum Mode ---------------------------------------------------------------------------------------------- 7 C. Sweep-Assisted Vacuum (COMBO) ----------------------------------------------------------------- 13
III. GENERAL SYSTEM DESIGN GUIDELINES ------------------------------------------------------------ 21
A. Flow Pattern Configurations----------------------------------------------------------------------------- 21 B. Vertical and Horizontal Mounting ---------------------------------------------------------------------- 21 C. Maximum Operating Temperature and Pressure Guidelines ----------------------------------- 24 D. Maximum Contactor Weights for Skid Fabrication------------------------------------------------- 26 E. Filtration Requirements----------------------------------------------------------------------------------- 26 F. Membrane Fouling----------------------------------------------------------------------------------------- 26 G. Minimum System Instrumentation Required -------------------------------------------------------- 27 H. Warnings of Misuse --------------------------------------------------------------------------------------- 27
IV. SYSTEM DESIGN REQUIREMENTS FOR OBTAINING LOW LEVELS OF -------------------- DISSOLVED OXYGEN ---------------------------------------------------------------------------------------- 28
V. STARTUP AND SHUTDOWN PROCEDURES---------------------------------------------------------- 29
A. Startup Procedure ----------------------------------------------------------------------------------------- 29 B. Shutdown Procedure-------------------------------------------------------------------------------------- 29 C. Startup after Shutdown Procedure -------------------------------------------------------------------- 30 VI. MAINTENANCE ------------------------------------------------------------------------------------------------- 30
VII. EXPECTED SERVICE LIFE---------------------------------------------------------------------------------- 30
VIII. PLASTIC AND FRP VESSEL OPERATING PRECAUTIONS --------------------------------------- 30
IX. CONTACTOR STORAGE ------------------------------------------------------------------------------------ 30
X. CONTACTOR SANITIZING, CLEANING AND CLEAN-IN-PLACE (CIP) ------------------------- 30
XI. CHEMICAL COMPATIBILITY-------------------------------------------------------------------------------- 30
XII. CARTRIDGE INSTALLATION ------------------------------------------------------------------------------- 30
XIII. TROUBLESHOOTING----------------------------------------------------------------------------------------- 31

Liqui-Cel® Membrane Contactors Design & Operating Procedures
TABLES
Table 1 Hollow Fiber Membrane Properties ------------------------------------------------------------------- 1 Table 2 Estimated Air Sweep Requirements for CO2 Removal --------------------------------------------- 4 Table 3 Outlet-Dissolved Oxygen Concentration, Using the Vacuum Mode------------------------------ 7 Table 4 Nitrogen Sweep Range for Combo Mode ------------------------------------------------------------ 14 Table 5 Minimum and Maximum Contactor Flow Rates----------------------------------------------------- 21 Table 6 Pressure Guidelines for 10-Inch Contactors---------------------------------------------------------- 25 Table 7 Pressure Guidelines for 14-Inch Contactors---------------------------------------------------------- 25 Table 8 Contactor Weights for System Fabrication ----------------------------------------------------------- 26 Table 9 General Filtration Guidelines -------------------------------------------------------------------------- 26
FIGURES
Figure 1 Generic P & ID for Horizontal Mounting Sweep-Gas Operation --------------------------------- 5 Figure 2 Generic P & ID for Vertical Mounting Sweep-Gas Operation------------------------------------- 6 Figure 3 Generic P & ID for Horizontal Mounting Vacuum Operation ------------------------------------- 9 Figure 4 Generic P & ID for Vertical Mounting Vacuum Operation ---------------------------------------- 10 Figure 5 Generic P & ID for Vertical Mounting 6-inch NB Vacuum Operation--------------------------- 11 Figure 6 Generic P & ID for Vertical Mounting 6-inch NB, 2 in Series, “H” Configuration Vacuum Operation -------------------------------------------------------------------- 12 Figure 7 Generic P & ID for Horizontal Mounting Sweep-Assisted (Combo) Operation ---------------- 16 Figure 8 Generic P & ID for Vertical Mounting Sweep-Assisted (Combo) Operation-------------------- 17 Figure 9 Generic P & ID for Horizontal Mounting, end-to-end, Sweep-Assisted (combo) Operation--------------------------------------------------------------------------------------- 18 Figure 10 Generic P & ID for for Air/Vacuum Mode, Vertical Using Atmospheric Air As Sweep------ 19 Figure 11 Generic P & ID for Air Blower Combo Mode Using Blower To Pull In Atmospheric Air ---- 20
ILLUSTRATIONS
Illustration 1 Liqui-Cel® Extra-Flow Membrane Contactor ----------------------------------------------- 2 Illustration 2 Liqui-Cel® NB™, No Baffle Membrane Contactor----------------------------------------- 2 Illustration 3 Liqui-Cel® MiniModule® Membrane Contactor -------------------------------------------- 2
Illustration 4 Port orientation Vertical Mounting-Vacuum Only with Extra-Flow ----------------------- 22 Illustration 5 Port orientation Vertical Mounting-Combo or Sweep with Extra-Flow ------------------ 22 Illustration 6 Port orientation Vertical Mounting-with No Baffle ------------------------------------------ 22 Illustration 7 Port orientation Vertical Mounting-H Configuration for Two No Baffle in Series------- 22 Illustration 8 Supporting Vertically Mounted 14 x 28 inch Contactors ------------------------------------ 23 Illustration 9 Port orientation Horizontal Mounting-Vacuum Only With No Baffle --------------------- 23 Illustration 10 Port orientation Horizontal Mounting-Combo or Sweep with Extra-Flow ---------------- 23 Illustration 11 2.5 x 8 Pressure/Temperature Graph ----------------------------------------------------------- 24 Illustration 12 4 x 13 and 4 x 28 Pressure/Temperature Graph ----------------------------------------------- 24 Illustration 13 6 x 28 Pressure/Temperature Graph ------------------------------------------------------------ 24 Illustration 14 10 x 28 Pressure/Temperature Graph----------------------------------------------------------- 25 Illustration 15 14 x 28 Pressure/Temperature Graph----------------------------------------------------------- 25

Liqui-Cel® Membrane Contactors Design & Operating Procedures
1
I. Technology Description
Liqui-Cel® Membrane Contactors make it possible to transfer gas to or from an aqueous stream without dispersion. The membrane contactors contain thousands of Celgard® microporous polypropylene hollow fibers knitted into an array that is wound around a distribution tube. The hollow fibers are arranged in a uniform open packing, allowing greater flow capacity and utilization of the total membrane surface area. Because the hollow fiber membrane is hydrophobic, the aqueous stream will not penetrate the pores. The gas/liquid interface is immobilized at the pore by applying a higher pressure to the aqueous stream relative to the gas stream. Unlike dispersed-phase contactors such as packed columns, Liqui-Cel Membrane Contactors provide a constant interfacial area for transfer over the entire operating range of flow rates. Although Liqui-Cel Membrane Contactors utilize a microporous membrane, the separation principle differs substantially from other membrane separations such as filtration and gas separation. With Liqui-Cel Membrane Contactors, there is no convective flow through the pores as occurs in other membrane separations. Instead, the membrane acts as an inert support that brings the liquid and gas phases in direct contact without dispersion. The mass transfer between the two phases is governed entirely by the pressure of the gas phase. Because of the Celgard hollow fibers and the contactor geometry, the surface area per unit volume is an order of magnitude higher than traditional technologies such as packed columns, forced draft deaerators and vacuum towers. This high level of surface area to volume leads to a dramatic reduction in contactor/system size for a given level of performance. Contactor Design It is important to note that there are now three design variants for Liqui-Cel Membrane Contactors. Our traditional Extra-Flow design uses a radial liquid flowpath around a central baffle. Liquid flows on the outside (shellside) of the hollow fibers. Our 2 and 4-inch SuperPhobic® Contactors are also Extra-Flow devices. They will use the same operating instructions and parts as the Extra-Flow contactor. Our NB, No Baffle design, does not utilize a central baffle, but it is still a radial flow device. The liquid outlet port on the no baffle design is located in the middle of the device rather than at the contactor ends as in the Extra-Flow design. One end of the NB contactor is capped and allows liquid to flow outward or radially across the fibers from a central distribution tube. This variant is only available in a 6-inch size and it is best suited for vacuum operation. Our Liqui-Cel MiniModule® design allows for liquid flow inside of the hollow fiber (lumenside). These devices are not radial flow devices. The same operating principles can be applied to both Extra-Flow and MiniModule® contactor designs. The difference will always be that the liquid flows on the shellside in Extra-Flow designs. The liquid flows on the lumenside for MiniModule® designs. MiniModules are suited for small flow applications. Membrane Selection Liqui-Cel Membrane Contactors utilize two primary fiber types for absorption/stripping techniques for water. X-40 membrane has a thicker wall with a smaller inside diameter and is recommended for oxygen removal. X-50 membrane has a slightly thinner wall with a larger inside diameter. This feature allows for greater carbon dioxide removal as compared to the X-40 membrane. Table 1 compares X-40 and X-50 fibers.
Table 1: X-40 and X-50 Hollow Fiber Comparison
Fiber Type Characteristic Unit X-40 X-50 Fiber OD (nominal) Microns 300 300 Fiber ID (nominal) Microns 200 220 Bubble Point psi 240 240 Load at Break grams 430 430 Porosity % 25 40 Pore Size Microns 0.03 0.04
A third fiber variant, a proprietary microporous polyolefin, was introduced in our smaller contactors for gas transfer of low surface tension fluids. It is available in our SuperPhobic® product variants and the fluid always flows on the shellside in these devices. Additionally, XIND fiber was introduced in our 10 x 28 Industrial Contactors. It is geared to non-FDA degassing applications.

Liqui-Cel® Membrane Contactors Design & Operating Procedures
2
Gas Absorption When using Liqui-Cel Extra-Flow or No-Baffle Membrane Contactors in gas absorption applications such as aeration or carbonation, etc., a gas is introduced into the inside (lumenside) of the hollow fiber membrane and the liquid phase is introduced to the outside (shellside) of the hollow fiber. The partial pressure of the gas and the water temperature controls the amount of gas dissolved in the liquid phase. When using Liqui-Cel MiniModules® in this application, the liquid is introduced to the lumenside while the gas is introduced to the shellside. MiniModules are not Radial Flow devices. Gas Stripping When using Liqui-Cel Extra-Flow or No Baffle Membrane Contactors in gas stripping applications such as decarbonation or deoxygenation, a vacuum or stripping gas or combination of those is applied to the lumenside of the hollow fiber. The liquid stream is introduced to the outside of the fiber. The partial pressure of the gas is decreased to remove dissolved gases from the liquid phase. When using Liqui-Cel MiniModules in this application, the liquid is introduced to the lumenside while the gas/vacuum is applied to the shellside. You can view an animated product tour, which demonstrates the liquid and gas flow paths in detail in our product tour available at www.liqui-cel.com.
Liquid Stream Liquid Stream

Liqui-Cel® Membrane Contactors Design & Operating Procedures
3
II. Gas Stripping Techniques
A dissolved gas can be removed from an aqueous stream by three methods. • Sweep Gas • Vacuum • Sweep-Assisted Vacuum (Combo Mode)
A. Sweep Gas Mode
Operation Note: Sweep gas is the most economical technique for removing carbon dioxide from the liquid stream.
Sweep-gas mode is a process by which a gas in the lumenside of the Extra-Flow contactor flows counter-current to the water flow. By choosing a gas different from the target gas you wish to remove, a partial pressure gradient is created between the liquid phase (shellside) and the gas phase (lumenside). This forces the target gas to transfer to the lumenside and be swept away. The sweep gas purity will impact the outlet dissolved gas level achieved. When using this technique, the liquid stream becomes saturated with the sweep gas. The same principle applies to MiniModules®. The gas phase, however, is on the shellside of the contactor while the liquid phase is on the lumenside. Gas-Side Configuration and Operation The following is a list of the minimum instrumentation required to design a sweep-gas line to the Liqui-Cel Membrane Contactor when using compressed gases (see Figures 1 & 2).
• Pressure regulator valve (PCV-201) • Needle valve (V-212) • Pressure indicator (PI-201) • Flowmeter (FI-201)
Compressed gases or oil-free compressed air (for Carbon Dioxide removal) can be used as a sweep gas. To operate the system, follow these steps:
1. Set the pressure at < 0.7 kg/cm2 (< 10 psig, 0.69 bar), by adjusting the PCV-201 valve. 2. Set the recommended total sweep flow rate by adjusting the V-212 valve and the reading on the FI-201 Flowmeter. 3. Introduce fresh sweep gas into each contactor. 4. Vent the outlet gases to an open area to avoid possible oxygen depletion within the operating area. 5. If using compressed air, make sure that it is oil-free. A 0.2-micron filter located prior to the PCV-201
valve is highly recommended for high purity applications. A 1.0-micron filter rating is sufficient for industrial applications.
If compressed gases or oil-free compressed air (for Carbon Dioxide Removal) are not available and your application is for CO2 removal, you may use a blower to create an air sweep. The sizing program (available from your Membrana representative) will calculate the pressure drop on the gas side expressed in inches of water. Use this information to choose the blower size. When using a blower, follow steps 2 to 3 listed above. It is also important that the blower does not increase the temperature to >30° C (86°F). Air warmer than this can have a negative impact on fiber life.

Liqui-Cel® Membrane Contactors Design & Operating Procedures
4
Table 2 below lists the range of air sweep gas that will be required for each size contactor.
Table 2: Estimated Air-Sweep Requirements for CO2 Removal
Typical Air Sweep per Contactor Contactor m3/hr scfm
1 x 5.5 0.06 – 0.3 0.04 – 0.2 1.7 x 5.5 0.2 – 0.9 0.1 – 0.5 2.5 x 8 0.2 – 1.8 0.1 – 1.1 4 x 13 0.8 – 4.8 0.5 – 3 4 x 28 1.6 – 9.6 1 – 66 x 28 1.6 – 32 1 – 20
10 x 28 6.4 – 40.2 4 – 2514 x 28 10 – 64 6 – 40
For water side configuration and operation, check General System Design Guidelines in Section III on page 19.
Important Operating Notes: PROTECTING THE MEMBRANE: When using air in the sweep gas mode, note the following information:
• Water temperature should not exceed 30oC (86oF). • Air temperature should not exceed 30° C (86°F). • Remove free chlorine, ozone and any other oxidizing elements prior to the Liqui-Cel Membrane
Contactor
When using an inert gas in the sweep gas mode, note the following information:
• Remove free chlorine, ozone and any other oxidizing elements prior to the Liqui-Cel Membrane Contactor. See the following exception for free chlorine.
• The use of city water containing ≤ 1 ppm free chlorine at ambient temperatures (≤ 40oC, 104oF) is allowable. However, to reduce the effects of membrane oxidation, always maintain a constant sweep gas especially during any on-and-off operation of the feedwater stream. The sweep gas must remain an inert gas. Do not use air sweep >30° C (86°F) when free chlorine is present.
Avoid contact with surfactants, alcohols and oxidizing agents (ozone, etc.)
Operating outside of these guidelines can negatively impact the membrane life and/or void the performance warranty. If you have questions about your system design, contact your Membrana representative. PROTECTING OTHER EQUIPMENT IN YOUR SYSTEM:
If membrane failure was to occur for any reason, water would flow to the gas side of the membrane. This would occur because the liquid must always maintain a greater pressure than the gas phase. In normal operating mode, gases exit the membrane system at atmospheric pressure, and in case of membrane failure, water will be drained out at the drain system exit. In the extreme case of a major water bypass to the drain, water will stop flowing in its regular path. To prevent any equipment damage downstream of the membrane system, a low pressure alarm switch or a flow switch is recommended.
MAINTAINING PERFORMANCE:
Since water vapor and other volatile gases will pass through the membrane, the sweep gas will become saturated with the water vapor. Depending upon the ambient temperature, condensation could occur in the outlet gas piping. Therefore, the outlet piping should be sloped away from the contactors. The piping must be designed to drain this water from the contactors and out of the piping. If water vapor is not removed, it can collect over time and reduce the performance of the contactors. The condensation rate will depend on the liquid temperature. The warmer the liquid stream, the higher the water-vapor transport rate. This condensation phenomenon is normal.

Liqui-Cel® Membrane Contactors Design & Operating Procedures
5
Figure 1. Generic P & ID for Horizontal sweep-gas operation for an Extra-Flow Contactor.

Liqui-Cel® Membrane Contactors Design & Operating Procedures
6
Figure 2. Generic P & ID for Vertical Mounting sweep-gas operation for an Extra-Flow Contactor.

Liqui-Cel® Membrane Contactors Design & Operating Procedures
7
B. Vacuum Mode
Operation note: The vacuum method is recommended for total gas control and bulk gas removal.
Vacuum mode is a process in which a vacuum is applied to the lumenside of the fiber in an Extra-Flow or NB device. A vacuum should be drawn from both lumen ports. When the vacuum is applied, it creates a partial pressure gradient between the liquid phase (shell) and the gas phase (lumen). This vacuum causes transfer of dissolved gases from the shellside to the lumenside. These gases are discharged through the vacuum pump. Vacuum levels affect the removal efficiency. The deeper the vacuum, the lower the outlet concentrations will be. Table 3 illustrates gas removal at different vacuum levels. The same principle applies to MiniModules®. The gas/vacuum phase, however, is on the shellside of the contactor while the liquid phase is on the lumenside.
Table 3: Outlet Dissolved Oxygen Concentration, Using the Vacuum Mode The following table provides and illustration of how vacuum level affects performance. All other operating parameters were the same except the vacuum level.
Vacuum Level (absolute gas pressure, assuming 760 mm Hg atmospheric pressure)
25 in. Hg (125 mm Hg)
27 in. Hg (74 mm Hg)
28 in. Hg (50 mm Hg)
28.5 in. Hg (36 mm Hg)
Outlet Concentration, ppb 1400
850
580
425
Conditions: Two 4x28, X-40 contactors in series Flow rate 20 gpm (4.5 m3/hr) Temperature 77°F (25°C) Calculations are based on inlet saturation conditions for nitrogen, oxygen and carbon dioxide.
Vacuum-Side Configuration and Operation The following is a list of the minimum instrumentation that is required to operate in the vacuum mode. (See Figures 3, 4, 5 & 6).
• Pressure switch (PS-301) • Pressure indicator (PI-301) for vacuum application. • Check valve (V-302) • Vacuum Liquid Trap
To operate the system, follow these steps: Follow the vacuum pump manufacturers instructions for startup.
1. Open the V-301 valve. 2. Turn on the vacuum pump. 3. Slowly open the water inlet valve, V-101.
Successful operation of the Liqui-Cel or SuperPhobic® Membrane Contactor degasification system depends on a well-designed vacuum system (piping and vacuum pump). It is important to follow these recommendations when designing a vacuum system:
1. Piping • Design the vacuum lines for vacuum service. Threads, pipe dope, and pipe tape should
not be used. Any air leak will affect the degassing efficiency. • Avoid long runs of piping and loops. Minimize the use of elbows and other sources of
pressure loss. • Design the vacuum manifold to handle the vapor load of the entire system.

Liqui-Cel® Membrane Contactors Design & Operating Procedures
8
Since water vapor and other volatile gases will pass through the membrane, the lumenside gas will become saturated with the water vapor. Depending upon the ambient temperature, condensation could occur in the outlet gas piping. Therefore, the outlet piping should be sloped away from the contactors to allow this water to drain from the contactors and out of the piping. If water vapor is not removed, it can collect over time and possibly reduce the performance of the vacuum pump, which will then affect the performance of the contactors. The condensation rate will depend on the liquid temperature. The warmer the liquid stream, the higher the water vapor transport rate. This condensation phenomenon is normal.
2. Vacuum Pump Type and Sizing
• Utilize the sizing program or contact your Membrana representative to estimate the vapor load to the vacuum pump expressed in Actual Cubic Feet per Minute (ACFM) or standard cubic meters per hour. The vapor load value and the vacuum level will determine the size of the vacuum pump.
• Α liquid ring pump is recommended. There are many brands of liquid ring pumps; choose the one that satisfies your needs and ask your supplier for a complete vacuum system, which includes: a vacuum pump, separator, check valve, air bleed valve, gauges and a complete make up water line. Membrana now offers vacuum systems in addition to membrane contactors, so you may now call us for your vacuum pump needs. (See Figures 3 and 4).
For waterside configuration and operation, check the General System Design Guidelines in Section III.
Important Operating Notes: PROTECTING THE MEMBRANE:
When using vacuum mode, note the following information: • Remove free chlorine, ozone and any other oxidizing elements prior to the Liqui-Cel Membrane
Contactor. See the following exception for free chlorine. • Use of city water containing ≤ 1 ppm free chlorine at ambient temperatures ≤ 40oC (≤ 104o F) is
allowable. However, to reduce the effects of membrane oxidation, leave the vacuum source operating at all times, especially during any on-and-off operation of the feed water stream.
Avoid contact with surfactants, alcohols and oxidizing agents (ozone, etc.) Operating outside of these guidelines can negatively impact the membrane life and/or void the performance warranty. If you have questions about your system design, contact your Membrana representative. PROTECTING OTHER EQUIPMENT IN YOUR SYSTEM:
If membrane failure was to occur for any reason, water would flow to the gas side of membrane. This would occur because the liquid must always maintain a greater pressure than the gas phase. To protect the overall system in case of membrane failure, a liquid vacuum trap and a high vacuum pressure switch are recommended when operating in vacuum or combo mode. A low pressure alarm switch or a flow switch located at the water membrane system exit is recommended. This will prevent the pump or other major equipment from running dry. Use the following as a guideline for establishing this precaution in your system. Vacuum trap set up (locate vacuum trap at the lowest point in the system):
1. Solenoid valves are normally closed. 2. During vacuum pump start up, V-201 should open, while V204 and V-202 should remain closed
during normal operation. 3. When liquid reaches the upper set up level, V-201 should close. Then with a time delay of no more
than couple of seconds, V-202 and V-204 should open. 4. When liquid reaches the lower set up level, V-204, V-202 should close. Then with a couple seconds
time delay V-201 should open.
Note: In the rare instance of major membrane failure, water would quickly fill the vacuum trap. In this case a significant increase in vacuum level will be detected by the high vacuum pressure switch PS-301. Under this condition, V-201, V-202 and V-204 should open and the vacuum pump should be shut down. During start up the high vacuum pressure switch should have a time delay allowing the vacuum level to come down.

Liqui-Cel® Membrane Contactors Design & Operating Procedures
9
Figure 3. Generic P & ID for Horizontal Mounting vacuum mode operation for an Extra-Flow Contactor.

Liqui-Cel® Membrane Contactors Design & Operating Procedures
10
Figure 4. Generic P & ID for Vertical Mounting vacuum mode operation for an Extra-Flow Contactor.

Liqui-Cel® Membrane Contactors Design & Operating Procedures
11
Figure 5. Generic P& ID for Vertical Mounting vacuum only operation with 6-inch NB Contactor.
PIPC
VTE
TRA
IN10
110
110
0
VEN
T TO
ATM
OSP
HERE
VAC
UUM
LIQ
UID
TRA
P
FLO
OR
DRA
IN
V-20
2
LEVE
L SE
NSO
R
LEVE
L SE
NSO
RC
ON
TRO
L BY
EVA
CUA
TION
TIME
V-20
1
S
S
V-20
4
S
V-10
2
SAM
PLE
V-40
3
S
V-40
2
FULL
PO
RT
STRA
INERV-
101
INITI
AL
FILL
MA
KE U
PW
ATE
R
ULTR
A-P
URE
WA
TER
IN
OPT
ION
AL
TOPA
RALL
EL
FILT
ER0.
2 M
ICRO
N
V-30
3
OVE
RFLO
WTO
DRA
IN
EXHA
UST
VAPO
R TO
ATM
OSP
HERE
DISC
HARG
E SE
PARA
TOR
S-30
1
VAC
UUM
VAC
UUM
MO
DE V
ERTIC
AL
6X28
NB
VAC
UUM
PUM
P SK
ID
PUM
P
0 TO
-30
IN H
g
-30
HG TO
60
PSIG
V-30
2 STA
RTST
OP
302
HS
PI 301
V-30
1
FULL
PO
RT
PI 301
V-20
7
FRO
M P
ARA
LLEL
PS 301
TRA
IN
LIQ
UI-C
EL
CO
NTA
CTO
RSR
V-11
4
RUPT
URE
DEG
AS
WA
TER
OUT
SAM
PLE
PSFR
OM
PA
RALL
ELTR
AIN
SAM
PLE
V-11
5

Liqui-Cel® Membrane Contactors Design & Operating Procedures
12
Figure 6. Generic P& ID for Vertical Mounting vacuum only H-configuration with two 6-inch NB Contactors in series.
V-30
3
OVE
RFLO
WTO
DRA
IN
EXHA
UST
VAPO
R TO
ATM
OSP
HERE
DISC
HARG
E SE
PARA
TOR
S-30
1
VAC
UUM
MO
DE V
ERTIC
AL
"H" C
ON
FIG
URA
TION
FO
R 6X
28 N
B
VAC
UUM
PUM
P SK
ID
0 TO
-30
IN H
g
-30
HG TO
60
PSIG
STA
RTST
OP
VAC
UUM
PU
MP
HS 302
PI 301
V-30
2
301
V-30
1
FULL
PO
RT
PIFR
OM
PA
RALL
EL
301
LIQ
UI-C
EL
CO
NTA
CTO
RS
PSTR
AIN
R
V-20
7
V-11
4
RUPT
URE
OUT
DEG
AS
WA
TER
SAM
PLE
PCV
100
V-11
5 SAM
PLE
PSFR
OM
PA
RALL
ELTR
AIN
VAC
UUM
LIQ
UID
TRA
P
FLO
OR
DRA
IN
V-20
2
LEVE
L SE
NSO
R
LEVE
L SE
NSO
RC
ON
TRO
L BY
EVA
CUA
TION
TIME
V-20
1
S
S
V-20
4
S
VEN
T TO
ATM
OSP
HERE
V-10
2
V-40
3
S
SAM
PLE
V-40
2
FULL
PO
RT
STRA
INERV-
101
INITI
AL
FILL
MA
KE U
PW
ATE
R
ULTR
A-P
URE
WA
TER
IN
OPT
ION
AL
TOPA
RALL
ELTR
AIN
TE 101
FILT
ER0.
2 M
ICRO
N
PI 101

Liqui-Cel® Membrane Contactors Design & Operating Procedures
13
C. Sweep-Assisted Vacuum (COMBO)
Operation note: Sweep-assisted vacuum is the most efficient way to achieve low levels of dissolved oxygen or Carbon Dioxide. Sweep-Assisted Vacuum (Combo Mode) is a method in which a sweep gas is applied to one lumenside port of the contactor, while the other is connected to a vacuum source. The sweep gas helps move and dilute the gas that is in the vacuum stream. The recommended vacuum level is 28 in. Hg (50 mm Hg absolute).
Sweep and Vacuum-Side Configuration and Operation Gas Side: The following is a list of the minimum instrumentation that is required to integrate a sweep line to the Liqui-Cel Membrane Contactor operating in a Combo mode (see Figures 7, 8 & 9):
• Pressure regulator valve (PCV-201) • Needle valve (V-212) • Compound Gauge (PI 201) • Flowmeter (FI-201)
Compressed gas or oil-free compressed air (for carbon dioxide removal) can be used as the sweep gas. To operate to the system in combo mode, follow these steps:
1. Start up as described in vacuum mode operation. 2. Set pressure at < 0.07 kg/cm2 (< 1 psig, 0.069 bar), by adjusting PCV-201. 3. Set the recommended total sweep flow rate by adjusting the V-212 valve and the reading on the FI-201 flowmeter. 4. Introduce fresh sweep gas into each contactor. 5. If using compressed air, make sure that it is oil-free. A 0.2-micron filter is highly
recommended for high purity applications. A 1.0-micron filter rating is sufficient for industrial applications.
The needle valve (V-212) is installed on the sweep gas inlet line between the contactor and the gas flowmeter. This allows the flowmeter to operate under a positive pressure thus eliminating possible air leaks into the gas line through the flowmeter.
Note: For CO2 removal, room air can be used. If room air is used, PCV-201 is not needed. Vacuum Side: The following is a list of the minimum instrumentation that is required to operate in Combo mode. (See Figures 7, 8 & 9).
• Pressure switch (PS-301) • Pressure indicator (PI-301) for vacuum application • Check valve (V-302)
• Vacuum Liquid Trap
Successful operation of the Liqui-Cel or SuperPhobic® Membrane Contactor degasification system depends on a well designed gas line and vacuum system (piping and vacuum pump). It is important to follow these recommendations when designing a vacuum system:
1. Piping • Design the vacuum lines for vacuum service. Threads, pipe dope, and pipe tape should
not be used. Any air leak will affect the degassing efficiency. • Avoid long runs of piping and loops. Minimize the use of elbows and other sources of
pressure loss. • Design the vacuum manifold to handle the vapor load of the entire system.

Liqui-Cel® Membrane Contactors Design & Operating Procedures
14
Since water vapor and other volatile gases will pass through the membrane, the lumenside gas will become saturated with the water vapor. Depending on the temperature, condensation could occur in the outlet gas piping. Therefore, the outlet piping should be sloped away from the contactors to allow this water to drain from the contactors and out of the piping. If water vapor is not removed, it can collect over time and possibly reduce the performance of the vacuum pump, which will affect the performance of the contactors. The condensation rate depends on the liquid temperature. The warmer the liquid stream, the higher the water-vapor transport rate. This condensation phenomenon is normal. Purging the lumens with sweep gas for 5 minutes at 40-60 psi will facilitate clearing water vapor out of the lumens. Additionally, when operating in sweep or combo mode with low flow rates in smaller contactors (<6-inch), we recommend vertically mounting the contactors. The downward sweep used in vertically mounted contactors also facilitates keeping the lumens purged of condensation.
2. Vacuum Pump Type and Sizing
• Utilize the sizing program or contact your local Membrana representative to estimate the vapor load to the vacuum pump expressed in Actual Cubic Feet per Minute (ACFM) or standard cubic meters per hour. The vapor load value and the vacuum level will determine the size of the vacuum pump.
• Α liquid ring pump is recommended. There are many brands of liquid ring pumps; choose the one that satisfies your needs and ask your supplier for a complete vacuum system, which includes: a vacuum pump, separator, check valve, air bleed valve, gauges and a complete make up water line. Membrana now offers vacuum systems in addition to Membrane Contactors so you may now single source your contactors and your vacuum pump from us if desired. (See Figures 5 & 6).
Table 4: Nitrogen Sweep Range for Combo Mode
Typical Nitrogen Sweep per Contactor Contactor m3/hr Scfm
1 x 5.5 0.006 – 0.03 0.004 – 0.02 1.7 x 5.5 0.02 – 0.09 0.01 – 0.05
2.5 x 8 0.03 – 0.2 0.02 – 0.1 4 x 13 0.04 – 0.4 0.03 – 0.3 4 x 28 0.08 – 0.8 0.05 – 0.5 6 x 28 0.2 – 11 0.1 – 7 10 x 28 0.3 – 5.6 0.15 – 3.5 14 x 28 0.34 – 17 0.2 – 10

Liqui-Cel® Membrane Contactors Design & Operating Procedures
15
Important Operating Notes PROTECTING THE MEMBRANE: When using air-sweep in the Combo mode, note the following information:
• Water temperature should not exceed 30° C (86° F). • Air temperature should not exceed 30° C (86° F). • Remove free chlorine, ozone and any other oxidizing elements prior to the Liqui-Cel Membrane
contactor When using an inert gas in the Combo mode, note the following information:
• Remove free chlorine, ozone and any other oxidizing elements prior to the Liqui-Cel Membrane contactor. See the following exception for free chlorine.
• Use of city water containing ≤ 1 ppm free chlorine at ambient temperatures, (≤ 40oC, ≤ 104oF) is allowable. However, to reduce the effects of membrane oxidation, always maintain a constant sweep gas especially during any on-and-off operation of the feed water stream. The sweep gas must remain an inert gas. Do not use air sweep to >30° C (86°F) when free chlorine is present.
Avoid contact with surfactants, alcohols and oxidizing agents (ozone, etc.) Operating outside of these guidelines can negatively impact the membrane life and/or void the performance warranty. If you have questions about your system design, contact your Membrana representative. PROTECTING OTHER EQUIPMENT IN YOUR SYSTEM: If membrane failure was to occur for any reason, water would flow to the gas side of the membrane. This would occur because the liquid must always maintain a greater pressure than the gas phase. To protect the overall system in case this was to happen, a liquid vacuum trap and a high vacuum pressure switch are recommended when operating in vacuum or combo mode. A low pressure alarm switch or a flow switch located at the water membrane system exit is recommended. This will prevent the pump or other major equipment from running dry. Use the following as a guideline for establishing this precaution in your system. Vacuum trap set up (locate vacuum trap at the lowest point in the system):
1. Solenoid valves are normally closed. 2. During vacuum pump start up, V-201 should open, while V204 and V-202 should remain closed
during normal operation. 3. When liquid reaches the upper set up level, V-201 should close. Then with a time delay of no more
than couple of seconds, V-202 and V-204 should open. 4. When liquid reaches the lower set up level, V-204, V-202 should close. Then with a couple seconds
time delay V-201 should open.
Note: In the rare instance of major membrane failure, water would quickly fill the vacuum trap. In this case a significant increase in vacuum level will be detected by the high vacuum pressure switch PS-301. Under this condition, V-201, V-202 and V-204 should open and the vacuum pump should be shut down. During start up the high vacuum pressure switch should have a time delay allowing the vacuum level to come down.

Liqui-Cel® Membrane Contactors Design & Operating Procedures
16
Figure 7. Generic P & ID for Horizontal Mounting sweep-assisted (Combo) operation with an Extra-Flow Contactor

Liqui-Cel® Membrane Contactors Design & Operating Procedures
17
Figure 8. Generic P& ID for Vertical Mounting sweep-assisted (Combo) operation .

Liqui-Cel® Membrane Contactors Design & Operating Procedures
18
Figure 9. Generic P & ID for Horizontal Mounting Extra-Flow Contactors, End-to-End in combo mode

Liqui-Cel® Membrane Contactors Design & Operating Procedures
19
Figure 10. Generic P & ID for Air/Vacuum Mode, Vertical Using Atmospheric Air As Sweep

Liqui-Cel® Membrane Contactors Design & Operating Procedures
20
Figure 11. Generic P & ID for Air Blower Combo Mode Using Blower To Pull In Atmospheric Air

Liqui-Cel® Membrane Contactors Design & Operating Procedures
21
III. General System Design Guidelines The following guidelines apply to all three gas removal techniques. Important Notes: - Both gas/vacuum ports should not be closed during operation. These ports provide a safety vent in the contactors
so that pressure does not build up. - All plastic port extensions should be supported to prevent bending of extensions under excessive piping loads.
A. Flow Pattern Configurations
1. Determination of Series and Parallel Configuration
Each type of Liqui-Cel® Membrane Contactor has a maximum design flow rate. For system flow rates that exceed the individual contactor flow rate, it is necessary to split the flow into parallel trains. To determine the number of parallel trains, divide the total system flow rate by the maximum flow rate as given in Table 5.
Table 5: Minimum and Maximum Contactor Flow Rates Contactor Minimum Flow Rate Maximum Flow Rate
0.75 x 5 MiniModule® 5 ml/min (0.001 gpm) 500 ml/min (0.13 gpm) 1.7 x 5.5 MiniModule 500 ml/min (0.13 gpm) 2500 ml/min (0.66 gpm) 2.5 x 8 Extra-Flow or
SuperPhobic® 0.023 m3/hr (0.1 gpm) 0.68 m3/hr (3 gpm)
4 x 13 Extra-Flow or SuperPhobic
0.5 m³/hr (2.2 gpm) 3.41 m³/hr (15 gpm)
4 x 28 Extra-Flow or SuperPhobic
1.0 m3/hr (4.4 gpm) 6.8 m3/hr (30 gpm)
6 x 28 Extra-Flow or NB 1.14 m³/hr (5 gpm) 11.4 m³/hr (50 gpm) 10 x 28 Extra-Flow 10 m3/hr (44 gpm) 56.8 m3/hr (250 gpm) X40 Fiber 10 x 28 Extra-Flow
10 m3/hr (44 gpm) 47.7 m3/hr (210 gpm) X50 and XIND Fiber
14 x 28 Extra-Flow 16 m3/hr (70 gpm) 90.8 m3/hr (400 gpm)
After calculating the minimum number of parallel trains, additional contactors can be added in series to obtain the desired dissolved gas concentration. The number of contactors in series will be a function of the required gas outlet and the maximum allowable system pressure drop. Typically 5 in series is the maximum. Performance is also improved with lower flow rates. If you reach the maximum desired pressure drop, you can also add additional parallel trains to achieve lower gas outlets.
2. Liquid-Stream Flow Configuration
The following are guidelines for designing the water process lines for a Liqui-Cel, Extra-Flow, NB or SuperPhobic Membrane Contactor system. These guidelines take into consideration the contactor orientation. While Fluids typically flow on the shellside of the contactor, some applications utilize lumenside liquid flow. It should be noted, however, that fluids should always flow on the shellside of the SuperPhobic Contactors.
B. Vertical or Horizontal Mounting • If the water pressure coming to the Liqui-Cel Membrane Contactor system is greater than or could be
greater than the maximum operating pressure (refer to appropriate data sheet or Section C. Maximum Temperature and Pressure Guideline Recommendations on page 24-25 of this guide), a pressure regulator will be required.
• If a pump is located downstream of the contactor system, an automatic on/off valve connected to the
pump's motor is required. The valve should operate with a time delay with a slow open/close ramp. The valve should be located between the pump and the contactor system. This will reduce the risk of water hammer.

Liqui-Cel® Membrane Contactors Design & Operating Procedures
22
• To avoid damage from water hammer, a rupture disc should be placed on the downstream side of the contactor system.
• Low-point drains, high-point vents, pressure indicators and temperature indicators should be included
in the design.
• Gas must flow countercurrent to liquid for all contactors. Lower efficiencies will result if co-current flow is used.
• The contactors should not be exposed to freezing temperatures during periods of system shutdown. Note: Horizontal Mounting is typically used to achieve a smaller footprint on large systems. If you
are designing a smaller system with less than 8 – 10 contactors (as a guideline) we typically recommend vertically mounting. We also recommend vertically mounting smaller contactors. This facilitates keeping lumens free of liquids if small gas flow rates are being used.
Vertical Mounting: • The liquid flowing into the contactor must enter from the bottom and exit from the top or side. If
Extra-Flow contactors are connected in series, the liquid leaving the preceding contactor must flow into the bottom of the next contactor. When operating 2 NB contactors in series, you may use the H configuration (see illustration 7).
• The bottom gas port should be located higher than the inlet port of the liquid ring pump. This will allow free drainage of condensed water to the vacuum pump. (Illustration 4 and 5).
*Note: The vacuum pump should always be located below the outlet gas/vacuum port of the contactor to facilitate draining.
Illustration 7
Illustration 5 Illustration 4
Liquid Inlet
Liquid Outlet
Liquid Inlet
Liquid Outlet
Extra-Flow Vertical Mounting-Vacuum Extra-Flow Vertical Mounting-Combo
Sweep
Illustration 6 NB Vertical mounting
Liquid Outlet
Liquid Inlet
Vacuum
Vacuum
Liquid Inlet Liquid Outlet
Vacuum
Vacuum
Vacuum
NB – Vertical –H Configuration
Vacuum

Liqui-Cel® Membrane Contactors Design & Operating Procedures
23
Additional Information for Vertically Mounting 14 x 28 Contactors
We recommend using our mounting kits and an additional steel bar support under the contactors to adequately support the full weight of the 14-inch contactors. Do not place the contactor load on the bolt flange that is used to secure the end caps onto the housing. You also do not want to place the contactor load on the piping materials. Please refer to the vertical 14-inch system layout drawing on our website entitled ‘14inch vertical skid draw12-6450. This will provide you will more detailed information. A basic view of the metal support that is located under the bottom end caps is depicted below.
Horizontal Mounting: • For vacuum only operation, the gas ports should be oriented downward, with the gas ports
located higher than the inlet port of the vacuum pump. (See Illustration 9) • For combo or sweep mode operation with Extra-Flow contactors, the gas ports should be
oriented 180° in relation to each other, and the vacuum side or gas exit should be in the downward position. The gas port exit should be higher than inlet port of vacuum pump to facilitate water drainage into the vacuum pump. (See Illustration 10)
Illustration 9 Illustration 10
Illustration 8:
Do use metal support bar under ledge of contactor end cap. Supplied by customer.
Do not use the bolt flange that connects the end cap to the vessel as support.
Supporting 14-inch Contactors when Mounted Vertically
NB Horizontal Mounting - Vacuum
Liquid Outlet
Extra-Flow Horizontal Mounting-Combo
Liquid Inlet
Sweep Liquid Outlet
LiquidInlet

Liqui-Cel® Membrane Contactors Design & Operating Procedures
24
2.5x8 Liqui-Cel Membrane ContactorPolypropylene Vessel
C. Maximum Operating Temperature and Pressure Guidelines
There are two pressure ratings on the contactors. There is a transmembrane pressure rating and a housing pressure rating. In some cases these ratings are the same but be certain to review both prior to operation. Transmembrane pressure is the difference from the inside to the outside of the fiber. For example, you could run a liquid pressure of 150 psi with a 316 LSS vessel so long as you maintain 30 psi of pressure on the lumenside or gas side of the membrane. This would keep the transmembrane pressure at 120 psi.
0
20
40
60
80
100
120
0 10 20 30 40 50 60 70 800.0
1.4
2.8
4.2
5.6
7.0
8.4
0
20
40
60
80
100
120
20 30 40 50 60 700.0
1.4
2.8
4.2
5.6
7.0
8.4
*Add 15 psig (1.05 kg/cm2) for X50 or X40 fiber when vacuum is not used on 4 (FRP Reinforced, PVDF & SS), 6-inch and 10-inch contactors
Note: Fiber used in SuperPhobic® Contactors is limited to 70 psi (4.9 kg/cm², 4.8 bar) at 25° C
4 x 13 & 4x28 Liqui-Cel Membrane Contactor*
Max
imum
Inle
t Pre
ssur
e (p
sig)
Temperature, °C
Max
imum
Inle
t Pre
ssur
e (p
sig)
PP Housing
PP Lined, FRP, PVDF and SS Housing
Temperature, °C
6x28 NB or Extra-Flow Design
Max
imum
Inle
t Pre
ssur
e (p
sig)
Temperature °C
Maxim
um Inlet Pressure (K
g/cm²)
Maxim
um Inlet Pressure (K
g/cm²)
Maxim
um Inlet Pressure (K
g/cm²)
0
20
40
60
80
100
120
0 10 20 30 40 50 60 70 800.0
1.4
2.8
4.2
5.6
7.0
8.4
Illustration 11
Illustration 12
Illustration 13
X40

Liqui-Cel® Membrane Contactors Design & Operating Procedures
25
10 x 28 Operating Temperature And Pressure Guidelines The 10 x 28 pressure ratings are summarized below. There are two sets of pressure limits specified for the 10 x 28 Contactor. The Pressure Equipment Directive (PED) 97/23/EC put forth by the European Union has specific guidelines that place devices in various hazardous classifications. We chose to limit some pressure ratings in our 10 inch device for sales into the European Union (EU) because the lower pressures do not affect our primary applications and uses. These limits keep them in a lower hazard classification and eliminate additional testing and fabrication costs associated with higher ratings. Pressure limits only apply to the use of dangerous liquids or gases in 10-inch products sold into European Union Member States. All other countries are free to operate to the higher pressures summarized in the table below.
MiniModules®, 2-inch, 4-inch and 6-inch products do not require CE Marking per the PED 97/23/EC.
14-inch Operating Temperature And Pressure Guidelines
0
20
40
60
80
100
120
20 30 40 50 0.0
1.4
2.8
4.2
5.6
7.0
8.4
14x28 Liqui-Cel Membrane Contactor*
Max
imum
Inle
t Pre
ssur
e (p
sig)
Temperature °C
Maxim
um Inlet Pressure (K
g/cm²)
X40/X50
*Add 15 psig (1.05 kg/cm2) for X50 or X40 fiber when vacuum is not used.
NOTE: Liquid flows on the shellside (outside) of the membrane and gasses are used on the lumenside (inside) of the membrane. If conducting a pressurized gas test on the shellside to check for system integrity, do not exceed pressure limits given for the gas side, as the gasses will permeate through the membrane when liquid is not present.
Table 6: 10 x 28 Pressure Rating Summary
Rest of World – All Applications Product Membrane PP X50 X40
Housing/ Liquid Side
Housing/ Gas Side
10 x 28 with 316L SS Housing
8.3 10.3 bar 8.4 10.5 Kg/cm2 120 150 psi
10.3 bar 10.5 Kg/cm2 150 psi
9.0 bar 9.1 Kg/cm2
130 psi 10 x 28 with FRP Housing
8.3 10.3 bar 8.4 10.5 Kg/cm2 120 150 psi
10.3 bar 10.5 Kg/cm2 150 psi
6.2 bar 6.3 Kg/cm2 90 psi
European Union Member States Product Dangerous
Liquid M/H*
Non-Dangerous Liquid M/H*
Dangerous Gas M/G*
Non-Dangerous Gas M/G*
10 x 28 X50 with 316L SS Housing
8.3/10 bar 120/145 psi
8.3/10.3 bar 120/150 psi
8.3/4.7 bar 120/68 psi
8.3/9.0 bar 120/130 psi
10 x 28 X50 with FRP Housing
8.3/10 bar 120/145 psi
8.3/10.3 bar 120/150 psi
8.3/4.7 bar 120/68 psi
8.3/6.2 bar 120/90 psi
* M = Membrane, H = Housing Liquid Pressure, G = Gas Side Pressure Pressures to be 15 psi lower when using vacuum mode X40 Membrane can be operated to 150 psi pressure. Housing pressure limits must also be
taken into consideration.
Max
imum
Inle
t Pre
ssur
e (p
sig)
10x28 Liqui-Cel Membrane Contactor* Stainless Steel or FRP Vessel with Non-Dangerous Liquid
Temperature, °C
Maxim
um Inlet Pressure (K
g/cm²) 0
20 40 60 80
100 120 140
0 10 20 30 40 50 60 70 80 0.0 1.4 2.8 4.2 5.6 7.0 8.4 9.8
Higher Limit For X40 10 inch Only
X40/X50
XIND
Table 7: 14 x 28 Pressure Rating Summary
EU and Rest of World – All Applications Product
Membrane PP X50/X40
Housing/ Liquid Side
Housing/ Gas Side
14 x 28 8.3 bar
8.4 Kg/cm2 120 psi
8.3 bar 8.4 Kg/cm2 120 psi
4.1 bar 4.2 Kg/cm2
60 psi Pressures to be 15 psi lower when using vacuum mode
Illustration 14
Illustration 15
Note: The maximum shell to lumen pressure differential is not to exceed 120 psi.

Liqui-Cel® Membrane Contactors Design & Operating Procedures
26
D. Contactor Weights for System Fabrication:
The System Frame work should be designed to support the maximum Liquid-full weights of the contactors. The weights listed below are for one contactor so the total number of contactors will need to be taken into consideration when designing the skid support structure. Also note that these are maximum weights. Some housing options may weigh less. See product data sheet for more details.
Table 8:Contactor Weights Product Kg. Lbs. 1 x 5/1.7 x 5.5 0.05/0.19 0.11/0.43 2.5 x 8 0.9 2 4 x 13 3.7 8.2 4 x 28 11.3 25 6 x 28 17.1 37.7 10 x 28 137.0 302 14 x 28 112.2 248
E. Filtration Requirements
The inlet liquid and gas streams should be prefiltered. Table 9 provides recommended guidelines. Depending on the liquid stream composition, it may be necessary to adjust the filtration requirements. Fluids containing adsorbing or agglomerating particles may require a more stringent filtration.
Table 9: General Filtration Guidelines
Liquid stream (shellside) 10 microns 4.5 microns when installed downstream of a carbon bed
Gas stream (lumenside)* 0.2 micron for high-purity applications 1.0 micron is sufficient for industrial applications
*oil- and aerosol-free F. Membrane Fouling
When a Liqui-Cel Membrane Contactor system is placed between a clarification unit and an RO unit to remove CO2 from a water stream, be aware of water pH changes. Precipitation of solids can occur when water is treated with flocculation chemicals followed by a change in pH. One typical example is the use of Alum (aluminum sulfate), which is used to remove suspended matter from water. The removal takes place by coagulation, flocculation and precipitation in the water clarifier tank. The precipitation occurs in the form of polymeric aluminum hydroxide at certain pH ranges. If CO2 is present in large quantities and is removed continuously as the feed water flows through the membrane contactors, the pH will rise. This change in pH may be enough to precipitate excess aluminum hydroxide or other ionic compounds on the membrane’s surface. The thin coating layer will prevent normal gas transfer through the membrane and the system’s removal capacity will drop. Fortunately this process is reversible by using a 3% w/w ortho-phosphoric acid solution (refer to the Liqui-Cel Membrane Contactor Cleaning Guidelines). The phosphoric acid solution will restore the degassing performance to original manufacture's specifications. When the contactors are installed down stream from the carbon beds, a 4.5 micron absolute filter should be installed and the carbon beds should be flushed to drain after the carbon change-out until all carbons fines are flush out. Care should also be taken when back flushing carbon beds that are downstream of Membrane Contactors. Filtration should be added to keep the contactors free from carbon particles, which can be difficult to clean. When Liqui-Cel Membrane Contactors are installed upstream of RO membranes, a cleaning cycle is highly recommended in order to prevent fouling of the Liqui-Cel Membrane Contactor. Please refer to the Liqui-Cel Membrane Contactor Cleaning Guidelines available on-line at www.liqui-cel.com or from your Membrana representative.

Liqui-Cel® Membrane Contactors Design & Operating Procedures
27
G. Minimum System Instrumentation Required
• Pressure gauges (bourdon type; Weksler, Ashcroft, US Gage) - Process inlet near contactor inlet, glycerin filled, diaphragm seal, isolation valve optional - Process outlet near contactor outlet, glycerin filled, diaphragm seal, isolation valve optional - Nitrogen inlet, isolation valve optional - Nitrogen flow meter pressure, isolation valve optional - Vacuum line pressure, compound, isolation valve optional
- Vacuum service water near pump connection, compound, isolation valve optional
• Flow meters - Nitrogen sweep, rotometer type, Fisher & Porter - Process inlet turbine, vortex, or magmeter type, Fisher & Porter, Hoffer (optional) • Pressure control - Nitrogen pressure regulator, which brings the line pressure down to atmospheric • Valves - Process stream Isolation valves, butterfly or ball Inlet manual flow control valve, butterfly Pressure relief valve - Vacuum pump Suction check valve - Vacuum pressure relief / vacuum breaker (to prevent pump cavitation) - Vacuum service water Check valve Needle valve Solenoid Inlet shut-off - Nitrogen Shut-off Manual flow control valve Pressure relief valve if required
• Pressure switches
- Process inlet high pressure switch to shutdown or warn operator - Vacuum line high pressure switch to warn operator
• Temperature measurement (bimetal dial-type thermometer with thermowell) - Process fluid - Nitrogen at flowmeter, optional
- Vacuum service water feed, optional
H. Warnings of Misuse Avoid the following: Water hammer, over pressurization, dropping, and over torquing the end cap clamp bolts. Nuts should NOT be quick driven onto bolts. Nuts should be driven slowly by hand to prevent galling. Using power driven tools can produce excessive friction and increase the risk of galling. Also note that if membrane failure occurs, liquid pressure could enter the gas side. Though this would be extremely rare, a pressure-limiting device downstream of the gas outlets would protect downstream technologies. Also note that the membrane will allow gases to pass from the gas side to the liquid side if water is not present on one side of the membrane. Therefore, any system pressure tests with compressed gas should be used only to the maximum listed gas side pressure of 90 psi for 10-inch FRP end caps, 130 psi for 10-inch SS end caps, and 60 psi for 14 x 28 Nylon end caps. It is also important to follow recommendations when supporting 14-inch contactors in a system. The bolt flange that attaches the end caps to the vessel should not be used to support the weight of the contactor.

Liqui-Cel® Membrane Contactors Design & Operating Procedures
28
IV. System Design Requirements for Obtaining Low Levels of Dissolved Oxygen To ensure optimum performance, it is important to follow the instructions below to minimize the chances of oxygen contamination or leakage from the atmosphere into the system. As specified by the standard product performance warranty, customer compliance with the following conditions is required.
• Do not use threaded connections in the sweep gas or vacuum piping. All-welded systems are recommended. When service connections are required, flanged connections or specially designed vacuum fittings are recommended.
• The system must be designed and installed such that there are no air leaks. • Performance results are dependent upon sweep gas purity. For units targeting < 5 ppb residual D.O.
concentration, the minimum purity nitrogen required is 99.99%. For units targeting < 1 ppb residual D.O. concentration, the minimum purity nitrogen required is 99.995%. Both purity levels are based on molar compositions.
• The sample lines used to measure D.O. concentrations must be constructed of materials that are impermeable to gases (e.g. PEEK or stainless steel) to prevent contamination from atmospheric oxygen. Do not use perfluoroalkoxy (PFA) or polyethylene tubing.
• Residual dissolved oxygen concentrations of < 5 ppb must be measured using an accurately calibrated Orbisphere model MOCA 3600 dissolved-oxygen analyzer that is equipped with a flow-cell type sensor having model 2956A membranes. The instrument calibration, operation and measurement conditions must be according to Orbisphere specifications and standards.
• Residual dissolved oxygen measurements must be made as close as practically possible to the outlet of the final contactor(s).
• Adequate vacuum pump capacity is critical for systems designed with vacuum. For vacuum pump sizing purposes, a design safety factor of 20 to 25% is recommended. Ideally, the vacuum pump capacity should be large enough to achieve > 28 in. Hg (< 50 mm Hg. absolute) pressure under the maximum gas loading condition. Lowering the absolute vacuum pressure enhances degassing performance.
• A very simple, but very important part of a degassing system design/operation includes the sample lines and the oxygen instrumentation and calibration. All Liqui-Cel Membrane Contactors are subject to a QC performance test before they are shipped to a customer site. Oxygen removal performance, pressure drop, and fiber leakage are all included in the QC testing. The possibility of a contactor being shipped that has lower performance than indicated in the sizing program due to a membrane or manufacturing defect is rare. Poor system performance during start-up is generally caused by an air leak in the system or a poorly operated or calibrated oxygen analyzer. Check equipment and sample lines for leaks.
• Avoid fittings not rated for vacuum service when building a degasification unit that operates under vacuum-only or sweep-assisted vacuum mode. These fittings can be a source of air leaks in the degassing system.

Liqui-Cel® Membrane Contactors Design & Operating Procedures
29
V. Startup and Shutdown Procedures A. General start-up instructions for the liquid phase
Note: Both gas/vacuum ports should not be closed during operation. These ports provide a safety vent in the contactors so that pressure does not build up.
1. Slowly introduce water to the system, making sure that water inlet pressure and water flow rate through the contactor never exceed the maximum operating limits (see page 22-23).
2. Adjust water flow rate and inlet pressure to the desired levels by adjusting the appropriate valves on the system.
B. Start-Up Instructions for strip gas and vacuum phase
Note: Vacuum when used in combo, should always be pulled from the lowest gas port to facilitate draining and ensure performance.
Sweep Gas Mode Set the pressure entering the contactor at ≤ 10 psig (0.7 bar, 0.7 kg/cm2) by adjusting the appropriate valve in the gas delivery system.
1. Set the recommended total sweep flow rate by adjusting the appropriate valves. See the sweep guidelines for typical sweep gas flow rate ranges in table 2 on page 4.
2. Introduce fresh sweep gas into each contactor. NOTE: If condensation is in the lumens from a shut down cycle, we recommend purging the lumens with sweep gas or air at 40-60 psi for about 5 minutes. This will clear the water condensation on the lumen side and will allow normal system performance.
Sweep Gas with Vacuum (Combo) Mode
1. Set the gas pressure entering the contactor at ≤ 1 psig (0.07 bar, 0.07 kg/cm2) by adjusting the appropriate valve on the gas delivery system.
2. Set the recommended total sweep flow rate by adjusting the appropriate valve. See sweep guidelines for typical sweep gas flow rate ranges in table 4 on page 14.
3. Introduce fresh sweep gas into each contactor. 4. Apply vacuum as described in the vacuum section below. NOTE: If condensation is in the lumens from a shut down cycle, we recommend purging the lumens with sweep gas or air at 40-60 psi for about 5 minutes. This will clear the water condensation on the lumen side and will allow normal system performance.
Vacuum Only Mode
1. Start vacuum pump following vacuum pump manufacturer's instructions. 2. Apply vacuum to the contactor by opening appropriate valve. 3. Adjust absolute gas pressure on the vacuum side to the desired level at the vacuum port on the contactor.
C. Shutdown Procedure
1. Slowly close the water inlet and outlet valves. If possible drain all liquids from the contactor. 2. Mode: a. Sweep-gas mode using nitrogen or other inert gas:
• Allow the nitrogen (or CO2 or other inert gas) to purge the system for 1 hour. • Close the nitrogen outlet valves only. This will allow the water to become saturated
with nitrogen thereby inhibiting bacterial growth. Maintain a low pressure, 0.07 - 0.14 kg/cm
2 (1 – 2 psig) nitrogen pressure during shutdown period.
b. Sweep-gas mode using air sweep or Combo with air or vacuum only mode:
• Shut off the vacuum pump and close the gas outlet valves (if applicable). • Close the air inlet valve(s) (if applicable). • To prevent biological growth, either follow step 2a. or fill the liquid side with a
biocide, such as 2000 ppm of sodium metabisulfite (SMS), for the duration of the shutdown period. Monitor the biocide level to maintain its effectiveness.
3. If your shutdown period will be less than 24 hours, we recommend leaving sweep or vacuum on.
This will keep the lumens purged of liquid

Liqui-Cel® Membrane Contactors Design & Operating Procedures
30
D. Startup after Shutdown Procedure
During the shutdown period, the water that condenses inside of the hollow fibers must be removed. • Open the vacuum inlet valve (if applicable) and start the vacuum pump. • Open the gas outlet valves. • Open the air sweep inlet valves (if applicable). • For a pressurized gas system (N2 sweep, N2 combo, air combo) raise the inlet gas pressure to 2.1
kg/cm2 (40-60 psig, 2.068427 bar) for 10 minutes. VI. Maintenance
Limited maintenance is required for Liqui-Cel Membrane Contactors. We suggest a weekly or bi-weekly check of the system to insure the performance is acceptable. For warranty purposes a log recording the information in the example below should be maintained.
Date Operator Flow
Rate Pressure Into Contactors
Temperature Inlet Gas Concentration
Outlet Gas Concentration
This log will show the user a pattern of consistent performance or a decline in performance over time. If the contactors are still performing to the stated performance, no maintenance is required. If a decline in performance is noted, it may be time to clean the membrane. Cleaning is typically the only maintenance required. See the Membrana Cleaning Guide available on-line at www.liqui-cel.com.
VII. Expected Service Life
• 2.5 x 8, 4 x 13, 4 x 28, and 6 x 28 Membrane Contactor: The expected service life of polypropylene and ABS vessels is 5 years when used with water temperatures of < 700 C (1580 F).
• 4 x 28 and 10 x 28 Membrane Contactors: The expected service life of the FRP vessel is > 10 years when used with water temperatures of < 700 C (1580 F).
• 14 x 28 Membrane Contactors: The expected service life of the PVC vessel and nylon end caps is > 5 years when used with water temperatures of < 450 C (1130 F).
• Refer to the appropriate data sheet and page 24-25 for maximum operating temperature for the membrane cartridge installed in the vessel. Membrane life will vary based on inlet conditions.
VIII. Plastic and FRP Vessel Operating Precautions
• To maintain the service life of the vessel, temperature cycling with FRP vessels should be minimized. Heat-up and cool-down rates should not exceed 1ºC/minute (1.8ºF/minute).
• To prevent premature failure of the PVDF, ABS and Nylon fittings, accurate alignment and proper support of those connections is critical. Pipe that is not properly supported will put additional stress on the plastic fittings, which can lead to a fitting failure. Use proper plastic pipe support guidelines when installing plastic vessels.
IX. Contactor Storage
Refer to the Liqui-Cel Membrane Contactor Storage and Handling guidelines located on the back of the Start Up Procedures and in the product shipping box or crate.
X. Contactor Sanitizing, Cleaning and Clean-in-Place
Refer to the Liqui-Cel Membrane Contactor Cleaning Guidelines document available at www.liqui-cel.com in the Technical Support Section or from your Membrana representative.
XI. Chemical Compatibility
For general guidelines, refer to the Liqui-Cel Membrane Contactor Chemical Resistance Guide available at www.liqui-cel.com in the Technical Support Section or from your Membrana representative.
XII. Cartridge Installation
For a detailed description, refer to the Liqui-Cel Membrane Contactor Assembly and Disassembly Instructions available at www.liqui-cel.com in the Technical Support Section or from your Membrana representative.

Liqui-Cel® Membrane Contactors Design & Operating Procedures
31
XIII. Troubleshooting
Problem Description Probable Cause Corrective Action Outlet dissolved gas concentration above specification or low performance after use.
Membrane Contamination/fouling.
Clean contactor. Refer to Cleaning Guidelines.
Dust covers used in shipping may not have been removed.
Verify shipping dust plugs are removed from gas ports.
Sweep Gas Contaminated. Verify sweep gas purity level.
Air leaks in the gas purge lines.
Tighten gas side flange connections. Pressurize gas line and monitor for leaks.
− Soap test – look for bubbles. − Pressure test – Pressurize then isolate and
monitor for pressure decay. − Electronic leak detection systems.
Operate system and collect data points. − Stop gas flow and operate in Vacuum only
mode. Record conditions and outputs in sweep only mode.
− Stop vacuum pump, open vacuum manifold and start gas flow. Record conditions and outputs in sweep only mode.
Contact Membrana Representative. Low Vacuum Level.
Air leaks in the vacuum
system.
Ensure that the vacuum system is sized correctly for system and that the vacuum manifold is sized to handle vapor load for the system.
Check system for air leaks. If the outlet dissolved gas concentration is within the sizing estimate limits, the leak is probably in the vacuum line after the contactor. Draw a vacuum on the contactor when it is filled with water and verify that it holds vacuum. Look for water accumulation in the vacuum piping. − Does the vacuum line slope down from
contactor to vacuum? If no, re pipe per page 11.
− Disconnect the vacuum line from the contactor. If the water leak is > 20ml per minute (without sweep gas). Contact a Membrana Representative.
− Condensation is a normal occurrence, insulate vacuum manifold.
Install larger capacity vacuum pump. Contact a Membrana Representative First.

Liqui-Cel® Membrane Contactors Design & Operating Procedures
32
XIII. Troubleshooting (Continued)
Problem Description Probable Cause Corrective Action Outlet dissolved gas concentration above specification or low performance after use.
Condensation in contactor or vacuum lines.
If contactor has been sitting wet while not in operation, there may be water condensation in the lumen. − Remove condensate inside of the fibers
with a gas purge. − Pressurize the gas side to 2.1 kg/cm2
(30 psi, 2.1 bar) and release pressure by opening the exit valve.
− Continue to sweep gas at high rate until no water drips from the gas exit port.
− If the water drip continues for several minutes, contact a Membrana Representative.
Look for water accumulation in vacuum pipe. − Does vacuum line slope down from
contactor to vacuum? If no, re-pipe per page 11.
− Condensation is a normal occurrence, insulate vacuum manifold.
Disconnect vacuum line from contactor. If water leak > 20 ml per minute, (without sweep gas), contact a Membrana Representative.
Liquid temperature below design specification. Raise temperature.
Liquid flow rate higher than design specification.
Reduce flow rate.
Low sweep gas flow rate. Increase sweep gas flow rate.
Unequal liquid flow through contactor trains.
Verify train flow rate. Adjust valves accordingly to equalize flow
rates.
High liquid-side pressure drop.
Dust covers used in shipping may not have been removed.
Verify dust covers /end cap plugs have been removed.
Particulate accumulation on shellside.
Check filter system. Clean contactors. Refer to Cleaning
Guidelines. Dissolve particles if soluble in acid or base. Replace contactors. Check flow rate: (do not exceed max.)
− 1 x 5.5 = <500 ml/min − 1.7 x 5.5 = <2500 ml/min − 2.5 x 8 = 0.68 m3/hr max.(3 gpm) − 4 x 28 = 6.8m3/hr max. (30 gpm) − 6 x 28 = 11.4 m3/hr max. (50 gpm) − 10 x 28(X50) = 47.7 m3/hr max.(210 gpm) − 10 x 28(X40) = 57 m3/hr max.(250 gpm) − 14 x 28 = 90.8 m3/hr max.(400 gpm)

XIII. Troubleshooting (Continued)
Problem Description Probable Cause Corrective Action Significant liquid passage into lumenside stream.
Verify the liquid inlet is connected to the shellside port.
Center seal nut may be loose.
Contactor shellside o-ring may not be sealing.
Verify contactor integrity.
Membrane break through (wet-out). If surfactants, oils, and/or alcohols have been introduced to the membrane, wet-out may have occurred.
Change piping connections. See contactor Assembly and Disassembly Instructions for details on how to tighten center seal nut.
Remove and install new o-ring. See contactor Assembly and Disassembly Instructions for details.
Pressurize shellside to 4.2 kg/cm2 (60 psi, 4.1 bar).
Monitor lumenside for leakage. Rinse and clean the contactor. Remove fluid and dry the membrane fibers by passing air through the pores. See Cleaning Guidelines for drying procedures.
Nuts are seizing when I tighten them
The nuts should not be quick driven onto the bolts.
Using power driven tools can produce excessive friction and increase the risk of galling.
Nuts should be driven slowly by hand to prevent galling.


This product is to be used only by persons familiar with its use. It must be maintained within the stated limitations. All sales are subject to Seller’s terms and conditions. Purchaser assumes all responsibility for the suitability and fitness for use as well as for the protection of the environment and for health and safety involving this product. Seller reserves the right to modify this document without prior notice. Check with your representative to verify the latest update. To the best of our knowledge the information contained herein is accurate. However, neither Seller nor any of its affiliates assumes any liability whatsoever for the accuracy or completeness of the information contained herein. Final determination of the suitability of any material and whether there is any infringement of patents, trademarks, or copyrights is the sole responsibility of the user. Users of any substance should satisfy themselves by independent investigation that the material can be used safely. We may have described certain hazards, but we cannot guarantee that these are the only hazards that exist. Liqui-Cel, Celgard, SuperPhobic and MiniModule are registered trademarks and NB is a trademark of Membrana-Charlotte, A division of Celgard, LLC and nothing herein shall be construed as a recommendation or license to use any information that conflicts with any patent, trademark or copyright of Seller or others. © 2009 Membrana – Charlotte A Division of Celgard, LLC. OP151-Rev.14 Operating Procedures (1/07)
Membrana - Charlotte A Division of Celgard, LLC. 13800 South Lakes Drive Charlotte, North Carolina 28273 USA Phone: 704 587 8888 Fax: 704 587 8610 Membrana GmbH Oehder Strasse 28 42289 Wuppertal Germany Phone: +49 202 6099 -658 +49 6126 2260 -41 Fax: +49 202 6099 -750 Japan Office Shinjuku Mitsui Building, 27F 1-1, Nishishinjuku 2-chome Shinjuku-ku, Tokyo 163-0427 Japan Phone: 81 3 5324 3361 Fax: 81 3 5324 3369
www.liqui-cel.com