deploying oracle database as a service with ibm cloud
TRANSCRIPT

© Copyright IBM Corp. 2017. All rights reserved.
Deploying Oracle Database as a Service with IBM Cloud PowerVC Manager 1.3.1
May 1, 2017
Stephen R. Poon
Ralf Schmidt-Dannert IBM Washington Systems Center, NA Power Technical Team - Oracle

2 © Copyright IBM Corp. 2017. All rights reserved.
Table of Contents 1 Abstract .............................................................................................................................................................. 3
2 Legal Disclaimer ................................................................................................................................................. 3
3 Comments / Feedback ....................................................................................................................................... 3
5 Introduction ....................................................................................................................................................... 4
6 IBM PowerVC 1.3.1 ............................................................................................................................................ 5
6.1 PowerVC 1.3.1 PoT Setup .......................................................................................................................... 6
6.1.1 Observed Role Capabilities ................................................................................................................ 7
6.1.2 Policies ............................................................................................................................................... 7
7 Oracle DBaaS – Deployment Steps .................................................................................................................... 8
7.1 Deploying Oracle DBaaS ............................................................................................................................. 8
7.1.1 Using Image Deployment ................................................................................................................... 8
7.1.2 Image Template Deployment (Self-service) ..................................................................................... 13
7.1.3 Deployed Virtual Machine ............................................................................................................... 18
8 Image Source Host ........................................................................................................................................... 19
8.1 Preparation and Capture ......................................................................................................................... 19
8.2 Fresh install .............................................................................................................................................. 20
8.2.1 Prep_image_capture.sh ................................................................................................................... 22
9 Source Image.................................................................................................................................................... 23
9.1 Software releases ..................................................................................................................................... 23
9.2 Operating Environment ........................................................................................................................... 23
9.2.1 Hardware.......................................................................................................................................... 23
9.2.2 Operating System ............................................................................................................................. 23
9.2.3 Oracle products ................................................................................................................................ 26
9.3 Post-deployment customization .............................................................................................................. 27
9.3.1 Scripts ............................................................................................................................................... 27
9.3.2 Script Configuration Files ................................................................................................................. 28
9.3.3 Implementation Considerations ...................................................................................................... 29
9.3.4 Code Logic ........................................................................................................................................ 30
10 Troubleshooting ............................................................................................................................................... 35
10.1 Troubleshooting ....................................................................................................................................... 35
10.2 Log Files .................................................................................................................................................... 35
11 Design Considerations...................................................................................................................................... 36
12 Package Availability .......................................................................................................................................... 36
13 References ....................................................................................................................................................... 37
14 Acknowledgements .......................................................................................................................................... 38
15 Appendix .......................................................................................................................................................... 39
15.1 PowerVC 1.3.1 Setup Procedure .............................................................................................................. 39
16 Notices and Trademarks .................................................................................................................................. 42

3 © Copyright IBM Corp. 2017. All rights reserved.
1 Abstract This paper describes the design for an Oracle Database as a Service (DBaaS V3) proof of technology (PoT) in a private cloud model. The PoT was developed by the IBM Washington Systems Center (WSC), North America Power - Oracle Solutions team and illustrates how a fully functional Oracle Database 12c on AIX can be deployed, without human intervention, in less than 30 minutes after the end-user request was approved. Readers of this paper are assumed to be familiar with the IBM Power environment, IBM PowerVC, AIX system administration, Oracle Database 12c and Oracle Grid Infrastructure 12c.
2 Legal Disclaimer No warrantee: Subject to any statutory warranties which cannot be excluded, IBM makes no warranties or conditions either express or implied, including without limitation, the warranty of non-infringement and the implied warranties of merchantability and fitness for a particular purpose, regarding the program or technical support, if any. Limitation of Liability: Neither IBM nor its suppliers will be liable for any direct or indirect damages, including without limitation, lost profits, lost savings, or any incidental, special, or other economic consequential damages, even if IBM is informed of their possibility. Some jurisdictions do not allow the exclusion or limitation of incidental or consequential damages, so the above exclusion or limitation may not apply to you.
3 Comments / Feedback The authors are interested in any feedback or comments on this white paper and the approach taken to implement Oracle database as a Service. Contact information: Ralf Schmidt-Dannert, IBM [email protected]

4 © Copyright IBM Corp. 2017. All rights reserved.
5 Introduction The advent of the Cloud delivery model and the increased business requirements of agile development are resulting in increased pressures on the IT department to deliver new services much faster and, preferably, “on demand” within minutes or hours instead of days, weeks or months and all that with the same or lower IT budgets. An on-premises private cloud, utilizing existing hardware infrastructure, can provide all the technical features required to provide such a self-service offering. This is especially true for environments based on IBM Power Systems and IBM Storage Systems with their market leading virtualization features. Hardware virtualization is a key requirement and the first step onto the road of a private cloud implementation. IBM Cloud PowerVC Manager, based on Openstack technology, enables the automated use of the virtualized hardware to provide the features expected from a private cloud like, being dynamic, agile, provide self-service and charge-back, while also supporting the full life-cycle of virtual machines. The Oracle DBaaS PoT shows the deployment of an IBM Power Virtual Machine (VM or LPAR) running AIX, tuned to run Oracle databases, and an Oracle database instance. The database instance is an Oracle Standalone server configuration, with database files residing on Oracle Automatic Storage Management (ASM). In this document, we provide:
• A brief overview of Oracle DBaaS and IBM PowerVC 1.3.1 • A description of the components of Oracle DBaaS as implemented • A procedure for preparing the image source host and capturing the image • A description of the post-deployment customization • A brief troubleshooting guide of the DBaaS post-deployment customization
This version of Oracle DBaaS includes:
• Oracle Grid Infrastructure and Oracle Database 12c • Standalone Server configuration with Oracle Restart (HAS) • Oracle Automatic Storage Management (ASM) • Use of cloud-init for early initialization in the deployed VM • Support for OEM 12c and 13c • Post-deployment customization scripts to allow deployment from either PowerVC 1.3.1 or VMware®
vRealize™ Automation™ 7.2. Note: VMware vRealize Automation 7.2 integration is not covered in this white paper.

5 © Copyright IBM Corp. 2017. All rights reserved.
The PoT runs in the WSC lab environment, which consists of the following major components: • One IBM Power S824 server with POWER8 processor and two IBM Power servers with POWER7
processors, all managed by an IBM Hardware Management Console (HMC) • An IBM Storewize V7000 with both Solid State Drives (SSD) and spinning disk drives providing virtualized
storage • Dual fiber based SAN switches connecting the storage to the servers (not shown in the graphic) • The Power servers and storage are fully virtualized, each configured with two Virtual I/O Servers (VIOS)
and Live Partition Mobility (LPM) capable; storage virtualization uses NPIV. • IBM Power Virtualization Center (PowerVC) 1.3.1.2 to provide simplified virtualization management and
cloud deployments for IBM AIX, IBM i and Linux on Power virtual machines (VMs) on IBM Power Systems • An Oracle Enterprise Manager (OEM) server to illustrate deployment of the OEM management agent
allowing the deployed VM to be easily added to OEM’s management realm. The OEM part of the demonstration will not be covered in this paper.
See the illustration below for further detail.
Figure 1. Demo lab environment
6 IBM PowerVC 1.3.1 Though IBM PowerVC 1.3.2 became available before this paper was finalized, we did not upgrade the demonstration environment to PowerVC 1.3.2 at this time, for project and schedule considerations. We have not tested with PowerVC 1.3.2, but expect no required changes in the approach or scripts. PowerVC 1.3.1 added the Cloud PowerVC Manager as an option to its Standard Edition. Cloud PowerVC Manager has all the functionality of PowerVC Standard plus the new “Self-Service Portal” functions in the same familiar PowerVC user interface. A key component of the Self-Service Portal is the image deploy template,

6 © Copyright IBM Corp. 2017. All rights reserved.
which allows the cloud administrator to create templates that can be used to deploy virtual machines with minimal input from the user. These templates include most of the deploy details, such as the target class of hosts, storage template, storage connectivity group, and so on. Self-service users do not need to worry about these details and administrators don’t have to worry about virtual machines being created with incorrect settings. Another key addition in PowerVC 1.3.1 is the ability to define security projects. Projects existed in prior versions of PowerVC, however there was only one default project. This new functionality is available to both the PowerVC Standard Edition and Cloud PowerVC Manager. Images, virtual machines, networks, and storage can be added to projects and only people who are granted a role in that project can access those resources. You can have different roles in different projects, so someone could be an administrator in Project X, a restricted deployer in Project Y, and have no access to Project Z. Cloud PowerVC Manager also gives administrators the ability to set policies on projects. These policies specify what self-service users can do without additional approval and what actions require administrator approval. When a self-service user tries to perform an action that requires administrator approval, such as extending the expiration date of a virtual machine, an approval request is automatically created. If the administrator approves that request, then the action is carried out. For more information on other functions of IBM PowerVC, refer to the IBM Redbook entitled IBM PowerVC Version 1.3.2 Introduction and Configuration at, http://www.redbooks.ibm.com/abstracts/sg248199.html?Open
6.1 PowerVC 1.3.1 PoT Setup Two key capabilities that we wanted to show in the PoT were the self-service functionality and deployment approvals. To do this, we installed Cloud PowerVC Manager and created a dbdemo project, groups and user ids which will access and use PowerVC. (Part of our motivation was to understand how these definitions affect the user capabilities.) Section 15.1, PowerVC 1.3.1 Setup Procedure, provide additional details on how PowerVC was configured to support the DBaaS PoT. Note that, as the name denotes, ibm-default is the default project.
User ID OS Group
PowerVC Project PowerVC Role
admin admin ibm-default dbdemo
admin
dbdemouser deployer dbdemo • deployer_restricted • self_service
dbdemouser2 deployer dbdemo deployer_restricted
dbdemouser3 deployer dbdemo self_service
See Section 15.1, PowerVC 1.3.1 Setup Procedure, on page 39 for the commands used in this step.
7 © Copyright IBM Corp. 2017. All rights reserved.
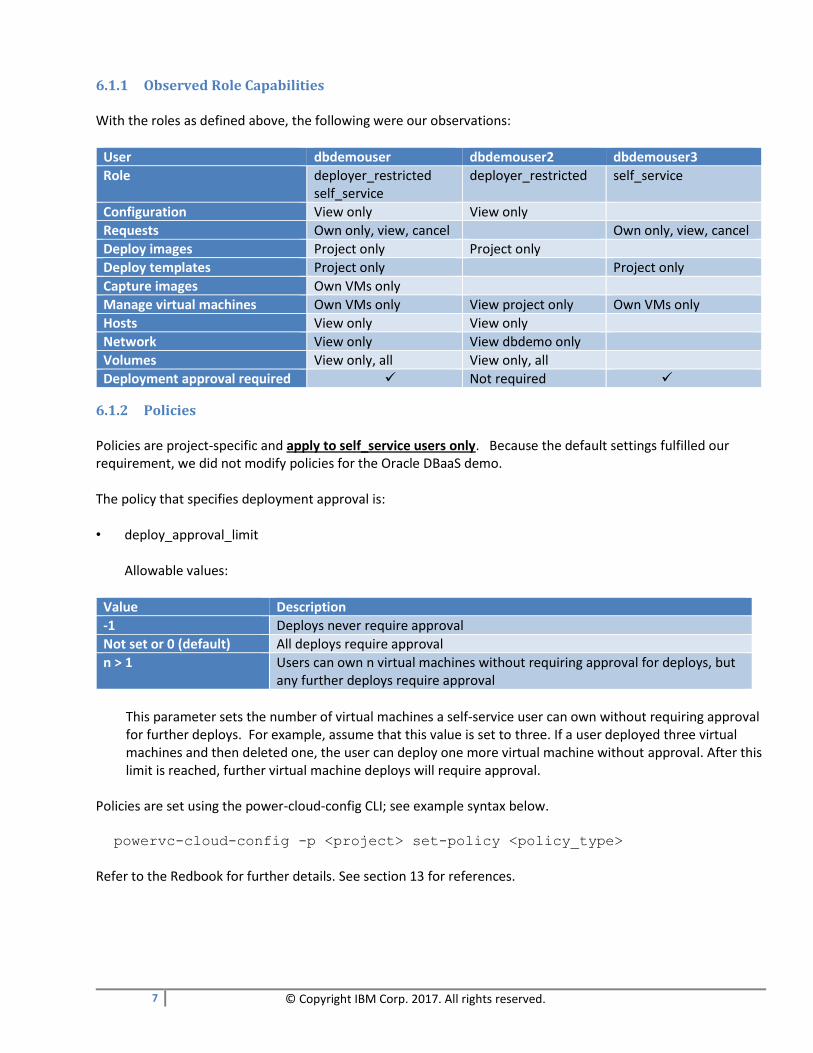
6.1.1 Observed Role Capabilities With the roles as defined above, the following were our observations:
User dbdemouser dbdemouser2 dbdemouser3
Role deployer_restricted self_service
deployer_restricted self_service
Configuration View only View only
Requests Own only, view, cancel Own only, view, cancel
Deploy images Project only Project only
Deploy templates Project only Project only
Capture images Own VMs only
Manage virtual machines Own VMs only View project only Own VMs only
Hosts View only View only
Network View only View dbdemo only
Volumes View only, all View only, all
Deployment approval required ✓ Not required ✓
6.1.2 Policies Policies are project-specific and apply to self_service users only. Because the default settings fulfilled our requirement, we did not modify policies for the Oracle DBaaS demo. The policy that specifies deployment approval is: • deploy_approval_limit
Allowable values:
Value Description
-1 Deploys never require approval
Not set or 0 (default) All deploys require approval
n > 1 Users can own n virtual machines without requiring approval for deploys, but any further deploys require approval
This parameter sets the number of virtual machines a self-service user can own without requiring approval for further deploys. For example, assume that this value is set to three. If a user deployed three virtual machines and then deleted one, the user can deploy one more virtual machine without approval. After this limit is reached, further virtual machine deploys will require approval.
Policies are set using the power-cloud-config CLI; see example syntax below.
powervc-cloud-config -p <project> set-policy <policy_type>
Refer to the Redbook for further details. See section 13 for references.
8 © Copyright IBM Corp. 2017. All rights reserved.
7 Oracle DBaaS – Deployment Steps This chapter demonstrates the PowerVC interface utilized and then steps through the deployment screens to illustrate how an actual DBaaS deployment looks like from start-to-finish. Two different scenarios are shown:
a. Deployment via “Image Deployment” (section: 7.1.1) b. Deployment via “Image Deployment Template” (self-service user-role) (section: 7.1.2)
The details on how to prepare the image utilized during the deployment and the workflow / scripts used in the virtual machine after deployment are described in chapters 8 and 9. The Oracle DBaaS PoT consists of an image which is deployed using IBM PowerVC 1.3.1. The captured image contains the following:
• AIX 7.2 operating system • Oracle Grid Infrastructure 12c binaries installed and configured for Oracle Standalone server • Oracle Automated Storage Management (ASM) instance configured with three ASM diskgroups for the
ASM repository, data and fast recovery area • Oracle Enterprise Edition Database 12c binaries installed • Post-deployment customization scripts and configuration files
The actual Oracle database is dynamically created as part of the post-deployment processing.
7.1 Deploying Oracle DBaaS
7.1.1 Using Image Deployment Image deployment provides the full-function GUI interface from previous PowerVC versions. This interface allows the user to specify or view all information for the deployment request. Note the user <dbdemouser2> used in this scenario and look back at how that user permissions and roles were specified in chapter three. Note that typically this interface would only be made available for cloud administrators, experience PowerVC users and not a DBA. A DBA would typically only get the “self-service” role assigned as shown for user dbdemouser3. See section 7.1.2 for details. A key parameter for dbaasv3 is db_name, which will be the name of the newly created Oracle database instance. This parameter is discussed later in this section. The deployment screen is shown below in three parts, visible as you scroll down the page. Note the user is dbdemouser2 which has the assigned role of “deployer_restricted”. The selected project is “dbdemo”.

9 © Copyright IBM Corp. 2017. All rights reserved.
Figure 2. Image deployment (1)
Notes:
1. Name of the virtual machine being deployed. This is the name that will be seen in the PowerVC VM display. If db_name (shown later, Activation Input) is not specified, this will also become the database name by default, after non-alphanumeric characters have been removed. Note that this will not be the AIX hostname after deployment!
2. Number of instances to deploy – typically left at 1. If a value greater than 1 is specified, the database name will depend on whether db_name is specified: db_name is specified: the database name on all deployed VMs will be the same. As before, non-
alphanumeric characters will be removed in the database name. db_name is not specified: PowerVC generates virtual machine names with sequence numbers
appended and these names will be used for the respective database names. In this example, testvm is entered in the field for virtual machine name. PowerVC will generate “testvm-1”, “testvm-2”, etc. for the virtual machine names. The database name on testvm-1 will be testvm1, on testvm-2 it will be testvm2.
Note that the database name can be at most 8 characters in length, which is an Oracle restriction. 3. Enter a suitable description. 4. Select the dbaas compute template which provides 4 virtual processors and 12GB of RAM. Note that the
“Deploy target” is “Default Group”, which means in our environment that any suitable physical host can be chosen for deployment.
1
4
3
2

10 © Copyright IBM Corp. 2017. All rights reserved.
Figure 3. Image deployment (2)
Notes:
5. Review the volumes that will be created for the VM. In dbaasv3, there should be 8 in total, as indicated in the summary on the lower left hand corner. Review the volume sizes and the storage template. Note that the storage template can be adjusted here if needed for example to a utilize spinning disks instead. The volume sizes in dbaas should be:
Volume GB Usage
1 25 Volume group rootvg
2 100 Volume group oravg. This volume group will contain the Grid and Oracle home filesystems.
3 - 5 25 For ASM diskgroup DATA
6 - 7 5 For ASM diskgroup RECOV
8 5 For ASM diskgroup ASMREPO
Scroll to the right if needed and note the Boot Set indicator for Volume 1 which indicates from which volume (LUN) the virtual machine will boot.
5

11 © Copyright IBM Corp. 2017. All rights reserved.
Figure 4. Image deployment (3)
Notes: 6. Uncheck the Specify IP address box to let PowerVC assign the ip address. PowerVC has a pool of IP
addresses allocated for its use and per project so there is no need for manual IP address selection. 7. Specify the network using the pick list. 8. The “cloud-init” post-deployment script on AIX receives the text entered into this free-form field and
makes it available for customization scripts. The “Server metadata key-value pairs” do not seem to be correctly processed by cloud-init on AIX and are therefore not used in the PoT. Specify the database name of the new database to be created. If unspecified, the database name will default to the VM name (#1 above) Additional options (without the quotes) implemented in the post-deploy scripts:
“startoem=<yes|no>” - specifies whether to start the rc.agent<version> script, which installs and registers the OEM agent. Overrides the setting in rc.oracledbaasv3.cfg
“oemversion=<12c|13c>” – appended to “rc.agent” to obtain the name of the script to set up the OEM agent. This overrides the setting in rc.oracledbaasv3.cfg.
“abort” – (without the quotes) this string will cause rc.oracledbaasv3 to exit without performing any post-deploy steps, except for creation of the iocp devices required for an Oracle 12c database. This option is used for debugging or development, e.g. when creating a new image source.
“debug” – (without the quotes) this string will result in a set –x being run in rc.oracledbaasv3. Use this for debugging.
Either of the above must be on its own line, because the rest of the line is ignored “# <text>” – (without quotes) a # sign in the first column is taken as a comment and this line will
simply be logged All other input will be logged as unsupported rc.oracledbaasv3 can process multiple parameters on one line, as long as they are delimited by a
semicolon.
8
6
7

12 © Copyright IBM Corp. 2017. All rights reserved.
When ready, click Deploy and monitor the VM from the PowerVC Virtual Machines screen (third icon down on the left hand panel). While the VM is being deployed, status messages will display in the lower right hand corner. Messages in the screen capture below indicate that the required SAN volumes are being created.
Figure 5. Virtual machines (deployment in progress)
When complete, the assigned ip address of the newly deployed VM (testvm) is shown on the Virtual Machines display. Once the deployed VM’s network has fully started, the user may access the VM using ssh. Note that parts of the IP address in the screen shot have been obfuscated before inclusion in this document.
Figure 6. Virtual machines (deployment complete)
13 © Copyright IBM Corp. 2017. All rights reserved.
The post-deployment customization script, rc.oracledbaasv3 is invoked out of /etc/inittab. This script customizes the Oracle environment and creates the database instance. Customization scripts are covered in further detail later in this paper.
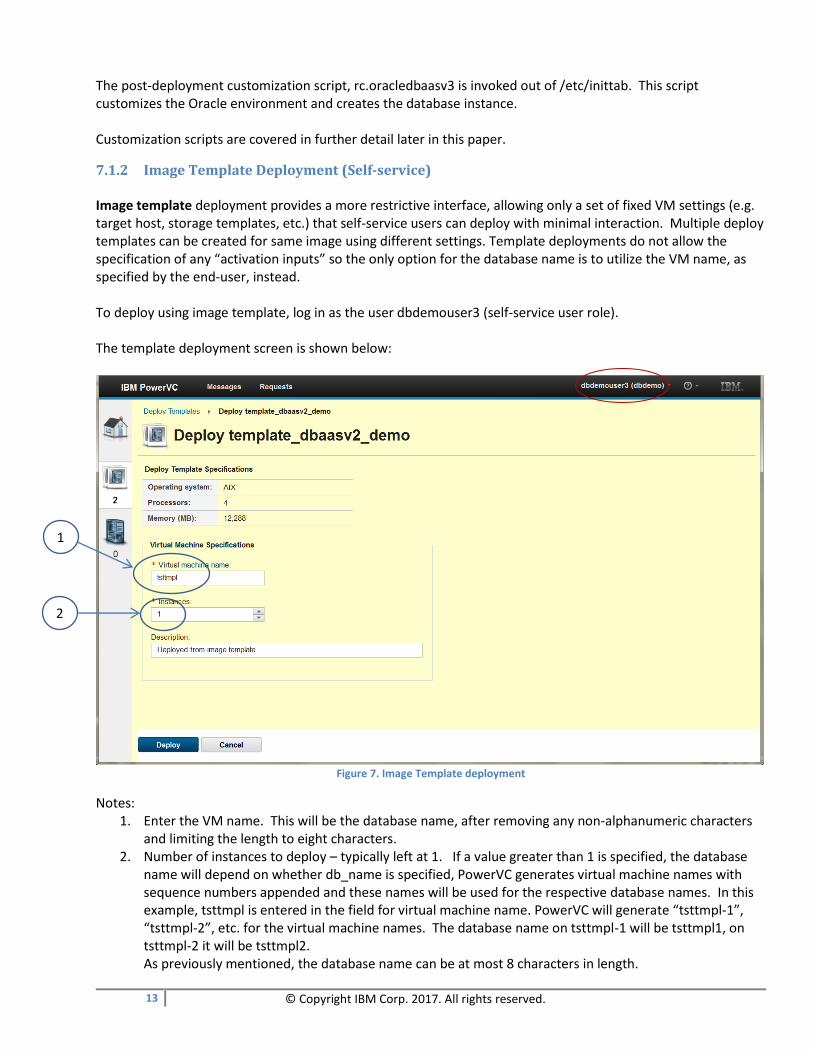
7.1.2 Image Template Deployment (Self-service) Image template deployment provides a more restrictive interface, allowing only a set of fixed VM settings (e.g. target host, storage templates, etc.) that self-service users can deploy with minimal interaction. Multiple deploy templates can be created for same image using different settings. Template deployments do not allow the specification of any “activation inputs” so the only option for the database name is to utilize the VM name, as specified by the end-user, instead. To deploy using image template, log in as the user dbdemouser3 (self-service user role). The template deployment screen is shown below:
Figure 7. Image Template deployment
Notes: 1. Enter the VM name. This will be the database name, after removing any non-alphanumeric characters
and limiting the length to eight characters. 2. Number of instances to deploy – typically left at 1. If a value greater than 1 is specified, the database
name will depend on whether db_name is specified, PowerVC generates virtual machine names with sequence numbers appended and these names will be used for the respective database names. In this example, tsttmpl is entered in the field for virtual machine name. PowerVC will generate “tsttmpl-1”, “tsttmpl-2”, etc. for the virtual machine names. The database name on tsttmpl-1 will be tsttmpl1, on tsttmpl-2 it will be tsttmpl2. As previously mentioned, the database name can be at most 8 characters in length.
1
2

14 © Copyright IBM Corp. 2017. All rights reserved.
3. All other parameters are taken from the defined template and there is no option to specify activation input. This means that “debug” and “abort” cannot be used with this deployment method.
Click Deploy. As mentioned earlier, the default policy setting for deploy_approval_limit requires approval for any deployment request. After dbdemouser3 clicks Deploy, a number appears in the Requests tab (shown below) indicating that the request was created but is pending approval.
Figure 8. Request pending (indicated)
Selecting the Requests tab shows the Request in Pending status.
Figure 9. Request pending (list)
Clicking Deploy brings up more detail; that approval from admin is required.

15 © Copyright IBM Corp. 2017. All rights reserved.
Figure 10. Request pending (detail)
To approve the request a cloud admin user must log into the project. On the admin user’s screen, any pending requests for approval are indicated as shown below.
Figure 11. admin user request pending (indicated)
Clicking the Requests tab shows the pending request.

16 © Copyright IBM Corp. 2017. All rights reserved.
At this point, the request may be approved by clicking the Approve button. If the request needs further review before approval, details can be viewed by selecting the request (click on Deploy).
Figure 12. admin user request pending (list)
Request details are shown in the picture below. Note: One indication of the “fixed” nature of image templates is that the requester does not know the actual image being deployed (dbaasv2_v7k3), just the image template (template_dbaasv2_demo) being requested. A cloud administrator could therefore create a new / improved DBaaS image and assign this new image to the image template without any change to the self-service interface or workflow.
Figure 13. admin user request pending (detailed)
17 © Copyright IBM Corp. 2017. All rights reserved.
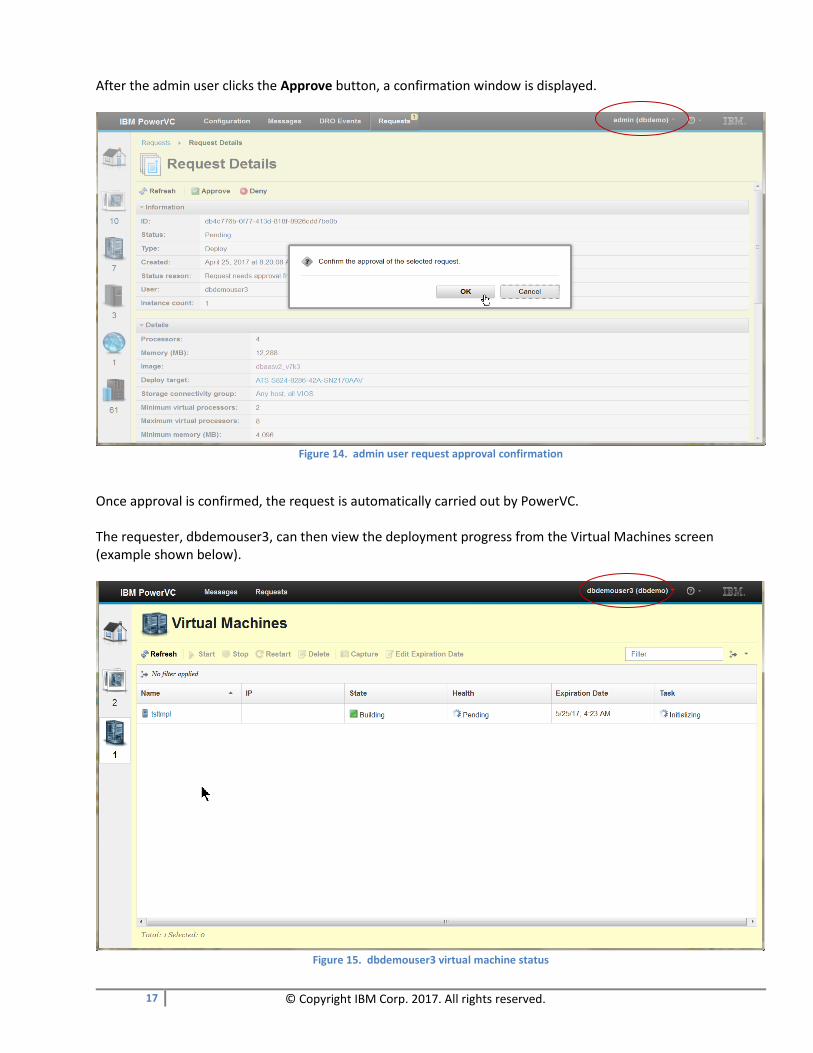
After the admin user clicks the Approve button, a confirmation window is displayed.
Figure 14. admin user request approval confirmation
Once approval is confirmed, the request is automatically carried out by PowerVC. The requester, dbdemouser3, can then view the deployment progress from the Virtual Machines screen (example shown below).
Figure 15. dbdemouser3 virtual machine status

18 © Copyright IBM Corp. 2017. All rights reserved.
7.1.3 Deployed Virtual Machine Once deployed, the virtual machine’s ip address is shown on PowerVC and can be accessed using ssh.
Figure 16. dbdemouser3 virtual machine deployed
See Figure 17. Illustration of LPAR (deployed VM ) for an illustration of the deployed LPAR configuration. The deployed virtual machine will have a running Oracle 12c database instance, as indicated by the Oracle processes (ps command) and the sqlplus command shown in the picture below.
Full deployment time from approval to completion of post-deployment steps takes approximately 18 minutes on the IBM Power S824 with V7000 and SSD drives.

19 © Copyright IBM Corp. 2017. All rights reserved.
8 Image Source Host The graphic below shows the high-level preparation steps of the image source VM. In this paper, we cover only the DBaaS image. A more detailed description follows the diagram.
8.1 Preparation and Capture Several approaches may be used to set up the image source host, depending on what has already been implemented before and can be reused.
• If no previous image exists that can be re-used as a suitable starting point, then a fresh AIX install and patching will be necessary.
• If a suitable IaaS or PaaS image exists, a VM deployed from one of these images can be a starting point. The following graphic illustrates the environment and the virtual machine to be captured and deployed. This configuration provides the highest availability configuration available with a single server and storage sub-system and has no single point of failure in hardware.

20 © Copyright IBM Corp. 2017. All rights reserved.
Figure 17. Illustration of LPAR (deployed VM )
8.2 Fresh install It is assumed that the underlying infrastructure of server, dual-vios, dual-SAN under PowerVC control has already been implemented and verified. This section provides an overview of all the required steps to create the virtual machine (LPAR) to be used as the
DBaaS image source. Section 9 provides all the detailed version and configuration settings used in our DBaaS
PoT.
1. Create a suitable LPAR as shown in the previous chapter. If available, deploy an AIX IaaS VM to create a starting point of an LPAR with highly available network and storage connectivity, required storage LUNs and CPU and memory configuration to support an Oracle database with ASM.
2. Provision one of the 25GB disks listed in Disk configuration, and install AIX 7.2. 3. Set up the AIX environment.
• Install prerequisite AIX products or filesets, or update to the required versions. • Create users and groups, modify shell limits and AIX parameters • Install cloud-init, which provides the ability to take user input and configure the operating system and
software on deployed virtual machines; note that the AIX cloud-init rpm file must be the one shipped with your PowerVC release!
• Install the unzip command; this will be used for the OEM agent deployment • Optional: install vnc to allow running GUI Oracle Assistants
4. Update to the latest AIX TL and apply latest fixes
21 © Copyright IBM Corp. 2017. All rights reserved.
5. Provision additional disks via PowerVC. Create the volume group / file system for Oracle binaries and modify ownership and permissions as specified in the Oracle installation documentation.
6. Obtain Oracle Grid Infrastructure and Database 12c installation files under valid Oracle licensing terms. • Oracle Grid Infrastructure is contained in Oracle provided installation zip files 5 and 6 • Oracle Enterprise Edition is contained in Oracle provided installation zip files 1 and 2
7. Install Grid Infrastructure • Check the default or pre-filled values for ORACLE_BASE and ORACLE_HOME, these should be in the /u01
filesystem. Make sure the values for ORACLE_BASE and ORACLE_HOME match those listed in Section 9.2.3, Oracle products, page 26.
• Configure Oracle Standalone (Oracle Restart) and ASM. Note down the passwords you entered on the Oracle Installer.
• Create the ASMREPO disk group via ASM on one of the 5GB disks. Separating the Oracle repository into an independent ASM disk group allows to take offline other ASM disk groups without impacting ASM overall.
8. Install Oracle Enterprise Edition – Note that no database is created, but only the oracle binaries, including all relevant patches, are installed! • Again, check the default or pre-filled values for ORACLE_BASE and ORACLE_HOME. These should be in the
/u01 filesystem. Make sure the values for ORACLE_BASE and ORACLE_HOME match those listed earlier in Section 9.2.3, Oracle products, page 26.
9. Obtain the oracledbaasv3 package, available as zip file distributed with this document, and move contents to their specified locations.
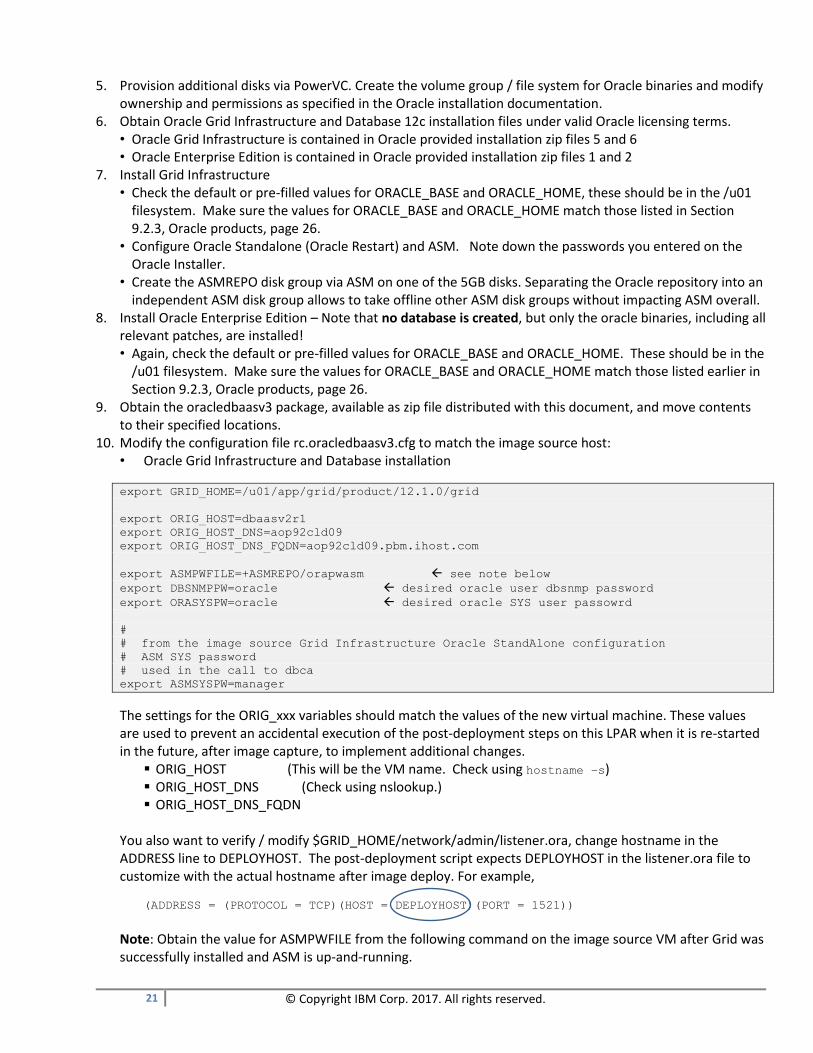
10. Modify the configuration file rc.oracledbaasv3.cfg to match the image source host: • Oracle Grid Infrastructure and Database installation
export GRID_HOME=/u01/app/grid/product/12.1.0/grid
export ORIG_HOST=dbaasv2r1
export ORIG_HOST_DNS=aop92cld09
export ORIG_HOST_DNS_FQDN=aop92cld09.pbm.ihost.com
export ASMPWFILE=+ASMREPO/orapwasm see note below
export DBSNMPPW=oracle desired oracle user dbsnmp password
export ORASYSPW=oracle desired oracle SYS user passowrd
#
# from the image source Grid Infrastructure Oracle StandAlone configuration
# ASM SYS password
# used in the call to dbca
export ASMSYSPW=manager
The settings for the ORIG_xxx variables should match the values of the new virtual machine. These values are used to prevent an accidental execution of the post-deployment steps on this LPAR when it is re-started in the future, after image capture, to implement additional changes.
▪ ORIG_HOST (This will be the VM name. Check using hostname –s) ▪ ORIG_HOST_DNS (Check using nslookup.) ▪ ORIG_HOST_DNS_FQDN
You also want to verify / modify $GRID_HOME/network/admin/listener.ora, change hostname in the ADDRESS line to DEPLOYHOST. The post-deployment script expects DEPLOYHOST in the listener.ora file to customize with the actual hostname after image deploy. For example,
(ADDRESS = (PROTOCOL = TCP)(HOST = DEPLOYHOST)(PORT = 1521))
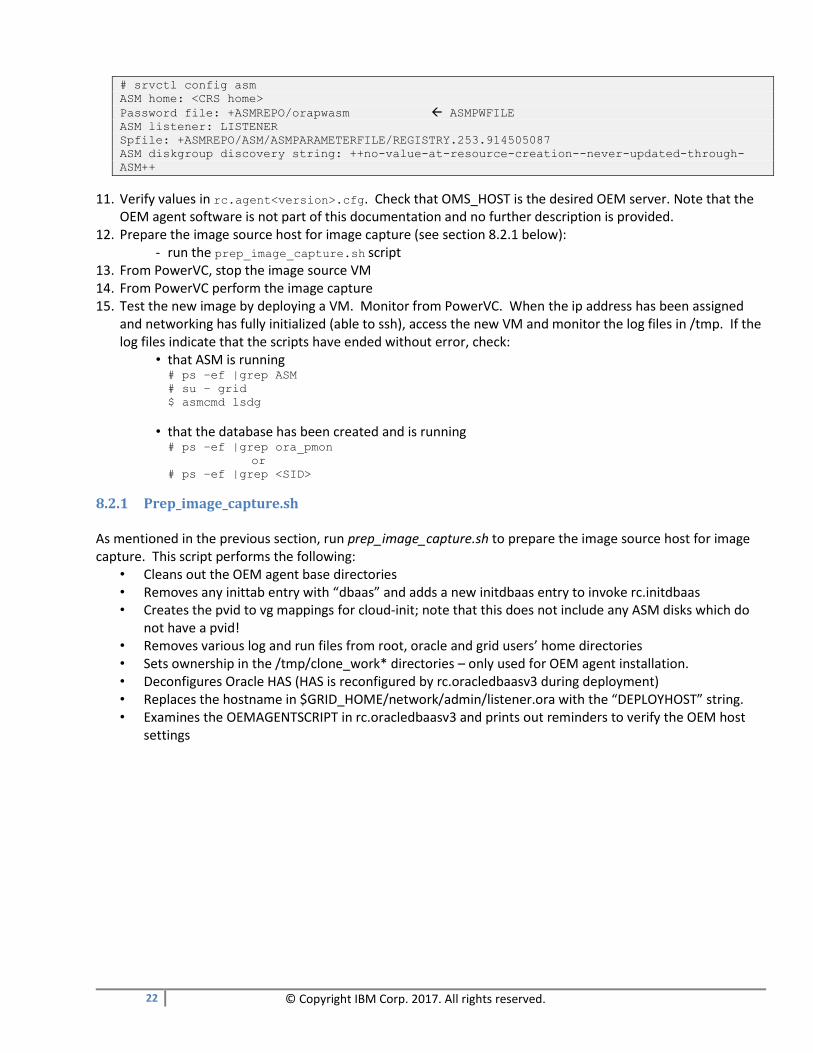
Note: Obtain the value for ASMPWFILE from the following command on the image source VM after Grid was successfully installed and ASM is up-and-running.
22 © Copyright IBM Corp. 2017. All rights reserved.
# srvctl config asm
ASM home: <CRS home>
Password file: +ASMREPO/orapwasm ASMPWFILE
ASM listener: LISTENER
Spfile: +ASMREPO/ASM/ASMPARAMETERFILE/REGISTRY.253.914505087
ASM diskgroup discovery string: ++no-value-at-resource-creation--never-updated-through-
ASM++
11. Verify values in rc.agent<version>.cfg. Check that OMS_HOST is the desired OEM server. Note that the OEM agent software is not part of this documentation and no further description is provided.
12. Prepare the image source host for image capture (see section 8.2.1 below): - run the prep_image_capture.sh script
13. From PowerVC, stop the image source VM 14. From PowerVC perform the image capture 15. Test the new image by deploying a VM. Monitor from PowerVC. When the ip address has been assigned
and networking has fully initialized (able to ssh), access the new VM and monitor the log files in /tmp. If the log files indicate that the scripts have ended without error, check:
• that ASM is running # ps –ef |grep ASM
# su – grid
$ asmcmd lsdg
• that the database has been created and is running # ps –ef |grep ora_pmon
or
# ps –ef |grep <SID>
8.2.1 Prep_image_capture.sh As mentioned in the previous section, run prep_image_capture.sh to prepare the image source host for image capture. This script performs the following:
• Cleans out the OEM agent base directories • Removes any inittab entry with “dbaas” and adds a new initdbaas entry to invoke rc.initdbaas • Creates the pvid to vg mappings for cloud-init; note that this does not include any ASM disks which do
not have a pvid! • Removes various log and run files from root, oracle and grid users’ home directories • Sets ownership in the /tmp/clone_work* directories – only used for OEM agent installation. • Deconfigures Oracle HAS (HAS is reconfigured by rc.oracledbaasv3 during deployment) • Replaces the hostname in $GRID_HOME/network/admin/listener.ora with the “DEPLOYHOST” string. • Examines the OEMAGENTSCRIPT in rc.oracledbaasv3 and prints out reminders to verify the OEM host
settings

23 © Copyright IBM Corp. 2017. All rights reserved.
9 Source Image In the rest of this paper, we refer to the “image source”, “image source VM” or “image source host” to mean the host (LPAR) from which the deployable image will be captured. The virtual machine (VM or LPAR) deployed from this DBaaS image will have a running Oracle database and its data files will be managed by Oracle ASM. This chapter first specifies the detailed software versions and customizable settings as used in the PoT and tested with the post-deploy scripts. In section 9.3, Post-deployment customization, the workflow and activities executed post deployment are then described in detail.
9.1 Software releases The following software releases were used:
• IBM PowerVC 1.3.1 SP2
• VIOS 2.2.4.23
• AIX 7.2 TL02 SP2
• Oracle grid: 12.1.0.2
• Oracle DB: 12.1.0.2
9.2 Operating Environment
9.2.1 Hardware The hardware environment required for the image source is as follows:
CPU: entitlement 0.4, uncapped VCPU - 4 RAM: 12GB Disk: LUNs, SAN provisioned, from IBM Storevize V7000 and mapped via dual VIOS and NPIV to LPAR
▪ 25GB for AIX ▪ 100GB for Oracle binaries ▪ 3x25GB for Oracle data ▪ 2x5GB for Oracle recovery area ▪ 1x5GB for Grid Infrastructure repository
Note that the storage sub-system utilized is highly reliable and ASM was therefore configured to utilize external redundancy. If your storage environment does not provide that level of protection, additional LUNs may be required and ASM would need to be set up with normal or high redundancy instead.
9.2.2 Operating System
1. AIX 7.2 with current Technology Level and current fixes. Note that later TL/SP levels are now available! # oslevel –s
7200-00-02-1614
2. Required additional AIX filesets to run Oracle database – with AIX 7.1 and later these are part of the default install of AIX:
bos.adt.base bos.adt.lib bos.adt.libm bos.perf.libperfstat

24 © Copyright IBM Corp. 2017. All rights reserved.
bos.perf.perfstat bos.perf.proctools xlC.aix61.rte:11.1.0.4 or later xlC.rte.11.1.0.4 or later
3. Disk configuration
Note that hdisk mapping may be different in other environments. Disk Size Owner/Permission Usage
hdisk0 25GB Volume group: rootvg
hdisk1 100GB Volume group: oravg Create filesystem for Grid and Oracle homes
Mount point: /u01 Owner: grid:oinstall Permission: 775 (rwxrwxr-x)
hdisk2 5GB grid:asmdba
660 (rw-rw----) ASM diskgroup ASMREPO
hdisk3 5GB grid:asmdba
660 (rw-rw----) ASM diskgroup RECOV
hdisk4 5GB grid:asmdba
660 (rw-rw----) ASM diskgroup RECOV
hdisk5 25GB grid:asmdba
660 (rw-rw----) ASM diskgroup DATA
hdisk6 25GB grid:asmdba
660 (rw-rw----) ASM diskgroup DATA
hdisk7 25GB grid:asmdba
660 (rw-rw----) ASM diskgroup DATA
Important: On the image source VM, the hdisks are not renamed (rendev) and locked (lkdev) for Oracle ASM as that mapping may be invalid after deployment. The renaming and locking of ASM disk devices, as is best practice on AIX, is instead handled on the deployed VM by the rc.oracledbaasv3 post-deployment script.
4. Users and groups
User Primary Group Other Groups
oracle oinstall dba, asmdba
grid oinstall dba, asmadmin, asmdba, asmoper
5. Set shell limits
Modify /etc/security/limits. Add, modify, verify the following settings as required to run an Oracle database on AIX: root:
data = -1
stack = -1
fsize_hard = -1
cpu_hard = -1
data_hard = -1
stack_hard = -1
fsize = -1
nofiles = -1
cpu = -1
rss = -1

25 © Copyright IBM Corp. 2017. All rights reserved.
oracle:
data = -1
stack = -1
fsize_hard = -1
cpu_hard = -1
data_hard = -1
stack_hard = -1
fsize = -1
nofiles = -1
cpu = -1
rss = -1
grid:
data = -1
stack = -1
fsize_hard = -1
cpu_hard = -1
data_hard = -1
stack_hard = -1
fsize = -1
nofiles = -1
cpu = -1
rss = -1
6. Validate / modify AIX operating system parameters; most will already be set correctly in AIX 7.2.
Parameter Value Command ipqmaxlen 512 no -r -o ipqmaxlen=512
rfc1323 1 no -p -o rfc1323=1
sb_max 4194304 no -p -o sb_max=4194304
tcp_ephemeral_low 9000 no -p -o tcp_ephemeral_low=9000
tcp_ephemeral_high 65500 no -p -o tcp_ephemeral_high=65500
tcp_sendspace 262144 no -p -o tcp_sendspace=262144
tcp_recvspace 262144 no -p -o tcp_recvspace=262144
esid_allocator=1 1 vmo -p -o esid_allocator=1
shm_1tb_unsh_enable 0 vmo -r -F -y -o shm_1tb_unsh_enable=0
maxuproc 16384 chdev -l sys0 -a maxuproc=16384
iocp device Available # make iocp0 available
mkdev -l iocp0
# make iocp0 persistent
chdev -l iocp0 -P -a
autoconfig='available'
ncargs >=128 (Note: Found this set to 256.)
Check first using lsattr –El sys0 –a
ncargs
If not equal to or greater than 128,
set to 128
chdev -l sys0 -a ncargs=128
Note: The iocp device setting is reset/lost during the deployment process and needs to be / is set correctly again in the post-deployment script rc.oracledbaasv3.
26 © Copyright IBM Corp. 2017. All rights reserved.
7. Additional products included in the image: • cloud-init – install according to documentation except:
▪ Specify in the cloud-init module set_hostname, do NOT use set_hostname_from_dns. The set_hostname module sets hostname, as specified in PowerVC “VM name”. Since cloud-init modules run before the post-deployment script rc.oracledbaasv3 during the boot process, this makes the VM name available to rc.oracledbaasv3 for use as the DB name. If DB name is not specified by the deployer, rc.oracledbaasv3 sets the DB name to VM name.
• unzip command (recommended, but not required if OEM agent is not installed) • vnc-3.3.3r2-6.aix5.1.ppc.rpm – for running Oracle GUI assistants (optional)
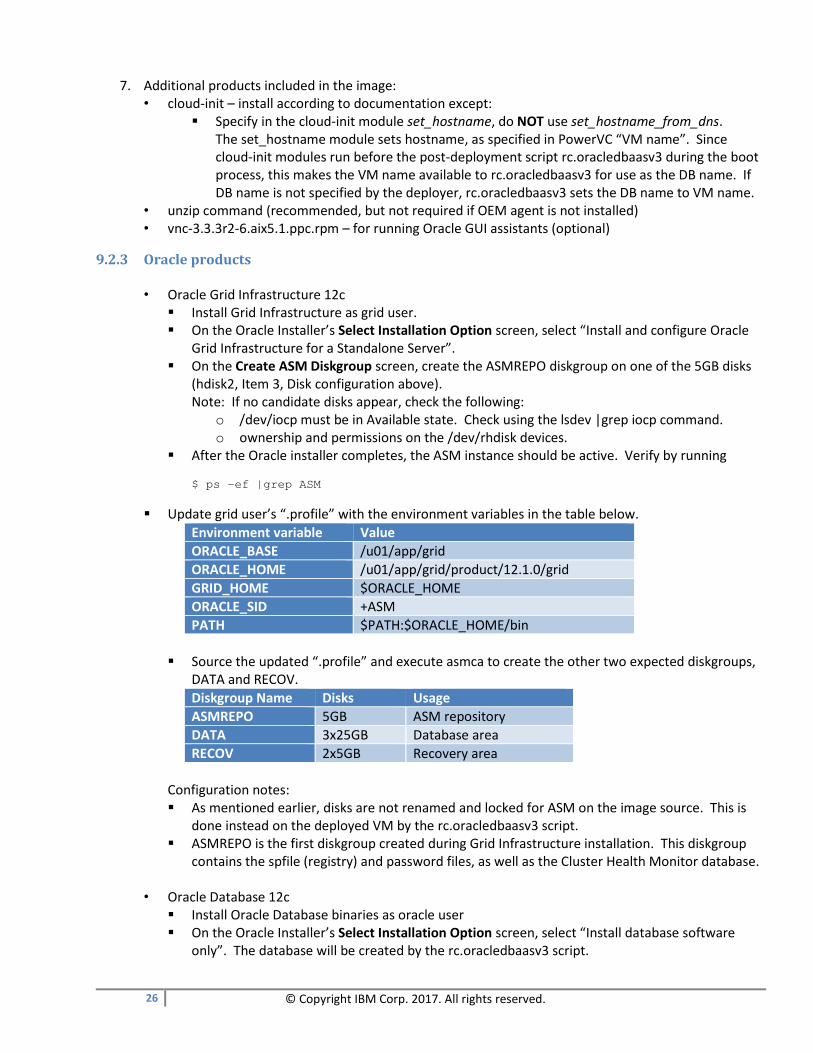
9.2.3 Oracle products
• Oracle Grid Infrastructure 12c ▪ Install Grid Infrastructure as grid user. ▪ On the Oracle Installer’s Select Installation Option screen, select “Install and configure Oracle
Grid Infrastructure for a Standalone Server”. ▪ On the Create ASM Diskgroup screen, create the ASMREPO diskgroup on one of the 5GB disks
(hdisk2, Item 3, Disk configuration above). Note: If no candidate disks appear, check the following:
o /dev/iocp must be in Available state. Check using the lsdev |grep iocp command. o ownership and permissions on the /dev/rhdisk devices.
▪ After the Oracle installer completes, the ASM instance should be active. Verify by running
$ ps –ef |grep ASM
▪ Update grid user’s “.profile” with the environment variables in the table below.
Environment variable Value
ORACLE_BASE /u01/app/grid
ORACLE_HOME /u01/app/grid/product/12.1.0/grid
GRID_HOME $ORACLE_HOME
ORACLE_SID +ASM
PATH $PATH:$ORACLE_HOME/bin
▪ Source the updated “.profile” and execute asmca to create the other two expected diskgroups,
DATA and RECOV.
Diskgroup Name Disks Usage
ASMREPO 5GB ASM repository
DATA 3x25GB Database area
RECOV 2x5GB Recovery area
Configuration notes: ▪ As mentioned earlier, disks are not renamed and locked for ASM on the image source. This is
done instead on the deployed VM by the rc.oracledbaasv3 script. ▪ ASMREPO is the first diskgroup created during Grid Infrastructure installation. This diskgroup
contains the spfile (registry) and password files, as well as the Cluster Health Monitor database.
• Oracle Database 12c ▪ Install Oracle Database binaries as oracle user ▪ On the Oracle Installer’s Select Installation Option screen, select “Install database software
only”. The database will be created by the rc.oracledbaasv3 script.

27 © Copyright IBM Corp. 2017. All rights reserved.
▪ After the Installer completes, update oracle user’s “.profile” by adding the environment variables listed in the table below.
Environment variable Value ORACLE_BASE /u01/app/oracle
ORACLE_HOME /u01/app/oracle/product/12.1.0/dbhome_1
PATH $PATH:$ORACLE_HOME/bin
9.3 Post-deployment customization This section describes all developed scripts, their roles and the call sequence. The actual scripts are include in the zip package available together with this document.
9.3.1 Scripts DBaaS v3 consists of the following post-deployment customization scripts and files:
Name Type Location Description
rc.initdbaas Shell script Owner – root Set execute permission.
This script is invoked from an inittab entry named initdbaas. In our PoT environment, this script was placed in /stage.
Determines if cloud-init’s user-data.txt file contains activation data. If it does, copies user-data.txt to /tmp/user-data.txt (trigger file). Starts the script specified by $RCDBAAS and waits until completed.
rc.oracledbaasv3 Shell script Owner - root
Set execute permission.
This script is invoked by rc.initdbaas. In the PoT environment, this script was placed in /stage.
Performs setup tasks for AIX, reconfigures Oracle Restart and ASM, creates the database and deploys the OEM agent.
rc.oracledbaasv3.cfg Shell script Owner: root
MUST be in the same location as rc.oracledbaasv3
Sourced by rc.oracledbaasv3, sets environment variables. This file needs to be adjusted to your environment.
rc.agent<version> Shell script Owner - root Set execute permission
MUST be in the same location as rc.oracledbaasv3.
Called by rc.oracledbaasv3 to install and deploy OEM agent Refer to Section 0 for additional details.
rc.agent<version>.cfg Shell script Owner - root
MUST be in the same location as rc.oracledbaasv3.
Sourced by rc.agent<version>, sets environment variables. This file needs to be adjusted to your environment.
atsdemo.dbc Oracle database template Owner -oracle:oinstall Permissions: rw-r-----
MUST be in the same location as rc.oracledbaasv3.
Used by dbca to create the database. Created using dbca and based on the General Purpose database. This file can be modified / adjusted to meet your specific database requirements.
OEM agent software Directory Owner -oracle:oinstall Permissions: rwx-r-x-r-x
Must be in location specified by T_WORK variable in filerc.agent<version>.cfg (configuration file)
Includes the OEM 12c or 13c Agent code and deployment script. This directory must be specified in rc.agent<version>.cfg.
prep_image_capture.sh Shell script Owner – root Set execute permission.
Must be the same location as rc.oracledbaasv3.
Prepares the image source host for capture. Execute on the image source host before a new image is captured. For more details, refer to Section
8.2.1, Prep_image_capture.sh.

28 © Copyright IBM Corp. 2017. All rights reserved.
9.3.2 Script Configuration Files The configuration files contain environment variable settings for the rc scripts. These environment variables
may need to be modified according to installation settings on the image source host. Refer to Section 8 for
more information about setting up the image source host.
The configuration files described in this section are rc.oracledbaasv3.cfg and rc.agent<version>.cfg. These are sourced by rc.oracledbaasv3 and rc.agent<version>, respectively. Note: rc.oracledbaasv3 and rc.agent<version> refer to these configuration files using the shell variable $0, based on the convention that the cfg file is named <calling script>.cfg. If for some reason, either rc.oracledbaasv3 or rc.agent<version> is renamed, the .cfg files must be renamed as well to match the new calling script names. See Section 9.3.3 below.
9.3.2.1 rc.initdbaas.cfg This file is sourced by rc.initdbaas.
Environment variable Current value Description RCINITDBAAS_VERSION v1r0 Version. Used for documentation only. RCDBAAS /stage/rc.oracledbaasv3 Name of the script that rc.initdbaas will
invoke.
9.3.2.2 rc.oracledbaasv3.cfg This file is sourced by rc.oracledbaasv3.
Environment variable Current value Description RCDBAAS_VERSION v3 Version. Used for documentation only. GRID_HOME /u01/app/grid/product/12.1.0/grid ORACLE_HOME of Grid Infrastructure. Used by
root user to invoke Oracle commands. Note: May be redundant if already set in root’s .profile.
ORIG_HOST dbaasv2 Set this variable to the hostname (hostname –s) of the image source host. rc.oracledbaasv3 will not do anything if current hostname is either: • equal to this name • or equal to the DNS-registered hostname of the
image source host (ORIG_HOST_DNS) ORIG_HOST_DNS aop92cld08 (lab environment) DNS-registered hostname (short name) of the
image source host. This may be the same as ORIG_HOST.
ORIG_HOST_DNS_FQDN aop92cld08.pbm.ihost.com (lab environment) Fully qualified DNS hostname of image source host. Not used / obsolete.
PARM_FILE /opt/freeware/var/lib/cloud/instance/user-
data.txt
/tmp/user-data.txt
File containing input parameters entered by the deployment user on the deployment screen. This is the default file from the cloud-init package and should not be manually changed.
ASMPWFILE +ASMREPO/orapwasm ASM password file. Obtain this from the image source host with the following command: srvctl config asm
DBSNMPPW oracle Password for Oracle database dbsnmp user. This will be set in the dbca command creating the database.
ORASYSPW oracle Password for Oracle database SYS user. This will be set in the dbca command creating the database.

29 © Copyright IBM Corp. 2017. All rights reserved.
ASMSYSPW manager Password for ASM SYS user. This is the password set when Grid Infrastructure is installed and configured.
DATADG DATA ASM diskgroup for data. This diskgroup should have been created during Grid Infrastructure installation and configuration. This name is passed to dbca during database creation.
RECOVDG RECOV ASM diskgroup for recovery. This diskgroup should have been created during Grid Infrastructure installation and configuration. This name is passed to dbca during database creation.
OEMAGENTSCRIPT rc.agent<version> Name of OEM deployment script. This script must be in same directory as rc.oracledbaasv3. This script is invoked by rc.oracledbaasv3 to install the OEM agent. Currently, <version> may be 12c or 13c. This parameter may be overridden by the OEMVERSION input parameter.
STARTOEM YES|NO Specifies if rc.agent<version> is to be run. This switch specifies whether to configure the OEM agent. If the value is “NO”, rc.agent<version> is not run. This parameter may be overridden by the STARTOEM input parameter.
9.3.2.3 rc.agent<version>.cfg This file is sourced by rc.agent<version>. Note that the required Oracle OEM agent software is not part of the provided zip package and needs to be created based on Oracle documentation.
Environment variable Current value Description AGENT_SOFTWARE_OWNER oracle Operating system user for OEM
software. AGENT_SOFTWARE_GROUP oinstall Operating system group for OEM
software. AGENT_BASE_DIR /u01/app/agent OEM agent base directory. AGENT_HOME $AGENT_BASE_DIR/core/12.1.0.4.0
(12c) OEM agent home directory.
T_WORK /tmp/clone_work Directory containing OEM mgmt. agent software and deployment scripts. This directory requires approximately: OEM 12c - 900MB OEM 13c -1.8GB
OMS_HOST <hostname of OEM Manager>
e.g. aobpj22s9-oem (lab environment) OEM 12c Server hostname. May also be FQDN. Must be DNS-registered.
OMS_PORT 1159 OEM Port. AGENT_REGISTRATION_PASSWORD <password> Password to register agent with OEM
Server.
9.3.3 Implementation Considerations
1. Names and locations: The current values in the previous sections reflect PoT environment. It is possible to rename or relocate various components in this package, if appropriate or preferred. Since the first script, rc.initdbaas is invoked from inittab, the requirement for various components to be in the same location as rc.initdbaas follows from this. Other files that do not have this “same location” requirement are specified via environment variables in the configuration (*.cfg) files.

30 © Copyright IBM Corp. 2017. All rights reserved.
2. Though the rc.agent scripts are essentially similar, we created two scripts, rc.agent12c and rc.agent13c,
and their accompanying configuration files, rc.agent12c.cfg and rc.agent13c.cfg. The OEMAGENTSCRIPT variable in rc.oracledbaasv3.cfg is used to point to the desired version. Similarly, two clone_work directories were created: clone_work_12c and clone_work_13c, with the appropriate settings for T_WORK set in the respective rc.agent*.cfg file. As mentioned, the contents of this “T_WORK” directory with installable OEM agent software is not provided in this package.
9.3.4 Code Logic This section details the calling sequence / flow of control after a newly deployed LPAR starts up. After the VM has been deployed and cloud-init has completed initialization, rc.initdbaas is invoked from /etc/inittab. Note that the initdbaas entry in /etc/inittab must be after the entry for cloud-init! A high-level flow diagram is shown below:
31 © Copyright IBM Corp. 2017. All rights reserved.
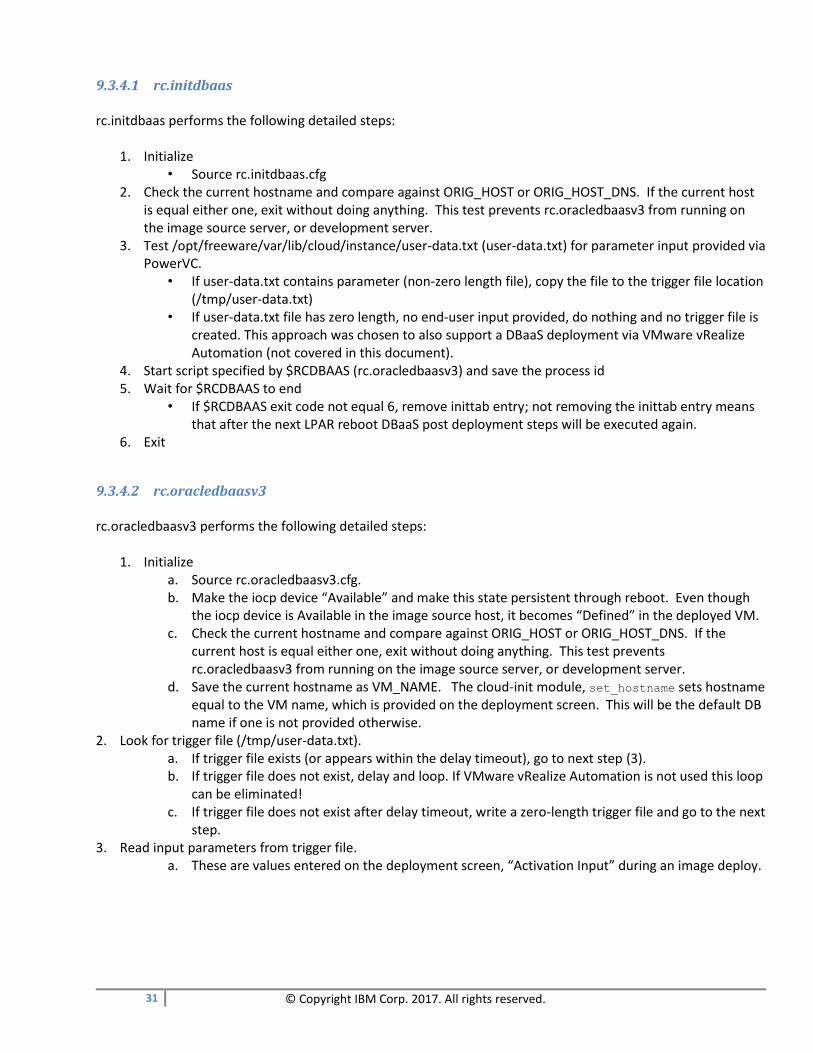
9.3.4.1 rc.initdbaas rc.initdbaas performs the following detailed steps:
1. Initialize • Source rc.initdbaas.cfg
2. Check the current hostname and compare against ORIG_HOST or ORIG_HOST_DNS. If the current host is equal either one, exit without doing anything. This test prevents rc.oracledbaasv3 from running on the image source server, or development server.
3. Test /opt/freeware/var/lib/cloud/instance/user-data.txt (user-data.txt) for parameter input provided via PowerVC.
• If user-data.txt contains parameter (non-zero length file), copy the file to the trigger file location (/tmp/user-data.txt)
• If user-data.txt file has zero length, no end-user input provided, do nothing and no trigger file is created. This approach was chosen to also support a DBaaS deployment via VMware vRealize Automation (not covered in this document).
4. Start script specified by $RCDBAAS (rc.oracledbaasv3) and save the process id 5. Wait for $RCDBAAS to end
• If $RCDBAAS exit code not equal 6, remove inittab entry; not removing the inittab entry means that after the next LPAR reboot DBaaS post deployment steps will be executed again.
6. Exit
9.3.4.2 rc.oracledbaasv3 rc.oracledbaasv3 performs the following detailed steps:
1. Initialize a. Source rc.oracledbaasv3.cfg. b. Make the iocp device “Available” and make this state persistent through reboot. Even though
the iocp device is Available in the image source host, it becomes “Defined” in the deployed VM. c. Check the current hostname and compare against ORIG_HOST or ORIG_HOST_DNS. If the
current host is equal either one, exit without doing anything. This test prevents rc.oracledbaasv3 from running on the image source server, or development server.
d. Save the current hostname as VM_NAME. The cloud-init module, set_hostname sets hostname equal to the VM name, which is provided on the deployment screen. This will be the default DB name if one is not provided otherwise.
2. Look for trigger file (/tmp/user-data.txt). a. If trigger file exists (or appears within the delay timeout), go to next step (3). b. If trigger file does not exist, delay and loop. If VMware vRealize Automation is not used this loop
can be eliminated! c. If trigger file does not exist after delay timeout, write a zero-length trigger file and go to the next
step. 3. Read input parameters from trigger file.
a. These are values entered on the deployment screen, “Activation Input” during an image deploy.

32 © Copyright IBM Corp. 2017. All rights reserved.
b. The supported formats are: Parameter format Comment
db_name=<database name> Name for new database. This will also be the SID name.
startoem=yes|no If yes, run rc.agent<version> to clone OEM agent. This parameter overrides value specified in the .cfg file.
oemversion=12c|13c Version of rc.agent. This is appended to “rc.agent” to get the name of the script, e.g. rc.agent12c, and override the value of OEMAGENTSCRIPT in the .cfg file.
debug Perform a set –x for detailed debugging to the log file. This is only done on rc.oracledbaasv3, not rc.agent.
abort Only change iocp settings, no other post-deploy processing.
See example in the Figure 2. Image deployment (1) on page 9.
rc.oracledbaasv3 can process single or multiple parameters from Activation Input:
• If multiple lines, “abort” or “debug” must be on their own line; the rest of the line is ignored • If single line, multiple parameters must be delimited by a semicolon, e.g.
db_name=<name>;abort;debug
The input data is read by cloud-init and placed in the file named:
/opt/freeware/var/lib/cloud/instance/user-data.txt
c. rc.oracledbaasv3 reads user-data.txt and saves the specified value for db_name in the
variable DBNAME. If db_name value is not specified, DBNAME is set to an empty string.
4. Rename and lock the ASM disks • obtain a list of the hdisks that do not have a pvid. For these hdisks,
- examine the header for the text “ORCLDISK”. If found, obtain the first 4 characters of the ASM diskgroup name from the disk header (see DESIGN NOTE below)
- rename the hdisk – create a new name by inserting the first 4 characters of the diskgroup between the “hdisk” and the number. For example, if the ASM diskgroup is DATA and the disk is hdisk2, the new name will be hdiskDATA2
- once renamed, lock the disk The result will look similar to the following:
# lspv
hdisk0 00f623c4e2259290 rootvg active
hdisk1 00f623c451149e38 oravg active
hdiskDATA2 none ASM locked
hdiskDATA3 none ASM locked
hdiskDATA4 none ASM locked
hdiskRECO5 none ASM locked
hdiskRECO6 none ASM locked
hdiskASMR7 none ASM locked
DESIGN NOTE: If the ASM diskgroup names are changed, the first four characters must be unique; otherwise code changes will be required in the post deployment script.
5. Change the hostname to the DNS-registered hostname a. obtain the ip address and use nslookup to find the DNS-registered hostname b. take the hostname and change using chdev command c. set the hosted to the new hostname d. if unable to set hostname (e.g. no DNS), log message and abort any further processing!
33 © Copyright IBM Corp. 2017. All rights reserved.
6. Reconfigure Oracle Restart. These steps mostly follow MOS Doc ID 1570358.1, “How to Reconfigure Oracle
Restart on 12c / 12.1”. a. change the hostname (placeholder “DEPLOYHOST”) in GRID_HOME/network/admin/listener.ora
from the image source hostname to the current hostname b. stop Oracle HAS. An error is expected here as HAS was de-configured before the image was
captured, which can and is ignored. c. run roothas.pl to de-configure HAS, if it is not already de-configured in the captured image d. run root.sh to reconfigure HAS e. register ASM with Oracle Restart f. register the ASM password file (MOS Doc ID 1935891.1) g. start ASM h. mount ASM diskgroups i. register and start the listener j. register the spfile
At this point, ASM will be up and running. 7. If startoem=yes, deploy and configure OEM agent via a parallel process
a. start (fork) $OEMAGENTSCRIPT (rc.agent<version>) in the background to deploy the OEM agent. b. save the background job’s process id (pid). This will be used to wait for the job to end later on.
(Our observation has been that this job ends before the database creation step finishes.) 8. Create database
a. validate DBNAME in preparation for database creation b. if the DBNAME is null, assign $VM_NAME to $DBNAME c. if DBNAME has non-alphanumeric characters, remove them
Rationale: i. Oracle documentation states that SID must be alphanumeric plus the underscore (_)
character, up to max of 255 characters. However, our observation is that dbca does not allow the underscore.
ii. it is common practice to set the SID to be equal to the database name. d. if DBNAME is longer than 8 characters, truncate DBNAME to 8 characters.
i. db name is restricted to a maximum of 8 characters. e. Note: If you utilize the template deploy and specify a VM name with seven or fewer characters
you can deploy multiple DBaaS images in parallel. PowerVC changes the VM name “myVM” by appending “-1”, “-2”, … The above post-processing will result in database names like “myVM1” on myVM-1 and “myVM2” on myVM-2. This also works with image deploy if the activation input “db_name=…” is not used.
f. create the database by running dbca silently; this utilizes the included dbca configuration file atsdemo.dbc.
g. add the correct $ORACLE_SID to oracle user’s .profile h. unlock the DBSNMP user account and set the password ($DBSNMPPW)
9. If started earlier, wait for the rc.agent background job to complete (from step 7 above) a. examine the exit code and log the outcome
10. Exit.

34 © Copyright IBM Corp. 2017. All rights reserved.
9.3.4.3 rc.agent<version> The OEM agent in the deployed VM is cloned from an existing managed host. This cloning process starts by installing the management agent on a target host. A management agent cloning package is created and placed on the image source host. During deployment, rc.agent<version> invokes Oracle’s agentDeploy.sh script (part of the cloning package) to install the OEM agent code and upload current management data from the deployed VM. After this process completes, the deployed VM (host) becomes a visible host target to the OEM Management Server. The agent cloning package consists of the management agent’s Oracle home, Oracle’s agentDeploy script, agentimage.properties file, and the unzip command. An overview chart of this cloning procedure is shown below.
The detailed procedure for preparing this Oracle Management agent code package is not be covered in this paper. Refer to Oracle documentation in Section 13, References, for further details. The location of the management agent cloning package is specified by $T_WORK in rc.agent<version>.cfg. DBaaS v3 does NOT include the agent cloning packages from OEM 12c, 13c and only provides the accompanying rc.agent scripts.

35 © Copyright IBM Corp. 2017. All rights reserved.
10 Troubleshooting This chapter provides guidance on how to troubleshoot the DBaaS deployment and customization steps.
10.1 Troubleshooting Successful deployment of an image or image template is shown in PowerVC with an ip address assigned, State=Active, and Health=Ok. During the deployment process, Health may temporarily show Warning status; this reflects a delay in setting up RMC communications with the HMC. For problem determination, review:
1. Issues associated with PowerVC deployment, review PowerVC messages. 2. Issues during post-powervc deploy, review the log files – see section Log Files for more details:
• /tmp/rc.initdbaas.log • /tmp/rc.oracledbaasv3.log • /tmp/rc.agent<version>.log
Common errors to look for:
Problem Diagnostic Information Possible resolution Deploy succeeds, rc.oracledbaasv3 fails on first step
/tmp/rc.oracledbaasv3.log Make sure that the compute template is one with at least 8GB RAM. Delete VM and re-deploy.
No ip address available PowerVC Message Log Determine if there are VMs that are no longer needed and can be deleted. Delete the VMs to free up ip addresses in the project pool and retry deployment. Note that with PoverVC 1.3.1 IP pools are project specific!
VM does not show up as an OEM target in OEM
/tmp/rc.agent<version>.log /tmp/rc.agent<version>.cfg
Was the agent deployment successful? Is OEM hostname correct ( rc.agent<version>.cfg)?
10.2 Log Files The inittab entry that invokes rc.initdbaas (shown below) redirects stdout and stderr to a log file named rc.initdbaas.log in the “/tmp” directory.
initdbaas:2:once:/stage/rc.initdbaas > /tmp/rc.initdbaas.log 2>&1 &
rc.oracledbaasv3 and rc.agent<version> scripts are invoked in the same way. In these cases, stdout and stderr messages are sent to /tmp/rc.oracledbaasv3.log and /tmp/rc.agent<version>.log respectively. Normal log messages from the scripts are written with the logmsg subroutine. Log messages appear in the following general format:
** 17:07:41 04/19/17 rc.oracledbaasv3: started from /stage
** 17:07:41 04/19/17 rc.oracledbaasv3: version=v3
iocp0 Available
iocp0 changed
** 17:07:41 04/19/17 rc.oracledbaasv3: current hostname (vm name) is testdb
.
.
etc.
Other messages in the log file are those from commands invoked in the scripts, such as dbca, agentDeploy.sh, etc.

36 © Copyright IBM Corp. 2017. All rights reserved.
11 Design Considerations This package was created to show a cloud environment for IBM Power Systems and to demonstrate the capability to quickly deploy enterprise-level services, in this case the Oracle Database as a Service. In the context of a PoT, we felt it important to achieve a small enough deployment time to fit into a one to two hour session. As such, a lot of what could be done at deployment time was moved into the image, such as the installation of Oracle product binaries, configuration of the ASM instance, the post-deployment customization scripts, and so forth. This resulted in what might be considered a relatively “heavy” deploy image and the need to recapture the image when fixing or modifying minor components. A future enhancement could include IBM BigFix clients or a Chef client to support automated post-deployment patching of AIX as this is not a functionality provided by PowerVC.
12 Package Availability The scripts and files described above are available with this white paper. For implementation services, please contact IBM STG Lab Services.
37 © Copyright IBM Corp. 2017. All rights reserved.
13 References
IBM Documentation
• IBM PowerVC, a comprehensive virtualization management tool, enables virtual machine setup and management, IBM United States Software Announcement 213-409, October 7, 2013 URL: http://www-01.ibm.com/common/ssi/ShowDoc.wss?docURL=/common/ssi/rep_ca/9/897/ENUS213-409/index.html
• IBM PowerVM NovaLink, V1.0.0.3, IBM PowerVC V1.3.1, and IBM Hardware Management Console V8.8.5 enhanced, IBM United States Software Announcement 216-144, April 12, 2016 URL: http://www-01.ibm.com/common/ssi/ShowDoc.wss?docURL=/common/ssi/rep_ca/4/897/ENUS216-144/index.html&request_locale=en
• IBM Redbook, IBM PowerVC Version 1.3.2 Introduction and Configuration, Javier Bazan Lazcano and Martin Parrella, January 2017, SG24-8199-0.
URL: http://www.redbooks.ibm.com/abstracts/sg248199.html?Open
Oracle Documentation
• My Oracle Support Doc ID 1570358.1, How to Reconfigure Oracle Restart on 12c / 12.1
• My Oracle Support Doc ID 1935891.1, Oracle Restart: WARNING: unknown state for ASM password file
location resource, Return Value: 3
• My Oracle Support Doc ID 1668455.1, ASM spfile in a disk group
• Oracle® Enterprise Manager Cloud Control Basic Installation Guide, 12c Release 5 (12.1.0.5), E22624-47,
August 2015, Chapter 7 Installing Oracle Management Agents
URL: http://docs.oracle.com/cd/E24628_01/install.121/e22624/install_agent.htm#EMBSC181
• Oracle® Enterprise Manager Cloud Control Advanced Installation and Configuration Guide, 12c Release
5 (12.1.0.5), E24089-47, February 2016, Chapter 7 Cloning Oracle Management Agents
URL: http://docs.oracle.com/cd/E24628_01/install.121/e24089/clone_agent.htm#EMADV157
• Oracle® Enterprise Manager Cloud Control Basic Installation Guide, 13c Release 1, E63676-03, March
2016
URL: http://docs.oracle.com/cd/E63000_01/EMBSC/install_agent_new.htm#EMBSC181
• Oracle® Enterprise Manager Cloud Control Advanced Installation and Configuration Guide, 13c Release
1, E63674-03, March 2016
URL: http://docs.oracle.com/cd/E63000_01/EMADV/clone_agent.htm#EMADV157

38 © Copyright IBM Corp. 2017. All rights reserved.
14 Acknowledgements We would like to thank Timothy Spencer, IBM, for his contributions to this project by reviewing code and testing the full deployment process.

39 © Copyright IBM Corp. 2017. All rights reserved.
15 Appendix
15.1 PowerVC 1.3.1 Setup Procedure
1. Create the operating system groups (not needed if in-place upgrade was done) # groupadd admin
# groupadd deployer
# groupadd viewer
2. Create the operating system users and set their passwords (department password for admin, user name for the dbdemouser’s).
# useradd -d /home/admin -g admin -m -c "PowerVC administrator" admin
# passwd admin
Changing password for user admin.
New password:
BAD PASSWORD: The password contains the user name in some form
Retype new password:
passwd: all authentication tokens updated successfully.
# useradd -d /home/dbdemouser -g deployer -m -c "Demo user" dbdemouser
# passwd dbdemouser
Changing password for user dbdemouser.
New password:
BAD PASSWORD: The password contains the user name in some form
Retype new password:
passwd: all authentication tokens updated successfully.
Repeat for dbdemouser2 and dbdemouser3 # useradd -d /home/dbdemouser2 -g deployer -m -c "Demo user 2" dbdemouser2
# passwd dbdemouser2
# useradd -d /home/dbdemouser3 -g deployer -m -c "Demo user 3" dbdemouser3
# passwd dbdemouser3
3. Add the last line shown below to root’s .bash_profile. Sourcing this file sets up the environment to run the openstack commands.

40 © Copyright IBM Corp. 2017. All rights reserved.
4. Modify /opt/ibm/powervc/powervcrc Note: At this point in time, root is the default PowerVC administrator. Once we make admin the administrator, we will replace root in this file.
5. Source .bash_profile.
# . .bash_profile
6. Create the dbdemo project
# openstack project create dbdemo
7. Add admin role
Roles may be assigned to a user or group. Here, we added the admin role to the projects for the admin group. This means that all users belonging to the admin group have the admin role for the project.
# openstack role add --project dbdemo --group admin admin
# openstack role add --project ibm-default --group admin admin
8. Assign other roles. Here we added the roles for the individual users, on order to understand the scope of each role.
# openstack role add --project dbdemo --user dbdemouser self-service
# openstack role add --project dbdemo --user dbdemouser deployer_restricted
# openstack role add --project dbdemo --user dbdemouser2 deployer_restricted
# openstack role add --project dbdemo --user dbdemouser3 self_service

41 © Copyright IBM Corp. 2017. All rights reserved.
9. Verify role assignments
Once the admin user has been created and the admin role assigned, disable root user’s access to PowerVC.
1. Remove root user from the admin group
# gpasswd -d root admin
2. Modify /opt/ibm/powervc/powervcrc. Replace root with admin in OS_USERNAME as shown below.
3. Test the change by sourcing .bash_profile again and running an openstack command:
# . .bash_profile
# openstack role assignment list --names --project dbdemo

42 © Copyright IBM Corp. 2017. All rights reserved.
16 Notices and Trademarks INTERNATIONAL BUSINESS MACHINES CORPORATION PROVIDES THIS PUBLICATION “AS IS” WITHOUT WARRANTY OF ANY KIND, EITHER EXPRESS OR IMPLIED, INCLUDING, BUT NOT LIMITED TO, THE IMPLIED WARRANTIES OF NON-INFRINGEMENT, MERCHANTABILITY OR FITNESS FOR A PARTICULAR PURPOSE. Some jurisdictions do not allow disclaimer of express or implied warranties in certain transactions, therefore, this statement may not apply to you. This information could include technical inaccuracies or typographical errors. IBM may make improvements and/or changes in the product(s) and/or the program(s) described in this publication at any time without notice. Any references in this information to non-IBM websites are provided for convenience only and do not in any manner serve as an endorsement of those websites. The materials at those websites are not part of the materials for this IBM product and use of those websites is at your own risk. IBM may use or distribute any of the information you provide in any way it believes appropriate without incurring any obligation to you. The performance data and client examples cited are presented for illustrative purposes only. Actual performance results may vary depending on specific configurations and operating conditions. Information concerning non-IBM products was obtained from the suppliers of those products, their published announcements or other publicly available sources. IBM has not tested those products and cannot confirm the accuracy of performance, compatibility or any other claims related to non-IBM products. Questions on the capabilities of non-IBM products should be addressed to the suppliers of those products. Statements regarding IBM’s future direction or intent are subject to change or withdrawal without notice, and represent goals and objectives only. COPYRIGHT LICENSE: This information contains sample application programs in source language, which illustrate programming techniques on various operating platforms. You may copy, modify, and distribute these sample programs in any form without payment to IBM, for the purposes of developing, using, marketing or distributing application programs conforming to the application programming interface for the operating platform for which the sample programs are written. These examples have not been thoroughly tested under all conditions. IBM, therefore, cannot guarantee or imply reliability, serviceability, or function of these programs. The sample programs are provided “AS IS”, without warranty of any kind. IBM shall not be liable for any damages arising out of your use of the sample programs. IBM, the IBM logo, and ibm.com are trademarks or registered trademarks of International Business Machines Corporation, in the United States, other countries, or both. Other product and service names might be trademarks of IBM or other companies. A current list of IBM trademarks is available on the web at “Copyright and trademark information” at http://www.ibm.com/legal/copytrade.shtml The following terms are trademarks of other companies: Linux is a trademark of Linus Torvalds in the United States, other countries, or both. UNIX is a registered trademark of The Open Group in the United States and other countries. VMware, VMware vRealize® Automation™, VMware vRealize® Orchestrator™, VMware ESXi™, VMware vSphere®, VMware vCenter® are registered trademarks or trademarks of VMware, Inc. in the United States and other jurisdictions. Oracle and Java are registered trademarks of Oracle and/or its affiliates. Other company, product, or service names may be trademarks or service marks of others.