deploying online responders should occur after … responder.pdf · when revocation data for...
TRANSCRIPT

Online Responders
When a new certificate is issued, the computer queries the issuing CA to find out whether the certificate
has been revoked. Traditionally, certificate revocation checking can be done by retrieving certificate
revocation lists that are published in Lightweight Directory Access Protocol (LDAP) or Hypertext Transfer
Protocol (HTTP) or by using a newer HTTP method named the Online Certificate Status Protocol (OCSP).
OCSP is a lightweight HTTP protocol that responds faster and more efficiently than downloading a
traditional CRL. An online responder is a trusted server that receives and responds to individual client
requests for the status of a certificate. An OCSP responder retrieves CRLs and provides digitally signed
real-time certificate revocation status responses to clients based on a given certificate authority’s CRL.
The amount of data retrieved per request remains constant regardless of the number of revoked
certificates.
Online responders process certificate status requests more efficiently than direct access to CRLs in
several scenarios
When clients have slow VPN connections or do not have the high-speed connections required to
download large CRLs
When network utilization peaks because revocation-checking activity is high, such as when
large numbers of users log on or send signed email simultaneously
When revocation data for certificates is needed from a non-Microsoft certification authority
When revocation data is needed to verify individual certificate status requests rather than all
revoked or suspended certificates
Deploying Online Responders should occur after deploying CAs and before deploying the end-
entity certificates. For more information about Server Manager and CA deployment, see
Windows Server 2008 CA Enhancements (http://go.microsoft.com/fwlink/?LinkID=83212).
1. Open Server Manager.
Figure 4: Server Manager

2. If the Online Responder is being installed on
a computer without any other AD CS role
services, click Add roles on the main page.

Note
If the Online Responder is installed on a computer where the CA or one of its
components is already installed, select the Active Directory Certificate Services node in
the left pane, and then click Add role services on the main page.
3. On the Select Server Roles page of the Add
Roles Wizard (Figure 5), select the Active
Directory Certificate Services check box,
and then click Next.
Figure 5: Select Server Roles
4. On the Select Role Services page (Figure 6),
select the Online Certificate Status Protocol
check box.
Figure 6: Select Role Services

Because the Online Responder requires IIS,
you are prompted to install IIS role services
(Figure 7). The following IIS features are
required for the Online Responder to operate
properly:
Web Server
Common HTTP Features
o Static Content
o Default Document
o Directory Browsing
o Http Errors
o Http Redirection

Application Development
o .NET Extensibility
o ISAPI Extensions
Health and Diagnostics
o Http Logging
o Logging Tools
o Request Monitor
o Tracing
Security
o Request Filtering
Performance
o Static Content Compression
Management Tools
o IIS Management Console
o IIS 6 Management Compatibility
o IIS Metabase Compatibility

5. Click Add Required Role Services to install
the required IIS services, and click Next.
Figure 7: Add Required Role Services
6. The next two steps allow selecting the role
services for the Web server (IIS). Click Next
twice.

7. On the Confirm Installation Options page
(Figure 8), click Install.
Figure 8: Confirm Installation Options
Note
The IIS installation process might take a long time to complete.
8. Figure 9: Installation Progress
9. When the installation is complete, the status
of the installation process is displayed on the
Installation Results page.
Figure 10: Installation Results

10. Click Close.
As part of the setup process, a virtual directory named OCSP is created in IIS, and the ISAPI
extension used as the Web proxy is registered. You can manually register or un-register the Web
proxy by using either of the following commands:
certutil –vocsproot
certutil –vocsproot delete

PREPARING THE ENVIRONMENT
The environment preparation consists of the following steps:
Configure the CA.
Configure the OCSP Response Signing
certificate template.
Enroll for an OCSP Response Signing
certificate against a stand-alone CA.
Use a hardware security module (HSM) to
protect OCSP signing keys.
You must configure the CAs to include the Online Responder's URL as part of the authority
information access extension of issued certificates. This URL is used by the OCSP client to
validate the certificate status.
To configure the authority information access extension
1. Open the Certification Authority snap-in,
right-click the name of the issuing CA,and
then click Properties.
2. Click the Extensions tab.
3. In the Select extension list, click Authority
Information Access (AIA) (Figure 11), and
then click Add.
Figure 11: CA Properties
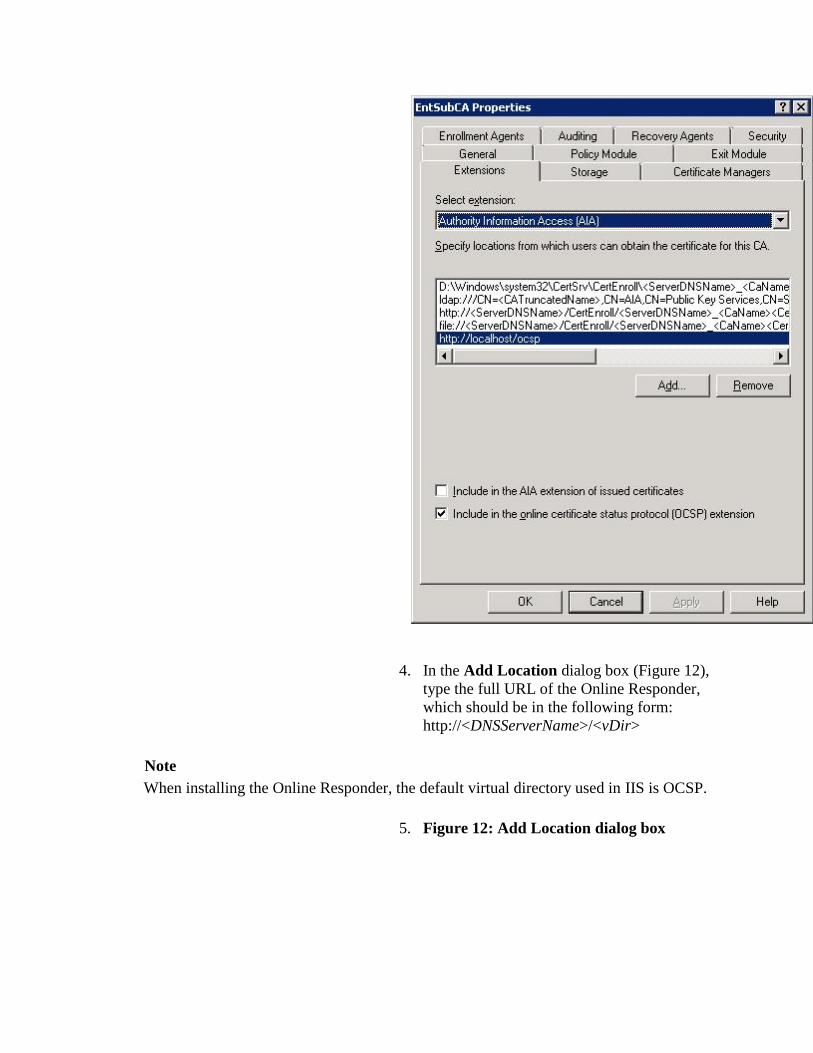
4. In the Add Location dialog box (Figure 12),
type the full URL of the Online Responder,
which should be in the following form:
http://<DNSServerName>/<vDir>
Note
When installing the Online Responder, the default virtual directory used in IIS is OCSP.
5. Figure 12: Add Location dialog box

6. 7. Click OK.
8. Select the location from the Location list.
9. Select the Include in the online certificate
status protocol (OCSP) extension check
box, and then click OK.
Configuring the OCSP Response Signing certificate template
The Online Responder can sign OCSP responses by using the issuing CA key or a dedicated
signing key. A signing certificate has the following attributes:
Has a short validity period. (A validity period
of two weeks is recommended.)
Includes the id-pkix-ocsp-nocheck extension.
Does not include CRL distribution point and
authority information access extensions.
Includes id-kp-OCSPSigning enhanced key
usage (EKU).
The steps to configure the OCSP Response
Signing template in the Windows Server 2003
operating system are different from the steps
starting in Windows Server 2008.

Note
In Windows Server 2008, a version 3 template is introduced. The new template version allows
advanced cryptography support in addition to other enhancements. For more information, see
Windows Server 2008 CA Enhancements (http://go.microsoft.com/fwlink/?LinkID=83212).
Configuring the OCSP Response Signing certificate template
Starting in Windows Server 2008, a new certificate template is added to the available templates
in Active Directory Domain Services (AD DS). The new template, named OCSP Response
Signing, is a version 3 template preconfigured with the required extensions and attributes listed
previously. No modifications are required to the template or to the CA.
As with any template, the enrollment permissions must be configured.
To configure the template security settings to allow Online Responders to enroll for signing certificates
1. Open the Certificate Templates snap-in.
2. Double-click the OCSP Response Signing
template or a duplicate you have created, and
then click the Security tab.
3. Add the Online Responder computers to the
Group or user names list.
4. To allow Online Responder computers to
enroll for the OCSP Response Signing
certificate, select the Allow check box for the
Read and Enroll permissions.
Note
The Autoenroll permission is not used by the Online Responder, which has a separate
implementation of autoenrollment that is explained in detail later in this document. The default
Windows autoenrollment implementation limits a template to issuing one certificate per client.
By default, Windows autoenrollment will renew only one of the signing certificates available on
the Online Responder computer and will archive the rest. In some cases, Windows
autoenrollment will not use the original CA that issued the certificate for renewal. This is not the
behavior expected by the Online Responder, which requires renewal by the same CA.
Assigning an OCSP Response Signing template to a CA

After the templates are properly configured, the CA needs to be configured to issue that
template.
To configure the CA to issue certificates based on the newly created OCSP Response Signing template
1. Open the Certification Authority snap-in.
2. Right-click Certificate Templates, click
New, and then click Certificate Template to
Issue.
3. In the available templates list, click the
OCSP Response Signing template, and then
click OK.
Enrolling for an OCSP Response Signing certificate
For enhanced security, the Online Responder runs with Network Service privileges. This means
it does not have access to computer private keys by default, and permissions for private keys that
need to be accessed by the Online Responder have to be modified to allow access. A new
functionality, which is introduced in version 3 templates, allows the enrollment client to
configure permissions for computer keys as part of the enrollment process to allow access for
services running as Network Service. This functionality is available starting in Windows Vista
and Windows Server 2008.
The new OCSP Response Signing version 3 template enables this functionality by default,
allowing the enrollment client to modify the private key permissions automatically to allow
Network Service Read access to the OCSP signing private key.
As long as a CA that is running at least Windows Server 2008 is used to issue a certificate based
on the OCSP Response Signing template or a duplicate of that template, no additional
configuration is required.
If a Windows Server 2003, Enterprise Edition–based CA is used, OCSP signing private key
permissions must be configured manually on the Online Responder computer to allow the Online
Responder service access to the private key.
In Windows Vista and Windows Server 2008, the ability to modify private key permissions was
added to the Certificates snap-in.
The following procedure is required only if a Windows Server 2003–based CA is used to issue
OCSP signing certificates.
To configure the private key permissions for an OCSP signing certificate issued by a Windows Server 2003–
based CA

1. On the Online Responder computer, open the
Certificates snap-in for the local computer.
2. In the available certificates list, select the
OCSP Response Signing certificate.
Note
The signing certificate should first be manually enrolled.
3. On the Actions menu, point to All Tasks,
click Manage Private Keys, and then click
Add.
4. Type network service, and then click OK.
5. Verify that only the Read permission is
allowed for the NETWORK SERVICE, and
then click OK.
6. Restart the Online Responder service by
typing the following commands at a
command prompt:
Copy
net stop ocspsvc
net start ocspsvc
Note
The steps above apply only if the Online Responder revocation configuration is set for manual
enrollment of the OCSP signing certificate. If the revocation configuration is configured for
OCSP automatic enrollment, the private keys should have the correct permissions by default and
the steps above should not be required.
Note
If the revocation configuration is set to use OCSP autoenrollment and a Windows Server 2003–
based CA is used, renewal of OCSP signing certificates will require additional steps, as specified
below.
Renewing OCSP Response Signing certificates
After the initial certificate enrollment is complete and the proper key access control list (ACL) is
set, renewing OCSP Response Signing certificates is similar to any other certificate renewal
procedure with one caveat. When the CA certificate is renewed, the OCSP Response Signing
certificate used for validation of existing certificates must still be signed by the CA certificate
that was used to issue the existing certificates.
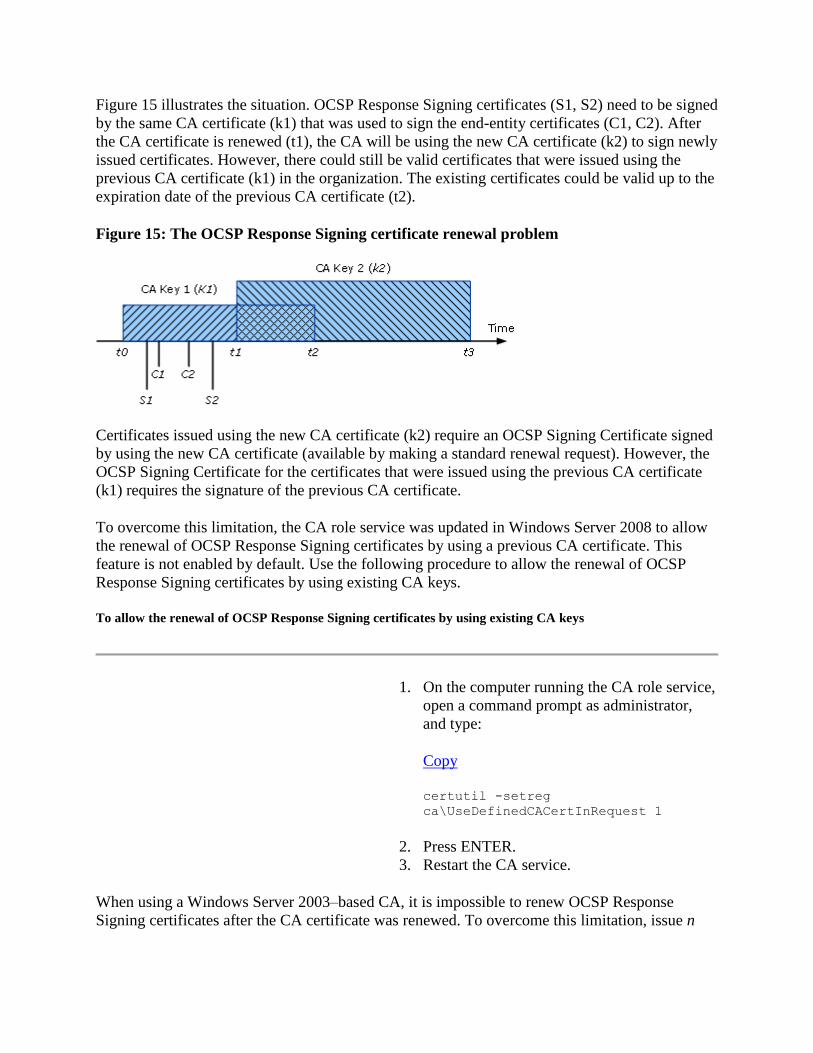
Figure 15 illustrates the situation. OCSP Response Signing certificates (S1, S2) need to be signed
by the same CA certificate (k1) that was used to sign the end-entity certificates (C1, C2). After
the CA certificate is renewed (t1), the CA will be using the new CA certificate (k2) to sign newly
issued certificates. However, there could still be valid certificates that were issued using the
previous CA certificate (k1) in the organization. The existing certificates could be valid up to the
expiration date of the previous CA certificate (t2).
Figure 15: The OCSP Response Signing certificate renewal problem
Certificates issued using the new CA certificate (k2) require an OCSP Signing Certificate signed
by using the new CA certificate (available by making a standard renewal request). However, the
OCSP Signing Certificate for the certificates that were issued using the previous CA certificate
(k1) requires the signature of the previous CA certificate.
To overcome this limitation, the CA role service was updated in Windows Server 2008 to allow
the renewal of OCSP Response Signing certificates by using a previous CA certificate. This
feature is not enabled by default. Use the following procedure to allow the renewal of OCSP
Response Signing certificates by using existing CA keys.
To allow the renewal of OCSP Response Signing certificates by using existing CA keys
1. On the computer running the CA role service,
open a command prompt as administrator,
and type:
Copy
certutil -setreg
ca\UseDefinedCACertInRequest 1
2. Press ENTER.
3. Restart the CA service.
When using a Windows Server 2003–based CA, it is impossible to renew OCSP Response
Signing certificates after the CA certificate was renewed. To overcome this limitation, issue n

OCSP signing certificates for each Online Responder computer from the Windows 2003–based
CA, where n = (the number of weeks until the expiration date of the CA key)/2.
Important
This procedure must be performed before renewing the CA certificate.
Each of the issued certificates should have a validity period of two weeks longer than the
previous one. For example:
Signing Certificate 1: Valid from NOW until
Now+2 weeks
Signing Certificate 2: Valid from NOW until
Now+4 weeks
Signing Certificate 3: Valid from NOW until
Now+6 weeks
The Online Responder service will select the signing certificate with the shorter validity period
first and will use that certificate until it expires.
Enrolling for an OCSP Response Signing certificate against a stand-alone CA
Since stand-alone CAs do not support the version 2 or version 3 certificate template required to
create an OCSP Response Signing certificate, you must manually create and submit an OCSP
Response Signing certificate request. Use the following procedure to enroll for an OCSP
Response Signing certificate against a stand-alone CA.
To enroll for an OCSP Response Signing certificate against a stand-alone CA
1. Click Start, point to All Programs, click
Accessories, and then click Notepad.
2. Copy and paste the following request data
into Notepad:
Copy
[NewRequest]
Subject =
"CN=<OCSPServerDistinguishedName>
PrivateKeyArchive = FALSE
Exportable = TRUE
UserProtected = FALSE
MachineKeySet = TRUE

ProviderName = "Microsoft Enhanced
Cryptographic Provider v1.0"
UseExistingKeySet = FALSE
RequestType = PKCS10
[ApplicationPolicyStatementExtension
]
Policies = OCSPSigning
Critical = false
[OCSPSigning]
OID = 1.3.6.1.5.5.7.3.9
[EnhancedKeyUsageExtension]
OID="1.3.6.1.5.5.7.3.9"
[Extensions]
1.3.6.1.5.5.7.48.1.5 = Empty
3. Save the file as ocsp.inf.
Warning
For a CA running on Windows Server 2008 or Windows Server 2008 R2 the
[ApplicationPolicyStatementExtension] section must include the OCSP Signing
certificate OID (or reference to the OID as shown in the example). For a CA running on
Windows Server 2012, the OCSP Signing certificate OID (or reference to it) can be
placed in either the [ApplicationPolicyStatementExtension] or
[EnhancedKeyUsageExtension] section.
4. Close Notepad.
5. At a command prompt, type:
Copy
certreq.exe –New ocsp.inf ocsp.req
certreq.exe –Submit ocsp.req
ocsp.cer
certreq.exe –Accept ocsp.cer
certutil -v -setreg
policy\EnableRequestExtensionList
+1.3.6.1.5.5.7.48.1.5
net stop && net start certsvc
After the enrollment process is complete, you must modify the ACL of the private key to allow
the Online Responder service to access the private key. For the required steps to configure
private key permissions, see Configuring the OCSP Response Signing certificate template.
Using a hardware security module (HSM) to protect OCSP signing keys
The following configuration steps are required in case an HSM (or a smart card) is used to
protect the OCSP signing keys.

Modifying the Online Responder service credentials
The Online Responder service uses Network Service credentials by default. To allow the Online
Responder service to interact with an HSM, it is required to change the service credentials to
Local System. Use the following steps to configure the Online Responder service credentials.
To configure the Online Responder service credentials
1. Open the Services snap-in.
2. Right-click the Online Responder service,
and click Properties.
3. Click the Log On tab.
4. Click the Local System account.
5. Select the Allow service to interact with
desktop check box, and click OK.
Configuring the OCSP Response Signing template
When you use an HSM to protect the OCSP signing keys, you must also configure the OCSP
Response Signing template to use the HSM's CryptoAPI cryptographic service provider (CSP) or
Cryptography Next Generation (CNG) provider. If only a CryptoAPI CSP is available, you must
duplicate the version 3 OCSP Response Signing template and create a new version 2 template
that supports CryptoAPI CSPs. See "Configuring the OCSP Response Signing certificate
template when using the Windows Server 2003–based CA" in the Configuring the OCSP
Response Signing certificate template section for the required steps to create a version 2
template.
Configuring the Online Responder
Whether the Online Responder is deployed on a single computer, clustered array, or multiple
clustered arrays, the Online Responder management tools provide a single point of monitoring
and configuration for Online Responder deployment.
The management tools installed by default on all Windows Server 2008 versions include the
Online Responder snap-in (Figure 16), which provides all the required functionality for
managing an Online Responder.
Figure 16: Online Responder snap-in
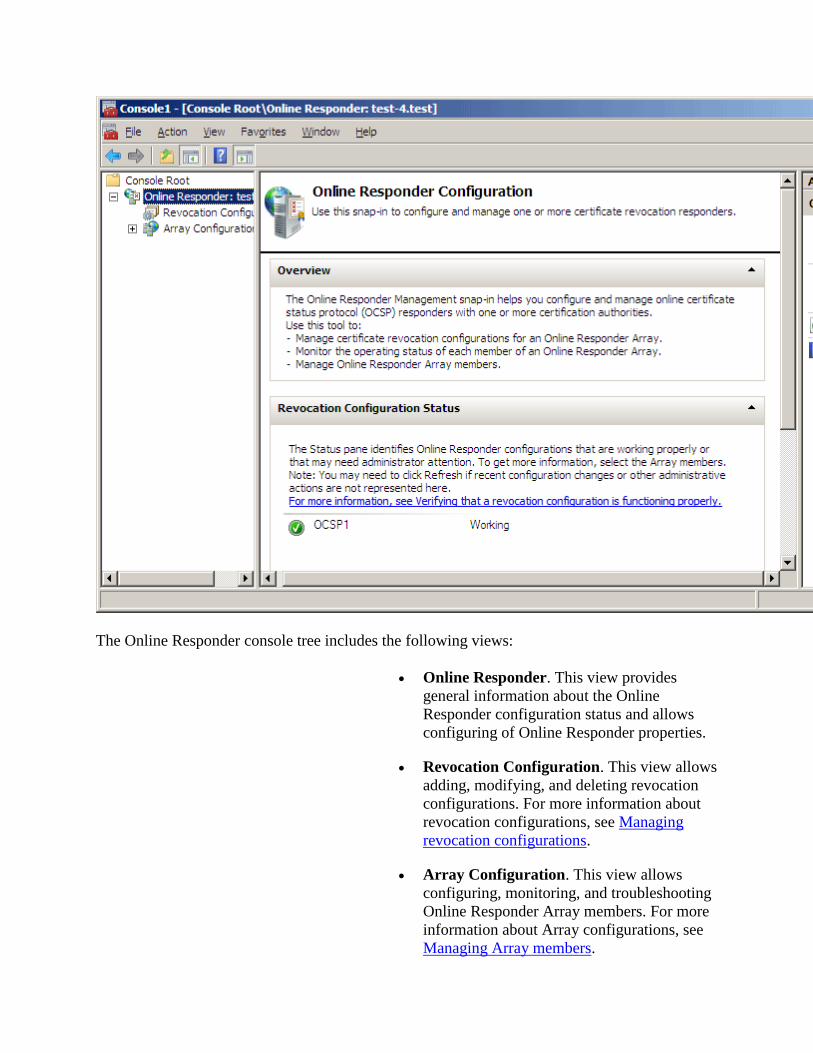
The Online Responder console tree includes the following views:
Online Responder. This view provides
general information about the Online
Responder configuration status and allows
configuring of Online Responder properties.
Revocation Configuration. This view allows
adding, modifying, and deleting revocation
configurations. For more information about
revocation configurations, see Managing
revocation configurations.
Array Configuration. This view allows
configuring, monitoring, and troubleshooting
Online Responder Array members. For more
information about Array configurations, see
Managing Array members.

Configuring Online Responder properties
The Online Responder provides a set of configurable properties that are Online Responder–wide
and apply to the Online Responder's service operation.
To open the Online Responder dialog box, click Responder Properties on the Action menu or
click Responder Properties in the Action pane.
Web proxy settings
The Online Responder Web proxy cache is implemented as an ISAPI extension hosted by IIS.
The following configurable settings are enabled (Figure 17).
Web proxy threads. This setting refers to the
number of threads that will be allocated by
the Online Responder ISAPI extension for
handling requests. Increasing the number of
threads will use more of the server's memory
and reducing the number of threads will
reduce the number of clients that can be
served concurrently. The minimum thread
number allowed is five.
Cache entries allowed. The cache is
implemented as part of the Online
Responder's ISAPI extension and is an in-
memory cache only. The recommended cache
size is between 1,000 and 10,000 entries. A
small cache size will cause more cache faults
and will result in a higher load on the Online
Responder service for lookup and signing
operations; a large cache size will increase
the Online Responder's memory usage. If the
CA certificate is used to sign responses, the
size of the cache entries in memory is
approximately 200 bytes; if a delegated signer
certificate is used to sign responses, the size
of the cache entries in memory is
approximately 2 KB (assuming a key size of
1,024 bytes).
Figure 17: Web proxy settings

Audit settings
To comply with Common Criteria requirements for secure certificate issuance systems and to
provide a secure platform, certain event and configuration settings are logged to the Windows
security event log. The Online Responder allows the configuration of the following audit events
(Figure 18).
Start/Stop the Online Responder Service.
Every Start/Stop event of the Online
Responder service will be logged.
Changes to the Online Responder
configuration. All Online Responder
configuration changes, including audit
settings changes, will be logged.
Changes to the Online Responder security
settings. All changes to the Online Responder
service request and management interfaces
ACL will be logged.

Requests submitted to the Online
Responder. All requests processed by the
Online Responder service will be logged.
This option can create a high load on the
service and should be evaluated on a case-by-
case basis. Note that only requests that
require a signing operation by the Online
Responder will generate audit events;
requests for previously cached responses will
not be logged.
Figure 18: Audit settings
Audit events will be logged to the Windows security log only if the Audit object access policy
is enabled.
To enable the Audit object access policy
1. Open the Local Group Policy Editor.

2. Under Computer Configuration, expand
Windows Settings, Security Settings, and
Local Policies, and then click Audit Policy.
3. Double-click the Audit object access policy.
4. Select the Success and Failure check boxes,
and click OK.
Security settings
The security settings for the Online Responder include two permission entries that can be set for
users and services to allow or deny access to the request and administration interfaces.
Manage Online Responder. The Online
Responder exposes a management interface
(IOCSPAdmin) that provides the ability to
perform administrative tasks such as creating
and managing revocation configurations and
to modify the Online Responder's global
settings.
Proxy Requests. The Online Responder
exposes a request interface (IOCSPRequestD)
that allows the Online Responder Web proxy
component to submit requests for certificate
status to the Online Responder service. This
interface is not used by applications that
submit the OCSP request.
Managing revocation configurations
Revocation configurations include a set of definitions that enable the Online Responder to
provide a signed OCSP response. These definitions include the CA certificate, the signing
certificate, and the source of the revocation information. Each revocation configuration serves
requests for a specific CA key pair and certificate. The following rules apply:
A separate revocation configuration should be
created for each CA that was configured to
include the Online Responder authority
information access in issued certificates.
A separate revocation configuration should be
created for each CA that is renewed with a
new key pair.

The Revocation Configuration view allows adding, modifying, and deleting revocation
configurations.
Creating a revocation configuration
This section explores the process of creating, modifying, and deleting revocation configurations.
To create a revocation configuration
1. On the Action menu or in the Actions pane,
click Add Revocation Configuration.
The Add Revocation Configuration wizard
appears.
2. Click Next.
3. In the Name box of the Name the
Revocation Configuration page, enter a
friendly name for the revocation
configuration (which will help identify the
revocation configuration from the available
revocation configurations), and then click
Next.
4. On the Select CA Certificate Location page,
select the location of the CA certificate for
which this revocation configuration provides
certificate status responses.
For the Online Responder to check a
certificate's status, the revocation
configuration must identify the CA that
issued the certificate. The following options
are available:
Figure 19: Select CA Certificate Location

Select a certificate for an existing
enterprise CA. This option allows selecting
the CA certificate from the available CA
certificates published in AD DS or by
querying a specific CA directly for its
certificate. If this option is selected in step 4,
the wizard will prompt the user to select the
CA certificate by browsing AD DS for
published CAs or for CA computer names
(Figure 20). After identifying the CA
certificate, you can verify the certificate
details by clicking the View Selected CA
certificate link on the wizard page.
Figure 20: Choose CA Certificate

Select a certificate from the local certificate
store. This option allows selecting a CA
certificate by browsing the certificate store on
the current computer. If this option is selected
in step 4, the wizard will prompt the user to
select the CA certificate by browsing the
local certificate store.
Import certificate from a file. This option
allows selecting a certificate file with a *.cer
extension. If this option is selected in step 4,
the wizard will prompt the user to select the
CA certificate by browsing the file system for
a certificate file with a *.cer extension.
5. On the Select Signing Certificate page
(Figure 21), the signing certificate must be
specified for each revocation configuration.
The following options are available:

Automatically select a signing certificate. If
this option is selected, the Online Responder
will automatically search the Personal
certificate store for the computer hosting the
Online Responder for a certificate that meets
the following conditions:
o The certificate has an OCSP Signing
EKU.
o The certificate was issued by the CA
that was selected in step 4.
o The certificate is valid.
o The certificate has a matching private
key.
If more than one signing certificate is
available, then the one with the shortest
validity period is selected.
The Auto-Enroll for an OCSP signing
certificate check box allows configuring the
Online Responder to automatically enroll and
renew OCSP Response Signing certificates
for the specified revocation configuration. If
the CA that was selected in step 4 is
configured to issue the OCSP Response
Signing template, this check box will be
selected and the Certification Authority and
Certificate Template boxes will be filled in
automatically. Otherwise, the Auto-Enroll
for an OCSP signing certificate check box
will not be selected.
Note
When the Online Responder's autoenrollment functionality is enabled, the enrolled
certificates will be stored in the certificate store for the Online Responder service and not
in the certificate store of the local computer. You can view the current configuration
signing certificate by using the following procedure.
To view the current configuration signing
certificate, use the following steps:
5. Open the Certificates snap-in.

6. Click Service account, and click
Next.
7. Click Local computer, and click
Next.
8. Select the Online Responder service
from the available services list, and
click Finish.
9. The signing certificate for the current
configuration can be found at the store
named: OCSPSVC\<configuration
name>.
Manually select a signing certificate. If this
option is selected, the Online Responder will
not assign a signing certificate for the
revocation configuration. After the wizard has
finished and the revocation configuration is
created, it is required to manually select a
signing certificate for each of the Online
Responder Array members. Until this
operation is accomplished, the revocation
configuration will not be operational.
Use the CA certificate for the revocation
configuration. If this option is selected, the
Online Responder will use the CA certificate
that was selected in step 4 as the signing
certificate. This option is available only if the
Online Responder is installed on the CA
computer.
Figure 21: Select Signing Certificate

6. After selecting the signing certificate, click
Next.
7. On the Revocation Provider page, click
Provider.
Additional information is required to
configure the revocation provider. The
Revocation Provider Properties dialog box
allows configuring the revocation provider by
selecting the CRLs and the delta CRLs for the
revocation configuration. The Online
Responder will use this information to
retrieve and cache the CRLs and delta CRLs
that will be used to provide certificate status
responses. In some cases, the locations of the
CRLs will be populated based on information
in AD DS. By default, the revocation
provider will retrieve a new CRL and delta
CRL based on the validity period specified in
the CRL. The refresh interval can be
manually set by entering a specific refresh

interval rate. The minimum interval is five
minutes.
If the CA is configured to issue delta CRLs,
the revocation provider will use the URL
provided in the Base CRLs list to retrieve the
base CRL and will use the information
included in the base CRL itself to retrieve the
delta CRLs. The Delta CRLs list should be
used only if you would like the revocation
provider to retrieve the delta CRLs from a
different location than the one specified in the
base CRL.
Figure 22: Revocation Provider Properties
8. To close the Revocation Provider
Properties dialog box, click OK.
9. To create the revocation configuration, click
Finish.
Note
The revocation provider will always look for a valid CRL and a delta CRL on the local computer
before trying to retrieve them from the network. If the Online Responder is installed on the same
computer as the CA, the values configured in the revocation provider are ignored.
Modifying a revocation configuration
After a revocation configuration is created, it can be modified. This is done by selecting the
revocation configuration to be edited from the Revocation Configurations view, and then
clicking Edit Properties on the Action menu or in the Actions pane.
Local CRL. The Local CRL tab allows locally managing revoked certificates for a revocation
configuration. When this option is used, the Online Responder manages a local list of revoked
certificates in addition to the CA CRL and delta CRL. This feature is useful when the CA is not
responding and cannot publish CRLs or when the Online Responder cannot retrieve the CRL.
The local revocation information supersedes information in a CA-published CRL. For example,
if a certificate is listed as revoked in the local CRL but is not listed in the CA-published CRL, the
Online Responder will still issue a response in which the specified certificate is revoked.
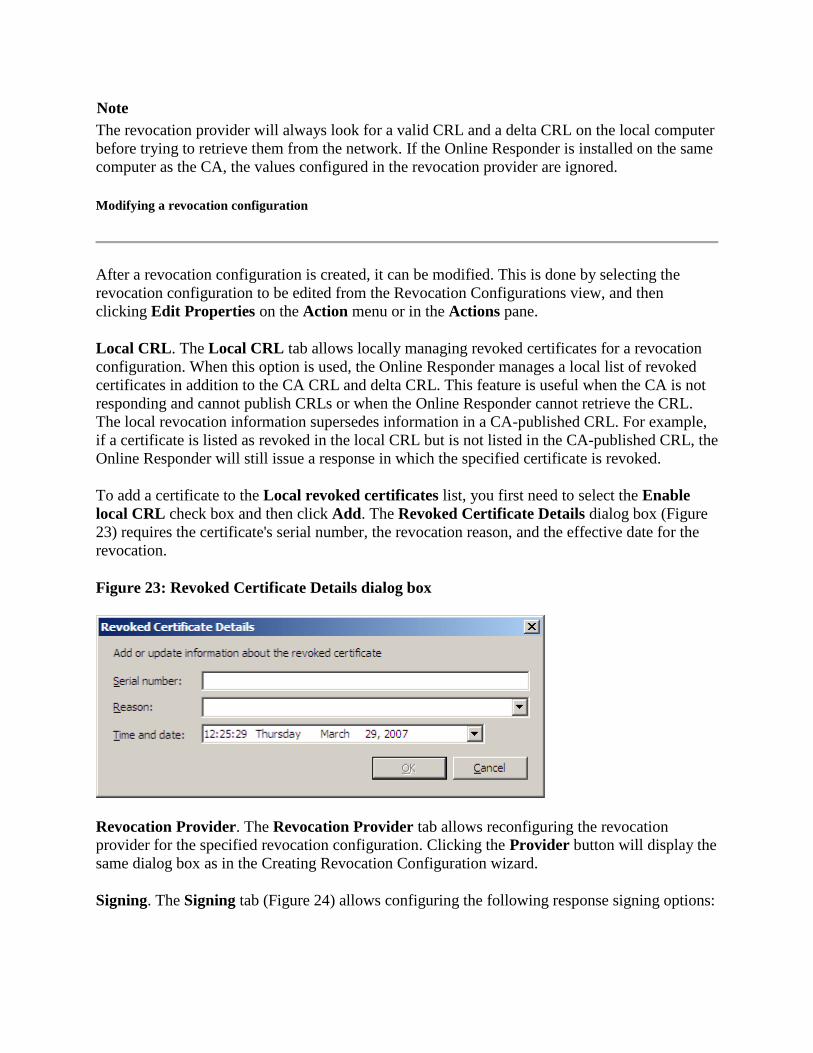
To add a certificate to the Local revoked certificates list, you first need to select the Enable
local CRL check box and then click Add. The Revoked Certificate Details dialog box (Figure
23) requires the certificate's serial number, the revocation reason, and the effective date for the
revocation.
Figure 23: Revoked Certificate Details dialog box
Revocation Provider. The Revocation Provider tab allows reconfiguring the revocation
provider for the specified revocation configuration. Clicking the Provider button will display the
same dialog box as in the Creating Revocation Configuration wizard.
Signing. The Signing tab (Figure 24) allows configuring the following response signing options:

Hash algorithm. The hash algorithm to be
used when signing the response.
Do not prompt for credentials for
cryptographic operations. If the signing key
is strongly protected by an additional
password, selecting this option means the
Online Responder will not prompt the user
for the password and will fail silently.
Understanding this option is important when
using HSMs to store the OCSP signing key. If
using an HSM and this option is selected,
CryptoAPI is instructed not to show the PIN
dialog box for accessing the private key, and
the signing operation will fail. If this option is
not selected, the PIN dialog box will be
displayed the first time the configuration is
loaded, which can occur when the service
starts or when the revocation configuration is
loaded for the first time.
Note
Do not select this option if HSM is used to protect private keys.
Automatically use renewed signing
certificates. This option instructs the Online
Responder to automatically use renewed
signing certificates without asking the Online
Responder administrator to manually assign
them.
Allow Nonce requests. This option instructs
the Online Responder to inspect and process
an OCSP request nonce extension. If a nonce
extension is included in the OCSP request
and this option is selected, the Online
Responder will ignore any cached OCSP
response and will create a new response that
includes the nonce provided in the request. If
this option is disabled and a request that
includes a nonce extension is received, the
Online Responder will reject the request with
an "unauthorized" error.
Note
The Microsoft OCSP client does not support the nonce extension.

Note
If a non-critical extension is included in the request, the Online Responder ignores the extension
and provides a response. If a critical extension is included in the request the Online Responder
will reject the request with an "unauthorized" error.
Use any valid OCSP signing certificate. By
default the Online Responder will only use
signing certificates that are issued by the
same CA that issued that certificate being
validated. This option allows modifying the
default behavior and instructs the Online
Responder to use any valid existing certificate
that includes the OCSP Signing EKU
extension.
Note
Starting with Windows Vista this deployment model is not supported and will fail if this option
is selected.
Online Responder Identifiers. This option is
used to select whether to include the key hash
or the subject of the signing certificate in the
response. This is required per RFC 2560.
Figure 24: Revocation Configuration dialog box, Signing tab
