department states of finishing wood exteriors · finishing wood exteriors . selection, application,...
TRANSCRIPT
United States Department of FinishingAgriculture
Forest Wood Exteriors Service
Agriculture Selection, Application,Handbook No. 647 and Maintenance

United States Department of Agriculture
Forest Service
Agriculture Handbook No. 647
FinishingWood Exteriors Selection, Application,and Maintenance
Daniel L. Cassens Associate professor of wood products, Department of Forestry and Natural Resources, Purdue University,West Lafayette, IN
and
William C. Feist Project leader, Wood Surface Chemistry and PropertyEnhancement, Forest Products Laboratory, Forest Service, U.S. Department of Agriculture, Madison, WI
May 1986
For sale by the Superintendent of Documents, U.S. Government Printing Office Washington, D.C. 20402

Contents
PageIntroduction. . . . . . . . . . . . . . . . . . . . . . . . . . . . . . . . . . . . . . . . . . 1 Wood properties and finish durability . . . . . . . . . . . . . . . 2
Natural characteristics . . . . . . . . . . . . . . . . . . . . . . . . . . . 2 Density . . . . . . . . . . . . . . . . . . . . . . . . . . . . . . . . . . . . . . 2 Earlywood/latewood . . . . . . . . . . . . . . . . . . . . . . . . . . 2 Texture . . . . . . . . . . . . . . . . . . . . . . . . . . . . . . . . . . . . . . 2 Heartwood/sapwood . . . . . . . . . . . . . . . . . . . . . . . . . . 4 Extractives, pitch, and oils . . . . . . . . . . . . . . . . . . . . . 4
Manufacturing characteristics. . . . . . . . . . . . . . . . . . . . . 6 Ring orientation . . . . . . . . . . . . . . . . . . . . . . . . . . . . . . 6 Surface texture . . . . . . . . . . . . . . . . . . . . . . . . . . . . . . . 7 Knots and other defects . . . . . . . . . . . . . . . . . . . . . . . 7 Moisture content. . . . . . . . . . . . . . . . . . . . . . . . . . . . . . 7
Finishing characteristics. . . . . . . . . . . . . . . . . . . . . . . . . . 7 Construction practices . . . . . . . . . . . . . . . . . . . . . . . . . . . . . 9
Controlling moisture content . . . . . . . . . . . . . . . . . . . . . 9 Siding application . . . . . . . . . . . . . . . . . . . . . . . . . . . . . . . 10
Lumber. . . . . . . . . . . . . . . . . . . . . . . . . . . . . . . . . . . . . . 10 Plywood and other sheet siding . . . . . . . . . . . . . . . . . 12
Wood products used outdoors . . . . . . . . . . . . . . . . . . . . . . 13 Lumber . . . . . . . . . . . . . . . . . . . . . . . . . . . . . . . . . . . . . . . 13 Plywood . . . . . . . . . . . . . . . . . . . . . . . . . . . . . . . . . . . . . . . 14 Reconstituted wood products . . . . . . . . . . . . . . . . . . . . . 15 Treated wood products . . . . . . . . . . . . . . . . . . . . . . . . . . 15 Fire retardants . . . . . . . . . . . . . . . . . . . . . . . . . . . . . . . . . . 16
Weathering. . . . . . . . . . . . . . . . . . . . . . . . . . . . . . . . . . . . . . . 17 Steps in weathering . . . . . . . . . . . . . . . . . . . . . . . . . . . . . 17 Rate of weathering . . . . . . . . . . . . . . . . . . . . . . . . . . . . 18 Surface deterioration . . . . . . . . . . . . . . . . . . . . . . . . . . . . 19 Wood-based materials . . . . . . . . . . . . . . . . . . . . . . . . . . . 21 Artificial weathering . . . . . . . . . . . . . . . . . . . . . . . . . . . 21 Precautions . . . . . . . . . . . . . . . . . . . . . . . . . . . . . . . . . . . . 22
Moisture-excluding effectiveness of finishes . . . . . . . . . . 22 Types of exterior wood finishes . . . . . . . . . . . . . . . . . . . 24
Opaque finishes . . . . . . . . . . . . . . . . . . . . . . . . . . . . . . . . 24 Paint . . . . . . . . . . . . . . . . . . . . . . . . . . . . . . . . . . . . . . . . 24 Solid-color stains . . . . . . . . . . . . . . . . . . . . . . . . . . . . . 26
Natural wood finishes . . . . . . . . . . . . . . . . . . . . . . . . . . . 27 Water-repellent preservatives . . . . . . . . . . . . . . . . . . . 28 Semitransparent penetrating stains . . . . . . . . . . . . . . 30 Transparent coatings . . . . . . . . . . . . . . . . . . . . . . . . . . 32
Fire-retardant coatings . . . . . . . . . . . . . . . . . . . . . . . . . . 33 Application of exterior wood finishes . . . . . . . . . . . . . . . 34
Opaque coatings . . . . . . . . . . . . . . . . . . . . . . . . . . . . . . . 34 Paint . . . . . . . . . . . . . . . . . . . . . . . . . . . . . . . . . . . . . . . . 34 Additional tips on painting. . . . . . . . . . . . . . . . . . . . . 35 Solid-color stains . . . . . . . . . . . . . . . . . . . . . . . . . . . . . 35
Natural finishes . . . . . . . . . . . . . . . . . . . . . . . . . . . . . . . . . 35 Water-repellent preservatives and water repellants 35 Semitransparent penetrating stains . . . . . . . . . . . . . . 35 Transparent coatings . . . . . . . . . . . . . . . . . . . . . . . . . . 37
Page Special application of exterior wood finishes . . . . . . . . . 37
Decks and porches . . . . . . . . . . . . . . . . . . . . . . . . . . . . . . 37 Fences . . . . . . . . . . . . . . . . . . . . . . . . . . . . . . . . . . . . . . . . . 38 Wood roofs . . . . . . . . . . . . . . . . . . . . . . . . . . . . . . . . . . . 30
Properties . . . . . . . . . . . . . . . . . . . . . . . . . . . . . . . . . . . 38 Application . . . . . . . . . . . . . . . . . . . . . . . . . . . . . . . . . . 40 Finishing. . . . . . . . . . . . . . . . . . . . . . . . . . . . . . . . . . . . .40 Preservatives and fire retardants for shingles . . . . .41 Maintenance . . . . . . . . . . . . . . . . . . . . . . . . . . . . . . . . . 41
Log structures . . . . . . . . . . . . . . . . . . . . . . . . . . . . . . . . . . 42 Marine environments . . . . . . . . . . . . . . . . . . . . . . . . . . . .43 Treated wood . . . . . . . . . . . . . . . . . . . . . . . . . . . . . . . . . . 43
Preservatives . . . . . . . . . . . . . . . . . . . . . . . . . . . . . . . . . 43 Fire-retardant treatments. . . . . . . . . . . . . . . . . . . . . . 44
Refinishing wood . . . . . . . . . . . . . . . . . . . . . . . . . . . . . . . . . 44 Opaque coatings: paint and solid-color stains . . . . . . 44 Natural finishes. . . . . . . . . . . . . . . . . . . . . . . . . . . . . . . . . 45
Water-repellent preservatives and water repellants.45 Semitransparent penetrating stains . . . . . . . . . . . . . 45 Transparent coatings . . . . . . . . . . . . . . . . . . . . . . . . . 45
Finish removal . . . . . . . . . . . . . . . . . . . . . . . . . . . . . . . . . 45 Sanding. . . . . . . . . . . . . . . . . . . . . . . . . . . . . . . . . . . . . . 45 Heat . . . . . . . . . . . . . . . . . . . . . . . . . . . . . . . . . . . . . . . . 46 Chemical . . . . . . . . . . . . . . . . . . . . . . . . . . . . . . . . . . . . 46 Sandblasting and pressurized water spray . . . . . . . . 46
Finish failure or discoloration problems and their cure 46 Mildew . . . . . . . . . . . . . . . . . . . . . . . . . . . . . . . . . . . . . . . 46
How paint makeup affects mildew . . . . . . . . . . . . . 47 Prevention and cure . . . . . . . . . . . . . . . . . . . . . . . . . . 47
Peeling and cracking . . . . . . . . . . . . . . . . . . . . . . . . . . . 47 Blistering . . . . . . . . . . . . . . . . . . . . . . . . . . . . . . . . . . . . . . 48 Discoloration due to water-soluble extractives . . . . . .49 chalking. . . . . . . . . . . . . . . . . . . . . . . . . . . . . . . . . . . . . . . . 50 Iron stain . . . . . . . . . . . . . . . . . . . . . . . . . . . . . . . . . . . . . 51 Blue stain . . . . . . . . . . . . . . . . . . . . . . . . . . . . . . . . . . . . . 52 Brown stain over knots . . . . . . . . . . . . . . . . . . . . . . . . . 53 Exudation of pitch . . . . . . . . . . . . . . . . . . . . . . . . . . . . . 53 Water stain . . . . . . . . . . . . . . . . . . . . . . . . . . . . . . . . . . . 54
Conclusions . . . . . . . . . . . . . . . . . . . . . . . . . . . . . . . . . . . . . 55
Introduction
Wood, because of its general abundance and versatility, has been used extensively in North America since the beginnings of settlement by Europeans. Each species or species group has certain unique characteristics that make it particularly suited for specific applications, whether they be for house siding, structural members, or other uses. These important characteristics have mostly been learned through experience by the earlier settlers rather than by scientific investigation.
Fortunately, as the virgin growth timber was cut and used, another forest was already renewing itself for our use today. Wood cut from this second-growth, or in some cases third-growth, forest varies somewhat from the wood cut from virgin growth, but if properly used and maintained, it will provide economical building material that, unlike many other resources, can be renewed for future generations. Furthermore, a minimal amount of energy is consumed during the manufacturing process. Once in place, wood continues to conserve energy, for it is a good natural insulator. New products use small-diameter, low-quality trees and even residue from the manufacture of solid wood products such as lumber and plywood. These new products often come in large panels that can be placed into service with a minimum amount of onsite labor. Panel products and lumber from hardwoods are finding applications in place of the traditional softwoods for construction purposes.
Wood has the ability to take and hold a variety of finishes (paints, stains, etc,), thus making it even more versatile. These finishes include clear ones that reveal and accentuate the natural beauty of wood, stains that impart a rustic appearance, and paint of every conceivable color. Furthermore, many of these finishes can be changed to provide a new color or appearance as desired.
This report will detail the characteristics and proper application of finishes to the different solid and reconstituted wood products now available. More particularly, it will focus on detailing the characteristics of different kinds of wood, manufacturing and construction practices that affect surfaces to be finished, and the ways in which various types of finishes interact with the effects of those characteristics and practices. Even with the best finishes and finishing procedures, some coatings remain serviceable much longer on some woods than others. The different types of finishes, their compatibility with different wood products, and application procedures for these products will be outlined. Resistance of the finish and
wood product to weathering will also be considered. Finally, explanation and remedial action will be given for those cases where finishes fail prematurely because of improper matching of the finish and wood product, poor construction practices, or application procedures.
1

Wood Properties and Finish Durability
Wood is a natural biological material and as such is variable not only from one species to another but within the same species. Some differences can even be expected for boards cut from the same tree. Within a species, factors that affect wood properties, and thus finishing characteristics, are usually related to growth rate. Growth rate in turn is determined by climatic factors, geographic origin, genetics, tree vigor, and competition-factors over which we currently have little control. Properties that vary greatly from species to species are density, texture (hardwood or softwood), grain characteristics (presence of earlywood/latewood), presence and amount of heartwood or sapwood, and the presence of extractives, resins, and oils. Additional factors such as how the board was sawn from the log (which determines growth ring orientation), the presence of knots and similar defects (lumber grade), and moisture content are determined for the most part during the manufacturing, grading, and distributing process and are also extremely important when finishing characteristics and durability are considered. However, most of these characteristics become important only as the finish coat begins to wear.
Natural Characteristics
Density. The density of wood, or its “weight,’’ is one of the most important factors to affect finishing characteristics. It varies tremendously from species to species (table 1) and is important because “heavy” woods shrink and swell more than “light” woods. This dimensional change in lumber and to a lesser extent in reconstituted wood products and plywood occurs as wood, particularly in exterior applications, gains or loses moisture with changes in the relative humidity and from periodic wetting due to rain, snow, and dew. Wood in heated homes tends to dry and shrink in the fall and winter, due to low relative humidity, then gain moisture and swell in the spring and summer months. Excessive dimensional change in wood constantly stresses a film-forming finish such as paint and may result in the early failure of the finish.
In addition, the amount of warping and checking that occurs as wood changes dimensions and during the natural weathering process is directly related to its density. Cupping is probably the most common form of warp. It is the distortion of a board that causes a deviation from flatness across the width of the piece. Wide boards cup more than narrow boards. But boards may also twist from one end to the other, or crook, deviating from a straight line along the length of the piece. Warping is generally caused by uneven
shrinking or swelling within the board. Further, checks, or small ruptures along the grain of the piece, may develop initially from stress set up during the drying process or from stresses due to the alternate shrinking and swelling that occurs during service. The lightweight woods tend to warp and check less than the heavy ones (table 1).
Finally, lightweight woods are generally easier to nail, machine, and handle than the heavy ones.
Earlywood/latewood. The presence and amount of latewood (fig. 1) in softwood (conifer) lumber is the second factor closely related to density that affects paint durability. Each year, most tree species add one growth increment or ring to their diameter. For most species this ring shows two distinct periods of growth-and therefore two bands called earlywood (springwood) and latewood (summerwood). Latewood is denser, harder, smoother, darker in color, and is made up of wood cells with thicker walls and smaller cavities than earlywood. The wider the latewood band, the denser the wood. New paint adheres firmly to both earlywood and latewood. However, old paint that has become brittle with age and weathering loses its adhesion and peels from the smooth, hard surface of the latewood first. With varnishes, failure occurs first over the earlywood due to ultraviolet light degradation of the varnish/wood interface. If the bands of latewood are narrow enough, as with slow growth trees, the coating may bridge the latewood and remain in place longer than on wider latewood bands. Wide latewood bands are normally absent from edge-grained cedar and redwood, improving the paintability of these species. However, they are prominent in southern yellow pine and Douglas-fir, two of the most common species used for general construction purposes and for the production of plywood. On the other hand, growth rate does not seem to significantly affect the ability of hardwoods to retain a paint coat.
Texture. Texture refers to the general coarseness of the individual wood cells and is often used in reference to the hardwoods (fig. 2). The hardwoods are composed mostly of relatively short, small diameter cells (fibers) and large diameter pores (vessels); the softwoods, in contrast, are composed of longer, smaller diameter cells (tracheids). The size and arrangement of these pores may outweigh the other factors of density and grain pattern in their effect on paint retention. Hardwoods with large pores such as oak and ash are poorly adapted to ordinary housepainting methods because pinholes can form in the coating over the large pores. pinholes are unsightly
2

Table 1–Characteristics of woods for painting and finishing (omissions in the table indicate inadequate data for classification)
Weight Color of (lbs/ft3) Ease of keeping Resistance Conspicuousness heartwood Degree of
at 8 percent well painted to cupping of checking (sapwood figure on moisture (I = easiest, (1 = best, (1 = least, is always flat-grained
Wood content V = most exacting1) 4 = worst) 2 = most) light) surface
Softwoods Cedar
Alaska California incense Port-Orford Western redcedar White
Cypress Redwood Products2 overlaid with
resin-treated paper Pine
Eastern white Sugar Western white Ponderosa
Fir, White Hemlock, Western Spruce Douglas-fir
(lumber and plywood) Larch, Western Lauan (plywood) Pine
Norway (red) Southern
(lumber and plywood) Tamarack
Hardwoods Alder Aspen Basswood Cottonwood, Eastern Magnolia Yellow-poplar Beech Birch, Yellow Cherry Gum Maple, Sugar Sycamore Ash, White Butternut Chestnut Elm, American Walnut Hickory, Shagbark Oak, Whlte Oak, Northern Red
Yellow Brown Cream Brown Light brown Light brown Dark brown
–
Cream Cream Cream Cream White Pale brown White
Pale red Brown Brown
Light brown
Light brown Brown
Pale brown Pale brown Cream White Pale brown Pale brown Pale brown Light brown Brown Brown Light brown Pale brown Light brown Light brown Light brown Brown Dark brown Light brown Brown Brown
Faint Faint Faint Distinct Distinct Strong Distinct
–
Faint Faint Faint Distinct Faint Faint Faint
Strong Strong Faint
Distinct
Strong Strong
faint Faint Faint Faint Faint Faint Faint Faint Faint Faint Faint Faint Distinct Faint Distinct Distinct Distinct Distinct Distinct Distinct
1Woods ranked in group V for ease of keeping well painted are hardwoods with large pores that require wood filler for durable painting. When properly filled before painting, the second classification recorded in the table applies.
2Plywood, lumber, and fiberboard with medium-density surface overlay.
3

Figure 1–Earlywood and latewood bands in southern yellow pine. These distinct bands often lead to early paint failure. Therefore, penetrating stains are preferred.
and lead to early failure of the coating. On the other hand, yellow-poplar has a relatively uniform, fine texture free of large pores which improves its overall paintability in comparison to the coarse-textured species.
Heartwood/sapwood. As trees mature, most species naturally develop a darker colored central column of wood called heartwood. To the outside of the heartwood is a lighter cylinder of wood called sapwood. The sapwood is composed of live cells that serve to transport water and nutrients from the roots to the leaves and as mechanical support for the tree. The heartwood, on the other hand, serves only as support. Heartwood is formed as the individual cells die and are impregnated with extractive, pitch, oi1, and other extraneous materials. Older trees have a higher percentage of heartwood as compared to younger trees, and some species such as southern yellow pine have a much wider sapwood region than others such as the cedars or redwood.
Extractives, pitch, and oils. Depending on species, wood may contain water-soluble extractives, pitch, or oil. Each of these substances has its own properties and characteristics. Although they constitute only a small percentage of the ovendry weight of wood, they affect, to some degree, many wood properties including color, odor, decay and insect resistance, permeability, density, and hardness, The deposition of these materials is generally associated with the formation of heartwood and, without them, many woods would appear essentially identical except for anatomical features.
Water-soluble extractives are extraneous materials, usually dark in color, that are naturally deposited in the lumens, or cavities, of cells in the heartwood of both softwoods and hardwoods. They are particularly abundant in those woods commonly used for exterior applications such as western redcedar, redwood, and cypress and are also found in lesser amounts in Douglas-fir and the southern pines. The attractive
4
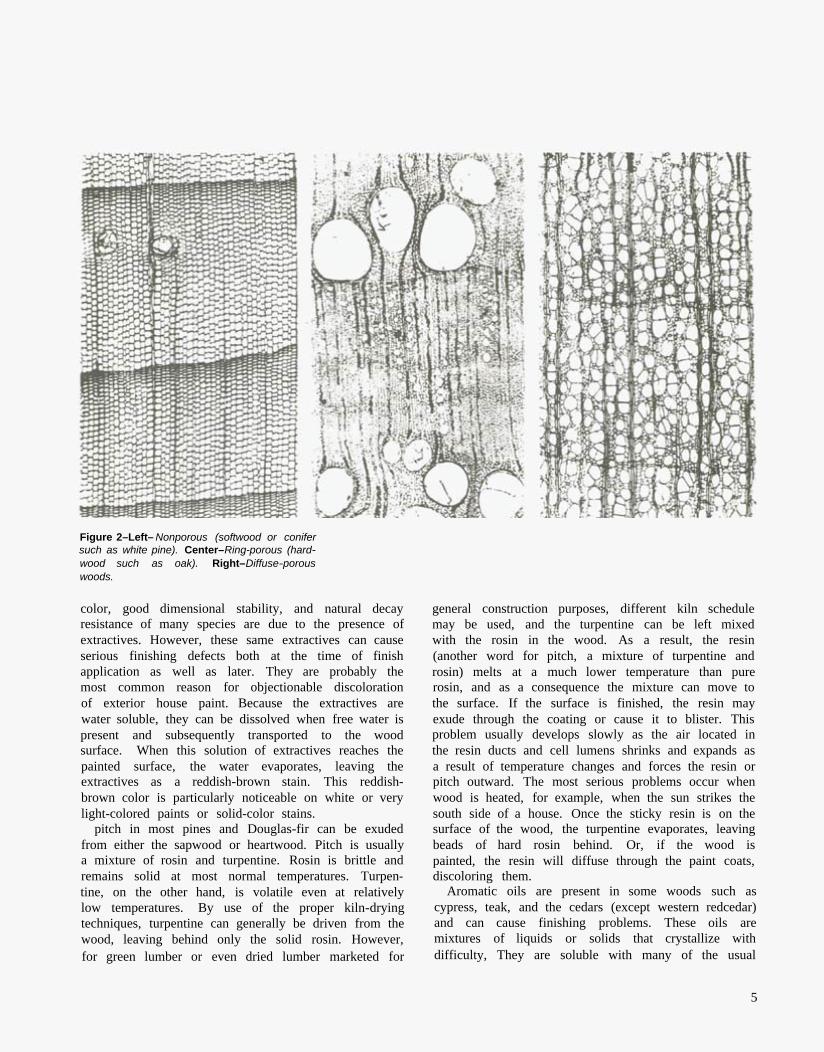
Figure 2–Left– Nonporous (softwood or conifer such as white pine). Center–Ring-porous (hardwood such as oak). Right–Diffuse-porous woods.
color, good dimensional stability, and natural decay resistance of many species are due to the presence of extractives. However, these same extractives can cause serious finishing defects both at the time of finish application as well as later. They are probably the most common reason for objectionable discoloration of exterior house paint. Because the extractives are water soluble, they can be dissolved when free water is present and subsequently transported to the wood surface. When this solution of extractives reaches the painted surface, the water evaporates, leaving the extractives as a reddish-brown stain. This reddish-brown color is particularly noticeable on white or very light-colored paints or solid-color stains.
pitch in most pines and Douglas-fir can be exuded from either the sapwood or heartwood. Pitch is usually a mixture of rosin and turpentine. Rosin is brittle and remains solid at most normal temperatures. Turpentine, on the other hand, is volatile even at relatively low temperatures. By use of the proper kiln-drying techniques, turpentine can generally be driven from the wood, leaving behind only the solid rosin. However, for green lumber or even dried lumber marketed for
general construction purposes, different kiln schedule may be used, and the turpentine can be left mixed with the rosin in the wood. As a result, the resin (another word for pitch, a mixture of turpentine and rosin) melts at a much lower temperature than pure rosin, and as a consequence the mixture can move to the surface. If the surface is finished, the resin may exude through the coating or cause it to blister. This problem usually develops slowly as the air located in the resin ducts and cell lumens shrinks and expands as a result of temperature changes and forces the resin or pitch outward. The most serious problems occur when wood is heated, for example, when the sun strikes the south side of a house. Once the sticky resin is on the surface of the wood, the turpentine evaporates, leaving beads of hard rosin behind. Or, if the wood is painted, the resin will diffuse through the paint coats, discoloring them.
Aromatic oils are present in some woods such as cypress, teak, and the cedars (except western redcedar) and can cause finishing problems. These oils are mixtures of liquids or solids that crystallize with difficulty, They are soluble with many of the usual
5

finishing films and thus may discolor the paint or resin of the heartwood and occurs usually on wood other finish. Their presence may also retard drying of that is damp while being painted. It rarely occurs on coatings, leaving them sticky, and often cause blister- dry wood. Because the discoloration fades with sun ing, softening, wrinkling, and general disintegration of light, it is less of a problem with exterior woodwork. the coatings. In Port-Orford-cedar, concentrations of
Manufacturing Characteristics the oil seem to run in streaks that result in paint wrinkling. Manufacturing, grading, and distributing processes
Some of these oils have high boiling points and can also affect the finishing characteristics and durabilevaporate only very slowly, even at the temperatures ity of solid wood products. used in kiln-drying wood. Finishing problems with Ring orientation. The manner in which a board is pitch and oils can generally be reduced through the use cut from a log affects the orientation of the annual of the correct kiln-drying schedules. However, some rings in the piece and thus its paintability. Lumber is care must be exercised not to carry the oil reduction referred to as either flat grained or edge grained process too far if an aromatic odor in the finished (plainsawed or quartersawed in hardwoods) or a product is desirable. combination of the two (fig. 3). Most standard lumber
White or light-colored paint occasionally may ac grades contain a high percentage of flat grain. Lumber quire a yellow or brown discoloration on the heart- used for board and batten siding and shiplap is wood of ponderosa pine and the white pines. The frequently flat gained. Bevel siding of redwood or discoloration generally begins immediately over the cedar is generally produced in a standard grade that is resin passages. Later, it may diffuse throughout the flat grained and a premium grade that is edge grained. coating over the heartwood, leaving the sapwood area Plat-grained lumber shrinks and swells more and also unaffected. The color comes from substances in the has wider, darker bands of latewood than edge-grained
Edge-grained
Cross section of log Flat-grained Figure 3—Effect of sawing method on ring orientation in lumber.
6
lumber. Therefore, edge-grained lumber or siding will usually hold paint better than flat-grained material.
Quartersawed hardwood boards also hold paint better than plainsawed boards, but the difference is relatively small compared to the difference in softwoods.
Surface texture. Lumber may be left in its roughsawn condition or surfaced smooth after drying. Paint will last longer on smooth, edge-grained surfaces, whereas natural finishes such as penetrating stains or preservative treatment are preferred for roughsawn and flat-grained lumber. These natural finishes often accentuate the rustic look of roughsawn lumber and allow the wood grain and surface texture to show through the finish. On plywood, paint will last longer on new, roughsawn surfaces than on smooth surfaces because more paint can be applied to the rough surface.
Knots and other defects. The presence of knots and other defects (bark, splits, pitch pockets, insect damage, etc.) in lumber will affect the paintability of the material and is generally a function of lumber grade. Knots are simply exposed end grain. This end-grained wood will absorb more of the finish than flat- and edge-grained lumber, and this affects the appearance of the paint coating. Knots in pine often contain a high percentage of resin, which may cause the paint over the knot to discolor. Furthermore, large knots usually check and crack to the extent that a noticeable split or defect can result. Therefore, the higher grades of lumber intended for finishing are generally preferred if maximum serviceability of a paint coat is desired.
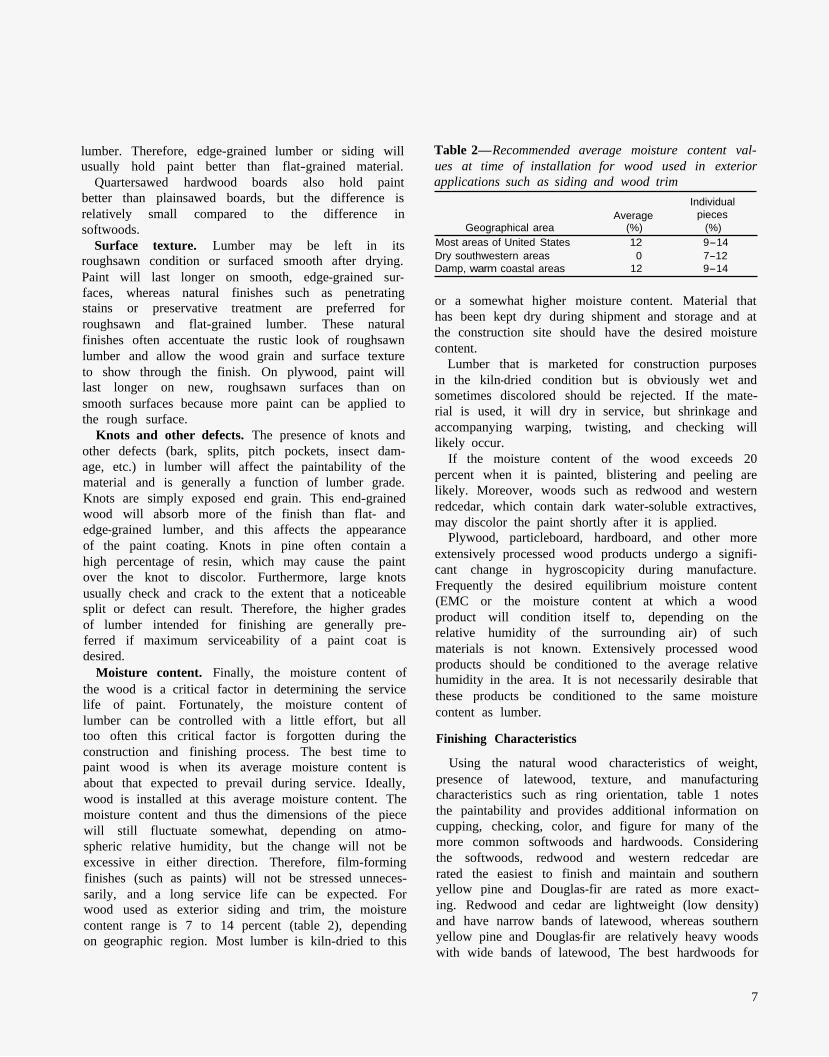
Moisture content. Finally, the moisture content of the wood is a critical factor in determining the service life of paint. Fortunately, the moisture content of lumber can be controlled with a little effort, but all too often this critical factor is forgotten during the construction and finishing process. The best time to paint wood is when its average moisture content is about that expected to prevail during service. Ideally, wood is installed at this average moisture content. The moisture content and thus the dimensions of the piece will still fluctuate somewhat, depending on atmospheric relative humidity, but the change will not be excessive in either direction. Therefore, film-forming finishes (such as paints) will not be stressed unnecessarily, and a long service life can be expected. For wood used as exterior siding and trim, the moisture content range is 7 to 14 percent (table 2), depending on geographic region. Most lumber is kiln-dried to this
Table 2—Recommended average moisture content values at time of installation for wood used in exterior applications such as siding and wood trim
Individual Average pieces
Geographical area (%) (%) Most areas of United States 12 9-14 Dry southwestern areas 0 7-12 Damp, warm coastal areas 12 9-14
or a somewhat higher moisture content. Material that has been kept dry during shipment and storage and at the construction site should have the desired moisture content.
Lumber that is marketed for construction purposes in the kiln-dried condition but is obviously wet and sometimes discolored should be rejected. If the material is used, it will dry in service, but shrinkage and accompanying warping, twisting, and checking will likely occur.
If the moisture content of the wood exceeds 20 percent when it is painted, blistering and peeling are likely. Moreover, woods such as redwood and western redcedar, which contain dark water-soluble extractives, may discolor the paint shortly after it is applied.
Plywood, particleboard, hardboard, and other more extensively processed wood products undergo a significant change in hygroscopicity during manufacture. Frequently the desired equilibrium moisture content (EMC or the moisture content at which a wood product will condition itself to, depending on the relative humidity of the surrounding air) of such materials is not known. Extensively processed wood products should be conditioned to the average relative humidity in the area. It is not necessarily desirable that these products be conditioned to the same moisture content as lumber.
Finishing Characteristics
Using the natural wood characteristics of weight, presence of latewood, texture, and manufacturing characteristics such as ring orientation, table 1 notes the paintability and provides additional information on cupping, checking, color, and figure for many of the more common softwoods and hardwoods. Considering the softwoods, redwood and western redcedar are rated the easiest to finish and maintain and southern yellow pine and Douglas-fir are rated as more exacting. Redwood and cedar are lightweight (low density) and have narrow bands of latewood, whereas southern yellow pine and Douglas-fir are relatively heavy woods with wide bands of latewood, The best hardwoods for
7
painting are the fine uniform-textured (small-pored) ones with medium to low density such as yellow-poplar, magnolia, cottonwood, basswood, aspen, and alder. These group III hardwoods should perform as well as those softwoods in group III and IV because they have less tendency to split and they do not have latewood bands that can peel loose, at least in part, from earlywood bands. The result is a raised grain or “shell out” effect. The group IV hardwoods can be painted using standard procedures with only a year or more shorter life expectancy than group III. However, repainting may be difficult and uncertain unless all old paint is removed first. On the hardwoods, the paint tends to scale off in rather large flakes having no observable relation to the grain of the wood underneath. The group V hardwoods contain pores so large that they are not filled and leveled off properly by ordinary house paint. These pores become the foci for early paint failure. Therefore, the pores must be filled with paste wood filler first.
Hardwoods of groups IV and V, when exposed to the weather without paint or with inadequate paint protection or when water gets behind the woad, have a very marked tendency to warp or cup and pull away from fastenings. These hardwoods need to be nailed
firmly but, if firmly nailed, the boards may split. Thinner boards are more likely to cup or warp from surface wetting and drying than thicker boards. For these reasons ½-inch siding of heavy hardwoods is impractical. Boards for exterior exposure should be no thinner than ¾ inch at any point and preferably less than 6 inches wide.
Where hardwoods of groups III and IV (table 1) are used for exterior coverings of buildings, alternative decorative procedures that avoid the use of paint should be considered.
Where practical, let the wood weather naturally but use thick, rough (unplaned) boards, well-nailed with corrosion-resistant nails. For maximum weather tightness use full-length,
vertical tongue-and-groove siding, dip-treated in a water-repellent preservative, and installed bark side out. All lumber should be accurately milled. For good performance and ease of refinishing,
semitransparent penetrating stains should be used. These stains will perform better on roughsawn boards than on new, smooth wood. The semitransparent stains cannot be used over painted surfaces.
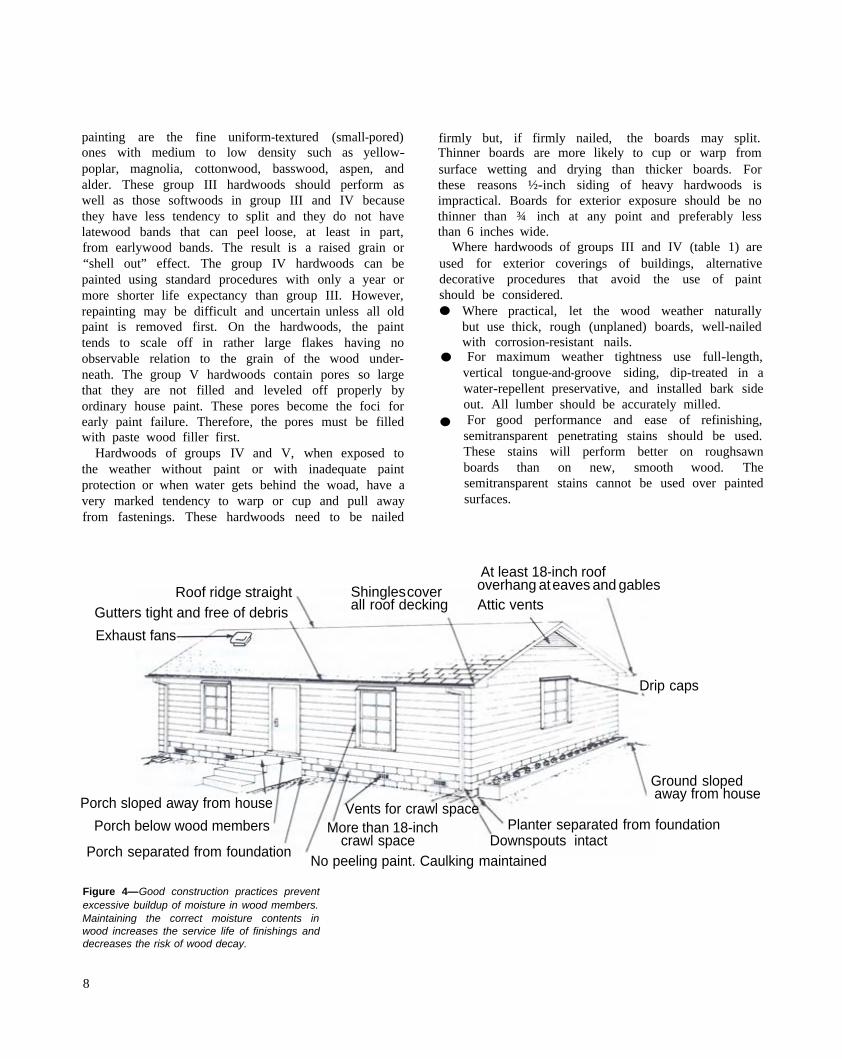
At least 18-inch roof overhang at eaves and gables Roof ridge straight Shinglescover
all roof decking Attic vents Gutters tight and free of debris Exhaust fans
Drip caps
Ground sloped away from house
Porch sloped away from house Vents for crawl space Porch below wood members More than 18-inch Planter separated from foundation
crawl space Downspouts intact Porch separated from foundation
No peeling paint. Caulking maintained
Figure 4—Good construction practices prevent excessive buildup of moisture in wood members. Maintaining the correct moisture contents in wood increases the service life of finishings and decreases the risk of wood decay.
8
Construction Practices
Controlling Moisture Content In addition to choosing the most cost-effective wood
product and compatible finish for a particular application, it is equally important that proper construction practices be followed during installation. Moisture content is critical in determining finish performance both at the time of installation and during the entire life of the structure. It is also critical in preventing decay and insect attack. In some cases excessive moisture content can even make a house uninhabitable because of allergic reactions of the inhabitants to mold and decay fungi.
The following construction features help minimize moisture damage to the structure and thus to the outside paint coat or finish (fig. 4): 1. Wide roof overhangs provide some protection
from sun and rain to at least the upper portions of the structure. When a 4-foot-wide overhang is provided, approximately two-thirds of a conventional one-story sidewall is protected from exposure to full sunlight.
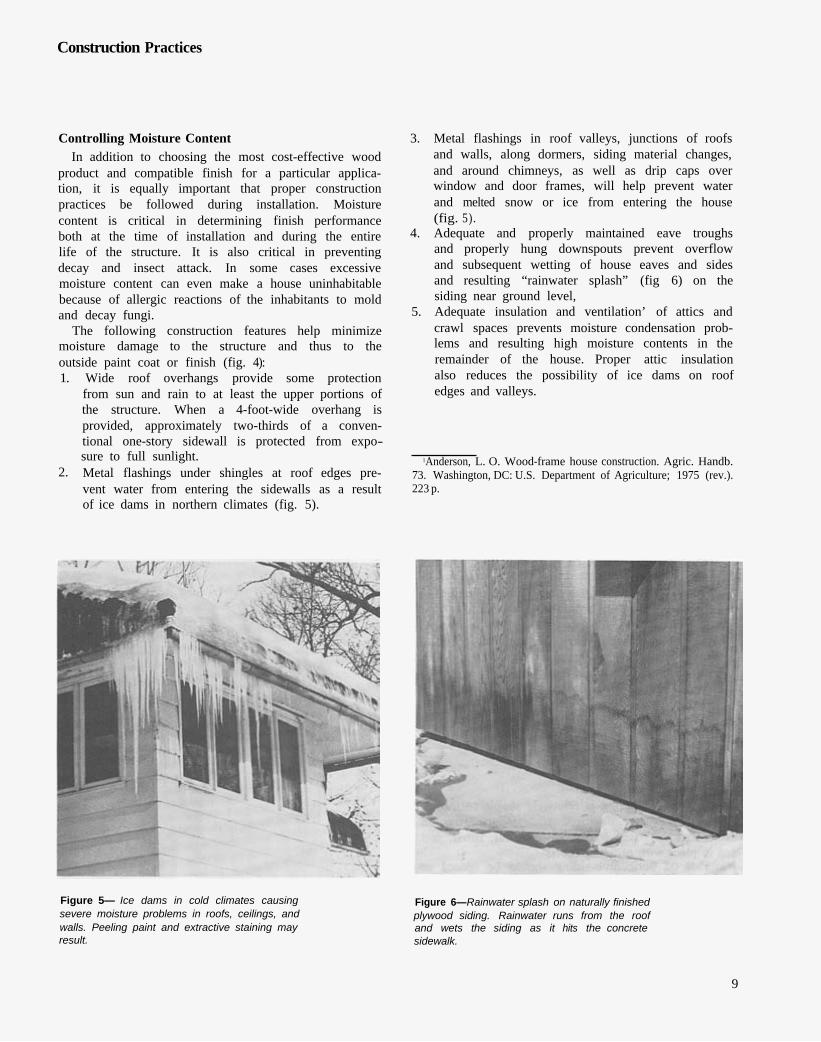
2. Metal flashings under shingles at roof edges prevent water from entering the sidewalls as a result of ice dams in northern climates (fig. 5).
3. Metal flashings in roof valleys, junctions of roofs and walls, along dormers, siding material changes, and around chimneys, as well as drip caps over window and door frames, will help prevent water and melted snow or ice from entering the house (fig. 5).
4. Adequate and properly maintained eave troughs and properly hung downspouts prevent overflow and subsequent wetting of house eaves and sides and resulting “rainwater splash” (fig 6) on the siding near ground level,
5. Adequate insulation and ventilation’ of attics and crawl spaces prevents moisture condensation prob lems and resulting high moisture contents in the remainder of the house. Proper attic insulation also reduces the possibility of ice dams on roof edges and valleys.
1Anderson, L. O. Wood-frame house construction. Agric. Handb. 73. Washington, DC: U.S. Department of Agriculture; 1975 (rev.). 223 p.
Figure 5— Ice dams in cold climates causing severe moisture problems in roofs, ceilings, and walls. Peeling paint and extractive staining may result.
Figure 6—Rainwater splash on naturally finished plywood siding. Rainwater runs from the roof and wets the siding as it hits the concrete sidewalk.
9

6. In northern climates and some areas of the Midsouth where winter condensation in the outside walls can occur (fig. 7), vapor barriers such as a 6-mil (1 mil = 0.001 in) polyethylene film, asphalt-coated paper, or aluminum foil should be used on the inside of all exterior walls. It should be carefully installed to prevent air seepage around edges, electrical outlets, and other breaks in the film, paper or foil. Condensation occurs where water vapor moves from the inside of the house to the cold outside wall. When warm weather returns in the spring this moisture can–and often does- cause the exterior paint to blister. The problem has been further accentuated by air-conditioning and by humidifying. If a film-type vapor barrier is not practical, it may help to paint the inside of exterior walls with a moisture-resistant paint. Two coats of aluminum paint plus two coats of decora tive paint an the best for sand-finished plaster. On smooth plaster, a prime-sealer and at least one coat of alkyd semigloss paint should be applied.
7. Exhaust fans should be used to remove moisture from high-humidity areas such as washrooms with showers or baths and kitchen areas. Be sure the fans are vented to the outside of the house. Clothes driers should never be vented to the inside living quarters or to the crawl, space or basement area. Plumbing should be well maintained and not leak.
8. If the house is built on a crawl space, a clearance of at least 18 inches between the soil and the floor joists is required. The ground should be covered with a 6-mil polyethylene sheet or soil cover to prevent moisture movement from the soil upward. The crawl space should be adequately ventilated and the vents kept open except in the coldest of weather.
9. Any wood used for siding, sheathing, or plates should be at least 8 inches above the outside groundline.
Siding Application
Lumber. Wood siding is relatively simple to install. It is precision manufactured to standard sizes in different patterns (fig. 8) and is easily cut, fitted, and fixed in place with ordinary tools.
Courses of horizontal siding should be spaced so that a single board runs continuously above and below windows and doors without notching or splicing (fig. 9). Bevel siding that is 6 inches wide should have at least 1 inch of overlap between courses. Siding that is
8 inches or wider should overlap 1 to 1½ inches, depending on spacing required between window heights.
Siding should be butted snugly and squarely against door and window casings, corner boards, and adjoining boards. (Comer boards should lie flat against the sheathing.) Mitered corners should be precisely fitted for the same reason (fig. 10). Even if metal corner covers are used, siding boards-should be carefully cut to avoid leaving a hollow place in the wood joint where water could collect.
All nailing should be over studs, and the total effective penetration of the nail into the wood should be at least 1½ inches. For example, 3/8-inch plywood siding over ¾-inch wood sheathing requires a sevenpenny nail, which is 2¼ inches long. This would
Figure 7—Cold weather condensation on a house without a vapor barrier on interior walls. Paint blistering, peeling, and wood decay are likely.
10
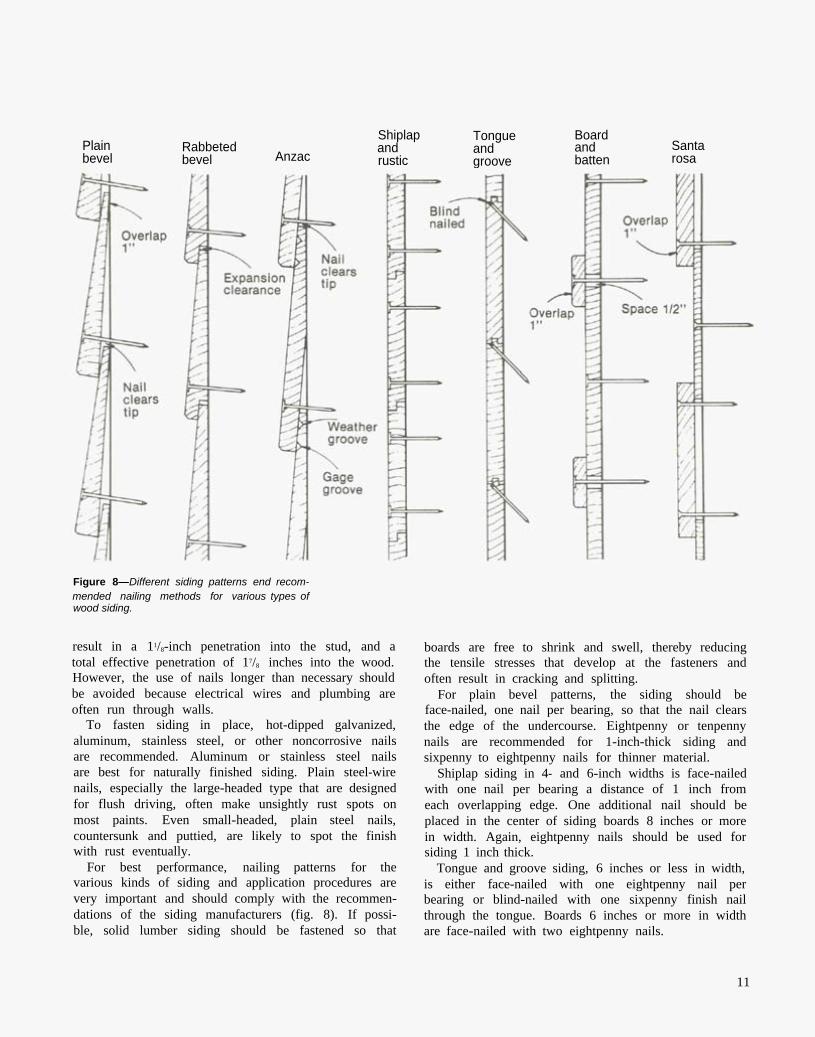
Shiplap Tongue Board Plain Rabbeted and and and Santa bevel bevel Anzac rustic groove batten rosa
Figure 8—Different siding patterns end recommended nailing methods for various types of wood siding.
result in a 11/8-inch penetration into the stud, and a total effective penetration of 17/8 inches into the wood. However, the use of nails longer than necessary should be avoided because electrical wires and plumbing are often run through walls.
To fasten siding in place, hot-dipped galvanized, aluminum, stainless steel, or other noncorrosive nails are recommended. Aluminum or stainless steel nails are best for naturally finished siding. Plain steel-wire nails, especially the large-headed type that are designed for flush driving, often make unsightly rust spots on most paints. Even small-headed, plain steel nails, countersunk and puttied, are likely to spot the finish with rust eventually.
For best performance, nailing patterns for the various kinds of siding and application procedures are very important and should comply with the recommendations of the siding manufacturers (fig. 8). If possible, solid lumber siding should be fastened so that
boards are free to shrink and swell, thereby reducing the tensile stresses that develop at the fasteners and often result in cracking and splitting.
For plain bevel patterns, the siding should be face-nailed, one nail per bearing, so that the nail clears the edge of the undercourse. Eightpenny or tenpenny nails are recommended for 1-inch-thick siding and sixpenny to eightpenny nails for thinner material.
Shiplap siding in 4- and 6-inch widths is face-nailed with one nail per bearing a distance of 1 inch from each overlapping edge. One additional nail should be placed in the center of siding boards 8 inches or more in width. Again, eightpenny nails should be used for siding 1 inch thick.
Tongue and groove siding, 6 inches or less in width, is either face-nailed with one eightpenny nail per bearing or blind-nailed with one sixpenny finish nail through the tongue. Boards 6 inches or more in width are face-nailed with two eightpenny nails.
11

Siding to cleardrip cap
Building paper around and under frame
Butt jointsmade over stud
12” Minimum clearance
Starting strip Fugure 9–Installation of bevel siding.
In board-and-batten patterns, the underboards are spaced ½ inch apart and nailed with one eightpenny or ninepenny siding nail at the center of the board. The batten strip, 1 ½ inches wide, is nailed at the center with one tenpenny or twelvepenny nail. In board-on-board or Santa Rosa siding the underboard also is nailed with one nail at the center of the board. The outer boards, positioned to lap the underboards by 1 inch, are face-nailed with two tenpenny or twelvepenny nails 1¼ inches from the edge.
Plywood and other sheet siding. Exterior-grade plywood, paper-overlaid plywood, and similar sheet materials used for siding are usually applied vertically. When used over sheathing, plywood should be at least5¼ inch thick; 5/16- and 3/8-inch-thick panels will normally provide a more even surface. When used as sheathing and siding, plywood should be at least ½ inch thick. Hardboard should be at least ¼ inch thick and materials such as medium-density fiberboard should be at least ½ inch thick. All types of sheet material should have joints caulked with mastic unless the joints are of the interlapping or matched type or battens are installed. Applying a strip of 15-pound asphalt felt under uncaulked joints is also a good
practice. When two or more sheets are applied vertically, metal flashing should be used to protect the top edge of the lower sheet. The edges should also be treated with a water-repellent preservative.
Plywood should be nailed at 6-inch intervals around the perimeter and 12-inch intervals in the middle. Hardboard siding should be nailed at 4- and 8-inch intervals. Always check the manufacturer's recommendations before installing any panel product.
Figure 10–Recommended procedures for corners of siding: (A) miter corners, (B) metal corners, (C) corner boards, (D) siding return at roof and (E) interior corner.
12
Wood Products Used Outdoors
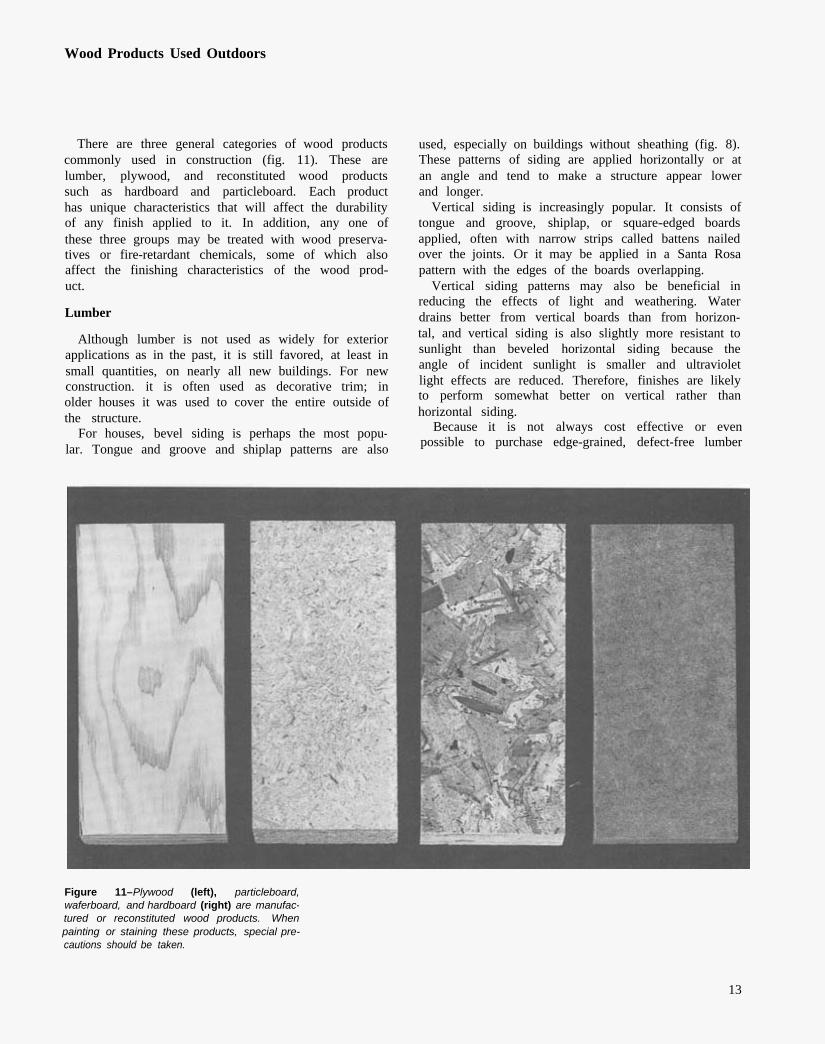
There are three general categories of wood products used, especially on buildings without sheathing (fig. 8). commonly used in construction (fig. 11). These are These patterns of siding are applied horizontally or at lumber, plywood, and reconstituted wood products an angle and tend to make a structure appear lower such as hardboard and particleboard. Each product and longer. has unique characteristics that will affect the durability Vertical siding is increasingly popular. It consists of of any finish applied to it. In addition, any one of tongue and groove, shiplap, or square-edged boards these three groups may be treated with wood preserva- applied, often with narrow strips called battens nailed tives or fire-retardant chemicals, some of which also over the joints. Or it may be applied in a Santa Rosa affect the finishing characteristics of the wood prod- pattern with the edges of the boards overlapping. uct. Vertical siding patterns may also be beneficial in
reducing the effects of light and weathering. Water Lumber drains better from vertical boards than from horizon
tal, and vertical siding is also slightly more resistant to Although lumber is not used as widely for exterior sunlight than beveled horizontal siding because theapplications as in the past, it is still favored, at least in angle of incident sunlight is smaller and ultravioletsmall quantities, on nearly all new buildings. For new light effects are reduced. Therefore, finishes are likelyconstruction. it is often used as decorative trim; in to perform somewhat better on vertical rather thanolder houses it was used to cover the entire outside of horizontal siding.the structure.
Because it is not always cost effective or evenFor houses, bevel siding is perhaps the most popupossible to purchase edge-grained, defect-free lumberlar. Tongue and groove and shiplap patterns are also
Figure 11–Plywood (left), particleboard, waferboard, and hardboard (right) are manufactured or reconstituted wood products. When painting or staining these products, special precautions should be taken.
13
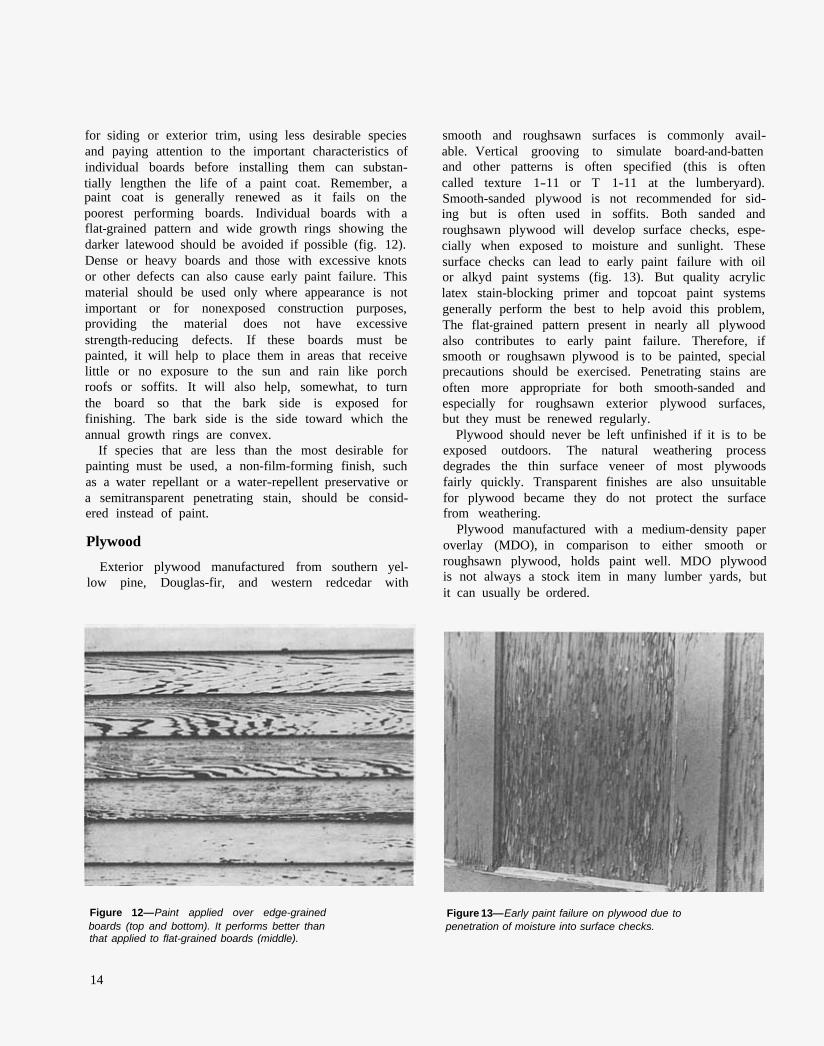
for siding or exterior trim, using less desirable species and paying attention to the important characteristics of individual boards before installing them can substantially lengthen the life of a paint coat. Remember, a paint coat is generally renewed as it fails on the poorest performing boards. Individual boards with a flat-grained pattern and wide growth rings showing the darker latewood should be avoided if possible (fig. 12). Dense or heavy boards and those with excessive knots or other defects can also cause early paint failure. This material should be used only where appearance is not important or for nonexposed construction purposes, providing the material does not have excessive strength-reducing defects. If these boards must be painted, it will help to place them in areas that receive little or no exposure to the sun and rain like porch roofs or soffits. It will also help, somewhat, to turn the board so that the bark side is exposed for finishing. The bark side is the side toward which the annual growth rings are convex.
If species that are less than the most desirable for painting must be used, a non-film-forming finish, such as a water repellant or a water-repellent preservative or a semitransparent penetrating stain, should be considered instead of paint.
Plywood
Exterior plywood manufactured from southern yellow pine, Douglas-fir, and western redcedar with
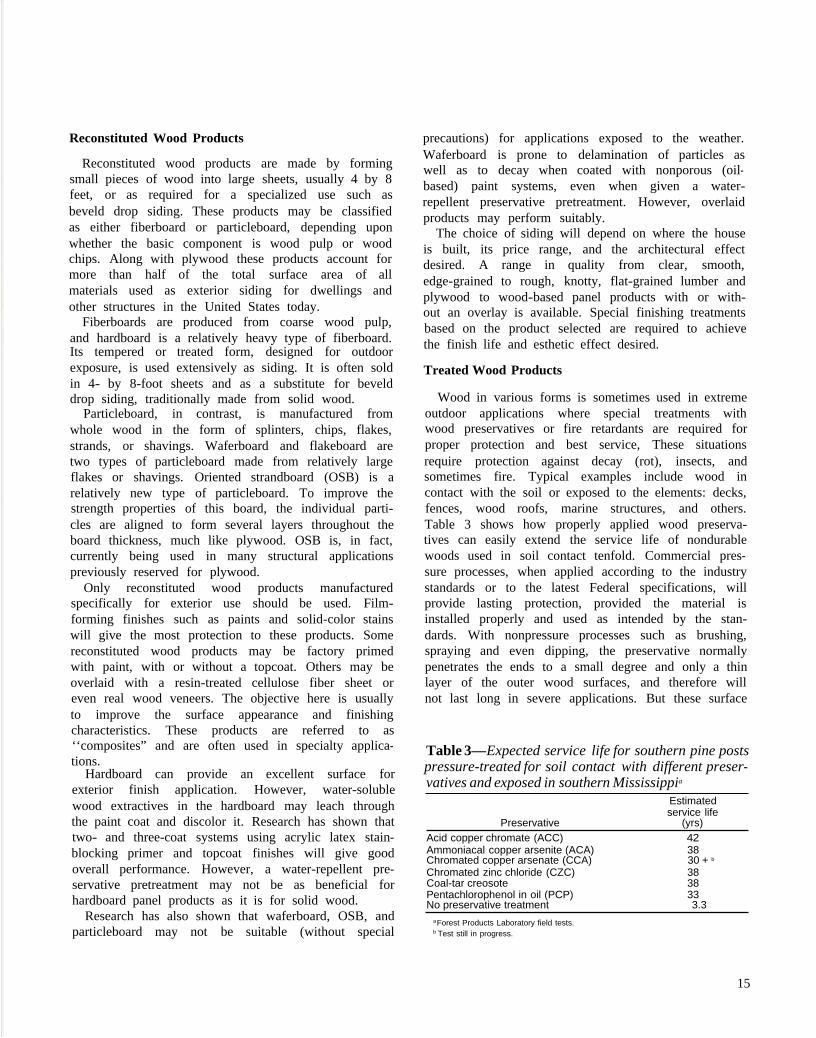
smooth and roughsawn surfaces is commonly available. Vertical grooving to simulate board-and-batten and other patterns is often specified (this is often called texture 1-11 or T 1-11 at the lumberyard). Smooth-sanded plywood is not recommended for siding but is often used in soffits. Both sanded and roughsawn plywood will develop surface checks, especially when exposed to moisture and sunlight. These surface checks can lead to early paint failure with oil or alkyd paint systems (fig. 13). But quality acrylic latex stain-blocking primer and topcoat paint systems generally perform the best to help avoid this problem, The flat-grained pattern present in nearly all plywood also contributes to early paint failure. Therefore, if smooth or roughsawn plywood is to be painted, special precautions should be exercised. Penetrating stains are often more appropriate for both smooth-sanded and especially for roughsawn exterior plywood surfaces, but they must be renewed regularly.
Plywood should never be left unfinished if it is to be exposed outdoors. The natural weathering process degrades the thin surface veneer of most plywoods fairly quickly. Transparent finishes are also unsuitable for plywood became they do not protect the surface from weathering.
Plywood manufactured with a medium-density paper overlay (MDO), in comparison to either smooth or roughsawn plywood, holds paint well. MDO plywood is not always a stock item in many lumber yards, but it can usually be ordered.
Figure 12—Paint applied over edge-grained boards (top and bottom). It performs better than that applied to flat-grained boards (middle).
Figure 13—Early paint failure on plywood due to penetration of moisture into surface checks.
14
Reconstituted Wood Products
Reconstituted wood products are made by forming small pieces of wood into large sheets, usually 4 by 8 feet, or as required for a specialized use such as beveld drop siding. These products may be classified as either fiberboard or particleboard, depending upon whether the basic component is wood pulp or wood chips. Along with plywood these products account for more than half of the total surface area of all materials used as exterior siding for dwellings and other structures in the United States today.
Fiberboards are produced from coarse wood pulp, and hardboard is a relatively heavy type of fiberboard. Its tempered or treated form, designed for outdoor exposure, is used extensively as siding. It is often sold in 4- by 8-foot sheets and as a substitute for beveld drop siding, traditionally made from solid wood.
Particleboard, in contrast, is manufactured from whole wood in the form of splinters, chips, flakes, strands, or shavings. Waferboard and flakeboard are two types of particleboard made from relatively large flakes or shavings. Oriented strandboard (OSB) is a relatively new type of particleboard. To improve the strength properties of this board, the individual particles are aligned to form several layers throughout the board thickness, much like plywood. OSB is, in fact, currently being used in many structural applications previously reserved for plywood.
Only reconstituted wood products manufactured specifically for exterior use should be used. Film-forming finishes such as paints and solid-color stains will give the most protection to these products. Some reconstituted wood products may be factory primed with paint, with or without a topcoat. Others may be overlaid with a resin-treated cellulose fiber sheet or even real wood veneers. The objective here is usually to improve the surface appearance and finishing characteristics. These products are referred to as ‘‘composites” and are often used in specialty applications.
Hardboard can provide an excellent surface for exterior finish application. However, water-soluble wood extractives in the hardboard may leach through the paint coat and discolor it. Research has shown that two- and three-coat systems using acrylic latex stain-blocking primer and topcoat finishes will give good overall performance. However, a water-repellent preservative pretreatment may not be as beneficial for hardboard panel products as it is for solid wood.
Research has also shown that waferboard, OSB, and particleboard may not be suitable (without special
precautions) for applications exposed to the weather. Waferboard is prone to delamination of particles as well as to decay when coated with nonporous (oilbased) paint systems, even when given a water-repellent preservative pretreatment. However, overlaid products may perform suitably.
The choice of siding will depend on where the house is built, its price range, and the architectural effect desired. A range in quality from clear, smooth, edge-grained to rough, knotty, flat-grained lumber and plywood to wood-based panel products with or without an overlay is available. Special finishing treatments based on the product selected are required to achieve the finish life and esthetic effect desired.
Treated Wood Products
Wood in various forms is sometimes used in extreme outdoor applications where special treatments with wood preservatives or fire retardants are required for proper protection and best service, These situations require protection against decay (rot), insects, and sometimes fire. Typical examples include wood in contact with the soil or exposed to the elements: decks, fences, wood roofs, marine structures, and others. Table 3 shows how properly applied wood preservatives can easily extend the service life of nondurable woods used in soil contact tenfold. Commercial pressure processes, when applied according to the industry standards or to the latest Federal specifications, will provide lasting protection, provided the material is installed properly and used as intended by the standards. With nonpressure processes such as brushing, spraying and even dipping, the preservative normally penetrates the ends to a small degree and only a thin layer of the outer wood surfaces, and therefore will not last long in severe applications. But these surface
Table 3—Expected service life for southern pine posts pressure-treated for soil contact with different preservatives and exposed in southern Mississippia
Estimated service life
Preservative (yrs) Acid copper chromate (ACC) 42 Ammoniacal copper arsenite (ACA) 38 Chromated copper arsenate (CCA) 30 + b
Chromated zinc chloride (CZC) 38 Coal-tar creosote 38 Pentachlorophenol in oil (PCP) 33 No preservative treatment 3.3
aForest Products Laboratory field tests. b Test still in progress.
15
treatments can be useful with wood products used in aboveground low- to medium-decay hazard areas, such as exterior millwork and siding. (See warning on page 56.)
There are three main types of preservatives: 1) preservative oils such as coal-tar creosote, 2) organic solvent solutions such as pentacholorophenol, and 3) waterborne salts such as chromated copper arsenate, also called CCA, and ammoniacal copper arsenite or ACA. Each of these preservative classes has its own unique characteristics and applications.
The preservative oils such as coal-tar creosote and organic solvent solutions such as pentachlorophenol in heavy nonvolatile oil leave the wood surface oily and dark. Creosote solutions have a strong odor. These types of preservatives are generally used in commercial applications where severe decay, insect, or marine borer hazards exist, and long service life is required. Examples include railroad ties, bridge construction, poles, and pilings. Woods treated with these preservatives are not intended for use where human contact is likely.
Where appearance is important, wood may be pressure-treated with pentachlorophenol in a light, volatile, organic solvent. Solvents such as methylene chloride or liquefied petroleum gas are used as a carrier for the pentachlorophenol. In either case, the carrier is removed after the treating process and a relatively clean surface is left, although the complete paintability of the wood may not return,
Wood treated with the waterborne preservatives is most commonly available at retail lumber yards, and it generally has a clean, paintable surface, characterized by a greenish or brownish color. During the treating process, the wood reacts with the waterborne salts to form an insoluble residue. The chromium-containing waterborne preservatives also protect against ultraviolet degradation, an important factor in the weathering process.
Pressure treatment of wood with preservatives should not be confused with wood treated by vacuum-pressure, dipping, or brushing processes using a water-repellent preservative. Window and door trim are often treated in this way, and the same solution can be brushed onto wood siding. Although these methods do not penetrate the wood deeply, they do provide some protection against decay in aboveground exposure and improve the paint performance. (See warning on page 56.)
Fire Retardants
In addition to the traditional preservatives, wood can also be pressure-treated with fire-retardant chemicals. The action of fire retardants depends on complicated chemical reactions. In general, the fire-retardant chemical reacts at temperatures below the ignition point of wood to product noncombustible gases and water vapor. These products dilute the normal flammable gases produced during the initial stages of combustion and thereby slow the combustion process. At the same time, a layer of charcoal is produced on the outside of the wood, thus insulating it against further heating and the release of more flammable gases.
Wood can be treated with several different types of fire retardants. Substantial differences exist between those intended for use indoors and those for exterior applications. Some retardants used for indoor applications take up moisture readily and thus can prevent good adhesion of a firm-forming finish to the surface. Blooming, or the movement of the treating chemical to the surface and subsequent formation of crystals, can also occur. These indoor fire-retardant-treated woods should never be used outdoors.
Generally, different chemicals are used in the treatment of wood intended for exterior applications. These chemicals normally leave a dry water-resistant surface that can be painted following traditional methods. Fire-retardant-treated lumber is normally kiln-dried to 19-percent moisture content after treatment. In the process, the material darkens somewhat, and noticeable marks often result where the lumber contacts the small sticks (“stickers”) used to separate the lumber during drying. These sticker marks normally do not weather away with exposure, and application of clear or lightly pigmented stain will not cover them. If a finished appearance showing natural grain and color characteristics is critical, some alternatives do exist, however. First, on special orders the lumber may be surfaced after treatment and drying. A much cleaner, brighter, and smoother surface will result. Some manufacturers will use stickers between every other layer of lumber or plywood, so that one surface is left free of sticker marks and can be exposed.
Southern yellow pine and Douglas-fir are two species commonly treated with fire-retardant chemicals. Because these species normally do not hold paint and solid-color stains as well as some others, strict adherence to recommended finishing procedures should be followed. Western hemlock and ponderosa pine are
16
Weathering
also treated in this manner and have somewhat better finishing characteristics.
Because of the variability of wood preservatives and fire retardants available and the different treating processes, the manufacturer or supplier should be consulted in regard to finishing details. They usually have specific recommendations to achieve maximum service life from paint and other finishes. Wood treated with a preservative or fire retardant should be manufactured in strict adherence to recognized standards and should contain a quality stamp indicating the treatment, treating company, and inspection bureau.
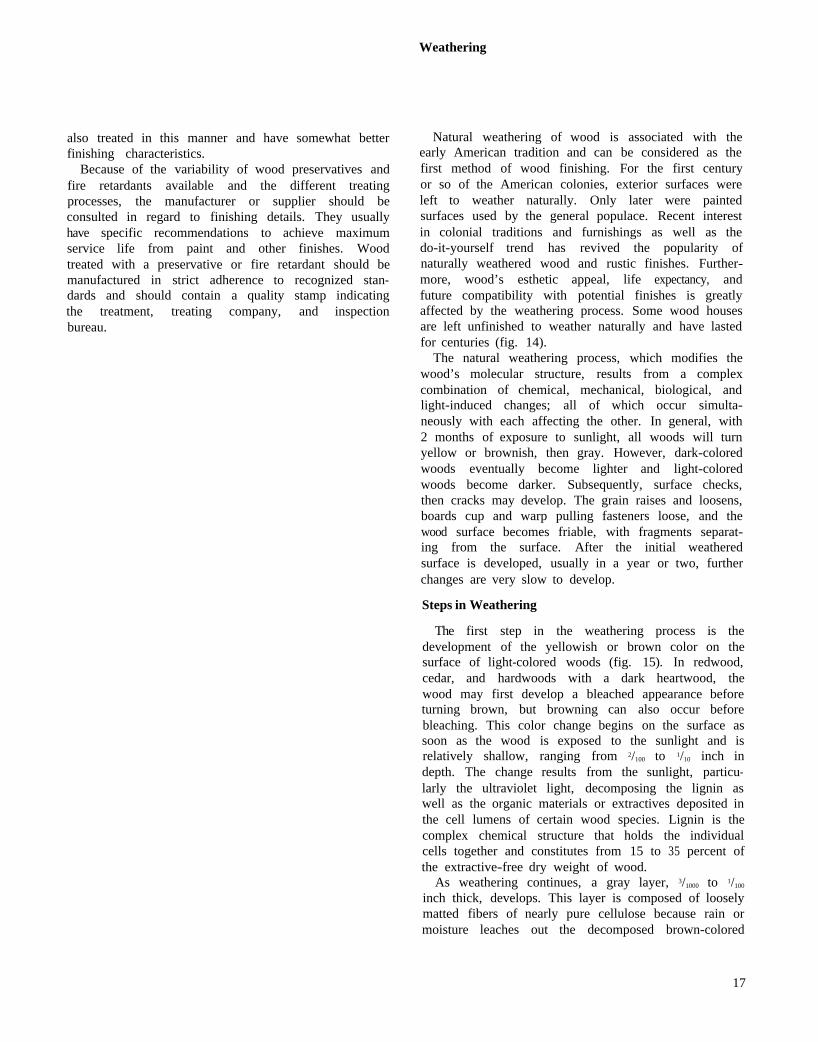
Natural weathering of wood is associated with the early American tradition and can be considered as the first method of wood finishing. For the first century or so of the American colonies, exterior surfaces were left to weather naturally. Only later were painted surfaces used by the general populace. Recent interest in colonial traditions and furnishings as well as the do-it-yourself trend has revived the popularity of naturally weathered wood and rustic finishes. Furthermore, wood’s esthetic appeal, life expectancy, and future compatibility with potential finishes is greatly affected by the weathering process. Some wood houses are left unfinished to weather naturally and have lasted for centuries (fig. 14).
The natural weathering process, which modifies the wood’s molecular structure, results from a complex combination of chemical, mechanical, biological, and light-induced changes; all of which occur simultaneously with each affecting the other. In general, with 2 months of exposure to sunlight, all woods will turn yellow or brownish, then gray. However, dark-colored woods eventually become lighter and light-colored woods become darker. Subsequently, surface checks, then cracks may develop. The grain raises and loosens, boards cup and warp pulling fasteners loose, and the wood surface becomes friable, with fragments separating from the surface. After the initial weathered surface is developed, usually in a year or two, further changes are very slow to develop.
Steps in Weathering
The first step in the weathering process is the development of the yellowish or brown color on the surface of light-colored woods (fig. 15). In redwood, cedar, and hardwoods with a dark heartwood, the wood may first develop a bleached appearance before turning brown, but browning can also occur before bleaching. This color change begins on the surface as soon as the wood is exposed to the sunlight and is relatively shallow, ranging from 2/100 to 1/10 inch in depth. The change results from the sunlight, particularly the ultraviolet light, decomposing the lignin as well as the organic materials or extractives deposited in the cell lumens of certain wood species. Lignin is the complex chemical structure that holds the individual cells together and constitutes from 15 to 35 percent of the extractive-free dry weight of wood.
As weathering continues, a gray layer, 3/1000 to 1/100
inch thick, develops. This layer is composed of loosely matted fibers of nearly pure cellulose because rain or moisture leaches out the decomposed brown-colored
17
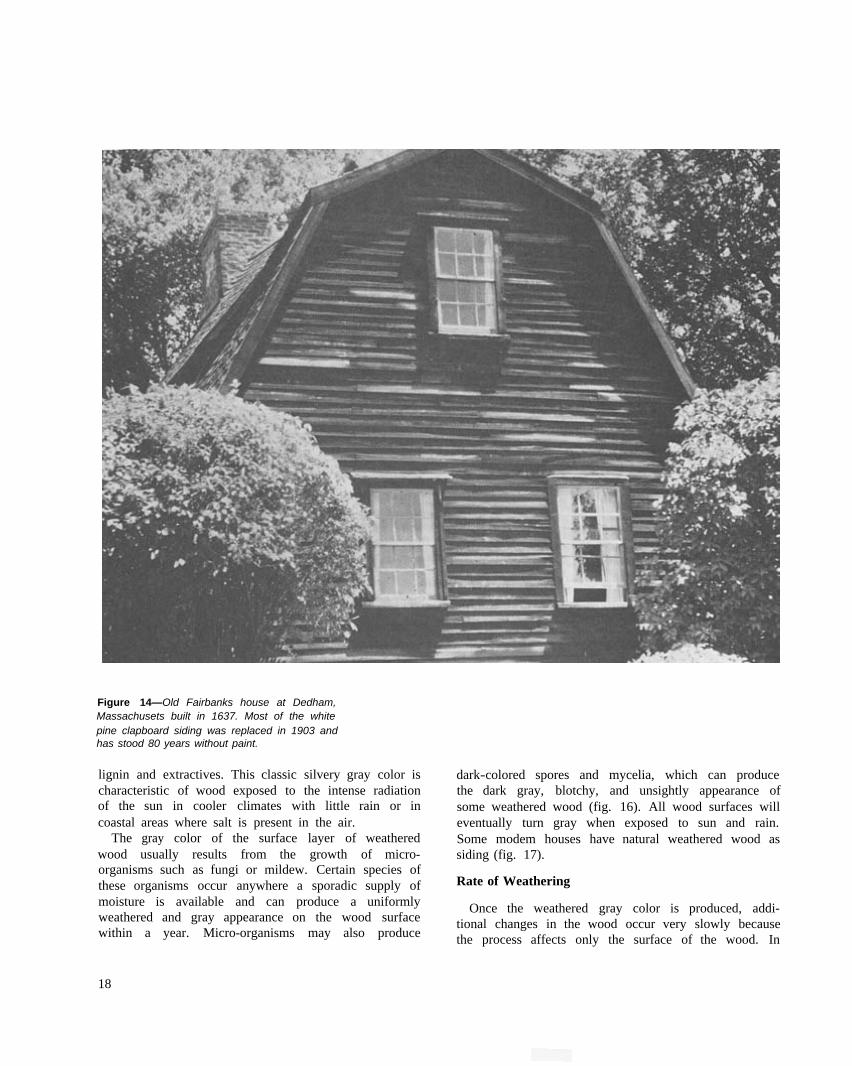
Figure 14—Old Fairbanks house at Dedham, Massachusets built in 1637. Most of the white pine clapboard siding was replaced in 1903 and has stood 80 years without paint.
lignin and extractives. This classic silvery gray color is characteristic of wood exposed to the intense radiation of the sun in cooler climates with little rain or in coastal areas where salt is present in the air.
The gray color of the surface layer of weathered wood usually results from the growth of microorganisms such as fungi or mildew. Certain species of these organisms occur anywhere a sporadic supply of moisture is available and can produce a uniformly weathered and gray appearance on the wood surface within a year. Micro-organisms may also produce
dark-colored spores and mycelia, which can produce the dark gray, blotchy, and unsightly appearance of some weathered wood (fig. 16). All wood surfaces will eventually turn gray when exposed to sun and rain. Some modem houses have natural weathered wood as siding (fig. 17).
Rate of Weathering
Once the weathered gray color is produced, additional changes in the wood occur very slowly because the process affects only the surface of the wood. In
18

Figure 15— Artist's monochromatic rendition of color changes and surface wood change during the outdoor weathering process of a typical softwood.
general for softwoods like pine, cedar, redwood, and spruce, about ¼ inch of wood thickness weathers away in every 100 years. The maximum weathering rate reported is 65/100 inch per 100 years for slow-grown (24 annual rings per inch) western redcedar exposed vertically facing south. For dense hardwoods like the oaks, the rate is only about 13/100 (1/8) inch per 100 years. The rate of weathering is affected by climatic conditions, the amount of exposure, wood density, the amount of earlywood and latewood, ring orientation, as well as the rate of growth and probably lignin and extractives content. In general, the less dense the material and the more severe the exposure, the faster the weathering and erosion rate.
Surface Deterioration
In addition to chemical and color changes, mechanical damage occurs on the exposed wood surface, mostly as a result of moisture. Water vapor is adsorbed or given up with changes in relative humidity. Rain or dew in contact with the unprotected wood
is quickly absorbed by the wood surface. As the moisture content of wood changes, swelling and shrinking take place and stress in the surface of the wood result. The moisture, in combination with the sunlight, causes macroscopic and microscopic intercellular and intracellular cracks and checks. Face-checking (see p. 21) as well as warping and cupping can follow with subsequent nail loosening. Grain raising due to differential swelling and shrinking of earlywood and latewood can also result. There is a loss of strength in the cell wall bonds near the wood surface, and as water continues to erode the softened surface, the surface becomes increasingly uneven and slowly erodes away (fig. 18).
Although the appearance of weathered wood is attractive for certain architectural effects, it does take time to develop. Moreover, the change seldom takes place evenly over different parts of a building. Those portions exposed to the most sun and rain become weathered first. These are usually the lower portions of the building, particularly on the south side. The top portions of a building, particularly if protected by
19
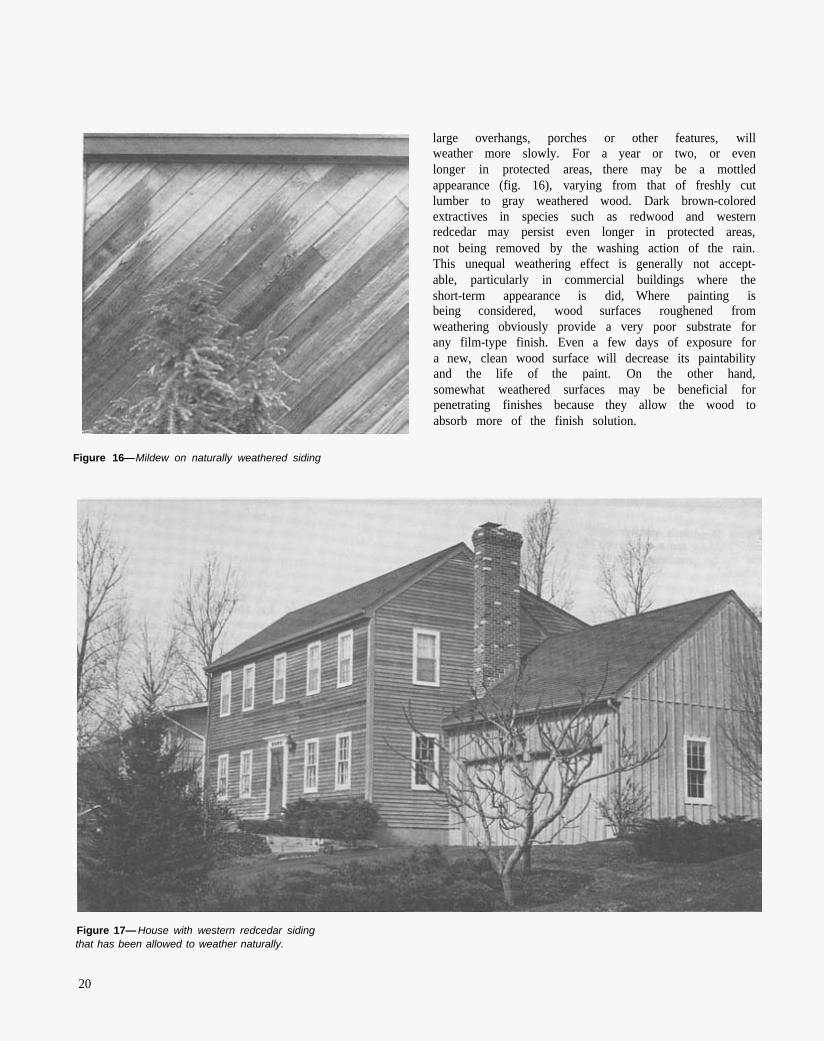
large overhangs, porches or other features, will weather more slowly. For a year or two, or even longer in protected areas, there may be a mottled appearance (fig. 16), varying from that of freshly cut lumber to gray weathered wood. Dark brown-colored extractives in species such as redwood and western redcedar may persist even longer in protected areas, not being removed by the washing action of the rain. This unequal weathering effect is generally not acceptable, particularly in commercial buildings where the short-term appearance is did, Where painting is being considered, wood surfaces roughened from weathering obviously provide a very poor substrate for any film-type finish. Even a few days of exposure for a new, clean wood surface will decrease its paintability and the life of the paint. On the other hand, somewhat weathered surfaces may be beneficial for penetrating finishes because they allow the wood to absorb more of the finish solution.
Figure 16—Mildew on naturally weathered siding
Figure 17— House with western redcedar siding that has been allowed to weather naturally.
20

Figure 18—Weathered surface of softwood after 15 years of exposure in Madison, Wisconsin.
Wood-Based Materials
The use of plywood, hardboard, and particleboard (including waferboard) for exterior exposure is increasing. The weathering of plywood is directly related to the quality and type of the veneer exposed and to the adhesives used. In manufacturing veneer to produce plywood, small checks are produced. As surface checks are initially present in plywood, exposure to the weather will enlarge these checks, thereby allowing moisture to penetrate deeply into the wood. This is called face-checking. Therefore, it is most important that a water-resistant adhesive be used. If water does become trapped because of surface checks, some decay in unprotected, nondurable wood species can be expected. For these species a finishing system containing a wood preservative should be used.
Plywood veneers generally do not exceed ¼ inch in thickness. Therefore, excessive surface erosion, particularly of lightweight species such as western redcedar and redwood, can expose the dark-colored glueline
with time. This means plywood should always be protected with a finish that contains a pigment. The more pigment the greater the protection (paints offer greater protection than do stains).
Unprotected hardboard and, especially, particleboard present serious weathering problems. As the outer surfaces are exposed to changes in moisture content, shrinking and swelling of the wood particles or individual fibers or fiber bundles result. The individual particles or fiber bundles are loosened and separate from the surface. Deeper and deeper layers are subsequently affected at an accelerated rate. As wetting occurs, springback in the wood particles due to compression set during the manufacturing process also occurs. With only 1 or 2 years of weathering, significant loss of strength and increased swelling can result. Cohesion is lost and panels may fail under mechanical load. For best performance, hardboard and particleboard, including the edges, must be coated with high-quality opaque finishes such as paints or solid-color stains.
Artificial Weathering
Some alternatives to the natural weathering process for solid wood exist. First, water repellants or water-repellent preservatives may be used to retain the bright color of freshly sawn lumber. This represents a “natural finish” to many consumers. Second, penetrating oil-based stains (available in most colors except white) can be applied to protect the wood and provide a uniform color to the structure. Another alternative is to apply a commercially prepared bleaching oil, bleaching stain, or weathering stain. The oil or stain is essentially a water-repellent finish containing some gray pigments. To maintain a uniformly gray wood surface, the bleaching oil may have to be renewed as needed. Or, it may be allowed to wear off naturally, leaving the wood in a more uniform, naturally weathered condition.
In addition to the commercially available products, wood may be treated with several different chemicals or chemical combinations to produce a weathered or aged appearance. Little quantitative information is available concerning these treatments, so some experimentation will be required to achieve an acceptable color.
Dark gray, aged colors can be produced by brushing the wood with small amounts of a dilute solution (2 percent) of an iron salt such as ferric chloride followed with a second treatment of tannic acid solution (2 percent). Iron tannate, an insoluble blue-black com
21

Moisture-Excluding Effectiveness of Finishes
pound, will form on the surface of the wood. The intensity of the gray color will depend on the concentration and the amount of the solution applied to the surface.
Another way of artificially weathering wood involves a process using lye and bleach. A silver-gray color can be achieved by soaking the wood in a concentrated solution of lye (sodium hydroxide) for several hours. All of the lye solution is then washed off, and the wood is allowed to dry thoroughly. Then it is exposed to sunlight or a sunlamp for as long as possible. Next, the wood is coated with freshly slaked lime. The lime is later removed with a soft brush, and the wood is bleached several times with liquid household bleach and thoroughly dried between treatments. The treated wood is neutralized with a strong vinegar solution and then rinsed thoroughly.
Warning: Eyes MUST be fully protected with chemical goggles or a face shield, skin with heavy rubber gloves and a rubber apron. LYE AND SLAKED LIME ARE EXTREMELY CORROSIVE.
Artificially stressed and weathered barn boards are also available commercially. The surface texture of weathered wood is produced by rough sawing, sand blasting, wire brushing, and planing with notched knives or other mechanical means. Color is usually controlled by staining or chemical treatment.
Precautions
When wood or wood-based products are left to weather naturally, certain precautions should be exercised. First, wood that becomes wet even at periodic intervals can decay. This decay must not be confused with the surface weathering process just described. Wood decay is the biological deterioration of the cellulose and/or lignin throughout the entire thickness of the board. To help guard against decay problems, which may take from one to several years to develop, all structures should be built so that exposure to moisture, both atmospheric and ground is minimized and moisture is not trapped. Furthermore, the naturally durable heartwood of certain species such as the cedars and redwood or preservative-treated wood should be chosen.
Raid grain, checking, and warping will be minimal with edge-grained lumber and low-density species as compared to flat-grained wood and high-density species. Warping and cupping can be minimized if the width of the board does not exceed eight times the thickness. Low-density defect-free softwoods tend to warp less than the lower grades of lumber or high-density species, especially hardwoods.
The various dimensions of woad and wood-based building materials are constantly changing because of changes in moisture content, which in turn are caused by fluctuations in the atmospheric relative humidity as well as from the periodic presence of free moisture such as rain, snow, or dew. Because film-forming wood finishes like paint will last longer on stable wood, it is sometimes desirable to help stabilize wood by treating, finishing, or coating it first.
The protection of wood from moisture by applying a finish or coating depends on a great number of variables. Among them are coating-film thickness, absence of defects and voids in the film, type of pigment if any, chemical composition of the vehicle or resin, volume ratio of pigment to vehicle, vapor-pressure gradient across the film, and length of exposure period. Regardless of the number of coatings used, the coating can never be entirely moisture proof, and there is no way to completely eliminate the changing moisture content of wood in response to changing relative humidities. The coating simply slows up the rate at which the wood changes moisture content.
Table 4 lists the moisture-excluding effectiveness of several different types of finishes on wood. The numeric rating given for each finish type is a relative value based on a three-coat system applied on wood at 80 °F and 30 percent relative humidity, exposed for 14 days at 80 °F and 90 percent relative humidity. Perfect protection, or no adsorption of water vapor, would be represented by 100 percent effectiveness; complete lack of protection (as with unfinished wood) by 0 percent. A dipped paraffin wax finish is the most effective, followed by the two-component epoxy finishes. Aluminum-pigmented varnishes or paints, as well as interior or exterior satin enamel paint with a soya/tung/alkyd resin, are also effective.
On the other hand, porous paints, such as the latex paints and low-luster (flat) or breather-type oil-based paints formulated at a pigment volume concentration usually above 40 percent, offer little protection against moisture. These paints permit rapid entry of water from dew and rain unless applied over a nonporous primer. Likewise, penetrating finishes like linseed oil, tung oil, and stain-type finishes are ineffective.
The data in table 4 are for coatings only a few weeks old and not yet exposed to the weather, but the effectiveness of many coatings improves slightly with age. Good exterior coatings either retain their maximum effectiveness for a considerable time or lose effectiveness slowly. As long as the original appearance
22

Table 4—Moisture-excluding effectiveness of three coats of various finishes (ponderosa pine sapwood was initially conditioned to 80°F and 30 percent relative humidity and then exposed to 80 °F and 90 percent relative humidity for 14 days)
Effective1 Somewhat effective Ineffective Percent Finish type Percent Finish type Percent Finish type
95 Paraffin wax-dipped 74 Polyurethane paint– 10 Nitrocellulose lacquer gloss(2-component)
91
87
84
82
80
Epoxy finish—clear (2-component)
Epoxy paint—gloss (2-component)
Aluminum flake-pigmented urethane varnish (oil-modified)
Aluminum paint (linseed/phenolic/ menhaden)
Enamel paint—satin (soya/tung)
73
69
66
60
59
59
Pigmented shellac
Paraffin wax– brushed
Polyurethane finish– clear(2-component)
Alkyd house primer paint (tall maleic alkyd resin)
Epoxy paint–gloss(1-component)
Enamel paint–gloss
16
11
11
10
4
2
Acrylic latex flat house paint
Water repellent (1% wax)
FPL natural finish (linseed oil-based semitransparent stain)
Latex enamel wall paint (epoxy)
Acrylic latex house primer paint
Tung oil
57
50
48
46
(soya alkyd; interior) Marine enamel–gloss
(soya alkyd)Epoxy varnish–gloss
(1-component) Polysilicone enamel
(silicone alkyd) Floor and deck
enamel (phenolic
1
0
0
0
Latex pigmented shellac
Semitransparent oil-based stain
Solid-color latex stain (acrylic resin)
Alkyd flat wall paint (soya alkyd)
44
44
alkyd)Urethane varnish (oil
modified) Gym seal (linseed
0
0
Latex flat wall paint (vinyl acrylic resin)
Paste furniture wax
42
oil/phenolicresin/tung oil)
Shellac 0 Linseed oil 42 Solid-color oil-based 0 Linseed oil
41 stain (linseed oil)
Oil-based house paint 0 Unfinished wood (con
35
32
(tall/soya alkyds)Floor seal (phenolic
resin/tung oil) Flat latex primer wall
trol)
paint (butadienestyrene resin)
30 Spar varnish (soya alkyd)
1One-hundred percent = perfect protection or no absorption of water vapor; 0 = no protection as with unfinished wood.
and integrity of the coating is retained, most of the effectiveness remains. Paint that is faded or chalking remains effective if vigorous rubbing removes the chalk and discloses a glossy film underneath. Deep chalking, checking, or cracking indicates serious impairment of the moisture-excluding effectiveness of the finish. Furthermore, the degree of protection provided by different treatments depends on the type of exposure. For example, water-repellent treatments may be ineffective against long-term exposure (2 weeks) to water vapor, but relatively effective against free water for a short (one-half hour) exposure time.
In order for the coating to be effective in minimizing moisture content changes of the wood, it must be applied to all wood surfaces, particularly the end grain. The end grain of wood absorbs moisture faster than the face grain, and finishes generally fail in this area first (fig. 19). Coatings applied to the surface only will result in unequal adsorption of moisture, increasing the likelihood of the wood cupping. A buildup of the finish (two or three coats) is also required, because mere plugging of the wood pores is not effective. The cell walls at the surface must likewise be fully covered. The first or primer coat
23

Types of Exterior Wood Finishes
applied to bare wood is rarely effective. In those houses where moisture is moving from the living quarters to the outside wall because there is no vapor barrier, moisture-excluding finishes applied to the outside will not prevent paint peeling.
Figure 19—Paint normally fails first around the ends and edges of a board. Liberal application of a water repellant or water-repellent preservative especially to the end grain can prolong paint life in these areas.
Finishes are applied to exterior wood surfaces for a variety of reasons. The particular reason will determine the type of finish selected and subsequently the amount of protection provided to the wood surface as well as the life expectancy for the finish. Finishes can be divided into two general categories. The first are the opaque coatings such as paints and solid-color stains; the second, natural finishes such as water repellants, water-repellent preservatives, and semitransparent penetrating stains. In addition, wood preservatives and fire-retardant coatings might also he called “finishes” in some respects. The various types of wood preservatives and finishes for exterior wood are summarized in table 5; finishing methods and suitability are summarized in table 6.
Opaque Finishes
Paint. Paints are common coatings used on wood that provide the most protection for it against surface erosion by weathering (fig. 20). They are also used for esthetic purposes and to conceal certain defects. Paints contain substantial quantities of pigments, which account for the wide range of colors available. Some coloring pigments will essentially eliminate ultraviolet light degradation of the wood surface. Oil-based or alkyd-based paints are a suspension of inorganic pigments in a resin vehicle and a solvent that helps bind the pigment particles and the bonding agent (resin) to the wood surface. Latex paints are likewise a suspension of inorganic pigments and various latex resins, but the solvent or dispersant in this case is water.
Oil-based paint films provide the best shield from liquid and vaporous water. However, they are not necessarily the most durable. No matter how well sealed, wood still moves with seasonal humidity, thus stressing and eventually cracking the paint. Latex paints, particularly the acrylics, remain more flexible with age, and even though they allow more water vapor to pass through, they hold up better by stretching and shrinking with the wood. Test fences at the Forest Products Laboratory show that the all-acrylic latex topcoat paints, applied in two coats over a stain-blocking acrylic latex primer, last longer than other paint systems even on difficult-to-paint roughsawn plywood surfaces.
Latex paints are generally easier to use because water is used in cleanup. They are also porous and will allow some moisture movement. In comparison, oil-based paints require organic solvents for cleanup, and at least some are nonporous. A nonporous paint film
24
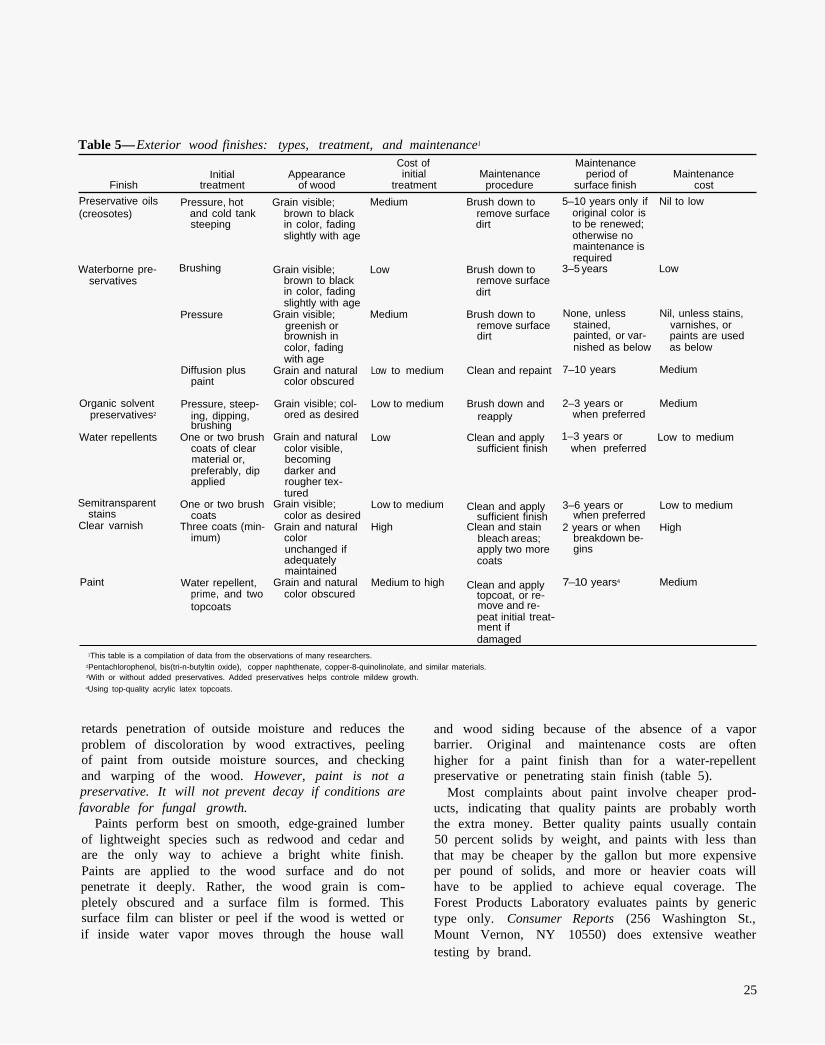
Table 5— Exterior wood finishes: types, treatment, and maintenance1
Cost of Maintenance
Finish Initial
treatment Appearance
of wood initial
treatment Maintenance
procedure period of Maintenance
surface finish cost Preservative oils (creosotes)
Pressure, hot and cold tank steeping
Grain visible; brown to black in color, fading slightly with age
Medium Brush down to remove surface dirt
5–10 years only if original color is to be renewed; otherwise no maintenance is
Nil to low
Waterborne preservatives
Brushing Grain visible; brown to black
Low Brush down to remove surface
required 3–5 years Low
Pressure
Diffusion plus paint
in color, fading
Grain visible; slightly with age
greenish or brownish in color, fading with age
Grain and natural color obscured
Medium
Low to medium
dirt
Brush down to remove surface dirt
Clean and repaint
None, unless stained, painted, or varnished as below
7–10 years
Nil, unless stains, varnishes, or paints are used as below
Medium
Organic solvent preservatives2
Water repellents
Semitransparent stains
Clear varnish
Pressure, steeping, dipping,brushing
One or two brush coats of clear material or, preferably, dip applied
One or two brush
Three coats (mincoats
imum)
Grain visible; colored as desired
Grain and natural color visible, becoming darker and rougher textured
Grain visible; color as desired
Grain and natural color unchanged if
maintained adequately
Low to medium
Low
Low to medium
High
Brush down and reapply
sufficient finish Clean and apply
Clean and applysufficient finish
Clean and stain bleach areas; apply two more coats
2–3 years or when preferred
1–3 years or when preferred
3–6 years or
2 years or when when preferred
breakdown begins
Medium
Low to medium
Low to medium
High
Paint Water repellent, prime, and two topcoats
Grain and natural color obscured
Medium to high Clean and apply topcoat, or remove and repeat initial treatment if
7–10 years4 Medium
damaged 1This table is a compilation of data from the observations of many researchers.
2Pentachlorophenol, bis(tri-n-butyltin oxide), copper naphthenate, copper-8-quinolinolate, and similar materials. 3With or without added preservatives. Added preservatives helps controle mildew growth. 4Using top-quality acrylic latex topcoats.
retards penetration of outside moisture and reduces the problem of discoloration by wood extractives, peeling of paint from outside moisture sources, and checking and warping of the wood. However, paint is not a preservative. It will not prevent decay if conditions are favorable for fungal growth.
Paints perform best on smooth, edge-grained lumber of lightweight species such as redwood and cedar and are the only way to achieve a bright white finish. Paints are applied to the wood surface and do not penetrate it deeply. Rather, the wood grain is completely obscured and a surface film is formed. This surface film can blister or peel if the wood is wetted or if inside water vapor moves through the house wall
and wood siding because of the absence of a vapor barrier. Original and maintenance costs are often higher for a paint finish than for a water-repellent preservative or penetrating stain finish (table 5).
Most complaints about paint involve cheaper products, indicating that quality paints are probably worth the extra money. Better quality paints usually contain 50 percent solids by weight, and paints with less than that may be cheaper by the gallon but more expensive per pound of solids, and more or heavier coats will have to be applied to achieve equal coverage. The Forest Products Laboratory evaluates paints by generic type only. Consumer Reports (256 Washington St., Mount Vernon, NY 10550) does extensive weather testing by brand.
25

Table 6—Finishing methods for exterior wood surfaces: suitability1
Water-repellent Semitransparent preservative stains Paints
Expected Expected Expected Type of exterior Suitability life2 Suitability life3 suitability life4
wood surfaces (yrs) (yrs) (yrs) Siding:
Cedar and redwood Smooth (vertical grain) High 1–2 Moderate 2–4 High 4–6 Roughsawn or weathered High 2–3 Excellent 5–8 Moderate 3–5
Pine, fir, spruce, etc. Smooth (flat-grained) High 1–2 Low 2–3 Moderate 3–5 Rough (flat-grained) High 2–3 High 4–7 Moderate 3–5
Shingles Sawn High 2–3 Excellent 4–8 Moderate 3–5 Split High 1–2 Excellent 4–8 — —
Plywood (Douglas-fir and southern pine) Sanded Low 1–2 Moderate 2–4 Moderate 3–5 Textured (smooth) Low 1–2 Moderate 2–4 Moderate 3–5 Textured (roughsawn) Low 2–3 High 4–8 Moderate 4–6 Medium-density overlay5 — — — — Excellent 6–8
Plywood (cedar and redwood) Sanded Low 1–2 Moderate 2–4 Moderate 3–5 Textured (smooth) Low 1–2 Moderate 2–4 Moderate 3–5 Textured (roughsawn) Low 2–3 Excellent 5–8 Moderate 4–6
Hardbard, medium density6
Smooth Unfinished — — — — High 4–6 Preprimed — — — — High 4–6
Textured Unfinished — — — — High 4–6 Preprimed — — — — High 4–6
Millwork (usually pine) Windows, shutters, doors, exterior trim High7 — Moderate 2–3 High 3–6
Decking New (smooth) High 1–2 Moderate 2–3 Low 2–3 Weathered (rough) High 2–3 High 3–6 Low 2–3
Glued-laminated members Smooth High 1–2 Moderate 3–4 Moderate 3–4 Rough High 2–3 High 6–8 Moderate 3–4
Waferboard — — LOW 1–3 Moderate 2–4
1These data were complied from the observations of many researchers.. Expected the predictions are for an average location in the continental United States; expected life will vary in extreme climates or exposure (desert, seashore, deep woods, etc.).
2Development of mildew on the surface indicates a need for refinishing. 3Smooth, unweathered surfaces are generally finished with only one coat of stain, but roughsawn or weathered surfaces, being more
adsorptive, can be finished with two coats, with the second coat applied while the first coat is still wet. 4Expected life of two coats, one primer and one topcoat. Applying a second topcoat (three-coat job) will approximately double the life.
Top-quality acrylic latex paints will have the best durability. 5Medium-density overlay is generally painted. 6Semitransparent stans are not suitable for hardboard. Solid color stains (acrylic latex) will perform like paints. Paints are preferred. 7Exterior millwork, such as windows, should be factory treated according to Industry Standard IS4-81. Other trim should be liberally
treated by brushing before painting.
Solid-color stains. Solid-color stains (also called obscure the natural wood color and grain and can also hiding, heavy-bodied, or blocking stains) are opaque be applied over old paints or stains. However, surface finishes that come in a wide range of colors and are texture is retained and a flat-finish appearance nor-essentially paints. Solid-color stains are made with a mally results. The wood is protected against ultraviolet much higher concentration of pigment than the degradation as with paints. Oil-based solid-color stains semitransparent penetrating stains, but somewhat less form a thin film much like paint and as a result can than that of standard paints. As a result they will also peel loose from the substrate. Film-forming,
26
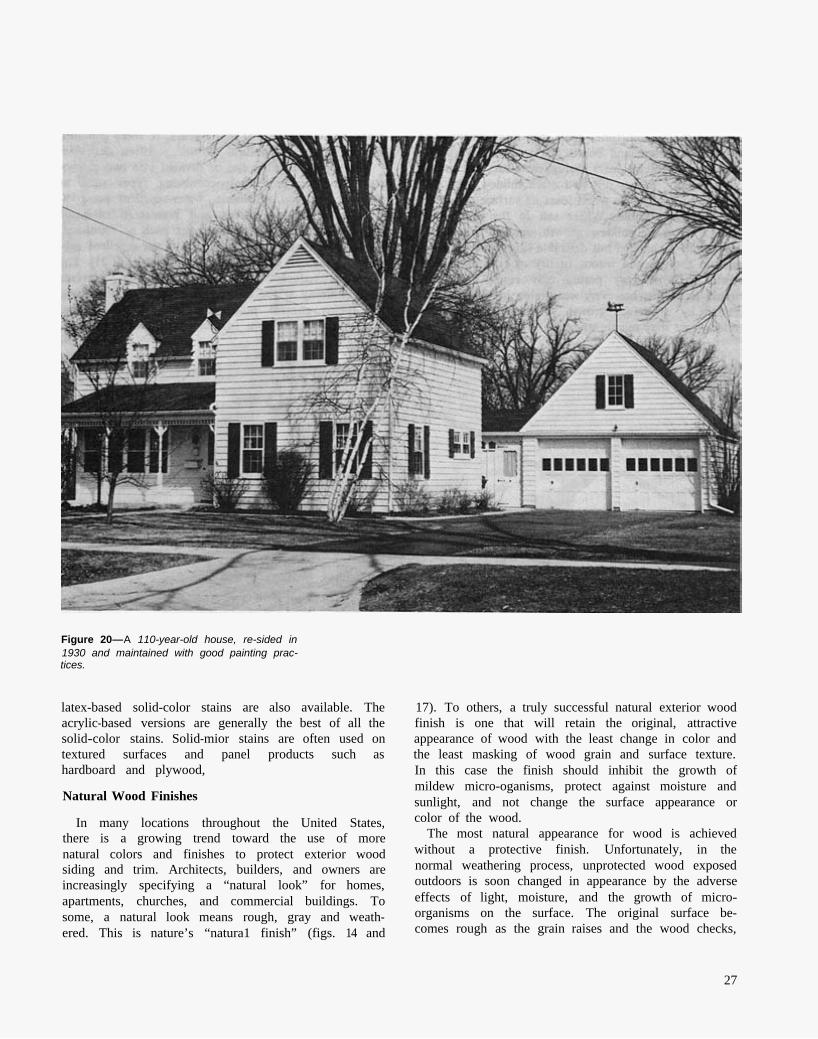
Figure 20—A 110-year-old house, re-sided in 1930 and maintained with good painting practices.
latex-based solid-color stains are also available. The acrylic-based versions are generally the best of all the solid-color stains. Solid-mior stains are often used on textured surfaces and panel products such as hardboard and plywood,
Natural Wood Finishes
In many locations throughout the United States, there is a growing trend toward the use of more natural colors and finishes to protect exterior wood siding and trim. Architects, builders, and owners are increasingly specifying a “natural look” for homes, apartments, churches, and commercial buildings. To some, a natural look means rough, gray and weathered. This is nature’s “natura1 finish” (figs. 14 and
17). To others, a truly successful natural exterior wood finish is one that will retain the original, attractive appearance of wood with the least change in color and the least masking of wood grain and surface texture. In this case the finish should inhibit the growth of mildew micro-oganisms, protect against moisture and sunlight, and not change the surface appearance or color of the wood.
The most natural appearance for wood is achieved without a protective finish. Unfortunately, in the normal weathering process, unprotected wood exposed outdoors is soon changed in appearance by the adverse effects of light, moisture, and the growth of microorganisms on the surface. The original surface becomes rough as the grain raises and the wood checks,
27
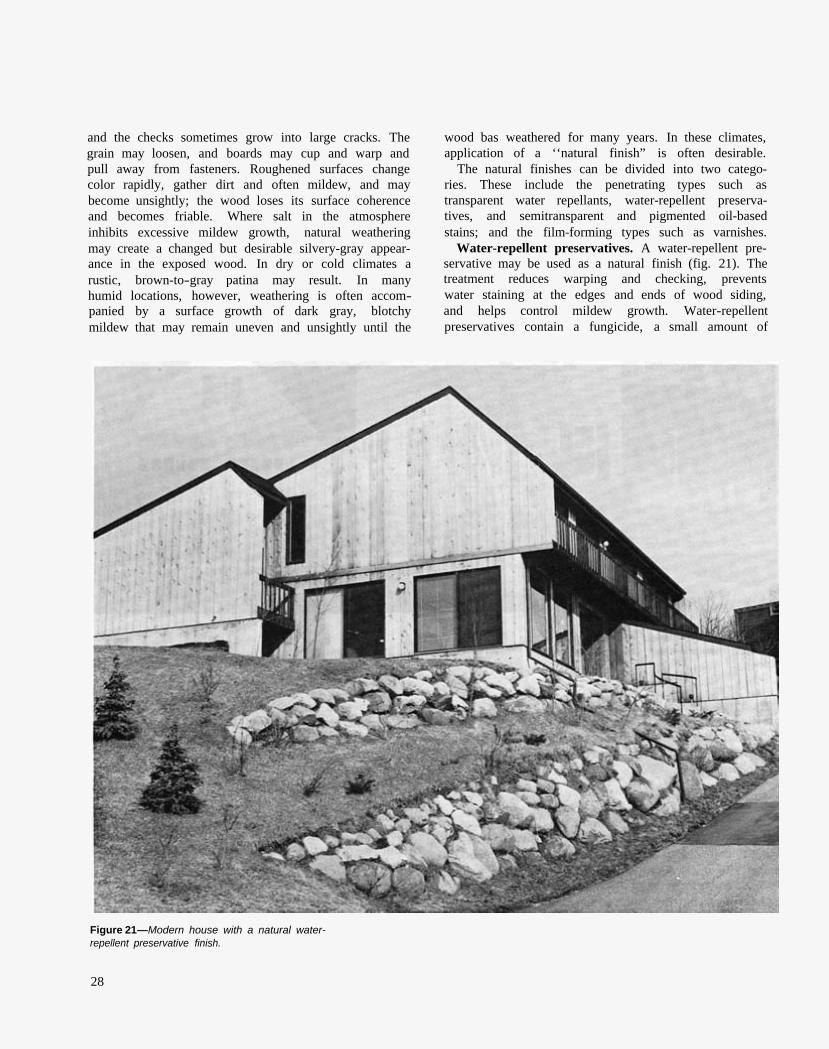
and the checks sometimes grow into large cracks. The grain may loosen, and boards may cup and warp and pull away from fasteners. Roughened surfaces change color rapidly, gather dirt and often mildew, and may become unsightly; the wood loses its surface coherence and becomes friable. Where salt in the atmosphere inhibits excessive mildew growth, natural weathering may create a changed but desirable silvery-gray appearance in the exposed wood. In dry or cold climates a rustic, brown-to-gray patina may result. In many humid locations, however, weathering is often accompanied by a surface growth of dark gray, blotchy mildew that may remain uneven and unsightly until the
wood bas weathered for many years. In these climates, application of a ‘‘natural finish” is often desirable.
The natural finishes can be divided into two categories. These include the penetrating types such as transparent water repellants, water-repellent preservatives, and semitransparent and pigmented oil-based stains; and the film-forming types such as varnishes.
Water-repellent preservatives. A water-repellent preservative may be used as a natural finish (fig. 21). The treatment reduces warping and checking, prevents water staining at the edges and ends of wood siding, and helps control mildew growth. Water-repellent preservatives contain a fungicide, a small amount of
Figure 21—Modern house with a natural water-repellent preservative finish.
28

wax as a water repellant, a resin or drying oil, and a solvent such as turpentine or mineral spirits. Some waterborne formulations are also available. The wax reduces the absorption of liquid water by the wood (fig. 22) and the preservative prevents wood from darkening (graying) by inhibiting the growth of mildew and decay organisms. Water-repellent preservatives do not contain any coloring pigments but will darken the color of the wood. The resulting finish will vary in color, depending upon the wood color itself, but will usually weather to a clean, golden tan.
The initial application of a water-repellent preservative to smooth surfaces is, however, short lived, usually 1 to 2 years on smooth surfaces and 1 to 3 years on roughsawn surfaces. When a surface starts to show a blotchy discoloration resulting from extractives or mildew, it should be cleaned with a solution of liquid household bleach and detergent (see p. 47) and retreated after drying. During the first few years, a fresh finish may have to be applied every year or so. But after the wood has gradually weathered to a uniform tan color, additional treatments may last 2 to 4 years because the weathered boards absorb more of the finish. Relatively small quantities of tinting colors can be added to the water-repellent preservative solution to provide special color effects, and the mixture is then classified as a pigmented penetrating stain. Two to six fluid ounces of tinting colors or color in oil per gallon of treating solution are normally used. Colors that match the natural color of the wood and extractives are preferred. As with semitransparent
Figure 22—Wood surface brush-treated with water repellant (left). It resists penetration by liquid water, whereas untreated wood surface (right) absorbs water quickly.
penetrating stains, the addition of pigment to the finish helps stabilize the color and increase the durability of the finish.
Water-repellent preservatives may also be used as a treatment for bare wood before priming and painting or in areas where old paint has peeled, exposing bare wood, particularly around butt joints or in corners. This treatment keeps rain or dew from penetrating into the wood, especially at joints and on end grain, thus decreasing the shrinking and swelling of wood. As a result, less stress is placed on the paint film, and its service Life is extended (figs. 19 and 23). This stability is achieved by the small amount of wax present in the water-repellent preservative. Providing the entire board has been treated, the wax also decreases the capillary movement of water up the back side of lap or drop siding. The fungicide inhibits surface decay, mold, and mildew. Water-repellent preservatives will not protect the wood surface from ultraviolet light damage unless ultraviolet light inhibitors are added to the finish.
Water repellants are also available. These are simply water-repellent preservatives with the preservative left out. Water repellants are not good natural finishes but can be used as a stabilizing treatment before priming and painting. They can also provide some decay resistance in low- to medium-decay hazard areas for outdoor woodwork used above ground and painted. Research on window units has shown that a water-repellent treatment can protect the wood from decay for 20 years or more in a northern climate. Untreated units were badly decayed within 6 years. All units were initially painted in the research.
Care should be exercised when purchasing water repellants or water-repellent preservatives. Manufacturers’ specifications should be read carefully and followed completely. Any type of water-repellent preservative can be used as a natural exterior finish by itself, but only some are paintable. Manufacturers have also developed water-repellent preservatives specifically for exterior natural finishes. In areas where decay is a serious problem or where wood will be in contact with the ground or water, wood that has been pressure-treated with an appropriate preservative should be purchased. Caution: Water repellants and water-repellent preser vatives should always be mixed and applied CARE FULLY. The safest place for mixing is outdoors. Solutions with solvents are volatile and flammable. Their vapors should not be inhaled or exposed to flame or sparks. Wear protective clothing on hands and arms and take care not to splash the solution into
29

Figure 23—Window sash and frame treated with a water-repellent preservative and then painted (A), and window sash and frame not treated before painting (B). Both treatments were weathered for 5 years. Note the normally weathered paint, good condition of the wood, and glazing on the treated structure.
eyes or onto the face. Remember that water-repellent preservatives may contain toxic materials. Read any labels carefully.
The composition of typical water repellants and water-repellent preservatives is given in table 7.
Semitransparent penetrating stains. Semitransparent penetrating stains are growing in popularity (fig 24). They are moderately pigmented water repellants or water-repellent preservatives. The pigment particles help to protect the wood surface from the degrading
effects of sunlight (ultraviolet light). These stains penetrate the wood surface to a degree, are porous, and do not form a surface film like paint. Thus, they do not totally hide the wood grain and will not trap moisture that may encourage decay. As a result, they will not blister or peel even if moisture gets into the wood. Design and construction practices are not as critical for long life as with the film-forming finishes. Penetrating stains are oil-based (or alkyd-based), and some may contain a fungicide or water repellant. The fungicide is important in preventing mildew, especially in southern and coastal areas where moisture is abundant. Latex-based (waterborne) stains are also available, but they do not penetrate the wood surface as do their oil-based counterparts.
Semitransparent penetrating stains are most effective on rough lumber and plywood surfaces. They also provide satisfactory performance on smooth wood surfaces but not smooth plywood surfaces. These stains are also an excellent finish for weathered wood and flat-grained surfaces of dense species that do not hold paint well. They are available from commercial sources in a variety of colors and are especially popular in the brown or the red earth tones because they give a “natural” or “rustic” wood appearance. They are not usually available in white. However, they are not effective when applied over a solid-color stain or old paint coat. They are not recommended for hardboard and waferboard panel surfaces.
Table 7—Composition of typical water repellants and water-repellent preservatives
Approximate composition (percent by weight)
Water Water-repellent Ingredient repellent preservative
Preservative1 0 0.25–5 Resin or drying oil2 10 10 Paraffin wax 0.5–1 0.5–1 Solvent (turpentine, mineral
spirits, or paint thinner) 89 84–89
1Examples of preservatives used commercially and their typical concentrations (by weight) included pentachlorophenol, 5%; copper naphthenate, 2% as copper metal; zinc naphthenate, 2% as zinc metal; bis(tri-N-butyltin) oxide, o.15 to 0.675%; copper-8quinolinolate, 0.15 to 0.675%; 3-iodo-2-propynyl butyl carbamate, 0.5%; and N(trichloromethylthio) phthalmide, 0.5%.
2Typical examples are boiled linseed oil, tung oil, exterior grade varnish resins, alkyd resins.
Water repellants and water-repellent preservatives should always be mixed and applied CAREFULLY. The safest place for mixing is outdoors. Solutions with solvents are volatile and flammable. Their vapors should not be inhaled or exposed to flame or sparks. Wear protective clothing on hands and arms and take care not to splash the solution into eyes or onto the face. Remember that water-repellent preservatives may contain toxic materials. Read any labels carefully.
30

Figure 24—Modern house finished with a semitransparent penetrating oil-based stain.
The first application of a semitransparent penetrating stain to a smoothly planed surface fully exposed to the weather should last about 2 to 3 years (table 5 ) . When refinished after weathering, the finish will usually last much longer. Two coats of stain applied to roughsawn or weathered surfaces may last 8 years or more. In general, oil- or alkyd-based semitransparent stains provide at least twice the service life of the unpigmented water-repellent preservatives.
In the finishing of wood of high-density species such as Douglas-fir and southern pine, the surface may be treated with a water-repellent preservative and allowed to weather for a year before staining. The first coat of stain will then penetrate uniformly and be more
durable because weathering has made the surface more absorptive.
Semitransparent penetrating stains have also been used successfully over other penetrating natural finishes that have weathered until they needed renewal. If the finish penetrates well into the previously finished surface, it will appear flat. If the finish does not penetrate, it will dry slowly with numerous glossy areas and probably will not be as durable as it is on new wood. Old varnish, paint, and solid-color stain films must be completely removed before applying a penetrating stain.
The Forest Products Laboratory Natural Finish is one of the first semitransparent penetrating stains
31

formulated. It is the basis of some commercial formulations and presents the option of preparing a finish from basic ingredients. As with the commercial versions, it can be prepared in almost any color except white. Research has demonstrated that the formulation itself can vary somewhat without detracting seriously from the durability and performance. Table 8 gives the approximate variations in composition that can be used to prepare the stain and information on other formulations.
The types and ratio of tinting colors determine the appearance or hue of the stain. High-quality iron oxide pigments are very durable, and other colors may prove only slightly less so. Durability, however, depends largely on the amount of pigment or stain applied to the surface. Doubling the amount of pigment in the formula will therefore improve the durability but will make the finish less transparent and the color more intense. Three “colors” well suited for use on siding are cedar brown, light redwood, and dark redwood. The type and quantity of tinting colors required for these and other hues are given in table 9. The finish used without pigments produces a natural oil appearance but will need refinishing about every 2 years and requires the use of a very effective mildewcide in the formula. (See cautionary statement, p. 56).
The boiled linseed oil, mineral spirits, or other paint thinner can be purchased at paint stores; preservatives (fungicides, mildewcides) are available from manufacturers, and the paraffin wax at grocery stores. The
Table 8—Formulation for Forest Products Laboratory Natural Finish
Amounts to make Approximate
approximately percent 5 gallons by weight
Boiled linseed oil 1–3 gal 20–60.0 Mineral spirits, turpentine, or
paint thinner 3–1 gal 43–17 Preservative1 0.1–1 gal 0.25–5 Paraffin wax 0.25–1.0 lb 0.5–2.5 Tinting colors 1.0–2.0 qt 8.0–16.0
1Examples of preservatives used commercally and their typical concentrations (by weight) include pentachlorophenol, 5%; copper naphtherate, 2% as copper metal; zinc naphthenate, 2% as zinc metal; bis(tri-N-butyltin) oxide, 0.15 to 0.675%; copper-8quinolinpnate, 0.15 to 0.675%; 3-iodo-2-propynyl butyl carbamate, 0.5%; and N(trichloromethylthio) phthalimide, 0.5%. The original Forest Products Laboratory Natural Finish (1957) contained 5% pentachlorophenol, 61% linseed oil, 1.3% wax, and 8% tinting colors.
Water repellants and water-repellent preservatives should always be mixed and applied CAREFULLY. The safest place for mixing is outdoors. Solutions with solvents are volatile and flammable. Their vapors should not be inhaled or exposed to flame or sparks. Wear protective clothing on hands and arms and take care not to splash the solution into eyes or onto the face. Remember that water-repellent preservatives may contain toxic materials. Read any labels carefully.
tinting colors may be obtained at paint or hardware stores as color in oil. Zinc stearate, which prevents caking of the pigments during storage, can be added (0.125 pounds/5 gallons) to help keep the pigments suspended during use. In the warm and moist parts of the country where resistance to discoloration by mildew is important, the amount of preservative used should be increased to the maximum recommended by the manufacturer. The amount of solvent should be increased to 3 gallons, and the quantity of boiled linseed oil reduced to 1 gallon. The ratio of solvent to linseed oil can therefore be varied from 1:3 to 3:1 without seriously affecting the performance. Slightly better spreading properties and greater durability, however, are achieved with the higher linseed oil content.
Mineral spirits and paint thinners are common solvents used in making the Forest Products Laboratory Natural Finish. Turpentine, kerosene, and No. 1 fuel oil are also suitable solvents. Fuel oil and kerosene, however, have a disagreeable odor that may persist for several weeks. Caution: All common solvents are flammable and some may be poisonous– always use with proper ventilation.
Transparent coatings. Clear coatings of conventional spar, urethane, or marine varnish, which are film-forming finishes, are not generally recommended for exterior use on wood. Ultraviolet light from the sun penetrates the transparent film and degrades the wood under it. Regardless of the number of coats applied,
Table 9—Tinting proportions for formulation of Forest Products Laboratory Natural Finish
Color Tinting color and proportions1
Cedar brown 1 pint burnt sienna, 1 pint raw umber Light redwood 2 pints burnt sienna Dark redwood 1/3 pint burnt sienna, 1/3 pint raw umber,
2/3 pint Indian red iron oxide Green gold 1 pint chromium oxide, 1 pint raw sienna Tan 1 quart raw sienna, 3 fluid ounces burnt
umber Chocolate brown 1 quart burnt umber Forest green 1 quart medium chrome green Fruitwood brown 1 pint raw sienna, 1 pint raw umber, ½
pint burnt sienna Smoky gray 1 quart white oil-based house paint, 6
fluid ounces raw umber, 3 fluid ounces lampblack
Charcoal black 1 quart carbon black
1Raw sienna = yellow iron oxide; burnt sienna = brown iron oxide.
32

the finish will eventually become brittle as a result of exposure to sunlight, develop severe cracks and peel, often in less than 2 years (fig. 25). The peeling finish takes the photochemically degraded fibers with it. If a long service life is not required, areas that are protected from direct sunlight by an overhang or porch and areas on the north side of a structure can be finished with exterior-grade varnish. In these areas, a minimum of three coats of finish is recommended, and the wood should be treated with a paintable water-repellent preservative first. The use of varnish-compatible pigmented stains and sealers as undercoats will also contribute to a longer life for the clear finish. In marine exposures, six coats of varnish should be applied for best performance.
There are two other types of transparent coatings, but neither works well in exterior applications. Two-part polyurethanes are tougher and perhaps more ultraviolet resistant, but they are expensive and difficult to use and usually have as short a life as conventional varnishes. Lacquers and shellacs are not suitable for exterior application, even as sealers or primers, because they have little resistance to moisture. These finishes are also normally brittle and thus crack and check easily.
Fire-Retardant Coatings
Most conventional decorative coatings in themselves will slightly reduce the flammability of wood products when applied in conventional film thicknesses. However, for improved protection, commercial fire
retardant, paint-like coatings have been developed, ana these products provide varying degrees of protection. Most fire-retardant coatings are intended for interior use, but some are available for exterior application. Conventional paints have been applied over the fire-retardant coatings to improve the durability of the fire retardant. Fire-retardant coatings generally have low surface flammability characteristics that form an expanded low-density film upon exposure to fire, thus insulating the wood surface below from heat and retarding burning. Additional ingredients restrict the flaming of any released combustible vapors. Chemicals may also be present in these paints to promote decomposition of the wood surface to charcoal and water rather than to the formation of volatile flammable products.
t
Figure 25—Transparent coatings like varnishes generally crack and peel in less than 2 years unless protected from the sun and rain.
33

Application of Exterior Wood Finishes
The correct application of a finish to a wood surface is as important for durability and good performance as selecting the most appropriate finishing material. All finishes are either brushed, rolled, sprayed, or applied by dipping. The application technique used, the quantity and quality of finish applied, the surface condition of the substrate, and the weather conditions existing at the time can substantially affect the life expectancy of the finish. The different methods of finish application along with other important variables are discussed below. In addition, manufacturers’ directions should always be read and followed.
Opaque Coatings
Paint. Proper surface care and preparation before applying paint to wood is absolutely essential for good performance. Wood and wood-based products should be fully protected from the weather and wetting on the jobsite and after they are installed. Surface contamination from dirt, oil, and other foreign substances must be eliminated. Preliminary research has shown that even the 3-day exposure of freshly cut wood surface to the weather can adversely affect the adhesion of paint to the wood. It is best to paint wood surfaces as soon as possible, weather permitting, before or after installation. Wood that has weathered badly before painting will have a degraded surface that is not good for painting, and a paint coating is more likely to peel from the more degraded areas.
To achieve maximum paint life, follow these steps: 1. Wood siding and trim should be treated with a
paintable water-repellent preservative or water repellant, and all joints and cracks caulked. Water repellants protect the wood against the entrance of rain and dew and thus prevent swelling and shrinking. They can be applied by brushing or dipping. Lap and butt joints and the edges of panel products such as plywood, hardboard, and particleboard should be especially well treated because paint normally fails in these areas first (fig. 19). Allow at least 2 warm, sunny days for adequate drying before painting the treated surface. If enough time is not allowed for most of the solvent to dry, the paint applied over it may be slow to dry, discolor, or dry with a rough surface that looks like alligator hide. If the wood has been dip-treated, allow at least 1 week of favorable weather. The small amount of wax in the water-repellent preservative will not prevent proper adhesion of the paint.
2. After the water-repellent preservative or water repellant has dried, the bare wood must be primed. Because the primer coat forms a base for all succeeding paint coats, it is very important. For woods such as redwood and cedar with water-soluble extractives, the best primers are good quality oil-based, alkyd-based, or stain-blocking acrylic latex-based primer paints. The primer seals in or ties up the extractives so that they will not bleed through the top coat. It should also be nonporous and thus inhibit the penetration of rain or dew into the wood surfaces, thus reducing the tendency of the wood to shrink and swell. A primer should be used whether the topcoat is an oil-based or latex-based paint. For species that are predominately sapwood and free of extractives such as pine, a high-quality acrylic latex paint may be used as both a primer and top coat. Enough primer should be applied to obscure the wood grain, but the primer should not be spread too thin and the application rates recommended by the manufacturer should be followed. A primer coat that is uniform, flexible, and of the proper thickness will distribute the swelling stresses that develop in wood and thus prevent premature paint failure. The topcoat should be applied as soon as the primer coat is dry, about 48 hours for oil-based paints or as recommended by the manufacturer.
3. Two coats of a good-quality all-acrylic latex house paint should be applied over the primer. If it is not practical to apply two topcoats to the entire house, two top coats for fully exposed areas on the south and west sides must be considered as a minimum for good protection. Areas fully exposed to sunshine and rain are the first to deteriorate and therefore should receive two coats. Allow each coat of oil-based paint to cure for 1 to 2 days before applying a second coat. In cold or damp weather an extra day or two should be allowed. Coats of latex paint can usually be applied within a few hours of each other. On those wood surfaces best suited for painting, one coat of a good house paint over a properly applied primer (a conventional two-coat paint system) should last 4 to 5 years, but two topcoats can last up to 10 years (table 6).
4. One gallon of paint will cover about 400 square feet of smooth surface area. However, coverage can vary with different paints, surface characteristics, and application procedures. Research has indicated that the optimum thickness for the total
34

dry paint coat (primer and two topcoats) is 3.5 to 5 mils or about the thickness of a sheet of newspaper. Some paints (especially latex) will successfully cover the primer coat at one-half this thickness, but these thin coats will erode rapidly. On the other hand, thick paint coats tend to build up and develop cracks. The coverage of a coat of paint can be checked by applying a pint of paint evenly over a measured area that corresponds to that recommended by the manufacturer. Brush application is always superior to roller or spray application, especially for the first coat. The quality of paint is usually, but not always, related to the price.
Additional tips on painting. To avoid future separation between paint coats, the first topcoat should be applied within 2 weeks of the primer and the second coat within 2 weeks of the first. As certain primer paints weather, they can form a soap-like substance on their surface that may prevent proper adhesion of new paint coats. If more than 2 weeks elapse before applying another paint coat, scrub the old surface with water using a bristle brush or sponge. If necessary use a mild detergent to remove all dirt and deteriorated paint. Then rinse well with water and allow the surface to dry before painting.
To avoid temperature blistering, oil-based paints should not be applied on a cool surface that will be heated by the sun within a few hours. Temperature blistering is most common with thick paint coats of dark colors applied in cool weather. The blisters usually show up in the last coat of paint and occur within a few hours to 1 or 2 days after painting. They do not contain water.
Oil-based paint may be applied when the temperature is 40 °F or above. A minimum of 50 °F is desired for applying latex-based paints. For proper curing of latex paint films, the temperature should not drop below 50 °F for at least 24 hours after paint application. Low temperatures will result in poor coalescence of the paint film and early paint failure.
Wrinkling, fading, or loss of gloss in oil-based paints and streaking of latex paints can be avoided by not applying paint in the evenings of cool spring and fall days when heavy dews can form before the surface of the paint has thoroughly dried. Allow at least 2 hours for the paint to dry before sunset. Serious water absorption problems and major finish failure can also occur with some latex paints when applied under these conditions. Likewise, painting in the morning should not begin until after the dew has had time to evaporate.
Solid-color stains. Solid-color stains may be applied to a smooth surface by brush or roller application, but brush application is the best. These stains act much like paint. However, solid-color stains are not generally recommended for flat wood surfaces such as decks and window sills. One coat of solid-color stain is adequate, but two coats will provide better protection and longer service. The all-acrylic latex solid-color stains are generally superior to all others, especially when two coats are applied.
Unlike paint, lap marks may form with a solid-color stain. Latex-based stains are fast-drying and are more likely to show lap marks than the oil-based ones. To prevent lap marks, follow the procedures suggested under application of semitransparent penetrating stains.
Natural Finishes
Water-repellent preservatives and water repellants. The most effective method of applying a water-repellent preservative or water repellant is to dip the entire board into the solution. However, brush treatment is also effective. When wood is treated in place, liberal amounts of the solution should be applied to all lap and butt joints, edges and ends of boards, and edges of panels where end grain occurs. Other areas especially vulnerable to moisture, such as the bottoms of doors and window frames, should not be overlooked. One gallon will cover about 250 square feet of smooth surface or 100 to 150 square feet of rough surface. The life expectancy is only 1 to 2 years, depending upon the wood and exposure, when these are used as natural finishes (see table 6). Treatments on rough surfaces are generally longer lived than those on smooth surfaces. Repeated brush treatment to the point of refusal (when no more will be absorbed) will enhance the finish durability and performance.
Weathering of the wood surface may be beneficial for both water-repellent preservatives and semitransparent penetrating stains. Weathering opens up checks and cracks, thus allowing the wood to absorb and retain much more of the preservative or stain so the finish is generally more durable.
Semitransparent penetrating stains. Semitransparent penetrating stains may be brushed, sprayed, or rolled on. Again, brushing will give better penetration and performance. These oil-based stains are generally thin and runny, so application can be messy. Lap marks will form if stains are improperly applied (fig. 26). Lap marks can be prevented by staining only a small number of boards or a panel at one time. This method
35

Figure 26—Lap marks formed by improper application of a semitransparent penetrating stain.
prevents the front edge of the stained area from drying out before a logical stopping place is reached. Working in the shade is desirable because the drying rate is dower. One gallon will usually cover about 200 to 400 square feet of smooth surface and from 100 to 200 square feet of rough or weathered surface.
For long life with penetrating, oil-based stain on roughsawn or weathered lumber, use two coats and apply the second coat before the first is dry. Start on one panel or area and apply the first coat to it. Then work on another area so that the first coat can soak into the wood for 20 to 60 minutes. Next, apply the second coat before the first has dried. (If the first coat dries completely, the second coat cannot penetrate into the wood.) Finally, about an hour after applying the second coat, use a cloth, sponge, or dry brush, lightly wetted with stain, to wipe off the excess stain that has
not penetrated into the wood. Otherwise, the stain that did not penetrate the wood will form an unsightly surface film and glossy spots. Avoid intermixing different brands or batches of stain. Stir stain thoroughly during application to prevent settling and color change.
For the oil-based stains, a two-coat wet system on rough wood may last as long as 8 years in certain exposures. By comparison, if only one coat is applied on new, smooth wood, its expected life is 2 to 4 years, but succeeding coats will usually last longer. Caution: Sponges or cloths that are wet with oil-based stain are particularly susceptible to spontaneous combustion. To prevent fires, bury them, immerse them in water, or seal them in an airtight container immediately after use.
36
Special Application of Exterior Wood Finishes
Latex semitransparent stains do not penetrate the wood surface but are easy to apply and less likely to form lap marks. For a long life, two coats, applying the second coat anytime after the first has dried, should be used. The second coat will remain free of gloss even on smooth wood. These stains are essentially very thin paints and perform accordingly.
Transparent coatings. Although short lived, transparent coatings such as high-quality polyurethane or spar varnish are occasionally used for exterior applications. The wood surface should be clean, smooth, and dry before application. The wood should first be treated with a paintable water-repellent preservative as discussed under painting procedures. The use of varnish-compatible, durable, pigmented stains and sealers or undercoats will help to extend the life of the finishing system. Finally, at least three topcoats should be applied. But the life expectancy for fully exposed surfaces is only 2 years at best. In marine exposures, six coats of varnish should be used for best performance. Varnish built up in many thin coats (as many as six) with a light sanding and a fresh mat added each year will usually perform the best.
Although there are general wood-finishing procedures appricable to typical situations, there are also some instances that deserve special mention. These include the application of finish to decks and porches, fences, wood roofs, marine environments, treated wood surfaces, and log structures. Wood used in all of these applications (except for log structures) is usually exposed to particularly harsh weathering conditions. Special consideration should be given to finish selection and application. Log structures also need special consideration because of the large amounts of end grain exposed and the deep checking associated with large timbers and even, small, round logs.
Decks and Porches
Decks and porches present a particularly severe exposure for wood and finishes and therefore require special consideration. Most of the wood members to be finished are in a horizontal or flat position. These flat surfaces, especially with decks, are often exposed to the direct rays of the sun and tend to collect moisture, so the weathering process is greatly accelerated. Checks tend to enlarge rapidly into cracks and, along with the end-grain surfaces, tend to retain moisture. The conditions for decay and insect attack due to the presence of moisture are thereby greatly improved. Any film-forming finish is subjected to excessive stress because of the continuous shrinking and swelling of the wood that results from changes in the moisture content. Furthermore, the finish is subjected to abrasive wear, particularly in high-traffic areas. Porches are usually somewhat protected, so the conditions are not normally as severe as with decks; but the same conditions-moisture,sun, and abrasive wear-areusually present, at least periodically.
As a result of these severe conditions, lumber that has been pressure-treated with the salt-type or waterborne preservatives and naturally durable wood such as redwood are generally used, at least on decks. These materials may be left to weather naturally or finished in a number of ways.
Because of the severe conditions for fully exposed decks, a water-repellent preservative or a semitransparent penetrating stain may provide the best finishing solution even on wood that has been pressure-treated with preservatives. These finishes, at least the water-repellent preservatives, may be somewhat shorter lived than paint, but they are more easily renewed. For severe exposures, they should be renewed annually; spring is usually the best time. Light-colored penetrating stains will also last longer than dark ones on flat
37

surfaces subject to traffic because they show the least contrast in grain color as wear occurs. They will need refinishing every 1 to 2 years. To refinish, a simple cleaning with a bristle brush is usually adequate before application of the water-repellent or penetrating finish. Paint, particularly in these applications, is likely to peel, thus requiring laborious scraping and sanding before it can be renewed, so paint is not a good finish for fully exposed decks. Solid-color stains are generally not recommended for decks, because they act more like paints than like stains.
For plywood decks, tough, skid-resistant, elastomeric coatings are available. These coatings include liquid neoprene and silicone- or rubber-based materials. Plywood joints for these systems are usually sealed with a high-performance caulk such as a silicone, but silicone caulks require a primer. Joints may also be covered with a synthetic reinforcing tape before the final surface coat is applied, when an elastomeric coating system is then used. To be effective, specific installation procedures described by the manufacturer must be followed.
Paint may be used successfully on roof-protected porch floors. The best procedure is to treat the wood with a paintable water-repellent preservative. After proper drying, a primer and topcoats of porch and deck enamel should be applied. Porch enamel is especially formulated to resist abrasion and wear. Because of their low resin content, solid-color stains should not be used on any flat surfaces such as decks and porches.
Fences
Fences are similar to decks in that they are fully exposed to the weather and have at least some parts in soil contact. As a result wood decay and termite attack are potential problems, and care must be exercised in selecting and applying a finish if a reasonable service life is to result.
Care must also be exercised in selecting materials for wood fence construction if decay and termite attack are to be avoided and maximum service life achieved. First, posts should be adequately treated with a wood preservative for belowground use. Posts cut from naturally durable species can also be used, provided they are composed predominantly of heartwood. Boards, pickets, and other fence posts should be of decay-resistant wood (either natural or treated) in those geographic regions where high humidity and warm temperatures prevail for long portions of the year (high-decay hazard areas). Elsewhere, any mate
rial may be used, but all joints should be thoroughly treated with a water-repellent preservative. Horizontal rails require more protection from decay, than do vertical boards. Therefore, rails usually should be of decay-resistant or treated woad.
Aluminum or stainless steel nails should be used whenever possible. These nails will prevent rust staining and also the possible formation of blue-black discoloration should a water-repellent preservative or semitransparent penetrating-stain finish be used.
Many fences are left to weather naturally. However, if a finish is desired, semitransparent penetrating stains are preferred because they soak into the wood without forming a film, and thus do not crack or peel. These stains come in a variety of colors and show the wood grain. If paint is to be used, brush the surface and all ends and joints liberally with a water-repellent preservative and let it dry for at least 2 warm, sunny days before painting. Use one coat of a good-quality stain-blocking acrylic latex primer, followed by two topcoats of a good-quality acrylic latex exterior house paint. When repainting, scrape all loose paint from the wood, then use a stiff bristle brush to remove any remaining loose paint and dirt. Next, brush on a water-repellent preservative, or, as second choice, a water repellant. Apply it liberally to ends of boards or pickets and to all joints. Let the treated wood dry and then paint with acrylic latex paint.
Varnish finishes are not recommended for exterior fences because they will not stand up to the sun and rain.
Wood Roofs
Although wood shingles and shakes have been largely replaced on standard buildings by composition or asphalt-based shingles, their use is still widespread on commercial structures and luxury homes (figs. 27 and 28). Shingles are sawed from large blocks of wood, tapered from one end to the other, and generally have a relatively smooth surface. Shakes are split from larger blocks of wood and thus have a more rugged appearance. They may be approximately the same thickness on both ends, or they may be sawed from corner to comer, thus providing taper as well as one relatively smooth side that is turned down during installation. Shakes may also come with a grooved appearance. Both are used on roofs as well as sidewalls.
Properties. Wood used in the manufacture of shingles should have the following properties: 1) durability; 2) freedom from splitting during nailing; 3)
38

Figure 27— Application of wood shingles to a commercial structure. (Photo courtesy of the Red Cedar Shingle and Handsplit Shake Bureau)
dimensional stability, i.e., low ratio of tangential to radial shrinkage and minimum shrinkage in all planes; 4) light weight; 5) good insulating properties; 6) adequate strength; 7) straight, even grain for ease of manufacture; 8) ability to take stains; 9) ability to resist abrasion; and 10) pleasing appearance. Edge-grained shingles will perform much better than flat-grained. Western redcedar, redwood, cypress, and northern and southern white cedars all possess the desired properties, but nearly all of today’s commercial production is from western redcedar.
Of all wood properties to be considered, durability is probably the most important. The heartwood of old-growth western redcedar is rated as extremely durable. The generally small sapwood associated with this species is of course nondurable. There is a general consensus that some second-growth timber, even of the decay-resistant species, is not as durable as the old growth. The durability of the wood will also be decreased as rain or other sources of moisture leach the extractives from the wood. It is these heartwood extractives that provide cedar with its natural decay resistance.
39

Figure 28—Newly constructed log home.
Application. Regardless of the type of finish, if any is to be used, proper application of shingles and shakes is required if a long life is to be expected. First, because of the direct exposure to moisture and rain, only the top grade of shingles or shakes manufactured with edge-grained heartwood should be used on roofs. Lower grades can be used on sidewalls or where an undercourse is required. In the application of shingles, some of the facts to be considered are 1) the decking to which the shingles are nailed; 2) the number, location, and type of nails; 3) the head lap or amount of lap over the course below (which often depends on shingle grade and application); 4) the space between the edges of the shingles or shakes; and 5) the separation of edge joints from one course to another.
The Red Cedar Shingle and Handsplit Shake Bureau (515 116th Avenue NE., Suite 275, Bellevue, WA 98004) provides an excellent publication containing details on shingle and shake grades and application procedures.
Finishing. Shingles and shakes, whether on a roof or sidewall, are often left to weather naturally. Depending on exposure and climatic conditions, a silver, dark gray, or dark brown color normally results. However, in warm humid climates and on heavily shaded roofs and sidewalls, moss, algae, lichens, and even wood decay can occur with time. For these reasons and for esthetic effects, in order to obtain particular color schemes, various finishes and preservation can be applied to wood shingles and shakes. However, the
40

types of finishes used on sidewalls differ substantially from those on roofs.
As previously indicated, roofs are exposed to rain and other sources of moisture as well as direct sunlight. These elements will rapidly deteriorate any finishing system. Furthermore, construction methods contribute to the conditions that encourage finish and wood deterioration. Because large quantities of end grain are exposed on shingles and shakes, the wood rapidly absorbs moisture, resulting in excessive shrinking and swelling. Because moisture tends to migrate from the living quarters to the outside of a house, shingles and shakes can also absorb moisture from their backside. Adequate attic ventilation and sidewall vapor barriers, therefore, should be provided. Furthermore, film-forming finishes, when applied to completed, in-place roofs, form small dams of finish across the bottom of the gaps between shingles, which adds to the amount of water absorbed by the back of the shingle.
As a result of these potential problems, film-forming finishes, such as paint, solid-color stains, and varnish or other clear, film finishes should never be used on roofs. The finish will deteriorate within a few months or years, resulting in an unsightly appearance that is difficult to refinish. Increased wood decay is also likely, because the film-forming finish can help to retain moisture in the shingle or shake. Paint and solid-color stains are sometimes used on shake or shingle sidewalls, however.
If roofs or sidewalls are to be finished, semitransparent penetrating oil-based stains provide the best alternative. These stains provide color without entirely concealing the grain and texture of the wood and are relatively long lived and easily renewed. They may last several years on roofs and longer on sidewalls. Rough-textured edge-grained surfaces give longer service life than smooth surfaces. Some semitransparent stains, such as the Forest Products Laboratory Natural Finish, contain a wood preservative. Penetrating oil-based stains are not usually available in white, however. Some paints and stains are specially formulated for use on shingles. Those with the highest concentration of pigment will likely give the longest service life. Water repellants and water-repellent preservatives may also be used on roofs and sidewalls, although their life expectancy on sidewalls is only 2 to 3 years and less on roofs. These finishes contain a wax or water repellant and a preservative (in the case of the water-repellent preservative) and a solvent or carrier. They do not contain any pigments,
and thus the natural color and grain of the wood are not obscured.
When shingles are to be finished, the first coat is best applied before the shingles are installed, so that the backs and butts as well as the faces are well coated. The finish may be applied by dipping the shingles to at least two-thirds of their length and then standing them vertically until the finish has dried. The finish may also be applied by brushing, rolling, or spraying. Dipping is the most effective method, followed by brushing. If the backs are not finished, rainwater seeping under the shingles may cause more curling than would otherwise take place; and if a light-colored finish has been applied, the butts and edges of the shingles may be discolored by water-soluble extractives from the wood. Any additional coats may be applied by brushing or spraying after the shingles have been installed. Care should be taken to see that the exposed butt ends are well coated with the finish. Brushing is preferable.
Preservatives and fire retardants for shingles. In some cases, particularly where warm temperatures and moist conditions persist for substantial portions of the year, it is desirable to extend the life of wood shingles and shakes. Shingles with special preservative treatments or even fire retardants can be purchased. For maximum effectiveness and long life, shingles and shakes pressure-treated with these chemicals should be purchased. It has been shown that chromated copper arsenate (CCA type C), copper-8-quinolinolate, copper naphthenate, and pentachlorophenol are all effective wood preservatives when properly applied.
Maintenance. First, leaves and other debris that often accumulate on roofs, particularly in roof valleys and gutters, will trap moisture in the shingles, increasing the likelihood of decay. Therefore, loose debris should be routinely cleaned from roofs and gutters. Overhanging limbs, vines, etc., that produce excessive shade should also be removed.
Next, the roof should be checked for moss or lichen growth and be chemically treated if necessary. One simple method to prevent moss from developing on roofs is to use zinc, galvanized, or copper flashings. The normal corrosion from these metals, when stretched along the butt end of the shingles, will provide some control of moss (and mold and mildew) for about 10 to 15 feet downslope from the metal.
Brush treatment of selected chemicals can also provide some protection. A solution of pentachlorophenol, copper naphthenate, copper-8-quinolinate, or other preservatives can be used to control moss,
41

lichens, and surface decay and to prevent their growth for some time. Solutions are best applied by brush or by dipping. Manufacturers’ applications and safety recommendations should be followed because wood preservatives can be toxic to plants and to humans if used improperly. Humans, animals, and vegetation should be protected from dripping and runoff from the roof or gutters. (See warning on page 56).
Certain commercial weed killers or herbicides can also be effective in moss control. Other relatively new wood preservatives are available, but little performance information and experience on treating shingles and shakes is available.
Regardless of the method used, surface treatments are just that. They will not prevent serious decay problems within the shingle or in unexposed portions that are not treated. However, in some cases they can help to lengthen the life of a wood roof by preventing the growth of moss and lichens, which retain moisture in the wood and thereby promote wood decay.
Log Structures
Interest in new log structures (fig. 28) as well as maintaining and restoring old ones has increased dramatically in recent years. These structures present some unique problems and opportunities in maintenance and finishing. But before a finish is even considered, the structure must be carefully built to keep the outside wood surface as dry as possible. Good construction practices include adequate roof overhang with properly hung and maintained gutters and downspouts; roof vents if attic space is present; good drainage and ventilation around the foundation; proper venting of showers and baths, dryers, etc.; adequate clearance between the soil and lower logs; and most important of all, design of logs so that any moisture will run down and off the log rather than being trapped. Trapped moisture is certain to result in decay.
Old structures that are still sound are probably constructed with attention to these many moisture-proofing details. Also, naturally durable woods such as white oak, walnut, heartwood of white pine, cedar, and some others were probably used, particularly for the lower courses of logs. However, even these woods will succumb to decay with prolonged exposure to moisture.
Log homes may be particularly susceptible to decay because of the deep seasoning checks that occur on the surface of large wood members. These checks allow moisture to penetrate into the wood member, and
decay results. Excessive end grain is also exposed particularly on the corners of log structures (fig. 29). This end grain, as well as the notching of the logs, allows for easy penetration of the moisture and subsequent decay. Proper construction, particularly wide roof overhangs and the application of preservative finishes can help to reduce or eliminate problems.
Because log cabins are rustic in appearance, nonfilm-forming (penetrating) natural finishes are preferred. Water-repellent preservatives liberally applied every couple of years will allow a new wood surface to weather to a light-brown or tan color. The preservative will also help prevent decay should water penetrate the surface checks and cracks or end grain. However, it will not prevent decay where poor construction practices allow repeated wetting or condensation. Deep surface cracks, the lower courses of logs, joints between logs, corners of the structure, and the bottoms of windows and doors often trap moisture and are particularly vulnerable. Because of this, these areas should be liberally treated.
Semitransparent penetrating stains may also be used if a longer service life for the finish is preferred, if a color other than the light brown or tan is desired, and if partial covering of the wood grain is not objectionable. Stains with preservatives incorporated are desirable.
If a new structure requiring chinking is to be finished, it will help to apply the finish and preservative before chinking. In this way, the tops of the logs, which are particularly vulnerable to wetting and subse-
Figure 29—Deep checking on an old log structure retains moisture and encourages decay.
42

quent decay, can be treated and the chinking will not be stained accidentally during finish application.
For existing structures, even those that are well weathered, the application of a water-repellent preservative can help prevent further deterioration. Any decayed wood should be removed and the newly exposed wood liberally treated after the moisture source has been eliminated and the wood dried. To facilitate treatment of hard-to-get-to areas that may have some decay, ¼-inch holes can be drilled in the wood and filled, preferably several times, with preservative solution that will diffuse into the adjacent wood. The holes should then be plugged with preservative-treated wood dowels. Most preservatives should not be used indoors.
Marine Environments
The marine environment is particularly harsh on wood finishes because of the abundance of moisture and exposure to full sunlight. The natural weathering process of wood and finishes is accelerated.
For best protection, wood exposed to marine environments above water or the ground line should be dip- or brush-treated with a water-repellent preservative, coated with a suitable paint primer, and given at least two topcoats of quality exterior products. For wood used in contact with water or soil, purchase wood that has been pressure-treated with a preservative to specifications recommended for marine or in-ground use. Such treated woods are not always paintable. However, wood treated with waterborne, salt-type preservatives is paintable when clean and dry.
Natural finishes (varnishes) for woods exposed to marine environments need almost constant care and refinishing. If used, varnishes should be applied in three- to six-coat thicknesses for best performance. The application of a paintable water-repellent preservative or lightly pigmented, varnish-compatible stain before finishing will help improve the performance of the varnish.
Antifouling paints can also be used for protection against marine organisms on piers and boat hulls.
Treated WOod
Preservatives. Lumber, plywood, and other wood products pressure-treated with preservatives do not normally require finishing for outdoor exposure. However, if for esthetic reasons a finish is desired, certain precautions should be exercised, for each of the three classes of wood preservatives imparts certain characteristics to the wood that affect its ability to accept and
retain a finish. The general classes of wood preservatives are 1) preservative oils such as coal-tar creosote; 2) organic solvent solutions such as pentachlorophenol; and 3) waterborne salts.
When coal-tar creosote or pentachlorophenol in a heavy oil solvent with low volatility is used to pressure-treat wood, successful finishing is impossible. The surface is generally oily and dark, and this dark color will usually bleed through any paint. Poor adhesion is also likely. Sometimes, if the wood has weathered for years, it can be stained or painted, but it is best to test a small area first and expose it to direct sunlight.
When wood has been pressure-treated with pentachlorophenol in a highly volatile solvent such as methylene chloride or liquefied petroleum gas, its surface can still generally be painted but only after the solvent has completely evaporated, However, solvents vary in their volatility, and the evaporation period may take from 1 to 2 years. Even with special drying schedules, the complete paintability of the wood may not be restored. Similarly, wood that is pressure-treated with a water-repellent preservative is loaded with relatively large quantities of the preservative and solvent, and the solvent must be completely removed before painting is attempted. This process, however, should not be confused with the brush, spray, or dip treatment of a water-repellent preservative, which serves to enhance paint durability and wood performance.
The waterborne salts such as chromated copper arsenate are the only common preservative chemicals applied by a pressure process that do not adversely affect wood-finishing characteristics. In fact, those preservatives that contain chromium reduce the degrading effect of weathering. Lumber or plywood treated in this manner can be finished following normal procedures or allowed to slowly weather to a light-gray color.
Most pressure-treated construction lumber and plywood in the eastern United States is produced from southern pine with flat-grained characteristics and wide latewood bands. Because of the relatively poor paint-holding properties of this species group, semitransparent oil-based penetrating stains will give better service, particularly if the wood is allowed to weather for 1 to 2 years, depending on exposure. Hemlock and ponderosa pine are often used in the western United States and have somewhat better painting characteristics. Douglas-fir, a popular West Coast species, is similar to southern yellow pine in finishing characteristics.
43

Refinishing Wood
Wood that is pressure-treated with waterborne salt-type preservatives generally contains large quantities of water when shipped to retail lumber yards. Therefore, care should be exercised to make certain that the lumber is dry before finishing. Air drying in place is acceptable, although some shrinking, warping, and checking may result. Regardless of the finish to be applied, the recommended procedures for its application should be done carefully, and the wood should be completely clean.
Fire-retardant treatments. Treating wood with fire-retardants generally does not interfere with adhesion of decorative paint coatings, unless the hygroscopicity of the wood has been increased because of the nature of the chemical used. It is most important that only those fire-retardant treatments specifically prepared and recommended for outdoor exposure be used for that purpose; others may be leached from the wood, causing discoloration and early paint failure. These treated woods are generally painted according to recommendations of the manufacturer rather than being left unfinished because the chemical treatment and subsequent kiln-drying process often darken and irregularly stain the wood.
Southern yellow pine and Douglas-fir are two species commonly treated with fire-retardant chemicals. Because these species normally do not hold paint or solid-color stains well, strict adherence to recommended finishing procedures should be followed. Western hemlock and ponderosa pine are also used and have somewhat better finishing characteristics.
Because of the variability of wood preservatives and fire retardants available as well as the treating processes, the manufacturer should be consulted regarding finishing details. They usually have specific recommendations for achieving maximum service life from paint and other finishes. Wood treated in strict adherence to recognized standards should contain a quality stamp indicating the treatment, treating company, inspection bureaus, and other information.
Exterior wood surfaces should be refinished only as the old finish deteriorates or for purely esthetic reasons such as a change in color or type of finish. Too frequent refinishing, especially with paint, will lead to a finish buildup and subsequent cracking and/or peeling. In some cases, dirty paint can simply be freshened by washing with a mild detergent and water. But to achieve maximum service life from a refinished surface, the surface preparation and finish application techniques, as outlined below, should be followed.
Opaque Coatings: Paint and Solid-Color Stains
In refinishing an old paint coat that has weathered normally or a solid-color stain, proper surface preparation and cleaning is essential if the new finish coat is to give the expected performance. First, scrape away all loose paint. Use sandpaper on any remaining paint to “feather” the edges smooth with the bare wood. Then, scrub any remaining old paint with a brush or sponge and water. Rinse the scrubbed surface with clean water. Wipe the surface with your hand. If the surface is still dirty or chalky, scrub it again using a detergent. Mildew should be removed with a dilute solution of household bleach (see p. 47). Rinse the cleaned surface thoroughly with fresh water and allow it to dry before repainting. Areas of exposed wood should be treated with a water-repellent preservative, or water repellant, and allowed to dry for at least 2 sunny, dry days, and then primed. Wipe away any water-repellent preservative accidently applied on paint areas. Paint topcoats can then be applied. In repainting with oil-based paints, one coat is usually adequate if the old paint surface is still in good condition.
It is particularly important to clean areas protected from sun and rain such as porches and sidewalls and with wide roof overhangs. These areas tend to collect dirt and water-soluble materials that interfere with adhesion of the new paint coat. It is probably adequate to repaint these protected areas every other time the house is painted.
Latex paint can be applied over freshly primed surfaces and on weathered paint surfaces if the old paint is clean and sound. Where old, sound paint surfaces are to be repainted with latex paint, a simple test should be conducted first. After cleaning the surface, repaint a small, inconspicuous area with latex paint, and allow it to dry at least overnight. Then, to test for adhesion, firmly press one end of an adhesive bandage onto the painted surface. Jerk it off with a snapping action. If the tape is free of paint, the latex paint is well bonded and the old surface does not need
44

priming or additional cleaning (fig. 30). If the new latex paint adheres to the tape, the old surface is too chalky and needs more cleaning or the use of an oil-based primer. The primer should penetrate the old chalky surface and form a firm base for the new coat of paint. If both the latex paint and the old paint coat adhere to the tape, the old paint is not well bonded to the wood and must be removed before repainting.
Natural Finishes
Water-repellent preservatives and water repellants. Water-repellent preservatives and water repellants can be renewed by a simple cleaning of the old surface with a bristle brush and an application of a new coat of finish. In some cases, a mild scrubbing with a detergent followed by rinsing with water is appropriate. The second coat of water-repellent preservative will last longer than the first because more can be applied as it penetrates into the small surface checks that open as the wood weathers.
To determine if a water-repellent preservative has lost its effectiveness, splash a small quantity of water against the wood surface. If the water beads up and runs off the surface, the treatment is still effective. if the water soaks in, the wood needs to be refinished.
Figure 30—The adhesive bandage test can be used to determine if a new coat of paint is properly bonded to an old surface. the bandage on the left was aplied to a well-bonded paint coat. The bandage on the right has pulled off a poorly bonded paint coat.
Refinishing is also required when the wood surface starts to show blotchy discoloration caused by extractives or mildew.
Semitransparent penetrating stains. Semitransparent penetrating stains are relatively easy to refinish. Excessive scraping and sanding are not required. Simply use a stiff bristle brush to remove all surface dirt, dust, and loose wood fibers, and then apply a new coat of stain. The second coat of penetrating stain often lasts longer than the first because more can be applied as it penetrates into the small surface checks that open as the wood weathers.
Note: Steel wool and wire brushes should never be used to clean surfaces to be finished with semitransparent stains or water-repellent preservatives because small iron deposits may be left behind. These deposits can react with certain water-soluble extractives in wood like western redcedar, redwood, Douglas-fir, and the oaks to yield dark blue-black stains on the surface. In addition, pentachlorophenol, which is present in some semitransparent penetrating stains and water-repellent preservatives, may cause iron remaining on the surface to corrode. The corrosion products may then react with certain wood extractives to form a blue-black, unsightly discoloration that becomes sealed beneath the new finishing system.
Transparent coatings. The refinishing practices described under paints should generally be followed for transparent film-forming finishes such as varnish.
Finish Removal
The removal of paint and other film finishes is a time-consuming and often difficult process. However, it is sometimes necessary where a new surface must be prepared if, for example, the old surface is covered with severely peeled or blistered paint, where cross-grain cracking has occurred from excessive paint buildup. It is also necessary when it is desirable to apply a penetrating stain or water-repellent finish to a previously painted surface. Several options for paint removal exist. These include sanding, using electrically heated paint removers and blow torches or chemical strippers, as well as sandblasting or spraying with pressurized water.
Sanding. Disk or siding sanders equipped with a tungsten carbide abrasive disk of medium grit are effective in removing old paint. This method is faster than the others discussed below, and the tungsten carbide disk is less likely to clog than more conventional sanding disks. The depth of cut for the sander can be set with the siding guide, but experienced
45
Finish Failure or Discoloration Problems and Their Cure
operators often work freehand, without the guide. The operator should be careful to remove only paint and not excess wood. After finishing with the disk sander, it is desirable to smooth the surface somewhat by tight hand sanding or with a straight-line power sander using 120 grit in the direction of the wood grain.
Heat. Electrically heated paint removers can be used to strip paint. The remover simply heats the paint, causing it to separate from the wood. This method, although effective, is slower than sanding and requires at least a 1,000-watt heater to be effective.
An open-flame blowtorch is another method sometimes used. A blowtorch is effective and inexpensive, but there is a constant danger of starting a fire within the walls of the building from flames that penetrate cracks in the siding.
Chemical. Liquid paint and varnish removers, such as commercially prepared chemical mixtures, lye, or trisodium phosphate, will also remove paint from wood surfaces. However, after removing the paint with chemical removers, the surface sometimes must be neutralized; and before repainting, the wood surface should be sanded in the direction of the grain. Strong caustic solutions, such as lye and trisodium phosphate, leave the wood surface very porous.
Sandblasting and pressurized water spray. Blasting with sand or high-pressure water are additional methods that can be used for paint removal. These methods usually require the services of a professional, however. The sand particles or water can erode the wood as well as strip the paint. The softer earlywood is eroded faster than the latewood, resulting in an uneven, rough surface. These rough surfaces may not be suitable for painting. With water, approximately 600 to 20,000 pounds of pressure per square inch are used.
If a film-type finish must be removed from a structure, consult with local equipment-rental stores and paint dealers for available equipment, or request bids from professional contractors. For safety’s sake, anyone using sandblasting equipment should wear approved eye goggles, and dust mask or respirator, as appropriate. Electrical equipment should be double insulated or equipped with a three-wire grounded outlet. Caution: Use a respirator or dust mask when sanding or scraping old surfaces. Some old paints contain lead and many natural finishes contain pentachlorophenol. Sanding and scraping these finishes creates a dust that should not be inhaled.
Paint properly applied and exposed under normal conditions is usually not affected by the first 2 to 3 years of exposure. Areas that deteriorate the fastest are those exposed to the greatest amount of sunshine and rain, usually on the south and west side of a building.
Under normal conditions paint deteriorates first by soiling or accumulating slight traces of dirt. Next, a flattening stage occurs when the coating gradually starts to chalk and erode away. Paint can sometimes become discolored by mildew, blue stain, wood extractives, pitch, and metals, making repainting necessary. In these cases, however, a simple repainting will not correct the problem for long. Furthermore, frequent repainting is expensive, and a buildup of paint on the wood surface may lead to cross-grain cracking or other were paint failures. If the old paint surface is not properly cleaned before repainting, intercoat peeling may also result. Paint may also peel from poor construction practices that allow excess moisture buildup in the wood. Iron and water stain may be a problem when natural finishes are applied and poor construction practices have been followed.
Finish failure or discoloration problems are eliminated only by identifying and correcting the problem. Refinishing without correcting the original problem will result in repeated failure.
Mildew
Mildew is probably the most common cause of discoloration of house paint and gray discoloration of unfinished wood (fig. 31). The term mildew applies both to the fungus (a type of microscopic plant life) and to its staining and degenerative effects on its substrate (the substance on which it grows, in this case paint and wood). The most common species are black, but some are brown, red, green, or other colors. it grows most extensively in warm, humid climates but is also found in cold Northern States. Midew may be found anywhere on a building whether painted or not, but it is most commonly found on walls behind trees or shrubs where air movement is restricted. Mildew may also be associated with the dew pattern of the house. Dew will form on those parts of the house that are not heated and tend to cool rapidly, such as eaves, the ceilings of carports and porches, and the wall area between studs. This dew then provides a source of moisture for the mildew.
Mildew can be distinguished from dirt by examination under a high-power magnifying glass. In the growing stage, when the paint surface is damp or wet, a mildew fungus is characterized by its threadlike
46
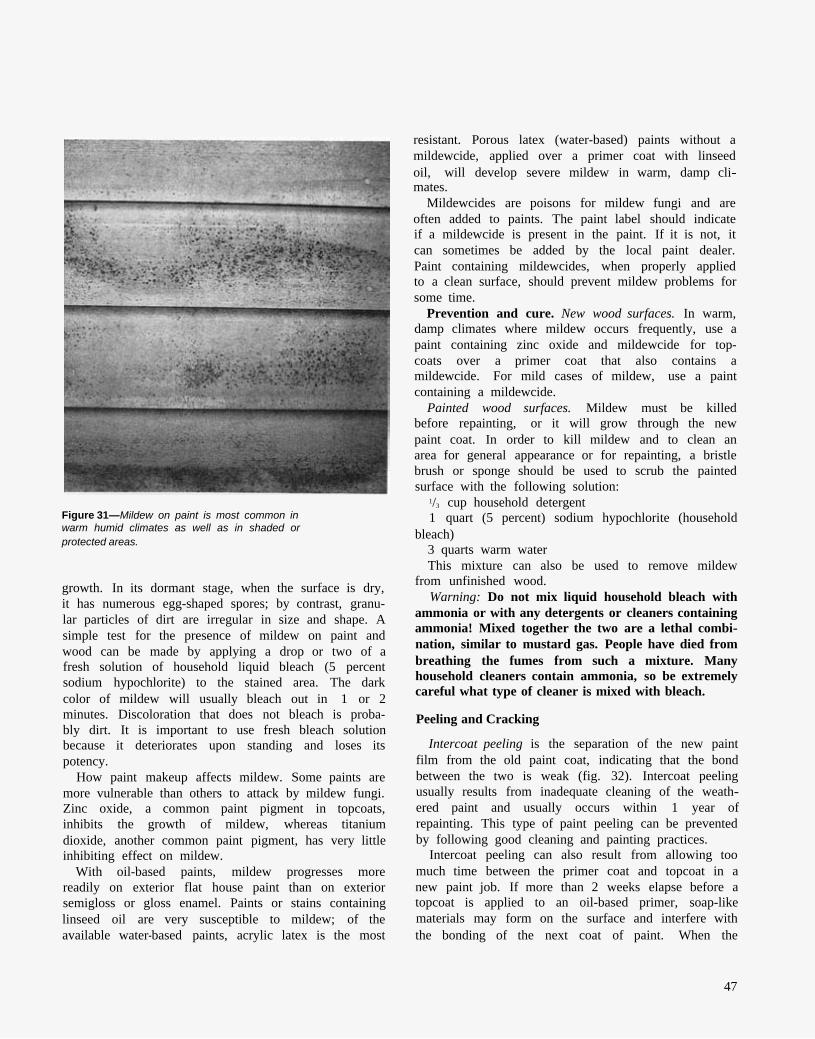
Figure 31—Mildew on paint is most common in warm humid climates as well as in shaded or protected areas.
growth. In its dormant stage, when the surface is dry, it has numerous egg-shaped spores; by contrast, granular particles of dirt are irregular in size and shape. A simple test for the presence of mildew on paint and wood can be made by applying a drop or two of a fresh solution of household liquid bleach (5 percent sodium hypochlorite) to the stained area. The dark color of mildew will usually bleach out in 1 or 2 minutes. Discoloration that does not bleach is probably dirt. It is important to use fresh bleach solution because it deteriorates upon standing and loses its potency.
How paint makeup affects mildew. Some paints are more vulnerable than others to attack by mildew fungi. Zinc oxide, a common paint pigment in topcoats, inhibits the growth of mildew, whereas titanium dioxide, another common paint pigment, has very little inhibiting effect on mildew.
With oil-based paints, mildew progresses more readily on exterior flat house paint than on exterior semigloss or gloss enamel. Paints or stains containing linseed oil are very susceptible to mildew; of the available water-based paints, acrylic latex is the most
resistant. Porous latex (water-based) paints without a mildewcide, applied over a primer coat with linseed oil, will develop severe mildew in warm, damp climates.
Mildewcides are poisons for mildew fungi and are often added to paints. The paint label should indicate if a mildewcide is present in the paint. If it is not, it can sometimes be added by the local paint dealer. Paint containing mildewcides, when properly applied to a clean surface, should prevent mildew problems for some time.
Prevention and cure. New wood surfaces. In warm, damp climates where mildew occurs frequently, use a paint containing zinc oxide and mildewcide for topcoats over a primer coat that also contains a mildewcide. For mild cases of mildew, use a paint containing a mildewcide.
Painted wood surfaces. Mildew must be killed before repainting, or it will grow through the new paint coat. In order to kill mildew and to clean an area for general appearance or for repainting, a bristle brush or sponge should be used to scrub the painted surface with the following solution:
1/3 cup household detergent 1 quart (5 percent) sodium hypochlorite (household
bleach) 3 quarts warm water This mixture can also be used to remove mildew
from unfinished wood. Warning: Do not mix liquid household bleach with
ammonia or with any detergents or cleaners containing ammonia! Mixed together the two are a lethal combination, similar to mustard gas. People have died from breathing the fumes from such a mixture. Many household cleaners contain ammonia, so be extremely careful what type of cleaner is mixed with bleach.
Peeling and Cracking
Intercoat peeling is the separation of the new paint film from the old paint coat, indicating that the bond between the two is weak (fig. 32). Intercoat peeling usually results from inadequate cleaning of the weathered paint and usually occurs within 1 year of repainting. This type of paint peeling can be prevented by following good cleaning and painting practices.
Intercoat peeling can also result from allowing too much time between the primer coat and topcoat in a new paint job. If more than 2 weeks elapse before a topcoat is applied to an oil-based primer, soap-like materials may form on the surface and interfere with the bonding of the next coat of paint. When the
47

Figure 32— Intercoat peeling of paint is usually caused by poor preparation of the old surface.
period between applications exceeds 2 weeks, the surface should be scrubbed before applying the second coat. (Do not apply a primer coat in the fall and wait until spring to finish with the topat.)
Cross-grain cracking occurs when paint coatings become too thick (fig. 33). This problem often occurs on older homes that have been painted several times. Normally, paint cracks in the direction it was brushed onto the wood. Cross-grain cracks run across the grain of the wood and paint. Once it has occurred, the only solution is to completely remove the old paint and apply a new finishing system on the bare wood.
To prevent cross-grain cracking, follow the paint manufacturer’s recommendations for spreading rates. Do not repaint unweathered, protected areas such as porch ceilings and roof overhangs as often as the rest of the house. If possible, repaint these areas only as they weather and require new paint. However, if repainting is required, be sure to scrub the areas with a sponge or bristle brush and detergent in water to remove any water-soluble materials that will interfere with adhesion of the new paint. Latex paints, based on either vinyl or acrylic polymers, have not been known to fail by cross-grain cracking.
Blistering
Temperature blisters are bubble-like swellings that occur on the surface of the paint film as early as a few hours or as long as 1 to 2 days after painting. They occur only in the last coat of paint (fig. 34). They are caused when a thin, dry skin has formed on the outer surface of the fresh paint and the liquid thinner in the wet paint under the dry skin changes to vapor and cannot escape. When the direct rays of the sun fall on
Figure 33—Cross-grain cracking results from an excessive buildup of paint.
Figure 34—Temperature blisters can result when partially dried paint is suddenly heated by the direct rays of the sun.
freshly painted wood the rapid rise in temperature will cause the vapors to expand and produce blisters. Usually only oil-based paint blisters in this way. Dark colors that absorb heat and thick paint coats are more likely to blister than white paints or thin coats.
To prevent temperature blisters, avoid painting surfaces that will soon be heated. The best procedure is to “follow the sun around the house.” The north side of the building should be painted early in the morning, the east side late in the morning, the south side well into the afternoon, and the west side late in the afternoon. However, at least 2 hours should be available for the fresh paint film to dry before it cools to the point where condensation could occur. If
48
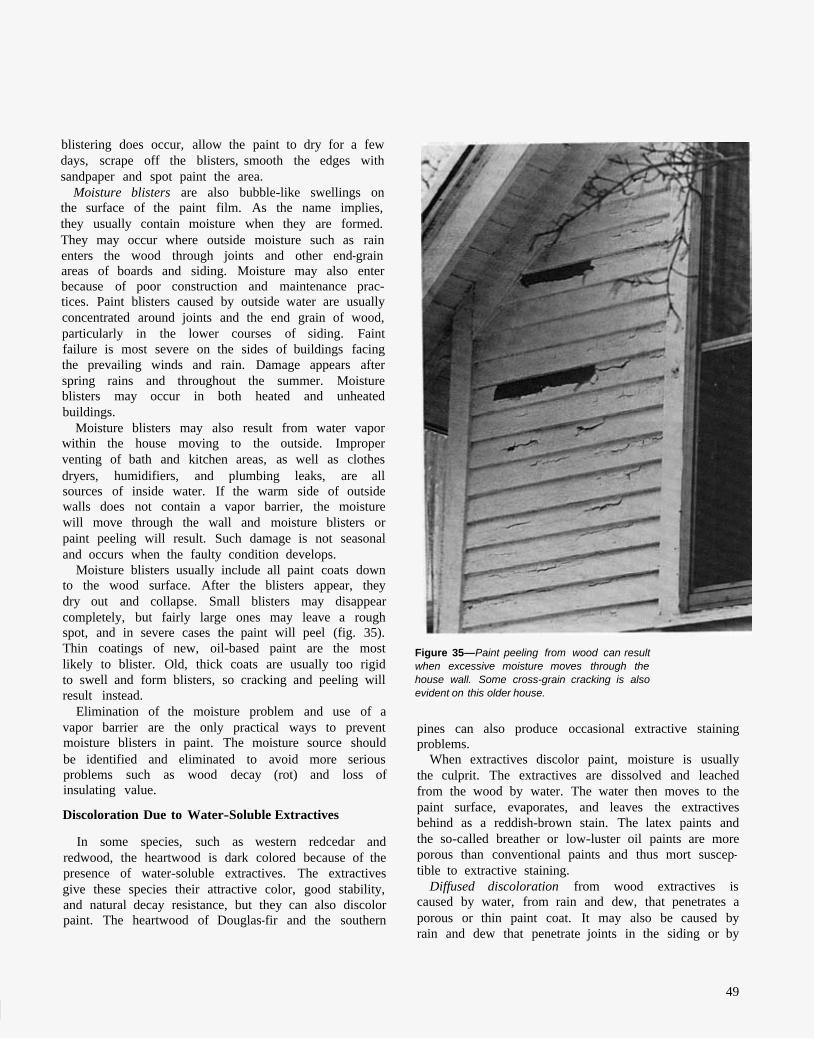
blistering does occur, allow the paint to dry for a few days, scrape off the blisters, smooth the edges with sandpaper and spot paint the area.
Moisture blisters are also bubble-like swellings on the surface of the paint film. As the name implies, they usually contain moisture when they are formed. They may occur where outside moisture such as rain enters the wood through joints and other end-grain areas of boards and siding. Moisture may also enter because of poor construction and maintenance practices. Paint blisters caused by outside water are usually concentrated around joints and the end grain of wood, particularly in the lower courses of siding. Faint failure is most severe on the sides of buildings facing the prevailing winds and rain. Damage appears after spring rains and throughout the summer. Moisture blisters may occur in both heated and unheated buildings.
Moisture blisters may also result from water vapor within the house moving to the outside. Improper venting of bath and kitchen areas, as well as clothes dryers, humidifiers, and plumbing leaks, are all sources of inside water. If the warm side of outside walls does not contain a vapor barrier, the moisture will move through the wall and moisture blisters or paint peeling will result. Such damage is not seasonal and occurs when the faulty condition develops.
Moisture blisters usually include all paint coats down to the wood surface. After the blisters appear, they dry out and collapse. Small blisters may disappear completely, but fairly large ones may leave a rough spot, and in severe cases the paint will peel (fig. 35). Thin coatings of new, oil-based paint are the most likely to blister. Old, thick coats are usually too rigid to swell and form blisters, so cracking and peeling will result instead.
Elimination of the moisture problem and use of a vapor barrier are the only practical ways to prevent moisture blisters in paint. The moisture source should be identified and eliminated to avoid more serious problems such as wood decay (rot) and loss of insulating value.
Discoloration Due to Water-Soluble Extractives
In some species, such as western redcedar and redwood, the heartwood is dark colored because of the presence of water-soluble extractives. The extractives give these species their attractive color, good stability, and natural decay resistance, but they can also discolor paint. The heartwood of Douglas-fir and the southern
Figure 35—Paint peeling from wood can result when excessive moisture moves through the house wall. Some cross-grain cracking is also evident on this older house.
pines can also produce occasional extractive staining problems.
When extractives discolor paint, moisture is usually the culprit. The extractives are dissolved and leached from the wood by water. The water then moves to the paint surface, evaporates, and leaves the extractives behind as a reddish-brown stain. The latex paints and the so-called breather or low-luster oil paints are more porous than conventional paints and thus mort susceptible to extractive staining.
Diffused discoloration from wood extractives is caused by water, from rain and dew, that penetrates a porous or thin paint coat. It may also be caused by rain and dew that penetrate joints in the siding or by
49

water from faulty roof drainage and gutters. It is best prevented by following good painting practices.
Rundown or streaked discoloration can also occur when water-soluble extractives are present (fig. 36). This discoloration results when the back of the siding is wetted, the extractives are dissolved, and the colored water runs down the face of the adjacent painted boards from the lap joint. A rundown discoloration can also result from water vapor within the house moving to the exterior walls and condensing during cold weather. Major sources of water vapor are humidifiers, clothes dryers and showers that are not vented to the outside, normal respiration, and moisture from cooking and dishwashing. Rundown discoloration may also be caused by water draining into exterior walls from roof leaks, faulty gutters, ice dams, or rain and snow blown through louvers in vents.
Figure 36—A streaked type of water-soluble extractive discoloration can result from water wetting the back of one piece of siding and then running down on the front of the next piece(A). Water that causes discoloration can also lead to paint failure (B).
Rundown discoloration can be prevented by reducing condensation or the accumulation of moisture in the walls. New houses or those undergoing remodeling should have a vapor barrier (continuous 6-mil polyethylene sheet, for example) installed on the inside of all exterior walls. If a vapor barrier is not practical, the inside of all exterior walls should be painted with a vapor-resistant paint. Water vapor in the house can be reduced by using exhaust fans vented to the outside in bathrooms and kitchens. Clothes dryers should be vented to the outside and not to the crawl space or attic. Humidifiers should be avoided, and if the house contains a crawl space, the soil should be covered with a vapor barrier to prevent migration of water into the living quarters (see p. 10).
Water from rain and snow can be kept from entering the walls by proper maintenance of gutters and the roof. Ice dam formation can be prevented by installing adequate insulation in the attic and by providing proper ventilation. For gable roofs, vents should be provided at the gable ends and should be about 1/300 of the ceiling area. More positive air movement can be obtained if additional openings are provided in the overhang. Hip roofs should have air inlet openings in the louvers and several smaller roof vents located near the edge.
If discoloration is to be stopped, moisture problems must be eliminated. Rundown discoloration will usually weather away in a few months. However, discoloration in protected areas can become darker and more difficult to remove with time. In these cases, discolored areas should be washed with a mild detergent soon after the problem develops. Paint cleaners are also effective on darker stains.
Chalking
Chalking results when a paint film gradually weathers or deteriorates, releasing the individual particles of pigment. These individual particles act like a fine powder on the paint surface. Most paints chalk to some extent, and this is desirable since it allows the paint surface to be self-cleaning. However, chalking is objectionable when it washes down over a surface with a different color (fig. 37) or when it causes premature disappearance of the paint film through excess erosion. It is also a common cause of fading with colored or tinted paints.
Discoloration problems from chalking can be reduced by selection of a paint with slow-chalking tendencies. The manner in which a paint is formulated may determine how fast it chalks. Therefore, if
50
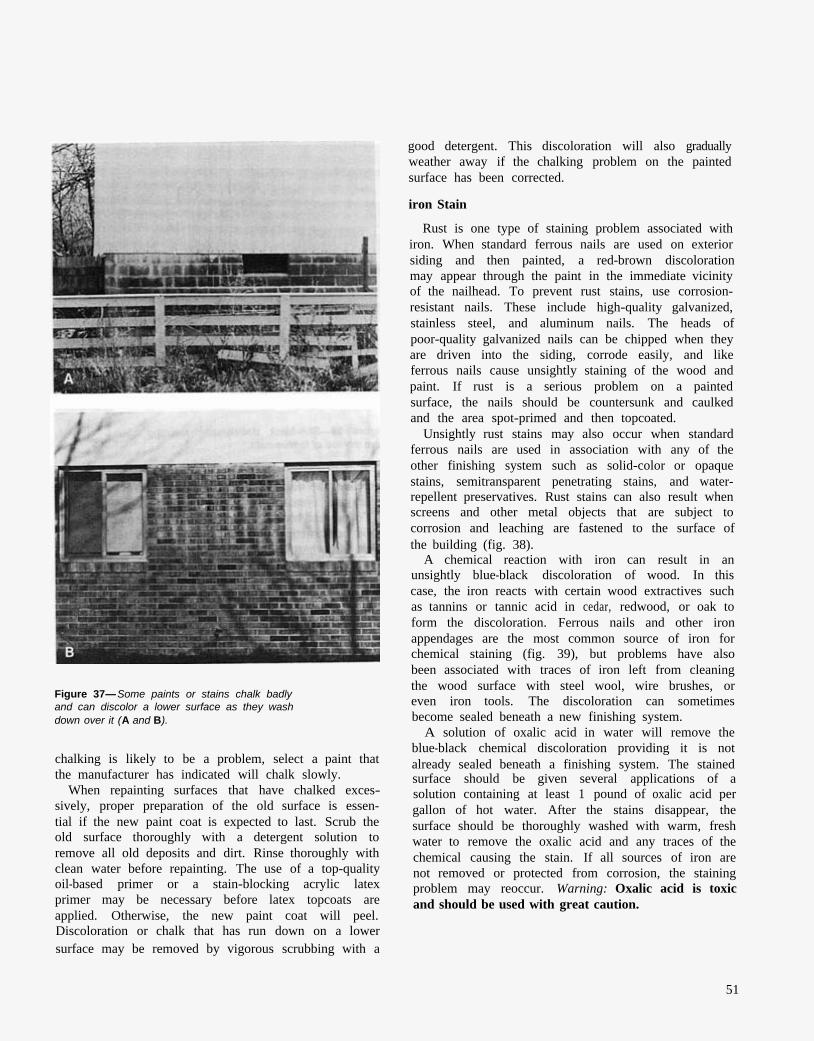
Figure 37— Some paints or stains chalk badly and can discolor a lower surface as they wash down over it (A and B).
chalking is likely to be a problem, select a paint that the manufacturer has indicated will chalk slowly.
When repainting surfaces that have chalked excessively, proper preparation of the old surface is essential if the new paint coat is expected to last. Scrub the old surface thoroughly with a detergent solution to remove all old deposits and dirt. Rinse thoroughly with clean water before repainting. The use of a top-quality oil-based primer or a stain-blocking acrylic latex primer may be necessary before latex topcoats are applied. Otherwise, the new paint coat will peel. Discoloration or chalk that has run down on a lower surface may be removed by vigorous scrubbing with a
good detergent. This discoloration will also gradually weather away if the chalking problem on the painted surface has been corrected.
iron Stain
Rust is one type of staining problem associated with iron. When standard ferrous nails are used on exterior siding and then painted, a red-brown discoloration may appear through the paint in the immediate vicinity of the nailhead. To prevent rust stains, use corrosion-resistant nails. These include high-quality galvanized, stainless steel, and aluminum nails. The heads of poor-quality galvanized nails can be chipped when they are driven into the siding, corrode easily, and like ferrous nails cause unsightly staining of the wood and paint. If rust is a serious problem on a painted surface, the nails should be countersunk and caulked and the area spot-primed and then topcoated.
Unsightly rust stains may also occur when standard ferrous nails are used in association with any of the other finishing system such as solid-color or opaque stains, semitransparent penetrating stains, and water-repellent preservatives. Rust stains can also result when screens and other metal objects that are subject to corrosion and leaching are fastened to the surface of the building (fig. 38).
A chemical reaction with iron can result in an unsightly blue-black discoloration of wood. In this case, the iron reacts with certain wood extractives such as tannins or tannic acid in cedar, redwood, or oak to form the discoloration. Ferrous nails and other iron appendages are the most common source of iron for chemical staining (fig. 39), but problems have also been associated with traces of iron left from cleaning the wood surface with steel wool, wire brushes, or even iron tools. The discoloration can sometimes become sealed beneath a new finishing system.
A solution of oxalic acid in water will remove the blue-black chemical discoloration providing it is not already sealed beneath a finishing system. The stained surface should be given several applications of a solution containing at least 1 pound of oxalic acid per gallon of hot water. After the stains disappear, the surface should be thoroughly washed with warm, fresh water to remove the oxalic acid and any traces of the chemical causing the stain. If all sources of iron are not removed or protected from corrosion, the staining problem may reoccur. Warning: Oxalic acid is toxic and should be used with great caution.
51
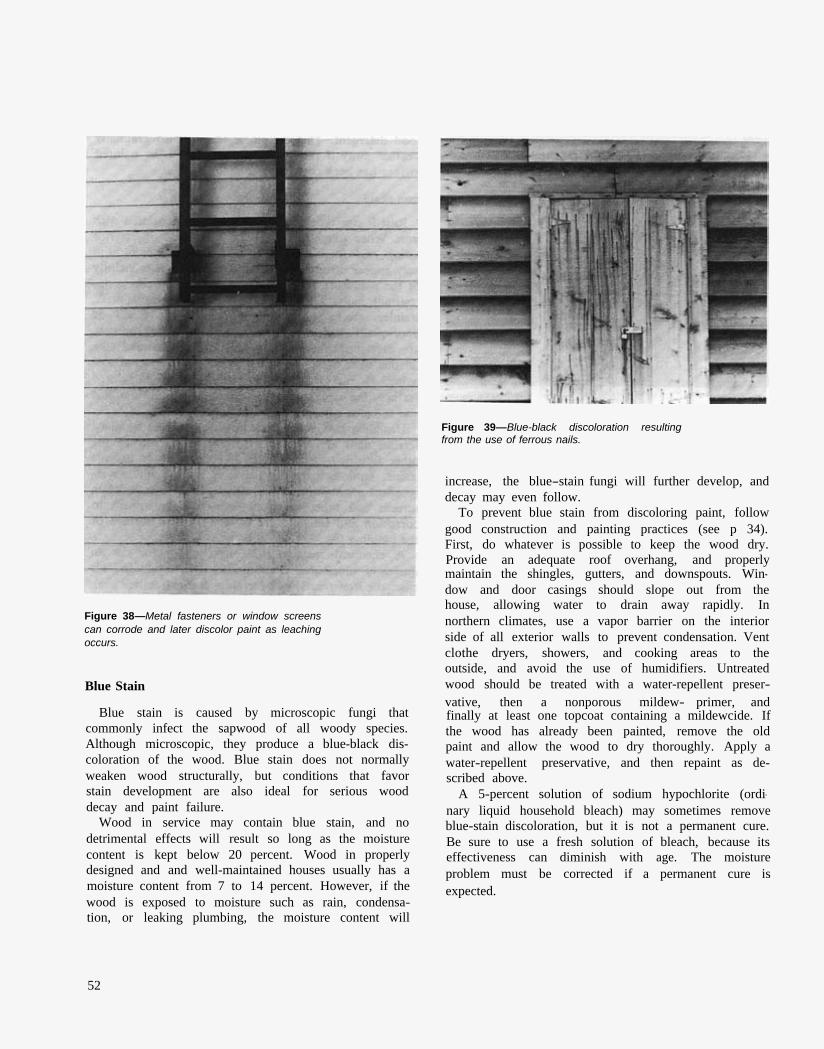
Figure 38—Metal fasteners or window screens can corrode and later discolor paint as leaching occurs.
Blue Stain
Blue stain is caused by microscopic fungi that commonly infect the sapwood of all woody species. Although microscopic, they produce a blue-black discoloration of the wood. Blue stain does not normally weaken wood structurally, but conditions that favor stain development are also ideal for serious wood decay and paint failure.
Wood in service may contain blue stain, and no detrimental effects will result so long as the moisture content is kept below 20 percent. Wood in properly designed and and well-maintained houses usually has a moisture content from 7 to 14 percent. However, if the wood is exposed to moisture such as rain, condensation, or leaking plumbing, the moisture content will
Figure 39—Blue-black discoloration resulting from the use of ferrous nails.
increase, the blue-stain fungi will further develop, and decay may even follow.
To prevent blue stain from discoloring paint, follow good construction and painting practices (see p 34). First, do whatever is possible to keep the wood dry. Provide an adequate roof overhang, and properly maintain the shingles, gutters, and downspouts. Window and door casings should slope out from the house, allowing water to drain away rapidly. In northern climates, use a vapor barrier on the interior side of all exterior walls to prevent condensation. Vent clothe dryers, showers, and cooking areas to the outside, and avoid the use of humidifiers. Untreated wood should be treated with a water-repellent preservative, then a nonporous mildew- primer, and finally at least one topcoat containing a mildewcide. If the wood has already been painted, remove the old paint and allow the wood to dry thoroughly. Apply a water-repellent preservative, and then repaint as described above.
A 5-percent solution of sodium hypochlorite (ordinary liquid household bleach) may sometimes remove blue-stain discoloration, but it is not a permanent cure. Be sure to use a fresh solution of bleach, because its effectiveness can diminish with age. The moisture problem must be corrected if a permanent cure is expected.
52

Brown Stain Over Knots
The knots in many softwood species, particularly pine, contain an abundance of resin. This resin can sometimes cause paint to peel or turn brown (fig. 40). In most cases, this resin is “set” or hardened by the high temperatures used in kiln-drying construction lumber.
Good painting practices should eliminate or control brown stain over knots. Apply a good primer to the bare wood first. Then follow with two topcoats. Do not apply ordinary shellac or varnish to the knot area first because this may result in early paint failure in outdoor exposure.
Exudation of Pitch
Pine and Douglas-fir can exude pitch (resin) while the different cedar species (except western redcedar) can exude oils. Normally pitch and oils are not a problem because lumber manufacturers have learned how to “set” pitch and evaporate excess oil during the kiln-drying process. The material is simply planed or sanded off later in the manufacturing process and does not present additional problems. However, where the proper schedules are not used in drying the lumber, problems can result (fig. 41).
Figure 40—Brown discoloration of paint due to resin exudation from a knot.
Figure 41— Exudated pitch from knots and pitch pocket on siding.
When exudation occurs before the wood has been painted, it should be removed. If the exuded pitch has hardened, it can be removed fairly easily with a putty knife, paint scraper, or sandpaper; but if it is still soft, such procedures smear it over the surface of the wood. If it is left there, the paint is likely to alligator, crack, and fail early over the pitch-coated areas. Exuded pitch that is still soft should be removed thoroughly by scrubbing it with rags wet with denatured alcohol and then sandpapering the surface after most of the soft pitch has been scrubbed off. Any further exudation that occurs before subsequent coats of paint are applied should be removed by scrubbing with alcohol.
Where exudation takes place after painting, the wood might best be left done until it is time to repaint. The pitch should then be scraped off thoroughly before applying new paint. If a few boards in the structure have proved particularly unsightly because of exudation or because of early paint failure, it may be wise to replace them with new lumber before repainting. In extreme cases such boards have been known to keep on exuding pitch for many years. Exudation is favored by fluctuations in temperature or by warming the wood to high temperatures.
Repainting should be deferred until all further exudation has ceased or until repainting has become necessary for other reasons. There are no paints and no painting procedures that can be relied upon to prevent exudation of pitch.
53

Conclusions
Water Stain
Wood siding, particularly if it is left unfinished or if its natural finish has started to deteriorate, can become water stained (fig. 6). Water stain is most common at the base of sidewalls where rainwater runs off a roof, hits a hard surface, and splashes back onto the side of the building. The water causes the finish to deteriorate faster in this area. If the finish is not replaced, the water can begin to remove the water-soluble extractives, which accelerates the weathering process. and a “water-stained” area results. Water stain can also be seen where gutters overflow. To prevent water stain, good construction practices that keep water from contacting the wood whenever, possible should be followed. The wood should be treated regularly with a water-repellent preservative. Removing water stains can be very difficult. Sometimes scrubbing with mild detergent and water is effective. Light sanding can be tried on smooth wood surfaces. Bleaches such as liquid household bleach or oxalic acid solutions have been used with various degrees of success.
Even in today’s high-tech society, wood remains one of the most commonplace building materials. In addition to its solid form, it is also found in remanufactured products such as plywood. particleboard, and hardboard. It often appears in outdoor applications such as house siding, trim, decks, fences, and countless other uses. Most masonry buildings wen have some wood trim. Because of the exposure of wood to natural elements such as moisture and sunlight in outdoor applications, special precautions in design as well as finish selection and applications must be exercised if a desirable service life is to be achieved.
In this publication, we present the basic characteristics of wood, reconstituted wood-based products, wood finishes, and application techniques. Those combinations of wood and finishes that can be expected to perform the best are outlined. Proper application methods are also suggested. Lastly, steps are given on how best to correct premature finish failures.
Following the suggestions provided in this publication will insure that the maximum service life �or your wood product and finish combination will be achieved while maintaining the esthetic qualitites desired.
54
Notice
This publication supersedes the following USDA publications:
Black, John M.; Laughnan, Don F.; Mraz, Edward A. Forest Products Laboratory natural finish. Res. Note FPL-046. Madison, WI: U.S. Department of Agriculture, Forest Service, Forest Products Laboratory; 1979. 9 p.
Browne, F. L. Wood properties and paint durability Misc. Pub. 629. Washington, DC: U.S. Department of Agriculture; 1962. 10 p.
Feist, William C.; Mraz, Edward A. Wood finishing: water repellents and water-repellent preservatives. Res. Note FPL-0124. Madison, WI: U.S. Department of Agriculture, Forest Service, Forest Products Laboratory; 1978. 8 p.
Mraz, Edward A. How to refinish wood siding with latex paints. Res. Note FPL-0232. Madison, WI: U.S. Department of Agriculture, Forest Service, Forest Products Laboratory; 1976. 2 p.
U.S. Department of Agriculture. Forest Service. Wood finishing: temperature blistering of house paints. Res. Note FPL-0126. Madison, WI: U.S. Department of Agriculture, Forest Service, Forest Products Laboratory; 1966. 2 p.
U.S. Department of Agriculture, Forest Service. Wood finishing: intercoat peeling of house paints. Res. Note FPL-0127. Madison, WI: U.S. Department of Agriculture, Forest Service, Forest Products Laboratory; 1966. 2 p.
U.S. Department of Agriculture, Forest Service. Wood finishing: cross-grain cracking of oil-base house paints. Res. Note FPL-0129. Madison, WI: U.S. Department of Agriculture, Forest Service, Forest Products Laboratory; 1966. 2 p.
U.S. Department of Agriculture, Forest Service. Wood finishing: discoloration of house paint by blue stain. Res. Note FPL-0131. Madison, WI: U.S. Department of Agriculture, Forest Service, Forest Products Laboratory; 1966. 2 p.
U.S. Department of Agriculture, Forest Service. Wood finishing: finishing exterior plywood. Res. Note FPL-0133. Madison, WI: U.S. Department of Agriculture, Forest Service, Forest Products Laboratory; 1966. 3 p.
U.S. Department of Agriculture, Forest Service. Wood finishing: blistering, peeling, and cracking of house paints from moisture. Res. Note FPL-0125. Madison, WI: U.S. Department of Agriculture, Forest Service, Forest Products Laboratory; 1970. 7 p.
U.S. Department of Agriculture, Forest Service, Wood finishing: painting outside wood surfaces. Res. Note FPL-0123, Madison, WI: U.S. Department of Agriculture, Forest Service, Forest Products Laboratory; 1972. 4 p.
U.S. Department of Agriculture, Forest Service. Wood finishing: discoloration of house paints by water-soluble extractives. Res. Note FPL-0132. Madison, WI: U. S. Department of Agriculture, Forest Service, Forest Products Laboratory; 1972 (rev.). 4 p.
U.S. Department of Agriculture, Forest Service. Wood finishing: mildew on house paints. Res. Note FPL-0128. Madison, WI: U.S. Department of Agriculture, Forest Service, Forest Products Laboratory; 1975. 3 p.
U.S. Department of Agriculture, Forest Service. Wood finishing: weathering of wood. Res. Note FPL-0135. Madison, WI: U.S. Department of Agriculture, Forest Service, Forest Products Laboratory; 1975. 4 p.
55
Caution
The pesticides-wood preservatives, mildewcides, and fungicides-reported on and recommended here were registered for the uses described at the time this publication was prepared. Registrations of pesticides are under constant review by the Environmental Protection Agency. Therefore, consult a responsible State agency on the Current status of any of these pesticides. Use only pesticides that bear a Federal registration number and carry directions for home and garden use.
Pesticides used improperly can be injurious to humans, animals, and plants. Follow the directions and heed all precautions on the label. Avoid inhalation of vapors and sprays; wear protective clothing and equipment if specified on the label.
If your hands become contaminated with a pesticide, do not eat, drink, or smoke until you have washed. In case a pesticide is swallowed or gets in the eyes, follow first aid treatment given on the label and get prompt medical attention. If a pesticide gets onto your skin or clothing, remove the clothing immediately and wash skin thoroughly.
Store pesticides and finishes containing pesticides in their original containers out of the reach of children and pets, under lock and key. Follow recommended practices for the disposal of surplus finishing materials and containers. Scraps of chemically treated wood or finished wood should never be burned, either for heat or for disposal. Toxic fumes may be released.
Pentachlorophenol (often called penta for short) is commonly used as a wood preservative in water-repellent preservatives, semitransparent penetrating stains, and pressure treatments of lumber. PENTACHLOROPHENOL IS TOXIC AND MUST NEVER BE USED IN INTERIORS OR WHERE HUMAN CONTACT IS LIKELY. AVOID CONTACT WITH ANY PENTACHLOROPHENOL SOLUTION AND ITS VAPORS.
U. S. GOVERNMENT PRINTING OFFICE : 1986 O - 166-072 56