demonstrating meiosis durham (2015) - gsa 2015_demonstrating... · demonstrating meiosis durham ......
TRANSCRIPT

Demonstrating Meiosis Durham (2015)
1
In-Class Exercise: Demonstrating Meiosis Using Manipulatable Chromosomes and Cells
Mary F. Durham*
School of Biological Sciences
University of Nebraska-Lincoln
Lincoln, NE 68588
*Corresponding Author: [email protected]
Accepted for publication May 15, 2015
Citation:
Durham, Mary F. (2015). Demonstrating Meiosis Using Manipulatable Chromosomes and Cells.
Genetics Society of America Peer-Reviewed Education Portal (GSA PREP): 2015.002; doi:
10.1534/gsaprep.2015.002

Demonstrating Meiosis Durham (2015)
2
Synopsis:
This resource describes an in-class, hands-on, manipulative modeling exercise designed for
students to complete individually but work through in small groups. The activity was designed
for use in discussion sections of approximately 30 students each, but it has also been used
successfully in lecture sections of up to 90 students and it can also be used in larger lecture
courses. This activity is designed to allow students to visualize and demonstrate meiosis in a
diploid cell by manipulating a simplified three-dimensional model of chromosomes in a model
germ cell. The implementation of this activity is designed to appeal to visual, auditory, and
kinesthetic learning styles. Meiosis is consistently a challenging process for students to grasp,
likely because it occurs on a microscopic and molecular level that is abstract to student
thinking. By allowing each student to manipulate individual model chromosomes in a model
cell, the activity makes meiosis a tangible and accessible concept to students in a way that
allows students to make sense of the abstract properties of meiosis. This activity can specifically
incorporate challenging aspects of meiosis and processes that occur during or as a result of
meiosis that are often difficult for students to understand or visualize. In particular, this activity
has been used to demonstrate crossing over, ploidy of the cells in different stages of meiosis,
the number of chromosomes, chromatids, and DNA molecules at different stages of meiosis,
how individual maternal and paternal alleles travel to individual gametes, how meiosis leads to
genetic variation, how mistakes in meiosis can result in aneuploidy, and to practice quantitative
skills by calculating chromosome or DNA molecule numbers at different stages of meiosis, with
and without the occurrence of nondisjunction.

Demonstrating Meiosis Durham (2015)
3
Approach/Method: (Instructor Guidelines)
Introduction:
Meiosis is a major biological process that is essential for student understanding of heritability in
sexually reproducing organisms. The main learning objective of this activity is for students to
demonstrate meiosis by manipulating and modifying model chromosomes and cells. Students
will also be able to quantify chromosomes, chromatids, and DNA molecules at each stage of
meiosis, follow a single allele on a chromosome through the process of meiosis, compare and
contrast mitosis and meiosis, visualize how meiosis leads to genetic variation in gametes, and
recognize how mistakes in meiosis lead to aneuploidy. Students work through the steps of
meiosis in teams, completing the manipulative modeling individually. Students are guided as a
class by the instructor through each step of the process with particular focus on what is
happening to the chromosomes and DNA molecules at each stage. Depending on the focus of
the course, parts 4 and 5 of the activity may be considered optional.
Estimated time: 30-50 minutes
Pre-Class Assignment:
It is recommended that students are given a priming activity to complete prior to class to
prepare them to apply the concepts related to meiosis to the demonstration. A suggested
assignment is an open-ended or short answer worksheet aligned to textbook reading material
followed by a short quiz at the beginning of class or just prior to class. An example worksheet
aligned to Freeman et al., Biological Science 5th edition (2013) is included in the supplementary
materials.
Part 1: In-Class Priming (7-10 minutes)
Ask the students to draw a schematic diagram of meiosis starting with a cell in the G1 stage of
the cell cycle and progressing through meiosis. Ask students to add as much detail as possible
and to pay close attention to what is happening to the chromosomes in the cell(s). First, have
students work individually with no textbook or notebook resources. This allows students to
become aware of what they do not yet know well. Circulate around the room to gauge the
point at which students get “stuck” and their writing slows or stops, often within five minutes.
At this point, allow students to work in teams of approximately four students with diverse
intellectual abilities and backgrounds. Ask students to build upon their diagrams based on input
from their peers, but still not using any resources other than their peers. Circulate around the
room to answer questions or offer suggestions of features to add to student diagrams. When
student discussion about the activity diminishes, often after 3 minutes, allow students to
reference their notebooks or textbooks to fill in any crucial missing aspects of their diagrams.
Demonstrating Meiosis Durham (2015)
4
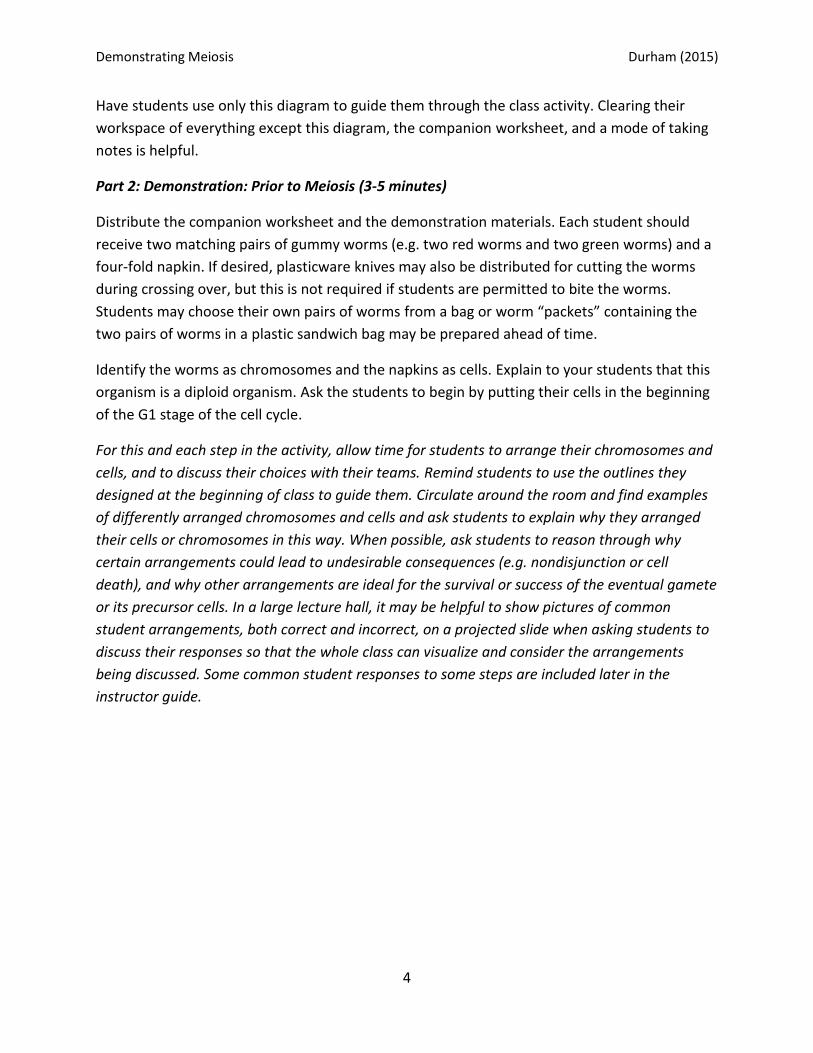
Have students use only this diagram to guide them through the class activity. Clearing their
workspace of everything except this diagram, the companion worksheet, and a mode of taking
notes is helpful.
Part 2: Demonstration: Prior to Meiosis (3-5 minutes)
Distribute the companion worksheet and the demonstration materials. Each student should
receive two matching pairs of gummy worms (e.g. two red worms and two green worms) and a
four-fold napkin. If desired, plasticware knives may also be distributed for cutting the worms
during crossing over, but this is not required if students are permitted to bite the worms.
Students may choose their own pairs of worms from a bag or worm “packets” containing the
two pairs of worms in a plastic sandwich bag may be prepared ahead of time.
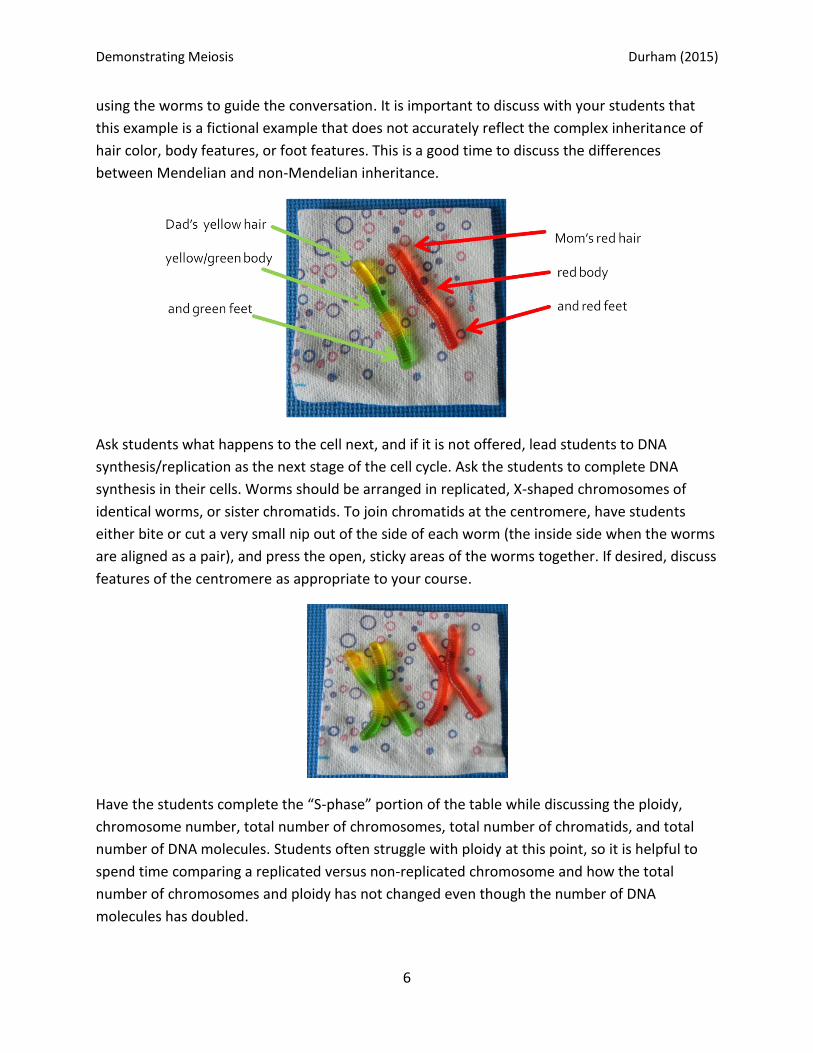
Identify the worms as chromosomes and the napkins as cells. Explain to your students that this
organism is a diploid organism. Ask the students to begin by putting their cells in the beginning
of the G1 stage of the cell cycle.
For this and each step in the activity, allow time for students to arrange their chromosomes and
cells, and to discuss their choices with their teams. Remind students to use the outlines they
designed at the beginning of class to guide them. Circulate around the room and find examples
of differently arranged chromosomes and cells and ask students to explain why they arranged
their cells or chromosomes in this way. When possible, ask students to reason through why
certain arrangements could lead to undesirable consequences (e.g. nondisjunction or cell
death), and why other arrangements are ideal for the survival or success of the eventual gamete
or its precursor cells. In a large lecture hall, it may be helpful to show pictures of common
student arrangements, both correct and incorrect, on a projected slide when asking students to
discuss their responses so that the whole class can visualize and consider the arrangements
being discussed. Some common student responses to some steps are included later in the
instructor guide.

Demonstrating Meiosis Durham (2015)
5
Guide the class conversation to lead to a cell in early G1, as displayed by the completely folded
napkin containing one worm of each color:
After discussing different student responses, take time to discuss the chromosome number (n)
of their cell, the ploidy, the total number of chromosomes, and the total number of DNA
molecules. Have students fill in the chart on the companion worksheet. It may also be helpful to
show a cell with an n>1 using other gummy or candy items, as shown below to illustrate what
multiple chromosomes might look like, how different chromosomes contain different genes
that code for different traits, and how homologous chromosomes are similar compared to non-
homologous chromosomes:
Next, take a few moments to discuss what types of cells undergo meiosis and where in the
student’s body meiosis occurs. Next, have the students assign one chromosome as inherited
from their father and one chromosome as inherited from their mother. Discuss how traits such
as “yellow hair” or “red hair” can be passed on to offspring through chromosome heritability,
Demonstrating Meiosis Durham (2015)
6
using the worms to guide the conversation. It is important to discuss with your students that
this example is a fictional example that does not accurately reflect the complex inheritance of
hair color, body features, or foot features. This is a good time to discuss the differences
between Mendelian and non-Mendelian inheritance.
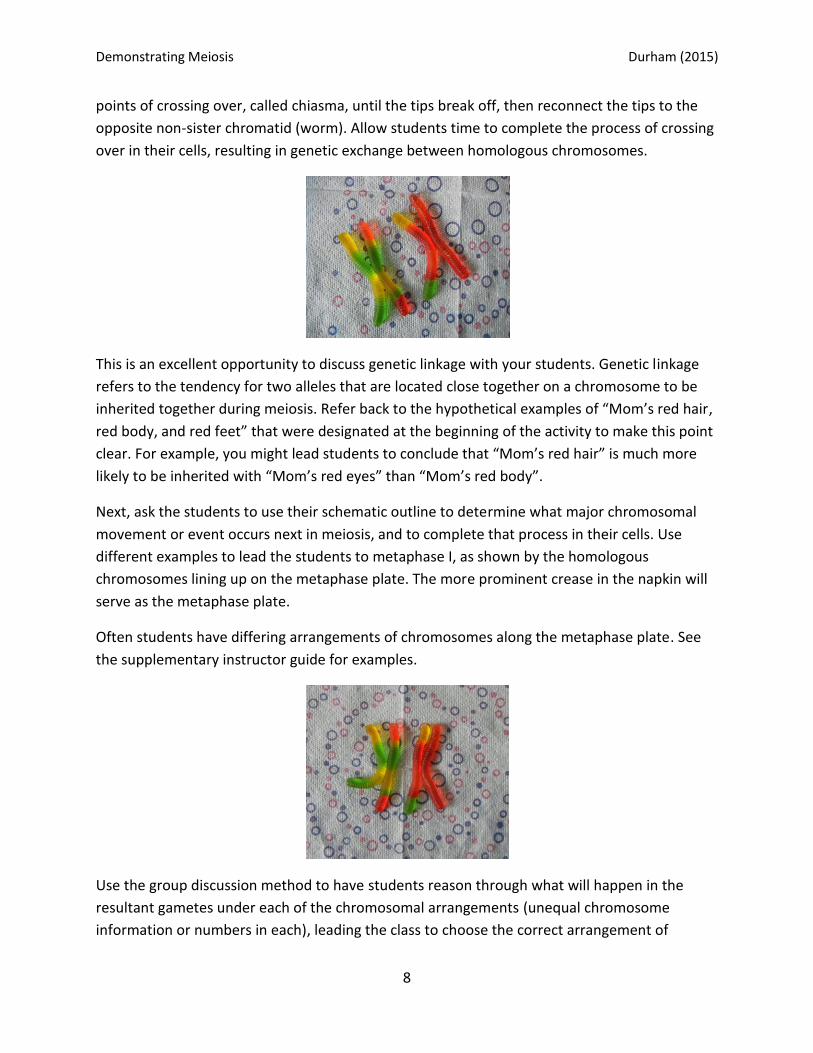
Ask students what happens to the cell next, and if it is not offered, lead students to DNA
synthesis/replication as the next stage of the cell cycle. Ask the students to complete DNA
synthesis in their cells. Worms should be arranged in replicated, X-shaped chromosomes of
identical worms, or sister chromatids. To join chromatids at the centromere, have students
either bite or cut a very small nip out of the side of each worm (the inside side when the worms
are aligned as a pair), and press the open, sticky areas of the worms together. If desired, discuss
features of the centromere as appropriate to your course.
Have the students complete the “S-phase” portion of the table while discussing the ploidy,
chromosome number, total number of chromosomes, total number of chromatids, and total
number of DNA molecules. Students often struggle with ploidy at this point, so it is helpful to
spend time comparing a replicated versus non-replicated chromosome and how the total
number of chromosomes and ploidy has not changed even though the number of DNA
molecules has doubled.

Demonstrating Meiosis Durham (2015)
7
Next ask your students to have their cells undergo the G2 stage of the cell cycle, which consists
of cell growth as indicated by the unfolding of the napkin.
Explain to the students that now the cell is ready to leave the cell cycle and undergo meiosis
instead of mitosis.
Part 3: Demonstration: Meiosis (10-15 minutes)
Although the focus of this activity in the past has not been on the breakdown of specific
properties and occurrences of each individual stage of meosis (prophase, metaphase,
anaphase, telophase), the activity can easily be adapted to include these aspects. For the
courses that this activity was used in, the primary focus was on major chromosomal and
division events in meiosis, and this guide will proceed as such.
Now that the cells are prepared for meiosis, the cells can begin the process of meiosis. Discuss
how homologous chromosomes pair up and form tetrads. Ask your students to put the cells in
late prophase I, when tetrads are formed. For illustrative purposes of the activity, have
chromosomes overlap only for one pair of non-sister chromatids.
Ask the students what major chromosomal event can happen when tetrads are formed, and
guide the discussion to crossing over, and discuss the features of crossing over. Ask the
students to complete crossing over in their cells. Demonstrate using sample worms how genetic
information can be “swapped” on the worms. Have students bite or cut the worms at the two
Demonstrating Meiosis Durham (2015)
8
points of crossing over, called chiasma, until the tips break off, then reconnect the tips to the
opposite non-sister chromatid (worm). Allow students time to complete the process of crossing
over in their cells, resulting in genetic exchange between homologous chromosomes.
This is an excellent opportunity to discuss genetic linkage with your students. Genetic linkage
refers to the tendency for two alleles that are located close together on a chromosome to be
inherited together during meiosis. Refer back to the hypothetical examples of “Mom’s red hair,
red body, and red feet” that were designated at the beginning of the activity to make this point
clear. For example, you might lead students to conclude that “Mom’s red hair” is much more
likely to be inherited with “Mom’s red eyes” than “Mom’s red body”.
Next, ask the students to use their schematic outline to determine what major chromosomal
movement or event occurs next in meiosis, and to complete that process in their cells. Use
different examples to lead the students to metaphase I, as shown by the homologous
chromosomes lining up on the metaphase plate. The more prominent crease in the napkin will
serve as the metaphase plate.
Often students have differing arrangements of chromosomes along the metaphase plate. See
the supplementary instructor guide for examples.
Use the group discussion method to have students reason through what will happen in the
resultant gametes under each of the chromosomal arrangements (unequal chromosome
information or numbers in each), leading the class to choose the correct arrangement of

Demonstrating Meiosis Durham (2015)
9
chromosomes along the metaphase plate. Take time to discuss the importance of the correct
arrangement along the metaphase plate and the consequences of improper alignment to follow
up on the student conversation.
This may be a good time to discuss the law of independent assortment of chromosomes during
meiosis. The law of independent assortment states that chromosomes, or units of inheritance,
assort independently during gamete production (meiosis). Adding one or two other
“chromosomes” to a projection or model that the whole class can view will help make this
concept clearer for students. For example, insert one or two pairs of different colored gummy
bears, sour patch kids, etc to the cell and arrange them in different combinations of colors for
multiple iterations of the chromosomes lining up on the metaphase plate. Discuss with the
students how the “red body” of the worm chromosome has an equal chance of combining with
the “orange bear” chromosome as it does with the “blue bear” chromosome.
Ask the students to reference their schematics to determine what happens to the cell next in
the process of meiosis, and have students complete this process in their cells. Most students
identify the separation of homologous chromosomes to opposite poles of the cell.
Ask the students to reference their schematics to determine what happens to the cell next in
the process of meiosis, and have students complete this process in their cells. Discuss
cytokinesis and have students rip the napkin along the main crease to model the division of the
cell that occurs as cytokinesis.

Demonstrating Meiosis Durham (2015)
10
Mitosis 1 is now complete. At this point, take a few moments to discuss the ploidy,
chromosome number, total number of chromosomes, total number of chromatids, and total
number of DNA molecules present in these cells, and have students fill in the appropriate cells
in the table of the companion worksheet.
Ask the students to reference their schematics to determine what major chromosomal event
happens next in the process of meiosis, and have students complete this process in their cells.
Lead students to metaphase II when the replicated chromosomes are lined up on the
metaphase plate. Again, you are likely to get discrepancy among students in the way that they
arrange the chromosomes on the metaphase plate. Often students have differing arrangements
of chromosomes along the metaphase plate. See the supplementary instructor guide for
examples.
As was done during metaphase I, use the group discussion method to have students reason
through what will happen in the resultant gametes under each of the chromosomal
arrangements (unequal chromosome information or numbers in each) during metaphase II,
leading the class to choose the correct arrangement of chromosomes along the metaphase
plate. Take time to discuss the importance of the correct arrangement along the metaphase
plate and the consequences of improper alignment to follow up on the student conversation.

Demonstrating Meiosis Durham (2015)
11
Ask the students to reference their schematics to determine what happens to the cell next in
the process of meiosis, and have students complete this process in their cells. Most students
identify the separation of homologous chromosomes to opposite poles of the cell.
Ask the students to reference their schematics to determine what happens to the cell next in
the process of meiosis, and have students complete this process in their cells. Students should
rip the cells along the remaining napkin creases to complete cytokinesis.
Meiosis II and the process of meiosis is complete. Ask the students what kind of cells they just
produced in their bodies, and lead them to discuss eggs and sperm. Take a few moments to
discuss the ploidy, chromosome number, total number of chromosomes, total number of
chromatids, and total number of DNA molecules present in these cells, and have students fill in

Demonstrating Meiosis Durham (2015)
12
the appropriate cells in the table of the companion worksheet. Discuss how the ploidy and
numbers of chromosomes and DNA molecules change throughout the process of meiosis.
Now is a good opportunity to discuss how meiosis increases genetic diversity. Poll the class to
see how many people have four identical gametes, then three identical gametes, and then two
identical gametes. Discuss how each egg or sperm, if they were to complete fertilization, could
lead to a child with a different combination of the student’s parent’s traits. Specifically discuss
that one child could look identical to the mother and one child could look identical to the father
for the traits coded for by this chromosome, but the children produced from the crossed-over
chromosomes could have the father’s yellow hair and green feet with the mother’s red body, or
another child could have the mother’s red hair and red feet with the father’s green body.
Next have the students view the gametes of a neighboring student of opposite sex and imagine
how the child might look when an egg of one student is fertilized by the sperm of another. The
child could have the one grandparent’s red hair, one grandparent’s orange body, and a
different grandparent’s green feet, depending on allelic relationships such as dominance or
epistasis. At the conclusion of the activity, students are permitted to eat their gametes.
Part 4: Demonstration: Mistakes in Meiosis (3-5 minutes)
If desired, this activity can also be used to help students visualize how mistakes in meiosis can
lead to cell death or chromosomal abnormalities. It is recommended to complete the process of
meiosis separately from the discussion of mistakes in meiosis. Using a document camera or
prepared powerpoint slides depicting gummy worm arrangements is recommended for this
portion of the exercise if class time or materials are a limiting factor for your course. A sample
powerpoint containing slides on mistakes in meiosis is provided.

Demonstrating Meiosis Durham (2015)
13
Ask students what happens if homologs fail to separate properly during meiosis I. Discuss and
display nondisjunction, explaining how it leads to unequal numbers of chromosomes in
daughter cells.
Engage students in a discussion about how this compares to nondisjunction during meiosis II,
and demonstrate or display how this can lead to unequal numbers of chromosomes in gametes
after meiosis II is complete.
Apply these instances of nondisjunction to the potential consequences of chromosomal
abnormalities in humans, including miscarriage, Down’s syndrome and Turner’s syndrome.
Part 5: Quantitative Reasoning Application Questions (5-10 minutes)
This modeling of meiosis can also be used to help students visualize how mistakes at different
points in meiosis can lead to different distributions of chromosomal abnormalities. Four
examples of quantitative reasoning application questions are included below. Note: these
questions were modeled after textbook questions in Freeman et al., Biological Science, 5th
edition.
When one of Joe’s human gonadal cells undergoes meiosis to form sperm cells, chromosomal
nondisjunction occurs at chromosome 21 during meiosis I. How many of Joe’s gametes

Demonstrating Meiosis Durham (2015)
14
produced by this gonadal cell might lead to a child with trisomy 21 (Down’s syndrome) if they
fertilize an egg?
a.1
b.2
c.4
d.8
(Answer: b.2)
The cells that produce sperm in humans contain 46 chromosomes. If one of these cells
undergoes meiosis to form sperm cells, and chromosomal nondisjunction occurs in chromosome
22 during meiosis I, how many chromosomes are in each of the resulting sperm?
a.23, 23, 22, and 24
b.24, 24, 23, and 23
c.24, 24, 22 and 22
d.45, 45, 47 and 47
(Answer: c.24, 24, 22 and 22)
When one of Jane’s human ovary cells undergoes meiosis to form egg cells, chromosomal
nondisjunction occurs on the X chromosome during meiosis II. How many of Jane’s gametes
produced by this ovarian cell might lead to a child with monosomy of the X chromosome (Turner
syndrome) if they are fertilized?
a.1
b.2

Demonstrating Meiosis Durham (2015)
15
c.4
d.8
(Answer: a.1)
The cells that produce sperm in humans contain 46 chromosomes. If one of these cells
undergoes meiosis to form sperm cells, and chromosomal nondisjunction occurs in chromosome
22 during meiosis II, how many chromosomes are in each of the resulting sperm?
a.23, 23, 22, and 24
b.22, 22, 23, and 23
c.24, 24, 22 and 22
d.45, 45, 47 and 47
(Answer: a.23, 23, 22 and 24)
Demonstrating Meiosis Durham (2015)
16
References
Freeman, S., Allison, L., Black, M., Podgorski, G., Quillin, K., Monroe, J., and Taylor, E. (2014).
Biological Science. 5th ed. Pearson Education, Inc.