dell emc avamar for vmware user guide · dell emc avamar for vmware version 19.2 user guide...
TRANSCRIPT

Dell EMC Avamar for VMwareVersion 19.2
User Guide302-005-840
REV 01
November 2019

Copyright © 2001-2019 Dell Inc. or its subsidiaries. All rights reserved.
Dell believes the information in this publication is accurate as of its publication date. The information is subject to change without notice.
THE INFORMATION IN THIS PUBLICATION IS PROVIDED “AS-IS.” DELL MAKES NO REPRESENTATIONS OR WARRANTIES OF ANY KIND
WITH RESPECT TO THE INFORMATION IN THIS PUBLICATION, AND SPECIFICALLY DISCLAIMS IMPLIED WARRANTIES OF
MERCHANTABILITY OR FITNESS FOR A PARTICULAR PURPOSE. USE, COPYING, AND DISTRIBUTION OF ANY DELL SOFTWARE DESCRIBED
IN THIS PUBLICATION REQUIRES AN APPLICABLE SOFTWARE LICENSE.
Dell Technologies, Dell, EMC, Dell EMC and other trademarks are trademarks of Dell Inc. or its subsidiaries. Other trademarks may be the property
of their respective owners. Published in the USA.
Dell EMCHopkinton, Massachusetts 01748-91031-508-435-1000 In North America 1-866-464-7381www.DellEMC.com
2 Dell EMC Avamar for VMware User Guide

9
11
13
Introduction 17Avamar for VMware data protection overview...................................................18
Image backup....................................................................................... 18Guest backup.......................................................................................20Considerations......................................................................................21
Changed block tracking.................................................................................... 23Image backup virtual machine quiescing........................................................... 23Image backup and recovery support in Amazon Web Services (AWS).............. 24
Configuration and Setup 27Best practices...................................................................................................28(Optional) Configuring support for multiple vCenters....................................... 28Installing Avamar Administrator software..........................................................29Configuring vCenter-to-Avamar authentication................................................30
Adding vCenter authentication certificates to the MCS keystore........ 30Disabling MCS certificate authentication..............................................31
Creating a dedicated vCenter user account.......................................................31Add a vCenter as an Avamar client in the AUI................................................... 34Register or add a proxy client........................................................................... 36Edit vCenter .....................................................................................................37Auto-discovery of virtual machines................................................................... 38
Domain mapping rules for VM auto-discovery......................................38Creating a rule..................................................................................... 39
Deploying proxies..............................................................................................39Proxy Deployment Manager.................................................................39Deploy proxies...................................................................................... 41
Upgrading proxies............................................................................................. 43Upgrading Avamar proxies................................................................... 44Upgrading older or manually deployed Avamar proxies.........................44
Maintaining proxies........................................................................................... 47Reregistering a proxy with an Avamar server....................................... 47Changing the proxy guest operating system admin password.............. 48Changing the proxy guest operating system root password.................49
Security patch updates for proxies................................................................... 49Best practices and troubleshooting for applying security patch updatesto proxies............................................................................................. 49Apply security patch updates to a proxy.............................................. 50
Additional Avamar server configuration............................................................. 51Configuring automatic proxy selection..................................................51Configuring the MCS to support both guest and image backup........... 52
Figures
Tables
Preface
Chapter 1
Chapter 2
CONTENTS
Dell EMC Avamar for VMware User Guide 3

Administration 53Clients and containers.......................................................................................54
Dynamic versus static containers.........................................................54Dynamic container behavior.................................................................54How independent and container protection interact............................ 54
Add a VMware client.........................................................................................55Delete a VMware client..................................................................................... 57Enable changed block tracking..........................................................................57Viewing protected virtual machines in Avamar Administrator............................58Viewing a replicated virtual machine name in Avamar Administrator................. 58Monitoring the vCenter connection in Avamar Administrator........................... 59Manually synchronizing the AUI with vCenter and VM clients...........................59Renaming a vCenter client................................................................................60VMware Image Dataset..................................................................................... 61Adding guest backup throttling parameters to a dataset in Avamar Administrator..........................................................................................................................61Groups.............................................................................................................. 62
Default Proxy Group............................................................................ 62Default Virtual Machine Group............................................................. 62Virtual machine and proxy relationships within groups......................... 62
Changing proxy datastore and group assignments in Avamar Administrator..... 63
Backup 65Limitations........................................................................................................ 66Perform an on-demand backup of a virtual machine by using AUI .................... 67Set advanced plug-in options in the AUI........................................................... 68Scheduling backups using the AUI Policy wizard...............................................70
Creating a dataset................................................................................70Creating a backup policy.......................................................................71Enabling a scheduled backup for a backup policy..................................71Automatically include virtual machines in a backup policy using dynamicrules..................................................................................................... 72
Log truncation backups.....................................................................................75Scheduled backups with Microsoft SQL log truncation........................ 75Scheduled backups with Microsoft Exchange log truncation................77
Monitoring backups...........................................................................................78Cancel backups................................................................................................. 79Support for vCenter HA failover for inflight backups........................................ 79Configure a backup to support VMware encryption.......................................... 79
VMware encryption support limitations................................................80Configure a backup to support vSAN encryption...............................................81Enforcement of backups to Data Domain.......................................................... 81
Restore 83Image and file-level restore guidelines.............................................................. 84
Year 2038.............................................................................................84Monitor restores.................................................................................. 84Cancel restores....................................................................................85Instant access......................................................................................85Restore an instance of a VM backup by using the AUI ........................ 88
Image backup overview.....................................................................................94Image-level restore limitations............................................................. 94Restoring the full image or selected drives to the original virtualmachine............................................................................................... 95
Chapter 3
Chapter 4
Chapter 5
Contents
4 Dell EMC Avamar for VMware User Guide

Restoring the full image or selected drives to a different virtual machine............................................................................................................ 96Mounting Windows VMDKs from an image backup.............................. 98Restore the full image or selected drives to a new virtual machine byusing Avamar Administrator................................................................. 99
File-level restore.............................................................................................. 101Performance improvements for file-level restore................................ 101File-level restore supported configurations......................................... 101RSA SecurID authentication in the AUI............................................... 103File level restore troubleshooting and limitations................................ 104File-level restore in the AUI................................................................ 106
Backup Validation 109Overview..........................................................................................................110
What is validated................................................................................. 110VM Backup Validation groups..............................................................110
Performing an on-demand backup validation....................................................110Scheduling backup validations..........................................................................112
Protecting the vCenter Management Infrastructure 115vCenter deployments overview........................................................................ 116Best practices for backup and restore..............................................................116Protecting an embedded PSC.......................................................................... 117Protecting external deployment models........................................................... 117
vCenter server appliance(s) with one external PSC where PSC fails.. 118vCenter server appliance is lost but the PSC remains......................... 119vCenter server appliance with multiple PSCs where one PSC is lost, oneremains............................................................................................... 119vCenter server appliance remains but all PSCs fail.............................. 119vCenter server appliance remains but multiple PSCs fail.................... 120vCenter server appliance fails.............................................................120
vCenter server restore workflow......................................................................121Platform Services Controller restore workfow.................................................122Command reference........................................................................................ 122Support for vCenter HA failover for inflight backups....................................... 123Additional considerations................................................................................. 123
Protecting ESX Hosts 125Overview......................................................................................................... 126
Limitations.......................................................................................... 126Task List............................................................................................. 126
Adding ESX host authentication certificates to the MCS keystore.................. 127Creating a dedicated ESX host user account...................................................128Adding an ESX host as a vCenter client...........................................................130Deploying a proxy in a standalone ESX host..................................................... 131
Deploying a proxy appliance in an ESX host using the vSphere Client. 131Manually configuring proxy network settings......................................132Registering and activating the proxy with the Avamar server............. 133
Disassociating an ESX host from a vCenter..................................................... 134
Avamar image backup and recovery for VMware Cloud on AmazonWeb Services (AWS) 135Avamar image backup and recovery for VMware Cloud on AWS..................... 136
Chapter 6
Chapter 7
Chapter 8
Chapter 9
Contents
Dell EMC Avamar for VMware User Guide 5

Configure the VMware Cloud on AWS web portal console...............................136Amazon AWS web portal requirements............................................................137vCenter server inventory requirements............................................................137Deploy the vProxy OVA on a vCenter server in VMware Cloud on AWS.......... 137Configure vCenter-to-Avamar authentication for VMware Cloud on AWS...... 138Avamar image backup and restore for VMware Cloud on AWS best practices.139Unsupported Avamar operations..................................................................... 139
Manually deploying proxies 141Overview......................................................................................................... 142Downloading the proxy appliance template file................................................ 142Deploying the proxy appliance in vCenter........................................................ 142Deploying a proxy appliance in vCenter using the vSphere Web Client............ 142Registering and activating the proxy with the Avamar server.......................... 144Configuring proxy settings in Avamar Administrator........................................145Performing optional proxy performance optimization...................................... 146
vSphere Data Ports 147Required data ports......................................................................................... 148
Using VMware vRealize Log Insight 149About VMware vRealize Log Insight................................................................ 150Configuring the Log Central Reporting Service............................................... 150Configuring Log Forwarding Agents ................................................................ 151
Plug-in Options 153How to set plug-in options...............................................................................154VMware Image backup plug-in options............................................................ 154VMware Image restore plug-in options............................................................ 157Windows VMware GLR plug-in options............................................................157
Troubleshooting 159Installation and configuration problems and solutions......................................160
Problems adding vCenter Server as Avamar client............................. 160Proxy network settings.......................................................................160Error when registering guest backup or Windows recovery target client........................................................................................................... 160
Backup problems and solutions........................................................................160Backup does not start.........................................................................160Exclude the proxy from the virtual machine backup if performing thebackup with other VMware software ..................................................161Backups fail with “No Proxy” errors.................................................... 161Changed block tracking does not take effect......................................163Proxies are not assigned to backup jobs............................................. 163VM snapshot fails backups due to incorrect pre-evaluation of availablespace.................................................................................................. 164Backup and restore of vFlash Read Cache enabled VMs will use NBDtransport mode................................................................................... 164Exchange log truncation unsupported when VMDK is encrypted viavSphere.............................................................................................. 164Indexing VMware image backups requires HotAdd transport mode.... 164
Restore problems and solutions....................................................................... 164
Appendix A
Appendix B
Appendix C
Appendix D
Appendix E
Contents
6 Dell EMC Avamar for VMware User Guide

Preexisting snapshots cause restores to fail....................................... 165Restore to new virtual machine not available when physical RDM disksare involved........................................................................................ 165FLR browse of a granular disk backup without a partition table is notsupported........................................................................................... 166Fault tolerance disabled when restore to new virtual machine isperformed...........................................................................................166Restore to new virtual machine to Virtual SAN 5.5 will fail ................ 166Powering on an instant access vFlash-VM backup to a host withoutflash capacity configured fails ........................................................... 166Maximum number of NFS mounts with instant access issue...............166File-level restore on RHEL 5 requires the standard C++ library...........167File-level restore of a folder or file name containing certain specialcharacters fails................................................................................... 167File-level restore to user profile fails when Admin Approval Mode isenabled............................................................................................... 167
169Glossary
Contents
Dell EMC Avamar for VMware User Guide 7

Contents
8 Dell EMC Avamar for VMware User Guide

Image backup diagram....................................................................................................... 18Default proxy virtual machine specifications......................................................................19Example independent and container protection................................................................ 55Selected VMware Entities drop-down...............................................................................56Virtual machine and proxy relationships within groups...................................................... 62Example nested container structure................................................................................. 66Example nested container structure................................................................................. 95vCenter server restore workflow......................................................................................121PSC restore workflow..................................................................................................... 122No proxy error..................................................................................................................161No proxy error on activity monitor................................................................................... 161On-demand VMware Image backup fails..........................................................................162Event details of failed backup.......................................................................................... 162
12345678910111213
FIGURES
Dell EMC Avamar for VMware User Guide 9

Figures
10 Dell EMC Avamar for VMware User Guide

Revision history................................................................................................................. 13Typographical conventions................................................................................................ 14Guest backup installation resources..................................................................................20Minimum required vCenter user account privileges...........................................................32Example chart for gathering proxy information................................................................. 44Example chart for gathering proxy information, continued................................................45Required permissions....................................................................................................... 0Image restore toolbar buttons...........................................................................................94FLR support partitioning scheme..................................................................................... 101File system support for FLR.............................................................................................102LVM support for FLR....................................................................................................... 102Multi-device support for FLR...........................................................................................103Minimum required ESX host user account privileges....................................................... 128Required vSphere data ports........................................................................................... 148Backup options for Avamar VMware Image plug-in..........................................................154Restore options for Avamar VMware Image plug-in......................................................... 157
12345678910111213141516
TABLES
Dell EMC Avamar for VMware User Guide 11

Tables
12 Dell EMC Avamar for VMware User Guide

Preface
As part of an effort to improve the product lines, revisions of the software and hardware areperiodically released. Therefore, some functions that are described in this document might not besupported by all versions of the software or hardware currently in use. The product release notesprovide the most up-to-date information on product features.
Contact the technical support professional when a product does not function correctly or does notfunction as described in this document.
Note: This document was accurate at publication time. To find the latest version of thisdocument, go to Online Support (https://support.EMC.com).
Purpose
This guide describes various methods and strategies for protecting VMware virtual machines.
Audience
The information in this publication is intended for system administrators who are familiar with:
l Basic Avamar system administration principles, and procedures found in the AvamarAdministration Guide
l Other Avamar client software information (primarily installation, and configuration procedures)found in various Avamar client guides
A comprehensive discussion of basic Avamar system administration concepts and principles, suchas clients, datasets, schedules, retention policies, and backup policies, is beyond the scope of thispublication. The Avamar Administration Guide provides details.
Revision history
The following table presents the revision history of this document.
Revision history
Table 1 Revision history
Revision Date Description
01 November 15, 2019 GA release of Avamar 19.2
Related documentation
The following Dell EMC publications provide additional information:
l E-LAB Navigator at https://elabnavigator.emc.com/eln/modernHomeDataProtection
l Avamar Release Notes
l Avamar Administration Guide
l Avamar Operational Best Practices Guide
l Avamar Product Security Guide
l Avamar Backup Clients User Guide
l Avamar for Exchange VSS User Guide
l Avamar for IBM DB2 User Guide
l Avamar for Lotus Domino User Guide
Dell EMC Avamar for VMware User Guide 13

l Avamar for Oracle User Guide
l Avamar for SharePoint VSS User Guide
l Avamar for SQL Server User Guide
l Avamar vSphere Web Client Administration Guide
The following VMware publications provide additional information:
l Introduction to VMware vSphere
l Getting Started with ESX
l vSphere Basic System Administration
l vSphere Resource Management Guide
l vSphere Web Access Administrator's Guide
l ESX and vCenter Server Installation Guide
l ESX Configuration Guide
l VMware Data Recovery Administration Guide
Special notice conventions used in this document
These conventions are used for special notices.
DANGER Indicates a hazardous situation which, if not avoided, results in death or seriousinjury.
WARNING Indicates a hazardous situation which, if not avoided, could result in death orserious injury.
CAUTION Indicates a hazardous situation which, if not avoided, could result in minor ormoderate injury.
NOTICE Addresses practices that are not related to personal injury.
Note: Presents information that is important, but not hazard-related.
Typographical conventions
These type style conventions are used in this document.
Table 2 Typographical conventions
Bold Used for names of interface elements, such as names of windows,dialog boxes, buttons, fields, tab names, key names, and menu paths(what the user specifically selects or clicks)
Italic Used for full titles of publications that are referenced in text
Monospace Used for:
l System code
l System output, such as an error message or script
l Pathnames, filenames, prompts, and syntax
l Commands and options
Monospace italic Used for variables
Monospace bold Used for user input
[ ] Square brackets enclose optional values
Preface
14 Dell EMC Avamar for VMware User Guide

Table 2 Typographical conventions (continued)
| Vertical bar indicates alternate selections - the bar means “or”
{ } Braces enclose content that the user must specify, such as x or y orz
... Ellipses indicate nonessential information that is omitted from theexample
Where to get help
The Avamar support page provides access to licensing information, product documentation,advisories, and downloads, as well as how-to and troubleshooting information. This informationmay resolve a product issue before contacting Customer Support.
To access the Avamar support page:
1. Go to https://www.dell.com/support/home/us/en/19.
2. Type a product name in the Enter a Service Tag, Serial Number, Service Request, Model,or Keyword search box.
3. Select the product from the list that appears. When you select a product, the ProductSupport page loads automatically.
4. (Optional) Add the product to the My Products list by clicking Add to My Saved Products inthe upper right corner of the Product Support page.
Documentation
The Avamar product documentation provides a comprehensive set of feature overview, operationaltask, and technical reference information. To supplement the information in product administrationand user guides, review the following documents:
l Release notes provide an overview of new features and known limitations for a release.
l Technical notes provide technical details about specific product features, including step-by-step tasks, where necessary.
l White papers provide an in-depth technical perspective of a product or products as applied tocritical business issues or requirements.
Knowledgebase
The Knowledgebase contains applicable solutions that you can search for either by solutionnumber (for example, KB000xxxxxx) or by keyword.
To search the Knowledgebase:
1. Go to https://www.dell.com/support/home/us/en/19.
2. Under the Support tab, click Knowledge Base.
3. Type either the solution number or keywords in the search box. Optionally, you can limit thesearch to specific products by typing a product name in the search box and then selecting theproduct from the list that appears.
Online communities
Go to Community Network at http://community.EMC.com for peer contacts, conversations, andcontent on product support and solutions. Interactively engage online with customers, partners,and certified professionals for all products.
Live chat
To engage Customer Support by using live interactive chat, click Join Live Chat on the ServiceCenter panel of the Avamar support page.
Preface
Dell EMC Avamar for VMware User Guide 15

Service Requests
For in-depth help from Customer Support, submit a service request by clicking Create ServiceRequests on the Service Center panel of the Avamar support page.
Note: To open a service request, you must have a valid support agreement. Contact a salesrepresentative for details about obtaining a valid support agreement or with questions about anaccount.
To review an open service request, click the Service Center link on the Service Center panel, andthen click View and manage service requests.
Enhancing support
It is recommended to enable ConnectEMC and Email Home on all Avamar systems:
l ConnectEMC automatically generates service requests for high priority events.
l Email Home sends configuration, capacity, and general system information to CustomerSupport.
Comments and suggestions
Comments and suggestions help to continue to improve the accuracy, organization, and overallquality of the user publications. Send comments and suggestions about this document to [email protected].
Please include the following information:
l Product name and version
l Document name, part number, and revision (for example, 01)
l Page numbers
l Other details to help address documentation issues
Preface
16 Dell EMC Avamar for VMware User Guide

CHAPTER 1
Introduction
This chapter includes the following topics:
l Avamar for VMware data protection overview....................................................................... 18l Changed block tracking......................................................................................................... 23l Image backup virtual machine quiescing................................................................................ 23l Image backup and recovery support in Amazon Web Services (AWS)...................................24
Dell EMC Avamar for VMware User Guide 17
Avamar for VMware data protection overviewAvamar offers two basic ways to protect data residing on VMware virtual machines: image backup,and guest backup.
Note: The Avamar AUI is only supported in stand-alone Windows and Linux environments only.
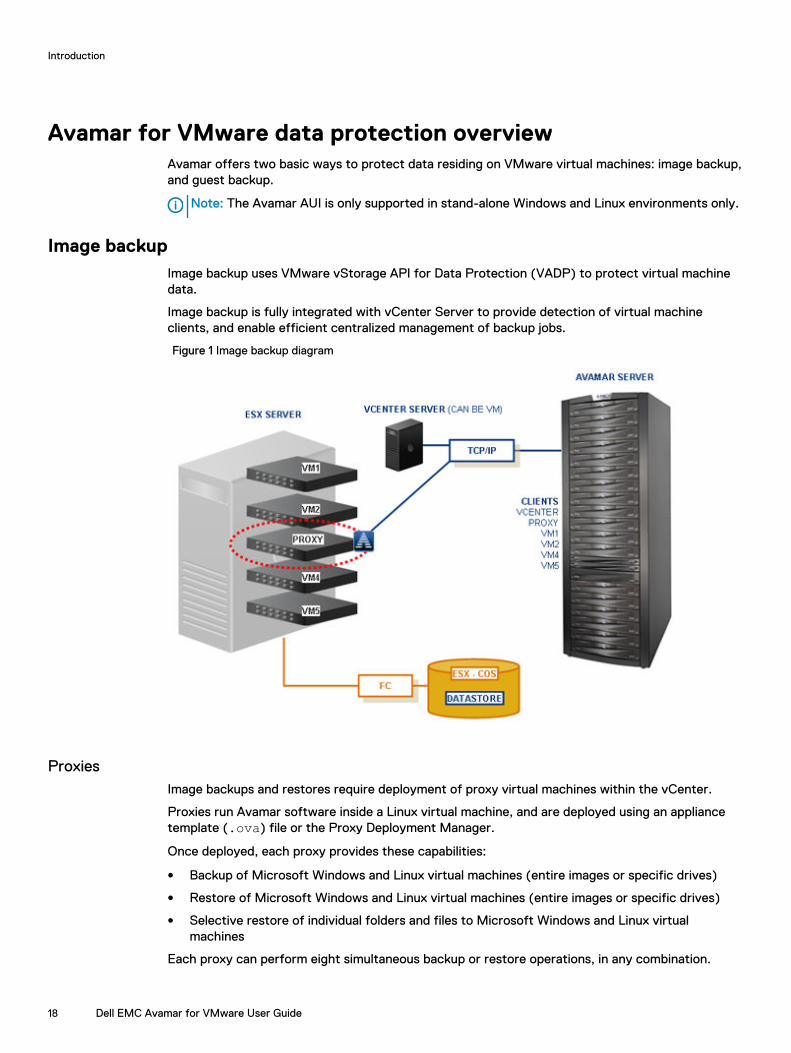
Image backupImage backup uses VMware vStorage API for Data Protection (VADP) to protect virtual machinedata.
Image backup is fully integrated with vCenter Server to provide detection of virtual machineclients, and enable efficient centralized management of backup jobs.
Figure 1 Image backup diagram
ProxiesImage backups and restores require deployment of proxy virtual machines within the vCenter.
Proxies run Avamar software inside a Linux virtual machine, and are deployed using an appliancetemplate (.ova) file or the Proxy Deployment Manager.
Once deployed, each proxy provides these capabilities:
l Backup of Microsoft Windows and Linux virtual machines (entire images or specific drives)
l Restore of Microsoft Windows and Linux virtual machines (entire images or specific drives)
l Selective restore of individual folders and files to Microsoft Windows and Linux virtualmachines
Each proxy can perform eight simultaneous backup or restore operations, in any combination.
Introduction
18 Dell EMC Avamar for VMware User Guide

Proxies are allowed in any part of the Avamar Administrator account management tree except thevCenter Server domain or subdomains. Additionally, you should not activate proxies into the rootdomain (/). Otherwise, this action causes problems during system migration.
Although it is possible to restore across datacenters (use a proxy that is deployed in one datacenter to restore files to a virtual machine in another data center), restores take noticeably longerthan if the proxy and the target virtual machine are in the same data center. For best performance,use the Proxy Deployment Manager which recommends the ideal deployment configuration.
Default proxy virtual machine specifications
The following figure outlines the default requirements for the proxy virtual machine.
Note: The IP address that is assigned to the network adapter belongs to the guest network.
Figure 2 Default proxy virtual machine specifications
SnapshotsThe image backup process requires temporary creation of a virtual machine snapshot.
If the virtual machine is running at the time of backup, this snapshot can impact disk I/O andconsume disk space on the datastore in which the virtual machine resides. Snapshot creation anddeletion can take a long time if the virtual machine runs a heavy disk I/O workload during backup
Avamar image backup supports the following types of virtual disks:
l Flat (version 1 and 2)
l Raw Device Mapped (RDM) in virtual mode only (version 1 and 2)
l Sparse (version 1 and 2)
Other virtual disk types are not supported.
Supported storage architectures
Image backup fully supports the following storage architectures:
l Fiber channel SAN storage hosting VMFS or RDMS
l iSCSI SAN storage
l NFS
Image backup system limitationsThe following system-wide limitations apply to image backups.
Special characters are not allowed in datacenter, datastore, folder, or virtual machine names
Because of a known limitation in the vCenter software, when special characters are used in thedatacenter, datastore, folder, or virtual machine names, the .vmx file is not included in the backup.
Introduction
Dell EMC Avamar for VMware User Guide 19

This issue is seen when special characters like %, &, *, $, #, @, !, \, /, :, *, ?, ", <, >, |, ;, ',+,=,?,~are used.As a long-term solution for this issue, upgrade the VMware software to a version where this issueis resolved. However, until a fix is provided by VMware, rename the datacenter, datastore, folder,or virtual machine names without using these special characters.
Avamar server upgrades require proxy reboots
After you upgrade Avamar server software, you must manually reboot all proxies connected to thatserver.
Guest backupGuest backup protects virtual machine data by installing Avamar client software on the virtualmachine just as if it were a physical machine, then registering and activating that client with anAvamar server. No special configuration is required.
Note: When registering virtual machine clients protected by guest backup, do not registerthem to a vCenter domain. Doing so prevents the administrator from locating or managing thatvirtual machine in Avamar Administrator. Instead register any virtual machine clients protectedby guest backup to some other domain or subdomain (for example, /clients).
The following table lists Avamar client guides, which provide detailed instructions for installingAvamar client software in virtual machines.
Table 3 Guest backup installation resources
Client Publication
IBM AIX file systems Avamar Backup Clients User Guide
Linux file systems:
l Debian
l CentOS
l Red Hat
l SUSE
l Ubuntu
Avamar Backup Clients User Guide
UNIX file systems:
l HP-UX
l Solaris
Avamar Backup Clients User Guide
IBM DB2 databases hosted on IBM AIX, RedHat and SUSE Linux, and Microsoft Windows
Avamar for IBM DB2 User Guide
Lotus Domino databases Avamar for Lotus Domino User Guide
Mac OS X file systems Avamar Backup Clients User Guide
Microsoft Exchange databases Avamar for Exchange VSS User Guide
Microsoft Office SharePoint implementations Avamar for SharePoint VSS User Guide
Microsoft SQL Server databases Avamar for SQL Server User Guide
Microsoft Windows file systems Avamar Backup Clients User Guide
Introduction
20 Dell EMC Avamar for VMware User Guide

Table 3 Guest backup installation resources (continued)
Client Publication
Oracle databases hosted on IBM AIX, RedHat, and SUSE Linux, Sun Solaris, andMicrosoft Windows
Avamar for Oracle User Guide
ConsiderationsThere are various considerations of using either image or guest backup to protect virtual machinedata.
General use case guidelinesFor virtual machines hosted in a vCenter, image backup enables you to protect multiple virtualmachines with the least amount of effort.
On Windows Vista/2008 and later virtual machines, image backups are fully application-consistentand sufficient for most use cases involving Microsoft Exchange, Microsoft Office SharePoint, andMicrosoft SQL Server. However, because image backup is limited to functionality offered by theVMware vStorage API for Data Protection (VADP), some deployments might require moreadvanced functionality than that offered by VADP. In these situations, the additional functionalitythat is provided by guest backup might offer a better solution.
The following deployments are known to benefit from using guest backup instead of image backup:
l Exchange Database Availability Groups (DAGs)
l SharePoint Server Farms
l SharePoint deployments requiring log truncation
Guest backup is the only way to protect virtual machines that are not hosted in a vCenter (forexample, desktops and laptops).
Ease of implementationImage backup:
l Can leverage vCenter to discover virtual machines, and add them to the Avamar server inbatches.
l Requires a moderate amount of initial setup and configuration.
Guest backup:
l Supports any virtual machine running an operating system for which Avamar client software isavailable.
l Supports applications such as DB2, Exchange, Oracle, and SQL Server databases.
l Easily fits into most existing backup schemes; day-to-day backup procedures do not change.
l Avamar client software must be individually installed, and managed inside each virtual machine.
EfficiencyImage backup:
l Offers moderate deduplication efficiency.
l Does not consume guest virtual machine CPU, RAM, and disk resources during backups.
l Does consume ESX Server CPU, RAM, and disk resources during backups.
Guest backup:
Introduction
Dell EMC Avamar for VMware User Guide 21

l Offers the highest level of data deduplication efficiency.
l Does consume small amounts of guest virtual machine CPU, RAM, and disk resources duringbackups.
l Does not consume ESX Server CPU, RAM, and disk resources during backups.
Backup and restoreImage backup:
l Image backups are supported for all machines currently supported by VMware.
l Backups can comprise an entire virtual machine image (all drives) or selected drives (.vmdkfiles).
l Individual folder and file restores supported for both Windows and Linux virtual machines.
l Backups are not optimized (temp files, swap files, and so forth, are included).
l Unused file system space is backed up.
l Virtual machines need not have a network connection to Avamar server.
l Virtual machines need not be running for backups to occur.
Guest backup:
l Backups are highly optimized (temp files, swap files, and so forth, are not included).
l Backups are highly customizable (supports full range of include and exclude features).
l Database backups support transaction log truncation, and other advanced features.
l Unused file system space is not backed up.
l Individual folder and file restores are supported for all supported virtual machines (not justLinux and Windows)
l Backup and restore jobs can execute pre- and post-processing scripts.
l Virtual machines must have a network connection to Avamar server.
l Virtual machines must be running for backups to occur.
Required VMware knowledgeImage backup requires moderate VMware knowledge. Integrators should have working knowledgeof the vCenter topology in use at that customer site (that is, which ESX Servers host eachdatastore, and which datastores store each virtual machine’s data), and the ability to log in tovCenter with administrator privileges.
Guest backup and restore requires no advanced scripting or VMware knowledge.
Using both image and guest backupA virtual machine can be protected by both guest backup and image backup. For example, a dailyguest backup might be used to protect selective files, and a less frequent or on-demand full imagebackup might be used to protect the full machine. This scheme accommodates scenarios withlimited backup windows.
To support using both image and guest backup to protect the same virtual machine, you mustconfigure the Avamar MCS to allow duplicate client names.
Introduction
22 Dell EMC Avamar for VMware User Guide
Changed block trackingChanged block tracking is a VMware feature that tracks which file system blocks on a virtualmachine have changed between backups.
Changed block tracking identifies unused space on a virtual disk during the initial backup of thevirtual machine, and also empty space that has not changed since the previous backup. Avamardata deduplication performs a similar function. However, using this feature provides valuable I/Oreduction earlier in the backup process. Changed block tracking dramatically improvesperformance if SAN connectivity is not available.
If changed block tracking is not enabled, each virtual machine file system image must be fullyprocessed for each backup, possibly resulting in unacceptably long backup windows, and excessiveback-end storage read/write activity.
Changed block tracking can also reduce the time that is required to restore (“roll back”) a virtualmachine to a recent backup image by automatically eliminating unnecessary writes during therestore process.
Changed block tracking is only available with the following types of virtual machines that use thefollowing types of virtual disk formats:
l Virtual machine versions 7 and laterThe earlier virtual machine version 4 is commonly used on ESX 3.X hosts and in virtualmachines that are deployed from templates that support both ESX 3.x and 4.0 hosts. Theversion of a virtual machine does not change when the underlying ESX host is upgraded. Manycommercial appliances exist in version 4 to allow deployment on ESX 3.x hosts.
vCenter version 4 provides the ability to upgrade version 4 virtual machine hardware from toversion 7 virtual machine hardware. This upgrade is irreversible and makes the virtual machineincompatible with earlier versions of VMware software products. vCenter online help providesdetails.
l Disks cannot be physical compatibility RDM
l The same disk cannot be mounted by multiple virtual machines
l Virtual machines must be in a configuration that supports snapshots
Enabling changed block tracking does not take effect until any of the following actions occur onthe virtual machine: reboot, power on, resume after suspend, or migrate.
Image backup virtual machine quiescingImage backup does not provide any additional virtual machine quiescing capabilities other thanthose features that are provided by VMware vStorage API for Data Protection (VADP).
Before performing an image backup, three levels of virtual machine quiescing are possible:
l Crash-consistent quiescing
l File system-consistent quiescing
l Application-consistent quiescing
Crash-consistent quiescing is the least desirable level of quiescing because the virtual disk imagebeing backed up is consistent with what would occur by interrupting power to a physical computer.File system writes might or might not be in progress when power is interrupted. Because of thisissue, there is always a chance of some data loss.
File system-consistent quiescing is more desirable because the virtual machine is allowed tocomplete any file system writes before the disk is backed up. This level of quiescing is only
Introduction
Dell EMC Avamar for VMware User Guide 23

available on Windows virtual machines capable of providing Windows Volume Snapshot Service(VSS) services, and that are running VMware Tools.
Application-consistent quiescing is the most desirable level of quiescing. In addition to theadvantages provided by file system-consistent quiescing, applications are notified that a backuphas occurred so that they can clear their transaction logs.
Application-consistent quiescing is only available on Windows Vista/2008 and later virtualmachines that are running VMware Tools.
Image backup and recovery support in Amazon Web Services(AWS)
Avamar proxy provides image backup and restore support for VMware Cloud on AWS.
You can use Avamar to seamlessly deploy and manage VMware workloads across all VMware on-premises and AWS environments.
Consider the following points:
l VMware vSphere 6.5 or greater is required.
l There is no network connection between the ESXi host and the Avamar proxy on VMwareCloud on AWS. A vCenter is required for communication.
l User privileges are limited on VMware Cloud on AWS.
l Supports virtual machines that reside in a workload service pool.
l Avamar Virtual Edition support for VMware tags with SSO service.
Prerequisites
Review the following item before you begin:
l If you use NSX-T, configure DNS to resolve to the internal IP address of the vCenter server.Click SDDC Management > Settings > vCenter FQDN and select the private vCenter IPaddress so that you can directly access the management network over the built-in firewall.Open TCP port 443 for the vCenter server in both the management gateway and the computegateway. VMware KB article 70846 provides more information.
Limitations
The following features are not supported:
l Application consistent backup
l File-level restore from an image-level backup if using NSX-V. Note that this is not a limitation ifusing NSX-T.
l Proxy deployment manager. Proxies must be deployed manually.
l Instant access recovery of an image-level backup
l Emergency restore (image restore directly to an ESXi host, bypassing the vCenter)
l Image-level backups and restores using NBD or NBDSSL, or SAN transport mode. Only HotAddis supported.
l Advanced policy based data protection for MS-SQL using Avamar.
l Application aware image backups for MS-SQL and MS-Exchange
l Image backup and restore when the datacenter is under a folder
l Data exclusion
l Proxy appliance configured with dual-stack or IPv6-only.
Introduction
24 Dell EMC Avamar for VMware User Guide
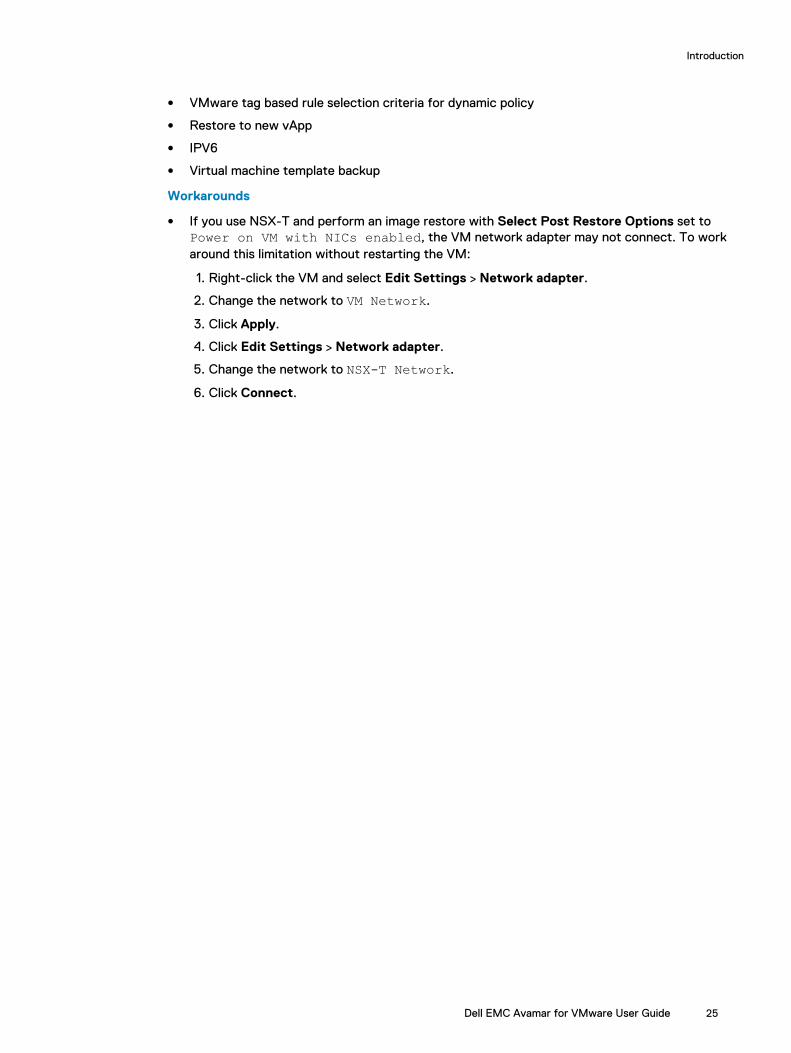
l VMware tag based rule selection criteria for dynamic policy
l Restore to new vApp
l IPV6
l Virtual machine template backup
Workarounds
l If you use NSX-T and perform an image restore with Select Post Restore Options set toPower on VM with NICs enabled, the VM network adapter may not connect. To workaround this limitation without restarting the VM:
1. Right-click the VM and select Edit Settings > Network adapter.
2. Change the network to VM Network.
3. Click Apply.
4. Click Edit Settings > Network adapter.
5. Change the network to NSX-T Network.
6. Click Connect.
Introduction
Dell EMC Avamar for VMware User Guide 25

Introduction
26 Dell EMC Avamar for VMware User Guide

CHAPTER 2
Configuration and Setup
This chapter includes the following topics:
l Best practices....................................................................................................................... 28l (Optional) Configuring support for multiple vCenters........................................................... 28l Installing Avamar Administrator software.............................................................................. 29l Configuring vCenter-to-Avamar authentication.................................................................... 30l Creating a dedicated vCenter user account........................................................................... 31l Add a vCenter as an Avamar client in the AUI........................................................................34l Register or add a proxy client................................................................................................36l Edit vCenter ......................................................................................................................... 37l Auto-discovery of virtual machines....................................................................................... 38l Deploying proxies.................................................................................................................. 39l Upgrading proxies................................................................................................................. 43l Maintaining proxies................................................................................................................47l Security patch updates for proxies........................................................................................49l Additional Avamar server configuration..................................................................................51
Dell EMC Avamar for VMware User Guide 27

Best practicesFollow these best practices when configuring your system.
Verify ESX and vCenter certificates
Use properly registered certificates from a trusted provider that match DNS names for ESX andvCenter.
Use fully qualified ESX Server hostnames
When adding new ESX Servers to vCenter environments, you should adhere to the VMwarerecommended practice of naming ESX Servers with fully qualified hostnames (not an IP address orsimple hostname). Using anything other than a fully qualified hostname can result in networkconnection failures due to incorrect SSL certificate handling.
Recommendations for high change-rate clients
When protecting high change rate clients, such as database hosts, use guest backup, or storeimage backups on a Data Domain system.
Use indirect root login for proxies
Direct root login for proxies is no longer available. Instead, when a procedure requires root access,log in as the admin user, and then change to the root user by typing su -. This behaviorcorresponds to the existing root login configuration for the Avamar server.
Network settings
If you do not restore network settings after a restore operation, ensure that you manuallyconfigure network settings after the operation completes.
(Optional) Configuring support for multiple vCentersAvamar servers support protecting up to 15 vCenters with no additional configuration required.However, if you will be protecting more than 15 vCenters, or if your Avamar server was upgradedfrom the previous version, some manual configuration is required.
Procedure
1. Open a command shell and log in by using one of the following methods:
l For a single-node server, log in to the server as admin.
l For a multi-node server, log in to the utility node as admin.
2. Stop the MCS by typing the following command:
dpnctl stop mcs
3. Open /usr/local/avamar/var/mc/server_data/prefs/mcserver.xml in a UNIXtext editor.
4. Ensure that the max_number_of_vcenters setting is equal to or greater than the numberof vCenters you intend to protect:
a. Find the max_number_of_vcenters entry key.
b. Change the max_number_of_vcenters setting to num, where num is an integer equalto or greater than the number of vCenters you intend to protect.
For example, this setting allows as many as 15 vCenters to be protected by this Avamarserver:
Configuration and Setup
28 Dell EMC Avamar for VMware User Guide

<entry key="max_number_of_vcenters" value="15" />5. If protecting 50 or more vCenters, also change the maxJavaHeap setting to -Xmx2G:
a. Find the maxJavaHeap entry key.
b. Change the maxJavaHeap setting to -Xmx2G:
<entry key="maxJavaHeap" value="-Xmx2G" />By default, the maxJavaHeap parameter is 2G. Use the following command to changethe parameter:
entry key="maxJavaHeap" value="-Xmx3G" merge="keep"
6. Close mcserver.xml and save the changes.
7. Start the MCS and the scheduler by typing the following command:
dpnctl start mcsdpnctl start sched
Installing Avamar Administrator softwareInstall Avamar Administrator software on your Windows computer.
Procedure
1. Open a web browser and type the following URL:
https://Avamar_server/dtlt/home.htmlwhere Avamar_server is the DNS name or IP address of the Avamar server.
The Avamar Web Restore page appears.
2. Click Downloads.
3. Navigate to the folder containing 32-bit Windows software installation packages.
4. Locate the Java Runtime Environment (JRE) install package (it is typically the last entry inthe folder).
5. If the JRE on the client computer is older than the JRE hosted on the Avamar server,download and install the newer JRE:
a. Click the jre-version-windows-i586-p link.
b. Open the installation file, or download the file, and then open it from the saved location.
c. Follow the onscreen instructions to complete the JRE installation.
6. Click the AvamarConsoleMultiple-windows-x86-version.exe link.
7. Open the installation file, or download the file, and then open it from the saved location.
8. Follow the onscreen instructions to complete the Avamar Administrator softwareinstallation.
Configuration and Setup
Dell EMC Avamar for VMware User Guide 29

Configuring vCenter-to-Avamar authenticationConfigure vCenter-to-Avamar authentication for each vCenter you intend to protect.
About this task
The most secure method for configuring vCenter-to-Avamar authentication is to add vCenterauthentication certificates to the Avamar MCS keystore. You must do this for each vCenter youintend to protect .
If you do not want to add vCenter authentication certificates to the Avamar MCS keystore, youmust disable certificate authentication for all vCenter-to-Avamar MCS communications.
Adding vCenter authentication certificates to the MCS keystoreConfigure vCenter-to-Avamar authentication by adding a vCenter authentication certificate to theMCS keystore. Perform this action for each vCenter that you intend to protect.
Before you begin
Note: Importing the same certificate with a different alias name is not permitted.
Procedure
1. Log in to the Avamar AUI with Administrator privileges. Open a web browser and type thefollowing URL:
https://Avamar_server/auiwhere Avamar_server is the DNS name or IP address of the Avamar server.
Note: If your environment does not meet HTTPS certificate validation requirements, thecertificate validation fails and an error message appears asking if you want to continueto download packages. Ignoring certificate validation might cause security issues.
a. In the Avamar Username field, type a username with administrative privileges.
b. In the Avamar Password field, type the password for the administrative user.
c. Select Avamar as the Auth Type.
d. Click Log In.
2. In the AUI navigation pane on the left, click , and then click Administration > System.
The System window appears.
3. Select the Certificate tab, and then click under the Trust Certificate tab.
The Import Certificate dialog box appears.
4. Import the vCenter trust certificate by specifying the following information:
a. In the Base Information window, perform the following steps:
a. Specify the alias name for the vCenter certificate.
b. Click the BROWSE button to browse and import the vCenter certificate.
c. Click NEXT.
b. (Optional) On the Validation window, specify the IP address of the vCenter, the Portnumber as 443, and then click VALIDATE.
Configuration and Setup
30 Dell EMC Avamar for VMware User Guide

The Validation Result pop-up window is displayed, where you can view if the validationis successful or failed. If the validation fails, verify the inputs again.If you skip validation and proceed with importing the certificate, the IP and Port fieldswill be grayed out.
Note: Although validation is optional, for vCenter authentication certificates it isstrongly recommended that you perform this step to ensure there is successfulcommunication between Avamar and the vCenter server. The Avamar ProductSecurity Guide provides more information.
5. Click FINISH.
The successfully imported vCenter certificates are displayed under the Trust Certificatetab. You can view and delete the vCenter certificates by clicking the View and Delete icons,respectively.
Note: To import the parent vCenter trusted certificate, open a web browser and go tohttps://vCenter IP, then right-click Download Root CA certificate in the bottomright corner of the window and select Save As... to extract the file. It is not necessaryto restart the MCS after the vCenter certificate is imported to the MCS keystore.
Disabling MCS certificate authenticationIf you do not want to add vCenter authentication certificates to the Avamar MCS keystore, youmust disable certificate authentication for all vCenter-to-Avamar MCS communications.
Procedure
1. Open a command shell and log in by using one of the following methods:
l For a single-node server, log in to the server as admin.
l For a multi-node server, log in to the utility node as admin.
2. Stop the MCS by typing the following command:
dpnctl stop mcs
3. Open /usr/local/avamar/var/mc/server_data/prefs/mcserver.xml in a UNIXtext editor.
4. Find the ignore_vc_cert entry key.
5. Change the ignore_vc_cert setting to true.
<entry key="ignore_vc_cert" value="true" />6. Close mcserver.xml and save the changes.
7. Start the MCS and the scheduler by typing the following command:
dpnctl start mcsdpnctl start sched
Creating a dedicated vCenter user accountWe strongly recommend that you set up a separate user account on each vCenter that is strictlydedicated for use with Avamar.
About this task
Using a separate vCenter user account ensures maximum clarity if it becomes necessary toexamine vCenter logs. Use of a generic user account such as “Administrator” might hamper future
Configuration and Setup
Dell EMC Avamar for VMware User Guide 31

troubleshooting efforts because it might not be clear which actions are actually interfacing orcommunicating with the Avamar server.
Note: The user account must be added to the top (root) level in each vCenter that you intendto protect. If you create the user account at any other level (for example, at a datacenterlevel), backups fail.
Table 4 Minimum required vCenter user account privileges
Privilege type Required privileges
Alarms l Create alarm
l Edit alarm
Datastore l Allocate space
l Browse datastore
l Configure datastore
l Low levefile operations
l Move datastore
l Remove datastore
l Delete File
l Rename datastore
Extension l Register extension
l Unregister extension
l Update extension
Folder l Create folder
Global l Cancel task
l Disable methods
l Enable methods
l Licenses
l Log event
l Manage custom attributes
l Set custom attribute
l Settings
Host l Configuration > Storage partition configuration
Network l Assign network
l Configure
Resource l Assign virtual machine to resource pool
Sessions l Validate session
Tasks l Create task
Configuration and Setup
32 Dell EMC Avamar for VMware User Guide
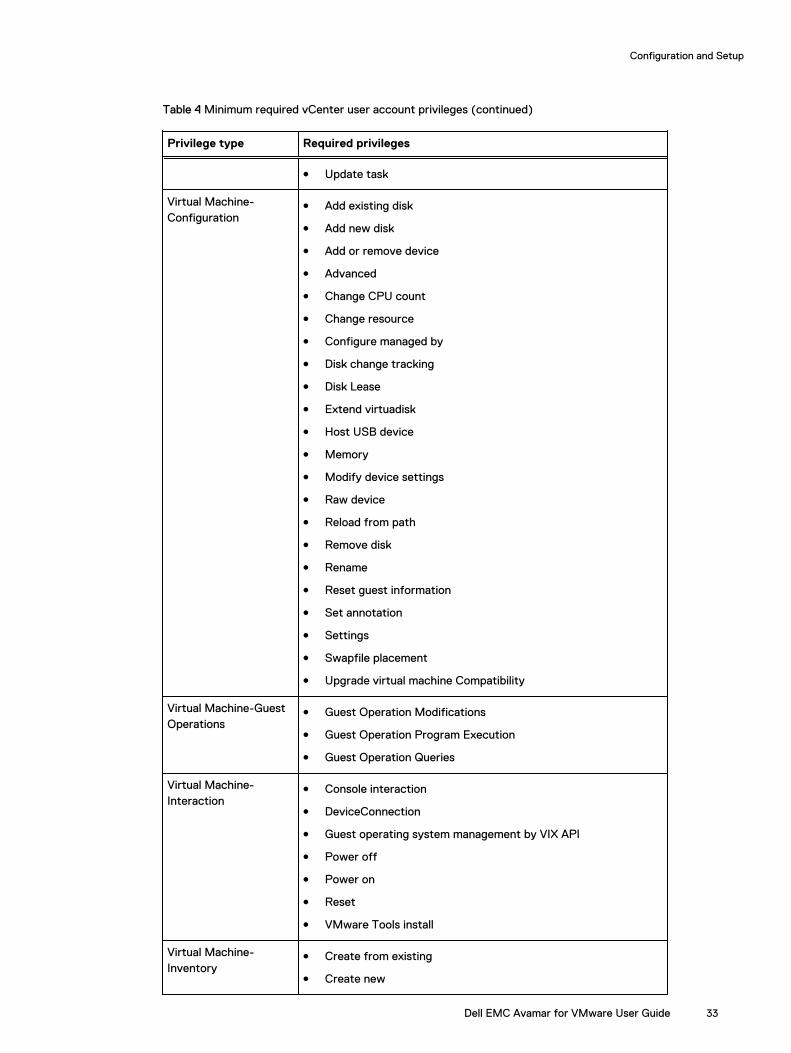
Table 4 Minimum required vCenter user account privileges (continued)
Privilege type Required privileges
l Update task
Virtual Machine-Configuration
l Add existing disk
l Add new disk
l Add or remove device
l Advanced
l Change CPU count
l Change resource
l Configure managed by
l Disk change tracking
l Disk Lease
l Extend virtuadisk
l Host USB device
l Memory
l Modify device settings
l Raw device
l Reload from path
l Remove disk
l Rename
l Reset guest information
l Set annotation
l Settings
l Swapfile placement
l Upgrade virtual machine Compatibility
Virtual Machine-GuestOperations
l Guest Operation Modifications
l Guest Operation Program Execution
l Guest Operation Queries
Virtual Machine-Interaction
l Console interaction
l DeviceConnection
l Guest operating system management by VIX API
l Power off
l Power on
l Reset
l VMware Tools install
Virtual Machine-Inventory
l Create from existing
l Create new
Configuration and Setup
Dell EMC Avamar for VMware User Guide 33

Table 4 Minimum required vCenter user account privileges (continued)
Privilege type Required privileges
l Register
l Remove
l Unregister
VirtuaMachine-Provisioning
l Allow disk access
l Allow read-only disk access
l Allow virtual machine download
l Clone virtual machine
l Mark as template
Virtual Machine-Snapshot Management
l Create snapshot
l Remove snapshot
l Revert to snapshot
vApp l Export
l Import
l vApp application configuration
Add a vCenter as an Avamar client in the AUIUse the following procedure to add a vCenter as an Avamar client in the AUI.
About this task
Note: If the vCenter was already registered as a normal backup client (for example, to supportguest level backup), attempting to add that same vCenter as a vCenter client will fail becausethe system will not allow you to register the same client twice. If this occurs:
1. Retire the existing vCenter client in the AUI.
2. Add the vCenter as a vCenter client by using the procedure below.
3. Re-invite the retired vCenter client as a normal client to support guest level backup fromthe vCenter server.
Procedure
1. In the AUI navigation pane on the left, click , and then click Asset Management.
2. In the domain tree, select a vCenter domain or a sub-domain for the client.
To select a sub-domain client, toggle the Include Sub-domain switch to on.
3. Click next to ADD CLIENT, and then select Add VMware vCenter.
The New vCenter Client wizard appears.
4. In the New Client Name or IP field, type the name of the client and then click NEXT.
The vCenter Information pane appears.
Configuration and Setup
34 Dell EMC Avamar for VMware User Guide

5. In the vCenter Information pane, compete the following information for the vCenter:
a. In the User Name field, type the user account name of the vCenter server administrator.
b. In the Password field, type the password for the vCenter user account.
c. In the Verify Password field, retype the password for the vCenter user account.
d. In the Port field, type the vCenter web services listener data port number.
443 is the default setting.
e. Click NEXT.
The Advanced pane appears where you can choose to enable the following auto discoveryfeatures that include Dynamic VM import by rule or Change Block Tracking.
6. To enable Dynamic VM import by rule, select Enable Dynamic VM import by rule andperform the following steps:
Note: When the VMs are auto-discovered, user defined rules are used by the Avamarsoftware to map the auto-discovered VMs to Avamar domains. User-defined rules arealso used to automatically assign backup policies to auto-discovered VMs.
l To add a rule:
a. Click ADD RULE.
b. In the Rule field, select a rule from the list.
c. In the Domain filed, type the domain that the auto-discovered VM should be includedin.If the domain entered here does not exist, it is automatically created.
l To create a rule:Rules are used to automatically map auto-discovered VMs to domains, and to assignbackup policies to auto-discovered VMs. Rules use one or more filtering mechanisms todetermine whether VMs qualify under the rule.
a. Click CREATE RULE.
b. In the Rule Name field, type a name for the rule.
c. In the Match Type field, select whether the rule should match Any of the listed filtermechanisms, or All of them.This selection allows you to configure multiple different filters to select VMs, and todetermine how these filters interact with one another to select the correct VMs. Forexample, you might create a filter that uses a VM folder path to select VMs, andanother filter that uses a VM naming convention.
This option can then be used as follows to determine which VMs are included underthis rule:
n To include only VMs that are in the defined folder path and also follow the namingconvention, select All. This step excludes VMs that are in the folder path but thatdo not follow the naming convention, and also excludes VMs that follow thenaming convention but are not in the folder path.
n To include any VMs that are either in the VM folder path or that follow the namingconvention, select Any.
d. In the Filter field, select the filter type.For example, to create a filter that uses a VM naming convention, select VM Name,or to create filter that uses a vCenter VM Tag, select VM Tag.
Note: The VM Tag selection is only available with vCenter 6.0 and greater.
Configuration and Setup
Dell EMC Avamar for VMware User Guide 35

e. In the Operator field, select the operand.For example, if VM Name is selected for the filter type and begins with is selectedfor the operand, then all VMs whose names begin with the filter text is selected.
f. In the Value field, type the filter text.For example, to create a filter that selects all VMs whose names begin with the textstring HR_, select VM Name for the filter type, begins with for the operand, and typeHR_ for the filter text.
g. To create additional filters, click the plus sign (+).This step adds a row to the list of filters. To delete an existing row, click Delete.
h. Click SUMBIT.Changes made to tags may experience a delay of up to 12 hours before beingenforced. For this reason, edit tags with caution, or perform a synchronized vCenteroperation, which automatically synchronizes the vCenter with the Avamar server.
Best practice for rule creation is to ensure that rules are mutually exclusive, to avoidthe situation where a VM might qualify under multiple rules.
l To enable Change Block Tracking, select Enable Change Block Tracking.If changed block tracking is not enabled, each virtual machine image must be fullyprocessed for each backup, which might result in long backup windows, or excessiveback-end storage read and write activity.
Enabling changed block tracking does not take effect until any of the following actionsoccur on the virtual machine:
n Restart
n Power on
n Resume after suspend
n Migrate
7. Click NEXT.
The Optional Information pane appears.
8. Optional, compete the optional contact information including the contact name, phonenumber, email, and location, and then click NEXT.
The Summary pane appears.
9. Review the client summary information, and then click ADD.
The Finish pane appears.
10. Click FINISH.
Note: Add IPV6 vCenter to Avamar using FQDN only. IPV6 address is not supported.
Register or add a proxy clientImage-level backup and restore operations require the use of proxy virtual machine clients.
About this task
Client registration is the process of establishing the identity of the proxy virtual machine clientswith the Avamar server. Once Avamar “knows” the client, it assigns a unique client ID (CID), whichit passes back to the client during activation.
Once the client is added and registered, you can then add a client to the system in a domain andgroup. This action provides a high degree of control. For example, you can assign a specificdataset, schedule, and retention policy. However, it can be time consuming to add many clients.
Configuration and Setup
36 Dell EMC Avamar for VMware User Guide

Procedure
1. In the AUI navigation pane on the left, click , and then click Asset Management.
2. To add a proxy virtual machine client, select the clients domain in the domain tree.
3. Click next to ADD CLIENT, and then select Add VMware Image Proxy.
The New Proxy Client wizard appears.
4. In the New Client Name field, type a unique fully qualified hostname, and then click NEXT.
A proxy can have three different names:
l The name of the host on which the proxy runs.
l The DNS name that is assigned to the proxy host.
l The Avamar client name after the proxy registers and activates with the Avamar server.
Note: To avoid confusion and potential problems, use the same fully qualified hostnamefor this proxy in all three contexts.
The Advanced pane appears.
5. In the Advanced pane, perform the following steps:
a. In the vCenter field, select the vCenter.
b. To enable auto data store mapping of the proxy, select Auto DataStore Mapping.
c. Click the Datastores tab, and then select all vCenter data stores that host machines thatyou want to protect with this proxy.
d. Click the Groups tab, and then assign this proxy to one or more groups by clicking thecheckbox next to each group.
The Optional Information pane appears.
6. Optional, complete the optional contact information including the contact name, phonenumber, email, and location, and then click NEXT.
The Summary pane appears.
7. Review the client summary information, and then click ADD.
The Finish pane appears.
8. Click FINISH.
Edit vCenterYou can edit existing information for vCenter client.
Procedure
1. In the AUI navigation pane on the left, click , and then click Asset Management.
2. In the hierarchical Domain tree, select the vCenter domain.
3. To edit the vCenter client information, Click the overflow menu( ), and then select EditvCenter.
The Edit Client dialog box is displayed.
4. Edit the vCenter information. You can edit the name, contact information, or locationinformation for vCenter.
Configuration and Setup
Dell EMC Avamar for VMware User Guide 37

l In Basic tab, you can edit name, domain, and overtime options available for backup.
l In Contact tab, you can edit the information like contact, phone, email address, andlocation.
l In VMware tab, following information can be edited:
n Username - you can edit the user account name of the vCenter server administrator.
n Password - you can edit the password for the vCenter user account.
n Confirm Password - retype the password for the vCenter user account.
n Port - you can edit the vCenter web services listener data port number. 443 is thedefault setting.
n You can enable or disable Dynamic VM Import by rule and Change Block Tracking
n You can ADD RULE from the existing or CREATE RULE for the vCenter client.
5. Click UPDATE.
Auto-discovery of virtual machinesWith Avamar release 7.4, you can configure Avamar vCenter clients to auto-discover VMs thathave been added to the vCenter. When the VMs are auto-discovered, user-defined rules are usedby the Avamar software to map the auto-discovered VMs to Avamar domains. User-defined rulesare also used to automatically assign backup policies to auto-discovered VMs.
In addition to auto-discovering new VMs, vMotion of VMs from one vCenter to another is alsoautomatically detected by the Avamar software. If the new vCenter hosting the VM is configuredin Avamar, the VM is automatically moved from the original vCenter client to the new vCenterclient using the same user-defined rules to assign its domain and backup policy. If a VM is deletedfrom vCenter, it is automatically removed from the vCenter client.
The auto-discover feature is supported with vCenter 5.5 and later releases. However, the vCentermust be at release 6.0 or greater to the use of VM Tags in rules. When protecting ESXi hostsinstead of vCenter, only VM names and the root folder are supported in rules.
As tag modification is not triggered by an event, if you are modifying tags on virtual machines,sync with vCenter operation immediately to make the tag change to be effective. If you do notwant to do this operation, the change is effective in these situations:
1. Restart Management Console Server.
2. Wait for every 12 hours full scan schedule.
3. Update vCenter, such as add or delete rule domain mapping.
Note: Avamar does not support auto-discovery for template VMs.
Domain mapping rules for VM auto-discoveryDomain mapping rules are used during auto-discovery to map new or moved VMs to Avamardomains.
About this task
Rules are selected or created when Enable dynamic VM import by rule is selected duringconfiguration of a vCenter client.
Configuration and Setup
38 Dell EMC Avamar for VMware User Guide

Creating a ruleRules are used to automatically map autodiscovered VMs to domains, and to assign backup policiesto autodiscovered VMs. Rules use one or more filtering mechanisms to determine whether VMsqualify under the rule.
About this task
You can apply a rule or create a rule during configuration of a vCenter client.
The Avamar Administration Guide provides information about creating rules.
Deploying proxiesDeploy one or more proxies on each vCenter you intend to protect with image backup.
About this task
If the proxy is deployed to a Distributed Resource Scheduler (DRS) enabled cluster, the clustercan move the proxy by using storage vMotion. While the proxy is migrating to a different storage,the jobs that are managed by the proxy are at risk. HotAdd does not work for the proxies that arelocated in a DRS cluster. Therefore, disable DRS for the deployed Avamar Proxy VMs.
For more information, refer to the VMware documentation.
Proxy Deployment ManagerProxy Deployment Manager is a feature that assists administrators with deploying and managingAvamar proxies in vCenter environments.
Proxy Deployment Manager is the preferred method for deploying proxies. Manual proxydeployment is still supported if necessary.
About proxy deploymentProxy Deployment assists administrators with proxy deployment by offering a recommendation asto the number of proxies that should be deployed in each vCenter, and a recommended ESX hostlocation for each proxy.
When generating a recommendation, Proxy Deployment performs a static point-in-time analysis ofthe virtual infrastructure. This analysis gathers data about the virtual infrastructure, such as thenumber of virtual machines, the number of datastores, and the number of virtual machines hostedin each datastore.
Users specify a data change rate and backup window duration for their site.
Proxy Deployment then calculates the optimum number of proxies that are required to back upthose virtual machines in the time that is allotted by the backup window. Proxy Deployment alsoconsiders the datastore and ESX host topology, and suggests an optimal ESX host location foreach proxy so that all datastores are protected.
This calculated proxy deployment topology is offered as a recommendation. This recommendationcan be accepted as offered, or modified to meet specific site requirements.
Before proxies can be deployed, each recommended proxy must be configured by specifying:
l Proxy name
l Avamar server domain where the proxy resides
l Proxy IP address
l Datastore assignment
Configuration and Setup
Dell EMC Avamar for VMware User Guide 39

l Network settings:
n Which existing virtual network to use
n DNS servers
n Network gateway
n Network mask
n NTP
After all proxies are configured, clicking creates the proxy virtual machines with the specifiedconfiguration settings.
You can generate new proxy deployment recommendations at any time. This is useful forperiodically reevaluating and optimizing proxy deployments when significant changes haveoccurred in the virtual infrastructure.
Considerations and best practicesProxy Deployment has been intentionally designed to ensure broad compatibility with mostcustomer environments. This necessitated making certain design assumptions about typicalcustomer environments and reasonable proxy capabilities in those environments. Understandingthese design assumptions can help you to better understand Proxy Deployment recommendationsin order to potentially further optimize proxy deployment at your site. Some best practices are alsodiscussed.
Data change rate
The data change rate is the percentage of a client file system that actually changes betweenbackups. Data change rates directly impact the number of proxies required to successfully back upall required virtual machines in the time allotted by the backup window. More data to be backed uprequires more time, more proxies, or both.
Even though empirical field data routinely reports client data change rates of 3-4% per day, bydefault Proxy Deployment assumes a client data change rate of 12% per day. The intentionallyconservative use of 12% as a design assumption provides a buffer.
If client data change rates at your site are routinely lower or higher than these assumed values, youcan add or delete proxies as needed. You can also shorten or lengthen the backup window.
Proxy data ingestion rate
Proxy data ingestion rate is another parameter that directly impacts the number of proxiesrequired to successfully back up all required virtual machines in the time allotted by the backupwindow. By default, Proxy Deployment assumes that each proxy can run 8 concurrent backup jobsand process 500 GB of data per hour.
While an assumed proxy data ingestion rate of 500 GB per hour is a very conservative estimate, anumber of factors at each customer site directly affect the actual proxy data ingestion rate. Someof these factors are the:
l Avamar server architecture (physical Avamar server using a Data Domain system for back endstorage versus a virtual Avamar server hosted in vCenter)
l Type of storage media used for proxy storage
l Network infrastructure and connectivity speed
l SAN infrastructure and connectivity speed
If proxy data ingestion rates at your site are routinely lower or higher than 500 GB per hour, youcan add or delete proxies as needed. You can also shorten or lengthen the backup window.
If your site consistently experiences substantially different proxy data ingestion rates (that is,either substantially lower or higher than 500 GB per hour), you can permanently change the
Configuration and Setup
40 Dell EMC Avamar for VMware User Guide

default proxy data ingestion rate setting, which will affect all future proxy deploymentrecommendations. To do this:
1. Open a command shell and log in to the Avamar server as user admin.
2. Switch user to root by typing su - .
3. Open /etc/vcs/dm.properties in a UNIX text editor.
4. Change the proxy_ingest_rate_gb_per_hour setting.
5. Save your changes and close /etc/vcs/dm.properties.
Protecting against proxy over commit
By default, each Avamar proxy is configured to allow 8 concurrent backup jobs. This setting isknown to work well for most customer sites.
We recommend against increasing the number of concurrent jobs to more than 8 because it canlead to a condition in which too many backup jobs are queued for a given proxy (proxy overcommit). This causes uneven distribution of backup jobs among proxies, and can also cause abottleneck in which backup jobs to take longer to complete than they otherwise might.
Some sites might benefit from configuring some proxies to allow fewer concurrent backup jobs.This generally requires deploying additional proxies, but can result in more even distribution ofbackup jobs among proxies, as opposed to concentrating or clustering backups in a certain area ofthe virtual infrastructure.
Optimization for level-1 incremental change block backups
When Proxy Deployment generates a proxy deploy recommendation, it does so by calculating howmany proxies are required to sustain normal backup operations. One of the assumptions aboutnormal backup operation is that backups will be level-1 incremental or changed block backups, notlevel-0 full backups.
Level-0 backups inherently take longer and use more proxy resources. Therefore, large new virtualmachine deployments can adversely affect the ability to complete all required backups in the timeallotted by the backup window.
For this reason, whenever possible phase-in large new virtual machine deployments in order to givethe system an opportunity to ingest the necessary level-0 backups.
If a phased-in deployment is not possible, another approach is to tolerate the failed backups thatwill occur due to proxy over commit. Once the system begins to settle, proxy resources will beunder committed, and those virtual machines will eventually be backed up. Administrators shouldmonitor the situation closely to ensure that the system does settle and that the virtual machineseventually do successfully back up.
Note: Avamar will attempt to deploy proxies where needed, but it is impossible to know alldetails about the environment so it is important you verify the proxy deployment does not overallocate proxies beyond the maximum supported.
Deploy proxiesDeploy one or more proxies on each vCenter that you intend to protect with image backup.
About this task
If the proxy is deployed to a Distributed Resource Scheduler (DRS) enabled cluster, the clustercan move the proxy by using storage vMotion. While the proxy is migrating to a different storage,the jobs that are managed by the proxy are at risk. HotAdd does not work for the proxies that arelocated in a DRS cluster. Therefore, disable DRS for the deployed Avamar Proxy virtual machines.
Configuration and Setup
Dell EMC Avamar for VMware User Guide 41

Procedure
1. In the AUI navigation pane on the left, click , and then click Proxy Management.
The Proxy Deployment page is displayed.
2. In the Config pane, complete the following settings:
a. Select a vCenter.
b. Set the Data Change Rate (%).
c. Set the Backup Window (minutes).
d. To include virtual machines using direct attached storage in this recommendation, selectthe Protect Virtual Machines on Local Storage check box.
This option ignores virtual machines on clustered-host local storage.
3. Click CREATE RECOMMENDATION.
The recommendation is added to the list in the lower pane.
The Recommendations pane shows the proposed deployment topology. Proposed newproxies are displayed under each ESX host with the name New proxy.
4. For each recommended proxy you intend to deploy, configure the proxy as follows:
a. In the Recommendations pane, select a New proxy.
b. Click .
The New Proxy dialog box is displayed.
c. Type the proxy name in the Name field.
d. Select an Avamar server Domain where this proxy resides.
e. Type the IP address in the IP field.
f. Select a datastore from the Datastore list.
g. Select a virtual network from the Network list.
h. Type the fully qualified DNS server name or IP address in the DNS String field.
i. Type the network gateway IP address in the Gateway field.
j. Type the network mask in the Netmask field.
k. Click SAVE.
5. (Optional) Add other proxies that you want to deploy:
Note: You must be prepared to specify the proxy name, IP address, fully qualified DNSserver name or IP address, network gateway and network mask for each proxy you add.
a. In the tree pane, select an ESX host.
b. Click New Proxy.
The New Proxy dialog box is displayed.
c. Type the proxy hostname in the Name field.
d. Select an Avamar server in the Domain list where the proxy resides.
e. Type the IP address in the IP field.
f. Select a datastore from the Datastore list.
Configuration and Setup
42 Dell EMC Avamar for VMware User Guide

g. Select a virtual network from the Network list.
h. Type the fully qualified DNS server name or IP address in the DNS String field.
i. Type the network gateway IP address in the Gateway field.
j. Type the network mask in the Netmask field.
k. Optional, type the NTP server address in the NTP field.
l. Click SAVE.
6. (Optional) Delete any proxies that you do not want to deploy:
a. In the tree pane, select a proxy.
b. Click .
c. Click YES.
7. To update the proxy topology, click .
8. When the proposed deployment topology is satisfactory, click to apply the changes anddeploy the proxy.
Results
If a proxy fails to deploy, it is completely deleted from the system. That hostname and IP addressare available for subsequent proxy deployments by setting keep_deploy_failed_proxy =Tru.
Upgrading proxiesThis section discusses how to upgrade proxies that run supported releases of the Avamarsoftware.
Avamar 19.2 includes an upgrade to the SLES 12 SP4 operating system, including for VMwareproxies. This upgrade replaces the previous SLES 11 and SLES 12 operating systems. AvamarRelease Notes contains important information about this upgrade, including prerequisites that youmust meet.
You cannot upgrade VMware proxies from one operating system to another by using the ISO file.Instead, use the Proxy Deployment Manager (PDM). PDM automatically removes the existingproxies and redeploys replacement Avamar 19.2 proxies. Upgrading Avamar proxies on page 44provides more information.
If you manually deployed a proxy for an earlier release, with a different version of the SLES OS,you must record the required information, remove the proxy, and then use the PDM to deploy anew proxy. Upgrading older or manually deployed Avamar proxies on page 44 provides moreinformation.
Note:The Proxy Deployment Manager does not list manually deployed proxies. Reregistering a proxywith an Avamar server on page 47 provides more information about using PDM to managemanually deployed proxies for Avamar 19.1 and later.
The following topics provide instructions that use Avamar Administrator, as some past Avamarreleases do not support the Avamar Web User Interface (AUI). Where available, you can use thePDM within the AUI instead. Deploying proxies on page 39 provides more information.
Configuration and Setup
Dell EMC Avamar for VMware User Guide 43

Upgrading Avamar proxiesProcedure
1. In Avamar Administrator, select VMware > Proxy Deployment Manager.
The Proxy Deployment Manager window appears.
2. Choose a vCenter, and then click Create Recommendation.
Existing proxies in the topology tree for the selected vCenter that must be upgraded are
indicated with a symbol, as well as a tooltip that indicates that the proxy has an updatepending.
3. Click Apply.
Upgrading older or manually deployed Avamar proxiesThis section provides information and procedures for upgrading supported Avamar proxy softwarefrom releases before Avamar 7.5.1, or where existing proxies were manually deployed.
Existing proxy configuration
The following information should be gathered before upgrading proxies to restore the proxysettings to the values that existed prior to the upgrade:
l VM container
n Name
n Host
n Datastore
n Network
n Folder
l VM client
n IP address
n Gateway
n DNS servers
n Netmask
l Policy
n Domain
n Datastores protecting
n Group membership
The following example charts demonstrate how this information should be gathered prior toupgrading proxies:
Table 5 Example chart for gathering proxy information
Name Host Datastore Network Folder IP
Proxy1 vcenter.com/host1
DS2 NW1 /proxies x.x.x.x
Configuration and Setup
44 Dell EMC Avamar for VMware User Guide

Table 5 Example chart for gathering proxy information (continued)
Name Host Datastore Network Folder IP
Proxy2 vcenter.com/host2
DS2 NW1 /proxies x.x.x.x
Table 6 Example chart for gathering proxy information, continued
Gateway DNS Netmask Domain Datastoreprotecting
Groupsprotecting
x.x.x.x x.x.x.x,x.x.x.x x.x.x.x /clients DS1,DS2 DefaultVirtualMachineGroup
x.x.x.x x.x.x.x,x.x.x.x x.x.x.x /clients DS1,DS2 Other Group
Viewing VM configurationProcedure
1. In the vSphere Client or vSphere Web Client, navigate to VMs and Templates view.
2. Locate existing proxies. For each proxy:
a. Note the VM and folder names.
b. Select the Summary tab.
c. Note the host, storage (datastore) and network.
d. Right click and select Edit Settings....
3. For each proxy:
l If using the vSphere Web Client, navigate to the vApp Options tab and note the IP,gateway, DNS, and netmask.
l If using the vSphere Client (Windows):
a. Navigate to the Options tab.
b. Select vApp Options > Advanced.
The right pane shows the vApp option fields.
c. Click Properties > Properties in the right pane.
The Advanced Properties Configuration window appears.
d. From the Properties table, note the IP address, gateway, DNS, and netmask values fromthe Value column corresponding to the following keys in the Key column:
Key Value
vami.ip0.EMC_Avamar_Virtual_Machine_Combined_Proxy IP address
vami.gateway.EMC_Avamar_Virtual_Machine_Combined_Proxy Gateway
vami.DNS.EMC_Avamar_Virtual_Machine_Combined_Proxy DNS servers
vami.netmask0.EMC_Avamar_Virtual_Machine_Combined_Proxy Netmask
Configuration and Setup
Dell EMC Avamar for VMware User Guide 45

Viewing datastore assignments and group membership
Procedure
1. In Avamar Administrator, click the Administration launcher link.
The Administration window is displayed.
2. Click the Account Management tab.
3. Locate the proxy and note the domain.
4. Select a proxy and click Edit.
The Edit Client dialog box appears.
5. Click the Datastores tab and note which datastores are selected.
6. Click the Groups tab and note which groups are selected.
7. Uncheck all groups in preparation for deleting this proxy.
8. Click OK.
Removing existing proxies
Procedure
1. In the vSphere Client or Web Client, locate existing proxies.
2. For each proxy:
a. Right click and select Power > Power off.
b. Wait for the proxy to power off, then right-click and select Delete from Disk.
The Confirm Delete confirmation windows appears.
c. Click Yes.
3. In Avamar Administrator, click the Administration launcher link.
The Administration window is displayed.
4. Click the Account Management tab.
5. Locate existing proxies, and for each proxy:
a. Right click and select Retire Client....
The Retire Client window appears.
b. Click OK.
Restoring datastore assignments and group membershipProcedure
1. In Avamar Administrator, click the Administration launcher link.
The Administration window is displayed.
2. Click the Account Management tab.
3. Select the updated proxy and click Edit.
The Edit Client dialog box appears.
4. Click the Datastores tab and verify the Datastore protecting the client, based on the chartcreated in Existing proxy configuration on page 44.
Configuration and Setup
46 Dell EMC Avamar for VMware User Guide

5. Click the Groups tab and verify the proxies that are members of this group, based on thechart created in Existing proxy configuration on page 44.
6. Click OK.
Re-deploying proxies using the Proxy Deployment Manager
About this task
Where available, you can use the Proxy Deployment Manager within the AUI instead. Deployingproxies on page 39 provides more information.
Procedure
1. In Avamar Administrator, select VMware > Proxy Deployment Manager.
The Proxy Deployment Manager window appears.
2. Choose a vCenter.
3. Set the Data change rate to 0.
This setting ensures that the Proxy Deployment Manager does not recommend proxiesthat are based on its analysis of the VMware environment.
4. Click Create Recommendation.
The tree pane shows the VMware topology. Verify that there are no recommended proxieslabeled New proxy.
5. For each proxy in the chart that is created in Existing proxy configuration on page 44:
a. Locate and select the host in the Proxy Deployment Manager.
b. Click New Proxy....
The New Proxy window appears.
c. Complete the Name, Domain, IP, Datastore, Network, DNS, Gateway, and Netmaskbased on the information in the chart.
d. Click Save.
6. Click Apply.
The new proxies are deployed. If any failures occur, the operation can be retried by clickingApply again.
Maintaining proxiesThis section includes the following topics:
Reregistering a proxy with an Avamar serverUse these instructions to reregister an existing proxy with an Avamar server.
Procedure
1. Launch the vSphere Client or vSphere Web Client, and log in to the vCenter Server.
2. Locate the proxy that you want to reregister.
3. Right click Power > Shut Down Guest.
4. Click Yes to confirm that you want to shut down the guest operating system.
5. Right click Power > Power Off.
Configuration and Setup
Dell EMC Avamar for VMware User Guide 47

6. Click Yes to confirm that you want to power off the proxy virtual machine.
7. Right-clickOpen Console.
A console window appears.
8. Right click Power > Power On.
9. Monitor the console window until the following message appears:
Please press a key now if you want to re-register this proxy withAvamar Administrator. Continuing in 10 seconds...
10. Click inside the console window and press Enter.
11. Type the Avamar server DNS name, and then press Enter.
12. Type an Avamar server domain name, and then press Enter.
The default domain is “clients.” However, your Avamar system administrator may havedefined other domains, and subdomains. Consult your Avamar system administrator for thedomain that you should use when registering this client.
Note: If typing a subdomain (for example, clients/MyClients), do not include a slash (/)as the first character. Including a slash as the first character causes an error, andprevents you from registering this client.
13. For proxies that run Avamar 19.1 and later, respond to the Proxy Deployment Managerprompt (Do you want this proxy to be managed by PDM (Proxy DeployManager) in AVE [Y/N]?).
This prompt does not appear if the proxy runs Avamar 18.2 or earlier.
For manually deployed proxies, this prompt controls the registration of the proxy with theProxy Deployment Manager.
l To manage the proxy with the Proxy Deployment Manager, type y, and then press Enter.Supply the vCenter hostname or IP address, and credentials when prompted.
l Otherwise, type n, and then press Enter.
Changing the proxy guest operating system admin passwordAbout this task
Note: Direct root login for SSH is disabled.
Procedure
1. Open a command shell and log in to the proxy as admin.
2. Type passwd.
3. Type the current guest operating system admin password, and then press Enter.
4. Type the new guest operating system admin password, and then press Enter.
5. Confirm the new password by typing the password again, and then press Enter.
Note: Once the proxy is deployed, change the password.
Configuration and Setup
48 Dell EMC Avamar for VMware User Guide

Changing the proxy guest operating system root passwordProcedure
1. Open a command shell and log in to the proxy as admin.
2. Switch user to root by typing the following command:
su -
3. Type passwd.
4. Type the current guest operating system root password, and then press Enter.
5. Type the new guest operating system root password, and then press Enter.
6. Confirm the new password by typing the password again, and then press Enter.
Note: Once the proxy is deployed, change the password.
Security patch updates for proxiesDell EMC periodically provides security roll-up patches to address potential security vulnerabilitieswith the proxy appliance. It is recommended that you check occasionally to determine if anupdated patch for the proxy is available.
Best practices and troubleshooting for applying security patch updates toproxies
Review the following items before you apply a security update patch to a proxy:
Best practices
l Security updates are only supported for proxies that are managed by the Proxy DeploymentManager. For a manually deployed proxy, use the initproxyappliace.sh option toregister a manually deployed proxy with the Proxy Deployment Manager. Older versions ofAvamar do not support this form of patching.
l Avamar 19.1 adds support for the package installation tracking feature. Proxy installations fromprevious releases are not traceable. Dell EMC recommends that you deploy or update proxiesto the most recent version by using the proxy upgrade functionality in the Proxy DeploymentManager.
l If you update the VAMI or the registered VAMI service (AVAMAR provider:AvamarVMwareCombined-CIM-linux-sles12sp1-x86_64-version.rpm), ensure thatyou manually restart the vami-sfcb service on the proxy.
Troubleshooting
l The patch install log resides on the proxy at /tmp/patch.log.
If the installation fails, the proxy fetches the log content and displays the content in the AUI.
l The install patch tracking log resides at /usr/local/avamarclient/var/patchinstall.log.
l The install script does not reside on the proxy. If you need to modify this script fortroubleshooting purposes, you can find the scripts at the following locations:
n For the hotfix RPM, the script resides on the Avamar server at /usr/local/avamar/var/vcs/dm/installpatch.sh.
Configuration and Setup
Dell EMC Avamar for VMware User Guide 49

n For the patch TGZ, the sec_rollup_proxy_install.sh script resides inside the TGZpackage.
The uploaded patch is saved in the Avamar server at /usr/local/avamar/var/vcs/dm/patches.
l To troubleshoot the CIM service, create a new empty file at /tmp/CIM.log. The CIM servicewrites the log entry to this file.
l You can change the upload file size limit by modifying the following lines in the MC REST APIservice .yaml file:
http: multipart:max-file-size:50000MBmax-request-size:500000MB
l If a proxy virtual machine was deleted or powered off from a VMware-side application such asthe vSphere Client, the proxy is removed from the Proxy Deployment tab in the AUI ProxyDeployment Manager window. However, the proxy list in the Proxy Patches tab still lists theproxy.
Clicking this proxy returns an HTTP 500 error that indicates No route to host (Hostunreachable). If you encounter this issue, verify whether the proxy is temporarilyunavailable or if the proxy has been permanently removed:
n If the proxy is temporarily unavailable, power ON the proxy virtual machine, and then retrythe operation in the Proxy Deployment Manager.
n If the proxy has been permanently deleted, use the Asset Management window in the AUIto remove the proxy, and then retry the operation in the Proxy Deployment Manager.
Apply security patch updates to a proxyIf an updated security patch is available, perform the following steps as an administrator to applythe patch to a proxy.
Before you begin
Review the information in Best practices and troubleshooting for applying security patch updatesto proxies on page 49.
Procedure
1. Download the patch files from the provided location.
2. Log in to the AUI or the vSphere Web Client as an administrator.
3. Go to Proxy Management > Proxy Patches.
4. In the Available Patches pane, click UPLOAD...
The Upload Proxy Patches dialog displays.
5. Click BROWSE.... to go to the location of the patch files, and then select the files that youwant to upload to the Avamar server patch folder.
When finished, click UPLOAD to save the selections and exit the dialog box. The AvailablePatches pane shows the selected patch files.
6. Select the radio button for the specific patch that you want to apply to the proxy.
Note: To remove unavailable patch files from this pane, select the file and then clickDELETE.
7. From the Proxies List pane, select the checkbox for the proxy on which you want to installthe patch file, and then click INSTALL PATCH.
Configuration and Setup
50 Dell EMC Avamar for VMware User Guide

Note: You can use the Filter Proxies by vCenter drop-down to display proxies from aspecific vCenter server. By default, All vCenters is selected.
Results
An informational message indicates the status of the patch application:
l Success indicates that the patch was successfully installed.
l Success, reboot required indicates that the patch was successfully installed, but thatyou must reboot the proxy.
l Success, restart vami-sfcb service required indicates that the patch wassuccessfully installed, but that you must restart the vami-sfcb service.
l Failed (view error) indicates that the patch was not installed. Click the View Error linkto determine why the failure occurred.
l Already install, bypass indicates that this patch is already installed on this proxy.
After a successful installation, you can click View in the History column to verify the installedpatches on the proxy.
Additional Avamar server configuration
Configuring automatic proxy selectionThe automatic intelligent proxy selection feature provides three different algorithms fordetermining which proxy to use to backup and restore operations. The algorithm can only beconfigured by manually modifying the mcserver.xml proxy_selection_algorithm setting.
Procedure
1. Open a command shell and log in by using one of the following methods:
l For a single-node server, log in to the server as admin.
l For a multi-node server, log in to the utility node as admin.
2. Stop the MCS by typing the following command:
dpnctl stop mcs
3. Open /usr/local/avamar/var/mc/server_data/prefs/mcserver.xml in a UNIXtext editor.
4. Find the proxy_selection_algorithm entry key.
5. Change the proxy_selection_algorithm setting to one of the following values:
l hot_add_preferred—The MCS intelligently prefers and automatically selects proxiesbased on hot-add capabilities. If none are found, then the MCS will fall back to usingproxies without hot-add capabilities. This is the default setting.
l hot_add_only—The MCS intelligently prefers and automatically selects proxies basedon hot-add capabilities. If none are found, then the MCS will pause the backup or restoreoperation and wait for a hot-add capable proxy to become available.
l ignore_associated_datastores—This setting causes known proxy-datastoreassociations to be ignored during the selection process. This allows the MCS to select aproxy from a larger pool of available proxies. Like the hot_add_preferred setting,proxies with hot-add capabilities are still preferred over proxies without hot-addcapabilities. But if no hot-add capable proxies are found, then the MCS will fall back tousing proxies without hot-add capabilities.
Configuration and Setup
Dell EMC Avamar for VMware User Guide 51

For example:
<entry key="proxy_selection_algorithm" value="hot_add_only" />configures the automatic proxy selection mechanism to use the hot_add_only algorithm.
6. Close mcserver.xml and save your changes.
7. Start the MCS and the scheduler by typing the following command:
dpnctl start mcsdpnctl start sched
Configuring the MCS to support both guest and image backupIn order to support using both image and guest backup to protect the same virtual machine, youmust configure the Avamar MCS to allow duplicate client names.
Procedure
1. Open a command shell and log in by using one of the following methods:
l For a single-node server, log in to the server as admin.
l For a multi-node server, log in to the utility node as admin.
2. Stop the MCS by typing the following command:
dpnctl stop mcs
3. Open /usr/local/avamar/var/mc/server_data/prefs/mcserver.xml in a UNIXtext editor.
4. Find the allow_duplicate_client_names entry key.
5. Change the allow_duplicate_client_names setting to true.
<entry key="allow_duplicate_client_names" value="true" />6. Close mcserver.xml and save your changes.
7. Start the MCS and the scheduler by typing the following command:
dpnctl start mcsdpnctl start sched
Configuration and Setup
52 Dell EMC Avamar for VMware User Guide
CHAPTER 3
Administration
This chapter includes the following topics:
l Clients and containers........................................................................................................... 54l Add a VMware client............................................................................................................. 55l Delete a VMware client..........................................................................................................57l Enable changed block tracking.............................................................................................. 57l Viewing protected virtual machines in Avamar Administrator................................................ 58l Viewing a replicated virtual machine name in Avamar Administrator......................................58l Monitoring the vCenter connection in Avamar Administrator................................................59l Manually synchronizing the AUI with vCenter and VM clients............................................... 59l Renaming a vCenter client.................................................................................................... 60l VMware Image Dataset..........................................................................................................61l Adding guest backup throttling parameters to a dataset in Avamar Administrator................. 61l Groups.................................................................................................................................. 62l Changing proxy datastore and group assignments in Avamar Administrator..........................63
Dell EMC Avamar for VMware User Guide 53

Clients and containersImage backup can be used to manage and protect any of the following VMware entities in avCenter:
l Virtual machines
l vApps
l Virtual machine folders (that is, any folder residing below the datacenter level)
l Resource pools
In the AUI, virtual machines and vApps are managed as clients; folders and resource pools aremanaged as containers.
Containers provide the capability of managing multiple virtual machines, vApps, virtual machinefolders, and resource pools as a single logical object.
Note: Empty containers such as a folder or resource pool are allowed to be added to MCS.When VMs or vApps are added to a container, they are automatically protected by Avamar.During a backup, MCS will skip a container if it is empty.
Dynamic versus static containersWhen containers are added to the AUI, you define them to be either dynamic or static.
Dynamic containers—include all contents of the vCenter container, but also continuously monitorthe container entity in vCenter, so that if changes occur (for example, virtual machines or foldersare added or deleted), those changes will automatically be reflected in the AUI.
Static containers—only include what is in the vCenter container at the time it is added to Avamar.If subsequent changes occur in vCenter, they will not be reflected in the AUI.
Dynamic container behaviorWhen adding a dynamic container using the Recursive Protection checkbox, all the child entitiesincluding the subcontainers get added to the AUI. Virtual machines or vApps residing in thesubcontainers will get added automatically to the AUI.
If a virtual machine client is deleted from a container in vCenter, and that container was beingprotected as a dynamic container in the AUI, that virtual machine client will continue to exist inAvamar as part of that dynamic container. However, the icon changes change color from blue togray. This enables past backups to be used for future restores. However, no new backups willoccur because the virtual machine client no longer exists in vCenter.
If you need to delete or retire one or more virtual machine clients from an Avamar dynamiccontainer, you must first change that container to a static container. An alternative method is tomove those virtual machine clients to another container in vCenter.
How independent and container protection interactWhen a virtual machine is protected independently and as a container member, retiring or deletingthat virtual machine requires special consideration.
Consider the following nested container structure and scenario:
Administration
54 Dell EMC Avamar for VMware User Guide

Figure 3 Example independent and container protection
In this example, vm-1 is added to Avamar as a virtual machine client and is independentlyprotected. When the vApp-1 container is added to Avamar, vm-1 is also protected as a member ofthe vApp-1 container. Avamar recognizes that the same virtual machine exists in two contexts:
l Independently protected as stand-alone virtual machine client vm-1
l Protected as a member of vApp-1 container
If the vApp-1 container is retired or deleted, vm-1 continues to exist in Avamar as a stand-alonevirtual machine client because it was explicitly added before it was protected as a member of thevApp-1 container. The stand-alone context supersedes the container member context. If you needto retire or delete vm-1, you cannot delete or retire the vApp-1 container. You must also retire ordelete the stand-alone instance. If you do not delete the stand-alone instance, vm-1 continues tobe protected by scheduled backups.
Add a VMware clientProcedure
1. In the AUI navigation pane on the left, click , and then click Asset Management.
2. In the Domain tree, select a vCenter domain or a subdomain for the client.
3. Click ADD CLIENT.
The Select VMware Entity window displays.
4. You can toggle the vCenter hierarchy view in the left pane to list containers by vSpherevirtual machines and templates, or by vSphere hosts and clusters.
l To view by vSphere virtual machines and templates, keep or move the VM/Tempateslider to the left. This is the default setting.
l To view by vSphere hosts and clusters, move the VM/Tempate slider to the right. Thename changes to Host/Cluster.
Note: Resource pools are only visible in the Host/Cluster view.
5. In the left pane, expand and select a container in the vCenter.
Use the filter icon in the Name column to search for an entity by name. The search filterlimits the list to entities with the same and similar names. You can search for an entity thatis located in a folder or subfolder.
The VMware entities for the selected object display in a table in the right pane.
6. Select the checkbox next to any folder, resource pool, virtual machine, or vApp in the rightpane. Use the filter icons in the Guest OS, Server and Location columns to quickly locatethe entity you want to add.
Note: You can further expand an entity in the table (for example, a folder) to view acontainer's child entities and select these entities.
Administration
Dell EMC Avamar for VMware User Guide 55

All selections appear in the Selected VMware Entities drop-down when you hover over the
icon. You can also click the - to the left of an entity in this drop-down to remove theselection.
Figure 4 Selected VMware Entities drop-down
Note: The checkbox next to an entity will be disabled in the following cases:
l The entity has already been added as a client.
l The entity is the AVE.
l The entity is a VMware proxy.
l The entity is a datacenter.
l The entity is an ESX host.
7. (Optional) When adding a container, select from one of the Inclusion options in the rightpane:
l Select Dynamic to make this a dynamic container
l Select Static to make this a static container.
8. To enable changed block tracking, move the CBT slider to the right/ON position.
If changed block tracking is not enabled, each virtual machine image must be fully processedfor each backup, which might result in long backup windows, or excessive back-end storageread and write activity.
Note: Enabling changed block tracking does not take effect until any of the followingactions occur on the virtual machine:
l Reboot
l Power on
l Resume after suspend
l Migrate
9. To add a dynamic container that uses recursive protection, move the Recursive Protectionslider to right/ON position.
This task automatically adds all the child entities, including the subcontainers, virtualmachines, and vApps residing in the subcontainers.
10. Click SUBMIT.
After you finish
If you enabled changed block tracking for any virtual machine, open the vSphere Client, locate thevirtual machine, and then perform any of the following actions:
l Reboot
l Power on
l Resume after suspend
Administration
56 Dell EMC Avamar for VMware User Guide

l Migrate
Delete a VMware clientDelete a client and all backups of the client. Optionally, choose to delete all replicas that exist onreplication destination systems.
About this task
When you delete a client, Avamar permanently deletes all backups that are stored for that client.Only delete a client when you are certain that there is no reason to retain the backups. If there isany doubt, retire the client instead.
Procedure
1. In the AUI navigation pane on the left, click , and then click Asset Management.
2. In the hierarchical Domain tree, select a vCenter domain or a subdomain.
3. In the list of clients, select the client that you want to delete.
You can only view clients in the domain for the login account. To view all clients, log in to theroot domain.
4. Click MORE ACTIONS > Delete Client.
The Delete Client dialog box appears and displays the number of existing backups for theclient.
5. Select I understand this action is permanent and irreversible.
This field is a safety net to avoid unintentionally deleting a client and the client's backups.
6. Click YES.
Enable changed block trackingIf changed block tracking is not enabled, each virtual machine image must be fully processed foreach backup, which might result in long backup windows, or excessive back-end storage read andwrite activity.
About this task
Enabling changed block tracking does not take effect until any of the following actions occur onthe virtual machine:
l Reboot
l Power on
l Resume after suspend
l Migrate
Procedure
1. In the AUI navigation pane on the left, click , and then click Asset Management.
2. In the hierarchical Domain tree, select a vCenter domain or a subdomain.
To include subdomain clients, toggle the Include Sub-domain switch to on.
3. In the list of clients, select the client that you want to edit.
You can only view clients in the domain for the login account. To view all clients, log in to theroot domain.
Administration
Dell EMC Avamar for VMware User Guide 57

4. Click MORE ACTIONS > Edit Client.
The Edit Client dialog box appears and displays the number of existing backups for theclient.
5. To enable changed block tracking:
a. Select the VMware tab.
b. In the CBT field, select the check box.
c. Click UPDATE.
Viewing protected virtual machines in Avamar AdministratorYou can view the backup protection state for all virtual machines from the Protection tab. Youcannot take any actions on this tab.
Procedure
1. In Avamar Administrator, click the Administration launcher link.
The Administration window is displayed.
2. Click on vCenter domain.
3. Click the Account Management tab.
4. Click the Protection tab.
Viewing a replicated virtual machine name in AvamarAdministrator
This feature is used to view the virtual machine name of any virtual machine in the REPLICATEdomain.
About this task
This feature is disabled anywhere other than in the REPLICATE domain.
If you try to view information for a nonvirtual machine client, No Information appears..
Procedure
1. In Avamar Administrator, click the Administration launcher link.
The Administration window is displayed.
2. Click the Account Management tab.
3. In the tree, select a virtual machine client in the REPLICATE domain.
4. Select Actions > Account Management > View Information.
A dialog box appears, which shows the virtual machine name.
5. Click OK.
Administration
58 Dell EMC Avamar for VMware User Guide

Monitoring the vCenter connection in Avamar AdministratorAvamar Administrator maintains a pool of connections to the vCenter Server. As with otheressential services, the Administration window Services Administration tab provides continuousstatus for the vCenter connection.
Procedure
1. In Avamar Administrator, click the Administration launcher link.
The Administration window is displayed.
2. Click the Services Administration tab.
3. Double-click the VMware vCenter Connection Monitor services entry.
The VMware vCenter Connection Monitor dialog box appears. Valid connection states areActive and Idle.
Results
Connections to the vCenter can be stopped, started, and restarted. Stop the connections forvCenter upgrades, and start them when the upgrade has completed. If vCenter is shutdown,connections become invalid and must be reestablished. If this occurs, Avamar Administratorcannot display the vCenter structure or virtual machines.
Manually synchronizing the AUI with vCenter and VM clientsAlthough Avamar Administrator automatically synchronizes with any vCenter it monitors at regularintervals, you can also perform a manual synchronization at any time. You can manuallysynchronize the AUI with both vCenter and VM clients.
Procedure
1. To synchronize the AUI with vCenter:
a. In the AUI navigation pane on the left, click , and then click Asset Management.
b. In the hierarchical Domain tree, select a vCenter.
c. To synchronize the AUI with a vCenter, perform either of the following steps:
l Click the overflow menu ( ), and then select Sync vCenter.
l In the DOMAIN ACTIONS pane, select Sync vCenter.
d. Click Yes to dismiss the confirmation message.
When the synchronization is complete, the following message is displayed:
vCenter data synchronized successfully2. To synchronize the AUI with a VM client:
a. In the AUI navigation pane on the left, click , and then click Asset Management.
b. In the hierarchical Domain tree, select a vCenter.
c. Select the VM client that you want to synchronize, and then click More Actions > SyncClient.
d. Click Yes to dismiss the confirmation message.
When the synchronization is complete, the following message is displayed:
Administration
Dell EMC Avamar for VMware User Guide 59

sync request has been sent to the the server
Renaming a vCenter clientIf an existing vCenter client’s DNS name changes, the Avamar server will lose its connection tothat vCenter. This will prevent any interaction with that vCenter, including scheduled backups,from occurring. If this occurs, you must manually rename that vCenter client in the AUI.
About this task
This is the only method by which you should ever rename a vCenter client. In the AUI, the vCenterclient name must always be the fully qualified DNS name or a valid IP address.
Procedure
1. In the AUI navigation pane on the left, click , and then click Asset Management.
2. In the domain tree, select the vCenter client.
3. Click MORE ACTIONS > Edit Client.
The Edit Client window is displayed.
4. In the Name field, type the new fully qualified DNS name.
5. Click UPDATE.
A confirmation message is displayed.
6. Open a command shell and log in by using one of the following methods:
l For a single-node server, log in to the server as admin.
l For a multi-node server:
a. Log in to the utility node as admin.
b. Load the admin OpenSSH key by typing the following command:
ssh-agent bashssh-add ~admin/.ssh/admin_key
7. Stop the MCS by typing the following command:
dpnctl stop mcs
8. Start the MCS and the scheduler by typing the following command:
dpnctl start mcsdpnctl start sched
9. Reboot every Avamar proxy in this vCenter:
a. Launch the vSphere Client or vSphere Web Client, and log in to the vCenter Server.
b. Locate an Avamar proxy.
c. Right-click Power > Shut Down Guest.
d. Click Yes to confirm that you want to shut down the guest operating system.
e. Right-click Power > Off.
f. Click Yes to confirm that you want to power off the virtual machine.
g. Right-click Power > On.
Administration
60 Dell EMC Avamar for VMware User Guide
VMware Image DatasetThe VMware Image Dataset is the default dataset for protecting VMware entities with imagebackup.
In many respects, the VMware Image Dataset is simpler than most other datasets:
l The only available source data plug-ins are Linux and Windows virtual disks, and both areselected by default.
l The Select Files and/or Folders option, as well as the Exclusions and Inclusions tabs, aredisabled.
l Change block tracking is enabled by default using an embeddedutilize_changed_block_list=true plug-in option statement.
Adding guest backup throttling parameters to a dataset inAvamar Administrator
When performing scheduled guest backups of virtual machines on the same ESX Server, addthrottling parameters to the Avamar dataset.
About this task
The reason for doing this is that Avamar tries to initiate as many backups as possible, subject tocertain load restrictions on the Avamar MCS. However, if multiple guest backups are attempted onvirtual machines on the same ESX Server, this can spike CPU usage, which will have an adverseeffect on overall ESX Server performance.
Procedure
1. In Avamar Administrator, select Tools > Manage Datasets.
The Manage All Datasets window is displayed.
2. Select a dataset from the list and click Edit.
TheEdit Dataset dialog box appears.
3. Click the Options tab, and then click Show Advanced Options.
4. If the client supports Network usage throttle, type a nonzero value in the Network usagethrottle (Mbps) field.
Begin with a low value such as 20. Then monitor the next backup session to verify that thishas resolved any ESX Server CPU usage issues.
5. Click OK.
Administration
Dell EMC Avamar for VMware User Guide 61

GroupsGroups have important behavioral differences when used with image backup and restore.
Default Proxy GroupThe Default Proxy Group is where all proxies reside. This group cannot be deleted.
Default Virtual Machine GroupThe Default Virtual Machine Group is where new virtual machine clients are automatically addedwhen they are registered. This group cannot be manually deleted but is automatically deleted if thevCenter domain is deleted.
Virtual machine and proxy relationships within groupsConsider the following simplified example configuration:
Figure 5 Virtual machine and proxy relationships within groups
Virtual machines VM-1 and VM-2 store their data in DATASTORE-1 and DATASTORE-2,respectively.
Within Avamar Administrator, proxies have been assigned to protect vCenter datastores asfollows:
l PROXY-1 has been assigned to DATASTORE-1 and DATASTORE-2
l PROXY-2 has been assigned to DATASTORE-2
l PROXY-3 has been assigned to DATASTORE-3
Datastore assignments are made at the proxy level in the Edit Client dialog box.
A group (GROUP-1) is created, to which virtual machines VM-1 and VM-2 are added.
In order to protect these virtual machines, proxies must also be added to the group as follows:
l PROXY-1, because it is assigned to both DATASTORE-1 and DATASTORE-2, can protect bothVM-1 and VM-2.
l PROXY-2, because it is only assigned to DATASTORE-2, is optional as long as Proxy-1 exists inthe group.
Administration
62 Dell EMC Avamar for VMware User Guide

l PROXY-3, because it is only assigned to DATASTORE-3, cannot protect either VM-1 or VM-2.
Every group must include enough proxies to support all the datastores assigned to every client.Otherwise, when a backup is initiated and a proxy cannot be located to perform the backup, thebackup will fail with an Activity monitor status of no proxy.
Changing proxy datastore and group assignments in AvamarAdministrator
Procedure
1. In Avamar Administrator, click the Policy launcher link.
The Policy window is displayed.
2. Click the Policy Management tab, and then click the Clients tab.
3. Select a proxy and click Edit.
Note: Click Show sub-domain clients to show all available virtual machine clients.
The Edit Client dialog box appears.
4. Click the VMware tab, and then click the Datastores tab.
5. Select one or more datastores.
6. Click the Groups tab.
7. Select one or more groups.
8. Click OK.
Administration
Dell EMC Avamar for VMware User Guide 63

Administration
64 Dell EMC Avamar for VMware User Guide

CHAPTER 4
Backup
This chapter includes the following topics:
l Limitations.............................................................................................................................66l Perform an on-demand backup of a virtual machine by using AUI .........................................67l Set advanced plug-in options in the AUI................................................................................68l Scheduling backups using the AUI Policy wizard................................................................... 70l Log truncation backups......................................................................................................... 75l Monitoring backups............................................................................................................... 78l Cancel backups..................................................................................................................... 79l Support for vCenter HA failover for inflight backups.............................................................79l Configure a backup to support VMware encryption...............................................................79l Configure a backup to support vSAN encryption................................................................... 81l Enforcement of backups to Data Domain...............................................................................81
Dell EMC Avamar for VMware User Guide 65

LimitationsThese are the known limitations of Avamar for VMware image backup.
All backups must be initiated from the AUI or Avamar Administrator
All image backups must be initiated from the AUI or Avamar Administrator. You cannot initiatebackups from the virtual machine or proxy.
Changing a virtual machine's disk configuration forces a full backup
Changing a virtual machine’s disk configuration (either adding or removing a disk), causes the nextentire image backup to be processed as a full backup (that is, all virtual disks are processed andchanged block tracking is not used), which will require additional time to complete. Backups ofspecific disks are not affected, unless that disk is previously unknown to Avamar.
Version 8 or higher virtual machines with disks on multiple datastores
If backing up a hardware version 8 or 9 virtual machine that has multiple disks residing on differentdatastores, not all datastores will be checked for orphaned snapshots. The only known remedy isto reconfigure the virtual machine such that all virtual disks reside on the same datastore.
Backups involving physical RDM disks
When backing up a virtual machine that has both virtual disks and physical RDM disks, the backupwill successfully process the virtual disks, bypass the RDM disks, and complete with the followingevent code:
Event Code: 30929Category: ApplicationSeverity: ProcessSummary: Virtual machine client contains disks that cannot be backed upor restored.
ContainerClients domain
The ContainerClients domain is a special system domain, which is populated with virtual machinesresiding in VMware container entities. Avamar assumes that when you add a VMware container toAvamar, that you will always manage the container and all virtual machines within it as a singleobject. Therefore, if only you add these virtual machines to a backup group as individual machines,rather than adding the parent VMware container, they will not be backed up.
Nested container limitations
When backing up a VMware container that contains other containers (that is, a nested containerstructure), Avamar only backs up the top-level of the hierarchy. Consider the following examplenested container structure:
Figure 6 Example nested container structure
When vApp-1 is backed up to Avamar, the vApp backup image will only contain virtual machinebackup images for vm-1 and vm-2. When vApp-1 backup is restored, only vm-1 and vm-2 data willbe restored. vApp-2 and vm-3 containers will also be present but will not contain any data.
Two interim solutions exist for this limitation:
Backup
66 Dell EMC Avamar for VMware User Guide

l Flatten the container structure.For example, move vm-3 under vApp-1. Then all three virtual machines will be backed up whenvApp-1 is backed up.
l Add both vApp-1 and vApp-2 to Avamar as separate container entities so that they can bebacked up separately.When restoring, restore vApp-1 first, then restore vApp-2 into vApp-1
vApp backups fail if any subvirtual machine fails to backup
When backing up a vApp, all virtual machines within the vApp must successfully complete the backup otherwise that entire back up will not be recorded. Backups for virtual machines that didsuccessfully complete are found in the ContainerClients domain. All backup failures should bepromptly investigated and remedied to ensure maximum data protection.
Perform an on-demand backup of a virtual machine by usingAUI
You can perform an instance backup that is independent of existing schedules and policies.
Procedure
1. In the AUI navigation pane on the left, click , and then click Asset Management.
The Asset Management window is displayed.
2. In the domain tree, select the domain for the client.
3. In the list of clients, select a virtual machine client, VMware folder, resource pool, or vApp.
4. Click BACKUP.
The Backup wizard is displayed. In the Plugins pane, a list of plug-ins on the client isdisplayed.
5. In the Plugin pane, perform the following steps:
a. Browse to and select the check box next to the data that you want to back up.
b. Click NEXT.
The Basic Configuration window is displayed.
6. In the Basic Configuration pane, perform the following steps:
a. Select the backup retention policy settings:
l To automatically delete this backup from the Avamar server after a specific amountof time, select Retention period. Specify the number of days, weeks, months, oryears for the retention period.
l To automatically delete this backup from the Avamar server on a specific calendardate, select End date and browse to that date on the calendar.
l To keep this backup for as long as this client remains active in the Avamar server,select No end date.
b. In the Avamar encryption method list, select the encryption method to use for datatransfer between the client and the Avamar server during the backup.
The encryption technology and bit strength for a client/server connection depends onseveral factors, including the client operating system and Avamar server version. TheAvamar Product Security Guide provides additional information.
c. In the Optionally select a proxy to perform backup list, select the proxy.
Backup
Dell EMC Avamar for VMware User Guide 67

The default setting is Automatic, which enables the Avamar server to choose the bestproxy for this operation.
d. Click NEXT.
The More Options window is displayed.
7. In the More Options pane, set the plug-in options:
Toggle the Show Advanced Options switch to view advanced configuration options. Setadvanced plug-in options in the AUI provides more information about the advanced backupoptions.
VMware Image backup plug-in options provides more information about the basic backupoptions.
8. Click FINISH.
The following status message is displayed:
Backup initiated.
Set advanced plug-in options in the AUIPerform the following optional tasks from the More Options window when performing an on-demand backup.
Before you begin
Note: You can only perform data exclusion on an application consistent backup. As a result, thetarget VM must be in a running state.
Procedure
1. Toggle the Show Advanced Options switch to on.
2. To enable changed block tracking, select the Use Changed Block Tracking (CBT) toincrease performance checkbox.
3. To enable the Avamar server to report information to the vSphere Client about the mostrecent backup and most recent successful backup, select the Set Annotation TagLastBackupStatus and LastSuccessfulBackup checkbox.
When selected, the following information displays in the vSphere Web Client:
l LastSuccessfulBackupStatus-com.dellemc.avamar: The date and time of the mostrecent successful backup.
l LastBackupStatus-com.dellemc.avamar: The date and time of the most recentbackup, whether successful or not.
4. To index VMware image backups, select Index VMware Image Backups.
Note: Indexing VMware image backups using the Data Protection Search software isonly supported with HotAdd transport mode.
5. To exclude the Windows page file (pagefile.sys) from the backup, select Exclude pagefile blocks when performing image backup on Windows VM.
Note: Page file exclusion is supported only for Windows Servers version 2008 R2 andabove. For client versions of Windows, this option has no effect. The page file isincluded in backups of Windows clients, regardless of this setting.
Backup
68 Dell EMC Avamar for VMware User Guide

6. To exclude deleted file blocks from the backup, select Exclude deleted file blocks whenperforming image backup on Windows VM.
7. For the Exclude files with path and filter field, type the files that you want to exclude.
Note:If you exclude a file during backup, and then perform a restore of the entire file systemwhich contained the excluded file, or just a restore of the excluded file, the excluded filewill be visible upon restore but will not be usable.
If you change the exclusion path or filename between backups, the next backup is a full(level 0) backup.
8. To store this backup on a Data Domain system, select the Store backup on Data DomainSystem checkbox, then select a Data Domain system from the list.
9. From the Encryption method to Data Domain system list, select the encryption method touse for data transfer between the client and the Data Domain system during the backup.
10. For the Windows VMware Image plug-in only, select one or more Snapshot Quiesce Options.The options include the following:
l Fail backup on snapshot quiesce error.
l If VMware tools are not running, mark completed backup as 'Complete w/Exception'(applications are not quiesced).
11. For the Max times to retry snapshot detele option, type the maximum number of timesthat a snapshot delete operation should be tried.
12. In Guest Credentials, type a virtual machine guest OS user account name and passwordwith sufficient privileges to run scripts before or after the backup.
For log truncation backups of Exchange servers, guest credentials must have administratorprivileges. If multiple VMs are backed up, the same credentials must be used for all VMs.
13. To run a script before the VMDK snapshot:
a. Type the full path and filename of the script that is run.
b. Ensure that the script timeout is sufficient for the script to complete.
14. To run a script after the backup completes and the VMDK snapshot is removed:
a. Type the full path and filename of the script that is run.
b. Ensure that the script timeout is sufficient for the script to complete.
15. For the Windows VMware Image plug-in only, in the Snapshot quiesce timeout (minutes)filed, type the number of minutes to wait before a snapshot quiesce operation is consideredto have failed.
16. If performing an image backup of a Microsoft SQL server, select the type of authentication:
l NT Authentication uses the credentials that are entered in Guest Credentials forauthentication.
l Application Authentication uses the SQL Server Username and SQL ServerPassword to log in to the SQL server.
17. If performing an image backup of a Microsoft SQL server, identify the post-action options:
l Type the maximum number of minutes to wait before post-action operations areconsidered to have failed in the Post Action Timeout (minutes) option.
l Select the type of post-action operation. LOG Truncation performs log truncation afterthe backup has successfully completed.
Backup
Dell EMC Avamar for VMware User Guide 69

l All disks of the VM must be selected for on-demand backup or log truncation will notoccur.
18. If performing an image backup of a Microsoft Exchange server, select the type of post-action operation. LOG Truncation performs log truncation after the backup hassuccessfully completed.
19. Click FINISH.
Scheduling backups using the AUI Policy wizardScheduled backups run automatically to ensure that backups occur on an ongoing basis. You canschedule backups to run daily, weekly, or monthly.
About this task
You can schedule backups by using the Policy wizard to create a backup policy.
Perform the following steps within the Policy wizard.
Procedure
1. Assign members to the new backup policy.
2. Assign a dataset to the new backup policy.
To create a dataset, use the Policy wizard or select Settings > Dataset > Add.
3. Assign a schedule to the new backup policy.
To create a schedule, use the Policy wizard or select Settings > Schedule > Add.
4. Assign a retention policy to the new backup policy.
To create a retention policy, use the Policy wizard or select Settings > Retention > Add.
5. Enable scheduling for the backup policy.
Creating a datasetA dataset specifies the data to include in a scheduled backup and the options to use for thebackup. Create at least one dataset for scheduled backups on a client or group of clients. Createmultiple datasets to segregate client data.
Procedure
1. In the AUI navigation pane on the left, click , and then click Settings.
The Setting pane is displayed.
2. Click the Dataset tab.
3. Click ADD.
The Create Dataset window is displayed.
4. In the Dataset Name field, type a name for the dataset.
The name can include alphanumeric characters (A-Z, a-z, 0–9) and the following specialcharacters: period (.), hyphen (-), and underscore (_), and space. Do not use Unicodecharacters or the following special characters: ` ~ ! @ # $ % ^ & * ( ) = + [ ] { } | \ / ; : ' " <> , ?
5. In the Plugins list, select the VMware plug-in appropriate for your operating system.
The VMware plug-in options are displayed.
Backup
70 Dell EMC Avamar for VMware User Guide

6. Click the Options tab, and then set the plug-in options.
To view advanced options, select Show Advanced Options.
Plug-in Options provides a detailed list of VMware plug-in options.
7. Click the Source Data tab, and then set the plug-in options:
l To include all virtual machines, select All virtual disks.
l To limit the dataset to specific items, perform the following steps:
a. In the File/Folder Path, type the file path.
b. Click ADD.
By default, dataset entries use absolute path notation. For example:
[datastore1] VM1/VM1.vmdkHowever, you can use relative path notation to ensure that a particular .vmdk is alwaysincluded in a backup, even if that virtual machine is migrated to another datastore usingStorage vMotion. For example, the following equivalent dataset entry uses relative pathnotation:
\[.*\] VM1/VM1.vmdk
8. Click SUBMIT.
Creating a backup policyA backup policy is a collection of Avamar clients that use the same dataset, schedule, andretention settings to implement scheduled backups.
About this task
Member clients must all be in the same Avamar domain. When you create a backup policy, youdefine the dataset, schedule, and retention settings that apply for scheduled backups. Thesesettings comprise the backup policy, which controls backup behavior for all members of thebackup policy unless you override these settings at the client level.
The Avamar Administration Guide provides information about creating and editing backup policies,schedules, or retention settings.
Enabling a scheduled backup for a backup policyScheduled backups occur only for enabled backup policies. Backup policies are disabled by defaultunless you select the Enabled check box on the first page of the New Policy wizard. If you did notenable the backup policy when you created it, use the menu options in the Policy window toenable backups.
Procedure
1. In the AUI navigation pane on the left, click , and then click Backup Policy.
The Policy page is displayed.
2. In the domain tree, select a domain or subdomain for the backup policy.
To select a subdomain for the backup policy, toggle the Include Sub-domain switch to on.
3. Select a backup policy from the list.
4. To enable a backup policy, click MORE ACTIONS > Enable Policy.
5. To disable a backup policy, click MORE ACTIONS > Disable Policy.
Backup
Dell EMC Avamar for VMware User Guide 71
Automatically include virtual machines in a backup policy using dynamic rulesAs part of the autodiscovery feature, virtual machines created in vCenter that have beendiscovered in Avamar can automatically be assigned to backup policies by using dynamic rules. Thisprocedure describes how to configure scheduled policy backups to use dynamic rules.
About this task
Note: Auto-discovery of virtual machines on page 38 contains information about configuringautodiscovery of virtual machines.
Procedure
1. In the left navigation pane of the AUI, go to Policy > Backup Policy, and then select adomain.
2. Click +ADD to open the Policy wizard, which is used to create the backup policy.
3. On the Members page, select Enable Dynamic rule, and then perform either of thefollowing:
l From the list, select an existing rule, or
l Click + to create a rule.
Virtual machines that match the rule criteria display with a green check mark and a status ofIncluded by Rule on the Members page, indicating that the virtual machines have beendynamically selected for inclusion in this backup policy.You can also add virtual machine clients to this policy that have not been dynamicallyincluded. This is also known as static inclusion, as described in the topic Dynamic versusstatic containers on page 54.
To include a virtual machine in the policy that has not been dynamically added, select thecheckbox next to the virtual machine. The entry displays with a blue check mark and astatus of Included by User, indicating that the virtual machine has been statically selectedfor inclusion in this backup policy.
Additionally, you can exclude a virtual machine client that was dynamically included in thepolicy. To exclude a virtual machine that was dynamically added to the policy, select the Xnext to the virtual machine. The entry displays with a red X and a status of Excluded.
Note: It is recommended that you do not manually include or exclude clients in a backuppolicy that uses using virtual machine autodiscovery. As a best practice, reserve backuppolicies that use automatic member selection (or selection based on dynamic rules) forthat purpose only, and create other backup policies for clients that are notautodiscovered virtual machines.
4. Click NEXT and complete the remaining steps in the Policy wizard.
Results
When you complete this task, the Avamar server applies the backup policy to the selected clients.
Managing rulesRules are used by the Avamar server to automatically map autodiscovered virtual machines todomains, and to assign backup policies to these virtual machines. Rules use one or more filteringmechanisms to determine whether virtual machines qualify for inclusion in a policy.
You can use the AUI to create a new rule, edit an existing rule, or delete a rule.
Backup
72 Dell EMC Avamar for VMware User Guide

Create a rule
Rules are used by the Avamar server for domain map and automatic backup policy assignment forautodiscovered VMs.
About this task
When creating rules, ensure that rules are mutually exclusive, to avoid the situation where a VMmight qualify under multiple rules.
Procedure
1. In the AUI navigation pane on the left, click , and then click Settings.
2. Click the Rule tab.
3. In the domain tree, select a vCenter domain or subdomain for the client.
4. On the Setting page, complete the following tasks:
a. Click ADD.
The New Rule window is displayed.
5. In the Rule Name field, type a name for the rule.
6. In the Match Type field, select whether the rule should match Any of the listed filtermechanisms, or All of them.
This selection allows you to configure multiple different filters to select VMs, and todetermine how these filters interact with one another to select the correct virtual machines.For example, you might create a filter that uses a virtual machine folder path to selectvirtual machines, and another filter that uses a virtual machine naming convention.
Use this option to determine which virtual machines are included under this rule:
l To include only virtual machines that are in the defined folder path and also follow thenaming convention, select All.This step excludes virtual machines that are in the folder path but that do not follow thenaming convention. It also excludes virtual machines that follow the naming conventionbut are not in the folder path
l To include any virtual machines that are either in the virtual machine folder path or thatfollow the naming convention, select Any.
7. To add a filter:
a. Click .
This step adds a row to the list of filters.
b. In the Filter column, select a filter type.
For example, to create a filter that uses a virtual machine naming convention, select VMName, or to create filter that uses a vCenter VM Tag, select VM Tag.
c. In the Operator column, select the operand.
For example, if VM Name is selected for the filter type and begins with is selected for theoperand, then all virtual machines whose names begin with the filter text is selected.
d. In the Value column, type the filter text.
For example, to create a filter that selects all virtual machines whose names begin withthe text string HR_, select VM Name for the filter type, begins with for the operand, andtype HR_ for the filter text.
Backup
Dell EMC Avamar for VMware User Guide 73

8. To create additional filters, click .
This step adds a row to the list of filters.
9. To delete an existing filter, click Delete.
10. Click SUBMIT.
Changes made to tags may experience a delay of up to 12 hours before being enforced. Forthis reason, edit tags with caution, or perform a synchronized vCenter operation, whichautomatically synchronizes the vCenter with the Avamar server.
Edit a rule
When editing a rule, ensure that rules are mutually exclusive, to avoid the situation where a virtualmachine might qualify under multiple rules.
Procedure
1. In the AUI navigation pane on the left, click , and then click Settings.
2. Click the Rule tab.
3. In the domain tree, select a vCenter domain or subdomain for the client.
4. In the Settings page, complete the following tasks:
a. Select a folder that contains a VMware entity.
b. Select a rule from the list that you want to edit, and then click EDIT.
The Edit Rule window is displayed.
5. In the Rule Name field, type a name for the rule.
6. In the Match Type field, select whether the rule should match Any of the listed filtermechanisms, or All of them.
This selection allows you to configure multiple different filters to select VMs, and todetermine how these filters interact with one another to select the correct virtual machines.For example, you might create a filter that uses a virtual machine folder path to selectvirtual machines, and another filter that uses a virtual machine naming convention.
Use this option to determine which virtual machines are included under this rule:
l To include only virtual machines that are in the defined folder path and also follow thenaming convention, select All.This step excludes virtual machines that are in the folder path but that do not follow thenaming convention. It also excludes virtual machines that follow the naming conventionbut are not in the folder path.
l To include any virtual machines that are either in the virtual machine folder path or thatfollow the naming convention, select Any.
7. To add a filter:
a. Click .
This step adds a row to the list of filters.
b. In the Filter column, select a filter type.
For example, to create a filter that uses a virtual machine naming convention, select VMName, or to create filter that uses a vCenter VM Tag, select VM Tag.
c. In the Operator column, select the operand.
For example, if VM Name is selected for the filter type and begins with is selected for theoperand, then all virtual machines whose names begin with the filter text is selected.
Backup
74 Dell EMC Avamar for VMware User Guide

d. In the Value column, type the filter text.
For example, to create a filter that selects all virtual machines whose names begin withthe text string HR_, select VM Name for the filter type, begins with for the operand, andtype HR_ for the filter text.
8. To create additional filters, click .
This step adds a row to the list of filters.
9. To delete an existing filter:
a. Select the filter.
b. In the Actions column, click Delete.
10. Click SUBMIT.
Changes made to tags may experience a delay of up to 12 hours before being enforced. Forthis reason, edit tags with caution, or perform a synchronized vCenter operation, whichautomatically synchronizes the vCenter with the Avamar server.
Delete a rule
Procedure
1. In the AUI navigation pane on the left, click , and then click Settings.
2. Click the Rule tab.
3. In the domain tree, select a vCenter domain or subdomain for the client.
4. In the Setting page, complete the following tasks:
a. Select a rule from the list.
b. Click DELETE.
Log truncation backupsAvamar release 7.4 and greater supports log truncation after a successful Microsoft SQL andMicrosoft Exchange image backup has been performed, thereby allowing the backup window to bereduced along with the disk space required for the database logs. The following sections describehow to configure scheduled log truncation backups.
Scheduled backups with Microsoft SQL log truncationAvamar performs log truncation of a SQL Server Database after the backup has completed.
This section describes how to schedule backups that perform log truncation.
Scheduling backups that contain multiple VMs requires an automated mechanism to select theVMs that are hosting SQL databases. Rules contain filtering mechanisms, such as the VM name orVM tag, that determine which VMs qualify under the rules. Configuring your VMs that host SQLdatabases correctly from within vCenter, and configuring corresponding rules, allows you todetermine which VMs in a multiple VM backup should have log truncation performed.
Full backup required before performing SQL log truncationA full backup is required before performing log truncation.
If a backup is performed of a database that has never had a full backup, log truncation fails.Performing a full database backup, using either an SQL server native backup or a full Avamarbackup, is required before performing log truncation.
Backup
Dell EMC Avamar for VMware User Guide 75

Scheduling backups of Microsoft SQL servers for log truncationScheduled backups of Microsoft SQL servers for log truncation are configured using the followingprocedure.
About this task
Follow this procedure to create a dataset for Microsoft SQL server backup and schedule backupsof Microsoft Exchange servers for log truncation.
Procedure
1. In the AUI navigation pane on the left, click , and then click Settings.
The Setting pane is displayed.
2. Click the Dataset tab.
3. Click ADD.
The Create Dataset window is displayed.
4. In the Dataset Name field, type a name for the dataset.
The name can include alphanumeric characters (A-Z, a-z, 0–9) and the following specialcharacters: period (.), hyphen (-), and underscore (_), and space. Do not use Unicodecharacters or the following special characters: ` ~ ! @ # $ % ^ & * ( ) = + [ ] { } | \ / ; : ' " <> , ?
5. In the Plugins list, select the Windows VMware Image plug-in.
6. Click the Options tab, and perform the following steps:
a. To view advanced options, select the Show Advanced Options check box.
b. In the Guest Credentials field, type a virtual machine guest operating system useraccount name and password with sufficient privileges to run scripts before or after thebackup.
c. In the Microsoft SQL Server authentication field, select the type of authentication:
l NT Authentication uses the credentials that are entered in Guest Credentials forauthentication. You must have Windows Authentication enabled on all SQL Serverinstances. If log truncation is used, the user who is entered here must have sufficientrights to run log truncation on all databases on all SQL Server instances.
l Application Authentication uses the SQL Server Username and SQL ServerPassword to log in to the SQL server. The user credentials that are listed here areused to log in to all SQL Server instances running on the target virtual machine.
d. In the Microsoft SQL Server post action field, identify the post-action options:
l Type the maximum number of minutes to wait before post-action operations areconsidered to have failed in the Post Action Timeout (minutes) option.
l Select the type of post-action operation. LOG Truncation performs log truncationafter the backup has successfully completed.
e. Complete other information in the Options tab as require.
The Avamar Administration Guide contains further information about creating andconfiguring datasets.
7. Click the Source Data tab, and then select All virtual disks:
8. Click SUBMIT.
Backup
76 Dell EMC Avamar for VMware User Guide

9. If multiple guest VMs are being backed up as part of this backup policy, create a rule that isused to select the appropriate VMs that have log truncation performed.
10. Create a backup policy for the backups.
During the backup policy creation process, you:
a. Assign the new dataset to the new backup policy.
b. Assign a schedule to the new backup policy.
c. Assign a retention policy to the new backup policy.
d. If multiple guest VMs are being backed up as part of this backup policy, in the Memberspane of the Policy wizard, select Enable Dynamic rule and select the rule that youpreviously created.
The Avamar Administration Guide provides more information about backup policies, rules,datasets, schedules, and retention policies.
11. Enable scheduling for the backup policy.
Scheduled backups with Microsoft Exchange log truncationAvamar performs log truncation of an Exchange Server Database after the backup has completed.
This section describes how to schedule backups that perform log truncation.
Scheduling backups that contain multiple VMs requires an automated mechanism to select theVMs that are hosting Exchange databases. Rules contain filtering mechanisms, such as the VMname or VM tag, that determine which VMs qualify under the rules. Configuring your VMs thathost Exchange databases correctly within vCenter, and configuring corresponding rules, allowsyou to determine which VMs in a multiple VM backup should have log truncation performed.
Log truncation with Microsoft Exchange is supported with the following:
l vSphere 6.5 and greater and ESXi 6.5 and later
l Windows Server 2008 R2 and later
l Exchange 2007 and later
l VMware Tools release 10.1 or later must be installed on the VM hosting the Exchange server
Scheduling backups of Microsoft Exchange servers for log truncationScheduled backups of Microsoft Exchange servers for log truncation are configured using thefollowing procedure.
About this task
Follow this procedure to create a dataset for Exchange server backup and schedule backups ofMicrosoft Exchange servers for log truncation.
Procedure
1. In the AUI navigation pane on the left, click , and then click Settings.
The Setting pane is displayed.
2. Click the Dataset tab.
3. Click ADD.
The Create Dataset window is displayed.
4. In the Dataset Name field, type a name for the dataset.
The name can include alphanumeric characters (A-Z, a-z, 0–9) and the following specialcharacters: period (.), hyphen (-), and underscore (_), and space. Do not use Unicode
Backup
Dell EMC Avamar for VMware User Guide 77

characters or the following special characters: ` ~ ! @ # $ % ^ & * ( ) = + [ ] { } | \ / ; : ' " <> , ?
5. In the Plugins list, select the Windows VMware Image plug-in.
6. Click the Options tab, and perform the following steps:
a. To view advanced options, select the Show Advanced Options check box.
b. In the Guest Credentials field, type a virtual machine guest operating system useraccount name and password with sufficient privileges to run scripts before or after thebackup.
c. Select the type of post-action operation. LOG Truncation performs log truncation afterthe backup has successfully completed.
d. Complete other information in the Options tab as required.
The Avamar Administration Guide contains further information about creating andconfiguring datasets.
7. Click the Source Data tab, and then select All virtual disks:
8. Click SUBMIT.
9. If multiple guest VMs are being backed up as part of this backup policy, create a rule that isused to select the appropriate VMs that have log truncation performed.
10. Create a backup policy for the backups.
During the backup policy creation process, you:
a. Assign the new dataset to the new backup policy.
b. Assign a schedule to the new backup policy.
c. Assign a retention policy to the new backup policy.
d. If multiple guest VMs are being backed up as part of this backup policy, in the Memberspane of the Policy wizard, select Enable Dynamic rule and then select the rule that youpreviously created.
The Avamar Administration Guide provides more information about backup policies, rules,datasets, schedules, and retention policies.
11. Enable scheduling for the backup policy.
Monitoring backupsYou can monitor and view status information for backup and restore operations by using theActivity Monitor.
About this task
To access the Activity Monitor, open the navigation pane, and then click Activity. The ActivityMonitor appears with a list of all activities.
Note: The AUI Activity Monitor window has been optimized for at least 1366 pixels-widescreens. Display issues might occur for smaller screens. To properly display the AUI, ensurethat your display is at least 1366 pixels wide.
The Activity Monitor provides you with options to filter the information that appears:
l Filter activities by duration—By default, the Activity Monitor displays the most recent 5,000client activities. To select a different duration, in the Filter activities by duration drop-downlist, select Last 24 hours or Last 72 hours.
Backup
78 Dell EMC Avamar for VMware User Guide

l Filter activities by domain—By default, the Activity Monitor displays all activities regardlessof domain. To display only the activities for a specific domain, in the Filter activities bydomain drop-down list, select a domain or subdomain.
l Filter activities by status—By default, the Activity Monitor displays all activities regardless ofstatus.To display only activities with a specific status, at the top of the Activity Monitor, select oneof the following options:
n Completed
n Failed
n Running
n Waiting
To filter activities by client, start time, plug-in, or type, click in their respective column.
The Activity Monitor displays the date and time that an activity began, and the total number ofbytes examined during an activity.
To view activity details, expand the Details pane, by clicking .
Cancel backupsYou can cancel a backup any time before it completes. The cancellation might take 5 minutes orlonger. The backup might complete before the cancellation finishes.
Procedure
1. In the AUI navigation pane on the left, click , and then click Activity.
The Activity Monitor appears with a list of activities.
2. Select the backup from the list.
3. Click CANCEL.
A confirmation dialog box is displayed.
4. Click YES.
Support for vCenter HA failover for inflight backupsDuring a vCenter failover period, the Avamar software monitors the failover process and performsthe following actions.
1. Automatically detects vCenter failover events and then waits for the vCenter failover tocomplete.
2. Cancels the hanging backup jobs that were caused by vCenter HA failover.
3. Removes mounted HotAdded disks from the proxy appliance.
4. Restarts all incomplete backups during the vCenter HA failover.
Configure a backup to support VMware encryptionAvamar supports encrypted virtual machine backups.
Before you begin
l Review the known limitations for configuring a backup to support VMware encryption.
Backup
Dell EMC Avamar for VMware User Guide 79

l To backup or restore encrypted virtual machines, ensure that the proxy appliance is alsoencrypted.
l Ensure that the proxy appliance is manually mapped to the backup policy.
About this task
For details about virtual machine encryption, the VMware vSphere Security Guide provides moreinformation.
When backing up an encrypted virtual machine, perform the following steps:
Procedure
1. Establish encryption for the virtual machine:
a. Set up the KMS.
b. Create the VM encryption policy.
2. Encrypt the proxy appliance.
3. Use a Linux text editor to open /usr/local/avamarclient/var/vddkconfig.ini.
4. Locate the value vixDiskLib.transport.hotadd.NoNFCSession.
5. Change the value to 0.
This change overrides a VMware VDDK bug that inhibits hot-adding an encrypted virtualmachine. The VMware Release Notes provide more information.
6. Save and close the file.
7. Set the following permissions for the Avamar admin role:
Crytopgraphic operations > Add disk.
Crytopgraphic operations > Direct access.
VMware encryption support limitationsConsider the following known limitations of Avamar for VMware encryption support.
l As a result of disabling NoNFCSession, backup and restore in VMware Cloud on AWS is notsupported. This VMware limitation is addressed in the vddk update.
l When restoring from an encrypted virtual machine and backup, the restored data isunencrypted.
l Restoring virtual machines requires that the target vCenter is configured for the same KeyManagement Service (KMS) host as the source vCenter.
l Attempts to perform an application-consistent quiesce snapshot on an encrypted virtualmachine will fail back to a file system-consistent snapshot. This process generates an errormessage in vCenter, which you can ignore. This is a VMware limitation.
l When restoring a virtual machine as a new image:
n By default, new virtual machines are not encrypted. If encryption is desired, apply therequired storage policy.
n For cases where a boot order other than the default was implemented before the imagebackup was performed, the original boot order is not restored. In this case, you must selectthe correct boot device after the restore completes. Alternatively, you can enter the non-default boot order to the VMX file so that the restored virtual machine starts without anyreconfiguration.
Backup
80 Dell EMC Avamar for VMware User Guide

This limitation does not affect virtual machines that use the default boot order.
Configure a backup to support vSAN encryptionAvamar supports encrypted vSAN backups.
Before you begin
For details about vSAN encryption, the VMware Administering VMware vSAN Guide provides moreinformation.
About this task
Before you configure a backup to support vSAN encryption, consider the following points:
l To backup or restore virtual machines that reside on vSAN datastores, deploy the proxy on avSAN datastore.
l You can use a proxy that is deployed on a vSAN datastore to back up virtual machines fromother vSAN datastores (encrypted or non-encrypted) by using hotadd or nbdssl transportmodes.
l You can use a proxy that is deployed on a vSAN datastore to back up virtual machines fromother non-vSAN datastores by using hotadd or nbdssl transport modes.
l Avamar supports all backup and restore functionality for encrypted vSAN virtual machines.
l Avamar supports restoring an encrypted vSAN virtual machine to a different vCenter that hasa non-encrypted datastore.
Procedure
1. Set the following permissions for the Avamar admin role:
Cryptographic operations > Add disk.
Cryptographic operations > Direct access.
2. Create a backup policy for the backup.
Note: To backup a vSAN virtual machine, deploy the proxy in the vSAN datastore.
Enforcement of backups to Data DomainIf the Avamar server is configured to enforce backups to a Data Domain system, the server rejectsbackups that are not destined for the Data Domain. This enforcement covers backups that youconfigure through the Avamar Administrator and the AUI, as well as from command-line interfacesand other tools.
These backups must have additional flags that indicate the storage target. The Avamar and DataDomain System Integration Guide provides more information about backup enforcement and therelated client version requirements. Backup enforcement is disabled by default.
Backup
Dell EMC Avamar for VMware User Guide 81

Backup
82 Dell EMC Avamar for VMware User Guide

CHAPTER 5
Restore
This chapter includes the following topics:
l Image and file-level restore guidelines...................................................................................84l Image backup overview......................................................................................................... 94l File-level restore...................................................................................................................101
Dell EMC Avamar for VMware User Guide 83

Image and file-level restore guidelinesAvamar provides two distinct mechanisms for restoring virtual machine data: image restores,which can restore an entire image or selected drives, and file-level restores, which can restorespecific folders or files.
Image restores are less resource intensive and are best used for restoring large amounts of dataquickly.
File-level restores are more resource intensive and are best used to restore relatively smallamounts of data.
If you restore a large number of folders or files, you will experience better performance if yourestore an entire image or selected drives to a temporary location (for example, a new temporaryvirtual machine). Copy those files to the desired location following the restore.
Year 2038The Avamar subsystem supports backup retention until February 2106. However, for olderreleases, the Avamar subsystem does not start after January 2038 due to the signed 32-bit integertime format of UNIX and Linux operating systems, and therefore cannot restore backup data afterthis date.
Newer Avamar releases offer support for longer retention periods:
l For Avamar 19.1 and later, the Avamar server subsystem uses an unsigned 32-bit integer andcontinues to start until 2106.
l For Avamar 19.1 and earlier, the Avamar client and plug-ins subsystem uses a signed 32-bitinteger and retains data until 2038.
l For Avamar 19.2 and later, the Avamar client and plug-ins subsystem uses an unsigned 32-bitinteger and retains data until 2106.
l Backup retention after 2038 is successful when all Avamar subsystems use unsigned 32-bitintegers.
Therefore, with both Avamar 19.2 and later, and an Avamar 19.2 or later client, backup retentionsucceeds after 2038.
Avamar 19.2 and later clients also support restoring backups where the retention time is after2038, and where the local (server and client) time is after 2038. Earlier client releases do notsupport this.
For backups of Windows or Linux clients, do not assign a retention period for a date after February7, 2106.
Monitor restoresYou can monitor and view status information for backup and restore operations in the ActivityMonitor.
About this task
To access the Activity Monitor, open the navigation pane, and then click Activity. The ActivityMonitor appears with a list of all activities.
Note: The AUI Activity Monitor window has been optimized for at least 1366 pixels-widescreens. Display issues might occur for smaller screens. To properly display the AUI, ensurethat your display is at least 1366 pixels wide.
The Activity Monitor provides you with options to filter the information that appears:
Restore
84 Dell EMC Avamar for VMware User Guide

l Filter activities by duration—By default, the Activity Monitor displays the most recent 5,000client activities. To select a different duration, in the Filter activities by duration drop-downlist, select Last 24 hours or Last 72 hours.
l Filter activities by domain—By default, the Activity Monitor displays all activities regardlessof domain. To display only the activities for a specific domain, in the Filter activities bydomain drop-down list, select a domain or subdomain.
l Filter activities by status—By default, the Activity Monitor displays all activities regardless ofstatus.To display only activities with a specific status, at the top of the Activity Monitor, select oneof the following options:
n Completed
n Failed
n Running
n Waiting
To filter activities by client, start time, plug-in, or type, click in their respective column.
The Activity Monitor displays the date and time that an activity began, and the total number ofbytes examined during an activity.
To view activity details, expand the Details pane, by clicking .
Cancel restoresYou can cancel a restore any time before it completes. The cancellation might take 5 minutes orlonger. The restore might complete before the cancellation finishes.
Procedure
1. In the AUI navigation pane on the left, click , and then click Activity.
The Activity Monitor appears with a list of activities.
2. Select the restore from the list.
3. Click CANCEL.
A confirmation dialog box is displayed.
4. Click YES.
Instant accessIf restoring an entire virtual machine from backups stored on a Data Domain system, a specialfeature called “instant access” is available.
Instant access is similar to restoring an image backup to a new virtual machine, except that therestored virtual machine can be booted directly from the Data Domain system. This step reducesthe amount of time that is required to restore an entire virtual machine.
Instant access comprises the following tasks:
1. Restoring the virtual machine:
l Instant access is initiated.
l Selected VMware backup is copied to temporary NFS share on the Data Domain system.
2. Performing post-restore migration and clean-up:
l From the vSphere Client or vSphere Web Client, power on the virtual machine, and thenuse Storage vMotion to migrate the virtual machine from the Data Domain NFS share to adatastore within the vCenter.
Restore
Dell EMC Avamar for VMware User Guide 85
l When Storage vMotion is complete, the restored virtual machine files no longer exist on theData Domain system.
l From Avamar Administrator, ensure that the Data Domain NFS share has been deleted.
Note: When used with Data Domain systems earlier than release 6.0, to minimize operationalimpact to the Data Domain system, only one instant access is permitted at a time. For DataDomain systems at release 6.0 or greater, 32 instant access processes are permitted at thesame time. If you are using the same ESXi host as the target for multiple instant accessprocesses, then to achieve 32 instant access processes, you must increase the values for thefollowing settings on the ESXi host to the maximum supported values:
l Under NFS, update NFS.MaxVolumes.
l Under Net, update Net.TcpipHeapSize.
l Under Net, update Net.TcpipHeapMax.
VMware KB article 2239 contains further information about increasing the limits for thesesettings. Refer VMware documentation for concurrent Virtual machine migration limits.
Restoring the virtual machineProcedure
1. In the AUI navigation pane on the left, click , and then click Asset Management.
The Asset Management window is displayed.
2. In the domain tree, select the domain that contains the virtual machine client or VMwarecontainer.
You cannot view clients outside the domain for the login account. To view all clients, log into the root domain.
3. In the list of clients, select the virtual machine client or VMware container.
A list of completed backups for this instance is displayed. Any backup in this list can be usedto restore the instance.
4. (Optional) To locate backups by date:
a. In the right pane, click VIEW MORE.
b. Click SEARCH.
c. In the From and To fields, specify the date range.
d. Click RETRIEVE.
e. In the list of backups, select a backup residing on the Data Domain.
The list of backups for the date range is displayed.
5. Click the RESTORE tab.
The Select Restore Content dialog box appears and displays a list of volumes that arecontained within the backup. The volume names identify the original mount point.
6. In the Select Restore Content dialog box, perform the following steps:
a. In the hierarchy tree, select the virtual disk that you want to restore.
b. In the Contents pane, select the files that are contained within the folder.
c. Click NEXT.
The Restore wizard is displayed and opens to the Basic Config pane.
Restore
86 Dell EMC Avamar for VMware User Guide

7. In the Basic Config pane, perform the following steps:
a. In the Destination field, select Instant Acess.
b. Click NEXT.
The Advanced Config pane appears.
8. In the Advanced Config pane, perform the following steps:
a. In the VM Name field, type a unique name for the new virtual machine.
b. Click NEXT.
The Location pane appears.
9. In the Location pane, perform the following steps:
a. In the inventory tree, select a data center and folder location.
b. Click NEXT.
The Host/Cluster pane appears.
10. In the Host/Cluster pane, perform the following steps:
a. In the inventory tree, select a host or cluster.
b. Click NEXT.
The Resource Pool pane appears.
11. In the Resource Pool pane, perform the following steps:
a. In the inventory tree, select a resource pool.
b. Click NEXT.
The Summary pane appears.
12. In the Summay pane, review the provided information, and then click FINISH.
The following status message is displayed:
Restore request initiated.
Performing post-restore migration and clean-upProcedure
1. Launch the vSphere Client or vSphere Web Client, and log in to the vCenter Server.
2. Locate the virtual machine you restored.
3. Use Storage vMotion to migrate that virtual machine from the Data Domain NFS share to adatastore within the vCenter.
When Storage vMotion is complete, the restored virtual machine files no longer exist on theData Domain system.
The MCS NFS datastore poller automatically unmounts unused Data Domain NFS mountsonce daily. However, it is still a good practice to ensure that the NFS mount has beenunmounted and removed by performing the remainder of this procedure.
4. In Avamar Administrator, click the Server launcher link.
The Server window is displayed.
5. Click the Data Domain NFS Datastores tab.
6. Ensure that there is no entry for the virtual machine you restored.
Restore
Dell EMC Avamar for VMware User Guide 87

If an entry is found, select it, and then click Unmount/Remove.
Restore an instance of a VM backup by using the AUIAny successful instance backup can be used to restore a copy of that instance. You can find abackup to restore by date. When you perform the restore, you can restore to either the originallocation, a different location, or multiple locations.
When you perform the restore, you can restore to either the original virtual machine, to a newvirtual machine, or to a different virtual machine.
Selecting a backup instance to restore
About this task
The steps in this procedure apply to the following plug-in types:
l Microsoft Windows File System
l Linux File System
l VMware image
l VMware File Level Restore (FLR)
l Microsoft SQL
l Microsoft Hyper-V
l Microsoft Exchange
For all other plugin types that are not in this list, use Avamar Administrator.
Procedure
1. In the AUI navigation pane on the left, click , and then click Asset Management.
The Asset Management window is displayed.
2. In the domain tree, select the domain for the client.
3. In the list of clients, select the client computer to recover.
A list of completed backups for this instance is displayed. Any backup in this list can be usedto restore the instance.
4. (Optional) To locate backups by date:
a. In the right pane, click VIEW MORE.
b. Click SEARCH.
c. In the From and To fields, specify the date range.
d. Click RETRIEVE.
e. In the list of backups, select a backup.
The list of backups for the date range is displayed.
5. Click the RESTORE tab.
The Select Restore Content dialog box appears and displays a list of volumes that arecontained within the backup. The volume names identify the original mount point.
6. (Optional) To perform a file-level restoration (FLR) of the content, perform the followingsteps:
a. Toggle the FLR switch to on.
The list of folders is displayed.
Restore
88 Dell EMC Avamar for VMware User Guide

b. Select the folder or file that you want to restore, and then click RESTORE.
The FLR feature retrieves files from the backup without the need to complete a full restoreoperation. This feature provides the ability to restore specific files from a volume in aparticular backup, or browse the files that are contained in the backup volumes.
7. In the Select Restore Content dialog box, perform the following steps:
a. In the hierarchy tree, select the folder that you want to restore.
b. In the Contents pane, select the files that are contained within the folder.
c. Click NEXT.
The Restore wizard is displayed and opens to the Basic Config page.For information about how to restore to the original virtual machine, see Restore data to theoriginal virtual machine.
Restore data to the original virtual machine
About this task
To access the Restore wizard, in the AUI navigation pane on the left, click , and then click AssetManagement > Restore.
Procedure
1. In the AUI navigation pane on the left, click , and then click Asset Management.
The Asset Management window is displayed.
2. In the domain tree, select the domain for the client.
3. In the list of clients, select the client computer to recover.
A list of completed backups for this instance is displayed. Any backup in this list can be usedto restore the instance.
4. (Optional) To locate backups by date:
a. In the right pane, click VIEW MORE.
b. Click SEARCH.
c. In the From and To fields, specify the date range.
d. Click RETRIEVE.
e. In the list of backups, select a backup.
The list of backups for the date range is displayed.
5. Click the RESTORE tab.
The Select Restore Content dialog box appears and displays a list of volumes that arecontained within the backup. The volume names identify the original mount point.
6. (Optional) To perform a file-level restoration (FLR) of the content, perform the followingsteps:
a. Toggle the FLR switch to on.
The list of folders is displayed.
b. Select the folder or file that you want to restore, and then click RESTORE.
The FLR feature retrieves files from the backup without the need to complete a full restoreoperation. This feature provides the ability to restore specific files from a volume in aparticular backup, or browse the files that are contained in the backup volumes.
Restore
Dell EMC Avamar for VMware User Guide 89

7. In the Select Restore Content dialog box, perform the following steps:
a. In the hierarchy tree, select the folder that you want to restore.
b. In the Contents pane, select the files that are contained within the folder.
c. Click NEXT.
The Restore wizard is displayed and opens to the Basic Config page.
8. In the Destination Client field:
a. Select Restore to Original Virtual Machine.
b. Click NEXT.
The Backups pane is displayed.
9. In the Backup Content pane, perform the following steps:
a. In the hierarchical Domain tree, select the client that you want to restore.
The Contents of Backup pane displays a list of files that are contained within thatfolder.
b. In the right pane, select the virtual machine backup that you want to restore.
c. Click NEXT.
The Destination Location pane is displayed.
10. In the Destination Locationpane, select Restore to Original Virtual Machine.
The More Options pane is displayed.
11. In the More Options pane, set the plug-in options:
a. In the Post Restore Options field, select an option.
b. To restore the virtual machine configuration, select Restore Virtual MachineConfiguration.
c. To restore the virtual machine as a new disk, select Restore as a new disk.
d. To use Changed Block Tracking (CBT) to increase performance, select Use CBT toincrease performance.
e. In the Proxy field, select an option.
Plug-in Options provides the complete list of plug-in options.
12. Click NEXT.
The Summary pane is displayed.
13. In the Summay pane, review the provided information, and then click FINISH.
The following status message is displayed:
Restore request initiated.
Restore data to a different virtual machine
About this task
To access the Restore wizard, in the AUI navigation pane on the left, click , and then click AssetManagement > Restore.
Restore
90 Dell EMC Avamar for VMware User Guide

Procedure
1. In the AUI navigation pane on the left, click , and then click Asset Management.
The Asset Management window is displayed.
2. In the domain tree, select the domain for the client.
3. In the list of clients, select the client computer to recover.
A list of completed backups for this instance is displayed. Any backup in this list can be usedto restore the instance.
4. (Optional) To locate backups by date:
a. In the right pane, click VIEW MORE.
b. Click SEARCH.
c. In the From and To fields, specify the date range.
d. Click RETRIEVE.
e. In the list of backups, select a backup.
The list of backups for the date range is displayed.
5. Click the RESTORE tab.
The Select Restore Content dialog box appears and displays a list of volumes that arecontained within the backup. The volume names identify the original mount point.
6. (Optional) To perform a file-level restoration (FLR) of the content, perform the followingsteps:
a. Toggle the FLR switch to on.
The list of folders is displayed.
b. Select the folder or file that you want to restore, and then click RESTORE.
The FLR feature retrieves files from the backup without the need to complete a full restoreoperation. This feature provides the ability to restore specific files from a volume in aparticular backup, or browse the files that are contained in the backup volumes.
7. In the Select Restore Content dialog box, perform the following steps:
a. In the hierarchy tree, select the folder that you want to restore.
b. In the Contents pane, select the files that are contained within the folder.
c. Click NEXT.
The Restore wizard is displayed and opens to the Basic Config page.
8. In the Basic Config pane, perform the following steps:
a. In the Destination field, select Restore to different (existing) Virtual Machine.
b. In the Post Restore Options field, select an option.
c. To restore the virtual machine as a new disk, select Restore as a new disk.
d. To use Changed Block Tracking (CBT) to increase performance, select Use CBT toincrease performance check box.
e. In the Proxy field, select an option.
Plug-in Options provides the complete list of plug-in options.
The Advanced Config page appears.
Restore
Dell EMC Avamar for VMware User Guide 91
9. In the Advanced Config pane, complete the following steps:
a. To view hosts, toggle Host/Cluster to off.
b. To view a cluster, toggle Host/Cluster to on.
c. In the Host/Cluster pane, expand the domain name, and then select a host or cluster.
The selected IP address appears.
10. Click NEXT.
The Summary pane is displayed.
11. In the Summay pane, review the provided information, and then click FINISH.
The following status message is displayed:
Restore request initiated.
Restore data to a new virtual machine
About this task
To access the Restore wizard, in the AUI navigation pane on the left, click , and then click AssetManagement > Restore.
Procedure
1. In the AUI navigation pane on the left, click , and then click Asset Management.
The Asset Management window is displayed.
2. In the domain tree, select the domain for the client.
3. In the list of clients, select the client computer to recover.
A list of completed backups for this instance is displayed. Any backup in this list can be usedto restore the instance.
4. (Optional) To locate backups by date:
a. In the right pane, click VIEW MORE.
b. Click SEARCH.
c. In the From and To fields, specify the date range.
d. Click RETRIEVE.
e. In the list of backups, select a backup.
The list of backups for the date range is displayed.
5. Click the RESTORE tab.
The Select Restore Content dialog box appears and displays a list of volumes that arecontained within the backup. The volume names identify the original mount point.
6. (Optional) To perform a file-level restoration (FLR) of the content, perform the followingsteps:
a. Toggle the FLR switch to on.
The list of folders is displayed.
b. Select the folder or file that you want to restore, and then click RESTORE.
The FLR feature retrieves files from the backup without the need to complete a full restoreoperation. This feature provides the ability to restore specific files from a volume in aparticular backup, or browse the files that are contained in the backup volumes.
Restore
92 Dell EMC Avamar for VMware User Guide

7. In the Select Restore Content dialog box, perform the following steps:
a. In the hierarchy tree, select the folder that you want to restore.
b. In the Contents pane, select the files that are contained within the folder.
c. Click NEXT.
The Restore wizard is displayed and opens to the Basic Config page.
8. In the Basic Config pane, perform the following steps:
a. In the Destination field, select Restore to new Virtual Machine.
b. In the Post Restore Options field, select an option.
c. To use Changed Block Tracking (CBT) to increase performance, select Use CBT toincrease performance check box.
d. In the Proxy field, select an option.
Plug-in Options provides the complete list of plug-in options.
The Advanced Config page appears.
9. In the Advanced Config pane, complete the following steps:
a. In the vCenter field, select a vCenter.
b. In the VM Name field, type the name of the virtual machine.
c. Click NEXT.
10. In the Location pane, complete the following steps:
a. Expand the domain name, and then select a destination.
The selected location appears.
b. Click NEXT.
11. In the Host/Cluster pane, complete the following steps:
a. Expand the domain name, and then select a host or cluster.
The selected IP address appears.
b. Click NEXT.
12. In the Resource Pool pane, complete the following steps:
a. Expand the domain name, and then select a resource pool.
The selected resource pool appears.
b. Click NEXT.
13. On the Datastore pane, complete the following steps:
a. Select a datastore.
b. Click NEXT.
14. Click NEXT.
The Summary pane is displayed.
15. In the Summay pane, review the provided information, and then click FINISH.
The following status message is displayed:
Restore request initiated.
Restore
Dell EMC Avamar for VMware User Guide 93

Image backup overviewImage backup offers three levels of restore functionality: image restore, file-level restore (FLR),and the capability to mount specific drives from a Windows image backup in order to supportapplication-level recovery.
Three buttons are provided above the Select for Restore contents pane, which are not shown if anon-VMware image backup is selected:
Table 8 Image restore toolbar buttons
Button Tooltip Description
Browse for Image Restore Initiates an image restore.
Browse for Granular Restore Initiates a file-level restore.
Mount Windows VMDK Mounts selected drives in aWindows image backup inorder to support application-level recovery.
When performing an image restore, the Restore Options dialog box is slightly different from thetypical Restore Options dialog box. The primary differences are that virtual machine information isshown and three choices for restore destinations are offered:
l Original virtual machine
l Different (existing) virtual machine
l New virtual machine
Once the destination selection is made, each procedure varies slightly from that point forward.
Image-level restore limitationsThe following limitations apply to image-level restores from virtual machine backups.
Virtual machine power state
When using image restore to restore an entire image or selected drives, the target virtual machinemust be powered off.
Restores involving physical RDM disks
When restoring data from a backup taken from a virtual machine with physical RDM disks, youcannot restore that data to a new virtual machine.
Nested container limitations
When restoring a VMware container that contains other containers (that is, a nested containerstructure), Avamar only restores the top-level of the hierarchy. Consider the following examplenested vApp structure:
Restore
94 Dell EMC Avamar for VMware User Guide

Figure 7 Example nested container structure
When vApp-1 is backed up to Avamar, the vApp backup image will only contain virtual machinebackup images for vm-1 and vm-2. When vApp-1 backup is restored, only vm-1 and vm-2 will bepresent.
Two interim solutions exist for this limitation:
l Flatten the container structure.For example, move vm-3 under vApp-1. Then all three virtual machines will be backed up whenvApp-1 is backed up.
l Add both vApp-1 and vApp-2 to Avamar as separate container entities so that they can bebacked up separately.When restoring, restore vApp-1 first, then restore vApp-2 into vApp-1
Restoring the full image or selected drives to the original virtual machineProcedure
1. In the vSphere Client or vSphere Web Client, ensure that the target virtual machine ispowered off.
2. In the AUI left navigation pane, click , and then click Asset Management.
The Asset Management window displays.
3. In the Domain pane, select the domain that contains the virtual machine client or VMwarecontainer that you want to restore.
4. From the list of clients in the Asset Management pane, select the virtual machine client orVMware container.
The Client Summary pane displays backup statistics for the selected object.
5. (Optional) To locate backups by date:
a. In the Client Summary pane, click VIEW MORE.
b. Click SEARCH.
c. In the From and To fields, specify the date range.
d. Click RETRIEVE.
e. In the list of backups, select a backup.
The list of backups for the date range is displayed.
6. Click the RESTORE tab.
The Restore wizard appears. If you clicked RESTORE from the Asset Management pane,the wizard opens on the Backup List page, which allows you to select from the availablebackups for the selected object. If you performed step 5, the wizard opens on the Contentpage, since the backup has already been selected from the list of available backups. TheContent page displays a list of volumes that are contained within the backup. The volumenames identify the original mount point.
7. In the Content page:
Restore
Dell EMC Avamar for VMware User Guide 95

a. From the hierarchy tree, select the folder that you want to restore.
b. Select the files that are contained within the folder.
c. Click NEXT.
The Basic Config page appears.
8. In the Basic Config page:
a. In the Destination field, select Restore to Original Virtual Machine.
b. In the Post Restore Options field, select an option.
c. To restore the virtual machine configuration, select the Restore Virtual MachineConfiguration check box.
d. To restore the virtual machine as a new disk, select the Restore as a new diskcheckbox.
e. To use Changed Block Tracking (CBT) to increase performance, select the Use CBT toincrease performance check box.
f. In the Proxy field, select an option.
g. Click NEXT.
The Summary pane is displayed.
9. Click NEXT.
The Summary pane is displayed.
10. In the Summay pane, review the provided information, and then click FINISH.
The following status message is displayed:
Restore request initiated.11. If the destination virtual machine for the restore will be using changed block tracking for
future backups, enable changed block tracking by performing any of the following actions onthat virtual machine: reboot, power on, resume after suspend, or migrate.
Restoring the full image or selected drives to a different virtual machineProcedure
1. In the vSphere Client or vSphere Web Client, ensure that the target virtual machine ispowered off.
2. In the AUI left navigation pane, click , and then click Asset Management.
The Asset Management window displays.
3. In the Domain pane, select the domain that contains the virtual machine client or VMwarecontainer that you want to restore.
4. From the list of clients in the Asset Management pane, select the virtual machine client orVMware container.
The Client Summary pane displays backup statistics for the selected object.
5. (Optional) To locate backups by date:
a. In the Client Summary pane, click VIEW MORE.
b. Click SEARCH.
c. In the From and To fields, specify the date range.
Restore
96 Dell EMC Avamar for VMware User Guide

d. Click RETRIEVE.
e. In the list of backups, select a backup.
The list of backups for the date range is displayed.
6. Click the RESTORE tab.
The Restore wizard appears. If you clicked RESTORE from the Asset Management pane,the wizard opens on the Backup List page, which allows you to select from the availablebackups for the selected object. If you performed step 5, the wizard opens on the Contentpage, since the backup has already been selected from the list of available backups. TheContent page displays a list of volumes that are contained within the backup. The volumenames identify the original mount point.
7. In the Content page:
a. From the hierarchy tree, select the folder that you want to restore.
b. Select the files that are contained within the folder.
c. Click NEXT.
The Basic Config page appears.
8. In the Basic Config page, perform the following steps:
a. In the Destination field, select Restore to different (existing) Virtual Machine.
b. In the Post Restore Options field, select an option.
c. To restore the virtual machine as a new disk, select the Restore as a new diskcheckbox.
d. To use Changed Block Tracking (CBT) to increase performance, select the Use CBT toincrease performance check box.
e. In the Proxy field, select an option.
f. Click NEXT.
The Advanced Configuration pane is displayed.
9. In the Advanced Config pane, complete the following steps:
a. To view hosts, toggle Host/Cluster to off.
b. To view a cluster, toggle Host/Cluster to on.
c. In the Host/Cluster pane, expand the domain name, and then select a host or cluster.
The selected IP address appears.
10. Click NEXT.
The Summary pane is displayed.
11. In the Summay pane, review the provided information, and then click FINISH.
The following status message is displayed:
Restore request initiated.12. If the destination virtual machine for the restore will be using changed block tracking for
future backups, enable changed block tracking by performing any of the following actions onthat virtual machine: reboot, power on, resume after suspend, or migrate.
Restore
Dell EMC Avamar for VMware User Guide 97

Mounting Windows VMDKs from an image backupAvamar provides a mechanism for mounting VMDKs from VMware image backups of Windowsvirtual machines. This feature is typically used to enable third party tools such as Kroll OnTrackPowerControls to perform data mining and advanced data recovery.
Configuring the recovery target machineThis task configures a physical or virtual Windows machine to be a recovery target for mountingWindows VMDKs from an image backup.
Before you begin
The recovery target machine must be a 64-bit Windows physical or virtual machine.
Note: Recovery targets can be physical or virtual machines. If you intend to use a virtualmachine as a recovery target, install the Avamar software directly on the virtual machine justas you would if implementing guest backup.
Procedure
1. Using instructions in the Avamar Backup Clients User Guide, install Avamar Windows clientsoftware on the recovery target machine.
2. Using instructions in the Avamar Backup Clients User Guide, register the recovery targetmachine as a client with the same Avamar server storing the image backup to be mounted.
3. Install the Windows VMware GLR plug-in software:
a. Log in to the recovery target machine with Windows administrator privileges.
b. Download the AvamarVMWareGLR-windows-x86_64-version.msi install package fromthe Avamar server.
c. Open the install package, and then follow the on screen instructions.
d. Reboot the computer.
Restoring and mounting the Windows VMDKs
Before you begin
Ensure that the recovery target machine has been properly configured:
l The Avamar Windows client, and Windows VMware GLR plug-in software is installed
l The recovery target machine is registered and activated as a client with the same Avamarserver storing the image backup from which the VMDK will be mounted
Procedure
1. In the vSphere Client or vSphere Web Client, ensure that the target virtual machine ispowered on.
2. In Avamar Administrator, click the Backup & Restore launcher link.
The Backup, Restore and Manage window is displayed.
3. Click the Restore tab.
The upper left pane contains a list of domains.
4. Select a virtual machine client or VMware container:
a. Select the domain that contains the virtual machine client or VMware container.
You cannot view clients outside the domain for the login account. To view all clients, login to the root domain.
Restore
98 Dell EMC Avamar for VMware User Guide

A list of Avamar clients appears in the pane under the domains list.
b. From the list of clients, select the virtual machine client or VMware container.
5. Select a backup:
a. Click the By Date tab.
b. Select the backup date from the calendar. Valid backups occurred on dates with a yellowhighlight.
A list of backups on that date appears in the Backups table next to the calendar.
c. Select a backup from the Backups table.
6. In the contents pane, select a virtual disk.
7. Click the Mount Windows VMDK button ( ).
The Select Destination Client dialog box appears.
8. Click Browse next to the Client box.
The Browse for Restore Destination Client dialog box appears.
9. Select the recovery target virtual machine, and then click OK.
The Browse Backup Status dialog box appears.
10. Click OK to confirm that the operation should continue.
The Restore Browse Options dialog box appears.
11. Select a time out value from the Amount of time to leave VMDKs mounted list, and thenclick OK.
Results
A folder path appears in the right backup contents pane. The Windows VMDK is now mounted tothat folder.
Restore the full image or selected drives to a new virtual machine by usingAvamar Administrator
Procedure
1. In Avamar Administrator, click the Backup & Restore launcher link.
The Backup, Restore and Manage window is displayed.
2. Click the Restore tab.
The upper left pane contains a list of domains.
3. Select a virtual machine client or VMware container:
a. Select the domain that contains the virtual machine client or VMware container.
You cannot view clients outside the domain for the login account. To view all clients, login to the root domain.
A list of Avamar clients appears in the pane under the domains list.
b. From the list of clients, select the virtual machine client or VMware container.
4. Select a backup:
a. Click the By Date tab.
b. Select the backup date from the calendar. Valid backups occurred on dates with a yellowhighlight.
Restore
Dell EMC Avamar for VMware User Guide 99

A list of backups on that date appears in the Backups table next to the calendar.
c. Select a backup from the Backups table.
5. Click the Browse for Image Restore button ( ) directly above the contents pane.
6. In the contents pane:
l Select the All virtual disks folder checkbox to restore the entire image.
l Select one or more drives to only restore those specific drives.
7. Select Actions > Restore Now.
The Restore Options dialog box appears.
8. Select Restore to a new virtual machine as the restore destination.
Note: When restoring an image backup to a new virtual machine, the Restore virtualmachine configuration option is selected and disabled (grayed out) because theseconfiguration files are always required to configure the new virtual machine.
9. Specify a location and settings for the new virtual machine:
a. Click Configure Destination.
The Configure Virtual Machine dialog box appears.
b. Click Browse.
The New Virtual Machine wizard appears.
c. In the Name and Location screen, type a unique Name for the new virtual machine,select a datacenter and folder location in the inventory tree, and then click Next.
d. In the Summary screen, review the information, and then Finish.
e. Click OK on the Configure Virtual Machine dialog box.
10. From the Avamar encryption method list, select the encryption method to use for datatransfer between the Avamar server and the client during the restore.
The encryption technology and bit strength for a client/server connection depends onseveral factors, including the client operating system and Avamar server version. TheAvamar Product Security Guide provides additional information.
11. (Optional) Optionally select a proxy to perform restore.
The default setting is Automatic, which enables the Avamar server to choose the best proxyfor this operation.
12. Click More Options.
The Restore Command Line Options dialog box appears.
13. Select or clear Use Changed Block Tracking (CBT) to increase performance.
14. From the Encryption method from Data Domain system list, select the encryption methodto use for data transfer between the Data Domain system and the client during the restore.
15. Select one of the following settings in the Select Post Restore Options list:
l Do not power on VM after restore.
l Power on VM with NICs enabled.
l Power on VM with NICs disabled.
16. (Optional) To include additional plug-in options with this restore, type Enter Attribute andEnter Attribute Value settings.
Restore
100 Dell EMC Avamar for VMware User Guide

17. Click OK on the Restore Command Line Options dialog box.
18. Click OK on the Restore Options dialog box.
The following status message appears: Restore initiated.
19. Click OK.
20. If the restore target virtual machine will be using changed block tracking for future backups,enable changed block tracking by performing any of the following actions on that virtualmachine: reboot, power on, resume after suspend, or migrate.
File-level restoreFile level restore (FLR) enables you to restore individual files and folders from a backup withoutrequiring a full (image-level) restore. You can browse the files contained within a backup volume toselect the specific items you want to restore.
Note: To use FLR, ensure that the virtual machine is powered on.
Performance improvements for file-level restoreBy default, Avamar uses the HTTPS protocol to perform file-level restore. This improves theperformance of restores by providing a faster mechanism for file transfer than the previousmechanism using file copy.
If HTTPS is not available, Avamar uses file copy, the previous mechanism, to perform the file-levelrestore. The following warning message is displayed during restore:
Target VM: server cannot reach proxy: proxy via https due to incorrect network configuration. Restoration process may take significantly longer time. Press ‘continue’ to start the restore.
where:
l server is the name of the Avamar server.
l proxy is the name of the proxy.
Select Yes to continue the restore operation using file copy. The restore will take significantlylonger.
Note: This implementation requires the wget command. To take advantage of theperformance improvement, you must have wget installed on the client.
File-level restore supported configurationsThe following supported configurations require that both the proxy version and Avamar server tobe at Avamar release 7.5 Service Pack 1 or later:
Partitioning scheme
The following table outlines the partitioning scheme for (File-level restore) FLR.
Table 9 FLR support partitioning scheme
Partitioning scheme Guest OS FLR Comment
MBR Windows/Linux Supported
Restore
Dell EMC Avamar for VMware User Guide 101

Table 9 FLR support partitioning scheme (continued)
Partitioning scheme Guest OS FLR Comment
EBR (LogicalPartition)
Windows/Linux Supported
GPT Windows/Linux Partial support Support BTRFS andLVM base on GPT inLinux
MixedGPT Windows/Linux Not supported Hybrid MBR
File system support
The following table outlines the file system support for FLR.
Table 10 File system support for FLR
File systemtype
Guest OS Partitioningscheme
Partition ID Partitionlessdisk
LVM
ext2 Linux MBR, EBR 0x83 Support Support
ext3 Linux MBR, EBR 0x83 Support Support
ext4 Linux MBR, EBR 0x83 Support Support
ntfs Windows MBR, EBR,GPT
0x04/0x07 Support Support
vfat Windows MBR, EBR 0x06/0x0E Support Support
xfs Linux MBR, EBR 0x83 Support Support
reiserfs Linux MBR, EBR 0x83 Support Support
btrfs Linux MBR, EBR,GPT
0x83 Support Support
LVM support
The following table outlines the LVM support for FLR.
Table 11 LVM support for FLR
LV type FLR
Linear LV Support
Striped LV Support
Mirrored LV Support
RAID LV Support
Thin LV Support
Multi-device support
The following table outlines multi-device support for FLR.
Restore
102 Dell EMC Avamar for VMware User Guide

Table 12 Multi-device support for FLR
RAID Occur FLR
RAID 0/Striping LVM/BTRFS Support
RAID 1/Mirroring LVM/BTRFS Support
RAID 4 LVM Support
RAID 5 LVM Support
RAID 6 LVM Support
RAID10 LVM/BTRFS Support
RSA SecurID authentication in the AUIAvamar 19.1 supports RSA SecurID, which is a two-factor authentication technology used toprotect network resources.
You can use two-factor authentication (2FA) for file-level restore of guest virtual machine backupsin the AUI and the Dell EMC Data Protection Restore Client, which previously could not takeadvantage of this technology due to the additional layer of user authentication required.
Log in to the AUI as an administrator to configure the required RSA server information to store inthe Avamar server. This information is then used to verify the connection with the RSAauthentication manager.
Once logged in, you can perform the following operations:
l Add the RSA Authentication Manager.
l Add or delete a replication RSA server.
Note: You can only add one RSA Authentication Manager. You can add anywhere from 0-10replication RSA servers.
Add RSA Manager and enable two-factor authenticationTo add or edit the RSA Manager so that you can enable two-factor authentication (2FA) on virtualmachines, perform the following.
About this task
Note: Avamar supports only one RSA authentication server at a time.
Procedure
1. In the AUI navigation pane on the left, click , and then click System.
The System window displays.
2. Select the RSA Authentication Manager tab.
3. Click ADD/EDIT RSA MANAGER.
The RSA Manager window displays, prompting you to provide the following configurationinformation for both a new and existing RSA Manager:
l RSA Client ID — The Avamar server fully qualified domain name (FQDN), which isregistered as an agent on the RSA server.
l RSA Base URL — the RSA server path, which includes the server FQDN and the port touse for communication with the Avamar server.
Restore
Dell EMC Avamar for VMware User Guide 103

l RSA Access ID — the RSA server remote access ID.
l RSA Access Key — the RSA server remote access key.
l RSA Root Cert — the Root certificate is required for the Avamar authentication agent toestablish a verified HTTPS connection with the RESTful service running on theauthentication manager (RSA Manager).
4. After completing the configuration, click Finish.
When you add an RSA Manager, an entry with the RSA server URL appears in the left pane.
5. If you add the RSA Manager under the vCenter:
a. Select the vCenter in the left pane to display the virtual machines in the right pane.
b. Select the checkbox next to the virtual machines.
c. Click UPDATE 2FA STATUS to enable RSA two-factor authentication on the virtualmachines in the vCenter.
6. If you change any configuration details of an existing RSA Manager, click UPDATE 2FASTATUS again.
After you finish
Add a replication RSA server. Add Replication RSA Server on page 104provides information.
Add Replication RSA ServerIf the primary server becomes unavailable, adding one or more replication RSA servers enables youto continue RSA 2FA authentication.
About this task
Note: Avamar supports one RSA authentication server at a time. If all replication servers andthe primary server are not available, authentication fails.
Procedure
1. In the AUI navigation pane on the left, click , and then click System.
The System window displays.
2. Select the RSA Authentication Manager tab.
3. Click ADD REPLICATION RSA SERVER.
The Add RSA Authentication Manager window displays.
4. Type the Replication Server Base URL, which includes the server FQDN and the port touse for communication with the Avamar server, and then click Finish.
Results
An entry for the added replication server now appears below the entry for the RSA AuthenticationManger in the left pane of the System window. If you want to remove a replication server, selectthe entry in the left pane and click DELETE REPLICATION RSA SERVER, and then confirm theselection.
File level restore troubleshooting and limitationsReview the following information related to file level restore troubleshooting and limitations:
File level restore limitations
Note the following limitations to file level restore support:
l You cannot restore or browse symbolic links.
Restore
104 Dell EMC Avamar for VMware User Guide

l Browsing either a specified directory that is contained within a backup or a restore destinationis limited to 50,000 files or folders.
l Restore is limited to 20,000 objects (files or folders) in the same restore operation.
l You can restore files from a Windows backup only to a Windows machine, and files from aLinux backup only to a Linux machine.
l The vCenter must be added to the root domain in the AUI. Any other location for the vCenterdomain is not supported.
l When performing a file-level restore to a /tmp location, the Avamar software redirects data toa private /tmp location.For example: /tmp/systemd-private-*
l All virtual machine clients must be in /vCenter/VirtualMachines subfolder in the AUI. Any otherlocation for the VMs is not supported.
l To overwrite ACLs of an existing file or folder, ensure that the user has ownership rights of thetarget file or folder that is being overwritten.
l Only one vCenter is allowed to be configured for the AUI.Note: If more than one vCenter is configured in Avamar, you must ensure that the Avamarserver's vcenter-sso-info.cfg reflects the correct vCenter server for theVC_hostname parameter. For example, the sample file /usr/local/avamar/var/ebr/server_data/prefs/vcenter-sso-info.cfg:
vcenter-sso-hostname=<VC_hostname>vcenter-sso-port=7444# configure only if more than one vCentervcenter-hostname=<VC_hostname>
Unsupported virtual disk configurations
File-level restore does not support the following virtual disk configurations:
l Filesystems that support FLR require a higher kernel than proxy operating system (3.12)
n XFS Free Inode B-Tree(finobt)
n Ext4 sparse_supper2(3.16), metdata_csum(3.18), encrypt(4.1), project(4.5)
l Windows Dynamic disks
l Encrypted/compressed partitions or bootloaders
l Deduplicated NTFS
l Unformatted disks
l Browsing of multiple active disks/partitions. Only the first active disk/partition displays forbrowsing.
Note: FLR operations on virtual machines with Logical Volume Manager (LVM) configurationsare supported only if the LVM configuration is complete. A complete LVM configurationconsists of at least one partition that is configured with a type 8E-Linux LVM, which consistsof one or more physical volumes. These physical volumes contain one or more volume groupsthat are made up of one or more logical volumes.
RSA 2FA verification errors
If you enabled RSA 2FA for file level restore and experience any errors during 2FA verification,these errors likely originate from the RSA server. Contact your RSA administrator for assistancechecking the RSA server log and troubleshooting these errors.
Restore
Dell EMC Avamar for VMware User Guide 105

File-level restore in the AUIThe file level restore (FLR) feature retrieves files from the backup without the need to complete afull restore operation. This feature provides the ability to restore specific files from a volume in aparticular backup, or browse the files that are contained in the backup volumes.
Before you begin
To perform file-level restores:
l Ensure that the source VM exists in VMware, and is powered on and registered.
l Ensure that an up-to-date version of VMware Tools is installed and running on the source VM.
l For non-Windows platforms, the user can be part of the Standard or Administrators group. Itdoes not support Domain users.
l For Windows VMs, only a local administrator user can perform file-level restore. Additionally,ensure that you disable User Account Control (UAC). The knowledgebase article at https://support.emc.com/kb/477118 provides more information.
About this task
To access the Restore wizard, In the AUI navigation pane on the left, click , and then click AssetManagement > Restore.
Procedure
1. In the AUI navigation pane on the left, click , and then click Asset Management.
The Asset Management window is displayed.
2. In the domain tree, select the domain for the client.
3. In the list of clients, select the client computer to recover.
A list of completed backups for this instance is displayed. Any backup in this list can be usedto restore the instance.
4. (Optional) To locate backups by date:
a. In the right pane, click VIEW MORE.
b. Click SEARCH.
c. In the From and To fields, specify the date range.
d. Click RETRIEVE.
e. In the list of backups, select a backup.
The list of backups for the date range is displayed.
5. Click the RESTORE tab.
The Select Restore Content dialog box appears and displays a list of volumes that arecontained within the backup. The volume names identify the original mount point.
6. To perform a file-level restoration (FLR) of the content, perform the following steps:
a. Toggle the FLR switch to on.
The list of folders is displayed.
b. Select the folder or file that you want to restore, and then click RESTORE.
The FLR feature retrieves files from the backup without the need to complete a full restoreoperation. This feature provides the ability to restore specific files from a volume in aparticular backup, or browse the files that are contained in the backup volumes.
Restore
106 Dell EMC Avamar for VMware User Guide

The Basic Config pane appears.
7. In the Basic Config pane, perform the following steps:
a. To select a client, perform the following steps:
a. Click SELECT CLIENT.The Select Client pane appears.
b. In the Domain tree, select a domain for the client.
c. In the Client pane, choose a destination client.
d. Click OK.
b. In the Username and Password fields, type the username and password for thedestination client.
If you enabled RSA 2FA, an additional password is required. This password will either bea fixed pass code or the RSA token code/system generated pass code. If you are unsureof the pass code required for verification, contact your RSA administrator.
c. In the Location field, the path for the restore.
d. (Optional) Select Restore ACL to restore ACLs.
Note: If the Restore ACL option is selected, the user performing the restore musthave file ownership of the original file to perform the restore. If the file ownershiphas changed since the backup was performed and the user performing the restoredoes not have proper file ownership, the restore fails.
e. In the Proxy field, select a proxy.
8. Click NEXT.
The Summary pane is displayed.
9. In the Summay pane, review the provided information, and then click FINISH.
The following status message is displayed:
Restore request initiated.
Restore
Dell EMC Avamar for VMware User Guide 107

Restore
108 Dell EMC Avamar for VMware User Guide

CHAPTER 6
Backup Validation
This chapter includes the following topics:
l Overview.............................................................................................................................. 110l Performing an on-demand backup validation........................................................................ 110l Scheduling backup validations.............................................................................................. 112
Dell EMC Avamar for VMware User Guide 109

OverviewFor image backups, the backup validation mechanism is similar to restoring a virtual machinebackup to a new virtual machine, except that once the backup is validated, the new virtual machineis automatically deleted from vCenter.
Backup validations can be initiated for a single virtual machine backup as needed (on-demand), orscheduled for an entire group of virtual machines. Scheduled backup validations always use thelatest completed backup for each virtual machine group member.
What is validatedThe default validation verifies that the virtual machine powers on and that the operating systemstarts following the restore.
Backup validations also provide an optional capability for running a user-defined script to performcustom application-level verifications. The script must exist in the backup to be validated. Youcannot run external scripts during a backup validation.
Supported script types are shell scripts for Linux virtual machines, and DOS batch files forWindows virtual machines. Perl scripts are not supported.
VM Backup Validation groupsScheduled backup validations are implemented using special VM Backup Validation groups. Thesegroups are only used to perform automated backup validations, they cannot be used for any otherpurpose.
VM Backup Validation groups differ from other groups as follows:
l VM Backup Validation groups do not have retention policies assigned to them.
l The dataset assigned to each VM Backup Validation group is automatically created when thegroup is created. The dataset name is the same as the VM Backup Validation group name.
l Each VM Backup Validation group also stores a location where new virtual machines aretemporarily created during the backup validation (that is, an ESX host or cluster, datastore,and folder).
Performing an on-demand backup validation
Procedure
1. In Avamar Administrator, click the Backup & Restore launcher link.
The Backup, Restore and Manage window is displayed.
2. Click the Manage tab.
3. Select a virtual machine client or VMware container:
a. Select the domain that contains the virtual machine client or VMware container.
You cannot view clients outside the domain for the login account. To view all clients, login to the root domain.
A list of Avamar clients appears in the pane under the domains list.
b. From the list of clients, select the virtual machine client or VMware container.
4. Select a backup:
Backup Validation
110 Dell EMC Avamar for VMware User Guide

a. Click the By Date tab.
b. Select the backup date from the calendar. Valid backups occurred on dates with a yellowhighlight.
A list of backups on that date appears in the Backups table next to the calendar.
c. Select a backup from the Backups table.
5. Select Actions > Validate Backup.
The Validate Options dialog box appears.
6. Click Configure Destination.
The Configure Location wizard appears.
7. Select a vCenter, and then click Next.
8. Type an inventory location name, select a datacenter folder in the tree, and then click Next.
9. Select a host or cluster and then click Next.
10. Select a resource pool and then click Next.
11. Select a datastore and then click Next.
12. At the Summary screen, click Finish.
13. From the Avamar encryption method list, select the encryption method to use for datatransfer between the client and the Avamar server during the backup validation.
The encryption technology and bit strength for a client/server connection depends onseveral factors, including the client operating system and Avamar server version. TheAvamar Product Security Guide provides additional information.
14. (Optional) To run a user-defined script as part of the validation:
Note: The script must already be in the backup to be validated. You cannot run externalscripts during a backup validation.
a. Click More Options.
The Validate Command Line Options dialog box appears.
b. Type a virtual machine guest OS user account name and password with sufficientprivileges to run scripts.
c. Type the full path and filename of the validation script.
Note: If this is a Windows virtual machine, type exit /B exitcode after the scriptpath and filename, where exitcode is a user-defined exit message.
d. Ensure that the Maximum script run time (minutes) setting allows sufficient time forthe script to complete.
e. Click OK.
15. Click OK on the Validate Options box.
The following status message appears: Restore request initiating.16. Click Close.
Backup Validation
Dell EMC Avamar for VMware User Guide 111

Scheduling backup validationsTo schedule backup validations for an entire group of virtual machines, create a VM BackupValidation Group.
Procedure
1. In Avamar Administrator, click the Policy launcher link.
The Policy window is displayed.
2. Click the Policy Management tab, and then click the Groups tab.
3. In the tree, select a location for the group.
4. Select Actions > Group > New > VM Backup Validation Group.
The New VM Backup Validation Group wizard appears.
5. In the General screen:
a. Type a Group name.
b. Select or clear the Disabled checkbox.
Select this checkbox to delay the start of scheduled backups for this group. Otherwise,clear this checkbox to enable scheduled backups for this group the next time theassigned schedule runs.
c. Select an Avamar encryption method for client/server data transfers during the backupvalidation.
Note: The encryption technology and bit strength for a client/server connectiondepends on several factors, including the client operating system and Avamar serverversion. The Avamar Product Security Guide provides details.
d. Click Next.
6. In the Membership screen:
a. Select checkboxes next to the virtual machines you want to be members of thisvalidation group.
b. Click Next.
7. In the Location screen:
a. Click Configure Location.
The Configure VM Backup Validation Location wizard appears.
b. Select a vCenter, and then click Next.
c. Select a datacenter folder in the tree, and then click Next.
d. Select a host or cluster, and then click Next.
e. Select a resource pool, and then click Next.
f. Select a datastore, and then click Next.
g. In the Summary screen, review your settings, and then click Finish.
h. Click Next.
8. In the Schedule screen, select a schedule from the list, and then click Next.
Backup Validation
112 Dell EMC Avamar for VMware User Guide

9. In the Overview screen, review your settings, and then click Finish.
10. Ensure that the scheduler is running.
Backup Validation
Dell EMC Avamar for VMware User Guide 113

Backup Validation
114 Dell EMC Avamar for VMware User Guide
CHAPTER 7
Protecting the vCenter ManagementInfrastructure
This chapter includes the following topics:
l vCenter deployments overview............................................................................................ 116l Best practices for backup and restore.................................................................................. 116l Protecting an embedded PSC...............................................................................................117l Protecting external deployment models................................................................................117l vCenter server restore workflow.......................................................................................... 121l Platform Services Controller restore workfow..................................................................... 122l Command reference.............................................................................................................122l Support for vCenter HA failover for inflight backups........................................................... 123l Additional considerations..................................................................................................... 123
Dell EMC Avamar for VMware User Guide 115

vCenter deployments overviewThis chapter describes how to protect the vCenter server Appliance (VCSA) and the PlatformServices Controllers (PSCs). It is intended for virtual administrators who utilize the distributedmodel of the vCenter server and require protection of the complete vCenter server infrastructure.
You can protect vCenter 6.5 deployments with Avamar by using the proxy appliance. Theinstructions in this chapter assume that the vCenter server and the PSCs are deployed as virtualmachines.
For the restores to complete successfully:
l Ensure that these virtual machines use a fully qualified domain name (FQDN) with correct DNSresolution, or
l Ensure that the host name of the machine is configured as an IP address. Note that if the hostname is configured as an IP address, the IP address cannot be changed.
There are mainly two types of vCenter deployments:
l vCenter server Appliance/Windows Virtual Machine with an embedded PSC.
l vCenter server (also multiple) Appliance/Windows virtual machine with an external PSC. Thistype has two sub categories:
n vCenter server environment with a single external PSC.
n vCenter server environment with multiple PSC instances: This environment containsmultiple vCenter server instances registered with different external PSC instances thatreplicate their data.
Best practices for backup and restoreReview the following recommendations and best practices when planning a vCenter virtualmachine or its component virtual machine(s) backup.
Note: Backups will not save Distributed switch configurations. The VMware Knowledge Basearticle at https://kb.vmware.com/s/article/2034602 provides steps to backup and restore theconfiguration of vSphere Distributed Switches.
l It is recommended to schedule the backup of the vCenter Server when the load on the vCenterserver is low, such as during off-hours, to minimize the impact of vCenter virtual machinesnapshot creation and snapshot commit processing overhead.
l Ensure that there are no underlying storage problems that might result in long stun times.
l Keep the vCenter virtual machine and all of its component virtual machines in one singleisolated protection policy. The protection policy should not be shared with any other virtualmachines. This is to ensure that the backup times of all vCenter Server component virtualmachines are as close to each other as possible.
l If using one or more external PSCs, it is recommended to have one dedicated proxy associatedto the policy group for the entire vCenter Server virtual machines backup. This will ensure thatthe backup times of all vCenter Server component virtual machines are as close to each otheras possible.
l Ensure that the backup start time of the vCenter Server does not overlap with any operationsfor other protected virtual machines being managed by this vCenter so that there is no impacton other protected virtual machines during snapshot creation and snapshot commit of thevCenter virtual machine.
Protecting the vCenter Management Infrastructure
116 Dell EMC Avamar for VMware User Guide

l If the vCenter Server and PSC instances fail at the same time, you must first restore thePlatform Services Controller and then the vCenter Server instances.
Protecting an embedded PSCThe following section describes backup and recovery options for protecting an embedded PSC.
Backup
You can perform a backup of an embedded PSC by using the following guidelines.
1. Create a protection policy, and then add the vCenter virtual machine to the policy.
2. Select the full virtual machine and not individual disks.Note: When selecting virtual machines and objects, ensure that you unselect the EnableCBT option.
3. Run the scheduled or on-demand (ad-hoc) policy.
Recovery
Depending on the type of failure, you can perform the virtual machine recovery by using one of thefollowing methods.
l Restore to original — This method is valid only when the vCenter Server Appliance (VCSA) isintact and running, but corrupted.
l Recover as a new virtual machine to an ESXi server — Use this method if you have completelylost your VCSA. This ESXi must be registered with the Avamar server.
l Instant access restore to an ESXi — Use this method if the backup is saved to a Data Domainsystem. Restores using this method will complete more quickly than the other methods.
Once the restore is complete, perform storage migration of this virtual machine to the desireddatastore, and then unmount the NFS datastore from the ESXi.
For appliance restore, perform any one of the above methods depending on the failure type, andthen perform the following steps.
1. After the recovery operation, wait until the virtual machine starts up.
2. Log in to the vCenter Server appliance shell as root.
3. Verify that all PSC and VC services are running:For an appliance, run the service-control --status -all command in the applianceshell.
For a vCenter Server installed on Windows, from the Windows Start menu, select ControlPanel > Administrative Tools > Services.
Protecting external deployment modelsReview the backup and recovery options for protecting external deployments.
Backup
You can perform a backup by using the following guidelines:
1. Create one policy/group and add the vCenter virtual machine and PSC virtual machine to thegroup. This will ensure that snapshots are taken at the same time.
2. Ensure that you select the full virtual machine and not individual disks.
3. Run the scheduled or on-demand (ad-hoc) policy.
Protecting the vCenter Management Infrastructure
Dell EMC Avamar for VMware User Guide 117

Note: Ensure that you back up all vCenter Server and PSC instances at the same time
Recovery
Depending on the failure, you can perform virtual machine recovery by using one of the followingmethods:
l Restore to original — This method is valid only when the VCSA is intact and running, butcorrupted.
l Recover as a new virtual machine to an ESXi server — Use this method if you have completelylost your VCSA. Note that this ESXi must be registered with the Avamar server.
l Instant access restore to an ESXi — Use this method if you have completely lost your VCSAand the backup is saved to a Data Domain system. Restores using this method will completemore quickly than the other methods.
Once the restore is complete, perform storage migration of this virtual machine to the desireddatastore, and then unmount the NFS datastore from the ESXi.
Note: In the event of a complete environment failure, PSCs should be restored first, followedby the vCenter Server restore.
The following scenarios provide specific instructions based on the number of vCenter serverappliances and external PSCs in the environment and the extent of the failure.
vCenter server appliance(s) with one external PSC where PSC failsProcedure
1. Perform an image-level recovery of the PSC by using one of the methods indicated above,and then power ON the virtual machine.
2. Verify that all PSC services are running.
l For a PSC deployed as an appliance, run the service-control --status --allcommand in the appliance shell.
l For a PSC installed on Windows, from the Windows Start menu, select Control Panel >Administrative Tools > Services.
3. Log into the vCenter server appliance shell as root.
4. Verify that no vCenter services are running, or stop any vCenter services that are runningby typing service-control --stop.
5. Run the vc-restore script to restore the vCenter virtual machines.
l For a vCenter server appliance, type vcenter-restore -upsc_administrator_username -p psc_administrator_password
l For a vCenter Server installed on Windows, navigate to C:\Program Files\VMware\vCenter Server\, and then run vcenter-restore -upsc_administrator_username -p psc_administrator_password
where psc_administrator_username is the vCenter Single Sign-On administrator user name,which must be in UPN format.
6. Verify that all vCenter services are running and the vCenter Server is started, as specified instep two.
7. Perform a log in test to the vCenter Server.
If the restore was successful, the login completes successfully.
Protecting the vCenter Management Infrastructure
118 Dell EMC Avamar for VMware User Guide

vCenter server appliance is lost but the PSC remainsProcedure
1. Perform an image-level recovery of the lost vCenter server by using one of the followingmethods, and then power ON.
l Restore to original — This method is valid only when the VCSA is intact and running, butcorrupted.
l Recover as a new virtual machine to a managed ESXi server — Use this method if youhave completely lost your VCSA. Note that this vCenter must be registered with Avamar.
l Emergency recovery to an ESXi server.
2. After a successful boot, verify that all services are started.
3. Perform a log in test.
vCenter server appliance with multiple PSCs where one PSC is lost, one remainsProcedure
1. Repoint the vCenter instance (insert link) to one of the functional PSC in the same SSOdomain.
Note: Log in to all vCenter servers one by one to determine which vCenter log in fails.This will be the vCenter that requires the repoint steps.
2. Run the following command on the vCenter server appliance:
cmsso-util repoint --repoint-psc psc_fqdn_or_static_ip [--dc-portport_number]
Note: The square brackets enclose the command options.
3. Perform a log in test on the vCenter server.
4. Deploy the new PSC and join to an active node in the same SSO and site, replacing lostones.
5. Repoint the vCenter server to the new PSC.
vCenter server appliance remains but all PSCs failAbout this task
Note: In this scenario, none of the vCenter logins (SSO user) have been successful.
Procedure
1. Restore the most recent PSC backup and wait for the vCenter services to start
2. Log in to the vCenter server appliance's shell as root.
3. Verify that no vCenter services are running, or stop vCenter services.
4. Run the vc-restore script to restore the VCSA (refer above for detailed steps).
Note: If the login test to any vCenter server appliance fails, then the restored PSC is notthe PSC that the vCenter server appliance is pointing to, in which case you may berequired to perform a repoint, as described above.
5. Deploy the new PSC and join to an active node in the same SSO domain and site.
Protecting the vCenter Management Infrastructure
Dell EMC Avamar for VMware User Guide 119

6. Repoint vCenter connections as required
vCenter server appliance remains but multiple PSCs failProcedure
1. Restore one PSC.
2. Test the vCenter server appliance login. If the login fails, repoint the vCenter serverappliance to an active PSC.
3. Deploy the new PSC and join to an active node in the same SSO domain and site.
vCenter server appliance failsAbout this task
Note: If a total failure has occurred (all PSCs and all vCenter server appliances failed), restoreone PSC first before restoring the vCenter server appliance.
Procedure
1. Perform an image-level restore of the lost vCenter server by using one of the followingmethods, and then power ON the vCenter.
l Restore to original — This method is valid only when the vCenter server appliance isintact and running, but corrupted.
l Recover as a new virtual machine to a managed ESXi server — Use this method if youhave completely lost your vCenter server appliance. Note that this vCenter must beregistered with Avamar.
l Emergency recovery to an ESXi server.
2. After a successful boot, verify that all vCenter services have started.
3. Perform a log in test.
4. If the log in test fails, then this vCenter server appliance is pointing to an inactive PSC.Repoint to an active node.
Protecting the vCenter Management Infrastructure
120 Dell EMC Avamar for VMware User Guide

vCenter server restore workflowThe following diagram shows the restore workflow for a vCenter server.
Figure 8 vCenter server restore workflow
Protecting the vCenter Management Infrastructure
Dell EMC Avamar for VMware User Guide 121

Platform Services Controller restore workfowThe following diagram shows the restore workflow for a Platform Services Controller (PSC).
Figure 9 PSC restore workflow
Command referenceUse the following command to start or stop services in the vCenter server/PSC, or obtain thestatus:
service-control -status/start/stop -allYou can use other Replication topology commands, as in the following example.
Example 1 Replication topology command
Protecting the vCenter Management Infrastructure
122 Dell EMC Avamar for VMware User Guide

Example 1 Replication topology command
/usr/lib/vmware-vmdir/bin/vdcrepadmin -f showpartners -hlocalhost -u PSC_Administrator -w password
Note: You can replace localhost with another PSC FQDN to obtain all of thepartnerships in the current vSphere domain.
Support for vCenter HA failover for inflight backupsDuring a vCenter failover period, the Avamar software monitors the failover process and performsthe following actions.
1. Automatically detects vCenter failover events and then waits for the vCenter failover tocomplete.
2. Cancels the hanging backup jobs that were caused by vCenter HA failover.
3. Removes mounted HotAdded disks from the proxy appliance.
4. Restarts all incomplete backups during the vCenter HA failover.
Additional considerationsReview the following additional considerations when backing up and restoring the vCenter serverand PSC.
l Backing up the vCenter server will not save the Distributed switch (vDS) configuration as it isstored on the hosts. As a best practice, back up the vDS configuration by using a script thatcan be used after restoring the virtual center.
l After restoring the PSC, verify that replication has been performed as designed by using thefollowing commands to display the current replication status of a PSC and any of thereplication partners of the PSC:
n For VCSA, go to /usr/lib/vmware-vmdir/bin and type ./vdcrepadmin -fshowpartnerstatus -h localhost -u administrator -w Administrator_Password
n For Windows, open a command prompt and type cd "%VMWARE_CIS_HOME%"\vmdird\The VMware vCenter server documentation, available at https://docs.vmware.com/en/VMware-vSphere/index.html, provides more information about the vCenter server and PSC.
Protecting the vCenter Management Infrastructure
Dell EMC Avamar for VMware User Guide 123

Protecting the vCenter Management Infrastructure
124 Dell EMC Avamar for VMware User Guide

CHAPTER 8
Protecting ESX Hosts
This chapter includes the following topics:
l Overview..............................................................................................................................126l Adding ESX host authentication certificates to the MCS keystore...................................... 127l Creating a dedicated ESX host user account....................................................................... 128l Adding an ESX host as a vCenter client............................................................................... 130l Deploying a proxy in a standalone ESX host......................................................................... 131l Disassociating an ESX host from a vCenter......................................................................... 134
Dell EMC Avamar for VMware User Guide 125

OverviewImage backup can be configured to protect virtual machines residing in standalone ESX hosts.
There are two primary uses for this feature:
1. Support for minimal customer configurations.Some customer sites use a simple VMware topology, comprising a single ESX host, with one ormore virtual machines residing on that ESX host. These sites typically do not implement avCenter management layer. However, the virtual machines residing on a standalone ESX hoststill must be backed up in order to protect against data loss. Adding the standalone ESX hostas an Avamar vCenter client enables those virtual machines to be backed up with imagebackup, rather than guest backup.
2. Virtual vCenter disaster recovery.Adding an ESX host as an Avamar vCenter client can be useful when virtual machines residingon a particular ESX host must be restored, but the vCenter is not operational. This is often thecase when a virtual vCenter must be recovered from Avamar backups. Adding the standaloneESX host as an Avamar vCenter client enables the vCenter management infrastructure virtualmachines to be restored so that the vCenter can be restarted.
LimitationsThese are the known limitation of protecting virtual machines residing in a standalone ESX host inAvamar.
ESX versions
Support for this feature is limited to ESX 5.5 or higher. Older versions are not supported.
Virtual vCenter disaster recovery
If you are using this feature for the purpose of recovering a virtualized vCenter from an ESX host,you must first disassociate that ESX host from the vCenter before restoring any virtual machinesto that ESX host.
Protecting ESX hosts
While protecting ESX hosts, the restored virtual machines might have an empty vc.uuid in theirVMX file. Therefore, you must manually configure this flag, if you want to add the restored virtualmachines to Avamar.
Task ListIn order to protect virtual machines residing in a standalone ESX host, perform the following tasks:
1. Ensure that the Avamar server can communicate and authenticate with the ESX host.Add the ESX host certificate to the Avamar MCS keystore. Otherwise, you must disablecertificate authentication for all MCS communications.
2. (Optional) Create a dedicated user account on the ESX host for use with Avamar.
3. Add the ESX host to Avamar as a vCenter client.This enables dynamic discovery of virtual machines residing on that ESX host, so that they canbe backed up with image backup rather than guest backup.
4. Deploy one or more proxies on the ESX host.
5. Perform on-demand or scheduled image backups of virtual machines residing on that ESXhost.
Protecting ESX Hosts
126 Dell EMC Avamar for VMware User Guide

Adding ESX host authentication certificates to the MCSkeystore
Add an ESX host authentication certificate to the MCS keystore. Do this for each ESX host youintend to protect.
About this task
This procedure uses the java keytool utility, which manages certificate keys. The keytoolutility is located in the Java bin folder (/usr/java/version/bin), where version is the JavaRuntime Environment (JRE) version currently installed on the MCS. If this folder is not in yourpath, you can either add it to the path, or specify the complete path when using keytool.
Procedure
1. Open a command shell and log in by using one of the following methods:
l For a single-node server, log in to the server as admin.
l For a multi-node server, log in to the utility node as admin.
2. Stop the MCS by typing the following command:
dpnctl stop mcs
3. Switch user to root by typing the following command:
su -
4. Copy /etc/vmware/ssl/rui.crt from the ESX host machine to /tmp on the Avamarutility node or single-node server.
5. Copy the MCS keystore to /tmp by typing:
cp /usr/local/avamar/lib/rmi_ssl_keystore /tmp/
This creates a temporary version of the live MCS keystore in /tmp.
6. Add the default ESX host certificate to the temporary MCS keystore file by typing:
cd /tmp$JAVA_HOME/bin/keytool –import –file rui.crt -alias alias -keystorermi_ssl_keystore
where alias is a user-defined name for this certificate, which can often be the file name.
7. Type the keystore password.
8. Type yes, and press Enter to trust this certificate.
9. (Optional) If you will be protecting more than one ESX host with this Avamar server, addthose ESX host certificates now.
10. Back up the live MCS keystore by typing:
cd /usr/local/avamar/libcp rmi_ssl_keystore rmi_ssl_keystore.date
where date is today's date.
11. Copy the temporary MCS keystore to the live location by typing:
cp /tmp/rmi_ssl_keystore /usr/local/avamar/lib/
Protecting ESX Hosts
Dell EMC Avamar for VMware User Guide 127

12. Exit the root subshell by typing exit.
13. Start the MCS and the scheduler by typing the following command:
dpnctl start mcsdpnctl start sched
Creating a dedicated ESX host user accountWe strongly recommend that you set up a separate user account on each ESX host that is strictlydedicated for use with Avamar.
About this task
Use of a generic user account such as “Administrator” might hamper future troubleshootingefforts because it might not be clear which actions are actually interfacing or communicating withthe Avamar server. Using a separate ESX host user account ensures maximum clarity if it becomesnecessary to examine ESX host logs.
Note: The user account must be added to the top (root) level in each ESX host you intend toprotect.
Create a ESX host user account with privileges listed in the following table.
Note: When creating the user account, select Propogate to children, if the option is available.
Table 13 Minimum required ESX host user account privileges
Privilege type Required Privileges
Alarms l Create alarm
Datastore l Allocate space
l Browse datastore
l Low level file operations
l Remove file
Extension l Register extension
l Unregister extension
l Update extension
Folder l Create folder
Global l Cancel task
l Disable methods
l Enable methods
l Licenses
l Log event
l Manage custom attributes
l Settings
Host > Configuration l Connection
Protecting ESX Hosts
128 Dell EMC Avamar for VMware User Guide

Table 13 Minimum required ESX host user account privileges (continued)
Privilege type Required Privileges
l Storage partition configuration
Network l Assign network
l Configure
Resource l Assign virtual machine to resource pool
Sessions l Validate session
Tasks l Create task
l Update task
vApp l Import
Virtual machine
Configuration l Add existing disk
l Add new disk
l Add or remove device
l Advanced
l Change CPU count
l Change resource
l Disk change tracking
l Disk Lease
l Extend virtual disk
l Host USB device
l Memory
l Modify device settings
l Raw device
l Reload from path
l Remove disk
l Rename
l Reset guest information
l Settings
l Swapfile placement
l Upgrade virtual machine compatibility
Guest Operations l Guest Operation Modifications
l Guest Operation Program Execution
l Guest Operation Queries
Interaction l Console interaction
Protecting ESX Hosts
Dell EMC Avamar for VMware User Guide 129

Table 13 Minimum required ESX host user account privileges (continued)
Privilege type Required Privileges
l DeviceConnection
l Guest operating system management by VIX API
l Power off
l Power on
l Reset
l VMware Tools install
Inventory l Create new
l Register
l Remove
l Unregister
Provisioning l Allow disk access
l Allow read-only disk access
l Allow virtual machine download
l Mark as Template
Snapshot Management l Create snapshot
l Remove snapshot
l Revert to snapshot
l Management
State
Adding an ESX host as a vCenter clientBefore you begin
Note: It is recommended that you do not add the ESX as a container.
Procedure
1. In Avamar Administrator, click the Administration launcher link.
The Administration window is displayed.
2. Click the Account Management tab.
3. In the tree, select the top-level (root) domain, and then select Actions > AccountManagement > New Client(s).
The New Client dialog box appears.
4. Complete the following settings:
a. Select VMware vCenter in the Client Type list.
b. Type the ESX host fully qualified DNS name or IP address in the New Client Name or IPfield.
Protecting ESX Hosts
130 Dell EMC Avamar for VMware User Guide

c. Type the ESX host web services listener data port number in the Port field.
443 is the default setting.
d. Type the ESX host administrative user account name in the User Name field.
e. Type the ESX host administrative user account password in the Password field.
f. Type the ESX host administrative user account password again in the Verify Passwordfield.
g. (Optional) Type a contact name in the Contact field.
h. (Optional) Type a contact telephone number in the Phone field
i. (Optional) Type a contact email address in the Email field.
j. (Optional) Type a contact location in the Location field.
5. Click OK.
Deploying a proxy in a standalone ESX hostBefore you begin
1. Add DNS entries for each proxy you intend to deploy.During proxy deployment, you will be asked to assign a unique IP address to each proxy. TheESX host performs a reverse DNS lookup of that IP address to ensure that it is resolvable to ahostname. For best results, configure all required DNS entries for proxies you plan to deploybefore proceeding with the remainder of this procedure.
2. Download the proxy appliance template file from the Avamar server.
3. Install the vSphere Client on your Windows computer.
Deploying a proxy appliance in an ESX host using the vSphere ClientProcedure
1. Launch the vSphere Client and log in to the ESX host.
2. Select File > Deploy OVF Template.
The Deploy OVF Template wizard appears.
3. In the Source screen:
a. Click Browse.
The Open dialog box appears.
b. Select Ova files (*.ova) from the Files of Type list.
c. Browse to the appliance template file that was previously downloaded.
d. Select the appliance template file and click Open.
The full path to the appliance template file appears in the Source screen Deploy fromfile field.
e. Click Next.
4. In the OVF Template Details screen:
a. Ensure that the template information is correct.
b. Click Next.
Protecting ESX Hosts
Dell EMC Avamar for VMware User Guide 131

5. In the Name and Location screen:
a. Type a unique fully qualified hostname in the Name field.
A proxy can potentially have three different names:
l The name of the virtual machine on which the proxy runs.
l The DNS name assigned to the proxy virtual machine.
l The Avamar client name after the proxy registers and activates with server.
Note: In order to avoid confusion and potential problems, we strongly recommendthat you consistently use the same fully qualified hostname for this proxy in all threecontexts.
b. Click Next.
6. In the Resource Pool screen:
a. Select an ESX host or a resource pool.
b. Click Next.
7. In the Storage screen:
a. Select a storage location for this proxy.
b. Click Next.
8. In the Disk Format screen:
a. Select a disk format for this proxy.
b. Click Next.
9. In the Network Mapping screen:
a. Select a destination network from list.
b. Click Next.
10. In the Ready To Complete screen:
a. Ensure that the information is correct.
b. Click Finish.
Manually configuring proxy network settingsProcedure
1. Launch the vSphere Client and log in to the ESX host.
2. Locate the proxy that you want to configure.
3. Right-click Open Console.
A console window appears.
4. In the console Main Menu, press 2 to quit.
5. In the welcome screen, select Log in, and then press Enter.
6. Log in as the admin user.
7. Switch to the root user by typing:
su -
8. Type /opt/vmware/share/vami/vami_config_net, and then press Enter.
Protecting ESX Hosts
132 Dell EMC Avamar for VMware User Guide

A Main Menu appears.
9. In the Main Menu, select 6, and then press Enter to configure the IP address for eth0.
You can configure an IPv6 address, a static IPv4 address, or a dynamic IPv4 address. Followthe on-screen prompts to configure the correct address type for your site.
10. In the Main Menu, select 4, and then press Enter to configure DNS.
Follow the on-screen prompts to specify the primary and secondary DNS servers in use atyour site.
11. In the Main Menu, select 3, and then press Enter to configure the hostname.
12. Type the proxy hostname, and then press Enter.
13. In the Main Menu, select 2, and then press Enter to configure the default gateway.
14. Type the IPv4 default gateway, and then press Enter.
15. Press Enter to accept the default IPv6 default gateway.
16. In the Main Menu, press Enter to show the current configuration.
17. Ensure that the settings are correct.
18. Press 1 to exit the program.
Registering and activating the proxy with the Avamar serverRegister and activate each proxy deployed in vCenter with the Avamar server.
Before you begin
1. Deploy the proxy appliance in vCenter.
2. Add the ESX host or vCenter as a vCenter client in Avamar.
About this task
Note: For best results, always register and activate proxies as described in this task. Using thealternative method of inviting the proxy from Avamar Administrator is known to haveunpredictable results.
Perform this task for every proxy you deploy in an ESX host.
Procedure
1. From the vSphere client, locate and select an Avamar image backup proxy.
2. Right-click Power > Power On.
3. Right-clickOpen Console.
A console window appears.
4. From the Main Menu, type 1, and then press Enter.
5. Type the Avamar server DNS name, and then press Enter.
6. Type an Avamar server domain name, and then press Enter.
The default domain is “clients.” However, your Avamar system administrator may havedefined other domains, and subdomains. Consult your Avamar system administrator for thedomain you should use when registering this client.
Note: If typing a subdomain (for example, clients/MyClients), do not include a slash (/)as the first character. Including a slash as the first character will cause an error, andprevent you from registering this client.
Protecting ESX Hosts
Dell EMC Avamar for VMware User Guide 133

7. From the Main Menu, type 2, and then press Enter to quit.
8. (optional) If proxy certificate authentication is required, see Configuring vCenter-to-Avamarauthentication on page 30
Disassociating an ESX host from a vCenterOnly perform this task if you are restoring virtual machines to an ESX host while the associatedvCenter is not operational.
Procedure
1. Launch the vSphere Client or vSphere Web Client, and log in to the ESX host.
2. Click the Summary tab.
3. In the Host Management pane, click Disassociate host from vCenter Server.
4. Click Yes to confirm the action.
Protecting ESX Hosts
134 Dell EMC Avamar for VMware User Guide

CHAPTER 9
Avamar image backup and recovery for VMwareCloud on Amazon Web Services (AWS)
This chapter includes the following topics:
l Avamar image backup and recovery for VMware Cloud on AWS..........................................136l Configure the VMware Cloud on AWS web portal console................................................... 136l Amazon AWS web portal requirements................................................................................ 137l vCenter server inventory requirements................................................................................ 137l Deploy the vProxy OVA on a vCenter server in VMware Cloud on AWS............................... 137l Configure vCenter-to-Avamar authentication for VMware Cloud on AWS........................... 138l Avamar image backup and restore for VMware Cloud on AWS best practices..................... 139l Unsupported Avamar operations.......................................................................................... 139
Dell EMC Avamar for VMware User Guide 135

Avamar image backup and recovery for VMware Cloud on AWSAvamar provides image backup and restore support for VMware Cloud on Amazon Web Services(AWS).
Using Avamar to protect virtual machines that are running in VMware Cloud on AWS is similar tohow you protect the virtual machines in an on-premises data center. This section providesinformation on network configuration requirements, Avamar best practices for VMware Cloud onAWS, and unsupported Avamar operations for VMware Cloud on AWS.
Configure the VMware Cloud on AWS web portal consoleDomain Name System (DNS) resolution is critical for Avamar deployment and configuration of theAvamar server, Avamar proxy, and the Data Domain appliance. All infrastructure componentsshould be resolvable through a Fully Qualified Domain Name (FQDN). Resolvable means thatcomponents are accessible through both forward (A) and reverse (PTR) lookups.
In the VMware Cloud on AWS web portal console, ensure that the following requirements are met:
l By default, there is no external access to the vCenter Server system in the Software DefinedData Center (SDDC). You can open access to the vCenter Server system by configuring afirewall rule. To enable communication to the vCenter public IP address from the SDDC logicalnetwork, set the firewall rule in the compute gateway of VMware Cloud on AWS. If the firewallrule is not configured in the SDDC, the Avamar server does not allow you to add the vCenterServer.
l The default compute gateway firewall rules prevent all virtual machine traffic from reachingthe internet. To allow the Avamar Server virtual machine to connect to the internet, create acompute gateway firewall rule. This action allows outbound traffic on the logical network thatthe Avamar Server virtual machine is connected to.
l Configure DNS to allow machines in the SDDC to resolve Fully Qualified Domain Names(FQDNs) to IP addresses belonging to the internet. If the DNS server is not configured in theSDDC, the Avamar server does not allow you to add the vCenter Server by using the server'spublic FQDN or IP address.
l It is recommended that you deploy the Data Domain system as a virtual appliance in theAmazon Virtual Private Cloud (VPC). During the SDDC creation, connect the SDDC to an AWSaccount, and then select a VPC and subnet within that account.
l The Data Domain system running in the Amazon VPC must be connected to the VMware SDDCthrough the VMware Cloud Elastic Network Interfaces (ENIs). This action allows the SDDC,the services in the AWS VPC, and subnet in the AWS account to communicate without havingto route traffic through the internet gateway.For more information about configuring ENIs, see https://vmc.vmware.com/console/aws-link.
l If DDVE is running in the Amazon VPC, configure the inbound and outbound firewall rules ofthe compute gateway for Data Domain connectivity.
l If using NSX-T, configure the DNS to resolve to the internal IP address of the vCenter server.Navigate to SDDC Management > Settings > vCenter FQDN and select the Private vCenterIP address so that you can directly access the management network over the built-in firewall.Additionally, ensure that you open TCP port 443 of the vCenter server in both themanagement gateway and the compute gateway.Also, using NSX-T for file-level restore operations requires you to update the axionfs.cmdfile on the proxy appliances with the IPv4 address of the Avamar server. After you register andactivate the Avamar proxy appliances in the Avamar server, log into each of the Avamar proxy
Avamar image backup and recovery for VMware Cloud on Amazon Web Services (AWS)
136 Dell EMC Avamar for VMware User Guide

appliances as root, and then open the /usr/local/avamar/var/axionfs.cmd file in aUNIX text editor. Within the file, locate the --server entry key and update the correspondingvalue to the IPv4 address of the Avamar server. For example, --server=192.168.2.150.
Amazon AWS web portal requirementsIn the Amazon AWS web portal, ensure that the following requirements are met:
l if Data Domain is running in your Amazon VPC, configure the inbound and outbound firewallrules of your Amazon VPC security group to provide connectivity between the VMware SDDCcompute gateway and Data Domain connectivity.
l If you are replicating from one Data Domain system to another, configure the inbound rule forthe security group in AWS to allow all traffic from the respective private IPs of the DataDomain Virtual Editions running in your Amazon VPC.
l If you have more than one Data Domain running in AWS to perform replication, both DataDomain systems must have the ability to ping each other using the FQDNs.
vCenter server inventory requirementsIn the vCenter server inventory of your SDDC, ensure that the following requirements are met:
l An internal DNS name lookup server must be running inside the vCenter inventory. This will bereferenced by all the workloads running in the VMware SDDC.
l The internal DNS server must have Forwarders enabled to access the internet. This action isrequired to resolve the vCenter Server's public FQDN.Forwarders are DNS servers that the server can use to resolve DNS queries for records thatthe server cannot resolve.
Deploy the vProxy OVA on a vCenter server in VMware Cloudon AWS
Perform the following steps to deploy the OVA for the Avamar proxy appliance from a vCenterserver by using the HTML5 vSphere Web Client.
Before you begin
Review the section Configure the VMware Cloud on AWS web portal console on page 136
Procedure
1. Log in to the HTML5 vSphere Web Client with the cloudadmin account credentials.
2. Click Menu > Hosts and Clusters.
3. In the inventory pane, expand the vCenter, and then expand the compute resource poolinside the SDDC cluster.
4. Right-click the resource pool where you want to deploy the OVA, and then select DeployOVF template.
5. In the Select an OVF template window, type a URL path to the OVA package, or clickChoose Files and navigate to the OVA package location, and then click Next.
6. On the Select a name and folder window:
a. Specify a name for the virtual appliance.
b. Specify the inventory location.
Avamar image backup and recovery for VMware Cloud on Amazon Web Services (AWS)
Dell EMC Avamar for VMware User Guide 137

c. Click Next.
7. In the Select a compute resource window, select the vApp or resource pool where youwant to deploy the OVA, and then click Next.
8. In the Review details window, review the product details, such as the product name,version, vendor, publisher, and download size, and then click Next.
9. In the Select storage window, select the disk format and the destination datastore wherethe virtual appliance files will be stored, and then click Next.
To ensure that the amount of storage space that is allocated to the virtual appliance isavailable, select Thick Provision Lazy Zeroed.
10. In the Select networks window, select the Destination Network:
a. Specify the IP address
b. Click Next.
11. In the Customize Template window, expand Networking properties:
a. In the Network IP address field, type the IP address for the Avamar proxy.
b. In the Network Netmask/Prefix field, specify the netmask for an IPv4 Network IPaddress.
c. In the DNS field, type the IP address of the DNS servers, separated by commas.
d. In the NTP field, type the IP address of the gateway host.
e. In the Default gateway field, type the IP address of the gateway host.
12. Click Next.
The Ready to Complete window appears.
13. In the Ready to Complete window, review the deployment configuration details, and thenclick Finish.
Results
The Deploying template task appears in the vCenter and provides status information about thedeployment.
Configure vCenter-to-Avamar authentication for VMwareCloud on AWS
The most secure method for configuring vCenter-to-Avamar authentication is to add vCenterauthentication certificates to the Avamar MCS keystore. You must complete this task for eachvCenter you intend to protect.
About this task
To import the authentication certificates for VMware Cloud on AWS, perform the following steps:
Procedure
1. Download any root certificate from entrust website.
Go to https://www.entrustdatacard.com/pages/root-certificates-download.
2. Place the root certificate in the Avamar server and follow the instructions in the section Adding vCenter authentication certificates to the MCS keystore on page 30.
3. Add the vCenter to the Avamar server.
Avamar image backup and recovery for VMware Cloud on Amazon Web Services (AWS)
138 Dell EMC Avamar for VMware User Guide

Avamar image backup and restore for VMware Cloud on AWSbest practices
Consider the following best practices when using Avamar to protect virtual machines running inVMware Cloud on AWS.
l When deploying or configuring the Avamar server or proxy, ensure that you specify the DNSserver IP address that points to the internal DNS server running in the vCenter inventory.
l Ensure that both forward and reverse lookup entries in the internal DNS server are in place forall the required components, such as the Avamar Server, Avamar proxy appliance, and DataDomain Virtual Edition (DDVE).
l If using NSX-T, configure the DNS to resolve to the internal IP address of the vCenter server.Navigate to SDDC Management > Settings > vCenter FQDN and select the Private vCenterIP address so that you can directly access the management network over the built-in firewall.Additionally, ensure that you open TCP port 443 of the vCenter server in both themanagement gateway and the compute gateway.Also, using NSX-T for file-level restore operations requires you to update the axionfs.cmdfile on the proxy appliances with the IPv4 address of the Avamar server. After you register andactivate the Avamar proxy appliances in the Avamar server, log into each of the Avamar proxyappliances as root, and then open the /usr/local/avamar/var/axionfs.cmd file in aUNIX text editor. Within the file, locate the --server entry key and update the correspondingvalue to the IPv4 address of the Avamar server. For example, --server=192.168.2.150.
l Add the vCenter server to the Avamar server by using one of the following options:
n Public FQDN of the vCenter server
n Public IP address of the vCenter server.
It is recommended that you use the FQDN.
l When adding the vCenter server to the Avamar server, specify the login credentials for thecloudadmin user.
l When accessing the AUI by using vCenter authentication, add the following parameter inthe /usr/local/avamar/var/mc/server_data/prefs/application-production.properties file, and then restart the mcs service:vmc.vcenters=VMware Cloud vCenter FQDN
Unsupported Avamar operationsAvamar image backup and restore in VMware Cloud on AWS does not currently support thefollowing operations:
l Application consistent backup
l Proxy deployment manager. Proxies must be deployed manually.
l File-level restore from an image-level backup if using NSX-V. Note that this operation issupported if using NSX-T.
l Instant access recovery of an image-level backup.
l Emergency restore (image-level restore directly to an ESXi host, bypassing the vCenter).
l Image-level backups and restores using NBD or NBDSSL transport mode.
l Advanced policy based data protection for MS-SQL using Avamar.
Avamar image backup and recovery for VMware Cloud on Amazon Web Services (AWS)
Dell EMC Avamar for VMware User Guide 139

l Application aware image backups for MS-SQL and MS-Exchange
l Image backup and restore when the datacenter is under a folder.
l Exclusion of pagefile or user defined files from Windows image backup.
l Proxy appliance that is configured with dual-stack or IPv6-only.
l NBD, NBDSSL, and SAN. Only HotAdd is supported.
l VMware tag based rule selection criteria for dynamic policy
l Restore to new vApp
l IPV6
l Virtual machine template backup
Avamar image backup and recovery for VMware Cloud on Amazon Web Services (AWS)
140 Dell EMC Avamar for VMware User Guide
APPENDIX A
Manually deploying proxies
This appendix includes the following topics:
l Overview..............................................................................................................................142l Downloading the proxy appliance template file.................................................................... 142l Deploying the proxy appliance in vCenter............................................................................ 142l Deploying a proxy appliance in vCenter using the vSphere Web Client................................ 142l Registering and activating the proxy with the Avamar server.............................................. 144l Configuring proxy settings in Avamar Administrator............................................................ 145l Performing optional proxy performance optimization.......................................................... 146
Dell EMC Avamar for VMware User Guide 141
OverviewThe Proxy Deployment Manager is the preferred method for deploying proxies. Manual proxydeployment is still supported, if necessary.
Downloading the proxy appliance template fileDownload the proxy appliance template file from the Avamar server.
About this task
Note: If adding more than one proxy, you only need to perform this task once.
Procedure
1. Open a web browser and type the following URL:
https://Avamar-server
where Avamar-server is the Avamar server network hostname or IP address.
The Avamar Web Restore page appears.
2. Click Downloads.
3. Navigate to the VMware vSphere\EMC Avamar VMware Image Backup\FLRAppliance folder.
4. Click the AvamarCombinedProxy-linux-sles12sp1-x86_64-version.ova link.
5. Save AvamarCombinedProxy-linux-sles12sp1-x86_64-version.ova to a temporary folder,such as C:\Temp, or the desktop.
Deploying the proxy appliance in vCenterUse either the vSphere Client running on a Windows computer (also known as the "thick client"),or the vSphere Web Client to deploy one or more proxies in each vCenter you intend to protectwith image backup.
Before you begin
1. Add DNS entries for each proxy you intend to deploy.During proxy deployment, you will be asked to assign a unique IP address to each proxy. ThevCenter performs a reverse DNS lookup of that IP address to ensure that it is resolvable to ahostname. For best results, configure all required DNS entries for proxies you plan to deploybefore proceeding with the remainder of this procedure.
2. Download the proxy appliance template file from the Avamar server.
Deploying a proxy appliance in vCenter using the vSphere WebClient
Procedure
1. Connect to the vCenter Server by opening a web browser, and then typing the followingURL:
http://vCenter-server:9443/
Manually deploying proxies
142 Dell EMC Avamar for VMware User Guide
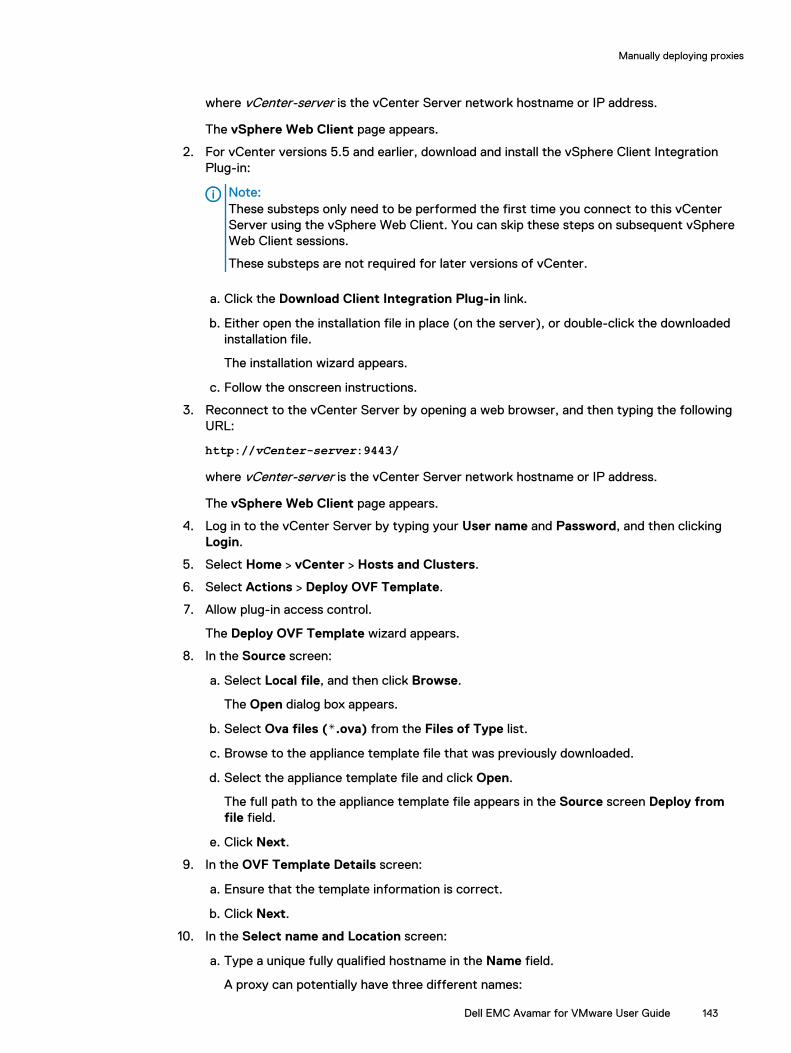
where vCenter-server is the vCenter Server network hostname or IP address.
The vSphere Web Client page appears.
2. For vCenter versions 5.5 and earlier, download and install the vSphere Client IntegrationPlug-in:
Note:These substeps only need to be performed the first time you connect to this vCenterServer using the vSphere Web Client. You can skip these steps on subsequent vSphereWeb Client sessions.
These substeps are not required for later versions of vCenter.
a. Click the Download Client Integration Plug-in link.
b. Either open the installation file in place (on the server), or double-click the downloadedinstallation file.
The installation wizard appears.
c. Follow the onscreen instructions.
3. Reconnect to the vCenter Server by opening a web browser, and then typing the followingURL:
http://vCenter-server:9443/
where vCenter-server is the vCenter Server network hostname or IP address.
The vSphere Web Client page appears.
4. Log in to the vCenter Server by typing your User name and Password, and then clickingLogin.
5. Select Home > vCenter > Hosts and Clusters.
6. Select Actions > Deploy OVF Template.
7. Allow plug-in access control.
The Deploy OVF Template wizard appears.
8. In the Source screen:
a. Select Local file, and then click Browse.
The Open dialog box appears.
b. Select Ova files (*.ova) from the Files of Type list.
c. Browse to the appliance template file that was previously downloaded.
d. Select the appliance template file and click Open.
The full path to the appliance template file appears in the Source screen Deploy fromfile field.
e. Click Next.
9. In the OVF Template Details screen:
a. Ensure that the template information is correct.
b. Click Next.
10. In the Select name and Location screen:
a. Type a unique fully qualified hostname in the Name field.
A proxy can potentially have three different names:
Manually deploying proxies
Dell EMC Avamar for VMware User Guide 143

l The name of the virtual machine on which the proxy runs. This is also the namemanaged and visible within vCenter.
l The DNS name assigned to the proxy virtual machine.
l The Avamar client name after the proxy registers and activates with server.
Note: In order to avoid confusion and potential problems, we strongly recommendthat you consistently use the same fully qualified hostname for this proxy in all threecontexts.
b. In the tree, select a datacenter and folder location for this proxy.
c. Click Next.
11. In the Select a resource screen:
a. Select an ESX host, cluster, vApp or resource pool.
b. Click Next.
12. In the Select Storage screen:
a. Select a storage location for this proxy.
b. Click Next.
13. In the Setup networks screen:
a. Select a Destination network from list.
b. Select an IP protocol from the list.
c. Click Next.
14. In the Customize template screen:
Note: Proxy network settings are difficult to change once they proxy is registered andactivated with the Avamar server. Therefore, ensure that the settings you enter in theCustomize template screen are correct.
a. Enter the default gateway IP address for the network in the Default Gateway field
b. If not using DHCP, type one or more Domain Name Server (DNS) IP addresses in theDNS field. Separate multiple entries with commas.
c. If not using DHCP, type a valid IP address for this proxy in the Isolated Network IPAddress field
d. Type the network mask in the Isolated Network Netmask field.
e. Click Next.
15. In the Ready To Complete screen:
a. Ensure that the information is correct.
b. Click Finish
Registering and activating the proxy with the Avamar serverRegister and activate each proxy deployed in vCenter with the Avamar server.
Before you begin
1. Deploy the proxy appliance in vCenter.
Manually deploying proxies
144 Dell EMC Avamar for VMware User Guide

2. Add the ESX host or vCenter as a vCenter client in Avamar.
About this task
Note: For best results, always register and activate proxies as described in this task. Using thealternative method of inviting the proxy from Avamar Administrator is known to haveunpredictable results.
Perform this task for every proxy you deploy in an ESX host.
Procedure
1. From the vSphere client, locate and select an Avamar image backup proxy.
2. Right-click Power > Power On.
3. Right-clickOpen Console.
A console window appears.
4. From the Main Menu, type 1, and then press Enter.
5. Type the Avamar server DNS name, and then press Enter.
6. Type an Avamar server domain name, and then press Enter.
The default domain is “clients.” However, your Avamar system administrator may havedefined other domains, and subdomains. Consult your Avamar system administrator for thedomain you should use when registering this client.
Note: If typing a subdomain (for example, clients/MyClients), do not include a slash (/)as the first character. Including a slash as the first character will cause an error, andprevent you from registering this client.
7. From the Main Menu, type 2, and then press Enter to quit.
8. (optional) If proxy certificate authentication is required, see Configuring vCenter-to-Avamarauthentication on page 30
Configuring proxy settings in Avamar AdministratorAfter deploying a proxy appliance in vCenter and registering it with the Avamar server, configuredatastore, group and optional contact settings in Avamar Administrator.
Before you begin
1. Deploy a proxy appliance in vCenter.
2. Register and activate the proxy with the Avamar server.
Procedure
1. In Avamar Administrator, click the Administration launcher link.
The Administration window is displayed.
2. Click the Account Management tab.
3. In the tree, select the proxy, and then select Actions > Account Management > ClientEdit.
The Edit Client dialog box appears.
4. Click the Datastores tab, and then select all vCenter datastores that host virtual machinesyou want to protect with this proxy.
5. Click the Groups tab, and then assign this proxy to one or more groups by clicking theSelect checkbox next to each group.
Manually deploying proxies
Dell EMC Avamar for VMware User Guide 145

6. (Optional) provide contact information:
a. Type a contact name in the Contact field.
b. Type a contact telephone number in the Phone field.
c. Type a contact email address in the Email field.
d. Type a contact location in the Location field.
7. Click OK.
Performing optional proxy performance optimizationBy default, Avamar proxies are configured with four virtual CPU sockets and one core per socket.However, if your ESXi host has two or more physical CPUs, changing the proxy configuration tofour virtual CPU sockets and two cores per socket will achieve better backup and restoreperformance.
Manually deploying proxies
146 Dell EMC Avamar for VMware User Guide

APPENDIX B
vSphere Data Ports
This appendix includes the following topics:
l Required data ports............................................................................................................. 148
Dell EMC Avamar for VMware User Guide 147

Required data portsThese are the required data ports in a vSphere environment.
Table 14 Required vSphere data ports
Port Source Destination Function Additionalinformation
22 AvamarAdministrator
Proxies SSH Diagnosticsupport.Optional, butrecommended.
53 Proxies DNS server DNS UDP+TCP.
443 Proxies ESXi hosts vSphere API
443 Proxies vCenter vSphere API
443 Avamar MCS vCenter vSphere API
902 Avamar DeploymentManager
ESXi hosts Network FileCopy (NFC)
902 Proxies ESXi hosts Network FileCopy (NFC)
5489 Avamar DeploymentManager
Proxies CIM service Used to registerthe proxy.
7444 Avamar MCS vCenter Test vCentercredentials
8543 Proxies Avamar server Snapshotmanager
Used for VMwaresnapshotoperations.
27000 Proxies Avamar server GSANcommunication
Non-securedcommunication.
28009 Avamar MCS Proxies Access proxylogs
29000 Proxies Avamar server GSANcommunication
Securedcommunication.
30001 Proxies Avamar MCS avagent to
MCScommunication
30009 Avamar MCS Proxies avagent paging
port
Securecommunicationwith VMwareproxy.
Note: All ports are TCP unless otherwise noted.
vSphere Data Ports
148 Dell EMC Avamar for VMware User Guide

APPENDIX C
Using VMware vRealize Log Insight
This appendix includes the following topics:
l About VMware vRealize Log Insight.....................................................................................150l Configuring the Log Central Reporting Service....................................................................150l Configuring Log Forwarding Agents .................................................................................... 151
Dell EMC Avamar for VMware User Guide 149

About VMware vRealize Log InsightYou can configure image proxies to forward logs to VMware vRealize Log Insight for centralizedlog management. This step allows a mechanism for identifying patterns and frequency of errortypes, and to prevent lost log entries due to log rotation.
Avamar support for Log Insight requires that the vRealize Log Insight appliance is deployed on avCenter. This feature uses Log Forwarding Agents (LFAs) installed on proxies or other clients topush log content to a Log Central Reporting Service (LCRS). LCRS is installed on a utility node orAvamar Virtual Edition server. The LCRS forwards the logs to the vRealize Log Insight serverrunning on the vCenter.
Note:Each time an Avamar server is upgraded, perform the following steps on the upgraded Avamarserver:
1. Configuring the Log Central Reporting Service
2. Configuring Log Forwarding Agents
This appendix describes configuration of the LCRS running on the Avamar server and the LFAsrunning on proxies and other clients.
Configuring the Log Central Reporting ServiceThe Log Central Reporting Service (LCRS) runs on the utility node or the Avamar Virtual Server(AVE). Use this procedure to configure the LCRS to forward logging information from proxies tothe vRealize Log Insight appliance.
Procedure
1. Open a command shell and log in by using one of the following methods:
l For a single-node server, log in to the server as admin, then switch user to root by typingsu -.
l For a multi-node server, log in to the utility node as admin, then switch user to root bytyping su -.
2. Change to the /usr/local/emc-lcrs/etc/ directory.
3. Open the lcrs.ini in a text editor.
4. Edit this file as follows:
server.port=8080forward.server=Log_Insight_Server_IPforward.port=Log_Insight_Server_portforward.messagePerSend=10forward.type=LogInsightupload.forward=trueforward.delete=trueforward.dispatch=true
where Log_Insight_Server_IP is the IP address of the vRealize Log Insight appliance, andLog_Insight_Server_port is the port used by the vRealize Log Insight appliance.
5. Save and close the file.
Using VMware vRealize Log Insight
150 Dell EMC Avamar for VMware User Guide

Configuring Log Forwarding AgentsFollow this procedure to configure Log Forwarding Agents (LFAs).
Procedure
1. Log in as admin to the proxy that will be configured to forward log messages to the LogCentral Reporting Service (LCRS).
2. Switch user to root by typing the following command:
su -
3. Type the following command:
/usr/local/avamarclient/etc/proxylfa_setup.sh
The following appears:
Avamar VMware Log Forwarding Agent SetupMain Menu---------1) Setup LCRS IP address2) Enable Avamar VMware Log Forwarding Agent cron job3) Disable Avamar VMware Log Forwarding Agent cron job4) quitYour choice:
4. Enter 1 at the prompt to enter the IP address of the Avamar utility node or AVE running theLog Central Reporting Service (LCRS).
5. Enter 2 at the prompt to enable the LFA cron job.
The cron job forwards the logs from the proxy to the LCRS every 10 minutes.
6. Enter 4 at the prompt to exit the program.
Using VMware vRealize Log Insight
Dell EMC Avamar for VMware User Guide 151

Using VMware vRealize Log Insight
152 Dell EMC Avamar for VMware User Guide

APPENDIX D
Plug-in Options
This appendix includes the following topics:
l How to set plug-in options................................................................................................... 154l VMware Image backup plug-in options.................................................................................154l VMware Image restore plug-in options.................................................................................157l Windows VMware GLR plug-in options................................................................................ 157
Dell EMC Avamar for VMware User Guide 153

How to set plug-in optionsPlug-in options enable you to control specific actions for on-demand backups, restores, andscheduled backups. The available plug-in options depend on the operation type and plug-in type.
Specify plug-in options in the AUI for on-demand backup or restore wizards, or when a dataset fora scheduled backup is created. Set plug-in options with the graphical user interface (GUI) controls(text boxes, check boxes, radio buttons, and so forth). Type an option and its value in the Key andValue fields.
NOTICE The Avamar software does not check or validate the information that is typed in theShow Free Form section of the More Options pane. The values in the Key and Value fieldsoverride settings that are specified with the GUI controls for the options.
VMware Image backup plug-in optionsThese backup options are available for the Avamar VMware Image plug-in.
Table 15 Backup options for Avamar VMware Image plug-in
Setting Description
Use Changed Block Tracking (CBT) toincrease performance
If selected, the VMware changed blocktracking feature is used to identify areas ofthe virtual machine file system that havechanged since the last backup and onlyprocess those changed areas during the nextbackup.
Note: Changed block tracking must beenabled at the virtual machine level inorder for this feature to work.
Set Annotionation Tag LastBackupStatus andLastSuccessfulBackup
If selected, enables the Avamar server toreport information to the vSphere Web Clientor the legacy Windows-based vSphere clientabout the most recent backup and mostrecent successful backup.
When selected, the following information isdisplayed in the Annotation list of the vSphereWeb Client:
l LastSuccessfulBackupStatus-com.dellemc.avamar: The date and timeof the most recent successful backup.
l LastBackupStatus-com.dellemc.avamar: The date and timeof the most recent backup, whethersuccessful or not.
Exclude page file blocks when performingimage backup on Windows VM
If selected, excludes the Windows page file(pagefile.sys) from the backup for all the
partitions. It is not limited to primarypartitions.
Plug-in Options
154 Dell EMC Avamar for VMware User Guide

Table 15 Backup options for Avamar VMware Image plug-in (continued)
Setting Description
Note: Page file exclusion is supported onlyfor Windows Servers version 2008 R2 andabove. For client versions of Windows,this option has no effect; the page file isincluded in backups of Windows clients,regardless of this setting.
Note: The proxy uses NBD transportmode internally in order to read the pagefile blocks. After recognizing the requiredblocks, the available mode (hotadd/nbdssl/nbd) will be used accordingly forbackup or restore operations.
Exclude deleted file blocks when performingimage backup on Windows VM
If selected, excludes the deleted file blocksfrom the backup for all the partitions. It is notlimited to primary partitions.
Exclude files with path and filter Excludes the files with path and filter from thebackup for all the partitions. It is not limited toprimary partitions.
Type the full path of the file or folder or thefilter path of the files and folders. Separatemultiple entries with a comma.
To exclude files with path and filter, type thepath in the following format:
l Start with driver letter
l End with "/" to exclude a folder
l End without "/" to exclude a file
l Use "*" as a wildcard in the filename toexclude all files. Do not use "*" as awildcard in the file path.For example:
n *:/*/*.TXT is not supported.
n D:/folder/*.txt is supported.
n D:/folder/* is supported.
Store backups on Data Domain system To store the backup on a Data Domain systeminstead of the Avamar server, select thecheckbox and then select the Data Domainsystem from the list.
Note: To enable this option, add a DataDomain system to the Avamarconfiguration. The Avamar and DataDomain System Integration Guide providesinstructions.
Plug-in Options
Dell EMC Avamar for VMware User Guide 155

Table 15 Backup options for Avamar VMware Image plug-in (continued)
Setting Description
Encryption method to Data Domain system Specifies the encryption method for datatransfer between the client and the DataDomain system during the backup. As ofAvamar release 7.5, the only supportedencryption method is "high."
Snapshot delete retry
Max times to retry snapshot delete The maximum number of times that asnapshot delete operations should beattempted.
Guest credentials
Username Guest operating system user account withsufficient privileges to run scripts.
Password Password for the guest operating systemusername.
Pre-snapshot Script
Script file Full path and filename of the script that will berun before the vmdk snapshot.
Maximum script run time (minutes) Maximum number of minutes this script isallowed to run before timing out.
Post-snapshot Script
Script file Full path and filename of the script that will berun after the backup completes and the vmdksnapshot is removed.
Maximum script run time (minutes) Maximum number of minutes this script isallowed to run before timing out.
Snapshot quiesce timeout
Snapshot quiesce timeout (minutes) Maximum number of minutes to wait beforethe snapshot quiesce operation is consideredto have failed (Windows WMware Image plug-in only)
Microsoft SQL Server authentication
NT Authentication Uses the credentials that are entered in GuestCredentials for authentication. User musthave administrative privileges and must havewrite permissions for the files system andread permissions for the Windows registry.
Application Authentication Uses the SQL Server Username and SQLServer Password to log into the SQL server.
Microsoft SQL Server post action
Plug-in Options
156 Dell EMC Avamar for VMware User Guide

Table 15 Backup options for Avamar VMware Image plug-in (continued)
Setting Description
Post Action Timeout (minutes) Maximum number of minutes to wait beforepost-action operations are considered to havefailed. Default is 900 seconds.
Post Action Type of MSSQL The type of post-action operation to perform.The only available option is LOG Truncation,which performs log truncation after thebackup has been performed. When backing upa single VM, all disks of the VM must beselected or log truncation will not occur.
VMware Image restore plug-in optionsThese restore options are available for the Avamar VMware Image plug-in.
Table 16 Restore options for Avamar VMware Image plug-in
Setting Description
Use Changed Block Tracking (CBT) toincrease performance
If selected, the VMware changed blocktracking feature is used to identify areas ofthe virtual machine file system that havechanged since the last backup and onlyprocess those changed areas during thisrestore operation.
Note: Changed block tracking mustenabled at the virtual machine level inorder for this feature to work.
Encryption method from Data Domain system Specifies the encryption method for datatransfer between the Data Domain systemand the client during the restore. As ofAvamar release 7.5, the only supportedencryption method is "high."
Windows VMware GLR plug-in optionsBackup operations are not supported by the Avamar Windows VMware GLR plug-in, and no user-configurable restore options are available.
Note: GLR does not support Windows dynamic disks.
Plug-in Options
Dell EMC Avamar for VMware User Guide 157

Plug-in Options
158 Dell EMC Avamar for VMware User Guide

APPENDIX E
Troubleshooting
This appendix includes the following topics:
l Installation and configuration problems and solutions.......................................................... 160l Backup problems and solutions............................................................................................ 160l Restore problems and solutions........................................................................................... 164
Dell EMC Avamar for VMware User Guide 159

Installation and configuration problems and solutionsCommon installation and configuration problems and solutions are described below.
Problems adding vCenter Server as Avamar clientIf you encounter problems adding a vCenter Server as an Avamar client, ensure that:
l vCenter hostname, username, and password are correct.
l Port 443 is open between the Avamar server and the vCenter.
If this step does not resolve the problem, turn off certificate authentication for all vCenter-to-Avamar MCS communications.
Proxy network settingsIf a proxy is deployed with an incorrect IP address or DNS entry, it might have registered with theAvamar server as localhost instead of the correct hostname.
Because proxies are virtual appliances that are managed by vCenter, once a proxy registers withthe Avamar server, it is difficult to change network settings. Otherwise, this step would involvedeleting it from the Avamar server, changing the network settings in vCenter, then reactivating itwith the Avamar server.
In most cases, the most efficient remedy is to deploy a new proxy with the correct settings, thendelete the old proxy from both Avamar and vCenter.
The vCenter documentation provides instructions for changing virtual appliance network settings.
Error when registering guest backup or Windows recovery target clientIf a virtual machine has been added to the Avamar server because it resides in a vCenter domain,and you want to also protect that same virtual machine using guest backup, or use that samevirtual machine as a recovery target for mounting Windows VMDKs, then you must change themcserver.xml allow_duplicate_client_names preference setting to true.
Backup problems and solutionsThese are common backup problems and solutions.
Backup does not startIf a backup activity fails to start:
l Ensure that an Avamar Image Backup Proxy has been correctly deployed.
l Ensure that the datastore for the source virtual machine has been selected on a running proxyserver.
If that does not resolve the problem, the account that is used to connect to vCenter might nothave sufficient privileges.
To verify account privileges, log in to the vSphere Client or vSphere Web Client with thatusername and password. Ensure that you can access datastores on that client. If you cannot, thataccount does not have the required privileges.
Troubleshooting
160 Dell EMC Avamar for VMware User Guide

Exclude the proxy from the virtual machine backup if performing the backupwith other VMware software
Including the Avamar proxy in a backup consumes a large amount of space. When using otherVMware software instead of the Avamar software to perform the virtual machine backup, it isrecommended that you exclude the proxy virtual machine from the backup.
Backups fail with “No Proxy” errorsOne or several VM image backups fail with No Proxy errors. Following are the error message thatis seen when backup is triggered:
Figure 10 No proxy error
Following is the No Proxy error Activity Monitor shows:
Figure 11 No proxy error on activity monitor
On-demand VMware Image backup fails with the following pop-up:
Troubleshooting
Dell EMC Avamar for VMware User Guide 161

Figure 12 On-demand VMware Image backup fails
When you click View Details, you get following details:
Figure 13 Event details of failed backup
The earlier mentioned issue occurs due to the following three reasons:
Cause 1
There are no Avamar Image Proxy servers that are configured to protect the datastore where theclient vmdk files are stored (This cause usually affects 1 or several VM backup clients.)
The steps to fix this error are:
1. Open Avamar Administrator in AUI.
2. Go to Asset Management and click the clients tab.
3. Find the failing VM with No Proxy and edit it.
4. Go to the VMware tab and look at the datastore that the VM is hosted on.
Troubleshooting
162 Dell EMC Avamar for VMware User Guide

5. Go to the Administration window.
6. Edit the proxies and check on the datastore that hosts the VM.
7. Click Ok to save the change.
Cause 2
Interruption to the vCenter connection (This cause usually affects all VM clients).
The steps to fix this error are:
1. Verify that Avamar can connect to the vCenter.
2. Go to the Administration window and click on the vCenter root domain.
3. Click the vCenter client connection object and edit the client.
4. Verify the Avamar server IP or Hostname is valid.
5. Verify the vCenter user account that Avamar uses is valid.
6. Click Ok to verify Avamar connect to vCenter.
Note: If the connection to vCenter was interrupted due to vCenter maintenance or networkoutage, restart the MCS service on the Avamar server to clear any vCenter connectioncaching issues.
Cause 3
The VM itself has no Hard Disks (This cause usually affects 1 or a couple of VMs).
The steps to fix this error are:
1. Open vCenter.
2. Find the VM that is failing with No Proxy.
3. Edit the VM settings and verify if there are any Hard Disks.
Note: If there are no Hard Disks, check with the VM Administrator and contact VMwaresupport. If a backup of the VM is no longer required, retire the VM object in Avamar.
Changed block tracking does not take effectEnabling changed block tracking in Avamar Administrator does not take effect until any of thefollowing actions occur on the virtual machine: restart, power on, resume after suspend, ormigrate.
If you enable changed block tracking but do not experience the expected performance increase,use the vSphere Client or vSphere Web Client to locate any virtual machines for which you haveenabled changed block tracking, and then perform any of the following actions: restart, power on,resume after suspend, or migrate.
Proxies are not assigned to backup jobsAny time that you restart the MCS, it might take some time until all proxies reconnect to the MCSand are available for backups. If you stop the MCS and do not restart it within 5 minutes, proxiesgo into a sleep mode for at least 40 minutes.
To verify that a proxy can connect to the MCS, view that proxy's avagent.log file and ensure thatmessages similar to the following appear at the end of the log history:
2014-03-20 20:34:33 avagent Info <5964>:Requesting work from 10.7.245.1612014-03-20 20:34:33 avagent Info <5264>:Workorder received: sleep
Troubleshooting
Dell EMC Avamar for VMware User Guide 163

2014-03-20 20:34:33 avagent Info <5996>:Sleeping 15 seconds
VM snapshot fails backups due to incorrect pre-evaluation of available spaceThe "snapshot_max_change_percent" flag tells the proxy to pre-evaluate free datastore space toensure that there is enough storage for the VM snapshot. The default value is set to 5%. If theproxy incorrectly fails the backup due to the perceived lack of storage, override the value by eitherchanging the percentage to "0" by the user of the policy, or by permanently overriding the value inthe proxy command file.
To permanently override this check in the proxy, log in to each proxy, modify the file "/usr/local/avamarclient/avvcbimageAll.cmd" to include the line:
-- snapshot_max_change_percent=0
This disables this feature.
Backup and restore of vFlash Read Cache enabled VMs will use NBD transportmode
vCenter will display the error:
Thedevice or operation specified at index '0' is not supported for thecurrent virtual machine version 'vmx-07'. A minimum version of'vmx-10' is required for this operation to succeed
If hot-add is desired then please upgrade the proxy hardware version to vmx-10 or above.
If the Proxy is residing on a host without vFlash resource configured, you may see an error in VCThe available virtual flash resource '0' MB ('0' bytes) is notsufficient for the requested operation during hot-add attempt and backup falls backto NBD mode and succeeds. This is expected, but if hot-add is strongly desired move the proxy toany host with vflash resource configured.
Exchange log truncation unsupported when VMDK is encrypted via vSphereWhen VMDK is encrypted via vSphere, WMware Tools does not use the VSS for applicationconsistent quiescing. The encrypted image backup is file-level consistent instead. Because theExchange server log truncation process includes the VSS writer, the VSS writer is not involved inthe snapshot quiesce, and log truncation is not triggered.
Note: SQL server log truncation does not rely on the VSS writer. SQL log truncation issupported.
Indexing VMware image backups requires HotAdd transport modeIndexing VMware image backups using the Data Protection Search software can only becompleted with HotAdd transport mode.
Restore problems and solutionsThese are common restore problems and solutions.
Troubleshooting
164 Dell EMC Avamar for VMware User Guide

Preexisting snapshots cause restores to failVirtual machine restores will fail if a snapshot for that virtual machine already exists. When thisoccurs, the restore operation will return an error message similar to the following:
2012-12-07 09:30:26 avvcbimage FATAL <0000>: The pre-existing snapshotsfrom VMX '[VNXe3300-Datastore1] vm-example/vm-example.vmx' will notpermit a restore.2012-12-07 09:30:26 avvcbimage FATAL <0000>: If necessary, use the '--skip_snapshot_check' flag to override this pre-existing snapshot check.2012-12-07 09:30:26 avvcbimage Error <9759>: createSnapshot: snapshotcreation failedTo resolve this condition, you must perform a new restore of the affected virtual machine andinclude the skip_snapshot_check plug-in option in the Restore Options dialog box. This willforce that restore operation to overwrite the existing snapshot, which will enable the restore tosuccessfully complete.
To perform a restore using the skip_snapshot_check plug-in option:
1. Initiate an image restore of the affected virtual machine.
2. When you reach the point in the procedure that instructs you to set restore options in theRestore Options dialog box, perform the following additional steps:
a. Click More Options.The Restore Command Line Options dialog box appears.
b. Click More.
c. Type [avvcbimage]skip_snapshot_check in the Enter Attribute field.
d. Type true in the Enter Attribute Value field.
e. Click +.The [avvcbimage]skip_snapshot_check=true entry appears in the plug-in options list.
f. Click OK.
3. Proceed with the remainder of the restore procedure.
Restore to new virtual machine not available when physical RDM disks areinvolved
If you back up a virtual machine that has both virtual disks and physical Raw Device Mapping(RDM) disks, the backup will successfully process the virtual disks, bypass the RDM disks.
However, when restoring data from one of these backups, you can restore the data to the originalvirtual machine, or redirect it to another existing virtual machine. However, you cannot restoredata to a new virtual machine.
Note that because the physical RDM disks were not processed during the backup, data residing onthe physical RDM disks cannot be restored at all.
If you need to restore data to a new virtual machine, you must:
1. Manually create a new virtual machine in vCenter.
2. This new virtual machine must have the same number of virtual disks as the original virtualmachine from which the backup was taken.
3. Manually add the new virtual machine to Avamar.
Troubleshooting
Dell EMC Avamar for VMware User Guide 165

4. Restore the data to this virtual machine.
FLR browse of a granular disk backup without a partition table is not supportedWhen a non-LVM granular disk backup is performed of a disk that does not have a partition table,FLR browsing of the backup will fail with the error:
Failed to mount disks. Verify that all the disks on the VM have valid/supported partitions.
The workaround for this issue is to perform a full image backup of all disks on the VM, then restorethe files or folders from the disk that does not have a partition table.
Fault tolerance disabled when restore to new virtual machine is performedWhen a fault-tolerant virtual machine is restored to a new virtual machine, fault tolerance isdisabled. You will need to enable fault tolerance after the machine is restored to a new virtualmachine. VMware documentation contains information regarding how to enable fault tolerance.
Restore to new virtual machine to Virtual SAN 5.5 will failRestore to new virtual machine to a Virtual SAN 5.5 will fail with the message unable toaccess file if the restore is of a multiple disk VM using a mix of datastore types (VSAN andVMFS or NFS and the restore of first disk is to a non-VSAN datastore. To workaround this issue,select a VSAN datastore for the first disk of the VM. This issue is not seen in VSAN 6.0.
Powering on an instant access vFlash-VM backup to a host without flashcapacity configured fails
Powering on an instant access vFlash-VM backup to a host without flash capacity configured failswith the following error:
The available virtual flash resource '0' MB ('0' bytes) is not sufficient for the requested operation
To workaround this issue, disable flash cache in VM before powering on.
Maximum number of NFS mounts with instant access issueWhen using the instant access feature, if the following error message is displayed, the maximumnumber of NFS mounts as configured in vSphere may be insufficient.
vmir Error <0000>: Mount NFS datastore failed to start with error: Failed to create Data Domain
A related message may be displayed in vSphere as well:
vmir Error <0000>: NFS has reached the maximum number of supported volumes.
The solution to this problem is to increase the number of NFS mountpoint configured on vSphere.The VMware knowledge base article https://kb.vmware.com/selfservice/microsites/search.do?language=en_US&cmd=displayKC&externalId=2239 contains information and procedures toincrease the number of mount points.
Troubleshooting
166 Dell EMC Avamar for VMware User Guide

File-level restore on RHEL 5 requires the standard C++ libraryWhen using HTTPS for enhanced FLR performance on RHEL 5.x, ACLs will be incorrect afterrestore unless the standard C++ library is installed.
File-level restore of a folder or file name containing certain special charactersfails
The use of the backslash (\) or the double quote (") in folder or file names is not supported withFLR.
File-level restore to user profile fails when Admin Approval Mode is enabledWhen the Microsoft Windows Admin Approval Mode (AAM) is enabled(FilterAdministratorToken=1), the administrator user cannot use FLR to restore a file or folder toan end user's profile.
A restore attempt results in the following error:
Unable to browse DestinationThe directory cannot be browsed. Please check the directory of the VM
To overcome this issue, the administrator user should open the end user's folder from withinC:\Users\. The following Windows UAC message appears:
You don't currently have permission to access this folder.
To permanently give the administrator user access to the folder, click Continue .
Troubleshooting
Dell EMC Avamar for VMware User Guide 167

Troubleshooting
168 Dell EMC Avamar for VMware User Guide

GLOSSARY
A
activation The process of passing the client ID (CID) back to the client, where it is stored in anencrypted file on the client file system. See also client activation
application-consistent The state of a virtual machine in which the virtual file system writes have beencompleted and all running applications have been quiesced.
Avamar Administrator A graphical management console software application that is used to remotelyadminister an Avamar system from a supported Windows or Linux client computer.
Avamar server The server component of the Avamar client/server system. Avamar server is a fault-tolerant, high-availability system that efficiently stores the backups from all protectedclients. It also provides essential processes and services required for data restores,client access, and remote system administration. Avamar server runs as a distributedapplication across multiple networked storage nodes.
B
backup A point-in-time copy of client data that can be restored as individual files, selecteddata, or as an entire backup.
backup policy In the AUI, a backup policy specifies a dataset, schedule, and retention settings thatare applied to a client or a group of clients. A backup policy must contain at least oneAvamar client. If the backup policy contains two or more clients, the clients mustbelong to the same Avamar domain. You can override backup policy settings at theclient level.
C
changed block tracking(CBT)
A VMware feature that tracks which virtual machine file system blocks have changedbetween backups.
client activation The process of passing the client ID (CID) back to the client, where it is stored in anencrypted file on the client file system. See also activation
client registration The process of establishing an identity with the Avamar server. When Avamarrecognizes the client, it assigns a unique client ID (CID), which it passes back to theclient during client activation. See also registration
Dell EMC Avamar for VMware User Guide 169

crash-consistent The state of a virtual machine that is consistent with what would occur by interruptingpower to a physical computer. Because file system writes might or might not be inprogress when power is interrupted, there is always the possibility of some data losswhen backing up a crash-consistent file system.
D
datacenter In VMware vSphere environments, a datacenter comprises the basic physical buildingblocks. These physical building blocks include virtualization servers, storage networksand arrays, IP networks, and a management server. Each vSphere vCenter can managemultiple datacenters.
Data Domain system Disk-based deduplication appliances and gateways that provide data protection anddisaster recovery (DR) in the enterprise environment.
dataset A policy that defines a set of files, directories, and file systems for each supportedplatform that are included or excluded in backups across a group of clients. A datasetis a persistent and reusable Avamar policy that can be named and attached to multiplegroups.
datastore In VMware vSphere environments, a datastore is the storage resources used by adatacenter.
E
ESX/ESXi Server A virtualization layer run on physical servers that abstracts processor, memory,storage, and resources into multiple virtual machines. ESX Servers provide anintegrated service console; ESXi Servers do not.
F
file system-consistent The state of a virtual machine in which the virtual file system has been quiesced (thatis, all file system writes have been completed).
G
group A level of organization in Avamar Administrator for one or more Avamar clients. Allclients in an Avamar group use the same group policies, which include the dataset,schedule, and retention policy.
group policy In Avamar Administration, a group policy is defined as a dataset, schedule, andretention policy for all clients in an Avamar group.
guest backup A method of protecting a virtual machine in which backup software is installed directlyin the guest operating system just as if it were a physical machine.
Glossary
170 Dell EMC Avamar for VMware User Guide

I
image backup A method for protecting virtual machines hosted in a vCenter in which a backup istaken of entire virtual disk images. Avamar for VMware image backup is fully integratedwith vCenter Server to provide detection of virtual machine clients, and enableefficient centralized management of backup jobs
M
MCS Management console server. The server subsystem that provides centralizedadministration (scheduling, monitoring, and management) for the Avamar server. TheMCS also runs the server-side processes used by Avamar Administrator.
P
plug-in Avamar client software that recognizes a particular kind of data resident on that client.
plug-in options Options that you specify during backup or restore to control backup or restorefunctionality.
proxy A virtual machine that is used to perform image backups, image restores, and file-levelrestores of other virtual machines. Proxies run Avamar software inside a Linux virtualmachine, and are deployed in a vCenter using an appliance template (.ova) file.
R
registration The process of establishing an identity with the Avamar server. When Avamarrecognizes the client, it assigns a unique client ID (CID), which it passes back to theclient during client activation. See also client registration
restore An operation that retrieves one or more file systems, directories, files, or data objectsfrom a backup and writes the data to a designated location.
retention The time setting to automatically delete backups on an Avamar server. Retention canbe set to permanent for backups that should not be deleted from an Avamar server.Retention is a persistent and reusable Avamar policy that can be named and attachedto multiple groups.
S
schedule The ability to control the frequency and the start and end time each day for backups ofclients in a group. A schedule is a persistent and reusable Avamar policy that can benamed and attached to multiple groups.
Storage vMotion A VMware feature the enables migration of a live virtual machine from one datastore toanother.
Glossary
Dell EMC Avamar for VMware User Guide 171

V
vCenter Server A centralized single point of management and control for one or more VMwaredatacenters.
vSphere Client A VMware software application used to control and manage a vCenter. The vSphereClient is also known as the "thick client."
vSphere Web Client A VMware web interface used to control and manage a vCenter.
Glossary
172 Dell EMC Avamar for VMware User Guide