dell emc avamar administration guide · 2019-10-31 · dell emc avamar version 18.2 administration...
TRANSCRIPT
Dell EMC AvamarVersion 18.2
Administration Guide302-005-101
REV 01

Copyright © 2001-2018 Dell Inc. or its subsidiaries. All rights reserved.
Published December 2018
Dell believes the information in this publication is accurate as of its publication date. The information is subject to change without notice.
THE INFORMATION IN THIS PUBLICATION IS PROVIDED “AS-IS.“ DELL MAKES NO REPRESENTATIONS OR WARRANTIES OF ANY KIND
WITH RESPECT TO THE INFORMATION IN THIS PUBLICATION, AND SPECIFICALLY DISCLAIMS IMPLIED WARRANTIES OF
MERCHANTABILITY OR FITNESS FOR A PARTICULAR PURPOSE. USE, COPYING, AND DISTRIBUTION OF ANY DELL SOFTWARE DESCRIBED
IN THIS PUBLICATION REQUIRES AN APPLICABLE SOFTWARE LICENSE.
Dell Technologies, Dell, EMC, Dell EMC and other trademarks are trademarks of Dell Inc. or its subsidiaries. Other trademarks may be the property
of their respective owners. Published in the USA.
Dell EMCHopkinton, Massachusetts 01748-91031-508-435-1000 In North America 1-866-464-7381www.DellEMC.com
2 Avamar 18.2 Administration Guide
11
13
17
Introduction 21Avamar system overview............................................................................ 22
Avamar server............................................................................... 22Avamar clients............................................................................... 25User interfaces.............................................................................. 27Data Domain system support.........................................................29
Data deduplication......................................................................................29Security and networking.............................................................................30
Encryption.....................................................................................30IPv4 and IPv6 support................................................................... 30TSL 1.2 encryption protocol required..............................................31SSH MAC algorithms..................................................................... 31
Avamar Administrator 33Overview of Avamar Administrator............................................................. 34Installing Avamar Administrator.................................................................. 34
Installing Avamar Administrator on Microsoft Windows................. 34Installing Avamar Administrator on Linux....................................... 35
Upgrading Avamar Administrator................................................................36Uninstalling Avamar Administrator..............................................................37Editing Avamar Administrator client preferences........................................37Setting a session time-out for Avamar Administrator..................................37Starting Avamar Administrator................................................................... 38Avamar Administrator dashboard............................................................... 40
launcher link.................................................................................. 40System Information panel...............................................................41Activities panel.............................................................................. 44Capacity panel...............................................................................45Critical Events panel......................................................................45
Avamar Administrator user interface elements........................................... 46Status bar......................................................................................46Navigation tree features................................................................ 49Mouse shortcuts........................................................................... 50
Avamar Web User Interface 51Overview of the AUI .................................................................................. 52Access the AUI........................................................................................... 52AUI navigation pane....................................................................................53Basic management tasks............................................................................ 54
Figures
Tables
Preface
Chapter 1
Chapter 2
Chapter 3
CONTENTS
Avamar 18.2 Administration Guide 3

Navigation tree features.............................................................................55AUI dashboard............................................................................................55
Monitoring assets in the dashboard............................................... 56Monitoring system capacity in the dashboard................................58Viewing events in the dashboard................................................... 58Monitoring backup jobs in the dashboard...................................... 59Monitoring replication jobs in the dashboard................................. 59Viewing client information............................................................. 60
AUI Activity Monitor...................................................................................60Activity Monitor details.................................................................. 61Monitor backups............................................................................63Cancel backups..............................................................................63Restart a backup job......................................................................64View a detailed client session log................................................... 64Monitor restores............................................................................64Cancel restores............................................................................. 65Monitor replication in the AUI........................................................65Cancel a replication task ...............................................................66
Client Management 67Overview of Avamar clients........................................................................ 68Client domains............................................................................................68
Create a domain............................................................................ 69Edit domain information.................................................................69Delete a domain............................................................................. 70
Client registration.......................................................................................70Client-side registration.................................................................. 70Register or add a client ..................................................................71Batch client registration................................................................. 71
Activating a client....................................................................................... 74Reactivating a client...................................................................... 75
Client paging.............................................................................................. 75Pageable clients.............................................................................75Non-pageable clients..................................................................... 76Adding or modifying client paging settings.....................................77
Editing client information............................................................................77Viewing client properties............................................................................ 78Enabling and disabling a client.................................................................... 79Moving a client to a new domain.................................................................79Retiring a client.......................................................................................... 80Deleting a client..........................................................................................80View integrated clients................................................................................81View unprotected clients............................................................................ 82
User Management and Authentication 83Overview of Avamar user accounts............................................................ 84User authentication.................................................................................... 85
How Avamar authenticates users and assigns roles....................... 85Avamar internal authentication...................................................................86Directory service authentication.................................................................86
LDAP directory service authentication...........................................87OpenLDAP directory service authentication.................................. 94Adding an NIS directory service.....................................................99Error messages during directory service configuration................. 101
Chapter 4
Chapter 5
CONTENTS
4 Avamar 18.2 Administration Guide

Adding an LDAP map.................................................................... 101Editing the role for an LDAP map................................................. 102Deleting an LDAP map..................................................................103Editing the time-out value for directory service processes...........103
Enabling backward compatibility with Enterprise Authentication.............. 104Roles.........................................................................................................105
Administrator roles.......................................................................105Operator roles.............................................................................. 105User roles..................................................................................... 107Role-based access control and the AUI........................................ 108
Adding a user to a domain..........................................................................110Editing user information............................................................................. 111Deleting a user........................................................................................... 112
Backup 113About on-demand backups........................................................................ 114Perform an on-demand backup..................................................................114Scheduling backups using the Policy wizard.............................................. 115
Dataset catalog.............................................................................116Managing schedules..................................................................... 122Manage rules................................................................................ 127Retention policies.........................................................................130About backup policies...................................................................134Managing backup policies.............................................................135Start an on-demand backup of a backup policy............................ 142Enabling a scheduled backup for a backup policy......................... 143
Monitoring backups...................................................................................143Cancel backups......................................................................................... 144Managing completed backups................................................................... 144
Finding a completed backup to manage........................................144Changing the expiration date for a backup................................... 145Changing the retention type for a backup.................................... 146Validating a backup by using Avamar Administrator..................... 146Viewing backup statistics............................................................. 147Deleting a backup......................................................................... 148
Restore and Recovery 151Restoring data from a backup................................................................... 152
Finding a backup.......................................................................... 152Restoring to the original client..................................................... 153Restoring to a different client...................................................... 154
Monitor restores....................................................................................... 155Cancel restores......................................................................................... 156Windows client system recovery...............................................................156Red Hat and CentOS Linux system recovery.............................................157
Reconstructing the partition table................................................157Preparing the target recovery client............................................ 158Performing system recovery of a Red Hat or CentOS Linux client....159Troubleshooting system recovery of a Red Hat or CentOS Linuxclient............................................................................................ 163
SUSE Linux system recovery.................................................................... 164Reconstructing the partition table................................................164Preparing the target recovery client............................................ 166
Chapter 6
Chapter 7
CONTENTS
Avamar 18.2 Administration Guide 5

Performing system recovery of a SUSE Linux client.................... 166Troubleshooting system recovery of a SUSE Linux client.............170
Oracle Solaris system recovery..................................................................171Preparing for Oracle Solaris system recovery............................... 171Performing system recovery of an Oracle Solaris client............... 172
Server Administration 175Server shutdown and restart.....................................................................176
Administering the Avamar subsystems......................................... 176Powering off or restarting the server........................................... 178
Suspending and resuming server activities................................................180Suspending and resuming backups and restores.......................... 180Suspending and resuming scheduled operations.......................... 180Suspending and resuming maintenance activities.........................180
Managing client sessions........................................................................... 181Monitoring client sessions.............................................................181Viewing a detailed client session log............................................. 182Creating a Zip file for Avamar Support......................................... 183Canceling a client session.............................................................183Resetting a client......................................................................... 183
Managing client agents and plug-ins......................................................... 184Adding a build record....................................................................184Editing version or build records.................................................... 185Deleting a build record................................................................. 185Disabling all client initiated activations......................................... 185Disabling all client initiated backups............................................. 186
Backup and maintenance windows............................................................ 186Editing the backup and maintenance windows..............................187
Checkpoints.............................................................................................. 188Creating a checkpoint.................................................................. 188Deleting a checkpoint...................................................................188Rolling back to a checkpoint.........................................................189Clearing a data integrity alert....................................................... 190
Activating the Avamar software and installing a server license................. 190Activating the Avamar software................................................... 190Installing and activating a license.................................................. 191
Managing services.................................................................................... 192Information on the Services Administration tab............................192
Changing server passwords and OpenSSH keys....................................... 193MCS configuration settings...................................................................... 195
Backing up MCS data...................................................................196Restoring MCS data..................................................................... 197Reverting to the default MCS configuration settings................... 197
Using network address translation (NAT)................................................. 198Solutions for common NAT problems........................................... 199
Editing network settings for a single-node server.....................................200Adding a custom security notification for web browser logins.................. 200Viewing and editing server contact information........................................200Migrating backups.....................................................................................201
Server Monitoring 203Recommended daily server monitoring.....................................................204Monitoring activities.................................................................................204
Activity Monitor details................................................................204
Chapter 8
Chapter 9
CONTENTS
6 Avamar 18.2 Administration Guide

Monitoring server status and statistics.....................................................207Server Monitor tab...................................................................... 207Server Management tab...............................................................210
Event monitoring...................................................................................... 223Event notifications.......................................................................223Event profiles.............................................................................. 225Viewing events in the Event Monitor............................................231Viewing the event catalog............................................................232Acknowledging system events.....................................................233Customizing error events.............................................................233
Server monitoring with syslog.................................................................. 233Configuring local syslog............................................................... 234Configuring remote syslog...........................................................235
Server monitoring with SNMP..................................................................239Configuring server monitoring with SNMP.................................. 239
Viewing Avamar server log files................................................................ 242Audit logging............................................................................................ 243
Viewing the Audit Log..................................................................243Automatic notifications to Avamar Support.............................................. 244
Usage Intelligence........................................................................244Email Home................................................................................. 246ConnectEMC............................................................................... 247
Verifying system integrity.........................................................................252
Capacity Management 253Capacity utilization information................................................................ 254Capacity limits and thresholds..................................................................254Capacity forecasting................................................................................ 255Customizing capacity limits and behavior................................................. 255
Editing capacity settings for Avamar Administrator.....................255
Replication 259Overview of Avamar replication................................................................260
Types of replication..................................................................... 260Replication scheduling................................................................. 260Replication authentication............................................................261Location of replicas on a destination Avamar system...................262Replicas at Source.......................................................................262Retention of replicas....................................................................264Replication with Data Domain systems........................................ 265
Enable Replicas at Source........................................................................ 266Configuring policy-based replication.........................................................267
Replication destinations...............................................................267Replication groups....................................................................... 270
Performing on-demand replication in the AUI........................................... 276Perform on-demand replication from the Policy window............. 276
Performing command line replication........................................................277Command reference.................................................................... 277CLI examples............................................................................... 287
Monitoring replication.............................................................................. 289Monitor replication in the AUI...................................................... 289
Cancel a replication task in the AUI.......................................................... 289Restore a backup from a replica on a destination system......................... 289MCS configuration parameters to support Replicas at Source..................291
Chapter 10
Chapter 11
CONTENTS
Avamar 18.2 Administration Guide 7

Changing the configuration of Replicas at Source....................... 293Restore Replicas at Source..........................................................294
Server Updates and Hotfixes 295Overview of the Avamar server software update process.........................296
Avamar Downloader Service........................................................ 296AvInstaller and Avamar Installation Manager................................297
Installing and configuring the Avamar Downloader Service.......................299Configuring the Avamar Downloader Service...............................299
Downloading new packages from the EMC repository..............................299Downloading and installing packages on the Avamar server..................... 300Viewing a list of installation packages on the Avamar server..................... 301
Uploading installation packages to the Avamar server................. 302Repository tab headings.............................................................. 302
Deleting packages from the Avamar server.............................................. 303Viewing the history of installations........................................................... 304
Installation history information.................................................... 304Using the legacy Avamar Downloader Service..........................................305
Legacy Avamar Downloader Service installation requirements.... 306Downloading the legacy Avamar Downloader Service software... 306Installing the legacy Avamar Downloader Service software......... 307Enabling HTTPS...........................................................................307Configuring the legacy Avamar Downloader Service....................308Updating the legacy Avamar Downloader Service software.........309Uninstalling the legacy Avamar Downloader Service.................... 310Downloading new packages from the EMC repository................. 310Viewing a list of packages available for download......................... 311Verifying connectivity with the EMC repository............................311Monitoring Avamar Downloader Service status.............................311Stopping and starting the Avamar Downloader Service monitor...313
Troubleshooting Avamar Downloader Service issues.................................313
Avamar Client Manager 315Overview of Avamar Client Manager.........................................................316
Connection security..................................................................... 316Apache web server authentication............................................... 316Editing the session time-out period.............................................. 316Increasing the JavaScript time-out period....................................317Avamar Client Manager configuration properties......................... 318
Starting Avamar Client Manager............................................................... 319Login page................................................................................... 320
Global tools.............................................................................................. 320Adding an Avamar server............................................................. 320Removing an Avamar server......................................................... 321Changing the settings for an Avamar server.................................321Selecting a server........................................................................ 322Filters.......................................................................................... 322Viewing details.............................................................................328Exporting data............................................................................. 329Setting the entries per page limit.................................................329Viewing tool tips.......................................................................... 329
Overview.................................................................................................. 330Server Summary..........................................................................330Dashboard.................................................................................... 331
Chapter 12
Chapter 13
CONTENTS
8 Avamar 18.2 Administration Guide

Clients...................................................................................................... 334Client and server tools................................................................. 334Add Clients.................................................................................. 340Registered Clients....................................................................... 345Activated Clients......................................................................... 346Failed Clients............................................................................... 348Idle Clients...................................................................................349Upgrade Clients........................................................................... 349
Policies.....................................................................................................352Adding clients to a group............................................................. 352Removing clients from a group.................................................... 353Viewing the dataset policy of a group.......................................... 353Viewing the retention policy of a group....................................... 353Viewing the schedule policy of a group........................................ 354
Queues..................................................................................................... 354Canceling a task.......................................................................... 354
Logs......................................................................................................... 355Viewing the client log after upgrading an Avamar client.............. 356Clearing all log entries in a section...............................................356
Avamar Desktop/Laptop 357Overview of Avamar Desktop/Laptop...................................................... 358Requirements for Avamar Desktop/Laptop.............................................. 359
Client computer requirements..................................................... 359Web browser requirements..........................................................360Network requirements..................................................................361
Avamar client software installation............................................................361Supported systems management tools........................................ 362Push installation on Windows computers.....................................362Push installation on Macintosh computers...................................363Local client installation................................................................ 364Avamar client software uninstall.................................................. 364
Avamar Desktop/Laptop user authentication........................................... 365Pass-through authentication....................................................... 365LDAP authentication....................................................................366Avamar authentication.................................................................368Mixed authentication................................................................... 369
Avamar Desktop/Laptop user interfaces.................................................. 369Client UI...................................................................................... 369Web UI......................................................................................... 371
Backup with Avamar Desktop/Laptop...................................................... 376Scheduled backups...................................................................... 376Add data option............................................................................377Single-click backups.................................................................... 377Interactive backups......................................................................378Disabling on-demand backups..................................................... 380Changing the retention policy for on-demand backups.................381
Restore with Avamar Desktop/Laptop...................................................... 381Finding data to restore................................................................. 381Restore types.............................................................................. 382Restore requirements.................................................................. 383Restore limits...............................................................................384Restore of replicated backups..................................................... 385
Client backup and restore activity history................................................ 385Editing Avamar Desktop/Laptop parameters............................................386
Chapter 14
CONTENTS
Avamar 18.2 Administration Guide 9

Avamar Desktop/Laptop parameters...........................................386Client log locations................................................................................... 388
Data Domain System Integration 389Overview of Data Domain system integration...........................................390
Integration of Avamar with Data Domain..................................... 390File system backups on a Data Domain system.............................391Application backups on a Data Domain system.............................391Data Domain Cloud Disaster Recovery......................................... 391VMware instant access................................................................392Cloud tier.....................................................................................392Checkpoints on a Data Domain system........................................ 392Data Domain system streams.......................................................393Replication with Data Domain systems........................................ 393Monitoring and reporting Data Domain system status................. 394Security with Data Domain system integration............................ 394Data migration to an attached Data Domain system.................... 394Enforcement of backups to Data Domain.................................... 395
Preparing to add a Data Domain system................................................... 395System requirements for Data Domain system integration.......... 395Creating a DD Boost user account...............................................398
Adding a Data Domain system.................................................................. 399
Command Shell Server Logins 403User accounts.......................................................................................... 404Starting command shell sessions.............................................................. 404Switching user IDs....................................................................................404Using sudo................................................................................................405
Prefixing commands with sudo.................................................... 405
Plug-in Options 407How to set plug-in options........................................................................408Backup options.........................................................................................408Restore options......................................................................................... 411
Adding Files to the Avamar Web Restore Page 415Adding files to the Avamar Web Restore Downloads page........................ 416Adding files to the Avamar Web Restore Documentation page..................417
419
Chapter 15
Appendix A
Appendix B
Appendix C
Glossary
CONTENTS
10 Avamar 18.2 Administration Guide

Avamar server nodes, stripes, and objects..................................................................22Avamar server functional block diagram..................................................................... 24Avamar client agent and plug-ins................................................................................25Data deduplication......................................................................................................30Avamar Administrator dashboard................................................................................40Avamar Administrator status bar................................................................................ 46Navigation tree features.............................................................................................49AUI navigation pane....................................................................................................53AUI dashboard............................................................................................................56Avamar domain example............................................................................................. 68Users in Avamardomains.............................................................................................84Schedule start time, end time, and duration.............................................................. 123Default backup and maintenance windows................................................................ 186Multi-node server configuration with NAT................................................................ 198Replication domain structure example...................................................................... 262View after uploading the example CSV file............................................................... 343Replaceable graphics on the Avamar client web UI................................................... 373
1234567891011121314151617
FIGURES
Avamar 18.2 Administration Guide 11

FIGURES
12 Avamar 18.2 Administration Guide

Typographical conventions..........................................................................................18MCS functions............................................................................................................24Supported plug-ins..................................................................................................... 26Avamar system management features of Backup & Recovery Manager..................... 27Dashboard launcher link..............................................................................................40System State fields on the Avamar Administrator dashboard......................................41Backup job fields in the Avamar Administrator dashboard...........................................44System alerts in the Critical Events panel...................................................................46Launcher shortcut icons on the status bar..................................................................46Scheduler and backup dispatching status messages...................................................47Status messages for unacknowledged events............................................................ 48Operational status messages for Avamaror Data Domain............................................48AUI navigation pane....................................................................................................53System alerts............................................................................................................. 58Session details available in the Activity Monitor ......................................................... 61Client details available in the Activity Monitor.............................................................61Policy details available in the Activity Monitor............................................................ 62Attributes for each entry in a clients definition file......................................................72Client Summary Information....................................................................................... 78Avamar user account information............................................................................... 84Supported directory service types..............................................................................86Required Key Distribution Center ports...................................................................... 88Parameter requirements for LDAP base functionality.................................................92Additional parameter for LDAP base functionality ..................................................... 92OpenLDAP directory service parameters....................................................................98Error messages during directory service configuration'............................................. 101Administrator roles....................................................................................................105Operator roles........................................................................................................... 106User roles.................................................................................................................. 107AUI feature pane access by administrator user role...................................................108AUI feature pane access by operator user role.......................................................... 109Directories excluded from Default Dataset backups ..................................................116Directories excluded from UNIX Dataset backups ..................................................... 117Directories excluded from Windows Dataset backups ............................................... 117Schedule types..........................................................................................................122Schedule catalog....................................................................................................... 124Settings for each type of schedule............................................................................125Basic retention settings............................................................................................ 130Retention policy catalog............................................................................................132VMware groups......................................................................................................... 134Settings for each type of schedule............................................................................138Jobs | Backups pane..................................................................................................147Backup statistics dialog box information................................................................... 148Target locations for system recovery backups of an Oracle Solaris client................. 172Session Monitor tab properties.................................................................................. 181Avamar server maintenance activities....................................................................... 187Checkpoint states..................................................................................................... 188Services Administration tab information....................................................................192Default live file directory for MCS configuration files................................................195MCS backup timestamp files.....................................................................................196Solutions for common NAT problems........................................................................ 199Read-only fields on the View/Edit Contact Information dialog box...........................200Editable fields on the View/Edit Contact Information dialog box...............................201
1234567891011121314151617181920212223242526272829303132333435363738394041424344454647484950515253
TABLES
Avamar 18.2 Administration Guide 13

System monitoring tools and tasks........................................................................... 204Session details available in the Activity Monitor ...................................................... 205Client details available in the Activity Monitor.......................................................... 205Policy details available in the Activity Monitor..........................................................206Node details on the Avamar tab of the Server Monitor.............................................207CPU details on the Avamar tab of the Server Monitor..............................................208Network details on the Avamar tab of the Server Monitor........................................208Disk details on the Avamar tab of the Server Monitor.............................................. 209Node details on the Data Domain tab of the Server Monitor.....................................209CPU details on the Data Domain tab of the Server Monitor......................................209Disk (KB/S) details on the Data Domain tab of the Server Monitor...........................210Network (KB/S) details on the Data Domain tab of the Server Monitor....................210Data display based on selections on the Server Management tab.............................. 211Bytes Protected Summary properties on the Server Management tab...................... 211Server Details on the Server Management tab...........................................................211Maintenance Activities Details on the Server Management tab.................................213Garbage Collection Details on the Server Management tab.......................................213Module properties on the Server Management tab .................................................. 214Status indicators on the Node Information part of Server Management....................214Server details on the Node Information part of Server Management........................ 215OS details on the Node Information part of Server Management.............................. 217Hardware details on the Node Information part of Server Management....................217Status indicators on the Partition Information part of Server Management.............. 218Server Details on the Node Information part of Server Management........................ 218Data Domain system properties on the Server Management tab...............................219Event information..................................................................................................... 223Example of a batch email notification message.........................................................224Mappings of syslog fields to Avamar event data....................................................... 234Locations for the Avamar MIB definition file.............................................................240Capacity limits and thresholds ................................................................................. 254Capacity settings in mcserver.xml............................................................................ 256Replicas at Source features available through the source Avamar server................. 262Descriptions of the integration of Replicas at Source into Avamar tasks.................. 263Replication configurations for Avamar replication using DD Boost............................265Replicas at Source....................................................................................................270Account options for the avrepl command..................................................................277Logging options for the avrepl command.................................................................. 278Replication options for the avrepl command............................................................. 279Avamar-only advanced options for the avrepl command...........................................282Numeric plug-in descriptors..................................................................................... 285Required options for the avrepl command................................................................ 287MCS configuration parameters to support Replicas at Source.................................. 291Information on the Repository tab............................................................................ 302Information on the History tab..................................................................................304Details on the History tab......................................................................................... 305Installation requirements for the legacy Avamar Downloader Service.......................306Avamar Downloader Service monitor status messages .............................................312Avamar Client Manager configuration properties...................................................... 318Characters not allowed in search strings.................................................................. 324Columns used in the Server Summary section.......................................................... 330Server information on the Server panel.................................................................... 332Settings on the Advanced tab of Client Details......................................................... 337Relationship states during client activation...............................................................344Failed client filters.................................................................................................... 349Task types on the Queues page................................................................................354Task types on the Logs page.................................................................................... 355
54555657585960616263646566676869707172737475767778798081828384858687888990919293949596979899100101102103104105106107108109
TABLES
14 Avamar 18.2 Administration Guide

Avamar Desktop/Laptop hardware requirements..................................................... 360Supported web browsers forAvamar Desktop/Laptop.............................................. 361Environment variables for launching a web browser in Avamar Desktop/Laptop.......361Avamar Desktop/Laptop network requirements........................................................361Push install launch command arguments.................................................................. 363Avamar Desktop/Laptop client UI functionality........................................................ 370Avamar Desktop/Laptop web UI functionality........................................................... 371Descriptions of methods for starting an Avamar Desktop/Laptop client backup.......376Datasets for single-click on-demand backups........................................................... 378Supported values for the restrictBackupsPerDay property...................................... 380Avamar Desktop/Laptop data restore filtering......................................................... 383Requirements to restore from a different computer with Avamar Desktop/Laptop.. 384Avamar Desktop/Laptop parameters........................................................................386Available client logs.................................................................................................. 388Paths to logs on Windows computers ......................................................................388Paths to logs on Linux and Mac computers ..............................................................388Replication configurations for Avamar replication using DD Boost............................393Data Domain system requirements........................................................................... 395Backup plug-in options............................................................................................. 408Backup plug-in options for (NetWare only) SMS Authentication..............................409Backup plug-in options for logging........................................................................... 409Backup plug-in options for file system traversal....................................................... 409Backup plug-in options for pre-script........................................................................410Backup plug-in options for post-script...................................................................... 410Backup plug-in client cache options.......................................................................... 410Backup plug-in advanced options ............................................................................. 410Quota limit per backup .............................................................................................. 411File system plug-in restore options............................................................................ 411NetWare only) SMS Authentication restore plug-in options......................................412Logging restore plug-in options.................................................................................412Pre-script restore plug-in options............................................................................. 413Post-script restore plug-in options............................................................................413Client cache restore plug-in options..........................................................................413Advanced restore plug-in options..............................................................................414
110111112113114115116117118119120121122123124125126127128129130131132133134135136137138139140141142143
TABLES
Avamar 18.2 Administration Guide 15

TABLES
16 Avamar 18.2 Administration Guide

PREFACE
As part of an effort to improve the product lines, revisions of the software andhardware are periodically released. Therefore, some functions that are described inthis document might not be supported by all versions of the software or hardwarecurrently in use. The product release notes provide the most up-to-date informationon product features.
Contact the technical support professional when a product does not function correctlyor does not function as described in this document.
Note
This document was accurate at publication time. To find the latest version of thisdocument, go to Online Support (https://support.EMC.com).
PurposeThis guide describes how to configure, administer, monitor, and maintain the Avamarsystem.
AudienceThe information in this guide is primarily intended for system administrators who areresponsible for maintaining servers and clients on a network, as well as operators whomonitor daily backups and storage devices.
Revision historyThe following table presents the revision history of this document.
Revision Date Description
01 December 14, 2018 GA release of Avamar 18.2
Related documentationThe following publications provide additional information:
l E-lab Navigator at https://elabnavigator.emc.com/eln/modernHomeDataProtection
l Avamar Release Notes
l Avamar Operational Best Practices Guide
l Avamar and Data Domain System Integration Guide
l Avamar Reports Guide
l All Avamar client and plug-in user guides
Avamar 18.2 Administration Guide 17

Special notice conventions used in this documentThese conventions are used for special notices.
DANGER
Indicates a hazardous situation which, if not avoided, results in death or seriousinjury.
WARNING
Indicates a hazardous situation which, if not avoided, could result in death orserious injury.
CAUTION
Indicates a hazardous situation which, if not avoided, could result in minor ormoderate injury.
NOTICE
Addresses practices that are not related to personal injury.
Note
Presents information that is important, but not hazard-related.
Typographical conventionsThese type style conventions are used in this document.
Table 1 Typographical conventions
Bold Used for names of interface elements, such as names of windows,dialog boxes, buttons, fields, tab names, key names, and menu paths(what the user specifically selects or clicks)
Italic Used for full titles of publications that are referenced in text
Monospace Used for:
l System code
l System output, such as an error message or script
l Pathnames, filenames, prompts, and syntax
l Commands and options
Monospace italic Used for variables
Monospace bold Used for user input
[ ] Square brackets enclose optional values
| Vertical bar indicates alternate selections - the bar means “or”
{ } Braces enclose content that the user must specify, such as x or y orz
... Ellipses indicate nonessential information that is omitted from theexample
PREFACE
18 Avamar 18.2 Administration Guide
Where to get helpThe Avamar support page provides access to licensing information, productdocumentation, advisories, and downloads, as well as how-to and troubleshootinginformation. This information may resolve a product issue before contacting CustomerSupport.
To access the Avamar support page:
1. Go to https://www.dell.com/support/home/us/en/19.
2. Type a product name in the Enter a Service Tag, Serial Number, ServiceRequest, Model, or Keyword search box.
3. Select the product from the list that appears. When you select a product, theProduct Support page loads automatically.
4. (Optional) Add the product to the My Products list by clicking Add to My SavedProducts in the upper right corner of the Product Support page.
DocumentationThe Avamar product documentation provides a comprehensive set of featureoverview, operational task, and technical reference information. To supplement theinformation in product administration and user guides, review the followingdocuments:
l Release notes provide an overview of new features and known limitations for arelease.
l Technical notes provide technical details about specific product features, includingstep-by-step tasks, where necessary.
l White papers provide an in-depth technical perspective of a product or productsas applied to critical business issues or requirements.
KnowledgebaseThe Knowledgebase contains applicable solutions that you can search for either bysolution number (for example, KB000xxxxxx) or by keyword.
To search the Knowledgebase:
1. Go to https://www.dell.com/support/home/us/en/19.
2. Under the Support tab, click Knowledge Base.
3. Type either the solution number or keywords in the search box. Optionally, you canlimit the search to specific products by typing a product name in the search boxand then selecting the product from the list that appears.
Online communitiesGo to Community Network at http://community.EMC.com for peer contacts,conversations, and content on product support and solutions. Interactively engageonline with customers, partners, and certified professionals for all products.
Live chatTo engage Customer Support by using live interactive chat, click Join Live Chat onthe Service Center panel of the Avamar support page.
Service RequestsFor in-depth help from Customer Support, submit a service request by clicking CreateService Requests on the Service Center panel of the Avamar support page.
PREFACE
Avamar 18.2 Administration Guide 19

Note
To open a service request, you must have a valid support agreement. Contact a salesrepresentative for details about obtaining a valid support agreement or with questionsabout an account.
To review an open service request, click the Service Center link on the ServiceCenter panel, and then click View and manage service requests.
Enhancing supportIt is recommended to enable ConnectEMC and Email Home on all Avamar systems:
l ConnectEMC automatically generates service requests for high priority events.
l Email Home sends configuration, capacity, and general system information toCustomer Support.
Comments and suggestionsComments and suggestions help to continue to improve the accuracy, organization,and overall quality of the user publications. Send comments and suggestions aboutthis document to [email protected].
Please include the following information:
l Product name and version
l Document name, part number, and revision (for example, 01)
l Page numbers
l Other details to help address documentation issues
PREFACE
20 Avamar 18.2 Administration Guide

CHAPTER 1
Introduction
This chapter includes the following topics:
l Avamar system overview....................................................................................22l Data deduplication............................................................................................. 29l Security and networking.................................................................................... 30
Introduction 21

Avamar system overviewAn Avamar system is a client/server network backup and restore solution.
An Avamar system consists of one or more Avamar servers and the network servers ordesktop clients that back up data to those servers. The Avamar system providescentralized management through the Avamar Administrator graphical managementconsole software application.
Avamar serverAvamar is a hard disk based IP network backup and restore solution. Avamar serversuse internal hard disk storage. An Avamar server is a logical grouping of one or morenodes that is used to store and manage client backups.
Hardware manufacturers typically call their equipment servers (for instance, the DellPowerEdge 2950 server). In the context of an Avamar system, this equipment is calleda node. An Avamar node is a self-contained, rack-mountable, network-addressablecomputer that runs Avamar server software on the Linux operating system.
Avamar ensures fault tolerance by managing disk drive space in units of space calledstripes.
In the Avamar system, an object is a single instance of deduplicated data. EachAvamar object inherently has a unique ID. Objects are stored and managed withinstripes on the Avamar server.
Figure 1 Avamar server nodes, stripes, and objects
1. Avamar server.2. Avamar node.3. Disk drive storage on the node.4. Stripe on the disk drive.5. Object on the stripe.
Introduction
22 Avamar 18.2 Administration Guide

All Avamar servers store client backups and also provide essential processes andservices that are required for client access and remote system administration.
Avamar servers are available in either single-node or scalable multi-nodeconfigurations. For the most part, when using Avamar Administrator managementconsole software, all Avamar servers look and behave the same. The main differencesamong Avamar server configurations are the number of nodes and disk drives that arereported in the server monitor.
Documenting specific differences in Avamar server hardware configurations is beyondthe scope of this guide. Whenever specific limitations and best practices for certainconfigurations are known, they are noted. However, these occasional notes should notbe considered definitive or exhaustive. Consult an Avamar Sales representative or anAvamar reseller for more information about specific hardware.
NodesThe primary building block in any Avamar server is a node. Each node is a self-contained, rack-mountable, network-addressable computer that runs Avamar serversoftware on the Linux operating system.
Nodes can also contain internal storage in the form of hard disk drives. If the node isconfigured with internal storage (that is, a single-node server), it is internally mirroredto provide robust fault tolerance.
There are three types of nodes.
Utility nodeA utility node is dedicated to scheduling and managing background Avamar serverjobs. In scalable multi-node Avamar servers, a single utility node provides essentialinternal services for the server, such as:
l Management Console Server (MCS)
l External authentication
l Network Time Protocol (NTP)
l Web access
Because utility nodes are dedicated to running these essential services on multi-nodeAvamar servers, they cannot be used to store backups. Single-node Avamar serverscombine all of the features and functions of utility and storage nodes on a single node.
Storage nodesStorage nodes are nodes that store backup data. Multiple storage nodes areconfigured with multi-node Avamar servers which are based on performance andcapacity requirements. You can add storage nodes to an Avamar server over time toexpand performance with no downtime.
Avamar clients connect directly with Avamar storage nodes. Client connections anddata are load that is balanced across storage nodes.
NDMP AcceleratorAn NDMP Accelerator node is a specialized node that uses NDMP to provide dataprotection for certain NAS devices, including the EMC Celerra® IP storage systemsand Network Appliance filers.
Avamar server functional blocksThe major Avamar server functional blocks include the data server, ManagementConsole Server (MCS), and the EM Tomcat server (EMT). The following figureillustrates the interaction of these components within the server and with otherAvamar components.
Introduction
Avamar server 23

Figure 2 Avamar server functional block diagram
Avamar server 01
Management Console Server (MCS)
PostgreSQL
database
Data
Server
Client
registry
Account
management
Scheduler/
dispatcher Reporting
Events
EM
Tomcat
(EMT)
Avamar
server 02
Avamar
server 03
Avamar
server 04
Avamar
backup client
Avamar Administrator
(management console)
Avamar
Client Manager
Data server
When performing a backup, restore, or validation, Avamar backup clientscommunicate directly with the data server. All scheduled backups are initiated by theMCS scheduler.
Management Console Server (MCS)
The Management Console Server (MCS) provides centralized administration(scheduling, monitoring, and management) for the Avamar server. The MCS also runsthe server-side processes that are used by the Avamar Administrator graphicalmanagement console.
The following table provides details on the functions that the MCS provides.
Table 2 MCS functions
Function Description
Client registry Controls client registration and activation.
Account management Used to create and manage domains, clients,users, and groups.
Reporting Used to create and export system reports.The Avamar Reports Guide provides moreinformation.
Events Displays system events and activities.
Scheduler/dispatcher Controls when backup and restore operationsoccur, or if the operations can be queued forprocessing.
Introduction
24 Avamar 18.2 Administration Guide

Table 2 MCS functions (continued)
Function Description
PostgreSQL database Stores Avamar server data. PostgreSQL is anopen architecture database managementsystem. Information in the MCS database isaccessible through any PostgreSQL-compliant ODBC interface. The MCSdatabase file name is mcdb, and it is on the
utility node in the /usr/local/avamar/var/mc/server_data/postgres directory. The MCS database
contents are fully backed up on the Avamarserver and can be restored when the MCSfails.
NOTICE
The MCS database is intended for read-onlyaccess for reporting or query purposes. Donot manually modify any data in mcdb tables
unless instructed to do so by Avamar Support.Directly modifying MCS operational data cancause loss of referential integrity, which couldresult in irretrievable loss of data.
EM Tomcat server (EMT)
The Avamar EM Tomcat server (EMT) provides essential services that are required todisplay, and work with Avamar server information.
The EMT also communicates directly with MCS. This communication is a required partof all Avamar systems.
Avamar clientsAvamar provides client software for various computing platforms. Each clientcomprises a client agent and one or more plug-ins.
Figure 3 Avamar client agent and plug-ins
Avamar client
Avamar server
File system
plug-in
Application
plug-in
Agent Management Console Server
(MCS)
Introduction
Avamar clients 25

AgentsAvamar agents are platform-specific software processes that run on the client andcommunicate with the Management Console Server (MCS) and any plug-ins that areinstalled on that client.
Plug-insThere are two types of Avamar plug-ins:
l File system plug-ins that are used to browse, back up, and restore files ordirectories on a specific client file system.
l Application plug-ins that support backup and restore of databases or other specialapplications.
The following table lists the file system and application plug-ins that Avamar supports.
Table 3 Supported plug-ins
Type of plug-in Supported file systems andapplications
File system l Free BSD
l HP-UX
l IBM AIX
l Linux
l Mac OS X
l Microsoft Windows
l Microsoft Windows Volume Shadow CopyService (VSS)
l SCO Open Server
l SCO UnixWare
l Oracle Solaris
l VMware
Application l IBM DB2
l Lotus Domino
l Microsoft Exchange
l Microsoft Hyper-V
l Microsoft Office SharePoint Server(MOSS)
l Microsoft SQL Server
l NDMP for NAS devices, including EMCCelerra IP storage systems and NetworkAppliance filers
l Oracle
l SAP with Oracle
l Sybase ASE
Introduction
26 Avamar 18.2 Administration Guide

See the E-lab Navigator at https://elabnavigator.emc.com/eln/modernHomeDataProtection for client compatibility requirements and supportedoperating systems and application versions.
The Avamar file system client and the plug-ins that you install on the host must havethe same version number.
User interfacesSeveral user interfaces are available in the Avamar system to enable management andmonitoring.
Avamar Web User InterfaceThe Avamar Web User Interface (AUI) is a web management application that is usedto administer an Avamar server.
Avamar AdministratorAvamar Administrator is a graphical management console software application that isused to administer an Avamar system from a supported Windows client computer.
Avamar Backup & Recovery ManagerBackup & Recovery Manager manages all Avamar systems in the enterprise. Backup &Recovery Manager also has an integrated user interface to manage the enterprise’sNetWorker servers and Data Domain backup targets.
The following table lists some of the enterprise management capabilities of Backup &Recovery Manager. The table does not include additional features in Backup &Recovery Manager that are specific to NetWorker servers and to Data Domain backuptargets.
Table 4 Avamar system management features of Backup & Recovery Manager
Feature Backup & Recovery Manager
Software host VMware vSphere client
At-a-glance dashboard Select between consolidated and individualstatus views of Avamar systems, NetWorkerservers, and Data Domain systems
Detailed backup and capacity information forAvamar systems
Yes
Monitor backups Yes, through an Activity Monitor screen. Usethe Activity Monitor screen to view backupand replication details, and to start, stop, andrestart tasks.
Replication management Yes
Launch other management applications l Avamar Administrator
l Avamar Client Manager
l Avamar Installation Manager
l AvInstaller service
Display warnings, errors, and system alerts Yes, in a quick-look graphical display and indetailed text. Filter the view by product,system, and category.
Introduction
User interfaces 27

Table 4 Avamar system management features of Backup & Recovery Manager (continued)
Feature Backup & Recovery Manager
Management reports: select, view, and export l Backup
l System
l Configuration
The Backup & Recovery Manager product documentation provides complete detailson the user interface.
Avamar Client ManagerAvamar Client Manager is a web-based management application that providescentralized Avamar client administration capabilities for larger businesses andenterprises. Avamar Client Manager helps with the management of large numbers ofAvamar clients.
Avamar Client Manager works with Avamar clients on a supported native operatingsystem and Avamar clients on a supported operating system running in a VMwarevirtual machine. Avamar Client Manager cannot work with Avamar clients throughvirtual center, virtual machine, or virtual proxy configurations. The Avamar ClientManager UI displays supported Avamar clients and hides all unsupported clients.
Avamar Desktop/LaptopAvamar Desktop/Laptop is a version of the Avamar client software that addsenhanced features for enterprise desktop and laptop computers.
The Avamar Desktop/Laptop features are designed to improve the functionality ofAvamar client for Windows and Macintosh desktops and laptops. Many of the featuresare also supported on qualifying Linux computers.
Avamar Desktop/Laptop functionality is available through two user interfaces:
l The client local user interface (client UI) is installed on the client computer whenyou install either the Avamar Client for Windows or the Avamar Client for Mac OSX. With the client UI, an Avamar icon appears in the notification area ("systemtray") on Windows computers or on the menu bar on Mac computers. Right-clickthe icon on Windows or click the icon on Mac to open the client menu, whichprovides access to backup, restore, program settings, and logs.
l Use the web browser user interface (web UI) to start an on-demand backup orrestore, view backup and restore activity for a client computer, or configure otherbackup settings for a client computer.
Avamar Installation ManagerThe Avamar Installation Manager user interface is part of the AvInstaller software thatCustomer Support installs on the utility node during an Avamar server softwareinstallation or upgrade. Use the Avamar Installation Manager to install and upgradesoftware on the Avamar server.
Avamar Downloader ServiceThe Avamar Downloader Service manages the process of checking for anddownloading Avamar server software updates. The Avamar Downloader Servicesoftware runs on a stand-alone Microsoft Windows server that allows network accessto Avamar sites on the Internet and to all Avamar servers at a site.
Avamar Web RestoreAvamar Web Restore provides access to the following functionality:
Introduction
28 Avamar 18.2 Administration Guide

l Search for or browse backed up directories and files to restore.
l Download Avamar client software.
l View Avamar product documentation that is stored on the Avamar server.
l Open the Avamar Administrator management console software.
Data Domain system supportYou can store backups on either the Avamar server or a Data Domain system. Backupmetadata is stored on the Avamar server.
Before you can store backups on a Data Domain system, add the Data Domain systemto the Avamar configuration by using Avamar Administrator. Then select the DataDomain system in the plug-in options when you perform an on-demand backup orwhen you create a dataset for a scheduled backup. You can also use the command lineinterface (CLI) to perform backups to a Data Domain system.
The steps to restore backups are the same whether you restore from the Avamarserver or a Data Domain system. The restore process determines the location of thebackup and restores the backup.
Support for Data Domain Cloud Tier was initiated in Avamar 7.4. DD Cloud Tier movesdata from Data Domain to the cloud. From the Avamar Administrator, you canconfigure cloud tier to move Avamar backups from Data Domain to the cloud, andperform seamless recovery of these backups.
Data Domain Cloud Tier Disaster Recovery support was initiated with Avamar 7.5. Youcan recover backups from the cloud in case of the loss of a Data Domain and alsorecover an Avamar server from the cloud.
The Avamar and Data Domain System Integration Guide provides more information aboutData Domain systems in an Avamar environment, including detailed steps to add aData Domain system to the Avamar configuration.
Data deduplicationData deduplication is a key feature of the Avamar system. Data deduplication ensuresthat each unique sub-file, variable length object is stored only once across sites andservers.
During backups, Avamar client software examines the client file system and applies adata deduplication algorithm that identifies redundant data sequences and breaks theclient file system into sub-file, variable length data segments. Each data segment isassigned a unique ID.
The client software then determines whether this unique ID has already been storedon the Avamar server. If this object resides on the Avamar server, a link to the storedobject is referenced in the backup.
Once an object has been stored on the server, it is not sent over the network again, nomatter how many times it is encountered on any number of clients. This featuresignificantly reduces network traffic and provides for greatly enhanced storageefficiency on the server.
Introduction
Data Domain system support 29

Figure 4 Data deduplication
1. Break data into atoms (variable length segments of file data).2. Send and store each atom only once.3. Up to 500 times daily data reduction in the Avamar backup repository.
Security and networkingThe following sections provide an overview of key Avamar security and networkingfeatures. The Avamar Product Security Guide provides full details on product securityand network configuration.
EncryptionTo provide enhanced security, Avamar can encrypt all data that is sent betweenclients and the server “in flight.”
You can set the encryption level on a client-by-client basis in client properties, or foran entire group of clients in group properties. You can also disable “in-flight”encryption entirely.
Each Avamar server can also be configured to encrypt data that is stored on theserver “at rest.” The decision to encrypt all data that is stored in an Avamar server istypically a one-time decision that is made when the server is initially deployed at acustomer site.
IPv4 and IPv6 supportInternet Protocol (IP) is a set of communication rules for routing traffic acrossnetworks to addressable devices like Avamar system components. The Avamar systemsupports both Internet Protocol Version 4 (IPv4) and IPv6 address notation.
IPv4 notationIPv4 notation is displayed as four octets, that are 1- to 3-digit base 10 numbers in arange of 0 to 255. Each octet is separated by periods and represents 8 bits of data fora total address space of 32 bits.
A subnet mask identifies a range (a subnet) of IP addresses on the same network. ForAvamar purposes, the subnet mask is /24, representative of a 255.255.255.0netmask.
Introduction
30 Avamar 18.2 Administration Guide
An example of IPv4 address and subnet mask is10.99.99.99/24.
IPv4 notation cannot be abbreviated. If an octet has zero (0) value, use a 0 in thatoctet.
IPv6 notationIPv6 notation is displayed as 16 octets, that are 2-digit hexadecimal (base 16) numbersin a range of 00 to FF. IPv6 notation combines octets by pairs into eight groups thatare separated by colons, each group representing 16 bits of data for a total addressspace of 128 bits.
For Avamar purposes, the subnet mask (called prefix in IPv6) is /64.
An example IPv6 address and prefix is 2001:0db8:85a3:0042:1000:8a2e:0370:7334/64.
As for a group with zero (0) value, IPv6 notation is different from IPv4 that can beabbreviated. For example, the following is a valid IPv6 address and prefix:2001:db8:abcd:0012::0/64.
Avamar IP configurationsIn the Avamar user interface, an IP address may be displayed in either IPv4 or IPv6notation. The displayed value depends on how that particular component wasconfigured when the hardware and software were installed.
IPv4 and IPv6 are not interoperable. They operate in separate stacks (that is, parallel,independent networks).
Avamar can be set up in a dual stack configuration. In that case, each Avamarcomponent may have an IPv4 address, an IPv6 address, or both (one primary and theother secondary). The Avamar user interface may display a component's primaryaddress or both dual stack addresses. For example, the following IP address for aparticular device indicates that it is configured as dual stack:10.99.99.99/24,2001:db8:abcd:0012::0/64.
TSL 1.2 encryption protocol requiredEncrypted traffic using the TLS 1.0 and 1.1 protocols is no longer supported. Browsers,clients, and other components that require these protocols are not allowed to connectto the server. Only TLS 1.2 encryption is supported.
SSH MAC algorithmsThe SSH configuration has been modified to remove weak MAC algorithms that areused for SSH connections.
The following MAC algorithms are used for SSH connections:
l hmac-sha2-512
l hmac-sha2-256
l hmac-ripemd160
Introduction
TSL 1.2 encryption protocol required 31

Note
Older versions of SSH clients, such as PuTTY or Plink, use weak MAC algorithms foran SSH connection and must be upgraded. To view the latest release of PuTTY, see http://www.putty.org/
Introduction
32 Avamar 18.2 Administration Guide
CHAPTER 2
Avamar Administrator
This chapter includes the following topics:
l Overview of Avamar Administrator.....................................................................34l Installing Avamar Administrator..........................................................................34l Upgrading Avamar Administrator....................................................................... 36l Uninstalling Avamar Administrator..................................................................... 37l Editing Avamar Administrator client preferences............................................... 37l Setting a session time-out for Avamar Administrator......................................... 37l Starting Avamar Administrator...........................................................................38l Avamar Administrator dashboard....................................................................... 40l Avamar Administrator user interface elements...................................................46
Avamar Administrator 33

Overview of Avamar AdministratorAvamar Administrator is a graphical management console software application that isused to administer an Avamar system from a supported Windows or Linux clientcomputer.
Install Avamar Administrator on a supported computer and launch the software fromthe desktop icon or a command shell, or launch the Java Web Start version of theconsole software from a web browser or from Backup & Recovery Manager.
Avamar Administrator is the primary user interface for monitoring and configuring theAvamar system. Use it to monitor backup, restore, and system maintenance activities,as well as to configure backup policies, manage clients and user accounts, andconfigure other system settings.
You can administer one Avamar system at a time from Avamar Administrator.
The Avamar Administrator dashboard appears when you log in to AvamarAdministrator. The dashboard provides an at-a-glance view of Avamar system status,as well as access to all functionality through menus and launcher links.
Installing Avamar AdministratorYou can install Avamar Administrator on supported Microsoft Windows and 64-bitLinux platforms.
Details on support for specific operating system versions are available in the E-labNavigator.
Note
Before installing Avamar Administrator, ensure that the platform has already beenmanually upgraded to Java 7 or 8. Ensure that the DNS environment is configured sothat all clients that run the Administrator can resolve the Hash File System address(hfsaddr) value.
Installing Avamar Administrator on Microsoft WindowsProcedure
1. Log in to the computer on which you are installing Avamar Administrator.
2. Open a web browser and type the following URL:
https://Avamar_server/dtlt/home.htmlwhere Avamar_server is the DNS name or IP address of the Avamar server.
The Avamar Web Restore page appears.
3. Click Downloads.
4. Do one of the following, depending on the operating system:
l If you are installing the software on 32-bit Windows, click + next to theWindows (32 bit) folder.
l If you are installing the software on 64-bit Windows, click + next to theWindows (64 bit) folder.
5. Do one of the following, depending on the operating system:
Avamar Administrator
34 Avamar 18.2 Administration Guide

l If you are installing the software on 32-bit Windows, click + next to theMicrosoft Windows Vista, 7, 8, 8.1, 10, Microsoft Windows Server 2008(Console) folder.
l If you are installing the software on 64-bit Windows, click + next to theMicrosoft Windows Vista, 7, 8, 8.1, 10, Microsoft Windows Server 2008,2008 R2, 2012, 2012 R2 (Console) folder.
6. Locate the Java Runtime Environment (JRE) install package, which is typicallythe last entry in the folder.
7. If the JRE on the client computer is older than the JRE hosted on the Avamarserver, download and install the newer JRE from the Avamar server:
a. Click the jre-version.exe install package, where version is the JREversion.
b. Open the installation file, or download the file and then open it from thesaved location.
c. Follow the onscreen instructions to complete the JRE installation.
8. Click the AvamarConsoleMultiple-windows-version.exe installpackage, where version is the Avamar Administrator software version.
9. Open the installation file, or download the file and then open it from the savedlocation.
10. Follow the onscreen instructions to complete the Avamar Administratorsoftware installation.
Installing Avamar Administrator on LinuxProcedure
1. Log in to the computer on which you are installing Avamar Administrator.
2. Open a web browser and type the following URL:
https://Avamar_server/dtlt/home.htmlwhere Avamar_server is the DNS name or IP address of the Avamar server.
The Avamar Web Restore page appears.
3. Click Downloads.
4. Click + next to the Linux for x86 (64 bit) folder.
5. Click + next to the Red Hat Enterprise Linux 5 (Console) folder.
Note
Use the Red Hat Enterprise Linux 5 install packages for all supported Linuxversions.
6. Locate the JRE RPM install package, which is typically the last entry in thefolder.
7. If the JRE on the client computer is older than the JRE hosted on the Avamarserver, then download the install package to a temporary folder such as /tmp.
The install package filename is jre-version-platform.rpm, where versionis the JRE version and platform is the computing platform.
Avamar Administrator
Installing Avamar Administrator on Linux 35

8. Download the AvamarConsole-linux-rhel5-x86_64-version.rpminstall package to a temporary install folder such as /tmp.
9. Open a command shell and log in as root on the computer where the software isinstalled.
10. Change directory to the temporary folder to which you downloaded the installpackages by typing a command such as cd /tmp.
11. If you downloaded a JRE, install it by typing rpm -ivh jre-version-platform.rpm.
12. Follow the onscreen instructions to complete the JRE installation.
13. Install Avamar Administrator by typing rpm -ih AvamarConsole-linux-rhel5-x86_64-version.rpmThe install process prompts you to run avsetup_mcc to configure AvamarAdministrator.
14. Configure Avamar Administrator by typing /usr/local/avamar/version/bin/avsetup_mcc.
The configuration process prompts you to specify the location of the JREinstallation.
15. Press Enter to accept the default install location.
The configuration process prompts you to specify the root directory of theAvamar software.
16. Press Enter to accept the default install location.
A confirmation message appears.
Upgrading Avamar AdministratorYou can upgrade Avamar Administrator on either Microsoft Windows or Linuxcomputers.
Procedure
l You can install multiple versions of Avamar Administrator on the same MicrosoftWindows computer. If you install Avamar Administrator on a computer where it isalready installed, select a destination folder carefully during the installationprocedure:
n To keep an older version, select a different installation folder.
n To directly upgrade the Avamar Administrator installation, select the sameinstallation folder. The full version numbers identify their two versions.
Note
Before installing/upgrading Avamar Administrator, ensure that the platform hasalready been manually upgraded to Java 7 or 8.
l To upgrade the Avamar Administrator software on the Linux platform, uninstall theprevious version and install the new software. Use of the Linux software upgradecommand (rpm -Uh) is not supported.
Avamar Administrator
36 Avamar 18.2 Administration Guide
Note
Before installing the new version of Avamar Administrator, ensure that theplatform has already been manually upgraded to Java 7 or 8.
Uninstalling Avamar AdministratorYou can uninstall Avamar Administrator from either a Microsoft Windows or a Linuxcomputer.
Before you begin
Close any open Avamar Administrator sessions. Otherwise, the uninstall process maynot complete successfully, which can complicate future installation of AvamarAdministrator.
Procedure
l On a Microsoft Windows computer, open the Windows Start menu and selectPrograms > Avamar > Administrator > version > Uninstall, and then click OK onthe confirmation message.
l On a Linux computer:
a. Open a command shell and log in as root.
b. Determine the package name by typing rpm -qa | grep Av.
c. Type rpm -e AvamarConsole-version, where AvamarConsole-version is theAvamar Administrator install package.
Editing Avamar Administrator client preferencesYou can edit some Avamar Administrator client preferences directly in AvamarAdministrator. However, a number of preferences are only available for editing in themcclient.xml client preferences file.
Procedure
1. Close Avamar Administrator.
2. Open install_dir/var/mc/gui_data/prefs/mcclient.xml in a texteditor, where install_dir is the Avamar Administrator installation directory.
3. Edit the preference elements.
4. Save and close the file.
The changes take effect the next time when you start Avamar Administrator.
Setting a session time-out for Avamar AdministratorAn Avamar Administrator session remains active until a user closes the application bychoosing Exit from the menu. To protect the assets available through AvamarAdministrator, set a session time-out value. The value applies to all AvamarAdministrator sessions connected to the Avamar server.
After you set a session time-out value, Avamar Administrator monitors the UI foractivity. When Avamar Administrator detects no mouse or keyboard activity within theUI for the number of minutes set in the time-out value, it shuts down all processes,closes all windows, and displays the Inactive dialog box.
Avamar Administrator
Uninstalling Avamar Administrator 37

Procedure
1. Open a command shell and log in by using one of the following methods:
l For a single-node server, log in to the server as admin.
l For a multi-node server:
a. Log in to the utility node as admin.
b. Load the admin OpenSSH key by typing the following command:
ssh-agent bashssh-add ~admin/.ssh/admin_key
2. Stop the Management Console Server (mcs) service by typing dpnctl stopmcs.
3. Change the working directory to /usr/local/avamar/var/mc/server_data/prefs by typing cd /usr/local/avamar/var/mc/server_data/prefs.
4. Open mcserver.xml in a plain text editor.
5. Find the <node name="mon"> entry.
6. Edit the value of the <entry key="consoleInactiveMinutesToReport"value="n" /> entry within the <node name="mon"> entry, where n is thesession time-out value in minutes.
7. Save the change and close the text editor.
8. Start the MCS and the scheduler by typing the following command:
dpnctl start mcsdpnctl start sched
9. Close the command shell.
Avamar Administrator uses the new session time-out value the next time thatyou open Avamar Administrator and connect with the Avamar server.
Starting Avamar AdministratorStart Avamar Administrator by using the console software that is installed on a localcomputer or start Avamar Administrator by using the Java Web Start version of theconsole software.
Before you begin
Ensure that a minimum of 512 MB of system RAM is available on the local computer.Otherwise, Java heap errors may occur when you start Avamar Administrator.Procedure
1. Launch Avamar Administrator by using one of the following methods.
Console softwareversion
Method
Microsoft Windows Double-click the Avamar Administrator icon on theWindows desktop.
Linux Open a command shell, and type mcgui.
Avamar Administrator
38 Avamar 18.2 Administration Guide

Console softwareversion
Method
Java Web Start Type https://Avamar_server/mc-portal/mcgui inthe web address field of a web browser, whereAvamar_server is the IP address or resolvablehostname of an Avamar server.
Java Web Startversion from Backup& RecoveryManager
In Backup & Recovery Manager, on the Systemswindow, select an Avamar system and click LaunchManagement Console.
The Login window appears.
2. In Server, type the IP address or DNS name of the Avamar server to log in to.
Note
Automatically supply the Server and Domain Name boxes with an Avamarserver name and an Avamar domain by clicking Options and typing the servername in Default Administrator Server and the domain name in DefaultDomain.
3. In User Name, type a username.
To access all Avamar Administrator functionality, the account that is associatedwith this username must be assigned the role of Administrator. Other rolesprovide reduced functionality.
To authenticate by using the internal authentication system, type only ausername. To authenticate by using the enterprise authentication system(deprecated) or directory service authentication, type username@server,where username is the username and server is the fully qualified domain nameof the authentication server.
If you use the format username@server for the username, then the system triesto authenticate the user by using enterprise authentication. If authenticationwith enterprise authentication fails, then the system tries to authenticate theuser by using directory service authentication.
4. In Password, type the password for the user account.
5. In Domain Name, type the Avamar domain to log in to:
l The root domain, in which the default should be used for entry of a singleslash (/) character.
l A specific domain or subdomain, in which the domain path should be typedby using the syntax /domain/subdomain1/subdomain2.
6. Click Log In.
If this is the first time that you have connected to this Avamar server, theAccept Server Certificate dialog box opens. Verify the server certificatedetails and click Yes.
The Avamar Administrator dashboard appears.
Avamar Administrator
Starting Avamar Administrator 39
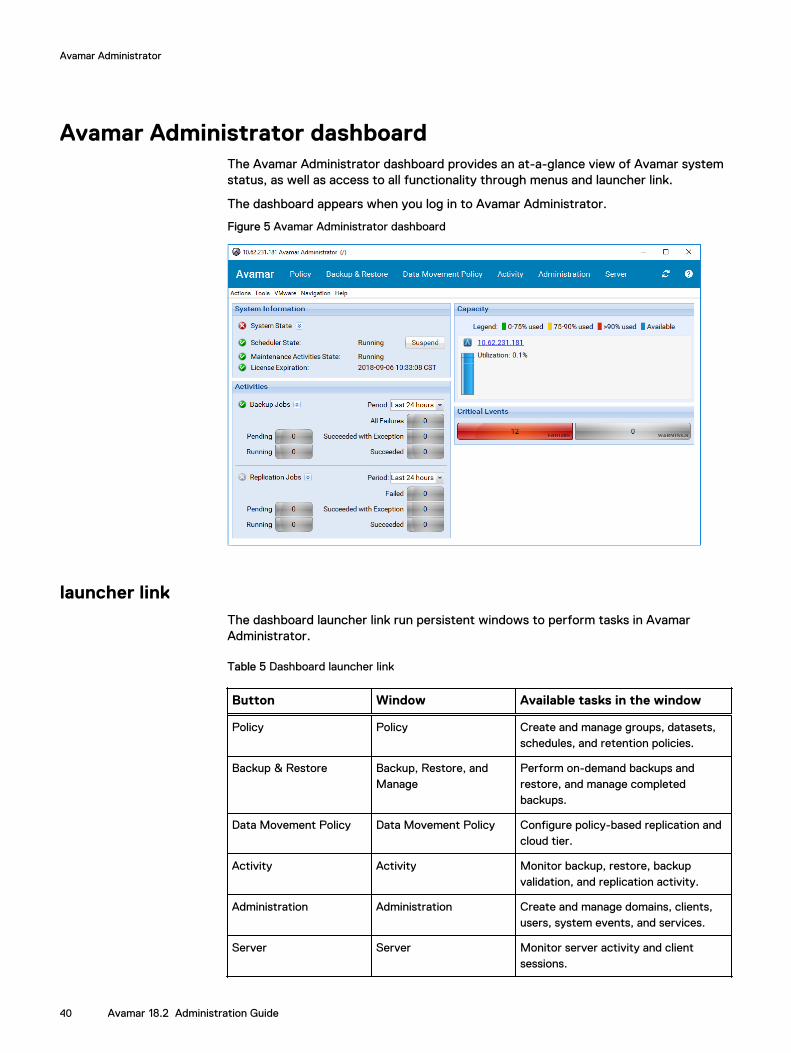
Avamar Administrator dashboardThe Avamar Administrator dashboard provides an at-a-glance view of Avamar systemstatus, as well as access to all functionality through menus and launcher link.
The dashboard appears when you log in to Avamar Administrator.
Figure 5 Avamar Administrator dashboard
launcher linkThe dashboard launcher link run persistent windows to perform tasks in AvamarAdministrator.
Table 5 Dashboard launcher link
Button Window Available tasks in the window
Policy Policy Create and manage groups, datasets,schedules, and retention policies.
Backup & Restore Backup, Restore, andManage
Perform on-demand backups andrestore, and manage completedbackups.
Data Movement Policy Data Movement Policy Configure policy-based replication andcloud tier.
Activity Activity Monitor backup, restore, backupvalidation, and replication activity.
Administration Administration Create and manage domains, clients,users, system events, and services.
Server Server Monitor server activity and clientsessions.
Avamar Administrator
40 Avamar 18.2 Administration Guide

System Information panelThe System Information panel on the Avamar Administrator dashboard provides anoverview of important system statistics.
System StateThe System State icon provides a status indicator for overall system status:
l A green check mark icon indicates that the system is fully operational.
l A yellow caution icon indicates that there is an issue with the system that requiresattention, but backups can continue.
l A red x icon indicates that there is a problem with the system that requiresimmediate attention. Backups cannot occur until you resolve the problem.
To view more detailed information on system state, click the arrow icon next to theSystem State field. The following table provides details about system stateinformation in the dashboard.
Table 6 System State fields on the Avamar Administrator dashboard
Field Description
Avamar State Summarizes the current operational state ofthe Avamar server:
l A green check mark indicates that theAvamar server is fully operational.
l A yellow caution icon indicates that thereare one or more issues with the Avamarserver that require attention, but backupscan continue.
l A red x icon indicates that the Avamarserver is in the Inactive, Offline,Degraded, or Unknown operational state.
Capacity State Summarizes system capacity usage andhealth:
l A green check mark indicates that thesystem has used > 75% of the totalstorage capacity.
l A yellow caution icon indicates that thesystem has used > 75% but less than90% of the total storage capacity.Consider adding capacity or deleting oldbackups.
l A red x icon indicates that the system hasused more than 90% of the total storagecapacity. No new backups can occur untilyou add capacity or delete old backups.
Critical Events Summarizes unacknowledged system events:
Avamar Administrator
System Information panel 41

Table 6 System State fields on the Avamar Administrator dashboard (continued)
Field Description
l A green check mark indicates that thereare no critical system events that requireacknowledgment.
l A yellow caution icon indicates that oneor more warning events requireacknowledgment.
l A red x icon indicates that one or moresystem error events requireacknowledgment.
Last Checkpoint Specifies the amount of time since the lastcheckpoint occurred:
l A green check mark indicates that acheckpoint has successfully completed onthis Avamar server within the past 24hours.
l A yellow caution icon indicates that acheckpoint has successfully completed onthis Avamar server between 24 hours and48 hours ago.
l A red x icon indicates that more than 48hours have elapsed since a checkpointhas successfully completed on thisAvamar server.
Last Validated Checkpoint Specifies the amount of time since the lastcheckpoint validation occurred:
l A green check mark indicates that acheckpoint validation has successfullycompleted on this Avamar server withinthe past 48 hours.
l A yellow caution icon indicates that acheckpoint validation has successfullycompleted on this Avamar server between48 hours and 72 hours ago.
l A red x icon indicates that more than 72hours have elapsed since a checkpointvalidation successfully completed on thisAvamar server.
Last Garbage Collection Specifies the amount of time since the lastgarbage collection occurred:
l A green check mark indicates thatgarbage collection has successfullycompleted on this Avamar server withinthe past 30 hours.
Avamar Administrator
42 Avamar 18.2 Administration Guide

Table 6 System State fields on the Avamar Administrator dashboard (continued)
Field Description
l A yellow caution icon indicates thatgarbage collection has not successfullycompleted on this Avamar server withinthe past 30 hours.
l A red x icon indicates that garbagecollection encountered an error the lasttime it was run.
Data Domain System(s) State Summarizes the operational state of all DataDomain systems that have been added to thisAvamar server:
l A green check mark indicates that all DataDomain systems are fully operational.
l A yellow caution icon indicates that thereis one or more issues with Data Domainsystems that require attention. However,backups can continue.
l A red x icon indicates that there is one ormore problems with Data Domain systemsthat require immediate attention. Backupscannot occur until all problems areresolved.
Scheduler StateThe Scheduler State field indicates whether scheduled activities are running orsuspended. Scheduled activities include backups, email notifications, and replications.If scheduled activities are running, then the activities occur at the scheduled time. Ifscheduled activities are suspended, then the activities do not occur until you resumethe activities.
To suspend or resume scheduled activities, click Suspend or Resume.
Maintenance Activities StateThe Maintenance Activities State field indicates whether maintenance activities arerunning or suspended. Maintenance activities include checkpoints, checkpointvalidation, and garbage collection. If maintenance activities are running, then theactivities occur at the scheduled time. If maintenance activities are suspended, thenthe activities do not occur until you resume the activities from the Server window.
License ExpirationThe License Expiration field lists the calendar date on which the license for theAvamar server expires.
Avamar Administrator
System Information panel 43

Activities panelThe Activities panel in the Avamar Administrator dashboard provides status anddetailed information for backup and replication jobs.
Backup JobsThe main status icon for backup jobs in the Activities panel indicates whetherscheduled backups occur at the scheduled time or if there is a problem that ispreventing scheduled backups from occurring.
To display detailed status information, click the arrow button next to the Backup Jobsfield. The following table provides details on the status information available forbackup jobs.
Table 7 Backup job fields in the Avamar Administrator dashboard
Field Description
Scheduler State Specifies whether the scheduler for activitiessuch as backups, email notifications, andreplications is running or suspended.
Dispatcher State Specifies whether the dispatcher is running orsuspended. If the dispatcher is suspended,then the Avamar server has reached thehealth check limit and no backups can occur. Capacity limits and thresholds on page 254provides details.
Backup Groups Enabled Specifies the number of backup groups that
are enabled. To open the Policy window andmanage groups, click the window icon to theright of the field.
You can also view the total number of backup jobs that:
l Are pending.
l Are currently running.
l Failed within the specified period.
l Succeeded with exceptions within the specified period.
l Succeeded within the specified period.
To control the period for the results of completed backups, select a value from thePeriod list.
To view detailed information for a backup job in the Activity Monitor, click a numericbutton.
Replication JobsThe main status icon for replication jobs in the Activities panel indicates whetherreplication jobs occur:
l A green check mark icon indicates that scheduled replication jobs occur at thescheduled time.
l A yellow caution icon indicates that one or more replication groups are disabled.
l A red x icon indicates that scheduled replication jobs are blocked. The block mightbe due to the scheduler being in a suspended state, all replication groups beingdisabled, or some other issue with the system.
Avamar Administrator
44 Avamar 18.2 Administration Guide

To configure replication groups in the Replication window, click the window icon tothe right of the icon.
You can also view the total number of replication jobs that:
l Are pending.
l Are currently running.
l Failed within the specified period.
l Succeeded with exceptions within the specified period.
l Succeeded within the specified period.
To control the period for the results of completed replication jobs, select a value fromthe Period list.
To view detailed information for a replication job in the Replication Report, click anumeric button.
Capacity panelThe Capacity panel on the Avamar Administrator dashboard provides system capacityusage information for the Avamar server and any Data Domain systems that have beenadded.
Avamar server capacity informationThe capacity usage of the Avamar server is shown as a vertical bar with colorindicators for usage levels that are based on the percentage of total capacity. A textfield lists the percentage of used capacity.
If the Avamar system configuration includes a Data Domain system, then Avamarserver capacity calculations include metadata usage for the Data Domain system.
Click the link on the Avamar server name to view detailed system information in theServer Monitor, including Data Domain metadata utilization, if applicable.
Data Domain system capacity informationEach configured Data Domain system is listed separately in the Capacity panel.
The capacity usage of the Data Domain system is shown as a vertical bar with colorindicators for usage levels that are based on the percentage of total capacity.
Text fields list the total capacity of the Data Domain system in gibibytes (GiB), theamount of used capacity as a percentage and value in GiB, and the total amount ofavailable capacity in GiB.
To view the Data Domain Enterprise Manager web page for that system, click the linkon the Data Domain system name.
Critical Events panelThe Critical Events panel in the Avamar Administrator dashboard shows the numberof unacknowledged serious system errors and warnings that have occurred, as well ascertain defined system alerts.
To clear these serious system errors and warnings (that is, reset the count to zero),you must explicitly acknowledge them. Acknowledging system events on page 233provides details.
The following table lists the system alerts that may appear in the Critical Eventspanel.
Avamar Administrator
Capacity panel 45

Table 8 System alerts in the Critical Events panel
Type of alert Description
HFS check failures If the last checkpoint validation failed, then adata integrity alert is generated. Investigateand address the issue as soon as possible. Creating a checkpoint on page 188 providesmore information.
Capacity warnings These alerts warn that the system isapproaching critical system storage capacityusage thresholds.
Capacity usage warnings These alerts warn that the system isapproaching critical system storage capacityforecasting thresholds.
Avamar Administrator user interface elementsAll of the primary windows in the Avamar Administrator user interface share severalelements and functionality in common, including the status bar, navigation treefeatures, and mouse shortcuts.
Status barThe status bar at the bottom of each Avamar Administrator persistent windowconveys status information and provides a single-click shortcut to specific featuresand functions.
Figure 6 Avamar Administrator status bar
Launcher shortcutsThe shortcut icons on the left side of the status bar provide shortcuts to the six mainAvamar Administrator windows.
The following table lists the shortcut icons that are available on the status bar.
Table 9 Launcher shortcut icons on the status bar
Button Window Available tasks in the window
Policy Policy Create and manage groups, datasets,schedules, and retention policies.
Backup & Restore Backup, Restore, andManage
Perform on-demand backups andrestore, and manage completedbackups.
Data Movement Policy Data Movement Policy Configure policy-based replication andcloud tier.
Activity Activity Monitor backup, restore, backupvalidation, and replication activity.
Avamar Administrator
46 Avamar 18.2 Administration Guide

Table 9 Launcher shortcut icons on the status bar (continued)
Button Window Available tasks in the window
Administration Administration Create and manage domains, clients,users, system events, and services.
Server Server Monitor server activity and clientsessions.
Status messagesThe right side of the status bar shows status messages for scheduler and backupdispatching, unacknowledged events, and the Avamar server and Data Domainsystems.
Scheduler and backup dispatching statusThe scheduler controls whether scheduled backups occur. The backup dispatchingstatus indicates whether backups can occur based on whether the health check limithas been reached. The following table lists the available status messages.
Table 10 Scheduler and backup dispatching status messages
Status message Description
Sch/Disp: Running/Running Backups occur at the scheduled time.Scheduled backups are enabled, and thehealth check limit has not been reached.
Sch/Disp: Running/Suspended Although scheduled backups are enabled,backups do not occur at the scheduled timebecause the health check limit has beenreached. Resolve the system capacity issuesand acknowledge the system event to resumebackups. Capacity Management on page 253and Acknowledging system events on page233 provide details.
Sch/Disp: Suspended/Running Although the health check limit has not beenreached, backups do not occur at thescheduled time because scheduled backupsare disabled. Backups can resume when youresume scheduled operations.
Sch/Disp: Suspended/Suspended Backups do not occur at the scheduled timebecause scheduled backups are disabled andthe health check limit has been reached. Suspending and resuming scheduledoperations on page 180Suspending andresuming scheduled operations on page 180provides details on reenabling the scheduler. Capacity Management on page 253 and Acknowledging system events on page 233provide details on resolving the systemcapacity issues and acknowledging systemevents to resume scheduled backups.
Avamar Administrator
Status bar 47

Unacknowledged eventsCertain system events to require acknowledgement by an Avamar server administratoreach time they occur. The following table lists the available status messages.
Table 11 Status messages for unacknowledged events
Status message Description
Have Unacknowledged Events There are entries in the unacknowledgedevents list that an Avamar serveradministrator must explicitly acknowledge.
Click the Unacknowledged Events statusicon or text label to show the
Administration window
Unacknowledged Events pane (tab). Acknowledging system events on page 233provides details.
No Unacknowledged Events There are no entries in the unacknowledgedevents list.
Avamar server and Data Domain system statusThis icon lists the operational status of either the Avamar server or any configuredData Domain systems. The following table lists the available status messages.
Table 12 Operational status messages for Avamaror Data Domain
Status message Description
Server: Full Access Normal operational state for an Avamarserver. All operations are allowed.
Server: Admin The Avamar server is in an administrativestate in which the Avamar server and rootuser can read and write data. Other users areonly allowed to read data.
Server: Admin Only The Avamar server is in an administrativestate in which the Avamar server or root usercan read or write data. Other users are notallowed access.
Server: Admin Read Only The Avamar server is in an administrativeread-only state in which the Avamar server orroot user can read data. Other users are notallowed access.
Server: Degraded The Avamar server has experienced a diskfailure on one or more nodes. All operationsare allowed, but immediate action should betaken to fix the problem.
Server: Inactive Avamar Administrator was unable tocommunicate with the Avamar server.
Server: Node Offline One or more Avamar server nodes are in anoffline state.
Avamar Administrator
48 Avamar 18.2 Administration Guide

Table 12 Operational status messages for Avamaror Data Domain (continued)
Status message Description
Server: Read Only The Avamar server is in a read-onlyadministrative state in which all users canread data, but writing data is not allowed.
Server: Suspended Avamar Administrator can communicate withthe Avamar server, but normal operationshave been temporarily suspended.
Server: Synchronizing The Avamar server is in a transitional state. Itis normal for the server to be in this stateduring startup and for short periods of timeduring maintenance operations.
Server: Unknown State Avamar Administrator could not determine theAvamar server state.
Data Domain System Unresponsive Avamar can connect to a Data Domainsystem, but there is a problem with theconnection.
DD System: Inactive Avamar cannot connect to a Data Domainsystem.
To suspend or resume Avamar server activities, click the Server status icon or textlabel to display the Avamar Server window Session Monitor tab. From there, selectActions > Resume Backups/Restores or Actions > Suspend Backups/Restores toresume or suspend server activities, respectively.
To view additional details about Data Domain system status, open the Server windowby clicking Navigation > Server. Select the Server Management tab, and then selectthe Data Domain system in the tree. The Monitoring Status of the Data Domainsystem appears in the right pane. The Avamar and Data Domain System IntegrationGuide provides details on the available detailed status messages.
Navigation tree featuresThe navigation trees in the Administration, Backup, Restore and Manage, and DataMovement Policy windows provide several controls to facilitate the location of one ormore clients.
Figure 7 Navigation tree features
The upper pane shows the Avamar server domain structure. The lower pane showscontents of any domain that is selected in the upper pane. You can click the split pane
Avamar Administrator
Navigation tree features 49
icon to the left of the filter field between the two panes to split the two panesvertically instead of horizontally.
To show all clients in subfolders, click the double folder icon to the left of the filterfield.
Type one or more characters in the filter field to filter the list to have only clients withnames that contain those characters.
Mouse shortcutsThe Avamar Administrator user interface supports context-sensitive left-click, right-click, and double-click shortcuts.
Right-clickAll GUI elements that can enable features or functions when clicked, have right-clicksupport added to them. However, when the GUI element only acts as a navigationmechanism, there is no right-click support. For example, the Policy window client treehas a right-click shortcut menu because specific features and functions becomeavailable based on which node of the tree is selected.
Double-clickFor all tables where properties or edit dialog boxes can be invoked, double-click anyrow of the table to display the properties or edit dialog box. Additionally, when lists areused, double-click an element in the list to display the edit dialog box.
Column heading sortClick a table column heading to sort that column. For example, double-click theActivity Monitor State column to sort the Activity Monitor by the state of eachbackup.
Press Shift and then click any table column heading to reverse sort the values in atable column.
Avamar Administrator
50 Avamar 18.2 Administration Guide

CHAPTER 3
Avamar Web User Interface
This chapter includes the following topics:
l Overview of the AUI ..........................................................................................52l Access the AUI...................................................................................................52l AUI navigation pane........................................................................................... 53l Basic management tasks....................................................................................54l Navigation tree features.................................................................................... 55l AUI dashboard................................................................................................... 55l AUI Activity Monitor.......................................................................................... 60
Avamar Web User Interface 51

Overview of the AUIThe Avamar Web User Interface is a web management application that is used toadminister an Avamar server.
You can use the AUI to monitor and configure the Avamar server. Use the AUI tomonitor backups, restore operations, and system maintenance activities, and toconfigure backup policies, manage clients and user accounts, and configure othersystem settings.
You can administer one Avamar server at a time from the AUI.
The AUI dashboard appears when you log in to Avamar. The dashboard provides an at-a-glance view of Avamar system status. A navigation pane provides access to allfunctionality.
Note
The Avamar AUI is only supported in stand-alone environments.
Access the AUIAccess the Avamar Web User Interface through a web browser.
Procedure
1. Open a web browser and type the following URL:
https://Avamar_server/auiWhere Avamar_server is the DNS name or IP address of the Avamar server.
Note
If the environment does not meet HTTPS certificate validation requirements,the certificate validation fails and an error message is displayed asking if youwant to continue to download packages. Ignoring certificate validation mightcause security issues.
2. In the Avamar Username field, type a username with root or administratorprivileges.
3. In the Avamar Password field, type the password for the root or administratoruser.
4. In the Avamar Domain field, type the Avamar domain to log in to:
l The root domain, in which the default should be used for entry of a singleslash (/) character.
l A specific domain or subdomain, in which the domain path should be typedby using the syntax /domain/subdomain1/subdomain2.
5. Click Log In.
The AUI dashboard is displayed.
6. To open the navigation pane from anywhere in the UI, click .
The navigation pane opens and displays the available menu items.
Avamar Web User Interface
52 Avamar 18.2 Administration Guide

AUI navigation paneUse the left navigation pane to quickly browse to different panes in the UI. Thenavigation pane provides links that open other panes to perform tasks in the AvamarWeb User Interface.
To open the navigation pane from anywhere in the UI, click . The navigation paneopens and displays the available menu items, as shown in the following illustration.
Figure 8 AUI navigation pane
To browse to another location in the UI, click a link in the navigation pane. This actionopens the menu item in the main window.
The links provide access to the following features in the AUI:
Table 13 AUI navigation pane
Navigation link Icon Available features
Dashboard Provides an at-a-glance view of Avamar system status.
Asset Management Provides the ability to manage Avamar domains andclient-related operations:
l Create, edit, delete, and refresh Avamar domains.
l Add, edit, delete, and sync clients on the Avamarserver.
l Backup and restore clients.
Backup Policy Automates backups and enforces consistent rules andsystem behavior across an entire segment, or group ofthe user community. The dataset, schedule, andretention policy comprise the backup policy. The
Avamar Web User Interface
AUI navigation pane 53

Table 13 AUI navigation pane (continued)
Navigation link Icon Available features
backup policy controls backup behavior of all membersof the backup policy.
Advanced Policy Manages Cloud DR-enabled backups and applicationconsistent SQL virtual machine backups, includingautomatic SQL discovery, automatic backup groupmanagement, and auto client SQL plugin installation andregistration.
Replication Policy Copies client backups from the source Avamar systemto an alternate destination. Replicating backups to analternate destination protects against data loss if thesource Avamar system fails.
Cloud Tier Policy Moves Avamar backups from Data Domain to the cloudand performs seamless recovery of these backups.
Settings Assists administrators with adding accounts to thesystem, and creating and managing schedules, datasets,retention policies, and rules.
Proxy Management Assists administrators with deploying and managingAvamar proxies by offering a recommendation as to thenumber of proxies that should be deployed in eachvCenter, and a recommended ESX host location foreach proxy.
System Assists administrators with configuring vCenter-to-Avamar authentication, registering the Avamar Plug-infor vSphere Web Client, and adding a Data Domainsystem to Avamar.
Activity Provides status and detailed information for backup andreplication jobs.
Event Monitors operational status and server activity.Examples of Avamar events include client registrationand activation, successful and failed backups, and harddisk status.
Basic management tasksLog out of the Avamar Web User Interface, access the online help, view productinformation, and suspend or run scheduled activities.
Procedure
1. To log out of the AUI:
a. In the AUI header pane, click .
A confirmation message is displayed.
b. Click YES.
You are logged out of the AUI.
Avamar Web User Interface
54 Avamar 18.2 Administration Guide

2. To access the AUI online help:
a. In the AUI header pane, click .
b. Click Help.
3. To view version and build details:
a. In the AUI header pane, click .
b. Click About.
4. To suspend or run scheduled activities:
a. In the AUI header pane, click .
b. Toggle the Scheduler State switch.
The Scheduler State indicates whether scheduled activities are running orsuspended. Scheduled activities include backups, email notifications, andreplications. If scheduled activities are running, then the activities occur atthe scheduled time. If scheduled activities are suspended, then the activitiesdo not occur until you resume the activities.
Navigation tree featuresNavigation trees on the Asset Management, Backup Policy, Advanced Policy, andSetting windows provide controls to facilitate the location of one or more clients.
The Domain pane shows the Avamar server domain structure.
To display all clients in subfolders, in the navigation tree, expand the domain folder by
clicking .
AUI dashboardThe Avamar Web User Interface dashboard provides an at-a-glance view of Avamarsystem status.
The dashboard appears when you log in to the AUI and is divided into sections witheach section displaying summary information.
The following figure illustrates the Dashboard view.
Avamar Web User Interface
Navigation tree features 55

Figure 9 AUI dashboard
The following information is available in the AUI dashboard:
l Integrated and unprotected assets on the Avamar server.
l System capacity usage for the Avamar server and Data Domain systems
l Events
l Client information
l Backup activity status
l Replication activity status
Monitoring assets in the dashboardThe Assets | Overview panel indicates the number of integrated and unprotectedassets on the Avamar server.
l Integrated indicates the number of clients that are integrated into the Avamarserver.
l Unprotected indicates the number of clients that do not have any backups.
Note
When you run a backup job for a client, the Avamar server updates this value.
You can manage assets from the AUI by selecting Asset Management in thenavigation pane.
View integrated clientsThe Assets | Overview panel on the AUI dashboard displays the number of clientsthat are integrated into the Avamar server.
Procedure
1. To view information about integrated clients, click the icon next to Integrated.
The Asset Management pane appears.
Avamar Web User Interface
56 Avamar 18.2 Administration Guide

2. In the domain tree, select a domain or subdomain.
The list of clients in the middle pane indicates client information includingstatus.
Results
The top part of the Asset Management pane displays information about the clientdomain, such as:
Icon Description
Clients
Indicates the number of clients within the domain.
Activities
Indicates the number of activities (backup and replication jobs) that havebeen initiated by clients within the domain.
Policies
Indicates the number of policies that apply to the clients within thedomain.
View unprotected clientsThe Assets | Overview panel on the AUI dashboard displays the number ofunprotected clients that do not have any backups.
Procedure
1. To view information about unprotected clients, click the icon next toUnprotected.
The Clients with no backups window appears and displays summaryinformation for each client.
2. Review the client properties:
Property Description
Name Descriptive client name.
Domain The Avamar domain for the client.
Enabled Whether Avamar can perform backups for the client. Regardlessof this setting, the client can restore files as long as a previousbackup exists in the system.
Activated Whether the client is activated with the Avamar server.
Client type The type of client (for example, regular, virtual machine, ImageProxy, or VMware vCenter).
Avamar Web User Interface
Monitoring assets in the dashboard 57

Monitoring system capacity in the dashboardThe Capacity | Overview panel provides system capacity usage information for theAvamar server and any Data Domain systems that have been added.
Avamar server capacity informationThe Capacity | Overview panel indicates the amount of available storage and usedstorage for the Avamar server in Gigabytes (GB). Additionally, a horizontal barindicates the percentage of total storage used.
If the Avamar system configuration includes a Data Domain system, then Avamarserver capacity calculations include metadata usage for the Data Domain system.
Data Domain system capacity informationEach configured Data Domain system is listed separately in the Capacity | Overviewpanel.
The Capacity | Overview panel indicates the amount of available storage and usedstorage for the Data Domain system in GB. Additionally, a horizontal bar indicates thepercentage of total storage used.
Viewing events in the dashboardThe Events | All panel displays the unacknowledged serious system errors andwarnings that have occurred, as well as certain defined system alerts.
The events appear in the list with the name, and the date and time that they occurred.
To filter events by severity, click one of the following options:
l Critical
l Error
l Warning
The Event Management pane appears and filters the results based on the chosenseverity.
To display all events, click View More. The Event Management pane appears with alist of all events.
To clear these serious system errors and warnings (that is, reset the count to zero),you must explicitly acknowledge them. You can acknowledge an event from the EventManagement pane.
The following table lists the system alerts that may appear in the Events | All panel.
Table 14 System alerts
Type of alert Description
HFS check failures If the last checkpoint validation failed, then adata integrity alert is generated. Investigateand address the issue as soon as possible.
Capacity warnings These alerts warn that the system isapproaching critical system storage capacityusage thresholds.
Avamar Web User Interface
58 Avamar 18.2 Administration Guide

Table 14 System alerts (continued)
Type of alert Description
Capacity usage warnings These alerts warn that the system isapproaching critical system storage capacityforecasting thresholds.
Monitoring backup jobs in the dashboardA backup job is an on-demand backup or a backup that has been scheduled to run onan ongoing basis. A backup policy can be configured from the Avamar Web UserInterface by selecting Backup Policy in the navigation pane.
The Activities | Backup panel indicates whether scheduled backups occur at thescheduled time or if there is a problem that is preventing backups from occurring:
l Blue indicates backup jobs that have completed successfully.
l Green indicates scheduled backup jobs that are in progress.
l Yellow indicates backup jobs that are scheduled but have not yet started.
l Red indicates backup jobs that did not complete successfully or completed witherrors.
Note
Only the backups within the past 24 hours appear in the Activities | Backup panel. Ifyou restart the Avamar Management Console Server (MCS), this value is reset.
Monitoring replication jobs in the dashboardA replication job copies a client backup from a source Avamar system to anothertarget destination, for example, a Data Domain system. The purpose of replication is toprotect against data loss if the source Avamar server fails. Replication jobs areconfigured from the Avamar Web User Interface by selecting Replication Policy inthe navigation pane.
The Activities | Replication panel indicates the current backup status of groups thatare configured with replication:
l Blue indicates replication jobs that have completed successfully.
l Green indicates scheduled replication jobs that are in progress.
l Yellow indicates replication jobs that are scheduled but have not yet started.
l Red indicates replication jobs that did not complete successfully or completed witherrors.
Note
Only the replication jobs within the past 24 hours appear in the Activities |Replication panel. If you restart the Avamar Management Console Server (MCS), thisvalue is reset.
Avamar Web User Interface
Monitoring backup jobs in the dashboard 59

Viewing client informationThe Client | Information panel displays Avamar client details, such as the plug-intype, total client count, and total protected Gigabytes (GB).
l Plug-in type indicates the top 10 most frequent plug-ins that clients use
l Total client count indicates the number of clients that use a specific plug-in
l Total protected GB indicates the total amount of data in GB that the systemprotects for each client
The Avamar server updates this data once per day.
Note
To view Avamar client details, ensure that you run the scheduler service:
1. In the AUI header pane, click .
2. Toggle the Scheduler State switch to Running.
AUI Activity MonitorThe Activity Monitor in the Avamar Web User Interface enables you to monitorbackup, restore, backup validation, and replication activity. To perform analysis ortroubleshooting, you can view a detailed log of a client session.
To access the Activity Monitor, open the navigation pane, and then click Activity.The Activity Monitor appears with a list of all activities.
Note
The AUI Activity Monitor window has been optimized for at least 1366 pixels-widescreens. Display issues might occur for smaller screens. To properly display the AUI,ensure that your display is at least 1366 pixels wide.
The Activity Monitor provides you with options to filter the information that appears:
l Filter activities by duration—By default, the Activity Monitor displays the mostrecent 5,000 client activities. To select a different duration, in the Filter activitiesby duration drop-down list, select Last 24 hours or Last 72 hours.
l Filter activities by domain—By default, the Activity Monitor displays all activitiesregardless of domain. To display only the activities for a specific domain, in theFilter activities by domain drop-down list, select a domain or subdomain.
l Filter activities by status—By default, the Activity Monitor displays all activitiesregardless of status.To display only activities with a specific status, at the top of the Activity Monitor,select one of the following options:
n Canceled
n Completed
n Completed with Exceptions
n Failed
n Running
Avamar Web User Interface
60 Avamar 18.2 Administration Guide

n Waiting
To filter activities by client, start time, plug-in, or type, click in their respectivecolumn.
The Activity Monitor displays the date and time that an activity began, and the totalnumber of bytes examined during an activity.
To view activity details, expand the Details pane, by clicking .
Activity Monitor detailsThe following tables provide details on the information that is available in the AvamarWeb User Interface Activity Monitor.
Table 15 Session details available in the Activity Monitor
Field Description
Status Status of the backup, restore, or validationactivity.
Error Code If the activity did not successfully complete, anumeric error code appears. To view adetailed explanation, double-click the errorcode.
Start Time Date and time that this activity began,adjusted for the prevailing time zone, which isshown in parentheses. Daylight Savings Time(DST) transitions are automaticallycompensated.
Elapsed Time Elapsed time for this activity.
End Time Date and time that this activity completed,adjusted for the prevailing time zone, which isshown in parentheses. Daylight Savings Time(DST) transitions are automaticallycompensated.
Type Type of activity. The Avamar Administratoronline help provides details on each type.
Server Server on which the activity occurred, eitherthe Avamar server or a Data Domain system.
Progress Bytes Total number of bytes examined during thisactivity.
New Bytes Percentage of new bytes backed up to eitherthe Avamar server or a Data Domain system.Low numbers indicate high levels of datadeduplication.
Table 16 Client details available in the Activity Monitor
Field Description
ID The unique identifier for the Avamar client.
Avamar Web User Interface
Activity Monitor details 61
Table 16 Client details available in the Activity Monitor (continued)
Field Description
Client Avamar client name.
Domain Full location of the client in the Avamarserver.
OS Client operating system.
Client Release Avamar client software version. If this activityis a VMware image backup or restore, thenthis value is the Avamar client softwareversion running on the image proxy client.
Proxy If this activity is a VMware image backup orrestore, then this value is the name of theproxy client performing the backup or restoreon behalf of the virtual machine. Blank for allother activities.
Table 17 Policy details available in the Activity Monitor
Field Description
Sched. Start Time Date and time that this activity was scheduledto begin.
Sched. End Time Date and time that this activity was scheduledto end.
Elapsed Wait Total amount of time that this activity spentin the activity queue. That is, the scheduledstart time minus the actual start time.
Policy Group that started this activity. One of thefollowing values:
l If the activity was a scheduled backup,the group that this client was a memberof when this scheduled activity started.
l On-demand is shown for other backup,restore, and validation activities.
l If the activity was a scheduled replication,then this value is the replication group.
l Admin On-Demand Group is shownfor-demand replication activities.
Plug-in Plug-in that is used for this activity.
Retention Retention types that are assigned to thisbackup. One or more of the following values:
l D—Daily
l W—Weekly
l M—Monthly
Avamar Web User Interface
62 Avamar 18.2 Administration Guide

Table 17 Policy details available in the Activity Monitor (continued)
Field Description
l Y—Yearly
l N—No specific retention type
Schedule If the activity was a scheduled backup, theschedule that began this activity. On-Demandor End User Request is shown for all otheractivities that are started from AvamarAdministrator or the client, respectively.
Dataset Name of the dataset that is used to create thebackup. If the activity is a replication job, thiscolumn lists the source system name on thedestination system, and the destination nameon the source system.
WID Work order ID. Unique identifier for thisactivity.
Monitor backupsYou can monitor backups to ensure a successful completion of restores andtroubleshooting of issues. The Activity Monitor in the Avamar Web User Interfaceenables you to view status information for backups.
Procedure
1. In the AUI navigation pane on the left, click , and then click Activity.
The Activity Monitor appears with a list of all activities.
2. To filter the results to display only backup activity:
a. Click next to the Type column.
b. Type On-Demand Backup.
c. Press Enter.
Cancel backupsYou can cancel a backup any time before it completes. The cancellation might take 5minutes or longer. The backup might complete before the cancellation finishes.
Procedure
1. In the AUI navigation pane on the left, click , and then click Activity.
The Activity Monitor appears with a list of activities.
2. Select the backup from the list.
3. Click CANCEL.
A confirmation dialog box is displayed.
4. Click YES.
Avamar Web User Interface
Monitor backups 63

Restart a backup jobYou can restart a completed or failed backup job in the Activity Monitor of theAvamar Web User Interface.
Procedure
1. In the AUI navigation pane on the left, click , and then click Activity.
The Activity Monitor appears with a list of all activities.
2. Select a backup job in the list, and then click RESTART.
A confirmation dialog box appears.
3. Click YES.
View a detailed client session logThe Activity Monitor in the Avamar Web User Interface enables you to view adetailed log of a client session to perform analysis or troubleshooting.
Procedure
1. In the AUI navigation pane on the left, click , and then click Activity.
The Activity Monitor appears and displays a list of all activities.
2. Select an activity from the list, and then click VIEW LOGS.
The Log details window appears. By default, the Activity Monitor displays adetailed log of all client backup activity for the past 72 hours.
3. To filter the content based on a search string, in the search field, type thestring.
4. To download the log file, click Download.
Monitor restoresYou can monitor and view status information for backup and restore operations in theActivity Monitor.
To access the Activity Monitor, open the navigation pane, and then click Activity.The Activity Monitor appears with a list of all activities.
Note
The AUI Activity Monitor window has been optimized for at least 1366 pixels-widescreens. Display issues might occur for smaller screens. To properly display the AUI,ensure that your display is at least 1366 pixels wide.
The Activity Monitor provides you with options to filter the information that appears:
l Filter activities by duration—By default, the Activity Monitor displays the mostrecent 5,000 client activities. To select a different duration, in the Filter activitiesby duration drop-down list, select Last 24 hours or Last 72 hours.
l Filter activities by domain—By default, the Activity Monitor displays all activitiesregardless of domain. To display only the activities for a specific domain, in theFilter activities by domain drop-down list, select a domain or subdomain.
l Filter activities by status—By default, the Activity Monitor displays all activitiesregardless of status.
Avamar Web User Interface
64 Avamar 18.2 Administration Guide

To display only activities with a specific status, at the top of the Activity Monitor,select one of the following options:
n Canceled
n Completed
n Completed with Exceptions
n Failed
n Running
n Waiting
To filter activities by client, start time, plug-in, or type, click in their respectivecolumn.
The Activity Monitor displays the date and time that an activity began, and the totalnumber of bytes examined during an activity.
To view activity details, expand the Details pane, by clicking .
Cancel restoresYou can cancel a restore any time before it completes. The cancellation might take 5minutes or longer. The restore might complete before the cancellation finishes.
Procedure
1. In the AUI navigation pane on the left, click , and then click Activity.
The Activity Monitor appears with a list of activities.
2. Select the restore from the list.
3. Click CANCEL.
A confirmation dialog box is displayed.
4. Click YES.
Monitor replication in the AUIThe Activity window in the AUI enables you to view status information for both on-demand and scheduled replication activity.
Procedure
1. In the AUI navigation pane on the left, click , and then go to Monitor >Activity.
The Activity Monitor appears and displays a list of all activities. Replicationjobs indicate Replication Source in the Type column. Additionally, you canfilter the view to display only replication jobs.
2. To filter the results to display only replication activity:
a. Click next to the Type column.
b. Type Replication Source.
Avamar Web User Interface
Cancel restores 65

Cancel a replication taskYou can cancel a policy-based replication task in the Activity Monitor any time beforeit completes. The cancellation might take 5 minutes or longer. The replication maycomplete before the cancellation finishes.
Procedure
1. In the AUI navigation pane on the left, click , and then click Activity.
The Activity Monitor appears with a list of activities.
2. Select the replication task from the list.
3. Click CANCEL.
A confirmation dialog box appears.
4. Click YES.
Avamar Web User Interface
66 Avamar 18.2 Administration Guide
CHAPTER 4
Client Management
This chapter includes the following topics:
l Overview of Avamar clients................................................................................68l Client domains................................................................................................... 68l Client registration.............................................................................................. 70l Activating a client...............................................................................................74l Client paging...................................................................................................... 75l Editing client information................................................................................... 77l Viewing client properties.................................................................................... 78l Enabling and disabling a client............................................................................ 79l Moving a client to a new domain........................................................................ 79l Retiring a client..................................................................................................80l Deleting a client................................................................................................. 80l View integrated clients....................................................................................... 81l View unprotected clients....................................................................................82
Client Management 67

Overview of Avamar clientsAvamar clients are networked computers or workstations that access the Avamarserver over a network connection.
You can organize and segregate clients by using Avamar domains. Domains provideenhanced security by enabling you to define administrative user accounts on adomain-by-domain basis.
Before Avamar can back up or restore data on a client, you must add, or register, theclient with the Avamar server, and then activate the client.
To provide maximum flexibility in deploying Avamar clients, registration and activationare separate events that occur asynchronously. Although they often occur at nearlythe same time, they can also occur hours, days, or even weeks apart.
In Avamar Administrator, the client name must always be the client’s hostname. If theclient name should be changed in Avamar Administrator because the hostnamechanged, shut down the Avamar software on the client computer. Change the clientname by editing the client information, then restart the Avamar client software. Thismethod is the only way to ensure that the client maintains its registration with theManagement Console Server (MCS) database, which ensures that past backupscontinue to be associated with the client.
Client domainsAvamar client domains are distinct zones to organize and segregate clients in theAvamar server. The server provides enhanced security by enabling you to defineadministrative user accounts on a domain-by-domain basis.
Avamar client domains are completely internal to the Avamar server and have nothingto do with Internet domains.
Nested structureYou can nest domains to create a rich tree structure. Consider the following exampledomain.
Figure 10 Avamar domain example
Client Management
68 Avamar 18.2 Administration Guide

The root domain, avamar-1.example.com, contains three departmental domains:Accounting, Engineering, and Operations. The Operations domain containsMaintenance and Shipping subdomains.
There is no functional difference between domains and subdomains. Subdomain ismerely a term that refers to any domain nested within another higher level domain.
Hierarchical managementThe real power of domains is to add administrators to a specific level on the clienttree. These domain-level administrators can then manage the clients and policieswithin that domain.
For example, if you add an administrative user to the root domain, then that user canadminister clients and policies anywhere in the system. However, if you add anadministrative user to a domain, then that user can only administer clients and policiesin that domain and its subdomains.
The procedures in this guide assume that you are logged in to the root domain. If youlog in to a lower-level domain, you may not have access to specific clients, datasets,groups, and event management features outside that domain.
Special domainsYou cannot delete the MC_RETIRED and REPLICATE domains.
The MC_RETIRED domain contains clients that have been retired. Its primary purposeis to facilitate restores from retired client backups.
The REPLICATE domain contains replicated data from other servers.
Create a domainProcedure
1. In the AUI navigation pane on the left, click , and then click AssetManagement.
2. In the Asset Management pane, perform the following steps:
a. In the hierarchical Domain tree, select a location in the tree where youwould like to create a domain.
b. Click .
The Create domain dialog box is displayed.
3. In the Name field, type the name of the domain.
Domain names must be 63 characters or fewer, and must not use any of thefollowing characters: =~!@$^%(){}[]|,`;#\/:*?<>'"&.
4. (Optional) Type the name, telephone number, email address, and location for acontact for the domain in the remaining fields.
5. Click OK.
A confirmation message is displayed.
Edit domain informationYou can edit contact and location information for a domain.
Procedure
1. In the AUI navigation pane on the left, click , and then click AssetManagement.
Client Management
Create a domain 69

2. In the hierarchical Domain tree, select the domain
3. To edit the domain information, perform either of the following steps:
l Click the overflow menu ( ), and then select Edit Domain.
l In the DOMAIN ACTIONS pane, select Edit Domain.
The Edit Domain dialog box is displayed.
4. Edit the domain contact information.
5. Click OK.
Delete a domainWhen you delete a domain, the process also deletes any clients in the domain. Topreserve the clients in the system, move the clients to a new domain before you deletethe domain.
If you use directory service authentication, Avamar removes the LDAP maps that usethat domain for access. The associated directory service groups are otherwiseunaffected by the deletion.
Procedure
1. In the AUI navigation pane on the left, click , and then click AssetManagement.
2. In the hierarchical Domain tree, select the domain that you would like to delete.
3. To delete the domain, perform either of the following steps:
l Click the overflow menu ( ), and then select Delete Domain.
l In the DOMAIN ACTIONS pane, select Delete Domain.
The Delete Domain dialog box is displayed.
4. Click Yes.
Client registrationClient registration is the process of establishing an identity with the Avamar server.Once Avamar “knows” the client, it assigns a unique client ID (CID), which it passesback to the client during activation.
There are three ways to register a client:
l Client-side registration
l Interactive server-side registration by using Avamar Administrator
l Batch client registration
Note
When registering a client to another server, unregister the client from the originalserver before registering it with another server.
Client-side registrationThe client-side registration process depends on the operating system.
The Avamar Backup Clients User Guide describes client-side registration for eachsupported operating system.
Client Management
70 Avamar 18.2 Administration Guide
Client-side registration also activates the client at the same time. However, the clientis automatically added to the Default Group and must use the default dataset,schedule, and retention policy. As a result, this method may not provide enoughcontrol for some sites.
Register or add a clientYou can use the AUI to add a client to the system in a domain and policy. This actionprovides a high degree of control. For example, you can assign a specific dataset,schedule, and retention policy. However, it can be time consuming to add manyclients.
Client registration is the process of establishing an identity with the Avamar server.Once Avamar “knows” the client, it assigns a unique client ID (CID), which it passesback to the client during activation.
Once the client is added and registered, you can add a client to the system in a domainand policy. This action provides a high degree of control. For example, you can assigna specific dataset, then schedule, and retention policy. However, it can be timeconsuming to add many clients.
Procedure
1. In the AUI navigation pane on the left, click , and then click AssetManagement.
2. In the domain tree, select a domain or a subdomain for the client.
3. Click ADD CLIENT.
Note
The Avamar for VMware User Guide provides information about VMwarevCenter, Image Proxy, and virtual machine client types.
The New Client pane is displayed.
4. In the New Client Name field, type the name of the account and then clickNEXT.
The Optional Information pane is displayed.
5. Optional, compete the optional contact information including the contact name,phone number, email, and location, and then click NEXT.
The Summary pane is displayed.
6. Review the client summary information, and then click ADD.
The Finish pane is displayed.
7. Click OK.
Batch client registrationTo support large sites with many clients, the batch client registration feature enablesyou to define multiple clients in a single client definition file. The file is then validatedand imported into the Avamar server.
Batch client registration at large sites provides nearly as much control as interactivelyadding the client using the Avamar Administrator or the AUI which is also much faster.
Client Management
Register or add a client 71
Clients definition filesAvamar supports Extensible Markup Language (XML) and comma-separated values(CSV) formats for the clients definition file for batch client registration.
XML formatXML clients definition files must have an .xml extension and conform to the followingstructure and format:
<?xml version="1.0" encoding="UTF-8" ?> <registration_stream> <registrants> <entry host_name="MyClient.Example.com" mcs_domain="clients" mcs_group="MyGroup" dataset="MyDataset" retention_policy="MyRetentionPolicy" contact_address="192.168.31.5" contact_port="28002" access_list="user1@avamar:password, user2@LDAP" encryption="high" encryption_override="false" /> </registrants> </registration_stream>
NOTICE
The clients definition file in this topic is for reference purposes only. Do not try tocopy and paste this example into a clients definitions file. Invisible formattingcharacters prevent you from successfully doing so.
Define each client by using a separate <entry> element. The following tabledescribes the available attributes for each <entry> element.
Table 18 Attributes for each entry in a clients definition file
Attribute Description
host_name Network hostname or IP address for thisclient.
mcs_domain Optional Avamar domain for this client.Specifying a value for this attribute overridesthe default clients domain.
mcs_group Optional default group for this client.Specifying a value for this attribute overridesassignment to the Default Group.
dataset Optional default dataset for this client to useduring backups. Specifying a value for thisattribute overrides the default dataset thatwould normally be inherited from the group.
retention_policy Optional default backup retention policy forthis client. Specifying a value for this attribute
Client Management
72 Avamar 18.2 Administration Guide

Table 18 Attributes for each entry in a clients definition file (continued)
Attribute Description
overrides the default retention policy thatwould normally be inherited from the group.
contact_address Optional client IP address.
contact_port Set contact_port to 28002, the default
Avamar data port.
access_list Optional list of users who can access theAvamar server from this client. The format isuser@authentication:password. When
you use the internal authentication system,the word password must follow the colon.
This step causes the system to prompt usersfor authentication when they access thesystem. When you use an externalauthentication system, omit :password. To
define multiple users, separate each userentry with a comma (,) and enclose the entirelist of users in quotation marks (" ").
encryption Encryption method for client/server datatransfer:
l High
l None
Note
The encryption technology and bit strengthfor a client/server connection depends onseveral factors, including the client platformand Avamar server version. The AvamarProduct Security Guide provides details.
encryption_override Optional encryptions override. If TRUE, then
this client does not use the group encryptionmethod.
CSV formatCSV clients definition files use the same element and attribute names as the XMLformat. However, you must define each client on a single line and separate eachattribute value by a comma, as shown in the following example:
host_name,mcs_domain,mcs_group,dataset,retention_policy,contact_address,contact_port,access_list,encryption,encryption_override
Validating and importing a clients definition fileProcedure
1. In Avamar Administrator, click the Administration launcher link.
The Administration window is displayed.
Client Management
Batch client registration 73

2. Click the Account Management tab.
3. From the Actions menu, select Account Management > Import Clients fromFile.
The Validate dialog box appears.
4. Browse to and select the saved clients definition file.
5. Click Validate.
The Validation Results dialog box appears.
6. If the clients definition file is error free, click Commit to import the client list.Or, of the clients definition file contains errors, correct the errors, save the fileagain, and repeat the steps in this procedure.
The Validation Results dialog box closes, and the new clients appear in theAccount Management tree.
Activating a clientClient activation is the process of passing the client ID (CID) back to the client, whereit is stored in a file on the client file system.
Before you begin
l The client must be present on the network.
l The Avamar client software must be installed and running on the client.
l The Avamar server must be able to resolve the hostname that was used to registerthe client.
There are two ways to activate a client:
l Begin activation from the client. The Avamar Backup Clients User Guide describesthis method.
l Invite the client to activate with the server by using the AUI
NOTICE
HP-UX, Linux, and Solaris clients can either be activated during installation or by usingAvamar Administrator. There is no client-side command to begin client activation onthese computing platforms.
Procedure
1. In the AUI navigation pane on the left, click , and then click AssetManagement.
2. In the domain tree, select the domain for the client.
3. In the list of clients, select the client that you want to activate.
You can only view clients in the domain for the login account. To view all clients,log in to the root domain.
4. Click MORE ACTIONS > Invite Client.
A status message indicates that the client was sent an invitation to activatewith the server.
Client Management
74 Avamar 18.2 Administration Guide

Reactivating a clientIn certain circumstance, such as client computer replacement, you may need toreactivate a client account with newly installed client software.
Procedure
1. In the AUI navigation pane on the left, click , and then click AssetManagement.
2. In the domain tree, select the domain for the client.
3. In the list of clients, select the client that you want to reactivate.
You can only view clients in the domain for the login account. To view all clients,log in to the root domain.
4. Click MORE ACTIONS > Edit Client.
The Edit Client window is displayed.
5. Select the Activated check box.
6. Click UPDATE.
After you finish
After deactivating the client, follow instructions in the user guide for the specific plug-in to complete client registration. This procedure deactivates the client so that it canbe activated again.
Client pagingAvamar clients can be either pageable or non-pageable. If a client is pageable you canspecify settings to control how the MCS determines the paging settings for the client.You may need to use workarounds for limitations that exist in environments with non-pageable clients.
Pageable clientsPageable clients have provided the Avamar server with a page address and portnumber, which enable performance of on-demand backups and restores. AvamarAdministrator can also browse the client file system during backups and restores inAvamar Administrator.
You can specify one of the following client paging settings to control how the MCSdetermines the paging settings for a client:
l Automatic — With the default setting of automatic paging, the MCS tries toautomatically determine the paging settings for the client. If the MCS receivesupdated paging information from the client, it automatically updates the settings.
l Manual — With manual paging, specify the IP address and data port number forclient/MCS communications. You may want to use manual paging when usingNetwork Address Translation (NAT). With NAT, the MCS probably cannotautomatically determine the correct client paging settings. In manual mode, theMCS never overwrites the IP address and port number settings for the client.
You can also disable automatic paging without specifying an IP address or data portnumber for client/MCS communications. Disabling automatic paging might be usefulto support clients that are off the network for extended periods of time, as can be the
Client Management
Reactivating a client 75

case with laptop computers. These clients must launch their own on-demand backups.For this reason, you should enable client paging whenever possible.
Non-pageable clientsA client is non-pageable when the Avamar Administrator server is not running on theAvamar server utility node or on a single-node server cannot establish a TCP/IPconnection to port 28002 on the Avamar client.
When a client might be non-pageableA client might be non-pageable in the following situations:
l The environment (including the client) has firewall rules that prevent incomingconnections on port 28002 to the client.
l The client is behind a router that does not support port-forwarding forconnections that were initiated from the Avamar server. (This step is the commonsituation that managed service providers to enable encounter when they deployAvamar without using VPN.)
l The Avamar Administrator server cannot connect to the Avamar client on thepaging address that is used by the Avamar Administrator server. An example iswhen the client is multi-homed and the paging address that the AvamarAdministrator server uses for connecting the client does not have a route to thepaging address.
l The environment requires authentication to establish a host-to-host connection toport 28002 on the client, and the Avamar Administrator server process is not ableto support the required authentication protocol.
l An IPSec environment. In a Windows environment, Microsoft best practicesrecommend enabling IPSec. Clients are not pageable in an IPSec environment.
MCS should automatically detect non-pageable clients and adjust settings. Usually nomanual changes are needed in MCS. You can determine whether a client is pageable ornon-pageable by viewing the Client Summary in the AUI. If No appears in the PagingEnabled field for the client, then MCS cannot connect to the avagent process onthe client, which makes the client non-pageable.
Limitations in environments with non-pageable clientsYou can use Avamar Administrator to perform backups or restores, or define policies inenvironments with non-pageable clients. In some cases, you must type explicit pathnames.
The following limitations apply when the client is non-pageable:
l If the MCS cannot page the client on port 28002, then Avamar cannot invite theclient to activate by using Avamar Administrator.
l You cannot browse the client file system when defining datasets or when browsingto select a target for restore. To work around this limitation, explicitly define thebackup dataset without browsing a client. During a restore, explicitly type therestore target path.
l You cannot view client logs. To work around this limitation, get the logs from theclient computer.
l You cannot page the client when there is a work order waiting for the client. In thiscase, the client connects to the MCS and polls for the existence of a work orderapproximately once every minute.If you are backing up several hundred or more non-pageable clients, you may needto increase the polling interval. The default polling interval is 60 s. If MCS
Client Management
76 Avamar 18.2 Administration Guide

performance is slowing down, increase the polling interval until you achieveacceptable performance.
Adding or modifying client paging settingsThe MCS can automatically determine client paging settings, or you can manuallyspecify paging settings for a client. You may need to manually specify paging settingswhen you use NAT.
Procedure
1. In the AUI navigation pane on the left, click , and then click AssetManagement.
2. In the domain tree, select the domain for the client.
3. In the list of clients, select the client that you want to edit.
You can only view clients in the domain for the login account. To view all clients,log in to the root domain.
4. Click MORE ACTIONS > Edit Client.
The Edit Client window is displayed.
5. Click the Paging tab.
6. Select either the Automatic or Manual paging mode.
7. If you selected Manual, specify the client information for client/MCScommunications:
l If the MCS is unable to automatically determine a hostname for this client inautomatic mode, type a valid (un-NAT’d) IP address for the client in theAddress (IP or hostname) field.
l In the Port Number (secure) field, specify the data port number. Thedefault data port is 30002.
l In the Port Number (insecure) field, specify the data port number. Thedefault data port is 28002.
8. Click UPDATE.
Editing client informationYou can edit the name, contact information, or location information for a client inAvamar Administrator.
In Avamar Administrator, the client name must always be the client hostname.Whenever you should change the client name in Avamar Administrator because theclient hostname changed, shut down the Avamar software on the client computer.Change the client name by way of this procedure, and then restart the Avamar clientsoftware. This action is the only way to ensure that the client maintains its registrationwith the Management Console Server (MCS) database, which ensures that pastbackups continue to be associated with the client.
Procedure
1. In the AUI navigation pane on the left, click , and then click AssetManagement.
2. In the domain tree, select the domain for the client.
3. In the list of clients, select the client that you want to edit.
Client Management
Adding or modifying client paging settings 77

You can only view clients in the domain for the login account. To view all clients,log in to the root domain.
4. Click MORE ACTIONS > Edit Client.
The Edit Client window is displayed.
5. Edit the name, contact information, or location information for the client.
6. Click UPDATE.
A confirmation message is displayed.
Viewing client propertiesProcedure
1. In the AUI navigation pane on the left, click , and then click AssetManagement.
2. In the domain tree, select the domain for the client.
3. In the list of clients, select a client whose properties you want to view.
You can only view clients in the domain for the login account. To view all clients,log in to the root domain.
The client details that are described in the following table appear in the rightpane of the window.
Table 19 Client Summary Information
Column Description
Name Descriptive client name.
Enabled Whether Avamar can perform backups for the client. Regardless of thissetting, the client can restore files as long as a previous backup exists inthe system.
Activated The client is activated with the Avamar server.
Activation Time The time that the client is activated with the Avamar server.
Domain The Avamar domain for the client.
Client OS The operating system on the client.
Client Version The version of Avamar client software on the client.
Client OS The operating system of the client.
Last Check-in The date and time that the Avamar client agent last checked in with theAvamar server.
Encryption The encryption method that is used for client/server data transfer.
CID The Client ID, a unique identifier for this client in the Avamar server. CIDsare assigned during client activation.
Client Paging Whether the client has provided the Avamar server with a page addressand port number, by that allowing it to perform on-demand backups andrestores. In addition, Avamar Administrator can browse its file systemduring Avamar Administrator-initiated backups and restores.
Client Management
78 Avamar 18.2 Administration Guide

Table 19 Client Summary Information (continued)
Column Description
BackupStatistics
Status information for backup jobs for the client.
Enabling and disabling a clientYou can disable a client so that it cannot use the Avamar server to back up files. Thisaction is typically done to place the system in a state that supports maintenanceactivities. If a client has been disabled, you must reenable the client before backupsfor the client can resume.
Procedure
1. In the AUI navigation pane on the left, click , and then click AssetManagement.
2. In the domain tree, select the domain for the client.
3. In the list of clients, select the client that you want to edit.
You can only view clients in the domain for the login account. To view all clients,log in to the root domain.
4. Click MORE ACTIONS > Edit Client.
The Edit Client window appears
5. To enable a client, in the Basic tab, select the Enabled checkbox.
A confirmation message appears
6. To disable a client, in the Basic tab, unselect the Enabled checkbox.
A confirmation message appears
7. Click UPDATE.
Moving a client to a new domainProcedure
1. In the AUI navigation pane on the left, click , and then click AssetManagement.
2. In the hierarchical Domain tree, select the domain.
3. In the list of clients, select the client that you want to move.
You can only view clients in the domain for the login account. To view all clients,log in to the root domain.
4. Click MORE ACTIONS > Move Client.
The Move Client dialog box is displayed.
5. Select the new domain for the client.
6. Click OK.
Client Management
Enabling and disabling a client 79

Retiring a clientWhen you retire a client, Avamar stops running backups of the client. Avamar uses thespecified retention setting for the existing backups of a retired client to determinehow long to retain the existing backups. Avamar also uses the specified retentionsetting for existing replicas of a retired client's backups to determine how long toretain the existing replicas.
To restore data from existing backups or replicas of a retired client, use AvamarAdministrator.
Procedure
1. In the AUI navigation pane on the left, click , and then click AssetManagement.
2. In the domain tree, select the domain for the client.
3. In the list of clients, select the client that you want to retire.
You can only view clients in the domain for the login account. To view all clients,log in to the root domain.
4. Click MORE ACTIONS > Retire Client.
The Retire Client window appears.
5. In the Local Backups section, choose how long to keep backups for the client:
l To keep backups until their existing expiration dates, select Retain localbackups with existing expiration date.
l To keep backups indefinitely, regardless of the existing expiration dates,select Retain all local backups indefinitely.
l To keep backups until a new expiration date, select Reset local backupexpiration date and in New Expiration Date, select a new date.
6. For clients with replicas, in the Remote Backups section, choose how long tokeep replicas for the client:
l To keep replicas until their existing expiration dates, select Retain remotebackups with existing expiration date.
l To keep replicas indefinitely, regardless of the existing expiration dates,select Retain all remote backups indefinitely.
l To keep replicas until a new expiration date, select Reset remote backupexpiration date and then select a new date.
7. To retire child VMware clients, in the Force Retire section, select Ignorerunning acitivity and force retire child vm client.
8. Click SUBMIT.
A confirmation message appears.
Deleting a clientDelete a client and all backups of the client. Optionally, choose to delete all replicasthat exist on replication destination systems.
When you delete a client, Avamar permanently deletes all backups that are stored forthat client. Only delete a client when you are certain that there is no reason to retainthe backups. If there is any doubt, retire the client instead.
Client Management
80 Avamar 18.2 Administration Guide

Procedure
1. In the AUI navigation pane on the left, click , and then click AssetManagement.
2. In the hierarchical Domain tree, select the domain.
3. In the list of clients, select the client that you want to delete.
You can only view clients in the domain for the login account. To view all clients,log in to the root domain.
4. Click MORE ACTIONS > Delete Client.
The Delete Client dialog box appears and displays the number of existingbackups for the client.
5. Select I understand this action is permanent and irreversible.
This field is a safety net to avoid unintentionally deleting a client and the client'sbackups.
6. Click YES.
View integrated clientsThe Assets | Overview panel on the AUI dashboard displays the number of clientsthat are integrated into the Avamar server.
Procedure
1. To view information about integrated clients, click the icon next to Integrated.
The Asset Management pane appears.
2. In the domain tree, select a domain or subdomain.
The list of clients in the middle pane indicates client information includingstatus.
Results
The top part of the Asset Management pane displays information about the clientdomain, such as:
Icon Description
Clients
Indicates the number of clients within the domain.
Activities
Indicates the number of activities (backup and replication jobs) that havebeen initiated by clients within the domain.
Policies
Indicates the number of policies that apply to the clients within thedomain.
Client Management
View integrated clients 81

View unprotected clientsThe Assets | Overview panel on the AUI dashboard displays the number ofunprotected clients that do not have any backups.
Procedure
1. To view information about unprotected clients, click the icon next toUnprotected.
The Clients with no backups window appears and displays summaryinformation for each client.
2. Review the client properties:
Property Description
Name Descriptive client name.
Domain The Avamar domain for the client.
Enabled Whether Avamar can perform backups for the client. Regardlessof this setting, the client can restore files as long as a previousbackup exists in the system.
Activated Whether the client is activated with the Avamar server.
Client type The type of client (for example, regular, virtual machine, ImageProxy, or VMware vCenter).
Client Management
82 Avamar 18.2 Administration Guide

CHAPTER 5
User Management and Authentication
This chapter includes the following topics:
l Overview of Avamar user accounts.................................................................... 84l User authentication............................................................................................85l Avamar internal authentication.......................................................................... 86l Directory service authentication........................................................................ 86l Enabling backward compatibility with Enterprise Authentication...................... 104l Roles................................................................................................................ 105l Adding a user to a domain................................................................................. 110l Editing user information..................................................................................... 111l Deleting a user...................................................................................................112
User Management and Authentication 83

Overview of Avamar user accountsA user account in Avamar can administer a domain or client. The user account definesthe authentication system that is used to grant users access to the Avamar server. Italso defines the role for the user, which controls the operations that a user canperform.
You can add user accounts to domains or individual clients. When you add a useraccount to a domain, the account can administer that domain and any subdomainsbeneath it. When you add a user account to an individual client, the account canperform backups and restores of that client, and access backups belonging to thatclient in the system.
In Avamar, users are entries in a domain or client access list. When you add a useraccount to the Avamar system, you are adding an entry to a domain or client useraccess list.
In the following example, the user “Gretchen” has been added to both the Accountingdomain and a computer. However, the authentication system and role are completelyseparate user accounts that happen to have the same username.
Figure 11 Users in Avamardomains
The following table describes the information that comprises an Avamar user account.
Table 20 Avamar user account information
Information Description
Username The username depends on the authenticationsystem and must be in the format that theauthentication system accepts. For example,the internal authentication system uses case-sensitive usernames, whereas Windows ActiveDirectory usernames are case-insensitive.Usernames cannot be longer than 31characters.
Authentication system An authentication system is a username/password system that is used to grant usersaccess to the Avamar server.
Role Roles define the allowable operations for eachuser account.
User Management and Authentication
84 Avamar 18.2 Administration Guide

User authenticationAn authentication system is a username/password system that is used to grant usersaccess to the Avamar server.
Avamar supports the following authentication systems:
l Avamar internal authentication, as described in Avamar internal authentication onpage 86.
l Directory service authentication, as described in Directory service authenticationon page 86.
Avamar also supports the deprecated authentication method EnterpriseAuthentication. Enabling backward compatibility with Enterprise Authentication onpage 104 describes how to enable continued support for Enterprise Authentication.
How Avamar authenticates users and assigns rolesTo provide backward compatibility with enterprise authentication and to account forthe possibility of users in more than one LDAP mapped group, Avamar uses thefollowing authentication and role assignment sequence for each login try:
1. When the username is in the format user, where user is a username without@server appended, then Avamar checks the internal Avamar authenticationdatabase.If the username, password, and domain match, then the login is successful andAvamar assigns the user a role in the Avamar database. If they do not match, thenthe login fails.
2. When the username is in the format user@server, where user is a username andserver is the fully qualified domain name of the authentication server, then Avamarchecks the login information by using enterprise authentication.If the username, password, and domain match, then the login is successful andAvamar assigns the user a role in the Avamar database. If there is no match, thenthe evaluation continues.
3. When the username is in the format user@server and authentication by usingenterprise authentication fails, then Avamar checks the LDAP mapping system.The login try is checked against all mapped groups for a match of each of thefollowing identifiers:
l Username, the portion of the User Name field entry before the @ symbol.
l Password, as typed in the Password field.
l Avamar domain, as typed in the Domain Name field.
l Directory service domain, the portion of the User Name field entry after the @symbol.
When all identifiers match, the login is successful and Avamar assigns the user arole from the mapped group.
A user can be the member of mapped groups in different directory servicedomains. The role of the mapped group that matches the directory service domainthat is provided during login is assigned to the user for that session.
When the user is a member of more than one mapped group in the same directoryservice domain, the role with the greatest authority is assigned.
User Management and Authentication
User authentication 85

4. When the login information does not meet the requirements of any of the previoussteps, then the login fails and a failure message appears.
Avamar internal authenticationWith Avamar internal authentication, you define the username and password forAvamar user accounts, and Avamar stores the information. Usernames are case-sensitive and cannot be longer than 31 characters.
No additional steps are required to use internal Avamar authentication to authenticateuser accounts. You define the username and password for each account when you addthe user in Avamar Administrator or the AUI.
Directory service authenticationUse directory service authentication to authenticate and assign roles to Avamar usersby using information from an existing directory service. Directory serviceauthentication works with specific LDAP directory services and provides additionalfunctionality when used with an OpenLDAP directory service. Directory serviceauthentication also works with a Network Information Service (NIS), on its own orwith one of the supported LDAP directory services.
Avamar products that use directory service authenticationThe following Avamar products can use directory service authentication toauthenticate and authorize users:
l Avamar Administrator
l Avamar Web Restore
l Avamar client web UI (Avamar Desktop/Laptop)
Avamar product that uses directory service client recordsAvamar Client Manager does not use directory service authentication to authenticateand authorize user logins. However, Avamar Client Manager can use the directoryservice mechanism to obtain information about computers that are potential Avamarclients. Avamar Client Manager queries the directory service to obtain informationabout clients and, if available, directory service organizational units, such as directorydomains, and directory groups.
Directory services typesDirectory service authentication supports the following types of directory services:
Table 21 Supported directory service types
Type Supported implementations
LDAP l Active Directory for Windows Server2003
l Active Directory Domain Services forWindows Server 2008
l Active Directory Domain Services forWindows Server 2012
l Active Directory Domain Services forWindows Server 2016
User Management and Authentication
86 Avamar 18.2 Administration Guide

Table 21 Supported directory service types (continued)
Type Supported implementations
l 389 Directory Server version 1.1.35
OpenLDAP SUSE OpenLDAP version 2.4
NIS Network Information Service
Avamar supports encrypted LDAP and OpenLDAP directory service authentication viaSSL/TLS. By default, Avamar uses TLS 1.2 if supported by the LDAP or OpenLDAPserver. Otherwise, Avamar falls back to a supported version of SSL/TLS. However,the Avamar server does not provide an SSL/TLS certificate to the LDAP orOpenLDAP server for client authentication.
LDAP mapsDirectory service authentication uses LDAP maps to form a group of Avamar domainusers by using information from a directory service. Link Avamar authorization levelsto mapped directory service user accounts to create LDAP maps. The Adding an LDAPmap section provides more information.
NOTICE
Deleting an Avamar domain removes the LDAP maps that rely on that Avamar domainfor access. However, removing LDAP maps does not affect the directory servicegroups or the directory service user records that are associated with the removedmaps.
LDAP directory service authenticationAvamar provides authentication and authorization of Avamar users through supportedLDAP directory services.
Preparing to use LDAP directory service authentication on page 88 describes how toprepare to implement LDAP directory service authentication.
Adding information for a supported LDAP directory service on page 89 describeshow to provide the required information about the LDAP directory service to theAvamar system.
Editing the directory service configuration files on page 91 describes how toperform an optional manual edit of the ldap.properties and krb5.conf files.
RequirementsAvamar directory service authentication supports the use of supported LDAPdirectory services that meet the following conditions:
l LDAP server permits username bind through both of the following formats:
n usernamen [email protected]
l LDAP server permits searching for group membership by using a username.l LDAP server permits searching for groups by using a search string.l LDAP server account that is provided when adding an LDAP map has permission to
run a nested ldapsearch command.
Kerberos protocolAvamar's LDAP directory service authentication normally uses the Kerberos protocolfor all communications with the Key Distribution Center. Avamar automatically
User Management and Authentication
LDAP directory service authentication 87

encrypts usernames and passwords before sending them to port 88 on the KeyDistribution Center.
To use Avamar's LDAP directory service authentication without the Kerberos protocol,in a Simple Bind, manually edit the ldap.properties file.
Preparing to use LDAP directory service authenticationTo prepare to use LDAP directory service authentication, give Avamar access tocertain ports on the Key Distribution Center. Also, create the directory service groupsthat are associated with Avamar LDAP maps.
Procedure
1. Ensure that Avamar has access to the following recognized ports on the KeyDistribution Center (KDC).
Table 22 Required Key Distribution Center ports
Portnumber
Description
88 Kerberos authentication system
389 Lightweight Directory Access Protocol (LDAP)
464 Kerberos Change/Set password
636 LDAP over SSL/TLS
The ports are defined in krb5.conf and ldap.properties.
2. Create directory service groups in the directory service (not in Avamar).
Groups can range in size from one member to as many members as thedirectory service allows.
Ideally, create directory service groups specifically for use with an AvamarLDAP map. With dedicated directory service groups, group composition isconsidered in the context of the level of Avamar access being granted. Also, thegroup name can include a common character pattern to simplify its discoveryduring mapping. For example, you could start each group name with thecharacters av, as in avAdministrators. This character pattern would enableyou to search for all groups that are associated with Avamar by using thewildcard search string av*.
3. Open a command shell and log in by using one of the following methods:
l For a single-node server, log in to the server as admin.
l For a multi-node server, log in to the utility node as admin.
4. Switch user to root by typing the following command:
su -
5. Back up the keystore by typing the following command on one line:
cp -p /usr/local/avamar/lib/rmi_ssl_keystore /usr/local/avamar/lib/rmi_ssl_keystore.bak
6. Import the LDAP server certificate into the keystore by typing the followingcommand on one line:
User Management and Authentication
88 Avamar 18.2 Administration Guide

keytool -importcert -file <certfile>.crt -keystore /usr/local/avamar/lib/rmi_ssl_keystore -storepass changemewhere <certfile> is the name of the LDAP server certificate, including path.
7. Restart the MCS by typing the following command:
mcserver.sh --restart
After you finish
Configure Avamar to use the LDAP directory service.
Adding information for a supported LDAP directory serviceUse a wizard to add information for a supported LDAP directory service to use forauthentication and authorization of Avamar users.
Before you begin
Check that the directory service meets the following requirements:
l Provides authentication through a SASL (Simple Authentication and SecurityLayer) BIND that uses Kerberos.
l Only uses LDAP v.3 base functionality.
l Permits username bind through both of the following formats:
n username
l Permits searching for group membership by using a username.
l Permits searching for groups by using a search string.
l Has an available LDAP server account that has permission to run a nestedldapsearch command.
NOTICE
Do not use the wizard to add a directory service that performs authentication usingSimple Bind (plaintext). Instead, manually edit the ldap.properties file asdescribed in Editing the directory service configuration files on page 91.
Procedure
1. Log in to the root domain in Avamar Administrator as an administrator.
a. Launch Avamar Administrator.
b. In Server, type the IP address or DNS name of the Avamar server to log into.
c. In User Name, type a username.
The username must be for an account that is assigned to the administratorrole at the root domain level.
When Avamar is already configured to use a directory service, alternativelylog in by using an LDAP account with administrator authorization at the rootdomain level. Use the format: username@ldap-domain.
d. In Password, type the password for the user account.
e. In Domain Name, use the default entry of a single slash (/) character tospecify the root domain.
User Management and Authentication
LDAP directory service authentication 89

f. Click Log In.
If this is the first time that you have connected to this Avamar server, theAccept Server Certificate dialog box opens. Verify the server certificatedetails and click Yes.
The Avamar Administrator dashboard appears.
2. In Avamar Administrator, click the Administration launcher link.
The Administration window is displayed.
3. Click the LDAP Management tab.
4. Click Directory Service Management.
The Directory Service Management dialog box appears.
5. Add the directory service:
a. Click Add.
The Adding a new Directory Service section appears.
b. Select LDAP.
c. In Enter a fully qualified domain name, type the fully qualified domainname (FQDN) of a directory server.
d. (Optional) If the directory server represents the organization’s defaultdirectory service domain, then select Make this the default domain LDAPdomain.
To allow the Avamar client web UI to authenticate users from Macintoshcomputers, the LDAP server that is assigned to Macintosh users must beconfigured as the default server.
e. Click Add.
A confirmation message appears.
f. Click Yes.
A success message appears. If an error message appears instead, thenresolve the issue and re-add the directory service. Error messages duringdirectory service configuration on page 101 provides details.
g. Click OK.
The changes are applied to the Management Console Server (mcs) and EMTomcat (emt) services.
6. (Optional) Repeat the previous step to add other authentication domains.
7. Test the directory service entries:
a. In the Directory Service Management dialog box, select one of the entriesfrom Configured Directory Services.
The Testing section appears.
b. In Username, type the username for an account that is authorized to readthe directory service database.
c. In Password, type the password that is associated with the username.
d. Click Run Test.
If an error message appears, then resolve the issue. Error messages duringdirectory service configuration on page 101 provides details.
User Management and Authentication
90 Avamar 18.2 Administration Guide

e. To close the Testing section, click Close.
8. Click Close on the Directory Service Management dialog box.
After you finish
To associate the directory service group to Avamar user information, create an LDAPmap. Adding an LDAP map on page 101 provides instructions.
Editing the directory service configuration filesThe LDAP Management tool provides you with the ability to manually edit theldap.properties and krb5.conf directory service configuration files. Manuallyedit these files to configure non-standard settings and to resolve problems that occurwhen configuring Avamar to use a directory service.
Before you begin
Determine the correct format for keys and values in the configuration files.
Procedure
1. Log in to the root domain in Avamar Administrator as an administrator.
a. Launch Avamar Administrator.
b. In Server, type the IP address or DNS name of the Avamar server to log into.
c. In User Name, type a username.
The username must be for an account that is assigned to the administratorrole at the root domain level.
When Avamar is already configured to use a directory service, alternativelylog in by using an LDAP account with administrator authorization at the rootdomain level. Use the format: username@ldap-domain.
d. In Password, type the password for the user account.
e. In Domain Name, use the default entry of a single slash (/) character tospecify the root domain.
f. Click Log In.
If this is the first time that you have connected to this Avamar server, theAccept Server Certificate dialog box opens. Verify the server certificatedetails and click Yes.
The Avamar Administrator dashboard appears.
2. In Avamar Administrator, click the Administration launcher link.
The Administration window is displayed.
3. Click the LDAP Management tab.
4. To edit ldap.properties or Edit KRB5 file to edit krb5.conf, click EditLDAP file.
5. Type additions and changes directly in the Edit file window.
6. Click Save, and then click Close.
Format requirements and settings for LDAP base functionality
The LDAP Management tool in Avamar Administrator creates a correctly formattedldap.properties file for supported LDAP directory services. When you manually
User Management and Authentication
LDAP directory service authentication 91

edit the file by using the LDAP Management tool, the format must comply withspecific parameter requirements. You can manually add other settings toldap.properties to meet an organization's authentication requirements.
LDAP base functionality parameter requirementsThe following table lists the parameter requirements for LDAP base functionality.
Table 23 Parameter requirements for LDAP base functionality
Rule Description Format
One LDAP URL parameter foreach LDAP server
The LDAP URL parameter maps anLDAP server to a specific domaincontroller.
ldap.url.ds.example.abc.com=ldap://dchost.r1.example.abc.com:389or
ldap.url.ds.example.abc.com=ldaps://dchost.r1.example.abc.com:636where:
l ds.example.abc.com is the FQDN of the LDAPserver.
l dchost.example.abc.com is the FQDN of thedomain controller for the LDAP server.
l 389 is the port that is used by the LDAP service.
l 636 is the port that is used by the LDAP servicewhen encrypted with SSL/TLS.
Exactly one default serverparameter
The default server parameter isused during authentication ofusers on clients that are notmapped to a specific domain. Forexample, local users and users thatlog in from an AIX, FreeBSD, HP-UX, Linux, SCO, or Solariscomputer.
ldap.qualified-name-default=dshost.example.abc.com where
dshost.example.abc.com is the FQDN of the defaultLDAP server.
Additional parametersYou can add other parameters to ldap.properties by using the LDAPManagement tool in Avamar Administrator. The following table lists the availablesettings.
Table 24 Additional parameter for LDAP base functionality
Parameter Description and values
ldap.auth.domain.login-domain-suffix Specifies a login domain name suffix that is included as part ofthe username value when authenticating through LDAP,where login-domain-suffix is the login domain name suffix andthe value is an authentication domain. For example, users canlog in using either: username@boston or
User Management and Authentication
92 Avamar 18.2 Administration Guide

Table 24 Additional parameter for LDAP base functionality (continued)
Parameter Description and values
[email protected], where this parameter is set asfollows:
ldap.auth.domain.boston=boston.edu
Use this parameter along with the next parameter,ldap.query.domain, to map multiple authentication
domains to a single login domain name suffix.
ldap.query.domain.log-in-domain-suffix Maps additional authentication domains to a single logindomain suffix, where the ldap.auth.domain parameter defineslogin-domain-suffix, and the ldap.query.domain values areadditional authentication domains within the organization'sintranet. For example, users from either authenticationdomain log in using the format username@boston, where thetwo parameters are set as follows:
ldap.auth.domain.boston=boston.eduldap.query.domain.boston=science.boston.edu,art.boston.edu
ldap.entry.lookup.type.ldap-domain Defines the method that is used by the LDAP server whenlooking up a username, where ldap-domain is theauthentication domain. Possible values are:
l UN for username, the method that is commonly used by
LDAP directory services. (Default)
l DN for distinguished name, the method that is commonly
used by OpenLDAP directory services.
user-login-module Controls the authentication mechanism. The following valuesare available:
l kerberos — LDAP authentication with Kerberos
encryption. This value is the default.
l ldap — Plaintext LDAP authentication. This parameter
also requires theldap.auth.force.username.input=trueparameter to force user login even on a Windows domaincomputer.
l avamar — Avamar authentication.
l mix — Both kerberos and avamar.
ldap.auth.force.username.input Controls whether Avamar requires user log in though a loginscreen on web applications that permit Kerberos pass throughauthentication. Possible values are:
l False — Log in is not required. This value is the default.
l True — Log in is required. Required for the following
parameter: user-login-module=ldap.
User Management and Authentication
LDAP directory service authentication 93

Table 24 Additional parameter for LDAP base functionality (continued)
Parameter Description and values
avamar-authentication-domains Required by the following parameter: user-login-module=mix. The value is a comma-separated list of
domains. Avamar authentication is applied to users from eachlisted domain. LDAP authentication is applied to all otherusers.
support-nis-authentication Enables (true) or disables (false) NIS authentication
support. The default value is false.
nis.qualified-name-default Specifies the FQDN of the NIS domain server.
nis.url.nisdomainname Specifies the IP address of the NIS domain server, wherenisdomainname is the value of nis.qualified-name-default.
OpenLDAP directory service authenticationAvamar supports authentication and authorization of Avamar users through anOpenLDAP directory service.
Adding information about an OpenLDAP directory service to Avamar is described in Adding an OpenLDAP directory service on page 94.
Configuring Avamar to use an OpenLDAP directory service for authentication includesthe ability to use optional parameters that exist for OpenLDAP. OpenLDAP directoryservice parameters on page 97 describes the required and optional parameters forOpenLDAP.
Adding an OpenLDAP directory serviceTo configure an Avamar system to use an OpenLDAP directory service forauthentication, edit the ldap.properties file.
Add an OpenLDAP directory service by manually editing the ldap.properties fileof the Avamar server and adding the required parameters. Optional parameters canalso be added to control how the Avamar system interacts with the OpenLDAPdirectory service. OpenLDAP directory service parameters on page 97 providesmore information about the required and optional parameters.
Procedure
1. Log in to the root domain in Avamar Administrator as an administrator.
a. Launch Avamar Administrator.
b. In Server, type the IP address or DNS name of the Avamar server to log into.
c. In User Name, type a username.
The username must be for an account that is assigned to the administratorrole at the root domain level.
When Avamar is already configured to use a directory service, alternativelylog in by using an LDAP account with administrator authorization at the rootdomain level. Use the format: username@ldap-domain.
User Management and Authentication
94 Avamar 18.2 Administration Guide

d. In Password, type the password for the user account.
e. In Domain Name, use the default entry of a single slash (/) character tospecify the root domain.
f. Click Log In.
If this is the first time that you have connected to this Avamar server, theAccept Server Certificate dialog box opens. Verify the server certificatedetails and click Yes.
The Avamar Administrator dashboard appears.
2. In Avamar Administrator, click the Administration launcher link.
The Administration window is displayed.
3. Click the LDAP Management tab.
4. To edit ldap.properties, click Edit LDAP file.
The Edit ldap.properties file dialog box appears.
5. In the text entry area, type the following, on a new line:
ldap.entry.lookup.type.ldap-domain=DNwhereldap-domain is the domain name of the OpenLDAP server.
This parameter is required.
6. In the text entry area, type the following, on a new line:
ldap.userdn.ldap-domain=rdn-valueswhere:
l ldap-domain is the domain name of the OpenLDAP server
l rdn-values is a semi-colon separated list of the relative distinguished namebases for users, from the root distinguished name of the LDAP tree.
Each entry in the list is a comma-separated, reverse-hierarchical,representation of a user group's relative distinguished name base.
This parameter is required, unless either the users are directly under the rootdistinguished name or the LDAP server permits anonymous searches.
For example, if the users for the domain example.com can be found in Users,inside Employees, inside People, at the tree root, and in Admins at the treeroot, then type:
ldap.userdn.example.com=ou=Users,ou=Employees,ou=People;ou=Admins
7. In the text entry area, type the following, on a new line:
ldap.rootdn.ldap-domain=rootdn-formatwhere:
l ldap-domain is the domain name of the OpenLDAP server
l rootdn-format is the root distinguished name format that is used by theLDAP server
This parameter is required, unless the LDAP server uses the following rootdistinguished name format: dc=domain-segment,dc=domain-segment
User Management and Authentication
OpenLDAP directory service authentication 95

For example, an LDAP server that stores the root distinguished name asdc=example, dc=com, does not require this parameter inldap.properties.
However, an LDAP server that stores the root distinguished name asu=example, o=com requires the following parameter in ldap.properties:ldap.rootdn.exaple.com=u=example,o=com
8. In the text entry area, add optional OpenLDAP parameters.
Type each parameter on a new line.
9. Click Save.
10. Test the directory service entries:
a. In the Directory Service Management dialog box, select one of the entriesfrom Configured Directory Services.
The Testing section appears.
b. In Username, type the username for an account that is authorized to readthe directory service database.
c. In Password, type the password that is associated with the username.
d. Click Run Test.
If an error message appears, then resolve the issue. Error messages duringdirectory service configuration on page 101 provides details.
e. To close the Testing section, click Close.
11. Click Close on the Directory Service Management dialog box.
Results
The Avamar system enables authentication through the OpenLDAP directory service.
After you finish
To associate the directory service group to Avamar user information, create an LDAPmap. Adding an LDAP map on page 101 provides instructions.
Enabling OpenLDAP and Avamar authenticationTo configure an Avamar system to use Avamar authentication and OpenLDAPauthentication, edit the ldap.properties file.
Before you begin
Add an OpenLDAP directory service to the Avamar system.
After adding an OpenLDAP directory service for authentication, configure the Avamarsystem to use Avamar authentication for some of the Avamar domains.
Procedure
1. Log in to the root domain in Avamar Administrator as an administrator.
a. Launch Avamar Administrator.
b. In Server, type the IP address or DNS name of the Avamar server to log into.
c. In User Name, type a username.
The username must be for an account that is assigned to the administratorrole at the root domain level.
User Management and Authentication
96 Avamar 18.2 Administration Guide

When Avamar is already configured to use a directory service, alternativelylog in by using an LDAP account with administrator authorization at the rootdomain level. Use the format: username@ldap-domain.
d. In Password, type the password for the user account.
e. In Domain Name, use the default entry of a single slash (/) character tospecify the root domain.
f. Click Log In.
If this is the first time that you have connected to this Avamar server, theAccept Server Certificate dialog box opens. Verify the server certificatedetails and click Yes.
The Avamar Administrator dashboard appears.
2. In Avamar Administrator, click the Administration launcher link.
The Administration window is displayed.
3. Click the LDAP Management tab.
4. To edit ldap.properties, click Edit LDAP file.
The Edit ldap.properties file dialog box appears.
5. In the text entry area, type the following, on a new line:
user-login-module=mixThis parameter is required when enabling Avamar authentication withOpenLDAP authentication.
6. In the text entry area, type the following on a new line:
user-login-module-mix-ldap=ldapThis parameter is required when enabling Avamar authentication withOpenLDAP authentication.
7. In the text entry area, type the following on a new line:
avamar-authentication-domains=av-domain-listwhere av-domain-list is a comma-separated list of Avamar domains.
The Avamar system uses Avamar authentication for login authentication ofusers from each listed domain. The Avamar system uses OpenLDAPauthentication for all other users.
8. Click Save.
9. Click Close on the Directory Service Management dialog box.
Results
The Avamar system enables the specified mix of Avamar authentication andOpenLDAP authentication.
OpenLDAP directory service parameters
The following table describes the ldap.properties file parameters for use with anOpenLDAP directory service, in addition to the base parameters specified in Table 23 on page 92.
User Management and Authentication
OpenLDAP directory service authentication 97

Table 25 OpenLDAP directory service parameters
Parameter and example Description
ldap.entry.lookup.type.ldap-domain=DN
For an LDAP domain "xyz.com" that uses OpenLDAP:
ldap.entry.lookup.type.xyz.com=DN
Specifies OpenLDAP. Replace ldap-domain with the domainname of the LDAP server. Use this parameter for OpenLDAPservers that accept user logins only in distinguished nameformat. For example: uid=jsmith,dc=example,dc=com.
This parameter enables the other OpenLDAP parameters inthis table.
ldap.userdn.ldap-domain=rdn-values
For an LDAP domain "xyz.com" that organizes users in thefollowing organizational units:
l Managers which is under the tree root
l Accountants, under people, which is under the tree
root
l HRs, under Employees, under Users, which is under the
tree root
l Users, which is under the tree root
ldap.userdn.xyz.com=ou=Managers;ou=Accountants,ou=people;ou=HRs,ou=Employees,ou=Users;ou=Users
Specifies the relative distinguished name bases that areassigned to the organizational units that contain users.Replace ldap-domain with the domain name of the LDAPserver and replace rdn-values with a semi-colon separated listof relative distinguished name bases for users, from the rootdistinguished name of the LDAP tree. Each entry in the list isa comma-separated reverse-hierarchical representation of auser group's relative distinguished name base.
ldap.rootdn.ldap-domain=rootdn-format
For an LDAP domain "xyz.com" that stores the rootdistinguished name as u=xyz, o=com:
ldap.rootdn.xyz.com=u=xyz,o=com
Specifies the root distinguished name format of the LDAPserver. This parameter is required unless the rootdistinguished name format is dc=domain-segment,dc=domain-segment. Replace ldap-domain with
the domain name of the LDAP server and replace rootdn-format with the root distinguished name format that is usedby the LDAP server.
ldap.user.search.classes.ldap-domain=search-object
For an LDAP domain "xyz.com" that uses the object classtype "person" in user searches:
ldap.user.search.classes.xyz.com=person
Specifies the object class type that is used by the user searchfilter. This parameter is optional. Replace ldap-domain withthe domain name of the LDAP server and replace search-object with the value that specifies the object class type thatis used by the user search filter. Comma separated values canbe used. The default value is *.
ldap.user.search.attrs.ldap-domain=search-attribute
For an LDAP domain "xyz.com" that uses the object classattribute "cn" in user searches:
ldap.user.search.attrs.xyz.com=cn
Specifies the object class attribute that is used by the usersearch filter. This parameter is optional. Replace ldap-domainwith the domain name of the LDAP server and replace search-attribute with a single attribute that is used by the user searchfilter. The default value is uid.
ldap.group.search.byUpn.classes.ldap-domain=search-upn
For an LDAP domain "xyz.com" that uses the User PrincipalName object class types: sambaGroupMapping andposixGroup in group searches:
ldap.group.search.byUpn.classes.xyz.com=sambaGroupMapping,posixGroup
Specifies the object class type that is used by the groupsearch User Principal Name filter. This parameter is optional.Replace ldap-domain with the domain name of the LDAPserver and replace search-upn with the value that specifiesthe object class type that is used by the group search UserPrincipal Name filter. Comma separated values can be used.The default value is *.
ldap.group.search.byUpn.attrs.ldap-domain=upn-attributes
Specifies the object class attributes used by the group searchUser Principal Name filter. This parameter is optional. Replaceldap-domain with the domain name of the LDAP server and
User Management and Authentication
98 Avamar 18.2 Administration Guide
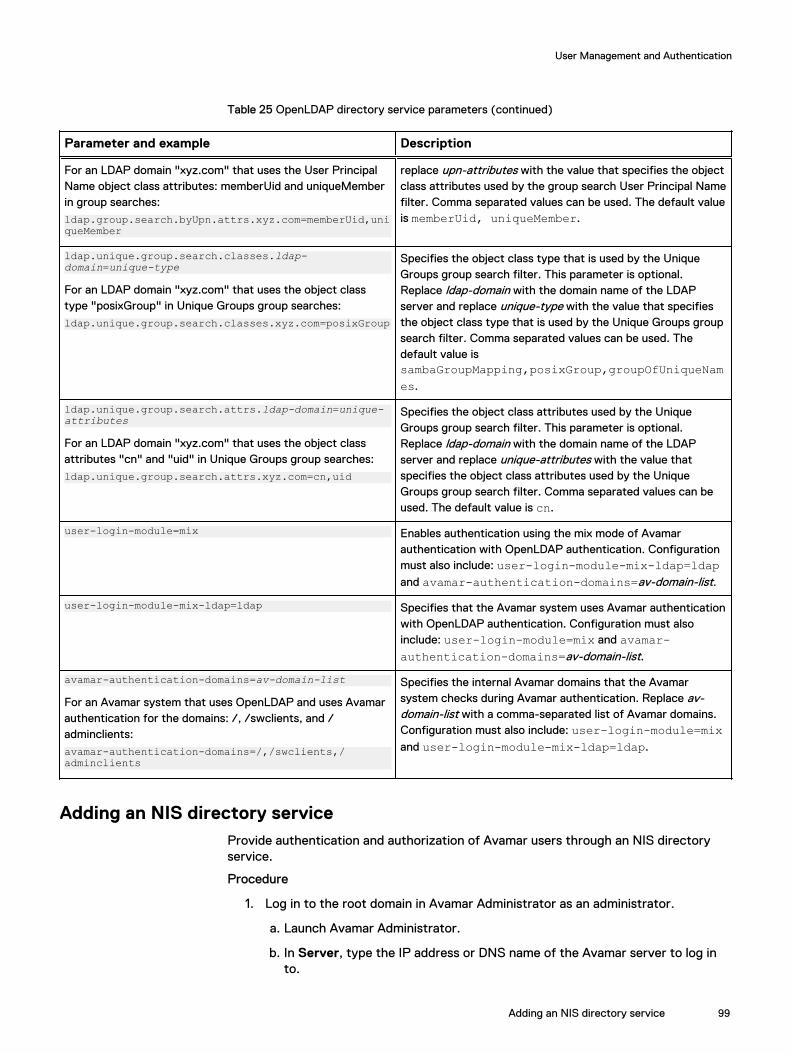
Table 25 OpenLDAP directory service parameters (continued)
Parameter and example Description
For an LDAP domain "xyz.com" that uses the User PrincipalName object class attributes: memberUid and uniqueMemberin group searches:
ldap.group.search.byUpn.attrs.xyz.com=memberUid,uniqueMember
replace upn-attributes with the value that specifies the objectclass attributes used by the group search User Principal Namefilter. Comma separated values can be used. The default valueis memberUid, uniqueMember.
ldap.unique.group.search.classes.ldap-domain=unique-type
For an LDAP domain "xyz.com" that uses the object classtype "posixGroup" in Unique Groups group searches:
ldap.unique.group.search.classes.xyz.com=posixGroup
Specifies the object class type that is used by the UniqueGroups group search filter. This parameter is optional.Replace ldap-domain with the domain name of the LDAPserver and replace unique-type with the value that specifiesthe object class type that is used by the Unique Groups groupsearch filter. Comma separated values can be used. Thedefault value issambaGroupMapping,posixGroup,groupOfUniqueNames.
ldap.unique.group.search.attrs.ldap-domain=unique-attributes
For an LDAP domain "xyz.com" that uses the object classattributes "cn" and "uid" in Unique Groups group searches:
ldap.unique.group.search.attrs.xyz.com=cn,uid
Specifies the object class attributes used by the UniqueGroups group search filter. This parameter is optional.Replace ldap-domain with the domain name of the LDAPserver and replace unique-attributes with the value thatspecifies the object class attributes used by the UniqueGroups group search filter. Comma separated values can beused. The default value is cn.
user-login-module=mix Enables authentication using the mix mode of Avamarauthentication with OpenLDAP authentication. Configurationmust also include: user-login-module-mix-ldap=ldapand avamar-authentication-domains=av-domain-list.
user-login-module-mix-ldap=ldap Specifies that the Avamar system uses Avamar authenticationwith OpenLDAP authentication. Configuration must alsoinclude: user-login-module=mix and avamar-authentication-domains=av-domain-list.
avamar-authentication-domains=av-domain-list
For an Avamar system that uses OpenLDAP and uses Avamarauthentication for the domains: /, /swclients, and /adminclients:
avamar-authentication-domains=/,/swclients,/adminclients
Specifies the internal Avamar domains that the Avamarsystem checks during Avamar authentication. Replace av-domain-list with a comma-separated list of Avamar domains.Configuration must also include: user-login-module=mixand user-login-module-mix-ldap=ldap.
Adding an NIS directory serviceProvide authentication and authorization of Avamar users through an NIS directoryservice.
Procedure
1. Log in to the root domain in Avamar Administrator as an administrator.
a. Launch Avamar Administrator.
b. In Server, type the IP address or DNS name of the Avamar server to log into.
User Management and Authentication
Adding an NIS directory service 99

c. In User Name, type a username.
The username must be for an account that is assigned the administrator roleat the root domain level.
If you already configured a directory service, then you can log in with anaccount for an LDAP user with the administrator role at the root domainlevel.
d. In Password, type the password for the user account.
e. In Domain Name, use the default entry of a single slash (/) character tospecify the root domain.
f. Click Log In.
If this is the first time that you have connected to this Avamar server, theAccept Server Certificate dialog box opens. Verify the server certificatedetails and click Yes.
The Avamar Administrator dashboard appears.
2. In Avamar Administrator, click the Administration launcher link.
The Administration window is displayed.
3. Click the LDAP Management tab.
4. Click Directory Service Management.
The Directory Service Management dialog box appears.
5. In the Directory Service Management dialog box, click Add.
The Adding a new Directory Service section appears.
6. Select NIS.
7. In Enter a fully qualified domain name, type the NIS domain name.
8. In NIS Domain IP address, type the IP address of the NIS server.
9. Click Add.
A confirmation message appears.
10. Click Yes.
If an error message appears, then resolve the issue and retry this task. Errormessages during directory service configuration on page 101 provides details.
A success message appears.
11. Click OK.
Results
The changes are applied to the Management Console Server (mcs) and EM Tomcat(emt) services.
After you finish
To associate the directory service group to Avamar user information, create an LDAPmap. Adding an LDAP map on page 101 provides instructions.
User Management and Authentication
100 Avamar 18.2 Administration Guide

Error messages during directory service configurationError messages appear when issues occur during adding or testing of a directoryservice configuration.
The following table lists some of the potential messages and provides a description ofthe cause.
Table 26 Error messages during directory service configuration'
Error message Description
Cannot discover KDC A key distribution center (KDC) could not be found by usingthe specified domain information.
No URL is present The specified domain is not present in theldap.properties file.
Parameters are not correct The directory service domain information in theldap.properties file is invalid.
Client not found in Kerberos database The specified username is invalid.
Pre-authentication information wasinvalid
The specified password is incorrect.
Query fails The specified user account does not have sufficient privilegesto read the directory service database.
Clock skew too great The differential between the clock on the Avamar server hostand the clock on the directory service host is too large.
Cannot open LDAP configuration file The ldap.properties file does not exist or the file
permissions prevent access.
Cannot open Kerberos configuration file The krb5.conf file does not exist or the file permissions
prevent access.
GSS initiate failed Authentication of credentials failed. Usually authenticationfailure is because reverse DNS is improperly configured. Addthe KDC host to /etc/hosts on the Avamar server.
Cannot get kdc for realm The KDC is improperly configured in the krb5.conf file.
Domain <domain> exists inldap.properties file
The specified domain is in the ldap.properties file
already.
Adding an LDAP mapTo associate the directory service group to Avamar user information, create an LDAPmap. An LDAP map is a database construct that ties a group of users to anauthentication system, domain or subdomain access list, and role.
Before you begin
Add directory service domains to the Avamar configuration.
Procedure
1. In Avamar Administrator, click the Administration launcher link.
The Administration window is displayed.
User Management and Authentication
Error messages during directory service configuration 101

2. Click the Account Management tab.
3. Click the LDAP Maps tab.
4. In the left-pane hierarchical tree, select a domain or a subdomain to specify theaccess level of the directory service group.
5. Select Actions > Account Management > New LDAP Map.
The New LDAP Group Map dialog box appears.
6. From the LDAP Domains list, select a directory service domain to map.
7. In the Group Search box, type a search string specific to the group beingmapped.
You can use an asterisk (*) as a wildcard that represents one or morealphanumeric characters.
8. Click Search.
The Directory Service Authentication dialog box appears.
9. Specify the authentication information that is required for querying thedirectory service.
Authentication can be through a domain different from the one being mapped,as long as there is a trust relationship between the two domains.
a. From the Auth Domain list, select a domain to use for authentication.
b. In the User Name box, type a username for an account that has Readprivileges for the domain.
c. In the Password box, type the password for the username.
d. Click OK.
The Directory Service Authentication dialog box closes and the search starts.The Search button on the New LDAP Group Map dialog box changes to Stop.
To terminate a search, click Stop. Searching a directory service can take a longtime.
The search is complete when groups appear in the LDAP Groups list.
10. From the LDAP Groups list, select the group to map.
11. From the Role list, select a role for the group.
12. Click OK.
The group is mapped and the New LDAP Group Map dialog box closes. To seethe mapping on the LDAP Maps tab, select the administrative node.
Editing the role for an LDAP mapProcedure
1. In Avamar Administrator, click the Administration launcher link.
The Administration window is displayed.
2. Click the Account Management tab.
3. Click the LDAP Maps tab.
4. In the left-pane hierarchical tree, select a domain or a subdomain.
The maps for the domain or subdomain appear in the LDAP Maps area.
User Management and Authentication
102 Avamar 18.2 Administration Guide

5. Select the map to edit.
6. Select Actions > Account Management > Edit LDAP Map.
The Edit LDAP Map dialog box appears.
7. In Role, select a new role to assign to the map.
8. Click OK.
The map is assigned the new role. Group members are assigned the new role inall subsequent sessions.
Deleting an LDAP mapProcedure
1. In Avamar Administrator, click the Administration launcher link.
The Administration window is displayed.
2. Click the Account Management tab.
3. Click the LDAP Maps tab.
4. In the left-pane hierarchical tree, select a domain or a subdomain.
The maps for the domain or subdomain appear in the LDAP Maps area.
5. Select the map to delete.
6. Select Actions > Account Management > Delete LDAP Map.
The Delete LDAP Map dialog box appears.
7. Click Yes.
Editing the time-out value for directory service processesDirectory service processes wait as long as 5 minutes for a response from thedirectory service. After this period, the try is discarded and a time-out messageappears. You can edit the time-out value.
The time-out value is used by the following directory service authentication processes:
l Authentication requests through the directory service
l Addition of a directory service to the Avamar configuration
l Testing of a directory service in the Avamar configuration
Procedure
1. Open a command shell and log in by using one of the following methods:
l For a single-node server, log in to the server as admin.
l For a multi-node server:
a. Log in to the utility node as admin.
b. Load the admin OpenSSH key by typing the following command:
ssh-agent bashssh-add ~admin/.ssh/admin_key
2. Stop the Management Console Server (mcs) service by typing dpnctl stopmcs.
3. Change the working directory by typing the following command:
cd /usr/local/avamar/var/mc/server_data/prefs
User Management and Authentication
Deleting an LDAP map 103

4. Open mcserver.xml in a text editor.
5. Find the <node name="ldap"> node.
6. Change the value of <entry key="ldap_services_timeout_seconds"value="n" /> to a new time-out value in seconds, where n is the new value.
The default value is 300 s (5 minutes).
7. Save the change and close the file.
8. Start the MCS and the scheduler by typing the following command:
dpnctl start mcsdpnctl start sched
9. Close the command shell.
Enabling backward compatibility with EnterpriseAuthentication
To continue to authenticate users through the deprecated Enterprise Authenticationmechanism enable the capability.
With Enterprise Authentication, Avamar uses the Pluggable Authentication Module(PAM) library of the host Linux operating system to provide access to externalauthentication databases. Enterprise Authentication, which is described in the AvamarProduct Security Guide, is deprecated and will be removed in future releases. Bydefault, you cannot select an Enterprise Authentication domain when you add a userto a domain or client. To continue to use Enterprise Authentication as anauthentication mechanism, configure the system to enable selection of EnterpriseAuthentication when adding a user by changing the Enterprise Authenticationselection setting in mcserver.xml.
Procedure
1. Open a command shell and log in by using one of the following methods:
l For a single-node server, log in to the server as admin.
l For a multi-node server:
a. Log in to the utility node as admin.
b. Load the admin OpenSSH key by typing the following command:
ssh-agent bashssh-add ~admin/.ssh/admin_key
2. Stop the Management Console Server (mcs) service by typing dpnctl stopmcs.
3. Change the working directory by typing the following command:
cd /usr/local/avamar/var/mc/server_data/prefs
4. Open mcserver.xml in a text editor.
5. Find the <node name="ldap"> node.
6. Change the value of <entrykey="enable_new_user_authentication_selection"value="false" /> from false to true.
User Management and Authentication
104 Avamar 18.2 Administration Guide

7. Save the change and close the file.
8. Start the MCS and the scheduler by typing the following command:
dpnctl start mcsdpnctl start sched
9. Close the command shell.
RolesRoles define the allowable operations for each user account.
There are three types of roles:
l Administrator roles
l Operator roles
l User roles
Administrator rolesAdministrators are responsible for maintaining the server.
You can only assign the role of administrator to user accounts at a domain level.Domain level includes the top-level (root) domain and any other domain or subdomain.You cannot assign the administrator role to user accounts at a client level.
You can assign the administrator role to users at the top-level (root) domain or to aspecific domain or subdomain.
Avamar 18.2 introduces the concept of the vCenter administrator. This role is specificto the AUI and has no counterpart in Avamar Administrator.
Table 27 Administrator roles
Administrator type Description
Root administrators Administrators at the top-level (root) domain have full control of the system. They are sometimesreferred to as “root administrators.”
Domain administrators Administrators at domains other than root generally have access to most of the features that aredescribed in this guide. Administrators typically can only view or operate on objects in the domain.Any activity that would allow a domain administrator to view data outside the domain is disallowed.Access to server features of a global nature (for example, suspending or resuming scheduledoperations or changing runtimes for maintenance activities) is disallowed. Domain administrators:
l Cannot add or edit other subdomain administrators.
l Cannot change their assigned role.
l Can change their password.
Domain administrators do not have access to the AUI dashboard.
vCenter administrator vCenter administrators have access to the same features as domain administrators, but additionallyhave access to the AUI dashboard and to event management area within the vCenter domain.
Operator rolesOperator roles are generally implemented to allow certain users limited access tocertain areas of the server to perform backups and restores, or obtain status and run
User Management and Authentication
Roles 105

reports. These roles allow greater freedom in assigning backup, restore, and reportingtasks to persons other than administrators.
You can only assign operator roles to user accounts at the domain level. You cannotassign these roles to user accounts at the client level. To add the user account tosubdomains, you must have administrator privileges on the parent domain or above.
Users with an operator role do not have access to all administrative features. Instead,after login, they are presented with an interface that provides access to the featuresthat they are allowed to use.
The following table describes the four operator roles.
Table 28 Operator roles
Operator type Description
Restore only operator Restore only operators are generally only allowed to perform restores and to monitor those activitiesto determine when they complete and if they completed without errors. Restore only operators atthe top-level (root) domain can perform restores for any client in the server. Restore only operatorsat a domain other than root can only perform restores for clients in that domain. Restore onlyoperators can restore backup data and monitor activities in the assigned domain.
l By default, restore only operators cannot perform restores to a different location or restores tomultiple locations. To enable this option, you must set therestore_admin_can_direct_restores attribute to true in the mcserver.xml file.
l By default, restore only operators cannot browse backups from the command line or the AvamarWeb Restore interface. To enable these activities for a restore only operator, add thenoticketrequired privilege by using the avmgr chgv command:avmgr chgv --acnt=location --u=name --ud=auth \ --pv="enabled,read,mclogin,noticketrequired" where location is the subdomain of
the operator, name is the Avamar username of the user, and auth is the external authenticationsystem that is used to authenticate the user.
Backup only operator Backup only operators are generally only allowed to perform backups and to monitor those activitiesto determine when they complete and if they completed without errors. Backup only operators atthe top-level (root) domain can perform backups for any client or group in the server. Backup onlyoperators at domains other than root can only perform backups for clients or groups in that domain.Backup only operators can perform on-demand backups of a client or a group, as well as monitoractivities in the assigned domain.
l By default, backup only operators cannot perform restores to a different location or restores tomultiple locations. To enable this option, you must set therestore_admin_can_direct_restores attribute to true in the mcserver.xml file.
l By default, backup only operators cannot perform backups from the command line. To enablecommand line backups for a backup only operator, add the noticketrequired privilege by
using the avmgr chgv avmgr chgv --acnt=location --u=name --ud=auth \ --pv="enabled,read,mclogin,backup,noticketrequired"command: where location is
the subdomain of the operator, name is the Avamar username of the user, and auth is theexternal authentication system that is used to authenticate the user.
Backup/restoreoperator
Backup/restore operators are generally only allowed to perform backups or restores and to monitorthose activities to determine when they complete and if they completed without errors. As with rolesthat are assigned to other domain user accounts, backup/restore operators at the top-level (root)domain can perform backups and restores for any client or group in the server. Backup/restoreoperators at domains other than root can only perform backups and restores for clients or groups inthat domain. Backup/restore operators can perform the following tasks in the assigned domain:
User Management and Authentication
106 Avamar 18.2 Administration Guide

Table 28 Operator roles (continued)
Operator type Description
l Perform on-demand backups for a client or group.
l Perform restores.
l Monitor activities.
By default, backup/restore operators cannot browse backups from the command line or by using theAvamar Web Restore interface, and cannot perform backups from the command line. To enablethese activities, add the noticketrequired privilege by using the avmgr chgv command:avmgr chgv --acnt=location --u=name --ud=auth \ --pv="enabled,read,mclogin,backup,noticketrequired" where location is the subdomain
of the operator, name is the Avamar username of the user, and auth is the external authenticationsystem that is used to authenticate the user.
Activity operator Activity operators are generally only allowed to monitor backup and restore activities and to createcertain reports. Activity operators at the top-level (root) domain can view or create reports forbackup and restore activities in all domains and subdomains. Activity operators at domains otherthan root can only view or create reports for backup and restore activities in that domain. Activityoperators can perform the following tasks in the assigned domain:
l Monitor activities.
l View the group status summary.
l View the Activity Report.
l View the Replication Report.
User rolesUser roles limit the operations that are allowed for a user account to a specific client.
Users who are assigned to one of the user roles cannot log in to the AvamarAdministrator, the AUI, Avamar Client Manager, or the Avamar client web UI.
Note
Avamar Administrator provides the ability to add a user account to a client. However,you cannot add a user account to a client from the Avamar Web User Interface (AUI).
The following table describes the four user roles.
Table 29 User roles
User type Description
Back Up Only User Users assigned this role can start backups directly from the client by using the avtar command line.
Restore (Read) OnlyUser
Users assigned this role can start restores directly from the client by using the avtar command line
or Management Console Server (MCS) web services.
Back Up/Restore User Users assigned this role can start backups and restores directly from the client by using the avtarcommand line or MCS web services.
Restore (Read) Only/Ignore File Permissions
Similar to the Restore (Read) Only User role except that operating system file permissions areignored during restores. This user is allowed to restore any file that is stored for an Avamar client.
User Management and Authentication
User roles 107

Table 29 User roles (continued)
User type Description
This role is only available when users are authenticated by using Avamar internal authentication. Toensure trouble-free restores, Windows client user accounts should be assigned this role only whenboth of the following are true:
l Users are authenticated using Avamar internal authentication.
l Users do not require access to the Avamar client web UI.
Role-based access control and the AUIThe AUI provides role-based security for users who access the web-based interface.
Each time that a user logs in to the AUI, the security subsystem maps the user to anyassigned roles and domains. Avamar uses that information to construct a table of theadministrative areas and URLs that correspond to a user's access level.
After logging in, the AUI directs the user to a default page for their role, and hides anycontrols and areas that do not correspond to the user's access level. For example, abackup only operator sees the Asset Management and Activity areas in thenavigation pane, but not the server management areas.
Each time that a user goes to an area within the AUI, regardless of the method, thesecurity subsystem checks the incoming request against the access table and grantsor denies the request accordingly. The AUI reroutes any attempts to accessunauthorized areas.
The following tables indicate the user roles that can access each of the specifiedfeature panes within the AUI.
Table 30 AUI feature pane access by administrator user role
AUI feature pane Rootadministrator
Domainadministrator
vCenteradministrator
Dashboard Yes No Yes
AssetManagement
Yes Yesa Yesa
AssetManagementDomain
Yes Yesa Yesa
AssetManagementBackup
Yes Yesa Yesa
AssetManagementRestore
Yes Yesa Yesa
Backup Policy Yes Yesa Yesa
Advanced Policy Yes Yesa Yesa
User Management and Authentication
108 Avamar 18.2 Administration Guide

Table 30 AUI feature pane access by administrator user role (continued)
AUI feature pane Rootadministrator
Domainadministrator
vCenteradministrator
Replication Policy Yes No No
Cloud Tier Policy Yes No No
Setting Yes Yesa Yesa
ProxyManagement
Yes Yesa Yesa
System Yes Yesa Yesa
Activity Yes Yesa Yesa
Event Yes No Yesa
a. Within the specified domain
Table 31 AUI feature pane access by operator user role
AUI featurepane
Backup/restoreoperator
Backup onlyoperator
Restore onlyoperator
Activityoperator
Dashboard No No No No
AssetManagement
Yes Yes Yes No
AssetManagementDomain
No No No No
AssetManagementBackup
Yes Yes No No
AssetManagementRestore
Yes No Yes No
Backup Policy No No No No
AdvancedPolicy
No No No No
ReplicationPolicy
No No No No
Cloud TierPolicy
No No No No
Setting No No No No
ProxyManagement
No No No No
User Management and Authentication
Role-based access control and the AUI 109

Table 31 AUI feature pane access by operator user role (continued)
AUI featurepane
Backup/restoreoperator
Backup onlyoperator
Restore onlyoperator
Activityoperator
System No No No No
Activity Yes Yes Yes Yes
Event No No No No
Adding a user to a domainYou can add a user account to a domain when the user account is authenticated byusing Avamar internal authentication or the deprecated enterprise authenticationsystem.
Preparing to use LDAP directory service authentication on page 88 provides details onadding a user that uses an existing directory service for authentication.
Procedure
1. To ensure that you assign the correct role to this user, review Roles on page105.
2. In the AUI navigation pane, click , and then click Setting.
The Setting pane appears.
3. Click the User tab.
4. In the hierarchical Domain tree, select the domain for the new user.
Note
You cannot add user accounts to the MC_RETIRED domain.
5. Click Add.
The User Management window appears.
6. (Optional) From the Authentication System list, select an authenticationsystem.
The Authentication System list normally appears in a dimmed state, withAxion Authentication System (the internal system) that is selected. This stepindicates that the ability to select an enterprise authentication system is notcurrently enabled.
The enterprise authentication system, which is described in the Avamar ProductSecurity Guide, is deprecated and will be removed in future releases. However itcan be used with this release. To enable the ability to select an enterpriseauthentication system, complete the procedure that is described in Enablingbackward compatibility with Enterprise Authentication on page 104.
For a more robust alternative to enterprise authentication, use the method thatis described in Preparing to use LDAP directory service authentication on page88.
7. In the User Name box, type the new username.
User Management and Authentication
110 Avamar 18.2 Administration Guide

The username must meet the following requirements:
l If you use enterprise authentication, this option must be the username thatthe system assigns to.
l The username cannot contain more than 31 characters.
l The username cannot contain any of the following characters: ~!@$^%(){}[]|,`;#\/:*?<>'"&.
8. From the Role list, select a role for the user.
9. In the Password box, type a password for the user.
Passwords are case-sensitive and must meet the following requirements:
l The password must be between 6 and 31 characters in length.
l The password must contain only alphanumeric, hyphen, period, orunderscore characters.
l The password must contain at least one alphabetic character.
This field is not used with enterprise authentication.
10. In the Confirm Password box, retype the password.
This field is not used with enterprise authentication.
11. Click OK.
A confirmation message appears.
Editing user informationProcedure
1. In the AUI navigation pane, click , and then click Setting.
The Setting pane appears.
2. Click the User tab.
3. In the hierarchical Domain tree, select the domain with the user.
4. Select the user.
5. (Optional) Change the role for the user:
a. Click Edit.
The User Management window appears.
b. From the Role list, select a role for the user.
c. Click OK.
A confirmation message appears.
6. (Optional) Change the password for the user:
a. Click the overflow menu ( ) for Edit.
b. Click Edit Password.
The User Management window appears.
c. Type a new password into both the Password and Confirm Passwordboxes.
User Management and Authentication
Editing user information 111

d. Click OK.
A confirmation message appears.
Deleting a userProcedure
1. In the AUI navigation pane, click , and then click Setting.
The Setting pane appears.
2. Click the User tab.
3. In the hierarchical Domain tree, select the domain with the user.
4. Select the user.
5. Click Delete.
A confirmation message appears.
6. Click Yes.
A second confirmation message appears.
User Management and Authentication
112 Avamar 18.2 Administration Guide
CHAPTER 6
Backup
This chapter includes the following topics:
l About on-demand backups................................................................................ 114l Perform an on-demand backup......................................................................... 114l Scheduling backups using the Policy wizard......................................................115l Monitoring backups.......................................................................................... 143l Cancel backups.................................................................................................144l Managing completed backups...........................................................................144
Backup 113

About on-demand backupsYou can perform an on-demand backup on an individual client, or a backup policy.
An on-demand backup is a one-time backup of data on an Avamar client computer.You may want to perform an on-demand backup for the first backup of the clientimmediately after you install the Avamar client software. Perform an on-demandbackup before system maintenance, software installations, or software upgrades.When the Avamar server is using Data Domain for back-end storage, on-demandbackups are written to the Data Domain by default.
Perform an on-demand backupYou can perform a client backup that is independent of existing schedules and backuppolicies.
You can perform an on-demand backup by using the AUI for the following plug-intypes:
l VMware image
l DB2
l Linux File System
l Microsoft SQL
l Microsoft Hyper-V
l Microsoft Exchange
l Microsoft Windows File System
l NDMP
l Oracle
For all other plug-in types that are not in this list, use Avamar Administrator.
Procedure
1. In the AUI navigation pane on the left, click , and then click AssetManagement.
The Asset Management window is displayed.
2. In the domain tree, select the domain for the client.
3. In the list of clients, select the client computer to back up.
You can only view clients in the domain for the login account. To view all clients,log in to the root domain.
4. Click BACKUP.
The Backup wizard is displayed. In the Plugin pane, a list of plug-ins on theclient is displayed.
5. In the Plugins pane, select the plug-in and then browse to and select the checkbox next to the data that you want to back up.
6. Click NEXT.
The Basic Configuration window is displayed.
7. Select the backup retention policy settings:
Backup
114 Avamar 18.2 Administration Guide

l To automatically delete this backup from the Avamar server after a specificamount of time, select Retention period. Specify the number of days,weeks, months, or years for the retention period.
l To automatically delete this backup from the Avamar server on a specificcalendar date, select End date and browse to that date on the calendar.
l To keep this backup for as long as this client remains active in the Avamarserver, select No end date.
8. From the Avamar encryption method list, select the encryption method to usefor data transfer between the client and the Avamar server during the backup.
The encryption technology and bit strength for a client/server connectiondepends on several factors, including the client operating system and Avamarserver version. The Avamar Product Security Guide provides additionalinformation.
9. From the Optionally select a proxy to perform backup list, select the proxy.
The default setting is Automatic, which enables the Avamar server to choosethe best proxy for this operation.
10. Click NEXT.
The More Options window is displayed.
11. Set the plug-in options. The user guide for each plug-in provides details on eachof the options.
12. (Optional) Toggle the Show Advanced Options switch to view advancedconfiguration options.
The user guide for each plug-in provides details on each of the options.
13. Click FINISH.
Scheduling backups using the Policy wizardScheduled backups run automatically to ensure that backups occur on an ongoingbasis. You can schedule backups to run daily, weekly, or monthly.
You can schedule backups by using the Policy wizard to create a backup policy.
Perform the following steps within the Policy wizard.
Procedure
1. Assign members to the new backup policy.
2. Assign a dataset to the new backup policy.
To create a dataset, use the Policy wizard or select Settings > Dataset > Add.
3. Assign a schedule to the new backup policy.
To create a schedule, use the Policy wizard or select Settings > Schedule >Add.
4. Assign a retention policy to the new backup policy.
To create a retention policy, use the Policy wizard or select Settings >Retention > Add.
5. Enable scheduling for the backup policy.
Backup
Scheduling backups using the Policy wizard 115

Dataset catalogThe Avamar system includes a set of preconfigured datasets by default. You can usethese datasets for scheduled backups of clients, or you can create a custom dataset.
Note
You cannot edit or delete the settings for the Avamar server preconfigured installeddatasets. Modification of a user-defined dataset impacts the existing backup policiesthat use the selected dataset. If you edit the settings of a user-defined dataset, thechanges are enforced on all members of the backup policy, unless you override thebackup policy settings and assign another dataset at the client level.
Base DatasetThe Base Dataset defines a set of minimum, or baseline, backup requirements. Theinitial settings in the Base Dataset are:
l No source data plug-ins
l No explicit exclusion or inclusion list entries
It is essentially an empty dataset.
Default DatasetThe Default Dataset defines persistent backup selections for the Default Group. Theinitial settings in the Default Dataset are:
l All available source data plug-ins
l No explicit exclusion or inclusion list entries
It ensures that all members of the Default Group can back up their client computersregardless of platform type.
The directories that are listed in the following table are also inherently excluded fromall backups, although they do not explicitly appear in the exclusion list.
Table 32 Directories excluded from Default Dataset backups
Exclusion Description
.snapshot/ NetApp mounts
VARDIR/f_cache.dat Local avtar file cache
VARDIR/p_cache.dat Local avtar “is present” cache
UNIX DatasetThe UNIX Dataset is optimized for use with AIX, FreeBSD, HP-UX, Linux, and Solarisclients. The initial settings in the UNIX Dataset are:
l Only the AIX, FreeBSD, HP-UX, Linux, Macintosh OS X, and Solaris file systemsource data plug-ins
l Explicit exclusion of various temp directories (/tmp, /var/tmp, /usr/tmp), coredump files (core), and local cache files (*cache.dat, *scan.dat)
l No explicit inclusion list entries
The directories that are listed in the following table are also inherently excluded fromall UNIX Dataset backups, although they do not explicitly appear in the exclusion list.
Backup
116 Avamar 18.2 Administration Guide

Table 33 Directories excluded from UNIX Dataset backups
Exclusion Description
.snapshot/ NetApp mounts
VARDIR/f_cache.dat Local avtar cache files
VARDIR/p_cache.dat Local avtar cache files
/proc Pseudo file system that cannot be restored
/dev Excluded only if not running as root
/devices Excluded only for Solaris
Windows DatasetThe Windows Dataset is optimized for use with Microsoft Windows clients. The initialsettings in the Windows Dataset are:
l Only Windows file system source data plug-in
l No explicit exclusion or inclusion list entries
The directories that are listed in the following table are also inherently excluded fromall Windows Dataset backups, although they do not explicitly appear in the exclusionlist.
Table 34 Directories excluded from Windows Dataset backups
Exclusion Description
.snapshot/ NetApp mounts
VARDIR/f_cache.dat Local avtar cache files
VARDIR/p_cache.dat Local avtar cache files
All files that the following registry keys arereferencing to:
l HKEY_LOCAL_MACHINE\SYSTEM\CurrentControlSet\Control\BackupRestore\FilesNotToBackup
l HKEY_CURRENT_USER\SYSTEM\CurrentControlSet\Control\BackupRestore\FilesNotToBackup
Files that are explicitly designated byMicrosoft to exclude from backups
Temporary Internet files Internet Explorer temporary files
outlook.ost Outlook local cache files
outlook\*.ost Outlook local cache files
VMware Image DatasetThe VMware Image Dataset is the default dataset for protecting VMware entities withimage backup. In many respects, the VMware Image Dataset is simpler than mostother datasets:
Backup
Dataset catalog 117

l The only available source data plug-ins are Linux and Windows virtual disks, andboth are selected by default.
l The Select Files and/or Folders option, as well as the Exclusions and Inclusionstabs, are disabled.
l Change block tracking is enabled by default using an embeddedutilize_changed_block_list=true plug-in option statement.
The Avamar for VMware User Guide provides details on using the VMware ImageDataset to back up VMware entities.
Add a datasetA dataset specifies the data to include in a scheduled backup and the options to usefor the backup. Create at least one dataset for scheduled backups on a client or groupof clients. Create multiple datasets to segregate client data.
Note
When the Avamar server is using Data Domain for back-end storage, the Data Domainsystem is the default backup storage location. The system can be changed in theOptions tab.
Procedure
1. In the AUI navigation pane on the left, click , and then click Settings.
The Setting pane is displayed.
2. Click the Dataset tab.
3. Click ADD.
The Create Dataset window is displayed.
4. In the Dataset Name field, type a name for the dataset.
The name can include alphanumeric characters (A-Z, a-z, 0–9) and thefollowing special characters: period (.), hyphen (-), and underscore (_). Do notuse Unicode characters or the following special characters: ` ~ ! @ # $ % ^ & *( ) = + [ ] { } | \ / ; : ' " < > , ?
5. In the Plugins list, select the plug-in to use for the backups.
6. Click the Options tab, and then set plug-in options either by using the graphicalcontrols or by typing option names and values as text entries.
(Optional) Toggle the Show Advanced Options switch to view advancedconfiguration options.
Plug-in options enable you to further customize the behavior of a dataset. Theuser guide for each plug-in provides details on the options available for the plug-in.
7. Click the Source Data tab, and then define the source data plug-ins thatcontribute data to this dataset.
l To include data from all plug-ins on the client, select Select All Data for AllLocal File Systems.
l To include data only from a specific plug-in and limit the dataset to specificdata:
a. From the Plugins list, select the plug-in to use for the backups.Additional options might be displayed below the Select Plug-In Type list.
Backup
118 Avamar 18.2 Administration Guide

b. To back up all available data with the plug-in:
n Select the option.
n Select Select Files and/or Folders and then type the path to thedata.
c. To type the path to the data to back up, type the path in the File/FolderPath field and then click Add.You can limit scheduled backups to a set of data by specifying the pathto the data in the dataset. The following rules apply when you type thepath:
n If you are using a file system plug-in, the first occurrence of anasterisk (*) in a path is treated as a folder wildcard. For example, tospecify the My Documents folder for all users on a Windowscomputer, type C:\Documents and Settings\*\My Documents.
n To specify the Documents folder for all users on a Macintosh, type /Users/*/Documents.
n When you specify a data path, only the first occurrence of an asteriskis treated as a folder wildcard. Subsequent occurrences areinterpreted literally.
n The path can include alphanumeric characters (A-Z, a-z, 0–9) and anasterisk (*) as a wildcard. Do not use any of the following charactersin the data path: ~!@$^%(){}[]|,`;#:*?<>'"&.
8. Click SUBMIT.
Dataset changes take effect on the next scheduled backup. Backups that havealready begun or have been completed are not affected.
Edit a datasetTo edit a dataset, complete the following steps.
Note
You cannot edit or delete the settings for the Avamar server preconfigured installeddatasets. Modification of a user-defined dataset impacts the existing backup policiesthat use the selected dataset. If you edit the settings of a user-defined dataset, thechanges are enforced on all members of the backup policy, unless you override thebackup policy settings and assign another dataset at the client level.
Procedure
1. In the AUI navigation pane on the left, click , and then click Settings.
2. Click the Dataset tab.
The list of configured datasets be displayed.
3. Select a dataset from the list that you want to edit, and then click EDIT.
The Edit DataSet window is displayed.
4. In the Edit DataSet window, complete the following tasks:
a. From the Plugins list, select the plug-in to use for the backups.
b. On the Option tab, edit the plug-in options either by using the graphicalcontrols or by typing option names and values as text entries.
Backup
Dataset catalog 119

(Optional) Toggle the Show Advanced Options switch to view advancedconfiguration options.
Plug-in options enable you to further customize the behavior of a dataset.The user guide for each plug-in provides details on the options available forthe plug-in.
c. Click the Source Data tab, and then define the source data plug-ins thatcontribute data to this dataset.
l To include data from all plug-ins on the client, select Select All Data forAll Local File Systems.
l To include data only from a specific plug-in and limit the dataset tospecific data:
a. From the Plugins list, select the plug-in to use for the backups.Additional options might be displayed below the Select Plug-In Typelist.
b. To back up all available data with the plug-in:
n Select the option.
n Select Select Files and/or Folders and then type the path to thedata.
c. To type the path to the data to back up, type the path in the File/Folder Path field and then click Add.You can limit scheduled backups to a set of data by specifying thepath to the data in the dataset. The following rules apply when youtype the path:
n If you are using a file system plug-in, the first occurrence of anasterisk (*) in a path is treated as a folder wildcard. For example,to specify the My Documents folder for all users on a Windowscomputer, type C:\Documents and Settings\*\My Documents.
n To specify the Documents folder for all users on a Macintosh,type /Users/*/Documents.
n When you specify a data path, only the first occurrence of anasterisk is treated as a folder wildcard. Subsequent occurrencesare interpreted literally.
n The path can include alphanumeric characters (A-Z, a-z, 0–9) andan asterisk (*) as a wildcard. Do not use any of the followingcharacters in the data path: ~!@$^%(){}[]|,`;#:*?<>'"&.
l To include data from all plug-ins on the client, select Select All Data forAll Local File Systems.
l To include data only from a specific plug-in and limit the dataset tospecific data:
a. From the Plugins list, select the plug-in to use for the backups.Additional options might appear below the Select Plug-In Type list.
b. To back up all available data with the plug-in:
n Select the option.
n Select Select Files and/or Folders and then browse to the datato include in the backups.
Backup
120 Avamar 18.2 Administration Guide

c. To type the path to the data to back up, type the path in the File/Folder Path field and then click Add.You can limit scheduled backups to a set of data by specifying thepath to the data in the dataset. You can browse to or type the path tothe data. Several rules apply when you type the path.
If you are using a file system plug-in, then the first occurrence of anasterisk (*) in a path is treated as a folder wildcard. For example, tospecify the My Documents folder for all users on a Windowscomputer, type C:\Documents and Settings\*\My Documents. Tospecify the Documents folder for all users on a Macintosh, type /Users/*/Documents.
NOTICE
When you specify a data path, only the first occurrence of an asteriskis treated as a folder wildcard. Subsequent occurrences areinterpreted literally.
The path can include alphanumeric characters (A-Z, a-z, 0–9) and anasterisk (*) as a wildcard. Do not use any of the following charactersin the data path: ~!@$^%(){}[]|,`;#:*?<>'"&.
5. Click SUBMIT.
Dataset changes take effect on the next scheduled backup. Backups that havealready begun or have been completed are not affected.
Delete a datasetTo delete a dataset, complete the following steps.
Before you begin
Ensure that the dataset is not currently assigned to a client or group. You cannotdelete a dataset if it is assigned to a client or group.
Note
You cannot edit or delete the settings for the Avamar server preconfigured installeddatasets. Modification of a user-defined dataset impacts the existing backup policiesthat use the selected dataset. If you edit the settings of a user-defined dataset, thechanges are enforced on all members of the backup policy, unless you override thebackup policy settings and assign another dataset at the client level.
Procedure
1. In the AUI navigation pane on the left, click , and then click Settings.
2. Click the Dataset tab.
The list of configured datasets is displayed.
3. Select a dataset from the list that you want to delete, and then click DELETE.
A confirmation message is displayed.
4. Click YES.
Backup
Dataset catalog 121

Managing schedulesThis section describes how to manage schedules.
Scheduling backups using the AUI Policy wizardScheduled backups run automatically to ensure that backups occur on an ongoingbasis. You can schedule backups to run daily, weekly, or monthly.
You can schedule backups by using the Policy wizard to create a backup policy.
Perform the following steps within the Policy wizard. The Avamar Administration Guideprovides more information about policies, datasets, schedules, and retention settings.
Procedure
1. Assign members to the new backup policy.
2. Assign a dataset to the new backup policy.
To create a dataset, use the Policy wizard or select Settings > Dataset > Add.
3. Assign a schedule to the new backup policy.
To create a schedule, use the Policy wizard or select Settings > Schedule >Add.
4. Assign a retention policy to the new backup policy.
To create a retention policy, use the Policy wizard or select Settings >Retention > Add.
5. Enable scheduling for the backup policy.
SchedulesSchedules are reusable objects that control when backups, custom event profile emailnotifications, and policy-based replication occur.
Schedule typesYou can configure an Avamar schedule to repeat a system activity at one of theintervals that are listed in the following table.
Table 35 Schedule types
Schedule type
Description
Daily Repeats a system activity every day at one or more times of the day. With dailyschedules, you must also limit the duration of the activity to prevent job overlap.
Weekly Repeats a system activity every week on one or more days of the week. Withweekly schedules, you must also define the earliest start time for the activity, aswell as the time at which the activity is stopped, even if it is still in progress.
Monthly Repeats a system activity on a specific calendar date or on a designated day of theweek each month, such as the first Sunday of every month. With monthlyschedules, you must also define the earliest start time for the activity, as well asthe time at which the activity is stopped, even if it is still in progress.
Schedule start time, end time, and durationWhen you create a schedule, you also define when the schedule should take effect,and when it should be discontinued. For example, assume that you know that the
Backup
122 Avamar 18.2 Administration Guide

client computers that are used for a specific development project will be obsolete at aspecific future date. You can create a schedule for backups that would automaticallycease backups on a certain date. Similarly, if you are administering a large site, youcan create schedules ahead of time, assign them to backup policies, and then activatethem on a certain date. These backup policy backups would not occur until theschedule took effect.
Because scheduled activities often straddle two calendar days, it is important tounderstand that Avamar allocates the full window of time to any activity started by aschedule. For example, consider a schedule with an earliest start time of 10 p.m., alatest end time of 6 a.m. (the following morning), and an end after date of December31 of the current calendar year. On the evening of December 31, the activity starts asexpected and runs until completed, typically sometime during the morning of January 1the following year. However, beginning January 1, the schedule does not start any newscheduled activities.
The following figure illustrates how the start time, end time, and duration of aschedule interact with one another, using the initial settings of the Default schedule.
Figure 12 Schedule start time, end time, and duration
This system activity begins at 10 p.m. (22:00), and can run until 6 a.m. (06:00) thenext day, creating an effective 8 hour duration.
In practice, scheduled activities rarely start or end precisely on time. Server loadaffects actual start times, and complexity of the activity affects actual end times. Thecomplexity of the activity includes the amount of new client data that must be backedup, the number of backup policy backups that are started, and the number of emailmessages that must be sent.
Specifying a schedule start time sets that time as the earliest point that the systemactivity can begin. Also, specifying a duration or end time establishes the latestpossible end time for the system activity.
Schedule time zonesWhen you create or edit schedules, all times are shown relative to the local time zonefor the Avamar Administrator client. For example, assume that you create a schedulein the Pacific Standard time zone with a next runtime of 10 p.m..The next runtime forthe schedule appears as 1 a.m. the following day (3 hours later) for an administrativeuser in the Eastern Standard time zone.
Backup
Managing schedules 123

Schedule catalogThe Avamar system includes a set of preconfigured schedules by default. You can usethese schedules or create a custom schedule.
Note
You cannot edit or delete the settings for the Avamar server preconfigured installedschedules. Modification of a user-defined schedule impacts the existing backuppolicies that use the selected schedule. If you edit the settings in user-definedschedule, the changes are enforced on all members of the backup policy, unless youoverride the backup policy settings and assign another schedule at the client level.
The following schedules are available by default.
Table 36 Schedule catalog
Schedule name Description
Default Schedule Controls backup scheduling for the Default Group. It is initiallyconfigured to run once per day at 10 p.m. If you edit these settings,the changes are enforced on all members of the Default Group.
Default ReplicationSchedule
Controls replication for replication groups.
Default TieringSchedule
Controls backup scheduling for cloud tiering that moves Avamarbackups from Data Domain to the cloud and performs seamlessrecovery of these backups.
Daily Schedule Avamar supplies a predefined Daily Schedule.
Evaluation Schedule Controls when the Evaluation Profile email notification is sent. It isinitially configured to run every Monday at 6 a.m.
Notification Schedule Controls when custom event profile email notification messages aresent.
Override DailySchedule
Defines the available start times for clients that have the Overridegroup schedules setting enabled. This schedule is editable. Copies
of this schedule are not used with the Override group schedulessetting.
Statistics Schedule Controls how often various Avamar server statistics (for example, the
Avamar server detail Bytes protected value) are retrieved orcalculated. The default setting for this schedule is hourly.
Usage IntelligenceSchedule
Controls how often the Avamar server collects and transfersreporting information to Avamar Support via the ESRS gateway.
Add a scheduleProcedure
1. In the AUI navigation pane on the left, click , and then click Settings.
2. Click the Schedule tab.
3. Click ADD.
The Create Schedule dialog box is displayed.
Backup
124 Avamar 18.2 Administration Guide

4. In the Schedule Name field, type a name for the schedule.
Do not use any of the following characters in the name: ~!@$^%(){}[]|,`;#\/:*?<>'"&.
5. In the Backup Window field, type a number of hours.
6. In the Recurrence Type section, choose the schedule type:
Table 37 Settings for each type of schedule
Schedule type
Settings
Daily To select the recurrence pattern by interval, perform the following steps:
a. Select By interval.
b. In the From field, select the time when the schedule should take effect. Tomake a schedule effective immediately, select the current time.
c. In the To field, select the time when the schedule should end.
d. Select the interval.
e. Click ADD.The selected times appear in the list.
f. Click NEXT.
To select the recurrence pattern by a point in time, perform the following steps:
a. Select By time point.
b. Specify the time. To make a schedule effective immediately, select the currenttime.
c. Click ADD.The selected times appear in the list.
d. Click NEXT.
Note
To prevent job overlap, limit the duration of scheduled system activities.
Weekly Select the check box next to the days of the week on which the schedule shouldrun.
Monthly Choose whether to repeat the activity on a specific calendar date or on adesignated day of the week each month:
l To repeat the activity on a specific calendar date, select Day of everymonth, and then select the day from the list.
l To repeat the activity on a designated day of the week each month, select
The ... of every month and then select the day from the lists.
7. Click NEXT.
The Recurrence Pattern pane is displayed.
8. Select how often the schedule runs:
a. Select the recurrence pattern. You can choose between by interval or bytime point.
Backup
Managing schedules 125

b. Select how long the interval runs and then click ADD.
The selected times appear in the list.
c. Click NEXT.
The Activites Constraint page is displayed.
9. On the Activities Constraint page, complete the following tasks:
a. In the Select schedule start time field, define the activity operating hoursby using the At and From fields. You can modify the date.
You can type the times, or select the time and use the arrow buttons tochange the times.
The server workload affects the start time for an activity. Also, the first timethat a backup is performed for any client, the backup is allowed to continuepast the specified end time. This behavior is permitted because initialbackups can take longer than subsequent backups of the same client.
b. In the Select schedule stop time field, select an end date option for theschedule.
Choose when to discontinue the schedule:
l To enable a schedule to run indefinitely, select No End Date.
l To discontinue a schedule on a specific date, select End after and thenselect a date from the list.
10. Click FINISH.
Edit a schedule
Note
You cannot edit or delete the settings for the Avamar server preconfigured installedschedules. Modification of a user-defined schedule impacts the existing backuppolicies that use the selected schedule. If you edit the settings in user-definedschedule, the changes are enforced on all members of the backup policy, unless youoverride the backup policy settings and assign another schedule at the client level.
Procedure
1. In the AUI navigation pane on the left, click , and then click Settings.
2. Click the Schedule tab.
3. Select a schedule and then click EDIT.
The Edit Schedule dialog box appears.
4. Edit the schedule settings.
5. Click OK.
Backup
126 Avamar 18.2 Administration Guide

Delete a scheduleEnsure that the schedule is not currently assigned to a group. If a schedule is assignedto a group, you cannot delete the schedule.
Note
You cannot edit or delete the settings for the Avamar server preconfigured installedschedules. Modification of a user-defined schedule impacts the existing backuppolicies that use the selected schedule. If you edit the settings in user-definedschedule, the changes are enforced on all members of the backup policy, unless youoverride the backup policy settings and assign another schedule at the client level.
Procedure
1. In the AUI navigation pane on the left, click , and then click Settings.
2. Click the Schedule tab.
3. Select the schedule, and then click DELETE.
4. In the confirmation message dialog box, click YES .
Manage rulesRules are used by the Avamar Server for domain map and automatic backup policyassignment for auto-discovered VMs.
You can create a new rule, edit an existing rule, or delete a rule.
Create a ruleRules are used by the Avamar server for domain map and automatic backup policyassignment for autodiscovered VMs.
When creating rules, ensure that rules are mutually exclusive, to avoid the situationwhere a VM might qualify under multiple rules.
Procedure
1. In the AUI navigation pane on the left, click , and then click Settings.
2. Click the Rule tab.
3. In the domain tree, select a vCenter domain or subdomain for the client.
4. On the Setting page, complete the following tasks:
a. Click ADD.
The New Rule window is displayed.
5. In the Rule Name field, type a name for the rule.
6. In the Match Type field, select whether the rule should match Any of the listedfilter mechanisms, or All of them.
This selection allows you to configure multiple different filters to select VMs,and to determine how these filters interact with one another to select thecorrect virtual machines. For example, you might create a filter that uses avirtual machine folder path to select virtual machines, and another filter thatuses a virtual machine naming convention.
Use this option to determine which virtual machines are included under this rule:
Backup
Manage rules 127

l To include only virtual machines that are in the defined folder path and alsofollow the naming convention, select All.This step excludes virtual machines that are in the folder path but that donot follow the naming convention. It also excludes virtual machines thatfollow the naming convention but are not in the folder path
l To include any virtual machines that are either in the virtual machine folderpath or that follow the naming convention, select Any.
7. To add a filter:
a. Click .
This step adds a row to the list of filters.
b. In the Filter column, select a filter type.
For example, to create a filter that uses a virtual machine namingconvention, select VM Name, or to create filter that uses a vCenter VM Tag,select VM Tag.
c. In the Operator column, select the operand.
For example, if VM Name is selected for the filter type and begins with isselected for the operand, then all virtual machines whose names begin withthe filter text is selected.
d. In the Value column, type the filter text.
For example, to create a filter that selects all virtual machines whose namesbegin with the text string HR_, select VM Name for the filter type, beginswith for the operand, and type HR_ for the filter text.
8. To create additional filters, click .
This step adds a row to the list of filters.
9. To delete an existing filter, click Delete.
10. Click SUBMIT.
Changes made to tags may experience a delay of up to 12 hours before beingenforced. For this reason, edit tags with caution, or perform a synchronizedvCenter operation, which automatically synchronizes the vCenter with theAvamar server.
Edit a ruleWhen editing a rule, ensure that rules are mutually exclusive, to avoid the situationwhere a virtual machine might qualify under multiple rules.
Procedure
1. In the AUI navigation pane on the left, click , and then click Settings.
2. Click the Rule tab.
3. In the domain tree, select a vCenter domain or subdomain for the client.
4. In the Settings page, complete the following tasks:
a. Select a folder that contains a VMware entity.
b. Select a rule from the list that you want to edit, and then click EDIT.
The Edit Rule window is displayed.
Backup
128 Avamar 18.2 Administration Guide

5. In the Rule Name field, type a name for the rule.
6. In the Match Type field, select whether the rule should match Any of the listedfilter mechanisms, or All of them.
This selection allows you to configure multiple different filters to select VMs,and to determine how these filters interact with one another to select thecorrect virtual machines. For example, you might create a filter that uses avirtual machine folder path to select virtual machines, and another filter thatuses a virtual machine naming convention.
Use this option to determine which virtual machines are included under this rule:
l To include only virtual machines that are in the defined folder path and alsofollow the naming convention, select All.This step excludes virtual machines that are in the folder path but that donot follow the naming convention. It also excludes virtual machines thatfollow the naming convention but are not in the folder path.
l To include any virtual machines that are either in the virtual machine folderpath or that follow the naming convention, select Any.
7. To add a filter:
a. Click .
This step adds a row to the list of filters.
b. In the Filter column, select a filter type.
For example, to create a filter that uses a virtual machine namingconvention, select VM Name, or to create filter that uses a vCenter VM Tag,select VM Tag.
c. In the Operator column, select the operand.
For example, if VM Name is selected for the filter type and begins with isselected for the operand, then all virtual machines whose names begin withthe filter text is selected.
d. In the Value column, type the filter text.
For example, to create a filter that selects all virtual machines whose namesbegin with the text string HR_, select VM Name for the filter type, beginswith for the operand, and type HR_ for the filter text.
8. To create additional filters, click .
This step adds a row to the list of filters.
9. To delete an existing filter:
a. Select the filter.
b. In the Actions column, click Delete.
10. Click SUBMIT.
Changes made to tags may experience a delay of up to 12 hours before beingenforced. For this reason, edit tags with caution, or perform a synchronizedvCenter operation, which automatically synchronizes the vCenter with theAvamar server.
Backup
Manage rules 129

Delete a ruleProcedure
1. In the AUI navigation pane on the left, click , and then click Settings.
2. Click the Rule tab.
3. In the domain tree, select a vCenter domain or subdomain for the client.
4. In the Setting page, complete the following tasks:
a. Select a rule from the list.
b. Click DELETE.
Retention policiesBackup retention policies enable you to specify how long to keep a backup in thesystem.
A retention policy is assigned to each backup when the backup occurs. Specify acustom retention policy when you perform an on-demand backup, or create aretention policy that is assigned automatically to a group of clients during a scheduledbackup.
When the retention for a backup expires, then the backup is automatically marked fordeletion. The deletion occurs in batches during times of low system activity.
If required, you can manually change the retention setting for an individual backup thathas already occurred. If you change a configured retention policy, however, thechange applies only to backups that occur after the change. The retention settingremains the same for backups that have already been performed. Therefore, it isimportant to consider and implement the best retention policy for a site before toomany backups occur.
There are two types of retention settings:
l Basic retention settings specify a fixed expiration date.
l Advanced retention settings specify the number of daily, weekly, monthly, andyearly backups to keep.
Basic retention settingsBasic retention settings are used to assign a fixed expiration date to a backup usingone the settings in the following table.
Table 38 Basic retention settings
Retentionsetting
Description
Retention period Enables you to define a fixed retention period in days, weeks, months, oryears after the backup is performed. For example, you could specify thatbackups expire after 6 months.
End date Enables you to assign a calendar date as the expiration date. For example,you could specify that backups expire on December 31, 2013.
No end date Enables you to keep backups indefinitely. This setting is useful for ensuringthat all backups that are assigned this retention policy are retained for thelife of the system.
Backup
130 Avamar 18.2 Administration Guide

NOTICE
For backups of 32-bit Windows or 32-bit Linux client computers, do not assign aretention period for a date after February 7, 2106. If you assign an extended retentionperiod to a 32-bit Windows client, the backup completes with exceptions. For 32-bitLinux clients, the backups complete but do not appear in Avamar Administrator.
Advanced retention settingsWith advanced retention settings, you can assign the expiration of backupsdynamically by using the number of daily backups, weekly backups, monthly backups,and yearly backups to retain in the system.
For scheduled daily backups, some backups are automatically assigned an advancedretention type:
l The first successful scheduled backup each day is designated as the daily backup.
l The first successful scheduled backup each week is designated as the weeklybackup.
l The first successful scheduled backup each month is designated as the monthlybackup.
l The first successful scheduled backup each year is designated as the yearlybackup.
For assigning advanced retention types, each day begins at 00:00:01 GMT, each weekbegins on Sunday, each month begins on the first calendar day of that month, andeach year begins on January 1.
NOTICE
You cannot apply advanced retention settings to on-demand backups. On-demandbackups can occur at any time, which are inherently asynchronous— the systemcannot tag them as daily, weekly, monthly, or yearly.
Always use daily scheduled backups with retention policies with advanced retentionsettings. The Always keep: n weeks of daily backups setting has no effect unlessthere are daily backups in the system. Depending on the schedule you use, dailybackups may not be in the system. For example, if you assign a schedule to a groupthat only performs weekly backups, then there are no daily backups in the system.
Retention policy catalogThe Avamar system includes a set of preconfigured retention policies by default. Youcan use these retention policies for scheduled backups of clients, or you can create acustom retention policy.
Note
You cannot edit or delete the settings for the Avamar server preconfigured installedretention policies. Modification of a user-defined retention policy impacts the existingbackup policies that use the selected retention policy. If you edit the settings in auser-defined retention policy, the changes are enforced on all members of the backuppolicy, unless you override the backup policy settings and assign another retentionpolicy at the client level.
The retention policies in the following table are available by default.
Backup
Retention policies 131

Table 39 Retention policy catalog
Retention policyname
Description
Minimal Retention Enables you to enforce a minimum basic retention setting across anentire site. For example, you can keep all backups for at least 90 daysregardless of what other retention policies specify. This feature isintended to address the need of some enterprises to enforce site-wideminimum retention standards regardless of what individualorganizations might decide to implement with other retention policies.The Minimal Retention policy is a global system object that controlsonly the minimal retention setting. Therefore, you cannot assign theMinimal Retention policy to a backup policy.
Default Retention Defines backup retention settings for the Default Group. By default,the Default Retention policy assigns a retention period of 60 days andretains 60 days of daily backups.
End User On DemandRetention
Controls the retention settings for on-demand backups that the client
begins with, such as using the Back Up Now command on theAvamar Windows client. Advanced retention settings are disabled onthis retention policy because advanced retention settings never applyto on-demand backups. The End User On Demand Retention policy is aglobal system object that only controls retention for on-demandbackups that the client begins with. Therefore, you cannot assign theEnd User On Demand Retention policy to a backup policy.
Monthly Retention Sets the expiration date to 1 month after the backup is performed.
Weekly Retention Sets the expiration date to 1 week after the backup is performed.
Add a retention policyIn the Administration window, you can add, remove, or delete a retention policy.
Note
Best practice is to specify a retention that is greater than or equal to 14 days. Whenyou create a retention policy for less than 14 days, an alert is displayed.
Procedure
1. In the AUI navigation pane on the left, click , and then click Settings.
2. Click the Retention tab.
3. Click ADD.
The Add Retention Policy dialog box is displayed.
4. In the Retention Name field, type a name for the retention policy.
Do not use any of the following characters in the retention policy name: ~!@$^%(){}[]|,`;#\/:*?<>'"&.
5. To delete backups automatically after a specific number of days, weeks,months, or years:
a. Select Retention period.
b. Specify the number of days, weeks, months, or years.
Backup
132 Avamar 18.2 Administration Guide

6. To delete backups automatically on a specific calendar date:
a. Select End date period.
b. Browse to that date on the calendar.
7. To keep backups for the period that a client is active, select No end date.
8. To override the retention policy for scheduled backups:
a. Select Override basic retention policy for scheduled backups.
b. Specify the maximum number of daily, weekly, monthly, and yearly backupsto retain.
9. Click SAVE.
Edit a retention policy
Note
You cannot edit or delete the settings for the Avamar server preconfigured installedretention policies. Modification of a user-defined retention policy impacts the existingbackup policies that use the selected retention policy. If you edit the settings in auser-defined retention policy, the changes are enforced on all members of the backuppolicy, unless you override the backup policy settings and assign another retentionpolicy at the client level.
Procedure
1. In the AUI navigation pane on the left, click , and then click Settings.
2. Click the Retention tab.
3. Select a retention policy and then click EDIT.
The Edit Retention Policy dialog box appears.
4. Edit the retention policy settings.
5. Click SAVE.
Delete a retention policyEnsure that the retention policy is not currently assigned to a client or a backup policy.You cannot delete a retention policy when it is assigned to a client or backup policy.
Note
You cannot edit or delete the settings for the Avamar server preconfigured installedretention policies. Modification of a user-defined retention policy impacts the existingbackup policies that use the selected retention policy. If you edit the settings in auser-defined retention policy, the changes are enforced on all members of the backuppolicy, unless you override the backup policy settings and assign another retentionpolicy at the client level.
Procedure
1. In the AUI navigation pane on the left, click , and then click Settings.
2. Click the Retention tab.
3. Select the retention policy, and then click DELETE.
4. On the confirmation message dialog box, click YES.
Backup
Retention policies 133
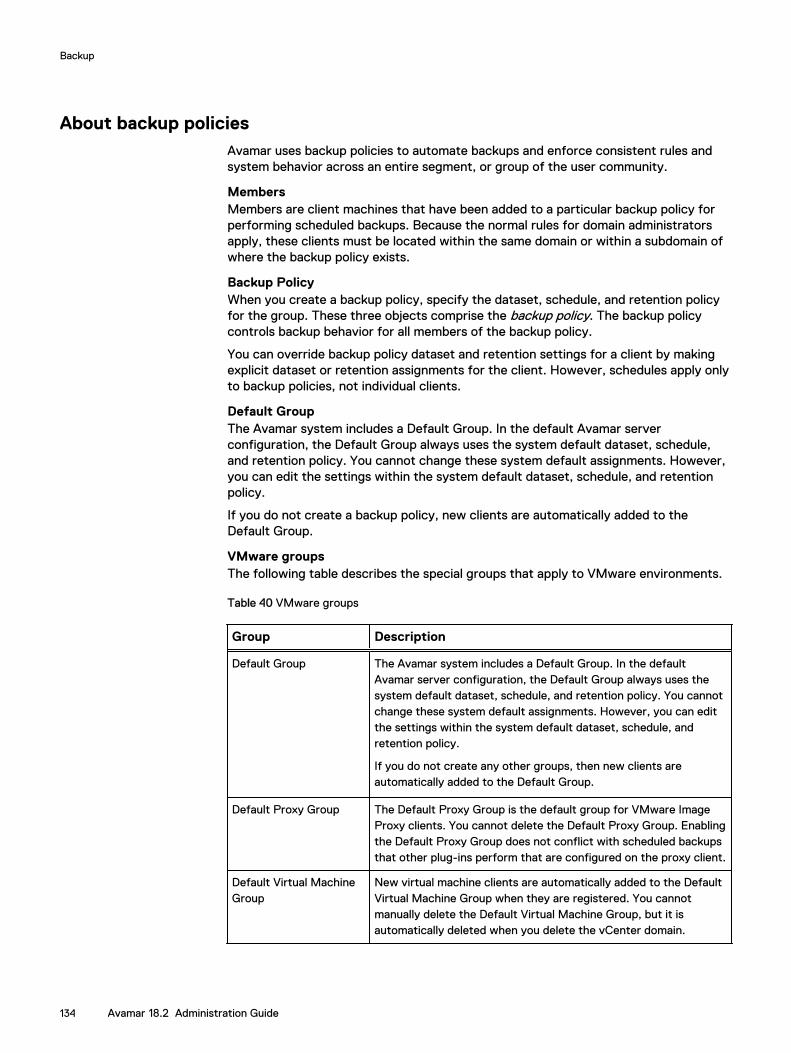
About backup policiesAvamar uses backup policies to automate backups and enforce consistent rules andsystem behavior across an entire segment, or group of the user community.
MembersMembers are client machines that have been added to a particular backup policy forperforming scheduled backups. Because the normal rules for domain administratorsapply, these clients must be located within the same domain or within a subdomain ofwhere the backup policy exists.
Backup PolicyWhen you create a backup policy, specify the dataset, schedule, and retention policyfor the group. These three objects comprise the backup policy. The backup policycontrols backup behavior for all members of the backup policy.
You can override backup policy dataset and retention settings for a client by makingexplicit dataset or retention assignments for the client. However, schedules apply onlyto backup policies, not individual clients.
Default GroupThe Avamar system includes a Default Group. In the default Avamar serverconfiguration, the Default Group always uses the system default dataset, schedule,and retention policy. You cannot change these system default assignments. However,you can edit the settings within the system default dataset, schedule, and retentionpolicy.
If you do not create a backup policy, new clients are automatically added to theDefault Group.
VMware groupsThe following table describes the special groups that apply to VMware environments.
Table 40 VMware groups
Group Description
Default Group The Avamar system includes a Default Group. In the defaultAvamar server configuration, the Default Group always uses thesystem default dataset, schedule, and retention policy. You cannotchange these system default assignments. However, you can editthe settings within the system default dataset, schedule, andretention policy.
If you do not create any other groups, then new clients areautomatically added to the Default Group.
Default Proxy Group The Default Proxy Group is the default group for VMware ImageProxy clients. You cannot delete the Default Proxy Group. Enablingthe Default Proxy Group does not conflict with scheduled backupsthat other plug-ins perform that are configured on the proxy client.
Default Virtual MachineGroup
New virtual machine clients are automatically added to the DefaultVirtual Machine Group when they are registered. You cannotmanually delete the Default Virtual Machine Group, but it isautomatically deleted when you delete the vCenter domain.
Backup
134 Avamar 18.2 Administration Guide

Managing backup policiesThe Policies page provides access to backup policy tasks and information.
The Policies page includes a summary of each backup policy on the selected Avamarserver.
Backup policy objects contain the following child objects:
l Schedule—when a scheduled backup is performed
l Retention—how long the backup is stored in the backup appliance
l Dataset—optional backup parameters
l Members—add and remove clients from a backup policy
Create a backup policyWhen you create a backup policy, you define the dataset, schedule, and retentionsettings that are applied to a client or a group of clients. A backup policy must containat least one Avamar client. If the backup policy contains two or more clients, theclients must belong to the same Avamar domain. You can override backup policysettings at the client level.
Procedure
1. In the AUI navigation pane on the left, click , and then click Backup Policy.
2. In the domain tree, select a domain or subdomain for the backup policy.
To select a subdomain for the backup policy, toggle the Include Sub-domainswitch to on.
3. To add a backup policy, click ADD.
The Policy wizard is displayed and opens to the Properties page.
Configure backup policy properties
You can configure backup policy properties, including creating a name for the backuppolicy, enabling the backup policy, setting an override schedule, and enabling autoproxy mapping.
Complete the following tasks from the Properties page of the Policy wizard.
To access the Properties page of the Policy wizard, in the AUI navigation pane on theleft, click , click Backup Policy > ADD.
Procedure
1. In the Name field, type a name for the backup policy.
2. To use this backup policy for scheduled client backups, select the Enabledcheck box.
Clearing the check box disables backups for the backup policy.
3. To override the assigned schedule for this backup policy, select OverrideSchedule:
l To skip the next scheduled backup, select Skip Next Backup.
l To perform the next scheduled backup one time only, select Run NextBackup Once.
4. To enable Auto proxy mapping, select the check box.
Backup
Managing backup policies 135

5. Select a proxy from the list.
6. To apply the backup policy to selected clients or remove a backup policy fromselected clients and complete the wizard, click NEXT.
The Members page is displayed.
Add or remove members to a backup policy
You can configure backup policy attributes, including applying the backup policy toselected clients or removing a backup policy from selected clients. You can add clientswhen you create or add or remove clients when you edit a back policy.
To access the Members page of the Policy wizard, in the AUI navigation pane on theleft, click , click Backup Policy.
Complete the following steps from the Members pane of the Policy wizard.
Procedure
1. In the domain tree, select the domain for the backup policy.
You can only view clients in the domain for the login account. To view all clients,log in to the root domain.
2. To add a client to a backup policy:
a. In the list of clients, select the client that you want to add.
b. Click NEXT.
When you complete this task, the Avamar server applies the backup policy tothe selected clients.
3. To remove a client from a backup policy:
a. In the list of clients, clear the client that you want to remove.
b. Click NEXT.
This step removes the association between selected clients and the backuppolicy. When you complete the task, the backup policy no longer applies to theselected clients.
4. To add a dataset to a backup policy and complete the wizard, click NEXT.
The Dataset pane appears.
Add a dataset to a backup policy
You can configure backup policy attributes, including adding a dataset.
Complete the following tasks from the Dataset page of the Policy wizard.
To access the Properties page of the Policy wizard, in the AUI navigation pane on theleft, click , click Backup Policy > ADD.
Note
When the Avamar server is using Data Domain for back-end storage, the Data Domainsystem is the default backup storage location. The system can be changed in theOptions tab.
Procedure
1. In the Dataset field, select a dataset from the drop-down list.
Backup
136 Avamar 18.2 Administration Guide

2. In the Dataset Name field, type a name for the dataset.
The name can include alphanumeric characters (A-Z, a-z, 0–9) and thefollowing special characters: period (.), hyphen (-), and underscore (_). Do notuse Unicode characters or the following special characters: ` ~ ! @ # $ % ^ & *( ) = + [ ] { } | \ / ; : ' " < > , ?
3. To include data from all plug-ins on the client, select Select All Data for AllLocal File Systems.
4. From the Plugins list, select the plug-in to use for the backups.
5. Click the Option tab, and then set plug-in options either by using the graphicalcontrols or by typing option names and values as text entries.
(Optional) Toggle the Show Advanced Options switch to view advancedconfiguration options.
Plug-in options enable you to further customize the behavior of a dataset. Theuser guide for each plug-in provides details on the options available for the plug-in.
6. Click the Source Data tab, and then define the source data plug-ins thatcontribute data to this dataset.
l To include data from all plug-ins on the client, select Select All Data for AllLocal File Systems.
l To include data only from a specific plug-in and limit the dataset to specificdata:
a. From the Plugins list, select the plug-in to use for the backups.Additional options might be displayed below the Select Plug-In Type list.
b. To back up all available data with the plug-in:
n Select the option.
n Select Select Files and/or Folders and then type the path to thedata.
c. To type the path to the data to back up, type the path in the File/FolderPath field and then click Add.You can limit scheduled backups to a set of data by specifying the pathto the data in the dataset. The following rules apply when you type thepath:
n If you are using a file system plug-in, the first occurrence of anasterisk (*) in a path is treated as a folder wildcard. For example, tospecify the My Documents folder for all users on a Windowscomputer, type C:\Documents and Settings\*\My Documents.
n To specify the Documents folder for all users on a Macintosh, type /Users/*/Documents.
n When you specify a data path, only the first occurrence of an asteriskis treated as a folder wildcard. Subsequent occurrences areinterpreted literally.
n The path can include alphanumeric characters (A-Z, a-z, 0–9) and anasterisk (*) as a wildcard. Do not use any of the following charactersin the data path: ~!@$^%(){}[]|,`;#:*?<>'"&.
7. To add a schedule to a backup policy and complete the wizard, click NEXT.
Backup
Managing backup policies 137

The Schedule page is displayed.
Add a schedule to a backup policy
You can configure backup policy attributes, including adding a schedule.
Complete the following tasks from the Schedule page of the Policy wizard.
To access the Schedule page of the Policy wizard, in the AUI navigation pane on theleft, click , click Backup Policy > ADD.
Procedure
1. To select an existing schedule, select a schedule type from the Schedule drop-down list, and then click NEXT.
The Retention window is displayed.
2. To edit a schedule:
a. In the Schedule field, select a schedule that you would like to edit from thedrop-down list.
b. Toggle the Edit Schedule switch to ON.
c. Edit the schedule settings, and then click NEXT.
The Retention window is displayed
3. To add a schedule:
a. In the Schedule field, select New from the drop-down list.
b. In the Schedule Name field, type a name for the schedule.
Do not use any of the following characters in the name: ~!@$^%(){}[]|,`;#\/:*?<>'"&.
c. In the Backup Window field, type a number of hours.
d. In the Recurrence Type section, choose the schedule type:
Table 41 Settings for each type of schedule
Schedule type
Settings
Daily To select the recurrence pattern by interval, perform the following steps:
a. Select By interval.
b. In the From field, select the time when the schedule should takeeffect. To make a schedule effective immediately, select the currenttime.
c. In the To field, select the time when the schedule should end.
d. Select the interval.
e. Click ADD.The selected times appear in the list.
f. Click NEXT.
To select the recurrence pattern by a point in time, perform thefollowing steps:
a. Select By time point.
Backup
138 Avamar 18.2 Administration Guide

Table 41 Settings for each type of schedule (continued)
Schedule type
Settings
b. Specify the time. To make a schedule effective immediately, selectthe current time.
c. Click ADD.The selected times appear in the list.
d. Click NEXT. The Retention window is displayed
Note
To prevent job overlap, limit the duration of scheduled system activities.
Weekly a. Select the check box next to the days of the week on which theschedule should run.
b. In the Select schedule start time field, define the activity
operating hours by using the At and From fields. You can modify thedate.You can type the times, or select the time and use the arrow buttonsto change the times.
The server workload affects the start time for an activity. Also, thefirst time that a backup is performed for any client, the backup isallowed to continue past the specified end time. This behavior ispermitted because initial backups can take longer than subsequentbackups of the same client.
c. In the Select schedule stop time field, select an end date optionfor the schedule.Choose when to discontinue the schedule:
l To enable a schedule to run indefinitely, select No End Date.
l To discontinue a schedule on a specific date, select End afterand then select a date from the list.
d. Click NEXT. The Retention window is displayed
Monthly a. Choose whether to repeat the activity on a specific calendar date oron a designated day of the week each month:
l To repeat the activity on a specific calendar date, select Day ofevery month, and then select the day from the list.
l To repeat the activity on a designated day of the week each
month, select The ... of every month and then select the dayfrom the lists.
b. In the Select schedule start time field, define the activity
operating hours by using the At and From fields. You can modify thedate.You can type the times, or select the time and use the arrow buttonsto change the times.
Backup
Managing backup policies 139

Table 41 Settings for each type of schedule (continued)
Schedule type
Settings
The server workload affects the start time for an activity. Also, thefirst time that a backup is performed for any client, the backup isallowed to continue past the specified end time. This behavior ispermitted because initial backups can take longer than subsequentbackups of the same client.
c. In the Select schedule stop time field, select an end date optionfor the schedule.Choose when to discontinue the schedule:
l To enable a schedule to run indefinitely, select No End Date.
l To discontinue a schedule on a specific date, select End afterand then select a date from the list.
d. Click NEXT. The Retention window is displayed
Apply retention to a backup policy
You can configure backup policy attributes, including adding retention.
Complete the following tasks from the Retention page of the Policy wizard.
To access the Schedule page of the Policy wizard, in the AUI navigation pane on theleft, click , click Backup Policy > ADD.
Note
Best practice is to specify a retention that is greater than or equal to 14 days. Whenyou create a retention policy for less than 14 days, an alert is displayed.
Procedure
1. To select an existing schedule, select a schedule type from the Retention drop-down list, and then click NEXT.
The Summary window is displayed
2. To edit retention policy:
a. In the Retention field, select a retention policy that you would like to editfrom the drop-down list.
b. Toggle the Edit Retention switch to ON.
c. Edit the retention settings, and then click NEXT.
The Retention window is displayed
3. To add a retention:
a. In the Retention field, select New from the drop-down list.
b. In the Retention Name field, type a name for the schedule.
Do not use any of the following characters in the name: ~!@$^%(){}[]|,`;#\/:*?<>'"&.
Backup
140 Avamar 18.2 Administration Guide

c. In the Backup Window field, type a number of hours.
d. In the Recurrence Type section, choose the schedule type:
4. To delete backups automatically after a specific number of days, weeks,months, or years:
a. Select Retention period.
b. Specify the number of days, weeks, months, or years.
5. To delete backups automatically on a specific calendar date:
a. Select End date period.
b. Browse to that date on the calendar.
6. To keep backups for the period that a client is active, select No end date.
7. To override the retention policy for scheduled backups:
a. Select Override basic retention policy for scheduled backups.
b. Specify the maximum number of daily, weekly, monthly, and yearly backupsto retain.
8. To review a summary of the backup policy and complete the wizard, clickNEXT.
The Summary page is displayed.
Edit a backup policyYou can edit a backup policy, including setting properties and adding or modifyingmembers, datasets, schedules, and retention.
Procedure
1. In the AUI navigation pane on the left, click , and then click Backup Policy.
The Policy page appears.
2. In the domain tree, select a domain or subdomain for the backup policy.
To select a subdomain for the backup policy, toggle the Include Sub-domainswitch to on.
3. Select a backup policy from the list, and then click Edit.
The Policy wizard is displayed where you can modify the required backup policysettings.
Copying a backup policyYou can copy backup policies within the same domain. You cannot copy a backuppolicy to another domain.
Procedure
1. In the AUI navigation pane on the left, click , and then click Backup Policy.
The Policy page is displayed.
2. Select the backup policy that you want to copy.
3. Select MORE ACTIONS > Copy Policy.
The Copy Policy dialog box is displayed.
4. Type a name for the new backup policy.
Backup
Managing backup policies 141

5. To copy the entire client list to this new backup policy, select the IncludeClient Members check box.
6. Click OK.
Enabling and disabling a backup policyYou can disable a backup policy to prevent scheduled backups from occurring for agroup of clients. This step is typically done to place the system in a state that supportsvarious maintenance activities.
If you disable a backup policy, you must re-enable the backup policy to resumescheduled backups.
Procedure
1. In the AUI navigation pane on the left, click , and then click Backup Policy.
The Policy page is displayed.
2. In the domain tree, select a domain or subdomain for the backup policy.
To select a subdomain for the backup policy, toggle the Include Sub-domainswitch to on.
3. Select a backup policy from the list.
4. To enable a backup policy, click MORE ACTIONS > Enable Policy.
5. To disable a backup policy, click MORE ACTIONS > Disable Policy.
Delete a backup policy
Before you begin
When deleting a backup policy, assign the clients in the backup policy that you wouldlike to delete to a different backup policy so that scheduled backups for the clientscan continue uninterrupted.
Procedure
1. In the AUI navigation pane on the left, click , and then click Backup Policy.
2. In the domain tree, select a domain or subdomain for the backup policy.
To select a subdomain for the backup policy, toggle the Include Sub-domainswitch to on.
3. Select the backup policy that you want to remove, and then click DELETE.
A confirmation message is displayed.
4. Click YES.
Start an on-demand backup of a backup policyProtecting an instance assigns the instance to a particular backup policy. You canassign more than one backup policy to an instance.
Procedure
1. In the AUI navigation pane on the left, click , and then click Backup Policy.
The Policy page appears.
2. In the domain tree, select a domain or subdomain for the backup policy.
To select a subdomain for the backup policy, toggle the Include Sub-domainswitch to on.
Backup
142 Avamar 18.2 Administration Guide

3. Select a backup policy from the list, and then click START BACKUP.
The instance receives protection that is based on the schedule and retentionperiod that are specified in the backup policy.
Enabling a scheduled backup for a backup policyScheduled backups occur only for enabled backup policies. Backup policies aredisabled by default unless you select the Enabled check box on the first page of theNew Policy wizard. If you did not enable the backup policy when you created it, usethe menu options in the Policy window to enable backups.
Procedure
1. In the AUI navigation pane on the left, click , and then click Backup Policy.
The Policy page is displayed.
2. In the domain tree, select a domain or subdomain for the backup policy.
To select a subdomain for the backup policy, toggle the Include Sub-domainswitch to on.
3. Select a backup policy from the list.
4. To enable a backup policy, click MORE ACTIONS > Enable Policy.
5. To disable a backup policy, click MORE ACTIONS > Disable Policy.
Monitoring backupsYou can monitor and view status information for backup and restore operations byusing the Activity Monitor.
To access the Activity Monitor, open the navigation pane, and then click Activity.The Activity Monitor appears with a list of all activities.
Note
The AUI Activity Monitor window has been optimized for at least 1366 pixels-widescreens. Display issues might occur for smaller screens. To properly display the AUI,ensure that your display is at least 1366 pixels wide.
The Activity Monitor provides you with options to filter the information that appears:
l Filter activities by duration—By default, the Activity Monitor displays the mostrecent 5,000 client activities. To select a different duration, in the Filter activitiesby duration drop-down list, select Last 24 hours or Last 72 hours.
l Filter activities by domain—By default, the Activity Monitor displays all activitiesregardless of domain. To display only the activities for a specific domain, in theFilter activities by domain drop-down list, select a domain or subdomain.
l Filter activities by status—By default, the Activity Monitor displays all activitiesregardless of status.To display only activities with a specific status, at the top of the Activity Monitor,select one of the following options:
n Canceled
n Completed
n Completed with Exceptions
Backup
Enabling a scheduled backup for a backup policy 143
n Failed
n Running
n Waiting
To filter activities by client, start time, plug-in, or type, click in their respectivecolumn.
The Activity Monitor displays the date and time that an activity began, and the totalnumber of bytes examined during an activity.
To view activity details, expand the Details pane, by clicking .
Cancel backupsYou can cancel a backup any time before it completes. The cancellation might take 5minutes or longer. The backup might complete before the cancellation finishes.
Procedure
1. In the AUI navigation pane on the left, click , and then click Activity.
The Activity Monitor appears with a list of activities.
2. Select the backup from the list.
3. Click CANCEL.
A confirmation dialog box is displayed.
4. Click YES.
Managing completed backupsAfter you perform an on-demand or scheduled backup, you can validate the backup,change settings for the backup, or delete the backup.
Finding a completed backup to manageYou can find a completed backup by searching for a backup that occurred on aspecific calendar date or during a specific date range, or by searching for a backupwith a specific retention type.
NOTICE
Avamar generally supports the use of specific supported international characters indirectory, folder, and filenames. However, proper display of international languagecharacters is contingent on the client computer’s Java locale and installed systemfonts being compatible with the original language. If you browse backups that werecreated with international characters and a compatible font is not installed, then anycharacters that the system cannot resolve appear as rectangles. This action is anormal limitation of that particular situation and does not affect the ability to restorethese directories, folders, or files. The Avamar Release Notes provide additionalinternational language support information.
Procedure
1. In the AUI navigation pane on the left, click , and then click AssetManagement.
The Asset Management window appears.
Backup
144 Avamar 18.2 Administration Guide

2. In the domain tree, select the domain for the client.
3. From the list of clients, select the client with the backups to manage.
4. In the Client Summary pane on the right, click VIEW MORE.
5. Click the Backups tab.
A list of completed backups for this client appears. Any backup in this list can beused to restore the client.
6. To locate backups by date:
a. Click .
b. Specify the date range in the From and To fields.
c. Click RETRIEVE.
The list of backups for the date range appears.
Changing the expiration date for a backupYou can change the date that a backup expires. When the backup expires, Avamarusers cannot recover data from the expired backup. A garbage collection process runson a nightly basis to clean up and reclaim space from orphaned data (data that isunique to the expired backups).
The expiration date can be a specific date that you select or a retention period of acertain number of days, weeks, months, or years. You can configure a backup toremain in backup storage for as long as the client remains active on the Avamarserver.
Procedure
1. In the AUI navigation pane on the left, click , and then click AssetManagement.
The Asset Management window is displayed.
2. In the domain tree, select the domain for the client.
3. From the list of clients, select the client with the backups to manage.
4. In the Client Summary pane on the right, click VIEW MORE.
5. Click the Backup tab.
A list of completed backups for this client is displayed. Any backup in this listcan be used to restore the client.
6. Select the backup that you would like to change the expiration date.
7. Select MORE ACTIONS > Change expiration date.
The Change expiration date dialog box is displayed.
8. Select the new expiration date:
l To automatically delete this backup from the Avamar server after a specificamount of time, select Retention period and then specify the number ofdays, weeks, months, or years for the retention period.
l To automatically delete this backup from the Avamar server on a specificcalendar date, select End date and browse to that date on the calendar.
l To keep this backup for as long as this client remains active in the Avamarserver, select No end date.
Backup
Changing the expiration date for a backup 145

9. Click OK.
A confirmation message is displayed.
Changing the retention type for a backupTo support certain advanced features, Avamar Administrator automatically assignsone or more retention types to every backup. For example, the first backup that iscreated on an Avamar system is tagged as a daily, weekly, monthly, or yearly. You canmanually change the retention types assigned to a backup.
When you manually change the retention types assigned to a backup, especially onethat has multiple retention types, ensure that you are not inadvertently removing aweekly, monthly, or yearly backup that you should retain. For example, consider abackup that is assigned daily, weekly, monthly, and yearly retention types. If youremove the yearly retention type designation, you might not have another yearlybackup in the system for quite a long time.
Procedure
1. In the AUI navigation pane on the left, click , and then click AssetManagement.
The Asset Management window is displayed.
2. In the domain tree, select the domain for the client.
3. From the list of clients, select the client with the backups to manage.
4. In the Client Summary pane on the right, click VIEW MORE.
5. Click the Backup tab.
A list of completed backups for this client is displayed. Any backup in this listcan be used to restore the client.
6. Select the backup that you would like to change the expiration date.
7. Select MORE ACTIONS > Change retention type.
The Change retention type dialog box is displayed.
8. Select one of the following retention types for the backups:
l To explicitly assign a daily, weekly, monthly, or yearly retention type to thisbackup, select Tags and then select the check box next to the retentiontype.
l If you do not want to explicitly assign a daily, weekly, monthly, or yearlyretention type to the backup, select Not tagged. The backup is designatedas untagged.
9. Click OK.
A confirmation message is displayed.
Validating a backup by using Avamar AdministratorYou can verify that files can be restored from a backup. This validation starts a“virtual” restore of all files in the backup, but does not actually restore any files to theclient file system.
Procedure
1. In Avamar Administrator, click the Backup & Restore launcher link.
The Backup, Restore and Manage window appears.
Backup
146 Avamar 18.2 Administration Guide

2. Find the backup. Finding a completed backup to manage on page 144 providesinstructions.
3. In the Backup History list, select the backup to validate.
4. Select Actions > Validate Backup.
The Select Client to Perform Validation dialog box appears.
5. Select the client on which to validate the backup:
l To validate the backup on the same client from which the backup wasoriginally performed, select Validate using the backup client.
l To validate the backup on a different client, select Validate using adifferent client, and then click Browse to browse to the client.
6. From the Validation Plug-in Type list, select the plug-in on which to validatethe backup. Only the plug-ins that are installed on the selected client appear inthe list.
7. From the Avamar encryption method list, select the encryption method to usefor client/server data transfer during the validation.
Note
The default encryption setting for backup validations is high, regardless of theencryption setting that is used for the original backup.
8. Click OK.
A confirmation message appears.
9. Click OK.
After you finish
Backup validations appear as activities in the Activity window. You can monitor andcancel the backup validation activity the same way that you monitor or cancel abackup. Monitoring backups on page 143 and Cancel backups on page 63 provideinstructions.
Viewing backup statisticsYou can view detailed statistics for completed backups from the Dashboard.
To access the dashboard, in the AUI navigation pane on the left, click , and thenclick Dashboard.
The Jobs | Backups pane of the Dashboard window provides statistics for any storedbackup.
Table 42 Jobs | Backups pane
Status Description
Running Indicates the running backup activities.
Scheduled Indicates the schedules backup activities that are queued to start.
Complete Indicates the number of hosts that backed up successfully during the last job,which is updated after each backup job. The job must run again to reflectchanges to a job between backups. For example, if a job reports that 10 hostswere successfully backed up, the system edits the job so only one host remains.
Backup
Viewing backup statistics 147

Table 42 Jobs | Backups pane (continued)
Status Description
This number continues to be 10 until the job runs again. If successful, the numberchanges to one.
Failed Indicates the number of hosts that did not back up successfully the last time thebackup job ran, updated after each backup job. The job must run again to reflectchanges to a job between backups. For example, if a job reports that 10 hostsfailed to back up, the system edits the job so only one host remains. This numbercontinues to be 10 until the job runs again. If the job fails, the number changes toone.
Information in the backup statistics dialog box
The following information is available on the tabs of the Backup Statistics dialog box.
Table 43 Backup statistics dialog box information
Tab Information
Details Detailed information from thev_activities_2 database view. The
Avamar Reports Guide provides moreinformation about the v_activities_2database view.
Files A list of files that are included in the backup.
File Aggregation A representative sampling of resource-intensive file types that are included in thebackup, and aggregates deduplicationstatistics by file type.
Options Any special options for the backup.
Errors Any errors that occurred during the backup.
Deleting a backupWhen deleting a backup, Avamar immediately and permanently deletes all data in thatbackup from the server.
Procedure
1. In the AUI navigation pane on the left, click , and then click AssetManagement.
The Asset Management window is displayed.
2. In the domain tree, select the domain for the client.
3. From the list of clients, select the client with the backups to manage.
4. In the Client Summary pane on the right, click VIEW MORE.
5. Click the Backup tab.
A list of completed backups for this client is displayed. Any backup in this listcan be used to restore the client.
Backup
148 Avamar 18.2 Administration Guide

6. Select the backup that you would like to delete, and then click DELETE.
A confirmation message is displayed.
7. Click YES.
Backup
Deleting a backup 149

Backup
150 Avamar 18.2 Administration Guide

CHAPTER 7
Restore and Recovery
This chapter includes the following topics:
l Restoring data from a backup...........................................................................152l Monitor restores...............................................................................................155l Cancel restores................................................................................................ 156l Windows client system recovery...................................................................... 156l Red Hat and CentOS Linux system recovery.................................................... 157l SUSE Linux system recovery............................................................................ 164l Oracle Solaris system recovery......................................................................... 171
Restore and Recovery 151

Restoring data from a backupYou can find a backup to restore either by date or by the contents of the backup.When you perform the restore, you can restore to either the original location, adifferent location, or multiple locations.
NOTICE
The options for the restore destination depend on the plug-in type. For example, theSQL Server plug-in enables you to restore to a file instead of to SQL Server, and youcannot restore to multiple locations with the Oracle plug-in. The user guide for eachplug-in provides details on the available options and how to perform each availabletype of restore.
Finding a backupThe first step to restore data is to find the backup with the data that you want torestore. You can find Avamar client backups by searching either for a specific date orfor specific content.
Locate backups by date when one or more of the following situations apply:
l You have saved all data for the client in a single backup set.
l The exact pathname or name of the data to restore is unknown.
l The backup that you want to restore is before a specific date or event. Forexample, you know the approximate date when data was lost or corrupted. inwhich you can search for a backup before that date.
l The specific types of backups are known. For example, scheduled disasterrecovery backups are running every Wednesday and Saturday night and fullvolume backups daily. When rebuilding a server, select the disaster recoverybackup with the date closest to the event that caused the loss of data.
Locate backups by the content of the backup when one or more of the followingsituations apply:
l You have backed up data on the client in separate backup sets.
l You want to view multiple versions of the same file so that you can decide theversion to restore.
l The date of the backup or the content of a backup is unknown, but you know thename of the data to restore.
NOTICE
Avamar generally supports the use of specific supported international characters indirectory, folder, and filenames. However, proper display of international languagecharacters is contingent on the client computer’s Java locale and installed systemfonts being compatible with the original language. If you browse backups that werecreated with international characters and a compatible font is not installed, then anycharacters that the system cannot resolve appear as rectangles. This action is anormal limitation of that particular situation and does not affect the ability to restorethese directories, folders, or files. The Avamar Release Notes provide additionalinternational language support information.
Restore and Recovery
152 Avamar 18.2 Administration Guide

Finding a backup by dateProcedure
1. In the AUI navigation pane on the left, click , and then click AssetManagement.
The Asset Management window is displayed.
2. In the domain tree, select the domain for the client.
3. From the list of clients, select the client with the backups to manage.
4. In the Client Summary pane on the right, click VIEW MORE.
5. Click the Backup tab.
A list of completed backups for this client is displayed. Any backup in this listcan be used to restore the client.
6. To locate backups by date:
a. Click SEARCH.
b. Specify the date range in the From and To fields.
c. Click RETRIEVE.
The list of backups for the date range is displayed.
Restoring to the original clientProcedure
1. In the AUI navigation pane on the left, click , and then click AssetManagement.
The Asset Management window is displayed.
2. In the domain tree, select the domain for the client.
You cannot view clients outside the domain for the login account. To view allclients, log in to the root domain.
A list of Avamar clients is displayed in the pane below the domains list.
3. From the list of clients, select the client computer to recover.
4. (Optional) To locate backups by date:
a. In the right pane, click VIEW MORE.
b. Click SEARCH.
c. In the From and To fields, specify the date range.
d. Click RETRIEVE.
e. In the list of backups, select a backup.
The list of backups for the date range is displayed.
5. Click the Restore tab.
The Restore wizard is displayed and the Destination Client pane is displayedon the right.
6. In the Destination Client pane, perform the following steps:
Restore and Recovery
Restoring to the original client 153

a. Select Restore to original client.
b. Click NEXT.
The Backup Content pane is displayed.
7. In the Backup Content pane, perform the following steps:
a. In the left pane, select the folder from the tree.
The Backup Content pane displays a list of databases within the backup.
b. In the right pane, select the databases that you want to restore.
c. Click NEXT.
The Destination Location pane is displayed.
8. In the Destination Location pane, perform the following steps:
a. Select Restore everything to its original location.
b. Click Next.
The More Options pane is displayed.
9. (Optional) In the More Option pane, toggle the Show Advanced Optionsswitch to view advanced configuration options.
The user guide for each plug-in provides details on each of the options.
10. Click NEXT.
The Summary page is displayed.
11. Review the provided information, and then click FINISH.
Restoring to a different clientProcedure
1. In the AUI navigation pane on the left, click , and then click AssetManagement.
The Asset Management window is displayed.
2. In the domain tree, select the domain for the client.
You cannot view clients outside the domain for the login account. To view allclients, log in to the root domain.
A list of Avamar clients is displayed in the pane below the domains list.
3. From the list of clients, select the client computer to recover.
4. (Optional) To locate backups by date:
a. In the right pane, click VIEW MORE.
b. Click SEARCH.
c. In the From and To fields, specify the date range.
d. Click RETRIEVE.
e. In the list of backups, select a backup.
The list of backups for the date range is displayed.
5. Click the Restore tab.
Restore and Recovery
154 Avamar 18.2 Administration Guide

The Restore wizard is displayed and the Destination Client pane is displayedon the right.
6. In the Destination Client pane, perform the following steps:
a. Select Restore everything to a different client.
b. In the domain tree, select the domain for the client.
c. In the list of clients, select the destination client.
The client is displayed in the Destination Client field.
d. Click NEXT.
The Backup Content pane is displayed.
7. In the Backup Content pane, perform the following steps:
a. In the left pane, select the folder from the tree.
The Backup Content pane displays a list of databases within the backup.
b. In the right pane, select the databases that you want to restore.
c. Click NEXT.
The Destination Location pane is displayed.
8. In the Destination Location pane, perform the following steps:
a. Select Restore everything to a different location.
b. In the Restore Location field, type the file path of the target location whereyou want to restore the data.
For example: E:/dbrestore_dir/
c. Click NEXT.
The More Options pane is displayed.
9. (Optional) In the More Option pane, toggle the Show Advanced Optionsswitch to view advanced configuration options.
The user guide for each plug-in provides details on each of the options.
10. Click NEXT.
The Summary page is displayed.
11. Review the provided information, and then click FINISH.
Monitor restoresYou can monitor and view status information for backup and restore operations in theActivity Monitor.
To access the Activity Monitor, open the navigation pane, and then click Activity.The Activity Monitor appears with a list of all activities.
Note
The AUI Activity Monitor window has been optimized for at least 1366 pixels-widescreens. Display issues might occur for smaller screens. To properly display the AUI,ensure that your display is at least 1366 pixels wide.
Restore and Recovery
Monitor restores 155

The Activity Monitor provides you with options to filter the information that appears:
l Filter activities by duration—By default, the Activity Monitor displays the mostrecent 5,000 client activities. To select a different duration, in the Filter activitiesby duration drop-down list, select Last 24 hours or Last 72 hours.
l Filter activities by domain—By default, the Activity Monitor displays all activitiesregardless of domain. To display only the activities for a specific domain, in theFilter activities by domain drop-down list, select a domain or subdomain.
l Filter activities by status—By default, the Activity Monitor displays all activitiesregardless of status.To display only activities with a specific status, at the top of the Activity Monitor,select one of the following options:
n Canceled
n Completed
n Completed with Exceptions
n Failed
n Running
n Waiting
To filter activities by client, start time, plug-in, or type, click in their respectivecolumn.
The Activity Monitor displays the date and time that an activity began, and the totalnumber of bytes examined during an activity.
To view activity details, expand the Details pane, by clicking .
Cancel restoresYou can cancel a restore any time before it completes. The cancellation might take 5minutes or longer. The restore might complete before the cancellation finishes.
Procedure
1. In the AUI navigation pane on the left, click , and then click Activity.
The Activity Monitor appears with a list of activities.
2. Select the restore from the list.
3. Click CANCEL.
A confirmation dialog box is displayed.
4. Click YES.
Windows client system recoveryComprehensive details about the necessary backups for Windows client systemrecovery and the procedures to perform the recovery are available in the Avamar forWindows Server User Guide.
Restore and Recovery
156 Avamar 18.2 Administration Guide

Red Hat and CentOS Linux system recoveryThe following topics describe how to restore a Red Hat or CentOS Linux client systemto its original system state.
Reconstructing the partition tableBefore you perform system recovery of a Linux client, you must reconstruct thepartition table that is used in the original Avamar backup. This action is performed byrunning an avtar --showlog mounts command on a temporary client computer.This action then examines the output to determine the number and size of partitionsto create when you install the operating system on the target recovery client.
Procedure
1. Locate the backup:
The information that is acquired in this step is used to perform a system staterecovery.
a. In the AUI navigation pane on the left, click , and then click AssetManagement.
The Asset Management window appears.
b. In the domain tree, select the domain for the client.
c. From the list of clients, select the original Linux client to recover.
d. In the Client Summary pane on the left, click VIEW MORE.
e. Click the Backups tab.
f. To use to recover the system state, find the full system backup.
g. Note the backup label number.
h. Leave the AUI open for the remainder of the system state recoveryprocedure.
2. On a temporary client computer with network connectivity to the Avamarserver, open a command shell and log in as root.
3. Type the following command:
/usr/local/avamar/bin/avtar --avamaronly --showlog mounts --server=Avamar_server --id=username --ap=password --path=/domain/client --labelnumber=nwhere:
l Avamar_server is the IP address or fully qualified hostname as defined inDNS for the Avamar server.
l username and password are the login credentials for a user account with asufficient role and privileges to perform a restore.
l /domain/client is the full location of the original Linux client on the Avamarserver.
l n is the label number of the backup to use for the system state recovery.
4. To locate entries beginning with mount_decision, examine the commandoutput.
Restore and Recovery
Red Hat and CentOS Linux system recovery 157

For example:
mount_decision: reason="starting_point" fstype="ext3"path="/"mount_decision: reason="default_backup" fstype="ext3"path="/boot"mount_decision: reason="default_backup" fstype="ext3"path="/home"These entries are for the mount points on the original system. Earlier in theoutput, there are entries for each of these mount points. For example:
mount: status="user_directed_backup" path="/" hdev="/dev/root" kind="ext3" blksize=4096 freeblks=1189334maxblks=2405872 freefiles=2259654 maxfiles=2432000dev=2050mount: status="default_backup" path="/boot" hdev="/dev/sda1" kind="ext3" blksize=1024 freeblks=183371maxblks=194442 freefiles=50167 maxfiles=50200 dev=2049mount: status="default_backup" path="/home" hdev="/dev/sdb1" kind="ext3" blksize=4096 freeblks=1027161maxblks=5158925 freefiles=2530548 maxfiles=2621440dev=2065These entries contain mount point size and path information.
5. Calculate the original file system size or each mount point in bytes bymultiplying the blksize value by the maxblks value.
NOTICE
Multiplying the blksize value by the maxblks value calculates the free spacethat is used on the original device. However, you should create the rootpartition with an additional 2 GB to 3 GB of free space to ensure sufficientspace for the minimal install that is used for the restore process.
6. Note which paths are mounted from separate file systems. This information isrequired later in the restore process.
Preparing the target recovery clientProcedure
1. Ensure that the recovery destination disk is connected to the target recoveryclient.
2. Perform a minimal installation of a compatible operating system. For thepurposes of this procedure:
l Minimal installation means that desktop environment entries such asDesktop - Gnome should not be selected for installation.
l In the Customize Now dialog box Base System category, select the Baseoption. Leave all other options disabled.
l Compatible operating system means the same version. For example, if theoriginal client backup on the Avamar server was performed on an RHEL3client, then install RHEL3 on the target recovery client.
Restore and Recovery
158 Avamar 18.2 Administration Guide

l Use the information that you gathered during Reconstructing the partitiontable on page 157 to create as many partitions as necessary to replicate theoriginal configuration.
3. (Optional) Save a copy of the /etc/fstab file so that you can compare it tothe restored /etc/fstab file.
4. Install the Avamar Client for Linux. The Avamar Backup Clients User Guideprovides instructions.
Performing system recovery of a Red Hat or CentOS Linux clientBefore you begin
Perform the steps in Reconstructing the partition table on page 157 and Preparing thetarget recovery client on page 158.
Procedure
1. Start the recovery target client from the install media (first CD/DVD):
l On Red Hat or CentOS 4 or 5, type linux rescue at the command prompt.
l On Red Hat or CentOS 6.0, select Rescue installed system.
l On Red Hat or CentOS 7.0 or later:
a. Select Troubleshooting.
a. Select Rescue a Red Hat Enterprise Linux system.
2. Follow the onscreen instructions.
Be sure to enable networking by providing IP address, network mask, defaultgateway, and DNS server values when prompted. You can use a temporaryhostname and IP, or the original information from the computer that you arerestoring.
3. On Red Hat or CentOS 7.0 or later, set up networking by performing thefollowing steps:
a. Log in as root.
b. chroot /mnt/sysimage
c. Modify the /etc/hosts, /etc/resolv.conf, and /etc/sysconfig/network as appropriate for the network configuration.
d. Restart the network service so that the changes take effect:
service network restart
e. Type exit to go back single-user mode.
4. Allow the installer to search for installations and mount the /mnt/sysimagefile system as read/write.
The /mnt/sysimage file system is the target of the restore, and is alsoreferred to as the recovery destination disk.
Restore and Recovery
Performing system recovery of a Red Hat or CentOS Linux client 159

Note
You cannot restore the root file system directly to /mnt/sysimage becausethere is no method to restrict the restore operation to only the local partitionwithout traversing network mount points. Therefore, a restore directlyto /mnt/sysimage might copy files from all the partitions, and /mnt/sysimage could fill up before all required files were restored.
5. Ensure that the following directories are all present in the LD_LIBRARY_PATHsystem variable:
l /libl /lib64l /usr/libl /usr/lib64l /mnt/sysimage/libl /mnt/sysimage/lib64l /mnt/sysimage/usr/local/avamar/libIf any directories are missing from LD_LIBRARY_PATH, add them.
6. Create a temporary /tmp/avtar.cmd flag file with a UNIX text editor. Forexample:
cd /tmpvi avtar.cmd--bindir=/mnt/sysimage/usr/local/avamar/bin--vardir=/mnt/sysimage/usr/local/avamar/var--sysdir=/mnt/sysimage/usr/local/avamar/etc--server=Avamar_server--account=/domain/client--id=username--ap=password--target=.
where:
l Avamar_server is the Avamar server IP address or fully qualified hostnameas defined in DNS.
l /domain/client is the full location of the original Linux client on the Avamarserver.
l username and password are the login credentials for a user account withsufficient role and privileges to perform the restore.
7. Restore most of the directories that originally existed under root (/):
NOTICE
Do not restore files that are on file systems other than the root file system atthis time. These directories and files are restored later in this procedure.
a. Create a temporary restore directory under the client /mnt/sysimagedirectory and change directory to it by typing commands similar to thefollowing examples:
Restore and Recovery
160 Avamar 18.2 Administration Guide

mkdir /mnt/sysimage/restorecd /mnt/sysimage/restore
b. Restore the contents of the root file system from the backup by typing thefollowing command on a single command line:
/mnt/sysimage/usr/local/avamar/bin/avtar.bin -x --flagfile=/tmp/avtar.cmd --labelnumber=n [--exclude=./boot --exclude=./home] /where n is the label number of the backup to use for the system staterecovery.
Use --exclude=path options to exclude paths that were identified asseparate mount points. These directories and files are separately restoredlater in this procedure.
The first two --exclude options in the previous command are included asan example. Replace the values with options appropriate to the system thatyou are restoring. Specify exclude options relative to the root of the originalbackup. For example, --exclude=./boot instead of --exclude=/boot.
c. For each directory that was restored, delete the original directoryfrom /mnt/sysimage, and move the restored directory from the /mnt/sysimage/restore directory to /mnt/sysimage by typing commandssimilar to the following examples:
rm -rf /mnt/sysimage/etcmv /mnt/sysimage/restore/etc /mnt/sysimage/etc
d. Repeat the previous step for each directory that successfully restoredto /mnt/sysimage/restore.
8. Restore individual files in the root (/) directory:
a. Change directory to /mnt/sysimage/restore by typing the followingcommand:
cd /mnt/sysimage/restore
b. Restore the individual files in the root (/) directory by typing the followingcommands:
mv ./* /mnt/sysimagemv ./.* /mnt/sysimage
9. Restore other mount points:
a. Check that file systems are mounted as expected by typing df -h at thecommand prompt.
b. Compare the output to the expected set of mounted file systems. If thereare discrepancies, mount the devices onto the correct mount points.
c. Change directory to each mount point by typing a command similar to thefollowing example:
cd /mnt/sysimage/home
d. Create a temporary restore directory, then change directory to it by typingcommands similar to the following examples:
Restore and Recovery
Performing system recovery of a Red Hat or CentOS Linux client 161

mkdir ./restorecd ./restore
e. Restore the contents of the mount point by typing the following command:
/mnt/sysimage/usr/local/avamar/bin/avtar.bin -x --flagfile=/tmp/avtar.cmd --labelnumber=n /homewhere n is the label number of the backup to use for the restore, and /homeis an example mount point.
f. Return to the mount point directory, and delete all files except for therestore directory by typing commands similar to the following examples:
alias ls=/usr/bin/lscd /mnt/sysimage/home; rm -rf `ls --hide restore`rm -rf ./.*
g. Change directory to the restore directory, then move the contents intothe correct place in the mount point by typing the following command:
cd ./restore;mv `ls -A ./` ..
h. Remove the restore directory by typing the following commands:
cd ..rmdir restore
i. Repeat steps d through i for each remaining mount point.
10. Perform final system checks:
a. Inspect /mnt/sysimage/etc/fstab, and verify that there are validstatements for each file system to be mounted on the new system.
There are three ways that devices might be listed in the fstab file: devicepath, volume label, and Universally Unique Identifier (UUID).
You can determine this information about the file systems by typing /mnt/sysimage/lib/udev/vol_id device_path, where device_path is the /devpath to the device.
If that program is not present on the system, type /mnt/sysimage/sbin/blkid device_path.
If you created partitions manually during the minimal system install, thedevice UUIDs might have changed. Update the device UUIDs in /mnt/sysimage/etc/fstab. If some volumes are missing expected labels, setthe label by typing /mnt/sysimage/sbin/e2label device_path label.
b. Re-examine the fstab carefully.
The restored system cannot start correctly when the fstab entries do notexactly match the storage device configuration. The rescue system on theinstall media has difficulty discovering which file systems to mount to /mnt/sysimage.
Restore and Recovery
162 Avamar 18.2 Administration Guide

Note
If you saved a reference copy of the fstab file when you were preparing thetarget client for recovery, then you can find the disk information in that file.For systems with few manual changes to the restored fstab file, it might bepossible to use the reference fstab file instead of the restored copy of thefile.
c. Verify that no more files are present in /mnt/sysimage/restore bytyping the following command:
ls -al /mnt/sysimage/restore
d. If the directory is empty, remove it by typing the following command:
rmdir /mnt/sysimage/restore
e. If the command fails because the directory is not empty, then there might bedirectories that you failed to move in when you restored most of thedirectories in root (/). Move the directories to the proper restore locations.
11. Exit the command shell and restart the system by typing exit.
If you are rebooting a Red Hat or CentOS 6 system, a menu appears.
12. Select reboot, then OK and press Enter.
The system restarts.
13. Eject the install media and start normally.
14. Confirm correct client operation.
Troubleshooting system recovery of a Red Hat or CentOS Linux clientThe following topics provide details on troubleshooting issues that may occur afteryou perform system recovery of a Red Hat or CentOS Linux client.
Troubleshooting a start failure after system recoveryIf the restored system does not start at the end of the restore procedure, then theversion of GRUB installed by the minimal OS might be dissimilar to the previousversion on the server. Start into the restore environment and reinstall GRUB.
Procedure
1. Start into the restore environment by starting the client from the install mediawith the rescue option.
2. If the startup process cannot find the restored operating system, then itsfstab is probably configured incorrectly. Mount the partitions manually, andcorrect the contents of the file.
3. Reinstall GRUB by typing the following commands:
chroot /mnt/sysimagegrub-install device
where device is the start device (for example, /dev/sda).
4. Exit the chroot environment by typing exit.
5. Exit the command shell and restart the system by typing exit.
Restore and Recovery
Troubleshooting system recovery of a Red Hat or CentOS Linux client 163

If you are rebooting a Red Hat or CentOS 6 system, a menu appears.
6. Select reboot, then OK and press Enter.
The system restarts.
7. Eject the install media and start normally.
Restoring network settings after system recovery of a Linux clientIf the operating system detects that you have restored the system to new hardware, itmight revert the network settings to defaults (for example, DHCP name resolutioninstead of static IP). You can recover the previous network settings by manuallyreconfiguring the settings.
To examine the previous settings, open the .bak files in /etc/sysconfig/network-scripts in a text editor. These files contain useful information, but shouldnot be used in the current configuration in an unmodified form, since they includeMAC address information from the previous hardware.
SUSE Linux system recoveryThe following topics describe how to restore a SUSE Linux client system to its originalsystem state.
Reconstructing the partition tableBefore you perform system recovery of a Linux client, you must reconstruct thepartition table that is used in the original Avamar backup. This action is performed byrunning an avtar --showlog mounts command on a temporary client computer.This action then examines the output to determine the number and size of partitionsto create when you install the operating system on the target recovery client.
Procedure
1. Locate the backup:
The information that is acquired in this step is used to perform a system staterecovery.
a. In the AUI navigation pane on the left, click , and then click AssetManagement.
The Asset Management window appears.
b. In the domain tree, select the domain for the client.
c. From the list of clients, select the original Linux client to recover.
d. In the Client Summary pane on the left, click VIEW MORE.
e. Click the Backups tab.
f. To use to recover the system state, find the full system backup.
g. Note the backup label number.
h. Leave the AUI open for the remainder of the system state recoveryprocedure.
2. On a temporary client computer with network connectivity to the Avamarserver, open a command shell and log in as root.
3. Type the following command:
Restore and Recovery
164 Avamar 18.2 Administration Guide

/usr/local/avamar/bin/avtar --avamaronly --showlog mounts --server=Avamar_server --id=username --ap=password --path=/domain/client --labelnumber=nwhere:
l Avamar_server is the IP address or fully qualified hostname as defined inDNS for the Avamar server.
l username and password are the login credentials for a user account with asufficient role and privileges to perform a restore.
l /domain/client is the full location of the original Linux client on the Avamarserver.
l n is the label number of the backup to use for the system state recovery.
4. To locate entries beginning with mount_decision, examine the commandoutput.
For example:
mount_decision: reason="starting_point" fstype="ext3"path="/"mount_decision: reason="default_backup" fstype="ext3"path="/boot"mount_decision: reason="default_backup" fstype="ext3"path="/home"These entries are for the mount points on the original system. Earlier in theoutput, there are entries for each of these mount points. For example:
mount: status="user_directed_backup" path="/" hdev="/dev/root" kind="ext3" blksize=4096 freeblks=1189334maxblks=2405872 freefiles=2259654 maxfiles=2432000dev=2050mount: status="default_backup" path="/boot" hdev="/dev/sda1" kind="ext3" blksize=1024 freeblks=183371maxblks=194442 freefiles=50167 maxfiles=50200 dev=2049mount: status="default_backup" path="/home" hdev="/dev/sdb1" kind="ext3" blksize=4096 freeblks=1027161maxblks=5158925 freefiles=2530548 maxfiles=2621440dev=2065These entries contain mount point size and path information.
5. Calculate the original file system size or each mount point in bytes bymultiplying the blksize value by the maxblks value.
NOTICE
Multiplying the blksize value by the maxblks value calculates the free spacethat is used on the original device. However, you should create the rootpartition with an additional 2 GB to 3 GB of free space to ensure sufficientspace for the minimal install that is used for the restore process.
6. Note which paths are mounted from separate file systems. This information isrequired later in the restore process.
Restore and Recovery
Reconstructing the partition table 165

Preparing the target recovery clientProcedure
1. Ensure that the recovery destination disk is connected to the target recoveryclient.
2. Perform a minimal installation of a compatible operating system. For thepurposes of this procedure:
l Minimal installation means that only Base System and Minimal System(Appliances) packages are installed from the Software selection page.Clear the selection of all other packages so that they are not installed.
l Compatible operating system means the same version. For example, if theoriginal client backup on the Avamar server was performed on an SLES10client, then install SLES10 on the target recovery client.
l Use the information that you gathered during Reconstructing the partitiontable on page 157 to create as many partitions as necessary to replicate theoriginal configuration.
3. (Optional) Save a copy of the /etc/fstab file so that you can compare it tothe restored /etc/fstab file.
4. Install the Avamar Client for Linux. The Avamar Backup Clients User Guideprovides instructions.
Performing system recovery of a SUSE Linux clientBefore you begin
Perform the steps in Reconstructing the partition table on page 157 and Preparing thetarget recovery client on page 166.
Procedure
1. Start the recovery target client from the install media (first CD/DVD) andselect Rescue System.
2. Open a command shell on the recovery target client and log in as root.
3. Mount the root partition that is created in the minimal install to /mnt by typingthe following command:
mount /dev/sda# /mntwhere /dev/sda# is the device that contains the root file system. If the drivewas configured to use Linux Logical Volume Management, then the root devicemight be in the form of /dev/VolGroup##/LogVol##.
4. Rebind the pseudo-file systems into the /mnt tree by typing the followingcommands:
mount --rbind /proc /mnt/procmount --rbind /sys /mnt/sysmount --rbind /dev /mnt/dev
5. Change the current file system root by typing the following command:
chroot /mnt
Restore and Recovery
166 Avamar 18.2 Administration Guide

6. Start the network as configured in the prerequisites by typing the followingcommand:
rcnetwork start
7. Mount the auto-mount file systems and verify that the correct file systemswere mounted by typing the following command:
mount -a;df -h
8. If any file systems are missing (for example, if /boot is not set to auto-mount),then manually mount them to the correct locations by using additional mountcommands.
9. Exit the chroot environment by typing exit.
10. Copy the network name resolution file from the chroot environment into theworking restore environment by typing the following command:
cp /mnt/etc/resolv.conf /etc/resolv.conf11. Ensure that the following directories are all present in the LD_LIBRARY_PATH
system variable:
l /libl /lib64l /usr/libl /usr/lib64l /mnt/libl /mnt/lib64l /mnt/usr/local/avamar/libIf any directories are missing from LD_LIBRARY_PATH, add them.
12. Create a temporary /tmp/avtar.cmd flag file with a UNIX text editor. Forexample:
cd /tmpvi avtar.cmd--bindir=/mnt/usr/local/avamar/bin--vardir=/mnt/usr/local/avamar/var--sysdir=/mnt/usr/local/avamar/etc--server=Avamar_server--account=/domain/client--id=username--ap=password--target=.
where:
l Avamar_server is the Avamar server IP address or fully qualified hostnameas defined in DNS.
l /domain/client is the full location of the original Linux client on the Avamarserver.
l username and password are the login credentials for a user account withsufficient role and privileges to perform the restore.
13. Restore most of the directories that originally existed under root (/):
Restore and Recovery
Performing system recovery of a SUSE Linux client 167

NOTICE
Do not restore files that are on file systems other than the root file system atthis time. These directories and files are restored later in this procedure.
a. Create a temporary restore directory under the client /mnt directory andchange directory to it by typing commands similar to the following examples:
mkdir /mnt/restorecd /mnt/restore
b. Restore the contents of the root file system from the backup by typing thefollowing command on a single command line:
/mnt/usr/local/avamar/bin/avtar.bin -x --flagfile=/tmp/avtar.cmd --labelnumber=n [--exclude=./boot --exclude=./home] /where n is the label number of the backup to use for the system staterecovery.
Use --exclude=path options to exclude paths that were identified asseparate mount points. These directories and files are separately restoredlater in this procedure.
The first two --exclude options in the previous command are included asan example. Replace the values with options appropriate to the system thatyou are restoring. Specify exclude options relative to the root of the originalbackup. For example, --exclude=./boot instead of --exclude=/boot.
c. For each directory that was restored, delete the original directory from /mnt, and move the restored directory from the /mnt/restore directoryto /mnt by typing commands similar to the following examples:
rm -rf /mnt/etcmv /mnt/restore/etc /mnt/etc
d. Repeat the previous step for each directory that successfully restoredto /mnt/restore.
14. Restore individual files in the root (/) directory:
a. Change directory to /mnt/restore by typing cd /mnt/restore.
b. Restore the individual files in the root (/) directory by typing the followingcommands:
mv ./* /mntmv ./.* /mnt
15. Restore other mount points:
a. Check that file systems are mounted as expected by typing df -h at thecommand prompt.
b. Compare the output to the expected set of mounted file systems. If thereare discrepancies, mount the devices onto the correct mount points.
c. Change directory to each mount point by typing a command similar to thefollowing example:
Restore and Recovery
168 Avamar 18.2 Administration Guide

cd /mnt/home
d. Create a temporary restore directory, then change directory to it by typingcommands similar to the following examples:
mkdir ./restorecd ./restore
e. Restore the contents of the mount point by typing the following command:
/mnt/usr/local/avamar/bin/avtar.bin -x --flagfile=/tmp/avtar.cmd --labelnumber=n /homewhere n is the label number of the backup to use for the restore, and /homeis an example mount point.
f. Return to the mount point directory, and delete all files except for therestore directory by typing commands similar to the following examples:
alias ls=/usr/bin/lscd /mnt/home; rm -rf `ls --hide restore`rm -rf ./.*
g. Change directory to the restore directory, then move the contents intothe correct place in the mount point by typing the following command:
cd ./restore;mv `ls -A ./` ..
h. Remove the restore directory by typing the following commands:
cd ..rmdir restore
i. Repeat steps d through i for each remaining mount point.
16. Perform final system checks:
a. Inspect /mnt/etc/fstab, and verify that there are valid statements foreach file system to be mounted on the new system.
There are three ways that devices might be listed in the fstab file: devicepath, volume label, and Universally Unique Identifier (UUID).
You can determine this information about the file systems bytyping /mnt/lib/udev/vol_id device_path, where device_path isthe /dev path to the device.
If you created partitions manually during the minimal system install, thedevice UUIDs might have changed. Update the device UUIDs in /mnt/etc/fstab. If some volumes are missing expected labels, set the label bytyping /mnt/sbin/e2label device_path label.
b. Re-examine the fstab carefully.
The restored system cannot start correctly when the fstab entries do notexactly match the storage device configuration. The rescue system on theinstall media has difficulty discovering which file systems to mount to /mnt.
Restore and Recovery
Performing system recovery of a SUSE Linux client 169

Note
If you saved a reference copy of the fstab file when you were preparing thetarget client for recovery, then you can find the disk information in that file.For systems with few manual changes to the restored fstab file, it might bepossible to use the reference fstab file instead of the restored copy of thefile.
c. Verify that no more files are present in /mnt/sysimage/restore bytyping the following command:
ls -al /mnt/restore
d. If the directory is empty, remove it by typing the following command:
rmdir /mnt/restore
e. If the command fails because the directory is not empty, then there might bedirectories that you failed to move in when you restored most of thedirectories in root (/). Move the directories to the proper restore locations.
17. Restart the system by typing reboot.
18. Eject the install media and start normally.
19. Confirm correct client operation.
Troubleshooting system recovery of a SUSE Linux clientThe following topics provide details on troubleshooting issues that may occur afteryou perform system recovery of a SUSE Linux client.
Troubleshooting a boot failure after system recoveryIf the restored system does not start at the end of the restore procedure, then theversion of GRUB installed by the minimal OS might be dissimilar to the previousversion on the server. Boot into the restore environment and reinstall GRUB.
Procedure
1. Boot into the restore environment:
a. Boot the recovery target client from the install media (first CD/DVD) andselect Rescue System.
b. Open a command shell on the recovery target client and log in as root.
c. Mount the root partition that is created in the minimal install to /mnt bytyping the following command:
mount /dev/sda# /mntwhere /dev/sda# is the device that contains the root file system. If the drivewas configured to use Linux Logical Volume Management, then the rootdevice might be in the form of /dev/VolGroup##/LogVol##.
d. Rebind the pseudo-file systems into the /mnt tree by typing the followingcommands:
mount --rbind /proc /mnt/procmount --rbind /sys /mnt/sysmount --rbind /dev /mnt/dev
Restore and Recovery
170 Avamar 18.2 Administration Guide

e. Change the current file system root by typing the following command:
chroot /mnt
f. Start the network as configured in the prerequisites by typing the followingcommand:
rcnetwork start
g. Mount the auto-mount file systems and verify that the correct file systemswere mounted by typing the following command:
mount -a;df -h
h. If any file systems are missing (for example, if /boot is not set to auto-mount), then manually mount them to the correct locations by usingadditional mount commands.
2. Reinstall GRUB by typing the following commands:
chroot /mntgrub-install device
where device is the start device (for example, /dev/sda).
3. Exit the chroot environment by typing exit.
4. Reboot the system by typing reboot.
5. Eject the install media and start normally.
Restoring network settings after system recovery of a Linux clientIf the operating system detects that you have restored the system to new hardware, itmight revert the network settings to defaults (for example, DHCP name resolutioninstead of static IP). You can recover the previous network settings by manuallyreconfiguring the settings.
To examine the previous settings, open the .bak files in /etc/sysconfig/network-scripts in a text editor. These files contain useful information, but shouldnot be used in the current configuration in an unmodified form, since they includeMAC address information from the previous hardware.
Oracle Solaris system recoveryThe following topics describe how to restore an Oracle Solaris client system to itsoriginal system state.
Preparing for Oracle Solaris system recoveryEnsure that the environment meets the following prerequisites before you performsystem recovery for an Oracle Solaris system.
Available backup with critical system filesTo successfully restore an Oracle Solaris client system to its original system state, youmust have an Avamar backup of the entire local file system and the following criticalsystem files and virtual file systems. This action is performed by forcing traversal ofthe targets that are listed in the following table during a backup.
Restore and Recovery
Oracle Solaris system recovery 171

Table 44 Target locations for system recovery backups of an Oracle Solaris client
Target Description
mntfs /etc/svc/volatile
tmpfs /etc/mnttab
cachefs Solaris Cache File System
fdfs Solaris File Descriptor File System
fifofs Solaris FIFO File System
namefs Solaris Name File System
specfs Solaris Device Special File System
swapfs Solaris Swap File System
tfs Solaris Translucent File System
To ensure that these targets are included in a backup, use one of the following backupmethods:
l In Avamar Administrator, explicitly add these targets in an on-demand backup ordataset by specifyingmntfs,tmpfs,cachefs,fdfs,fifofs,namefs,specfs,swapfs,tfs in the Forcetraversal of the specified file system type(s) box in the plug-in options.
l Specify --forcefs=”mntfs,tmpfs,cachefs,fdfs,fifofs,namefs,specfs,swapfs,tfs”on the avtar command line.
Available /var and /opt file systemsThe original file system tables must have partitions for /opt and /var. The partitionsfor /opt and /var are mounted when you start Solaris in read-only mode.
If the partitions do not mount, then you must create new, temporary file systemsfor /opt and /var when you install a minimal version of Solaris on the client.
Other file systemsIf you are using zfs or any other add-on file system, ensure that these file systemsare correctly re-created and mounted before beginning system recovery.
Installation of a minimal version of SolarisCreate a file system layout that matches the original system as closely as possible.Ensure that there are separate file systems for /opt and /var.
Performing system recovery of an Oracle Solaris clientBefore you begin
Perform the steps in Preparing for Oracle Solaris system recovery on page 171.
Procedure
1. Start from CD by typing reboot -- cdrom or by changing the boot order in theBIOS menu, depending on the platform.
2. (Solaris 11 and 10 only) At the boot options menu, select one of the followingoptions:
l 3. Solaris Interactive Text (Desktop session)
Restore and Recovery
172 Avamar 18.2 Administration Guide

l 4. Solaris Interactive Text (Console session)
3. Continue through the prompts, providing the client hostname, IP address,default gateway, and corporate DNS server name when prompted to do so.
4. Exit the command prompt and return to a shell prompt:
l On Solaris 8, press ! when you are prompted to install software for Solariswith Solaris Web Start.
l On Solaris 10 or 11, press F5 to exit when you are prompted to select aninstallation type, and then press F2 to confirm the exit.
5. Mount the /partition under /a as the target of the restore by typing thefollowing command:
mount /dev/dsk/c1t0d0s0 /aUse the correct site-specific disk partition and mount parameters for the rootvolume.
6. Mount the /opt partition under /opt by typing the following command:
mount /dev/dsk/c1t0d0s5 /optUse the correct site-specific disk partition and mount parameters for the /optvolume.
7. Mount the /var partition under /var by typing the following command:
mount /dev/dsk/c1t0d0s4 /varUse the correct site-specific disk partition and mount parameters for the /varvolume.
8. Mount any additional file systems in their respective mount points under /a.
Create the mount point if does not exist. For example, to mount file system /data01 on c1t0d0s7, type the following command:
mount /dev/dsk/c1t0d0s7 on /a/data01
9. Install the proper version of the Avamar Client for Solaris software by using theinstructions in the Avamar Backup Clients User Guide.
NOTICE
The installation program displays a warning about root (/) having 0 free bytes,as well as errors related to read-only file systems when trying to create /etc/init.d/avagent and various links in /usr/bin and /etc/rc.d/rcX.d.However, despite these warnings, all the binaries are correctly installedin /opt/AVMRclnt/bin.
10. Restore /etc to /a/etc by typing the following commands:
cd /a/etc/opt/AVMRclnt/bin/avtar -x --server=Avamar_server --id=username--password=password --account=/domain/client --target=. /etc --labelnumber=n --overwrite=always
where:
l Avamar_server is the hostname or IP address of the Avamar server.
Restore and Recovery
Performing system recovery of an Oracle Solaris client 173

l username and password are the Avamar login credentials for a user with arole that allows access to the backups for this client.
l /domain/client is the Avamar domain and Solaris client to restore.
l n is the label number of the backup to restore. If you do not specify a labelnumber, then the most recent backup is used for the restore.
NOTICE
You cannot restore the root file system directly to /a, because there is no wayto restrict the restore operation to only the local partition without traversingnetwork mount points. A restore directly to /a might copy files from allpartitions, causing /a to fill up before all required files are restored.
11. Inspect /a/etc/vfstab to verify the original mount points for the local filesystem.
12. In Avamar Administrator, click the Backup & Restore launcher link.
The Backup, Restore and Manage window is displayed.
13. Click the Restore tab.
14. In the clients tree, select the original Solaris client.
15. Find and select the backup for the restore.
16. Examine the directories and files that originally existed under root (/).
17. For each directory that originally existed under root (/), perform the followingsteps:
a. If the directory does not exist, then manually create an empty directory withthe same name under /a.
b. Change directory to that directory.
c. From the command line, restore the contents of the directory from thebackup.
For example, consider the following commands to restore /usr:
mkdir /a/usr; cd /a/usr/opt/AVMRclnt/bin/avtar -x --server=Avamar_server --id=username--password=password --account=/domain/client --labelnumber=n --overwrite=always --target=. /usr
If /opt and /var were originally on the root partition, then you can restoreto /a/opt and /a/var. If /opt and /var were separate file systems, thenrestore to new, temporary locations, such as /a/newopt and /a/newvar.After completing all restores, move the contents of /a/newopt to /optand /a/newvar to /var.
18. To restore the individual files that originally existed under root, run the restorecommand with the --norecursionoption to restore files without descendinginto subdirectories:
/opt/AVMRclnt/bin/avtar -x --server=Avamar_server --id=username--password=password --account=/domain/client --labelnumber=n --norecursion --overwrite=always --target=. /
19. Restart the client normally and confirm correct operation.
Restore and Recovery
174 Avamar 18.2 Administration Guide

CHAPTER 8
Server Administration
This chapter includes the following topics:
l Server shutdown and restart............................................................................ 176l Suspending and resuming server activities....................................................... 180l Managing client sessions................................................................................... 181l Managing client agents and plug-ins................................................................. 184l Backup and maintenance windows................................................................... 186l Checkpoints......................................................................................................188l Activating the Avamar software and installing a server license......................... 190l Managing services............................................................................................ 192l Changing server passwords and OpenSSH keys............................................... 193l MCS configuration settings.............................................................................. 195l Using network address translation (NAT)......................................................... 198l Editing network settings for a single-node server............................................ 200l Adding a custom security notification for web browser logins..........................200l Viewing and editing server contact information............................................... 200l Migrating backups............................................................................................ 201
Server Administration 175

Server shutdown and restartThe components that make up an Avamar server are shut down in stages:
l A shutdown of the Avamar software or individual subsystems as part ofmaintenance and other indicated activities.
l A shutdown of the Avamar software, operating system, and hardware as part of afull power-down.
The following topics describe both processes in greater detail.
Administering the Avamar subsystemsThe dpnctl program enables you to gracefully shut down and restart the Avamarsoftware or selected subsystems via the command-line interface. This process isindependent of restarting the operating system.
Shutting down or restarting the Avamar software stops or restarts all of the Avamarsubsystems as a group.
Shutting down the Avamar software
Before you begin
Ensure that there is a recent and validated checkpoint before you perform a fullshutdown.
Procedure
1. Open a command shell and log in by using one of the following methods:
l For a single-node server, log in to the server as admin.
l For a multi-node server:
a. Log in to the utility node as admin.
b. Load the admin OpenSSH key by typing the following command:
ssh-agent bashssh-add ~admin/.ssh/admin_key
2. Type dpnctl stop.
A confirmation message prompts whether to shut down the local instance ofEM Tomcat.
3. Type y to shut down the local EM Tomcat instance, and then press Enter.
The output displays the status of the shutdown process until the shut down iscomplete.
Restarting the Avamar softwareProcedure
1. Open a command shell and log in by using one of the following methods:
l For a single-node server, log in to the server as admin.
l For a multi-node server:
a. Log in to the utility node as admin.
b. Load the admin OpenSSH key by typing the following command:
Server Administration
176 Avamar 18.2 Administration Guide

ssh-agent bashssh-add ~admin/.ssh/admin_key
2. Type dpnctl start.
The output displays a confirmation message.
3. Type y to begin with restarting the software, and then press Enter.
The output displays the status of the restart process until the restart iscomplete.
Stopping the MCSProcedure
1. Open a command shell and log in by using one of the following methods:
l For a single-node server, log in to the server as admin.
l For a multi-node server:
a. Log in to the utility node as admin.
b. Load the admin OpenSSH key by typing the following command:
ssh-agent bashssh-add ~admin/.ssh/admin_key
2. Type dpnctl stop mcs.
Starting the MCSProcedure
1. Open a command shell and log in by using one of the following methods:
l For a single-node server, log in to the server as admin.
l For a multi-node server:
a. Log in to the utility node as admin.
b. Load the admin OpenSSH key by typing the following command:
ssh-agent bashssh-add ~admin/.ssh/admin_key
2. Type dpnctl start mcs.
3. Resume scheduled operations by typing dpnctl start sched.
Getting MCS statusProcedure
1. Open a command shell and log in by using one of the following methods:
l For a single-node server, log in to the server as admin.
l For a multi-node server:
a. Log in to the utility node as admin.
b. Load the admin OpenSSH key by typing the following command:
ssh-agent bashssh-add ~admin/.ssh/admin_key
2. Type dpnctl status mcs.
Server Administration
Administering the Avamar subsystems 177

Stopping the EM Tomcat serverProcedure
1. Open a command shell and log in by using one of the following methods:
l For a single-node server, log in to the server as admin.
l For a multi-node server, log in to the utility node as admin.
2. Type dpnctl stop emt.
Starting the EM Tomcat server
Before you begin
Ensure that EM Tomcat server has been correctly shut down.
Procedure
1. Open a command shell and log in by using one of the following methods:
l For a single-node server, log in to the server as admin.
l For a multi-node server, log in to the utility node as admin.
2. Type dpnctl start emt.
Getting EM Tomcat server statusProcedure
1. Open a command shell and log in by using one of the following methods:
l For a single-node server, log in to the server as admin.
l For a multi-node server:
a. Log in to the utility node as admin.
b. Load the admin OpenSSH key by typing the following command:
ssh-agent bashssh-add ~admin/.ssh/admin_key
2. Type dpnctl status emt.
Powering off or restarting the serverAvamar Administrator allows you to gracefully power off or restart the entire Avamarserver, including the Avamar software, operating system, and hardware (whereapplicable).
Note
For the Avamar Data Store, this process powers off or restarts all nodes.
PrerequisitesBefore powering off or restarting the Avamar server, complete the followingprerequisites:
l Stop all backup, restore, and data movement operations.The shutdown process terminates any active operations before proceeding.
l Complete all active Avamar Installation Manager package operations.
l Ensure that a validated checkpoint was taken during the last 36 hours.
Server Administration
178 Avamar 18.2 Administration Guide

l Ensure that the MCS was flushed during the last 12 hours.
l Complete or stop any garbage collection and HFS check operations.The shutdown process terminates any active operations before proceeding.
l Verify that sufficient free space exists.Server utilization must be less than 85% of total capacity and 62% of availableAvamar subsystem storage capacity.
Powering off the serverPower off the server to enable maintenance such as site power outages or physicalequipment moves.
Procedure
1. In Avamar Administrator, click the Server launcher link.
The Server window is displayed.
2. Click the Server Management tab.
3. Select the server that you want to power off.
4. Select Actions > Shut Down Avamar System.
A confirmation dialog box appears.
5. Click Yes.
The server issues a notification about the impending shutdown.
6. Click OK.
The server begins the power off process.
Results
The following logs provide more information and progress updates:
l /usr/local/avamar/var/log/avosshutdown.logl /usr/local/avamar/var/log/dpnctl.logAfter you finish
After completing maintenance, power on the server by one of the following methods:
l The power button on the front control panel (Gen4S).
l The power/reset button on the rear I/O panel (Gen4T).
l The RMM4 or RMC power control window.
l The virtual environment control console or control interface.
For multi-node servers, power on each storage node in turn and then the utility node.
Note
Powering up the utility node before the storage nodes may cause delays in the start-up process.
Rebooting the serverProcedure
1. In Avamar Administrator, click the Server launcher link.
The Server window is displayed.
Server Administration
Powering off or restarting the server 179

2. Click the Server Management tab.
3. Select the server that you want to reboot.
4. Select Actions > Reboot Avamar System.
A confirmation dialog box appears.
5. Click Yes.
The server issues a notification about the impending reboot.
6. Click OK.
The server begins the reboot process.
Results
The following logs provide more information and progress updates:
l /usr/local/avamar/var/log/avosshutdown.logl /usr/local/avamar/var/log/dpnctl.log
Suspending and resuming server activitiesYou can suspend and resume backups and restores, scheduled operations, andmaintenance activities.
Suspending and resuming backups and restoresProcedure
1. In Avamar Administrator, click the Server launcher link.
The Server window is displayed.
2. Click the Server Management tab.
3. In the left pane, select the Avamar server node.
4. Open the Actions menu and select Suspend Backups/Restores or ResumeBackups/Restores.
A confirmation message appears.
5. Click Yes.
Suspending and resuming scheduled operationsProcedure
1. In Avamar Administrator, select Tools > Manage Schedules.
The Manage All Schedules window is displayed.
2. Click Suspend All or Resume All.
Suspending and resuming maintenance activitiesProcedure
1. In Avamar Administrator, click the Server launcher link.
The Server window is displayed.
2. Open the Actions menu and select Suspend Maintenance Activities orResume Maintenance Activities.
Server Administration
180 Avamar 18.2 Administration Guide

A confirmation message appears.
3. Click OK.
Managing client sessionsYou can view a detailed log of a client session to perform troubleshooting or analysisof a backup or restore. If necessary, you can cancel a client session or reset a clientwhen unexpected system behavior occurs.
Monitoring client sessionsThe Session Monitor displays a list of active client backup and restore sessions.
Procedure
1. In Avamar Administrator, click the Server launcher link.
The Server window is displayed.
2. Click the Session Monitor tab.
The information in the following table appears for each session in the SessionMonitor.
Table 45 Session Monitor tab properties
Property Description
User
User Avamar user ID (account name).
Path Specifies a hierarchical location in the Avamarserver. This option is relative to the user'shome location unless slash (/) is prefixed tothe path designation, in which case anabsolute path is assumed.
Domain Avamar domain where this user resides.
Client ID Unique identifier for this Avamar client.
Session
Type This activity is either avtarbackup or
avtarrestore.
Root Top level of the file system being backed up,restored, or validated.
Start time Date and time that this client session started.
Plug-in Plug-in that is used for this activity.
Session ID Unique identifier for this client session.
Work order ID Unique identifier for this activity.
Elapsed Length of time that this client session hasbeen running.
Progress bytes Total number of bytes examined during thisactivity.
Server Administration
Managing client sessions 181

Table 45 Session Monitor tab properties (continued)
Property Description
New bytes Percentage of new bytes backed up to eitherthe Avamar server or a Data Domain system.Low numbers indicate high levels of datadeduplication.
System
Name Client hostname.
OS name Operating system that is used by this client.
App version Avamar client software version.
Viewing a detailed client session logYou can view a detailed log of a client session to perform analysis or troubleshooting.
Procedure
1. In Avamar Administrator, click the Activity launcher link.
The Activity window is displayed.
2. Click the Activity Monitor tab.
By default, the Activity Monitor shows a detailed log of all client backup activityfor the past 72 hours.
3. Specify the session log options:
a. Select Action > Session Log Options.
The Session Log Options dialog box appears.
b. Select Show HTML logs to view the session log summary in HTML format,or Show raw logs to view the session log summary as unformatted text.
c. (Optional) If you select the HTML log format, select the Show debuginformation checkbox to include troubleshoot information in the session logsummary.
d. Click OK.
4. Select an activity in the list.
5. Select Actions > View Session Log.
The Activity Session Drill-down dialog box appears.
6. Perform any of the following tasks in the session log summary:
l (HTML format only) In the Log Files section, click a hyperlink to go to thelog file.
l Search for a specific text string in the session log summary by typing a textstring in the Find field and then clicking Next or Previous.
l Return to the top of the session log summary by clicking Back to Top.
l Export the session log summary to a file by clicking Export, specifying alocation for the file, and clicking Save.
l Update the contents in the session log summary by clicking Refresh.
Server Administration
182 Avamar 18.2 Administration Guide

7. Click Close.
Creating a Zip file for Avamar SupportThe Activity window enables you to create a Zip file of session log information forAvamar Support and upload the Zip file to the Avamar server.
Procedure
1. In Avamar Administrator, click the Activity launcher link.
The Activity window is displayed.
2. Select an activity in the list.
3. Select Actions > Download Support Bundle.
The Download Support Bundle dialog box appears.
4. Browse to a directory for the Zip file.
5. Click Save.
A progress dialog box displays the status of the operation.
6. When the operation completes, click Close on the progress dialog box.
7. To create a Zip file and copy it to the Avamar server, select Actions > UploadSupport Bundle to Server.
The upload process creates a Zip file for session log summary information andcopies the Zip file to the /tmp folder on the Avamar server. A progress dialogbox displays the status of the operation.
Canceling a client sessionOccasionally, a client might experience unexpected system behavior while it isperforming a backup or restore. In these cases, it might be necessary to force an endto these client sessions from Avamar Administrator.
Procedure
1. In Avamar Administrator, click the Server launcher link.
The Server window is displayed.
2. Click the Session Monitor tab.
A list of active client sessions appears.
3. Select the client session to cancel.
4. Select Actions > Cancel Session.
A dialog box shows the progress of the cancellation.
5. When the cancellation is complete, click Close.
After you finish
If you cannot cancel the client session, reset the client. This step immediately andforcibly terminates active avtar sessions on the client.
Resetting a clientResetting a client immediately and forcibly terminates active client avtar session onthat client. In most cases, you should try to cancel the client session before resettingit.
Server Administration
Creating a Zip file for Avamar Support 183

Procedure
1. In Avamar Administrator, click the Policy launcher link.
The Policy window is displayed.
2. Click the Policy Management tab.
3. Click the Clients tab.
4. Select the client to reset.
5. From the Actions menu, select Client > Reset Client.
Managing client agents and plug-insWhenever a client communicates with an Avamar server, it identifies itself by sendingthe following:
l The client ID
l The specific agent version
l The build running on that client
l A list of plug-ins (version and build) currently installed on that client
Occasionally, because of known incompatibilities, you may want to deny Avamarserver access to all clients running a specific version (all builds) or a specific build of aclient agent or plug-in.
You can also selectively allow or disallow the following plug-in operations for all clientsrunning a specific plug-in version (all builds) or build:
l Client activations that are initiated from the client
l On-demand backups that are initiated from the client
l Scheduled backups
l Restores
l Backup validation
l Ability to browse stored backups on the server
Any specific version (all builds) or build that is designated as obsolete is denied accessto the Avamar server. A build is designated as obsolete only in cases of knownincompatibility between the client agent or plug-in and the specific version of serversoftware that was installed. To prevent potential problems, this obsolete designationcannot be overridden using the feature to edit properties for that version or build.
Adding a build recordYou can add an MCS database record for a specific client agent or plug-in build. Youcan only add records at the build level. New version records are automatically addedafter Avamar server software upgrades.
Procedure
1. In Avamar Administrator, select Tools > Manage Agents & Plug-ins.
The Manage All Agents & Plug-ins window is displayed.
2. In the left pane, select the agent or plug-in version for the build.
3. Click New.
The New Build dialog box appears.
Server Administration
184 Avamar 18.2 Administration Guide

4. In the Build box, type a valid agent or plug-in build number.
5. To deny Avamar server access to clients with this agent or plug-in build, selectthe Disable checkbox.
6. (Optional) Type a descriptive comment in the Comment box.
7. Click OK.
Editing version or build recordsProcedure
1. In Avamar Administrator, select Tools > Manage Agents & Plug-ins.
The Manage All Agents & Plug-ins window is displayed.
2. In the left pane, select the agent or plug-in.
3. In the right pane, select the version or build to edit.
4. Click Edit.
The Edit Build dialog box appears.
5. To deny Avamar server access to clients with this agent or plug-in build, selectthe Disable checkbox.
6. (Optional) Type a descriptive comment in the Comment box.
7. Click OK.
Deleting a build recordYou can delete an MCS database record for a specific client agent or plug-in build. Youcannot delete a record for an entire version.
Procedure
1. In Avamar Administrator, select Tools > Manage Agents & Plug-ins.
The Manage All Agents & Plug-ins window is displayed.
2. In the left pane, select the agent or plug-in.
3. In the right pane, select the build to delete.
Click Delete.
Disabling all client initiated activationsYou may want to temporarily prevent clients from activating with the Avamar serverto place the system in a state that supports maintenance activities. Client Invite doesnot work when clients are prevented from activating.
Procedure
1. In Avamar Administrator, select Tools > Manage Agents & Plug-ins.
The Manage All Agents & Plug-ins window is displayed.
2. Click Disable All Client Initiated Activations.
3. To re-enable client initiated activations, click Enable All Client InitiatedActivations.
Server Administration
Editing version or build records 185
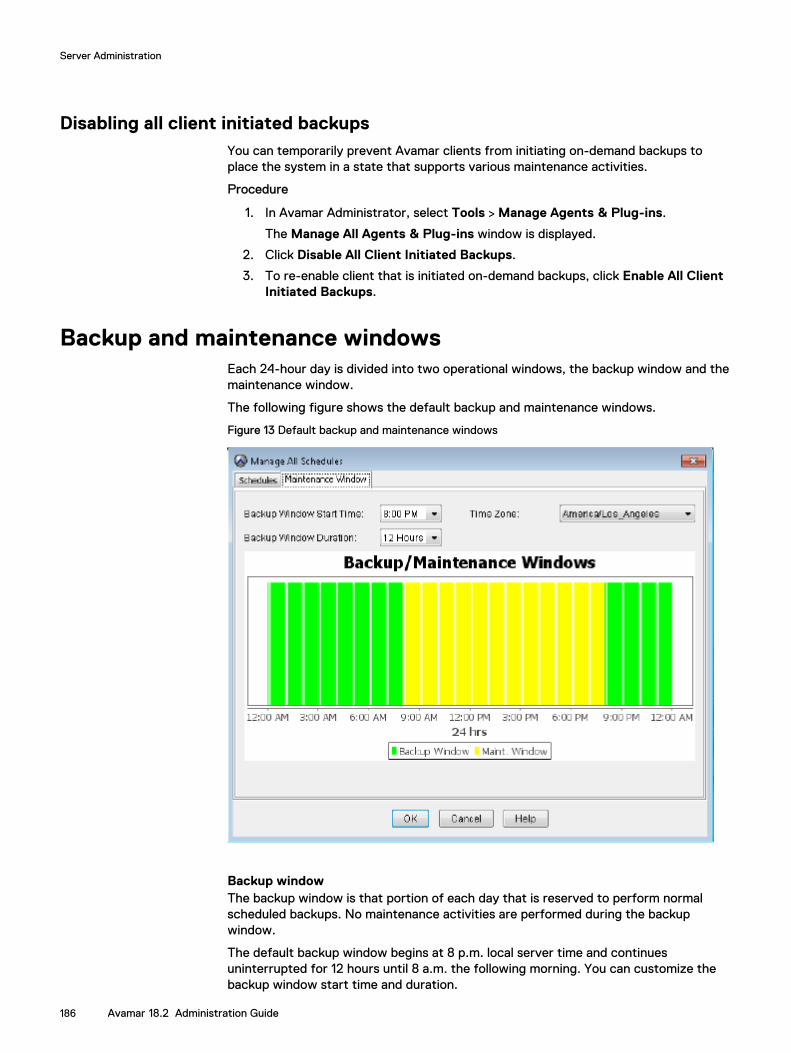
Disabling all client initiated backupsYou can temporarily prevent Avamar clients from initiating on-demand backups toplace the system in a state that supports various maintenance activities.
Procedure
1. In Avamar Administrator, select Tools > Manage Agents & Plug-ins.
The Manage All Agents & Plug-ins window is displayed.
2. Click Disable All Client Initiated Backups.
3. To re-enable client that is initiated on-demand backups, click Enable All ClientInitiated Backups.
Backup and maintenance windowsEach 24-hour day is divided into two operational windows, the backup window and themaintenance window.
The following figure shows the default backup and maintenance windows.
Figure 13 Default backup and maintenance windows
Backup windowThe backup window is that portion of each day that is reserved to perform normalscheduled backups. No maintenance activities are performed during the backupwindow.
The default backup window begins at 8 p.m. local server time and continuesuninterrupted for 12 hours until 8 a.m. the following morning. You can customize thebackup window start time and duration.
Server Administration
186 Avamar 18.2 Administration Guide

Maintenance windowThe maintenance window is that portion of each day that is reserved to perform theroutine server maintenance activities in the following table.
Table 46 Avamar server maintenance activities
Activity Description
Checkpoint A snapshot of the Avamar server that is takenfor the express purpose of server rollbacks.
Checkpoint validation An internal operation that validates theintegrity of a specific checkpoint. Checkpointvalidation is also known as a Hash File System(HFS) check. After a checkpoint passes anHFS check, it can be considered reliableenough to be used for a server roll back.
Garbage collection An internal operation that recovers storagespace from deleted or expired backups.
Although you can perform backups and restores during the maintenance window,doing so impacts the backup, restore, and maintenance activities. For this reason,minimize any backup, restore, or administrative activities during the maintenancewindow. There might be brief periods of time when backup or administrative activitiesare not allowed.
The default maintenance window begins at 8 a.m. local server time and continuesuninterrupted for 12 hours until 8 p.m. Although you cannot directly customize themaintenance window, its start time and duration are derived from backup windowsettings.
Editing the backup and maintenance windowsYou can edit the backup and maintenance windows by setting the backup windowstart time and duration, as well as the time zone for the backup and maintenancewindows.
Any changes to the backup window duration also affect the maintenance windowduration. For example, changing the backup window duration from 12 hours to 14hours reduces the maintenance window duration by 2 hours.
The following best practices apply when you schedule system activities:
l Limit on-demand backups during the maintenance window.
You might want to advise users to avoid initiating any on-demand backups fromtheir client computers during the first hour and a half of the maintenance window(8 a.m. to 8 p.m. local time for most systems).
l Avoid initiating on-demand maintenance activities
Manually initiating maintenance activities such as checkpoints, checkpointvalidation, or garbage collection temporarily disables all scheduled maintenanceactivities until the manually initiated operation completes. Unless there is anobligation to begin an on-demand maintenance activity, it is best to rely onscheduled maintenance activities to ensure that sufficient time is allocated foreach activity daily.
Procedure
1. In Avamar Administrator, select Tools > Manage Schedules.
The Manage All Schedules window is displayed.
Server Administration
Editing the backup and maintenance windows 187

2. Click the Maintenance Window tab.
3. Change the backup window start time, duration, or time zone by selecting anew value from the corresponding list.
4. Click OK.
CheckpointsCheckpoints are system-wide backups that are taken for assisting with disasterrecovery.
A checkpoint occurs automatically during the maintenance window. You can alsomanually start checkpoints at any time.
You can delete checkpoints to reclaim server storage capacity.
The Checkpoint Management tab on the Server window in Avamar Administratordisplays the status of individual checkpoints. The following table provides the possiblestates for a checkpoint.
Table 47 Checkpoint states
State Description
The checkpoint failed validation or wascanceled before it could complete.
The checkpoint has not yet been validated.
Validation is being performed on thischeckpoint.
The checkpoint passed validation.
Creating a checkpointA checkpoint occurs automatically during the maintenance window. You can alsomanually begin checkpoints at any time.
Procedure
1. In Avamar Administrator, click the Server launcher link.
The Server window is displayed.
2. Click the Checkpoint Management tab.
3. Select Actions > Create Checkpoint.
A progress dialog box displays the status of the operation.
4. When the checkpoint completes, click Close.
Deleting a checkpointYou can delete checkpoints to reclaim additional server storage capacity. Generally, itis best to delete unvalidated checkpoints before you delete validated checkpoints.
Procedure
1. In Avamar Administrator, click the Server launcher link.
The Server window is displayed.
Server Administration
188 Avamar 18.2 Administration Guide

2. Click the Checkpoint Management tab.
3. Select the checkpoint and select Actions > Delete Checkpoint.
A confirmation message appears.
4. Click OK.
Rolling back to a checkpointRollback is the process of restoring the Avamar server to a known good state usingdata stored in a validated checkpoint. You cannot roll back an Avamar release 7.xserver to a version 4.x or earlier checkpoint.
Before you begin
If you added nodes to the Avamar server after the checkpoint occurred, remove theentries for the nodes from the probe.out file.
Use a validated checkpoint for roll back. Checkpoint validation occurs during eachmaintenance window.
Note
If you need a validated checkpoint before the next maintenance window completes,contact Avamar Support for assistance.
Procedure
1. Open a command shell and log in by using one of the following methods:
l For a single-node server, log in to the server as admin.
l For a multi-node server:
a. Log in to the utility node as admin.
b. Load the admin OpenSSH key by typing the following command:
ssh-agent bashssh-add ~admin/.ssh/admin_key
2. Shut down the server by typing dpnctl stop.
3. Display a list of checkpoints by typing cplist.
The checkpoint list appears similar to the following example:
cp.20140106170113 Fri Jan 6 17:01:13 2014 valid hfs delnodes 4 stripes 396cp.20140107170042 Sat Jan 7 17:00:42 2014 valid hfs delnodes 4 stripes 396cp.20140108170040 Sun Jan 8 17:00:40 2014 valid hfs ...nodes 4 stripes 396cp.20140109170043 Mon Jan 9 17:00:43 2014 valid hfs ...nodes 4 stripes 396where:
l cp.yyyymmddhhmmss is the checkpoint ID.
l valid hfs indicates a validated checkpoint.
l valid par indicates a partially validated checkpoint.
4. Note the checkpoint ID of the checkpoint that you plan to use for thecheckpoint.
Server Administration
Rolling back to a checkpoint 189

Generally, roll the system back to the most recent fully validated checkpointunless you have a good reason to roll back to an earlier checkpoint.
5. Start the roll back by typing the following command:
rollback.dpn --cptag=checkpoint_id >& filewhere checkpoint_id is the checkpoint ID and file is a temporary file.
6. Wait for the roll back to complete. The roll back might take an hour, dependingon the amount of data present in the Avamar server.
When the roll back is complete, the command prompt returns.
7. Open the user-defined temporary file that was created during the roll back, andverify that the roll back successfully completed without errors.
The server automatically restarts after a successful roll back.
Clearing a data integrity alertTo ensure data integrity, the Avamar server issues an alert any time a checkpointvalidation fails. The only way to clear this alert is to contact Avamar Support to obtaina reset code, and then input that code in the Clear Data Integrity Alert dialog box.
Before you begin
Obtain a reset code from Avamar Support.
Procedure
1. In Avamar Administrator, click the Administration launcher link.
The Administration window is displayed.
2. Click the Event Management tab.
3. Click the Unacknowledged Events tab near the bottom of the window.
4. Select Actions > Event Management > Clear Data Integrity Alert.
The Clear Data Integrity Alert dialog box appears.
5. Type the reset code in the Enter reset code field and click OK.
Activating the Avamar software and installing a serverlicense
The Avamar server requires a license key for permanent operation. Avamar software islicensed using the Dell EMC Common Licensing Platform.
After installation, the Avamar software enters a 90-day evaluation period with fullfunctionality. After the evaluation period expires, the Avamar server enters anunlicensed state. Without a valid license key, the Avamar server stops performing orlimits several functions.
Activating the Avamar softwareUse this procedure to activate the Avamar software with the Common LicensingPlatform.
Before you begin
This procedure requires a License Authorization Code (LAC), provided in the LicenseAuthorization (LAC) email sent to you. If you cannot find the email, send an email to
Server Administration
190 Avamar 18.2 Administration Guide

[email protected] to request that the License Authorization email be resent. Includethe Avamar product SO number in the email. The Avamar product SO number isrequired.
Procedure
1. Log in to Support Zone (https://support.emc.com) by using the logincredentials that are provided in the License Authorization (LAC) email.
2. In the Service Center drop-down list, click Manage Licenses.
3. Select Avamar from the list of products.
4. Click Activate my software.
The Activation wizard opens.
5. Search for an available product to license by entering the License AuthorizationCode (LAC) and click Search.
6. To complete licensing information, follow the prompts in the wizard.
7. After the license key has been generated, download the key to be used whenlicensing the software.
Installing and activating a licenseAfter you receive the Avamar license key file, install and activate the license on theAvamar server.
Before you begin
Obtain the Avamar license key by following the procedure in Activating the Avamarsoftware on page 190.
Procedure
1. Use WinSCP or an equivalent program to copy the license key file to the /tmpdirectory on a single-node server, or to the /tmp directory on the utility node ina multi-node server.
2. Open a command shell and log in by using one of the following methods:
l For a single-node server, log in to the server as admin.
l For a multi-node server:
a. Log in to the utility node as admin.
b. Load the admin OpenSSH key by typing the following command:
ssh-agent bashssh-add ~admin/.ssh/admin_key
3. Ensure that the Avamar server subsystem (also known as GSAN) is running bytyping dpnctl status gsan.
If GSAN is running, the output displays a status of up.
4. Use the correct command sequence to change file permissions on the Avamarlicense key file and activate the license.
Serverstatus
Command sequence
Running a. chmod 644 /tmp/license_key_file
Server Administration
Installing and activating a license 191

Serverstatus
Command sequence
b. avmaint license /tmp/license_key_file --avamaronly
where license_key_file is the license key file.
Not running a. cd /usr/local/avamar/etcb. mv license.lic license.lic.oldc. cp /tmp/license_key_file license.licd. chmod 644 license.lic
where license_key_file is the license key file.
5. If the Avamar server is not running, start it by typing dpnctl start.
6. After the Avamar server restarts, verify that the server license is correctlyinstalled by typing the following command:
avmaint license --avamaronly
License information appears in the command shell.
Managing servicesThe Services Administration tab on the Administration window in AvamarAdministrator enables you to start, stop, suspend, or resume individual services on theAvamar server.
Procedure
1. In Avamar Administrator, click the Administration launcher link.
The Administration window is displayed.
2. Click the Services Administration tab.
3. Manage the services:
l To start a service, right-click the service and select Start.
l To stop a service, right-click the service and select Stop.
l To suspend a service temporarily until you explicitly resume it, right-click theservice and select Suspend.
l To resume a service that you previously suspended, right-click the serviceand select Resume.
Information on the Services Administration tabThe following information appears on the Services Administration tab.
Table 48 Services Administration tab information
Name Description
Hostname DNS name of the Avamar server.
IP Address IP address of the Avamar server.
Server Administration
192 Avamar 18.2 Administration Guide
Table 48 Services Administration tab information (continued)
Name Description
Load Average Average number of CPU threads over the pastminute.
Last Administrator Datastore Flush Date and time of the last MCS flush.
PostgreSQL database Status of the MCS database.
Web Services Status of MCS web services.
Web Restore Disk Space Available Number of hard drive bytes that MCS webservices can use to create the restore Zip file.
Login Manager Status of the Avamar Login Manager service.
snmp sub-agent Status of the Avamar SNMP sub-agentservice
ConnectEMC Status of the ConnectEMC service.
VMware vCenter Connection Monitor Status of the VMware vCenter connections.This service is only listed when at least onevCenter client is added to the system.
snmp daemon Status of the Avamar SNMP master agentservice.
ssh daemon Status of the Avamar Secure Shell (SSH)service.
syslog daemon Status of the Avamar syslog service.
Data Domain SNMP Manager Status of the SNMP service for monitoringconfigured Data Domain systems.
Remote Backup Manager Service Status of the external backup managerservice that is used by the Replicas at Sourcefeature.
RabbitMQ Status of the RabbitMQ message brokerservice.
Replication job Status of the replication job on the Avamarserver.
Note
The list of services on the Services Administration tab varies according to theconfiguration of the Avamar system.
Changing server passwords and OpenSSH keysUse the change-passwords utility to change the passwords for operating systemuser accounts and Avamar server user accounts. Also use change-passwords tocreate and modify SSH keys for those accounts.
The change-passwords utility guides you through the following operations:
l Changing passwords for the operating system accounts: admin and root
Server Administration
Changing server passwords and OpenSSH keys 193

l Changing passwords for the internal Avamar server accounts: root, MCUser,repluser, and viewuser
l Creating and changing SSH keys
Procedure
1. Suspend all scheduled operations:
a. In Avamar Administrator, select Tools > Manage Schedules.
b. On the Manage All Schedules window, click Suspend All.
2. Open a command shell:
a. Log in to the server as admin.
b. Switch user to root by typing the following command:
su -
c. For a multi-node server, load the rootid OpenSSH key by typing thefollowing command:
ssh-agent bashssh-add /root/.ssh/rootid
3. Start the utility by typing change-passwords.
On a multi-node server, the output prompts you to specify whether to changepasswords on all nodes or selected nodes.
4. Type y to change passwords on all nodes or n to change passwords on selectednodes, and then press Enter.
The output prompts you to indicate whether you plan to specify SSH privatekeys that are authorized for root operations.
5. Type n and press Enter.
The output prompts you to specify whether to change admin or root operatingsystem user account passwords.
6. Type y to change the passwords or n to skip the process of changing thepasswords, and then press Enter.
7. If you typed y in the previous step, then follow the system prompts to changethe passwords for one or more of the admin or root operating system useraccounts.
The output prompts you to specify whether to change SSH keys.
8. Type y to change or create an SSH key, or type n, and then press Enter.
9. If you typed y in the previous step, then follow the system prompts to changeor create the keys.
The output prompts you to specify whether to change Avamar serverpasswords.
10. When prompted, type y to change the MCUser, Avamar root, repluser, andviewuser passwords, or if you do not want to change the passwords, type n, andthen press Enter.
11. If you typed y in the previous step, then follow the system prompts to changethe passwords.
The output prompts you to accept or reject the changes that are made topasswords or SSH keys during this utility session.
Server Administration
194 Avamar 18.2 Administration Guide
12. Type y to accept the changes or type n to exit this utility session withoutchanges, and then press Enter.
The output provides the status of the operation.
13. When the operation completes, resume scheduled operations:
a. In Avamar Administrator, select Tools > Manage Schedules.
b. On the Manage All Schedules window, click Resume All.
MCS configuration settingsAvamar Administrator consists of both client and server software applications. Youcan independently configure each application by editing either the server or clientpreferences file.
Changes to the server preferences file, mcserver.xml, affect all AvamarAdministrator sessions. Changes to a client preferences file, mcclient.xml, onlyaffect Avamar Administrator sessions on that client. Both files conform to thepreferences.dtd XML Document Type Description (DTD) referenced by the JSDK1.4 API.
Default and live copiesTwo copies of each of these files are present on the system:
l An initial default copy is used to initialize each application after installation.
l A live copy contains the current settings that are used by the application.
The default copies are located in the /lib directory for each application. The livecopies are located in a “live file” directory. The following table lists the default live filedirectory for each application.
Table 49 Default live file directory for MCS configuration files
Application Default live file directory
Server /usr/local/avamar/var/mc/server_data/prefs
Client install_directory/var/mc/gui_data/prefs, where install_directory is
typically C:\Program Files\avs\administrator on Microsoft Windows
computers and /usr/local/avamar on
Linux computers.
Initialization behaviorWhen either the server or client application is initialized, the respective defaultpreferences file in the \lib directory is loaded into memory and replicated to the livefile directory.
Note
Reinitializing a running MCS is highly destructive. It completely overwrites any custompreference settings that are stored in the live file and reverts the system configurationback to default settings. If this step occurs, you must recover custom preferencesettings from a previous flush (backup) if they are overwritten.
Server Administration
MCS configuration settings 195

Upgrade behaviorDuring server upgrades, any mcserver.xml entry that is marked with themerge="delete" attribute in the new default mcserver.xml file is not merged intothe new live copy. These entries are obsolete. They are retained in the defaultmcserver.xml file so that the MCS knows to delete the preferences on an upgradedcustomer system.
You can manually add a merge="keep" attribute to any entry in the live /usr/local/avamar/var/mc/server_data/prefs/mcserver.xml file. Settingswith merge="keep" attributes are retained in the new live copy after the upgrade.
Backing up MCS dataTo protect itself from hardware failures, the MCS automatically backs up or flushes itspersistent data to the Avamar server hourly and as part of system checkpoints.Flushes are done by way of an avtar client session. You can also force an on-demandflush.
The flush process generates the timestamp files in the following table.
Table 50 MCS backup timestamp files
File Description
flush.timestamp Before every flush, flush.timestamp is
created in the server_data directory. This
file includes the time and date of the flush. Ona server rollback, this file is restored and canbe used to verify that the rollback wassuccessful to the selected time and date. Thecontents of flush.timestamp are also
accessible by using of the mcserver.sh --status command.
init.timestamp During system initialization, theinit.timestamp file is created or
overwritten in the server_data directory.
This file includes the time and date of thesystem initialization and can be used to verifythat initialization was successful on theselected time and date.
Procedure
1. Open a command shell and log in by using one of the following methods:
l For a single-node server, log in to the server as admin.
l For a multi-node server:
a. Log in to the utility node as admin.
b. Load the admin OpenSSH key by typing the following command:
ssh-agent bashssh-add ~admin/.ssh/admin_key
2. To begin an on-demand MCS flush, type the following command:
mcserver.sh --flush
Server Administration
196 Avamar 18.2 Administration Guide

Restoring MCS dataBefore you begin
If you are planning to restore MCS data to a specific backup, find the label number forthe backup either by browsing for the backup in Avamar Administrator or by using theavtar command:
l In Avamar Administrator, open the Backup, Restore and Manage window, andbrowse for backups in the /MC_BACKUPS account.
l Type the following command on a single command line:
avtar --backups --id=root --ap=password --path=/MC_BACKUPS --hfsaddr=Avamar_server --count=nwhere password is the Avamar root user account password (not the operatingsystem root password), Avamar_server is the IP address or DNS name of theAvamar server, and n is the number of backups to list. A total number of 26 MCSflushes typically occurs each day for an Avamar server — one per hour and oneeach during the morning and evening system checkpoints. Therefore, to list allMCS backups for a specific past number of days, specify --count=n inincrements of 26.
Procedure
1. Open a command shell and log in by using one of the following methods:
l For a single-node server, log in to the server as admin.
l For a multi-node server:
a. Log in to the utility node as admin.
b. Load the admin OpenSSH key by typing the following command:
ssh-agent bashssh-add ~admin/.ssh/admin_key
2. Stop the MCS by typing dpnctl stop mcs.
3. Restore the MCS by typing one of the following commands:
l To restore to the most recent backup, type mcserver.sh --restore.
l To restore to a specific backup, type mcserver.sh --restore --labelnum=n, where n is the label number of the backup.
4. Open /usr/local/avamar/var/mc/server_log/restore.log to verifythe success of the restore.
5. Start the MCS and the scheduler by typing the following command:
dpnctl start mcsdpnctl start sched
Reverting to the default MCS configuration settingsProcedure
1. Open a command shell and log in by using one of the following methods:
l For a single-node server, log in to the server as admin.
l For a multi-node server:
Server Administration
Restoring MCS data 197

a. Log in to the utility node as admin.
b. Load the admin OpenSSH key by typing the following command:
ssh-agent bashssh-add ~admin/.ssh/admin_key
2. Stop the MCS by typing dpnctl stop mcs.
3. Change the working directory by typing the following command:
cd /usr/local/avamar/var/mc/server_data/prefs4. Rename mcserver.xml to old.mcserver.xml by typing the following
command:
mv mcserver.xml old.mcserver.xml5. Copy the default server preferences file to the current directory by typing the
following command on a single command line:
cp /usr/local/avamar/lib/mcserver.xml /usr/local/avamar/var/mc/server_data/prefs/mcserver.xml
6. Start the MCS and the scheduler by typing the following command:
dpnctl start mcsdpnctl start sched
Using network address translation (NAT)Avamar clients can access Avamar storage nodes by using a set of addresses thatundergo NAT.
To make NAT information available to the Avamar server, the probe.xml file mustcontain nat-address elements for storage nodes. After a client makes initial contactwith the utility node on the Avamar server, the Avamar server provides a set ofroutable addresses for the storage nodes to each client. In the absence of a nat-address element, a client uses a pre-configured “real” (untranslated) networkinterface address.
The following figure illustrates an example of a 1x4 multi-node server configuration inwhich Avamar uses NAT.
Figure 14 Multi-node server configuration with NAT
Real: 10.6.250.90 0.3
Storage Node
Storage Node
Storage Node
Storage Node
Utility Node
Avamar ServerReal IP address
of each server
node
NAT IP address
of each server
node
NAT/real IP
address
translation
ROUTER
AVAMAR
CLIENT 1
192.168.6.2
AVAMAR
CLIENT 2
192.168.6.3
SWITCH
2
(NAT: 192.168.6.8)
Real: 10.6.250.89 0.2
(NAT: 192.168.6.7)
Real: 10.6.250.88 0.1
(NAT: 192.168.6.6)
Real: 10.6.250.87 0.0
(NAT: 192.168.6.5)
Real: 10.6.250.86 0.s
10.6.250.88
(NAT: 192.168.6.4)
SWITCH
1
192.168.6.6
192.168.6.7
192.168.6.8
192.168.6.5
192.168.6.4
192.168.6.6
192.168.6.7
192.168.6.8
192.168.6.5
192.168.6.4
10.6.250.87
10.6.250.89
10.6.250.90
10.6.250.91
192.168.6.1
10.6.250.86
The following instructions assume that each Avamar node has a unique address (fromthe Avamar client perspective), and that you configure a router on the network to
Server Administration
198 Avamar 18.2 Administration Guide

apply transparent one-to-one network address translation. You can also use theseinstructions to enable NAT for use in a single-node server configuration.
Procedure
1. Use either the dpnnetutil or nodedb program to add NAT addresses toprobe.xml.
Command Command prompt example
dpnnetutil su - rootdpnnetutil
Respond to the interactive prompts displayed bydpnnetutil.
nodedb nodedb update if --addr=10.6.250.87 --new-nat=192.168.6.4=192.168.6.5
2. If the Avamar storage subsystem is stopped, restart it by typing dpnctl startgsan.
3. If the Avamar storage subsystem is running, reread the probe.xml file bytyping the following command:
avmaint networkconfig /usr/local/avamar/var/probe.xml --avamaronly
4. Register clients by using the avregister (UNIX) or avregister.bat(Windows) command, or by using Avamar Administrator.
Solutions for common NAT problemsTo determine whether NAT is in use, the client and Avamar server must have anetwork connection. The following table provides solutions for common NATconnection and configuration problems.
Table 51 Solutions for common NAT problems
Problem Solution
The Avamar server terminates with a FATALERROR message.
Ensure that the probe.xml file:
l Exists in the /usr/local/avamar/var/ directory.
l Is a valid XML file and adheres to thenode resource database format.
l Lists NAT IP addresses correctly.
Use the nodedb print --say command to
view the contents of probe.xml. The --sayoption displays the path and name of thecurrent node resource database.
The server/client connection fails. Use network diagnostic tools such as ping,
traceroute, tracert, or iperf to verify
network connectivity.
Server Administration
Solutions for common NAT problems 199

Editing network settings for a single-node serverThe Changing the Name and IP Addressing of Avamar Systems Technical Note, which isavailable on Avamar Support at https://support.EMC.com, provides instructions onhow to edit the network settings for a single-node server.
Adding a custom security notification for web browserlogins
You can include a custom security notification on the login page of Avamar WebRestore. This notification typically explains that only authorized users are permittedaccess. It can also list the penalties for unauthorized access.
Procedure
1. In a text editor, create a file that is named disclaimer_Web_Restore.txt.
2. Add the notification content to the file.
You can use some basic HTML tags and CSS inline styles in the notificationcontent.
3. Copy the file to the following location on a single-node server, or on the utilitynode of a multi-node server:
/usr/local/avamar/var/em/server_data/
Viewing and editing server contact informationThe Avamar server sends contact information for the Avamar server to Avamar withevery event it reports, including capacity reports that help prevent the system fromexceeding critical thresholds. Keep this information current.
A server roll back applies the contact information that existed at the time of thecheckpoint. When the roll back completes, you can view or edit the contactinformation to ensure that the information is current.
Procedure
1. In Avamar Administrator, select Help > View/Edit Contact Information.
The View/Edit Contact Information dialog box appears. The fields in thefollowing table are read-only on the dialog box.
Table 52 Read-only fields on the View/Edit Contact Information dialog box
Field Description
System ID Unique Avamar server identifier, which iscreated during initial server installation. Thisfield is read-only.
AVE Yes (Y) if this server is an Avamar Virtual
Edition (AVE) server or no (N) if it is not. Thisfield is read-only.
2. Edit the contact information.
Server Administration
200 Avamar 18.2 Administration Guide

Table 53 Editable fields on the View/Edit Contact Information dialog box
Field Description
Avamar site ID Unique customer site identifier, which isspecified during initial server installation.
Data Domain S/N Serial number of Data Domain systems thathave been added to this server. If no DataDomain systems have been added, type
(N/A).
Server location Physical location of the Avamar server at thecustomer site.
Company Information Name and address of the company that ownsthis Avamar server.
Contact Information Name, telephone number, and email addressof the primary contact for this Avamar server.
3. Click OK.
Migrating backupsAvamar can now perform an automatic migration of GSAN, Data Domain, and hybridbackup data from the source server to the destination server.
The Avamar server only supports automatic migration for the following backup types:
l Linux file system
l Windows file system
l NDMP
To automatically move backup data, trigger the migration job from the destinationserver. After the migration job has started, the migration tool moves the backup datafrom the source server to the destination server.
Note
Backups with a large number of small files might cause low migration performance.
For manual steps on how to perform system migrations of existing mixed Avamar andData Domain systems to Avamar and Data Domain systems, see the Avamar Mixed-source (GSAN and Data Domain) Backups Migration Technical Note.
Server Administration
Migrating backups 201

Server Administration
202 Avamar 18.2 Administration Guide

CHAPTER 9
Server Monitoring
This chapter includes the following topics:
l Recommended daily server monitoring.............................................................204l Monitoring activities........................................................................................ 204l Monitoring server status and statistics............................................................ 207l Event monitoring..............................................................................................223l Server monitoring with syslog.......................................................................... 233l Server monitoring with SNMP......................................................................... 239l Viewing Avamar server log files........................................................................242l Audit logging.................................................................................................... 243l Automatic notifications to Avamar Support......................................................244l Verifying system integrity................................................................................ 252
Server Monitoring 203

Recommended daily server monitoringTo ensure that the Avamar server is working correctly, we recommend that youperform the system monitoring tasks that are listed in the following table on a dailybasis.
Table 54 System monitoring tools and tasks
Monitoring tool Monitoring task
Activity Monitor Investigate any abnormal client activity, suchas backups that complete with exceptions.
Server Monitor Confirm that the last checkpoint and validatedcheckpoint are recent. Ideally, they shouldhave occurred within the past 24 hours.
Event Monitor Investigate any system errors or warnings.
Unacknowledged Events list Investigate and clear (acknowledge) anyunacknowledged events.
NOTICE
Enable the Email Home feature and the ConnectEMC feature, which automaticallyemail Avamar Support with the status of the daily data integrity check and otherimportant server messages.
Monitoring activitiesProcedure
1. In Avamar Administrator, click the Activity launcher link.
The Activity window is displayed.
2. Click the Activity Monitor tab.
Activity Monitor details on page 204 provides details on the informationavailable in the Activity Monitor.
3. (Optional) Filter the information in the Activity Monitor to display only activitieswith a specific state, type, group, client, or plug-in:
a. Select Actions > Filter.
The Filter Activity dialog box appears.
b. Define the filtering criteria and click OK.
Activity Monitor detailsBy default, the Activity Monitor tab displays the most recent 5,000 client activitiesduring the past 72 hours. You can increase or reduce the amount of information in theActivity Monitor by editing the com.avamar.mc.wocompleted_job_retention_hours preference in the /usr/local/avamar/var/mc/server_data/prefs/mcserver.xml file, and then restartingthe MCS.
Server Monitoring
204 Avamar 18.2 Administration Guide

The following tables provide details on the information that is available in the ActivityMonitor.
Table 55 Session details available in the Activity Monitor
Column Description
Status Status of the backup, restore, or validationactivity. The Avamar Administrator online helpprovides details on each status.
Error Code If the activity did not successfully complete, anumeric error code appears. To view adetailed explanation, double-click the errorcode .
Start Time Date and time that this activity began,adjusted for the prevailing time zone, which isshown in parentheses. Daylight Savings Time(DST) transitions are automaticallycompensated.
Elapsed Time Elapsed time for this activity.
End Time Date and time that this activity completed,adjusted for the prevailing time zone, which isshown in parentheses. Daylight Savings Time(DST) transitions are automaticallycompensated.
Type Type of activity. The Avamar Administratoronline help provides details on each type.
Server Server on which the activity occurred, eitherthe Avamar server or a Data Domain system.
Progress Bytes Total number of bytes examined during thisactivity.
New Bytes Percentage of new bytes backed up to eitherthe Avamar server or a Data Domain system.Low numbers indicate high levels of datadeduplication.
Table 56 Client details available in the Activity Monitor
Column Description
Client Avamar client name.
Domain Full location of the client in the Avamarserver.
OS Client operating system.
Client Release Avamar client software version. If this activityis a VMware image backup or restore, thenthis value is the Avamar client softwareversion running on the image proxy client.
Server Monitoring
Activity Monitor details 205

Table 56 Client details available in the Activity Monitor (continued)
Column Description
Proxy If this activity is a VMware image backup orrestore, then this value is the name of theproxy client performing the backup or restoreon behalf of the virtual machine. Blank for allother activities.
Table 57 Policy details available in the Activity Monitor
Column Description
Sched. Start Time Date and time that this activity was scheduledto begin.
Sched. End Time Date and time that this activity was scheduledto end.
Elapsed Wait Total amount of time that this activity spentin the activity queue. That is, the scheduledstart time minus the actual start time.
Group Group that started this activity. One of thefollowing values:
l If the activity was a scheduled backup,the group that this client was a memberof when this scheduled activity started.
l On-demand is shown for other backup,restore, and validation activities.
l If the activity was a scheduled replication,then this value is the replication group.
l Admin On-Demand Group is shownfor-demand replication activities.
Plug-in Plug-in that is used for this activity.
Retention Retention types that are assigned to thisbackup. One or more of the following values:
l D—Daily
l W—Weekly
l M—Monthly
l Y—Yearly
l N—No specific retention type
Schedule If the activity was a scheduled backup, theschedule that began this activity. On-Demandor End User Request is shown for all otheractivities that are started from AvamarAdministrator or the client, respectively.
Dataset Name of the dataset that is used to create thebackup. If the activity is a replication job, this
Server Monitoring
206 Avamar 18.2 Administration Guide

Table 57 Policy details available in the Activity Monitor (continued)
Column Description
column lists the source system name on thedestination system, and the destination nameon the source system.
WID Work order ID. Unique identifier for thisactivity.
Monitoring server status and statisticsThe Server window in Avamar Administrator enables you to monitor status andstatistics for the Avamar server as a whole, for individual nodes on the Avamar server,and for any configured Data Domain systems.
The following tabs appear on the Server window:
l The Server Monitor tab presents a summarized view of CPU, network, and harddrive performance statistics for the Avamar server. A separate subtab provides thesame information for any configured Data Domain systems.
l The Server Management tab shows a detailed view of the server hardwareresources for the Avamar server and any configured Data Domain systems.
l The Session Monitor tab shows a list of active client backup and restore sessions.
l The Checkpoint Management tab shows detailed information for all systemcheckpoints that are performed for this Avamar server.
l The Data Domain NFS Datastores tab lists the temporary NFS share for VMwareinstant access on any configured Data Domain systems. The Avamar for VMwareUser Guide provides more information on instant access.
Server Monitor tabThe Server Monitor tab on the Server window in Avamar Administrator includesseparate tabs for the Avamar server and any configured Data Domain systems.
Avamar tabThe Avamar tab in the Server Monitor presents a summarized view of CPU, network,and hard drive performance statistics for the Avamar server.
The following tables describe the information available on the Avamar tab.
Table 58 Node details on the Avamar tab of the Server Monitor
Property Description
Status indicators Status of the node. One of the followingvalues:
l Online (green)—The node is functioningcorrectly.
l Read-Only (blue)—This status occursnormally as background operations are
Server Monitoring
Monitoring server status and statistics 207

Table 58 Node details on the Avamar tab of the Server Monitor (continued)
Property Description
performed and when backups have beensuspended.
l Time-Out (gray)—MCS could notcommunicate with this node.
l Unknown (yellow)—Node status cannotbe determined.
l Offline (red)—The node has experienceda problem. If ConnectEMC has beenenabled, a Service Request (SR) islogged. Go to Avamar Support to viewexisting SRs. Search the knowledgebasefor KB000457963, Troubleshooting NodeOffline\GSAN Degraded Issues on anAvamar System.
ID Each node in the Avamar server has a uniquelogical identifier. This node ID is expressed inthe format module.node.
Note
Module and node numbering begins with zero.Therefore, the ID for the third node in the firstmodule is 0.2.
Table 59 CPU details on the Avamar tab of the Server Monitor
Property Description
Load Average number of CPU threads over the pastminute.
User Percentage of CPU capacity that is consumedby running server instructions (anything otherthan operating system overhead).
Sys Percentage of CPU capacity that is consumedby operating system overhead.
Table 60 Network details on the Avamar tab of the Server Monitor
Property Description
Ping Time in seconds that this node took torespond to a ping request.
In Received packet throughput reported in KBper second.
Out Sent packet throughput reported in KB persecond.
Server Monitoring
208 Avamar 18.2 Administration Guide

Table 61 Disk details on the Avamar tab of the Server Monitor
Property Description
Reads Average number of hard drive reads persecond as reported by the operating system.
Writes Average number of hard drive writes persecond as reported by the operating system.
Utilization Percentage of total available server storagecapacity currently used.
Data Domain tabThe Data Domain tab in the Server Monitor provides CPU, disk activity, and networkactivity for each node on the Data Domain system.
The following tables describe the information available on the Data Domain tab.
Table 62 Node details on the Data Domain tab of the Server Monitor
Property Description
Status indicators Status of the node. One of the followingvalues:
l OK (green)—The Data Domain system isfunctioning correctly.
l Warning (yellow)—There is a problemwith the Data Domain system, butbackups and restores can continue.
l Error (red)—There is a problem with theData Domain system, and backups andrestores are stopped until the problem isresolved.
If the status is yellow or red, you can viewadditional status information to determine andresolve the problem. The Avamar and DataDomain System Integration Guide providesdetails.
Name Hostname of the Data Domain system asdefined in corporate DNS.
Table 63 CPU details on the Data Domain tab of the Server Monitor
Property Description
Busy Avg. Average CPU usage as a percentage of totalpossible CPU usage.
Max Maximum CPU usage that has occurred as apercentage of total possible CPU usage.
Server Monitoring
Server Monitor tab 209

Table 64 Disk (KB/S) details on the Data Domain tab of the Server Monitor
Property Description
Read Disk read throughput in kilobytes per second.
Write Disk write throughput in kilobytes per second.
Busy Disk I/O usage as a percentage of totalpossible disk I/O usage.
Table 65 Network (KB/S) details on the Data Domain tab of the Server Monitor
Property a Description
Eth#1 Desc—Description of the networkinterface.
In/Out—Network bandwidth usage inkilobytes per second on network interface1.
Eth#2 Desc—Description of the networkinterface.
In/Out—Network bandwidth usage inkilobytes per second on network interface2.
Eth#3 Desc—Description of the networkinterface.
In/Out—Network bandwidth usage inkilobytes per second on network interface3.
Eth#4 Desc—Description of the networkinterface.
In/Out—Network bandwidth usage inkilobytes per second on network interface4.
a. The number of Eth# columns depends on the maximum number of network interfaces thatthe configured Data Domain systems support.
Server Management tabThe Server Management tab on the Server window in Avamar Administrator shows adetailed view of the server hardware resources, including both the Avamar server andany configured Data Domain systems.
Avamar server information is listed under the Avamar folder in the tree, andconfigured Data Domain systems are listed under the Data Domain folder in the tree.
The information in the right pane of the window changes when you select differentitems in the tree.
Server Monitoring
210 Avamar 18.2 Administration Guide

Table 66 Data display based on selections on the Server Management tab
Selected item Information in the right pane of theServer Management tab
Servers node Summary of bytes protected
Avamar or Data Domain nodes Blank
Avamar server name Detailed information for the Avamar server
Module Detailed information for that module
Node Detailed information for that node
Partition Detailed information for that logical hard drivepartition
Data Domain system Detailed information for that Data Domainsystem
NOTICE
Avamar is licensed in decimal units. Therefore, Total capacity and Capacity used aredisplayed in decimal units on the Server Management tab. All other parts of theproduct that output capacity is displayed in binary units.
Bytes Protected Summary
The following table provides details on the Bytes Protected Summary properties onthe Server Management tab.
The amount is the pre-compress size on the client side.
Table 67 Bytes Protected Summary properties on the Server Management tab
Property Description
Properties Name of the Avamar server and configuredData Domain systems.
Values Number of bytes of protected data on theserver or Data Domain system. The amount isthe pre-compress size on the client side.
Server information
The following tables describe the Server Information that is provided when anAvamar server is selected on the Server Management tab.
Table 68 Server Details on the Server Management tab
Property Description
Active sessions Current number of active client sessions.
Click the Session Monitor tab for moreinformation.
Total bytes free in partitions Disk free size from the OS level.
Server Monitoring
Server Management tab 211

Table 68 Server Details on the Server Management tab (continued)
Property Description
Server bytes reserved The maximum size that the current stripe filesoccupy.
Total capacity Total amount of server storage capacity.
Server utilization Percentage of total available server storagecapacity currently used. This value is derived
from the largest Disk Utilization value on
the Avamar tab in the Server Monitor, andtherefore represents the absolute maximumAvamar server storage utilization. Actualutilization across all modules, nodes, anddrives might be slightly lower.
Bytes protected (client pre-comp size) Total amount of client data in bytes that hasbeen backed up (protected) on this server.The amount is the pre-compress size on theclient side.
Bytes protected quota (client pre-comp size) Maximum amount of client data in bytes thatis licensed for protection on this server. Theamount is the pre-compress size on the clientside.
License expiration Calendar date on which this server's licensingexpires. When the licensing is perpetual, thevalue is never.
Time since Server initialization Number of hours, days, and minutes that haveelapsed since this Avamar server wasinitialized.
Last checkpoint Date and time that the last server checkpointwas performed. Checkpoints are typicallyperformed twice daily.
Last validated checkpoint Date and time that the server checkpoint waslast validated. Checkpoint validation normally
occurs once per day. Therefore, the Lastvalidated checkpoint time and Lastcheckpoint time might be differentdepending on the time of day that you viewthis information.
Note
If the Last validated checkpoint and Lastcheckpoint times are more than 36 hoursapart, checkpoint validation is not occurring,which is a problem.
System Name User-assigned name of this Avamar server.
System ID Unique identifier for this Avamar server.
Server Monitoring
212 Avamar 18.2 Administration Guide

Table 68 Server Details on the Server Management tab (continued)
Property Description
HFSAddr Hash File System (HFS) address (Addr). Thehostname or IP address that backup clientsuse to connect to this Avamar server.
HFSPort HFS data port. The data port that backupclients use to connect to this Avamar server.The default is port 27000.
IP Address IP address of this Avamar server. If theHFSAddr is an IP address, this value is thesame as the HFSAddr.
Table 69 Maintenance Activities Details on the Server Management tab
Property Description
Suspended One of the following values:
l No — Server maintenance activities arenot currently suspended (that is, servermaintenance activities will run normallyduring the next maintenance window).
l Yes — Server maintenance activities arecurrently suspended.
Table 70 Garbage Collection Details on the Server Management tab
Property Description
Status One of the following values:
l Idle — Garbage collection is not currentlytaking place.
l Processing — Garbage collection istaking place.
Result One of the following values:
l OK — Last garbage collection activitysuccessfully completed.
l Error code — Last garbage collectionactivity did not successfully complete.
Start time Date and time that the last garbage collectionactivity began.
End time Date and time that the last garbage collectionactivity ended.
Passes Total number of passes during the lastgarbage collection activity.
Server Monitoring
Server Management tab 213

Table 70 Garbage Collection Details on the Server Management tab (continued)
Property Description
Bytes recovered Total amount of storage space in bytes thatwas recovered during the last garbagecollection activity.
Chunks deleted Total number of data chunks that weredeleted during the last garbage collectionactivity.
Index stripes Total number of index stripes.
Index stripes processed Total number of index stripes that wereprocessed during the last garbage collectionactivity.
Module information
The following table provides details on the Module properties on the ServerManagement tab.
Table 71 Module properties on the Server Management tab
Property Description
Total bytes free in partitions Disk free size from the OS level.
Server bytes reserved The maximum size that the current stripe filesoccupy.
Total capacity Total amount of server storage capacity.
Server utilization Percentage of total available server storagecapacity currently used. This value is derived
from the largest Disk Utilization value thatis shown on the Avamar tab in the ServerMonitor, and therefore represents theabsolute maximum Avamar server storageutilization. Actual utilization across allmodules, nodes, and drives might be slightlylower.
Number of nodes Total number of nodes in this module.
IP address Base IP address of this module.
Node information
The following tables provide details on the Node properties on the ServerManagement tab.
Table 72 Status indicators on the Node Information part of Server Management
Property Description
Status indicators One of the following values:
Server Monitoring
214 Avamar 18.2 Administration Guide

Table 72 Status indicators on the Node Information part of Server Management
Property Description
l Online (green) — Node is functioningcorrectly.
l Read-Only (blue) — This option occursnormally as background operations andwhen backups have been suspended.
l Time-Out (gray) — MCS could notcommunicate with this node.
l Unknown (yellow) — Node status cannotbe determined.
l Offline (red) — Node has experienced aproblem. If ConnectEMC has beenenabled, a Service Request (SR) shouldhave been logged. Go to Avamar Supportto view existing SRs. Search theknowledgebase for KB000457963,Troubleshooting Node Offline\GSANDegraded Issues on an Avamar System.
Table 73 Server details on the Node Information part of Server Management
Property Description
State Current operational state of the server. Oneof the following values:
l ONLINE — Node is functioning correctly.
l DEGRADED — One or more disk errorshave been detected.
l OFFLINE — Node has experienced aproblem. If ConnectEMC has beenenabled, a Service Request (SR) shouldhave been logged. Go to Avamar Supportto view existing SRs. Search theknowledgebase for KB000457963,Troubleshooting Node Offline\GSANDegraded Issues on an Avamar System.
l READONLY — Occurs normally asbackground operations are performed andwhen backups have been suspended.
Runlevel Current operational state of the server. Oneof the following values:
l fullaccess — This Avamar server is fullyoperational.
l admin — Avamar server is fullyoperational but only the administratorroot account can access the server.
Server Monitoring
Server Management tab 215

Table 73 Server details on the Node Information part of Server Management (continued)
Property Description
l adminonly — Avamar server is fullyoperational but only the administratorroot account can access the server.
l adminreadonly — Avamar server is in aread-only condition and only theadministrator root account can accessthe server.
l readonly — Avamar server is in a read-only condition. Restores are allowed butno new backups can be taken.
l suspended — Scheduled backups aredisabled until you reenable the scheduler.
l synchronizing — Avamar server ispriming or synchronizing stripes. Atemporary condition. Some operationsmight be delayed.
Accessmode Current access level of the server. The fullserver access mode is typically represented as3 4-bit fields. For example: mhpu+mhpu+0000 The most significant bits show server
privileges, the middle bits show root userprivileges, and the least significant bits showprivileges for all other users. Individual bits inthese fields convey the following information:
l m — Migrate allowed.
l h — Hash File System (HFS) is writable.
l p — Persistent store is writable.
l u — User accounting is writable.
Port Data port that is used for intra-nodecommunication.
Dispatcher Data port that is used by various utilities tocommunicate with this node.
Server uptime Number of hours, days, and minutes that haveelapsed since this Avamar server wasinitialized.
Server bytes reserved The maximum size that the current stripe filesoccupy.
Amount of reserved used The size for backup data in the stripe files andcache.
Total capacity Total amount of server storage capacity.
Capacity used Total amount of server storage capacity thathas been used for any reason.
Server Monitoring
216 Avamar 18.2 Administration Guide

Table 73 Server details on the Node Information part of Server Management (continued)
Property Description
Server utilization Percentage of total available node storagecapacity currently used.
Number of stripes Total number of stripes on this node.
Server version Version of Avamar software running on thisnode.
Table 74 OS details on the Node Information part of Server Management
Property Description
Version Current operating system version running onthis node.
Node uptime Number of hours, days, and minutes that haveelapsed since this node was last started.
Total bytes free in partitions Disk free size from the OS level.
Total bytes used in partitions Disk used size from the OS level.
Load average The average number of CPU threads over thepast minute.
CPU % Percentage of this node’s CPU currentlybeing used.
Ping time (sec) Time in seconds this node took to respond toa ping request.
Disk reads Number of hard drives read operations persecond.
Disk writes Number of write operations per second forthe hard drive.
Network reads Number of kilobytes per second read by wayof this node’s network connection.
Network writes Number of kilobytes per second written byway of this node’s network connection.
Table 75 Hardware details on the Node Information part of Server Management
Property Description
IP address IP address of this node.
MAC address Media Access Control (MAC) address. A low-level hardware address that uniquely identifiesthis node in the Avamar server.
Number of partitions Total number of logical hard drive partitions inthis node.
Generation The hardware platform type.
Server Monitoring
Server Management tab 217

Table 75 Hardware details on the Node Information part of Server Management (continued)
Property Description
Generation Description The hardware platform type description.
Partition information
The following tables provide details on the Partition Information that is availablewhen a partition is selected on the Server Management tab.
Table 76 Status indicators on the Partition Information part of Server Management
Property Description
Status indicators One of the following values:
l Online (green) — The partition isfunctioning correctly.
l Offline (yellow) — The partition has oneor more offline stripes. If ConnectEMChas been enabled, a Service Request (SR)should have been logged. Go to theAvamar Support website to view existingSRs.
l Read-Only (blue) — The partition is read-only.
l Nonfunctional (red) — The partition isnot functioning. Search theknowledgebase on the Avamar Supportwebsite for KB000465715, SuspendedPartitions\Stripes and Hfscheck Failureson Avamar (Symptom Code 22632).
Server bytes reserved The maximum size that the current stripe filesoccupy.
Amount of reserved used The size for backup data in the stripe files andcache.
Table 77 Server Details on the Node Information part of Server Management
Property Description
Total capacity Total amount of server storage capacity.
Capacity used Total amount of server storage capacity thathas been used.
Server utilization Percentage of total available partition storagecapacity that is used.
State Current operational state of this partition.One of the following values:
l ONLINE — The partition is functioningcorrectly.
Server Monitoring
218 Avamar 18.2 Administration Guide

Table 77 Server Details on the Node Information part of Server Management (continued)
Property Description
l MIGRATING — Transitional state thatmight or might not be due to normaloperation.
l OFFLINE — Transitional state that mightor might not be due to normal operation.
l READY — Transitional state that might ormight not be due to normal operation.
l RESTARTING — Transitional state thatmight or might not be due to normaloperation.
Number of offline stripes Total number of stripes on this partition thatare offline due to media errors.
Number of transitioning stripes Total number of stripes on this partition thatare in a transitional state that might or mightnot be due to normal operation.
Properties Various operating system properties (ifknown).
Values Settings for operating system properties (ifknown).
Total bytes free in partitions Disk free size from the OS level.
Total bytes used in partitions Disk used size from the OS level.
Data Domain system information
The following table provides details on the Data Domain system properties on theServer Management tab.
Table 78 Data Domain system properties on the Server Management tab
Property Description
Status indicators One of the following values:
l Online (green)—The Data Domain systemis functioning correctly.
l Offline (yellow)—The Data Domainsystem is offline. The Data Domain OfflineDiagnostics Suite User Guide, which isavailable on Avamar Support, providesmore information.
l Read-Only (blue)—The Data Domainsystem is read-only.
l Nonfunctional (red)—The Data Domainsystem is not functioning. The Data
Server Monitoring
Server Management tab 219

Table 78 Data Domain system properties on the Server Management tab (continued)
Property Description
Domain Offline Diagnostics Suite User Guideprovides more information.
IPv4 Hostname IPv4 hostname of the Data Domain system asdefined in corporate DNS.
IPv6 Hostname IPv6 hostname of the Data Domain system asdefined in corporate DNS.
Total Capacity (post-comp size) The total capacity for compressed data on theData Domain system.
Server Utilization (post-comp use%) The percentage of capacity that is used onthe Data Domain system for any reason aftercompression of the data.
Bytes Protected (client pre-comp size) The total number of bytes of data that areprotected, or backed up, on the Data Domainsystem. This value is the number of bytesbefore the data is compressed.
File System Available (post-comp avail) The total amount of disk space available forcompressed data in the DDFS.
File System Used (post-comp used) The total amount of disk space that is used inthe DDFS for compressed data.
Username The username of the Data DomainOpenStorage (OST) account that Avamarshould use to access the Data Domain systemfor backups, restores, and replication, ifapplicable. This username is specified whenyou add the Data Domain system to theAvamar configuration.
Default Replication Storage System Whether the Data Domain system isconfigured as default replication storage. Thisoption is selected or cleared when you add theData Domain system to the Avamarconfiguration.
Target For Avamar Checkpoint Backups Indicate whether to store Avamar CheckpointBackups on the Data Domain system or not.
Maximum Streams For Avamar CheckpointBackups
The maximum number of reserved streams forAvamar CheckPoint Backup on Data Domainsystem.
Maximum Streams The maximum number of Data Domain systemstreams that Avamar can use at any one timeto perform backups and restores. This numberis configured for the Data Domain systemwhen you add the system to the Avamarconfiguration.
Maximum Streams Limit The maximum number of Data Domainsystems backup write streams.
Server Monitoring
220 Avamar 18.2 Administration Guide

Table 78 Data Domain system properties on the Server Management tab (continued)
Property Description
Instant Access Limit The amount limit of VMs that generated fromInstant Access Restore.
DDOS Version Version number of the Data Domain OperatingSystem (DD OS) on the Data Domain system.
Serial Number The manufacturer’s serial number for the diskin the Data Domain system.
Model number Model number of the Data Domain system.
Encryption Strength The default global encryption strength ofDDBoost clients on Data Domain system. Thevalues are none, medium, and high.
Authentication Mode The default global authentication mode ofDDBoost clients on Data Domain system. Thevalues are none, one-way, two-way, andanonymous.
Monitoring Status Monitoring status of the Data Domain system.The Avamar and Data Domain SystemIntegration Guide provides details on theavailable values.
Monitoring status details When the monitoring status is a value otherthan OK, then additional information appears
in a list below the Monitoring Status row.The following entries describe the availablevalues.
Note
The Avamar and Data Domain SystemIntegration Guide provides details on how totroubleshoot error conditions that result fromeach of these values.
DD Boost licensing status, either:
l DDBoost Licensed
l DDBoost not Licensed
DD Boost status, either:
l DDBoost Enabled
l DDBoost Disabled
Whether the DD Boost user is enabled ordisabled, either:
l DDBoost User Enabled
l DDBoost User Disabled
DD Boost user status, either:
l DDBoost User Valid
Server Monitoring
Server Management tab 221

Table 78 Data Domain system properties on the Server Management tab (continued)
Property Description
l DDBoost User Changed
DD Boost option status, either:
l DDBoost Option Enabled
l DDBoost Option Disabled
l DDBoost Option not Available
Status of the non-OST user, if configured,either:
l Non-ost user state is Unknown
l Non-ost user Invalid
l Non-ost user disabled
l Non-ost user is not an admin user
Note
The non-OST user row does not appear whena non-OST user has not been configured.
SNMP status, either:
l SNMP Enabled
l SNMP Disabled
Status of the Data Domain file system, either:
l File System Running
l File System Enabled
l File System Disabled
l File System Unknown
l File system status unknown since SNMPis disabled
Whether synchronization of maintenanceoperations, such as checkpoints, HFS checks,and Garbage Collection, between the Avamarserver and the Data Domain system canoccur, either:
l Synchronization of maintenanceoperations is off.
l Synchronization of maintenanceoperations is on.
Cloud Tier The status of Cloud Tier. If enabled, displaythe Cloud Unit name, or display as disabled.
Server Monitoring
222 Avamar 18.2 Administration Guide

Event monitoringAll Avamar system activity and operational status is reported as events to the MCS.Examples of Avamar events include client registration and activation, successful andfailed backups, and hard disk status.
Each event contains the information in the following table.
Table 79 Event information
Information Description
Event code Unique identifier
Date and time Date and time the event was reported
Category Category of event:
l SYSTEM
l APPLICATION
l USER
l SECURITY
Type Type of event:
l INTERNAL
l ERROR
l WARNING
l INFORMATION
l DEBUG
Summary A one-line summary description of the event
Hardware source System node that reported the event
Software source System or application module that reportedthe event
Event notificationsThe following features generate notifications when specific events occur.
Pop-up alertsYou can configure individual events to generate a graphical pop-up alert each time theevent occurs. Avamar Administrator must be running for the pop-up alerts to appear.
Acknowledgment required listYou can specify that when a certain event type occurs, the Avamar systemadministrator must acknowledge the event.
Email messagesYou can specify that when a certain event type occurs, an email message is sent to adesignated list of recipients. Email notifications can be sent immediately or in batchesat scheduled times.
A typical batch email notification message looks like the following example.
Server Monitoring
Event monitoring 223

Table 80 Example of a batch email notification message
MCS: avamar-1.example.com
MCS Version: 7.1.0-nnnAvamar Server: avamar-1.example.comAvamar Server Version: 7.1.0-nnn
Event profile: My Custom ProfileCount of events: 3
Summary of events:Type-----------INFORMATIONINFORMATIONINFORMATION
Type-----------INFORMATIONINFORMATIONINFORMATION
Code------222072220822209
Count------111
Summary-------New groupcreatedGroup modifiedGroup deleted
Event Code = 22207Event Date/Time = 5/10/14 09:58:20 PDTEvent Type = INFORMATIONEvent Severity = OKEvent Summary = New group createdSoftware Source = MCS:CR
Event Code = 22209Event Date/Time = 5/10/14 09:58:25 PDTEvent Type = INFORMATIONEvent Severity = OKEvent Summary = Group deletedSoftware Source = MCS:CR
Event Code = 22208Event Date/Time = 5/10/14 10:55:28 PDTEvent Type = INFORMATIONEvent Severity = OKEvent Summary = Group modifiedSoftware Source = MCS:CR
Syslog supportYou can specify that when an event type occurs, Avamar logs information to local orremote syslog files that are based on filtering rules that are configured for the syslogdaemon that receives the events. Third-party monitoring tools and utilities capable of
Server Monitoring
224 Avamar 18.2 Administration Guide

examining log entries can access the syslog files and process them to integrateAvamar event information into larger site activity and status reports.
SNMP supportThe Avamar SNMP implementation provides two ways to access Avamar serverevents and activity completion status:
l SNMP requests provide a mechanism for SNMP management applications to“pull” information from a remote SNMP-enabled client (in this case, the Avamarserver).
l SNMP traps provide a mechanism for the Avamar server to “push” information toSNMP management applications whenever designated Avamar events occur. Youcan configure an event type to output SNMP traps.
Usage intelligenceEnables the Avamar server to automatically collect and transfer reporting informationto Avamar Support via the ESRS gateway.
Event profilesProfiles are a notification management feature that is used to logically group certainevent codes together and specify which notifications to generate when the eventsoccur.
There are two basic types of event profiles:
l System profile — There is only one system event profile. It contains all possiblesystem event codes.
l Custom profiles — Custom profiles are used to send various notifications whencertain system events occur. You can create as many custom profiles as youshould. This step is done to organize system events and generate notificationswhen any of those events occur.
Profile catalogThe Avamar system includes a set of preconfigured event profiles by default.
System profileThere is only one system event profile. It contains all possible system event codes.
Evaluation profileThe evaluation profile is primarily intended to be used to support system evaluations. Ifenabled, this profile generates an email notification and attaches 2 weeks’ worth ofActivities - DPN Summary report information to the email message. The AvamarReports Guide provides more information about the Activities - DPN Summary report.
High Priority Events profileThe High Priority Events profile is enabled by default. This special event profileautomatically email messages the following information to Avamar Support([email protected]) twice daily:
l Status of the daily data integrity check
l Selected Avamar server warnings and information messages
l Any Avamar server errors
The only change that you can make to the High Priority Events profile is to add emailaddresses to the Recipient Email List. If you require custom High Priority Eventsprofile settings, copy the profile and then edit the copy.
Server Monitoring
Event profiles 225

Local SNMP Trap profileThe Local SNMP Trap profile is read-only and is intended to be used for test purposesonly. The profile enables you to verify successfully generated traps and that the localsnmptrapd process receives the traps, which then writes the trap information to asyslog file.
Local Syslog profileIf enabled, the Local Syslog profile reports status by way of the local syslogdprocess on the Avamar server.
Usage Intelligence profileEnables the Avamar server to automatically collect and transfer reporting informationto Avamar Support via the ESRS gateway.
Editing the system event profileThe system event profile contains all possible system event codes. You can edit thesystem event profile to control whether an event generates a pop-up alert in AvamarAdministrator, an entry in the common unacknowledged events list, or neither.
Procedure
1. In Avamar Administrator, select Tools > Manage Profiles.
The Manage All Profiles window is displayed.
2. Select System Profile in the left pane and click Edit.
The Edit Profile dialog box appears with a list of event codes.
3. To show a graphical pop-up alert in Avamar Administrator each time an eventoccurs, select the GUI Alert checkbox next to the event.
4. To add an entry to the common unacknowledged events list each time that anevent occurs, select the Acknowledgement Required checkbox.
5. Click OK.
Creating a custom event profileCustom event profiles enable you to send notifications when specific system eventsoccur.
You cannot view system events and profiles outside the domain that you are logged into. This step affects the profiles that you can edit and the events that you can add toa profile.
Procedure
1. In Avamar Administrator, select Tools > Manage Profiles.
The Manage All Profiles window is displayed.
2. In the left pane, select the domain for the custom event profile, and click New.
The New Profile wizard appears.
3. In the Profile Name box, type a name for the event profile.
4. For Profile Type, leave the default setting of Email, Syslog, and SNMP TrapNotification.
Server Monitoring
226 Avamar 18.2 Administration Guide

Note
Because the Usage Intelligence feature uses the preconfigured UsageIntelligence profile, do not create a profile that is based on the UsageIntelligence profile type. This step results in redundant data being sent toAvamar Support.
5. Choose whether to enable or disable the profile by selecting or clearing theProfile Enabled checkbox.
6. Choose whether to enable email notifications for the profile by selecting orclearing the Email Enabled checkbox.
7. If you enabled email notifications, then specify whether to send emailnotifications as soon as events occur or on a scheduled basis:
l To send email notifications as soon as events occur, select Send data asevents occur.
l To send email notifications on a scheduled basis, select Send data on aschedule, and then select the schedule from the list.
8. Choose whether to enable or disable syslog notification for the profile byselecting or clearing the Syslog Notification – Enabled checkbox.
9. Choose whether to enable or disable SNMP notification for the profile byselecting or clearing the SNMP Trap Notification – Enabled checkbox.
10. Click Next.
The Event Codes page appears.
11. Click the All Codes tab, and then select the Notify checkbox next to the errorsthat should trigger notifications.
NOTICE
An asterisk (*) next to an event indicates an event of such severity that anotification is sent when that event occurs, even if other event notifications aresent on a schedule.
12. Click the Audit Codes tab, and then select the Notify checkbox next to theaudit events that should trigger notifications.
NOTICE
An asterisk (*) next to an event code indicates an event of such severity that anotification is sent when that event occurs, even if other event notifications aresent on a schedule.
13. If you are adding this custom event profile at the top-level (that is, not to adomain or subdomain), specify the parameters to control capacity forecastalerts:
a. Click the Parameters tab.
b. Select the checkbox next to the parameter, and then type a new value forthe parameter.
c. Repeat the previous step as necessary for each parameter.
Server Monitoring
Event profiles 227

14. Click Next.
The Attachments page appears.
15. (Optional) If the profile includes email notification messages, select the AttachServer status in email (XML) checkbox to include a report of overall Avamarserver status in XML format in the messages.
16. (Optional) To include Avamar server logs in email notification messages, selectthe Attach Server logs in email checkbox and then type the full path to thelocation of Avamar server logs in the Directory box. The default locationis /usr/local/avamar/var/cron/.
17. Specify the reports to include in email notification messages:
a. Select the Attach checkbox next to the report to include.
b. Select the checkbox next to the report for the file formats in which to sendthe report. You can select XML, CSV, or TXT.
c. Specify the number of historical reports of this type to send with eachnotification message using the Since Count and Since Unit fields. Forexample, send the past 2 months of these reports.
The following values are available from the Since Count list:
l day(s) ago
l week(s) ago
l month(s) ago
l since last modified
18. Click Next.
The Email Notification page appears.
19. If the profile includes email notification messages, then specify the recipientsand options for the email notification messages:
a. In the Email Subject Header box, type an email subject line for thenotification message.
b. Add an email recipient to the list by typing a valid email address in the EnterRecipient box and then clicking +.
c. (Optional) To remove a recipient from the Recipient Email List, select therecipient and click -.
d. To insert all attachments into the body of the email notification message,select the Inline attachments checkbox.
NOTICE
When you insert the attachments, the email message may be very long.
e. To immediately send a test email message, click Send Email.
If the test email message is sent successfully, an Email accepted bytransport layer confirmation message appears.
20. Click Next.
The Syslog Notification page appears.
21. If the profile includes syslog notification messages, then specify the syslognotification parameters:
Server Monitoring
228 Avamar 18.2 Administration Guide

a. In the Address (IP or hostname) box, type the IP address or hostname ofthe Avamar server node running the syslogd process.
b. In the Port Number box, type the port number that is used for syslogcommunication.
c. Choose whether to include extended event code information in the syslogmessage by selecting or clearing the Include extended event datacheckbox.
The extended information is delimited by using the following tags:
<Code><Type><Severity><Category><HwSource><Summary><active><lastEmailSendDate><domain><scheduleID><num_prefs><name><isSystem>
d. From the Facility list, select one of the following: user, local0, local1,local2, local3, local4, local5, local6, or local7.
e. To test the syslog notification parameters, click Send Test Syslog Entry.
22. Click Next.
The SNMP Trap Notification page appears.
23. If the profile includes SNMP notification messages, then specify SNMPnotification parameters:
a. In the SNMP Trap address (IP or hostname) box, type the IP address orhostname of the computer running an application that can receive andprocess an SNMP trap.
b. In the Port Number box, type the port number on the host server that islistening for SNMP traps. The default data port is 162.
c. In the SNMP Community box, type the name of the SNMP community thatthe SNMP trap listener is configured to use.
The SNMP community is a text string that the local Net-SNMP agent usesto authenticate itself with the SNMP management application.
d. To test the SNMP notification parameters, click Send Test SNMP Trap.
24. Click Finish.
Editing a custom event profileAfter you create a custom event profile for notifications of specific system events,you can edit any of the properties of the profile.
You cannot view system events and profiles outside the domain that you are logged into. This step affects the profiles that you can edit and the events that you can add toa profile.
Server Monitoring
Event profiles 229

Procedure
1. In Avamar Administrator, select Tools > Manage Profiles.
The Manage All Profiles window is displayed.
2. In the left pane, select the custom event profile and click Edit.
The Edit Profile dialog box appears.
3. Edit the custom event profile. The properties are the same as when you createthe profile.
4. Click OK.
Copying a custom event profileYou can create a custom event profile with the same properties as a profile that youalready created by copying the profile. You can copy the profile to the same domain orto a different domain.
Procedure
1. In Avamar Administrator, select Tools > Manage Profiles.
The Manage All Profiles window is displayed.
2. In the left pane, select the profile and click Copy.
The Save As dialog box appears.
3. Type a name for the new custom event profile in the Save As box.
4. (Optional) To copy the new custom event profile to a different domain, clickthe ... button, browse to the new domain, and then click OK.
5. Click OK.
Testing custom event profile notificationsYou can test custom event profile notification mechanisms by sending a short emailmessage or writing a short message to the syslog file.
Procedure
1. In Avamar Administrator, select Tools > Manage Profiles.
The Manage All Profiles window is displayed.
2. In the left pane, select the custom event profile and click Edit.
The Edit Profile dialog box appears.
3. Test the custom event profile:
l To send a test email message, select the Email Notification tab and clickSend Email.
l To write a test message to the syslog file, select the Syslog Notificationtab and click Send Test Syslog Entry.
l To send a test SNMP trap message, select the SNMP Trap Notification taband click Send Test SNMP Trap.
If the test message is successfully sent, a confirmation message appears.
4. Click OK.
5. To close the Edit Profile dialog box, click OK.
Server Monitoring
230 Avamar 18.2 Administration Guide

Enabling and disabling a custom event profileWhen you disable an event profile, no email notifications are sent until you reenablethe profile. You can disable any profile except the system events profile.
Procedure
1. In Avamar Administrator, select Tools > Manage Profiles.
The Manage All Profiles window is displayed.
2. In the left pane, select the event profile.
3. To disable the event profile, click Disable, or to enable the event profile,clickEnable.
Deleting a custom event profileYou can permanently delete any custom event profile except the system eventsprofile.
Procedure
1. In Avamar Administrator, select Tools > Manage Profiles.
The Manage All Profiles window is displayed.
2. Select the event profile and click Delete.
A confirmation message appears.
3. Click Yes.
Viewing events in the Event MonitorProcedure
1. In Avamar Administrator, click the Administration launcher link.
The Administration window is displayed.
2. Click the Event Management tab.
3. Click the Event Monitor tab near the bottom of the window.
The Avamar Administrator online help provides details on each of the columns inthe Event Monitor.
4. Select the display mode for the Event Monitor:
l To display the most recent 5,000 system events for a defined range ofdates, select Query.
l To display the most recent 5,000 system events during the past 24 hours,select Monitor.
5. (Optional) Filter the events that appear in the Event Monitor:
a. Open the Actions menu and select Event Management > Filter.
The Filter dialog box appears.
b. If you selected the Query display mode for the Event Monitor, select therange of dates for the events to display by using the From Date and To Datefields.
c. From the Category list, select the category of events to display.
d. From the Type list, select the type of events to display.
Server Monitoring
Viewing events in the Event Monitor 231

e. From the Severity list, select the severity of the events to display.
f. To view events for all domains, select All Domains. Or, to view events for aspecific domain, select Domain and then browse to or type the domainname.
g. To display only events that contain certain case-sensitive keywords in theevent code data XML element, type the keyword in the Data box.
This criterion promotes easy filtering on important keywords across eventattributes. For example, filtering the Event Monitor on error returns allevents that contain the word error in any XML attribute (for example,category, type, or severity).
h. Choose whether to display events from all sources, from only the Avamarserver, from all Data Domain systems, or from a single Data Domain system:
l To view events from all sources, leave the default selection of AllSources in the Source list.
l To view events from only the Avamar server, select Avamar from theSource list.
l To view events from all Data Domain systems, select Data DomainSystems from the Source list and leave the default selection of AllSystems.
l To view events from a single Data Domain system, select Data DomainSystems from the Source list, select the System option, and then eithertype or browse to the Data Domain system.
i. Click More to view additional filtering criteria.
j. To limit the Event Monitor to events with a certain event code, select Onlyinclude codes and then add and remove codes from the list. Or, to excludeevents with a certain event code from the Event Monitor, select Excludecodes and then add and remove codes from the list.
k. Click OK.
Viewing the event catalogA sequential listing of all event codes and summary information is available in /usr/local/avamar/doc/event_catalog.txt on the Avamar server. You can alsoview event_catalog.txt by using a web browser.
Procedure
1. Open a web browser and type the following URL:
https://Avamar_serverwhere Avamar_server is the DNS name or IP address of the Avamar server.
The Avamar Web Restore page appears.
2. Click Documentation.
The Avamar Documentation page appears.
3. Click the plus icon next to Avamar Event Codes.
4. Click event_catalog.txt.
The file opens in the web browser.
Server Monitoring
232 Avamar 18.2 Administration Guide

Acknowledging system eventsSystem events that are configured to require acknowledgment each time they occur,remain in the unacknowledged events list until they are explicitly cleared, oracknowledged, by an Avamar server administrator.
Procedure
1. In Avamar Administrator, click the Administration launcher link.
The Administration window is displayed.
2. Click the Event Management tab.
3. Click the Unacknowledged Events tab near the bottom of the window.
4. Acknowledge the events:
l To acknowledge one or more events, select the event entries and selectActions > Event Management > Acknowledge Unacknowledged Events.
l To acknowledge all events in the list, select Actions > Event Management >Clear All Alerts.
Customizing error eventsBy default, Avamar software continually monitors /var/log/messages for anyoccurrence of the case-insensitive search string error. Any occurrences of errorcreate an event code of the type ERROR. You can customize this default behavior.
Procedure
1. Define additional case-insensitive search strings that also create AvamarERROR events.
2. Add the search strings to /usr/local/avamar/var/mc/server_data/adminlogpattern.xml.
Server monitoring with syslogThe syslog system logging feature on UNIX and Linux systems collects system logmessages and writes them to a designated log file. You can configure the Avamarserver to send event information in syslog format.
The Avamar server supports both syslog and syslog-ng implementations.
Note
Persons configuring syslog monitoring of an Avamar server should be familiar withbasic syslog concepts. A complete discussion of basic syslog concepts andimplementation is beyond the scope of this guide. The www.syslog.org websiteprovides additional information.
At the operating system level, system monitoring and logging rely on the syslogdprocess to collect system log messages and write them to a designated log file. Thesyslogd process runs locally on every Avamar server node.
However, without additional configuration, each node’s syslogd only collects systeminformation for that node, and writes it to a local log file on that node. From a syslogperspective, each Avamar server node is unaware that any other server nodes exist.Also, the utility node syslog process is not aware that the Avamar ManagementConsole Server (MCS) is collecting and logging Avamar event information.
Server Monitoring
Acknowledging system events 233

You can configure an Avamar event profile to format Avamar server event messages insyslog format and send this data to the syslogd process running on the Avamarserver utility node.
The following table describes how an event profile maps Avamar server event data tosyslog fields.
Table 81 Mappings of syslog fields to Avamar event data
Field in syslog Avamar event data
Facility Either User or Local#, where # is a number
from 0 to 7.
Priority One of the following values, which are basedon the Avamar event type:
l debug, if the Avamar event type is
DEBUG
l err, if the Avamar event type is ERROR
l info, if the Avamar event type is INFO
l none, if the Avamar event type is
INTERNAL
l warning, if the Avamar event type is
WARNING
Date Avamar event date.
Time Avamar event time.
Hardware source Avamar event hardware source.
Software source Avamar event software source.
Message The following fields from the Avamar eventcode:
l event code
l category
l summary
l event data
Configuring local syslogThe most basic way to implement Avamar server syslog monitoring is to configure theMCS to output Avamar event information to the local syslogd process running onthe utility node. The local syslogd service merges the Avamar event information withthe operating system messages in a single local log file.
Procedure
1. Enable the Local Syslog event profile on the Avamar server:
a. In Avamar Administrator, select Tools > Manage Profiles.
b. Select the Local Syslog event profile in the left pane and click Enable.
Server Monitoring
234 Avamar 18.2 Administration Guide

2. On single-node servers and utility nodes with SLES 11 or later, configure thelocal utility node syslogd process to listen for MCS event messages on UDPdata port 514:
a. Open a command shell and log in as admin on the single-node server or theutility node of a multi-node server.
b. Switch user to root by typing su -.
c. Open /etc/syslog-ng/syslog-ng.conf in a text editor.
d. Locate the following entry:
## uncomment to process log messages from network:## udp(ip("0.0.0.0") port(514));
e. Add the following entry, including the comment:
## uncomment to process log messages from MCS:#udp(ip("0.0.0.0") port(514));
f. Save and close the file.
g. Restart the syslog process by typing the following command:
service syslog restart
h. Verify that syslog is listening on port 514 by typing the following command:
netstat -nap | grep 514
The following output appears in the command shell:
udp 0 0 127.0.0.1:514 127.0.0.1:* 8043/syslog-ng
Configuring remote syslogRemote syslog monitoring includes the following:
l Configuring each server node to send syslog data to a remote logging host.
l Creating a custom syslog event profile that sends Avamar server event messagesin syslog format to the remote logging host.
Sites that implement remote syslog monitoring of an Avamar server in most casesalready have a remote logging host that is configured and deployed.
Many different syslog monitoring tools are available. Any syslog monitoring toolgenerally works with Avamar as long as it is configured to listen for remote syslogmessages over a LAN connection on UDP data port 514.
NOTICE
For maximum security, implement remote syslog monitoring.
Procedure
1. Create a custom syslog event profile that sends Avamar server event messagesin syslog format to the remote logging host.
Server Monitoring
Configuring remote syslog 235

2. Configure all server nodes to send syslog messages to the remote logging host.
3. Configure the remote logging host to listen for syslog messages over a LANconnection on UDP data port 514.
4. If a firewall is enabled on the remote logging host, configure the firewall to allowUDP traffic on port 514 for a defined IP range.
Creating a custom syslog event profileProcedure
1. In Avamar Administrator, select Tools > Manage Profiles.
The Manage All Profiles window is displayed.
2. Select the Local Syslog event profile in the left pane and click Copy.
The Save As dialog box appears.
3. Type a name for the new custom event profile in the Save As field.
4. Leave the domain set to root (/). Custom syslog profiles must reside in the rootdomain.
5. Click OK.
6. In the Manage All Profiles dialog box, select the custom syslog event profilethat you created and click Edit.
The Edit Profile dialog box appears.
7. Select the Syslog Notification tab and specify syslog notification parameters:
a. In the Address (IP or hostname) field, type the IP address or hostname ofthe remote logging host.
b. In the Port Number field, leave the port number set to 514.
c. Select the Include extended event data option to include extended eventcode information in the syslog message.
The extended information is delimited by using the following tags:
<Code><Type><Severity><Category><HwSource><Summary><active><lastEmailSendDate><domain><scheduleID><num_prefs><name><isSystem>
d. From the Facility list, select one of the following values: user, local0, local1,local2, local3, local4, local5, local6, or local7.
8. (Optional) To test the syslog notification parameters, click Send Test SyslogEntry.
9. Click OK.
Server Monitoring
236 Avamar 18.2 Administration Guide

Configuring server nodes to send syslog messages to the remote logging serverAs part of the process to configure remote syslog, you must configure all Avamarserver nodes to send syslog messages to a remote logging server over a LANconnection on UDP data port 514.
Procedure
1. Open a command shell:
a. Log in to the server as admin.
b. Switch user to root by typing the following command:
su -
c. For a multi-node server, load the rootid OpenSSH key by typing thefollowing command:
ssh-agent bashssh-add /root/.ssh/rootid
2. Open /etc/syslog-ng/syslog-ng.conf in a text editor.
3. Add the following entry:
destination logserver {udp("ip_address" port(514)); };log { source(src); destination(logserver); };where ip_address is the IP address of the remote logging host.
4. Save and close the file.
5. Restart the syslog process by typing the following command:
service syslog restart
6. On multi-node servers, repeat the previous steps for each node.
Configuring RHEL remote logging hosts running syslogProcedure
1. Open a command shell and log in to the remote logging host as root.
2. Open /etc/sysconfig/syslog in a text editor.
3. Locate the following entry:
SYSLOGD_OPTIONS="-m 0"4. Add the -r parameter to the entry:
SYSLOGD_OPTIONS="-r -m 0"5. Save and close the file.
6. Restart the syslogd process by typing the following command:
service syslog restart
Configuring SLES remote logging hosts running syslog-ngProcedure
1. Open a command shell and log in to the remote logging host as root.
Server Monitoring
Configuring remote syslog 237

2. Open /etc/syslog-ng/syslog-ng.conf in a text editor.
3. Locate the following entry:
## uncomment to process log messages from network:## udp(ip("0.0.0.0") port(514));
4. Uncomment the entry:
## uncomment to process log messages from network:#udp(ip("0.0.0.0") port(514));
5. Save and close the file.
6. Restart the syslog process by typing the following command:
service syslog restart
7. Verify that syslog is listening on port 514 by typing the following command:
netstat -nap | grep 514
The following output appears in the command shell:
udp 0 0 0.0.0.0:514 0.0.0.0:* 8043/syslog-ng
Configuring the firewall on the remote logging hostIf a firewall is enabled on the remote logging host, configure the firewall to allow UDPtraffic on port 514 for a defined IP range.
Procedure
1. Restrict the source IP addresses of the remote log messages in iptables oranother firewall to avoid Denial Of Service (DOS) attacks on the remote logginghost.
The following example rule for iptables would allow client system logs for an IPaddress range of Avamar server nodes:
# Rules to allow remote logging for syslog(-ng) on the logHOST systemiptables -A INPUT -p udp -s 192.168.1.0/24 --dport 514 -jACCEPTwhere 192.168.1.0/24 is in the IP address range of the Avamar server nodes.
The following example rule for iptables specifies the IP address for each Avamarserver node on a single line and includes the Mac address of the NetworkInterface Card (NIC) for the node:
iptables -A INPUT -p udp -s 192.168.1.12 -m mac --mac-source 00:50:8D:FD:E6:32 --dport 514 -j ACCEPTiptables -A INPUT -p udp -s 192.168.1.13 -m mac --mac-source 00:50:8D:FD:E6:33 --dport 514 -j ACCEPTiptables -A INPUT -p udp -s 192.168.1.14 -m mac --mac-source 00:50:8D:FD:E6:34 --dport 514 -j ACCEPTiptables -A INPUT -p udp -s 192.168.1.15 -m mac --mac-source 00:50:8D:FD:E6:35 --dport 514 -j ACCEPT
Server Monitoring
238 Avamar 18.2 Administration Guide

...No rules are necessary for the outgoing syslog traffic on the client side.
2. Restart the firewall service on the remote logging host for the changes to takeeffect.
3. Restart the syslog-ng service on all server nodes and the remote logging hostfor the changes to take effect:
service syslog restart
Server monitoring with SNMPSimple Network Management Protocol (SNMP) is a protocol for communicating andmonitoring event notification information between an application, hardware device, orsoftware application and any number of monitoring applications or devices.
Note
Persons configuring an Avamar server to send event information over SNMP shouldbe familiar with basic SNMP concepts. A complete discussion of basic SNMPconcepts and implementation is beyond the scope of this guide. The www.net-snmp.org website provides additional information.
The Avamar SNMP implementation provides SNMP requests and SNMP traps toaccess Avamar server events and activity status. The Avamar server supports SNMPversions v1 and v2c.
SNMP requestsSNMP requests provide a mechanism for SNMP management applications to “pull”information from a remote SNMP-enabled application or device (in this case, theAvamar server). The SNMP management application sends a request to an SNMPmaster agent running on the Avamar server. The SNMP master agent thencommunicates with the Avamar SNMP sub-agent, which passes the request to theMCS. The MCS retrieves the data and sends it back to the Avamar SNMP sub-agent,which passes it back to the management application by way of the SNMP masteragent. Data port 161 is the default data port for SNMP requests.
Avamar servers that are purchased directly from Avamar use the Net-SNMP masteragent. Avamar servers that are built with other industry standard hardware likely usean SNMP master agent that is provided by the hardware manufacturer.
SNMP trapsSNMP traps provide a mechanism for the Avamar server to “push” information toSNMP management applications when designated Avamar events occur. Data port 162is the default data port for SNMP traps. Typically, the SNMP management applicationlistens for the SNMP traps that designated remote hosts generate.
Configuring server monitoring with SNMPProcedure
1. To enable an SNMP management application to monitor an Avamar server, loadthe Avamar Management Information Base (MIB) definition file (AVAMAR-MCS-MIB.txt) into the master MIB used by the SNMP management application.
The MIB contains definitions of the information that can be monitored or whichtraps are sent for each SNMP application or device.
Server Monitoring
Server monitoring with SNMP 239

The following table provides the locations for the Avamar MIB definition file.
Table 82 Locations for the Avamar MIB definition file
Computer type MIB location
Single-node server /usr/local/avamar/doc
Multi-node server /usr/local/avamar/doc on theutility node
Computer with Avamar Administrator install_dir/doc, where install_dir istypically:
l C:\Program Files\avs\administrator on Microsoft Windows
computers
l /usr/local/avamar on Linux
computers
l /opt/AVMRconsl on Solaris computers
A copy of the Avamar MIB definition file also resides in the /usr/share/snmp/mibs directory on single-node servers and utility nodes. This copy isused by the Avamar SNMP sub-agent and should not be moved or distributed.
2. Configure the Net-SNMP agent. Configuring the Net-SNMP agent on page240 provides instructions.
3. Configure a custom event profile to output designated Avamar server events toan SNMP trap. Creating a custom event profile for an SNMP trap on page 242provides instructions.
Configuring the Net-SNMP agentThe avsetup_snmp command line utility configures the Net-SNMP agent tocommunicate with the Avamar server by using the Avamar SNMP sub-agent.
Procedure
1. Open a command shell:
a. Log in to the server as admin.
b. Switch user to root by typing the following command:
su -
c. For a multi-node server, load the rootid OpenSSH key by typing thefollowing command:
ssh-agent bashssh-add /root/.ssh/rootid
2. Type the following commands to launch the utility:
cd /rootavsetup_snmp
The output prompts you to specify the port on which to listen for SNMPrequests.
Server Monitoring
240 Avamar 18.2 Administration Guide
3. Specify the SNMP request data port:
l To use port 161, the default SNMP request data port, press Enter.
l To use a different SNMP request data port, type the data port number andpress Enter.
If avsetup_snmp was not able to detect any SNMP communities, the outputprompts you to specify whether to allow SNMPv3 read-write user basedaccess.
4. Type n and press Enter.
The output prompts you to specify whether to allow SNMPv3 read-only userbased access.
5. Type n and press Enter.
The output prompts you to specify whether to allow SNMPv1/v2c read-writecommunity access.
6. Type n and press Enter.
The output prompts you to specify whether to allow SNMPv1/v2c read-onlycommunity access.
7. To accept the default value of y, press Enter.
The output prompts you to specify the community name to which to add read-only access. The SNMP community is a text string that the local Net-SNMPagent uses to authenticate itself with the SNMP management application.
8. Type the SNMP community name and press Enter.
The output prompts you to specify the hostname or network address fromwhich to accept this community name.
9. To accept the community name from all hostnames or network addresses, pressEnter.
The output prompts you to specify the OID to which this community should berestricted.
10. To specify no restriction, press Enter.
The output prompts you to specify whether to configure another community.
11. Type n and press Enter.
The output indicates that /etc/snmp/snmpd.conf was created and run toconfigure the system_setup group. Then the output prompts you to specify thelocation of the system.
12. Type the physical location of the Avamar server and press Enter.
The output prompts you to specify contact information.
13. Type contact information (for example, email address, telephone extension) andpress Enter.
The output prompts you to specify whether to correctly set the value of thesysServices.0 OID.
14. Type n and press Enter.
The output indicates that /etc/snmp/snmpd.conf was installed and thatsnmpd was enabled.
Server Monitoring
Configuring server monitoring with SNMP 241

Creating a custom event profile for an SNMP trapAs part of the process of configuring server monitoring with SNMP, create a customevent profile to output designated Avamar server events to an SNMP trap.
The default Avamar configuration includes a Local SNMP Trap profile that outputsAvamar server event messages to the local Net-SNMP trap listener (snmptrapdprocess). However, you cannot edit the Local SNMP Trap profile. The profile isintended to be used for test purposes only, to verify that the local snmptrapdprocess can successfully generate and receive the traps. The process then writes thetrap information to a syslog file. Usually, the next step is to configure another customprofile to send Avamar SNMP traps to a remote Net-SNMP trap listener.
Procedure
1. Create a custom event profile by using the steps in Creating a custom eventprofile on page 226.
On the first page of the New Profile wizard, select the option to enable SNMPtrap notification.
2. Continue through the wizard until the SNMP Trap Notification page appears.
3. In the SNMP Trap Address (IP or hostname) box, type the IP address orhostname of a computer with an application capable of receiving and processingan SNMP trap.
4. In the Port Number box, type the port number on the host computer thatlistens for SNMP traps.
5. In the SNMP Community box, type the name of the SNMP community that theSNMP trap listener is configured to use.
6. (Optional) To test the SNMP notification parameters, click Send Test SNMPTrap.
7. Click Finish.
Viewing Avamar server log filesBy default, the Avamar storage process log file (gsan.log) is limited to 25 MB in sizeand always contains the most recent information. Additional historic log files (forexample, gsan.log.1, gsan.log.2, and so forth) might also exist. You can collectand view these log files by using command line operations.
Procedure
1. Open a command shell and log in by using one of the following methods:
l For a single-node server, log in to the server as admin.
l For a multi-node server:
a. Log in to the utility node as admin.
b. Load the admin OpenSSH key by typing the following command:
ssh-agent bashssh-add ~admin/.ssh/admin_key
2. Create a new user-defined temporary directory and change directory to it bytyping the following commands:
mkdir directorycd directory
Server Monitoring
242 Avamar 18.2 Administration Guide

where directory is the directory name.
3. Retrieve copies of the storage node log files by typing the following command:
getlogsThe getlogs command gathers the important log files from a particular node,compresses them into a single tar file, nodelogs.tgz, then copies these filesto numbered subdirectories in the current working directory.
4. Examine the nodelogs.tgz files for any entry that contains the string ERROR.To accomplish this, run the following shell commands, which write anynodelogs.tgz entries that contain the string ERROR to a user-definedtemporary file:
for p in [01].[!sm]*/nodelogs.tgz; dotar xzf $pgrep ERROR: cur/gsan.log*rm -rf cur/*done
5. Remove the user-defined temporary directory by typing the followingcommands:
cd ../rm -rf directory
Audit loggingThe audit log keeps a permanent log of system actions that users begin with. The datain this log enables enterprises that deploy Avamar to enforce security policies, detectsecurity breaches or deviation from policies, and hold users accountable for thoseactions.
Only actions that users begin with are logged. Actions that the system begins withwithout a user account, such as scheduled backups, maintenance activities, are notlogged.
System events with a category of SECURITY and type of AUDIT are used toimplement the Avamar audit logging feature. Because the underlying data for audit logentries are system events, this information is available in two places:
l Event Monitor, which also contains all other system events
l Audit Log, which only contains events that are also audit log entries
By default, audit log information is retained for 1 year.
You can increase or reduce the audit log retention period by editing the value ofclean_db_audits_days in /usr/local/avamar/var/mc/server_data/prefs/mcserver.xml, and restarting the MCS.
Viewing the Audit LogProcedure
1. In Avamar Administrator, click the Administration launcher link.
The Administration window is displayed.
Server Monitoring
Audit logging 243

2. Click the Event Management tab.
3. Click the Audit Log tab near the bottom of the window.
The Avamar Administrator online help provides details on each of the columns inthe Audit Log.
4. Select the display mode for the Audit Log:
l To display the most recent 5,000 audit log entries for a defined range ofdates, select Query.
l To display the most recent 5,000 audit log entries during the past 24 hours,select Monitor.
5. (Optional) Filter the entries that appear in the Audit Log:
a. Open the Actions menu and select Event Management > Filter.
The Filter dialog box appears.
b. If you selected the Query display mode for the Audit Log, select the range ofdates for the entries to display by using the From Date and To Date fields.
c. From the Severity list, select the severity of the log entries to display.
d. To view log entries for all domains, select All Domains. Or, to view entriesfor a specific domain, select Domain and then browse to or type the domainname.
e. To display only log entries that contain certain case-sensitive keywords inthe audit log entry data XML element, type the keyword in the Data box.
This criterion promotes easy filtering on important keywords across logentry attributes. For example, filtering the log in error returns all logentries that contain the word error in any XML attribute (for example,category, type, or severity).
f. To view additional filtering criteria, click More.
g. To limit the Audit Log to events with a certain event code, select Onlyinclude codes and then add and remove codes from the list. Or, to excludeevents with a certain event code from the Audit Log, select Exclude codesand then add and remove codes from the list.
h. Click OK.
Automatic notifications to Avamar SupportThe Email Home and ConnectEMC features automatically send notifications toAvamar Customer Support. These notifications include alerts for high priority eventsand daily reports to facilitate monitoring the Avamar server.
For environments where the Avamar server is part of a solution, such as theIntegrated Data Protection Appliance, the automatic notifications include the type ofsolution and other relevant details. This information ensures correct routing for alertsfor improved serviceability and no customer action is required.
Usage IntelligenceUsage Intelligence is a feature that enables the Avamar server to automatically collectand transfer reporting information to Avamar Support. The types of reports that aresent to Avamar Support vary depending on how the Avamar server is licensed.
The use of this feature requires that:
Server Monitoring
244 Avamar 18.2 Administration Guide

l ESRS gateway is installed and deployed in the local environment.
l You have the credentials to authorize registration with ESRS.
Installing and activating the ESRS licenseTo use Avamar with ESRS, you must have an Avamar license key file that includesESRS licensing.
Installing and activating a license on page 191 contains information about how to installand activate an Avamar license key file.
Importing the ESRS Gateway certificate to the Avamar server's keystoreBefore registering the Avamar server with the ESRS Gateway, you must import theESRS Gateway certificate to the Avamar server's keystore.
Procedure
1. Export the ESRS Gateway certificate:
a. Point a browser at https://esrs_gateway:9443
where esrs_gateway is the hostname or IP address of the local ESRSgateway.
b. Use the browser's functionality to export the certificate.
For example, in Internet Explorer 11:
a. Click the lock icon in the URL field and select View Certificates.
b. Click the Details tab.
c. Click Copy to File and complete the steps in the Certificate ExportWizard.
2. Copy the exported certificate to a temporary location on the Avamar server.
3. Open a command shell and log in by using one of the following methods:
l For a single-node server, log in to the server as admin.
l For a multi-node server, log in to the utility node as admin.
4. Switch user to root by typing the following command:
su -
5. Back up the keystore by typing the following command on one line:
cp -p /usr/local/avamar/lib/rmi_ssl_keystore /usr/local/avamar/lib/rmi_ssl_keystore.bak
6. Import the ESRS server certificate into the keystore by typing the followingcommand on one line:
keytool -importcert -keystore /usr/local/avamar/lib/rmi_ssl_keystore -storepass changeme -file <certfile>.crtwhere <certfile> is the name of the ESRS server certificate, including path.
7. Restart the MCS by typing the following command:
mcserver.sh --restart
Server Monitoring
Usage Intelligence 245

Registering Avamar with ESRSTo enable the Usage Intelligence feature, you must register the Avamar server withESRS.
Procedure
1. In Avamar Administrator, select Tools > Manage ESRS.
The Edit ESRS Gateaway Information window appears.
2. Type the IP address of the ESRS gateway in the ESRS Gateway field.
3. Type the port number of the ESRS gateway in the Port field.
4. Type the username and password for your Dell EMC Support credentials.
5. Click Register.
6. A message window indicates that the registration was successful. Click OK toclear.
Results
Once the Avamar server has been registered with the ESRS gateway, no furtherconfiguration of the Usage Intelligence feature is required.
Email HomeThe Avamar Email Home feature automatically sends configuration, capacity, andgeneral system information to Avamar Support once daily, and provides critical alertsin near-real time as needed.
By default, notification schedule email messages are sent at 6 a.m. and 3 p.m. eachday. The Notification Schedule controls the timing of these messages.
Editing Email Home mail settingsEmail Home is configured and enabled during Avamar server installation. You can editthe mail settings for Email Home after the installation.
Procedure
1. Open a command shell and log in by using one of the following methods:
l For a single-node server, log in to the server as admin.
l For a multi-node server:
a. Log in to the utility node as admin.
b. Load the admin OpenSSH key by typing the following command:
ssh-agent bashssh-add ~admin/.ssh/admin_key
2. Change directories by typing the following command:
cd /usr/local/avamar/var/mc/server_data/prefs
3. Open mcserver.xml in a UNIX text editor.
4. Find the com.avamar.asn.module.mail node.
The com.avamar.asn.module.mail node contains the smtpHost andadmin_mail_sender_address entries.
Server Monitoring
246 Avamar 18.2 Administration Guide

5. Verify that the value for the smtpHost entry is the DNS name of the outgoingSMTP mail server that is used to send Email Home messages, such assmtp.example.com.
If the value for the entry is incorrect, edit the value.
NOTICE
The Avamar server installation or upgrade automatically completes the value forthe smtpHost entry. In most cases, some arrangement must be made to enableemail messages originating from the Avamar server to be forwarded through theoutgoing SMTP mail server to Avamar Support over the Internet.
6. Specify a valid email address with access to a corporate outgoing SMTP mailserver as the value for the admin_mail_sender_address entry.
NOTICE
If you do not configure the Email Home feature to send messages from a validemail address, the incoming email server rejects messages that are generatedby the Email Home feature. Avamar Support is completely unaware that theseprogrammatically generated messages were rejected. In addition, because avalid sending email account is not known, programmatically generated warningsto the sender that these messages could not be sent are never viewed byanyone who can correct the problem.
7. Save the changes and close the file.
8. Restart the MCS by typing the following commands:
dpnctl stop mcsdpnctl start
9. Close the command shell.
ConnectEMCConnectEMC is a program that runs on the Avamar server and sends information toAvamar Support. ConnectEMC is typically configured to send alerts for high priorityevents as they occur, as well as reports once daily.
ConnectEMC is integrated with EMC Secure Remote Support (ESRS), provided thatit is installed, operational, and network accessible by the Avamar server. Contact theAvamar Sales Representative for more information about implementing ESRS.
Although ConnectEMC is initially configured during Avamar server softwareinstallation, Avamar Administrator enables you to manage ConnectEMC settings, inthe form of three user-configurable transports, after the server is operational:
l Primary transport
l Failover transport
l Notification transport
The primary and failover transports send alerts for high priority events as they occur.The primary transport is used unless it fails, at which time the failover transport isused.
The notification transport sends email notifications messages to one or more customeremail addresses under certain conditions.
Server Monitoring
ConnectEMC 247

You also can control whether the MCS generates and sends ConnectEMC messagesby enabling, disabling, stopping, and starting ConnectEMC.
Enabling and disabling ConnectEMCDisabling ConnectEMC causes the MCS to stop generating ConnectEMC messagesuntil ConnectEMC is reenabled. To allow the MCS to continue generatingConnectEMC messages but to queue the messages, stop ConnectEMC.
Procedure
1. In Avamar Administrator, select Tools > Manage ConnectEMC.
The Manage ConnectEMC window is displayed.
2. Specify whether the MCS generates and sends ConnectEMC messages:
l To stop the MCS from generating messages, click Disable.
l To restart the generation of messages, click Enable.
l To continue generating messages but queue the messages, click Stop.
l To start sending the messages, click Start.
If you disable ConnectEMC, you are prompted to type a password.
3. Type a valid password and click OK.
Editing the primary and failover transportsProcedure
1. In Avamar Administrator, select Tools > Manage ConnectEMC.
The Manage ConnectEMC window is displayed.
2. Select either Primary Transport or Failover Transport in the left pane, andclick Edit.
The Edit Primary/Secondary Transport dialog box appears.
3. Select the transport type from the Transport Type list:
l Email
l FTP
l HTTPS
Note
An operational Secure Remote Support gateway is required to use the FTP orHTTPS transport types.
4. (Email only) After selecting Email, complete the following steps.
a. In the SMTP Host (Email Server) field, specify the mail server hostname orIPv4 address.
b. In the Email Address field, specify one or more recipients of these emailmessages. Separate multiple email addresses with commas.
c. In the Email Sender Address field, specify the email address from which tosend the message.
d. (Optional) To configure advanced settings, click Advanced, and thenspecify the following settings in the Edit Advanced Email Settings dialogbox:
Server Monitoring
248 Avamar 18.2 Administration Guide

l Retries – The number of retries to perform before reporting a failure.The default setting is five retries.
l Timeout – The number of seconds to wait before reporting that theoperation timed out. The default setting is 5 minutes (300 s).
l Description – A description of this transport that appears in the ManageConnectEMC window. The default description is Email Transport.
l Email Subject – The subject line in the email. The default subject line isAvamar ConnectEMC Notification Email.
Do not change the email subject unless instructed to do so by AvamarSupport. Avamar spam filters can reject email messages with othersubject lines.
e. Click OK.
5. (FTP only) After selecting FTP, complete the following steps.
a. In the IP Address field, specify an IPv4 address.
b. In the Username field, specify an FTP username. The setting depends onthe FTP server software.
c. In the Password field, specify the password for the username.
d. (Optional) To configure advanced settings, click Advanced, and thenspecify the following settings in the Edit Advanced FTP Settings dialogbox:
l Retries – The number of retries to perform before reporting a failure.The default setting is five retries.
l Timeout – The number of seconds to wait before reporting that theoperation timed out. The default setting is 5 minutes (300 s).
l Description – A description of this transport that appears in the ManageConnectEMC window. The default description is FTP Transport.
l FEP Folder – A unique customer UNIX path in the ConnectEMC FrontEnd Processor (FEP). Use the folder location that is supplied by AvamarSupport.
l FTP Port – An IP port. The default setting is port 21.
l Mode – Either Active or Passive. The default setting is Active.
Do not change the email subject unless instructed to do so by AvamarSupport. Avamar spam filters can reject email messages with othersubject lines.
e. Click OK.
6. (HTTPS only) After selecting HTTPS, complete the following steps.
a. Type a valid URL for the Secure Remote Support home page in the URLfield.
Valid URLs use the following format:
https://home_name[:port]/target_directorywhere home_name, port, and target_directory are the home name, dataport, and target directory, respectively.
Use the URL provided by Avamar Support.
Server Monitoring
ConnectEMC 249

b. (Optional) To configure advanced settings, click Advanced, and thenspecify the following settings in the Edit Advanced HTTPS Settings dialogbox:
l Retries – The number of retries to perform before reporting a failure.The default setting is five retries.
l Timeout – The number of seconds to wait before reporting that theoperation timed out. The default setting is 5 minutes (300 s).
l Private Key Pass Phrase – The passphrase that is associated with theprivate key file.
l Private Key File – The file name of the private key file.
l Client Certificate – The client certificate to use. The default setting is“Default,” which uses the certificate that the MCS uses. Otherwise, typethe file name of the client certificate.
l Server CA Bundle – File containing a list of root certificates.
l Verify Server Name – Whether to verify the server name. Either Yes orNo. The default setting is No.
c. Click OK.
Sample key files are provided in /opt/connectemc/certs/ and https-privatekey.pem. Sample client certificates are provided in /opt/connectemc/certs/ and https-cert.pem. Sample root certificate bundlesare provided in /opt/connectemc/certs/ and https-ca-cert.pem.
7. Click OK on the Edit Primary/Secondary Transport dialog box.
Editing the notification transportProcedure
1. In Avamar Administrator, select Tools > Manage ConnectEMC.
The Manage ConnectEMC window is displayed.
2. Select Notification Transport and click Edit.
The Edit Notification Transport dialog box appears.
3. From the Notification Type list, select one of the following types:
l On Success — Notify recipients when an event file is successfullytransferred to EMC.
l On Failure — Notify recipients when an event file is not successfullytransferred to EMC.
l On Success or Failure — Notify recipients when an attempt is made totransfer an event file to EMC, regardless of the outcome.
l On All Failure — Notify recipients when all attempts to transfer an eventfile to EMC have failed.
4. In the SMTP Host (Email Server) box, type the mail server hostname or IPv4address.
5. In the Email Address box, type one or more recipients of these email messages.Separate multiple email addresses with commas.
6. In the Email Sender Address box, type the email address from which thenotification is sent.
Server Monitoring
250 Avamar 18.2 Administration Guide

7. (Optional) To specify advanced settings, click Advanced and then specify thesettings in the Edit Advanced Email Settings dialog box:
a. In the Retries box, specify the number of retries to attempt before reportinga failure. The default setting is five retries.
b. In the Timeout box, specify the number of seconds to wait before reportingthat the operation timed out. The default setting is 300 s (5 minutes).
c. In the Description box, specify the description of this transport that appearsin the Manage ConnectEMC window. The default description is EmailTransport.
d. In the Email Subject box, specify the subject line for the email. The defaultsubject line is Avamar ConnectEMC Notification Email.
NOTICE
Do not change the email subject unless instructed to do so by AvamarSupport. EMC spam filters may reject email messages with other subjectlines.
e. From the Email Format list, select the format of the email, either ASCII orHTML. The default setting is ASCII.
f. Choose whether to include attachments that are sent to ConnectEMC in thenotification email message by selecting or clearing the Include CallHomeData checkbox.
g. Click OK.
8. On the Edit Notification Transport dialog box, click OK.
Editing the site nameProcedure
1. Open a command shell:
a. Log in to the server as admin.
b. Switch user to root by typing:
su -
2. Type the following commands to launch the utility and change the site name:
cd /rootavsetup_ connectemc.pl --site_name=site_nameWhere site_name is the name of the customer site.
3. Disable and then enable ConnectEMC.
Enabling and disabling ConnectEMC provides detailed information.
4. Restart MCS.
Starting the MCS provides detailed information.
Server Monitoring
ConnectEMC 251

Testing transportsProcedure
1. In Avamar Administrator, select Tools > Manage ConnectEMC.
The Manage ConnectEMC window is displayed.
2. Click Test.
Editing the site name
Procedure
1. Open a command shell:
a. Log in to the server as admin.
b. Switch user to root by typing:
su -
2. Type the following commands to launch the utility and change the site name:
cd /rootavsetup_ connectemc.pl --site_name=site_nameWhere site_name is the name of the customer site.
3. Disable and then enable ConnectEMC.
Enabling and disabling ConnectEMC provides detailed information.
4. Restart MCS.
Starting the MCS provides detailed information.
Verifying system integrityTo verify Avamar server integrity, you must first ensure that a validated servercheckpoint exists.
You might also want to collect and examine the server log files to ensure that no errorshave occurred since that checkpoint was performed. Viewing Avamar server log fileson page 242 provides instructions.
Procedure
1. In Avamar Administrator, click the Server launcher link.
The Server window is displayed.
2. Click the Server Management tab.
3. Select the Avamar server name in the left pane.
4. Verify that the Last validated checkpoint field shows a recent calendar date.
Server Monitoring
252 Avamar 18.2 Administration Guide

CHAPTER 10
Capacity Management
This chapter includes the following topics:
l Capacity utilization information........................................................................254l Capacity limits and thresholds..........................................................................254l Capacity forecasting........................................................................................255l Customizing capacity limits and behavior.........................................................255
Capacity Management 253

Capacity utilization informationView real-time capacity utilization information for a single server in AvamarAdministrator or for multiple servers in Backup & Recovery Manager.
In Avamar Administrator, view capacity utilization information for a single Avamarserver on the Capacity panel of the Avamar Administrator dashboard and on theServer Management tab in the Server window.
Capacity utilization information for multiple servers is available through Backup &Recovery Manager. For information about this capability, refer to the Backup &Recovery Manager product documentation.
Capacity limits and thresholdsThis following table describes how an Avamar server behaves as it crosses variousconsumed storage thresholds.
Table 83 Capacity limits and thresholds
Storage utilization Status Description
Less than 75% The system is considered tohave adequate capacity tostore future backups.
75% Study server storageutilization to determinewhether the server hasadequate capacity to storefuture backups.
80% A pop-up notification warnsyou that the server hasconsumed 80% of its availablestorage capacity. Studyserver storage utilization todetermine whether the serverhas adequate capacity tostore future backups.
90% Study server storageutilization to determinewhether the server hasadequate capacity to storefuture backups.
95% The server has reached thedefault health check limit,which is the amount ofstorage capacity that can beused and still have a “healthy”server. Avamar completes allin-progress backups, but thedispatcher stops new backupactivity. When you log in to
Capacity Management
254 Avamar 18.2 Administration Guide

Table 83 Capacity limits and thresholds (continued)
Storage utilization Status Description
Avamar Administrator, anotification appears. Toresume future backupactivity, acknowledge thesystem event. You cancustomize the health checklimit, but setting the limithigher than 95% is notrecommended. Customizingcapacity limits and behavioron page 255 providesinstructions.
100% The server has reached theread-only limit andautomatically becomes read-only to protect the integrityof the data that is alreadystored on the server. IfConnectEMC has beenenabled, a Service Request(SR) is logged. Go to theAvamar Support website toview existing SRs for thesystem, and search theknowledgebase forKB000472030, AvamarCapacity Troubleshooting,Issues and Questions - AllCapacity (Resolution Path).
Capacity forecastingEvery Avamar server continuously tracks and analyzes the rate at which storagecapacity is consumed, and projects how long storage capacity can be consumed atthat rate. This forecasting occurs in the background.
Capacity forecasting results for an Avamar server and configured Data Domainsystems are available in the Capacity panel of Avamar Administrator. For moreinformation, see Capacity panel on page 45.
Customizing capacity limits and behaviorTo customize the settings that control capacity limits and system behavior, edit theAvamar Administrator preferences file.
Editing capacity settings for Avamar AdministratorProcedure
1. Open a command shell and log in by using one of the following methods:
Capacity Management
Capacity forecasting 255

l For a single-node server, log in to the server as admin.
l For a multi-node server:
a. Log in to the utility node as admin.
b. Load the admin OpenSSH key by typing the following command:
ssh-agent bashssh-add ~admin/.ssh/admin_key
2. Shut down the Management Console Server (MCS) by typing the followingcommand:
dpnctl stop mcs
3. Change directory by typing the following command:
cd /usr/local/avamar/var/mc/server_data/prefs
4. Open mcserver.xml in a text editor.
5. Find the com.avamar.mc.mcsm section of the preferences file.
6. Edit the following settings.
Table 84 Capacity settings in mcserver.xml
Setting Description Default value
capErrPercent When capacity usage reachesthis percentage, the capacitystate icon is red.
95%
capForecastDataDays Amount of historical capacityusage data that is used forforecasting.
30 days
capForecastDataMinDays Minimum amount of historicalcapacity usage data that isrequired for forecasting.
14 days
capForecastReachedDays When forecasted capacityfalls below this number ofdays, Avamar Administratorbegins generating events thatrequire acknowledgment anddisplaying pop-up alerts atlogin.
30 days
capMonitorIntervalMin This setting controls howoften Avamar Administratorchecks forecasted capacity.
1 day (daily)
capReachedPercentage When total capacity utilizationreaches this percentagethreshold, the AvamarAdministrator processgenerates an eventnotification that the system isfull.
95%
Capacity Management
256 Avamar 18.2 Administration Guide

Table 84 Capacity settings in mcserver.xml (continued)
Setting Description Default value
capWarnPercent When capacity usage reachesthis percentage, the capacitystate icon is yellow.
80%
hcMonitorIntervalMin This setting controls howoften Avamar Administratorperforms a health check (thatis, verifies whether consumedcapacity has reached thehealth check limit).
1 day (daily)
hcOffsetROPercentage Percentage that, whensubtracted from the serverread-only limit (100%),produces the health checklimit.
5%
hcReminderIntervalMin This setting controls howoften Avamar Administratorissues events and pop-upalerts once the health checklimit has been reached.
60 minutes (hourly)
7. Save the changes and close the file.
8. Start the MCS and the scheduler by typing the following command:
dpnctl start mcsdpnctl start sched
Capacity Management
Editing capacity settings for Avamar Administrator 257

Capacity Management
258 Avamar 18.2 Administration Guide

CHAPTER 11
Replication
This chapter includes the following topics:
l Overview of Avamar replication....................................................................... 260l Enable Replicas at Source................................................................................266l Configuring policy-based replication................................................................ 267l Performing on-demand replication in the AUI...................................................276l Performing command line replication............................................................... 277l Monitoring replication...................................................................................... 289l Cancel a replication task in the AUI.................................................................. 289l Restore a backup from a replica on a destination system................................. 289l MCS configuration parameters to support Replicas at Source......................... 291
Replication 259

Overview of Avamar replicationAn Avamar replication job copies client backups from the source Avamar system to analternate destination.
Replicating backups to an alternate destination protects against data loss if the sourceAvamar system fails.
Types of replicationAvamar provides the option to perform policy-based replication and command linereplication.
Policy-based replication in the AUIPolicy-based replication provides greater control of the replication process. Withpolicy-based replication, you can create replication groups in the AUI that define thefollowing replication settings:
l Replication group members, either domains or clients
l Priority order for replication tasks
l Backups to replicate, based on the retention setting or the backup date
l Maximum number of backups to replicate for each client
l Destination system for the replicas
l Replication schedule
l Retention of replicas
Command line replication in the CLIPerform on-demand replication from the command line by logging in to the utility nodeand using the avrepl command line interface (CLI). Command line replicationprovides greater control of the replication process. Options for the avrepl commanddefine the following replication settings:
l Domains or clients to replicate
l Backups to replicate, based on:
n Plug-in that is used for the backup
n Retention setting for the backup
n Backup date
l Maximum number of backups to replicate for each client
l Destination system for the replicas
l Retention of replicas
Replication schedulingThe method for scheduling replication tasks depends on the type of replication that isused. For policy-based replication, define schedules similar to how backup schedulesare defined. For command line replication, no schedule is defined because a replicationtask is manually started by running the avrepl command on the utility node.
Defining a schedule for policy-based replication in the AUITo configure schedules for policy-based replication in the AUI:
Replication
260 Avamar 18.2 Administration Guide

1. In the left navigation pane, click .
2. Click Administration > Settings, and then select the domain.
3. Click the Schedule tab and then click + ADD.
From this window, you can define a schedule to start replication tasks automaticallyon a daily, weekly, or monthly interval. You can also use an ad hoc (on-demand)schedule that does not run automatically.
The schedule includes a start time and end time to specify the replication window.
Time zone considerationsWhen using the AUI to schedule replication tasks, note that the start time appears inthe time zone of the system that is running the AUI web browser. The start time doesnot appear in the time zone of the source system or in the time zone of the destinationsystem.
For example, consider using the AUI web browser in the PT zone with a source systemin the ET zone. The source system compensates for the three-hour differencebetween the two time zones. An 8 p.m. PT start time that is specified in the AUImeans that the source system starts the replication task at 11 p.m ET.
Best practices for replication schedulingSchedule replication tasks during periods of low backup activity to ensure that thegreatest number of client backups successfully replicate during each replicationsession. This scheduling consideration accommodates the fact that only completedclient backups are replicated.
For policy-based replication, consider the size of each replication group so that allbackups replicate successfully during each scheduled replication task. When a groupgrows so large that backups are not all replicating successfully, edit the schedule toenable more time, or split the group into smaller groups that run separately.
Replication authenticationPolicy-based replication requires that you specify valid credentials for an account onlyon the destination system when you configure the replication policy. CLI-basedreplication, however, requires that you specify valid credentials for the source Avamarsystem and the destination system in the command prompt.
For policy-based replication in the AUI, specify the credentials when you add thedestination system using the Add New Replication Destination wizard:
1. In the left navigation pane, click .
2. Navigate to Administration > System .
3. Click the Replication Destination tab, and then click + Add.
For CLI-based replication, specify the user account and password for the destinationsystem by using the --[replscript]dstid and --dstpassword options in thecommand prompt. To specify the user account and password for the source system,use the --[avtar]id and --password options.
On the source Avamar system, the repluser account is the default account forreplication. When you use the repluser account for command line replication, omitthe --[avtar]id option from the command and specify the password for therepluser account with the --password option. The Avamar Product Security Guideprovides a complete list of default accounts and passwords on the Avamar system.
Replication
Replication authentication 261

Location of replicas on a destination Avamar systemOn a destination Avamar system, replicas are available in the REPLICATE domain. Thisdomain contains a duplicate representation of the client hierarchy that exists on thesource Avamar system.
In the following figure, the avamar-1.example.com destination Avamar systemcontains both local clients and replicas from the avamar-2.example.com sourceserver.
Figure 15 Replication domain structure example
All data in the REPLICATE domain is read-only. You can perform only the followingoperations on replicas in the REPLICATE domain:
l Change the expiration date of the replica
l View backup statistics
l Delete a replica
Replicas at Source on page 262 describes the Replicas at Source feature thatprovides management of replicas through the replication source Avamar serverinstead of the REPLICATE domain on the destination system.
Replicas at SourceWith Replicas at Source, view and manage replicas by using an Avamar Administratorsession on the Avamar server that is the replication source.
FeaturesThe Replicas at Source feature is in Avamar server version 7.2 and newer. EnableReplicas at Source on page 266 describes how to enable the feature.
The following table describes the features that Replicas at Source provides on thesource Avamar server.
Table 85 Replicas at Source features available through the source Avamar server
Feature Description
View replicas on Restore tab Replicas appear along with backups on the
Restore tab of the Backup, Restore andManage window in Avamar Administrator.
Manage replica settings Use Avamar Administrator or the CLI toperform the following actions with a replica:
Replication
262 Avamar 18.2 Administration Guide

Table 85 Replicas at Source features available through the source Avamar server (continued)
Feature Description
l Change expiration date
l Change retention
l Delete
l Validate
l View statistics
Restore from replica Using the same methods that are available forbackups, select a replica and restore it.
Periodic synchronization Periodically, the source Avamar systemsynchronizes with each active destinationsystem. The default interval betweensynchronizations is 12 hours. Recent changesmay not be reflected for some time. Thissynchronization includes the followingactions:
l Apply expiration setting changes
l Apply retention setting changes
l Delete local listing if replica does not existon remote destination
l Add local listing when unlisted replica isfound on remote destination
Note
Replicas at Source does not support replicas of virtual machine backups.
IntegrationSeveral Avamar tasks integrate Replicas at Source. The sections that document thesetasks include information about the integration of Replicas at Source features. Thefollowing table provides an overview of the Replicas at Source integration.
Table 86 Descriptions of the integration of Replicas at Source into Avamar tasks
Task Description
Remote destination management Prevents deletion of a remote destinationlisting from the source Avamar server whenreplicas from the source Avamar server existon the destination system. Includes anoverride option to force the deletion of theremote destination listing and delete all thesource server's replicas from the destinationsystem.
Restore Lists replicas with backups on the Restoretab of the Backup, Restore and Managewindow in Avamar Administrator. When abackup exists on the source Avamar system
Replication
Replicas at Source 263
Table 86 Descriptions of the integration of Replicas at Source into Avamar tasks (continued)
Task Description
and replicas exist on remote destinationsystems, the Avamar system uses the backupto restore.
Retire client When retiring a client, Replicas at Sourceprovides additional choices that are related tothe retention and expiration of replicas.
Delete client When deleting a client, Replicas at Sourceprovides an option to also delete the client'sreplicas.
Services administration Adds the External Backup Manager Service to
the Services Administration tab of the
Administration window in AvamarAdministrator. The service includes standardservice actions: Start, Stop, Restart, and ViewProperties. When the External BackupManager Service is stopped, AvamarAdministrator prevents Replicas at Sourcemanagement of replicas.
MCS Replicas at Source adds customizable settingsto mcserver.xml.
MCCLI Replicas at Source adds hostname andlocation information to the output of mcclibackup show. Replicas at Source also
provides the --location option for
identifying replicas when running any of thefollowing commands:
l mccli backup validatel mccli backup deletel mccli backup editl mccli backup restore
Retention of replicasWhen you replicate backups, the retention settings for the backup on the sourceAvamar system automatically apply to the replica on the destination system. However,you can change the retention settings for the replica.
Set retention before replication occursFor policy-based replication in the AUI, specify a different retention setting forreplicas on the Retention page of the Replication Policy wizard when you configurethe policy for the replication group.
For command line replication, use the --[avtar]expires option to specify adifferent retention setting for replicas.
Replication
264 Avamar 18.2 Administration Guide

Set retention after replication occursYou can enable Replicas at Source to use an Avamar Administrator session on thesource Avamar server to set the retention of replicas on the destination system, or login to a destination Avamar system using AUI and manually change the expiration dateof the replica after replication occurs. Changing the expiration date for a backup onpage 145 provides instructions for changing the retention of backups. Theseinstructions also apply to replicas on an Avamar system.
Replication with Data Domain systemsWhen an Avamar system stores backups on a Data Domain system, Avamar replicationuses DD Boost to copy backups from the original Data Domain system and to createreplicas on another Data Domain system.
Supported replication configurationsThe following table lists the supported replication configurations for Avamarreplication using DD Boost.
Table 87 Replication configurations for Avamar replication using DD Boost
Backup storage Replication storage
Single Data Domain system Single Data Domain system
Single Data Domain system Multiple Data Domain systems
Multiple Data Domain systems Single Data Domain system
Multiple Data Domain systems Multiple Data Domain systems
In a configuration where the replication storage consists of multiple Data Domainsystems, control the system which receives the replicas by mapping a domain on thesource Avamar server to a destination Data Domain system. Specify the Data Domainsystem with the default destination. Avamar replicates to the default destination whena destination Data Domain system is not identified.
The Avamar and Data Domain System Integration Guide provides instructions on storagemapping and specifying the default destination Data Domain system.
Replication detailsThe following details apply to Avamar replication with Data Domain systems:
l Data transfer during replication is between the Data Domain systems, withoutintermediate staging
l Replication uses DD Boost to copy backups and to write replicas
l Requires a Data Domain replication license
l Does not use Data Domain replication
l Replication is configured and monitored on the Avamar server
l Replication task scheduling uses Avamar replication schedules only
l Data Domain administration tools are not used
Replication
Replication with Data Domain systems 265

Enable Replicas at SourceThe Replicas at Source feature is available in Avamar server versions 7.2 and later. Toenable the feature, modify mcserver.xml and then start the Remote BackupManager Service.
Before you begin
Install or upgrade the Avamar server software to version 7.2 or later.
Procedure
1. Open a command shell and log in by using one of the following methods:
l For a single-node server, log in to the server as admin.
l For a multi-node server:
a. Log in to the utility node as admin.
b. Load the admin OpenSSH key by typing the following command:
ssh-agent bashssh-add ~admin/.ssh/admin_key
2. Stop the MCS by typing the following command:
dpnctl stop mcs
3. Change the working directory by typing the following command:
cd /usr/local/avamar/var/mc/server_data/prefs
4. Open mcserver.xml in a text editor.
5. In the repl container element, set the value of theallow_dest_replica_management parameter to true.
The default value is false.
6. In the repl container element, set the value of theshow_external_backups parameter to true.
The default value is true.
7. In the repl container element, set the value of theallow_manage_remote_backups_at_source parameter to true.
The default value is true.
8. Save the change and close the file.
9. Start the MCS and the scheduler by typing the following command:
dpnctl start mcsdpnctl start sched
10. Log in to Avamar Administrator on the Avamar server that is associated with theclient backups (source server).
11. In Avamar Administrator, click the Administration launcher link.
The Administration window is displayed.
12. Click the Services Administration tab.
Replication
266 Avamar 18.2 Administration Guide

13. Right-click the Remote Backup Manager Service, and select Start.
Results
The Avamar server enables the Replicas at Source feature.
Configuring policy-based replicationPreparing to use policy-based replication in the AUI requires the completion of thefollowing tasks.
Before you begin
Log in to AUI on the Avamar server that is associated with the client backups (sourceserver).
The following steps provide an overview of the order of the tasks for configuringpolicy-based replication in the AUI. Each step is explained in more detail in a separatetask section.
Procedure
1. Add a replication destination for each system that stores replicas from thesource server (destination system).
The section Add an Avamar system as a replication destination providesinformation about adding a replication destination system.
2. Create daily, weekly, or monthly schedules to use for replication scheduling.
3. Create one or more replication groups to define the settings for policy-basedreplication.
Replication destinationsTo begin configuring policy-based replication on an Avamar server, add replicationdestinations.
Provide connection details for a supported data storage system to add it as areplication destination.
Avamar supports replication to other Avamar systems and to Data Domain systemsthrough DD Boost. An Avamar system can replicate to another Avamar system that isrunning a different version of the Avamar server software, but best results occur withthe same server software version.
Add an Avamar system as a replication destinationProvide connection information for an Avamar system to add it as a replicationdestination.
Procedure
1. In the AUI, navigate to Administration > System .
2. Click the Replication Destination tab, and then click + ADD.
The Add New Replication Destination wizard appears.
3. In the Name field, type a reference name for the destination Avamar system.
4. From the Encryption drop-down, select an encryption level.
The selected encryption level applies to replication data transfers with thedestination Avamar system. The default setting is High, and should not be
Replication
Configuring policy-based replication 267

changed unless the source is configured to use authentication and thedestination does not use authentication, in which case it should be set to none.
5. In the Target Server Address field, type the DNS name or the IP address ofthe destination Avamar system.
6. In the Target server connection port field, type the number of the outboundport on the source Avamar system to use when communicating with thedestination Avamar system.
The default port value is 27000.
Selecting High level Encryption results in an offset being applied to port toallow connections through firewalls. The default offset is +2000. Edit the offsetby manually editing the secured_port_offset preference inmcserver.xml, and then restarting the MCS.
7. In the Target MCS connection port field, type the number of the inbound porton the destination Avamar server to use for data connections with MCS on thedestination system.
The default port value is 28001.
8. In the User ID on target server field, type a username for an account on thedestination Avamar system that has the backup privilege and the adminprivilege.
Normally, type repluser or root.
Note
For a user with access that is limited to a domain beneath the root domain(tenant access), both the source Avamar server and the destination systemmust be running Avamar server version 7.2 or later.
9. In the Password on target server field, type the password that is associatedwith the username.
10. Click VALIDATE.
The source Avamar system authenticates with the destination Avamar systemby using the specified settings.
When the validation completes successfully, the OK button is enabled.
11. Click OK to add the replication destination and exit the wizard.
Results
AUI adds the replication destination to the list on the Replication Destinations tab.
Edit a replication destinationChange the connection information for a replication destination.
Procedure
1. In the AUI, navigate to Administration > System .
2. Click the Replication Destination tab, and then highlight the replicationdestination you want to edit.
3. Click EDIT.
The Edit replication destination wizard appears.
Replication
268 Avamar 18.2 Administration Guide

4. Edit the settings for the replication destination, and then click VALIDATE.
5. Upon successful validation, click OK.
Results
AUI modifies the settings of the selected replication destination.
Setting the default Data Domain destinationIn a replication environment with more than one destination Data Domain system, youcan specify which Data Domain system is the default destination. The defaultdestination is the Data Domain system to which Avamar replicates data when adestination Data Domain system is not identified on the Storage Mapping tab of theAUI.
Procedure
1. In the AUI, go to Administration > System .
The System window appears
2. Click the Data Domain tab to display a list of configured Data Domain systems.
3. If you need to add the default Data Domain destination, click + ADD. If the DataDomain system is already listed, select the system and click Edit.
The Add Data Domain or Edit Data Domain wizard appears.
4. Scroll down the wizard page to the Misc section, and select the Use system asdefault replication storage checkbox.
5. Click VALIDATE.
Results
AUI modifies the settings of the selected replication destination.
Mapping a domain to a Data Domain system
If there are multiple destination Data Domain systems, you can control which systemreceives the data that replicates from the source Data Domain system. To specify thedestination Data Domain system, map a domain on the source Avamar server to adestination Data Domain system. If you do not provide a mapping, then Avamarreplicates the data from the source Data Domain system to the default destination.
Note
You cannot map the domains on the source Avamar server to a destination DataDomain system until after the first replication. During the first replication, the datareplicates to the default destination.
Procedure
1. In the AUI, go to Administration > System .
The System window appears
2. Click the Storage Mapping tab, and then click + ADD.
The Add Storage Mapping dialog appears.
3. From the list, select the Data Domain system to use as the replication target.
4. Click SUBMIT.
Replication
Replication destinations 269
Delete a replication destination recordDelete the record for a replication destination from a source Avamar system.
If using Replicas at Source in Avamar Administrator to delete a replication destinationrecord, when Replicas at Source is enabled, the Avamar system checks for replicason the replication destination system. If replicas associated with the source Avamarsystem exist, Avamar Administrator prevents the deletion of the replicationdestination record. To delete the replication destination record even when replicasexist, override this setting.
When Replicas at Source is disabled, the Avamar system does not check for replicason the replication destination system before deleting the replication destinationrecord. Any existing replicas remain on the replication destination system until theyexpire or until they are deleted by using the destination system interface.
Table 88 Replicas at Source
Replicas atSource
Result
Enabled The Avamar system checks for replicas on the replication destination systemand if no replicas exist, deletes the replication destination record. To preventthe Avamar system from checking for replicas, and delete the replicationdestination record even if replicas exist on the replication destination system,
unselect Check for remote backups before deletion, and then click
Yes.
Disabled The Avamar system deletes the replication destination record.
Procedure
1. In the AUI, navigate to Administration > System .
2. Click the Replication Destination tab, and then select the replicationdestination record that you want to delete.
3. Click the Delete icon.
A confirmation dialog appears.
4. To confirm the deletion, click YES.
Replication groupsReplication groups enable you to define the settings for policy-based replication.
The replication groups option includes the following:
l The domain and client members of the replication group
l The backup types to replicate
l The number of backups to replicate
l The destination server
l The replication schedule
l How long replicated backups are retained on the destination server
You can specify the priority for which backup data replicates first. When you definethe members of the replication group, the order in which members are listed in theMember(s) list controls the order in which backup data is replicated.
Replication
270 Avamar 18.2 Administration Guide

Backup data for a client replicates only once even if a client is listed individually and isalso a member of a domain in the Member(s) list.
If an individual client is a higher priority in the Member(s) list than the domain, thenthe backup data for the individual client replicates before the backup data for anyother clients in the domain.
Create a replication policy/group in the AUI
Before you begin
l Add a destination Avamar server to the configuration on the source Avamarserver.
l (Optional) Create a schedule to specify when replication for the group occurs.
Procedure
1. In the AUI left navigation pane, click .
2. Navigate to Policy > Replication Policy.
The Replication Policy window appears.
3. In the Replication Policy window, click + ADD.
The Policy wizard appears.
4. On the Properties page, type a name for the replication group, and then selectEnabled to enable replication for the replication group.
5. If pool-based replication is used to enable multiple parallel replication backupsfrom a Data Domain source to a Data Domain target, select Replicate clientbackups in parallel. Otherwise, select Default Mode.
a. To instruct the replication plug-in to use VSR optimization for plug-ins thatsupport optimization, select Optimize Virtual Synthetic Replication(VSR).
Note
VSR optimization requires that the Replication order of client backupsmust be Oldest to Newest. This option is selected by default. To requirethat all ordering options for pool-based replication are followed, regardlessof the plug-in, clear the selection from this option.
b. For the Replication order of client backups, select one of the following:
l Oldest to Newest begins replication with the oldest backup first.
l Newest to Oldest begins replication with the newest backup first.
6. Click NEXT.
The Members page appears.
7. On the Members page, complete the steps that are required for the membersin the replication group.
Members in thereplication group
Steps
All clients Select Replicate all clients and click NEXT.
Replication
Replication groups 271

Members in thereplication group
Steps
Specific domainsor clients
a. Select Choose Membership.
b. To add to the replication group, click > to expand thelist of domains/clients, and then select or unselect thecheckbox next to a domain/client.
Selected members are added to the table.
c. To remove a member from the replication group, click -next to the entry in the table.
d. Click NEXT.
8. On the Backup Filters page, complete the steps that are required for the typeof backups to replicate.
Type ofbackups toreplicate
Steps
All backupsfrom allmembers of thereplicationgroup
Select Replicate all backups.
Specificbackups
a. Select Include/Exclude backups by date, type, andmore.
b. Click Select Backup Filter.
The Backup Filter dialog box appears.
c. Select the type of backups to replicate: Daily, Weekly,Monthly, Yearly, or No tag. Ensure that you select atleast one backup type.
d. To replicate for each client that is a member of thereplication group, specify the maximum number ofbackups.
To replicate all backups (no maximum), select No limitfor number of backups per client.
To replicate a certain number of the most recentbackups for each member client, select Limit to andthen specify the maximum number to limit the backupsto.
e. Specify date restrictions for the backups to replicate foreach client that is a member of the replication group.
To replicate all backups regardless of when the backupsoccurred, select No Date Restrictions.
To replicate only backups that occurred within a recentperiod, select Last and then specify an amount of pastDay(s), Weeks(s), Month(s), or Year(s) to include.
To replicate only backups that occurred during a range ofdates, select Range and specify the start date/time in
Replication
272 Avamar 18.2 Administration Guide

Type ofbackups toreplicate
Steps
the From fields, the end date/time in the To fields, orboth.
f. Click OK.
9. Click NEXT.
The Schedule page appears.
10. On the Schedule page, use the Select Existing Schedule drop-down to choosethe default replication schedule or another schedule that you have created.
11. Click NEXT.
The Retention page appears.
12. On the Retenion page, specify when the replicated backups should expire onthe destination server:
l To expire the replicated backups at the current expiration setting, selectKeep current backup expiration.
l To expire the replicated backups at a different time than the currentexpiration setting, select Set expiration by backup type and then specifythe number of days, weeks, months, or years to retain each backup type.
If a backup is of multiple types, then the expiration for the replicated backupis set to the specified value for the longest duration backup type. Forexample, if a backup is both a daily and a monthly backup, then theexpiration for the replicated backup is set to the value that you specify formonthly backups.
13. Click NEXT.
The Destination page appears.
14. On the Destination page, select an existing destination server from the tablethat you would like to replicate backups to, or add a destination server byclicking + ADD DESTINATION to open the Add replication destination dialog.
15. Click NEXT.
The Summary page appears.
16. On the Summary page, review the replication policy configuration details. Thispage also provides you with the option to specify advanced configurationdetails.
l If you do not want to perform advanced configuration, click FINISH.
l If you want to specify more configuration details, scroll to the bottom of thepage and click Advanced Parameters.
When you click Advanced Parameters, a dialog displays.
17. (Optional) Specify the following advanced parameters for the replication group.Additionally, you can move the Show Advanced Options slider to the right toreveal additional fields. Advanced options will appear in bold.
a. To replicate only backups from specific plug-ins, specify the numeric plug-indescriptor in the Include plug-in specific backups field.
Replication
Replication groups 273

Separate multiple entries with a comma, or leave the box empty to replicateall backups. Numeric plug-in descriptors on page 285 provides a list ofnumeric plug-in descriptors.
b. To exclude backups from specific plug-ins from replication, specify thenumeric plug-in descriptor in the Exclude plug-in specific backups field.
Separate multiple entries with a comma, or leave the box empty to replicateall backups.
c. For Excludes clients containing PATTERN from replication, separatemultiple entries with a comma, or leave the box empty to replicate allbackups.
d. To replicate only a specific backup, specify the backup sequence number inthe Backup sequence number field or the backup label in the Backup labelfield. Specify the complete backup sequence number or label.
e. To replicate backups that have a label that matches a specific pattern,specify the pattern in the Backup label pattern field.
f. From the Informational message level drop-down, select the verbosity forinformational messages in the replication log files:
l To suppress all informational messages but include errors and warnings inthe log files, select No informationals.
l To provide some information messages in the log files with errors andwarnings, select Some informationals.
l To provide additional status information in the log files with errors andwarnings, select Many informationals.
l To provide maximum information in the log files, including allinformational messages, errors, and warnings, select All informationals.
g. Specify whether to include advanced timing and deduplication statistics inthe replication log files by selecting or unselecting the Report advancedstatistics checkbox.
h. From the List contents being replicated drop-down, specify how muchinformation about the replicated backups to include in the replication logfiles:
l No file listing
l List file names
l List files and dates
Use caution when including file information in the replication log files.Replication performance decreases, and the size of the log files can be verylarge.
i. To write the maximum amount of information to log files for troubleshooting,select the Enable debugging messages checkbox.
The replication process generates very large log files.
j. From the Maximum concurrent processes drop-down, select the maximumnumber of clients to replicate simultaneously.
k. To reduce network usage to a specified rate in megabits per second, specifythe number of megabits in the Network usage throttle field.
Replication
274 Avamar 18.2 Administration Guide

Specify 0 (zero) for unrestricted network usage. To use 50 percent of a T1,specify 0.772.
l. If pool-based replication is being configured for Data Domain systems, selectthe order for client replication in the Client list ordering drop-down.
m. If pool-based replication is being configured for Data Domain systems, forthe Maximum number of Data Domain Replication Streams, type or usearrows in the field to specify the maximum number of avtar processes thatcan be started in parallel.
n. When you complete the advanced parameters, click OK to save theconfiguration details and exit the dialog, and then FINISH.
Enable or disable a replication policy/groupYou can disable a replication policy/group to prevent scheduled replications fromoccurring for that group. This step is typically done to place the system in a state thatsupports maintenance activities. If you disable a replication group, you must re-enablethe group to resume scheduled replications.
Procedure
1. In the AUI left navigation pane, click .
2. Navigate to Policy > Replication Policy.
The Replication Policy window appears.
3. Select the desired replication policy and click the Edit icon.
The Policy wizard appears.
4. Select the Enabled checkbox to enable the group, or unselect the checkbox todisable the group.
5. Click NEXT to navigate through the remaining wizard steps, and then clickFINISH to save any changes.
If the group is enabled, then the Enabled column in the Replication Policywindow indicates True. If the group is disabled, then the Enabled column in theReplication Policy window indicates False.
Edit a replication policy/groupProcedure
1. In the AUI left navigation pane, click .
2. Navigate to Policy > Replication Policy.
The Replication Policy window appears.
3. Select the desired replication group and click the Edit icon.
The Replication Policy wizard appears.
4. Edit the settings for the replication group.
The settings are the same settings that you specified when you created thegroup.
5. Click FINISH.
Delete a replication policy/groupWhen you delete a replication group from the configuration on the source Avamarserver, any data that you already replicated to the destination server for the group
Replication
Replication groups 275

remains on the destination server until the replicated backups expire or you delete thebackups.
Procedure
1. In the AUI left navigation pane, click .
2. Navigate to Policy > Replication Policy.
The Replication Policy window appears.
3. Select the replication group you want to remove and click the Delete icon.
A confirmation message appears.
4. Click YES.
Performing on-demand replication in the AUIYou can perform on-demand replication of a replication group when you use policy-based replication in the AUI. An on-demand replication is a one-time replication of datafor the replication group. You may want to perform an on-demand replication for thefirst replication of the replication group after you configure policy-based replication.Perform on-demand replication before system maintenance, software installations, orsoftware upgrades.
You can perform on-demand replication in the AUI by navigating to Policy >Replication Policy and selecting a policy from the Replication Policy window.
Perform on-demand replication from the Policy windowProcedure
1. In the AUI left navigation pane, click .
2. Navigate to Policy > Replication Policy.
The Replication Policy window appears.
3. Select the desired replication group's policy from the table.
4. Click RUN.
A confirmation message appears indicating that the replication activity hasstarted. You can click the Activity link in the message or go to the Activitywindow to view the progress.
Results
When the replication activity completes, the replicated backup appears in the AssetManagement window.
1. Go to the Asset Management window and select a domain from the Domainpane.
2. Select a client from the Asset Management pane, and then click VIEW MORE inthe Client Summary pane.
Note
The source Avamar system currently lists only local backups. For remote backups, login to the destination system.
Replication
276 Avamar 18.2 Administration Guide

Performing command line replicationThe avrepl command line interface (CLI) enables you to replicate data from a sourceAvamar server to a destination Avamar server.
The avrepl binary is located in the \usr\local\avamar\bin directory on theserver utility node. Log in as admin or root and run the command from that location.
Command referenceThe following topics provide a reference for the operations and options that theavrepl command supports.
Synopsis
avrepl --operation=replicate [options] [target]
OperationsThe only supported operation for avrepl is --operation=replicate, whichreplicates data from the source Avamar server to a destination Avamar server.
OptionsUse the avrepl command options to control replication behavior.
Account options
Account options for the avrepl command enable you to specify credentials toconnect to the destination Avamar server for replication.
The following account options are available for the avrepl command.
Table 89 Account options for the avrepl command
Option Description
--account=location
--acnt=location
--path=location
Specifies a hierarchical location on the destination Avamarserver. This option is relative to the current home location,unless you use a slash (/) as a prefix to the path designation,in which case an absolute path is assumed. The defaultaccount is REPLICATE.
--[replscript]dstaddr=destination_server Specifies the DNS name or IP address of the destinationAvamar server. Replication between servers of differentversions is supported. However, for best results, ensure thatthe Avamar server software on the destination server is thesame version or a newer version than the source Avamarserver.
--[replscript]dstid=repluser Specifies the Avamar user ID and domain to use forauthentication on the destination Avamar server.
Note
The repluser account is the only user account that is known towork reliably on all destination servers.
Replication
Performing command line replication 277

Table 89 Account options for the avrepl command (continued)
Option Description
--dstpassword=password
--dstap=password
--dstpswd=password
Specifies the password for repluser account on thedestination Avamar server.
--[replscript]dstpath=domain Specifies a location (domain) on the destination Avamarserver to store replicated source data. The default value is thetop-level directory (/), which stores the replicated data in a
new domain that is named for the source Avamar server. Usethis option with the --[replscript]srcpath option. You
cannot use this option with the --[replscript]dpnnameoption.
--[replscript]dstport=port Specifies the data port to use when connecting to thedestination Avamar server. The default value is 27000.
--hfsaddr=Avamar_server
--server=Avamar_server
Specifies the DNS name or IP address of the source Avamarserver.
--[avtar]id=user@auth Specifies the Avamar user ID and authentication system touse for authentication on the source Avamar server. Thedefault value is repluser, which is the default replication
user account on the Avamar server. To authenticate with theAvamar authentication system, specify avamar for auth. For
example: --[avtar]id=jdoe@avamar.
--password=password
--ap=password
--pswd=password
Specifies the password for the Avamar user ID to use forauthentication on the source Avamar server.
Logging options
Logging options for the avrepl command enable you to specify the path and filename for the avrepl log file, and to control how much information the plug-in writesto the log file.
The following logging options are available for the avrepl command.
Table 90 Logging options for the avrepl command
Option Description
--[avtar]informationals=n Sets the information level for status messages, where n is asingle-digit integer value.
--[avtar]noinformationals={true | false} Specify true to disable all status messages.
--[avtar]statistics={true | false} Specify true to include advanced timing and deduplication
statistics in the replication log files.
--log=file--logfile=file
Specifies the full path and file name of the avrepl plug-in log
file.
Replication
278 Avamar 18.2 Administration Guide

Table 90 Logging options for the avrepl command (continued)
Option Description
--nostdout={true | false} Specify true to disable output to STDOUT. However, if you
use the --log or --logfile option, output still goes to the
log file.
--nowarnings={true | false} Specify true to disable warning messages.
--quiet={true | false} Specify true to suppress all messages. This option is
equivalent to using both --[avtar]noinformationals=true and --nowarnings=true.
--verbose--v
Specify either --verbose or --v to enable all messages,
including status and warning messages. o control the level ofverbosity, specify --verbose=n . The default value is --verbose=6.
Replication options
Replication options for the avrepl command enable you to control replicationfunctionality, such as which backups should replicate and how long to retain replicatedbackups on the destination server.
The following replication options are available for the avrepl command.
Table 91 Replication options for the avrepl command
Option Description
--[avtar]after=timestamp Specifies that only backups matching timestamp and latershould be replicated. For timestamp, use 24 hour local timezone values that conform to the syntax yyyy-mm-ddhh:mm:ss. You can use partial timestamp values. Theresolution is truncated to the last supplied value. For example,2014-02 is equivalent to 2014-02-01 00:00:00. You can
also use this option with --[avtar]before=timestamp to
define a range of effective dates. Only backups that occurredwithin the date range are replicated.
--[avtar]allsnapups={true | false} The default value is true, which replicates all backups. If
false, then only the most recent backup for each client is
replicated. If you specify the --[avtar]count option, then
the --[avtar]count option overrides the --[avtar]allsnapups option. Only the specified number of
most recent backups replicates for each client.
--[avtar]before=timestamp Specifies that only backups that occurred before timestampshould be replicated. For timestamp, use 24 hour local timezone values that conform to the syntax yyyy-mm-ddhh:mm:ss. You can use partial timestamp values. Theresolution is truncated to the last supplied value. For example,2014-02 is equivalent to 2012-02-01 00:00:00. You can
also use this option with --[avtar]after=timestamp to
Replication
Command reference 279

Table 91 Replication options for the avrepl command (continued)
Option Description
define a range of effective dates. Only backups that occurredwithin the date range are replicated.
--[avtar]count=n Limits replicated backups to this maximum number (n) ofmost recent backups for each client.
--[avtar]exclude-pluginid-list=list Excludes backups that are performed with the specified plug-in, where list is a comma-separated list of plug-in IDs.
--[avtar]expires={n | period | timestamp} Specifies how long to retain replicated backups on thedestination server:
l A number of days (n).
l An expiration period as a specific number of days, weeks,months, or years. To specify a period, use one of thefollowing values:
days=n
weeks=n
months=n
years=n
where n is a positive integer. For example, supply --[avtar]expires=years=2 to retain replicated
backups for two years on the destination server. Also, --[avtar]expires=30 and --[avtar]expires=days=30 are equivalent.
l A timestamp for the date and time at which the replicatedbackup expires. Use 24 hour local time zone values thatconform to the syntax yyyy-mm-dd hh:mm:ss. You canuse partial timestamp values. The resolution is truncatedto the last supplied value. For example, 2014-02 is
equivalent to 2014-02-01 00:00:00.
--[avtar]pluginid-list=list Replicates only backups that are performed with the specifiedplug-ins, where list is a comma-separated list of plug-in IDs.
--[avtar]retention-type={daily | weekly |monthly | yearly | none}
Replicates only backups with one of the following retentiontypes:
l dailyl weeklyl monthlyl yearlyl noneIf you supply none, then only backups without a specific
retention type are replicated.
--[replscript]dpnname=source_server--dpn=source_server
Specifies a name to use to represent the source Avamarserver (source_server) as part of the path for the replicatedfiles in the REPLICATE domain on the destination server.
Specify the fully qualified domain name of the source server.
Replication
280 Avamar 18.2 Administration Guide

Table 91 Replication options for the avrepl command (continued)
Option Description
You cannot use this option with the --[replscript]dstpath or --[replscript]srcpathoptions.
--[replscript]dstencrypt={ssl | tls} Enables the specified encryption method for avtar,
avmaint, and avmgr on the destination server. Valid
encryption methods are ssl and tls.
--[replscript]srcpath=domain Specifies a location (domain) on the source Avamar serverfrom which to begin replication. Only data within this locationis replicated. The default setting is the top-level domain (/),
which replicates the entire server. Use this option with the --[replscript]dstpath option. You cannot use this option
with the --[replscript]dpnname option.
--backup-type=type Replicates only the specified type of backup, where type isone of the following values:
l differentiall differential_fulll incrementall incremental_fulll level0_fulll synthetic_full
-- max-ddr-streams= n Sets maximum number of avtar processes that can be startedin parallel which target the back-end Data Domain system.
--optimize-vsr={true | false} Used with --vsr-plug-in-ids when --use-pool-based is set to true, this option identifies whether Virtual
Synthetic Replication (VSR) optimization should be used withplug-ins that support optimization. VSR optimization requiresthat the order of replication must be oldest-to-newest,regardless of other settings. The default setting for thisoption is true. To require that all ordering options for pool-based replication are followed, regardless of plug-in, set thisoption to false.
--ordering-criterion= order If --use-pool-based is set to true, this option determines
the order in which backups are replicated. Available valuesare:
l oldest-to-newest Begins replication with the oldest
backup first. If this option is not specified, it is the defaultsetting.
l newest-to-oldest Begins replication with the most
recent backup first.
l largest-to-smallest Begins replication with the
largest backup first.
Replication
Command reference 281

Table 91 Replication options for the avrepl command (continued)
Option Description
l smallest-to-largest Begins replication with the
smallest backup first.
--use-pool-based={true | false} If true, enables pool-based replication mode, which replicatesall client backups in parallel when replicating from one DataDomain storage system to another.
--vsr-plug-in-ids= plug-in-ids If --optimize-vsr is set to true, this option lists plug-in IDs
for plug-ins that should use Virtual Synthetic Replication(VSR) optimization. By default, the NDMP and VMware plug-ins use VSR optimization. No other plug-ins are supported.
--within={days | weeks | months | years}=n Replicates backups that occurred within these most recentdays, weeks, months, or years, where n is a positive
integer. For example, supply --within=months=3 to
replicate three months' worth of backups for each client.
Avamar-only options
Avamar-only options access advanced functionality that is normally reserved for useby Avamar personnel only. Misuse of these advanced options can cause loss of data. Ifyou are unsure about any aspect of these options, contact Avamar Support for moreinformation before using them.
The following Avamar-only options are available for the avrepl command.
Table 92 Avamar-only advanced options for the avrepl command
Option Description
--bindir=path Specifies the directory that contains Avamar binary files. Thedefault value is /usr/local/avamar/bin.
--[avtar]exp-delta={days | weeks | months |years}=n
Changes replicated backup expiration dates on the destinationserver by the specified number (n) of days, weeks, months, oryears. The value can be either a positive or negative integer.For example, supply --[avtar]exp-delta=days=-2 to
decrease the backup expiration dates on the destinationserver by two days. Do not use --[avtar]exp-delta with
--[avtar]expires.
--[avtar]expiration-policy=type=period Replicates backups of a specific retention type within thespecified period, where type is one of the following values:
l dailiesl weekliesl monthliesl yearliesand period is one of the following values:
l days=n
l weeks=n
Replication
282 Avamar 18.2 Administration Guide

Table 92 Avamar-only advanced options for the avrepl command (continued)
Option Description
l months=n
l years=n
and n is a positive integer. For example, supply --[avtar]expiration-policy=dailies=years=2 to
replicate two years' worth of daily backups for each client.The --[avtar]expiration-policy option takes
precedence over --[avtar]expires.
--[avtar]label=name
--f=name
Specifies the labels of the backups to replicate. Separatemultiple values with a comma.
--[avtar]label-pattern=pattern Replicates backups with a label that matches the specifiedpattern. Common glob operators (wildcards) such as asterisk(*) and question mark (?) are allowed. Separate multiplepatterns by commas, such as ----[avtar]label-pattern=temp, tmp. You can also specify the ----[avtar]label-pattern option multiple times in a single
command.
--[avtar]sequencenumber=n
--[avtar]labelnumber=n
Specifies the sequence number of the backup to replicate.Separate multiple entries with a comma.
--[avtar]throttle=n Controls the rate at which the underlying avtar process
sends data to the server. If you specify this option, avtarpauses after sending each packet to ensure that networkusage does not exceed the specified maximum bandwidth inmegabits per second (Mbps). For example, --[avtar]throttle=5 uses half of a 10 Mbps connection,
and --[avtar]throttle=0.772 restricts usage to half of
a T1 link.
--[replscript]exclude=pattern Excludes domains or clients that contain pattern fromreplication, where pattern is a matching pattern in the domainor client name. Common glob operators (wildcards) such asasterisk (*) and question mark (?) are allowed. For example,specify --[replscript]exclude=spot to exclude any
domain or client with a name that contains the pattern spot.
Specify --[replscript]exclude=/clients/ to exclude
all clients in the /clients domain. Separate multiple
patterns by commas, such as --[replscript]exclude=spot, /clients/. You can also
specify the --[replscript]exclude option multiple times
in a single command to specify more than one pattern.
--[replscript]forcecreate={true | false} Specify true to force the creation of all source server
accounts on the destination server, even if no data for anaccount is in the replication. The default value is false,
which creates accounts on the destination server only forclients that replicate data.
Replication
Command reference 283

Table 92 Avamar-only advanced options for the avrepl command (continued)
Option Description
--[replscript]force-move={1 | 0} Specify 1 (true) to force a move to the target server backup
account. Specify 0 (false) if you do not want to force a move.
--[replscript]fullcopy={true | false} Specify true to assert full root-to-root replication mode,
which creates a complete logical copy of an entire sourceserver on the destination server. The replicated data is notcopied to the REPLICATE domain but is added directly to the
root domain as if the source clients had registered with thedestination server. Source server data that is replicated in thismanner is fully modifiable on the destination server.
--[replscript]globalcid={true | false} Specify true to use global client IDs (CIDs) during
replication. Global CIDs are primarily used to enable fastfailovers from one server to another after a root-to-rootreplication. true is the default setting.
--[replscript]reportonly={true | false} Specify true to assert report-only operational mode. Report-
only operational mode is used to predetermine the amount ofstorage a replication activity might consume on a destinationserver by running the replication job without actually savingany data to the destination server.
--[replscript]restore={true | false} Specify true to assert restore operational mode. If you
previously replicated a source Avamar server to a destinationAvamar server, you can run avrepl from the destination
server and supply this command with the --[replscript]dpnname=original_source_server option to
restore that data to an Avamar server.
--[replscript]small-client-mb=n Threshold in MB before which the new data for a client isconsidered “small.” The default setting is 128 MB of new
data. Specify 0 to disable this optimization.
--rechunk={disable | enable | default} Controls whether replicated data should be rechunked tomaximize data deduplication on the destination server. Useone of the following values:
l disable — Do not rechunk data before storing on the
destination server.
l enable — Rechunk data before storing on the
destination server to maximize data deduplication.
l default — Automatically rechunk data when source and
destination server chunking parameters are different.
Help option
The --help option displays a list of available options for the avrepl command:
avrepl --help
Version option
The --version option displays the software version of the avrepl command:
Replication
284 Avamar 18.2 Administration Guide

avrepl --version
Target listTo replicate specific clients or Avamar domains, include a list of the clients anddomains at the end of the avrepl command. Separate multiple entries with a space.
If you do not supply a list, then the replication includes all client backups on the sourceAvamar server.
Numeric plug-in descriptorsSome command options require one or more numeric plug-in descriptors as values.Valid numeric plug-in descriptors are listed in the following table.
Table 93 Numeric plug-in descriptors
Descriptor Plug-in name
1000 Linux avagent
1001 Linux avtar
1002 Linux Oracle RMAN
1003 Linux NDMP
1009 Linux DB2
1014 Linux Lotus
1016 Linux VMware image
1019 Linux VMware File Level Restore (FLR)
1024 Linux extended retention
1025 Linux extended retention restore
1029 Linux Sybase
1030 Linux SAP
1034 Linux extended retention import
1035 Linux VDR Migration
1038 Linux VMware image restore
1039 Linux vApp image
2000 Oracle Solaris avagent
2001 Oracle Solaris avtar
2002 Oracle Solaris RMAN
2009 Oracle Solaris DB2
2014 Oracle Solaris Lotus
2029 Oracle Solaris Sybase
2030 Oracle Solaris SAP
3000 Windows avagent
Replication
Command reference 285

Table 93 Numeric plug-in descriptors (continued)
Descriptor Plug-in name
3001 Windows avtar
3002 Windows Oracle RMAN
3004 Windows Exchange message
3005 Windows Exchange database
3006 Windows SQL
3009 Windows DB2
3011 Windows Exchange 2007 database
3012 Windows Exchange 2007 web
3014 Windows Lotus
3015 Windows VSS
3016 Windows VMware image
3017 Windows MOSS
3018 Windows Exchange VSS
3019 Windows VMware File Level Restore (FLR)
3026 Windows MOSS VSS
3027 Windows Exchange Granular Level Restore (GLR)
3028 Windows MOSS Granular Level Restore (GLR)
3029 Windows Sybase
3030 Windows SAP
3032 Windows Hyper-V VSS
3033 Windows Hyper-V Granular Level Restore (GLR)
3036 Windows cluster file system
3041 Windows VMware Granular Level Restore (GLR)
4000 HP-UX avagent
4001 HP-UX avtar
4002 HP-UX Oracle RMAN
4009 HP-UX DB2
4029 HP-UX Sybase
4030 HP-UX SAP
5000 IBM AIX avagent
5001 IBM AIX avtar
5002 IBM AIX Oracle RMAN
5009 IBM AIX DB2
Replication
286 Avamar 18.2 Administration Guide

Table 93 Numeric plug-in descriptors (continued)
Descriptor Plug-in name
5014 IBM AIX Lotus
5029 IBM AIX Sybase
5030 IBM AIX SAP
6000 Mac OSX avagent
6001 Mac OSX avtar
7003 NetApp NDMP
8003 EMC Celerra NDMP
10000 Novell NetWare avagent
10001 Novell NetWare avtar
10003 Novell NetWare NDMP
11000 FreeBSD avagent
11001 FreeBSD avtar
12000 SCO OpenServer avagent
12001 SCO OpenServer avtar
13000 SCO UnixWare avagent
13001 SCO UnixWare avtar
14003 EMC Isilon NDMP
CLI examplesReview the avrepl command examples for details on how to use options to controlreplication behavior.
Specify the following options with the avrepl command:
Table 94 Required options for the avrepl command
Option Description
--operation=replicate Command operation for avrepl.
--[replscript]dpnname=source_server Fully qualified domain name of the sourceAvamar server.
--[avtar]id=user@auth User account for the source Avamar server.The default value is repluser. To use the
repluser account, you can omit --[avtar]id and specify only the password
for the repluser account with the --password option.
--password=password Password for the user account on the sourceAvamar server.
Replication
CLI examples 287

Table 94 Required options for the avrepl command (continued)
Option Description
--[replscript]dstaddr=destination_server
Destination Avamar server.
--[replscript]dstid=repluser Specifies the Avamar user ID and domain touse for authentication on the destinationAvamar server.
Note
The repluser account is the only user accountthat is known to work reliably on alldestination servers.
--dstpassword=password
--dstap=password
--dstpswd=password
Specifies the password for repluser accounton the destination Avamar server.
If the firewall is installed and enabled on the destination server, then specify the --[replscript]dstencrypt option with the correct encryption method, which iseither ssl or tls.
Replicating all client backupsThe following command replicates all client backups from theavamar-1.example.com source server to the replication-server-1.example.com destination server. The user account on the source serveris jdoe@avamar (the jdoe user account with the Avamar internal authenticationsystem), and the password is password. The user account on the destination serveris repluser, and the password is password.
avrepl --operation=replicate --[replscript]dpnname=avamar-1.example.com --[avtar]id=jdoe@avamar --password=password --[replscript]dstaddr=replication-server-1.example.com --[replscript]dstid=repluser --dstpassword=password --[replscript]dstencrypt=ssl
Replicating backups for specific clients or domainsThe following command replicates all backups for the client1 and client2 clients,as well as for all clients in the domain3 domain.
avrepl --operation=replicate --[replscript]dpnname=avamar-1.example.com --[avtar]id=jdoe@avamar --password=password --[replscript]dstaddr=replication-server-1.example.com --[replscript]dstid=repluser --dstpassword=password --[replscript]dstencrypt=ssl client1 client2domain3
Replicating specific types of backupsThe following command replicates all full (level 0) backups that occurred afterFebruary 1, 2014 for the client1 and client2 clients.
avrepl --operation=replicate --[replscript]dpnname=avamar-1.example.com --[avtar]id=jdoe@avamar --ap=password --[replscript]dstaddr=replication-server-1.example.com --[replscript]dstid=repluser --dstpassword=password --
Replication
288 Avamar 18.2 Administration Guide
[replscript]dstencrypt=ssl --[avtar]after=2014-02-01 --backup-type=level0_full client1 client2
Monitoring replicationTo ensure that it is completing successfully and to troubleshoot issues, monitorreplication.
The Monitor > Activity window in the AUI enables you to view status information forboth on-demand and scheduled replication activity.
Monitor replication in the AUIThe Activity window in the AUI enables you to view status information for both on-demand and scheduled replication activity.
Procedure
1. In the AUI navigation pane on the left, click , and then go to Monitor >Activity.
The Activity Monitor appears and displays a list of all activities. Replicationjobs indicate Replication Source in the Type column. Additionally, you canfilter the view to display only replication jobs.
2. To filter the results to display only replication activity:
a. Click next to the Type column.
b. Type Replication Source.
Cancel a replication task in the AUIYou can cancel a policy-based replication task in the Activity window of the AUI atany time before the task completes. Note that the cancellation might take 5 minutesor longer, and if the replication task completes before the cancellation occurs, thetask does not get cancelled.
Procedure
1. In the AUI, navigate to Monitor > Activity.
A list of all activities appears.
2. In the Activity window, select the replication task you want to cancel, and clickCANCEL.
A confirmation message appears.
3. Click YES.
Restore a backup from a replica on a destination systemRestore replicated data from a client in the REPLICATE domain of a destinationserver. The restore target can be any client that is a member of a domain on thedestination server, including the client that is the source of the original backup.
Use this method to restore data from a replica when the source Avamar server isunavailable and when Replicas at Source is not enabled on the source Avamar system.
Replication
Monitoring replication 289

Note
Restore is supported in only Avamar Administrator.
Procedure
1. Register and activate the client that is the restore target with the destinationAvamar server that manages the replicated data:
a. On a Windows client, right-click the Avamar system tray icon and selectManage > Activate Client.
The Activate Client Setup dialog box appears.
b. Type the hostname of the destination Avamar server in the AdministratorServer Address box.
c. Type 28001 in the Administrator Server Port box.
d. Type the Avamar domain for the client in the Client Domain box.
e. Click Activate.
2. In Avamar Administrator, click the Backup & Restore launcher link.
The Backup, Restore and Manage window is displayed.
3. Click the Restore tab.
The upper left pane contains a list of domains.
4. Select the REPLICATE domain, and then select the hostname of the sourceAvamar server.
5. Select the domain that contains the client that is the source of the originalbackup.
6. Select the client from the list.
7. Click the By Date tab or the By File/Folder tab and select the data to restore.
Note
Restoring data from a backup on page 152 provides alternate methods to find abackup and perform a restore.
8. Select Actions > Restore Now.
The Restore Options dialog box appears.
9. Click Browse next to the Restore Destination Client box, and then browse toand select the client that is the restore target.
Do not select a client in the REPLICATE domain as the restore target. Select aclient that is listed in the clients domain, or in another domain on the Avamarserver.
10. To use for the restore from the Restore Plug-in list, select the plug-in.
11. From the Avamar encryption method list, select an encryption method forclient/server data transfer during the restore.
Replication
290 Avamar 18.2 Administration Guide

Note
The encryption technology and bit strength for a client/server connectiondepend on several factors, including the client operating system and Avamarserver version. The Avamar Product Security Guide provides details.
12. Select either Restore everything to a different location or Restoreeverything to multiple locations.
13. Click Set Destination below the Items Marked for Restore list, and thenselect the destination paths for the data to restore.
14. To include plug-in options with this restore, click More Options, and thenconfigure the settings.
15. Click OK on the Restore Options dialog box.
The Restore Request dialog box indicates that the restore was started.
16. Click Close.
17. (Optional) Change the registration of the restore target client back to thesource Avamar server.
Perform this step when the source Avamar server is available.
MCS configuration parameters to support Replicas atSource
Configure MCS management of Replicas at Source through configuration parametersin mcserver.xml.
Changing the configuration of Replicas at Source on page 293 describes how tochange mcserver.xml. The following table describes the Replicas at Sourceparameters in mcserver.xml.
Table 95 MCS configuration parameters to support Replicas at Source
Container Parameter Default value Description
repl external_sync_interval_minute
120 Sets the number of minutesbetween tries to synchronizethe replica metadata from thedestination system to theMCS database on the sourceAvamar system. Settingget_backups_from_external_server to true
overrides this parameter.
repl allow_dest_replica_management
false Set to true to permit
synchronization of replicametadata between theremote destination systemand the source Avamarserver. Set to false to
disable synchronization and
Replication
MCS configuration parameters to support Replicas at Source 291

Table 95 MCS configuration parameters to support Replicas at Source (continued)
Container Parameter Default value Description
effectively disable theReplicas at Source feature.
repl get_backups_from_external_server
false Set this value to true to
override the default behaviorand force MCS to obtainreplica metadata directly fromthe destination system. Bydefault, MCS obtains replicametadata from thedestination system byperiodic synchronization. Thissynchronization writes themetadata to the local MCSdatabase on the sourceAvamar system.AvamarAdministrator accesses thelocal database to providereplica information.
repl show_external_backups true Set to true to enable the
listing of replicas on theRestore tab. Set to false to
disable the listing of replicason the Restore tab.
ebms ebms_home lib/mcebms.war Sets the location of the webarchive file for the externalbackup manager service.
ebms ebms_descriptor /WEB-INF/web.xml Sets the location of the XMLdescriptor file for the externalbackup manager service.
ebms ebms_port 9090 Sets the inbound (listening)port for the external backupmanager service.
ebms ebms_use_https true Set to true to force the
external backup managerservice to use SSL/TLSencryption for communicationwith destination systems.
mon ebmsIntervalMinutes 720 Sets the number of minutesbetween checks of the stateof the Remote BackupManager Service.
mon ebmsFailEventIntervalMinutes
120 Sets the number of minutesbetween published updates ofRemote Backup ManagerService stop events and
fail events.
Replication
292 Avamar 18.2 Administration Guide

Table 95 MCS configuration parameters to support Replicas at Source (continued)
Container Parameter Default value Description
mon ebmsMonitorTimeout 300 Sets the number of minutesto try to check the state ofthe Remote Backup ManagerService.
repl allow_manage_remote_backups_at_source
true Set to true to permit
management of replicas onthe source Avamar server.Management includes: Delete,Change Expiration, andChange Retention. Set tofalse to disable
management of replicas onthe source Avamar server.
Changing the configuration of Replicas at SourceTo change the configuration of the Replicas at Source feature change the parametervalues in mcserver.xml.
This topic describes how to change the Replicas at Source configuration parametersin mcserver.xml. Refer to MCS configuration parameters to support Replicas atSource on page 291 for descriptions of the configuration parameters.
Procedure
1. Open a command shell and log in by using one of the following methods:
l For a single-node server, log in to the server as admin.
l For a multi-node server:
a. Log in to the utility node as admin.
b. Load the admin OpenSSH key by typing the following command:
ssh-agent bashssh-add ~admin/.ssh/admin_key
2. Stop the MCS by typing the following command:
dpnctl stop mcs
3. Change the working directory by typing the following command:
cd /usr/local/avamar/var/mc/server_data/prefs
4. Open mcserver.xml in a text editor.
5. Find the container element of the parameter, and within that element, find theparameter.
6. Change the value of the parameter.
7. Save the change and close the file.
8. Start the MCS and the scheduler by typing the following command:
Replication
Changing the configuration of Replicas at Source 293

dpnctl start mcsdpnctl start sched
Restore Replicas at SourceWhen the Replicas at Source feature is enabled on the Avamar server, AvamarAdministrator lists replicas on the Restore tab in the same table that lists backups.
View and restore data from replicas through the Restore tab of Avamar Administrator.Replicas appear with the following information:
l Remote in the Type column
l Name/IP address and system type of the remote destination system in the Servercolumn
Note
When Avamar Administrator lists data from a backup as both Local and Remote, theAvamar system always uses the local backup to restore the data. However, whenbackup data that is listed as Remote is selected for validation, the Avamar systemstages and validates the referenced replica.
Replicas at Source on page 262 provides additional information about the Replicas atSource feature.
Replication
294 Avamar 18.2 Administration Guide

CHAPTER 12
Server Updates and Hotfixes
This chapter includes the following topics:
l Overview of the Avamar server software update process................................ 296l Installing and configuring the Avamar Downloader Service.............................. 299l Downloading new packages from the EMC repository..................................... 299l Downloading and installing packages on the Avamar server............................. 300l Viewing a list of installation packages on the Avamar server.............................301l Deleting packages from the Avamar server...................................................... 303l Viewing the history of installations...................................................................304l Using the legacy Avamar Downloader Service................................................. 305l Troubleshooting Avamar Downloader Service issues........................................ 313
Server Updates and Hotfixes 295

Overview of the Avamar server software update processAvamar periodically provides updates and hotfixes for the Avamar server software.Avamar stores update packages and hotfix packages in the EMC repository. Use theAvamar Downloader Service to download the installation packages to an Avamarserver, or to a local Windows server and push the packages to an Avamar server. Thenuse Avamar Installation Manager to install the packages on the Avamar server.
When required, you can remove old installation packages from the local repository onthe Avamar server and then download them via the Avamar Downloader Service again.
If Internet access is unavailable, manually copy packages to the /data01/avamar/repo/packages directory on the utility node or single-node server instead of usingthe Avamar Downloader Service. Then use Avamar Installation Manager to install thepackages on the Avamar server.
Avamar Downloader ServiceBefore Avamar release 7.3, the Avamar Downloader Service was installed on aseparate standalone Microsoft Windows computer. Beginning with Avamar release7.3, the downloader service is also available on the Avamar server, integrated with theAvamar Installation Manager. You can use either the legacy downloader service on astandalone Microsoft Windows computer or use the new downloader service that isintegrated with the Avamar Installation Manager.
Customer Support typically installs the Avamar Downloader Service software duringthe installation or upgrade of an Avamar server. You can also download the AvamarDownloader Service from the Avamar server and install the software yourself.
If the Avamar Downloader Service computer is on a private network with restrictionson access to the EMC repository server, then you can set up a proxy server forcommunication between the Avamar Downloader Service computer and the EMCrepository server.
SecurityThe Avamar Downloader Service encrypts outgoing communication to the EMCrepository by using SSL (Secure Socket Layers) over an HTTP connection. TheAvamar Downloader Service validates each package that it downloads to ensure thatthe package has been correctly signed and transmitted.
Legacy Avamar Downloader ServiceThe legacy Avamar Downloader Service computer is a standalone Microsoft Windowscomputer with network access to Avamar sites on the Internet and to all internalAvamar servers.
The legacy Avamar Downloader Service runs as a Windows service to monitor theEMC repository. A desktop shortcut, task tray icon, and Windows Start menu itemsprovide access to the legacy Avamar Downloader Service user interface, whichenables you to configure the downloader service and check the EMC repository forinstallation packages. The Avamar Downloader Service monitor contains statusmessages for the service.
The legacy Avamar Downloader Service accepts incoming requests for installationpackages only from Avamar systems that are on a known systems list.
Server Updates and Hotfixes
296 Avamar 18.2 Administration Guide

Local repositoryThe C:\Program Files\EMC\Avamar Downloader Service\repositorydirectory on the Avamar Downloader Service computer serves as the local repositoryfor downloaded installation packages.
Note
Do not rename client installation packages. The Avamar push upgrade mechanisms areincompatible with renamed packages.
The manifest.xml file in the local repository contains a list of all server, client, andworkflow packages that are currently available for download from the EMC repository.
AvInstaller and Avamar Installation ManagerThe AvInstaller process controls the download and installation process for installationpackages on the Avamar server. Use Avamar Installation Manager to manage theAvInstaller process.
InstallationCustomer Support installs AvInstaller during the installation or upgrade of an Avamarserver. AvInstaller is installed on the utility node in a multi-node environment or theserver in a single-node environment.
Local repositoryAvInstaller uses the /data01/avamar/repo/packages directory on the Avamarutility node or single-node server serves as the local repository for downloadedinstallation packages. AvInstaller also manages a temporary directory that is used toextract the packages during installation.
To determine if new packages are available, the Avamar Downloader Serviceautomatically downloads the manifest file from the EMC repository once a day. If thelegacy Avamar Downloader Service is being used, it sends the updated manifest file tothe local repository for each known Avamar system. AvInstaller uses the manifest fileto obtain current information about all software packages that are available fordownload from the EMC repository.
User interfaceUse the Avamar Installation Manager user interface to manage AvInstaller. AvamarInstallation Manager is installed automatically with AvInstaller. Avamar InstallationManager provides the following features:
l Download software packages via the Avamar Downloader Service.
l Install the packages on the Avamar server.
l View a list of the software packages in the repository of the Avamar server.
l To reclaim storage, delete old installation packages from the Avamar server.
l View the software installation history for the Avamar server.
Checking the status of the AvInstaller processTo check the status of the AvInstaller process:
Procedure
1. Open a command shell and log in by using one of the following methods:
l For a single-node server, log in to the server as admin.
l For a multi-node server:
Server Updates and Hotfixes
AvInstaller and Avamar Installation Manager 297

a. Log in to the utility node as admin.
b. Load the admin OpenSSH key by typing the following command:
ssh-agent bashssh-add ~admin/.ssh/admin_key
2. Type dpnctl status avi.
Output from the dpnctl status avi command should look similar to thefollowing:
dpnctl: INFO: avinstaller status: up.
Stopping the AvInstaller processTo stop the AvInstaller process:
Procedure
1. Open a command shell and log in by using one of the following methods:
l For a single-node server, log in to the server as admin, then switch user toroot by typing su -.
l For a multi-node server, log in to the utility node as admin, then switch userto root by typing su -.
2. Type avinstaller.pl --stop.
3. Verify that the AvInstaller process has stopped by typing avinstaller.pl --test.
Output from the avinstaller.pl --test command should look similar tothe following:
Avistart process:INFO: AVI is not running.
Restarting the AvInstaller processTo restart the AvInstaller process:
Procedure
1. Open a command shell and log in by using one of the following methods:
l For a single-node server, log in to the server as admin, then switch user toroot by typing su -.
l For a multi-node server, log in to the utility node as admin, then switch userto root by typing su -.
2. Type avinstaller.pl --start.
3. Verify that the AvInstaller process is running by typing avinstaller.pl --test.
Output from the avinstaller.pl --test command should look similar tothe following:
Avistart process pid:INFO: AVI is running.
Server Updates and Hotfixes
298 Avamar 18.2 Administration Guide

Installing and configuring the Avamar Downloader ServiceThe Avamar Downloader Service is installed as part of the Avamar softwareinstallation process.
Using the legacy Avamar Downloader Service on page 305 contains information aboutinstalling and configuring the legacy Avamar Downloader Service software on astandalone Microsoft Windows machine.
Configuring the Avamar Downloader ServiceConfigure Avamar Downloader Service before using it to download packages from theEMC repository server. Configuration tasks include providing login information forAvamar Support, specifying proxy server settings.
Procedure
1. Open a web browser and log in to Avamar Installation Manager:
a. Type the following URL:
https://Avamar-server/aviwhere Avamar-server is the IP address or resolvable hostname of theAvamar server.
The Avamar Installation Manager login page appears.
b. Type the username of the Avamar administrator user account in the UserName field and the password in the Password field.
c. Click Login.
2. Click Configuration.
The Configuration window opens.
3. Specify the Avamar Support Username and Password that you received withthe Avamar license at the time of product purchase.
4. (Optional) Select Enable Proxy to enable a proxy server when the downloaderservice requires a proxy server to pass through the firewall whencommunicating with Avamar Support. Specify the hostname or IP address andthe port number for the proxy server.
a. Specify the hostname or IP address and the port number for the proxyserver.
b. If the proxy server requires authentication, type the Username andPassword for the proxy server.
5. Click Save.
Downloading new packages from the EMC repositoryYou can check the EMC repository for new server, client, and workflow packages, andthen download the packages to install them.
Procedure
1. Open a web browser and log in to Avamar Installation Manager:
Server Updates and Hotfixes
Installing and configuring the Avamar Downloader Service 299

a. Type the following URL:
https://Avamar-server/aviwhere Avamar-server is the IP address or resolvable hostname of theAvamar server.
The Avamar Installation Manager login page appears.
b. Type the username of the Avamar administrator user account in the UserName field and the password in the Password field.
c. Click Login.
2. Click Configuration.
The Configuration window opens.
3. Click Check for New Packages.
The Check for New Packages dialog box appears and provides statusmessages. The Avamar server downloads the manifest file from the EMCrepository server to the local repository. The Avamar server then processes themanifest file to determine which packages apply to the current serverconfiguration.
When packages become available to download, they appear on the SWReleases, SW Upgrades, SW Updates, and Maintenance tabs, as defined byeach package.
4. Click Close on the Check for New Packages dialog box.
5. For any package on the SW Releases, SW Upgrades, SW Updates, andMaintenance tab, click Download to retrieve the package from the EMCrepository.
Downloading and installing packages on the Avamar serverUse Avamar Installation Manager to download and install software packages, patches,and hotfixes.
Before you begin
Use a computer with at least 2 GB of RAM.
Procedure
1. Open a web browser and log in to Avamar Installation Manager:
a. Type the following URL:
https://Avamar-server/aviwhere Avamar-server is the IP address or the resolvable hostname of theAvamar server.
The Avamar Installation Manager login page appears.
b. Type the username of the Avamar administrator user account in the UserName field and the password in the Password field.
c. Click Login.
2. If a Download button appears for the package, click the button to download thepackage to the local repository.
Server Updates and Hotfixes
300 Avamar 18.2 Administration Guide

After the download completes, the Download button is replaced with an Installbutton and a Delete button.
3. To start the installation, click Install.
The background color for the package changes to yellow and the initializationbegins. When the initialization process completes, the Installation Setup pageappears.
4. Provide installation setup information.
Some packages do not require setup information.
5. To provide advanced settings, select Show advanced settings.
6. Click Continue.
The Installation Progress page displays the status of the installation.
NOTICE
If you close the browser during the installation of a package, the installationdoes not stop. To resume monitoring the installation, open a browser windowand log in to Avamar Installation Manager.
7. Respond to all installation prompts.
After the installation completes, the Install button becomes a Run button forworkflow packages. The Run button enables you to run the workflow packageagain.
Viewing a list of installation packages on the Avamar serverView a list of installation packages in the repository on an Avamar server on theRepository tab of Avamar Installation Manager.
Procedure
1. Open a web browser and log in to Avamar Installation Manager:
a. Type the following URL:
https://Avamar-server/aviwhere Avamar-server IP address or resolvable hostname of the Avamarserver.
The Avamar Installation Manager login page appears.
b. Type the username of the Avamar administrator user account in the UserName field and the password in the Password field.
c. Click Login.
2. Click Repository.
The Repository tab appears.
3. (Optional) Toggle the sort order of the packages in the list by clicking a columnheading.
Server Updates and Hotfixes
Viewing a list of installation packages on the Avamar server 301

Uploading installation packages to the Avamar serverUpload packages to the Avamar server from the local hard drive or other attachedmedium such as a flash drive using the Package Upload feature on the Repositorytab
Procedure
1. Open a web browser and log in to Avamar Installation Manager:
a. Type the following URL:
https://Avamar-server/aviwhere Avamar-server is the IP address or resolvable hostname of theAvamar server.
The Avamar Installation Manager login page appears.
b. Type the username of the Avamar administrator user account in the UserName field and the password in the Password field.
c. Click Login.
2. Click Repository.
The Repository tab appears.
3. Click Browse to select a package for upload.
Note
Versions 9 through 11 of the Internet Explorer browser support a maximumupload size of 4 GB. Versions 6 through 8 support a maximum upload size of 2GB.
Once the package upload completes, it automatically appears in the Repositorytable.
Repository tab headingsThe packages in the repository on an Avamar server appear on the Repository tab ofAvamar Installation Manager. The most recently installed package appears at thebottom of the list.
The following table describes the information that appears for each package.
Table 96 Information on the Repository tab
Heading Description
FileName The name of the package.
Status The status of the package:
l Waiting — The AvInstaller service iscopying the package to the EMCrepository.
l Checksum — The AvInstaller service iscalculating the package checksum.
Server Updates and Hotfixes
302 Avamar 18.2 Administration Guide

Table 96 Information on the Repository tab (continued)
Heading Description
l Unsigning — The AvInstaller service isverifying the package signature.
l Extracting — The AvInstaller service isextracting the package from the tarball.
l Accepted — The package is fullydownloaded to the EMC repository and isready to be installed.
l Rejected — Either the package wasrejected due to a problem in transit or itwas downloaded successfully but was notapplicable to the system in its currentstate.
Note A brief description of the status.
Last Updated The date and time of the last status update.
Deleting packages from the Avamar serverAfter you successfully install a software package, the AvInstaller service automaticallydeletes the package from the repository on the Avamar system. Manually deletepackages that are not installed.
Only Customer Support can delete restricted packages.
Procedure
1. Open a web browser and log in to Avamar Installation Manager:
a. Type the following URL:
https://Avamar-server/aviwhere Avamar-server IP address or resolvable hostname of the Avamarserver.
The Avamar Installation Manager login page appears.
b. Type the username of the Avamar administrator user account in the UserName field and the password in the Password field.
c. Click Login.
2. In the Package List, select a package.
3. Click the Delete button next to the package.
A confirmation message appears.
4. Click Yes.
Server Updates and Hotfixes
Deleting packages from the Avamar server 303

Viewing the history of installationsYou can view a history of the software installations, updates, and hotfixes for anAvamar server on the History tab of Avamar Installation Manager.
Procedure
1. Open a web browser and log in to Avamar Installation Manager:
a. Type the following URL:
https://Avamar-server/aviwhere Avamar-server IP address or resolvable hostname of the Avamarserver.
The Avamar Installation Manager login page appears.
b. Type the username of the Avamar administrator user account in the UserName field and the password in the Password field.
c. Click Login.
2. Click History.
The History tab appears.
3. (Optional) Toggle the sort order of the packages in the list by clicking theheading of any column.
4. (Optional) Filter the list of packages by selecting a filter value from the Showlist.
5. (Optional) View details about a package in the list by selecting the row for thepackage.
6. (Optional) View the log file for a packages that has a processing status byclicking Logs in the Details table.
7. (Optional) Export the log information to a Microsoft Excel or PDF file byclicking Export.
Installation history information
History columnsThe following table describes the information that appears on the Avamar InstallationManager History tab for each package.
Table 97 Information on the History tab
Heading Description
Title The name of the package.
Version The version of Avamar server software.
Description A brief description of the package.
Status The status of the package:
l Available — The package is in themanifest and is available to download.
Server Updates and Hotfixes
304 Avamar 18.2 Administration Guide

Table 97 Information on the History tab (continued)
Heading Description
l Completed — The package installationcompleted.
l Processing — A package installation is inprogress.
l Ready — The package is ready to install.
l Removed — The package has beendeleted from the Avamar grid.
Last Updated The date and time of the last status updatefor the package.
Details columnsThe following table describes the information that appears in the Details table in thelower right pane of the History tab.
Table 98 Details on the History tab
Details table column heading Description
Status Status details for a package:
l Available — The package is in themanifest and is available to download.
l Ready — The package is ready to install.
l Deployed — The start of the installationinitialization.
l Deploying — The start of the packagedeployment.
l Processing — The start of the packageinstallation.
l Completed — The completion of thepackage installation.
l Removed — The removal of the package.
Last Updated The corresponding date and time of thepackage status message.
Logs Displays a Logs button for packages with a
processing status. Click Logs to open awindow that provides details about the tasksthat are performed to install the package.
Using the legacy Avamar Downloader ServiceThe following topics explain how to prepare for, install, configure, and use the legacyAvamar Downloader Service software on a Microsoft Windows system, as well as howto update and uninstall the software.
Server Updates and Hotfixes
Using the legacy Avamar Downloader Service 305

Legacy Avamar Downloader Service installation requirementsThe legacy Avamar Downloader Service is available as either a 32-bit or 64-bitapplication. You install the legacy Avamar Downloader Service on a MicrosoftWindows server that has network access to the Avamar server. This system can be adesktop or laptop system.
The following table provides the installation requirements for the computer on whichyou install the legacy Avamar Downloader Service.
Table 99 Installation requirements for the legacy Avamar Downloader Service
Software/hardware Requirement
Operating system l Microsoft Windows Server 2016
l Microsoft Windows 10
l Microsoft Windows Server 2012 (64-bitonly)
l Microsoft Windows Server 2008 R2
l Microsoft Windows 8
l Microsoft Windows 7 SP1
File system Any file system
Hard drive space Minimum of 12 MB
RAM Minimum of 20 MB
Recent releases of Avamar support only TLS 1.2. Older operating systems may requiresteps or updates to enable TLS 1.2. The Avamar Product Security Guide provides moreinformation.
To enable TLS 1.2 for Windows 7, Windows 2008 and Windows 2012, refer to thedocumentation on the Microsoft Support site.
Downloading the legacy Avamar Downloader Service softwareDownload the legacy Avamar Downloader Service software from the Avamar WebRestore page on the Avamar server.
Procedure
1. Log in to the Windows host system as an administrator.
2. Type the URL of the Avamar server into the web browser:
https://Avamar_serverwhere Avamar_server is the Avamar system network hostname (as defined inDNS) or IP address.
The Avamar Web Restore page appears.
3. Click Downloads.
The Downloads. list appears.
4. Click + next to the platform heading for the Windows computer.
5. Click + next to the operating system heading for the Windows computer.
Server Updates and Hotfixes
306 Avamar 18.2 Administration Guide

6. Click the link for AvamarDownloaderService-windows-platform-version.exe.
where:
l platform is the type of Windows platform (32-bit or 64-bit).
l version is the version of the Avamar server software.
A dialog box prompts you to either run the file or save it.
7. Save the installation file to a temporary directory.
Installing the legacy Avamar Downloader Service softwareProcedure
1. Log in to the Windows host computer as an administrator.
2. Browse to the directory that contains AvamarDownloaderService-windows-platform-version.exe, and then double-click the file to startthe installation.
The Microsoft Visual C++ 2010 Redistributable Maintenance setupapplication opens.
3. Accept the license and then click Install.
Wait for the Visual C++ runtimes to install.
4. Click Finish.
The setup wizard opens, starting with the welcome page.
5. Click Next.
The Destination Folder page appears.
6. Specify the folder for the Avamar Downloader Service installation:
l To accept the default folder, C:\Program Files\EMC\AvamarDownloader Service, click Next.
l To specify a different folder, click Change and then browse to the folder.Then click Next.
The Ready to install Avamar Downloader Service page appears.
7. Click Install.
The Installing Avamar Downloader Service page appears and displays theprogress of the installation. After the installation completes, the Completedthe Avamar Downloader Service Setup Wizard page appears.
8. Click Finish.
The installation adds an Avamar Downloader Service icon to the Control Paneland the system tray. The installation also adds theAvamarDownloaderService to Windows Services.
Enabling HTTPSHTTPS functionality must be enabled on the Microsoft Windows computer hosting thelegacy Avamar Downloader Service. In some circumstances, HTTPS might already beenabled on the computer. If not, perform the following steps on the computer.
Procedure
1. Select Control Panel > Windows Firewall > Advanced settings.
Server Updates and Hotfixes
Installing the legacy Avamar Downloader Service software 307

The Windows Firewall with Advanced Security console appears.
2. In the navigation pane, click Outbound Rules.
3. In the Actions pane, click New Rule.
The New Outbound Rule Wizard appears.
4. Select Port, and then click Next.
5. Select Specific remote ports, type 443 in the text box, and click Next.
6. Click Allow the connection and clickNext.
7. Accept the default settings and click Next.
8. Provide a name for the outbound rule (for instance, “Avamar DownloaderService”) and click Finish.
The New Outbound Rule Wizard appears.
9. In the Outbound Rules pane, right-click the outbound rule that you createdbefore (should be at the top of list) and select Properties.
The Properties window appears.
10. Select the Programs and Services tab.
11. Click Settings.
12. Select Apply to this service.
13. From the list of services, select Avamar Downloader Service and click OK.
14. Click Apply and thenOK.
15. Close the Windows Firewall with Advanced Security console.
Configuring the legacy Avamar Downloader ServiceConfigure Avamar Downloader Service before using it to download packages from theEMC repository server. Configuration tasks include verifying the connection, buildinga known systems list, and specifying proxy server settings.
Before you begin
Install the Avamar Downloader Service software.
Procedure
1. On the Avamar Downloader Service computer, right-click the AvamarDownloader Service task tray icon and select Configure Service.
The Avamar Downloader Service configuration wizard opens, starting with thewelcome page.
2. (Optional) To use the local version of the manifest.xml file, select DisableInternet access. Use only local files.
Use this option when the Avamar Downloader Service computer cannot connectover the Internet with the EMC repository.
3. On the welcome page of the configuration wizard, click Next.
The Avamar Credentials page appears.
4. On this page, specify the Avamar Support Username and Password (plusconfirmation) that you received with the Avamar license at the time of productpurchase, and then click Next.
The Proxy Configuration page appears.
Server Updates and Hotfixes
308 Avamar 18.2 Administration Guide

Note
To edit Avamar credentials later, open the Show Advanced Settings windowby right-clicking the task tray icon and selecting Show Advanced Settings.
5. (Optional) Specify the hostname or IP address and the port number for theproxy server as well as Avamar credentials: Username, Password, and ConfirmPassword.
Supply proxy server information to use a proxy server as an intermediary forrequests from the Avamar Downloader Service computer to the EMC repositoryserver. The page also allows you to select Use Authentication.
For example, use a proxy server when the Avamar Downloader Servicecomputer is on a private network and access to the EMC repository server isrestricted.
6. Click Next.
The Avamar Systems page appears.
7. Click Add.
The Avamar Downloader Service - Add Known System dialog box appears.
8. Specify the hostname, username, and password for an Avamar server:
a. In the Hostname box, type the IP address or hostname for the Avamarserver.
b. In the Username box, type root to specify the Linux operating system rootuser.
c. In the Password and Confirm Password boxes, type the password for theroot user.
9. Click OK.
When the configuration process cannot resolve the hostname, an informationalmessage appears. Click Yes to add the system or No to cancel the addoperation. You can add systems with unresolvable hostnames, such as offlinesystems, to the known systems list.
10. Add other Avamar servers.
11. After all Avamar servers have been added, click Next.
The Review Configuration page appears.
12. Review the configuration details, and then click Finish.
After you finish
When required, rerun the configuration wizard to edit the hostname, IP address, orport number for a proxy server, or to edit the known systems list to add and removeAvamar servers.
Updating the legacy Avamar Downloader Service softwareUse the Avamar Downloader Service to check for updates of the Avamar DownloaderService software, and to download and install the updates.
Procedure
1. Right-click Avamar Downloader Service task tray icon and select Check forUpdates.
Server Updates and Hotfixes
Updating the legacy Avamar Downloader Service software 309

If an update is available, the message Update is ready to installappears.
If no updates are available, then the message Your software is up todate appears.
The Avamar Downloader Service Updater dialog box appears.
2. When an update is available, click Install.
TheAvamar Downloader Service setup wizard appears.
3. Follow the prompts to continue through the wizard and install the new softwarebuild.
Uninstalling the legacy Avamar Downloader ServiceUninstall Avamar Downloader Service through the Windows Programs and Featuresconsole.
Procedure
1. On the Avamar Downloader Service computer, close all running applications.
2. Open the Windows Programs and Features console from the Control Panel.
3. In the Name column, select Avamar Downloader Service.
4. Click Uninstall.
Results
The uninstall process removes all files, including file cache contents, configurationitems, and Windows registry entries for the Avamar Downloader Service
Downloading new packages from the EMC repositoryYou can check the EMC repository for new server, client, and workflow packages, andthen download the packages to install them.
Before you begin
Ensure that the status of the Avamar Downloader Service is either OK or Waitingfor configuration. Otherwise, you cannot check for new packages.
Procedure
1. Right-click the Avamar Downloader Service task tray icon and select Check forNew Packages.
The Check for New Packages dialog box appears and provides statusmessages. The Avamar Downloader Service downloads the manifest file fromthe EMC repository server to the local repository on the Windows server and toAvamar servers on the known systems list.
A check mark next to a status message indicates that the process wassuccessful. An X next to a status message indicates that the process failed.
2. To view details about failed processes, double-click the X next to the statusmessage.
3. Click Close on the Check for New Packages dialog box.
Server Updates and Hotfixes
310 Avamar 18.2 Administration Guide

Viewing a list of packages available for downloadThe manifest.xml file in the repository folder on the Avamar Downloader Servicecomputer contains a list of software packages that are currently available fordownload from the EMC repository.
Procedure
1. Right-click the Avamar Downloader Service task tray icon and select OpenRepository.
Windows Explorer opens and displays the C:\Program Files\EMC\AvamarDownloader Service\repository folder, which contains themanifest.xml file.
2. To view the package information, open the manifest.xml.
Package names use the .avp file name extension and appear within<filename> tags.
Verifying connectivity with the EMC repositoryAfter editing repository connection settings, or after package download failures, verifythat the Avamar Downloader Service computer can connect to the EMC repositoryserver.
Procedure
1. Right-click the Avamar Downloader Service task tray icon and select RunDiagnosis.
The status of the process appears in the Run Diagnosis dialog box. An X nextto a status message indicates a problem with the network connection, Click theX next to failures to view more information about the error in the ErrorInformation dialog box.
The Run Diagnosis dialog box appears, and the process to check that networkconnectivity starts automatically.
2. (Optional) To stop the verification process before it completes, click StopSystem Check.
3. When the verification completes, click Close.
Monitoring Avamar Downloader Service statusThe Avamar Downloader Service monitor automatically starts when you log in to theAvamar Downloader Service computer. Use the monitor to view the status of theAvamar Downloader Service.
Procedure
l To view the status from the monitor, hover the mouse over the AvamarDownloader Service task tray icon.
A popup window with a status message appears.
The following table describes Avamar Downloader Service monitor statusmessages.
Server Updates and Hotfixes
Viewing a list of packages available for download 311

Table 100 Avamar Downloader Service monitor status messages
Status message Description
Avamar Downloader Service Default status message.
Authentication Failure with the EMCRepository.
HTTP basic authentication failure.
Authentication Failure with one or more“Known Systems.”
HTTP basic authentication failure including:
n Failed communication with the EMCrepository.
n SSL (Secure Socket Layers) handshakefailed.
n HTTP dropped connection.
n HTTP NAK (negatively acknowledgedmessage).
Failed communication with one or more“Known Systems.”
Possible causes:
n SSL handshake failed.
n HTTP dropped connection.
n HTTP NAK.
Failed file download from the EMCrepository.
File transfer was aborted.
Failed file transfer to one or more knownsystems.
File transfer was aborted.
Network Error HTTPS browser settings prevent the AvamarDownloader Service from requesting files fromthe Avamar Online Support site.
Out of space. The Avamar Downloader Service file cache isfull. To free up disk space, remove files fromthe local repository.
Running. The service is running and communicating withall known systems as well as the EMCrepository.
Socket failure on host computer. Possible causes:
n The host computer is out of socketresources.
n A binding problem with the NIC.
n Deadlock condition within Winsock.
Waiting for configuration. The Avamar Downloader Service was installed,but not configured.
Server Updates and Hotfixes
312 Avamar 18.2 Administration Guide

Stopping and starting the Avamar Downloader Service monitorThe Avamar Downloader Service monitor starts automatically when you log in to theAvamar Downloader Service computer.
Procedure
l To stop the monitor, right-click the Avamar Downloader Service task tray icon andselect Exit.
l To start the monitor, open the Windows Start menu and select All Programs >Avamar Downloader Service version > Avamar Downloader Service Monitor.
Troubleshooting Avamar Downloader Service issuesResolve common issues with the Avamar Downloader Service.
Package download failsSYMPTOM: The utility node or the single-node server cannot access the Windowshost computer, and a message similar to the following message appears whendownloading a package.
The selected package cannot be downloaded.RESOLUTION: Add a line to the /etc/hosts file on the utility node with the IPaddress, fully qualified domain name, and short name of the Avamar DownloaderService computer.
SAMPLE ENTRY: 10.6.172.50 avamar-1.example.com avamar-1Temporary IPv6 addresses cause package download to failSYMPTOM: The Avamar Downloader Service fails to download a package and displaysconnection refused errors.
POSSIBLE CAUSE: Temporary IPv6 addresses are in use on all operating systems. Theconnection refused errors are due to the use of temporary IPv6 addresses.Windows Vista, Windows 2008 Server, or later versions of Windows use temporaryIPv6 addresses by default.
RESOLUTION: To work around this issue, block temporary IPv6 addresses on theAvamar Downloader Service computer. Type each of the following netsh commandsat the command prompt on the Avamar Downloader Service computer. Type eachnetsh command on a separate line.
netsh interface ipv6 set privacy state=disabled store=activenetsh interface ipv6 set privacy state=disabled store=persistentnetsh interface ipv6 set global randomizeidentifiers=disabledstore=activenetsh interface ipv6 set global randomizeidentifiers=disabledstore=persistent
Server Updates and Hotfixes
Stopping and starting the Avamar Downloader Service monitor 313

Server Updates and Hotfixes
314 Avamar 18.2 Administration Guide

CHAPTER 13
Avamar Client Manager
This chapter includes the following topics:
l Overview of Avamar Client Manager.................................................................316l Starting Avamar Client Manager.......................................................................319l Global tools...................................................................................................... 320l Overview..........................................................................................................330l Clients..............................................................................................................334l Policies.............................................................................................................352l Queues.............................................................................................................354l Logs.................................................................................................................355
Avamar Client Manager 315

Overview of Avamar Client ManagerAvamar Client Manager is a web-based management application that providescentralized Avamar client administration capabilities for larger businesses andenterprises. Avamar Client Manager facilitates the management of large numbers ofAvamar clients.
Avamar Client Manager works with Avamar clients on a supported native operatingsystem and Avamar clients on a supported operating system running in a VMwarevirtual machine. Avamar Client Manager cannot work with Avamar clients throughvirtual center, virtual machine, or virtual proxy configurations. The Avamar ClientManager UI displays supported Avamar clients and hides all unsupported clients.
Connection securityTo secure data transmissions between a computer and the Avamar server, a secureconnection is created using HTTPS.
This form of the HTTP protocol encrypts messages before they are sent and decryptsthem when they are received. HTTPS is used for all login transmissions and for alltransmission of data during registration and activation operations.
All trials to access the Avamar server through the UI over standard HTTP protocol areredirected to HTTPS to prevent plain text transmissions.
Apache web server authenticationThe Avamar Client Manager UI uses only secure web pages, and an authenticationwarning appears in web browsers that access those pages unless you install a trustedpublic key certificate on the Apache web server. This option is provided with Avamar.
The Avamar Product Security Guide describes how to obtain and install a trusted publickey certificate for the Apache web server.
Editing the session time-out periodWhen a session has been running for 72 hours or more without any interactionbetween the web browser and the Avamar Client Manager server, Avamar ClientManager ends the session. The automatic session time-out protects the security ofthe assets accessible through Avamar Client Manager. You can increase or decreasethe time-out period.
When Avamar Client Manager ends a session, close the web browser window or tab inwhich the session was running, and restart Avamar Client Manager. Avamar ClientManager does not end a session while a commit task is in progress.Procedure
1. Open a command shell:
a. Log in to the server as admin.
b. Switch user to root by typing the following command:su -
c. For a multi-node server, load the rootid OpenSSH key by typing thefollowing command:
ssh-agent bashssh-add /root/.ssh/rootid
Avamar Client Manager
316 Avamar 18.2 Administration Guide

2. Stop the EM Tomcat server by typing the following command:
dpnctl stop emt
3. Open the following file in a text editor:
/usr/local/avamar-tomcat/webapps/aam/WEB-INF/web.xml4. Change the value of the session-timeout tag to a new value in minutes.
The following example illustrates the session-timeout tag with the defaultvalue of 4320 minutes (72 hours):
<session-config> <session-timeout>4320</session-timeout></session-config>
5. Save and close the file.
6. Start the EM Tomcat server by typing the following command:
dpnctl start emt
Increasing the JavaScript time-out periodThe Avamar Client Manager UI uses JavaScript to perform many of its tasks.Sometimes an Avamar Client Manager UI script requires more time to finish than whata web browser’s default script time-out value permits.
When this step happens, a message appears and the script is stopped. You can clickcontinue to allow the script to finish its work.
To avoid seeing this message, increase the script time-out period. The steps dependon the web browser.
Increasing the JavaScript time-out period in Internet Explorer on WindowsProcedure
1. Open a registry editor, such as Regedt32.exe.
2. Open the following registry key:
HKEY_CURRENT_USER\Software\Microsoft\InternetExplorer\StylesIf the key does not exist, create it.
3. Create a DWORD value called MaxScriptStatements under the key.
4. Set the value of the DWORD to 20,000,000.
This number represents the number of script statements.
5. Restart the web browser.
Increasing the JavaScript time-out period in FirefoxProcedure
1. In the browser address bar, type about:config.
A warning message appears.
2. Click I’ll be careful, I promise!.
The preferences window opens.
Avamar Client Manager
Increasing the JavaScript time-out period 317

3. In Filter, type dom.max_script_run_time.
The script runtime preference appears.
4. Double-click the preference.
The Enter integer value dialog box appears.
5. Type 30 and click OK.
6. Restart the browser.
Avamar Client Manager configuration propertiesAvamar Client Manager normally does not require any changes to its defaultconfiguration. However, some properties can be adjusted to suit a particulardeployment requirement.
Avamar Client Manager properties are in the /usr/local/avamar/etc/acm.properties file.
The following table provides information about the properties.
Table 101 Avamar Client Manager configuration properties
Property Description Default value
activation.retry.attempts The number tries to activate a client activationbefore activation fails.
24
activation.retry.frequency.minutes The number of minutes between client activationtries.
120
move.getactivities.retry.attempts The number of checks to determine whether aclient is inactive (so that it can be moved).
7
move.getactivities.frequency.seconds The number of seconds between checks todetermine whether a client is inactive (so that itcan be moved).
5
move.queue.error.codes Sets a comma-separated list of error codes thatdetermine whether a move task failure is addedto the queue. A move is only added to the queueif its failure generates one of these error codes.Use the value none to prevent all failed move
tasks from being added to the queue. Use thevalue empty to add all failed move tasks to the
queue.
22271, 22280, 22282,22295, 30006, 30012,30016, 30017, 30019
move.retry.attempts Sets the number of times a failed move task isretried.
24
move.retry.frequency.minutes Sets the span of time in minutes between retrytries.
120
orgu.name.append.domain Determines whether clients displayed in the
Client Information area of the UI are listedusing the client hostname or FQDN. The defaultvalue displays the FQDN for each client.
true
toolbar.displaytime.client Determines whether time displayed withinAvamar Client Manager uses the time zone of theweb browser’s host computer or time zone of the
true
Avamar Client Manager
318 Avamar 18.2 Administration Guide

Table 101 Avamar Client Manager configuration properties (continued)
Property Description Default value
Avamar server. The default value uses the timezone of the web browser’s host computer.
upgrade.freeform.flags Provides a way to pass key/value flags toupgrade work orders. The value is a commaseparated list of KV pairs. For example:upgrade.freeform.flags=key1=val1,key2=val2,key3=val3
No default value
Changing an Avamar Client Manager configuration propertyProcedure
1. Open a command shell:
a. Log in to the server as admin.
b. Switch user to root by typing the following command:
su -
c. For a multi-node server, load the rootid OpenSSH key by typing thefollowing command:
ssh-agent bashssh-add /root/.ssh/rootid
2. Change the current working directory by typing the following command:
cd /usr/local/avamar/etc
3. Open the Avamar Client Manager properties file, acm.properties, in a texteditor.
4. Edit the value of the property.
5. Save and close the file.
6. Restart the EM Tomcat server by typing the following command:
dpnctl stop emtdpnctl start emt
Starting Avamar Client ManagerStart Avamar Client Manager by typing the Avamar Client Manager URL in a webbrowser. Avamar Client Manager can also be started within Backup & RecoveryManager.
Procedure
1. Open a web browser and type the following URL:
https://Avamar_server/aamwhere Avamar_server is the resolvable hostname or IP address of the Avamarserver that is running the Avamar Client Manager process.
Avamar Client Manager
Starting Avamar Client Manager 319

2. In User Name, type the username of an administrator account on the Avamarserver.
3. In Password, type the password for the account.
Results
Avamar Client Manager opens to Server Summary section of the Overview page.
Login pageThe login page limits access to the Avamar Client Manager UI by requiring a usernameand a password.
The login page authenticates the username and the password through comparisonwith administrator accounts that are registered on the Avamar server. Avamar ClientManager only allows access for accounts with administrator privileges on the Avamarserver that is running the Avamar Client Manager process.
After a successful login, the Avamar Client Manager UI opens to the Server Summarysection of the Overview page.
Global toolsAvamar Client Manager provides several tools that you can use with more than onepage.
Use these tools to help with the following tasks:
l Adding an Avamar server
l Removing an Avamar server
l Changing the settings for an Avamar server
l Selecting an Avamar server to work with
l Filtering a page's summary view
l Viewing context relevant details
l Exporting information from a page
l Enabling tool tips
Adding an Avamar serverTo enable management of the Avamar clients of an Avamar server, add the Avamarserver to Avamar Client Manager.
Before you begin
Determine the following information:
l The resolvable hostname or IP address of the Avamar server.
l The inbound RMI port on the Avamar server.
l The password for the MCUser account on the Avamar server.
Procedure
1. Browse to the Server Summary section of the Overview page.
2. Click Add Server.
The Add Server window appears.
Avamar Client Manager
320 Avamar 18.2 Administration Guide

3. In System name (or) IP, type the resolvable hostname, or IP address, of theAvamar server.
4. In Port, type the inbound RMI port for the Avamar server.
The field appears with the default value of 9443. Leave the default valueunchanged unless a non-default port is used on the Avamar server.
5. In MCUser Password, type the password for the MCUser account on theAvamar server.
6. Click Save.
Results
Avamar Client Manager checks the values and adds the Avamar server.
Removing an Avamar serverTo stop management of the Avamar clients of an Avamar server, remove the Avamarserver from Avamar Client Manager.
Procedure
1. Browse to the Server Summary section of the Overview page.
2. Select the Avamar servers to remove.
The Avamar server that hosts the Avamar Client Manager process cannot beremoved.
3. Click Remove Server.
A warning dialog box appears.
4. Click Yes.
Results
Avamar Client Manager removes the selected Avamar servers from the group ofmanaged servers.
Changing the settings for an Avamar serverChanges on an Avamar server to the inbound RMI port or to the password for theMCUser account prevent management of the Avamar server by Avamar ClientManager. Edit the stored settings for the Avamar server to reenable management byAvamar Client Manager.
Before you begin
Determine the following information:
l The new inbound RMI port on the Avamar server.
l The new password for the MCUser account on the Avamar server.
Procedure
1. Suspend all activity on the Avamar server.
Suspending and resuming server activities on page 180describes how tosuspend Avamar server activity.
2. Browse to the Server Summary section of the Overview page.
3. Select an Avamar server.
4. Click Edit Server.
Avamar Client Manager
Removing an Avamar server 321

The Edit Server window appears.
5. In Port, type the inbound RMI port on the selected Avamar server.
6. In MCUser Password, type the password for the MCUser account on theselected Avamar server.
7. Click Save.
Results
Avamar Client Manager checks the values and reestablishes management of theAvamar server.
Selecting a serverUse the server selection field to display, and work with, information for a specificserver.
Before you begin
Expand the Navigation panel on the left side of the UI so that the server selectionfield is visible at the top of the panel. Browse to a page that displays the serverselection field in an active, selectable, state.Procedure
1. On the server selection field, click the arrow icon.
When the server selection field is not visible, expand the Navigation panel onthe left side of the UI. When the server selection field is not relevant to thecurrent page view it appears in a dimmed state, that is, it is not active andselectable.
2. From the list of servers, select a server.
The page view refreshes. Information about the server and its tasks appears.
FiltersAvamar Client Manager offers you a wide range of filters.
Use a filter to determine which objects appear in the list on the current page. Filterswork with a variety of objects. The type of object and the available filters depend onthe page's context. In Avamar Client Manager you can filter the following types ofobjects:
l Servers
l Clients
l Policies
l Groups
l Tasks
l Log entries
Filters that apply to the current context appear on the Filters bar at the top of thepage.
Avamar Client Manager
322 Avamar 18.2 Administration Guide

Searching by nameTo find objects by comparing a search string to object names, use the search field.
Before you begin
Browse to a view that has one of the following search-enabled fields on the Filtersbar:
l User name
l Client name
l Group name
l Domain name
Use search to limit the list to objects with the same and similar names.
Procedure
1. Click the arrow next to the search-enabled field.
A text entry box appears.
2. In the text entry box, type a search string.
Avamar Client Manager compares the search string that you type to the namesof objects and includes matching objects on the list. Objects match when aportion of the name contains the search string.
3. Click the magnifying glass icon.
Results
Avamar Client Manager refreshes the list and only objects with names that match thesearch string appear.
Example 1 Searching by username
To include all clients that have a user with the characters "eng" in their username,type *eng* in the text entry field.
After you finish
(Optional) To remove the search string and to display all objects, click X next to thetext entry field.
Search string rules
A search string is one or more characters that you type into a name search field.Avamar Client Manager compares the search string with all object names. When thesearch string matches all or part of an object's name, Avamar Client Manager adds theobject's name to the results.
The following rules apply to a search string:
l No more than 24 characters
l Can use an asterisk (*) character to represent zero or more characters
l Cannot start with a period character
l Cannot include any of the characters that are listed in the Character column of thefollowing table:
Avamar Client Manager
Filters 323

Table 102 Characters not allowed in search strings
Character Name Unicode
/ a Solidus 002F
: Colon 003A
; Semicolon 003B
? Question Mark 003F
" Quotation Mark 0022
< Less-than Sign 003C
> Greater-than Sign 003E
\ Reverse Solidus 005C
, Comma 002c
~ Tilde 007E
! Exclamation Mark 0021
@ Commercial At 0040
# Number Sign 0023
$ Dollar Sign 0024
% Percent Sign 0025
^ Circumflex Accent 005E
| Vertical Line 007C
& Ampersand 0026
' Apostrophe 0027
` Grave Accent 0060
( Opening parenthesis 0028
) Closing parenthesis 0029
{ Left Curly Bracket 007B
} Right Curly Bracket 007D
[ Left Square Bracket 005B
] Right Square Bracket 005D
a. An exception to this exclusion permits the solidus character in the Domain Name filter onthe Policies page.
Using the activity type filterUse the activity type filter to limit a list to one type of activity.
Before you begin
Browse to a view that includes Activity Type on the Filters bar.
Avamar Client Manager
324 Avamar 18.2 Administration Guide

Procedure
1. On the Filters bar, click the arrow next to Activity Type.
A selection list appears, with the values: Backup and Restore.
2. Select a value.
Select Backup to include only backup tasks in the list. Select Restore toinclude only restore tasks in the list.
For example, in the Idle Clients section of the Clients page, select Backup onthe Activity Type filter. Avamar Client Manager limits the list to clients withoutany backup activity during the defined period.
Results
Avamar Client Manager filters the results using the activity type that you selected.
Using the client status filterUse the client status filter to add clients with the specified client status to the list.
Before you begin
Browse to a view that includes Client Status on the Filters bar.Procedure
1. On the Filters bar, click the arrow next to Client Status.
A selection list of the client statuses for all clients in that context appears.
2. Select a status.
For example, in the Add Clients section of the Clients page, select ActivationFailure on the Client Status filter. Avamar Client Manager limits the list toregistered computers with at least one unsuccessful activation try.Avamar Client Manager refreshes the list. Only entries with the selected clientstatus appear on the list.
3. (Optional) Repeat the steps to select additional statuses.
Results
Avamar Client Manager refreshes the list. Only entries with the selected clientstatuses appear on the list.
Using the failure criteria filterUse the failure criteria filter to define which clients Avamar Client Manager includes ina list of failed clients.
Before you begin
Browse to a view that includes Failure Criteria on the Filters bar.Procedure
1. On the Filters bar, click the arrow next to Failure Criteria.
A selection list appears, with the values: At least one activity failed, Allactivities failed, and Last activity failed.
2. Select a value.
The value that you select determines which clients Avamar Client Managerincludes in the list of failed clients. Avamar Client Manager includes only clientsthat match the selected activity status.
Avamar Client Manager
Filters 325

For example, select Last activity failed. Avamar Client Manager refreshes thelist and includes clients only when their most recent activity failed. The failedactivity can be either a backup or a restore.
Results
Avamar Client Manager refreshes the list. Only clients with an activity status thatmatches the selected value appear on the list.
Using the OS filterUse the OS filter to limit a list to clients with specific operating systems.
Before you begin
Browse to a view that includes OS on the Filters bar.
Procedure
1. On the Filters bar, click the arrow next to OS.
A list of the OS versions of all clients in that context appears.
2. Select an OS version.
Avamar Client Manager refreshes the list. Only clients with the selected OSversion appear on the list.
3. (Optional) To select additional OS versions, repeat the steps.
Results
Avamar Client Manager refreshes the list. Only clients with the selected OS versionsappear on the list.
Using the period filterUse the period filter to define the calendar date boundaries of the displayed results.
Before you begin
Browse to a view that includes Period on the Filters bar.Procedure
1. On the Filters bar, click the arrow next to Period.
A selection list appears, with the values: Before, After, and On.
2. Select a value.
3. Click the arrow next to the selected value.
A date entry field and a small calendar icon appear.
4. Click the calendar icon, browse to a specific date, and then click the date.
Alternatively, in the date entry field, type a date using the format m/d/yy, andclick the magnifying glass icon.
Avamar Client Manager refreshes the list. Only entries within the specifiedperiod appear on the list.
5. (Optional) Further refine the results by repeating these steps using the othervalues.
Results
Avamar Client Manager refreshes the list. Only entries within the specified periodappear on the list.
Avamar Client Manager
326 Avamar 18.2 Administration Guide

Using the status filterUse the status filter to limit a list to entries with specific statuses.
Before you begin
Browse to a view that includes Status on the Filters bar.
Procedure
1. On the Filters bar, click the arrow next to Status.
A selection list of all statuses for all entries in that context appears.
2. Select a status.
Avamar Client Manager refreshes the list. Only entries with the selected statusappear on the list.
3. (Optional) To select additional statuses, repeat the steps.
Results
Avamar Client Manager refreshes the list. Only entries with the selected statusesappear on the list.
Using the status code filterUse the status code filter to limit a list to entries with specific status codes.
Before you begin
Browse to a view that includes Status Code on the Filters bar.
Procedure
1. On the Filters bar, click the arrow next to Status Code.
A selection list of the status codes for all entries in that context appears.
2. Select a status code.
Avamar Client Manager refreshes the list. Only entries with the selected statuscode appear on the list.
3. (Optional) To select additional status codes, repeat the steps.
Results
Avamar Client Manager refreshes the list. Only entries with the selected status codesappear on the list.
Using the success criteria filterUse the success criteria filter to define which clients Avamar Client Manager includesin a list of successful clients.
Before you begin
Browse to a view that includes Success Criteria on the Filters bar.Procedure
1. On the Filters bar, click the arrow next to Success Criteria.
A selection list appears, with the values: At least one activity successful, Allactivities successful, and Last activity successful.
2. Select a value.
Avamar Client Manager
Filters 327

The value that you select determines which clients Avamar Client Managerincludes in the list of successful clients. Avamar Client Manager only includesclients that match the selected activity status.
For example, select Last activity successful. Avamar Client Manager refreshesthe list and only includes the clients with a successful backup or restore.
Results
Avamar Client Manager refreshes the list. Only clients with an activity status thatmatches the selected value appear on the list.
Using the version filterUse the version filter to limit a list to clients with specific versions of the Avamar clientsoftware.
Before you begin
Browse to a view that includes Version on the Filters bar.
Procedure
1. On the Filters bar, click the arrow next to Version.
A selection list of the Avamar client software versions for all clients in thatcontext appears.
2. Select a version.
Avamar Client Manager refreshes the list. Only clients with the selectedsoftware version appear on the list.
3. (Optional) To select additional software versions, repeat the steps.
Results
Avamar Client Manager refreshes the list. Only clients with the selected softwareversions appear on the list.
Viewing detailsUse the Details panel to view context relevant details.
Before you begin
Browse to a view that includes the Details panel or Details bar on the right-side.Procedure
1. On the right-side of the page, click the Details bar.
The Details panel expands.
2. In Summary, select an object.
The page context determines the object type. An object can be a client or agroup. You can select more than one object.
Detailed information for the selected object appears in the Details panel.
3. (Optional) When you select more than one object, use the paging controls atthe bottom of the Details panel to view information for each selected object.
Avamar Client Manager
328 Avamar 18.2 Administration Guide

Exporting dataUse export to download the selected summary as an Excel spreadsheet.
Before you begin
Browse to a page view that includes Export on the page bar.Procedure
1. On the page bar, click Export.
Avamar Client Manager includes all information from the summary in theexported data.
The web server pushes an Excel file containing the summary information to thebrowser.
2. Save the file locally.
3. Use an application that can read the Excel-formatted spreadsheets to open thefile.
Setting the entries per page limitIncrease the limit on the number of entries displayed in summary lists.
By default, Avamar Client Manager limits its summary lists to 25 entries per page.When there are more entries than the current entries per page limit, the entriesappear on 2 or more pages. You can increase the entries per page limit to make iteasier to work with many entries.
Procedure
1. On the status bar at the bottom of Avamar Client Manager, click Entries PerPage.
The list of choices appears.
2. Click a number on the list.
Results
Avamar Client Manager sets the selected number as the new limit and refreshes thepage.
Viewing tool tipsEnable and display tool tips to view concise help messages for various elements of theUI.
Procedure
1. On the status bar at the bottom of Avamar Client Manager, select ShowTooltips.
2. Hover the pointer over a user interface element that has a tool tip.
The following elements may have tool tips:
l Dashboard chart sections
l Controls
l Column headings
Avamar Client Manager
Exporting data 329

OverviewThe Overview page provides access to high-level information about the managementof Avamar clients. It also provides tools for the administration of Avamar servers.
From the left-side menu of the Overview page, select:
l Server SummarySelect Server Summary to view information about the selected Avamar server, toadd an Avamar server, to remove an Avamar server, or to edit the settings for anAvamar server.
l DashboardSelect Dashboard to view information about the client backups for the selectedAvamar server.
Server SummaryThe Server Summary section of the Overview page provides columns of informationabout the Avamar servers that Avamar Client Manager manages.
Filter this information by using the filters available on the Filters bar. Change thesorting method that is used for the list by clicking a column heading.
In each of the following columns, click a nonzero value to see a more detailed reportabout that column's information:
l Active Clients
l Idle Clients
l Successful Clients
l Failed Clients
Server Summary columns
The following table describes the columns that are used in the Server Summarysection of the Overview page.
Table 103 Columns used in the Server Summary section
Column Description
Server Hostname or IP address of the Avamar server.
Version Version of Avamar server software that isinstalled on the Avamar server.
Total Clients Total number of clients that are registeredwith the Avamar server. Does not includeretired clients.
Active Clients Total number of clients with activity (backupor restore) during the specified period.
Idle Clients Total number of clients with no backupactivity during the specified period.
Successful Clients Total number of clients with a backup statusthat matches the value set in the Successful
Avamar Client Manager
330 Avamar 18.2 Administration Guide

Table 103 Columns used in the Server Summary section (continued)
Column Description
Backups filter. Also includes the averageamount of time for those backups.
Failed clients Total number of clients with failed backupsduring the specified period.
Clients with Restore Total number of clients with restore activity(successful or unsuccessful) during thespecified period.
DashboardThe Dashboard section of the Overview page provides a graphical snapshot view of aselected server.
The dashboard provides information in panels that you can expand, collapse, or deleteto create the view you need.
Usage tips:
l Collapse or expand a panel by clicking the arrow icon in the panel's title bar.
l Return the dashboard to its default view by reloading the page in the web browser.
Setting a panel's periodSet a panel's period to define the number of days of data in the display.
Before you begin
Browse to the Dashboard section of the Overview page, with any of the followingpanels displayed: Analyze, Backup Report, and Backup Trend.Procedure
1. On a panel, in the period field, click the arrow icon.
The period field is available on the following panels:
l Analyze
l Backup Report
l Backup Trend
The period list appears.
2. Select a period.
The available choices are:
l Last 24 hours
l Last 7 days
l Last 30 days
Avamar Client Manager refreshes the panel with data for the selected period.
Client panelThe Client panel uses a pie chart to represent the total number of potential clients forthe selected server. Colors represent the percentage of the total for:
Avamar Client Manager
Dashboard 331

l ActivatedGreen represents the percentage of clients that the selected server has activated.
l Not activatedRed represents the percentage of clients that the selected server has registered,but not activated.
l FreeGray represents the percentage of unused client connections available on theselected server.
Server panelThe Server panel provides a grid view of information about the selected server.
Table 104 Server information on the Server panel
Column Description
Node Type Specifies the server's node type: Single orMulti.
Active Backup Number of running backups.
Backup in Queue Number of backups in the server's queuewaiting to run.
Replication Current state of the replication job:
l Running
l Not running
Status Current state of the server's ManagementConsole Server (MCS) system:
l Active
l Down
Backup Trend panelThe Backup Trend panel is a line chart that shows the size of data that is backed upat specific points in time over a defined period. The x-axis represents points in timeover the selected period. The y-axis represents the size of data in the backup at eachpoint in time.
The line that is drawn between the plotted points represents the backup trend, whichis the change in backed up data over time.
Client Type panelThe Client Type panel uses a bar chart to represent for the selected server thenumber of activated clients that are in each of the following categories:
l RegularAll activated clients that do not fit into one of the other three categories.
l vMachineGuest clients. The virtual computers that are backed up through Avamar clientsoftware running on the host computer.
Avamar Client Manager
332 Avamar 18.2 Administration Guide

l ProxyProxy virtual machine clients. Clients that use Avamar for VMware image backupand restore.
l vCenterAvamar clients that protect vCenter management infrastructure by backing upvCenter hosts.
Analyze panelThe Analyze panel uses a bar chart to represent the number of clients that are in eachof the following states during the selected period:
l SuccessfulClients with at least one successful backup.
l FailedClients with backup activity but no successful backups.
l IdleClients with no backup activity.
Backup Report panelFor backups started during the selected period, the Backup Report panel uses a barchart to represent the number of each of the following results:
l SuccessfulSuccessfully completed backups, with or without errors.
l FailedBackups that failed to complete.
l CanceledBackups that are canceled before completion.
Client Queues panelThe Client Queues panel uses a bar chart to display the number of clients in each ofthe following queues:
l Upgrade
l Move to server
l Activation
Storage Capacity panelThe Storage Capacity panel uses a pie chart to represent the total storage capacityof the selected server. Colored slices represent the following:
l UsedRed represents the portion of storage that contains data.
l Free CapacityGreen represents the portion of storage that is unused and available.
Backup Health panelThe Backup Health panel uses a bar chart to represent the number of clients thathave retained backup data for specific periods of time. The panel uses the periods: 1day, 30 days, 60 days, and 90 days.
Avamar Client Manager
Dashboard 333

On the bar chart, the x-axis represents the period that Avamar has retained the dataand the y-axis represents the number of clients.
ClientsThe Clients page provides information and tools for working with Avamar clients.
From this page, you can:
l Select the computers in the enterprise's domain and add them as Avamar clients
l View detailed information about individual clients
l Move, retire, and delete clients
l Change a client's group associations
l Upgrade the Avamar software on the client
To browse between the sections of the Clients page, select from the choices in theleft-side menu.
Client and server toolsAvamar Client Manager provides several tools to help manage Avamar clients andAvamar servers.
A tool only appears when it is relevant to the context. Changes that are made by thetool apply to the selected client and the selected server. Launch a tool by clicking itscommand button.
Creating an Avamar domainTo add a branch to an Avamar server's administrative hierarchy, create an Avamardomain.
Before you begin
Browse to a view that includes Create Domain: either the Add New Clients dialogbox or the Client Move dialog box.
Procedure
1. In the Domain Selection pane, select the location for the new domain.
To locate the new domain directly beneath the root domain, select the servericon. To locate the new domain beneath another domain, select that domain.
2. Click Create Domain.
The New domain dialog box appears.
3. In New Domain Name, type a name for the domain.
Avamar does not allow the following characters in a domain name: =~!@$^%(){}[]|,`;#\/:*?<>'"&+
4. (Optional) Type information in the Contact, Phone, Email, and Location fields.
5. Click OK.
Results
Avamar Client Manager adds the new domain to the selected server and the newdomain appears on the Domain Selection pane.
Avamar Client Manager
334 Avamar 18.2 Administration Guide
Viewing the group associations of a clientTo determine the policies that apply to a client, view the groups that include the client.
Before you begin
Browse to a view that includes Group Associations on the Actions bar.
The group associations of a client determine the client's backup dataset, the client'sbackup schedule, and the client's backup retention period.
Procedure
1. Select a client.
2. Click Group Associations.
Results
The Groups for Client dialog box appears and lists the client's groups.
Adding group associations to a clientTo apply the policies of a group to a client, add the group association to the client.
Before you begin
Browse to a view that includes Group Associations on the Actions bar.
This task results in an association between a client and a group. The Avamar serverapplies the group's policies to the client.
Procedure
1. Select a client.
2. Click Group Associations.
3. On the Groups for Client dialog box, click Add Groups.
The Add Groups for Client dialog box appears.
4. Select a group.
You can select more than one group.
5. Click Add.
Results
Avamar Client Manager adds the group associations to the client.
Creating a groupTo make a new set of policies available for assignment to clients, create a group withthe policies. The Create Group command is available when adding a client to a group,and when moving a client to a new domain or to a new server.
Before you begin
Browse to a view that includes Create Group: either the Add Groups dialog box orthe Client Move dialog box.
Procedure
1. Click Create Group.
On the Client Move dialog box, selecting a domain enables the button.
The Create Group in Domain dialog box appears.
Avamar Client Manager
Client and server tools 335

2. In Group Name, type a name for the new group.
Avamar does not allow any of the following characters in a group's name: =~!@$^%(){}[]|,`;#\/:*?<>'"&+
3. (Optional) Select Enable to enable scheduled backups of clients that you assignto the group.
To disable scheduled backups of clients that you assign to the group, clear thischeckbox .
4. In Dataset, select a dataset for the group.
5. In Schedule, select a schedule for the group.
6. In Retention Policy, select a retention policy for the group.
7. Click OK.
Results
Avamar Client Manager creates the group in the selected domain.
Removing group associations from a clientTo stop applying a group's policies to a client, remove the group association from theclient.
Before you begin
Browse to a view that includes Group Associations on the Actions bar.
This task removes the association between a client and a group. When you completethe task the group's policies no longer apply to the client.
Procedure
1. Select a client.
2. Click Group Associations.
3. On the Groups for Client dialog box, select a group.
You can select more than one group.
4. Click Remove.
Results
Avamar Client Manager removes the association between the client and the selectedgroups.
Overriding group policy settings for a clientTo modify policies that are applied to a client, override the policies of its group.
Before you begin
Browse to a view where View/Edit Details appears on the Actions bar and the clientappears in the clients list.
Procedure
1. Select a client.
2. On the Actions bar, click View/Edit Details.
The Client Details dialog box appears.
3. Select the Advanced tab.
The policy override settings appear with the client's current state shown.
Avamar Client Manager
336 Avamar 18.2 Administration Guide

4. Modify the client's current state by selecting or clearing settings.
5. Click OK.
Results
Avamar Client Manager changes the group policy settings for the client.
Group policy override settings
To modify a policy that is applied to a client, use one of the policy override settings.
The following table describes the policy override settings on the Advanced tab of theClient Details dialog box.
Table 105 Settings on the Advanced tab of Client Details
Setting Description
Override group retention Permits you to assign to a client a retentionsetting that is different from the groupsetting. After selecting this option, assign aretention setting by selecting it from the
Select an existing retention policy list.
Select an existing retention policy List of available retention settings that youcan assign to a client. To use this list, first
select Override group retention.
Disable all backups Disables all backups of the client. Users canstill restore data.
Activated Places a registered client in an activatedstate. When you clear this setting, userscannot perform backups or restores.
Allow client-initiated backups Permits users to begin backups from theclient.
Allow file selection for client-initiated backups Permits users to select files to include inbackups that are started from the client. TheExclude list for the group's dataset does notapply.
Allow client to add to dataset Permits users to add folders to the datasetsof the client's groups. The following rulesapply to this setting:
l The Avamar server filters the added datawith the group's Exclude list and Includelist.
l The added data is in every scheduled andon-demand backup for each group that isassigned to the client.
l User must have access to the Avamarclient web UI to add folders or removefolders.
Allow client to override daily group schedules Permits users to select a start time forscheduled backups that is different from thegroup start time. Prerequisites:
Avamar Client Manager
Client and server tools 337

Table 105 Settings on the Advanced tab of Client Details (continued)
Setting Description
l Add time entries to the Avamar server'sOverride schedule.
l Assign a daily schedule to the client'sgroup.
l To allow them to select a new schedule,provide users access to the Avamar clientweb UI.
Allow client to override retention policy onclient-initiated backups
Assigns the retention policy that is specified
in Select an existing retention policy toclient-initiated backups. Prerequisites:
l Enable Override group retention.
l Enable Allow client-initiatedbackups.
Viewing summary information about a clientUse Client Details to see information about a client and its users.
Before you begin
Browse to a view where View/Edit Details appears on the Actions bar and the clientappears in the clients list.
Procedure
1. Select a client.
2. On the Actions bar, click View/Edit Details.
The Client Details dialog box appears.
3. Select the Summary tab.
Results
Information about the client appears. Also, a list of users who are associated with theclient appears.
Changing a client's name on the serverWhen you change a computer's hostname, also change the name that is used by theAvamar server to identify the computer as an Avamar client.
Before you begin
Change the hostname on the computer, and in DNS, before performing this task.Browse to a view where View/Edit Details appears on the Actions bar and thecomputer appears in the clients list.
Procedure
1. Select a client.
2. On the Actions bar, click View/Edit Details.
The Client Details dialog box appears.
Avamar Client Manager
338 Avamar 18.2 Administration Guide

3. Select the Summary tab.
4. In Client name, type the new hostname for the computer.
5. Click OK.
Results
Avamar Client Manager replaces the old hostname with the new hostname for theAvamar client on the Avamar server.
Viewing a client's backup historyTo determine whether an Avamar server has backed up a client as expected, view theclient's backup history.
Before you begin
Browse to a view where View/Edit Details appears on the Actions bar and the clientappears in the clients list.
Procedure
1. Select a client.
2. On the Actions bar, click View/Edit Details.
The Client Details dialog box appears.
3. Select the Backups tab.
4. In From, select the earliest date of the period to view.
5. In To, select the latest date of the period to view.
6. (Optional) Select On-demand backups.
Select this choice to include user-initiated backups in the results. Clear thischoice to exclude those backups.
7. (Optional) Select Scheduled backups.
Select this choice to include backups that a group schedule begins with in theresults. Clear this choice to exclude those backups.
Results
A list of the client's backups that match the filter settings appears.
Viewing a client's installed plug-insView the Avamar plug-ins that are installed on an Avamar client to help determine thetypes of data in its backups.
Before you begin
Browse to a view where View/Edit Details appears on the Actions bar and the clientappears in the clients list.
Procedure
1. Select a client.
2. On the Actions bar, click View/Edit Details.
The Client Details dialog box appears.
3. Select the Plug-ins tab.
Avamar Client Manager
Client and server tools 339

Results
The plug-ins that are installed on the client appear.
Deleting a client from a serverTo remove a client's records and backups from an Avamar server, delete the clientfrom the server.
Before you begin
Browse to a view where the client appears in the client list and Delete appears on theActions bar.
When Avamar Client Manager deletes a client from an Avamar server it stops allactivity with that client, deletes the client's backups, and removes all record of theclient from the server's database.
Procedure
1. Select a client.
2. On the Actions bar, click Delete.
3. On the Confirm dialog box, type the password.
Use the password of the account that is logged in to Avamar Client Manager.
4. Click OK.
The Alert dialog box appears.
5. Click OK.
Results
Avamar Client Manager runs a background process that removes all the client'sinformation and data from the server.
Add ClientsThe Add Clients section provides information and tools to register and activateenterprise computers as Avamar clients.
Use the Add Clients section to import information about the computers in theenterprise. Import the information from a supported LDAP naming system or from aCSV file.
After import, filter the information by client status and client name to help in theselection of prospective Avamar clients.
Use Avamar Client Manager to register and activate the selected computers to anAvamar server. Completion of the activation process requires installation of theAvamar client software on the computers and access to Avamar client processes fromthe server. The normal workflow is to install the client software on a computer beforeselecting it for activation.
Directory service informationYou can use an enterprise's directory service to provide Avamar Client Manager withinformation about the computers that are potential Avamar clients.
Use a supported directory service that has information about the potential Avamarclient computers. Avamar Client Manager queries the directory service to obtaininformation about clients and, if available, directory service organizational units, suchas directory domains, and directory groups.
Avamar Client Manager
340 Avamar 18.2 Administration Guide

Before using the directory service method to obtain information about computers in adomain, configure Avamar Client Manager to use the directory service.
The directory service method requires the following:
l TCP/IP access to the directory service from the server that is running AvamarClient Manager.
l Account information for a user account with read access to the directory service.
l The name of the directory service domain for the computers that you want toimport.
Importing information from a directory service
To prepare to add computers as Avamar clients, import information about thecomputers from the directory service.
Before you begin
Do the following:
l Configure Avamar Client Manager to use the directory service.
l Obtain a username, and its associated domain and password for an account withread access to the directory service.
l Have available the name of the directory service domain of the computers that arebeing imported.
Procedure
1. In the left-side menu, click Clients > Add Clients.
2. On the Actions bar, click New Clients.
The Client Information Source dialog box appears.
3. Select Active Directory.
4. In User Domain, select the domain of the account you are using to access thedirectory service.
To add directory service domains to this list, refer to the administration guide.
5. In User Name, type the name of the account.
6. In Password, type the password of the account.
7. In Directory Domain, select the name of the directory service domain for thecomputer information you are importing.
8. Click OK.
Results
Avamar Client Manager imports the information from the directory service.
After you finish
Using the imported computer information, select and activate computers as clients ofan Avamar server.
CSV file informationYou can use a comma-separated values (CSV) file to provide Avamar Client Managerwith information about the computers that are potential Avamar clients.
Create the CSV file manually or create it by using the output of a Systemsmanagement tool such as the Microsoft System Center Configuration Manager or theMicrosoft Systems Management Server.
Avamar Client Manager
Add Clients 341

You can use the output that a Systems management tool generates during installationof the Avamar client software a group of computers to create the CSV file. However,only those clients with the Avamar client software successfully installed appear inAvamar Client Manager.
During the upload of a CSV file, Avamar Client Manager checks the file for correctformatting, and cancels the upload when it finds a problem.
CSV file format
A correctly formatted CSV file complies with the following rules:
l At least two rows.
l The values are separated only by a comma.
l The first row of the file must consist of the literal names for each type of value.The name for the first value is Hostname. The name for the second value is Group.
l The second row, and all subsequent rows, must have at least one value and nomore than two values.
l The formatting rules require a first value that is a valid hostname for a computerand a trailing comma.
l The second value is optional, but when you include it, it must be the directoryservice logical group name for the computer.When you do not provide the second value for a computer, Avamar Client Managerlists the computer at the root level in the hierarchical display.
l In the second value, use a forward slash (/) to separate the hierarchical levels ofthe directory service logical group name.
If you use spreadsheet software to create or edit the client list, do not add a commawith the value to try to create comma separated values. Adding a comma to the valuewithin the spreadsheet software can result in an incorrectly formatted file. When yousave the client list in the editor as a CSV file type, the editor adds the commaseparators as part of the file conversion process. To check the formatting, open theclient list in a plain text editor.
Example of a correctly formatted client list fileIn a plain text editor, a correctly formatted client list file looks like the followingexample.
Hostname,GroupUser1-desktop.Acme.corp.com,acme.corp/USA/MAUser1-laptop.Acme.corp.com,acme.corp/USA/CA/SFOUser2-desktop.Acme.corp.com,acme.corp/EngineeringUser3-desktop.Acme.corp.com,User4-desktop.Acme.corp.com,
The first line lists the literal names of each type of value.
The second line contains the hostname User1-desktop.Acme.corp.com, theseparating comma, and the group acme.corp/USA/MA.
The third line contains the hostname User1-laptop.Acme.corp.com, theseparating comma, and the group acme.corp/USA/CA/SFO.
The fourth line contains the hostname User2-desktop.Acme.corp.com, theseparating comma, and the group acme.corp/Engineering.
The fifth and sixth lines contain only the hostnames User3-desktop.Acme.corp.com and User4-desktop.Acme.corp.com, each followed
Avamar Client Manager
342 Avamar 18.2 Administration Guide

by a comma. The formatting rules require a comma, even without a group. The lines donot list groups, so both hostnames appear at the root level of the hierarchical display.
Figure 16 View after uploading the example CSV file
Uploading information in a CSV file
To prepare to add computers as Avamar clients, upload information about thecomputers in a comma-separated values (CSV) file.
Before you begin
Generate or create a correctly formatted CSV file and have a copy available on theweb browsing computer.Procedure
1. In the left-side menu, click Clients > Add Clients.
2. On the Actions bar, click New Clients.
The Client Information Source dialog box appears.
3. Select CSV File.
4. Click Browse.
The Choose File to Upload dialog box appears.
5. Browse to the CSV file, select it, and click Open.
6. On the Client Information Source dialog box, click OK.
Results
Avamar Client Manager uploads the information from the CSV file.
After you finish
Using the uploaded computer information, select and activate computers as clients ofan Avamar server.
ActivationActivation consists of changing the relationship between a computer and an Avamarserver to enable the server to manage backups of the computer.
The relationship moves through the three states that are shown in the following table.
Avamar Client Manager
Add Clients 343

Table 106 Relationship states during client activation
State Description
No relationship The computer is unknown to the server. Computers in this state
appear in Add Clients, when you first add the computer informationto Avamar Client Manager.
Registered Avamar Client Manager added the information about the computer tothe Avamar server's database. Computers in this state appear in
Registered Clients after Avamar Client Manager starts theactivation process and completes registration with the Avamar server.
The changed state of these computers also appears in Add Clients.
Activated The computer has Avamar client software that is installed andrunning. The client software and the server are in communication andhave exchanged an encrypted key to verify their identities. Computers
in this state appear in Activated Clients after activation is
complete. The changed state of these computers also appears in AddClients and Registered Clients.
A computer that is in the activation process appears on the Queues page, inActivation. Avamar Client Manager tries to activate a computer every 2 hours until itsucceeds or until it reaches the limit of 24 tries. When the process completes, AvamarClient Manager removes the computer from this view and adds an entry on the Logspage, in Activation.
Activating computers to enable backup management
To enable backup management of a client, activate it with an Avamar server.
Before you begin
Install Avamar client software on the computers being activated and importinformation about the computers from either a directory service or a CSV file.Procedure
1. On the left-side menu, click Clients > Add Clients.
A hierarchical view of the computers in the enterprise appears. Avamar ClientManager generates this view from the information that you imported.
2. To find the computers to activate, browse or search the hierarchy.
3. Select each computer to activate.
To select all computers in a folder, expand the folder to show the computers,then select the folder.
4. Click Activate.
The Server - Domain Selection dialog box appears.
5. Expand the listing for a server, and select an Avamar domain.
Avamar Client Manager assigns the computers to the selected server anddomain during activation.
6. Click Next.
The Server - Group Selection dialog box appears.
7. Select a group or multiple groups.
Avamar Client Manager
344 Avamar 18.2 Administration Guide

Avamar Client Manager assigns the computers to the selected group or groupsduring activation.
8. Click Finish.
Results
Avamar Client Manager sends the activation task to the queue.
After you finish
To determine the status of the activation process, Check the Activation section ofthe Queues page. After the process completes, check the Activation section of theLogs page to determine its final status.
Registered ClientsClients that an Avamar server has registered but not activated appear in theRegistered Clients section.
Use the Registered Clients section to select clients and perform the following client-related tasks:
l Activate
l Delete
l Associate with groups
l View and edit details
l Add and remove group override settings
Activating a registered clientTo enable backup management of a registered client that failed to activate when itwas registered, activate it from the Registered Clients section.
Before you begin
Install the Avamar client software on the computers you want to activate.
When activation of a computer as a client of an Avamar server fails, Avamar ClientManager still registers the computer with the server. Correct any problems thatprevent the activation. Then retry the activation of the registered client.
Procedure
1. On the left-side menu, click Clients > Registered Clients.
2. Select each client to activate.
3. Click Activate.
Results
Avamar Client Manager sends the activation task to the queue.
After you finish
To determine the status of the activation process, check the Activation section of theQueues page. After the process completes, check the Activation section of the Logspage to determine its final status.
Avamar Client Manager
Registered Clients 345

Activated ClientsClients that are activated with the selected Avamar server appear in the ActivatedClients section.
Use the Activated Clients section to perform the following tasks:
l Move client to a different server
l Move client to a different Avamar domain
l Retire a client
l Delete a client
l Manage a client's group associations
l View and edit a client's details
l Add and remove group override settings
Moving a client to a new serverTo manage an Avamar client through a new Avamar server, move the Avamar client'sregistration, activation, and backups to the new server.
Before you begin
Do the following:
l Add the target server to Avamar Client Manager as described in Adding an Avamarserver on page 320.
l Select a client that is activated to a server with Avamar server software version5.0.1.31 or newer.
l For a client activated with an Avamar server older than version 6.x, fully initializethe MCS process on that server.
Procedure
1. On the left-side menu, click Clients > Activated Clients.
2. Select a client.
Do not select an NDMP client. Do not select a client that has backups on a DataDomain server.
3. On the Actions bar, click Move.
The Domain Selection pane of the Client Move dialog box appears.
4. At the top of the Domain Selection pane, from the server selection list, selectthe Avamar server that is the target of the move.
The target server's domains appear in the Domain Selection pane.
5. In the Domain Selection pane, select the target domain.
6. Click Next.
The Group Selection pane of the Client Move dialog box appears.
7. Select a target group.
You can optionally select more than one target group. Avamar Client Manageradds the client to all selected groups.
8. In Replicate Existing Backups at the bottom of the Group Selection pane,select a value.
Avamar Client Manager
346 Avamar 18.2 Administration Guide

Option Description
All Replicate all the client's backups to the target server.
Last Replicate only the last backup.
None Replicate none of the backups.
Replication makes the backups available from the target server.
9. (Optional) In Delete From Source:
l Select to remove all the client's backups from the source server.
l Clear to move the source server's registration of the client to the sourceserver's MC_RETIRED domain and retain copies of the client's backups onthe source server.
10. Click Finish.
The Confirm Replication Authentication dialog box appears.
11. In Source Server, type the password for the repluser account on the sourceserver.
12. In Target Server, type the password for the repluser account on the targetserver.
13. Click OK.
Results
In a background process, Avamar Client Manager moves the client to the selectedtarget.
Moving a client to a different Avamar domainTo change the administrative relationship between an Avamar client and an Avamarserver you can move the client to a different Avamar domain.
Before you begin
Select a client that is activated to a server with Avamar server software version 6.x ornewer.
Procedure
1. On the left-side menu, click Clients > Activated Clients.
2. Select a client.
3. On the Actions bar, click Move.
The Client Move dialog box appears.
4. In the Domain Selection pane of the Client Move dialog box, select the targetdomain.
5. Click Next.
The Group Selection pane appears on the Client Move dialog box.
6. Select a target group.
You can optionally select more than one target group. Avamar Client Manageradds the client to all the selected groups.
7. Click Finish.
An alert box appears.
Avamar Client Manager
Activated Clients 347

8. Click OK.
Results
In a background process, Avamar Client Manager moves the client to the selectedtarget.
Retiring a clientTo stop backups of an Avamar client, retire the Avamar client. Avamar Client Managerretains backups that exist at the time of retirement so that you can restore data whennecessary.
Procedure
1. On the left-side menu, click Clients > Activated Clients.
2. Select a client.
You can select more than one client. The retention policy setting you selectapplies to all selected clients.
3. On the Actions bar, click Retire.
The Retire Client dialog box appears.
4. In Select Retention Policy, select one of the options.
Option Description
Retire client and retain backupswith existing expiration date
The Avamar server retains the backups forthe existing retention period
Retire client and retain allbackups indefinitely
The Avamar server retains the backups untilyou manually delete them
Retire client and reset backupexpiration date
The Avamar server retains the backups untilthe date set in New Expiration Date
5. If you select Retire client and reset backup expiration date in the previousstep then, in New Expiration Date, select a date.
The Confirm dialog box appears.
6. Click Yes.
The Alert dialog box appears.
7. Click OK.
Results
In a background process, Avamar Client Manager retires the selected client.
Failed ClientsClients that have unsuccessful backup or restore activity appear in the Failed Clientssection.
Use the Failed Clients section to perform the following tasks:
l Delete a client
l Manage a client's group associations
l View and edit a client's details
l Add and remove group override settings
Avamar Client Manager
348 Avamar 18.2 Administration Guide

When working with failed clients, use the filters that are described in the followingtable.
Table 107 Failed client filters
Filter Description
Period Specifies the period that Avamar ClientManager examines.
Activity Type Specifies the type of activity that AvamarClient Manager examines.
Failure Criteria Defines the failure threshold that is used byAvamar Client Manager.
Idle ClientsActivated Avamar clients that do not have any activity during a specified periodappear in the Idle Clients section.
When working with idle clients, use the Period filter to specify the period that AvamarClient Manager examines for activity, and the Activity Type filter to specify the typeof activity.
Use the Idle Clients section to perform the following tasks:
l Delete a client
l Manage a client's group associations
l View and edit a client's details
l Add and remove group override settings
Upgrade ClientsThe Upgrade Clients section provides information and tools you can use to applyupgrades and hot fixes to Avamar clients.
Use the Upgrade Clients section to perform the following tasks:
l Download an upgrade package to a server
l Select an upgrade package
l Apply the package to selected clients
l Remove an upgrade package from a server
Upgrade Clients section requirements
Before using the Avamar Client Manager Upgrade Clients section, do the following:
l For each client or plug-in, install the minimum client version that is listed in theAvamar Push Client upgrade compatibility table of the E-lab Navigator.
Note
Use of the Upgrade Clients feature to upgrade Avamar client software onWindows cluster nodes is not supported. The Avamar for Windows Server UserGuide describes how to upgrade Avamar client software on Windows clusternodes.
Avamar Client Manager
Idle Clients 349

l Install, configure, and run the Avamar Downloader Service. The AvamarDownloader Service obtains the client packages and plug-in packages that theupgrade feature requires. This service pulls the packages and pushes them ontothe Avamar data server subsystem (GSAN). After the packages are updated inGSAN, the packages appear in the Avamar Client Manager Select Packagewindow, and upgrades can be performed.
Multiple system deploymentsFor Avamar deployments that include more than one Avamar system, Avamar ClientManager running on one of the Avamar systems (managing system) can be used tomanage clients that are associated with other Avamar systems (managed systems).
The managed systems must meet the following requirements:
l Managed system is added to Avamar Client Manager on the managing system.Adding managed systems to Avamar Client Manager on the managing systemprovides the managing system with the information that it requires to supportclient upgrades on the managed systems.
l Managed system is running a "near version" of Avamar software that is no morethan two versions earlier than the managing system.
The near version requirement ensures that all packages required by clients on themanaged systems are available for deployment through the managing system.
To provide full client upgrade support for clients that are associated with Avamarsystems that do not meet the near version requirement, run Avamar Client Manageron those systems.
Downloading upgrade and hotfix packagesUse Avamar Client Manager to download upgrade and hotfix packages to an Avamarserver.
Before you begin
Do the following:
l Install and configure the Avamar Downloader Service and the AvInstaller service.Refer to the administration guide for information about these tasks.
l Select an Avamar server.
Before applying an upgrade or hotfix package to an Avamar client, download thepackage to the Avamar server associated with the Avamar client.
Procedure
1. On the left-side menu, click Clients > Upgrade Clients.
2. On the Actions bar, click Select Package.
The Upgrade Client dialog box appears.
3. In the Status column for the package, click Download.
The status of the package must be Available.
Results
Avamar Client Manager begins the download. A progress bar appears. After thedownload finishes, Avamar Client Manager updates the package status, in sequence,to each of the following values: Waiting, Processing, and Ready.
Avamar Client Manager
350 Avamar 18.2 Administration Guide

Selecting an upgrade packageTo apply to Avamar clients, select an upgrade package or hotfix package.
Before you begin
Do the following:
l Install and configure the Avamar Downloader Service and the AvInstaller service.Refer to the administration guide for information about these tasks.
l Select an Avamar server.
l Download the upgrade or hotfix package to the selected Avamar server.
Procedure
1. On the left-side menu, click Clients > Upgrade Clients.
2. On the Actions bar, click Select Package.
The Upgrade Client dialog box appears.
3. Select a package.
Before you can select a package, the package must have a Ready status.
4. Click Select.
The Upgrade Client dialog box closes.
Results
The Avamar clients that are eligible for the upgrade or the hotfix appear.
After you finish
Select clients and apply the upgrade or hotfix package to them.
Applying the upgrade packageSelect Avamar clients and apply the upgrade package or the hotfix package.
Before you begin
Select an upgrade package or a hotfix package. View the list of Avamar clients thatare eligible for the selected package.
NOTICE
Applying an upgrade to an Avamar NDMP Accelerator node (accelerator node) causesthe accelerator node to drop running backups. After the upgrade, the accelerator nodestarts and completes NDMP backups normally.
Procedure
1. From the list of Avamar clients that are eligible for the upgrade or the hotfix,select a client.
You can select more than one client.
2. On the Actions bar, click Upgrade.
Results
Avamar Client Manager starts upgrading the selected clients. The upgrade runs in thebackground.
Avamar Client Manager
Upgrade Clients 351

After you finish
Track the progress of the upgrade in the Upgrade section of the Queues page. Viewthe final status of the upgrade in the Upgrade section of the Logs page.
Deleting upgrade and hotfix packagesUse Avamar Client Manager to delete upgrade and hotfix packages from an Avamarserver.
Before you begin
Select an Avamar server that has an unneeded upgrade or hotfix package.
Procedure
1. On the left-side menu, click Clients > Upgrade Clients.
2. On the Actions bar, click Select Package.
The Upgrade Client dialog box appears.
3. Select a package.
You can only delete packages that have a Ready status.
4. Click Delete.
Results
Avamar Client Manager removes the selected package from the Avamar server.
PoliciesThe Policies page provides access to group policy tasks and information.
The Policies page includes a summary of each group policy on the selected Avamarserver.
Use the Policies page to perform the following tasks:
l Add clients to a group
l Remove clients from a group
l View the details of a group's dataset policy, retention policy, and schedule policy
Adding clients to a groupTo apply the policies of a group to selected clients, add the clients to the group.
Completion of this task results in association between the selected clients and agroup. The Avamar server then applies the group's policies to the selected clients.
Procedure
1. Click Policies > Groups.
2. Select a group.
3. Click Edit Group Members.
The Edit Group Members dialog box appears.
4. Click Add.
The Add Clients to Group dialog box appears.
5. Select a client.
You can select more than one client.
Avamar Client Manager
352 Avamar 18.2 Administration Guide

6. Click Add.
Results
Avamar Client Manager adds the clients to the group.
Removing clients from a groupTo remove the policies of a group from selected clients, remove the clients from thegroup.
This task removes the association between selected clients and a group. When youcomplete the task, the group's policies no longer apply to the selected clients.
Procedure
1. Click Policies > Groups.
2. Select a group.
3. Click Edit Group Members.
The Edit Group Members dialog box appears.
4. Select a client.
You can select more than one client.
5. Click Remove.
Results
Avamar Client Manager removes the clients from the group.
Viewing the dataset policy of a groupUse the entry for a group on the Policies page to view details of the dataset policy ofthe group.
Procedure
1. Select an Avamar server.
2. Click Policies > Groups.
A summary view of the groups on the selected server appears.
3. On the entry for a group, in the Dataset column, click the name of the datasetpolicy.
Results
The dataset policy details for the selected group appear in a dialog box.
Viewing the retention policy of a groupUse the entry for a group on the Policies page to view details of the retention policy ofthe group.
Procedure
1. Select an Avamar server.
2. Click Policies > Groups.
A summary view of the groups on the selected server appears.
3. On the entry for a group, in the Retention column, click the name of theretention policy.
Avamar Client Manager
Removing clients from a group 353

Results
The retention policy details for the selected group appear in a dialog box.
Viewing the schedule policy of a groupUse the entry for a group on the Policies page to view details of the schedule policy ofthe group.
Procedure
1. Select an Avamar server.
2. Click Policies > Groups.
A summary view of the groups on the selected server appears.
3. On the entry for a group, in the Schedule column, click the name of theschedule policy.
Results
The schedule policy details for the selected group appear in a dialog box.
QueuesThe Queues page provides access to the Avamar Client Manager activity queues.
The Queues page provides a summary view of active and pending Avamar ClientManager tasks for the selected Avamar server. Tasks appear in separate sections thatare based on the type of task.
Table 108 Task types on the Queues page
Type oftask
Browse path Description
Activation Queues > Activation View active and pending tasks that are relatedto client activation.
Delete Queues > Delete View active and pending tasks that are relatedto the removal of clients from Avamarservers.
Move Queues > Move View active and pending tasks that are relatedto moving clients from one Avamar server toanother
Retire Queues > Retire View active and pending tasks that are relatedto retiring Avamar clients.
Upgrade Queues > Upgrade View active and pending tasks that are relatedto upgrading the software on Avamar clients.
Use the Queues page to perform the following tasks:
l View the details of active and pending tasks
l Cancel tasks
Canceling a taskTo prevent it from running, cancel a pending task.
You can stop a task from running by canceling it while it is in the pending state.
Avamar Client Manager
354 Avamar 18.2 Administration Guide

Procedure
1. On the left-side menu, click Queues > task_queue, where task_queue is theQueues page section for the type of task you are canceling.
For example to cancel a client activation, click Queues > Activation.
2. Select a task.
3. Click Cancel.
A confirmation dialog box appears.
4. Click OK.
Results
Avamar Client Manager removes the task from the queue, cancels the task, and addsan entry to the log.
LogsThe Logs page provides access to the Avamar Client Manager logs.
The Logs page provides a summary view of Avamar Client Manager logs. Log entriesappear in separate sections that are based on the type of task that generated theentry.
Table 109 Task types on the Logs page
Task type Browse path Description
Activation Logs > Activation View log entries that are related to clientactivation.
Delete Logs > Delete View log entries that are related to theremoval of clients from Avamar servers.
Move Logs > Move View log entries that are related to movingclients from one Avamar server to another.
Retire Logs > Retire View log entries that are related to retiringAvamar clients.
Upgrade Logs > Upgrade View log entries that are related to upgradingthe software on Avamar clients.
l ActivationClick Logs > Activation to view log entries that are related to client activation.
l DeleteClick Logs > Delete to view log entries that are related to the removal of clientsfrom Avamar servers.
l MoveClick Logs > Move to view log entries that are related to moving clients from oneAvamar server to another.
l RetireClick Logs > Retire to view log entries that are related to retiring Avamar clients.
l UpgradeClick Logs > Upgrade to view log entries that are related to upgrading thesoftware on Avamar clients.
Use the Logs page to perform the following tasks:
Avamar Client Manager
Logs 355

l View log entries
l View the client log for upgrades
l Clear all log entries in a section
Viewing the client log after upgrading an Avamar clientView the Avamar client's local log after a completed upgrade try.
Before you begin
Use Avamar Client Manager to apply an upgrade package or hotfix to an Avamarclient.
Viewing the Avamar client's local log can provide details about the reasons for anunsuccessful client upgrade.
Procedure
1. On the left-side menu, click Logs > Upgrade.
2. On the right-side of the page, click the Details bar.
The Details panel expands.
3. In Summary, select a client upgrade log entry.
Detailed information for the selected log entry appears in the Details panel.
4. On the Details panel, in Log, click View Log.
Results
The Upgrade Log window opens and the client's local log appears in the window.
After you finish
(Optional) Select and copy information from the client's local log. Paste the copiedinformation into a text editor.
Clearing all log entries in a sectionAvamar Client Manager provides a method for you to remove all log entries from atask section of Logs.
Before you begin
Complete at least one task that results in a log entry in one of the task sections of theLogs page.
Procedure
1. On the left-side menu, click Logs > task_log, where task_log is a Logs pagesection.
For example, to clear all upgrade entries, click Logs > Upgrade.
2. Click Clear All.
The Alert dialog box appears.
3. Click Yes.
Results
Avamar Client Manager removes all log entries for the selected section.
Avamar Client Manager
356 Avamar 18.2 Administration Guide

CHAPTER 14
Avamar Desktop/Laptop
This chapter includes the following topics:
l Overview of Avamar Desktop/Laptop.............................................................. 358l Requirements for Avamar Desktop/Laptop......................................................359l Avamar client software installation................................................................... 361l Avamar Desktop/Laptop user authentication...................................................365l Avamar Desktop/Laptop user interfaces..........................................................369l Backup with Avamar Desktop/Laptop.............................................................. 376l Restore with Avamar Desktop/Laptop..............................................................381l Client backup and restore activity history........................................................ 385l Editing Avamar Desktop/Laptop parameters................................................... 386l Client log locations...........................................................................................388
Avamar Desktop/Laptop 357

Overview of Avamar Desktop/LaptopAvamar Desktop/Laptop is a version of the Avamar client software for Windows andMacintosh that adds enhanced features for enterprise desktop and laptop computers.Many Avamar Desktop/Laptop features are also available on supported Linuxcomputers.
Client installation and managementIn a corporate environment, you can install Avamar Desktop/Laptop on Windows andMacintosh desktop and laptop computers by using systems management tools such asMicrosoft Systems Management Server 2003 (SMS).
You can also install the Avamar Desktop/Laptop software locally by launching aninstallation wizard.
After client installation, you can activate, upgrade, analyze, and manage clients byusing the Avamar Client Manager web browser UI.
User authenticationAvamar Client Manager users authenticate through the enterprise Active Directory orOpenLDAP-compliant directory service, with or without Kerberos encryption. Userscan also authenticate by using built-in Avamar authentication, or a combination ofAvamar authentication and LDAP authentication.
Pass-through authentication enables users to access the web UI without using thelogin screen. A secure message mechanism authenticates users that are based oninformation from the client computer. Pass-through authentication also enablesadministrators to allow non-domain users to restore files to their local account on thecomputer.
User interfacesAvamar Desktop/Laptop functionality is available through two user interfaces:
l The client local user interface (client UI) is installed on the client computer whenyou install either the Avamar Client for Windows or the Avamar Client for Mac OSX. With the client UI, an Avamar icon appears in the notification area ("systemtray") on Windows computers or on the menu bar on Mac computers. Right-clickthe icon on Windows or click the icon on Mac to open the client menu, whichprovides access to backup, restore, program settings, and logs.
l Use the web browser user interface (web UI) to start an on-demand backup orrestore, view backup and restore activity for a client computer, or configure otherbackup settings for a client computer.
BackupUsers can start an on-demand backup with a single click on the client menu, or openthe web UI for an interactive on-demand backup. Options to customize on-demandbackup behavior include:
l Allowing users to create on-demand backup sets.
l Limiting the total number of backups that can occur each day for each clientcomputer.
l Changing the retention policy for on-demand backups.
l Disabling on-demand backups.
Perform scheduled backups of all Avamar Desktop/Laptop clients. For daily scheduledbackups, you can allow users to select a different start time for their backups from alist of available times that you create. The system runs the backup as soon as possibleafter the selected time.
Avamar Desktop/Laptop
358 Avamar 18.2 Administration Guide

You can also allow users to add folders to the source data defined by the groups towhich a client belongs. The folders are included in both on-demand and scheduledbackups for the client.
RestoreUsers can search for or browse to folders, files, and file versions to either the originallocation or to a new location on the same computer. Users can restore data with thesame name or a new name.
When users restore data to the original location with the same name, the restoreprocess overwrites any current local file versions with the restored files. This type ofrestore is useful in situations where the current local versions contain errors or havedata corruption issues.
To avoid overwriting the current local file versions, users can restore to a newlocation, restore with a new name, or both.
Domain users can restore files from any Windows or Mac computer on which theyhave a user profile to the Windows or Mac computer to which they are logged in.
If large restore tasks are impacting network performance, you can specify a limit forthe amount of data that users are allowed to restore.
Users are allowed to begin with only one restore task at a time. Additional requests areblocked and a message appears to the user. You can change this behavior to allowusers to start multiple restore tasks.
Activity historyThe History page in the web UI provides a 14-day history of the status of restore andbackup tasks for a client computer, as well as listings of the folders and files backedup during that period. If you are a domain user with a user profile on the sourcecomputer, then you can view the activity history for the source computer from adifferent computer.
Requirements for Avamar Desktop/LaptopWork with an Avamar field sales representative when deciding on the characteristicsof the Avamar system deployment that work best to support desktop and laptopclients for an enterprise. The environment must meet the requirements in thefollowing topics.
A description of the requirements for an Avamar system to support desktops andlaptops at any one enterprise is beyond the scope of this guide. The guide exists dueto many differences in desktop and laptop topology for each enterprise.
Client computer requirementsAvamar client computers with Avamar Desktop/Laptop must meet the minimumrequirements in the following sections.
Operating system requirementsAvamar Desktop/Laptop client computers require a Windows, Mac, or Linux operatingsystem that is supported for use with the Avamar client. The E-lab Navigator providesa complete and updated list.
Windows Server, MacOS X Server, and Linux computers that meet the requirementsthat are specified in the Avamar Backup Clients User Guide are supported as server-class clients. Generally, the Avamar Desktop/Laptop enhancements function the samefor server-class computers as for desktop and laptops. Differences include:
Avamar Desktop/Laptop
Requirements for Avamar Desktop/Laptop 359

l On a server-class computer, clicking Back Up Now on the Client menu or on theBackup reminder launches a backup of the dataset that is assigned individually tothe computer.
To view or edit the dataset that is assigned to a computer, use AUI to edit thepolicy settings for the client. Edit a dataset provides instructions.
l The Avamar Desktop/Laptop feature for disabling backups for computers runningon battery power is not available for server-class computers.
Backups are always enabled on server-class computers.
l After disabling locally started restores on Windows server-class computers andMacintosh server-class computers, a restore can only be performed by using AUI.
However, users with local administrative rights on the server-class computer canrestore backups to a different computer.
Hardware requirementsThe following table lists hardware requirements for Avamar Desktop/Laptop clientcomputers.
Table 110 Avamar Desktop/Laptop hardware requirements
Category Requirement
CPU 1 GHz
RAM 1 GB
Hard drive space 250 MB permanent hard drive space minimumfor software installation. Snapshot technologyand system state backup may requireadditional space.
Network interface Either of the following:
l 10BaseT or higher, configured with thelatest drivers for the platform
l IEEE 802.11a/b/g, configured with thelatest drivers for the platform
Supported Avamar plug-insAvamar Desktop/Laptop supports backup and restore with the following Avamar FileSystem plug-ins:
l Windows
l Mac
l Linux
Avamar Desktop/Laptop does not support application plug-ins or file system plug-insfor other operating systems.
Port requirementsThe TCP data port must enable bi-directional communication with the Avamar server.
Web browser requirementsThe web browser that you use for the Avamar Desktop/Laptop user interface must beJavaScript-enabled and meet other requirements.
The following table lists supported web browsers.
Avamar Desktop/Laptop
360 Avamar 18.2 Administration Guide

Table 111 Supported web browsers forAvamar Desktop/Laptop
Operating system Supported web browsers
Windows l Windows Internet Explorer
l Mozilla Firefox
Macintosh Apple Safari
Linux Mozilla Firefox
Note
Browsers used with the Avamar software must support TLS 1.2 encryption.
Use one of the environment variables in the following table to launch the web browser.
Table 112 Environment variables for launching a web browser in Avamar Desktop/Laptop
Browser Environment variable
KDE kfmclient
GNOME gnome-open
Others BROWSER
Network requirementsThe network in an Avamar Desktop/Laptop environment must meet the requirementsin the following table.
Table 113 Avamar Desktop/Laptop network requirements
Category Requirement
Protocol TCP/IP.
Routers Must permit TCP packet routing between theAvamar server and each client computer.
Firewalls Must allow bi-directional communicationbetween the Avamar server and each clientcomputer using TCP data port 28002.
Naming system Must facilitate connections between eachclient and the Avamar server, includingsituations where DHCP and VPN accesscause changes in IP address.
Avamar client software installationThe recommended method to install the Avamar client software on large numbers ofWindows or Mac computers is to use a systems management tool. A systems
Avamar Desktop/Laptop
Network requirements 361

management tool can remotely push install the software on large numbers ofcomputers in a short amount of time.
A systems management tool can often generate a list of the computers where thesoftware is successfully installed. You can use this list in Avamar Client Manager toregister and activate computers.
You can install the Avamar Client for Windows by using several silent install options.
NOTICE
Do not rename client installation packages. The Avamar push upgrade mechanisms areincompatible with renamed packages.
Supported systems management toolsRemote installation has been tested and approved using the following systemsmanagement tools:
l Microsoft Systems Management Server 2003 (SMS) on Windows computers
l SMS with Quest Software’s Quest Management Xtensions for SMS on Macintoshcomputers
You may also use other systems management tools, such as the tools in the followinglist, to remotely push install the Avamar client software:
l Microsoft System Center Configuration Manager 2007
l IBM Tivoli Management Framework
l HP OpenView ServiceCenter
l Symantec Altiris
l Apple Remote Desktop
Systems management tools vary. The steps that are required to push software to aset of computers depend on the tool. Consult the documentation for the tool todetermine the steps that are required to perform these tasks.
Push installation on Windows computersProcedure
1. Copy the installer package for the Avamar Client for Windows to a location thatis accessible to the systems management tool.
2. Configure the systems management tool to copy the correct installer packageto each computer.
3. Designate the computers on which to install the software.
4. Provide an installation launch command that uses the following format:
msiexec /qn /I "path_to_MSI_pkg" SERVER=server DOMAIN=domainGROUP=”groups” UICOMPONENT={0|1} PROGRESSBAR={true|false}BALLOONMESSAGE={true|false} BACKUPREMINDER=daysThe following table provides details on the arguments for the installation launchcommand.
Avamar Desktop/Laptop
362 Avamar 18.2 Administration Guide

Table 114 Push install launch command arguments
Argument Description
"path_to_MSI_pkg" Specifies the full path to the location of theinstaller package relative to the root of thecomputer file system.
SERVER=server Specifies the IP address or FQDN of theAvamar server that is assigned to the client.When this argument is omitted or incorrect,the client is successfully installed but is notactivated.
DOMAIN=domain Specifies the Avamar domain for the client.The path must start with a slash pathcharacter (Unicode 002F: /). The default
value is /clients.
GROUP=groups Specifies a comma-separated list of Avamarbackup groups for the client. Start the pathfor each group with a slash path character(Unicode 002F: /), and enclose the group
path in quotation marks. For example:GROUP=”/clients/text,/clients/admin”. The default value is “/DefaultGroup”.
UICOMPONENT={0|1} Specifies whether to enable the Avamar clientwith the standard GUI (1) or as an agent
process with no user interface (0). When you
specify 0, all remaining options are ignored.
PROGRESSBAR={true|false} Specifies whether to show (true) or hide
(false) the progress window on the client
during tasks.
BALLOONMESSAGE={true|false} Specifies whether to show (true) or hide
(false) balloon messages on the client
during tasks.
BACKUPREMINDER=days Specifies the number of days after the lastbackup before a backup reminder appears.The possible values for days are numbers 1through 7 and Never. The default value is 3.
Users can change the values set by the UICOMPONENT, PROGRESSBAR,BALLOONMESSAGE, and BACKUPREMINDER by using options on the client menuin the client UI. You can also change the values during an upgrade.
5. Launch the systems management tool installation process.
Push installation on Macintosh computersProcedure
1. Copy the installer package for the Avamar Client for Mac OS X to a locationthat is accessible to the systems management tool.
Avamar Desktop/Laptop
Push installation on Macintosh computers 363

2. Configure the systems management tool to copy the correct installer packageto each computer.
3. Designate the computers on which to install the software.
4. Provide the installation launch command:
/usr/sbin/installer -pkg "path_to_install_pkg" -targetinstall_location
where path_to_install_pkg is the full path to the location of the installerpackage relative to the root of the computer file system, and install_location isthe location in which to install the software. Normally, install_location is theroot (/), but any local volume is allowed.
5. Launch the systems management tool installation process.
After you finish
After installation of the Avamar Client for Mac OS X, a restart of some clients may berequired. A change to the process data size setting that is made on those computerscauses the restart of those clients. During installation, the installer determines if theprocess data size is less than 96 MB. A minimum process data size of 96 MB isrequired for optimal performance of the Avamar Client for Mac OS X.
If the process data size is less than 96 MB, then the installer changes it to 96 MB anddisplays a restart reminder. If you leave the message open for more than 30 s withoutclicking a button to restart immediately or at a later time, then the reminder is hiddenand appears again in 2 hours.
If you choose to restart the computer but the restart process is interrupted, then thereminder does not appear again. To complete the process data size change, rememberto restart the computer.
Local client installationYou can install the Avamar Desktop/Laptop software locally by launching a graphicalinstallation interface. After the installation, the computer is ready to register andactivate with an Avamar server.
To perform a local installation, you can download the client installer by using thedownloads link. If the downloads link is disabled, you must transfer the client installerto the computer by some other file transfer method.
The disadvantages of using local installation are:
l It is very time consuming when performed individually on thousands of computers.
l It does not provide a list that you can use to register and activate groups ofcomputers in Avamar Client Manager.
The Avamar Backup Clients User Guide provides more information on local installation,upgrade, and uninstall of Avamar Desktop/Laptop.
Avamar client software uninstallWhen you uninstall Avamar client software from a client computer, scheduled backupsno longer occur for the client. You cannot restore backups to the client after youuninstall the software.
When you uninstall the Avamar client software, you can keep or delete the backups forthe client:
l To keep the backups for the client so that you can restore the backups to adifferent client, retire the client by using Avamar Administrator.
Avamar Desktop/Laptop
364 Avamar 18.2 Administration Guide

l To delete the backups for the client, delete the client by using AvamarAdministrator.
Retire or delete the client either before or after you uninstall the Avamar clientsoftware.
Uninstall on WindowsProcedure
1. Open the Windows Add or Remove Programs or Programs and Featuresapplet.
2. In the list of currently installed programs, select Avamar for Windows.
3. Click Remove.
A confirmation message appears.
4. Click Yes.
Uninstall on MacintoshProcedure
1. Open a Terminal (shell) session.
2. Log in as an administrator.
The uninstall command requires root (super-user) permissions. The sudocommand is used to run the command with root permissions. An administratoraccount or another account that is listed in sudoers is what sudo requires.
3. Run the uninstall script by typing the following command:
sudo /usr/local/avamar/bin/avuninstall.sh
Avamar Desktop/Laptop user authenticationAvamar Desktop/Laptop protects backup data by authenticating users and enforcingaccess rights. Avamar Desktop/Laptop uses a separate server process running on theAvamar system to facilitate authentication through both internal and externalmethods. Every Avamar system installation includes the Avamar Desktop/Laptopserver process.
Pass-through authenticationPass-through authentication uses encrypted channels to access user credentials froma client computer and associate the credentials with file ownership properties. Theclient computer operating system obtains the user credentials during login to thecomputer or through common access card (CAC) technology.
Avamar Desktop/Laptop performs pass-through authentication transparently. Userscan back up and restore files without viewing the Avamar Desktop/Laptop loginscreen.
Avamar Desktop/Laptop enables pass-through authentication by default. It is limitedto users on Windows computers and Mac computers. Also, Windows users with localadministrator privileges can restore files that anyone owns on the computer withoutadditional login.
Pass-through authentication is supported with LDAP authentication.
Avamar Desktop/Laptop
Avamar Desktop/Laptop user authentication 365

Enabling local user access for pass-through authenticationYou can configure Avamar Desktop/Laptop to allow local user access through pass-through authentication. A local user is a user that is authenticated through a localcomputer account instead of a domain account.
With local user access enabled, local users can access the Avamar client web UI torestore data they own on the authenticating computer.
Local user access requires pass-through authentication on a Windows computer or aMac computer. By default local user access is disabled.
Note
Enabling local user access applies to all clients and backups that are associated withthe server. Before you enable local user access, carefully consider its securityimplications within the context of the organization. Local user authentication isinherently less secure than domain authentication.
To enable local user access for pass-through authentication, uncomment theallowLocalUsers property in the dtlt.properties file on the Avamar server,and then set its value to true by changing #allowLocalUsers=false toallowLocalUsers=true.
Disabling pass-through authenticationYou can disable pass-through authentication and require that all users log in throughthe Avamar Desktop/Laptop login screen. When pass-through authentication isdisabled, configure one of other methods of authentication for Windows users andMac users.
To disable pass-through authentication, set the value of the userLoginRequiredproperty in the dtlt.properties file on the Avamar server to true.
LDAP authenticationConfigure Avamar Desktop/Laptop to use a supported LDAP directory service toauthenticate users by using the directory service user names and passwords.
The authentication process uses Kerberos in a Simple Authentication and SecurityLayer (SASL) Bind by default. Alternatively, configure the authentication process touse plaintext in a Simple Bind. Only SASL Bind is supported with pass-throughauthentication. Plaintext Simple Bind is not compatible with pass-throughauthentication.
With LDAP authentication, users log in to the client computer with a domain accountauthenticated through a domain directory service. To use a local account, enable localuser access.
To increase the security of user data, Avamar Desktop/Laptop obtains the domainusername of a Windows user or Mac user from the client computer and displays it in aread-only field on the Avamar Desktop/Laptop login screen.
Note
Do not use the root account on a Mac to restore files from backups.
Avamar Desktop/Laptop
366 Avamar 18.2 Administration Guide

Configuring LDAP authentication for Avamar Desktop/LaptopTo configure Avamar Desktop/Laptop to authenticate users through a supportedLDAP directory service, with either Kerberos in an SASL Bind or plaintext in a SimpleBind, edit the LDAP configuration file.
Before you begin
l Configure Avamar with information about the directory service. Addinginformation for a supported LDAP directory service on page 89 providesinstructions.
l Ensure that the configuration of the Avamar Desktop/Laptop server correctlydescribes any domain components that are used to segregate authentication.
l To use Kerberos in an SASL Bind, ensure that the Kerberos realm for LDAP userauthentication from Macintosh computers is the default Kerberos realm.
Procedure
1. In Avamar Administrator, click the Administration launcher link.
The Administration window is displayed.
2. Click the LDAP Management tab.
3. Click Edit LDAP file.
4. In the text area, edit or create the user-login-module key:
l To specify Kerberos in an SASL Bind, set user-login-module=kerberos.
l To specify plaintext in a Simple Bind, set user-login-module=ldap.
Kerberos is the default value. Avamar Desktop/Laptop assumes this value whenthe key is missing.
5. Click Save.
6. Click Close.
Changing the Kerberos encryption typeIf you use LDAP authentication with Kerberos, you may need to change the Kerberosencryption type.
Avamar Desktop/Laptop uses the MIT Kerberos encryption type “DES cbc mode withCRC-32” to communicate with LDAP servers by default. This encryption type mayconflict with a key distribution center (KDC) in the Active Directory environment. Ifthat occurs, the message KDC has no support for encryption typeappears. To resolve this issue, remove the specified encryption type from thekrb5.conf configuration file, which enables the KDC to select the encryption type.
Procedure
1. In Avamar Administrator, click the Administration launcher link.
The Administration window is displayed.
2. Click the LDAP Management tab.
3. Click Edit KRB5 file.
4. In the text area, find the following entries:
[libdefaults]default_tgs_enctypes = des3-cbc-sha1-kd des-cbc-crc des-
Avamar Desktop/Laptop
LDAP authentication 367

cbc-md5default_tkt_enctypes = des3-cbc-sha1-kd des-cbc-crc des-cbc-md5
5. Comment out the entries:
[libdefaults]#default_tgs_enctypes = des3-cbc-sha1-kd des-cbc-crc des-cbc-md5#default_tkt_enctypes = des3-cbc-sha1-kd des-cbc-crc des-cbc-md5
6. Click Save.
7. Click Close.
Avamar authenticationYou can configure Avamar Desktop/Laptop to authenticate users by using Avamarauthentication, which uses internal Avamar domain information.
Avamar authentication works with users who authenticate at the Avamar root level,Avamar domain levels, or Avamar subdomain levels. The mechanism first checks at thesubdomain level. If the username is found at that level, then authentication proceeds.If the username is not found, then the next level is checked. This step continues untilthe username is found, or the Avamar root is reached without finding the username.
For example, if the login computer 123abc.example.com is activated with the /clients/mountain Avamar subdomain, then the mechanism checks the Avamarsystem in the following order until the username is found:
1. /clients/mountain (activation subdomain)
2. /clients (next level up)
3. / (root)
With Avamar authentication, client computers must have a static, resolvable, fullyqualified domain name. In addition, users must have a local or domain login account forthe client computer and an account on the Avamar domain that is associated with theclient computer.
Avamar Desktop/Laptop applies the role that is assigned to the Avamar user accountwhen it grants access to the account through Avamar authentication. Users canperform only those operations that their role allows to. The one exception is that userswith the Restore only operator role can launch a backup from Avamar Desktop/Laptop.
Configuring Avamar authenticationConfigure an Avamar system to use Avamar authentication through the LDAPManagement tab of Avamar Administrator.
Before you begin
Add Avamar user records to domain-level lists. Adding a user to a domain on page 110provides instructions.
Procedure
1. In Avamar Administrator, click the Administration launcher link.
The Administration window is displayed.
Avamar Desktop/Laptop
368 Avamar 18.2 Administration Guide

2. Click the LDAP Management tab.
3. Click Edit LDAP file.
4. Edit or create the user-login-module key:
l To use Avamar authentication and all other configured and enabledauthentication methods, set user-login-module=mix.
l To use Avamar authentication and all other configured and enabledauthentication methods except LDAP, set user-login-module=avamar.
5. In the text area, type the following key/value pair:
avamar-authentication-domains=/domain1,/domain2,/domain3,/...
where domain1, domain2, and domain3 are Avamar domain names that arecombined in a comma-separated list. Each domain name must begin with theroot path designator: /.
For example, to use Avamar authentication for the following domains:
//clients/accounting/clients/shipping
Type the following key/value pair:
avamar-authentication-domains=/,/clients/accounting,/clients/shipping
6. Click Save.
7. Click Close.
Mixed authenticationYou can use multiple authentication methods in the same environment.
The authentication process occurs in the following order when you enable multipleauthentication methods:
1. Users on a client in an Avamar domain are authenticated by using Avamarauthentication.
2. Users who are not logged in to a client in an Avamar domain are authenticated byusing pass-through authentication.
3. When mixed authentication is enabled and LDAP is configured, authenticatesusers, who are not logged in to a client assigned to a specified Avamar domain,through LDAP.
Avamar Desktop/Laptop user interfacesAvamar Desktop/Laptop functionality is available through the client UI and the web UI.
Client UIThe client local user interface (client UI) is installed on the client computer when youinstall either the Avamar Client for Windows or the Avamar Client for Mac OS X. Withthe client UI, an Avamar icon appears in the notification area ("system tray") onWindows computers or on the menu bar on Mac computers. Right-click the icon on
Avamar Desktop/Laptop
Mixed authentication 369
Windows or click the icon on Mac to open the client menu, which provides access tobackup, restore, program settings, and logs.
The following table lists the functionality that is available in the client UI.
Table 115 Avamar Desktop/Laptop client UI functionality
Client menu item Description
Back Up Now Launches a single-click on-demand backup.
Back Up... Launches an interactive on-demand backup.
Restore... Launches an interactive restore.
Settings > Show Backup Reminder (days) Controls when a backup reminder appears toremind you that the computer has not beenbacked up for a period of time between oneand seven days. You can also disable the
reminder by selecting Never.
Settings > Show Progress Bar Controls whether the Progress windowappears during a backup. You can cancel,pause, or view logs for a backup from the
Progress window.
Settings > Show Balloon Messages Controls whether system status balloonmessages appear near the Avamar icon onsupported Windows computers.
Settings > Back Up On Battery Power Controls whether scheduled or on-demandbackups can occur for the computer when thecomputer is running on battery power.
Settings > Back Up On Wireless Controls whether scheduled or on-demandbackups can occur for the computer when thecomputer is joined to the network solely by awireless connection.
Languages Enables you to select the language for theclient UI.
Manage > Activate Client Activates the client, which provides a uniqueID for the client and links the client to aspecific Avamar server.
Manage > View Console Opens the client console, which providesaccess to local status records for tasks, theAgent Log, the Console Log, and the WorkOrder Log.
Manage > Create ZIP File of Logs Creates a ZIP file of logs required byadministrators to diagnose backup and restoreproblems.
(Mac only) Client Agent Tasks Stops or restarts the backup agent process.
(Mac only) Logs Provides access to the Agent Log, ConsoleLog, and functionality for creating a ZIP file oflogs required by administrators to diagnosebackup and restore problems.
Avamar Desktop/Laptop
370 Avamar 18.2 Administration Guide

Table 115 Avamar Desktop/Laptop client UI functionality (continued)
Client menu item Description
About Provides version, server, and copyrightinformation for Avamar Desktop/Laptop.
Help Launches online help for Avamar Desktop/Laptop when the client is activated to anAvamar server.
Exit Shuts down the Avamar client.
Web UIUse the web browser user interface (web UI) to start an on-demand backup orrestore, view backup and restore activity for a client computer, or configure otherbackup settings for a client computer.
The following table describes the main elements of the web UI.
Table 116 Avamar Desktop/Laptop web UI functionality
Element Description
Avamar Desktop/Laptop logo You can replace the Avamar logo and theDesktop/Laptop logo in the upper left cornerof the web UI to rebrand the web UI.
Settings menu The settings menu in the upper right corner ofthe web UI enables you control web UIconfiguration settings, including:
l Whether to show tooltips
l The language for the web UI
l How many entries to show on the
Search, Browse, or History pages
l The default page that appears when youperform a restore
l Whether the full web UI or the browse-only mode, which displays only the
Search and History pages, is used
Refresh icon Refreshes the web UI page.
Help menu Provides access to the Avamar Desktop/Laptop online help and to software versioninformation.
Search page Enables you to search for files and folders onthe client computer to restore.
Browse page Enables you to browse to files and folders onthe client computer to restore.
Backup page Provides information about the backup groupsto which the client is assigned, as well as thenext scheduled backup. Also enables you to
Avamar Desktop/Laptop
Web UI 371

Table 116 Avamar Desktop/Laptop web UI functionality (continued)
Element Description
perform an on-demand backup of the client byusing the group policies for the groups to
which the client is assigned. When the AddData button is enabled on the Backup page,users can add folders to the group datasetsfor scheduled and on-demand backups.
History page Provides a 14-day record of backup andrestore activity on the computer, including:
l Status of backup activity, and for eachbackup, a listing of the file data that wastransferred
l Status of restore activity
Status bar Displays the date and time of the last and nextscheduled backup, as well as the outcome ofthe last backup. The status bar displaysinformation for the most recent 14 days.When the last backup was more than 14 daysin the past, the status bar displays themessage No backups found. However,
if the retention policy assigned to the groupfor the client is more than 14 days, you may
still see files on the Browse and Searchpages.
Limited user interfaceThe Avamar server presents a limited version of the web UI to a client when thenumber of files and directories in a client backup exceeds about 4 million or whenthere is insufficient allocated memory for Avamar Desktop/Laptop.
Large number of files and directories in a client backupThe exact number of files and directories that causes these changes is based on theavailable memory on the Avamar server.
There is no upper limit to the number of files and directories that can be in a backup.
Insufficient allocated memoryThe limited version of the web UI also appears for all clients accessing the Avamarserver when the memory it requires to satisfy its current Avamar Desktop/Laptoprequests exceeds the memory that it has allocated for Avamar Desktop/Laptop.
Encouraging users to log out of the web UI at the end of their session helps preventthis issue.
Description of the limited web UIThe limited version of the web UI has the following changes:
l The Search and History pages do not appear the web UI.
l File versions are not available on the Browse page.
Avamar Desktop/Laptop
372 Avamar 18.2 Administration Guide

l Restore is only allowed for users with local administrator rights on the computer.Non-administrator users cannot restore any files, including those that they ownlocally on a server-class computer.
l Restore data size limits are not enforced.
Apache web server authenticationTo protect user security, web browsers display an authentication warning whenaccessing a secure web page unless the web server provides a trusted public keycertificate with the page. The Avamar Desktop/Laptop web UI uses only secure webpages, and this warning is seen in browsers that access those pages. To avoid thewarning, install a trusted public key certificate on the Apache web server that isprovided with Avamar.
The Avamar Product Security Guide describes how to obtain and install a trusted publickey certificate for the Apache web server.
Rebranding the web UIYou can rebrand the Avamar client web UI by replacing the two logo graphics in theupper left corner of the UI.
Figure 17 Replaceable graphics on the Avamar client web UI
Procedure
1. Create two replacement graphics that are named ProductNameAvamar.pngand ProductNameDTLT.png.
The replacement graphics must meet the following requirements:
l The file format must be Portable Network Graphic (.png).
l The background must be transparent so that the background gradient isvisible behind the graphic text and images.
l ProductNameAvamar.png Must be 97 pixels wide and 18 pixels tall.
l ProductNameDTLT.png Must be 128 pixels wide and 18 pixels tall.
2. Open a command shell:
a. Log in to the server as admin.
b. Switch user to root by typing the following command:
su -
c. For a multi-node server, load the rootid OpenSSH key by typing thefollowing command:
Avamar Desktop/Laptop
Web UI 373

ssh-agent bashssh-add /root/.ssh/rootid
3. Change the working directory by typing the following command:
cd /usr/local/avamar-tomcat-7.0.59/webapps/dtlt/images/banner
4. Make backup copies of the original graphics by typing the following commands:
cp ProductNameAvamar.png ProductNameAvamar.png_origcp ProductNameDTLT.png ProductNameDTLT.png_orig
5. Move the new logos to the current working directory asProductNameAvamar.png and ProductNameDTLT.png.
6. If the new graphics do not appear, delete the cached copies of previouslyviewed files in the web browser, and then refresh the page.
Changing the web UI portAccess to the web UI requires HTTPS communication between the Avamar server andthe client web browser. When a user requests a backup or restore by using theAvamar client menu, the default web browser on the client is instructed to contact theAvamar server on port 443, the standard HTTPS port. On the Avamar server, thisinitial request to port 443 is redirected to port 8443, the HTTPS port for the web UI.You can change the initial contact port by editing the avscc.cfg configuration file onthe client and the Apache SSL configuration file on the server.
Procedure
1. To use the new port number, edit the avscc.cfg file on the client computer:
a. Open avscc.cfg in a text editor.
On Windows clients, the file is in the %SystemDrive%\Program Files\avs\var directory. On all other clients, the file is in the /usr/local/avamar/var directory.
If avscc.cfg does not exist at this location, then create the file.
b. Add the following line to the file:
--dtlt-port=n
where n is the initial contact port number.
c. Save and close avscc.cfg.
d. Restart the client.
2. Edit the Apache SSL configuration file on the Avamar server:
a. Open a command shell and log in as admin on a single-node server or on theutility node of a multi-node server.
b. Open the Apache SSL configuration file in a text editor.
On Red Hat Enterprise Linux, the file is /etc/httpd/conf.d/ssl.conf.On SuSE Linux Enterprise Server, the file is /etc/apache2/vhosts.d/vhost-ssl.conf.
c. Find the HTTPS port listening directive and change Listen 443 toListen n, where n is the initial contact port number.
Avamar Desktop/Laptop
374 Avamar 18.2 Administration Guide

d. Save and close the file.
e. Restart the Apache server process by typing apachectl restart.
Changing the secure token time-out valueAvamar Desktop/Laptop includes a temporary secure token as part of the URL it usesto begin a backup or restore session in a client web browser. The client web browsermust establish an HTTPS connection with the Avamar server before the token expiresor the session is rejected and the backup or restore cannot proceed. You can edit thedefault time-out value of 20 s.
Procedure
1. Open a command shell and log in by using one of the following methods:
l For a single-node server, log in to the server as admin.
l For a multi-node server:
a. Log in to the utility node as admin.
b. Load the admin OpenSSH key by typing the following command:
ssh-agent bashssh-add ~admin/.ssh/admin_key
2. Stop the MCS by typing the following command:
dpnctl stop mcs
3. Change the working directory by typing the following command:
cd /usr/local/avamar/var/mc/server_data/prefs
4. Open mcserver.xml in a text editor.
5. In the <node name="dtlt"> section, edit the value of <entrykey="expire_data_after_secs" value="20" /> from 20 to the newtime-out value in seconds.
6. Save the change and close the file.
7. Start the MCS and the scheduler by typing the following command:
dpnctl start mcsdpnctl start sched
Forcing clients to use the alternate file browsing methodThe Avamar client web UI uses the OS-specific file browsing services on the clientcomputer to provide a file manager interface for users to select local files and foldersto back up or restore. However, if these services are not available because the clientuses NAT or because a firewall rule blocks port 28002 on the client, then an alternatefile browsing method is offered. You can require clients to use the alternate filebrowsing method.
One reason to change is to support the removable media. The default file browsingmethod does not support removable media, but the alternate method does.
The alternate method uses a Java applet to provide file browsing services. When thedefault services are unavailable, and the user elects to permit the alternate method,the Java applet is loaded. During loading of the applet, the user may seeauthentication warnings about the website certificate of the Avamar server and thedigital signature of the Java applet. Acknowledge these warnings or the applet doesnot load.
Avamar Desktop/Laptop
Web UI 375

After the applet loads, the web page is automatically refreshed to allow the Avamarclient web UI to use the applet. The user must restart the task after the page isrefreshed.
To force clients to use the alternate file browsing method, add theuseAppletToBrowseLocalFile property to the dtlt.properties file on theAvamar server, and set the value to true.
Backup with Avamar Desktop/LaptopAvamar Desktop/Laptop provides several methods for starting a client backup.
The following table describes the methods for starting a client backup, and the optionsthat are available for the method.
Table 117 Descriptions of methods for starting an Avamar Desktop/Laptop client backup
Method Description Options Dataset
Scheduled Avamar server automatically backsup the client according to theschedule specified for the client'sgroup.
l User selectedbackup time
l Add data
The dataset that is specified for thescheduled group, or the dataset thatis assigned to the computer. When
Add Data is enabled, the datasetalso includes folders that the userhas added.
Single-click Avamar server queues a backup of
the client when a user clicks BackUp Now on the client.
l Add data The dataset for each group that isassociated with the computer, orthe dataset that is assigned to the
computer. When Add Data isenabled, the dataset also includesfolders that the user has added.
Interactive User clicks Back Up and the webUI appears. User selects fromavailable start and data options and
clicks Back Up Now on the
Backup page. Avamar server addsthe backup to the backup queue onthe Avamar server.
l Add data
l On-demand backupset
The dataset of the group that theuser selects from the groups thatare assigned to the client. When
Add Data is enabled, the datasetalso includes folders that the user
has added. When Select Now (on-demand backup set option) isenabled and clicked, the datasetonly includes the files and foldersthat the user selects.
Scheduled backupsPerform scheduled backups of Avamar Desktop/Laptop client computers the sameway that you back up other Avamar client computers in the environment. Createdatasets, schedules, retention policies, and groups for the backups by using AvamarAdministrator.
Users see the groups that are associated with an Avamar Desktop/Laptop client onthe Backup page in the web UI.
The next scheduled backup time for each group that is associated with an AvamarDesktop/Laptop client also appears on the Backup page. The group's policy normallydetermines the schedule start time for that group's backups. For individual Avamar
Avamar Desktop/Laptop
376 Avamar 18.2 Administration Guide

Desktop/Laptop clients, you can permit users to select a different start time for theirclient's scheduled backups.
Allowing users to select the start time for scheduled backupsPermit users of an Avamar Desktop/Laptop client to select a start time for the client'sscheduled backups that is different from the start time that is assigned through grouppolicy.
When you enable this feature for an Avamar Desktop/Laptop client, users can selectfrom a list of administrator-defined times that appear on the Backup page in the webUI. The selected start time applies to all subsequent scheduled backups for the client.
To prevent gaps in protection, Avamar Desktop/Laptop clients continue to use theuser-selected backup start time even when you remove that time from the OverrideDaily Schedule. When the user next logs in to the web UI Avamar Desktop/Laptopprompts the user to select a new start time from the Backup page.
The Avamar server associates a user-selected start time with the client's group.Removing the client from a group also removes the user-selected start time for thatclient.
Procedure
1. Ensure that the client belongs to a group that uses a daily schedule.
2. Using AUI, add time entries to the Override Daily Schedule.
Note
The Override Daily Schedule displays time values using the time zone of theAvamar server. Avamar Desktop/Laptop uses the time zone of the client whendisplaying the times that appear on the Backup page.
3. Using Avamar Administrator, enable Allow override of group's daily schedulefor the client.
Add data optionFor scheduled backups and for on-demand backups, allow users to specify folders toinclude in the group policy-based backups of an Avamar Desktop/Laptop clientcomputer.
When the Add data option is enabled, Avamar Desktop/Laptop creates backupdatasets for the client computer by adding the folders that the user selects to thedataset of each group that the Avamar Desktop/Laptop client computer belongs to.Avamar Desktop/Laptop applies the exclusions and inclusions in the dataset policy ofeach group to the folders that the user specifies.
Use Avamar Administrator to enable this option.
After you enable the Add data option, users add folders by clicking Add Data on theBackup page of the web UI, and selecting the folders.
Single-click backupsUsers can start an on-demand backup on an Avamar Desktop/Laptop client computerby a single click on the Back Up Now button on the client menu or on the backupreminder dialog box.
The data that is included in a single-click backup depends on the operating system ofthe client computer. The following table describes the data that is included for specific
Avamar Desktop/Laptop
Add data option 377
operating systems. When the Add data option is enabled, Avamar Desktop/Laptop alsoadds user selected folders to the data included in the backup.
Table 118 Datasets for single-click on-demand backups
Operating system Data included in the backup
l Windows
l Mac
Dataset for each group that the client belongsto
l Linux
l Windows Server
l Mac OS X Server
Dataset that is assigned to the computer
Interactive backupsInteractive backups allow users to select a backup group that is associated with theclient and back up the client by using the group's settings. When on-demand backupsets are enabled, interactive backups also allow users to choose instead to back uponly selected files and folders.
Group selectionTo perform an interactive backup of a single group:
1. Select Back Up... on the Client menu.
2. Select the backup group on the Backup page in the Web UI.
3. Click Back Up Now.
When a user runs an interactive backup of a group, all policies that are associated withthe selected group apply to the backup.
An interactive backup of a group differs from a single-click backup because in aninteractive backup of a group only the selected group is backed up.
File and folder selectionTo allow users to back up selected files on an Avamar Desktop/Laptop client withoutregard for the group policies that are assigned to the client, enable on-demand backupsets. After enabling on-demand backup sets, users on Windows, Mac, and Linuxcomputers that are Avamar Desktop/Laptop clients can create sets of folders and filesto back up through on-demand backups. Users can create multiple sets, save the setsfor reuse, and send a backup that is based on a set to the backup queue of the Avamarserver.
On-demand backup sets do not change the data that is backed up according to thegroup policies that are assigned to the Avamar Desktop/Laptop client.
The Avamar server can be configured to limit the number of on-demand backup setbackups that can be started from an Avamar Desktop/Laptop client.
To store backup data to the Data Domain, consider the following information:
l If a Data Domain system has been configured for the Avamar server, on-demandbackups go to the GSAN.
l If a single Data Domain system has been configured for the Avamar server, on-demand backups go to the Data Domain.
l If there are multiple Data Domain systems configured for the Avamar server, on-demand backups are sent to the Data Domain, which has more available space.
Avamar Desktop/Laptop
378 Avamar 18.2 Administration Guide

Allowing users to create on-demand backup setsEnable users on Windows, Mac, and Linux clients that use Avamar Desktop/Laptop tocreate on-demand backup sets.
Procedure
1. Enable the Allow file selection on client initiated backups setting in AvamarAdministrator by overidding the group policy setting for the client.
2. Change the value of the allowUserInititedBackupsFileSelection keyin the dtlt.properties file on the Avamar server to true.
3. Users create the on-demand backup sets:
a. On the Avamar Desktop/Laptop client computer, right-click the Avamar iconand select Back Up....
The web UI opens to the Backup page.
b. In Select folders and files to backup, click Select Now.
The On-Demand Backup Sets dialog box appears.
c. To back up, and click OK, select the folders and files.
d. To save the backup set for reuse, type a name for the backup set in Savebackup set as, and click Save.
e. (Optional) To instruct the Avamar server to add a backup of the on-demandbackup set to the backup queue, click Start Backup, and click OK.
4. Users instruct the Avamar server to add a backup of a saved on-demand backupset to the backup queue:
a. On the Avamar Desktop/Laptop client computer, right-click the Avamar iconand select Back Up....
The web UI opens to the Backup page.
b. In Select folders and files to backup, click Select Now.
The On-Demand Backup Sets dialog box appears.
c. In Load Backup Set, select the backup set.
d. Click Start Backup, and click OK.
Setting an on-demand backup limit
Set a limit on the number of on-demand backup set backups that a user can add to theAvamar server's task queue.
By default, Avamar server uses the following rules for on-demand backup set backups:
l Only one on-demand backup set backup from a client is allowed in the task queueat a time.
l An on-demand backup set backup cannot start while a backup for the client isrunning.
l No limit on the number of on-demand backup set backups of a client that a usercan add to the task queue.
To set a limit on the number of on-demand backup set backups that can occur eachday for Avamar Desktop/Laptop client computers, set therestrictBackupsPerDay property in the dtlt.properties file on the Avamarserver.
Avamar Desktop/Laptop
Interactive backups 379

The following table describes the available values.
Table 119 Supported values for the restrictBackupsPerDay property
Value Description
false There is no limit on the number of on-demandbackup set backups that can successfully runin a day. No limit is the default setting.
0 Users cannot run on-demand backup setbackups.
n No more than n on-demand backup setbackups can occur for each client in a day. Asused here, n is any positive integer less thanor equal to 100, and a day is defined asmidnight to midnight in the time zone for theAvamar server.
The specified value applies to all clients activated on the Avamar server. Allsuccessfully completed backups for all users on an Avamar Desktop/Laptop clientcomputer count toward the total number of backups allowed each day.
Note
This limit applies only to backups that are based on a user-created on-demand backupset.
Disabling on-demand backupsPrevent users from performing on-demand backups from Avamar Desktop/Laptopclient computers. This setting applies to both single-click on-demand backups andinteractive on-demand backups.
Procedure
1. In Avamar Administrator, click the Policy launcher link.
The Policy window is displayed.
2. Click the Clients tab.
3. Disable on-demand backups for either a single client or multiple clients.
Number ofclients
Steps to disable on-demand backups
One a. Select the client and click Edit.
b. In the Edit Client dialog box, clear Allow client initiatedbackups.
c. Click OK.
Two or more a. Select the clients and click Edit.
b. In the Edit Multiple Clients dialog box, change Allowclient initiated backups to No.
c. Click Apply Change.
Avamar Desktop/Laptop
380 Avamar 18.2 Administration Guide

Number ofclients
Steps to disable on-demand backups
d. Click OK.
Changing the retention policy for on-demand backupsThe End User On Demand Retention policy controls the retention of data for on-demand backups. You can change the End User On Demand Retention policy on anAvamar server by using Avamar Administrator. The change applies to all on-demandbackups initiated by a client that is activated with that server. However, the changeonly applies to on-demand backups that occur after the change.
Procedure
1. In Avamar Administrator, select Tools > Manage Retention Policies.
The Manage All Retention Policies window is displayed.
2. Select End User On Demand Retention from the list and click Edit.
The Edit Retention dialog box appears.
3. In Retention period, type a number and select a unit of time (days, weeks,months, or years).
4. Click OK.
Restore with Avamar Desktop/LaptopThe following topics provide information on performing a restore and controllingrestore-related settings in Avamar Desktop/Laptop.
Finding data to restoreAvamar Desktop/Laptop users can use the web UI to either browse to or search forfolders, files, and file versions to restore.
Browsing for data to restoreFrom the left-side menu, select Browse to view the backups for a client computer in atree view that you can browse to find folders and files to restore.
To browse a specific backup instead of all backups for the client, use Backup Dateand Time to select the date and time of the backup.
Searching for data to restoreFrom the left-side menu in the web UI, select Search to search for specific foldersand files to restore. To start a search, type a search string in the search field, and clickSearch. Results appear as they are gathered, and a progress indicator providesinformation about the length of the search.
The search string that you specify in the search field must be 255 characters or fewerand is not case sensitive. Supported wildcards in the search string include an asterisk(*) to represent zero or more characters and a question mark (?) to represent onecharacter.
The string is compared to the names of all folders and files in the backups for theclient computer. If all or part of a folder or file name matches the string, then thefolder or file name appears in the search results.
Avamar Desktop/Laptop
Changing the retention policy for on-demand backups 381

Selecting a file versionThe backups for a client computer contain more than one version of many of the filesthat are backed up. When a file is backed up and then subsequently edited, the nextbackup contains a new version of the file. Each version is kept for the retention periodset by the Avamar administrator.
The number of versions of a file in the client backups depends on many factors,including:
l The length of time that backed up data is retained
l The frequency of backups
l How often the file is edited
When there are multiple versions of a file in the backups for a client, a version iconappears next to the file name when you browse or search for data to restore. To selecta version of the file other than the most recent version, click the version icon and thenselect the version. Then choose whether to overwrite the existing file on the clientcomputer or to restore the file version with a new name.
Restore typesAvamar Desktop/Laptop users can restore data to the original location or to a newlocation on the same computer. Users can restore data with the same name or a newname.
When users restore data to the original location with the same name, the restoreprocess overwrites any current local file versions with the restored files. This type ofrestore is useful in situations where the current local versions contain errors or havedata corruption issues.
To avoid overwriting the current local file versions, users can restore to a newlocation, restore with a new name, or both.
Domain users can restore files from any Windows or Mac computer on which theyhave a user profile to the Windows or Mac computer to which they are logged in. Youcan disable restore from a different computer by setting the value of thedisableRestoreFromAlternateComputer property in the dtlt.propertiesfile on the Avamar server to true. This is a global property that affects all clients.
Linux and Mac limitation on restoreLinux and Mac users who do not have write permission for the root folder cannot useAvamar Desktop/Laptop to restore their complete directory structure to the originallocation. The operating system views this type of restore as an unauthorized try towrite to the root folder and prevents it.
Trying to restore a complete directory structure fails when all the following are true:
l User logs in to a Mac or Linux computer with a user account that does not havewrite permission for the root folder.
l User logs in to the Avamar Desktop/Laptop web UI using the AvamarAuthentication method.
l On the Avamar Desktop/Laptop Browse page, the user selects the completedirectory structure.
l User does not select a new location for the restore.
WorkaroundsTo work around this limitation, use either of the following methods for the restore:
Avamar Desktop/Laptop
382 Avamar 18.2 Administration Guide

l Restore the complete directory structure to a new location.
l Restore less than all the files in the directory structure.
For example, clear one file from the folder that is furthest down the hierarchy ofthe restore set. Restoring less than all the files works because the operatingsystem views the subsequent restore as a series of write operations to foldersbeneath the root folder.
Restore requirementsTo restore from a different computer before you perform a restore, review thepermissions requirements and the requirements.
Restore permissionsThe data that users can browse to, search for, and restore depends on user loginaccount permissions.
When users search or browse for data to restore, the results that appear are filteredbased on the current login credentials and the data that has been backed up from theclient computer. The following table provides details on the filtering.
Table 120 Avamar Desktop/Laptop data restore filtering
Data type Filtering on Windows Filtering on Mac
Folders Displays all folders for whichthe logged in user is owner oris a member of a group withownership rights, and anyfolder that contains folders orfiles for which the user hasrights.
Displays all folders for whichthe logged in user has Readpermission either as owner orbased on the folder's group orother permissions.
Files Displays all files that thelogged in user owns.
Displays all files that thelogged in user owns.
When users browse for data to restore, the following actions happen:
l A folder that a user does not have ownership rights for appears on the file systempath for a folder or file for which the user has ownership rights. This option helpsto provide a more accurate representation of the file system on the computer.
l A dimmed checkbox appears next to the folders. The folders are not restoredwhen you restore a folder or file that includes them in its path.
Users can restore data only if their login credentials grant operating system Writepermission for the restore location. To restore data that has the same path and nameas data on the client computer, the login credentials must authenticate the user as theowner of the existing data before the restore proceeds.
To restore files on Windows, the login account must have the Restore files anddirectories user right in Local Security. This user right is assigned by default toaccounts that are members of either the Administrators or Backup Operators groups.Assign the right to an account that is not a member of either of these groups, or ofanother group that includes this user right, before a user can use the account torestore data.
Requirements to restore from a different computer
To restore from a different computer, meet the requirements in the following table.
Avamar Desktop/Laptop
Restore requirements 383

Table 121 Requirements to restore from a different computer with Avamar Desktop/Laptop
Category Requirement
Operating system l Windows operating system
l Mac operating system
Note
Restores between Windows and Maccomputers are supported.
Account type Domain
Profile Both source and target computers have alocal profile for the user’s domain account.
Note
A local profile for a domain account is createdautomatically at a user’s first login on thecomputer.
Avamar client Version 7.0 or later is installed on both sourceand target.
Avamar server Both source and target are activated with thesame Avamar server and the server is runningAvamar 7.0 or later.
Backup There is at least one qualifying backup. Aqualifying backup is completed successfullyafter:
l Avamar Desktop/Laptop 7.0 or later isinstalled on the source computer.
l A local profile for the user’s domainaccount is created on the sourcecomputer.
By default, users with local administrator rights on a Windows source computer at thetime of a backup can restore any file from that source computer to a target computer,regardless of file ownership. You can change this behavior to restrict their access toonly files that they own. To restrict file access for Windows administrators, changethe value of the checkAlternateComputerOwnership property in thedtlt.properties file on the Avamar server to true.
Restore limitsYou can limit the amount of data in a single restore task and the number of concurrentrestore tasks for a client computer.
Restore data size limitAvamar client users do not normally have a limit on the amount of data that is restoredin a single task. This default setting enables a user to restore an entire backup in asingle task. Large restore tasks can cause undesirable load on the network. Set arestore data size limit to control the network load that these large restore tasks cause.
Avamar Desktop/Laptop
384 Avamar 18.2 Administration Guide
When you set a limit, individual users cannot restore more than the limit in any onerestore task. Users must restore files that exceed the limit in multiple tasks that do notexceed the limit, or an administrator must perform the restore.
NOTICE
By design, the restore data size limit does not apply to server-class clients (thoseclients with a very large backup data set).
To specify a restore data size limit, uncomment the limitRestoreSize key in thedtlt.properties file on the Avamar server, and set the value to the data size limitin MB.
Restore queue limitThe Avamar client web UI minimizes network and server load by blocking restorerequests for clients that already have a restore task in the queue. Users who start anew restore while one task is pending receive a message that the request is blocked.After the pending task is complete, users can begin with a new restore task. You canchange this behavior to allow users to start multiple restore tasks. The change appliesto all clients of the Avamar server.
To remove the restore queue limit, change the value of thedisallowMultipleRestores property in the dtlt.properties file on theAvamar server to false.
Restore of replicated backupsYou can move an Avamar client to a new Avamar server by using Avamar ClientManager replication commands. When you move a client, the backups for the clientare replicated on the new server. Avamar Desktop/Laptop must index replicatedbackups before they are available to browse or search in the web UI.
When a user logs in from the web UI on the client after the client has been moved, theReplicated Backups Available dialog box appears. The user can either start indexingof the replicated backups or close the dialog box without starting indexing. When theuser closes the dialog box without indexing, an alert icon appears on the web UIbanner bar. The user can also start indexing from the alert icon.
Indexing is a one-time task for a computer that has been moved to a new server. Itruns in the same session in which it is started. When it completes, Avamar Desktop/Laptop sends the web browser a refresh command. The data from the replicatedbackups appears in the web UI.
Client backup and restore activity historyThe History page in the Avamar Desktop/Laptop web UI provides a 14-day record ofbackup and restore activity on the client computer.
The Activity History section of the History page provides information about eachbackup and restore initiated during the past 14 days. The section also provides links tomore detailed information about the backups. Information includes the results of theactivity, the start date and time, the duration of the activity, the amount of data, andthe workorder ID. Click the activity label for a backup to view a list of files in thedataset for the backup.
To view the backup history for a different computer, select the computer from the list.Meet the requirements in Requirements to restore from a different computer on page383 before viewing the backup history for a different computer.
Avamar Desktop/Laptop
Restore of replicated backups 385

Editing Avamar Desktop/Laptop parametersThe Avamar Desktop/Laptop properties file, dtlt.properties, enables you tochange parameters that affect functionality for all Avamar Desktop/Laptop clientsthat connect to the Avamar server. The file is on the Avamar server at: /usr/local/avamar/etc/dtlt.properties.
Procedure
1. Open a command shell:
a. Log in to the server as admin.
b. Switch user to root by typing the following command:
su -
c. For a multi-node server, load the rootid OpenSSH key by typing thefollowing command:
ssh-agent bashssh-add /root/.ssh/rootid
2. Change directory to /usr/local/avamar/etc by typing the followingcommand:
cd /usr/local/avamar/etc
3. Open dtlt.properties in a text editor.
4. Create or edit parameters.
5. Save and close the file.
Avamar Desktop/Laptop parametersThe following table lists the parameters that are available in the dtlt.propertiesfile.
Table 122 Avamar Desktop/Laptop parameters
Parameter Description
allowLocalUsers Enables and disables local user access for pass-throughauthentication. Uncomment the parameter by removing the #in front of the parameter, and then set the value to true to
enable local user access for pass-through authentication. Usethe default value of false to disable local user access for
pass-through authentication.
allowServerRestores Enables or disables locally started restores on server classcomputers. Use the default value of true to allow restores on
server class computers, or false to disable restores on
server class computers.
allowUserInititedBackupsFileSelection Enables or disables the ability for users to create sets offolders and files to back up in on-demand backups. To enable
selectable backup sets, enable the Allow file selection onclient initiated backups setting for the client in Avamar
Avamar Desktop/Laptop
386 Avamar 18.2 Administration Guide

Table 122 Avamar Desktop/Laptop parameters (continued)
Parameter Description
Administrator, and then set the value of theallowUserInititedBackupsFileSelection parameter
to true. Use the default value of false to disable selectable
backup sets.
checkAlternateComputerOwnership Controls whether users with local administrator rights canrestore any file from the source computer or only files thatthey own. Specify true to restrict local administrators to
restore only files that they own, or the default value of falseto allow local administrators restore any file from the sourcecomputer.
disableRestoreFromAlternateComputer Enables or disables restore from a different computer. Specifytrue to disable restore from a different computer, or the
default value of false to enable restore from a different
computer.
disallowMultipleRestores Controls whether users can start multiple restore tasks for aclient computer simultaneously. Specify false to allow
multiple simultaneous restores, or use the default value oftrue to prevent multiple simultaneous restores.
limitRestoreSize Controls whether to limit the amount of data that is restoredin a single task. To specify a limit, uncomment thelimitRestoreSize parameter and specify the data size
limit in MB. The default limit is 500 MB.
maxDirectoryDepth Specifies the number of nested subfolders in each hierarchicalbranch of a backup that the Avamar Desktop/Laptop servertraverses during indexing. The default value is 3000.
restrictBackupsPerDay Controls whether there is a limit to the number of on-demandbackups that can be performed from the client computer in asingle day, and if so, the maximum number. Use the defaultvalue of false if you do not want to limit the number of on-
demand backups that can successfully run in a day. Specify 0to disable on-demand backups on the client computer. To limitthe number of on-demand backups that can successfully runin a day, specify the limit as a positive integer that is less thanor equal to 100.
useAppletToBrowseLocalFile Controls whether users use the OS-specific file browsingservices on the client computer or the alternate file browsingmethod. Specify true to allow users to use the OS-specific
file browsing services, or false to force users to use the
alternate file browsing method. The default value is false.
userLoginRequired Enables and disables pass-through authentication. Use thedefault value of false to enable pass-through authentication,
or true to disable pass-through authentication.
Avamar Desktop/Laptop
Avamar Desktop/Laptop parameters 387

Client log locationsLocal logs on client computers provide information about backup and restoreoperations and UI functionality.
Available logsThe following table lists the available logs on client computers.
Table 123 Available client logs
Log type Log file name Description
Workorder workorder_name.log,
where workorder_name is thefull name of a task
Provide detailed informationabout a specific task.
Agent avagent.log Provides information aboutthe status of all backup andrestore activity on thecomputer.
Console avscc.log Provides information aboutthe performance of the UI. Aconsole log is created foreach user on a computer.
These logs are accessible through the client UI, and also can be accessed directly.
Log locations on Windows computersOn Windows computers the logs are available through the paths in the following table.
Table 124 Paths to logs on Windows computers
Log Path
Workorder %SystemDrive%\Program Files\avs\var\clientlogs\
Agent %SystemDrive%\Program Files\avs\var\
Console %APPDATA%\Avamar\
Log locations on Linux and Mac computersOn Linux and Mac computers the logs are available through the paths in the followingtable.
Table 125 Paths to logs on Linux and Mac computers
Log Path
Workorder /usr/local/avamar/clientlogs
Agent /var/avamar/
Console On Linux: $HOME/On Mac:$HOME/.avamardata/
Avamar Desktop/Laptop
388 Avamar 18.2 Administration Guide

CHAPTER 15
Data Domain System Integration
This chapter includes the following topics:
l Overview of Data Domain system integration.................................................. 390l Preparing to add a Data Domain system...........................................................395l Adding a Data Domain system..........................................................................399
Data Domain System Integration 389

Overview of Data Domain system integrationYou can store Avamar backups on one or more Data Domain systems, and thenseamlessly restore data from the backups.
You can back up both file system and application data to a Data Domain system.Storage of Avamar backups on a Data Domain system is recommended inenvironments with large databases that have a high change rate. Store the followingtypes of backups on the Avamar server instead:
l File system backups
l Virtual machine backups
l Remote office backups
l Backups of databases with low change rates
When you store VMware image backups on a Data Domain system, you can boot a lostor corrupted virtual machine almost instantly from the backup by using the instantaccess feature.
You also can store Avamar checkpoints for a single-node server or Avamar VirtualEdition (AVE) on a Data Domain system.
Integration of Avamar with Data DomainDD OS software handles the deduplication of data on a Data Domain system. The DataDomain Boost (DD Boost) library provides an interface for an Avamar system to senddata that is deduplicated at the source to a Data Domain system.
Avamar uses the DD Boost library through API-based integration to access and workwith directories, files, and other items on the Data Domain File System. The DD BoostAPI gives an Avamar system an interface into some of the properties and capabilitiesof the Data Domain system. This interface enables an Avamar system to controlbackup images that are stored on Data Domain systems. It also enables Avamar tomanage maintenance activities and to control replication to remote Data Domainsystems.
DD Boost is installed on the backup clients and on the Avamar utility node or anAvamar single node system. DD Boost is installed automatically when you install theAvamar client or server software.
You can specify whether specific backup datasets are stored on an Avamar server or aData Domain system.
When you select an Avamar server as the backup target, the Avamar client on eachhost performs deduplication segment processing. The Avamar client sends the backupdata and the associated metadata to the Avamar server.
When you select a Data Domain system as the backup target, the backup data istransferred to the Data Domain system. Simultaneously, the Avamar client sends theassociated metadata to the Avamar server for storage. The metadata enables theAvamar management system to perform restore operations directly from the DataDomain system without first staging the restored data on the Avamar system.
The process of data recovery is transparent to the backup administrator. The backupadministrator uses the same Avamar recovery processes that are native to currentAvamar implementations.
Data Domain System Integration
390 Avamar 18.2 Administration Guide
File system backups on a Data Domain systemAvamar supports Data Domain system storage of file system backups for the followingoperating systems:
l Windows and Windows Server
l IBM AIX
l HP-UX (IA-64 only, requires ONCPlus Library revision 11.31.06 or later)
l Solaris (for Solaris 10 on SPARC, client side deduplication is disabled anddeduplication is performed on the Data Domain system)
l Red Hat Enterprise Linux (RHEL)
l SUSE Linux Enterprise Server (SLES)
l Mac 10.8, 10.9, and 10.10
Note
Only 64-bit operating systems are supported.
The E-lab Navigator provides detailed compatibility information.
Application backups on a Data Domain systemYou can store application data backups from the following Avamar plug-ins on a DataDomain system:
l Avamar Plug-in for DB2
l Avamar Plug-in for Exchange VSS
l Avamar Plug-in for Hyper-V VSS
l Avamar Plug-in for Lotus Domino
l Avamar Plug-in for Oracle
l Avamar Plug-in for SAP with Oracle
l Avamar Plug-in for SharePoint VSS
l Avamar Plug-in for Sybase ASE
l Avamar Plug-in for SQL Server
You can also store VMware image backups and backups with the Avamar NDMPAccelerator on a Data Domain system.
Data Domain Cloud Disaster RecoveryThe Data Domain Cloud Disaster Recovery (Cloud DR) solution facilitates the disasterrecovery of on-premises virtual machines by providing the capability to recover VMs inthe cloud.
Cloud DR works with on-premises Avamar software and on-premises Data Domainstorage to replicate backups of virtual machine data to the public cloud, and toperform disaster recovery of production environments by recovering the complete VMas an Amazon Web Services Elastic Compute Cloud (EC2) instance.
The Avamar and Data Domain System Integration Guide provides more information aboutusing Avamar with Data Domain Cloud Disaster Recovery.
Data Domain System Integration
File system backups on a Data Domain system 391

VMware instant accessWhen you store VMware image backups on a Data Domain system, you can boot somelost or corrupted virtual machines from the backup by using the instant accessfeature.
With instant access, the virtual machine image backup is staged to a temporary NFSshare on the Data Domain system. You can then use the vSphere Client to power onthe virtual machine and initiate a vMotion of the virtual machine to a datastore withinthe vCenter. When the vMotion is complete, the restored virtual machine files nolonger exist on the Data Domain system. Then yo use Avamar Administrator to deletethe NFS share on the Data Domain system.
Note
When you use instant access, do not leave the virtual machine running on the DataDomain system for extended periods. When the virtual machine runs on the DataDomain system, performance might degrade because of the workflow.
You can also restore a virtual machine to the production environment instead of usinginstant access. The Avamar software leverages Changed Block Tracking (CBT) todramatically speed the recovery process.
The Avamar for VMware User Guide provides details on instant access and restore ofimage backups.
Cloud tierWhen you store Avamar backup data on a Data Domain system, you can also configurethe backups to be tiered to the cloud.
Data Domain Cloud Tier support was initiated with Avamar 7.4. DD Cloud Tier movesdata from Data Domain to the cloud. From the Avamar Administrator, you canconfigure cloud tier to move Avamar backups from Data Domain to the cloud, and canperform seamless recovery of these backups.
Data Domain Cloud Tier disaster recovery support was initiated with Avamar 7.5. Youcan recover backups from the cloud in case of the loss of a Data Domain and you canalso recover an Avamar server from the cloud.
The Avamar and Data Domain System Integration Guide provides more information aboutcloud tier with Data Domain.
Checkpoints on a Data Domain systemYou can store Avamar checkpoints for a single-node server or Avamar Virtual Edition(AVE) on a Data Domain system that uses DD OS 5.3 or later. Checkpoints aresystem-wide backups of the Avamar server for disaster recovery purposes.
Storage of checkpoints on a Data Domain system is recommended in environmentsthat do not include the following options:
l Replication to a secondary Avamar server.
l Environments where most client backups are stored on a Data Domain system.
To configure storage of checkpoints on a Data Domain system, select the Use astarget for Avamar Checkpoint Backups checkbox when adding or editing the DataDomain system in Avamar Administrator.
Data Domain System Integration
392 Avamar 18.2 Administration Guide

Contact Avamar Professional Service representatives for assistance with rolling backthe Avamar server to a checkpoint on a Data Domain system.
Data Domain system streamsEach Data Domain system has a soft limit to the maximum number of connection anddata streams that can be sustained simultaneously while maintaining performance. Thenumber of streams varies depending on the Data Domain system model.
Configure the maximum number of streams Avamar can use when adding a DataDomain system to the Avamar server. The Avamar server uses the backup streamvalue to limit the number of concurrent backups or restore jobs.
If the Data Domain system is fully dedicated to the Avamar server, the stream valuethat is entered in Avamar Administrator could be the maximum number of streams thatthe Data Domain system model supports. In cases where the Data Domain system isshared with other third-party applications or another Avamar server, a subset of thenumber of streams should be allocated.
Each Avamar backup client that supports multi-stream backups can be configured touse the correct number of streams (typically based on the number of databases). Thisstep is done through multi-streaming configuration when the Avamar backup job isconfigured. The streams are released when the backup or restore operationcompletes. The number of streams that are allocated should depend on the numberand type of Avamar clients that backs up data about the same time.
Replication with Data Domain systemsWhen an Avamar system stores backups on a Data Domain system, Avamar replicationuses DD Boost to copy backups from the original Data Domain system and to createreplicas on another Data Domain system.
Supported replication configurationsThe following table lists the supported replication configurations for Avamarreplication using DD Boost.
Table 126 Replication configurations for Avamar replication using DD Boost
Backup storage Replication storage
Single Data Domain system Single Data Domain system
Single Data Domain system Multiple Data Domain systems
Multiple Data Domain systems Single Data Domain system
Multiple Data Domain systems Multiple Data Domain systems
In a configuration where the replication storage consists of multiple Data Domainsystems, control the system which receives the replicas by mapping a domain on thesource Avamar server to a destination Data Domain system. Specify the Data Domainsystem with the default destination. Avamar replicates to the default destination whena destination Data Domain system is not identified.
The Avamar and Data Domain System Integration Guide provides instructions on storagemapping and specifying the default destination Data Domain system.
Replication detailsThe following details apply to Avamar replication with Data Domain systems:
Data Domain System Integration
Data Domain system streams 393

l Data transfer during replication is between the Data Domain systems, withoutintermediate staging
l Replication uses DD Boost to copy backups and to write replicas
l Requires a Data Domain replication license
l Does not use Data Domain replication
l Replication is configured and monitored on the Avamar server
l Replication task scheduling uses Avamar replication schedules only
l Data Domain administration tools are not used
Monitoring and reporting Data Domain system statusAvamar can collect and display data for health monitoring, system alerts, and capacityreporting on a Data Domain system by using Simple Network Management Protocol(SNMP).
SNMP enables monitoring Data Domain activities, events, capacity, and system statusin the same way as monitoring activities, events, capacity, and system status for theAvamar server. Configure SNMP settings when adding a Data Domain system to theAvamar configuration.
The Avamar Reports Guide provides more information about creating reports. Toanalyze the system, run the reports.
The Avamar and Data Domain System Integration Guide provides more information onmonitoring system status for a Data Domain system.
Security with Data Domain system integrationThe following sections provide details on security in an Avamar environment with DataDomain for encryption and user access.
EncryptionThe DD Boost library supports data encryption between the Avamar client and theData Domain system for DDOS 5.5 or newer. The DD Boost library does not supportdata encryption between the Avamar client and the Data Domain system for DDOS5.4.
Backups from the Avamar client to the Avamar server are always compressed andencrypted.
User accessUse caution when granting users access to the Data Domain system. Never provideauthorization for a user to access the Data Domain system and manually delete thedata.
Data migration to an attached Data Domain systemYou cannot migrate backup data directly from the Avamar server to an attached DataDomain system.
To start using the Data Domain system as the backup target for an Avamar clientinstead of the Avamar server, edit the dataset to use the Data Domain system. Startperforming backups to the Data Domain system. When changing the backup target tothe Data Domain system, perform a full backup.
After you successfully perform a backup to the Data Domain system, you can deletethe earlier backups from the Avamar server.
Data Domain System Integration
394 Avamar 18.2 Administration Guide

Enforcement of backups to Data DomainIn addition to selecting Data Domain as the storage target for a backup, administratorscan configure an Avamar server to reject backups that are not destined for theconfigured Data Domain. This enforcement covers backups that you configurethrough the Avamar Administrator and the AUI, as well as from command-lineinterfaces and other tools.
Without backup enforcement, if a backup does not specify Data Domain as thestorage target, the Avamar server stores both the backup data and metadata. Thisscenario can lead to unexpected capacity utilization issues. With backup enforcement,backups that do not specify Data Domain as the storage target fail with a warning.Backups that specify a Data Domain storage target continue normally.
Backup enforcement is disabled by default. In this state, the server behavior isunchanged from previous Avamar releases.
Note
Backup enforcement does not affect the normal practices for storing and replicatingmaintenance backups of the Avamar server, such as data from the MCS.
Configuring backup enforcement affects the replication behavior for environmentsthat store any backups on the source Avamar server. The choice of enforcementmode may also impose software requirements on the source Avamar server.
The Avamar and Data Domain System Integration Guide provides more information.
Preparing to add a Data Domain systemBefore you add a Data Domain system to the Avamar configuration, install andconfigure both the Avamar server and the Data Domain system. Ensure that theenvironment meets the system requirements, and create a DD Boost user account onthe Data Domain system.
System requirements for Data Domain system integrationEnsure that the environment meets the necessary system requirements before addinga Data Domain system to the Avamar configuration.
The following table lists the requirements for the Data Domain system.
Table 127 Data Domain system requirements
Feature or specification Requirement for use with Avamar
Data Domain Operating System (DD OS) DD OS 5.3 or newer
DD Boost DD Boost 2.6 or newer
Data Domain System Integration
Enforcement of backups to Data Domain 395

Table 127 Data Domain system requirements (continued)
Feature or specification Requirement for use with Avamar
Note
DD Boost software enables backup servers tocommunicate with storage systems withoutthe need for Data Domain systems to emulatetape. There are two components to DD Boost:one component that runs on the backupserver and another that runs on the DataDomain system. In the context of Avamar, thecomponent that runs on the backup server(DD Boost libraries) is integrated into theAvamar client. DD Boost software is anoptional product that requires a license tooperate on the Data Domain system.
Data Domain device type Avamar supports any Data Domain systemthat supports the execution of the requiredDD OS version.
Data Domain File System Enable Data Domain File System by usingeither the Data Domain System Manager orCLI. After you enable file system operations, itmay take up to 10 minutes before AvamarAdministrator correctly reflects the status ofthe Data Domain system. The time delay isincreased slightly when the Data Domainsystem is using the DD Extended Retentionoption. Do not perform backups, restores, orsystem maintenance operations until thestatus appears correctly in AvamarAdministrator. Otherwise, backups, restores,or system maintenance operations may fail.
DD Boost Enable DD Boost on the Data Domain system.When you enable DD Boost, DD Boostbecomes the preferred method ofconnectivity for any clients that are enabledfor DD Boost. While this method is acceptablefor clients that can take advantage of DDBoost features, it can result in performancedegradation for other clients. Proper duediligence and effective data gathering arekeys to avoiding such interactions, especiallyduring upgrades.
DD Boost user account The DD Boost library uses a unique loginaccount name that is created on the DataDomain system. This account name is knownas the DD Boost account. Only one DD Boostaccount exists per Data Domain system. If theaccount is renamed and/or the password ischanged, these changes must be immediately
Data Domain System Integration
396 Avamar 18.2 Administration Guide

Table 127 Data Domain system requirements (continued)
Feature or specification Requirement for use with Avamar
updated on the Avamar system by editing theData Domain configuration options. Failure toupdate the DD Boost account informationcould yield integrity check errors or backupand restore problems. The DD Boost accountmust have administrator privileges.
Capacity requirementsCarefully assess backup storage needs when evaluating how much data to store onthe Data Domain system and the Avamar server. Add estimates from data that is sentto the Data Domain system from any other servers.
When the Data Domain system reaches its maximum storage capacity, no furtherbackups to the Data Domain system occur until additional capacity is added or oldbackups are deleted.
Requirements when using other backup productsData Domain systems can use other third-party backup and archiving software. TheAvamar server does not assume having sole ownership of the Data Domain system. Ifthe system is shared with other software products, ensure that proper sizing isevaluated.
The Avamar server does not use the native Data Domain system snapshot andreplication features. Replication occurs through the DD Boost SDK library by usingcopying and cloning. However, other third party products might use the native DataDomain system snapshot and replication features. In this case, a snapshot of an entireData Domain system or a replication of an entire Data Domain system includes theAvamar data.
Network requirementsThe Avamar server and all Data Domain systems must be on the same local network.Do not connect the Avamar server and Data Domain systems over a Wide AreaNetwork (WAN). Configurations that use a WAN are not supported.
You can use Avamar replication over a WAN to replicate data from source Avamarservers and Data Domain systems to target Avamar servers and Data Domain systems.
Before integrating a Data Domain system with an Avamar server, ensure that enoughnetwork bandwidth is available. Verify that the network infrastructure provides morebandwidth than the bandwidth required by the maximum throughput of the DataDomain system. This step is to obtain the maximum throughput available on a DataDomain system (for restores, level zero backups, and subsequent incremental backupsafter a level-zero backup).
The network configuration must also meet the following requirements:
l Assign a Fully Qualified Domain Name (FQDN) to each Data Domain system.
l Do not use IP addresses in place of hostnames when registering a Data Domainsystem. This action can limit the ability to route optimized duplication trafficexclusively through a registered interface.
l Ensure that DNS on the Data Domain system is correctly configured.
Data Domain System Integration
System requirements for Data Domain system integration 397

l Ensure that forward and reverse DNS lookups work between the Avamar server,the Data Domain system, and all backup and restore clients.
l Use Hosts files to resolve hostnames to non-routable IP addresses.
l Do not create secondary hostnames to associate with alternate or local IPinterfaces.
NTP requirementsThe Avamar server, the Data Domain system, and all Avamar clients must use thesame Network Time Protocol(NTP) server.
Port usage and firewall requirementsTo enable communication between Avamar and the Data Domain systems, review andimplement the port usage and firewall requirements in the following documents, whichare available on Avamar Support:
l Avamar Product Security Guide
l Port Requirements for Allowing Access to Data Domain System Through a FirewallTechnical Note
Additional configuration settings when adding a Data Domain to the 8TB or 16 TB AVEBefore adding a Data Domain system to the 8 TB or 16 TB Avamar Virtual Edition(AVE), it is recommended to modify the following Avamar GSAN settings in order toimprove system performance.
l avmaint config maxcompdatastripe=20971520 --avamaronly
l avmaint config checkdiratomicrefs=true --avamaronly
Creating a DD Boost user accountBefore you can add a Data Domain system to the Avamar configuration, prepare theData Domain system by enabling DD Boost and creating a DD Boost user account forthe Avamar server. This action is performed to access the Data Domain system forbackups and restores (and replication, if applicable).
If you change the DD Boost account name or password after you create the account,remember to edit the Data Domain system configuration in Avamar Administrator.Otherwise all backups, restores, and maintenance activities fail.
Procedure
1. Disable DD Boost on the Data Domain system by logging in to the Data DomainCLI as an administrative user and typing the following command:
ddboost disable
2. Create the DD Boost user account with administrator privileges by typing thefollowing command:
user add username role adminwhere username is the username for the new account.
3. Set the new account as the DD Boost user by typing the following command:
ddboost set user-name usernamewhere username is the username for the account.
Data Domain System Integration
398 Avamar 18.2 Administration Guide

4. Enable DD Boost to allow the changes to take effect by typing the followingcommand:
ddboost enable
Adding a Data Domain systemYou can add a Data Domain system to Avamar by authenticating the Data Domainsystem with credentials, or by key-based SSH. If the login method by providingcredentials (username/password) for a Data Domain system is disabled, you mustimport the SSH public key (/usr/local/avamar/lib/ddr_key.pub) from the Avamarserver and add the key to the Data Domain system manually before connecting them.Ensure that you have additional access to log in to the Data Domain system when loginmethod by providing credentials for a Data Domain system is disabled.
Before you begin
Perform the following steps if you want to authenticate the Data Domain system bykey-based SSH:
1. Log in to the Data Domain system either as a sysadmin or with avamar_ostuserprivileges where avamar_ostuser is the name of the DD Boost user for Avamar onthe Data Domain system.
2. Add the SSH public key (/usr/local/avamar/lib/ddr_key.pub) from the Avamarserver to the SSH authorized keys file on the Data Domain system by typing thecommand: adminaccess add ssh-key user Avamar_ostuser.
3. Ensure that the public key is successfully added to the Data Domain system bytyping the command: adminaccess show ssh-key user Avamar_ostuser.
Procedure
1. In Avamar Administrator, click the Server launcher link.
The Server window is displayed.
2. Click the Server Management tab.
3. Select Actions > Add Data Domain System.
The Add Data Domain System dialog box appears.
4. On the System tab, specify Data Domain system information:
a. In the Data Domain System Name box, type the fully qualified domain nameof the Data Domain system.
Note
Do not use an IP address or a secondary hostname that associates withalternative or local IP interfaces. It may limit the ability of Avamar to routeoptimized deduplication traffic.
b. In the DDBoost User Name box, type the username of the DD Boostaccount for Avamar to access the Data Domain system for backups,restores, and replication.
c. In the Password box, type the password for the account that Avamar usesto access the Data Domain system for backups, restores, and replication.
d. In the Verify Password box, type the password again for verification.
Data Domain System Integration
Adding a Data Domain system 399

e. If you have more than one Data Domain system that is associated withAvamar, you can specify one Data Domain system to be the defaultreplication storage. Select Use system as default replication storage ifthis system is the default replication storage.
f. To store checkpoints for a single-node Avamar server or Avamar VirtualEdition (AVE) server on the Data Domain system instead of the Avamarserver, select the Use as target for Avamar Checkpoint Backupscheckbox.
g. Select the Use certificate authentication for REST communicationcheckbox to enable Avamar to use certificate-based authentication whileperforming an operation with Data Domain system using REST-basedcommunication.
Note
The Use certificate authentication for REST communication checkbox isdisplayed only on the Avamar AUI.
h. To view the maximum number of streams that the Data Domain systemsupports, click Verify.
i. Specify the maximum number of streams that Avamar can use at any onetime to perform backups and restores:
l To specify a defined number of streams, type the number in the Maxused by Avamar box.
l To specify a maximum number of streams which are based on thepercentage of the total number of supported streams:
a. Type the percentage in the Max used by Avamar box.
b. Select the As percentage of the max limit checkbox.
Consider both the maximum number of streams that the Data Domainsystem supports, as well as whether other applications are using streams tosend data to and receive data from the Data Domain system.
If the writing to and reading from the Data Domain system use all availablestreams, then Avamar queues backup or restore requests until one or morestreams become available.
5. To configure SNMP, click the SNMP tab.
SNMP configuration enables Avamar to collect and display data for systemhealth monitoring, system alerts, and capacity reporting.
6. Verify the SNMP configuration:
l The Getter/Setter Port Number box lists the port on the Data Domainsystem from which to receive and on which to set SNMP objects. Thedefault value is 161.
l The SNMP Community String box lists the community string Avamar usesfor read-only access to the Data Domain system.
l The Trap Port Number box lists the trap port on the Avamar server. Thedefault value is 163.
7. To configure the cloud tier feature, click the Tiering tab.
Avamar software uses Cloud tier to move Avamar backup data from a DataDomain system to the cloud.
Data Domain System Integration
400 Avamar 18.2 Administration Guide

8. Click OK.
A progress message appears.
9. When the operation completes, click Close.
Results
When you add a Data Domain system to the Avamar configuration, Avamar creates anMTree on the Data Domain system for the Avamar server. The MTree refers to thedirectory created within the DD Boost path. Data Domain systems support a maximumof 100 MTrees. If you reach the limit, you cannot add the Data Domain system to theAvamar configuration.
Data Domain System Integration
Adding a Data Domain system 401

Data Domain System Integration
402 Avamar 18.2 Administration Guide

APPENDIX A
Command Shell Server Logins
This appendix includes the following topics:
l User accounts.................................................................................................. 404l Starting command shell sessions......................................................................404l Switching user IDs........................................................................................... 404l Using sudo....................................................................................................... 405
Command Shell Server Logins 403

User accountsThe following user accounts are commonly used for system administration andmaintenance tasks:
l root
l admin
The admin account requires authentication by Secure Shell (SSH).
Starting command shell sessionsLog in to an Avamar server or utility node through SSH as the admin user. This actionis performed for maintenance tasks and configuration for the Avamar system.
Before you begin
Note
Cryptographic changes in Avamar 7.5.1 require the use of PuTTY 0.7 or later, andWinSCP 5.11.1 (build 7725) or later.
Procedure
l To start a command shell session on a single-node server, open a command shelland log in to the server as admin.
l To start a command shell session on a multi-node server:
a. Open a command shell and log in to the utility node as admin.
b. Load the admin OpenSSH key by typing the following commands:
ssh-agent bashssh-add ~admin/.ssh/admin_key
c. When prompted, type the admin_key passphrase and press Enter.
Switching user IDsYou can switch the user of a command shell session to root by typing su, and switchback to the previous login ID by typing exit. When you switch the user of a commandshell session to admin, you must also load the admin OpenSSH key.
Procedure
1. Switch user to the admin user account and login shell by typing su - admin.
2. When prompted for a password, type the admin password and press Enter.
3. Load the admin OpenSSH key by typing:
ssh-agent bashssh-add ~admin/.ssh/admin_key
Command Shell Server Logins
404 Avamar 18.2 Administration Guide

Note
To determine the active user account (login ID) of a shell session, type whoami.
Using sudoOn Gen4 and later Avamar Data Stores, the admin user accounts are automaticallyadded to the sudoers file. This option enables admin users to run a limited set ofcommands that would otherwise require operating system root permission.
Prefixing commands with sudoInstead of switching user to root with the su command, the admin user can directlyissue commands that require root permissions by prefixing each command with sudo.
For example, the following command installs MyPackage.rpm:
sudo rpm -ivh MyPackage.rpmIf prompted for a password, type the password and press Enter.
You might be periodically prompted to retype the admin password when prefixingother commands with sudo.
Command Shell Server Logins
Using sudo 405

Command Shell Server Logins
406 Avamar 18.2 Administration Guide

APPENDIX B
Plug-in Options
This appendix includes the following topics:
l How to set plug-in options............................................................................... 408l Backup options................................................................................................ 408l Restore options................................................................................................. 411
Plug-in Options 407

How to set plug-in optionsPlug-in options enable you to control specific actions for on-demand backups,restores, and scheduled backups. The available plug-in options depend on theoperation type and plug-in type.
Specify plug-in options in the AUI for on-demand backup or restore wizards, or when adataset for a scheduled backup is created. Set plug-in options with the graphical userinterface (GUI) controls (text boxes, check boxes, radio buttons, and so forth). Typean option and its value in the Key and Value fields.
NOTICE
The Avamar software does not check or validate the information that is typed in theShow Free Form section of the More Options pane. The values in the Key and Valuefields override settings that are specified with the GUI controls for the options.
Backup optionsThe backup options that appear depend on the type of plug-in.
This section describes the backup options for the following plug-ins:
l AIX file system
l FreeBSD file system
l HP-UX file system
l Linux file system
l Macintosh file system
l NetWare file system
l SCO OpenServer file system
Backup options for the Avamar Plug-in for Microsoft Windows are available in theAvamar for Windows Server User Guide. Backup options for application plug-ins, such asSQL Server and SharePoint VSS, are available in the user guide for the plug-in.
The following tables describe the options that are available when performing an on-demand backup or when configuring a dataset for scheduled backups for the listed filesystem plug-ins.
Table 128 Backup plug-in options
Option Description
Store backup on Data Domainsystem
Stores the backup on a configured Data Domain systeminstead of on the Avamar server. To store the backup on aData Domain system, select the checkbox and then select theData Domain system from the list.
Encryption method to DataDomain system
Specifies the encryption method for data transfer betweenthe client and the Data Domain system.
Backup label Assigns this descriptive label to the backup.
Plug-in Options
408 Avamar 18.2 Administration Guide

Table 129 Backup plug-in options for (NetWare only) SMS Authentication
Option Description
Server login ID Specifies the SMS login username. For example,CN=admin.O=HOSTNAME_CTX.
Server password Specifies the password for the SMS login username.
Snapshot stored-on pool Specifies the snapshot stored-on pool name.
Table 130 Backup plug-in options for logging
Option Description
List backup contents Specifies how much information about the backup contents toinclude in the log files. The information includes:
l No file listing
l List file names
l List files and dates
Informational message level Specifies how many informational messages to include in thelog files. This option includes:
l No informationals—Suppresses all informationalmessages, but includes errors and warnings in the logfiles.
l Some informationals—Includes some informationalmessages in the log files.
l Many informationals—Includes additional statusinformation in the log files.
l All informationals—Provides maximum information.Includes all informational messages, errors, and warningsin the log files.
Report advanced statistics Specifies whether to write advanced timing and deduplicationstatistics to the log files.
Enable debugging messages Specifies whether to write maximum information to log files,which creates large log files.
Table 131 Backup plug-in options for file system traversal
Option Description
Do not traverse any mounts Specifies whether to traverse mount points during the backup.
Traverse fixed-disk mounts Specifies whether to traverse only hard disk file system mountduring the backup.
Traverse fixed-disk andremote network mounts
Specifies whether to traverse both hard disk and NFS networkmount points during the backup.
Force traversal of specifiedfile system type(s)
Accepts a comma-separated list of one or more file systemtypes (for example, nfs, ext2, jfs, xfs) that should not betraversed during this backup.
Plug-in Options
Backup options 409

Table 132 Backup plug-in options for pre-script
Option Description
Run user-defined script atbeginning of backup
Runs a user-defined script at the beginning of the backupsession. The script must be located in /usr/local/avamar/etc/scripts.
Abort backup if script fails Specifies whether to stop the backup when the script returnsa non-zero status code.
Table 133 Backup plug-in options for post-script
Option Description
Run user-defined script atend of backup
Runs a user-defined script at the end of the backup session.The script must be located in /usr/local/avamar/etc/scripts.
Exit process with scriptfailure exitcode
Specifies whether avtar should exit with the exit code of the
script instead of a standard avtar exit code.
Table 134 Backup plug-in client cache options
Option Description
Check client-side caches andreport inconsistencies
If selected, a backup does not occur. Instead, Avamarperforms a validation check of the client-side cache with theAvamar server.
Check and repair client-sidecaches
If selected, a backup does not occur. Instead, Avamarperforms a validation check of the client-side cache with theAvamar server, and repairs inconsistencies.
Maximum client file cachesize (MBs)
Specifies the maximum client file cache size in MB. A negativevalue indicates a fraction of RAM. For example, -8 specifiesthat no more than 1/8th of physical RAM should be allocatedto the client file cache.
Maximum client hash cachesize (MBs)
Specifies the maximum client hash cache size in MB. Anegative value indicates a fraction of RAM. For example, -8specifies that no more than 1/8th of physical RAM should beallocated to the client hash cache.
Table 135 Backup plug-in advanced options
Option Description
Client-side flag file Specifies the path to a flag file on the client that containsadditional option settings.
Network usage throttle(Mbps)
Specifies a setting that reduces network usage to a specifiedrate, expressed as megabits/second. For example, 0 =unrestricted, 50% of a T1 = 0.72.
Directly connect to all servernodes
Specifies whether to establish multiple connections to theserver. Multiple connections can improve backup performance.
Plug-in Options
410 Avamar 18.2 Administration Guide

Table 136 Quota limit per backup
Option Description
Soft limit size (MBs) Specify the soft limit size of a backup. If the size of the backupsource exceeds the soft limit, the backup succeeds with awarning. If you specify both the soft and hard limit size, ensurethat the soft limit size is smaller than the hard limit size.
Hard limit size (MBs) Specify the hard limit size of a backup. If the size of thebackup source exceeds the hard limit, the backup fails.
Restore optionsThe restore options that are available depend on the type of plug-in.
This section describes the backup options for the following plug-ins:
l AIX file system
l FreeBSD file system
l HP-UX file system
l Linux file system
l Macintosh file system
l NetWare file system
l SCO OpenServer file system
Restore options for the Avamar Plug-in for Microsoft Windows are available in theAvamar for Windows Server User Guide. Restore options for application plug-ins, suchas SQL Server and SharePoint VSS, are available in the user guide for the plug-in.
File system plug-in restore optionsThe following table describes the options that are available when you perform arestore using the listed file system plug-ins.
Table 137 File system plug-in restore options
Option Description
Overwrite existing files Controls behavior when the file to be restoredexists. One of the following:
l Never
l Always
l Generate New Name
l If Modified
l If Newer
Encryption method from Data Domain system If the backup was stored on a Data Domainsystem, select the encryption method to usefor data transfer from the Data Domainsystem to the client.
Plug-in Options
Restore options 411

NetWare only SMS Authentication restore optionsThe following table describes the options that are available when you perform arestore using NetWare only SMS Authentication.
Table 138 NetWare only) SMS Authentication restore plug-in options
Option Description
Server login ID (NetWare only) Specifies the SMS loginusername. For example,CN=admin.O=HOSTNAME_CTX.
Server password (NetWare only) Specifies the password forthe SMS login username.
Logging restore plug-in optionsThe following table describes the logging options that are available when you performa restore.
Table 139 Logging restore plug-in options
Option Description
List backup contents Specifies how much information about thebackup contents to include in the log files.The information includes:
l No file listing
l List file names
l List files and dates
Informational message level Specifies how many informational messagesto include in the log files. This option includes:
l No informational—Suppresses allinformational messages, but includeserrors and warnings in the log files.
l Some informationals—Includes someinformational messages in the log files.
l Many informationals—Includes additionalstatus information in the log files.
l All informationals—Provides maximuminformation. Includes all informationalmessages, errors, and warnings in the logfiles.
Report advanced statistics Specifies whether to write advanced timingand deduplication statistics to the log files.
Enable debugging messages Specifies whether to write maximuminformation to log files, which creates verylarge log files.
Pre-script restore plug-in optionsThe following table describes the pre-script options that are available when youperform a restore.
Plug-in Options
412 Avamar 18.2 Administration Guide

Table 140 Pre-script restore plug-in options
Option Description
Run user-defined script at beginning ofrestore
Runs a user-defined script at the beginning ofthe restore session. The script must belocated in /usr/local/avamar/etc/scripts.
Abort restore when script fails When the script returns a non-zero statuscode, specify whether to stop the restore.
Post-script restore plug-in optionsThe following table describes the post-script options that are available when youperform a restore.
Table 141 Post-script restore plug-in options
Option Description
Run user-defined script at end of restore Runs a user-defined script at the end of therestore session. The script must be locatedin /usr/local/avamar/etc/scripts.
Exit process with script failure exitcode Specifies whether avtar should exit with the
exit code of the script instead of a standardavtar exit code.
Client cache restore plug-in optionsThe following table describes the client cache options that are available when youperform a restore.
Table 142 Client cache restore plug-in options
Option Description
Check client-side caches and reportinconsistencies
If selected, a restore does not occur. Instead,Avamar performs a validation check of theclient-side cache with the Avamar server.
Check and repair client-side caches If selected, a restore does not occur. Instead,Avamar performs a validation check of theclient-side cache with the Avamar server, andrepairs inconsistencies.
Rebuild client-side caches from most recentbackup
Does not restore data. If selected, Avamaruses the contents of the last backup to re-create the client-side file cache.
Advanced restore plug-in optionsThe following table describes the Advanced plug-in options that are available whenyou perform a restore.
Plug-in Options
Restore options 413

Table 143 Advanced restore plug-in options
Option Description
Do not descend into subdirectories Specifies whether to restore only thespecified top-level directory and not anysubdirectories.
Recreate original path beneath targetdirectory
Specifies whether to re-create the originalpath to files and directories beneath thespecified target directory. For example, if yourestore /usr/MyDir/MyFile to /tmp and
you select this option, then the full path tothe restored file is /tmp/usr/MyDir/MyFile.
Directly connect to all server nodes Specifies whether to establish multipleconnections to the server. Multipleconnections can improve restore performanceunder certain circumstances.
Plug-in Options
414 Avamar 18.2 Administration Guide

APPENDIX C
Adding Files to the Avamar Web Restore Page
This appendix includes the following topics:
l Adding files to the Avamar Web Restore Downloads page................................ 416l Adding files to the Avamar Web Restore Documentation page......................... 417
Adding Files to the Avamar Web Restore Page 415

Adding files to the Avamar Web Restore Downloads pageYou can add software files that are specific to your environment to the Downloadspage, which you access from the Avamar Web Restore page for Avamar Desktop/Laptop.
At installation, the Downloads page is populated with default software files. Ifrequired, include additional software on the Downloads page.
Procedure
1. Open a shell command and log in to the server as admin.
2. Change directory to /data01/avamar/src/downloads/ by typing thefollowing command:
cd /data01/avamar/src/downloads/
3. Create a folder by typing the following command:
mkdir folder_namewhere folder_name is the location in which you want to place files, for example,the Golden_Tenant folder.
4. Change directory to /data01/avamar/src/downloads/folder_name.
For example:
cd /data01/avamar/src/downloads/Golden_Tenant
5. Copy files that you want to be downloadable to the user into the folder.
6. Change directory to /usr/local/avamar/httpds/downloads/ by typingthe following command:
cd /usr/local/avamar/httpds/downloads/
7. Create an XML file to define the folder.
For example, for the Golden Tenant folder, the XML file is similar to thefollowing example:
<?xml version="1.0" encoding="UTF-8"?><download heading="Golden Tenant" displayName="Plug-Ins" path="/DPNInstalls/downloads/Golden_Tenant/" />
where:
l heading—Defines the root folder name.
l displayName—Defines the sub-folder name.
l path—Defines the location of the software file on disk, in which /DPNInstalls/downloads points to /data01/avamar/src/downloads on the Avamar server.
8. Refresh the Downloads page to verify that you can see the newly uploadedfiles.
Adding Files to the Avamar Web Restore Page
416 Avamar 18.2 Administration Guide

Adding files to the Avamar Web Restore Documentationpage
You can add documents that are specific to your environment to the Documentationpage, which you access from the Avamar Web Restore page for Avamar Desktop/Laptop.
At installation, you can access the latest Avamar documentation by clicking the OnlineSupport link on the Documentation page. If required, include additional guides andmanuals on the Documentation page.
Procedure
1. Open a shell command and log in to the server as admin.
2. Change directory to /space/avamar/doc/downloads/ by typing thefollowing command:
cd /space/avamar/doc/downloads/
3. Copy files that you want to be downloadable to the user into the folder.
4. Change directory to /usr/local/avamar/httpds/docs/ by typing thefollowing command:
cd /usr/local/avamar/httpds/docs/
5. Create an XML file to define a document.
For example, for the Golden Tenant User Guide, the XML file is similar to thefollowing example:
<?xml version="1.0" encoding="UTF-8"?><download heading="40" displayName="Golden Tenant User Guide" path="/axiondocs/cur/GoldTenantUG.pdf/" />
Where:
l heading—Is set to the default value of 40.
l displayName—Defines the name of the document as it is displayed in theDocumentation page.
l path—Defines the location of the document file on disk, in which /axiondocs/cur points to /space/avamar/doc/downloads on theAvamar server.
6. to verify that you can see the newly uploaded files, refresh the Documentationpage.
Adding Files to the Avamar Web Restore Page
Adding files to the Avamar Web Restore Documentation page 417

Adding Files to the Avamar Web Restore Page
418 Avamar 18.2 Administration Guide

GLOSSARY
A
accelerator The Avamar NDMP Accelerator (accelerator) is a specialized Avamar server node that,when used as part of an Avamar system, enables backup and restore of networkaddressed storage (NAS) systems by way of the network data management protocol(NDMP).
activation The process of passing the client ID (CID) back to the client, where it is stored in anencrypted file on the client file system. See also client activation
authentication system A username and password system that is used to grant user access to the Avamarserver. Avamar supports its own internal authentication system (avs), as well as severalexternal authentication systems (OpenLDAP, Windows Active Directory, NIS, andSMB).
Avamar Administrator A graphical management console software application that is used to remotelyadminister an Avamar system from a supported Windows or Linux client computer.
Avamar client A computer or workstation that runs Avamar software and accesses the Avamar serverover a network connection. Avamar client software comprises a client agent and one ormore plug-ins.
Avamar DownloaderService
A Windows-based file distribution system that delivers software installation packages totarget Avamar systems.
Avamar File System(AvFS)
A browsable virtual file system view of the normally inaccessible Avamar HFS. TheAvamar File System provides read-only accessibility to all backups stored on an Avamarserver down to the individual file level. This allows an Avamar server to be used as anonline long-term historical strategic enterprise information store in addition to a backupand restore repository.
Avamar InstallationManager
A web interface that manages installation packages.
Avamar server The server component of the Avamar client/server system. Avamar server is a fault-tolerant, high-availability system that efficiently stores the backups from all protectedclients. It also provides essential processes and services required for data restores,client access, and remote system administration. Avamar server runs as a distributedapplication across multiple networked storage nodes.
Avamar Web Access A browser-based user interface that provides access to the Avamar server for theexpress purpose of restoring files to a client.
AvInstaller A backend service that executes and reports package installations.
Avamar 18.2 Administration Guide 419

B
backup A point-in-time copy of client data that can be restored as individual files, selected data,or as an entire backup.
backup policy In the AUI, a backup policy specifies a dataset, schedule, and retention settings that areapplied to a client or a group of clients. A backup policy must contain at least oneAvamar client. If the backup policy contains two or more clients, the clients must belongto the same Avamar domain. You can override backup policy settings at the client level.
C
client activation The process of passing the client ID (CID) back to the client, where it is stored in anencrypted file on the client file system. See also activation
client agent A platform-specific software process that runs on the client and communicates with theManagement Console Server (MCS) and with any plug-ins installed on that client.
client registration The process of establishing an identity with the Avamar server. When Avamarrecognizes the client, it assigns a unique client ID (CID), which it passes back to theclient during client activation. See also registration
ConnectEMC A program that runs on the Avamar server and that sends information to AvamarSupport. ConnectEMC is typically configured to send alerts for high priority events asthey occur, as well as reports once daily.
D
dataset A policy that defines a set of files, directories, and file systems for each supportedplatform that are included or excluded in backups across a group of clients. A dataset isa persistent and reusable Avamar policy that can be named and attached to multiplegroups.
DNS Domain Name Server. A dynamic and distributed directory service for assigning domainnames to specific IP addresses.
domain A feature in Avamar Administrator that is used to organize large numbers of clients intonamed areas of control and management.
E
Email Home An optional feature that uses the High Priority Events profile and Notification scheduleto regularly send server error and status messages to Avamar Support.
Glossary
420 Avamar 18.2 Administration Guide

EMC repository A repository that contains server installation packages, client installation packages, andmanifest files. The repository is located on the EMC network. Each EMC customer hasa download center that contains files available to them. Outgoing communication fromthe Avamar Downloader Service to the EMC repository is encrypted with SSL over anHTTP connection.
EM Tomcat server(EMT)
The Avamar EM Tomcat server (EMT) provides essential services required to displayAvamar system information, and provides a mechanism for managing Avamar systemsusing a standard web browser. The EMT also communicates directly with MCS.
ESRS EMC Secure Remote Support.
F
full replication A full “root-to-root” replication creates a complete logical copy of an entire sourcesystem on the destination system. The replicated data is not copied to the REPLICATEdomain. Instead, it is added to the root domain just as if source clients had registeredwith the destination system. Also, source server data replicated in this manner is fullymodifiable on the destination system. This replication method is typically used forsystem migration (from a smaller Avamar configuration to a larger, possibly multi-nodeconfiguration) or system replacement (for instance, in a case of disaster recovery).
G
group A level of organization in Avamar Administrator for one or more Avamar clients. Allclients in an Avamar group use the same group policies, which include the dataset,schedule, and retention policy.
group policy In Avamar Administration, a group policy is defined as a dataset, schedule, and retentionpolicy for all clients in an Avamar group.
H
HFS Hash File System. The content addressed storage area inside the Avamar server used tostore client backups.
HFS check An Avamar Hash File System check (HFS check) is an internal operation that validatesthe integrity of a specific checkpoint. Once a checkpoint has passed an HFS check, itcan be considered reliable enough to be used for a server rollback.
J
JRE Java Runtime Environment.
L
LAN Local Area Network.
Glossary
Avamar 18.2 Administration Guide 421
local repository The /data01/avamar/repo/packages directory on the utility node or single-nodeserver. This directory contains the most current manifest file from the EMC repository.The Avamar Downloader Service pushes packages from the EMC repository to the localrepository. If a customer site does not allow Internet access, you can manually copypackages into the local repository.
LOFS Loopback File System
M
MAC address Media Access Control Address. A unique hardware address, typically embedded at thelowest level in a hardware assembly, that uniquely identifies each device on a network.
manifest file An XML file listing all the server, client, and workflow packages currently available fordownload from the EMC repository.
MCS Management console server. The server subsystem that provides centralizedadministration (scheduling, monitoring, and management) for the Avamar server. TheMCS also runs the server-side processes used by Avamar Administrator.
module Avamar 1.2.0 and earlier multi-node Avamar servers utilized a dual-module synchronousRAIN architecture in which nodes were equally distributed in two separate equipmentcabinets on separate VLANs. The term “module” is a logical construct used to describeand support this architecture (older multi-node Avamar servers comprised a primarymodule and a secondary module). These legacy systems continue to be supported.However, newer multi-node Avamar servers use a single module architecture, and eventhough Avamar Administrator provides “module detail” information, a module istherefore logically equivalent to the entire server.
N
NAT Network Address Translation.
NDMP Network data management protocol. An open protocol that is used to move data from aNAS system to a backup server.
NFS Network file system.
NIS Network Information Service. An external authentication system that can be used to login to an Avamar server.
node A networked storage subsystem that consists of both processing power and hard drivestorage, and runs Avamar software.
NTP Network Time Protocol. Controls the time synchronization of a client or servercomputer to another reference time source.
Glossary
422 Avamar 18.2 Administration Guide

O
ODBC Open DataBase Connectivity. A standard database access method that makes itpossible to access any data from any application, regardless of which databasemanagement system (DBMS) is handling the data.
OpenLDAP Open Lightweight Directory Access Protocol. An external authentication system thatcan be used to log in to an Avamar server.
P
packages Avamar software installation files, hotfix patches, and OS patches available from theEMC repository. Packages comprise three types:
l Client—A release of Avamar file system or application backup software.
l Server—A new release of Avamar server software, a service pack, or a patch forthe operating system, MC, or GSAN.
l Workflow—A package that runs operations such as adding a node or replacing anode.
Package files use the .avp file extension.
PAM Pluggable Authentication Module. A Linux library that enables a local systemadministrator to define how individual applications authenticate users.
plug-in Avamar client software that recognizes a particular kind of data resident on that client.
plug-in options Options that you specify during backup or restore to control backup or restorefunctionality.
policy A set of rules for client backups that can be named and applied to multiple groups.Groups have dataset, schedule, and retention policies.
R
RAIN Redundant Array of Independent Nodes. A flexible, fault-tolerant architecture thatenables an Avamar server to maintain availability and preserve data storage if singlenodes fail in an Avamar module.
RDMS Relational Database Management System.
registration The process of establishing an identity with the Avamar server. When Avamarrecognizes the client, it assigns a unique client ID (CID), which it passes back to theclient during client activation. See also client registration
replica Replicated copy of a backup.
Glossary
Avamar 18.2 Administration Guide 423

replication Replication is an optional feature that enables an Avamar system to store read-onlycopies of its data on a remote system. The replicated data can be replicas of clientbackups and copies of Avamar system data. Replication supports disaster recovery ofthe Avamar system.
restore An operation that retrieves one or more file systems, directories, files, or data objectsfrom a backup and writes the data to a designated location.
retention The time setting to automatically delete backups on an Avamar server. Retention can beset to permanent for backups that should not be deleted from an Avamar server.Retention is a persistent and reusable Avamar policy that can be named and attached tomultiple groups.
roles A setting in Avamar Administrator that controls which operations each user can performin the Avamar server. Roles are assigned on a user-by-user basis.
S
schedule The ability to control the frequency and the start and end time each day for backups ofclients in a group. A schedule is a persistent and reusable Avamar policy that can benamed and attached to multiple groups.
SSH Secure Shell. A remote login utility that authenticates by way of encrypted securitykeys instead of prompting for passwords. This prevents passwords from travelingacross networks in an unprotected manner.
storage node A node in the Avamar server that provides storage of data.
system migration A planned operation that uses full “root-to-root” replication to copy all data residing ona source Avamar server to a new destination server. If global client IDs (global CIDs) areused, clients that formerly backed up to the source server can continue to operatetransparently without reregistering with the new destination server.
T
TFTP Trivial File Transfer Protocol. A version of the TCP/IP FTP protocol that has nodirectory or password capabilities.
U
utility node In scalable multi-node Avamar servers, a single utility node provides essential internalservices for the server. These services include MCS, Domain Name Server (DNS),External authentication, Network Time Protocol (NTP), and Web access. Becauseutility nodes are dedicated to running these essential services, they cannot be used tostore backups.
V
VLAN Virtual Local Area Network.
Glossary
424 Avamar 18.2 Administration Guide