decontaminating firefighting equipment … _nrcg_how_to...decontaminating items 1. place item (e.g....
TRANSCRIPT
1
DECONTAMINATING
FIREFIGHTING
EQUIPMENT TO
REDUCE THE SPREAD
OF AQUATIC
INVASIVE SPECIES HOW TO GUIDE FOR THE NORTHERN ROCKIES
WILDFIRE MANAGEMENT TEAM
OVERVIEW This HOW TO GUIDE serves as supplement to the National Wildfire Coordinating Group’s Guide to Preventing AIS Transport by Wildfire Operations (PMS 444, January 2017)
LAST UPDATED: June 11, 2018

2
HOW TO GUIDE for the
Decontamination of Wildfire Equipment to Prevent the Spread of Aquatic
Invasive Species Contents Introduction ................................................................................................................................................ 3
Drafting from Water Source ....................................................................................................................... 4
Fire fill sites ............................................................................................................................................. 4
Required Equipment: .......................................................................................................................... 4
Best Management Practices for Fire Fill Sites ......................................................................................... 5
Assembly, Use and Disassembly of Chemical Decontamination Station .................................................... 5
Required Equipment ........................................................................................................................... 5
Decontamination Station Assembly........................................................................................................ 6
Decontaminating Items .......................................................................................................................... 7
Decontamination Station Disassembly ................................................................................................... 8
Montana DEQ Requirements for Disposal .......................................................................................... 8
Assembly and Use of Hot Water Decontamination Station ....................................................................... 8
Required Equipment ........................................................................................................................... 8
Best Management Practices for Hot Water Decontamination ............................................................... 8
APPENDIX A: Field Testing for Footvalve Leaks .......................................................................................... 9
Background information ......................................................................................................................... 9
Equipment List ........................................................................................................................................ 9
Low Pressure Test (3-5 psi) ...................................................................................................................10
High Pressure Test (130 psi) .................................................................................................................10

3
APPENDIX B: Decontamination Sign for Station .......................................................................................11
APPENDIX C: Safety Data Sheets for Chlorine Bleach ...............................................................................12
Product Name: CHLORINE BLEACH ....................................................................................................12
Introduction In the US, the National Invasive Species Management Plan defines an invasive species as “a species that is non-native to the ecosystem under consideration and whose introduction causes or is likely to cause economic or environmental harm or harm to human health.” Invasive species are one of the largest threats to biodiversity, cited as second only to habitat destruction as a result of development. Invasive species are one of the most serious environmental threats of the 21st century.
Over the past 30 years, aquatic invasive species (AIS) have become a prominent concern and focus in managing North America’s freshwaters. Many of these species, including plants, mussels, fish, amphibians, snails, and others, pose a significant threat to water management facilities, water supply infrastructure, and aquatic ecosystems in the Northern Rockies region. This threat involves direct and indirect economic costs to the agriculture sector, industry, and municipalities. It affects aquatic ecosystem integrity and has social and economic impacts on recreation and tourism activities. In the United States, AIS cost the country an estimated $123 billion annually. For example, it is estimated that an infestation of invasive mussels (e.g., quagga or zebra) would create about $500 million in annual losses in the Columbia River Basin, $95 million in Idaho, and $75 million in Alberta if they were to become established.
Watercraft are the most likely source of an AIS introduction to western waters, but all water-based equipment must be considered as a potential vector as well. This includes firefighting equipment and gear, construction equipment, agricultural implements, and seaplanes. In wildland fire management, AIS can be transported via firefighting equipment that contacts or transports untreated water, such as portable pumps (including floatable pumps), portable tanks, helicopter buckets, and internal tanks of fire engines, water tenders, helicopters, and fixed wing aircraft. By being conscious of drafting techniques and following Clean Drain Dry principles, the risk of many types of equipment can be mitigated. The components that have the highest risk of introducing or spreading AIS include foot valves, drafting hoses and helicopter buckets. The Northern Rockies Coordinating Group Directive focuses on these items for mandatory decontamination between uses.
It is recommended that jurisdictions use a stamp or other means of documenting equipment that has been decontaminated to ensure efficiency and reduce waste. Montana Dept. of Natural Resources & Conservation will be piloting the use of a custom stamp that can be applied to Resource Orders when equipment has undergone the necessary decontamination (information to include: ‘AIS Decontaminated Completed’ with room for a date and initial).
This guide will provide step-by-step instructions for setting up and utilizing decontamination stations at wildfire and inspection sites. Every time you are working on a wildfire, it is essential that you these principles are followed:
• Ensure that your firefighting equipment is CLEAN and free of all plants, mud and organic debris, DRAINED of all standing water, and as DRY as possible before it is used again.
• Removing all organic material prior to decontamination is essential as it increases the efficacy of the treatment.

4
• Required methods for decontamination include a hot water or chemical (chlorine bleach) bath. Compliance is mandatory.
• When priming pumps, always use the water source (not the tank water) to reduce the chance of backflow from the engine tank into the water source.
• Whenever possible, bring extra (clean) foot valves to reduce risk of spreading AIS.
This HOW TO GUIDE provides step-by-step instructions on drafting from a water source, setting up and using a decontamination station, and disposing of products once finished at a site. This Guide is serve as a supplement to the National Wildfire Coordinating Group’s Guide to Preventing AIS Transport by Wildfire Operations (PMS 444, January 2017). All protocols and practices in this How To Guide are supported by the science and literature in the PMS 444, and are mandatory in the Northern Rockies region per the Northern Rockies Coordinating Group AIS Directive (effective march 29, 2018). Training slides have also been developed to accompany the NRCG How To Guide and Directive.
Drafting from Water Source
• When possible, fill engines from a municipal hydrant, a water tender, or from a pump assigned to a single drafting source.
• When spraying water to suppress a fire, avoid application of untreated water into local waterbodies (ponds, lakes, rivers, streams, wetlands, seeps, or springs), especially if the water in the tank came from a different watershed. Water delivery equipment and accessories (e.g., fire line hoses, wye valves, nozzles) that do not transfer tank water to waterbodies do not need to be decontaminated.
• To prevent leakage and to maintain the prime, be sure that foot valves are screwed snugly onto drafting hoses and are fully closing and not leaking before and during drafting. If foot valves are leaking, refrain from drafting and replace foot valve with one that is operating properly.
• Priming the engine pump for drafting —To minimize the potential for engine water leakage through the foot valve, prime with water from the drafting source rather than using water from the engine tank. When priming by filling the drafting hose with a bucket, first make sure that the bucket is clean so that it does not transfer AIS. Additionally, don’t leave draft hose full with foot valve engaged and submerged in water source when not pumping.
• Elevate foot valves above the bottom of the waterbody for clean, sediment-free operation—for example, duct tape foot valve to a shovel or place the valve in a hard hat or bucket.
• Remove water drain plug/s from self-priming pumps (e.g., trash pumps) to empty pump housing before moving to a new waterbody.
• When filling the engine tank, avoid tank overflow into the water source.
(See PMS 444 page 6-7 for more information)
Fire fill sites Required Equipment:
• Pump(s) sufficient to keep up with the demand of the equipment drawing water • Porta-tanks(s) sufficient for the demand

5
• If possible, set up the tanks 300’ from the waterway so spilled water is not a risk to contaminate the waterway
Best Management Practices for Fire Fill Sites • Use an approved pump into a porta tank for all apparatus to draft from (instead of all engines
drafting raw water) • This technique greatly reduces risk of contamination by limiting the number of equipment that
must directly fill from the water source. • This also further protects the waterway by limiting the amount of traffic on the banks of the
water source (streams, lakes, ponds, rivers, etc.)
Figure 1: Fire Fill Tank Example
Assembly, Use and Disassembly of Chemical Decontamination Station Required Equipment
• 2ea 30 gallon drum/lid (metal/plastic) OR 32 gallon trash can/lid (NFES001005, NFES001249)
• 2ea Ratchet straps 15’ • 1g Chlorine bleach (household, 6%) • 15g Clean water for solution • 30g Clean water for rinse tank • 1ea Pallet • 1pr Eye protection • 1pr Rubber gloves (common gauntlet style) • 4x 6’ Parachute cord (NFES00533) OR 2 laundry mesh bags with clip to secure • 3ea Document protectors (print SDS, Risk Assessment and Sign and put in protectors) • 1ea Safety Data Sheet (SDS) for chlorine bleach (see appendix A) • 1ea Risk Assessment – fill out and signed (see Appendix B & C for bleach and hot water)
6
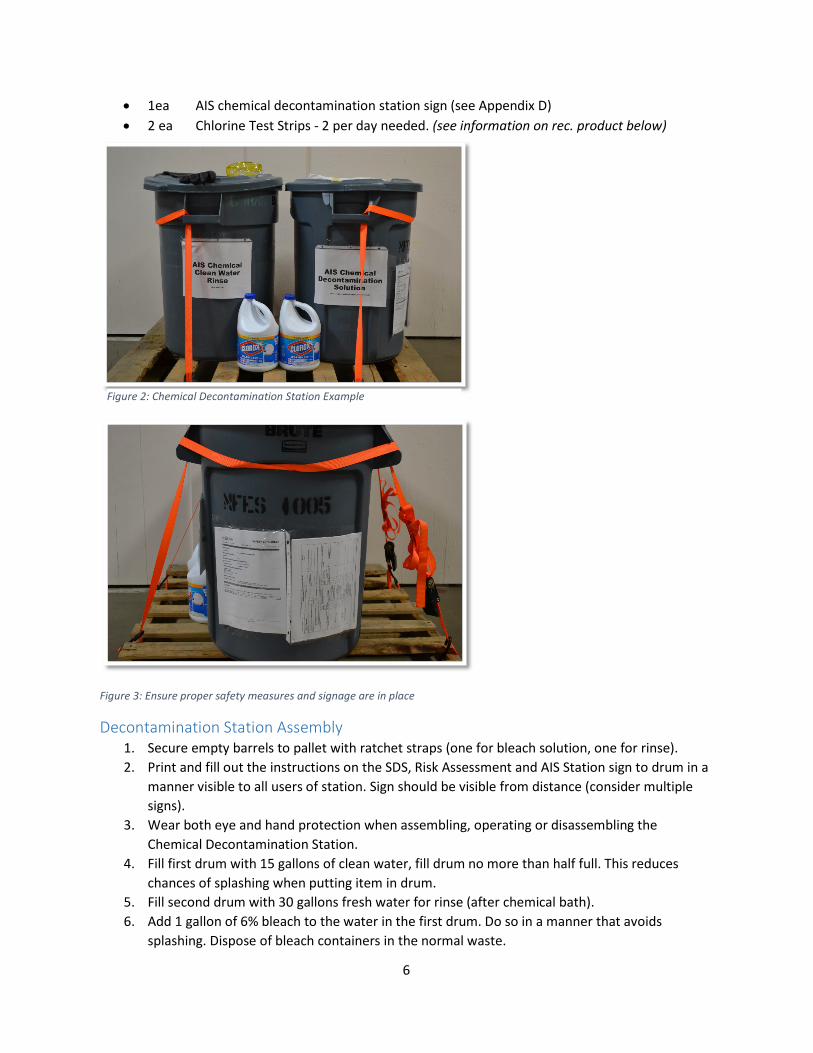
• 1ea AIS chemical decontamination station sign (see Appendix D) • 2 ea Chlorine Test Strips - 2 per day needed. (see information on rec. product below)
Figure 3: Ensure proper safety measures and signage are in place
Decontamination Station Assembly 1. Secure empty barrels to pallet with ratchet straps (one for bleach solution, one for rinse). 2. Print and fill out the instructions on the SDS, Risk Assessment and AIS Station sign to drum in a
manner visible to all users of station. Sign should be visible from distance (consider multiple signs).
3. Wear both eye and hand protection when assembling, operating or disassembling the Chemical Decontamination Station.
4. Fill first drum with 15 gallons of clean water, fill drum no more than half full. This reduces chances of splashing when putting item in drum.
5. Fill second drum with 30 gallons fresh water for rinse (after chemical bath). 6. Add 1 gallon of 6% bleach to the water in the first drum. Do so in a manner that avoids
splashing. Dispose of bleach containers in the normal waste.
Figure 2: Chemical Decontamination Station Example

7
7. Tie 6’ parachute cord sections to handles of trash can (to easily retrieve items from chemical bath). OR insert foot valves and hose into laundry mesh bag and secure with clip to barrel edge.
8. Place lid on drums when not actively placing or removing items from the decontamination solution. This will lessen evaporation and provide increased safety for people.
Figure 4: Draft hose fully submerged in chemical solution
Figure 5: Soak equipment in freshwater after bathing in chemical solution
Decontaminating Items 1. Place item (e.g. foot valves, draft hose) in solution for 10 minutes to decontaminate foot valves
and hose from potential AIS present. 2. After 10 minutes carefully remove item (using parachute cord or laundry mesh bag), allowing
solution to drain back into barrel. 3. When drained remove item completely and rinse in clean water barrel (bleach is corrosive). 4. Place items back into service as a decontaminated item. 5. Use chemical test strips to check bleach concentration each day at noon and 5 pm to ensure
adequate treatment of equipment (Recommended product: Cole Parmer High Level Chlorine Test Strips available at: https://www.coleparmer.com/i/cole-parmer-high-level-chlorine-test-strips-0-to-10-000-ppm-50-pk/1810501).

8
Decontamination Station Disassembly 1. Add clean water to chemical solution to dilute (up to top of barrel or trash can). Solution is
now neutralized and can be disposed of as tap water. 2. See disposal requirements for rural and urban areas in section below. 3. No dilution required for clean water rinse barrel – dispose of on vegetated area. 4. Return other materials to source of supply.
Montana DEQ Requirements for Disposal A discharge of wastewater containing chlorine or other approved oxidants used for disinfection may be subject to permitting requirements. However, for the purpose of preventing aquatic invasive species transport by wildland fire operations, disposal of disinfected water will not require permitting under the conditions discussed herein. The most secure method of disposal in urban areas is at a sanitary wastewater treatment facility. This method will require reasonable access and a minimum service fee. In rural areas, Incident Management Teams may dispose of disinfected water by on-site land application on porous roadways, parking areas, or similar land surfaces following the BMPs below:
• Land apply using tenders with aerating spray bars; • Land apply using high pressure pumps and aerating nozzles; • Land apply in self-contained low areas like gravel pits; • Prevent direct contact or runoff with surface water or natural drainages; • Prevent discharge into municipal sewer systems; • Prevent runoff from vegetated areas; and • Further dilute disinfected water with clean water prior to land application.
Assembly and Use of Hot Water Decontamination Station A fire-equipment specific hot water decontamination system for field settings has not yet been finalized, however options for this treatment are currently being tested and may be developed in the near future. This guide will be updated if a hot water system appropriate for field settings that specifically meets fire equipment needs is developed. However, if you have access to hot water, decontamination of footvalves and hoses can be achieved at 140 F for a minimum of two minutes.
Required Equipment • Portable Fuel powered Hot water wash unit (minimum 200 gallons) • Water source (preferred municipal suppled) • Tender fill into pumpkin or direct hydrant
Best Management Practices for Hot Water Decontamination • Secure hot water wash equipment for footvalve and draft hose. • Hot water bath to put draft and foot valve into 140 – 150 F for a minimum of five minutes. • Secure container (50 gallons) such as a horse trough.

9
APPENDIX A: Field Testing for Footvalve Leaks Background information AIS can be found in the untreated water sources used in firefighting operations, either a natural source (a river or lake) or a human-made water body (a reservoir, canal, or stock tank). Untreated water sources may harbor a variety of AIS, including quagga and zebra mussels, New Zealand mudsnails, whirling disease, didymo (rock snot), and many others.
Of great concern for ground equipment is the possibility that residual tank water contaminated with AIS could be transferred to uncontaminated waterbodies during the drafting process.
Therefore, the following best management practices are recommended:
• Use a properly functioning and tested foot valve during drafting. Ensure the foot valve is screwed on snugly and not leaking.
• To minimize the potential for engine and water tender tank water leakage through the foot valve, prime with water from the drafting source rather than water from the engine tank. When priming using a bucket, first make sure that the bucket is clean prior to priming so the bucket does not transfer AIS. Additionally, during drafting and water tending operations, don’t leave draft hose full with foot valve engaged and submerged in water source when not pumping.
• Care should be taken when drafting to minimize any potential of tank water to come in contact with drafting source; e.g., pump priming or overflow of engine tank when filling.
• Untreated tank water obtained in one location should never be directly discharged into a waterbody at a different location.
In order to be prepared, foot valves on engines and water tenders should be tested monthly during the fire season and whenever an apparatus is moved between waterbodies. The following protocol outlines a simple test method that can be implemented in the field. Because foot valves can leak at either low or high pressures, testing at both pressure levels is required to evaluate the potential for leakage during operational drafting conditions.
Equipment List Some items may be part of an engine’s supplied equipment. Other items may need to be purchased but are easily found at fire equipment vendors.
Items needed to perform the leak test include:
• Suction hose and ratchet straps
• Assorted male-to-female adapters, increasers, and reducers
If a pressure gauge is not present on equipment:
• 1 ½” Pump Test Kit with Gauge – CFE (Cascade Fire Equipment) P/N: 11495 or similar

10
• 1 ½” 90 Degree Elbow – CFE (Cascade Fire Equipment) P/N: 10251-90 or similar
Low Pressure Test (3-5 psi) To perform the low pressure test, fasten a length of suction hose to the engine or water tender (Figure 8). Use ratchet straps or another suitable method, as long as the suction hose is attached safely and securely to the ladder.
To adjust for size of the foot valve (e.g., 1½”, 3”, or other), use a combination of male-to-female adapters, increasers, and/or reducers to attach the foot valve to the suction hose (Figure 9). Fill the suction hose with 6 to 10 feet of water to obtain 3-5 psi (2’ of hose = 1 psi). The weight of the water provides the pressure on the foot valve. Check the foot valve for 3 to 5 minutes. There should be no leakage. If leakage occurs, replace the foot valve with one that does not leak.
HIGH PRESSURE TEST (130 PSI) To perform the high pressure test, first attach a wye or other suitable shut-off valve to the rear discharge (Figure 10). If a pressure gauge is not available on the equipment, attach a pressure gauge to the wye, then attach the 90 degree elbow and next attach the foot valve. The test set-up should resemble the one shown in Figure 10. Using the engine’s pump, increase the pressure to 130 psi. Check the foot valve for 3 to 5 minutes. There should be no leakage. If leakage occurs, replace the foot valve with one that does not leak.
Thanks to Carl Schaefer at U.S. Forest Service, San Dimas Technology and Development Center, for development of this test protocol.
Figure 10. Pressure valve attached to the footvalve.
Figure 9. Foot valve attached to suction line with various adapters as needed to adjust for foot valve size.
Figure 8 Suction hose with foot valve attached to engine ladder.

11
APPENDIX B: Decontamination Sign for Station *PRINT AND POST AT DECONTAMINATION STATION (multiple signs may be required)

12
APPENDIX C: Safety Data Sheets for Chlorine Bleach Product Name: CHLORINE BLEACH *PRINT AND ATTACHED TO CHLORINE BATH AT DECONTAMINATION STATION
Product Name: CHLORINE BLEACH
Emergency phone: Chemtrec: 800-424-9300 Product Information: 508-583-8066
Company: PACKAGE SUPPLY CORP 355 BODWELL STREET AVON, MA 02322
Date Prepared: 10-25-11 Supersedes: NEW Prepared by: JAS
2. COMPOSITION/INFORMATION ON INGREDIENTS
Component
CAS No.
Exposure Limits
Typical
% by Weight
1. Sodium Chloride 7647-14-5 N/A 75 - 85
2. Sodium dichloroisocyanurate 51580-86-0 N/A 5 - 15
3. Sodium Carbonate 497-19-8 N/A 5 - 15
3. HAZARDS IDENTIFICATION
EMERGENCY OVERVIEW
WARNING: Causes severe eye irritation and /or burns. May cause skin irritation with prolonged contact. Inhalation of mist can cause damage to respiratory tract. Harmful if swallowed. Avoid contact with eyes, skin and clothing. Wash thoroughly after handling. Avoid
breathing mist. Do not take internally.
EFFECTS of OVEREXPOSURE:
CARCINOGENICITY:
NTP: No IARC: No OSHA: No
EYES: Causes severe eye burns on contact. SKIN: Repeated or prolonged contact causes skin burns INHALATION: Inhalation of dust and/or fumes causes choking & irritation of the mucous membranes. INGESTION: Can result in severe gastric irritation, nausea, vomiting, and pain. CHRONIC EFFECTS and MEDICAL CONDITIONS: The effects of long-term, low-level exposures to this product have not been determined. Safe handling of this material on a long-term basis should emphasize the avoidance of all effects from repetitive acute exposure. This product may aggravate existing eye, skin and respiratory conditions.
EYES: Flush with copious amounts of water for at least 15 minutes, lifting upper and lower lids occasionally. Get immediate medical attention. SKIN: Immediately flush with water. Remove contaminated clothing. Launder contaminated clothing before reuse. INHALATION: Remove to fresh air. Flush mouth and nasal passages with water. Get medical attention. INGESTION: If swallowed, give several glasses of water. Do not induce vomiting. If vomiting does occur, give fluids again and keep head below hips to help prevent aspiration. Do not give anything by mouth to an unconscious person. Get immediate medical attention.
PACKAGE SUPPLY CORP.
1. CHEMICAL PRODUCT AND COMPANY IDENTIFICATION
4. FIRST AID MEASURES

13
FLAMMABLE PROPERTIES: Flash Point: None Test: Tag N/A Explosive Limits: LEL: N/A UEL: N/A
EXTINGUISHING MEDIA: Deluge with water. SPECIAL PROCEDURES & UNUSUAL HAZARDS: Product decomposes to form chlorine gas. Use NIOSH approved canisters for chlorine. Remove any containers to open air and flood with water. FIREFIGHTING INSTRUCTIONS: Firefighters should wear NIOSH approved, positive pressure, self-contained breathing apparatus and full protective clothing when appropriate.
Shovel up spills at once and immediately remove to a clean container outside of the building. DO NOT MIX WITH TRASH OR OTHER CHEMICALS. Use large quantities of water to dissolve remaining residues and ventilate area. May be neutralized with sodium thiosulphate (hypo).
Handle according to good manufacturing and warehousing practices. Keep containers tightly closed when not in use. Use good personal hygiene practices. Wash hand before eating, drinking, smoking or using toilet facilities. Promptly remove soiled clothing and wash thoroughly before reuse. Store only in tightly closed containers away from heat.
EYE PROTECTION: Avoid splashing. Wear chemical-resistant safety goggles if necessary. Contact lenses must not be worn. PROTECTIVE GLOVES: Depending on conditions of use, protective gloves, apron, boots, head and face protection should be worn. This equipment should be cleaned thoroughly after each use. RESPIRATORY PROTECTION: No occupational exposure standards have been developed for this material. Where exposure through inhalation may occur from use, NIOSH/MSHA approved respiratory protection equipment is recommended. VENTILATION: Ventilation is required in case of dust conditions. Either local exhaust or general room ventilation is usually adequate. OTHER PROTECTIVE EQUIPMENT: Emergency eye wash fountains and safety showers should be available in the immediate vicinity of any potential exposure.
APPEARANCE: White, granular solid BOILING POINT: Solid FREEZE/MELT POINT: N/A VAPOR PRESSURE (mm): N/A VAPOR DENSITY (air=1): N/A EVAPORATION RATE: N/A SOLUBILITY IN WATER: 25% SPECIFIC GRAVITY: N/A DENSITY: N/A pH (1% aqueous soln) 8.0 ODOR: Mild chlorine odor ODOR THRESHOLD (ppm): Not determined.
CHEMICAL STABILITY (CONDITIONS TO AVOID): Unstable. INCOMPATIBILITY: Ammonia, organic materials, combustible & reducing agents. HAZARDOUS DECOMPOSITION PRODUCTS: Chlorine, cyanogen chloride, nitrogen trichloride HAZARDOUS POLYMERIZATION: Non
5. FIRE FIGHTING MEASURES
6. ACCIDENTAL RELEASE MEASURES
7. HANDLING AND STORAGE
8. EXPOSURE CONTROLS/PERSONAL PROTECTION
9. PHYSICAL AND CHEMICAL PROPERTIES
10. STABILITY AND REACTIVITY

14
No LD50 or LC50 found for oral, dermal or inhalation routes of administration.
Toxic to aquatic life. Do not discharge to streams, ponds, or waterways. Surfactant components are biodegradable.
RCRA: This product, if disposed as shipped, is not considered a hazardous waste as specified in 40 CFR 261. Dispose in accordance with all applicable federal, state and local regulations. Product may be deactivated by mixing with a 5% solution of hydrogen peroxide or sodium bisulfite.
SHIPPING NAME: Cleaning Compound, solid HAZARD CLASS: Not regulated as HAZMAT ID# N/A PACKING GROUP : N/A LABEL: N/A
This material does not contain nor was it manufactured using ozone-depleting chemicals. U.S.
FEDERAL REGULATIONS:
TSCA STATUS: All ingredients on Toxic Substance Control Act Inventory.
CERCLA REPORTABLE QUANTITY: N/A
SARA TITLE III: Section 302 Extremely Hazardous Substances: None. Section 311/312 Hazardous Categories: Immediate (Acute) Section 313 Toxic Chemicals: None.
All label precautions must be observed when handling, storing and transporting empty containers due to product residues. Do not reuse this container unless it is professionally cleaned and reconditioned.
REFERENCES: • U.S. Dept. of Health and Human Services, NIOSH: Registry of Toxic Effects of Chemical Substances, 1985-86 Edition. • Sax, N. Irving and Lewis, R.J.: Dangerous Properties of Industrial Materials, 7th Edition, Van Nostrand Reinhold Co., 1989. • Lewis, R.J.: Hawley’s Condensed Chemical Dictionary,12th Edition, Van Nostrand Reinhold Co., 1993. • U.S. Dept. of Transportation, U.S. Coast Guard: CHRIS Hazardous Chemical Data, 1982. • U.S. Dept. of Labor, OSHA: Air Contaminants - Permissible Exposure Limits, 1989. • National Fire Protection Association (NFPA): Fire Protection Guide on Hazardous Materials (NFPA 325M/49/491M/704), 9th
Edition, 1986. • National Fire Protection Association (NFPA): Hazardous Materials Response Handbook, Henry, M.F., Editor, 1989. • Merck & Co., Inc.: The Merck Index, 11th Edition, 1989.
Information herein is given in good faith as authoritative and valid; no warranty, express or implied can be made.
11. TOXICOLOGICAL INFORMATION
12. ECOLOGICAL INFORMATION
13. DISPOSAL CONSIDERATIONS
14. TRANSPORT INFORMATION
15. REGULATORY INFORMATION
16. OTHER INFORMATION