december 2015 (version 1) - bpec · december 2015 (version 1) 2 ... bending pipe; they can be set...
TRANSCRIPT

December 2015 (Version 1)

2
Essential Plumbing Skills Development
For Copper Pipe Installation
Contents Introduction ............................................................................................................................................ 3
Tools ........................................................................................................................................................ 3
Soldering Equipment ............................................................................................................................... 6
Measuring Accurately ............................................................................................................................. 8
Setting out for bends and bending ....................................................................................................... 10
Production of 90° bends ....................................................................................................................... 10
Passovers............................................................................................................................................... 12
Offsets ................................................................................................................................................... 16
Soldering of joints on Copper Pipe ....................................................................................................... 19

3
Introduction The aim of this manual is to help new entrants to the plumbing industry improve their essential skills. It contains technical tips and advice to enable you to achieve your full potential. By working through this manual, with the support of your tutor, you’ll be able to understand the techniques for measuring, bending and soldering copper pipe.
Tools Remember, you should not use tools until you have been shown how to use them safely.
To accuratly complete the tasks described in this guide, you’ll need the following tools:
(You can use the table below as a checklist)
Engineers square Pipe cutting tool/reamer
Pipe cleaning material
Measuring equipment Pipe bender
Solder
Aids for checking angles/ producing drawings
Blowtorch Flux & brush
Pencil or marker pen
Heat proof mat Appropirate personal precedure equipment
Small engineers square – Aids the accurate taking of
measurements and used when bending copper pipe
Measuring equipment – The most accurate tools used
for measuring are metric solid steel rulers or folding
rulers, widely used by plumbers across Europe.

4
An alternative is to use a tape measure. The
disadvantage of using a tape measure is that the
end hook can become loose, reducing accuracy.
When working to precise dimensions - plus or
minus 2mm (± 2mm) - the use of a ruler is
preferable.
Aids for checking angles and the setting out of drawings / templates –
60o/30o and 45o squares are good for producing setting out
drawings because these angles are the most common angles
used in construction. For more obscure angles a protractor
can be used, sometimes these are incorporated in the square,
(as in the picture of the 45o square.)
Engineers split rulers are good for checking angles when
bending pipe; they can be set to the required angle and
held adjacent to the pipe in the bender, to ensure bending
is accurate.
Digital angle finders are superb for accuracy in both setting
out and taking of angles from construction tasks, such as wall
angles for setting out and checking of angles when bending.
They are very expensive and delicate so care must be taken
to avoid dropping them.

5
A pencil or marker pen is required for the production of setting out
drawings / templates and marking pipework. For the marking of
pipe the fine permanent marker is recommended, as it makes it
easy to see the mark clearly when the
pipe is in the pie bender. Remember to remove the marks from the pipe
after fitting, because the customer will not wish to see these and it looks a
lot more professional.
Pipe cutting – Pipe cutters are the preferred tool for
cutting pipe; hacksaws produce a lot of very fine
copper filings that could be washed into the system
and into the crevices of radiators leading to electrolytic
corrosion. So where possible, pipe cutters should be
used.
After cutting the pipe, always use a reamer to remove the burr inside
as this can restrict flow, increase fluid noise and lead to the possible
build-up of scale etc.
Pipe benders - The most popular type is the scissor bender
shown here - they are portable and fairly cheap to purchase.
Upright stand benders are available and tend to be used for larger diameter
pipes as they will bend up to 42mm pipe.

6
Bench or vice mounted benders are also available, these are very good and
widely used in Europe. They are very expensive and have varied results on UK
pipe, which has only a 0.6mm thick wall, compared to the common pipe
around the world, which has a wall thickness of 1mm.
Soldering Equipment
Blowtorch and cylinder of gas - This is the most popular type of soldering blowtorch.
Remember, for small diameter pipes butane is the best gas, as it provides a much
cooler flame than that offered by the use of mapp gas (methylacetylene-
propadiene propane).
An alternative is a blowtorch kit (handle, burner head, hose and
pressure regulator) connected to a larger type gas cylinder,
usually propane. This style has various types of head for the
flexibility, depending on the size of pipework to be soldered. This
type is usually used by plumbers that work with larger diameter
pipes.
Heat proof mat – This is used to protect the fabric of the
building from damage by the flame when soldering. Care
should be taken when using soldering equipment and the
flame should be directed away from combustible materials.
Mats should only be seen as an aid. DO NOT point the flame
directly at the mat. Whilst they are called heat proof mats, in
fact, they are heat resistant.

7
Pipe cleaning – Fibre cleaning strips can be used
for cleaning copper pipe and fittings prior to
soldering. Remember that cleanliness is a key
part of good soldering. Steel wool was
commonly used for cleaning copper pipe,
however this type of cleaning material can
enter the pipe and contaminate parts of the
system containing different metals, leading to
electrolytic corrosion.
Solder and flux - Lead free solder is required for all potable water
supplies. However, for learning purposes, only in a training
environment, using leaded solder is beneficial to achieve early
success in soldering until you get used to controlling heat and flame.
Most fluxes used in the industry are of the self-cleaning variety.
(Check for suitability for the type of system you are working on.)
For best results, the pipe should be cleaned with a suitable pipe
cleaner before the flux is applied.

8
Measuring Accurately Taking accurate measurements is very important and can make a big difference to the quality of
work. You should never try to guess. In this section we’ll look at techniques that avoid guessing.
If you try to measure to the centre of a pipe, (as illustrated below), you’ll struggle to be accurate.
Using the above method is inaccurate because it relies on the user guessing the centres of the pipes
- The measurement appears to be between 77mm and 79mm.
Using a square and accurately measuring makes a big difference, as can be seen in the diagram
below; when measuring point A to point B, it can be seen that the more accurate method actually
shows a centre to centre measurement of 75mm.
If you measure like this, then you are well within the ±2mm.
A
B
9
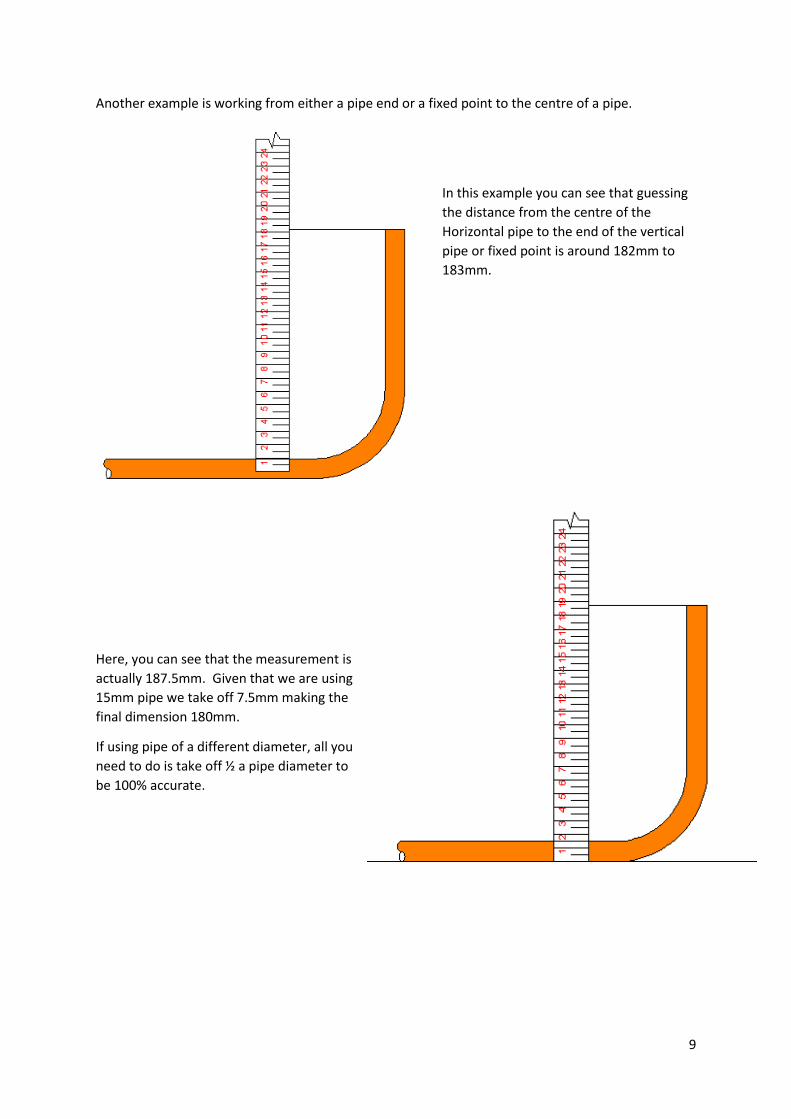
Another example is working from either a pipe end or a fixed point to the centre of a pipe.
In this example you can see that guessing
the distance from the centre of the
Horizontal pipe to the end of the vertical
pipe or fixed point is around 182mm to
183mm.
Here, you can see that the measurement is
actually 187.5mm. Given that we are using
15mm pipe we take off 7.5mm making the
final dimension 180mm.
If using pipe of a different diameter, all you
need to do is take off ½ a pipe diameter to
be 100% accurate.
10
Setting out for bends and bending
When bending pipe, it’s important that you know the parts of the bender and the radius of the bend
that it will produce.
Most benders bend at a radius of 4 x the diameter of the pipe so: -
For 15mm pipe it will be 15mm x 4 = 60mm
radius to centre line.
The outside radius will be 60mm + 7.5mm =
67.5mm.
The inside radius (nearest the former) will
be: - 60mm – 7.5mm (half the diameter) =
52.5mm.
For 22mm it will be: - 4 x 22mm = 88mm to the centre line. The inside radius (nearest the former)
will be: - 88mm – 11mm (half the diameter) = 77mm and the outside radius will be 88mm + 11mm =
99mm.
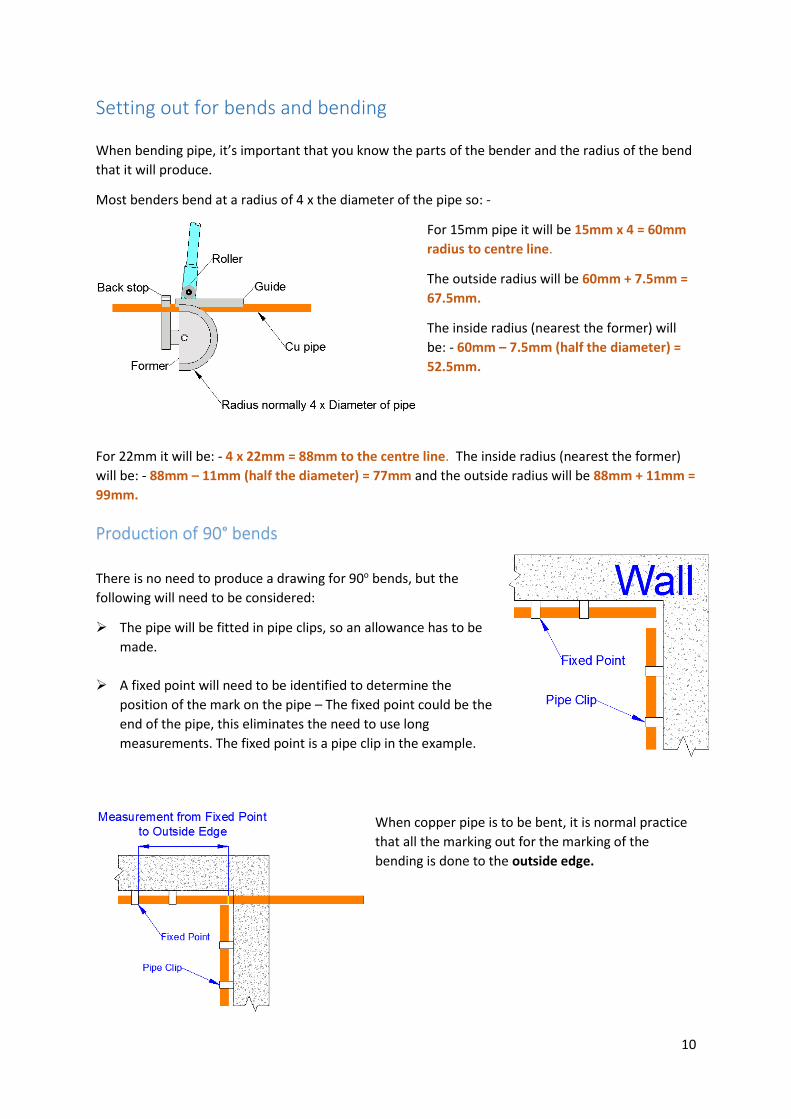
Production of 90° bends
There is no need to produce a drawing for 90o bends, but the
following will need to be considered:
The pipe will be fitted in pipe clips, so an allowance has to be
made.
A fixed point will need to be identified to determine the
position of the mark on the pipe – The fixed point could be the
end of the pipe, this eliminates the need to use long
measurements. The fixed point is a pipe clip in the example.
When copper pipe is to be bent, it is normal practice
that all the marking out for the marking of the
bending is done to the outside edge.

11
Measure the distance from the fixed point to the
outside edge. A piece of scrap pipe can be used to
determine where to mark the outside edge.
Transfer this to the pipe to be bent and mark as
shown (see yellow line in diagram).
Place the pipe to the bender, ensuring the
fixed point is behind the back stop. Use a
scrap piece pipe and a square to ensure the
mark on the pipe is aligned with the outside
edge of the scrap pipe. Pull the bend to the
correct angle.
Tip: It is much easier to bend accurately if
your hands are free to hold squares etc. So in
the early days of developing your skills
consider mounting your bender either in a vice or a workbench for best results.
Check with either a square or an angle
finder that the bend is 90o. Remember that
the copper will spring back a little due to its
elasticity, so release the pressure before
checking the angle or your bend will not be
accurate.
The pipe should fit in the clips without straining.
Note: do not make manual adjustments if the bend is
not accurate as this will cause damage to the bend.

12
Passovers Passovers are much more complex and it’s not unusual for two to be on the same piece of pipe, so
setting out is very important.
This can be achieved by drawing the passover
out. In this diagram, the object to be passed
over and the clearance can be seen - This is
the start of our setting out.
Strike an arc at a radius of 4 times
the diameter of the inner edge, so
77mm for 22mm pipe and 52.5mm
for 15mm pipe.
Striking through the two arcs – one at 52.5mm
and 67.5mm if using 15mm pipe, or 77mm and
99mm for 22mm pipe as shown.
Using squares or angle finder set at (in this
case) 135o, draw a line from the tangent of
each of the arcs as shown.
The final set out drawing should look like the
drawing shown. That completes the setting out.

13
Use the drawing as a template, decide
on a fixed point, which can be a pipe
clip, a fitting or something else. The pipe
should be marked on the outside edge
of the first bend (yellow line).
Place the pipe in the bender and, using
the square and a piece of scrap pipe,
line up your mark as shown -
remembering to keep the fixed point
behind the machine.
Pull the bend to the required
angle. Using a split rule set at the
angle (or an angle finder), check
that your bend is accurate before
removing from the bending
machine. Remember to allow for
the spring back when releasing
the pressure on the arm.
The pipe can now be returned to the
drawing and should fit perfectly without
any adjustment by pulling etc., which will
that distort the bend and detract from
the quality of the finished job.
The second bend can be marked in line
with the outside edge using the drawing as a template. In the diagram the 135o (45o) bend will mean
that this bend is a straightforward 90o bend.

14
Return the pipe to the bending
machine with the use of a
square and a scrap piece of
pipe, as shown. Remember the
fixed point still needs to be
inserted behind the bending
machine.
Tip: Before bending look
across the pipe bender to
ensure that the pipe is not
twisted in the machine.
Pull the bend to the required angle and check with a square
to confirm it is correct, before removing from the bending
machine.
The pipe should now fit the
drawing without any
tweaking, as shown.
The last bend can now be
marked out on the outside
edge.

15
Now place the pipe in the machine and if it
has been set out correctly it will look like it
does in the diagram. Accuracy can be checked
by ensuring the two legs of the bend are
aligned, as shown by the blue line.
When checking, use a long steel rule to ensure that the
passover is in line.
Then return to the drawing and it should match 100%.
Check that the clearance is correct – remember that the
industry accepted tolerance is ± 2mm
Then fit to pipe clips and
it should fit without the
need for adjustment or
forcing it to fit.

16
Offsets
These bends are often found in two or
three pipes that run parallel in an
installation: consistent, accurate bending is
the key to aesthetics (looking good). It is
best practice to set out to ensure
consistency of offset quality, to keep the
pipes aligned (identical / straight)
To set out, start as above then strike an
arc from the centre of the pipe at 4
times the diameter as the radius, as
shown:
For 22mm 4 X dia = 88mm
For 15mm 4 X dia = 60mm
Draw a circle as shown, and draw a line
from the tangent of the circle at the
required angle of the offset. To obtain the
outside edge, draw a line parallel to the
first line at a distance that matches the
diameter of the tube used. That
completes the setting out.

17
Use the drawing as a template, and decide on a fixed point, which can be a pipe clip, a fitting or
something else. The pipe should be marked for bending on the outside of the first bend as shown:
Place the pipe in the bender and using the square and
a piece scrap of pipe, line up the mark as shown -
Remember to keep the fixed point behind the
machine.
Pull the bend to the required angle and
using a split rule set at the angle, or an
angle finder, check that the bend is
accurate before removing from the
bending machine. Remember to allow for
the ‘spring back’ when releasing the
pressure on the arm.
The pipe can now be returned to the drawing
and should fit perfectly without any adjustment
by pulling etc. which will distort the bend and
detract from the quality of the finished.
Use the drawing as a template to mark out the
second bend, in line the outside edge as shown.

18
Place the pipe in the machine and if it has been
set out correctly, the pipe will sit in the bending
machine as shown. It can be checked for
accuracy by ensuring the two legs of the bend are
in line, as shown by the blue line, to give the
correct offset distance.
To check that the offset is in-line and parallel use a long steel
rule. Then return to the drawing and it should match 100%.
Check that the clearance is correct – The accepted industry
tolerance is +/- 2mm.
The pipe should now fit the drawing without any
tweaking, as shown.

19
Soldering of joints on Copper Pipe The quality of soldered joints is greatly influenced by your work processes. Therefore, it is worth
visiting the method of preparing a soldered joint and the quality of the finished product.
Preparation
The pipe needs to be cut correctly and at the correct length to ensure full insertion into the fitting.
When cutting copper pipe, it is best to use wheeled
pipe cutters where possible. Cutting pipe with a
hacksaw produces lots of very fine copper filings that
could go inside the pipe and end up circulating to
parts of the system that would result in electrolytic
corrosion.
In some cases, you have no alternative for access reasons to cut pipe with a hacksaw, but make sure
the pipe is cut square.
After cutting the pipe it is important to ensure that the pipe burr is
reamed out to maintain the full bore of the pipe. If the burr is left in
place this will reduce the flow inside the pipe and also create unusual
flow patterns which will create noise. In hard water areas scale will
build up much easier where burrs are left on the pipe.
Cleaning the pipe and fitting is also important for
good results. Most plumbers use self-cleaning fluxes
and in the majority of cases these do a great job.
However, if you look at fitting manufacturer’s
literature they always say ‘clean the pipe and fitting.’
This means that their guarantee will be good, should
it be needed in the future. The cleaning process
should be completed using a suitable pipe cleaning
pad to remove all the surface oxides from the copper tube from its exposure to the atmosphere.
Cleaning these surface oxides off the pipe also assists the solder in doing its job and flows more
easily and adhere to the pipe / fitting.
Choice of Flux is also very important. Most manufacturers prefer the use of the
traditional type fluxes that are not self-cleaning. Self-cleaning fluxes tend to be
corrosive, so it is important that they are used correctly and used sparingly. For
water pipes, the flux can be removed from inside the pipe by flushing with water.
However, for gas pipes this is not possible and the corrosion
process will continue over a long period of time during
temperature changes. If used sparingly, this can be avoided. Remember, the
purpose of the flux is to reduce the surface tension and viscosity of fused solder,
improving its wettability (fluidity) and preventing metal from being re-oxidized in
the soldering process.

20
When applying flux, apply sparingly with a small brush to both the inside of the fitting and the pipe.
Wipe off any excess prior to soldering. NOTE: Check that the flux you are using is suitable for the
type of system you are working on, as some are not suitable for gas installations.
Jointing
Once the joint is prepared, it is ready for soldering.
The finished joint needs to look professional and an excellent joint will look
like that pictured with a ring of solder clearly visible and the joint not burnt by
the over application of heat.
A joint that is still acceptable in the workplace may well look very similar with
maybe a slight over application of solder. Again, note that the fitting is not
burnt.
Joints that are not acceptable look as pictured - very untidy and
unprofessional. They might not leak, but they look no better than a
DIY attemt.
The secret to quality soldering is the flame. The flame needs to be hot enough for the solder to flow
into the joint, but not enough to burn the fitting.
If the flame is too intense then the fitting and pipe are likely to burn very
quickly and the application of solder will be virtually impossible. Also, it is
more likely that you will burn the fabric of the building, as the flame is not
controlled.
The flame needs to be well defined and provide sufficient heat. (The flame is more
controlable and less likely to burn the fitting.) The hottest part of the flame is at the
tip of the cone of the inner flame and this needs to be located close to where you
require the heat. Practice will determine the size of flame that you require.

21
When soldering the pipe, the inside of the fiiting needs to be heated as well,so
a good tip is to warm the pipe up slightly first, so that the heat on the pipe
conducts inside the fitting.
Then move the flame on to the fitting, so that both the pipe and the fitting are
heated to a temperature where the solder will flow. Experience / practice will
determine this point
Apply the solder at the face of the joint with one touch point for 15mm
and 22mm joints and two touch points for 28mm.
Do not over apply solder. A good tip is bend your solder at 15mm for a
15mm fitting and 22mm for a 22mm joint. This should be sufficient solder
for the joint and will aid your practice in getting the quantity correct.
In this picture you can see the solder flowing and the pipe
is not burnt using a reasonable flame. Apply solder so
that a solder-ring is visible all round.
Once soldered, allow to cool naturally. DO NOT wipe with a rag, as this
will diturb the solder as it soldifies and could lead to a leak in the future
through movement during the cooling process.
Also, wiping will spread the solder whilst in liquid form all over the pipe
and fitting which again, looks unprofesional. The need to wipe the
solder off is due to over application of solder. If you apply the correct
amount of solder this will not be necessary.
Once cooled and prior to handing the work over to the customer, remove any remains of the flux
from the pipe by cleaning with a wet cloth.
If flux is not removed, the pipe will start to look unsightly and if it is a self
cleaning flux, the flux could continue to be active when heat passes through or
near the pipe leading to corrosion over time.

22
We hope that this guide was useful and supports your development as a plumber.
Some sources of information on soldering are:-
http://www.pegleryorkshire.co.uk/EN/literature/brochures
http://copperplumbing.org.uk/education
Note:
BPEC would like to thank Paul Dodds (the WorldSkills plumbing expert and SkillPLUMB lead judge)
for compiling the information and guidance contained within this document.