davinci resolveÔ video editing software guide
TRANSCRIPT
1
In the 21st century, consuming content through multiple devices and through a variety of mediums is an ever-increasing part of everyday life. Educators, journalists, writers, researchers and scientists – among others – are gravitating towards video production as a means for disseminating information to the masses, as it provides visual and auditory links for an audience, while also being portable and accessible whenever and wherever. The skills associated with this form of production are becoming more and more applicable within or without the context of education. At Ormiston College, we engage with this 21st century skill through a number of academic subjects and therefore, a consistent and accessible video editing platform will ensure, not only the continual growth of student skills, but the production of creative, professional and relevant content for the real-world. DaVinci ResolveÔ provides students and teachers with a user-friendly, professional standard editing software, that can be used in a variety of ways. This guide will step students and teachers through the basic aspects of video editing that can be completed using Resolve, as well as some further considerations for students’ video-based productions.
Contents: 1. Video Production Timeline pg. 2 2. Software Orientation pg. 3
2.1. Setting Up Your Production pg. 3 2.2. Importing Media and Sound pg. 4
3. Creating Video Timelines and Tracks pg. 6 4. Splitting Clips pg. 8 5. Adding and Resizing Overlay Images/Clips pg. 9 6. Adjusting Volume pg. 11
6.1. Adding Audio Cross-Fades pg. 12 6.2. Adding Audio Effects pg. 13 6.3. Muting Tracks pg. 13
7. Adding Transitions and Titles pg. 14 7.1. Adding Titles pg. 14 7.2. Adding Transitions pg. 15
8. Chroma-Key (Green Screening) pg. 17 8.1. Adjusting the Overlay Image After Chroma-Key pg. 21
9. Converting Production to MP4 pg. 23 10. Further Resources pg. 24
For any further questions regarding the DaVinci ResolveÔ software, please contact Mr. Anderson, or consult one of the helpful websites on Page 24. There are also hundreds of tutorial videos on YouTube for you to utilise.
DaVinci ResolveÔ Video Editing Software Guide Ormiston College
2
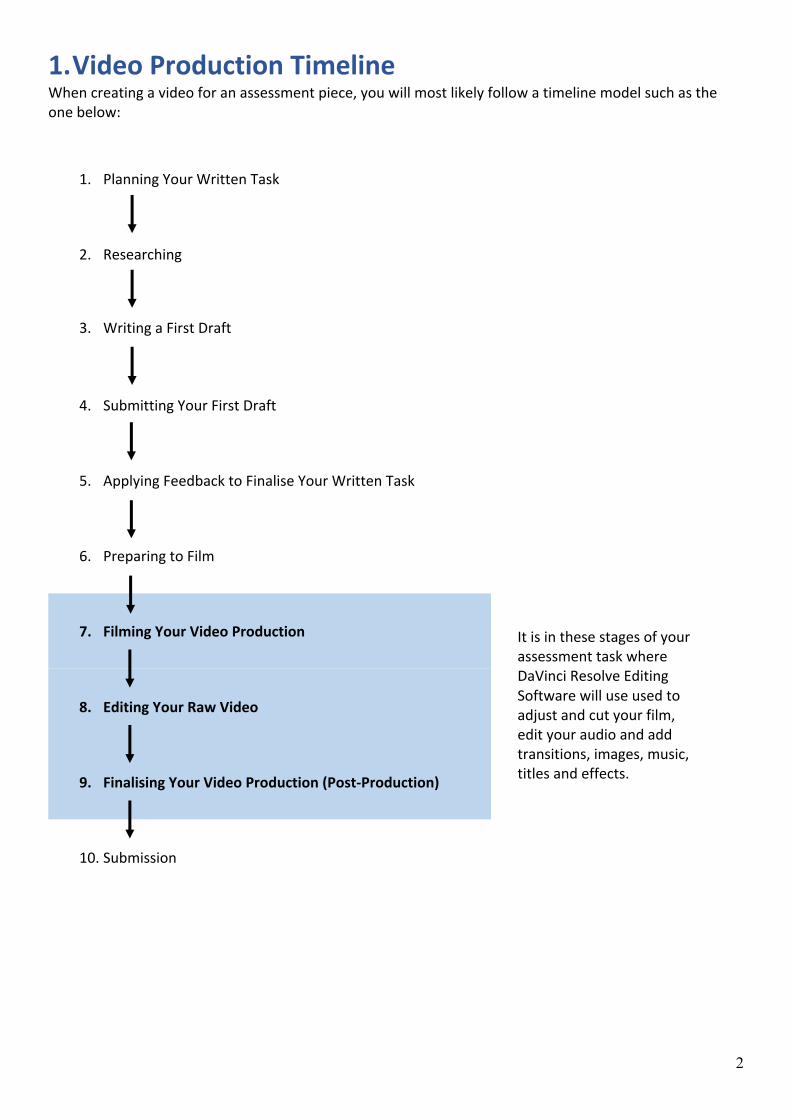
1. Video Production Timeline When creating a video for an assessment piece, you will most likely follow a timeline model such as the one below:
1. Planning Your Written Task
2. Researching
3. Writing a First Draft
4. Submitting Your First Draft
5. Applying Feedback to Finalise Your Written Task
6. Preparing to Film
7. Filming Your Video Production
8. Editing Your Raw Video
9. Finalising Your Video Production (Post-Production)
10. Submission
It is in these stages of your assessment task where DaVinci Resolve Editing Software will use used to adjust and cut your film, edit your audio and add transitions, images, music, titles and effects.
3
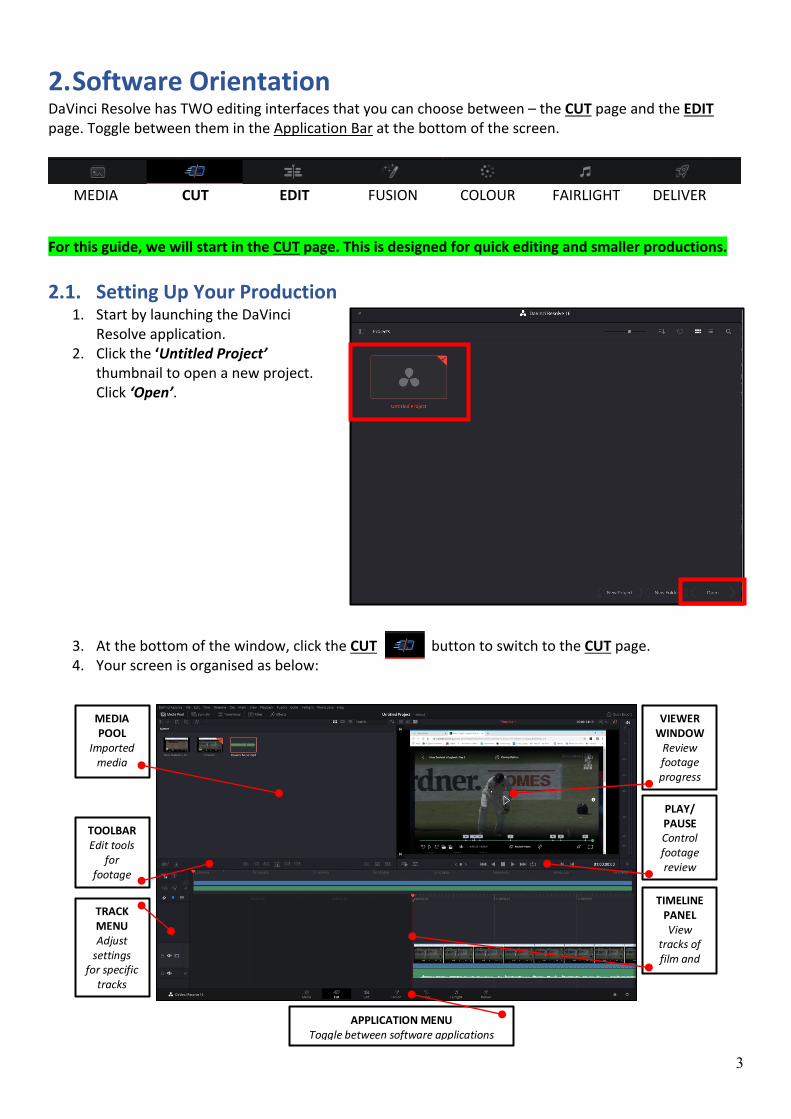
2. Software Orientation DaVinci Resolve has TWO editing interfaces that you can choose between – the CUT page and the EDIT page. Toggle between them in the Application Bar at the bottom of the screen.
MEDIA CUT EDIT FUSION COLOUR FAIRLIGHT DELIVER
For this guide, we will start in the CUT page. This is designed for quick editing and smaller productions.
2.1. Setting Up Your Production 1. Start by launching the DaVinci
Resolve application. 2. Click the ‘Untitled Project’
thumbnail to open a new project. Click ‘Open’.
3. At the bottom of the window, click the CUT button to switch to the CUT page. 4. Your screen is organised as below:
MEDIA POOL
Imported media
VIEWER WINDOW
Review footage progress
TIMELINE PANEL View
tracks of film and
audio
TRACK MENU Adjust
settings for specific
tracks
APPLICATION MENU Toggle between software applications
TOOLBAR Edit tools
for footage
and audio
PLAY/ PAUSE Control footage review
4
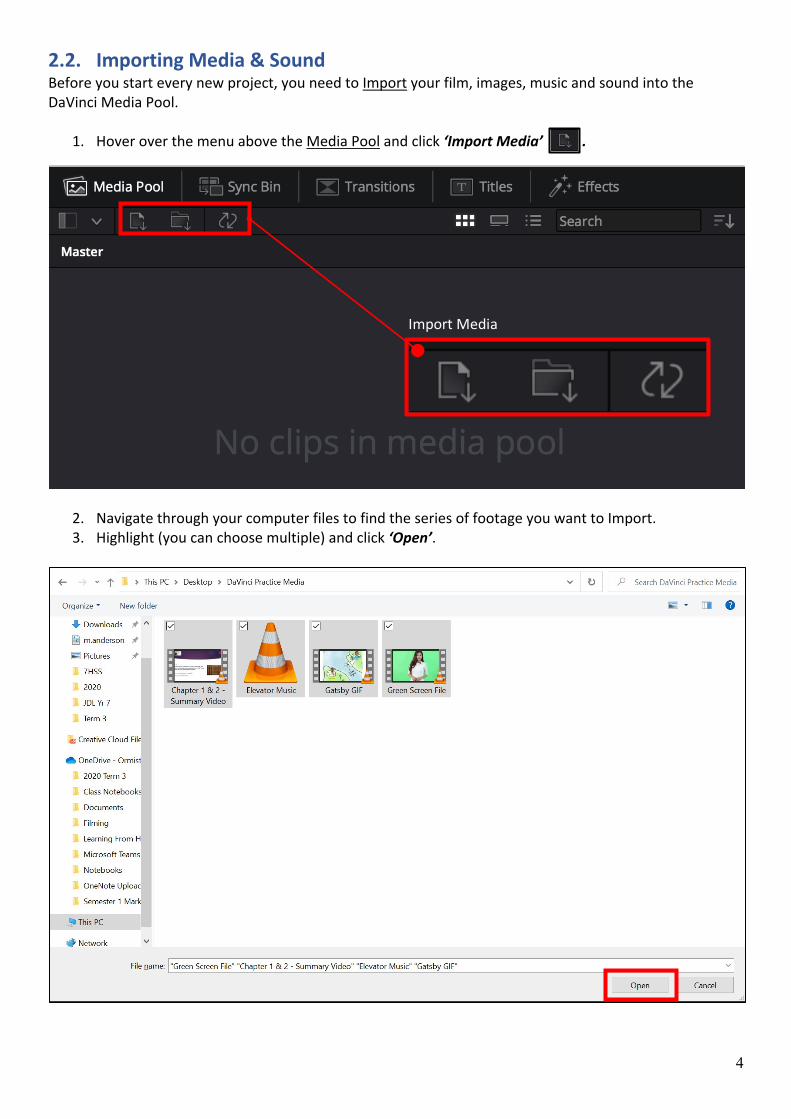
2.2. Importing Media & Sound Before you start every new project, you need to Import your film, images, music and sound into the DaVinci Media Pool.
1. Hover over the menu above the Media Pool and click ‘Import Media’ .
2. Navigate through your computer files to find the series of footage you want to Import. 3. Highlight (you can choose multiple) and click ‘Open’.
Import Media
5
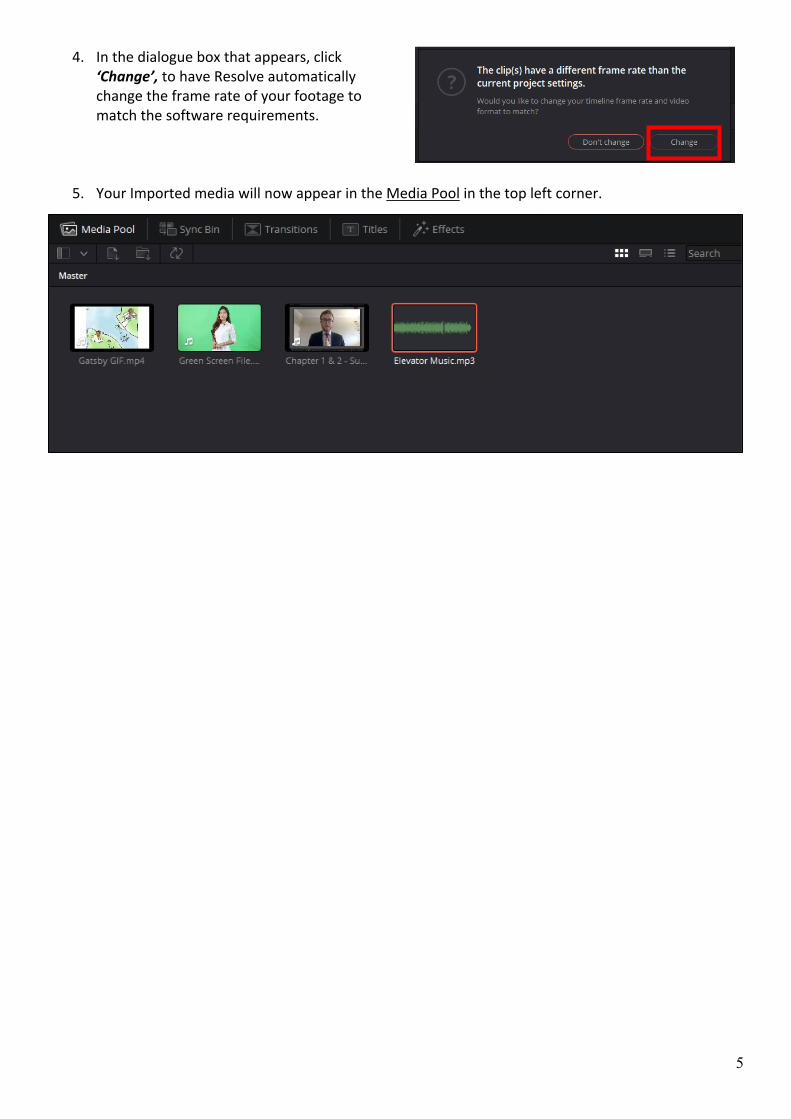
4. In the dialogue box that appears, click ‘Change’, to have Resolve automatically change the frame rate of your footage to match the software requirements.
5. Your Imported media will now appear in the Media Pool in the top left corner.
6
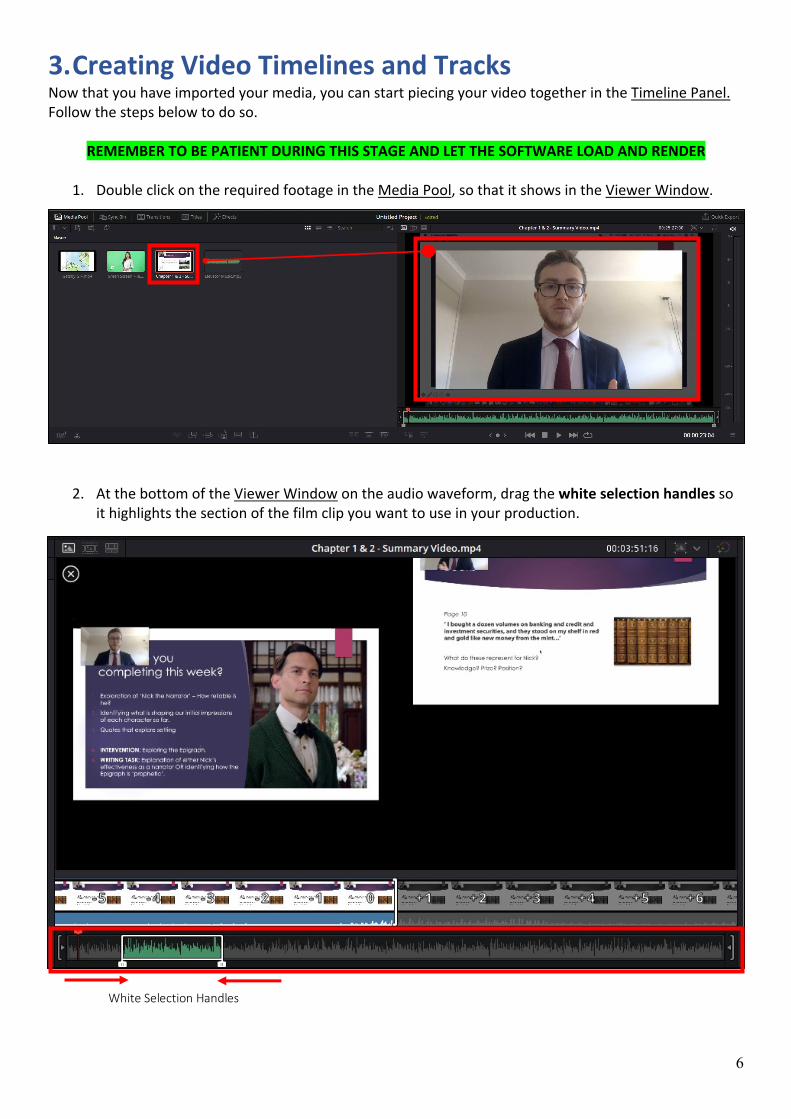
3. Creating Video Timelines and Tracks Now that you have imported your media, you can start piecing your video together in the Timeline Panel. Follow the steps below to do so.
REMEMBER TO BE PATIENT DURING THIS STAGE AND LET THE SOFTWARE LOAD AND RENDER
1. Double click on the required footage in the Media Pool, so that it shows in the Viewer Window.
2. At the bottom of the Viewer Window on the audio waveform, drag the white selection handles so it highlights the section of the film clip you want to use in your production.
White Selection Handles
7
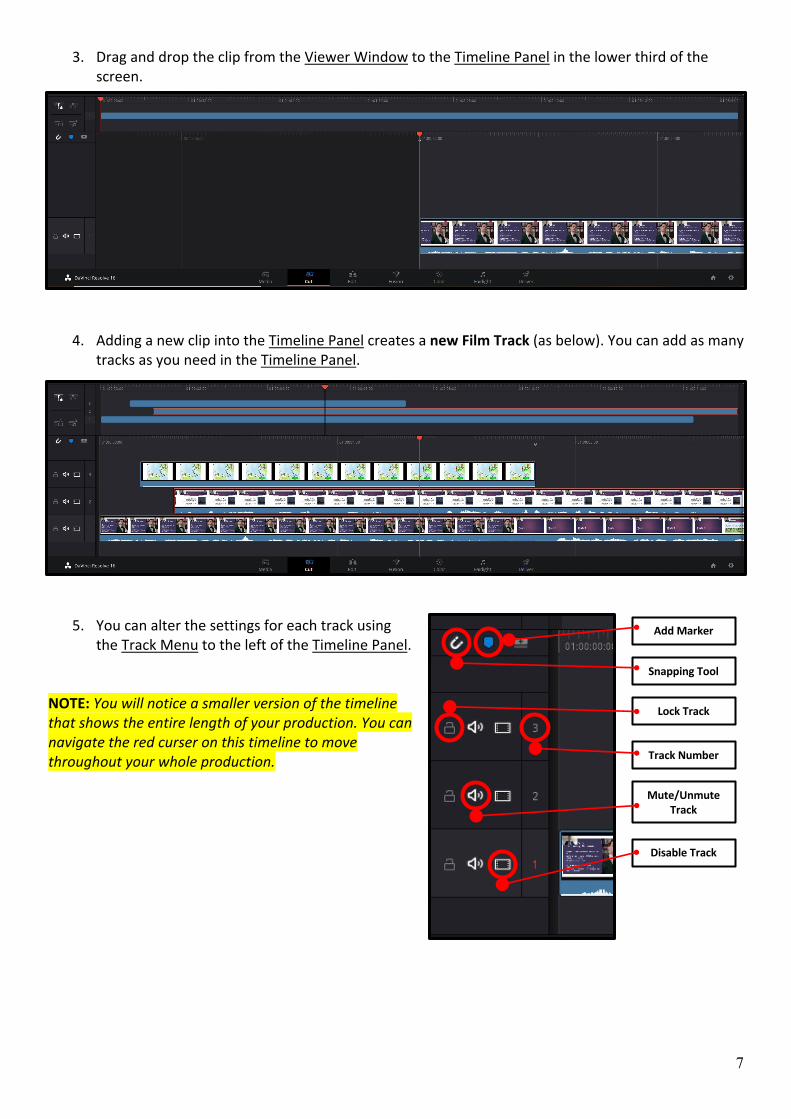
3. Drag and drop the clip from the Viewer Window to the Timeline Panel in the lower third of the screen.
4. Adding a new clip into the Timeline Panel creates a new Film Track (as below). You can add as many tracks as you need in the Timeline Panel.
5. You can alter the settings for each track using the Track Menu to the left of the Timeline Panel.
NOTE: You will notice a smaller version of the timeline that shows the entire length of your production. You can navigate the red curser on this timeline to move throughout your whole production.
Add Marker
Snapping Tool
Lock Track
Track Number
Mute/Unmute Track
Disable Track
8
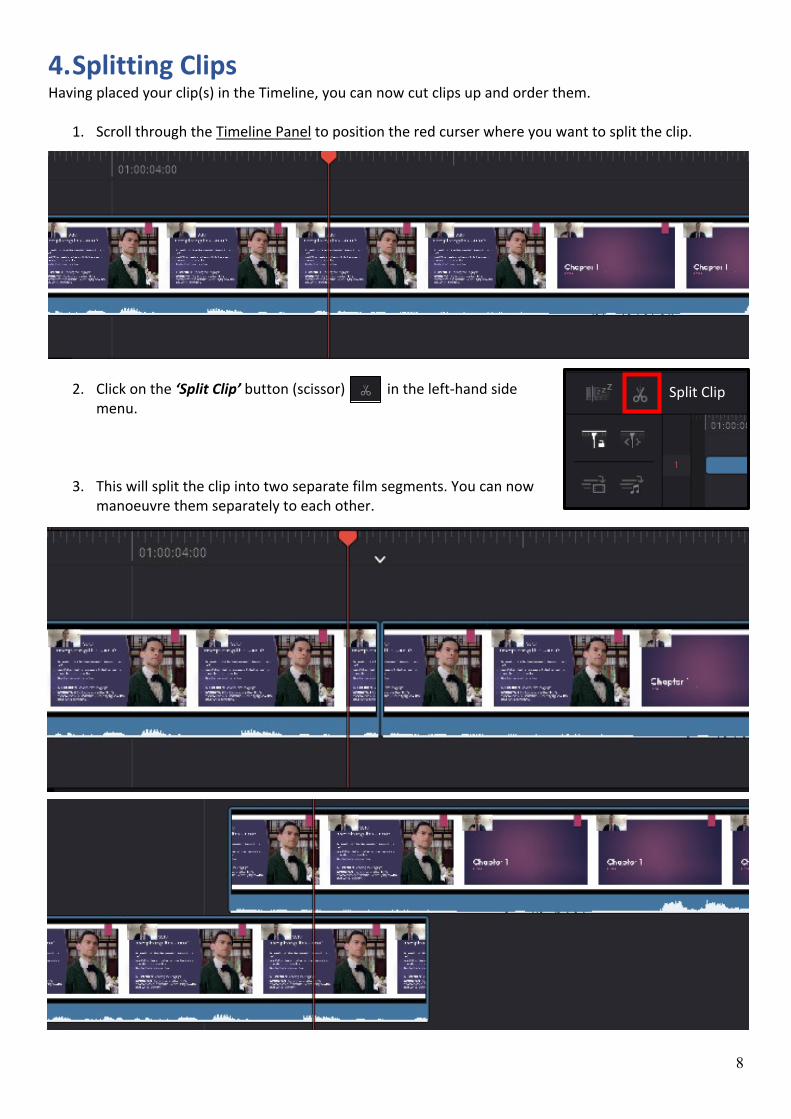
4. Splitting Clips Having placed your clip(s) in the Timeline, you can now cut clips up and order them.
1. Scroll through the Timeline Panel to position the red curser where you want to split the clip.
2. Click on the ‘Split Clip’ button (scissor) in the left-hand side
menu.
3. This will split the clip into two separate film segments. You can now manoeuvre them separately to each other.
Split Clip
9
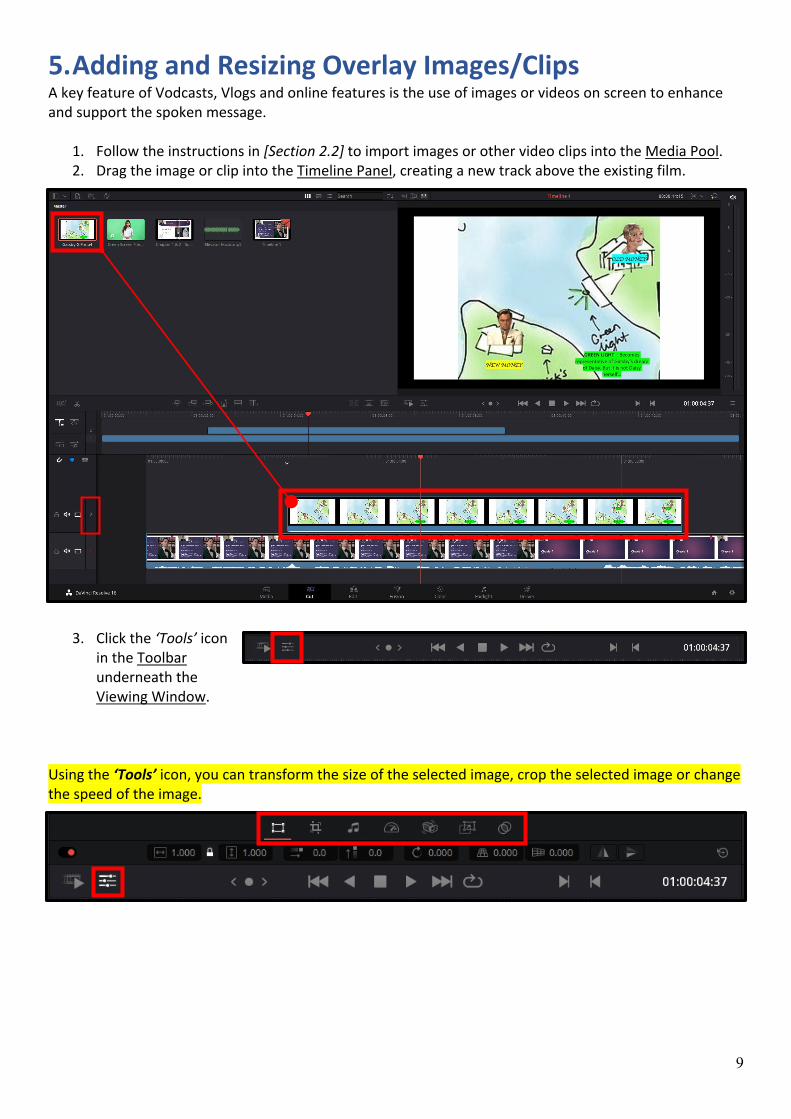
5. Adding and Resizing Overlay Images/Clips A key feature of Vodcasts, Vlogs and online features is the use of images or videos on screen to enhance and support the spoken message.
1. Follow the instructions in [Section 2.2] to import images or other video clips into the Media Pool. 2. Drag the image or clip into the Timeline Panel, creating a new track above the existing film.
3. Click the ‘Tools’ icon in the Toolbar underneath the Viewing Window.
Using the ‘Tools’ icon, you can transform the size of the selected image, crop the selected image or change the speed of the image.
10
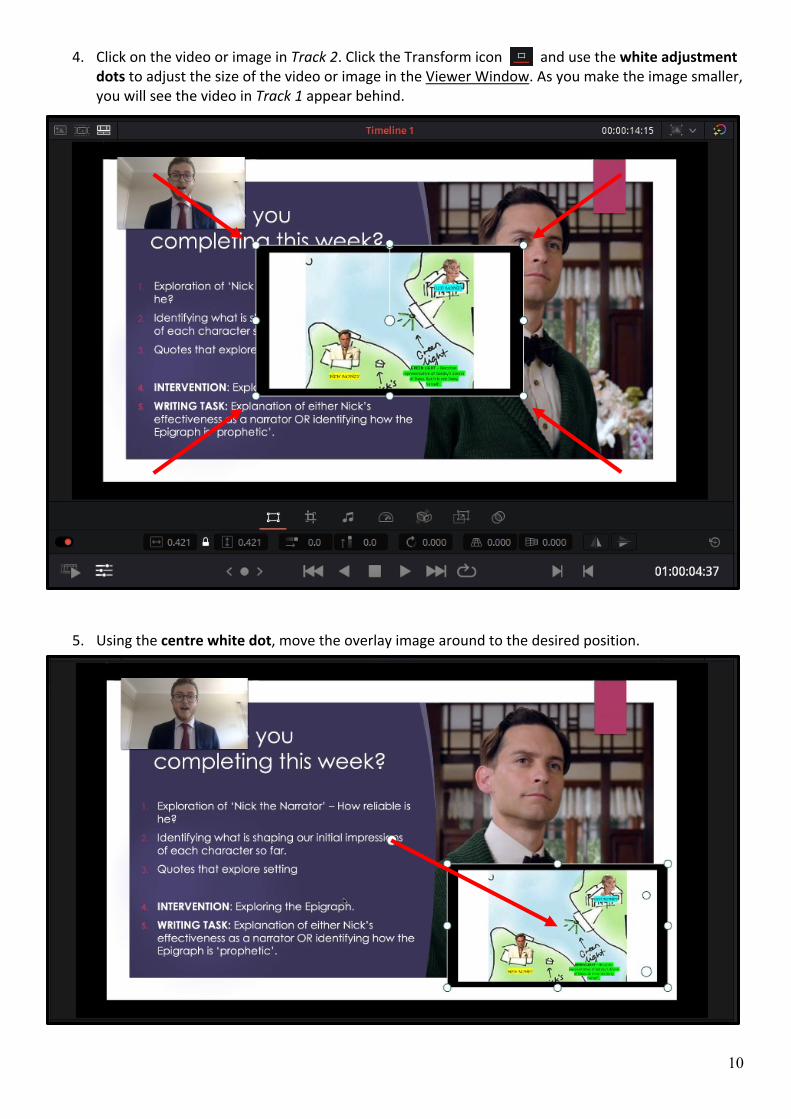
4. Click on the video or image in Track 2. Click the Transform icon and use the white adjustment dots to adjust the size of the video or image in the Viewer Window. As you make the image smaller, you will see the video in Track 1 appear behind.
5. Using the centre white dot, move the overlay image around to the desired position.

11
6. Adjusting Volume When producing a Vodcast or Vlog, you need to pay attention to your audio levels. If you are filming on your iPhone, the audio is usually manageable, depending on the distance you are from your device. Otherwise, you can hire microphone plug ins from the CLI to enhance the audio quality of your footage. In DaVinci Resolve, you can adjust the volume of any clip easily:
1. Once you have your video clip in the Timeline Panel track, you will see the Audio Waveform underneath.
2. Click the ‘Tools’ button in the Toolbar and click the ‘Audio’ button .
3. Drag the toggle to adjust the volume higher or lower.
NOTE: When adjusting volume, you will see the audio waveform under the track get larger or smaller, showing peaks and troughs in your audio. The Decibel Meter at the right will also show you the decibel levels at each point of your video. When adjusting audio, you want your level to be ‘just in the red’, or around -10 to -5 decibels. NOTE: Volume can be adjusted in this manner on AUDIO ONLY tracks as well.
12
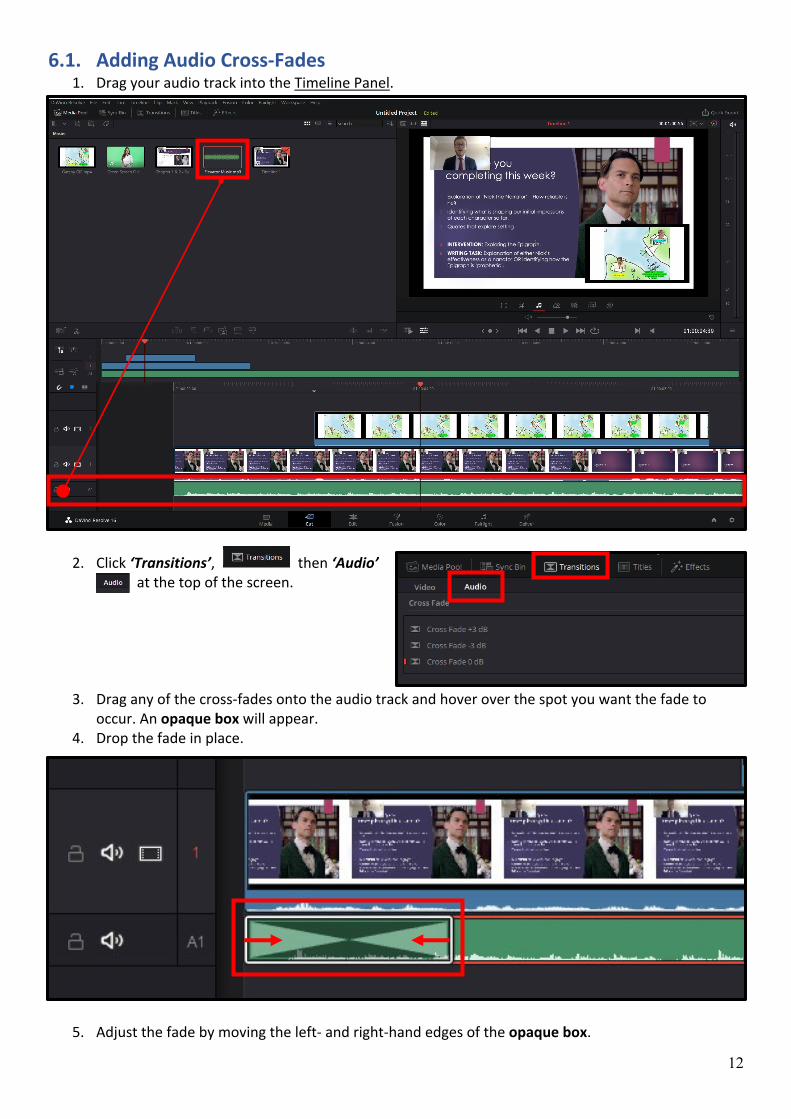
6.1. Adding Audio Cross-Fades 1. Drag your audio track into the Timeline Panel.
2. Click ‘Transitions’, then ‘Audio’
at the top of the screen.
3. Drag any of the cross-fades onto the audio track and hover over the spot you want the fade to occur. An opaque box will appear.
4. Drop the fade in place.
5. Adjust the fade by moving the left- and right-hand edges of the opaque box.
13
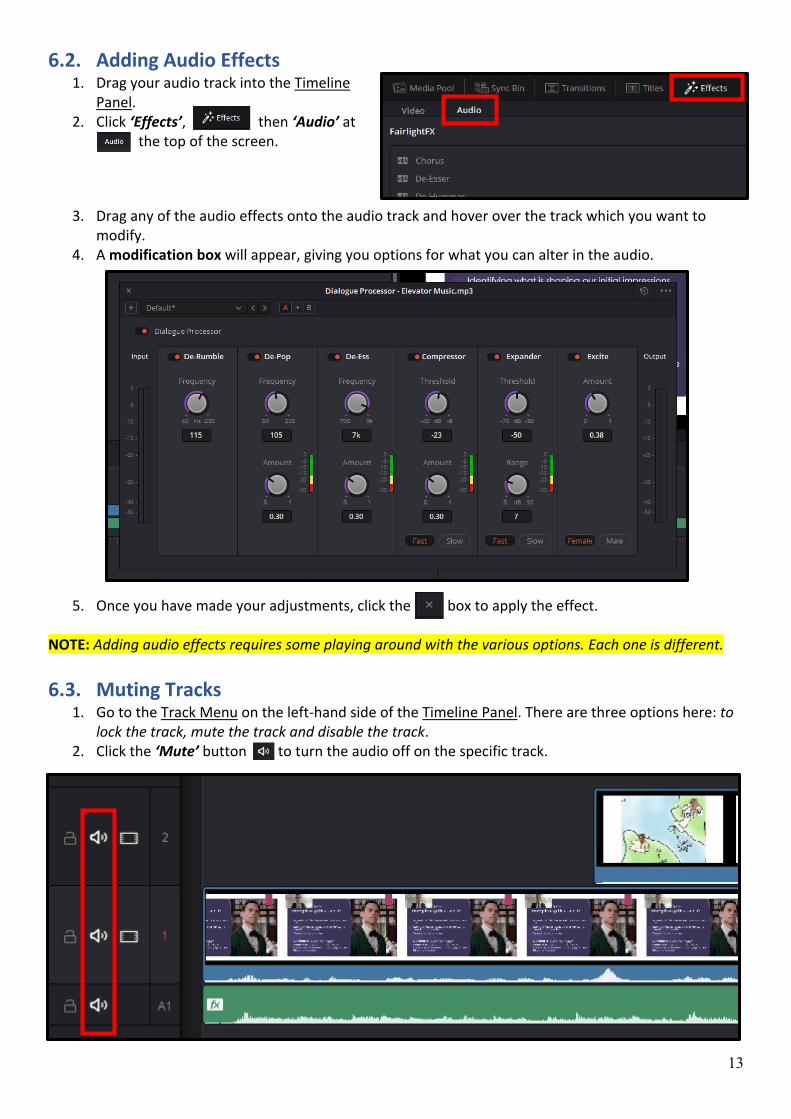
6.2. Adding Audio Effects 1. Drag your audio track into the Timeline
Panel. 2. Click ‘Effects’, then ‘Audio’ at
the top of the screen.
3. Drag any of the audio effects onto the audio track and hover over the track which you want to modify.
4. A modification box will appear, giving you options for what you can alter in the audio.
5. Once you have made your adjustments, click the box to apply the effect. NOTE: Adding audio effects requires some playing around with the various options. Each one is different.
6.3. Muting Tracks 1. Go to the Track Menu on the left-hand side of the Timeline Panel. There are three options here: to
lock the track, mute the track and disable the track. 2. Click the ‘Mute’ button to turn the audio off on the specific track.
14
7. Adding Titles and Transitions Your Vodcast or Vlog requires some form title sequence and credits to acknowledge sources. You should also look at whether you require transitions to switch between clips in your video. DaVinci Resolve has many pre-created titles and transitions to choose from.
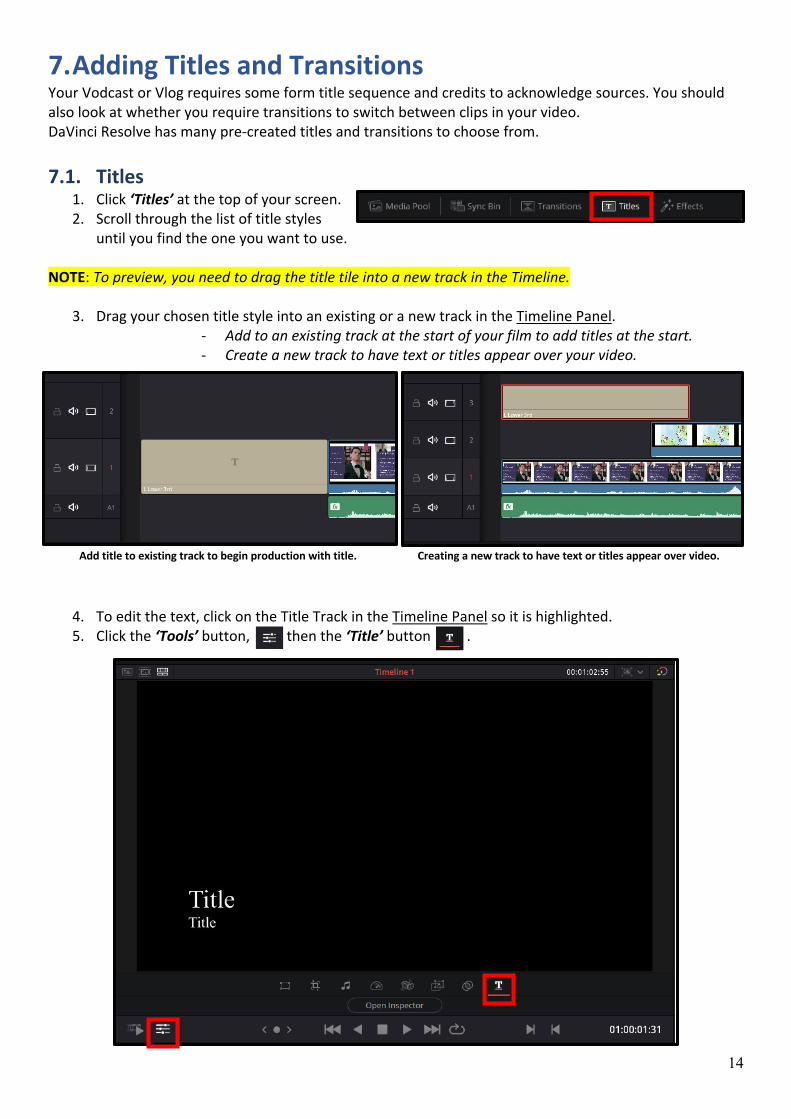
7.1. Titles 1. Click ‘Titles’ at the top of your screen. 2. Scroll through the list of title styles
until you find the one you want to use. NOTE: To preview, you need to drag the title tile into a new track in the Timeline.
3. Drag your chosen title style into an existing or a new track in the Timeline Panel. - Add to an existing track at the start of your film to add titles at the start. - Create a new track to have text or titles appear over your video.
4. To edit the text, click on the Title Track in the Timeline Panel so it is highlighted. 5. Click the ‘Tools’ button, then the ‘Title’ button .
Add title to existing track to begin production with title. Creating a new track to have text or titles appear over video.
15
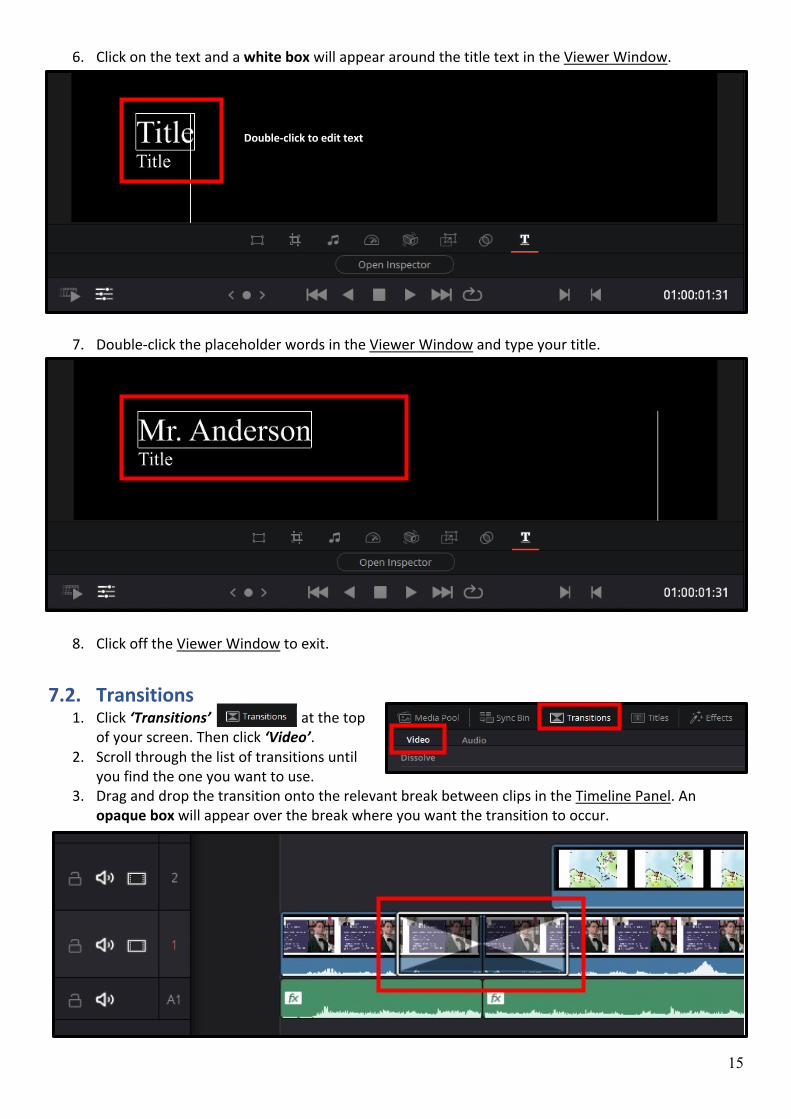
6. Click on the text and a white box will appear around the title text in the Viewer Window.
7. Double-click the placeholder words in the Viewer Window and type your title.
8. Click off the Viewer Window to exit.
7.2. Transitions
1. Click ‘Transitions’ at the top of your screen. Then click ‘Video’.
2. Scroll through the list of transitions until you find the one you want to use.
3. Drag and drop the transition onto the relevant break between clips in the Timeline Panel. An opaque box will appear over the break where you want the transition to occur.
Double-click to edit text

16
4. You can adjust the length of time the transition takes by moving the left- and right-hand edges of the opaque box.
NOTE: If you find that the program is not letting you add a transition between two different clips, try trimming some time off the end of the first clip and the beginning of the second clip. This will give a ‘time-buffer’ for the fade to occur within. A small adjustment will suit.
17
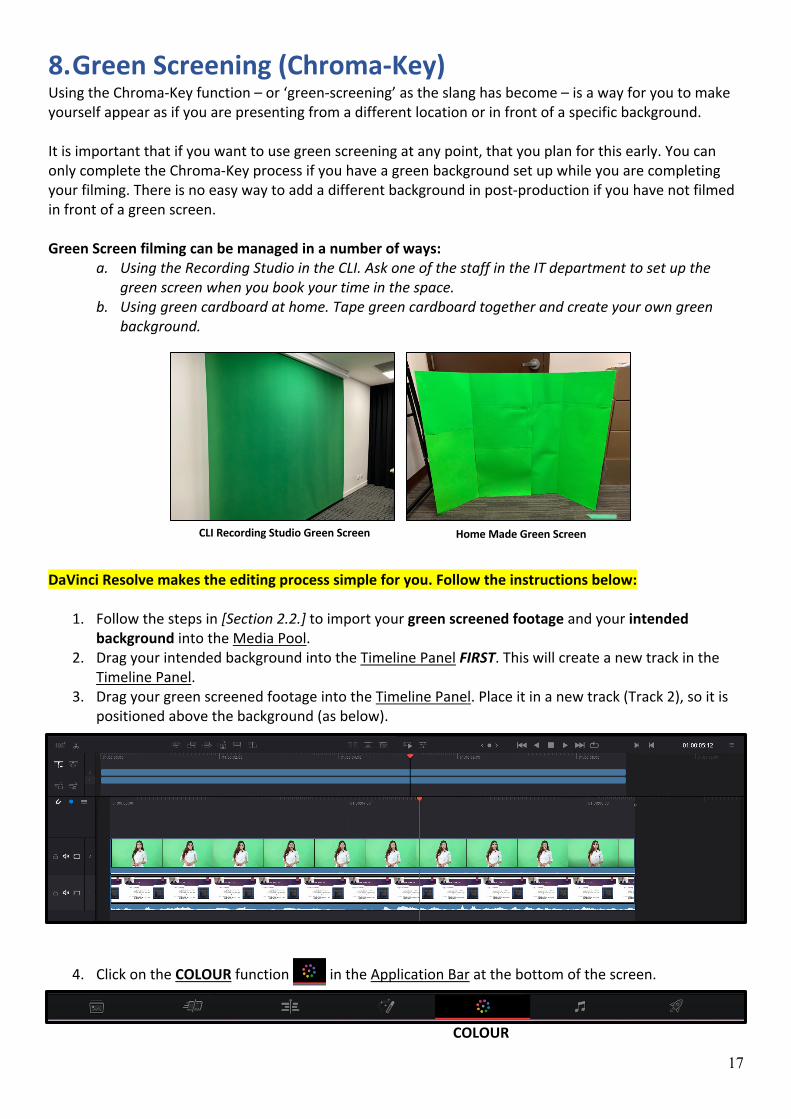
8. Green Screening (Chroma-Key) Using the Chroma-Key function – or ‘green-screening’ as the slang has become – is a way for you to make yourself appear as if you are presenting from a different location or in front of a specific background. It is important that if you want to use green screening at any point, that you plan for this early. You can only complete the Chroma-Key process if you have a green background set up while you are completing your filming. There is no easy way to add a different background in post-production if you have not filmed in front of a green screen. Green Screen filming can be managed in a number of ways:
a. Using the Recording Studio in the CLI. Ask one of the staff in the IT department to set up the green screen when you book your time in the space.
b. Using green cardboard at home. Tape green cardboard together and create your own green background.
DaVinci Resolve makes the editing process simple for you. Follow the instructions below:
1. Follow the steps in [Section 2.2.] to import your green screened footage and your intended background into the Media Pool.
2. Drag your intended background into the Timeline Panel FIRST. This will create a new track in the Timeline Panel.
3. Drag your green screened footage into the Timeline Panel. Place it in a new track (Track 2), so it is positioned above the background (as below).
4. Click on the COLOUR function in the Application Bar at the bottom of the screen.
COLOUR
CLI Recording Studio Green Screen Home Made Green Screen
18
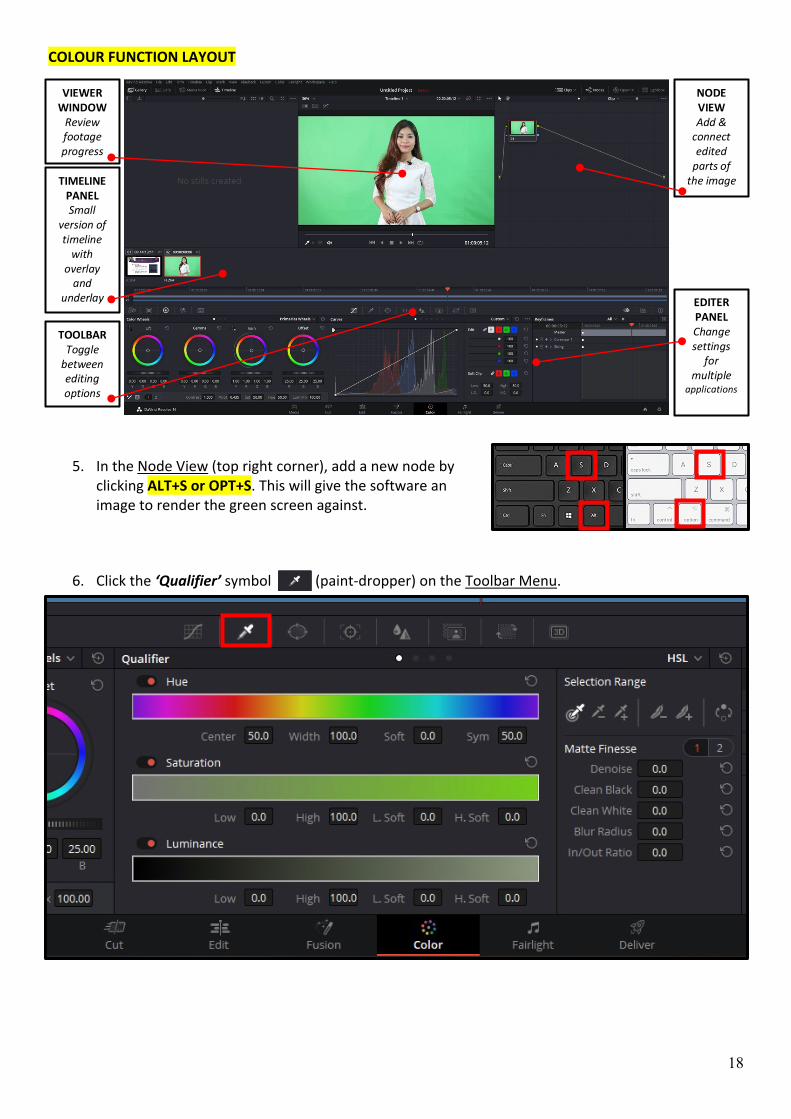
COLOUR FUNCTION LAYOUT
5. In the Node View (top right corner), add a new node by clicking ALT+S or OPT+S. This will give the software an image to render the green screen against.
6. Click the ‘Qualifier’ symbol (paint-dropper) on the Toolbar Menu.
VIEWER WINDOW
Review footage progress
NODE VIEW Add &
connect edited
parts of the image TIMELINE
PANEL Small
version of timeline
with overlay
and underlay
TOOLBAR Toggle
between editing options
EDITER PANEL Change settings
for multiple
applications
19
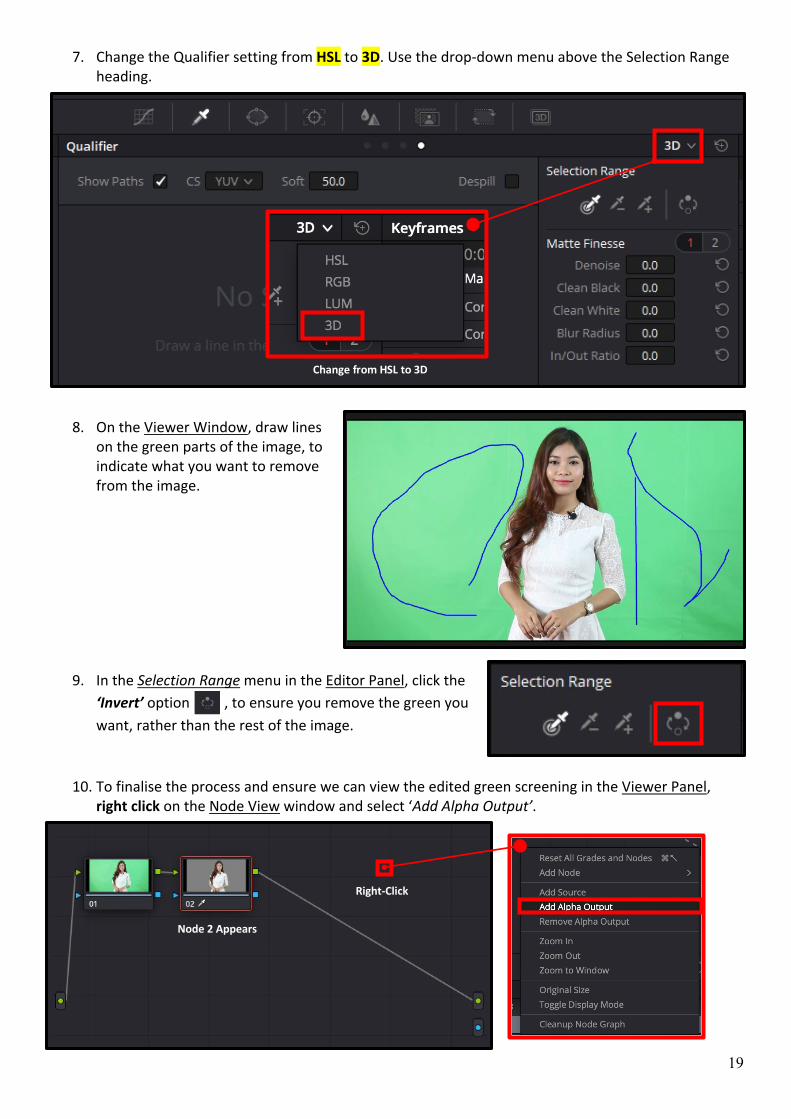
7. Change the Qualifier setting from HSL to 3D. Use the drop-down menu above the Selection Range heading.
8. On the Viewer Window, draw lines on the green parts of the image, to indicate what you want to remove from the image.
9. In the Selection Range menu in the Editor Panel, click the ‘Invert’ option , to ensure you remove the green you want, rather than the rest of the image.
10. To finalise the process and ensure we can view the edited green screening in the Viewer Panel, right click on the Node View window and select ‘Add Alpha Output’.
Change from HSL to 3D
Right-Click
Node 2 Appears
20
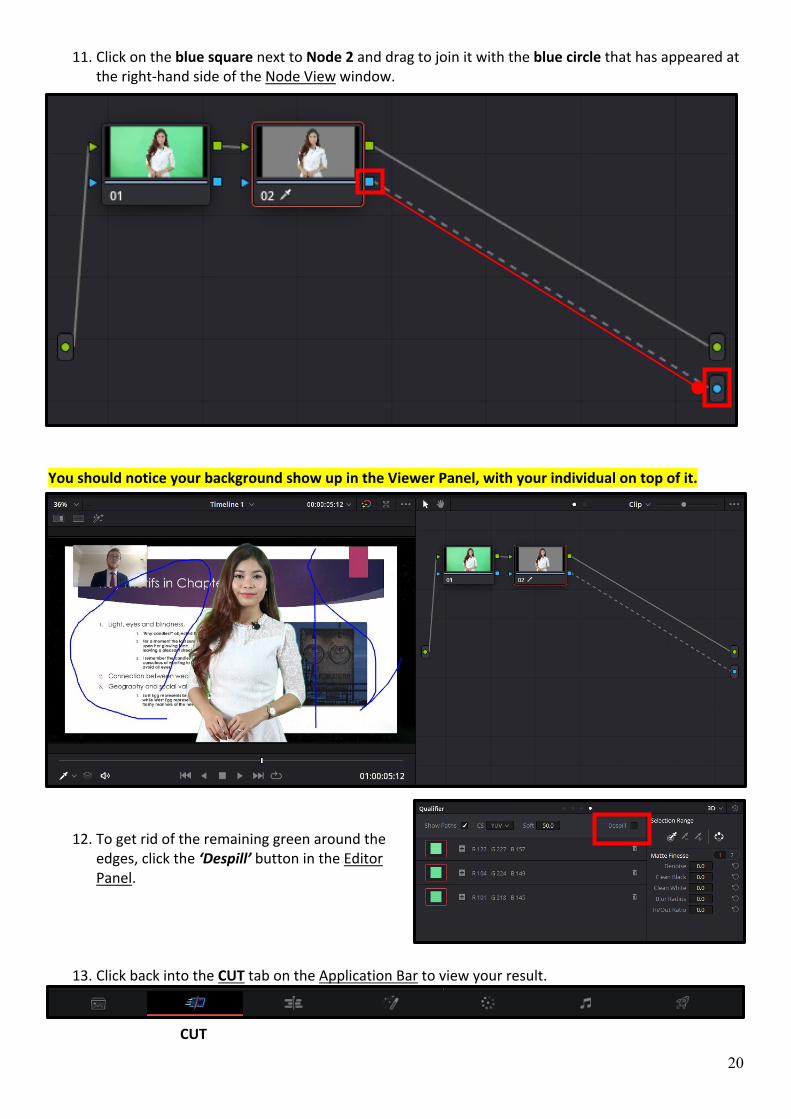
11. Click on the blue square next to Node 2 and drag to join it with the blue circle that has appeared at the right-hand side of the Node View window.
You should notice your background show up in the Viewer Panel, with your individual on top of it.
12. To get rid of the remaining green around the edges, click the ‘Despill’ button in the Editor Panel.
13. Click back into the CUT tab on the Application Bar to view your result.
CUT

21
8.1. Adjusting the Overlay Image After Chroma-Key If you want to move your green screened image around or make it smaller in the frame, there are a few more steps to follow than simply resizing the image (see Section 5).
1. Start in the CUT tab and follow the instructions in Section 5 to resize and position the image. NOTE: Do not get concerned if your background disappears into black as you resize the image. This will be fixed momentarily.
2. Go back to the COLOUR tab.
COLOUR
3. Click on the ‘Window’ symbol in the Toolbar Menu.
4. Select the Square Window (option 1) to apply to your image. You will see your background reappear, but some of your green screened image get cropped.
This will be fixed momentarily
22
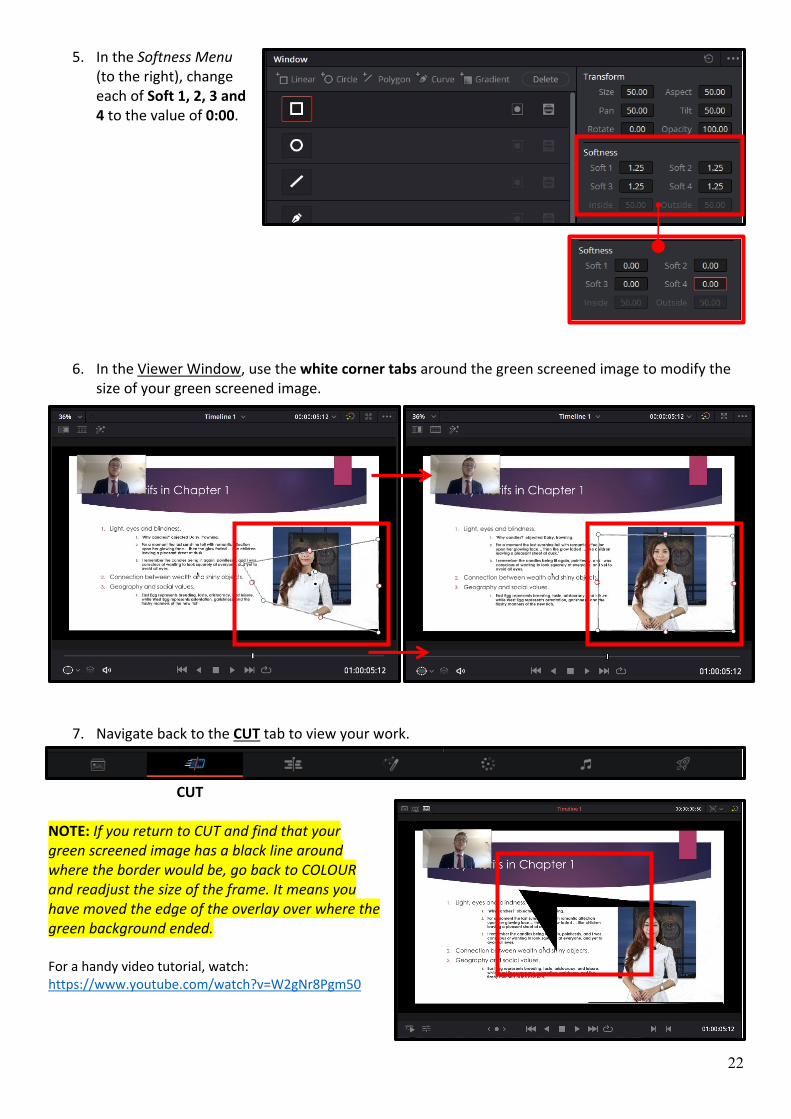
5. In the Softness Menu (to the right), change each of Soft 1, 2, 3 and 4 to the value of 0:00.
6. In the Viewer Window, use the white corner tabs around the green screened image to modify the size of your green screened image.
7. Navigate back to the CUT tab to view your work. CUT NOTE: If you return to CUT and find that your green screened image has a black line around where the border would be, go back to COLOUR and readjust the size of the frame. It means you have moved the edge of the overlay over where the green background ended. For a handy video tutorial, watch: https://www.youtube.com/watch?v=W2gNr8Pgm50
23
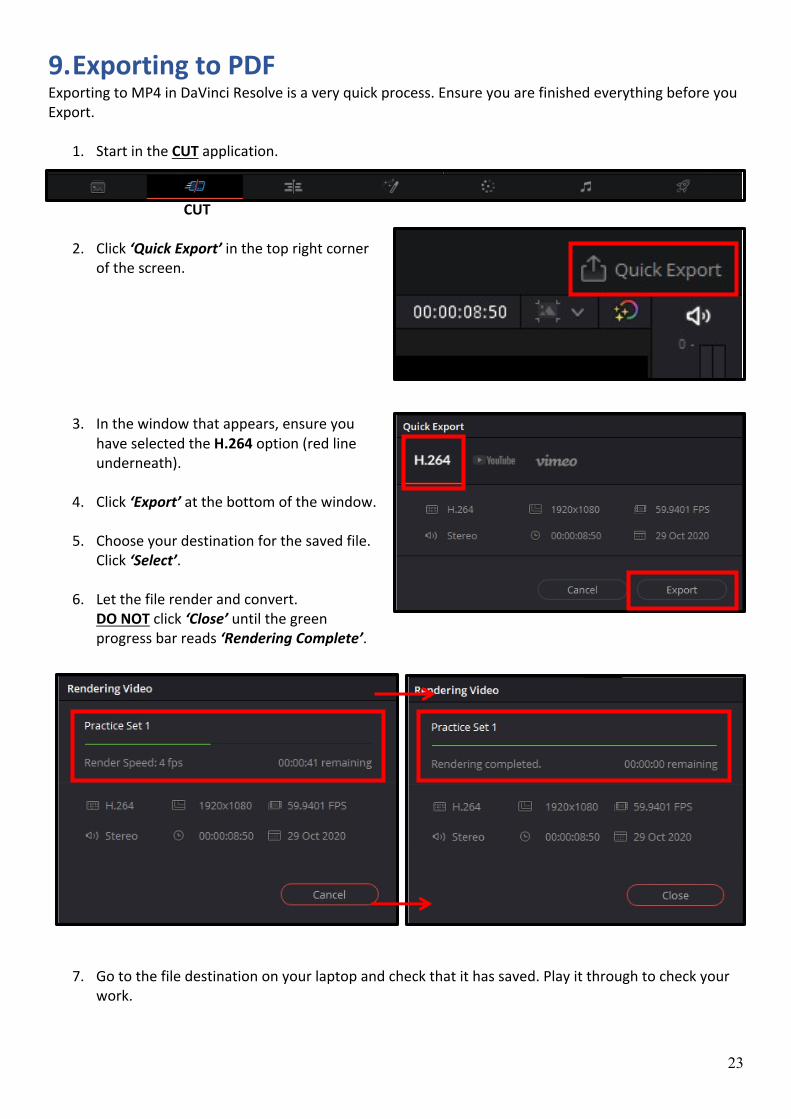
9. Exporting to PDF Exporting to MP4 in DaVinci Resolve is a very quick process. Ensure you are finished everything before you Export.
1. Start in the CUT application. CUT
2. Click ‘Quick Export’ in the top right corner of the screen.
3. In the window that appears, ensure you have selected the H.264 option (red line underneath).
4. Click ‘Export’ at the bottom of the window.
5. Choose your destination for the saved file.
Click ‘Select’.
6. Let the file render and convert. DO NOT click ‘Close’ until the green progress bar reads ‘Rendering Complete’.
7. Go to the file destination on your laptop and check that it has saved. Play it through to check your work.
24
10. Further Resources If you are requiring more information on functions within DaVinci Resolve, you can look though one of the following resources:
1. Beginners Guide to DaVinci Resolve 16 https://documents.blackmagicdesign.com/UserManuals/DaVinci-Resolve-16-Beginners-Guide.pdf
2. DaVinci Resolve Training https://www.blackmagicdesign.com/products/davinciresolve/training
Search YouTube for helpful tutorials on various skills within the software.
Download DaVinci Resolve 16: https://www.blackmagicdesign.com/products/davinciresolve/