dave crane eric pascarello - amazon web services · dave crane eric pascarello with darren ......
TRANSCRIPT

S A M P L E C H A P T E R
M A N N I N G
Dave CraneEric Pascarello
with Darren James

Ajax in Actionby Dave Crane
and Eric PascarelloSample Chapter 4
Copyright 2005 Manning Publications

Brief ContentsPART I RETHINKING THE WEB
APPLICATIONChapter 1 ■ A new design for the WebChapter 2 ■ First steps with AjaxChapter 3 ■ Introducing order to Ajax
PART II CORE TECHNIQUESChapter 4 ■ The page as an applicationChapter 5 ■ The role of the serverChapter 6 ■ The user experience
PART III PROFESSIONAL AJAXChapter 7 ■ SecurityChapter 8 ■ Performance
PART IV AJAX BY EXAMPLEChapter 9 ■ Dynamic double combo
Chapter 10 ■ Type-ahead suggest

Chapter 11 ■ The enhanced Ajax web portalChapter 12 ■ Live search using XSLChapter 13 ■ Building stand-alone applications with Ajax
Appendix A ■ The Ajax craftsperson’s toolkitAppendix B ■ JavaScript for object-oriented programmersAppendix C ■ Ajax frameworks

119
The page asan application
This chapter covers■ Organizing complex user interface code■ Using the Model-View-Controller pattern
with JavaScript■ Separating presentation from logic for
maintainable code■ Creating a flexible event-handling mode■ Generating the user interface directly from
your business objects

120 CHAPTER 4The page as an application
In chapters 1 and 2 we covered the basic principles of Ajax, from both a usabilityand a technology perspective. In chapter 3 we touched on the notion of creatingmaintainable code through refactoring and design patterns. In the examples thatwe’ve looked at so far, this may have seemed like overkill, but as we explore thesubject of Ajax programming in more depth, they will prove themselves to beindispensable tools.
In this chapter and the next, we discuss the details of building a larger, scal-able Ajax client, and the architectural principles needed to make it work. Thischapter looks at the coding of the client itself, drawing heavily on the Model-View-Controller (MVC) pattern that we discussed in chapter 3. We’ll also encoun-ter the Observer and other smaller patterns along the way. Chapter 5 will look atthe relationship between the client and the server.
4.1 A different kind of MVC
In chapter 3, we presented an example of refactoring a simple garment storeapplication to conform to the MVC pattern. This is the context in which most webdevelopers will have come across MVC before, with the Model being the domainmodel on the server, the View the generated content sent to the client, and theController a servlet or set of pages defining the workflow of the application.
However, MVC had its origins in desktop application development, and thereare several other places in an Ajax application where it can serve us well too. Let’shave a look at them now.
4.1.1 Repeating the pattern at different scales
The classic web MVC model describes the entire application in coarse-graineddetail. The entire generated data stream is the View. The entire CGI or servletlayer is the Controller, and so on.
In desktop application development, MVC patterns are often applied at amuch finer scale, too. Something as simple as a pushbutton widget can use MVC:
■ The internal representation of states—pressed, unpressed, inactive, forexample—is the Model. An Ajax widget would typically implement this asa JavaScript object.
■ The painted-on-screen widget—composed of Document Object Model(DOM) nodes, in the case of an Ajax UI—with modifications for differentstates, highlights, and tooltips, is the View.

A different kind of MVC 121
■ The internal code for relating the two is the Controller. The event-handlercode (that is, what happens in the larger application when the user pressesthe button) is also a Controller, but not the Controller for this View andModel. We’ll get to that shortly.
A pushbutton in isolation will have very little behavior, state, or visible variation,so the payback for using MVC here is relatively small. If we look at a more compli-cated widget component, such as a tree or a table, however, the overall system iscomplicated enough to benefit from a clean MVC-based design more thoroughly.
Figure 4.1 illustrates MVC applied to a tree widget. The Model consists of treenodes, each with a list of child nodes, an open/closed status, and a reference tosome business object, representing files and directories in a file explorer, say. TheView consists of the icons and lines painted onto the widget canvas. The Control-ler handles user events, such as opening and closing nodes and displaying pop-up menus, and also triggering graphical update calls for particular nodes, toallow the View to refresh itself incrementally.
That’s one way of applying MVC outside of the more familiar web server sce-nario. But we’re not finished yet. Let’s turn our attention to the web browser next.
Figure 4.1Model-View-Controller applied to the internal functioning of a tree widget. The view consists of a series of painted-on-screen elements composed of DOM elements. Behind the scenes, the tree structure is modeled as a series of JavaScript objects. Controller code mediates between the two.

122 CHAPTER 4The page as an application
4.1.2 Applying MVC in the browser
We’ve focused on the small details of our application. We can also zoom out ourperspective, to consider the entire JavaScript application that is delivered to thebrowser on startup. This, too, can be structured to follow the MVC pattern, and itwill benefit from clear separation of concerns if it is.
At this level, the Model consists of the business domain objects, the View is theprogrammatically manipulated page as a whole, and the Controller is a combina-tion of all the event handlers in the code that link the UI to the domain objects.Figure 4.2 illustrates the MVC operating at this level. This is perhaps the mostimportant use of MVC for an Ajax developer, because it is a natural fit to the Ajaxrich client application. We’ll examine the details of such use of the pattern, andwhat it buys us, in the remainder of the chapter.
If you think back to the conventional web MVC that we discussed in chapter 3as well, you’ll remember that we have at least three layers of MVC within a typicalAjax application, each performing different roles within the lifecycle of the appli-cation and each contributing to clean, well-organized code. Figure 4.3 illustrates
Figure 4.2 Model-View-Controller applied to the Ajax client application as a whole. The Controller at this level is the code that links the UI to the business objects in the JavaScript.

A different kind of MVC 123
how these MVC patterns at different scales are nested within each other in theapplication architecture.
So, what does this mean to us when we’re working on the code? In the follow-ing sections, we’ll take a more practical look at using MVC to define the structureof our JavaScript application, how it will affect the way we write code, and whatthe benefits will be. Let’s start with a look at the View.
Figure 4.3 Nested MVC architecture, in which the pattern repeats itself at different scales. At the outermost level, we can see the pattern defining the workflow of the application as a whole, with the model residing on the web server. At a smaller scale, the pattern is replicated within the client application and, at a smaller scale than that, within individual widgets in the client application.

124 CHAPTER 4The page as an application
4.2 The View in an Ajax application
From the position of the JavaScript application delivered to the browser when theapplication starts up, the View is the visible page, consisting of the DOM elementsthat are rendered by HTML markup or through programmatic manipulation.We’ve already shown how to manipulate the DOM programmatically in chapter 2.
According to MVC, our View has two main responsibilities. It has to provide avisible interface for the user to trigger events from, that is, to talk to the Control-ler. It also needs to update itself in response to changes in the Model, usuallycommunicated through the Controller again.
If the application is being developed by a team, the View will probably be thearea subject to the most contention. Designers and graphic artists will be involved,as will programmers, particularly as we explore the scope for interactivity in anAjax interface. Asking designers to write code, or programmers to get involved inthe aesthetics of an application, is often a bad idea. Even if you’re providing bothroles, it can be helpful to separate them, in order to focus on one at a time.
We showed in our overview of server MVC how code and presentation couldbecome intertwined, and we separated them out using a template system. Whatare the options available to us here on the browser?
In chapter 3, we demonstrated how to structure our web pages so that the CSS,HTML, and JavaScript are defined in separate files. In terms of the page itself,this split follows MVC, with the stylesheet being the View and the HTML/DOMbeing the model (a Document Object Model). From our current perspective,though, the page rendering is a black box, and the HTML and CSS togethershould be treated as the View. Keeping them separate is still a good idea, and sim-ply by moving the JavaScript out into a separate file we have started to keep thedesigners and the programmers off each other’s backs. This is just a start, how-ever, as you’ll see.
4.2.1 Keeping the logic out of the View
Writing all our JavaScript in a separate file is a good start for enforcing separationof the View, but even with this in place, we can entangle the View with the logicroles (that is, Model and Controller) without having to try too hard. If we writeJavaScript event handlers inline, such as
<div class='importButton' onclick='importData("datafeed3.xml", mytextbox.value);'/>

The View in an Ajax application 125
then we are hard-coding business logic into the View. What is datafeed3? Whatdoes the value of mytextbox have to do with it? Why does importData() take twoarguments, and what do they mean? The designer shouldn’t need to knowthese things.
importData() is a business logic function. The View and the Model shouldn’ttalk to one another directly, according to the MVC canon, so one solution is toseparate them out with an extra layer of indirection. If we rewrite our DIV tag as
<div class='importButton' onclick='importFeedData()'/>
and define an event handler like this
function importFeedData(event){ importData("datafeed3.xml", mytextbox.value); }
then the arguments are encapsulated within the importFeedData() function,rather than an anonymous event handler. This allows us to reuse that functional-ity elsewhere, keeping the concerns separate and the code DRY (at the risk ofrepeating myself, DRY means “don’t repeat yourself ”).
The Controller is still embedded in the HTML, however, which might make ithard to find in a large application.
To keep the Controller and the View separate, we can attach the event pro-grammatically. Rather than declare an event handler inline, we can specify amarker of some sort that will later be picked up by the code. We have severaloptions for this marker. We can attach a unique ID to the element and specifyevent handlers on a per-element basis. The HTML would be rewritten as
<div class='importButton' id='dataFeedBtn'>
and the following code executed as part of the window.onload callback, for example:
var dfBtn=document.getElementById('dataFeedBtn'); dfBtn.onclick=importFeedData;
If we want to perform the same action on multiple event handlers, we need toapply a non-unique marker of some sort. One simple approach is to define anextra CSS class.
Adding events indirectly using CSSLet’s look at a simple example, in which we bind mouse events to keys on a virtualmusical keyboard. In listing 4.1, we define a simple page containing an unstyleddocument structure.

126 CHAPTER 4The page as an application
<!DOCTYPE htmlPUBLIC "-//W3C//DTD XHTML 1.0 Strict//EN""http://www.w3.org/TR/xhtml1/DTD/xhtml1-strict.dtd"><html><head><title>Keyboard</title><link rel='stylesheet' type='text/css' href='musical.css'/><script type='text/javascript' src='musical.js'></script><script type='text/javascript'>window.onload=assignKeys;</script></head><body><div id='keyboard' class='musicalKeys'> <div class='do musicalButton'></div> <div class='re musicalButton'></div> <div class='mi musicalButton'></div> <div class='fa musicalButton'></div> <div class='so musicalButton'></div> <div class='la musicalButton'></div> <div class='ti musicalButton'></div> <div class='do musicalButton'></div> </div><div id='console' class='console'></div></body></html>
We declare the page to conform to XHTML strict definition, just to show that itcan be done. The keyboard element is assigned a unique ID, but the keys are not.Note that the keys designated b are each defined as having two styles. musical-Button is common to all keys, and a separate style differentiates them by note.These styles are defined separately in the stylesheet (listing 4.2).
.body{ background-color: white;}.musicalKeys{ background-color: #ffe0d0; border: solid maroon 2px; width: 536px; height: 68px; top: 24px; left: 24px;
Listing 4.1 musical.html
Listing 4.2 musical.css
b Keys on our "keyboard"

The View in an Ajax application 127
margin: 4px; position: absolute; overflow: auto;}.musicalButton{ border: solid navy 1px; width: 60px; height: 60px; position: relative; margin: 2px; float: left;}.do{ background-color: red; }.re{ background-color: orange; }.mi{ background-color: yellow; }.fa{ background-color: green; }.so{ background-color: blue; }.la{ background-color: indigo; }.ti{ background-color: violet; }div.console{ font-family: arial, helvetica; font-size: 16px; color: navy; background-color: white; border: solid navy 2px; width: 536px; height: 320px; top: 106px; left: 24px; margin: 4px; position: absolute; overflow: auto;}
The style musicalButton defines the common properties of each key. The note-specific styles simply define a color for each key. Note that whereas top-leveldocument elements are positioned with explicit pixel precision, we use the floatstyle attribute to lay the keys out in a horizontal line using the browser’s built-inlayout engine.
Binding the event-handler codeThe JavaScript file (listing 4.3) binds the events to these keys programmatically.
function assignKeys(){ var keyboard=document.getElementById("keyboard");
Listing 4.3 musical.js
Find parent DIV

128 CHAPTER 4The page as an application
var keys=keyboard.getElementsByTagName("div"); if (keys){ for(var i=0;i<keys.length;i++){ var key=keys[i]; var classes=(key.className).split(" "); if (classes && classes.length>=2 && classes[1]=="musicalButton"){ var note=classes[0]; key.note=note; key.onmouseover=playNote; } } }}function playNote(event){ var note=this.note; var console=document.getElementById("console"); if (note && console){ console.innerHTML+=note+" . "; }}
The assignKeys() function is called by window.onload. (We could have definedwindow.onload directly in this file, but that limits its portability). We find the key-board element by its unique ID and then use getElementsByTagName() to iteratethrough all the DIV elements inside it. This requires some knowledge of the pagestructure, but it allows the designer the freedom to move the keyboard DIVaround the page in any way that she wants.
The DOM elements representing the keys return a single string as classNameproperty. We use the inbuilt String.split function to convert it into an array,and check that the element is of class musicalButton. We then read the otherpart of the styling—which represents the note that this key plays—and attach itto the DOM node as an extra property, where it can be picked up again in theevent handler.
Playing music through a web browser is rather tricky, so in this case, we simplywrite the note out to the “console” underneath the keyboard. innerHTML is ade-quate for this purpose. Figure 4.4 shows our musical keyboard in action. We’veachieved good separation of roles here. Provided the designer drops the key-board and console DIV tags somewhere on the page and includes the stylesheetand JavaScript, the application will work, and the risk of accidentally breakingthe event logic is small. Effectively, the HTML page has become a template intowhich we inject variables and logic. This provides us with a good way of keeping
Enumerate children
Add custom attribute
Retrieve custom attribute
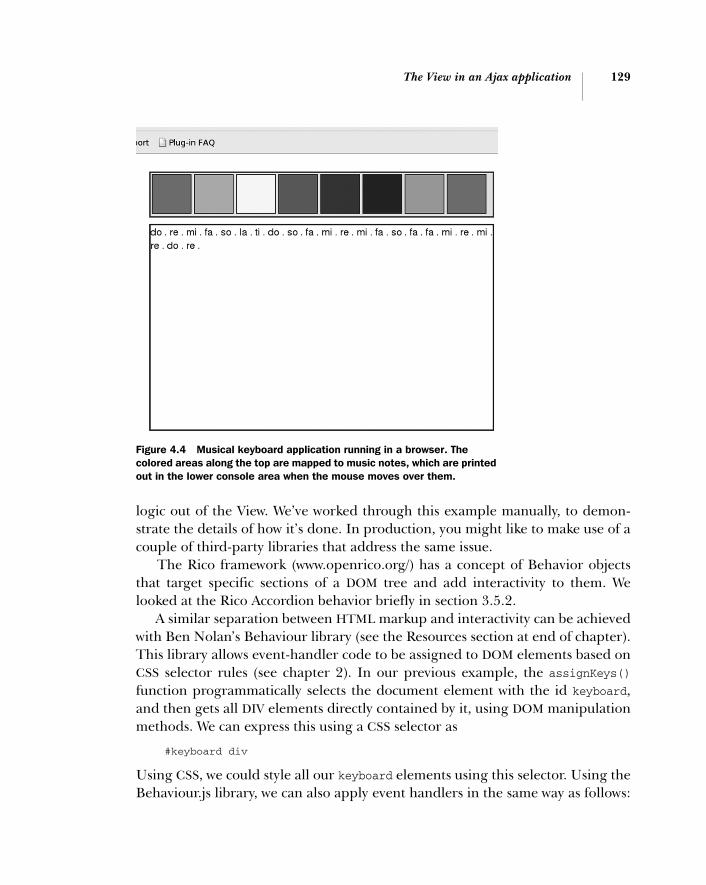
The View in an Ajax application 129
logic out of the View. We’ve worked through this example manually, to demon-strate the details of how it’s done. In production, you might like to make use of acouple of third-party libraries that address the same issue.
The Rico framework (www.openrico.org/) has a concept of Behavior objectsthat target specific sections of a DOM tree and add interactivity to them. Welooked at the Rico Accordion behavior briefly in section 3.5.2.
A similar separation between HTML markup and interactivity can be achievedwith Ben Nolan’s Behaviour library (see the Resources section at end of chapter).This library allows event-handler code to be assigned to DOM elements based onCSS selector rules (see chapter 2). In our previous example, the assignKeys()function programmatically selects the document element with the id keyboard,and then gets all DIV elements directly contained by it, using DOM manipulationmethods. We can express this using a CSS selector as
#keyboard div
Using CSS, we could style all our keyboard elements using this selector. Using theBehaviour.js library, we can also apply event handlers in the same way as follows:
Figure 4.4 Musical keyboard application running in a browser. The colored areas along the top are mapped to music notes, which are printed out in the lower console area when the mouse moves over them.

130 CHAPTER 4The page as an application
var myrules={ '#keyboard div' : function(key){ var classes=(key.className).split(" "); if (classes && classes.length>=2 && classes[1]=='musicalButton'){ var note=classes[0]; key.note=note; key.onmouseover=playNote; } }};Behaviour.register(myrules);
Most of the logic is the same as in our previous example, but the use of CSS selec-tors offers a concise alternative to programmatically locating DOM elements, par-ticularly if we’re adding several behaviors at once.
That keeps the logic out of the view for us, but it’s also possible to tangle theView up in the logic, as we will see.
4.2.2 Keeping the View out of the logic
We’ve reached the point now where the designers can develop the look of thepage without having to touch the code. However, as it stands, some of the func-tionality of the application is still embedded in the HTML, namely, the orderingof the keys. Each key is defined as a separate DIV tag, and the designers couldunwittingly delete some of them.
If the ordering of the keys is a business domain function rather than a designissue—and we can argue that it is—then it makes sense to generate some of theDOM for the component programmatically, rather than declare it in the HTML.Further, we may want to have multiple components of the same type on a page. Ifwe don’t want the designer to modify the order of the keys on our keyboard, forexample, we could simply stipulate that they assign a DIV tag with the class key-board and have our initialization code find it and add the keys programmatically.Listing 4.4 shows the modified JavaScript required to do this.
var notes=new Array("do","re","mi","fa","so","la","ti","do");function assignKeys(){ var candidates=document.getElementsByTagName("div"); if (candidates){ for(var i=0;i<candidates.length;i++){ var candidate=candidates[i]; if (candidate.className.indexOf('musicalKeys')>=0){ makeKeyboard(candidate);
Listing 4.4 musical_dyn_keys.js

The View in an Ajax application 131
} } }}function makeKeyboard(el){ for(var i=0;i<notes.length;i++){ var key=document.createElement("div"); key.className=notes[i]+" musicalButton"; key.note=notes[i]; key.onmouseover=playNote; el.appendChild(key); }}function playNote(event){ var note=this.note; var console=document.getElementById('console'); if (note && console){ console.innerHTML+=note+" . "; }}
Previously, we had defined our key sequence in the HTML. Now it is defined as aglobal JavaScript array. The assignKeys() method examines all the top-levelDIV tags in the document, to see if the className contains the value musical-Keys. If it does, then it tries to populate that DIV with a working keyboard, usingthe makeKeyboard() function. makeKeyboard() simply creates new DOM nodesand then manipulates them in the same way as listing 4.4 did for the declaredDOM nodes that it encountered. The playNote() callback handler operatesexactly as before.
Because we are populating empty DIVs with our keyboard controls, adding asecond set of keys is simple, as listing 4.5 illustrates.
<!DOCTYPE htmlPUBLIC "-//W3C//DTD XHTML 1.0 Strict//EN""http://www.w3.org/TR/xhtml1/DTD/xhtml1-strict.dtd"><html><title>Two Keyboards</title><head><link rel='stylesheet' type='text/css' href='musical_dyn_keys.css'/><script type='text/javascript' src='musical_dyn_keys.js'></script><script type='text/javascript'>
Listing 4.5 musical_dyn_keys.html

132 CHAPTER 4The page as an application
window.onload=assignKeys;</script></head><body><div id='keyboard-top' class='toplong musicalKeys'></div><div id='keyboard-side' class='sidebar musicalKeys'></div><div id='console' class='console'></div></body></html>
Adding a second keyboard is a single-line operation. Because we don’t want themsitting one on top of the other, we move the placement styling out of the musical-Keys style class and into separate classes. The stylesheet modifications are shownin listing 4.6.
.musicalKeys{ background-color: #ffe0d0; border: solid maroon 2px; position: absolute; overflow: auto; margin: 4px;}.toplong{ width: 536px; height: 68px; top: 24px; left: 24px;}.sidebar{ width: 48px; height: 400px; top: 24px; left: 570px;}
The musicalKeys class defines the visual style common to all keyboards. toplongand sidebar simply define the geometry of each keyboard.
By refactoring our keyboard example in this way, we have made it possible toreuse the code easily. However, the design of the keyboard is partly defined in theJavaScript, in the makeKeyboard() function in listing 4.4, and yet, as figure 4.5shows, one keyboard has a vertical layout and the other a horizontal one. How didwe achieve this?
Listing 4.6 Changes to musical_dyn_keys.css
Common keyboard styling
Geometry of keyboard 1
Geometry of keyboard 2

The View in an Ajax application 133
makeKeyboard() could easily have computed the size of the DIV that it was target-ing and placed each button programmatically. In that case, we would need to getquite fussy about deciding whether the DIV was vertical or horizontal and writeour own layout code. To a Java GUI programmer familiar with the internals ofLayoutManager objects, this may seem all too obvious a route to take. If we tookit, our programmers would wrest control of the widget’s look from the designers,and trouble would ensue!
As it is, makeKeyboard()modifies only the structure of the document. The keysare laid out by the browser’s own layout engine, which is controlled by style-sheets—by the float style attribute in this case. It is important that the layout becontrolled by the designer. Logic and View remain separate, and peace reigns.
The keyboard was a relatively simple widget. In a larger, more complex wid-get such as a tree table, it may be harder to see how the browser’s own renderengine can be coerced into doing the layout, and in some cases, programmaticstyling is inevitable. However, it’s always worth asking this question, in the inter-ests of keeping View and Logic separate. The browser render engine is also a
Figure 4.5 Our revised musical keyboard program allows the designer to specify multiple keyboards. Using CSS-based styling and the native render engine, we can accommodate both vertical and horizontal layouts without writing explicit layout code in our JavaScript.

134 CHAPTER 4The page as an application
high-performing, fast, and well-tested piece of native code, and it is likely to beatany JavaScript algorithms that we cook up.
That about wraps it up for the View for the moment. In the next section, we’llexplore the role of the Controller in MVC and how that relates to JavaScript eventhandlers in an Ajax application.
4.3 The Controller in an Ajax application
The role of the Controller in MVC is to serve as an intermediary between theModel and the View, decoupling them from one another. In a GUI applicationsuch as our Ajax client application, the Controller layer is composed of eventhandlers. As is often the case with web browsers, techniques have evolved overtime, and modern browsers support two different event models. The classicmodel is relatively simple and is in the process of being superseded by the newerW3C specifications for event handling. At the time of writing, however, imple-mentations of the new event-handling model vary between browsers and aresomewhat problematic. Both event models are discussed here.
4.3.1 Classic JavaScript event handlers
The JavaScript implementation in web browsers allows us to define code that willbe executed in response to a user event, typically either the mouse or keyboard.In the modern browsers that support Ajax, these event handlers can be assignedto most visual elements. We can use the event handlers to connect our visible userinterface, that is, the View, to the business object Model.
The classic event model has been around since the early days of JavaScript,and is relatively simple and straightforward. DOM elements have a small numberof predefined properties to which callback functions can be assigned. For exam-ple, to attach a function that will be called when the mouse is clicked on an ele-ment myDomElement, we could write
myDomElement.onclick=showAnimatedMonkey
myDomElement is any DOM element that we have a programmatic handle on. show-AnimatedMonkey is a function, defined as
function showAnimatedMonkey(){ //some skillfully executed code to display //an engaging cartoon character here }

The Controller in an Ajax application 135
that is, as an ordinary JavaScript function. Note that when we assign the eventhandler, we pass the Function object, not a call to that object, so it doesn’t haveparentheses after the function name. This is a common mistake:
myDomElement.onclick=showAnimatedMonkey();
This looks more natural to programmers unaccustomed to treating functions asfirst-class objects, but it will not do what we think. The function will be calledwhen we make the assignment, not when the DOM element is clicked. Theonclick property will be set to whatever is returned by the function. Unless you’redoing something extremely clever involving functions that return references toother functions, this is probably not desirable. Here’s the right way to do it:
myDomElement.onclick=showAnimatedMonkey;
This passes a reference to our callback function to the DOM element, telling itthat this is the function to invoke when the node is clicked on. DOM elementshave many such properties to which event-handler functions can be attached.Common event-handler callbacks for GUI work are listed in table 4.1. Similarproperties can be found elsewhere in web browser JavaScript, too. The XML-HttpRequest.onreadystate and window.onload, which we have encounteredalready, are also event handler functions that can be assigned by the programmer.
There is an unusual feature of the event handler functions worth mentioninghere, as it trips people up most frequently when writing object-oriented Java-Script, a feature that we will lean on heavily in developing Ajax clients.
Table 4.1 Common GUI event handler properties in the DOM
Property Description
onmouseover Triggered when the mouse first passes into an element’s region.
onmouseout Triggered when the mouse passes out of an element’s region.
onmousemove Triggered whenever the mouse moves while within an element’s region (i.e., frequently!).
onclick Triggered when the mouse is clicked within an element’s region.
onkeypress Triggered when a key is pressed while this element has input focus. Global key handlers can be attached to the document’s body.
onfocus A visible element receives input focus.
onblur A visible element loses input focus.
136 CHAPTER 4The page as an application
We’ve got a handle on a DOM element, and assigned a callback function to theonclick property. When the DOM element receives a mouse click, the callback isinvoked. However, the function context (that is, the value that variable thisresolves to—see appendix B for a fuller discussion of JavaScript Function objects)is assigned to the DOM node that received the event. Depending on where andhow the function was originally declared, this can be very confusing.
Let's explore the problem with an example. We define a class to represent abutton object, which has a reference to a DOM node, a callback handler, and avalue that is displayed when the button is clicked. Any instance of the button willrespond in the same way to a mouse click event, and so we define the callbackhandler as a method of the button class. That’s a sufficient spec for starters, solet’s look at the code. Here’s the constructor for our button:
function Button(value,domEl){ this.domEl=domEl; this.value=value; this.domEl.onclick=this.clickHandler;}
We go on to define an event handler as part of the Button class:
Button.prototype.clickHandler=function(){ alert(this.value);}
It looks straightforward enough, but it doesn’t do what we want it to. The alertbox will generally return a message undefined, not the value property that wepassed to the constructor. Let’s see why. The function clickHandler gets invokedby the browser when the DOM element is clicked, and it sets the function contextto the DOM element, not the Button JavaScript object. So, this.value refers tothe value property of the DOM element, not the Button object. You’d never tell bylooking at the declaration of the event-handler function, would you?
We can fix things up by passing a reference to the Button object to the DOMelement, that is, by modifying our constructor like this:
function Button(value,domEl){ this.domEl=domEl; this.value=value; this.domEl.buttonObj=this; this.domEl.onclick=this.clickHandler;}
The DOM element still doesn’t have a value property, but it has a reference to theButton object, which it can use to get the value. We finish up by altering the eventhandler like this:

The Controller in an Ajax application 137
Button.prototype.clickHandler=function(){ var buttonObj=this.buttonObj; var value=(buttonObj && buttonObj.value) ? buttonObj.value : "unknown value"; alert(value);}
The DOM node refers to the Button, which refers to its value property, and ourevent handler does what we want it to. We could have attached the value directlyto the DOM node, but attaching a reference to the entire backing object allowsthis pattern to work easily with arbitrarily complex objects. In passing, it’s worthnoting that we’ve implemented a mini-MVC pattern here, with the DOM elementView fronting a backing object Model.
That’s the classic event model, then. The main shortcoming of this eventmodel is that it allows only one event-handler function per element. In theObserver pattern that we presented in chapter 3, we noted that an observable ele-ment could have any number of observers attached to it at a given time. Whenwriting a simple script for a web page, this is unlikely to be a serious shortcoming,but as we move toward the more complex Ajax clients, we start to feel the con-straint more. We will take a closer look at this in section 4.3.3, but first, let’s lookat the more recent event model.
4.3.2 The W3C event model
The more flexible event model proposed by the W3C is complex. An arbitrarynumber of listeners can be attached to a DOM element. Further, if an action takesplace in a region of the document in which several elements overlap, the eventhandlers of each are given an opportunity to fire and to veto further calls in theevent stack, known as “swallowing” the event. The specification proposes that theevent stack be traversed twice in total, first propagating from outermost to inner-most (from the document element down) and then bubbling up again from theinside to the outside. In practice, different browsers implement different subsetsof this behavior.
In Mozilla-based browsers and Safari, event callbacks are attached usingaddEventListener() and removed by a corresponding removeEventListener().Internet Explorer offers similar functions: attachEvent() and detachEvent().Mike Foster’s xEvent object (part of the x library—see the Resources section at theend of this chapter) makes a brave attempt at creating a Façade (see chapter 3)across these implementations in order to provide a rich cross-browser event model.
There is a further cross-browser annoyance here, as the callback handler func-tions defined by the user are called slightly differently. Under Mozilla browsers,

138 CHAPTER 4The page as an application
the function is invoked with the DOM element receiving the event as a contextobject, as for the classic event model. Under Internet Explorer, the functioncontext is always the Window object, making it impossible to work out whichDOM element is currently calling the event handler! Even with a layer such asxEvent in place, developers need to account for these variations when writingtheir callback handlers.
The final issue to mention here is that neither implementation provides a sat-isfactory way of returning a list of all currently attached listeners.
At this point, I advise you not to use the newer event model. The main short-coming of the classic model—lack of multiple listeners—can be addressed by theuse of design patterns, as we will see next.
4.3.3 Implementing a flexible event model in JavaScript
Because of the incompatibilities of the newer W3C event model, the promise of aflexible event listener framework remains just out of reach. We described theObserver pattern in chapter 3, and that seems to fit the bill nicely, allowing us toadd and remove observers from the event source in a flexible fashion. Clearly, theW3C felt the same way, as the revised event model implements Observer, but thebrowser vendors delivered inconsistent and just plain broken implementations.The classic event model falls far short of the Observer pattern, but perhaps wecan enhance it a little with some code of our own.
Managing multiple event callbacksBefore going on to implement our own solution, let’s come to grips with the prob-lem through a simple example. Listing 4.7 shows a simple web page, in which alarge DIV area responds to mouse move events in two ways.
<html><head><link rel='stylesheet' type='text/css' href='mousemat.css' /><script type='text/javascript'>var cursor=null;window.onload=function(){ var mat=document.getElementById('mousemat'); mat.onmousemove=mouseObserver; cursor=document.getElementById('cursor');}function mouseObserver(event){ var e=event || window.event; writeStatus(e);
Listing 4.7 mousemat.html
The Controller in an Ajax application 139
drawThumbnail(e);}function writeStatus(e){ window.status=e.clientX+","+e.clientY;}function drawThumbnail(e){ cursor.style.left=((e.clientX/5)-2)+"px"; cursor.style.top=((e.clientY/5)-2)+"px";}</script></head><body><div class='mousemat' id='mousemat'></div><div class='thumbnail' id='thumbnail'> <div class='cursor' id='cursor'/></div></body></html>
First, it updates the browser status bar, in the writeStatus() function. Second, itupdates a smaller thumbnail image of itself, by repositioning a dot in the thumb-nail area, to copy the mouse pointer’s movements, in the drawThumbnail() func-tion. Figure 4.6 shows the page in action.
These two actions are independent of each other, and we would like to be ableto swap these and other responses to the mouse movement in and out at will, evenwhile the program is running.
The mouseObserver() function is our event listener. (The first line is perform-ing some simple cross-browser magic, by the way. Unlike Mozilla, Opera, orSafari, Internet Explorer doesn’t pass any arguments to the callback handlerfunction, but stores the Event object in window.event.) In this example, we havehardwired the two activities in the event handler, calling writeStatus() and draw-Thumbnail() in turn. The program does exactly what we want it to do, and,because it is a small program, the code for mouseObserver() is reasonably clear.Ideally, though, we would like a cleaner way to wire the event listeners together,allowing the approach to scale to more complex or dynamic situations.
Implementing Observer in JavaScriptThe proposed solution is to define a generic event router object, which attaches astandard function to the target element as an event callback and maintains a listof listener functions. This would allow us to rewrite our mousemat initializationcode in this way:

140 CHAPTER 4The page as an application
window.onload=function(){ var mat=document.getElementById('mousemat'); ... var mouseRouter=new jsEvent.EventRouter(mat,"onmousemove"); mouseRouter.addListener(writeStatus); mouseRouter.addListener(drawThumbnail);}
We define an EventRouter object, passing in the DOM element and the type ofevent that we would like to register as arguments. We then add listener functionsto the router object, which also supports a removeListener() method that wedon’t need here. It looks straightforward, but how do we implement it?
Figure 4.6 The Mousemat program tracks mouse movement events on the main “virtual mousemat” area in two ways: by updating the browser status bar with the mouse coordinates and by moving the dot on the thumbnail view in sync with the mouse pointer.

The Controller in an Ajax application 141
First, we write a constructor for the object, which in JavaScript is simply a func-tion. (Appendix B contains a primer on the syntax of JavaScript objects. Take alook if any of the following code looks strange or confusing.)
jsEvent.EventRouter=function(el,eventType){ this.lsnrs=new Array(); this.el=el; el.eventRouter=this; el[eventType]=jsEvent.EventRouter.callback;}
We define the array of listener functions, which is initially empty, take a refer-ence to the DOM element, and give it a reference to this object, using the patternwe described in section 3.5.1. We then assign a static method of the EventRouterclass, simply called callback, as the event handler. Remember that in JavaScript,the square bracket and dot notations are equivalent, which means
el.onmouseover
is the same as
el['onmouseover']
We use this to our advantage here, passing in the name of a property as an argu-ment. This is similar to reflection in Java or the .NET languages.
Let’s have a look at the callback then:
jsEvent.EventRouter.callback=function(event){ var e=event || window.event; var router=this.eventRouter; router.notify(e)}
Because this is a callback, the function context is the DOM node that fired theevent, not the router object. We retrieve the EventRouter reference that we hadattached to the DOM node, using the backing object pattern that we saw earlier.We then call the notify() method of the router, passing the event object in asan argument.
The full code for the Event Router object is shown in listing 4.8.
var jsEvent=new Array();jsEvent.EventRouter=function(el,eventType){ this.lsnrs=new Array(); this.el=el; el.eventRouter=this;
Listing 4.8 EventRouter.js

142 CHAPTER 4The page as an application
el[eventType]=jsEvent.EventRouter.callback;}jsEvent.EventRouter.prototype.addListener=function(lsnr){ this.lsnrs.append(lsnr,true);}jsEvent.EventRouter.prototype.removeListener=function(lsnr){ this.lsnrs.remove(lsnr);}jsEvent.EventRouter.prototype.notify=function(e){ var lsnrs=this.lsnrs; for(var i=0;i<lsnrs.length;i++){ var lsnr=lsnrs[i]; lsnr.call(this,e); }}jsEvent.EventRouter.callback=function(event){ var e=event || window.event; var router=this.eventRouter; router.notify(e)}
Note that some of the methods of the array are not standard JavaScript but havebeen defined by our extended array definition, which is discussed in appendixB. Notably, addListener() and removeListener() are simple to implement usingthe append() and remove() methods. Listener functions are invoked using theFunction.call() method, whose first argument is the function context, and sub-sequent arguments (in this case the event) are passed through to the callee.
The revised mousemat example is shown in listing 4.9.
<html><head><link rel='stylesheet' type='text/css' href='mousemat.css' /><script type='text/javascript' src='extras-array.js'></script><script type='text/javascript' src='eventRouter.js'></script><script type='text/javascript'>var cursor=null;window.onload=function(){ var mat=document.getElementById('mousemat'); cursor=document.getElementById('cursor'); var mouseRouter=new jsEvent.EventRouter(mat,"onmousemove"); mouseRouter.addListener(writeStatus); mouseRouter.addListener(drawThumbnail);}function writeStatus(e){ window.status=e.clientX+","+e.clientY
Listing 4.9 Revised mousemat.html, using EventRouter

Models in an Ajax application 143
}function drawThumbnail(e){ cursor.style.left=((e.clientX/5)-2)+"px"; cursor.style.top=((e.clientY/5)-2)+"px";}</script></head><body><div class='mousemat' id='mousemat'></div><div class='thumbnail' id='thumbnail'> <div class='cursor' id='cursor'/></div></body></html>
The inline JavaScript is greatly simplified. All we need to do is create the Event-Router, pass in the listener functions, and provide implementations for the listen-ers. We leave it as an exercise for the reader to include checkboxes to add andremove each listener dynamically.
This rounds out our discussion of the Controller layer in an Ajax applicationand the role that design patterns—Observer in particular—can play in keeping itclean and easy to work with. In the following section, we’ll look at the final part ofthe MVC pattern, the Model.
4.4 Models in an Ajax application
The Model is responsible for representing the business domain of our applica-tion, that is, the real-world subject that the application is all about, whether that isa garment store, a musical instrument, or a set of points in space. As we’ve notedalready, the Document Object Model is not the model at the scale at which we’relooking at the application now. Rather, the model is a collection of code that wehave written in JavaScript. Like most design patterns, MVC is heavily based onobject-oriented thinking.
JavaScript is not designed as an OO language, although it can be persuadedinto something resembling object orientation without too much struggle. It doessupport the definition of something very similar to object classes through its pro-totype mechanism, and some developers have gone as far as implementinginheritance systems for JavaScript. We discuss these issues further in appendix B.When implementing MVC in JavaScript so far, we’ve adapted it to the JavaScriptstyle of coding, for example, passing Function objects directly as event listeners.When it comes to defining the model, however, using JavaScript objects, and as

144 CHAPTER 4The page as an application
much of an OO approach as we’re comfortable with for the language, makes goodsense. In the following section, we’ll show how that is done.
4.4.1 Using JavaScript to model the business domain
When discussing the View, we are very much tied to the DOM. When we talk aboutthe Controller, we are constrained by the browser event models. When writing theModel, however, we are dealing almost purely with JavaScript and have very littleto do with browser-specific functionality. Those who have struggled with browserincompatibilities and bugs will recognize this as a comfortable situation in whichto be.
Let’s look at a simple example. In chapter 3 we discussed our garment storeapplication, from the point of view of generating a data feed from the server. Thedata described a list of garment types, in terms of a unique ID, a name, and adescription, along with price, color, and size information. Let’s return to thatexample now and consider what happens when the data arrives at the client.Over the course of its lifetime, the application will receive many such streams ofdata and have a need to store data in memory. Think of this as a cache if youlike—data stored on the client can be redisplayed very quickly, without needing togo back to the server at the time at which the user requests the data. This benefitsthe user’s workflow, as discussed in chapter 1.
We can define a simple JavaScript object that corresponds to the garmentobject defined on the server. Listing 4.10 shows a typical example.
var garments=new Array();function Garment(id,title,description,price){ this.id=id; garments[id]=this; this.title=title; this.description=description; this.price=price; this.colors=new Object(); this.sizes=new Object();}Garment.prototype.addColor(color){ this.colors.append(color,true);}Garment.prototype.addSize(size){ this.sizes.append(size,true);}
Listing 4.10 Garment.js

Models in an Ajax application 145
We define a global array first of all, to hold all our garments. (Yes, global variablesare evil. In production, we’d use a namespacing object, but we’ve omitted that forclarity here.) This is an associative array, keyed by the garment’s unique ID,ensuring that we have only one reference to each garment type at a time. In theconstructor function, we set all the simple properties, that is, those that aren’tarrays. We define the arrays as empty and provide simple adder methods, whichuses our enhanced array code (see appendix B) to prevent duplicates.
We don’t provide getter or setter methods by default and don’t support the fullaccess control—private, protected, and public variables and methods—that a fullOO language does. There are ways of providing this feature, which are discussedin appendix B, but my own preference is to keep the Model simple.
When parsing the XML stream, it would be nice to initially build an emptyGarment object and then populate it field by field. The astute reader may be won-dering why we haven’t provided a simpler constructor. In fact, we have. JavaScriptfunction arguments are mutable, and any missing values from a call to a functionwill simply initialize that value to null. So the call
var garment=new Garment(123);
will be treated as identical to
var garment=new Garment(123,null,null,null);
We need to pass in the ID, because we use that in the constructor to place the newobject in the global list of garments.
4.4.2 Interacting with the server
We could parse the XML feed of the type shown in listing 4.10 in order to gener-ate Garment objects in the client application. We’ve already seen this in action inchapter 2, and we’ll see a number of variations in chapter 5, so we won’t go intoall the details here. The XML document contains a mixture of attributes and tagcontent. We read attribute data using the attributes property and getNamed-Item() function and read the body text of tags using the firstChild and dataproperties, for example:
garment.description=descrTag.firstChild.data;
to parse an XML fragment such as
<description>Large tweedy hat looking like an unappealing strawberry </description>

146 CHAPTER 4The page as an application
Note that garments are automatically added to our array of all garments as theyare created, simply by invoking the constructor. Removing a garment from thearray is also relatively straightforward:
function unregisterGarment(id){ garments[id]=null; }
This removes the garment type from the global registry, but won’t cascade todestroy any instances of Garment that we have already created. We can add a sim-ple validation test to the Garment object, however:
Garment.prototype.isValid=function(){ return garments[this.id]!=null; }
We’ve now defined a clear path for propagating data all the way from the data-base to the client, with nice, easy-to-handle objects at each step. Let’s recap thesteps. First, we generate a server-side object model from the database. Insection 3.4.2, we saw how to do this using an Object-Relational Mapping (ORM)tool, which gave us out-of-the-box two-way interactions between object modeland database. We can read data into objects, modify it, and save the data.
Second, we used a template system to generate an XML stream from our objectmodel, and third, we parsed this stream in order to create an object model on theJavaScript tier. We must do this parsing by hand for now. We may see ORM-likemapping libraries appearing in the near future.
In an administrative application, of course, we might want to edit our data too,that is, modify the JavaScript model, and then communicate these changes backto the server model. This forces us to confront the issue that we now have two cop-ies of our domain model and that they may get out of sync with each other.
In a classic web application, all the intelligence is located on the server, so ourmodel is located there, in whatever language we’re using. In an Ajax application,we want to distribute the intelligence between the client and the server, so that theclient code can make some decisions for itself before calling back to the server. Ifthe client makes only very simple decisions, we can code these in an ad hoc way,but then we won’t get much of the benefit of an intelligent client, and the systemwill tend to still be unresponsive in places. If we empower the client to make moreimportant decisions for itself, then it needs to know something about our busi-ness domain, at which point it really needs to have a model of the domain.
We can’t do away with the domain model on the server, because some resourcesare available only on the server, such as database connections for persistence,

Generating the View from the Model 147
access to legacy systems, and so on. The client-side domain model has to workwith the one on the server. So, what does that entail? In chapter 5 we will developa fuller understanding of the client/server interactions and how to work cleanlywith a domain model split across both tiers.
So far we’ve looked at Model, View, and Controller in isolation. The final topicfor this chapter brings the Model and View together again.
4.5 Generating the View from the Model
By introducing MVC into the browser, we’ve given ourselves three distinct sub-systems to worry about. Separating concerns may result in cleaner code, but it canalso result in a lot of code, and a common critique of design patterns is that theycan turn even the simplest task into quite an involved process (as Enterprise Java-Beans [EJB] developers know only too well!).
Many-layered application designs often end up repeating information acrossseveral layers. We know the importance of DRY code, and a common way of tack-ling this repetition is to define the necessary information once, and generate thevarious layers automatically from that definition. In this section, we’ll do just that,and present a technique that simplifies the MVC implementation and bringstogether all three tiers in a simple way. Specifically, we’ll target the View layer.
So far, we’ve looked at the View as a hand-coded representation of the under-lying Model. This gives us considerable flexibility in determining what the usersees, but at times, we won’t need this flexibility, and hand-coding the UI canbecome tedious and repetitive. An alternative approach is to automatically gener-ate the user interface, or at least portions of it, from the underlying Model. Thereare precedents for doing this, such as the Smalltalk language environments andthe Java/.NET Naked Objects framework (see the Resources section), and Java-Script is well suited to this sort of task. Let’s have a look at what JavaScript reflec-tion can do for us in this regard, and develop a generic “Object Browser”component, that can be used as a View for any JavaScript object that we throw at it.
4.5.1 Reflecting on a JavaScript object
Most of the time when we write code to manipulate an object, we already have afairly good idea of what the object is and what it can do. Sometimes, however,we need to code blindly, as it were, and examine the object without any priorknowledge. Generating a user interface for our domain model objects is justsuch a case. Ideally, we would like to develop a reusable solution that can beequally applied to any domain—finance, e-commerce, scientific visualization,

148 CHAPTER 4The page as an application
and so on. This section presents just such a JavaScript library, the ObjectViewer,that can be used in your own applications. To give you a taste of the Object-Viewer in action, figure 4.7 shows the ObjectViewer displaying several layers of acomplex object graph.
The object being viewed, representing the planet Mercury, is quite sophisti-cated, with properties including an image URL, an array of facts, as well as simplestrings and numbers. Our ObjectViewer can handle all of these intelligently with-out knowing anything specific about the type of object in advance.
The process of examining an object and querying its properties and capabili-ties is known as reflection. Readers with a familiarity to Java or .NET should alreadybe familiar with this term. We discuss JavaScript’s reflection capabilities in moredetail in appendix B. To summarize briefly here, a JavaScript object can be iter-ated over as if it were an associative array. To print out all the properties of anobject, we can simply write
var description="";for (var i in MyObj){ var property=MyObj[i]; description+=i+" = "+property+"\n";}alert(description);
Presenting data as an alert is fairly primitive and doesn’t integrate with the rest ofa UI very well. Listing 4.11 presents the core code for the ObjectViewer object.
objviewer.ObjectViewer=function(obj,div,isInline,addNew){ styling.removeAllChildren(div); this.object=obj; this.mainDiv=div; this.mainDiv.viewer=this;
Listing 4.11 ObjectViewer object
Figure 4.7Here the ObjectViewer is used to display a hierarchical system of planets, each of which contains a number of informational properties, plus a list of facts stored as an array.
Generating the View from the Model 149
this.isInline=isInline; this.addNew=addNew; var table=document.createElement("table"); this.tbod=document.createElement("tbody"); table.appendChild(this.tbod); this.fields=new Array(); this.children=new Array(); for (var i in this.object){ this.fields[i]=new objviewer.PropertyViewer( this, i ); }objviewer.PropertyViewer=function(objectViewer,name){ this.objectViewer=objectViewer; this.name=name; this.value=objectViewer.object[this.name]; this.rowTr=document.createElement("tr"); this.rowTr.className='objViewRow'; this.valTd=document.createElement("td"); this.valTd.className='objViewValue'; this.valTd.viewer=this; this.rowTr.appendChild(this.valTd); var valDiv=this.renderSimple(); this.valTd.appendChild(valDiv); viewer.tbod.appendChild(this.rowTr);}objviewer.PropertyViewer.prototype.renderSimple=function(){ var valDiv=document.createElement("div"); var valTxt=document.createTextNode(this.value); valDiv.appendChild(valTxt); if (this.spec.editable){ valDiv.className+=" editable"; valDiv.viewer=this; valDiv.onclick=objviewer.PropertyViewer.editSimpleProperty; } return valDiv;}
Our library contains two objects: an ObjectViewer, which iterates over the mem-bers of an object and assembles an HTML table in which to display the data, anda PropertyViewer, which renders an individual property name and value as atable row.
This gets the basic job done, but it suffers from several problems. First, it williterate over every property. If we have added helper functions to the Object pro-totype, we will see them. If we do it to a DOM node, we see all the built-in prop-erties and appreciate how heavyweight a DOM element really is. In general, we

150 CHAPTER 4The page as an application
want to be selective about which properties of our object we show to the user. Wecan specify which properties we want to display for a given object by attaching aspecial property, an Array, to the object before passing it to the object renderer.Listing 4.12 illustrates this.
objviewer.ObjectViewer=function(obj,div,isInline,addNew){ styling.removeAllChildren(div); this.object=obj; this.spec=objviewer.getSpec(obj); this.mainDiv=div; this.mainDiv.viewer=this; this.isInline=isInline; this.addNew=addNew; var table=document.createElement("table"); this.tbod=document.createElement("tbody"); table.appendChild(this.tbod); this.fields=new Array(); this.children=new Array(); for (var i=0;i<this.spec.length;i++){ this.fields[i]=new objviewer.PropertyViewer( this,this.spec[i] ); }objviewer.getSpec=function (obj){ return (obj.objViewSpec) ? obj.objViewSpec : objviewer.autoSpec(obj);}objviewer.autoSpec=function(obj){ var members=new Array(); for (var propName in obj){ var spec={name:propName}; members.append(spec); } return members;}objviewer.PropertyViewer=function(objectViewer,memberSpec){ this.objectViewer=objectViewer; this.spec=memberSpec; this.name=this.spec.name; ...}
We define a property objViewSpec, which the ObjectViewer constructor looks forin each object. If it can’t find such a property, it then resorts to creating one by
Listing 4.12 Using the objViewSpec property

Generating the View from the Model 151
iterating over the object in the autoSpec() function. The objViewSpec property isa numerical array, with each element being a lookup table of properties. For now,we’re only concerned with generating the name property. The PropertyViewer ispassed the spec for this property in its constructor and can take hints from thespec as to how it should render itself.
If we provide a specification property to an object that we want to inspect inthe ObjectViewer, then we can limit the properties being displayed to those thatwe think are relevant.
A second problem with our ObjectViewer is that it doesn’t handle complexproperties very well. When objects, arrays, and functions are appended to astring, the toString() method is called. In the case of an object, this generallyreturns something nondescriptive such as [Object object]. In the case of aFunction object, the entire source code for the function is returned. We need todiscriminate between the different types of properties, which we can do usingthe instanceof operator. With that in place, let’s see how we can improve onour viewer.
4.5.2 Dealing with arrays and objects
One way of handling arrays and objects is to allow the user to drill down intothem using separate ObjectViewer objects for each property. There are severalways of representing this. We have chosen here to represent child objects as pop-out windows, somewhat like a hierarchical menu.
To achieve this, we need to do two things. First, we need to add a type propertyto the object specification and define the types that we support:
objviewer.TYPE_SIMPLE="simple";objviewer.TYPE_ARRAY="array";objviewer.TYPE_FUNCTION="function";objviewer.TYPE_IMAGE_URL="image url";objviewer.TYPE_OBJECT="object";
We modify the function that generates specs for objects that don’t come with theirown to take account of the type, as shown in listing 4.13.
objviewer.autoSpec=function(obj){ var members=new Array(); for (var propName in obj){ var propValue=obj[name]; var propType=objviewer.autoType(value); var spec={name:propName,type:propType};
Listing 4.13 Modified autoSpec() function

152 CHAPTER 4The page as an application
members.append(spec); } if (obj && obj.length>0){ for(var i=0;i<obj.length;i++){ var propName="array ["+i+"]"; var propValue=obj[i]; var propType=objviewer.ObjectViewer.autoType(value); var spec={name:propName,type:propType}; members.append(spec); } } return members;}objviewer.autoType=function(value){ var type=objviewer.TYPE_SIMPLE; if ((value instanceof Array)){ type=objviewer.TYPE_ARRAY; }else if (value instanceof Function){ type=objviewer.TYPE_FUNCTION; }else if (value instanceof Object){ type=objviewer.TYPE_OBJECT; } return type;}
Note that we also add support for numerically indexed arrays, whose elementswouldn’t be discovered by the for...in style of loop.
The second thing that we need to do is to modify the PropertyViewer to takeaccount of the different types and render them accordingly, as shown inlisting 4.14.
objviewer.PropertyViewer=function (objectViewer,memberSpec,appendAtTop){ this.objectViewer=objectViewer; this.spec=memberSpec; this.name=this.spec.name; this.type=this.spec.type; this.value=objectViewer.object[this.name]; this.rowTr=document.createElement("tr"); this.rowTr.className='objViewRow'; var isComplexType=(this.type==objviewer.TYPE_ARRAY ||this.type==objviewer.TYPE_OBJECT); if ( !(isComplexType && this.objectViewer.isInline) ){ this.nameTd=this.renderSideHeader();
Listing 4.14 Modified PropertyViewer constructor

Generating the View from the Model 153
this.rowTr.appendChild(this.nameTd); } this.valTd=document.createElement("td"); this.valTd.className='objViewValue'; this.valTd.viewer=this; this.rowTr.appendChild(this.valTd); if (isComplexType){ if (this.viewer.isInline){ this.valTd.colSpan=2; var nameDiv=this.renderTopHeader(); this.valTd.appendChild(nameDiv); var valDiv=this.renderInlineObject(); this.valTd.appendChild(valDiv); }else{ var valDiv=this.renderPopoutObject(); this.valTd.appendChild(valDiv); } }else if (this.type==objviewer.TYPE_IMAGE_URL){ var valImg=this.renderImage(); this.valTd.appendChild(valImg); }else if (this.type==objviewer.TYPE_SIMPLE){ var valTxt=this.renderSimple(); this.valTd.appendChild(valTxt); } if (appendAtTop){ styling.insertAtTop(viewer.tbod,this.rowTr); }else{ viewer.tbod.appendChild(this.rowTr); }}
To accommodate the various types of properties, we have defined a number ofrendering methods, the implementation of which is too detailed to reproduce infull here. Source code for the entire ObjectViewer can be downloaded from thewebsite that accompanies this book.
We now have a fairly complete way of viewing our domain model automati-cally. To make the domain model objects visible, all that we need to do is to assignobjViewSpec properties to their prototypes. The Planet object backing the viewshown in figure 4.7, for example, has the following statement in the constructor:
this.objViewSpec=[ {name:"name", type:"simple"}, {name:"distance", type:"simple", editable:true}, {name:"diameter", type:"simple", editable:true}, {name:"image", type:"image url"}, {name:"facts", type:"array", addNew:this.newFact, inline:true }];

154 CHAPTER 4The page as an application
The notation for this specification is the JavaScript object notation, known asJSON. Square braces indicate a numerical array, and curly braces an associativearray or object (the two are really the same). We discuss JSON more fully inappendix B.
There are a few unexplained entries here. What do addNew, inline, and edit-able mean? Their purpose is to notify the View that these parts of the domainmodel can not only be inspected but also modified by the user, bringing in theController aspects of our system, too. We’ll look at this in the next section.
4.5.3 Adding a Controller
It’s nice to be able to look at a domain model, but many everyday applicationsrequire us to modify them too—download the tune, edit the document, add itemsto the shopping basket, and so on. Mediating between user interactions and thedomain model is the responsibility of the Controller, and we’ll now add that func-tionality to our ObjectViewer.
The first thing that we’d like to do is to be able to edit simple text values whenwe click on them, if our specification object flags them as being editable.Listing 4.15 shows the code used to render a simple text property.
objviewer.PropertyViewer.prototype.renderSimple=function(){ var valDiv=document.createElement("div"); var valTxt=document .createTextNode(this.value); valDiv.appendChild(valTxt); if (this.spec.editable){ valDiv.className+=" editable"; valDiv.viewer=this; valDiv.onclick=objviewer.PropertyViewer.editSimpleProperty; } return valDiv;} objviewer.PropertyViewer.editSimpleProperty=function(e){ var viewer=this.viewer; if (viewer){ viewer.edit(); }}objviewer.PropertyViewer.prototype.edit=function(){ if (this.type=objviewer.TYPE_SIMPLE){ var editor=document.createElement("input"); editor.value=this.value; document.body.appendChild(editor);
Listing 4.15 renderSimple() function
Show read-only value
b Add interactivity if editable
c Begin editing

Generating the View from the Model 155
var td=this.valTd; xLeft(editor,xLeft(td)); xTop(editor,xTop(td)); xWidth(editor,xWidth(td)); xHeight(editor,xHeight(td)); td.replaceChild(editor,td.firstChild); editor.onblur=objviewer. PropertyViewer.editBlur; editor.viewer=this; editor.focus(); }}objviewer.PropertyViewer .editBlur=function(e){ var viewer=this.viewer; if (viewer){ viewer.commitEdit(this.value); }}objviewer.PropertyViewer.prototype.commitEdit=function(value){ if (this.type==objviewer.TYPE_SIMPLE){ this.value=value; var valDiv=this.renderSimple(); var td=this.valTd; td.replaceChild(valDiv,td.firstChild); this.objectViewer .notifyChange(this); }}
Editing a property involves several steps. First, we want to assign an onclick han-dler to the DOM element displaying the value, if the field is editable b. We alsoassign a specific CSS classname to editable fields, which will make them changecolor when the mouse hovers over them. We need the user to be able to realizethat she can edit the field, after all.
editSimpleProperty() c is a simple event handler that retrieves the referenceto the PropertyViewer from the clicked DOM node and calls the edit() method.This way of connecting the View and Controller should be familiar fromsection 4.3.1. We check that the property type is correct and then replace theread-only label with an equivalent-sized HTML form text input, containing thevalue d. We also attach an onblur handler to this text area e, which replaces theeditable area with a read-only label f and updates the domain model.
We can manipulate the domain model in this way, but in general, we would oftenlike to take some other action when the model is updated. The notifyChange()
d Replace with read/write view
e Add commit callback
f Finish editing
g Notify observers

156 CHAPTER 4The page as an application
method of the ObjectViewer g, invoked in the commitEdit() function, comes intoplay here. Listing 4.16 shows this function in full.
objviewer.ObjectViewer.prototype .notifyChange=function(propViewer){ if (this.onchangeRouter){ this.onchangeRouter.notify(propViewer); } if (this.parentObjViewer){ this.parentObjViewer.notifyChange(propViewer); }}objviewer.ObjectViewer.prototype .addChangeListener=function(lsnr){ if (!this.onchangeRouter){ this.onchangeRouter=new jsEvent.EventRouter(this,"onchange"); } this.onchangeRouter.addListener(lsnr);}objviewer.ObjectViewer.prototype .removeChangeListener=function(lsnr){ if (this.onchangeRouter){ this.onchangeRouter.removeListener(lsnr); }}
The problem we are facing—notifying arbitrary processes of a change in ourdomain model—is ideally solved by the Observer pattern and the EventRouterobject that we defined in section 4.3.3. We could attach an EventRouter to theonblur event of the editable fields, but a complex model may contain many ofthese, and our code shouldn’t have visibility of such fine details in the Object-Viewer implementation.
Instead, we define our own event type on the ObjectViewer itself, an onchangeevent, and attach an EventRouter to that. Because our ObjectViewers arearranged in a tree structure when drilling down on object and array properties,we pass onchange events to the parent, recursively. Thus, in general, we can attachlisteners to the root ObjectViewer, the one that we create in our application code,and changes to model properties several layers down the object graph will prop-agate back up to us.
A simple example of an event handler would be to write a message to thebrowser status bar. The top-level object in a model of planets is the solar system,so we can write
Listing 4.16 ObjectViewer.notifyChange()

Summary 157
var topview=new objviewer.ObjectViewer (planets.solarSystem,mainDiv);topview.addChangeListener(testListener);
where testListener is an event-handler function that looks like this:
function testListener(propviewer){ window.status=propviewer.name+" ["+propviewer.type+"] =
"+propviewer.value;}
Of course, in reality, we would want to do more exciting things when the domainmodel changes, such as contacting the server. In the next chapter, we’ll look atways of contacting the server and put our ObjectViewer to further use.
4.6 Summary
The Model-View-Controller pattern is an architectural pattern that has beenapplied to the server code of classic web applications. We showed how to reusethis pattern on the server in an Ajax application, in order to generate data feedsfor the client. We also applied the pattern to the design of the client itself anddeveloped a range of useful insights through doing so.
Looking at the View subsystem, we demonstrated how to effectively separatepresentation from logic, with the very practical benefit of allowing designer andprogrammer roles to be kept separate. Maintaining clear lines of responsibilitiesin the codebase that reflect your team’s organizational structure and skill sets canbe a great productivity booster.
In the Controller code, we looked at the different event models available toAjax and erred on the side of caution toward the older event model. Although it islimited to a single callback function for each event type, we saw how to implementthe Observer pattern to develop a flexible, reconfigurable event-handler layer ontop of the standard JavaScript event model.
Regarding the Model, we began to address the larger issues of distributedmultiuser applications, which we will explore further in chapter 5.
Looking after a Model, a View, and a Controller can seem like a lot of work. Inour discussion of the ObjectViewer example, we looked at ways of simplifying theinteractions between these using automation, and we created a simple systemcapable of presenting an object model to the user and allowing interaction with it.
We’ll continue to draw upon design patterns as we move on to explore client/server interactions in the next chapter.

158 CHAPTER 4The page as an application
4.7 Resources
The Behaviours library used in this chapter can be found at http://ripcord.co.nz/behaviour/. Mike Foster’s x library can be found at www.cross-browser.com.
Autogeneration of the View from the Model is a technique inspired by theNaked Objects project (http://www.nakedobjects.org/). The book Naked Objects(John Wiley & Sons, 2002), by Richard Pawson and Robert Matthews, is somewhatout of date as far as the code goes, but provides an incisive critique of hand-codedMVC in the opening sections.
The images of the planets used in the ObjectViewer are provided by Jim’sCool Icons (http://snaught.com/JimsCoolIcons/), and are modeled using the POV-Ray modeler and textured with real images from NASA (according to the website)!