date: may.29.15 star frost - michael miller fabrics
TRANSCRIPT
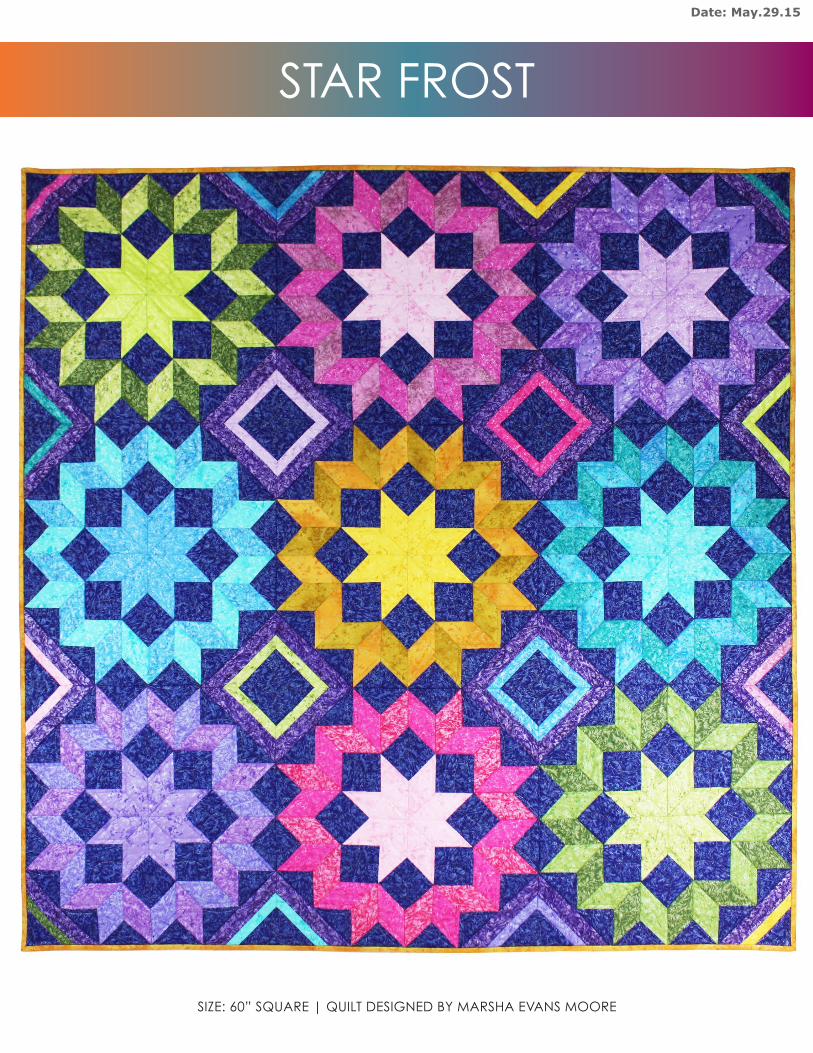
SIZE: 60” SQUARE | QUILT DESIGNED BY MARSHA EVANS MOORE
STAR fROSTDate: May.29.15
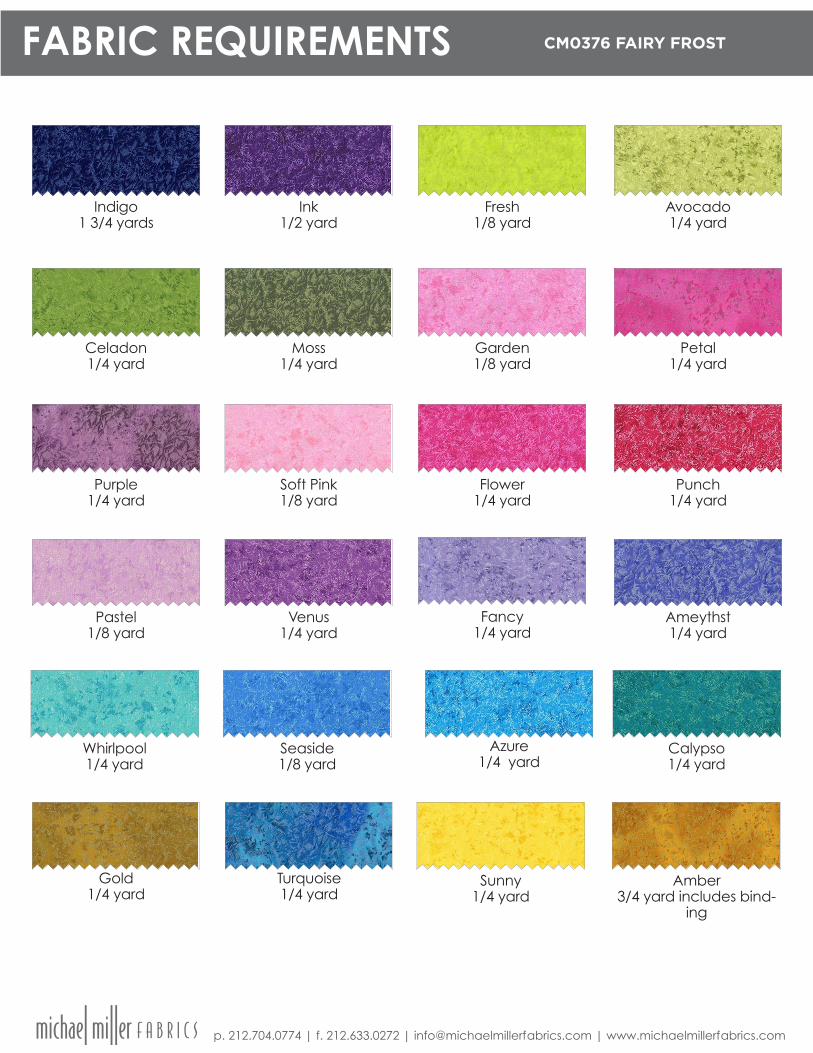
FABRIC REQUIREMENTS
p. 212.704.0774 | f. 212.633.0272 | [email protected] | www.michaelmillerfabrics.com
CM0376 Fairy Frost
fancy1/4 yard
Pastel1/8 yard
Venus1/4 yard
Ameythst1/4 yard
flower1/4 yard
Purple1/4 yard
Soft Pink1/8 yard
Punch1/4 yard
Garden1/8 yard
Celadon1/4 yard
Moss1/4 yard
Petal1/4 yard
Azure1/4 yard
Turquoise1/4 yard
Gold1/4 yard
fresh1/8 yard
Indigo1 3/4 yards
Ink1/2 yard
Avocado1/4 yard
Sunny1/4 yard
Amber3/4 yard includes bind-
ing
Whirlpool1/4 yard
Seaside1/8 yard
Calypso1/4 yard
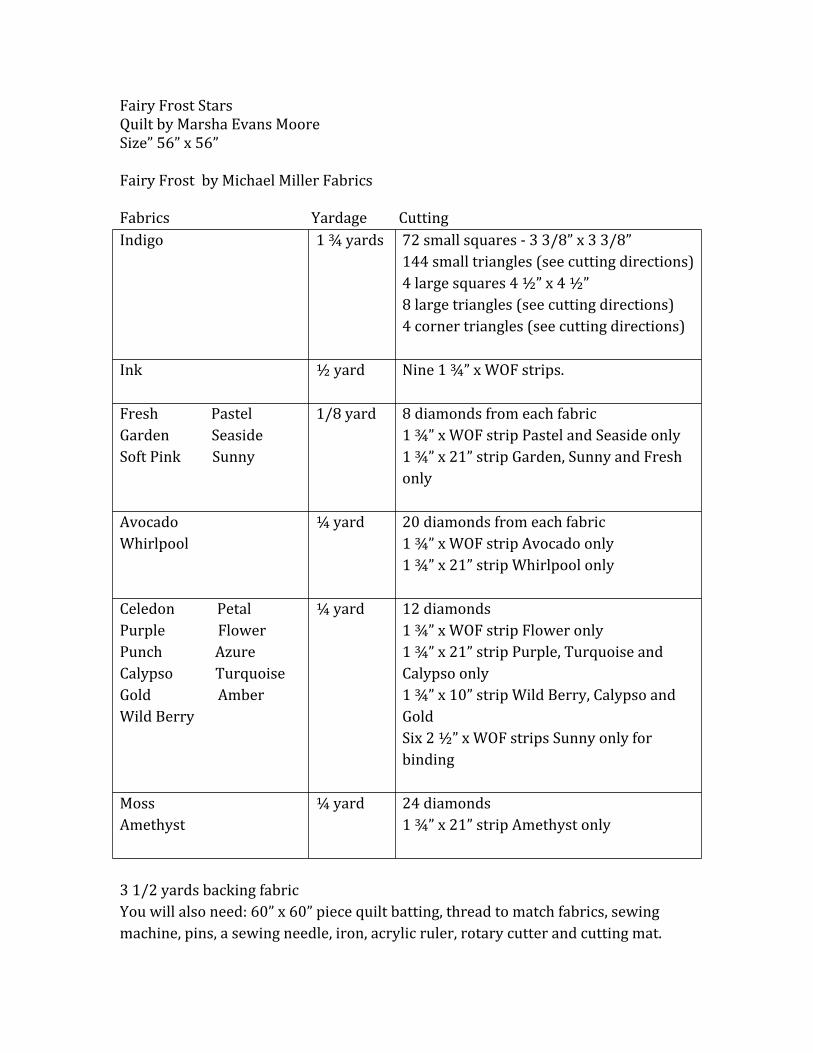
Fairy Frost StarsQuilt by Marsha Evans MooreSize” 56” x 56”
Fairy Frost by Michael Miller Fabrics
Fabrics Yardage CuttingIndigo 1 ¾ yards 72 small squares ‐ 3 3/8” x 3 3/8”
144 small triangles (see cutting directions)4 large squares 4 ½” x 4 ½”8 large triangles (see cutting directions)4 corner triangles (see cutting directions)
Ink ½ yard Nine 1 ¾” x WOF strips.
Fresh PastelGarden SeasideSoft Pink Sunny
1/8 yard 8 diamonds from each fabric1 ¾” x WOF strip Pastel and Seaside only1 ¾” x 21” strip Garden, Sunny and Fresh only
AvocadoWhirlpool
¼ yard 20 diamonds from each fabric1 ¾” x WOF strip Avocado only1 ¾” x 21” strip Whirlpool only
Celedon PetalPurple FlowerPunch AzureCalypso TurquoiseGold AmberWild Berry
¼ yard 12 diamonds1 ¾” x WOF strip Flower only1 ¾” x 21” strip Purple, Turquoise and Calypso only1 ¾” x 10” strip Wild Berry, Calypso andGold Six 2 ½” x WOF strips Sunny only for binding
MossAmethyst
¼ yard 24 diamonds1 ¾” x 21” strip Amethyst only
3 1/2 yards backing fabricYou will also need: 60” x 60” piece quilt batting, thread to match fabrics, sewing machine, pins, a sewing needle, iron, acrylic ruler, rotary cutter and cutting mat.
Cutting
Cut the number of pieces for each pattern piece indicated on the chart above by
tracing the template on the fabric using a chalk pencil or fabric marking pen. Cut
out along the lines. Or alternately cut the pieces using a rotary cutter, mat and ruler
as indicated in the steps below. Diagrams 1‐4 show a WOF strip folded in half.
1. For the diamonds, cut 2 1/2” x WOF strips. Then cut the strips into 2 1/2”
wide diamonds using the 45o angle on your ruler.
2. For the small squares, cut 3 3/8” x WOF strips. Then cut the strip
perpendicularly every 3 3/8”.
3. For the small triangles, cut 5 ¼” x WOF strips. Then cut the strip
perpendicularly every 5 ¼”. Cut the squares diagonally twice to make
triangles.
4. For the large triangles, cut 3 5/8” x WOF strips. Then cut the strip into
triangles using the 45o angle on your ruler.
5. Cut four large squares 4 ½” x 4 ½”.
6. Cut the additional WOF strips indicated on cutting chart.
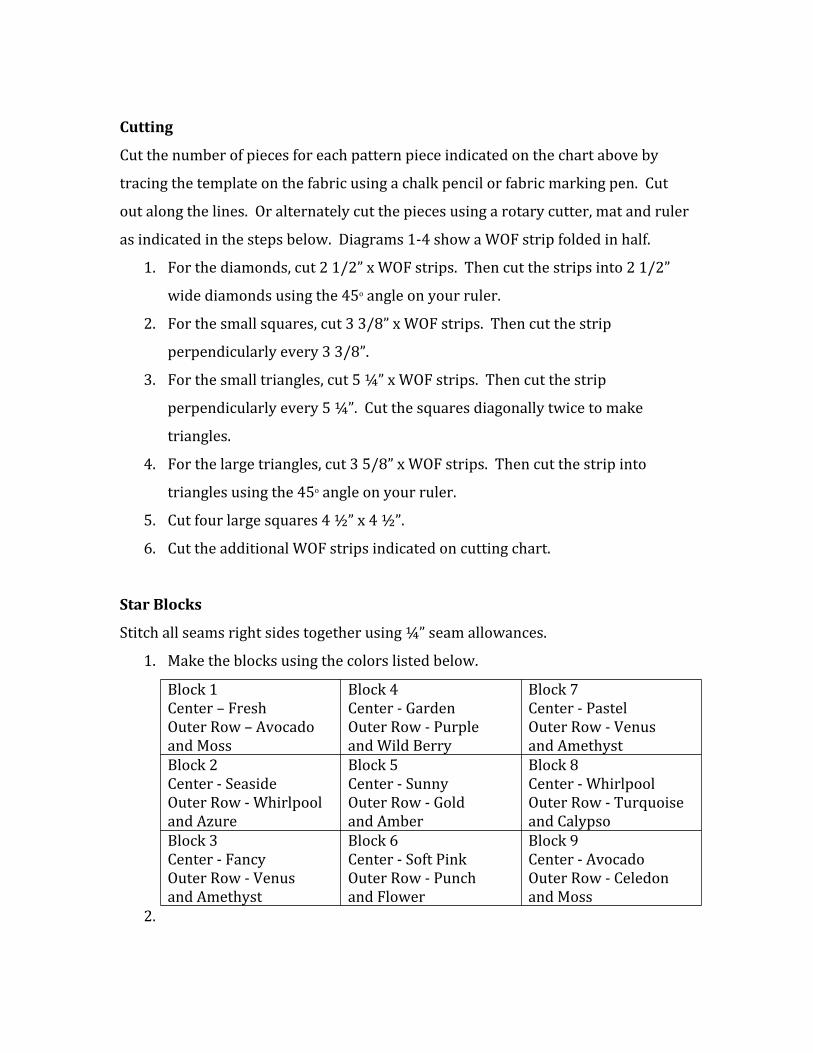
Star Blocks
Stitch all seams right sides together using ¼” seam allowances.
1. Make the blocks using the colors listed below.
Block 1Center – FreshOuter Row – Avocado and Moss
Block 4Center ‐ GardenOuter Row ‐ Purpleand Wild Berry
Block 7Center ‐ PastelOuter Row ‐ Venusand Amethyst
Block 2Center ‐ SeasideOuter Row ‐ Whirlpooland Azure
Block 5Center ‐ SunnyOuter Row ‐ Goldand Amber
Block 8Center ‐ WhirlpoolOuter Row ‐ Turquoiseand Calypso
Block 3Center ‐ FancyOuter Row ‐ Venusand Amethyst
Block 6Center ‐ Soft PinkOuter Row ‐ Punchand Flower
Block 9Center ‐ AvocadoOuter Row ‐ Celedonand Moss
2.
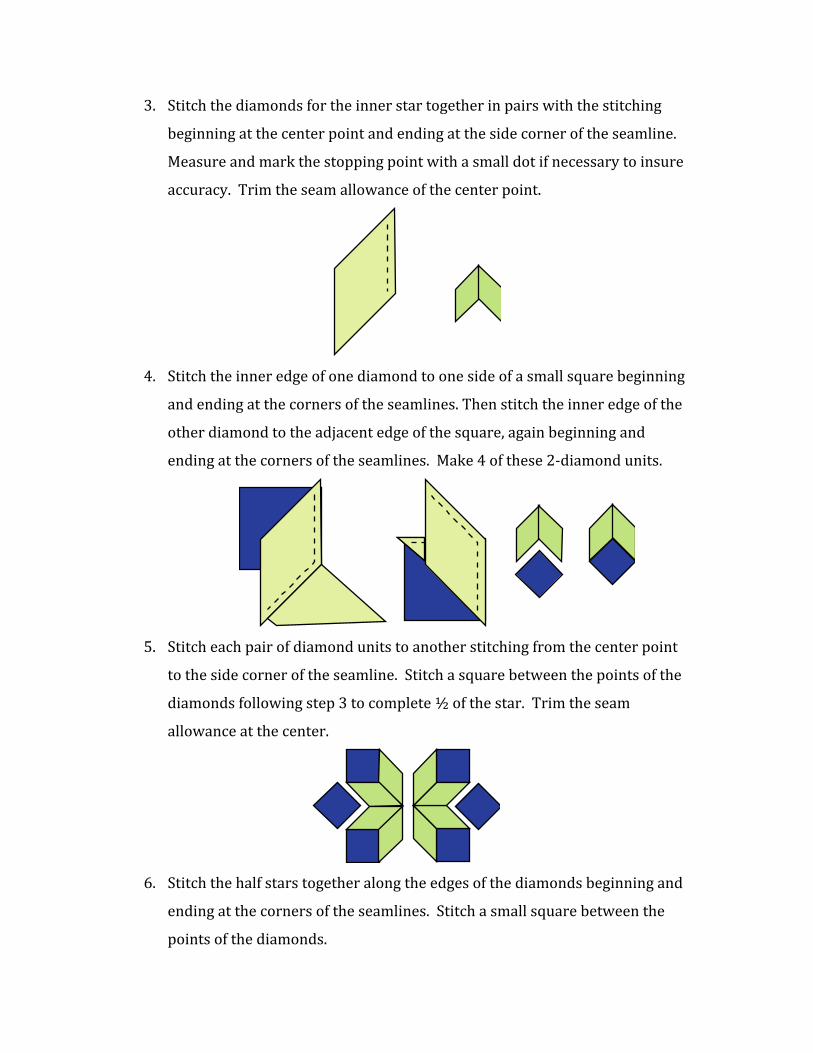
3. Stitch the diamonds for the inner star together in pairs with the stitching
beginning at the center point and ending at the side corner of the seamline.
Measure and mark the stopping point with a small dot if necessary to insure
accuracy. Trim the seam allowance of the center point.
4. Stitch the inner edge of one diamond to one side of a small square beginning
and ending at the corners of the seamlines. Then stitch the inner edge of the
other diamond to the adjacent edge of the square, again beginning and
ending at the corners of the seamlines. Make 4 of these 2‐diamond units.
5. Stitch each pair of diamond units to another stitching from the center point
to the side corner of the seamline. Stitch a square between the points of the
diamonds following step 3 to complete ½ of the star. Trim the seam
allowance at the center.
6. Stitch the half stars together along the edges of the diamonds beginning and
ending at the corners of the seamlines. Stitch a small square between the
points of the diamonds.
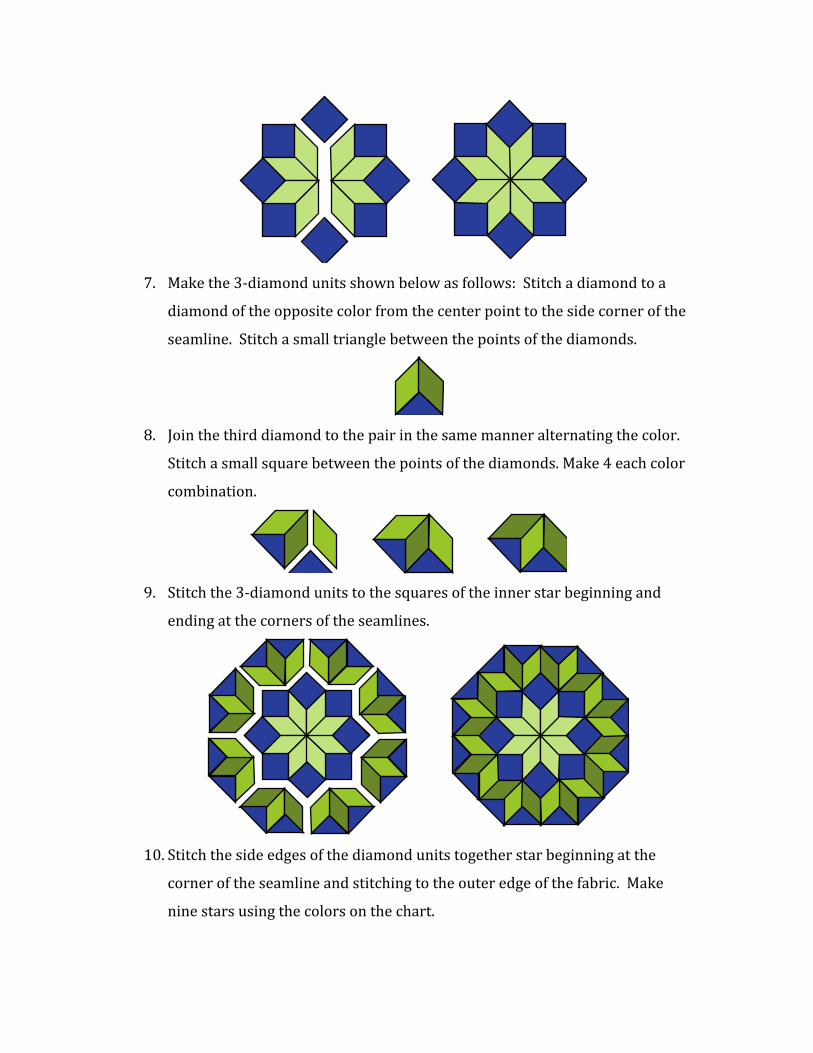
7. Make the 3‐diamond units shown below as follows: Stitch a diamond to a
diamond of the opposite color from the center point to the side corner of the
seamline. Stitch a small triangle between the points of the diamonds.
8. Join the third diamond to the pair in the same manner alternating the color.
Stitch a small square between the points of the diamonds. Make 4 each color
combination.
9. Stitch the 3‐diamond units to the squares of the inner star beginning and
ending at the corners of the seamlines.
10. Stitch the side edges of the diamond units together star beginning at the
corner of the seamline and stitching to the outer edge of the fabric. Make
nine stars using the colors on the chart.
Squares and triangles
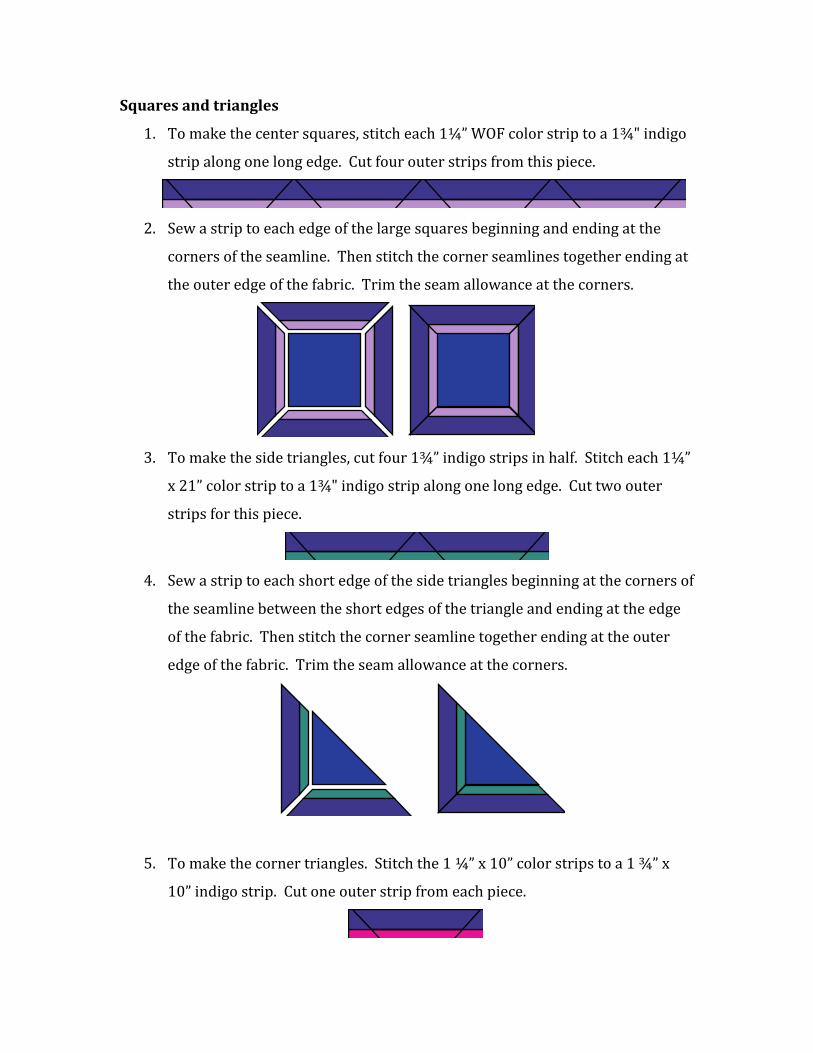
1. To make the center squares, stitch each 1¼” WOF color strip to a 1¾" indigo
strip along one long edge. Cut four outer strips from this piece.
2. Sew a strip to each edge of the large squares beginning and ending at the
corners of the seamline. Then stitch the corner seamlines together ending at
the outer edge of the fabric. Trim the seam allowance at the corners.
3. To make the side triangles, cut four 1¾” indigo strips in half. Stitch each 1¼”
x 21” color strip to a 1¾" indigo strip along one long edge. Cut two outer
strips for this piece.
4. Sew a strip to each short edge of the side triangles beginning at the corners of
the seamline between the short edges of the triangle and ending at the edge
of the fabric. Then stitch the corner seamline together ending at the outer
edge of the fabric. Trim the seam allowance at the corners.
5. To make the corner triangles. Stitch the 1 ¼” x 10” color strips to a 1 ¾” x
10” indigo strip. Cut one outer strip from each piece.
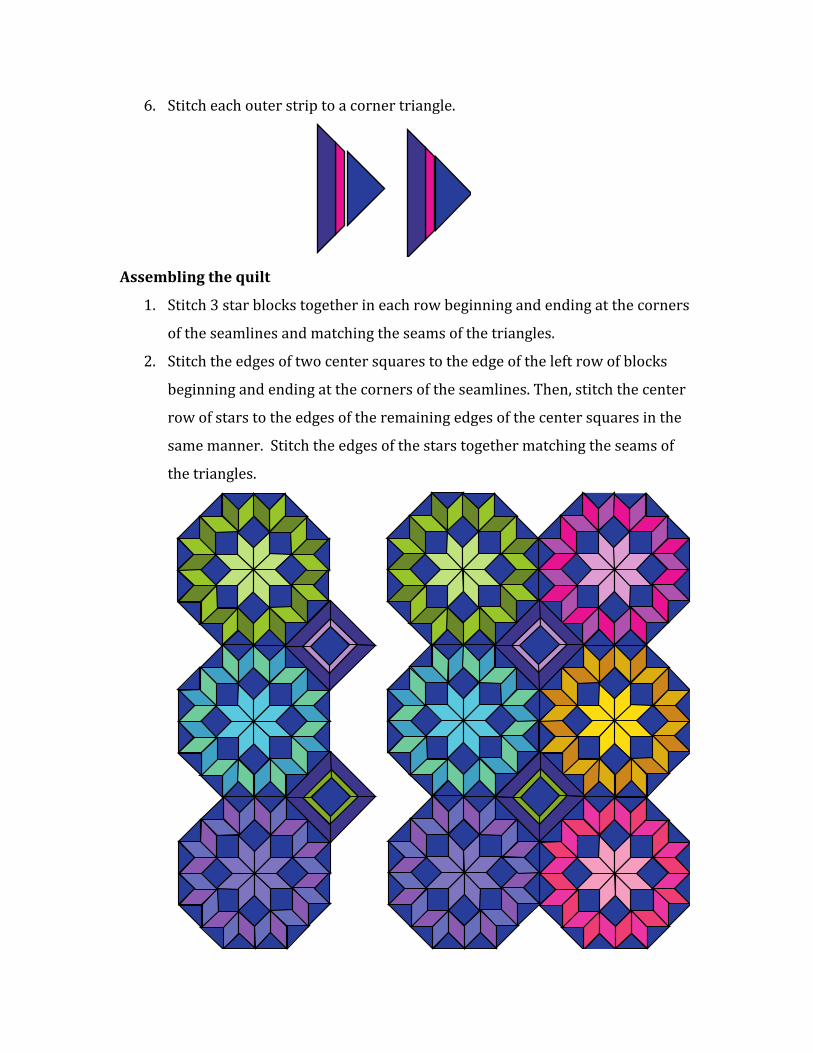
6. Stitch each outer strip to a corner triangle.
Assembling the quilt
1. Stitch 3 star blocks together in each row beginning and ending at the corners
of the seamlines and matching the seams of the triangles.
2. Stitch the edges of two center squares to the edge of the left row of blocks
beginning and ending at the corners of the seamlines. Then, stitch the center
row of stars to the edges of the remaining edges of the center squares in the
same manner. Stitch the edges of the stars together matching the seams of
the triangles.
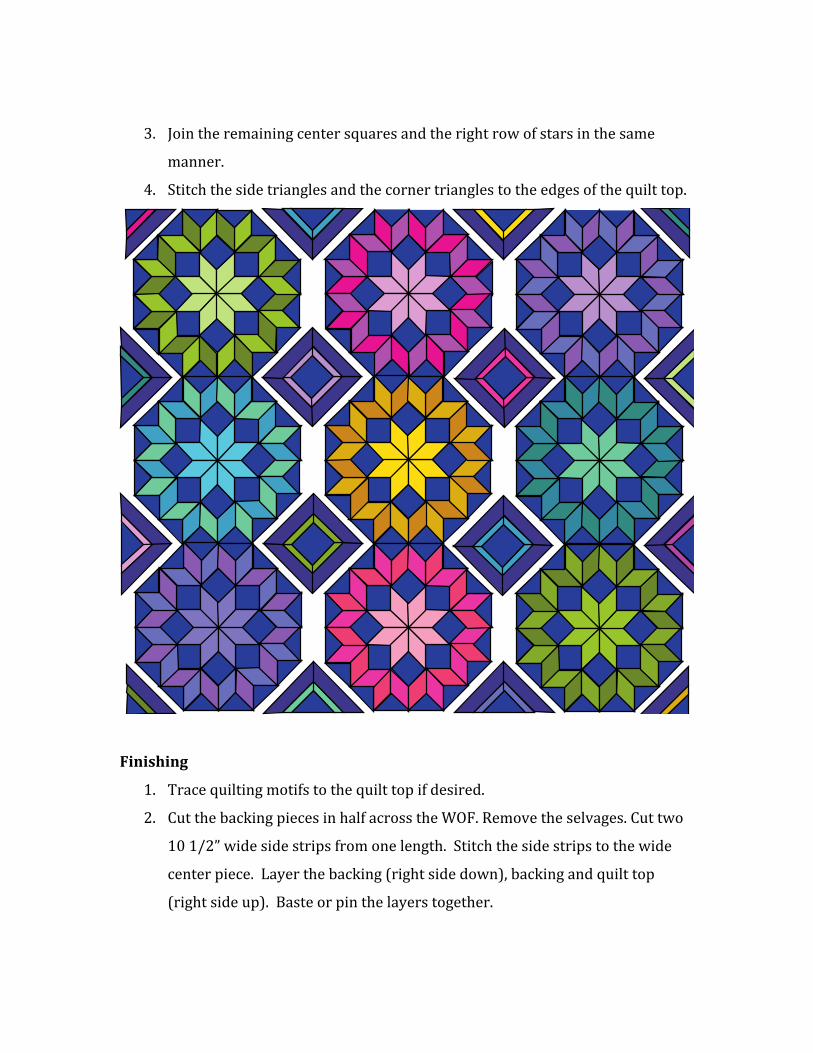
3. Join the remaining center squares and the right row of stars in the same
manner.
4. Stitch the side triangles and the corner triangles to the edges of the quilt top.
Finishing
1. Trace quilting motifs to the quilt top if desired.
2. Cut the backing pieces in half across the WOF. Remove the selvages. Cut two
10 1/2” wide side strips from one length. Stitch the side strips to the wide
center piece. Layer the backing (right side down), backing and quilt top
(right side up). Baste or pin the layers together.
3. Quilt by machine or by hand. Trim the batting and backing 1/8” larger than
the patchwork to allow for a 3/8” binding.
4. Trim the ends of the binding diagonally. Stitch the binding strips together
along the diagonal ends. Press seams open. Fold the binding in half
lengthwise and press the fold.
5. Stitch the raw edges binding to the right side along the edges of the quilt
using 3/8” seam allowance and mitering at the corners. Join the ends neatly.
6. Fold the binding to the backing side of the quilt mitering at the corners. Stitch
the fold in place along the seamline.
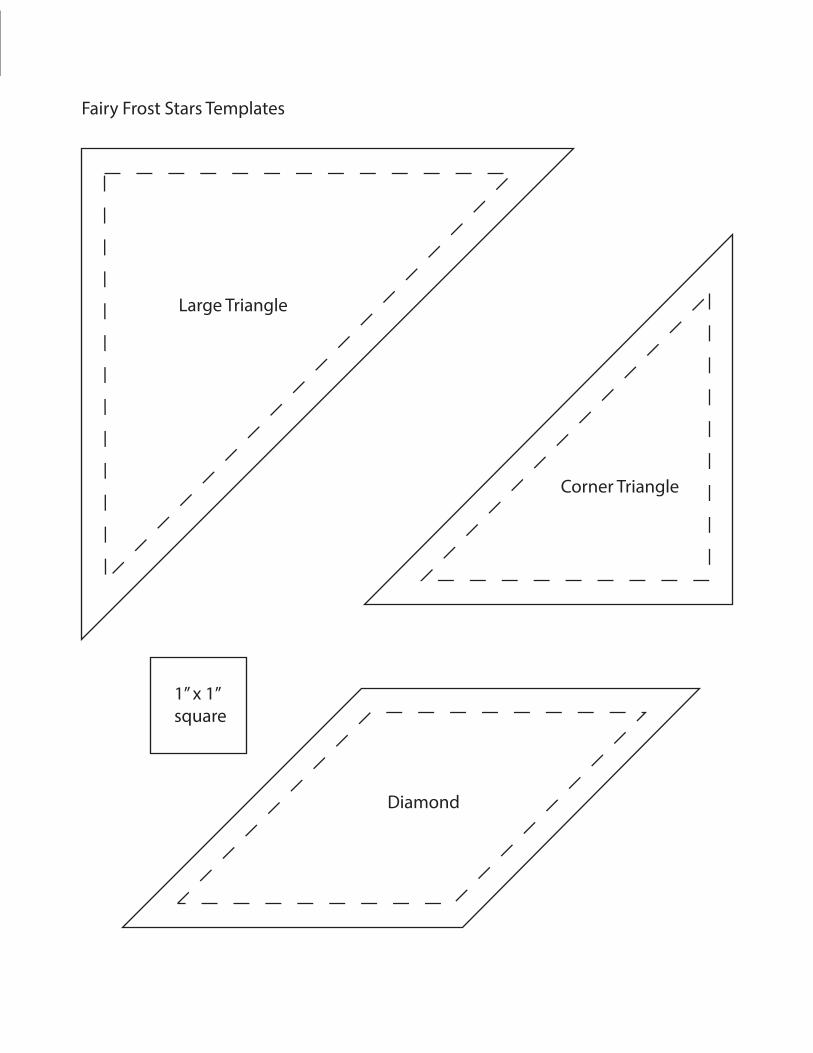
1” x 1”square
Diamond
Fairy Frost Stars Templates
Large Triangle
Corner Triangle
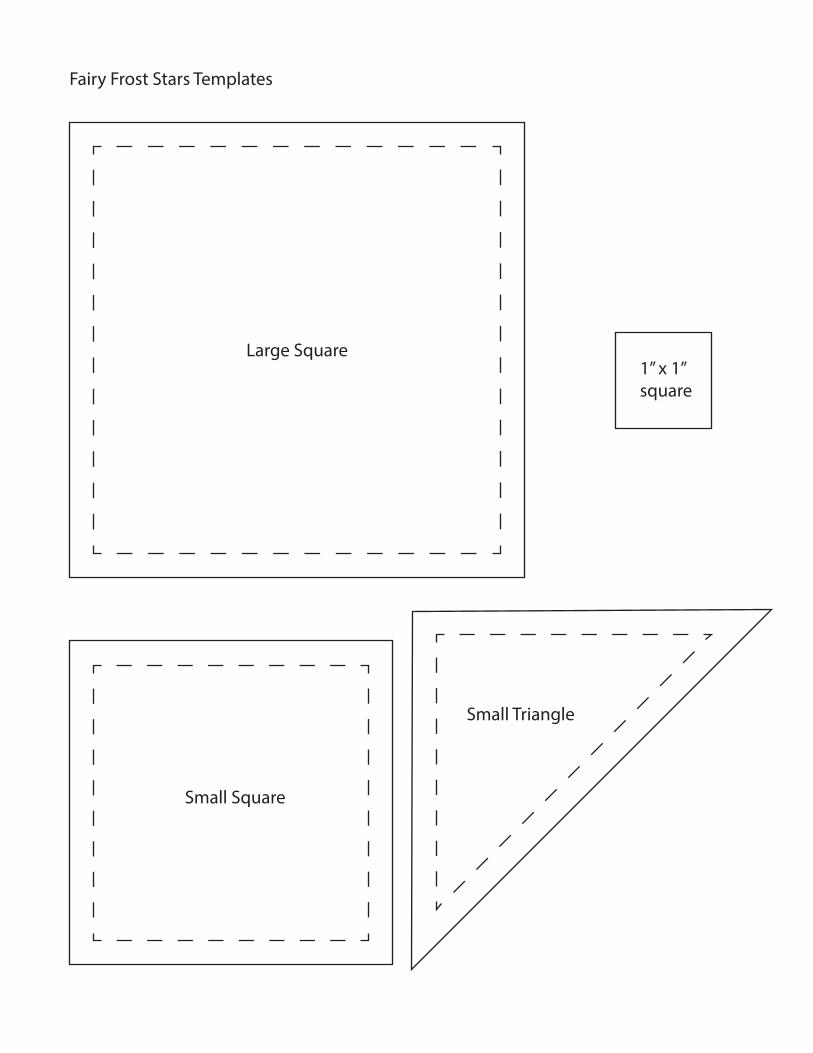
Large Square
Small Square
Small Triangle
1” x 1”square
Fairy Frost Stars Templates
Fairy Frost Stars Templates
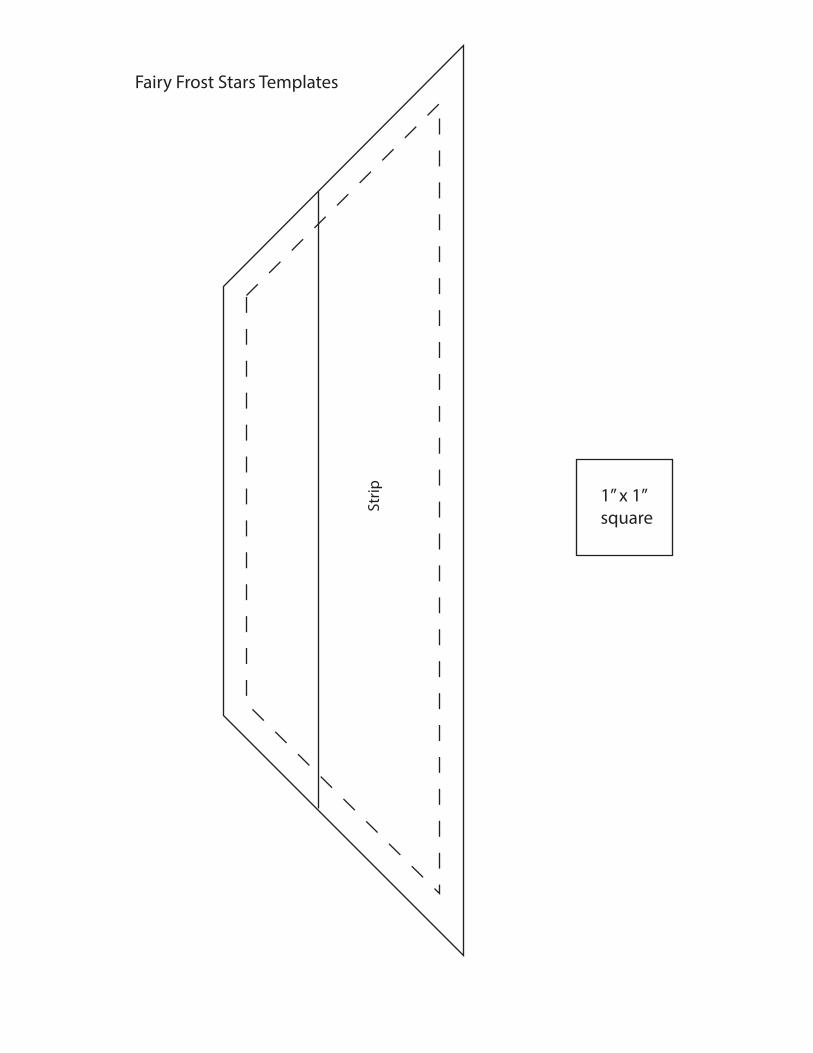
Strip 1” x 1”
square