datacard sd, cd, and ce series card printers windows driver
TRANSCRIPT

Datacard® SD, CD, and CE Series Card PrintersWindows Driver Software Development Kit
Programmer’s Reference Guide
April 2013
Part No. 527250-001, Rev C

Trademark AcknowledgmentsDatacard is a registered trademark and service mark of DataCard Corporation in the United States and other countries.
Microsoft and Windows are registered trademarks of Microsoft Corporation.
All other product names are the property of their respective owners.
Revision LogXPS Card Printers Software Development Kit
Programmer’s Development Guide
Revision Date Description of Changes
A May 2012 First release of this document
B November 2012 Updates for XPS Card Printer Driver v. 4.0
C April 2013 Updates for XPS Card Printer Driver v. 4.1
Datacard Group11111 Bren Road WestMinnetonka, MN 55343-9015Phone: 952-933-1223Fax: 952-933-7971www.datacard.com
© 2012, 2013 DataCard Corporation. All rights reserved.Printed in the United States of America.
ii
Contents
Introduction ___________________________________________________________________ 1Installation_____________________________________________________________________ 2Sample Code__________________________________________________________________ 3
Samples Included in the SDK ________________________________________________ 3Print Sample (Not Interactive)____________________________________________ 3Magnetic Stripe Sample_________________________________________________ 4Smart Card Sample _____________________________________________________ 4Single-Wire Smart Card Sample __________________________________________ 4Emboss and Indent Sample______________________________________________ 4Print Locking Sample ____________________________________________________ 4Printer Control Sample __________________________________________________ 4Status Sample __________________________________________________________ 5Card Completion Sample _______________________________________________ 5
Sample Code Location _____________________________________________________ 5Developer Environments ____________________________________________________ 5
Printing ________________________________________________________________________ 6Text Printing ________________________________________________________________ 6Raster Graphics Printing_____________________________________________________ 7Vector Graphics Printing ____________________________________________________ 8Topcoat and Print Blocking__________________________________________________ 8Controlling Card Printing Preferences ________________________________________ 9Sample Code Demonstrating Printing________________________________________ 9Viewing Print Separations ___________________________________________________ 9Getting the Status of a Print Job ___________________________________________ 10
Sample Code Demonstrating Print Job Status___________________________ 10Embossing ___________________________________________________________________ 11
Embossing Sample Code _________________________________________________ 11Interactive Mode Using the IBiDiSpl Interface __________________________________ 12
IBiDiSpl Requests__________________________________________________________ 12Java helper DLL Interface_________________________________________________ 14Order and Timing of Interactive Job Operations ____________________________ 15Determine the Success of an IBiDiSpl Request ______________________________ 15Starting and Ending an Interactive Job ____________________________________ 16
Sample Code ________________________________________________________ 17Getting the Status of an Interactive Job ___________________________________ 18
Sample Code ________________________________________________________ 19Interactive Mode Error Recovery __________________________________________ 20
Understanding Error Related Values in Printer Status Structure____________ 20Recovery from Errors __________________________________________________ 21
Encoding a Magnetic Stripe with Data ____________________________________ 23Interactive Mode Magnetic Stripe Encoding ___________________________ 23Magnetic Stripe Track Data Format ____________________________________ 25Sample Code - Magnetic Stripe Encode _______________________________ 25
iii

Reading Data from a Magnetic Stripe _____________________________________ 26Sample Code – Magnetic Stripe Read _________________________________ 27
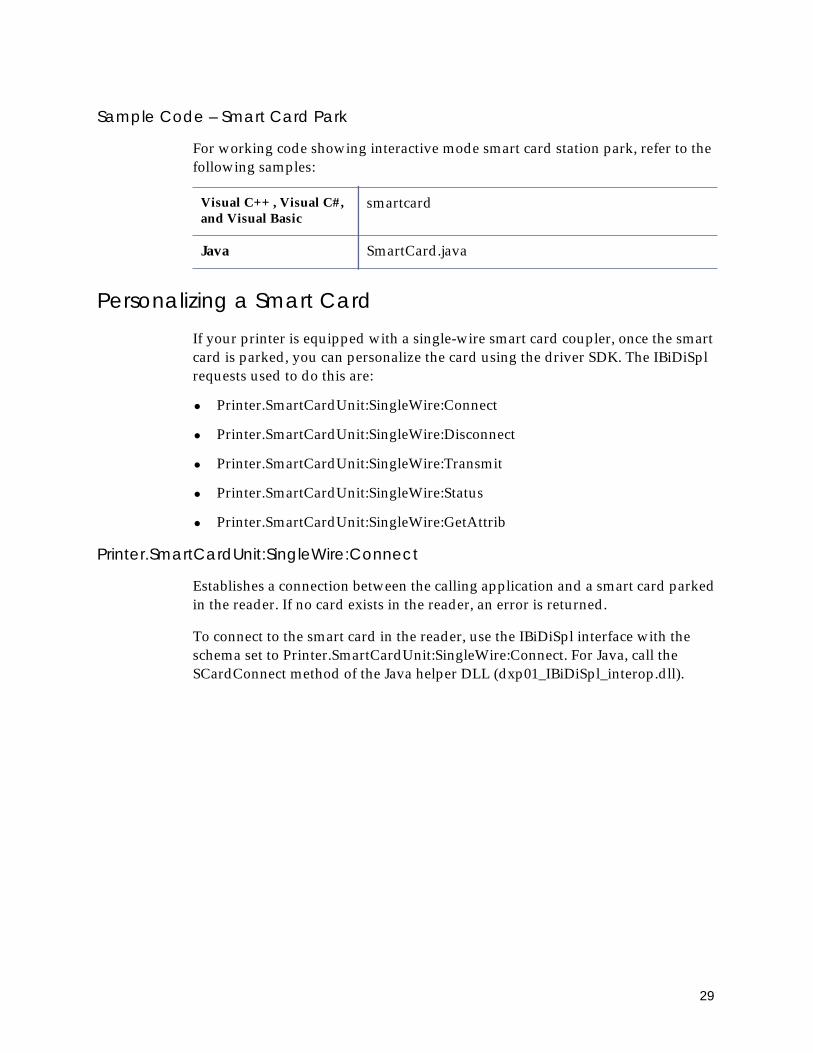
Placing a Card in the Smart Card Station __________________________________ 28Sample Code – Smart Card Park_______________________________________ 29
Personalizing a Smart Card________________________________________________ 29Printer.SmartCardUnit:SingleWire:Connect______________________________ 29Printer.SmartCardUnit:SingleWire:Disconnect ___________________________ 31Printer.SmartCardUnit:SingleWire:Transmit_______________________________ 32Printer.SmartCardUnit:SingleWire:Status_________________________________ 34Printer.SmartCardUnit:SingleWire:GetAttrib _____________________________ 35
Application Responsibilities with Single-Wire Smart Card ____________________ 36Sample Code – Single-Wire Smart Card Personalization _________________ 37
Return Values from the Sample Code SCard Wrapper ______________________ 37Installed Printer Options, Printer Status, and Supplies Status __________________ 38Printer Status _____________________________________________________________ 39
Message Number _____________________________________________________ 39Printer Connection Information ________________________________________ 40
Printer Options ___________________________________________________________ 41Sample Code – Printer Status __________________________________________ 42
Supplies Information ______________________________________________________ 43Sample Code – Supplies Status ________________________________________ 44
Card Counts _____________________________________________________________ 45Sample Code – Card Counts __________________________________________ 47
Locking __________________________________________________________________ 48Lock or Unlock the Printer______________________________________________ 48Change the Lock/Unlock Password ____________________________________ 49Determining the Success of a Lock Request ____________________________ 50Sample Code – Locking _______________________________________________ 50
Interactive Mode Best Practices ___________________________________________ 51Appendix A – Error Description Strings _________________________________________ 52Appendix B – Printing to a File with the XPS Card Printer Driver __________________ 55Appendix C – Using the Java SDK Sample Code with Eclipse ___________________ 58Appendix D – Suppressing the Driver Message Display _________________________ 63
Enabling Driver Silent Mode _______________________________________________ 63Silent Mode Operation Notes______________________________________________ 64
Appendix E – References _____________________________________________________ 65
iv

IntroductionThe Application Programming Interface (API) built into the XPS Card Printer Windows driver (referred to as “the driver”) provides two means for your application to control card personalization operations using the driver. Both use built-in Windows operating system interfaces.
One means of control is the use of the driver Print Ticket. Print Ticket is a required feature of any driver using the XML Paper Specification (XPS) print driver architecture introduced with Windows Vista (and available on Windows XP when the XPS Essentials Pack is installed). Through the Print Ticket, your application can override the driver’s printing preferences on a job-by-job basis.
The other means of control is the use of the Windows IBiDiSpl interface. The IBiDiSpl interface is the Microsoft preferred API for printer control. Using the IBiDiSpl interface, your application places the driver in “interactive mode” where the application has fine-grained job control and can access data on the card during the card personalization process.
The XPS Card Printer Windows Driver SDK (referred to as “the SDK”) includes documentation and sample code describing and demonstrating the use of both Print Ticket and the IBiDiSpl interface.
The interfaces documented in the SDK provide the following capabilities to your application using the driver:
• Print while modifying printing characteristics using the Print Ticket:
• Print one- or two-sided
• Disable printing on one or both card sides
• Specify the copy count
• Print in portrait or landscape orientation
• Select from the predefined topcoat and print blocking
• Rotate a card side by 180 degrees
• Specify the input hopper used to select the card
Java does not directly support the IBiDiSpl interface. For Java applications, Datacard has created a C++ helper DLL that your Java application uses as the interface for interactive printer control. The helper DLL is included with the Software Development Kit.
To learn more about Print Ticket and the IBiDiSpl interface, see Appendix E – References.
1

• Use escaped text in the card data to encode standard format magnetic stripe data
• Use escaped text in the card data to set topcoat blocking rectangles, and set print blocking rectangles
• Use escaped text in the card data to specify the input hopper used to select the card
• Use escaped text in the card data to emboss, indent, and top a card when printing to a CE Series printer
• Read magnetic stripe data
• Encode custom magnetic stripe data
• Stage a smart card so it can be personalized
• Monitor supplies and printer status
• Get printer and driver error messages
• Recover from printer and driver errors
• Get job status for the current interactive mode job
• Stage and personalize a smart card using the single-wire smart card interface
• Specify if you want to check printer supplies status before printing the card
• Get a count of cards processed by the printer
The SDK supports the same Microsoft Windows operating systems as the driver.
InstallationFor most situations there are no SDK components to install with your application. All you need is a working version 4.1 XPS Card Printer Driver and a Datacard SD, CD, or CE Series card printer. A C++ helper DLL is included for Java applications because they cannot interface directly to the IBiDiSpl COM interface.
2

Sample CodeThe SDK includes sample code that demonstrates the details needed to successfully use the driver API in your application. The SDK sample code demonstrates specific card personalization tasks using best practices for Print Ticket usage, job sequencing, and basic error handling. The samples are all console applications to make it easier to integrate the code into your application. Samples are provided in C++, C#, Visual Basic, and Java. The C++, C#, and Visual Basic samples use direct calls to the IBiDiSpl interface. The Java samples use calls to the helper DLL (dxp01_IBiDiSpl_interop.dll).
Samples Included in the SDKThe SDK includes nine samples: print, magnetic stripe, smart card, single-wire smart card, embossing*, lock control*, printer control, status, and card completion*.
Print Sample (Not Interactive)
• Use of Print Ticket to override the driver preferences for:
• One- or two-sided printing
• Copy count
• Per card side portrait or landscape orientation (Java is limited to card level orientation)
• Input hopper used to select the card
• Predefined topcoat and print blocking patterns*
• Per card side 180-degree rotation*
• Per card side disabling of printing*
• Color graphics printing
• K (black) text and K graphics printing
• Custom topcoat and print blocking using escapes
• Standard IAT format magnetic stripe encoding using escapes
• Input hopper used to select the card using escapes
• Specify to check printer supplies status before printing the card
*Java does not support these features.
3

Magnetic Stripe Sample
Demonstrates magnetic stripe encoding, magnetic stripe read, and printing using interactive mode with job status.
Smart Card Sample
The Smart Card sample demonstrates parking a card in the printer smart card coupler, moving the card from the coupler, and printing using interactive mode with job status.
Single-Wire Smart Card Sample
The single-wire smart card sample demonstrates interactive mode control and personalization of a smart card using the integrated smart card coupler that communicates with the personalization application using the same cable the driver uses to communicate with the printer. It includes optional printing, input hopper selection, magnetic stripe encoding, and job status to check for job state and errors.
Emboss and Indent Sample
The emboss and indent sample demonstrates the use of escapes to emboss, indent, and apply topping foil to a card using a Datacard CE Series system. It includes input hopper selection and optional supplies checking and polling for job status and error conditions.
Print Locking Sample
The locking sample demonstrates locking, unlocking and changing the lock password for lock equipped printers.
Printer Control Sample
The printer control sample demonstrates a means of canceling all jobs in the printer. It can be used when there is a need to get the printer back into a known good state. In addition to canceling jobs active or queued in the printer, any job in an error state in the driver will be canceled.
The printer must be equipped with a single-wire smart card option for this sample to function correctly.
This sample is not available in Java.
This sample is not available in Java.
This sample is not available in Java.
4

Status Sample
Demonstrates getting printer and supplies information, printer status messages, card counts, and job status using interactive mode.
Card Completion Sample
Demonstrates how to get card completion status for non-interactive jobs submitted using Windows printing methods.
Sample Code LocationSample source code can be found under the Samples folder. Select the folder matching the programming language you are interested in, and then select the folder for the sample containing the features you want to learn about.
Compiled samples are included for Visual C++, Visual C#, and Visual Basic to demonstrate the sample code without your having to build the code yourself. The compiled binaries have runtime dependencies:
C++: Microsoft Visual C++ 2010 Redistributable Package (x86 and x64)
x86: http://www.microsoft.com/downloads/en/details.aspx?FamilyID=a7b7a05e-6de6-4d3a-a423-37bf0912db84&displaylang=en
x64: http://www.microsoft.com/downloads/en/details.aspx?FamilyID=BD512D9E-43C8-4655-81BF-9350143D5867
C# and Visual Basic: Microsoft.NET v4 Client Framework
Developer Environments The sample code was developed using the following tools. You are not required to use these, but their use will guarantee that the sample code builds without issue.
• C++, C#, and Visual Basic: Microsoft Visual Studio 2010 (Any edition including the free Express Edition will work for C# and Visual Basic. Visual C++ requires the Professional edition at a minimum.)
• Java: Eclipse Helios release. “Appendix C – Using the Java SDK Sample Code with Eclipse” on page 58 contains step-by-step instructions for importing and building the SDK java sample code with Eclipse. In addition the Java helper dll requires that the Microsoft Visual C++ 2010 Redistributable Package be installed. Download links are shown in the previous section.
5

PrintingYour application will print and block areas on the card from printing and topcoating using conventional printing APIs along with escapes. This method is always used, even when a job includes interactive mode operations for other card personalization tasks or monitoring job status.
Using the Print Ticket, a Microsoft Visual C++, C#, or Visual Basic application can override any of the printing preferences set in the driver's Printing Preferences editor. Java printing does not have access to the Print Ticket so Java applications are limited to setting the following: orientation (not per-side), one or two-sided, and copy count.
The driver separates the print items into separate images expected by the printer (color, monochrome, and topcoat). Which of these gets created is based on both the type of print items on the card design and on the type of ribbon installed in the printer. The following sections describe rules for rendering card design elements.
Text PrintingThe driver uses the following rules to determine which panels are used to print text:
• If the printer has a color ribbon, any text that is 100% opaque and pure black is rendered by the monochrome black (K) ribbon panel. Text that is 100% opaque and pure white is “punched out” of both the color and monochrome panels; in other words, the white text is created by not printing any color so the white card background shows through. All other text is rendered using the color (YMC) ribbon panels.
• If the printer has a monochrome ribbon, all non-white text is converted to pure black and prints the same as pure black text would. Pure white text is punched out of any color surrounding it.
6

Raster Graphics PrintingRaster graphics are images with formats such as bmp, jpeg, png, and tiff.
The driver uses the following rules to determine which panels to use when printing a raster graphic:
• If the printer has a color ribbon, a raster graphic is rendered by the monochrome (K) ribbon panel when:
• It is a 2-color (1 bpp) image with black being one of the colors
OR
• It is a 100% opaque image with only pure black and pure white pixels
OR
• An image contains a valid bar code and the printing preference “Print bar codes using monochrome” is enabled
All other images are rendered to the color (YMC) panels.
• If the printer has a monochrome ribbon, all raster graphics are rendered by the monochrome (K) ribbon panel. Images that normally would be rendered to the color panels (for example, photos) are half-toned to preserve the image details.
Due to the way JPEG compresses images, it is unlikely that a JPEG image will ever have only black and white pixels.
7
Vector Graphics PrintingVector graphics are images with formats such as WMF. These images are represented by a series of commands that draw graphic objects to create the complete image. Most vector graphics elements have an outside border (the stroke) and an inside color (the fill).
The driver uses the following rules to determine which panels are used to print a vector graphic element:
• If the printer has a color ribbon, a vector graphic is rendered by the monochrome (K) ribbon panel when:
• There is no Fill and the Stroke is 100% opaque and pure black, OR
• There is no Stroke and the Fill is 100% opaque and pure black, OR
• Both the Fill and Stroke are 100% opaque and pure black.
All other elements are rendered to the color (YMC) panels.
• If the printer has a monochrome ribbon, all vector graphic elements are rendered by the monochrome (K) ribbon panel. Elements that would normally be rendered to the color panels are half-toned to make them appear as a shade of gray.
Topcoat and Print Blocking Your card design may have features that must not be printed on or have topcoat applied over. Examples include a contact smart card chip, a magnetic stripe, and a signature panel. Using escape characters, you can specify rectangles to block printing, block topcoat, or apply topcoat. Details on using escapes for blocking printing and topcoat can be found in the “Use Print Blocking Escapes” section of the Driver Guide. For more information on non-printing areas, refer to the “Non-Printing Areas” section of the printer’s Installation and Administrator’s Guide.
8

Controlling Card Printing PreferencesThe Windows printing interface allows job-level application control of:
• Card orientation (portrait or landscape)
• Two-sided printing
• Copy count
Applications written in Microsoft Visual C++, C#, and Visual Basic can use the Print Ticket to access custom preferences created just for the XPS Card Printer driver. The custom preferences are:
• Per side card orientation
• Per side 180-degree card image rotation
• Per side disable printing flag that ignores print data in the job
• Selection of one of the print and topcoat blocking preset masks.
• Input hopper used to select the card
• Split-ribbon color printing
Sample Code Demonstrating PrintingThe SDK includes sample code with language-specific implementation details for printing. The samples are:
Viewing Print SeparationsThe driver can be configured to redirect the images normally sent to the printer to a file on disk. The output is a zip file which, once extracted, contains a PNG image for color rendering, a PNG image for monochrome rendering, and a PNG image for topcoat. Using these files simplifies the task of confirming that graphics are being separated correctly without using printer supplies. The instructions for configuring the driver to print to a file are included in “Appendix B – Printing to a File with the XPS Card Printer Driver”.
Visual C++ , Visual C#, and Visual Basic
Java javaprint.java
Compiled samples outputs
The magnetic stripe track data also is written to the zip file, making it a convenient way to inspect the data after it is formatted for the printer.
9

Getting the Status of a Print JobYour application can retrieve the status for the current print job to determine whether the printer is still actively processing the card or whether the card is complete.
PrinterJobID is used to identify the job. The printer job ID is retrieved by calling Printer.PrintMessages:Read after the print job has been submitted to the printer. Once the printer job ID is known, the job status can be retrieved using Printer.JobStatus:Read with the PrinterJobID of the current job.
Sample Code Demonstrating Print Job Status
The SDK includes sample code with language-specific non-interactive print job. The sample code is:
Visual C++ , Visual C#, and Visual Basic
card_completion
Java Java does not include a print job status sample at this time.
10

EmbossingYour application can emboss, indent, and apply topping foil to a card with the Datacard CE Series Card Personalization System by using escapes.
An emboss escape is made up of the following elements:
• Escape preamble—tells the driver that the text characters following are part of an embosser escape and not text for rendering on the card.
• Embosser font number—CE Series embossers use a font number to specify the emboss or indent character set, the front or back of the card, and in some cases the supply to use.
• Emboss/Indent position—two values specify the starting location of the emboss/indent operation.
• Emboss data—the text to be embosses or indented at a given location using the font number specified
The elements are separated by a semicolon character. The embosser escape syntax is: ~EM% font#; horz_offset; vert_offset; data
For more information about embosser escapes, including examples and limitations, refer to your printer’s Driver Guide.
Embossing Sample CodeFor working code showing embossing, indenting, and topping, refer to the following samples:
Visual C++ , Visual C#, and Visual Basic
Emboss_indent
Java Java does not include an embossing sample at this time.
11

Interactive Mode Using the IBiDiSpl InterfaceInteractive mode is used when your application needs to control the movement of the card in the printer, retrieve data from the card, or get access to error and job status information. The XPS Card Printer Windows driver uses the Microsoft IBiDiSpl interface for communicating with your application in interactive mode. The interactive mode functions supported by this release of the driver SDK are:
• Job control of interactive card personalization functions
• Job control for error detection and recovery
• Encode Magnetic Stripe
• Read Magnetic Stripe
• Smart Card Park (front side of card)
• Monitor Supplies and Printer Status
• Single-wire smart card park and personalize
• Monitor card counts
• Get installed printer options
• Lock and unlock a printer with locks
Printing, magnetic stripe encoding using escapes or fonts, and topcoating is done outside interactive mode but can be mixed with interactive functions within the same job.
IBiDiSpl RequestsThe IBiDiSpl requests used to implement the above functions are:
Job control (normal)
• Printer.Print:StartJob:Set
• Printer.Print.EndJob:Set
• Printer.Action:Set
• Printer.JobStatus:Read
Job control (error state)
• Printer.PrintMessages:Read
• Printer.Action:Set
Java does not have direct access to the IBiDiSpl interface. A C++ helper DLL is provided with the SDK that Java applications can use for interactive mode.
12

Card personalization
• Printer.MagstripeUnit:Back:Encode
• Printer.MagstripeUnit:Back:Read
• Printer.MagstripeUnit:Front:Encode
• Printer.MagstripeUnit:Front:Read
• Printer.SmartCardUnit:Front:Park
• Printer.SmartCardUnit:SingleWire:Connect
• Printer.SmartCardUnit:SingleWire:Disconnect
• Printer.SmartCardUnit:SingleWire:Transmit
• Printer.SmartCardUnit:SingleWire:Status
• Printer.SmartCardUnit:SingleWire:Control
• Printer.SmartCardUnit:SingleWire:GetAttrib
Printer and supplies capabilities and status
• Printer.PrinterOptions2:Read
• Printer.CounterStatus2:Read
• Printer.SuppliesStatus2:Read
Lock control
• Printer.Locks:ChangeLockState:Set
• Printer.Locks:ChangePassword:Set
Deprecated—The following IBiDiSpl requests have been deprecated:
• Printer.PrinterOptions:Read was replaced by the following in an earlier version of the driver:
• Printer.PrinterOptions2:Read
• Printer.CounterStatus2:Read
• Printer.SuppliesStatus:Read
• Printer.SuppliesStatus:Read was replaced by the following in Version 4.1:
• Printer.SuppliesStatus2:Read
13

Java helper DLL InterfaceThe Java helper DLL functions used to implement the above functions are:
Job control (normal)
• StartJob
• EndJob
• ResumeJob
• GetJobStatusXML
Job control (error state)
• CancelJob
Card personalization
• MagstripeEncode2
• MagstripeRead2
• SmartCardPark
• SCardConnect
• SCardDisconnect
• SCardGetAttrib
• SCardStatus
• SCardTransmit
Printer and supplies capabilities and status
• GetPrinterOptions2
• GetPrinterCounterStatus2
• GetPrinterSuppliesStatus
14

Order and Timing of Interactive Job OperationsThe application must implement some interactive operations in a specific order or at a specific time. These are:
• A Start Job request is always the first operation
• An End Job or Cancel Job request is always the last operation
• An End Job request must not be issued until printing operations for the job have entered the driver spooler.
Determine the Success of an IBiDiSpl Request Because all IBiDiSpl requests return success, the return value cannot be used to determine the outcome of the request. IBiDiSpl requests also return a printer status XML structure. This structure contains an indication of whether the request succeeded or failed and, if it failed, information about the error that was detected.
The following example shows the printer status XML structure returned from a failed Start Job command. The command failed because the printer failed to pick a card.
<?xml version="1.0" ?> <!-- Printer status xml file.--> <PrinterStatus> <ClientID>VISTATEST</ClientID> <WindowsJobID>0</WindowsJobID> <PrinterJobID>780</PrinterJobID> <ErrorCode>111</ErrorCode> <ErrorSeverity>4</ErrorSeverity> <ErrorString>Message 111: Card not picked.</ErrorString> <DataFromPrinter><![CDATA[ ]]></DataFromPrinter></PrinterStatus>
For operations that return data from the printer, this structure also contains the data if the operation succeeded.
15

The printer status structure contains the following elements:
Starting and Ending an Interactive JobTo start a job that contains one or more interactive operations, your Visual C++, Visual C#, or Visual Basic application must call the IBiDiSpl interface with the schema set to Printer.Print:StartJob:Set. For printers with a multi-card input hopper, you can include the input hopper to pick the card from. For printers other than the SD260, you can check printer and/or embosser supplies before starting the job. If nothing is specified, the driver will pick a card from hopper 1 and not check supplies.
For Java, call the StartJob method of the dxp01_IBiDiSpl_interop.dll.
The start job request must always be the first IBiDiSpl request.
Element Description of the element value
ClientID A unique identifier of the client that created the job. Not used at this time.
WindowsJobID Windows Job ID assigned by the operating system.
PrinterJobID Print job ID assigned by the driver.
ErrorCode If the command succeeded, the ErrorCode will be 0 (zero). A non-zero value means an error was detected. For non-zero ErrorCode values, the ErrorSeverity and ErrorString elements will contain values.
ErrorSeverity Errors are classified into severity levels (1, 2, 3, 4, or 5). An error is placed in a level based on the error recovery actions that are possible.
ErrorString A short human-readable description of the error, including the error number.
DataFromPrinter If the command was intended to read data from the card in the printer and the read operation was a success, this element will contain the data in the CDATA section.
The input hopper selection and check supplies options are not supported by Java at this time.
16

To end a job, your Visual C++, Visual C#, or Visual Basic application calls the IBiDiSpl interface with the schema set to Printer.Print:EndJob:Set. For Java, call the EndJob method of the dxp01_IBiDiSpl_interop.dll. The end job command is issued after the last interactive operation is successful.
Sample Code
For working code showing interactive mode Start Job, End Job, and basic error recovery, refer to the following samples:
If printing follows the interactive operations, the end job request cannot be sent until the print data appears in the spooler. Submitting an end job immediately results in the job ending before the print data is detected, ending the job before the card prints.
Visual C++ , Visual C#, and Visual Basic
magstripesmartcard
Java Magstripe.javaSmartCard.java
17

Getting the Status of an Interactive JobYour application can retrieve the status for the current interactive job to determine if the printer is still actively processing the card or if the card is complete. The PrinterJobID is used to identify the job. This ID is part of the Printer Status structure returned from the Start Job request.
To retrieve job status, your application uses the IBiDiSpl interface with the schema set to Printer.JobStatus:Read to send an XML structure with the Printer Job ID of the current interactive job. For Java, call the GetJobStatusXML method of the Java helper DLL (dxp01_IBiDiSpl_interop.dll).
<?xml version=\"1.0\"?><!--job status xml--><JobStatus> <PrinterJobID>5860</PrinterJobID></JobStatus>
The Job Status request returns the job status in another XML structure.
<?xml version="1.0" ?> <!-- Job status xml file. --> <JobStatus> <ClientID>VISTATEST</ClientID> <WindowsJobID>5</WindowsJobID> <PrinterJobID>5680</PrinterJobID> <JobState>JobActive</JobState> <JobRestartCount>0</JobRestartCount> </JobStatus>
The ClientID, WindowsJobID, and PrinterJobID have the same meaning as the Printer Status elements returned from other IBiDiSpl requests. The JobState and JobRestartCount are unique to this request.
Element Description of the element value
JobState The state of the job. The value is one of the following: JobActive, JobSucceeded, JobFailed, JobCancelled, or NotAvailable.
JobRestartCount The number of times the job was retried. Normally this is zero.
18

Using the JobState value, your application can determine if the card is still being processed by the printer or, if it has completed, whether it was personalized successfully.
Sample Code
For working code showing interactive mode Job Status use, refer to the following samples:
JobState value What it means
JobActive A card is still being personalized by the printer.
JobSucceeded The card is complete. The job completed without a detected error.
JobFailed The card is complete. An error forced the job to terminate before the card personalization process completed.
JobCancelled The card is complete. The job was cancelled before the card personalization process completed.
NotAvailable There is no information for the PrinterJobID provided. Either the value provided is wrong or this is no longer the current job.
Visual C++ , Visual C#, and Visual Basic
magstripesmartcardstatus
Java SmartCard.javaJobStatusXML.java
19

Interactive Mode Error RecoveryWhen the driver is in interactive mode, errors are reported back to your application through the printer status structure returned by every IBiDiSpl request. Your application can also get this information by calling the IBiDiSpl interface with the schema set to Printer.PrintMessages:Read.
Understanding Error Related Values in Printer Status Structure
There are three values in the Printer Status structure used to communicate error information to your application.
Element Description of the element value
ErrorCode If the command succeeded the ErrorCode will be 0 (zero). A non-zero value means an error was detected. The value of the ErrorCode element will be one of the message numbers listed in “Appendix A – Error Description Strings” on page 52. For non-zero ErrorCode values, the ErrorSeverity and ErrorString elements will contain values.
ErrorSeverity Errors are classified into severity levels (1, 2, 3, 4, or 5). An error is placed in a level based on the error recovery actions that are possible.
ErrorString A short description of the error, including the error number. “Appendix A – Error Description Strings” on page 52 lists the ErrorString values your application can receive from the driver while in interactive mode. The ErrorString value will be in the language of the operating system if the language is one of the translations released with the driver.
ErrorSeverity Severity description Allowed recovery actions
1 Alert Unrecoverable issue for job Cancel job
2 Critical Unrecoverable issue for job Cancel job
3 Error Unrecoverable issue for card, recoverable issue for job
Restart or cancel job
4 WARNING Recoverable issue for card
Resume or cancel job
5 Notice Information only None required
20

Recovery from Errors
To clear an error while in interactive mode, your application uses the IBiDiSpl interface with the schema set to Printer.Action:Set to send an XML structure with the Printer Job ID of the current interactive job, the ErrorCode you are responding to, and the action you want to take. Java can call the CancelJob, ResumeJob or SendResponseToPrinter method of the Java helper DLL (dxp01_IBiDiSpl_interop.dll).
The following example shows the structure sent to cancel a job when the input hopper is empty.
<?xml version="1.0"?><!--printer command xml--><PrinterAction> <Action>100</Action> <PrinterJobID>5860</PrinterJobID> <ErrorCode>112</ErrorCode></PrinterAction>
Basic Error Recovery (Recommended)
The most robust form of error recovery from an interactive mode error is to cancel the job. Using this error recovery strategy, your application reports the job as failed and if a card has been picked it is ejected from the printer. After the cause of the error is corrected, the card personalization job can be attempted again.
You must set the ErrorCode to match the error you are responding to for successful error recovery.
Action value Action description
Allowed for ErrorSeverity level
100 Cancel Reject the current card. End the current job.
All
101 Resume Attempt to continue with the current card.
4
102 Restart Reject the current card. Restart the current job.
3
21
Advanced Error Recovery
By evaluating the ErrorSeverity value, your application can sometimes offer to restart or resume the job after the cause of the error is corrected. In practice, this complicates error recovery because your application must poll the driver for printer status in the event that the error is corrected and cleared using the printer LCD display. If the ErrorCode goes to 0, your application can assume that the error was cleared using the printer LCD. Polling the driver for printer messages is not available to java applications. Failure to follow this process results in errors.
Cancel All Jobs
If you know that your application is the only one sending jobs to the printer, you can cancel all the jobs in the printer to return it to a known good state.
Sample Code
For working code showing how to cancel all jobs, refer to the following sample:
Errors Cleared at the Printer
After an error condition is corrected at the printer, the operator can sometimes use either your application or the printer’s front panel to report that the error is corrected. It is recommended that operators be instructed to use your application to acknowledge that error conditions are corrected. Otherwise, your application may get out of sync with the state of the printer.
Suppressing Driver Message Display
If you prefer to have your application manage error reporting and resolution, you can configure the driver to suppress the display of messages. Refer to Appendix D – Suppressing the Driver Message Display for details.
Visual C++ , Visual C#, and Visual Basic
control
Java Java does not have a sample showing cancel all jobs.
22

Encoding a Magnetic Stripe with DataThere are three ways to encode data onto a magnetic stripe on the back side of a card.
• Use magnetic stripe escapes in the card data to instruct the driver to encode an IAT, JIS, or binary track with the data included between the escape characters. This is processed by the driver along with the print data and does not require interactive mode. Find details on the use of escapes for magnetic stripe encoding in the “Use Magnetic Stripe Escapes” section of the printer’s Driver Guide.
• Use the magnetic stripe fonts installed with the XPS Card Printer driver to encode IAT or JIS formatted data by placing the data on the card design and specifying the magnetic stripe font for the format and track desired. This is processed by the driver along with the print data and does not require interactive mode. For details about the use of magnetic stripe fonts for magnetic stripe encoding, refer to the “Use Magnetic Stripe Fonts” section of the printer’s Driver Guide.
• Use the IBiDiSpl interface to pass magnetic stripe data through the driver in the format expected by the printer. This method is described next.
Interactive Mode Magnetic Stripe Encoding
Using the IBiDiSpl interface, a card’s magnetic stripe can be encoded on the front side or back side of the card. The following assumes you are encoding to the back side of the card.
To encode a magnetic stripe with data, your application calls the IBiDiSpl interface with the schema set to Printer.MagstripeUnit:Back:Encode. For Java, call the MagstripeEncode2 method of the Java helper DLL (dxp01_IBiDiSpl_interop.dll).
The IBiDiSpl commands used to encode the magnetic stripe on a card (and nothing else) are:
1. StartJob—The printer starts the job and picks the card.
2. MagstripeEncode—The application sends the magnetic stripe track data.
3. EndJob—The printer ejects the card into the output tray.
The printer must be configured to match the format of the magnetic stripe data being sent.
23
This is illustrated below in a simplified flowchart.
24

Magnetic Stripe Track Data Format
When using interactive mode magnetic stripe encoding, the magnetic stripe track data must be provided in the XML format the printer expects. The track data itself must be encoded as UTF-8 and then converted to base64 ASCII. Your application is also responsible for sending track data that is valid for the magnetic stripe format configured at the printer.
The following example shows an XML structure with three tracks of IAT data: track 1 = TRACK1, track 2 = 1122, track 3 = 321.
<?xml version="1.0" encoding="UTF-8"?><magstripe > <track number="1"> <base64Data>VFJBQ0sx</base64Data> </track> <track number="2"> <base64Data>MTEyMg==</base64Data> </track> <track number="3"> <base64Data>MzIx</base64Data> </track></magstripe >
Sample Code – Magnetic Stripe EncodeFor working code showing interactive mode magnetic stripe encoding, refer to the following samples:
Visual C++ , Visual C#, and Visual Basic
magstripe
Java Magstripe.java
25

Reading Data from a Magnetic StripeUsing the IBiDiSpl interface, data can be read from the tracks of a card’s magnetic stripe on the back side of the card. The following assumes you want to read data from a magnetic stripe on the back of the card. To read data from the a magnetic stripe, your application calls the IBiDiSpl interface with the schema set to Printer.MagstripeUnit:Back:Read. For Java, call the MagstripeRead2 method of the Java helper DLL (dxp01_IBiDiSpl_interop.dll).
Like all IBiDiSpl requests, the printer status XML structure is returned to your application. The magnetic stripe track data is returned inside the !CDATA[] element of the printer status structure. This data comes directly from the printer without any modification from the driver.
<?xml version="1.0"?><!--Printer status xml file.--><PrinterStatus> <ClientID>VISTATEST_{200AEAAC-CA0A-4AF6-BD77-083A5836AE1A}</ClientID> <WindowsJobID>0</WindowsJobID> <PrinterJobID>5837</PrinterJobID> <ErrorCode>0</ErrorCode> <ErrorSeverity>0</ErrorSeverity> <ErrorString></ErrorString> <DataFromPrinter><![CDATA[<?xml version="1.0" encoding="UTF-8"?><magstripe xmlns:SOAP-ENV="http://www.w3.org/2003/05/soap-envelope"
xmlns:SOAP-ENC="http://www.w3.org/2003/05/soap-encoding" xmlns:xsi="http://www.w3.org/2001/XMLSchema-instance" xmlns:xsd="http://www.w3.org/2001/XMLSchema" xmlns:DPCLMagStripe="urn:dpcl:magstripe:2010-01-19" xsi:type="DPCLMagStripe:MagStripe" SOAP-ENV:encodingStyle="http://www.w3.org/2003/05/soap-encoding">
<track number="1"> <base64Data>zw9PkBBQQzw9PkBBQUVJTVFVWV1hZWltcXV5fICEiIyQlJicoKSorLA==</base64Data> </track> <track number="2"> <base64Data>MDEyMzQ1Njc4OTo7PD0+jc4OTo7PD0+MDEyMzQ1Ng==</base64Data> </track> <track number="3"> <base64Data>MDEyMzQ1Njc4OTo7PDDEyMzQ1Njc4OTo7PD0+MDEyMzQ1Njc4OTo7PD0=</base64Data> </track></magstripe>]]></DataFromPrinter></PrinterStatus>
The track data must be converted from base64 ASCII to the format required by your application.
26

As an example: a job consisting of magnetic stripe read, magnetic stripe encoding, and printing would use the following operations in the order specified:
1. Start Job—The printer starts the job and picks the card.
2. Magnetic Stripe Read—The application reads the magnetic stripe track data.
3. Magnetic Stripe Encode—The application sends the magnetic stripe track data.
4. Print card side(s)—Use the Windows printing interface (GDI, WinForms, etc.), not IBiDiSpl.
5. Wait for the print data to enter the spooler.
6. End Job—The printer completes printing and then ejects the card into the output tray.
Sample Code – Magnetic Stripe Read
For working code showing interactive mode magnetic stripe read, refer to the following samples:
Visual C++ , Visual C#, and Visual Basic
magstripe
Java Magstripe.Java
27

Placing a Card in the Smart Card StationUsing the IBiDiSpl interface, a card can be placed (parked) in the printer’s smart card station where it can be read, personalized, or both. To park a card in the printer’s smart card station, your application calls the IBiDiSpl interface with the schema set to Printer.SmartCardUnit:Front:Park. For Java, call the SmartCardPark method of the Java helper DLL (dxp01_IBiDiSpl_interop.dll).
After smart card personalization completes, your application controls if the card is placed in the output tray, the reject tray, or if it continues on to other personalization operations. To resume or cancel the job, use the IBiDiSpl interface with the schema set to Printer.Action:Set to send an XML structure with the Printer Job ID of the current interactive job and the action you want to take.
<?xml version="1.0"?><!--printer command xml--><PrinterAction> <Action>101</Action> <PrinterJobID>5860</PrinterJobID> <ErrorCode>0</ErrorCode></PrinterAction>
A Resume action (Action value = 101) indicates that smart card personalization completed successfully, and the card is ready for further processing.
A Cancel action (Action value = 100) indicates that smart card personalization failed, and card should be rejected without any further personalization. For Java, call either the ResumeJob, CancelJob, or EndJob method of the Java helper DLL (dxp01_IBiDiSpl_interop.dll).
As an example: a job consisting of smart card encoding and printing would use the following operations in the order specified:
1. StartJob—The printer starts the job and picks the card.
2. ParkCard—The printer parks the card at the smart card station.
3. ResumeJob—The printer moves the card from the smart card station so that the card can be processed further.
4. Print Card Side(s)—Use the Windows printing interface (GDI, WinForms, etc.), not IBiDiSpl.
5. Wait for the print data to enter the spooler.
6. EndJob—The printer completes printing and then ejects the card into the output tray.
28
Sample Code – Smart Card Park
For working code showing interactive mode smart card station park, refer to the following samples:
Personalizing a Smart CardIf your printer is equipped with a single-wire smart card coupler, once the smart card is parked, you can personalize the card using the driver SDK. The IBiDiSpl requests used to do this are:
• Printer.SmartCardUnit:SingleWire:Connect
• Printer.SmartCardUnit:SingleWire:Disconnect
• Printer.SmartCardUnit:SingleWire:Transmit
• Printer.SmartCardUnit:SingleWire:Status
• Printer.SmartCardUnit:SingleWire:GetAttrib
Printer.SmartCardUnit:SingleWire:Connect
Establishes a connection between the calling application and a smart card parked in the reader. If no card exists in the reader, an error is returned.
To connect to the smart card in the reader, use the IBiDiSpl interface with the schema set to Printer.SmartCardUnit:SingleWire:Connect. For Java, call the SCardConnect method of the Java helper DLL (dxp01_IBiDiSpl_interop.dll).
Visual C++ , Visual C#, and Visual Basic
smartcard
Java SmartCard.java
29
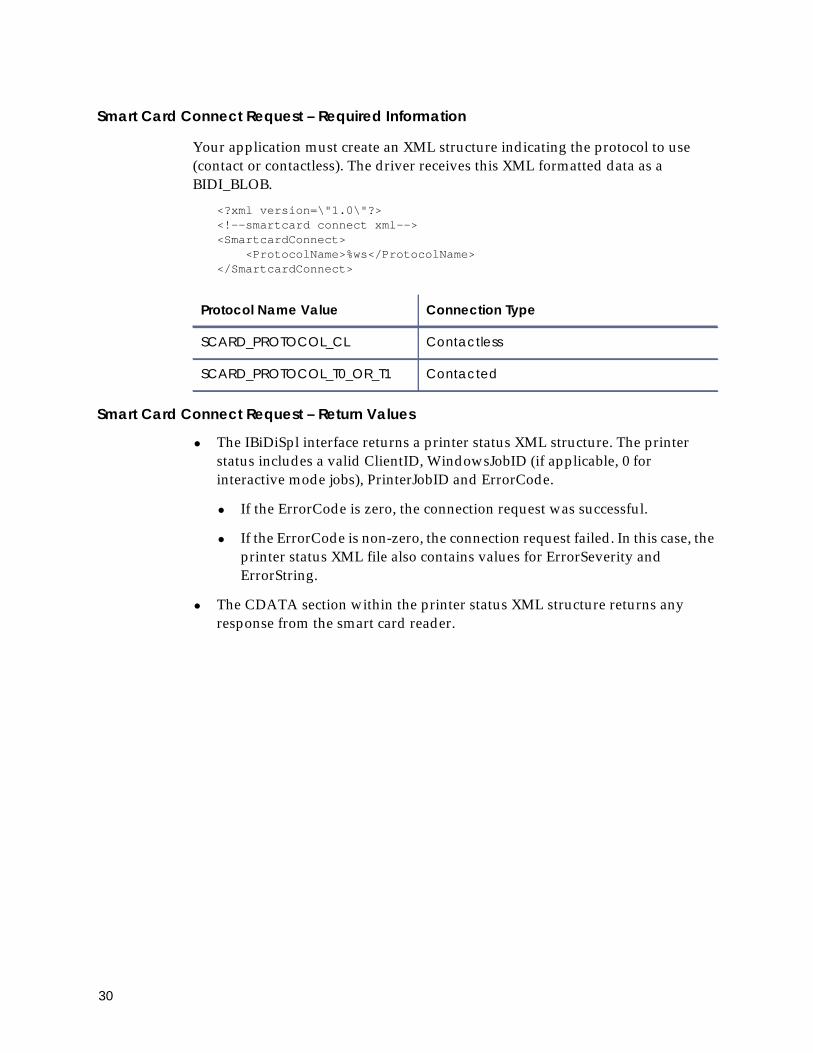
Smart Card Connect Request – Required Information
Your application must create an XML structure indicating the protocol to use (contact or contactless). The driver receives this XML formatted data as a BIDI_BLOB.
<?xml version=\"1.0\"?><!--smartcard connect xml--><SmartcardConnect> <ProtocolName>%ws</ProtocolName></SmartcardConnect>
Smart Card Connect Request – Return Values
• The IBiDiSpl interface returns a printer status XML structure. The printer status includes a valid ClientID, WindowsJobID (if applicable, 0 for interactive mode jobs), PrinterJobID and ErrorCode.
• If the ErrorCode is zero, the connection request was successful.
• If the ErrorCode is non-zero, the connection request failed. In this case, the printer status XML file also contains values for ErrorSeverity and ErrorString.
• The CDATA section within the printer status XML structure returns any response from the smart card reader.
Protocol Name Value Connection Type
SCARD_PROTOCOL_CL Contactless
SCARD_PROTOCOL_T0_OR_T1 Contacted
30
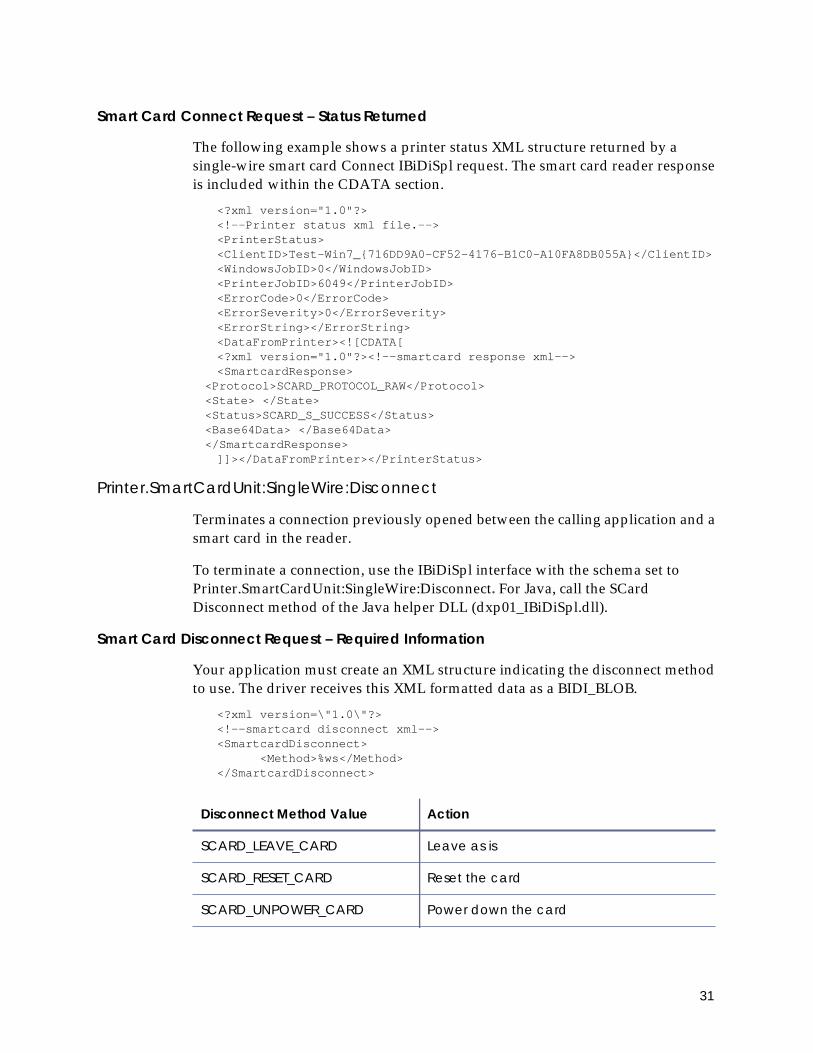
Smart Card Connect Request – Status Returned
The following example shows a printer status XML structure returned by a single-wire smart card Connect IBiDiSpl request. The smart card reader response is included within the CDATA section.
<?xml version="1.0"?><!--Printer status xml file.--><PrinterStatus><ClientID>Test-Win7_{716DD9A0-CF52-4176-B1C0-A10FA8DB055A}</ClientID><WindowsJobID>0</WindowsJobID><PrinterJobID>6049</PrinterJobID><ErrorCode>0</ErrorCode><ErrorSeverity>0</ErrorSeverity><ErrorString></ErrorString><DataFromPrinter><![CDATA[<?xml version="1.0"?><!--smartcard response xml--><SmartcardResponse>
<Protocol>SCARD_PROTOCOL_RAW</Protocol><State> </State><Status>SCARD_S_SUCCESS</Status><Base64Data> </Base64Data></SmartcardResponse>]]></DataFromPrinter></PrinterStatus>
Printer.SmartCardUnit:SingleWire:Disconnect
Terminates a connection previously opened between the calling application and a smart card in the reader.
To terminate a connection, use the IBiDiSpl interface with the schema set to Printer.SmartCardUnit:SingleWire:Disconnect. For Java, call the SCard Disconnect method of the Java helper DLL (dxp01_IBiDiSpl.dll).
Smart Card Disconnect Request – Required Information
Your application must create an XML structure indicating the disconnect method to use. The driver receives this XML formatted data as a BIDI_BLOB.
<?xml version=\"1.0\"?><!--smartcard disconnect xml--><SmartcardDisconnect> <Method>%ws</Method></SmartcardDisconnect>
Disconnect Method Value Action
SCARD_LEAVE_CARD Leave as is
SCARD_RESET_CARD Reset the card
SCARD_UNPOWER_CARD Power down the card
31
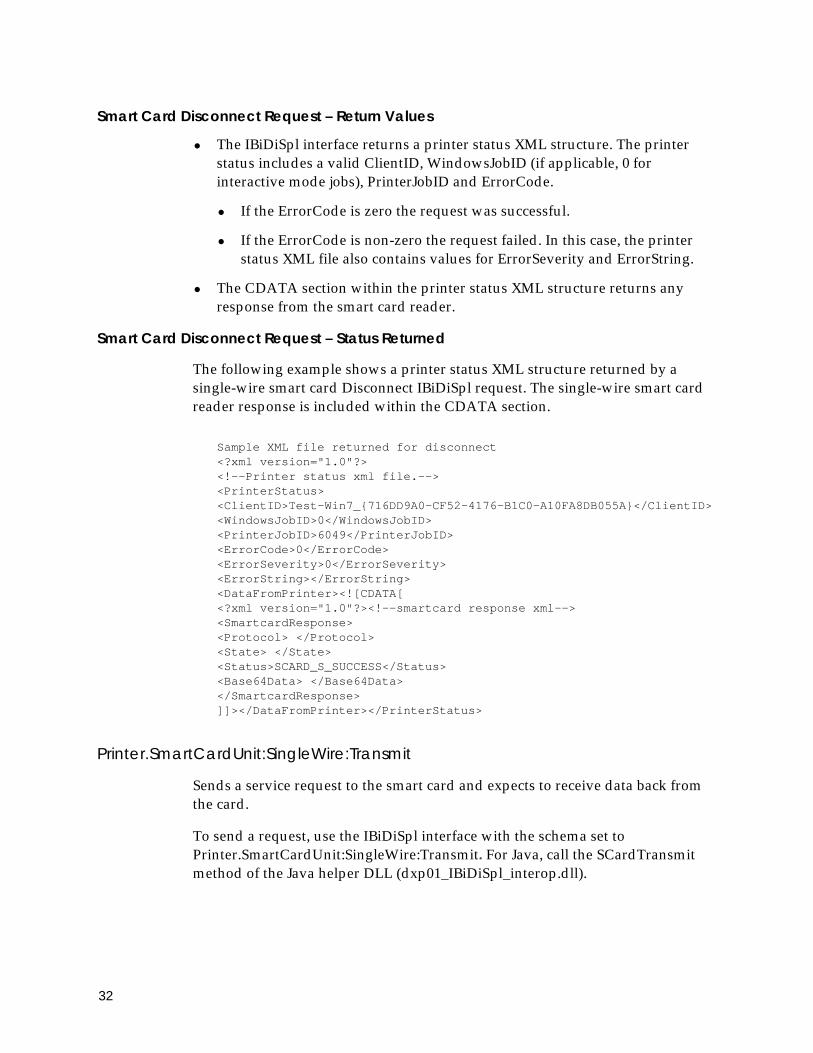
Smart Card Disconnect Request – Return Values
• The IBiDiSpl interface returns a printer status XML structure. The printer status includes a valid ClientID, WindowsJobID (if applicable, 0 for interactive mode jobs), PrinterJobID and ErrorCode.
• If the ErrorCode is zero the request was successful.
• If the ErrorCode is non-zero the request failed. In this case, the printer status XML file also contains values for ErrorSeverity and ErrorString.
• The CDATA section within the printer status XML structure returns any response from the smart card reader.
Smart Card Disconnect Request – Status Returned
The following example shows a printer status XML structure returned by a single-wire smart card Disconnect IBiDiSpl request. The single-wire smart card reader response is included within the CDATA section.
Sample XML file returned for disconnect<?xml version="1.0"?><!--Printer status xml file.--><PrinterStatus><ClientID>Test-Win7_{716DD9A0-CF52-4176-B1C0-A10FA8DB055A}</ClientID><WindowsJobID>0</WindowsJobID><PrinterJobID>6049</PrinterJobID><ErrorCode>0</ErrorCode><ErrorSeverity>0</ErrorSeverity><ErrorString></ErrorString><DataFromPrinter><![CDATA[<?xml version="1.0"?><!--smartcard response xml--><SmartcardResponse><Protocol> </Protocol><State> </State><Status>SCARD_S_SUCCESS</Status><Base64Data> </Base64Data></SmartcardResponse>]]></DataFromPrinter></PrinterStatus>
Printer.SmartCardUnit:SingleWire:Transmit
Sends a service request to the smart card and expects to receive data back from the card.
To send a request, use the IBiDiSpl interface with the schema set to Printer.SmartCardUnit:SingleWire:Transmit. For Java, call the SCardTransmit method of the Java helper DLL (dxp01_IBiDiSpl_interop.dll).
32

Smart Card Transmit Request – Required Information
Your application must create a smart card transmit XML structure with the chip data encoded as Base64 ASCII. The driver receives this XML formatted data as a BIDI_BLOB.
<?xml version=\"1.0\"?><!--smartcard transmit xml--><SmartcardTransmit> <Base64Data><%s></Base64Data></SmartcardTransmit>
Smart Card Transmit Request – Return Values
• The IBiDiSpl interface returns a printer status XML structure. The printer status includes a valid ClientID, WindowsJobID (if applicable, 0 for interactive mode jobs), PrinterJobID and ErrorCode.
• If the ErrorCode is zero, the transmit request was successful.
• If the ErrorCode is non-zero, the transmit request failed. In this case, the printer status XML file also contains values for ErrorSeverity and ErrorString.
• The CDATA section within the printer status XML structure returns any response from the smart card reader.
Smart Card Transmit Request – Status Returned
The following example shows a printer status XML structure returned by a single-wire smart card Transmit IBiDiSpl request. The single-wire smart card reader response is included within the CDATA section.
<?xml version="1.0"?><!--Printer status xml file.--><PrinterStatus><ClientID>agarwas-Win7_{716DD9A0-CF52-4176-B1C0-A10FA8DB055A}</ClientID><WindowsJobID>0</WindowsJobID><PrinterJobID>6049</PrinterJobID><ErrorCode>0</ErrorCode><ErrorSeverity>0</ErrorSeverity><ErrorString></ErrorString><DataFromPrinter><![CDATA[<?xml version="1.0"?><!--smartcard response xml--><SmartcardResponse><Protocol> </Protocol><State> </State><Status>SCARD_S_SUCCESS</Status><Base64Data>ZwA=</Base64Data></SmartcardResponse>]]></DataFromPrinter></PrinterStatus>
33

Printer.SmartCardUnit:SingleWire:Status
Provides the current status of the smart card in the reader. You can call it any time after a successful call to SCardConnect and before a successful call to SCardDisconnect. It does not affect the state of the reader or reader driver.
To retrieve the smart card status, use the IBiDiSpl interface with the schema set to Printer.SmartCardUnit:SingleWire:Status. For Java, call the SCardStatus method of the Java helper DLL (dxp01_IBiDiSpl_interop.dll).
Smart Card Status Request – Return Values
• The IBiDiSpl interface returns a printer status XML structure. The printer status includes a valid ClientID, WindowsJobID (if applicable, 0 for interactive mode jobs), PrinterJobID and ErrorCode.
• If the ErrorCode is zero, the status request was successful.
• If the ErrorCode is non-zero, the status request failed. In this case, the printer status XML file also contains values for ErrorSeverity and ErrorString.
• The CDATA section within the printer status XML structure returns any response from the smart card reader.
Smart Card Status Request – Status Returned
The following example shows a sample printer status XML structure returned by a single-wire smart card Status IBiDiSpl request. The single-wire smart card response is included within the CDATA section.
<?xml version="1.0"?><!--Printer status xml file.--><PrinterStatus>
<ClientID>agarwas-Win7_{716DD9A0-CF52-4176-B1C0-A10FA8DB055A}</ClientID><WindowsJobID>0</WindowsJobID><PrinterJobID>6049</PrinterJobID><ErrorCode>0</ErrorCode><ErrorSeverity>0</ErrorSeverity><ErrorString></ErrorString><DataFromPrinter><![CDATA[
<?xml version="1.0"?><!--smartcard response xml--><SmartcardResponse><Protocol>SCARD_PROTOCOL_RAW</Protocol><State>SCARD_PRESENT|SCARD_POWERED|SCARD_NEGOTIABLE</State><Status>SCARD_S_SUCCESS</Status><Base64Data>O/2RAP+RgXH+QABCAAAAAACBgYAXCACIGQ==</Base64Data></SmartcardResponse>]]></DataFromPrinter></PrinterStatus>
34

Printer.SmartCardUnit:SingleWire:GetAttrib
Retrieves the current reader attributes. It does not affect the state of the reader, driver, or card.
To retrieve the smart card reader attributes, use the IBiDiSpl interface with the schema set to Printer.SmartCardUnit:SingleWire:GetAttrib.
Smart Card GetAttrib Request – Required Information
Your application must create a smart card status XML structure with the name of the reader attribute you want information for. The driver receives this XML formatted data as a BIDI_BLOB.
<?xml version=\"1.0\"?><!--smartcard get attrib xml--><SmartcardGetAttrib> <Attr>%ls</Attr></SmartcardGetAttrib>
Smart Card GetAttrib Request – Return Values
• The IBiDiSpl interface returns a printer status XML structure. The printer status includes a valid ClientID, WindowsJobID (if applicable, 0 for interactive mode jobs), PrinterJobID and ErrorCode.
• If the ErrorCode is zero, the GetAttrib request was successful.
• If the ErrorCode is non-zero, the GetAttrib request failed. In this case, the printer status XML file also contains values for ErrorSeverity and ErrorString.
• The CDATA section within the printer status XML structure returns any response from the smart card reader.
AttribName Action
SCARD_ATTR_VENDOR_NAME Reader Vendor
SCARD_ATTR_VENDOR_IFD_VERSION
Vendor-supplied interface device version. (DWORD in the form 0xMMmmbbbb where MM = major version, mm = minor version, and bbbb = build number
SCARD_ATTR_VENDOR_IFD_TYPE Vendor-supplied interface device type (model designation of reader)
SCARD_ATTR_VENDOR_IFD_SERIAL_NO
Vendor-supplied interface device serial number
35
Smart Card GetAttrib Request – Status Returned
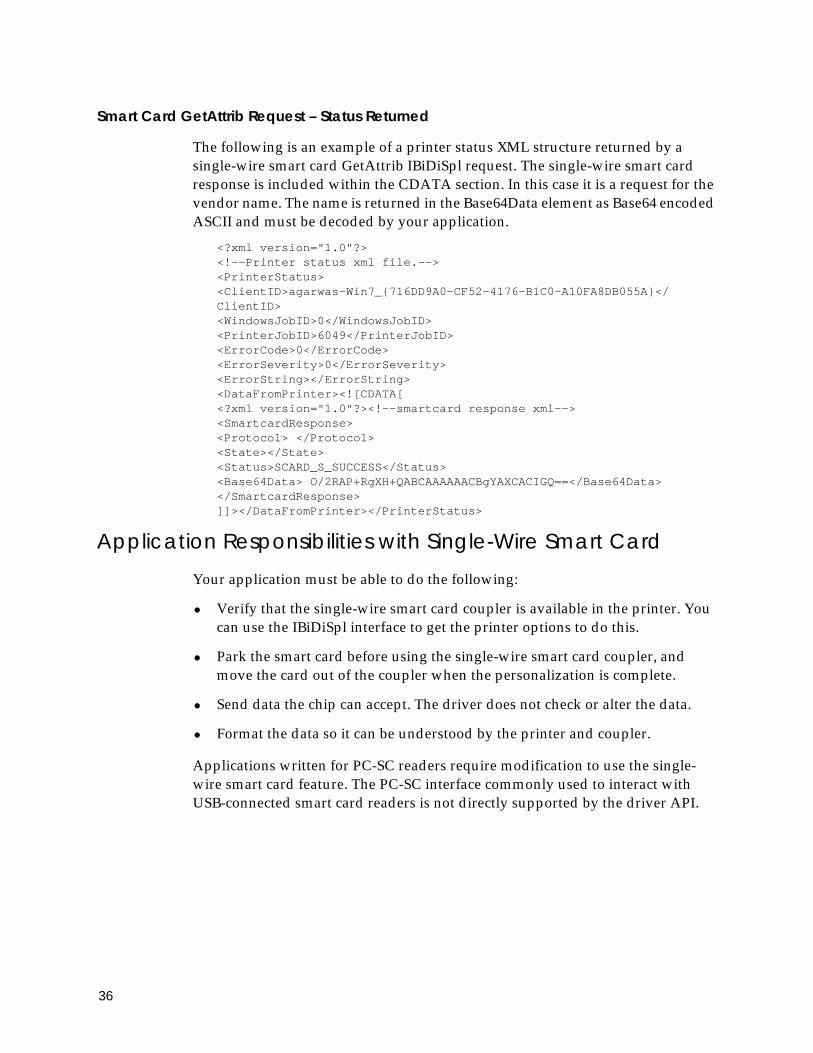
The following is an example of a printer status XML structure returned by a single-wire smart card GetAttrib IBiDiSpl request. The single-wire smart card response is included within the CDATA section. In this case it is a request for the vendor name. The name is returned in the Base64Data element as Base64 encoded ASCII and must be decoded by your application.
<?xml version="1.0"?><!--Printer status xml file.--><PrinterStatus><ClientID>agarwas-Win7_{716DD9A0-CF52-4176-B1C0-A10FA8DB055A}</ClientID><WindowsJobID>0</WindowsJobID><PrinterJobID>6049</PrinterJobID><ErrorCode>0</ErrorCode><ErrorSeverity>0</ErrorSeverity><ErrorString></ErrorString><DataFromPrinter><![CDATA[<?xml version="1.0"?><!--smartcard response xml--><SmartcardResponse><Protocol> </Protocol><State></State><Status>SCARD_S_SUCCESS</Status><Base64Data> O/2RAP+RgXH+QABCAAAAAACBgYAXCACIGQ==</Base64Data></SmartcardResponse>]]></DataFromPrinter></PrinterStatus>
Application Responsibilities with Single-Wire Smart CardYour application must be able to do the following:
• Verify that the single-wire smart card coupler is available in the printer. You can use the IBiDiSpl interface to get the printer options to do this.
• Park the smart card before using the single-wire smart card coupler, and move the card out of the coupler when the personalization is complete.
• Send data the chip can accept. The driver does not check or alter the data.
• Format the data so it can be understood by the printer and coupler.
Applications written for PC-SC readers require modification to use the single-wire smart card feature. The PC-SC interface commonly used to interact with USB-connected smart card readers is not directly supported by the driver API.
36
Sample Code – Single-Wire Smart Card Personalization
For working code showing personalization of a smart card, refer to the following samples:
The SDK sample code wraps the IBiDiSpl interface providing an interface that is similar to the Microsoft Windows SCard API. You are welcome to include this code in your application or communicate directly to the IBiDiSpl interface, as you prefer.
Return Values from the Sample Code SCard WrapperReturn values are provided by the printer as strings, but PC-SC applications expect a numeric HRESULT value. The SDK wrapper code converts the return string to the HRESULT value expected by the application. Possible return values are either SCARD_S_SUCCESS or an error. You can find PC-SC error code information at: http://msdn.microsoft.com/en-us/library/ms936965.aspx
Visual C++ , Visual C#, and Visual Basic
Smartcard_singlewire
Java SmartCard_singlewire.java
37
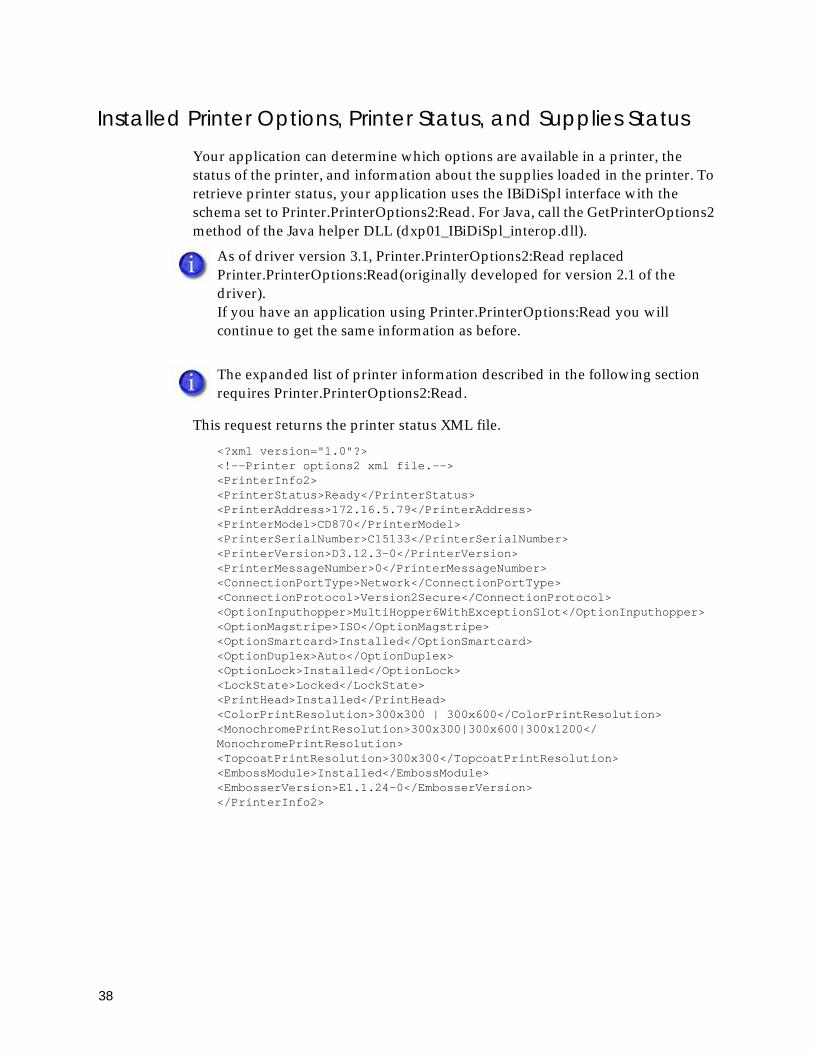
Installed Printer Options, Printer Status, and Supplies StatusYour application can determine which options are available in a printer, the status of the printer, and information about the supplies loaded in the printer. To retrieve printer status, your application uses the IBiDiSpl interface with the schema set to Printer.PrinterOptions2:Read. For Java, call the GetPrinterOptions2 method of the Java helper DLL (dxp01_IBiDiSpl_interop.dll).
This request returns the printer status XML file.
<?xml version="1.0"?><!--Printer options2 xml file.--><PrinterInfo2><PrinterStatus>Ready</PrinterStatus><PrinterAddress>172.16.5.79</PrinterAddress><PrinterModel>CD870</PrinterModel><PrinterSerialNumber>C15133</PrinterSerialNumber><PrinterVersion>D3.12.3-0</PrinterVersion><PrinterMessageNumber>0</PrinterMessageNumber><ConnectionPortType>Network</ConnectionPortType><ConnectionProtocol>Version2Secure</ConnectionProtocol><OptionInputhopper>MultiHopper6WithExceptionSlot</OptionInputhopper><OptionMagstripe>ISO</OptionMagstripe><OptionSmartcard>Installed</OptionSmartcard><OptionDuplex>Auto</OptionDuplex><OptionLock>Installed</OptionLock><LockState>Locked</LockState><PrintHead>Installed</PrintHead><ColorPrintResolution>300x300 | 300x600</ColorPrintResolution><MonochromePrintResolution>300x300|300x600|300x1200</MonochromePrintResolution><TopcoatPrintResolution>300x300</TopcoatPrintResolution><EmbossModule>Installed</EmbossModule><EmbosserVersion>E1.1.24-0</EmbosserVersion></PrinterInfo2>
As of driver version 3.1, Printer.PrinterOptions2:Read replaced Printer.PrinterOptions:Read(originally developed for version 2.1 of the driver).If you have an application using Printer.PrinterOptions:Read you will continue to get the same information as before.
The expanded list of printer information described in the following section requires Printer.PrinterOptions2:Read.
38
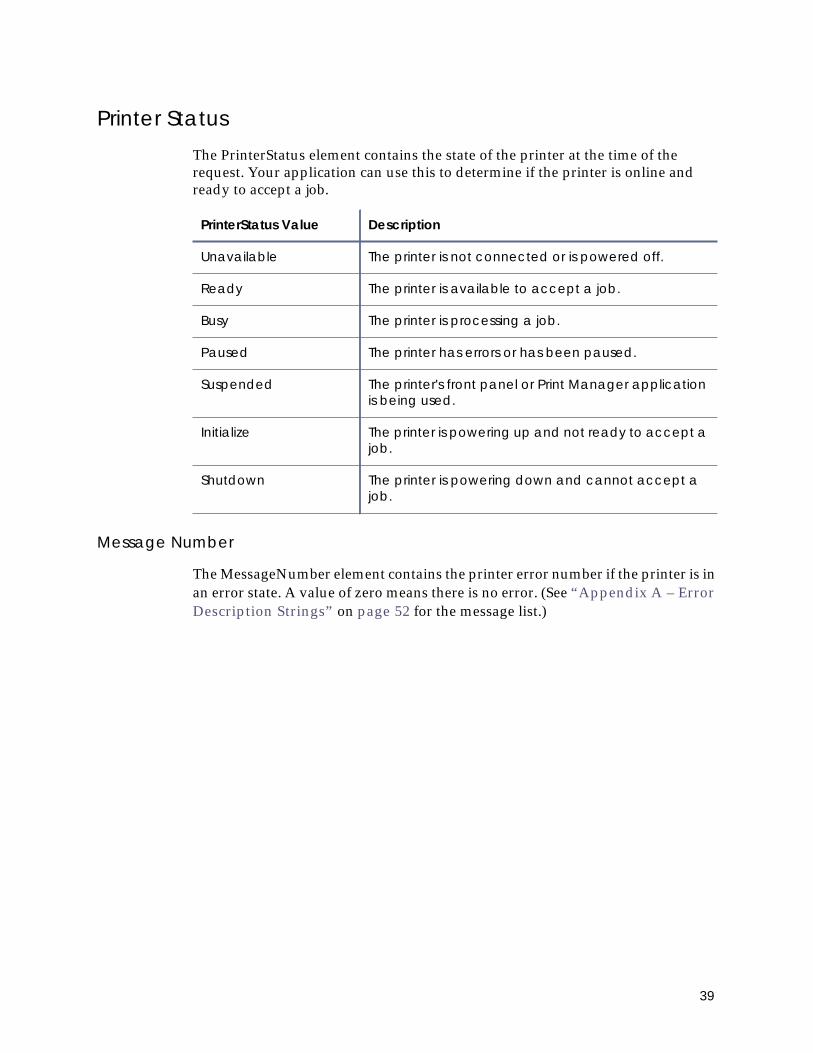
Printer StatusThe PrinterStatus element contains the state of the printer at the time of the request. Your application can use this to determine if the printer is online and ready to accept a job.
Message Number
The MessageNumber element contains the printer error number if the printer is in an error state. A value of zero means there is no error. (See “Appendix A – Error Description Strings” on page 52 for the message list.)
PrinterStatus Value Description
Unavailable The printer is not connected or is powered off.
Ready The printer is available to accept a job.
Busy The printer is processing a job.
Paused The printer has errors or has been paused.
Suspended The printer's front panel or Print Manager application is being used.
Initialize The printer is powering up and not ready to accept a job.
Shutdown The printer is powering down and cannot accept a job.
39
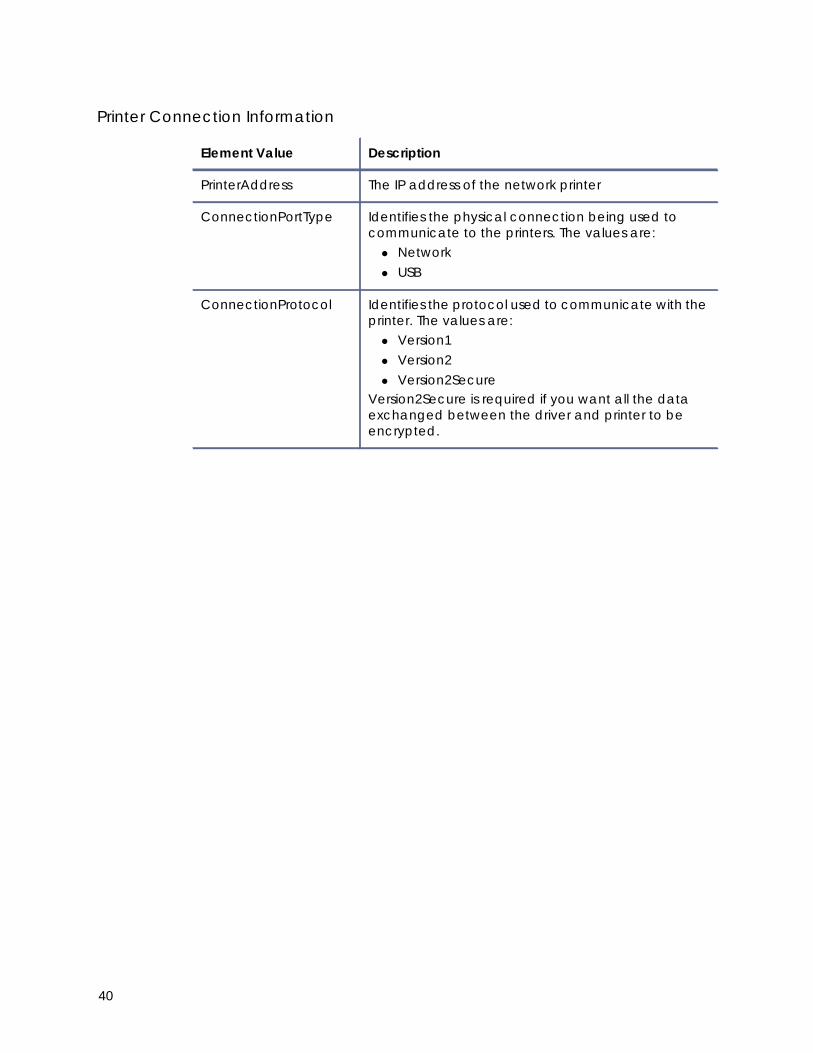
Printer Connection Information
Element Value Description
PrinterAddress The IP address of the network printer
ConnectionPortType Identifies the physical connection being used to communicate to the printers. The values are:• Network• USB
ConnectionProtocol Identifies the protocol used to communicate with the printer. The values are:• Version1• Version2• Version2Secure
Version2Secure is required if you want all the data exchanged between the driver and printer to be encrypted.
40

Printer Options
Element Value Description
OptionInputhopper The input hopper configuration for this printer. The values are:• SingleFeed• SingleHopperWithExceptionSlot• MultiHopper6WithExceptionSlot
OptionMagstripe The magnetic stripe configuration for this printer. The values are:• None• ISO• JIS
OptionSmartcard The smart card configuration for this printer. The values are:• None• Installed• SingleWire
OptionDuplex The duplex configuration for this printer. The values are:• Manual• Auto
OptionLock The lock configuration for this printer. The values are:• None• Installed
LockState The lock state if the printer has the lock option installed. The values are:• Locked• Unlocked
This element is missing if the OptionLock value is None.
PrintHead Indicates if this printer includes a print head. (The printer might not have a printhead if you are connected to an emboss-only CE Series system.) The values are:• None• Installed
41
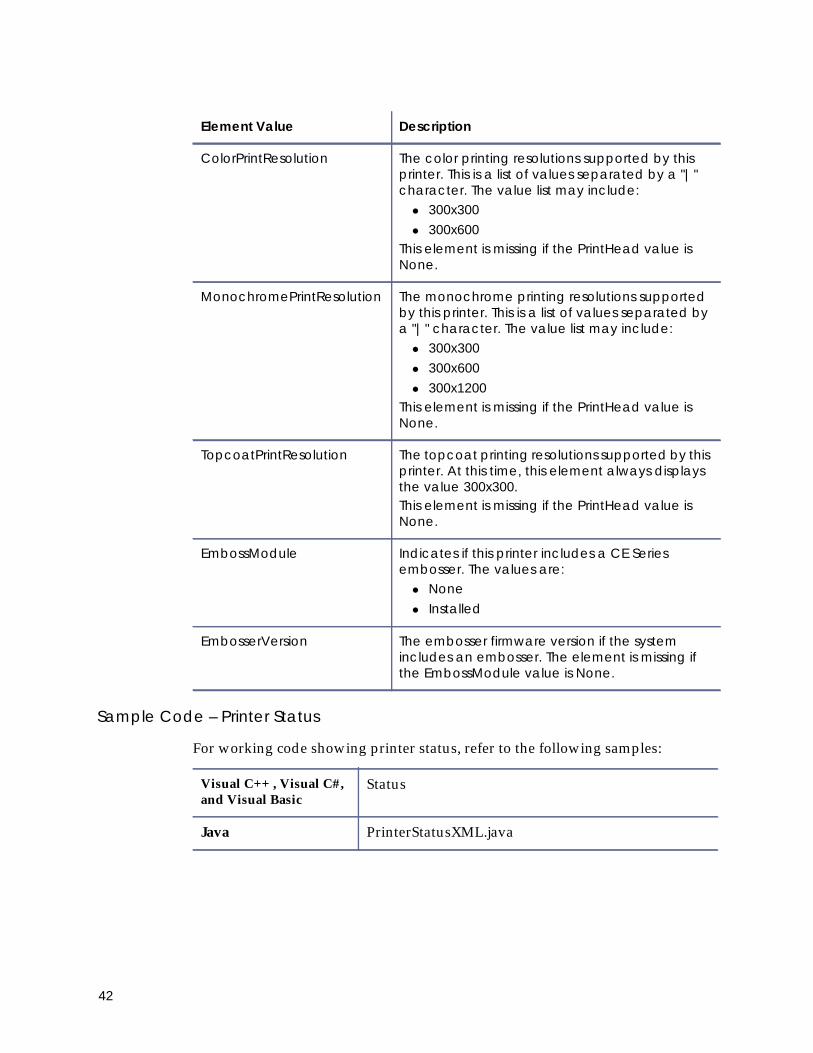
Sample Code – Printer Status
For working code showing printer status, refer to the following samples:
ColorPrintResolution The color printing resolutions supported by this printer. This is a list of values separated by a "|" character. The value list may include:• 300x300• 300x600
This element is missing if the PrintHead value is None.
MonochromePrintResolution The monochrome printing resolutions supported by this printer. This is a list of values separated by a "|" character. The value list may include:• 300x300• 300x600• 300x1200
This element is missing if the PrintHead value is None.
TopcoatPrintResolution The topcoat printing resolutions supported by this printer. At this time, this element always displays the value 300x300.This element is missing if the PrintHead value is None.
EmbossModule Indicates if this printer includes a CE Series embosser. The values are:• None• Installed
EmbosserVersion The embosser firmware version if the system includes an embosser. The element is missing if the EmbossModule value is None.
Visual C++ , Visual C#, and Visual Basic
Status
Java PrinterStatusXML.java
Element Value Description
42
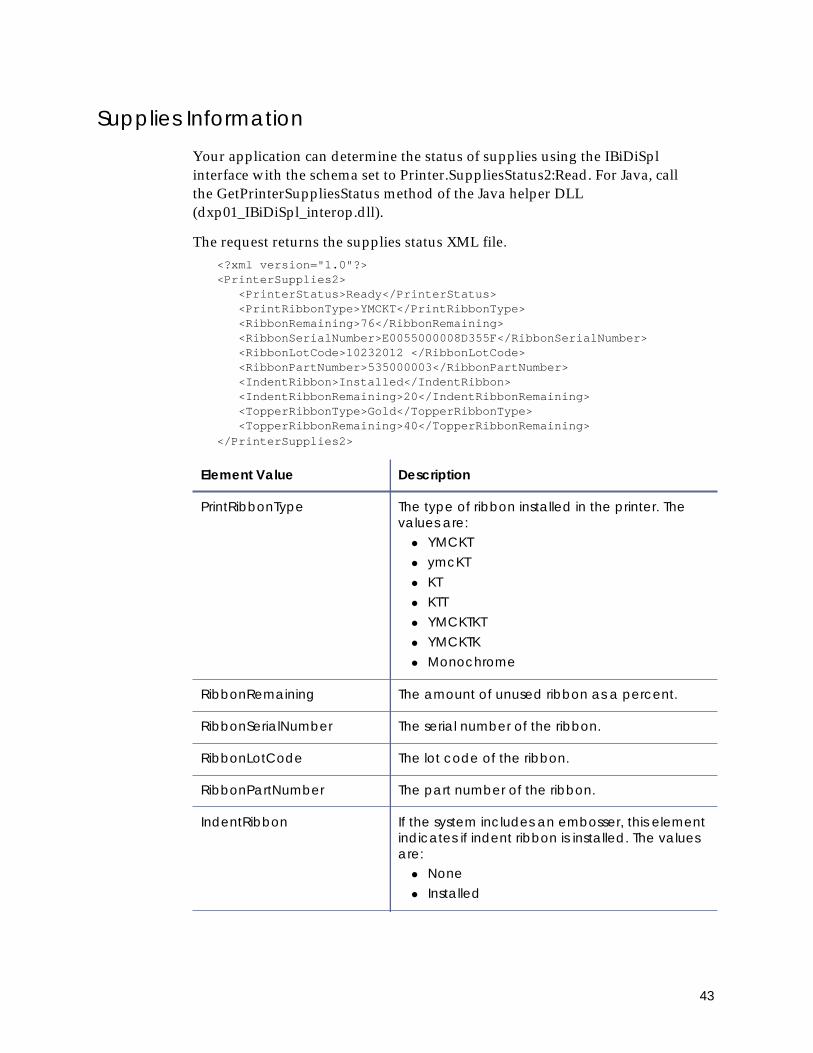
Supplies InformationYour application can determine the status of supplies using the IBiDiSpl interface with the schema set to Printer.SuppliesStatus2:Read. For Java, call the GetPrinterSuppliesStatus method of the Java helper DLL (dxp01_IBiDiSpl_interop.dll).
The request returns the supplies status XML file.<?xml version="1.0"?><PrinterSupplies2> <PrinterStatus>Ready</PrinterStatus> <PrintRibbonType>YMCKT</PrintRibbonType> <RibbonRemaining>76</RibbonRemaining> <RibbonSerialNumber>E0055000008D355F</RibbonSerialNumber> <RibbonLotCode>10232012 </RibbonLotCode> <RibbonPartNumber>535000003</RibbonPartNumber> <IndentRibbon>Installed</IndentRibbon> <IndentRibbonRemaining>20</IndentRibbonRemaining> <TopperRibbonType>Gold</TopperRibbonType> <TopperRibbonRemaining>40</TopperRibbonRemaining></PrinterSupplies2>
Element Value Description
PrintRibbonType The type of ribbon installed in the printer. The values are:• YMCKT• ymcKT• KT• KTT• YMCKTKT• YMCKTK• Monochrome
RibbonRemaining The amount of unused ribbon as a percent.
RibbonSerialNumber The serial number of the ribbon.
RibbonLotCode The lot code of the ribbon.
RibbonPartNumber The part number of the ribbon.
IndentRibbon If the system includes an embosser, this element indicates if indent ribbon is installed. The values are:• None• Installed
43

Sample Code – Supplies Status
For working code showing supplies status, refer to the following samples:
IndentRibbonRemaining The amount of unused indent ribbon as a percent.
TopperRibbonType The type of topping foil installed in the printer. The values are:• Silver• Gold• Black• White• Blue
TopperRibbonRemaining The amount of unused topping foil as a percent.
Visual C++ , Visual C#, and Visual Basic
Status
Java PrinterSuppliesStatus.java
Element Value Description
44
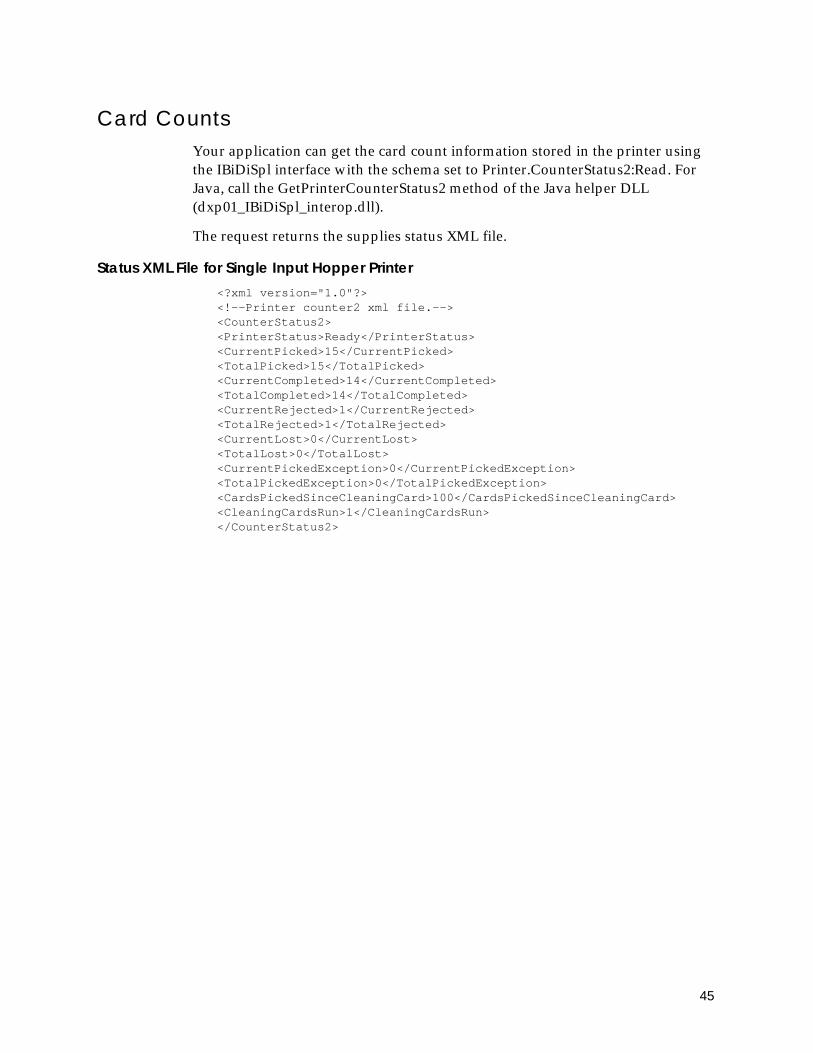
Card CountsYour application can get the card count information stored in the printer using the IBiDiSpl interface with the schema set to Printer.CounterStatus2:Read. For Java, call the GetPrinterCounterStatus2 method of the Java helper DLL (dxp01_IBiDiSpl_interop.dll).
The request returns the supplies status XML file.
Status XML File for Single Input Hopper Printer<?xml version="1.0"?><!--Printer counter2 xml file.--><CounterStatus2><PrinterStatus>Ready</PrinterStatus><CurrentPicked>15</CurrentPicked><TotalPicked>15</TotalPicked><CurrentCompleted>14</CurrentCompleted><TotalCompleted>14</TotalCompleted><CurrentRejected>1</CurrentRejected><TotalRejected>1</TotalRejected><CurrentLost>0</CurrentLost><TotalLost>0</TotalLost><CurrentPickedException>0</CurrentPickedException><TotalPickedException>0</TotalPickedException><CardsPickedSinceCleaningCard>100</CardsPickedSinceCleaningCard><CleaningCardsRun>1</CleaningCardsRun></CounterStatus2>
45

Status XML for Six Position Input Hopper Printer<?xml version="1.0"?><!--Printer counter2 xml file.--><CounterStatus2><PrinterStatus>Ready</PrinterStatus><CurrentPicked>371</CurrentPicked><TotalPicked>371</TotalPicked><CurrentCompleted>298</CurrentCompleted><TotalCompleted>298</TotalCompleted><CurrentRejected>71</CurrentRejected><TotalRejected>71</TotalRejected><CurrentLost>2</CurrentLost><TotalLost>2</TotalLost><CurrentPicked1>189</CurrentPicked1><TotalPicked1>189</TotalPicked1><CurrentPicked2>43</CurrentPicked2><TotalPicked2>43</TotalPicked2><CurrentPicked3>38</CurrentPicked3><TotalPicked3>38</TotalPicked3><CurrentPicked4>36</CurrentPicked4><TotalPicked4>36</TotalPicked4><CurrentPicked5>34</CurrentPicked5><TotalPicked5>34</TotalPicked5><CurrentPicked6>31</CurrentPicked6><TotalPicked6>31</TotalPicked6><CurrentPickedException>0</CurrentPickedException><TotalPickedException>0</TotalPickedException><CardsPickedSinceCleaningCard>100</CardsPickedSinceCleaningCard><CleaningCardsRun>1</CleaningCardsRun></CounterStatus2>
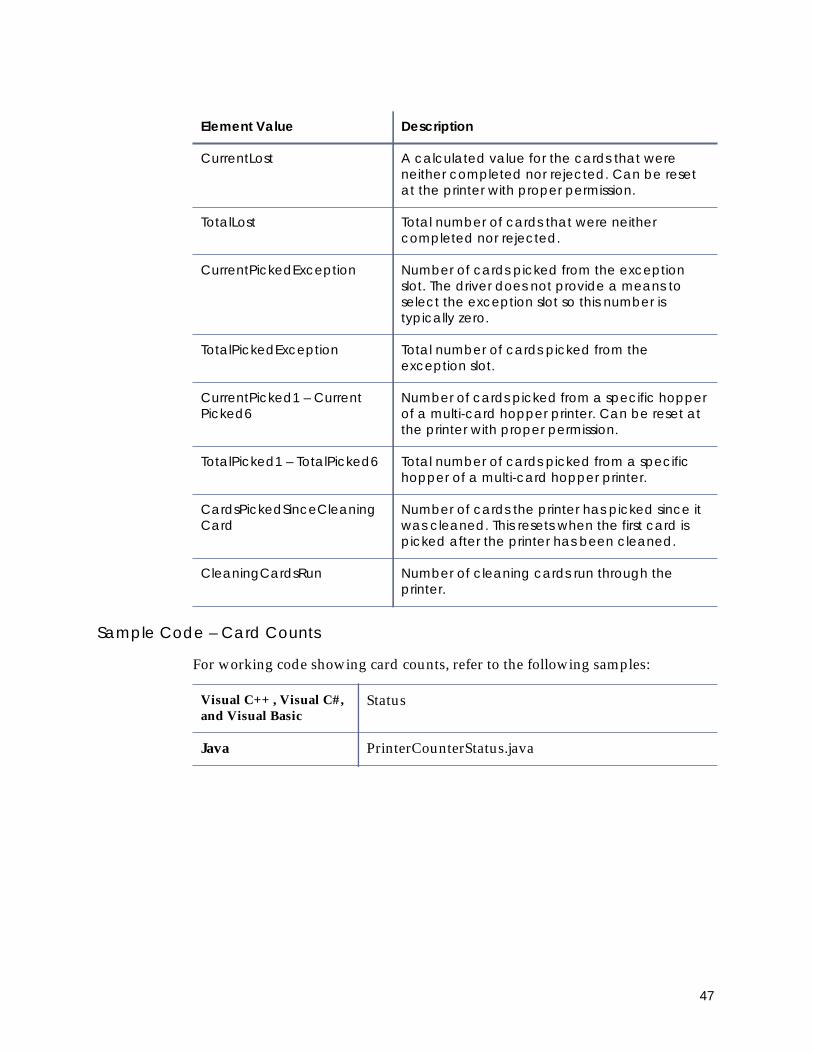
Element Value Description
CurrentPicked Number of cards picked by the printer. Can be reset at the printer with proper permission.
TotalPicked Total number of cards picked by this printer.
CurrentCompleted Number of cards successfully completed by the printer. Can be reset at the printer with proper permission
TotalCompleted Total number of cards successfully completed by the printer.
CurrentRejected Number of cards that were rejected by the printer because they failed or were cancelled. Can be reset at the printer with proper permission.
TotalRejected Total number of cards that were rejected by the printer because they failed or were cancelled.
46
Sample Code – Card Counts
For working code showing card counts, refer to the following samples:
CurrentLost A calculated value for the cards that were neither completed nor rejected. Can be reset at the printer with proper permission.
TotalLost Total number of cards that were neither completed nor rejected.
CurrentPickedException Number of cards picked from the exception slot. The driver does not provide a means to select the exception slot so this number is typically zero.
TotalPickedException Total number of cards picked from the exception slot.
CurrentPicked1 – Current Picked6
Number of cards picked from a specific hopper of a multi-card hopper printer. Can be reset at the printer with proper permission.
TotalPicked1 – TotalPicked6 Total number of cards picked from a specific hopper of a multi-card hopper printer.
CardsPickedSinceCleaningCard
Number of cards the printer has picked since it was cleaned. This resets when the first card is picked after the printer has been cleaned.
CleaningCardsRun Number of cleaning cards run through the printer.
Visual C++ , Visual C#, and Visual Basic
Status
Java PrinterCounterStatus.java
Element Value Description
47

LockingIf your printer is equipped with locks, your application can lock and unlock the printer, as well as change the password needed to unlock the printer. The IBiDiSpl requests used to do this are:
• Printer.Locks:ChangeLockState:Set
• Printer.Locks:ChangePassword:Set
Lock or Unlock the Printer
Your application must create an XML structure with the lock state and password. The driver receives this XML formatted data as a BIDI_BLOB.
<?xml version="1.0" ?> <ChangeLocks> <LockPrinter>%d</LockPrinter> <CurrentPassword>%ls</CurrentPassword> </ChangeLocks>
The CurrentPassword value must be set to the correct password to successfully lock or unlock the printer.
LockPrinter Value Description
1 Lock printer
2 Unlock printer
48

Change the Lock/Unlock Password
Your application must create an XML structure with the lock state and password. The driver receives this XML formatted data as a BIDI_BLOB.
<?xml version="1.0" ?> <ChangeLocksPassword><LockPrinter>1</LockPrinter> <CurrentPassword>test</CurrentPassword> <NextPassword>abcd</NextPassword> </ChangeLocksPassword>
Your application must supply both the correct CurrentPassword and the new password in the NextPassword element.
Password Rules
Use the following rules to make sure the password is considered valid by the printer:
• A password must have at least 4 legal characters. Legal characters are:
• alphanumeric (English)
• plus (+)
• slash (/)
• dollar sign ($)
• A password is case sensitive.
• Empty quotes "" are used to disable the locking password.
If the printer is configured to not require a password, the printer locks or unlocks ignoring whatever password is sent.
• When the locking password is changed, the NextPassword value becomes the CurrentPassword for the next attempt to lock or unlock the printer.
When you send empty quotes "" as the NextPassword value, the printer no longer requires a password to lock or unlock.
LockPrinter is always set to 1. Changing the lock password locks the printer if it is unlocked.
49

Determining the Success of a Lock Request
For both lock requests, the status is returned in another XML structure. The following is an example of an attempt to lock a printer that does not have locks installed.
<?xml version="1.0"?><!--Printer status xml file.--><PrinterStatus> <ClientID>agarwas-Win7_{32DCD216-3B4E-4806-9661-3F80D6D99F72}</ClientID> <WindowsJobID>0</WindowsJobID> <PrinterJobID>0</PrinterJobID> <ErrorCode>511</ErrorCode> <ErrorSeverity>2</ErrorSeverity> <ErrorString>Message 511: Cannot lock or unlock the printer. Locks are not installed.</ErrorString> <DataFromPrinter><![CDATA[ ]]></DataFromPrinter></PrinterStatus>
Sample Code – Locking
For working code showing the lock operation, refer to the following samples:
Visual C++ , Visual C#, and Visual Basic
Locks
Java Java does not support locking at this time.
50

Interactive Mode Best Practices• When interactive mode operations are used for card personalization, the
driver can process only one job at a time. It is the responsibility of your application to manage the card production queue so that only one card personalization job is active for a given printer.
• Your application should always verify that the printer is online before starting a job. “Installed Printer Options, Printer Status, and Supplies Status” on page 38 describes how to request and interpret the printer status to determine that the printer is online.
• Before starting an interactive job, your application should verify that the printer is not printing. “Installed Printer Options, Printer Status, and Supplies Status” on page 38 describes how to request and interpret the printer status to determine that the printer is not busy.
• Your application should always check the Printer Status returned by an IBiDiSpl request to determine if the request succeeded or failed.
• When recovering from an error while in interactive mode, always use the PrinterJobID value returned by the Start Job request. The currently active job in the printer will be canceled if your application sends a cancel action with a printer job ID of 0. Unless this printer is dedicated to your application, the currently active job may not be the job you intend to cancel.
51
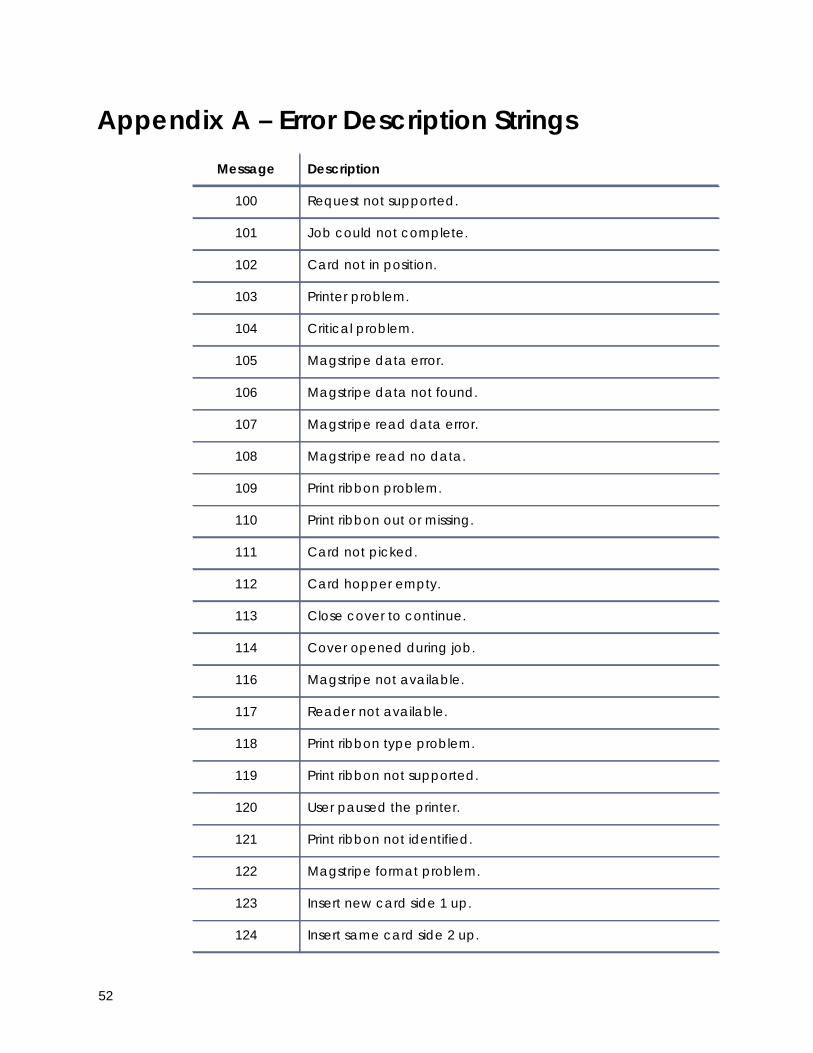
Appendix A – Error Description StringsMessage Description
100 Request not supported.
101 Job could not complete.
102 Card not in position.
103 Printer problem.
104 Critical problem.
105 Magstripe data error.
106 Magstripe data not found.
107 Magstripe read data error.
108 Magstripe read no data.
109 Print ribbon problem.
110 Print ribbon out or missing.
111 Card not picked.
112 Card hopper empty.
113 Close cover to continue.
114 Cover opened during job.
116 Magstripe not available.
117 Reader not available.
118 Print ribbon type problem.
119 Print ribbon not supported.
120 User paused the printer.
121 Print ribbon not identified.
122 Magstripe format problem.
123 Insert new card side 1 up.
124 Insert same card side 2 up.
52
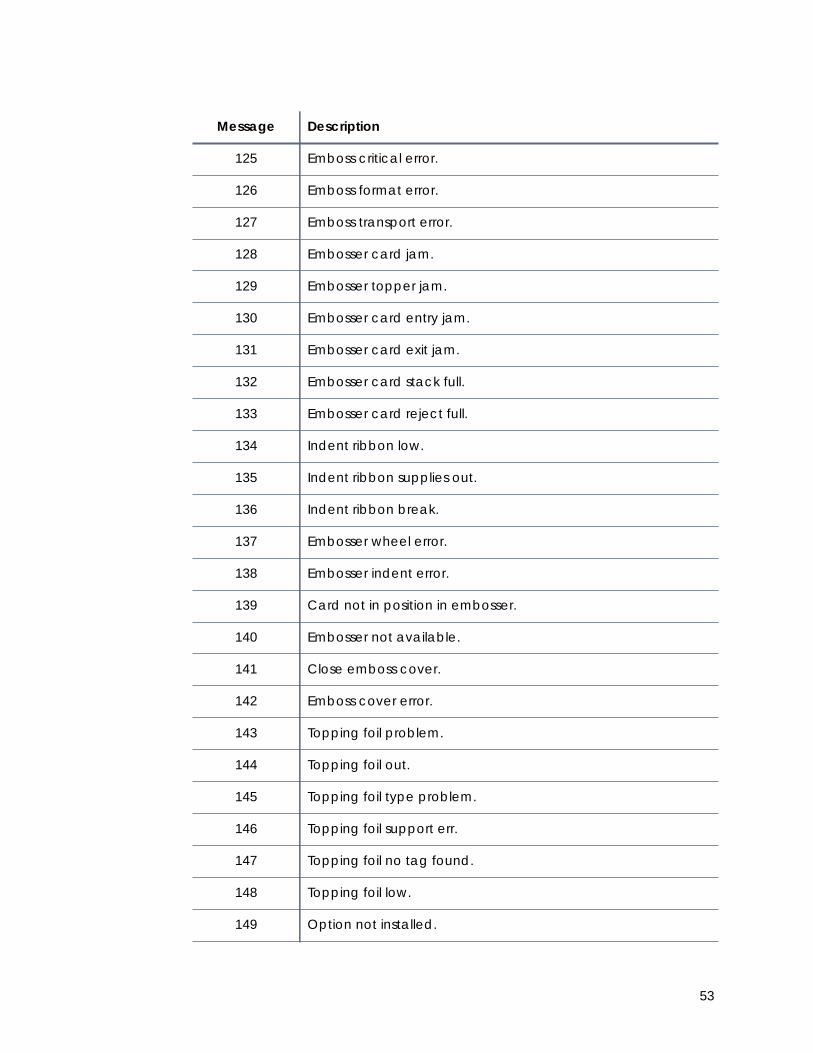
125 Emboss critical error.
126 Emboss format error.
127 Emboss transport error.
128 Embosser card jam.
129 Embosser topper jam.
130 Embosser card entry jam.
131 Embosser card exit jam.
132 Embosser card stack full.
133 Embosser card reject full.
134 Indent ribbon low.
135 Indent ribbon supplies out.
136 Indent ribbon break.
137 Embosser wheel error.
138 Embosser indent error.
139 Card not in position in embosser.
140 Embosser not available.
141 Close emboss cover.
142 Emboss cover error.
143 Topping foil problem.
144 Topping foil out.
145 Topping foil type problem.
146 Topping foil support err.
147 Topping foil no tag found.
148 Topping foil low.
149 Option not installed.
Message Description
53

150 Print while unlocked.
151 Failed to lock.
152 Insert new card side 2 up.
153 Insert same card side 2 up.
170 Insert new card side 1 up.
171 Insert same card side 1 up.
172 Insert Cleaning Card.
173 Improper Shutdown.
500 The printer is not available.
501 The printer connection was lost.
502 The card data is missing or is not usable.
504 The card data is missing or is not usable.
505 USB communication issue.
506 A card is currently processing.
507 The printer is unlocked.
508 The printer is shutting down.
509 The printer is offline or suspended.
510 The printer is unlocked.
511 Cannot lock or unlock the printer. Locks are not installed.
512 Cannot lock or unlock the printer. The password is incorrect or invalid.
513 Cannot lock or unlock the printer. The printer is busy.
514 Cannot lock or unlock the printer. The cover is open.
515 Failed to lock or unlock the printer. The locks did not function.
Message Description
54

Appendix B – Printing to a File with the XPS Card Printer Driver
You can “print” without having a printer attached using the XPS Card Printer Driver. The result is a zip file on disk that contains the PNG images that would normally be sent to the printer.
1. Create a folder to hold the files (for example: D:\Temp\DriverOutput). This folder will be used in Step 3.
2. Install a network printer (if not already installed). Use the XPS Card Printer installation instructions to install a network printer if one is not already installed. When the configure port window displays, follow the instructions in Step 3.
3. Create and assign the printer to a local port. If you are installing a new printer, the installation displays the Ports tab on the Printer Properties window. If a printer is installed already, open the Printer Properties window for the printer and click the Ports tab.
A. Create a new local port:
a. Click Add Port.
b. Select Local Port and click New Port.
c. Enter the path to the folder you created in Step 1 and add the file name: pages.zip. For example: D:\Temp\DriverOutput\pages.zip.
55
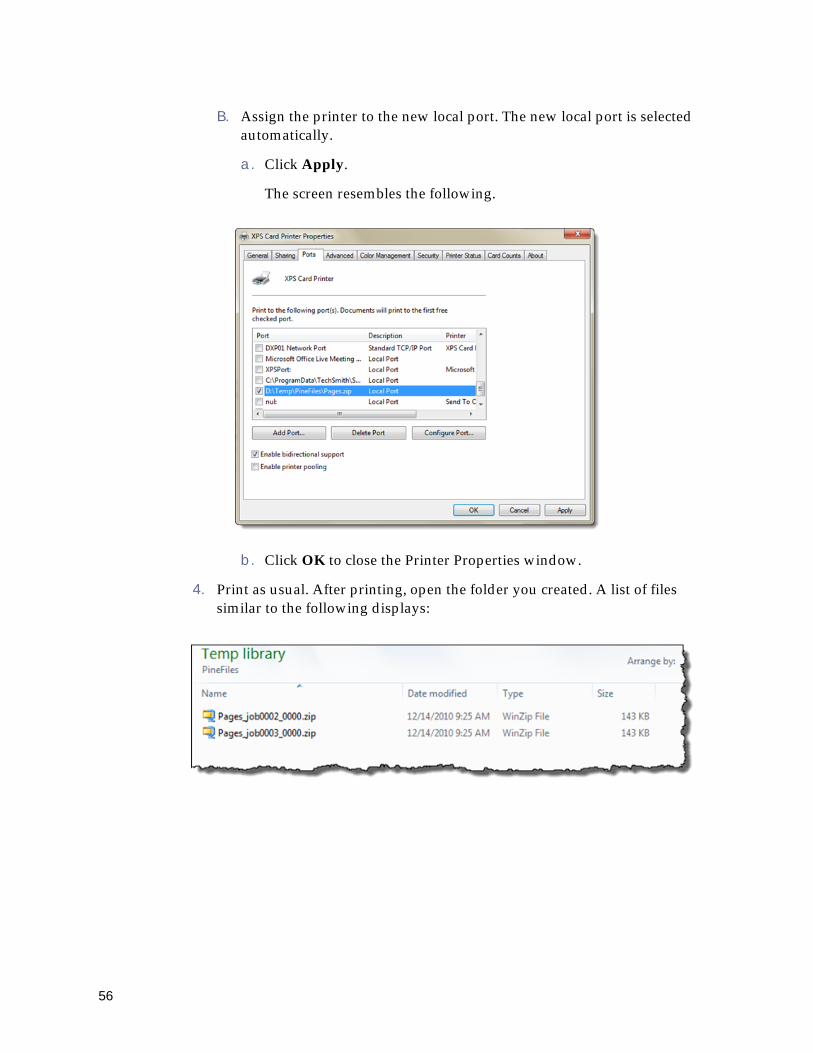
B. Assign the printer to the new local port. The new local port is selected automatically.
a. Click Apply.
The screen resembles the following.
b. Click OK to close the Printer Properties window.
4. Print as usual. After printing, open the folder you created. A list of files similar to the following displays:
56

5. Inspect the printer-ready image files. Unzip the job you want to inspect. A list of files similar to the following displays:
If you encoded magnetic stripe data, the list will include an additional XML file containing that data formatted for the printer.
57

Appendix C – Using the Java SDK Sample Code with Eclipse
The XPS Driver SDK Java samples work with either the 32- or 64-bit Java runtimes. Make sure a Java runtime is installed on your computer. From the command line, issue 'java -version':
C:\Users\fellmad>java -version
java version "1.6.0_23" Java(TM) SE Runtime Environment (build 1.6.0_23-b05) Java HotSpot(TM) Client VM (build 19.0-b09, mixed mode, sharing)
1. Extract the XPS Driver SDK zip file to a folder. For example: D:\java\xps_driver_sdk:
d:\java\xps_driver_sdk>dirDirectory of d:\java\xps_driver_sdk03/04/2011 03:55 PM <DIR> doc03/02/2011 01:46 PM 21 readme.txt03/04/2011 03:55 PM <DIR> samples03/04/2011 03:51 PM 1,990,963 XPS_Card_Printer_SDK.zip
2. Start Eclipse and create a new workspace.
58
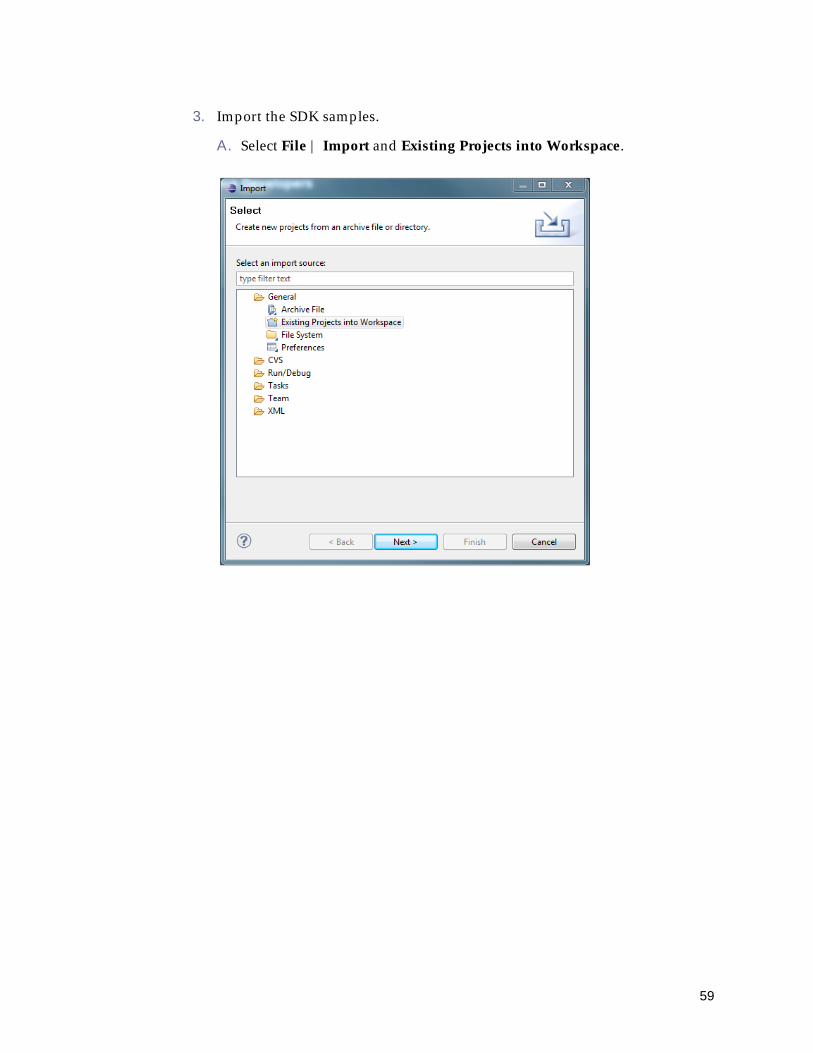
3. Import the SDK samples.
A. Select File | Import and Existing Projects into Workspace.
59
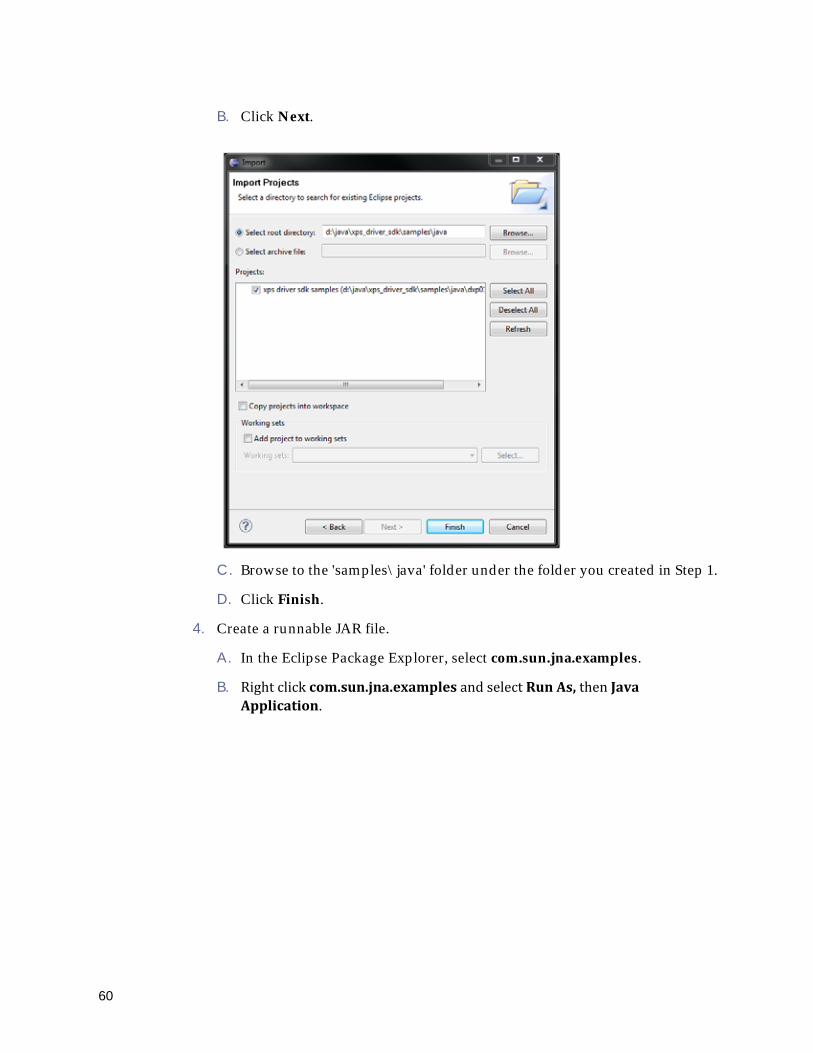
B. Click Next.
C. Browse to the 'samples\java' folder under the folder you created in Step 1.
D. Click Finish.
4. Create a runnable JAR file.
A. In the Eclipse Package Explorer, select com.sun.jna.examples.
B. Rightclickcom.sun.jna.examplesandselectRunAs,thenJavaApplication.
60

C. Create a runnable JAR file using File | Export and selecting Java- | Runnable JAR File:
61
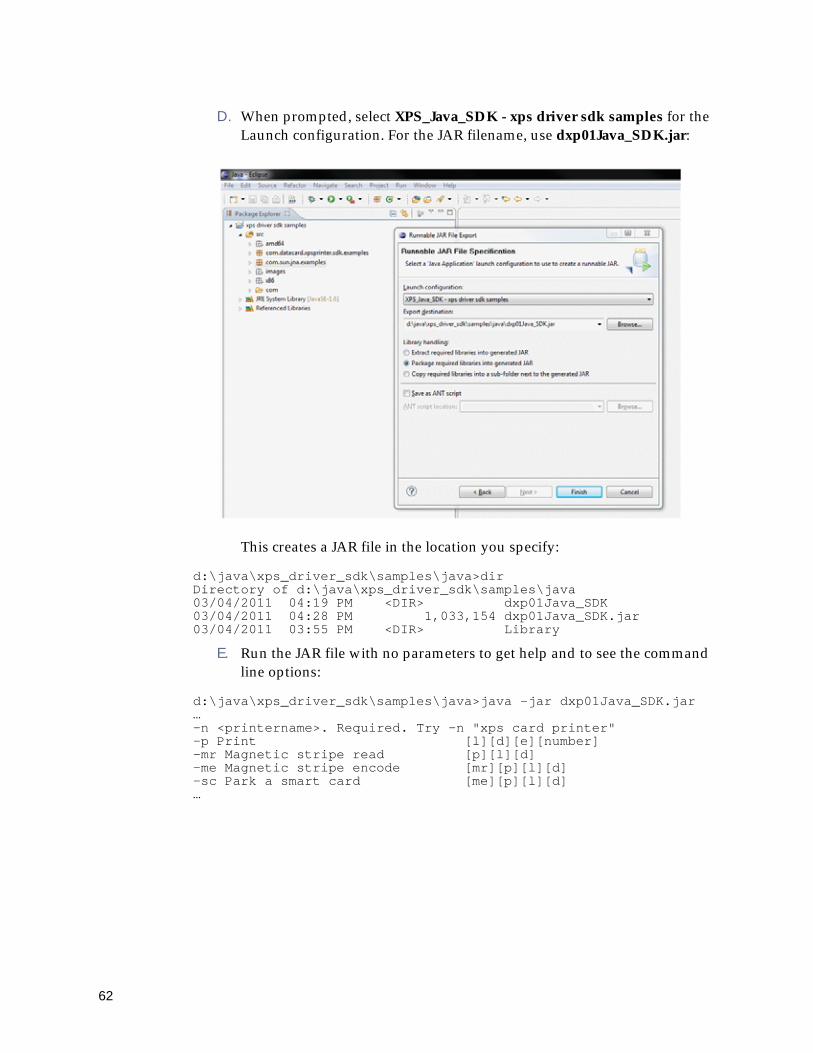
D. When prompted, select XPS_Java_SDK - xps driver sdk samples for the Launch configuration. For the JAR filename, use dxp01Java_SDK.jar:
This creates a JAR file in the location you specify:
d:\java\xps_driver_sdk\samples\java>dirDirectory of d:\java\xps_driver_sdk\samples\java03/04/2011 04:19 PM <DIR> dxp01Java_SDK03/04/2011 04:28 PM 1,033,154 dxp01Java_SDK.jar03/04/2011 03:55 PM <DIR> Library
E. Run the JAR file with no parameters to get help and to see the command line options:
d:\java\xps_driver_sdk\samples\java>java -jar dxp01Java_SDK.jar…-n <printername>. Required. Try -n "xps card printer"-p Print [l][d][e][number]-mr Magnetic stripe read [p][l][d]-me Magnetic stripe encode [mr][p][l][d]-sc Park a smart card [me][p][l][d]…
62

Appendix D – Suppressing the Driver Message Display
If you want your application to present printer and driver messages to the user and resolve errors directly, you can suppress the display of messages by the driver. This mode is known as “silent mode.”
Enabling Driver Silent Mode1. Silent mode is enabled when the following registry setting is present and the
data is set correctly. This registry key must be created manually.
2. The driver checks the DXP01SilentMode setting at startup. To guarantee that the setting takes effect, restart the computer after you create or modify the registry setting.
Key HKEY_LOCAL_MACHINE\SYSTEM\CurrentControlSet\Control\Print\Printers
Value Name DXP01SilentMode
Value Type REG_DWORD
Data 1 = enable, any other value disable
63

Silent Mode Operation Notes• Enabling silent mode causes suppression of pop-up messages for all instances
(printers) of the XPS Card Printer driver for all user accounts on the system.
• The SDK application can retrieve the error message anytime using dxp01sdk:PRINTER_MESSAGES. In addition, most of the SDK calls include printer errors as part of the status information returned to the application.
• The application can cancel jobs using the SDK, including canceling all jobs in the printer. When “cancel all jobs” is requested, the printer will cancel all of its jobs. The driver will also cancel all the driver jobs that are in an error state.
• When the error is a driver condition (a 500-level message), the application must resolve the error because the printer operator won't be aware of the issue (there is no printer error). The driver will not process the next job until the 500-level message is resolved. The application can either use “cancel all jobs” to cancel the job or it can issue job-specific cancel or resume commands to recover from the error.
The printer operator can cancel the job using the LCD panel. When this happens, an error is removed from the driver automatically. Make sure that the application accounts for this possibility.
64
Appendix E – ReferencesWith Microsoft .NET Framework, application developers have a rich set of printing and print system management APIs. At the core of this functionality is the XPS print path. The following link provides an XPS Windows printing overview:
http://msdn.microsoft.com/en-us/library/ms742418.aspx
A PrintTicket defines the settings of a print job. A PrintTicket object is an easy-to-work-with representation of a certain type of XML document called a PrintTicket document. The following link explains more about PrintTicket class:
http://msdn.microsoft.com/en-us/library/system.printing.printticket.aspx
Windows has improved bidirectional printer communication (BiDi communication), starting with Windows XP. This allows drivers and applications to make requests to, and get responses from, a printer device. The following link explains more about BiDi printer communication:
http://msdn.microsoft.com/en-us/library/dd183366(v=VS.85).aspx
The IBiDiSpl interface allows an application to send a BiDi request to the printer. The following link explains more about the IBiDiSpl Interface:
http://msdn.microsoft.com/en-us/library/dd144980(v=VS.85).aspx
65

66