data transfer sop – qa labs - image-hf transfer sop – qa labs ... after the attachment is opened...
TRANSCRIPT

Data Transfer SOP – QA Labs
1 of 16
Data Transfer SOP – QA Labs By: Ran Klein, University of Ottawa Heart Institute.
Creation Date: 2011-11-21 Last Updated: 2012-11-20
Intended Audience: These operating procedures are intended for participating imaging sites in the IMAGE-HF
project, including:
- Interpreting physicians
- Research coordinators
- Research support staff
Background: Standardization of image interpretation is a key feature of the IMAGE-HF project.
Standardization is conducted by QA labs of respective imaging modalities and indicators as
listed below. All participating sites are responsible for image interpretation and reporting. A
subset of images will be selected and sent to the corresponding QA lab for interpretation.
Feedback will be provided to the imaging site, to standardize image quality and interpretation.
For cases with discordant interpretations, consensus will be reached and documented.
The following table summarizes the IMAGE-HF QA lab sites and contact persons.
Study CRF Modality Indication QA Lab QA lab director
QA Contact
1A HF-15 PET, SPECT
Ischemia UOHI Rob Beanlands Ran Klein
HF-12 PET, SPECT
Viability UOHI Rob Beanlands Ran Klein
HF-15 CMRi Ischemia London James White Irene Pauchard
HF-13 CMRi Viability London James White Irene Pauchard
1B HF-18 Echo Non-ischemics UOHI Kwan Chan Ran Klein
HF-19 CMRi Non-ischemics Edmonton Ian Paterson Ian Paterson
1C HF-21 CTA Anatomy UOHI Ben Chow Ran Klein
HF-22 ICA Anatomy MHICC Philippe L’Allier Philippe L’Allier
The IMAGE-HF database will automatically flag patients to be used as QA when the modality
forms (i.e. HF 12, HF13, HF15, HF18, HF19, HF21, & HF22) are entered to the APA system (via
the web interface).

Data Transfer SOP – QA Labs
2 of 16
Procedure Overview: The following flow diagram summarizes the QA procedure step-by-step from top to bottom.
Detailed explanations follow.
Consensus
Review
Stage
Enrollment
Clinical
Interpretation
QA Data Transfer
QA Interpretation
QA Comparison
Review and
consensus
Feedback
Anonymized Image
Data
Anonymized clinical
form
Completed HF##
HF1 Site Coord.
DTF Site Coord.
HF## Site Coord.
HF##C QA MD
HF##QA QA MD
QA?
HF##QA QA MD
Meets report & quality standard and interpretation agreement?
Done
Statistics
Coordinator No
Yes
QA MD
Yes
No
TCON QA MD &
Site MD
Submit
HF##QA QA MD
Submit
HF##QA QA MD
Save
HF##QA QA MD
Imaging Site QA Site
Report to
Site QA Coord. &
Site Coord.
Legend
Italics – tasked person.

Data Transfer SOP – QA Labs
3 of 16
Retrieving QA Data Data Transfer Form: The DTF CRF will be used to track image data that has been transferred
from the imaging site to the QA lab using DICOM transfer or FTP. An email is sent to a
designated QA site representative from the APA system or administrator notifying that a DTF
has been submitted by the Imaging Site. The DTF contains information on transmission of key
QA data and how they were transmitted to the QA site. This data includes:
Anonymized image data
Anonymized clinical reports
The IMAGE-HF image interpretation CRF.
The DTF also contains contact information for the imaging site representative.
1) Click on the Inbox tab.
2) Select an HF_DTF subject message, as shown below.
3) Click on the form icon to view the DTF-CRF or the paperclip icon to view the attachments.
4) Clicking on the will display the DTF, as shown below:

Data Transfer SOP – QA Labs
4 of 16
! NOTE – The DTF is your reference for locating key data for image interpretation and imaging
site contact information.

Data Transfer SOP – QA Labs
5 of 16
5) Double clicking on the icon will view the attachment, as demonstrated below:
OPTIONAL: Saving attachments to file for your record a) After the attachment is opened from the DTF form, click on the Save button to save the
file to your computer.
b) Choose the location where you would like to save your file, and rename the file if necessary (e.g. form id –project – site – number) and click the Save button.
Data Transfer SOP – QA Labs
6 of 16
Retrieving Additional Data Refer to the DTF for details on how the images and supporting documentation (e.g. clinical
report forms) have been transferred to the QA site. The QA site core lab coordinator should be
contacted for site specific information.
In general, anonymized image data is transferred by secure FTP, but in the same institution
DICOM transfer may also be used. Clinical report forms may be attached to the DTF and
retrieved using APA as described above, but in some cases may also be faxed or transferred by
FTP (with the image data).
Complete IMAGEHF Core Image Interpretation CRF
Completion of e‐form via the forms portal (https://forms.ottawaheart.ca/jsp/login.jsp).
Each QA lab will be assigned a user account in order to complete the Image HF CRF
online.
Applies to respective core lab interpretation (HF-XXC) CRFs.
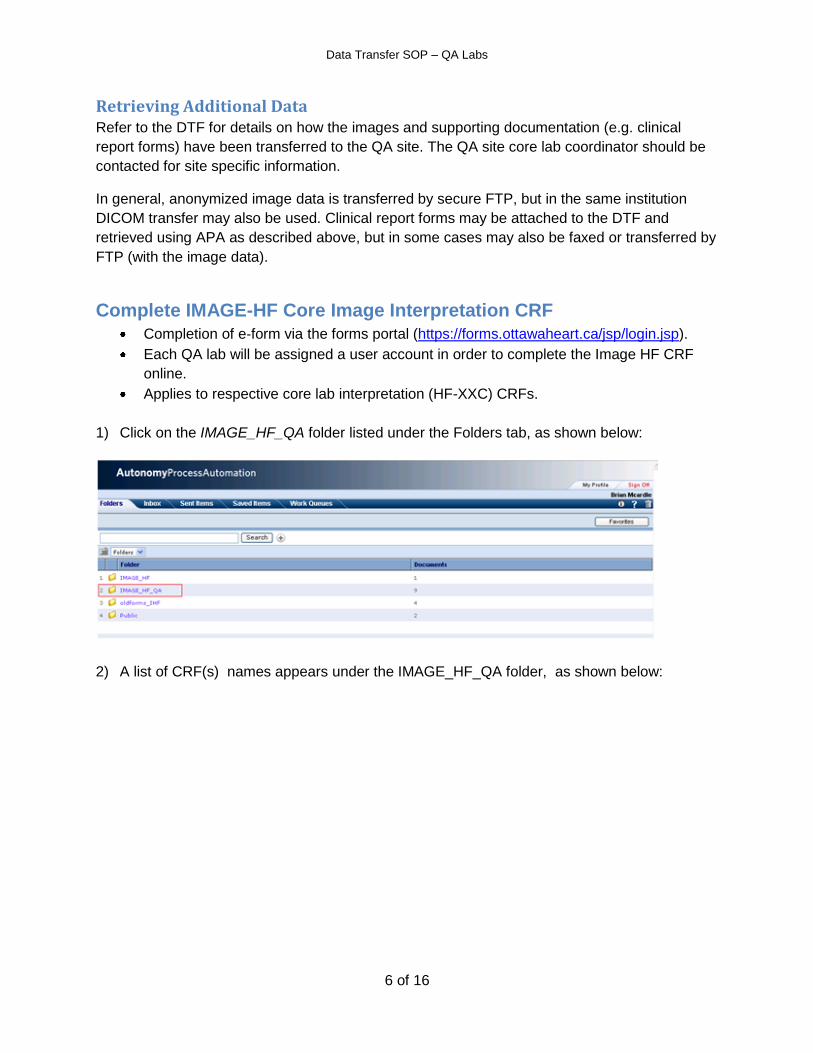
1) Click on the IMAGE_HF_QA folder listed under the Folders tab, as shown below:
2) A list of CRF(s) names appears under the IMAGE_HF_QA folder, as shown below:

Data Transfer SOP – QA Labs
7 of 16
Select the desired form, (e.g. HF15C_IA_Stress_Perfustion_report) by either clicking on the
icon or on the name of the file (HF15C_IA_Stress_Perfusion_Report). For detailed
information, please refer to the modality specific SOP (available at http://www.image-
hf.ca/imaging-technology-sops.htm)
Complete the corresponding IMAGE-HF QA CRF.
Complete IMAGE-HF Quality Assurance CRF
Completion of e‐form via the forms portal (https://forms.ottawaheart.ca/jsp/login.jsp).
Each QA lab will be assigned a user account in order to complete the Image HF CRF
online.
Applies to respective quality assurance (HF-XXQA) CRFs.
1) Select the appropriate HF QA form to complete for QA (e.g. HF15_QA_update).
2) Complete all fields of the QA form comparing the imaging site and QA lab interpretation
CRFs (e.g. HF15 and HF15C CRFs respectively), indicating N/A where data is not available.
Data Transfer SOP – QA Labs
8 of 16
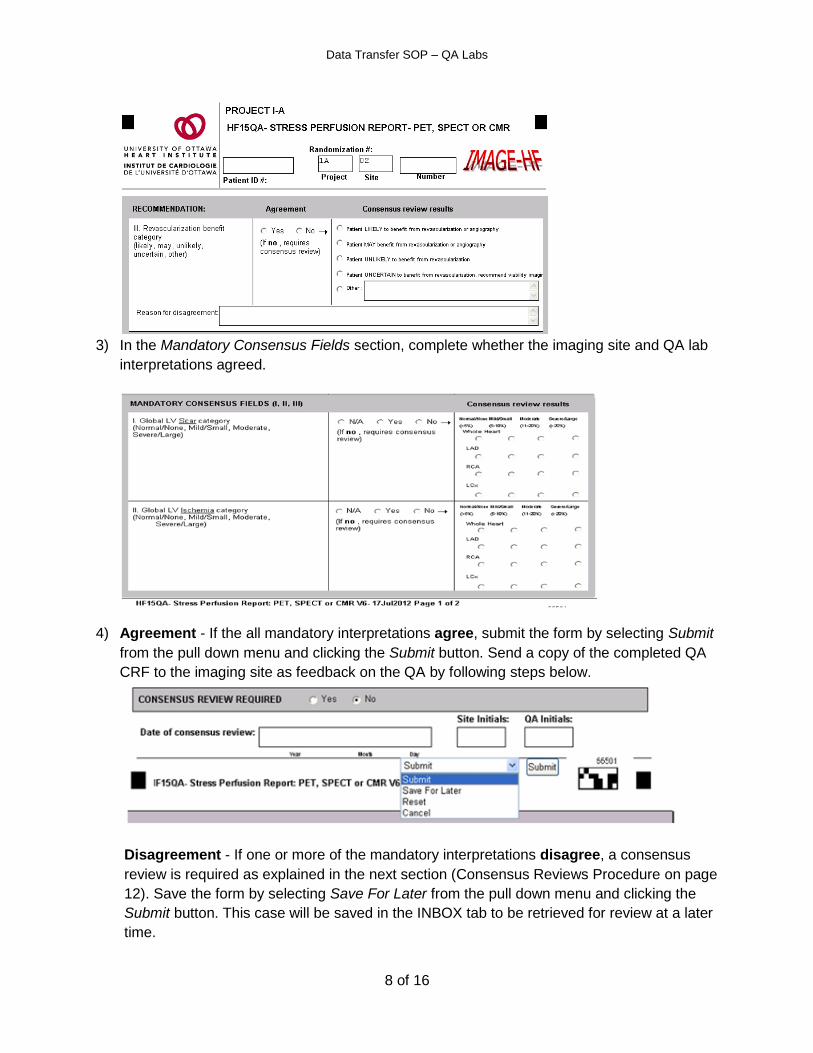
3) In the Mandatory Consensus Fields section, complete whether the imaging site and QA lab
interpretations agreed.
4) Agreement - If the all mandatory interpretations agree, submit the form by selecting Submit
from the pull down menu and clicking the Submit button. Send a copy of the completed QA
CRF to the imaging site as feedback on the QA by following steps below.
Disagreement - If one or more of the mandatory interpretations disagree, a consensus
review is required as explained in the next section (Consensus Reviews Procedure on page
12). Save the form by selecting Save For Later from the pull down menu and clicking the
Submit button. This case will be saved in the INBOX tab to be retrieved for review at a later
time.

Data Transfer SOP – QA Labs
9 of 16
5) After you click on the Submit option, another window (Routing for Form: HF15_QA) will
display, as shown below:
6) Under the “Send to” section, please click on the Routing Completed option, as shown below:
7) Under the Notes section, you can write some notes, as shown in the example below:

Data Transfer SOP – QA Labs
10 of 16
8) Under the Copy Final Document section, please click on the Search button to retrieve the
list of the site you are choosing to send a copy of the QA to:
9) A list of users or centres will be displayed as below:
10) Please choose the centre you wish to send a copy of the QA form to. For example, if site 1,
then choose IHF_QA_Centre1. Doing this will send a copy of the QA form to the Work
Queue tab of the user for site 1. IHF_QA_Centre1 is a folder which stores all the QA forms
in a separate tab called Work-Queue for each centre.

Data Transfer SOP – QA Labs
11 of 16
11) Here is an example of how to send a final copy of QA to site
Data Transfer SOP – QA Labs
12 of 16
Consensus Reviews Procedure In the event of a disagreement in the mandatory fields on the quality assurance CRF, a
consensus review is required. The QA site and imaging site must coordinate the consensus
review. Based on the particular needs of the modality a web conferencing (e.g. GoToMeeting,
WebEx) session may be used. Contact the respective core lab manager for technical support.
1) The QA lab reviewers and the imaging site will schedule a time to review the interpretation
and reach a consensus.
2) Retrieve the previously saved: HFXXQA, HFXX, and HFXXC CRFs as well as any other
relevant data (e.g. images, clinical reports, technical reports).
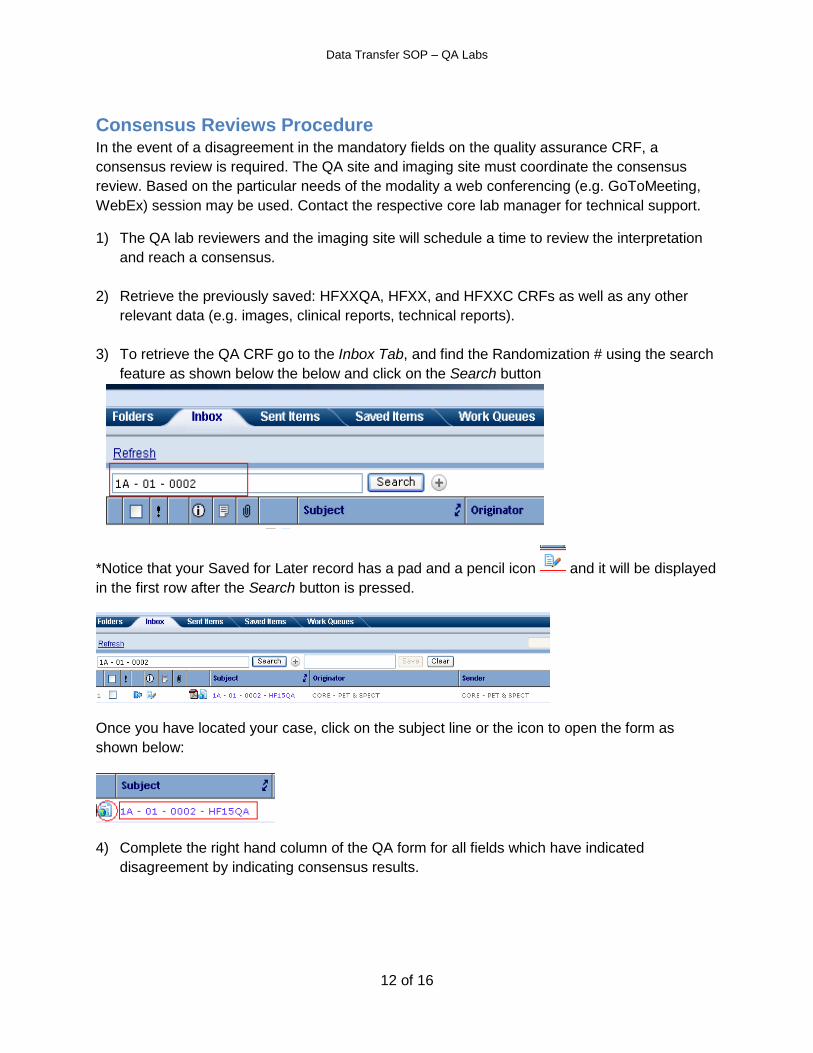
3) To retrieve the QA CRF go to the Inbox Tab, and find the Randomization # using the search
feature as shown below the below and click on the Search button
*Notice that your Saved for Later record has a pad and a pencil icon and it will be displayed
in the first row after the Search button is pressed.
Once you have located your case, click on the subject line or the icon to open the form as
shown below:
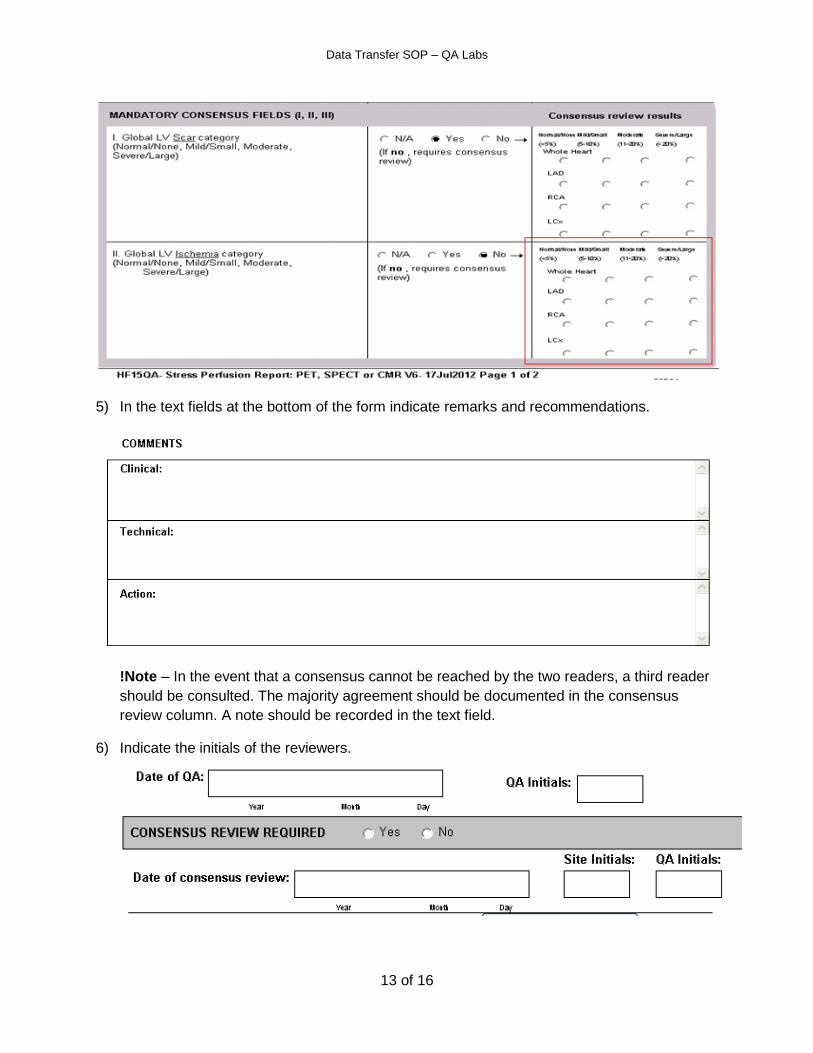
4) Complete the right hand column of the QA form for all fields which have indicated
disagreement by indicating consensus results.
Data Transfer SOP – QA Labs
13 of 16
5) In the text fields at the bottom of the form indicate remarks and recommendations.
!Note – In the event that a consensus cannot be reached by the two readers, a third reader
should be consulted. The majority agreement should be documented in the consensus
review column. A note should be recorded in the text field.
6) Indicate the initials of the reviewers.
Data Transfer SOP – QA Labs
14 of 16
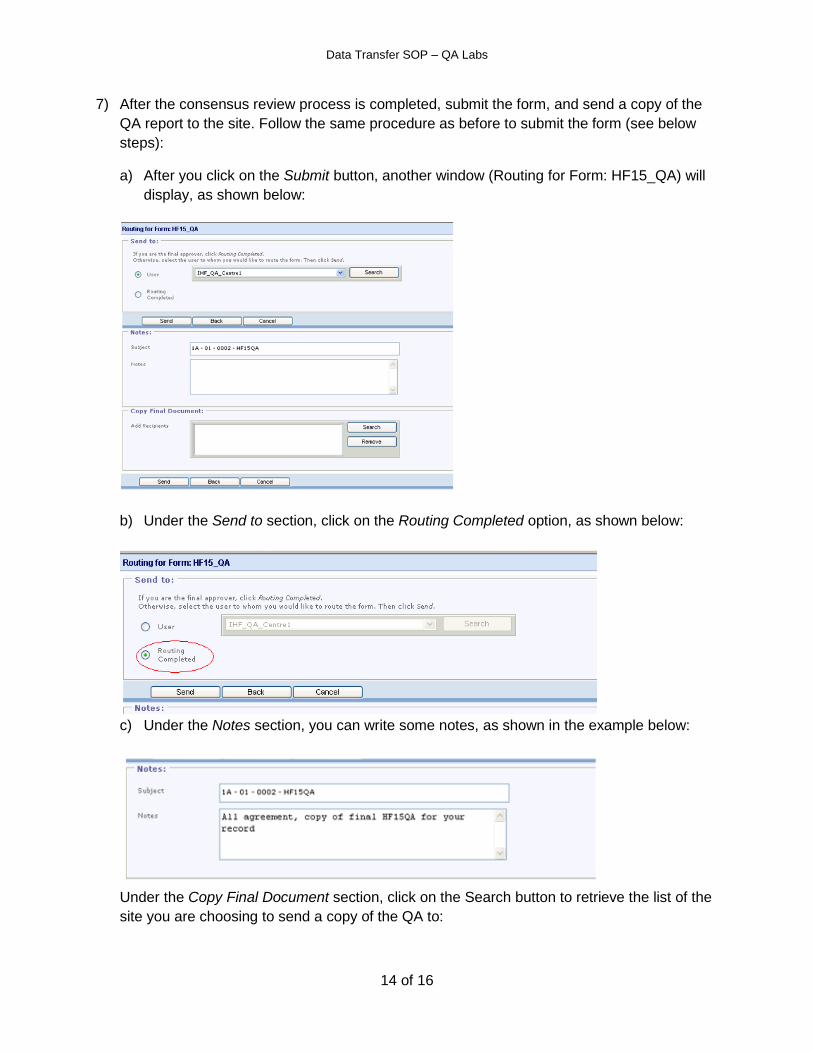
7) After the consensus review process is completed, submit the form, and send a copy of the
QA report to the site. Follow the same procedure as before to submit the form (see below
steps):
a) After you click on the Submit button, another window (Routing for Form: HF15_QA) will
display, as shown below:
b) Under the Send to section, click on the Routing Completed option, as shown below:
c) Under the Notes section, you can write some notes, as shown in the example below:
Under the Copy Final Document section, click on the Search button to retrieve the list of the
site you are choosing to send a copy of the QA to:

Data Transfer SOP – QA Labs
15 of 16
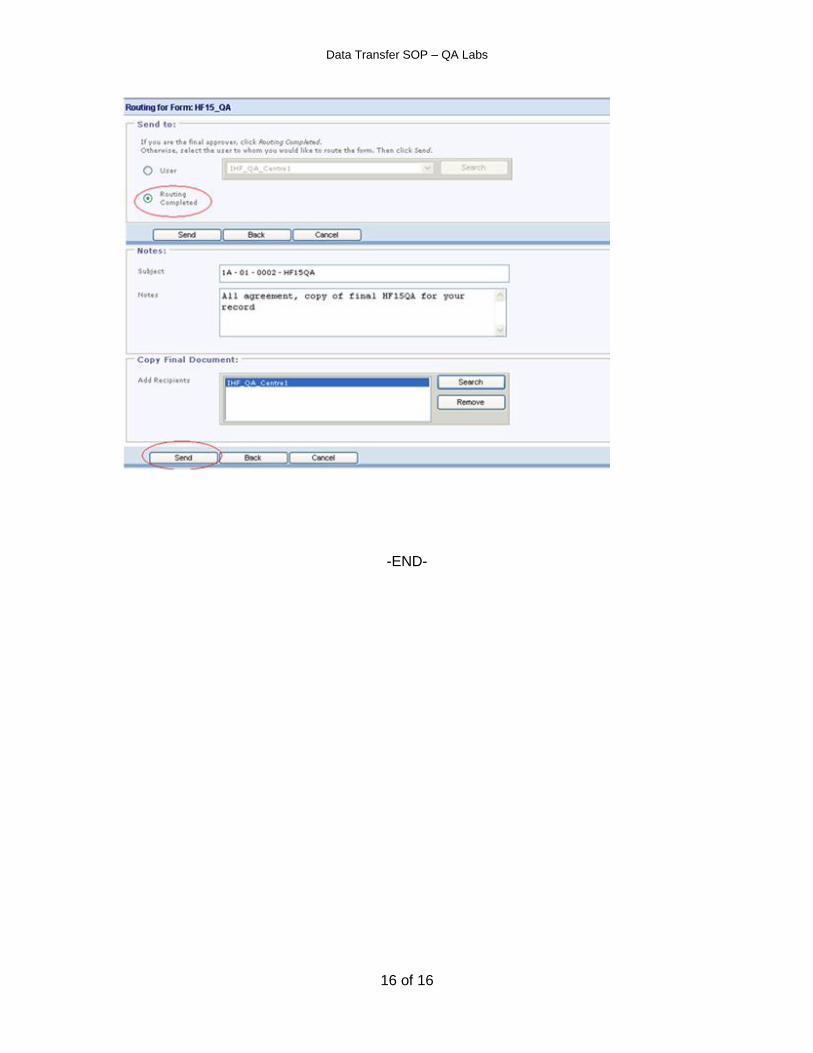
d) A list of users or centre will be displayed as below:
e) Choose the centre you wish to send a copy of the QA form to. For example, if site 1,
then choose IHF_QA_Centre1. Doing this will send a copy of the QA form to the Work
Queue tab of the user for site 1. IHF_QA_Centre1 is a folder which stores all the QA
forms in a separate tab called Work-Queue for each centre.
f) In summary, after you have submitted your form, in the Routing for Form: HF15QA
window, select Routing Completed button, add appropriate notes (if any), and click the
Send button (6), as shown below.
Data Transfer SOP – QA Labs
16 of 16
-END-