data innovation instructional implementation guide - …€¦ · web view · 2002-02-25data...
TRANSCRIPT

LABORATORYDATA INNOVATIONS INSTRUCTIONAL
IMPLEMENTATION GUIDE
VERSION 5.2
March 1997
Office of Employee EducationSalt Lake Education Center
Clin2 Customer ServicesLab ADPAC Training Advisory Council

Data Innovation
Lab Development Team
Office of Employee Education ii March 1997Vista National Training Program

Data Innovation
Table of Contents
Introduction----------------------------------------------------------------------------------------------4REQUIRED PACKAGES----------------------------------------------------------------------------------4SPECIAL INSTRUCTIONS FOR THE FIRST-TIME COMPUTER USER------------------------------4SPECIAL NOTATIONS-----------------------------------------------------------------------------------5ON-LINE HELP-------------------------------------------------------------------------------------------5
SITE PREPARATION-----------------------------------------------------------------------------------6PLACEMENT CONSIDERATIONS-----------------------------------------------------------------------6PORT CONFIGURATION---------------------------------------------------------------------------------7WIRING---------------------------------------------------------------------------------------------------7
INSTRUMENT MANAGER-VALIDATION--------------------------------------------------------8INSTRUMENT MANAGER HARDWARE----------------------------------------------------------------8
VISTA CONFIGURATION----------------------------------------------------------------------------9
ACCESSION FILE (#68)-------------------------------------------------------------------------------9HL7 PACKAGE-------------------------------------------------------------------------------------------9
DEVICE file (# 3.5)-----------------------------------------------------------------------------------9HL7 APPLICATION PARAMETER file (#771)--------------------------------------------------11HL7 NON DHCP APPLICATION PARAMETER file (#770)----------------------------------12LA7 MESSAGE PARAMETER CONFIGURATION (#62.48)----------------------------------13TOPOGRAPHY file (#61)--------------------------------------------------------------------------14URGENCY file (#62.05)----------------------------------------------------------------------------14AUTO INSTRUMENT file (#62.4)-----------------------------------------------------------------14Other Files-------------------------------------------------------------------------------------------15
INSTRUMENT MANAGER CONFIGURATION------------------------------------------------16INSTRUMENT MANAGER SYSTEM CONFIGURATION---------------------------------------------16CONFIGURATION FOR EACH ANALYZER-----------------------------------------------------------16CLUSTER DEFINITION---------------------------------------------------------------------------------18
ANALYZER CONFIGURATION--------------------------------------------------------------------19ANALYZER HOST COMMUNICATIONS TO INSTRUMENT MANAGER---------------------------19BARCODE LABELS-------------------------------------------------------------------------------------19
CONFIRMING DATA TRANSMISSION-----------------------------------------------------------20TEST DATA STREAM (UPLOAD RESULTS)---------------------------------------------------------20
Analyzer to Instrument Manager------------------------------------------------------------------20Interface Manager to VISTA------------------------------------------------------------------------20Troubleshooting-------------------------------------------------------------------------------------22
TEST DATA STREAM (DOWNLOAD ORDERS)------------------------------------------------------23Data-VISTA to Instrument Manager---------------------------------------------------------------23Instrument Manager to Analyzer------------------------------------------------------------------23Troubleshooting-------------------------------------------------------------------------------------23
Office of Employee Education iii March 1997Vista National Training Program

Data Innovation
TRAINING------------------------------------------------------------------------------------------------24
APPENDIX A: SAMPLE INSTRUMENT----------------------------------------------------------25CLINITEK 100------------------------------------------------------------------------------------------25
Load/Work List:-------------------------------------------------------------------------------------25Auto Instrument Setup:------------------------------------------------------------------------------25
BECKMAN CX SERIES---------------------------------------------------------------------------------26Load/Work List:-------------------------------------------------------------------------------------26Auto Instrument Setup:------------------------------------------------------------------------------26CX Host Communication Parameters:------------------------------------------------------------29
MODULUS DIFFERENTIAL COUNTER---------------------------------------------------------------30Load/Work List:-------------------------------------------------------------------------------------30Auto Instrument Setup:------------------------------------------------------------------------------30
COULTER STKS---------------------------------------------------------------------------------------32Load/Work List:-------------------------------------------------------------------------------------32Auto Instrument Setup:------------------------------------------------------------------------------32
URO-COMP FOR CLINITEK 200----------------------------------------------------------------------33Load/Work List:-------------------------------------------------------------------------------------33Auto Instrument Setup:------------------------------------------------------------------------------33
AXSYM---------------------------------------------------------------------------------------------------35Load/Work List:-------------------------------------------------------------------------------------35Auto Instrument Setup:-----------------------------------------------------------------------------35
Office of Employee Education iv March 1997Vista National Training Program

Data Innovation
Introduction
To complete this training, the following documentation is required:
Data Innovations Users Manual Laboratory Universal Interface Patch Documentation Laboratory Version 5.2, Planning and Implementation Guide
Required Packages
Laboratory Universal Interface Patches LA*5.2*17 and LR*5.2*65
Note The ACCESSION file (#68) must be edited immediately post patch installation and before any tests can be accessioned (refer to the VISTA Configuration Part A. ACCESSION file portion of this documentation).
For additional requirements, see specifications on page 13 of the Laboratory Universal Interface Patch Documentation.
Special Instructions for the First-Time Computer UserIf you are not very familiar with Veterans Health Information Systems and Technology Architecture (VISTA) software applications, we recommend that you study the DHCP User’s Guide to Computing. This orientation guide is a comprehensive handbook benefiting first time users of any VISTA application. The purpose of the introductory material is to help you become familiar with basic computer terms and the components of a computer. It is reproduced and distributed periodically by the Kernel Development Group. To request a copy, contact your local Information Resources Management (IRM) staff.
Office of Employee Education 5 March 1997Vista National Training Program

Data Innovation
Special Notations
In this manual, the user’s response is bolded. The bolded part of the entry is the letter or letters that must be typed so that the computer can identify the response. In most cases, you need only enter the first few letters. This increases speed and accuracy.
Every response you type in must be followed by pressing the Return key (or Enter key for some keyboards). Whenever the Return or Enter key should be pressed, you will see the symbol <RET>. This symbol is not shown but is implied if there is bolded input.
Within the examples representing actual terminal dialogues, editorial comments are enclosed in brackets and will not appear on the screen.
To stop what you are doing, enter an up-arrow (^). You may use the up-arrow at almost any prompt to terminate the line of questioning and return to the previous level in the routine. Continue entering up-arrows to completely exit the system.
On-line Help
On-line help is available at almost any prompt in the software. Entering a question mark (?) will provide information to help you answer the prompt. In some instances entering two or three question marks will provide even further information.
Office of Employee Education 6 March 1997Vista National Training Program

Data Innovation
Site Preparation
Placement Considerations
In determining where the Data Innovations Instrument Manager should be located, consideration should be given to the present and planned locations of Laboratory and Non-Laboratory Analyzers.
If all analyzers are located in one area, the Instrument Manager may be located within the same area.
If analyzers are, or will be located in separate distinct areas or facilities, the Instrument Manager should be located in an area that would facilitate connection with minimum routing of communication lines.
If network capabilities are available throughout the facilities, that is, Local Area Network (LAN) using LAT or TCP/IP Protocols, then the Instrument Manager can be located at any location with network access.
Office of Employee Education 7 March 1997Vista National Training Program

Data Innovation
Port Configuration
For port configuration information see Appendix A pages 95 through 98 of Laboratory Universal Interface Patch Documentation.
Test
If using RS-232 Serial connection, test the line by connecting a CRT and successfully send and receive data at the terminal.
Wiring
Modem wiring for Data Innovations Instrument Managers Dial-In Modem
Provide direct inward dial line (DID).
Wiring for Data Innovations Instrument Manager to analyzer(s)
Use Port Configuration if necessary.
- See Appendix A pages 95 through 98 of Laboratory Universal Interface Patch Documentation.
- If the analyzer is connected through a terminal server, supply IRMS with analyzer specific host communication settings: baud rate, data bits, stop bits, parity and protocol for each analyzer.
Test
If using RS-232 Serial connection, test line by connecting a CRT and successfully send/receive data at the terminal.
Office of Employee Education 8 March 1997Vista National Training Program

Data Innovation
Instrument Manager-Validation
Instrument Manager Hardware
1. Install PC, monitor, keyboard, and modem per installation instructions.
2. Power Up Instrument Manager.
3. Install Instrument Manager software if not purchased pre-installed per vendor instructions.
4. Notify Data Innovations of individual analyzer software drivers required and provide the following information.
Analyzer Name Analyzer software version Communication protocol Unidirectional Bidirectional Cluster
Office of Employee Education 9 March 1997Vista National Training Program

Data Innovation
VISTA Configuration
ACCESSION file (#68)
Using FileMan edit the ACCESSION file according to instructions in the Lab Universal Interface Patch Documentation (page 28).
Notes
Field #.091, Numeric Identifier, has been changed to Field #.4.
The Numeric Identifier field is a 1-2 alpha-numeric character(s) using the combination of numbers 1-9 and/or uppercase letters A-Z. If using the UID and an analyzer requires a numeric UID, then use number(s) 1-99.
HL7 Package
When Version 1.6 of the HL7 package is installed, use HL7 V 1.5 options in configuring package parameters related to the Universal Interface.
You must configure the following files:
DEVICE file (# 3.5)
1. Define entry-NULL DEVICE
The VISTA HL7 package requires the entry of a NULL DEVICE.
The NULL DEVICE must be defined if not already defined.
For DSM Sites, Suggested Setup:
Field Entry
NAME: NULL DEVICE$I: _NLA0:VOLUME SET(CPU): ROUSIGN-ON/SYSTEM DEVICE: NOLOCATION OF TERMINAL: COMPUTER ROOMSUBTYPE: P-OTHER [or any generic terminal
type]TYPE: TERMINAL
Office of Employee Education 10 March 1997Vista National Training Program

Data Innovation
For MSM sites running additional HL7 interfaces, more than one Null device must be defined. Refer to pages 19 through 22 of the Laboratory Universal Interface Patch Documentation for specifics.
2. Define the device used by the VISTA HL7 package to communicate with the Instrument Manager.
Suggested Setup:
Field Entry
NAME: LABDATA-IM$I: [Set to appropriate value per
operating system]ASK DEVICE: NOASK PARAMETERS: NOSIGN ON/SYSTEM DEVICE: NOLOCATION OF TERMINAL: [Location of IM]SUPPRESS FORM FEED AT CLOSE:
YES
SUBTYPE: P-OTHER [or any generic terminal type, e.g., No codes in Open/Close Execute fields or other fields allowing control codes.]
TYPE: TERMINAL
Suggested Setup for Alpha VMS/DSM Systems:
Field Entry
LAT SERVER NODE: [Terminal Server Name]LAT SERVER PORT: [Terminal Server Port Address]VMS DEVICE TYPE: LAB INSTRUMENTLAT PORT SPEED: [Baud rate of this port]
Office of Employee Education 11 March 1997Vista National Training Program

Data Innovation
HL7 APPLICATION PARAMETER file (#771)
LA*5.2*17 patch post init should create the entry LA AUTO INST as follows:
Field Entry
NAME: LA AUTO INSTACTIVE/INACTIVE: ACTIVEHL7 ENCODING CHARACTERS:
~^\&
HL7 FIELD SEPARATOR: |HL7 MESSAGE: ORUPROCESSING ROUTINE: ORU^LA7HL7HL7 MESSAGE: ORMPROCESSING ROUTINE: NONEHL7 SEGMENT: OBRFIELDS USED IN THIS SEGEMENT:
4,7,8,9,14,22
HL7 SEGMENT: OBXFIELDS USED IN THIS SEGEMENT:
2,3,4,5,6,7,8
HL7 SEGMENT: MSH[FIELDS USED IN THIS SEGEMENT: 1,2,3,4,5,6,7,8,9,10,11,12]
HL7 SEGMENT: PIDFIELDS USED IN THIS SEGEMENT:
3,5,7,8,19
HL7 SEGMENT: ORCFIELDS USED IN THIS SEGEMENT:
1,2,3
HL7 SEGMENT: NTEFIELDS USED IN THIS SEGEMENT:
3
Note An entry must also be created or exist in File # 771 for LAB INTERFACE:
Field Entry
NAME: LAB INTERFACEACTIVE/INACTIVE: ACTIVEFACILITY NAME: Instrument Manager
Office of Employee Education 12 March 1997Vista National Training Program

Data Innovation
HL7 NON DHCP APPLICATION PARAMETER file (#770)
Set up Lab Interface using the HL7 Main Menu
Version 1.5 Option Non- VISTA Application Parameter Enter/Edit
Suggested field entries:
Field Entry
NAME: LAB INTERFACEVISTA STATION NUMBER: [Site’s VA station number]NON- VISTA FACILITY NAME:
Instrument Manager
MAXIMUM BLOCK SIZE: 245NUMBER OF RETRIES: 3HL7 DEVICE: [Name of device specified in DEVICE
file (#3.5) to which the Instrument Manager is connected for VISTA connection.]
HL7 VERSION NUMBER: [Version of HL7 Specification used by Data Innovations. At this writing it is V. 2.2]
VISTA APPLICATION: LA AUTO INSTLOWER LEVEL PROTOCOL TIMEOUT:
5
RELATED FILE 771 ENTRY:
LAB INTERFACE
HL7 PROCESING ID: PRODUCTIONSTART/STOP TRANSMISSION LOG:
STOP LOG
Office of Employee Education 13 March 1997Vista National Training Program

Data Innovation
LA7 MESSAGE PARAMETER CONFIGURATION (#62.48)
The following entries are required for this file:
Field Entry
CONFIGURATION: UNIVERSAL INTERFACEPROTOCOL: HEALTH LEVEL SEVENSTATUS: ACTIVEDEBUG LOG: ON [Turning this on logs errors]HL7 NON- VISTA APPLICATION:
LAB INTERFACE
PROCESS IN: D QUE^LA7UIINPROCESS DOWNLOAD: D EN^LA7UID1REMOTE SYSTEM ID: [This is a free text field and should
contain the following entries in order.
.01 field of file #770, #3 field of file #770, field #8 of file # 770 and field #2 of file # 770.Do not insert spaces between field entries. This entry is case sensitive.ExampleLAB INTERFACEInstrument ManagerLA AUTO INST695]
Office of Employee Education 14 March 1997Vista National Training Program

Data Innovation
TOPOGRAPHY file (#61)
Map those entries that are used by your site to define test specimens to the appropriate HL7 specimen type.
Refer to page 29 of the Lab Universal Interface Patch Documentation.
URGENCY file (#62.05)
Map VISTA Lab urgency to the HL7 urgency. These entries are used when downloading to analyzer and analyzer accepts multiple urgencies. It is unnecessary to map workload urgencies.
AUTO INSTRUMENT file (#62.4)
Create an entry for each instrument connected through the Instrument Manager.
Entries in the Auto Instrument file must be created as specified in the Laboratory Planning and Implementation Guide. The following are unique requirements for entries using the universal interface.
Field Description/Entry
NUMBER Select an entry that is <100 and does not conflict with any Laboratory System Interface (LSI) entries
NAME: This name should be 1-8 alpha numeric characters, unique and match exactly the corresponding entry in the Instrument Manager.
PROGRAM: This field is not used by the universal interface.
LOAD/WORK LIST Name of load/work list associated with this instrument
ENTRY for LAGEN ROUTINE
IDE
CROSS LINKED BY Accession cross-referenceMESSAGE CONFIGURATION:
UNIVERSAL INTERFACE
Office of Employee Education 15 March 1997Vista National Training Program

Data Innovation
Field Description/Entry
CHEM TEST (Multiples)PARAM 1: This is an old field with a new use. Any
M code written into this field will be executed on a given test result that is contained in the variable LA7VAL. **Any prior code in this field will need to be removed. If additional coding is required, refer to page 47 of the Laboratory Universal Interface Patch Documentation
PARAM 2 & 3: These fields are not used by the universal interface.
UI TEST CODE: Refer to analyzer vendor documentation for specific codes required.
NUMBER OF DECIMAL PLACES:
Site preference
CONVERT RESULT TO REMARK:
Site preference
ACCEPT RESULTS FOR THIS TEST:
Site preference
DOWNLOAD TO INSTRUMENT:
Site preference
IGNORE RESULTS NOT ORDERED:
Site preference
REMOVE SPACES FROM RESULT:
Site preference
DOWNLOAD ENTRY & DOWNLOAD PROTOCOL:
These fields are not used by the universal interface.
FILE BUILD ENTRY: ENFILE BUILD ROUTINE: LA7UID
AUTO DOWNLOAD: Set to YES if analyzer is run in Bidirectional mode in order to send orders automatically to the analyzer
Other Files
Additional entries must be created in Files #'s 3.5, 770, 771, 62.48, and 62.4, for each Instrument Manager in use. (Suggested naming: LAB
Office of Employee Education 16 March 1997Vista National Training Program

Data Innovation
INTERFACE2, LAB INTERFACE3, etc., UNIVERSAL INTERFACE2, UNIVERSAL INTERFACE3, as applicable.)
Office of Employee Education 17 March 1997Vista National Training Program

Data Innovation
Instrument Manager Configuration
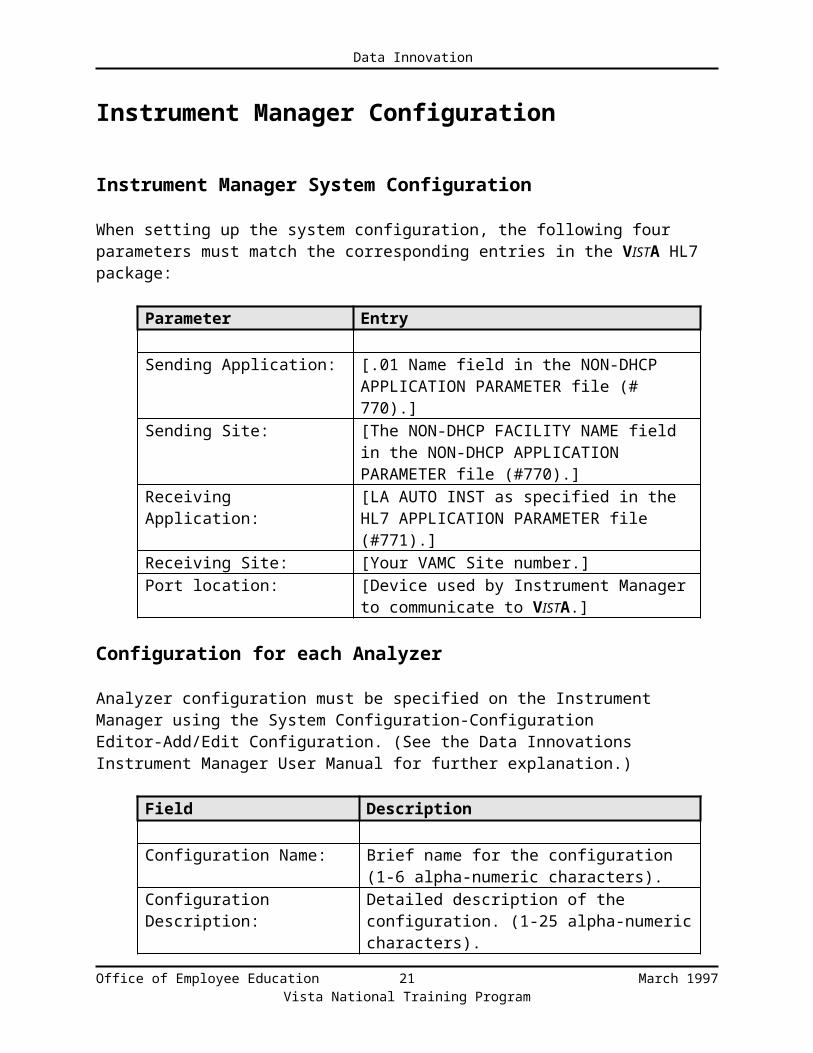
Instrument Manager System Configuration
When setting up the system configuration, the following four parameters must match the corresponding entries in the VISTA HL7 package:
Parameter Entry
Sending Application: [.01 Name field in the NON-DHCP APPLICATION PARAMETER file (# 770).]
Sending Site: [The NON-DHCP FACILITY NAME field in the NON-DHCP APPLICATION PARAMETER file (#770).]
Receiving Application: [LA AUTO INST as specified in the HL7 APPLICATION PARAMETER file (#771).]
Receiving Site: [Your VAMC Site number.]Port location: [Device used by Instrument Manager to
communicate to VISTA.]
Configuration for each Analyzer
Analyzer configuration must be specified on the Instrument Manager using the System Configuration-Configuration Editor-Add/Edit Configuration. (See the Data Innovations Instrument Manager User Manual for further explanation.)
Field Description
Configuration Name: Brief name for the configuration (1-6 alpha-numeric characters).
Configuration Description:
Detailed description of the configuration. (1-25 alpha-numeric characters).
Driver type: Choose the appropriate driver for the instrument you are interfacing. All available drivers will be listed for selection.
Test Mapping performed (if necessary). If you use the test code transmitted by the instrument as the UI test code in the DHCP Auto Instrument file (#62.4), no test code mapping will be required.
Office of Employee Education 18 March 1997Vista National Training Program

Data Innovation
Test code mapping is unique to each instrument. If further information is required, refer to the Data Innovations Instrument Manager User Manual.
Configurations may be copied and assigned to multiple identical instruments. (See the Data Innovations Instrument Manager User Manual for further information.)
Port connection for each analyzer is defined on the Instrument Manager using the System Configuration Menu option/Connection Assignment. (See the Data Innovations Instrument Manager User Manual for further explanation.)
Field Description
Connection Name: A unique one to eight character name must be entered which has a corresponding identical entry in the DHCP AUTO INSTRUMENT file (#62.4).
Configuration Name: Choose entry created using configuration editor
Device: This field is similar to the VISTA Device file, in that a device name is associated with a physical device and the system address to access that device. Refer to Data Innovations Instrument Manager User Manual for specifications.
Days of data to keep: This field is selected by the site. This field determines the number of days in which the orders and results are kept on the Instrument Manager for the specified analyzer. Orders will be purged after the specified number of days and will be unavailable for host query purposes. Increase this parameter when testing is not performed within the number of days specified.
Destination Line(s): This field is generally left blank. It is only used when running multiple applications (lab and non-lab).
Auto Start on System Start:
This field determines if the instrument interface should be started automatically when the Instrument Manager system is started.
Office of Employee Education 19 March 1997Vista National Training Program

Data Innovation
Cluster Definition
Groups of similar instruments may be "clustered" together. Clustering allows a specimen to be run and reported on any of the analyzers included in the cluster without specifying a particular analyzer. The individual analyzers must have unique entries, and an additional "cluster" entry that contains all tests to be analyzed in the VISTA Auto Instrument file (#62.4). Orders are downloaded using the "cluster" entry and results are returned to the individual analyzer entry that performed the test All individual analyzers must be defined in the Instrument Manager as specified above. The Cluster is then created using the System Configuration/Connection Assignment/Cluster Definition option on the Data Innovations Instrument Manager. See the Data Innovations Instrument Manager User Manual for further explanation.
When changes are made to any configuration, save the changes to an appropriately labeled floppy disk as per instructions in the Data Innovations Instrument Manager User Manual.
Office of Employee Education 20 March 1997Vista National Training Program
Data Innovation
Analyzer Configuration
Each analyzer must be defined in the AUTO INSTRUMENT file (#62.4)
Refer to technical notes in the Lab Universal Interface Patch Documentation pages 47 through 51 for more detailed information.
Analyzer Host Communications to Instrument Manager
Refer to specific analyzer documentation for the required host communication setups.
Barcode Labels
If barcode labels are utilized for instrument interfacing, the following steps are necessary:
1. Printer should be installed and functioning.
2. Barcode capable label routine should be installed and printing barcodes.
3. Barcodes should be set to YES using field #5 Barcode Print of the ACCESSION file (#68) for each accession area that has an analyzer utilizing barcodes.
4. Barcode type should be identified as SHORT (accession number) or LONG (UID) in the Type Of Accession Number field (#092) of the ACCESSION file (#68).
Each analyzer utilizing barcodes should have barcode capabilities enabled. Barcodes should be functional before interfacing is attempted.
Office of Employee Education 21 March 1997Vista National Training Program

Data Innovation
Confirming Data Transmission
Test Data Stream (Upload Results)
1. Turn on the Instrument Manager system 2. Start the individual interface to the analyzer to be tested as per the
Data Innovations Instrument Manager User Manual instructions.
Note Upload testing should always be successfully performed prior to download testing.
Analyzer to Instrument Manager
1. Transmit results from analyzer to Instrument Manager.
Note This may be accomplished by either running a specimen on the analyzer or retransmitting a prior unverified result.
2. Watch Instrument Manager System Status screen for incrementing IN Status for the analyzer.
Interface Manager to VISTA
1. Turn on Transmission Log via HL7 Menu Option
Note The log will be stored in global TMP("HL",hl7 device name for Instrument Manager,date/time,"SEND" or "REC." The SEND node is what VISTA is sending to the Instrument Manager. The REC node is what VISTA is receiving from the Instrument Manager.
Caution Remember to turn off transmission log after communication is successfully established. If transmission log is left on then site incurs danger of disk containing TMP global becoming full. Use above option to purge log, user must be on same system which contains TMP global used to log transmissions.
Office of Employee Education 22 March 1997Vista National Training Program

Data Innovation
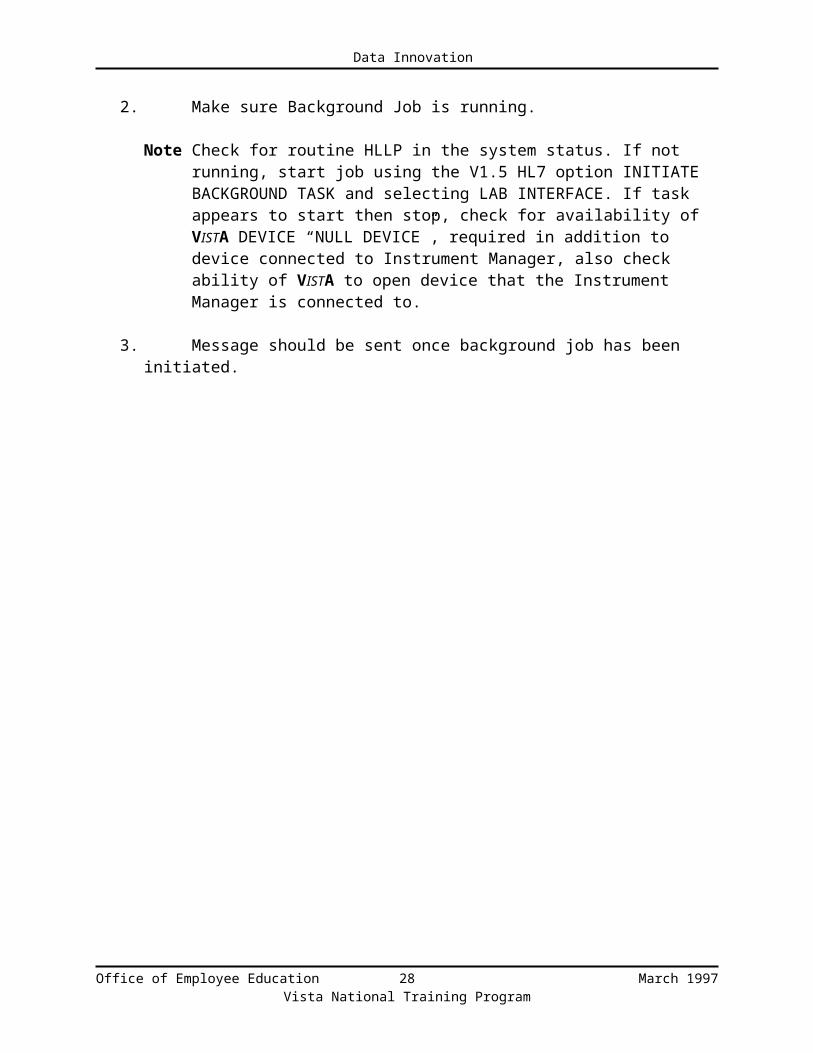
2. Make sure Background Job is running.
Note Check for routine HLLP in the system status. If not running, start job using the V1.5 HL7 option INITIATE BACKGROUND TASK and selecting LAB INTERFACE. If task appears to start then stop, check for availability of VISTA DEVICE “NULL DEVICE”, required in addition to device connected to Instrument Manager, also check ability of VISTA to open device that the Instrument Manager is connected to.
3. Message should be sent once background job has been initiated.
Office of Employee Education 23 March 1997Vista National Training Program

Data Innovation
Troubleshooting
Successful receipt of message by VISTA HL7 package can be confirmed by viewing the TMP("HL",...global. If a message is rejected by the HL7 package due to transmission problems, the VISTA HL7 package will send an N21 message that indicates a checksum problem with the message.
This usually indicates a possible line noise problem. Recheck line connections.
If the message is successfully received by the VISTA HL7 package it will then pass the message off to the Laboratory package. The Laboratory package will process the message and create an MSA message segment. This will show in the transmission log in the SEND node. The MSA segment will have the following:
AA - Application Accept AR - Application Reject
If AA, then the laboratory package will process the message. Any problems detected in processing the message will be logged in the "debug log" if the site has set “DEBUG LOG” on in File #62.48, LA7 MESSAGE CONFIGURATION. This log is viewed using the LA7 PRINT LAB UI ERROR LOG option.
If AR, then the laboratory package could not find the entry in File #62.48 that will process this message. Review the field "REMOTE ID" for entry "UNIVERSAL INTERFACE" and for correct spelling. Corresponding entries in Files #770, #771 and on Instrument Manager for sending application/facility and receiving application/facility need to be uniform.
If you see that the message is not transmitting, review file setups and check for presence of routines on all the systems. If routines are mapped, check to see if appropriate changes have been made for mapping. Review entries in the Instrument Manager.
Office of Employee Education 24 March 1997Vista National Training Program

Data Innovation
Test Data Stream (Download Orders)
1. Accession test specimen or utilize specimen that has been accessioned but not yet assigned to a load/work list.
2. For testing of bidirectional load/work list download, build a load/work list for the analyzer to be tested.
All processes for testing upload should remain active.
Data-VISTA to Instrument Manager
1. For auto download, a message should be created upon accessioning.
2. Download load/work list for testing of bidirectional load/work list download.
Instrument Manager to Analyzer
Messages should be sent from the Instrument Manager to the analyzer including tests to be run on the specimen and may include specimen ID and location on the analyzer if applicable. If unsuccessful, the analyzers host computer will flag an error and reject the request.
Troubleshooting
Watch TMP("HL"...global for messages. If messages are not created, utilize the LA7 PRINT LAB UI ERROR LOG option to review errors as listed above. Review the lab files for correct and complete entries Watch for spelling. If mapping was performed on the Instrument Manager, review for correct and complete entries and spelling. If the message is not transmitting, review file setups and checks for presence of routines on all the systems. If routines are mapped, check to see if appropriate changes have been made for mapping.
If checking data from the Instrument Manager to the Analyzer, check Host Configuration Parameters on your analyzer.
For more information regarding HL7 messages, refer to the Laboratory Universal Interface Patch Documentation pages 65 through 83.
Office of Employee Education 25 March 1997Vista National Training Program

Data Innovation
Training
Most of the changes present will be transparent to the lab user. Individuals that are responsible for set up, training and workflow should be informed of any new capabilities. Be aware that the operation of the analyzers may change, especially when moving from a unidirectional to a bidirectional mode.
If the Instrument Manager is located in the laboratory, users may be trained in the following operations of the Instrument Manager:
Starting/Stopping of individual interfaces.
Monitoring System Status screen on the Instrument Manager for changes in the IN and SEND queues that would indicate transmission and receipt of messages.
IRMS should be aware that the interface should be re-started after any system downtime. IRM can task multiple background jobs. Only one job will run at a time. If the background job should stop or the system rebooted, then TaskMan will automatically start one of the waiting tasks.
The Laboratory Information Manager (LIM) should be assigned the LA7 MAIN MENU (Lab Universal Interface menu).
It is recommended that the error log be reviewed once a day (on screen or printed) using the option LA7 PRINT LAB UI ERROR LOG.
Office of Employee Education 26 March 1997Vista National Training Program

Data Innovation
Appendix A: Sample Instrument
Clinitek 100
Load/Work List:
NAME: CLINITEK-100 LOAD TRANSFORM: UNIVERSAL TYPE: TRAY,CUP CUPS PER TRAY: 10 FULL TRAY'S ONLY: NO EXPAND PANELS ON PRINT: NO VERIFY BY: ACCESSION SUPPRESS SEQUENCE #: NO INCLUDE UNCOLLECTED ACCESSIONS: NO ADDITIONAL LAB TESTS: Instrument Set Up - UrinalysisPROFILE: URINALYSIS ACCESSION AREA: URINALYSISTEST: URINALYSIS BUILD NAME ONLY: NOTEST: T.REACTION,URINE BUILD NAME ONLY: NOTEST: URINE MICROSCOPIC BUILD NAME ONLY: NOTRAY #: 1CUP or SEQUENCE #: 1 CONTROL: CLINITEK QC LEVEL 1CUP or SEQUENCE #: 2 CONTROL: CLINITEK QC LEVEL 2 WKLD METHOD: CLINITEK 100 WKLD CODE METHOD NAME: CLINITEK 100 WKLD CODE SUFFIX: .4339 MAJOR ACCESSION AREA: URINALYSIS
Auto Instrument Setup:
NUMBER: 18 NAME: CL100-IM LOAD/WORK LIST: CLINITEK-100 ENTRY for LAGEN ROUTINE: Accession cross-reference CROSS LINKED BY: ID MESSAGE CONFIGURATION: UNIVERSAL INTERFACE METHOD: CLT100 DEFAULT ACCESSION AREA: URINALYSIS OVERLAY DATA: YESNUMBER: 1 TEST: URINE COLOR UI TEST CODE: URINE COLOR ROUTINE STORAGE:TV(683,1) CONVERT RESULT TO REMARK: NONUMBER: 2 TEST: URINE CLARITY UI TEST CODE: URINE CLARITY ROUTINE STORAGE:TV(162,1) CONVERT RESULT TO REMARK: NONUMBER: 3 TEST: SPECIFIC GRAVITY (URINES) UI TEST CODE: SPECIFIC GRAVITY (URINES) ROUTINE STORAGE: TV(685,1) NUMBER OF DECIMAL PLACES: 3NUMBER: 4 TEST: URINE PH UI TEST CODE: URINE PH ROUTINE STORAGE: TV(692,1) NUMBER OF DECIMAL PLACES: 1NUMBER: 7 TEST: URINE KETONES PARAM 1: S LA7VAL=$S(LA7VAL="Negative":"Negative",1:$P("TRACE;SMALL;MOD;LARGE",";",LA7VAL+1)) UI TEST CODE: URINE KETONES ROUTINE STORAGE: TV(689,1) CONVERT RESULT TO REMARK: NO WKLD METHOD: CLINITEK 100 WKLD CODE METHOD NAME:CLINITEK 100
Office of Employee Education 27 March 1997Vista National Training Program
Data Innovation
WKLD CODE SUFFIX: .4339
Office of Employee Education 28 March 1997Vista National Training Program

Data Innovation
Beckman CX Series
Load/Work List:
NAME: CX7M TYPE: SEQUENCE/BATCH CUPS PER TRAY: 0 FULL TRAY'S ONLY: NO EXPAND PANELS ON PRINT: NO VERIFY BY: ACCESSION SUPPRESS SEQUENCE #: YES INCLUDE UNCOLLECTEDACCESSIONS: NO SHORT TEST LIST: YESPROFILE: CX7 ACCESSION AREA: CHEMISTRYTEST: GLUCOSE (PLASMA/SERUM) BUILD NAME ONLY: NOTEST: UREA NITROGEN BUILD NAME ONLY: NOTEST: CREATININE BUILD NAME ONLY: NOTEST: CHEM 7 BUILD NAME ONLY: YESTEST: CHEM 3 BUILD NAME ONLY: YESTEST: ELECTROLYTES BUILD NAME ONLY: YESTEST: CREATININE CLEARANCE BUILD NAME ONLY: YESTEST: GLUCOSE, FLUID BUILD NAME ONLY: NOTEST: PROTEIN,TOTAL (FLUID) BUILD NAME ONLY: NOSpecimens to EXCLUDE!: BLOODPROFILE: HDL ACCESSION AREA: CHEMISTRYTEST: HDL CHOLESTEROL BUILD NAME ONLY: NOTEST: LDL CHOLESTEROL BUILD NAME ONLY: NOTEST: LDL CALCULATED BUILD NAME ONLY: NOPROFILE: DAU ACCESSION AREA: CHEMISTRYTEST: AMPHETAMINES BUILD NAME ONLY: NOTEST: BENZODIAZEPINES BUILD NAME ONLY: NOTEST: ZDRUGS OF ABUSE - URINE SCREEN BUILD NAME ONLY: YES WKLD METHOD: SYNCHRON CX7 WKLD CODE METHOD NAME: SYNCHRON CX7 WKLD CODE SUFFIX: .4009 MAJOR ACCESSION AREA: CHEMISTRY LAB SUBSECTION: SYNCHRON BENCH
Auto Instrument Setup:
NUMBER: 16 NAME: CX5-IM LOAD/WORK LIST: CX7M ENTRY for LAGEN ROUTINE: Accession cross-reference CROSS LINKED BY: ID MESSAGE CONFIGURATION: UNIVERSAL INTERFACE METHOD: CX5 DEFAULT ACCESSION AREA: CHEMISTRY OVERLAY DATA: YESNUMBER: 1 TEST: UREA NITROGEN UI TEST CODE: O5C ROUTINE STORAGE: TV(3,1) NUMBER OF DECIMAL PLACES: 0 DOWNLOAD TO INSTRUMENT: YESNUMBER: 2 TEST: GLUCOSE UI TEST CODE: 06C ROUTINE STORAGE: TV(608085,1) NUMBER OF DECIMAL PLACES: 0 DOWNLOAD TO INSTRUMENT: YESNUMBER: 3 TEST: CREATININE UI TEST CODE: 03C ROUTINE STORAGE: TV(4,1) NUMBER OF DECIMAL PLACES: 1
Office of Employee Education 29 March 1997Vista National Training Program

Data Innovation
DOWNLOAD TO INSTRUMENT: YES
Office of Employee Education 30 March 1997Vista National Training Program

Data Innovation
Auto Instrument Setup (continued):NUMBER: 37 TEST: HDL CHOLESTEROL UI TEST CODE: 83A ROUTINE STORAGE: TV(80,1) NUMBER OF DECIMAL PLACES: 0 DOWNLOAD TO INSTRUMENT: NONUMBER: 38 TEST: LDL CHOLESTEROL UI TEST CODE: LDL(CALC) ROUTINE STORAGE: TV(291,1) NUMBER OF DECIMAL PLACES: 0 DOWNLOAD TO INSTRUMENT: NONUMBER: 40 TEST: AMPHETAMINES PARAM 1: S LA7VAL=$S(LA7VAL=1:"POS",LA7VAL=0:"NEG",1:"")S:LA7VAL="" LA7VAL="",LA7XFORM(3)=0 UI TEST CODE: 84A ROUTINE STORAGE: TV(26,1) DOWNLOAD TO INSTRUMENT:YESNUMBER: 41 TEST: BENZODIAZEPINES PARAM 1: S LA7VAL=$S(LA7VAL=1:"POS",LA7VAL=0:"NEG",1:"")S:LA7VAL="" LA7VAL="",LA7XFORM(3)=0 UI TEST CODE: 86A ROUTINE STORAGE: TV(216,1) DOWNLOAD TO INSTRUMENT:YES METH NAME: CX5-IM FILE BUILD ENTRY: EN FILE BUILD ROUTINE: LA7UID SEND TRAY/CUP LOCATION: yes AUTO DOWNLOAD: NO WKLD METHOD: SYNCHRON CX5CE WKLD CODE METHOD NAME:SYNCHRON CX5CE WKLD CODE SUFFIX: .4576NUMBER: 15 NAME: CX7-IM LOAD/WORK LIST: CX7M ENTRY for LAGEN ROUTINE: Accession cross-reference CROSS LINKED BY: ID MESSAGE CONFIGURATION: UNIVERSAL INTERFACE METHOD: CX7 DEFAULT ACCESSION AREA: CHEMISTRY OVERLAY DATA: YESNUMBER: 1 TEST: GLUCOSE UI TEST CODE: 06C ROUTINE STORAGE: TV(608085,1) NUMBER OF DECIMAL PLACES: 0 DOWNLOAD TO INSTRUMENT: YESNUMBER: 2 TEST: UREA NITROGEN UI TEST CODE: 05C ROUTINE STORAGE: TV(3,1) NUMBER OF DECIMAL PLACES: 0 DOWNLOAD TO INSTRUMENT: YESNUMBER: 3 TEST: CREATININE UI TEST CODE: 03C ROUTINE STORAGE: TV(4,1) NUMBER OF DECIMAL PLACES: 1 DOWNLOAD TO INSTRUMENT: YESNUMBER: 25 TEST: HDL CHOLESTEROL UI TEST CODE: 83A ROUTINE STORAGE: TV(80,1) NUMBER OF DECIMAL PLACES: 0 DOWNLOAD TO INSTRUMENT: NONUMBER: 27 TEST: LDL CHOLESTEROL UI TEST CODE: LDL(CALC) ROUTINE STORAGE: TV(291,1) NUMBER OF DECIMAL PLACES: 0 DOWNLOAD TO INSTRUMENT: NO METH NAME: 195 FILE BUILD ENTRY: EN FILE BUILD ROUTINE:LA7UID SEND TRAY/CUP LOCATION: yes AUTO DOWNLOAD: NO
Office of Employee Education 31 March 1997Vista National Training Program

Data Innovation
WKLD METHOD: SYNCHRON CX7 WKLD CODE METHOD NAME:SYNCHRON CX7 WKLD CODE SUFFIX: .4009
Office of Employee Education 32 March 1997Vista National Training Program

Data Innovation
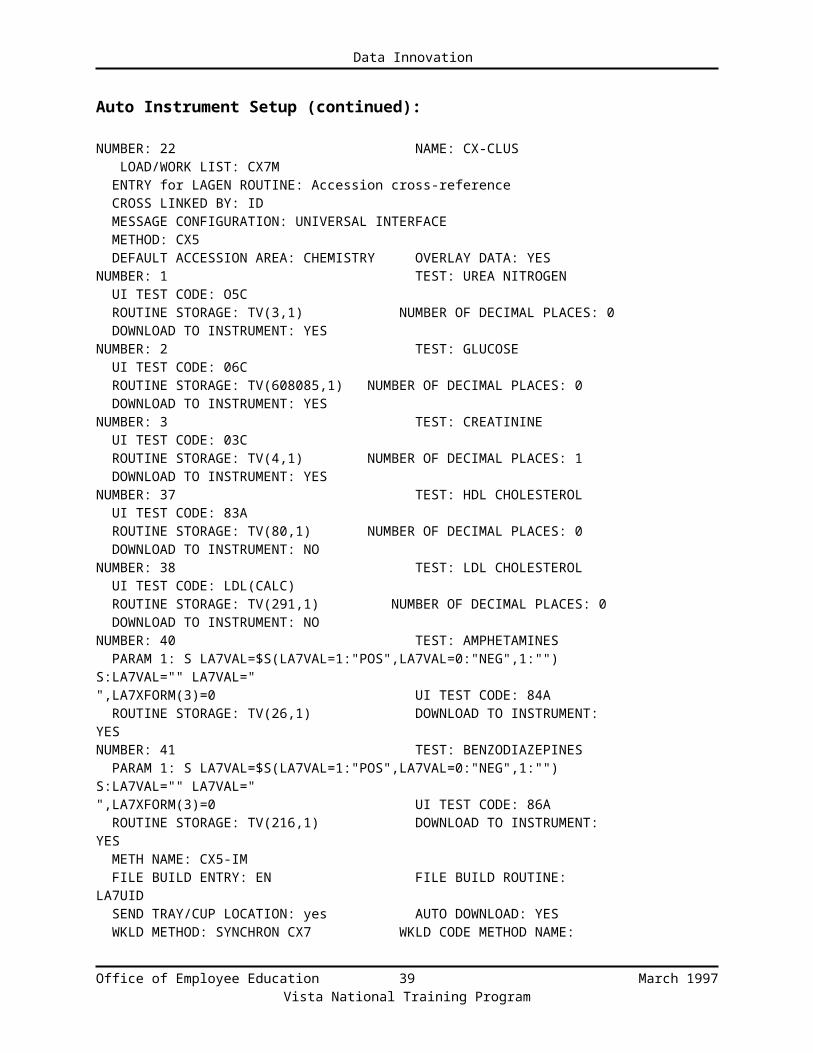
Auto Instrument Setup (continued):
NUMBER: 22 NAME: CX-CLUS LOAD/WORK LIST: CX7M ENTRY for LAGEN ROUTINE: Accession cross-reference CROSS LINKED BY: ID MESSAGE CONFIGURATION: UNIVERSAL INTERFACE METHOD: CX5 DEFAULT ACCESSION AREA: CHEMISTRY OVERLAY DATA: YESNUMBER: 1 TEST: UREA NITROGEN UI TEST CODE: O5C ROUTINE STORAGE: TV(3,1) NUMBER OF DECIMAL PLACES: 0 DOWNLOAD TO INSTRUMENT: YESNUMBER: 2 TEST: GLUCOSE UI TEST CODE: 06C ROUTINE STORAGE: TV(608085,1) NUMBER OF DECIMAL PLACES: 0 DOWNLOAD TO INSTRUMENT: YESNUMBER: 3 TEST: CREATININE UI TEST CODE: 03C ROUTINE STORAGE: TV(4,1) NUMBER OF DECIMAL PLACES: 1 DOWNLOAD TO INSTRUMENT: YESNUMBER: 37 TEST: HDL CHOLESTEROL UI TEST CODE: 83A ROUTINE STORAGE: TV(80,1) NUMBER OF DECIMAL PLACES: 0 DOWNLOAD TO INSTRUMENT: NONUMBER: 38 TEST: LDL CHOLESTEROL UI TEST CODE: LDL(CALC) ROUTINE STORAGE: TV(291,1) NUMBER OF DECIMAL PLACES: 0 DOWNLOAD TO INSTRUMENT: NONUMBER: 40 TEST: AMPHETAMINES PARAM 1: S LA7VAL=$S(LA7VAL=1:"POS",LA7VAL=0:"NEG",1:"")S:LA7VAL="" LA7VAL="",LA7XFORM(3)=0 UI TEST CODE: 84A ROUTINE STORAGE: TV(26,1) DOWNLOAD TO INSTRUMENT:YESNUMBER: 41 TEST: BENZODIAZEPINES PARAM 1: S LA7VAL=$S(LA7VAL=1:"POS",LA7VAL=0:"NEG",1:"")S:LA7VAL="" LA7VAL="",LA7XFORM(3)=0 UI TEST CODE: 86A ROUTINE STORAGE: TV(216,1) DOWNLOAD TO INSTRUMENT:YES METH NAME: CX5-IM FILE BUILD ENTRY: EN FILE BUILD ROUTINE:LA7UID SEND TRAY/CUP LOCATION: yes AUTO DOWNLOAD: YES WKLD METHOD: SYNCHRON CX7 WKLD CODE METHOD NAME:SYNCHRON CX7 WKLD CODE SUFFIX: .4009
Office of Employee Education 33 March 1997Vista National Training Program

Data Innovation
CX Host Communication Parameters:
Enable Barcode type that prints on label printer.
Host Communications:
Mode: Bidirectional Baud Rate: 9600 Data Bits: 8Stop Bits: 1 Parity: None Device ID: 0Flow Control: XON/XOFF
For Query Mode:
Stream 700 Special Functions /Func 2 Host Set-up = ONStream 701 Sample/Cup/Func 6 Host Query= ONStream 702 Results/Func 3 Test Results= ON
Stream 703 Instrument Status /Func 2 Bidirectional Start Up = ON.
Office of Employee Education 34 March 1997Vista National Training Program

Data Innovation
Modulus Differential Counter
Load/Work List:
NAME: DIFFERENTIAL (BLOOD) LOAD TRANSFORM: UNIVERSAL TYPE: TRAY,CUP CUPS PER TRAY: 30 FULL TRAY'S ONLY: NO EXPAND PANELS ON PRINT: NO VERIFY BY: ACCESSION SUPPRESS SEQUENCE #: NO INCLUDE UNCOLLECTED ACCESSIONS: NOPROFILE: DIFFERENTIAL (BLOOD) ACCESSION AREA: HEMATOLOGYTEST: DIFFERENTIAL (BLOOD) BUILD NAME ONLY: YESTEST: WBC SCAN BUILD NAME ONLY: NOTEST: SEGS BUILD NAME ONLY: NOTEST: BANDS BUILD NAME ONLY: NOTEST: POLYCHROMASIA BUILD NAME ONLY: NOTEST: NUCLEATED RBC/100WBC BUILD NAME ONLY: NOPROFILE: SCAN COMPLETE ACCESSION AREA:HEMATOLOGYTEST: SEGS BUILD NAME ONLY: YESTEST: BANDS BUILD NAME ONLY: YESTEST: PLT (ESTM) BUILD NAME ONLY: YESTEST: POLYCHROMASIA BUILD NAME ONLY: YESTEST: HYPOCHROMIA BUILD NAME ONLY: YESTEST: DIFFERENTIAL (BLOOD) BUILD NAME ONLY: YESTEST: SCAN-COMPLETE BUILD NAME ONLY: NOPROFILE: RBC MORPHOLOGY ACCESSION AREA: HEMATOLOGYTEST: PLT (ESTM) SPECIMEN: BLOOD BUILD NAME ONLY: YESTEST: RBC SCAN SPECIMEN: BLOOD BUILD NAME ONLY: YES WKLD METHOD: MANUAL WKLD CODE METHOD NAME: MANUAL WKLD CODE SUFFIX: .3000 MAJOR ACCESSION AREA: HEMATOLOGY
Auto Instrument Setup:
NUMBER: 13 NAME: DIFF1-IM LOAD/WORK LIST: DIFFERENTIAL (BLOOD) ENTRY for LAGEN ROUTINE: Accession cross-reference CROSS LINKED BY: ID MESSAGE CONFIGURATION: UNIVERSAL INTERFACE METHOD: MODULUS DEFAULT ACCESSION AREA: HEMATOLOGY OVERLAY DATA: YESNUMBER: 1 TEST: EOSINOPHILS PARAM 1: S LA7VAL=+LA7VAL UI TEST CODE: EOSINOPHILS ROUTINE STORAGE: TV(398,1)NUMBER: 14 TEST: POLYCHROMASIA PARAM 1: S LA7VAL=LA7VAL_"+" UI TEST CODE:POLYCHROMASIA ROUTINE STORAGE: TV(412,1)NUMBER: 18 TEST: PLT (ESTM) PARAM 1: S LA7VAL=$S(LA7VAL="0":"ADQ",LA7VAL="1":"DEC",LA7VAL="2":"INC",1:LA7VAL) UI TEST CODE: PLT (ESTM) ROUTINE STORAGE: TV(405,1)NUMBER: 30 TEST: WBC SCAN
Office of Employee Education 35 March 1997Vista National Training Program

Data Innovation
PARAM 1: S LA7VAL=$S(LA7VAL="1":"OK",1:LA7VAL) UI TEST CODE: WBC SCAN ROUTINE STORAGE:TV(608029,1)
Office of Employee Education 36 March 1997Vista National Training Program

Data Innovation
Auto Instrument Setup (continued):NUMBER: 33 TEST: LARGE PLATELETS PARAM 1: S LA7VAL=$S(LA7VAL="1":"OCC",LA7VAL="2":"MODERATE",LA7VAL="3":"MANY",1:LA7VAL) UI TEST CODE: LARGE PLATELETS ROUTINE STORAGE: TV(608050,1) INTERFACE NOTES: PIN CONFIGURATION: 3(GREEN)...7(RED)...ONLY.
Office of Employee Education 37 March 1997Vista National Training Program

Data Innovation
Coulter STKS
Load/Work List:
NAME: COULTER STKS LOAD TRANSFORM: UNIVERSAL TYPE: SEQUENCE/BATCH CUPS PER TRAY: 200 FULL TRAY'S ONLY: NO EXPAND PANELS ON PRINT: NO VERIFY BY: ACCESSION SUPPRESS SEQUENCE #: NO INCLUDE UNCOLLECTED ACCESSIONS: NO SHORT TEST LIST: YESADDITIONAL LAB TESTS: Instrument Set Up - HematologyPROFILE: COULTER CBC ACCESSION AREA: HEMATOLOGYTEST: WBC SPECIMEN: BLOOD BUILD NAME ONLY: NOTEST: RBC SPECIMEN: BLOOD BUILD NAME ONLY: NO TEST: CBC SPECIMEN: BLOOD BUILD NAME ONLY: YESSpecimens to EXCLUDE!: PERITONEAL FLUID WKLD METHOD: STKS WKLD CODE METHOD NAME: STKS WKLD CODE SUFFIX: .4191 MAJOR ACCESSION AREA: HEMATOLOGY
Auto Instrument Setup:
NUMBER: 11 NAME: STKS-IM LOAD/WORK LIST: COULTER STKS ENTRY for LAGEN ROUTINE: Accession cross-reference CROSS LINKED BY: IDE MESSAGE CONFIGURATION: UNIVERSAL INTERFACE METHOD: STKS DEFAULT ACCESSION AREA: HEMATOLOGY OVERLAY DATA: YESNUMBER: 1 TEST: WBC UI TEST CODE: WBC ROUTINE STORAGE: TV(384,1) NUMBER OF DECIMAL PLACES: 1NUMBER: 2 TEST: RBC METH NAME: STKS-IM INTERFACE NOTES: Timeout (secs) 9 Baud rate 9600 Parity noneStop Bits 1 Handshake Yes Block size 256 Enable Spooler Yes Replace NULL by SP Yes AUTO DOWNLOAD: NO
Office of Employee Education 38 March 1997Vista National Training Program
Data Innovation
Uro-Comp for Clinitek 200
Load/Work List:
NAME: CLINITEK-200 LOAD TRANSFORM: UNIVERSAL TYPE: TRAY,CUP CUPS PER TRAY: 10 FULL TRAY'S ONLY: NO EXPAND PANELS ON PRINT: NO VERIFY BY: ACCESSION SUPPRESS SEQUENCE #: NO INCLUDE UNCOLLECTED ACCESSIONS: NO PROFILE: URINALYSIS ACCESSION AREA: URINALYSISTEST: URINALYSIS BUILD NAME ONLY: NOTEST: T.REACTION,URINE BUILD NAME ONLY: NOTEST: URINE MICROSCOPIC BUILD NAME ONLY: NOTEST: URINE COLOR BUILD NAME ONLY: YESTEST: URINE CLARITY BUILD NAME ONLY: YESTEST: URINE GLUCOSE BUILD NAME ONLY: YESTEST: URINE WBC/HPF BUILD NAME ONLY: YESTEST: URINE RBC/HPF BUILD NAME ONLY: YESTEST: SQUAMOUS EPITHELIAL BUILD NAME ONLY: YESEST: AMORPHOUS CRYSTALS BUILD NAME ONLY: YESTRAY #: 1CUP or SEQUENCE #: 1 CONTROL: CLINITEK QCLEVEL 1CUP or SEQUENCE #: 2 CONTROL: CLINITEK QCLEVEL 2 WKLD METHOD: CLINITEK 200 WKLD CODE METHOD NAME: CLINITEK 200 WKLD CODE SUFFIX: .3100 MAJOR ACCESSION AREA: URINALYSIS
Auto Instrument Setup:
NUMBER: 12 NAME: URO-IM LOAD/WORK LIST: CLINITEK-200 ENTRY for LAGEN ROUTINE: Accession cross-reference CROSS LINKED BY: ID MESSAGE CONFIGURATION: UNIVERSAL INTERFACE METHOD: UROC/CLINT DEFAULT ACCESSION AREA: URINALYSIS OVERLAY DATA: YESNUMBER: 1 TEST: URINE COLOR PARAM 1: S LA7VAL=$P("YELLOW;PALE YEL;STRAW;AMBER;DK.AMBER;ORANGE;RED;BROWN;BLUE;GREEN",";",LA7VAL+1) UI TEST CODE: URINE COLOR ROUTINE STORAGE: TV(683,1)NUMBER: 2 TEST: URINE CLARITY PARAM 1: S LA7VAL=$P("CLEAR;HAZY;CLOUDY;TURBID;FLOC;SMOKEY;MUCOID",";",LA7VAL+1) UI TEST CODE: URINE CLARITY ROUTINE STORAGE: TV(162,1)NUMBER: 3 TEST: SPECIFIC GRAVITY (URINES) UI TEST CODE: SPECIFIC GRAVITY (URINES) ROUTINE STORAGE: TV(685,1) NUMBER OF DECIMAL PLACES: 3NUMBER: 5 TEST: URINE PROTEIN PARAM 1: S LA7VAL=$S(LA7VAL=0:"NEG",LA7VAL=1:"TRACE",1:LA7VAL) UI TEST CODE: URINE PROTEIN ROUTINE STORAGE: TV(691,1)
Office of Employee Education 39 March 1997Vista National Training Program

Data Innovation
NUMBER OF DECIMAL PLACES: 0
Office of Employee Education 40 March 1997Vista National Training Program

Data Innovation
Auto Instrument Setup (continued):
NUMBER: 6 TEST: URINE GLUCOSE PARAM 1: S LA7VAL=$S(LA7VAL=0:"NEG",1:LA7VAL) UI TEST CODE: URINE GLUCOSE ROUTINE STORAGE:TV(690,1) NUMBER OF DECIMAL PLACES: 0NUMBER: 7 TEST: URINE KETONES PARAM 1: S LA7VAL=$S(LA7VAL=">80":"LARGE",1:$P("NEG;TRACE;SMALL;MOD",";",LA7VAL+1)) UI TEST CODE: URINE KETONES ROUTINE STORAGE: TV(689,1)NUMBER: 8 TEST: URINE BILIRUBIN PARAM 1: S LA7VAL=$P("NEG;;SMALL;MOD;LARGE",";",LA7VAL+1) UI TEST CODE: URINE BILIRUBIN ROUTINE STORAGE: TV(688,1)NUMBER: 10 TEST: NITRITE, URINE PARAM 1: S LA7VAL=$S(LA7VAL=0:"NEG",LA7VAL=6:"POS",1:LA7VAL) UI TEST CODE: NITRITE, URINE ROUTINE STORAGE: TV(795,1)NUMBER: 13 TEST: URINE WBC/HPF PARAM 1: S LA7VAL=$P("NONE;0-4;5-10;10-20;20-30;30-50;50-100;100+;TNTC",";",LA7VAL+1) UI TEST CODE: URINE WBC/HPF ROUTINE STORAGE: TV(693,1)NUMBER: 15 TEST: SQUAMOUS EPITHELIAL PARAM 1: S LA7VAL=$P("NONE;OCC;FEW;MOD;MANY",";",LA7VAL+1) UI TEST CODE: SQUAMOUS EPITHELIAL ROUTINE STORAGE: TV(777,1) INTERFACE NOTES: Clinitek 200 interfaced through a URO-Comp PIN CONFIGURATION: 3(GREEN)...7(RED)
Office of Employee Education 41 March 1997Vista National Training Program

Data Innovation
Axsym
Load/Work List:
NAME: AXSYM TYPE: SEQUENCE/BATCH CUPS PER TRAY: 0 FULL TRAY'S ONLY: NO VERIFY BY: ACCESSION INCLUDE UNCOLLECTEDACCESSIONS: NOPROFILE: TDM ACCESSION AREA: SPECIAL CHEMISTRYTEST: DIGOXIN BUILD NAME ONLY: NOPROFILE: PSA ACCESSION AREA: SPECIAL CHEMISTRYTEST: PROSTATE SPECIFIC ANTIGEN BUILD NAME ONLY: NO WKLD METHOD: ABBOTT AXSYM WKLD CODE METHOD NAME: ABBOTT AXSYM WKLD CODE SUFFIX: .4455 MAJOR ACCESSION AREA: CHEMISTRY LAB SUBSECTION: SPECIAL CHEMISTRY
Auto Instrument Setup:
NUMBER: 20 NAME: AXSYM LOAD/WORK LIST: AXSYM ENTRY for LAGEN ROUTINE: Accession cross-reference CROSS LINKED BY: ID MESSAGE CONFIGURATION: UNIVERSAL INTERFACE METHOD: AXSYM DEFAULT ACCESSION AREA: SPECIAL CHEMISTRY OVERLAY DATA: YES NUMBER: 1 TEST: PROSTATE SPECIFIC ANTIGEN UI TEST CODE: 441 ROUTINE STORAGE: TV(608312,1) NUMBER OF DECIMAL PLACES: 1 DOWNLOAD TO INSTRUMENT: NONUMBER: 2 TEST: DIGOXIN UI TEST CODE: 601 ROUTINE STORAGE: TV(608060,1) NUMBER OF DECIMAL PLACES: 1 DOWNLOAD TO INSTRUMENT: YES METH NAME: AXSYM FILE BUILD ENTRY: EN FILE BUILD ROUTINE: LA7UID SEND TRAY/CUP LOCATION: yes AUTO DOWNLOAD: YES WKLD METHOD: ABBOTT AXSYM WKLD CODE METHOD NAME: ABBOTT AXSYM WKLD CODE SUFFIX: .4455
Note UI test codes are the assay numbers for each test. Test codes may be found using the axsym instrument terminal, configuration option, or assay parameters.
At this time, the Digoxins are set to run Host/Query. The PSAs are only run once a week and are set up to run Unidirectional and options for Host Query and Auto-ID are turned off. Only Transmit to Host is left on.
Office of Employee Education 42 March 1997Vista National Training Program

Data Innovation
On the instrument:
Main Menu: Configuration: General: 6, 26, 28, and 29 set to on.
Sample Bar Code: (We use the LRLABEL routine for Intermec 4100 10 part label)
Code 39 Enable Symbology: YES Use Checksum: NO
Ports: Host Port: Parity- NONE Baud Rate- 9600 Data Bits- 8 Stop Bits- 1
Pin Configuration:
STD RS232:
AXSYM VISTA
Pin 1----------Shield------------ 1 ||
Pin 2----------Output-----\ /--->> 2 \/ /\Pin 3<<--------Input------/ \--->> 3
Pin 7----------Ground------------- 7
Pins 2 and 3 are "crossed" in this twisted pair diagram.
Further documentation may be found in patch LR*5.2*11 SEQ 6.
The Data Innovations Instrument Manager will automatically default the LRDFN as the patient ID. You must go into Configuration Edit on the Instrument Manager and change the PID to SSN.
Office of Employee Education 43 March 1997Vista National Training Program