d2l brightspace - kennesaw state university · page 6 of 27 holistic rubrics use a one-dimensional...
TRANSCRIPT
D2L Brightspace Rubrics
Learning Technologies, Training & Audiovisual Outreach
University Information Technology Services

Copyright © 2016 KSU Division of University Information Technology Services
This document may be downloaded, printed, or copied for educational use without further permission
of the University Information Technology Services Division (UITS), provided the content is not modified
and this statement is not removed. Any use not stated above requires the written consent of the UITS
Division. The distribution of a copy of this document via the Internet or other electronic medium
without the written permission of the KSU - UITS Division is expressly prohibited.
Published by Kennesaw State University – UITS 2016
The publisher makes no warranties as to the accuracy of the material contained in this document and
therefore is not responsible for any damages or liabilities incurred from UITS use.
D2L Brightspace is a trademark of D2L Brightspace Incorporated.

University Information Technology Services
D2L Brightspace®
Rubrics
Table of Contents
Introduction ................................................................................................................................................ 4
Learning Objectives ..................................................................................................................................... 4
The Rubrics Tool .......................................................................................................................................... 5
Types of Rubrics ...................................................................................................................................... 5
Creating Rubrics .......................................................................................................................................... 6
Creating an Analytic Rubric ..................................................................................................................... 7
Adding Additional Levels or Criteria in an Analytic Rubric ............................................................... 12
Removing Levels or Criteria in an Analytic Rubric ............................................................................ 12
Creating a Holistic Rubric ...................................................................................................................... 13
Adding Additional Levels in a Holistic Rubric .................................................................................... 16
Deleting Levels in a Holistic Rubric ................................................................................................... 17
Setting a Rubric to Published Status ..................................................................................................... 18
Editing a Rubric ..................................................................................................................................... 18
Copying a Rubric ................................................................................................................................... 19
Archiving a Rubric ................................................................................................................................. 20
Grading an Assignment Submission Folder using Rubrics ........................................................................ 20
Associating a Rubric with an Assignment Submission Folder ............................................................... 20
Grading Items in the Assignments Submission Folder Using Rubrics ................................................... 21
Grading Discussions Using Rubrics ........................................................................................................... 24
Associating a Rubric with a Grade Item for Discussions ....................................................................... 24
Grading Discussion Items in the Grade Book Using a Rubric ............................................................... 26
Additional Help ......................................................................................................................................... 27

Revised: 7/20/2016 Page 4 of 27
Introduction
D2L Brightspace® is an excellent tool for instructors. This document has been developed to introduce
you to the Rubrics tool.
Learning Objectives
After completing the instructions in this booklet, you will be able to:
Become familiar with the types of rubrics available in D2L Brightspace
Create a Rubric
Use a Rubric to grade an Assignment
Use a Rubric to grade a Discussion
Page 5 of 27
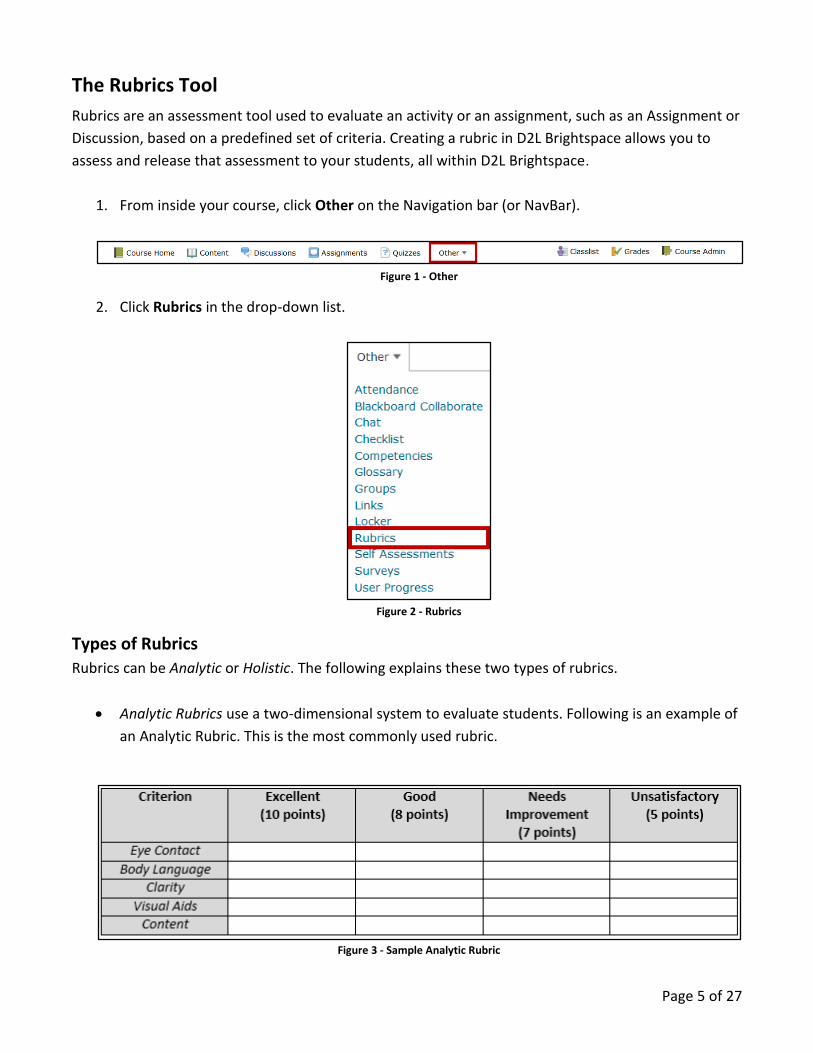
The Rubrics Tool
Rubrics are an assessment tool used to evaluate an activity or an assignment, such as an Assignment or
Discussion, based on a predefined set of criteria. Creating a rubric in D2L Brightspace allows you to
assess and release that assessment to your students, all within D2L Brightspace.
1. From inside your course, click Other on the Navigation bar (or NavBar).
Figure 1 - Other
2. Click Rubrics in the drop-down list.
Figure 2 - Rubrics
Types of Rubrics
Rubrics can be Analytic or Holistic. The following explains these two types of rubrics.
Analytic Rubrics use a two-dimensional system to evaluate students. Following is an example of
an Analytic Rubric. This is the most commonly used rubric.
Figure 3 - Sample Analytic Rubric
Page 6 of 27
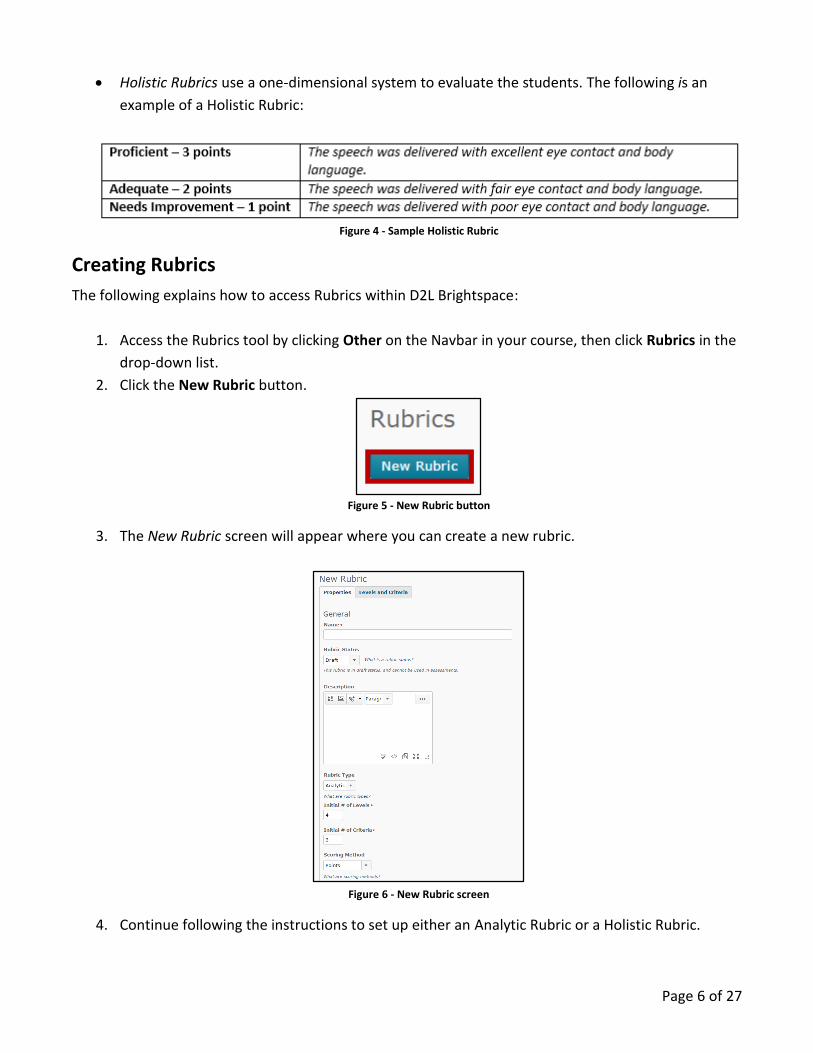
Holistic Rubrics use a one-dimensional system to evaluate the students. The following is an
example of a Holistic Rubric:
Figure 4 - Sample Holistic Rubric
Creating Rubrics
The following explains how to access Rubrics within D2L Brightspace:
1. Access the Rubrics tool by clicking Other on the Navbar in your course, then click Rubrics in the
drop-down list.
2. Click the New Rubric button.
Figure 5 - New Rubric button
3. The New Rubric screen will appear where you can create a new rubric.
Figure 6 - New Rubric screen
4. Continue following the instructions to set up either an Analytic Rubric or a Holistic Rubric.
Page 7 of 27
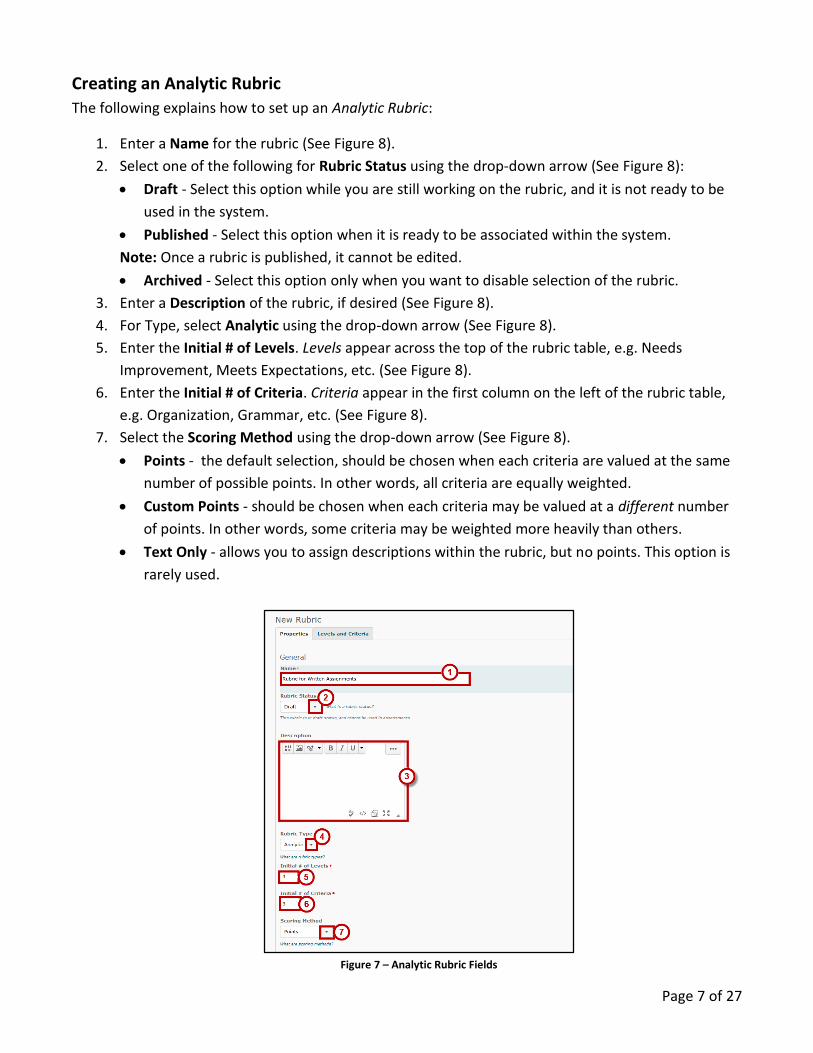
Creating an Analytic Rubric
The following explains how to set up an Analytic Rubric:
1. Enter a Name for the rubric (See Figure 8).
2. Select one of the following for Rubric Status using the drop-down arrow (See Figure 8):
Draft - Select this option while you are still working on the rubric, and it is not ready to be
used in the system.
Published - Select this option when it is ready to be associated within the system.
Note: Once a rubric is published, it cannot be edited.
Archived - Select this option only when you want to disable selection of the rubric.
3. Enter a Description of the rubric, if desired (See Figure 8).
4. For Type, select Analytic using the drop-down arrow (See Figure 8).
5. Enter the Initial # of Levels. Levels appear across the top of the rubric table, e.g. Needs
Improvement, Meets Expectations, etc. (See Figure 8).
6. Enter the Initial # of Criteria. Criteria appear in the first column on the left of the rubric table,
e.g. Organization, Grammar, etc. (See Figure 8).
7. Select the Scoring Method using the drop-down arrow (See Figure 8).
Points - the default selection, should be chosen when each criteria are valued at the same
number of possible points. In other words, all criteria are equally weighted.
Custom Points - should be chosen when each criteria may be valued at a different number
of points. In other words, some criteria may be weighted more heavily than others.
Text Only - allows you to assign descriptions within the rubric, but no points. This option is
rarely used.
Figure 7 – Analytic Rubric Fields

Page 8 of 27
8. Click the Save button.
9. Next, click the Levels and Criteria tab.
Figure 8 - Levels and Criteria Tab
10. The Levels and Criteria screen appears, displaying a grid of the number of levels and criteria.
Figure 9 - Levels and Criteria Screen

Page 9 of 27
11. Edit the Criteria and Levels following the steps below.
a. Click the drop-down arrow next to the column heading Criteria.
Figure 10 - Click the Drop-Down Arrow
b. In the menu that appears, select Edit Criteria Group.
Figure 11 - Edit Criteria Group
c. Adjust the Level Names and Score (points) for each level (See Figure 12).
d. Adjust the Criteria Names as desired (See Figure 12).
Note: You may enter any point increment scheme desired for your criteria.
e. When done, click the Save button in the lower-left area of the window (See Figure 12).
Figure 12 - Edit the Levels, Points, and Criteria Names
Page 10 of 27
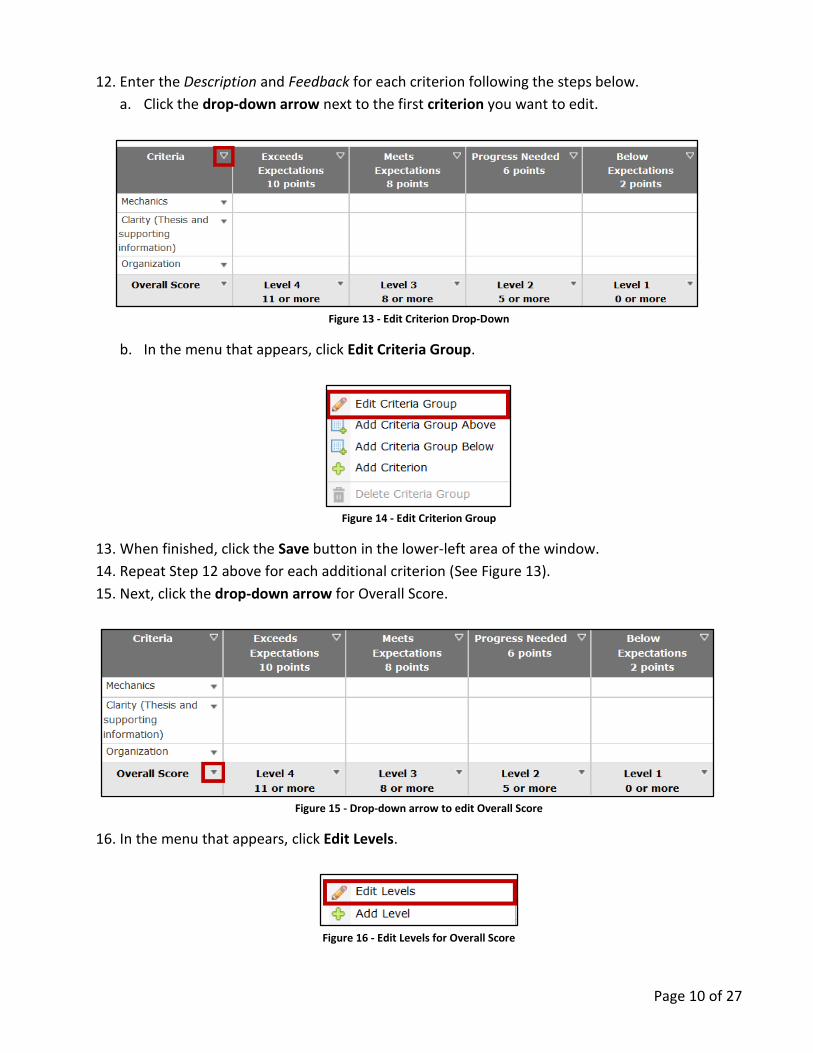
12. Enter the Description and Feedback for each criterion following the steps below.
a. Click the drop-down arrow next to the first criterion you want to edit.
Figure 13 - Edit Criterion Drop-Down
b. In the menu that appears, click Edit Criteria Group.
Figure 14 - Edit Criterion Group
13. When finished, click the Save button in the lower-left area of the window.
14. Repeat Step 12 above for each additional criterion (See Figure 13).
15. Next, click the drop-down arrow for Overall Score.
Figure 15 - Drop-down arrow to edit Overall Score
16. In the menu that appears, click Edit Levels.
Figure 16 - Edit Levels for Overall Score

Page 11 of 27
17. For Start Range, enter the minimum amount of overall points to achieve each level.
18. Change the Level Name, if desired.
Figure 17 - Editing Overall Levels
19. Enter a Description and Feedback for each overall level, if desired (See Figure 18).
20. Click the Save button in the lower-left area of the window when finished (See Figure 18).
Figure 18 - Enter Description & Feedback
21. When you are finished editing your rubric, click the Close button.
22. Remember to set your rubric to Published status when you have finished editing the rubric.

Page 12 of 27
Adding Additional Levels or Criteria in an Analytic Rubric
To add another criterion or level:
1. Click the Levels and Criteria tab of the rubric.
2. Click the Add Criterion or the Add Level button.
Figure 19 - Add Criterion or Add Level
3. Complete the details for the level or criterion as prompted.
4. Click the Save button.
Removing Levels or Criteria in an Analytic Rubric
To remove a criterion or level:
1. Navigate to the Levels and Criteria tab of the rubric.
2. Click the drop-down arrow for the item to be deleted.
3. In the menu that appears, select the Delete Level option.
Figure 20 - Delete Level or Criterion

Page 13 of 27
Creating a Holistic Rubric
The following explains how to set up a Holistic Rubric:
1. Enter a Name for the rubric (See Figure 21).
2. Select one of the following for Status (See Figure 21).
a. Draft - Select this option while you are still working on the rubric, and it is not ready to be
used in the system (See Figure 21).
b. Published - Select this option when it is ready to be associated within the system
(See Figure 21).
Note: Once a rubric is published, it cannot be edited.
c. Archived - Select this option only when you want to disable selection of the rubric
(See Figure 21).
3. Enter a Description of the rubric, if desired (See Figure 21).
4. For Type, click the drop-down arrow and select Holistic (See Figure 21).
5. Enter the Initial # of Levels. Levels are the options you’ll choose from to grade with a Holistic
rubric, e.g. Needs Improvement, Meets Expectations, etc. (See Figure 21).
Note: Holistic rubrics do not use Criteria.
Figure 21 - Creating a Holistic Rubric

Page 14 of 27
6. Click the Scoring Method drop-down arrow to select the scoring method (See Figure 22).
Percentages - the default selection, allows you to assign a percent earned to each level.
Text Only - allows you to assign descriptions within the rubric, but no points. This option is
rarely used.
7. Click the Save button (See Figure 22).
Figure 22 - Select Scoring Method
8. After saving, the Levels and Criteria tab becomes the Levels tab, click the Levels tab.
Figure 23 - Levels Tab

Page 15 of 27
9. The Levels screen appears, displaying a grid of the number of levels as entered in Step 5.
10. To enter information about the rubric, click the Edit Levels button.
Figure 24 - Edit Levels
11. Adjust the Level Name, Start Range, Description, and (optional) Feedback.
Figure 25 - Completing Levels for a Holistic Rubric
12. Click the Save button in the lower-left area of the window when finished.
13. When you are finished editing your rubric, click the Close button.

Page 16 of 27
14. Remember to set your rubric to Published status when you have finished editing the rubric. To
set the status to Published:
a. Click the drop-down arrow to the right of the rubric you just created (See Figure 26).
b. Click Set Status (See Figure 26).
c. Click Published (See Figure 26).
Figure 26 - Set Status to Published
Adding Additional Levels in a Holistic Rubric
1. To add another criterion or level, go to the Levels tab of the rubric.
2. Click the Add Level button.
Figure 27 - Add Level button

Page 17 of 27
3. Enter the Level Name and the Start Range (%).
Figure 28 - Complete the Level Name and Start Range
4. Enter a Description for the level. Also, optionally enter Feedback for the students.
5. Click the Save button in the lower-left area of the window when finished.
Deleting Levels in a Holistic Rubric
1. To delete a level, click the indicated arrow next to the level to be deleted.
Figure 29 - Drop-Down Arrow Next to a Level
2. In the menu that appears, click Delete Level.
Figure 30 - Delete Level
3. At the Confirmation message, click Yes.
Figure 31 - Confirm Delete
Page 18 of 27
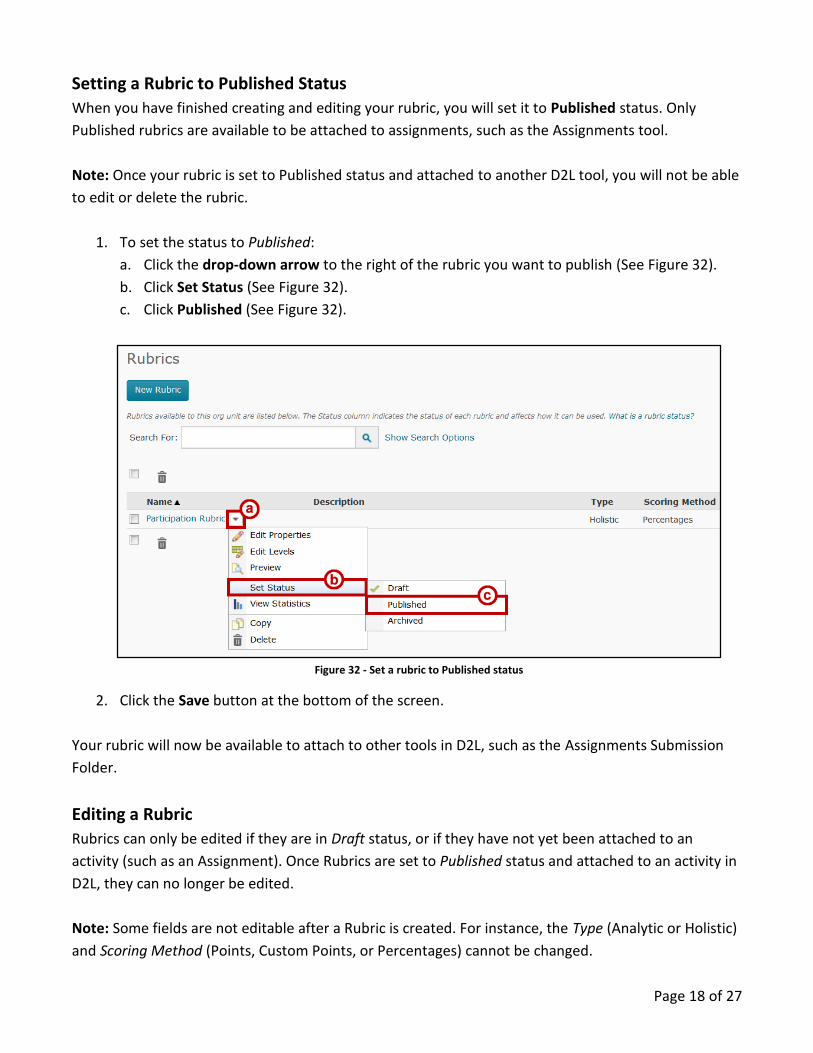
Setting a Rubric to Published Status
When you have finished creating and editing your rubric, you will set it to Published status. Only
Published rubrics are available to be attached to assignments, such as the Assignments tool.
Note: Once your rubric is set to Published status and attached to another D2L tool, you will not be able
to edit or delete the rubric.
1. To set the status to Published:
a. Click the drop-down arrow to the right of the rubric you want to publish (See Figure 32).
b. Click Set Status (See Figure 32).
c. Click Published (See Figure 32).
Figure 32 - Set a rubric to Published status
2. Click the Save button at the bottom of the screen.
Your rubric will now be available to attach to other tools in D2L, such as the Assignments Submission
Folder.
Editing a Rubric
Rubrics can only be edited if they are in Draft status, or if they have not yet been attached to an
activity (such as an Assignment). Once Rubrics are set to Published status and attached to an activity in
D2L, they can no longer be edited.
Note: Some fields are not editable after a Rubric is created. For instance, the Type (Analytic or Holistic)
and Scoring Method (Points, Custom Points, or Percentages) cannot be changed.
Page 19 of 27
Follow the steps below to edit an eligible rubric:
1. From the main Rubrics screen, where all available rubrics are listed, click the name of the rubric
you want to edit.
2. In the window that appears, edit the Rubric as desired on the Properties tab and the Levels and
Criteria tab.
3. When finished, click the Save button in the lower-left area of the Properties tab.
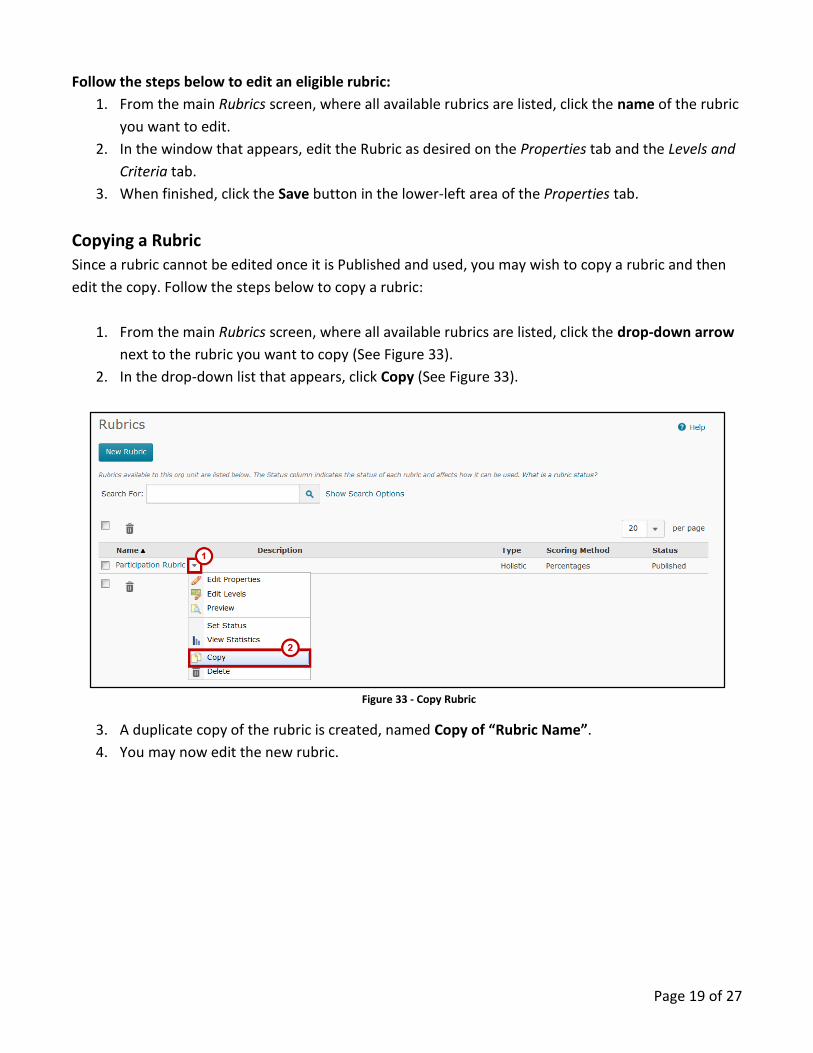
Copying a Rubric
Since a rubric cannot be edited once it is Published and used, you may wish to copy a rubric and then
edit the copy. Follow the steps below to copy a rubric:
1. From the main Rubrics screen, where all available rubrics are listed, click the drop-down arrow
next to the rubric you want to copy (See Figure 33).
2. In the drop-down list that appears, click Copy (See Figure 33).
Figure 33 - Copy Rubric
3. A duplicate copy of the rubric is created, named Copy of “Rubric Name”.
4. You may now edit the new rubric.

Page 20 of 27
Archiving a Rubric
Once a rubric is set to Published status, it cannot be deleted. However, the rubric can be set to
Archived status to remove it from your list. Follow the steps below to archive a rubric:
1. From the main Rubrics screen, click the drop-down arrow next to the rubric you want to
archive (See Figure 34).
2. In the drop-down list that appears, hover your mouse over Set Status (See Figure 34).
3. Click Archived (See Figure 34).
Figure 34 - Archiving a Rubric
4. The rubric will be removed from your list of available rubrics.
Grading an Assignment Submission Folder using Rubrics
Associating a Rubric with an Assignment Submission Folder
The following explains how to associate a rubric with an Assignment Submission folder.
1. While creating or editing your Assignment Submission folder, click the Add Rubric button on the
Properties tab.
Figure 35 - Add Rubric button in Dropbox setup
Page 21 of 27
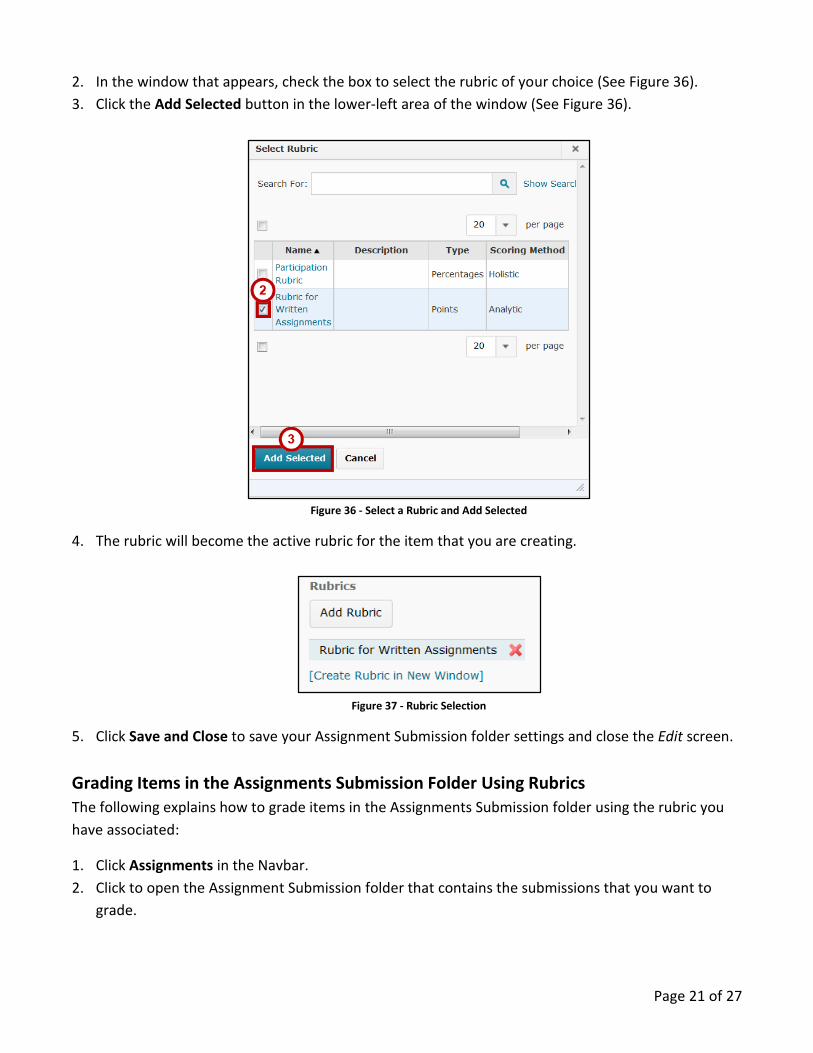
2. In the window that appears, check the box to select the rubric of your choice (See Figure 36).
3. Click the Add Selected button in the lower-left area of the window (See Figure 36).
Figure 36 - Select a Rubric and Add Selected
4. The rubric will become the active rubric for the item that you are creating.
Figure 37 - Rubric Selection
5. Click Save and Close to save your Assignment Submission folder settings and close the Edit screen.
Grading Items in the Assignments Submission Folder Using Rubrics
The following explains how to grade items in the Assignments Submission folder using the rubric you
have associated:
1. Click Assignments in the Navbar.
2. Click to open the Assignment Submission folder that contains the submissions that you want to
grade.

Page 22 of 27
3. Upon opening the submission folder, you will see the names of your students near the bottom of
the screen. Their submissions to the Assignments Submission folder will appear below their names.
To access the rubric so that you can give feedback to the student, click the Evaluate button next to
a student’s name.
Figure 38 - Evaluate Submission
4. The Evaluate Submission screen will appear. Click the file name of the student’s submission to view
it on-screen.
5. To open the rubric, click the name of the rubric that is attached to this assignment submission
folder.
Figure 39 - Evaluate Submission Screen

Page 23 of 27
6. The Assess Rubric window will open. Complete the rubric by choosing a level for each criterion.
Figure 40 - Assessing with the Rubric
7. You can edit the score and/or feedback for any criterion by clicking the Edit pencil icon.
Figure 41 - Edit Score and Feedback
8. In the Edit Score and Feedback window that appears, modify the score (points) and feedback as
desired.
9. Click the Save button.
10. The score for the edited criteria will show a yellow exclamation symbol, indicating that an
adjustment was made.
Figure 42 - Adjusted score or feedback
11. Click the Save & Record button at the bottom-left of the screen so that the grade will be sent to
the gradebook.

Page 24 of 27
12. You will be returned to the Evaluate Submission screen. On the right side of the screen, you will
see that the score and the feedback from the rubric have been transferred over.
13. To save the score, click either Publish or Save Draft below the evaluation information.
14. Click Next Student to move on to the next submission.
Figure 43 - Evaluate Submission Screen
Grading Discussions Using Rubrics
After you have set up a discussion, you may want to use a rubric to grade student posts. The following
explains how to grade discussion topics using an existing rubric.
Associating a Rubric with a Grade Item for Discussions
The rubric that will be used to grade the discussion posts will be attached to the grade book. The rubric
can also be attached in the ‘Discussions’ area for the sole purpose of showing students how they will
be assessed.
1. Click Grades in the Navbar.
Figure 44 - Click Grades

Page 25 of 27
2. Click Manage Grades.
3. Click New near the top of the page.
Figure 45 - Manage Grades
4. Click Item.
5. Click Numeric.
6. An area will appear on your screen allowing you to enter information about the discussion topic
for the grade book. Enter the necessary information.
Figure 46 - New Grade Item

Page 26 of 27
7. You are now ready to add the rubric. To do this, click the Add Rubric button.
Figure 47 - Add Rubric button
8. The Select Rubric window will appear on your screen. Place a check-mark to select the rubric of
your choice.
9. Click the Add Selected button in the lower-left area of the window.
Figure 48 - Select Rubric
10. Click Save and Close to save the grade item with the attached rubric.
11. The grade item that you just created appears in Grades.
Grading Discussion Items in the Grade Book Using a Rubric
The following explains how to complete the rubric to provide feedback to your students for their
discussion posts:
1. First, read the discussion post(s) in the Discussions area.
2. Then, to provide feedback, click Grades in the Navbar.

Page 27 of 27
3. Click Enter Grades.
4. Find the column for the discussion post and click the drop-down arrow next to the grade item
title at the top of the column.
Figure 49 - Grade Item Drop-Down Arrow
5. Select Grade All from the menu that appears.
Figure 50 - Grade All
6. To access the rubric, click the icon in the Submission column.
Figure 51 - Assessment Column
7. Complete the rubric for the student, click the Save button in the lower-right area of the
window, and close the window.
8. Enter the grade for the student in the Grade column.
Note: The grade will not transfer from the rubric window into the grade column; it must be entered
manually. To review the grade from the rubric, you can click the icon in the Assessment column.
Figure 52 - Graded Student
9. Click the Save button in the lower-right area of the window.
10. Repeat the steps above until all grades have been entered.
Additional Help
For additional support, please contact the KSU Service Desk:
KSU Service Desk for Faculty & Staff
Phone: 470-578-6999
Email: [email protected]
Website: http://uits.kennesaw.edu