custom shade installation 09
TRANSCRIPT

8/2/2019 Custom Shade Installation 09
http://slidepdf.com/reader/full/custom-shade-installation-09 1/4
CUSTOM WINDOW SHADESMANUAL INSTALLATION INSTRUCTIONS
MOUNT THE BRACKETS
If the clutch is on the right end of the shade, attach the brackets to the window frame, window molding, wall or ceiling, as shownbelow. If the clutch is on the left end of the shade, reverse the bracket positions, left for right.
TO THE INSIDE OF THE WINDOW FRAME TO THE CEILING OR TO THE TOP OF THE
WINDOW FRAME
TO THE WALL OR TO THE FRONT OF
THE WINDOW MOLDING
The LUG rests here
After lug is setrotate retaineronto lug
The LUG rests here
After lug is setrotate retaineronto lug
The LUG rests here
After lug is setrotate retaineronto lug
INSTALL THE SHADE
a) Push the clutch straightonto the blade of its bracket.The bottom of the clutch
should always point straightdown.
b) Lower the lug of the end
plug onto the “V” of itsbracket. The roller should fitin the brackets securely, with
just a little play. Rotate theriveted retainer portion tolock the lug in position.
RETAINER ARM LUG
“V”
USE THE CONTROL CORD TO OPERATE THE SHADE
Pulling gently on the cord in one direction raises the shade; pulling it in the other direction lowers it.
ATTACH STOPS TO BEAD CHAIN
On metal bead chain, attach a metal stop ball that is at least 5/16” (8mm) in diameter, so that it touches the mouth of the clutchwhen the shade is in the all-rolled-up position. For metal or plastic bead chain, lower the shade to sill or floor height, and attach theappropriate metal stop or plastic connector next to the clutch, this prevents the shade from being lowered beyond that point.
IF USING PLASTIC OR METAL BEAD CHAIN, POSITION THE PLASTIC CONNECTOR OR STOP BALL
AS THE UPPER SHADE STOP
Decide which end of the tube you want to put the clutch in. Keep track of which is the “clutch end” of the tube. Roll the shade all the
way up and lay it on the work table so it looks like this and not like this
Insert the clutch into its end of the tube, and pull on the upper chain until the connector touches the clutch firmly. Do not attach the
lower plastic stop, or any stops on metal chain bead, until installing the chain.
TOOLS:screwdriver (phillips)

8/2/2019 Custom Shade Installation 09
http://slidepdf.com/reader/full/custom-shade-installation-09 2/4
The brackets for clutch roller shades are universal – you can use the same bracket for
right, left, ceiling, wall or inside mount installations.
CLUTCH ROLLERINSTALLATION INSTRUCTIONS
REEL ON THE RIGHT
If your shade was made with the reel and chain on the right, the simple slot bracket goes on
the right and the hinged bracket goes on the left. Like this:
REEL ON THE LEFT
If your shade was made with the reel and chain on the left, the simple slot bracket goes onthe left and the hinged bracket goes on the right. Like this:
WALL MOUNT
If your shade is going to be mounted into the wall or on the trim around a window, use the
screw holes in the foot of the bracket. Like this:
INSIDE MOUNT
If your shade is going to be mounted inside the window frame, use the screw holes in the
side of the brackets. Like this:
CEILING INSTALLATION
If your shade is going to be mounted upwards into the ceiling, position the brackets with thefoot upwards and use the screw holes in the foot of the bracket. Like this:
INSTALLATION NOTES
Make sure that the brackets are perfectly level with each other
After placing the shade into the brackets, turn the lever on the hinged bracket to secure the shade in place
After the shade is completely installed, carefully remove the paper wrap
TOOLS:screwdriver (phillips)
8/2/2019 Custom Shade Installation 09
http://slidepdf.com/reader/full/custom-shade-installation-09 3/4
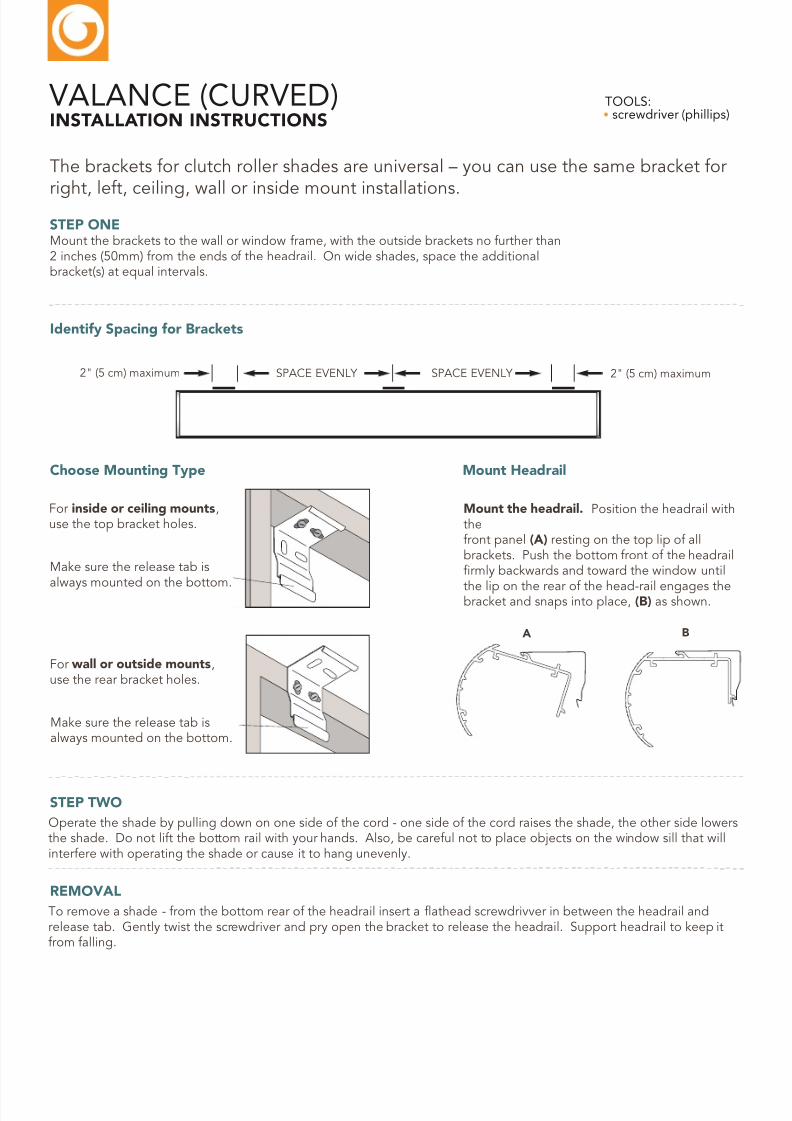
The brackets for clutch roller shades are universal – you can use the same bracket for
right, left, ceiling, wall or inside mount installations.
VALANCE (CURVED)INSTALLATION INSTRUCTIONS
STEP ONE
2" (5 cm) maximum SPACE EVENLY SPACE EVENLY 2" (5 cm) maximum
Mount the brackets to the wall or window frame, with the outside brackets no further than2 inches (50mm) from the ends of the headrail. On wide shades, space the additionalbracket(s) at equal intervals.
STEP TWO
A B
Identify Spacing for Brackets
Choose Mounting Type Mount Headrail
For inside or ceiling mounts,use the top bracket holes.
Make sure the release tab is
always mounted on the bottom.
For wall or outside mounts,use the rear bracket holes.
Make sure the release tab isalways mounted on the bottom.
Mount the headrail. Position the headrail withthefront panel (A) resting on the top lip of allbrackets. Push the bottom front of the headrailfirmly backwards and toward the window until
the lip on the rear of the head-rail engages thebracket and snaps into place, (B) as shown.
Operate the shade by pulling down on one side of the cord - one side of the cord raises the shade, the other side lowersthe shade. Do not lift the bottom rail with your hands. Also, be careful not to place objects on the window sill that willinterfere with operating the shade or cause it to hang unevenly.
REMOVAL
To remove a shade - from the bottom rear of the headrail insert a flathead screwdrivver in between the headrail andrelease tab. Gently twist the screwdriver and pry open the bracket to release the headrail. Support headrail to keep itfrom falling.
TOOLS:screwdriver (phillips)

8/2/2019 Custom Shade Installation 09
http://slidepdf.com/reader/full/custom-shade-installation-09 4/4
The brackets for clutch roller shades are universal – you can use the same bracket for
right, left, ceiling, wall or inside mount installations.
VALANCE (BOX)
V V
Lug
Blade
INSTALLATION INSTRUCTIONS
STEP ONE
STEP THREE
STEP TWO
ATTACH FASCIA PANEL. Attach the fascia by first hooking the top lip of the fascia panel onto the bracket as shown (A). Swing thebottom fascia panel towards the bracket and gently press at the bottom of the panel until the lip on the fascia engages and snapslocked to the bracket (B).
STEP FOUR
ENJOY. Pulling gently on one side of the control cord or bead chain raises the shade; pulling down on the other side lowers it.
MOUNT THE BRACKETS. The open end of each bracket faces downward, as shown in the drawing below. NOTE : if you have aninside mount and must use inside mount holes, you will have to drill your own holes in the side of the bracket. Use at least twoscrews per bracket, and make sure the screw heads clear the clutch.
INSTALL THE SHADE. Push the clutch straight onto the blade of its bracket. The bottom of the clutch should always pointstraight down, as shown above. Lower the lug of the end plug onto the “V” of its bracket. The roller should fit in the bracketssecurely, with just a little play.
WARNING. Be careful with children around operating cord. Entanglement can cause seriousinjury or death.
A
B
TOOLS:screwdriver (phillips)