custom curriculum: instructor’s guide 1. create a … curricula & learning modules page, write...
TRANSCRIPT

Custom Curriculum: Instructor’s Guide
1. Create a Learning Module. a. From the Instructor View, select Curricula & Learning Modules in the left-hand
navigational column. b. Click Add Learning Module.

c. On the My Curricula & Learning Modules page, write or select the following: i. Module Title
ii. Curriculum (a topical organization for learning modules) iii. Learning Objectives
d. Save the Learning Module.
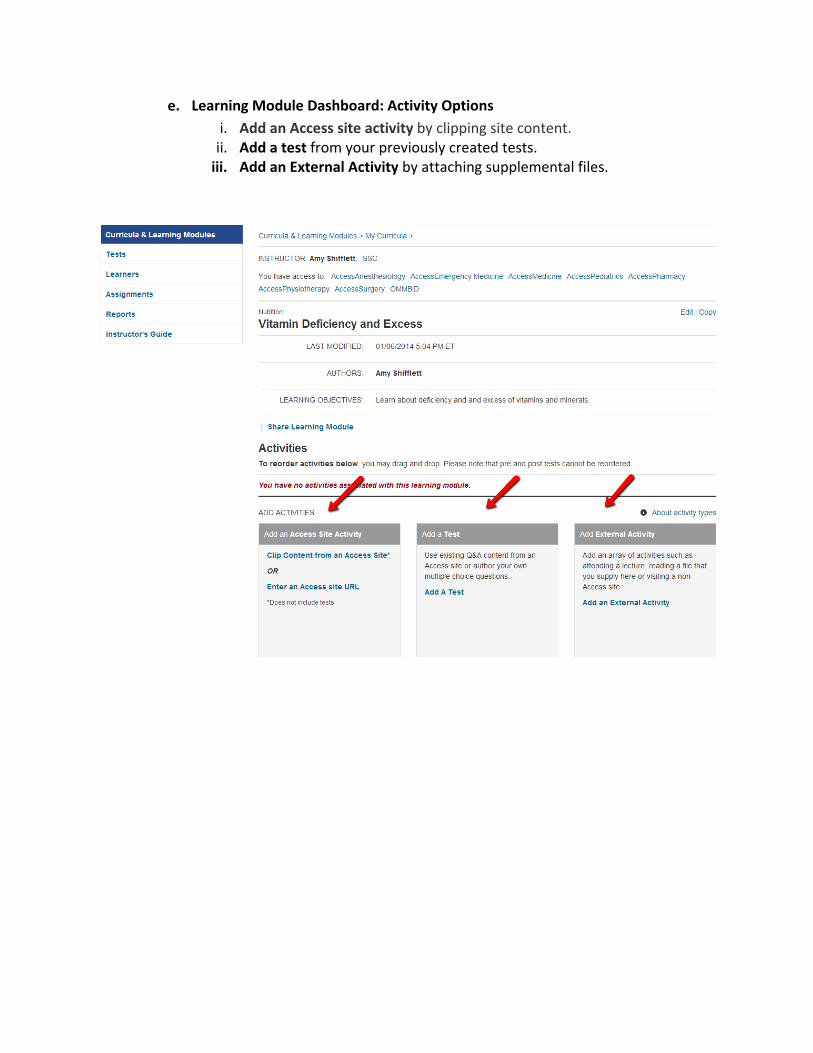
e. Learning Module Dashboard: Activity Options i. Add an Access site activity by clipping site content.
ii. Add a test from your previously created tests. iii. Add an External Activity by attaching supplemental files.

f. Add Activity: Clip from Access Site i. From the Learning Module Dashboard, click Add an Access site activity.
ii. Click Clip Content from an Access Site. Pop-up instructions will appear. 1. Click the desired Access site. 2. Navigate to the desired content for the activity.
a. Click the scissors icon from the toolbar. b. Move the pointer to the chapter title, section title,
paragraph, figure title or table title that you want to clip. c. Clip once on the applicable content. d. Select Learning Module, and add a note for learners. e. Click Add to Selected Modules.
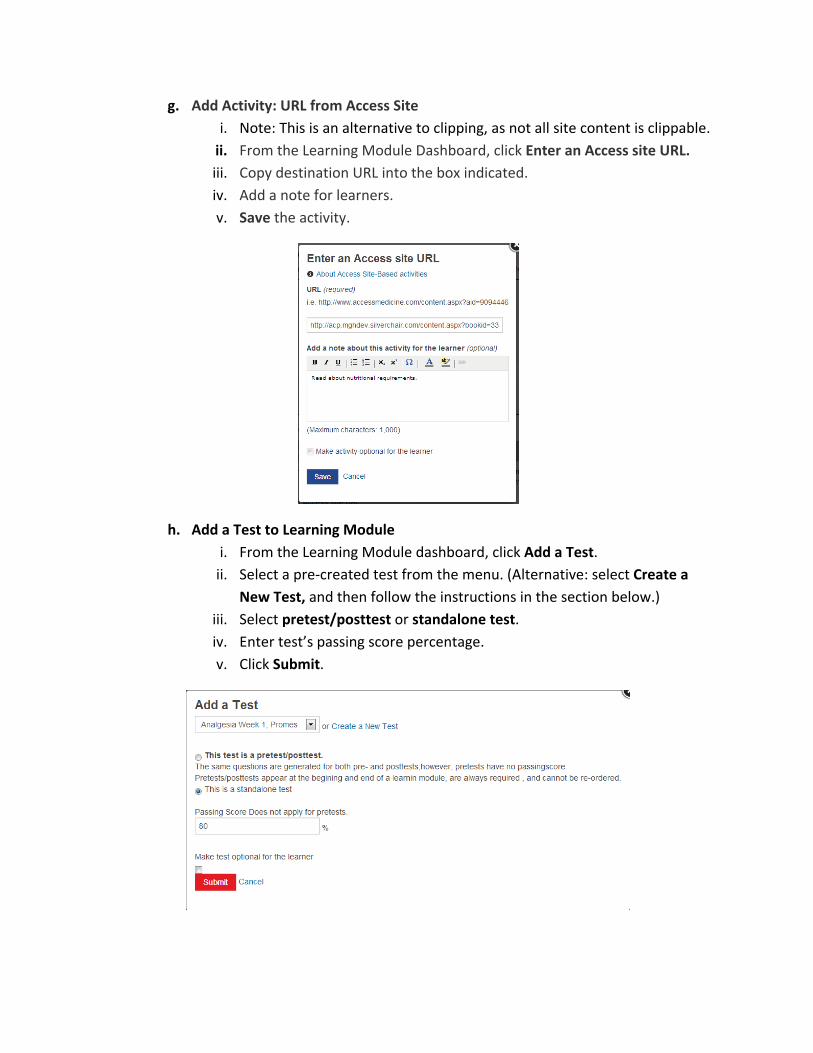
g. Add Activity: URL from Access Site i. Note: This is an alternative to clipping, as not all site content is clippable.
ii. From the Learning Module Dashboard, click Enter an Access site URL. iii. Copy destination URL into the box indicated. iv. Add a note for learners. v. Save the activity.
h. Add a Test to Learning Module i. From the Learning Module dashboard, click Add a Test.
ii. Select a pre-created test from the menu. (Alternative: select Create a New Test, and then follow the instructions in the section below.)
iii. Select pretest/posttest or standalone test. iv. Enter test’s passing score percentage. v. Click Submit.

i. Add External Activity to Learning Module. i. From the Learning Module dashboard, click Add and External Activity.
ii. Write an Activity Title and Description in the box. iii. Upload a file and/or require learners to upload files. iv. Save the external activity.
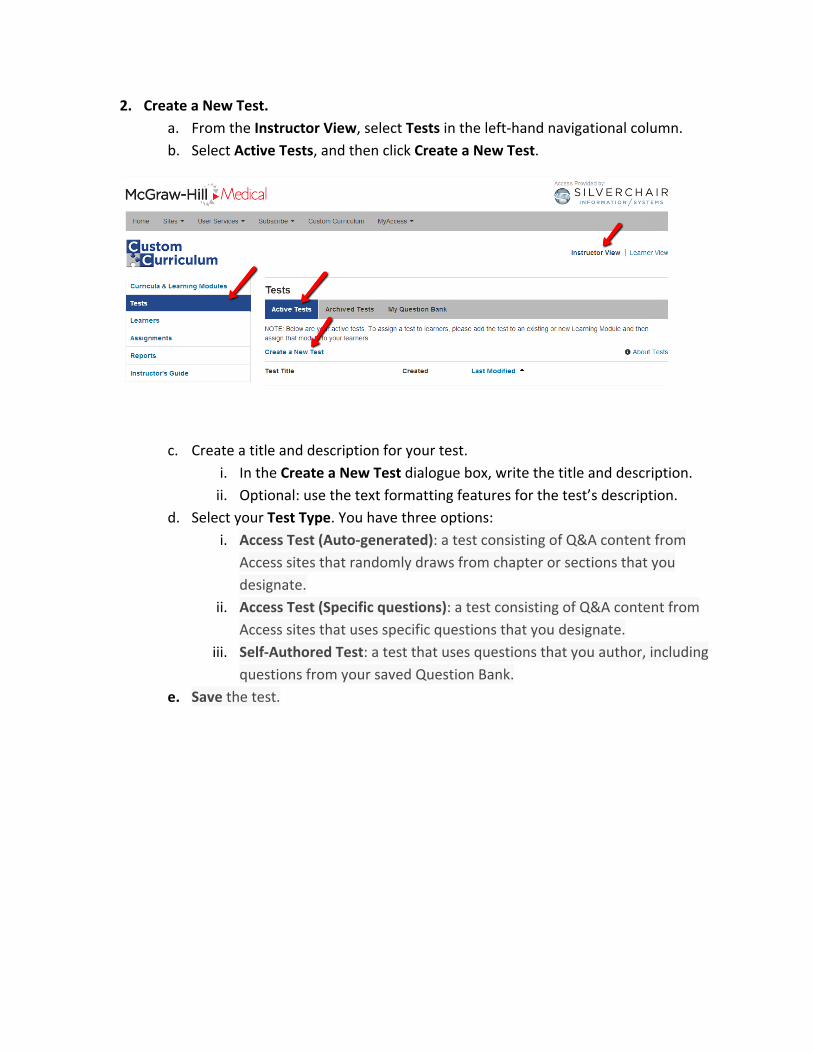
2. Create a New Test. a. From the Instructor View, select Tests in the left-hand navigational column. b. Select Active Tests, and then click Create a New Test.
c. Create a title and description for your test. i. In the Create a New Test dialogue box, write the title and description.
ii. Optional: use the text formatting features for the test’s description. d. Select your Test Type. You have three options:
i. Access Test (Auto-generated): a test consisting of Q&A content from Access sites that randomly draws from chapter or sections that you designate.
ii. Access Test (Specific questions): a test consisting of Q&A content from Access sites that uses specific questions that you designate.
iii. Self-Authored Test: a test that uses questions that you author, including questions from your saved Question Bank.
e. Save the test.
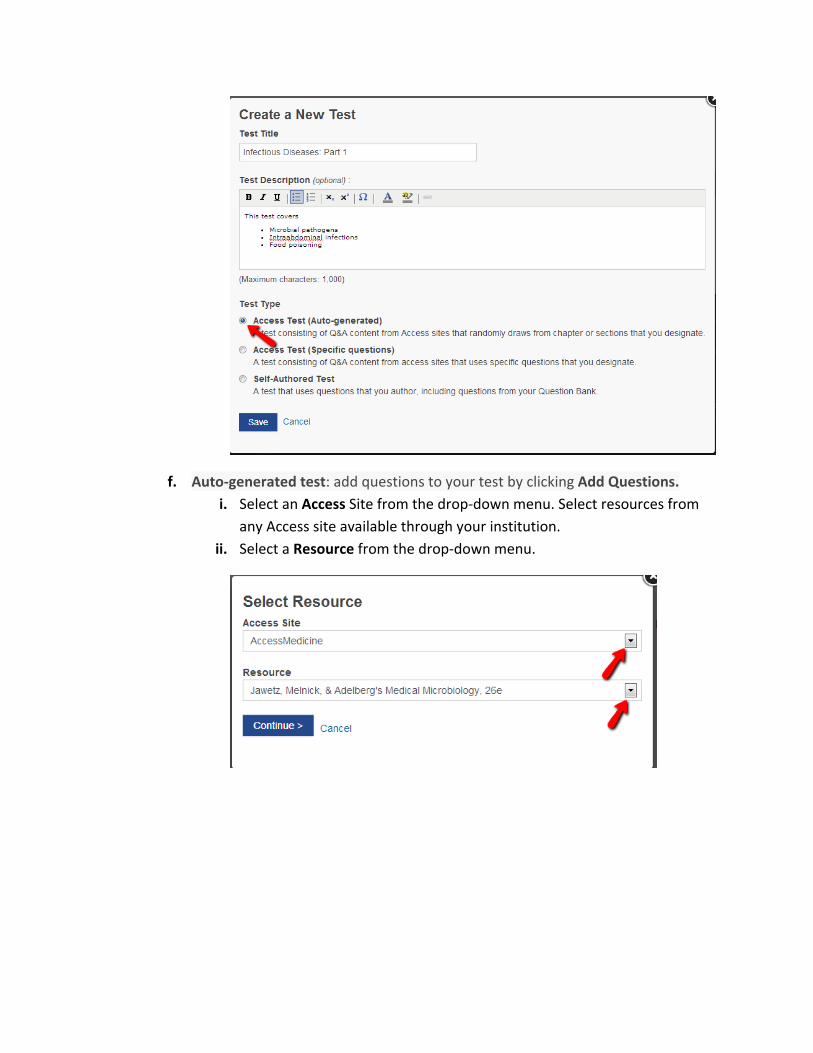
f. Auto-generated test: add questions to your test by clicking Add Questions. i. Select an Access Site from the drop-down menu. Select resources from
any Access site available through your institution. ii. Select a Resource from the drop-down menu.
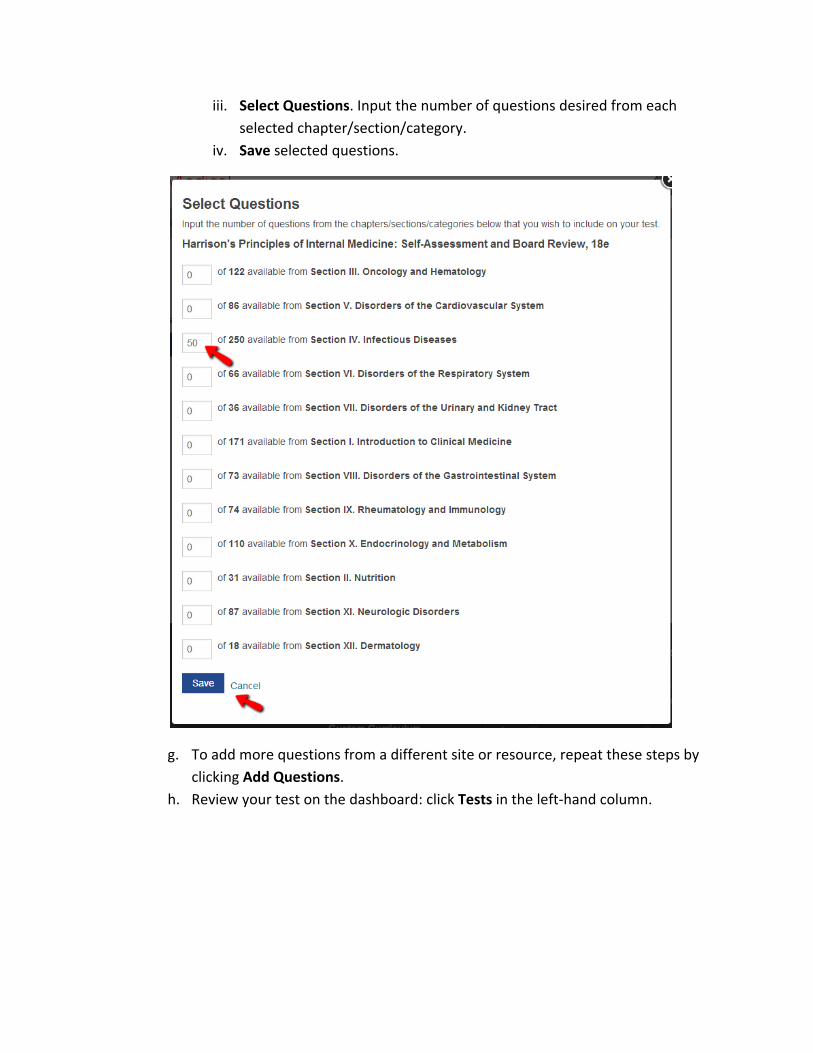
iii. Select Questions. Input the number of questions desired from each selected chapter/section/category.
iv. Save selected questions.
g. To add more questions from a different site or resource, repeat these steps by clicking Add Questions.
h. Review your test on the dashboard: click Tests in the left-hand column.

i. Test with Specific Questions: i. Click Tests in the left-hand navigational column.
ii. Under Active Tests, click Create a New Test. iii. Write a test title and description. iv. Select Access Test (Specific questions) from the radio buttons. v. Save test.
vi. Add Questions 1. Select the desired Access site, resource and category from the
drop-down menus. 2. Check the boxes to select the desired questions. 3. Review the full question and answer: click View Question with
Answer. 4. Save your questions: scroll to the bottom of the questions page to
save. 5. Add more questions by repeating these steps.
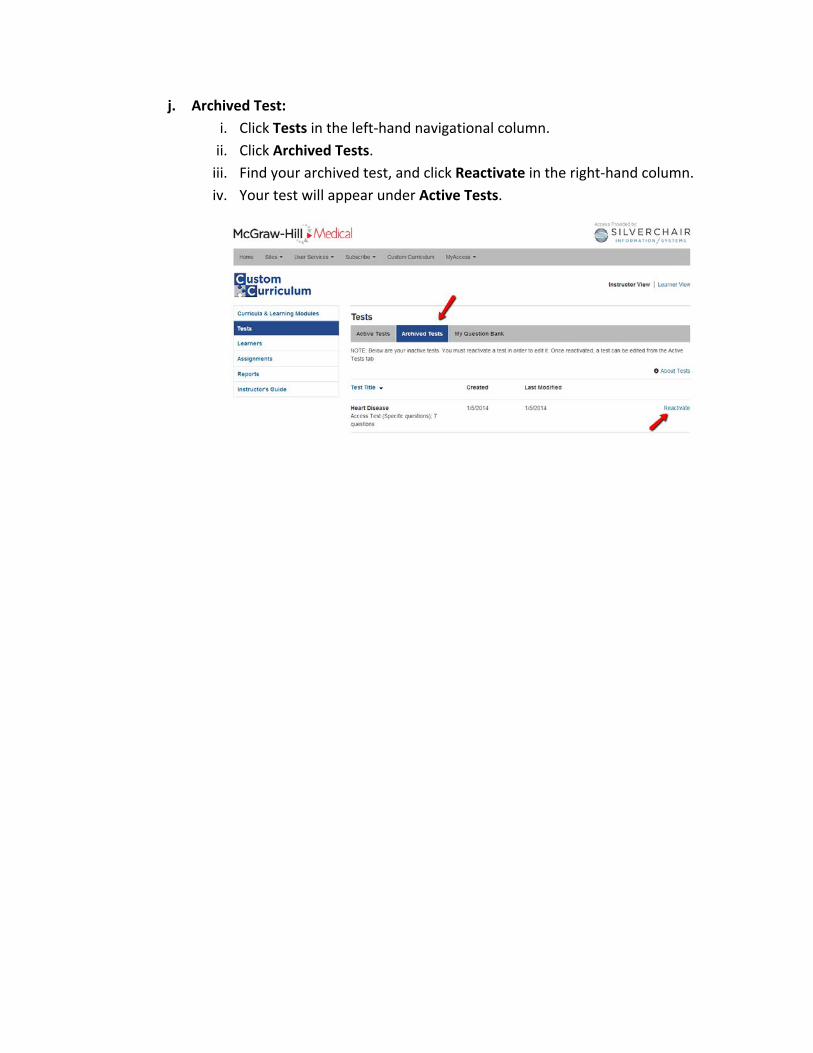
j. Archived Test: i. Click Tests in the left-hand navigational column.
ii. Click Archived Tests. iii. Find your archived test, and click Reactivate in the right-hand column. iv. Your test will appear under Active Tests.

k. Self-Authored Test: i. Click Tests in the left-hand navigational column.
ii. Under Active Tests, click Create a New Test. iii. Write a test title and description. iv. Select Self-Authored Test, and Save test. v. Select Create a New Question or Add from Question Bank. (Note: You
must have questions already created in order to select from the Question Bank.)
vi. Write or copy text in the Question Text box. vii. Add Image from your own collection of image files (optional).
viii. Select the Number of Multiple Choice Answer Options, and click Continue.
ix. Question: Write or copy answer selections in the box, and click Continue.
x. Answers: Select which answer is the correct answer, and click Continue. xi. Other Options: Write or copy an Answer Explanation, and click Continue.
xii. Confirmation: Review question and answer content. xiii. Click Save and Add to Test.
3. Manage Learners. a. Select Learners in the left-hand navigational column. b. Under Active Learner Groups:
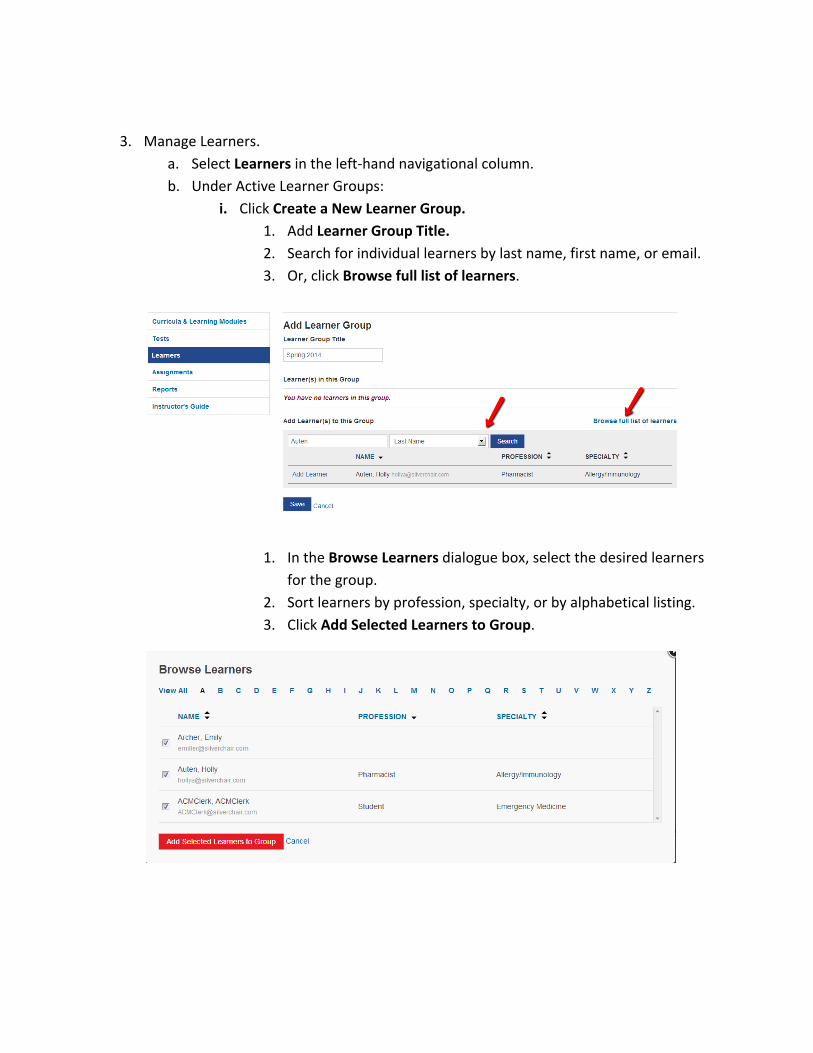
i. Click Create a New Learner Group. 1. Add Learner Group Title. 2. Search for individual learners by last name, first name, or email. 3. Or, click Browse full list of learners.
1. In the Browse Learners dialogue box, select the desired learners for the group.
2. Sort learners by profession, specialty, or by alphabetical listing. 3. Click Add Selected Learners to Group.

ii. Edit Existing Learner Group. 1. Select Learners in the left-hand navigational column, and then
select Active Learner Groups. a. Click the desired learner group title.
b. Search for individual learners, or browse the full list of learners.
c. Add selected learner(s) to the group. d. Remove learners: click the X next to the learner’s name. e. Save your learner group.

4. Assignments a. Click Assignments in the left-hand navigational column. b. Click Create New Assignment. c. Write an Assignment Name in the Create Assignment dialogue box. d. Select a Learning Module. e. Select the learner group under Assigned to. f. Save the assignment.

5. Reports a. Select Reports from the left-hand navigational column. b. Select the type of report:
i. Learner Report provides a view into specific learners’ progress. ii. Assignment Report provides a view into assignment details.
iii. Shared Modules Report shows modules shared across the institution. c. Select Learner or Learner Groups. d. Indicate the assignment date range. e. Click Run Report.