cucm tutorial cisco
TRANSCRIPT

8/11/2019 Cucm Tutorial Cisco
http://slidepdf.com/reader/full/cucm-tutorial-cisco 1/180
sco’s Unified Communications Management Solutionsco’s Unified Communications Management Solution
Cisco UnifiedProvisioning Manager
Tutorial
Cisco UnifiedProvisioning Manager
utorial

8/11/2019 Cucm Tutorial Cisco
http://slidepdf.com/reader/full/cucm-tutorial-cisco 2/180
© 2007 Cisco Systems, Inc. All rights reserved. Introduction 1-2Provisioning Manager Tutorial
About This Tutorial
Explore the Unified Communicationsenvironment and tools for provisioningphone services
Highlight the key features of Cisco’sSolution - Provisioning Manager
Follow along with various scenariosdetailing how to use ProvisioningManager
Provide system administrationguidelines for Provisioning Manager
Provide links to additional information
on Provisioning Manager
About This Tutorial
This tutorial on Cisco Unified Provisioning Manager (PM) provides self-paced training focused on using thkey features of the PM application.
The tutorial is structured as a series of self-paced chapters that explore the architecture, key features
common usage, and system administration guidelines for the product. Also included as part of the tutorial is ahelpful reference section containing links to technical documents on component products, concepts, andterminology. The tutorial material is presented through text, illustrations, hypertext links, and typicascenarios.
This tutorial is an excellent resource to introduce you to using the many features found in the Cisco UnifieProvisioning Manager product, as well as, its interaction with other related products.

8/11/2019 Cucm Tutorial Cisco
http://slidepdf.com/reader/full/cucm-tutorial-cisco 3/180
© 2007 Cisco Systems, Inc. All rights reserved. Introduction 1-3Provisioning Manager Tutorial
How the Tutorial is Organized
Chapter 1
Introduction
Chapter 2
Provisioning Manager (PM)Product Features
Chapter 3
Provisioning Manager Scenarios
Chapter 4
System AdministrationGuidelines
Chapter 5
Helpful Links to ReferenceMaterial
Explore the Unified Communications’ environment, thechallenges, and the tools for managing Unified
Communications
Learn about the key features of PM for provisioning IPphone services
Using several examples, learn how to deploy PM anduse many of its features for provisioning IP phone
services
Review important system requirements, installationguidelines, and system administrative functions
A comprehensive set of links to more information onProvisioning Manager and related topics
How This Tutorial Is OrganizedThe tutorial is divided into five chapters:
Chapter 1: Introduction
This chapter describes Unified Communications and highlights both the need for management and the
challenges often encountered in the provisioning of IP phone services.
Chapter 2: Provisioning Manager Product Features
This chapter discusses the key features of the Cisco Unified Provisioning Manager (PM) application. Thproduct is presented through both discussions of the major functional components and screen shots of manykey product features.
Chapter 3: Provisioning Manager Scenarios
This chapter walks you through step-by-step examples to provide hands-on experience using the PMapplication. The case studies begin with steps on how to get started, followed by using various features toprovision IP phone services in both existing and new deployments.
Chapter 4: System Administration Guidelines
This chapter provides information about the PM client and server requirements, software installatioguidelines, security administration, periodic maintenance, and troubleshooting tips.
Chapter 5: References
This chapter contains a list of additional product information, such as links to related white papers anddocumentation.

8/11/2019 Cucm Tutorial Cisco
http://slidepdf.com/reader/full/cucm-tutorial-cisco 4/180
<Intentionally Left Blank>

8/11/2019 Cucm Tutorial Cisco
http://slidepdf.com/reader/full/cucm-tutorial-cisco 5/180
Chapter 1Chapter 1
Cisco Unified
Provisioning Manager ntroduction
Cisco Unified
Provisioning Manager ntroduction

8/11/2019 Cucm Tutorial Cisco
http://slidepdf.com/reader/full/cucm-tutorial-cisco 6/180
© 2007 Cisco Systems, Inc. All rights reserved. Introduction 1-6Provisioning Manager Tutorial
Chapter 1 Outline
Managing UnifiedCommunications
– Environment – Need
– Provisioning Challenges
Cisco’s Solution
– Cisco Unified Provisioning Manager
– Unified Communications ManagementSuite
Chapter 1 Outline
It’s no secret that companies can enjoy many benefits by converging their voice and data networks. Witconverged networks becoming more and more the norm, the industry has seen a rapid introduction of newmedia-rich applications providing end-users with more and more communications flexibility to achieve even
greater levels of convenience and productivity. As in all network related fields, Cisco continues to be a leadeoffering a vast integrated portfolio of communications related products and services.
As with data networks, the main goal is to provide the end-user with a high-level service that is consistent oa day-to-day basis. Because communication networks differ in operation, the network manager needs awhole new set of tools to help simplify and expedite his day-to-day duties.
This chapter first presents the Unified Communications’ environment and associated management tasksSince this tutorial is focusing on the provisioning of voice services, the challenges associated witprovisioning tasks are presented next, followed by the introduction of Cisco’s management tool foperforming these tasks, Provisioning Manager, and a brief discussion on Cisco’s entire UnifiedCommunications Management suite of tools.

8/11/2019 Cucm Tutorial Cisco
http://slidepdf.com/reader/full/cucm-tutorial-cisco 7/180
Managing UnifiedCommunicationsManaging UnifiedCommunications
Managing Unified
Communications
Cisco’s Solution

8/11/2019 Cucm Tutorial Cisco
http://slidepdf.com/reader/full/cucm-tutorial-cisco 8/180
© 2007 Cisco Systems, Inc. All rights reserved. Introduction 1-8Provisioning Manager Tutorial
Unified Communications Defined
Cisco Unified Communications is an integrated and open portfolio ofproducts and applications that unify and simplify all forms of
communications, independent of location, time, or device
Communications that… – Eliminate Chaos
– Improve Processes
– Enhance Productivity
– Control Costs
– Increase Satisfaction
– Improve Competitive Advantage
Cisco UnifiedCommunications
Cisco UnifiedCommunications
Voice MailVoice Mail
ConferencingConferencing
VideoVideo
Call ControlCall Control
Calendar Calendar
Contact Center Contact Center
EmailEmail
MobilityMobility
SecuritySecurity
PresencePresence
DirectoriesDirectories
Unified Communications Defined
Today's organizations must contend with increasingly complex communication environmentsfeaturing a wide array of communication methods. Employees, business partners, and customerscommunicate with one another through infinite combinations of phones, voice messaging, e-mail,
fax, mobile clients, and rich-media conferencing. Too often, however, these tools are not used aseffectively as they could be. The result is information overload and misdirected communicationsthat delay decisions, slow down processes, and reduce productivity.
IP communications solutions have proven their ability to help organizations solve such problems,enabling them to streamline business processes and reduce costs. For years, companies of allsizes have been realizing the benefits that carrying voice, data, and video communications acrossa common, IP infrastructure can bring.
Today, with the Cisco Unified Communications system of voice and IP communications products,those benefits are greater than ever. Instead of simply connecting products, the Cisco UnifiedCommunications system provides structure and intelligence that helps organizations integrate theircommunications more closely with business processes, and ensure information reaches recipientsquickly, through the most appropriate medium.
Businesses can collaborate in real time using advanced applications such as videoconferencing;integrated voice and Web conferencing; mobile IP soft phones; voicemail; and more-from anintegrated, easy-to-use interface. The solution saves time and helps control costs, while improvingproductivity and competitiveness. In a 2005 Sage Research study, 86 percent of companies usingUnified Communications reported that productivity benefits have grown. More than 60 percentreported savings of three or more hours per week for each mobile worker. Such studies confirmthat migrating to a Unified Communications system provides a substantial return on investment(ROI) and a reduced total cost of ownership (TCO).
The Cisco Unified Communications portfolio is an integral part of the Cisco BusinessCommunications Solution-an integrated solution for organizations of all sizes that also includesnetwork infrastructure, security, network management products, wireless connectivity, and alifecycle services approach, along with flexible deployment and management options, financingpackages, and third-party communications applications.

8/11/2019 Cucm Tutorial Cisco
http://slidepdf.com/reader/full/cucm-tutorial-cisco 9/180
© 2007 Cisco Systems, Inc. All rights reserved. Introduction 1-9Provisioning Manager Tutorial
Managing Unified CommunicationsEnvironment
The broad range of CiscoUnified Communicationsproducts provides enormous
flexibility
What provides value in termsof flexibility makes the need forunified management morecritical than ever before
Effective management ofUnified Communications
systems requires managementof all components
CU Presence Server
CUCC, CUCCE, CER
Applications
CU MeetingPlace
CU MeetingPlace Express
Rich Media Collaboration
CUCM, CUCME
CU, CUC, CUE
Call Control and Messaging
Routers
Switches
Gateways/Gatekeepers
Trunking
IP Fabric
Managing Unified Communications
Most companies have spent a considerable amount of resources to design and implement a networmanagement strategy for the data network. Surely the addition of voice and voice services to the networwon’t change the management strategy? Unfortunately, with the introduction of any new technology o
service to the network, the network management plan must be revised to meet the special managemenrequirements of the new technology or service.
The network management plan may have been originally created to manage data, which by nature is burstyand tolerant of delay and jitter. This is in direct contrast with voice and video transmission, which is highlysusceptible to delay and jitter. Therefore, new management techniques must be implemented to ensureproper operation of both types of traffic. Further with the IP-enabling of voice services, a network managemust now ensure these services will be available across the network at all times, this includes the availabilityand proper operation of the IP infrastructure, as well as, the proper configuration and availability of thecommunication related call control services and communication applications.
Each of these components is essential to a successful Unified Communications deployment and thereforshould be managed accordingly in order to provide the end-user with complete spectrum of their offeredadvantages.
8/11/2019 Cucm Tutorial Cisco
http://slidepdf.com/reader/full/cucm-tutorial-cisco 10/180
© 2007 Cisco Systems, Inc. All rights reserved. Introduction 1-10Provisioning Manager Tutorial
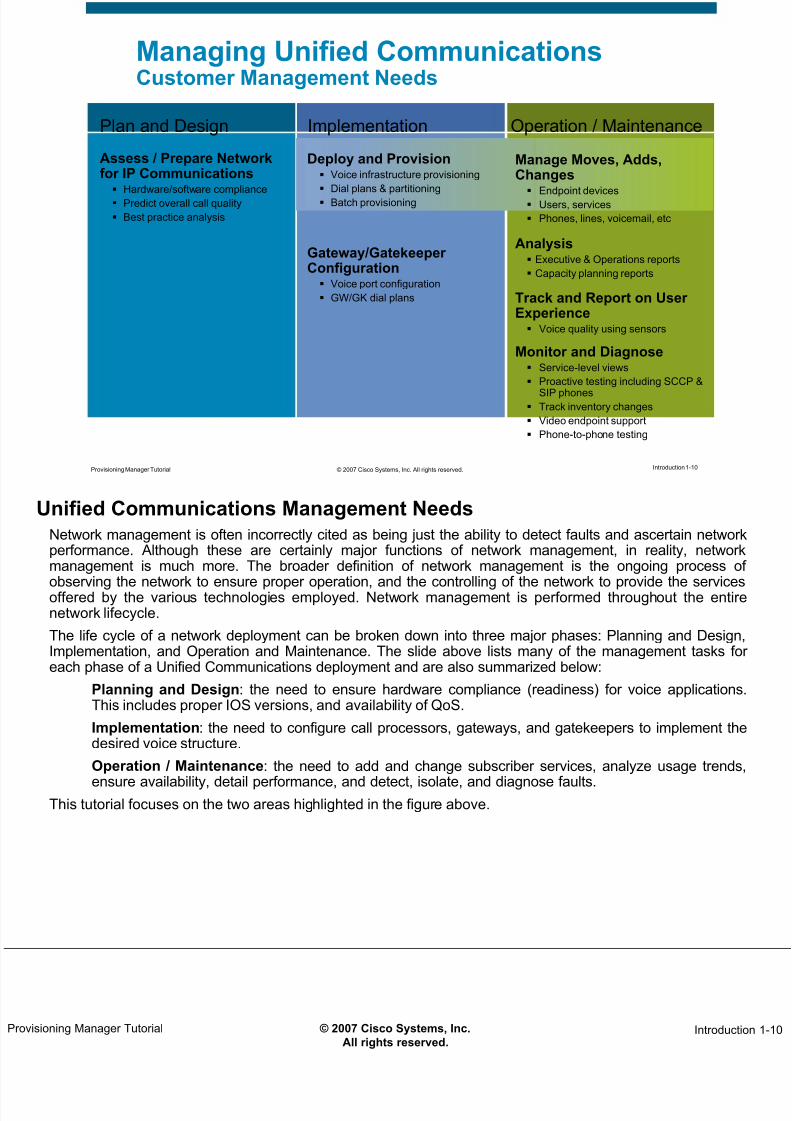
Managing Unified CommunicationsCustomer Management Needs
Plan and Design Implementation Operation / Maintenance
Gateway/GatekeeperConfiguration
Voice port configuration
GW/GK dial plans Track and Report on UserExperience
Voice quality using sensors
Analysis Executive & Operations reports
Capacity planning reports
Assess / Prepare Networkfor IP Communications
Hardware/software compliance
Predict overall call quality
Best practice analysis
Monitor and Diagnose Service-level views
Proactive testing including SCCP &
SIP phones Track inventory changes
Video endpoint support
Phone-to-phone testing
Deploy and Provision Voice infrastructure provisioning
Dial plans & partitioning
Batch provisioning
Manage Moves, Adds,Changes
Endpoint devices Users, services
Phones, lines, voicemail, etc
Unified Communications Management Needs
Network management is often incorrectly cited as being just the ability to detect faults and ascertain networperformance. Although these are certainly major functions of network management, in reality, networmanagement is much more. The broader definition of network management is the ongoing process o
observing the network to ensure proper operation, and the controlling of the network to provide the servicesoffered by the various technologies employed. Network management is performed throughout the entirnetwork lifecycle.
The life cycle of a network deployment can be broken down into three major phases: Planning and DesignImplementation, and Operation and Maintenance. The slide above lists many of the management tasks foeach phase of a Unified Communications deployment and are also summarized below:
Planning and Design: the need to ensure hardware compliance (readiness) for voice applicationsThis includes proper IOS versions, and availability of QoS.
Implementation: the need to configure call processors, gateways, and gatekeepers to implement thdesired voice structure.
Operation / Maintenance: the need to add and change subscriber services, analyze usage trends
ensure availability, detail performance, and detect, isolate, and diagnose faults.This tutorial focuses on the two areas highlighted in the figure above.

8/11/2019 Cucm Tutorial Cisco
http://slidepdf.com/reader/full/cucm-tutorial-cisco 11/180
© 2007 Cisco Systems, Inc. All rights reserved. Introduction 1-11Provisioning Manager Tutorial
Managing Unified CommunicationsProvisioning Challenges
Call Manager
Unity
Call Manager Express
Unity Express
Exchange
When provisioning IP telephonyservices, there are separateinterfaces for each component to
be configured – “Simple” provisioning tasks often
require highly skilled personnel
The provisioning workflowprocess is typically not welldefined or difficult to control andmonitor
The inventory is not integratedwith provisioning workflow,
making tasks more difficult
Provisioning Challenges
This tutorial will focus on provisioning tasks, so let’s take a look at some of the challenges associated withprovisioning related tasks.
Perhaps the biggest challenge is the fact that to provision a new service for a subscriber may require the
configuration of several applications. This means not only having expertise on each of these systems, bualso knowing each separate interface. This requires time (to perform and learn), which is often a preciouscommodity in the day of a network administrator (who more often than not is wearing many different hats)and is prone to operator error. Hence, simple day-to-day provisioning tasks are often being handled by thhighly skilled staff member, which keeps them from performing tasks better suited to their talents.
Further, the actual provisioning of a new phone, requires many intermediate physical steps such as retrievingthe phone from the inventory (if there is one, and the phone requested actually physical exists in thinventory), shipping the phone, and even possibly getting someone to first approve the request. With athese steps, the possibility of an order getting “lost’ or ‘delayed’ is very real.
Though this is a common task, it requires expertise, consumes time, and is prone to errors. A good networkmanagement tool will directly address these problems by simplifying the task (concealing configuration stepsthus reducing the dependency on expertise), reducing or eliminating mistakes, and saving time.

8/11/2019 Cucm Tutorial Cisco
http://slidepdf.com/reader/full/cucm-tutorial-cisco 12/180
<Intentionally Left Blank>

8/11/2019 Cucm Tutorial Cisco
http://slidepdf.com/reader/full/cucm-tutorial-cisco 13/180
Cisco’s SolutionCisco’s Solution
Managing Unified
Communications
Cisco’s Solution

8/11/2019 Cucm Tutorial Cisco
http://slidepdf.com/reader/full/cucm-tutorial-cisco 14/180
© 2007 Cisco Systems, Inc. All rights reserved. Introduction 1-14Provisioning Manager Tutorial
Cisco’s SolutionCisco Unified Provisioning Manager
Service Active
CallManager
Request for
Service
Unity CCME
Automated Activation
Unified: single interface
Simplified: business-process &user-oriented
Rapid: <1 minute for activation
Accurate: Reduce manual &duplicate entry errors
User-friendly: template-basedinterface & business abstraction
CUE
A web-based, integrated provisioningsolution used to manage IP telephony andrelated unified messaging services
Unity
Connection
Cisco Unified Provisioning Manager
Cisco Unified Provisioning Manager (PM) is a user-friendly web-based, integrated provisioning solution usedto provision Cisco Unified Communications initial deployments and implementations, as well as, providingongoing operational provisioning and activation for individual subscriber service requests.
PM answers the biggest provisioning challenge by simplifying and expediting the provisioning procesthrough a single unified interface eliminating the need to learn multiple application interfaces, as well as, ancommand level configuration. With PM, day-to-day provisioning tasks no longer require the expertise ohighly skilled staff member, thus saving money and freeing their time. Further, PM can be used across thenterprise to provide provisioning services for many calling domains.

8/11/2019 Cucm Tutorial Cisco
http://slidepdf.com/reader/full/cucm-tutorial-cisco 15/180
© 2007 Cisco Systems, Inc. All rights reserved. Introduction 1-15Provisioning Manager Tutorial
Cisco’s SolutionCisco Unified Provisioning Manager
Day 1 Tasks Day 2 Tasks
Pre-configure and push Dial-Plancomponents and other ‘common’constructs to end systems
− Templates provide consistency
Batch processing of total ‘services’for subscribers
Managing subscribers and orderingsubscriber services
−
Can use provisioning workflow withoptional checkpoints for each task(authorization, asset assignment, shipping,and receiving)
− Provisioning policy can be set at severallevels
− Administration can be delegated bydomain
Tracking and reporting of subscriberassets
Auditing and tracking of all configuration changes on the underlying applications
Auto population and periodic synchronization of data from Cisco Unified CommunicationsManager, Cisco Unified Communications Manager Express, Unity, Unity Express, andUnity Connection for system configuration and subscriber information
Cisco Unified Provisioning Manager
Cisco Unified Provisioning Manager can be used for both Day 1 and Day 2 provisioning tasks driving downthe costs of both the initial deployment and on-going day-to-day operations.
Day 1 – Using a powerful template capability, a network administrator can define and configur
common constructs for provisioning call and messaging systems. These templates can be reused fonew sites or location deployments. A batch provisioning capability allows for the rollout of a largnumber of subscribers at once.
Day 2 – After Day 1, PM provides the mechanism to quickly and accurately provision and activatsubscriber services. Policies can be defined at various levels that dictates who can manage that levehow the business level services map onto the Cisco Unified set of call and messaging applicationsand which types of subscribers are permitted to order which standard services.
Additionally, PM creates an audit trail of all configuration changes, and synchronizes on-demand with andefined CallManager and Unity system for configuration and subscriber information.
PM greatly simplifies the provisioning and activating of subscriber services, while retaining the overall abilitto manage and provide services that leverage the underlying Cisco Unified applications. Costs are reduced
time to dial tone is reduced; errors are practically eliminated. Subscribers are more satisfied, and thcompany’s voice administrators are freer to focus on higher value activities rather than repetitive operationaissues.

8/11/2019 Cucm Tutorial Cisco
http://slidepdf.com/reader/full/cucm-tutorial-cisco 16/180
© 2007 Cisco Systems, Inc. All rights reserved. Introduction 1-16Provisioning Manager Tutorial
Cisco’s SolutionUnified Communications Management Suite
Plan and Design Implementation Operation / Maintenance
CiscoWorks Voice Manager Cisco Unified Service Monitor
Cisco Unified OperationsManager
Service Statistics Manager
Cisco Unified Provisioning Manager
Assess / Prepare Network forUnified Communications
Hardware / software compliance
Predict overall call quality
Best practice analysis
Deploy and Provision Voice infrastructure provisioning
Dial plans & partitioning
Batch provisioning
Manage Moves, Adds, Changes Endpoint devices
Users, services
Phones, lines, voicemail, etc
Gateway/GatekeeperConfiguration
Voice port configuration
GW/GK dial plans
Monitor and Diagnose Service-level views
Proactive testing including SCCP &SIP phones
Track inventory changes
Video endpoint support
Phone-to-phone testing
Analysis Executive & Operations reports
Capacity planning reports
Track and Report on UserExperience
Voice quality using sensors
Unified Communications Management Suite
The Cisco Unified Communications Management Suite is a comprehensive portfolio of tools that providemanagement capabilities for all tasks associated with the Unified Communications lifecycle.
Readiness Assessment Manager – Assists the network designer to ensure the network is ready to
support communication traffic.Cisco Unified Provisioning Manager – As previously described, provides the ability to configurvoice constructs on Cisco CallManager, CallManager Express, Unity, Unity Express, and UnityConnection systems, as well as, provision and activate subscriber services.
CiscoWorks Voice Manager - Provides enhanced capabilities to configure and provision voice portscreate and modify dial plans, and collect call history data on Cisco IOS routers with Gatekeeper andGateway capabilities.
Cisco Unified Service Statistics Manager – Provides trending information to assist in planninupgrades and monitoring performance.
Cisco Unified Service Monitor - Continuously monitors active calls supported by the Cisco UnifieCommunications system and provides near-real-time notification when the voice quality of a call fails
to meet a user-defined quality threshold.
Cisco Unified Operations Manager - Provides comprehensive monitoring and diagnostics for thentire Unified Communications system, including the multiple applications as well as the underlyingtransport infrastructure.

8/11/2019 Cucm Tutorial Cisco
http://slidepdf.com/reader/full/cucm-tutorial-cisco 17/180
© 2007 Cisco Systems, Inc. All rights reserved. Introduction 1-17Provisioning Manager Tutorial
Cisco’s SolutionUnified Communications Management Suite
Empowering Customers to be More Efficient WhileOperating the Unified Communication System
Empowering Customers to be More Efficient WhileOperating the Unified Communication System
Productivity Simplification Automation
Unified Communications Management Suite
The Cisco Unified Communications Management Suite is designed to work with the Cisco UnifieCommunication portfolio of products to improve productivity and reduce total cost of ownership throughautomation, integration, and simplification.
8/11/2019 Cucm Tutorial Cisco
http://slidepdf.com/reader/full/cucm-tutorial-cisco 18/180
Thank You!
Continue on to Chapter 2 to discover the many features of Cisco Unified Provisioning Manager.
Cisco Systems
8/11/2019 Cucm Tutorial Cisco
http://slidepdf.com/reader/full/cucm-tutorial-cisco 19/180
Chapter 2Chapter 2
Cisco UnifiedProvisioning Manager Product Features
Cisco Unified
Provisioning Manager Product Features

8/11/2019 Cucm Tutorial Cisco
http://slidepdf.com/reader/full/cucm-tutorial-cisco 20/180
© 2007 Cisco Systems, Inc. All rights reserved. Features 2-2Provisioning Manager Tutorial
Chapter 2 Outline
Overview
Functional Architecture
Features
Benefits
Chapter 2 Outline
As outlined in Chapter 1, provisioning voice services for subscribers has traditionally required expertise onumerous systems, is time consuming, and can be prone to human error. Further, with no easy way toquickly and concisely view the voice infrastructure configuration, consistency issues could easily arise, an
subscribers may inadvertently be configured with more or less privileges than intended.To mitigate, and in many cases completely eliminate, these inherent issues with manual provisioningChapter 1 introduced Cisco Unified Provisioning Manager (PM). This chapter will further explore the manfeatures and benefits of PM.
Chapter 3 will then provide a jump start guide to simplifying voice services, by provisioning and activatinservices using PM through a series of real world scenarios.

8/11/2019 Cucm Tutorial Cisco
http://slidepdf.com/reader/full/cucm-tutorial-cisco 21/180
OverviewOverview
Overview
Functional Architecture
Features
Benefits

8/11/2019 Cucm Tutorial Cisco
http://slidepdf.com/reader/full/cucm-tutorial-cisco 22/180
© 2007 Cisco Systems, Inc. All rights reserved. Features 2-4Provisioning Manager Tutorial
Overview
Cisco Unified Provisioning Manager (PM) is a GUI web-based productused to simplify IP telephony management tasks, such as provisioning
and activating call services
Cisco Unified Provisioning Manager (PM) is a GUI web-based productused to simplify IP telephony management tasks, such as provisioning
and activating call services
PM can be used to manageboth new and existing UnifiedCommunications deployments
PM can be used to manageboth new and existing UnifiedCommunications deployments
Overview
Cisco Unified Provisioning Manager (PM) is a web-based GUI application that provides voice administratorwith an easy to use management application for managing IP communications services in an integrated IPtelephony, voicemail, and unified messaging environment.
PM acts as a single interface to voice application servers allowing for simple voice infrastructurconfiguration and subscriber services’ provisioning and activation. Using an infrastructure import feature, PMis just as effective managing existing deployments, as it is managing new ones.

8/11/2019 Cucm Tutorial Cisco
http://slidepdf.com/reader/full/cucm-tutorial-cisco 23/180
© 2007 Cisco Systems, Inc. All rights reserved. Features 2-5Provisioning Manager Tutorial
OverviewMulti-Dimensional Policy
Provisioning Manager provides a set of business-level management abstractions,which are policy driven through the use of automation, for managing subscriber
services across the Cisco Unified Communications infrastructure
Provisioning Manager provides a set of business-level management abstractions,which are policy driven through the use of automation, for managing subscriber
services across the Cisco Unified Communications infrastructure
Domains A secure locally administered sub-
division of the enterprise, whichdefines operational capabilities for agroup of subscribers
Service Areas
Subscriber services are mapped tothe devices and applications in thevoice network
Subscriber Types
Policies define the types of productsand services that can be ordered
Service
Areas
Subscriber Types
Domains
Multi-Dimensional Policy
The goal of any management platform is to simplify tasks. PM simplifies provisioning tasks by providing a seof business-level management abstractions. Policies are assigned to these abstractions, which thenfacilitates automation and reduces the daily reliance on experts.
We will briefly described these abstractions here; and in Chapter 3, they will be used in the scenarios.Domains: The concept of domains allows the enterprise to be sub-divided into secure, separatelyadministered partitions for a set of subscribers. Each domain has a set of policies that define the operationacapabilities for the subscriber services ordered within the domain.
Service Areas: Abstractions defined within domains that basically define IP telephony and message services(i.e. dial plan) for a subset of subscribers (based on Subscriber Type – see below) within the domain. Foexample, one service area may allow the assigned Subscriber Types to make long distance calls, whereanother service area would restrict the subscribers of the assigned Subscriber Types to local calls only.
Subscriber Types: Subscribers are assigned a Subscriber Type whose policies define products andservices that they can order.

8/11/2019 Cucm Tutorial Cisco
http://slidepdf.com/reader/full/cucm-tutorial-cisco 24/180
FunctionalArchitectureFunctionalArchitecture
Overview
Functional Architecture
Features
Benefits

8/11/2019 Cucm Tutorial Cisco
http://slidepdf.com/reader/full/cucm-tutorial-cisco 25/180
© 2007 Cisco Systems, Inc. All rights reserved. Features 2-7Provisioning Manager Tutorial
Functional ArchitectureAdministration
CCMECUE
CUCM
Unity Unity
Connection
PM administrator configures businessabstractions and sets policies
Devices (voice applications)
Domains
Service Areas
Subscriber Types
Provisioning Attributes
PM administrator configures businessabstractions and sets policies
Devices (voice applications)
Domains
Service Areas
Subscriber Types
Provisioning Attributes
PM manages existing VoIPdeployments by importing the voice
infrastructure configuration
PM manages existing VoIPdeployments by importing the voice
infrastructure configuration
H
T T P / S ,T el n e t / S S H , J DB C
HT T P
Use PM to configure and update thevoice infrastructure configuration
The Batch Provisioning feature allowsadministrators to rollout multiple ordersfor subscribers
Use PM to configure and update thevoice infrastructure configuration
The Batch Provisioning feature allowsadministrators to rollout multiple ordersfor subscribers
Functional Architecture - Administration
PM can be broken down into two basic functions:
• Administration
• Ordering
Administrator’s use a standard web browser to access PM to add and configure voice applications, and tconfigure and set policies on the various business abstractions. When either pushing or pulling voicinfrastructure configurations, PM will contact the appropriate voice application using its preferred accessprotocol (HTTP/S, Telnet/SSH, or JDBC(Java Database Connectivity)).
Note(s):
• The Java Database Connectivity (JDBC) API is the industry standard for database-independenconnectivity between the Java programming language and a wide range of databases – SQdatabases and other tabular data sources, such as spreadsheets or flat files. The JDBC API providesa call-level API for SQL-based database access.
• Microsoft Windows using the MS-SQL database and Linux based versions use an Informix database.

8/11/2019 Cucm Tutorial Cisco
http://slidepdf.com/reader/full/cucm-tutorial-cisco 26/180
© 2007 Cisco Systems, Inc. All rights reserved. Features 2-8Provisioning Manager Tutorial
Functional ArchitectureOrdering
CCMECUE
CUCM
Unity Unity
Connection
Configure Order Processing(approve, assign equipment, ship,
and receive)
Configure Order Processing(approve, assign equipment, ship,
and receive)
HT T P
/ S ,T el n e t / S S H , J DB C
HT T P
PM users create subscribers and placeorders for them within a single domain
Simple, single user interface
Reduces reliance on expertise
Order options controlled by policy
PM users create subscribers and placeorders for them within a single domain
Simple, single user interface
Reduces reliance on expertise
Order options controlled by policy Provisioning and Activation
PM handles all interaction with devices Eliminates error due to manual entry
Speeds up activation
Provisioning and Activation
PM handles all interaction with devices
Eliminates error due to manual entry
Speeds up activation
Functional Architecture - Ordering
When using PM to create subscribers and order subscriber services, the PM user launches a standard webbrowser to access PM. Once the order has been processed through the configurable ordering workflow, PMwill ‘activate’ it by configuring the appropriate processors using their preferred access protocol (HTTP/S
Telnet/SSH, or JDBC). This single web-based interface simplifies the ordering process and alleviates thenecessity of expertise on multiple systems to provision and activate.

8/11/2019 Cucm Tutorial Cisco
http://slidepdf.com/reader/full/cucm-tutorial-cisco 27/180
FeaturesFeatures
Overview
Functional Architecture
Features
Benefits

8/11/2019 Cucm Tutorial Cisco
http://slidepdf.com/reader/full/cucm-tutorial-cisco 28/180
© 2007 Cisco Systems, Inc. All rights reserved. Features 2-10Provisioning Manager Tutorial
FeaturesDay 1 Activities – Voice Infrastructure Configuration
Simple to use templateswith keyword substitution
Simple to use templateswith keyword substitution
Create, extend, and push voice infrastructure components of call andmessaging systems
Create, extend, and push voice infrastructure components of call andmessaging systems
Configurable voiceinfrastructure components
Configurable voiceinfrastructure components
PM can also import the voiceinfrastructure configuration for
existing deployments
PM can also import the voiceinfrastructure configuration for
existing deployments
Day 1 Activities – Voice Infrastructure Configuration
In this section, we will take a look at the key features of PM. As noted in Chapter 1, PM can be used for botDay 1 and Day 2 provisioning tasks, driving down the cost of both the initial deployment and on-going day-today operations.
On Day 1 of voice deployments, the main activity is the configuration of the voice infrastructure. Using apowerful template capability, a network administrator can define and configure common constructs foprovisioning call and messaging systems. These templates can be created using keyword substitutions tofacilitate reuse for additional new site or location deployments. As PM configures the voice processors andapplications, it records the settings, which will be needed when configuring PM business abstractions tsimplify the ordering and provisioning of subscriber services.
Provisioning Manager is not limited to new deployments, but can also manage existing deployments byimporting the existing voice infrastructure configuration. These settings will again be used to configure PMbusiness abstractions, which simplify the ordering and provisioning of subscriber services.
The template feature can also be used to extend any voice deployment.

8/11/2019 Cucm Tutorial Cisco
http://slidepdf.com/reader/full/cucm-tutorial-cisco 29/180
© 2007 Cisco Systems, Inc. All rights reserved. Features 2-11Provisioning Manager Tutorial
FeaturesDay 1 Activities – Batch Service Processing
Batch processing of total ‘services’ for subscribersBatch processing of total ‘services’ for subscribers
Enables easy rollouts of new offices Simplifies the transition off of legacy systems Enables easy rollouts of new offices Simplifies the transition off of legacy systems
Tab delimited spreadsheetTab delimited spreadsheet
Phone, line, voice mail, etcPhone, line, voice mail, etc
CCMECUE
CUCM
Unity UnityConnection
Day 1 Activities – Batch Service Processing
Typically, any new rollout of IP voice capabilities will also require the provisioning of a large number osubscriber services on Day 1. Subscriber services may be ordered using the Web interface on an individuabasis for a single subscriber. However, when deploying a large number of services, it is often desirable to
combine these together into a single batch, which can be scheduled to run at a later time. PM includes aeasy to use batch provisioning capability, which permits a single batch to contain multiple types of ordersadd, change, or cancel (i.e a batch can contain a combination of phone and voicemail additions or changes)

8/11/2019 Cucm Tutorial Cisco
http://slidepdf.com/reader/full/cucm-tutorial-cisco 30/180
© 2007 Cisco Systems, Inc. All rights reserved. Features 2-12Provisioning Manager Tutorial
FeaturesDay 2 Activities – Subscriber Services
Single view of a subscriber and their servicesSingle view of a subscriber and their services
Active Services Active Services
Order HistoryOrder History
Order DetailsOrder Details
Actions Actions
Day 2 Activities – Subscriber Services
In order to reduce the costs related to on-going day-to-day subscriber service management, the provisioningprocess needs to be simplified and automated without losing administrative control. PM greatly simplifiethis process by removing the complexities associated with the mapping of subscribers to voice constructs
(i.e. dial plans) and the configuration of multiple voice applications.PM provides a single, easy to use GUI interface that allows total management of subscribers and theiservices. From this GUI, an administrator can view the subscribers active services, view the history anddetails of services ordered for the subscriber, and order, change, or upgrade services for the subscriber.

8/11/2019 Cucm Tutorial Cisco
http://slidepdf.com/reader/full/cucm-tutorial-cisco 31/180
© 2007 Cisco Systems, Inc. All rights reserved. Features 2-13Provisioning Manager Tutorial
FeaturesDay 2 Activities – Ordering Services
Simple to use wizard-based orderingSimple to use wizard-based ordering
List of orderable products &services associated with subscriber
List of orderable products &services associated with subscriber
Day 2 Activities – Ordering Services
Provisioning Manager permits standard voice services (phone, line, and voicemail, for example) to beordered for subscribers (the owner of the individual phone, voicemail, etc). The available products andservices available to a specific subscriber depend on the policy associated with the subscriber’s Subscribe
Type. An ordering wizard guides the order administrator quickly and accurately through the provisioning of thproduct or service without requiring them to have an underlying knowledge of the voice applications that aredelivering those services or the interfaces required to configure them.

8/11/2019 Cucm Tutorial Cisco
http://slidepdf.com/reader/full/cucm-tutorial-cisco 32/180
© 2007 Cisco Systems, Inc. All rights reserved. Features 2-14Provisioning Manager Tutorial
FeaturesDay 2 Activities – Provisioning Attributes
Product and service attributes can be configured atvarious policy levels and applied during activation
Product and service attributes can be configured atvarious policy levels and applied during activation
Domain
Subscriber Type
Service Area
Order Entry
Line AttributesLine Attributes
Voicemail Attributes
Voicemail Attributes
Day 2 Activities – Provisioning Attribute
Provisioning Manager can be configured by a system administrator at several policy levels (domainsubscriber type, service area, or on an individual order basis) with service attributes that will be applied to theservices of an order during activation. This allows flexibility and again relieves the ordering administrato
from having to fully understand voice provisioning.

8/11/2019 Cucm Tutorial Cisco
http://slidepdf.com/reader/full/cucm-tutorial-cisco 33/180
© 2007 Cisco Systems, Inc. All rights reserved. Features 2-15Provisioning Manager Tutorial
FeaturesDay 2 Activities – Order Processing
Yes Yes Yes Yes
No NoNo NoApproval
RequiredProvision
Order
Assignment
Required
Shipping
Required
Receiving
Required
Approve
Order
Assign MAC
and place in
Workflow
Ship
Product(s)
Confirm
Receipt of
Product(s)
Place
Order
Individual workflow activities can be enabled or disabled andassigned to different PM administrative users resulting in many
possible workflow arrangements on a per domain basis
Individual workflow activities can be enabled or disabled andassigned to different PM administrative users resulting in many
possible workflow arrangements on a per domain basis
Flexible coordination of activities within the ordering process(approve order, assign equipment, ship equipment, and receive equipment)
Flexible coordination of activities within the ordering process(approve order, assign equipment, ship equipment, and receive equipment)
Day 2 Activities – Order Processing
Though PM allows for the automation of provisioning, control can be maintained using a workflow, whicprovides administrative activities acting as checkpoints (approval, assignment, shipping, and receiving).
Individual workflow activities can be enabled or disabled and assigned to different PM administrators on a
per domain basis, resulting in many possible workflow arrangements. If enabled, processing will stop untthe assigned PM user accepts the order and takes the appropriate action. Once the action is acknowledgedthe processing will continue. Any disabled steps will be automatically acknowledged by PM.

8/11/2019 Cucm Tutorial Cisco
http://slidepdf.com/reader/full/cucm-tutorial-cisco 34/180
© 2007 Cisco Systems, Inc. All rights reserved. Features 2-16Provisioning Manager Tutorial
FeaturesRole-based Provisioning
PM user roles are associated with the steps of the provisioning tasks• User can be assigned more than one role
• Access scope limited to a single domain
PM user roles are associated with the steps of the provisioning tasks• User can be assigned more than one role
• Access scope limited to a single domain
Provision
Order Approve
Order
Assign MAC
and ship
Confirm
Receipt of
Product(s)
Place
Order
Mary has‘Ordering’privileges
and ordersservices for
a subscriber
Mary also has‘Receiving’
privileges andconfirms the
equipment has
been receivedto finish theworkflow
David has‘Approval’privilegesand mustapprove
order beforeworkflow cancontinue
Bill has‘Assignment and
Shipping’privileges andmust assign a
phone to theorder and ship itbefore continuing
the workflow
Role Based Provisioning
Provisioning Manager users are assigned various user roles, which define the user’s access to certaifunctions exposed via the web interface.
The system or global administrator user role allows the user total access to PM. This user is typically an IP
telephony expert and configures PM’s business abstractions with the appropriate configurations to reflect theprovisioning to take place on the underlying voice applications.
Other users are assigned to a specific domain and their user roles are based on the activity steps of theordering workflow. A domain user can be assigned more than one user role. In the example above, theworkflow in a specific domain has been configured to wait for approval, assignment, and receiving. Differendomain users have been assigned to perform the different activities. For example,
• Mary is responsible for placing the order.
• David must then approve the order before order processing can continue.
• Once approved, Bill selects a phone and assigns a MAC address to the order.
• Since shipping is not enabled, PM automatically acknowledges that step and the order waits at th
receiving step.• Mary, who is also assigned to receiving, waits to acknowledge the order until she is sure the phone i
in place on the subscriber’s desk. Once Mary acknowledges the receiving step, the order iprovisioned and activated on the underlying voice applications.

8/11/2019 Cucm Tutorial Cisco
http://slidepdf.com/reader/full/cucm-tutorial-cisco 35/180
© 2007 Cisco Systems, Inc. All rights reserved. Features 2-17Provisioning Manager Tutorial
Inventory Management
PM keeps a searchable inventory of phones and Directory Numbers (DN).Phones and DNs can also be added and reserved for a specific subscriber.PM keeps a searchable inventory of phones and Directory Numbers (DN).Phones and DNs can also be added and reserved for a specific subscriber.
Inventory Management
PM keeps an inventory of both phones and Directory Numbers (DN). The phone database includes in-usand also available phones. Available phones can be reserved for specific subscribers. If the assignment stepin the ordering workflow is disabled, PM will select an available phone from the inventory and assign its MAC
address to the order prior to acknowledging the step.The Directory Number database tracks in-use numbers, but also allows available numbers to be reserved fospecific subscribers.

8/11/2019 Cucm Tutorial Cisco
http://slidepdf.com/reader/full/cucm-tutorial-cisco 36/180
© 2007 Cisco Systems, Inc. All rights reserved. Features 2-18Provisioning Manager Tutorial
Reports
PM has a set of pre-configured reports allowing the PMadministrator to view various system configurations
PM has a set of pre-configured reports allowing the PMadministrator to view various system configurations
Reports
PM provides a number of pre-configured standard reports that allows the global administrator to quickly viewvarious configurations and assignments.
Global PM administrators can also create custom reports by searching for any object in the PM inventory.

8/11/2019 Cucm Tutorial Cisco
http://slidepdf.com/reader/full/cucm-tutorial-cisco 37/180
© 2007 Cisco Systems, Inc. All rights reserved. Features 2-19Provisioning Manager Tutorial
FeaturesApplication Support
Cisco Unified CallManager
– 4.0(2), 4.1(3), 4.2(1)
Cisco Unified CallManager Express
– 3.3, 3.4
Cisco Unified Communications Manager – 5.0(4), 5.1(1), 6.0
Cisco Unified Communications Manager Express
– 4.0, 4.1
Cisco Unity
– 4.0, 4.1, 4.2, 5.0
Cisco Unity Express
– 2.1, 2.2, 2.3, 3.0
Cisco Unity Connection
– 1.1.1, 2.0
Cisco Unified IP Phones.
Refer to the Cisco Unified Provisioning Manager Compatibility Information
for specific versions that have been certified in testing
http://www.cisco.com/en/US/products/ps7125/products_device_support_tables_list.html
Refer to the Cisco Unified Provisioning Manager Compatibility Information
for specific versions that have been certified in testing
http://www.cisco.com/en/US/products/ps7125/products_device_support_tables_list.html
Application Support
The underlying voice applications supported by Provisioning Manager v1.1 are:
Cisco Unified CallManager
4.0(2), 4.1(3), 4.2(1)
Cisco Unified CallManager Express
3.3, 3.4
Cisco Unified Communications Manager
5.0(4), 5.1(1), 6.0
Cisco Unified Communications Manager Express
4.0, 4.1
Cisco Unity
4.0, 4.1, 4.2, 5.0
Cisco Unity Express2.1, 2.2, 2.3, 3.0
Cisco Unity Connection
1.1.1, 2.0
Cisco Unified IP Phones.
Note(s):
• Consult the Cisco Unified Provisioning Manager Compatibility Information for specific versions thathave been certified in testing:http://www.cisco.com/en/US/products/ps7125/products_device_support_tables_list.html

8/11/2019 Cucm Tutorial Cisco
http://slidepdf.com/reader/full/cucm-tutorial-cisco 38/180
BenefitsBenefits
Overview
Functional Architecture
Features
Benefits

8/11/2019 Cucm Tutorial Cisco
http://slidepdf.com/reader/full/cucm-tutorial-cisco 39/180
© 2007 Cisco Systems, Inc. All rights reserved. Features 2-21Provisioning Manager Tutorial
Benefits
Manage existing or new Unified Communications deployments
Greatly simplifies the process of provisioning and activatingsubscriber services
– Errors are practically eliminated
– Reduced time to dial-tone
– Permits defining standard configurations, which can bereused for new sites or location deployments
– Batch provisioning permits the rollout of large numbers ofsubscribers at once
Lower operational costs through automation
IP communications professionals are free to focus on higher value
activities than repetitive operational issues
Benefits
Cisco Unified Provisioning Manager provides a reliable and scalable web-based solution to manage acompany’s new or existing Unified Communications deployment. PM greatly simplifies the process oprovisioning and activating subscriber services through use of business abstractions and automation. Th
result is quicker time to dial tone and reduced costs by eliminating configuration errors and reliance on IPvoice experts for routine day-to-day operations.

8/11/2019 Cucm Tutorial Cisco
http://slidepdf.com/reader/full/cucm-tutorial-cisco 40/180
Thank You!
Continue on to Chapter 3 to use the many features of Cisco UnifiedProvisioning Manager.
Cisco Systems

8/11/2019 Cucm Tutorial Cisco
http://slidepdf.com/reader/full/cucm-tutorial-cisco 41/180
Chapter 3Chapter 3
Cisco UnifiedProvisioning Manager Usage Scenarios
Cisco Unified
Provisioning Manager Usage Scenarios

8/11/2019 Cucm Tutorial Cisco
http://slidepdf.com/reader/full/cucm-tutorial-cisco 42/180
© 2007 Cisco Systems, Inc. All rights reserved. Scenarios 3-2Provisioning Manager Tutorial
Chapter 3 Outline
Network Description
Getting Started
Using PM with an ExistingVoIP Deployment
Advanced Policy &Management
Managing Orders
Adding Sites
Batch Provisioning
Chapter 3 Outline
To facilitate your learning, this chapter follows the exploits of a fictitious company as they deploy CiscUnified Provisioning Manager to simplify their IP telephony provisioning.
The presented scenarios detail the actual steps that the fictitious company will use to meet their IP telephony
management goals for subscriber services. The scenarios cover all the major features of ProvisioningManager including: managing existing VoIP deployments, bringing new deployments on-line, and of coursethe ordering and provisioning of subscriber services.
8/11/2019 Cucm Tutorial Cisco
http://slidepdf.com/reader/full/cucm-tutorial-cisco 43/180
Network DescriptionNetwork Description
Network Description
Getting StartedExisting VoIP Deployment Setup
Advanced Policy & Management
Managing Orders
Adding Sites
Batch Provisioning

8/11/2019 Cucm Tutorial Cisco
http://slidepdf.com/reader/full/cucm-tutorial-cisco 44/180

8/11/2019 Cucm Tutorial Cisco
http://slidepdf.com/reader/full/cucm-tutorial-cisco 45/180
Getting StartedGetting Started
Network Description
Getting StartedExisting VoIP Deployment Setup
Advanced Policy & Management
Managing Orders
Adding Sites
Batch Provisioning

8/11/2019 Cucm Tutorial Cisco
http://slidepdf.com/reader/full/cucm-tutorial-cisco 46/180
© 2007 Cisco Systems, Inc. All rights reserved. Scenarios 3-6Provisioning Manager Tutorial
Scenario 1 OutlineGetting Started
PM Concepts
– Domains
– Service Areas
– Users vs. Subscribers
– Ordering Workflow
– Business Rules
– Provisioning Attributes
– Basic Task Flow
Login
Navigation
Create Subscriber Type
Scenario 1 Outline
Prior to using Cisco Unified Provisioning Manager (PM), users must first understand several concepts thawill help dictate how to set-up and use PM. After covering these concepts, and how they apply to ChamberEngineering’s IP voice deployment, the lead voice engineer, Phil, will log into PM and begin using PM to
create a new Subscriber Type, which will define the policies for calling and ordering.Note(s):
• Creating a new Subscriber Type is not necessary for all PM deployments. The example is provided ithis chapter to highlight how the Subscriber Type business abstraction can be used to controprovisioning policy for a class of subscribers.

8/11/2019 Cucm Tutorial Cisco
http://slidepdf.com/reader/full/cucm-tutorial-cisco 47/180
© 2007 Cisco Systems, Inc. All rights reserved. Scenarios 3-7Provisioning Manager Tutorial
PM ConceptsDomains and Service Areas
Domains allow you to sub-divide a shared environment creating separatesecure locally administrated partitions that contain Service Areas which
determine the dial plans and other voice related configuration settings availablefor Subscriber Types in the Domain
Domains allow you to sub-divide a shared environment creating separatesecure locally administrated partitions that contain Service Areas which
determine the dial plans and other voice related configuration settings availablefor Subscriber Types in the Domain
...Domain #1
Admin = Bill, Sally
CM ExpressUnity Express
Service AreaSubscriber Type
= Contractor
CM Express
Unity Express
Service AreaSubscriber Type
= Employee
CM Unity
Service AreaSubscriber Type
= Lobby
Service AreaSubscriber Type
= Field Eng= Employee Service Area
Subscriber Type= Employee
Unity Express
Domain #N Admin = Mary
Domains and Service AreasChapter 2 introduced the fact that PM uses business abstractions to help set and control policy. The first wthe concept of a Domain. PM allows the enterprise to be sub-divided into separate partitions, Domains, tcan be configured with policies and can be locally administered.
Perhaps the easiest way to best understand a Domain is in an example of PM being used in a mu
departmental enterprise with business units in different areas. A Domain could be created for each busineunit or geographical area. In turn, each business unit or geographical area would then be provided with onemore administrator accounts for their Domain. These administrators could then log into PM, but will only able to order and provision services for subscribers in their Domain, and will have no knowledge of any othDomains or subscribers within PM.
Each Domain has one or more Service Areas defined within them. Each Service Area basically defines the dplan for one or more types of subscribers, and is typically associated with a site or location of the enterpriSimple examples of Service Areas might include: one that allows local calls only that is assigned to contractand lobby phones, and another that allows all calls including international ones that is available to executsubscribers only. This abstraction greatly simplifies the provisioning process as the Domain administrator donot need to understand which call processor, route partition, call search space or any other voice provisionrelated attribute to use. These attributes would have been previously associated with the Service Area by overall PM administrator who is more than likely a IP voice expert. In the simple example above, a Dom
administrator who is ordering services for a lobby phone subscriber, will only be allowed to provision tsubscriber in the “local calls only” Service Area.
The following provides some basic configuration details about Domains and services areas:
• One or more call processors are associated with each Domain, one or more message processors coptionally be associated with each Domain
• A call or message processor can be a member of more than one Domain
• Domain Users (administrators) are assigned task privileges within a single Domain
• Subscribers are assigned a Subscriber Type and are members of a single Domain
• A single call processor and optionally a single message processor are assigned to each Service Area
• Service Areas are typically associated to geographical locations, and include dial plan constru
(location, route partition, calling search spaces, etc.)• One or more Subscriber Types can be assigned to each Service Area

8/11/2019 Cucm Tutorial Cisco
http://slidepdf.com/reader/full/cucm-tutorial-cisco 48/180
© 2007 Cisco Systems, Inc. All rights reserved. Scenarios 3-8Provisioning Manager Tutorial
PM ConceptsChambers Engineering Domain Plan
Chambers Engineering has chosen to administer their VoIP deployment in ageographical manner and create Domains accordingly
Service Areas (SAs), shown above, represent offices – In reality, each office may have multiple SAs (i.e. Paris HQ Employee, Paris HQ
Executive, Paris HQ Facilities)
Call processing components can be associated with more than one Domain Service Area is assigned to single call processor and optional message processor
CM
Express
Field OfficeA Field Office
B
Unity
Express
CM
Express
Unity
Express
ParisHQ Nice
CM
Unity Unity
CM
MunichFrankfurt
Unity
CM
Luxembourg
Unity
Express
France Germany North America
Chambers Engineering Domain Plan
Let’s take a look at how Chambers Engineering plans to use the Domain concept for their PM deploymenThey want administrative duties based on regions, all offices in France to be administered as an entity, aoffices in and around Germany to be administered as an entity, and all North America Field offices to be
administered as an entity. Hence they will create three Domains: France, Germany, and North America.Notice that the Domains have nothing to do with the location or use of the processors. The Nice office wihost a CallManager, but Munich subscribers will also be provisioned on it. At the same time, the Municoffices will share a Unity processor hosted in the Frankfurt offices.
Note(s):
• The Service Areas in the diagram above have been simplified to show office locations. In reality eaclocation will have multiple Service Areas (i.e. In Paris HQ there may be a local, national, andinternational Service Area)

8/11/2019 Cucm Tutorial Cisco
http://slidepdf.com/reader/full/cucm-tutorial-cisco 49/180
© 2007 Cisco Systems, Inc. All rights reserved. Scenarios 3-9Provisioning Manager Tutorial
PM ConceptsUsers vs. Subscribers
Task authorization is based on assigned user roles
User Types:
– Global Complete authorization to perform all tasks in PM
PM Admin (created at install) has global administrative rights
– Domain Specific Authorization limited to tasks within a specific Domain
Individual user roles are related to either policy or workflow tasks
Can be assigned more than one user role
Users can also have services themselves; thus a user can also be asubscriber (discussed shortly)
A PM User is a person with authorization to perform varioustasks in Provisioning Manager
A PM User is a person with authorization to perform varioustasks in Provisioning Manager
Users vs. Subscribers
The next concept to discuss is the difference between a PM user and a subscriber. They are two differenentities, but unfortunately a subscriber often times gets called a user, which can lead to some confusion.
A PM user is personnel with authorization to perform various tasks within PM (i.e. set policy, order services
etc). The PM tasks the user can perform depend on their assigned user roles, which will be discusseshortly.
There are two basic types of PM users: a Global user which has complete authorization to perform any tasin PM. The user created at install, pmadmin, has global administrative rights. The other basic user type is aDomain Specific user. Users of this type only have privilege to perform tasks within their assigned DomainTheir roles are related to steps of the ordering workflow (discussed later in this section).
What causes some of the confusion is that subscriber services can also be ordered for PM users, thumaking them subscribers (discussed shortly).

8/11/2019 Cucm Tutorial Cisco
http://slidepdf.com/reader/full/cucm-tutorial-cisco 50/180
© 2007 Cisco Systems, Inc. All rights reserved. Scenarios 3-10Provisioning Manager Tutorial
PM ConceptsUser Roles
• Manage phone inventory, create new Subscriber Types, and set phonebutton templates
• Subscriber management and product ordering
– All Ordering privileges plus set provisioning attributes at time of order
– All Ordering privileges plus assign MAC address at time of order .
• Approves or rejects provisioning requests
• Assigns phone (MAC address) to an order
• Ensures equipment sent before order processing continues
• Ensures equipment received before order processing continues
• Policy
• Ordering
– Advanced Ordering
– Advanced Assignment
• Approval
• Assignment
• Shipping
• Receiving
Domain Specific
(Users with theseroles can onlyperform authorizedtasks within theirassigned Domain)
• Full rights
• Configure system cleanup activities
• Administration
• Maintenance
Global
RightsUser RolesUser Type
User roles determines level of access within Provisioning Manager
Some Domain specific roles are only applicable, if workflow is enabled
User Roles
Before defining subscribers in detail, let’s look at the different user roles available. Besides the aencompassing global administrative role, a Global type user can be created that only has the right to modifyif and when system cleanup activities will take place (see Chapter 4 for details on this function).
As previously mentioned, Domain specific users can only perform tasks within their assigned Domain anthose tasks are basically associated with steps of the ordering workflow. The possible Domain specific useroles are shown in the chart above. For example, a Domain specific user with the ‘Approval” user role caonly perform the PM task of approving orders for subscriber services within his assigned Domain. More thaone user role can be assigned to a Domain specific user.
Note(s):
• The user roles and the listed rights will be easier to understand after the ordering workflow idiscussed later in this chapter.

8/11/2019 Cucm Tutorial Cisco
http://slidepdf.com/reader/full/cucm-tutorial-cisco 51/180
© 2007 Cisco Systems, Inc. All rights reserved. Scenarios 3-11Provisioning Manager Tutorial
PM ConceptsUsers vs. Subscribers
Subscriber Type defines the products that can be provisioned for subscribers of thistype
Default Subscriber Types: – Employee
– Contractor
– Manager
– Senior Manager
– Executive
– Operator
Default Subscriber Role Types can be modified in a global template or a per Domainbasis
Default Domain Subscriber Role Types take on values of global template Subscriber
Types at time of Domain creation only If Provisioning Manager Self-Care mode is enabled, a subscriber can order services
for themselves; thus a Subscriber can also be a PM User
A Subscriber is an entity, which uses IP telephony servicesprovided by the underlying voice applications
A Subscriber is an entity, which uses IP telephony servicesprovided by the underlying voice applications
Users vs. Subscribers
As discussed, a PM user is someone who has privilege within PM to perform some tasks. On the other handa subscriber is an entity, which uses IP telephony services provided by the underlying voice applications.
Subscribers created within PM are assigned to a specific Domain and one or more Subscriber Types. A
Subscriber Type is a PM business abstraction that defines the products and services that PM can provisiofor a subscriber of this type. By default, PM defines several Subscriber Types as listed in the chart aboveThe products and services available for each of these Subscriber Types can be modified globally providing baseline for each new Domain created, or on a per Domain basis.
The difference between subscriber and user can be confusing if PM is configured for Self-Care mode, whicallows a Subscriber to view his history and even order services for themselves, thus becoming also a PMuser.
Best Practice:
• If Self-Care mode is enabled, the ordering workflow should at least require approval prior tprovisioning.

8/11/2019 Cucm Tutorial Cisco
http://slidepdf.com/reader/full/cucm-tutorial-cisco 52/180
© 2007 Cisco Systems, Inc. All rights reserved. Scenarios 3-12Provisioning Manager Tutorial
PM ConceptsProvisioning Attributes
You can override anyset policy by using theProvisioning Attributes
settings in the Advance Order
Options on the OrderEntry page
(Highest Precedence)
You can override anyset policy by using theProvisioning Attributes
settings in the Advance Order
Options on the OrderEntry page
(Highest Precedence)
Provisioning attributescan be assigned at
different levels
Provisioning attributescan be assigned at
different levels
Provisioning Attributes are configuration settings that are appliedto a product during activation
Provisioning Attributes are configuration settings that are appliedto a product during activation
Domain“France”
Attribute VideoEnabled=False
Subscriber Type“Executive”
Attribute VideoEnabled=True
Service Area“ParisLocal”
Order Entry Advanced Order Options
Attributes at a higherprecedence level
override those at alower precedence level
Attributes at a higherprecedence level
override those at alower precedence level
Provisioning Attributes
Both call and messaging services have many attributes that can be assigned and further define and enhancethe service provided to the subscriber. For example, one attribute that can be defined on a phone as anenhancement to its use, is the setting of speed dials. Within PM, these settings are known as Provisioning
Attributes, and can be set at multiple levels within PM to enforce policy; again simplifying the overaprovisioning of subscriber services.
Provisioning attributes can be set for Domains, Subscriber Types, Service Areas, and during order entryThis order also defines the order of precedence in the event that the same attribute is set at multiple levels.
Let’s look at a brief example to help clarify this.
• A policy at Chambers Engineering states that no subscribers in any of the offices in France are thave video capabilities on their phones except the executives.
• One way to implement this would be to set the phone attribute VideoEnable to “false” at the Domailevel, and “true” for the Executive Subscriber Type.
• Now, all orders for phones in the France Domain will set VideoEnabled to “false”, but for subscriberof type Executive, this will be overridden with a value of “true”.
• If an individual employee has also given clearance for video privileges, his “false” setting can boverridden during order entry.
8/11/2019 Cucm Tutorial Cisco
http://slidepdf.com/reader/full/cucm-tutorial-cisco 53/180
© 2007 Cisco Systems, Inc. All rights reserved. Scenarios 3-13Provisioning Manager Tutorial
Subscriber Attributes• Domain = XXX• Type = Contractor
Subscriber Attributes
• Domain = XXX• Type = Contractor
Subscriber
Attributes• Domain = XXX• Type = Employee
Subscriber
Attributes• Domain = XXX• Type = Employee
Subscriber Attributes
• Domain = XXX• Type = Executive
Subscriber Attributes
• Domain = XXX• Type = Executive
Subscriber Attributes
• Domain = XXX
• Type = Contractor
Subscriber Attributes
• Domain = XXX
• Type = Contractor
User Attributes
• Domain = XXX• Roles = Policy, Ordering• UserID = Bill• PWD = *******
User Attributes
• Domain = XXX• Roles = Policy, Ordering• UserID = Bill• PWD = *******
Subscriber Type Attributes
• Domain = XXX• Name = Employee• Products = 7960, VM, etc• Provisioning Attributes
Subscriber Type Attributes
• Domain = XXX• Name = Employee• Products = 7960, VM, etc• Provisioning Attributes
Subscriber Type Attributes
• Domain = XXX• Name = Employee• Products = 7960, VM, etc• Provisioning Attributes
Subscriber Type Attributes
• Domain = XXX• Name = Employee• Products = 7960, VM, etc• Provisioning Attributes
Domain XXXAttributes
• Subscriber Types• Provisioning Attributes• Call & Message Processors
• Service Area ZZZAttributes
• Provisioning Attributes• Subscriber Role Types (subset)• Directory Number Blocks• Call Processor (1)
• Call Search Space• Location• Route Partition• Voice Device Group• External Phone Number Mask• Call Forwarding Settings
• Message Processor (Optional)• VM Enabling Subscriber Template• VM Disabling Subscriber Template• VM Enabling CoS• VM Disabling CoS
• Service Area XYZ
Domain XXXAttributes
• Subscriber Types• Provisioning Attributes• Call & Message Processors
• Service Area ZZZAttributes
• Provisioning Attributes• Subscriber Role Types (subset)• Directory Number Blocks• Call Processor (1)
• Call Search Space• Location• Route Partition• Voice Device Group• External Phone Number Mask• Call Forwarding Settings
• Message Processor (Optional)• VM Enabling Subscriber Template• VM Disabling Subscriber Template• VM Enabling CoS• VM Disabling CoS
• Service Area XYZ…
PM ConceptsBig Picture
User Attributes
• Domain = XXX• Roles = Policy, Ordering• UserID = Bill• PWD = *******
User Attributes
• Domain = XXX• Roles = Policy, Ordering• UserID = Bill• PWD = *******
Subscriber Type Attributes
• Domain = XXX• Name = Employee• Products = 7960, VM, etc• Provisioning Attributes
Subscriber Type Attributes
• Domain = XXX• Name = Employee• Products = 7960, VM, etc• Provisioning Attributes
Subscriber Attributes
• Domain = XXX• Type = Employee
Subscriber Attributes
• Domain = XXX• Type = Employee
Domain
Administration
Domain
Member
Big Picture
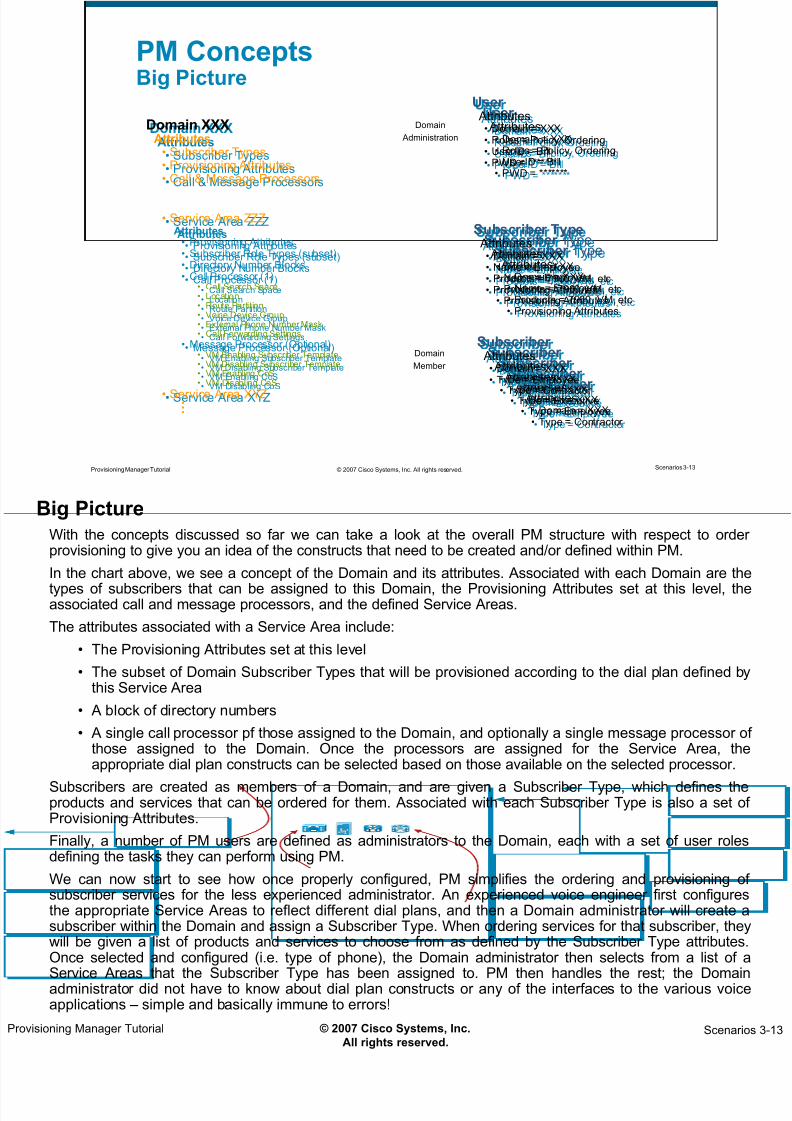
With the concepts discussed so far we can take a look at the overall PM structure with respect to ordeprovisioning to give you an idea of the constructs that need to be created and/or defined within PM.
In the chart above, we see a concept of the Domain and its attributes. Associated with each Domain are th
types of subscribers that can be assigned to this Domain, the Provisioning Attributes set at this level, thassociated call and message processors, and the defined Service Areas.
The attributes associated with a Service Area include:
• The Provisioning Attributes set at this level
• The subset of Domain Subscriber Types that will be provisioned according to the dial plan defined bthis Service Area
• A block of directory numbers
• A single call processor pf those assigned to the Domain, and optionally a single message processor othose assigned to the Domain. Once the processors are assigned for the Service Area, thappropriate dial plan constructs can be selected based on those available on the selected processor.
Subscribers are created as members of a Domain, and are given a Subscriber Type, which defines theproducts and services that can be ordered for them. Associated with each Subscriber Type is also a set oProvisioning Attributes.
Finally, a number of PM users are defined as administrators to the Domain, each with a set of user rolesdefining the tasks they can perform using PM.
We can now start to see how once properly configured, PM simplifies the ordering and provisioning osubscriber services for the less experienced administrator. An experienced voice engineer first configuresthe appropriate Service Areas to reflect different dial plans, and then a Domain administrator will create asubscriber within the Domain and assign a Subscriber Type. When ordering services for that subscriber, thewill be given a list of products and services to choose from as defined by the Subscriber Type attributesOnce selected and configured (i.e. type of phone), the Domain administrator then selects from a list of Service Areas that the Subscriber Type has been assigned to. PM then handles the rest; the Domaiadministrator did not have to know about dial plan constructs or any of the interfaces to the various voicapplications – simple and basically immune to errors!

8/11/2019 Cucm Tutorial Cisco
http://slidepdf.com/reader/full/cucm-tutorial-cisco 54/180
© 2007 Cisco Systems, Inc. All rights reserved. Scenarios 3-14Provisioning Manager Tutorial
PM ConceptsOrdering Workflow
No NoNo NoApproval
EnabledProvision
Order
Assignment
Enabled
Shipping
Enabled
Receiving
Enabled
Assign MAC
and place in
Workflow
Ship
Product(s)
Confirm
Receipt of
Product(s)
Individual activities can be enabled or disabled and assignedto different User Roles resulting in many possible workflow
arrangements on a per Domain basis
Individual activities can be enabled or disabled and assignedto different User Roles resulting in many possible workflowarrangements on a per Domain basis
Workflow coordinates activities of the ordering process(approve, phone assignment, shipping, and receiving)
Workflow coordinates activities of the ordering process(approve, phone assignment, shipping, and receiving)
Place
Order
Yes Yes Yes Yes
STOP
No
Order
Approved
Yes
Ordering Workflow
Once the order has been placed, what exactly does PM do with it? PM has a built-in ordering workflow tcoordinate activities in the ordering process. The activities include approving the order, assigning a phone tthe order, shipping the product, and receiving the product. This workflow can be customized to fit th
customer’s exact needs by enabling or disabling each step, and assigning the enabled steps to a PM userole. By default, all steps are disabled.
If any step of the workflow is enabled, the order processing will wait at that point in the workflow for a userwith the user role assigned to the workflow step, to take appropriate action. Once the action has beencompleted, that user would inform PM, and the order processing will continue.

8/11/2019 Cucm Tutorial Cisco
http://slidepdf.com/reader/full/cucm-tutorial-cisco 55/180
© 2007 Cisco Systems, Inc. All rights reserved. Scenarios 3-15Provisioning Manager Tutorial
PM ConceptsBusiness Rules
Rules can be set per Domain or in a globaltemplate assigned to all new Domains
Rules can be set per Domain or in a globaltemplate assigned to all new Domains
Control steps of the ordering workflow
IsAuthor izationRequiredForAddOrder = FalsePhoneAssignmentDoneBy = AssignmentPhoneShippingDoneBy = ShippingPhoneReceiptDoneBy = OrderOwner
Control steps of the ordering workflow
IsAuthor izationRequiredForAddOrder = FalsePhoneAssignmentDoneBy = AssignmentPhoneShippingDoneBy = ShippingPhoneReceiptDoneBy = OrderOwner
Provisioning Manager contains a pre-defined set ofBusiness Rules that control:
• Processing of orders
• Behavior of synchronization process
• Default values for various objects
Provisioning Manager contains a pre-defined set ofBusiness Rules that control:
• Processing of orders
• Behavior of synchronization process
• Default values for various objects
Business Rules
We have mentioned several times that some PM concepts are configurable. This is achieved by configuringBusiness Rules. The Business Rules are used to control the processing of orders, the behavior osynchronizing with call and message processors, and to set default values for various objects used
repeatedly within PM.Business Rules can be applied to a global template which provides the starting set of rules when a Domain iscreated, and can also be modified on a per Domain basis. Business Rules can only be configured by a globaPM administrator.
8/11/2019 Cucm Tutorial Cisco
http://slidepdf.com/reader/full/cucm-tutorial-cisco 56/180
© 2007 Cisco Systems, Inc. All rights reserved. Scenarios 3-16Provisioning Manager Tutorial
PM ConceptsBasic Task Flow
1. Setup Devices
– Add Call & Message Processors to PM
2. Setup Deployment
– Create Domains and assign Call and
Message Processors3. Provision Voice Network
– Create and push Template(s) to configureCCMs
– Or import current voice infrastructureconfigurations from existing deployment
4. Setup Deployment
– Create Service Areas for each Domain(typically one per dial plan)
– Assign Subscriber Types to each Service Area
5. Admin
– Create Administrative users for eachDomain
6. Order, Update, or Change SubscriberServices
Optional/Advanced Configuration
– Add new Subscriber Types
– Modify products available to SubscriberTypes
– Configure Business Rules
– Can use to set ordering workflow
– Set Provisioning Attributes
Optional/Advanced Configuration
– Add new Subscriber Types
– Modify products available to SubscriberTypes
– Configure Business Rules
– Can use to set ordering workflow
– Set Provisioning Attributes
Basic Task Flow
Before we actually follow Chamber Engineering’s PM deployment, let’s briefly look at a high level PM tasflow.
The first step should be fairly obvious – adding of devices to PM. Since PM will be actually configuring ca
and message processors, you must not only inform PM about them, but also how to communicate with them After adding the devices to PM, the PM administrator could optionally attend to some global configurationincluding the modifying of the global templates which define Subscriber Types and Business Rules. Thesemodifications would then be applied to new Domains as they are created.
The next step is to create one or more Domains and assign the appropriate call and message processors tothem. Next, PM needs to know the voice infrastructure components of each processor in the Domain. Thimay entail either the creation of the configurations using templates and pushing them out to the processorsor import of any existing configurations.
Once PM is aware of the configured voice infrastructure, the Service Areas mapping dial plans to SubscribeTypes can be created and configured.
Finally, PM users for each Domain should be created and assigned the appropriate user roles according t
the ordering workflow to be utilized.
At this point the ‘experts’ hand-over PM to the Domain administrators to order, update, and changsubscriber services.
Note(s):
• At any time after the Domain has been created, the Subscriber Types, Business Rules, and/oProvisioning Attributes specific to it may be modified. This also holds true for the configuration oProvisioning Attributes for Subscriber Types and Service Areas.

8/11/2019 Cucm Tutorial Cisco
http://slidepdf.com/reader/full/cucm-tutorial-cisco 57/180
© 2007 Cisco Systems, Inc. All rights reserved. Scenarios 3-17Provisioning Manager Tutorial
Getting StartedLogging In
‘pmadmin’account created
during installand has globalaccess to PM
‘pmadmin’account created
during installand has globalaccess to PM
http://<server-name or IP address> will redirect the link to:
http://<server-name or IP address>/cupm/Login
Logging In
Chambers Engineering has installed PM and they are ready to get started. All the initial setup of PM istypically done by a IP voice expert, so one of Chambers best, (we will call him Phil) is ready to get startedLet’s follow Phil and his peers as they configure and use PM.
1. Phil opens a standard web browser on his PC (see Chapter 4 for supported versions) and enters thhostname or IP address of the PM server as a URL and is then redirected to the URL for login.
http://<server-name or IP address>
This will redirect you to the following URL for login:
http://<server-name or IP address>/cupm/Login
2. The PM login screen is displayed. During installation a global administrator account is created witthe default login of pmadmin. Phil enters this and the password, also assigned at installation, anclicks the Login button.
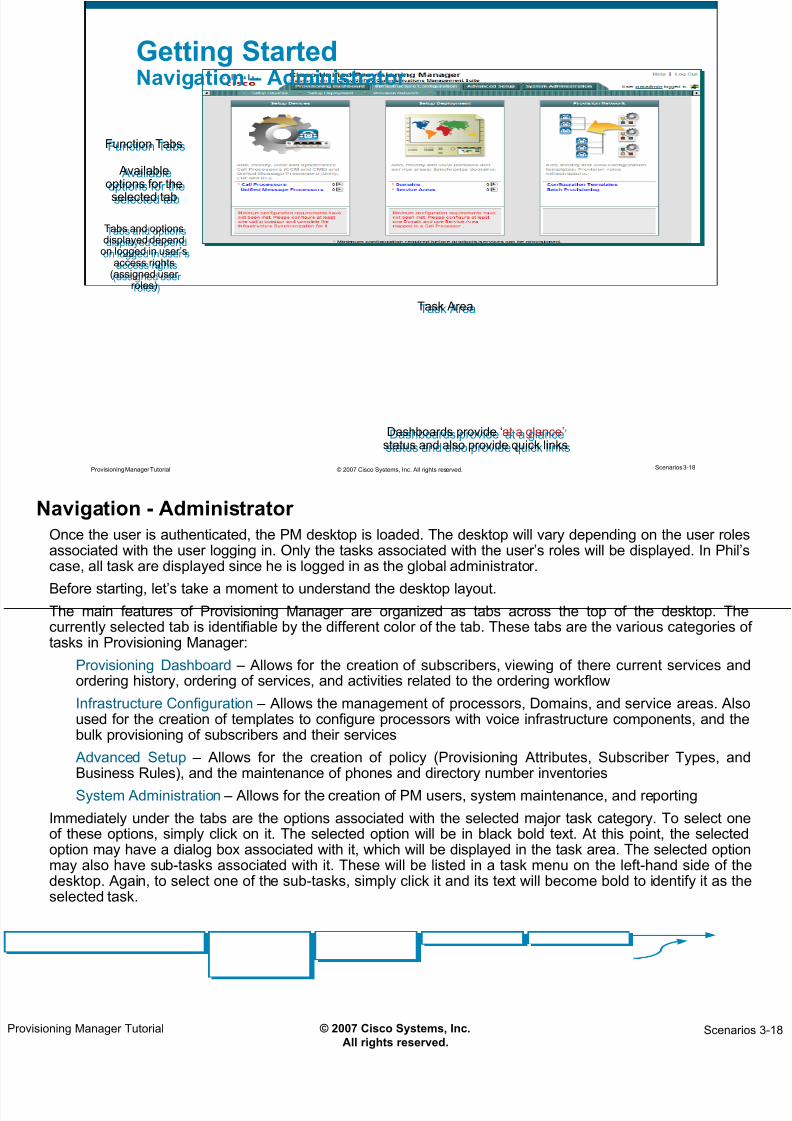
8/11/2019 Cucm Tutorial Cisco
http://slidepdf.com/reader/full/cucm-tutorial-cisco 58/180
© 2007 Cisco Systems, Inc. All rights reserved. Scenarios 3-18Provisioning Manager Tutorial
Getting StartedNavigation – Administrator
Availableoptions for the
selected tab
Availableoptions for the
selected tab
Function TabsFunction Tabs
Task AreaTask Area
Tabs and optionsdisplayed depend
on logged in user’saccess rights
(assigned userroles)
Tabs and optionsdisplayed depend
on logged in user’saccess rights
(assigned userroles)
Dashboards provide ‘at a glance’status and also provide quick links
Dashboards provide ‘at a glance’status and also provide quick links
Navigation - Administrator
Once the user is authenticated, the PM desktop is loaded. The desktop will vary depending on the user roleassociated with the user logging in. Only the tasks associated with the user’s roles will be displayed. In Phil’case, all task are displayed since he is logged in as the global administrator.
Before starting, let’s take a moment to understand the desktop layout.The main features of Provisioning Manager are organized as tabs across the top of the desktop. Thecurrently selected tab is identifiable by the different color of the tab. These tabs are the various categories otasks in Provisioning Manager:
Provisioning Dashboard – Allows for the creation of subscribers, viewing of there current services anordering history, ordering of services, and activities related to the ordering workflow
Infrastructure Configuration – Allows the management of processors, Domains, and service areas. Alsused for the creation of templates to configure processors with voice infrastructure components, and thebulk provisioning of subscribers and their services
Advanced Setup – Allows for the creation of policy (Provisioning Attributes, Subscriber Types, anBusiness Rules), and the maintenance of phones and directory number inventories
System Administration – Allows for the creation of PM users, system maintenance, and reporting
Immediately under the tabs are the options associated with the selected major task category. To select onof these options, simply click on it. The selected option will be in black bold text. At this point, the selectedoption may have a dialog box associated with it, which will be displayed in the task area. The selected optiomay also have sub-tasks associated with it. These will be listed in a task menu on the left-hand side of thdesktop. Again, to select one of the sub-tasks, simply click it and its text will become bold to identify it as thselected task.

8/11/2019 Cucm Tutorial Cisco
http://slidepdf.com/reader/full/cucm-tutorial-cisco 59/180
© 2007 Cisco Systems, Inc. All rights reserved. Scenarios 3-19Provisioning Manager Tutorial
Getting StartedNavigation – Ordering
A user with onlythe ‘Ordering’User Role will
see fewer tabsand options
A user with onlythe ‘Ordering’User Role will
see fewer tabsand options
Some optionshave tasks
found in a menu
Some optionshave tasks
found in a menuTask DialogTask Dialog
Tasks areperformed on
elements specificto user’s assigned
Domain
Tasks areperformed on
elements specificto user’s assigned
Domain
Navigation - Ordering
The screen shot above depicts the PM desktop presented to a PM user who only has the ‘Ordering’ userole. Notice that they only have a single tab - Provisioning Dashboard. The options available to this user aralso limited. A third possible option would be displayed if the User had any of the user roles associated with
workflow activities (approval, assignment, shipping, receiving).This screen shot also shows a sub- menu that was mentioned on the previous page.

8/11/2019 Cucm Tutorial Cisco
http://slidepdf.com/reader/full/cucm-tutorial-cisco 60/180
© 2007 Cisco Systems, Inc. All rights reserved. Scenarios 3-20Provisioning Manager Tutorial
Getting StartedNew Subscriber Type
All office locations will need to provision phones fortheir lobbies. PM must:
Limit types of calls lobby phones can make
Limit types of phones to be ordered Limit services that can be ordered
Create a new Subscriber Type to cover thissituation:
Create new Subscriber Type in GlobalTemplate (available to all new Domains)
Limit products and services
New Subscriber Type
Phil is now ready to begin using PM. Reviewing the Chambers Engineering’s VoIP deployment plan, Phnotices a policy for lobby phones that limits not only the calling area, but also the types of products andservices that can be ordered for them.
Phil can control the calling area though appropriate configuration of a a Service Area. Phil can also controthe products and services available for ordering via a Subscriber Type. Since none of the default SubscribeTypes (Employee, Contractor, Manager, Senior Manager, Executive, Operator) covers this type osubscriber, Phil needs to create a new one. He will create it in the Global Domain Template so it will be paof all new Domains. Once a Domain is created, the attributes Phil originally assigned to the new SubscribeType can be modified for use within this Domain without affecting the Global Domain Template assignments

8/11/2019 Cucm Tutorial Cisco
http://slidepdf.com/reader/full/cucm-tutorial-cisco 61/180
© 2007 Cisco Systems, Inc. All rights reserved. Scenarios 3-21Provisioning Manager Tutorial
Getting StartedCreate New Subscriber Type
Subscriber Types canbe modified on a per
Domain basis
Subscriber Types canbe modified on a per
Domain basis
12
3
4
Create as a default for allDomains. Can also be createdon a per Domain basis (Domain
must first be created)
Create as a default for allDomains. Can also be createdon a per Domain basis (Domain
must first be created)6
All office locations will need to provision phones for their lobbies
Create a new Subscriber Type for Facilities
Configure globally to be default for all Domains
All office locations will need to provision phones for their lobbies
Create a new Subscriber Type for Facilities
Configure globally to be default for all Domains
5
Create New Subscriber Type
To create a new Subscriber Type in the Global Domain Template, Phil uses the following steps:
1. Phil selects the Advanced Setup tab.
2. The options bar displays three choices, Phil selects Policies
3. A sub-menu appears on the left-side of the desktop with possible policy tasks, Phil selectSubscriber Roles
4. The task area of the desktop displays the Subscriber Role Configuration – Configure a SubscribeRole Type dialog. It can be used to create new Subscriber Types or modify existing ones. Phil clickon New Subscriber Role
5. The Subscriber Role Configuration – Configure a New Subscriber Role Type dialog is now displayedPhil selects Customer Domain Template from the Domain pull-down menu (At this time it would bethe only option since no Domains have been created yet). Phil also enters a name for this SubscribeRole – Facilities.
6. Phil clicks Save to create the new Subscriber Type.

8/11/2019 Cucm Tutorial Cisco
http://slidepdf.com/reader/full/cucm-tutorial-cisco 62/180
© 2007 Cisco Systems, Inc. All rights reserved. Scenarios 3-22Provisioning Manager Tutorial
Getting StartedConfigure Subscriber Type
Dialog resulting from creating anew Subscriber Type
(Note: this is the dialog displayed if‘View Subscriber Role was selected)
Dialog resulting from creating anew Subscriber Type
(Note: this is the dialog displayed if‘View Subscriber Role was selected)
Next Page
No products yet associatedwith this Subscriber Type
No products yet associatedwith this Subscriber Type
7
Configure Subscriber Type
Once PM has created the new Subscriber Type, the Subscriber Role Configuration – View Subscriber RolType dialog shows its details. Since it was just created, no products or services are listed as beingassociated with this Subscriber Type.
7. Phil selects the Associate Products option (see next page)
Note(s):
• This result dialog is what would appear had you selected View Subscriber Role as opposed to New Subscriber Role.

8/11/2019 Cucm Tutorial Cisco
http://slidepdf.com/reader/full/cucm-tutorial-cisco 63/180
© 2007 Cisco Systems, Inc. All rights reserved. Scenarios 3-23Provisioning Manager Tutorial
Getting StartedConfigure Subscriber Role Type (Cont.)
Select appropriate products.Limits products available whenordering services for this type of
subscriber
Select appropriate products.Limits products available whenordering services for this type of
subscriber
This configuration for SubscriberType Facilities will be the initial
configuration for SubscriberType Facilities in all new
Domains.
Choices for this Subscriber Typecan be changed on a per
Domain basis
This configuration for SubscriberType Facilities will be the initial
configuration for SubscriberType Facilities in all new
Domains.Choices for this Subscriber Type
can be changed on a perDomain basis
Configure Facilitiessubscribers to only beable to order a Phoneand Line bundle with
the phone beingeither 7960 or 7961
Configure Facilitiessubscribers to only be
able to order a Phoneand Line bundle with
the phone beingeither 7960 or 7961
8
9
Configure Subscriber Type
The Subscriber Role Configuration – Associate Products dialog is displayed listing all possible phones anservices (that PM is aware of) that can be associated with the Subscriber Type. Phil can select phone andline types, base products like line, phone, voice mail, etc, and/or bundled products like phone service which
includes base products phone and line.8. Phil selects two types of phones, that the line can only be auto-assigned, and that only the phon
service bundle can be ordered.
9. Click Save when finished configuring the products to be associated with the Subscriber TypeFacilities.
Phil has successfully created a new Subscriber Type and associated products and services in accordancewith Chambers policy. The Subscriber Type, Facilities, will be available to all new Domains. If necessaryonce the Domain is created, the Facilities Subscriber Type for the Domain can be modified using similasteps as just detailed except, using the View Subscriber Role option instead of the New Subscriber Roloption and selecting the specific Domain instead of Customer Domain Template.

8/11/2019 Cucm Tutorial Cisco
http://slidepdf.com/reader/full/cucm-tutorial-cisco 64/180
<Intentionally Left Blank>

8/11/2019 Cucm Tutorial Cisco
http://slidepdf.com/reader/full/cucm-tutorial-cisco 65/180
Existing VoIPDeployment SetupExisting VoIPDeployment Setup
Network Description
Getting StartedExisting VoIP Deployment Setup
Advanced Policy & Management
Managing Orders
Adding Sites
Batch Provisioning

8/11/2019 Cucm Tutorial Cisco
http://slidepdf.com/reader/full/cucm-tutorial-cisco 66/180

8/11/2019 Cucm Tutorial Cisco
http://slidepdf.com/reader/full/cucm-tutorial-cisco 67/180
© 2007 Cisco Systems, Inc. All rights reserved. Scenarios 3-27Provisioning Manager Tutorial
Setup Devices
ExistingDeployment
Add the ParisHQ PublisherCCM to PM
Add the ParisHQ PublisherCCM to PM
1
SynchronizeCCM constructsand subscribers
into PMdatabase
SynchronizeCCM constructsand subscribers
into PMdatabase
2
Setup Devices
Phil’s first task will be to add the Paris HQ call and message processors to PM. After that he will synchronizthe existing infrastructure components and subscriber data into the PM database.

8/11/2019 Cucm Tutorial Cisco
http://slidepdf.com/reader/full/cucm-tutorial-cisco 68/180
© 2007 Cisco Systems, Inc. All rights reserved. Scenarios 3-28Provisioning Manager Tutorial
Setup DevicesAdd Call Processors
1
2
Note: Steps for adding a MessageProcessor are basically the same
Note: Steps for adding a MessageProcessor are basically the same
Click to change user passwordClick to change user password
Set time zoneSet time zone Add existing CCM atthe Paris HQ
Add existing CCM atthe Paris HQ
Add Call Processors
Phil uses the following steps to add the Paris HQ call and message processors to PM :
1. Phil selects the Infrastructure Configuration tab
2. A set of dashboards are displayed that provide shortcuts to the various tasks. So rather thaselecting the Setup Devices option and then the Call Processors task that will be displayed in a submenu, Phil simply selects Call Processors in the displayed Setup Devices dashboard.
Note(s):
• The Setup Devices dashboard will indicate the number of call and message processors defined iPM. Clicking the small icon arrow next to the number will open a dialog listing the processors, thedevice type, and the time of their last synchronization with PM.
• Only the “Publisher” Call Processor is added to PM. PM only communicates with the Publisher annot the Subscriber.

8/11/2019 Cucm Tutorial Cisco
http://slidepdf.com/reader/full/cucm-tutorial-cisco 69/180
© 2007 Cisco Systems, Inc. All rights reserved. Scenarios 3-29Provisioning Manager Tutorial
Setup DevicesAdd Call Processors (Cont.)
3
5
Note: Original dialog expands basedon Type and Version selected
Note: Original dialog expands basedon Type and Version selected
4
Configure existingCall Processor
Configure existingCall Processor
Alternate launch:Infrastructure Configuration
> Setup Devices > CallProcessors
Alternate launch:Infrastructure Configuration
> Setup Devices > CallProcessors
Enter detailsabout the Call
Processor
Enter detailsabout the Call
Processor
Add Call Processors (Cont.)
3. The Call Processor Configuration – Configure a Call Processor dialog is displayed. Phil selects thNew Call Processor option.
4. The dialog changes to Call Processor Configuration – Configure a New Call Processor dialog whic
contains entry boxes for details about the call processor to add. Phil enters the following:• Name ParisHQ
• Type CallManager
• IP Address Address of Call Manager
• Version Version of Call Manager
Once the version is entered additional fields will be displayed depending on the versionselected, in this case:
• Device Protocol HTTPS (how PM will talk to processor)
• User Name Call Processor administrator login
(Used by PM to login to the Call Processor)• Password Password for Call Processor administrator account
Extension mobility details, service name and service URL, can also be added if availableIf EM details are not added, PM users will not be able to order EM related products.
5. Phil clicks Save to add the call processor.
Phil would repeat these steps to add any additional call processors.
Note(s):
• To modify any of these settings at a later time, select Infrastructure Configuration > SetupDevices > Call Processors then View Call Processors, select appropriate one from the list, thenclick Update.
• Adding message processors is optional, but would follow steps similar to those for adding a ca processor.

8/11/2019 Cucm Tutorial Cisco
http://slidepdf.com/reader/full/cucm-tutorial-cisco 70/180
© 2007 Cisco Systems, Inc. All rights reserved. Scenarios 3-30Provisioning Manager Tutorial
Setup DevicesInfrastructure Sync Screen displayed after New Call Processor Save
or by selecting Infrastructure Configuration >Setup Devices > Call Processors > View CallProcessor and selecting the Call Processor to
view from the displayed list
Screen displayed after New Call Processor Saveor by selecting Infrastructure Configuration >Setup Devices > Call Processors > View CallProcessor and selecting the Call Processor to
view from the displayed list
PMInventory
CallManager
Discovers all objects in CCM that PM
uses and are not specific to individual
subscribers. For example:
– Calling Search Space
– Voice Device Groups
– Route Patterns
– Translation Patterns
Discovers all objects in CCM that PM
uses and are not specific to individual
subscribers. For example: – Calling Search Space
– Voice Device Groups
– Route Patterns
– Translation Patterns
Click toExpand
Click toExpand
Infrastructure Sync
The next task is for Phil to have PM query the call processor to retrieve its current infrastructurconfigurations (i.e. route partitions, calling search spaces, translation patterns, etc.) After clicking Save tadd the call processor to PM, the Call Processor Configuration – View a Call Processor dialog display
details about the processor.1. From this dialog, Phil clicks the Synchronize option, which causes two options for synchronization to
appear. Phil clicks Start for the Infrastructure option.
The sync process begins and a percentage complete bar is displayed. This step can take a bit of time tocomplete. Phil could go on to other aspects of the setup or just wait. To get back to this screen, selecInfrastructure Configuration > Setup Devices > Call Processors, next select View Call Processors, anthen select the call processor from the list. The display will show the status of the Synchronization taskWhen finished, the details for the Call Processor will indicate the start and completion times and a statusmessage.

8/11/2019 Cucm Tutorial Cisco
http://slidepdf.com/reader/full/cucm-tutorial-cisco 71/180
© 2007 Cisco Systems, Inc. All rights reserved. Scenarios 3-31Provisioning Manager Tutorial
Setup DevicesSubscriber Sync
PMInventory
CallManager
Discovers all objects in CCM
related to individual subscribers.For example:
– Configured Phones
– Configured Lines
– Device Profiles
Discovers all objects in CCM
related to individual subscribers.For example:
– Configured Phones
– Configured Lines
– Device Profiles
Subscriber Sync
The next step is for PM to retrieve the current subscriber data (i.e. subscriber, configured phonesconfigured lines, etc.). Phil selects the Start button for the Subscribers Synchronization. Again a percentagcomplete bar will be displayed and when finished the details for the Call Processor will indicate the start an
completion times and a status message. At this point, PM is aware of the Chamber Engineering’s current VoIP deployment.
Note(s):
• The process for synchronizing a message processor’s configuration and subscriber information iidentical.

8/11/2019 Cucm Tutorial Cisco
http://slidepdf.com/reader/full/cucm-tutorial-cisco 72/180
© 2007 Cisco Systems, Inc. All rights reserved. Scenarios 3-32Provisioning Manager Tutorial
Setup Deployment
France
Create newDomain
Create newDomain
1
Create andconfigure Service Area for Lobby
Phones
Create andconfigure Service Area for Lobby
Phones
2
Create additionalService Areas as
needed
Create additionalService Areas as
needed
3
SynchronizeDomain withexisting CCM
subscribers
SynchronizeDomain withexisting CCMsubscribers
4
1
4ParisLobby
2
Setup Deployment
With PM now aware of the current voice infrastructure deployed at Chambers Engineering, Phil needs tmap it into PM’s business abstractions so future provisioning can be done using PM.
According to Chambers Engineering’s management plan, all offices in France will be managed as a singl
entity. Therefore, Phil will create a Domain and appropriate Service Areas to support the Paris Headquarteoffices. One such Service Area will be created for provisioning of Lobby phones. As their voice deploymenefforts continue, Phil can add Service Areas for the Nice office.

8/11/2019 Cucm Tutorial Cisco
http://slidepdf.com/reader/full/cucm-tutorial-cisco 73/180

8/11/2019 Cucm Tutorial Cisco
http://slidepdf.com/reader/full/cucm-tutorial-cisco 74/180
© 2007 Cisco Systems, Inc. All rights reserved. Scenarios 3-34Provisioning Manager Tutorial
Setup DeploymentConfigure Domain
Create Domainresult dialog
Create Domainresult dialog
Alternate way to create,view, and edit Service Areas
for this Domain
Alternate way to create,view, and edit Service Areas
for this Domain
Click to assign Call
Processors to this Domain
Click to assign Call
Processors to this Domain
Click to assign MessageProcessors to this Domain
(optional)
Click to assign MessageProcessors to this Domain
(optional)
Note newSubscriber
Type
Note newSubscriber
Type
1
2
Configure Domain
After creating the Domain the Domain Configuration – Update Domain dialog is displayed. It is primarily useto associate processors with the Domain, but can also be used as a launch point for creating, viewing, anmodifying Service Areas within the Domain. Phil uses the following steps to configure the France Domain he
just created:1. Phil clicks the small arrow icon to the right of the Call Processor(s) entry box which opens a dialog
listing all call processors that have been added to PM. Phil selects the ParisHQ call processor toassociate it with the France Domain. Phil would follow a similar procedure to associate messagprocessors.
2. Click Save to update the France Domain’s configuration.
Note(s):
• One or more call processor can be associated with a Domain. Message processors are optional, bumultiple ones can be associated.

8/11/2019 Cucm Tutorial Cisco
http://slidepdf.com/reader/full/cucm-tutorial-cisco 75/180
© 2007 Cisco Systems, Inc. All rights reserved. Scenarios 3-35Provisioning Manager Tutorial
Setup DeploymentCreate Service Areas
Create a Service Area to be usedwhen provisioning ‘Lobby’ Phones
Create a Service Area to be usedwhen provisioning ‘Lobby’ Phones
Displays list of existingService Areas
Displays list of existingService Areas
1
2
4
3
AssignService
Area to aDomain
AssignService
Area to aDomain6
5
Next Page
Create Service Areas
The next step is perhaps one of the most critical as Phil must create Service Areas for the France Domaito reflect dial plans for different types of subscribers according to the Chambers Engineering deploymenplan. The Service Area business abstraction greatly simplifies subscriber provisioning because the
Domain Administrator only needs to assign a Service Area to a subscriber and not the individuacomponents such as Calling Search Space and Route Partition.
Earlier Phil created a new Subscriber Type to cover lobby phones. Using the following steps, Phil wicreate a Service Area specifically for lobby phones:
1. Phil selects the Infrastructure Configuration tab.
2. Next Phil selects the Setup Deployment option.
3. A sub-menu appears on the left-side of the desktop and Phil selects Service Areas. AlternativelyPhil could have selected the Service Areas option in the Setup Deployment dashboard displayedafter selecting the Infrastructure Configuration tab.
4. The Service Area Configuration – Configure a Service Area dialog is displayed. Phil selects the NewService Area option.
5. The dialog changes to display 2 entry boxes. Phil enters the Service Area ID as ParisLobby, anuses the pull-down Domain menu to select the France Domain. Use a descriptive name to facilitatthe understanding of the dial plan the Service Area represents.
6. Phil clicks the Save button to create the Service Area. (see next page)
Note(s):
• To view or modify the configuration of an existing Service Area, use the View Service Area option.

8/11/2019 Cucm Tutorial Cisco
http://slidepdf.com/reader/full/cucm-tutorial-cisco 76/180
© 2007 Cisco Systems, Inc. All rights reserved. Scenarios 3-36Provisioning Manager Tutorial
Setup DeploymentConfigure Service Areas
Assign a Call Processor Assign a Call Processor
Create Service Area result dialog
Create Service Area result dialog
Select Dial Plan(pulled from CCM during
infrastructure sync)
Select Dial Plan(pulled from CCM during
infrastructure sync)
Assign a block ofdirectory numbers
Assign a block ofdirectory numbers
Assign subscriber roles tothe Service Area – Thensubscribers with these
role(s) can order from thisService Area
Assign subscriber roles tothe Service Area – Thensubscribers with these
role(s) can order from this
Service Area
Configure Service Area After creating the Service Area the Service Area Configuration – Edit Service Area dialog is displayed. It iused to define the parameters of a dial plan. Phil uses the following steps to configure the “ParisLobbyService Area he just created:
1. Phil uses the pull-down menus to select the appropriate values.Call Processor Settings:
Name: Select the ParisHQ call processor.
Once this field is set, the remain options will be populated based on the valueretrieved from the selected call processor during the infrastructuresynchronization task. Phil uses the appropriate values to create a dial plan folobby phones according to the Chambers Engineering IP voice deploymenplan.
Unified Message Processor Settings:
Identical procedure to the call processor settings. Defining a messageprocessor in a service area is optional. For the ParisLobby Service Area a
message processor is not needed because the IP voice deployment plan doenot allow voice mail on the lobby phones.
Subscriber Roles:
Phil selects Facilities – The Facilities Subscriber Role was specificallcreated for lobby phones. It limits the type of phones and services that can bordered. More than one Subscriber type can be chosen.
Directory Number Block(s):
A feature of PM is the ability to assign a block of numbers to a Service AreaUse the notepad icon to configure a set of directory numbers to be assigned(auto-configured) when provisioning a subscriber in this Service Area.
2. Click Save to update the ParisLobby Service Area’s configuration.

8/11/2019 Cucm Tutorial Cisco
http://slidepdf.com/reader/full/cucm-tutorial-cisco 77/180
© 2007 Cisco Systems, Inc. All rights reserved. Scenarios 3-37Provisioning Manager Tutorial
Setup DeploymentDomain Sync
Put existing subscribers discovered duringCall Processor Subscriber Sync into theDomain and appropriate Service Area
Put existing subscribers discovered duringCall Processor Subscriber Sync into theDomain and appropriate Service Area
1
2
4
3 6
5
Details filled inon completion
Details filled inon completion
Domain Sync behavior is controlled bythe following business rules:
• AssociateAllUsersInCallProcessor • AssociateUserByDeptCode
Domain Sync behavior is controlled bythe following business rules:
• AssociateAllUsersInCallProcessor • AssociateUserByDeptCode
Domain Sync
After creating all the necessary Service Areas within the France Domain, the next step is to associatexisting subscribers (imported during subscriber synchronization) with the appropriate Domain and Service Area.
By performing a Domain synchronization, the imported subscribers will be placed into a Domain and themapped into the appropriate PM Service Area within the Domain. This is done to not only allow PM users toview subscriber configurations, but to also modify and update them using PM.
The Domain synchronization behavior is controlled by a couple of Business Rules. One rule simply puts asubscribers imported into the Domain performing the sync. The other rule, only places subscribers with aDepartment name listed by the rule into the Domain. For our example, the first rule is enabled since at thistime only a single Domain exists.
Phil uses the following steps to perform a Domain synchronization:
1. Phil selects the Infrastructure Configuration tab.
2. Next Phil selects the Setup Deployment option.
3. A sub-menu appears on the left-side of the desktop and Phil selects Domains.4. The Domain Configuration – Configure a Domain dialog is displayed. Phil selects the View Domai
option.
5. The Choose a Domain dialog changes to a listing of all Domains. Phil selects France. AlternativelyPhil could have selected the arrow icon next to the Domains option in the Setup Deploymendashboard displayed after selecting the Infrastructure Configuration tab and selected the FranceDomain from the list displayed.
6. The Domain Configuration – View Domain dialog is displayed showing the current configuration fothe France Domain. Phil clicks the Synchronize option. A percentage completion bar will bdisplayed. When the synchronization is complete details about its start and completed time and astatus message will be displayed under the configuration details.

8/11/2019 Cucm Tutorial Cisco
http://slidepdf.com/reader/full/cucm-tutorial-cisco 78/180
© 2007 Cisco Systems, Inc. All rights reserved. Scenarios 3-38Provisioning Manager Tutorial
User Administration
FranceCreate PM usersfor FranceDomain
Create PM usersfor FranceDomain
1
Assign User Rolesto newly created
users
Assign User Rolesto newly created
users
2
Mary will be responsible forordering products for
subscribers assigned to theFrance Domain
Mary will be responsible forordering products for
subscribers assigned to theFrance Domain
David will be responsible forapproving orders within the
France Domain
David will be responsible forapproving orders within the
France Domain
Domain AdministrationParis
Lobby
User Administration
The PM configuration that Phil has performed up to this point is enough for him to begin managinsubscribers and their services. However, this is a task that he wants to hand-off to less experienced stafmember. We’ll finish this scenario by detailing how Phil would create the PM users assigned to handle
provisioning tasks in the France Domain. According to Chambers Engineering’s IP voice deployment plans, Mary will be responsible for orderingchanging, and updating all subscriber services in the France Domain. David, Mary’s boss wants to beinformed about all subscriber provisioning, so he has asked to approve any order prior to it beingprovisioned.
To meet this requirement, Phil must create two new PM users to administer the France Domain, and assignthem with the appropriate user privileges for their job responsibilities.

8/11/2019 Cucm Tutorial Cisco
http://slidepdf.com/reader/full/cucm-tutorial-cisco 79/180
© 2007 Cisco Systems, Inc. All rights reserved. Scenarios 3-39Provisioning Manager Tutorial
User AdministrationCreate User
Create a User responsible forordering phones and managing
subscribers in the France Domain
Create a User responsible forordering phones and managing
subscribers in the France Domain
Limit responsibility to France DomainLimit responsibility to France Domain
12
4
3
Next Page
Create User
To recap, a PM user is staff member who should be allowed to perform tasks within PM. The followingsteps detail how Phil creates an account for Mary in the France Domain and assigns her orderinprivileges:
1. Phil selects the System Administration tab.2. Next Phil selects the Manage Users option.
3. The Manage User – Create User or Select User to Update dialog is displayed. Phil enters thappropriate information for user Mary, and uses the Domain pull-down menu to assign Mary to theFrance Domain.
4. Phil clicks Create to create Mary’s account. (see next page)
Note(s):
• To update an existing user, click the arrow icon to the right of the User ID entry box. A dialog idisplayed listing all existing users. Then, select the user to update.

8/11/2019 Cucm Tutorial Cisco
http://slidepdf.com/reader/full/cucm-tutorial-cisco 80/180
© 2007 Cisco Systems, Inc. All rights reserved. Scenarios 3-40Provisioning Manager Tutorial
User AdministrationSet User Password
Create new User result dialogCreate new User result dialog
NextPage
NextPage
5
6
9
8
7
Default passwordsame as User ID
Default passwordsame as User ID
Set User Password
5. Upon creation of the user, the Manage User – Update or Remove User dialog is displayed. To add password for user Mary, Phil clicks the Manage Passwords option.
6. The dialog changes to Password Management. Phil selects Provisioning Manger Login from th
“Select password to modify” pull-down menu, and adds and confirms the password.7. To have this value take effect, Phil clicks Set to New Value.
8. Phil clicks Done to return to the Update or Remove User dialog.
9. Next, Phil needs to assign user roles to Mary. Phil can click either the Manage AuthenticatioRoles option or the Edit button to the right of the Assigned Roles entry box (illustrated above).
Note(s):
• If a password is not set for a newly created user, the default is the same as the User ID.
• A user can change their password when logged in, by clicking their User ID, displayed as the loggein user in the upper right-hand corner of the PM desktop.

8/11/2019 Cucm Tutorial Cisco
http://slidepdf.com/reader/full/cucm-tutorial-cisco 81/180

8/11/2019 Cucm Tutorial Cisco
http://slidepdf.com/reader/full/cucm-tutorial-cisco 82/180
<Intentionally Left Blank>

8/11/2019 Cucm Tutorial Cisco
http://slidepdf.com/reader/full/cucm-tutorial-cisco 83/180
Advanced Policy andManagementAdvanced Policy andManagement
Network Description
Getting StartedExisting VoIP Deployment Setup
Advanced Policy & Management
Managing Orders
Adding Sites
Batch Provisioning

8/11/2019 Cucm Tutorial Cisco
http://slidepdf.com/reader/full/cucm-tutorial-cisco 84/180
© 2007 Cisco Systems, Inc. All rights reserved. Scenarios 3-44Provisioning Manager Tutorial
Scenario 3 OutlineAdvanced Policy & Management
Business Rules Example
– Configure Workflow
Provisioning Attributes Example
– Configure Speed Dial
Scenario 3 Outline
At this point, Mary and David could begin using PM to manage subscribers and their services in the FrancDomain. However, PM allows for additional configurations to further control PM’s execution and thprovisioning itself.
In this scenario, we will explore the configuration of Business Rules and Provisioning Attributes as they relateto Chambers Engineering’s IP voice deployment plan.

8/11/2019 Cucm Tutorial Cisco
http://slidepdf.com/reader/full/cucm-tutorial-cisco 85/180
© 2007 Cisco Systems, Inc. All rights reserved. Scenarios 3-45Provisioning Manager Tutorial
Advanced Policy and ManagementBusiness Rules Example – Configure Workflow
Yes
Approval
Required
ProvisionOrder
Approve Order (User Role –
Approval)
Place Order (MAC assigned at time
of order)
Desired Order Workflow in France Domain Approval = True
– User David has ‘Approval’ user role
Assignment = Done at time of order
– User Mary has ‘Advanced Assignment’ user role
Shipping = Workflow automatic
Receiving = Workflow automatic
Business Rules Example – Workflow Configuration
The Chambers Engineering IP voice management plan for the offices in France states that Mary will bresponsible for all subscriber ordering and phone assignment, and that David must first approve all ordersbefore they are provisioned. Phil has already created the PM users Mary and David, and assigned them wit
the proper user roles to satisfy this requirement.The next step is to configure PM so that the ordering workflow reflects this requirement. By default, all stepof the ordering workflow are set to automatic. If left in this state, any order Mary placed would bautomatically provisioned without any approval.
In this example, Phil will modify the appropriate Business Rules to configure the ordering workflow in thFrance Domain to meet the stated requirement.

8/11/2019 Cucm Tutorial Cisco
http://slidepdf.com/reader/full/cucm-tutorial-cisco 86/180
© 2007 Cisco Systems, Inc. All rights reserved. Scenarios 3-46Provisioning Manager Tutorial
Business Rule ExampleConfigure Workflow
Configure workflow Business Rules so that all orders in theFrance Domain be approved by a user with the User Role -
‘Approval’
Note - Default value for all workflow steps is ‘workflow automatic’
Configure workflow Business Rules so that all orders in theFrance Domain be approved by a user with the User Role -
‘ Approval’
Note - Default value for all workflow steps is ‘workflow automatic’
3
12
Select France Domain (other choicesinclude Global Template)
Select France Domain (other choicesinclude Global Template)4
Select Rule to modifySelect Rule to modify5
Click to modifyClick to modify6 Next Page
Only user with the global user role‘Administration’ can modify Business
Rules
Only user with the global user role‘ Administration’ can modify Business
Rules
Workflow Configuration
Phil uses the following steps to edit the appropriate Business Rules in the France Domain to configure thedesired processing workflow:
1. Phil selects the Advanced Setup tab.
2. Next Phil selects the Policies option.
3. A sub-menu is displayed of the left side of the PM desktop. Phil selects the Rules task.
4. The Rules Configuration – Configure a Rule dialog is displayed. From the ‘Configure Rules iDomain’ pull-down menu, Phil selects France.
5. Phil then uses the ‘Select a Rule’ pull-down menu to select IsAuthorizationRequiredForAddOrder
6. The description and current setting of the rule is displayed. Phil clicks the notepad icon to the righof the rules name to modify it (see next page)
Note(s):
• To configure a rule to be applied to all new Domains, use the ‘Configure Rules in Domain’ pull-dow
and select Customer Domain Template

8/11/2019 Cucm Tutorial Cisco
http://slidepdf.com/reader/full/cucm-tutorial-cisco 87/180
© 2007 Cisco Systems, Inc. All rights reserved. Scenarios 3-47Provisioning Manager Tutorial
Business Rule ExampleConfigure Workflow (Cont.)
Click to enableClick to enable7
No data for thisrule
No data for thisrule
8
Rules are configured by enablingand entering a corresponding
data value
Rules are configured by enablingand entering a corresponding
data value
Workflow Configuration (Cont.)
7. The dialog changes to allow editing. For this particular rule there is no associated data (i.e. like useroles that can be set to perform this action), only enabled or disabled. When enabled a user in theFrance Domain with the Approver user role must approve all add orders. Phil clicks the Enabl
check box.8. Phil clicks Save to have the new rule take effect.
Note(s):
• Phil uses the same steps to also enable rules to necessitate approval for change and cancel orders(IsAuthorizationRequiredForChangeOrder and IsAuthorizationRequiredForCancleOrder)

8/11/2019 Cucm Tutorial Cisco
http://slidepdf.com/reader/full/cucm-tutorial-cisco 88/180
© 2007 Cisco Systems, Inc. All rights reserved. Scenarios 3-48Provisioning Manager Tutorial
Advanced Policy and ManagementProvisioning Attributes Example – Speed Dial
Configure the ParisLobbyService Area Provisioning
Attributes to set a speed dial forsecurity
Configure the ParisLobbyService Area Provisioning
Attributes to set a speed dial forsecurity
Paris Lobby
France
Speed Dial 1 = 65911, Security
Security
Provisioning Attributes Example – Speed Dial
When provisioning phones, lines, voice mail, and extension mobility there are many possible attributes thacan be set. Setting them for each provisioning instance would require substantial time and be prone tohuman error. PM allows Provisioning Attributes to be set at the Domain, Subscriber Type, and Service Area
levels that will be assigned to provisioning orders, thus simplifying the process. A PM user with the AdvancedOrdering user role can also override any of these settings when placing an order.
Let’s look at an example of setting a Speed Dial for Security on all Lobby Phones. For this example, we wiconfigure the attribute at the Service Area level.
Note(s):
• Setting the attribute at the Service Area level takes precedence over any Speed Dials that may havebeen set at the Domain or Subscriber Type level.

8/11/2019 Cucm Tutorial Cisco
http://slidepdf.com/reader/full/cucm-tutorial-cisco 89/180
© 2007 Cisco Systems, Inc. All rights reserved. Scenarios 3-49Provisioning Manager Tutorial
Provisioning Attributes ExampleSpeed Dial
Set Speed Dial attributes for theParisLobby Service Area
Set Speed Dial attributes for theParisLobby Service Area
Only user with the global user role‘Administration’ can modify Provisioning Attributes for a Domain or Service Area
Only user with the global user role‘ Administration’ can modify Provisioning Attributes for a Domain or Service Area
3
1
2
4
5
Next PageProvisioning Attributes can also be edited from theappropriate Create/Update tasks (i.e. InfrastructureConfiguration > Setup Deployment > Service Areas)
Provisioning Attributes can also be edited from theappropriate Create/Update tasks (i.e. InfrastructureConfiguration > Setup Deployment > Service Areas)
Speed Dial
Phil uses the following steps to edit the Provisioning Attributes for the Service Area - ParisLobby. Any phonprovisioning using the ParisLobby Service Area will be assigned these attributes:
1. Phil selects the Advanced Setup tab.
2. Next, Phil selects the Policies option.
3. A sub-menu is displayed of the left side of the PM desktop. Phil selects the Provisioning Attributetask.
4. The Launching Provisioning Attributes Management – Choose a Provisioning Attributes AssignmenLevel to Start dialog is displayed. Phil selects the Service Area option.
5. A dialog is displayed listing all configured Service Areas in PM. Phil selects ParisLobby. (see nexpage)

8/11/2019 Cucm Tutorial Cisco
http://slidepdf.com/reader/full/cucm-tutorial-cisco 90/180
© 2007 Cisco Systems, Inc. All rights reserved. Scenarios 3-50Provisioning Manager Tutorial
Provisioning Attributes ExampleSpeed Dial (Cont.)
Click toexpand
Click toexpand
7
Enter appropriateinformation
Enter appropriateinformation
8
Provisioning AttributesProvisioning Attributes
6
10
9
Speed Dial, (Cont.)
6. The Service Area Configuration – Provisioning Attribute Management dialog is displayed. It listonly the products that can be provisioned for this Service Area. Notice that there is no entry fovoicemail. This is because no message processor was defined for the ParisLobby Service Area
Phil expands the Phone entry.7. All Phone attributes are displayed. Phil finds the one related to Speed Dial and clicks the notepa
icon to the right of the entry to modify it.
8. A new dialog is displayed. Phil enters the directory number for Security and enters the labeSecurity.
9. Phil clicks Update which saves the attribute, and presents another entry line.
10. Phil clicks Done when finished adding speed dial information.
All phones provisioned using the ParisLobby Service Area will have a Speed Dial entry for Security displayeon their phone’s display.
8/11/2019 Cucm Tutorial Cisco
http://slidepdf.com/reader/full/cucm-tutorial-cisco 91/180
Managing OrdersManaging Orders
Network Description
Getting StartedExisting VoIP Deployment Setup
Advanced Policy & Management
Managing Orders
Adding Sites
Batch Provisioning

8/11/2019 Cucm Tutorial Cisco
http://slidepdf.com/reader/full/cucm-tutorial-cisco 92/180
© 2007 Cisco Systems, Inc. All rights reserved. Scenarios 3-52Provisioning Manager Tutorial
Scenario 4 OutlineManaging Orders
Create Subscriber
Order Services – Phone and Line
Order Status
Workflow Step
Order Completion
– Shared Line
– Change Phone
– Change Owner
Scenario 4 Outline
Phil is now ready to turn over PM to Mary for managing the subscribers in the France Domain. This scenariowill follow her steps as she creates a subscriber and orders a number of services.

8/11/2019 Cucm Tutorial Cisco
http://slidepdf.com/reader/full/cucm-tutorial-cisco 93/180
© 2007 Cisco Systems, Inc. All rights reserved. Scenarios 3-53Provisioning Manager Tutorial
Managing Orders
France
Create a new
subscriber of typeFacilities &
assign to theFrance Domain
Create a new
subscriber of typeFacilities &
assign to theFrance Domain
1
Assigned to
ParisHQCCM
MainLobby
Ordered phone andline provisioned on
Paris HQ CCM
Ordered phone andline provisioned on
Paris HQ CCM
2
3
Managing Orders
Mary’s first activity with PM is to create a subscriber for a phone to be placed in the main lobby. She will theorder a phone and line for the subscriber, called “MainLobby”.
David will need to approve the order before it can be provisioned and activated.

8/11/2019 Cucm Tutorial Cisco
http://slidepdf.com/reader/full/cucm-tutorial-cisco 94/180
© 2007 Cisco Systems, Inc. All rights reserved. Scenarios 3-54Provisioning Manager Tutorial
Create Subscriber
Create a subscriber for the phoneto be placed in the main lobby
Create a subscriber for the phoneto be placed in the main lobby
1
2
3
4
AssignSubscriber Type AssignSubscriber Type
Create Subscriber
Mary logs into PM with the account created by the PM admin, Phil. Notice that her PM desktop doesn’t haveas many tabs and options as Phil’s did. Since Mary was configured to only have ordering user rights, only thtabs and options pertaining to the ordering task are displayed.
As seen above in Mary’s PM desktop, she can basically create subscribers and order services for themBecause of her assigned Domain, Mary can do this only for the France Domain. This is not a problembecause from Mary’s perspective she has no reason to know that PM is being used by any other areas.
Let’s follow Mary as she creates a subscriber for the phone to be placed in the main lobby of the ParisHeadquarters:
1. Mary selects the Provisioning Dashboard tab (her only option so it will be selected by default)
2. A set of dashboards are displayed that provide shortcuts to the various tasks. So rather thaselecting the Manage Subscribers option and then the Add Subscribers task that will be displayed ia sub-menu, Mary simply selects Add Subscriber in the Manage Subscribers dashboard.
3. The Manage a Subscriber – Create Subscriber or Select Subscriber to Update dialog is displayedMary adds information pertaining to this subscriber’s account, ID, first and last name, a contac
phone number and email address, and department. Notice that she did not need to select a Domainbecause she only has rights in the France Domain. She must also assign the type of subscribeRemember, Subscriber Type dictates the products and services that can be ordered. Mary uses theAdd and Remove buttons until the Assigned Subscriber Type is Facilities.
4. Mary clicks Create to create this subscriber account.
Note(s):
• If Phil (pmadmin) was logged in and creating a subscriber, he would also have a pull-down menu tselect the Domain to place the subscriber in.
• To modify subscriber information, click the arrow icon to the right of the Subscriber ID entry field. A
list of subscribers in the Domain of the user logged in will be listed (or all subscribers if global adminSelect the subscriber to modify.

8/11/2019 Cucm Tutorial Cisco
http://slidepdf.com/reader/full/cucm-tutorial-cisco 95/180

8/11/2019 Cucm Tutorial Cisco
http://slidepdf.com/reader/full/cucm-tutorial-cisco 96/180
© 2007 Cisco Systems, Inc. All rights reserved. Scenarios 3-56Provisioning Manager Tutorial
Order ServicesPhone and Line, (Cont.-1)
Listing depends on the productsassociated with the Subscriber
Type and devices in the Domain(Example listing for another Subscriber Type)
Listing depends on the productsassociated with the Subscriber
Type and devices in the Domain(Example listing for another Subscriber Type)
6
7
Next Page
Phone and Line, (Cont.-1)
The desktop now displays the subscriber’s record. The record is used to order services, view thsubscriber’s current services (if any), and view a history of orders for the subscriber. As the scenariocontinues, you will have a chance to see subscriber records with more details than the one presented above
6. MainLobby’s subscriber record only lists a single bundle of products that can be ordered. Thproducts listed depend on the products associated with the Subscriber Type of the subscriber, anthe devices defined in the Domain (i.e. if the Domain does not have any message processors definedthen voicemail will not be offered as a service even if it is associated with the Subscriber Type). Marselects Phone Service to begin the ordering process.
7. The bottom half of the subscriber record changes into an Order Entry Wizard. The first step of thwizard describes what is being ordered. In this case, it is a single extension number and a single IPhandset. Mary clicks Continue for the next step of the wizard. (see next page)

8/11/2019 Cucm Tutorial Cisco
http://slidepdf.com/reader/full/cucm-tutorial-cisco 97/180
© 2007 Cisco Systems, Inc. All rights reserved. Scenarios 3-57Provisioning Manager Tutorial
Order ServicesPhone and Line, (Cont.-2)
No selections in this step of thewizard based on Subscriber Type
products settings
No selections in this step of thewizard based on Subscriber Type
products settings
8
9
Phones available depends onproducts specified for SubscriberType. After selecting type, phone
picture is displayed
Phones available depends onproducts specified for SubscriberType. After selecting type, phone
picture is displayed
Phone assignment available here ifuser has Ordering – Advanced
Assignment user role.
(Note: based on Business Rule, workflowmay still wait for an assignment activity)
Phone assignment available here ifuser has Ordering – Advanced Assignment user role.
(Note: based on Business Rule, workflowmay still wait for an assignment activity)
10
Next Page
Phone and Line, (Cont.-2)
8. The second step of the wizard configures the line. In this case, the Subscriber Type only allows aauto-assigned line so there is no selection to be made. The other possibility, if associated with theSubscriber Type, is to choose a line, which allows the user doing the ordering to assign the Director
Number. Mary simply clicks Continue to go to the next step in the wizard.9. This step of the wizard is also used to configure a product being ordered. This time it’s the phone
Mary uses the pull-down list to select a phone type. Again this list is based on the productassociated with the Subscriber Type assigned to this subscriber. Once a phone is selected, a samplpicture of the phone is displayed. Since Mary was also granted the Advanced Assignment user roleshe can now assign the actual phone by entering its MAC address.
10.Mary clicks Continue to move to the final step of this wizard. (see next page)

8/11/2019 Cucm Tutorial Cisco
http://slidepdf.com/reader/full/cucm-tutorial-cisco 98/180
© 2007 Cisco Systems, Inc. All rights reserved. Scenarios 3-58Provisioning Manager Tutorial
Order ServicesPhone and Line, (Cont.-3)
11
12
13
Order only matches one Service
Area, so no selection necessary
Order only matches one Service
Area, so no selection necessary
Note the order number to trackprovisioning progress
Note the order number to trackprovisioning progress
Allows for setting specific Provisioning Attributesfor ordered products. User must have Ordering –
Advanced Ordering user role
Allows for setting specific Provisioning Attributesfor ordered products. User must have Ordering –
Advanced Ordering user role
Phone and Line, (Cont.-3)
11. If the Subscriber Type was defined in more than one Service Area, Mary would need to select thappropriate one (good reason for descriptive naming of Service Areas). Here, Mary does nothingbecause Facilities was only associated with the ParisLobby Service Area. Mary must also selec
the appropriate Phone Button Template to use and finally which line on the phone the extensionwill be attached to.
12. Mary is satisfied with her selections, and clicks Confirm to place the order.
13. The Confirmation of Order dialog is displayed providing Mary with the Order Number to help hetrack it. Mary clicks Done.
Note(s):
• Many of the fields and available options will differ depending on the products being ordered.

8/11/2019 Cucm Tutorial Cisco
http://slidepdf.com/reader/full/cucm-tutorial-cisco 99/180
© 2007 Cisco Systems, Inc. All rights reserved. Scenarios 3-59Provisioning Manager Tutorial
Order ServicesPhone and Line - Status
1
Dashboard can provide directlinks to orders pending
Dashboard can provide directlinks to orders pending
Can search orders by ordernumber or subscriber
Can search orders by ordernumber or subscriber
2
Next Page
Checkstatus of
order
Checkstatus of
order
Phone and Line – Status
Once the order is placed, it enters the ordering workflow where it goes through the steps of approvaassignment, shipping, and receiving. The steps are handled either automatically by PM or must have manuaintervention by a PM user before proceeding. The workflow processing is defined by the setting of Busines
rules as discussed in the previous scenario.Mary wants to check on the status of this order and uses the following steps to do so:
1. Mary selects the Provisioning Dashboard tab (her only option so it will be selected by default)
2. A set of dashboards are displayed that provide shortcuts to the various tasks. The Manage OrdeDashboard contains a summary of currently being provisioned orders. Mary selects the Waiting totasince she has only made one order so far. She could also have selected the Search Orders option oany option that would eventually display the MainLobby’s subscriber record (see next page).
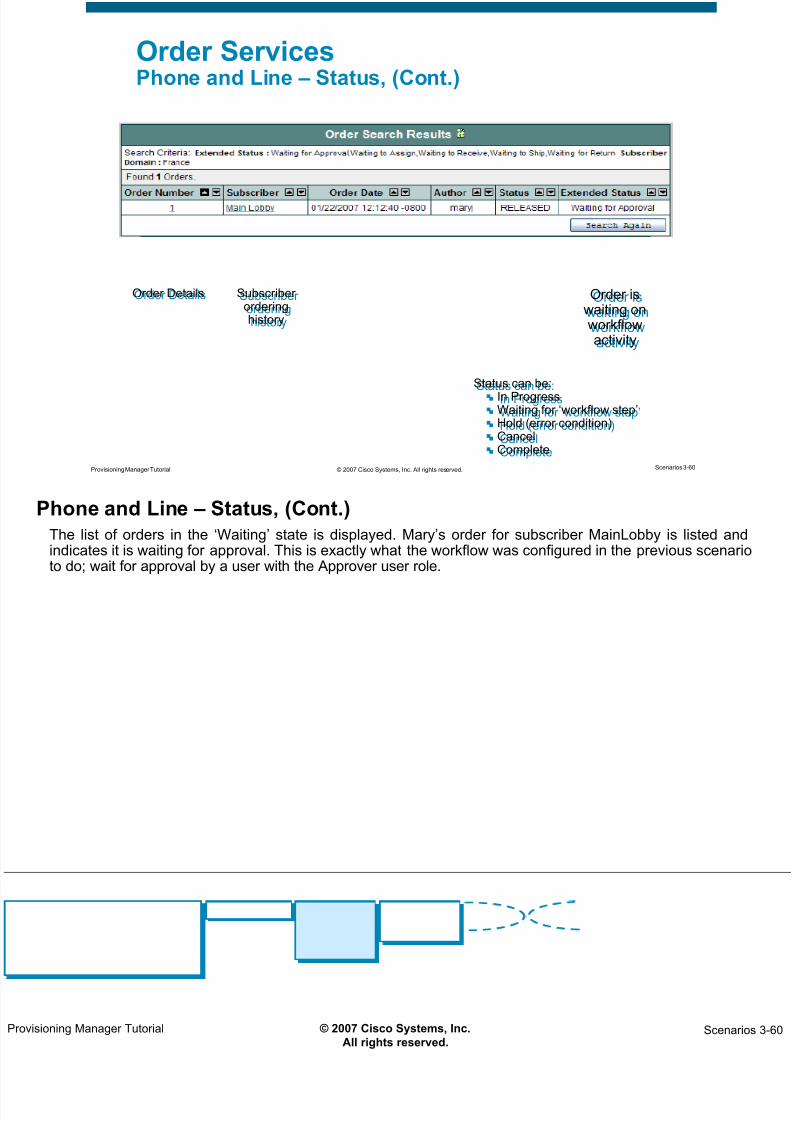
8/11/2019 Cucm Tutorial Cisco
http://slidepdf.com/reader/full/cucm-tutorial-cisco 100/180
© 2007 Cisco Systems, Inc. All rights reserved. Scenarios 3-60Provisioning Manager Tutorial
Order ServicesPhone and Line – Status, (Cont.)
Order DetailsOrder Details Subscriberorderinghistory
Subscriberorderinghistory
Order iswaiting onworkflowactivity
Order iswaiting onworkflowactivity
Status can be: In Progress Waiting for ‘workflow step’ Hold (error condition) Cancel Complete
Status can be: In Progress Waiting for ‘workflow step’ Hold (error condition) Cancel Complete
Phone and Line – Status, (Cont.)
The list of orders in the ‘Waiting’ state is displayed. Mary’s order for subscriber MainLobby is listed andindicates it is waiting for approval. This is exactly what the workflow was configured in the previous scenarito do; wait for approval by a user with the Approver user role.

8/11/2019 Cucm Tutorial Cisco
http://slidepdf.com/reader/full/cucm-tutorial-cisco 101/180
© 2007 Cisco Systems, Inc. All rights reserved. Scenarios 3-61Provisioning Manager Tutorial
Order ServicesPhone and Line – Workflow Completion
User David with‘Approver’ user role
in the FranceDomain logs in
User David with‘Approver’ user role
in the FranceDomain logs in
1
2
Order 1 is waiting to be approved beforecontinuing in the order workflow
Order 1 is waiting to be approved beforecontinuing in the order workflow
Depending on business rules, workflow can alsorequire user intervention for workflow steps:
assignment, shipping, and receiving
Depending on business rules, workflow can alsorequire user intervention for workflow steps:
assignment, shipping, and receiving
3
Next Page
Workflow relatedactivities
Workflow relatedactivities
Phone and Line – Workflow Completion
The order will remain in the waiting state until it is approved. Phil configured David with the Approver userole in the France Domain. Therefore, before the order will continue on in the workflow, David must log intPM, and approve the order.
The screenshot above depicts David’s PM desktop. Notice that the only task he can perform is titled M Activities. The My Activities task is used to handle the manual steps of the workflow assigned to the PM uselogged in. If you were to look back a few pages, you would notice that Mary’s desktop did not include thistask because her account was not configured to handle any workflow steps.
For this order to proceed, David uses the following steps to approve the order:
1. David selects the Provisioning Dashboard tab (his only option so it will be selected by default)
2. A single dashboard is displayed. At the bottom of the My Activities dashboard is a status of thnumber of orders waiting for action by David. To view them, David selects the My Activities option.
3. A list of orders waiting for David’s action is displayed. David selects Order 1 for MainLobby (senext page)
Note(s):• There are many more options available for the Global Administrator under the Manage Activitie
dashboard including: My Activities, All Activities, Activities for a Group, Activities for a User. The lasthree only allows the Global Administrator to look at the activities, but not act on them. The Globa Administrator can only act on the activities listed under My Activities.

8/11/2019 Cucm Tutorial Cisco
http://slidepdf.com/reader/full/cucm-tutorial-cisco 102/180
© 2007 Cisco Systems, Inc. All rights reserved. Scenarios 3-62Provisioning Manager Tutorial
Order ServicesPhone and Line – Workflow Completion, (Cont.)
4
5
Order 1 is waiting to be approved beforecontinuing in the order workflow
Order 1 is waiting to be approved beforecontinuing in the order workflow
Add comments to appear in order history Add comments to appear in order history
If there are more thanone Approver in theDomain, then one
Approver could deferto another
If there are more thanone Approver in theDomain, then one
Approver could deferto another
Phone and Line – Workflow Completion, (Cont.)
4. The Viewing Activity dialog is displayed. It presents details about what was ordered. David’s firsorder of business is to either accept or decline the responsibility of approving this order. The Declineoption may be selected if there were other users with the approval right that David wanted to defer to
In this case, David selects Accept.5. At this point, David can choose to delegate this activity to another user or accept or reject it himsel
David can add comments to this order that will appear in the order history for the subscriber. Daviselects Approve to approve the order.
Based on his assigned user roles, David’s job is done and he can do nothing further using PM, includinchecking the order’s progress.

8/11/2019 Cucm Tutorial Cisco
http://slidepdf.com/reader/full/cucm-tutorial-cisco 103/180
© 2007 Cisco Systems, Inc. All rights reserved. Scenarios 3-63Provisioning Manager Tutorial
Order ServicesPhone and Line – Order Completion
Mary can search order by numberor subscriber to get current status
Mary can search order by numberor subscriber to get current status
Phone and Line – Order Completion
Once approved the order moved through the remainder of the workflow automatically (because no other useinterventions were configured with the Business Rules), and was activated. Mary uses the same procedureas earlier to search for the order to get its status, where she sees that it completed successfully.
The subscriber, phone, and line were all configured in the CallManager ParisHQ by PM, and once the IPPhone is installed in the lobby, it is ready for use.

8/11/2019 Cucm Tutorial Cisco
http://slidepdf.com/reader/full/cucm-tutorial-cisco 104/180
© 2007 Cisco Systems, Inc. All rights reserved. Scenarios 3-64Provisioning Manager Tutorial
Order ServicesShared Line
DN=65000 DN=65000
Matt and Susan will have theirown phones but share a line
Matt and Susan will have theirown phones but share a line
Matt’s phone and line havealready been provisioned, Mary
first searches the subscriberrecords to determine the DN to
be shared
Matt’s phone and line havealready been provisioned, Mary
first searches the subscriberrecords to determine the DN to
be shared
Susan’s phone and line areprovisioned by Mary. The line is
assigned to the existing lineDN=65000
Susan’s phone and line areprovisioned by Mary. The line is
assigned to the existing lineDN=65000
Matt Susan
Shared Line
Chambers Engineering is a progressive company that allows job sharing. Matt is the current TrainingCoordinator, but will now be sharing the job with new hire Susan. Both Matt and Susan have their own desand phone, but both need to be able to answer the Training Coordinator’s line from their desks.
To meet this requirement, Mary will first search for Matt’s subscriber record to determine the number to beshared, and then provision Susan with a phone and the shared number.

8/11/2019 Cucm Tutorial Cisco
http://slidepdf.com/reader/full/cucm-tutorial-cisco 105/180
© 2007 Cisco Systems, Inc. All rights reserved. Scenarios 3-65Provisioning Manager Tutorial
Order ServicesShared Line – Determine Line to be Shared
Subscribers Matt and Susanwill be sharing a line
Subscribers Matt and Susanwill be sharing a line
Matt has already been provisioned a phone. First step is todetermine his assigned extension that he will be sharing.
Matt has already been provisioned a phone. First step is todetermine his assigned extension that he will be sharing.
1
5
3
2
Search by order details,Subscriber, or order date
Search by order details,Subscriber, or order date 4
Next PageCould also use Provisioning Dashboard
> Manage subscribers > SearchSubscribers
Could also use Provisioning Dashboard> Manage subscribers > Search
Subscribers
Shared Line – Determine the Line to be Shared
Matt’s phone was previously provisioned, so his current number will be the one shared with Susan. Mary’first task is to determine Matt’s current directory number. Mary doesn’t want to rely on the published phondirectory as it may be out-of-date, so she will search for Matt’s subscriber records to determine what wa
provisioned for him.1. Mary selects the Provisioning Dashboard tab (her only option so it will be selected by default)
2. She next selects the Manage Orders option.
3. A sub-menu is displayed on the left side of the PM desktop, Mary selects Search Orders.
4. A Search dialog is displayed allowing Mary to search for orders using a combination of Order DetailsSubscriber Information, and/or Order Dates. Mary enters Matt’s subscriber ID in the Subscriber Loginentry box.
5. Mary clicks Search (see next page).
Note(s):
• Mary could have also selected the Manage Subscribers option to search for Matt’s subscriberecords.

8/11/2019 Cucm Tutorial Cisco
http://slidepdf.com/reader/full/cucm-tutorial-cisco 106/180
© 2007 Cisco Systems, Inc. All rights reserved. Scenarios 3-66Provisioning Manager Tutorial
Order ServicesShared Line - Determine Line to be Shared, (Cont.)
6
Matt and Susan will besharing extension x65000
Matt and Susan will besharing extension x65000
Click products forprovisioning
details (attributes)
Click products forprovisioning
details (attributes)
Shared Line – Determine the Line to be Shared, (Cont.)
6. A dialog appears, displaying a list of orders matching Mary’s search parameters. She locates onrelated to Matt, and clicks on the subscriber in the Subscriber field to launch Matt’s subscriberecords.
7. Matt’s Subscriber Record Details are displayed listing task options, order history, and currenproducts. Under current products, Mary notes that the directory number associated with Line 1 onMatt’s phone is 65000. This is the line that will be shared with Susan.

8/11/2019 Cucm Tutorial Cisco
http://slidepdf.com/reader/full/cucm-tutorial-cisco 107/180
© 2007 Cisco Systems, Inc. All rights reserved. Scenarios 3-67Provisioning Manager Tutorial
Order ServicesShared Line – Order Susan’s Phone and Line
Order Susan’s phone and lineto be shared with x65000
Order Susan’s phone and lineto be shared with x65000
A new subscriber has already been created for Susan. Use ProvisioningDashboard > Manage Orders > Order Subscriber Services to search for
subscriber Susan
A new subscriber has already been created for Susan. Use ProvisioningDashboard > Manage Orders > Order Subscriber Services to search for
subscriber Susan
1
2
3 Next Page
Shared Line – Order Susan’s Phone and Line
With the information about Matt’s line, Mary uses the following steps to order phone services for Susan:
1. Mary selects Provisioning Dashboard > Manage Orders > Order Subscriber Services to searcfor subscriber Susan and launch the Products Ordering dialog.
2. From the Products Ordering dialog, she selects Phone Service from the list of available products foordering.
3. The lower portion of the dialog displays the first step of the ordering wizard detailing what waselected for ordering. Mary clicks Continue to move to the next step of the ordering wizard (senext page)
Note(s):
• Subscriber Susan was given a Subscriber Type of employee which has more products and serviceassociated with it then the Facilities Subscriber Type detailed earlier in this scenario.

8/11/2019 Cucm Tutorial Cisco
http://slidepdf.com/reader/full/cucm-tutorial-cisco 108/180
© 2007 Cisco Systems, Inc. All rights reserved. Scenarios 3-68Provisioning Manager Tutorial
Order ServicesShared Line – Order Susan’s Phone and Line, (Cont.-1)
5
Use Line Type of ‘Chosen Line’
to share an existing line
Use Line Type of ‘Chosen Line’to share an existing line
4
Next Page
Select phone typeand assign phone
Select phone typeand assign phone6
7
Shared Line – Order Susan’s Phone and Line (Cont.-1)
4. The second step of the wizard is used to configure parameters for the line. Mary selects ChoseLine from the Line Type pull-down menu. A new entry box is now displayed asking for the DirectoryNumber. Mary enters Matt’s extension - 65000.
5. Mary clicks Continue to advance to the next step of the wizard.6. The third step of the wizard is used to configure parameters for the phone. Mary selects a Cisc
7960 from the Phone Type pull-down menu. A picture of a 7960 is displayed. Since Mary has the Advanced Assignment user role assigned to her, she enters the MAC address of the phone she haselected to be placed on Susan’s desk.
7. Mary clicks Continue to advance to the final step of the wizard (see next page).

8/11/2019 Cucm Tutorial Cisco
http://slidepdf.com/reader/full/cucm-tutorial-cisco 109/180
© 2007 Cisco Systems, Inc. All rights reserved. Scenarios 3-69Provisioning Manager Tutorial
Order ServicesShared Line – Order Susan’s Phone and Line, (Cont.-2)
9
Enter button template and lineon phone to be shared. Select
line on phone to be shared
Enter button template and lineon phone to be shared. Select
line on phone to be shared
8
10
Assign any Provisioning Attributes(Option only displayed if user has Advanced
Ordering User Role)
Assign any Provisioning Attributes(Option only displayed if user has Advanced
Ordering User Role)
Shared Line – Order Susan’s Phone and Line (Cont.-2)
8. In the final step of the wizard, Mary needs to select a Service Area, if more than one exists. In thicase, the Employee Subscriber Type is only associated with the FranceNationwide Service Area, sno selection is necessary. Mary also selects the Standard 7960 Phone Button template, and Line 1
as the Line Position to use for the extension.9. Mary clicks Confirm to enter the order.
10. A confirmation dialog is displayed providing the order number. Mary clicks Done.
At this point the order enters the ordering workflow and, as before, will wait until David logs in anapproves the order.

8/11/2019 Cucm Tutorial Cisco
http://slidepdf.com/reader/full/cucm-tutorial-cisco 110/180
© 2007 Cisco Systems, Inc. All rights reserved. Scenarios 3-70Provisioning Manager Tutorial
Order ServicesShared Line – Verify Order
Susan’s Subscriber Recordshows that the line with DN
65000 on her phone is shared
Susan’s Subscriber Recordshows that the line with DN
65000 on her phone is shared
Shared Line – Verify Order
Once David has approved the order, the phone and line are provisioned on the ParisHQ CallManager andactivated. Looking at the details in Susan’s subscriber record, Mary can see that Susan’s line was set to65000, and the icon (illustrated above) indicates that it is a shared line.

8/11/2019 Cucm Tutorial Cisco
http://slidepdf.com/reader/full/cucm-tutorial-cisco 111/180
© 2007 Cisco Systems, Inc. All rights reserved. Scenarios 3-71Provisioning Manager Tutorial
Order ServicesChange Phone
DN=65000
Change Matt’s physicalphone
Change Matt’s physicalphone
Matt
Change To
Change Phone
It seems that most of Matt’s calls these days require input from others in the room. He has decided thachanging his phone to a conference model would simplify his life and has asked Mary to make it happen.

8/11/2019 Cucm Tutorial Cisco
http://slidepdf.com/reader/full/cucm-tutorial-cisco 112/180
© 2007 Cisco Systems, Inc. All rights reserved. Scenarios 3-72Provisioning Manager Tutorial
Order ServicesChange Phone, (Cont.)
Upgrade Matt’s PhoneUpgrade Matt’s Phone Use Provisioning Dashboard > Manage Subscribers >Search Subscribers to search for subscriber Matt
Use Provisioning Dashboard > Manage Subscribers >Search Subscribers to search for subscriber Matt
2
Next Page
Click to expandClick to expand1
3
Change Phone
Mary uses the following steps to change Matt’s phone:
1. Mary selects Provisioning Dashboard > Manage Subscribers > Search Subscribers to searcfor subscriber Matt and launch his Subscriber Record. Under the current products provisioned
section, Mary locates the phone entry and clicks the expand icon.2. This displays a number of tasks that can be executed. Mary clicks Change.
3. The Order Wizard is opened in the lower portion of the record. The first step of the wizard indicatethe products being ordered. Mary clicks Continue to move to the next step of the wizard (see nexpage).

8/11/2019 Cucm Tutorial Cisco
http://slidepdf.com/reader/full/cucm-tutorial-cisco 113/180
© 2007 Cisco Systems, Inc. All rights reserved. Scenarios 3-73Provisioning Manager Tutorial
Order ServicesChange Phone, (Cont.)
5
Choose new phone type, andassign phone
(Note assign step dependson business rules)
Choose new phone type, andassign phone(Note assign step depends
on business rules)
4
6
Assign any Provisioning Attributes(Option only displayed if user has Advanced
Ordering User Role)
Assign any Provisioning Attributes(Option only displayed if user has Advanced
Ordering User Role)
Change Phone, (Cont.)
4. The next step is used to configure parameters for products being ordered. In this case, Mary selecta Cisco 7936 from the Phone Type pull-down menu. A picture of a 7936 is displayed. Since Marhas the Advanced Assignment user role assigned to her, she enters the MAC address of the phone
she has selected to replace the one on Matt’s desk.5. Mary clicks Continue to advance to the final step of the wizard.
6. The final step of this wizard would be to assign Service Area, Phone Button Template, and Linposition, but in this case, there is nothing to be selected. Mary clicks Confirm to enter the order. Aconfirmation dialog is displayed providing the order number. Mary clicks Done.
At this point the order enters the ordering workflow and, as before, will wait until David logs in and approvethe order.
Note(s):
• Since Mary has also been assigned the user role Advanced Ordering, an Advanced Orderin
Options button is displayed on the final step of the wizard allowing Mary to set Provisioning Attributes.

8/11/2019 Cucm Tutorial Cisco
http://slidepdf.com/reader/full/cucm-tutorial-cisco 114/180
© 2007 Cisco Systems, Inc. All rights reserved. Scenarios 3-74Provisioning Manager Tutorial
Order ServicesChange Phone – Verify Order
New PhoneNew Phone
Change Phone – Verify Order
Once David has approved the order, the new phone is provisioned on the ParisHQ CallManager anactivated. Looking at the details of Matt’s subscriber record, Mary can see that Matt’s provisioned phone inow a model Cisco 7936.

8/11/2019 Cucm Tutorial Cisco
http://slidepdf.com/reader/full/cucm-tutorial-cisco 115/180
© 2007 Cisco Systems, Inc. All rights reserved. Scenarios 3-75Provisioning Manager Tutorial
Order ServicesChange Owner
DN=65000
• Susan is changingpositions and Steve willtake her place.
• Replace Susan withSteve as the new owner.
• Susan is changingpositions and Steve willtake her place.
• Replace Susan withSteve as the new owner.
Susan
Change
Steve
Change Owner
Susan has found a full-time position within the company and is being transferred. Luckily, Steve is looking foa part-time position and applies for Susan’s old position of shared Training Coordinator with Matt. Marneeds to update current provisioning to show Steve as the new owner of Susan’s phone services.

8/11/2019 Cucm Tutorial Cisco
http://slidepdf.com/reader/full/cucm-tutorial-cisco 116/180
© 2007 Cisco Systems, Inc. All rights reserved. Scenarios 3-76Provisioning Manager Tutorial
Order ServicesChange Owner, (Cont.)
Change owner of Susan’sphone to Steve
Change owner of Susan’sphone to Steve
Use Provisioning Dashboard > Manage Orders > OrderSubscriber Services to search for subscriber Susan
Use Provisioning Dashboard > Manage Orders > OrderSubscriber Services to search for subscriber Susan
2
Next Page
Click to expandClick to expand1
3
Change Owner
Mary uses the following steps to make Steve the new owner of Susan’s services:
1. Mary selects Provisioning Dashboard > Manage Subscribers > Search Subscribers to searcfor subscriber Susan and launch her Subscriber Record. Under the current products provisione
section, Mary locates the phone entry and clicks the expand icon.2. This displays a number of tasks that can be executed. Mary clicks Change Owner .
3. The Change Owner Wizard is opened in the lower portion of the record. The first step of the wizarindicates the existing products and current owner. Mary clicks Continue to move to the next step othe wizard (see next page).

8/11/2019 Cucm Tutorial Cisco
http://slidepdf.com/reader/full/cucm-tutorial-cisco 117/180
© 2007 Cisco Systems, Inc. All rights reserved. Scenarios 3-77Provisioning Manager Tutorial
Order ServicesChange Owner, (Cont.)
Click toassign new
owner
Click toassign new
owner
5
4
6
7
Change Owner, (Cont.)
4. The next step is used to select a new owner. Mary clicks the arrow icon to the right of the ChoosNew Owner entry to display a list of existing subscribers.
5. Mary selects subscriber steveb as the new owner.
6. Mary clicks Continue to advance to the final stage of this wizard.
7. A confirmation for this order shows Steve will be the new owner of Susan’s phone and associatelines. Mary clicks Submit to enter the order. A confirmation dialog is displayed providing the ordenumber. Mary clicks Done.
At this point the order enters the ordering workflow and, as before, will wait until David logs in anapproves the order before being provisioned and activated.
Note(s):
• Steve must have already been configured as a subscriber prior to being set as the new owner.

8/11/2019 Cucm Tutorial Cisco
http://slidepdf.com/reader/full/cucm-tutorial-cisco 118/180
© 2007 Cisco Systems, Inc. All rights reserved. Scenarios 3-78Provisioning Manager Tutorial
Order ServicesChange Owner – Verify Order
Click todisplay order
details
Click todisplay order
details
New Owner New Owner
Use Provisioning Dashboard > Manage Orders >Order Subscriber Services to search for subscriber
Steve to see that the change was made
Use Provisioning Dashboard > Manage Orders >Order Subscriber Services to search for subscriber
Steve to see that the change was made
Change Owner – Verify Order
Once David has approved the order, Susan’s phone and associated lines are provisioned for Steve on theParisHQ CallManager. Looking at the details of Steve’s subscriber record, Mary can see that Steve nowowns Susan’s phone and associated line. Notice that the line is still shared with Matt (shared icon i
displayed).

8/11/2019 Cucm Tutorial Cisco
http://slidepdf.com/reader/full/cucm-tutorial-cisco 119/180
Adding SitesAdding Sites
Network Description
Getting StartedExisting VoIP Deployment Setup
Advanced Policy & Management
Managing Orders
Adding Sites
Batch Provisioning

8/11/2019 Cucm Tutorial Cisco
http://slidepdf.com/reader/full/cucm-tutorial-cisco 120/180
© 2007 Cisco Systems, Inc. All rights reserved. Scenarios 3-80Provisioning Manager Tutorial
Scenario 5 OutlineAdding Sites
Task Flow
Configuration Templates Overview
Create Template
Push Template
Scenario 5 Outline
Chambers Engineering is now ready to bring additional offices on-line. This scenario looks at how PM can beused to configure the voice infrastructure.

8/11/2019 Cucm Tutorial Cisco
http://slidepdf.com/reader/full/cucm-tutorial-cisco 121/180
© 2007 Cisco Systems, Inc. All rights reserved. Scenarios 3-81Provisioning Manager Tutorial
Adding SitesTask Flow
1. Setup Devices
– Add NiceMunich Processors (Call & Message) to PM
2. Setup Deployment
– Add NiceMunich CCM to France Domain
– Create Germany Domain – Add NiceMunich CCM
3. Provision Voice Network
– Create Template(s) to configure CCMs
– Push Template(s)
4. Setup Deployment
– Create Service Areas for Nice and Munich offices inthe France and Germany Domains as needed
– Sync both Domains
5. Admin
– Add or modify Subscriber Types as needed in bothDomains
– Create Users to administrate the Germany Domain
– Set Provisioning Attributes
6. Manage Orders
NiceMunich
Germany
NiceMunich
France
NiceMunichParisHQ
NiceMunich
ParisHQ Nice
France
Munich
Germany
NiceMunichParisHQ
NiceMunich
Adding Sites - Task Flow
There is only one real difference between the task flow for managing an existing IP voice deployment andeploying a new one. Instead of importing the existing voice infrastructure into PM, PM can be used toconfigure and push the voice infrastructure. This capability could also be use to extend an existing
deployment as well.Since most task flow steps have already been covered in previous scenarios, this scenario will focus on thtask of using PM to create and push voice infrastructure configurations.
Prior to this step, Phil (the PM global administrator):
• Added the call and message processor that will be used to provision subscribers in the Nice anMunich offices to PM.
• Associated the NiceMunich CCM to the France Domain. This will allow Mary to order services for thNice subscribers.
• Created a Germany Domain to allow for the administration of voice services to Germany and nearboffices, separate from the France administration.
• Associated the NiceMunich CCM with the Germany Domain to allow Germany Domain administratorto order subscriber services for Munich subscribers.

8/11/2019 Cucm Tutorial Cisco
http://slidepdf.com/reader/full/cucm-tutorial-cisco 122/180
© 2007 Cisco Systems, Inc. All rights reserved. Scenarios 3-82Provisioning Manager Tutorial
Adding Sites
Push new CCM constructs to supportVoIP deployment in the Nice site: Route
Partitions, Translation Patterns , CallSearch Spaces, etc.
Push new CCM constructs to supportVoIP deployment in the Nice site: Route
Partitions, Translation Patterns , CallSearch Spaces, etc.
Configuration
Templates
Most of the Adding Sites workflow has been covered in earlierscenarios; therefore, this scenario will focus on the
‘Provisioning Network’ step that hasn’t been covered
Most of the Adding Sites workflow has been covered in earlierscenarios; therefore, this scenario will focus on the
‘Provisioning Network’ step that hasn’t been covered
Adding Sites
Phil needs to configure the NiceMunich CCM with voice constructs, such as: Route Partitions, TranslationPatterns, Calling Search Spaces, etc. After the voice infrastructure configuration is complete, Phil cacontinue with the PM configuration by adding Services Areas for the Nice and Munich sites.
In this scenario, Phil will use the PM Configuration Templates to create generic templates for configuringbasic voice infrastructure components that can then be reused when deploying future processors.
When the voice infrastructure is configured by PM, it is immediately aware of the configuration. Thereforeinfrastructure synchronization is not necessary for PM to learn about the voice infrastructure that configured.

8/11/2019 Cucm Tutorial Cisco
http://slidepdf.com/reader/full/cucm-tutorial-cisco 123/180
© 2007 Cisco Systems, Inc. All rights reserved. Scenarios 3-83Provisioning Manager Tutorial
Add SitesConfiguration Templates Overview
Configuration Templates provide the ability tocreate or extend CallManagers, CallManagerExpress, and Unity Express configurations in a
consistent reusable manner
Configuration Templates provide the ability tocreate or extend CallManagers, CallManagerExpress, and Unity Express configurations in a
consistent reusable manner
CallManager Express and Unity Expressconfiguration templates are created byadding the appropriate IOS commands
CallManager Express and Unity Expressconfiguration templates are created byadding the appropriate IOS commands
CallManager configuration templatesprovide a list of configurable items and
include configuration boxes for allnecessary attributes
CallManager configuration templatesprovide a list of configurable items and
include configuration boxes for allnecessary attributes
Configuration templates allow replaceablekeywords for consistency across devices
Configuration templates allow replaceablekeywords for consistency across devices
Configuration Templates Overview
Configuration Templates provide PM with the ability to create or expand CallManager, CallManager Expressand Unity Express configurations in a consistent reusable manner.
The left-side of the illustration above displays a list of the constructs that PM can configure on a CallManage
via a template. The template can be constructed generically using keywords (variables) that are replaced arun-time to allow for both consistency and reuse. Typically, templates are created by grouping togethesimilar voice constructs that build upon one another, and are then executed in the appropriate order.
Configuration Templates for CallManager Express and Unity Express simply contain IOS commands, but canalso take advantage of the keyword replacement feature.
This is a task that can only be performed by a global PM administrator.

8/11/2019 Cucm Tutorial Cisco
http://slidepdf.com/reader/full/cucm-tutorial-cisco 124/180
© 2007 Cisco Systems, Inc. All rights reserved. Scenarios 3-84Provisioning Manager Tutorial
Provision NetworkCreate Template
1
2
Create a template to add CCM constructsto the CCM covering the Nice site
Create a template to add CCM constructsto the CCM covering the Nice site
Next Page
Only users with the global user role‘Administration’ can use Configuration Templates
Only users with the global user role‘ Administration’ can use Configuration Templates
Create Template
Let’s peek over Phil’s shoulder as he creates a generic template for defining Route Partitions and CallinSearch Spaces that can be reused when he brings other sites on-line.
1. Phil selects the Infrastructure Configuration tab.
2. A set of dashboards are displayed that provide shortcuts to the various tasks. So rather thaselecting the Provision Network option and then the Configuration Templates task that will bdisplayed in a sub-menu, Phil simply selects Configuration Templates in the Provision Networdashboard (see next page).

8/11/2019 Cucm Tutorial Cisco
http://slidepdf.com/reader/full/cucm-tutorial-cisco 125/180
© 2007 Cisco Systems, Inc. All rights reserved. Scenarios 3-85Provisioning Manager Tutorial
Provision NetworkCreate Template, (Cont.)
Next Page
5
4
3CreateCreate
OpenExisting
OpenExisting
6
Alternate launch: InfrastructureConfiguration > Provision Network >
Configuration Templates
Alternate launch: InfrastructureConfiguration > Provision Network >
Configuration TemplatesCreate a generic template
for creating Site RoutePartitions and Calling
Search Spaces
Create a generic templatefor creating Site RoutePartitions and Calling
Search Spaces
Create Template (Cont.)
3. The Template Configuration- Setup Configuration Template dialog is displayed. Icons exist that allowPhil to open an existing template or create a new one. Phil selects the Notepad Icon to create a newtemplate.
4. A Explorer User Prompt window is displayed. Phil enters a name for the template. Phil tries to makethe name as descriptive as possible to reflect that it will be used for creating Route Partitions andCalling Search Spaces for new sites. Phil enters Site_RP_CSS.
5. Phil clicks OK to create the new template.
6. The Template Configuration – Setup Configuration Template is displayed. There are several iconnext to the template name that would allow Phil to select a different template, create a new templateor delete this template. There is also a button that allows Phil to Add a new item to the templatwhich he selects now (see next page).

8/11/2019 Cucm Tutorial Cisco
http://slidepdf.com/reader/full/cucm-tutorial-cisco 126/180
© 2007 Cisco Systems, Inc. All rights reserved. Scenarios 3-86Provisioning Manager Tutorial
Provision NetworkCreate Template – Add Items
Select Itemto configure
Select Itemto configureConfiguration
dialog changesaccording to item
selected
Configurationdialog changes
according to itemselected
1. Select a configuration item type or embed another template2. Complete the required field information3. Repeat steps 1 & 2 for each configuration item type required
1. Select a configuration item type or embed another template2. Complete the required field information3. Repeat steps 1 & 2 for each configuration item type required
9
10
Notes: The ${KEYWORD} construct allows you to create generic templates. The keyword isdefined during configuration
Use the ‘Existing Configuration Template’ to embed templates configuring other constructs
Notes: The ${KEYWORD} construct allows you to create generic templates. The keyword isdefined during configuration
Use the ‘Existing Configuration Template’ to embed templates configuring other constructs
11Continue adding items or
embedding templates
Continue adding items orembedding templates
Next Page
8
7
Create Template – Add Items
Templates are a collection of voice infrastructure constructs. They can be added one at a time or in massby adding another existing template. Phil uses the following steps to add an item to the template:
7. After selecting the Add a new Item button, the Template Configuration – Add a Configuration Item
dialog is displayed. Phil has a choice of adding either a new item or an existing template. Phselects the New Item radio button.
8. Next, Phil must select the type of device that this template will configure. He selects CallManagefrom the pull-down list. This changes the remaining input fields.
9. Phil then selects the type of item to add and configure. From the Item Type pull-down menu, Phselects Route Partition.
10. The configuration fields depend on the item selected. In this case, two parameters are displayedone to name the Route Partition and the other to provide a description.
Phil will use the keyword construct to make this template reusable. The construct ${KEYWORD} isused to create a variable that will be replaced at configuration time. Phil enters ${SITE}_Local trepresent a site local Route Partition (i.e. Nice_Local).
11. Phil clicks Save to enter this item into the template and save the template. Phil continues addingitems in this manner (steps 6-11) until finished (see next page).
Note(s):
• If CallManager Express or Unity Express were chosen as the Device Type, the remaining inpufields will be an entry box to enter IOS commands.

8/11/2019 Cucm Tutorial Cisco
http://slidepdf.com/reader/full/cucm-tutorial-cisco 127/180
© 2007 Cisco Systems, Inc. All rights reserved. Scenarios 3-87Provisioning Manager Tutorial
Provision NetworkCreate Template – Keyword List
Notes: The same dependencies exist for configuringinfrastructure objects automatically that exist
for configuring them manually on CallManager Objects must be defined in the configurationtemplate in the appropriate order. Use ‘Arrow’icons to move items as necessary
Notes: The same dependencies exist for configuringinfrastructure objects automatically that exist
for configuring them manually on CallManager Objects must be defined in the configurationtemplate in the appropriate order. Use ‘Arrow’icons to move items as necessary
Continue to add items(or templates) until
complete
Continue to add items(or templates) until
complete
Create NewCreate New
EditExisting
EditExisting
1
3
5
2
Save and/or Add morekeywords
Save and/or Add morekeywords
4
Create Template – Keyword List
When the items of a Configuration Template are executed, they will be configured on the processor in theorder they appear in the template. Therefore, Phil must make sure he maintains any dependencies. If heneeds to re-order the list, he can use the up/down arrow icons next to each item to put them in the prope
order.Once the order is set, Phil can create a keyword replacement or select an existing one. Phil creates akeyword replacement using the following steps:
1. In the upper right-hand corner of the Template Configuration – Setup Configuration Template dialogPhil finds a couple of icons associated with the Keyword Substitution list. Phil selects the NotepaIcon to create a new substitution list.
2. An Explorer User Prompt window is displayed. Phil enters a meaningful name for this list.
3. Phil clicks OK and returns to the Template Configuration – Keyword List dialog. The dialog has single row that asks for the Keyword to be replaced and the replacement value. Since Phil will beusing this template instance to configure Route Partitions and Calling Search Spaces for Nice heenters SITE as the keyword and NICE as the value.
4. Phil clicks Update to add the keyword substitution to the list. A new row for more substitutions wiappear.
5. Since no additional substitutions are required, Phil clicks Done.
Note(s):
• Phil will later use this same template to configure Route Partitions and Calling Search Spaces foMunich. He will just need to create a new Keyword Substitution List defining Site as the keyword andMUNICH as the value.

8/11/2019 Cucm Tutorial Cisco
http://slidepdf.com/reader/full/cucm-tutorial-cisco 128/180
© 2007 Cisco Systems, Inc. All rights reserved. Scenarios 3-88Provisioning Manager Tutorial
Provision NetworkCreate Template – Generate Configuration
This selection area isused as filters to select
the Call Processor thatthe will be configured
This selection area isused as filters to select
the Call Processor thatthe will be configured
1 2
Select Domain. Thiswill then populateDevice pull-down withonly the CCMs definedin the selected Domain
Note: Selecting a SAwill auto-populate theDevice field since onlyone processor can beassociated with a SA
Select Domain. Thiswill then populateDevice pull-down withonly the CCMs definedin the selected Domain
Note: Selecting a SAwill auto-populate theDevice field since onlyone processor can beassociated with a SA
Select Keyword listto use for
substitution
Select Keyword listto use for
substitution
3
Once processor isselected, PM willanalyze the itemsto ensure they aresupported by theversion of CCM
Once processor isselected, PM willanalyze the itemsto ensure they aresupported by theversion of CCM
4
Next Page
Create Template – Generate Configuration
Phil now has a Keyword Substitution List selected. The remaining steps to generate the configuratiobasically tell the template which CallManager to configure. The other two selection areas in the GenerateConfiguration area of the dialog are basically filters that allow you to select the appropriate device to
configure. Phil uses the following steps to make sure this configuration is done on the NiceMunich CCM:1. Using the Domain pull-down list, Phil selects France since Nice provisioning will be handled by Mar
– the ordering administrator of the France Domain.
2. The Device pull-down is now populated with all CallManagers associated with the France DomainPhil selects the NiceMunich CCM.
3. Ensure that the Keyword Substitution List is the one Phil created previously.
4. Phil is now ready to generate the configuration and clicks the Generate Configuration button (senext page).
Note(s):
• Before configuring new CCMs, it is important to add them first to PM and then associated them witall appropriate Domains. Before starting this effort, Phil had added the NiceMunich CCM andassociated it with both the France and Germany Domains.
• If the Service Area filter is used, then the Device field will be selected automatically since only single call processor can be associated with a Service Area.

8/11/2019 Cucm Tutorial Cisco
http://slidepdf.com/reader/full/cucm-tutorial-cisco 129/180
© 2007 Cisco Systems, Inc. All rights reserved. Scenarios 3-89Provisioning Manager Tutorial
Provision NetworkPush Template
Choose to run now or at a
scheduled time
Choose to run now or at a
scheduled time
Notice thekeywordsubstitution
Notice thekeywordsubstitution
DetailsDetails
Push Template
Once the configuration is generated from the template, the Batch Provisioning – Configure a Batch Projecdialog is displayed. The lower portion of the dialog lists the batch action steps that will be executed. Clickinon the View link shows the details of the action. When Phil clicks one, he sees that the Keyword substitutio
was made and the proper name will be created.Phil has the option to schedule the push (provisioning) operation or to execute it immediately. Phil selectNow for immediate execution.

8/11/2019 Cucm Tutorial Cisco
http://slidepdf.com/reader/full/cucm-tutorial-cisco 130/180
© 2007 Cisco Systems, Inc. All rights reserved. Scenarios 3-90Provisioning Manager Tutorial
Provision NetworkResults
Results of the ConfigurationTemplate Push
Results of the Configuration
Template Push
Results
Leaving this dialog open, Phil can track the results of the configuration. If Phil performed other PM activitiesthus closing this dialog, he could check the results later by selecting Infrastructure Configuration Provision Network > Batch Provisioning, then clicking the arrow icon, and finally selecting the batc
provisioning job from the displayed list.Phil notes that the configuration of Route Partitions and Calling Search Spaces, used for provisioning thNice office, were completed successfully on the NiceMunich CCM.
Note(s):
• All changes were made following the order process so they can be searched like any other order tsee what changes were made, who made the changes, etc.

8/11/2019 Cucm Tutorial Cisco
http://slidepdf.com/reader/full/cucm-tutorial-cisco 131/180

8/11/2019 Cucm Tutorial Cisco
http://slidepdf.com/reader/full/cucm-tutorial-cisco 132/180
© 2007 Cisco Systems, Inc. All rights reserved. Scenarios 3-92Provisioning Manager Tutorial
Scenario 6 OutlineBatch Provisioning
Overview
Create Batch Action File
Create Batch Project
Upload Batch Action File
Execute Batch Project
Results
Scenario 6 Outline
Once Phil is finished configuring PM for the Nice and Munich offices, he wants to quickly bring all subscriberon-line without using PM repeatedly to creating the subscriber and then order their services.
This scenario looks at how PM can be used to create a Batch Project to provision subscribers and thei
services.

8/11/2019 Cucm Tutorial Cisco
http://slidepdf.com/reader/full/cucm-tutorial-cisco 133/180

8/11/2019 Cucm Tutorial Cisco
http://slidepdf.com/reader/full/cucm-tutorial-cisco 134/180
© 2007 Cisco Systems, Inc. All rights reserved. Scenarios 3-94Provisioning Manager Tutorial
Batch ProvisioningProvision Services for Nice Office Subscribers
Provision the Niceoffice subscribers at
once
Provision the Niceoffice subscribers at
once
Execute Batch Action fileExecute Batch Action file
Create a Batch action file to createsubscribers and provision their
products
Create a Batch action file to createsubscribers and provision their
products
1
2
Batch Provision
The Nice office is ready to go on-line for IP communications. IP phones have already been placed onemployees’ desks. Phil could turn the task of provisioning all the subscriber services over to Mary (FranceDomain ordering administrator), but using the GUI to configure one subscriber at a time will be too time
consuming, considering their analog phones have already been removed. So Phil will use the BatcProvisioning feature to quickly provision all Nice employees at once.

8/11/2019 Cucm Tutorial Cisco
http://slidepdf.com/reader/full/cucm-tutorial-cisco 135/180
© 2007 Cisco Systems, Inc. All rights reserved. Scenarios 3-95Provisioning Manager Tutorial
Batch ProvisioningCreate Batch Action File
To create a batch action file, create a spreadsheet of users,phones, and lines and then convert it to a tab-delimited text fileFile should be saved to client PC and not on PM server
To create a batch action file, create a spreadsheet of users,phones, and lines and then convert it to a tab-delimited text fileFile should be saved to client PC and not on PM server
Add and provision a groupof subscribers
Add and provision a groupof subscribers
The action file must contain a single row of column headers
– The data columns can be in any order
– Any number of non-required attributes can be included
The action file must contain a single row of column headers
– The data columns can be in any order
– Any number of non-required attributes can be included
Create Batch Action File
Phil’s first task is to create a Batch Action File detailing the subscribers and their services.
Phil copies one of the sample files to his local PC and opens it in Microsoft Excel (using a spreadsheeapplication facilitates this process) to give him a head start.
Phil then quickly enters all necessary information and saves the file as a tab-delimited file on his local PC.
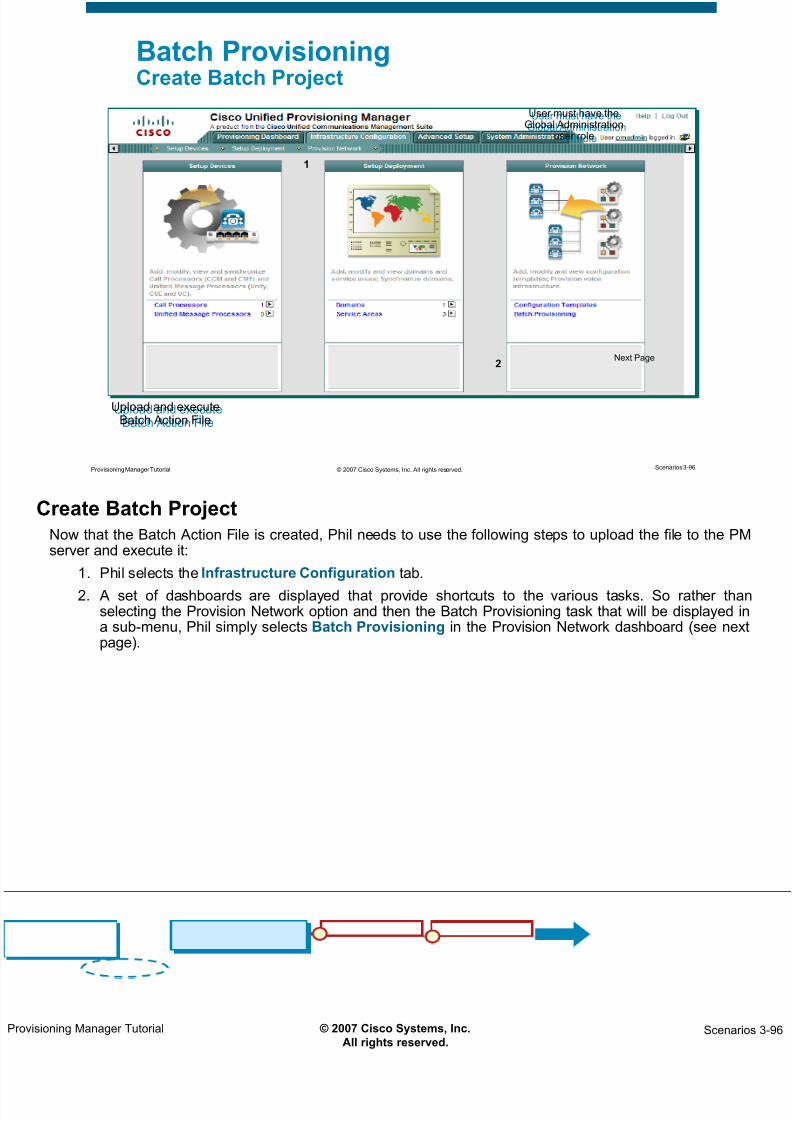
8/11/2019 Cucm Tutorial Cisco
http://slidepdf.com/reader/full/cucm-tutorial-cisco 136/180
© 2007 Cisco Systems, Inc. All rights reserved. Scenarios 3-96Provisioning Manager Tutorial
Batch ProvisioningCreate Batch Project
User must have theGlobal Administration
user role
User must have theGlobal Administration
user role
1
2
Upload and executeBatch Action File
Upload and executeBatch Action File
Next Page
Create Batch Project
Now that the Batch Action File is created, Phil needs to use the following steps to upload the file to the PMserver and execute it:
1. Phil selects the Infrastructure Configuration tab.
2. A set of dashboards are displayed that provide shortcuts to the various tasks. So rather thaselecting the Provision Network option and then the Batch Provisioning task that will be displayed ia sub-menu, Phil simply selects Batch Provisioning in the Provision Network dashboard (see nexpage).

8/11/2019 Cucm Tutorial Cisco
http://slidepdf.com/reader/full/cucm-tutorial-cisco 137/180
© 2007 Cisco Systems, Inc. All rights reserved. Scenarios 3-97Provisioning Manager Tutorial
Batch ProvisioningCreate Batch Project (Cont.)
Alternate launch: InfrastructureConfiguration > Provision Network >
Batch Provisioning
Alternate launch: InfrastructureConfiguration > Provision Network >
Batch Provisioning
Create new Batch ProjectCreate new Batch Project
OpenExisting
OpenExisting
4
5
3
Next Page
Create Batch project (Cont.)
3. The Batch Provisioning – Configure a Batch Project dialog is displayed. Icons exist that allow Phil topen an existing project or create a new one. Phil selects the Notepad Icon to create a new project.
4. The Batch Provisioning – Create a New Batch Project dialog is displayed. Phil enters a meaningfu
name and adds notes detailing the purpose of the project.5. Phil clicks Create to create the new project (see next page).

8/11/2019 Cucm Tutorial Cisco
http://slidepdf.com/reader/full/cucm-tutorial-cisco 138/180
© 2007 Cisco Systems, Inc. All rights reserved. Scenarios 3-98Provisioning Manager Tutorial
Batch ProvisioningUpload Batch Action File
5
Batch Actions listed once the Batch Action file is uploaded
Batch Actions listed once the Batch Action file is uploaded
6File should be on client PCFile should be on client PC
Next Page
Upload Batch Action File
5. The Batch Provisioning – Configure a Batch Project dialog is re-displayed with details of the projec(This screen was also seen after generating the configuration from the infrastructure templateUnder the Batch Project Actions portion of the dialog, Phil clicks the Upload a Batch Action Fil
button.6. The Batch Provisioning Configuration – Upload a Batch Action File dialog is displayed. Phil uses th
Browse button to find the Batch Action File that he created on his local PC and then clicks ADD (senext page).

8/11/2019 Cucm Tutorial Cisco
http://slidepdf.com/reader/full/cucm-tutorial-cisco 139/180
© 2007 Cisco Systems, Inc. All rights reserved. Scenarios 3-99Provisioning Manager Tutorial
Batch ProvisioningExecute Batch Project
DetailsDetails
Choose to run now or at ascheduled time
Choose to run now or at ascheduled time
Execute Batch Action File
The Batch Provisioning – Configure a Batch Project dialog is again re-displayed, only this time, the individuaactions from the Batch Action File are loaded. Clicking on the View link next to any action shows its details.
Phil has the option to schedule the push (provisioning) operation or to execute it immediately. Phil select
Now to execute them immediately.

8/11/2019 Cucm Tutorial Cisco
http://slidepdf.com/reader/full/cucm-tutorial-cisco 140/180
© 2007 Cisco Systems, Inc. All rights reserved. Scenarios 3-100Provisioning Manager Tutorial
Batch ProvisioningResults
Results of the BatchProject execution
Results of the BatchProject execution
Subscriber Record showphone and line have
been provisioned
Subscriber Record showphone and line have
been provisioned
Results
Leaving this dialog open, Phil can track the results of the subscriber service provisioning. If Phil performedother PM activities, thus closing this dialog, he could return at a later time to check the results by selectingInfrastructure Configuration > Provision Network > Batch Provisioning, then clicking the arrow icon
and finally selecting the batch provisioning job from the displayed list.Phil searches for one of the subscribers just provisioned and reviews the details of their subscriber record tverify that the service was provisioned and activated as expected.
Note(s):
• All batches are created, managed, and tracked as orders, thus all the same workflow and policies arapplied to them as if they were manually executed by the GUI.

8/11/2019 Cucm Tutorial Cisco
http://slidepdf.com/reader/full/cucm-tutorial-cisco 141/180
Thank You!
This chapter has demonstrated the use of most PM features in a simulated real-world environment. The readeshould now have a good understanding of how to use PM to manage provisioning tasks in their enterprise.
Continue on to Chapter 4 to learn about some of the PM system administrative tasks not yet discussed.
Cisco Systems

8/11/2019 Cucm Tutorial Cisco
http://slidepdf.com/reader/full/cucm-tutorial-cisco 142/180
<Intentionally Left Blank>

8/11/2019 Cucm Tutorial Cisco
http://slidepdf.com/reader/full/cucm-tutorial-cisco 143/180
Chapter 4Chapter 4
Cisco Unified
Provisioning Manager System Administration
Cisco Unified
Provisioning Manager System Administration

8/11/2019 Cucm Tutorial Cisco
http://slidepdf.com/reader/full/cucm-tutorial-cisco 144/180
© 2007 Cisco Systems, Inc. All rights reserved. System Admin 4-2Provisioning Manager Tutorial
Chapter 4 Outline
Requirements
– System Capacity
– Server
– Client
– Applications
– Ports
Installation Guidelines
– Licensing
Additional Administration Tasks
Maintenance
Helpful Troubleshooting Tips
Chapter 4 Outline
This chapter covers system administration aspects of Cisco Unified Provisioning Manager (PM). The chaptestarts out by presenting the basic requirements for both the PM server and the client used to access theserver, as well as, the requirements for preparing the voice applications in order to be managed by PM
Following the requirements, the remaining sections cover installation guidelines, additional administratiotasks not covered in Chapters 2 or 3, periodic maintenance tasks, and some helpful troubleshooting tips.
For detailed installation steps, refer to the Installation and Setup Guide for Cisco Unified ProvisioningManager.

8/11/2019 Cucm Tutorial Cisco
http://slidepdf.com/reader/full/cucm-tutorial-cisco 145/180
System RequirementsSystem Requirements
Requirements
Installation Guidelines
Additional Administrative Tasks
Maintenance
Helpful Troubleshooting Tips

8/11/2019 Cucm Tutorial Cisco
http://slidepdf.com/reader/full/cucm-tutorial-cisco 146/180
© 2007 Cisco Systems, Inc. All rights reserved. System Admin 4-4Provisioning Manager Tutorial
RequirementsSystem Capacity
No LimitCisco Unified Unity Express
No LimitCisco Unified Unity Connection
No LimitCisco Unified Unity
No LimitCisco Unified CallManager Express
No LimitCisco Unified CallManager
60,000Device Profiles
60,000Directory Numbers
60,000Lines
30,000Phones
30,000Users/Subscribers
Maximum Supported Number Item
System Capacity
The table above presents the current maximum number of supported elements that can be managed bCisco Unified Provisioning Manager.
Note(s):
• The actual number of phones supported by Provisioning Manager depends on the applied licenseMore details on licensing will be presented in the next section.
• An evaluation license is limited to 100 phones, 5 call processors, and 2 message processors.

8/11/2019 Cucm Tutorial Cisco
http://slidepdf.com/reader/full/cucm-tutorial-cisco 147/180
© 2007 Cisco Systems, Inc. All rights reserved. System Admin 4-5Provisioning Manager Tutorial
RequirementsServer
Up to 1000 Phones
Processor
Memory
Swap
SystemSoftware
Drive Space
2 GB
2 - 4 GB
Windows Server 2003 Standard or Enterprise with SP2
30 GB
* Minimum requirementsCheck Release Notes for most up-to-date requirements
Up to 10,000 Phones
2 machine deployment:
• App. – Dual 3.0 GHz Intel P4• DB – Dual 3.0 GHz Intel P4
4 GB
4 - 8 GB
Up to 30,000 Phones
4 GB each machine
4 - 8 GB each machine
60 GB Application - 30 GB
Database – 80 GB
Single 3.0-GHz Intel
P4 Processor
Single 3.0-GHz Intel
P4 Processor
Server Requirements
The chart above details the sizing requirements for the Cisco Unified Provisioning Manager servedepending on the size of the deployment.
Note(s):
• It is always a good idea to check the latest release notes for up-to-date information regarding systemrequirements.

8/11/2019 Cucm Tutorial Cisco
http://slidepdf.com/reader/full/cucm-tutorial-cisco 148/180
© 2007 Cisco Systems, Inc. All rights reserved. System Admin 4-6Provisioning Manager Tutorial
RequirementsServer, (Cont.)
Special Notes
Memory
On 4 GB system, Windows only detects 3.5 GB of RAM even though yoursystem has 4 GB installed.
If you want to choose the medium or large installation when installingProvisioning Manager, you must first enable all 4 GB of RAM on the system -Refer to install guide for procedure
OtherSoftware Provisioning Manager has been tested with the following software:
– Cisco Security Agent 5.0 (Disable prior to installing)
– McAfee Virus Scan Enterprise 8.0
Check Release Notes for most up-to-date requirements
Exclude virus scan of the following: pgsql folder and postmaster.exe file (see Student Guidefor locations)
Server Requirements, (Cont.)
On 4 GB system, Windows only detects 3.5 GB of RAM even though your system has 4 GB installed. you want to choose the medium or large installation when installing PM, you must first enable all 4 GB oRAM on the system. Do the following:
1. On the Provisioning Manager system, in Windows right-click My Computer .2. Select Properties.
3. Select the Advanced tab.
4. Under Startup and Recovery, click Settings.
5. Click Edit. The boot.ini file opens.
6. In the file, add "/PAE" in line starting with "multi(0)disk(0)rdisk(0)partition(1)\WINDOWS=...“
7. Restart the system.
PM has undergone interoperability testing with the following software:
• Cisco Security Agent 5.0• McAfee Virus Scan Enterprise 8.0 (Patch 11)
Note(s):
• Cisco Security Agent must be disabled during installation of PM.
• Exclude the following from virus scanning: The pgsql folder (if you selected the default locatioduring installation, it is C:\CUPM\pgsql). The postmaster.exe file (located in the CUPM\pgsql\bifolder).

8/11/2019 Cucm Tutorial Cisco
http://slidepdf.com/reader/full/cucm-tutorial-cisco 149/180
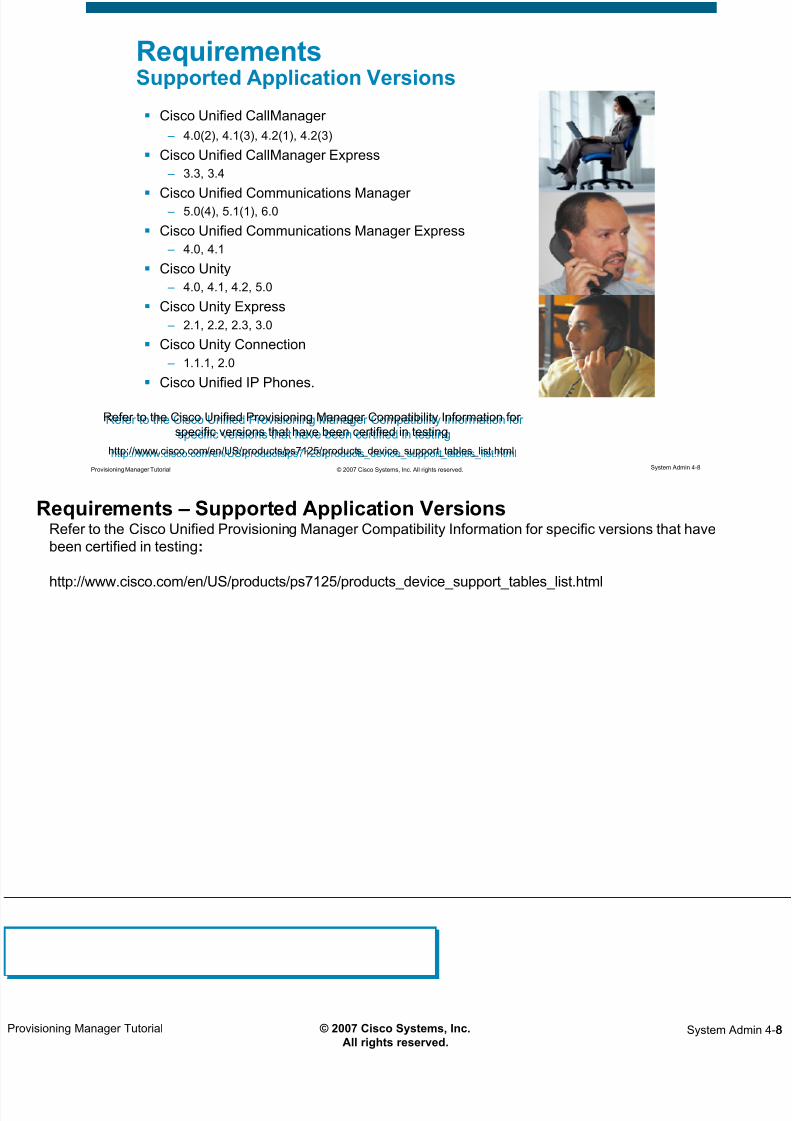
8/11/2019 Cucm Tutorial Cisco
http://slidepdf.com/reader/full/cucm-tutorial-cisco 150/180

8/11/2019 Cucm Tutorial Cisco
http://slidepdf.com/reader/full/cucm-tutorial-cisco 151/180

8/11/2019 Cucm Tutorial Cisco
http://slidepdf.com/reader/full/cucm-tutorial-cisco 152/180
© 2007 Cisco Systems, Inc. All rights reserved. System Admin 4-10Provisioning Manager Tutorial
RequirementsPre-Setup of End Systems (Message Processors)
Cisco Unity and Cisco Unity Connection (v1.1.1 only) Configure message store with Microsoft Exchange 2000 or 2003 (Required for Cisco
Unity only)
Integrate with one or more CUCMs
Create a SQL Server user and password that can be used by CUPM to access Cisco
Unity or Cisco Unity Connection database and the SQL Server master database
Verify the TCP/IP port used by Cisco Unity or Cisco Unity Connection This portnumber is needed when adding a Message Processor in CUPM.
Define Class of Service and Subscriber templates
Cisco Unity Express Determine the Service Engine Interface number. The Service Engine Interface
number is needed when adding a Cisco Unity Express to CUPM.
Check see the Cisco Unified Provisioning Manager Supported Device Table for most up-to-date certified device versions
http://www.cisco.com/en/US/products/ps7125/products_device_support_tables_list.html
Check see the Cisco Unified Provisioning Manager Supported Device Table for most up-to-date certified device versions
http://www.cisco.com/en/US/products/ps7125/products_device_support_tables_list.html
Since Unity Connection v1.1.1 uses JDBC to interface with CUPM, it requires the pre-configuration of a JDBC account on theSQL server. For Unity Connection 2.0, a HTTP/SOAP based interface is used and that just needs the administrator password
of Unity Connection.
Since Unity Connection v1.1.1 uses JDBC to interface with CUPM, it requires the pre-configuration of a JDBC account on theSQL server. For Unity Connection 2.0, a HTTP/SOAP based interface is used and that just needs the administrator password
of Unity Connection.
Pre-Setup of End Systems (Message Processors)
Some minimal configuration is required on end systems before you can use them with Provisioning ManageThe chart above and the text following describe the pre-configuration steps required for the various messagprocessor applications. (Refer to Installation Guide for detailed steps.)
Cisco Unity / Cisco Unity Connection (v1.1.1)
Before you can create a Unified Message Processor based on Cisco Unity or Cisco Unity Connection (onlrequired for Cisco Unity Connection 1.1.1) in Provisioning Manager, you must do the following:
• Install and configure the message store using Microsoft Exchange 2000 or 2003. (Required for CiscoUnity only.)
• Configure an integration with one or more corresponding Cisco Unified Communications Managersystems.
• Create a SQL Server user and password that can be used by Provisioning Manager to access theSQL Server database on Cisco Unity or Cisco Unity Connection (only required for Cisco UnityConnection 1.1.1). The SQL Server user requires access to both the Cisco Unity (or Cisco Unity
Connection) and master databases.
• Verify the TCP/IP port used by Cisco Unity or Cisco Unity Connection (only required for Cisco UnityConnection 1.1.1). This port number is required when you create a Unified Message Processor.
• Define Class of Service and Subscriber templates.
Cisco Unity Express
Before you can create a Unified Message Processor based on Cisco Unity Express in Provisioning Manageryou must determine the Service Engine Interface number for Cisco Unity Express. The Service EngineInterface number is required when adding a Cisco Unity Express to Provisioning Manager.

8/11/2019 Cucm Tutorial Cisco
http://slidepdf.com/reader/full/cucm-tutorial-cisco 153/180
© 2007 Cisco Systems, Inc. All rights reserved. System Admin 4-11Provisioning Manager Tutorial
RequirementsPorts
PMHTTP / Apache Web Server 80 *
PMJBoss Webservice8083
PMJBoss UILServerILService8093
PM AJP Connector 8009
PMJBoss Application Server8008
PMPostgres database5432 *
PMJBoss pooled invoker 4445
PMJBoss RMI/JRMP4444
PMNetwork Interface & Configuration Engine1602 *
PMJBoss JNDI1099
PMJBoss RMI activation1098
CU and CU ConnectionMS SQL1433
CUCME and CUETelnet23
CUCME and CUESSH22
CUCM 5.0HTTPS8443
CUCM 4.xHTTPS443
CUCMHTTP / Apache Web Server 80
ApplicationService NamePort Number
If there is firewall betweenthe client browser and PMserver, then the HTTP portused by PM needs to be
opened.
If there is firewall betweenthe client browser and PMserver, then the HTTP portused by PM needs to be
opened.
Not all ports need to beopened in firewall.
Not all ports need to beopened in firewall.
If there is firewallbetween PM andthe call / messageprocessors, thenthe ports listed in
dark gray need tobe opened.
If there is firewallbetween PM andthe call / messageprocessors, thenthe ports listed in
dark gray need tobe opened.
Ports
Before installing PM, make sure that the ports used by PM (listed above) are not used by other applications.

8/11/2019 Cucm Tutorial Cisco
http://slidepdf.com/reader/full/cucm-tutorial-cisco 154/180

8/11/2019 Cucm Tutorial Cisco
http://slidepdf.com/reader/full/cucm-tutorial-cisco 155/180
nstallation Guidelinesnstallation Guidelines
Requirements
Installation Guidelines
Additional Administrative Tasks
Maintenance
Helpful Troubleshooting Tips

8/11/2019 Cucm Tutorial Cisco
http://slidepdf.com/reader/full/cucm-tutorial-cisco 156/180
© 2007 Cisco Systems, Inc. All rights reserved. System Admin 4-14Provisioning Manager Tutorial
Installation Guidelines
Requires approximately 60 minutes to complete
Use local Administrator account (not cloned account)
Install on a dedicated platform with static IP Address
Do not install it on a system with:
– A Primary or Backup Domain Controller
– Other management software
– Access Control Server
– Voice applications
Verify server requirements and Required andRecommended Service Packs or Patches for operatingsystem are installed
Verify TCP, UCP ports are available for use
Refer to Installation and Setup Guide for ProvisioningManager for installation procedure
– Do not install under the Program Files directory – Have license file available or choose evaluation copy
– Advanced install option allows you to select installation details(ports, JBoss servers, accounts, etc.)
See install guide forexact steps and options
See install guide forexact steps and options
Installation Requirements
Installation of Provisioning Manager should be performed according to the steps detailed in the Installationand Setup Guide. (A link to this guide can be found in Chapter 5.)
• Provisioning Manager should be installed using the local Administrator (not a cloned account) use
account.• Provisioning Manager requires a dedicated system; do not install it on a system with:
• Third-party management software (such as HP OpenView or NetView).
• Cisco Secure Access Control Server (ACS).
• Any Cisco applications other than those that are documented to be able to coexist witProvisioning Manager
• Do not install on any of your voice application servers or on a Cisco CallManager server.
• Verify that the system date and time are set properly.
Note(s):
• Do not install Provisioning Manager under the Program Files directory.

8/11/2019 Cucm Tutorial Cisco
http://slidepdf.com/reader/full/cucm-tutorial-cisco 157/180
© 2007 Cisco Systems, Inc. All rights reserved. System Admin 4-15Provisioning Manager Tutorial
Installation GuidelinesLicensing
Product Evaluation – good for 90 days, limited to 100 phones, 5call processors, and 2 message processors. Can register licensefile at a later date.
Valid License – Can be purchased in increments of number ofphones to be managed. Comes with Product Authorization Key(PAK). Register PAK and PM server MAC address atwww.cisco.com/go/license. A license file will be emailed. Placelicense file in <PM Install Dir>/license
The Provisioning Manager license dictates the features of PM availableand the number and types of devices that can be managed
The Provisioning Manager license dictates the features of PM availableand the number and types of devices that can be managed
Licensing
Provisioning Manager requires a license to operate. If a license is not installed, Provisioning Manageoperates in Evaluation mode for 90 days. An evaluation license supports 100 phones, 5 call processors, and2 message processors.
The license enables functions within Provisioning Manager and dictates the number and types of devicethat can be managed. Licenses can be bought in increments of phones supported. If multiple licenses arepurchased, they are combined to determine the total number of phones supported.
A purchased license comes with a Product Authorization Key (PAK). An administrator must register this PAKalong with the PM server’s MAC address at www.cisco.com/go/license. When registration is complete, thadministrator will receive a license file via email. This file is placed in the <Install Dir>\license directory. Thelicense should take effect after a few minutes.
Note(s):
• The MAC address is required because PM licensing uses node-locking technology. The license filcan only be used with the MAC address supplied during registration.

8/11/2019 Cucm Tutorial Cisco
http://slidepdf.com/reader/full/cucm-tutorial-cisco 158/180
© 2007 Cisco Systems, Inc. All rights reserved. System Admin 4-16Provisioning Manager Tutorial
Installation GuidelinesLicense Status
Unavailable features – Lists features in PM that you do not have access to basedon currently installed license
Products in overdraft – Lists the types and number of devices this instance of PM islicensed for and any that are currently in an overdraft state
System Administration > License Information
License Status
Since the license can put restrictions on the use of Provisioning Manager, there is a GUI task that allows theadministrator to view the current license conditions. To view this information, select the SystemAdministration > License Information task.
Note(s):
• If a new license does not take affect after a few minutes, verified by this task: Select the Perform Audit which will force a license update.

8/11/2019 Cucm Tutorial Cisco
http://slidepdf.com/reader/full/cucm-tutorial-cisco 159/180
Additional AdministrativeTasksAdditional AdministrativeTasks
Requirements
Installation Guidelines
Additional Administrative Tasks
Maintenance
Helpful Troubleshooting Tips

8/11/2019 Cucm Tutorial Cisco
http://slidepdf.com/reader/full/cucm-tutorial-cisco 160/180
© 2007 Cisco Systems, Inc. All rights reserved. System Admin 4-18Provisioning Manager Tutorial
Provisioning Manager keeps an inventory of Phones: – Add phones that can be used for provisioning – Reserve phones for specific subscribers – View details for specific phone – Search for phones by Domain
Provisioning Manager keeps an inventory of Phones: – Add phones that can be used for provisioning – Reserve phones for specific subscribers – View details for specific phone – Search for phones by Domain
Phone Inventory
Phone details (for selectedphone or phone to add)
Phone details (for selectedphone or phone to add)
Search phones in a DomainSearch phones in a Domain
Select specific phoneSelect specific phone
Reserve phoneReserve phone
Global PM Administrators OnlyGlobal PM Administrators Only
Phone Inventory
PM keeps an inventory of phones for tracking purposes. Without any interaction, this inventory will includethe phones provisioned by PM and/or the phones learned during a subscriber synchronization with a caprocessor.
The phone inventory can also be used to add phones that are available for provisioning for all subscribers ocan be reserved for a specific subscriber. To add a phone and reserve it for a subscriber, use the followingsteps:
1. Select the Advanced Setup tab.
2. The options bar displays three choices, select the Phone option.
3. The Phone Inventory Management – Add a Phone or Choose a Phone to Update dialog is displayedSelect a Domain to associate this phone with from the Domain pull-down menu or to make thephone available system-wide, select Global Resources.
4. Select the Model of the Phone to add from the Model pull-down menu.
5. Enter the MAC address of the phone to add in the MAC Address entry field.
6. Select Reserved from the Status pull-down menu.
7. Click the Arrow Icon to the right of the Reserved For entry field to display a list of subscribers in thselected domain. Select the subscriber to reserve the phone for.
8. Click Add to add the phone and make the reservation.
Note(s):
• To see a list of phones for a domain, select the Domain (or Global Resources to see all phones ithe inventory) from the Domain pull-down list in the bottom right-hand corner of the dialog, and clicSearch Phones.

8/11/2019 Cucm Tutorial Cisco
http://slidepdf.com/reader/full/cucm-tutorial-cisco 161/180
© 2007 Cisco Systems, Inc. All rights reserved. System Admin 4-19Provisioning Manager Tutorial
Directory Number Inventory
Provisioning Manager keeps an inventory of Directory Numbers: – Add Directory Number for a Call Processor/Route Partition
– View/Update status of Directory Number
– Reserve Directory Number for specific subscribers
Provisioning Manager keeps an inventory of Directory Numbers: – Add Directory Number for a Call Processor/Route Partition
– View/Update status of Directory Number
– Reserve Directory Number for specific subscribers
Global PM Administrators OnlyGlobal PM Administrators Only
Directory Number Inventory
PM also keeps an inventory of Directory Numbers that have been allocated. In most cases, Service AreaDirectory Number Blocks (DNBs) are used to allocate the directory numbers. However, you can use theDirectory Number Inventory to explicitly reserve a directory number for a specific subscriber using the
following step:1. Select the Advanced Setup tab.
2. The options bar displays three choices, select the Directory Number option.
3. The Directory Number Inventory Management – Add or Update a Directory Number dialog idisplayed. Select the Add a New Directory Number task.
4. Enter the number to reserve for a subscriber in the Directory Number entry box.
5. Select the Call Processor/Route Partition this number is to be part of from the CaProcessor/Route Partition pull-down menu.
6. Select Reserved from the Status pull-down menu.
7. Click the Arrow Icon to the right of the Reserved For entry field to display a list of subscribers in th
selected domain. Select the subscriber to reserve the phone for.
8. Click Save to add and reserve the directory number.

8/11/2019 Cucm Tutorial Cisco
http://slidepdf.com/reader/full/cucm-tutorial-cisco 162/180
© 2007 Cisco Systems, Inc. All rights reserved. System Admin 4-20Provisioning Manager Tutorial
PM Inventory
Global PM Administrator can browsethe inventory or create Advanced
Searches of the inventory to produce
report templates
Global PM Administrator can browsethe inventory or create Advanced
Searches of the inventory to produce
report templates
Provisioning Manager tracks theinformation about all services and
subscribers in an internal assetmanagement or inventory system
Provisioning Manager tracks theinformation about all services and
subscribers in an internal assetmanagement or inventory system
PM Inventory
PM tracks the information about all services and subscribers in an internal asset management or inventorysystem. This information can be viewed by an administrator, and advanced searches may be created andsaved that permit producing report templates in HTML or Microsoft Excel format.

8/11/2019 Cucm Tutorial Cisco
http://slidepdf.com/reader/full/cucm-tutorial-cisco 163/180
© 2007 Cisco Systems, Inc. All rights reserved. System Admin 4-21Provisioning Manager Tutorial
Sync Script
If you provide:
The 'callprocessor' input it will run infrastructure and subscribersyncs for ALL call processors in the system.
The 'messageprocessor' input it will run infrastructure andsubscriber syncs for ALL message processors in the system.
The 'domain' input it will execute syncs for all domains in thesystem.
The 'all' input it will execute infrastructure and subscriber syncsfor ALL call processors, then for all message processors,followed by domain syncs for all domains.
<PM_DIR>/sep/build/bin/sync.bat [callprocessor] [messageprocessor] [domain] [all]
Ensure Provisioning Manager is up-to-date in the event of amanual update to a call or message processor:
– Default is manually through PM GUI
– Alternatively use the Windows Scheduler to run the sync script
Ensure Provisioning Manager is up-to-date in the event of amanual update to a call or message processor:
– Default is manually through PM GUI
– Alternatively use the Windows Scheduler to run the sync script
Sync Script
After adding a call processor from an existing deployment, the PM administrator next performs synchronization so that PM is made aware of the existing configuration and subscriber base. Moving forwardif all configuration and subscriber provisioning is done with PM, then the call processor and PM should
remain in sync. However, there is nothing other than policy keeping an IP voice administrator from makingchanges through the applications interface. In this case, the processor and PM would be out-of-sync.
The PM administrator can always use the GUI to perform a synchronization, but it may prove easier andmore reliable to schedule a special sync job.
Using the Microsoft Windows scheduler, schedule the sync.bat job to run on a periodic basis. The script wiperform synchronizations depending on the inputs to the batch job.
• If the 'callprocessor' input is provided, an infrastructure and subscriber sync for ALL call processor ithe system will be executed.
• If the 'messageprocessor' input is provided, an infrastructure and subscriber syncs for ALL messagprocessor in the system will be executed.
• If the 'domain' input is provided, a syncs for all domains in the system will be executed.
• If the 'all' input is provided, the sync.bat job will execute infrastructure and subscriber syncs for ALcall processors, then all message processors, followed by domain syncs for all domains.

8/11/2019 Cucm Tutorial Cisco
http://slidepdf.com/reader/full/cucm-tutorial-cisco 164/180
© 2007 Cisco Systems, Inc. All rights reserved. System Admin 4-22Provisioning Manager Tutorial
Integration with Operations Manager Configuration
Integrate with Cisco Unified Operations Manager to seeadditional details about a subscriber’s phone:
– IP Address, CCM Address, Switch Address, Switch Port
Integrate with Cisco Unified Operations Manager to seeadditional details about a subscriber’s phone:
– IP Address, CCM Address, Switch Address, Switch Port
Next Page
Enter Operations Manager information inthe <Install Dir>\sep\ipt.properties file
Stop and restart PM
Enter Operations Manager information inthe <Install Dir>\sep\ipt.properties file
Stop and restart PM
Integration with Cisco Unified Operations Manager
Cisco Unified Operations Manager (OM) is another management product in the Cisco UnifiedCommunications Management Suite of products. It is used for managing voice infrastructures on a day-today basis. As such, it contains a wealth of information on voice applications and IP phones.
PM can be integrated with OM and allow the PM administrators to get more information about a provisionedphone, like the phones IP address, the CCM the phone is registered to, and the switch and switch port thphone is connected to.
To configure the OM integration, the <Install Dir>\sep\ipt.properties file must be modified. The file containtwo entries to inform PM of how to contact OM:
dfc.ipt.operationsmanager.host: <Enter the IP address or DNS host name of the OM server>
dfc.ipt.operationsmanager.port: <Enter the OM port – 1741 by default>
After making the changes, PM must be stopped and restarted.
Start > All Programs > Cisco Unified Provisioning Manager > Stop Cisco Unified ProvisioninManager
Start > All Programs > Cisco Unified Provisioning Manager > Start Cisco Unified ProvisioningManager

8/11/2019 Cucm Tutorial Cisco
http://slidepdf.com/reader/full/cucm-tutorial-cisco 165/180
© 2007 Cisco Systems, Inc. All rights reserved. System Admin 4-23Provisioning Manager Tutorial
Integration with Operations ManagerExecution
Details button added to list ofSubscriber’s phone tasks
Launches Operations ManagerIP Phone Details report
Details button added to list ofSubscriber’s phone tasks
Launches Operations ManagerIP Phone Details report
Integration with Cisco Unified Operations Manager (Cont.)
An additional button "DETAILS“ will now be available in a Subscriber Record under Phone product. Clickinon this launches OM. You will need to provide OM credentials to continue. OM initiates an IP Phone Searcon the selected phones’ MAC address and when found will display an IP Phone Details report providin
additional information about the selected phone(s).

8/11/2019 Cucm Tutorial Cisco
http://slidepdf.com/reader/full/cucm-tutorial-cisco 166/180
<Intentionally Left Blank>

8/11/2019 Cucm Tutorial Cisco
http://slidepdf.com/reader/full/cucm-tutorial-cisco 167/180
Requirements
Installation Guidelines
Additional Administrative Tasks
Maintenance
Helpful Troubleshooting Tips
MaintenanceMaintenance

8/11/2019 Cucm Tutorial Cisco
http://slidepdf.com/reader/full/cucm-tutorial-cisco 168/180
© 2007 Cisco Systems, Inc. All rights reserved. System Admin 4-26Provisioning Manager Tutorial
Periodic MaintenanceDatabase Backup
Step 1. On the CUPM system, stop the following services using the Control Panel:Apache, cupm JBossService, and cupm NiceService
Step 2. Open postgres command prompt: Start > All Programs > PostgreSQL8.2
> Command Prompt
Step 3. Run command to backup the database, by storing the database informationin a file
pg_dumpall -o -U<username> >[path and fileForBackup]
Where <username> is the username of the postgres administrator. Defaultadministrator username is postgres.
Step 4. If you are backing up for a new install, make backup copies of the files anddirectories listed in the student guide.
Step 5. Restart the following services using the Control Panel: Apache, cupm
JBossService, and cupm NiceService
Database Backup
CUPM and Database on Same Machine
It is important that the PM database be periodically backed up. This can not be done from the ProvisionManager’s GUI. Use these steps to backup the data in the database into a file, preferably on a different serv
This procedure requires postgres administrator level access.
1. On the Provisioning Manager system, stop the following services: Apache, cupm JBossService, cupm NiceService. Stop these services from the Control Panel. Select Start > Control PanAdministrative Tools > Services; Right-click each of the services and click Stop.
2. On the Windows desktop, select Start > All Programs > PostgreSQL8.2 > Command Prompcommand prompt opens in the <Install directory>\pgsql\bin directory. Note If you accepted the delocation during installation, the installation directory is C:\CUPM.
3. In the command prompt, run the following command and enter the postgres admin password wprompted. pg_dumpall -o –U <username> >[path and fileForBackup]
Where <username> is the username of the postgres administrator. If you accepted the default,
administrator username is postgres. Note Enter the password each time that you are prompted. command is used to backup the database, by storing the database information in a file.
4. If you are backing up on the same install, proceed to the next step. If you are backing up for a install, make backup copies as described in this step. In a backup folder, make copies of the followfiles and directories:
• <installLocation>/install.log
• <installLocation>/sep/dfc.properties
• <installLocation>/sep/dfc.keystore
• <installLocation>/jboss-4.0.3SP1/server/cupm/conf/login-config.xml
5. Start the following services: Apache, cupm JBossService, and cupm NiceService. Start these
services from the Control Panel. Select Start > Control Panel > Administrative Tools > Services;Right-click each of the services and click Start.

8/11/2019 Cucm Tutorial Cisco
http://slidepdf.com/reader/full/cucm-tutorial-cisco 169/180
© 2007 Cisco Systems, Inc. All rights reserved. System Admin 4-27Provisioning Manager Tutorial
Periodic MaintenanceDatabase Restore
Step 1. If you are restoring to a new install, have the CUPM system with the newinstall up and running
Step 2. Shutdown Provisioning Manager (previous slide)
Step 3. Open postgres command prompt: Start > All Programs > PostgreSQL8.2
> Command Prompt
Step 4. Run command to backup the database, by storing the database informationin a file: psql.exe –U <username>
Step 5. Drop the database name and role by entering several commands in thecommand prompt. (See Student Guide)
Step 6. Run command to restore the database: psql.exe -U<username> -dpostgres < [path and fileToRestoreFrom]
Step 7. If restoring to a new install, copy the backed up files
Step 8. Restart the following services using the Control Panel: Apache, cupmJBossService, and cupm NiceService
Step 9. You should perform a subscriber synchronization to all Call Unified MessageProcessors, and a Domain synchronization before placing any orders.
Database – Restore
CUPM and Database on Same Machine
If you have backed up your data and want to restore it, follow these steps. If you are restoring to a new ins
have the system with the new install up and running before beginning this procedure. Note This procedrequires postgres administrator level access.
1. Stop Provisioning Manager services on the machine running CUPM.
2. On the Windows desktop, select Start > All Programs > PostgreSQL8.2 > Command Promptcommand prompt opens in folder <Install directory>\pgsql\bin. Note If you accepted the default locaduring installation, the installation directory is C:\CUPM.
3. To enter the postgres prompt, run the following command and enter the postgres administrator passwfor the current install when prompted: psql.exe -U<username>
Where <username> is the username of the postgres administrator. If you accepted the default,administrator username is postgres.
4. Before restoring the database, you must drop the database name and role. In the command prompt
the following commands exactly as shown, one at a time in the following order:
• DROP DATABASE cupm;
Where cupm is the database name to be removed. Expected output: DROP DATABASE
• DROP ROLE <rolemame>;
Where <rolename> is the username for the SEP database user. If you accepted the defthe username is cupm. Expected output: DROP ROLE
• ALTER ROLE <username> WITH PASSWORD ‘<password>’;
Where username is the username of the postgres administrator user, and password shouldthe password set for the postgres administrator with backed up data. If you accepteddefault administrator username, the username is postgres. Expected output: ALTER ROLE
8/11/2019 Cucm Tutorial Cisco
http://slidepdf.com/reader/full/cucm-tutorial-cisco 170/180
5. Enter \q to quit the postgres promt.
6. From the command line, run the following command, entering the password set in the previousstep for the postgres user when prompted: psql.exe -U<username> -d postgres < [path andfileToRestoreFrom]
Where <username> is the username of the postgres administrator. If you accepted the default,the administrator username is postgres. This command restores the database.
7. If you are restoring to the same install, proceed to the next step. If you are restoring to a new
install, complete the following step to copy the backed up files. Copy back the following backedup files:
• <installLocation>/install.log
• <installLocation>/sep/dfc.properties
• <installLocation>/sep/dfc.keystore
• <installLocation>/jboss-4.0.3SP1/server/cupm/conf/login-config.xml
8. Start the following services: Apache, cupm JBossService, and cupm NiceService. Startthese services from the Control Panel. Select Start > Control Panel > Administrative Tools >Services; Right-click each of the services and click Start.
Distributed Machines
If the CUPM and database are distributed, follow the same procedures as with a single machinebackup and restore, however, review the following important notes.
Stop the services (Apache, cupm JBossService, and cupm NiceService) and run thepostgres command prompt on the system where CUPM is running
If restoring to a new install with a new IP address, then following these steps prior torestarting the services:
– On the system where Provisioning Manager is running, in the file
<installLocation>\sep\dfc.properties, find the property dfc.postgres.host, andchange it to: dfc.postgres.host=<New DB Server IP Address>
– On the Windows desktop of the machine where the database is running, go toStart > Programs >PostgresSQL 8.2 > pgAdmin III.
– Double click on cupmPostgresSQL and login using the postgresadministrator password.
– Click on the SQL menu item at the top of the query window, and in the topright window pane enter the following command: delete from nicesysengwhere host='<Old NICE Server IP Address>'
– Click on the Execute Query button at the top of the query window.
– In the Output Pane at the bottom of the screen, confirm that the resultmessage says the query was returned successfully.
– Exit the query window.
– Exit the pgAdminIII window.
– Restart Postgres on the machine where the database is running. On theWindows desktop, select Start > Control Panel > Administrative Tools >Services. Right-click the service cupmPostgreSQL and click Start.

8/11/2019 Cucm Tutorial Cisco
http://slidepdf.com/reader/full/cucm-tutorial-cisco 171/180
© 2007 Cisco Systems, Inc. All rights reserved. System Admin 4-29Provisioning Manager Tutorial
Periodic MaintenanceData Purge
Provisioning Manager retains the following types of data:
Order - order data objects are created for any placed order
Service Action – objects created during PM to device communication for provisioning
Workflow – workflow objects are created after order placed and before service activation
Save data before purgeSave data before purge
How often to purgeHow often to purge
How muchto keep
How muchto keep
What datato purge
What datato purge
Data Purge
Provisioning Manager retains the following types of data:
• Order —When an order is placed for any product provisioning (for example; phone, line, voicemail oany bundle), an order data object is created and stored in the system.
• ServiceAction—Are objects that get created during the application to device communication foproduct provisioning.
• Workflow—After an order is placed for a product, it goes through a workflow (approval, and shippingand receiving) before going to the service activator.
You can use the System Administration > Data Maintenance task to modify the retention count (number oobjects to keep) for each of these three objects and schedule the purge interval. The task also gives you theoption to first export the file prior to purging the data.
The default settings for the Retention Count are:
• Orders—100
• ServiceAction—100
• Workflow—50

8/11/2019 Cucm Tutorial Cisco
http://slidepdf.com/reader/full/cucm-tutorial-cisco 172/180
Requirements
Installation Guidelines
Additional Administrative Tasks
Maintenance
Helpful Troubleshooting Tips
Helpful TroubleshootingTipsHelpful TroubleshootingTips

8/11/2019 Cucm Tutorial Cisco
http://slidepdf.com/reader/full/cucm-tutorial-cisco 173/180
© 2007 Cisco Systems, Inc. All rights reserved. System Admin 4-31Provisioning Manager Tutorial
Helpful Troubleshooting TipsLog Files
PM keeps log files detailing behavior of the system
Located in the <install-dir>/sep/logs file
Files naming format <log-name>.log.<date-stamp>-<time-stamp> – Current logs have no date/time stamp
Files backed up hourly or when they reach maximum size (default is 20MB)
– To change, open the <install-dir>/sep/dfc.properties file and modify thedfc.log.maxsize property to desired size
Cannot disable, but can change amount of data written to file
– Available logging levels: DETAIL, LOW, NORMAL (default), HIGH, andEMERGENCY
– To change, open the <install-dir>/sep/dfc.properties file and modify the
dfc.log.level property to desired level
Log File Management
Provisioning Manager writes application log files for the Service Enabling Platform (SEP) module (sep.logand the Network Interface and Configuration Engine (NICE) service (nice.log). The log files are located in the<Installation Directory>/sep/logs folder.
You cannot disable logging. However, you can:• Collect more data when needed by increasing the logging level
• Return to the default logging level (NORMAL)
Following are the available logging levels:
• DETAIL (provides the most information)
• LOW
• NORMAL
• HIGH
• EMERGENCY (provides the least information)
To change, open the <install-dir>/sep/dfc.properties file and modify the dfc.log.level property to desired level
Log files are backed up every hour, or when they reach their maximum log size limit. The default size limit i20 Mb. To change, open the <install-dir>/sep/dfc.properties file and modify the dfc.log.maxsize property todesired size. The files are saved in the format
<log_name>.log.<date stamp>-<timestamp>
the current files have no date/time stamp.
8/11/2019 Cucm Tutorial Cisco
http://slidepdf.com/reader/full/cucm-tutorial-cisco 174/180
Thank You!
We hope that you have enjoyed using Cisco Unified Provisioning Manager and have found its features to bean important part of your network-management toolkit.
Cisco Systems
8/11/2019 Cucm Tutorial Cisco
http://slidepdf.com/reader/full/cucm-tutorial-cisco 175/180
Chapter 5
Cisco Unified
Provisioning Manager
References

8/11/2019 Cucm Tutorial Cisco
http://slidepdf.com/reader/full/cucm-tutorial-cisco 176/180
Provisioning Manager Tutorial © 2007 Cisco Systems, Inc References
<Intentionally Left Blank>

8/11/2019 Cucm Tutorial Cisco
http://slidepdf.com/reader/full/cucm-tutorial-cisco 177/180

8/11/2019 Cucm Tutorial Cisco
http://slidepdf.com/reader/full/cucm-tutorial-cisco 178/180
Provisioning Manager Tutorial © 2007 Cisco Systems, Inc Reference 5-4
• Other Related Material
♦ Cisco Unified Communications (URL)
http://www.cisco.com/en/US/products/ps7125/prod_brochure_list.html
♦ Cisco Unified Communications Management (URL)
http://www.cisco.com/en/US/products/ps5747/Products_Sub_Category_Home.html
♦ IP Communications and Voice Solutions (URL)
http://www.cisco.com/en/US/netsol/ns340/ns394/ns165/networking_solutions _packages_list.html
♦ Deployment of QoS in Converged Networks (PDF)
http://www.cisco.com/application/pdf/en/us/guest/tech/tk759/c1482/cdccont_ 0900aecd8019f3e0.pdf
♦ QoS Configuration and Monitoring White Papers (URL)
http://www.cisco.com/en/US/partner/tech/tk543/tk759/tech_white_papers_list.html
♦ Network Professionals Connection (URL) <Select Network Management>
http://forums.cisco.com/eforum/servlet/NetProf?page=main
♦ Cisco’s SNMP Object Navigator (URL)
http://tools.cisco.com/Support/SNMP/do/BrowseOID.do?local=en
• Online Bug Tracker
Search for known problems on the Cisco bug tracking system tool, called Bug Toolkit.To access Bug Toolkit, perform the following steps:
o Click on the link above (www.cisco.com/cgi-bin/Support/Bugtool/launch_bugtool.pl)o Login to Cisco.como Click Launch Bug Toolkit .o Locate Provisioning Manager from the list of Cisco Software Productso Then click Next .

8/11/2019 Cucm Tutorial Cisco
http://slidepdf.com/reader/full/cucm-tutorial-cisco 179/180

8/11/2019 Cucm Tutorial Cisco
http://slidepdf.com/reader/full/cucm-tutorial-cisco 180/180