critical incident system (cis) - ltc homes guide_ cis... · critical incident system (cis): user...
TRANSCRIPT

Critical Incident System (CIS): User Guide for Long-Term Care Homes Staff

Table of Contents
Search Field Definitions ................................................................................................................. 3
Section One: Introducing the CIS Application .......................................................................... 4 Contacts ....................................................................................................................................... 4
Section Two: Signing on to the Critical Incident System (CIS)................................................ 5 The LTCH Portal ......................................................................................................................... 5
Section Three: Reporting a Critical Incident............................................................................. 8 The Add New Button................................................................................................................. 12
Section Four: Attaching a file to a Critical Incident Form..................................................... 14
Section Five: Reporting a Disease Outbreak............................................................................ 16 Insert Button .............................................................................................................................. 18 Outbreak Form Stages ............................................................................................................... 18
Section Six: Searching for CI forms.......................................................................................... 20 Editing CI forms ........................................................................................................................ 21
Section Seven: Search for Critical Incident Notes ................................................................... 23 Adding a Note............................................................................................................................ 24
Section Eight: Detailed Report .................................................................................................. 25 Report Toolbar........................................................................................................................... 26 Saving Reports........................................................................................................................... 26
Section Nine: LTCH Status Report........................................................................................... 27
2
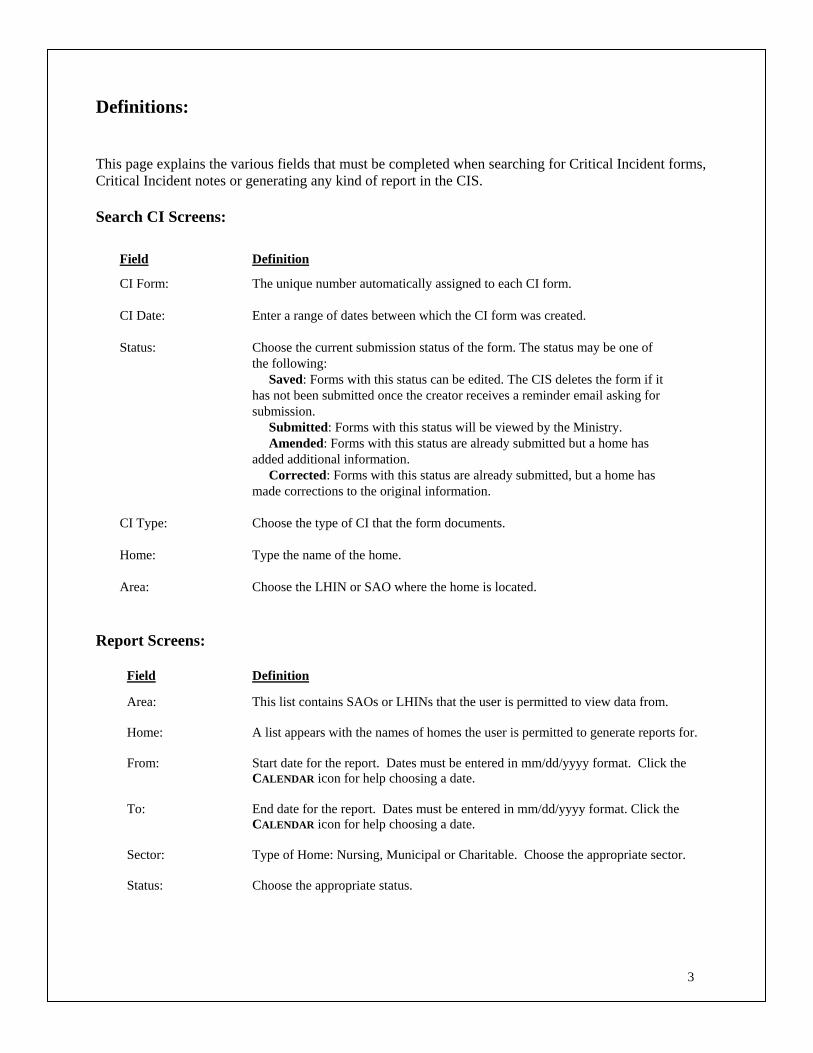
Definitions: This page explains the various fields that must be completed when searching for Critical Incident forms, Critical Incident notes or generating any kind of report in the CIS. Search CI Screens:
Field Definition
CI Form: The unique number automatically assigned to each CI form.
CI Date: Enter a range of dates between which the CI form was created.
Status: Choose the current submission status of the form. The status may be one of the following: Saved: Forms with this status can be edited. The CIS deletes the form if it has not been submitted once the creator receives a reminder email asking for submission. Submitted: Forms with this status will be viewed by the Ministry. Amended: Forms with this status are already submitted but a home has added additional information. Corrected: Forms with this status are already submitted, but a home has made corrections to the original information.
CI Type: Choose the type of CI that the form documents.
Home: Type the name of the home.
Area: Choose the LHIN or SAO where the home is located. Report Screens:
Field Definition
Area: This list contains SAOs or LHINs that the user is permitted to view data from.
Home: A list appears with the names of homes the user is permitted to generate reports for.
From: Start date for the report. Dates must be entered in mm/dd/yyyy format. Click the CALENDAR icon for help choosing a date.
To: End date for the report. Dates must be entered in mm/dd/yyyy format. Click the CALENDAR icon for help choosing a date.
Sector: Type of Home: Nursing, Municipal or Charitable. Choose the appropriate sector.
Status: Choose the appropriate status.
3
Section One: Introducing the CIS Application
The Critical Incident System (CIS) is located on the www.ltchomes.net website. This guide will aid in navigating the various aspects of the CIS.
CIS replaces the paper “Unusual Occurrence” forms currently in use; however it does not alter the current processes. Information regarding current protocols for unusual occurrences can be found in section 8 of the Program Manual. Please note: that while the Program Manual refers “Unusual Occurrences”, the CIS uses the terms “Unusual Occurrence” and “Critical Incident” interchangeably.
The CIS was designed to help homes securely submit their Critical Incident forms. The system will lead to better tracking of incidents and more consistent reporting practices. The information gathered through the system will be used to develop benchmarks and other tools for improvement and may assist in identifying opportunities to apply best practices. CIS records may contain Personal Health Information which is protected by privacy legislation. Creating, viewing or modifying a Critical Incident form or report on the CIS, requires a valid login ID and secure password. While the ltchomes.net portal provides a secure environment for the reporting of Personal Health Information, all users also play a role in maintaining the security of these records. Please refer to the back panel of the Quick Guide for tips on how keep Critical Incident records safe in an online environment. Contacts: For assistance, comments and general inquiries regarding the Critical Incident System please contact: E-mail: [email protected] LTCH CAP Support Centre: 1-866-909-5600 Option 5 For assistance with user accounts on ltchomes.net (passwords, adding new users) please contact your home’s User Account Manager
4

Section Two: Signing on to the Critical Incident System (CIS) 1. Go to the ltchomes website by typing www.ltchomes.net in the address bar of your browser and pressing the ENTER key. [Screen 1]
Screen 1
2. A security alert message [Screen 2] may be displayed. Click YES button to continue.
Screen 2
5

3. The Login screen [Screen 3] of ltchomes.net is displayed. Enter your Login ID and your Password, and click the LOGIN button.
Click the FORGOT YOUR PASSWORD link for help retrieving your password
Screen 3
Your User Account Manager can provide you with your Login ID and Password. If you have forgotten your password click the FORGOT YOUR PASSWORD link to have the password sent to you.
4. If you have permission to access MORE THAN ONE home, the Select a Home page will open [Screen 4]. Scroll through the list until you see the home you want to use as your default. Click the name of the home to highlight it and then click the SELECT button.
Screen 4
6
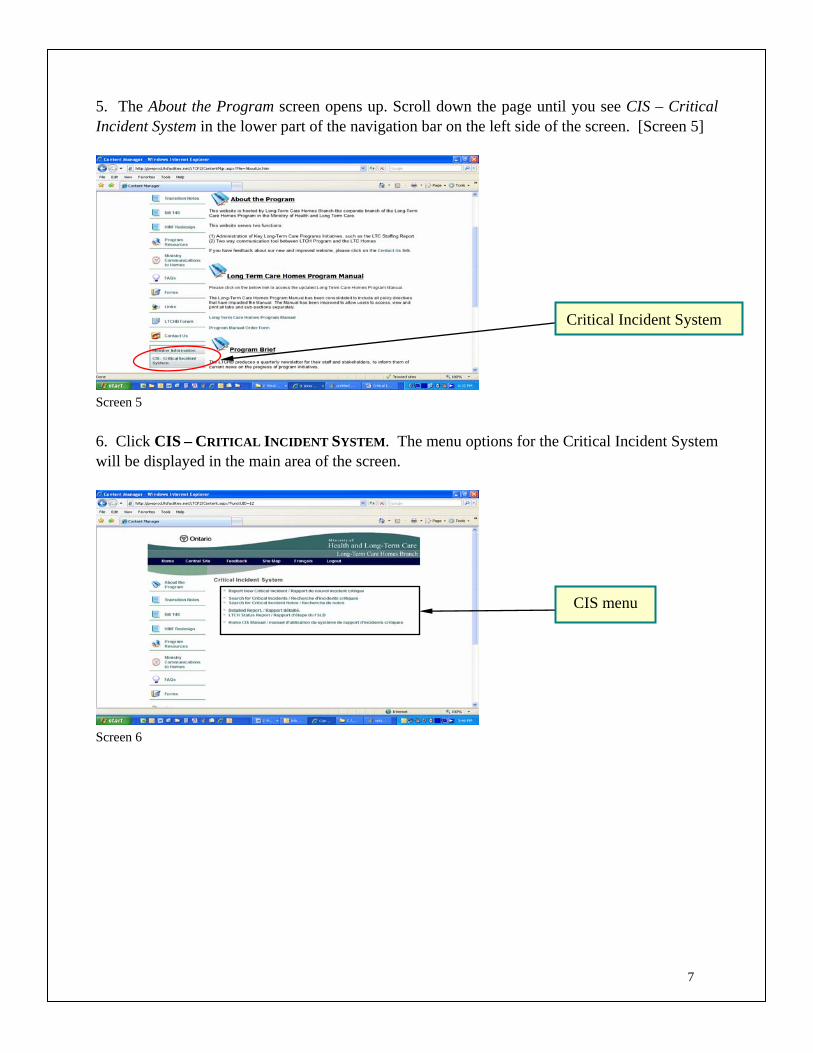
5. The About the Program screen opens up. Scroll down the page until you see CIS – Critical Incident System in the lower part of the navigation bar on the left side of the screen. [Screen 5]
Critical Incident System
Screen 5
6. Click CIS – CRITICAL INCIDENT SYSTEM. The menu options for the Critical Incident System will be displayed in the main area of the screen.
CIS menu
Screen 6
7

Section Three: Reporting a Critical Incident 1. Click REPORT NEW CRITICAL INCIDENT. A new window (or new tab) will open with the first screen of the reporting form. [Screen 7]
Reporting screen loads in new window
Click the box in the right hand corner to
maximize screen
CIS menu screen remains open
Screen 7 To switch to French click the link in the upper right corner. This must be done on the first screen of the reporting form. Switching between French and English is disabled on future screens. [Screen 8]
Close the window
Help with current screen
Switch to English
Screen 8
8
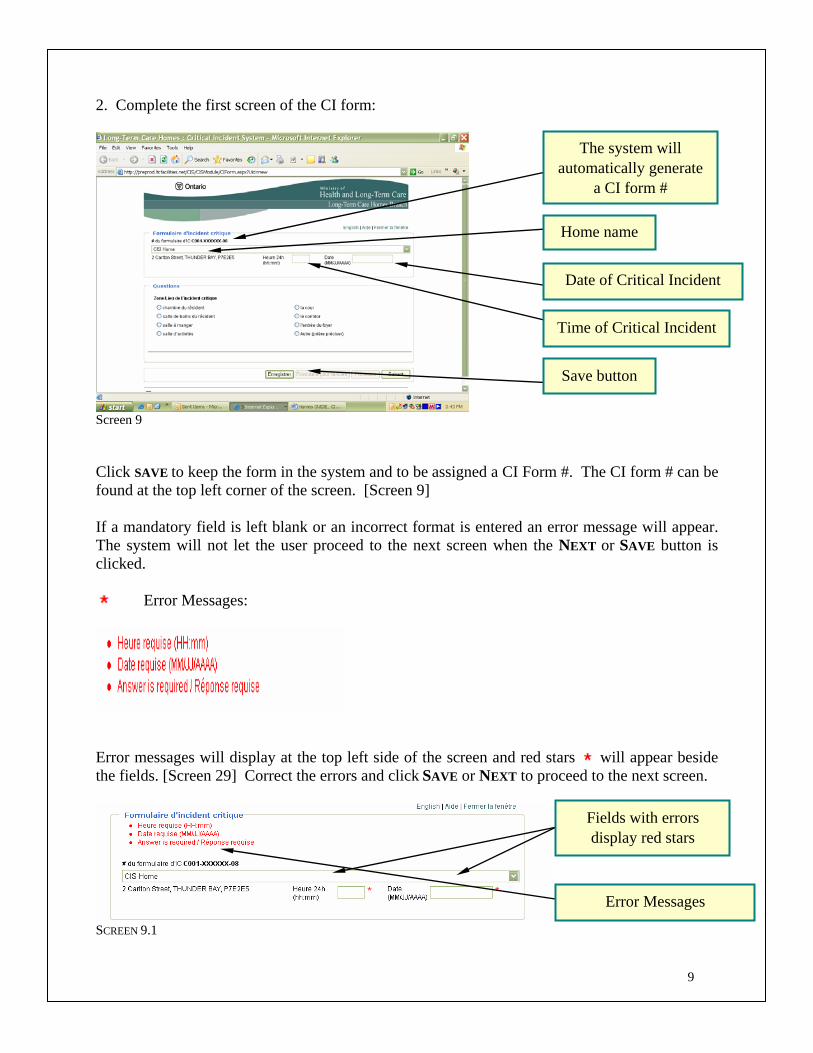
2. Complete the first screen of the CI form:
Home name
The system will automatically generate
a CI form #
Time of Critical Incident
Date of Critical Incident
Save button
Screen 9 Click SAVE to keep the form in the system and to be assigned a CI Form #. The CI form # can be found at the top left corner of the screen. [Screen 9] If a mandatory field is left blank or an incorrect format is entered an error message will appear. The system will not let the user proceed to the next screen when the NEXT or SAVE button is clicked.
Error Messages:
Error messages will display at the top left side of the screen and red stars will appear beside the fields. [Screen 29] Correct the errors and click SAVE or NEXT to proceed to the next screen.
Fields with errors display red stars
Error Messages
SCREEN 9.1
9

3. The second screen of the reporting window allows the user to specify the type of Critical Incident. [Screen 10]
Attach a file. Paper documents can be scanned to create an electronic copy
View responses to completed questions
Screen 10 On this screen two new icons appear that will remain accessible until the CI is submitted. ICONS
Click this icon to attach any electronic document to the form.
Click this icon to view the progress made on the form. If the document is blank, close the pop-up window, click the SAVE button and try again.
Click NEXT or SAVE to proceed to the next question.
10

4. Once the type of CI is selected, the system will prompt the user through a series of questions to describe the CI [Screen 11 & 12].
Several of the Critical Incident types have sub-types or other
questions specific to the incident selected.
(See list below).
Screen 11
Critical Incident Category Sub-Types / Sub-Classes
Transfer or Admission to Hospital: Fracture, Fall, Bruising, Other
Alleged/Actual Abuse/Assault: Resident to Resident, Resident to Staff, Staff to Resident, Visitor to Staff, Visitor to Resident, Other
Medication: Errors in Administering, Adverse Reactions, Misappropriation
Emergency Service Plan: Bomb Threat, Loss of Essential Services, Fire, Unplanned Evacuation, Intake of Evacuees, Flooding, Other
Environmental Hazards: Failure / Breakdown of Security System, Breakdown of Major Equipment, Unusual Weather, Other
Type a description of the occurrence here
NEXT button
Screen 12 Type a detailed description of the unusual occurrence in this screen and click the NEXT button.
11

5. Complete the Identifying Information screen [Screen 13] by clicking and entering names of residents, staff or visitors. Click ADD NEW to generate each new row for text entry.
Clicking ADD NEW creates a new row for
text entry
Screen 13 Enter the name of the home staff who responded to the unusual occurrence then click NEXT. 6. Continue completing the form using the NEXT and PREVIOUS buttons to navigate between screens. To complete the form at a later date click the Save button and refer to the ‘Searching for Critical Incident forms’ section
* Saved (not yet submitted) forms left in the CIS for more than 10 days will be deleted*
7. Once the form has been completed click SUBMIT to submit the Critical Incident form to the Ministry of Health and Long-Term Care. [Screen 14]
SUBMIT button
Screen 14
12

This will lead you to the next screen to PRINT a copy of your report (mandatory requirement).
Click to print submitted CI form
Screen 15 Close the final screen to return to the main menu. 8. The Home Administrator will receive an email notification each time the home submits a Critical Incident form, with a link to access the details of the form.
Date Modified defaults to date Created
Date Submitted
Date of CI
Screen 16
13

Section Four: Attaching a File to a Critical Incident Form 1. Click the UPLOAD ATTACHMENT icon found at the top right corner of the CI form. [Screen 17]
Click to UPLOAD ATTACHMENT
Screen 17 2. Click the BROWSE button to find the document. Type the name of the document in the Name of File field. [Screen 18]
Click BROWSE or type the path and filename
Screen 18
14

3. Click the UPLOAD button. If the attachment has been successfully added a green message will appear in the window. [Screen19]
Successful Attachment Message
Screen 19 Repeat steps 1-3 for each file to be attached. When all files have been attached close the window by clicking the found at the top right corner of the screen. * Note: that once uploaded, files cannot be deleted* *Note: Maximum size of a file to upload cannot exceed 4MB*
15
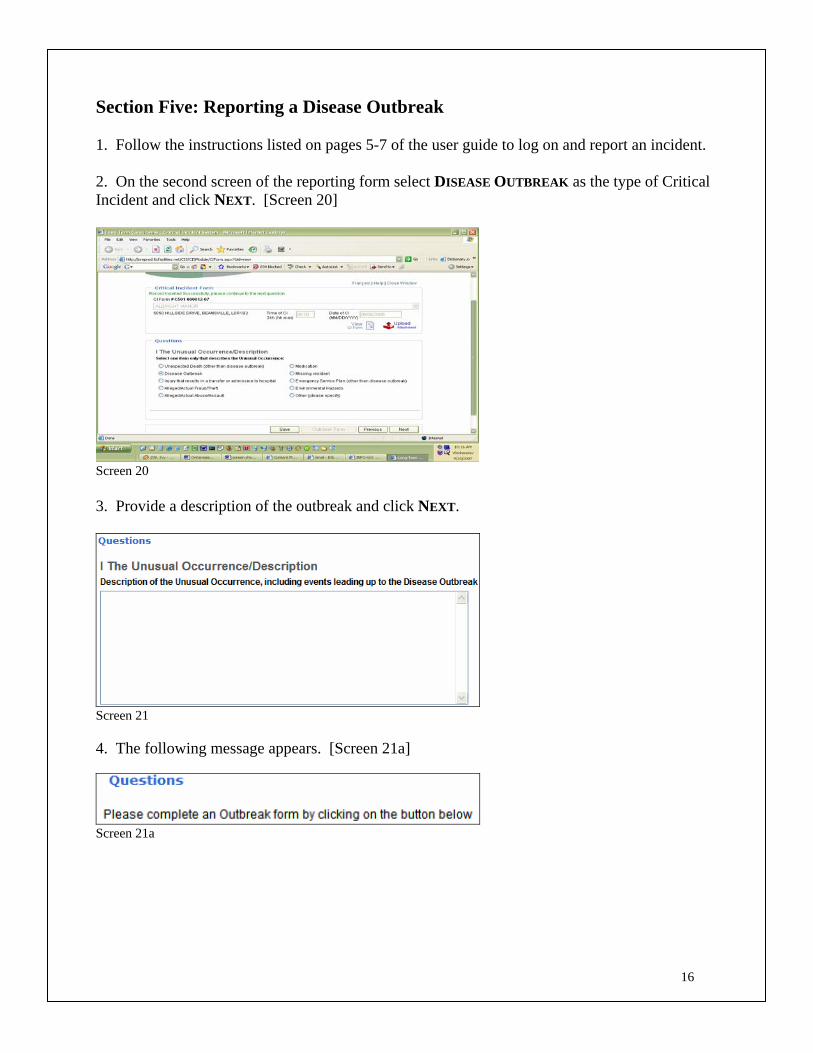
Section Five: Reporting a Disease Outbreak 1. Follow the instructions listed on pages 5-7 of the user guide to log on and report an incident. 2. On the second screen of the reporting form select DISEASE OUTBREAK as the type of Critical Incident and click NEXT. [Screen 20]
Screen 20 3. Provide a description of the outbreak and click NEXT.
Screen 21 4. The following message appears. [Screen 21a]
Screen 21a
16
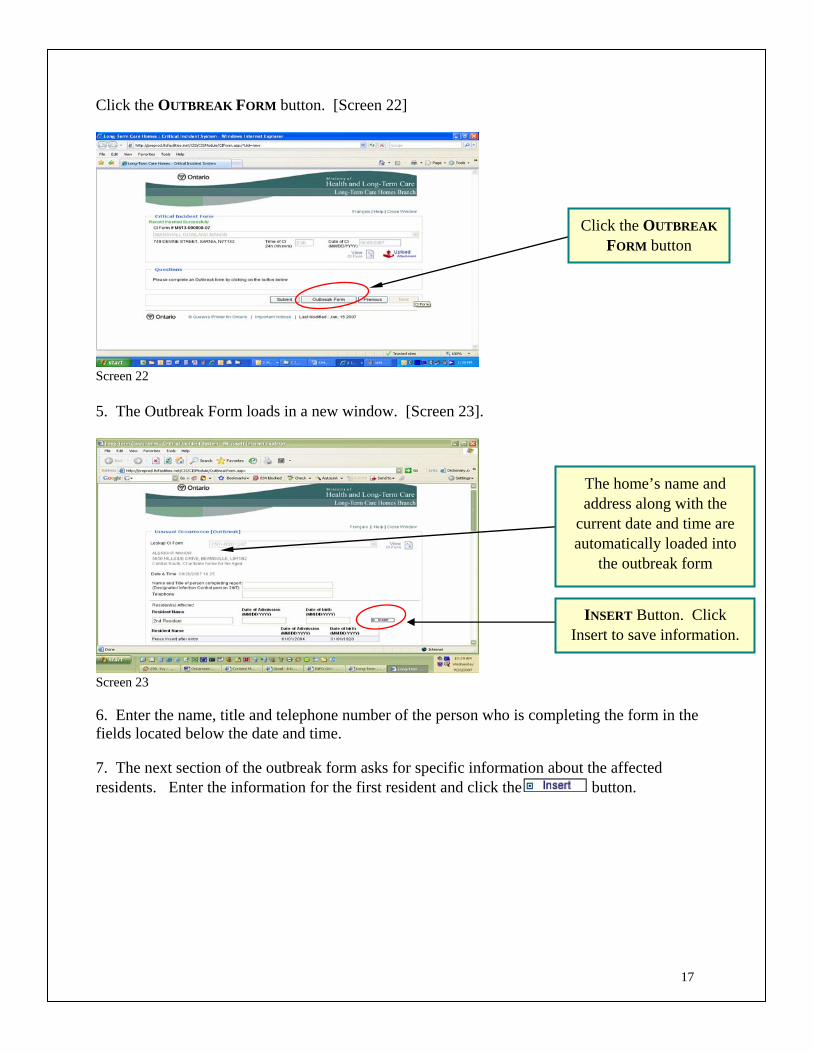
Click the OUTBREAK FORM button. [Screen 22]
Click the OUTBREAK FORM button
Screen 22 5. The Outbreak Form loads in a new window. [Screen 23].
The home’s name and address along with the
current date and time are automatically loaded into
the outbreak form
INSERT Button. Click Insert to save information.
Screen 23 6. Enter the name, title and telephone number of the person who is completing the form in the fields located below the date and time. 7. The next section of the outbreak form asks for specific information about the affected residents. Enter the information for the first resident and click the button.
17
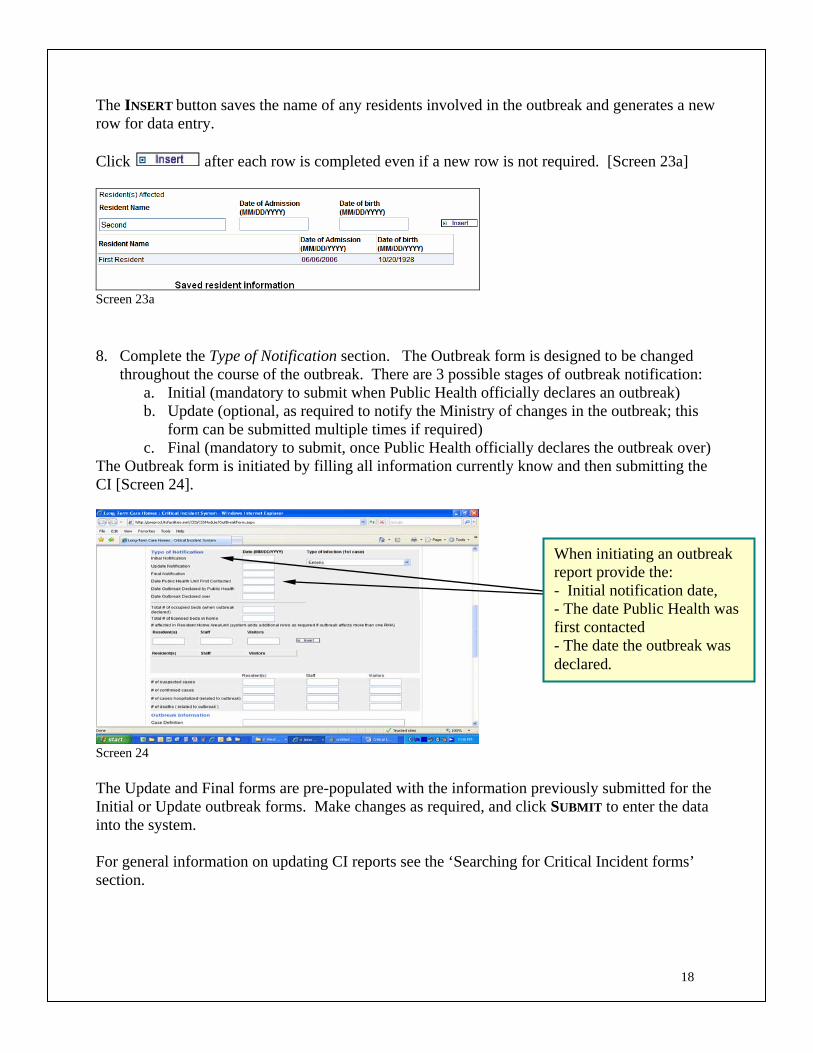
The INSERT button saves the name of any residents involved in the outbreak and generates a new row for data entry. Click after each row is completed even if a new row is not required. [Screen 23a]
Screen 23a
8. Complete the Type of Notification section. The Outbreak form is designed to be changed throughout the course of the outbreak. There are 3 possible stages of outbreak notification:
a. Initial (mandatory to submit when Public Health officially declares an outbreak) b. Update (optional, as required to notify the Ministry of changes in the outbreak; this
form can be submitted multiple times if required) c. Final (mandatory to submit, once Public Health officially declares the outbreak over)
The Outbreak form is initiated by filling all information currently know and then submitting the CI [Screen 24].
When initiating an outbreak report provide the: - Initial notification date, - The date Public Health was first contacted - The date the outbreak was declared.
Screen 24 The Update and Final forms are pre-populated with the information previously submitted for the Initial or Update outbreak forms. Make changes as required, and click SUBMIT to enter the data into the system. For general information on updating CI reports see the ‘Searching for Critical Incident forms’ section.
18

9. Continue filling out the outbreak form using the scroll bar to access all the questions. To save the Outbreak form, click SUBMIT. [Screen 25]
SUBMIT
Screen 25 If the form has been successfully saved a green message appears at the top left side of the screen. [Screen 25a]
Click CLOSE WINDOW to
return to CI form Screen 25a Close the Outbreak window to return to the Critical Incident form. Click SUBMIT button to submit the initial / updated / completed outbreak incident report. [Screen 26]
Click SUBMIT to submit the outbreak incident
report
Screen 26
19

Section Six: Searching for Critical Incident forms Use this option to check the status, amend or correct existing forms. 1. Log on to www.ltchomes.net, as per the instructions on page 5 of manual, ‘Signing on to the Critical Incident System’. 2. In the Critical Incident System menu, click SEARCH FOR CRITICAL INCIDENTS. [Screen 27]
Screen 27 3. The Search screen loads in a new window. [Screen 28] All search fields are optional. Complete as many of these fields as you wish. The more fields that are filled in, the more targeted the search will be. To generate a list of all permitted CI forms, a user may to leave all the fields blank and click the SUBMIT button.
Click the drop down menu boxes to view a list of choices
SEARCH button
Screen 28
20

4. Click the SEARCH button. Search results load in the area below the search criteria. [Screen 29]
Search Results
Screen 29 5. To edit a form, click the edit button. [Screen 29a]
EDIT pencil
Screen 29a
21
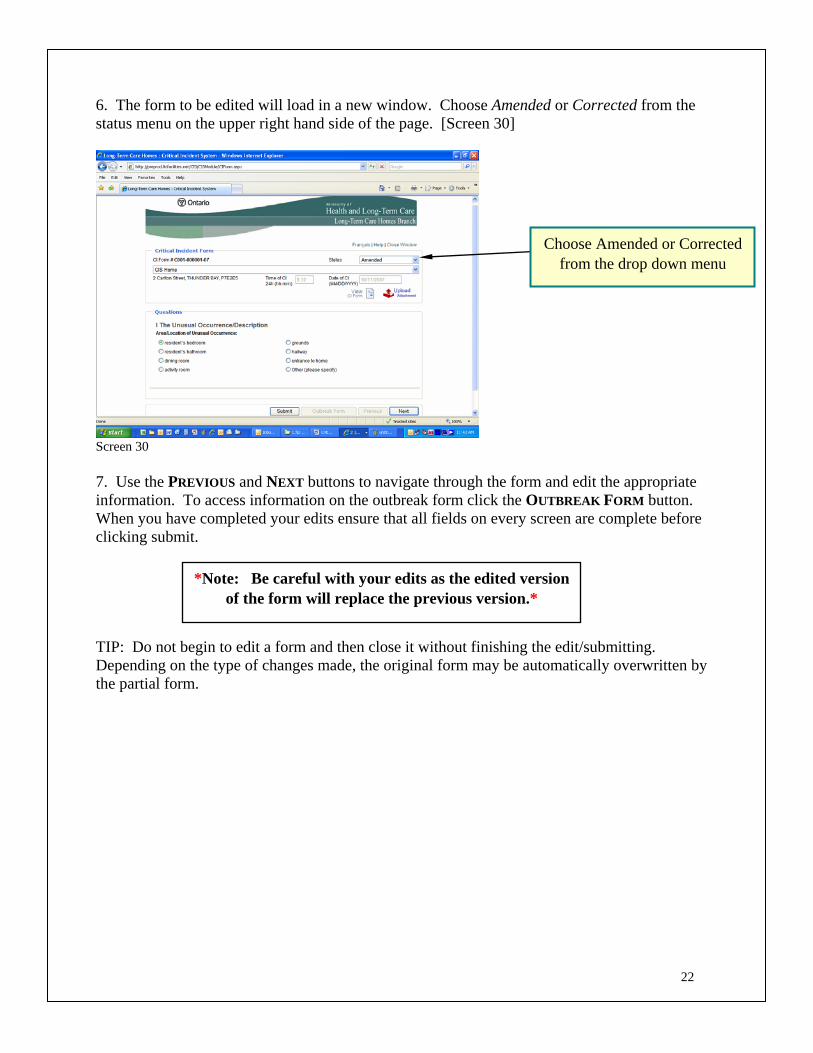
6. The form to be edited will load in a new window. Choose Amended or Corrected from the status menu on the upper right hand side of the page. [Screen 30]
Choose Amended or Corrected from the drop down menu
Screen 30 7. Use the PREVIOUS and NEXT buttons to navigate through the form and edit the appropriate information. To access information on the outbreak form click the OUTBREAK FORM button. When you have completed your edits ensure that all fields on every screen are complete before clicking submit.
*Note: Be careful with your edits as the edited version of the form will replace the previous version.*
TIP: Do not begin to edit a form and then close it without finishing the edit/submitting. Depending on the type of changes made, the original form may be automatically overwritten by the partial form.
22
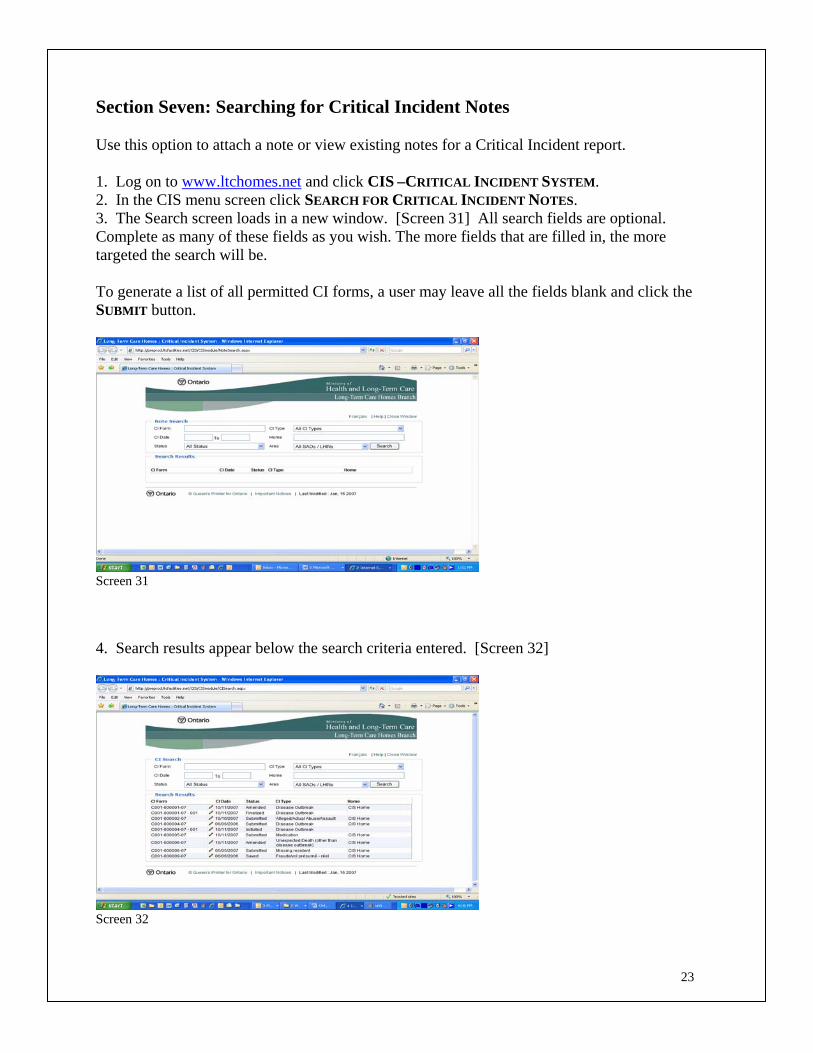
Section Seven: Searching for Critical Incident Notes Use this option to attach a note or view existing notes for a Critical Incident report. 1. Log on to www.ltchomes.net and click CIS –CRITICAL INCIDENT SYSTEM. 2. In the CIS menu screen click SEARCH FOR CRITICAL INCIDENT NOTES. 3. The Search screen loads in a new window. [Screen 31] All search fields are optional. Complete as many of these fields as you wish. The more fields that are filled in, the more targeted the search will be. To generate a list of all permitted CI forms, a user may leave all the fields blank and click the SUBMIT button.
Screen 31 4. Search results appear below the search criteria entered. [Screen 32]
Screen 32
23

To view a thread, click the button. 5. The Note Threads screen loads in a new window. [Screen 33] The Critical Incident notes are listed on the top half of the screen along with the name of the user who made the notes and the date the note was made.
Close Window
Existing notes
Type any notes in the text box
Success Message
Screen 33 7. Type any permanent notes that need to be made about this Critical Incident into the text box and click submit. A green message appears at the bottom of the screen if the note has been successfully saved. [Screen 33] 8. Close the Note Threads screen to return to the main menu.
24

Section Eight: Detailed Report The Detailed Report option is used to generate a document containing 1 or more Critical Incident forms. This document can be printed or saved on the user’s computer. 1. Log on to www.ltchomes.net and click CIS –CRITICAL INCIDENT SYSTEM. 2. In the Critical Incident System menu, click DETAILED REPORT. The Detailed Report screen opens in a new window / tab. [Screen 34]
Click drop-down menu boxes to view a list of choices
Click the calendar icon beside the date fields to view an
interactive calendar Screen 34 3. The search options determine how many CI forms will be part of the document. The From and To text boxes must be filled in but all other fields are optional. The more fields that are filled in the more targeted the search will be. For example, if 01/01/2008 is entered as the ‘From’ date and 10/17/2008 is entered as the ‘To’ date and nothing is specified for the Home or Area fields, the report that will be generated will contain the details of all Critical Incidents from Jan. 1, 2008 to Oct. 17, 2008, for every home the user has permission to view data from. 5. Click the VIEW REPORT button. The report appears below the search fields. [Screen 35]
Screen 35
25

Users can use the report tool bar [Screen 36] along the top of the report to do the following:
• Export information to other programs, like Acrobat PDF and Excel. • Print the report • Move between pages of the report • Search for specific text within the report • Set zoom
Click the Export drop down menu to choose the format
the file will be saved in
Screen 36 6. To save a copy of the report click the on the drop down menu beside the button on the report toolbar. Select the appropriate file format and then click the button. Save the file in the appropriate location . 7. To return to the main CIS menu click the text at the top right hand side of the page.
26
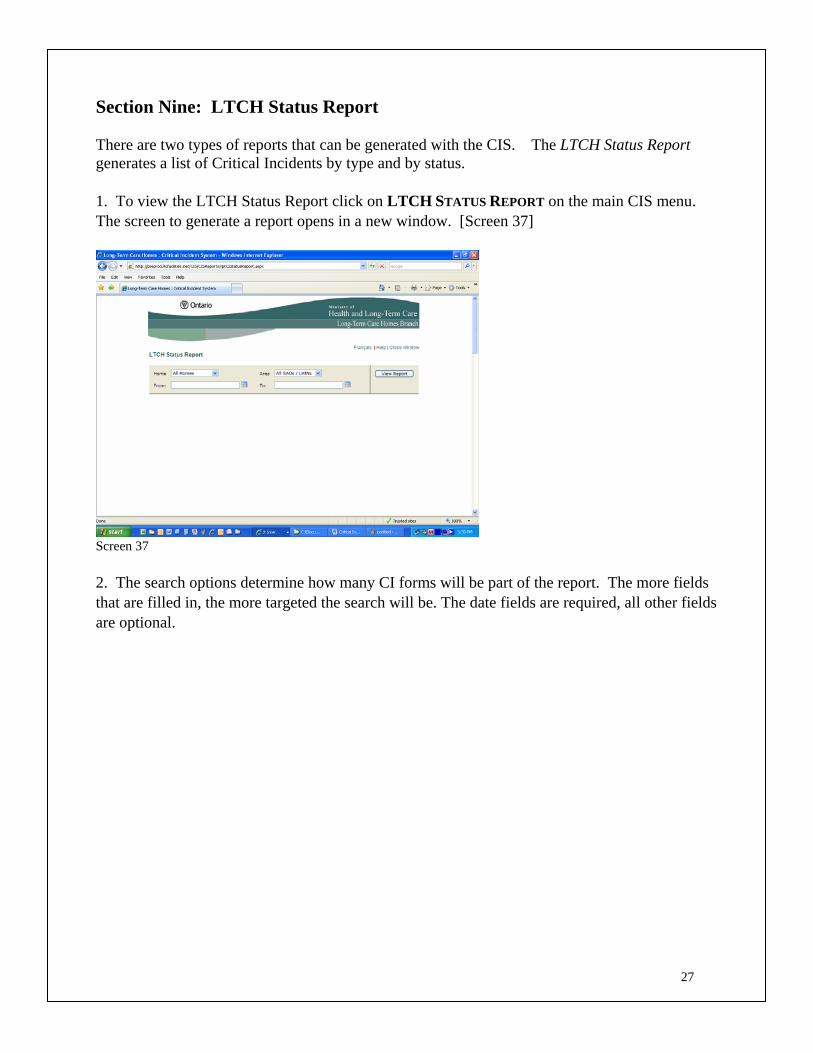
Section Nine: LTCH Status Report There are two types of reports that can be generated with the CIS. The LTCH Status Report generates a list of Critical Incidents by type and by status. 1. To view the LTCH Status Report click on LTCH STATUS REPORT on the main CIS menu. The screen to generate a report opens in a new window. [Screen 37]
Screen 37 2. The search options determine how many CI forms will be part of the report. The more fields that are filled in, the more targeted the search will be. The date fields are required, all other fields are optional.
27

28
3. Click the PREVIEW button. The report loads in the white space below the search options. [Screen 38]
Report Toolbar
To save a copy of the report select the appropriate file format and click Export
Click the printer icon to print the report.
Screen 38 4. To return to the main CIS menu click the text at the top right hand side of the page.
