crew hours, man hours, hours – what’s the difference?c.ymcdn.com/sites/ hours, man hours, hours...
TRANSCRIPT

May 2012News and Information for Users of Sage Timberline Office Software
Crew Hours, Man Hours, Hours –
What’s the Difference? .................1
Overview of AP Issues and
New Features in 9.8 .....................3
A “Mini”Course in Macros ....................5
TUG Online WebEx Training
and Open Forums .........................6
Print the Right Stuff Under
Any CONDITION! ...........................7
AR Contact Setup ..................................8
To: The Estimating Guru ........................8
Sage Summit 2012 – Real Value,
Real Insights, Real Networking ....9
Calling All Writers! ..............................10
TUG Resource Library and
Submit-A-Resource ....................11
From the TUG Talk Bulletin Board .......12
TUG Local Chapters – Connect with
Users Near You! ..........................13
People working with the crew feature in Timberline Estimating often wonder how a man hour (MH) is handled
differently than a crew hour (CH), and how a generic hour fits into the picture. The software handles the order units very differently, especially if a crew is assigned.
A man hour is the total number of hours to accomplish a task. It doesn’t matter if there is a crew assigned or not. It is based entirely on productivity. Take for example the following case in which there is no crew:
Takeoff unit: cuyd Order unit: man hour (MH)Conversion: 4 cuyd/MH Labor price: $20/MH
Note: Labor cost needs to be the total cost to achieve that productivity.
If we take off 100 cuyd at 4cuyd/MH, we generate 25 man hours at $20/MH, which equals $500. We don’t care, from an estimating standpoint, if they have one person working for 25 hours, or 25 people working for one hour. The total time doesn’t change. We have 25 total hours to achieve the task.
Now let’s assume there is a crew of five laborers with an order unit of MH.
Takeoff unit: cuyd Order unit: man hour (MH) Conversion: 4 cuyd/MH Labor price: $20/MH
A man hour order unit assumes that each person on the crew can achieve the stated productivity and that the average cost per man hour for the crew is $20.
If we take off 100 cuyd at 4cuyd/MH, we generate 25 man hours at $20/MH, which equals $500.Here the costs and man hours are exactly the same as a generic non-crewed item, but the elapsed time on site would be five hours.
Note: By definition, a man hour order unit assumes that each person can do the same amount of work per hour (4 cuyd/MH in this example). Depending on the makeup of the crew, this may or may not be valid. For instance, let’s say we need to add a non-working foreman (being paid $40/hour) to this crew. The productivity would need to be adjusted so that the productivity reflected the non-working crew member in the productivity. In this example, if one laborer can do 4cuyd/MH, the productivity for this six-man crew using MH as an order unit is 3.33 cuyd/MH (5 lab * 4cuyd/hour /6 people on the crew equals 3.33 cuyd/MH).
Crew Hours, Man Hours, Hours – What’s the Difference?
u 1 u
by: Gary SimpsonG L Simpson & Associates
o Continues
May 2012 News and Information for Users of Sage Timberline Office Software
u 2 u
the TUG PulsePublished by the
Timberline Users Group, Inc.and sent to all members.
Board of DirectorsMatt Weaver, President
Tim Cooke, Vice President
Sharon Hessong, Treasurer
Jon Banse, Secretary
Natalie Allen, Past President
Janice Barnard
Scott Bishop
Barbara Morse
Michael Suhovecky
Marlene Williams
Lenni M. Witt
Publications CommitteeDavid Brown
Sharon Hessong
Maeva Mayes
Liz Perez-Lavin
Val Steffen
Eire Stewart
Shanna Torges
Timberline Users Group3525 Piedmont Road
Building Five, Suite 300
Atlanta, GA 30305
e-mail: [email protected]
Phone: 404.760.8171
Fax: 404.240.0998Toll Free: 866.846.0999
Web Sitewww.TUGweb.com
The MH hourly price would be $23.33 (5 laborers @ $20 + one foreman @ $40 divided by 6 people on the crew).
Now, let’s look at a five-person crew of laborers using an order unit of crew hour. For a crew hour order unit, the productivity reflects the productivity of the entire team working together, and the price reflects the aggregate cost of the crew.
Takeoff unit: cuyd Order unit: crew hour (CH) Conversion: 20 cuyd/CH Labor price: $100/CH If we take off 100 cuyd at 20cuyd/CH, we generate 5 CH at $100/CH, which equals $500.
Note: The man hour column on the spreadsheet would still reflect 25 man hours.
Let’s assume, as in the previous example, that we need to add a non-working foreman. The productivity remains at 20 cuyd/CH because it takes the entire crew to achieve the crew hour productivity; however, the labor price would increase to $140/CH.
The complexity increases when crews are assigned to the items, but the order unit is the generic hour ( 4cy/hour). If the “hour” is being treated as a crew hour, the productivity needs to be entered as the entire crew productivity. If the “hour” is being treated as a man hour, the productivity is entered as the productivity of each crew member.
You can determine how a generic hour is calculated by checking the Default Crew Pricing setting on the Crew Pricing tab of the Database Settings window (Database>Database Settings>Crew Pricing Tab). If Default Crew Pricing is set to Average cost per person, a generic hour is treated as a man hour. If it is set to Total cost of crew, a generic hour is treated as a crew hour. If you need to change the settings from Average cost per person to Total Cost of Crew, or vice versa, you will need to do that in Estimating Tools on the “Setup” pull down. As always, make sure you have current backup before making large changes to your database.
So, when should you use a man hour or a crew hour? This decision is governed mainly by how you have historically viewed labor. If you think of labor as how much work a crew can accomplish in a given time, a crew hour might be more appropriate. If you think of labor as how much a man can accomplish in an hour, a man hour order unit might be the proper choice. In addition, if you are using Timberline’s Scheduling Integrator (an application that transfers an estimate from Estimating to Microsoft Project or Primavera P3 scheduling software) the duration of activities or tasks will be affected by the man hour or crew hour choice.

News and Information for Users of Sage Timberline Office Software
u 3 u
May 2012
Overview of AP Issues and New Features in 9.8
Credit Card Management The new Accounts Payable credit card management feature allows you to record and track credit card purchases, bank fees and miscellaneous charges. You can record credit card receipts, reconcile the credit card statements against the receipts, track your balances and select how you will pay the credit card issuer. In addition, you can record credit card payments or Electronic Funds Transfer (EFT) against existing invoices. The steps outlined before are for the accrual method of accounting.
The workflow will be:
• Recordpaymentsbycreditcard• Verifystatementbalance• Createinvoiceforcreditcardissuer• Printchecksorrecordmanual/printquickchecks
To get started, set up a liability account for credit cards in General Ledger, then add the Credit Card Payable Account in Accounts Payable: AP Settings > GL Entry Settings.
Set up each credit card issuer in Setup > Vendors.
Then set up one or more credit cards for each account or cardholder in Setup > Credit Cards. You can designate a vendor-specific credit card payable account.
1. In the Credit Card Setup window, click the asterisk in the toolbar to add a credit card.2. When the Add New Credit Card window opens.
3. Click Add.4. In the Credit Card Setup window enter the cardholder’s name. This can be used for reporting later.5. Enter the rest of the details about the credit card.
by: Mary AllainTechware
News and Information for Users of Sage Timberline Office Software
u 3 u
o Continues
Instead of the full card number, only 10 characters are allowed for security purposes.
This ID can be changed later if necessary in the event the card is lostor stolen.
May 2012 News and Information for Users of Sage Timberline Office Software
u 4 u
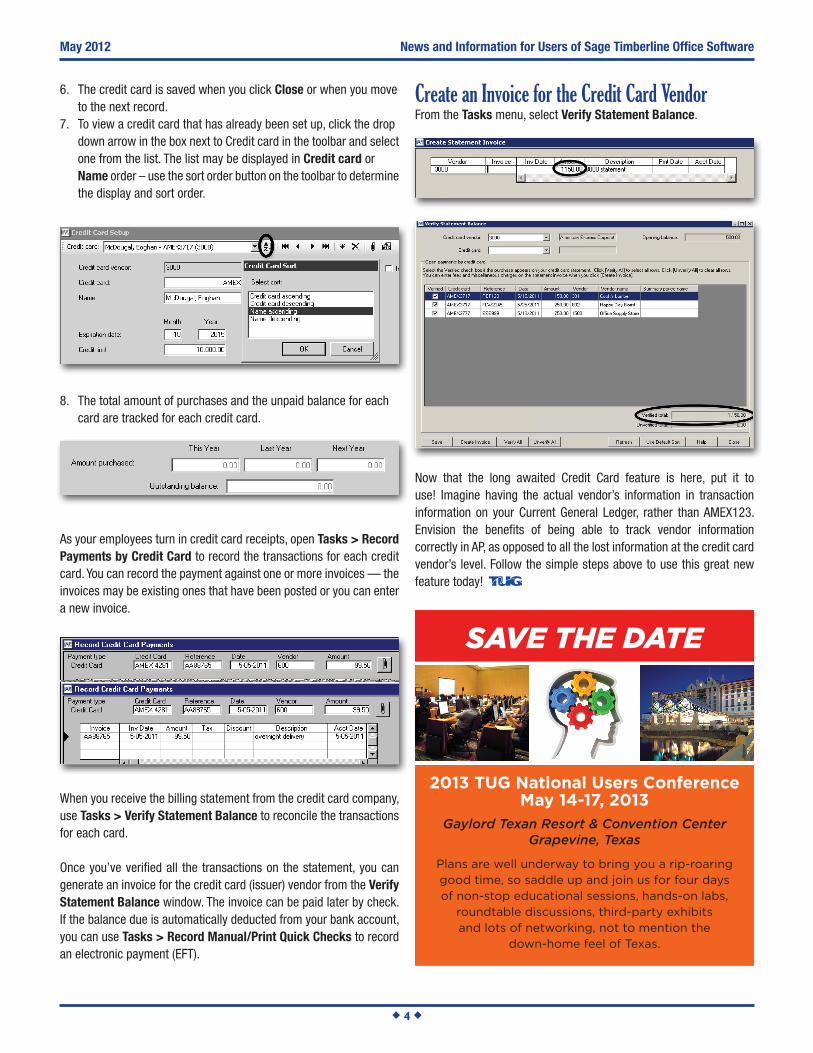
6. The credit card is saved when you click Close or when you move to the next record.7. To view a credit card that has already been set up, click the drop down arrow in the box next to Credit card in the toolbar and select one from the list. The list may be displayed in Credit card or Name order – use the sort order button on the toolbar to determine the display and sort order.
8. The total amount of purchases and the unpaid balance for each card are tracked for each credit card.
As your employees turn in credit card receipts, open Tasks > Record Payments by Credit Card to record the transactions for each credit card. You can record the payment against one or more invoices — the invoices may be existing ones that have been posted or you can enter a new invoice.
When you receive the billing statement from the credit card company, use Tasks > Verify Statement Balance to reconcile the transactions for each card.
Once you’ve verified all the transactions on the statement, you can generate an invoice for the credit card (issuer) vendor from the Verify Statement Balance window. The invoice can be paid later by check. If the balance due is automatically deducted from your bank account, you can use Tasks > Record Manual/Print Quick Checks to record an electronic payment (EFT).
Plans are well underway to bring you a rip-roaring good time, so saddle up and join us for four days of non-stop educational sessions, hands-on labs,
roundtable discussions, third-party exhibitsand lots of networking, not to mention the
down-home feel of Texas.
2013 TUG National Users ConferenceMay 14-17, 2013
SAVE THE DATE
Gaylord Texan Resort & Convention CenterGrapevine, Texas
Create an Invoice for the Credit Card VendorFrom the Tasks menu, select Verify Statement Balance.
Now that the long awaited Credit Card feature is here, put it to use! Imagine having the actual vendor’s information in transaction information on your Current General Ledger, rather than AMEX123. Envision the benefits of being able to track vendor information correctly in AP, as opposed to all the lost information at the credit card vendor’s level. Follow the simple steps above to use this great new feature today!

May 2012News and Information for Users of Sage Timberline Office Software
u 5 u
There may be 50 ways to leave your lover, but there must be more than 100 ways to use a Macro in Sage Timberline Office
(STO). Macros are scripted lines of Timberline Workflow Tasks and Report Printing instructions. They are a great tool to use any time you have to apply a series of conditions to a report because the conditions will be saved within the Macro. You can combine functions by posting a batch and printing a series of reports in a single Macro. Macros can be as many as 99 lines long and can reach across STO modules to include reports, financial statements or tasks from a variety of modules. A single Macro can be created to print the Current Ledger from GL and then print all of the supporting reconciliation reports from AP, AR, JC, CM and PM.
Steps to Create a MacroTo create a Macro in any module:
1. Go to [Tools], [Macros] and click [Add Step]. 2. Select the task or function you want to perform, just as you usually would. A series of questions will prompt, dependent on what task or report you select.3. If you are using STO’s named file convention then you will be asked if you want to change the file selection at run time (run time refers to the next time the Macro will be executed). You will be asked this question for each file selection and can opt to change some and not others.
4. Dependent on the Report Design, some reports have built-in prompts for dates. Others default to [System Date]. Select any date perimeters such as Report Date and “to” “From” dates just as you would ordinarily do. The Macro will retain the original dates from when the Macro was created, but you will have the ability to enter dates over these each time the Macro is run. 5. Create any conditions you want to apply to this report. The Macro will store these conditions to be used each time the Macro is run.6. Enter any Print or Send instructions you want retained with this Macro.7. Click [OK]. The [Macro Completion] prompt will pop up asking what action you want taken if this step of the Macro is unsuccessful. Select to either [Continue with remaining steps in macro] or [Terminate macro immediately].
8. Repeat this process until you have added all the tasks/reports you want included when this Macro is run.9. Save your Macro. We use a naming convention that begins with the primary Module being used. As an example, we have a Macro that groups GL Bank Balances by Prefix A for multiple companies based on conditions. That macro is saved as GL Prop Bank. This way all the Macros that print GL information are grouped together.
Steps to Run a Macro1. Go to [Tools], [Macros] and click [Open]. 2. Select the Macro you wish to run.3. Answer any file or date related prompts.4. Done!
Here are a couple of examples of uses for Macros:
• ImportingInvoicesorJournalEntries. If your import file name remains consistent and is saved in a consistent location, you can create a macro to further automate the import process and eliminate of the need to browse to the import file. • CreateaMacrowithaseriesofprint instructions that e-mail specific ranges of Job Cost Progress reports to clients. Better yet, create the Macro so that it posts them directly to a SharePoint website.• UseaMacrotoprintyourmonth-end closing reports overnight or print them directly to *.pdf and save them paperless on your server. A single Macro can include the financial statement, current GL, bank reconciliation, outstanding payables, check register and accounts receivable reports.• SendDetailCostReportsouttothefield using a Macro that gives each superintendent or project manager just his specific Jobs by conditioning on the Project Manager field.• Propertymanagersanddevelopershave a ton of different companies in a single directory.UseprintMacrostorange reports for a specific entity or property.
A “Mini” Course in Macrosby: Eire Stewart
JP DiNapoli Companies
o Continues

News and Information for Users of Sage Timberline Office Software
u 6 u
May 2012
• ReachacrossmultipleentitiestofigureoutwhatLeasing Commissions or Capital Improvements are in this year’s budget by conditioning on the base account. Save it in a Macro so that the conditions are retained for the next time you need to run the report.• Automatethepostingprocess.Doyouprintaseriesofreports before posting AP invoices? Perhaps an Open Invoice Register and some sort of Distribution report that is passed out to Managers are produced before posting a batch? Automate the whole process by creating a Macro that prints the required reports and then posts the invoice batch. This avoids the opportunity for someone to forget a step!• DoyouhaveacoupleofdifferentfilesforAutomatedJournal Entries?UseaMacrotopostaseriesofRecurringandAuto- Reversing Journal Entries in a single step.
Macros are a terrific way to automate any recurring series of tasks and print instructions. They offer flexibility in that any conditioning or ranging or other special instruction you need to do, including specifying paper size or sending reports to print at an alternate printer, and can be saved to be reused the next time you print this report. Imagine the ease of being able to pull a single base account across a series of companies without having to condition for Prefix A-B, or printing a series of reports for a single manager without having to select them one by one. Time is money – let Macros help you economize your efforts!
When you look at a Sage Timberline Office Macro on
screen, all you see is the Task instruction lines. This
makes it nearly impossible to make changes to a
specific line because you can’t see ranges, condition
or print instructions, but did you know that you can
print your Macros? To print a Macro, go to [Tools],
[Macro] and open the macro you wish to print. Next,
click on the Printer Icon in the upper left hand corner,
just below [File] and your macro instruction lines will
print, including all conditions, print instructions and
file selections. In older versions of STO, the print
feature may error out on Macros with more than 7
lines of instruction.
Yes, Virginia,Macros Can be Printed
JUNE 2012Tuesday 6.5.12 1:00 p.m. ET PJJobSEtUP&WoRkfLoW/SECURItyRoLES+USIngStoDESktoP
Friday 6.8.12 2:00 p.m. ET PUbLICAtIonSCoMMIttEEMEEtIng
Tuesday 6.12.12 1:00 p.m. ET PJ:USIngADDRESSbookWIthPJ
Wednesday 6.13.12 2:00 p.m. ET ConStRUCtIonACCoUntIngCoMMIttEE&foRUM
Thursday 6.14.12 2:00 p.m. ET REALEStAtECoMMIttEE&foRUM
Tuesday 6.19.12 1:00 p.m. ET PJSEttIngS,CUStoMDESCRIPtIonS,CUStoMfIELDS&DEfAULtS
Monday 6.25.12 1:00 p.m. ET InfoRMAtIontEChnoLogyCoMMIttEE&foRUM
Tuesday 6.26.12 1:00 p.m. ET PJoPEnfoRUM:PJPRoJECtMAnAgEMEnttIPS&tRICkS
Wednesday 6.27.12 11:00 a.m. ET EStIMAtIngCoMMIttEE&foRUM
Thursday 6.28.12 11:00 a.m. ET SERVICEMAnAgEMEntCoMMIttEE&foRUM
To attend an online event, please e-mail attendee(s) name and e-mail address to [email protected]. You will receive an e-mail confirmation along with connection instructions once you are registered. These classes are free of charge and open to members only – one more benefit of belonging
to the Timberline Users Group!Weareaddingmoresessionseveryday.ChecktheonlineEventCalendarattUgweb.comforanupdatedlist.Ifyou have any suggestions on sessions you would like to see, please e-mail [email protected].
TUG Online WebEx Training and Open Forums

News and Information for Users of Sage Timberline Office Software
u 7 u
May 2012
Print the Right Stuff Under Any CONDITION!by: Val Steffen
Dean Snyder Construction Co.
Conditions are a wonderful tool that can be used to limit reports to the data you want to view. A condition can be set
using the data records available in the report being used. For instance, the payroll tax register report uses the PR-Check, PR-Check Tax and PR-Employee records in addition to the system, prompt and formula records. This means that the fields in these three records can be used to define the information displayed in the report that is generated.
To set a condition, select the report you wish to view. This example uses the Payroll/Reports/Registers/Tax Register report. Complete any prompt cells (in this example, the period end dates) and select any Ranges that you intend to use. Remember, these items will affect your output, too, so don’t enter a date range that is mutually exclusive to your condition, for instance. Next, click on the Conditions button. Typically, your additional conditions can/should be placed below any existing conditions, but this is not always the case, so review the conditions and determine if any of yours will conflict with the existing conditions when determining which line to highlight. The new condition will add below the highlighted line. You may need to delete
existing condition(s) to add a new one on the first line and then add the condition(s) back. If your report has no output and you know there should be some information generated, always check condition order to make sure this isn’t preventing the generation.
Conditions are read in the order they show in the condition box. Some conditions will need to be processed before others when there are multiple conditions being used or
they might return faulty or no data. In the example, the report returns all paychecks for June of 2010 that have state or local tax not in Iowa because the conditions tell the report to first process any date range set in the period end date
cells, then include voided checks, then eliminate federal taxes, and then eliminate Iowa unemployment and state withholding.
To set a condition, highlight where you want to add the new condition and click the Add button. Select the field and the operator. If the field you want isn’t available in the current record, click on Index to select a different record (remember, the field has to be available on one of the records linked to the report you are using). Select a value if there is a selection available (such as in the example shown) or enter the value you will use. Click OK.
As you can see, you also have the option to change or delete an existing condition. If the report has a condition to display all jobs not equal to “ “ (blank) and you want information on a specific job to display, highlight the line you need to change, select Change and adjust the condition to display job equal to 12-322. Click OK to accept the change screen. Add, delete or change any other conditions, then click OK to return to the print/preview screen. Click Preview to view the output before printing.
You can add or adjust conditions on a report in Report Designer, as well. If you have a condition that will be used every time you access the report, ask someone with the knowledge and proper access to add the condition to the default report and save a step when you actually use the report. Another option is to create a Macro (see the article A “Mini”CourseonMacros! in thistUgPulseedition) that will retain these condition for the next time you want to print a specific report.
Play around with this a little and you will begin to appreciate the power and usefulness of this tool. Enjoy!
May 2012 News and Information for Users of Sage Timberline Office Software
u 8 u
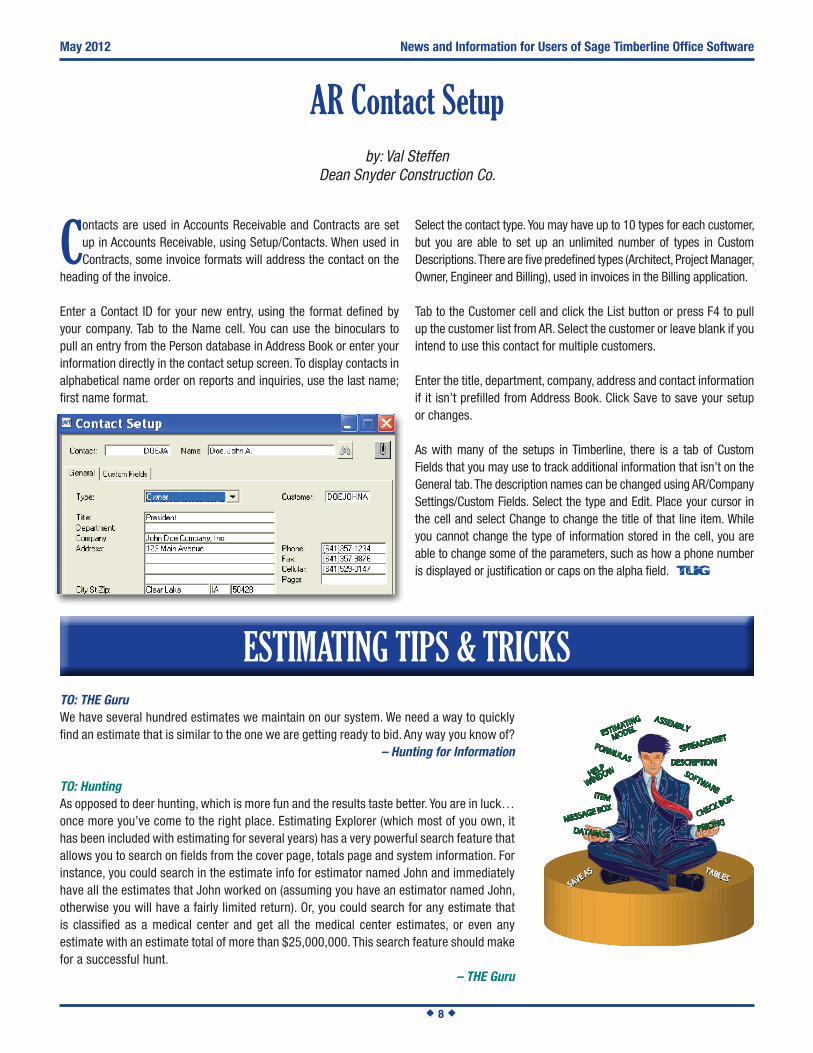
Contacts are used in Accounts Receivable and Contracts are set up in Accounts Receivable, using Setup/Contacts. When used in Contracts, some invoice formats will address the contact on the
heading of the invoice.
Enter a Contact ID for your new entry, using the format defined by your company. Tab to the Name cell. You can use the binoculars to pull an entry from the Person database in Address Book or enter your information directly in the contact setup screen. To display contacts in alphabetical name order on reports and inquiries, use the last name; first name format.
Select the contact type. You may have up to 10 types for each customer, but you are able to set up an unlimited number of types in Custom Descriptions. There are five predefined types (Architect, Project Manager, Owner, Engineer and Billing), used in invoices in the Billing application.
Tab to the Customer cell and click the List button or press F4 to pull up the customer list from AR. Select the customer or leave blank if you intend to use this contact for multiple customers.
Enter the title, department, company, address and contact information if it isn’t prefilled from Address Book. Click Save to save your setup or changes.
As with many of the setups in Timberline, there is a tab of Custom Fields that you may use to track additional information that isn’t on the General tab. The description names can be changed using AR/Company Settings/Custom Fields. Select the type and Edit. Place your cursor in the cell and select Change to change the title of that line item. While you cannot change the type of information stored in the cell, you are able to change some of the parameters, such as how a phone number is displayed or justification or caps on the alpha field.
AR Contact Setupby: Val Steffen
Dean Snyder Construction Co.
TO: THE GuruWe have several hundred estimates we maintain on our system. We need a way to quickly find an estimate that is similar to the one we are getting ready to bid. Any way you know of?
– Hunting for Information
TO: HuntingAs opposed to deer hunting, which is more fun and the results taste better. You are in luck…once more you’ve come to the right place. Estimating Explorer (which most of you own, it has been included with estimating for several years) has a very powerful search feature that allows you to search on fields from the cover page, totals page and system information. For instance, you could search in the estimate info for estimator named John and immediately have all the estimates that John worked on (assuming you have an estimator named John, otherwise you will have a fairly limited return). Or, you could search for any estimate that is classified as a medical center and get all the medical center estimates, or even any estimate with an estimate total of more than $25,000,000. This search feature should make for a successful hunt.
– THE Guru
ESTIMATING TIPS & TRICKS

News and Information for Users of Sage Timberline Office Software
u 9 u
Sage Summit 2012August 14-17, 2012
Gaylord Opryland Resort and Convention Center
Nashville, Tennessee That’s what you get at Sage Summit – the educational and networking Sage event of the year. Find answers and learn what works at product intensives for Sage Timberline Office (becoming Sage 300 Construction and Real Estate), Sage Estimating and our newest product, Sage Construction Anywhere (an easy-to-use cloud-based service), as well as sessions focused on building your business.
Only Sage Summit brings together 4,000+ Sage product users, partners, experts and thought leaders who are eager to share their perspective and tips. It’s hands down the best opportunity to find better ways to work, make new contacts and learn how to do more with your Sage solution than you ever thought possible.
Conference highlights include:
• Databasefundamentals–gettingmorefromyourSage300 Construction and Real Estate database• triedandtrue“designer”sessionsformultipletools–Sage300 Construction and Real Estate Report Designer, SAP Crystal, Inquiry Designer and ODBC...these are all hands-on sessions• CfMA-hostedsessions• newSQLEstimatingandbestpracticesfortransitioningtoit• bIMindustrysessions• businessSkillssessions–software-agnosticsessionsfocused largely on leveraging social media and other trending topics...a great way to supplement product-intensive sessions• ProductivityandprocessimprovementwithSage300 Construction and Real Estate MyAssistant• ExcelintegrationwithSage300ConstructionandRealEstate Office Connector
Registration is now open, so make plans to register before May 31, 2012, to take advantage of the savings with early-bird rates, reserve your preferred hotel accommodations and secure your top session choices. Learn more and register today at www.SageSummit.com.
Sage Summit 2012 – Real Value,Real Insights, Real Networking
May 2012News and Information for Users of Sage Timberline Office Software
u 9 u
News and Information for Users of Sage Timberline Office Software
u 10 u
May 2012
Do you have some helpful Sage Timberline Office (STO) tips and tricks you want to share with your peers in the user community? Have you discovered new ways to be more efficient in your daily use of the software? If yes, then TUG Pulse is the perfect platform for you!
TUG Pulse is published electronically each month and features articles in the areas of estimating, construction, project management, property management, service management, real estate, accounts payable, address book, information technology…the list of topics knows no bounds. Articles are due on the 5th of each month for use in that month’s publication. Each article needs to meet the following criteria:
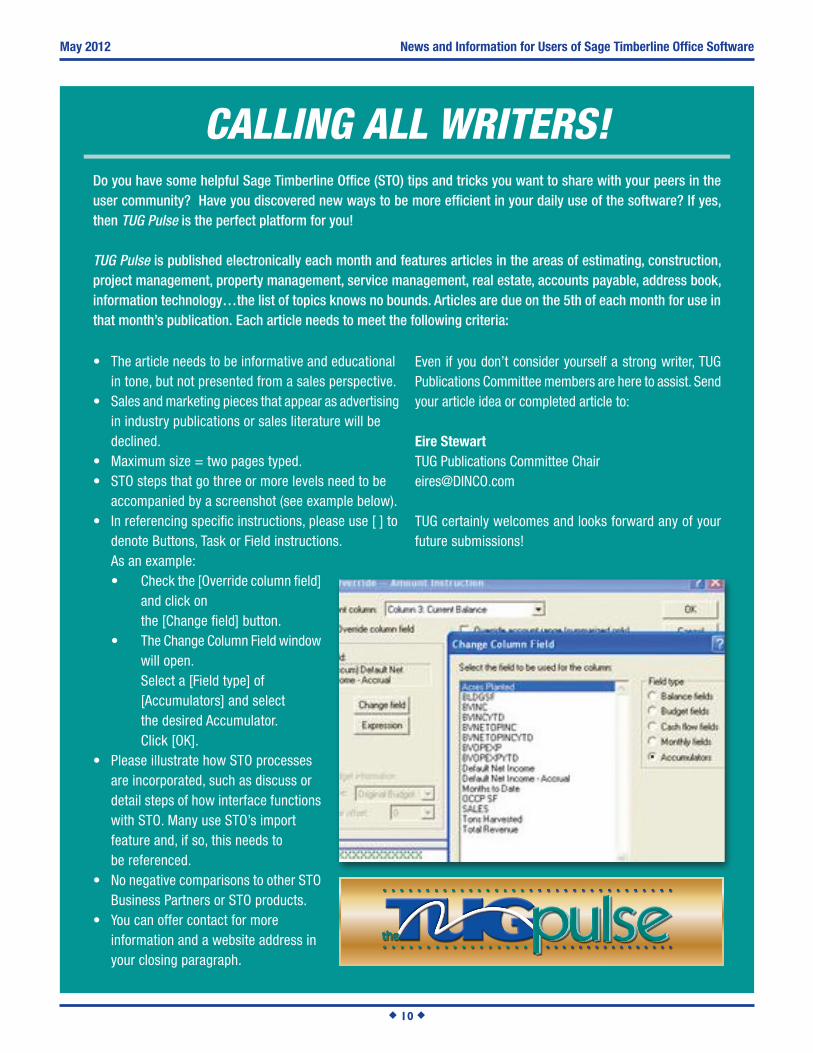
• The article needs to be informative and educational in tone, but not presented from a sales perspective.• Sales and marketing pieces that appear as advertising in industry publications or sales literature will be declined.• Maximum size = two pages typed.• STO steps that go three or more levels need to be accompanied by a screenshot (see example below). • In referencing specific instructions, please use [ ] to denote Buttons, Task or Field instructions. As an example: • Check the [Override column field] and click on the [Change field] button. • The Change Column Field window will open. Select a [Field type] of [Accumulators] and select the desired Accumulator. Click [OK]. • Please illustrate how STO processes are incorporated, such as discuss or detail steps of how interface functions with STO. Many use STO’s import feature and, if so, this needs to be referenced.• No negative comparisons to other STO Business Partners or STO products.• You can offer contact for more information and a website address in your closing paragraph.
Even ifyoudon’tconsideryourselfastrongwriter,tUgPublications Committee members are here to assist. Send your article idea or completed article to:
Eire StewarttUgPublications Committee [email protected]
tUgcertainly welcomes and looks forward any of your future submissions!
CALLING ALL WRITERS!

News and Information for Users of Sage Timberline Office Software
u 11 u
April 2012
Be sure to stay abreast of the latest news relating to STO:
• E-mailexclusivefortUgmembers:[email protected]• Follow Sage on Twitter: @SageConstruct• Join the Sage Construction and Real Estate LinkedIn group• Subscribe to the SageCRE1 YouTube channel
STAYCONNECTED WITH SAGE
One of the many benefits included with yourtUgmembership is the ability toconnect with other users and share
information. the tUg website at tUgweb.com offers an easy way to share resources via the Resource Library.
The Resource Library currently contains several areas (tUg Pulse newsletters,Reports& InquiryLibrary,templatesLibraryand the Submit-A-Resource link) with over 250 resource documents. You can browse resources by selecting one of the areas. You can select a topic to view the resources; each resource will have detailed information and a download link. Please keep in mind that the Resource Library is only available to current tUgmembers.
To submit a resource, active members can use the Submit-A-Resource link. You can upload resources, such as report designs, templates and formulas. Any of the report designs, templates and formulas that you have designed for your business might be extremely useful to other members, and Submit-A-Resource provides a convenient mechanism to share these. Please keep in mindthatresourcessubmittedtotUgshouldbe original work and by submitting a resource totUgweb.comyou agree that you are theauthor and are sharing the resources with the tUgmembership.
To submit a resource, simply login to tUgweb.com and click on the SUbMIt-A-RESoURCE link in the leftnavigationcolumnundertheheadingRESoURCELIbRARy. The Submit-A-Resource page will open where you can browse your PC for the file you want to upload. You will also need to fill out a few fields about the resource you are submitting. Once you have completed the form click the SUbMItbuttontocompleteyoursubmission.your resourcewill be transmitted totUg forapproval and posted to the tUg ResourceLibrary. We do our best to review each resource submitted and may contact the author if we have questions. Please note that it may take up to 48 hours for the resources to be approved and posted to the site.
TUG Resource Library and Submit-A-Resourceby: Matt Weaver
President, Timberline Users Group
News and Information for Users of Sage Timberline Office Software
u 12 u
May 2012
PROJECT MANAGEMENTKim Collins wrote:After an internal change request is completed, how is the Job Estimate updated? Do I have to do an internal change order? While in Change Request we selected Update JobEstimates, but the change is not showing up on inquiries and reports. What’s wrong?
Lisa Glass responded with:Have you posted Job Cost?
Kim replied:No, had not posted Job Cost, but then I did and the changes have been made to the estimates. Thanks. Does the internal change request status change to approved at that time?
Denise Pierce wrote back:NO, that status does not change to approved unless it is attached to a Change Order.
ACCOUNTS RECEIVABLEMidge Bentley had a retainage payment posting issue. She wrote:We have retainage on a project that was paid, but posted into AR just as a regular progress payment. The project is completed, but is still showing retainage due. How do we remove the retainage? The payment has posted and cleared in CM.
Amanda Leith said:If the payment is not applied to something, just release the retainage and apply the payment to it.
Kevin McGuire said:If the payment has been applied to a regular invoice, you need to unapply the payment then void the invoice. Next, you will bill retainage and apply the payment against the retainage.
PAYROLLJennifer Anderson was trying to find out in Timberline when a person(s) receives a raise.
Ken Rizzo said:I do an inquiry on “Check Time” conditioned to that employee and a general date range, and you should be able to see the date of the pay increase.
Amanda Leith said:You can write a report in RD that uses the PR time record, then just pull over the employee #, period end date, pay ID and rate. Range on the employee you are looking for and then condition it for period end dates (maybe PED> Jan. 1, 2010) and the pay ID. Then just scan the report to see when the rate changed.
Toni Kolitsch responded:If they are a typical 40/80 hours, go to inquiries, check information and check activity. You can look at their gross pay to see when it increases.
Johnan MacKenzie said:Within each employee setup they add comments via the attachments tab. They document all changes in salaries here and it is very helpful. Each entry has a time date stamp.
INFORMATION TECHNOLOGYLynn Jacobs said:I am having trouble increasing the font size of Timberline Modules. They appear very small on the screen. They were larger, but the computer had to be restored and everything reset. How can she increase the font size?
Eire Stewart responded:The font size is customizable by desktop. The settings were probably lost when the computer was restored. To reset your font from any module, go to [Tools], [Customize], and on the General Tab, toward the bottom, you will see the font settings.
JOB COST
Ruthann Hahn wrote:Is there a way to generate a report showing Schedule of Values. Probably would have to come from Contracts after all line items are in? Of course, the object is to print a Schedule for Architect approval. Not sure if I want to enter all my line items in Contracts without Architect approval anyway. Comments?
Doug Lewanda said to take a look at the following:CN>Reports>Work in Progress Billing Worksheet. Many of users use this report as a workpaper when preparing monthly billing. Typically, the PMs pencil it in and forward it to Accounting for requisition preparation.
Jim Morrison responded:We use Contracts and the billing schedule of values already input there for our pay application negotiations. Go into Billing>Tasks>Contract Based Invoices and select the contract to be billed. Fill in the desired amounts and click on the Print button on the right side and select “Draft.” This provides a draft schedule of values for negotiation/approval purposes and is then easily and quickly revised and finalized.
From the TUG Talk Bulletin Board: Users to Users
o Continues

News and Information for Users of Sage Timberline Office Software
u 13 u
May 2012
After the comments, Ruthann resolved her issue like this:I set the contract up with all the proposed Cost Codes with dollar amounts. I then approved all contract items at the contract level. Went to billings, prepared an invoice with zero (0) entries, and ran a “draft” page 2 only of the AIA billing continuation sheet. The architect wanted some changes, so I went back to Contracts, unapproved all contract items and made my changes. Approved all contract items again and ran another draft AIA Continuation Sheet. This is my process.
As a side note:Jim Morrison said that their PMs actually fill the desired billing amounts in using Timberline Billing. They do have security set so that the PMs are unable to actually finalize and post the invoice. When the PM has the invoice in a near final form, an accounting person assigns the invoice number and finalizes things.
ACCOUNTS PAYABLEMikki Martin asked:Is anyone was using ACH to pay their vendors? If so, how well is it working? Did you write your own NACHA file to upload to your bank?
Jeff Adams from Sage responded:The fall 2012 release will include ACH payments and the generation of the NACHA file.
GENERAL LEDGERNicholle Anderson was going through and audit and needing to pull the last five years of balance sheets. She wanted to know if there was a way to print them out of Timberline instead of shuffling through box after box in the archives.
Eire Stewart responded: Open your existing Balance Sheet in Financial Statement Designer, delete the “Current” column(s), and edit the NYD column, replacing the NYD field with “Year End Balance 1 year ago.” You can create one design for each year backwards. You can also create a single design that stacks all five years side-by-side just by adding the additional columns.
Ken Rizzo on the same thought process said:You can build your own in Crystal or Report Designer since the GL Master Account has a “end Balance 1 Year Ago” thru “5 Year Ago” field, which gives you all the information you would need.
Thanks to all of you that take time out to respond on the bulletin board and assist fellowtUgmembers!
TakeyourtUgexperiencetoanewlevelwiththetUglocalchapters.Currently, there are active local chapters in: Tucson, Arizona; Tampa/St. Petersburg, Florida; Atlanta, Georgia; Indianapolis,
Indiana; Des Moines, Iowa; Kansas City, Missouri; Omaha, Nebraska; and Albany, New York. If you do not see the area where you live listed, don’t despair, as several areas are in the process of forming new or rejuvenating former chapters.
Depending on where you live, meetings are held two to 12 times per year and little or no registration fees are required to attend. There is NO MEMBERSHIP FEE to attend a local chapter meeting. The local chapters arepartofyournationaltUgmembershipbenefits.
Topics at meetings are just as individual as each user. WebEx presentations, consultant presentations, third-party vendor presentationsand,mostimportantly,USERtoUSERinteractionarejusta few of the ways the local chapter members share with each other. Some areas even come together to host joint meetings and expand the networking and educational opportunities.
No matter how often or long the meetings last, the most important thing is user participation. If you have not had a chance to attend your local chapter meeting, please try to do so! It is amazing how many little things youcanlearnfromyourpeers.thisistrulywherePoWERtothEUSERhappens at the local level by being a part of this great organization.
Ifyouareinterestedinstartingalocalchapter,pleasecontactthetUgofficeatme@tugweb.com.tUgstaffwouldbehappytoassistyouinstarting a group in your area.
TUG Local Chapters – Connect with Users Near You!by: Marlene Williams
Marick, Inc.
Omaha, NEDes Moines, IA
Kansas City, MO
Tucson, AZ Atlanta, GA
Tampa / St. Petersburg, FL
Albany, NYIndianapolis, IN