creo csx2000 color server software version 2.0 for the xerox...
TRANSCRIPT
Creo CSX2000 Color Server Software Version 2.0
for the Xerox DocuColor2000 series
Release Notes
Creo Part Number: 399Z1P969C
Xerox Part Number:
Software Version: 2.0
Date: February 21, 2002

Table of Contents Software Kit Content........................................................................................................................ 5 New Features .................................................................................................................................. 6
Admin page................................................................................................................................................................. 6 Exception - Mixed Paper Stock Attributes.................................................................................................................... 6 Front Cover ................................................................................................................................................................. 7 Back Cover ................................................................................................................................................................. 8 Image Scale................................................................................................................................................................ 8 Pre-RIP Preview.......................................................................................................................................................... 9 Imposition ................................................................................................................................................................... 9 User-Defined Imposition Templates .......................................................................................................................... 10 Automatic Creep ....................................................................................................................................................... 10 Additional Information to Calibration Curves.............................................................................................................. 11 DFE Monitor.............................................................................................................................................................. 11 Job Batching ............................................................................................................................................................. 11 Graphic Arts Port (GAP)............................................................................................................................................ 12 Preflight..................................................................................................................................................................... 12 PDFtoGo................................................................................................................................................................... 13 PDF Optimization...................................................................................................................................................... 13 Job ticket report......................................................................................................................................................... 13
Enhancements............................................................................................................................... 14 Configuration Backup................................................................................................................................................ 14 Configuration Restore ............................................................................................................................................... 14 Sample Files ............................................................................................................................................................. 15 View/Print/Export Configuration Report ..................................................................................................................... 15 Slip–Sheet................................................................................................................................................................. 15 Interleaves Between Transparencies......................................................................................................................... 15 Image Position .......................................................................................................................................................... 16 Save as Calibration ................................................................................................................................................... 16 Spool Store Virtual Printer......................................................................................................................................... 16 Bypass Tray.............................................................................................................................................................. 16 CMYK Workflow........................................................................................................................................................ 16 RGB Workflow .......................................................................................................................................................... 17 RGB & CMYK Rendering Intent Workflow ................................................................................................................. 17 GCR.......................................................................................................................................................................... 17 PS Overprint and GCR.............................................................................................................................................. 17 Accounting data for failed and aborted jobs............................................................................................................... 18 Spool indication......................................................................................................................................................... 18 Booklet range for VI jobs ........................................................................................................................................... 18 DCS Format Support................................................................................................................................................. 18
2
Multiple Archive......................................................................................................................................................... 18 Archive Operation Indication ..................................................................................................................................... 19 VIPP2001.................................................................................................................................................................. 19 PPML........................................................................................................................................................................ 19 XYZ profile support ................................................................................................................................................... 19
CSX2000 Color Server Tips .......................................................................................................... 20 Antivirus software...................................................................................................................................................... 20 Loading Software ...................................................................................................................................................... 20 Add printers on client workstations ............................................................................................................................ 20 Virtual Printers and PPD ........................................................................................................................................... 20 1 GHz CPU Systems................................................................................................................................................. 20 Driver and Application Collation Options ................................................................................................................... 20 Embedded ICC Profiles............................................................................................................................................. 21 CMYK Emulation....................................................................................................................................................... 21 Range printing with HCSS......................................................................................................................................... 21 Font Substitution ....................................................................................................................................................... 21 HCSS - Rotate 180° .................................................................................................................................................. 21 Staple Feature Options ............................................................................................................................................. 21 Novell Banner Page .................................................................................................................................................. 22 Re-RIP after Imposition Programming Changes........................................................................................................ 22 Image size to trim size ratio in Imposition .................................................................................................................. 22 OS Set Up and Software Requirements .................................................................................................................... 22 Job Editor.................................................................................................................................................................. 22
Variable Information (VI)................................................................................................................ 23 Reference Documentation......................................................................................................................................... 23 VPS Process............................................................................................................................................................. 23 VPS Printing.............................................................................................................................................................. 23 VI Job Thumbnails .................................................................................................................................................... 23 File Naming Convention ............................................................................................................................................ 23 VPS Image Files ....................................................................................................................................................... 24 Print Shop Mail jobs .................................................................................................................................................. 24
Application Notes........................................................................................................................... 25 Windows/office.......................................................................................................................................................... 25 QuarkXpress ............................................................................................................................................................. 25 PageMaker................................................................................................................................................................ 25 Adobe Acrobat .......................................................................................................................................................... 26 Illustrator v9.x and 10.x ............................................................................................................................................. 26 Adobe PS Known Limitations .................................................................................................................................... 27
3

Creo is a world leader in solutions for the graphic arts industry. Core product lines include image capture systems; inkjet proofers; thermal imaging devices for films, plates and proofs; professional color and copydot scanning systems; creative workflow; and workflow management software. Creo is also an Original Equipment Manufacture supplier of on-press imaging technology, components for digital presses, and color servers for high-speed, print-on-demand digital printers. Creo trades on NASDAQ (CREO) and the TSE (CRE).
Note: This document contains information about the CSX2000 Color Server 2.0. Before using the CSX2000 Color Server, it is recommended to distribute this Release Notes document to all users.
4

Software Kit Content Windows NT Server Version 4.0 Fast Install (CD # 1).
This CD includes:
* Windows NT Server Version 4.0 operating system with a customized menu for reinstalling the CSX 2000 Color Server
* A Folder with the DFE drivers (Communication, SCSI, VGA and misc.).
* A Folder with all the Win-NT files (I386)
* Internet Explorer 5.5 high encryption with Microsoft VM
* Service Pack 6a high encryption (different than the one on the Microsoft CD)
CSX 2000 Multi-Lingual Application Software - (CD #2)
This CD includes all the CSX 2000 Color Server software (Setup, PPD's, printer drivers and utilities).
CSX 2000 Documentation and Utilities - (CD #3)
This CD contains client utilities, the CSX 2000 Installation and Printing Guides and customer Release Notes in PDF format in the following languages: English, French, German, Spanish, Italian, Portuguese and Dutch.
The CD has both Macintosh and PC partitions so that it can be mounted on both platforms. The Installation and Printing Guides can be inserted on any client computer with a CD-ROM drive and submitted to print on any printer. They can also be submitted to print via the CSX2000 Color Server and sent to print on the DocuColor 2045/2060.
To print the CSX 2000 Installation and Printing Guides on a DocuColor 2045/2060 using the CSX 2000:
1. Insert the CSX 2000 Color Server Documentation and Utilities CD #3 into the CSX 2000's CD-ROM drive while the CSX 2000 application workspace is open.
2. From the File menu, select Import Job. 3. Browse to the CD-ROM and select the required document. 4. Click Add to List.
The file appears on the right hand side of the Import Job dialog box. 5. Click Submit.
The selected document is submitted to the CSX 2000 Color Server to be printed.
5
New Features
Admin page The Admin page is printed directly after the job’s printing is completed and includes the following information about the job:
Job title, Page Size, Number of pages, Number of sets, Sheet Size, Number of sheets, Client workstation name, Submitted on Date, Sender Name, Account Name, Recipient, Comments.
To print the Admin page:
1. Go to: Finishing Tab � Admin Page 2. There are two options:
� Do Not Print Admin Page (Default) � Use paper stock:
3. If “Use paper stock” is selected, the following paper properties are available: Paperweight Coating Tray
� The Admin page is printed in B&W and face up only.
�In jobs, which are printed on transparencies, Admin page will be printed on paper.
�The Admin page can’t be stapled and previewed.
�The "Color client Name" field on the Admin Page will print with the color server name from Macintosh client workstations and client workstation name from PC client workstations.
�The "Sender Name" field from Macintosh OS 9.X clients will print with the Owner name. From OS X, the User Name will be printed in this field.
�Imposition using "Fit to Page" with Admin page causes Admin page image scaling to change
Exception - Mixed Paper Stock Attributes The Exception tab feature enables programming of any page or range of pages for different paper type and weights of coated or uncoated paper stock.
In addition, this feature allows the insertion of blank pages after specific pages in the job.
To program mixed paper stock attributes:
1. Go to the Exceptions tab and do the following: 2. In the Exceptions window, click the Add New icon. 3. In the Page fields, enter the range of pages number. 4. Choose paper stock attributes: paper type, weight, coated/uncoated. 5. Click Add. 6. Click Apply.
6

To insert blank pages:
1. Go to: Exceptions tab� do the following: 2. In the Inserts window, click the Add New icon. 3. In the After Page field, enter the page number that is after where you want to
add the inserts, and in the Quantity field enter the quantity of inserts. 4. Choose the paper stock attributes: paper type, paperweight, and
coated/uncoated. 5. Click Add. 6. Click Apply.
�When changing parameters that require re-Rip, a re-Rip message will not appear.
� Page exceptions cannot be set with imposition
� Exception Page Programming can not be used with VI jobs that have varying number of pages in a booklet.
Front Cover A job’s front cover can be printed with paper stock parameters different than the job itself.
The front cover can be printed on the front side, on both sides, or added as a blank page.
To print the Front Cover:
1. Go to: Finishing Tab � Front Cover 2. Select:
� Do Not Print Front Cover (Default value) � Use paper stock:
3. If “Use paper stock” is selected, the following paper properties are available: Type Paperweight Coating Tray
4. Select how to print: � Add blank (Default value) � Print on front size � Print on both sizes
� Front cover cannot be set with imposition.
7

Back Cover A job’s Back Cover can be printed with different paper stock parameters than the job itself.
The back cover can be printed on the backside, on both sides, or it can be added as a blank page.
To print a Back Cover:
1. Go to: Finishing Tab � Back Cover 2. There are two options:
� Do not print back cover (default) � Use paper stock:
3. If “Use paper stock” is selected, the following paper properties are available: Type Paperweight Coating Tray
4. Select how to print: � Add blank (default value) � Print on Backside � Print on Both sides
� Back cover cannot be set with imposition
Image Scale The ability to enlarge or reduce the size of the input page images.
To adjust image page sizes:
1. Go to: Print Settings Tab � Image Scale 2. There are three options:
� 100% � Fit to Paper � Custom
� When enlarging the image above the sheet size the image will be cropped around the center.
� The image size after scaling should not exceed the job’s paper size.
� Image Scale may reduce image quality.
8
Pre-RIP Preview The Pre-RIP Preview is a preference option, which enables you to control the Pre-RIP preview for PS and VI jobs.
PS Preview This feature gives the option to keep the PDF files after preview or leave the original PS file in the storage folder without converting it to PDF.
VI Jobs Preview This feature gives the option to choose the number of booklets for preview before processing the job.
To preview booklets:
Go to: Admin � Preferences � Pre-RIP preview
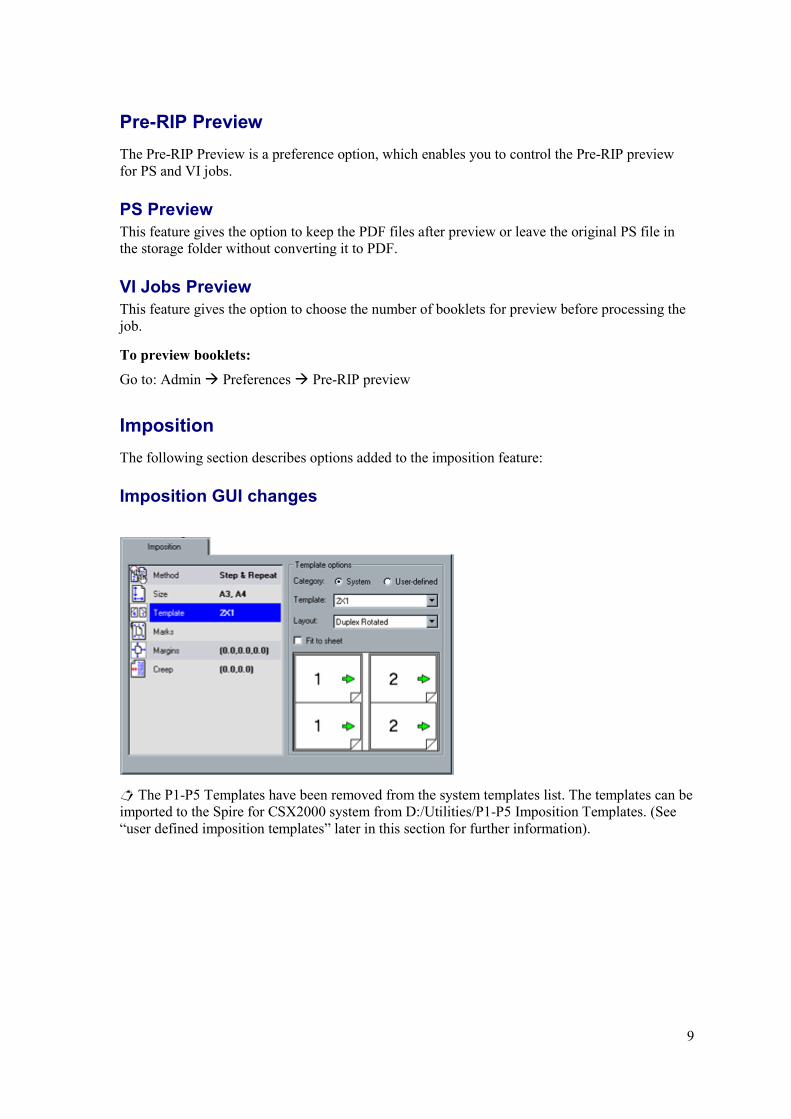
Imposition The following section describes options added to the imposition feature:
Imposition GUI changes
� The P1-P5 Templates have been removed from the system templates list. The templates can be imported to the Spire for CSX2000 system from D:/Utilities/P1-P5 Imposition Templates. (See “user defined imposition templates” later in this section for further information).
9

Cut & Stack The Cut & Stack option was added to the Step & Repeat imposition method. Cut & Stack sets the images in order to properly cut the printed sheets, and to stack one package above the other without further need for print set-up.
To Cut & Stack:
1. Go to: Imposition Tab � Method � Step & Repeat 2. Select:
� Cut & Stack
Fit to Sheet The ability to fit an imposition layout (scale up or scale down) to any sheet size is supported.
To fit imposition layout to a sheet size:
Go to: Imposition Tab � Template � Fit to Sheet.
User-Defined Imposition Templates User Defined Imposition templates enables the import of custom imposition templates into the system.
Ultimate InSpire (English only application) enables to create custom imposition templates. More details about the “Ultimate Inspire” application can be found at www.Ultimate-tech.com.
To import custom imposition templates:
Go to: Admin � Preferences � User-defined imposition template.
To use custom imposition templates:
1. Go to: Imposition Tab � Template 2. There are two options:
System (Default) User-Defined
Automatic Creep An additional option of auto Creep In was added to the total Creep In feature.
To set auto Creep In:
Go to: Imposition Tab � Creep � Total Creep in
10
Additional Information to Calibration Curves The calibration information can be viewed for every existing calibration look-up table. The window displays the D-max targets and the D-max measured for every separation (C, M, Y, K). In addition the following properties details of the same particular calibration are displayed: paper weight, screening, paper coating and % of max density.
To view calibration information:
Go to: Tools Menu� Calibration � Select Calibration LUT � click the Info button.
DFE Monitor DFE Monitor displays the following:
��Disks usage and capacity
��Networking information
��Virtual printers details
To view the DFE monitor information:
Click on: server animation (top right corner in the workspace) � DFE Monitor window
Job Batching Spire for CSX2000 is capable of combining similar jobs into a single batch before sending them to the DocuColor 2000. The Job Batching feature prevents the engine’s cycle down between printed jobs and thus increases the performance of DocuColor 2000.
To batch jobs:
Go to: Admin � Preferences � Job Batching (The default value is on)
� The batch’s name, which is displayed on the DocuColor 2000, is same as the first job name in the batch.
� Collated and uncollated jobs cannot be combined.
� Jobs with different destination trays cannot be combined.
� Offset and No Offset jobs cannot be combined.
� Jobs with different staple positions cannot be combined.
� The first file in the “batched’ set of jobs must start with the largest paper size required to print in the “batched set”.
11
Graphic Arts Port (GAP) CSX2000 is capable of importing and processing Brisque jobs, Tiff and TIFF/IT and CT/LW files by converting them to “pre-rasterized” PDF files. GAP PDF files behave the same as any other PDF file and they have the same programming options.
Brisque Job A rasterized Brisque Job’s typical structure:
A job containing an assign file with one page or several pages (in case of a multiple job), each containing its own assign file that combines LW and CT/s.
In order to import a Brisque Job to the DFE, import the assign file of the job.
�To print a specific page, import the assign file of the specific page.
Tiff/IT A Tiff/IT file has 3 components:
CT.TIF, LW.TIF and FP (final page) file, which combines CT and LW.
In order to import Tiff/IT file to the Spire CSX2000, the FP file must be imported.
CT, LW, TIFF The components of a Brisque Job and TIFF/IT - CT, LW and TIFF - can be imported and printed separately to Spire CSX2000.
To import Brisque Job and TIFF/IT components:
Go to: Job menu � import
� Spire for CSX 2000 only support GAP files that are in composite format.
�GAP files, which contain spot colors, are not supported
Preflight The preflight feature enables the system to check the availability of (1) Hi-Res images and (2) fonts before starting to RIP the job. An addition option of the Preflight feature is the Color summary, which provides information in regards to existing Spot colors. The Preflight report is displayed in the Job History.
To enable preflight:
1. Go to: Services Tab � Preflight: 2. There are two options:
� Skip preflight (Default Value) � Run Preflight check: � Hi-Res files � Fonts � Color summary
� A Preflight check will fail the job if resources are missing, pending font substitution is set to “No” and APR set to “print with Hi- Res”.
12
� The Color Summary option provides information of Spot color names and whether it was found in SPIRE for CSX2000 spot color dictionary.
� Preflight procedures may slowdown the overall processing time.
� A Preflight check programming option is not available from PPD.
PDFtoGo Spire for CSX2000 is capable of exporting jobs, both before and after processing, as a standard PDF file. For an exported RTP job the PDF file includes the rasterized data of the job.
The operation converts the RTP information to raster files that can be encapsulated in a PDF format. This ensures all resources are embedded in the PDF and that the file can be processed and printed on any PDF printer.
While Exporting as PDFtoGo a running bullet moves from right to left on the top right animation.
To enable PDFtoGo:
Go to: Job Menu � PDFToGo
Or:
Click: Right Click Menu � PDFToGo
� Export as PDFtoGO is not available for VI jobs (VPS, VIPP, PPML).
PDF Optimization Processing time can be significantly decreased with the PDF Optimization feature, when using PDF jobs with repeated elements, such as heavy PowerPoint presentations, or files that describe VI jobs.
To use PDF Optimization:
Go to: Admin � Preferences � PDF Optimization. (Default: enable)
� PDF version1.4 is not supported.
Job ticket report Spire for CSX2000 enables Printing and Exporting a Job Parameters Report containing all Job Parameters set through the Job Ticket, except the “Exception” information.
To print a Job Ticket Report:
Click: right click menu � job ticket report
13

Enhancements
Configuration Backup All user-defined tables and templates are added to the Spire system configuration backup:
��Color tables: gradation, CMYK emulation, custom spot color, and calibration tables.
�� Imposition templates: system and user defined imposition templates.
�� System and custom downloaded fonts.
The default configuration path is: C:/CSX2000/General/Configuration.
Default configuration file name is: Spireconf.cab’.
The path and the file name default values can be changed by clicking on the ‘Browse’ button.
� If backup was completed on external media then the path will not be saved and displayed. After backup, the default path will be displayed: C:/CSX2000/General/Configuration.
Configuration Restore The restore configuration feature gives flexibility in choosing from various categories from the backup information to restore.
Go To: Admin � Utilities � Backup Configuration � click Start Recovery:
� The configuration can also be restored to the Spire for CSX2000 through the Configuration Wizard.
In order to restore the configuration when upgrading from version 1.1 to version 2.0 do the following:
1. Upgrade the Spire for CSX200 version 1.1 to Spire for CSX2000 version 2.0 2. Go to: Admin � Utilities � Configuration Backup � Click start backup. 3. After backup operation is completed, uninstall the version. 4. Install NT and version 2.0. 5. Go to: Admin � Utilities � Configuration Backup �
Click Start Recovery button.
14

Sample Files Ps and PDF sample files were moved from C:\CSX2000\General, to D:\Sample_File.
View/Print/Export Configuration Report The Configuration report includes additinal information regarding the following: Server HW Configuration, Network Setup, Server Resources, Printer Info, Color Tables Imposition Templates and Diagnostic version.
The configuration report can be viewed, exported and printed.
To view the configuration report:
Go To: Admin � Utilities � View Configuration
Slip–Sheet Slip-sheets can be printed between copies (or between booklets in VI jobs) using a paper stock other than the job’s paper stock.
To print slip-sheets:
1. Go to: Finishing Tab � Slip-Sheet 2. There are two options:
� Do Not Print Slip-Sheet (Default)
� Use paper stock: Select the following paper properties:
Paperweight Coating Tray
� When the print mode is uncollated, the slip-sheet will be printed between each page of the job.
� Slip-sheet is not supported with stapling.
Interleaves Between Transparencies You can add interleaves between transparencies.
To add interleaves:
1. Go to: Paper Stock Tab � Type � Transparency 2. Select:
� Add Interleave
� Use paper stock: Select the following paper properties:
Paper weight Coating Tray
15
Image Position After printing a sample page, use the image position feature to adjust the positioning of the image (on one side or both) according to the lead and rear edges.
To adjust the image position:
Go to: Print Setting Tab � Image Position
� In Duplex printing image position front size always refers to the first page of the job (or first page of the printed range).
Save as Calibration A default name was added to the “Save As” option in the calibration window.
The default name is based on the calibration info: Screen Type, Paper Weight, Coated or Uncoated (for example, Auto_105gsm_U).
Spool Store Virtual Printer The Spool Store virtual printer was added by default to Spire for CSX2000 in addition to Process Print and Process Store. By using the Spool Store virtual printer, jobs can be spooled directly to the storage folder.
Bypass Tray The ability to print to a connected DFA supported device using the Bypass tray.
To enable bypass tray:
Go to: Finishing Tab � Finisher � HCS � Bypass tray
CMYK Workflow CMYK workflow option includes the following parameters from which to choose:
�Original CMYK values �Embedded source CSA �CMYK Emulation
To use CMYK workflow options:
Go To: Job Parameters � Color Tab � CMYK Workflow
� CMYK Emulations content and functionality was not changed.
16

RGB Workflow RGB workflow option enables the following choices:
�Source CSA � Replace it with one of the following values:
CSX RGB 1.8 CSX RGB 2.1 CSX RGB 2.4
To use the RGB workflow:
Go To: Job Parameters � Color Tab � RGB Workflow
RGB & CMYK Rendering Intent Workflow Different Rendering Intent values can be set for CMYK and RGB elements:
To set different Rending Intent values:
Go To: Job Parameters � Color Tab � Rendering Intent (Default value for CMYK: Relative, Default value for RGB: Perceptual).
GCR GCR default value was changed to Medium.
� Native pre-ripped images or graphics consisting of more than 90% ink coverage for each color separation resulting in a total ink coverage of greater than 360% must not be processed with GCR = 'None' option. Failure to adhere to this requirement can lead to uneven densities resulting in extended and excessive service calls. In addition, Image off-setting at the fuser may occur resulting in increased service calls. Overall, productivity may be impacted due to an increase in machine downtime. For the remaining GCR options of “low”, “medium (default)” and “high” there are no restrictions on total ink coverage for pre-ripped native files. �If Xerox Service determines that service issues are attributable to customer jobs with total ink coverage greater than 360% and GCR = ‘None’, then Xerox Corporation reserves the right to incrementally charge for additional service time and associated materials required.
PS Overprint and GCR The start situation is: PS overprint default value = "No". GCR default value = "Medium". When the PS overprint setting is changed from "No" to "Yes" the following message will appear: “PS Overprint selection conflicts with Current GCR setting. Select ‘OK’ to set GCR to ‘None’ or ‘Cancel’ to cancel your PS Overprint setting.” The options will be OK/Cancel (Cancel will be the default option). If "OK" is selected, the PS overprint will be changed to "Yes" and the GCR to "None". If "Cancel" is selected, the start situation will not be changed.
17

Accounting data for failed and aborted jobs In addition to successfully printed jobs, also jobs that were aborted while printing or jobs that failed in print are displayed in the Accounting window.
Spool indication When jobs are spooled to the DFE, a running yellow bullet appears in the printer animation window section.
Booklet range for VI jobs When setting a “booklet range” of a VI job before processing, the system will process only the defined booklet range.
� Re-rip of the job might be required in cases where the “booklet range” is changed.
� In some cases VI jobs with booklet range might fail in process due to some authoring tools limitations. In these cases, define the booklet range from booklet number 1.
DCS Format Support Spire for CSX2000 can process input files with embedded DCS1 or DCS2 (Photoshop) format files.
DCS Printing Steps:
1. Place the DCS file in a DTP (Desk Top Publishing) Application such as QuarkXPress or Freehand.
2. Copy the DCS file to the CSX2000 color server high-resolution folder (at D\Shared\High Res).
3. Set PS Overprint in Print Quality Tab in Job parameters or in PPD to Yes. 4. Print the file in composite mode.
� A different path can be used for the high-resolution DCS files. When doing so make sure the path is added to the APR search paths (Services Tab of the Job Ticket).
Multiple Archive Several jobs can be archived together into one target folder.
To archive several jobs:
1. Select files from Storage folder (using Shift or Ctrl keys). 2. Choose � Archive from right-click menu, or, Go to: � job menu � Archive.
All the selected files will be archived one after the other, each one as a different cabinet file that will be named under its job name.
18
Archive Operation Indication While jobs are archived, a red bullet moves from left to right on the top right animation. By clicking on the arrow beside these bullets, the archived job related information can be viewed and choose whether to skip the Archive operation can also be skipped.
To view archived information:
Go to: Top Right Animation � Click on the red bullet
VIPP2001 Spire for CSX 2000 processes VIPP2001 jobs efficiently. In addition, a management mechanism for the VIPP2001 reusable elements, with a hierarchical structure, is provided.
To view VIPP elements:
Go to: Admin �Resource Manager � Elements Viewer
PPML Spire for CSX 2000 processes PPML 1.5 (Graphic Arts conformance) jobs efficiently. In addition, a management mechanism for the PPML 1.5 reusable elements, with a hierarchical structure, is provided.
To view PPML elements:
Go to: Admin �Resource Manager � Elements Viewer
� Imposition for PPML jobs is not supported.
� PPML jobs cannot be previewed.
� PPML commands, which are not supported, are: External Data Array (single page of an external multi page PS / PDF), External Data , where the external file is a PDF, and Segment Array (single page of an external multi page PS / PDF).
XYZ profile support XYZ based profiles are supported. Emulations using XYZ profiles will emulate images using the same mechanism for LAB based profiles.
19
CSX2000 Color Server Tips
Antivirus software CSX2000 Color Server was tested successfully with the McAfee Virus Scan v4.5 - for NT 2000 server, Antivirus Software. To limit degradation of performance, it is recommended to avoid auto scan mode and to activate the Anti Virus software only when the CSX2000 Color Server application is closed.
Before installing the CSX2000 make sure all other applications are closed including Anti-virus applications.
Loading Software Unauthorized software should not be loaded onto the CSX2000 Color Server system with the exception of the Anti-Virus software that protects the software.
Add printers on client workstations It is recommended to use Adobe PS Driver utility from CD #3 for install printers on client workstations.
� When updating or installing a new version, the old printers must be removed from the client workstation and new printers installed.
Virtual Printers and PPD All job parameters can be programmed in Virtual Printers, except Page Exception parameters, Front and Back covers
When printing from a client workstation to one of the Spire for CSX2000 Virtual Printers, the job is automatically programmed with the selected Virtual Printer’s programming. To override one of the Virtual Printer’s values, select other value than “Printer’s default” for the relevant parameter in the PPD.
�Paper size value in the PPD will always override Virtual Printers’ paper size value. Thus, when printing job from a client, the proper paper size for the job must be selected in the PPD paper size parameter.
1 GHz CPU Systems During the NT install on the 1 GHz CPU platforms, the Default Adapter setting in Microsoft AppleTalk Protocol Properties must be set to the 1st adapter setting. By default, this is set to the 2nd adapter during software installation.
Driver and Application Collation Options Most printer drivers and MS Office applications support a "Collate" option. To receive properly collated or stapled output, disable the "Collate" feature in the print driver and in the application and enable the "Collate" feature in the PPD.
20
Embedded ICC Profiles Adobe and the CSX2000 Color Server support PS color management (CSAs and CRDs mechanism). Color space array is pulled out from the ICC profile (only when PS color management is selected parameter.) and interact with the color-rendering dictionary of the printer (CRD).
CMYK Emulation The ICC profile names should not contain any spaces or the improper characters. Examples of improper characters include the following symbols: ! @ # $ % ^ & * ( ) - / ? > < ' " ; : ] [ { } \
Range printing with HCSS In duplex printing, use only continuous range printing, not non-continuous page printing, which requires a comma.
Font Substitution In case when the DFE fails to substitute fonts and no fonts printed in the output, turn Font Substitution Off in the virtual printer.
Go to: Admin � Resource Manager � Virtual Printer
HCSS - Rotate 180° In some cases a job may get to the CSX2000 Color Server rotated in 180 degrees, and prevent the proper usage of the HCSS. In those cases, in order to allow stapling in the right place, use the Rotate 180° option.
The following cases require "Landscape" staple selections with the "Rotate 180°" print option (all of these cases are relevant to files with "Landscape" image orientation only):
��QuarkXpress - from Win 98
�� Freehand - from Win 98 and Mac
��Microsoft Office - from Win NT/2000
The following case requires "Portrait" staple selections with the "Rotate 180°" print option (This case is relevant to files with "Portrait" image orientation only):
�� PageMaker – from Mac
Staple Feature Options A file with "Landscape" image orientation also has portrait staple options available, and likewise a file with "Portrait" image orientation will have Landscape options available. Choose the correct Staple orientation option according to its job image orientation. The image might be cropped when choosing a staple orientation different from the image orientation set by the application.
Some known applications requiring opposite staple orientation settings in the print options are:
Adobe Acrobat from Windows 2000- a "Landscape" document requires a "Portrait" staple selection only.
21
CorelDraw from Windows 2000/NT - a "Landscape" document requires a "Portrait" staple selection only.
PageMaker from Windows 98/2000/NT and Mac - a "Landscape" document requires a "Portrait" staple selection only.
Novell Banner Page Banner page for Novell is not supported.
Re-RIP after Imposition Programming Changes When modifying Imposition settings for a Ready to Print job, re-RIP is automatically performed when the new imposition setting requires changes in the page's rotation. For example, when you change the template from HTH to HTT.
Image size to trim size ratio in Imposition The ratio between image size and trim size in imposition setting should not be more than 1.5, otherwise job might fail in print. For example, don’t place two Tabloid size images, trimmed to Letter size on a Tabloid size sheet.
OS Set Up and Software Requirements The supported Macintosh OS is 8.51 and higher. The recommended print driver depends on the Macintosh OS that is being used. Unknown problems may occur if other drivers are used.
MAC OS Recommended Print Driver 8.51-8.xx LaserWriter 8.6.1 9.0-9.x LaserWriter 8.7
Adobe PostScript Driver for Win NT/2000/XPis 5.2.1 and Win 98/ME is 4.5.1.
� Spire for CSX2000 does not require any driver installation for MAC OS 10.x. To print to the Spire for CSX2000 from MAC OS 10.x use the Print Center application Add Printer to add the virtual printer.
Job Editor In merged jobs created in the Preview/Job Editor, job parameters that would require a re-RIP (for example, color emulation, orientation change, image quality and imposition templates) cannot be changed.
22
Variable Information (VI)
Reference Documentation Please refer to the Variable Information Customer Expectations Document for the DocuColor 2045/2060CSX, specifically to the VI application section.
VPS Process It is recommended to use Creo Darwin 3.3 or higher version.
In general, the DocuColor 2045/2060CSX is capable of efficiently handling variable data jobs in segmented run lengths. Large complex jobs should always be segmented into smaller run lengths to achieve maximum throughput. The exact size of the run length varies based on the amount of variable coverage and element demographics (size and percentage of variable text vs. images/graphics). As a matter of good practice, customers should always perform regular disk maintenance to ensure trouble-free operation.
VPS Printing Creo Darwin does not support trapping of VI elements. Gallop mode automatically uses the Face Down print option.
VI Job Thumbnails Do not attempt to view thumbnails with multi record VI jobs, since no other job can be selected until these thumbnails have been generated on all the pages of the of the selected VI job. Do not open thumbnails for VIPP and/or VPS jobs that have been RIPed and are being held in the Storage folder, unless the user desires to view the thumbnails of the entire VI job.
File Naming Convention Follow the naming conventions specified in the CSX 2000 Printing Guidel. Note that improper characters and file names with spaces may cause errors. For examples avoid using the following symbols: ! @ # $ % ^ & * ( ) - / ? > < ' " ; : ] [ { } \ |. This is relevant for image and job files. In some cases, the CSX2000 Color Server will substitute underbars ( _ ) in file names that contain the aforementioned characters. This will result in an inability to call out the Hi-Res image when using APR. It is recommended that all image files and the database file is scanned for these characters and fixed prior to creating any Darwin VPS file.
23
VPS Image Files Supported file types utilizing the Spire APR feature and the Synapse PrintXT extension includes: EPS, TIFF, and CT.
Note: General Postscript errors may result when Synapse PrintXT is set to perform Image Swap on unsupported file types (that is, PDF, LZW compressed TIFF, grayscale bitmaps).
Print Shop Mail jobs VI elements in Landscape orientation of Print Shop Mail jobs will be processed and printed out in Portrait orientation.
24

Application Notes
Windows/office Custom page sizes cannot be defined in Microsoft Word for Windows NT and 2000. The value defaults back to Letter size. In case the image is larger than Letter (8.5x11"), the image will be cropped upon printing.
QuarkXpress To print transparencies from QuarkXpress, first select the page size (A4 or Letter) in the Page Setup window and from the PPD options. Only then select the Media type: Transparency.
In order to achieve good results in imposition using quark files in custom size and Landscape orientation, define the paper size as follows:
1. Document setup: Width = Long number, High =Short Number 2. Print window: Width = Short number, High =Long Number 3. PPD, Custom: Width = Long number, High =Short Number
To ensure validity of files, check the preview window in QuarkXpress before the postscript creation.
In the printer driver window, Output tab the only resolution option available is 300dpi, although the DocuColor 2045/2060 will print the file in 600dpi. Disregard the resolution option setting.
PageMaker Jobs arrive to the CSX2000 Color Server with a full path name as the job's title.
All operating systems enable the selection of transparency with custom paper size, although the printer can only print transparencies in A4 and Letter sizes.
All operating systems enable the selection of the custom paper size and tray 1 or 2, although the printer can only print custom paper sizes from tray 3 or 4.
Custom page sizes cannot be defined in PageMaker for the Macintosh operating system. The value defaults back to Letter size. If the image is larger than Letter, it will be cropped.
There are no error messages from the PPD when selecting the HCSS and Printer Default (Face Up) in PageMaker. Face down must be selected .
For PageMaker files with the Landscape orientation and Duplex Mode properties, Head to Head prints as Head to Toe, and Head to Toe, prints as Head to Head.
In PageMaker 6.5, there is no constrain from PPD referring to "Face Down" and "collation=Yes" when choosing the stapler option.
25

Adobe Acrobat In order to print (PS files) from Adobe Acrobat 5.0 to Spire for CSX2000 do not select the Optimize to Speed option in Adobe Acrobat 5.0.
Adobe Acrobat converts any Landscape file it prints to Portrait (that is, rotates the file's pages 90 degrees). If the file's orientation needs to be preserved, the file should be printed from the original application in which the file was created (e.g. QuarkXPress).
When using imposition with a landscape PDF file, the job's images are printed cropped, although the dynamic imposition view in the job ticket shows a legal layout. To obtain the desired output, import the PDF file to the Storage Folder and preview it. In Adobe Acrobat rotate the job pages (Click the Document menu and select Rotate Pages) by 90 degrees and save the file. Submit the file to the Process queue again to print correctly.
For PS files from Adobe Acrobat (PC version) in Duplex Mode, Head to Head prints as Head to Toe.
For Adobe Acrobat files in Landscape orientation in Duplex Mode, Head to Head prints as Head to Toe.
Adobe PDF version 1.4 is not supported in this version.
Illustrator v9.x and 10.x Illustrator application functionality, such as transparent color, which is enabled though CPSI 3015 is not supported.
26

Adobe PS Known Limitations The following applications do not support all Adobe PS features. Usually the application simply ignores the feature, but in rare cases, a printing error may occur.
Application
Driver Feature
Acrobat 4.0 Rotated Landscape, Mirror Image, Negative Image
CorelDraw 9.0 Scaling, Mirror Image, Negative Image
Frame Maker 5.5 Rotated Landscape
Freehand 8.0 N-up, Scaling, Landscape, Rotated Landscape, Mirror Image, Negative Image, Watermark, OpenType
Illustrator 8.0 Watermark, Euro
InDesign 1.0 Scaling, OpenType
PageMaker 6.5 N-up, Scaling, Rotated Landscape, Mirror Image, Negative Image, Watermark, Euro
Photoshop 5.5 Watermark, Euro
QuarkXPress 3.32, 4.0
N-Up, Rotated Landscape, Mirror Image, Watermark, Euro, OpenType
WordPerfect 9.0 Rotated Landscape
Workaround: Do not use these Adobe PS features when printing from the above applications. Newer versions of these applications may resolve these incompatibilities.
27