creating cool mindstorms nxt robots -...
TRANSCRIPT

Daniele Benedettelli
Creating CoolMINDSTORMS®
NXT Robots

Creating Cool MINDSTORMS® NXT Robots
Copyright © 2008 by Daniele Benedettelli
All rights reserved. No part of this work may be reproduced or transmitted in any form or by any means,electronic or mechanical, including photocopying, recording, or by any information storage or retrievalsystem, without the prior written permission of the copyright owner and the publisher.
ISBN-13 (pbk): 978-1-59059-966-2
ISBN-10 (pbk): 1-59059-966-7
ISBN-13 (electronic): 978-1-4302-0599-9
ISBN-10 (electronic): 1-4302-0599-7
Printed and bound in the United States of America 9 8 7 6 5 4 3 2 1
Trademarked names may appear in this book. Rather than use a trademark symbol with every occurrenceof a trademarked name, we use the names only in an editorial fashion and to the benefit of the trademarkowner, with no intention of infringement of the trademark.
Lead Editor: Jeffrey PepperTechnical Reviewer: Claude BaumannDevelopmental Editor: John R. VaccaEditorial Board: Clay Andres, Steve Anglin, Ewan Buckingham, Tony Campbell, Gary Cornell,
Jonathan Gennick, Matthew Moodie, Joseph Ottinger, Jeffrey Pepper, Frank Pohlmann, BenRenow-Clarke, Dominic Shakeshaft, Matt Wade, Tom Welsh
Project Manager: Beth ChristmasCopy Editor: Susannah Davidson PfalzerAssociate Production Director: Kari Brooks-CoponyProduction Editor: Kelly WinquistCompositor: Kinetic Publishing Services, LLCProofreader: April EddyIndexer: Becky HornyakArtists: April Milne, Dina QuanCover Designer: Kurt KramesManufacturing Director: Tom DebolskiDistributed to the book trade worldwide by Springer-Verlag New York, Inc., 233 Spring Street, 6th Floor,New York, NY 10013. Phone 1-800-SPRINGER, fax 201-348-4505, e-mail [email protected], orvisit http://www.springeronline.com.
For information on translations, please contact Apress directly at 2855 Telegraph Avenue, Suite 600, Berkeley,CA 94705. Phone 510-549-5930, fax 510-549-5939, e-mail [email protected], or visit http://www.apress.com.
Apress and friends of ED books may be purchased in bulk for academic, corporate, or promotional use.eBook versions and licenses are also available for most titles. For more information, reference our SpecialBulk Sales–eBook Licensing web page at http://www.apress.com/info/bulksales.
The information in this book is distributed on an “as is” basis, without warranty. Although every precautionhas been taken in the preparation of this work, neither the author(s) nor Apress shall have any liability toany person or entity with respect to any loss or damage caused or alleged to be caused directly or indirectlyby the information contained in this work.
The source code for this book is available to readers at http://www.apress.com. You will need to answerquestions pertaining to this book in order to successfully download the code.

To my brother Alessandro
Contents at a Glance
About the Author . . . . . . . . . . . . . . . . . . . . . . . . . . . . . . . . . . . . . . . . . . . . . . . . . . . . . . . . . . . . . . . . . . xi
About the Technical Reviewer . . . . . . . . . . . . . . . . . . . . . . . . . . . . . . . . . . . . . . . . . . . . . . . . . . . . . . xiii
Acknowledgments . . . . . . . . . . . . . . . . . . . . . . . . . . . . . . . . . . . . . . . . . . . . . . . . . . . . . . . . . . . . . . . . xv
Introduction . . . . . . . . . . . . . . . . . . . . . . . . . . . . . . . . . . . . . . . . . . . . . . . . . . . . . . . . . . . . . . . . . . . . xxvii
PART 1■ ■ ■ Look, Mom! No Wheels!■CHAPTER 1 Building Biped Robots . . . . . . . . . . . . . . . . . . . . . . . . . . . . . . . . . . . . . . . . . . 3
■CHAPTER 2 Quasimodo . . . . . . . . . . . . . . . . . . . . . . . . . . . . . . . . . . . . . . . . . . . . . . . . . . . . 11
■CHAPTER 3 Finite State Machines. . . . . . . . . . . . . . . . . . . . . . . . . . . . . . . . . . . . . . . . . . 47
■CHAPTER 4 NXT AT-ST . . . . . . . . . . . . . . . . . . . . . . . . . . . . . . . . . . . . . . . . . . . . . . . . . . . . . 59
■CHAPTER 5 Omni-Biped . . . . . . . . . . . . . . . . . . . . . . . . . . . . . . . . . . . . . . . . . . . . . . . . . . 143
■CHAPTER 6 NXT Turtle . . . . . . . . . . . . . . . . . . . . . . . . . . . . . . . . . . . . . . . . . . . . . . . . . . . . 203
PART 2■ ■ ■ Back on Wheels■CHAPTER 7 Mine Sweeper . . . . . . . . . . . . . . . . . . . . . . . . . . . . . . . . . . . . . . . . . . . . . . . . 281
■CHAPTER 8 JohnNXT Is Alive! . . . . . . . . . . . . . . . . . . . . . . . . . . . . . . . . . . . . . . . . . . . . . 347
■CHAPTER 9 Need Input! Building a Remote Control Device . . . . . . . . . . . . . . . . . 517
■APPENDIX Introduction to BricxCC and NXC Programming . . . . . . . . . . . . . . . . 567
■INDEX . . . . . . . . . . . . . . . . . . . . . . . . . . . . . . . . . . . . . . . . . . . . . . . . . . . . . . . . . . . . . . . . . . . . . . . 579
v

Contents
About the Author . . . . . . . . . . . . . . . . . . . . . . . . . . . . . . . . . . . . . . . . . . . . . . . . . . . . . . . . . . . . . . . . . . xi
About the Technical Reviewer . . . . . . . . . . . . . . . . . . . . . . . . . . . . . . . . . . . . . . . . . . . . . . . . . . . . . . xiii
Acknowledgments . . . . . . . . . . . . . . . . . . . . . . . . . . . . . . . . . . . . . . . . . . . . . . . . . . . . . . . . . . . . . . . . xv
Introduction . . . . . . . . . . . . . . . . . . . . . . . . . . . . . . . . . . . . . . . . . . . . . . . . . . . . . . . . . . . . . . . . . . . . xxvii
PART 1■ ■ ■ Look, Mom! No Wheels!
■CHAPTER 1 Building Biped Robots . . . . . . . . . . . . . . . . . . . . . . . . . . . . . . . . . . . . . . . 3
LEGO Bipedal Walking: The State of the Art . . . . . . . . . . . . . . . . . . . . . . . . . . 3
Interlacing Legs Bipeds . . . . . . . . . . . . . . . . . . . . . . . . . . . . . . . . . . . . . . . . . . . 3
Jerky COG Shifting Bipeds . . . . . . . . . . . . . . . . . . . . . . . . . . . . . . . . . . . . . . . . . 5
Smooth COG Shifting Bipeds . . . . . . . . . . . . . . . . . . . . . . . . . . . . . . . . . . . . . . . 9
Summary . . . . . . . . . . . . . . . . . . . . . . . . . . . . . . . . . . . . . . . . . . . . . . . . . . . . . . 10
■CHAPTER 2 Quasimodo . . . . . . . . . . . . . . . . . . . . . . . . . . . . . . . . . . . . . . . . . . . . . . . . . . 11
Applying What You Learned . . . . . . . . . . . . . . . . . . . . . . . . . . . . . . . . . . . . . . 12
Introducing NXT Technology . . . . . . . . . . . . . . . . . . . . . . . . . . . . . . . . . . . . . . 15
Meeting the NXT-G Software . . . . . . . . . . . . . . . . . . . . . . . . . . . . . . . . . . . . . . 17
Connecting the NXT for the First Time . . . . . . . . . . . . . . . . . . . . . . . . . 17
Programming Quasimodo Using NXT-G . . . . . . . . . . . . . . . . . . . . . . . . 20
The Shortest Program in the Book . . . . . . . . . . . . . . . . . . . . . . . . . . . . . . . . . 22
Building Your Belfry Hunchback . . . . . . . . . . . . . . . . . . . . . . . . . . . . . . . . . . . 25
Summary . . . . . . . . . . . . . . . . . . . . . . . . . . . . . . . . . . . . . . . . . . . . . . . . . . . . . . 45
■CHAPTER 3 Finite State Machines. . . . . . . . . . . . . . . . . . . . . . . . . . . . . . . . . . . . . . . 47
Finite State Machines in Brief . . . . . . . . . . . . . . . . . . . . . . . . . . . . . . . . . . . . . 47
Saturating Counter . . . . . . . . . . . . . . . . . . . . . . . . . . . . . . . . . . . . . . . . . . . . . . 49
FSM General Implementation . . . . . . . . . . . . . . . . . . . . . . . . . . . . . . . . . . . . . 55
Decision Tables . . . . . . . . . . . . . . . . . . . . . . . . . . . . . . . . . . . . . . . . . . . . . . . . . 56
Summary . . . . . . . . . . . . . . . . . . . . . . . . . . . . . . . . . . . . . . . . . . . . . . . . . . . . . . 58
viivii
■CHAPTER 4 NXT AT-ST . . . . . . . . . . . . . . . . . . . . . . . . . . . . . . . . . . . . . . . . . . . . . . . . . . . 59
Design Thoughts . . . . . . . . . . . . . . . . . . . . . . . . . . . . . . . . . . . . . . . . . . . . . . . . 60
Programming the AT-ST . . . . . . . . . . . . . . . . . . . . . . . . . . . . . . . . . . . . . . . . . . 62
Building Your Personal AT-ST . . . . . . . . . . . . . . . . . . . . . . . . . . . . . . . . . . . . . 71
Summary . . . . . . . . . . . . . . . . . . . . . . . . . . . . . . . . . . . . . . . . . . . . . . . . . . . . . 141
■CHAPTER 5 Omni-Biped . . . . . . . . . . . . . . . . . . . . . . . . . . . . . . . . . . . . . . . . . . . . . . . . . 143
History of a Biped . . . . . . . . . . . . . . . . . . . . . . . . . . . . . . . . . . . . . . . . . . . . . . 144
Single-Tasking vs. Multitasking . . . . . . . . . . . . . . . . . . . . . . . . . . . . . . . . . . 145
Writing a Single-Task Program . . . . . . . . . . . . . . . . . . . . . . . . . . . . . . . . . . . 149
Using Hysteresis . . . . . . . . . . . . . . . . . . . . . . . . . . . . . . . . . . . . . . . . . . . . . . . 154
Writing a Multitask Program . . . . . . . . . . . . . . . . . . . . . . . . . . . . . . . . . . . . . 158
Building Instructions . . . . . . . . . . . . . . . . . . . . . . . . . . . . . . . . . . . . . . . . . . . . 163
Summary . . . . . . . . . . . . . . . . . . . . . . . . . . . . . . . . . . . . . . . . . . . . . . . . . . . . . 201
■CHAPTER 6 NXT Turtle . . . . . . . . . . . . . . . . . . . . . . . . . . . . . . . . . . . . . . . . . . . . . . . . . . 203
Quadruped Walking . . . . . . . . . . . . . . . . . . . . . . . . . . . . . . . . . . . . . . . . . . . . 204
Introducing the Turtle . . . . . . . . . . . . . . . . . . . . . . . . . . . . . . . . . . . . . . . . . . . 206
Programming the Turtle . . . . . . . . . . . . . . . . . . . . . . . . . . . . . . . . . . . . . . . . . 207
Simple Program . . . . . . . . . . . . . . . . . . . . . . . . . . . . . . . . . . . . . . . . . . . 207
Line Following . . . . . . . . . . . . . . . . . . . . . . . . . . . . . . . . . . . . . . . . . . . . 214
Autonomous Behavior Simulation . . . . . . . . . . . . . . . . . . . . . . . . . . . . 217
Building Your Pet . . . . . . . . . . . . . . . . . . . . . . . . . . . . . . . . . . . . . . . . . . . . . . . 233
Design Thoughts . . . . . . . . . . . . . . . . . . . . . . . . . . . . . . . . . . . . . . . . . . . . . . . 277
Summary . . . . . . . . . . . . . . . . . . . . . . . . . . . . . . . . . . . . . . . . . . . . . . . . . . . . . 278
PART 2■ ■ ■ Back on Wheels
■CHAPTER 7 Mine Sweeper . . . . . . . . . . . . . . . . . . . . . . . . . . . . . . . . . . . . . . . . . . . . . . 281
Getting More Actions from a Single Motor . . . . . . . . . . . . . . . . . . . . . . . . . 282
The Double Scanner . . . . . . . . . . . . . . . . . . . . . . . . . . . . . . . . . . . . . . . . . . . . 286
Programming the Mine Sweeper . . . . . . . . . . . . . . . . . . . . . . . . . . . . . . . . . 286
Building the Mine Sweeper . . . . . . . . . . . . . . . . . . . . . . . . . . . . . . . . . . . . . . 299
Mines Building Instructions . . . . . . . . . . . . . . . . . . . . . . . . . . . . . . . . . . . . . . 341
Summary . . . . . . . . . . . . . . . . . . . . . . . . . . . . . . . . . . . . . . . . . . . . . . . . . . . . . 344
■CONTENTSviii

■CHAPTER 8 JohnNXT Is Alive! . . . . . . . . . . . . . . . . . . . . . . . . . . . . . . . . . . . . . . . . . . 347
Johnnicle: My LEGO Johnny 5 Chronicle . . . . . . . . . . . . . . . . . . . . . . . . . . . 347
JohnNXT Features . . . . . . . . . . . . . . . . . . . . . . . . . . . . . . . . . . . . . . . . . . . . . . 354
Sensors and Actuators . . . . . . . . . . . . . . . . . . . . . . . . . . . . . . . . . . . . . 354
JohnNXT’s Behavior and Menu . . . . . . . . . . . . . . . . . . . . . . . . . . . . . . 356
JohnNXT User Guide . . . . . . . . . . . . . . . . . . . . . . . . . . . . . . . . . . . . . . . . . . . . 357
Turning It On . . . . . . . . . . . . . . . . . . . . . . . . . . . . . . . . . . . . . . . . . . . . . 357
Autonomous Behavior . . . . . . . . . . . . . . . . . . . . . . . . . . . . . . . . . . . . . . 358
JohnNXT’s Menu . . . . . . . . . . . . . . . . . . . . . . . . . . . . . . . . . . . . . . . . . . 358
Programming JohnNXT . . . . . . . . . . . . . . . . . . . . . . . . . . . . . . . . . . . . . . . . . 360
Panoramic View of the JohnNXT Software . . . . . . . . . . . . . . . . . . . . 360
High Speed Communication Library . . . . . . . . . . . . . . . . . . . . . . . . . . 361
Slave Program . . . . . . . . . . . . . . . . . . . . . . . . . . . . . . . . . . . . . . . . . . . . 362
Master Program . . . . . . . . . . . . . . . . . . . . . . . . . . . . . . . . . . . . . . . . . . . 366
Sound Counting FSM. . . . . . . . . . . . . . . . . . . . . . . . . . . . . . . . . . . . . . . 370
JohnNXT Programming Guide . . . . . . . . . . . . . . . . . . . . . . . . . . . . . . . . . . . . 374
Moving the Treads . . . . . . . . . . . . . . . . . . . . . . . . . . . . . . . . . . . . . . . . . 376
Moving the Head . . . . . . . . . . . . . . . . . . . . . . . . . . . . . . . . . . . . . . . . . . 376
Playing Sounds. . . . . . . . . . . . . . . . . . . . . . . . . . . . . . . . . . . . . . . . . . . . 376
Moving the Slave NXT Motors . . . . . . . . . . . . . . . . . . . . . . . . . . . . . . . 377
Building JohnNXT . . . . . . . . . . . . . . . . . . . . . . . . . . . . . . . . . . . . . . . . . . . . . . 378
Summary . . . . . . . . . . . . . . . . . . . . . . . . . . . . . . . . . . . . . . . . . . . . . . . . . . . . . 516
■CHAPTER 9 Need Input! Building a Remote Control Device . . . . . . . . . . 517
The Remote Control Design . . . . . . . . . . . . . . . . . . . . . . . . . . . . . . . . . . . . . . 517
Bluetooth Autoconnection Library. . . . . . . . . . . . . . . . . . . . . . . . . . . . . . . . . 518
R/C: A Program for Every Need . . . . . . . . . . . . . . . . . . . . . . . . . . . . . . . . . . . 520
Simple R/C Programs . . . . . . . . . . . . . . . . . . . . . . . . . . . . . . . . . . . . . . 520
Advanced Program . . . . . . . . . . . . . . . . . . . . . . . . . . . . . . . . . . . . . . . . 534
Remote Control Template Programs. . . . . . . . . . . . . . . . . . . . . . . . . . . . . . . 542
Sender Program Template . . . . . . . . . . . . . . . . . . . . . . . . . . . . . . . . . . 543
Receiver Program Template . . . . . . . . . . . . . . . . . . . . . . . . . . . . . . . . . 544
Building the Remote Control . . . . . . . . . . . . . . . . . . . . . . . . . . . . . . . . . . . . . 552
Summary . . . . . . . . . . . . . . . . . . . . . . . . . . . . . . . . . . . . . . . . . . . . . . . . . . . . . 565
■CONTENTS ix

■APPENDIX Introduction to BricxCC and NXC Programming . . . . . . . . . 567
Getting Connected with BricxCC . . . . . . . . . . . . . . . . . . . . . . . . . . . . . . . . . . 568
Ready to Go . . . . . . . . . . . . . . . . . . . . . . . . . . . . . . . . . . . . . . . . . . . . . . . . . . . 574
BricxCC Menu. . . . . . . . . . . . . . . . . . . . . . . . . . . . . . . . . . . . . . . . . . . . . . . . . . 575
BricxCC Tools . . . . . . . . . . . . . . . . . . . . . . . . . . . . . . . . . . . . . . . . . . . . . . . . . . 576
Summary . . . . . . . . . . . . . . . . . . . . . . . . . . . . . . . . . . . . . . . . . . . . . . . . . . . . . 577
■INDEX . . . . . . . . . . . . . . . . . . . . . . . . . . . . . . . . . . . . . . . . . . . . . . . . . . . . . . . . . . . . . . . . . . . . . . . 579
■CONTENTSx

About the Author
■DANIELE BENEDETTELLI appeared in this world on December 2, AD 1984in Grosseto, the capital city of the beautiful Maremma Toscana. Whileattending high school, apart from his compulsory studies, his main pas-sion was writing music and playing the piano, a passion to which hedevoted his childhood. When he was not playing the piano, you couldfind him playing with LEGOs.
This last passion took a backseat during his “dark age of LEGO,” whenreal-life interests got the better of building plastic creations. In 2000,Daniele scraped enough savings together to get the LEGO MINDSTORMSRobotics Invention System, and from that moment on, a new way of relat-
ing to LEGO began: his adult career in the LEGO community started! In 2006, he got a Bachelor ofScience degree cum laude in Computer Engineering (Automation concentration) from the Univer-sity of Siena with a thesis whose approximately translated title is “LEGO MINDSTORMS–basedmobile robots team.” A toy—a destiny, we could say. Now he’s studying for a Master of Sciencedegree in Robotics and Automation at the University of Siena.
In 2006, he was selected by The LEGO Group as member of the MINDSTORMS DeveloperProgram (MDP), and in 2007 as one of MINDSTORMS Community Partners (MCP).
2007 was a turning point for Daniele. He gave birth to a LEGO NXT robot that can solveautomatically any 3 × 3 Rubik’s Cube in less than a minute. This robot is the mechanical partof the project called the LEGO Rubik Utopy. The world has gone crazy over this wonderfulcontraption. His activity with LEGO on the NXT line is continuing now with the group calledthe MINDSTORMS Community Partners 2.0.
xi

About the Technical Reviewer
Since 1999, CLAUDE BAUMANN has taught advanced LEGO MINDSTORMSrobotics in after-school classes and maintains the related widely knownweb site http://www.convict.lu/Jeunes/RoboticsIntro.htm. He partici-pated in beta testing of the ROBOLAB software that originated at TuftsUniversity. He also has been in charge—in collaboration with ProfessorChris Rogers— of the creation of ULTIMATE ROBOLAB, a cross-compilerenvironment that allows graphical programming of RCX firmware, and ofa unique RCX self-replicating program (also called a “virus”). Claude hasbeen the assessor of various high-school robot projects (among which is
the famous LEGO humanoid robot GASTON). He is the author and coauthor of several relatedarticles and conference presentations, and he was the technical reviewer of Extreme NXT:Extending the LEGO MINDSTORMS NXT to the Next Level by Michael Gasperi et al. (Apress,2007). In 2004 and 2005, he was guest speaker at the annual ROBOLAB Conference in Austin,Texas. He’s married and has three children, is the director of a boarding institution in Luxem-bourg, and is the radio amateur LX1BW.
xiii

Acknowledgments
I always find reading a book’s Acknowledgments section interesting: it is a sort of back stage,where you can get an idea of the work hidden behind these pages.
As is customary, let me first thank all my family. In particular, a thanks goes to my fatherfor the support and inspiration through the development process of the robotic creations inthis book. Also, the one-way chats with my mother led me to think aloud and solve manytricky building and programming issues: thanks to her for listening to my incomprehensibleponderings! Thanks to my brother Alessandro, talented guitarist, who spurred me on withsuggestions such as “Go and do something serious, instead of playing!” However, this Englishtranslation is just a pale rendering of the Italian “Ma vai a lavoro!”
Now, I have to thank and acknowledge a lot of people who helped me, more or less directly,during the creation of this book. Forgive me if one name happens to appear before another.Keeping the list in chronological order is as good a rule as another.
I wish to thank Mario Ferrari, major author of well-known LEGO books, who guided myfirst steps in the LEGO community, since the LEGO Fest where I met him and the members ofITLUG, the Italian LEGO Users Group.
I wish to acknowledge the great work of John Hansen, programmer and MDP/MCP fellow.He is the creator of Not eXactly C (NXC), the powerful textual programming language for the NXTthat has been used for the robots of this book. Also, he wrote a number of utilities to interface theLEGO bricks to the computer. One above all, Bricx Command Center (BricxCC), is the environ-ment you’ll use to program your robots in NXC. Thanks, John. You gave me the words to instructmy robots!
In this book, you’ll enjoy hundreds of detailed building instruction step images, the resultof many, many hours of hard work that’s not only mine. In fact, the LDRAW system, whichI used to draw the 3D CAD models of my robots, is powered by many people who made up theLEGO elements’ virtual counterparts. A huge thanks go to all the authors of the parts and of thesoftware: talented people who built up the LDRAW system as we know it today. In particular,I wish to thank the ones who designed the NXT parts you’ll see in the following pages: SteveBliss, Matthias Paul Scholz, and Marc Klein. I myself contributed a little bit, making an earlyversion of the Ultrasonic Sensor front shell.
Philippe Hurbain and Kevin Clague are among those parts’ authors, and deserve specialthanks. Philippe Hurbain (Philo) is another MDP member and Apress author, who took price-less time to design great-looking CAD versions of most parts of the NXT system. Above all, hismasterpieces are the NXT brick, the Sound Sensor, the servomotors, and the BIONICLE clawweapon.
Kevin Clague—MDP member, book author, and creator of many inspiring LEGO bipeds—wrote some really useful programs that I used to assemble the layouts for the building instructions:LEGO Publisher (LPUB) and LEGO Synth, a LEGO bendable parts synthesizer, used to draw theflexible cables. He helped me in learning LPUB, during a period of testing and debugging ofthe software. Kevin, thank you for your great patience!
xv

Speaking of patience, another person I really want to thank is Claude Baumann, the tech-nical reviewer of this book. My gratitude goes to him for many reasons. First, he believed in myRubik Solver robot, and invited me, in Luxembourg, to The Science Circus. There I had occa-sion to see his skill for instruction and passion for teaching. I am glad he accepted the positionof my technical reviewer. Apart from the mere technical reviewing of the programs and robotsin this book, I wish to thank him for having tried to teach me how to teach. I say “tried” becauseI was not the ideal pupil! Anyway, your words of advice are precious. Thank you.
Thanks also to the Apress staff, whose names were reported a few pages ago. In particular,thanks to editor Gary Cornell: my brief e-mail was enough for him and his staff to believe in thisbook that did not exist at that time, except in my head. So, Apress, thanks for having believed inthe robots shown on my web page and the material for a book! Thanks to Jeffrey Pepper, leadeditor. Thanks to Beth Christmas, my kind project manager, who kept order in my (sometimes)messy material submissions, and John Vacca for his work in getting the “English” into English.On the writing side, thanks to Susannah Davidson Pfalzer, copy editor, who made my style fluentand grammar-examination–proof!
The photos of JohnNXT and the NXT AT-ST robots on the book cover are by BenjaminMaier, professional photographer and friend of mine. I hope he enjoyed spending his timefinding my robots’ best side and lighting direction. Anyway, I won’t steal his time again, so hecan direct another feature film—then I’ll have the occasion to compose another soundtrack.Thanks, Ben!
I conclude with a little note of regret, while I thank Narendra Sakharam Gaonkar, mynative-English-speaking friend and linguistic consultant. Narendra, if only one of the epic andfar-reaching alternative titles we conceived for this book had been accepted!
■■ACKNOWLEDGMENTSxvi
Introduction
You are a LEGO MINDSTORMS NXT owner, aren’t you?If you have this book in your hands, maybe you’ve already tried (and maybe exhausted)
the possibilities offered by the NXT retail set, and the building and programming guides. Ifnot, I recommend that you use those official LEGO guides to start. So, you should have at leasta basic idea of what a robot is—otherwise I suspect that you would not even have thought aboutreading this book!
I began to think of this book as a way to introduce LEGO users to some advanced topics ofrobotic programming, always keeping it simple, without scaring anyone. In the few theoreticaldiscussions you’ll find, you won’t have time to get bored: all the theory is explained in order tounderstand the practice better.
This book is divided into two parts. With the first, I want to break away from the sameboring wheeled robots—there are too many of them around. We’re used to vehicles; we wantto move on legs! So, this part is devoted to walking robots—bipeds in particular. In Chapter 1,I tried to summarize the state of the art for LEGO bipedal walkers. Subsequent Chapters 2, 4,and 5 present three biped robots in order of complexity. Chapter 3 is the only real theoreticalchapter, where you learn the finite state machine software technique to give your robot person-ality and autonomous behaviors. In Chapter 6, the NXT Turtle is described. This is a quadrupedrobot, featuring a funny autonomous behavior.
The second part is about wheeled robots. I could not write a book without them. That’s alsobecause, apart from the Mine Sweeper (an object-collecting vehicle), the other wheeled robot isthe great JohnNXT: a replica of Johnny 5, robot star from the Short Circuit 1980s movies. I haven’tcounted the number of people who directly contacted me to ask for JohnNXT instructions, butthey are in the hundreds. So, JohnNXT could not be missing from this book.
Except for Chapters 1 and 3, the other chapters containing a robot are organized as fol-lows. At the beginning, the robot is introduced and its capabilities are described. Then, theNot eXactly C (NXC) programs to implement those capabilities are reported and describedin detail. Various arguments are deepened, taking advantage of the occasion to discuss pro-gramming techniques that arise over and over. The building section is at the end of thechapter. This placement avoids chopping the reading flow in two. The building instructionsare introduced first with a detailed bill of materials; then, each step is commented to helpwith the building. At the end of some chapters, you might find a few exercises, meant to beinspirational cues.
xvii

■INTRODUCTIONxviii
Who Is This Book For?Mainly, this is a book that should entertain everyone. If the reading will add something to yourknowledge, so much the better! So, this book is for the following:
• Those from 6 to 106 years old, wishing to build cool LEGO robots to have fun, withoutbeing expert programmers.
• Those who want to build a Johnny 5 replica (more than you might think!).
• Those who need inspiration for their own new creations.
• Those who are tired of exploring the equivalent area of hundreds of computer screensoccupied by the graphical NXT-G block programs, who want to change radically theway to program the NXT.
• Those wishing to learn a textual C-like programming language without getting frus-trated by complicated useless programs for novices, or bored by abstract exercises.Every program in this book produces visible results.
• Those wishing to learn new programming techniques.
Children, remind your parents that LEGO MINDSTORMS is not their exclusive toy. Askthem for help if you want—you’ll have a great time! Parents and grandparents, you can usethis book as an excuse to start playing seriously with LEGO robots, while spending time withyour kids and grandkids. But let go of that NXT brick—let ’em play too!
What You Need to Use This BookYou can build all the robots using the parts from a single LEGO MINDSTORMS NXT retail set(code number 8527), except the last big one, JohnNXT, and the remote control. So you canenjoy the building and relax—you won’t find out that you’re missing a needed part whenyou’re a step from the end! If you plan to build and control JohnNXT remotely, I suggest youfind all the parts first: you need three NXT sets, and many other extra parts, all listed in theappropriate bills of materials in Chapters 8 and 9.
Then you need a computer to write and send the programs to your NXT robots. The soft-ware I used runs on Windows. Mac and Linux releases of the NXC compiler exist, but you’llhave to find an alternative Integrated Development Environment (IDE) for the handy BricxCommand Center (BricxCC).
To enjoy this book, you do not have to be a programmer, although it can help you learnthe basics to become a programmer. You can also follow the building instructions and thendownload the programs provided to your robots, without having to write a single line of code.
About the software: you should already have the NXT-G program provided by LEGO inyour retail set. The other software is the BricxCC IDE and the NXC compiler, both download-able from http://bricxcc.sourceforge.net/ and http://bricxcc.sourceforge.net/nbc/.
When facing a new programming topic, I recommed that you keep an eye on the com-plete Not eXactly C (NXC) Programmer’s Guide by John Hansen, which you can download from

■INTRODUCTION xix
http://bricxcc.sourceforge.net/nbc/nxcdoc/NXC_Guide.pdf. To get an idea of what the NXClanguage looks like, you can also read the tutorial I wrote, Programming LEGO NXT Robotsusing NXC. This paper is available for free at http://bricxcc.sourceforge.net/nbc/nxcdoc/NXC_tutorial.pdf.
Source Code and Extras for This BookYou can download the complete source code for the programs from the Source Code/Downloadarea on the Apress web site, at http://www.apress.com. Also, you can visit the web sitehttp://robotics.benedettelli.com.

Look, Mom! No Wheels!
After building your first wheeled robots, you can feel bored. Okay, they’re built for preci-
sion, you can make them go exactly where you want, at the speed you want . . . but they
still use wheels! LEGO itself, planning a new MINDSTORMS line, never thought about
a wheeled robot becoming its logo and NXT mascot—months before the product release,
the figure of Alpha Rex filled every advertising space. In this first section of the book, you’ll
discover how to leave the wheels behind and get moving on legs.
P A R T 1
■ ■ ■

Building Biped Robots
I can imagine your impatience—the urge to skip this introduction chapter altogether, and godirectly to building the robots that are shown in the next chapters of this part, which areentirely devoted to walker robots. However, you would entirely miss the essentials necessaryto understand why the walkers presented in this book actually work; you would miss findingout how to let your robots leave the wheels behind them and get on their own two feet.
This chapter will present the state of the art in LEGO walking biped robots. I’ll introducesome basic notions of that branch of physics called statics (balancing forces) to help youdevelop steady biped robots that do not need to use any advanced sensor to balance, such asaccelerometers, tilt sensors, or gyroscopes. The stability of those robots is guaranteed only bythe hardware configuration.
LEGO Bipedal Walking: The State of the ArtIt has been almost ten years since LEGO MINDSTORMS users like you developed variousbipedal walking techniques. The numerous biped robots, created fairly successfully duringthose years, can be categorized as follows:
• Interlacing legs bipeds
• Jerky center of gravity (COG from now on) shifting bipeds
• Smooth COG shifting bipeds
I’ll describe these categories in detail, focusing on their level of complexity and the mechan-ical solutions used, with the help of some visual examples. In the next chapters you’ll find thepractical examples of this categorization: Quasimodo (Chapter 2) is an interlacing legs biped,Star Wars AT-ST chicken walker (Chapter 4) is a jerky COG shifting biped, while the Omni-Biped(Chapter 5) is a smooth COG shifting biped.
Interlacing Legs BipedsRobots that fall in the category of interlacing legs bipeds generally use the simplest walkingtechnique. In other words, you must figure out what is the best way to put one foot in front ofanother. The solution is usually a cam shaft (see Figure 1-4c, d, and f). With the parts providedin the NXT retail set, you can easily build a cam shaft using the holes in the 24-tooth or the40-tooth gear (see Omni-Biped’s legs in Chapter 5). You must attach the legs to an off-center
3
C H A P T E R 1
■ ■ ■

hole to achieve what’s called eccentric motion. As an alternative, you can use the black 3-longliftarms (as in Quasimodo, Chapter 2).
The particular shape of the feet stabilize a robot of this category (see Figure 1-1a)—feetinterlace each other (hence the name of this category). Usually, in this kind of robot, the cen-ter of gravity is not shifted from side to side. So, you must pay close attention to designing thestructure in such a way that the COG projection on the ground always falls inside the area thatsupports the feet, during each phase of walking. This condition must hold when the feet areon the ground together, but also when one of them is lifted from the ground.
Figure 1-1 shows the various walking phases. In a, both feet are on the ground; in b and c,the right foot begins to step forward and is lifted from the ground, leaving all the weight loadedon the left foot and reducing the support area to only the left foot; in d both feet are on theground again. Next, the process starts again with the left foot leaving the ground and steppingforward.
Figure 1-1. Interlacing legs biped footprints in the various phases of walking
The preceding approach suffers from the slackness of the LEGO joints: the legs tend tobend inside and the feet do not lift completely from the ground. To solve this problem, you canplace a wedge in the inner side of the feet as shown in Figure 1-2c, or you can provide your bipedwith a sort of “hip tendon” made with rubber bands or LEGO parts, as shown in Figure 1-2d.All bipeds in nature have similar muscles to keep their equilibrium, so that they can walk steadily.
CHAPTER 1 ■ BUILDING BIPED ROBOTS4

LEGO veteran users tend to be purists and quite conservative. They might consider it a sac-rilege to use non-LEGO parts in your robot building. If you are willing to use rubber bands, youshould use original LEGO rubber bands, although it is not the most elegant solution.
However, the best solution is to keep the whole leg frame short and rigid by using cross-bracing. The weaker parts of the leg are usually the moving joints, at the ankle and hip level.
Figure 1-2. Solving the problems related to LEGO joints’ flexible nature
All this might seem a bit abstract to you, but it will all come clear when you build yourown Quasimodo—a biped, and the subject of the next chapter. In Chapter 2, I’ll emphasize thedefects of this particular walking mechanism and will cover the remedies step by step.
Jerky COG Shifting BipedsIf you want to get really serious, or if your robot begins to get heavier, you should start thinkingabout COG shifting. As the term implies, the robot shifts its weight on the foot that remains onthe ground, and unloads the other foot that is in the flight phase.
The adjective “jerky” implies that shifting the COG and stepping forward occurs in dis-tinct stages. It also implies that it is done with different motors.
You can accomplish weight shifting while moving the whole mass (RCX or NXT, wheremost weight resides) from side to side, or by bending the legs at the ankle, knee, or hip level(see Figure 1-3).
CHAPTER 1 ■ BUILDING BIPED ROBOTS 5

Figure 1-3. Weight shifting methods
You can achieve stepping by rotating the legs or translating them, keeping them parallelto each other (see Figure 1-4a, b, and e). In these cases, if the feet are moved while they areboth touching the ground, the resulting effect is that the robot turns slightly in place. You’lluse this feature in the AT-ST biped to make it turn (see Chapter 4).
Figure 1-4 from c through f shows various stepping solutions. In these pictures, just oneleg is shown for clarity: you must attach the hidden one (grayed in c and d) on the other sideof the robot 180 degrees out of phase. For example, in Figure 1-4c and d, you should attach thelegs, on the opposite sides of the robot, at the leftmost position on the cam (the white circle),so that one leg is ahead of the other one. You must apply the same concept when attaching theother leg in elements e and f.
CHAPTER 1 ■ BUILDING BIPED ROBOTS6

Figure 1-4. Various stepping methods: a) this top view shows that the legs are translated, keepingthem parallel each other; b) another top view where the legs are rotated together; c) side viewshowing a cammed mechanism keeping the body horizontal; d) a similar side view showinga cammed mechanism with the body kept vertical; e) this side view shows another solution forstepping; f) this cammed mechanism works like the one in c but is better looking.
As shown in Figure 1-5, many of the bipeds I’ve built follow this line, such as the Matrix APU(February 2004), the OWL (May 2004), and the RCX-based AT-ST (December 2004). The new NXTAT-ST that you will find in Chapter 4 falls in this category. The dates in parentheses are the con-struction dates, showing the month in which these creations were published on the Web.
CHAPTER 1 ■ BUILDING BIPED ROBOTS 7
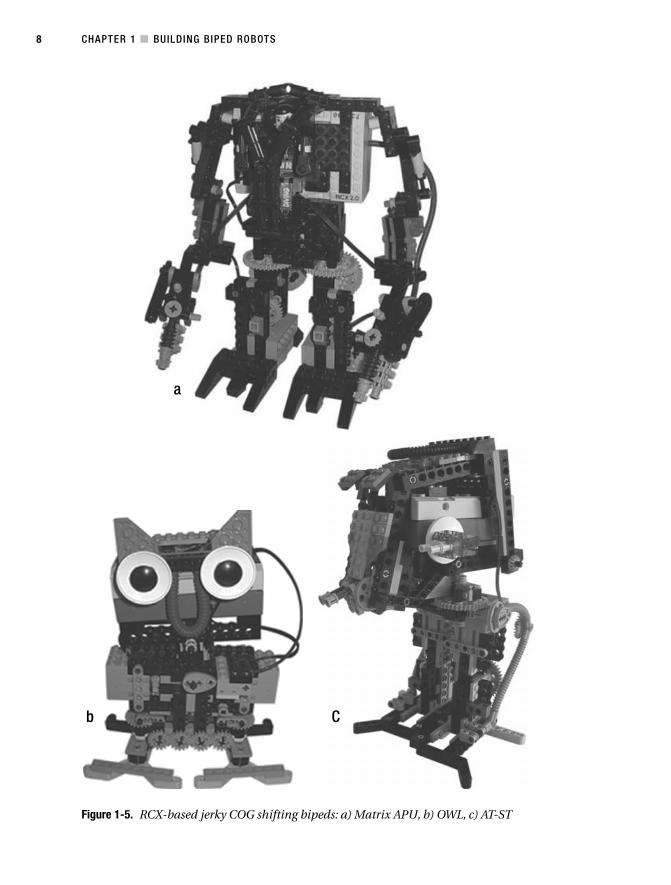
Figure 1-5. RCX-based jerky COG shifting bipeds: a) Matrix APU, b) OWL, c) AT-ST
a
b C
CHAPTER 1 ■ BUILDING BIPED ROBOTS8

Smooth COG Shifting BipedsI prefer smooth COG shifting bipeds due to their speed and smoothness—you probably will,too. They use a single motor to achieve both weight shifting and stepping; hence you needa refined mechanism.
In Figure 1-6, you can see the biped robot that I built in August 2004. This particular robotcould only walk straight using COG shifting, and was meant to be a prototype for futurebipeds that could also turn.
Figure 1-6. COG-shifting Biped I
My Advanced COG Biped (dated October 2004), shown in Figure 1-7, features a smoothwalking gait and can turn thanks to a motorized rotating ankle. The left foot includes a motorto allow it to turn, while the other foot is built of normal parts (in the Robotics Invention Systemkit, there were only two motors), trying to balance the other foot’s weight. On each foot, a touchsensor lets the robot know which foot is touching the ground.
The robot uses this sequence for turning: when the left foot is lifted from the ground, it isswung outside at a little angle; then the robot steps to load the weight on the foot, to bring itonto the ground. The ankle is then rotated back in its place and the whole robot turns left.
You can repeat this routine as many times as needed to turn in place, and you can modifyit slightly to turn in the other direction.
CHAPTER 1 ■ BUILDING BIPED ROBOTS 9

Figure 1-7. Advanced COG Biped
SummaryIn this introductory chapter, you saw various approaches to bipedal walking. You were shownsome startup ideas that might shed light on the mystery of how to develop a biped that notonly walks, but can also turn.
To make a biped that walks without resembling a drunken sailor (and that is not at risk offalling down with every step it takes), the clever designer should try to bind the COG projec-tion inside the area supporting the feet. You should do this during every phase of the walkingcycle, when both feet are touching the ground and when one of them is in flight phase, leavingthe other to support the whole robot’s weight. This condition is essential for creating a bipedwithout advanced sensors such as accelerometers or gyroscopes. Such a robot is a static one,because dynamic effects are not taken into account. Stability is guaranteed only by hardwarestructure, with no need of sensor feedback.
In the next chapters, you’ll create three bipeds using all these techniques.
CHAPTER 1 ■ BUILDING BIPED ROBOTS10

Quasimodo
The hunchbacked biped described in this chapter fits our educational purposes perfectly. Bybuilding it, you’ll get to see in practice all the theoretical tips, tricks, and rules explained inChapter 1 about the stability of biped robots.
I decided to call this biped Quasimodo (after the hunchback of Victor Hugo’s famous bookNotre-Dame de Paris), because of its particular shape and the funny way it walks. When youbuild it, you’ll see what I mean. You can get an idea of how Quasimodo looks in Figure 2-1.
I recommend that you read the following sections with a bookmark in Chapter 1, asyou’ll see that the practical examples of this chapter and the theory that lies behind them (inChapter 1) correspond.
Throughout this book, in chapters where a model is being built, the chapters will be organ-ized the same way. The first part of the chapter will discuss key features of the model, and itsoverall function; the second part will discuss the program that has been created to make themodel run; and the third part shows the building instructions, part by part, so that you cancreate the given model yourself.
Figure 2-1. The NXT biped of this chapter, Quasimodo 11
C H A P T E R 2
■ ■ ■

Applying What You Learned Quasi (to his friends) is an interlacing legs biped, the simplest approach you can adopt fora biped. When designing such a biped, you might start thinking about the leg shape and thecammed mechanism needed to step forward. You can choose two paths: should the cams bealigned in a horizontal or vertical position (as shown in Figure 1-4c and d, respectively)? Placingthe geartrain on a vertical beam yields a much higher and more unstable biped, because themotor and the NXT would be placed in a vertical position. It would be more difficult to designthe structure to have the NXT center of gravity (COG) inside the feet area. The COG itself wouldbe placed higher, so a slight oscillation due to leg joint flexibility would result in a large oscilla-tion at the top of the robot, causing the COG to go outside the feet area and the robot to fall.For these reasons, I chose to settle the motor, the geartrain beam, and the NXT horizontally.
After I had designed the legs and the motor placement, I didn’t know where to put theNXT brick itself. I ended up putting it on the robot’s back, just like a hump, and attaching it tothe legs so that it swings left and right as the legs move. This way I also achieved COG shifting(as explained in Chapter 1), with surprising ease. Often you have to think hard about a satis-factory solution, but in some rare cases, as here, things seem to work out by themselves.
Let me guide you through the design process that led to the final look of Quasi. This bipedis meant to be an educational model, to help me to emphasize the defects and problems youcould encounter while designing your first bipeds. The leg attachment to the cams is the weakpart of this interlacing legs biped, because the cam pins fit a bit loosely in the leg beam holes.As you’ll see, you can solve these problems to result in a biped that walks well.
■Caution When I talk about LEGO parts’ flexibility, I do not mean that LEGO beams actually bend. Do not tryto force LEGO parts, or you might risk breaking something! Here, I mean the looseness of the parts shown incertain assemblies, due to their construction tolerance and material. Examples of this slackness are the pins,which don’t fit tightly inside the beam holes, making the leg structure not perfectly rigid.
The feet are shaped as shown in Figure 1-1, to let the COG projection always fall inside thesupporting area of the feet. You attach the legs to the motor geartrain by a cammed shaft thatkeeps them 180 degrees out of phase; this simply means that when one leg is up, the other isdown; when one is forward, the other is back.
Unfortunately, as you might expect, such a structure is so loose that it risks falling apart.Figure 2-2 shows what I mean. As already explained in Chapter 1, the weaker points of sucha biped are the attachments at the hip and ankle levels.
CHAPTER 2 ■ QUASIMODO12

Figure 2-2. The biped from behind (with the NXT on top removed) shows the looseness of thestructure at hip level. The ankle is quite rigid instead.
It’s easy to run into similar problems when working with LEGO parts. Having such a loosestructure is a problem that can arise, but don’t worry. You can solve it as indicated in the schematicshown in Figure 1-2c, by adding the wedges in the inner side of the feet beams. The result of ourbiped is shown in Figure 2-3.
Figure 2-3. Putting wedges in the inner side of both feet compensates for the leg joints’ slackness.
CHAPTER 2 ■ QUASIMODO 13

Even after the wedge additions, the hip joint still tends to be quite loose (it’s made withlong gray pins, which connect the cam to the leg). To solve this tricky issue, I adopted the hiptendons shown in Figure 1-2d, a matter that could have been obscure to you just after readingChapter 1. Don’t worry though, it will become clear now.
Compare Figure 2-4 (before the treatment) with Figure 2-5 (after the treatment). Notice howthis elegant solution with the tendons made from LEGO steering links with ball joints, preventsthe legs from bending. This last idea of creating tendons is particularly good because it does twothings for the price of one: it solves the looseness problem and allows us to connect to the NXTbrick in an original way.
Figure 2-4. Tendons are not attached yet.
CHAPTER 2 ■ QUASIMODO14

Figure 2-5. Tendons are now attached.
Because the tendons are connected to the legs, they swing the NXT in harmony withQuasimodo’s gait, and the NXT seems as light as a butterfly. Don’t forget that our beloved pro-grammable brick acts as a hump here! I came up with this COG shifting mechanism almostwithout noticing it, and I must admit this combination of technique, inspiration, and luck israre. Such a mix makes this robot special. In its simple shape, it summarizes a lot of theoryabout an unusual way of walking. Ah, I almost forgot: Quasimodo can only walk straight. Tocreate a biped that turns, read the following chapters.
Introducing NXT TechnologyBefore going on, it’s worth introducing the LEGO MINDSTORMS NXT technology briefly. Inyour NXT retail set, you have LEGO parts, of course, but also some electronic devices that makethe NXT system special: three interactive servomotors, a Touch Sensor, a Light Sensor, an Ultra-sonic Sensor, and the NXT programmable brick itself. In addition, you have a user guide, andthe LEGO software CD-ROM, which allows you to program the NXT using the NXT-G graphicalprogramming language.
CHAPTER 2 ■ QUASIMODO 15
The LEGO elements are well assorted, so that you can start creating every kind of robot atonce, without having to look for additional spare parts. The set includes LEGO TECHNIC stud-less elements, except for a few parts. Unlike the common LEGO studded bricks, you do nothave to place one brick on another, like building a wall, but you have to start thinking morethree-dimensionally, attaching beams and liftarms using pins.
The NXT servomotors are different from the common LEGO motors. They are interactive,meaning that they include a Rotation Sensor (optical encoder) that allows you to control inter-actively the shaft position with 1 degree of resolution, and to set the rotation speed from–100 to 100. A whole shaft rotation is equal to 360 degrees.
The Touch Sensor gives your robots the sense of touch: it detects when it is pressed or released,returning a Boolean reading that can be 1 or 0. The Light Sensor can distinguish between lightand dark colors, measuring the amount of light reflected by the surface illuminated by its LED;it can also measure the light intensity in the environment with the LED off. The Sound Sensormakes your robot hear, measuring the sound intensity in decibels. Its readings go from 4 ina silent room to 100, corresponding to people shouting or loud music.
The Ultrasonic Sensor enables your robot to see obstacles, measure distances, and detectmovement. This digital sensor measures the distance from an object like a bat does, calculat-ing the time needed by an ultrasonic sound wave to hit the object and return. It can measuredistances from 0 to 255 centimeters, with an error of 5 3cm.
Finally, the brain of your robot is the NXT brick. It is a microcomputer, programmable witha PC, that lets your LEGO robots come alive, just like JohnNXT (see Chapter 8). You can connectthe NXT brick to your PC using a USB cable or Bluetooth. Bluetooth wireless communicationis useful if you want to control your robots remotely, or just program it without annoyingcables around. You can also connect more NXTs using Bluetooth, to make big complex robots.The NXT has three output ports for attaching motors and four input ports to connect sensors;it has a large dot-matrix screen to display text, numbers, and images. Also, your robots canproduce sounds, because the NXT features a loudspeaker to play tones and WAV-like soundfiles. Two microprocessors are at the base of the NXT brick. The main processor is an AtmelARM7 (like the one you might have in your mobile phone), and works at 48 MHz, on 32 bits.This allows your robots to deal with large numbers, making calculations at a high speed. TheNXT has 256KB of nonvolatile memory; you can store files into it and they won’t be erased,even if you remove the batteries.
Oh, I forgot! The NXT needs six AA batteries to work, but can also be powered by the LEGOLi-Ion rechargeable battery. For other details, you can always consult the NXT User Guideincluded in your retail set.
CHAPTER 2 ■ QUASIMODO16