creating and managing video conference bookings · creating and managing video conference bookings...
TRANSCRIPT
Creating and Managing Video Conference Bookings Division of Information Technology
Copyright 2015, Charles Sturt University No part of this document may be reproduced, altered or sold without prior written permission of the Executive Director, Division of Information Technology, Charles Sturt University

1
Table of Contents Table of Contents ............................................................................................................................ 1 Navigating This Guide ..................................................................................................................... 2 Introduction ...................................................................................................................................... 2 Getting Started................................................................................................................................. 2 Creating and Managing Bookings in Outlook 2013 .......................................................................... 2
Creating Bookings ........................................................................................................................ 3 Recurring Video Conference Bookings ........................................................................................ 8 Modifying Bookings .................................................................................................................... 10
Troubleshooting ............................................................................................................................. 11 Frequently Asked Questions .......................................................................................................... 11 Further Assistance ......................................................................................................................... 11

2
Navigating This Guide A table of contents has been provided to assist you in navigating this guide. Wherever possible, links to other useful documentation and self-help material has been provided.
Introduction The new video conference (VC) system at CSU is designed to make collaboration between staff as easy and flexible as possible. You can join conferences from any device, anywhere, anytime, book your meetings through Outlook and have your own personal virtual meeting room (VMR). This document deals specifically with booking and managing conferences and has been designed to provide in-depth instructions for creating and managing conference bookings.
Getting Started In order to create bookings within the new system, it is necessary to have Outlook 2013 installed on your PC. This can be obtained from the Install Software shortcut on your desktop. In addition to Outlook 2013, installation of a plugin known as the VC Scheduling Addin for Outlook is required. This plugin should be installed on your computer automatically if you have Outlook 2013 already installed. If not, it can be installed after upgrading your version of Outlook by selecting it from the list within the Install Software shortcut. All other versions of Outlook, including Outlook for Mac, are incompatible with the new VC system and cannot be used to create or manage bookings.
Creating and Managing Bookings in Outlook 2013 As mentioned previously, Outlook 2013 is required to create and manage bookings using the VC system. Three common types of bookings created via Outlook include:
1. Standard bookings. Created by any staff member using their personal calendar to book the required rooms and participants,
2. Bookings created ‘on behalf’ of another member of staff. Be aware that ownership may still be assigned to the person who created the booking, rather than the calendar owner. This may make modifying the booking difficult, and
3. Bookings created from a generic mailbox calendar. Requires direct access to the mailbox to which the calendar is attached. Creating a booking from a personal mailbox with the calendar open will create the booking ‘on behalf’ of the generic mailbox and may cause issues with conference ownership and management.
3
Creating Bookings All VC bookings must be created via Outlook 2013. When a conference booking is created via Outlook, the conference creator is designated as the conference ‘owner’ by the conference management system. Once the booking has been accepted by the system, the conference owner is the only person who may make changes to the booking via Outlook. The IT Service Desk may be able to modify the booking under certain circumstances. Bookings may be created ‘on behalf’ of another staff member, typically by those with delegate permissions to view and create bookings from another person’s calendar. To create a new booking for a single VC meeting:
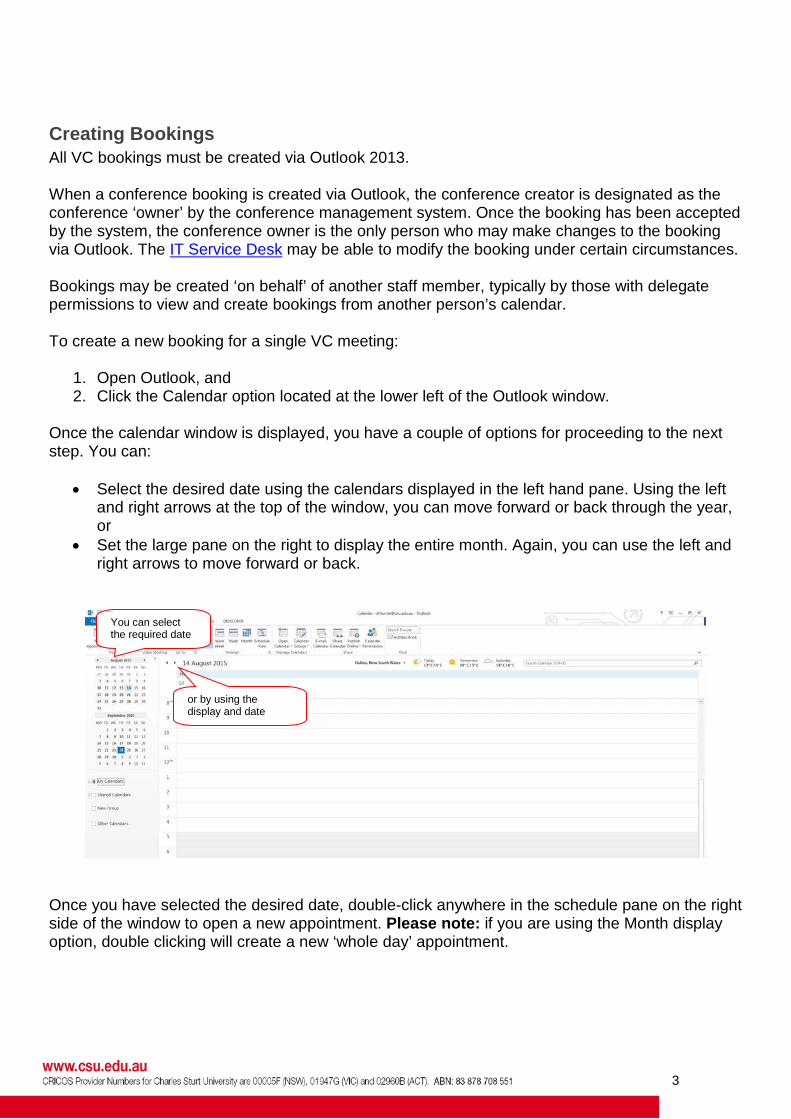
1. Open Outlook, and 2. Click the Calendar option located at the lower left of the Outlook window.
Once the calendar window is displayed, you have a couple of options for proceeding to the next step. You can:
• Select the desired date using the calendars displayed in the left hand pane. Using the left and right arrows at the top of the window, you can move forward or back through the year, or
• Set the large pane on the right to display the entire month. Again, you can use the left and right arrows to move forward or back.
Once you have selected the desired date, double-click anywhere in the schedule pane on the right side of the window to open a new appointment. Please note: if you are using the Month display option, double clicking will create a new ‘whole day’ appointment.
or by using the display and date
You can select the required date

4
When you open a new appointment in Outlook 2013, a window similar to the one below will open. From here you can alter the date and time of the meeting, add attendees and VC rooms and create or alter a meeting recurrence.
Before you can add participants or meeting rooms to the booking, you will need to complete the following steps:
1. Add a name for the conference or meeting (this should be as short as possible, but still meaningful), and
2. Set the start and end times using the options provided just below the Location field. Please Note: when setting the start and end times for a conference, it’s a good idea to consider WHS requirements and the comfort of your attendees. Long conferences should have time for a tea and/or lunch break factored into the total duration. To add meeting rooms and participants to your meeting, click on the Scheduling Assistant button at the top of the meeting request. The Scheduling Assistant allows you to add your required meeting participants and choose the required VC facilities for your meeting. The window shows you the times when your meeting participants and rooms are busy or free, so you can adjust your meeting date and time. Once the Scheduling Assistant has opened, you can use the Add Attendees and Add Rooms buttons at the bottom left of the window to add your desired meeting rooms and meeting participants.
Set the start and end date times
Type the meeting subject/name here
Click here to proceed to the next

5
To add a person to the VC meeting:
• Click Add Attendees to open the Outlook address book. You can scroll through the list or enter the name of someone you wish to find in the Search box using the last-name, first-name format.
• Highlight their name and click ‘Required’ or ‘Optional’ to add them as a required or optional participant, and
• Click OK to return to the Scheduling Assistant.
Click these buttons to add people and VC rooms
6
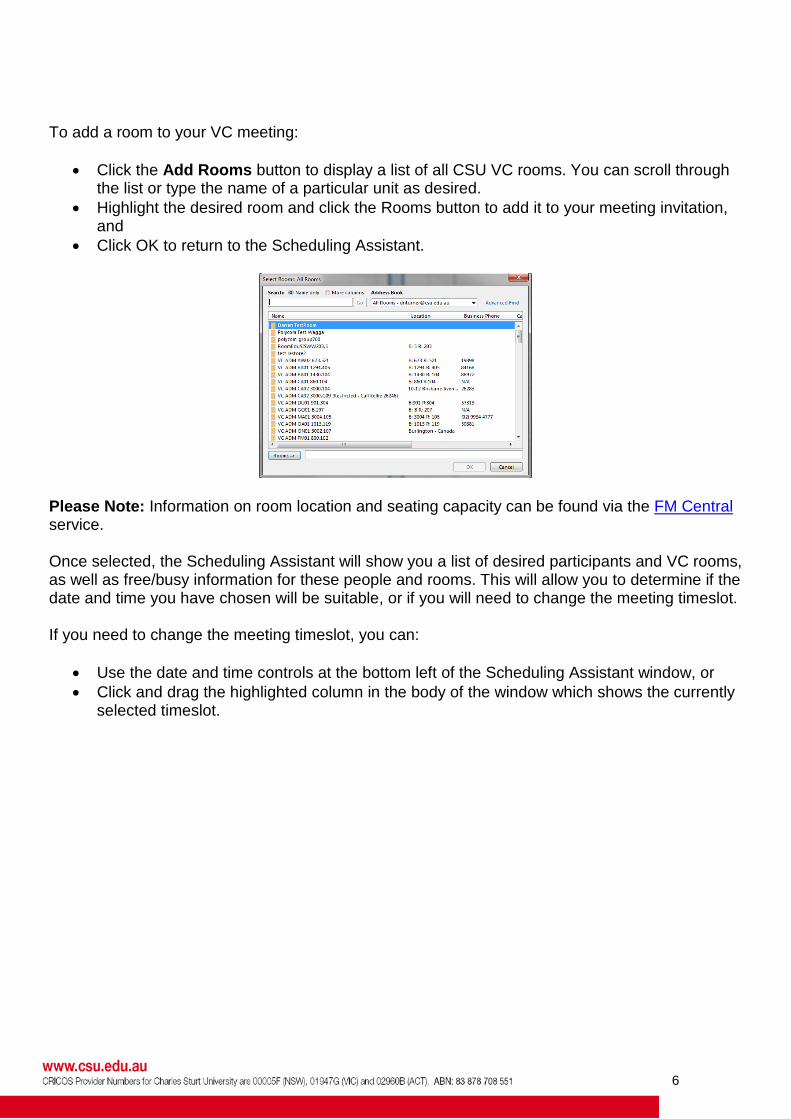
To add a room to your VC meeting:
• Click the Add Rooms button to display a list of all CSU VC rooms. You can scroll through the list or type the name of a particular unit as desired.
• Highlight the desired room and click the Rooms button to add it to your meeting invitation, and
• Click OK to return to the Scheduling Assistant.
Please Note: Information on room location and seating capacity can be found via the FM Central service. Once selected, the Scheduling Assistant will show you a list of desired participants and VC rooms, as well as free/busy information for these people and rooms. This will allow you to determine if the date and time you have chosen will be suitable, or if you will need to change the meeting timeslot. If you need to change the meeting timeslot, you can:
• Use the date and time controls at the bottom left of the Scheduling Assistant window, or • Click and drag the highlighted column in the body of the window which shows the currently
selected timeslot.
7
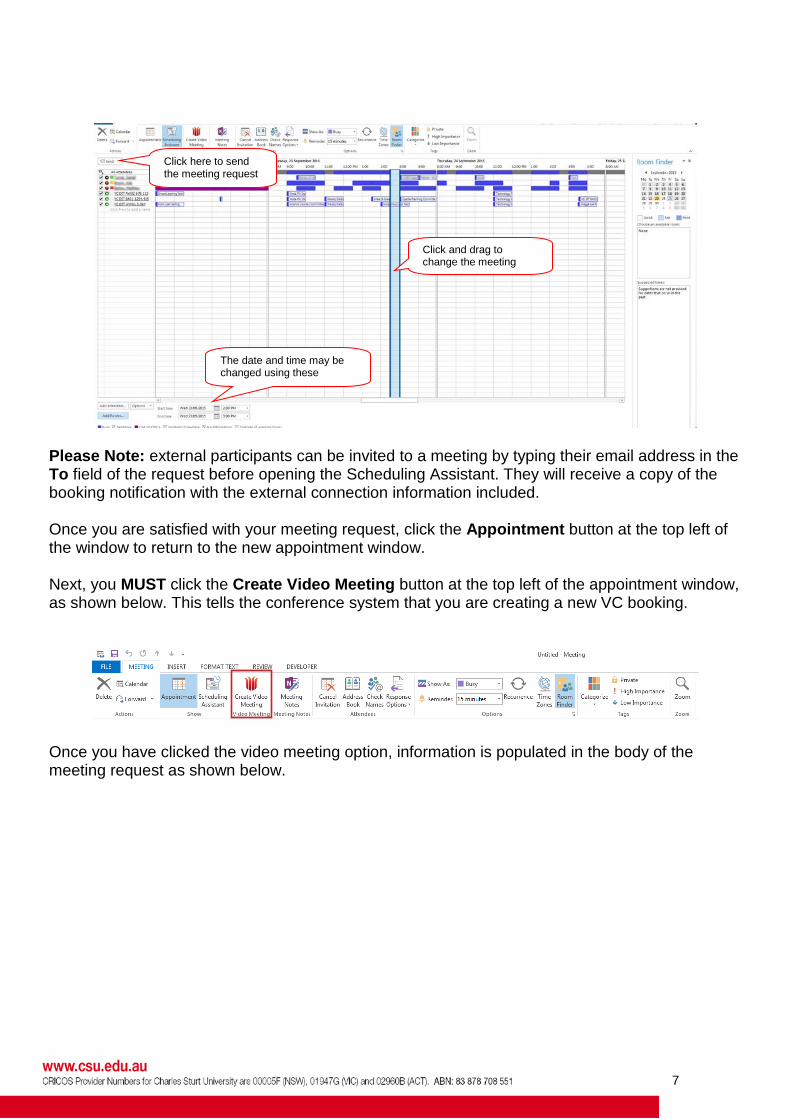
Please Note: external participants can be invited to a meeting by typing their email address in the To field of the request before opening the Scheduling Assistant. They will receive a copy of the booking notification with the external connection information included. Once you are satisfied with your meeting request, click the Appointment button at the top left of the window to return to the new appointment window. Next, you MUST click the Create Video Meeting button at the top left of the appointment window, as shown below. This tells the conference system that you are creating a new VC booking.
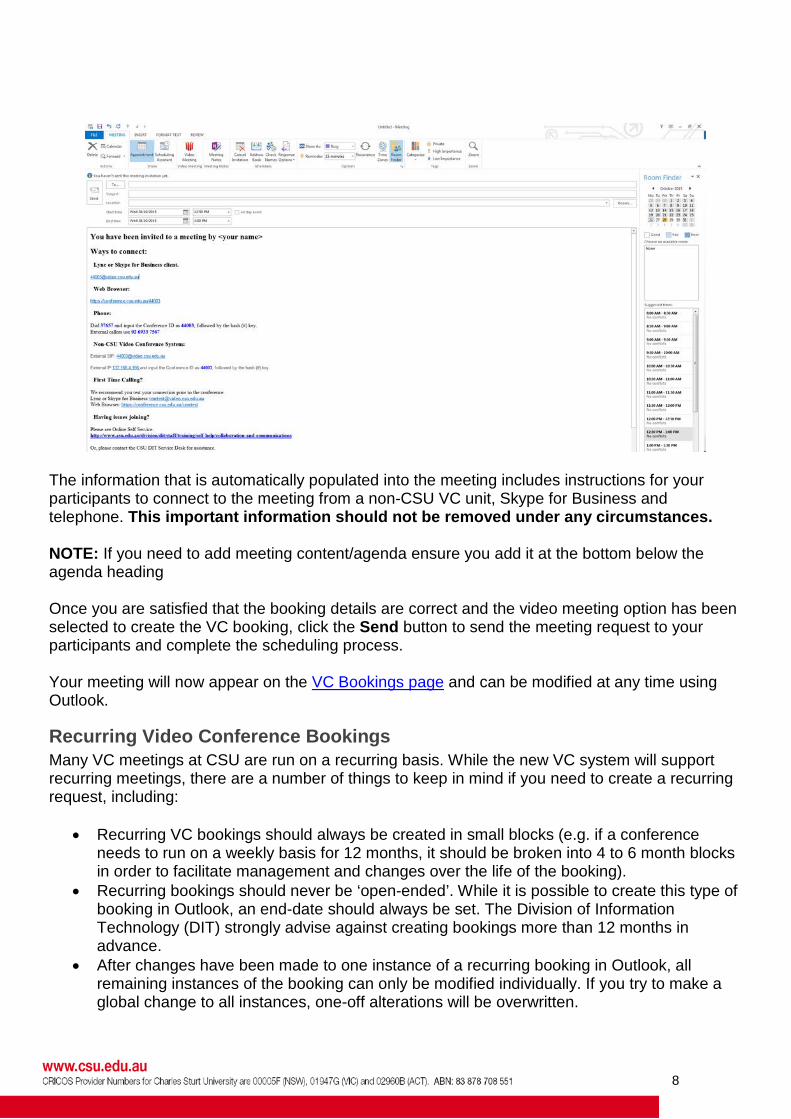
Once you have clicked the video meeting option, information is populated in the body of the meeting request as shown below.
The date and time may be changed using these
Click here to send the meeting request
Click and drag to change the meeting
8
The information that is automatically populated into the meeting includes instructions for your participants to connect to the meeting from a non-CSU VC unit, Skype for Business and telephone. This important information should not be removed under any circumstances. NOTE: If you need to add meeting content/agenda ensure you add it at the bottom below the agenda heading Once you are satisfied that the booking details are correct and the video meeting option has been selected to create the VC booking, click the Send button to send the meeting request to your participants and complete the scheduling process. Your meeting will now appear on the VC Bookings page and can be modified at any time using Outlook.
Recurring Video Conference Bookings Many VC meetings at CSU are run on a recurring basis. While the new VC system will support recurring meetings, there are a number of things to keep in mind if you need to create a recurring request, including:
• Recurring VC bookings should always be created in small blocks (e.g. if a conference needs to run on a weekly basis for 12 months, it should be broken into 4 to 6 month blocks in order to facilitate management and changes over the life of the booking).
• Recurring bookings should never be ‘open-ended’. While it is possible to create this type of booking in Outlook, an end-date should always be set. The Division of Information Technology (DIT) strongly advise against creating bookings more than 12 months in advance.
• After changes have been made to one instance of a recurring booking in Outlook, all remaining instances of the booking can only be modified individually. If you try to make a global change to all instances, one-off alterations will be overwritten.

9
• Availability of VC rooms on the same day/time can be difficult to achieve over an extended period of time and may not book the rooms correctly.
To create a recurring VC booking, you need to follow the steps for creating a non-recurring meeting provided in the Creating Bookings section and then add the recurrence information to the meeting. To add a recurrence to a meeting:
• Click on the Recurrence button on the ribbon menu at the top of the Scheduling Assistant,
• After you click on the Recurrence button - you will be able to alter the start and end times of the conference, the recurrence pattern and set an end-date or required number of instances for the conference,
• Verify that the Start and End times are correct. When setting recurrences for the conference, remember that small blocks of bookings are the recommended option for simplifying conference management, and
• Click the OK button once you are satisfied with the recurrence settings. The Recurrence window will close and you can send the meeting invite.
Once all the details for your meeting request are correct, click the Video Meeting button to populate the booking to the conferencing system; then click the Send button at the top left of the meeting request. Please note: a small dialogue box will be displayed for a moment as the meeting is created on the conference management system and the meeting invite will be sent to your selected participants. Your meeting will now appear on the VCBookings page and can be modified at any time using Outlook.
Check the Start, End and Duration settings
Set the Recurrence pattern using these options
Set the End after or End by using these controls
10
Modifying Bookings If you need to modify a booking that you have already created, you can find and open it from your Outlook calendar. Booking changes that you can make include:
• Adding or removing meeting participants, • Adding or removing conference rooms, and • Changing the date and time of the meeting by using the Scheduling Assistant to verify that
the new timeslot is available for all meeting participants and rooms. Once you have made the required changes, these need to be sent to the conference management system and your meeting participants by clicking the Send Update button. If you are cancelling the meeting, click the Cancel Meeting button. This will send a cancellation notification to all participants, rooms and the conference management system..
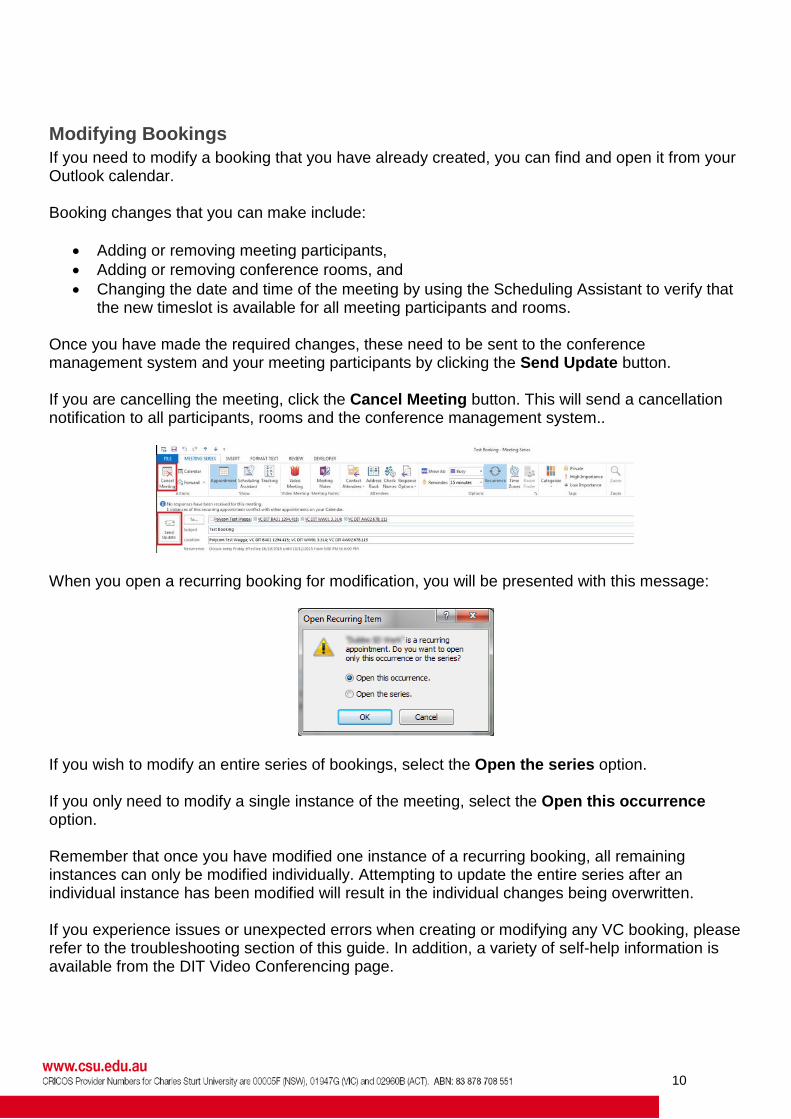
When you open a recurring booking for modification, you will be presented with this message:
If you wish to modify an entire series of bookings, select the Open the series option. If you only need to modify a single instance of the meeting, select the Open this occurrence option. Remember that once you have modified one instance of a recurring booking, all remaining instances can only be modified individually. Attempting to update the entire series after an individual instance has been modified will result in the individual changes being overwritten. If you experience issues or unexpected errors when creating or modifying any VC booking, please refer to the troubleshooting section of this guide. In addition, a variety of self-help information is available from the DIT Video Conferencing page.

11
Troubleshooting The New Video Meeting button is missing from Outlook To resolve this issue, please follow these steps:
1. Verify that you are using Outlook 2013. The button and associated plugin are not compatible with older versions of Outlook. If you are unable to install Office 2013 due to a software compatibility issue, please contact the IT Service Desk for advice,
2. If Outlook 2013 is installed, open the Install Software shortcut on the desktop of your computer. You will need to locate and run the VC Scheduling Addin from the list of available software, and
3. If the button is still missing after installing the addin and closing and re-opening Outlook, please contact the IT Service Desk.
An error message is displayed when the New Video Meeting button is clicked To resolve this issue, follow the steps below:
1. Verify that you only have one active network connection. This can be done by mousing-over the V icon at the bottom right of your desktop. If more than one sequence of numbers is displayed, turn the wireless adaptor on your computer off and try clicking on the video meeting button again, and
2. If this does not resolve the issue, try re-installing the add-in from the Install Software menu. You may need to close and re-open Outlook after completing the installation.
If these steps do not resolve the issue, contact the DIT Service Desk for advice.
Frequently Asked Questions For frequently asked questions, tips and suggestions on the use of the new VC system, please see the DIT Self Help and FAQ page for this service.
Further Assistance For assistance and advice on the use of the new conferencing system, booking management and other VC tools, please contact the IT Service Desk. The Service Desk can be contacted by phone at any time during business hours (see below) or via Online Self Service. Monday to Friday - 8am - 6pm (GMT+10) Extended support hours during Session 1 and 2 Monday to Thursday - 6pm - 9pm Local Call Australia wide: 1300 653 088 International: +612 6338 4357 CSU Internal: 84357