creating a syllabus quiz in canvas - fullerton...
TRANSCRIPT
1
Creating a Syllabus Quiz in Canvas
Introduction In order to ensure that students are initially participating in online classes (like taking roll the first day in on-campus
classes), it is useful to create a starting quiz that students must complete in order to proceed with the class. A good idea
is to base this quiz on the class syllabus so that students who have not yet purchased their books can still get started in
the class.
In order to set this up, you must do the following:
1. Create two modules; one for the Starting Quiz and a second to hold all the remaining class content.
2. Create a Page in the first module, and insert the class Syllabus into the page.
3. Create a quiz in the first module and add syllabus questions to the quiz.
4. Set the conditions on the quiz such as due date, etc.
5. Set the requirements for completing the first module to viewing the syllabus page and getting a perfect score on
the quiz.
6. Set the requirements for starting the second module (containing class content) to finishing the first module.
7. Set the modules as the class starting home page.
Logging into your Class 1. Go to the site http:// fullcoll.instructure.com
2. Login with your Banner ID number and your Banner password (do not use the @ with your ID number).
You will see a list of classes you are taking (both in-class and online).
3. Click your class link (CRN and title).
2
Creating Modules A module in Canvas is a container into which you can add pages of content, links, discussions, quizzes, and so on. The
Module can also be set with conditions that must be met in order to leave the module as well as prerequisites in order
to access the module.
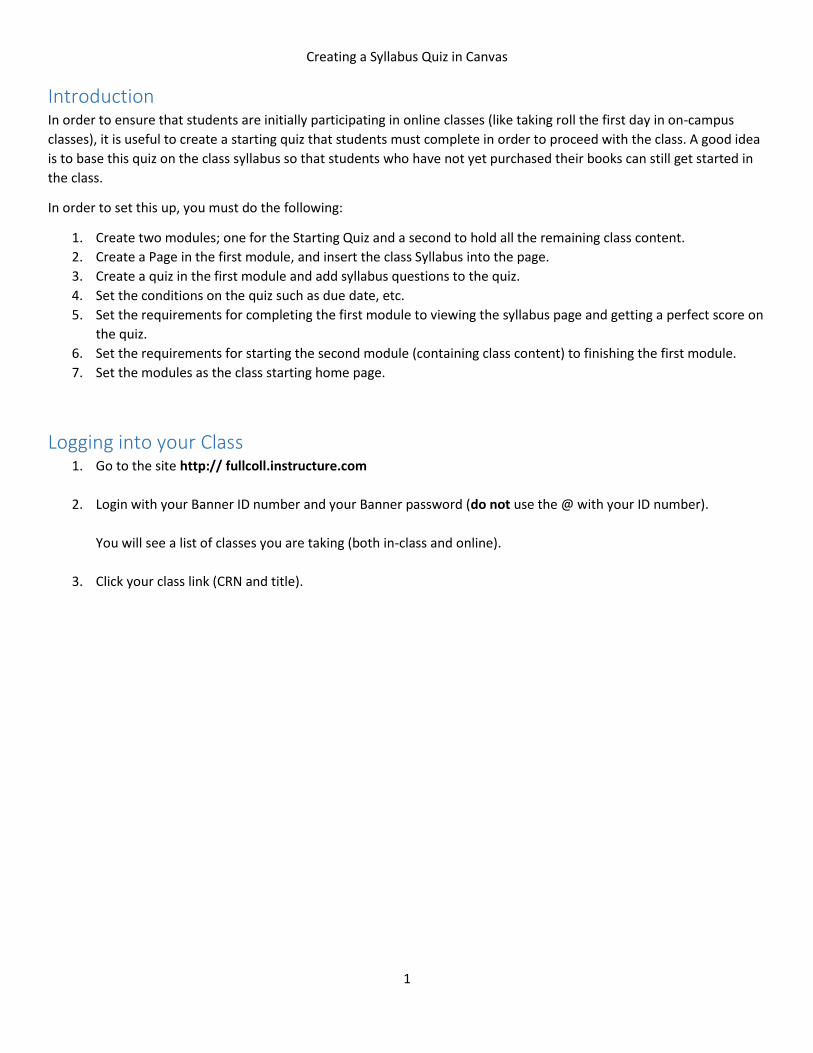
1. In your canvas course, click the Modules link (it will be grayed out). This is shown in Figure 1. Note that your list
of items along the left margin may not look like the list in Figure 1.
Figure 1
3
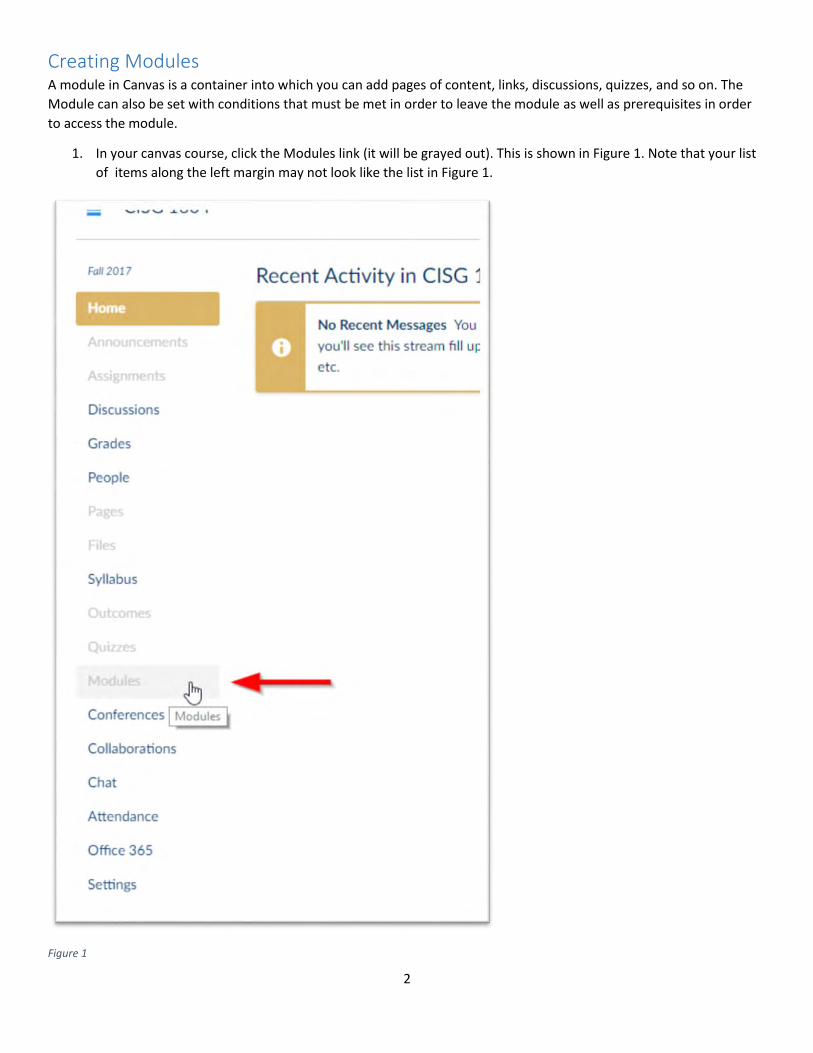
2. Move the mouse over the icon for Create a new module and click (Figure 2):
Figure 2
4
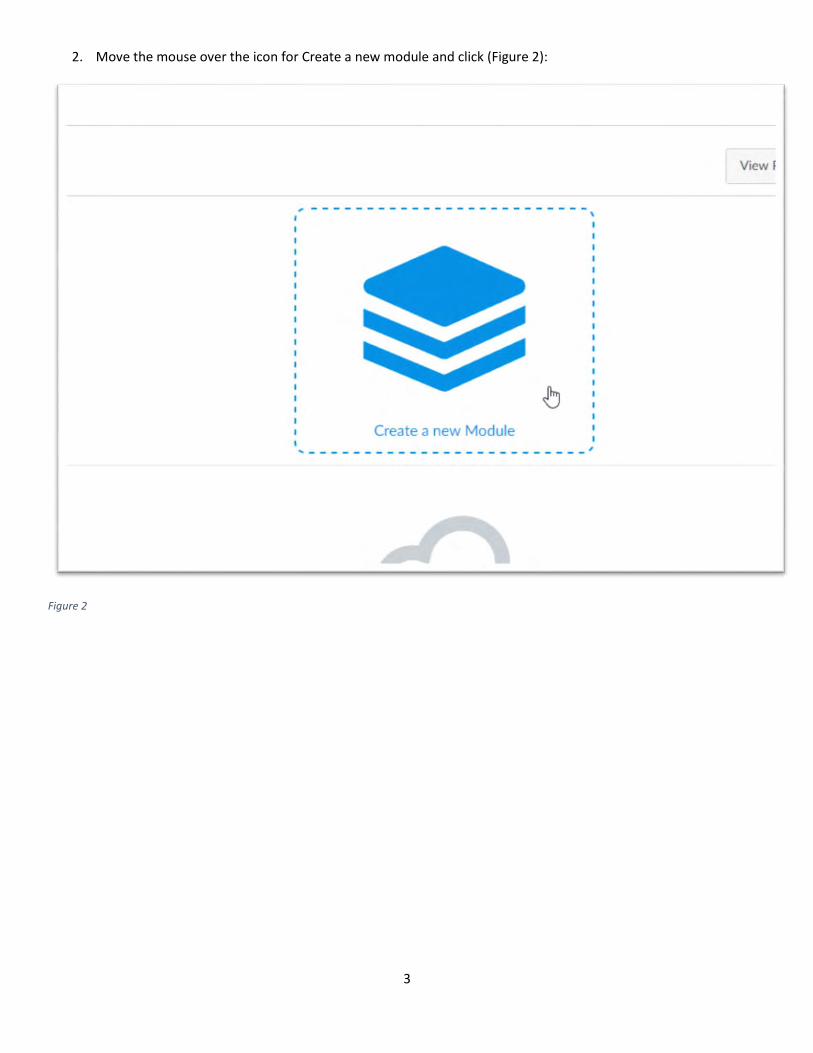
3. For the Module name type Getting Started (or whatever you wish) and click the Add Module button (Figure 3).
Figure 3
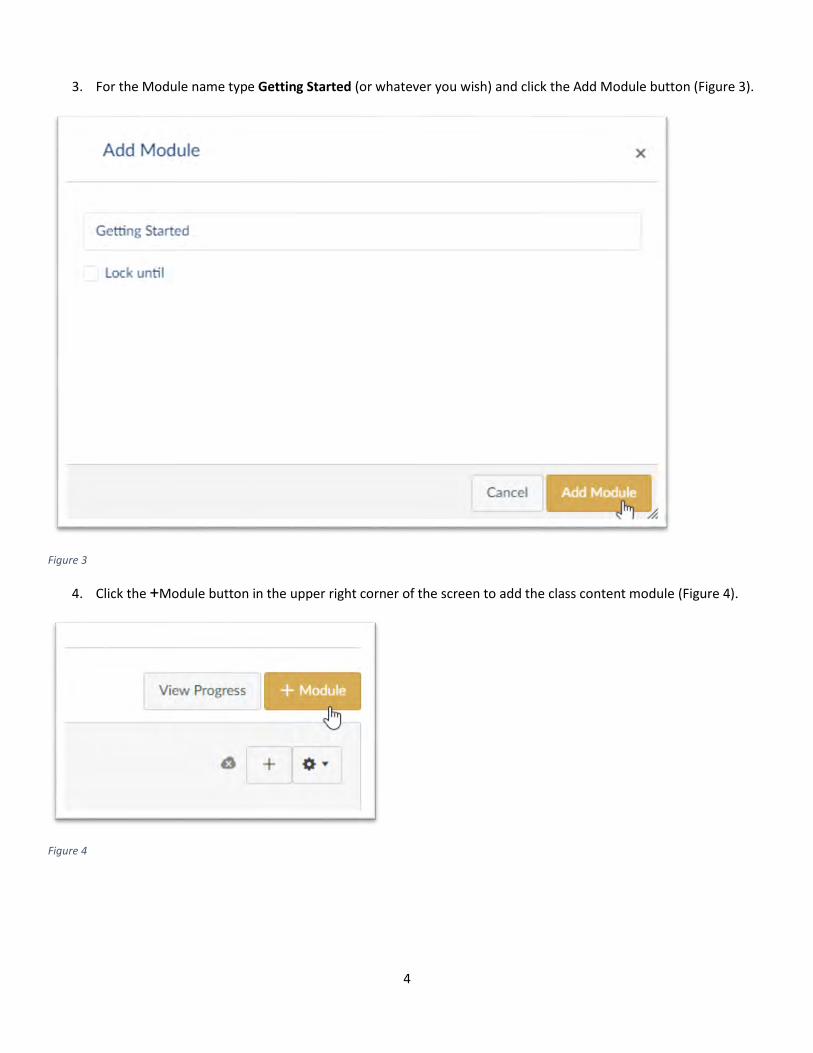
4. Click the +Module button in the upper right corner of the screen to add the class content module (Figure 4).
Figure 4
5
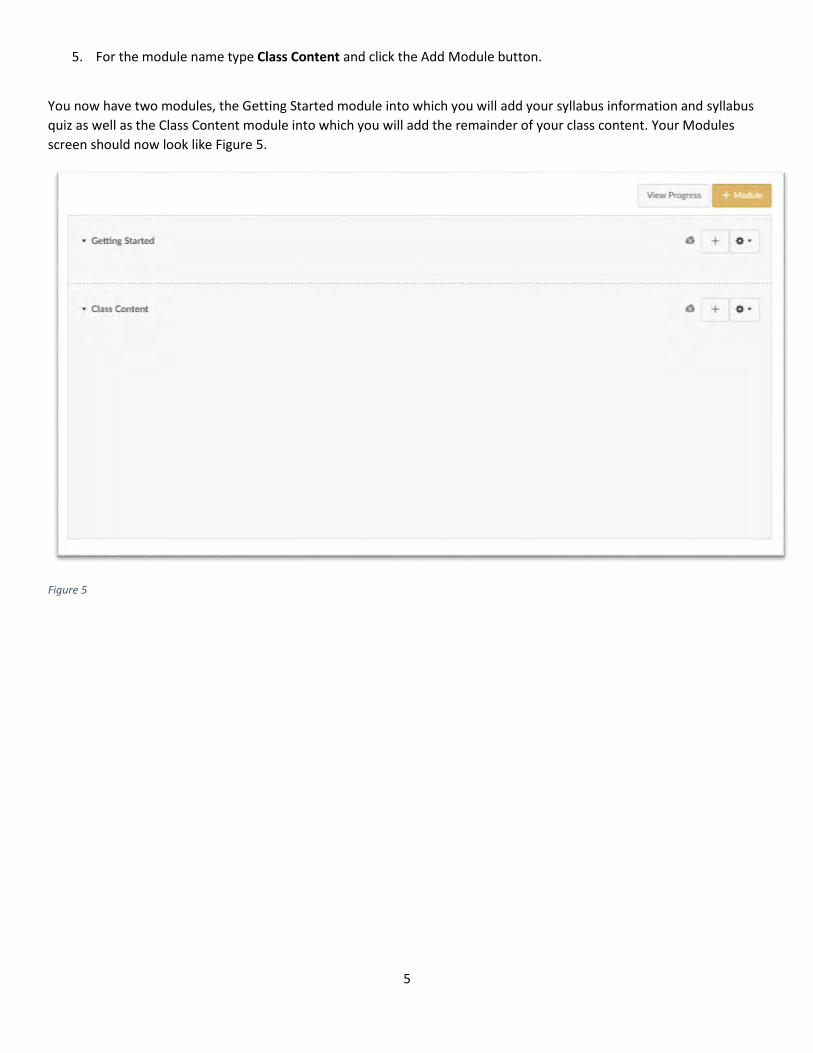
5. For the module name type Class Content and click the Add Module button.
You now have two modules, the Getting Started module into which you will add your syllabus information and syllabus
quiz as well as the Class Content module into which you will add the remainder of your class content. Your Modules
screen should now look like Figure 5.
Figure 5
6
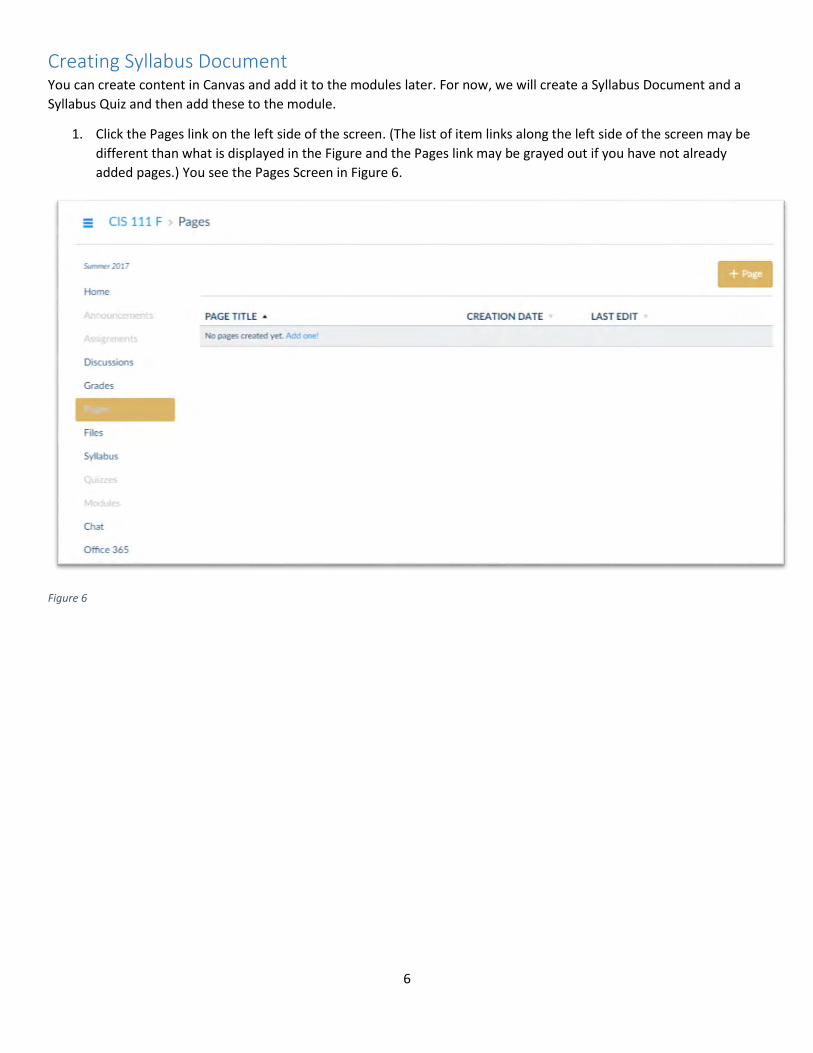
Creating Syllabus Document You can create content in Canvas and add it to the modules later. For now, we will create a Syllabus Document and a
Syllabus Quiz and then add these to the module.
1. Click the Pages link on the left side of the screen. (The list of item links along the left side of the screen may be
different than what is displayed in the Figure and the Pages link may be grayed out if you have not already
added pages.) You see the Pages Screen in Figure 6.
Figure 6
7
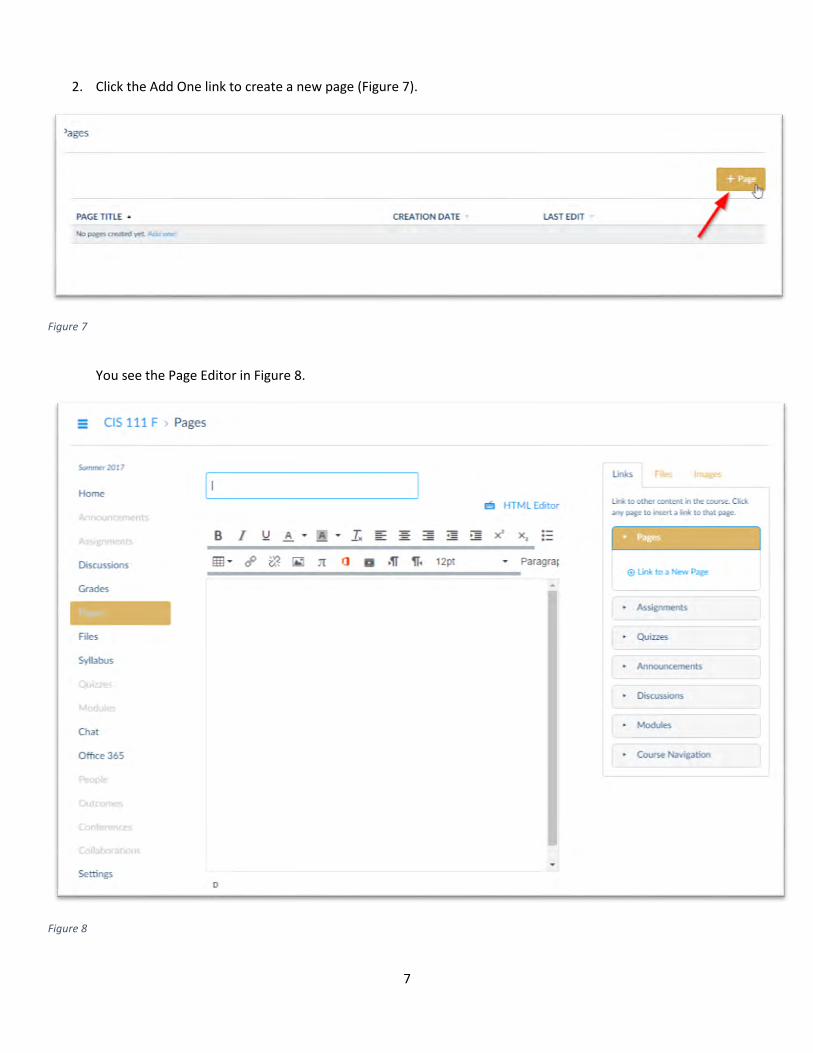
2. Click the Add One link to create a new page (Figure 7).
Figure 7
You see the Page Editor in Figure 8.
Figure 8
8
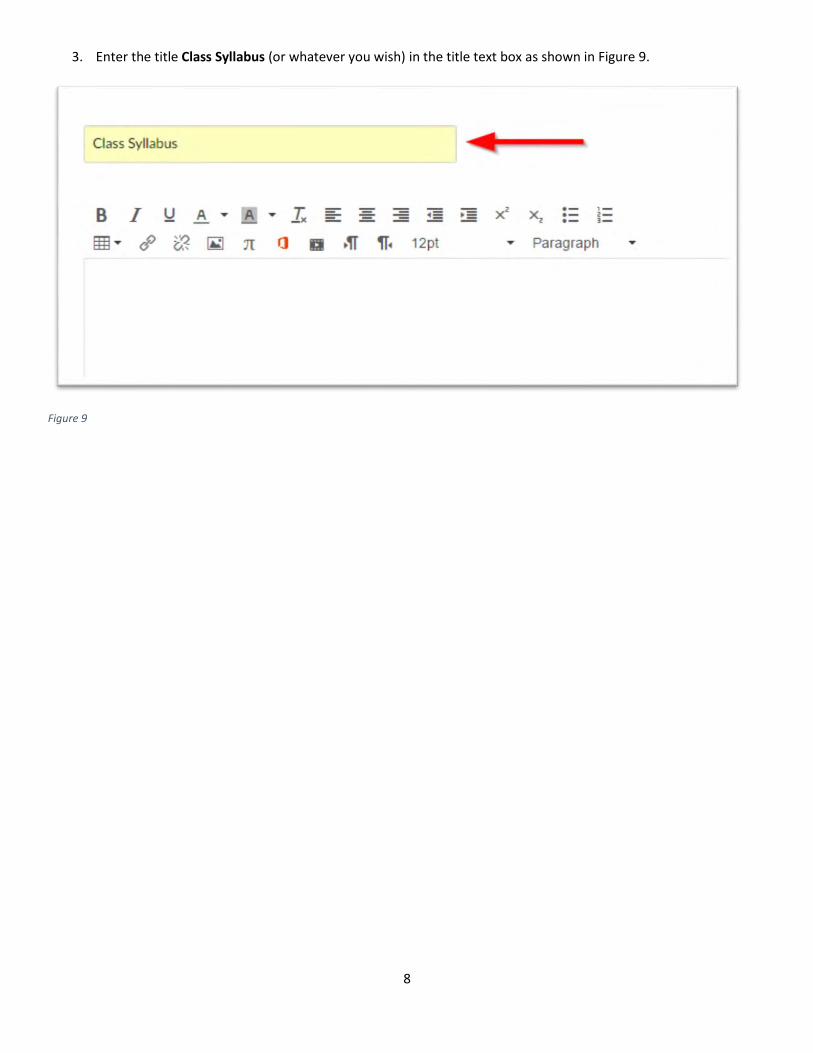
3. Enter the title Class Syllabus (or whatever you wish) in the title text box as shown in Figure 9.
Figure 9
9
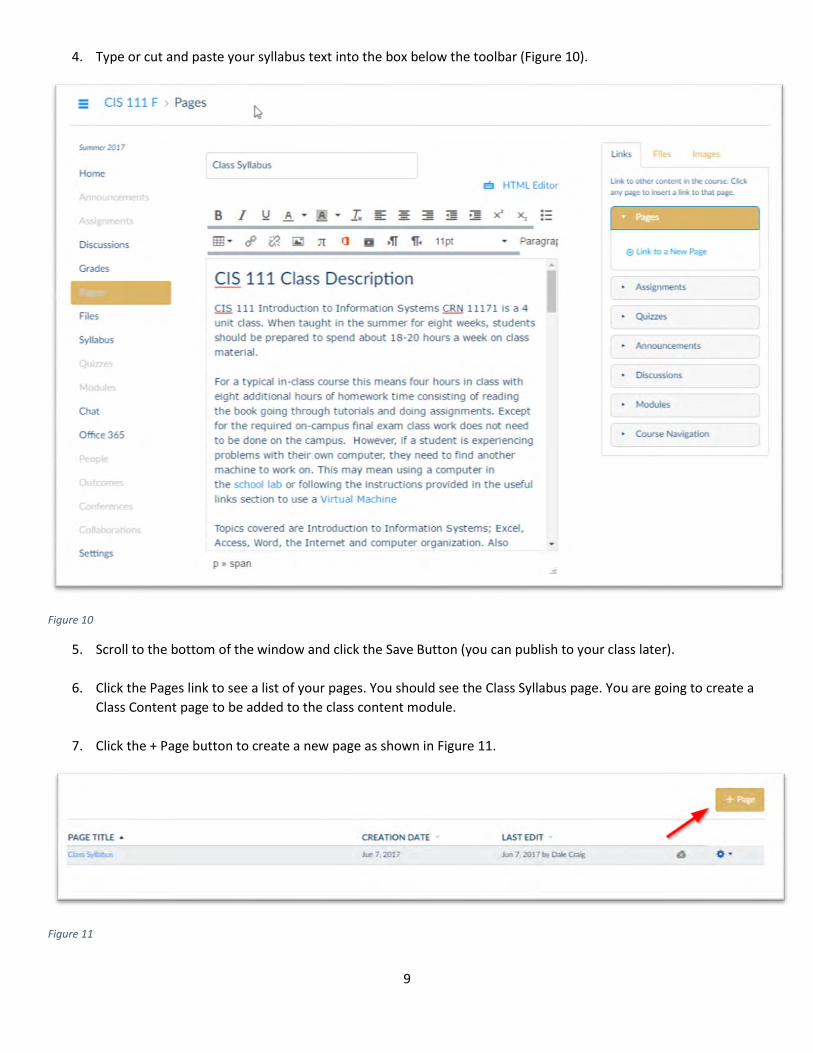
4. Type or cut and paste your syllabus text into the box below the toolbar (Figure 10).
Figure 10
5. Scroll to the bottom of the window and click the Save Button (you can publish to your class later).
6. Click the Pages link to see a list of your pages. You should see the Class Syllabus page. You are going to create a
Class Content page to be added to the class content module.
7. Click the + Page button to create a new page as shown in Figure 11.
Figure 11
10
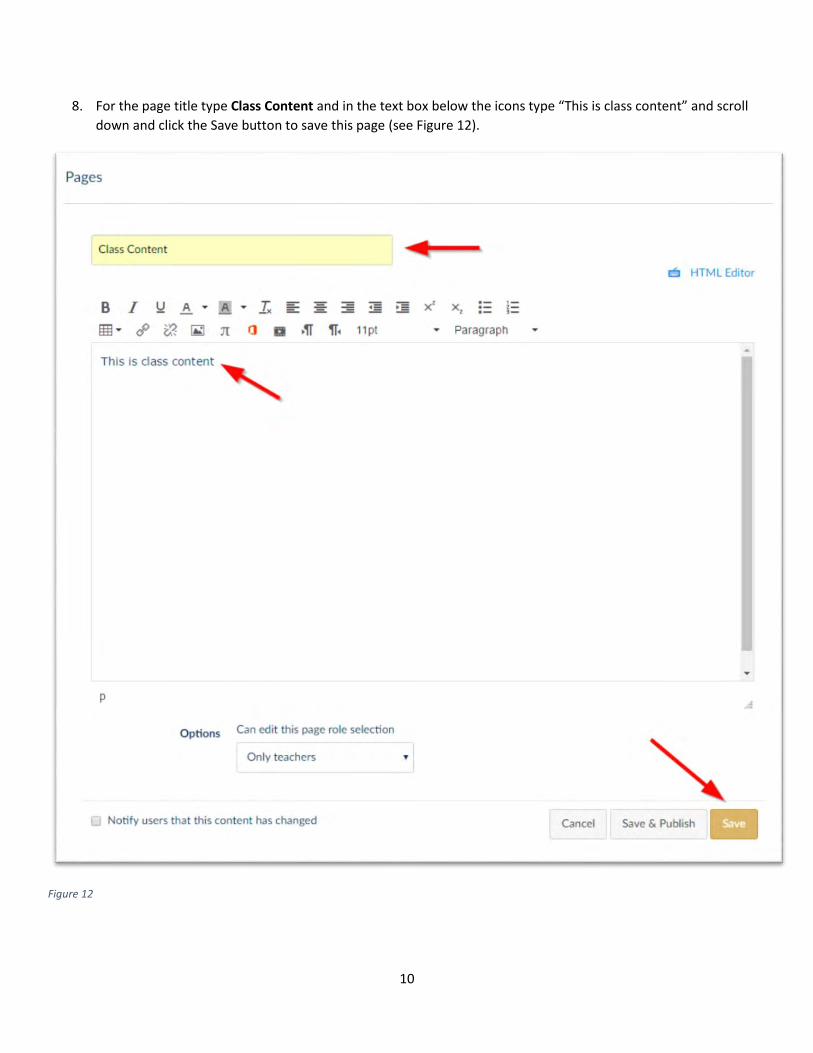
8. For the page title type Class Content and in the text box below the icons type “This is class content” and scroll
down and click the Save button to save this page (see Figure 12).
Figure 12
11
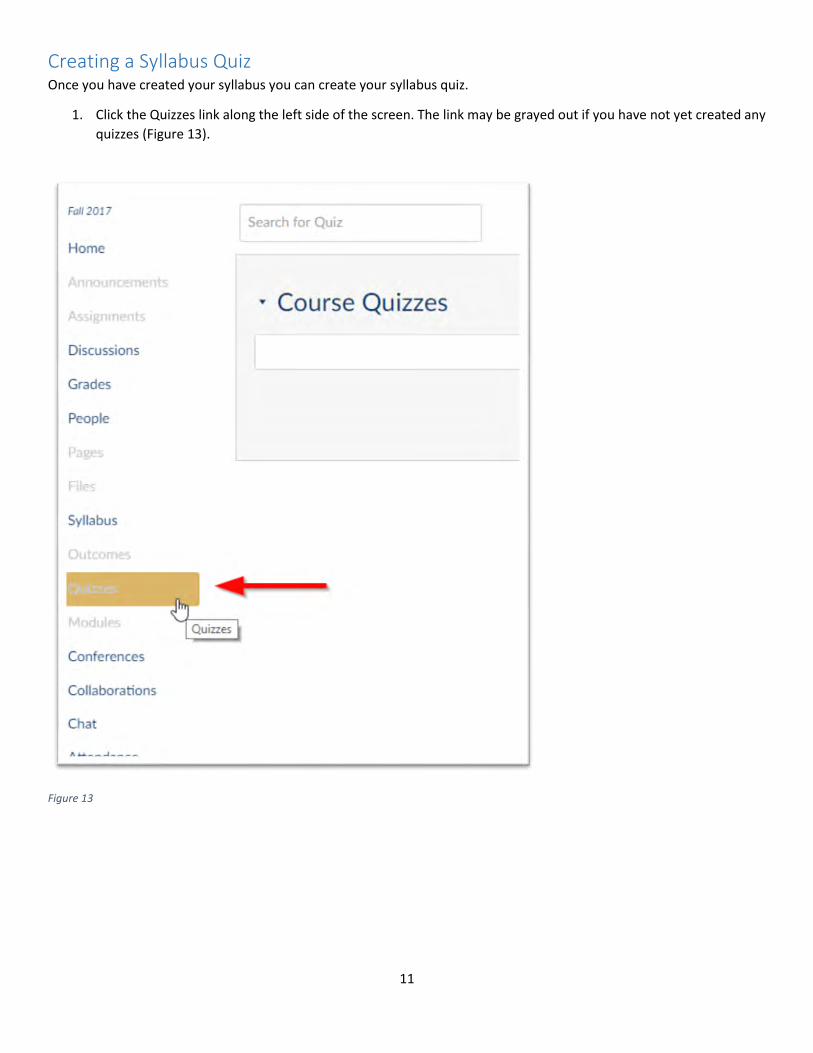
Creating a Syllabus Quiz Once you have created your syllabus you can create your syllabus quiz.
1. Click the Quizzes link along the left side of the screen. The link may be grayed out if you have not yet created any
quizzes (Figure 13).
Figure 13
12
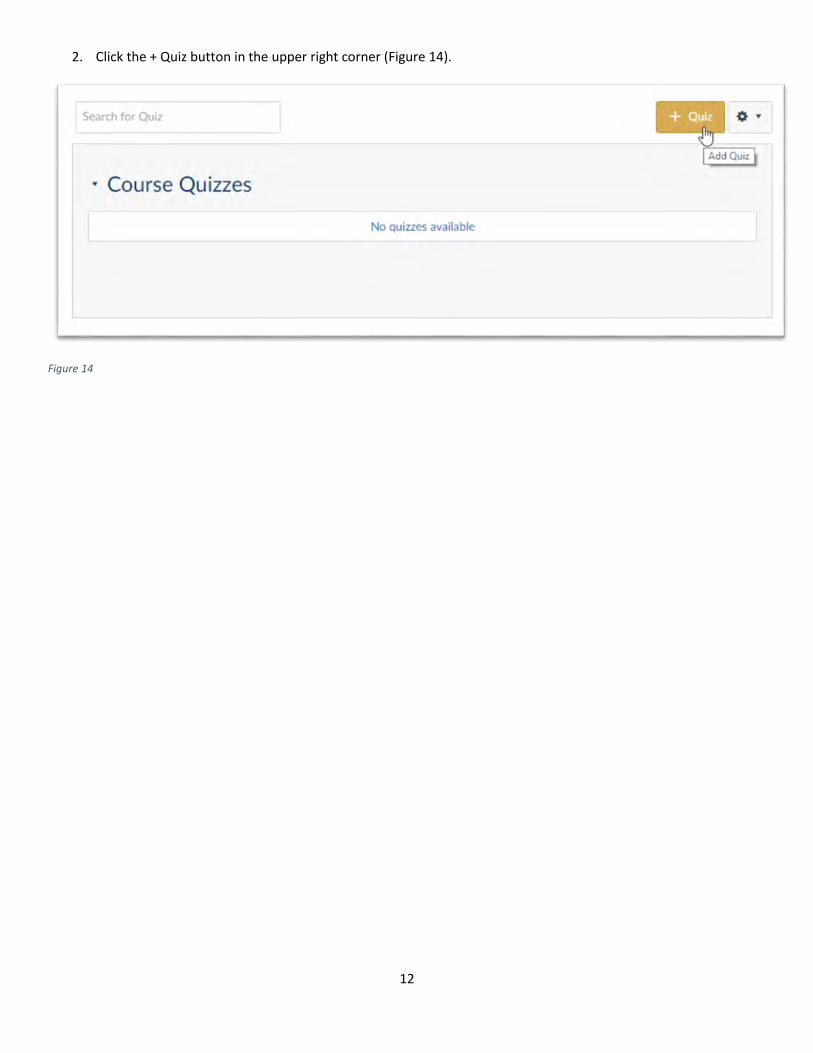
2. Click the + Quiz button in the upper right corner (Figure 14).
Figure 14
13
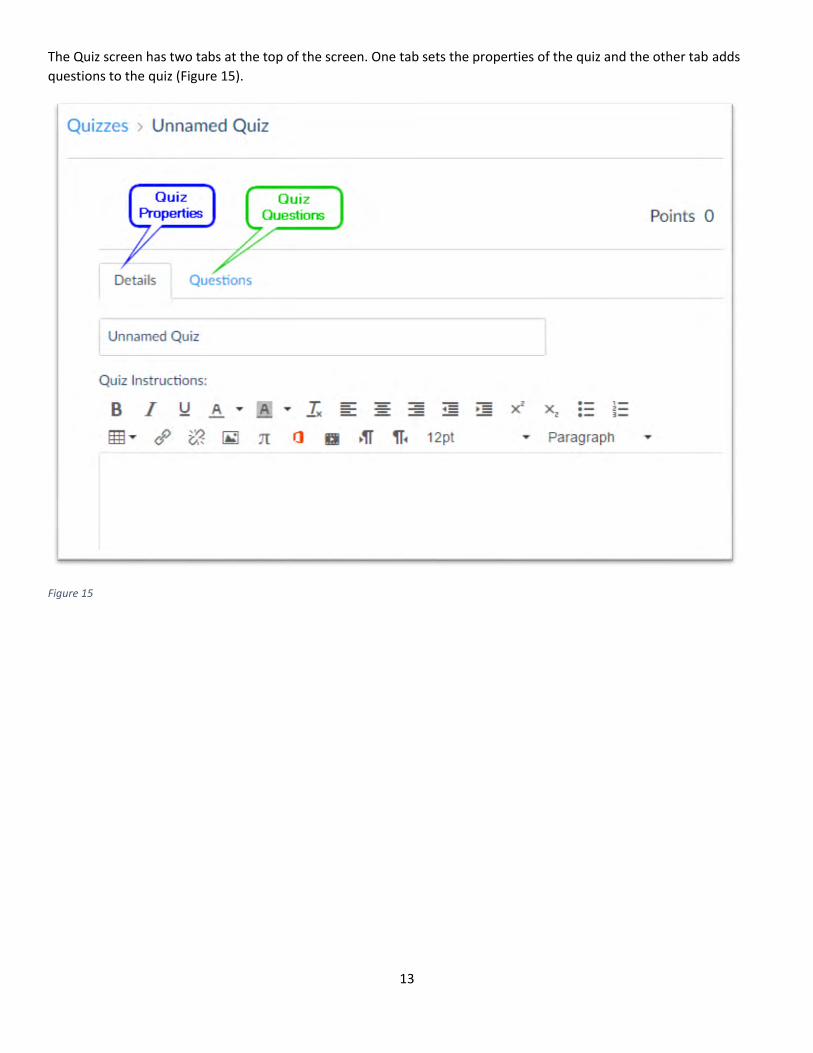
The Quiz screen has two tabs at the top of the screen. One tab sets the properties of the quiz and the other tab adds
questions to the quiz (Figure 15).
Figure 15
14
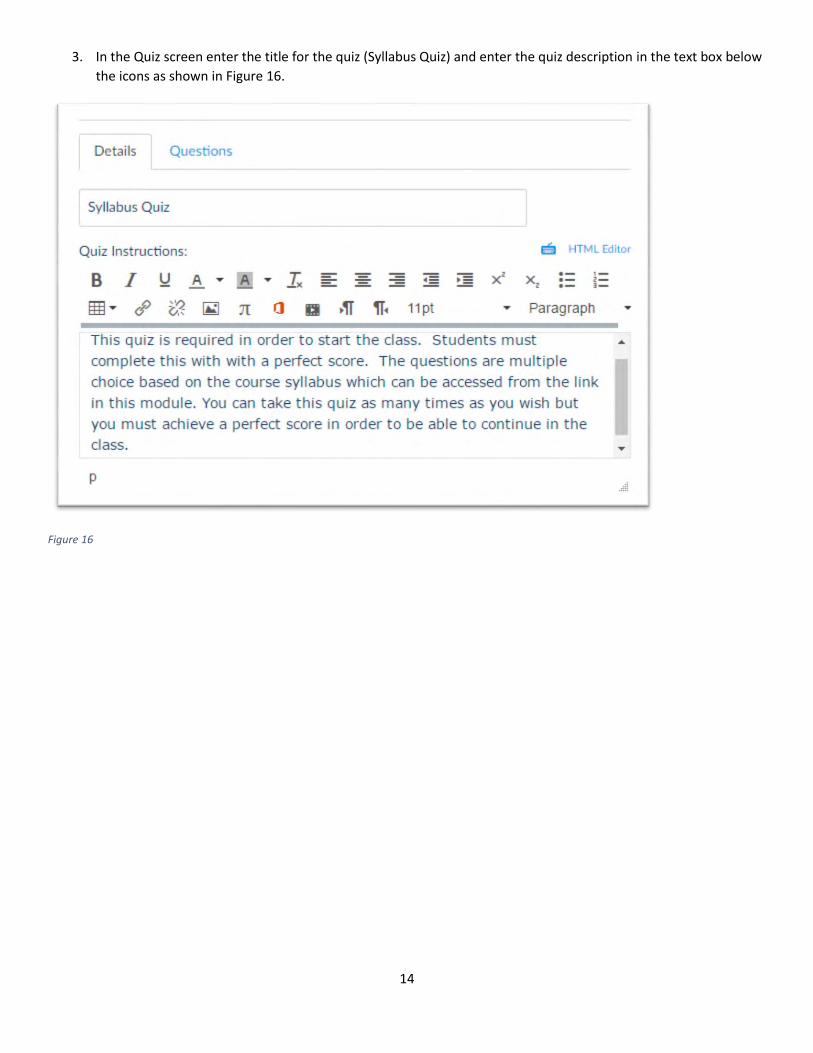
3. In the Quiz screen enter the title for the quiz (Syllabus Quiz) and enter the quiz description in the text box below
the icons as shown in Figure 16.
Figure 16
15
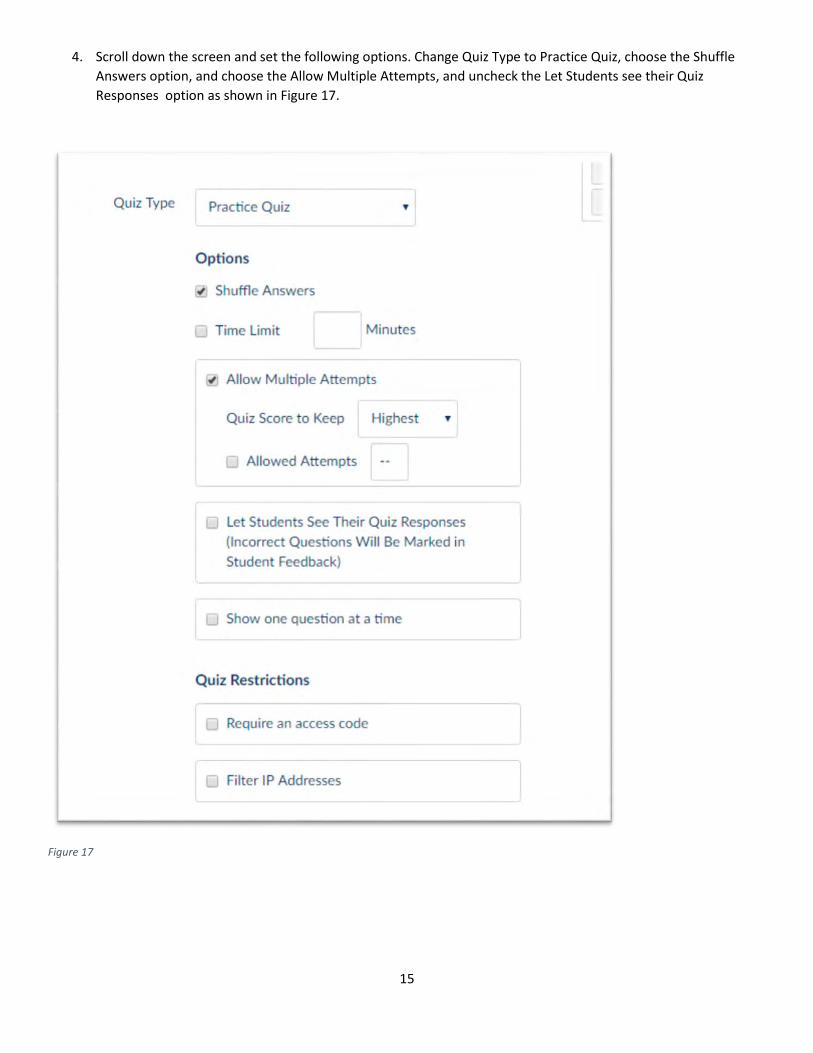
4. Scroll down the screen and set the following options. Change Quiz Type to Practice Quiz, choose the Shuffle
Answers option, and choose the Allow Multiple Attempts, and uncheck the Let Students see their Quiz
Responses option as shown in Figure 17.
Figure 17
16
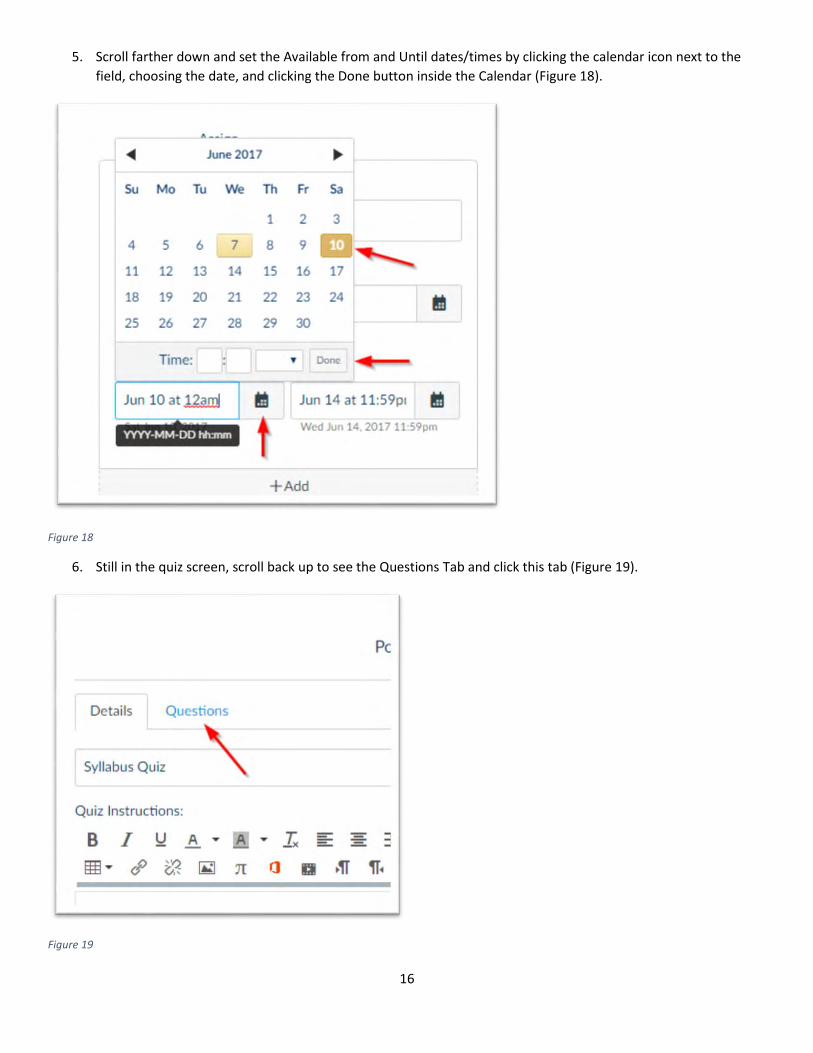
5. Scroll farther down and set the Available from and Until dates/times by clicking the calendar icon next to the
field, choosing the date, and clicking the Done button inside the Calendar (Figure 18).
Figure 18
6. Still in the quiz screen, scroll back up to see the Questions Tab and click this tab (Figure 19).
Figure 19
17
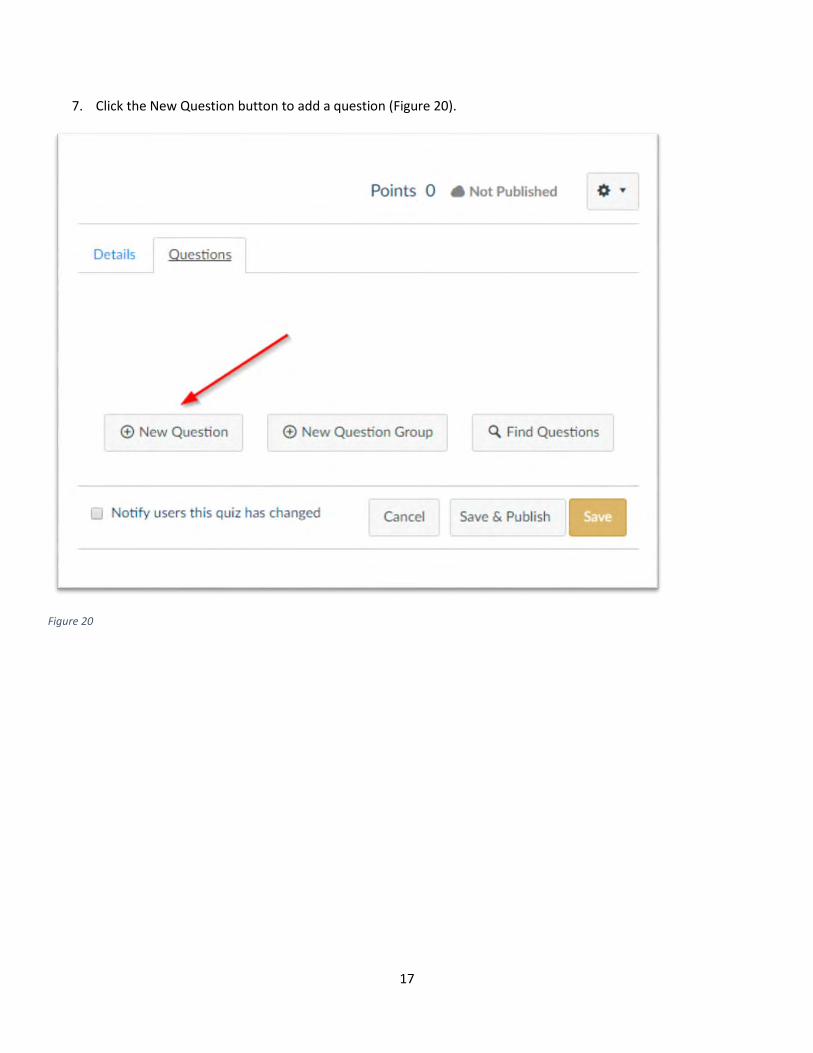
7. Click the New Question button to add a question (Figure 20).
Figure 20
18
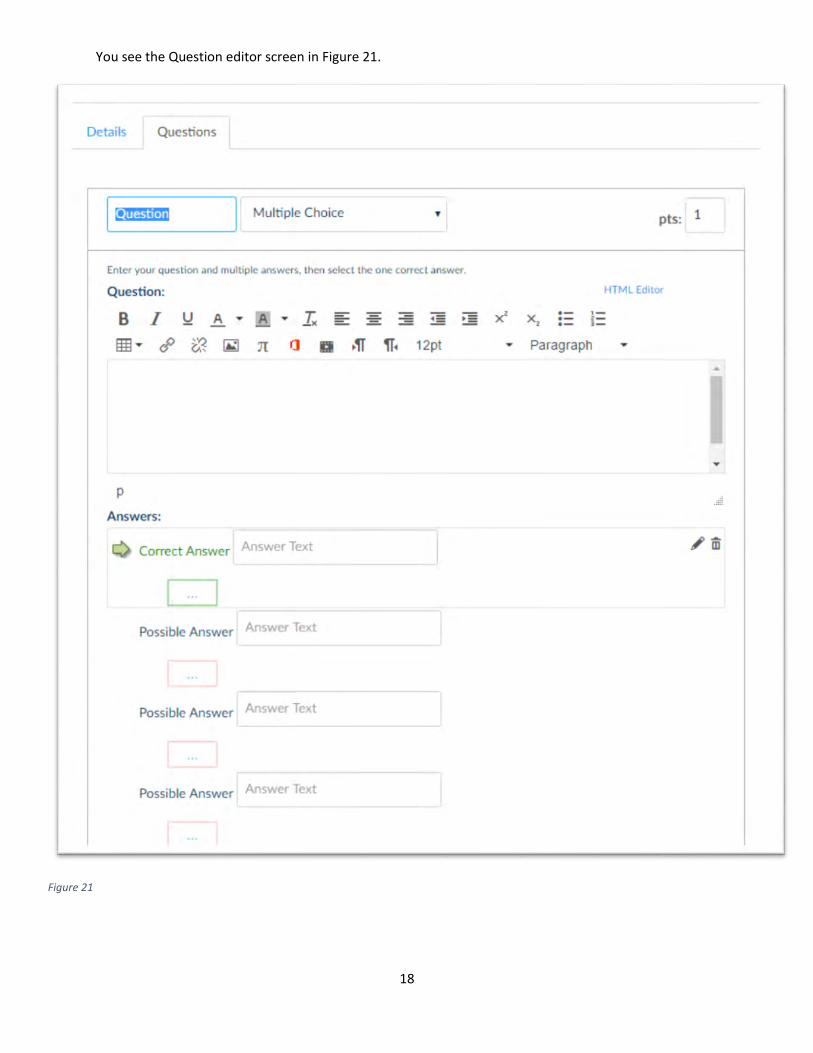
You see the Question editor screen in Figure 21.
Figure 21
19
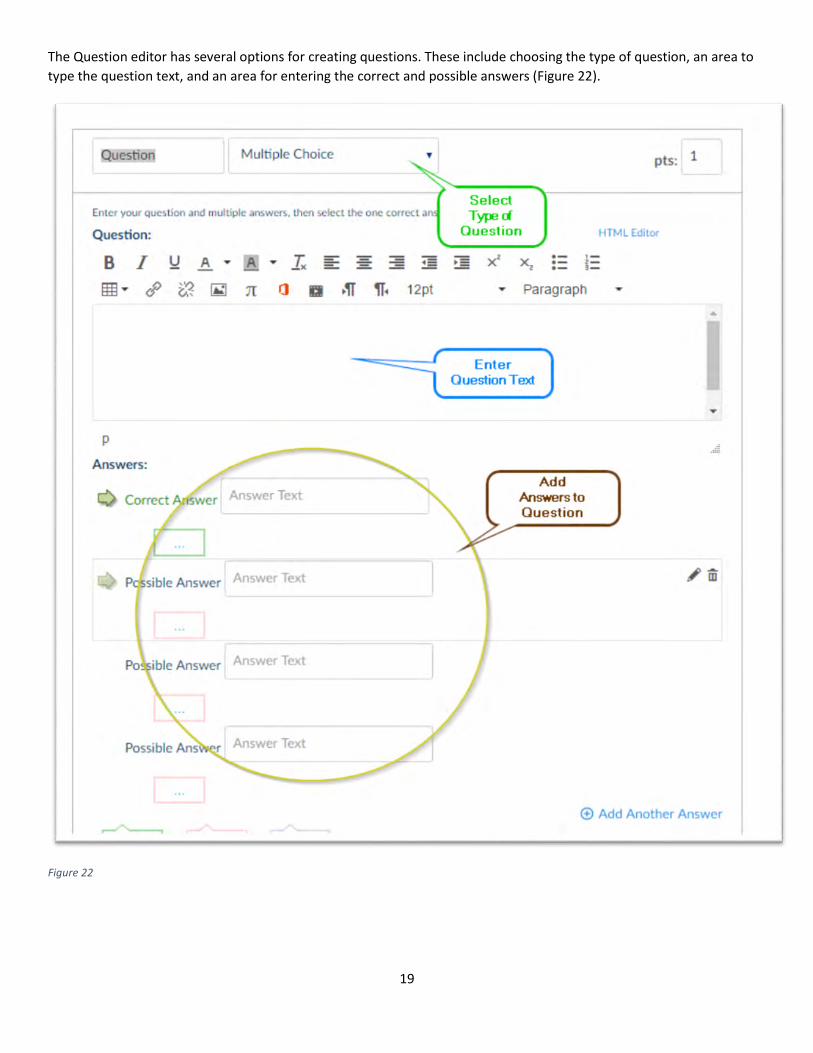
The Question editor has several options for creating questions. These include choosing the type of question, an area to
type the question text, and an area for entering the correct and possible answers (Figure 22).
Figure 22
20
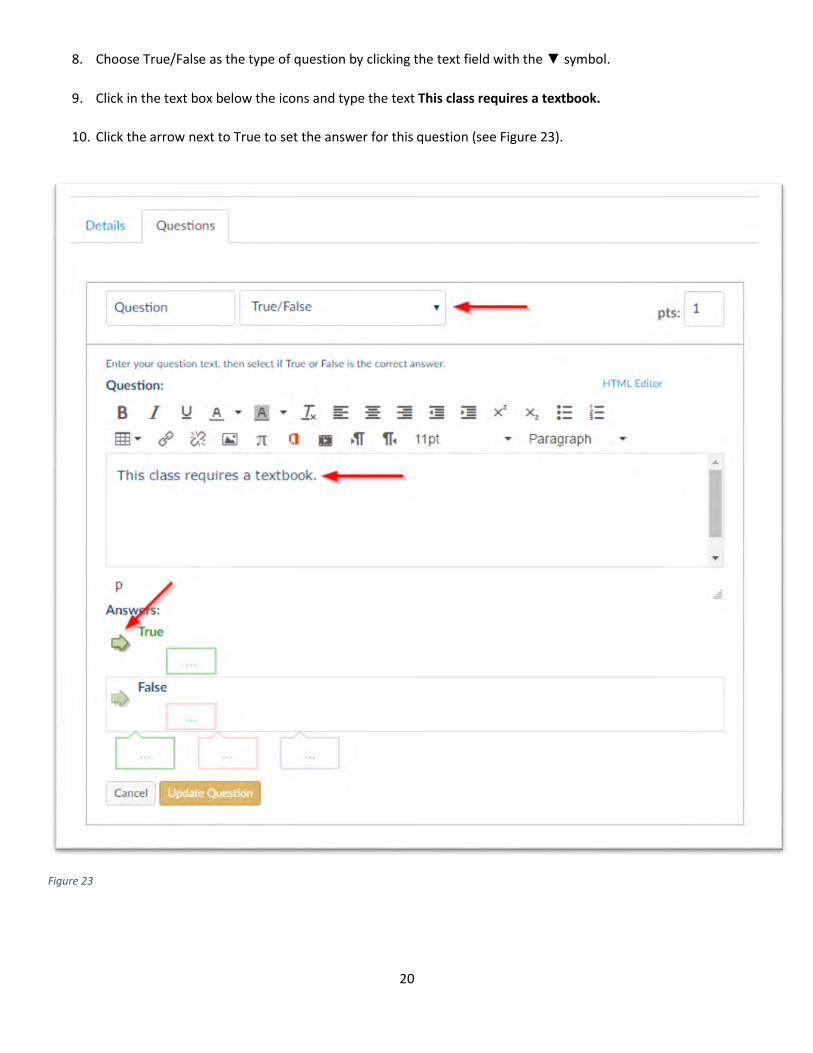
8. Choose True/False as the type of question by clicking the text field with the ▼ symbol.
9. Click in the text box below the icons and type the text This class requires a textbook.
10. Click the arrow next to True to set the answer for this question (see Figure 23).
Figure 23
21
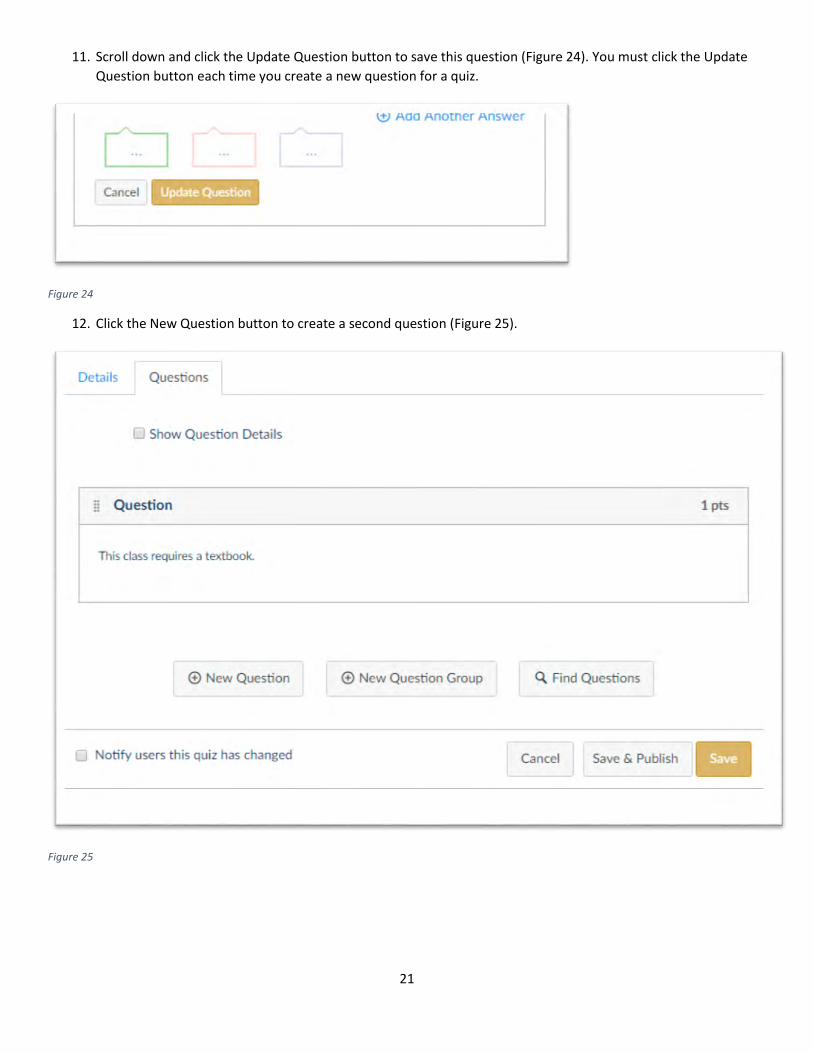
11. Scroll down and click the Update Question button to save this question (Figure 24). You must click the Update
Question button each time you create a new question for a quiz.
Figure 24
12. Click the New Question button to create a second question (Figure 25).
Figure 25
22
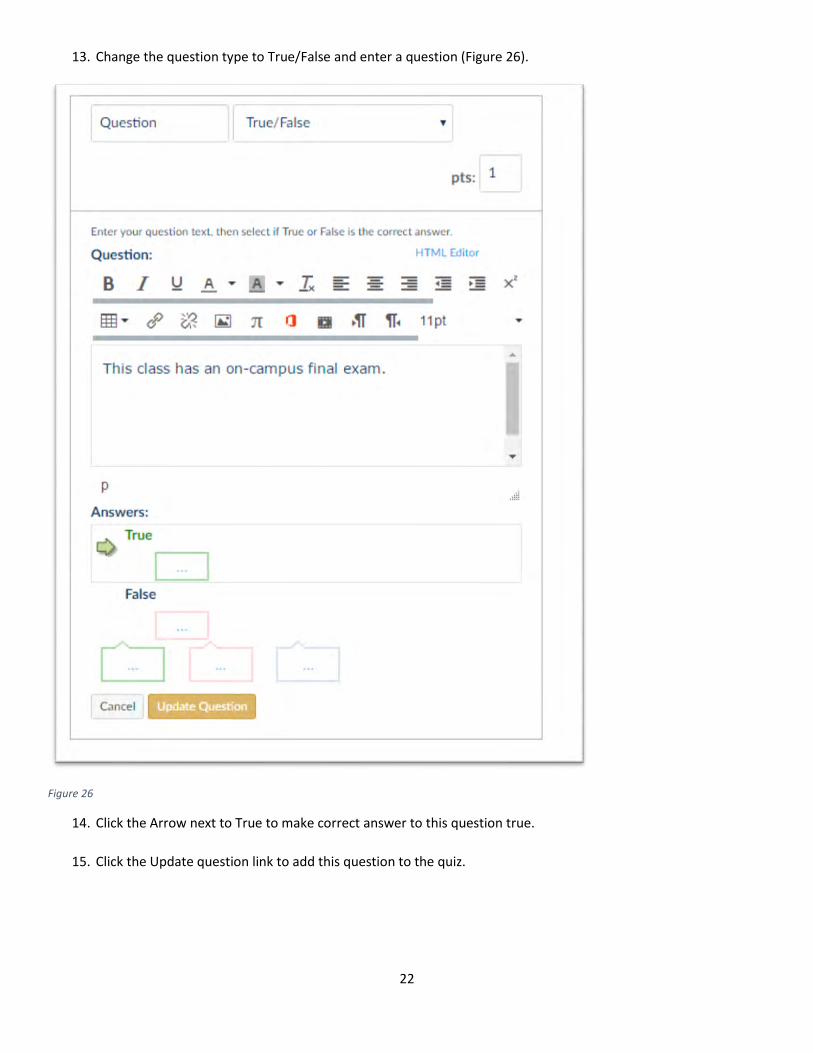
13. Change the question type to True/False and enter a question (Figure 26).
Figure 26
14. Click the Arrow next to True to make correct answer to this question true.
15. Click the Update question link to add this question to the quiz.
23
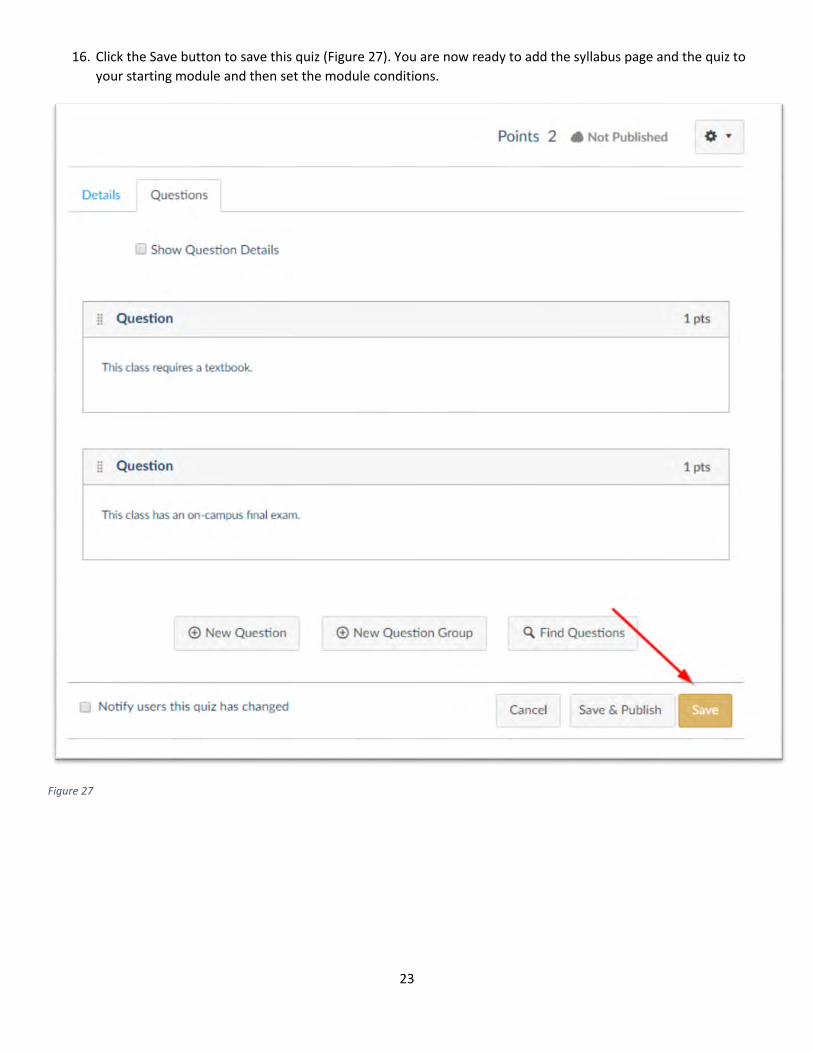
16. Click the Save button to save this quiz (Figure 27). You are now ready to add the syllabus page and the quiz to
your starting module and then set the module conditions.
Figure 27

24
Adding Content to the Module To add content to a module you must choose the module and click the + button to add content.
1. Click the Modules link.
2. In the Getting Started module click the + button to add some content as shown in Figure 28.
Figure 28
3. Click the drop-down list (indicated by the ▼ ) and choose Content Page as shown in Figure 29.
Figure 29
25
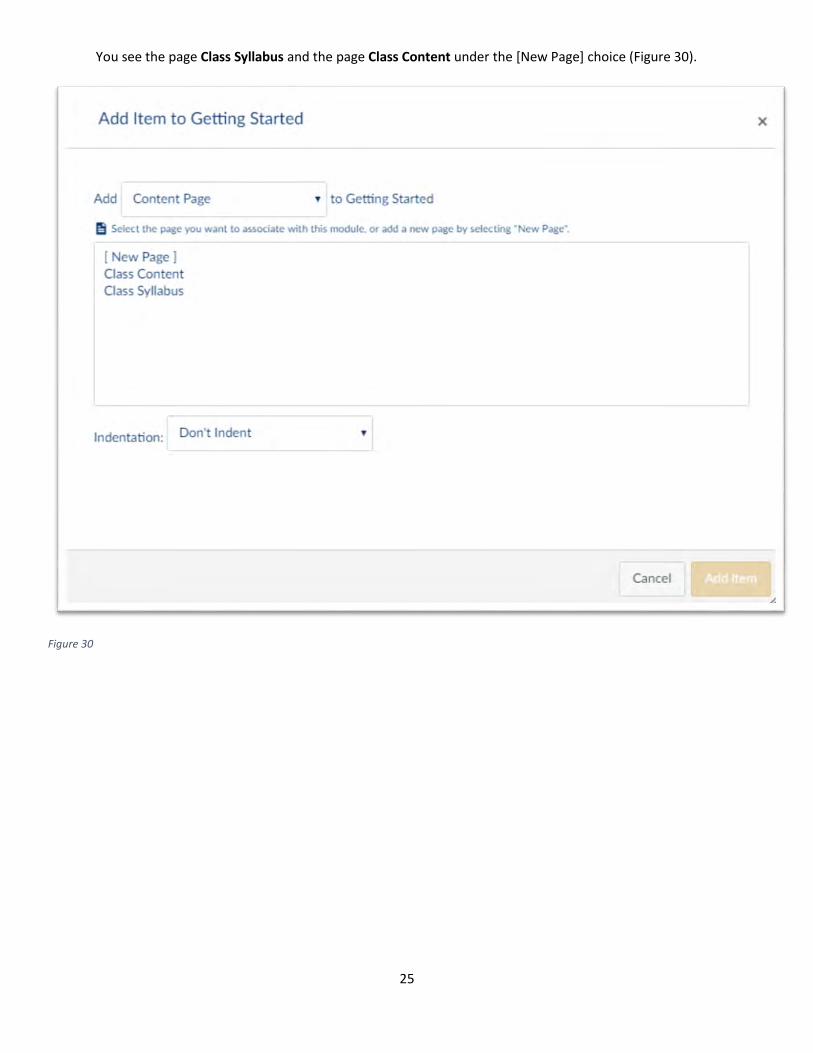
You see the page Class Syllabus and the page Class Content under the [New Page] choice (Figure 30).
Figure 30
26
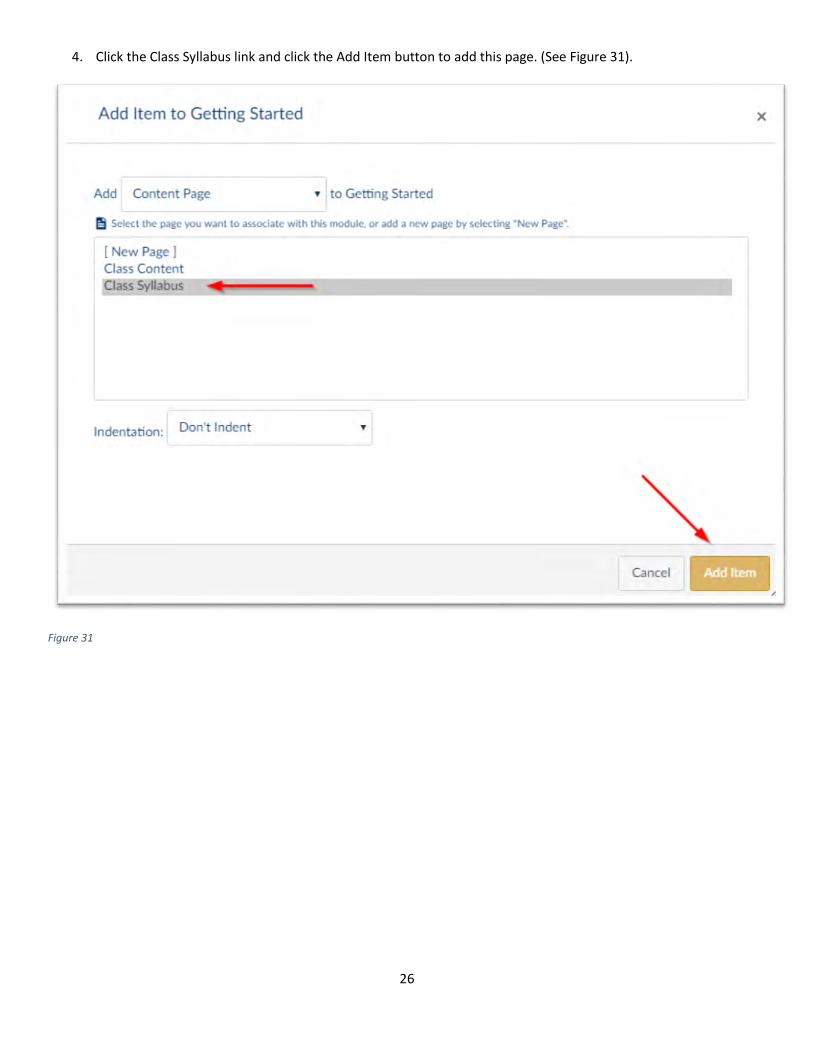
4. Click the Class Syllabus link and click the Add Item button to add this page. (See Figure 31).
Figure 31
27
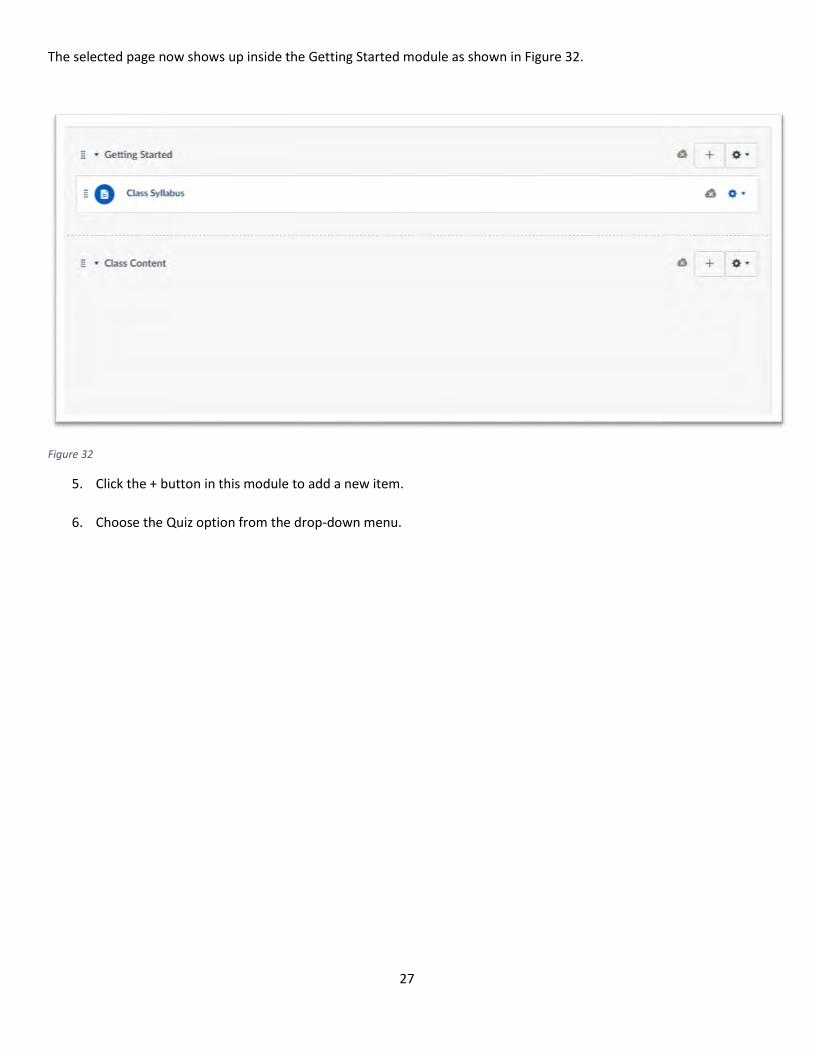
The selected page now shows up inside the Getting Started module as shown in Figure 32.
Figure 32
5. Click the + button in this module to add a new item.
6. Choose the Quiz option from the drop-down menu.
28
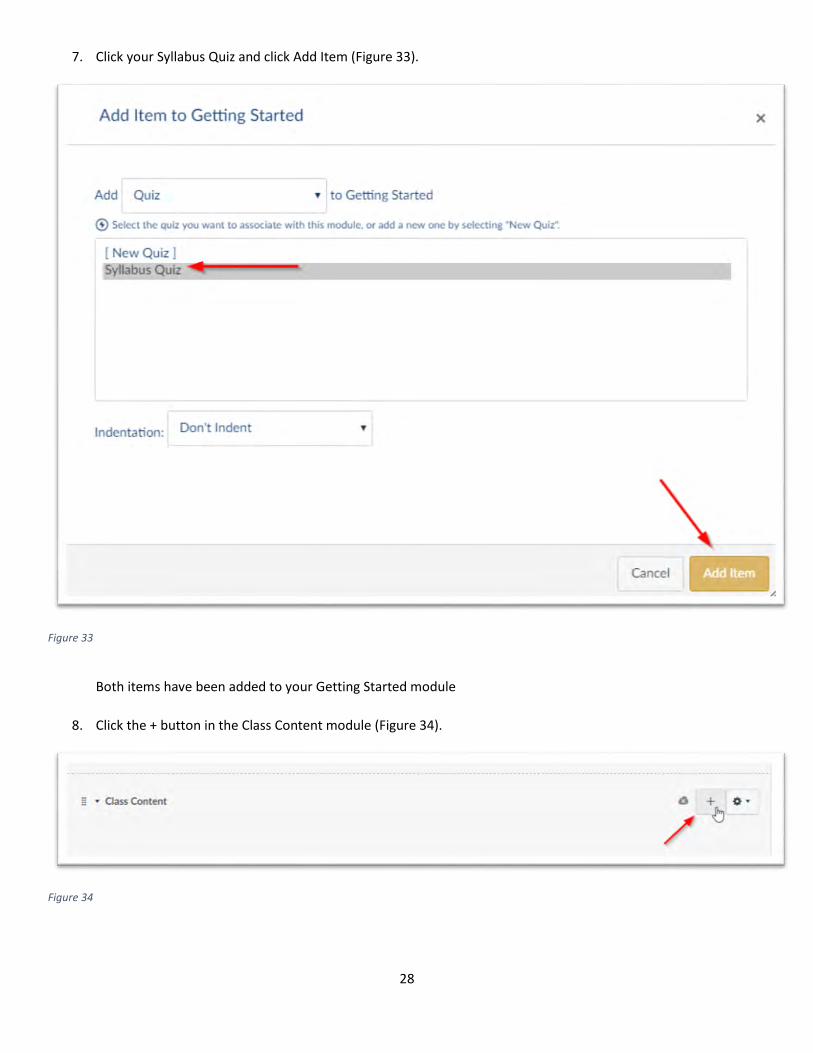
7. Click your Syllabus Quiz and click Add Item (Figure 33).
Figure 33
Both items have been added to your Getting Started module
8. Click the + button in the Class Content module (Figure 34).
Figure 34
29
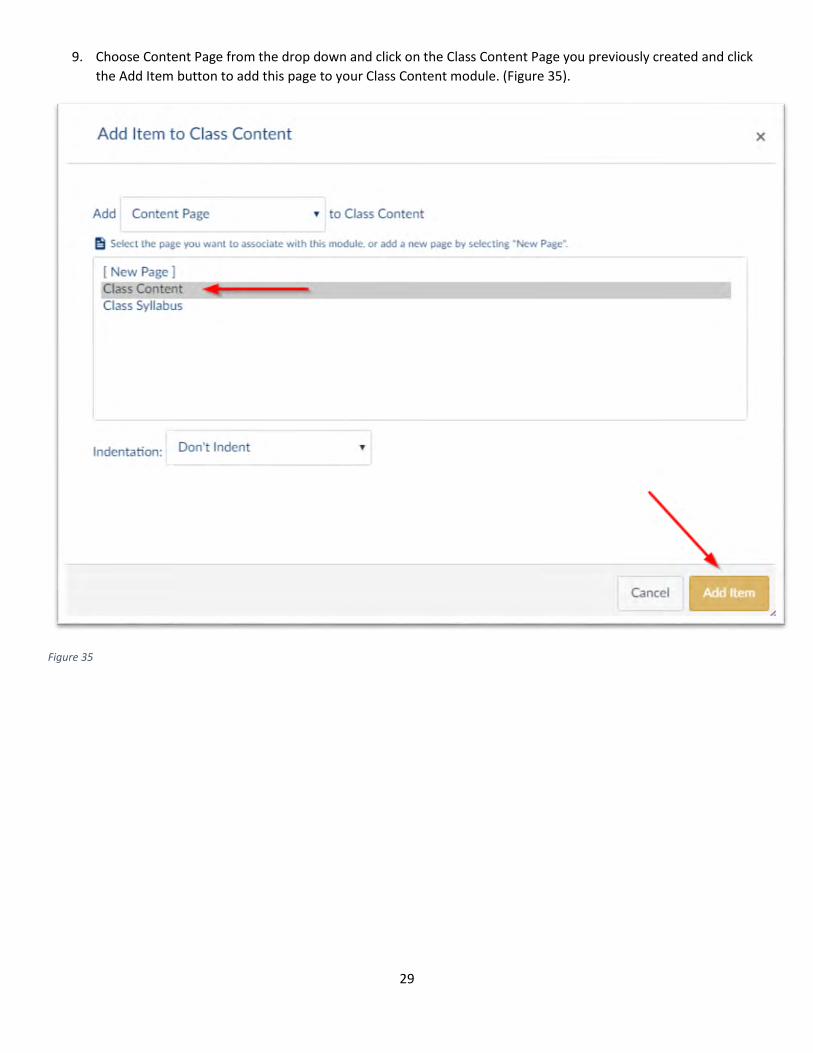
9. Choose Content Page from the drop down and click on the Class Content Page you previously created and click
the Add Item button to add this page to your Class Content module. (Figure 35).
Figure 35
30
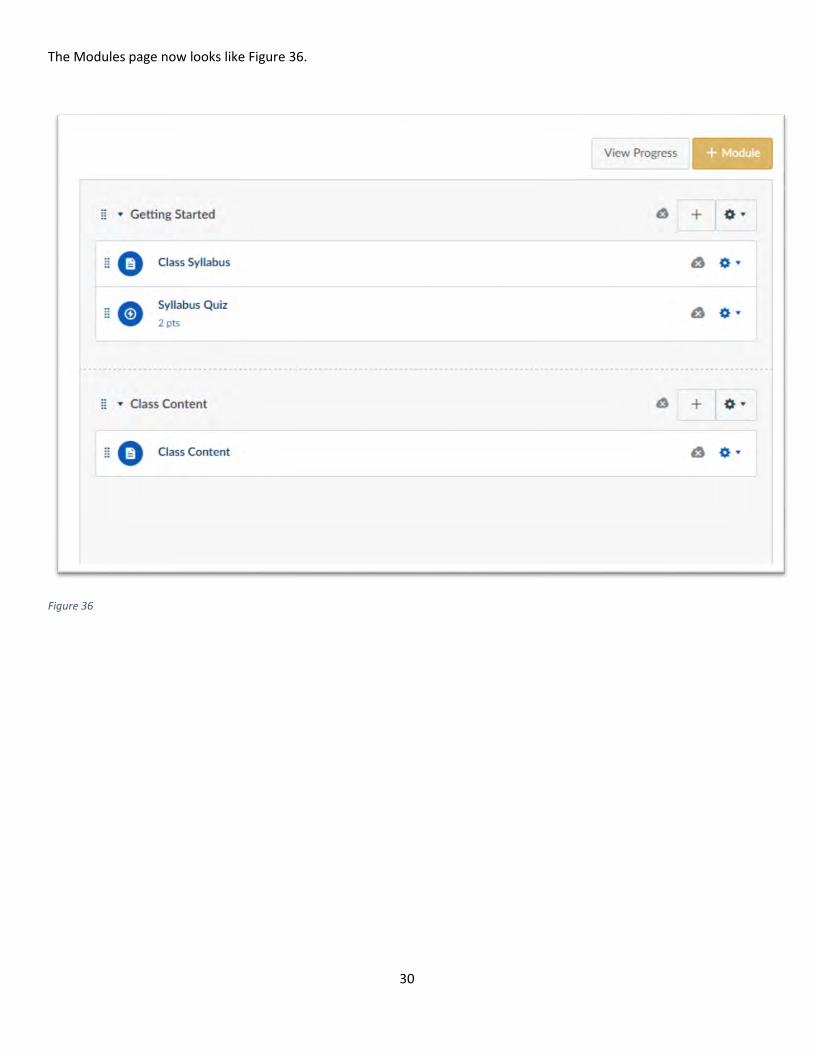
The Modules page now looks like Figure 36.
Figure 36
31
Setting Conditions on the Modules Once you have created the modules, you will next set the conditions for them. The two conditions you will set are:
The condition for completing the Getting Started module
The condition for starting the Class Content module
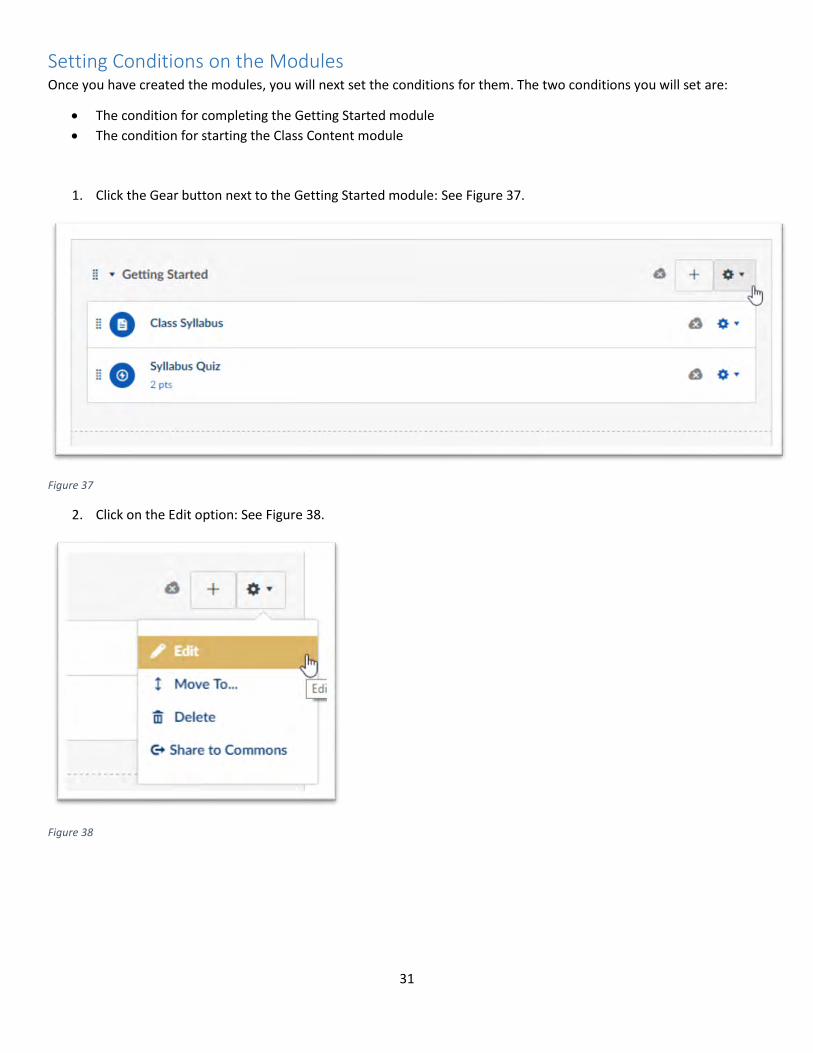
1. Click the Gear button next to the Getting Started module: See Figure 37.
Figure 37
2. Click on the Edit option: See Figure 38.
Figure 38
32
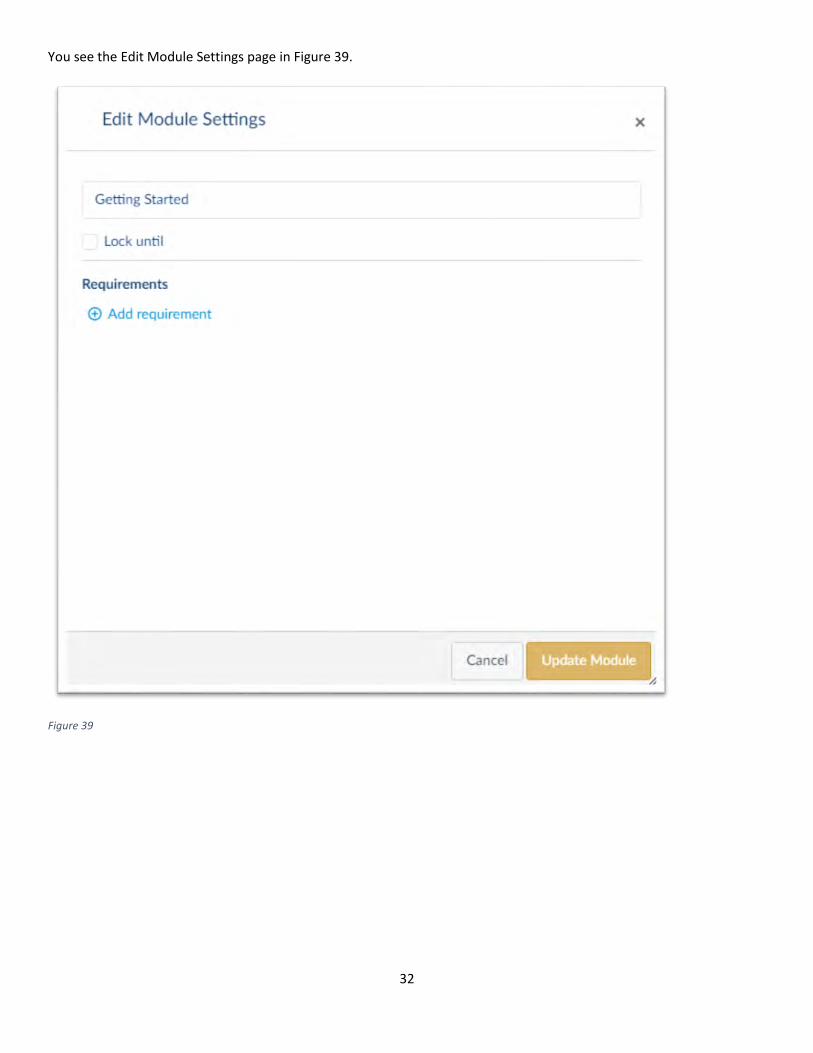
You see the Edit Module Settings page in Figure 39.
Figure 39
33
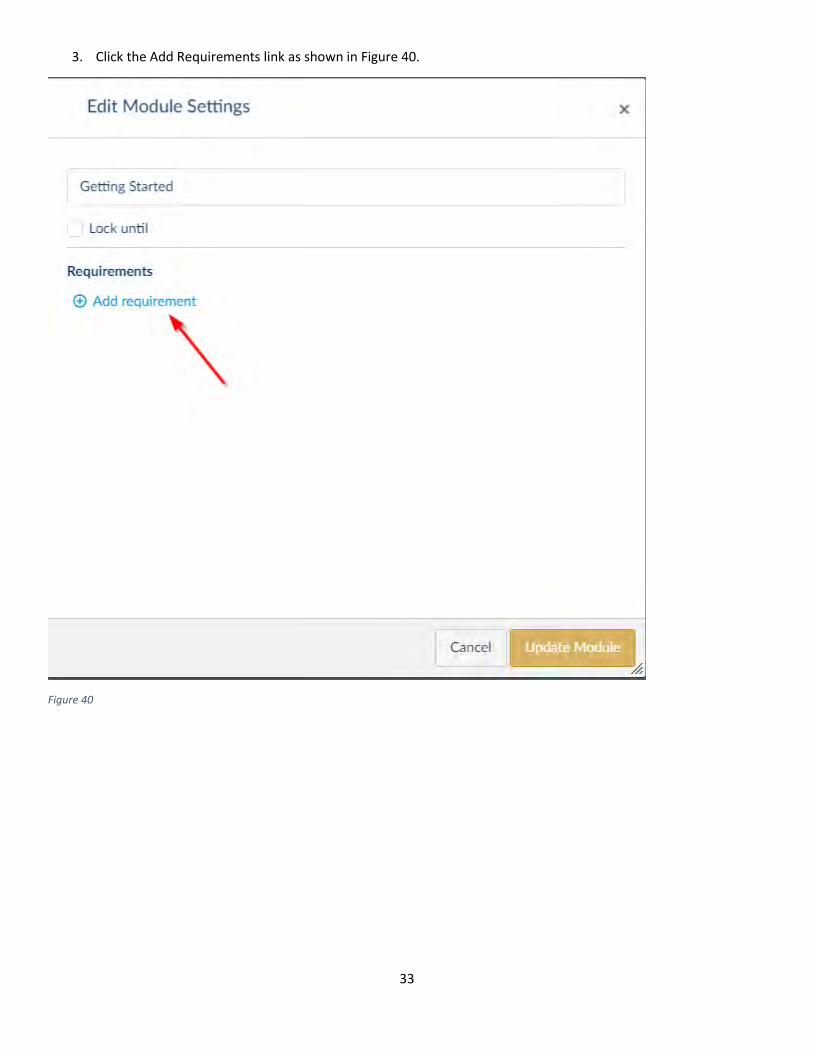
3. Click the Add Requirements link as shown in Figure 40.
Figure 40
34
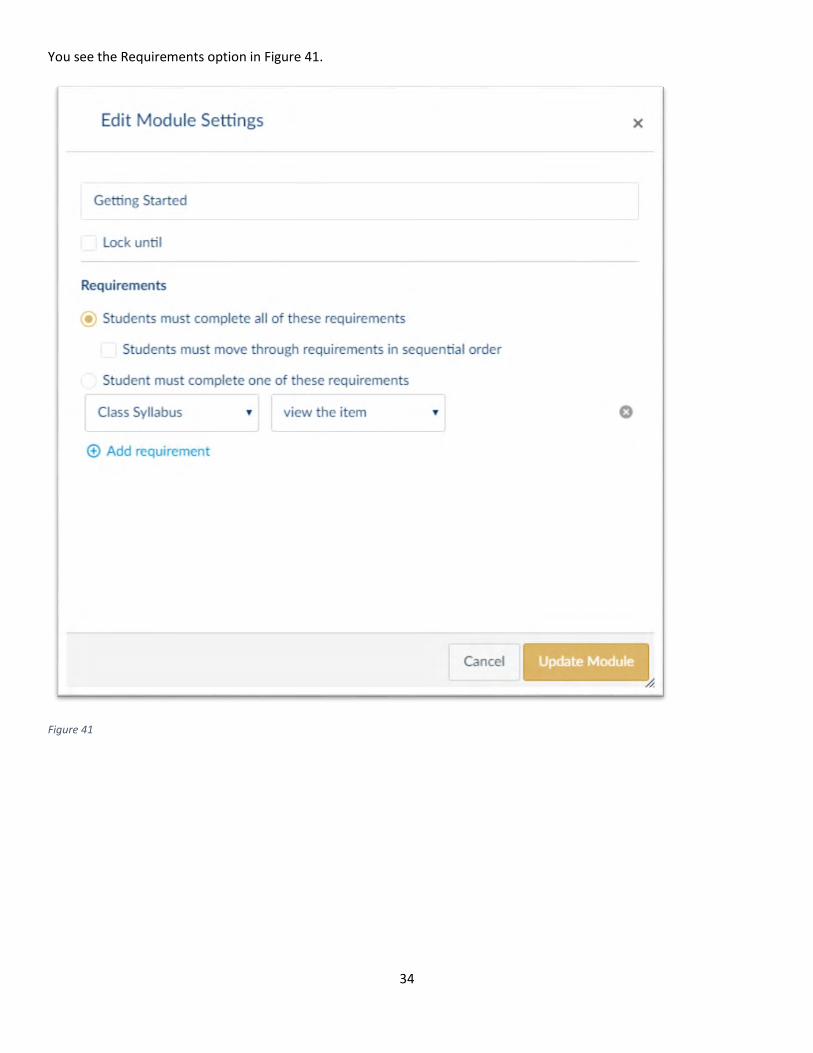
You see the Requirements option in Figure 41.
Figure 41
35
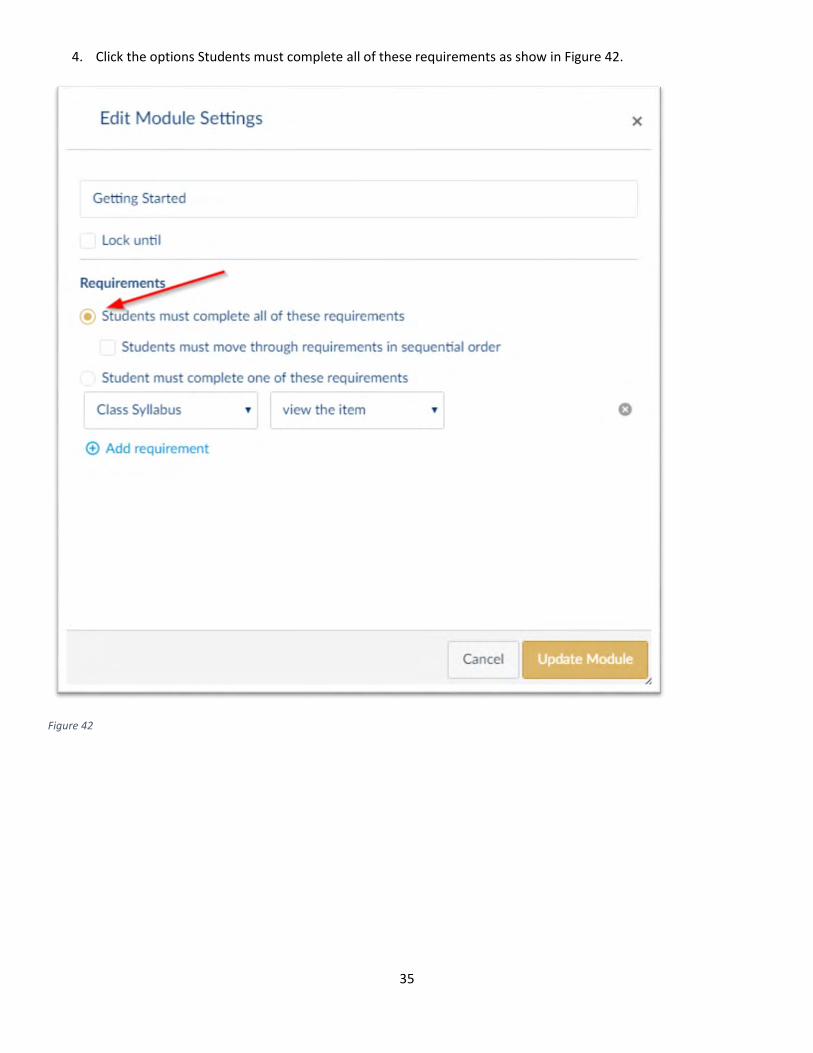
4. Click the options Students must complete all of these requirements as show in Figure 42.
Figure 42
36
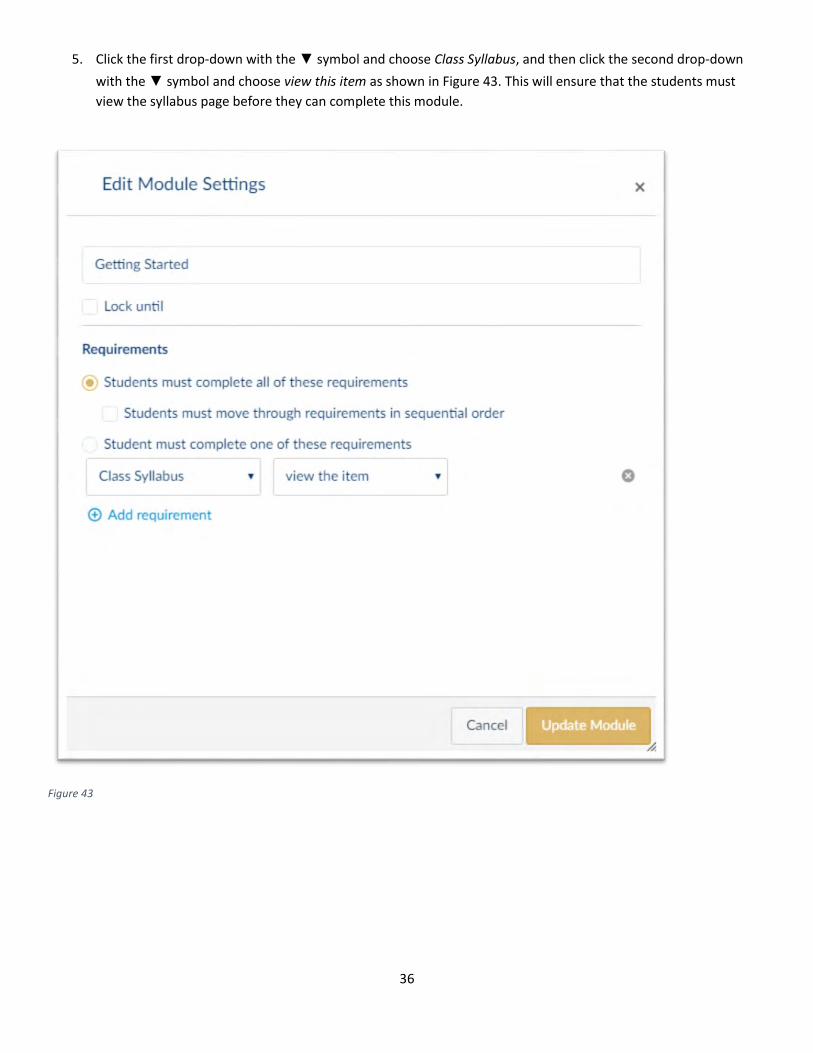
5. Click the first drop-down with the ▼ symbol and choose Class Syllabus, and then click the second drop-down
with the ▼ symbol and choose view this item as shown in Figure 43. This will ensure that the students must
view the syllabus page before they can complete this module.
Figure 43
37
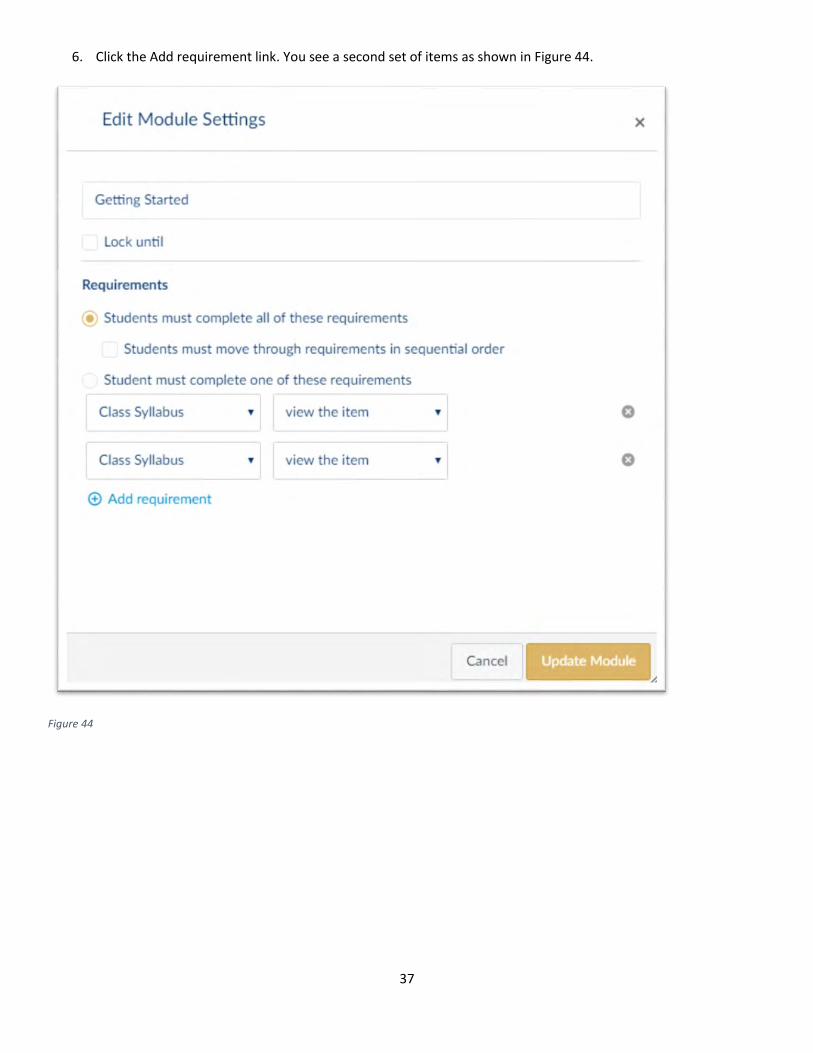
6. Click the Add requirement link. You see a second set of items as shown in Figure 44.
Figure 44
38
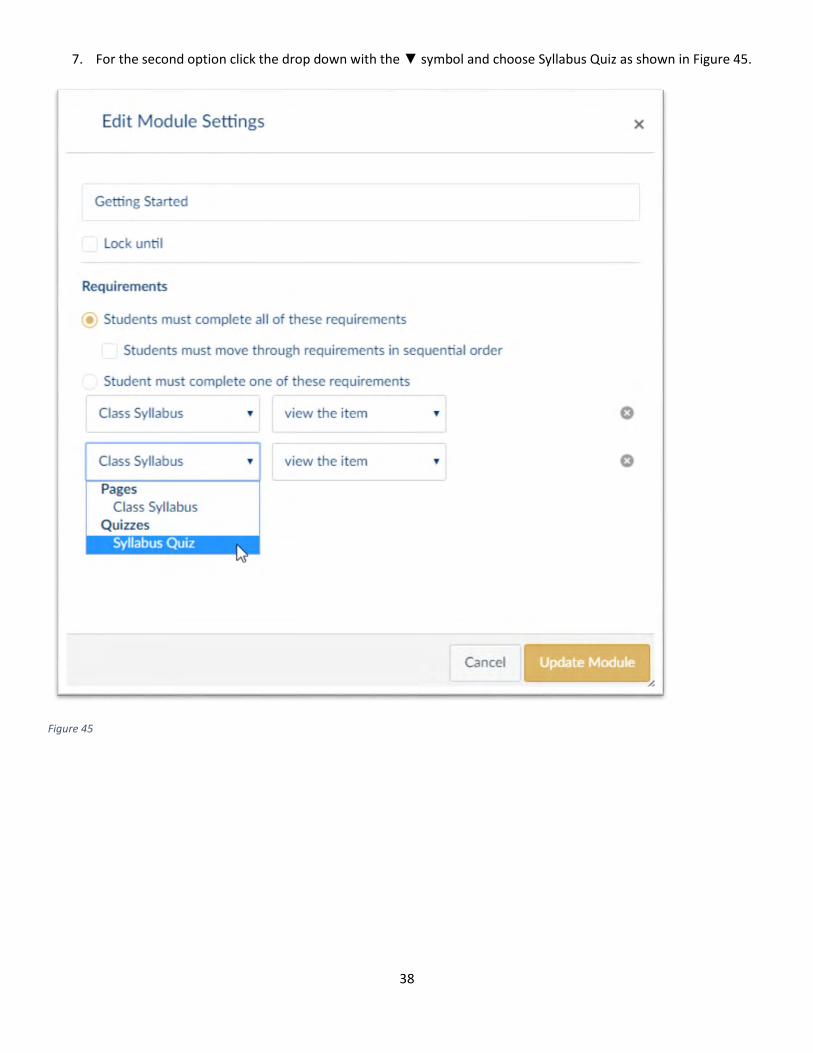
7. For the second option click the drop down with the ▼ symbol and choose Syllabus Quiz as shown in Figure 45.
Figure 45
39
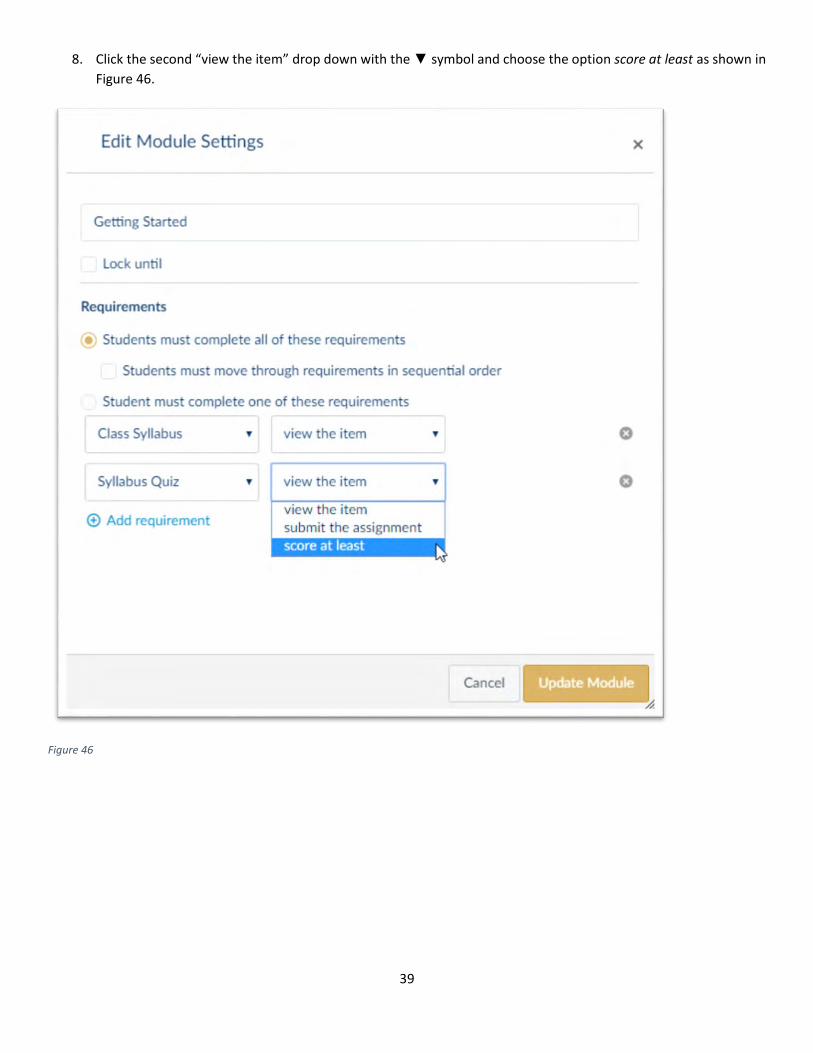
8. Click the second “view the item” drop down with the ▼ symbol and choose the option score at least as shown in
Figure 46.
Figure 46
40
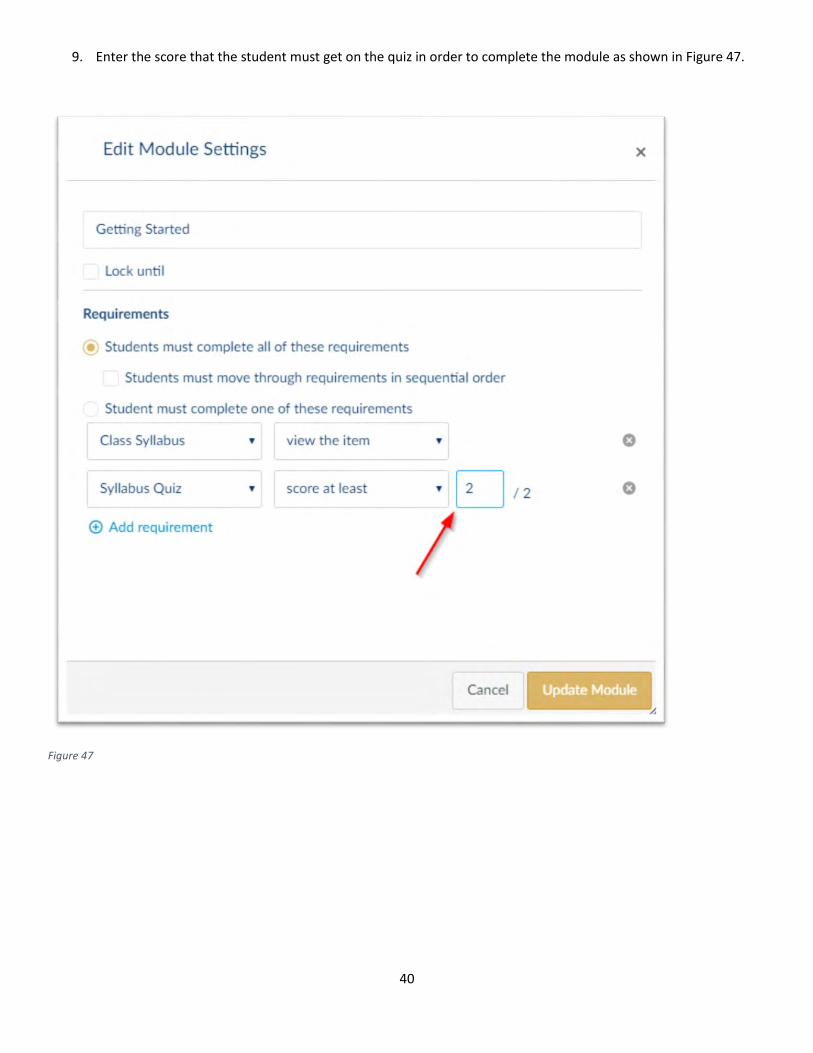
9. Enter the score that the student must get on the quiz in order to complete the module as shown in Figure 47.
Figure 47
41
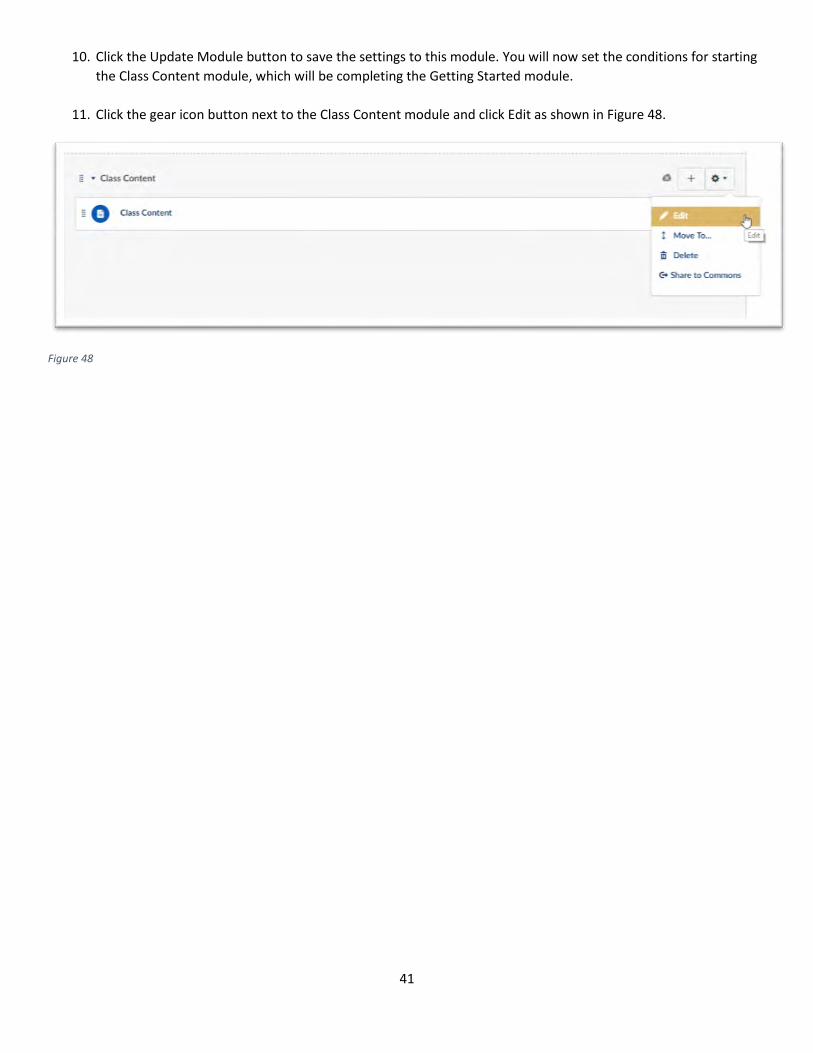
10. Click the Update Module button to save the settings to this module. You will now set the conditions for starting
the Class Content module, which will be completing the Getting Started module.
11. Click the gear icon button next to the Class Content module and click Edit as shown in Figure 48.
Figure 48
42
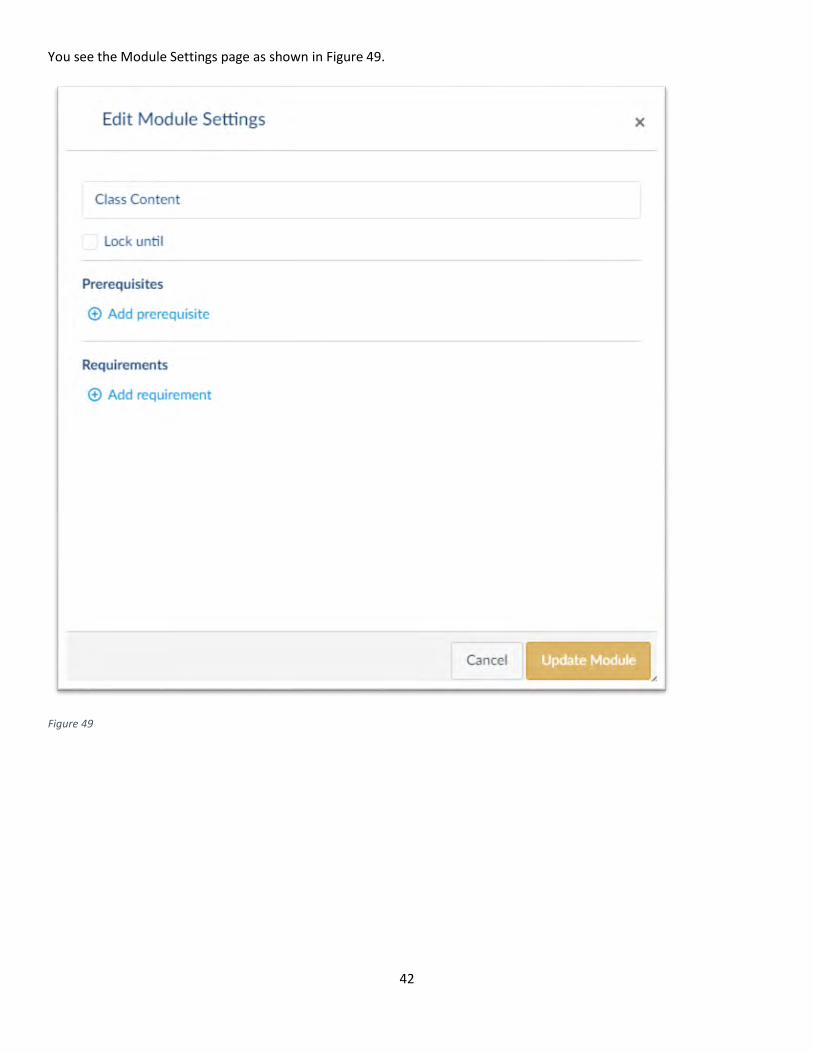
You see the Module Settings page as shown in Figure 49.
Figure 49
43
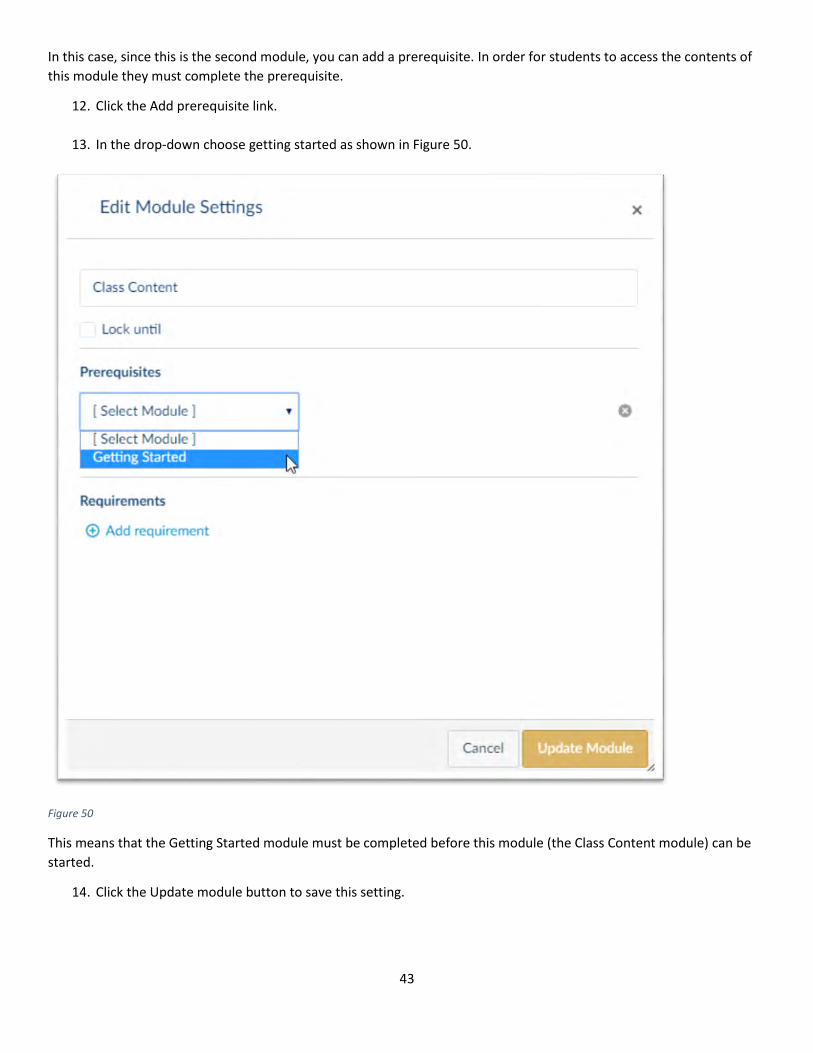
In this case, since this is the second module, you can add a prerequisite. In order for students to access the contents of
this module they must complete the prerequisite.
12. Click the Add prerequisite link.
13. In the drop-down choose getting started as shown in Figure 50.
Figure 50
This means that the Getting Started module must be completed before this module (the Class Content module) can be
started.
14. Click the Update module button to save this setting.
44
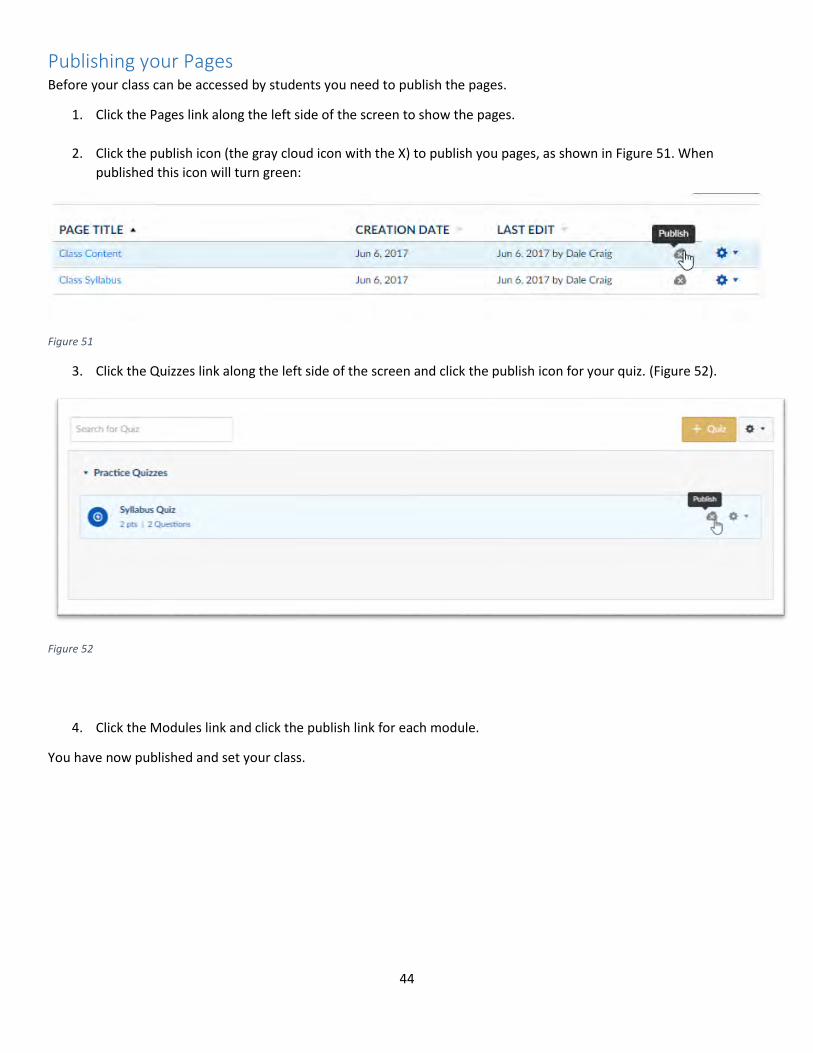
Publishing your Pages Before your class can be accessed by students you need to publish the pages.
1. Click the Pages link along the left side of the screen to show the pages.
2. Click the publish icon (the gray cloud icon with the X) to publish you pages, as shown in Figure 51. When
published this icon will turn green:
Figure 51
3. Click the Quizzes link along the left side of the screen and click the publish icon for your quiz. (Figure 52).
Figure 52
4. Click the Modules link and click the publish link for each module.
You have now published and set your class.
45
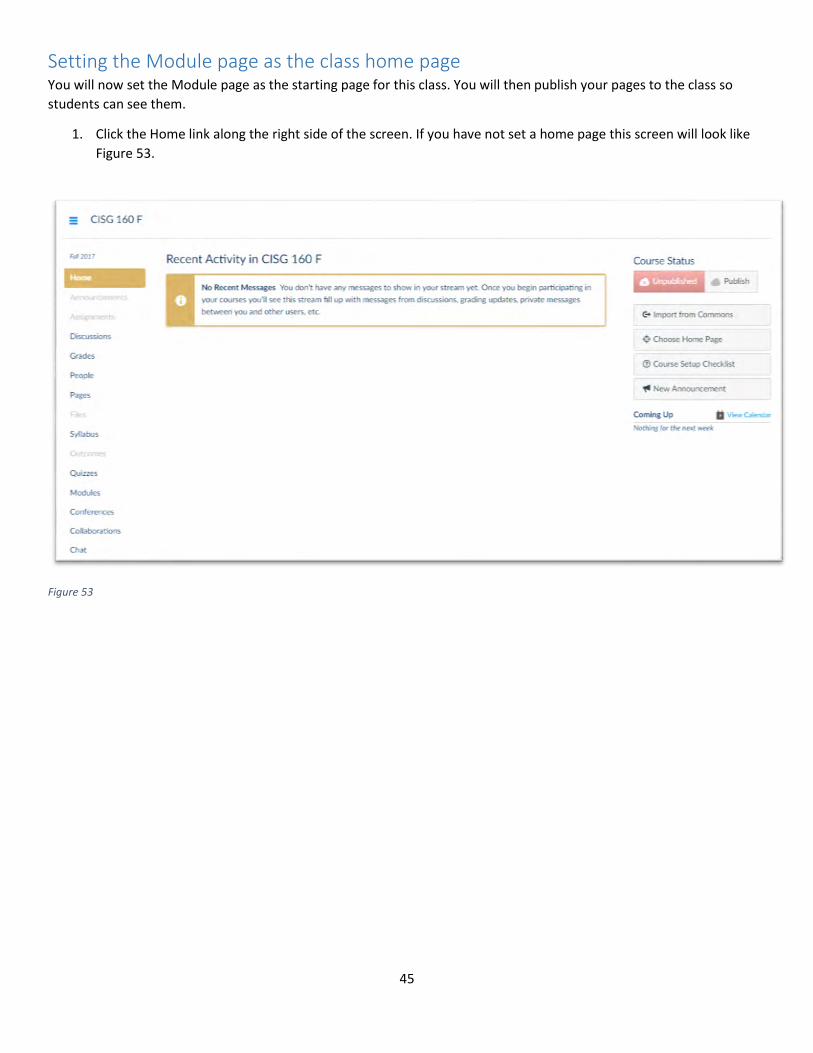
Setting the Module page as the class home page You will now set the Module page as the starting page for this class. You will then publish your pages to the class so
students can see them.
1. Click the Home link along the right side of the screen. If you have not set a home page this screen will look like
Figure 53.
Figure 53
46
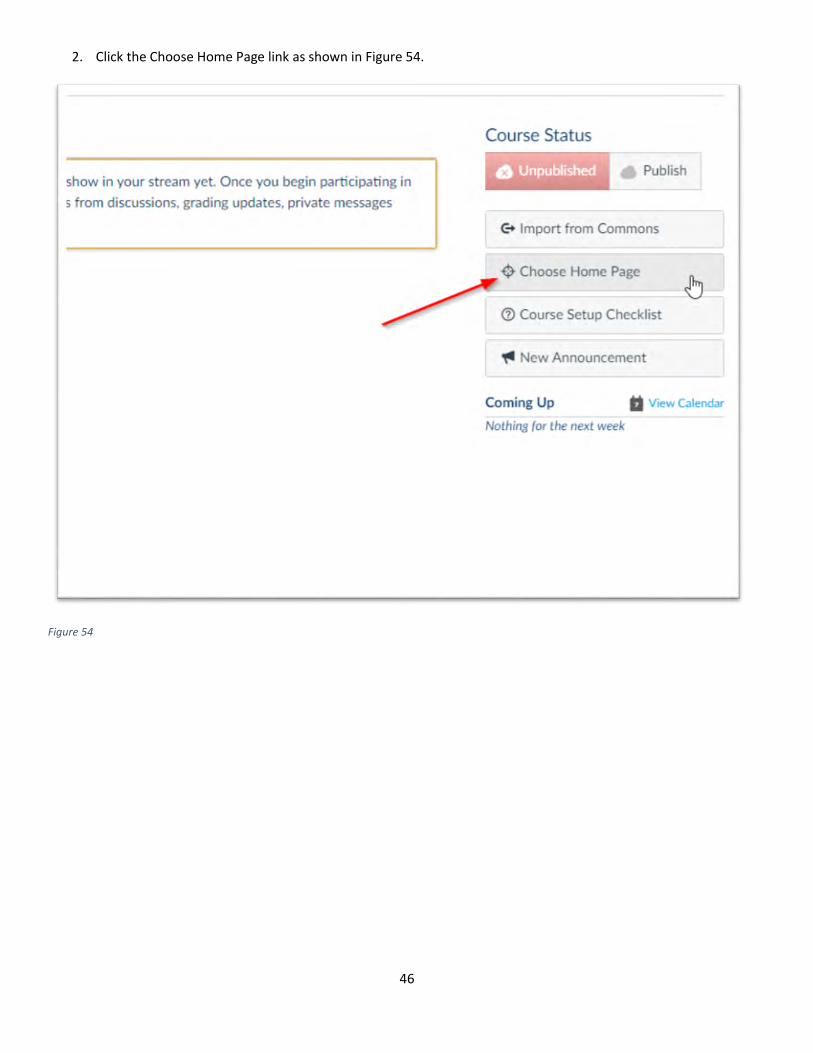
2. Click the Choose Home Page link as shown in Figure 54.
Figure 54
47
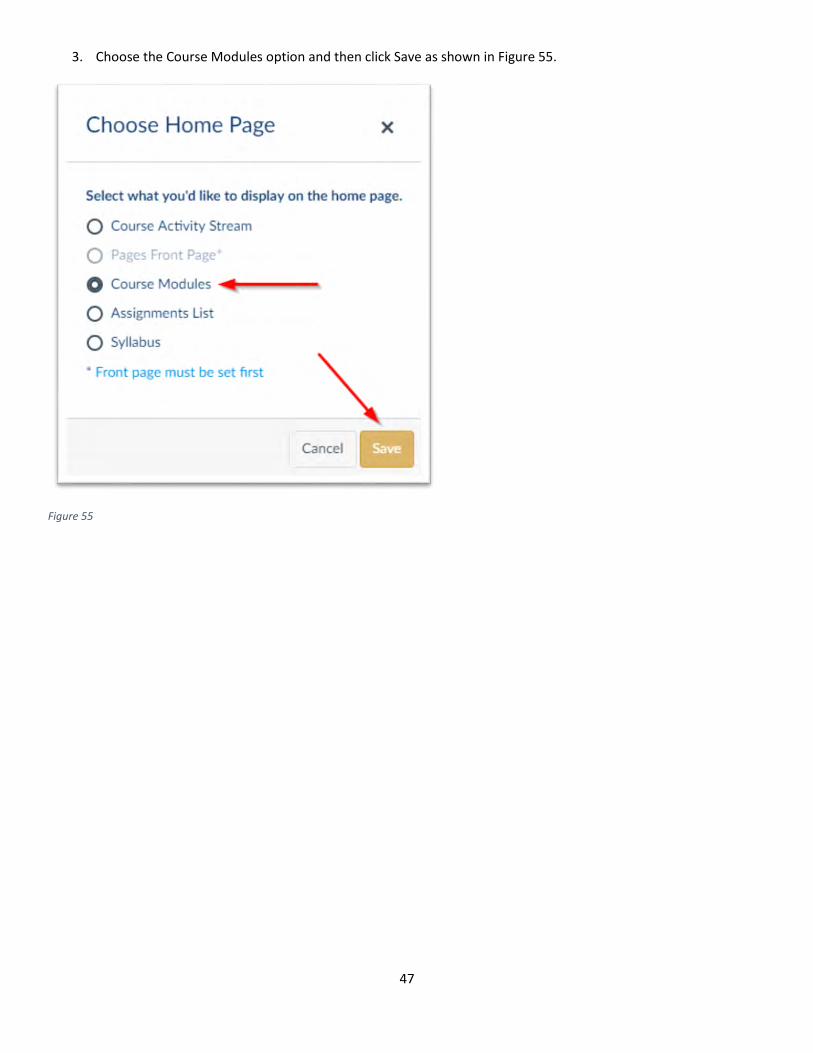
3. Choose the Course Modules option and then click Save as shown in Figure 55.
Figure 55
48
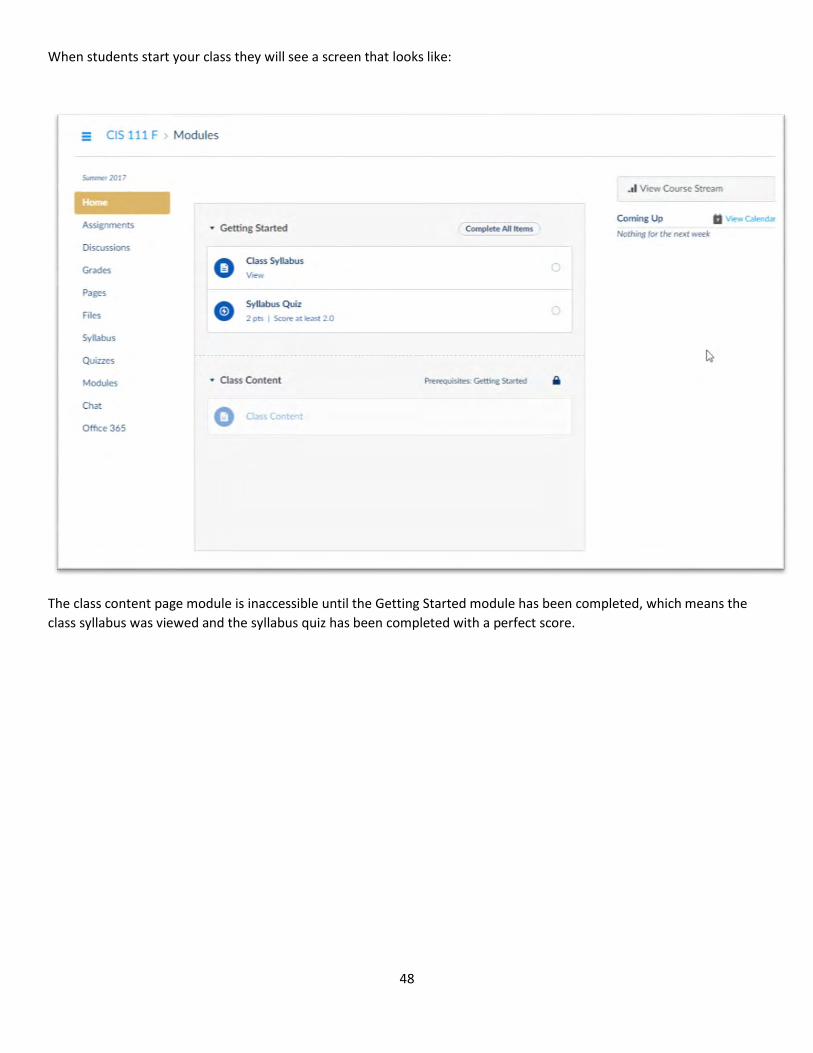
When students start your class they will see a screen that looks like:
The class content page module is inaccessible until the Getting Started module has been completed, which means the
class syllabus was viewed and the syllabus quiz has been completed with a perfect score.