creating a databound treeview as an inherited...
TRANSCRIPT
December, 2009 Page 1 of 19
CREATING A DATABOUND TREEVIEW AS AN INHERITED CONTROL
John Sadd Fellow and OpenEdge Evangelist
Document Version 1.0 November 2009
John Sadd
Using Visual Designer and GUI for .NET
Creating a DataBound TreeViewas an Inherited Control

Creating a Databound TreeView as an Inherited Control John Sadd
December, 2009 Page 2 of 19
DISCLAIMER
Certain portions of this document contain information about Progress Software Corporation’s plans for future product development and overall business strategies. Such information is proprietary and confidential to Progress Software Corporation and may be used by you solely in accordance with the terms and conditions specified in the PSDN Online (http://www.psdn.com) Terms of Use (http://psdn.progress.com/terms/index.ssp). Progress Software Corporation reserves the right, in its sole discretion, to modify or abandon without notice any of the plans described herein pertaining to future development and/or business development strategies. Any reference to third party software and/or features is intended for illustration purposes only. Progress Software Corporation does not endorse or sponsor such third parties or software.
This document accompanies a two-part video presentation on Creating a DataBound TreeView as an Inherited Control, which shows a simple example of creating an Inherited Control in Visual Designer, in this case a visual control that inherits and is based on the Microsoft TreeView control that’s included in OpenEdge 10.2, and then adds properties and behavior to it to specialize it for use in ABL applications.
First I’ll look up the Treeview in the Class Browser as a reminder that you can use the Class Browser to review all the methods, properties, and events that are defined for any class. This can be especially useful to get an overview of classes that define controls that are available from Microsoft, or if you purchase them with OpenEdge, from Infragistics, since you don’t have access to the source for those controls. If I open the Class Browser as a Fast View, I can search for a control or other class that I want to inspect.

Creating a Databound TreeView as an Inherited Control John Sadd
December, 2009 Page 3 of 19
In this case I want to create an extended TreeView control, so I search for that by entering treeview in the Search fill-in at the top of the Class Browser, and then select the Microsoft control from the System.Windows.Forms namespace. The methods that define the control’s behavior are displayed first, and if I collapse that list, I you can see the control’s properties as well as shown below.
Scrolling down through the properties the significant thing I can confirm is that there is no DataSource property for the control. The control isn’t data-bound, that is, it isn’t set up to create treeview nodes automatically based on a data source. That’s the part of the control that I want to extend, so that I can associate an instance of the control with another class that supplies multi-level data, for instance from a ProDataSet, and have it automatically create treeview nodes to display field values from all the rows in the ProDataSet.

Creating a Databound TreeView as an Inherited Control John Sadd
December, 2009 Page 4 of 19
If I open the File menu, I can select New -> ABL Inherited Control, a control defined as an ABL class that inherits from a single other control class.
The control’s package is TreeView, so the class file will be located in a TreeView sub-directory in my project. I name the class DataBoundTreeView, so I wind up with an ABL class named DataBoundTreeView.cls. This dialog makes you specify what class you’re inheriting from, so I can search for the Microsoft control class I locate the TreeView class in System.Windows.Forms and select that.

Creating a Databound TreeView as an Inherited Control John Sadd
December, 2009 Page 5 of 19
I can then enter a Description or other information that I want to have appear in the header for the class’s source code, and finish up the definition.
Back in the design pane for the new control, there’s no visualization of it to display, because there’s no form yet to display it in, so I first take a look at the code for the new class.
You can see from the code box below that the CLASS statement names the control class that the new class inherits. My new class is a Microsoft TreeView control just by virtue of the INHERITS phrase in the class definition. Above it, there's a USING statement that tells the compiler to search for the control in the namespace System.Windows.Forms, so that it doesn't need to be fully qualified in the CLASS statement.
USING Progress.Lang.*. USING System.Windows.Forms.*. CLASS TreeView.DataBoundTreeView INHERITS TreeView :
I want to extend the control by making it load and display data automatically, so I need to define a couple of new class properties to do that. The first is a DataSource property. For simplicity, I just make this the name of a class that can provide data. . I also need a second property that defines which field values for each level of data the treeview should display in the tree’s nodes, so that will be a delimited character string. The property definitions don’t have any specific code yet for getting or setting the property value. I define the code to execute when the property is set later in this session.
DEFINE PUBLIC PROPERTY DataSource AS CHARACTER NO-UNDO GET. SET. DEFINE PUBLIC PROPERTY FieldList AS CHARACTER NO-UNDO GET. SET.

Creating a Databound TreeView as an Inherited Control John Sadd
December, 2009 Page 6 of 19
Before I define any more code for the ABL class, I want to show you how to see the effects of what I’ve done so far. After going back to the design pane I first need to put my new control where I can select it just like any other control. Right-clicking anywhere in the controls area of the Toolbox, I select Add Control Group to create a new group of my own extended controls.
I call the new group CustomControls, and after it’s created for me, I right-click in the group and select Add Controls. My new control is an ABL control, so I select the ABL Controls tab and select the DataBoundTreeView control in the TreeView package, and click OK. My new control is now available to drop onto a form just like any other control.
Creating a Databound TreeView as an Inherited Control John Sadd
December, 2009 Page 7 of 19
Note that if you put a bitmap file into the same directory as the source file for the control, with the same name, and with the extension .bmp, that icon will appear in the Toolbox in place of the default icon you see here.
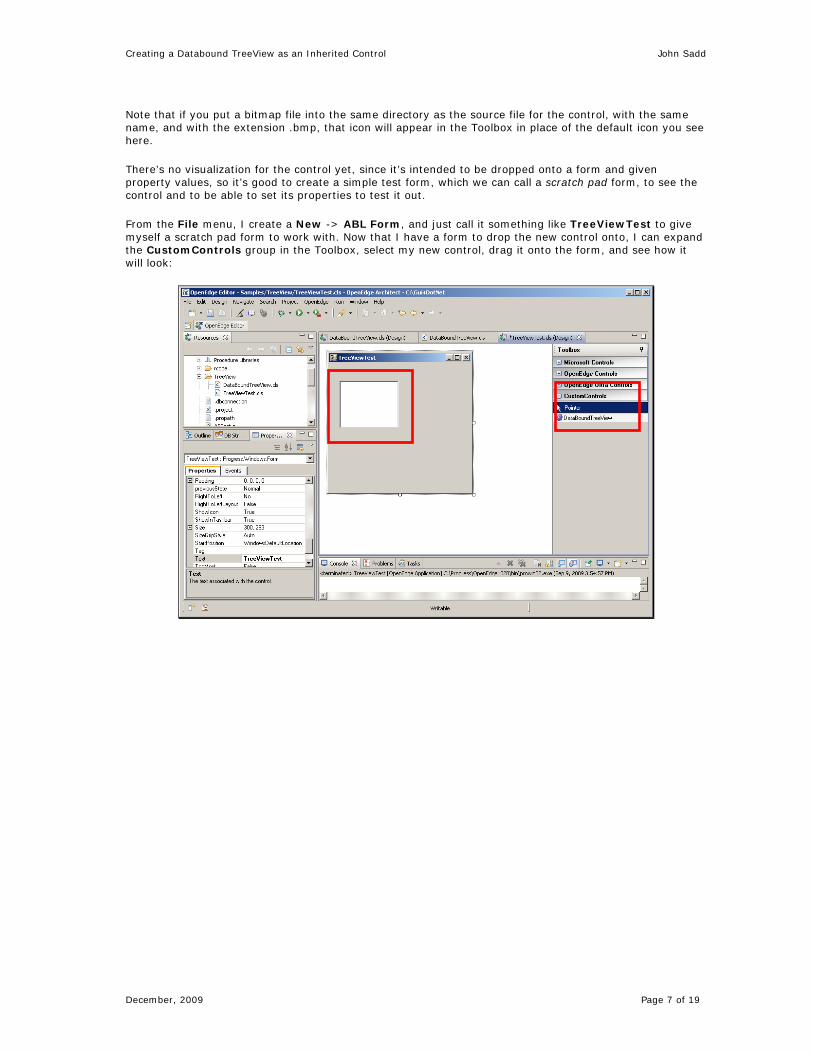
There’s no visualization for the control yet, since it’s intended to be dropped onto a form and given property values, so it’s good to create a simple test form, which we can call a scratch pad form, to see the control and to be able to set its properties to test it out.
From the File menu, I create a New -> ABL Form, and just call it something like TreeViewTest to give myself a scratch pad form to work with. Now that I have a form to drop the new control onto, I can expand the CustomControls group in the Toolbox, select my new control, drag it onto the form, and see how it will look:
Creating a Databound TreeView as an Inherited Control John Sadd
December, 2009 Page 8 of 19
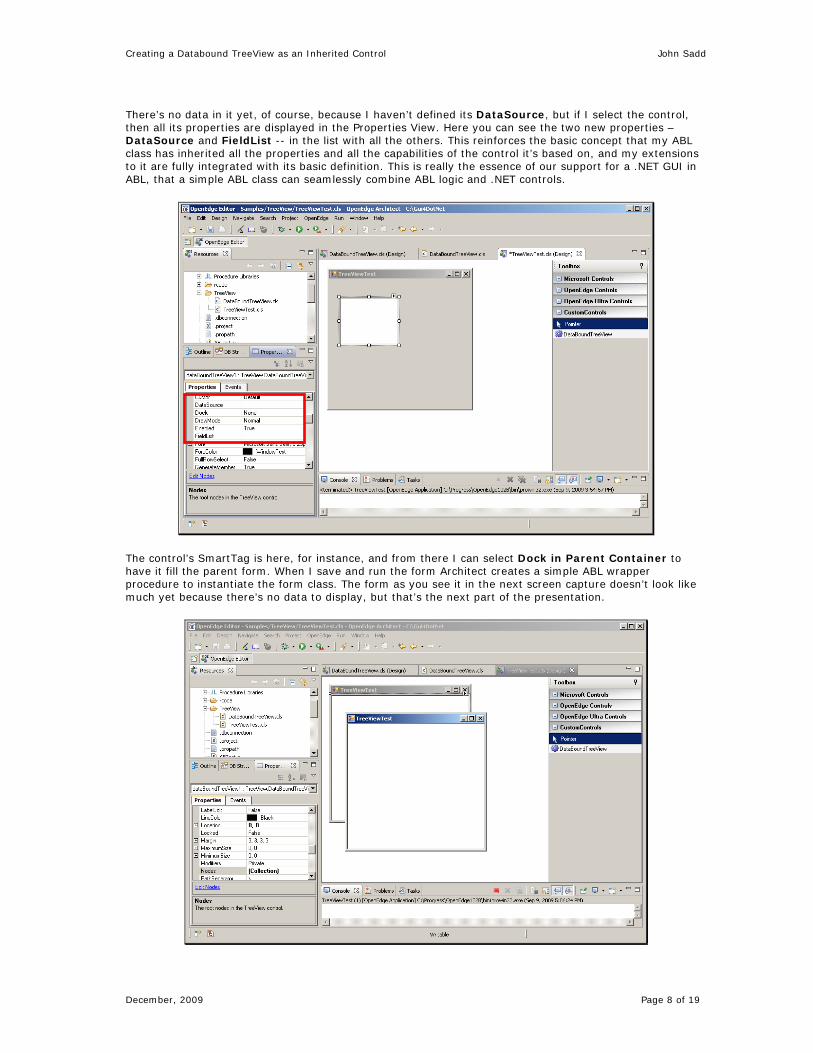
There’s no data in it yet, of course, because I haven’t defined its DataSource, but if I select the control, then all its properties are displayed in the Properties View. Here you can see the two new properties – DataSource and FieldList -- in the list with all the others. This reinforces the basic concept that my ABL class has inherited all the properties and all the capabilities of the control it’s based on, and my extensions to it are fully integrated with its basic definition. This is really the essence of our support for a .NET GUI in ABL, that a simple ABL class can seamlessly combine ABL logic and .NET controls.
The control’s SmartTag is here, for instance, and from there I can select Dock in Parent Container to have it fill the parent form. When I save and run the form Architect creates a simple ABL wrapper procedure to instantiate the form class. The form as you see it in the next screen capture doesn’t look like much yet because there’s no data to display, but that’s the next part of the presentation.

Creating a Databound TreeView as an Inherited Control John Sadd
December, 2009 Page 9 of 19
To summarize what I’ve shown you so far:
- Use the Class Browser to examine the methods and properties of classes that you want to inherit and extend.
- Create a New ABL Inherited Control to inherit and extend a single control. Enter the definition for the extended class, including the name and namespace of the class it inherits. Then define ABL code just as you would for any other class to extend the control for your application.
- Create a new Control Group in the Visual designer toolbox for your controls, and add your controls to it.
- And create a test form to try out how it looks and how its property settings affect its behavior.
Now that I’ve created the basic extended TreeView control with its new properties, the next step is to understand how to connect it to a data source. The principle I try to illustrate here is that it’s important to separate out all aspects of data retrieval from the classes that define the controls and user interface. To accomplish this, there’s a separate class that provides a very simple data model whose role is to retrieve data and put it into a temp-table to be used by any user interface control that wants to work with nested levels of parent-child data and field values in simple text form, as shown in this simple diagram:
These are the essentials of the model class, called TextDataModel.cls because (for the purposes of this simplified example) it is specialized to take data from a ProDataSet and put it into a temp-table that holds just each data element’s level in the data hierarchy and some text to display at each level:
I define the class itself as ABSTRACT; this means that the class provides some data and behavior definition, but it’s not complete. It has to be inherited by a subclass that provides a specific data definition to retrieve data with.
USING Progress.Lang.*. CLASS TextDataModel ABSTRACT :

Creating a Databound TreeView as an Inherited Control John Sadd
December, 2009 Page 10 of 19
Following the variable definitions, the ttStringData temp-table holds levels of data within the data hierarchy, and a field from each table in character form, so the user interface part of the application doesn’t need to define database buffers or other data management specifics.
DEFINE VARIABLE cFieldList AS CHARACTER NO-UNDO. DEFINE VARIABLE hTopQuery AS HANDLE NO-UNDO. DEFINE VARIABLE hChildQuery AS HANDLE NO-UNDO. DEFINE VARIABLE hTopBufferField AS HANDLE NO-UNDO. DEFINE VARIABLE hChildBufferField AS HANDLE NO-UNDO. DEFINE PRIVATE TEMP-TABLE ttStringData FIELD DataLevel AS INTEGER FIELD DataValue AS CHARACTER.
Following the temp-table definition are two properties, the first to hold the handle to a ProDataSet the data is retrieved into, and the second a list of fields from each table that should be turned into text in the treeview nodes or any other user interface controls that can make use of this format.
DEFINE PROTECTED PROPERTY TextDataHandle AS HANDLE GET. SET. DEFINE PUBLIC PROPERTY TextFieldList AS CHARACTER GET. SET.
The method that fetches the data is called FetchTextData, and this in turn invokes the method FillData:
METHOD PUBLIC VOID FetchTextData (OUTPUT TABLE ttStringData): FillData(). /* Abstract method overridden in subclass */ hTopQuery = TextDataHandle:TOP-NAV-QUERY...
If you look at the definition of FillData later in the class, you can see that that method is also defined as ABSTRACT, meaning that it is defined in this class but not implemented here. The class has to be inherited by a subclass that defines the specifics of how data gets filled from the data source.
METHOD PROTECTED ABSTRACT VOID FillData().
The following diagrams illustrate how the classes interact. TextDataModel.cls acts as a super class. It provides concrete definitions for some elements such as the temp-table where it holds data in the format used by the user interface and the class’s properties. A subclass that provides access to a specific DataSet then fills in the value of the DataSet handle as the property TextDataHandle for the super class to use.

Creating a Databound TreeView as an Inherited Control John Sadd
December, 2009 Page 11 of 19
The second illustration shows how the implementation of FetchTextData in the super class is able to operate on the data supplied by a subclass and covert it into the neutral temp-table form, even though the implementation of FillData is left to a subclass, which has to know how to access some specific ProDataSet.
For completeness, the following code box shows the entire FetchTextData method. Once the subclass that supports a specific data source has filled its ProDataSet with data, FetchTextData starts at the top of the ProDataSet hierarchy, walks down through the (two-level) data, creates a row in the text temp-table for each row of data in the DataSet, sets its DataLevel to 1 or 2 accordingly, and stores the value of the selected field for each level in the DataValue field. Again, this simplified code just assumes two levels of data and one field from each level to display in the user interface; it could easily be generalized to support any number of levels of data and any number of fields to string together to display. The key element of the

Creating a Databound TreeView as an Inherited Control John Sadd
December, 2009 Page 12 of 19
code is that it does not assume what exact user interface control type is being populated with its data, and it leaves the specifics of the data retrieval to its subclass.
METHOD PUBLIC VOID FetchTextData (OUTPUT TABLE ttStringData): FillData(). /* Abstract method overridden in subclass */ hTopQuery = TextDataHandle:TOP-NAV-QUERY. hTopBufferField = TextDataHandle:GET-BUFFER-HANDLE(1):BUFFER-FIELD(ENTRY(1, cFieldList,",")). hChildQuery = TextDataHandle:GET-RELATION (1):QUERY. hChildBufferField = TextDataHandle:GET-BUFFER-HANDLE(2):BUFFER-FIELD(ENTRY(2, cFieldList,",")). hTopQuery:QUERY-OPEN (). hTopQuery:GET-FIRST(). DO WHILE NOT hTopQuery:QUERY-OFF-END: CREATE ttStringData. ASSIGN ttStringData.DataLevel = 1 ttStringData.DataValue = hTopBufferField:STRING-VALUE. hChildQuery:QUERY-OPEN (). hChildQuery:GET-FIRST(). DO WHILE NOT hChildQuery:QUERY-OFF-END: CREATE ttStringData. ASSIGN ttStringData.DataLevel = 2 ttStringData.DataValue = hChildBufferField:STRING-VALUE. hChildQuery:GET-NEXT (). END. hTopQuery:GET-NEXT (). END. END METHOD.
Next let’s take a look at a specific subclass that implements the ABSTRACT elements of TextDataModel.cls and fills a specific DataSet from its data sources.
Note that if you want to hold data within your application in temp-tables and ProDataSets, you can use the Tools for Business Logic perspective in Architect to build diagrams like this one to represent any set of related data.

Creating a Databound TreeView as an Inherited Control John Sadd
December, 2009 Page 13 of 19
The Tools for Business Logic utility can then generate include file definitions like the following that you can include in classes or procedures that directly manage data your application uses. The data definition then provides a basis for building a specific data model class to manage, for instance, Car Dealers and their Employees, which inherits from the Text Data Model class we just looked at. Here’s the include file for the DataSet that combines Dealer and Employee data:
/*------------------------------------------------------------------------ File : From template DataSet - template for DataSet. Author(s) : <author> Created : Tue Aug 25 15:53:12 EDT 2009 Version : 1.0 Notes : ----------------------------------------------------------------------*/ {ttDealer.i} {ttEmployee.i} @com.openedge.t4bl.model(modeFile="platform:/resource/Samples/appModel.t4bl",
uuid="_LsL4FZGuEd60RcEKQSxCZA"). DEFINE DATASET dsDealerEmp FOR ttDealer, ttEmployee DATA-RELATION DealerId FOR ttDealer, ttEmployee RELATION-FIELDS (DealerID,DealerID) .
Here’s one of the two temp-table include files that dsDealerEmp.i references:
/*------------------------------------------------------------------------ File : From template TempTable - template for temp-table. Author(s) : <author> Created : Tue Aug 25 15:53:12 EDT 2009 Version : Notes : ----------------------------------------------------------------------*/ /* temp-table definition for ttDealer */ @com.openedge.t4bl.model(modeFile="platform:/resource/Samples/appModel.t4bl",
uuid="_93KMcJGuEd60RcEKQSxCZA"). DEFINE TEMP-TABLE ttDealer NO-UNDO BEFORE-TABLE Before_eDealer FIELD DealerName AS CHARACTER LABEL "Dealership" COLUMN-LABEL "Dealership"
FORMAT "X(40)" FIELD DealerID AS CHARACTER LABEL "Dealer ID" COLUMN-LABEL "Dealer ID"
FORMAT "X(64)" FIELD DealerNotes AS CHARACTER LABEL "Notes" COLUMN-LABEL "Notes"
FORMAT "X(40)" view-as editor size 40 by 2 scrollbar-vertical INDEX dealerName DealerName ASCENDING INDEX uDealer IS PRIMARY UNIQUE DealerID ASCENDING .
Finally, here is the code for the DealerEmpModel.cls that inherits and completes the ABSTRACT TextDataModel class. You can see that this class inherits TextDataModel, so it completes the class that was designated ABSTRACT in its definition.
/*------------------------------------------------------------------------ File : DealerEmpModel Description : Container for data from the DealerEmp ProDataSet ----------------------------------------------------------------------*/ USING Progress.Lang.*. CLASS DealerEmpModel INHERITS TextDataModel :

Creating a Databound TreeView as an Inherited Control John Sadd
December, 2009 Page 14 of 19
Here’s the ProDataSet include file reference, and the ProDataSet support code to define the actual database tables that act as data sources:
{dsDealerEmp.i} DEFINE DATA-SOURCE srcDealer FOR Dealer. DEFINE DATA-SOURCE srcEmployee FOR Employee.
The class constructor attaches those data sources to the temp-tables in the ProDataSet, and assigns the ProDataSet handle to the TextDataHandle property defined in the super class:
CONSTRUCTOR PUBLIC DealerEmpModel ( ): SUPER (). BUFFER ttDealer:ATTACH-DATA-SOURCE (DATA-SOURCE srcDealer:HANDLE). BUFFER ttEmployee:ATTACH-DATA-SOURCE (DATA-SOURCE srcEmployee:HANDLE). TextDataHandle = DATASET dsDealerEmp:HANDLE. END CONSTRUCTOR.
Next is the implementation of the FillData method that fills the DataSet with database data:
/*------------------------------------------------------------------------------ Purpose: Fills the DataSet with all data for the tables. Notes: ------------------------------------------------------------------------------*/ METHOD PUBLIC OVERRIDE VOID FillData( ): DATASET dsDealerEmp:FILL(). END METHOD.
Now that I’ve developed some Model classes to provide data to my user interface, I need to understand what properties and methods of the Microsoft TreeView control on I need to use to get that data into the extended TreeView.
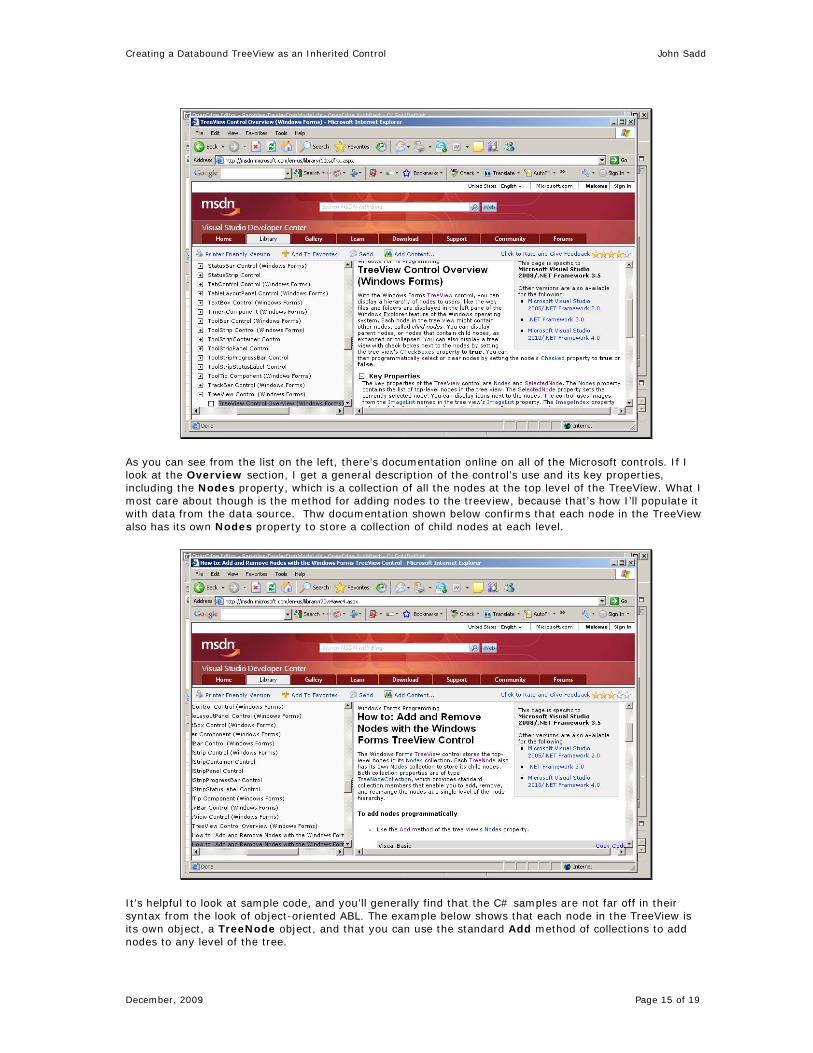
Because my Inherited Control is based on a Microsoft control, I can check out the documentation on the msdn.microsoft.com website. If I search on TreeView control, I can select the primary Windows Forms documentation on the TreeView:
Creating a Databound TreeView as an Inherited Control John Sadd
December, 2009 Page 15 of 19
As you can see from the list on the left, there’s documentation online on all of the Microsoft controls. If I look at the Overview section, I get a general description of the control’s use and its key properties, including the Nodes property, which is a collection of all the nodes at the top level of the TreeView. What I most care about though is the method for adding nodes to the treeview, because that’s how I’ll populate it with data from the data source. Thw documentation shown below confirms that each node in the TreeView also has its own Nodes property to store a collection of child nodes at each level.
It’s helpful to look at sample code, and you’ll generally find that the C# samples are not far off in their syntax from the look of object-oriented ABL. The example below shows that each node in the TreeView is its own object, a TreeNode object, and that you can use the standard Add method of collections to add nodes to any level of the tree.

Creating a Databound TreeView as an Inherited Control John Sadd
December, 2009 Page 16 of 19
I can then follow the link to the doc on the TreeNode object itself. Scrolling down through that, I can follow another link to a description of the various constructors for the TreeNode object. The one I want is shown below as TreeNode(String). This constructor description tells me that if I pass a string to the constructor when I NEW each node, then I get back a new TreeNode with its Text property set to the string that I passed in. Doing that will let me assign the DataValue field from the text temp-table to each new node.

Creating a Databound TreeView as an Inherited Control John Sadd
December, 2009 Page 17 of 19
Now I know enough to add the code I need to my extended TreeView control to populate it from the data source. I reselect the DataBoundTreeView code in the Editor, and define the InitData method that populates the treeview. It’s just a few lines of code, and each one is instructive in showing some element of the object-oriented syntax in ABL. The method itself is private to this class, and has no return value, so it’s defined as VOID:
METHOD PRIVATE VOID InitData():
I need a variable to hold a reference to the current TreeNode object. This shows the key difference between procedural programming with handles and object-oriented programming with types. Here I specify exactly what object type the variable will hold, so that the compiler can verify that I’m referencing it properly:
DEFINE VARIABLE oTreeNode AS TreeNode.
The next variable holds a reference to the DataSource, the TextDataModel class instance that will provide data. You can see that I use exactly the same object-oriented ABL to reference both controls that I’m using from Microsoft or other .NET sources, as well as my own ordinary ABL classes.
DEFINE VARIABLE oDataSource AS TextDataModel.
Because the DataSource property just holds the name of the class, I use the DYNAMIC-NEW built-in function to create an instance of the class, which will be type-checked at runtime:
oDataSource = DYNAMIC-NEW DataSource().
Here’s an example of setting a property that’s defined as PUBLIC in the data model class, just by referencing it relative to the oDataSource variable:
oDataSource:TextFieldList = FieldList.
Likewise I can invoke a method in a class just by naming it relative to its object reference.
oDataSource:FetchTextData(OUTPUT TABLE ttTextData).
Next the method needs to walk through the rows in the temp-table that holds the data in its simplified text format. DataLevel 1 means that this is a top-level row. If that’s the case the codeuses the Add method to add a new TreeNode with the DataValue field as its Text. Remember that the class I’m coding here is a TreeView, because it inherits the Microsoft TreeView, so THIS-OBJECT is a reference to that extended TreeView control.
FOR EACH ttTextData: IF ttTextdata.DataLevel = 1 THEN oTreeNode = THIS-OBJECT:Nodes:Add(ttTextData.dataValue).
Because this very simplified code assumes just two levels of data, the ELSE clause just adds a new TreeNode object to the current TreeNode, to create children for the current parent node.
ELSE oTreeNode:Nodes:Add(ttTextData.DataValue). END. END METHOD.
Creating a Databound TreeView as an Inherited Control John Sadd
December, 2009 Page 18 of 19
I can check whether I got everything right here by pressing Ctrl-Shift-C for Check Syntax. Remember that when I compile or check syntax, the compiler is cross-referencing every other class that I name to make sure that I am using the class and its methods and properties correctly. This is the advantage of the strong typing provided with the object-oriented syntax: you get much more checking at compile time and fewer unexpected errors at runtime.
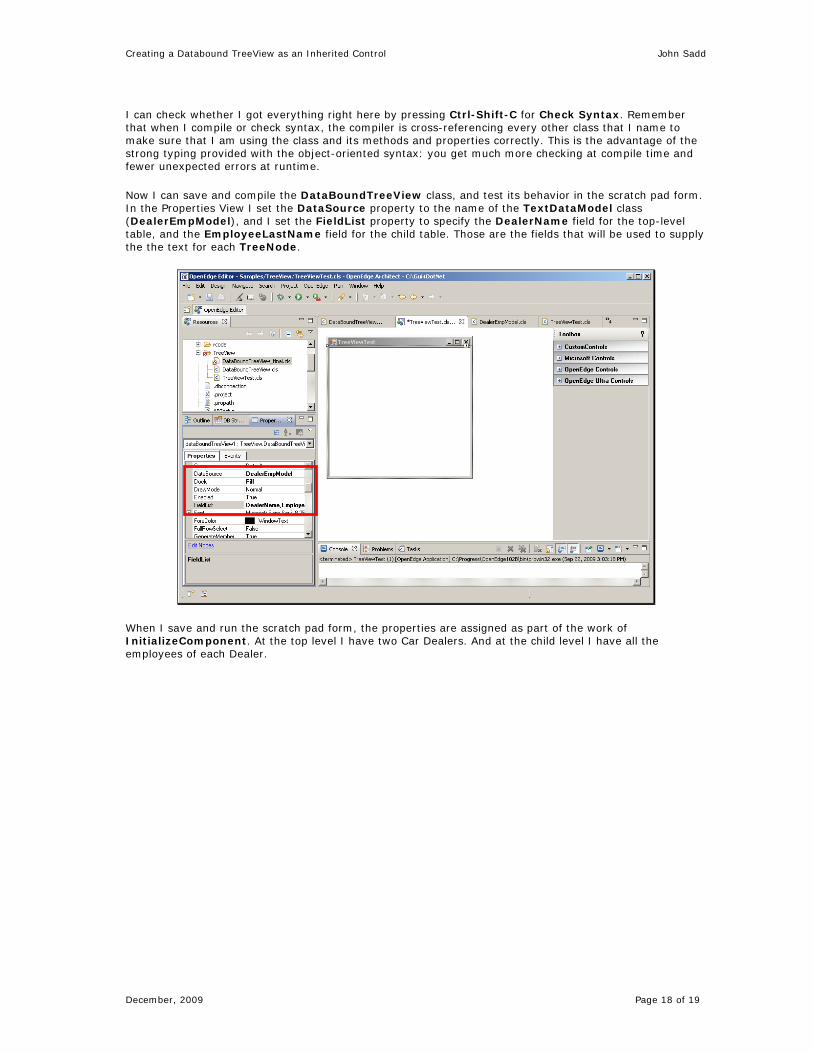
Now I can save and compile the DataBoundTreeView class, and test its behavior in the scratch pad form. In the Properties View I set the DataSource property to the name of the TextDataModel class (DealerEmpModel), and I set the FieldList property to specify the DealerName field for the top-level table, and the EmployeeLastName field for the child table. Those are the fields that will be used to supply the the text for each TreeNode.
When I save and run the scratch pad form, the properties are assigned as part of the work of InitializeComponent. At the top level I have two Car Dealers. And at the child level I have all the employees of each Dealer.

Creating a Databound TreeView as an Inherited Control John Sadd
December, 2009 Page 19 of 19
Now I have a TreeView control that populates itself at runtime with data from a separate data source. I can use it anywhere in the user interface of my application, and attach it to a data source for any data, with the data retrieval managed independently of the control definition.
Let me quickly review a few of the key points of this part of the document:
- Code your classes so that you keep user interface definitions and control extensions separate from classes and procedures that retrieve and manage data for you.
- Use Tools for Business Logic to build temp-table and DataSet definitions that let you separate the data objects that hold data in your application from the database tables that the data comes from.
- Use the online documentation resource at Microsoft or other control vendors to teach you what you need to know to use and extend these powerful UI controls.
- Then write your own ABL code that can access .NET controls and your own ABL classes and procedures using exactly the same language statements. Then assemble everything in Visual Designer and build a test form to verify your work.
That’s all for this two-part series on building an inherited control in the Visual Designer of OpenEdge Architect.