· create tools for investigating pinholes, light, color and art _____ 3rd-12th grades • asking...
TRANSCRIPT

Eric Muller [email protected]
© 2013 Exploratorium, all rights reserved
Create tools for investigating pinholes, light, color and art _____________________________________________________________________________
3rd
-12th grades
• Asking questions and defining problems • Developing and using models • Planning and carrying out investigations • Analyzing and Interpreting data • Using Mathematics and Computational Thinking • Designing solutions
15 minutes prep, 45 minutes activity
Materials:
A cardboard tube (i.e. inner cardboard tube from a roll of paper towels, toilet paper, gift wrapping paper, aluminum foil, wax paper, etc…) Other sources may include:
Poster tube, PVC or ABS pipe (2 or 3” diameter) Lengths of tubing should be cut approximately 15 to 30 cm long
2 Rubber bands
Aluminum foil
Wax paper (or white translucent plastic bags)
A pushpin
A room you can darken
Optional: o 1 sheet of black construction paper o 2 more rubber bands
Materials:
Red, Green, and Blue (RGB) light bulbs one of each color. You can use various bulb options:
o Colored incandescent bulbs o Colored Compact Fluorescent bulbs o Colored LED bulbs o Or white bulbs wrapped in colored filters
3 screw-in light sockets
A power strip with at least 3 plugs
A power outlet
Optional: 3 dimmer sockets
Build a simple camera obscura, also known as a pinhole viewer, and a multi-colored light source (RGB). Use these tools to investigate, experiment and learn about a variety of concepts.
Eric Muller [email protected]
© 2013 Exploratorium, all rights reserved
Look for the associated activities:
1. Poking fun at Science: Light Rays and Pinholes 2. Poking fun at Science: Math with Pinholes 3. Poking fun at Science: Color Mixing 4. Poking fun at Science: The Art of Pinholes
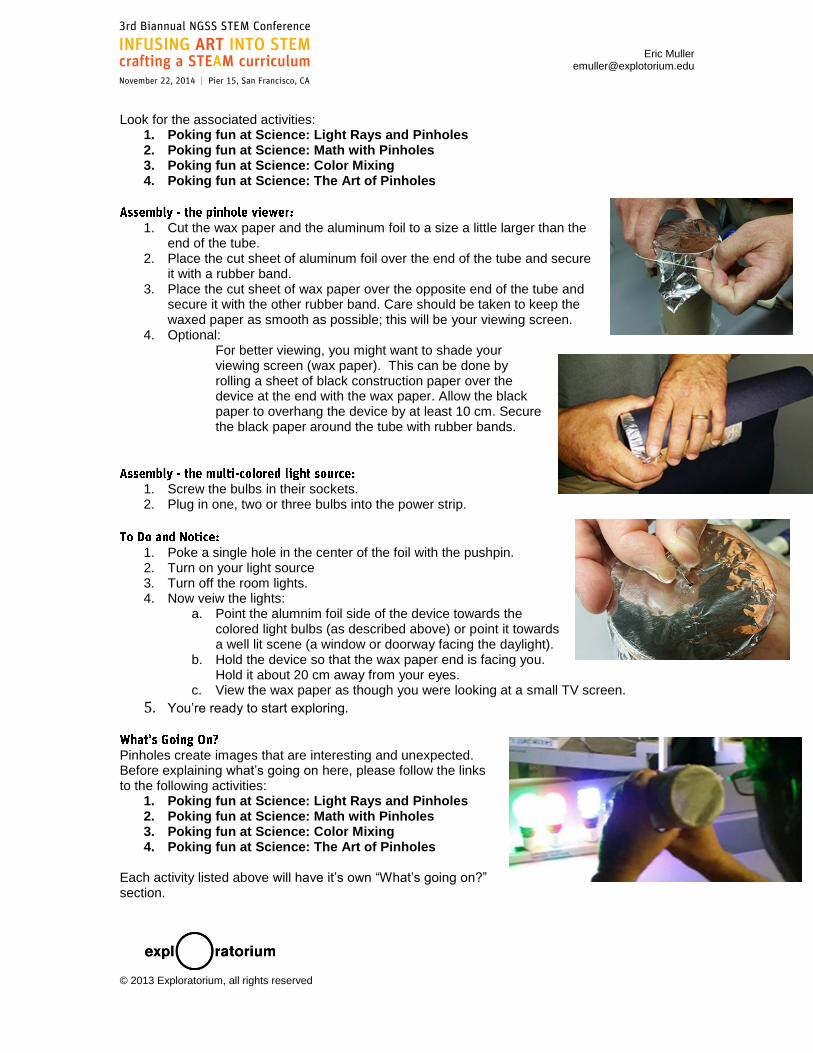
1. Cut the wax paper and the aluminum foil to a size a little larger than the end of the tube.
2. Place the cut sheet of aluminum foil over the end of the tube and secure it with a rubber band.
3. Place the cut sheet of wax paper over the opposite end of the tube and secure it with the other rubber band. Care should be taken to keep the waxed paper as smooth as possible; this will be your viewing screen.
4. Optional: For better viewing, you might want to shade your viewing screen (wax paper). This can be done by rolling a sheet of black construction paper over the device at the end with the wax paper. Allow the black paper to overhang the device by at least 10 cm. Secure the black paper around the tube with rubber bands.
1. Screw the bulbs in their sockets. 2. Plug in one, two or three bulbs into the power strip.
1. Poke a single hole in the center of the foil with the pushpin. 2. Turn on your light source 3. Turn off the room lights. 4. Now veiw the lights:
a. Point the alumnim foil side of the device towards the colored light bulbs (as described above) or point it towards a well lit scene (a window or doorway facing the daylight).
b. Hold the device so that the wax paper end is facing you. Hold it about 20 cm away from your eyes.
c. View the wax paper as though you were looking at a small TV screen.
5. You’re ready to start exploring.
Pinholes create images that are interesting and unexpected. Before explaining what’s going on here, please follow the links to the following activities:
1. Poking fun at Science: Light Rays and Pinholes 2. Poking fun at Science: Math with Pinholes 3. Poking fun at Science: Color Mixing 4. Poking fun at Science: The Art of Pinholes
Each activity listed above will have it’s own “What’s going on?” section.
Eric Muller [email protected]
© 2013 Exploratorium, all rights reserved
Light passing through a pinhole produces amazing effects. Besides showing you the fundamentals of how pinholes work, the set of associated activities (see above) will help you address many key NGSS science & engineering practices (see the beginning of this document). A pinhole viewer (also known as a camera obscura), is a good starting point for many scientific inquiries and engineering challenges. What discoveries did you make with your viewer? What problems did you encounter while making it? What new questions do you have after looking through the viewer? How can you pursue your question? What data will you need? How can the viewer be improved to better achieve a desired goal? To begin your journey into pinhole explorations, check out: Poking fun at Science: Light Rays and Pinholes.
Making a Pinhole Viewer – by the Exploratorium: Institute for Inquiry, 1998 http://www.exploratorium.edu/ifi/activities/pinholeinquiry/viewer.html Pinhole Images --- What's Happening Here? http://www.exploratorium.edu/ifi/activities/pinholeinquiry/images.html
Camera Obscura – by Zeke Kossover of the Exploratorium Teacher Institute Colored Shadows – by the Exploratorium Teacher Institute http://www.exploratorium.edu/snacks/colored_shadows/ Pringles® Pinhole – by the Exploratorium, 1998 http://www.exploratorium.edu/science_explorer/pringles_pinhole.html
Personal Pinhole Theater – by Eric Muller of the Exploratorium Teacher Institute http://www.exo.net/~emuller/activities/personal_pinhole.pdf
Modesto Tamez first showed me a variation of this activity in 1994 (Way to go Modesto)!
Eric Muller
1
© 2014 Exploratorium, all rights reserved
Seeing the world in a new way
3
rd -12
th
• Asking questions and defining problems • Developing and using models • Planning and carrying out investigations • Designing solutions
5 minutes prep, 30 minutes activity
• Please refer to the activity entitled: Poking Fun at Science: The Basic Set-Up for materials, assembly and basic operation of your device.
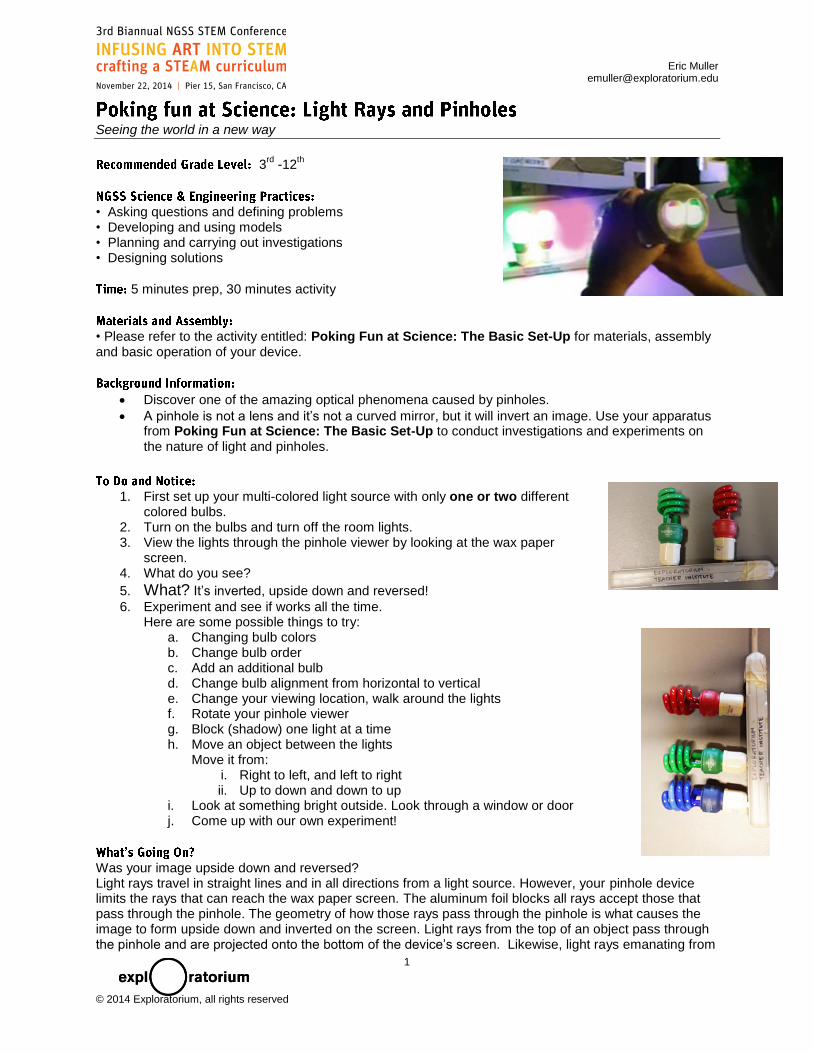
Discover one of the amazing optical phenomena caused by pinholes.
A pinhole is not a lens and it’s not a curved mirror, but it will invert an image. Use your apparatus from Poking Fun at Science: The Basic Set-Up to conduct investigations and experiments on the nature of light and pinholes.
1. First set up your multi-colored light source with only one or two different colored bulbs.
2. Turn on the bulbs and turn off the room lights. 3. View the lights through the pinhole viewer by looking at the wax paper
screen. 4. What do you see?
5. What? It’s inverted, upside down and reversed!
6. Experiment and see if works all the time. Here are some possible things to try:
a. Changing bulb colors b. Change bulb order c. Add an additional bulb d. Change bulb alignment from horizontal to vertical e. Change your viewing location, walk around the lights f. Rotate your pinhole viewer g. Block (shadow) one light at a time h. Move an object between the lights
Move it from: i. Right to left, and left to right ii. Up to down and down to up
i. Look at something bright outside. Look through a window or door j. Come up with our own experiment!
Was your image upside down and reversed? Light rays travel in straight lines and in all directions from a light source. However, your pinhole device limits the rays that can reach the wax paper screen. The aluminum foil blocks all rays accept those that pass through the pinhole. The geometry of how those rays pass through the pinhole is what causes the image to form upside down and inverted on the screen. Light rays from the top of an object pass through the pinhole and are projected onto the bottom of the device’s screen. Likewise, light rays emanating from

Eric Muller
2
© 2014 Exploratorium, all rights reserved
the bottom of the object pass through the pinhole and are projected onto the top of the screen. The same is true for rays of light traveling from the right and left side of the object, they are projected onto the opposite side of the screen. These inverted rays are what form the inverted image.
Can you improve your pinhole viewer design? Can you make your image larger? Sharper? Brighter? Will changing the material used in the device’s construction help? How can you optimize this device? Use your viewer as a launching point for a variety of engineering challenges. What happens if you poke more than one hole in your pinhole? Check out Poking fun at Science: Math and Pinholes!
Eric Muller
© 2014 Exploratorium, all rights reserved
Multiplying a pinhole’s effect
3rd
-12th grades
• Asking questions and defining problems • Planning and carrying out investigations • Analyzing and Interpreting data • Using Mathematics and Computational Thinking
5 minutes prep, 30 minutes activity
• Please refer to the activity Poking Fun at Science: The Basic Set-Up for materials, assembly and basic operation of your device. • Print the simple table on the next page to collect and your record data.
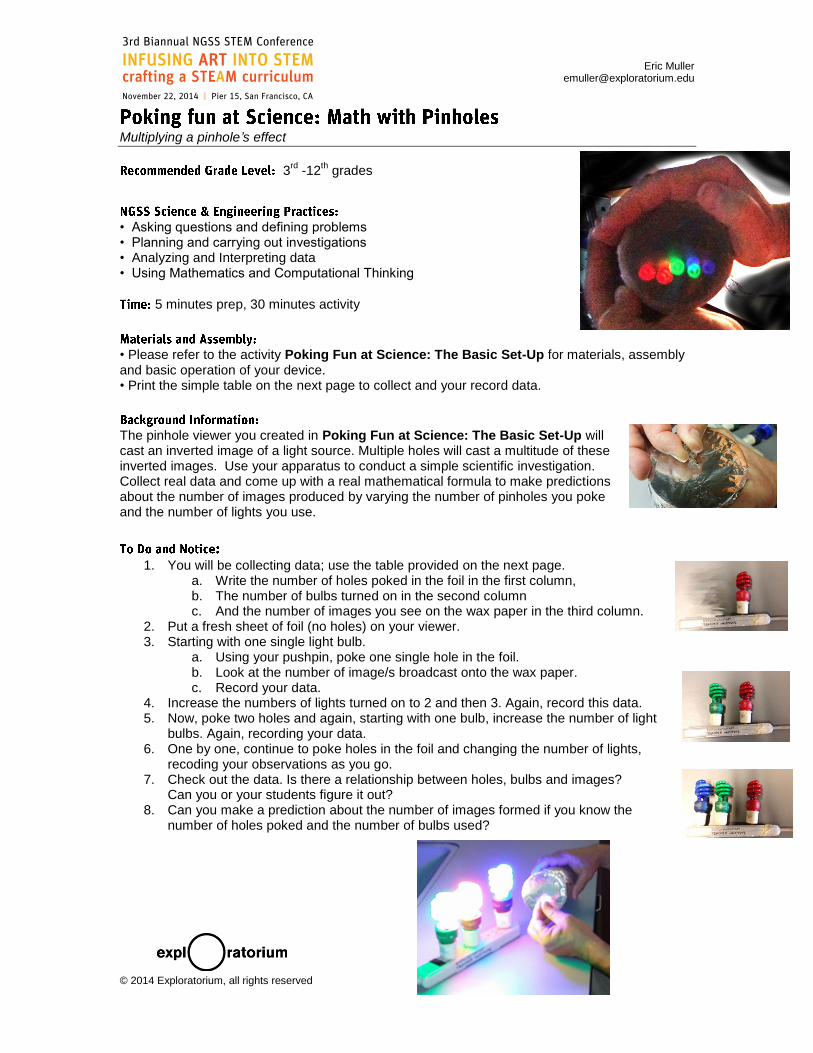
The pinhole viewer you created in Poking Fun at Science: The Basic Set-Up will cast an inverted image of a light source. Multiple holes will cast a multitude of these inverted images. Use your apparatus to conduct a simple scientific investigation. Collect real data and come up with a real mathematical formula to make predictions about the number of images produced by varying the number of pinholes you poke and the number of lights you use.
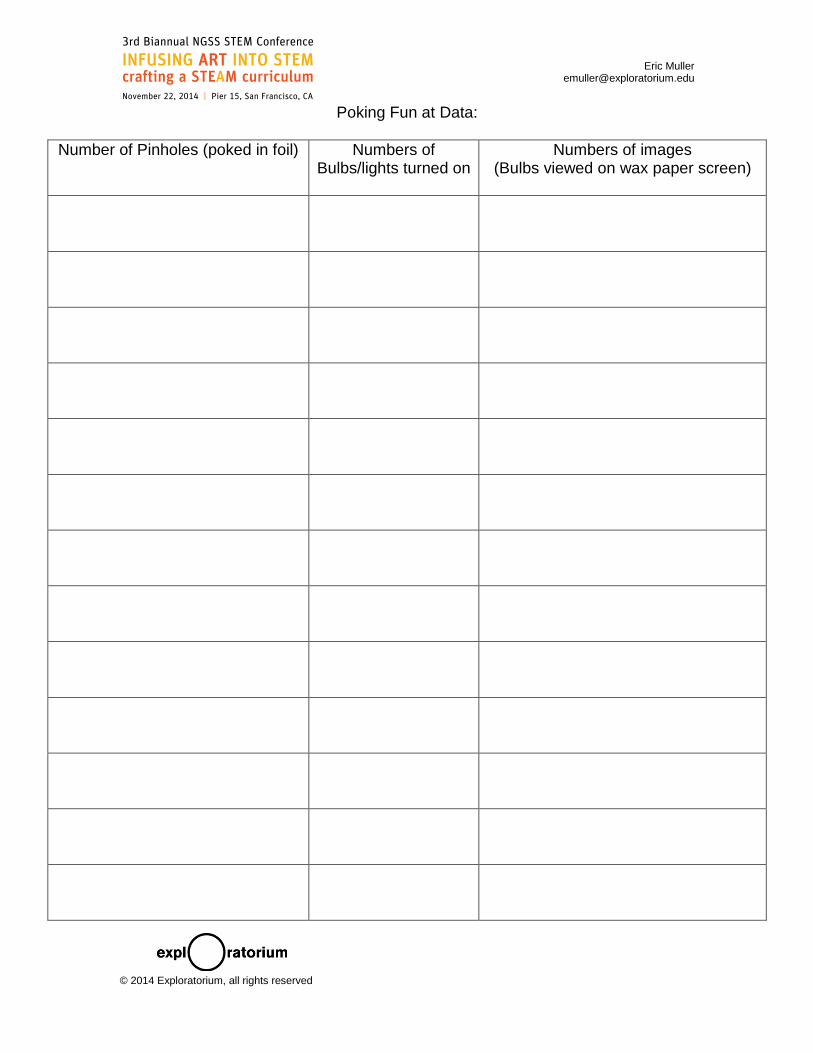
1. You will be collecting data; use the table provided on the next page. a. Write the number of holes poked in the foil in the first column, b. The number of bulbs turned on in the second column c. And the number of images you see on the wax paper in the third column.
2. Put a fresh sheet of foil (no holes) on your viewer. 3. Starting with one single light bulb.
a. Using your pushpin, poke one single hole in the foil. b. Look at the number of image/s broadcast onto the wax paper. c. Record your data.
4. Increase the numbers of lights turned on to 2 and then 3. Again, record this data. 5. Now, poke two holes and again, starting with one bulb, increase the number of light
bulbs. Again, recording your data. 6. One by one, continue to poke holes in the foil and changing the number of lights,
recoding your observations as you go. 7. Check out the data. Is there a relationship between holes, bulbs and images?
Can you or your students figure it out? 8. Can you make a prediction about the number of images formed if you know the
number of holes poked and the number of bulbs used?
Eric Muller
© 2014 Exploratorium, all rights reserved
Poking Fun at Data:
Number of Pinholes (poked in foil) Numbers of Bulbs/lights turned on
Numbers of images (Bulbs viewed on wax paper screen)

Eric Muller
© 2014 Exploratorium, all rights reserved
It’s a pinhole image multiplier!
The multitude of inverted images is caused by the pinholes.
Check out the sample data below: Sample data:
Number of holes Number of lights turned on Number of images 1 1 1 1 2 2 1 3 3 2 1 2 2 2 4 2 3 6 3 1 3 3 2 6 3 3 9
It’s a simple mathematical relationship! Each separate pinhole inverts and projects each set of bulbs.
Or
Holes x Bulbs = Bulb images That’s the formula!
Does this simple equation always work? Are there other mathematical variations you can try? Can you engineer a pinhole camera to collect data other kinds of data? What happens if you poke a huge number of holes right next to each other or just make a big hole? Check out Poking fun at Science: Color Mixing to find the answer to that question.

Eric Muller
© 2014 Exploratorium, all rights reserved
Get colorfully enlightened with enlarged pinholes _____________________________________________________________________________
3rd
-12th grades
• Asking questions and defining problems • Planning and carrying out investigations • Analyzing and Interpreting data • Designing solutions
5 minutes prep, 45 minutes activity
• Please refer to the activity Poking Fun at Science: The Basic Set-Up for materials, assembly and basic operation of your device. • Print the simple table on the next page to collect and record your data.
By using a pinhole viewer and a red, green and blue light, mix colored lights together. Red, Green and Blue (or RGB) color perception is the basis of how we perceive color. Use your pinhole viewer to conduct a simple scientific investigation into color perception. Collect real data to understand how we see color.
1. See Poking Fun at Science: The Basic Set-Up to see how to create your apparatus.
2. On the foil side of your pinhole viewer, use a pushpin to tear a single hole in the center of the aluminum foil.
3. Enlarge the hole with your finger. The hole shouldn’t be larger than a few centimeters. It can be ragged or circular.
4. Turn on 2 lights on your light source. Try one (and eventually all) of the following light combinations:
a. Red and green
b. Red and blue
c. Green and blue
5. Turn off the room lights. 6. Point your pinhole viewing device at the lights so that the foil (and large hole) are
pointed towards the lit bulbs. 7. View the wax paper screen. 8. Now, try to get the two colors of light to overlap. It might help if you:
a. Walk around the lights. b. Hold your device closer or further from the light source. c. Rotate your device in your hand. d. Rotate the light source.

Eric Muller
© 2014 Exploratorium, all rights reserved
e. Or, make your hole even larger.
9. What do you see where the images of the colored bulbs overlap? Fill in the table below.
Color of Bulb 1 Color of Bulb 2 Color of light at overlap
Red + Green =
Red + Blue =
Green + Blue =
10. Take a guess…what will you see if all three colored lights overlap: Red, Green and Blue? 11. Try it and record your observations!
Color of Bulb 1 Color of Bulb 2 Color of Bulb 3 Color of light at overlap
Red
+
Green
+
Blue
=
Did the combinations surprise you? It turns out, you only have three color receptors in your eyes: one for Red, Green and Blue (RGB)…that’s it! These receptors, located in the back of your retina are called cones. All the colors you see are caused by light of a certain wavelength stimulating one, two or all three of your RGB cones. When these cones are stimulated, a signal is sent to your brain, you process it and you perceive color. Depending on how much stimulation each of your RGB cones receives, you interpret a different color.
Red Light
Blue Light
Green Light
Green Light
Red Light
Blue Light ? ?
Green
Light Red
Light
Blue
Light
?
Color of all three lights at overlap
?
Eric Muller
© 2014 Exploratorium, all rights reserved
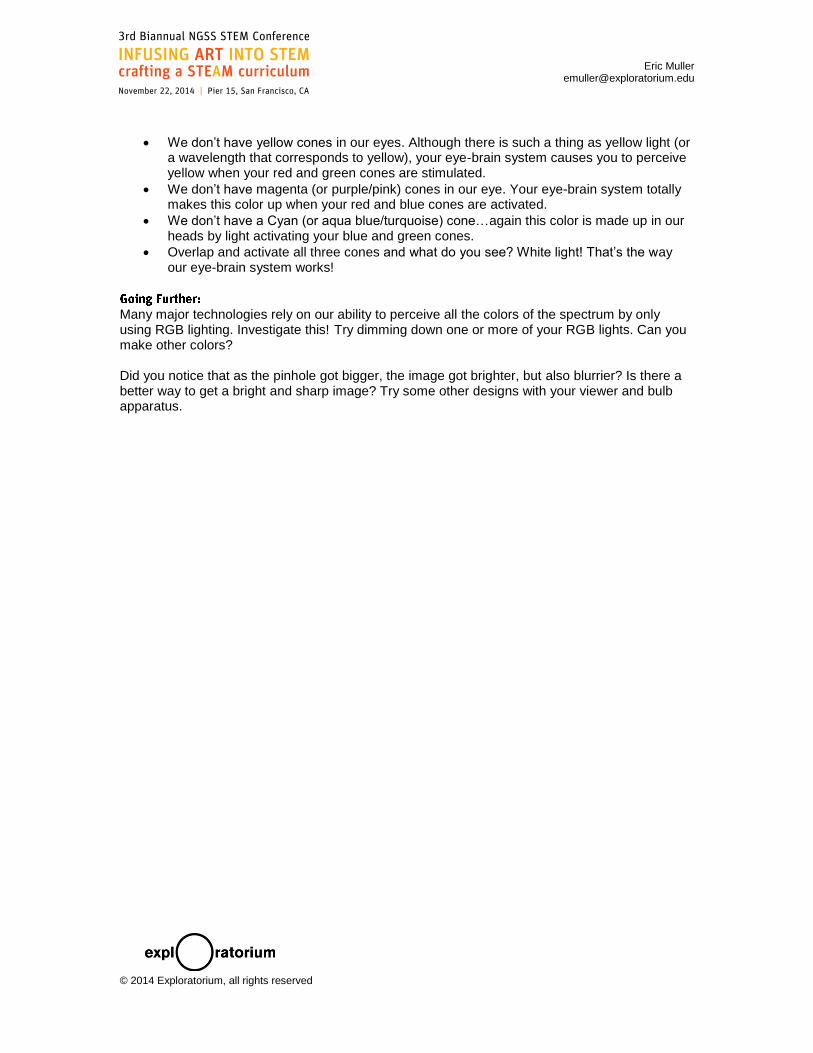
We don’t have yellow cones in our eyes. Although there is such a thing as yellow light (or a wavelength that corresponds to yellow), your eye-brain system causes you to perceive yellow when your red and green cones are stimulated.
We don’t have magenta (or purple/pink) cones in our eye. Your eye-brain system totally makes this color up when your red and blue cones are activated.
We don’t have a Cyan (or aqua blue/turquoise) cone…again this color is made up in our heads by light activating your blue and green cones.
Overlap and activate all three cones and what do you see? White light! That’s the way our eye-brain system works!
Many major technologies rely on our ability to perceive all the colors of the spectrum by only using RGB lighting. Investigate this! Try dimming down one or more of your RGB lights. Can you make other colors? Did you notice that as the pinhole got bigger, the image got brighter, but also blurrier? Is there a better way to get a bright and sharp image? Try some other designs with your viewer and bulb apparatus.

Eric Muller
© 2014 Exploratorium, all rights reserved
Bring art into a colorful mixture with science _____________________________________________________________________________
3rd
-12th grades
• Asking questions and defining problems • Planning and carrying out investigations • Designing solutions
5 minutes prep, 30 minutes activity
• Please refer to the activity Poking Fun at Science: The Basic Set-Up for materials, assembly and basic operation of your device.
Did you do the following activities? 1. Poking fun at Science: Light Rays and Pinholes 2. Poking fun at Science: Math with Pinholes 3. Poking fun at Science: Color Mixing
If you did, you know that pinholes and colored lights are an amazing combination! Images are invert and reversed! Images can be multiplied! Colors can be mixed together! Now, use all you’ve learned to make some cool art!
1. Make some art!
2. Put a fresh sheet of foil on your viewer.
3. Using your pushpin, poke multiple holes in your foil. Poke out a cool pattern, shape or picture into the foil: maybe try a star, square, circles, letters, a face…etc.
4. Turn on 1, 2 or 3 colored bulbs.
5. What do you see?
6. Walk around the light source, rotate your viewer…etc.
7. Pass your viewing device around and look at what others have created.
8. Go for it! Make some art! Try various techniques and be creative! a. Poke small holes or large holes. b. Poke a single hole or multiple holes. c. Make a pattern or something abstract. d. Try various combinations of lights. e. Use other kinds of materials
i. Try other size tubes. ii. Will something other than foil work?

Eric Muller
© 2014 Exploratorium, all rights reserved
iii. How about something other than wax paper? iv. How about other brands, styles or technologies of light bulbs?
f. Experiment!
Art is cool! Using art in science activities helps to promote creativity and student engagement. Making art can lead to experimentation, investigation, discovery, a deeper understanding of science concepts and a sense of ownership.