create compelling infographics with powerpointcontent.mimeo.com/rs/207-odz-857/images/brightcarbon...
TRANSCRIPT

Create compelling infographics
with PowerPoint
Visual conversations,
visible results
www.brightcarbon.com

Infographics help convey your message powerfully because they combine text
with visuals in a way that tells a story and makes sense to the viewer. Watch this
summary video to gain an understanding of infographic design theory so you
can create some on your own.
Infographics in PowerPoint
View video
tutorial

Download BrightCarbon’s most
used PowerPoint functions in
our own customized toolbar
www.brightcarbon.com
Search:
Quick Access Toolbar
Add to Quick Access Toolbar
File > Options > Quick Access Toolbar
Quick Access Toolbar
Add shortcuts to your Quick Access Toolbar to access the things you use
more quickly.
A
Right click on anything in the
menus to add to the Quick
Access Toolbar
or
View video
tutorial

Keyboard shortcuts
Group
Ungroup
Decrease/Increase font size
Change type casing
Find and replace text
Duplicate objects
Cycle through layers/objects
Run slideshow
Run slideshow from current slide
Jump to specific slide (slideshow mode)
Copy style formatting
Paste style formatting
Move on a straight axis
Keep aspect when resizing
Ctrl G
Ctrl Shift G
Ctrl [ ]
Shift F3
Ctrl H
Ctrl
Tab
F5
F5Shift
Enter
<#>
Slide
number
Ctrl Shift C
Ctrl Shift V
Shift
Shift
+
+
+
+
+
+
+
+
+
+
+
+
+
+
Be a PowerPoint productivity superhero with the top shortcuts that will have
you creating amazing slides in seconds

Copy style formatting
Paste style formatting
Ctrl Shift C
Ctrl Shift V
+ +
+ +
Formatting tricks
Use keyboard shortcuts and tools to speed up working.
Use Animation Painter to copy animations.
It only works once each time it’s selected.
A nice
boxA nice
box
Static
Box
Animating
Box
Animations -> Animation PainterQuick access toolbar > Pick Up / Apply Object style
The format is stored until you close
PowerPoint, so use it any time.

Quickly ensure consistency by using the Set as Default Shape, Line,
and Text Box functions.
Setting Default Styles
Right Click > Set As Default Shape
Create a shape, text box or line
use the format tools to create a
style that you like.
Insert > Shape Insert > Shape
Once you are happy with the
style, set the shape, text box or
line as the default.
Now when you draw a new shape, line or
text box, it will have the formatting that
you set. This is much quicker than altering
styles through the slide master.
A nice text box A nice text box A nice text box
Set as Ḏefault Shape

Freeform Shapes
Create custom shapes and edit existing shapes using the Freeform Shape
Tool and Edit Points.
Insert > Shapes > Lines >
Freeform Shape Tool
Use the Freeform Shape Tool to draw any
object. Click near the start or double click
anywhere to finish drawing.
Move any black edit points to alter the
shape. Create new points by left clicking on
the red outline. Remove points by holding
the Ctrl key and left clicking on the point to
be deleted.
Right Click Shape > Select Edit Points Customise further by clicking on any black
edit point to reveal the Bézier vector
handles. Right click the black edit point to
choose smooth, straight, or corner point.
Move the white box edges of the Bézier to
change the point shape or curve.

Boolean shape tools
Add the Boolean Tools to your toolbar to create custom icons and graphics
by merging and cutting out shapes.
Insert > Shapes Shape UnionShape Subtract
Arrange the shapes in the correct positions
then select two of them.
The Boolean tools are only available through the Quick Access Toolbar in PowerPoint 2010.
They’re in the Format tab in PowerPoint 2013 & 2016

Cropping a photo can completely change the focus of the image and the effect
that it can have on your slide.
Image cropping
Select your image and crop
into a circle
Format > Crop > Crop to Shape
Use the distribution tool to align
your images accurately
Format > Align
To create a more accurate circle,
use the 1:1 aspect ratio tool
Format > Crop > Aspect Ratio
Use the crop tool, and hold the
shift key whilst resizing your image
to fill the shape accordingly
Format > Crop
Repeat this step across the
remaining images
View video
tutorial
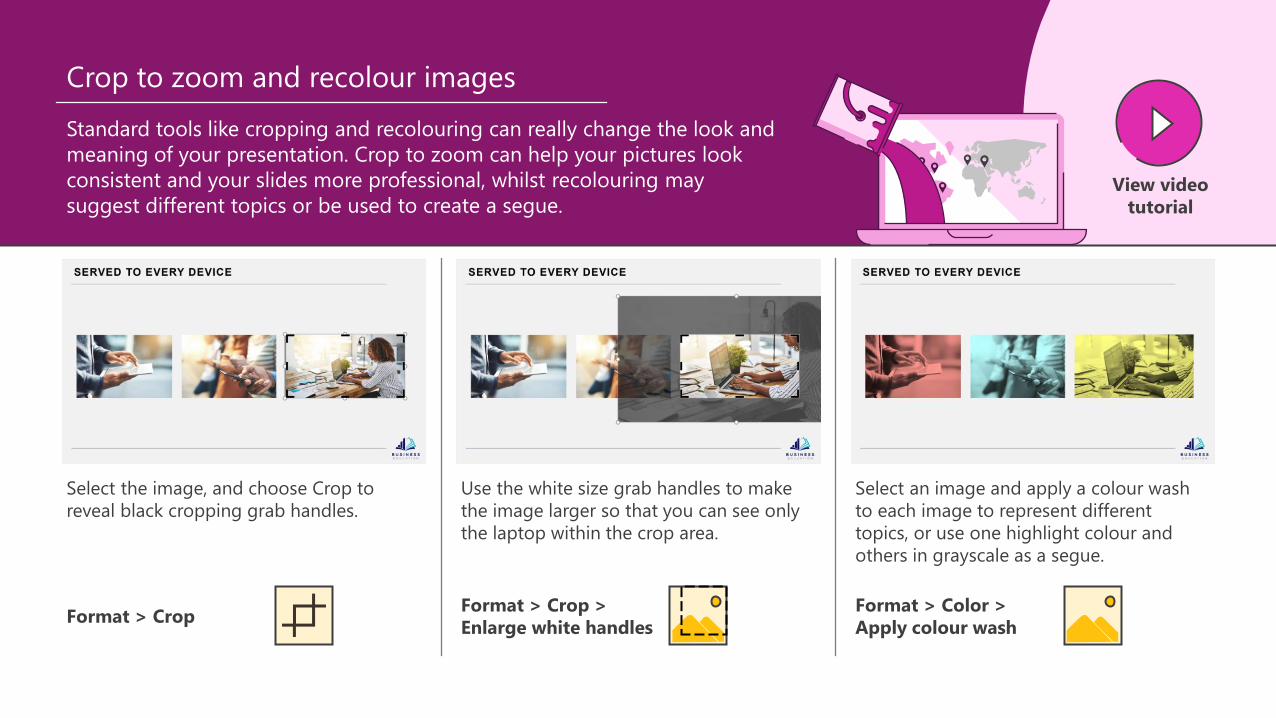
Standard tools like cropping and recolouring can really change the look and
meaning of your presentation. Crop to zoom can help your pictures look
consistent and your slides more professional, whilst recolouring may
suggest different topics or be used to create a segue.
Crop to zoom and recolour images
Select the image, and choose Crop to
reveal black cropping grab handles.
Format > CropFormat > Crop >
Enlarge white handles
Use the white size grab handles to make
the image larger so that you can see only
the laptop within the crop area.
Format > Color >
Apply colour wash
Select an image and apply a colour wash
to each image to represent different
topics, or use one highlight colour and
others in grayscale as a segue.
View video
tutorial

Recolour top image
Format > Color > Grayscale
Align images to slide edges
Home > Arrange > Align
Turn a standard image into an effective visual tool that will enhance
communication and get your message across more clearly. Simple highlighting
can represent relevant stats more powerfully than numbers alone.
Image-enhanced story
Fill screen with imageCrop grey image to 80% of
full image width
Format > Crop
Resize text to 40pt and
increase text box size
Home > Font
Triangle to link text to image
and highlight message
Home > Drawing
Create duplicate image
Ctrl + C > Ctrl + V
Send images to back
Home > Arrange
View video
tutorial

White space doesn’t necessarily have to contain a lot of white. It’s about using
areas of contrast to focus attention on specific elements. You can use actual
white space, but also other colours, and even images to create the effect.
Whitespace image and text formatting
Overcrop image and expand across
full slide, positioning key focus to
one side
Format > Crop
Align text left and change paragraph
font size to 20pt
Home > Font
Change text to Body font and
change text colour to white
Home > Font
Add shape around text and send
back, behind text to add contrast
Home > Arrange
30% transparency to shape box to
link with image
Right click > Format
Change bullet text font size to 24pt,
make Bold, and toggle off bullets
Home > Font
Select bullet text and apply 1.5x
line spacing
Home > Paragraph > Line Spacing
Add lines to demark individual
text lines
Home > Drawing
View video
tutorial

Using a grid provides a classic design layout for your slides. A 3x3 grid – the
rule of thirds – is a good start. PowerPoint guides can help form the grid clearly
and make your text, images, and other content look more uniform, and instantly
more pleasing to look at. Everyone loves a tidy slide.
Grids and guides
Right click to begin bringing
guides into your document.
Holding Ctrl while dragging will
copy your existing guide.
Place your guides over the lines
you have drawn to create an
accurate three column grid.
Draw four vertical lines,
ensuring there are two on the
outer edges of your document.
Click and drag to move the
lines roughly into the position
you need.
Select all of the lines, and use the
distribute tool to automatically
space them correctly.
Repeat this step using horizontal
lines to complete your 3x3 grid.
Format > Align >
Distribute Horizontally
Right click >
Grid and GuidesInsert > Shapes
Repeat steps
horizontally
View video
tutorial

The best way to handle colours in PowerPoint is to set your template correctly.
Keeping everything consistent and on brand helps to make your slides
recognisable and full of impact.
Setting theme colours
Open the colour menu within the
current theme
Design > Variants > Colors
Select Customize Colors to change
the programmed swatches
Design > Variants > Colors >
Customize Colors
Select your colours, or insert
colour values to create your
personalised theme
View video
tutorial

Colours can have specific meanings – red for bad or green for good. Clever use
of colour can enhance your message and help your audience to understand
your story more quickly and more easily.
Colour to convey meaning
Draw a triangle, and flip the shape so that
the right-hand side is tallest. Resize and
reposition the triangle to fit the
appropriate area on the slide.
Insert > Shapes
Home > Arrange > Rotate >
Flip Horizontal
Right click > Format Shape
Use the gradient fill effects to create a
scale, from red through yellow, and into
green, to give a sense of scale.
Format > Align >
Distribute Horizontally
Add markers and use the distribute tool to
space them accurately. Create a single
thicker line to act as a gauge
View video
tutorial

View video
tutorial
Morph is a stunning way to seamlessly transition between slides, but also to
create motion, emphasis and tell stories. Note that it only works with Office
365 or PowerPoint 2019. Earlier versions of PowerPoint will simply use a
Fade transition.
Morph magic
Transitions > Morph
Morph recognizes objects across slides and will seamlessly move,
resize, recolour, and rotate objects. You can use this to change
content on your slide. Objects have to be on both slides to create
any change using morph, otherwise, the transition appears like a
fade.
Introduce objects by having them off the edge of the first slide
canvass and on the second slide, or remove them by having them
on the first slide and off the edge of the second slide canvass.
Give the effect of moving around a more complex diagram with
content moving off and onto the slide, by creating a diagram that
only partly fits on the slide canvass. On the second slide, move the
diagram so that a different part is on the slide canvass, and morph
will pan around the diagram. Zoom into particular elements by
making the diagram larger on the second slide.

Morph isn’t just for transitioning between slides, it can be used for
interesting effects to tell stories, such as creating a magnifying lens to
highlight content. Note that it only works with Office 365 or PowerPoint
2019. Earlier versions of PowerPoint will simply use a Fade transition.
Morph magnify
Transitions > Morph
Insert an image on the slide, copy, paste, and align the new
image on top of the original.
View video
tutorial
Crop the top image to a rough square focusing on a specific
area, set the Crop to Shape (Oval), and set the Aspect
Ratio to 1:1 (Picture Tools Format > Crop).
Add a shadow or outline to the new cropped circle image
and make it larger (use Shift and Ctrl to expand in
proportion and the correct position).
Duplicate the slide (Ctrl + D) and on the new slide, move
the circle image to a different position.
Select Crop on the circle image, but now move the image
within the circle placeholder, so that it matches the image
behind in the new position.

PhoneUK +44 161 883 0225
USA +1 866 789 2482
Webwww.brightcarbon.com
@BrightCarbon