crazytalk web edition - reallusion · crazytalk web edition user manual ... copy and paste code...
TRANSCRIPT

CCrraazzyyTTaallkk WWeebb EEddiittiioonn
UUsseerr MMaannuuaall
VVeerrssiioonn 22..5511
MMaarrcchh 22000022

ii
Limited use license agreement By receiving and/or using Reallusion Inc. software, you accepted the Limited use license agreement, which was displayed during the installation process and is visible in the help file. This agreement is a binding legal agreement between Reallusion Inc. and the purchasers, users or evaluators of Reallusion Inc.’s software and products. If you do not intend to honor this agreement, remove all installed Reallusion Inc. software from your computer now.
All the titles, ownership of the software, and the enclosed related documentation remain the exclusive property of Reallusion Inc.
You may copy or reproduce the software or documentation for backup purpose only. The Reallusion.com copyright notice must be included in the backup files.
The laws of the State of California govern this Agreement. Should you have any questions concerning this Agreement, you may contact Reallusion Inc. at the address below:
Reallusion Inc. PMB #240, 171 Branham Lane, Suite #10 San Jose, CA 95136 Voice 408.350.1693 Fax 408.972.0832 http://www.reallusion.com/ email [email protected] Copyright 2002

iii
Table of Contents
Chapter 1........................................................................................... 1 Overview....................................................................................1
Say it with CrazyTalk! ..............................................................1 Features...................................................................................2 CrazyTalk Interface..................................................................4 Applications .............................................................................5 System Requirements .............................................................6
Hardware ..........................................................................................6 OS.....................................................................................................6 Browsers...........................................................................................6
Chapter 2........................................................................................... 7 Installing CrazyTalk ..................................................................7
Installation................................................................................7 Chapter 3......................................................................................... 12
Getting Started........................................................................12 Getting Started ...............................................................................12
Chapter 4......................................................................................... 30 CrazyTalk Fitting Editor .........................................................30
Introducing the CrazyTalk Fitting Editor ................................30 Fitting Editor overview ...........................................................31
Fitting Editor toolbar and icon descriptions: ...................................32 Importing photos from image files .........................................36 Importing photos from TWAIN devices..................................38 Importing photos from external devices.................................40 Importing photos from Kodak PhotoNet Online .....................42 Importing photos from Kodak Picture CD/Disks ....................48 Importing & Exporting Wireframe (TPM) Files.......................50 Cropping Images ...................................................................52 What is a Wireframe ..............................................................56 Fitting the Wireframe .............................................................57 Fitting facial features..............................................................63
Fitting Eyebrows .............................................................................63 Fitting Eyes.....................................................................................63 Fitting the Nose ..............................................................................64 Fitting the Mouth.............................................................................65
iv
Feature Enhancement ...........................................................66 Editing TTS Voice ..................................................................70 Voice Characters ...................................................................72 Previewing Your Work ...........................................................73 Saving your CrazyPal character ............................................74 Morphing................................................................................76 CrazyTalk Fitting Editor Hot Keys..........................................77
Adjusting Eye Position Hot Keys ....................................................79 Tips and Suggestions ............................................................80
Picture Selection.............................................................................80 Use Smooth feature........................................................................80 Use Zoom feature...........................................................................80 Use Hot Keys..................................................................................81 Adjust Your Interface Environment.................................................81 Use Preview Often..........................................................................81
Chapter 5......................................................................................... 82 CrazyTalk Expression Editor .................................................82
Introducing the CrazyTalk Expression Editor ........................82 Expression Editor toolbar and icon descriptions: ...........................84
Opening CrazyTalk Model Files ............................................87 Wave Editor ...........................................................................88 Editing the Expression – Wave Mode....................................90 Text Editor .............................................................................93 Editing the Expression and Voice – Text Mode.....................94 Saving Your CrazyTalk Script File .........................................96 Sending Mail ..........................................................................98
Send Html Mail (Outlook 98 & 2000 users only) ..........................100 Send Html Attachment..................................................................101 Send Exe Attachment...................................................................103
Exporting to EXE .................................................................105 Exporting to AVI, BMP or WAV............................................108
Export AVI Files............................................................................108 Export BMP Files..........................................................................110 Export WAV Files .........................................................................111
Exporting (Quicktime movie) to External Devices ...............112 CrazyTalk Expression Editor Hot Keys................................113 Tips and Suggestions ..........................................................114
Include Voice data ........................................................................114 Alter voice attributes .....................................................................114 Get more CrazyTalk model files ...................................................114 Get more Voices...........................................................................114 Keyboard shortcuts.......................................................................115

v
Virus’s and how to protect yourself......................................116 Chapter 6....................................................................................... 118
CrazyTalk on the web ...........................................................118 Introducing the CrazyTalk Web Editor.................................118 Exporting a .WMV Windows streaming media file...............122 Exporting an .RM RealMedia streaming media file .............127 Exporting as a HTML page..................................................130 Copy and Paste code into your favorite HTML Editor .........132 Removing the Unregistered Popup Window........................135 Embedding CrazyTalk within HTML ....................................136 Accessing Properties ...........................................................139
Player Initialization........................................................................139 Controlling Interaction...................................................................141
Invoking Methods.................................................................142 Capturing Script Events from CrazyTalk .............................143
Capturing Script Events from the CrazyTalk ActiveX Control (for IE)......................................................................................................143 Capturing Script Events from the CrazyTalk Plug-in (for Netscape)......................................................................................................144
Appendix................................................................................145 Appendix A: Illustration of CrazyTalk...................................145 Appendix B: CrazyTalk Method Summary...........................146
Hide ..............................................................................................147 LoadTPS.......................................................................................149 Pause............................................................................................150 Play...............................................................................................151 PlayText........................................................................................152 Show.............................................................................................153 Stop ..............................................................................................154 SetFontFace .................................................................................155 SetFontSize ..................................................................................156 SetFontStyle .................................................................................157
Appendix C: CrazyTalk Property Summary.........................158 AudioChannel ...............................................................................160 BackColor .....................................................................................161 BorderStyle...................................................................................162 ControlStyle ..................................................................................163 CurrentMode.................................................................................164 EncodeData..................................................................................165 Eof ................................................................................................166 Expression....................................................................................167 ForeColor......................................................................................169 Level .............................................................................................170

vi
LifeMode.......................................................................................171 MenuStyle.....................................................................................172 Pitch..............................................................................................173 Speed ...........................................................................................174 Subtitle..........................................................................................175 TextWidth......................................................................................176 TagMode.......................................................................................177 Text...............................................................................................179 TextStyle.......................................................................................181 TJMready......................................................................................182 TPSready......................................................................................183 TTSinfo .........................................................................................184 VoiceMode....................................................................................186 Volume..........................................................................................187
Appendix D: CrazyTalk Event Summary .............................188 Click ..............................................................................................189 DblClick.........................................................................................190 Eof ................................................................................................192 MouseDown..................................................................................193 MouseMove ..................................................................................195 MouseEnter ..................................................................................197 MouseLeave .................................................................................198 MouseUp ......................................................................................199 Pause............................................................................................201 StartPlay .......................................................................................202 Stop ..............................................................................................203 TextChange ..................................................................................204 TjmChange ...................................................................................205 TpsChange ...................................................................................206 WordPosition ................................................................................207
Appendix E: Glossary ..........................................................209

1
Chapter 1 OOvveerrvviieeww
Say it with CrazyTalk! CrazyTalk is here to make your photos speak! CrazyTalk uses innovative real time morphing and either TTS (Text-To-Speech) technology or NaturalVoice technology to make your favorite images come to life!
CrazyTalk lets you import photographs of your choice. The face is bonded with a wireframe so it can make various gestures. A lip sync technique allows the character’s mouth to move in asynchronous fashion with the words that are spoken from the source text.
These animated characters - CrazyPals - can be displayed on your desktop to act as newsreaders, email readers, or whatever other talking head you desire. You can choose from a library of models or create your own. Use pictures of family or your favorite movie star to create your own personal newsreader to read back news reports, weather updates or sports results.
With the Web Edition you can also create a Website with your CrazyPal character on it. CrazyPal characters are inexpensive to generate—no 3D modeling software or streaming server is needed. The small file size (one CrazyPal character is only 20 KB) helps ensure fast Web performance. CrazyTalk characters make your site interactive, and give it that personal touch.

2
Features • Photo-fitting Technology: CrazyTalk's proprietary 3D facial
technology lets you import any image of a face and bring it to life. The face is matched to CrazyTalk's Wireframe.
• Expression Morphing technology: Enables you to apply over 20 expressions and gestures (such as smiling, frowning, crying and laughing) to the image.
• TTS Technology: CrazyTalk uses TTS to give your models a voice. The TTS application lets you easily control volume, pitch, and frequency. CrazyTalk's design is based on the SAPI (Speech Application Program Interface) and is compatible with all TTS applications based on SAPI.
• NaturalVoice: CrazyTalk uses NaturalVoice to give your characters a natural voice. The Wave Editor lets you easily import or record your own wave files, which are then analyzed to provide lip-sync between the character and the audio.
• Talking Email: With CrazyTalk, you can send your creations as an email to your friends in a number of different formats. Options include sending as a HTML format message or as an .EXE file attachment. When your friends open the email, they can view the CrazyMail animated character and voice without needing to install the CrazyTalk application or TTS voice drivers. When viewing a HTML formatted message a small plug-in is required to be downloaded from the Internet.
• Web Ready: CrazyPals can be uploaded to a Web site or emailed as an attachment. With CrazyTalk, you can also export CrazyPals as an EXE file that can be sent as an email attachment. When executed, the file displays real time animation with the applied TTS voice.

3
• Internet Applications: Once 2D photos have been transformed into talking animations, you can export your finished product to HTML and put it on the World Wide Web using Internet Explorer, Netscape, or other Web browsers.
• Interactive: Using Java or Visual Basic script, you can control the CrazyTalk character directly on the Web - interactive and lots of fun!

4
CrazyTalk Interface CrazyTalk’s easy-to-use interface allows you to effortlessly create, modify, export, and save your CrazyPal. Each function has been designed to be quickly accessible from toolbars that are presented to you as required. Functions include:
• Import BMP or JPG images
• Fit photo's using simple or normal wireframe modes
• Select facial features to speed up and simplify the process of fitting the wireframe to your own images. Features include: eyebrows, eyes, nose, and mouth.
• Save your wireframe allowing it to be used time and time again, further simplifying the fitting process.
• Image Zoom feature to assist in precise fitting
• TTS (voice) settings include voice mode, volume, pitch, and speed.
• Natural Voice enables import wave files or use of the built-in audio record function
• Apply mood to your models from twenty sets of facial expressions.
• Export CrazyPals directly to E-mail in many formats, including: HTML e-mail, .html attachment, .exe attachment.
• Export CrazyPals directly as .exe, .avi, .bmp, and .wav file formats.
• Export to the Web (note: this feature is not available in the Standard version). Import BMP or JPG images; four control sets (eyebrows, eyes, nose, and mouth) on the wireframe, let you manipulate facial expressions.
• Apply moods to your models from twenty sets of facial expressions.
• Recipients of a CrazyPal don’t need to download any special software or plug-in to run.

5
Applications CrazyTalk uses and applications are limited only by your imagination, with the Standard version you are able to export in a number of useful and widely used formats. This gives you the ability to either send your CrazyPal to a friend or insert the file into a document or presentation. With the Web Edition you can also export to the web giving you the ability to add to a website as a virtual character to provide a greeting, aid in navigation, guide users, show presentations, provide news updates, offer suggestions, or inform search engine results. The following lists provides only a few of the possible applications for CrazyPals:
• Entertainment: E-mail messenger, greeting card reader, joke teller
• Marketing tool: E-mail messages, product introductions to clients
• Introductions: Send a CrazyPal of yourself to new friends to help break the ice
• Accessibility: Dictating aid for the visually impaired
• Web spokesperson: Web tour guide, customer service, sales person
• News and information: Virtual journalist, virtual weather reporter, virtual sports reporter
• Services: Online doctor, fortune teller, traffic updates

6
System Requirements System requirements to create and play CrazyTalk files are as follows:
Hardware
• Pentium II 233 MHz (Pentium II 400 MHz or higher recommended)
• 64 MB RAM (128 MB or higher recommended)
• 50 MB disk space (100MB or higher recommended)
• Soundcard
OS
• Windows 98/2000/Me/XP/NT 4.0
Browsers
• Netscape 4.x or higher
• Internet Explorer 4.0 or higher
• AOL 5.0 or higher

7
Chapter 2 IInnssttaalllliinngg CCrraazzyyTTaallkk
Installation Follow these instructions to install the CrazyTalk program:
1. Insert the CrazyTalk CD-ROM into your CD-ROM drive. The Install Shield Wizard Setup Program starts extracting files:
Note: If the Installation Wizard does not start automatically click Start, Run. In the run dialog box type "D:\CrazyTalkwe.exe" where D: is your CD-ROM drive letter:
Then click OK to start the Install Shield Wizard.

8
2. After the files have been extracted you see the following screen:
3. Click Next to begin installing the CrazyTalk program. The following screen appears:
4. Read the License Agreement and click Yes if you accept the terms. The next screen appears:

9
5. Input your personal information and enter the serial number in the Serial box, and click Next. The following screen appears:
6. Click Next to choose the default destination folder or click Browse to choose a different folder. Then click Next to view the following screen:
7. Click Next to select the default program folder; alternatively, you can type in the name of a different folder or select one from the Existing Folders list, then click Next. Setup copies files to the disk:

10
8. After copying program files to your hard drive, Setup prompts you to install the Text-to-Speech Engine:
9. Click Yes to install the Microsoft Text-to-Speech Engine. After you click Yes, Setup copies files and displays the following screen:
11
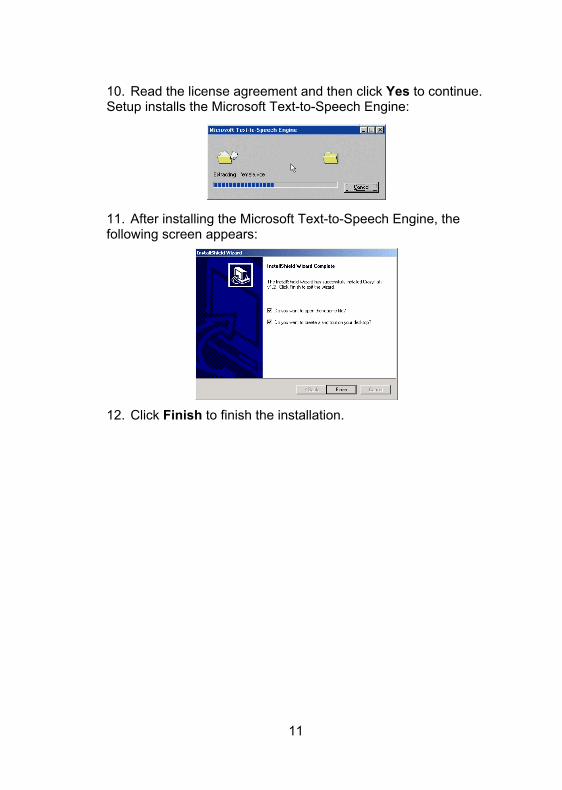
10. Read the license agreement and then click Yes to continue. Setup installs the Microsoft Text-to-Speech Engine:
11. After installing the Microsoft Text-to-Speech Engine, the following screen appears:
12. Click Finish to finish the installation.

12
Chapter 3 GGeettttiinngg SSttaarrtteedd
Getting Started CrazyTalk allows you to import any digital photo, image or likeness of a face. Then using a combination of innovative real time image morphing, TTS (Text-To-Speech) technology and/or Natural Voice technology it brings your favorite photos to life!
During the photo-fitting process an image is bonded with a wireframe so it can be morphed to display many different expressions and gestures. From the Expression Editor you simply type a text message and a lip-sync technique allows the fitted image to mouth the text. By combining this with the speech synthesis a complete animated character or Crazy Pal is created.
After you install CrazyTalk from your desktop or the CrazyTalk
program group, click the CrazyTalk icon to launch the Expression Editor. The CrazyTalk application is composed of three different editors:
Fitting Editor:
This program is used to import photos and create your own CrazyPal models (TJM files).
Expression Editor:
This editor is used to import your CrazyTalk model file, edit text, import .wav files, add expressions, and then save the result as a TPS file. After saving the file, you can export your creation to an EXE file, an HTML file, or send it with Email.
Web Editor:
This editor is used to set the properties of the CrazyTalk web component. You can preview the results in real-time. Results can be exported as a new HTML page or the HTML code can be copied and pasted into your favorite HTML editor.

13
Correctly fitting a photo takes a little time; we suggest that you first try the Expression Editor with one of our pre-fitted photos before you fit your own photo. Correctly fitting a photo takes a little time and at first may seem quite difficult. Like any graphic tool with practice and a better understanding of the editor, creating your own personalized CrazyPals will become quick and easy.
Using the Expression Editor you can create a finished CrazyPal by simply selecting a model, typing in your message text and applying expressions and gestures to different sections of the text. Once complete this can be exported and sent to a friend in a number of different formats.
The following quick guide will take you though the process of photo fitting with the Fitting Editor, and then the creation of a CrazyPal with the Expression Editor:
1. Click Start, Programs, CrazyTalk, and then click the CrazyTalk icon. The CrazyTalk Expression editor will open:

14
2. Select File, Open Fitting Editor or click to open the Fitting Editor
3. Click View, Change Wireframe mode to switch between wireframe modes. There are 3 modes available simple, normal or off. Initially we suggest you try simple mode. Press the Change wireframe mode button until the simple wireframe is displayed:
non-wireframe mode simplified mode normal mode

15
4. Click File, Import Photo, Image files:
5. Browse to a photo or an image file that you would like to use as CrazyPal or select C:\Program Files\Reallusion\Crazytalk\Sample\dog.bmp and click Open to open the sample file, remember image files need to be either .BMP or .JPG format.
6. The Crop dialog box will appear select Yes to crop the image. Cropping the image allows you to remove excess background area and enlarge the facial image that you wish to turn into a CrazyPal character:
7. The crop-box will appear in the image window. To move the crop-box you need to first grab it by placing your mouse pointer within the crop-box area, then you can grab and move the crop-box by holding down the left mouse button. Release the mouse to drop the crop-box in the desired position.
8. To change the size of the crop-box place your mouse pointer outside the crop-box area, then hold down the left mouse button, move the mouse pointer up to increase the crop-box size and down to decrease. Alternatively you can grab the edge of the crop-box, then whilst holding down the mouse drag it to your desired position. Release the mouse once the desired image is contained within the crop-box.

16
9. When you are happy with the image selected within crop-box
press Enter or select from the model control bar to crop the image and proceed to the fitting editor:

17
10. Click the Change wireframe Color button to change the wireframe to a color that is easily visible:
11. Using a combination of Size , Rotate , and
Move , adjust the complete wireframe to get the best possible fit for the eyes and mouth features. Do not worry about the face outline or precise detail at this time. Aim to get the major features (eyes and mouth) as close to the correct position as possible.
12. To assist in fitting the wireframe you can use the Zoom feature to enlarge the portion of the image you are currently working on. Three controls are available including Zoom In, Zoom Out and Restore. Once you have zoomed in on the image you can use the scroll bars to move to a different portion of the image.

18
13. For quick navigation use the following hot key combinations:
a. A + to size the complete wireframe.
b. D + to move the complete wireframe.
c. S + to rotate the complete wireframe.
14. Next, use the TAB key to switch between each of the facial features including eyebrows, eyes, nose and mouth. Then drag each of the selected area to their final position. For example the mouth area is selected:

19
15. Move and align the wireframe mouth over the photo's mouth. To move the selected feature you need first grab it by moving your mouse over the active area of the wireframe, when your mouse is over the wireframe it will change color. You can then grab and move the active area by holding down the left mouse button. Release the mouse to drop the wireframe in the desired position:
16. When the feature is completely aligned select Move point mode and make any final adjustments. In this mode you can select every individual point of the feature and move it to the precise position. Again highlight the point you wish to move with

20
the mouse grab and drag. Use the hotkeys for precise adjustment:
17. Repeat the previous 3 steps for each of the facial features in turn.
18. To aid in fitting the mouth you can enable the Close Mouth option from the File menu. This will cause the points for the upper and lower lip to move together as a single line, if your model has a closed mouth we suggest you use this option.
Not snapped shut Snapped shut
19. Finally press the TAB key until the complete wireframe is selected. In Move Point mode use the mouse to drag the edges of the wireframe to correspond to the edges of the photo’s face:

21
20. Turn off wireframe mode to view your work so far:
21. CrazyTalk replaces the eyes from the original image with virtual eyes. To adjust the virtual eye properties click the Feature Enhancement button:
22. The Feature Enhancement dialog box opens:

22
23. Make changes to the virtual eyes to match exactly the original eyes. Changes you make can be seen immediately in the image window. You can size, position and color the eyes. Accurately match the darkness of the virtual eyes with the darkness of the original eyes.
24. Select Mouth Texture to apply the throat texture to your model. Adjust the color by using the RGB slider bars to provide the best match, changes can be seen immediately in the image window. The mouth of your model will be wide open during this operation to allow you to better see the color change.
No texture Texture applied

23
25. Once you are satisfied with the results click OK.
26. After fitting the model from the file menu select Edit > Smooth to enable the Smooth option, this will smooth the curve of the eyes and the mouth, this process removes all the sharp edges giving a more natural and better quality finish to your animation's.
Non-smoothed eye Smoothed eye
27. Click Set TTS Voice Attributes button:
28. The TTS Voice Attributes dialog opens:

24
29. From here, you can change the voice attributes to best match your CrazyPal. Select a voice from the Voice Mode drop down list, and then adjust the volume, pitch, and speed. When satisfied click OK.
30. Finally click File, Save, to save your new CrazyTalk model.
31. Select File, Apply Model or click then the CrazyTalk Expression Editor will open with your CrazyPal model loaded.
32. In the text editing box, type in the text that you want your CrazyPal character to say:

25
33. Click the Play All button to preview your character speaking the text you just wrote:
34. To customize your message further with your mouse, you can highlight a section of text, and then click the “Select Voice and Mood Attributes” button. In this menu you are able to assign a different expression to your selected text. You can also change voice attributes including volume, pitch and speed. Click OK to save those changes. You can apply different expressions or voice settings to different words or sections of text.

26
35. Alternatively, from the file menu if you select View, Change
to Wave Mode or click the button the Text Editor window will be replaced with the Wave Editor
36. In this mode you are able to import a .wav file to be used as the voice for your CrazyTalk character. To import a .wav file select File, Import, Import a Wave File. The file open dialog box will appear, locate a .wav file on your hard drive and select OK.

27
37. The wave file will be imported into CrazyTalk and then analyzed to allow lip-sync between the voice and animation
38. To customize your message further, with your mouse you can highlight a section of the wave file, and then click the Select Voice and Mood Attributes button. In this menu you are able to assign a different expression to your selected .wav file. Click OK to save those changes. You can apply many different expressions to different sections of speech

28
39. When you apply different expressions to the wave file, the expressions will be displayed in the Wave Editing window. You can also use the Zoom control functions to enlarge a portion of the wave file to assist in editing
40. You may choose the enable or disable the use of the LifeMode feature within the Expression Editor. This will cause the selected CrazyTalk character to randomly animate including, blinking, changing expression, etc. providing a very natural look, this will not affect the final output as all exported files have this feature enabled as standard. However you can better understand the final results that your friends will receive. To enable or disable this feature from the file menu select Control > LifeMode.

29
41. Once you are happy with the results of your CrazyPal you can click the “Send Mail” button to export and send your CrazyPal to your friends via email. This will automatically launch your default mail program.

30
Chapter 4 CCrraazzyyTTaallkk FFiittttiinngg EEddiittoorr
Introducing the CrazyTalk Fitting Editor The CrazyTalk Fitting Editor is used to bond a wireframe with your own image. This process once complete allows your image to be used as a CrazyPal, and then animated by the CrazyTalk Expression Editor application.
Initially, correctly fitting a photo takes a little time and at first may seem quite difficult. Like any graphic tool with practice and a better understanding of the editor, creating your own personalized CrazyPals will become quick and easy. When bonding a wireframe to an image you simply need to match the contours of the wireframe to the contours of the image.
The first time you fit a photo we suggest you follow our guidelines carefully. Fitting a photo really is simple and quick, as long as you follow the correct procedure. Fitting a photo in a haphazard way will lead to much frustration as areas or contours you fit may no longer fit correctly after you make further changes in different areas.
In the following sections we will introduce the Fitting Editor window, and then walk you through step by step the procedure to correctly fit a photo.

31
Fitting Editor overview
The Fitting Editor window displays the image and the wireframe that are to be bonded together to create your CrazyPal. All the fitting editor functions have been neatly organized into 5 different toolbars for easy access. These functions are also accessible directly from the file menu. The toolbars and their functions include:
File management Bar
Enables you to open, close, and reset CrazyTalk model files, load wireframe models (TPM) and photo files, and undo/redo actions.
Model control bar
Changes the wireframe mode, wireframe color, and controls Zoon feature.

32
Fitting utility bar
Enables you to modify the Wireframe: rotate, resize, move points and regions, and modify eye attributes.
Morph preview bar
Enables you to preview the fitting result with six different expressions. You can preview the changes on either the wireframe or the model.
Player control bar
Enables you to preview the fitting result, and open the TTS attributes dialog window.
Status bar
Provides you with hints and the status of your work.
Fitting Editor toolbar and icon descriptions:
File management bar
New
Reset to default model.
Open CrazyTalk Model
Open a CrazyTalk model complete with fitted wireframe.
Save CrazyTalk Model
Save a CrazyTalk model complete with fitted wireframe.
Import Wireframe
Open a CrazyTalk wireframe (TPM) model.
Hint: This is useful if you create many CrazyPals with similar features.

33
Import photo
Import a photo or image file you wish to use when creating your CrazyPal. Images must be either .JPG or .BMP format.
Apply Model
Applies current model to Expression Editor.
Undo
Undo last action.
Redo
Redo last action.
Model control bar
Toggle Wireframe
Toggle wireframe mode between simple, normal and off modes. Preview your CrazyPal in wireframe off mode to see finished results.
Change Wireframe color
Toggle wireframe colors to better distinguish between image and wireframe points. Colors include black, green, and white.
Zoom In
Zoom in to see more image detail
Zoom Out
Zoom out to see less image detail
Restore
Restore image to original size

34
Crop
Click to crop selected photo area
Fitting utility bar
Change Active Target Area
Changes active target area between region and point mode. In region mode you can select to move only a region of the wireframe.
Select Active Region
Select wireframe active region from list. Includes eyes, eyebrows, nose and mouth.
Change Wireframe size
Select then hold down left mouse button. Move mouse up to increase or down to decrease wireframe size.
Rotate Wireframe
Select then hold down left mouse button. Rotate mouse pointer clockwise or anti-clockwise to rotate the wireframe.
Move Active Area
Select by moving mouse to active area when active area color changes grab by pressing and holding the left mouse button, drag to desired position and release.
Move point
Move point by highlighting selected point, when point color changes grab and drag to desired position.
Feature Enhancement
Not available in wireframe mode, set feature attributes including eyeball size, color and position; mouth texture and color.

35
Morph preview bar
Bright
Preview model with bright expression.
Frightened
Preview model with frightened expression.
Happy
Preview model with happy expression.
Angry
Preview model with angry expression.
Surprised
Preview model with surprised expression.
Blink
Preview model with eyes closed.
Player control bar
Preview
Play demonstration CrazyTalk file.
Stop
Stop CrazyTalk demonstration.
Set TTS voice attributes
Set TTS attributes such as volume, pitch, and speed.

36
Importing photos from image files When you open the Fitting Editor the default CrazyPal is displayed. You can import a photo from an image file, image files must be either .BMP or .JPG format. The CrazyTalk image size is preset to 256x256; no matter what size your source photo is CrazyTalk will scale your image to fit into that size. If the height to width ratio of your image isn't 1 to 1, CrazyTalk will simply fill blank areas with a black background. For best results you should use the in-built crop tool to create a square 256x256 image.
Follow these instructions to import a BMP/JPEG file:
1. From the CrazyTalk Fitting Editor click File, Import Photo,
Image files or click :
2. Browse to the location of the photo you want to import.
3. Select the BMP/JPEG file and click Open.

37
4. The Crop dialog box will appear:
5. Select Yes to crop the image or select No to continue fitting the image without cropping. Cropping the image will create a square 256x256 image removing any black borders and allowing you to remove excess background area and enlarge the facial image of the CrazyPal character you wish to create.
38
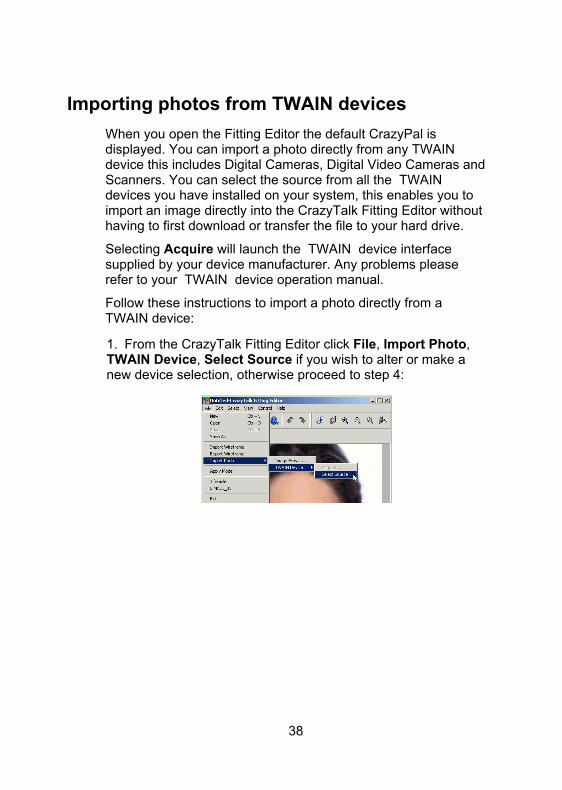
Importing photos from TWAIN devices When you open the Fitting Editor the default CrazyPal is displayed. You can import a photo directly from any TWAIN device this includes Digital Cameras, Digital Video Cameras and Scanners. You can select the source from all the TWAIN devices you have installed on your system, this enables you to import an image directly into the CrazyTalk Fitting Editor without having to first download or transfer the file to your hard drive.
Selecting Acquire will launch the TWAIN device interface supplied by your device manufacturer. Any problems please refer to your TWAIN device operation manual.
Follow these instructions to import a photo directly from a TWAIN device:
1. From the CrazyTalk Fitting Editor click File, Import Photo, TWAIN Device, Select Source if you wish to alter or make a new device selection, otherwise proceed to step 4:

39
2. Select from the list of installed TWAIN devices the source you wish to import from. This selection is remembered by the CrazyTalk application so you are only required to do this each time you wish to alter the currently selected device, once you have made your selection click Select to continue:
3. Click File, Import Photo, TWAIN Device, Acquire:
4. This will launch your device interface. Select the photo to be imported from your TWAIN device, for further details follow the instruction given within your TWAIN device operation manual.
5. The Crop dialog box will appear:
6. Select Yes to crop the image or select No to continue fitting the image without cropping. Cropping the image will create a square 256x256 image removing any black borders and allowing you to remove excess background area and enlarge the facial image of the CrazyPal character you wish to create.

40
Importing photos from external devices When you open the Fitting Editor the default CrazyPal is displayed. You can import a photo directly from any External Device that supports drive letter access, this includes the Panasonic range of Digital Cameras. This enables you to import an image directly into the CrazyTalk Fitting Editor without having to first download or transfer the file to your harddrive. Selecting Import from External Device will launch the file open dialog box. Any problems communicating with your device please view the device operation manual. Follow these instructions to import a photo directly from an external device.
1. From the CrazyTalk Fitting Editor, click File, Import Photo, Import From External Device:

41
2. Select your device from the list of available devices displayed in the pop up window, Click OK to continue:
3. An Open file dialog box will appear that links directly to the contents of your digital camera. All of your photos will be listed. Select the image you wish to import and click OK to continue.
4. The image will be imported directly into the Fitting Editor allowing you to crop the image as required.
42
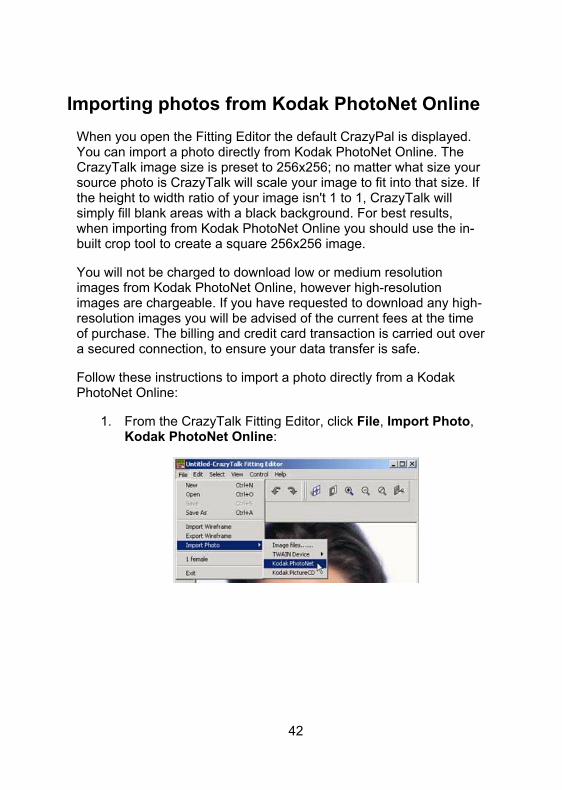
Importing photos from Kodak PhotoNet Online When you open the Fitting Editor the default CrazyPal is displayed. You can import a photo directly from Kodak PhotoNet Online. The CrazyTalk image size is preset to 256x256; no matter what size your source photo is CrazyTalk will scale your image to fit into that size. If the height to width ratio of your image isn't 1 to 1, CrazyTalk will simply fill blank areas with a black background. For best results, when importing from Kodak PhotoNet Online you should use the in-built crop tool to create a square 256x256 image.
You will not be charged to download low or medium resolution images from Kodak PhotoNet Online, however high-resolution images are chargeable. If you have requested to download any high-resolution images you will be advised of the current fees at the time of purchase. The billing and credit card transaction is carried out over a secured connection, to ensure your data transfer is safe.
Follow these instructions to import a photo directly from a Kodak PhotoNet Online:
1. From the CrazyTalk Fitting Editor, click File, Import Photo, Kodak PhotoNet Online:

43
2. The Kodak PhotoNet Online wizard will appear, enter your Login ID & Password to login to Kodak PhotoNet Online or enter the ID you have been provided to access your roll of film directly. You can check the "remember account information" box to save your account information. Once you have selected your login method click Connect to continue:
3. You will proceed to login and connect. A dialog box will appear during the connection process detailing the status of your connection, if you wish to stop the connection click Cancel. Once you have successfully connected a list of all your available rolls of film will be displayed:

44
4. Select a roll of film and click Open to display thumbnail images of all the photos contained on the roll, a progress bar will appear indicating the status of the current action:
5. Browse the thumbnail collection, select and then highlight the image you wish to import by placing the mouse pointer over the thumbnail and pressing the left mouse button. Select the image resolution you wish to download, if you request high-resolution images then a fee will be charged. Also at this time select a download directory, the default is c:\Program Files\Reallusion\CrazyTalk\Editor\ Click Download to begin the download process (proceed to step 9 if you have not requested any high-resolution images):
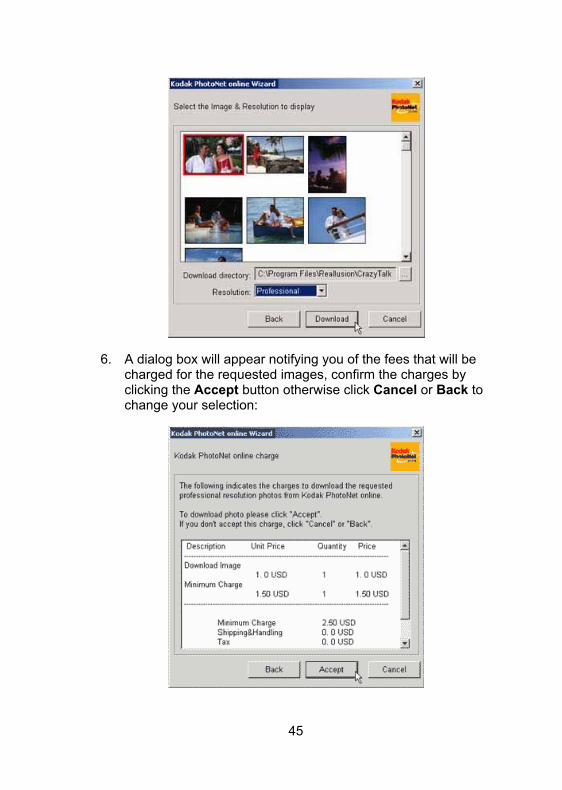
45
6. A dialog box will appear notifying you of the fees that will be charged for the requested images, confirm the charges by clicking the Accept button otherwise click Cancel or Back to change your selection:

46
7. After confirming acceptance of the charges you are required to fill out the billing information. Once complete click Submit to process the credit card payment. The billing and credit card transaction is carried out over a secured connection, to ensure your data transfer is safe:
8. The image file download will begin, a progress bar will appear indicating the status of the current download:
9. Photo images contained within your download directory will be displayed, the most recent download will be highlighted by an asterisks "*" select the image you wish to import into the CrazyTalk fitting editor and click Apply:

47
10. Once the import has completed the crop dialog box will appear:
11. Select Yes to crop the image or select No to continue fitting the image without cropping Cropping the image will create a square 256x256 image removing any black borders and allowing you to remove excess background area and enlarge the facial image of the CrazyPal character you wish to create.

48
Importing photos from Kodak Picture CD/Disks When you open the Fitting Editor the default CrazyPal is displayed. You can import a photo directly from a Kodak Picture CD or Picture Disk. The CrazyTalk image size is preset to 256x256; no matter what size your source photo is CrazyTalk will scale your image to fit into that size. If the height to width ratio of your image isn't 1 to 1, CrazyTalk will simply fill blank areas with a black background.
For best results, when importing from Kodak Picture CD/Disks you should use the in-built crop tool to create a square 256x256 image.
Follow these instructions to import a photo directly from a Kodak Picture CD/Disk:
1. From the CrazyTalk Fitting Editor, click File, Import Photo, Kodak Picture CD:
2. The Picture CD/Disk import dialog box will appear, select the media type you wish to import your photo from, and then click OK to continue:

49
3. Thumbnails of the all photos contained on the selected media will be displayed. Browse the thumbnail collection, select and then highlight the image you wish to import by placing the mouse pointer over the thumbnail and pressing the left mouse button. Click the Apply button to import the photo into the CrazyTalk fitting editor application:
4. Once the import has completed the crop dialog box will appear:
5. Select Yes to crop the image or select No to continue fitting the image without cropping. Cropping the image will create a square 256x256 image removing any black borders and allowing you to remove excess background area and enlarge the facial image of the CrazyPal character you wish to create.
50
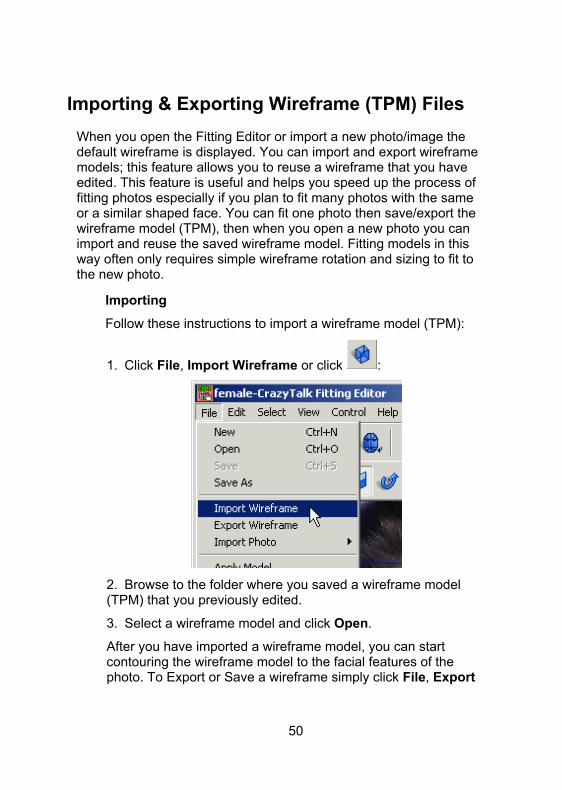
Importing & Exporting Wireframe (TPM) Files When you open the Fitting Editor or import a new photo/image the default wireframe is displayed. You can import and export wireframe models; this feature allows you to reuse a wireframe that you have edited. This feature is useful and helps you speed up the process of fitting photos especially if you plan to fit many photos with the same or a similar shaped face. You can fit one photo then save/export the wireframe model (TPM), then when you open a new photo you can import and reuse the saved wireframe model. Fitting models in this way often only requires simple wireframe rotation and sizing to fit to the new photo.
Importing Follow these instructions to import a wireframe model (TPM):
1. Click File, Import Wireframe or click :
2. Browse to the folder where you saved a wireframe model (TPM) that you previously edited.
3. Select a wireframe model and click Open.
After you have imported a wireframe model, you can start contouring the wireframe model to the facial features of the photo. To Export or Save a wireframe simply click File, Export

51
Wireframe and save with a filename in the location of your choice.
Exporting
Saving a wireframe allows you to reuse them time and time again. This is especially useful if you plan to animate many different photos of the same person. Also certain animals have the same basic characteristics so creating wireframe templates for certain topics can save much time. Fitting models from pre-saved wireframe templates often only requires simple wireframe rotation and sizing to fit to the new photo
Follow these instructions to export a Wireframe model (TPM):
1. Click File, Export Wireframe:
2. Save the wireframe model to the hard disk drive. For reference, be sure to use a useful filename so you can remember the details of the wireframe from only it's filename.

52
Cropping Images The crop function allows you to scale and selectively only use a portion of your original source image. This allows you to tailor your CrazyPal characters by discarding large empty background areas or focusing on specific facial outlines within an image.
CrazyTalk output images are preset to 256x256 pixels in size; therefore no matter what the size your source photo after importing and cropping the resulting CrazyPal will be scaled to that size. If the height to width ratio of your image isn't 1:1, CrazyTalk will fill blank areas with a black background.
Note: If you are starting from an image that does not have a 1:1 height to width ratio it is recommended that you use the crop tool.
Follow these instructions to crop an image:
1. After importing a photo from either an image file or a TWAIN device the Crop image dialog box will appear, click Yes to continue:

53
2. The original image will appear in the fitting editor with the crop box visible:
3. You can move the crop-box by placing the mouse pointer within the crop-box area. With your mouse pointer within the crop-box area grab the crop-box by pressing and holding down the left mouse button, then drag to the desired position and release.

54
4. You can scale the crop-box by placing the mouse pointer outside the crop-box area. With your mouse pointer outside the crop-box area hold down the left mouse button, move the mouse pointer up to increase the crop-box size and down to decrease. Alternatively you can grab the edge of the crop-box, then whilst holding down the mouse drag it to your desired position. Once the desired size has been reached release the mouse button.
Note: If the size of the crop box is less than 256x256 the color will change from yellow to red. Cropping an image smaller than 256x256 may result in a degradation of the final CrazyPal image quality. Hint: Details of the crop-box are shown in the status bar, the best results can be achieved when the height and width are set to 256x256.

55
5. Once you are satisfied with the image shown within the crop-
box click or press Enter to begin the wire fitting process.

56
What is a Wireframe To make your photos display expressions and gestures CrazyTalk manipulates or morphs a wireframe. By mapping this wireframe to the facial features of your photo CrazyTalk is able to manipulate the image giving the illusion of an animated photo.
When fitting a wireframe to your own personal photos take your time. Acceptable results can be achieved within minutes however, the better you fit the model the better the results will look, take time to ensure you get the best results. During the fitting process use the preview function often to see your work as you edit. Also use the different expression preview buttons to view the results. To view the finished results use non-wireframe mode and press the Preview button on the Player control bar.

57
Fitting the Wireframe The following example will guide you in fitting a photo’s facial features with a wireframe to enable the photo to create expressions. Follow these instructions to fit a wireframe:
1. Click Start, Programs, CrazyTalk, and then click Fitting Editor. The Fitting Editor program opens with the default model displayed, here you can select your photo or TJM file as described in the previous section.
2. Click View, Change Wireframe mode or click to change between simple, normal and wireframe off modes:
3. In simple wireframe mode, a simplified version of our wireframe is displayed over the top of the photo you are about to fit. In this mode the wireframe only includes the most important facial feature; eyes, eyebrows, nose, mouth and face outline:

58
4. In normal wireframe mode a seemingly complex frame will be displayed over the top of the photo that you are about to fit. By breaking the wireframe down into features you will see that only 6 exist, those are 2 eyes, 2 eyebrows, nose and mouth. You can move a single point, a region or the entire wireframe:
5. Initially you will need to move the complete wireframe to get the best possible fit for the eyes and mouth features. Do not worry about the face outline or precise detail at this time, as this precise fitting will be done in a moment. At this time your aim should be to get the major features (eyes and mouth) as close to the correct position as possible. To move the complete wireframe you use a combination of the following 3 controls:
Size , Rotate , and Move . To Size the wireframe, select the change wireframe size control,

59
move the mouse into the image area of the application, and then hold down left mouse button. Move mouse up to increase or down to decrease the wireframe size. To Rotate the wireframe, select the rotate control, move the mouse into the image area of the application, and then hold down left mouse button. Rotate mouse pointer clockwise or anti-clockwise to rotate the wireframe. To Move the wireframe, select the move control then move the mouse over an active portion of the wireframe, when you are above an active area of the wireframe you will notice it change color (In this case all of wireframe will change color as currently it is all active), grab the wireframe by pressing and holding the left mouse button, then drag to desired position and release.
6. You can use the Zoom feature to enlarge or reduce any portion of the image to assist in fitting, select from the file menu View, Zoom In to enlarge, Zoom out to reduce and Restore to restore to original size, alternatively use the controls on the
toolbar Zoom In, Zoom Out, Restore.
60
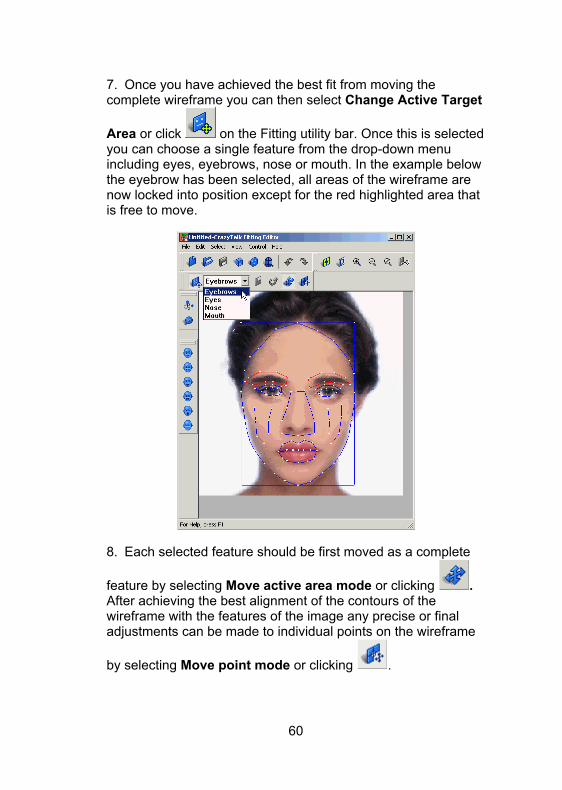
7. Once you have achieved the best fit from moving the complete wireframe you can then select Change Active Target
Area or click on the Fitting utility bar. Once this is selected you can choose a single feature from the drop-down menu including eyes, eyebrows, nose or mouth. In the example below the eyebrow has been selected, all areas of the wireframe are now locked into position except for the red highlighted area that is free to move.
8. Each selected feature should be first moved as a complete
feature by selecting Move active area mode or clicking . After achieving the best alignment of the contours of the wireframe with the features of the image any precise or final adjustments can be made to individual points on the wireframe
by selecting Move point mode or clicking .

61
Remember to move a single point; move the mouse over the point you wish to move, when it changes color grab it by holding down the left mouse button, drag it to the desired position and then release the mouse button.
9. Repeat the previous steps for each of the facial features in turn to precisely align the wireframe contours with the image contours. Make any necessary final adjustments in Move point mode.
10. Once all the features have been precisely fitted you can turn off Change Active target area mode, which will unlock all areas of the wireframe. Then in Move point mode you can select each point of the wireframe face outline and align it with the image outline.

62
11. During the fitting process you should use the preview function often to see your work as you edit. Use the different expression preview buttons to view the results. To view the finished results use non-wireframe mode and press the Preview button on the Player control bar a short dialog will be played and your image will lip sync with the text.
12. Once the wireframe has been correctly fitted with the image you will need to adjust the eyeball properties. This will be described in the next section.

63
Fitting facial features During the fitting process you need to accurately fit the facial features. Below you will see some useful hints and tips to assist you fitting each feature.
Tip: To fine tune control points on the wireframe, click the right mouse button on the target point, and use arrow keys to move the point more accurately.
Fitting Eyebrows The eyebrow region has nine control points that enable you to adjust the wireframe to match the eyebrow contours. The complete eyebrow and a small section of surrounding skin should be included within this area:
Fitting Eyes The eye region has 12 control points that enable you to adjust the wireframe to match the eye contours. Closely matching the white of the eye is important, as this will be replaced with a virtual eye. Use the eyes closed preview often when fitting the eyelids as this area gets distorted a lot. With bad fitting you will

64
often see part of the eyebrow pulled down during a blink giving an unrealistic looking black eyelid:
Tips: 1. Fit the eyelid area with the eye feature wireframe. If you get a black looking eyelid you can use an image editor (such as Photoshop) to lighten or add a more natural color to the eyelid area so there is more contrast with eyebrow. Refer to your image editor help for details on how to edit an image. 2. Click Eyes closed preview button often to check the result.
Fitting the Nose The nose region has nine control points that enable you to adjust the wireframe to match the nose contours. The nostrils should be completely within the bottom rectangle, the top of this rectangle should pass across the point of the nose:
65
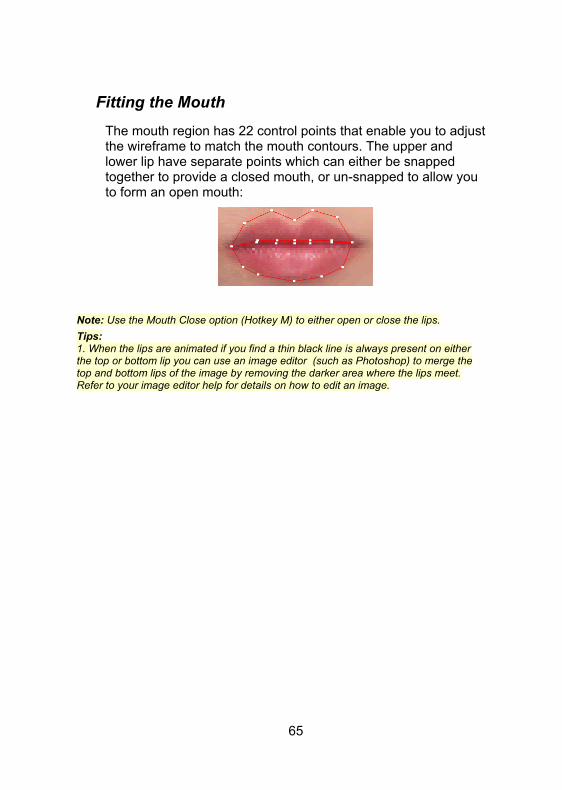
Fitting the Mouth The mouth region has 22 control points that enable you to adjust the wireframe to match the mouth contours. The upper and lower lip have separate points which can either be snapped together to provide a closed mouth, or un-snapped to allow you to form an open mouth:
Note: Use the Mouth Close option (Hotkey M) to either open or close the lips. Tips: 1. When the lips are animated if you find a thin black line is always present on either the top or bottom lip you can use an image editor (such as Photoshop) to merge the top and bottom lips of the image by removing the darker area where the lips meet. Refer to your image editor help for details on how to edit an image.

66
Feature Enhancement To animate your image CrazyTalk adds two virtual features to your images, this includes a virtual eye and a virtual mouth.
The virtual eye overlays on the eye portion of the image to enable you to create a more realistic animated eye. This is required because when the image is morphed the area within the eye is squashed and the real eyeball would be flattened. You can alter the virtual eye attributes to match exactly the original eyes with the Feature Enhancement dialog box.
The virtual mouth is visible when the lips are animated, this is the space between the two lips is filled with a texture to give the appearance of a throat. This throat texture can be colored to provide the most natural look when the mouth is being animated.
Follow these instructions to edit the features:
1. Click View, Change Wireframe mode or click to exit wireframe mode:
2. Click Edit, Feature Enhancement:

67
3. The Feature Enhancement dialog box opens:

68
The following options are available:
Size Enhancement
Enables you to increase or decrease the eyeball size or move the eyeball up, down, left, or right. Clicking Reset will return the eyeball to the original state.
Color Enhancement
Enables you to change the color characteristics of the mouth, entire eye, only the eyeball, or only the white part of the eye. Sliders increase or decrease the darkness of the selection, or change the amount of red, green, or blue color. Clicking Reset to Default will return the color parameters to normal. Clicking Hide Eye will temporarily remove the virtual eye overlay so you can compare with the original.
Any changes you make in this menu can immediately be seen in the image window.
Virtual Eye Begin by correctly sizing the eyeballs. Once complete, move each of the eyeballs into a realistic looking position.
When setting the color enhancement for the white of the eye you will want to select the white of the eye control and use the darkness slider to accurately match the darkness of the white of the eye with the darkness of the image.
When setting the color enhancement for the eyeball you will want to select the Eyeball control. First use the red, green and blue sliders to closely match the original eyeball color, and then adjust the darkness slider to accurately match the darkness of the eyeball with the darkness of the image.

69
Virtual Mouth Select the Mouth Texture check box to apply the mouth texture. When the Mouth Texture option is selected you can adjust the color by moving the RGB sliders. Choose a color that best matches the model.
Non-textured mouth Textured mouth
After you have made your changes, press OK to confirm the changes, or click Cancel to discard the changes and exit the Feature Enhancement dialog box.

70
Editing TTS Voice You can edit many of the TTS voice characteristics such as voice, pitch, volume, and speed to best match the image that you have used as a CrazyPal. Altering these characteristics will give your CrazyPal a default sound that you feel best fits with the image. Follow these instructions to open the TTS Attributes Dialog box and edit the characteristics:
1. Click Control, Set TTS Voice Attributes, or click :
2. The TTS Voice Attributes Dialog box opens:

71
The following options are available:
Voice Mode Enables you to select a different voice model from the drop-down menu of available voices.
Volume Volume slider to increase or decrease the voice’s volume.
Pitch Pitch slider to increase or decrease the voice’s pitch.
Speed Speed slider to increase or decrease the rate at which the voice speaks.
Any changes you make to the TTS attributes can be heard by clicking Test to preview your settings button this will play a short dialog. Check the box next to Preview Voice Only to preview the voice without animating the photo.
Click OK to save your changes, or click Cancel to discard the changes and exit the TTS Attributes Dialog box.
If you only have the Sam voice available to you other voices are available directly from our website go to: http://www.reallusion.com/mtts.asp

72
Voice Characters CrazyTalk supports SAPI compliant Text-to-Speech engines. We currently use the Microsoft TTS engine as this has 19 voice characters available. If you currently only have the Sam voice available other voices are available directly from our or Microsoft’s website. After you have installed the MS TTS engine, you will be able to choose from 19 voice characters:
Mary Mike Sam RoboSoft
Mary (on telephone)
Mike (on telephone)
Male (whisper)
RoboSoft One
Mary (in Space)
Mike (in Space)
Female (whisper)
RoboSoft Two
Mary (in hall) Mike (in hall) RoboSoft Three
Mary (in stadium)
Mike (in stadium)
RoboSoft Four
RoboSoft Five
RoboSoft Six
73
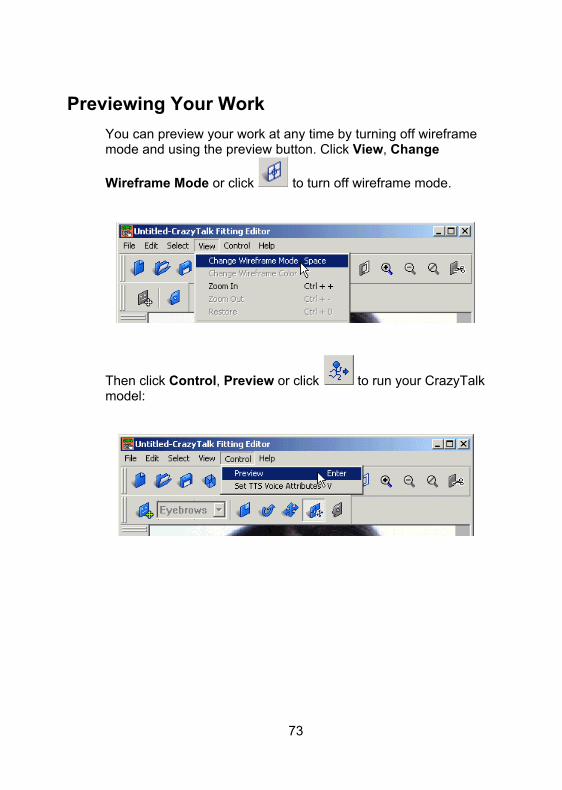
Previewing Your Work You can preview your work at any time by turning off wireframe mode and using the preview button. Click View, Change
Wireframe Mode or click to turn off wireframe mode.
Then click Control, Preview or click to run your CrazyTalk model:

74
Saving your CrazyPal character Once you are satisfied with the results of your CrazyTalk model you can save your new CrazyPal ready to be used in the Expression Editor.
1. Click File, Save:
2. Save your new CrazyPal to your hard disk drive in a convenient location of your choice.
3. When saving as a JPG image you can select the quality of the image and the amount of compression used. Note: Greater compression will result in a smaller file size but a lower quality of image.

75
4. Once you are satisfied with the results click Save to save the CrazyTalk model to your hard disk drive.
5. After saving your CrazyTalk model file you can immediately begin to use your new character by clicking the Apply button. This will open the expression editor window with your new character loaded.

76
Morphing During the fitting process you can at any time click any of the Expression preview buttons to see how your photo will look with that expression applied. There are 6 available these include Bright, Happy, Surprised, Frightened, Angry and Eyes closed. If you view the expression in non-wireframe mode this will show you how your finished CrazyPal will look, viewing in wireframe mode will simply morph the wireframe:
Bright
Frightened
Happy
Angry
Surprised
Blink

77
CrazyTalk Fitting Editor Hot Keys The following hot keys can be used in the Fitting Editor program when wireframe mode is enabled:
Hot key Function
Space Toggles wireframe mode between Simple, Normal and off.
C Changes wireframe color
Tab Toggles between each of the facial features: All, eyebrows, eye, nose, and mouth. Shift + Tab goes to the previous item.
A Enables you to enlarge or shrink the wireframe model. Hold this key and use the following hot keys: Up arrow : Enlarge wireframe model Down arrow : Shrink wireframe model
S Enables you to rotate the wireframe model. Hold this key and use the following hot keys: Left arrow : Rotate counterclockwise Right arrow : Rotate clockwise
D Moves wireframe model. Hold this key and use the following hot keys: Up arrow : Move upwards 1 pixel Down arrow : Move downwards 1 pixel Left arrow : Move left 1 pixel Right arrow : Move right 1 pixel
F With the right mouse button, move control point on wireframe model. Hold this key, right click a control point and use the following hot keys: Up arrow : Move control point upwards 1 Down arrow : Move point downwards 1 pixel Left arrow : Move left 1 pixel

78
Right arrow : Move right 1 pixel
Enter Press <Enter> to preview your CrazyTalk model. Press <Enter> again to stop the preview.
V Open Text-to-Speech (TTS) attributes dialog box.
Ctrl + N New; Reset to default model file and wireframe
Ctrl + O Open; opens a previously saved CrazyTalk model file (TJM)
Ctrl + S Save; saves the current CrazyTalk model file
M Mouth Close; Snaps mouth shut by joining top and bottom lips
W Smooth; Uses subdivision to smooth the curve of the eyes and the mouth
Ctrl + + Zoom In; enlarges the image in the editing window
Ctrl + - Zoom Out; reduces the image in the editing window
Ctrl + 0 Restore; restores the image to the original size
Ctrl+Z Undo your last action.
F1 Opens help dialog box.

79
Adjusting Eye Position Hot Keys In addition, these hot keys can be used to adjust eye position when in non-wireframe mode:
Hot key Function
E Opens Feature Enhancement dialog box.
Right arrow
Moves the model’s right eyeball one pixel to the right.
Left arrow
Moves the model’s right eyeball one pixel to the left.
Up arrow
Moves the model’s right eyeball one pixel upwards.
Down arrow
Moves the model’s right eyeball one pixel downwards.
Shift + Right
arrow
Moves the model’s left eyeball one pixel to the right.
Shift + Left arrow
Moves the model’s left eyeball one pixel to the left.
Shift + Up arrow
Moves the model’s left eyeball one pixel upwards.
Shift + Down
arrow
Moves the model’s left eyeball one pixel downwards.
Asterisk * Enlarges left and right eyeball.
Slash / Shrinks left and right eyeball.

80
Tips and Suggestions The following tips make creating a CrazyTalk model easier:
Picture Selection
• Use a front facing photo to enable you to accurately position the wireframe over your image.
• Use a subject with a neutral expression whose mouth is closed.
• Don’t use photos where the hair covers the subject’s eyes or you will not be able to adjust the eyeball attributes correctly.
• Don’t use photos whose subjects wear glasses, glasses will inhibit the eye enhancement and wireframe adjustment features.
• When you fit the wireframe to the photo, fit the complete frame to the eyes and mouth first, these are the most complicated regions; fitting them first will reduce work later.
Use Smooth feature
• Use the smooth feature to subdivide the curve of the eyes and the mouth, this process removes all the sharp edges giving a more natural and better quality finish to your animation's
Use Zoom feature
• Use the Zoom feature to enlarge or reduce the image in the fitting editor window to aid precise fitting and the fitting of small images

81
Use Hot Keys
• Use hot keys A, S, D, and F to quickly navigate and speed up fitting facial features.
• Use mouse right click + arrow keys for more accurate and controllable fine-tuning.
Adjust Your Interface Environment
• Drag tool bars to places that you find most suitable.
• Enlarge fitting window size for fitting fine detail, and condense window size for quicker preview.
Use Preview Often
• Use the preview button to show your work as you edit.
• Use the eye closed morph to check eye and eyebrow fitting for accuracy and a natural look.
• Use other preview expressions to help you to check finished results.
• Use Move point control in wireframe mode and preview expressions in non-wireframe mode to fine-tune your image for perfect results.

82
Chapter 5 CCrraazzyyTTaallkk EExxpprreessssiioonn EEddiittoorr
Introducing the CrazyTalk Expression Editor The CrazyTalk Expression Editor is used to create and export your finished CrazyPal characters. Within the editor you can select a CrazyPal character, edit your text messages, import or record wave files and then apply expressions to individual words and sections of the speech.
The Expression Editor window by default displays the selected CrazyPal image and the Text Editor. Selecting the Switch Wave Mode button will launch the Wave Editor

83
All the expression editor functions have been neatly organized into 5 different toolbars for easy access. These functions are also accessible directly from the file menu. The toolbars and their functions include:
Text editing area
Enables you to input, edit, and preview text.
File handle bar
Enables you to create, open, and save scripted text document files (TPS), and to open CrazyPal model files (TJM).
Edit control bar
Enables you to cut, copy, and paste text, and undo your last action.
Export handle bar
Enables you to export your finished CrazyPal character as an EXE file, an HTML file, or send directly via email.
Wave mode control bar
Enables you to record, Zoom, preview your input text with the CrazyPals, and open the TTS attributes dialog window
Player control bar
Enables you to preview the finished results of your CrazyPal message, also open the TTS attributes dialog window.

84
Status bar Provides you with hints and the status of your work.
Expression Editor toolbar and icon descriptions:
File handle bar
New
Create a new scripted text document (TPS).
Open
Open a new scripted text document (TPS).
Save
Save a scripted text document (TPS).
Open CrazyTalk Model
Import a CrazyTalk model file (TJM).
Open Text File
Import a Text File.
Open Wave File
Import a Wave File.
Open Fitting Editor
Opens the Fitting Editor application.

85
Switch to Wave Mode
Switches from Text Mode to Wave Mode.
Switch to Text Mode
Switches from Wave Mode to Text Mode.
Edit control bar
Cut
Cut selection to clipboard
Copy
Copy selection to clipboard
Paste
Paste clipboard contents
Undo
Undo previous action
Export handle bar
Export Media
Export CrazyTalk in different media formats including: .WMV .AVI .WAV .BMP
Export exe
Export CrazyTalk as a self-executable file.
Export HTML
Launches the CrazyTalk Web Editor. Note: This function is not included in the Standard Edition

86
Send Mail
Send CrazyTalk Mhtml, HTML attachment or self-executable file to a friend by email.
Player control bar
Edit Expression
Set TTS attributes such as volume, pitch and speed, and select expression.
Play All
Play all the text that is in the text editing area.
Play Selection
Play selected section.
Stop
Stop playback.
Wave Mode control bar
Record
Record wave file.
Zoom In
Zoom in to see more wave file detail.
Zoom Out
Zoom out to see less wave file detail.
Restore
Restore wave file to its original size.

87
Opening CrazyTalk Model Files When creating your own personalized CrazyPal to send to your friends first you will need to select the CrazyPal character that you wish to use. Follow these instructions to import a CrazyPal model file (TJM) for use in the CrazyTalk Expression Editor:
1. Click Start, Programs, CrazyTalk, and then click Expression Editor. The Expression Editor program opens.
2. Click File, Open:
3. Browse to the folder where the CrazyPal you wish to use is located. Sample CrazyPal models are provided in the Samples folder located in the CrazyTalk application folder.
4. Select a model and click Open.
5. Many CrazyPal characters are provided free for download from our web page. From the help menu click Help, Add Free CrazyPals to link directly to the Free CrazyPal page.
After you have imported a model, you can start editing the message text or importing the wave file that you want your CrazyPal to say.

88
Wave Editor 1. To select Wave Mode from the file menu select View,
Change to Wave Mode or click the Wave mode button
located in the file handle toolbar
2. To import a .wav sound file you wish your CrazyPal to speak, from the file menu select File, Import, Import Wave File or
click . The file will be imported and then analyzed to enable the CrazyTalk character to lip-sync together with the audio:
3. Alternatively, you can use the inbuilt record function to record
your own wave file, from the file menu select Control,
Record Wave or click the record button to launch the CrazyTalk Sound Recorder.
4. Select your microphone as the input device. Click the Record button to begin recording, adjust the volume until the

89
sound is clearly seen in the preview window without clipping, and then click Stop. Click Play to listen to the wave file you have just recorded. Once you are satisfied click Apply to import
5. After you have imported your message, click to play all text. If you want to hear only a selected word or group of
words, select the words and click :
6. If you wish to cancel the playback at any time click to stop playback.

90
Editing the Expression – Wave Mode 1. After you have imported your message, you can add
expressions to individual words or sections of the message to customize the finished CrazyPal further.
2. To assist in selecting a section of audio you can use the zoom keys to enlarge the area where you wish to place an expression. After Zooming use the scroll bar found above the Wave Preview Window to quickly move the desired section of audio.
3. Place your mouse within the Wave Preview Window at the start of the section you wish to apply an expression. Hold down the left mouse button and drag it highlighting the desired audio.
4. To select specific phonemes or sounds, make your selection with the mouse within the Visual Cue section of the window. This will cause the selection to snap to the closest cue (signified by a red dot).
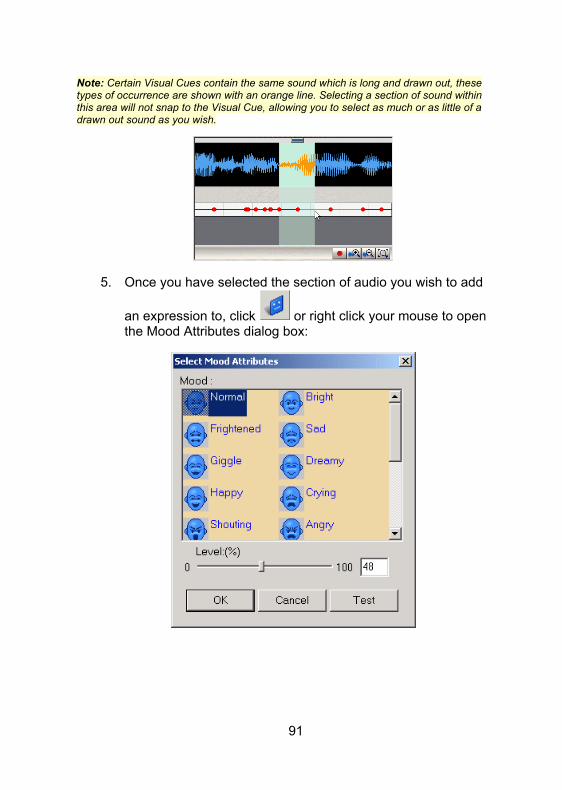
91
Note: Certain Visual Cues contain the same sound which is long and drawn out, these types of occurrence are shown with an orange line. Selecting a section of sound within this area will not snap to the Visual Cue, allowing you to select as much or as little of a drawn out sound as you wish.
5. Once you have selected the section of audio you wish to add
an expression to, click or right click your mouse to open the Mood Attributes dialog box:

92
6. The following options are available:
Function Description
Level Click and drag the slider to raise or lower the expression strength.
Note: By changing these different attributes you are able to emphasize different sections of the message exactly the same way as you would in normal conversation. Note: Do not apply more than one expression or voice attribute to any word. The output will be incorrect
7. After you have made any changes, click Test to preview your settings. Click OK to save your changes, or click Cancel to discard the changes and exit the Select Mood Attributes dialog box.
8. You can make any final adjustments to the strength of any expressions applied from the Strength Meter. Select an expression, then whilst holding down the left mouse button drag the strength bar up or down to increase or decrease the effect. Changes you make to the strength will be seen in real-time in the CrazyPal Preview Window.

93
Text Editor 1. To select Text Mode from the file menu select View, Change to Text Mode or click the Text mode button located in
the file handle toolbar
2. The message that you wish your CrazyPal to speak should be typed in the text editing area:
3. Alternatively, you can copy text from your word processing program and paste it into the text editing area.
4. After you have written your message text, click to play all text. If you want to hear only a selected word or group of
words, select the words and click :
5. If you wish to cancel the playback at any time click to stop playback.

94
Editing the Expression and Voice – Text Mode 1. After you have edited your message text to your satisfaction, you can add expressions or change the voice attributes of individual words or sections of the message to customize the finished CrazyPal further. Select the text you wish to add an
expression to and click to open the Voice and Mood Attributes dialog box:

95
2. The following options are available:
Function Description
Mood Select a mood from the list to apply to your CrazyTalk.
Level Click and drag the slider to raise or lower the expression strength.
Volume Click and drag the slider to raise or lower the voice volume.
Pitch Click and drag the slider to raise or lower the voice pitch.
Speed Click and drag the slider to increase or decrease the rate at which the voice speaks.
By changing these different attributes you are able to emphasize different sections of the message exactly the same way as you would in normal conversation.
3. After you have made any changes, click Test to preview your settings. Click OK to save your changes, or click Cancel to discard the changes and exit the Select Voice and Mood Attributes dialog box.
Tip: If you want to change the TTS Voice Character, you must go back to the Fitting Editor. Note: Do not apply more than one expression or voice attribute to any word. The output will be incorrect.

96
Saving Your CrazyTalk Script File Once you are satisfied with the CrazyPal message that you have just created you need to save your changes. To do this:
1. Click File, Save:
2. Then save your CrazyPal script to a convenient location on your hard disk drive.
When creating .TPS files in wave mode the original wave data is stored within the .TPS file. If you wish to use the .TPS file on the Internet or include it in an email message you can select to Export to Web, this will remove the original wave data providing you will a much smaller file size. You should note however if you try to re-edit this file later the audio quality will become distorted. To save a .TPS file for the web:
1. Click File, Save for Web:

97
2. Save your CrazyPal script to a convenient location on your hard disk drive. By default your files will be saved in your My Documents folder within the CrazyTalk/CrazyTalk Model folder.

98
Sending Mail After you have saved your CrazyPal file, you are able to send it directly to a friend via Email. CrazyTalk provides 3 different Send Mail options so you can select the method most suitable. Options include Mhtml email (Outlook98 & 2000 users only), Html attachment and .exe file attachment. If you do not have an Email program installed in your system (or if you use web based email) you will need to manually export an .exe file and then attach it to a message from within your email account. For more information about exporting an .exe file see the following section.
1. To sent mail click File, Send Mail or press from the export toolbar:
2. A dialog box will appear allowing you to select the type of email you wish to send, the audio format and quality of the voice that you wish to be included with your message. Include audio voice data is selected as default; this includes an audio file so any user (even anyone without TTS installed) can hear the message. TTS users will hear a much higher quality of voice and it is recommended that users install TTS. If you are sure the user you are sending the message to has TTS installed you can de-select Include audio voice data, this will greatly reduce the size of your output file, however users without TTS will not hear any sound. If you are at all unsure we suggest you keep the Include audio voice data checked. When Include audio voice data is selected you are able to select the quality of the audio that is included. The default quality is Mid, selecting High will increase the final file size and

99
selecting low will decrease the final file size. Clicking the Preview button will playback the audio voice data without using the higher quality TTS voice drivers, so you have an idea of what your recipient will hear. When selecting Preview you can also enter the number of characters that you wish to preview.
3. When you have completed your audio format and voice quality selections, select the email format that you wish to send, and then click OK. The options are listed below with a description of each:
a. Html Mail (Outlook 98 & 2000 users only)
b. Html attachment
c. Exe attachment
Note: When sending a CrazyPal, if you are unsure the recipient has TTS drivers installed select Include audio voice data. Note: CrazyTalk users have the TTS voice drivers installed; not including audio voice data will reduce file sizes significantly. Note: The CrazyTalk Expression Editor converts the finished CrazyPal to an EXE file, and then opens your Email client with the CrazyPal attached, ready to send.

100
Send Html Mail (Outlook 98 & 2000 users only) Users with Outlook 98 or Outlook 2000 installed are able to send a CrazyTalk in the form of an Html email and should use the Html Mail option. This message will play immediately upon opening by the recipient (once they have installed the web plug-in for the first time). This Html email can be played directly by most email programs that support the viewing of Html messages as well as many of the web based email programs. In the case of a web based email system or email viewer that does not support Html, a Html attachment is provided to the user so they are still able to view the received message simply by double clicking the attached Html file. To send a Html Mail: 1. Select the Html Mail (Outlook98 & 2000 only) option, and then click OK.
2. The Exporting Media dialog box will then appear and your data file will be created. To stop the operation at any time you can press the Cancel button or the escape key on your keyboard, depending on the length of your message the creation can take a while.
3. Once complete Outlook will automatically open a new message and the CrazyTalk will be added to the message.

101
4. Type in the address of the recipient or select from your address book, and then press Send. You should not edit the Html message as it contains special text strings to allow the page to function correctly.
Send Html Attachment If you are using Outlook Express or another email program that does not support the creation of MHTML messages, when sending a CrazyTalk message as an email you should use the Html attachment option. This will create a plain text message and attach an Html page to the email message. The CrazyTalk message contained in the attachment will play immediately upon opening by the recipient (once they have installed the web plug-in for the first time). This Html attachment will open the default web browser in another window and play the CrazyTalk message. Any Windows system with a web browser is capable of viewing this attachment.

102
1. Select the Html attachment option, and then click OK.
2. The Exporting Media dialog box will then appear and your data file will be created. To stop the operation at any time you can press the Cancel button or the escape key on your keyboard, depending on the length of your message the creation can take a while.
3. Once complete your email application will automatically open a new message and an Html file will be attached to the message.
4. Type in the address of the recipient or select from your address book, and then press Send. You can personalize the message by typing anything you wish into the message area. To view the attachment double-click, this will launch you default web browser.

103
Send Exe Attachment All users (except web based mail users) are able to send a CrazyTalk message as an .exe file attachment. To send these types of email select the Exe attachment option. This will create a plain text message and attach an .exe file. This .exe file contains a stand-alone player so users will not need to download or install any other file. Users should take care when sending or opening .exe format files as they can potentially contain a virus. For more information view our Virus's and protecting yourself section.
1. Select the Exe attachment option, and then click OK.
2. The Exporting Media dialog box will then appear and your data file will be created. To stop the operation at any time you can press the Cancel button or the escape key on your keyboard, depending on the length of your message the creation can take a while.
3. Once complete your email application will automatically open a new message and the .exe file will be attached to the message.

104
4. Type in the address of the recipient or select from your address book, and then press Send. You can personalize the message by typing anything you wish into the message area. To view the attachment double-click, this will run the CrazyTalk message in the standalone player.

105
Exporting to EXE You can export your CrazyPal message as an EXE file; this file contains a stand-alone player enabling you to share your CrazyPal creations across a variety of platforms.
1. Click to export the CrazyTalk to an EXE file:
2. A dialog box will appear allowing you to select the audio format and quality. You can choose to include the audio voice data or by un-checking the option only include TTS voice data. Include audio voice data is selected as default, however TTS will playback the voice at a higher quality and does not require an audio file to be sent; TTS is supported by CrazyTalk users and greatly reduces the output file size. If you are unsure whether the user has TTS drivers installed we suggest you keep the Include audio voice data checked.
3. If you select Include audio voice data you are able to select the quality of the audio that is included. The default quality is Mid, selecting High will increase the final file size and selecting low will decrease the final file

106
size. Clicking the Preview button will playback the audio voice data without using the higher quality TTS voice drivers, you can also enter the number of characters that you wish to preview. When you are satisfied with the sound set the Send Mail Type option to Exe attachment, and then click OK to begin export.
4. The Export EXE file dialog box opens. Browse to the location you want to save the file, and click Save to save the file to your hard disk drive.
5. To play the file, browse to the location of the file in Windows Explorer and double-click the file. The CrazyTalk Messenger opens and plays the CrazyTalk:
6. Right click your mouse to open a menu that enables you to play and stop the message, and change the size of the CrazyTalk Messenger window.

107
7. In Text Mode, if you insert a Web URL in your dialog as shown in the example below:
8. Users will be able to click the image from the executable file and be taken to the Website:

108
Exporting to AVI, BMP or WAV You can export your CrazyPal message in many other media formats including .AVI, .BMP or .WAV files, enabling you to easily import them into a variety of other editing tools and platforms.
Export AVI Files
1. Click to export the CrazyTalk to an AVI file:
2. A dialog box will appear select the file type .AVI, and then video size and frame rate. Browse the location you want to save the file, and click Save to save the file to your hard disk drive.

109
3. A Video compression dialog box will appear, this will list any compression Codec's that Windows has installed so you can compress the output and preview the results. Once you are satisfied with the results click OK to finish.
4. To play the file, browse to the location of the file in Windows Explorer and double-click the file. The default Windows Media player will open and play the Results.

110
Export BMP Files
1. Click to export the CrazyTalk as a BMP sequence file:
2. A dialog box will appear select the file type .BMP, and then image size and frame rate. Browse the location you want to save the file, and click Save to save the file to your hard disk drive. The sequence of files will be saved as the file name you suggest consecutively numbered. Click OK to finish.
3. Use a standard graphic editing tool to view the BMP sequence.

111
Export WAV Files
1. Click to export the CrazyTalk as a WAV file:
2. A dialog box will appear, select the file type .WAV; no options are available. Browse the location you want to save the file, and click Save to save the file to your hard disk drive.
3. To play the file, browse to the location of the file in Windows Explorer and double-click the file. The default Windows Media player will open and play the Results

112
Exporting (Quicktime movie) to External Devices
You can export a CrazyTalk animation directly to external devices that support .mov file format and drive letter access, this includes the Panasonic range of Digital Cameras. This enables you to export your creation directly to your device for playback. Any problems communicating with your device please view the device’s operation manual.
Follow these instructions to export an animation directly to an external device:
1. From the CrazyTalk Fitting Editor, click File, Export, Export to External Device:
2. Select your device from the list of available devices displayed in the pop up window, Click OK to continue.
3. A Save file dialog box will appear that links directly to the contents of your digital camera. Select the folder that you wish to export and click OK to continue. For Panasonic digital cameras the file name must be "P999XXXX " (where XXXX needs to be a number between "1000" and "9999").

113
CrazyTalk Expression Editor Hot Keys The following hot keys can be used in the CrazyTalk Expression Editor program.
Hot key Function
Ctrl + A Select all text
Ctrl + C Copy text
Ctrl + X Cut text
Ctrl + V Paste text
Ctrl + Z Undo
Ctrl + N New
Ctrl + S Save
Ctrl + O Open
Right mouse click on
selected text
Opens Voice and Mood Attributes dialog box
F1 Help

114
Tips and Suggestions Use the following tips to help you take full advantage of the Expression editor’s options:
Include Voice data Only include voice data if you are unsure whether the user you are sending a CrazyTalk message to already has TTS installed. All CrazyTalk users have TTS installed. By deselecting the Include voice data option your CrazyTalk messages will be much smaller.
Alter voice attributes Alter the voice attributes including, volume, pitch and speed to give a more natural sound. You can change the voices attributes in combination with the facial expressions to highlight a point or topic within the dialog. For example when using the happy expression increase the pitch, when using the angry expression lower the pitch and increase the volume.
Get more CrazyTalk model files You can download many more FREE CrazyTalk model files to send to your friends. Either visit http://crazytalk.reallusion.com/gettjm.asp or from the file menu select Help, Add free CrazyPals
Get more Voices To add more variety to your selection of voices, download more TTS engines and voices. CrazyTalk requires a SAPI 4 compliant TTS engine. Either visit http://www.reallusion.com/mtts.asp or from the file menu select Help, Add more voices

115
Keyboard shortcuts Use hot keys to quickly navigate and speed up creating your CrazyTalk messages.
116
Virus’s and how to protect yourself Whilst there is no way to completely protect yourself against all virus's a few simple tips will go a long way to providing a good level of prevention and peace of mind. Some of this information might seem obvious to some people, but sometimes the obvious is not so obvious. If you have ever been attacked by a computer virus, you'll know that it is no laughing matter. Viruses can destroy your entire hard drive, and can often mean that you lose all the files and programs on your computer, not to mention all those CrazyPals you spent many hours working on. Sometimes you might have a virus on your computer without even knowing it. Luckily, there are many things you can do to prevent as well as prepare for virus attacks.
Virus Detection and Prevention Tips
1. Do not open any files attached to an e-mail from an unknown, suspicious or untrustworthy source.
2. Do not open any files attached to an e-mail unless you know what it is, even if it appears to come from a dear friend or someone you know. Some viruses can replicate themselves and spread through e-mail. Better be safe than sorry and confirm that they really sent it.
3. Do not open any files attached to an e-mail if the subject line is questionable or unexpected. If the need to do so is there always save the file to your hard drive before doing so.
4. Delete chain mails and junk e-mail. Do not forward or reply to any to them. These types of e-mail are considered Spam, which is unsolicited, intrusive mail that clogs up the network.
5. Do not download any files from strangers.
6. Exercise caution when downloading files from the Internet. Ensure that the source is a legitimate and reputable one. Verify that an anti-virus program checks the files on the download site. If you're uncertain, don't download the file at all or download the file to a floppy and test it with your own anti-virus software.

117
7. Update your anti-virus software regularly. Over 500 viruses are discovered each month, so you'll want to be protected. These updates should be at the least the products virus signature files. You may also need to update the product's scanning engine as well.
8. Back up your files on a regular basis. If a virus destroys your files, at least you can replace them with your back-up copy. You should store your backup copy in a separate location from your work files, one that is preferably not on your computer.
9. When in doubt, always err on the side of caution and do not open, download, or execute any files or e-mail attachments. Not executing is the more important of these caveats. Check with your product vendors for updates that include those for your operating system web browser, and e-mail. One example is the security site section of Microsoft located at http://www.microsoft.com/security.
10. If you are in doubt about any potential virus related situation you find yourself in, check one of the many locations listed here for up to date information:
• Symantec Virus Alerts http://www.symantec.com/avcenter/
• Symantec Virus Hoax Alerts http://www.symantec.com/avcenter/hoax.html
• McAfee Virus Alerts http://www.mcafee.com/anti-virus/
• McAfee Virus Hoax Alerts http://vil.mcafee.com/hoax.asp?
• McAfee World Virus Map http://mast.mcafee.com/mast/mass_map.asp?
If you don't have any anti-virus software, get some. There are many products available from companies like Symantec, DrSolomon's and McAfee, you can even get web based protection from virus's by installing McAfee clinic you can sign up for a free trial at the following location: http://www.mcafee.com/myapps/clinic/ov_scan.asp

118
Chapter 6 CCrraazzyyTTaallkk oonn tthhee wweebb
Introducing the CrazyTalk Web Editor The CrazyTalk Web Editor is used to set the properties of the CrazyTalk web component used within HTML web pages. This allows you to preview in real-time how your CrazyTalk character will appear within your web page.
Once you have set the component with your desired settings you can selectively copy and paste the HTML code directly into an existing HTML page within your favorite HTML editor or save your selection as a new HTML page
The Web Editor consists a main window displaying a real-time preview of your final output and the properties that maybe applied. A Text Window is also provided which displays either the HTML code that may be copied & pasted into a HTML editor or the properties of the Web component:

119
Toolbar
Open TJM File
Selects the TJM model file that the web component will load (Note: this data file must be uploaded to the same location as the final HTML page).
Open TPS File
Selects the TPS speech file that the web component will load (Note: this data file must be uploaded to the same location as the final HTML page).
Save HTML File
Save final HTML page.
Copy HTML Code
Copy HTML code to Microsoft Clipboard enabling you to paste into your favorite HTML editor.

120
View HTML Code
View complete HTML code.
View CrazyTalk Properties
View CrazyTalk Web Component properties.
Preview
Preview results in your default web browser.
CrazyPal Settings
Size
Increases or decreases the size of the web component using the slider bar.
Reduce 24 Pixels
Increases or decreases the vertical size by 24 pixels to account for the width of the subtitle/control bar. (Note: you should enable this if you turn on either subtitles or control bar).
Control Bar
Adds Play, Pause and Stop control buttons when selected.
Border
Adds a border when selected.
Menu
Includes or excludes playback controls in the right-click menu.
AutoPlay
Causes CrazyTalk component to automatically begin playback once page completes loading.

121
Subtitles
Includes subtitles below the character window. (Note: Subtitles will only appear in TTS text mode).
Background
Select Subtitle background from color pallet.
Foreground
Select Subtitle foreground (font) from color pallet.
LifeMode
Select LifeMode to add natural lifelike movements to model during idle.
Domain URL
Create domain license keys by adding your Domain URL, this will prevent the unregistered pop-up window from appearing.
Code
Includes HTML header code when enabled.
Netscape Support
Includes HTML code for Netscape support when enabled.
Layer
Includes HTML code to place CrazyTalk Component in a Layer when enabled.
Load
Includes HTML code to add a "Loading" image to be displayed whilst user downloads and installs the CrazyTalk web component.
You can also replace the default loading image with your own to better suit your website. (Note: This feature requires "Layers" to be selected).

122
Exporting a .WMV Windows streaming media file
You can export your CrazyPal creation as a .wmv file that can be published on the Internet. WMV is a standard Windows file format that stores audio and video information, and is specially designed to run over networks like the Internet. It is a highly compressed format that contains streaming audio and video. WMV enables content to be delivered to you as a continuous flow of data with little wait time before playback begins. This means that your users don't have to wait for audio and video files to fully download before starting to view them. The files can be of virtually unlimited length, and can run over Internet bandwidths.
Note: Exporting .wmv files is a CrazyTalk Web Edition feature, in non-registered versions a watermark with the words "www.reallusion.com" will be added to the final output.
Follow these instructions to export as a wmv file:
1. Click to export the CrazyTalk as an WMV file:
2. The Export Media file dialog box opens. From the Save as type pull-down menu select the file type .WMV, browse to the location you wish to save the file, and then click Save to save the file to your hard disk drive:

123
3. The Exporting Media dialog box will appear and your media file will be created. You can click Cancel at any time to immediately stop the export procedure.
4. Once creation of your media file is complete, the Select WMV Option dialog box will appear; here you can select the encoding of your image based on bandwidth. Try to choose the highest bandwidth possible to get the best quality output. If you are planning to send the output via email then select the dual-channel ISDN encoding type.
5. Select OK and the encoding process will begin. This is processed in real-time and may take a while.
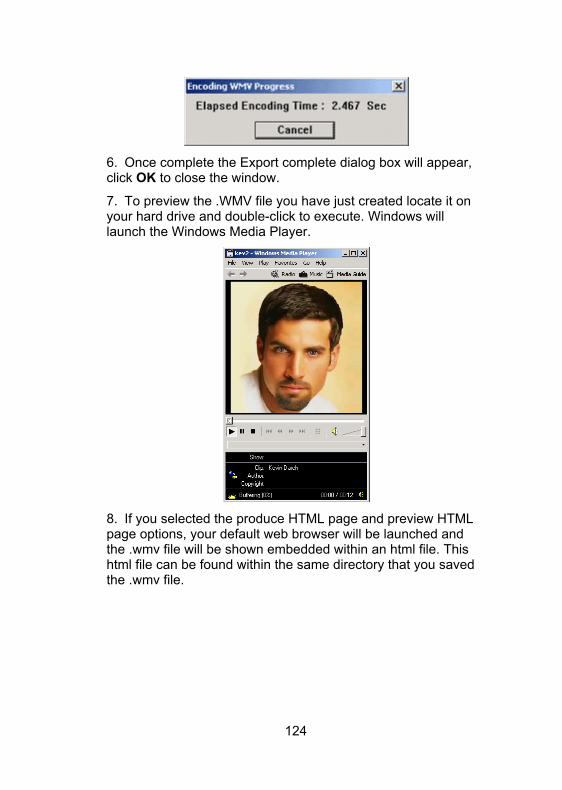
124
6. Once complete the Export complete dialog box will appear, click OK to close the window.
7. To preview the .WMV file you have just created locate it on your hard drive and double-click to execute. Windows will launch the Windows Media Player.
8. If you selected the produce HTML page and preview HTML page options, your default web browser will be launched and the .wmv file will be shown embedded within an html file. This html file can be found within the same directory that you saved the .wmv file.

125
9. Depending on the output method chosen FTP the .html and/or the .wmv files to your web server to allow users to access the page via the Internet. You can customize the page with the look and feel of the rest of your site by using an .html editing tool like FrontPage or Dreamweaver.
10. Alternatively you can open the html file you have created, copy the <object> statement and paste it into an existing page within your web site. An example of the object statement is shown below:
<OBJECT ID="MediaPlayer" CLASSID="CLSID:22d6f312-b0f6-11d0-94ab-0080c74c7e95" CODEBASE="http://activex.microsoft.com/activex/controls/mplayer/en/nsmp2inf.cab#Version=6,4,5,715" Standby="Loading Microsoft Windows Media Player Components..." type="application/x-oleobject"> <PARAM NAME="FileName" VALUE=web.wmv> <PARAM NAME="AutoSize" VALUE="1"> <PARAM NAME="AutoStart" VALUE="1"> <PARAM NAME="ShowControls" VALUE="1"> <PARAM NAME="ShowAudioControls" VALUE="0"> <PARAM NAME="ShowPositionControls" VALUE="1">

126
<PARAM NAME="ShowDisplay" VALUE="0"> <PARAM NAME="ShowGotoBar" VALUE="1"> <PARAM NAME="VideoBorder3D" VALUE="1"> <!--NETSCAPE PLUG-IN STARTS HERE--> <EMBED Type="application/x-mplayer2" Src=web.wmv Name=MediaPlayer Width=128 Height=128 Pluginspage="http://www.microsoft.com/isapi/redir.dll?prd=windows&sbp=mediaplayer&ar=media&sba=plugin&" AutoSize=1 AutoStart=1 ShowControls=0 ShowDisplay=0 ShowStatusBar=0> </OBJECT>

127
Exporting an .RM RealMedia streaming media file
You can export your CrazyPal creation as an .rm file that can be published on the Internet. RM is a common and popular Internet file format that stores audio and video information, and is specially designed to run over networks like the Internet. It is a highly compressed format that contains streaming audio and video. RM enables content to be delivered to you as a continuous flow of data with little wait time before playback begins. This means that your users don't have to wait for audio and video files to fully download before starting to view them. The files can be of virtually unlimited length, and can run over Internet bandwidths.
Follow these instructions to export as an rm file:
1. Click to export the CrazyTalk as an RM file:
2. The Export Media file dialog box opens. From the Save
as type pull-down menu select the file type .RM, browse to the location you wish to save the file, and then click Save to save the file to your hard disk drive:

128
3. The Exporting Media dialog box will appear and your
media file will be created. You can click Cancel at any time to immediately stop the export procedure.
4. Once creation of your media file is complete, the Select
WMV Option dialog box will appear; here you can select the encoding of your image based on bandwidth. Try to choose the highest bandwidth possible to get the best quality output. If you are planning to send the output via email then select the xDSL/Cable Modem encoding type.
5. Select OK and the encoding process will begin. This is
processed in real-time and may take a while.

129
6. Once complete the Export complete dialog box will
appear, click OK to close the window.
7. To preview the .RM file you have just created locate it on your hard drive and double-click to execute. Windows will launch the RealMedia Player.

130
Exporting as a HTML page You can export your CrazyPal creation as a HTML page, which can be published on the Internet; this enables any user across the Internet to view your CrazyPal. When publishing your HTML page you also must publish your data files (.TJM model file and .TPS script file) to the same directory. When FTP'ing CrazyTalk data files to the web ensure you use BINARY mode and not ASCII mode.
1. Once you have set the CrazyPal settings to your
liking, from within the Web Editor click to export the CrazyTalk as an HTML file:
2. The Save As HTML File dialog box opens. Browse to the location you want to save the file, and click Save to save the file to your hard disk drive:
Note: In the Web Editor, you must add your domain URL. This will prevent illegal use of your content and stop the 'un-registered' pop-up window from appearing. In the domain URL text box add your domain name. The domain name you enter in the Domain URL box should be the domain where the page will be hosted, you can also use an IP address. You should type the URL exactly as it would appear within the address box of your web browser

131
Note: The CrazyPal will still function correctly without a valid license number, however a pop-up screen will be activated
3. After saving the file, you can open the file in your Web browser.
4. Right-click anywhere on the picture to open a menu that enables users to play and stop the CrazyTalk HTML.
5. Open the page in your favorite HTML editing tool, to enhance the look of the page by adding text, graphics and links.
For further details regarding the interactive features and how to control the Web component using JavaScript or VB Script see the advanced chapter.

132
Copy and Paste code into your favorite HTML Editor
The code embedded within a HTML page adding the CrazyTalk Web Component is fairly simple. Rather than each time creating a blank HTML page, you can use the Copy to Clipboard command to copy the required code to your Windows clipboard. This will enable you to simply paste the code into an existing web page you have previously created using your favorite HTML editor.
1. Once you have set the CrazyPal Settings and the Web Editor preview window displays the CrazyTalk component as you would like it to appear in your web page, click the Copy to Clipboard button:
2. This will copy the code displayed in the Text View window to the clipboard.
3. Open your favorite HTML editor, in this example we will use Microsoft FrontPage. Select the page you wish to add the Web Component to and load it into FrontPage.
4. In the Editor window highlight the position within your page where you wish to add the component. Switch to the HTML View by pressing the HTML tab and paste the copied code by pressing the Paste button (Ctrl + V).

133
5. If you return to the Normal View you will notice a gray box with the word "CrazyTalk" has been placed into your page. This is a representation of the code or <object> that you just placed into your page.
6. To see the final results, press the Preview tab at the bottom of the page. Your page will now be displayed as it will appear on your web site.

134
7. The component should appear and play correctly. If not you will need to copy the 2 data files that you selected in the Web Editor to the same local directory where the HTML page you just edited is stored. The data files include the .TJM model file and the .TPS script file. If you are not sure which files you should copy you can check these in the CrazyTalk Web Editor by viewing the HTML code in the Text View. The files you are looking for are those set in the parameter’s "TpsName" and "TjmName".
8. Once you have copied these files to the same folder try again. Once the preview is working correctly you can Save your HTML page and then publish it to the internet in the normal way.
Note: When using FTP to upload your files to the internet you must ensure that you use BINARY mode and not ASCII mode otherwise your data files will get corrupt during the uploading.

135
Removing the Unregistered Popup Window The CrazyTalk web component will force a popup window to appear if a license key is not generated for the web site the HTML page is published to. You can create a License Key by typing in the URL of the web site where you plan to publish the HTML page that will display the CrazyTalk Web Player.
To Create a License Key:
1. Type the URL of the domain where you plan to publish your HTML into the Domain URL text box:
2. This will add a value to the license key parameter of the CrazyTalk <object> statement valid for only the domain entered. You should ensure that this key is present on all pages containing a CrazyTalk Player. If the license key is not present the player will still function but a popup window will appear.
3. Rather than creating new pages with valid license keys you can copy and paste you new valid key from the HTML code in the Text View and paste it into the value field of the parameter called License.

136
Embedding CrazyTalk within HTML When you embed the CrazyTalk component within a HTML page you place some JavaScript into the HTML. An example of this is shown below. The JavaScript itself is made up of a number of parameters that all together tell the users HTML browser how to display the CrazyTalk player correctly. The JavaScript detects the users browser type and loads either an <object> statement for IE or an <embed> statement for Netscape.
With an understanding of what each parameter controls you can manually edit them to suit your intended purpose within the HTML page itself. If you understand JavaScript or VB script you can write routines to alter the parameter values by assigning or retrieving different values using different events.
Note: Use of JavaScript is beyond the scope of this user manual however further details regarding accessing properties, methods and events are detailed in the following pages.
The CrazyTalk Web component uses either an ActiveX control for Internet Explorer or a plug-in for Netscape Navigator. The required code to add a CrazyTalk player a web page must be placed between the <body> and </body> tags of your HTML page.
<script language=javascript> if(navigator.userAgent.indexOf("MSIE") != -1 && navigator.userAgent.indexOf("Opera") == -1) { document.write ("<object id='CrazyTalk'"); document.write ("classid='CLSID:1CC506A7-1B8D-11D4-BDD5-0060977007E0'"); document.write ("codebase='http://plug-in.reallusion.com/CrazyTalk.cab#version=2,5,1220,2'"); document.write ("width='200'"); document.write ("height='200'>"); document.write ("<param NAME ='autoplay' value='1'>"); document.write ("<param NAME ='tjmname' value='crazytalk.tjm'>");
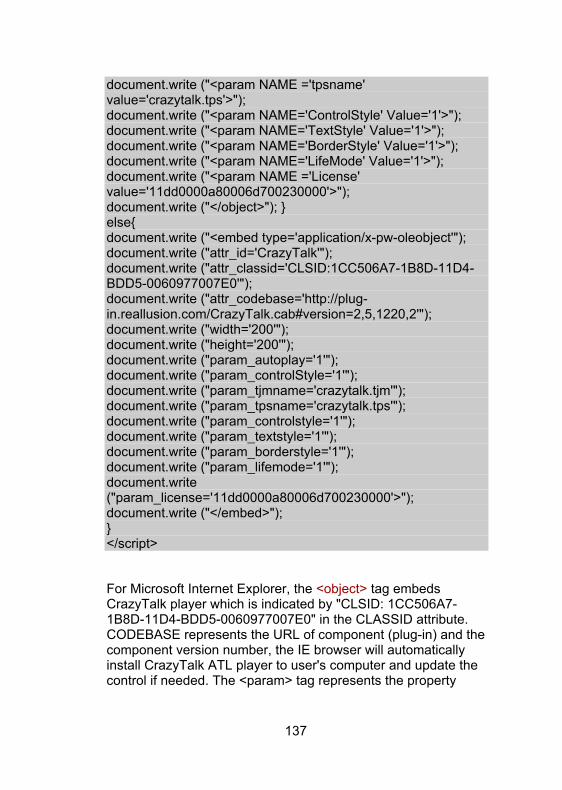
137
document.write ("<param NAME ='tpsname' value='crazytalk.tps'>"); document.write ("<param NAME='ControlStyle' Value='1'>"); document.write ("<param NAME='TextStyle' Value='1'>"); document.write ("<param NAME='BorderStyle' Value='1'>"); document.write ("<param NAME='LifeMode' Value='1'>"); document.write ("<param NAME ='License' value='11dd0000a80006d700230000'>"); document.write ("</object>"); } else{ document.write ("<embed type='application/x-pw-oleobject'"); document.write ("attr_id='CrazyTalk'"); document.write ("attr_classid='CLSID:1CC506A7-1B8D-11D4-BDD5-0060977007E0'"); document.write ("attr_codebase='http://plug-in.reallusion.com/CrazyTalk.cab#version=2,5,1220,2'"); document.write ("width='200'"); document.write ("height='200'"); document.write ("param_autoplay='1'"); document.write ("param_controlStyle='1'"); document.write ("param_tjmname='crazytalk.tjm'"); document.write ("param_tpsname='crazytalk.tps'"); document.write ("param_controlstyle='1'"); document.write ("param_textstyle='1'"); document.write ("param_borderstyle='1'"); document.write ("param_lifemode='1'"); document.write ("param_license='11dd0000a80006d700230000'>"); document.write ("</embed>"); } </script>
For Microsoft Internet Explorer, the <object> tag embeds CrazyTalk player which is indicated by "CLSID: 1CC506A7-1B8D-11D4-BDD5-0060977007E0" in the CLASSID attribute. CODEBASE represents the URL of component (plug-in) and the component version number, the IE browser will automatically install CrazyTalk ATL player to user's computer and update the control if needed. The <param> tag represents the property

138
settings of CrazyTalk player. Internet Explorer will ignore all the <embed> tags within the object.
For Netscape, the <object> tag will invoke the CrazyTalk plug-in.
In the sample script above, we set up some of the basic properties of the CrazyTalk Player. The properties are assigned between the <object> tags or the <embed> tags. These property values control the behavior of the Player as follows:
• Width & Height: Sets the size of the component within the web page.
• ControlStyle: Set to 1 to show the Control Bar.
• TextStyle: Set to 1 to show the Subtitle.
• BorderStyle: Set to 1 to draw the Player with the border.
• AutoPlay: Set to 1 to start playback immediately after TJM and TPS data is loaded.
• TjmName: The URL specifies the location of the TJM file.
• TpsName: The URL specifying the location of the TPS file.
• LifeMode: Set to 1 to enable natural life mode
• License: CrazyTalk license number generated based on URL
You can copy and paste this above example into an existing web page. You must also ensure you have a crazytalk.tjm & a crazytalk.tps file copied to the same directory as the web page. .TJM & .TPS files are created by the Fitting and Expression editor's respectively. Alternatively you can edit the script to point to your own .TJM and .TPS files.

139
Accessing Properties By assigning the open properties, you can initialize a CrazyTalk player or control its interaction with users. To initialize the player, you specify the values of the properties between the <object> or <embed> tags. The player then starts with these values, to control its interaction you can change these values by using Java Script or VB Script.
Player Initialization To initialize a CrazyTalk player in Microsoft IE, you specify the properties in the <object> segment. Each assignment begins with a <param> tag, and then assignment of a property to the name and value variables is made. For example, to set the player to autoplay, add the following line to your script between the <object> and </object> tags.
<PARAM NAME=”AutoPlay” VALUE=”1”>
To initialize a CrazyTalk player in Netscape Navigator, you specify the properties within the <embed> tag. You specify the properties directly within the <embed> tag. For the same example of auto playing, the script looks like this:
<EMBED type='application/x-pw-oleobject' attr_id='CrazyTalk' attr_classid='CLSID:1CC506A7-1B8D-11D4-BDD5-0060977007E0' attr_codebase='http://plug-in.reallusion.com/CrazyTalk.cab#version=2,5,1220,2' Width ='200' Height =200 param_autoplay ='1' >

140
Note: Not all properties can be set as in the example above. Only the properties in the following table can be set during initialization.
Property Name IE Netscape Usage
Name • The name of the object. (For IE, the object ID)
Width • • The width of the display area
Height • • The height of the display area
Font • • The font used in the Subtitle area
Text • • The text content of the talk
TextStyle • • To show/hide the Subtitle
TextWidth • • To set width of the subtitles
ControlStyle • • To show/hide the Control Bar
BorderStyle • • To show/hide the border
MenuStyle • • To set style of right-click menu
TjmName • • The URL of the TJM file
TpsName • • The URL of the TPS file
AutoPlay • • To turn on/off the auto-play function
ForeColor • • The font color for the Subtitle
BackColor • • The background color for the Subtitle
EncodeData • • Only used in Email mode
LifeMode • • Natural life-mode setting
License • • License key to remove pop-up window

141
Controlling Interaction CrazyTalk properties are controlled in different ways for Microsoft Internet Explorer and Netscape Navigator. For example, you have an object named “CrazyTalk” in your web page, and want to access its property “Speed”. In the case of Microsoft Internet Explorer, the script would be like this:
CrazyTalk.Speed=50; //To set the value of the Speed property
var Speed=CrazyTalk.Speed; //To get the value of the Speed property
For the detail of all the CrazyTalk properties, please refer to the Appendix:
[Appendix C:CrazyTalk Property Summary]

142
Invoking Methods Follow the usual object model to invoke a method through the CrazyTalk plug-in for Netscape Navigator. The following example defines play and stop buttons that invoke the Play and Stop methods of CrazyTalk.
<form> <input type=button name=playbtn value=”Play” onclick=”CrazyTalk.Play()”> <input type=button name=stopbtn value=”Stop” onclick=”CrazyTalk.Stop()”> </form>
Following codes do the same action as above. In many situations, we would write codes to invoke methods like this.
<Script Lanaguage=”JavaScript”> function Play() { document.CrazyTalk.Play(); // put other codes you want to do after invoking the Play method } function Stop() { document.CrazyTalk.Stop(); } </Script> …… <form> <input type=button name=playbtn value=”Play” onclick=”Play()”> <input type=button name=stopbtn value=”Stop” onclick=”Stop()”> </form>
This syntax for invoking methods works for both Netscape Navigator and Microsoft Internet Explorer.
For a full list of supported CrazyTalk methods, consult [Appendix B: CrazyTalk Method Summary]

143
Capturing Script Events from CrazyTalk When in a web page, the CrazyTalk player sends special messages to the browser to indicate that certain events have happened, e.g., the playing stops. These special messages are called “Events”. Using JavaScript, you can capture these events and handle them correctly to invoke a response. The event handling processes are again different for Internet Explorer and Netscape. The following example shows how to handle the events in both cases.
Capturing Script Events from the CrazyTalk ActiveX Control (for IE)
Syntax: <Script Language=”JavaScript” For=”CrazyTalk” Event=”Event(Pn)”>
// code goes here </script>
Description:
• CrazyTalk: The ID specified in the <Object> section.
• Event(Pn): The event to capture and its parameters (Pn)
Example: <Script Language=”JavaScript” For=”CrazyTalk” EVENT=”Pause(word)”> alert(‘Pause:’+word); </script>
Take the Pause Event for example. The CrazyTalk player fires a Pause Event whenever it is paused. The Pause Event carries a value indicating the position where it is paused. The following sample captures the Pause Event, retrieves the pause position into a word variable, and then prompts the user of this event by using the Alert command of JavaScript.

144
Capturing Script Events from the CrazyTalk Plug-in (for Netscape) Syntax:
<Script Language=”JavaScript”> function crazytalk_EVENT(Pn) {
// code goes here } </Script>
Description:
• EVENT(Pn): The event to capture and its parameters.
Example: <Script Language=”JavaScript”>
function crazytalk_pause(word) { alert('Pause:'+word);
} </Script>
For a full list of supported CrazyTalk events, consult [Appendix D: CrazyTalk Event Summary]

AAppppeennddiixx
Appendix A: Illustration of CrazyTalk The CrazyTalk web component consists of three main parts, the display area, the subtitle and the control bar. The function of each part is as follows:
• Display area: Displays the CrazyTalk character.
• Subtitle: Displays a text version of the speech.
• Control bar: Includes two buttons, PLAY, and STOP. They control the playback action. During play mode the play button is replace with a pause button.
r
Control Ba
14
le
Subtit5
Display area

146
Appendix B: CrazyTalk Method Summary Method Name Description Hide Hide the CrazyTalk.
LoadTJM Load a TJM file.
LoadTPS Load a TPS file.
Pause Suspends playback.
Play Start playback.
PlayText Start to play the content of the text.
SetFontFace Sets the font face of the subtitle.
SetFontSize Sets the font size of the subtitle.
SetFontStyle Sets the font style of the subtitle.
Show Show the CrazyTalk.
Stop Stop playback.

147
Hide This method hides CrazyTalk player.
Syntax [For IE] / [For Netscape] document.CrazyTalk.Hide();
Parameters None
Remarks None

148
LoadTJM This method loads a TJM file into the CrazyTalk player.
Syntax [For IE] / [For Netscape] document.CrazyTalk.LoadTJM(sFileName);
Parameters sFileName
String value specifying the TJM filename that you want to load.
Remarks Calling this method will cause a TjmChange event to occur.

149
LoadTPS This method will load a TPS file into the CrazyTalk player.
Syntax [For IE] / [For Netscape] document.CrazyTalk.LoadTPS(sFileName);
Parameters sFileName
String value specifying the TPS filename that you wish to load.
Remarks Calling the method will cause TpsChange, WordPosition
events to occur.

150
Pause This method suspends the current playback at the current
position.
Syntax [For IE] / [For Netscape] document.CrazyTalk.Pause();
Parameters None
Remarks This method performs the same action as clicking the
pause button on the control bar.
Calling this method will cause Pause, WordPosition event to occur.

151
Play This method starts playback of the speech content.
Syntax [For IE] / [For Netscape] document.CrazyTalk.Play(0);
Parameters Value 0 - Play all text
Remarks This method performs the same action as clicking the play
button on the control bar.
Calling this method will cause a StartPlay, WordPosition event to occur.

152
PlayText This method starts playing the text that was by the SetText
method.
Syntax [For IE] / [For Netscape] document.CrazyTalk.PlayText();
Parameters None
Remark Calling this method will cause a StartPlay, WordPosition
event to occur.

153
Show This method shows the CrazyTalk.
Syntax [For IE] / [For Netscape] document.CrazyTalk.Show();
Parameters None
Remarks None

154
Stop This method stops playback.
Syntax [For IE] / [For Netscape] document.CrazyTalk.Stop();
Parameters None
Remarks This method performs the same action as clicking the stop
button on the control bar.
To halt a play operation without changing the current position, you must use the Pause method.
Calling this method will cause a Stop, WordPosition event to occur.

155
SetFontFace This method sets the font-face of the subtitle.
Syntax [For IE] / [For Netscape] document.CrazyTalk.SetFontFace(sFace);
Parameters sFace
String value specifies the font face.
Remarks The default value of the font-face of the subtitle is “Arial”.

156
SetFontSize This method sets the font-size of the subtitle.
Syntax [For IE] / [For Netscape] document.CrazyTalk.SetFontSize(iSize);
Parameters iSize
Integer value specifies the size of the font.
Remarks The default value is 160.

157
SetFontStyle This method sets the font-style of the subtitle.
Syntax [For IE] / [For Netscape]
document.CrazyTalk.SetFontStyle(iStyle);
Parameters iStyle
Integer value specifies the style of the font.
Value Font Style Example
0 Normal This is an example.
1 Bold This is an example. 2 Italic This is an example.
4 Underline This is an example.
8 Streakout This is an example.
Remarks None

158
Appendix C: CrazyTalk Property Summary Property Name
Description
AudioChannel Retrieves a value specifying soundcard has multi-channel capability
BackColor Sets a value specifying the background color of the subtitle.
BorderStyle Sets a value specifying whether the border of the CrazyTalk is visible
ControlStyle Sets a value specifying whether the control bar is visible.
CurrentMode Retrieves a value specifying the current playback mode.
EncodeData Sets or retrieves a value for CTM encoded data.
Eof Retrieves a value specifying whether the player is playing.
Expression Sets a value specifying the expression.
ForeColor Sets a value specifying the front color of the subtitle.
Level Sets or retrieves a value specifying the expressional level.
LifeMode Sets or retrieves a value for Bio-life mode
MenuStyle Sets a value specifying right click menu style.
Pitch Sets or retrieves a value specifying the pitch.
Speed Sets or retrieves a value specifying the speed.
Subtitle Retrieves a value specifying the current di l d btitl

159
displayed subtitle.
TextWidth Sets or retrieves a value for the width of the subtitle
TagMode Sets a value specifying the tagmode.
Text Sets a value specifying the content of the text.
TextStyle Sets a value specifying whether the subtitle is visible.
TJMready Retrieves a value specifying TJM status
TPSready Retrieves a value specifying TPS status
TTSinfo Retrieves a value specifying selected TTS voice.
Version Retrieves a value specifying the component version number.
VoiceMode Retrieves a value specifying the voice mode.
Volume Sets or retrieves a value specifying the volume.

160
AudioChannel This property specifies a value indicating whether the
soundcard has multi-channel capability in user’s computer.
Syntax The following codes can be use to get the AudioChannel property.
[For IE & Netscape] var bAudioChannel=document.CrazyTalk.AudioChannel;
Possible Values This property is a Boolean containing one of the following values:
Value Description
True Has multi-channel capability.
False Does not have multi-channel capability.
So the value of the bAudioChannel can be true or false.
Remarks If bAudioChannel is False, User can see more than one CrazyTalk at the same time, but only one can have sound.

161
BackColor This property specifies the background color of the subtitle.
Syntax The following codes can be use to set/get the BackColor property.
[For IE & Netscape] document.CrazyTalk.BackColor=iColor; //set
var iColor=document.CrazyTalk.BackColor; //get
Possible Values This property is an Integer with default value of #000000. It consists of RGB color in 0XBBGGRR format.
Remarks Following are some example values for different colors.
0X00FF00 Green color
0XFF0000 Blue color
0 Black color (equal to 0X000000)
255 Red color (equal to 0X0000FF)

162
BorderStyle This property specifies a value indicating whether the
border of the CrazyTalk is visible.
Syntax The following codes can be use to set the BorderStyle property.
[For IE & Netscape] document.CrazyTalk.BorderStyle=bStyle; //set
var bStyle=document.CrazyTalk.BorderStyle; //get
Possible Values This property is a Boolean containing one of the following values:
Value Description
True The border is visible. (Default)
False The border is not visible
So the value of the bStyle can be true or false.
Remarks None

163
ControlStyle This property specifies a value indicating whether the control bar of the CrazyTalk is visible.
Syntax The following codes can be use to set/get the ControlStyle property.
[For IE & Netscape] document.CrazyTalk.ControlStyle=bStyle; //set
var bStyle=document.CrazyTalk.ControlStyle; //get
Possible Values This property is a Boolean containing one of the following values:
Value Description
True The control bar is visible. (Default)
False The control bar is not visible
So the value of the bStyle can be true or false.
Remarks None

164
CurrentMode This property specifies a value indicating which playing
mode has be used now.
Syntax The following codes can be use to get the CurrentMode property.
[For IE & Netscape] var iCurrentMode=document.CrazyTalk.CurrentMode;
Possible Values This property is an Integer containing one of the following values:
Value Description
0 Cannot play because lack for enough information.
1 Play with wav (the voice data)
2 Play with TTS (define in TJM)
3 Play with TTS (the default TTS voice mode)
4 No voice data and no TTS engine , play without sound
5 Play with stream voice (do not support in current version)
The value of the iCurrentMode can be 0 to 4.
Remarks None

165
EncodeData This property only used in E-mail, not supported for web
design.

166
Eof This property specifies a value indicating whether the CrazyTalk player is current playing or stopped.
Syntax The following code can be used to get the Eof property.
[For IE & Netscape] var bStyle=document.CrazyTalk.Eof;
Possible Values This property is a Boolean containing one of the following values:
Value Description
True The CrazyTalk player is currently playing
False The CrazyTalk player is currently stopped
So the value of the bStyle can be true or false.
Remarks None

167
Expression This property specifies the CrazyTalk character expression.
Syntax The following codes can be use to set/get the Expression property.
[For IE & Netscape] document.CrazyTalk.Expression=iExpression; //set
var iExpression=document.CrazyTalk.Expression; //get
Possible Values This property is an Integer ranging from 1 to 20. It must contain one of following values:
Value Expression Value Expression
1 Normal. (default)
11 Sorry
2 Bright 12 Begging
3 Frightened 13 Surprised
4 Sad 14 Awestruck
5 Giggle 15 Unwilling
6 Dreamy 16 Distrustful
7 Happy 17 Calculating
8 Crying 18 Whistle
9 Shouting 19 Disgusted
10 Angry 20 Crazy

168
The value of the iExpression can be a value between 1 to 20.
Remarks While setting the Expression property, the TagMode property should be set to 4, i.e., disable the expression tag.

169
ForeColor This property specifies the front color of the subtitle.
Syntax The following codes can be use to set/get the ForeColor property.
[For IE & Netscape] document.CrazyTalk.ForeColor=iColor; //set
var iColor=document.CrazyTalk.ForeColor; //get
Possible Values This property is an Integer with default value of #00FFFF. It consists of RGB color in 0XBBGGRR format.
Remarks Following are some example values of the color.
0X00FF00 Green color
0XFF0000 Blue color
0 Black color (equal to 0X000000)
255 Red color (equal to 0X0000FF)

170
Level This property specifies the level of the expression.
Syntax The following codes can be use to set/get the Level property.
[For IE & Netscape] document.CrazyTalk.Level=iLevel; //set
var iLevel=document.CrazyTalk.Level; //get
Possible Values This property is an Integer ranging from 0 to 100.
Remarks While setting the Level property, the TagMode property should be set to 16, i.e., disable the expression level tag.

171
LifeMode This property specifies a value indicating which life-mode
currently used in CrazyTalk
Syntax The following codes can be use to set/get the LifeMode property.
[For IE & Netscape] document.CrazyTalk.LifeMode=iLifeMode; //set
var iLifeMode=document.CrazyTalk.LifeMode; //get
Possible Values This property is an Integer containing one of the following values:
Value Description
0 Disable the life mode.
1 The wait mode
2 The Sleep mode
So the value of the iLifeMode can be 0 to 2.
Remarks The LifeMode effects occur when the CrazyTalk is stopped.

172
MenuStyle This property specifies a value indicating the menu available when right-clicking within the CrazyTalk component area.
Syntax The following codes can be use to set/get the MenuStyle property.
[For IE & Netscape] document.CrazyTalk.MenuStyle=bMenuStyle; //set
var bMenuStyle=document.CrazyTalk.MenuStyle; //get
Possible Values This property is a Boolean containing one of the following values:
Value Description
True The right-click menu includes Play & Stop controls
False The right-click menu excludes Play & Stop controls
So the value of the bMenuStyle can be true or false.
Remarks None

173
Pitch This property specifies or retrieves the value of the pitch.
Syntax The following codes can be use to set/get the Pitch property.
[For IE & Netscape] document.CrazyTalk.Pitch=iPitch; //set
var pitch=document.CrazyTalk.Pitch; //get
Possible Values This property is an Integer ranging from 0 to 100.
Remarks While setting the Pitch property, the TagMode property should be set to 1, i.e., disable the pitch tag.

174
Speed This property specifies or retrieves the value of the speed.
Syntax The following codes can be use to set/get the Speed property.
[For IE & Netscape] document.CrazyTalk.Speed=iSpeed; //set
var speed=document.CrazyTalk.Speed; //get
Possible Values This property is an Integer ranging from 0 to 100.
Remarks While setting the Speed property, the TagMode property should be set to 2, i.e., disable the speed tag.

175
Subtitle This property specifies a value indicating whether the
subtitle of the CrazyTalk is visible.
Syntax The following codes can be use to set/get the Subtitle property.
[For IE & Netscape] document.CrazyTalk.Subtitle=bSubtitle; //set
var bSubtitle=document.CrazyTalk.Subtitle; //get
Possible Values This property is a Boolean containing one of the following values:
Value Description
True The subtitle is visible. (Default)
False The subtitle is not visible
So the value of the bSubtitle can be true or false.
Remarks None

176
TextWidth This property specifies a value indicating the width of the
subtitle.
Syntax The following codes can be use to set/get the TextWidth property.
[For IE & Netscape] document.CrazyTalk.TextWidth=iTextWidth; //set
var iTextWidth=document.CrazyTalk.TextWidth; //get
Possible Values This property is an Integer whose range is unlimited.
Remarks None

177
TagMode This property specifies the value of the TagMode.
Syntax The following codes can be use to set/get the TagMode property.
[For IE & Netscape] document.CrazyTalk.TagMode=iMode; //set
var iMode=document.CrazyTalk.TagMode; //get
Possible Values This property is an Integer containing the one of the following values:
Value Description
0 Disable tags (Default)
1 Enable pitch tag
2 Enable speed tag
4 Enable volume tag
8 Enable expression tag
16 Enable expressional level tag
255 Enable all tags (Set by the TPS)
The value of the iMode can be one of the above values. If you want to enable both the speed tag and the volume tag, the value of the iMode should be set to 6, and so on.
Remarks Toggling the bits of the TagMode properties switches the control of the player between the TPS(or Text) and individual properties.

178
Turn a bit on (enable) to let the TPS/Text control the player, and turn it off to make the setting of the individual property valid.

179
Text This property specifies the content of the text.
Syntax The following codes can be use to set/get the Text property.
[For IE & Netscape] document.CrazyTalk.Text=sText; //set
var sText=document.CrazyTalk.Text; //get
Possible Values This property is a String with the default value of “”(empty string)
Following are “tags” which can be used to set the content of the Text property.
Tags Description
<:|> Set to the normal expression.
<:)> Set to the bright expression.
<:{> Set to the frighten expression.
<:(> Set to the sad expression.
<Pnn> Set the value of the pitch. (nn: 0~100)
<Snn> Set the value of the speed. (nn: 0~100)
<Vnn> Set the value of the volume. (nn: 0~100)
<Enn> Set the value of the expression. (nn: 1~20)
<R> Reset all settings.
Example:
<:)>Ha! Ha! <s50p50:(> so sad.<R>

180
Remarks Use the PlayText method to play the content of the Text property. The Play method plays only the content of the TPS, as does the Play Button on the Control Bar.

181
TextStyle This property specifies a value indicating whether the
subtitle of the CrazyTalk is visible.
Syntax The following codes can be use to set/get the TextStyle property.
[For IE & Netscape] document.CrazyTalk.TextStyle=bStyle; //set
var bStyle=document.CrazyTalk.TextStyle; //get
Possible Values This property is a Boolean containing one of the following values:
Value Description
True The subtitle is visible. (Default)
false The subtitle is not visible.
So the value of the bStyle can be true or false.
Remarks None

182
TJMready This property specifies a value indicating whether the TJM
file is ready for use.
Syntax The following codes can be use to get the TJMready property.
[For IE & Netscape] var bTJMready=document.CrazyTalk.TJMready;
Possible Values This property is a Boolean containing one of the following values:
Value Description
True TJM file is ready.
False TJM file is not ready.
So the value of the bTJMready can be true or false.
Remarks None

183
TPSready This property specifies a value indicating whether the TPS
file is ready for use.
Syntax The following codes can be use to get the TPSready property.
[For IE & Netscape] var bTPSready=document.CrazyTalk.TPSready;
Possible Values This property is a Boolean containing one of the following values:
Value Description
True TPS file is ready.
False TPS file is not ready.
So the value of the bTPSready can be true or false.
Remarks None

184
TTSinfo This property specifies a value indicating the name of the
voice mode currently used.
Syntax The following codes can be use to get the TTSinfo property.
[For IE & Netscape] var sTTSinfo=document.CrazyTalk.TTSinfo;
Possible Values This property is a String, it could be “Sam”,“Mary” , etc.
Remarks None

185
Version
This property specifies a value indicating the version of the CrazyTalk currently used.
Syntax The following codes can be use to get the Version property.
[For IE & Netscape] var sVersion=document.CrazyTalk.Version;
Possible Values This property is a String:
Value Description
xx.xx.xx.xx The version of the CrazyTalk (xx is a numeral )
.
Remarks None

186
VoiceMode This property retrieves the VoiceMode that indicates the
CrazyPal voice style.
Syntax The following codes can be use to get the VoiceMode property.
[For IE & Netscape] var vMode=document.CrazyTalk.VoiceMode;
Possible Values This property is a String of TTS Voice Mode GUID.
Remarks None

187
Volume This property specifies or retrieves the value of the volume.
Syntax The following codes can be use to set/get the Volume property.
[For IE & Netscape] document.CrazyTalk.Volume=iVolume; //set
var volume=document.CrazyTalk.Volume; //get
Possible Values This property is an Integer ranging from 0 to 100.
Remarks To change the Volume property, the TagMode property should be set to 4, i.e., disable the volume tag.

188
Appendix D: CrazyTalk Event Summary Event Name Description Click Occurs when a user clicks the mouse with
the cursor in the CrazyTalk.
DblClick Occurs when a user double-clicks the mouse with the cursor in the CrazyTalk.
Eof Occurs when the end of the file is reached.
MouseDown Occurs when a mouse button is pressed.
MouseEnter Occurs when the mouse pointer moves into the player area
MouseLeave Occurs when the mouse pointer moves out of the player area
MouseMove Occurs when the mouse pointer is moved within the player area.
MouseUp Occurs when a mouse button is released.
Pause Occurs when the CrazyTalk is paused.
StartPlay Occurs when the CrazyTalk begins to play.
Stop Occurs when the CrazyTalk is stopped.
TextChange Occurs when the Text property changes.
TjmChange Occurs when the TJM file is changed.
TpsChange Occurs when the TPS file is changed.
WordPosition Occurs when the text changes.

189
Click This event occurs when a user clicks the mouse with the cursor within the CrazyTalk.
Syntax [For IE] <Script FOR=”CrazyTalk”
Event=”Click”
Language=”JavaScript”>
<!-- insert script commands -->
</Script>
[For Netscape] <Script Language=”JavaScript”>
function CrazyTalk_Click() {
<!-- insert script commands -->
}
</Script>
Parameters None
Remarks None

190
DblClick This event occurs when a user double-clicks the mouse with the cursor in the CrazyTalk.
Syntax [For IE] <Script FOR=”CrazyTalk”
Event=”DblClick(fX, fY)”
Language=”JavaScript”>
<!-- insert script commands -->
</Script>
[For Netscape] <Script Language=”JavaScript”>
function CrazyTalk_DblClick(fX, fY) {
<!-- insert script commands -->
}
</Script>
Parameters fX
Integer value specifying the x-coordinate of the mouse pointer relative to the upper-left corner of the CrazyTalk window.
fY
Integer value specifying the y-coordinate of the mouse pointer relative to the upper-left corner of the CrazyTalk window.

191
Remarks None

192
Eof This event occurs when the end of the file is reached.
Syntax [For IE] <Script FOR=”CrazyTalk”
Event=”Eof”
Language=”JavaScript”>
<!-- insert script commands -->
</Script>
[For Netscape] <Script Language=”JavaScript”>
function CrazyTalk_Eof() {
<!-- insert script commands -->
}
</Script>
Parameters None
Remarks None

193
MouseDown This event occurs when a mouse button is pressed.
Syntax
[For IE] <Script FOR=”CrazyTalk”
Event=”MouseDown(iButton, iShiftState, fX, fY)”
Language=”JavaScript”>
<!-- insert script commands -->
</Script>
[For Netscape] <Script Language=”JavaScript”>
function CrazyTalk_MouseDown(iButton, iShiftState, fX, fY) {
<!-- insert script commands -->
}
</Script>
Parameters iButton
Integer value specifying a bit field with bits corresponding to the left button (bit 0), right button (bit 1), and middle button (bit 2). These bits correspond to the values 1, 2, and 4, respectively. Only one of the bits is set, indicating the button that caused the event.
iShiftState
Integer value specifying a bit field with the least significant bits corresponding to the SHIFT key (bit 0) and the CTRL key (bit 1). These bits correspond to the values 1 and 2, respectively. The shift argument indicates the state of

194
these keys. Some, all, or none of the bits can be set, indicating that some, all, or none of the keys are pressed.
fX
Integer value specifying the x-coordinate of the mouse pointer relative to the upper-left corner of the CrazyTalk window.
fY
Integer value specifying the y-coordinate of the mouse pointer relative to the upper-left corner of the CrazyTalk window.
Remarks None

195
MouseMove This event occurs when the mouse pointer is moved.
Syntax [For IE] <Script FOR=”CrazyTalk”
Event=”MouseMove(iButton, iShiftState, fX, fY)”
Language=”JavaScript”>
<!-- insert script commands -->
</Script>
[For Netscape]
<Script Language=”JavaScript”>
function CrazyTalk_MouseMove(iButton, iShiftState, fX, fY) {
<!-- insert script commands -->
}
</Script>
Parameters iButton
Integer value specifying a bit field with bits corresponding to the left button (bit 0), right button (bit 1), and middle button (bit 2). These bits correspond to the values 1, 2, and 4, respectively. Only one of the bits is set, indicating the button that caused the event.
iShiftState
Integer value specifying a bit field with the least significant bits corresponding to the SHIFT key (bit 0) and the CTRL key (bit 1). These bits correspond to the values 1 and 2,

196
respectively. The shift argument indicates the state of these keys. Some, all, or none of the bits can be set, indicating that some, all, or none of the keys are pressed.
fX
Integer value specifying the x-coordinate of the mouse pointer relative to the upper-left corner of the CrazyTalk window.
fY
Integer value specifying the y-coordinate of the mouse pointer relative to the upper-left corner of the CrazyTalk window.
Remarks None

197
MouseEnter This event occurs when the mouse pointer is moved into the CrazyTalk player area.
Syntax
[For IE] <Script FOR=”CrazyTalk”
Event=”MouseEnter()”
Language=”JavaScript”>
<!-- insert script commands -->
</Script>
[For Netscape] <Script Language=”JavaScript”>
function CrazyTalk_MouseEnter() {
<!-- insert script commands -->
}
</Script>
Parameters None
Remarks None

198
MouseLeave This event occurs when the mouse pointer is moved out of the CrazyTalk player area.
Syntax [For IE] <Script FOR=”CrazyTalk”
Event=”MouseLeave()”
Language=”JavaScript”>
<!-- insert script commands -->
</Script>
[For Netscape] <Script Language=”JavaScript”>
function CrazyTalk_MouseLeave() {
<!-- insert script commands -->
}
</Script>
Parameters None
Remarks None

199
MouseUp This event occurs when a mouse button is released.
Syntax [For IE] <Script FOR=”CrazyTalk”
Event=”MouseUp(iButton, iShiftState, fX, fY)”
Language=”JavaScript”>
<!-- insert script commands -->
</Script>
[For Netscape] <Script Language=”JavaScript”>
function CrazyTalk_MouseUp(iButton, iShiftState, fX, fY) {
<!-- insert script commands -->
}
</Script>
Parameters iButton
Integer value specifying a bit field with bits corresponding to the left button (bit 0), right button (bit 1), and middle button (bit 2). These bits correspond to the values 1, 2, and 4, respectively. Only one of the bits is set, indicating the button that caused the event.
iShiftState
Integer value specifying a bit field with the least significant bits corresponding to the SHIFT key (bit 0) and the CTRL key (bit 1). These bits correspond to the values 1 and 2, respectively. The shift argument indicates the state of

200
these keys. Some, all, or none of the bits can be set, indicating that some, all, or none of the keys are pressed.
fX
Integer value specifying the x-coordinate of the mouse pointer relative to the upper-left corner of the CrazyTalk window.
fY
Integer value specifying the y-coordinate of the mouse pointer relative to the upper-left corner of the CrazyTalk window.
Remarks None

201
Pause This event occurs when the CrazyTalk is paused.
Syntax [For IE] <Script FOR=”CrazyTalk”
Event=”Pause(iCharacter)”
Language=”JavaScript”>
<!-- insert script commands -->
</Script>
[For Netscape] <Script Language=”JavaScript”>
function CrazyTalk_Pause(iCharacter) {
<!-- insert script commands -->
}
</Script>
Parameters iCharacter
Integer value that specifies
Remarks Calling the Pause method causes this event to occur.

202
StartPlay This event occurs when the CrazyTalk is start to play.
Syntax [For IE] <Script FOR=”CrazyTalk”
Event=”StartPlay(iCharacter)”
Language=”JavaScript”>
<!-- insert script commands -->
</Script>
[For Netscape] <Script Language=”JavaScript”>
function CrazyTalk_StartPlay(iCharacter) {
<!-- insert script commands -->
}
</Script>
Parameters iCharacter
Integer value that specifies
Integer value specifies which character the playback stops.
Remarks Calling the Play and the PlayText method causes this event to occur.

203
Stop This event occurs when the CrazyTalk is stopped.
Syntax [For IE] <Script FOR=”CrazyTalk”
Event=”Stop(iCharacter)”
Language=”JavaScript”>
<!-- insert script commands -->
</Script>
[For Netscape] <Script Language=”JavaScript”>
function CrazyTalk_Stop(iCharacter) {
<!-- insert script commands -->
}
</Script>
Parameters iCharacter
Integer value that specifies
Integer value specifies which character the playback stops.
Remarks Calling the Stop method causes this event to occur.

204
TextChange This event occurs when the content of the text is changed.
Syntax [For IE] <Script FOR=”CrazyTalk”
Event=”TextChange()”
Language=”JavaScript”>
<!-- insert script commands -->
</Script>
[For Netscape] <Script Language=”JavaScript”>
function CrazyTalk_TextChange() {
<!-- insert script commands -->
}
</Script>
Parameters None
Remarks Calling the SetText method causes this event to occur.
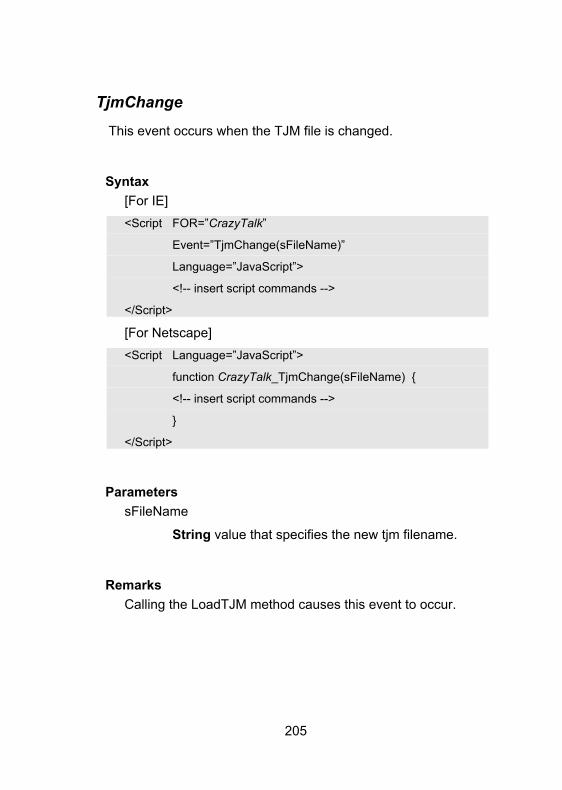
205
TjmChange This event occurs when the TJM file is changed.
Syntax [For IE] <Script FOR=”CrazyTalk”
Event=”TjmChange(sFileName)”
Language=”JavaScript”>
<!-- insert script commands -->
</Script>
[For Netscape] <Script Language=”JavaScript”>
function CrazyTalk_TjmChange(sFileName) {
<!-- insert script commands -->
}
</Script>
Parameters sFileName
String value that specifies the new tjm filename.
Remarks Calling the LoadTJM method causes this event to occur.

206
TpsChange This event occurs when the TPS file is changed.
Syntax [For IE] <Script FOR=”CrazyTalk”
Event=”TpsChange(sFileName)”
Language=”JavaScript”>
<!-- insert script commands -->
</Script>
[For Netscape] <Script Language=”JavaScript”>
function CrazyTalk_TpsChange(sFileName) {
<!-- insert script commands -->
}
</Script>
Parameters sFileName
String value that specifies the new TPS filename.
Remarks Calling the LoadTPS method causes this event to occur.

207
WordPosition This event occurs when the text changes.
Syntax [For IE] <Script FOR=”CrazyTalk”
Event=”WordPosition(iFlag, iPos, sText, iTextSize)”
Language=”JavaScript”>
<!-- insert script commands -->
</Script>
[For Netscape] <Script Language=”JavaScript”>
function CrazyTalk_ WordPosition(iFlag, iPos, sText, iTextSize) {
<!-- insert script commands -->
}
</Script>
Parameters iFlag
Integer value that specifies the current situation.
0:play 1:LoadTPS 2:Stop 3:Playing
iPos
Integer value
sText
String value
iTextSize

208
Integer value
Remarks None

209
Appendix E: Glossary
Property Characteristic of an object. The term property is used to describe attributes associated with a data structure.
GUID (Globally Unique IDentifier) A unique number used to identify a COM object. It is computed by adding the time and date to the network adapter's internal serial number. See COM. COM (Component Object Model) A component software architecture from Microsoft, which defines a structure for building program routines (objects) that can be called up and executed in a Windows environment. COM provides the interfaces between objects, and Distributed COM (DCOM) allows them to run remotely over a network or the internet. Applications can invoke COM objects, called "controls," that blend in and become just another part of the program. ActiveX controls can be downloaded from the Internet to make a Web page perform any kind of processing. See ActiveX control.
Integer A whole number or arithmetic without fractions. In programming, sending the number 123.898 to an integer function would return 123
Boolean Boolean logic such as AND, OR and NOT return YES/NO or TRUE/FALSE data

210
String In programming, a contiguous set of alphanumeric characters that does not contain numbers used for calculations. Names, addresses and error messages are examples of strings
TTS Text-to-Speech is a technology that converts plain written text to speech. For more information browse to http://www.microsoft.com/speech/
ActiveX A software module based on Microsoft's Component Object Model (COM) architecture. It enables a program to add functionality by calling ready-made components that blend in and appear as normal parts of the program.
On the Internet or on an intranet, ActiveX controls can be linked to a Web page and downloaded by an ActiveX-compliant Web browser. ActiveX controls turn Web pages into software pages that can perform just like any program that is launched from a server.