crafty kidsmas - cms.barnardos.org.uk
TRANSCRIPT

Crafty kidsmas
#Craftykidsmas
Fundraising Guide

Crafty kidsmas Fundraising Guide 2
WelCome
Thank you for taking part in Crafty kidsmas!We’re snow happy to be partnered with CraftWorld this year so that, with your help, we can bring our Kidsmas Snowman to life, all whilst raising vital funds for vulnerable children.
Whether you’re knitting, crocheting
or stitching our Kidsmas Snowman
mascot, this handy fundraising guide
has everything you need-le to get started.
Scroll through to find your step-by-step
guide to fundraising, your free Craftworld
designs and information about how your
amazing donations will give vulnerable
children the magical Christmas
they deserve.
If you get your threads in a twist at any point, simply get in touch with our team of trusty elves on 0800 008 7005.
We can’t wait to see your Crafty designs, don’t forget to share them with us using #CraftyKidsmas.
happy Crafting!The Crafty kidsmas elves

Crafty kidsmas Fundraising Guide 3
1 Choose your craft – knitting superstar? Crochet Champion? Paper wizard?
2 Scroll to the next page to find your free patterns, designed by CraftWorld
3 Set up a JustGiving page to collect donations from friends and family. These donations are automatically transferred to Barnardo’s, making it easier for you to fundraise virtually, without any trips to the bank!
4 Join the Crafty community by joining our Crafty Facebook Group
5 Spread the word! download your social media pack with shareable assets to let others know you’re taking part in #CraftyKidsmas this year and don’t forget to share your JustGiving pages
6 get Crafty
sTep by sTep
Whether you’re knitting, crocheting or making paper crafts of our Kidsmas Snowman mascot, this email has everything you need-le to get started.

Crafty kidsmas Fundraising Guide 4
designs
Knitting Design 5
Crochet Design 9
Felt Design 12
Cross-Stitch Design 16
Paper Craft Design 18

Crafty kidsmas Fundraising Guide 5
KniTting designprojeCt by sue sTratford
suestratford.co.uk
@knittingandgin
Tension6 sts to 2.5cm (1”), measured over SS.
Please check your tension before
starting and adjust needle size if
necessary
AbbreviationsCDD Slip the next 2 stitches, as if
knitting them together, K1, pass the
slipped stitches over the knitted stitch,
making a central decrease
cm centimetres
DK Double Knitting
g grammes
in(s) inch(es)
K Knit
K2tog Knit 2 stitches together
Kfb Knit into the front and back of the
stitch, making one extra stitch
mm millimetre(s)
M1 Make one stitch (see techniques)
P Purl
P2tog Purl 2 stitches together
sl1 slip 1 stitch
ssK slip 2 sts knitwise one at a time,
pass the 2 slipped stitches back to the
left needle, knit both stitches together
through the back of the loops
SS Stocking stitch
st(s) stitch(es)
Tools and materialsSizeLarge Snowman - 25.5cm (10”)
Materials▯ DK yarn in the following colours:
▯ White (50g)
▯ Black, blue, green, pink, light pink, yellow and orange (25g)
▯ Toy filling
▯ Two 9mm black toy safety eyes for large snowman
NeedlesPair of 3mm (UK 11) knitting
needles (recommended size for
double knitting yarn)
Notions▯ Darning needle
▯ Pins

TeChniquesMake one Stitch
With your right hand needle, pick
up the ‘bar’ of yarn between the two
stitches on your left and right hand
needles. Slip the loop of yarn onto
your left hand needle and knit (or
purl) through the back of the stitch.
If you are increasing on the first
row of a pattern this technique can
be tricky and so I use the following
method instead:
Make a backwards loop on your
needle by twisting the yarn towards
you and slipping the resulting loop
onto the right hand needle. On the
following row knit or purl through
the back of the stitch. This produces
a very neat result.
sTart KniTtingBody and HeadUsing white yarn and 3mm (UK11) knitting needles, cast on 14 sts and purl 1 row. Next row K1, Kfb, K1, Kfb, Kfb, K1, Kfb, Kfb, K1, Kfb, Kfb, K1, Kfb, K1. (22 sts) Purl 1 row. Next row K1, (Kfb, K3, Kfb) to last st, K1. (30 sts) Purl 1 row. Next row K1, (Kfb, K5, Kfb) to last st, K1. (38 sts) Purl 1 row. Next row K1, (Kfb, K7, Kfb) to last st, K1. (46 sts) Purl 1 row. Next row K1, (Kfb, K9, Kfb) to last st, K1. (54 sts) Purl 1 row. Next row K1, (Kfb, K11, Kfb) to last st, K1. (62 sts) Purl 1 row. Next row K1, (Kfb, K13, Kfb) to last st, K1. (70 sts) Purl 1 row.
Next row K1, (Kfb, K15, Kfb) to last st, K1. (78 sts) Purl 1 row. Next row K1, (Kfb, K17, Kfb) to last st, K1. (86 sts) Starting with a purl row, work 19 rows in SS. Next row K1, (ssK, K17, K2tog) to last st, K1. (78 sts) Purl 1 row. Next row K1, (ssK, K15, K2tog) to last st, K1. (70 sts) Purl 1 row. Next row K1, (ssK, K13, K2tog) to last st, K1. (62 sts) Purl 1 row. Next row K1, (ssK, K11, K2tog) to last st, K1. (54 sts) Purl 1 row. Next row K1, (ssK, K9, K2tog) to last st, K1. (46 sts) Purl 1 row. Next row K1, (ssK, K7, K2tog) to last st, K1. (38 sts) Purl 1 row. Next row K1, (ssK, K5, K2tog) to last st, K1. (30 sts) Purl 1 row. Next row K1, (Kfb, K5, Kfb) to last st, K1. (38 sts) Purl 1 row. Next row K1, (Kfb, K7, Kfb) to last st, K1. (46 sts) Purl 1 row. Next row K1, (Kfb, K9, Kfb) to last st, K1. (54 sts) Purl 1 row. Next row K1, (Kfb, K11, Kfb) to last st, K1. (62 sts) Purl 1 row. Next row K1, (Kfb, K13, Kfb) to last st, K1. (70 sts) Starting with a purl row, work 11 rows in SS. Next row K1, (ssK, K13, K2tog) to last st, K1. (62 sts) Purl 1 row. Next row K1, (ssK, K11, K2tog) to last st, K1. (54 sts) Purl 1 row. Next row K1, (ssK, K9, K2tog) to last st, K1. (46 sts) Purl 1 row. Next row K1, (ssK, K7, K2tog) to last st, K1. (38 sts) Purl 1 row.Next row K1, (ssK, K5, K2tog) to last st, K1. (30 sts) Purl 1 row. Next row K1, (ssK, K3, K2tog) to last st, K1. (22 sts) Purl 1 row. Next row K1, (ssK, K1, K2tog) to last st, K1. (14 sts) Purl 1 row.
Crafty kidsmas Fundraising Guide 6

Crafty kidsmas Fundraising Guide 7
Thread yarn through remaining stitches and fasten, leaving a length of yarn for sewing up.
Hat Worked in Garter Stitch. Using black yarn and 3mm (UK11) knitting needles, cast on 80 sts and knit 4 rows. Next row (K6, K2tog) to end. (70 sts) Knit 2 rows. Next row K2, (K2tog, K5) to last five sts, K2tog, K3. (60 sts) Knit 2 rows. Next row K3, (K2tog, K8) to last 7 sts, K2tog, K5. (54 sts) Knit 1 row. Cast off. Using black yarn and 3mm (UK11) knitting needles, carefully pick up the 54 cast-off stitches through the back of the stitch (so you are only picking up half of the stitch). This will make the brim fold up. Knit 4 rows. Change to blue yarn and knit 2 rows. Change to green yarn and knit 4 rows. Change to blue yarn and knit 2 rows. Change to black yarn and knit 6 rows. Cast off.
Top of Hat Using black yarn and 3mm (UK11) knitting needles, cast on 5 sts and knit 1 row. Next row K1, M1, K to last st, M1, K1. (7 sts) Knit 1 row. Repeat last 2 rows five more times. (17 sts) Knit 7 rows. Next row K1, ssK, K to last 3 sts, K2tog, K1. (15 sts) Knit 1 row. Repeat last 2 rows five more times. (5 sts) Cast off remaining sts, leaving a length of
yarn for sewing up.
Buttons (make one each in blue, pink and yellow) Using chosen colour and 3mm (UK11) knitting needles, cast on 16 sts and purl 1 row.
Next row (K2tog) eight times. (8 sts) Starting with a purl row, work 2 rows in SS. Next row (P2tog) four times. (4 sts) Thread yarn through remaining sts and fasten, leaving a length of yarn for sewing up.
Cheeks (make two) Using light pink yarn and 3mm knitting needles, cast on 14 sts and purl 1 row. Next row (K2tog) seven times. (7 sts) Next row (P2tog) three times, P1. (4 sts) Thread yarn through remaining sts and fasten, leaving a length of yarn for sewing up.
Arms (make two) Using blue yarn and 3mm knitting needles, cast on 18 sts. * Cast off 6 sts.Slip remaining sts back to left hand needle and cast on 6 sts. (18 sts) *Work from * to * once more.Cast off remaining sts.
Scarf Using green yarn and 3mm (UK11) knitting needles, cast on 7 sts and knit 1 row. Next row Sl1, K to end. Repeat last row until scarf measures 21.5cm (8 1/2”) Cast off. Repeat instructions above to make a second section measuring 5cm (2”)
NoseUsing orange yarn and 3mm (UK11) knitting needles, cast on 8 sts. Starting with a knit row, work 4 rows in SS. Next row K3, K2tog, K3. (7 sts) Purl 1 row. Next row K2, CDD, K2. (5 sts) Purl 1 row. Next row K1, CDD, K1. (3 sts) Purl 1 row.

Crafty kidsmas Fundraising Guide 8
Next row CDD. (1 st) Thread yarn through remaining stitch and fasten, leaving a length of yarn for sewing up.
making upTaking the body and head and starting at the cast-on end (body), gather the cast-on stitches and sew the seam for the body which will run up the back of the snowman, stuffing with toy filling as you go.
Pin the head together, stuffing with toy filling as you go. Using the pictures for guidance, position the safety eyes. When you are happy with their placement, remove the toy filling and the pins from the head and push on the backs of the safety eyes.
Sew the seam at the back of the head, stuffing with toy filling as you go. Gather and sew the cast-off edge together.
Taking the hat, sew the side seam and sew the top of the hat in place. Using the pictures for guidance, pin the hat to the top of the snowman’s head, placing a small amount of toy filling inside. When you are happy with it’s placement, sew carefully into place.
Sew the side seam of each cheek. Using the pictures for guidance, sew the cheeks in place and embroider the mouth using black yarn and straight stitches.
Sew the side seam of the nose and sew in place, placing a small amount of toy filling inside. Pin the arms in position and sew in place.
Taking the larger scarf section and using white yarn, embroider French knots along the scarf. I left five ‘purl ridges’ between each French knot. Repeat for the smaller scarf section. Using the pictures for guidance, sew the larger scarf section in place around the snowman’s neck and then attach the smaller scarf section. Finish off by embroidering the scarf tassels using green yarn and straight stitches.
Sew the side seam of each button. Pin the buttons in place and sew to the body. Embroider button holes on the buttons using black yarn and straight stitches. Pin the arms in place using the picture for guidance and then sew in place. Pin the buttons in place and sew to the body. Using the pictures for guidance, embroider button holes on the buttons using black yarn.
Crafty kidsmas Fundraising Guide 9
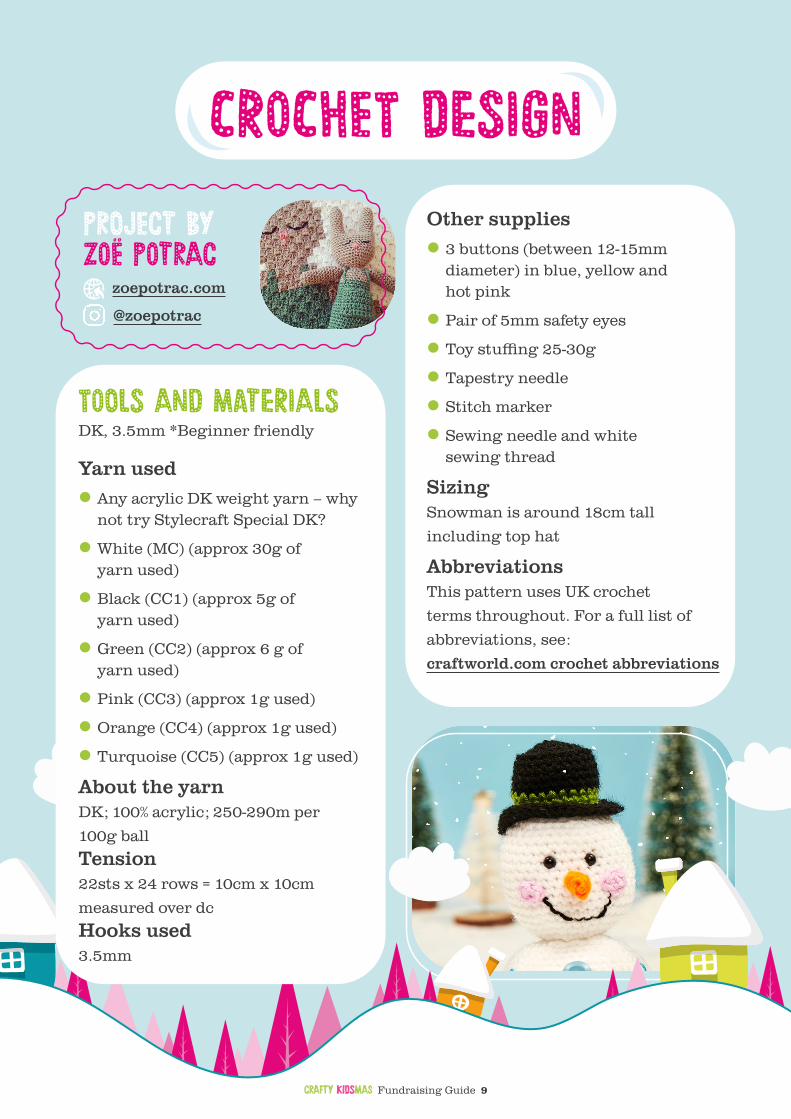
CroCheT designprojeCt by Zoë potraC
zoepotrac.com
@zoepotrac
Other supplies▯ 3 buttons (between 12-15mm diameter) in blue, yellow and hot pink
▯ Pair of 5mm safety eyes
▯ Toy stuffing 25-30g
▯ Tapestry needle
▯ Stitch marker
▯ Sewing needle and white sewing thread
SizingSnowman is around 18cm tall
including top hat
AbbreviationsThis pattern uses UK crochet
terms throughout. For a full list of
abbreviations, see:
craftworld.com crochet abbreviations
Tools and materialsDK, 3.5mm *Beginner friendly
Yarn used▯ Any acrylic DK weight yarn – why not try Stylecraft Special DK?
▯ White (MC) (approx 30g of yarn used)
▯ Black (CC1) (approx 5g of yarn used)
▯ Green (CC2) (approx 6 g of yarn used)
▯ Pink (CC3) (approx 1g used)
▯ Orange (CC4) (approx 1g used)
▯ Turquoise (CC5) (approx 1g used)
About the yarnDK; 100% acrylic; 250-290m per
100g ball
Tension22sts x 24 rows = 10cm x 10cm
measured over dc
Hooks used3.5mm

how To maKeUnless otherwise stated, this pattern
is crocheted in the amigurumi style,
in a spiral without joning. Use a
stitch marker to mark the beginning
of your rounds. Make and join the
pieces in the order written to avoid
any confusion.
sTart CroChetingBodyRnd 1: With MC, working into a magic
ring, 6 dc. 6 sts
Rnd 2: 2 dc in each st around. 12 sts
Rnd 3: [1 dc, 2 dc in next st] 6 times. 18 sts
Rnd 4: [2 dc, 2 dc in next st] 6 times. 24 sts
Rnd 5: [3 dc, 2 dc in next st] 6 times. 30 sts
Rnd 6: [4 dc, 2 dc in next st] 6 times. 36 sts
Rnd 7: [5 dc, 2 dc in next st] 6 times. 42 sts
Rnd 8: [6 dc, 2 dc in next st] 6 times. 48 sts
Rnd 9-23: Dc around
Rnd 24: [6 dc, dc2tog] 6 times. 42 sts
Rnd 25: [5 dc, dc2tog] 6 times. 36 sts
Rnd 26: [4 dc, dc2tog] 6 times. 30 sts
Rnd 27: [3 dc, dc2tog] 6 times. 24 sts
At this point, stuff the body before
decreasing further.
Rnd 28: [2 dc, dc2tog] 6 times. 18 sts
Rnd 29: [1 dc, dc2tog] 6 times. 12 sts
Rnd 30: 6 dc2tog. 6 sts.
Fasten off leaving a long tail for
sewing up.
HeadRnd 1: With MC, working into a magic
ring, 6 dc. 6 sts
Rnd 2: 2 dc in each st around. 12 sts
Rnd 3: [1 dc, 2 dc in next st] 6 times. 18 sts
Rnd 4: [2 dc, 2 dc in next st] 6 times. 24 sts
Rnd 5: [3 dc, 2 dc in next st] 6 times. 30 sts
Rnd 6: [4 dc, 2dc in next st] 6 times. 36 sts
Rnd 7-17: Dc around.
Rnd 18: [4 dc, dc2tog] 6 times. 30 sts
Rnd 19: [3 dc, dc2tog] 6 times. 24 sts
At this point, insert safety eyes at Rnd 13,
approximately 4 sts apart, before stuffing
the Head.
Rnd 20: [2 dc, dc2tog] 6 times. 18 sts
Rnd 21: [1 dc, dc2tog] 6 times. 12 sts
Rnd 22: 6 dc2tog. 6 sts
Fasten off and weave in ends.
Use tail end of Body to sew Head to Body.
HatRnd 1: With CC1, working into a magic
ring, 6 dc. 6 sts
Rnd 2: 2 dc in each st around. 12 sts
Rnd 3: [1 dc, 2 dc in next st] 6 times. 18 sts
Rnd 4: [2 dc, 2 dc in next st] 6 times. 24 sts
Rnd 5: Dc around in BLO.
Rnd 6-8: Dc around
Rnd 9-10: With CC2, dc around.
Rnd 11: With CC1 in BLO, [3 dc, 2 dc in
next st] 6 times. 30 sts
Rnd 12: [4 dc, 2 dc in next st] 6 times.
36 sts
Rnd 13: [5 dc, 2 dc in next st] 6 times.
42 stsFasten off, leaving long tail to sew onto Head.
Stuff lightly, sew onto Head.
Crafty kidsmas Fundraising Guide 10

Crafty kidsmas Fundraising Guide 11
ScarfWorked in turned rows. Beg 1 ch does not
count as a st throughout.
With CC2, chain 61.
Row 1: Beg in 2nd ch from hook, 60 dc.
Turn. 60 sts
Row 2: 1 ch, 60 dc.
Fasten off and weave in ends.
With a double length of MC and tapestry
needle, sew a running stitch along the
length of the scarf to create the effect of
dots along the scarf.
Knot two or three short lengths of CC2
at the ends of the scarf and trim to create
miniature tassels.
Cheeks (make 2)Rnd 1: With CC3, working into a magic
ring, 6 dc, sl st to join. 6 sts
Fasten off, use tail end to sew onto face
MouthWith CC1 and tapestry needle and using
photograph as a guide, backstitch a smile
onto the face
NoseRnd 1: With CC4, working into a magic
ring, 3 dc. 3 sts
Rnd 2: 2 dc in each st. 6 sts
Rnd 3-5: Dc around
ArmsWith CC5 and tapestry needle, backstitch
to create two arms using photographs as a
guide.
ButtonsWith needle and thread, sew the three
buttons on the front of the snowman,
using photograph as a guide for
placement.

Crafty kidsmas Fundraising Guide 12
felT design
projeCt by laura howardLaura “Lupin” Howard
is a craft designer and
maker who is completely obsessed
with felt! She shares lots of free
projects on her blog, bugsandfishes.
com, and sells downloadable hand
sewing patterns in her shop etsy.com/shop/lupin. You can follow her
creative adventures on
@lauralupinhoward
shopping listCraft felt and DMC embroidery
thread from hobbycraft.co.uk
Materials & Tools▯ The templates provided.
▯ Craft scissors (for cutting out the paper templates).
▯ Sewing needles and pins.
▯ Embroidery scissors (the small, sharp blades of these are ideal for cutting out felt shapes!).
▯ White tissue paper.
▯ A ballpoint pen.
▯ Craft felt in the following colours: black, white, lime green, orange, baby pink, yellow, bright pink, and aqua.
▯ Stranded cotton embroidery thread in the following colours (the DMC shades I used are in brackets but any close match will be fine!): black (DMC 310), white (DMC B5200), lime green (DMC 907), orange (DMC 946), baby pink (DMC 151), yellow (DMC 973), bright pink (DMC 3805), dark grey (DMC 535), and turquoise blue (DMC 3845).
▯ Narrow white ribbon.

how To maKeRead through all the instructions
before you begin. Unless otherwise
stated, all the snowman pieces are
sewn together with one strand of
matching embroidery thread (e.g. to
sew his orange nose use one strand
of matching orange thread) so your
stitches will be as invisible
as possible.
Remember that you’ll be cutting
out the snowman shape to turn him
into an ornament, so keep all your
stitching within the snowman’s
outline. You don’t want to accidentally
snip your stitching when cutting out
the ornament!
1 Trace the templates and cut them out using craft scissors. Then use the templates to cut out the felt pieces in the colours marked on the template page. Roughly cut out a piece of felt slightly larger than the template, then hold or pin the template to the felt and cut around it carefully with embroidery scissors.
2 Place the white snowman shape and the black hat on a piece of bright pink backing felt, leaving enough space for a small felt border around the shape and plenty of room for the snowman’s arms. Pin the pieces in position so the snowman’s head slightly overlaps his hat (as shown) and sew both shapes in place with whip stitch. See Photo A.
3 Add the lime green band to the snowman’s hat with whip stitch – make sure to sew the band the right way up! See Photo C.
4 Use all six strands from a skein of turquoise embroidery thread (switching to a larger needle if required) to sew a thick line of backstitch around the snowman and his hat, as shown. Sew flush with the edge of the felt shapes you’re sewing around, this will give you a line to follow and keep things looking nice and neat. See Photo D.
5 Now add the small felt pieces to decorate the snowman. Sew his lime green scarf in place with running stitch. Add his pale pink cheeks with whip stitch, and his orange carrot nose with running stitch. Then add the three buttons as shown – sew the top button with an X of two stitches, and the other two buttons with a single stitch at a slight angle. See Photo F.
6 Use four strands of lime green embroidery thread to add the scarf’s fringe: sew four single stitches sticking out from the bottom of the scarf, as shown. Then decorate the scarf with French knots. Use three strands of white embroidery thread, wrapping the thread around your needle four times for each knot. Sew seven French knots in a horizontal line (I found it helpful to sew one knot at each end, one in the middle, then add the remaining knots in between to help space the knots evenly), then add three more knots on the dangling section of the scarf (I found it helpful here to sew the middle knot first). See Photo G.
7 Now use three strands of grey embroidery thread to give the buttons their “holes”. Sew four tiny single stitches on the top button, and two tiny stitches on each of the other two buttons. See Photo H.
Crafty kidsmas Fundraising Guide 13
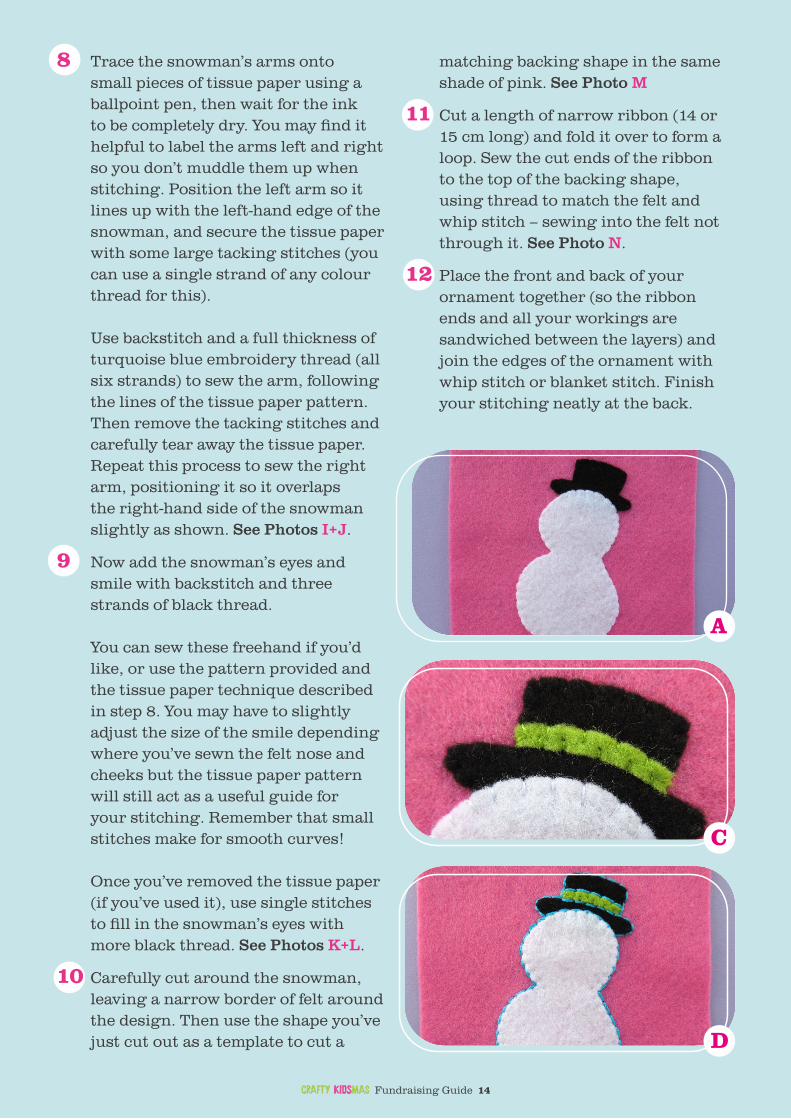
matching backing shape in the same shade of pink. See Photo M
11Cut a length of narrow ribbon (14 or 15 cm long) and fold it over to form a loop. Sew the cut ends of the ribbon to the top of the backing shape, using thread to match the felt and whip stitch – sewing into the felt not through it. See Photo N.
12Place the front and back of your ornament together (so the ribbon ends and all your workings are sandwiched between the layers) and join the edges of the ornament with whip stitch or blanket stitch. Finish your stitching neatly at the back.
8 Trace the snowman’s arms onto small pieces of tissue paper using a ballpoint pen, then wait for the ink to be completely dry. You may find it helpful to label the arms left and right so you don’t muddle them up when stitching. Position the left arm so it lines up with the left-hand edge of the snowman, and secure the tissue paper with some large tacking stitches (you can use a single strand of any colour thread for this). Use backstitch and a full thickness of turquoise blue embroidery thread (all six strands) to sew the arm, following the lines of the tissue paper pattern. Then remove the tacking stitches and carefully tear away the tissue paper.Repeat this process to sew the right arm, positioning it so it overlaps the right-hand side of the snowman slightly as shown. See Photos I+J.
9 Now add the snowman’s eyes and smile with backstitch and three strands of black thread. You can sew these freehand if you’d like, or use the pattern provided and the tissue paper technique described in step 8. You may have to slightly adjust the size of the smile depending where you’ve sewn the felt nose and cheeks but the tissue paper pattern will still act as a useful guide for your stitching. Remember that small stitches make for smooth curves! Once you’ve removed the tissue paper (if you’ve used it), use single stitches to fill in the snowman’s eyes with more black thread. See Photos K+L.
10Carefully cut around the snowman, leaving a narrow border of felt around the design. Then use the shape you’ve just cut out as a template to cut a
A
C
D
Crafty kidsmas Fundraising Guide 14

E J
F K
G L
H M
I N
Crafty kidsmas Fundraising Guide 15

Crafty kidsmas Fundraising Guide 16
Cross-sTiTCh design
you’ll need14 stitch/in 47 x 62 Stitches (3.4 x 4.4 in.)
Number Name Strands Length Stitches
DMC 3812 Sea Green very dark 2 4.86 yd. 247
DMC 704 Chartreuse bright 2 3.15 yd. 160
DMC 818 Baby Pink 2 0.43 yd. 22
DMC 3804 Cyclamen Pink dark 2 0.37 yd. 19
DMC 310 Black 2 3.26 yd. 166
DMC 3820 Straw dark 2 0.55 yd. 28
DMC 3756 Baby Blue ultra 2 3.60 yd. 183
DMC 3819 Moss Green light 2 0.31 yd. 16
DMC Blanc White 2 13.55 yd. 689
DMC 3815 Celadon Green dark 2 0.08 yd. 4
DMC 581 Moss Green 2 0.16 yd. 8
DMC 3803 Mauve medium 2 0.04 yd. 2
➤
✖
✸
projeCt by sophie Crabb
sewsophiecrafts.co.uk
@sewsophiecrafts

Crafty kidsmas Fundraising Guide 17
10 20 30 40 50
10
20
30
40
50
60
70
Sew Sophie Crafts Page 1
Kidsmas Snowman
DMC 3812 DMC 704 DMC 818 DMC 3804 DMC 310DMC 3820 DMC 3756 DMC 3819 DMC BLANC DMC 3815DMC 581 DMC 3803
how To maKe

Crafty kidsmas Fundraising Guide 18
paper CrafT design
barnardo’s Crafty Kidsmas Cards
happy holidays Card design1 Print a selection of patterned
papers and toppers from the downloads onto white printable cardstock.
2 Create a A6 card blank from blue cardstock and matt and layer with contrasting patterned paper leaving narrow borders.
3 Cut out the snowman border and mount onto green paper. Affix the border diagonally across a 9.5x13.5cm piece of contrasting paper and secure to the card front using 3D foam tape.
4 Cut out and mount the sentiment topper onto a contrasting cardstock panel and affix to the centre of the card to finish.
you’ll need▯ White printable cardstock
▯ Blue, red & lilac cardstock
▯ Paper pack
▯ Acetate
▯ Silver gilding flake
▯ Baker’s twine
▯ 3D foam tape
▯ Circle nesting dies
▯ Manual die-cutting machine
▯ Hole punch

merry ChrisTmas Card design1 Print a selection of patterned
papers and toppers from the downloads onto white printable cardstock.
2 Create a A6 card blank from blue cardstock and matt and layer with contrasting patterned paper leaving narrow borders.
3 Matt the sentiment topper onto red paper and secure to the bottom of the card front as shown.
4 Carefully cut out the snowman topper and affix to the right-hand side of the focal topper to finish.
let iT snow Card design1 Print a selection of patterned
papers and toppers from the downloads onto white printable cardstock.
2 Create a 15x15cm card blank from lilac cardstock and matt the card front with patterned paper leaving a narrow border.
3 Die-cut a circle into a 12.5cm square of contrasting paper, back the aperture with acetate and outline the edge with 3D foam tape.
4 Remove the backing from the tape, sprinkle the acetate with gilding flake and secure the snowman topper in place the create the shaker element
5 Add the shaker element to the card front and embellish with a red die-cut circle frame.
6 Mount the sentiment onto red paper, punch a hole and thread with baker’s twine before securing to the card front using 3D foam tape.
Crafty kidsmas Fundraising Guide 19

Crafty kidsmas Fundraising Guide 20
get soCial
Don’t forget to share photos with us and tell us about your crafts on social media – just use
#Craftykidsmasto let us know. We can’t wait to hear all about it!
Be part of the Crafty Community by
joining our Crafty Group on Facebook
– a place to share ideas, creative tips
and be the first to hear about new crafty
activities with Barnardo’s! You can also
download your social media pack, with
shareable assets to let others know
you’re taking part.
facebook.com/barnardos
@barnardos
@barnardos_uk
barnardos.org.uk

Every penny raised for Crafty Kidsmas is helping vulnerable children across the UK feel the magic of Christmas.
Below you can see the huge impact your fundraising will have. You can share this with friends, family and loved ones when asking them to donate, or thanking them for their support.
how your fundraising helps
£10could buy a special gift to bring a little bit
of Christmas magic to a young carer
£15could help throw a magical
Christmas party for a group of vulnerable
children, to help every child have a
magical day
£18could feed a family, who could otherwise
go hungry, on Christmas eve and
Chiristmas day
£35could provide warm clothing to keep
a child warm, happy and healthy this
Christmas
£50could provide one hour of virtual 1-2-1 counselling to a child
this Christmas
£500could help us protect a child at risk
of sexual exploitation
By getting crafty this Christmas, you are helping raise vital funds to ensure vulnerable
children feel part of a happy, safe and caring Christmas – and can access that support all
year round.
Find out more about how Barnardo’s work at Christmas time here.
Thank you!
Crafty kidsmas Fundraising Guide 21
Thank you
Thank you for taking part in Crafty Kidsmas. Your support means our incredible project workers could help children feel included and believed in, so that they can focus on simply believing in the magic of Christmas.
Registered Charity Nos. 216250 and SC037605 22794az21#Craftykidsmas