cortex player setup guide english
TRANSCRIPT


Important NoticeBefore operating this unit, please verify that you have the latest firmware version available from our website -http://www.cortex-pro.com. New versions of the CORTEX PLAYER firmware will include additional features,bug fixes, and enhanced compatibility to guarantee optimum performance of your unit. There are even Span-ish, French and German language versions, to make operating the CORTEX PLAYER easier than ever!
Additionally, please also download our FREE Cortex Database Creation Software, which allows you to create searchable databases of your entire music collection within minutes, as well as create playlists for useon your unit! This indispensable utility is designed to save you time when preparing large storage devices touse with the CORTEX PLAYER.
To find out what version of CORTEX PLAYER firmware you are running:
1. Power on the CORTEX PLAYER with NO DEVICES CONNECTED.2. At the prompt that says ‘Insert Devices,’ press the INFO button.3. The screen will display the version number of the currently installed CORTEX PLAYERfirmware.
To upgrade your firmware to the newest version:
1. Using your PC, download the firmware update to the root directory of your USB storagedevice (X:\ where X is the letter of the drive). We recommend Internet Explorer.2. Connect the USB storage device to the CORTEX PLAYER.3. Power on the CORTEX PLAYER, and select the aforementioned device.4. The unit will display the date/version of the new update, and will ask if you want to up-date. Select ‘YES,’ and press enter.5. The unit will go through a 8-step update procedure, after which the power will automati-cally shut down. When the unit is powered on again, you will be running the latest firmware.Warning: If the power is interrupted or the USB device is removed during this process, it can dam-age the operating system of the unit. As well, it is advisable that the unit is not moved during theupdate process to make sure that the process is uninterrupted.

Setting up your Cortex and iTunes®............................................................2 - 3
DB MANAGER..................................................................................................4 - 6
Setting up your Mass Storage Device.........................................................7 - 8
Error Messages.......................................................................................................9
Setup Guide
Table of Contents
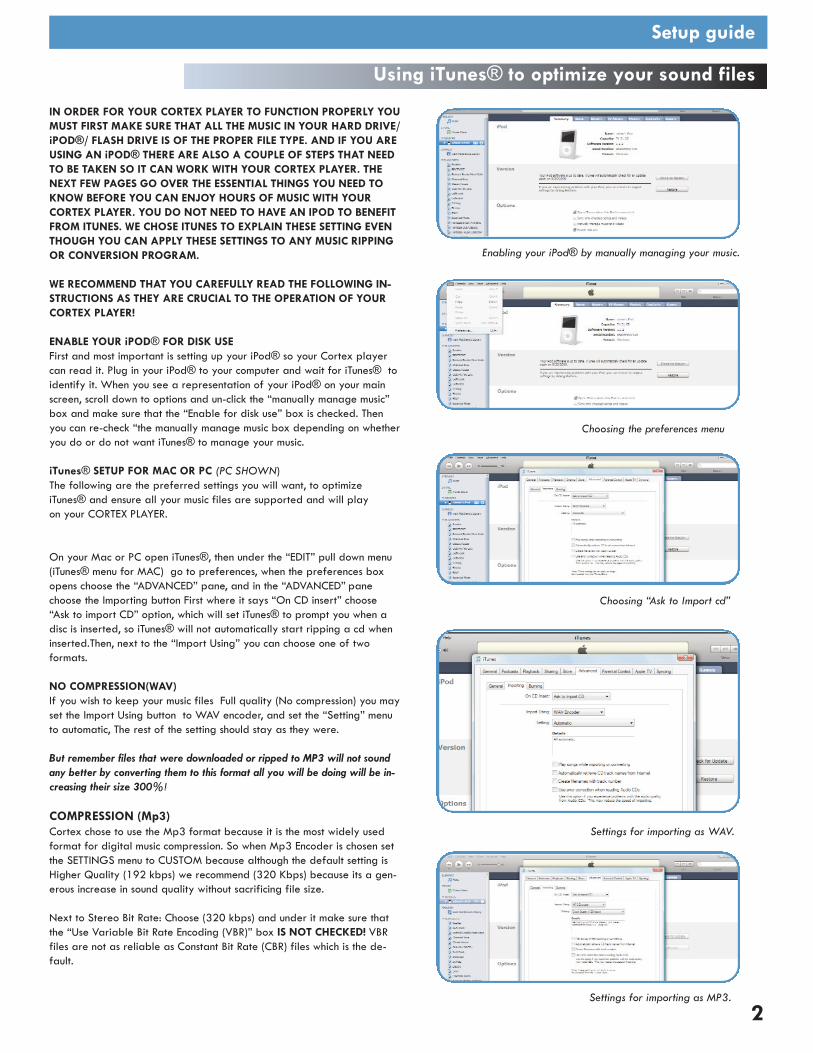
IN ORDER FOR YOUR CORTEX PLAYER TO FUNCTION PROPERLY YOUMUST FIRST MAKE SURE THAT ALL THE MUSIC IN YOUR HARD DRIVE/iPOD®/ FLASH DRIVE IS OF THE PROPER FILE TYPE. AND IF YOU AREUSING AN iPOD® THERE ARE ALSO A COUPLE OF STEPS THAT NEEDTO BE TAKEN SO IT CAN WORK WITH YOUR CORTEX PLAYER. THENEXT FEW PAGES GO OVER THE ESSENTIAL THINGS YOU NEED TOKNOW BEFORE YOU CAN ENJOY HOURS OF MUSIC WITH YOURCORTEX PLAYER. YOU DO NOT NEED TO HAVE AN IPOD TO BENEFITFROM ITUNES. WE CHOSE ITUNES TO EXPLAIN THESE SETTING EVENTHOUGH YOU CAN APPLY THESE SETTINGS TO ANY MUSIC RIPPINGOR CONVERSION PROGRAM.
WE RECOMMEND THAT YOU CAREFULLY READ THE FOLLOWING IN-STRUCTIONS AS THEY ARE CRUCIAL TO THE OPERATION OF YOURCORTEX PLAYER!
ENABLE YOUR iPOD® FOR DISK USEFirst and most important is setting up your iPod® so your Cortex playercan read it. Plug in your iPod® to your computer and wait for iTunes® toidentify it. When you see a representation of your iPod® on your mainscreen, scroll down to options and un-click the “manually manage music”box and make sure that the “Enable for disk use” box is checked. Thenyou can re-check “the manually manage music box depending on whetheryou do or do not want iTunes® to manage your music.
iTunes® SETUP FOR MAC OR PC (PC SHOWN)The following are the preferred settings you will want, to optimizeiTunes® and ensure all your music files are supported and will play on your CORTEX PLAYER.
On your Mac or PC open iTunes®, then under the “EDIT” pull down menu(iTunes® menu for MAC) go to preferences, when the preferences boxopens choose the “ADVANCED” pane, and in the “ADVANCED” panechoose the Importing button First where it says “On CD insert” choose“Ask to import CD” option, which will set iTunes® to prompt you when adisc is inserted, so iTunes® will not automatically start ripping a cd wheninserted.Then, next to the “Import Using” you can choose one of two formats.
NO COMPRESSION(WAV)If you wish to keep your music files Full quality (No compression) you mayset the Import Using button to WAV encoder, and set the “Setting” menuto automatic, The rest of the setting should stay as they were.
But remember files that were downloaded or ripped to MP3 will not soundany better by converting them to this format all you will be doing will be in-creasing their size 300%!
COMPRESSION (Mp3)Cortex chose to use the Mp3 format because it is the most widely usedformat for digital music compression. So when Mp3 Encoder is chosen setthe SETTINGS menu to CUSTOM because although the default setting isHigher Quality (192 kbps) we recommend (320 Kbps) because its a gen-erous increase in sound quality without sacrificing file size.
Next to Stereo Bit Rate: Choose (320 kbps) and under it make sure thatthe “Use Variable Bit Rate Encoding (VBR)” box IS NOT CHECKED! VBRfiles are not as reliable as Constant Bit Rate (CBR) files which is the de-fault.
Using iTunes® to optimize your sound files
Settings for importing as WAV.
Setup guide
Enabling your iPod® by manually managing your music.
Choosing the preferences menu
Choosing “Ask to Import cd”
Settings for importing as MP3.
2

COMPRESSION (Mp3) (Continued)
The rest of the settings can stay as the default with the exception of thelast box (Filter Frequencies Below 10Hz) should be unchecked becausealthough it may be fine to filter those frequencies for your laptop thatbarely audible low end can go a long way in a big club system.
Once that is done hit OK twice and iTunes® will be ready to rip/convertall your files to the proper form of WAV and or MP3 used by your COR-TEX PLAYER.
CONVERTING AAC and DRM FILESMost downloaded or ripped music is in the appropriate Mp3 format,however you may have ripped CD’s on to your drive with the default set-tings in iTunes® or another ripping program which would have createdfiles that may not be currently supported. Or you may have purchasedsongs from iTunes® and those files may be copy protected and are alsoknown as DRM files, which must be sorted out of your iTunes® becausethey cannot be converted.
Here are a few easy steps to quickly identify, sort and/or convert allother files including AAC and DRM files which are not currently supportedwith your CORTEX PLAYER.
First you must identify the different types of files and to do that you mustsort them by file type also known as “KIND”, if you do not have a “KIND”column displayed in iTunes® you can set iTunes® to display that columnby right clicking on the top of the “NAME” column and adding “Kind” asone of the sort column’s, once that column is added click on the word“Kind” and the music will sort by its format, you can then highlight theones that are not mpeg (MP3), but before you convert anything you musthighlight the files that say protected and or DRM and copy them to aseparate folder as they are not currently compatible and WILL NOT BEABLE TO BE CONVERTED! after you have highlighted and copied thosefiles to a separate folder you can delete them from iTunes®.
Then you can highlight all other files that are not WAV or MP3 and fromthe “ADVANCED” pull down menu select the “Convert Selection to MP3”and iTunes® will go to work, this process may take a while depending onhow many songs you are converting.
Once the conversion is done you will see both files in the iTunes™ window,the old files should still be highlighted, now you may either hit DELETE ifthe old files are still highlighted, or just sort by kind again and delete theold non-MP3 files.
Once completed and your files are ready you may either use them offyour hardrive or SYNC them back to your iPod® or simply add them toyour iPod®.
Remember to use the DBSE software to verify your databaseThe resulting files will work perfect with your CORTEX PLAYER!
Using iTunes™ to optimize your sound files (continued)
Using the CORTEX
NOTE: MAKE SURE THAT ALL YOUR SONGFILES ARE AT OR ABOVE 128 KBPS. ALSOMAKE SURE THAT THERE ARE NO SONG
FILES THAT ARE ABOVE OR BELOW44.1KHZ SAMPLE RATE AS THEY WILLCAUSE THE CORTEX PLAYER TO RESET.
MP3 Settings menu.
Adding “KIND” Column
Choosing songs to be converted
Converting selection
Convert or erase bad file types!
3

PLEASE MAKE SURE YOUR PLAYER HAS BEEN UPDATED, AND
THAT YOU HAVE DOWN LOADED THE LATEST VERSION OF THE
CORTEX DATABASE MANAGER BEFORE PROCEEDING!
GO TO WWW.CORTEX-PRO.COM
INSTALLING THE DB MANAGER / MAC OS® USER WARNING
Setup Guide
Before you can use your CORTEX you need to properly set up your MASS STORAGE DEVICE (HARD DRIVE, FLASH DRIVE, iPOD®). This should be done using the CORTEX DATABASE MANAGER which can be downloaded from our website at: WWW.CORTEX-PRO.COM.
If you do not have access to a computer and need to index your MSD youcan do so using the CORTEX player itself, skip down to SETTING UP THEMSD USING THE CORTEX PLAYER, but we STRONGLY recommend thatyou use the DATABASE MANAGER software exclusively for this function asit is quicker and more reliable.
Once you have downloaded and installed the DATABASE MANAGERthere will be an icon on your desktop of a white box with blue bars, dou-ble click on it to open the manager. If this is the first time you are usingthe cortex manager there should NOT be anything present in the title box(1). If there is a MSD present in the box you must close the DATABASEMANAGER and locate the drive on your computer by “clicking” START then MY COMPUTER. Locate the drive and click on it toopen it. You will see a folder that says (.db), you must delete this folderFIRST (making sure you empty the recycle bin). MAC users can downloada program called Wizard, which will allow you to see hidden files. Onceyou have erased the old (.db) folder you can re-open the DATABASEMANAGER and with a clear title box showing you can create a newdatabase (See Indexing Below)
The screen shots shown are from a PC but MAC users have the same functions. (eg... In PC its options on a MAC its preferences)
MAC OS® USERS WARNING!
DS_Store/Resource fork (._) filesMacs using the OSX platform by default create hidden files that are metadatafiles. Basicaly these files are used for backwards compatibility and also are created when you copy files from one volume to another. This feature must beturned off or the Cortex will see these files as actual music files! causing the unit toreset when you try to play these files (because they are not actual musicfiles). CORTEX user need not fear! There is an application called BLUE HARVESTwhich quickly and easily gets rid of these files
BlueHarvestBlueHarvest allows you to keep your disks and servers free of Mac "trails" by:
Automatically removing DS_Store files. Automatically removing resource forks("dot underscore" files). Automatically removing hidden folders such as ".Trashes"from removable disks. Providing simple Control-Click Finder based cleaning ofdisks, folders and Zip archives.
What is a DS_Store/Resource fork (._) file?DS_Store files are created by the Finder to store information about directories andfiles including viewing options and icon positions. Resource fork (._XXXXX) files,(correctly called AppleDouble files) are created by the MacOS when an applica-tion adds a resource fork to a file on a volume whose format doesn't natively sup-port resource forks. Such as SMB, UFS and NTFS. A file's resource fork may containinformation which is important, redundant or both.
Click on the white box with theBLUE BARS to open the CORTEXDATABASE MANAGER.
DATABASE MANAGER MAIN WINDOW
BLUE HARVEST helps MAC users keeptheir drives free of useless files
4

THE DATABASE MANAGERThe DATABASE MANAGER PROGRAM is the single most important tool you can use with your CORTEX PLAYER, it will as-sist you in properly setting up your MSD so you can use it withyour player. Here is a quick look ot all its functions.
1. TITLE BOXThis box shows which MASS STORAGE DEVICES have beenindexed as well as VIRTUAL DRIVES and PLAYLISTS you canchoose and edit all available from this box.
2. CREATE DBChoose this function to CREATE A DATABASE (INDEX) yourMSD. You will use this the first time you use the DB MANAGER but it is always recommended to CREATE a fresh new DB every now and then as .db folders can become corrupt and cause you CORTEX player to fail.
3. MENU CHOICESClick FILE to EXIT the DB manager, Click VIEW to choose which of the DB manager windows youwish to be displayed in the MAIN WINDOW, Click DISK to choose any of the (5) DISK optionsClick “ABOUT” to display the current version of the DBM.
4. OPTIONS MENUBy clicking “OPTIONS” you open the “OPTIONS MENU”which allows you to change the different features availablein the DB MANAGER, these features are:
A. ENCODE ENGINE QUALITY:Which sets the quality at which the built in AAC converter willconvert AAC files default is “standard”, setting it on “low”will convert files faster but will give you less sound quality inthe converted files. Setting it on “high” will take longer to con-vert but the sound quality will be better.
B. BITRATE:The second setting is bitrate, bitrate is also a quality settingand determines the size of the file produced by the converterso in turn the higher the bitrate the larger the file but also thebetter the quality, and of course the lower the bitrate thelower the quality and subsequently the smaller the file size.
C. DON’T CONVERT M4A TO MP3Don’t convert m4a to MP3 allows you to choose weather ornot the DB MANAGER will automatically convert your AACfiles to MP3, its set to off by default and you would have touncheck this box in order to convert your AAC files to MP3.Please make sure you set your convert settings first before disengaging this box.
DB MANAGER FEATURES
Setup Guide
Options Menu
A
BC
D
EF
DB Manager Main Window
Menu Choices
Additional functions
DATABASE MANAGERFEATURESOVERVIEW
1
2
3
4
5 6 7 8 9 10 11
12 13
14
D. CONVERT DUPLICATESThe convert duplicates box when not checked allows you to add songs with thesame name to your database and it will not automatically convert them or if thereare existing duplicate files it will also not convert them. Checking this box willturn the auto converter on and may inadvertently convert files that you do not wishto be converted!
E. COPY FILES TO TEMPORARYCopy file to temporary will use the computers RAM to create a temporary filesgreatly improving the speed at which the DB MANAGER creates waveforms andother functions.The default is ON.
F. OVERWRITE EXISTING WAVEFORMSWhen overwrite existing waveforms In the off or UNCHECKED position the DB MANAGER will only create waveforms for those files that have not been created, if the box is checked every time you you press the create all waveforms button the DBM will create waveforms for all the files even if you haddone so before keeping this button unchecked (its default position) will greatly im-prove the speed at which the DBM creates waveforms.
5. VIRTUAL DRIVEUse VIRTUAL DRIVE to create CD-Rs and DVD’s with DATABASES already em-bedded in them to be used by the CORTEX PLAYERS in an external CD or DVDROM drives.
6. DELETE (DB)Use DELETE to erase an existing .db file on your MSD. to create a fresh one thiswill erase any PLAYLISTS you have made, so make sure you save and back upyour playlist files before using this function. Another way to DELETE a DTABASEFILE is to manually opening your MSD and right click DELETEING th .db folder onthe ROOT level of your MSD. this method is preferred as it assures that you haveproperly erased the .db folder and does not erase the .pl folder which containsyour playlists.
7. VERIFY DBWill rescan the chosen MSD and adjust the DATABASE FILE according to anychanges that were made since the last DATABASE CREATION and or VERIFICA-TION. Use this function if you have made ANY changes to the MSD for exampleADDED or REMOVED music changed iD3 tags or even created a new PLAYLIST.
5
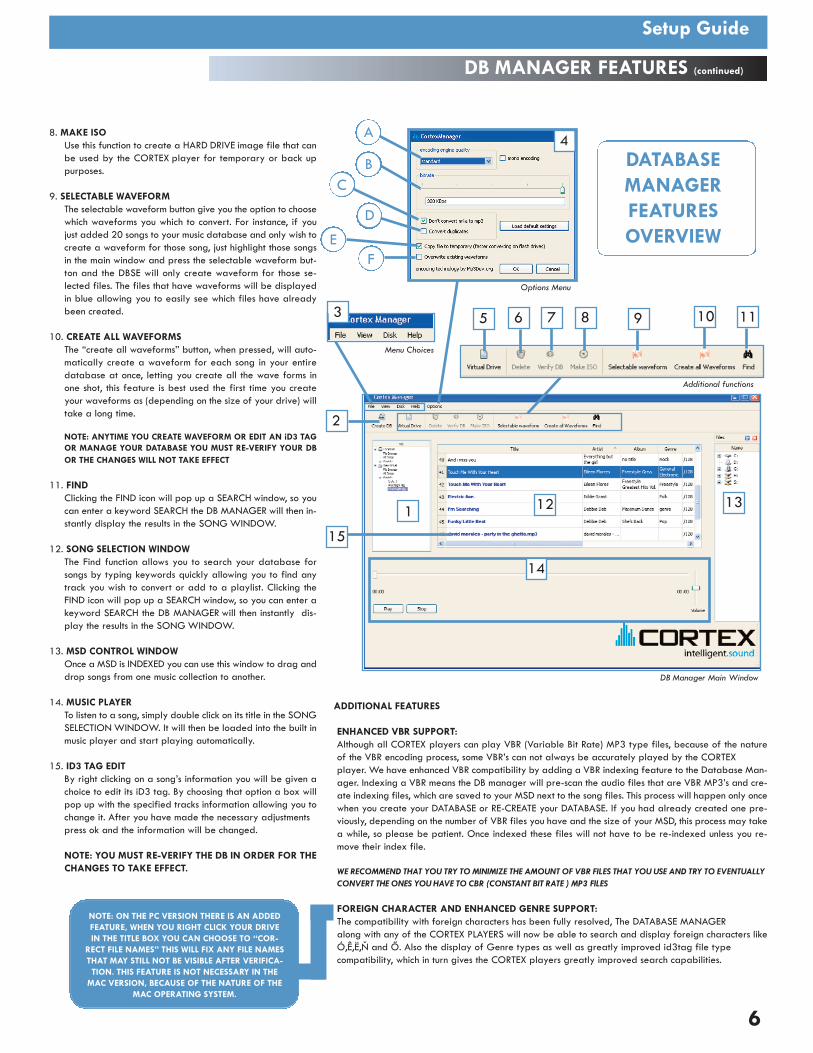
8. MAKE ISOUse this function to create a HARD DRIVE image file that canbe used by the CORTEX player for temporary or back uppurposes.
9. SELECTABLE WAVEFORMThe selectable waveform button give you the option to choosewhich waveforms you which to convert. For instance, if youjust added 20 songs to your music database and only wish tocreate a waveform for those song, just highlight those songsin the main window and press the selectable waveform but-ton and the DBSE will only create waveform for those se-lected files. The files that have waveforms will be displayedin blue allowing you to easily see which files have alreadybeen created.
10. CREATE ALL WAVEFORMSThe “create all waveforms” button, when pressed, will auto-matically create a waveform for each song in your entiredatabase at once, letting you create all the wave forms inone shot, this feature is best used the first time you createyour waveforms as (depending on the size of your drive) willtake a long time.
NOTE: ANYTIME YOU CREATE WAVEFORM OR EDIT AN iD3 TAGOR MANAGE YOUR DATABASE YOU MUST RE-VERIFY YOUR DBOR THE CHANGES WILL NOT TAKE EFFECT
11. FINDClicking the FIND icon will pop up a SEARCH window, so youcan enter a keyword SEARCH the DB MANAGER will then in-stantly display the results in the SONG WINDOW.
12. SONG SELECTION WINDOWThe Find function allows you to search your database forsongs by typing keywords quickly allowing you to find anytrack you wish to convert or add to a playlist. Clicking theFIND icon will pop up a SEARCH window, so you can enter akeyword SEARCH the DB MANAGER will then instantly dis-play the results in the SONG WINDOW.
13. MSD CONTROL WINDOWOnce a MSD is INDEXED you can use this window to drag anddrop songs from one music collection to another.
14. MUSIC PLAYERTo listen to a song, simply double click on its title in the SONGSELECTION WINDOW. It will then be loaded into the built inmusic player and start playing automatically.
15. ID3 TAG EDITBy right clicking on a song’s information you will be given achoice to edit its iD3 tag. By choosing that option a box willpop up with the specified tracks information allowing you tochange it. After you have made the necessary adjustmentspress ok and the information will be changed.
NOTE: YOU MUST RE-VERIFY THE DB IN ORDER FOR THECHANGES TO TAKE EFFECT.
DB MANAGER FEATURES (continued)
Setup Guide
Options Menu
A
BC
D
EF
DB Manager Main Window
Menu Choices
Additional functions
1
2
3
4
5 6 7 8 9 10 11
12 13
14
DATABASE MANAGERFEATURESOVERVIEW
15
ADDITIONAL FEATURES
ENHANCED VBR SUPPORT:Although all CORTEX players can play VBR (Variable Bit Rate) MP3 type files, because of the natureof the VBR encoding process, some VBR’s can not always be accurately played by the CORTEX player. We have enhanced VBR compatibility by adding a VBR indexing feature to the Database Man-ager. Indexing a VBR means the DB manager will pre-scan the audio files that are VBR MP3’s and cre-ate indexing files, which are saved to your MSD next to the song files. This process will happen only oncewhen you create your DATABASE or RE-CREATE your DATABASE. If you had already created one pre-viously, depending on the number of VBR files you have and the size of your MSD, this process may takea while, so please be patient. Once indexed these files will not have to be re-indexed unless you re-move their index file.
WE RECOMMEND THAT YOU TRY TO MINIMIZE THE AMOUNT OF VBR FILES THAT YOU USE AND TRY TO EVENTUALLYCONVERT THE ONES YOU HAVE TO CBR (CONSTANT BIT RATE ) MP3 FILES
FOREIGN CHARACTER AND ENHANCED GENRE SUPPORT:The compatibility with foreign characters has been fully resolved, The DATABASE MANAGERalong with any of the CORTEX PLAYERS will now be able to search and display foreign characters likeÓ,Ê,Ë,Ň and Ő. Also the display of Genre types as well as greatly improved id3tag file type compatibility, which in turn gives the CORTEX players greatly improved search capabilities.
NOTE: ON THE PC VERSION THERE IS AN ADDEDFEATURE, WHEN YOU RIGHT CLICK YOUR DRIVEIN THE TITLE BOX YOU CAN CHOOSE TO “COR-
RECT FILE NAMES” THIS WILL FIX ANY FILE NAMESTHAT MAY STILL NOT BE VISIBLE AFTER VERIFICA-TION. THIS FEATURE IS NOT NECESSARY IN THE
MAC VERSION, BECAUSE OF THE NATURE OF THEMAC OPERATING SYSTEM.
6
7
SETTING UP YOUR M.S.D.(HARD DRIVE, FLASH DRIVE, IPOD®)
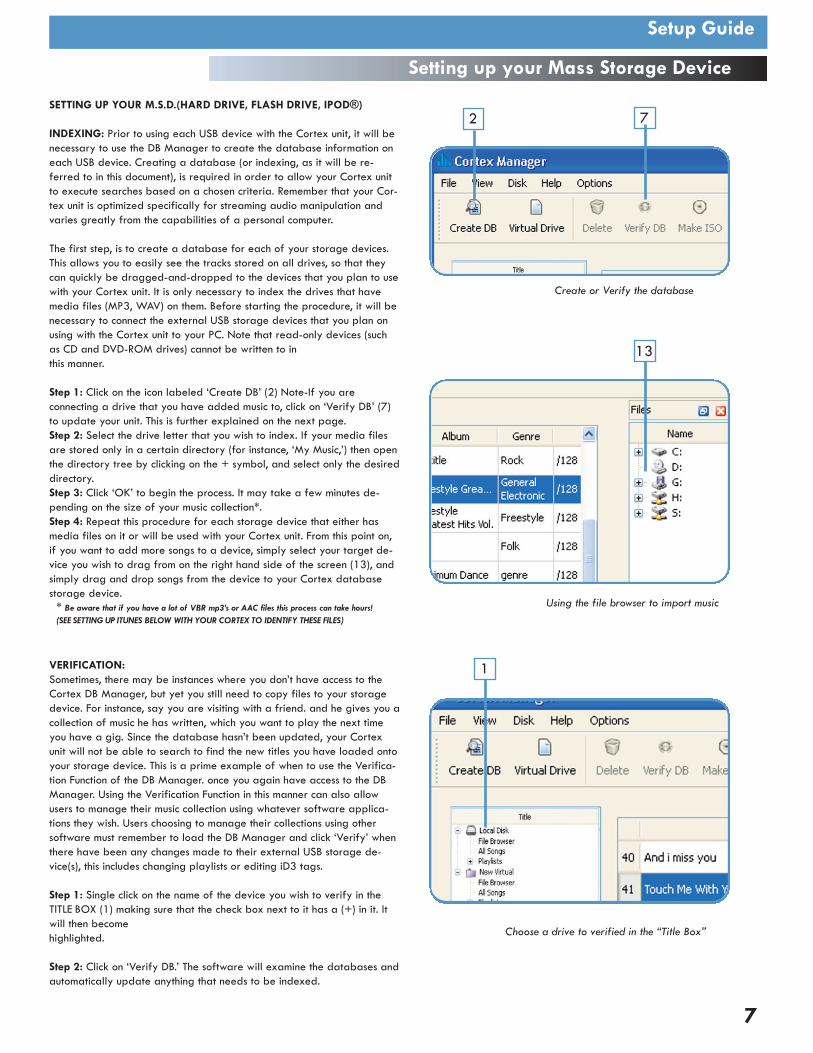
INDEXING: Prior to using each USB device with the Cortex unit, it will benecessary to use the DB Manager to create the database information oneach USB device. Creating a database (or indexing, as it will be re-ferred to in this document), is required in order to allow your Cortex unitto execute searches based on a chosen criteria. Remember that your Cor-tex unit is optimized specifically for streaming audio manipulation andvaries greatly from the capabilities of a personal computer.
The first step, is to create a database for each of your storage devices.This allows you to easily see the tracks stored on all drives, so that theycan quickly be dragged-and-dropped to the devices that you plan to usewith your Cortex unit. It is only necessary to index the drives that havemedia files (MP3, WAV) on them. Before starting the procedure, it will benecessary to connect the external USB storage devices that you plan onusing with the Cortex unit to your PC. Note that read-only devices (suchas CD and DVD-ROM drives) cannot be written to in this manner.
Step 1: Click on the icon labeled ‘Create DB’ (2) Note-If you are connecting a drive that you have added music to, click on ‘Verify DB’ (7)to update your unit. This is further explained on the next page.Step 2: Select the drive letter that you wish to index. If your media filesare stored only in a certain directory (for instance, ‘My Music,’) then openthe directory tree by clicking on the + symbol, and select only the desireddirectory.Step 3: Click ‘OK’ to begin the process. It may take a few minutes de-pending on the size of your music collection*.Step 4: Repeat this procedure for each storage device that either hasmedia files on it or will be used with your Cortex unit. From this point on,if you want to add more songs to a device, simply select your target de-vice you wish to drag from on the right hand side of the screen (13), andsimply drag and drop songs from the device to your Cortex databasestorage device.
VERIFICATION:Sometimes, there may be instances where you don’t have access to theCortex DB Manager, but yet you still need to copy files to your storagedevice. For instance, say you are visiting with a friend. and he gives you acollection of music he has written, which you want to play the next timeyou have a gig. Since the database hasn’t been updated, your Cortexunit will not be able to search to find the new titles you have loaded ontoyour storage device. This is a prime example of when to use the Verifica-tion Function of the DB Manager. once you again have access to the DBManager. Using the Verification Function in this manner can also allowusers to manage their music collection using whatever software applica-tions they wish. Users choosing to manage their collections using othersoftware must remember to load the DB Manager and click ‘Verify’ whenthere have been any changes made to their external USB storage de-vice(s), this includes changing playlists or editing iD3 tags.
Step 1: Single click on the name of the device you wish to verify in theTITLE BOX (1) making sure that the check box next to it has a (+) in it. Itwill then become highlighted.
Step 2: Click on ‘Verify DB.’ The software will examine the databases andautomatically update anything that needs to be indexed.
* Be aware that if you have a lot of VBR mp3’s or AAC files this process can take hours!(SEE SETTING UP ITUNES BELOW WITH YOUR CORTEX TO IDENTIFY THESE FILES)
Setting up your Mass Storage Device
Setup Guide
2 7
Create or Verify the database
13
Using the file browser to import music
Choose a drive to verified in the “Title Box”
1

Setting up your Mass Storage Device (Continued)
Setup Guide
CREATING A PLAYLIST & MUSIC PLAYBACK:Now that you have created a database, you are ready to sort your musicinto playlists. This will allow you to be able to browse through your musicmore quickly, as well as prepare “sets” for the night. Think of the playlistsas virtual record crates, containing the music that you wish to have athand for a gig. To create a Playlist and add songs, please perform thefollowing steps:
Step 1: Select the “Playlist” (1) option on your target device by pressingthe (+) symbol next to the drive and clicking on “Playlist”.Step 2: Right Click on the “Playlist” option and select the option “CreatePlaylist”. This will create an unnamed playlist. To rename this playlist, se-lect it and right click to select the option “Rename Playlist”.Step 3: Select the songs you wish to copy (12) by clicking and draggingthem over to the Playlist you have created. You may hold the Shift keywhile clicking on the left mouse key to select any number of contiguousfiles; you may alternatively hold down the Ctrl key to select multiple filesthat are not contiguous. You can also use the “FIND” feature (11) to typein a an artist’s name or song title and the song information window (12)will display your results.
-Note- You may click on any one of the ID3 tag fields above the field you wish to sort by (Artist, Title, etc) to sort your songs out in a way that makes finding song titles easier.
Step 4: If you wish to audition files before you load them into a playlist,select the song with the left mouse key and click on the play button (14),located on the bottom left hand of the screen.Step 5: Repeat the procedure until you have copied all desired file(s) andfolder(s).Step 6: Make sure to VERIFY (7) once you are done to make sure thechanges have taken affect.
CREATING A DATABASE FOR CD/DVD DRIVES:A useful feature of the Cortex DB Manager software is the ability to cre-ate CD/DVD compilations that can be used by your Cortex unit (in conjunction with a compatible USB CD/DVD-ROM drive). The purposeof using the DB Manager to accomplish this task is simply to create thedatabases required to search through these compilations via your Cortexunit. If a compilation is not assembled in this fashion illustrated below, theuser will have the option to use the Cortex unit to create a temporarydatabase (will not be saved when the power is shut down), but due to theextremely slow access time of optical drives, it might take an excessivelylong period of time. Using the DB Manager allows the database informa-tion to be written to the target CD or DVD, where it can be loaded intothe Cortex unit within seconds.
Step 1: Click the “Virtual Drive” (5) icon on the top of the window. Noticethat this will create a folder called “New Virtual” in the TITLE BOX (1).Step 2: Click on the ‘+’ box next to “New Virtual”.Step 3: Find the songs or files on your other storage devices that you wishto add to the complication. You may drag the files fromeither the All Songs option, or from the Files box (found on the lower por-tion of the screen).
ONCE YOUR PLAYER IS UPDATED AND YOUR MSD HAS
BEEN PROPERLY SET UP, YOU CAN CONNECT THE MSD
TO ANY AVAILABLE USB PORT ON THE CORTEX PLAYER,
8
Making a “Playlist”
1
14
Using the internal music player
5Creating a “Virtual Drive”

Error MessagesIf you experience an error message while navigating the unit, here are afew explanations of those errors and how they can be corrected. For amore complete troubleshooting guide, consult our website athttp://www.cortex-pro.com.
“Can’t access device” will be displayed because of one of the followingproblems with the storage device:
- Device is write protectedIn the case of a USB flash drive, some units have a switch to enable write-access.
- Device has already been ejected using the eject procedure.Remove the USB device and plug it back in.
- Device is using an unsupported file systemThe file systems supported are FAT32, NTFS, HFS+, CDFS, and UDFS.
- Device is not able to run without a proprietary hardware driverSome devices require proprietary hardware device drivers. Although withthe introduction of USB, this is less common, it still sometimes presents anissue. These devices are not compatible with the CORTEX PLAYER.
- Device has been removed while before using the eject procedureIf the device is removed from the USB port without using the proper ejec-tion procedure, it is possible that the unit will not detect the absence of aUSB storage device, and will try to access the port anyway.
- If the device is powered by an external power supply, make sure that theunit is receiving power.
- If the device has just been plugged in, and it was immediately selected,the drive might not be ready to be accessed. Wait 10 seconds and tryagain.
“Error creating DB” may be displayed if there is not a sufficient amount ofspace left on your storage device to create the necessary database files re-quired to search through your music library.
- If you are out of space, try to delete some files and try the databaseprocess again.
- Check the USB cable that is being used to connect the storage device tothe CORTEX PLAYER.
- If the device is powered by an external power supply, make sure that theunit is receiving power.
Error Messages
Using the CORTEX
9

cortex-pro.com
Cortex is a division of GCI Technologies