copeland scroll digital™ receiver unit hlr - emerson · pdf filecopeland scroll...
TRANSCRIPT

Copeland Scroll Digital™Receiver Unit HLR

C6.1.7/0609-1110/E
1 Safety instructions ............................................................................................ 1
1.1 Icon explanation ................................................................................................................. 1
1.2 Safety statements .............................................................................................................. 1
1.3 General instructions ........................................................................................................... 2
2 Product description .......................................................................................... 3
2.1 Common information about Copeland Scroll Digital™ Receiver HLR units ...................... 3
2.2 About this guideline ............................................................................................................ 3
2.3 Product range .................................................................................................................... 3
2.4 Product nameplate ............................................................................................................. 3
2.5 Nomenclature ..................................................................................................................... 3
2.6 Application range ............................................................................................................... 4
2.6.1 Qualified refrigerants and oils ................................................................................ 4
2.6.2 Application limits ..................................................................................................... 4
2.7 Main components description ............................................................................................ 4
2.7.1 Compressor ............................................................................................................ 4
2.7.2 Liquid receiver ........................................................................................................ 4
2.7.3 Electrical box components ..................................................................................... 5
2.7.4 Pressure switch ...................................................................................................... 5
2.7.5 Liquid line equipment ............................................................................................. 6
2.7.6 Solenoid valve for Copeland Scroll Digital™ compressor ...................................... 6
2.7.7 Oil separator: Alco Controls OSH .......................................................................... 6
2.8 Dimensions in mm ............................................................................................................. 7
3 Installation ......................................................................................................... 8
3.1 Receiver unit handling ....................................................................................................... 8
3.1.1 Transport and storage ............................................................................................ 8
3.1.2 Weights................................................................................................................... 8
3.2 Connection access ............................................................................................................. 9
3.2.1 Access to refrigeration components ....................................................................... 9
3.2.2 Access door to electrical box ................................................................................. 9
3.3 Electrical connections ...................................................................................................... 10
3.3.1 Power supply connections.................................................................................... 10
3.3.2 Electrical components pre-wired .......................................................................... 10
3.3.3 Discharge temperature protection ........................................................................ 11
3.3.4 Electrical protection standard (protection class) .................................................. 11
3.3.5 Receiver unit electrical data ................................................................................. 11
3.4 Refrigeration connections ................................................................................................ 12
3.4.1 Brazing recommendations.................................................................................... 12
3.4.2 Brazing procedure ................................................................................................ 12
3.5 Electronic controller EC2-552 .......................................................................................... 12
3.6 Parameters ...................................................................................................................... 13

C6.1.7/0609-1110/E
3.6.1 Select parameter configuration ............................................................................ 13
3.6.2 Parameter modification ........................................................................................ 14
3.6.3 Important parameters on EC2-552 to configure according to unit model ............ 14
4 Starting up & operation................................................................................... 16
4.1 Charging procedure ......................................................................................................... 16
4.1.1 Refrigerant charging procedure ........................................................................... 16
4.1.2 Oil charging procedure ......................................................................................... 16
4.2 Rotation direction of scroll compressors .......................................................................... 16
4.3 Maximum compressor cycle ............................................................................................ 16
4.4 Checks before starting up and during operation .............................................................. 17
5 Maintenance & repair ...................................................................................... 17
6 Certification & approval .................................................................................. 17
7 Dismantling & disposal ................................................................................... 17
C6.1.7/0609-1110/E 1
1 Safety instructions
Copeland Scroll Digital™ Receiver units HLR are manufactured according to the latest European and US Safety Standards. Particular emphasis has been placed on the user's safety.
These receiver units are intended for installation in machines and systems according to the EC Machines directive. They may be put to service only if they have been installed in these systems according to instructions and conform to the corresponding provisions of legislation. For relevant standards please refer to Manufacturers Declaration, available on request.
These instructions should be retained throughout the lifetime of the compressor and the condensing unit.
You are strongly advised to follow these safety instructions.
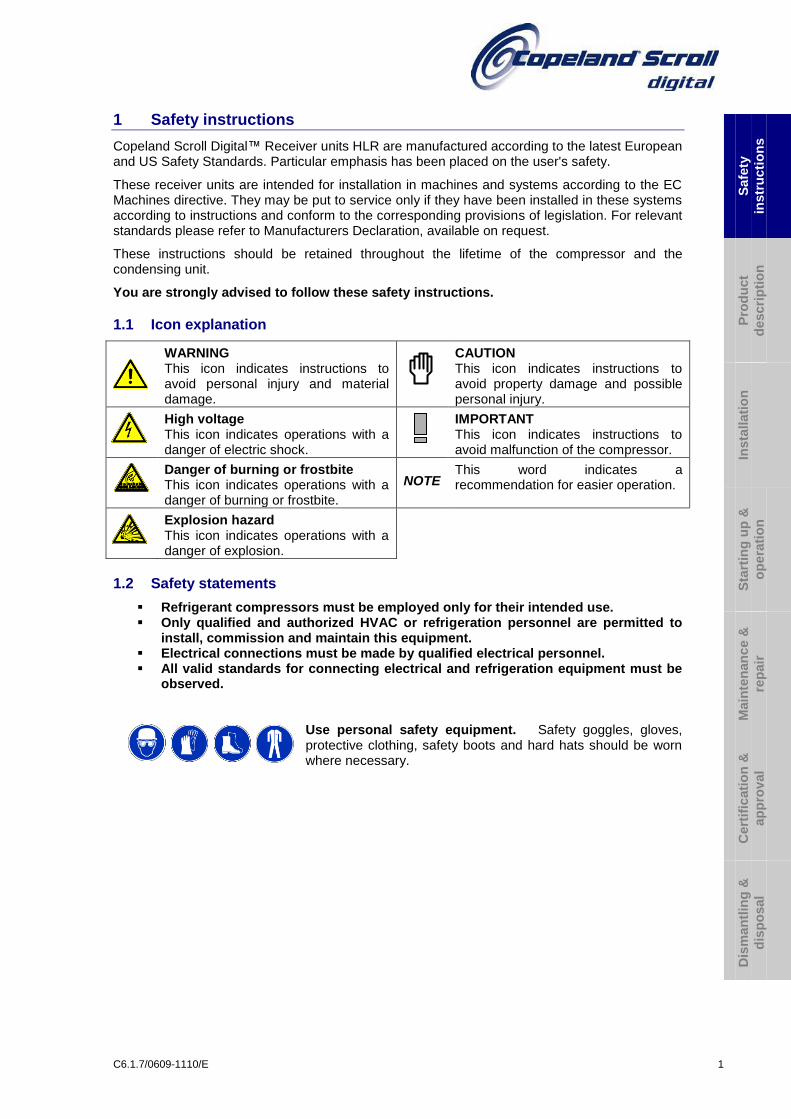
1.1 Icon explanation
WARNING This icon indicates instructions to avoid personal injury and material damage.
CAUTION This icon indicates instructions to avoid property damage and possible personal injury.
High voltage This icon indicates operations with a danger of electric shock.
IMPORTANT This icon indicates instructions to avoid malfunction of the compressor.
Danger of burning or frostbite This icon indicates operations with a danger of burning or frostbite.
NOTE
This word indicates a recommendation for easier operation.
Explosion hazard This icon indicates operations with a danger of explosion.
1.2 Safety statements
Refrigerant compressors must be employed only for their intended use. Only qualified and authorized HVAC or refrigeration personnel are permitted to
install, commission and maintain this equipment. Electrical connections must be made by qualified electrical personnel. All valid standards for connecting electrical and refrigeration equipment must be
observed.
Use personal safety equipment. Safety goggles, gloves, protective clothing, safety boots and hard hats should be worn where necessary.
Safe
ty
instr
ucti
on
s
Pro
du
ct
descri
pti
on
Insta
llati
on
S
tart
ing
up
&
op
era
tio
n
Main
ten
an
ce &
rep
air
Cert
ific
ati
on
&
ap
pro
val
Dis
man
tlin
g &
dis
po
sal

2 C6.1.7/0609-1110/E
1.3 General instructions
WARNING System breakdown! Personal injuries! Never install a system in the field and leave it unattended when it has no charge, a holding charge, or with the service valves closed without electrically locking out the system. System breakdown! Personal injuries! Only approved refrigerants and refrigeration oils must be used.
WARNING
High shell temperature! Burning! Do not touch the compressor until it has cooled down. Ensure that other materials in the area of the compressor do not get in touch with it. Lock and mark accessible sections.
CAUTION
Overheating! Bearing damage! Do not operate compressors without refrigerant charge or without being connected to the system.
IMPORTANT
Transit damage! Compressor malfunction! Use original packaging. Avoid collisions and tilting.
The contractor, responsible for the installation of the unit, should ensure sufficient liquid sub-cooling in the line to the expansion valve(s) to avoid “flash-gas” in the liquid line.
It is of vital importance that the discharge stop valve has been fully opened before the compressor is started. If the discharge stop valve is closed or partly closed an unacceptable pressure with accordingly high temperatures may develop on the discharge outlet in the compressor. When operating with air the so-called diesel effect may occur, ie, the air sucked in is mixed with oil gas and can explode due to the high temperature, and thereby destroy the compressor.

C6.1.7/0609-1110/E 3
2 Product description
2.1 Common information about Copeland Scroll Digital™ Receiver HLR units
Emerson Climate Technologies has developed the Copeland Scroll Digital™ Receiver units HLR to meet refrigeration demands for compact solutions at highest efficiency levels. These units allow continuous capacity modulation from 10% to 100% and can be combined with various condenser concepts.
2.2 About this guideline
This guideline is intended to enable users to ensure the safe installation, starting, operation and maintenance of Copeland Scroll Digital™ Receiver units HLR.
This guideline is not intended to replace the system expertise available from system manufacturers.
For additional information, please refer to the Product Catalogue or to the Copeland® Brand Products Selection Software accessible from the Emerson Climate Technologies website at www.emersonclimate.eu.
2.3 Product range
The range features ZB Scroll Digital™ compressors for medium temperature applications. It consists of four models: two models including one compressor, and two models including two compressors.
2.4 Product nameplate
The digital receiver unit nameplate shows model designation and serial number.
The compressor has its own nameplate with all electrical characteristics.
2.5 Nomenclature
The model designation contains the following technical information about the compressor:
Standard motor version available:
TFD: 380-420V / 3 Ph / 50 Hz
Digital Receiver Unit HLR
H L R 31 ZB D T 90KCE TFD
Motor version Compressor size T = Tandem D = Digital ZB = Scroll Medium Temp Receiver size Receiver Liquid Horizontal
Safe
ty
instr
ucti
on
s
Pro
du
ct
descri
pti
on
Insta
llati
on
S
tart
ing
up
&
op
era
tio
n
Main
ten
an
ce &
rep
air
Cert
ific
ati
on
&
ap
pro
val
Dis
man
tlin
g &
dis
po
sal

4 C6.1.7/0609-1110/E
2.6 Application range
2.6.1 Qualified refrigerants and oils
IMPORTANT It is essential that the glide of refrigerant blends is carefully considered when adjusting pressure and superheat controls.
Oil recharge values can be taken from Copeland Scroll™ compressors brochures or Copeland® Brand Products Selection Software.
Unit HLR13-ZBD30KCE, HLR13-ZBD45K,
HLR13-ZBD58K, HLR13-ZBD76K,
HLR31-ZBDT60KCE, HLR31-ZBDT90KCE,
HLR31-ZBDT116KCE, HLR31-ZBDT152KCE
Qualified refrigerant R404A
Copeland® Brand Products standard oil
Emkarate RL 32 3MAF
Qualified servicing oil Emkarate RL 32 3MAF / MOBIL EAL Arctic 22 CC
Table 1: Qualified refrigerants and oils
2.6.2 Application limits
For application envelopes, please refer to the compressor application envelope available in Copeland® Brand Products Selection Software.
Medium temperature range Evaporating temperature from –30°C up to 10°C, condensing temperature range depending on evaporating temperature. See Copeland® Brand Products Selection Software or literature for further information.
2.7 Main components description
2.7.1 Compressor
Single-compressor unit Two-compressor unit
Unit model Compressor
model Unit model Compressor models
HLR13-ZBD30KCE ZBD30KCE HLR31-ZBDT60KCE ZBD30KCE + ZB30KCE
HLR13-ZBD45KCE ZBD45KCE HLR31-ZBDT90KCE ZBD45KCE + ZB45KCE
HLR13-ZBD58KCE ZBD58KCE HLR31-ZBDT116KCE ZBD58KCE + ZB58KCE
HLR13-ZBD58KCE ZBD76KCE HLR31-ZBDT152KCE ZBD76KCE + ZB76KCE
Table 2: Compressor type used in Digital Receiver unit HLR
2.7.2 Liquid receiver
Copeland Scroll Digital™ Receiver units HLR are equipped with a liquid receiver with:
Rotalock service valve on top of the receiver for liquid outlet line; 3/8’’–14 NPTF connection for relief valve.
Fitting a pressure relief device according to standard EN 378-2 is the responsibility of the installer.
Model type Receiver volume (L)
HLR13-ZBD30KCE, HLR13-ZBD45KCE, HLR13-ZBD58KCE, HLR13-ZBD760KCE
13
HLR31-ZBDT60KCE, HLR31-ZBDT90KCE, HLR31-ZBDT116KCE, HLR31-ZBDT152KCE
31
Table 3: Receiver volume
It is recommended to charge the system with refrigerant via the Rotalock service valves.

C6.1.7/0609-1110/E 5
2.7.3 Electrical box components
All electrical components are pre-wired into the panel. The panel contains:
Compressor contactor(s) Fuse(s) Terminal blocks DIN rail-mounted terminals Alarm relays Electronic controller
NOTE: For further information, please refer to the application guideline C6.1.3 "Condensing Unit Controller for Copeland EazyCool™ Outdoor Condensing Units" available on www.emersonclimate.eu.
2.7.4 Pressure switch
Single-compressor units are equipped with:
Dual pressure switch with automatic reset ALCO PS2-W7A Electronic unit controller EC2-552 with HP and LP pressure transmitters
Two-compressor units are equipped with:
Single low-pressure switch with automatic reset ALCO PS1-W3A Two high-pressure switches with automatic reset ALCO PS3-W4S Electronic unit controller EC2-552 with HP and LP pressure transmitters
1) PS2-W7A: Alco Controls dual pressure switch with automatic reset (for single-compressor unit)
The switch is equipped with display scale and pointers to indicate the approximate settings. The display scales are printed in relative pressure units “bar” and “psi”.
For precise setting of the control, external gauges must be used.
The PS2-W7A has the following characteristics:
Adjustable dual pressure switch Set point adjustment range: LP (left) = -0.5 to 7 bar and HP (right) = 6 to 31 bar Differential adjustment range: LP = 0.5 to 5 bar, HP = 4 bar Factory setting: LP = 3.5 / 4.5 bar, HP = 20 bar
NOTE: The HP value should be set at maximum 26.2 bar (according to EN 12263).
2) PS1-W3A: Alco Controls single low-pressure switch with automatic reset
The control is equipped with display scale and pointers to indicate the approximate settings. The display scales are printed in relative pressure units “bar” and “psi”.
For precise setting of the control, external gauges must be used.
The PS1-W3A has the following characteristics:
Adjustable single pressure switch Set point adjustment range: = -0.5 to 7 bar Differential adjustment range: = 0.5 to 5 bar Factory setting: = 3.5 / 4.5 bar
3) PS3-W4S: Alco Controls high-pressure switch with automatic reset
Fixed switch point settings Cut-out point: 26.2 bar Cut-in point: 22 bar
Safe
ty
instr
ucti
on
s
Pro
du
ct
descri
pti
on
Insta
llati
on
S
tart
ing
up
&
op
era
tio
n
Main
ten
an
ce &
rep
air
Cert
ific
ati
on
&
ap
pro
val
Dis
man
tlin
g &
dis
po
sal

6 C6.1.7/0609-1110/E
4) Alco Controls PT5 Pressure Transmitter
Digital Scroll™ units are equipped with HP and LP pressure transmitters, connected to the EC2 electronic unit controller.
An Alco PT5-30M pressure transmitter is used at the high-pressure part of the system. An Alco PT5-07M pressure controller is used at the low-pressure part of the system. The PT5 pressure transmitter converts a pressure into a linear electrical 4-20 mA current output signal. The heart of the transmitter is a piezo resistive chip enclosed in an oil capsule.
2.7.5 Liquid line equipment
1) Filter drier Alco Controls ADK-plus
ADK-165 liquid line filter drier is for new installation or after service. Optimum blend of molecular sieve and activated alumina.
2) Liquid sight glass Alco Controls AMI 1SS*
The AMI series of moisture indicator is designed to monitor the moisture content within the liquid line of a refrigeration system. When the line is empty of liquid, circles may be seen in the glass. However, when the liquid refrigerant touches the glass, the circles disappear indicating the system is fully charged.
2.7.6 Solenoid valve for Copeland Scroll Digital™ compressor
Copeland Scroll Digital™ compressors in Digital Receiver units HLR are equipped with a 24-volt AC solenoid valve. The electronic condensing unit controller operates the solenoid valve used for digital compressor modulation based on the suction pressure.
2.7.7 Oil separator: Alco Controls OSH
The Alco Controls OSH-407 oil separator is fitted as standard on two-compressor Digital Receiver units HLR. The oil separator has the following characteristics:
Hermetic construction Comply with UL standard and HP German pressurised vessel regulations (CE standard
effective Nov. 1999) PED category I
NOTE: The oil separator is not charged with oil. The installer has to charge the system during the first hours in operation. Please refer to section 4.1 "Charging procedure".

C6.1.7/0609-1110/E 7
2.8 Dimensions in mm
Figure 1: HLR 13-ZBD30KCE, HLR13-ZBD45KCE, HLR 13-ZBD58KCE and HLR13-ZBD76KCE
Figure 2: HLR31-ZBDT60KCE, HLR31-ZBDT90KCE, HLR31-ZBDT116KCE and HLR31-ZBDT152KCE
Safe
ty
instr
ucti
on
s
Pro
du
ct
descri
pti
on
Insta
llati
on
S
tart
ing
up
&
op
era
tio
n
Main
ten
an
ce &
rep
air
Cert
ific
ati
on
&
ap
pro
val
Dis
man
tlin
g &
dis
po
sal

8 C6.1.7/0609-1110/E
3 Installation
WARNING High pressure! Injury to skin and eyes possible! Be careful when opening connections on a pressurized item.
Copeland Scroll Digital™ Receiver units HLR are delivered with a holding charge of neutral gas.
Since these units are used with remote condensers, they should be located in such a place to prevent any dirt, plastic bag, leaves or papers from covering the condenser and its fins. A clogged condenser will increase the condensing temperature, thus reduce the cooling capacity, and lead to a high-pressure switch tripping. Clean the condenser fins on a regular basis.
3.1 Receiver unit handling
3.1.1 Transport and storage
WARNING Risk of collapse! Personal injuries! Move units only with appropriate mechanical or handling equipment according to weight. Keep in the upright position. Do not stack single boxes on top of each other. Keep the packaging dry at all times.
Figure 3
The unit without packaging must be handled by a forklift truck, while taking care of the centre of gravity of the unit.
3.1.2 Weights
Single-compressor unit Two-compressor unit
Unit model Weight (kg)
Unit model Weight (kg)
Net Gross Net Gross
HLR13-ZBD30KCE 72 89 HLR31-ZBDT60KCE 130 152
HLR13-ZBD45KCE 75 92 HLR31-ZBDT90KCE 138 160
HLR13-ZBD58KCE 84 107 HLR31-ZBDT116KCE 165 192
HLR13-ZBD76KCE 90 113 HLR31-ZBDT152KCE 175 202
Table 4: Weights
Net weight = Receiver unit Gross weight = Receiver unit and packaging

C6.1.7/0609-1110/E 9
3.2 Connection access
3.2.1 Access to refrigeration components
Figure 4: HLR 13-ZBD30KCE, HLR13-ZBD45KCE, HLR 13-ZBD58KCE and HLR13-ZBD76KCE
Figure 5: HLR31-ZBDT60KCE, HLR31-ZBDT90KCE, HLR31-ZBDT116KCE and HLR31-ZBDT152KCE
3.2.2 Access door to electrical box
Access door opening: use supplied key to open and close the access door.
Figure 6
Discharge line
Liquid line
Suction line
Suction line
Discharge line
Liquid line
Safe
ty
instr
ucti
on
s
Pro
du
ct
descri
pti
on
Insta
llati
on
S
tart
ing
up
&
op
era
tio
n
Main
ten
an
ce &
rep
air
Cert
ific
ati
on
&
ap
pro
val
Dis
man
tlin
g &
dis
po
sal
Suction line

10 C6.1.7/0609-1110/E
3.3 Electrical connections
3.3.1 Power supply connections
The electrical connection of the Digital Receiver unit HLR to the power supply must be made by qualified technicians, who should refer to the electrical diagrams located inside the electrical connection box.
Figure 7: Electrical connection box
3.3.2 Electrical components pre-wired
When connecting electrically, care should be taken to avoid reverse rotation.
Electrical components pre-wired S i n g l e c o m p r e s s o r u n i t s
HLR13-ZBD30KCE HLR13-ZBD45KCE HLR13-ZBD58KCE HLR13-ZBD76KCE
Compressor contactor 18 A 18 A 25A 25A
Overload protector 6 to 10A 9 to 14A 13 to 18A 17 to 23A
Fuses 2 2 2 2
Electronic controller EC2-552 EC2-552 EC2-552 EC2-552
Crankcase heater 1 1 1 1
HP/LP Pressure switch PS2 1 1 1 1
HP Pressure switch PS3 – – – –
LP Pressure switch PS1 – – – –
Digital 24V solenoid valve 1 1 1 1
Table 5: Electrical connections – Single compressor units
Contactor K1
Circuit breaker
Auxiliary relay K10
Fuses F1, F2
Transformer T1

C6.1.7/0609-1110/E 11
Electrical components pre-wired T a n d e m c o m p r e s s o r u n i t s
HLR31-ZBDT60KCE HLR31-ZBDT90KCE HLR31-ZBDT116KCE HLR31-ZBDT152KCE
Compressor contactor 2 x 25 A 2 x 25 A 2x25A 2x25A
Overload protector 2 x (9 to 14A) 2 x (9 to 14A) 2 x (13 to 18A) 2 x (17 to 23A)
Fuses 2 2 2 2
Electronic controller EC2-552 EC2-552 EC2-552 EC2-552
Crankcase heater 2 2 2 2
HP/LP Pressure switch PS2 – – – –
HP Pressure switch PS3 2 2 2 2
LP Pressure switch PS1 1 1 1 1
Digital 24V solenoid valve 1 1 1 1
Table 6: Electrical connections – Tandem compressor units
3.3.3 Discharge temperature protection
Compressor discharge line thermostat Under extreme operating conditions internal discharge temperatures can reach very high levels. Receiver units are equipped with digital gas temperature control on compressor top cap and connected directly to EC2-552.
3.3.4 Electrical protection standard (protection class)
Compressors are IP21 according to IEC 34. HP-LP and LP safety pressure switches (Alco PS2 and PS1) are IP44 according to
EN 60529/IEC 529. HP safety pressure switch PS3 with cable assy is IP65 according to EN 175301-803/
IEC 529. EC2-552 is IP65 (frontal protection with gasket).
3.3.5 Receiver unit electrical data
Unit Maximum operating current Locked rotor current
HLR13-ZBD30KCE-TFD 7.5 Amp 51.5 Amp
HLR13-ZBD45KCE-TFD 11.4 Amp 74 Amp
HLR13-ZBD58KCE-TFD 16.4 Amp 95 Amp
HLR13-ZBD76KCE-TFD 20.4 Amp 118 Amp
HLR31-ZBDT60KCE-TFD 18.2 Amp 2 x 51.5 Amp
HLR31-ZBDT90KCE-TFD 24.5 Amp 2 x 74 Amp
HLR31-ZBDT116KCE-TFD 31.8 Amp 2 x 95 Amp
HLR31-ZBDT152KCE-TFD 40.8 Amp 2 x 118 Amp
Table 7: Electrical data
TFD: 380-420V/3~/50 Hz
Safe
ty
instr
ucti
on
s
Pro
du
ct
descri
pti
on
Insta
llati
on
S
tart
ing
up
&
op
era
tio
n
Main
ten
an
ce &
rep
air
Cert
ific
ati
on
&
ap
pro
val
Dis
man
tlin
g &
dis
po
sal

12 C6.1.7/0609-1110/E
3.4 Refrigeration connections
IMPORTANT Blockage! Compressor breakdown! Maintain a flow of oxygen-free nitrogen through the system at very low pressure during brazing. Nitrogen displaces the air and prevents the formation of copper oxides in the system. If allowed to form, the copper oxide material can later be swept through the system and block screens such as those protecting capillary tubes, thermal expansion valves, and accumulator oil return holes.
3.4.1 Brazing recommendations
Remove the fishtails (= compressed tube ends) by cutting them off in the following sequence:
1. Remove the discharge connection fishtail; 2. Then remove the suction connection fishtail. Removing the plugs in this sequence prevents oil mist from coating the suction tube making brazing difficult.
Be sure tube fitting inner diameter and tube outer diameter are clean prior to assembly.
Recommended brazing materials: a copper/phosphorous or copper/phosphorous/silver alloy rod should be used for joining copper to copper whereas to join dissimilar or ferric metals a silver alloy rod either flux coated or with a separate flux would be used.
Use a double-tipped torch.
3.4.2 Brazing procedure
For brazing of the tubes, please refer to illustration and procedure hereunder:
1. Fit the copper tube into the compressor tube.
2. Heat area 1. As the tube approaches brazing temperature:
3. Heat area 2 until braze temperature is attained. It is necessary to heat the tube evenly. Move the torch up and down and rotating around the tube.
4. Add braze material to the joint while moving the torch around the joint to flow braze material around the circumference.
5. Then heat area 3. This will draw the brazing material down into the joint.
Figure 8: Suction tube brazing
NOTE: The time spent heating area 3 should be minimal. As with any brazed joint, overheating may be detrimental to the final result.
To disconnect:
Heat joint areas 2 and 3 slowly and uniformly until solder softens and tube can be pulled out of the fitting.
To reconnect:
See the procedure above.
3.5 Electronic controller EC2-552
The EC2-552 electronic condensing unit controller is mounted as standard in Digital Receiver HLR units.
receiver units with single compressor
receiver units with two compressors

C6.1.7/0609-1110/E 13
The electronic controller enables:
1. compressor modulation and / or staging based on suction pressure;
2. TCP/IP Ethernet with web server functionality allows monitoring and configuration of controllers through a standard web browser;
3. alarm messaging by email;
4. fan speed control if an Alco Controls FSP150 fan speed driver is installed.
Figure 9: Electronic controller EC2-552
The controller has been pre-programmed with a number of parameter values that are most likely correct. Individual installation requirements however may make it necessary to alter parameter settings.
The control target of the compressor controller (1) is to maintain the suction pressure at a defined value by varying the available compressor capacity.
The control target of the condenser controller (2) is to maintain the condensing pressure at a defined value. This is done by varying the fan speed, if fan speed control is installed.
3.6 Parameters
3.6.1 Select parameter configuration
The configuration parameters can be protected by a numerical password. A value of “0” disables this protection (default password: 12).
To select the parameter configuration:
Press the Prg button for more than 5 seconds
In case of password value equal to “0”:
The first modifiable parameter code is displayed (/1)
To modify parameters see ”Parameter modification” below
In case of password value not equal to “0”:
A flashing 0 is displayed
Press or until the password value is displayed
Press SEL to confirm password
The first modifiable parameter code is displayed (/1)
To modify parameters see “Parameter modification” below
Controller 2: Fan
Value to be displayed: LED ON: pressure
LED OFF: temperature
Active alarm )
Compressor 1: On
Fan: On
Compressor 2: On
IR service LED
Controller 1: Compressor
Safe
ty
instr
ucti
on
s
Pro
du
ct
descri
pti
on
Insta
llati
on
S
tart
ing
up
&
op
era
tio
n
Main
ten
an
ce &
rep
air
Cert
ific
ati
on
&
ap
pro
val
Dis
man
tlin
g &
dis
po
sal

14 C6.1.7/0609-1110/E
/1 Value to show on display
0 = Compressors and fans states (controller 1 = Compressor(s), and controller 2 = Fan(s))
1 = Suction pressure (bar(g))
2 = Saturation temperature from suction pressure (°C)
3 = Condensing pressure (bar(g))
4 = Saturation temperature from condensing pressure (°C)
5 = Digital Scroll™ capacity (%)
6 = Fan speed (%)
7 = Digital Scroll™ discharge temperature (°C)
3.6.2 Parameter modification
Press or to show the code of the parameter that has to be changed
Press SEL to display the selected parameter value
Press or to increase or decrease the value
Press SEL to temporarily confirm the new value and display its code
Repeat the procedure from the beginning "press or to show..." to modify another parameter, etc.
To exit modifying the parameters with the new values:
Press PRG to confirm the new values and exit the parameter modification procedure
To exit without modifying any parameter:
Do not press any button for at least 60 seconds (TIME OUT)
3.6.3 Important parameters on EC2-552 to configure according to unit model
Major parameters for operation of Copeland Scroll Digital™ Receiver unit HLR with Digital Scroll™ compressor:
Parameter
c Application Parameters Min Max Unit Def
c1 Number of compressors 1 2 - 2
c4 Compressor 1 control mode 0 2 flag 2
c5 Compressor switch logic 0 1 flag 1
c6Number of compressor to switch on in case of sensor
failure0 2 - 0
EC2-552
Table 8
c1 Number of compressors
This default parameter is set to 2 for two-compressor units
For single-compressor receiver units with Digital Scroll™, c1 should be changed to 1
c4 Compressor 1 control mode
0 = compressor 1 in standard control loop
1 = compressor 1 act as base load compressor
2 = compressor 1 act as modulating (PWM control for Digital Scroll™ compressor only)
NOTE: For a digital unit c4 should only be fixed on "2".

C6.1.7/0609-1110/E 15
Parameter
F Modulating Parameters Min Max Unit Def
F2 Minimum output value 10 100 % 20
F3 Maximum output value 10 100 % 100
EC2-552
Table 9
Minimum and maximum output values can be adjusted. In case of a single-compressor unit with a Digital Scroll™ compressor; the maximum output could be set below 100% if system requests less than the maximum capacity. In that case F3 > F2.
NOTE: For further information, please refer to the application guideline C6.1.3 "Condensing Unit Controller for Copeland EazyCool™ Outdoor Condensing Units" available on www.emersonclimate.eu.
Safe
ty
instr
ucti
on
s
Pro
du
ct
descri
pti
on
Insta
llati
on
S
tart
ing
up
&
op
era
tio
n
Main
ten
an
ce &
rep
air
Cert
ific
ati
on
&
ap
pro
val
Dis
man
tlin
g &
dis
po
sal

16 C6.1.7/0609-1110/E
4 Starting up & operation
Before commissioning, ensure that all Rotalock valves and other valves on the unit are fully opened.
4.1 Charging procedure
4.1.1 Refrigerant charging procedure
It is recommended to charge the unit with refrigerant into the receiver, via the Rotalock service valve.
Alternatively, it could also be done by charging gas through the suction valve of the compressor. The charging procedure should follow the rules of art of refrigeration.
Recommendation is to break vacuum in the system with partial charge of refrigerant, then start the system.
For the charge adjustment it is recommended to check the liquid sight glass just before the expansion valve and adjust further bulling.
4.1.2 Oil charging procedure
Copeland Scroll Digital™ Receiver units HLR are supplied only with a compressor oil charge. After commissioning, the oil level should be checked and recharged if necessary.
NOTE: The oil level should be approximately halfway up the sight glass.
Emerson Climate Technologies recommends charging the oil with one of the following oil types:
Emkarate RL 32 3MAF
Mobil EAL Artic 22 CC
Charging is done through the Schraeder valve located on the suction Rotalock valve.
Two-compressor Digital Receiver units HLR equipped with an oil separator are delivered with a small oil can to add oil, if necessary.
4.2 Rotation direction of scroll compressors
Scroll compressors, like several other types of compressors, will only compress in one rotational direction. Direction of rotation is not an issue with single-phase compressors since they will always start and run in the proper direction. Three-phase compressors will rotate in either direction depending upon phasing of the power. Since there is a 50-50 chance of connecting power in such a way as to cause rotation in the reverse direction, it is important to include notices and instructions in appropriate locations on the equipment to ensure proper rotation direction when the system is installed and operated.
Observing that suction pressure drops and discharge pressure rises when the compressor is energized allows verification of proper rotation direction. There is no negative impact on durability caused by operating three-phase Copeland Scroll™ compressors in the reversed direction for a short period of time (under one hour) but oil may be lost. After several minutes of operation in reverse, the compressor's protection system will trip due to high motor temperature. However, if allowed to repeatedly restart and run in reverse without correcting the situation, the compressor will be permanently damaged.
All three-phase Scroll compressors are identically wired internally. Therefore, once the correct phasing is determined for a specific system or installation, connecting properly phased power leads to the identified compressor terminals in the electrical panel will ensure proper rotation direction.
4.3 Maximum compressor cycle
Maximum permitted starts per hour: 10.
It can be controlled via the EC2-552 controller (parameter t3, t4 and / or t5).

C6.1.7/0609-1110/E 17
4.4 Checks before starting up and during operation
Please check that all Rotalock valves are fully opened.
Check that the electrical panel is closed.
After starting up and operation conditions are stabilised, we recommend to check the oil level in compressor(s) and if needed to add oil to ensure a sufficient oil level (halfway up the sight glass).
5 Maintenance & repair
De-energize the unit before any intervention.
Close Rotalock valves to isolate the compressor from the system and unscrew the flare Rotalock connector from the compressor.
Release the compressor mounting parts and then lift it to replace with a new compressor.
For more detailed instructions, please refer to the compressor application guideline.
6 Certification & approval
The piping is in compliance with the Pressure Equipment Directive 97/23/EEC (Art.3 §3 - Sound Engineering Practice).
Components of the units carry a CE mark as far as required and thereby establish conformity with the relevant directives.
Conformity Declarations for components are available as far as required.
The units are in conformity with the low voltage directive. The applied harmonised standard is EN 60335-1 (Safety Household and Similar Electrical Appliance, Part 1: General Requirements).
To incorporate these products into a machine the Manufacturer's Declaration of Incorporation has to be respected.
7 Dismantling & disposal
Removing oil and refrigerant: Do not disperse in the environment. Use the correct equipment and method of removal. Dispose of oil and refrigerant properly. Dispose of unit properly.
Safe
ty
instr
ucti
on
s
Pro
du
ct
descri
pti
on
Insta
llati
on
S
tart
ing
up
&
op
era
tio
n
Main
ten
an
ce &
rep
air
Cert
ific
ati
on
&
ap
pro
val
Dis
man
tlin
g &
dis
po
sal

Emerson Climate Technologies - European Headquarters - Pascalstrasse 65 - 52076 Aachen, GermanyPhone: +49 (0) 2408 929 0 - Fax: +49 (0) 2408 929 570 - Internet: www.emersonclimate.eu
The Emerson Climate Technologies logo is a trademark and service mark of Emerson Electric Co. Emerson Climate Technologies Inc. is a subsidiary of Emerson Electric Co.Copeland is a registered trademark and Copeland Scroll is a tr ademark of Emerson Climate Technologies Inc.. All other trademark s are property of their respective owners.Information contained in this brochure is subject to change without noti� cation.
© 2011 Emerson Climate Technologies, Inc.
For more details, see www.emersonclimate.eu
BENELUXDeltakade 7NL-5928 PX VenloTel. +31 77 324 02 34Fax +31 77 324 02 [email protected]
UK & IRELANDUnit 17, Theale Lakes Business ParkReading, Berks RG7 4GB Tel: +44 1189 83 80 00Fax: +44 1189 83 80 [email protected]
BALKANSelska cesta 93HR-10 000 ZagrebTel. +385 1 560 38 75Fax +385 1 560 38 [email protected]
GERMANY, AUSTRIA & SWITZERLANDSenefelder Str. 3DE-63477 MaintalTel. +49 6109 605 90Fax +49 6109 60 59 [email protected]
SWEDEN, DENMARK, NORWAY & FINLANDPascalstr. 65DE-52076 AachenTel. +49 2408 929 0Fax +49 2408 92 95 [email protected]
UKRAINETurgenevskaya Str. 15, of� ce 33UA-01054, KievTel. +38 - 44 - 4 92 99 24Fax. +38 - 44 - 4 92 99 [email protected]
FRANCE, GREECE & MAGHREB8, Allée du Moulin BergerFR-69130 Ecully CédexTel. +33 4 78 66 85 70Fax +33 4 78 66 85 [email protected]
EASTERN EUROPE & TURKEYPascalstr. 65DE-52076 AachenTel. +49 2408 929 0Fax +49 2408 929 [email protected]
ROMANIA
Tel. +40 - 364 - 73 11 72Fax. +40 - 364 - 73 12 [email protected]
ITALYVia Ramazzotti, 26IT-21047 Saronno (VA)Tel. +39 02 96 17 81Fax +39 02 96 17 88 [email protected]
POLANDSzturmowa 2PL-02678 WarsawTel. +48 22 458 92 05Fax +48 22 458 92 [email protected]
MIDDLE EAST & AFRICAPO Box 26382Jebel Ali Free Zone - South, Dubai - UAETel. +971 4 811 81 00Fax +971 4 886 54 [email protected]
SPAIN & PORTUGALC/ LLull, 321 (Edi�ci CINC)ES-08019 BarcelonaTel. +34 93 412 37 52Fax +34 93 412 42 [email protected]
RUSSIA & CISLetnikovskaya 10, Bld. 2, � oor 5RU-115114 MoscowTel. +7 495 981 98 11Fax +7 495 981 98 [email protected]
C6.1
.7/0
609-
1110
/E