cooking guide - gas bbq, charcoal bbq and bbq … gas smokers can be used as an outdoor oven and a...
TRANSCRIPT

COOKING GUIDEHARK GAS SMOKERHK0521 & HK0528
Prepared by:Chris Girvan-Brownwww.urbangriller.com.au
g r i l l r o a s t s m o k e
I
INDEX1. INTRODUCTION 1
2. GET TO KNOW YOUR GAS SMOKER 1
3. SEASONING THE HARK GAS SMOKER 2
4. SMOKING INTRODUCTION 3
4.1 COLD SMOKING 3
4.2 HOT SMOKING 3
4.3 SMOKE QUANTITY 3
4.4 SMOKE RING 4
5. MEAT PREPARATION 5
5.1 BRINE CURING 5
5.2 SALT AND SUGAR CURING 5
5.3 MARINADES 6
5.4 DRY RUBS 6
6. WOOD FLAVOURING 7
6.1 WOOD CHIPS 7
6.2 WOOD PELLETS 8
6.3 OTHER SMOKING MATERIALS 8
6.4 RECOMMENDED QUANTITIES 8
7. SMOKE COOKING 9
7.1 RECOMMENDED EQUIPMENT 9
7.2 PREPARATION 9
7.3 GOOD SMOKING PRACTICES 10
7.4 TIPS 11
8. TEMPERATURE CONTROL 12
8.1 CONTROLLING SMOKER TEMPERATURES 12
8.2 TEMPERATURE RANGE 12
8.3 COOKING TEMPERATURE ZONES 13
9. GUIDE TO COOKING MEAT 14
9.1 GRADES OF MEAT 14
9.2 INTERNAL TEMPERATURES 14
9.3 RESTING MEAT 15
9.4 FOOD SAFETY 15

II
10. TROUBLESHOOTING 16
10.1 TEMPERATURE FLUCTUATIONS 16
10.2 INTERNAL TEMPERATURE ‘STALL’ 16
11. CARE INSTRUCTIONS 18
HARK GAS SMOKER COOKING LOG 19
GAS SMOKER RECIPES 21
1. CLASSIC TEXAS BBQ BRISKET 22
2. REVERSE SEAR STEAK 24
3. PORK RIBS 25
4. SMOKY PORCHETTA 27
5. COUNTRY HAM 29
6. OLD-SCHOOL BACON - NITRATE FREE 29
7. PULLED PORK 30
8. PULLED LAMB OR MUTTON 32
9. BEER-CAN CHICKEN – TEXAS STYLE 34
10. SMOKED CHICKEN 35
11. SMOKED CHICKEN & PROSCUITTO 36
12. OLIVE BRINED QUAIL 37
13. CEDAR PLANK SALMON 38
14. SMOKED TROUT 39
15. BACON-WRAPPED SMOKED TROUT 40
16. SMOKED OYSTERS 41
17. SMOKED ITALIAN SAUSAGE [BOERWARS] 41
18. JALAPENO POPPERS 42
19. ARMADILLO EGGS 42
20. SPICED BBQ CORN 42
21. STUFFED POTATO WITH SWEET CORN & CAPSICUM 43
22. SMOKED PORTABELLO MUSHROOMS 43
23. SMOKED ROAST POTATO 44
24. SMOKED GARLIC 44
25. SMOKED SALT 44
26. SMOKED TOMATOES 45
27. SMOKED LEMONS 45
28. SMOKED APPLES 45
29. SMOKED ALMONDS 45
30. BRINE, MARINADES, RUBS AND SAUCES 47

1
1. INTRODUCTIONHark gas smokers can be used as an outdoor oven and a smoker, enabling low to medium temperature cooking. You can use a Hark gas smoker as a traditional smoker or, for baking and reheating. It can also be used to produce slow cooked, US style BBQ, where food is cooked gently over long periods of time using the 'Hangi' style steam cooking.
Smoke cooking requires a whole new set of cooking techniques that once mastered, will guarantee meal after meal of delicious food.
The aim of this Hark Cooking Guide is to help you become confident with smoke cooking and will cover everything from seasoning you smoker, to preparing meats, types of wood chips and pellets and a list of recomended recipes to get you started.(also available on the Hark website - www.hark.com.au).
2. GET TO KNOW YOUR GAS SMOKER
A
B
C
D
E
F
A Wood Chip Box
B Wood Chip Box Lid
C Wood Chip Box Rack
D Water Bowl Grid Track
E Cooking Rack (Grid)
F Damper
Table 1: Key components of your gas smoker

2
3. SEASONING YOUR SMOKEROnce you have carefully read and followed the assembly instructions contained in your accompanying manual, your Hark gas smoker should be seasoned prior to use. Seasoning effectively burns off any impurities and manufacturing oils that occur during the production process. It further protects the smoker by coating the cooking surfaces with a thin patina of smoke residue.
The following steps are a guide to seasoning a Hark gas smoker:
• Lightly spray the shelves and inside walls with canola oil.• Fill the wood chip box with wood chips, then light the smoker and set the gas control to
MEDIUM.• DO NOT USE THE WATER BOWL.• Once your Hark gas smoker fills up with smoke, leave it to season” for approximately 30
minutes.• Your Hark gas smoker is now seasoned and ready to use!
Note: It’s good practice to re-season your gas smoker at regular intervals and once a year at the very least.

3
4. SMOKING INTRODUCTIONSmoking food is an art form. There is much to learn about the different processes and equipment available today. Cold smoking and hot smoking are two different ways to smoke food and there really isn’t one singular cooking or smoking device that does both.
4.1 Cold SmokingCold smoking takes place at temperatures around 20°C or lower and involves smoking partially cured foods with very little heat. This is a popular smoking method for foods such as nuts, fish, jerky and foods that are dried or cured prior to smoking. It is important to remember that cold smoking is not a cooking process and that cold smoked foods are not actually ‘cooked’. Instead they are cured and preserved. This can allow foods to be edible for hours, days, weeks or months after smoking. It is always advisable to employ safe food practices when cold smoking and ensure that you follow recipe instructions very carefully.
Your Hark gas smoker is not ideally suited to cold smoking.
4.2 Hot SmokingHot smoking involves cooking at low temperatures over long periods of time (anywhere from 7-24 hours). Hot smoking takes place when cooking food with temperatures greater than what is considered to be normal ambient temperatures.
Typically, hot smoking is carried out in temperatures between 70-180˚C. It is important to note that hot smoking alone does not act to preserve food. Anything hot smoked should generally be stored in a refrigerator.
Electric and gas smokers tend to burn the source of smoke ie wood chips or pellets, from the outset. They fill the chamber with high density smoke and heat the food within this smoke-heavy cooking chamber. This is what we mean by hot smoking. The process works well and produces more of a ‘smoked’ taste than a barbequed one. Think smoked chicken vs barbequed chicken, there’s a subtle difference.
Your Hark gas smoker is suited to hot smoking.
Low and SlowUS style barbequing with meats such as pork shoulder (pulled pork), ribs and briskets are examples of hot smoking. These classic smoked BBQ meats are generally smoked at temperatures between 110-120˚C and will soften greatly and increase in flavour if you hold them ‘at temperature’ for several hours inside the cooking chamber.
Temperature control is essential to smoking successfully. Practice keeping your smoker at a stable temperature in the smoking “zone” for hours at a time. Don’t be tempted to open the smoker door, as this lets out heat and air in and may take some 15 minutes or more to regain the original temperature.
4.3 Smoke Quantity & QualityToo much smoke or the wrong type of smoke will make food bitter. The bitter taste is attributed to creosote produced from ‘white smoke’, or, from the soot deposited from ‘black smoke’. Good hot smoking means clean smoke travels over food continuously from the wood chip box and into the cooking chamber, picking up faint smoke on the way.

4
4.4 Smoke RingA smoke ring is the result of nitrates in the smoke “curing” the outer layer of meat, turning it pink (the same way cured ham is pink but roast pork is grey). Whilst it’s an attractive look, a smoke ring is not an integral part of smoking and isn’t a criteria used by judges in US BBQ competitions.
What’s more, you can “cheat” and obtain this look by adding nitrate-curing salt to the surface of the meat via a rub or brine. But more often than not, it will occur naturally in the normal smoking process.
It is important to understand that when hot smoking, meat won’t take on any more smoke once the internal temperature hits 65°C. However if a glaze or marinade is added to the meat towards the end of the cooking process, the meat will still absorb the smoke flavour.
5
5. MEAT PREPARATIONThere are a number of methods that can be employed to tenderise, moisten and flavour your meat. These include brining, curing, marinating and rubs.
5.1 Brine CuringBrining foods in a mixture of salt and water is a form of curing and is one of the simplest techniques to prepare foods for smoking.
The brining of meats is an age-old process used for preserving foods. Heavy concentrations of salt helped preserve meats for long ocean voyages and military campaigns before the arrival of refrigeration.
Brining today uses smaller quantities of salt, mixed with other spices and herbs, and is used to flavour and tenderise meat. The most basic brining mixture incorporates a minimum of 1 tablespoon of salt to every 1 litre of water. We recommend salt flakes as they are easier to dissolve, and the use of non iodised salt where possible. A good rule of thumb for achieving an effective brine cure is that it should contain enough salt in the mixture to allow a raw egg to float. This equates to 20% of the salt in the liquid. Always store brine meat in a refrigerator.
In terms of the quantity of brine required, you will need enough brine to completely submerge the meat. Some foods may need to be weighed down to stay submerged. Meat is best brined for approximately 4 hours per kilogram. Depending on the size of meat you wish to brine, it can take up to 24 hours or more. If you are brining whole poultry you will need to add 6 to 12 hours between brining and cooking. It is best to sit the poultry in the refrigerator for several hours after you remove it from the brined so that the skin can dry before cooking.
Also, when brining poultry or pork in a low salt brine it is recommended that you change the brining liquid every 24 hours. Beef and lamb however can be submerged in the same brine for up to 3 days. Once you have finished brining lightly rinse the cut of meat to remove any excess salt before cooking. Do not reuse the brine.
Chris' Basic Brine Recipe1 litre of water 1 tblsp of salt
Directions:Flavour the mixture with anything you like ie. crushed garlic, lemon, peppercorns, herbs, a teaspoon of good curry paste, brown sugar, soy sauce or ginger.Soak the meat in the brine and place in the refrigerator overnight. Ensure that the meat is fully submerged in the brine.
Note that there is an increasing push to include Iodised salt in our cooking. Whilst this is a good initiative, Iodised salt is not recommend for use in brining.
5.2 Salt and Sugar CuringSalt and sugar curing is an age-old technique that involves removing all the available moisture from the food in order to prevent it from spoiling. Once foods are cured this way, they are generally hung up in the open air or left packed in salt or sugar.
When the food is required for consumption, it is usually reconstituted with a liquid such as water.

6
Salt and sugar curing can be enhanced with the addition of pepper, herbs or honey for extra flavour.
5.3 Marinades Marinades are liquids or pastes comprising a mixture of spice or herbs, used to flavour and tenderise meat over generous periods of time.
Marinades are used to increase the flavour of foods. However a common problem with them is that they often contain far too much sugar for close-contact cooking such as on barbeques or in fry pans. Marinades however, are perfect for smoking as the temperatures used in this cooking environment aren’t high enough to burn the sugars.
Chris' Basic Marinade Recipe1 cup white wine1 cup grape seed oil Juice from one lemon3 crushed cloves of garlic 3 or 4 stems of rosemary 1 tsp of crushed pepper
Directions:Combine all ingredients in a ceramic or glass dish.Add the meat and thoroughly cover it with the marinade before refrigerating overnight.
5.4 Dry RubsDry rubs are generally comprised of a mixture of dry herb and spices combined with salt and sugar. These rubs help dry the food by extracting moisture from the meat. When used properly, dry rubs can function like a combination of brining and salt or sugar curing. Generally rubs are applied on the outside of the meat the day before and allowed to refrigerate overnight.
If smoking for long periods, it is advisable to apply the dry rub in small batches throughout the cooking process. Or as an alternative, add the dry rub towards the end of the smoking process in order to ensure the spice flavours are at their peak.
Note: wet rubs are essentially dry rubs combined with a wetting agent, such as olive oil, beer, wine or fruit juice.
Chris' Basic Rub Recipe1 tblsp cumin powder1 tblsp smoked paprika1 tsp black pepper powder
Directions:Rub the meat with a clove of garlic, cover with the rub mixture. Leave in a plastic bag or in a glass or ceramic bowl in the fridge overnight.

7
6. WOOD FLAVOURINGWood chips or wood pellets are considered to be premium smoke generating materials and greatly impact the quality of the foods you have choosen to smoke. 6.1 Wood ChipsWood chips are small pieces of suitable wood that can be used during the cooking process to produce flavoured smoke. For use in a Hark gas smoker, they need to be small pieces. Large chunks of wood aren’t suitable for this type of smoking.
Flavoured wood provide a subtle flavour to your food from the smoke that is generated. Typically the wood will come from a fruit tree or from Mesquite, banksia and sheoak. Generally fruit and nut trees produce a sweeter, milder smoke, which complements white and pink meats. Hardwoods like wattle, box, gum and mesquite produce more robust smoke and are more suited to redder meats. Imported timbers like hickory, mesquite and beech (favoured by European smallgoods makers) are also available.
The following table provides a guide to the different types of flavoured woods available today.
Table 2: Flavoured Wood Types
WOOD FLAVOUR DESCRIPTION FOODS
Black WattleGrey BoxRed GumJarrah
Strong. pungent, smoky bacon flavourSimilar to Hickory
Great for most meat smoking Not as ideal for seafood and vegetables
IronbarkMelaleuka
Medium smoke, similar to Hickory but not as strong
Great for most smoking, including seafood
Beech (Imported) Strong earthy flavour Good for most meats, particularly beef. Also great with vegetables
Beech (Imported) Very mid. A light, sweet flavour Pork, ham, poultry, cheese, game birds
Sheoak Mild smoke, slightly sweet, preferred for fish
Good with red meat, pork, fish
Apple Slightly sweet but denser, fruity smoke flavour
Beef, poultry, game birds, pork (particularly ham)
Cherry, Peach and other stonefruit
Slightly sweet, fruity smoke flavour
Good with all meats
Banksia (the Banksia cone is particularly good)
Very delicate light taste with a hint of sweetness
Good with fish, pork, poultry and light-meat game birds
Grapevine Aromatic, similar to fruit woods Good with all meats
Macadamia Nutty and sweet smoke flavour Light and subtle smoke
Good with all meats
MyrtleTasmanian Oak
Strong smoke, but not bitter Good with everything

8
As a general rule, the wood of any plant which bears an edible fruit is usable. For example grape, vine cuttings and olive tree wood. Experiment with different types and quantities of wood chips and remember that you can mix different types of wood chips together. NEVER USE THE FOLLOWING WOOD TYPES IN YOUR SMOKER - PINEWOODS, TEA TREE AND TREATED, PAINTED OR STAINED WOODS. THESE WOODS PRODUCE TOXIC FUMES OR HIGH HEAT THAT WILL ADVERSLEY AFFECT THE FLAVOUR OF THE FOOD YOU ARE COOKING! 6.2 Wood PelletsSmoking pellets can also be used to enhance the smoking process and are increasingly becoming more popular and available in Australia. Pellets are formed from compressed, kiln-dried sawdust and come from many of the same woods that wood chips are sourced from. Hark offers a range of pellets - Apple, Pecan and Hickory. 6.3 Other Smoking MaterialsOther materials than can be used in the smoking process, include herbs, spices, rice, tea, sea weed and nut shells. The resulting flavours can range from subtle or to strong and pungent. This is where it can be beneficial to experiment with adding new ingredients and to keep notes for future reference. 6.4 Recommended Quantities The biggest “rookie” mistake is to over smoke your food. Less is more when it comes to adding wood chips and pellets. Most smoke and therefore flavour is absorbed in the first 2 hours of smoking. After that, you may not need to replenish the pellets or chips. Wood chips – 1 cup at a timeWood pellets – up to 2 cups.
9
7. SMOKE COOKINGEnsure that you have followed the assembly instructions in your Hark gas smoker Owner’s Manual, particularly section D (The Gas System), to ensure that your gas bottle and smoker are safe to use.
7.1 Recommended EquipmentBefore commencing cooking with the Hark gas smoker, it pays to ensure you have all the necessary tools and utensils required to achieve the best cooking results.
ThermometersPrior to using your smoker, we recommend you invest in two types of thermometers. The first thermometer can be used for checking the inside temperature of your smoker box. There are several digital oven thermometers that are available in the marketplace, some of which are remote. The second thermometer is used to check the internal temperature of the meat being smoked. Here you can use products such as the Hark Remote Wireless Digital Thermometer or a Hark Stainless Steel Meat Thermometer to periodically check the internal temperature of the meat.
Warning: Never wash a temperature probe, never immerse in water. Always wipe clean with a damp cloth or sanitiser wipe.
Long Handle TongsA pair of long handled BBQ tongs for smaller pieces of meat or a meat hook for larger cuts is recommended to safely handle meat during the cooking process and, to safely remove the meat once take it out when you have finished.
BBQ Mitts A good pair of extra-long, heavy duty BBQ mitts or gloves so that you do not burn your hands or forearms. These are particularly necessary when adding water or wood chips to the smoker during the smoking process. Refer the Hark Leather BBQ Gloves.
Smoking Sheet Hark Smoking Sheets are great for smoking smaller items that will fall through between the bars of the shelves. The coated Smoking Sheets will stop the food sticking to the shelves while still allowing the smoke to push through. They also make handling delicate foods like fish easier as well as the washing up process!
Aluminium FoilAl foil is also required to wrap around meat once it has reached the desired temperature and colour. The foil will help prevent the wood resins from further darkening the meat. It is also a good idea to line the wood chip box and water bowl with foil before use. This can make the cleaning process less cumbersome.
7.2 Preparation• Place the smoker outside in a well ventilated area.• Ensure there is enough gas for the Hark gas smoker to complete the preheating and cooking
process.• Ensure the water bowl has water in it and is placed under the wood chip box. This way any fat
will fall into the water bowl and not onto the wood chips. If fat falls directly onto wood chips, it could potentially cause a fire to break out.

10
• Consider placing a BBQ mat under the smoker unit to avoid staining your deck or patio.• Always preheat your Hark gas smoker before commencing cooking. Remove the cooking
racks beforehand and load them with the food once the smoker is preheated. Loading racks into the smoker takes time and can let out significant heat.
• Soak your smoker wood chips in a separate bowl of water for at least 20 minutes prior to smoking. This will give a longer burn time and improve the smoky flavour. DO NOT SOAK WOOD PELLETS AS THEY WILL DISINTEGRATE!
• Line the wood chip box and water bowl with aluminium foil to minimise cleaning later.• Put some wood chips into the wood chip box and slide the box onto the wood chip box rack.• Insert the water bowl and add hot water. Other liquids can be used, such as beer or wine.• Insert clean cooking racks (grids) at the levels you want and lay the meat on the grill (always
place the smaller pieces on the lower grid if double loading).• Remember that some meats will drip during the cooking process, so place vegetables on a
rack above the meat to eliminate contamination.
CAUTION:The wood chip box and lid become very hot during the smoking process. Always wear protective BBQ mitts or use long handled tongs when adding wood during the smoking process.
7.3 Good Smoking PracticesPreheatAlways wait until the fire has stablished and the cooking chamber is up to the desired oven temperature before commencing cooking.
Thin Blue SmokeToo much acrid creosote laden “white” smoke will ruin the entire cook. Always use flavour wood, wood chips or pellets sparingly, be sure to add small amounts at a time, waiting 30 to 45 minutes before adding any more. Smoke will penetrate meat up until internal temperatures hit 77°C (170°F). Beyond that, smoke and therefore flavour won’t penetrate the meat much. Most smoke penetration occurs within the first two hours of cooking. If you choose to add glaze to your meat prior to finishing cooking, you may wish to add a small amount of smoke to give the glaze a smoky flavour.
The biggest “rookie” mistake is to over smoke the food. With this style of smoking or barbequing, less is more!
Air FlowControl your Hark gas smoker by the gas control knob and simply adjusting the vents. Make fine adjustments to the airflow out of the Hark gas smoker to achieve the desired temperatures.
Monitor TemperaturesInvest in a good thermometer to monitor the temperature. A digital meat probe is also important for tracking the internal temperature of the meat you are cooking.Ambient weather conditions can affect the cooking temperatures. Rain, wind and snow can significantly lower the cooking temperature.
Tip: Rotate the thermometer gauge on the Hark gas smoker door so that your target temperature is at the top of the dial. This will allow you to easily track whether the needle is vertical and therefore “on temperature”.

11
Food PositionUnderstanding temperature variations in the Hark gas smoker is essential. These zones can be used to great advantage. The areas beside the vents for example, have an increased airflow. This can be useful if you want to dry the surface of the food.
Note that some foods may also drip therefore you will need to think about what food place under them, to avoid contamination!
RelaxThe most important tip when it comes to any kind of smoking is to relax. Stay near your Hark gas smoker, check your temperatures, enjoy a drink as you watch it all unfold. Remember that it will take practice and some experimentation before you master your smoker. Taking notes and using the Hark gas smoker Cooking Log will help you repeat success stories and avoid mistakes more easily.
7.4 Tips• Always use the best quality ingredients available.• Do not allow food to touch the smoker walls, or other pieces of food.• Always use a temperature probe so that you know the temperature of the food being cooked.• Always make sure you know what temperature the smoker unit is in order to avoid over-cooked
food. • Use a Hark gas smoker Cooking Log (appendix) as the basis for your recipe development.
These sheets have been specially designed to take into account all of the variables you may experience. This way, you will be better able to build you smoking expertise over a shorter period of time.

12
8. TEMPERATURE CONTROL
8.1 Controlling Smoker TemperaturesAir flow is crucial for gas smokers. The dampers in your Hark gas smoker can be used to make small temperature adjustments. Important to note is that the Hark Patio gas smoker has one damper at the rear of the unit where as the Hark 2 Door gas smoker has three in total – rear and each side].
The more the vent dampers are open, the more heat and smoke escapes. You’ll notice that the dampers aren’t able to be 100% closed. This is an intentional design to ensure there is always airflow for the gas fire.
Whilst starting out, it is recommended that your dampers are always set to approximately ½ open. This will allow plenty of air into the smoker and will provide a good supply of smoke flow past the meat. As you become more experienced, the vents can be adjusted for future sessions.
If you want a more intense smoke flavour, you can close the dampers (as far as they go) to effectively trap the smoke. However if you do this, it is important to ensure that cooking temperatures don’t get too high.
Below is a rough guide of smoking cooking temperatures with the vents fully open:
LOW: 90°C (194°F)Slow smoking for delicate foods: sausage, small goods, fish, vegetables, nuts etc. Ideal for food warming.
MED: 135°C (275°F)Smoke cooking for US style BBQ, ribs, chicken etc. Also good for baking.
HIGH: 180°C (356°F)Smoke roasting, roast cooking, baking and general oven cooking.
The best way to develop reliable smoke cooking techniques is firstly understand the processes you are working with and to record each step. Again, use the Hark Smoker Cooking Log (appendix) as the basis for your recipe development, these sheets have been specially designed to take into account all of the variables you may experience.
8.2 Temperature RangeA number of factors can impact on what temperatures your smoker can achieve. These factors include ambient temperature, humidity, wind conditions and even low gas pressure. Small differences in temperature are nothing to worry about, it simply means the food will cook slower or faster. If you can protect your smoker from wind, it will function more efficiently.
At the start of a cooking process, it’s normal for the smoker to show a lower temperature. Cold water in the water bowl and cold food brings the temperature down. As the food and the water in the water bowl increase in temperature, so does the smoker itself. It should be noted that the colder the food is during the initial smoke phase the better the smoke adheres to the food.

13
8.3 Cooking Temperature ZonesUnlike an oven, it is often difficult to aim for an exact temperature when smoking outside with a gas smoker. As such , it is more effective if we aim to achieve temperatures a certain cooking zone ie LOW, MEDIUM and HIGH. LOW ZONE 105°C - 135°C.MED ZONE 135°C - 160°C.HIGH ZONE 160°C - 180°C. When focusing on cooking zones, we can aim to smoke foods within a healthy range of temperatures, rather than a set temperature that may be difficult to achieve or hold on that given day. You will note that many of the recipes included at the end of this Cooking Guide, refer to a Temperature Zone, rather than an exact temperature for this very reason.

14
9. GUIDE TO COOKING MEATWe cook food for a number of reasons – to preserve, make food safe to eat and to make food more appetising.
9.1 Grades of MeatAs you are probably aware, there are prime and secondary cuts of meat available for cooking.
Prime CutsPrime cuts come from those parts of the animal that work less and are therefore more tender, eg rump steak and eye fillet.
Secondary CutsSecondary cuts are from the working parts of an animal - steering, lifting, moving. They are tougher but possess more flavor e.g. ribs, brisket, chuck etc. This is because they possess more collagen, a protein that makes meat tough. Collagen is the connective tissue that wraps around muscle fibres. It forms the major component in tendons, ligaments, cartilage and blood vessels. Tough and fibrous, collagen will, under the right conditions, break down into gelatin. Gelatin provides a lovely silky baste to the meat.
Temperature is the key here. Collagen breaks down only with the application of heat over for a long period of time. Hence the term 'low and slow'. Collagen begins to break down in most meats at around 60°C (140°F). In fish it is much lower, around 41°C (106°F). However secondary cuts are generally cooked to a higher internal temperature than prime cuts to ensure the tough collagen has completely broken down.
9.2 Internal TemperaturesThe internal temperature of meat tells us how cooked it is and a temperature probe is the most accurate way to determine the “doneness” of any cut of meat. Internal temperature is the decider in determining how long you grill or smoke food in the Hark gas smoker.
Obviously it is best not to continually measure the internal temperature as it will involve opening the lid to the cooking chamber. The ideal scenario is to invest in a remote, digital thermometer whereby the probe remains in the meat for the duration of the cooking process. Temperatures can be checked on a reading that sits outside the gas smoker. Good thermometers will also tell you the temperature in the cooking chamber or you can opt for one that sits on the smoker.
Table 3: Internal Temperatures of Beef, Chicken, Lamb & Pork.
BEEF, VEAL & STEAKS DESCRIPTION INTERNAL TEMPERATURE
Extra-Rare / Blue Red from edge to edge 46-49°C 115-120°F
Rare Soft and red in the middle 52-55°C 125-131°F
Medium rare Firm, warm red in the middle 55-60°C 131-140°F
Medium Firmer, Pink from edge to edge 60-65°C 140-150°F
Medium well Signs of pink in the middle 65-69°C 150-155°F
Well done Firm, grey/brown from edge to edge 71°C + 160°F +

15
9.3 Resting MeatThe interior of a cut of meat increases in temperature by 3°-5°C (37°- 41°F) after it is removed from the heat source. It is therefore advisable to remove meat from your Hark gas smoker a few degrees before you read the target internal temperature (or target “doneness”).
If you cut into meat before it is properly rested, the tension in the muscle fibres can squeeze the moisture out of the meat. This presents as a pool of red liquid that is often mistaken as blood. Blood is bled out of meat at the abattoir. The pool of liquide is simply the juices and pigment myoglobin from the muscles in the meat. For meats cooked above 66°C (151°F), it is essential to employ a resting period to allow the fibres to relax and draw back the juices within their structure. Wrap the meat in foil then wrap the foil in a towel for at least 15 minutes (this is enough time to cook the veggies).
Some chefs rest for the equivalent time as the cooking process itself. During this process the juices will redistribute and the “cook” will be more even. When cut, the colour of meat will appear more even and the redness of medium-rare beef will disappear. You will be able to serve the meat to your more fussy guests with nothing but compliments for how juicy your roast is!
9.4 Food Safety• Always maintain a high standard of cleanliness when handling food. Cleanliness goes a long
way in preventing bacterial infection.• Cook different types of food in separate batches. For example separate cooked fish from
chicken.• Never use salt that contains additives such as Iodised salt. They can taint the food and change
the chemical process dramatically.• Always clean out ash after using your Hark gas smoker and season periodically to avoid food
contamination from rust.
CHICKEN / TURKEY INTERNAL TEMPERATURE
Whole 83°C 181°F
Breast 77°C 170°F
Legs & Thighs 83°C 181°F
LAMB INTERNAL TEMPERATURE
Rare 57°C 135°F
Medium Rare 60-65°C 140-150°F
Medium 71°C 160°F
Well Done 74°C 165°F
PORK INTERNAL TEMPERATURE
Medium 71°C 160°F
Well Done 77°C plus 170°F plus

16
10. TROUBLESHOOTINGHere are some suggestions for how to overcome common issues that arise when using your gas smoker.
10.1 Temperature FluctuationsSometimes when you are smoking meat over long periods of time, you will encounter variations in temperature. Small variations in temperature should be ignored.
Increased temperatures can occur for a few reasons. A flare up in the wood chip box can occur if there is no water bowl placed above the wood chip box to stop meat fats from dripping into the smouldering wood chips. It is very important to have a filled water bowl in the smoker to act as a heat sink and keep the oven moist and temperatures stable.
Always use quality wood chips or pellets in small quantities (less is more) and place them directly in the wood chip box (as the box is designed to facilitate the right amount of airflow). Avoid tea tree, rosemary and other resinous or oily matter that could potentially cause unwanted flare-ups, and never use treated wood as the chemicals used are usually poisonous.
If your smoker does begin to overheat, open the smoker door (lower or upper door where applicable). Leave the door wide open for a few minutes to allow the heat escape (do not leave unattended). After the smoker temperature has dropped, close the smoker door and adjust the vents to maintain a stable target temperature.
Adding cold water to the water bowl will also help to rapidly decrease the temperature in the cooking chamber.
To minimise cooking temperatures from falling, avoid opening your smoker door(s) unless it is absolutely necessary. If you need to refill the water bowl, replenish wood chips or wrap meat in foil for example, ensure you have everything ready prior to opening the door so that you can close the door as quickly as possible. This ensures cooking temperatures return to where they were over a shorter period of time.
Weather and wind conditions can also adversely impact oven temperatures. Prior to cooking, make sure you place your smoker in a protected, safe and well ventilated position (never move during the cooking process). This will help maintain relatively stable cooking temperatures.
IMPORTANT: Always use the water bowl, to ensure that fat doesn’t drip directly onto the wood chip box and potentially catch fire.
10.2 Internal Temperature ‘Stall’Your meat has been in the Hark gas smoker for hours but the internal temperature is no longerrising. This phenomenon has been named 'the stall'. This can be attributed to meat sweating iemoisture evaporates and then cools the meat. The ‘stall’ is typical with U.S. style BBQ smoking and tends to happen when smoking tougher cuts of meat at low temperatures.
During the ‘stall’, tough collagen found inside secondary cuts of meat, are broken down over time into luscious gelatin.

17
There are really two main approaches you can take when internal temperatures stall:
1. Be patient. Wait it out until the temperature eventually increases. Or,
2. Speed the process up by carrying out a technique some in BBQ circles refer to as 'The TexasCrutch’. This involves removing the meat, placing it on thick foil and splashing liquid such as beer, apple juice or water all over the meat. The meat then is covered securely in foil and returned it the smoker. The conventional wisdom here is that the extra moisture applied will create steam and, since steam conducts heat faster than air, it will speed up the cooking process. The foil prevents evaporation so the temperature inside the foil will slowing reach a low simmer. The meat will effectively sweat (but not cool off) as the moisture is being further heated and trapped within the foil.

18
11. CARE INSTRUCTIONS• Make sure you clean your Hark gas smoker after each use.• Remove the racks and wipe them clean with a cloth or paper towel. Remove all charcoal and
ash and dispose of them responsibly.• DO NOT USE CLEANING PRODUCTS ON THE INSIDE OF THE SMOKER. This will remove
the seasoning and potentially ruin the flavour of your food.• Once cooled, store your smoker in a cool, dry space to avoid it being exposed to moisture and
therefore rust.

19
19
Mea
t Typ
e P
urch
ased
Fro
m
Wei
ght
Pric
e/K
g
Fr
esh
/ Fr
ozen
D
efro
st S
tart
Tim
e D
efro
st E
nd T
ime
PREP
AR
ATIO
N IN
FOR
MAT
ION
Mar
inad
e / B
rine
Det
ails
S
tart
time
End
tim
e
Bas
te /
Gla
ze D
etai
ls
Rub
, Mop
/Sau
ce D
etai
ls
Oth
er C
omm
ents
CO
OK
ING
PR
OC
EDU
RE
Targ
et In
tern
al T
emp
Sta
rt S
mok
er T
emp
Sta
rt M
eat I
nter
nal T
emp
Fuel
Typ
e Q
ty U
sed
Woo
d U
sed
Soa
ked
or D
ry
Oth
er C
omm
ents
WEA
THER
Tem
pera
ture
Con
ditio
ns
REC
IPE
NA
ME:
D
ATE:
HA
RK
GA
S S
MO
KE
R
CO
OK
ING
LO
G

20
TIME SMOKER TEMP
MEAT TEMP ACTION COMMENT
DATE:H
AR
K G
AS
SM
OK
ER
CO
OK
ING
LO
G

21
RECIPESHARK GAS SMOKERHK0521 & HK0528
Prepared by:Chris Girvan-Brownwww.urbangriller.com.au

22
1. CLASSIC TEXAS BBQ BRISKETNeed Digital meat probe
FoilPrep Time Begin preparation the day beforeWood Flavouring Add a handful of a strong flavoured wood chips for the first 1-2 hours of cookingCook Time Will vary between 9-18 hours depending on what cut is used
45 mins for restingTemperature Zone LOW: 105-135°C (220-275°F)Internal Temperature 93-98°C (210°F)
Remove at 95°C as the temperature will increase during resting period
Unless it has been slow cooked, brisket is a tough cut of meat. Brisket is loaded with connective tissue called collagen that makes the meat tough and chewy. It is only when the collagen has been transformed into gelatin that the meat will become tender. The gelatin provides an all-important “mouth feel” of juiciness. Collagen begins to convert to gelatin at 60°C (140°F) internal temperature, but the conversion is most rapid at temperatures over 82°C (180°F) internally. It is common when cooking brisket to “stall” between 65-70°C (149-158°F). This is thought to be because at this temperature the meat “sweats” and the evaporation of surface moisture cools the meat.
An oven proof digital meat probe is recommended for cooking as an internal temperature of 93-98°C (210°F) must be reached to fully cook the brisket. Typically brisket is removed when internal temperature hits roughly 95°C (203°F) as the temperature will rise further when the meat rests.
What little juices there are in a brisket are normally lost to the cooking process. Hence brisket is often served with barbecue sauce. Cooking the meat in foil with moist heat (braising) is preferred. This way it conserves the juices and utilizes the heat better than just cooking in a smoker.
INGREDIENTSBeef brisket (Get the biggest you can! 3kg minimum)Dry rub (use your own or refer rub recipes further along)Cumin 1 can of beer (Stout or Porter)
PREPARATIONPerforate the brisket using a large fork, piercing the brisket all over.
DRY RUBUse a dry rub of your liking. Apply the rub liberally to all sides of the meat.Cover with cling wrap and place in the refrigerator from 4 hours to overnight (to allow all flavours to fully permeate the meat).
Keep the brisket as cold as you can before cooking. The longer it spends “on smoke” before the internal temperature hits 65°-70°C (150°-160°F) the better.
COOKINGPre heat your smoker to LOW: 105-135°C (220-275°F). Sprinkle the rub and cumin over the brisket and once 120°C is reached, quickly sear the brisket in the Hark smoker, fat side down for 2-3 minutes. Then, smoke the brisket fat-side up for
23
approximately 3½ - 4 hours at LOW. To allow a good smoke flavour to develop deep into the meat and to provide the characteristic “smoke ring”, try not to open the smoker doors. At the end of this time your brisket should sit at roughly 65-70°C (150-160°F).
Remove the brisket and place on a large piece of foil. Spread the thinly sliced onion under the brisket and pour ½ a can of beer over the brisket. Sprinkle with a little cumin before sealing the foil. Make sure you seal the foil well. Wrap the brisket in one more layer of heavy duty foil. Replace the wrapped brisket into the Hark gas smoker at LOW and cook for 5 to 6 hours (depending on size) until it is fork tender and roughly 95°C (203°F) internal temperature.
If you like a firmer “bark”, once the brisket comes close to temperature, you can un-wrap the foil; pour off the liquid and place it on a BBQ grill. This will dry the bark a little.
RESTRemove the meat from smoker or BBQ, loosen the foil at one end to release the steam and let the brisket rest for 45 minutes.
After resting the brisket, carefully drain the juices from the foil into a bowl and freeze for 20 to 30 minutes to allow the fat to separate from the reserved juices. Remove the fat from the juices and discard, then pour up to 1 cup of the remaining juices into a saucepan with your favourite barbecue sauce and add some of the rub. Stir and heat through to combine into a spicy hot sauce. Serve the sauce on the side (as not everybody likes a lot of sauce) and consider having a mustard or horseradish as a condiment.
SERVESeparate the top and bottom of the brisket, trimming off any undesired excess fat. Slice across grain into long, thin slices.
TIPSWhen selecting a brisket, pick it up and fold it in half. It should be supple enough to touch end to end after trying a couple of times.
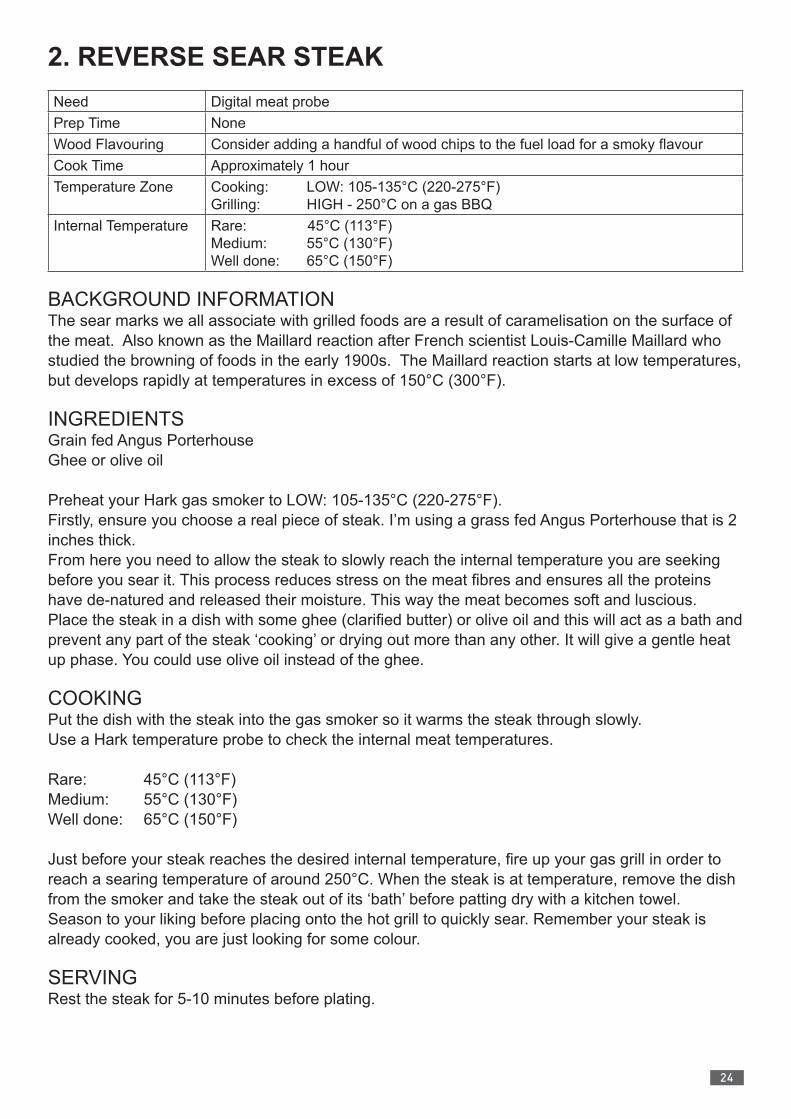
24
2. REVERSE SEAR STEAKNeed Digital meat probePrep Time NoneWood Flavouring Consider adding a handful of wood chips to the fuel load for a smoky flavourCook Time Approximately 1 hourTemperature Zone Cooking: LOW: 105-135°C (220-275°F)
Grilling: HIGH - 250°C on a gas BBQ Internal Temperature Rare: 45°C (113°F)
Medium: 55°C (130°F)Well done: 65°C (150°F)
BACKGROUND INFORMATIONThe sear marks we all associate with grilled foods are a result of caramelisation on the surface of the meat. Also known as the Maillard reaction after French scientist Louis-Camille Maillard who studied the browning of foods in the early 1900s. The Maillard reaction starts at low temperatures, but develops rapidly at temperatures in excess of 150°C (300°F).
INGREDIENTSGrain fed Angus Porterhouse Ghee or olive oil
Preheat your Hark gas smoker to LOW: 105-135°C (220-275°F).Firstly, ensure you choose a real piece of steak. I’m using a grass fed Angus Porterhouse that is 2 inches thick.From here you need to allow the steak to slowly reach the internal temperature you are seeking before you sear it. This process reduces stress on the meat fibres and ensures all the proteins have de-natured and released their moisture. This way the meat becomes soft and luscious.Place the steak in a dish with some ghee (clarified butter) or olive oil and this will act as a bath and prevent any part of the steak ‘cooking’ or drying out more than any other. It will give a gentle heat up phase. You could use olive oil instead of the ghee.
COOKINGPut the dish with the steak into the gas smoker so it warms the steak through slowly.Use a Hark temperature probe to check the internal meat temperatures.
Rare: 45°C (113°F)Medium: 55°C (130°F)Well done: 65°C (150°F)
Just before your steak reaches the desired internal temperature, fire up your gas grill in order to reach a searing temperature of around 250°C. When the steak is at temperature, remove the dish from the smoker and take the steak out of its ‘bath’ before patting dry with a kitchen towel. Season to your liking before placing onto the hot grill to quickly sear. Remember your steak is already cooked, you are just looking for some colour.
SERVINGRest the steak for 5-10 minutes before plating.

25
3. PORK RIBSNeed Digital meat probe
FoilPrep Time Begin preparing the pork ribs at least 24 hours before you plan to start cookingWood Flavouring Use a handful of apple or fruitwood wood chips to the fuel load in the first 1-2
hours of cookingCook Time 5-6 hrsTemperature Zone LOW: 105-135°C (220-275°F)Internal Temperature Not required (not enough flesh to take internal temperature)
First decide what pork ribs you are using. “American” style ribs are usually poor value for money in Australia as too much of the meat has been taken from the outside of the ribs to make bacon. I suggest using forequarter short rib instead (where the rib joins the shoulder). This is a cheaper cut but has more meat. Just make sure you buy them whole.
Use your favourite BBQ rub and BBQ sauce. Or you can use Chris Brown's Cheats BBQ Rub and Simple BBQ Sauce recipes included in this Cooking Guide.
INGREDIENTSPork ribs1 lire apple juice1 cup lime / lemon juice
PREPARATIONPlace slab of rib rack bone side down.Slide a knife under the membrane & against the end bone to separate it from the bone, Using a dry paper towel hold the edge of the thin membrane & pull it off slowly. It should separate from theback side of the rib in one piece.Generously apply the BBQ Rub onto the front & back sides of the rib rack. Gently pat to ensure that the rub sticks well.Place in the fridge for a minimum of 3 hours although 24 hours is preferred.
PREPARATION & COOKINGStep 1Mix 150ml of the lime / lemon juice with the apple juice and set aside.Preheat the gas smoker to LOW: 105-135°C (220-275°F). Place the ribs on a rack in the smoker meat side up. Or, place if you have a rib rack, place that on one of the smoker racks. Slowly smoke the ribs for the next 3-4 hours.
Step 2Remove the ribs from the heat.Place each set of ribs in heavy-duty foil (use two layers of foil to minimise the risk of tearing). The foil should be big enough to cover the whole rack of ribs.Add 150 to 250ml of the juice marinade to each rib racks in its foil pack. Seal each pack tightly. Return the foil packs to the heat for 2 more hours.
Step 3Remove the foil-wrapped ribs from the heat. Take off the foil and set aside the juice. Add some hooney, BBQ sauce and some rib run to the juice to make a glaze. Brush some of the glaze onto

26
the ribs.Place the ribs uncovered and meat side up, back into the smoker for a further 45 minutes. Glaze every 15 minutes.
SERVINGCut up the ribs and serve with a tangy coleslaw and a fresh potato salad. Make sure you have plenty of napkins. Eating ribs is a messy process, enjoy!

27
4. SMOKY PORCHETTANeed Baking tray
Brine bucketFork or spike tenderiser Cooking stringBaking paper
Prep Time 2 DaysWood Flavouring Consider adding a handful of apple wood chips to the fuel load in the first 1-2
hours of cookingCook Time HIGH: 160-180°C (320-356°F) for 45 mins, then
MED: 135-160°C (275-320°F) for 45-60 minsTemperature Zone HIGH then MEDInternal Temperature 60°C (Medium) or 75°C (Well Done)
INGREDIENTSPork loin or belly
RUB1 tblsp salt1 tblsp 5 spice powder1 tblsp sugar½ tblsp garlic powder ½ tblsp pepper¼ tblsp fennel seed¼ tblsp ginger powder
BRINEWaterTable salt
PREPARATION & COOKINGDay 1Prick the skin of the pork all over with a canvas needle, carving fork or “docker” style tenderiser.Prepare a brine of 1 tablespoon of salt to 1 litre of water. Add a tablespoon of the rub and submerge the loin in the brine overnight in the fridge.Mix all of the rub ingredients together in a separate bowl and set aside.Remove the pork from the brine and dry thoroughly. Rub the meat side of the pork, the sides and the ends generously with the spice rub.Line a baking tray with baking paper and place the belly on the tray skin-side down and refrigerate uncovered over night or up to 24 hours so it can absorb the flavours.
Day 2Preheat your Hark gas smoker to HIGH: 160-180°C (320-356°F). Remove from the refrigerator and place the skin side down on a board and cover with the leftover rub. Place the tied pork into your smoker and cook for approximately 45 minutes. Then reduce the heat to MED (approximately 150°C) and cook the Porchetta for another 45-65 minutes until the internal temperature reaches 60°C (Medium) and 75°C (Well Done), depending on your preference.If you’d like crackling, rub the skin with a little baking soda or salt before placing it in a BBQ tray and exposing it high radiant heat, by placing it on your gas BBQ or in your oven.

28
Allow the porchetta to rest about 15-20 minutes before carving.
SERVINGCarve and serve with apple sauce and your favourite greens and cooked potatoes.

29
5. COUNTRY HAMTemperature Zone: LOW: 105-135°C (220-275°F)
This couldn’t be any easier! Ham is smoke-cooked, pickled pork. Tell your butcher you want to make your own ham and order a pickled leg of pork. A good butcher will ask you if you want a salt brined leg or a nitrate cured leg. A nitrate cured leg will “keep” because the nitrate acts as a preservative. Nitrate cured ham also gives the ham a pink colour. Where as salt brined pork won’t last as long due to the lack of preservatives and will appear more greyish in colour (still tastes like ham).
Smoke at LOW until the internal temperature of the ham reaches 70°C (160°F).Remove the ham from the smoker, serve hot or plunge into ice water to cease the cooking process. Cover the ham with waxed paper, then cover the paper with a layer of foil.Place in the fridge and on the following day, you will have ham!
6. OLD SCHOOL BACON (NITRATE FREE)Temperature Zone: LOW: 105-135°C (220-275°F)
This is a traditional bacon recipe without nitrites. Nitrate acts as a preservative to ensure the bacon lasts longer in your fridge. But for the purpose of this recipe, we’re opting for preservative free. Note that you can freeze or vacuum seal the bacon in order to make it last longer.
The pork is cured in the fridge for 5 days prior to smoking, so plan ahead.
INGREDIENTS2kg pork belly300g salt200g brown sugar6 juniper berries (crushed)1 Tblspn of cracked black pepper
Mix the dry ingredients together, coat the pork and place in a zip-lock bag, together with the remaining cure, store in the fridge and turn over once every day for 5 days.
Remove the pork from the bag, discard the cure and rinse off to remove any excess, pat dry, place on a rack and sit in a baking dish to catch any drips. Leave uncovered in the fridge overnight so it completely dries out.
Smoke at LOW until the internal temperature of the bacon reaches 60°C (140°F).Remove the bacon from the smoker and plunge into ice water to cease the cooking process. Cover the bacon with waxed paper, then cover the paper with a layer of foil before storing in the fridge overnight.On the following day, thinly slice the bacon and vacuum pack portions to freeze for later use. Remembering of course to leave enough bacon in your fridge for the week ahead.

30
7. PULLED PORKNeed Digital meat probe
Hark Marinade InjectorFoil
Prep Time Start the night before if you want to brine the porkWood Flavouring Consider adding a handful of banksia cones or some fruitwood to the fuel load in
the first 1-2 hours of cookingCook Time 7-10½ hours and 1 hour restingTemperature Zone LOW: 105-135°C (220-275°F)Internal Temperature 90°C (195°F)
INGREDIENTS1 Pork Shoulder or whole pork Scotch1 cup Pay Dirt Rub
INJECTOR SAUCE2 cups apple juice1¼ cup of raw sugar4 tblsp of cider vinegar3 tblsp table salt2 tblsp of your hot chili sauce
POACHING MIX125g butter½ cup raw sugar½ can beer (not bitter)2 tblsp of hot chili sauce
SAUCE - SWEET PORK1 cup of BBQ sauce¼ cup Golden Syrup2 tblsp of hot chili sauce75 mls apple juice
Place the pork in a container and inject the Injector Sauce into the pork using a Hark Marinade Injector.Rub a good layer of Pay Dirt Rub all over the pork.Place the pork, uncovered in the fridge overnight.
COOKINGPreheat your Hark gas smoker to LOW: 105-135°C (220-275°F).Place the pork into the smoker straight from the fridge. The meat only takes on smoke up until it reaches 65°C (150°F) so a cold start prolongs the smoke exposure.After 5 hours, look to see if a nice “bark” or crust has formed.Remove the pork, slather it with the butter and double wrap in foil with the Poaching Mix. Return to the Hark smoker.
After one hour, check the temperature with an instant read thermometer. It may take a couple more hours to reach the target internal temperature, just over 90°C (195°F). Also important is the texture, your probe should slide in easily!

31
Open a corner of the foil to let the steam out, this will prevent the pork from overcooking. Remove the pork from the Hark gas smoker and let it rest in the foil for at least 1 hour.
SERVINGUse two forks to tear the meat into shreds and mix with the pork jus from the foil packet.Serve with the Sweet Pork Sauce and some freshly prepared coleslaw.
32
8. PULLED LAMB OR MUTTONNeed Digital meat probe
FoilPrep Time Start the night before if you want to brine the lambWood Flavouring Consider adding fresh rosemary to your wood chips in the first 1-2 hours of
cooking Cook Time 7-10½ hours 30 mins restingTemperature Zone LOW: 105-135°C (220-275°F)Internal Temperature 93-98°C (210°F)
Some people, such as my wife, complain that lamb and mutton are gamey and fatty. However I think they are packed with subtle, sweet, grassy flavours. Leg of lamb, lamb chops and lamb fillet all work well when cooked medium-rare. The shoulder and forequarter however have more flavour due to the increased connective tissue. This connective tissue can be tough, hence gentle, slow cooking over a long period of time is required to convert the collagen into soft sticky flavourful gelatin.
If you can get mutton you will be rewarded with deep complex flavours. Lamb will give a lighter but equally luscious result. In Australia and New Zealand our lamb is historically a by-product of the wool industry. It has a stronger flavour than you will find in other places where a milder, more subtle and grassy meat is a result of selective breeding.
INGREDIENTSLamb shoulder (use leg if you can’t source a shoulder) 1 bunch fresh rosemary1 bunch fresh mint
BASTE1 cup apple cider vinegar 1 cup water1 can of dark beer (stout or porter) ¼ cup Worcestershire sauce1 tblsp chopped rosemary 1 tblsp dark brown sugar ½ tblsp salt½ tblsp crushed fresh garlic1 tsp hot smoked paprika
Mix all the baste ingredients together in a saucepan and stir continuously over low heat. Simmer for 5 minutes, remove ¾ of the baste and allow to cool.
Heat the remaining baste to a boil and add another tablespoon of dark brown sugar to use as a 'dip' with finished meat. Set aside for the resting period.
COOKINGPre heat your gas smoker to LOW: 105-135°C (220-275°F). Place the lamb inside smoker and smoke for 10 hours (yes 10!). Baste the shoulder once an hour, every hour for the next 10 hours.
After 10 hours, or when the meat registers an internal temperature of roughly 90°C (195°F),

33
remove the lamb from the smoker. Place on a double layer of foil, add a bunch of fresh rosemary and mint as well as the left over ¼ cup of baste before sealing.
Rest the pork for 30 minutes. In that time, the fresh herbs will infuse into the lamb.
SERVINGLoosely shred the meat with a fork or food handlers gloves and serve with the juices from the foil mixed through the meat.
Larger chunks amongst the shredded meat give a textural difference and add to the experience.
Heat the remaining baste to a boil, add another tablespoon of the dark brown sugar and use as a 'dip' with finished meat.

34
9. BEER-CAN CHICKEN, TEXAS STYLENeed Hark Beer-Can Chicken Roaster or Hark Grill Basket with Chicken Roaster
Digital meat probeFoil
Prep Time Start the night before if you wish to brine the chickenWood Flavouring Use a lighter flavor like apple wood chips / pellets Cook Time 45-60 minutesTemperature Zone HIGH: 160-180°C (320-356°F)Internal Temperature Thigh 83°C
I’m not convinced by the logic of beer-can chicken. The theory is that the chicken cavity slides over a beer can. The beer heats up and produces steam that flavours the inside of the chicken, keeping the chicken moist. But for me, if the beer is hot enough to steam, then the chicken is already well cooked! Rather, I think by plugging the cavity with the can, it stops the juices escaping from the bird. One thing is for certain, this method of vertical roasting cooks the bird evenly and that makes for great chicken. Kind of like the ‘poor man’s rotisserie’!
INGREDIENTSFree range whole chicken Butter or olive oilDry rub / Harissa
Pre-heat your Hark gas smoker to HIGH: 160-180°C (320-356°F).Bring the chook out of the fridge before cooking to bring it to room temperature. Rub the chicken all over with a thin coat of butter or olive oil and coat with your favourite BBQ rub or spice mix. Pay Dirt Rub is ideal, but I also like harissa for that Mediterranean feel.Open a can of beer and pour out half. Add a few tablespoons of left over rub or a smidge of harissa into the beer.
COOKINGSlide the chicken over the can on the beer-can roaster and place in the gas smoker at 170°C. Roast until the internal thigh temperature reaches 83°C.Cover the chicken with a clean tea towel and rest it for at least ten minutes before carving and serving.
SERVINGServe with a salad, in wraps with Tzatziki or with your favourite roast vegetables.

35
10. SMOKED CHICKENNeed Chicken shearsPrep Time Start the night before to brine the chickenWood Flavouring Use a lighter flavor like apple wood chips / pellets.Cook Time 1 hour approximatelyTemperature Zone MED: 135-160°C (275-320°F)Internal Temperature Breast 83°C
INGREDIENTS1 whole chicken2 litres of water2 tblsp salt1 tblsp honey1 tsp ground pepper1 tblsp oil
Day 1Mix the water, salt, honey and pepper to make a brine.Remove the chicken’s backbone and flatten (this will enable to chicken to cook more quickly).Submerge the chicken into the brine and refrigerate for 24 hours.
Day 2Pre-heat your Hark gas smoker to MED (approximately 110°C).Drain the chicken and pour boiling water over the skin. Pat the chicken dry and rub with oil.Place inside the smoker at 110°C for 2 hours or until the internal breast temperature reaches 83°C (180°F).Rest the chicken for 10 minutes before serving.
36
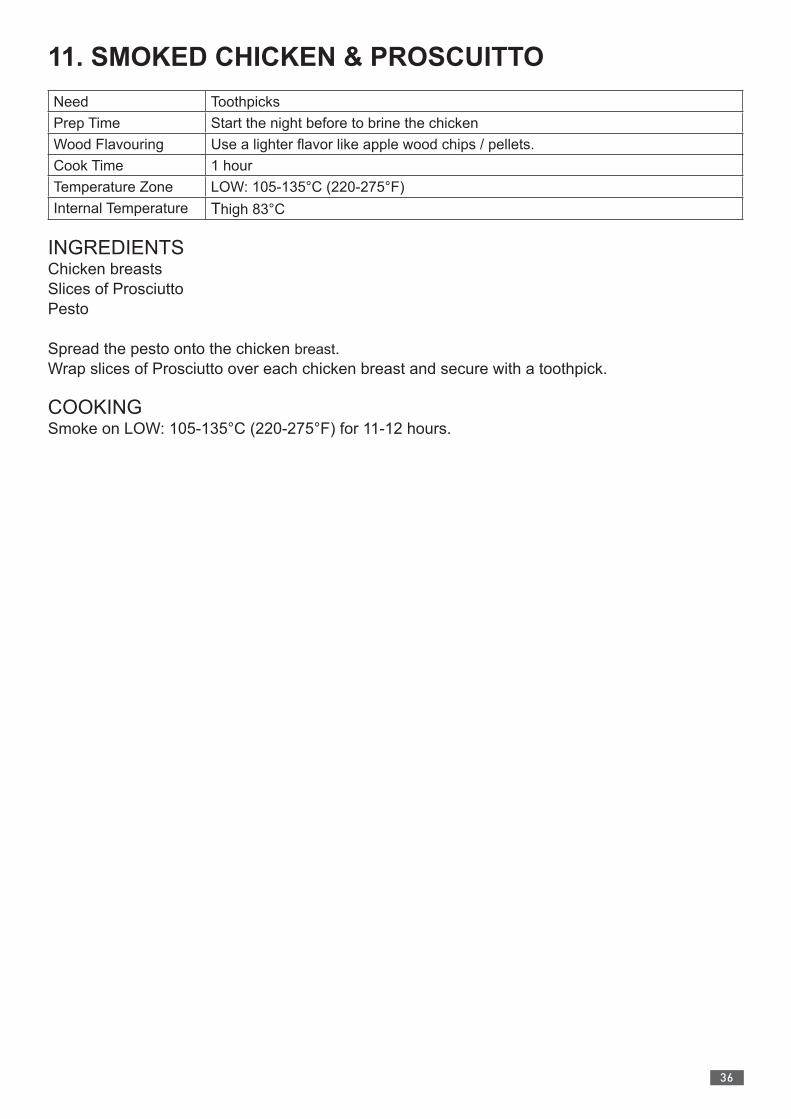
11. SMOKED CHICKEN & PROSCUITTO Need ToothpicksPrep Time Start the night before to brine the chickenWood Flavouring Use a lighter flavor like apple wood chips / pellets.Cook Time 1 hourTemperature Zone LOW: 105-135°C (220-275°F)Internal Temperature Thigh 83°C
INGREDIENTSChicken breastsSlices of ProsciuttoPesto
Spread the pesto onto the chicken breast.Wrap slices of Prosciutto over each chicken breast and secure with a toothpick.
COOKINGSmoke on LOW: 105-135°C (220-275°F) for 11-12 hours.

37
12. OLIVE BRINED QUAIL Need Poultry sheers
Large pot for briningPrep Time 4-8 hoursWood Flavouring Use a lighter flavor like apple wood chips or pelletsCook Time 30-45 minutesTemperature Zone MED: 135-160°C (275-320°F)Internal Temperature Thigh 83°C
INGREDIENTS6 quails1 litre of brine from a good bucket/jar of olives.
Remove the backbones from the quails and flatten them.The secret here is olive brine, ie. the liquid your olives come in. My supermarket deli keeps olive brine for me (normaly they tip it out). Ask nicely and they may do the same for you!Taste the brine. If it has the saltiness as the sea, brine the quails in the fridge for 8 hours.If it tastes saltier than see water, brine the quails in the fridge for only 4 hours.
Note: ensure the quails are fully submersed in the brine for the required time.
COOKINGPre heat your gas smoker to MED: 135-160°C (275-320°F).Smoke the quails for 30-45 minutes until the thigh read 83°C.Rest for 5 minutes before serving.

38
13. CEDAR PLANK SALMON Need Cedar planks (Western Red Cedar)Prep Time [Soak the cedar planks in water the night before]
1-1½ hour on the dayWood Flavouring Consider adding a handful of wood chips or herbs to the fuel load at the start of
the cookingCook Time 45-60 minutesTemperature Zone MED: 135-160°C (275-320°F)Internal Temperature 60°C
INGREDIENTSSalmon fillet portions, skin removed Lemon slices
GLAZE⅓ cup olive oil1½ tblsp apple cider vinegar ⅓ cup soy sauce¼ cup chopped spring onions 1 tblsp grated fresh ginger1 tsp minced garlic
PREPARATIONSoak the cedar planks in water overnight.
COOKINGMix the glaze ingredients together in a bowl. Place the salmon fillets in the glaze to marinate for one hour.Preheat your Hark gas smoker to MED: 135-160°C (275-320°F).Option: preheat the planks in the smoker. Place the drained salmon fillets onto the planks and put a slice of lemon on top of each one.Smoke for approximately 45-60 minutes.
SERVINGThe salmon is ready to serve when you can flake it with a fork, or when the internal temperature reaches 60°C.Serve on the cedar planks.

39
14. SMOKED TROUT Need Paper towels
Bamboo skewersPrep Time 1 hour plus marinating over nightWood Flavouring Beech or fruitwood chipsCook Time 2 - 3 hoursTemperature Zone LOW: 105-135°C (220-275°F)Internal Temperature 60°C
INGREDIENTS6-8 whole trout (10-12 inches thick), cleaned and rinsed4 cups water½ cup sugar½ cup non-Iodised salt2 tblsp chili powder2 tblsp garlic powder3 bamboo skewers, cut into 2-3 inch pieces
PREPARATIONMix all the ingredients together in a large bowl until the sugar and salt fully dissolve. Place the trout into the mixture and coat thoroughly before coving and marinating in the fridge overnight.Remove the trout from the mixture on the next day and pat dry.Place the trout fillets between two layers of paper towels and let them stand for 30 minutes. Preheat your Hark gas smoker to the lowest temperature.Slide 1 length of bamboo skewer through each trout horizontally in order to hold it open.
COOKINGSmoke the trout on LOW: 105-135°C (220-275°F) for approximately 3-4 hours. Replace the wood chips two or three times during the smoking process.To add flavour to your smoked trout, glaze each fillet with butter when the wood chips are being replaced.This smoked trout recipe serves many and the smoked trout can be stored in the freezer for up to 8 months (use a vacuum sealer if you have one).

40
15. BACON-WRAPPED SMOKED TROUT Need Hark BBQ Grill Sheet or Baking paperPrep Time 30 minutes approximatelyWood Flavouring Consider adding a handful of fruit wood chips or a couple of banksia cones to the
fuel load in as you start cooking.Cook Time Approximately 30 minutesTemperature Zone HIGH: 160-180°C (320-356°F)Internal Temperature 60°C
This classic trout dish gives a crisp smoky bacon shell and a soft succulent pink flesh.
INGREDIENTS12 thin slices of bacon or speck2 whole rainbow trout about 500g (1lb) 2 tblsp olive oilSalt and freshly ground black pepper, to taste 6 sprigs of fresh tarragon
COOKINGPreheat your Hark gas smoker to HIGH: 160-180°C (320-356°F).Cook the bacon on a pan or on your BBQ hotplate for approximately 5-10 minutes. Allow the bacon to cool.Brush the inside and outside of each trout with 1 teaspoon of the olive oil, season with salt and pepper and then stuff with 3 sprigs of tarragon each. Set aside.Arrange the 6 bacon slices on a cutting board, slightly overlapping each other. Position a trout at right angles at one end, then pick up the bacon to wrap the trout.Place the trout in your gas smoker with the seam side down (use a BBQ Grill Sheet so the salmon won’t get stuck on the cooking grate).Preheat your gas BBQ while you smoke the trout in the smoker for approximately 15 minutes.Remove the trout from the smoker and the BBQ Grill Sheet). Place the trout onto your BBQ hotplate in order to crisp the bacon.
SERVINGPlate immediately and serve with a fresh garden salad.

41
16. SMOKED OYSTERS INGREDIENTSOystersOption – garlic and pepper
Preheat your Hark gas smoker to 90°C (195°F) and use a light wood chip like beech.Boil a large pot of water. Remove oysters from their shells and reserve the liquor.
COOKINGPlace the oysters into the hot water, stir them in the water so that they blanch evenly for 5-6 seconds.Place in the smoker for 25-30 minutes.Once cooled, store the oysters in a clean jar covered with olive oil. Pour the reserved liquor into the jar and if you wish, add some crushed garlic and pepper before sealing.Store in the refrigerator for up to 2 weeks.
17. SMOKED ITALIAN SAUSAGE [BOERWARS] INGREDIENTSBoerwars or Italian sausageOlive oil
Preheat your Hark gas smoker to LOW: 105-135°C (220-275°F). Use beech or oak wood chips.Lightly brush the sausages with olive oil (better still, garlic infused olive oil).
COOKINGPlace the sausages in the smoker for approximately 1 hour prior to serving.
42
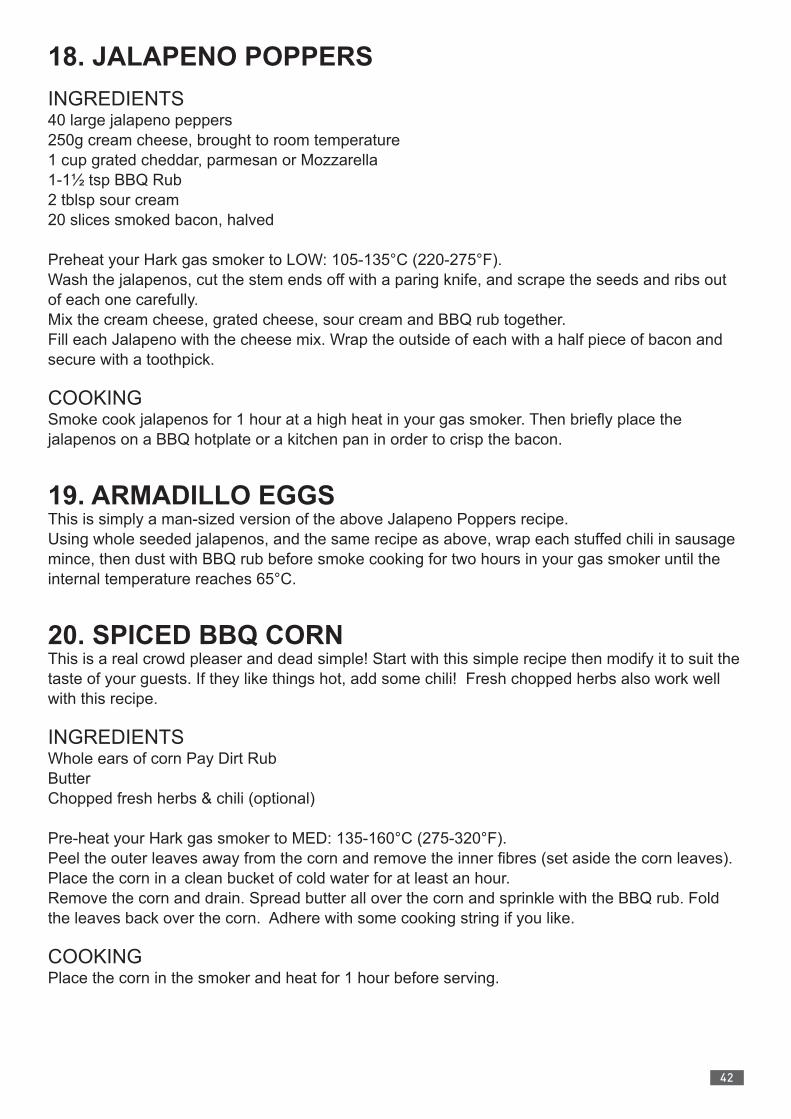
18. JALAPENO POPPERS INGREDIENTS40 large jalapeno peppers250g cream cheese, brought to room temperature 1 cup grated cheddar, parmesan or Mozzarella1-1½ tsp BBQ Rub 2 tblsp sour cream20 slices smoked bacon, halved
Preheat your Hark gas smoker to LOW: 105-135°C (220-275°F).Wash the jalapenos, cut the stem ends off with a paring knife, and scrape the seeds and ribs out of each one carefully.Mix the cream cheese, grated cheese, sour cream and BBQ rub together.Fill each Jalapeno with the cheese mix. Wrap the outside of each with a half piece of bacon and secure with a toothpick.
COOKINGSmoke cook jalapenos for 1 hour at a high heat in your gas smoker. Then briefly place the jalapenos on a BBQ hotplate or a kitchen pan in order to crisp the bacon.
19. ARMADILLO EGGSThis is simply a man-sized version of the above Jalapeno Poppers recipe.Using whole seeded jalapenos, and the same recipe as above, wrap each stuffed chili in sausage mince, then dust with BBQ rub before smoke cooking for two hours in your gas smoker until the internal temperature reaches 65°C.
20. SPICED BBQ CORNThis is a real crowd pleaser and dead simple! Start with this simple recipe then modify it to suit the taste of your guests. If they like things hot, add some chili! Fresh chopped herbs also work well with this recipe.
INGREDIENTSWhole ears of corn Pay Dirt RubButterChopped fresh herbs & chili (optional)
Pre-heat your Hark gas smoker to MED: 135-160°C (275-320°F).Peel the outer leaves away from the corn and remove the inner fibres (set aside the corn leaves). Place the corn in a clean bucket of cold water for at least an hour.Remove the corn and drain. Spread butter all over the corn and sprinkle with the BBQ rub. Fold the leaves back over the corn. Adhere with some cooking string if you like.
COOKINGPlace the corn in the smoker and heat for 1 hour before serving.

43
21. STUFFED POTATO WITH SWEET CORN & CAPSICUMINGREDIENTS4 medium sized potatoes1cup grated cheese (Mozzarella and tasty mixed is ideal)½ cup capsicum, finely chopped 1 tin sweet corn kernels1 tsp chili flakes2 tsp dried oregano Salt to tasteOlive oil
Preheat your Hark gas smoker to MED: 135-160°C (275-320°F).Wash the potatoes and boil them gently till ¾ cooked. Remove from the pot and cool.Cut the potatoes in half and carefully scoop out the centre without breaking the skin to make small “boats”. Save the scooped out potato in a bowlFinely chop the capsicum, sweet corn kernels, oregano and chili flakes and mix into the scooped-out potato. Season with some salt and gently stir to mix the seasoning well.To the oil, add some salt and with a pastry brush, paint the salt-oil mixture to the skin of the potato boats.Spoon the potato mixture into each boat and top with a sprinkle of grated cheese and ground black pepper.
COOKINGPlace the stuffed potatoes in the smoker at 150°C and bake for a further 20-25 minutes until the cheese turns golden.
22. SMOKED PORTABELLO MUSHROOMSINGREDIENTSPortabello mushrooms2 tblsp Worcestershire sauce2 tblsp butter, meltedSalt and pepper
Preheat the gas smoker to LOW: 105-135°C (220-275°F) and use a light flavoured wood like beech or apple.Clean the mushrooms, remove the stem and scrape out the black gills with a spoon.Combine the Worcestershire sauce with the melted butter.Coat the mushrooms with the butter mixture and season with salt and pepper.
COOKINGPlace inside the smoker and smoke for approximately 45 minutes.

44
23. SMOKED ROAST POTATOINGREDIENTSKestral or Royal Blue PotatoesOlive oilButter
Preheat the gas smoker to LOW: 105-135°C (220-275°F).Peel the potatoes and cut into pieces no bigger than a golf ball.Par-boil the potatoes in boiling water for 5-6 minutes.Drain and them put them back into the hot pot, drizzle over some olive oil and a good dollop of butter. Make sure all the potatoes are coated before removing from the pan (set the pan aside).
COOKINGPlace the potatoes into the smoker for 10 minutes and then return them to the butter mixture.20 minutes before you wish to serve dinner, place the potatoes into the oven or a frying pan to obtain a crisp, golden shell.
24. SMOKED GARLICINGREDIENTSGarlic
Whenever you have spare room in your smoker, place garlic pieces with the skin on, anywhere you can. Serve as an accompaniment or store in a jar full of olive oil (great for salad dressings).
COOKINGPlace inside the smoker and smoke for 20 minutes.Serve with roast pork or use in an apple pie.
25. SMOKED SALTINGREDIENTSNon Iodised, course seat salt (or rock salt)Water (in a spray bottle)
Consider smoking salt whenever you have spare room in your smoker (low temperature is best). Spread the salt in a thin layer across some aluminium foil or in a roasting dish and give it a light spray of water. Place it in the smoker and smoke for 1 hour on low heat.Let the salt cool to room temperature and pack into your salt grinder or store as required.
COOKINGPlace inside the smoker and smoke for 20 minutes.Serve with roast pork or use in an apple pie.

45
26. SMOKED TOMATOESINGREDIENTSTomatoes
Preheat the gas smoker to LOW: 105-135°C (220-275°F).Cut the tomatoes in half.
COOKINGPlace the tomatoes into the smoker and smoke for 20-30 minutes.Serve as an accompaniment to a mixed grill or sausages, or, use to make a sumptuous, smoky pasta sauce.
27. SMOKED LEMONSINGREDIENTSLemons
Preheat the gas smoker to LOW: 105-135°C (220-275°F). Cut the tomatoes in half and remove any pips.
COOKINGPlace inside the smoker and smoke for 20-30 minutes.Serve as a condiment or use to make preserved lemons.
28. SMOKED APPLESINGREDIENTSApples
Preheat the gas smoker to LOW: 105-135°C (220-275°F).Cut the apples into quarters or slices and remove the core and pips.
COOKINGPlace inside the smoker and smoke for 20 minutes.Serve with roast pork or use in an apple pie.
29. SMOKED ALMONDSINGREDIENTS2 cups of whole, raw almonds¼ cup butter, melted1 tblsp salt2 tsp white sugar½ tsp onion powder½ tsp celery powder or curry powder
Preheat the gas smoker to LOW: 105-135°C (220-275°F) and use a light flavoured wood like

46
beech or apple.Melt the butter in a small pot. Add the almonds and stir to coat them thoroughly.Remove from the heat and cover. Stir every couple of minutes for 10 minutes.Place the onion powder, celery powder, salt and sugar in a spice grinder and grind until it forms a fine powder.Drain the almonds, coat with the powder and spread on a tray that is lined with baking powder.
COOKINGPlace inside the smoker and smoke for 30-60 minutes.Remove and cool before storing in an air tight container.
Note: The almonds will be soft when they are hot and will crunchy as they cool as moisture evaporates.

47
30. BRINE, MARINADES, RUBS AND SAUCESCHRIS' BASIC BRINE1 litre of water 1 tblsp of salt
This mixture can be flavoured with anything you like - such as crushed garlic, lemon, peppercorns, herbs, a teaspoon of good curry paste, brown sugar, soy sauce or ginger.Soak the meat in the brine and place in the refrigerator overnight. Ensure that the meat is fully submerged in the brine.Note that there is an increasing push to include Iodised salt in our cooking. Whilst this is a good initiative, Iodised salt is not recommend for use in brining.
CHRIS' BASIC MARINADE1 cup white wine1 cup grape seed oil Juice from one lemon3 crushed cloves of garlic 3 or 4 stems of rosemary 1 tsp of crushed pepper
Combine all ingredients in a ceramic or glass dish.Add the meat and thoroughly cover it with the marinade before refrigerating overnight.
CHRIS' BASIC RUB1 tblsp cumin powder1 tblsp smoked paprika1 tsp black pepper powder
Rub the meat with a clove of garlic, cover with the rub mixture. Refrigerate overnight in a plastic bag or in a glass or ceramic bowl.
DALMATIAN RUBEqual quantities of rock salt and peppercorns.
Heat the salt and pepper in a dry wok till it starts to smoke, remove from the heat and allow to cool before grinding into a powder.
BIG RED RUB1 tblsp salt1 tblsp pepper1 tblsp garlic powder 1 tblsp onion powder1 tblsp cayenne powder 1 tblsp chilli powder¼ cup paprika½ cup brown sugar
Mix all ingredients together and keep in an airtight jar.
48
PAY DIRT RUB2 packs Old El Paso fajita mix80g unrefined sugar (Demerara) 50g coffee sugar crystals
Mix all ingredients together and keep in an airtight jar.You could add a little fresh ground black pepper if you like.
SANTA MARIA STEAK RUB1 tblsp kosher salt1 tblsp coarse ground black pepper 1 tblsp garlic powder1 tblsp onion powder 1 tblsp dried oregano2 tsp cayenne pepper ½ tsp dried sage1 tsp fresh minced rosemary
Mix all ingredients together and keep in an airtight jar.
SMOKED CHILLI OIL AND SMOKED GARLIC OILOlive oil (or grapeseed oil)GarlicJalapeno Chili(Quantity of olive oil and garlic depends on the quantity of chilies you have and size of your pot. You will need enough oil to cover the chilies.)
These are fantastic condiments for pasta and salad dressings. And the chili oil is mandatory in our house whenever we cook pizza!Peel garlic cloves and / or cut jalapeno chilies in half.Place the garlic / chilies in a cast iron pot, pour over olive / grapeseed oil and place in the cooking chamber when you are cooking low and slow.The gentle heat will cook the garlic and chili whilst the smoke will infuse the oil. Allow to cool and store in a sterile, airtight jar.
HARLEM SAUCE1 cup tomato sauce½ cup hot sauce (Louisiana Hot Sauce) ¾ cup Worcestershire sauce2 cups vinegar4 cloves garlic, chopped 1 cup brown sugar 1 tsp salt½ tsp ground white pepper½ cup lemon juice, freshly squeezed
Gently heat all the above on the stove top until all the sugar is dissolved. Allow to cool and bottle in a sterile, airtight jar.
49
CLASSIC BBQ SAUCE2 tblsp (30 ml) tomato paste*1 tblsp (15 ml) white vinegar1 tblsp (15 ml) soy sauce1 tsp (5 ml) Worcestershire sauce1 dash hot Tabasco sauce1 tblsp (15 ml) honey1 tblsp (15 ml) dark brown sugar1 tblsp (15 ml) molasses1 tsp (5 ml) mustard powder1 tsp (5 ml) garlic powder1 tsp (5 ml) onion powder1 tsp (5 ml) salt1 tsp (5 ml) mixed herbs½ cup (125 ml) water
Great for smoked meats. Combine all the ingredients in a saucepan. Whisk thoroughly or combine with a hand-held blender to ensure there are no lumps. Simmer over low heat while stirring frequently for 1 hour (this pasteurizes the sauce). Cool for at least 1 hour before transferring to an airtight container.Store for up to 1 month in the refrigerator.
*consider using your own smoked tomatoes instead of the tomato paste.
SIMPLE BBQ SAUCE1 small (1/3 cup) red onion minced2 tblsp olive oil4 garlic cloves, minced1 small can tomato paste2 cans water, from empty tomato paste can¼ cup molasses 1 cup honey¼ cup red wine vinegar 1 tblsp fish sauce1 tblsp Dijon mustard 1 tsp saltIn a small heavy-bottomed saucepan gently heat the olive oil on your stove top. Add the shallots and garlic and sauté for 2-3 minutes or until the shallots start to turn translucent and begin to brown.Add the tomato paste and water and mix through. Allow to come to a boil, then lower the heat to a simmer and cook for 5 minutes.Add the molasses, honey, vinegar, fish sauce, Dijon mustard, and salt and mix through. Bring to the boil, then lower the temperature and simmer for approximately 15 minutes.

50
Hark Enterprises Pty Ltd
Unit 11, 41-49 Norcal Rd, Nunawading, VIC, 3131
T: 03 9857 0999; 1300 799 787
W: www.hark.com.au