conveyor oven - ovention ovenseach conveyor oven is equipped with dedicated upper and lower heating...
TRANSCRIPT

PN 07.04.673.00 © 2016 Ovention, Inc.
Do not operate this equipment unless youhave read and understood the contents ofthis manual! Failure to follow theinstructions contained in this manual mayresult in serious injury or death. Thismanual contains important safetyinformation concerning the maintenance,use, and operation of this product. Ifyou’re unable to understand the contentsof this manual, please bring it to theattention of your supervisor. Keep thismanual in a safe location for futurereference.
No opere este equipo al menos que hayaleído y comprendido el contenido de estemanual! Cualquier falla en el seguimientode las instrucciones contenidas en estemanual puede resultar en un serio lesióno muerte. Este manual contieneimportante información sobre seguridadconcerniente al mantenimiento, uso yoperación de este producto. Si usted nopuede entender el contenido de estemanual por favor pregunte a susupervisor. Almacenar este manual enuna localización segura para la referenciafutura.
Ne pas utiliser cet équipement sans avoirlu et compris le contenu de ce manuel !Le non-respect des instructionscontenues dans ce manuel peut entraînerde graves blessures ou la mort. Cemanuel contient des informationsimportantes concernant l'entretien,l'utilisation et le fonctionnement de ceproduit. Si vous ne comprenez pas lecontenu de ce manuel, veuillez le signalerà votre supérieur. Conservez ce manueldans un endroit sûr pour pouvoir vous yréférer plus tard.
WARNING ADVERTENCIA AVERTISSEMENT
Installation and Operating Manual
Conveyor OvenModels: C2000, C2600

Form No. OVCm-04162
Safety information that appears in this manual is identified bythe following signal word panels:
WARNING indicates a hazardous situation which, if notavoided, could result in death or serious injury.
CAUTION indicates a hazardous situation which, if notavoided, could result in minor or moderate injury.
NOTICE is used to address practices not related to personalinjury.
NOTICE
CAUTION
WARNING
INTRODUCTIONOvention® Conveyor Ovens set a new standard in cookingquality, speed, flexibility, and efficiency. a new discovery in airhandling not only speeds the cooking process, but “scrubs” andrecirculates the air through the oven—eliminating the need fora hood system in most installations (non-catalyst [NC] modelsrequire a hood system). Using an icon-driven touchscreencontroller, operators can choose, edit, and develop customconveyor settings easily. These settings can be developed toinclude varying heat profiles, upper and lower air velocitysettings, and timing. Ovention Conveyor Ovens are designedspecifically for ease of operation and high throughput.Ovention Conveyor Ovens are products of extensive researchand field testing. The materials used were selected formaximum durability, attractive appearance, and optimumperformance. Every unit is inspected and tested thoroughly priorto shipment. This manual provides the installation, safety, and operatinginstructions for Ovention Conveyor Ovens. Oventionrecommends all installation, operating, and safety instructionsappearing in this manual be read prior to installation oroperation of the oven.
Important Owner Information ..............................................2Introduction...........................................................................2Important Safety Information...............................................3Model Description.................................................................4Model Designation................................................................5Specifications........................................................................5
Plug Configurations .............................................................5Electrical Rating Chart .........................................................5Temperature Range .............................................................5Dimensions ..........................................................................6
Installation .............................................................................7General ................................................................................7
Operation...............................................................................8General ................................................................................8Conveyor Setting Information ..............................................8Startup..................................................................................8Cooking—Single Belt ...........................................................9Cooking—Split Belt ..............................................................9Shutdown .............................................................................9Programming Conveyor Settings.......................................10Changing Temperature Unit of measure............................11Uploading from a USB Drive..............................................11
Maintenance ........................................................................12General ..............................................................................12Daily Cleaning....................................................................12monthly Cleaning ...............................................................12
Troubleshooting Guide ......................................................15Options and Accessories...................................................15Limited Warranty.................................................Back Cover
IMPORTANT OWNER INFORMATIONRecord the model number, serial number, voltage, andpurchase date of the unit in the spaces below (specificationlabel located on the left side of the unit). Please have thisinformation available when calling Ovention for serviceassistance.
model No. ________________________________________
Serial No. ________________________________________
Voltage __________________________________________
Date of Purchase __________________________________
BusinessHours: 7:00 am to 5:00 Pm
Central Standard Time (CST)
(Summer Hours: June to September – 7:00 am to 5:00 Pm CST monday through Thursday7:00 am to 4:00 Pm CST Friday)
Telephone: 855-298-6836 (Ovention Hotline)
E-mail: [email protected]
additional information can be foundby visiting our web site atwww.oventionovens.com.
Need help? Call our 24 hour, toll-free
Ovention Hotline
CONTENTS
Form No. OVCm-0416 3
IMPORTANT SAFETy INFORMATION
This oven is designed specifically to heat or cook—NOT forindustrial or laboratory use.
In the event of emergency, turn OFF Main Disconnect switch.
Make sure all operators have been instructed on the safe andproper use of the unit.
This unit is not intended for use by children or persons withreduced physical, sensory, or mental capabilities. Ensure propersupervision of children and keep them away from the unit.
This unit has no “user-serviceable” parts. If service is requiredon this unit, contact an Authorized Ovention Service Agent orcontact the Ovention hotline at 855-298-6836.
BURN hAzARD:• Some exterior surfaces on unit will get hot. Avoid
unnecessary contact with unit.• Pan/tray will be very hot upon removal—use oven mitt, pan
gripper, or other utensil to remove.
Do not turn off Main Disconnect switch or unplug unitimmediately after use. Internal fans must cool oven to avoiddamage to electrical components.
Locate unit at proper counter height in an area that isconvenient for use. Location should be level to prevent unitor its contents from falling accidentally and strong enough tosupport the weight of the unit and contents.
DO NOT lift unit by conveyor frame on each side of ovenchamber. Conveyor is not designed to support weight of unit.Lift from underneath oven chamber only.
Do not move or relocate unit for cleaning. Unit is bulky and heavy.
Do not place anything on top of unit; doing so may subjectpersonnel to injury or could damage unit.
Do not heat sealed containers or products such as whole eggsin oven. These items may explode.
Do not store any materials or items inside oven chamber whennot in use.
Improper cleaning of oven could damage catalyst and will voidunit warranty.
Allow a minimum clearance of 1″ (25 mm) along the sides andrear of unit for proper ventilation. Do not block or cover anycabinet venting.
Do not cover racks or any other part of oven with metal foil.Airflow restriction will cause oven to overheat.
Do not lay unit on front or back side. Damage to unit could occur.
Use non-abrasive cleaners and cloths only. Abrasive cleanersand cloths could scratch finish of unit, marring its appearanceand making it susceptible to soil accumulation.
Clean unit daily to avoid malfunctions and maintain sanitaryoperation.
CAUTION
WARNING
NOTICE
ELECTRIC ShOCK hAzARD:• Plug unit into a properly grounded electrical receptacle of
the correct voltage, size, and plug configuration. If plugand receptacle do not match, contact a qualified electricianto determine and install proper voltage and size electricalreceptacle.
• Unit must be grounded properly. Failure to ground unitproperly could result in serious personal injury or death.
• Turn off Standby switch, allow unit to cool, and unplugunit/turn OFF Main Disconnect switch before performingany cleaning, adjustments, or maintenance.
• DO NOT submerge or saturate with water. Unit is notwaterproof. Do not operate if unit has been submerged orsaturated with water.
• Unit is not weatherproof. Locate unit indoors whereambient air temperature is a minimum of 70°F (21°C).
• Do not steam clean or use excessive water on unit.• This unit is not “jet-proof” construction. Do not use jet-
clean spray to clean this unit.• Do not clean unit when it is energized or hot.• Do not clean unit with metal scouring pads. Metal pieces
can break off pad and touch electrical components,creating risk of electric shock.
• Do not pull unit by power cord.• Keep power cord away from heated surfaces.• Do not allow power cord to hang over edge of counter.• Discontinue use if power cord is frayed or worn.• Do not attempt to repair or replace a damaged power cord.
Cord must be replaced by an Authorized Ovention ServiceAgent or a person with similar qualifications.
• This unit must be serviced by qualified personnel only.Service by unqualified personnel may lead to electricshock or burn.
• Use only Genuine Ovention Replacement Parts whenservice is required. Failure to use Genuine OventionReplacement Parts will void all warranties and may subjectoperators of the equipment to hazardous electrical voltage,resulting in electrical shock or burn. Genuine OventionReplacement Parts are specified to operate safely in theenvironments in which they are used. Some aftermarket orgeneric replacement parts do not have the characteristicsthat will allow them to operate safely in Ovention equipment.
FIRE hAzARD: • Do not install unit on or around combustible surfaces.
Discoloration or combustion could occur. Unit must beinstalled in non-combustible surroundings only.
• Do not use an extension cord. If power cord is too short,contact a qualified electrician to determine and installproper voltage and size electrical receptacle near unit.
ExPLOSION hAzARD: Do not store or use gasoline or otherflammable vapors or liquids in the vicinity of this or any otherappliance.
Install unit in accordance with installation instructions in thismanual.
WARNING
Read the following important safety information before using this equipment to avoid serious injury or death and to avoid damage to equipment or property.

Form No. OVCm-04164
MODEL DESCRIPTIONAll ModelsOvention® Conveyor Ovens are designed to provide unequaledflexibility in both kitchen and front-of-the-house installations.The superior cooking control, small footprint, low heat escape,and option for hood-less installation make the Conveyor Ovena modern solution for ease of operation and high throughput.
Each Conveyor Oven is equipped with dedicated upper andlower heating elements and air blowers. The air blowers directheated air through upper and lower jet plates inside the ovenchamber, above and below the food. a conveyor belt movesproduct continuously from one side of the conveyor, throughthe oven chamber, to the opposite side of the conveyor.
Operator controls consist of a touchscreen, a Standby switch,and a main Disconnect switch. adjustable door panels on eachside of the oven chamber can be used to customize thechamber opening height. Two removable crumb trays, onebelow each side of the conveyor, allow for easy cleanup. a USBport allows the uploading of pre-programmed menu items,installation of software updates, and opportunity for servicediagnostics. a 6′ (1829 mm) cord and plug set is standard.
Model C2000model C2000 is a standard, single belt conveyor oven. It has a20″ (508 mm) conveyor belt that can be set to cook from left-to-right or right-to-left.
Model C2600model C2600 has three different conveyor ovenconfigurations—single belt, 50/50 split belt, and 70/30 split belt.The split belt models allow two different cook durations (beltspeeds) to be running at the same time.
The single belt model has a 26″ (659 mm) conveyor belt thatcan be set to cook from left-to-right or right-to-left.
The 50/50 split belt modelhas two separate 12″ (304 mm) conveyor belts.Each can be operatedindependently and can beset to cook from left-to-rightor right-to-left.
The 70/30 split belt modelhas a 17″ (431 mm)conveyor belt and a 8″(203 mm) conveyor belt.Each can be operatedindependently and can beset to cook from left-to-rightor right-to-left.
Two 12" (304 mm)Conveyor Belts
17" (431 mm)Conveyor Belt
8" (203 mm) Conveyor Belt
TouchscreenUSB Port
Standy Switch
CrumbTray
ConveyorEnd Stop
Conveyor Belt
ConveyorEnd Stop
AdjustableDoor Panel
Main Disconnect Switch(located on side)
Oven Door
Left Side ofConveyor Assembly Oven Chamber
Right Side ofConveyor Assembly
model Description (model C2000 shown)

Form No. OVCm-0416 5
Model Voltage Kilowatts Amps Phase hertzPlug
Configuration Unit Weight
C2000 208/240 9.2/11.8 44/49 1 60 NEma 6-50P 226 lbs. (103 kg)
C2000CSa 208 8.3 40 1 60 NEma 6-50P 226 lbs. (103 kg)
C20003PH 208/240 12.0 34 3 60 NEma 15-50P 243 lbs. (110 kg)
C2600 208/240 12.6/14.7 37 3 60 NEma 15-50P 266 lbs. (121 kg)
MODEL DESIGNATION
SPECIFICATIONS
Electrical Rating Chart
C X X X XOven Type:
C = ConveyorModel Number:2000 = 20" x 20" Cavity With Catalyst2000NC = 20" x 20" Cavity, No Catalyst20003PH = 20" x 20" Cavity, With Catalyst, 3 Phase2600 = 20" x 26" Cavity With Catalyst
NOTE: Ovention Conveyor Ovens are designed to accepteither 208 VAC or 240 VAC. The oven will adjustautomatically to the input voltage.
NOTE: The specification label is located on the left side of theunit. See the label for the serial number and verificationof unit electrical information.
Plug ConfigurationsUnits are equipped with an electrical cord and plug appropriatefor the electrical rating of the unit. Unit must be connected to adedicated circuit.
ELECTRIC ShOCK hAzARD: Plug unit into a properlygrounded electrical receptacle of the correct voltage, size,and plug configuration. If plug and receptacle do notmatch, contact a qualified electrician to determine andinstall proper voltage and size electrical receptacle.
WARNING
Plug ConfigurationsNOTE: Receptacle not supplied by Ovention.
NEMA 15-50PNEMA 6-50P
Temperature RangeThe operating temperature ranges of the Conveyor Oven areas follows:
C2000/C2000CSa = 300°–525°F (149°–274°C)C20003PH = 300°–550°F (149°–288°C)C2600 = 300°–550°F (149°–288°C)

ModelOverall
Width (A)Depth
(B)height
(C)FootprintWidth (D)
FootprintDepth (E)
RearWidth (F)
PlatformWidth (G)
BodyWidth (h)
PlatformDepth (J)
C2000 60-1/4″(1531 mm)
37″(940 mm)
20-1/4″(514 mm)
20-5/16″(516 mm)
26″(659 mm)
35-1/8″(891 mm)
19-5/8″(497 mm)
21″(533 mm)
20-5/16″(516 mm)
C2600 60-1/4″(1531 mm)
43″(1092 mm)
20-1/4″(514 mm)
20-5/16″(516 mm)
26″(659 mm)
44-1/8″(1121 mm)
19-5/8″(497 mm)
21″(533 mm)
26-5/16″(668 mm)
Form No. OVCm-04166
SPECIFICATIONSDimensions
Specification Labelon left side of unit.
A B
C
J
F
D
G H G
EFront View Side View
Top View
Power Cord
Oven Cavity DimensionsModel C200020" W x 20″ D x 3-1/4″ H(508 x 508 x 82 mm)
Model C260020" W x 26″ D x 3-1/4″ H(508 x 660 x 82 mm)
Dimensions (model C2000 shown)

Form No. OVCm-0416 7
INSTALLATIONGeneralOvention® Conveyor Ovens are shipped with most componentspre-assembled. Care should be taken when unpacking shippingcarton to avoid damage to the unit and components enclosed.
ELECTRIC ShOCK hAzARD: Unit is not weatherproof.Locate unit indoors where ambient air temperature is aminimum of 70°F (21°C).
FIRE hAzARD: Locate unit a minimum of 1″ (25 mm) fromcombustible walls and materials. If safe distances are notmaintained, discoloration or combustion could occur.
Locate unit at proper counter height in an area that isconvenient for use. Location should be level to preventunit or its contents from falling accidentally and strongenough to support the weight of the unit and contents.
Do not lay unit on front or back side. Damage to unit couldoccur.
NOTE: Due to the size and weight of the Conveyor Oven, usethe proper number of people for installation based onthe weight of the oven.
1. Inspect the shipping container for obvious signs of transitdamage. If damaged, inform the freight companyimmediately. CAUTION! Stop! Do not attempt to useoven if damaged. Contact Ovention for assistance.
2. Cut and remove the shipping bands from around the ovenpackaging.
3. Remove tape and protective packaging from all surfaces ofthe unit.
4. Remove crumb trays and conveyor end stops frompackaging.
5. Inspect the oven for freight damage such as dents in theend caps or inside the oven chamber. If damaged, informthe freight company immediately.
DO NOT lift unit by conveyor frame on each side of ovenchamber. Conveyor is not designed to support weight ofunit. Lift from underneath oven chamber only.
6. Place the unit in the desired location. make sure to lift fromunderneath the front and rear of the oven chamber only.• Locate the unit in an area where the ambient air
temperature is constant and a minimum of 70° F (21° C).
• make sure the unit is at the proper counter height in anarea convenient for use.
• make sure the countertop/table is level and strongenough to support the weight of the unit and foodproduct.
• Position the unit with a minimum 1” (25 mm) clearanceat the back and on either side for proper venting.
• make sure all the feet on the bottom of the unit arepositioned securely on the countertop/table.
CAUTION
WARNING
NOTICE
CAUTION
7. Install a crumb tray underneath each side of the conveyor.• Slide the tray underneath the conveyor and above the
tray support located below the conveyor frame.• Position the two hooks on the tray into the holes at the
end of the conveyor frame.
Installing a Crumb Tray8. Install a conveyor end stop at each end of the conveyor
frame.• Position the two hooks on the end stop over the
conveyor frame while aligning the cutouts with thecrumb tray hooks.
Installing a Conveyor End Stop9. Plug the unit into a properly grounded electrical receptacle
of the correct voltage, size, and plug configuration. See theSPECIFICaTIONS section for details.
NOTE: The oven is suitable for either 208 VAC or 240 VAC andwill adjust automatically to the voltage being supplied.
Right-SideConveyor Frame
Hook
Crumb Tray
Bottom ofCrumb Tray
TraySupport
TraySupport
Left-SideConveyor FrameLeft-SideConveyor Frame
Cutout
Hook
ConveyorEnd Stop

Form No. OVCm-04168
OPERATIONGeneralUse the following information and procedures to operate anOvention® Conveyor Oven.
Read all safety messages in the IMPORTANT SAFETyINFORMATION section before operating this equipment.
In the event of emergency, turn OFF Main Disconnectswitch.
BURN hAzARD: Some exterior surfaces on unit will gethot. Avoid unnecessary contact with unit.
Use caution and be aware of pinch points when sliderassembly is moving.
Conveyor Setting InformationConveyor Ovens are designed to provide unequaled flexibilityand efficiency. Each oven has the capability of storing 36different conveyor settings. all conveyor settings appear on theSelect Desired Item screen, which has eight additional sub-screens.at initial startup, the Select Desired Item screen will show eithersample conveyor settings or customer-specific, preloadedconveyor settings. If the Select Desired Item screen showssample conveyor settings, these settings can be used to helpdevelop specific conveyor settings appropriate for theinstallation. Refer to the “Programming Conveyor Settings”procedure in this section for instructions on creating conveyorsettings.
Startup1. make sure the main Disconnect switch is in the ON (I)
position.NOTE: The Conveyor Oven can be set up to cook from left-to-
right or right-to-left. This manual is written to reflect anoven set to cook from left-to-right. The conveyor beltson split belt models can travel in the same directiononly.
2. move the Standby switch up to the “On” position.• The touchscreen will energize and show the name of
the oven and current software version for a fewseconds.
Startup Screen
WARNING
CAUTION
• after the Startup Screen, the Select Desired Item screenappears. The first four pre-set conveyor settings areavailable on this screen.
Select Desired Item Screen—Single Belt model3. Touch the desired conveyor setting.
• The oven heaters, air blowers, and cooling fans will startup. allow 10–15 minutes for the oven to reach setpointtemperature.
• The touchscreen shows the selected setpointtemperature and the current cavity temperature.
Preheat ScreenWhen the oven reaches setpoint temperature, the oven beginsa temperature stabilizing period (a countdown screen appears).
Oven Stabilizing Screenafter the oven temperature stabilizes, the conveyor belt beginsmoving and the Select Desired Item screen appears on thetouchscreen. The oven is now ready for cooking.NOTE: The conveyor settings shown are for example only.
Depending on the configuration of the oven, the SelectDesired Item screen will show either sample settings orcustomer-specific, preloaded settings.
OVEN TEMPERATURE STABILIZINGOVEN TEMPERATURE STABILIZING
TIME REMAININGTIME REMAINING
5:005:00
Touch to return to Select Desired Itemscreen and select a different conveyorsetting.
Touch to scroll to next screen andview additional conveyor settings.

Form No. OVCm-0416 9
OPERATIONCooking—Single BeltUse the following procedure to operate a single belt model andcook items continuously.
1. make sure the oven has reached setpoint temperature.The Select Desired Item screen will appear on thetouchscreen.
Select Desired Item Screen—Single Belt model2. Using a paddle, pan gripper, or other utensil, place food
product onto the conveyor belt on the left side of theconveyor assembly.• Continue loading food product as needed.
3. Using a paddle, pan gripper, or other utensil, removecooked food product from the right side of the conveyorassembly.
BURN hAzARD: Pan/tray will be very hot upon removal—use oven mitt, pan gripper, or other utensil to remove.
4. If a different conveyor setting is required during operation,touch the desired setting on the Select Desired Itemscreen.
NOTE: If the new conveyor setting temperature is different thanthe original temperature, the oven will need a fewminutes to adjust to the new temperature.
Touch to scroll to next screen andview additional conveyor settings.
CAUTION
Cooking—Split BeltUse the following procedure to operate a split belt model andcook items continuously.
1. make sure the oven has reached setpoint temperature. TheSelect Desired Item screen will appear on the touchscreen.
Select Desired Item Screen—Split Belt modelNOTE: Split belt models are delivered from the factory with the
Back Belt Cook Duration set to “0:00” for all conveyorsettings. To adjust this setting, refer to “ProgrammingConveyor Settings” in this section.
2. Using a paddle, pan gripper, or other utensil, place foodproduct onto the front or back conveyor belt on the left sideof the conveyor assembly.• Continue loading food product onto the desired
conveyor belt as needed.3. Using a paddle, pan gripper, or other utensil, remove
cooked food product from the right side of the conveyorassembly.
BURN hAzARD: Pan/tray will be very hot upon removal—use oven mitt, pan gripper, or other utensil to remove.
4. If a different conveyor setting is required during operation,touch the desired setting on the Select Desired Itemscreen.
NOTE: If the new conveyor setting temperature is different thanthe original temperature, the oven will need a fewminutes to adjust to the new temperature.
Shutdown1. move the Standby switch down to the “Off” position.
• The oven heaters, touchscreen, and conveyor belt willshut off.
• The air blowers and cooling fans will continue to operateuntil the oven chamber temperature drops below 140°F(60°C).
Do not turn off Main Disconnect switch or unplug unitimmediately after use. Internal fans must cool oven toavoid damage to electrical components.
CAUTION
CAUTION
Touch to scroll to next screen andview additional conveyor settings.
FrontBelt CookDuration
BackBelt CookDuration

Form No. OVCm-041610
OPERATIONProgramming Conveyor SettingsUse the following procedure to edit or create conveyor settings.This procedure requires access to password-protected screensand should be performed by authorized personnel only.
NOTE: The USB port allows the uploading of pre-programmedconveyor settings from an external USB drive. Refer tothe “Uploading from a USB Drive” procedure in thissection for details.
1. From the Select Desired Item screen, touch the “up” arrow.• a password keypad will appear on the touchscreen.
2. Input the password using the keypad, and touch ENTER. • The admin mode screen will appear on the
touchscreen.
admin mode Screen3. Touch RECIPES to access the Recipe Development
screen.a. The Recipe Development screen will appear. This
screen will look like the Select Desired Item screen.
Recipe Development Screen—Single Belt model
RecipesBack
USB LogsMaint
ADMIN MODEADMIN MODE465 F465 F
Touch to return toSelect Desired Item
screen.
Touch to accessRecipe Development
screen.
Touch to accessMaintenance Mode
screen.
Touch to accessUSB Functions
screen.Touch to access
Logs Detailscreen.
Touch an existing conveyorsetting to edit.
Touch to scroll to next screen and viewadditional conveyor settings or select empty
box to create a new conveyor setting.
Touch to return to Admin Mode screen.
4. Edit or create a conveyor setting.• To edit an existing conveyor setting, touch the desired
setting.• To create a new conveyor setting, touch an empty box.
If no empty boxes are available, touch the “down” arrowto scroll to the next screen.
• The Edit Preset Data screen will appear.
Edit Preset Data Screens5. Touch each “setting” box on the Edit Preset Data screen to
edit the corresponding setting. Common settings includeitem name, top blower percentage, bottom blowerpercentage, and cook temperature. For cook duration:single belt models will have a single COOk DURaTIONbox; split belt models will have a FRONT BELT box and aBaCk BELT box.• Touching a “setting” box will bring up a keypad specific
to the setting. Enter the desired value using the keypad,then touch ENTER to return to the Edit Recipe Settingsscreen.
• menu item names can have up to 16 characters.6. When conveyor setting programming is complete, touch
SaVE aND EXIT on the Edit Preset Data screen.• The Recipe Development screen will appear. • To program additional menu items, repeat steps 4 and
5 of this procedure.7. If all programming is complete, touch the “up” arrow on the
first (screen 1 of 9) Recipe Development screen to returnto the admin mode screen.
Single Belt Split Belt
Touch to save settings and return toRecipe Development screen.
Touch to exit withoutsaving and return toRecipe Development
screen.

Form No. OVCm-0416 11
OPERATIONChanging Temperature Unit of MeasureUse the following procedure to change the temperature unit ofmeasure between fahrenheit and celsius. This procedurerequires access to password-protected screens and should beperformed by authorized personnel only.
1. From the Select Desired Item screen, touch the “up” arrow. • a password keypad will appear on the touchscreen.
2. Input the password using the keypad, and touch ENTER. • The admin mode screen will appear on the
touchscreen.3. Touch maINT to access the maintenance mode screen.
maintenance mode Screen4. Touch CONFIG on the maintenance mode screen. The
Oven Configuration screen appears.5. Touch TEmP mODE on the Oven Configuration screen to
toggle the unit of measure between fahrenheit and celsius.
Oven Configuration Screen
Touch to accessOven Configurationscreen.
Touch to return toAdmin Mode screen.
Touch to accessSound Settings
screen.
Touch to accessDiagonostics Mode
screen.
Touch to accessSet Time/Datescreen.
Touch to return toMaintenance Mode screen.
Touch to toggle betweenfahrenheit and celcius.
Uploading from a USB DriveUse the following procedure to upload pre-programmed menuitems or firmware updates from an external USB drive. Thisprocedure requires access to password-protected screens andshould be performed at oven startup by authorized personnelonly.
1. move the Standby switch up to the “On” position.• The touchscreen will energize. after the Startup Screen,
the Select Desired Item screen appears.2. Remove the cover from the USB port above the Standby
switch, and insert the USB drive into the port.3. From the Select Desired Item screen, touch the “up” arrow.
• a password keypad will appear on the touchscreen.4. Input the password using the keypad, and touch ENTER.
• The admin mode screen will appear on the touchscreen.5. Touch USB to access the USB Functions screen.
USB Functions Screen6. Touch the desired function to begin the corresponding
upload.• Select the upload file from the list that appears.• a screen will appear to indicate that the upload is in
progress.• When the upload is complete, the oven will restart.
7. When the startup screens reappear, remove the USB drivefrom the USB port, and replace the port cover.
8. Perform the normal “Startup” procedure at the beginning ofthis section to use the oven.
Touch to uploadrelay firmware
update.
Touch to uploadtouchscreen
firmware update.
Touch to uploadpre-programmedmenu items.
Form No. OVCm-041612
MAINTENANCEGeneralOvention® Conveyor Ovens are designed for maximumdurability and performance with minimum maintenance.
ELECTRIC ShOCK hAzARD:• Turn off Standby switch, allow unit to cool, and unplug
unit/turn OFF Main Disconnect switch beforeperforming any cleaning, adjustments, or maintenance.
• DO NOT submerge or saturate with water. Unit is notwaterproof. Do not operate if unit has been submergedor saturated with water.
• Do not steam clean or use excessive water on unit.• This unit is not “jet-proof” construction. Do not use jet-
clean spray to clean this unit.• Do not clean unit when it is energized or hot.• Do not clean unit with metal scouring pads. Metal
pieces can break off pad and touch electricalcomponents, creating risk of electric shock.
• This unit must be serviced by qualified personnel only.Service by unqualified personnel may lead to electricshock or burn.
• Use only Genuine Ovention Replacement Parts whenservice is required. Failure to use Genuine OventionReplacement Parts will void all warranties and maysubject operators of the equipment to hazardouselectrical voltage, resulting in electrical shock or burn.Genuine Ovention Replacement Parts are specified tooperate safely in the environments in which they areused. Some aftermarket or generic replacement partsdo not have the characteristics that will allow them tooperate safely in Ovention equipment.
This unit has no “user-serviceable” parts. If service isrequired on this unit, contact an Authorized Ovention ServiceAgent or contact the Ovention hotline at 855-298-6836.
Do not move or relocate unit for cleaning. Unit is bulky andheavy.
Never use steel pads, wire brushes, or scrapers to clean unit.
Wear protective rubber gloves and protective eyewearwhen cleaning unit.
Improper cleaning of oven could damage catalyst and willvoid unit warranty.
WARNING
CAUTION
IMPORTANT NOTE:Use of cleaning chemicals not approved by Ovention whencleaning the oven chamber will void the warranty.
Daily CleaningTo maintain performance and preserve the finish of theOvention Conveyor Oven, clean the unit daily.
Do not turn off Main Disconnect switch or unplug unitimmediately after use. Internal fans must cool oven toavoid damage to electrical components.
Use non-abrasive cleaners and cloths only. Abrasivecleaners and cloths could scratch finish of unit, marringits appearance and making it susceptible to soilaccumulation.
1. Turn off the Standby switch and allow unit to cool. Coolingfans will operate until the oven chamber temperature dropsbelow 140°F (60°C).
2. after the cooling fans shut off, move the main Disconnectswitch to the OFF (O) position.
3. Remove and discard any remaining food product.4. Remove any spillages using damp paper towel or a non-
abrasive cloth. 5. Remove and clean each conveyor end stop using a damp
paper towel.6. Remove and clean each crumb tray.
• Brush crumbs into a waste container.• Clean the tray using damp paper towel.
7. Reinstall the crumb trays and conveyor end stops (seeOPERaTION section for details).
8. Wipe down all exterior surfaces using a non-abrasive,damp cloth (a non-abrasive cleaner may be used fordifficult stains).
9. Wipe dry all surfaces using a non-abrasive, dry cloth.10. Polish the exterior surfaces of the oven using a good
quality stainless steel cleaner.
Monthly Cleaning1. Turn off the Standby switch and allow unit to cool. Cooling
fans will operate until the oven chamber temperature dropsbelow 140°F (60°C).
2. after the cooling fans shut off, move the main Disconnectswitch to the OFF (O) position.
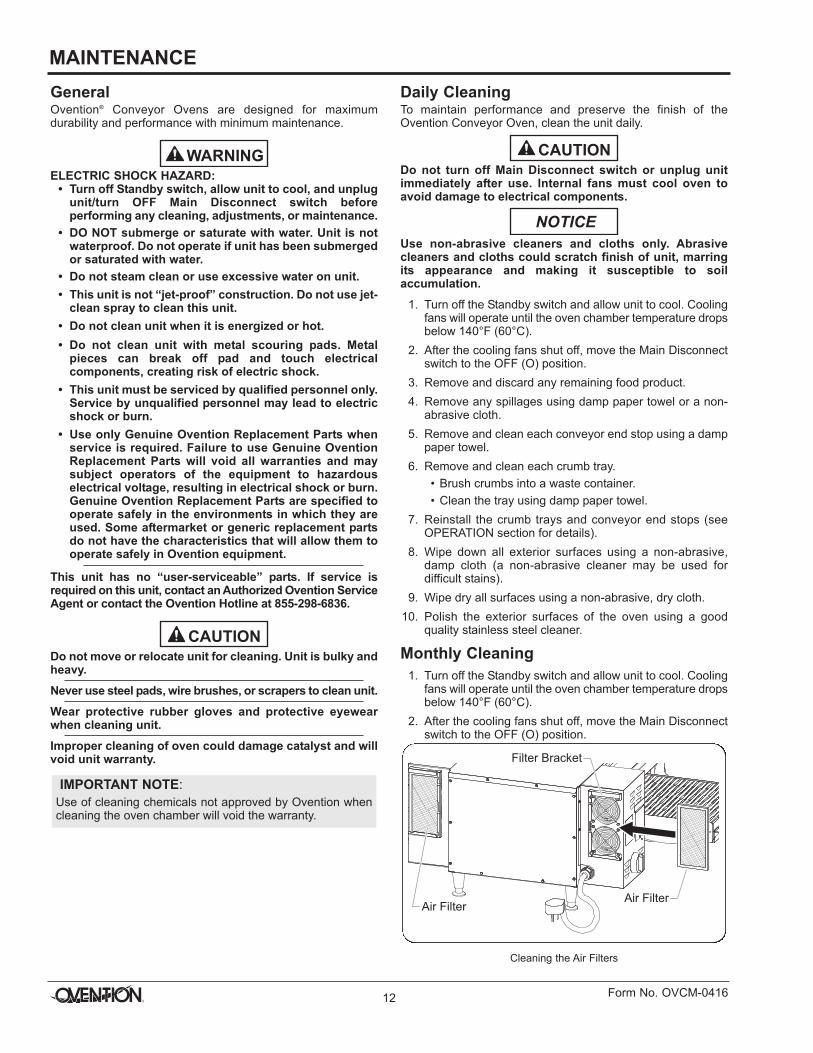
Cleaning the air Filters
NOTICE
CAUTION
Air FilterAir Filter
Filter Bracket
Form No. OVCm-0416 13
MAINTENANCE3. Remove and clean the two air filters on the back of the
oven. To clean each filter:a. Slide the filter straight out the side of the filter bracket.b. Spray the filter with water and/or soak in mild soap and
water.c. Rinse clean and allow the filter to air dry.d. When the filter is dry, reinstall the filter into the filter
bracket.
4. Remove and clean the upper and lower jet plates insidethe oven chamber. To clean the jet plates:a. Unlatch and open the oven door so that the inside of the
oven chamber is exposed.b. Remove each plate by gripping the two tabs on each
plate and pulling straight out of the oven.c. Spray Chemco Dirt Buster III Oven Cleaner onto both
sides of each jet plate. allow the cleaner to sit for 3–5minutes.
d. Using a non–abrasive nylon scouring pad, applypressure to wipe away grease residue.
e. Wipe the jet plates clean using a damp, non-abrasivecloth and allow to air dry. Do not reinstall at this time.
Cleaning the Jet Plates5. Clean the visible areas of the oven chamber using the same
procedure as the jet plates (steps “c” through “e” above).
6. Reinstall the upper and lower jet plates into the ovenchamber.
7. Close the oven door and secure both door latches.8. Remove and clean each conveyor end stop and crumb tray
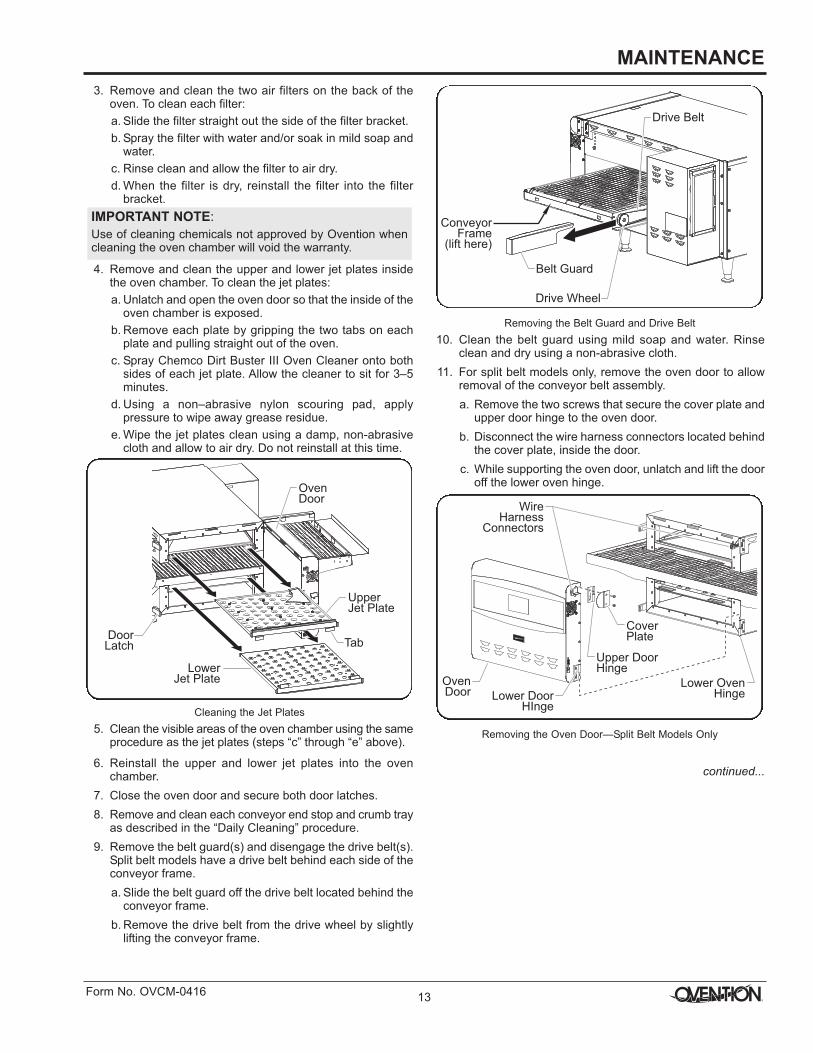
as described in the “Daily Cleaning” procedure.9. Remove the belt guard(s) and disengage the drive belt(s).
Split belt models have a drive belt behind each side of theconveyor frame.a. Slide the belt guard off the drive belt located behind the
conveyor frame.b. Remove the drive belt from the drive wheel by slightly
lifting the conveyor frame.
UpperJet Plate
OvenDoor
LowerJet Plate
DoorLatch Tab
IMPORTANT NOTE:Use of cleaning chemicals not approved by Ovention whencleaning the oven chamber will void the warranty.
Removing the Belt Guard and Drive Belt10. Clean the belt guard using mild soap and water. Rinse
clean and dry using a non-abrasive cloth.11. For split belt models only, remove the oven door to allow
removal of the conveyor belt assembly.a. Remove the two screws that secure the cover plate and
upper door hinge to the oven door.b. Disconnect the wire harness connectors located behind
the cover plate, inside the door.c. While supporting the oven door, unlatch and lift the door
off the lower oven hinge.
Removing the Oven Door—Split Belt models Only
continued...
Belt Guard
Drive Wheel
Drive Belt
ConveyorFrame
(lift here)
OvenDoor
CoverPlate
Upper DoorHinge
WireHarness
Connectors
Lower DoorHInge
Lower OvenHinge

Form No. OVCm-041614
MAINTENANCE12. Remove the conveyor belt assembly. This step requires
two people.For single belt models:a. With one person on each side of the oven cavity, lift up
the conveyor belt assembly and slide the entireassembly to the right.
b. When most of the conveyor belt assembly is through theoven cavity, the person on the left should move to theright side of the oven cavity and continue sliding theassembly out of the cavity.
Removing the Conveyor Belt assembly—Single Belt model
Conveyor BeltAssembly
Lift up until recessed areaclears oven cavity, then
slide out to the right.
For split belt models (oven door removed):a. With one person on each side of the oven cavity, lift up
the conveyor belt assembly and slide the entireassembly out the front of the oven cavity.
Removing the Conveyor Belt assembly—Split Belt model13. Clean the conveyor belt assembly.
a. Spray Chemco Dirt Buster III Oven Cleaner onto bothsides of the conveyor belt assembly. allow the cleaner tosit for 3–5 minutes.
b. Using a non–abrasive nylon scouring pad, applypressure to wipe away grease residue on the conveyorbelt and frame.
c. Spray clean with water and dry using a non-abrasivecloth. additional air dry time may be necessary beforereinstallation.
14. Reinstall the conveyor belt assembly, oven door, beltguard, crumb trays, and conveyor end stops by reversingthe above procedure.
Conveyor BeltAssembly

Form No. OVCm-0416 15
Symptom Probable Cause Corrective Action
Oven does not operate (blanktouchscreen).
Standby switch turned off, main Disconnectturned OFF (O), or unit unplugged.
make sure unit is plugged in, main Disconnect switch is inON (I) position, and Standby switch is moved up to the “On”position.
Unit connected to incorrect power supply. Refer to SPECIFICaTIONS section for unit electricalspecifications. Contact a qualified electrician to determineand install proper voltage and size electrical receptacle.
Irregular belt movement. Loose screw and/or bracket. Check all screws on conveyor belt assembly. Tighten screws,if necessary.
malfunction of gear and/or drive belt. Contact authorized Service agent or Ovention® Hotline forassistance.
Incorrect software installed on oven operatingsystem.
Contact authorized Service agent or Ovention Hotline forassistance.
Improper cooking of food. Incorrect setpoint temperature/conveyorsetting.
Verify desired setpoint temperature/conveyor setting. Changeto proper settings, if necessary (refer to OPERaTIONsection).
Jet plate or air flow malfunction. Contact authorized Service agent or Ovention Hotline forassistance.
CHECk FaNS indicator light ison (located on front, right sideof oven chamber).
CHECK FANSIndicator Light
ambient air temperature is over 95°F (35°C). Light will illuminate in ambient temperatures over 120°F(49°C). Verify light shuts off after ambient temperature dropsbelow 120°F (49°C) consistently. If not, see “ProbableCauses” listed below.
air filters are dirty. Check air filters and clean, if necessary. Refer to “monthlyCleaning” procedure in maINTENaNCE section.
Cooling fan(s) malfunction. Contact authorized Service agent or Ovention Hotline forassistance.
Oven not heating.
TemperatureHigh LimitReset Button
Temperature High Limit switch has tripped. Press the Temperature High Limit Reset Button located onthe rear, left side of the oven chamber near the mainDisconnect switch. If switch continues to trip, contactauthorized Service agent or Ovention Hotline for assistance.
TROUBLEShOOTING GUIDE
OPTIONS AND ACCESSORIESMiscellaneousOVNTN-FIL ........Replacement air Filter
OVNTN-CLNR ....Oven Cleaner, case of six bottles
NOTE: Use Oven Cleaner to clean cooking grease and residuesafely from the jet plates, oven chamber, and conveyorbelt assembly.
This unit must be serviced by qualified personnel only.Service by unqualified personnel may lead to electricshock or burn.
WARNINGELECTRIC ShOCK hAzARD: Turn off Standby switch,allow unit to cool, and unplug unit/turn OFF MainDisconnect switch before performing any cleaning,adjustments, or maintenance.
WARNING
NOTE: To locate an Authorized Ovention Service Agent, accessthe Ovention website at www.oventionovens.com andselect the Service & Support tab, or call the OventionHotline at 855-298-OVEN(6836).
IMPORTANT NOTEadditional accessories are available for Ovention Ovens.Contact the Ovention Hotline at 855-298-OVEN(6836) forinformation.

Ovention, Inc.P.O. Box 340500
Milwaukee, WI 53234-0500 U.S.A.855-298-OVEN(6836)
[email protected]@oventionovens.com
www.oventionovens.com
Ovention, Inc.P.O. Box 340500
Milwaukee, WI 53234-0500 U.S.A.855-298-OVEN(6836)
[email protected]@oventionovens.com
www.oventionovens.com
Printed in U.S.a. april 2016 P/N 07.04.673.00 Form No. OVCm-0416
Need help? Call our 24 hour, toll-free
Ovention Hotline
LIMITED WARRANTy1. PRODUCT WARRANTyOvention®, Inc. (“Ovention”) warrants the products that itmanufactures (the “Products”) to be free from defects inmaterials and workmanship, under normal use and service, fora period of one (1) year from the date of purchase wheninstalled and maintained in accordance with Ovention’s writteninstructions or 18 months from the date of shipment fromOvention. Buyer must establish the product’s purchase datewith Ovention sales representative or by other meanssatisfactory to Ovention in its sole discretion.
Ovention warrants the following Product components to be freefrom defects in materials and workmanship from the date ofpurchase (subject to the foregoing conditions) for the period(s)of time and on the conditions listed below:
• Ninety (90) Day Parts-Only Warranty: Replacement Parts
THE FOREGOING WaRRaNTIES aRE EXCLUSIVE aND INLIEU OF aNY OTHER WaRRaNTY, EXPRESSED ORImPLIED, INCLUDING BUT NOT LImITED TO aNY ImPLIEDWaRRaNTY OF mERCHaNTaBILITY OR FITNESS FOR aPaRTICULaR PURPOSE OR PaTENT OR OTHERINTELLECTUaL PROPERTY RIGHT INFRINGEmENT.Without limiting the generality of the foregoing, SUCHWaRRaNTIES DO NOT COVER: Damage to touchscreensfrom abuse or impact; Wear items such as air filters andconveyor belts; Damage to catalyst from use of non-approvedcleaning products; Product misuse, tampering ormisapplication; improper installation; lack of or impropercleaning; or application of improper voltage.
2. LIMITATION OF REMEDIES AND DAMAGESOvention’s liability and Buyer’s exclusive remedy hereunder willbe limited solely, at Ovention’s option, to repair or replacementby an Ovention-authorized service agency (other than whereBuyer is located outside of the United States, Canada, Unitedkingdom or australia, in which case Ovention’s liability andBuyer’s exclusive remedy hereunder will be limited solely toreplacement of part under warranty) with respect to any claimmade within the applicable warranty period referred to above.Ovention reserves the right to accept or reject any such claimin whole or part. Ovention will not accept the return of anyProduct without prior written approval from Ovention, and allapproved returns shall be made at Buyer’s sole expense.OVENTION WILL NOT BE LIaBLE, UNDER aNYCIRCUmSTaNCES, FOR CONSEQUENTIaL OR INCIDENTaLDamaGES, INCLUDING BUT NOT LImITED TO LaBORCOSTS OR LOST PROFITS RESULTING FROm THE USE OFOR INaBILITY TO USE THE PRODUCTS OR FROm THEPRODUCTS BEING INCORPORaTED IN OR BECOmING aCOmPONENT OF aNY OTHER PRODUCT OR GOODS.