controlsoft identity access management...
TRANSCRIPT

Controlsoft Identity and Access Management Software
9020-0001 Issue 4 Page 1 of 50 29/10/2018
Controlsoft Identity Access Management Software
IA Software Operator’s Guide v8.0.229 © 2018 Controlsoft Ltd

Controlsoft Identity and Access Management Software
9020-0001 Issue 4 Page 2 of 50 29/10/2018
Contents
1. Introduction .................................................................................................................................................... 3
2. Starting the Identity Access Software ............................................................................................................. 4
3. The Dashboard ................................................................................................................................................ 6
4. Configuring Groups ......................................................................................................................................... 9
4.1. Creating Groups .................................................................................................................................... 10
4.2. Allocating Users to Groups ................................................................................................................... 14
5. Users ............................................................................................................................................................. 15
5.1. User General ......................................................................................................................................... 16
5.2. User Photo ............................................................................................................................................ 18
5.3. User Fingerprints .................................................................................................................................. 19
5.4. User Mobile Access ............................................................................................................................... 21
5.5. Multiple Tokens .................................................................................................................................... 25
5.6. User Extra Data ..................................................................................................................................... 26
5.7. User Contact ......................................................................................................................................... 28
5.8. User Notes ............................................................................................................................................ 28
5.9. Importing Users .................................................................................................................................... 29
6. Configure Time Zones ................................................................................................................................... 33
6.1. Creating Time Zones ............................................................................................................................. 34
7. Public Holidays .............................................................................................................................................. 37
7.1. Creating Public Holidays ....................................................................................................................... 38
8. Companies and Departments ....................................................................................................................... 41
8.1. Creating Companies and Departments ................................................................................................. 42
9. Event Viewers and Reports ........................................................................................................................... 43
9.1. Event Viewers ....................................................................................................................................... 43
9.2. Access Control Reporting ...................................................................................................................... 45
9.3. System Log Reporting ........................................................................................................................... 47

Controlsoft Identity and Access Management Software
9020-0001 Issue 4 Page 3 of 50 29/10/2018
9.4. Fire Rollcall Report ................................................................................................................................ 47
9.5. Access Control Status Report ................................................................................................................ 48
9.6. Inactivity Report ................................................................................................................................... 49
1. Introduction
The Identity Access (IA) Management Software from Controlsoft© is a PC-based Access
Control Management system. The Identity Access software manages the access control
database, which is downloaded to one or more Master i-Net® Controllers. The Master i-Net
controls access through the doors, either directly or via expanders. The i-Net controller(s)
make the decisions as to whether access is granted or denied.
NOTE: Your system may not support all the features described in this manual, depending on
the configuration of the system and the type of license applied. Please contact your installer
/ maintenance company for further information.
Conventions used in manual:
On-screen text
Cross reference links
Text to be typed in
Notes
[On-screen Buttons]

Controlsoft Identity and Access Management Software
9020-0001 Issue 4 Page 4 of 50 29/10/2018
2. Starting the Identity Access Software
To launch the Identity Access software:
1. Start Identity Access as follows.
Select Start > All Programs > Controlsoft > Identity Access > IA User Interface (for
Windows 7)
or Start > All Apps > Controlsoft > IA User Interface (for Windows 10)
The following splash screen will be displayed:

Controlsoft Identity and Access Management Software
9020-0001 Issue 4 Page 5 of 50 29/10/2018
2. When initialised, the Logon screen will be displayed:
3. Enter a valid Username (default = Admin) and Password (default = Password) and click
the [Logon] button (or press [Enter] on the keyboard).
NOTE: these credentials are case sensitive.
4. The main user interface will then be displayed, showing the Dashboard:
Note: The most common technique to log on to the software is to enter a Username and
Password as described above If the operator is also a user, it is possible to log on to the
software using a fingerprint (if enrolled).

Controlsoft Identity and Access Management Software
9020-0001 Issue 4 Page 6 of 50 29/10/2018
• Click the [Secure Logon] button on the Logon screen and present a finger to the
fingerprint enrolment reader.
3. The Dashboard
The Dashboard is where Operators can monitor the system on a day to day basis. Each
section is dynamically updated, without the need to press a refresh button or similar.
The Dashboard can be accessed from anywhere in the software by clicking the
symbol in the top left of the screen (or click on the Home tab and select Dashboard)
On the left hand display is a box called User Status that
shows how many users are currently on site. This is only
relevant where there are IN and OUT readers to and from
the premises. In the example here, there are 2 users, and
both are off site.
Also on the left, is the Controller Status box, this shows
how many Master i-Net Access Controllers are online and
offline. Any offline controllers will be listed individually
using the drop down arrow. If any are showing as Offline,
please report this to your installation / maintenance
company immediately as the i-Net Access Controller will
not be updated while it is in this state.
Access Log Tab
The Access Log Tab shows a live view of access events from all around the premises.
Whenever the software is closed this window viewer will be cleared. Where the event shows
a tick the controller has granted access, where the event shows a cross someone has been

Controlsoft Identity and Access Management Software
9020-0001 Issue 4 Page 7 of 50 29/10/2018
denied access. Scrolling the viewer window to the right will show the Reason for the access
denied event.
Alarms Tab
The Alarms Tab will show various user defined software alarms, such as Door Forced Open
or Fire Alarms. The operator can view these alarms, once investigated the event can be
cleared with the [Clear] button. If the event is on-going the alarm will reappear in the Alarm
Tab.
Doors Tab
The Doors tab is available to remotely Grant Access or to Force a Door Open. Simply select
the door you wish to open. Clicking [Grant Access] will unlock the door for its defined
unlock time (default = 5 seconds). Clicking [Force Open] will latch the door open. This door
will then remain open until [Force Close] is clicked which will then override the Forced Open
command.
The symbols next to the doors indicate the last event at the door. The options are:
Access Granted via Operator: This symbol indicates that access was granted through
the software by the operator.
Door Forced Open via Operator: This symbol indicates that the door was latched open
through the software by the operator.
Door Forced Closed via Operator. This symbol indicates that the door was latched
closed through the software by the operator.
Pushbutton. This symbol indicates that the door was accessed by pressing a Request
to Exit pushbutton.
Access Granted. This symbol indicates that access was granted via the reader to unlock
the door.

Controlsoft Identity and Access Management Software
9020-0001 Issue 4 Page 8 of 50 29/10/2018
Access Denied. This symbol indicates that access was denied via the reader and the
door was not unlocked.
Door has not been accessed since the software has been opened.
The doors tab also has facility for Site Lockdown. This allows an operator to deny access to
some or all users, depending on whether Level 1 (Amber) or Level 2 (Red) lockdown is
selected.
System Status tab
This screen provides information as to whether the Log Server and Download Server are
running and whether Asure ID and Mobile Access Portal are available. The Log Server and
Download Server must be running for Identity Access to operate correctly.
Cameras tab
This screen allows an image from a single camera to be viewed. Pan, Tilt and Zoom buttons
are provided for moving PTZ cameras
Reader Monitor
On the right hand side of the Dashboard are 2 Reader
Monitor screens. Select the Card Reader you wish to
monitor. When someone accesses the reader, their
photograph (if programmed) will be displayed in the
Reader Monitor display alongside their name and time of
entry.

Controlsoft Identity and Access Management Software
9020-0001 Issue 4 Page 9 of 50 29/10/2018
4. Configuring Groups
Each Group is allocated a combination of Readers and Time Zones, so each new user
allocated to that Group will automatically inherit all the relevant “Access Rights”.
To create a new Group, select the Management Tab, then select Groups from the ribbon
bar.
This Groups window shows that there are no Groups in the database. The option buttons
are:
Refresh: Updates the list of Groups
Add: Creates a new Group in the list
Delete: Removes the selected Group/s from the list
Edit: edits the selected Group
Show/Hide Active: This button will show or hide Groups selected as Active.
Show/Hide Inactive: This button will show or hide Groups not selected as Active.

Controlsoft Identity and Access Management Software
9020-0001 Issue 4 Page 10 of 50 29/10/2018
Select the Add New button
4.1. Creating Groups
To configure the Group, use the Group Properties Window:
Enter a Name for the Group
The List of users that belong to this group displays all users on the system. To allocate
one or more to the Group, simply select the required user/s in the right hand column and
click the button. To place all users in the group, use the button.
Tick the Time and Attendance Group box if members of this Group are to be monitored for
Time & Attendance.

Controlsoft Identity and Access Management Software
9020-0001 Issue 4 Page 11 of 50 29/10/2018
Tick Overide Anti Passback if members of this group are to be excluded from APB
constraints.
Tick Requires extra time at door to use the Extended Door Open Time
Tick Override Lockdown for users in this group to operate doors during Lockdown Level 1
Tick the Active box to ensure that users in this Group are operational.
Select Card Readers in the side bar:
Select the readers that members of this Group will have access to. To select all readers, tick
the All box.
Select Morpho Readers in the side bar:

Controlsoft Identity and Access Management Software
9020-0001 Issue 4 Page 12 of 50 29/10/2018
Select the Morpho (fingerprint) Readers that members of this Group will have access to. To
select all readers, tick the All box.
Select APB Doors in the side bar:
Select one or more Doors where members of this Group will be subject to AntiPassBack
Select the Elevators in the side bar to define which floors are accessible to users in this
group:

Controlsoft Identity and Access Management Software
9020-0001 Issue 4 Page 13 of 50 29/10/2018
Tick all the floors to be accessible to these users.
Select Time Zones in the side bar:
Select the Time Zone that members of this Group will have access to (information on how to
add a Time Zone can be found on Page 33).

Controlsoft Identity and Access Management Software
9020-0001 Issue 4 Page 14 of 50 29/10/2018
The Notes section, accessed from the side bar, provides 2 text fields called Description and
Notes to help a Service Engineer during their first visit:
4.2. Allocating Users to Groups
A user can be allocated to a Group in one of 2 ways:
1. From within the User Properties Window.
2. From within the Group Properties Window.
NOTE: Users can be allocated to more than one Group, but please be
aware that in versions prior to v2017.1 constraints exist when multiple
Groups are combined:
EXAMPLE:
Group 1 has access to Reader A from 10:00 to 11:00
Group 2 has access to Reader B from 12:00 to 13:00
A user allocated to Group 1 AND Group 2 will have access through BOTH readers from
10:00 to 11:00, AND will have access through BOTH readers from 12:00 to 13:00

Controlsoft Identity and Access Management Software
9020-0001 Issue 4 Page 15 of 50 29/10/2018
5. Users
"Users" is a collective term for Employees, Visitors and Contractors. These user types have
been separated as they often have different requirement for Access Rights, for example:
Employees may have very flexible access to the premises for long periods of time.
Visitors may have limited access to the premises and may be heavily managed on a day to
day basis.
Contractors may have flexible access to the premises but only for short periods of time.
Furthermore, separating Employees, Visitors and Contractors makes reporting on each
criteria easier and more flexible.
NOTE: Programming screens for Employees, Visitors and Contractors are
the same. Only programming screens for Employees has been shown for
brevity.
Select the Management tab, then select Employees from the ribbon bar:
The option icons are as follows:
Refresh: Updates the list of Users

Controlsoft Identity and Access Management Software
9020-0001 Issue 4 Page 16 of 50 29/10/2018
Add: Creates a new User to the list
Delete: Removes the selected User/s from the list
Edit: edits the selected User
Enrol fingerprint using MorphoManager: This icon will be greyed out (as shown) if
MorphoManager is not enabled.
Print: Prints a card for the selected user
Report: Run an access log report for the selected user
Temporary Token: Assign or remove Temporary Token for a User
Import: Adds a new User to the list from a vCard
Show/Hide Active: This button will show or hide Users selected as Active.
Show/Hide Inactive: This button will show or hide Users not selected as Active.
Paging Mode: Splits the list of users into manageable pages to avoid too much
scrolling up and down.
NOTE: Any changes made to Users (Employees, Visitors and Contractors)
will automatically be downloaded to the Controllers and/or Biometric
Readers
5.1. User General
To create a new Employee, select the Add New button:

Controlsoft Identity and Access Management Software
9020-0001 Issue 4 Page 17 of 50 29/10/2018
Enter the First Name and Last Name of the user (Title is optional).
Enter the Primary Token Number of the card allocated to this user. This may be written on
the card, read via an Enrolment reader, or may be a sequential number in systems using
fingerprint only. Pressing the icon to the right of the Token Number field will automatically
generate a token number. This is useful when using fingerprint readers.
If the system has readers with a keypad, enter a PIN Number for the user. Pressing the icon
to the right of the PIN Number field will automatically generate a PIN. NOTE: If you are
using keypads in 'PIN Only' or 'PIN OR Proximity' modes, the required
PIN Number should be added as a Token Number.
The user will have no access to the system until the Valid from date and time (the default is
the date that the user profile was created). Similarly, the user will have no access to the

Controlsoft Identity and Access Management Software
9020-0001 Issue 4 Page 18 of 50 29/10/2018
system after the Valid for expires (default is Indefinite, but this can be changed in the Server
Configuration utility).
Allocate the user to a Company and a Department (if used). Companies and Departments
can be a useful filter when running reports on users.
Groups that this user belongs to lists all the available Groups within the system. To
allocate the user to a group, simple tick the box for that group.
Ensure that the Active box is ticked for this user to have access to the system
NOTE: Users can be allocated to more than one Group
5.2. User Photo
Allocating a photo to a user can be useful when identifying a lost card as it is possible to
read the card and display the photo and other details of the relevant user. As standard there
are two Reader Monitors located in the Dashboard to view the photos of people entering
and exiting the premises.

Controlsoft Identity and Access Management Software
9020-0001 Issue 4 Page 19 of 50 29/10/2018
Select the import icon to import a previously saved image. It is possible to import a
.jpg or .png picture file. The camera icon can be used to capture a photo from a
webcam.
5.3. User Fingerprints
To read a fingerprint for a user, first select the finger to be read:
Read a fingerprint as follows:
Left click on the fingerprint you wish to add, then select Assign from the Option Wheel:

Controlsoft Identity and Access Management Software
9020-0001 Issue 4 Page 20 of 50 29/10/2018
.
Place the selected finger on the enrolment reader 3 times, following the on-screen
instructions where necessary.
Assign a second finger. Qualify that both fingers have been enrolled and the score is
satisfactory.

Controlsoft Identity and Access Management Software
9020-0001 Issue 4 Page 21 of 50 29/10/2018
NOTE: The higher the enrolment scores the better the biometric reader
will perform on a day to day basis. It may be necessary to enrol multiple
fingerprints and use the fingerprints with the highest score.
5.4. User Mobile Access
If you have a Mobile Access account, you can allocate mobile credentials from within Identity
Access.

Controlsoft Identity and Access Management Software
9020-0001 Issue 4 Page 22 of 50 29/10/2018
Having first entered the required information in the General screen and the user's email
address in the Contact screen, select the Mobile Access tab and click [Find Me]

Controlsoft Identity and Access Management Software
9020-0001 Issue 4 Page 23 of 50 29/10/2018
Assign the user to the relevant list of available Mobile IDs (example Controlsoft Mobile 26
bit), and click [Create Profile]
Click [Refresh] to update the user details:

Controlsoft Identity and Access Management Software
9020-0001 Issue 4 Page 24 of 50 29/10/2018
When the user has installed the HID Mobile Access App on their phone, they select 'Enter
Invitation Code' and enter the code which the system automatically emailed to them.
NOTE: This invitation code is time limited and must be activated
promptly.
Once the user has confirmed that this has been completed, simply select [Issue Mobile ID]
to complete the process.

Controlsoft Identity and Access Management Software
9020-0001 Issue 4 Page 25 of 50 29/10/2018
5.5. Multiple Tokens
Each user can be given more than 1 token to allow for multiple credential types (e.g. an
Employee may have a card, a mobile credential and a windscreen tag for the car park). The
Tokens tab allows these secondary credentials to be allocated to the user. Whichever
credential is used, it will be recognised and the same user, hence Fire Roll Call, AntiPassBack
etc. will continue to operate correctly.

Controlsoft Identity and Access Management Software
9020-0001 Issue 4 Page 26 of 50 29/10/2018
The titles Secondary token 1, Secondary token 2 etc. can be renamed in the Server
Configuration utility to provide more meaning titles such as "Mobile Credential" or
"Windscreen Tag". Please contact your installer / maintenance company for assistance in
changing these titles.
5.6. User Extra Data
It is sometimes useful to have additional information logged against a user, depending on
the work environment. For example, a Courier company may want to log whether a driver
has a valid driving license, store the expiry date of the license or even store a scan of the
license itself.
The Extra Fields are configured within the Identity Access Server Configuration software (ask
your installer / maintenance company for further information on this).
To use the Extra Field previously configured, select the Extra Data tab:

Controlsoft Identity and Access Management Software
9020-0001 Issue 4 Page 27 of 50 29/10/2018
In this instance, the Extra Data Field has been configured to record whether the user has a
valid driver's license. Simply select Yes or No as appropriate, followed by [Accept].
The Extra Data tab can display a variety of information as the data fields can be text, numeric,
lists, checkbox, date, time, or image.

Controlsoft Identity and Access Management Software
9020-0001 Issue 4 Page 28 of 50 29/10/2018
5.7. User Contact
The Contact Details in this tab are not mandatory, but can be recorded if required:
5.8. User Notes
Information in this tab is not mandatory, but can be recorded if required:

Controlsoft Identity and Access Management Software
9020-0001 Issue 4 Page 29 of 50 29/10/2018
The Personnel Number is displayed in the Employee Properties screen and can be selected
to be unique via the Server Configuration utility.
5.9. Importing Users
It is possible to import multiple users into Identity Access from another Controlsoft
application (Controlsoft Lite, Controlsoft Pro or CWBio), or any other application capable of
exporting its user database to a .csv file.
When importing from a Controlsoft application, Identity Access knows the data layout, so it
is only necessary to point to the database.
When importing from a .csv file, it is also necessary to map the fields in the file to the correct
fields in Identity Access.
To import data, select Import Data from the Tools menu and follow the Import Wizard:
Under Select Import Source, select the appropriate source, for example, to import from a
csv file, select Text File from the dropdown list and click [Next]
Under Source File, click the [...] button to browse to the .csv file. Select Remove old data
before importing new data if required. Click [Next].

Controlsoft Identity and Access Management Software
9020-0001 Issue 4 Page 30 of 50 29/10/2018
Select Destination should be set to define the types of user being imported (Employee,
Visitor or Contractor). Select Ignore duplicate names to avoid duplicate entries. Click
[Next]
NOTE: While this will stop a User appearing in the list twice, it will also
stop a new User from being imported if they have the same name as an
existing User. To avoid this, always ensure that there are differences
between similar names (e.g. Fred Smith, Fred A Smith and Freddie Smith)
Selecting the source file's format defines how the .csv file is configured (the actual settings
required will depend on how the .csv file has been configured). Click [Next]
Under Delimiters, choose which character has been used in the .csv to separate data (usually
commas or tabs). Click [Next]. Under Mapping the source data to the database fields,
link each column in the .csv file to the corresponding database field.
Click on each header <IGNORE> and select the appropriate field name for that field.
When complete, click [Next], followed by [Import] to start the import process and [Close]
when the import is complete.

Controlsoft Identity and Access Management Software
9020-0001 Issue 4 Page 31 of 50 29/10/2018
Identity Access also has the facility to import a user via a "vCard" which can be created from
some email clients such as Microsoft Outlook. To import a vCard, select Employees from the
Management tab, then select the Import icon
NOTE: it is not possible to import vCards for Visitors or Contractors.
Use the [...] button against Select vCard option to browse to the vCard.

Controlsoft Identity and Access Management Software
9020-0001 Issue 4 Page 32 of 50 29/10/2018
Use the Select fields to be imported to select the required information (in this example
First name, Last name and Cell phone)
Select Import photo to add a photograph for the user.
Click the [Accept] button when complete.
NOTE: If the vCard is imported with no Token Number, Identity Access
will allocate the first available number to it, in this instance '1'

Controlsoft Identity and Access Management Software
9020-0001 Issue 4 Page 33 of 50 29/10/2018
6. Configure Time Zones
Time Zones is a useful facility as it modifies the operation of the system at given times. By
allocating a Time Zone to a Group, all Users in that Group will have access through the
relevant doors only within the Time Zone period
To use Time Zones, select the Management tab, then click Time Zones in the ribbon bar.
This Time Zones window shows that there are no Time Zones in the database. The option
buttons are:
Refresh: Updates the list of Time Zones
Add: Creates a new Time Zone in the list
Delete: Removes the selected Time Zone/s from the list
Edit: edits the selected Time Zone
Show/Hide Active: This button will show or hide Time Zones selected as Active.
Show/Hide Inactive: This button will show or hide Time Zones not selected as Active.

Controlsoft Identity and Access Management Software
9020-0001 Issue 4 Page 34 of 50 29/10/2018
To create a Time Zone, select the Add New button
6.1. Creating Time Zones
Use the Time Zone Properties screen to configure the Time Zones:
Enter a Name for the Time Zone
Each Time Zone can have up to 3 segments, each with its own Start Time and End Time.
Unlike previous versions of Identity Access, Time Zones can now be entered to 1 minute
resolution.
Time Zones can be created graphically rather than entering times by selecting the [Advanced
View] tab

Controlsoft Identity and Access Management Software
9020-0001 Issue 4 Page 35 of 50 29/10/2018
The following buttons are available in Advanced View:
The display can be adjusted to show 1 hour, 30 minute, 15 minute, 5 minute or 1
minute resolution

Controlsoft Identity and Access Management Software
9020-0001 Issue 4 Page 36 of 50 29/10/2018
Adds a time entity. Drag the mouse to select a time period, then click this button.
Once created, the display will show the relevant Start Time and End Time Example:
Deletes the selected time entity
Edits the selected time entity
Copies the selected time entity
Pastes the selected time entity
In either view, if Disabled on public holidays is selected, the Time Zone will not be active
during defined public holidays.
Ensure that Active is ticked otherwise it will not be possible to use the Time Zone.
The Notes section, accessed from the side bar, provides 2 text fields called Description and
Notes to help a Service Engineer during their first visit.

Controlsoft Identity and Access Management Software
9020-0001 Issue 4 Page 37 of 50 29/10/2018
NOTE: Remember to associate Time Zones with the relevant Users /
Doors, otherwise they will not be operational.
The i-Net controller can support up to 16 Time Zones when fitted with firmware version
98.33 or older, although it can support up to 62 Time Zones with firmware version 98.34 or
later.
7. Public Holidays
To configure a Public Holiday, select the Management tab, then select Public Holiday in the
ribbon bar

Controlsoft Identity and Access Management Software
9020-0001 Issue 4 Page 38 of 50 29/10/2018
This Public Holidays window shows that there are no Public Holidays in the database. The
option buttons are:
Refresh: Updates the list of Public Holidays
Add: Creates a new Public Holiday in the list
Delete: Removes the selected Public Holiday/s from the list
Edit: edits the selected Public Holiday
Show/Hide Active: This button will show or hide Public Holidays selected as Active.
Show/Hide Inactive: This button will show or hide Operators who are not Active.
To create a new Public Holiday, click the Add New button
7.1. Creating Public Holidays
To configure a Public Holiday:

Controlsoft Identity and Access Management Software
9020-0001 Issue 4 Page 39 of 50 29/10/2018
Enter a Name for the Public Holiday
Select date of the Public Holiday from the calendar
Select This is a recurring holiday if appropriate (e.g. New Year's Day)
Ensure that Active is ticked to use the Public Holiday date.

Controlsoft Identity and Access Management Software
9020-0001 Issue 4 Page 40 of 50 29/10/2018
Click [Accept] when done.

Controlsoft Identity and Access Management Software
9020-0001 Issue 4 Page 41 of 50 29/10/2018
8. Companies and Departments
Companies and Departments can be a useful tool when running reports to filter out
unwanted data. It would be possible, for example, to run a report only on users in the
Finance department.
To configure Companies and Departments, select Companies from the Management tab:
Refresh: Updates the list of Companies / Departments
Add: Creates a new Company / Department in the list
Delete: Removes the selected Company / Department/s from the list
Edit: Edits the selected Company / Department
Show/Hide Active: This button will show or hide Companies / Departments selected as
Active.
Show/Hide Inactive: This button will show or hide Companies / Departments not
selected as Active.
NOTE: When allocating a User to a Company / Department, simply
choose the relevant option from the pull-down lists

Controlsoft Identity and Access Management Software
9020-0001 Issue 4 Page 42 of 50 29/10/2018
8.1. Creating Companies and Departments
Select the Add button to display the Company Properties screen below:
.
Refresh: Updates the list of Departments
Add: Creates a new Department in the list
Delete: Removes the selected Department/s from the list
Edit: Edits the selected Department
Name: Add a name for the new Company

Controlsoft Identity and Access Management Software
9020-0001 Issue 4 Page 43 of 50 29/10/2018
Click the Add button to create a Department for the Company
Name: Add a name for the new Department
Notes: Add any notes which could make the configuration easier to understand in the future.
NOTE: A Company can support multiple Departments.
9. Event Viewers and Reports
The Event Viewer in Identity Access software is a powerful tool for analysing system activity.
9.1. Event Viewers

Controlsoft Identity and Access Management Software
9020-0001 Issue 4 Page 44 of 50 29/10/2018
Identity Access provides a live view of events, useful for trouble-shooting or tracking users
through the system. To view live events, ensure that the option Viewer Windows is selected
in the View tab.
When selected, the viewer window will be visible in the lower half of the screen:
Clear Window: Clears all events in the Viewer Window
Pause/Run: Pausing the Viewer Window will temporarily suspend events from being
displayed.
The information to be displayed is controlled by the 3 tabs below the Viewer Window:
Displays events from the Access Log.
Displays events from the System Log.

Controlsoft Identity and Access Management Software
9020-0001 Issue 4 Page 45 of 50 29/10/2018
Displays events from the Time & Attendance Log
NOTE: The size of the viewer window can be adjusted simply by dragging
the top of the window up or down.
9.2. Access Control Reporting
An Access Control report is a record of when people have used their token at a reader,
providing an audit trail of when someone entered or exited areas of the premises.
Within Identity Access there are multiple ways to run Access Control reports. It is possible to
run reports based on specific date / times, specific readers, or specific users. The Access
Report menu can be accessed by selecting Reporting and Access Control under Logs.
This then runs the Identity Access: Access Log Report form as shown below:
The options on generating the report are as follows:
- defines whether the report contains All events or the First or Last
100/500/1000/5000 events in the log.

Controlsoft Identity and Access Management Software
9020-0001 Issue 4 Page 46 of 50 29/10/2018
– defines the date that the report starts (Example ignore
dates, start of last month or 1st January 2016)
- defines the date that the report ends (Example today or end of
last month)
– defines which events are to be reported on,
Access Allowed and/or Access Denied and any combination of events from the drop down list . The
Tick selects all events in the dropdown list and the Cross deselects all events in the dropdown list.
- defines which user/s to report on
- defines which Company and Department to report on
- defines which reader/s to report on.
As an example, to generate a report to see if John Smith tried to get into R&D this month, the
configuration would look like:
Once configured, click the [Execute] button to generate the report.
To run a report on a specific person it is also possible to go to Management and Employee
/ Visitor / Contractor (depending on who you wish to run your report on). Highlight the
user by left clicking their entry and click the icon. This will automatically generate a
report for this specific person. To run a report on several people it is possible to hold down
the [Ctrl] key and highlight multiple entries, then click the icon.

Controlsoft Identity and Access Management Software
9020-0001 Issue 4 Page 47 of 50 29/10/2018
9.3. System Log Reporting
The System Log report is a record of all Identity Access system events, such as when people
have logged on / off the software, when doors have been forced open or when database
entries have been modified. The System Log Report menu can be accessed by selecting
Reporting and System Log.
The way System Log reports are configured is similar to the Access log Reports, but with
fewer options:
- defines whether the report contains All events or the First or Last
100/500/1000/5000 events in the log.
– defines the date that the report starts (Example ignore
dates, start of last month or 1st January 2016)
- defines the date that the report ends (Example today or end of
last month)
– defines which events are to be reported on, such as startup
& shutdowns, which Operators have logged on.
Once configured, click the [Execute] button to generate the report.
9.4. Fire Rollcall Report
The Fire Rollcall is a report that indicates who is currently inside the building. For the Fire
Rollcall to be available there must be dedicated IN and OUT readers that everyone uses
when they enter and exit the building. The Fire Rollcall report can be accessed by selecting
Reporting and Fire Rollcall.

Controlsoft Identity and Access Management Software
9020-0001 Issue 4 Page 48 of 50 29/10/2018
When generating a Fire Rollcall report, no configuration is required, simply click the Fire Rollcall
button
NOTE: The Fire Rollcall report is NOT available in Identity Access unless
an Identity Access Professional license is applied (part number IA-PRO).
9.5. Access Control Status Report
The Access Control Status report shows which readers are accessible to one or more users.
The report is generated by clicking Access Control in the Status area of the reporting ribbon
bar
Options when running the report are as follows:
Display - selects specific users to report on
from - selects specific Companies and Departments to report on
who has access at - selects the readers to report on
EXAMPLE: to report whether a specific user has access through a particular reader, the report
configuration would look as follows:

Controlsoft Identity and Access Management Software
9020-0001 Issue 4 Page 49 of 50 29/10/2018
Clicking [Execute] would then generate the following report:
This report shows that the reader called "Server Room" is accessible by the group "staff"
which includes the user "Will Evans"
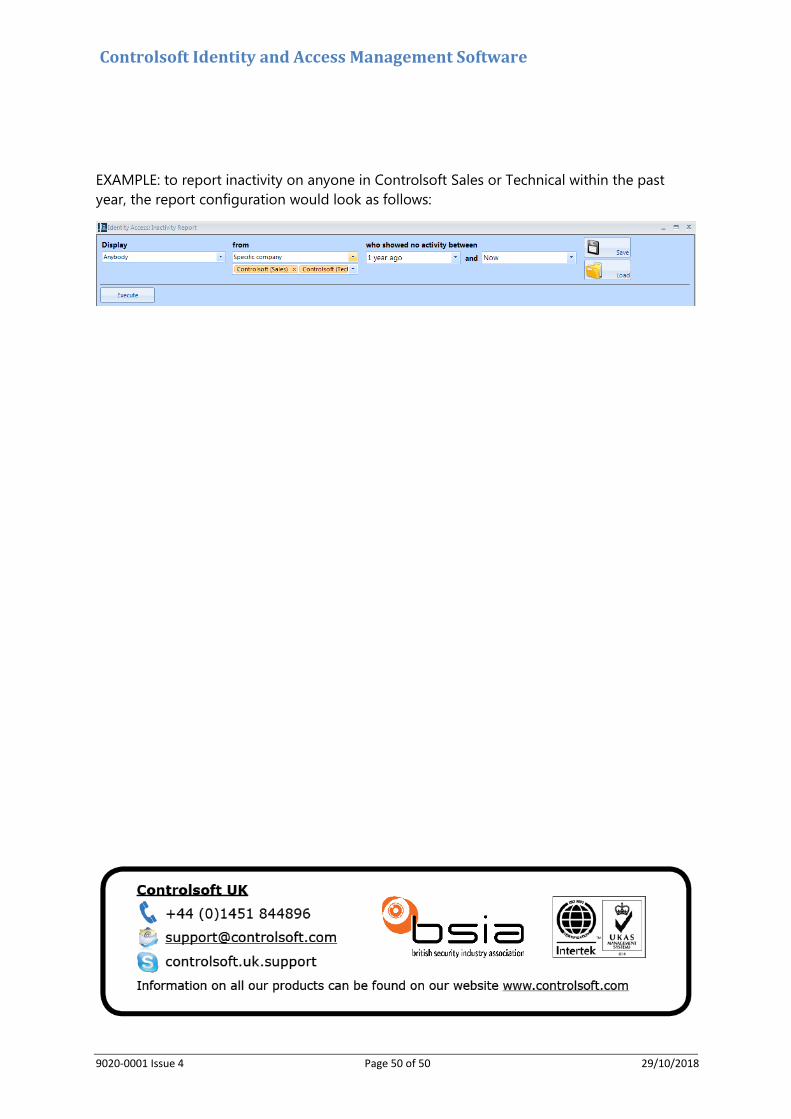
9.6. Inactivity Report
The Inactivity report is used to identify users who are no longer using the system, to allow an
operator to effectively manage the user database.
To run an Inactivity Report, select the Reporting tab.
Now select the Inactivity button to run the report
Display - selects specific users to report on
from - selects specific Companies and Departments to report on
who showed no activity between - selects the time range to report on
Controlsoft Identity and Access Management Software
9020-0001 Issue 4 Page 50 of 50 29/10/2018
EXAMPLE: to report inactivity on anyone in Controlsoft Sales or Technical within the past
year, the report configuration would look as follows: