contents read first connection of equipment …ip54_model... · setting parameters monitoring the...
TRANSCRIPT

E6581429
Operations
Introduction
Contents
Read first
Connection of equipment
Searching and setting parameters
Monitoring the operation status
List of function key functions
Measures to satisfy the standards
Selection of peripheral devices
Table of parameters
Specifications
Safety precautions I
II 1 2 3 4 5 6 7 8 9 10
Instruction Manual
Totally enclosed box type Inverter
TOSVERTTM VF-PS1
NOTICE 1. Make sure that this instruction manual is delivered to the end user of the
inverter unit. 2.This manual gives supplementary information of some items referred in the
instruction manual E6581386 supplied with the product. Read this manual and E6581386 before installing or operating the inverter unit, and store them in a safe place for reference.


E6581429
1
I I. Safety precautions Thoroughly familiarize yourself with the symbols and indications shown in “I. Safety Precautions,” of the instruction manual E6581386 and below, and then continue to read manuals. Make sure that you observe all cautions given.
Transportation & installation
Caution
Mandatory
• Handle the inverter unit with a crane. Lifting heavy inverters can cause injury to persons. Taking care of safety for users, handle carefully in order not to damage the inverter. Carefully lift up the inverter, hanging wires on the hanging bolts or holes on the top or bottom of the inverter.
Note 1: Always keep the two sling ropes in balance when lifting the inverter, and take care that unexpected force does not apply to the inverter during lifting. Note 2: Always protect the inverter with a cover when transporting it. Note 3: Do not put your hand in the wiring port or do not hold it when transporting the inverter. • The main unit must be installed on a base that can bear the unit's weight. If the unit is installed on a base
that cannot withstand that weight, the unit may fall resulting in injury. • Install a mechanical brake whenever the motor requires a brake (device which retains the motor shaft).
Failure to do so could lead to injury to persons because the inverter itself has no function of mechanically retaining the brake shaft.

E6581429
2
II
II. Introduction Thank you for your purchase of the totally enclosed box type for IP54 Inverter, “TOSVERT VF-PS1”. Note) Drives with UL Type 12 conformity are optional. Contact your nearest Toshiba inverter distributor for them.

E6581429
i
- Contents - I. Safety precautions ······················································································································································ 1 II. Introduction ································································································································································ 2 1. Read first····························································································································································· A-1
1.1 Check the product ········································································································································ A-1 1.2 Contents of the product code ······················································································································· A-1 1.3 Structure of the main body ··························································································································· A-2
1.3.1 Names and functions ···························································································································· A-2 1.3.2 Detaching the cover ······························································································································ A-11 1.3.3 Grounding capacitor switching method ································································································· A-12 1.3.4 In case of adopting external braking resistor (Optional)········································································ A-13
1.4 Notes on the application······························································································································· A-14 1.4.1 Installation············································································································································· A-14
2. Connection of equipment ···································································································································· B-1
2.1 Cautions on wiring········································································································································ B-1 2.2 Standard connections··································································································································· B-2 2.3 Description of terminals································································································································ B-3
2.3.1 Main circuit terminals ···························································································································· B-3 3. Operations··························································································································································· C-1
3.1 Settings to be made at first power on··········································································································· C-1 3.2 Setting/monitor modes ································································································································· C-2 3.3 Operation in Top View Mode ························································································································ C-3
3.3.1 Setting a panel operation frequency ····································································································· C-3 3.3.2 Using an EASY key function ················································································································· C-4 3.3.3 Selecting a language to be displayed ··································································································· C-5 3.3.4 Performing jog run ································································································································ C-5 3.3.5 Emergency stop / reset operation ········································································································· C-6
4. Searching and setting parameters······················································································································· D-1
4.1 Searching for the change histories of parameters (History function)···························································· D-1 4.2 Setting a basic parameter ···························································································································· D-2 4.3 Setting an extended parameter ···················································································································· D-3 4.4 Searching for parameters whose setting has been changed (Changed Parameters) ·································· D-4
5. Monitoring the operation status ··························································································································· E-1
5.1 Displaying details of an item monitored········································································································ E-2
6. List of function key functions ······························································································································· F-1 7. Measures to satisfy the standards······················································································································· G-1
7.1 How to cope with the CE standard ··············································································································· G-1 7.1.1 Measures to satisfy the EMC directive·································································································· G-1
7.2 Measures to be taken to satisfy the UL/CSA standards ··············································································· G-4 7.2.1 Cautions as to peripheral devices········································································································· G-4 7.2.2 Conforming to UL Type 12 ···················································································································· G-4
8. Selection of peripheral devices ··························································································································· H-1
8.1 Selection of wiring materials and devices ···································································································· H-1 9. Table of parameters············································································································································· I-1 10. Specifications ······················································································································································ J-1
10.1 Models and their standard specifications ····································································································· J-1 10.2 Outside dimensions and weights·················································································································· J-4


E6581429
A-1
1
1. Read first 1.1 Check the product
Type indicationlabel
Series namePower supplyMotor capacity
Inverter TypeApplicable motorInvert rated output capacityPower supplyRelated input currentRelated output currentSerial No.
Type indication Inverter main unit
Carton box
Name plate
Warning label
VF-PS1 3PH-200/240V 0.75kW/1HP
Type indication
Name plate
Warning label
Instruction manuals (2 volumes)This manual
Risk of injury, electric shock or fire.・ Read the Instruction Manual.・ Do not open the cover while power is applied or
for 15 minutes after power has been removed.・ Ensure proper earth connection.
DANGER
E6581386
Operation panel*1)
*1): Operation panel is not attached to the inverter main unit at the delivery. Refer to 1.3.1 and attach the panel to the unit before installing the inverter.
1.2 Contents of the product code
Explanation of the type and form written on the label. Type Form
V F P S 1 - 4 0 0 7 P L E - W N - A 2 2
Model name
TOSVERTVF-PS1 series
Operation panel
P: Provided
Additional functions II
E: Totally enclosedbox type
Y: Others(non-standard)
Applicable motor capacity
004:0.4kW007:0.75kW015:1.5kW022:2.2kW037:3.7kW055:5.5kW075:7.5kW110:11kW150:15kW
185:18.5kW220:22kW300:30kW370:37kW450:45kW550:55kW750:75kW900:90kW
Voltage class
4: 380V~480V
Specialspecification code
A : Specialspecification code( is a number)
Additional functions I
L: Built-in EMC filter (class A)
+basic filter
D: Built-in EMC filter (class B) +
basic filter
Special specification code
Default interfacelogic (*1)
WN: NegativeWP: Positive
*1): This code represents the factory default logic setting. You can switch from one input/output logic to the other using slide switch SW1. ⇒For more details, refer to the manual E6581386 Section 2.3.2.

E6581429
A-2
1
1.3 Structure of the main body 1.3.1 Names and functions 1) Outside view
[ Front view ] [ Side view ]
[ Bottom view ]
Note: Operation panel is not attached to the inverter main unit at the delivery. Attach the panel at the position of the upper figure before installing the inverter.
Operation panel (Note)
Wiring port plate
Cooling fan

E6581429
A-3
1
Operation panel Totally enclosed box type VF-PS1 series have a special operation panel.
(2) (3) (4) (5)
(1)
(9)(8)
(6)(7)
(10)
(1): LCD panel For explanation of windows displayed, see the next page.
(2) to (5): [F1] to [F4] function keys
The function of each function key varies depending on the window currently displayed. ⇒ Refer to the next page and “6. List of function key functions”
(6): [ESC] key
Each time this key is pressed, modes change from one to another. Also, pressing this key brings you back to the window one level higher in the window hierarchy.
(7): [FWD/REV] key
Each time this key is pressed, the direction of operation changes between forward run and reverse run. (To use this key, parameter settings need to be changed. ⇒ Refer to the next page.)
(8): [RUN] key
The drive starts operation. (To use this key, parameter settings need to be changed. ⇒ Refer to the nest page.)
(9): [STOP/RESET] key
The drive stops operation. (To use this key, parameter settings need to be changed. ⇒ Refer to the next page.) In case the inverter has tripped, pressing this key twice in a row resets the inverter. * If multiple commands are entered by pressing the three keys [F2], [F3] and [F4] or [ESC], [FWD] and [RUN] in rapid succession, a stop command will be issued instead to stop operation.
(10): Control dial
In a menu window, turn the dial clockwise or counterclockwise to select a menu item (the item selected is highlighted) and press the dial to confirm the menu item selected. Turn the dial clockwise (+) to select an item that follows the item currently selected. Turn the dial counterclockwise (-) to select an item that precedes the item currently selected. Selecting a menu item by turning the dial clockwise or counterclockwise and confirm the item selected by pressing the dial are referred to as “select/confirm an item.” In a value setting window, turn the dial clockwise or counterclockwise to increment or decrement the value displayed, and press the dial to confirm the value specified.*1 Turn the dial clockwise (+) to increment the value. Turn the dial counterclockwise (-) to decrement the value. Turning the dial clockwise or counterclockwise to increment or decrement the value displayed and pressing the dial to confirm the value specified are referred to as “specify/confirm a value.” *1: Some settings are executed only by tuning the control dial.

E6581429
A-4
1
LCD panel This section explains the features of windows available, using the top window of Status Monitor Mode as an example.
(1): Displays the mode currently selected. (2): Displays the operating status of the inverter with a graphical symbol. (Rotating) : In operation : Operation impossible (While the frequency is set at 0Hz, the [RUN] key is pressed.) EOFF (blinking) : Waiting for emergency stop operation (3): Displays the title or status of the window. (4): Displays settings both in a menu form and numerically, or a list of various kinds of information. (5): Displays the function assigned to each function key in an abbreviation or graphical symbol. The abbreviations and graphical symbols in the window correspond to the [F1] to [F4] keys, respectively starting from the left. Top : In this example, pressing the [F1] key displays the Top View Mode window.
: In this example, pressing the [F2] key displays the previous window. : In this example, pressing the [F3] key displays the next window.
Prm : In this example, pressing the [F4] key displays the Parameter Setting Mode window. ⇒ For details, refer to “5. List of function key functions”. (6) Graphical symbols displayed vary depending on whether there are windows that precede or follow the current window.
: There are windows that precede and/or follow the current window. : There is no window that precedes or follows the current window.
About changing parameter settings By default, the inverter is set with parameters to the mode in which it controls the operation of the machine via a terminal board. Moreover, the inverter is set so that the switching between forward run and reverse run cannot be performed using its operation panel. To operate the inverter using this unit, parameter settings need to be changed, as described below. Parameter CMOd (Command input mode) = 1 (Pane/LCD-option) Parameter FMOd (Frequency input mode 1) = 4 (Pane/LCD-option) Parameter Fr (Panel FWD/REV selection) = 2 (Forward (switchable)),
3 (Reverse (switchable)) This change of parameter settings makes it possible to start operation using the [RUN] key, to stop operation using the [STOP/RESET] key, and to switch between forward run and reverse run using the [FWD/REV] key. Furthermore, it allows you to set an operation frequency using the control dial. ⇒ Refer to “3.3.1 Setting a panel operation frequency.”
(2)
(3)
(4)
(5)
(6)
(1)
Real-time information
Top Prm
Rotative direction FWDFrequency reference 60.0HzOutput current 90%Input voltage 99%Output voltage 99%
Status Monitor Mode

E6581429
A-5
1
2) Main circuit terminal VFPS1-4007PLE~4022PLE
Grounding capacitorswitching switch
M4 screw
Grounding terminal(M5 screw)
PO PA/+ PB PC/-
U/T1 V/T2 W/T3
R/L1 S/L2 T/L3
VFPS1-4007PDE~4022PDE
M4 screw
Grounding terminal(M5 screw)
PO PA/+ PB PC/-
U/T1 V/T2 W/T3R/L1 S/L2 T/L3
M4 slotted head screw
VFPS1-4037PLE, 4055PLE
Grounding capacitorswitching switch
M4 screw
Grounding terminal(M5screw)
PO PA/+ PB PC/-
V/T2 W/T3T/L3
U/T1R/L1 S/L2

E6581429
A-6
1
VFPS1-4037PDE, 4055PDE
M4 screw
Grounding terminal (M5 screw)
PO PA/+ PB PC/-
W/T3
T/L3
U/T1
R/L1 S/L2
V/T2
M4 slotted headscrew
VFPS1-4075PLE, 4110PLE
Grounding capacitorswitching switch
M5 screw
Grounding terminal(M5 screw)
PO PA/+ PB PC/- V/T2 W/T3T/L3 U/T1R/L1 S/L2
VFPS1-4075PDE, 4110PDE
M5 screw
Grounding terminal(M5 screw)
PO PA/+ PB PC/- W/T3
T/L3
U/T1
R/L1 S/L2
V/T2
M4 slotted head screw

E6581429
A-7
1
VFPS1-4150PLE
Grounding capacitorswitching switch M5 screw
Grounding terminal(M5 screw)
W/T3V/T2U/T1PC/-PBPA/+POT/L3S/L2R/L1
VFPS1-4150PDE
M5 screw
Grounding terminal(M5 screw)
W/T3V/T2U/T1PC/-PBPA/+PO
T/L3S/L2
R/L1
M4 slotted head screw
Grounding terminal(M6 screw)
VFPS1-4185PLE, 4220PLE
Grounding capacitorswitching switch
M6 screw
grounding terminal(M5 screw)
W/T3V/T2U/T1PC/-PBPA/+POT/L3S/L2R/L1

E6581429
A-8
1
VFPS1-4185PDE, 4220PDE
M6 screw
Grounding terminal(M5 screw)
W/T3V/T2U/T1PC/-PBPA/+PO
T/L3S/L2
R/L1
Grounding terminal(M6 screw)
M5 slotted head screw
VFPS1-4300PLE
Grounding capacitorswitching switch
M10 hexagon socket set screw
Grounding terminal(M10 hexagon socket set screw)
PA/+PO
Grounding terminal(M5 screw)
VFPS1-4300PDE
M5 slotted head screw
M10 hexagon socket set screw
Grounding terminal(M10 hexagon socket set screw)
PA/+PO
Grounding terminal(M5 screw)Grounding terminal(M6 screw)
S/L2R/L1 T/L3
E6581429
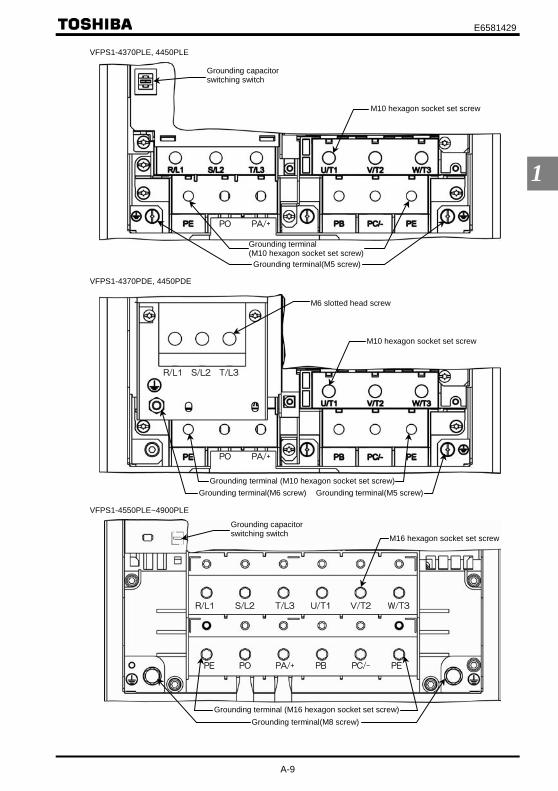
A-9
1
VFPS1-4370PLE, 4450PLE
Grounding capacitorswitching switch
M10 hexagon socket set screw
Grounding terminal(M10 hexagon socket set screw)
PA/+PO
Grounding terminal(M5 screw) VFPS1-4370PDE, 4450PDE
M6 slotted head screw
M10 hexagon socket set screw
Grounding terminal (M10 hexagon socket set screw)
PA/+PO
Grounding terminal(M5 screw)Grounding terminal(M6 screw)
S/L2R/L1 T/L3
VFPS1-4550PLE~4900PLE
Grounding capacitorswitching switch M16 hexagon socket set screw
Grounding terminal (M16 hexagon socket set screw)
PA/+PO
Grounding terminal(M8 screw)
PC/-PBPE PE
T/L3S/L2 V/T2U/T1R/L1 W/T3

E6581429
A-10
1
VFPS1-4550PDE~4900PDE
M20 hexagon socket head cap screw
M16 hexagon socket set screw
grounding terminal(M16 hexagon socket set screw)
PA/+PO
grounding terminal(M8 screw)
PC/-PBPE PE
T/L3S/L2
V/T2U/T1
R/L1
W/T3
Following power terminals are cage type ones. - Input terminals of VFPS1-4007PDE to 4220PDE - All power terminals of VFPS1-4300PLE to 4900PLE, VFPS1-4300PDE to 4900PDE For tightening torque and cable stripping length, refer to the table below.
Input terminals R/L1, S/L2, T/L3
DC terminals and Output terminals P0, PA/+, PB, PC/-, U/T1, V/T2, W/T3
Grounding terminals *1)
Tightening torque Stripping length Tightening torque Stripping
length Tightening torque Stripping length
Type VFPS1-
N·m lb·ins mm N·m lb·ins mm mm 4300PLE 24 212 22 24 212 22 24 212 22 4370PLE, 4450PLE 24 212 22 24 212 22 24 212 22 4550PLE~4900PLE 41 360 34 41 360 34 41 360 34 4007PDE~4022PDE 0.7 6.3 8 - - - - - - 4037PDE, 4055PDE 0.7 6.3 8 - - - - - - 4075PDE, 4110PDE 1.7 15.2 9 - - - - - - 4150PDE 1.7 15.2 11 - - - - - - 4185PDE, 4220PDE 2.2 19.6 16 - - - - - - 4300PDE 4.3 38.4 19 24 212 22 24 212 22 4370PDE, 4450PDE 7 62.6 24 24 212 22 24 212 22 4550PDE~4900PDE 25 221 27 41 360 34 41 360 34
*1) For 4300PLE to 4900PLE and 4300PDE to 4900PDE, these values are for PE terminals (cage type ones). Refer to following table for tightening torque for other grounding terminals.
Recommended tightening torque for power terminal screws
N·m lb·ins M 3 0.6 5.3 M 4 1.4 12.4 M 5 3.0 26.6 M 6 5.4 47.8 M 8 12.0 106 M10 24.0 212 M12 41.0 360

E6581429
A-11
1
1.3.2 Detaching the cover
Danger
Mandatory
• Never remove the front cover while power is on or within 15 minutes after power off. Never turn on the power while the front cover is open. Circuit boards are exposed when the front cover is removed and contact with them will result in electric shock.
• The following steps must be performed before wiring. (1) Turn off all input power to the inverter. (2) Wait at least 15 minutes, and remove screws on front cover and open the front cover. In this step, take care not to touch inside the inverter drive. (3) Check that the charge lamp is no longer lit, and remove the front cover. (4) Use a tester that can measure DC voltage 800VDC or more, and check to make sure that
the voltage to the DC main circuits (between PA/+ and PC/-) is 45V or less. If these steps are not properly performed, the wiring will cause electric shock.
Front cover
Before removing the front cover in order to wire for power terminals or control terminals, detach the cable for operation panel as shown below. After wiring, connect the cable for operation panel to its original location before closing front cover. Note) Attach the front cover correctly. Imperfect attachment may result in failure of IP54 compliance.
3) Detach the cable for operation panel
1) Remove screws 2) Open the front cover

E6581429
A-12
1
Charge lamp Charge lamp is inside the unit front cover open. Never remove the front cover while power is on or within 15
minutes after power off, nor turn on the power while the front cover is open. They can result in electric shock. Location of charge lamp depends on type form.
1.3.3 Grounding capacitor switching method
The inverter is grounded through a capacitor. The leakage current from the inverter can be reduced using the switching switch on the main circuit terminal board. This switching device is used to detach the capacitor from the grounding circuit or to reduce its capacitance. Some models have capacitors that can be detached completely, while others have capacitors whose capacitances can be reduced. VFPS1-4007PDE to 4220PDE don’t have this switch. Note 1: Please note that, without the capacitor, the inverter does not comply with the EMC directive.
With default setting, PLE type drives comply with EN55011 class A, and PDE type drives comply with EN55011 class B. For detailed information, refer to 7.1.1.
Note 2: When attaching or detaching the capacitor, be sure to turn off power.
VFPS1-4007PLE~4220PLE
Danger
Prohibited
If you are using one of VFPS1-4007PLE~4055PLE inverter, or one of 4075PLE~4220PLE inverter with the cable between inverter to the motor which length is 100m or more, in case of detaching the grounding capacitor, be sure to set the carrier frequency (CF) at 4kHz or less. If the carrier frequency is set above 4kHz, internal parts of the inverter may overheat and be damaged.
A switch enables to detach the grounding capacitor. However, if you are using one of VFPS1-4007PLE~4055PLE inverter, or one of 4075PLE~4220PLE inverter with the cable between inverter to the motor which length is 100m or more, detaching the grounding capacitor must be followed with setting the carrier frequency (CF) at 4kHz or less. Be sure to read the above precaution.
*1: For 4007PLE~4055PLE inverter, the
switch is fixed with a label saying “CF/SFr 4kHz”. If such a label is affixed to your inverter, you should set the carrier frequency (CF) at 4kHz or less according to the instructions when switching.
VFPS1-4007PLE~4220PLE VFPS1-4007PDE~4220PDE
VFPS1-4300PLE~4900PLE VFPS1-4300PDE~4900PDE
To connect and groundthe capacitor, push inthe button.
Pull up this part to detachthe capacitor to prevent itfrom being grounded.
*1
*1
Charge lamp
Charge lamp

E6581429
A-13
1
VFPS1-4300PLE~4900PLE A switch or switches enable to reduce grounding capacitance.
VFPS1-4007PDE~4220PDE There is no switch.
VFPS1-4300PDE~4900PDE A switch enables to reduce grounding capacitance.
1.3.4 In case of adopting external braking resistor (Optional) To wire for external braking resistor, an attention is needed because PA/+ terminal have a wiring to the internal DC reactor. Refer to followings when you wire for external braking resistor.
0.75~22kW With reference of the figure right, make the each solderless terminal in back to back and fasten them with the screw.
30~90kW Fasten with the screw both of copper bar connected to the PA/+ terminal and the stripped cable for external braking resistor.
To change the capacitance from small to large, push in the button. (Factory default position)
To change the capacitance from large to small, pull up the button.
*2: VFPS1-4300PLE have two switches. ⇒ For details, refer to main circuit terminal
*2
Large Small
Large Small
To change the capacitance from small to large, slide the switch in direction shown left. (Factory default position)
To change the capacitance from large to small, slide the switch in direction shown left.
Large Small
Large Small
PA/+ terminal screw
Wiring to the internal DC reactor Wiring to the external braking resistor
E6581429
A-14
1
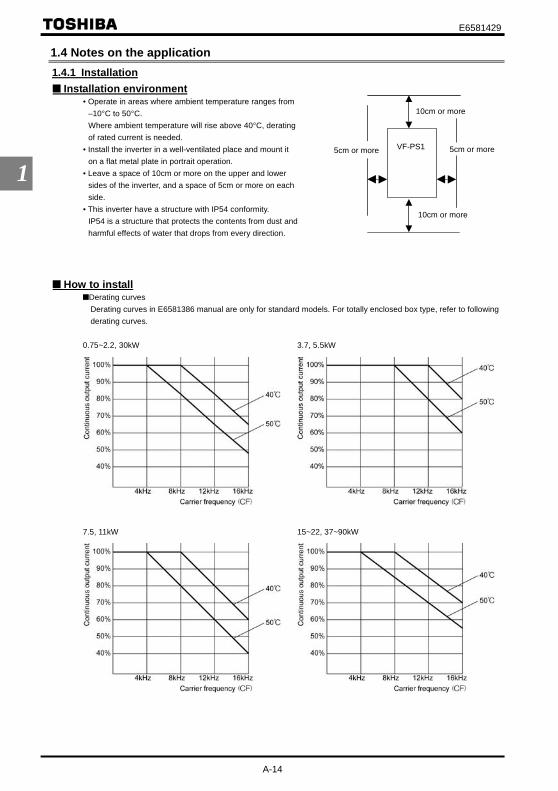
1.4 Notes on the application 1.4.1 Installation
Installation environment • Operate in areas where ambient temperature ranges from
–10°C to 50°C. Where ambient temperature will rise above 40°C, derating of rated current is needed.
• Install the inverter in a well-ventilated place and mount it on a flat metal plate in portrait operation.
• Leave a space of 10cm or more on the upper and lower sides of the inverter, and a space of 5cm or more on each side.
• This inverter have a structure with IP54 conformity. IP54 is a structure that protects the contents from dust and harmful effects of water that drops from every direction.
How to install Derating curves Derating curves in E6581386 manual are only for standard models. For totally enclosed box type, refer to following derating curves.
0.75~2.2, 30kW 3.7, 5.5kW
7.5, 11kW 15~22, 37~90kW
5cm or more 5cm or more
10cm or more
10cm or more
VF-PS1

E6581429
B-1
2
2. Connection of equipment 2.1 Cautions on wiring
Wiring • Following power terminals are cage type ones.
- Input terminals of VFPS1-4007PDE to 4220PDE - All power terminals of VFPS1-4300PLE to 4900PLE, VFPS1-4300PDE to 4900PDE For tightening torque and cable stripping length, refer to 1.3.1 2).
• For power terminal other than above, use sleeved pressure terminal to connect. This is because the space between terminals is small. Connect sleeved pressure terminals so that adjacent terminals do not touch each other.
• For ground terminal, use wires of the size that is equivalent to or larger than those given in table below and always ground the inverter. Use as large as and short a ground wire as possible and wire it as close as possible to the inverter.
Voltage class Applicable Motor Grounding wire size (AWG) [Note]
Grounding wire size (mm2) [Note]
0.75~7.5kW 14 2.5 11kW 12 4 15, 18.5kW 10 6 22kW 10 10 30~45kW 4 16 55, 75kW 2 35
400V
90kW 2 50 Note1: The recommended cable size is that of the cable (e.g. 600V class, HIV cable) with continuous maximum
permissible temperature of 75°C. The ambient temperature is assumed to be 40°C or below. (The interconnect cable length is assumed to be 30m or less.)

E6581429
B-2
2
2.2 Standard connections [Standard connection diagram – sink logic]
The figure below shows an example of typical wiring in the main circuit 200V 0.4-45kW/400V 0.75-75kW inverter. This inverter has following three setting/monitor modes.
*1: A DC reactor (DCL) is incorporated in the position shown the figure above. External DC reactor cannot be used. *2: For 30kW to 90kW drives, an additional DC reactor is incorporated in the position shown the figure above. *3: The noise filter is built in. *4: External braking resistor (option). Dynamic braking drive circuit (GTR7) is built-in as standard. *5: To supply a DC power, connect the cables to the PA/+ and PC/- terminals. *6: If you want to use a DC power supply to operate 30kW or more inverters, be sure to contact your supplier
customer support center, because an inrush current limiting circuit is required in such a case. *7: ⇒ Refer to Section 2.3.2 of instruction manual E6581386 for each switch functions. *8: The functions assigned to terminals OUT1, VI/II and RR/S4 can be switched by changing parameter settings.
⇒ For details, refer to Section 2.3.2 of instruction manual E6581386. *9: To supply control power from an external power supply for backing up the control power supplied from the
inverter, an optional control power backup device (CPS002Z) is required. In such a case, the backup device is used at the same time with the internal power supply of the inverter. To back up control power, set the parameter F647 (Control power supply backup option failure monitoring) properly. ⇒ For more information, refer to 6.33.22 of instruction manual E6581386.
*10: For PWR connection conforming to safety standards, refer to Section 9.3 of instruction manual E6581386.

E6581429
B-3
2
[Standard connection diagram – source logic] The figure below shows an example of typical wiring in the main circuit 200V 0.4-45kW/400V 0.75-75kW inverter. This inverter has following three setting/monitor modes.
*1: A DC reactor (DCL) is incorporated in the position shown the figure above. External DC reactor cannot be used. *2: For 30kW to 90kW drives, an additional DC reactor is incorporated in the position shown the figure above. *3: The noise filter is built in. *4: External braking resistor (option). Dynamic braking drive circuit (GTR7) is built-in as standard. *5: To supply a DC power, connect the cables to the PA/+ and PC/- terminals. *6: If you want to use a DC power supply to operate 30kW or more inverters, be sure to contact your supplier
customer support center, because an inrush current limiting circuit is required in such a case. *7: ⇒ Refer to Section 2.3.2 of instruction manual E6581386 for each switch functions. *8: The functions assigned to terminals OUT1, VI/II and RR/S4 can be switched by changing parameter settings.
⇒ For details, refer to Section 2.3.2 of instruction manual E6581386. *9: To supply control power from an external power supply for backing up the control power supplied from the
inverter, an optional control power backup device (CPS002Z) is required. In such a case, the backup device is used at the same time with the internal power supply of the inverter. To back up control power, set the parameter F647 (Control power supply backup option failure monitoring) properly. ⇒ For more information, refer to 6.33.22 of instruction manual E6581386.
*10: For PWR connection conforming to safety standards, refer to Section 9.3 of instruction manual E6581386.

E6581429
B-4
2
2.3 Description of terminals 2.3.1 Main circuit terminals
This diagram shows an example of wiring of the main circuit. Use options if necessary.
Power supply and motor connections
Power supply
S/L2 T/L3 MotorNo-fusebreaker
Connect the powercables to RL1, S/L2,and T/L3.
Connect the motorcables to U/T1, V/T2and W/T3.
VF-PS1
E
U/T1 V/T2 W/T3R/L1
Connection with peripheral equipment
Motor
Zero-phasereactor
Powersupply
Inverter
Braking resistor [Note]
Surgesuppressing filter
Simplifiedradio noisefilter
High-attenuationradio noisereduction filter
Input ACreactor
Magneticcontactor
No-fusebreaker
R/L1
S/L2
T/L3
P0 PA/+ PB
V/T2
U/T1
W/T3
IM
Note) This inverter have DC reactor included, and have advantage of reducing input current, reducing harmonics and
power factor improvement. So, no DC reactor option is available. In case of requirement of additional reduction of harmonics or more power factor improvement, input AC reactor is recommended.
Main circuit Terminal symbol Terminal function
Grounding terminal for inverter casing
R/L1, S/L2, T/L3 Power input terminal 0.75~110kW Three-phase 380~480V-50/60Hz
U/T1, V/T2, W/T3 Connect to a (3-phase induction) motor.
PA/+, PB Connect a braking resistor. Change the parameters Pb, Pbr and PbCP if necessary.
PC/- This is a negative potential terminal in the internal DC main circuit. DC power supply can be input across the PA/+ terminals (positive potential). (For 400V-30kW or more models, an optional circuit is needed to suppress a rush current.)
PO Do not use.
, PE
E6581429
C-1
3
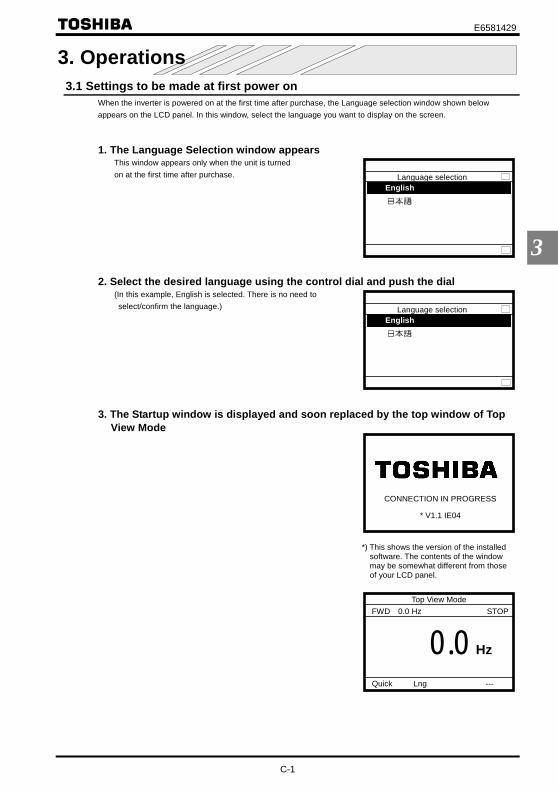
3. Operations 3.1 Settings to be made at first power on
When the inverter is powered on at the first time after purchase, the Language selection window shown below appears on the LCD panel. In this window, select the language you want to display on the screen.
1. The Language Selection window appears
This window appears only when the unit is turned on at the first time after purchase.
2. Select the desired language using the control dial and push the dial
(In this example, English is selected. There is no need to select/confirm the language.)
3. The Startup window is displayed and soon replaced by the top window of Top View Mode
Top View Mode FWD 0.0 Hz STOP
0.0 Hz
Lng Quick ---
Language selection English
CONNECTION IN PROGRESS
* V1.1 IE04
*) This shows the version of the installed software. The contents of the window may be somewhat different from those of your LCD panel.
Language selection
English

E6581429
C-2
3
3.2 Setting/monitor modes This inverter has following three setting/monitor modes. (1) Top View Mode
When the inverter is powered on, it enters this mode first. The top window displays the operating status. In this mode, you can set a panel operation frequency, use a function key as the EASY key, and so on. ⇒ Refer to “3.3. Operation in Top View Mode”.
(2) Parameter Setup Mode This mode allows you to set parameters. ⇒ Refer to “4. Searching and setting parameters”.
(3) Status Monitor Mode This mode allows you to monitor various kinds of statuses and information, such as the operating status of the inverter and information on the terminal board. ⇒ Refer to “5. Monitoring the operation status”.
The figures below show the top windows of these modes. To change from one mode to another, press the [ESC] key.
*) When Quick mode is selected with the EASY key, other windows are displayed.
Parameter Setup Mode
Parameter Setup Mode Category Selection
Top Mon
History function Basic Parameters Extended Parameters Changed Parameters
ESC
Top View Mode FWD 60.0 Hz STOP
0.0 Hz
Lng Quick ---
Top View Mode
Status Monitor Mode
Real-time information
Top Prm
Rotative direction FWDFrequency reference 60.0HzOutput current 0%Input voltage 99%Output voltage 0%
Status Monitor Mode
ESC
ESC

E6581429
C-3
3
3.3 Operation in Top View Mode When the inverter is powered on, it enters this mode first, which allows you to monitor the operating status, set an operation frequency, use EASY key, and switch between languages. When Panel Jog Run is selected, a jog run frequency also can be specified in this mode.
Explanation of the top window • Display of commands executed:
“FWD” or “REV” is displayed to indicate the direction of rotation. The operation frequency is displayed in the form of “ . Hz”.
• Display of operating status: “RUN” is displayed during operation. “STOP” is displayed during a stop. “Trip” is displayed in the event of tripping.
• Display of output frequency: The operation frequency is displayed in the form of “ . Hz”.
• Display of alarm/trip: In case of alarm or trip, Its code is displayed.
• Display of alarm/trip information: In case of alarm or trip, Its information is displayed.
Functions of function keys
: Switches between Quick mode and Standard Setting mode.
: Goes to the Language selection window.
3.3.1 Setting a panel operation frequency Only when Frequency input mode selection 1 (parameter “FMOd”) is set at “4”, panel operation frequency setting is activated. 1. Press the control dial.
The panel frequency window appears. The current operation frequency setting is displayed at the center of the window. The current output frequency is displayed in the upper right section of the window. The minimum allowable frequency (min) and the maximum allowable frequency (max) are displayed at the bottom of the window. Functions of function keys The functions keys allow you to select the position or decimal place of each figure (operation frequency) you want to increment or decrement with the control dial.
: Selects the position of 1000 times of minimum setting unit.
: Selects the position of 100 times of minimum setting unit.
: Selects the position of 10 times of minimum setting unit.
: Selects the position of minimum setting unit (In this case, 0.1).
F1
F2
F1
F2
F3
F4
Top View Mode
FWD 60.0 Hz RUN
60.0 Hz
Overheat alarm
Lng Quick ---
Display of commands executed
Display of operating status
Display of output frequency
Display of alarm/trip
Display of alarm/tripmessage
F1 F2
Basic Parameters
FC
×100 ×1000 ×10 ×1
Output frequency 0.0Hz
0.0Hz min=0.0 max=60.0
Panel frequency
F1 F2 F3 F4

E6581429
C-4
3
2. After selecting the position of a figure you want to change, specify/confirm a value with the control dial.
(In this example, 30.0Hz is specified.) Functions of function keys The functions keys allow you to select the position or decimal place of each figure (operation frequency) you want to increment or decrement with the control dial.
: Selects the position of 1000 times of minimum setting unit.
: Selects the position of 100 times of minimum setting unit.
: Selects the position of 10 times of minimum setting unit.
: Selects the position of minimum setting unit (In this case, 0.1). When you confirm the value specified, the screen goes back to the top window of Top View Mode.
To change the frequency during operation Press the control dial during operation to display the operation panel operation frequency menu and turn the control dial to change the setting.
3.3.2 Using an EASY key function
The [F1] function key can be used as a substitute for the EASY key described in the manual E6581386 5.22. The name of the function assigned to the [F1] key is displayed in the lower left corner of the window, and the [F1] key can be used as the EASY key. “Quick” : Quick mode / standard setting mode switching
(F750=0) “Loc/Rem” : Local / Remote key (F750=2) “Update” : Monitor peak / minimum hold trigger (F750=3) * Shortcut key function (F750=1) cannot be used. Even if the
parameter is set so, the name of the function is not displayed on the screen.
(1) Quick mode / standard setting mode switching function
<Standard Setting mode is selected at power on (parameter PSEL=0)> • When power is turned on, ”Quick” is displayed. ([F1] key is in OFF State)
In this case, top window of Parameter Setup Mode is ordinary one. • If the [F1] key is pressed while “Quick” is displayed, it turns to highlighted “ Quick ”. ([F1] key is in ON State)
In this case, the Quick mode window appears as the top window of Parameter Setup Mode.
<Quick mode is selected at power on (parameter PSEL=1)> • When power is turned on, highlighted “ Quick ” is displayed. ([F1] key is in OFF State)
In this case, the Quick mode window appears as the top window of Parameter Setup Mode. • If the [F1] key is pressed while “ Quick ” is displayed, it turns to normal “Quick”. ([F1] key is in ON State)
In this case, top window of Parameter Setup Mode is ordinary one. <Always Quick mode (parameter PSEL=2)> • Highlighted “ Quick ” is displayed.
The Quick mode window appears as the top window of Parameter Setup Mode. * In this case, [F1] key is not active.
Basic Parameters
FC
×1000 ×10 ×1
Output frequency 0.0Hz
30.0Hz min=0.0 max=60.0
Panel frequency
×100
F1 F2 F3 F4
F1
F2
F3
F4
Quick Loc/Rem Update
Top View Mode
FWD 60.0 Hz STOP
0.0 Hz
Lng Quick ---

E6581429
C-5
3
(2) Local / Remote key function • “Loc/ Rem ” is displayed. ([F1] key is in OFF State)
In this state, remote controlled operation via terminal board is available. • If the [F1] key is pressed while “Loc/ Rem ” is displayed, it turns to “ Loc /Rem”. ([F1] key is in ON State)
In this state, local operation with operation panel is available. There is no need to switch to local operation mode by changing parameter settings. * [F1] key is not active while the drive is operating.
(3) Monitor peak / minimum hold trigger function
• “Update” is displayed. ([F1] key is in OFF State) In this case, the instant the [F1] key is pressed a measurement for peak / minimum hold starts. While the [F1] key is pressed, highlighted “ Update ” is displayed. ([F1] key is in ON State)
3.3.3 Selecting a language to be displayed A language to be displayed on the screen can be selected between Japanese and English. In this window, the language selected at the first power on can also be changed to the other language. 1. Press the [F2] (Lng) key.
The Language selection window appears on the screen. The language selected is highlighted and marked with a checkmark. Functions of function keys
: Goes to the Top View Mode. 2. Select/confirm the desired language with the control dial.
(In this example, Japanese is selected.) Functions of function keys
: Goes to the Top View Mode.
3.3.4 Performing jog run When Panel Jog Run is selected (parameter F262=1, CMOd=1), “JOG” is displayed in the lower right corner of the window. When “JOG” is displayed, jog run can be performed using the [F4] key. The switching to jog run cannot be performed during operation. When switching to Jog Run mode, operation has to be stopped temporarily.
F1
Language selection
V English
Top
F1
Language selection
V English
Top
F1
F1
Top View Mode
FWD 60.0 Hz STOP
0.0 Hz
LngQuick JOG

E6581429
C-6
3
1. Press the [F4] key to carry out jog run. The jog run frequency is displayed on the screen. (In this example, the operation frequency is set at 5.0Hz.) Operation continues as long as the [F4] key is pressed, and it stops when the [F4] key is released. Functions of function keys
: Switches between Quick mode and Standard Setting mode.
: Goes to the Language selection window.
: Executes a jog run command.
3.3.5 Emergency stop / reset operation To make an emergency stop or to reset the inverter, follow these steps. An emergency stop can be made when operation is performed with the terminal board inputs (parameter CMOd=0, 2, 3 or 4). 1. Press the [STOP/RESET] key.
Blinking code “ EOFF ” is displayed in the upper right corner of the window.
2. Then press the [STOP/RESET] key again.
The Emergency Stop window appears and the blinking code “E” is displayed.
3. Then press the [STOP/RESET] key again.
The Trip window appears and the blinking code “CLr” is displayed.
4. Last of all, press the [STOP/RESET] key once again to reset the inverter.
F1
F2
F4
Top View Mode
FWD 60.0 Hz JOG
5.0 Hz
LngQuick JOG
F1 F2 F4
Top View Mode EOFF
FWD 60.0 Hz RUN
60.0 Hz
Emergency stop?
LngQuick ---
Top View Mode
FWD 60.0 Hz Trip
E Emergency stop
LngQuick ---
Top View Mode
FWD 60.0 Hz Trip
CLr Trip reset? (STOP-Key)
LngQuick ---

E6581429
D-1
4
4. Searching and setting parameters In the Parameter Setup Mode, you can set basic parameters and extended parameters. This mode also allows you to use the history function (parameter “auh” in the manual E6581386) and the changed parameter search function (parameter “gru” in the manual E6581386) easily by simply selecting the desired function from a menu. Functions of function keys
: Goes to the Top View Mode.
: Goes to the Status Monitor Mode.
When Quick mode is selected The window shown in the figure right appears when Quick mode is selected. This window displays the parameter currently selected for Quick mode. Functions of function keys
: Goes to the Top View Mode.
: Displays the previous window.
: Displays the next window.
: Goes to the Status Monitor Mode.
4.1 Searching for the change histories of parameters (History function) The change histories of recent 5 parameters can be displayed in a list form. 1. Select/confirm “History function” using the control dial.
The change histories beginning at the latest one are displayed. If the number of change histories exceeds 5, the oldest history is deleted. Functions of function keys
: Goes to the Top View Mode.
In this window, settings can be changed. By pressing the control dial, it displays the parameter setting window, in which you can change settings as required. ⇒ For the steps to be followed, see the following pages.
F1
F2
F3
F4
F1
F4
F1
Parameter Setup Mode Category Selection
Top Mon
History function Basic Parameters
Extended Parameters
Changed Parameters
Parameter Setup Mode
Mon
Quick mode
Top
AU4 :Automatic function set Pt :V/f control mode FH :Maximum frequency ACC :Acceleration time 1 DEC :Deceleration time 1
F1 F4
F1 F2 F3 F4

E6581429
D-2
4
4.2 Setting a basic parameter When Quick mode is selected using the EASY key function, skip step 1. Go straight to step 2. 1. Select/confirm “Basic parameters” using the control dial.
The Basic Parameters window appears. Functions of function keys
: Goes to the Top View Mode.
: Displays the previous window.
: Displays the next window.
2. Select/confirm the parameter you want to change, using the control dial. (Ex. Select/confirm “Command input mode” and “Base frequency 1.”) The Parameter Setting window appears. If the selected parameter is changed by selecting a menu item, the menu item selected is highlighted and marked with a checkmark. Functions of function keys
: Displays the previous window.
: Displays the next window. If the selected parameter is changed by specifying a value, the value specified is displayed. In addition, the minimum allowable value (min) and the maximum allowable value (max) are displayed at the bottom of the window. Functions of function keys The functions keys allow you to select the position or decimal place of each figure (operation frequency) you want to increment or decrement with the control dial.
: Selects the position of 1000 times of minimum setting unit.
: Selects the position of 100 times of minimum setting unit.
: Selects the position of 10 times of minimum setting unit.
: Selects the position of minimum setting unit (In this case, 0.1).
F1
F2
F3
F2
F3
F1
F2
F3
F4
Parameter Setup Mode
Basic Parameters
Top
AU1 :Automatic acc/dec AU2 :Automatic torque boost AU4 :Automatic function set CMOd :Command input mode FMOd :Frequency input mode 1
F1 F2 F3
• If the setting selected is changed by specifying a value
Basic Parameters
vL
min=25.0 max=500.0
×100 ×1000 ×10 ×1
60.0 Hz
Base frequency 1
• If the setting selected is changed by selecting a menu item
Basic Parameters
CMOd
Command input mode
0 :Terminal 口
1 :Panel / LCD-option 2 :RS485-2wire 3 :RS485-3wire
∨
F2 F3
F1 F2 F3 F4

E6581429
D-3
4
3. Using the control dial, select/confirm an item or specify/confirm a value. (In this example, “Panel / LCD-option” is selected and confirmed or frequency of 90.0Hz is specified and confirmed.) When the change you made is saved, the title of the parameter stops blinking and the screen returns to the previous window.
4.3 Setting an extended parameter 1. Select/confirm “Extended parameters” using the control dial.
The Extended Parameters window appears. Functions of function keys
: Displays parameters in the number range of 900. The number displayed decrements each time this key is pressed.
: Displays the previous window.
: Displays the next window.
: Displays parameters in the number range of 900. The number displayed increments each time this key is pressed.
2. Change the parameter setting.
To do this, perform steps 2 and 3 in the “3.2 Setting a basic parameter” section.
F1
F2
F3
F4
• If the setting selected is changed by specifying a value
Basic Parameters
vL
×100 ×1000 ×10 ×1
90.0 Hz
Base frequency 1
min=25.0 max=500.0
• If the setting selected is changed by selecting a menu
Basic Parameters
CMOd
Command input mode
0 :Terminal 1 :Panel / LCD-option 口 2 :RS485-2wire 3 :RS485-3wire
∨
Parameter Setup Mode
Extended Parameters
F9-- F2--
F100 :Low-speed signal freq F101 :Speed reach frequency F102 :Speed reach freq band F105 :Priority of FWD/REV F106 :Input terminal priority
F1 F2 F3 F4

E6581429
D-4
4
4.4 Searching for parameters whose setting has been changed (Changed Parameters) This function displays parameters whose current settings are different from their default settings, and their present settings. 1. Select/confirm “Changed Parameters” using the control dial.
The Changed Parameters window appears. Functions of function keys
: Goes to the Top View Mode.
: Displays, in reverse order, parameters whose setting were changed.
: Displays, in normal order, parameters whose setting were changed.
2. Search for the desired parameter by pressing the [F3] or [F4] key repeatedly. The title, function and current setting of the parameter selected are displayed. Functions of function keys
: Goes to the Top View Mode.
: Displays, in reverse order, parameters whose setting were changed.
: Displays, in normal order, parameters whose
setting were changed.
In this window, settings can be changed. By pressing the control dial, it displays the parameter setting window, in which you can change settings as required. ⇒ For the steps to be followed, see the previous sections.
F1
F3
F4
F1
F3
F4
Parameter Setup Mode
Changed Parameters
Top Back Next
[ U - - - ] Waiting for search
Parameter Setup Mode
Changed Parameters
Top Back Next
[ CMOd ] Command input mode
1 :Panel / LCD-option
F1 F3 F4
F1 F3 F4

E6581429
E-1
5
5. Monitoring the operation status In the Status Monitor Mode, you can monitor various kinds of statuses and information, such as the operating status of the inverter, information on the terminal board, and trip information. Functions of function keys
: Goes to the Top View Mode.
: Displays the previous window.
: Displays the next window.
: Goes to the Parameter Setup Mode. Here are the items that can be monitored in this mode and an explanation of them.
Items displayed Description Display of details
Rotative direction Rotating direction -
Frequency reference *1 Set item of parameter F711 and its current value
v
Output current *1 Set item of parameter F712 and its current value
v
Input voltage *1 Set item of parameter F713 and its current value
v
Output voltage *1 Set item of parameter F714 and its current value
v
Input terminal 1 : S4,S3…R,F Input terminal board information (Standard terminal board)
v
Input terminal 2 : L8,L7…L2,L1 Input terminal board information (Optional terminal board)
v
Output terminal 1 : FL,OUT1,OUT2 Output terminal board information (Standard terminal board)
v
Output terminal 2 : R4,R3…OT4,OT3Output terminal board information (Optional terminal board)
v
Version of APP-CPU CPU2 version information (Application) - Version of MOT-CPU CPU2 version information (Motor) - Past trip # 1 (latest) Trip history information 1 (latest) v Past trip # 2 Trip history information 2 v Past trip # 3 Trip history information 3 v Past trip # 4 Trip history information 4 v Parts replacement alarm Parts replacement alarm information v Cumulative run time Cumulative run time informatiton -
*1: The display item shows the case of a default setting.
F1
F2
F3
F4
Status Monitor Mode
Real-time information
Top Prm
Rotative direction FWD
Frequency reference 60.0Hz Output current 22% Input voltage 99% Output voltage 50%
F1 F2 F3 F4

E6581429
E-2
5
5.1 Displaying details of an item monitored 1. Select/confirm the desired item using the control dial.
(Ex. Select/confirm “Output current”) The monitor window of the item selected appears. * Depending on the item selected, no monitor window may be displayed. Functions of function keys
: Goes to the Top View Mode.
: Goes to the Parameter Setup Mode.
How to use monitor windows Monitor windows can be broadly classified under the following three types <Type of window 1: Displays a value and a graph> This type of window displays an analog value, such as an output frequency, output current or output voltage. (Ex. “Output current”) It displays the current value in both of numerical form and graph form. In addition, the minimum allowable value (min) and the maximum allowable value (max) are also displayed at the bottom of the window. <Type of window 2: Displays information in a graph form> This type of window displays input/output terminal information and parts replacement alarm. (Ex. “Input terminal : S4, S3...R, F”) It displays the ON/OFF status of each terminal signal or alarm signal in a graph form. If the arrow is moved to a terminal or alarm symbol, the name of the function assigned to the terminal or the name of the alarm is displayed. <Type of window 3: Displays information in a list form> This type of window displays detailed past trip information. (Ex. Past trip # 1 (latest)) It displays the conditions under which the inverter was operated at the occurrence of tripping.
F1
F4
Status Monitor Mode
Input terminal 1 : S4,S3…R,F
ON OFF
Forward run
Top Prm
S4 S3 S2 S1 RES ST R F
Past trip # 1 (latest) E :Emergency stop
Sequence number 1 Output frequency 25.0Hz Rotative direction FWD Frequency reference 30.0Hz Output current 40%
Top Prm
Output current
min=0 max=185 Top Prm
22%
Status Monitor Mode
Output current
min=0 max=185 Top Prm
22%
Status Monitor Mode

E6581429
F-1
6
6. List of function key functions Each function key is corresponding to the function whose abbreviation or graphic symbol is displayed at the bottom of the window and over the key. And by pressing a function key, corresponding function is performed. Here are the functions keys available and their functions.
Display Function key
Position Item Function Reference
Quick Switches between Quick mode and Standard Setting mode.
3. 3. 2
Loc/Rem Switches between Local and Remote. 3. 3. 2 Update Measurement for Peak/Minimum Hold starts. 3. 3. 2 Top Goes to the Top View Mode. 3. 2
F9-- ~ F1--Displays parameters in the number range of 900 ~ displays parameters in the number range of 100.
4. 3
[F1] key Far left
×1000 Selects the position of 1000 times of minimum setting unit. 3. 3. 1 Lng Goes to the Language selection window. 3. 3. 3
Displays the previous window. 4. [F2] key Left center ×100 Selects the position of 100 times of minimum setting unit. 3. 3. 1
Displays the next window. 4. ×10 Selects the position of 10 times of minimum setting unit. 3. 3. 1
[F3] key Right center
Back Displays, in reverse order, parameters whose setting were changed.
4. 4
--- No function. - Mon Goes to the Status Monitor Mode. 3. 2 Prm Goes to the Parameter Setup Mode 3. 2
F1-- ~ F9--Displays parameters in the number range of 100 ~ displays parameters in the number range of 900.
4. 3
×1 Selects the position of minimum setting unit. 3. 3. 1
Next Displays, in normal order, parameters whose setting were changed.
4. 4
[F4] key Far right
JOG Executes a jog run command. 3. 3. 4
Press the [F1] key to perform this function.
Press the [F2] key to perform this function.
Press the [F3] key to perform this function.
Press the [F4] key to perform this function.
Top View Mode FWD 60.0 Hz STOP
0.0 Hz
LngQuick ---


E6581429
G-1
7
7. Measures to satisfy the standards 7.1 How to cope with the CE standards 7.1.1 Measures to satisfy the EMC directive
Concrete measures to EMC directive are shown below. (1) This inverter installs a EMC filter inside. So the conducted and radiated noise can be reduced.
EMC directive compliance Requirements
Inverter type form PWM carrier frequency CF
(kHz)
Length of motor connecting cable
(m)
Conducted noise level
2~4 10 VFPS1-4007PLE~VFPS1-4055PLE
4.1~16 5 IEC61800-3 category C2
(EN55011 class A Group 1)
2~4 10 VFPS1-4075PLE~VFPS1-4185PLE
4.1~16 5
VFPS1-4220PLE 2~16 25
2~2.5 50 VFPS1-4300PLE~VFPS1-4900PLE
2.6~16 25
IEC61800-3 category C3 (EN55011 class A Group 2)
20 IEC61800-3 category C1
(EN55011 class B Group 1)
50 IEC61800-3 category C2
(EN55011 class A Group 1) VFPS1-4007PDE~VFPS1-4150PDE 2~16
100 IEC61800-3 category C3
(EN55011 class A Group 2)
25 IEC61800-3 category C1
(EN55011 class B Group 1)
50 IEC61800-3 category C2
(EN55011 class A Group 1) VFPS1-4185PDE~VFPS1-4450PDE 2~16
100 IEC61800-3 category C3
(EN55011 class A Group 2)
2~8 25 IEC61800-3 category C1
(EN55011 class B Group 1)
50 IEC61800-3 category C2
(EN55011 class A Group 1) VFPS1-4550PDE~VFPS1-4900PDE
2~16 100
IEC61800-3 category C3 (EN55011 class A Group 2)
(2) Use shielded power cables and control signal cables for the input and output lines of the inverter. Route the
cables and wires so as to minimize their lengths. Keep a distance between the power cable and the control cable and between the input and output wires of the power cable. Do not route them in parallel or bind them together, instead cross at right angle.
(3) To limit the radiation noise from cables, fix the motor cable to the wiring port plate with metal cable gland. (4) To further limit the radiation noise, insert a zero-phase reactor in the inverter output line and insert ferrite cores in
the earth cables.

E6581429
G-2
7
Ex. Countermeasure – inverter wiring PLE - type PDE - type
Power supply wiring (Shielded cables) Power supply wiring (Shielded cables) R/L1, S/L2, T/L3 Motor wiring (Shielded cables) R/L1, S/L2, T/L3 Motor wiring (Shielded cables) (Fix with nonmetal cable gland) U/T1, V/T2, W/T3 (Fix with nonmetal cable gland) U/T1, V/T2, W/T3 (Fix with metal cable gland) (Fix with metal cable gland) Control wiring (Shielded cables) Control wiring (Shielded cables) Login input/output +SU, F, R, S1~S3 Login input/output +SU, F, R, S1~S3
RES, PWR, NO, RES, PWR, NO, P24/PLC, OUT1, P24/PLC, OUT1, OUT2, CC OUT2, CC
(Fix with nonmetal cable gland) (Fix with nonmetal cable gland) Note1) For cables other than above, refer to the example of countermeasure in instruction manual E6581386 9.1.2. Note2) Wiring port plate have holes only for cables listed in above. In case of wiring other cables, please add hole for
each cable.
Mounting and connecting the shielded motor cable with metal cable gland (not supplied with the drive) Fix the motor cable to the wiring port plate with metal cable gland with reference to the figure below.

E6581429
G-3
7
Wiring port plate PLE – type PDE - type
A
(mm) B
(mm) C
(mm) D
(mm) E
(mm) F
(mm) G
(mm) H
(mm) J
(mm)
4007PLE~4022PLE 97.5 97.5 84 91.5 83 74 20.5 (20.7)
25.5 (22.8)
16.5 (18.8)
4037PLE, 4055PLE 111.5 111.5 84 91.5 83 74 20.5 (20.7)
25.5 (22.8)
16.5 (18.8)
4075PLE, 4110PLE 117.9 117.9 78.5 86.5 98 93 20.5 (20.7)
25.5 (22.8)
16.5 (18.8)
4150PLE 148.2 141.2 84 78.8 132 132 32.5 (37.4)
25.5 (28.6)
16.5 (18.8)
4185PLE, 4220PLE 155.2 148.2 80 88.8 132 144 32.5 (37.4)
32.5 (28.6)
16.5 (18.8)
4300PLE 158.4 158.4 84 73.8 141 139 40.5 (47.5)
40.5 (37.4)
16.5 (18.8)
4370PLE, 4450PLE 167.5 167.5 96 76.8 141 138 50.5 (47.5)
40.5 (37.4)
16.5 (18.8)
4550PLE~4900PLE 189 191 97 69.5 207 228 63.5 (60.5)
50.5 (47.5)
16.5 (18.8)
4007PDE~4022PDE 175.5 97.5 84 44.5 130 121 20.5 (20.7)
25.5 (22.8)
16.5 (18.8)
4037PDE, 4055PDE 189.5 111.5 84 44.5 130 121 32.5 (20.7)
25.5 (22.8)
16.5 (18.8)
4075PDE, 4110PDE 192.9 117.9 78.5 56.5 128 123 32.5 (20.7)
25.5 (22.8)
16.5 (18.8)
4150PDE 233.2 141.2 84 73.8 137 137 32.5 (37.4)
25.5 (28.6)
16.5 (18.8)
4185PDE, 4220PDE 240.2 148.2 80 88.8 132 144 32.5 (37.4)
32.5 (28.6)
16.5 (18.8)
4300PDE 226.5 158.5 84 74 141 139 40.5 (47.5)
40.5 (37.4)
16.5 (18.8)
4370PDE, 4450PDE 251.5 167.5 96 76.8 141 138 50.5 (47.5)
40.5 (37.4)
16.5 (18.8)
4550PDE~4900PDE 271 191 97 106 170.5 191.5 63.5 (60.5)
50.5 (47.5)
16.5 (18.8)
Note) Values in ( ) are for UL Type 12 conformity type. Drives with UL Type 12 conformity are optional. Contact your nearest Toshiba inverter distributor for them.

E6581429
G-4
7
7.2 Measurements to be taken to satisfy the UL/CSA standards 7.2.1 Caution as to peripheral devices
When installing a no-fuse circuit breaker or a fuse box on the primary side of the inverter, use UL-certified one. The UL certification test on this inverter was conducted under the AIC* conditions shown in table below (*: current that flows in the event of a short-circuit in the power supply). Note that AIC currents vary depending on the capacity of the motor used.
AIC and maximum input voltage Applicable motor
(kW) AIC (A)
Maximum input voltage(V)
0.4 ~ 37 5,000 45 ~ 90 10,000
480
AIC, Fuse and Wire sizes
Applicable motor (kW)
Inverter type form UL
Output current(A)*1, *2
AIC (A) (Interrupting
capacity)
Fuse class and current (A)
Input wire sizeof power circuit
(AWG) *3
Output wire size of power circuit
(AWG) *3
Grounding wire
(AWG) *3
0.75 VFPS1-4007PLE/PDE 2.1 (CF=8) AIC 5000A CC 6Amax. 14 14 14 1.5 VFPS1-4015PLE/PDE 3.4 (CF=8) AIC 5000A CC 6Amax. 14 14 14 2.2 VFPS1-4022PLE/PDE 4.8 (CF=8) AIC 5000A CC 12Amax. 14 14 14 3.7 VFPS1-4037PLE/PDE 7.6 (CF=8) AIC 5000A J 15Amax. 12 12 14 5.5 VFPS1-4055PLE/PDE 11.0 (CF=8) AIC 5000A J 25Amax. 10 10 12 7.5 VFPS1-4075PLE/PDE 14. 0 (CF=8) AIC 5000A J 40Amax. 10 10 12 11 VFPS1-4110PLE/PDE 21.0 (CF=8) AIC 5000A J 40Amax. 8 8 10 15 VFPS1-4150PLE/PDE 27.0 (CF=8) AIC 5000A J 60Amax. 6 6 10
18.5 VFPS1-4185PLE/PDE 34.0 (CF=4) AIC 5000A J 70Amax. 6 6 10 22 VFPS1-4220PLE/PDE 40.0 (CF=4) AIC 5000A J 70Amax. 6 6 10 30 VFPS1-4300PLE/PDE 52.0 (CF=4) AIC 5000A J 80Amax. 4 4 10 37 VFPS1-4370PLE/PDE 65.0 (CF=4) AIC 5000A J 90Amax. 3 3 8 45 VFPS1-4450PLE/PDE 77.0 (CF=4) AIC 10000A J 110Amax. 1 1 8 55 VFPS1-4550PLE/PDE 96.0 (CF=4) AIC 10000A J 150Amax. 1/0 1/0 6 75 VFPS1-4750PLE/PDE 124.0 (CF=4) AIC 10000A J 175Amax. 3/0 3/0 6 90 VFPS1-4900PCE/PDE 156.0 (CF=4) AIC 10000A J 225Amax. 250MCM 250MCM 2
*1: UL output current is different from unit rating output current. *2: The value of the UL rated output current is applicable when the carrier frequency (CF) is less than the value
shown in the table. *3: The cables used must be 75°C copper cables within 40°C ambient temperature.
7.2.2 Conforming to UL Type 12 Drives with UL Type 12 conformity are optional. Contact your nearest Toshiba inverter distributor for them.

E6581429
H-1
8
8. Selection of peripheral devices 8.1 Selection of wiring materials and devices
Wire size
Main circuit Input terminal
(R,S,T) Output terminal
(U,V,W)
DC terminal (optional)
Braking resistor / Braking unit (Optional)
Earth cable Applicable
motor (kW)
Inverter type form
AWG mm2 AWG mm2 AWG mm2 AWG mm2 AWG mm2
0.75 VFPS1-4007PLE/PDE 14 1.5 14 1.5 14 1.5 14 1.5 14 2.5 1.5 VFPS1-4015PLE/PDE 14 1.5 14 1.5 14 1.5 14 1.5 14 2.5 2.2 VFPS1-4022PLE/PDE 14 1.5 14 1.5 14 1.5 14 1.5 14 2.5 3.7 VFPS1-4037PLE/PDE 12 1.5 12 1.5 14 1.5 14 1.5 14 2.5 5.5 VFPS1-4055PLE/PDE 10 1.5 10 1.5 12 1.5 14 1.5 14 2.5 7.5 VFPS1-4075PLE/PDE 10 1.5 10 2.5 10 2.5 14 1.5 14 2.5 11 VFPS1-4110PLE/PDE 8 4 8 4 8 4 10 2.5 12 4 15 VFPS1-4150PLE/PDE 6 6 6 6 8 6 10 4 10 6 18.5 VFPS1-4185PLE/PDE 6 6 6 6 6 10 8 6 10 6 22 VFPS1-4220PLE/PDE 6 10 6 10 4 16 8 10 10 10 30 VFPS1-4300PLE/PDE 4 16 4 16 4 25 4 16 4 16 37 VFPS1-4370PLE/PDE 3 25 3 25 2 25 4 25 4 16 45 VFPS1-4450PLE/PDE 1 25 1 25 1 35 3 25 4 16 55 VFPS1-4550PLE/PDE 1/0 35 1/0 35 2/0 50 2 35 2 35 75 VFPS1-4750PLE/PDE 3/0 70 3/0 70 4/0 95 1/0 70 2 35 90 VFPS1-4900PLE/PDE 250MCM 95 250MCM 70 250MCM 120 2/0 95 2 50
(*1): The recommended cable size is that of the cable (e.g. 600V class, HIV cable) with continuous maximum permissible temperature of 75°C. The ambient temperature is assumed to be 40°C or below. (The interconnect cable length is assumed to be 30m or less.)
(*2): For the control circuit, use shielded wires whose size (cross-section) is 0.75mm2 or more. (*3): For the earth cable, use wires larger than the specified ones in size (cross-section). (*4): Recommended wire size for an optional braking resistor. Refer to instruction manual E6581386 5.19 for use of
external braking resistor.

E6581429
H-2
8
Selection of wiring equipment No-fuse breaker (MCCB) Magnetic contactor (MC) Applicable motor
(kW) Inverter type form Input current [A]
Rated current [A] Rated current [A] AC-1
0.75 VFPS1-4007PLE/PDE 1.8 4 25 1.5 VFPS1-4015PLE/PDE 3.5 6.3 25 2.2 VFPS1-4022PLE/PDE 5 10 25 3.7 VFPS1-4037PLE/PDE 8.8 14 25 5.5 VFPS1-4055PLE/PDE 11.4 25 25 7.5 VFPS1-4075PLE/PDE 15.8 25 25 11 VFPS1-4110PLE/PDE 21.9 30 32 15 VFPS1-4150PLE/PDE 30.5 40 40 18.5 VFPS1-4185PLE/PDE 37.5 60 50 22 VFPS1-4220PLE/PDE 43.6 60 50 30 VFPS1-4300PLE/PDE 56.7 100 80 37 VFPS1-4370PLE/PDE 69.5 100 125 45 VFPS1-4450PLE/PDE 85.1 125 125 55 VFPS1-4550PLE/PDE 104.8 150 125 75 VFPS1-4750PLE/PDE 140.3 200 250 90 VFPS1-4900PLE/PDE 171.8 200 250
(*1): Selections for use of the Toshiba 4-pole standard motor with power supply voltage of 400V-50Hz. (*2): Choose the MCCB according to the power supply capacity.
For comply with UL and CSA standard, use the fuse certified by UL and CSA. (*3): When using on the motor side during commercial-power supply operation, choose the MC with class AC-3 rated
current for the motor rated current. (*4): Attach surge killers to the magnetic contactor and exciting coil of the relay. (*5): In the case the magnetic contactor (MC) with 2a-type auxiliary contacts is used for the control circuit, raise the
reliability of the contact by using 2a-type contacts in parallel connection.
E6581429
I-1
9
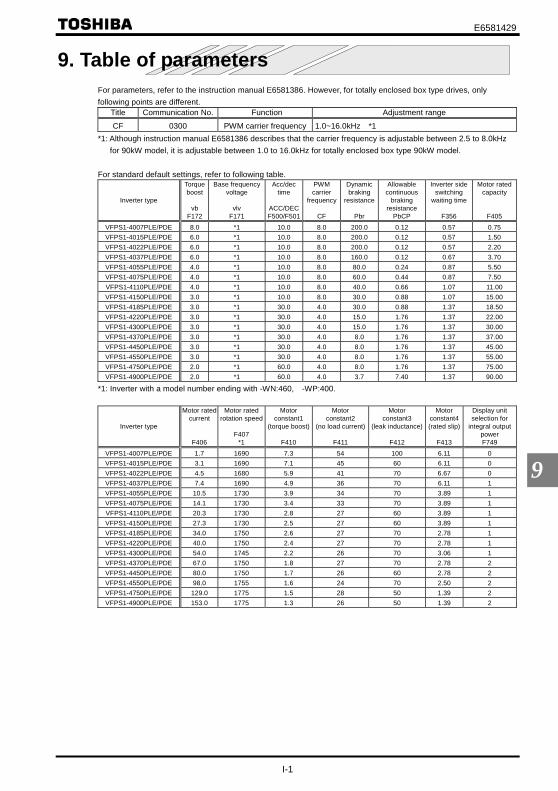
9. Table of parameters For parameters, refer to the instruction manual E6581386. However, for totally enclosed box type drives, only following points are different.
Title Communication No. Function Adjustment range
CF 0300 PWM carrier frequency 1.0~16.0kHz *1 *1: Although instruction manual E6581386 describes that the carrier frequency is adjustable between 2.5 to 8.0kHz for 90kW model, it is adjustable between 1.0 to 16.0kHz for totally enclosed box type 90kW model. For standard default settings, refer to following table.
Inverter type
Torque boost
vb
F172
Base frequencyvoltage
vlv
F171
Acc/dec time
ACC/DECF500/F501
PWM carrier
frequency
CF
Dynamicbraking
resistance
Pbr
Allowable continuous
braking resistance
PbCP
Inverter side switching
waiting time
F356
Motor rated capacity
F405
VFPS1-4007PLE/PDE 8.0 *1 10.0 8.0 200.0 0.12 0.57 0.75 VFPS1-4015PLE/PDE 6.0 *1 10.0 8.0 200.0 0.12 0.57 1.50 VFPS1-4022PLE/PDE 6.0 *1 10.0 8.0 200.0 0.12 0.57 2.20 VFPS1-4037PLE/PDE 6.0 *1 10.0 8.0 160.0 0.12 0.67 3.70 VFPS1-4055PLE/PDE 4.0 *1 10.0 8.0 80.0 0.24 0.87 5.50 VFPS1-4075PLE/PDE 4.0 *1 10.0 8.0 60.0 0.44 0.87 7.50 VFPS1-4110PLE/PDE 4.0 *1 10.0 8.0 40.0 0.66 1.07 11.00 VFPS1-4150PLE/PDE 3.0 *1 10.0 8.0 30.0 0.88 1.07 15.00 VFPS1-4185PLE/PDE 3.0 *1 30.0 4.0 30.0 0.88 1.37 18.50 VFPS1-4220PLE/PDE 3.0 *1 30.0 4.0 15.0 1.76 1.37 22.00 VFPS1-4300PLE/PDE 3.0 *1 30.0 4.0 15.0 1.76 1.37 30.00 VFPS1-4370PLE/PDE 3.0 *1 30.0 4.0 8.0 1.76 1.37 37.00 VFPS1-4450PLE/PDE 3.0 *1 30.0 4.0 8.0 1.76 1.37 45.00 VFPS1-4550PLE/PDE 3.0 *1 30.0 4.0 8.0 1.76 1.37 55.00 VFPS1-4750PLE/PDE 2.0 *1 60.0 4.0 8.0 1.76 1.37 75.00 VFPS1-4900PLE/PDE 2.0 *1 60.0 4.0 3.7 7.40 1.37 90.00
*1: Inverter with a model number ending with -WN:460, -WP:400.
Inverter type
Motor ratedcurrent
F406
Motor ratedrotation speed
F407
*1
Motor constant1
(torque boost)
F410
Motor constant2
(no load current)
F411
Motor constant3
(leak inductance)
F412
Motor constant4 (rated slip)
F413
Display unit selection for
integral output power F749
VFPS1-4007PLE/PDE 1.7 1690 7.3 54 100 6.11 0 VFPS1-4015PLE/PDE 3.1 1690 7.1 45 60 6.11 0 VFPS1-4022PLE/PDE 4.5 1680 5.9 41 70 6.67 0 VFPS1-4037PLE/PDE 7.4 1690 4.9 36 70 6.11 1 VFPS1-4055PLE/PDE 10.5 1730 3.9 34 70 3.89 1 VFPS1-4075PLE/PDE 14.1 1730 3.4 33 70 3.89 1 VFPS1-4110PLE/PDE 20.3 1730 2.8 27 60 3.89 1 VFPS1-4150PLE/PDE 27.3 1730 2.5 27 60 3.89 1 VFPS1-4185PLE/PDE 34.0 1750 2.6 27 70 2.78 1 VFPS1-4220PLE/PDE 40.0 1750 2.4 27 70 2.78 1 VFPS1-4300PLE/PDE 54.0 1745 2.2 26 70 3.06 1 VFPS1-4370PLE/PDE 67.0 1750 1.8 27 70 2.78 2 VFPS1-4450PLE/PDE 80.0 1750 1.7 26 60 2.78 2 VFPS1-4550PLE/PDE 98.0 1755 1.6 24 70 2.50 2 VFPS1-4750PLE/PDE 129.0 1775 1.5 28 50 1.39 2 VFPS1-4900PLE/PDE 153.0 1775 1.3 26 50 1.39 2


E6581429
J-1
10
10. Specifications 10.1 Models and their standard specifications
1) Standard specifications Item Specification
Voltage class 400V class Applicable motor (kW) 0.75 1.5 2.2 3.7 5.5 7.5 11 15 18.5 22 30 37 45 55 75 90 Applicable motor (HP) 1 2 3 5 7.5 10 15 20 25 30 40 50 60 75 100 125
Type VFPS1- PLE type 4007PLE 4015PLE 4022PLE 4037PLE 4055PLE 4075PLE 4110PLE 4150PLE 4185PLE 4220PLE 4300PLE 4370PLE 4450PLE 4550PLE 4750PDE 4900PLE
Form PDE type 4007PDE 4015PDE 4022PDE 4037PDE 4055PLE 4075PDE 4110PDE 4150PDE 4185PDE 4220PDE 4300PDE 4370PDE 4450PDE 4550PDE 4750PDE 4900PDE
Output capacity (kVA) [Note1]
1.8 3.1 3.9 6.9 9.1 12 17 23 28 33 45 54 65 78 104 124
Output current (A) [Note2]
2.3 4.1 5.1 9.1 12 16 22.5 30.5 37 43.5 58.5 71.5 85 103 137 163
Output voltage Three-phase 380~480V(The maximum output voltage is equal to the input supply voltage)
Rat
ing
Overload current rating
110% - 1 minute
Dynamic braking circuit
Built-in dynamic braking drive circuit
Ele
ctric
al
brak
ing
Dynamic braking resistor
An external breaking resistor (optional)
Voltage-frequency Three-phase 380~480V-50/60Hz [Note3]
Pow
er
supp
ly
Allowable fluctuation
Voltage + 10% - 15% [Note 4] Frequency ±5%
Protective method Totally enclosed (JEM1030) IP54 / UL Type 12 [Note 5] Cooling method Forced air-cooled Cooling fan noise (dBA) 43 43 43 55 55 56 56 58 60 60 60 64 64 64 64 64 Color RAL7016
PLE type IEC61800-3 category C2(EN55011
class A Group 1) filter Built-in IEC61800-3 category C3(EN55011 class A Group 2) filter Built-in
EM
C
filte
r
PDE type IEC61800-3 category C1(EN55011 class B Group 1) filter Built-in DC reactor Built-in
Note 1: Capacity is calculated at 440V. Note 2: Rated output current when the PWM carrier frequency (parameter CF) is 8kHz or less.
⇒ Refer to 1.4.1 ” Derating curves” for details. Note 3: An external power supply backup available (optional) (Type: CPS002Z) Note 4: ±10% when the inverter is used continuously (load of 100%). Note 5: Drives with UL Type 12 conformity are optional. Contact your nearest Toshiba inverter distributor for them.

E6581429
J-2
10
2) Common specification Item Specification
Control system Sinusoidal PWM control Output voltage adjustment Main circuit voltage feedback control. (Switchable between automatic adjustment/fix/control off)
Output frequency range Setting between 0.01 to 500Hz. Default max. frequency is set to 0.01 to 60Hz. Maximum frequency adjustment (30 to 500Hz)
Minimum setting steps of frequency
0.01Hz: operation panel input (60Hz base), 0.02Hz: analog input (60Hz base, 11 bit/0 to 10Vdc)
Frequency accuracy Analog input: ±0.2% of the maximum output frequency (at 25±10°C) Digital input: ±0.01%±0.022Hz of the output frequency
Voltage/frequency characteristics
V/f constant, square reduction torque control, automatic torque boost, vector calculation control, base frequency adjustment 1 and 2 (25 to 500Hz), V/f 5-point arbitrary setting, torque boost adjustment (0 to 30%), start frequency adjustment (0 to 10Hz), stop frequency adjustment (0 to 30Hz)
Frequency setting signal
3kΩ potentiometer (possible to connect to 1 to 10kΩ-rated potentiometer) 0 to 10Vdc (input impedance Zin: 30kΩ) 0 to ±10Vdc (Zin: 22kΩ) 4 to 20mAdc (Zin:242Ω)
Terminal board base frequency
The characteristic can be set arbitrarily by two-point setting. Compliant with 6 types of input; analog input (RR, VI/II, RX, RX2), pulse input and binary/BCD input (*RX2, binary/BCD input: optional)
Frequency jump 3 places. Setting of jump frequency and width. Upper and lower limit frequencies
Upper limit frequency: 0 to max. frequency, lower limit frequency: 0 to upper limit frequency
PWM carrier frequency Adjustable between 1.0 to 16kHz.
Con
trol s
peci
ficat
ion
PID control Adjustment of proportional gain, integral time, differential time and delay filter Acceleration/deceleration time
0.01 to 6000 sec. Selectable from among acceleration/deceleration. times 1 and 2. Automatic acceleration/deceleration function. S-pattern acceleration/deceleration 1 and 2 pattern adjustable.
DC braking Adjustment of braking start frequency (0 to 120Hz), braking (0 to 100%) and braking time (0 to 20 sec.). With emergency stop braking function and motor shaft fix control function.
Forward run/reverse run [Note 1]
With F-CC closed to forward run, with R-CC closed to reverse run, with both closed to reverse run. With ST-CC opened to coast stop. Emergency stop by panel operation or terminal board.
Jog run [Note 1]
Jog mode, if selected, allows jog operation from the operation panel Jog run operation by terminal board is possible by setting the parameters.
Preset speed operation [Note 1]
By changing the combination of open/close between S1, S2, S3, RR/S4-CC, set frequency + 15-speed operation. Selectable between acceleration/deceleration time, torque limit and V/f by set frequency.
Retry Capable of restarting after a check of the main circuit elements in case the protective function is activated. Max. 10 times selectable arbitrarily. Waiting time adjustment (0 to 10 sec.)
Soft stall Automatic load reduction control at overloading. (Default: OFF)
Cooling fan ON/OFF The cooling fan will be stopped automatically to assure long life when unnecessary. However, the fan inside the drive will always runs.
Operation panel key operation ON/OFF control
Key prohibition selectable for frequency setting, etc. All key operations can also be prohibited.
Regenerative power ride-through control
Possible to keep the motor running using its regenerative energy in case of a momentary power failure. (Default: OFF)
Auto-restart operation Possible to restart the motor in coasting in accordance with its speed and direction. (Default: OFF) Commercial inverter switching
Possible to switch operation by commercial power source or inverter
Drooping function When two or more inverters are used to operate a single load, this function prevents load from concentrating on one inverter due to unbalance.
Ope
ratio
n sp
ecifi
catio
ns
Override function External input signal adjustment is possible to the operation frequency command value.
Protective function
Stall prevention, current limit, overcurrent, overvoltage, short circuit on the load side, ground fault on the load side [Note 5], undervoltage, momentary power failure (15ms or more), non-stop control at momentary power failure, overload protection, arm overload at starting, overcurrent on the load side at starting, overcurrent and overload at dynamic braking resistance, fin overheat, emergency stop
Electronic thermal characteristic
Switchable between standard motor/constant torque VF motor, adjustment of overload protection and stall prevention level.
Prot
ectiv
e fu
nctio
n
Reset Reset by 1a contact closed (or 1b contact opened), or by operation panel. Or power source OFF/ON. This function is also used to save and clear trip records.
(Continued overleaf)

E6581429
J-3
10
(Continued) Item Specification
Alarms Stall prevention during operation, overload limit, overload, undervoltage on power source side, DC circuit undervoltage, setting error, in retry, upper limit, lower limit.
Causes of failures
Overcurrent, overvoltage, fin overheat, short circuit on the load side, ground fault on the load side, inverter overload, arm overcurrent at starting, overcurrent on the load side at starting, EEPROM error, RAM error, ROM error, transmission error, (dynamic braking resistor overcurrent/overload), (emergency stop), (undervoltage), (low current), (overtorque), (motor overload), (output phase failure) The items in the parentheses are selectable.
Monitoring function
Operation frequency, operation frequency command, forward run/reverse run, output current, DC voltage, output voltage, compensated frequency, terminal board input/output information, CPU version, control EEPROM version, past trip history, cumulative operation time, speed feedback, torque, torque command, torque current, exiting current, PID feedback value, motor overload factor, inverter overload factor, PBR overload factor, PBR load factor, input power, output power, peak output current, peak DC voltage, Motor counter pseudo PG, position pulse, RR input, VI/II input, RX input, RX2 input, FM output, AM output, meter adjustment fix output, flash memory version, main circuit EEPROM version, types of connection option, previous default setting, previous automatic control (AU2)
Free unit display Display of optional units other than output frequency (motor speed, line speed, etc), current ampere/% switch, voltage volt/% switch
Automatic edit function
Searches automatically parameters that are different from the standard default setting parameters. Easy to find changed parameters.
LCD panel
User default setting
User parameter settings can be saved as default settings. Allows to reset the parameters to the user-defined parameter settings.
Dis
play
func
tion
LED Charge display Displays main circuit capacitor charging.
Power Removal safety function Built-in Power Removal safety function which complies with EN954-1 category 3 and IEC/EN 61508-1 SIL2.
Input/output terminal input function
Possible to select positive logic or negative logic with programmable input/output terminal function menu. [Note 1] [Note 2] (Default setting: positive logic)
Sink/source switching Possible to switch between minus common (CC) and plus common (P24) for control terminal. (Default setting: minus common (CC))
Failure detection signal 1c contact output (250Vac-2A-cosФ=1, 250Vac-1A-cosФ=0.4, 30Vdc-1A) Low speed/speed reach signal output [Note 2]
Open collector output (24Vdc, max. 50mA, output impedance: 33Ω)
Upper/lower limit frequency signal output [Note 2]
Open collector output (24Vdc, max. 50mA, output impedance: 33Ω)
Output for frequency meter/ Output for ammeter [Note 3]
Analog output. 1mAdc full-scale DC ammeter or 7.5Vdc-1mA voltmeter
outp
ut s
igna
l
Pulse train frequency output
Open collector output (24Vdc, max. 50mA)
Communication function RS-485 standard 2-channel equipped (connector: modular 8P) CC-Link, DeviceNet and PROFIBUS-DP are optional.
Use environments Indoor use. Altitude: 3000m or less (current reduction necessary if 1000m or more.) Place not exposed to direct sunlight and free of corrosive and explosive gases.
Ambient temperature -10 to +50°C (Remove the upper cover if 40°C or more, max. 60°C) [Note 4] Storage temperature -25 to +70°C Relative humidity 20 to 93% (free from condensation) E
nviro
nmen
ts
Vibration 5.9m/s20.6G or less (10 to 55Hz) (Compliant with JIS C60068-2-6)
Note 1: 15 contact input terminals (of which 8 are options) are programmable contact input terminals, and they make it possible to arbitrarily select from about 80 types of signals.
Note 2: Programmable ON/OFF output terminals make it possible to arbitrarily select from about 180 types of signals. Note 3: Programmable analog output terminals make it possible to arbitrarily select from about 50 types of signals. Note 4: When using inverters where the ambient temperature will rise above 40°C, derate the output current. Note 5: This function protects inverters from overcurrent due to output circuit ground fault.

E6581429
J-4
10
10.2 Outside dimensions and mass Outside dimensions and weight
Dimensions (mm) Applicable
motor (kW)
Applicable motor (HP)
Inverter type W H D W1 H1
Drawing Approximate
mass (kg) [Note 1]
0.75 1 VFPS1-4007PLE(PDE)1.5 2 VFPS1-4015PLE(PDE)2.2 3 VFPS1-4022PLE(PDE)
240 490 261 200 476 A 13(15)
3.7 5 VFPS1-4037PLE(PDE)5.5 7.5 VFPS1-4055PLE(PDE)
240 490 275 200 476 B 16(18)
7.5 10 VFPS1-4075PLE(PDE)11 15 VFPS1-4110PLE(PDE)
260 525 275 220 511 C 20(23)
15 20 VFPS1-4150PLE(PDE) 296 560 304 250 544 D 25(29) 18.5 25 VFPS1-4185PLE(PDE)22 30 VFPS1-4220PLE(PDE)
315 665 305 270 647 E 36(41)
30 40 VFPS1-4300PLE(PDE) 285 720 301 245 700 F 34(39) 37 50 VFPS1-4370PLE(PDE)45 60 VFPS1-4450PLE(PDE)
285 880 332 245 860 G 43(49)
55 75 VFPS1-4550PLE(PDE)75 100 VFPS1-4750PLE(PDE)90 125 VFPS1-4900PLE(PDE)
362 1000 353 300 975 H 69(80)
Note 1: The values in parentheses are values for PDE type.
Outline drawing
Fig. A Fig. B

E6581429
J-5
10
Fig. C Fig. D
Fig. E Fig. F

E6581429
J-6
10
Fig. G Fig. H