contents compact disc player dx-7333€¦ · dx-7333(e)book page 1 2001年 4月 26日 木曜日...
TRANSCRIPT

Contents
Before using
Important Safeguards........................ 2Precautions ....................................... 3Features............................................. 4Supplied accessories......................... 4Before operating this unit ................. 5Connecting other components .......... 6
Operation
Playing CDs...................................... 7Using the memory function ............ 10Useful Functions............................. 12
Other informations
Control positions and names .......... 14Precautions for handling
the Compact Disc (CD) ............... 15Troubleshooting Guide................... 16Specifications ................................. 16
Compact Disc Player
DX-7333
Instruction Manual
Thank you for purchasing the Onkyo CD player.Please read this manual thoroughly before makingconnections and plugging in the unit. Following the instructions in this manual will enableyou to obtain optimum performance and listeningenjoyment from your new CD player. Please retain this manual for future reference.
DX-7333(E)Book Page 1 2001年 4月 26日 木曜日 10:28 AM

2
DX-7333(E)Book Page 2 2001年 4月 26日 木曜日 10:28 AM
Important Safeguards1. Read Instructions – All the safety and operating instructions
should be read before the appliance is operated.2. Retain Instructions – The safety and operating instructions
should be retained for future reference.3. Heed Warnings – All warnings on the appliance and in the
operating instructions should be adhered to.4. Follow Instructions – All operating and use instructions
should be followed.5. Water and Moisture – The appliance should not be used near
water – for example, near a bathtub, washbowl, kitchen sink,laundry tub, in a wet basement, or near a swimming pool, andthe like.
6. Carts and Stands – The appliance should be used only with acart or stand that is recom-mended by the manufacturer.
6A.An appliance and cart combi-nation should be moved withcare. Quick stops, excessiveforce, and uneven surfaces maycause the appliance and cartcombination to overturn.
7. Wall or Ceiling Mounting – The appliance should be mountedto a wall or ceiling only as recommended by the manufacturer.
8. Ventilation – The appliance should be situated so that its loca-tion or position does not interfere with its proper ventilation.For example, the appliance should not be situated on a bed,sofa, rug, or similar surface that may block the ventilationopenings; or if placed in a built-in installation, such as a book-case or cabinet that may impede the flow of air through theventilation openings, there should be free space of at least 5 cm(2 in.) and an opening behind the appliance.
9. Heat – The appliance should be situated away from heatsources such as radiators, heat registers, stoves, or other appli-ances (including amplifiers) that produce heat.
10. Power Sources – The appliance should be connected to apower supply only of the type described in the operatinginstructions or as marked on the appliance.
11. Polarization – If the appliance is provided with a polarized plughaving one blade wider than the other, please read the followinginformation: The polarization of the plug is a safety feature. The polarized plugwill only fit the outlet one way. If the plug does not fit fully into theoutlet, try reversing it. If there is still trouble, the user should seekthe services of a qualified electrician. Under no circumstancesshould the user attempt to defeat the polarization of the plug.
12. Power-Cord Protection – Power-supply cords should berouted so that they are not likely to be walked on or pinched byitems placed upon or against them, especially near plugs, con-venience receptacles, and the point where they exit from theappliance.
13. Cleaning – The appliance should be cleaned only as recom-mended by the manufacturer.
14. Nonuse Periods – The power cord of the appliance should beunplugged from the outlet when left unused for a long periodof time.
15. Object and Liquid Entry – Care should be taken so thatobjects do not fall and liquids are not spilled into the enclosurethrough openings.
16. Damage Requiring Service – The appliance should be ser-viced by qualified service personnel when:A. The power-supply cord or the plug has been damaged; orB. Objects have fallen, or liquid has been spilled into the
appliance; orC. The appliance has been exposed to rain; orD. The appliance does not appear to operate normally or
exhibits a marked change in performance; orE. The appliance has been dropped, or the enclosure damaged.
17. Servicing – The user should not attempt to service the appliancebeyond that described in the operating instructions. All other ser-vicing should be referred to qualified service personnel.
WARNING:TO REDUCE THE RISK OF FIRE OR ELECTRIC SHOCK, DO NOT EXPOSE THIS APPLIANCE TO RAIN OR MOISTURE.
CAUTION:TO REDUCE THE RISK OF ELECTRIC SHOCK, DO NOT REMOVE COVER (OR BACK). NO USER-SERVICEABLE PARTS INSIDE. REFER SERVICING TO QUALIFIED SERVICE PERSONNEL.
The lightning flash with arrowhead symbol, within an equilateral triangle, is intended to alert the user to the presence of uninsulated “dangerous voltage” within the product’s enclosure that may be of sufficient magnitude to constitute a risk of electric shock to persons.
The exclamation point within an equilateral triangle is intended to alert the user to the presence of important operating and maintenance (servicing) instructions in the literature accompanying the appliance.
WARNINGRISK OF ELECTRIC SHOCK
DO NOT OPENRISQUE DE CHOC ELECTRIQUE
NE PAS OUVRIR
AVIS
PORTABLE CART WARNING
S3125A
This label on the rear panel states that:1. This unit is a CLASS 1 LASER PRODUCT and employs a
laser inside the cabinet.2. To prevent the laser from being exposed, do not remove the
cover. Refer servicing to qualified personnel.
“CLASS 1 LASER
PRODUCT”
This unit contains a semiconductor laser system and is classifiedas a “CLASS 1 LASER PRODUCT”. So, to use this model prop-erly, read this Instruction Manual carefully. In case of any trou-ble, please contact the store where you purchased the unit. Toprevent being exposed to the laser beam, do not try to open theenclosure.
DANGER:INVISIBLE LASER RADIATION WHEN OPEN AND INTER-LOCK FAILED OR DEFEATED. AVOID DIRECT EXPOSURETO BEAM.
CAUTION:THIS PRODUCT UTILIZES A LASER. USE OF CONTROLSOR ADJUSTMENTS OR PERFORMANCE OF PROCEDURESOTHER THAN THOSE SPECIFIED HEREIN MAY RESULTIN HAZARDOUS RADIATION EXPOSURE.

3
DX-7333(E)Book Page 3 2001年 4月 26日 木曜日 10:28 AM
Precautions1. Warranty ClaimYou can find the serial number on the rear panel of this unit. In caseof warranty claim, please report this number.
2. Recording CopyrightRecording of copyrighted material for other than personal use isillegal without permission of the copyright holder.
3. PowerWARNINGBEFORE PLUGGING IN THE UNIT FOR THE FIRST TIME,READ THE FOLLOWING SECTION CAREFULLY.
The voltage of the available power supply differs according tocountry or region. Be sure that the power supply voltage of the areawhere this unit will be used meets the required voltage (e.g., AC230–240 V, 50 Hz) written on the rear panel.
4. Do not touch this unit with wet handsDo not handle this unit or power cord when your hands are wet ordamp. If water or any other liquid enters the case, take this unit toan authorized service center for inspection.
5. Location of this unitPlace this unit in a well-ventilated location.Take special care to provide plenty of ventilation on all sides of thisunit especially when it is placed in an audio rack. If ventilation isblocked, this unit may overheat and malfunction.
Do not expose this unit to direct sunlight or heating units as thisunit’s internal temperature may rise and shorten the life of thepickup.
Avoid damp and dusty places and places directly affected by vibra-tions from the speakers. In particular, avoid placing the unit on orabove one of the speakers.
Be sure this unit is placed in a horizontal position. Never place it onits side or on a slanted surface as it may malfunction.
Do not place near tuners or TV sets.If placed next to a TV or tuner, it may cause reception interferenceresulting in some noise in the TV or tuner output.
6. CareFrom time to time you should wipe the front and rear panels and thecabinet with a soft cloth. For heavier dirt, dampen a soft cloth in aweak solution of mild detergent and water, wring it out dry, andwipe off the dirt. Following this, dry immediately with a clean cloth.
Do not use rough material, thinners, alcohol or other chemical sol-vents or cloths since these could damage the finish or remove thepanel lettering.
7. Points to rememberIf this unit is brought from a cold environment to a warm one or isin a cold room that is quickly heated, condensation may form onthe pickup, preventing proper operation. In this case, remove thedisc and leave the power ON for about one hour to remove the con-densation.
When transporting this unit, be careful not to bump it.
For British modelReplacement and mounting of an AC plug on the power supply cordof this unit should be performed only by qualified service personnel.
IMPORTANTThe wires in the mains lead are coloured in accordance with thefollowing code:
Blue : NeutralBrown : Live
As the colours of the wires in the mains lead of this apparatus maynot correspond with the coloured markings identifying the termi-nals in your plug, proceed as follows:The wire which is coloured blue must be connected to the terminalwhich is marked with the letter N or coloured black.The wire which is coloured brown must be connected to the termi-nal which is marked with the letter L or coloured red.
IMPORTANTA 5 ampere fuse is fitted in this plug. Should the fuse need to bereplaced, please ensure that the replacement fuse has a rating of 5amperes and that it is approved by ASTA or BSI to BS1362. Checkfor the ASTA mark or the BSI mark on the body of the fuse. IF THE FITTED MOULDED PLUG IS UNSUITABLE FOR THESOCKET OUTLET IN YOUR HOME, THEN THE FUSESHOULD BE REMOVED AND THE PLUG CUT OFF AND DIS-POSED OF SAFELY. THERE IS A DANGER OF SEVEREELECTRICAL SHOCK IF THE CUT OFF PLUG IS INSERTEDINTO ANY 13 AMPERE SOCKET.If in any doubt, please consult a qualified electrician.
Declaration of Conformity
We, ONKYO EUROPEELECTRONICS GmbHINDUSTRIESTRASSE 2082110 GERMERING,GERMANY
GERMERING, GERMANY
ONKYO EUROPE ELECTRONICS GmbH
A.HORIUCHI
declare in own responsibility, that the ONKYO product describedin this instruction manual is in compliance with the corresponding technical standards such as EN60065, EN55013, EN55020 and EN61000-3-2, -3-3.

4
DX-7333(E)Book Page 4 2001年 4月 26日 木曜日 10:28 AM
Features� High-quality sound design in concert with the concept
of “Onkyo Soundism”The high-quality playback performance offers a powerful yetmusically elegant sound that “re-creates music that not onlysounds ‘beautiful’ but also echoes in the soul.”
� AccuPulse D/A converter with Single-bit PWM (PulseWidth Modulation) technologyThe D/A converter uses AccuPulse D/A conversion with Single-bit PWM (Pulse Width Modulation) technology that generateszero cross-distortion and improves non-linearity to achieve high-quality sound.
� Two optical digital outputsYou can connect up to two digital recording devices, such as aDAT deck and an MD recorder.
� Peak search (Remote controller only)� Next selection (Remote controller only)� Memory and Memory reverse
The Memory function enables you to select tracks to play; theMemory reverse function enables you to easily specify tracksyou did not wish to play.
� 36-Track Random Memory (Remote controller only)� Five mode repeat function: entire side, single track, A-B,
memory and shuffle (Remote controller only)� 10-key direct track access (Remote controller only)
Supplied accessoriesCheck that the following accessories are supplied with this unit.
REMOTE CONTROLLER RC-402C
PEAK SEARCH
+10
0
TIME EDIT
CLEAR
MEMORY
REPEAT
DISPLAY
7
8
4
5
1
2
9
6
3
NEXTSELECTION
A–BSHUFFLE
Audio connection cable ×1
cable × 1
Remote controller × 1
Batteries (size AA, R6 or UM-3) × 2
DX-7333(E)Book Page 5 2001年 4月 26日 木曜日 10:28 AM
Before operating this unit
5
3
2
1
Remote control sensor
30˚30˚
DX-7333
approx. 5 m(16 feet)
REMOTE CONTROLLER RC-402C
PEAK SEARCH
+10
0
TIME EDIT
CLEAR
MEMORY
REPEAT
DISPLAY
7
8
4
5
1
2
9
6
3
NEXTSELECTION
A–BSHUFFLE
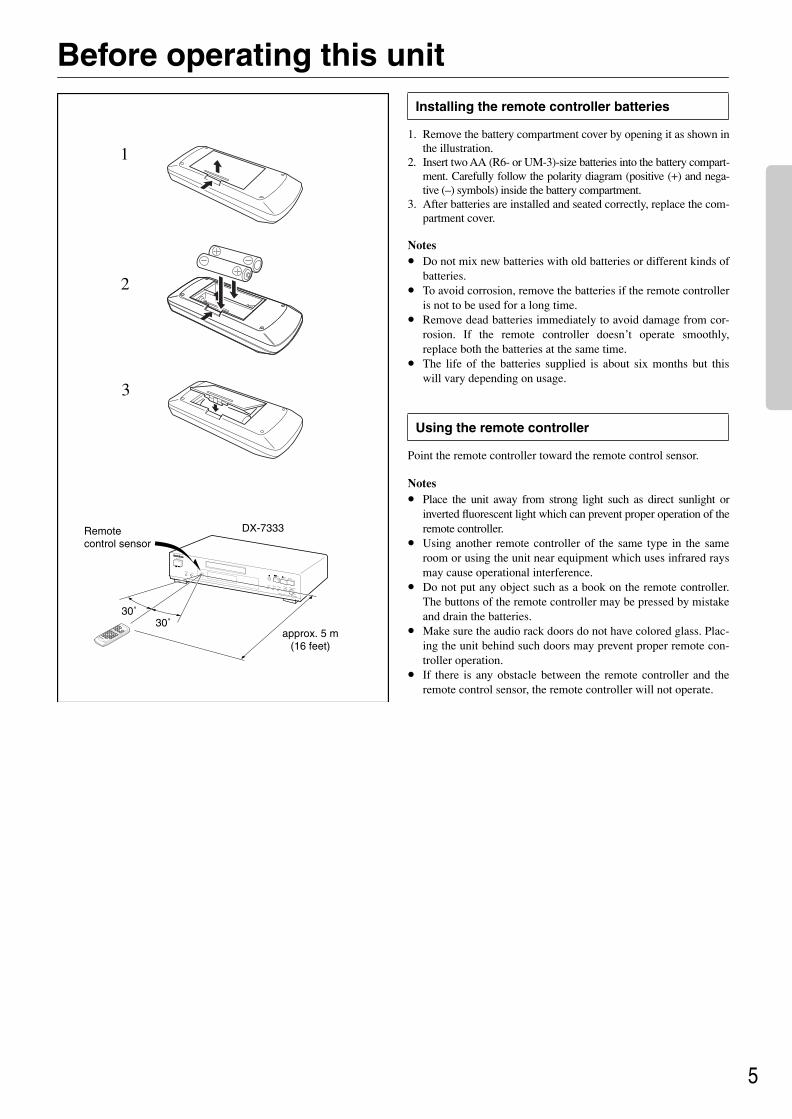
1. Remove the battery compartment cover by opening it as shown inthe illustration.
2. Insert two AA (R6- or UM-3)-size batteries into the battery compart-ment. Carefully follow the polarity diagram (positive (+) and nega-tive (–) symbols) inside the battery compartment.
3. After batteries are installed and seated correctly, replace the com-partment cover.
Notes• Do not mix new batteries with old batteries or different kinds of
batteries.• To avoid corrosion, remove the batteries if the remote controller
is not to be used for a long time.• Remove dead batteries immediately to avoid damage from cor-
rosion. If the remote controller doesn’t operate smoothly,replace both the batteries at the same time.
• The life of the batteries supplied is about six months but thiswill vary depending on usage.
Point the remote controller toward the remote control sensor.
Notes• Place the unit away from strong light such as direct sunlight or
inverted fluorescent light which can prevent proper operation of theremote controller.
• Using another remote controller of the same type in the sameroom or using the unit near equipment which uses infrared raysmay cause operational interference.
• Do not put any object such as a book on the remote controller.The buttons of the remote controller may be pressed by mistakeand drain the batteries.
• Make sure the audio rack doors do not have colored glass. Plac-ing the unit behind such doors may prevent proper remote con-troller operation.
• If there is any obstacle between the remote controller and theremote control sensor, the remote controller will not operate.
Installing the remote controller batteries
Using the remote controller

6
DX-7333(E)Book Page 6 2001年 4月 26日 木曜日 10:28 AM
Connecting other components• Do not plug in the AC power cord until all other connections have been made.• For output jacks, the jack marked R corresponds to the right channel, and the jack marked L to the left channel. Refer to the
amplifier’s instruction manual for further information on connections.• Avoid bundling the audio connection cables with the power cord or speaker cables. Doing so may degrade sound reproduction.• Insert the plugs and connectors securely. Remember that improper connection can result in noise, poor performance, or dam-
age to the equipment.
A Connection with the amplifierConnect the DX-7333 to the CD jacks of your amplifier.
B Connection via the digital output jack (DIGITALOUTPUT OPTICAL)Connection to digital equipment, such as an MD recorder orDAT.Use an optical cable to connect this unit to the digital input(optical) jack of an MD recorder or DAT in order to make dig-ital recordings. The optical cable should have connectorswhich fit into the digital jacks.
C Connections for remote controlWhen the DX-7333 is connected to an amplifier with the Onkyo
jack, pressing the CD operation button on the amplifier’sremote controller enables you to operate the CD player.
Note:• The upper and lower remote control jacks have the
same function.• Remote control operation is not possible when only the
remote control cable is connected – the audio cables mustalso be connected.
• An cable equipped with a 1/8" (3.5mm) diameter min-iature two-conductor phone plug is included with the DX-7333 and with every tuner or cassette tape deck with the
symbol.
D Connecting the AC power cord and turning thepower on
1. Insert the AC power cord into a wall outlet.
2. Press the POWER button.The display will light.
REMOTECONTROL
L
R
DIGITAL OUTPUT
OPTICAL
ANALOGOUTPUT
2-1, NISSHIN-CHO, NEYAGAWA-SHI,OSAKA,JAPAN MANUFACTURED IN MALAYSIA
COMPACT DISC PLAYER
MODEL NO. DX-7333
WARNINGRISK OF ELECTRIC SHOCK
DO NOT OPENRISQUE DE CHOC ELECTRIQUE
NE PAS OUVRIR
AVIS
12
34
L RCD jack jack OPTICAL IN jack OPTICAL IN jack
Improper connection
Insert completely
To AC outletConnecting an Onkyo product
Amplifier without MD player, DAT, etc. Amplifier, Tuner amplifier, etc. with digital inputsdigital inputs
Audio connection cablewith connectors enables you to use the System function.
with digital inputs
Protection caps are attached to the DIGITAL OUTPUT OPTICALjacks. Remove the cap for the jack you wish to use when connect-ing the DX-7333 to digital equipment. Replace the caps if you arenot using the DIGITAL OUTPUT OPTICAL jacks.
ONKYO
Optical fiber cable(not included)
cable
TUNER
DX-7333
AMPLIFIER
TAPE DECK

DX-7333(E)Book Page 7 2001年 4月 26日 木曜日 10:28 AM
Playing CDs
OFFON
POWER
COMPACT DISC PLAYER DX-7333
MEMORY CLEAR
STOP PLAYPAUSE
PHONES LEVEL
MIN MAX
PHONES
DISPLAY
LINEAR SINGLE Bit D/A CONVERTER
Open/close
PAUSE
PLAYSTOP
POWER
REMOTE CONTROLLER RC-402C
PEAK SEARCH
+10 0 TIME EDIT
CLEAR
MEMORY
REPEAT
DISPLAY
7 8
4 5
1 2
9
6
3
NEXTSELECTION
A–B SHUFFLE
Disc tray
7
TOTAL REMAIN
TRACKTRACK
DISC
1 2 3 4 5
6 7 8 9 10
11 12OVER
OFFON
POWER
COMPACT DISC PLAYER DX-7333
MEMORY CLEAR
STOP PLAYPAUSE
PHONES LEVEL
MIN MAX
PHONES
DISPLAY
1 2
3
4
5
OFFON
POWERRemote controller
Label side
Remote controller
SINGLE ELAPSED
TRACKTRACK
NEXTNEXT
DISC
1 2 3 4 5
6 7 8 9 10
11 12
PLAY
Remote controller
STOP Remote controller
PAUSE
PAUSE
Remote controller
1. Press the POWER button to turn on the power.
2. Press the (Open/close) button.
3. Put the disc in the disc tray, with the label side of the discfacing up.
4. Press the button.
5. Press the PLAY button.The CD player will play the first track (track 1).* If you want to, you can skip step 4 by pressing the PLAY
button instead of the button. The disc tray will close auto-matically and play track 1.
If the CD player does not start playing when the PLAY buttonis pressed:• The disc may be upside down in the tray. Press the button to
open the disc tray. If you cannot read the label on the disc, turnthe disc over.
• Moisture may have formed inside the CD player. Remove thedisc from the disc tray and leave the power on for about onehour to evaporate the moisture.
Using the timer for playThe CD player starts playing the loaded CD automatically as soonas power is supplied. Using this feature, you can enjoy timer playusing your audio timer. For instructions on how to set the timer, seethe instruction manual supplied with the timer.
• Before starting play after you have inserted a discThe total number of tracks on the discAll of the track numbers on the disc (When the number of tracksexceeds 20, the OVER indicator lights.)The total playing time of the disc
• After starting playThe track number currently being playedThe next track numberThe elapsed time of the current trackThe display can be changed by pressing the DISPLAY button.
Press the STOP button.
Press the PAUSE button.The PAUSE indicator will light.
To resume play, press the PLAY button or the PAUSE but-ton. The PAUSE indicator will turn off.
Normal play
Contents of the display
Stopping play
Stopping play temporarily
ab
c
def

8
DX-7333(E)Book Page 8 2001年 4月 26日 木曜日 10:28 AM
Playing CDs
OFFON
POWER
COMPACT DISC PLAYER DX-7333
MEMORY CLEAR
STOP PLAYPAUSE
PHONES LEVEL
MIN MAX
PHONES
DISPLAY
LINEAR SINGLE Bit D/A CONVERTER
PLAY
DISPLAY
PHONES LEVELPHONES
,/ /REMOTE CONTROLLER RC-402C
PEAK SEARCH
+10 0 TIME EDIT
CLEAR
MEMORY
REPEAT
DISPLAY
7 8
4 5
1 2
9
6
3
NEXTSELECTION
A–B SHUFFLE
DISPLAY
1 – 9, 0, +10
,,
COMPACT DISC PLAYER DX-7333
STOP PLAYPAUSE
PHONES LEVEL
MIN MAX
PHONES
DISPLAY
SINGLE REMAIN
SINGLE ELAPSED
TOTAL REMAIN
DISPLAY
DISPLAY
Remote controller
Remote controller
PLAY
Remote controller
Remote controller
+10 0
7 8
4 5
1 2
9
6
3
Remote controller
• Plug the headphones with a standard binaural (stereo) plug intothe PHONES jack, and then adjust the sound level using thePHONES LEVEL knob.
• Turn the knob clockwise to increase the sound level; turn itcounterclockwise to decrease the sound level.
Press the DISPLAY button during play to switch the time displayamong the following three modes:
TOTAL REMAIN: Shows how much playing time is left forthe entire disc.SINGLE ELAPSED: Shows how long the current track hasbeen playing.SINGLE REMAIN: Shows how much time is left for the trackcurrently playing.
Hold down the / or / button (or the or button on the remote controller) during play.Release your finger when the music you would like to listen to isreached. The music will start playing from that point.
1. Each time the / button (or the button on the remotecontroller) is pressed, the pickup will advance one track; andeach time the / button (or the button on the remotecontroller) is pressed, the pickup will go back one track. Pressthese buttons until the desired track number is selected.
2. Press the PLAY button to begin play.When the / button (or the button on the remotecontroller) is pressed once while playing, the pickup will returnto the beginning of the current track and play it.
1. Select the track number you wish to play, using the numberbuttons and the +10 button.
2. The CD player starts playing automatically.
• The +10 number button is used to select a track with a numberof 10 or higher. For example, to select Track Number 30, pressthis button three times, and then press 0.
Listening with the headphones
DISPLAY button
Search play
Skip play
Starting play from a given track (Remote controller only)
a
b
c

DX-7333(E)Book Page 9 2001年 4月 26日 木曜日 10:28 AM
Playing CDs
REPEAT
A-BSHUFFLE
REMOTE CONTROLLER RC-402C
PEAK SEARCH
+10 0 TIME EDIT
CLEAR
MEMORY
REPEAT
DISPLAY
7 8
4 5
1 2
9
6
3
NEXTSELECTION
A–B SHUFFLE
9
REPEATREPEAT
REPEAT
REPEAT 1
1 2
A B
A B
Point A Point B
A–B
A–B
A–B A–B
Remote controller
Remote controller
Lights
Flashes
2
Remote controller
Remote controller
Full repeat
Single repeat
1Block repeat
Twice
SHUFFLE
SHUFFLE
Remote controller
Press the REPEAT button to enter the repeat play mode.Repeat play can be used in conjunction with normal, memory, andshuffle play modes.
Full repeat (Repeating all tracks on a disc)Press the REPEAT button once.During normal play
When the last track on the CD finishes, the CD player startsplaying from the first track on the CD.
During memory playWhen the last track in memory finishes, the CD player startsplaying from the first track in memory.
During shuffle playWhen the last track in shuffle play finishes, the CD player startsplaying the CD again, in a different order.
• Press the REPEAT button to cancel repeat play. The REPEATindicator will turn off.
Single repeat Press the REPEAT button twice.Before starting play
The CD player will play the first track repeatedly.During play
The CD player will play the current track repeatedly.• Press the REPEAT button to cancel repeat play. The REPEAT
indicator will turn off.
Block repeat (Repeating a block of music)You can repeatedly play a part between the start and end pointsspecified with the A-B button.Follow the procedure below while a CD is playing.1. Press the A-B button at the beginning of the block repeat.
(Point A)2. Press the A-B button at the end of the block repeat. (Point B)
The section between A and B will be played repeatedly.Note:You can specify A and B points beyond a track. This function is not available during memory play, repeat play (fullrepeat and single repeat), shuffle play, and time edit play. • Press the A-B button once again to cancel block repeat play.
Press the SHUFFLE button.In shuffle play mode, the CD player will play the tracks in random order.• The auto space function will insert 3 seconds of blank time
between tracks during shuffle play. Play automatically begins.• This function can be used in memory mode. In this case, the
programmed tracks are played at random.Press the SHUFFLE button to cancel shuffle play. The SHUFFLEindicator will turn off.Note:In shuffle play repeat mode, when all of the tracks have been playedonce, play will be repeated with a different track progression.
Repeating play (Remote controller only)
Shuffle play (Remote controller only)

10
DX-7333(E)Book Page 10 2001年 4月 26日 木曜日 10:28 AM
Using the memory function• Up to 36 tracks can be stored in memory.
OFFON
POWER
COMPACT DISC PLAYER DX-7333
MEMORY CLEAR
STOP PLAYPAUSE
PHONES LEVEL
MIN MAX
PHONES
DISPLAY
LINEAR SINGLE Bit D/A CONVERTER
MEMORYCLEAR
PLAYSTOP
,/ /
MEMORY
1 – 9, 0, +10
REMOTE CONTROLLER RC-402C
PEAK SEARCH
+10 0 TIME EDIT
CLEAR
MEMORY
REPEAT
DISPLAY
7 8
4 5
1 2
9
6
3
NEXTSELECTION
A–B SHUFFLE
CLEAR
1
2 Remote controller
3
MEMORY
MEMORY
Remote controllerMEMORY
MEMORY
PLAYRemote controller
TOTAL REMAIN
TRACK
DISC
MEMO CH
MEMORY
1 2 3 4 5
6 7 8 9 10
11 12
SINGLE ELAPSED
TRACKTRACK
NEXTNEXT
DISCMEMORY
2 3 5
6 9
12
+10 0
7 8
4 5
1 2
9
6
3
STOPRemote controller
1. Press the MEMORY button.
2. Select the desired track number, using the and but-tons and press the MEMORY button.To enter further track numbers into memory, repeat this proce-dure. You can store maximum of 36 tracks in memory.
If you use the remote controller, press the number buttons toselect the desired track.
3. When you press the PLAY button, the CD player willplay the tracks in the order you selected.
Note:• If more than 36 tracks are selected, “FL” will flash in the mem-
ory channel display area to indicate that the memory is full.• If the MEMORY button is pressed during play, the current track
being played is stored in memory.
Example: After storing tracks 2, 3, 5, 6, 9 and 12 in memory.
• Before starting playThe selected track numbersMemory channelThe total playing time of selected tracks
• During playTrack number 2 is currently being played (the first track inmemory).Next track number in memoryTime elapsed in track currently playingThe remaining track numbers in memory
Press the STOP button.
Storing a program into memory and playing it
Contents of the display
Stopping a memory play
abc
d
efg
DX-7333(E)Book Page 11 2001年 4月 26日 木曜日 10:28 AM
Using the memory function
1
MEMORY
TOTAL REMAIN
TRACKTRACK
DISC
MEMO CH
MEMORY
1 2 3 4 5
6 7 8 9 10
TOTAL REMAIN
TRACKTRACK
DISC
MEMO CH
MEMORY
1 2 3 4 5
6 7 8 9 10
Remote controllerMEMORY
CLEAR CLEAR
Remote controller
STOPRemote controller
SPACE
1
2
SINGLE REMAIN
TRACKTRACK
DISC
MEMO CH
MEMORY
1 2 3 4 5
6 7 8 9 10
11 12
Remote controller
SINGLE REMAIN
TRACKTRACK
DISC
MEMO CH
MEMORY
1 2 3 4 5
6 7 8 9 10
11 12
1
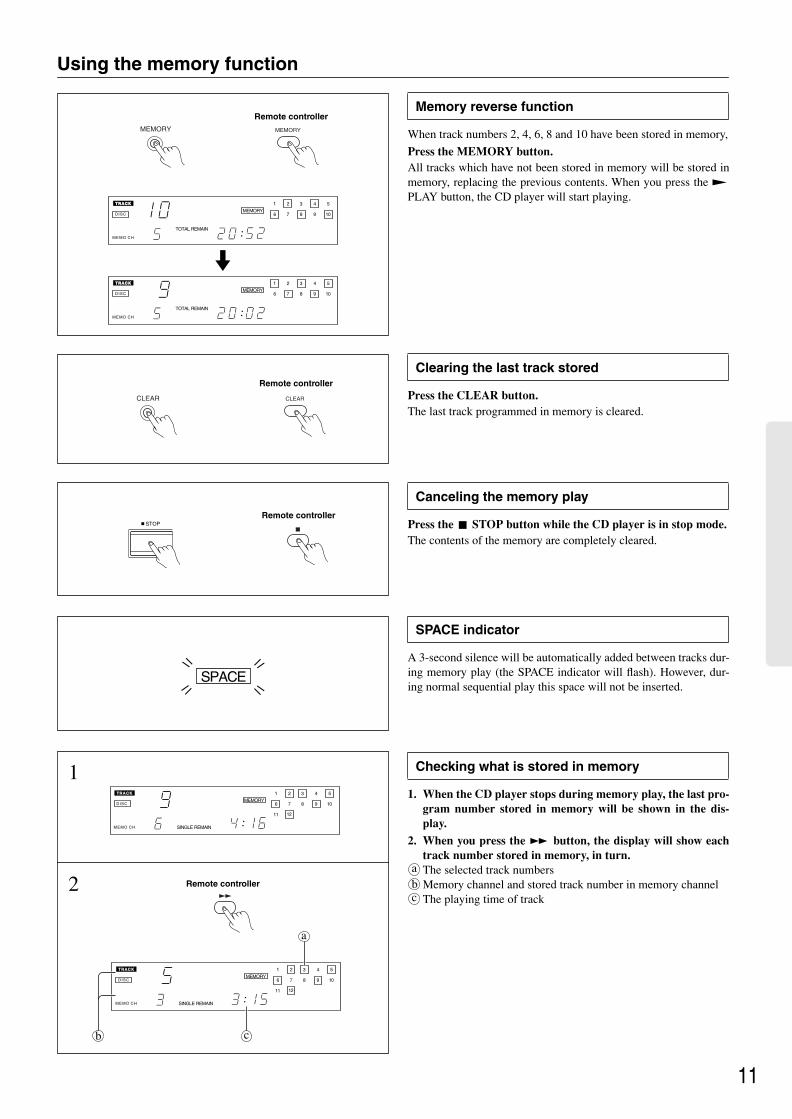
When track numbers 2, 4, 6, 8 and 10 have been stored in memory,
Press the MEMORY button.All tracks which have not been stored in memory will be stored inmemory, replacing the previous contents. When you press the PLAY button, the CD player will start playing.
Press the CLEAR button.The last track programmed in memory is cleared.
Press the STOP button while the CD player is in stop mode.The contents of the memory are completely cleared.
A 3-second silence will be automatically added between tracks dur-ing memory play (the SPACE indicator will flash). However, dur-ing normal sequential play this space will not be inserted.
1. When the CD player stops during memory play, the last pro-gram number stored in memory will be shown in the dis-play.
2. When you press the button, the display will show eachtrack number stored in memory, in turn.The selected track numbersMemory channel and stored track number in memory channelThe playing time of track
Memory reverse function
Clearing the last track stored
Canceling the memory play
SPACE indicator
Checking what is stored in memory
abc

12
DX-7333(E)Book Page 12 2001年 4月 26日 木曜日 10:28 AM
Useful Functions
NEXT SELECTION
TIME EDIT
1 – 9, 0, +10
REMOTE CONTROLLER RC-402C
PEAK SEARCH
+10 0 TIME EDIT
CLEAR
MEMORY
REPEAT
DISPLAY
7 8
4 5
1 2
9
6
3
NEXTSELECTION
A–B SHUFFLE
,
1
2
Remote controller
+10 0
7 8
4 5
1 2
9
6
3
Remote controller
NEXTSELECTION NEXT
TOTAL REMAIN
DISCTIME EDIT
1 2 3 4 5
6 7 8
1
2
Remote controller
+10 0
7 8
4 5
1 2
9
6
3
Remote controller
TIME EDIT
3
Remote controller
Remote controller
PAUSE
or
Remote controller
1. During playback, press the NEXT SELECTION button.
2. While the “– –” is flashing, select the next desired trackusing the number buttons and the +10 button.After playing the current track, the selected track will be played.
Note:The Memory Play or the Shuffle Play mode, if appropriate, will becanceled before the playing of the specified track begins.
This function can be used when recording from a CD to a cassettetape.Make sure that you cancel the memory mode before using thisfunction.
1. Press the TIME EDIT button.• Pressing this button will change the Track Number display from
46 → 50 → 54 → 60 → 70 → 80 → 90 → 46 → .....These numbers indicate the length of the tape.Tape length.The track numbers to be recorded onto side A will be displayedin a box.This is the total time for the tracks on side A. This changes tothe display for side B ( ) after 2 or 3 seconds. Pressing theDISPLAY button will show the display for the A side again.
• Each time the / buttons are pressed, the tape length willchange by 1 minute.
• Use number buttons and + 10 button to directly enter the lengthof the tape.The maximum setting is 99 minutes.
2. Press the button.The CD player starts playing from the first track on the disc tobe recorded onto side A.When the last track on side A is completed, the pause mode isautomatically set.
3. Press the button again.The pause mode is canceled and the CD player starts playing theremaining tracks for recording onto side B.
Note:• The time edit mode does not function for discs with more than
20 tracks, or when the first track is longer than half the indicatedlength of the tape.
• During time edit play, buttons other than STOP, Open/close,DISPLAY and number buttons cannot be used for input.
Selecting the next track for play(Remote controller only)
Time edit function (Remote controller only)
ab
c

DX-7333(E)Book Page 13 2001年 4月 26日 木曜日 10:28 AM
Useful Functions
PEAK SEARCH
A–B
REMOTE CONTROLLER RC-402C
PEAK SEARCH
+10 0 TIME EDIT
CLEAR
MEMORY
REPEAT
DISPLAY
7 8
4 5
1 2
9
6
3
NEXTSELECTION
A–B SHUFFLE
3
1
2
Remote controller
Remote controller
3
4
A–B
Remote controller
Remote controller
PEAK SEARCH
PEAK SEARCHPEAK SEARCH
LightsFlashes
1
This function searches for the peak sound level on the disc.When using the memory mode, press the MEMORY button toreturn to normal mode.
1. Press the PEAK SEARCH button.
• The CD player checks the disc for the highest sound level. ThePEAK SEARCH indicator will flash during this operation.When the search is complete, the indicator will light.
2. Press the A-B button.“P” appears in the memory channel display area and flashes.
3. Press the button.
• The section of the disc with the highest sound level will beplayed repeatedly for 6 seconds. Refer to this level when record-ing the disc onto a cassette tape.
4. Press the button.The CD player stops.
• This level is stored until the button is pressed or the power isturned off. To repeat the 6-seconds playback of the peak level,follow steps 2, 3, and 4 when the CD player is stopped.
• Pressing the PEAK SEARCH button will turn off the PEAKSEARCH indicator and the level will be cleared from thememory.
• Pressing the A-B button after pressing the button will startthe block repeat operation.
Note:Depending on the disc playing, memorizing of a level which is notthe maximum audible level could occur. This is due to the CDplayer’s microprocessor memorizing inaccurate informationbecause of flaws in the disc itself, or recording conditions. Undersuch circumstances, the recording level for the cassette tape may bevery low, or else distortion or similar symptoms could arise onaccount of excessively high signal levels. To avoid this, be sure toreset the recording level of the cassette deck if such symptomsoccur.
Peak search (Remote controller only)

14
DX-7333(E)Book Page 14 2001年 4月 26日 木曜日 10:28 AM
Control positions and namesNote:If there is a protective film on the surface of the display, making it difficult to read the display, remove it.For more information about the function of a particular button, please turn to the page listed in the brackets ([ ]) following each name.
OFFON
POWER
COMPACT DISC PLAYER DX-7333
MEMORY CLEAR
STOP PLAYPAUSE
PHONES LEVEL
MIN MAX
PHONES
DISPLAY
LINEAR SINGLE Bit D/A CONVERTER
1 3 42 5 6 7 8
91011121314
a b c d e f g
hijklm
TOTAL REMAINSINGLE ELAPSEDSINGLE REMAIN
TRACKTRACK
NEXTNEXT
DISC
MEMO CH
PEAK SEARCH SHUFFLE
REPEAT 1 A B SPACE MEMORY
PAUSE TIME EDIT OVER
1 2 3 4 5
6 7 8 9 10
11 12 13 14 15
16 17 18 19 20
Display
Front panel
1. POWER button [7]
2. Remote control sensor [5]
3. Disc tray [7]
4. Display (Refer to the “Display” illustration.)
5. Open/close button [7]
6. PAUSE button [7]
7. STOP button [7, 11]
8. PLAY button [7, 10]
9. PHONES LEVEL knob [8]
10. PHONES jack [8]
11. Skip/Search buttons [8, 10]
12. DISPLAY button [8]
13. CLEAR button [11]
14. MEMORY button [10, 11]
a. Track number displayb. REPEAT indicatorc. Block repeat indicatord. PEAK SEARCH indicatore. SPACE indicatorf. SHUFFLE play indicatorg. MEMORY indicatorh. Music calendar displayi. OVER indicatorj. Time displayk. TIME EDIT indicatorl. PAUSE indicator
m. Next track number/memory channel display
Front panel Display

DX-7333(E)Book Page 15 2001年 4月 26日 木曜日 10:28 AM
Control positions and names
REMOTE CONTROLLER RC-402C
PEAK SEARCH
+10 0 TIME EDIT
CLEAR
MEMORY
REPEAT
DISPLAY
7 8
4 5
1 2
9
6
3
NEXTSELECTION
A–B SHUFFLE
1 6
7
8
9
10
11
12
2
3
4
5
1. Open/close button [7]
2. CD operation buttons: Pause button [7]: Stop button [7, 11, 13]: Play button [7, 10, 12, 13]: Fast reverse button [8]: Fast forward button [8, 11]: Reverse skip button [8, 12]: Forward skip button [8, 12]
3. Number buttons and +10 button [8, 10, 12]
4. PEAK SEARCH button [13]
5. A-B button [9, 13]
6. DISPLAY button [8]
7. REPEAT button [9]
8. MEMORY button [10, 11]
9. CLEAR button [11]
10. TIME EDIT button [12]
11. NEXT SELECTION button [12]
12. SHUFFLE button [9]
Remote controller
Precautions for handling the Compact Disc (CD)
1. Carefully lift the disc from the disc case, making sure to holdthe disc by its edges or the hole in the middle.
2. A dry, soft cloth may be used to wipe dust and fingerprintsoff the surface of CDs.Do not use volatile agents on discs, such as thinner or ben-zine. Also, do not use conventional record cleaner or anti-static agents.
• Do not place a CD in direct sunlight or locations subject to highhumidity or low temperature.
• Do not store a CD in this unit tray for a long period of time.
This unit can play back the following discs.
You cannot play back discs other than those listed above.
Do not use discs that are not audio discs (e.g. CD-ROMs for usewith personal computers), as these could damage the speakers andamplifier.
Avoid using heart-shaped or octagonal discs. playing irregularlyshaped discs may damage the internal mechanism of the unit.
Do not use discs on which adhesive from adhesive tape or a disclabel (if it is a rental disc) remains.Otherwise, you may not be able to eject the discs or the unit maybecome inoperative.
Important note on handling CDs Playable discs
AudioCDs
Disc mark Contents Disc size Maximum playback time
Audio12 cm
8 cm(CD single)
74 minutes
20 minutes
15

16
/
SN
DX-7333(E)Book Page 16 2001年 4月 26日 木曜日 10:28 AM
E
http://www.onkyo.co.jpHOMEPAGE
29343067 I0104-1
Sales & Product Planning Div. : 2-1, Nisshin-cho, Neyagawa-shi, OSAKA 572-8540, JAPANTel: 072-831-8111 Fax: 072-833-5222 http://www.onkyo-intl.com
ONKYO U.S.A. CORPORATION18 Park Way, Upper Saddle River, N.J. 07458, U.S.A.Tel: 201-785-2600 Fax: 201-785-2650 http://www.onkyo.net
ONKYO EUROPE ELECTRONICS GmbHLiegnitzerstrasse 6, 82194 Groebenzell, GERMANYTel: +49-8142-4401-0 Fax: +49-8142-4401-555 http://www.onkyo.net
ONKYO CHINA LIMITEDUnits 2102-2107, Metroplaza Tower I, 223 Hing Fong Road, Kwai Chung,N.T., HONG KONG Tel: 852-2429-3118 Fax: 852-2428-9039 http://www.onkyochina.com
Troubleshooting Guide• No power.
Cause: Power cable is not properly plugged into the AC outlet.Remedy: Insert the power plug firmly.
• A disc is loaded in the disc tray, but playback will not start.Cause: A disc in the disc tray may be upside down.
Remedy: Load the disc with the label facing upward.Cause: The disc is dirty.
Remedy: Clean the disc.Cause: Moisture has accumulated inside the CD player.
Remedy: Remove the disc from the disc tray, place the CDplayer in a warm place, and leave the power on forabout one hour.
• No sound is heard.Cause: Connections may be incomplete or incorrect.
Remedy: Check all cable connections. Insert all the plugsfirmly into the jacks.
Cause: The input selector switch on the amplifier may be setincorrectly.
Remedy: Set the switch to the proper position. See youramplifier’s operating instructions for more informa-tion.
• Disc playback skips.Cause: The disc is dirty.
Remedy: Clean the disc.Cause: A disc is scratched.
Remedy: Replace the disc.Cause: The CD player is subject to being accidentally bumped.
Remedy: Place the CD player in a more stable location.
• Search time (when locating a specific track) is extremely long.Cause: The disc is dirty.
Remedy: Clean the disc.Cause: The disc is scratched.
Remedy: Replace the disc.
• Track numbers cannot be stored in memory.Cause: No disc in the tray.
Remedy: Load a disc in the tray.Cause: You have entered a track number that does not exist on
the disc.Remedy: Use only the track numbers that exist on the disc.
• Front panel controls function correctly, but remote control-ler does not.Cause: No batteries in remote controller.
Remedy: Insert batteries.Cause: Batteries have worn out.
Remedy: Replace batteries.
This unit contains a sensitive microcomputer, which under certaincircumstances might fail to operate due to excessive noise interfer-ence. In such case, switch off the main power by pressing thePOWER switch, wait five seconds, then switch it on again.
SpecificationsSignal readout system: Optical non-contactReading rotation: About 500 - 200 r.p.m.
(constant linear velocity)Linear velocity: 1.2 - 1.4 m/sError correction system: Cross Interleave Reed-Solomon codeD/A converter: Single-bit PWM (Pulse Width Mod-
ulation)/AccuPulseSampling frequency: 352.8 kHz (8 times oversampling)Number of channels: 2 (stereo)Frequency response: 5 Hz - 20 kHzTotal harmonic distortion: 0.005% (at 1 kHz)Dynamic range: 96 dBSignal-to-noise ratio: 90 dBChannel separation: 85 dB (at 1 kHz)Wow and Flutter: Below threshold of measurabilityOutput level: 2 volts r.m.s.Power consumption: 9 wattsPower supply: 230-240 V, 50 HzDimensions (W × H × D): 435 × 91 × 314 mm
(17-1/8" × 3-9/16" × 12-3/8")Weight: 4.0 kg (8.8 lbs.)
Specifications and features are subject to change without notice.