contents - acl · pdf filecontents importing the trial balance ... trial balance and/or...
TRANSCRIPT
Contents Importing the Trial Balance ..................................................................................................................... 1
Accounting Software Imports - Summary ....................................................................................... 1
Pastel Partner/Express ........................................................................................................................... 1
Direct Import ........................................................................................................................................ 1 Indirect Import ...................................................................................................................................... 3
QuickBooks ............................................................................................................................................. 7
Indirect Import ...................................................................................................................................... 7
Installation Notes ............................................................................................................................. 7 Exporting from QuickBooks ............................................................................................................. 7 Example Export ................................................................................................................................ 8 Important: First Export ..................................................................................................................... 9 Importing into CaseWare Working Papers ...................................................................................... 9
MS Excel ............................................................................................................................................... 10
Indirect Import ................................................................................................................................ 10
Advanced importing – divisional ........................................................................................................ 17
Method 1 ........................................................................................................................................ 18 Method 2 ........................................................................................................................................ 24 Troubleshooting Import Failure ...................................................................................................... 25 Reimporting Data ........................................................................................................................... 25
Importing the Trial Balance
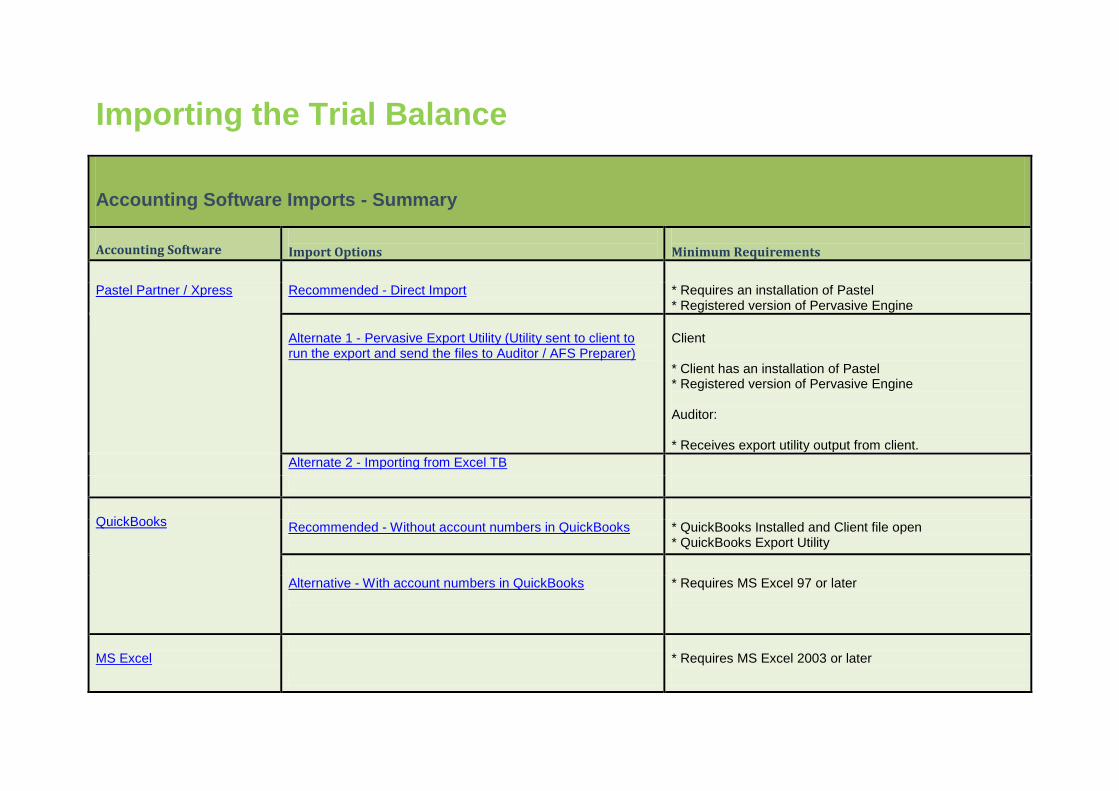
Accounting Software Imports - Summary
Accounting Software Import Options
Minimum Requirements
Pastel Partner / Xpress Recommended - Direct Import * Requires an installation of Pastel * Registered version of Pervasive Engine
Alternate 1 - Pervasive Export Utility (Utility sent to client to run the export and send the files to Auditor / AFS Preparer)
Client * Client has an installation of Pastel * Registered version of Pervasive Engine Auditor: * Receives export utility output from client.
Alternate 2 - Importing from Excel TB
QuickBooks
Recommended - Without account numbers in QuickBooks * QuickBooks Installed and Client file open * QuickBooks Export Utility
Alternative - With account numbers in QuickBooks
* Requires MS Excel 97 or later
MS Excel
* Requires MS Excel 2003 or later

Pastel Partner/Express
Direct Import
CaseWare Working Papers can import directly from a comprehensive list of accounting packages.
The software does not need to be installed on the computer. Although some accounting packages do
need a third party software installed on the user’s machine to complete the import, e.g. Pervasive
SQL, QuickBooks Export Utility, etc.
From the CaseWare Menu at the top of the screen, select File | Import | Accounting Software
The Import - Accounting Software dialogue will appear:

From the drop-down menu, select the desired accounting package to imported from:
Import From: Select the applicable accounting package.
Version: Select the version that the CaseWare file is based on.
Import Path: Click on the browse button to navigate to where the file/s is/are
stored.
Import Components:
Import Client Information: Selecting this option will override information
entered into the Engagement Properties with the information available in
the accounting data.
Trial Balance (Opening Entries) or General Ledger Detail:
Select the Trial Balance option to import closing
balances without underlying transactions. The period
balances option can be selected this will indicate the
movement for the line items.
Select the General Ledger Detail option to import all
general ledger transactions for the year, which can then
be accessed from within the CaseWare Working Papers
CaseWare file.
The options in the bottom half of the screen will differ depending on which application
is being imported from. Click on the button once all the applicable options
have been selected. The trial balance and/or general ledger detail will then be
imported into the CaseWare file, and a notification will appear once the process has
been completed.
How do I know which software version I use?
The software version can be found by selecting Help | About in the software application.

Indirect Import
In some instances the person who will be drafting the AFS in CaseWare is not the same person who
performs the accounting processing. In this case, the CaseWare user may not have access to
pervasive (backend software used to run Pastel Partner/Express) and would not be able to perform a
direct import from Pastel Partner/Express into CaseWare Working Papers.
The Pervasive Export utility can be used to export data from Pastel, which in turn can be imported into
Working Papers.
The utility will need to be sent to your client where Pastel Partner and pervasive are installed
Where do I find the Pervasive export utility?
The Utility can be found in the following location:
Start | Computer | Open/Browse your CaseWare CD | Go to Administrator | Pervasive Export
Utility V2012
Highlight all the files| Right click and send to Zip Compressed file
What if I don’t have the software installed?
As mentioned previously, the users do not need to have the accounting software installed on their
machines; however certain third party software might be required. For more information on this please
contact our technical support team.
The accounting data files needs to be copied into an independent folder. To view which files is needed to
import:
• Select File | Import | Accounting Software.
• From the drop-down box Import From select the applicable application.
• Press F1 to access CaseWare Working Papers Help.
• The Help window will appear, showing which files needs to be obtained and copied from the
organization’s files for the selected application.
Once these files have been copied into a new independent folder, navigate the Import Path to where the
new folder has been saved.
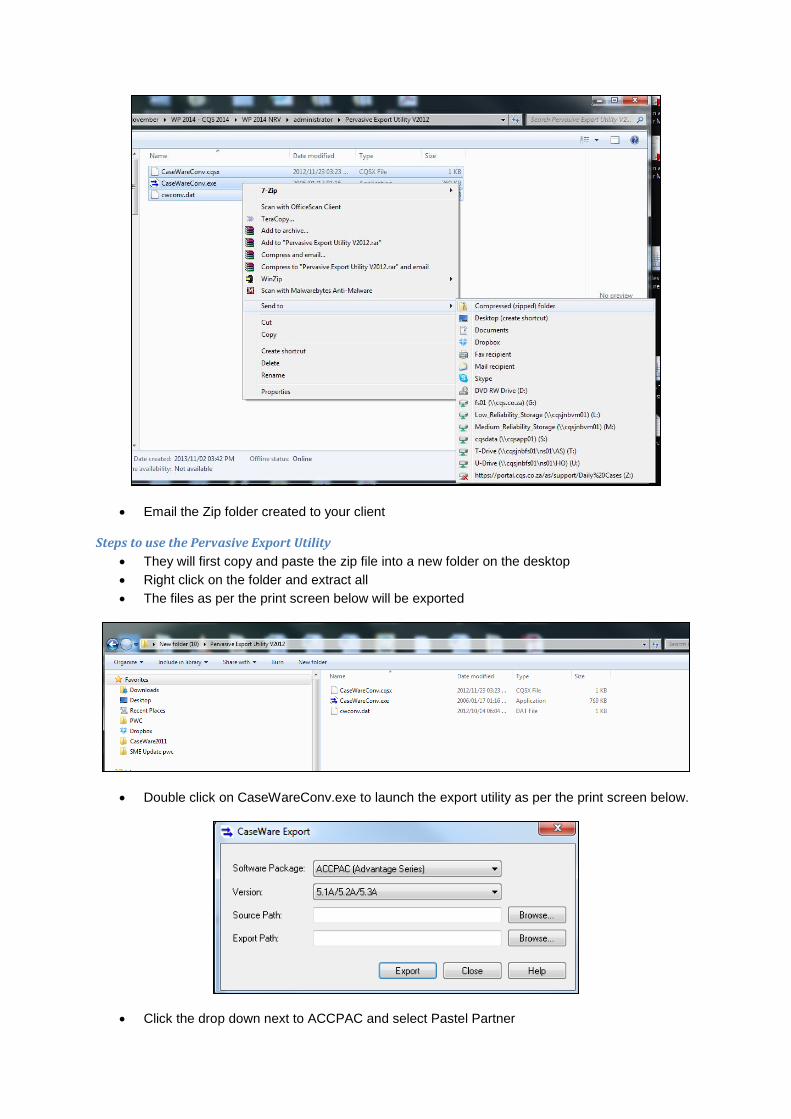
Email the Zip folder created to your client
Steps to use the Pervasive Export Utility
They will first copy and paste the zip file into a new folder on the desktop
Right click on the folder and extract all
The files as per the print screen below will be exported
Double click on CaseWareConv.exe to launch the export utility as per the print screen below.
Click the drop down next to ACCPAC and select Pastel Partner
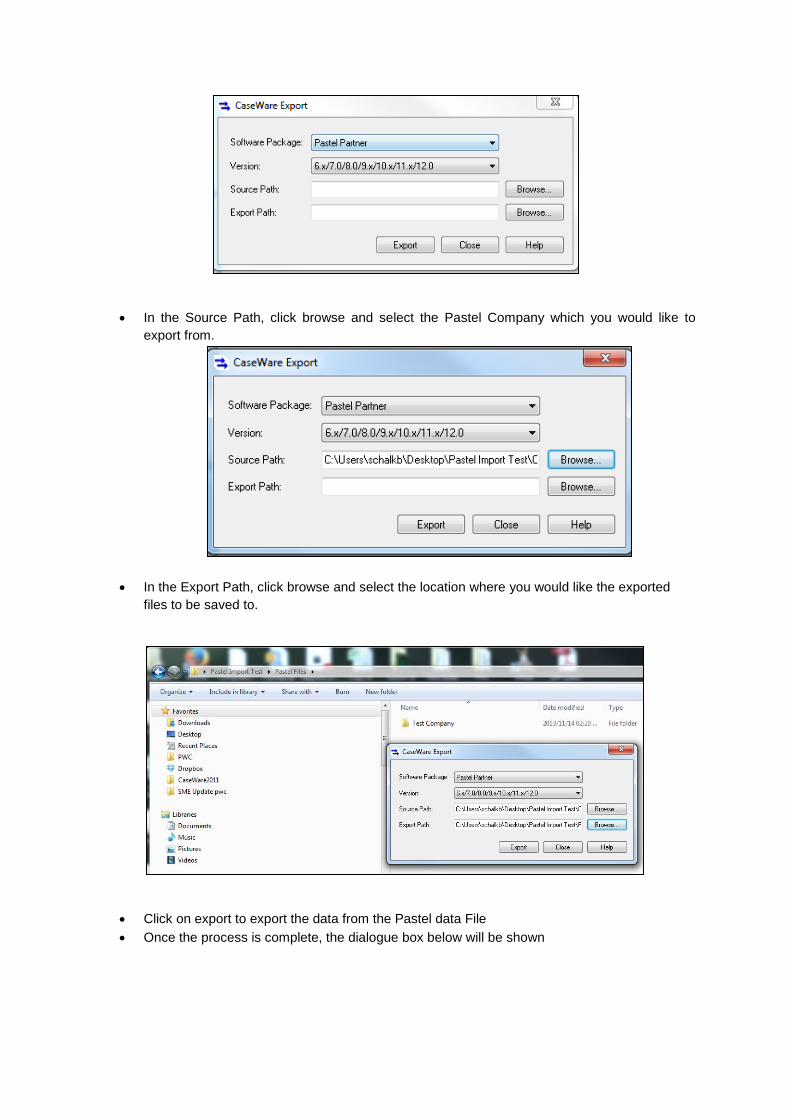
In the Source Path, click browse and select the Pastel Company which you would like to
export from.
In the Export Path, click browse and select the location where you would like the exported
files to be saved to.
Click on export to export the data from the Pastel data File
Once the process is complete, the dialogue box below will be shown
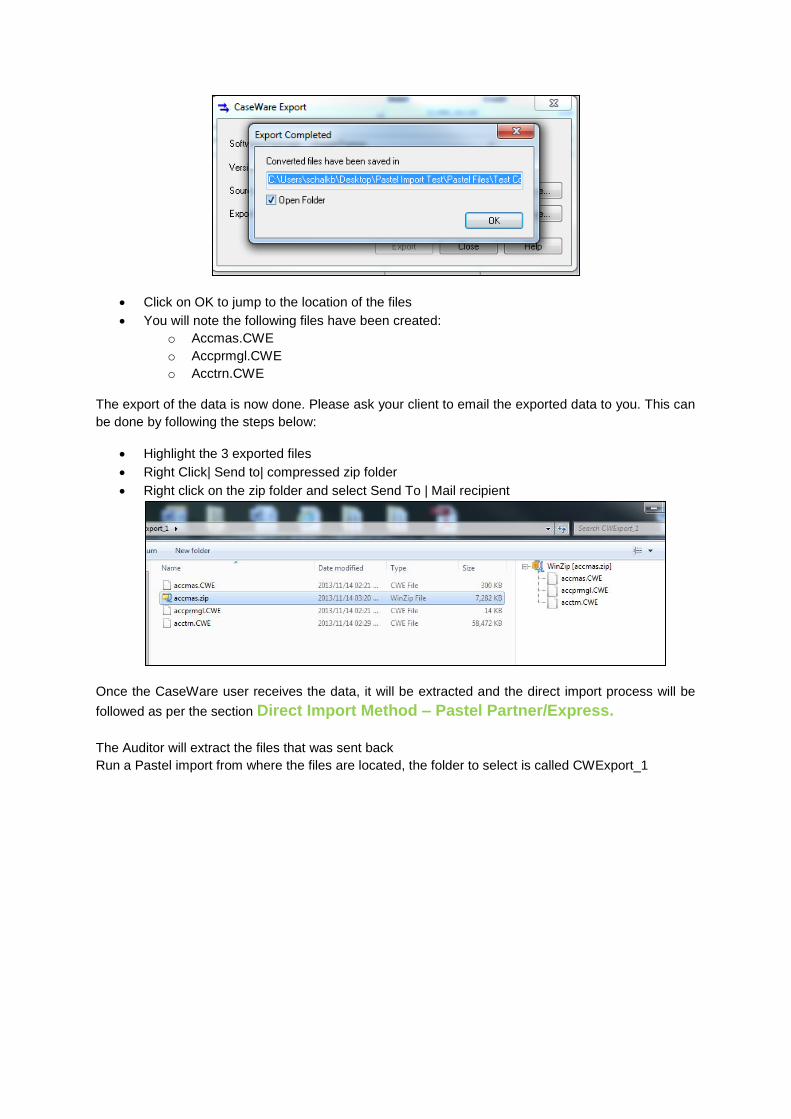
Click on OK to jump to the location of the files
You will note the following files have been created:
o Accmas.CWE
o Accprmgl.CWE
o Acctrn.CWE
The export of the data is now done. Please ask your client to email the exported data to you. This can
be done by following the steps below:
Highlight the 3 exported files
Right Click| Send to| compressed zip folder
Right click on the zip folder and select Send To | Mail recipient
Once the CaseWare user receives the data, it will be extracted and the direct import process will be
followed as per the section Direct Import Method – Pastel Partner/Express.
The Auditor will extract the files that was sent back
Run a Pastel import from where the files are located, the folder to select is called CWExport_1

QuickBooks
Indirect Import
To allow for the import of data into CaseWare from QuickBooks, an export utility has been developed
to ensure data integrity between the two software packages. This tool exports the QuickBooks
2008/2009/2010/2011/2012 information to files that can be imported into CaseWare Working Papers.
Installation Notes
Ensure that QuickBooks 2008, 2009, 2010, 2011, 2012, 2013 or 2014 is installed on your computer.
Location of the Utility: The QuickBooks Export Utility can be found in the following two locations:
CQS Knowledge Base:
http://support.cqs.co.za/live/xx_kb_view.php?Item_ID=7911&urlName=QuickBooks-Export-
Utility&articleType=Download_Article
CQS installation DVD:
Make sure the DVD is in your computer
Click Start | Computer | Open/Browse your CaseWare CD | Go to Administrator | QuickBooks
Export Utility V1039
Please Note: The QuickBooks Export Utility has to be Installed and run on the computer where
QuickBooks is installed and running.
Important: Before starting the export process, you must launch QuickBooks and open the company
file you want to export using the Admin account or the user account that has full access to the
QuickBooks file.
On the QuickBooks Learning Centre Welcome screen, click Begin Using QuickBooks in the bottom
right-hand corner. If you fail to exit the Welcome screen, the QuickBooks Export Utility will not work.
Exporting from QuickBooks
1. Select the QuickBooks version you are using. Currently, 2008 to 2014 versions are available.
2. Type the location of where you would like to save the exported files or click Browse and locate
the folder.
3. Click Export to start exporting. The exported files are saved in the specified location.

Note: Do not open any dialogs in QuickBooks while exporting. This action will block the data from
being read.
Example Export
If the company name is "Mountain Sports Equipment", the following files will be generated in the
export path:
Mountain Sports Equipment.cwq
Mountain Sports Equipment.account.txt
Mountain Sports Equipment.gl.txt
Mountain Sports Equipment.gle.txt
Mountain Sports Equipment.item.txt
Mountain Sports Equipment.class.txt
Mountain Sports Equipment.taxcode.txt
Mountain Sports Equipment.budget.txt
4. Copy all of these files or the entire export folder and forward them to the CaseWare user, who
will run the import into CaseWare Working Papers.

Important: First Export
When the Export Utility connects to QuickBooks for the first time, QuickBooks displays the following
dialog to gather certificate information:
Select the options as shown in the screenshot above. Be sure to select the “Allow this application to
access……” option and login as Admin or the user that has full access; otherwise, not all of the
transaction data will be exported. Click Continue.
If the wrong option is selected and access is denied, go to QuickBooks Preferences and change the
properties for "Company Preferences" in "Integrated Applications" to grant the access right to the
application "QBExport".
Importing into CaseWare Working Papers
1. Ensure that a supported version of CaseWare Working Papers is installed on your computer.
2. Open Working Papers.
3. In the File menu, select Import, then Accounting Software.
4. In the Import From drop-down menu, select QuickBooks.
5. Click Help at the bottom of the dialog.
6. Use the help to make the appropriate selections in the Import - Accounting Software dialog.
7. Click OK.

MS Excel
Indirect Import
Where the organisation’s accounting package is not supported by CaseWare Working Papers, the
trial balance and/or general ledger details can be exported into a Microsoft Excel spread sheet or
ASCII text file and imported into CaseWare Working Papers from there.
Importing from Microsoft Excel
Export and save the trial balance as an Excel spread sheet.
From the CaseWare Menu, select File | Import | Excel File…
The Excel File Import wizard opens.
Select the following ‘Import File’ Settings:
Components to import:
Chart of Accounts & General Ledger Balances: Select this option if to
import the Trial Balance.
General Ledger Details: Select this option if the spread sheet contains
transactional detail.
EXCEL file to import: Click on the browse button to navigate to the where the
file is stored.
Select a worksheet: Enter the number of the Excel worksheet where the data is
saved on (counting tabs from the left).
Record layout file (optional): This field is normally left blank. A previously
saved layout can be selected. Click on the browse button to navigate to where
the layout file is saved (.vtb file).
Period Date Sequence for importing period balances: The period date
sequence defaults to the current date sequence set up in the Engagement
Properties.
When would I use the record layout file feature?
Record layout files are useful when trial balances with exactly the same layouts are imported
frequently – retrieve a previously saved layout and settings (file type, column selection and
assignments, etc.) specified for a previous input file with the same layout in order to prevent having
to re-enter them over and over again.
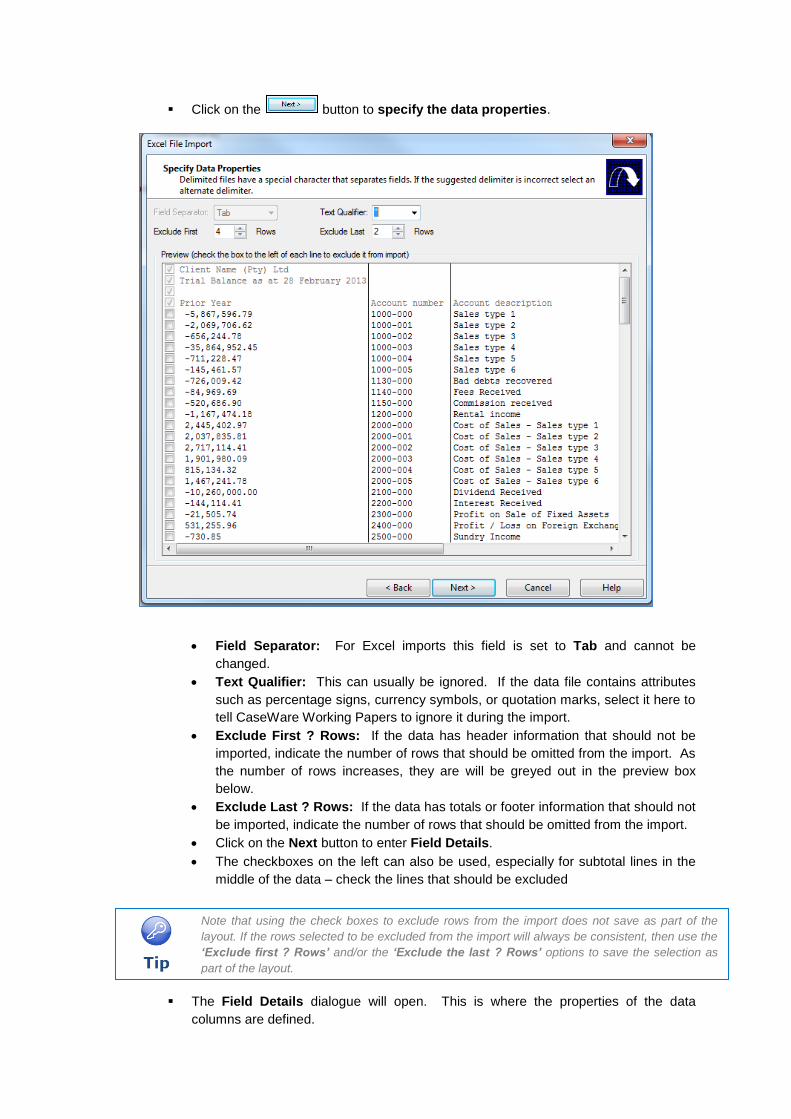
Click on the button to specify the data properties.
Field Separator: For Excel imports this field is set to Tab and cannot be
changed.
Text Qualifier: This can usually be ignored. If the data file contains attributes
such as percentage signs, currency symbols, or quotation marks, select it here to
tell CaseWare Working Papers to ignore it during the import.
Exclude First ? Rows: If the data has header information that should not be
imported, indicate the number of rows that should be omitted from the import. As
the number of rows increases, they are will be greyed out in the preview box
below.
Exclude Last ? Rows: If the data has totals or footer information that should not
be imported, indicate the number of rows that should be omitted from the import.
Click on the Next button to enter Field Details.
The checkboxes on the left can also be used, especially for subtotal lines in the
middle of the data – check the lines that should be excluded
The Field Details dialogue will open. This is where the properties of the data
columns are defined.
Note that using the check boxes to exclude rows from the import does not save as part of the
layout. If the rows selected to be excluded from the import will always be consistent, then use the
‘Exclude first ? Rows’ and/or the ‘Exclude the last ? Rows’ options to save the selection as
part of the layout.

The columns headers are labelled Ignore by default. They will change to the header
selected once defined. All columns with the header Ignore will not be imported. Only the
data is to be imported should be defined.
Define the data columns by clicking on the heading and selecting the appropriate
category. The essential fields to define are:
Account Number: Account Details > Account Number.
Account Description: Account Details > Account Description.
Current Year Account Balances: Balances > Current Year Balance > (select
appropriate period, for example period 12 if monthly).
Prior year account balances (for new CaseWare files only): Balances > Prior
Year 1 Balance > (select appropriate period).
What if debits and credits are shown in separate columns in Excel?
Once the balance field has been selected, the Field Information will appear in the grey area at the
bottom of the window, as per picture 2 above. The default setting is that debits and credits are in
the same column with credits being negative. If debits and credits are separate, indicate which field
by selecting the applicable radio button. For the credit column, also indicate whether the balances
are shown as positive or negative.


Once all applicable fields have been defined, click on the button to set
advanced specifications.
Advanced specifications are defaulted to the following settings (change if
necessary):
Default Account Type: Income Statement (unmapped accounts will be allocated
the default type Income Statement when imported – this is updated as soon as
the account has been mapped).
Accumulate Balances: Check this box to ADD the balances being imported to
balances already in Working Papers.
Clear Balances of Period(s) Being Imported: Check this box if when re-
importing an updated trial balance to ensure that the old balances are deleted.
Round Balances: The option to round balances being imported to the nearest
ones, thousands or millions is available. This will eliminate rounding differences
in the financial statements due to cents. Check the box if to round the balances
being imported.
Click on the button to specify import rounding settings.
What if I mistakenly select the incorrect column header? How can I change it?
Change the column properties by first changing the header back to Ignore, and then reselecting the
correct header.

The Import Rounding Settings dialogue will open.
Round to: From the drop-down box, select the rounding level.
Rounding differences for: From the drop-down boxes, select the
account to post any rounding differences to for the balance sheet and
income statement.
Click on the button to save the settings.
Import: Defaults to all accounts. To import accounts with balances, change
selection to Accounts with Non-Zero Total Balance. Accounts with Opening
Balance/Period Movement.
Regional settings: (If the default regional settings should not be used, uncheck
the box to overwrite the default symbols).
Balance settings: Do not change any balance settings (default).
Can I use this rounding feature even in a new file where I don’t have accounts to which to
allocate the differences?
If this is a new CaseWare file, the rounding feature can still be used – enter the account NUMBER
(only) where the rounding difference should be allocated to. A notification will appear indicating that
the accounts don’t exist and will be created. On import, the newly created accounts will be renamed
to their proper account names.
When can I use the balance settings option?
The balance settings option should be used in the case where a user imports the trial balance on a
monthly basis and where the trial balance represents year-to-date balances and not movements.
The ‘Balances being imported are year-to-date’ option should only be selected if the user intends
to import year-to-date balances for every subsequent month.
Should the user only import movements in the subsequent months, the rest of the options remain
unchecked. However, if the user intends to import year-to-date balances for every subsequent
month, the ‘Import balance for subsequent periods’ option needs to be selected as well.
This will then import each period as year – to – date, preventing the working trial balance from
accumulating the year-to-date balances.

Click on the button to proceed to the last step – the Completing Excel
Import Wizard will appear.
Save Layout Settings: This option allows the user to save the layout and settings
(file type, column selection and assignments, etc.) that they have just specified to
enable them to be reused for another input file, either for the same CaseWare file or
for a different CaseWare file with the same file layout, without having to re-enter all
the settings again.
Click on the button to navigate to where the layout file should be saved.
Click on the button to complete the import. The Working Trial Balance will
be updated with all accounts and balances imported.
Advanced importing – divisional
A default divisional/consolidation structure exists within the BizSuite file. It is recommended that the
user clears this structure before importing into the management accounts file. Refer to Setting up the
reports for instructions on how to clear this setup. CaseWare can automatically create the divisional
structure in the CaseWare file, via the import of the trail balance. There are two methods of doing this.
Method 1: Cost/divisional code exists in a separate field as the account number
Method 2: The account name and the Cost/divisional code share the same field
Method 1
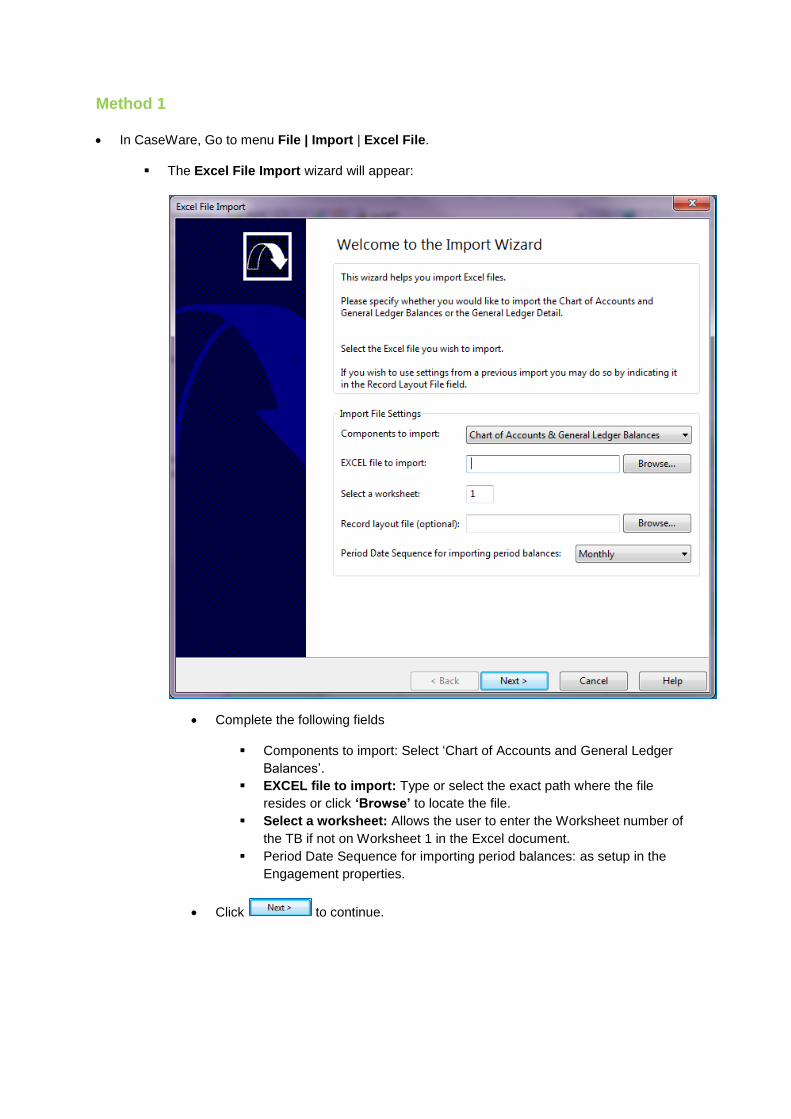
In CaseWare, Go to menu File | Import | Excel File.
The Excel File Import wizard will appear:
Complete the following fields
Components to import: Select ‘Chart of Accounts and General Ledger
Balances’.
EXCEL file to import: Type or select the exact path where the file
resides or click ‘Browse’ to locate the file.
Select a worksheet: Allows the user to enter the Worksheet number of
the TB if not on Worksheet 1 in the Excel document.
Period Date Sequence for importing period balances: as setup in the
Engagement properties.
Click to continue.

The ‘Specify Data Properties’ screen will appear:
Use the Exclude First Rows and Exclude Last Rows fields to take outlines that
should not be imported into CaseWare Working Papers. Alternatively, the user
can also use the tick boxes to the left of each row to select items that should be
excluded.
Click to continue.

In the ‘Field Details’ details screen, assign the columns as indicated below:
Entity Description: Assign the field to the column that represents the Division
description if applicable.
Entity Abbreviation: Assign the column representing the cost/divisional code.
This abbreviation has to be the same as the abbreviation created in the
Engagement | Consolidate screen. Refer to Setting Up the Organisational
Structure for more information on adding the entity abbreviation.
Assign the rest of the columns:
Account Description: Assign the account description by clicking in the
relevant column and selecting Account Details | Account Description.
To assign current year balances: Click on the relevant column, select
Balances | Current year | Period 1 – 12. If only the final at year – end
balances are being imported, only Period 12 needs to be assigned.
Prior Year balances can be imported in the same way by selecting
Balances | Prior year (1 – 4) | Period 1 – 12.
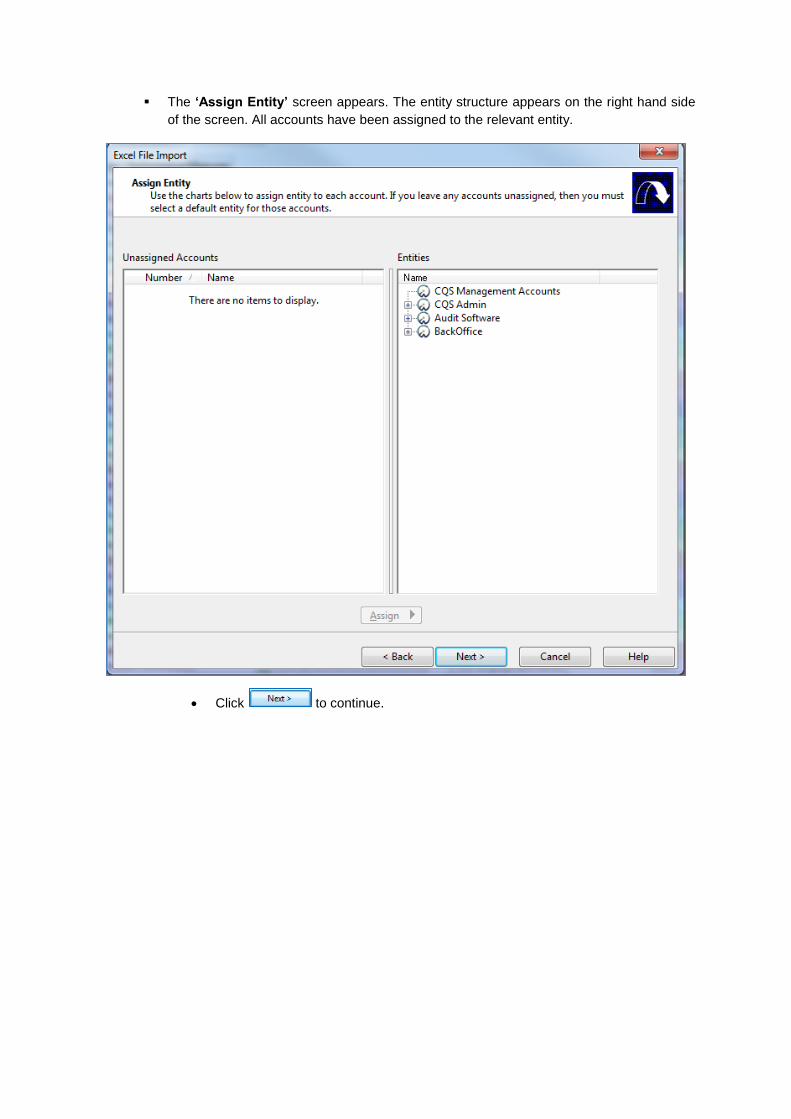
The ‘Assign Entity’ screen appears. The entity structure appears on the right hand side
of the screen. All accounts have been assigned to the relevant entity.
Click to continue.

In the ‘Advance Specifications’ screen are the options for the account, regional settings
and file settings presented clearly for users to set as needed.
Click to continue.
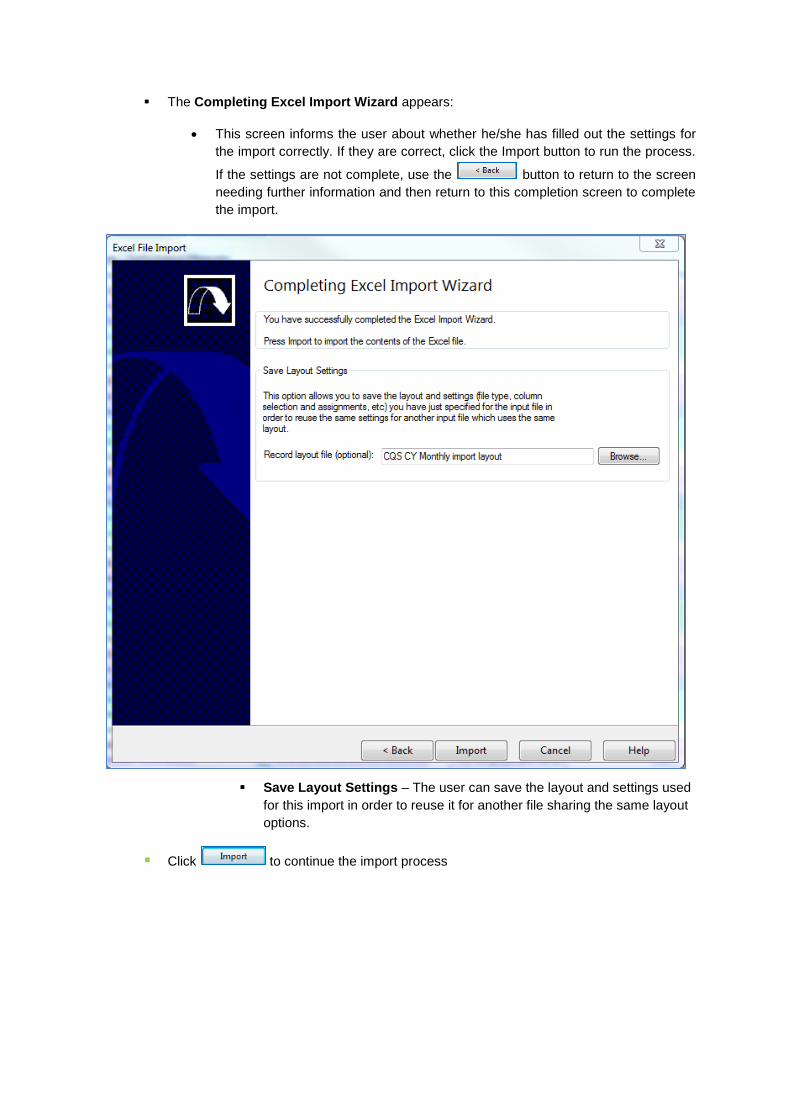
The Completing Excel Import Wizard appears:
This screen informs the user about whether he/she has filled out the settings for
the import correctly. If they are correct, click the Import button to run the process.
If the settings are not complete, use the button to return to the screen
needing further information and then return to this completion screen to complete
the import.
Save Layout Settings – The user can save the layout and settings used
for this import in order to reuse it for another file sharing the same layout
options.
Click to continue the import process

Method 2
Setup the divisional structure in the CaseWare file before importing. Refer to Setting Up the
Organisational Structure for more information how to setup the divisional structure.
Follow the same import process as mentioned on pg. 18.
When completing the field details, select the following additional options.
Entity Position: Select the tick box ‘Account Number and Entity share the same field but
are not separated’. The ‘Entity Start Position’ should be the position where the entity
code starts for e.g. the position on the screen shot shown above would be 1, as the entity
code is numbered first. Then enter the ‘Number of Characters’ that the entity code is, for
e.g. the number of characters on the screen shot below is 3 as the entity code is the first
3 characters
Assign the rest of the columns as indicated on pg.Method 1 20. And complete the import.
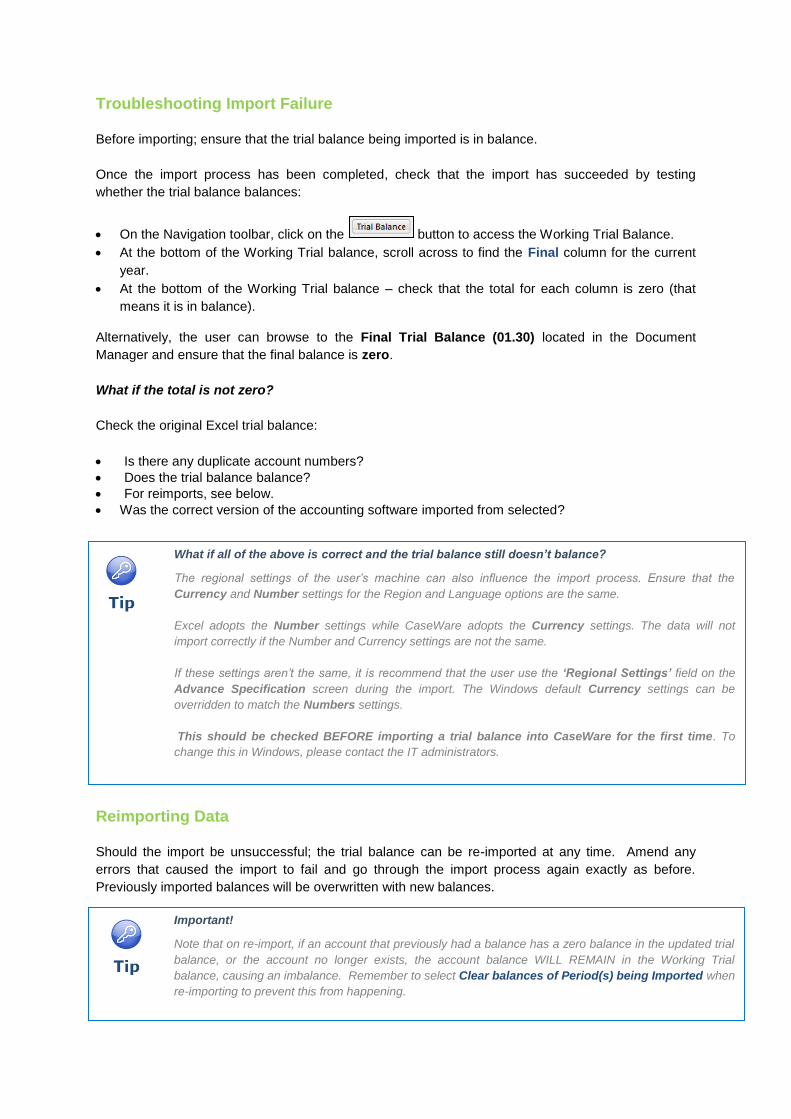
Troubleshooting Import Failure
Before importing; ensure that the trial balance being imported is in balance.
Once the import process has been completed, check that the import has succeeded by testing
whether the trial balance balances:
On the Navigation toolbar, click on the button to access the Working Trial Balance.
At the bottom of the Working Trial balance, scroll across to find the Final column for the current
year.
At the bottom of the Working Trial balance – check that the total for each column is zero (that
means it is in balance).
Alternatively, the user can browse to the Final Trial Balance (01.30) located in the Document
Manager and ensure that the final balance is zero.
What if the total is not zero?
Check the original Excel trial balance:
Is there any duplicate account numbers?
Does the trial balance balance?
For reimports, see below.
Was the correct version of the accounting software imported from selected?
Reimporting Data
Should the import be unsuccessful; the trial balance can be re-imported at any time. Amend any
errors that caused the import to fail and go through the import process again exactly as before.
Previously imported balances will be overwritten with new balances.
Important!
Note that on re-import, if an account that previously had a balance has a zero balance in the updated trial
balance, or the account no longer exists, the account balance WILL REMAIN in the Working Trial
balance, causing an imbalance. Remember to select Clear balances of Period(s) being Imported when
re-importing to prevent this from happening.
What if all of the above is correct and the trial balance still doesn’t balance?
The regional settings of the user’s machine can also influence the import process. Ensure that the
Currency and Number settings for the Region and Language options are the same.
Excel adopts the Number settings while CaseWare adopts the Currency settings. The data will not
import correctly if the Number and Currency settings are not the same.
If these settings aren’t the same, it is recommend that the user use the ‘Regional Settings’ field on the
Advance Specification screen during the import. The Windows default Currency settings can be
overridden to match the Numbers settings.
This should be checked BEFORE importing a trial balance into CaseWare for the first time. To
change this in Windows, please contact the IT administrators.