content server / spark - oracle · department’s specially designated nationals list or the table...
TRANSCRIPT
Content Server / SparkVersion: 6.3
Configuration Guide: Third-Party Software
Document Revision Date: Jan. 31, 2006

FATWIRE CORPORATION PROVIDES THIS PUBLICATION “AS IS” WITHOUT WARRANTY OF ANY KIND, EITHER EXPRESSED OR IMPLIED, INCLUDING BUT NOT LIMITED TO THE IMPLIED WARRANTIES OF MERCHANTABILITY OR FITNESS FOR A PARTICULAR PURPOSE. In no event shall FatWire be liable for any loss of profits, loss of business, loss of use of data, interruption of business, or for indirect, special, incidental, or consequential damages of any kind, even if FatWire has been advised of the possibility of such damages arising from this publication. FatWire may revise this publication from time to time without notice. Some states or jurisdictions do not allow disclaimer of express or implied warranties in certain transactions; therefore, this statement may not apply to you.
Copyright © 2005 FatWire Corporation. All rights reserved.
This product may be covered under one or more of the following U.S. patents: 4477698, 4540855, 4720853, 4742538, 4742539, 4782510, 4797911, 4894857, 5070525, RE36416, 5309505, 5511112, 5581602, 5594791, 5675637, 5708780, 5715314, 5724424, 5812776, 5828731, 5909492, 5924090, 5963635, 6012071, 6049785, 6055522, 6118763, 6195649, 6199051, 6205437, 6212634, 6279112 and 6314089. Additional patents pending.
FatWire, Content Server, Content Server Bridge Enterprise, Content Server Bridge XML, Content Server COM Interfaces, Content Server Desktop, Content Server Direct, Content Server Direct Advantage, Content Server DocLink, Content Server Engage, Content Server InSite Editor, Content Server Satellite, and Transact are trademarks or registered trademarks of FatWire, Inc. in the United States and other countries.
iPlanet, Java, J2EE, Solaris, Sun, and other Sun products referenced herein are trademarks or registered trademarks of Sun Microsystems, Inc. AIX, IBM, WebSphere, and other IBM products referenced herein are trademarks or registered trademarks of IBM Corporation. WebLogic is a registered trademark of BEA Systems, Inc. Microsoft, Windows and other Microsoft products referenced herein are trademarks or registered trademarks of Microsoft Corporation. UNIX is a registered trademark of The Open Group. Any other trademarks and product names used herein may be the trademarks of their respective owners.
This product includes software developed by the Apache Software Foundation (http://www.apache.org/) and software developed by Sun Microsystems, Inc. This product contains encryption technology from Phaos Technology Corporation.
You may not download or otherwise export or reexport this Program, its Documentation, or any underlying information or technology except in full compliance with all United States and other applicable laws and regulations, including without limitations the United States Export Administration Act, the Trading with the Enemy Act, the International Emergency Economic Powers Act and any regulations thereunder. Any transfer of technical data outside the United States by any means, including the Internet, is an export control requirement under U.S. law. In particular, but without limitation, none of the Program, its Documentation, or underlying information of technology may be downloaded or otherwise exported or reexported (i) into (or to a national or resident, wherever located, of) Cuba, Libya, North Korea, Iran, Iraq, Sudan, Syria, or any other country to which the U.S. prohibits exports of goods or technical data; or (ii) to anyone on the U.S. Treasury Department’s Specially Designated Nationals List or the Table of Denial Orders issued by the Department of Commerce. By downloading or using the Program or its Documentation, you are agreeing to the foregoing and you are representing and warranting that you are not located in, under the control of, or a national or resident of any such country or on any such list or table. In addition, if the Program or Documentation is identified as Domestic Only or Not-for-Export (for example, on the box, media, in the installation process, during the download process, or in the Documentation), then except for export to Canada for use in Canada by Canadian citizens, the Program, Documentation, and any underlying information or technology may not be exported outside the United States or to any foreign entity or “foreign person” as defined by U.S. Government regulations, including without limitation, anyone who is not a citizen, national, or lawful permanent resident of the United States. By using this Program and Documentation, you are agreeing to the foregoing and you are representing and warranting that you are not a “foreign person” or under the control of a “foreign person.”
Configuration Guide: Third-Party SoftwareDocument Revision Date: Jan. 31, 2006Product Version: 6.3
FatWire Technical Supportwww.fatwire.com/Support
FatWire HeadquartersFatWire Corporation330 Old Country RoadSuite 207Mineola, NY 11501www.fatwire.com
3
Table of
Contents
About This Guide . . . . . . . . . . . . . . . . . . . . . . . . . . . . . . . . . . . . . . . . . . . . . . . .5Who Should Use This Guide . . . . . . . . . . . . . . . . . . . . . . . . . . . . . . . . . . . . . . . . . . . . . . . 5Graphics Used in This Guide . . . . . . . . . . . . . . . . . . . . . . . . . . . . . . . . . . . . . . . . . . . . . . . 5Technical Support . . . . . . . . . . . . . . . . . . . . . . . . . . . . . . . . . . . . . . . . . . . . . . . . . . . . . . . . 5
Part 1. Creating and Configuring a Database
1 Creating and Configuring an Oracle 9 Database . . . . . . . . . . . . . . . . . . . . . . 9Step I. Create an Oracle 9.2.0.x Database . . . . . . . . . . . . . . . . . . . . . . . . . . . . . . . . . . . . 10Step II. Configure the Database for Content Server (Spark). . . . . . . . . . . . . . . . . . . . . . 13
2 Creating and Configuring an Oracle 10g Database . . . . . . . . . . . . . . . . . . . 19Step I. Create an Oracle 10g Database . . . . . . . . . . . . . . . . . . . . . . . . . . . . . . . . . . . . . . 20Step II. Create a New User for Content Server (Spark) . . . . . . . . . . . . . . . . . . . . . . . . . 35Step III. (For Type 2 Drivers) Install and Configure an Oracle Client . . . . . . . . . . . . . . 43
3 Creating and Configuring an MS SQL Server Database. . . . . . . . . . . . . . . . 49
4 Creating and Configuring an IBM DB2 Database . . . . . . . . . . . . . . . . . . . . . 51
5 Creating and Configuring SQL Anywhere . . . . . . . . . . . . . . . . . . . . . . . . . . . 55Step I. Prepare the Environment . . . . . . . . . . . . . . . . . . . . . . . . . . . . . . . . . . . . . . . . . . . 56Step II. Create a Database . . . . . . . . . . . . . . . . . . . . . . . . . . . . . . . . . . . . . . . . . . . . . . . . 56Step III. Create a New User for Spark. . . . . . . . . . . . . . . . . . . . . . . . . . . . . . . . . . . . . . . 57Step IV. Next Step . . . . . . . . . . . . . . . . . . . . . . . . . . . . . . . . . . . . . . . . . . . . . . . . . . . . . . 57
Configuration Guide V6.3: Third-Party Software
Table of Contents4
Part 2. Installing a Web Server
6 Worksheets for Documenting the Web Server Installation . . . . . . . . . . . . . 61Key to Sample Values . . . . . . . . . . . . . . . . . . . . . . . . . . . . . . . . . . . . . . . . . . . . . . . . . . . 62Web Server Parameters . . . . . . . . . . . . . . . . . . . . . . . . . . . . . . . . . . . . . . . . . . . . . . . . . . . 62
7 Installing IIS on Windows . . . . . . . . . . . . . . . . . . . . . . . . . . . . . . . . . . . . . . . . 65Step I. Install IIS . . . . . . . . . . . . . . . . . . . . . . . . . . . . . . . . . . . . . . . . . . . . . . . . . . . . . . . 66Step II. Document Your IIS Installation . . . . . . . . . . . . . . . . . . . . . . . . . . . . . . . . . . . . . 66Step III. Verify the Installation . . . . . . . . . . . . . . . . . . . . . . . . . . . . . . . . . . . . . . . . . . . . 66
A. Start IIS . . . . . . . . . . . . . . . . . . . . . . . . . . . . . . . . . . . . . . . . . . . . . . . . . . . . . . . . . 66B. Verify that IIS is Serving Pages . . . . . . . . . . . . . . . . . . . . . . . . . . . . . . . . . . . . . . 67
Next Step . . . . . . . . . . . . . . . . . . . . . . . . . . . . . . . . . . . . . . . . . . . . . . . . . . . . . . . . . . . . . . 67
8 Installing Apache on Solaris or Linux . . . . . . . . . . . . . . . . . . . . . . . . . . . . . . 69Step I. Install Apache. . . . . . . . . . . . . . . . . . . . . . . . . . . . . . . . . . . . . . . . . . . . . . . . . . . . 70Step II. Document Your Apache Parameters. . . . . . . . . . . . . . . . . . . . . . . . . . . . . . . . . . 70Step III. Verify that Apache Contains the Correct Module. . . . . . . . . . . . . . . . . . . . . . . 71Step IV. Verify that Apache Runs Properly . . . . . . . . . . . . . . . . . . . . . . . . . . . . . . . . . . 71Next Step . . . . . . . . . . . . . . . . . . . . . . . . . . . . . . . . . . . . . . . . . . . . . . . . . . . . . . . . . . . . . . 71
Part 3. LDAP Integration
9 Integrating Content Server with LDAP. . . . . . . . . . . . . . . . . . . . . . . . . . . . . . 75LDAP Integration Overview . . . . . . . . . . . . . . . . . . . . . . . . . . . . . . . . . . . . . . . . . . . . . . 76Automatic Integration with LDAP . . . . . . . . . . . . . . . . . . . . . . . . . . . . . . . . . . . . . . . . . . 76Manual Integration with LDAP. . . . . . . . . . . . . . . . . . . . . . . . . . . . . . . . . . . . . . . . . . . . . 77
Step 1. Make Sure the LDAP Server is Installed. . . . . . . . . . . . . . . . . . . . . . . . . . . . 78Step 2. Make Sure That Content Server is Installed and Tested . . . . . . . . . . . . . . . . 78Step 3. Configure Content Server Properties. . . . . . . . . . . . . . . . . . . . . . . . . . . . . . . 79Step 4. Configure the LDAP Server . . . . . . . . . . . . . . . . . . . . . . . . . . . . . . . . . . . . . 83Step 5. Check the mail Attribute . . . . . . . . . . . . . . . . . . . . . . . . . . . . . . . . . . . . . . . . 83Step 6. Create LDAP User Groups (Content Server ACLs) . . . . . . . . . . . . . . . . . . . 83Step 7. Create Required Users and Their Group Memberships. . . . . . . . . . . . . . . . . 84Step 8. (Optional) Create Sites and Roles in the LDAP Server. . . . . . . . . . . . . . . . . 85Step 9. If You Completed Step 8 . . . . . . . . . . . . . . . . . . . . . . . . . . . . . . . . . . . . . . . . 87Step 10. Test the LDAP Integration . . . . . . . . . . . . . . . . . . . . . . . . . . . . . . . . . . . . . 87Step 11. Resume Your Previous Operations . . . . . . . . . . . . . . . . . . . . . . . . . . . . . . . 87
Post-Integration Management of ACLs, Users, Sites, and Roles . . . . . . . . . . . . . . . . . . . 88ACL and User Management . . . . . . . . . . . . . . . . . . . . . . . . . . . . . . . . . . . . . . . . . . . 88Site and Role Management . . . . . . . . . . . . . . . . . . . . . . . . . . . . . . . . . . . . . . . . . . . . 88LDAP Configuration Management . . . . . . . . . . . . . . . . . . . . . . . . . . . . . . . . . . . . . . 89
Reference: Example ldif Files . . . . . . . . . . . . . . . . . . . . . . . . . . . . . . . . . . . . . . . . . . . . . . 90
Configuration Guide V6.3: Third-Party Software

5
About This Guide
This guide contains information about installing and configuring third-party software specifically for use by Content Server and Spark. Instructions in this guide supplement the instructions in the Content Server and Spark installation guides. The steps you will follow show you how to create and configure the supported databases, install supported web servers, and integrate Content Server with LDAP servers.
Who Should Use This GuideThis guide is for installation engineers who have experience installing and configuring enterprise-level software, including databases, database drivers, application servers, and portal servers, and LDAP servers.
Graphics Used in This GuideGraphics in this guide are screen captures of dialog boxes and similar windows that you will interact with during the installation or configuration process. These graphics are presented to help you follow the installation and configuration processes. They are not intended to be sources of information such as parameter values, options to select, and product version numbers.
Technical SupportHelp is available from FatWire Technical Support at the following website:
http://www.fatwire.com/Support/contact_info.html
Configuration Guide V6.3: Third-Party Software
About This Guide
Technical Support6
Configuration Guide V6.3: Third-Party Software
7
Par t 1
Creating and Configuring a Database
Content Server and Spark each require access to a supported database that is specifically configured for the product. Supported databases include:
• Oracle 9 • Oracle 10g• Microsoft SQL Server 2000 SP3 and SP4• DB2• My SQL Anywhere (Spark only)
The databases listed above are not configured for production, but are set up with full permissions. In practice, the permissions can be curtailed for the user that Content Server (or Spark) will use to access a database. However, the following rights must exist: ability to create, modify, and delete tables and indexes.
If you need instructions on installing a supported database, refer to the product documentation.
Instructions on creating and configuring the databases for Content Server (or Spark) are given in the chapters of this guide. Because database configuration is identical across different application servers, refer to the correct chapter to set up the database of your choice.
This guide contains the following chapters:
• Chapter 1, “Creating and Configuring an Oracle 9 Database”
• Chapter 2, “Creating and Configuring an Oracle 10g Database”
• Chapter 3, “Creating and Configuring an MS SQL Server Database”
• Chapter 4, “Creating and Configuring an IBM DB2 Database”
• Chapter 5, “Creating and Configuring SQL Anywhere”
Configuration Guide V6.3: Third-Party Software

8
Configuration Guide V6.3: Third-Party Software
9
Chapter 1
Creating and Configuring an Oracle 9 Database
Use this chapter to set up an Oracle 9.2.0.x database for your Content Server (Spark) installation. For background information regarding database configuration and users’ permissions, see “Creating and Configuring a Database,” on page 7.
This chapter contains the following sections:
Step I. Create an Oracle 9.2.0.x Database
Step II. Configure the Database for Content Server (Spark)
Configuration Guide V6.3: Third-Party Software
Chapter 1. Creating and Configuring an Oracle 9 Database
Step I. Create an Oracle 9.2.0.x Database10
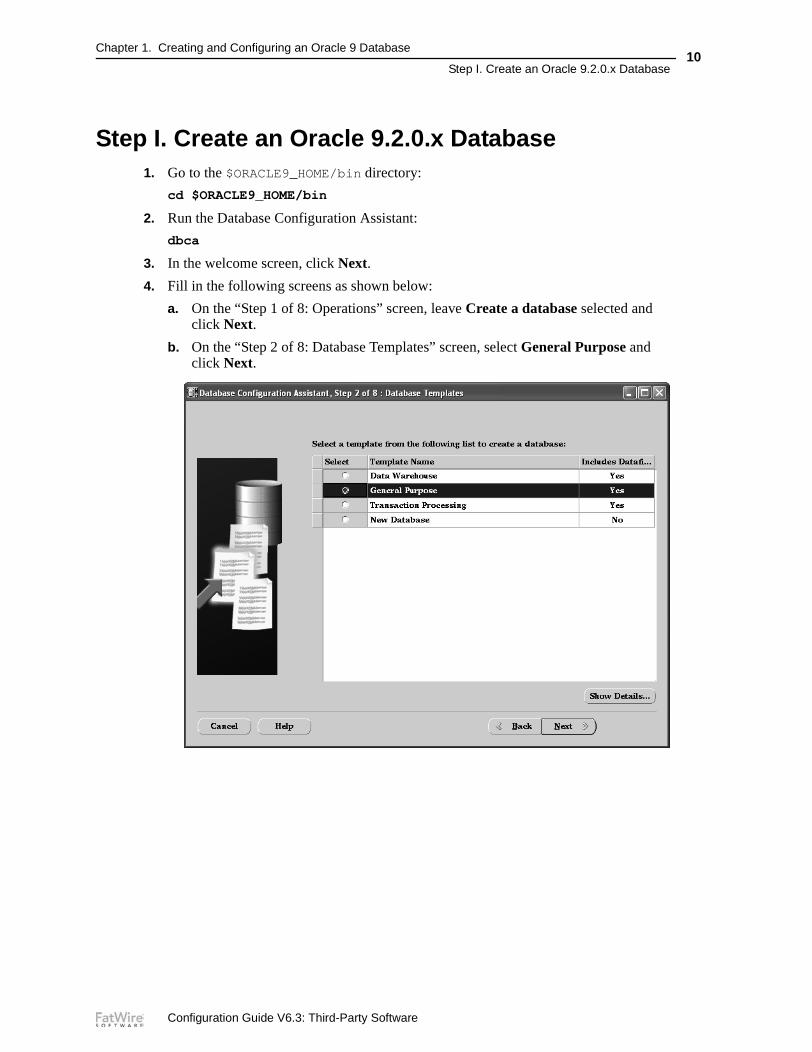
Step I. Create an Oracle 9.2.0.x Database1. Go to the $ORACLE9_HOME/bin directory:
cd $ORACLE9_HOME/bin
2. Run the Database Configuration Assistant:
dbca
3. In the welcome screen, click Next.
4. Fill in the following screens as shown below:
a. On the “Step 1 of 8: Operations” screen, leave Create a database selected and click Next.
b. On the “Step 2 of 8: Database Templates” screen, select General Purpose and click Next.
Configuration Guide V6.3: Third-Party Software
Chapter 1. Creating and Configuring an Oracle 9 Database
Step I. Create an Oracle 9.2.0.x Database11
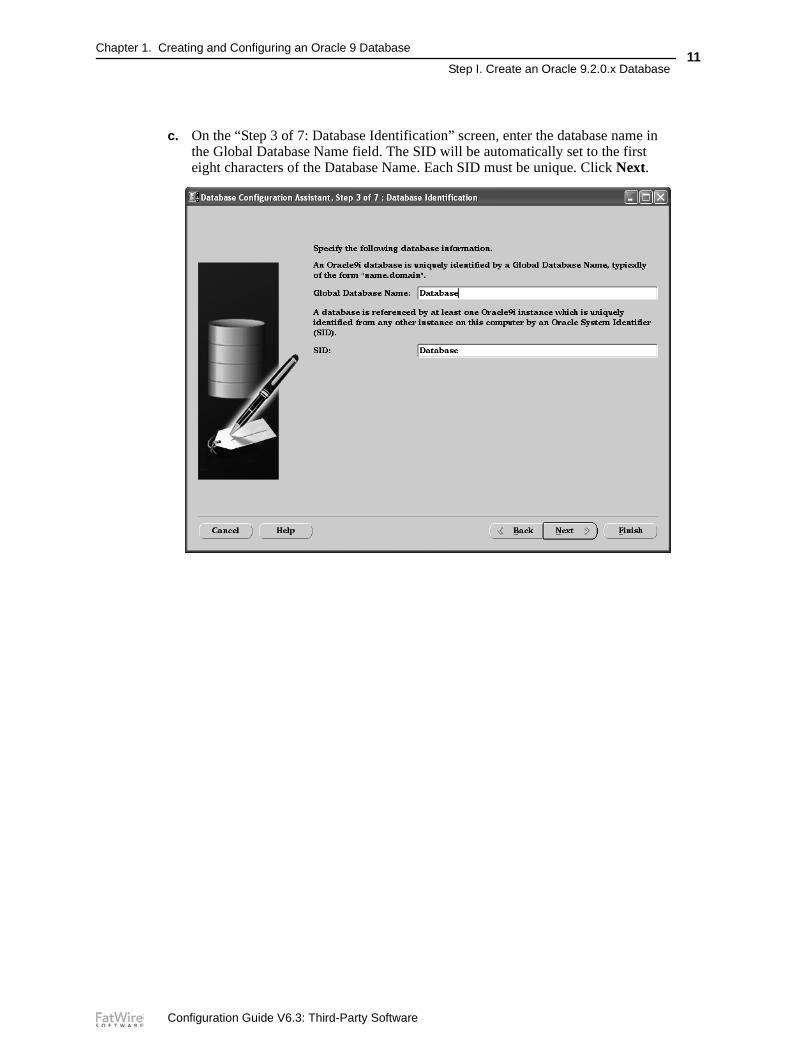
c. On the “Step 3 of 7: Database Identification” screen, enter the database name in the Global Database Name field. The SID will be automatically set to the first eight characters of the Database Name. Each SID must be unique. Click Next.
Configuration Guide V6.3: Third-Party Software
Chapter 1. Creating and Configuring an Oracle 9 Database
Step I. Create an Oracle 9.2.0.x Database12
d. On the “Step 4 of 7: Database Connection Options” screen, leave Dedicated Server mode selected and click Next.
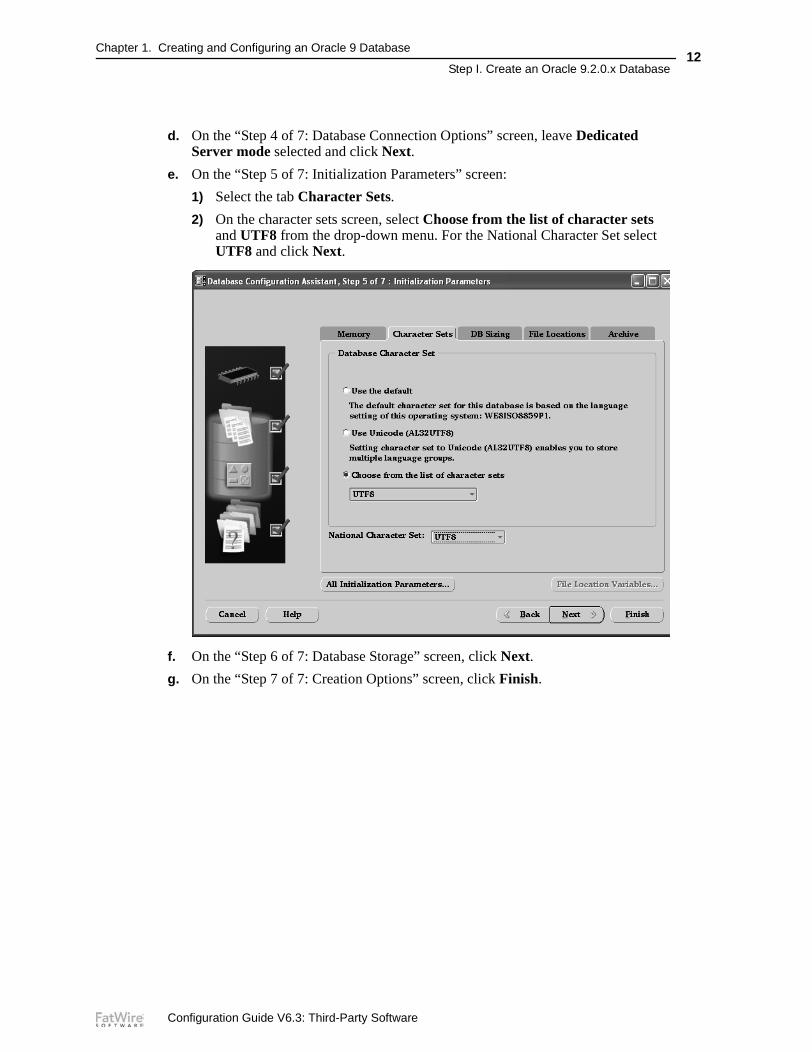
e. On the “Step 5 of 7: Initialization Parameters” screen:
1) Select the tab Character Sets.
2) On the character sets screen, select Choose from the list of character sets and UTF8 from the drop-down menu. For the National Character Set select UTF8 and click Next.
f. On the “Step 6 of 7: Database Storage” screen, click Next.
g. On the “Step 7 of 7: Creation Options” screen, click Finish.
Configuration Guide V6.3: Third-Party Software
Chapter 1. Creating and Configuring an Oracle 9 Database
Step II. Configure the Database for Content Server (Spark)13
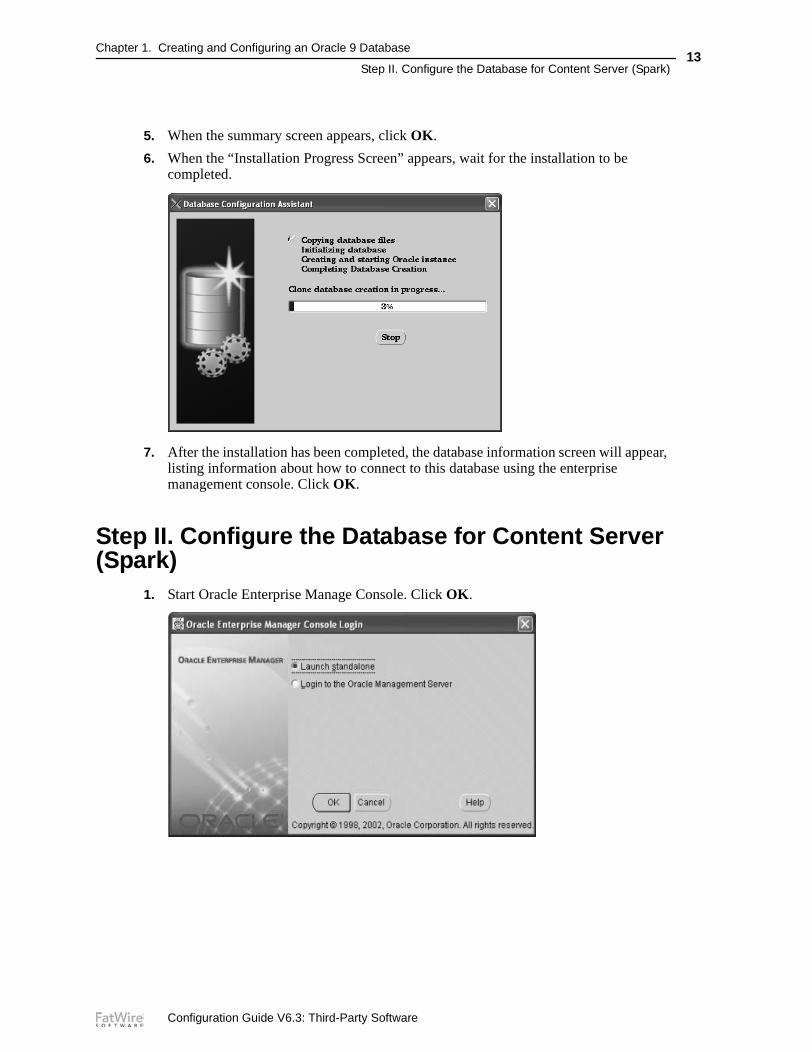
5. When the summary screen appears, click OK.
6. When the “Installation Progress Screen” appears, wait for the installation to be completed.
7. After the installation has been completed, the database information screen will appear, listing information about how to connect to this database using the enterprise management console. Click OK.
Step II. Configure the Database for Content Server (Spark)
1. Start Oracle Enterprise Manage Console. Click OK.
Configuration Guide V6.3: Third-Party Software

Chapter 1. Creating and Configuring an Oracle 9 Database
Step II. Configure the Database for Content Server (Spark)14
2. Expand Network > Databases. Select the database you have created.
3. In the database login screen, log in as SYS and enter the password you specified earlier while creating the database. Click OK.
Configuration Guide V6.3: Third-Party Software
Chapter 1. Creating and Configuring an Oracle 9 Database
Step II. Configure the Database for Content Server (Spark)15
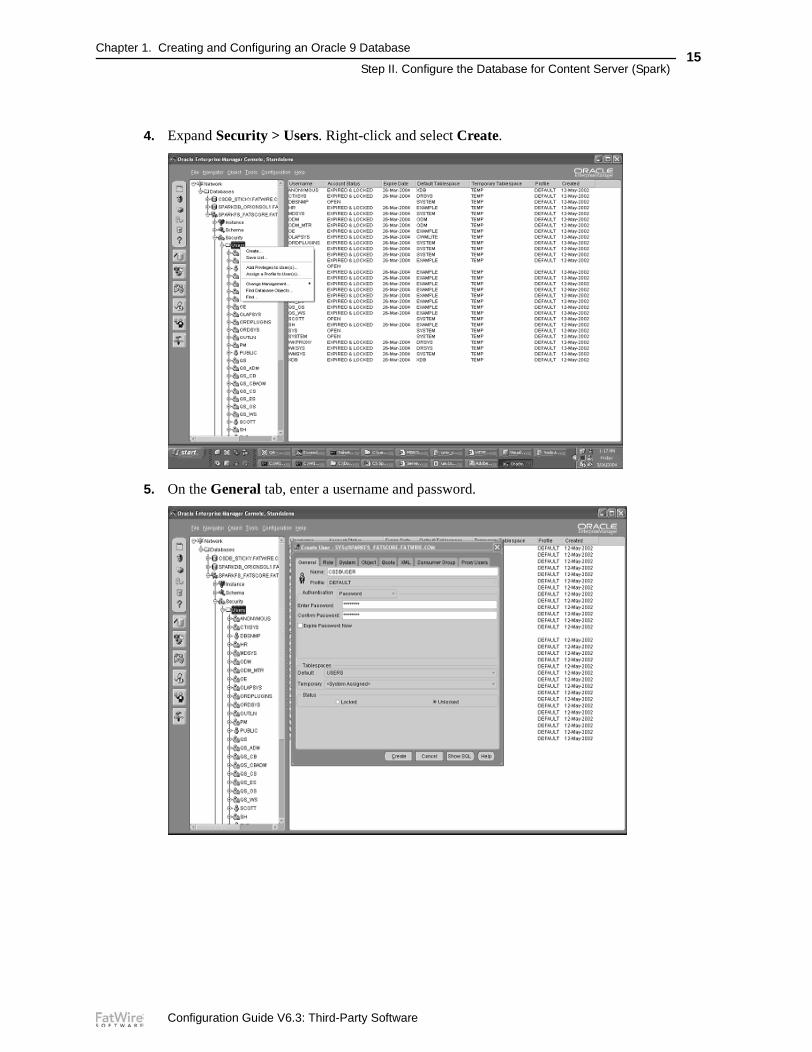
4. Expand Security > Users. Right-click and select Create.
5. On the General tab, enter a username and password.
Configuration Guide V6.3: Third-Party Software
Chapter 1. Creating and Configuring an Oracle 9 Database
Step II. Configure the Database for Content Server (Spark)16
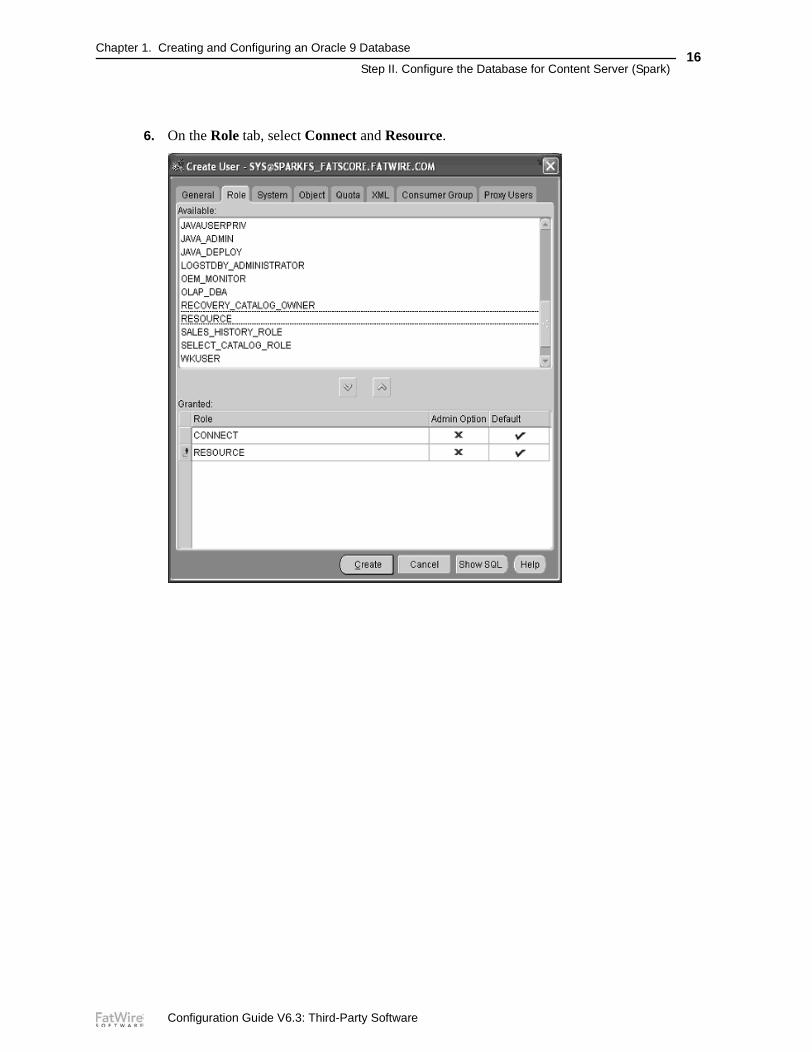
6. On the Role tab, select Connect and Resource.
Configuration Guide V6.3: Third-Party Software
Chapter 1. Creating and Configuring an Oracle 9 Database
Step II. Configure the Database for Content Server (Spark)17
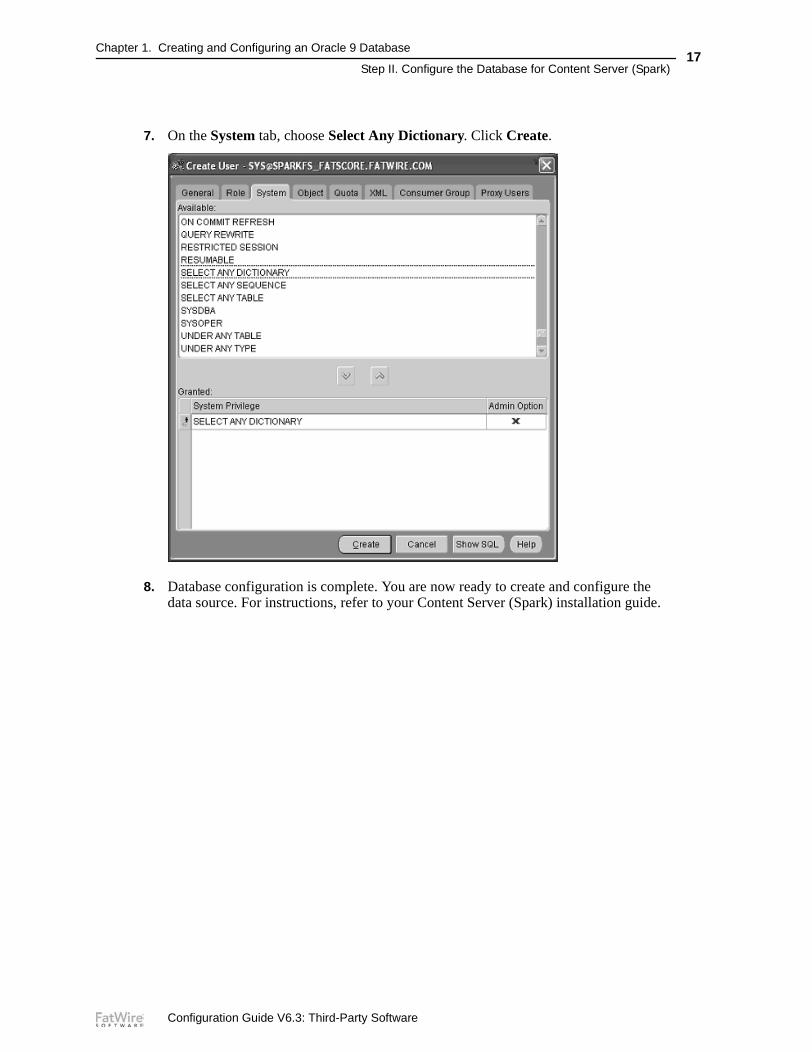
7. On the System tab, choose Select Any Dictionary. Click Create.
8. Database configuration is complete. You are now ready to create and configure the data source. For instructions, refer to your Content Server (Spark) installation guide.
Configuration Guide V6.3: Third-Party Software

Chapter 1. Creating and Configuring an Oracle 9 Database
Step II. Configure the Database for Content Server (Spark)18
Configuration Guide V6.3: Third-Party Software
19
Chapter 2
Creating and Configuring an Oracle 10g Database
Use this chapter to set up an Oracle 10g database for your Content Server (Spark) installation. For background information regarding database configuration and users’ permissions, see Part 1, “Creating and Configuring a Database.”
This chapter contains the following sections:
• Step I. Create an Oracle 10g Database
• Step II. Create a New User for Content Server (Spark)
• Step III. (For Type 2 Drivers) Install and Configure an Oracle Client
Configuration Guide V6.3: Third-Party Software

Chapter 2. Creating and Configuring an Oracle 10g Database
Step I. Create an Oracle 10g Database20
Step I. Create an Oracle 10g Database1. Execute the “Oracle Database Configuration Assistant” by doing one of the following:
- In Unix, execute the command: dbca
- In Windows, go to the “Oracle Programs” group and select Database Configuration Assistant.
Note
This step displays a load screen that can take some time to complete. Be patient.
Configuration Guide V6.3: Third-Party Software
Chapter 2. Creating and Configuring an Oracle 10g Database
Step I. Create an Oracle 10g Database21
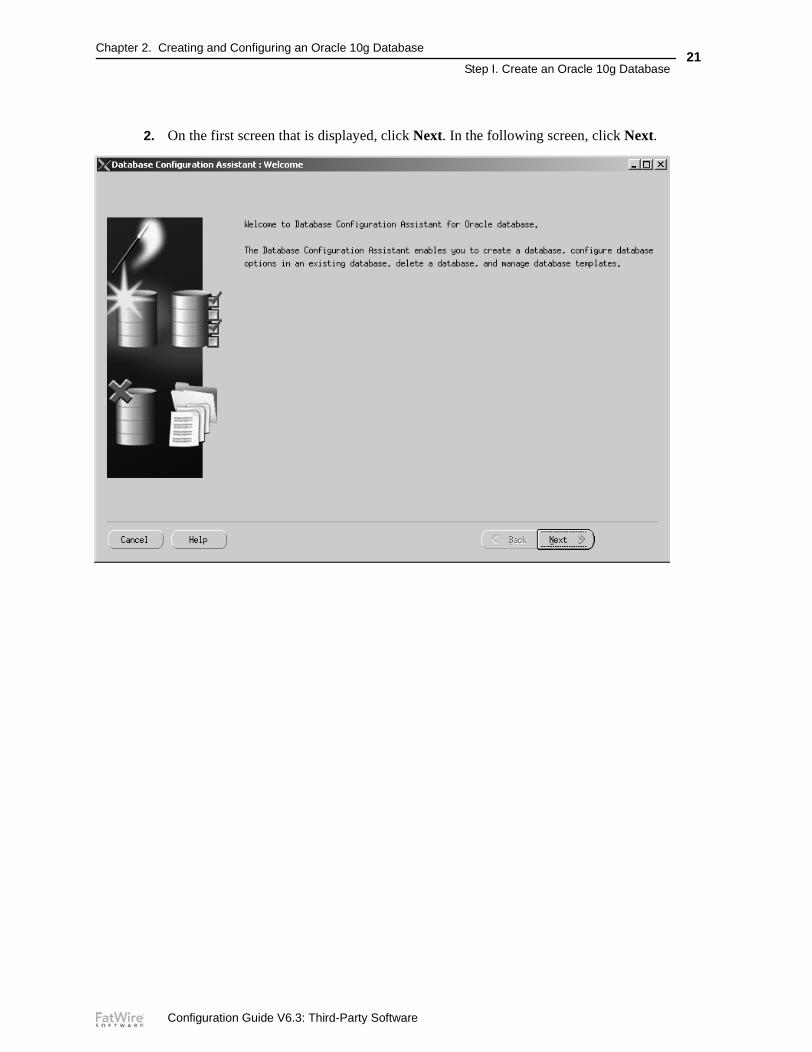
2. On the first screen that is displayed, click Next. In the following screen, click Next.
Configuration Guide V6.3: Third-Party Software
Chapter 2. Creating and Configuring an Oracle 10g Database
Step I. Create an Oracle 10g Database22
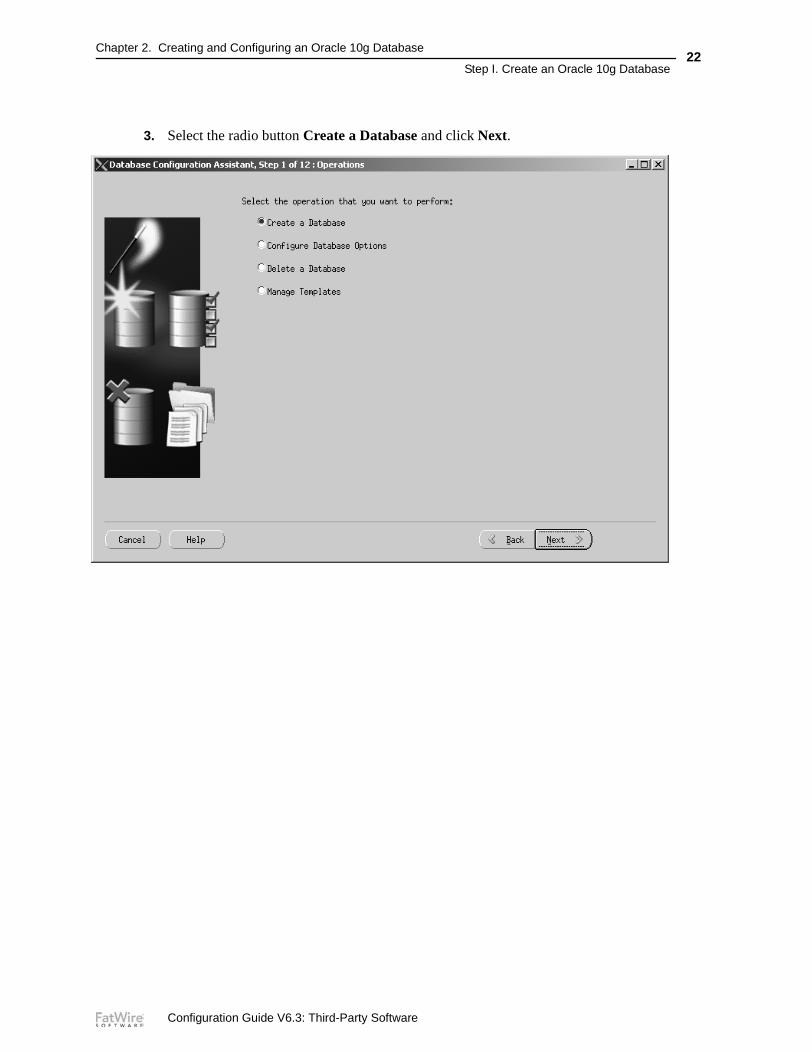
3. Select the radio button Create a Database and click Next.
Configuration Guide V6.3: Third-Party Software
Chapter 2. Creating and Configuring an Oracle 10g Database
Step I. Create an Oracle 10g Database23
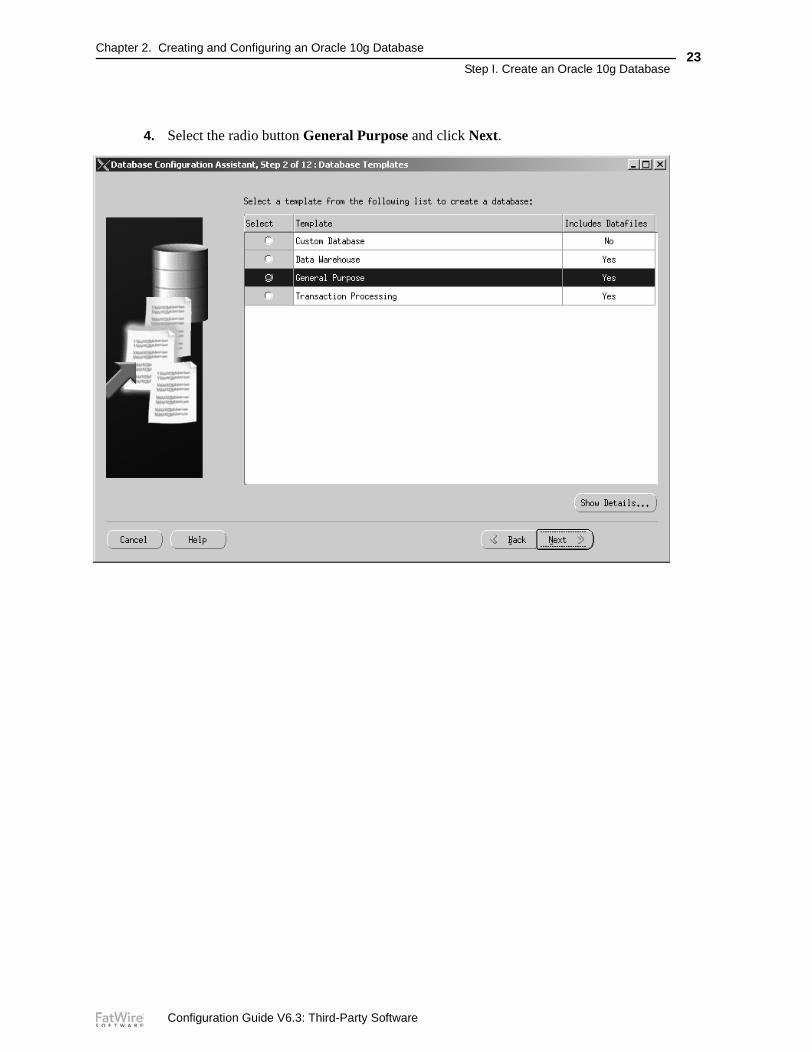
4. Select the radio button General Purpose and click Next.
Configuration Guide V6.3: Third-Party Software
Chapter 2. Creating and Configuring an Oracle 10g Database
Step I. Create an Oracle 10g Database24
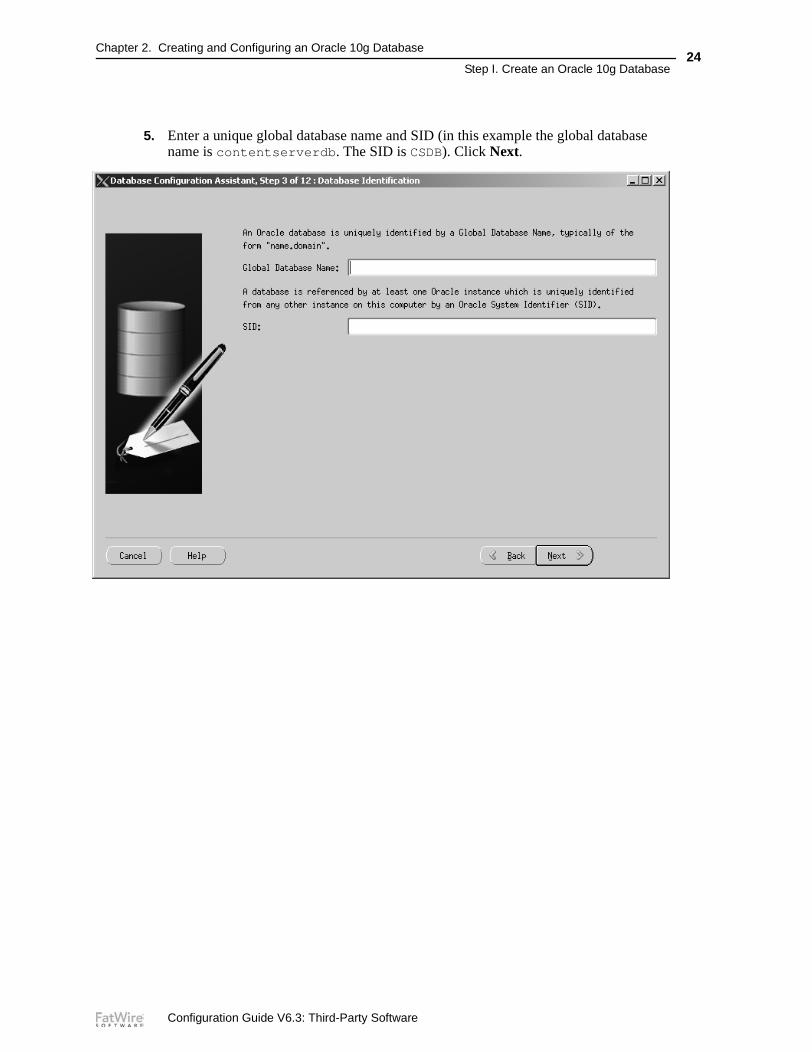
5. Enter a unique global database name and SID (in this example the global database name is contentserverdb. The SID is CSDB). Click Next.
Configuration Guide V6.3: Third-Party Software

Chapter 2. Creating and Configuring an Oracle 10g Database
Step I. Create an Oracle 10g Database25
6. Do not change any options. Click Next.
Configuration Guide V6.3: Third-Party Software

Chapter 2. Creating and Configuring an Oracle 10g Database
Step I. Create an Oracle 10g Database26
7. Do not change any options. Click Next.
8. Enter a password, re-enter the same password in the “Confirm Password” field and click Next.
9. For enhanced security select the radio button Use Different Passwords and enter a unique password for each of the given users.
Configuration Guide V6.3: Third-Party Software
Chapter 2. Creating and Configuring an Oracle 10g Database
Step I. Create an Oracle 10g Database27
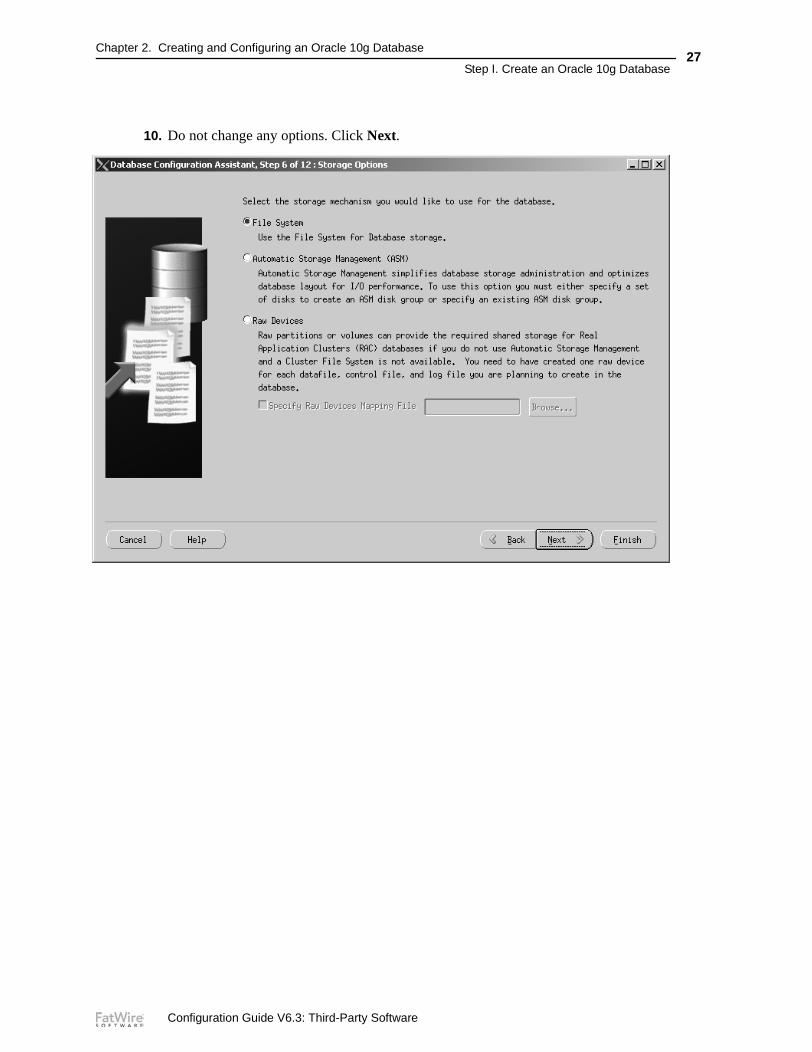
10. Do not change any options. Click Next.
Configuration Guide V6.3: Third-Party Software
Chapter 2. Creating and Configuring an Oracle 10g Database
Step I. Create an Oracle 10g Database28
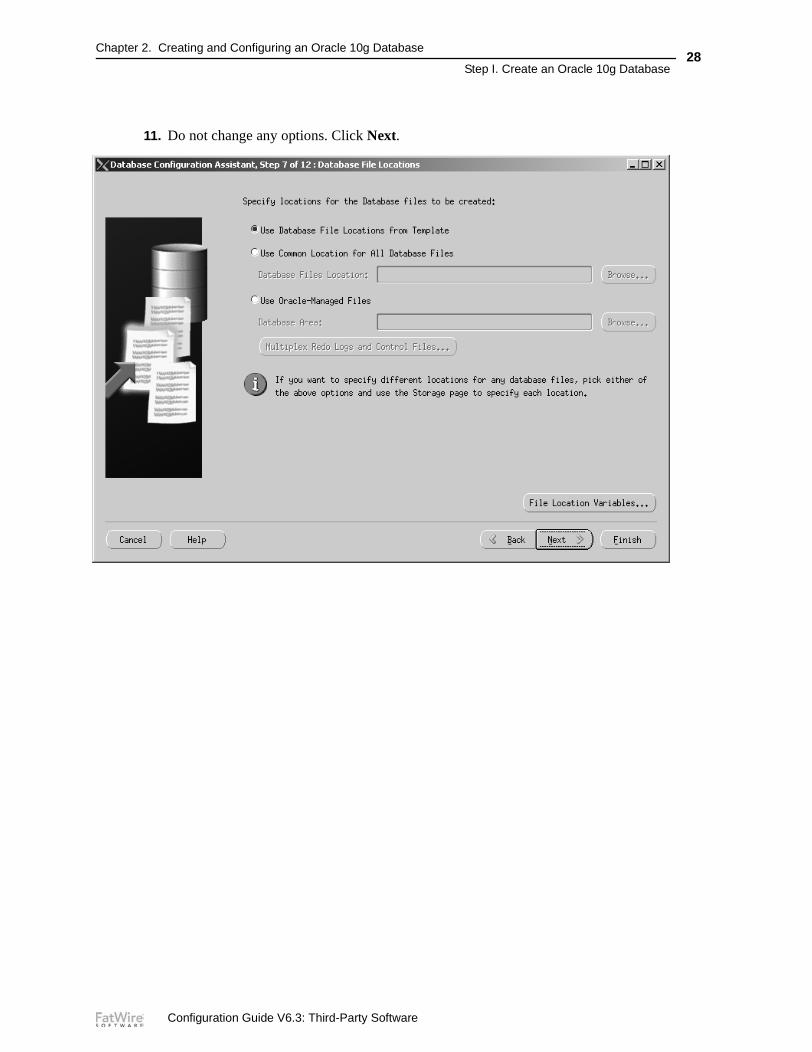
11. Do not change any options. Click Next.
Configuration Guide V6.3: Third-Party Software
Chapter 2. Creating and Configuring an Oracle 10g Database
Step I. Create an Oracle 10g Database29
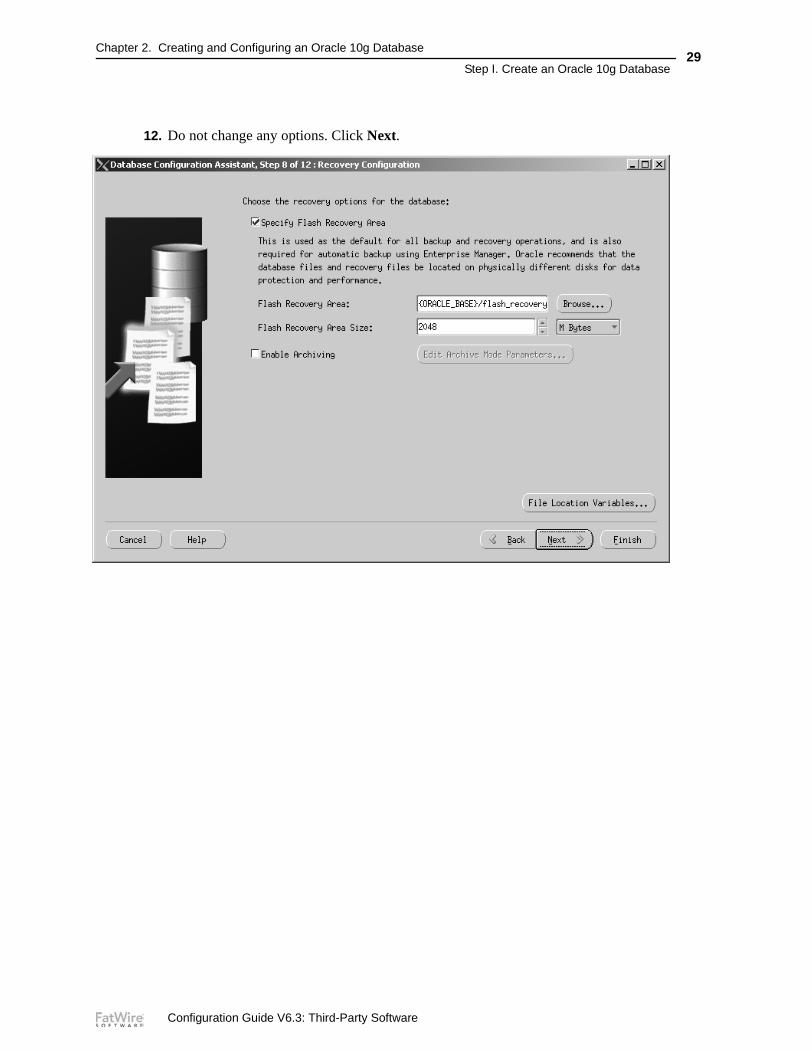
12. Do not change any options. Click Next.
Configuration Guide V6.3: Third-Party Software
Chapter 2. Creating and Configuring an Oracle 10g Database
Step I. Create an Oracle 10g Database30
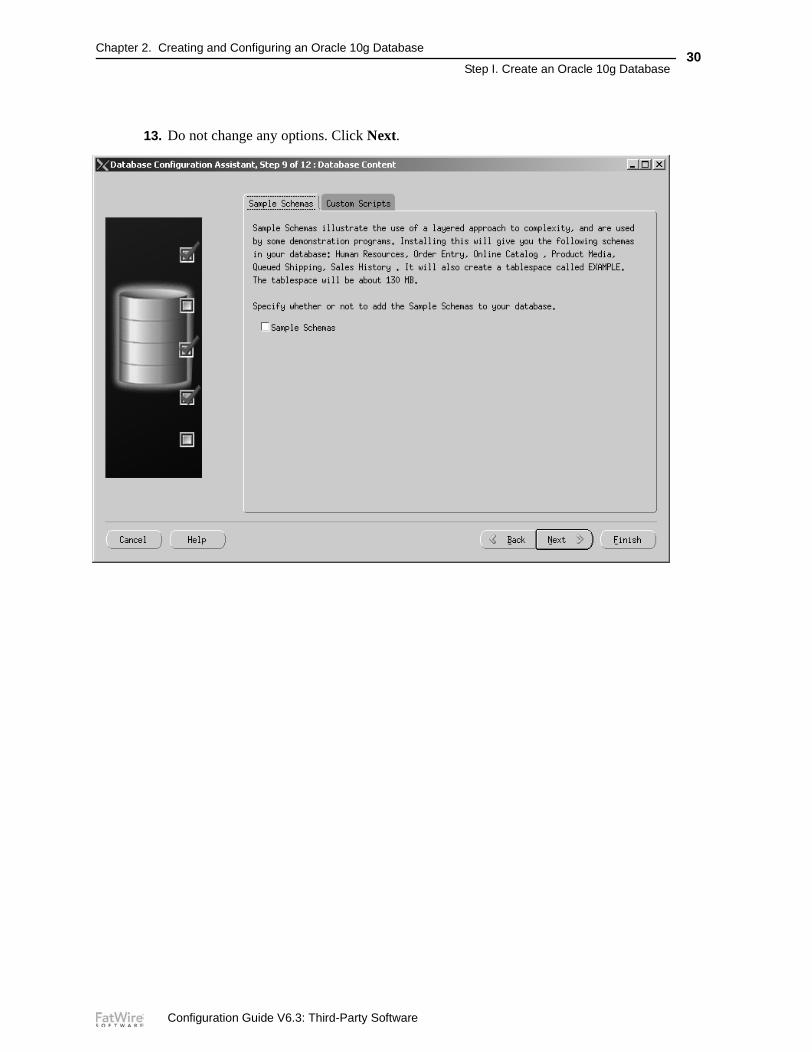
13. Do not change any options. Click Next.
Configuration Guide V6.3: Third-Party Software
Chapter 2. Creating and Configuring an Oracle 10g Database
Step I. Create an Oracle 10g Database31
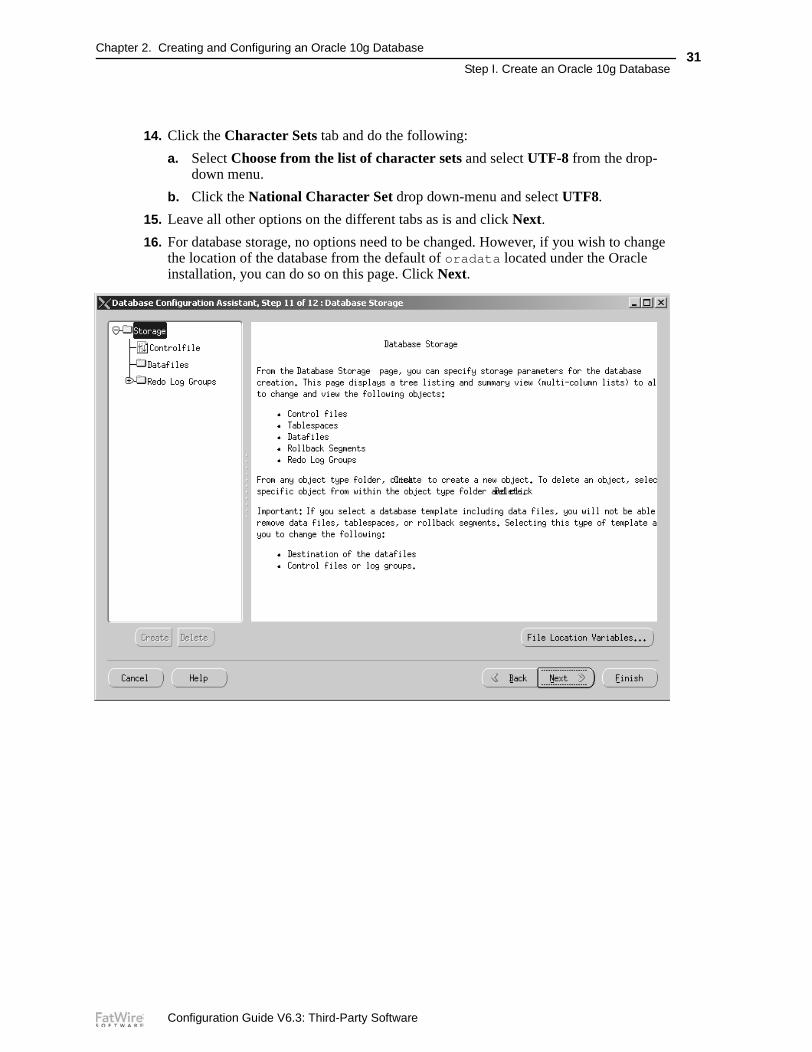
14. Click the Character Sets tab and do the following:
a. Select Choose from the list of character sets and select UTF-8 from the drop-down menu.
b. Click the National Character Set drop down-menu and select UTF8.
15. Leave all other options on the different tabs as is and click Next.
16. For database storage, no options need to be changed. However, if you wish to change the location of the database from the default of oradata located under the Oracle installation, you can do so on this page. Click Next.
Configuration Guide V6.3: Third-Party Software

Chapter 2. Creating and Configuring an Oracle 10g Database
Step I. Create an Oracle 10g Database32
17. Do not change any options. Click Finish.
Configuration Guide V6.3: Third-Party Software

Chapter 2. Creating and Configuring an Oracle 10g Database
Step I. Create an Oracle 10g Database33
18. In the “Configuration” window, review the choices that you made on the previous screens. If you need to modify your choices, click Cancel and make the modifications. Otherwise, click OK to continue.
Note
If you are planning to use internationalization, for Content Server (Spark) the key value is: National Character Set: UTF8
Configuration Guide V6.3: Third-Party Software
Chapter 2. Creating and Configuring an Oracle 10g Database
Step I. Create an Oracle 10g Database34
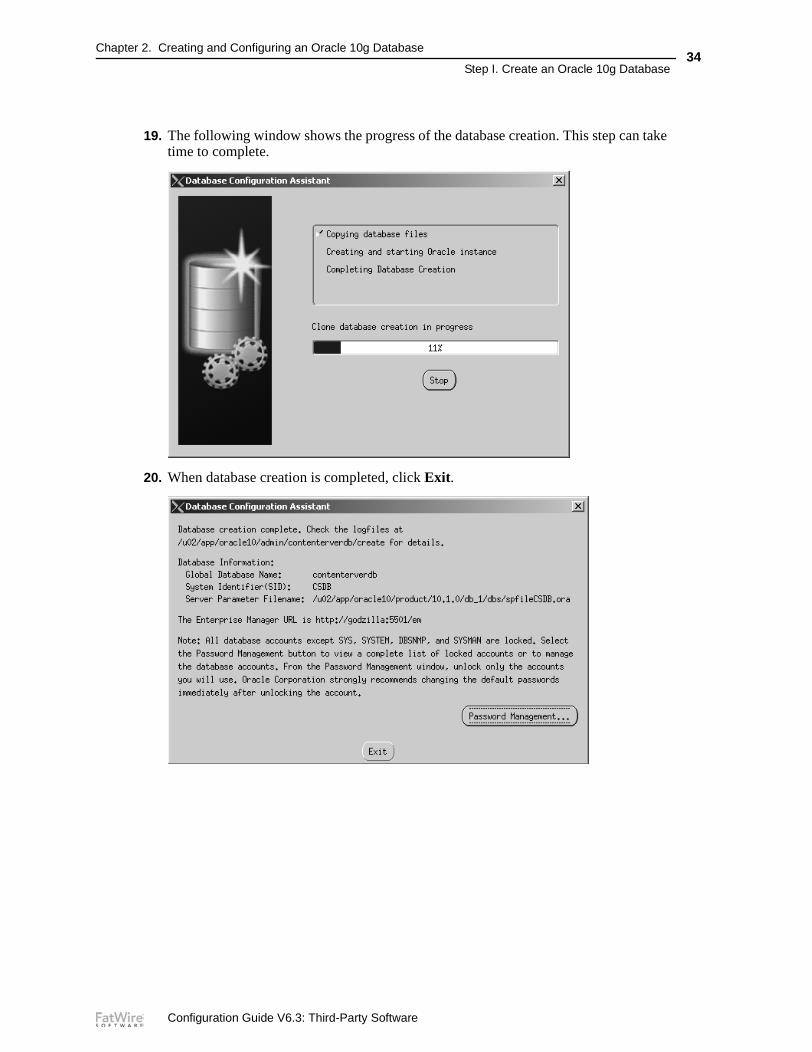
19. The following window shows the progress of the database creation. This step can take time to complete.
20. When database creation is completed, click Exit.
Configuration Guide V6.3: Third-Party Software

Chapter 2. Creating and Configuring an Oracle 10g Database
Step II. Create a New User for Content Server (Spark)35
Step II. Create a New User for Content Server (Spark)
1. Locate the file emoms.properties (in <oracle home>/<server name>_<SID>/sysman/config/).
a. Find the line: oracle.sysman.emSDK.svlt.ConsoleServerPort
b. The port after the line in step a is important. Make a note of it.
2. Run the command: emctl status dbconsole
The command should return an output similar to the following:
Oracle Enterprise Manager 10g Database Control Release 10.1.0.2.0 Copyright (c) 1996, 2004 Oracle Corporation. All rights reserved.http://godzilla:5500/em/console/aboutApplication Oracle Enterprise Manager 10g is running. ---------------------------------------------------------------Logs are generated in directory /u02/app/oracle10/product/ 10.1.0/db_1/godzilla_orcl10so/sysman/log
3. Open a browser and do the following:
a. Browse to the URL http://<hostname>:<port>/em (from step 2).
Note
If the command returns the message that the Oracle Enterprise Manager is not running, start Oracle Enterprise Manager with the command: emctl start dbconsole
Configuration Guide V6.3: Third-Party Software

Chapter 2. Creating and Configuring an Oracle 10g Database
Step II. Create a New User for Content Server (Spark)36
b. Log in to the browser, using the following field values:
c. As this is the first time you are using the Oracle Enterprise Manager, a license page is displayed. Click I Agree.
Field Name Field Value
User name sys
Password <password entered when creating the db>
Connect As SYSDBA
Configuration Guide V6.3: Third-Party Software
Chapter 2. Creating and Configuring an Oracle 10g Database
Step II. Create a New User for Content Server (Spark)37
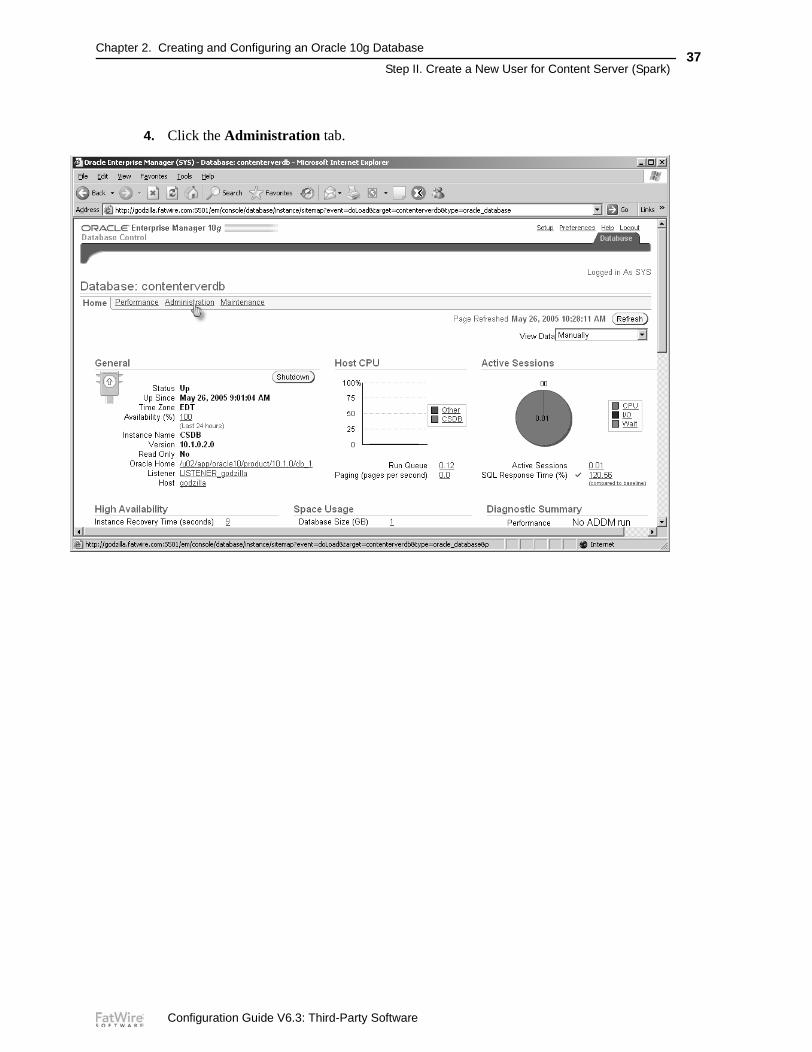
4. Click the Administration tab.
Configuration Guide V6.3: Third-Party Software
Chapter 2. Creating and Configuring an Oracle 10g Database
Step II. Create a New User for Content Server (Spark)38
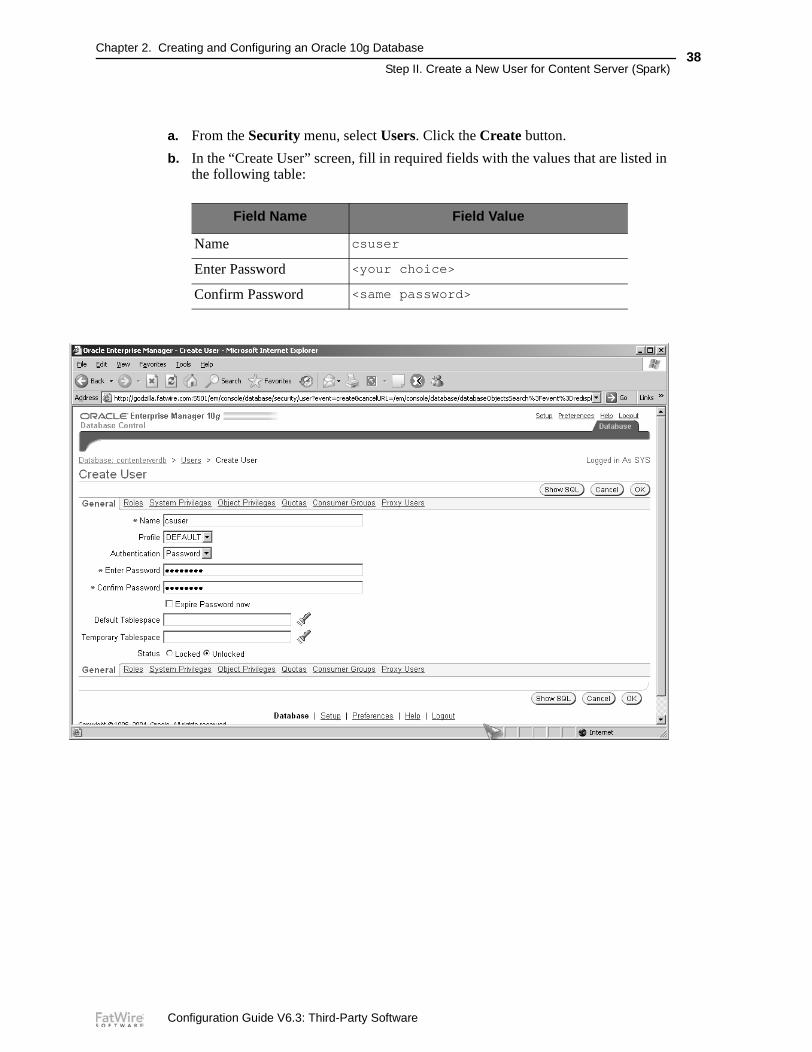
a. From the Security menu, select Users. Click the Create button.
b. In the “Create User” screen, fill in required fields with the values that are listed in the following table:
Field Name Field Value
Name csuser
Enter Password <your choice>
Confirm Password <same password>
Configuration Guide V6.3: Third-Party Software

Chapter 2. Creating and Configuring an Oracle 10g Database
Step II. Create a New User for Content Server (Spark)39
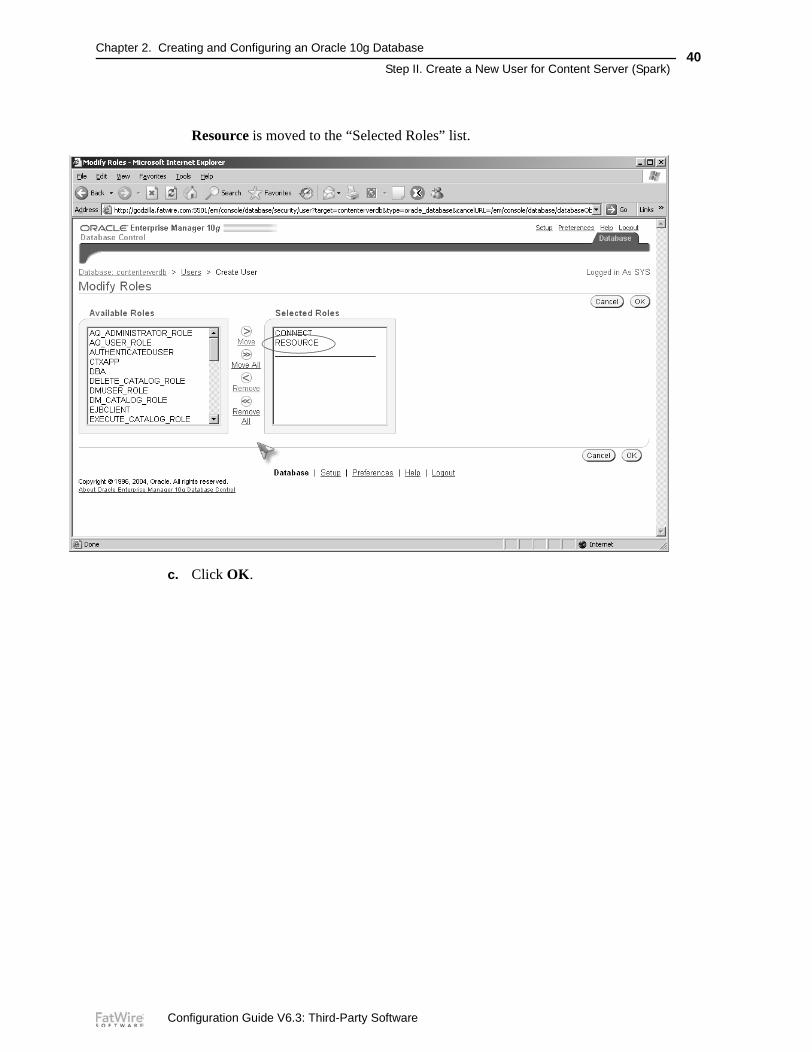
5. Click the Roles tab.
a. Click the Modify button.
b. From the list of “Available Roles” (left side), select Resource and click the Move button.
Configuration Guide V6.3: Third-Party Software
Chapter 2. Creating and Configuring an Oracle 10g Database
Step II. Create a New User for Content Server (Spark)40
Resource is moved to the “Selected Roles” list.
c. Click OK.
Configuration Guide V6.3: Third-Party Software

Chapter 2. Creating and Configuring an Oracle 10g Database
Step II. Create a New User for Content Server (Spark)41
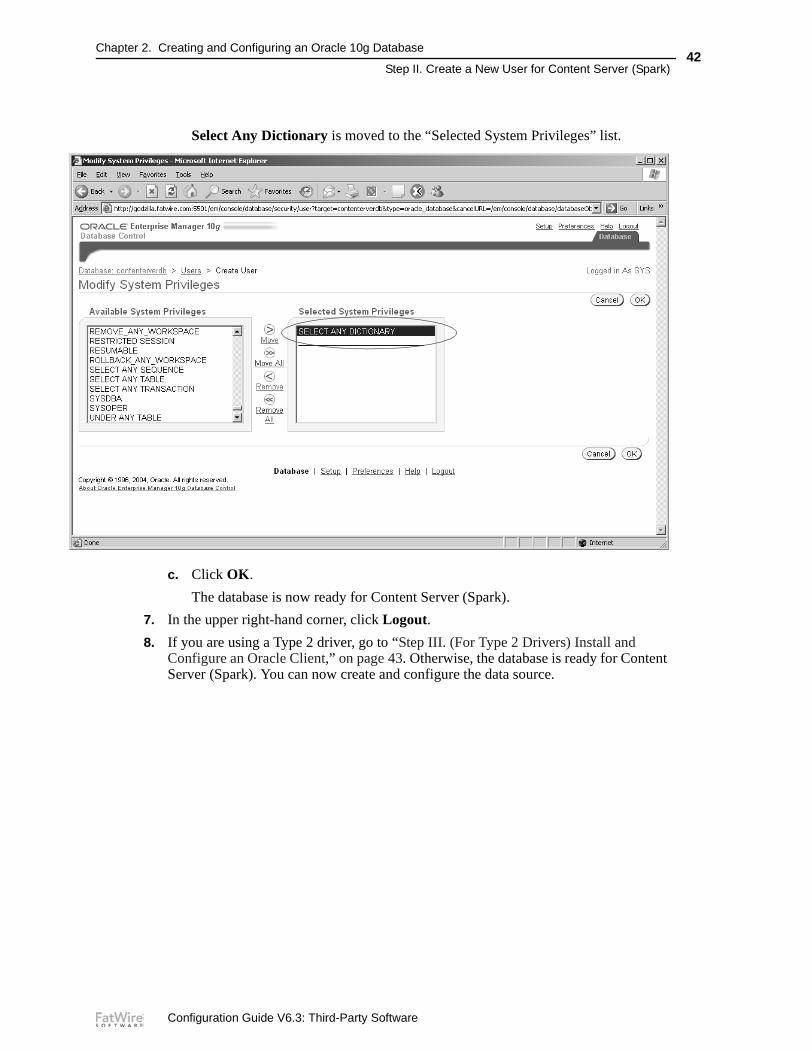
6. Click the System Privileges tab.
a. Click the Modify button.
b. From the list of “Available System Privileges” (left side), choose Select Any Dictionary and click the Move button.
Configuration Guide V6.3: Third-Party Software
Chapter 2. Creating and Configuring an Oracle 10g Database
Step II. Create a New User for Content Server (Spark)42
Select Any Dictionary is moved to the “Selected System Privileges” list.
c. Click OK.
The database is now ready for Content Server (Spark).
7. In the upper right-hand corner, click Logout.
8. If you are using a Type 2 driver, go to “Step III. (For Type 2 Drivers) Install and Configure an Oracle Client,” on page 43. Otherwise, the database is ready for Content Server (Spark). You can now create and configure the data source.
Configuration Guide V6.3: Third-Party Software
Chapter 2. Creating and Configuring an Oracle 10g Database
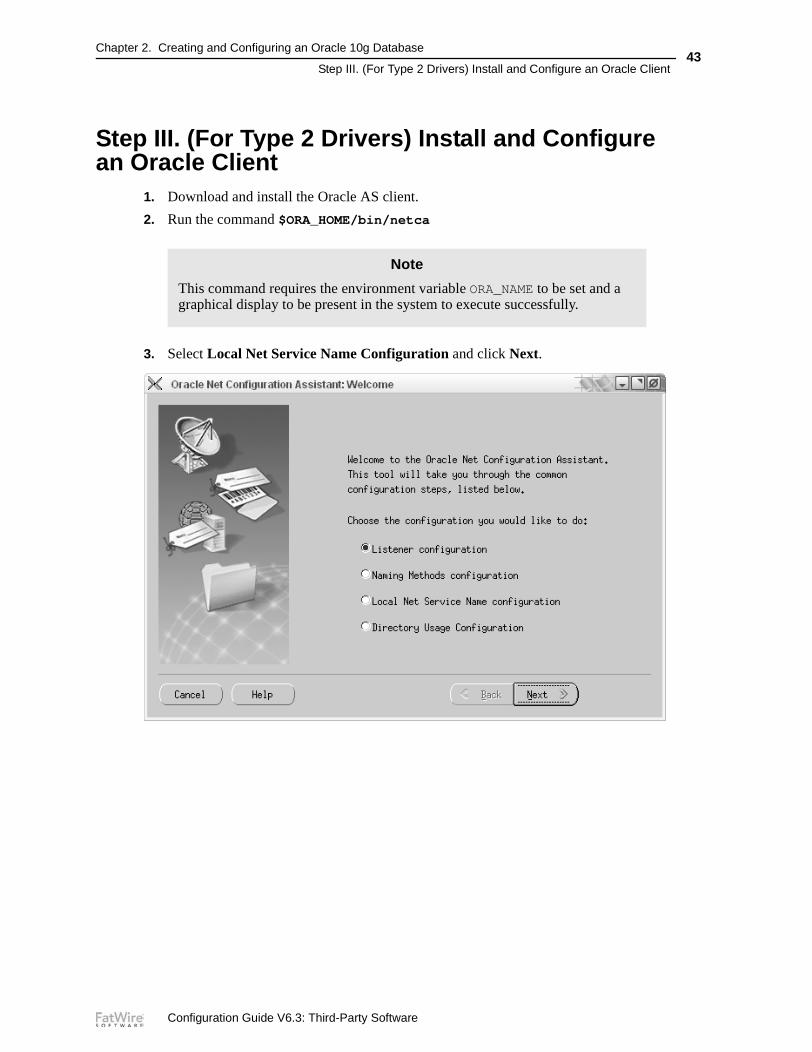
Step III. (For Type 2 Drivers) Install and Configure an Oracle Client43
Step III. (For Type 2 Drivers) Install and Configure an Oracle Client
1. Download and install the Oracle AS client.
2. Run the command $ORA_HOME/bin/netca
3. Select Local Net Service Name Configuration and click Next.
Note
This command requires the environment variable ORA_NAME to be set and a graphical display to be present in the system to execute successfully.
Configuration Guide V6.3: Third-Party Software

Chapter 2. Creating and Configuring an Oracle 10g Database
Step III. (For Type 2 Drivers) Install and Configure an Oracle Client44
4. Select Add and click Next.
5. Enter a name for this service (this is the SSID of the database on the remote server) and click Next.
Configuration Guide V6.3: Third-Party Software

Chapter 2. Creating and Configuring an Oracle 10g Database
Step III. (For Type 2 Drivers) Install and Configure an Oracle Client45
6. Leave the default option of TCP selected and click Next.
7. Enter the host name (the name of the computer that is hosting the database you are connecting to). If you have instructed Oracle 10g to run on a port other than the default, enter the custom port number and click Next.
Configuration Guide V6.3: Third-Party Software
Chapter 2. Creating and Configuring an Oracle 10g Database
Step III. (For Type 2 Drivers) Install and Configure an Oracle Client46
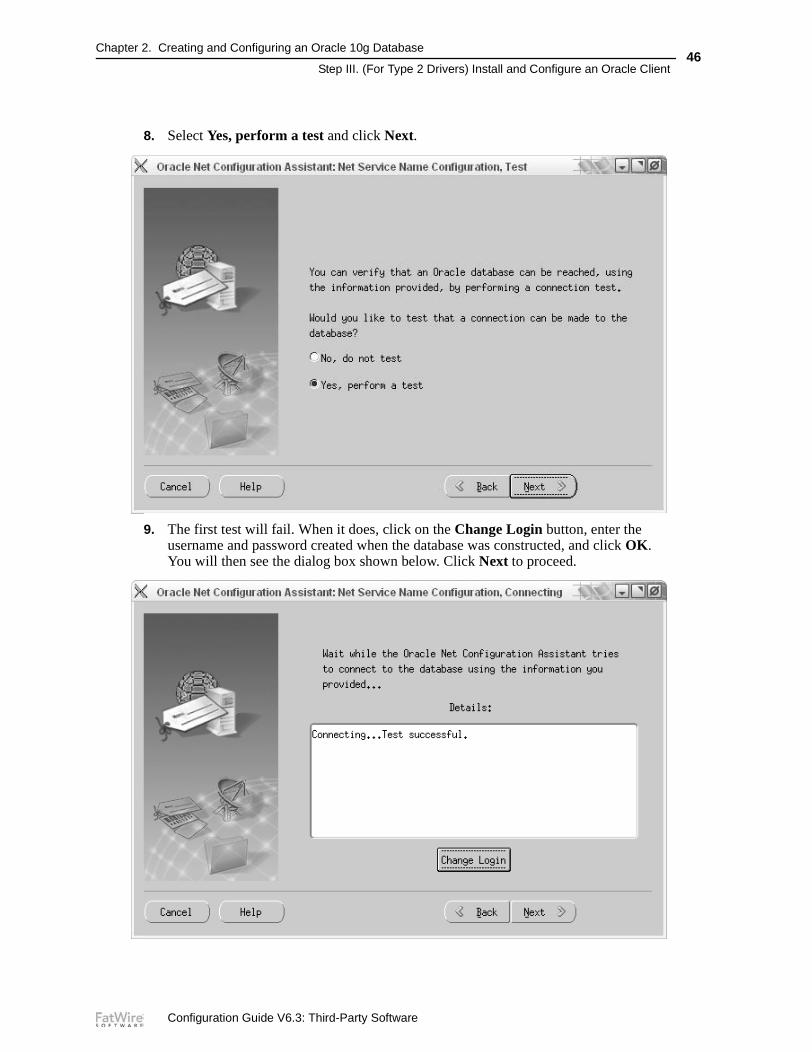
8. Select Yes, perform a test and click Next.
9. The first test will fail. When it does, click on the Change Login button, enter the username and password created when the database was constructed, and click OK. You will then see the dialog box shown below. Click Next to proceed.
Configuration Guide V6.3: Third-Party Software
Chapter 2. Creating and Configuring an Oracle 10g Database
Step III. (For Type 2 Drivers) Install and Configure an Oracle Client47
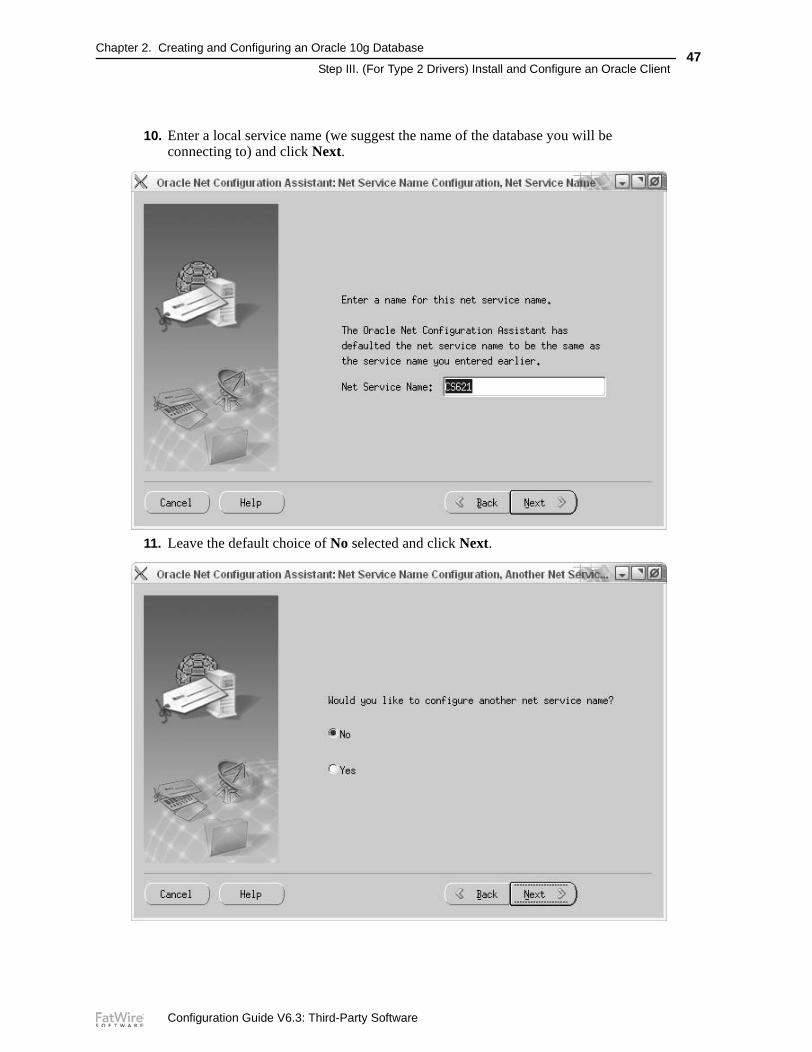
10. Enter a local service name (we suggest the name of the database you will be connecting to) and click Next.
11. Leave the default choice of No selected and click Next.
Configuration Guide V6.3: Third-Party Software
Chapter 2. Creating and Configuring an Oracle 10g Database
Step III. (For Type 2 Drivers) Install and Configure an Oracle Client48
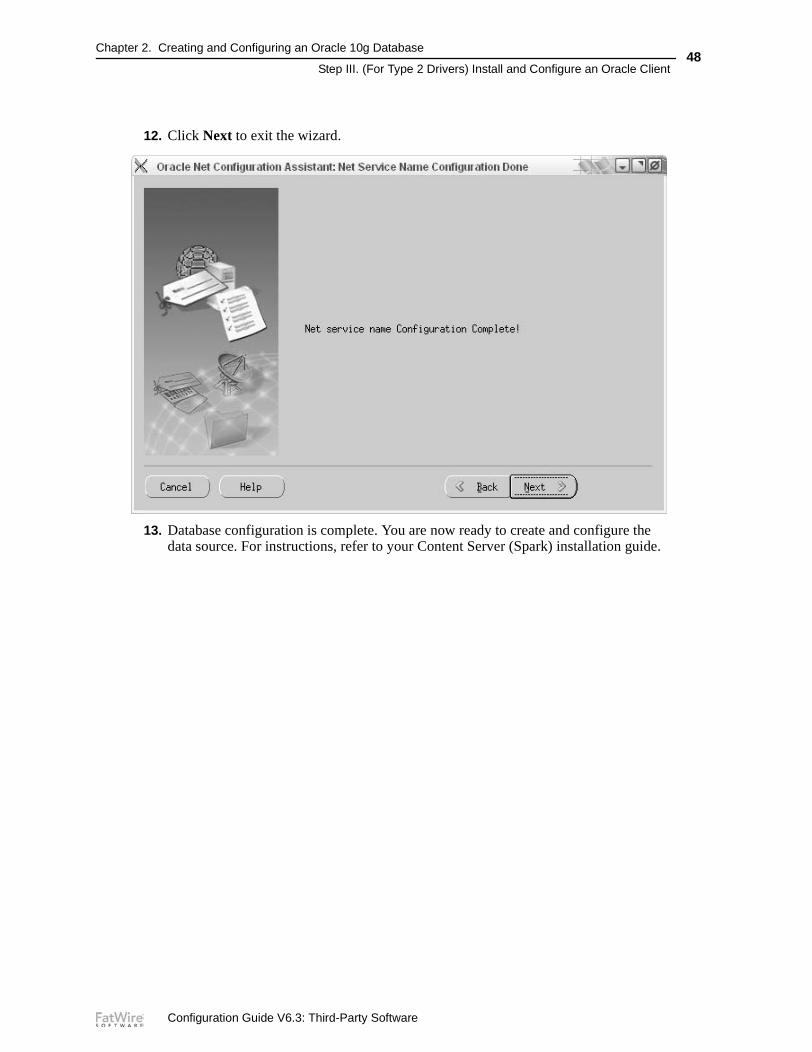
12. Click Next to exit the wizard.
13. Database configuration is complete. You are now ready to create and configure the data source. For instructions, refer to your Content Server (Spark) installation guide.
Configuration Guide V6.3: Third-Party Software
49
Chapter 3
Creating and Configuring an MS SQL Server Database
Use this chapter to set up a SQL Server database for your Content Server (Spark) installation. For background information regarding database configuration and users’ permissions, see Part 1, “Creating and Configuring a Database.”
Configuration Guide V6.3: Third-Party Software
Chapter 3. Creating and Configuring an MS SQL Server Database50
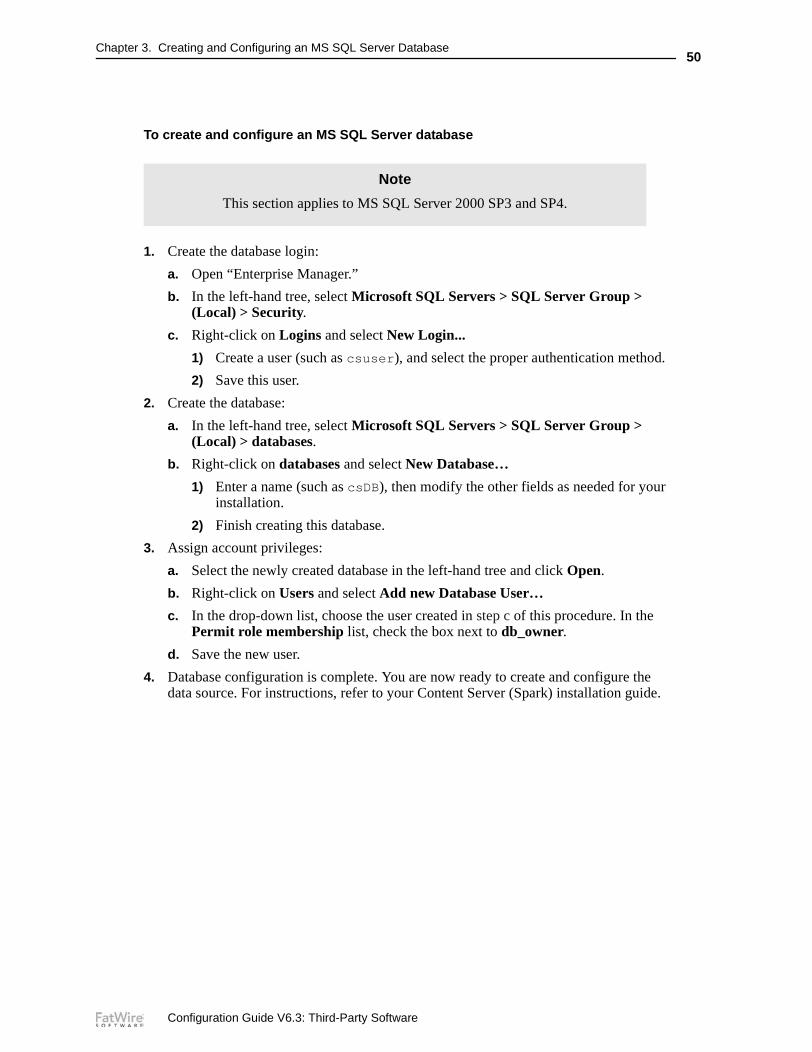
To create and configure an MS SQL Server database
1. Create the database login:
a. Open “Enterprise Manager.”
b. In the left-hand tree, select Microsoft SQL Servers > SQL Server Group > (Local) > Security.
c. Right-click on Logins and select New Login...
1) Create a user (such as csuser), and select the proper authentication method.
2) Save this user.
2. Create the database:
a. In the left-hand tree, select Microsoft SQL Servers > SQL Server Group > (Local) > databases.
b. Right-click on databases and select New Database…
1) Enter a name (such as csDB), then modify the other fields as needed for your installation.
2) Finish creating this database.
3. Assign account privileges:
a. Select the newly created database in the left-hand tree and click Open.
b. Right-click on Users and select Add new Database User…
c. In the drop-down list, choose the user created in step c of this procedure. In the Permit role membership list, check the box next to db_owner.
d. Save the new user.
4. Database configuration is complete. You are now ready to create and configure the data source. For instructions, refer to your Content Server (Spark) installation guide.
Note
This section applies to MS SQL Server 2000 SP3 and SP4.
Configuration Guide V6.3: Third-Party Software

51
Chapter 4
Creating and Configuring an IBM DB2 Database
Use this chapter to set up an IBM DB2 database for your Content Server (Spark) installation. For background information regarding database configuration and users’ permissions, see Part 1, “Creating and Configuring a Database.”
Configuration Guide V6.3: Third-Party Software

Chapter 4. Creating and Configuring an IBM DB2 Database52
To create and configure a DB2 database for Content Server (Spark)
1. Open DB Control Center (db2cc).
2. Browse to the instance under which you want to create the new database.
If you do not have an existing instance in the left-hand tree, do the following:
a. Right-click Instances and click Add…
b. Fill in the form provided (or click Discover) then click OK.
3. Right-click Branch Databases > Create > Database Using Wizard…
4. In the “Create Database Wizard,” fill in the following screens as indicated:
a. “Database name”Enter a unique database name (such as CSDB2), then click Next.
b. “Specify how and where to store the user tables.” Leave the default option Low maintenance selected and click Next.
c. “Specify how and where to store the system catalog tables.” Leave the default option Low maintenance selected and click Next.
d. “Specify how and where to store system temporary tables.” Leave the default option Low maintenance selected and click Next.
e. “Tune the performance of this database.” Click Next.
f. “Specify the locale for this database.” Complete the following steps:
1) In the Code Set drop-down list, select UTF-8.
2) Under Collating Sequence, leave the default option selected.
3) Click Next.
g. Review the actions that will take place when you click Finish, then click Finish.
5. A DB2 message box appears, giving you the option to run the “Configuration Advisor.” Click No.
A new database (with the name you provided in step 4) is now available in the left-hand tree.
6. In the left-hand tree, right-click Buffer Pools > Create.
7. In the “Create Buffer Pool” dialog box, do the following:
a. In the “Buffer Pool name” field, add a unique name (such as CSBUFFER32).
b. In the Page size drop-down list, select 32.
c. Click OK.
8. In the left-hand tree, right-click Table Spaces > Create.
Note
This section applies to DB2 version 8.x.
Configuration Guide V6.3: Third-Party Software
Chapter 4. Creating and Configuring an IBM DB2 Database53
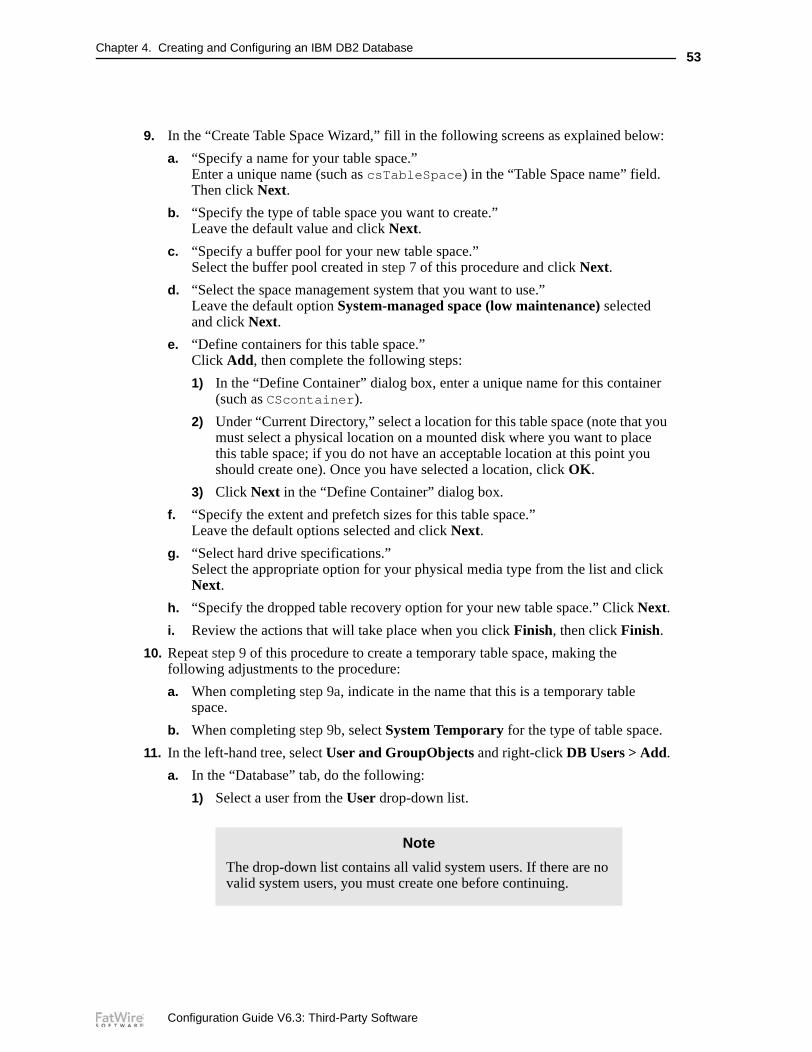
9. In the “Create Table Space Wizard,” fill in the following screens as explained below:
a. “Specify a name for your table space.” Enter a unique name (such as csTableSpace) in the “Table Space name” field. Then click Next.
b. “Specify the type of table space you want to create.”Leave the default value and click Next.
c. “Specify a buffer pool for your new table space.” Select the buffer pool created in step 7 of this procedure and click Next.
d. “Select the space management system that you want to use.” Leave the default option System-managed space (low maintenance) selected and click Next.
e. “Define containers for this table space.”Click Add, then complete the following steps:
1) In the “Define Container” dialog box, enter a unique name for this container (such as CScontainer).
2) Under “Current Directory,” select a location for this table space (note that you must select a physical location on a mounted disk where you want to place this table space; if you do not have an acceptable location at this point you should create one). Once you have selected a location, click OK.
3) Click Next in the “Define Container” dialog box.
f. “Specify the extent and prefetch sizes for this table space.” Leave the default options selected and click Next.
g. “Select hard drive specifications.” Select the appropriate option for your physical media type from the list and click Next.
h. “Specify the dropped table recovery option for your new table space.” Click Next.
i. Review the actions that will take place when you click Finish, then click Finish.
10. Repeat step 9 of this procedure to create a temporary table space, making the following adjustments to the procedure:
a. When completing step 9a, indicate in the name that this is a temporary table space.
b. When completing step 9b, select System Temporary for the type of table space.
11. In the left-hand tree, select User and GroupObjects and right-click DB Users > Add.
a. In the “Database” tab, do the following:
1) Select a user from the User drop-down list.
Note
The drop-down list contains all valid system users. If there are no valid system users, you must create one before continuing.
Configuration Guide V6.3: Third-Party Software

Chapter 4. Creating and Configuring an IBM DB2 Database54
2) Under “Grant authorities for the Selected User,” select all of the options. .
b. Click the Table Space tab and do the following:
1) Click Add Tablespace. In the “Add Tablespace” dialog box, select the tablespace created in step 9 of this procedure and click OK.
2) In the “Table Space” tab, the new table space is now selected, but has a ∅ symbol next to it. Select Grant from the Privileges drop-down list (located near the bottom of the tab).
c. Repeat step b for the temporary table space created in step 10.
d. Optionally, repeat step b to add the default table space USERSPACE1.
e. Click OK.
12. In the left-hand tree, right-click the database created in step 4 of this procedure and click Configure Parameters. In the list that opens, make the following changes:
a. Change LOCKLIST/100 to LOCKLIST/1024
b. Change LOCKTIMEOUT/None to LOCKTIMEOUT/30
c. Change APPLHEAPSZ/256 to APPLHEAPSZ/1024
13. Database configuration is complete. You are now ready to create and configure the data source. For instructions, refer to your Content Server (Spark) installation guide.
Note
This is not recommended for a delivery system. Choose the options that are appropriate for your delivery system)
Note
The default table space was created with the database. Therefore its location is not under your control.
Configuration Guide V6.3: Third-Party Software
55
Chapter 5
Creating and Configuring SQL Anywhere
This appendix shows you how to create and configure an SQL Anywhere database for your Spark installation.
This appendix contains the following sections:
• Step I. Prepare the Environment
• Step II. Create a Database
• Step III. Create a New User for Spark
• Step IV. Next Step
Configuration Guide V6.3: Third-Party Software
Chapter 5. Creating and Configuring SQL Anywhere
Step I. Prepare the Environment56
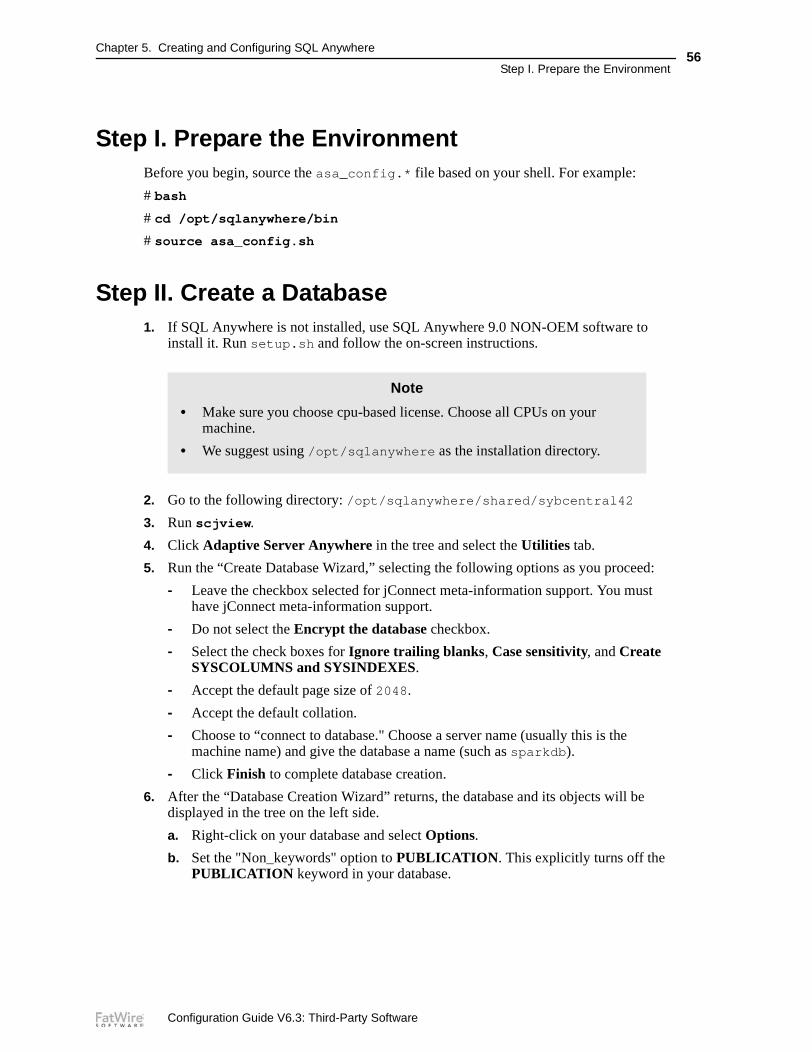
Step I. Prepare the EnvironmentBefore you begin, source the asa_config.* file based on your shell. For example:
# bash
# cd /opt/sqlanywhere/bin
# source asa_config.sh
Step II. Create a Database1. If SQL Anywhere is not installed, use SQL Anywhere 9.0 NON-OEM software to
install it. Run setup.sh and follow the on-screen instructions.
2. Go to the following directory: /opt/sqlanywhere/shared/sybcentral42
3. Run scjview.
4. Click Adaptive Server Anywhere in the tree and select the Utilities tab.
5. Run the “Create Database Wizard,” selecting the following options as you proceed:
- Leave the checkbox selected for jConnect meta-information support. You must have jConnect meta-information support.
- Do not select the Encrypt the database checkbox.
- Select the check boxes for Ignore trailing blanks, Case sensitivity, and Create SYSCOLUMNS and SYSINDEXES.
- Accept the default page size of 2048.
- Accept the default collation.
- Choose to “connect to database." Choose a server name (usually this is the machine name) and give the database a name (such as sparkdb).
- Click Finish to complete database creation.
6. After the “Database Creation Wizard” returns, the database and its objects will be displayed in the tree on the left side.
a. Right-click on your database and select Options.
b. Set the "Non_keywords" option to PUBLICATION. This explicitly turns off the PUBLICATION keyword in your database.
Note
• Make sure you choose cpu-based license. Choose all CPUs on your machine.
• We suggest using /opt/sqlanywhere as the installation directory.
Configuration Guide V6.3: Third-Party Software
Chapter 5. Creating and Configuring SQL Anywhere
Step III. Create a New User for Spark57
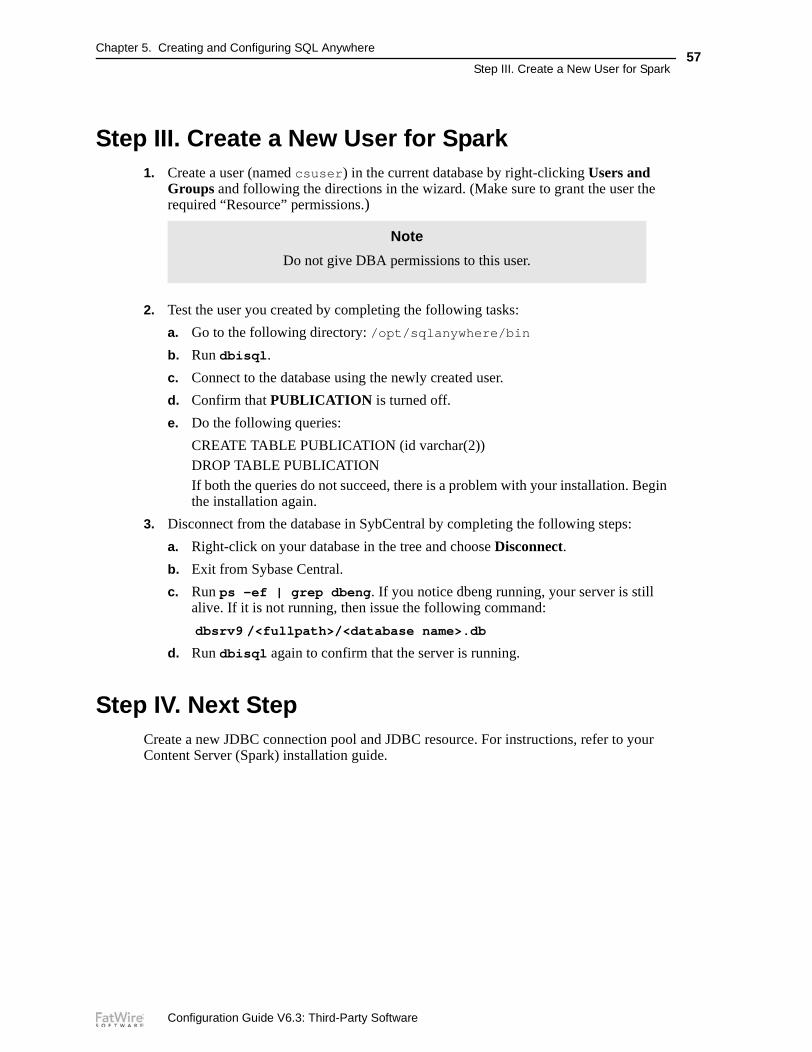
Step III. Create a New User for Spark1. Create a user (named csuser) in the current database by right-clicking Users and
Groups and following the directions in the wizard. (Make sure to grant the user the required “Resource” permissions.)
2. Test the user you created by completing the following tasks:
a. Go to the following directory: /opt/sqlanywhere/bin
b. Run dbisql.
c. Connect to the database using the newly created user.
d. Confirm that PUBLICATION is turned off.
e. Do the following queries:
CREATE TABLE PUBLICATION (id varchar(2))DROP TABLE PUBLICATIONIf both the queries do not succeed, there is a problem with your installation. Begin the installation again.
3. Disconnect from the database in SybCentral by completing the following steps:
a. Right-click on your database in the tree and choose Disconnect.
b. Exit from Sybase Central.
c. Run ps -ef | grep dbeng. If you notice dbeng running, your server is still alive. If it is not running, then issue the following command:
dbsrv9 /<fullpath>/<database name>.db
d. Run dbisql again to confirm that the server is running.
Step IV. Next StepCreate a new JDBC connection pool and JDBC resource. For instructions, refer to your Content Server (Spark) installation guide.
Note
Do not give DBA permissions to this user.
Configuration Guide V6.3: Third-Party Software
Chapter 5. Creating and Configuring SQL Anywhere
Step IV. Next Step58
Configuration Guide V6.3: Third-Party Software

59
Par t 2
Installing a Web Server
This part describes how to install a web server. It contains the following chapters:
• Chapter 7, “Installing IIS on Windows”
• Chapter 8, “Installing Apache on Solaris or Linux”
Configuration Guide V6.3: Third-Party Software

60
Configuration Guide V6.3: Third-Party Software
61
Chapter 6
Worksheets for Documenting the Web Server Installation
This chapter contains worksheets listing the web server parameters that you need to track.
Print this chapter. Then, as you install software, fill in the blank fields in these worksheets with the values of the specified parameters. You will save considerable time by doing this. Additionally, if something fails during the installation, the information in these worksheets will be valuable while you are troubleshooting. Use a separate set of worksheets for each installation so that each installation is fully documented.
The worksheets are constructed as tables that are divided into the following categories:
• Key to Sample Values
• Web Server Parameters
Configuration Guide V6.3: Third-Party Software

Chapter 6. Worksheets for Documenting the Web Server Installation
Key to Sample Values62
Key to Sample ValuesThe installation worksheets list parameters along with their sample values. Each sample value is classified as one of the following:
• Default: the value is automatically created at the time of the installation.
• Normal: the value represents the normal configuration for a simple installation. Do not use a different value unless your system requires it.
• Option: the value must be chosen from a preset list of options.
• Suggested: the value is recommended for the parameter.
• Example: the value is only an example that must be replaced by the value that is appropriate for your installation. The example value is not likely to be valid in your environment.
Web Server Parameters
Note
A Suggested account name has an Example password value. We strongly recommend that you select a password for this account that is appropriate for the security of your system.
Table 1: IIS Web Server Parameters
Parameter Shown As Comments Your Value
Web Version WebVersion Example:
Apache 1.3.37
Web Host Name WebHost Example:
jeeves
Web Host IP Address WebIP Example:
104.222.111.155
Web Server Port WebPort Default:
80
IIS Only:
Filter Name (ISAPI plug-in name)
FilterName Suggested:
iisforwardfilter
Apache Only:
Apache Root Directory
ApacheRoot Example:
/usr/apache
Configuration Guide V6.3: Third-Party Software
Chapter 6. Worksheets for Documenting the Web Server Installation
Web Server Parameters63
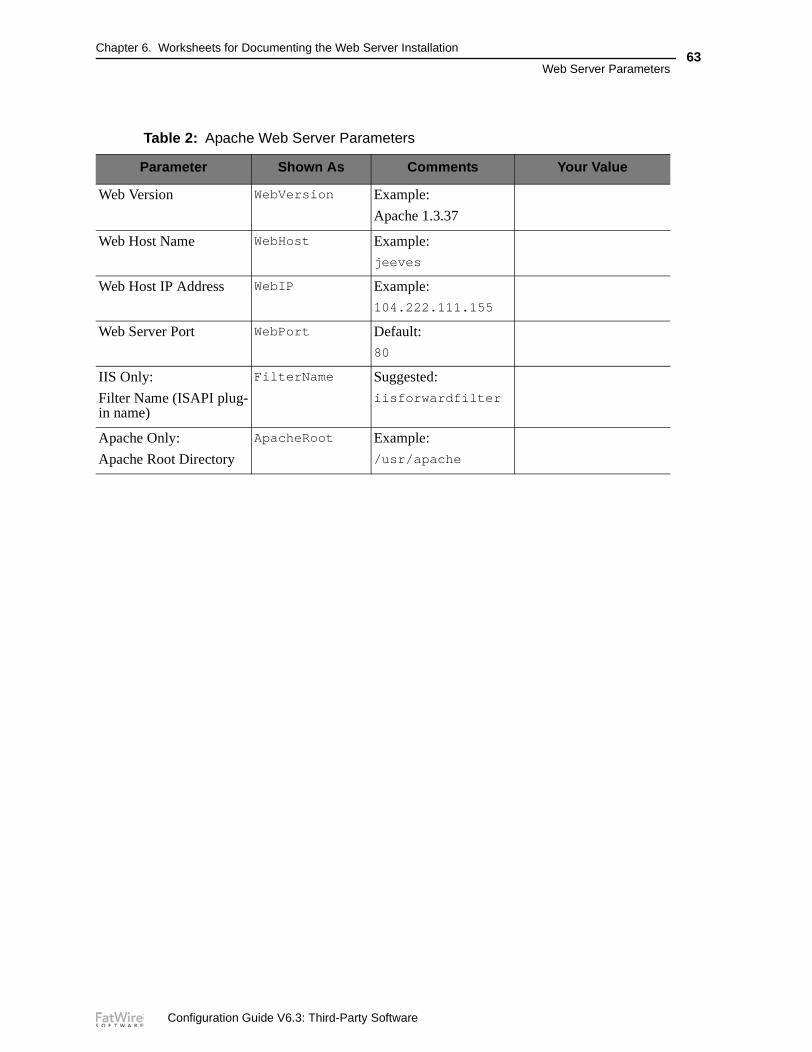
Table 2: Apache Web Server Parameters
Parameter Shown As Comments Your Value
Web Version WebVersion Example:
Apache 1.3.37
Web Host Name WebHost Example:
jeeves
Web Host IP Address WebIP Example:
104.222.111.155
Web Server Port WebPort Default:
80
IIS Only:
Filter Name (ISAPI plug-in name)
FilterName Suggested:
iisforwardfilter
Apache Only:
Apache Root Directory
ApacheRoot Example:
/usr/apache
Configuration Guide V6.3: Third-Party Software
Chapter 6. Worksheets for Documenting the Web Server Installation
Web Server Parameters64
Configuration Guide V6.3: Third-Party Software
65
Chapter 7
Installing IIS on Windows
This chapter explains how to install and test Microsoft’s Internet Information Services (IIS). It contains the following sections:
• Step I. Install IIS
• Step II. Document Your IIS Installation
• Step III. Verify the Installation
• Next Step
Note
Typically, IIS is either partially or fully installed on most Windows 2000 machines.
• If IIS is only partially installed or not installed, start with the first section, “Step I. Install IIS,” on page 66.
• If IIS is fully installed, start with the section “Step II. Document Your IIS Installation,” on page 66.
Configuration Guide V6.3: Third-Party Software

Chapter 7. Installing IIS on Windows
Step I. Install IIS66
Step I. Install IISIf IIS is not installed or is only partially installed, follow Microsoft’s instruction for installing IIS on a Windows 2000 system.
As a convenience, here is a quick synopsis of the instructions:
1. Select Start > Settings > Control Panel.
2. Select Add/Remove Programs.
3. Select the Add/Remove Windows Components tab on the left.
The Add/Remove Windows Components Wizard appears.
4. Select Internet Information Services (IIS) and then follow the instructions for installing it.
Step II. Document Your IIS InstallationWe strongly recommend that you document the details of your IIS installation in Table 1, “IIS Parameters.”
Step III. Verify the InstallationAfter you have installed IIS, you start it and then browse to it in a web browser to determine whether it is serving pages as it should.
A. Start IISYou can start the various IIS services in various ways. To be sure that all the necessary services are running, start IIS from the Services node.
To start IIS services
1. Right-click on the My Computer icon.
Table 1: IIS Parameters
Parameter What It Holds Your Value
Web Version
(WebVersion)
The version number of the IIS software that you installed.
Web Host Name
(WebHost)
The name by which the installation machine is known on the network.
Web Host IP Address
(WebIP)
The numeric Internet Protocol address assigned to the web server host machine.
Web Server Port
(WebPort)
The port number assigned for web server communications. By default, it has the value 80.
Configuration Guide V6.3: Third-Party Software
Chapter 7. Installing IIS on Windows
Next Step67
2. Select Manage from the right-mouse menu.
3. In the Computer Management dialog box, expand the Services and Applications node in the tree.
4. Select Services.
5. In the list of services on the right, right click IIS Admin Service.
6. Select Start from the right mouse menu.
To start or stop the default web site only
1. Right-click on the MyComputer icon.
2. Select Manage from the right mouse menu.
3. In the Computer Management window, expand the Services and Applications. node in the tree.
4. Expand the Internet Information Services node.
5. Right-click on Default Web Site.
6. Select Start or Stop, as appropriate, from the right mouse menu.
B. Verify that IIS is Serving PagesTo verify that IIS can serve pages, test it from both the server that is hosting it and from another browser on the network.
To verify that IIS can serve pages
1. Start a browser on the host on which IIS is running.
2. From the browser, go to the following URL:
http://WebHost:WebPort
3. Do one of the following:
- If the browser displays the IIS home page, then IIS is installed and running properly. Continue to step 4.
- If the browser returns an error, consult Microsoft’s documentation, determine what went wrong, and fix it before you continue.
4. Start a browser on another machine on your network (a host other than the machine hosting IIS).
5. From the browser, go to the following URL:
http://WebHost:WebPort
If the browser displays the IIS “Under Construction” page, then IIS is installed and running and the network naming service appears to be working properly.
Next StepConfigure the web server to run with WebLogic and Content Server (Spark). For instructions, refer to the installation guide for your configuration.
Configuration Guide V6.3: Third-Party Software

Chapter 7. Installing IIS on Windows
Next Step68
Configuration Guide V6.3: Third-Party Software
69
Chapter 8
Installing Apache on Solaris or Linux
This chapter describes how to install and configure Apache HTTP Server. As previously mentioned, you can install Apache on the same machine that will host WebLogic and Content Server (Spark) or you can install and use it on a separate host.
This chapter contains the following sections:
• Step I. Install Apache
• Step II. Document Your Apache Parameters
• Step III. Verify that Apache Contains the Correct Module
• Step IV. Verify that Apache Runs Properly
• Next Step
Configuration Guide V6.3: Third-Party Software
Chapter 8. Installing Apache on Solaris or Linux
Step I. Install Apache70
Step I. Install Apache1. Apache HTTP Server can be pre-installed on Solaris 8, Solaris 9, Linux RedHat, and
Linux SuSE systems. Determine whether Apache is installed on the environment(s) on which you plan to run it.
2. Do one of the following:
- If Apache is already installed, continue with “Step II. Document Your Apache Parameters,” on page 70.
- If Apache is not already installed, you can do one of the following:
• Install it from your source medium.
• Download it from the Internet.
• Build it from source; that is, select the modules and compile the Apache executable yourself. If you want to build it from source, refer to the information that the Apache Foundation makes available at http://www.apache.org/ and follow their instructions.
Step II. Document Your Apache ParametersWe strongly recommend that you document the details of your Apache installation in Table 2, “Apache Parameters.”
Table 2: Apache Parameters
Parameter What it Holds Your Value
Web Server Version
(WebVersion)
The version of Apache that the host is running. Note that you must use a version that Content Server (Spark) supports.
Web Host Name
(WebHost)
The name by which the Apache host machine is known on the network.
Web Host IP Address
(WebIP)
The numeric Internet Protocol address assigned to the Apache host machine.
Web Server Port
(WebPort)
The port number assigned for Apache communications. By default, it has the value 80.
Apache Root Directory
(ApacheRoot)
The top-level directory in which Apache is installed. Immediate subdirectories of ApacheRoot include bin and conf.
Configuration Guide V6.3: Third-Party Software

Chapter 8. Installing Apache on Solaris or Linux
Step III. Verify that Apache Contains the Correct Module71
Step III. Verify that Apache Contains the Correct Module
Apache is modular software, built from a set of modules. WebLogic Server requires that the mod_so.c module be present on the machine that is hosting the Apache web server. Please verify that your Apache server contains this module by using the command httpd with the -l option and search for mod_so in the output.
For example:
$ ApacheRoot/bin/httpd -l | grep ‘mod_so’ mod_so.c
Examine the output and do one of the following:
• If the output from the preceding command contains mod_so.c, then your version of Apache contains the correct module. Proceed to “Step IV. Verify that Apache Runs Properly,” on page 71.
• If the output from the preceding command does not contain mod_so.c, you must rebuild and reinstall Apache. For guidelines, see “Step I. Install Apache,” on page 70.
Step IV. Verify that Apache Runs ProperlyIn this step, you will start Apache and verify that it is running properly. For verification instructions, see the Apache web site (given in “Step I. Install Apache,” on page 70).
Next StepConfigure Apache to run with WebLogic and Content Server (Spark). For instructions, refer to the installation guide for your configuration.
Note
This section applies only to Apache version 1.3x.
Configuration Guide V6.3: Third-Party Software
Chapter 8. Installing Apache on Solaris or Linux
Next Step72
Configuration Guide V6.3: Third-Party Software
73
Par t 3
LDAP Integration
This part describes how to configure an LDAP server for your Content Server web application. It contains the following chapter:
• Chapter 9, “Integrating Content Server with LDAP”
Note
Spark uses a bundled LDAP server. Spark must be automatically integrated with the LDAP server during the Spark installation process. The Spark installer performs the integration as explained in “Automatic Integration with LDAP,” on page 76.
Configuration Guide V6.3: Third-Party Software

74
Configuration Guide V6.3: Third-Party Software
75
Chapter 9
Integrating Content Server with LDAP
Content Server administrators who need to manage users and their ACLs outside the Content Server database can use an LDAP server to store user names and attributes. Additionally, the LDAP server can be used to manage roles and sites.
Content Server supports the following integration options:
• External LDAP servers, which must be integrated manually after Content Server is installed.
• Bundled LDAP servers, which are packaged with their application servers. Bundled LDAP servers can be integrated either automatically by the CS installer or manually following the CS installation process, depending on whether the installation is a portal or a web application.
This appendix shows you how to integrate LDAP servers with Content Server.
This appendix contains the following sections:
• LDAP Integration Overview
• Automatic Integration with LDAP
• Manual Integration with LDAP
• Post-Integration Management of ACLs, Users, Sites, and Roles
• Reference: Example ldif Files
Note
CS-LDAP integration is made possible by the Directory Services API, which also supports the following features:
• The plug-in that functions as Content Server’s native user manager. The plug-in authenticates users by means of the native Content Server user management tables: SystemUsers and SystemUserAttrs
• External user managers, which must be customized in order to authenticate users.
Configuration Guide V6.3: Third-Party Software
Chapter 9. Integrating Content Server with LDAP
LDAP Integration Overview76
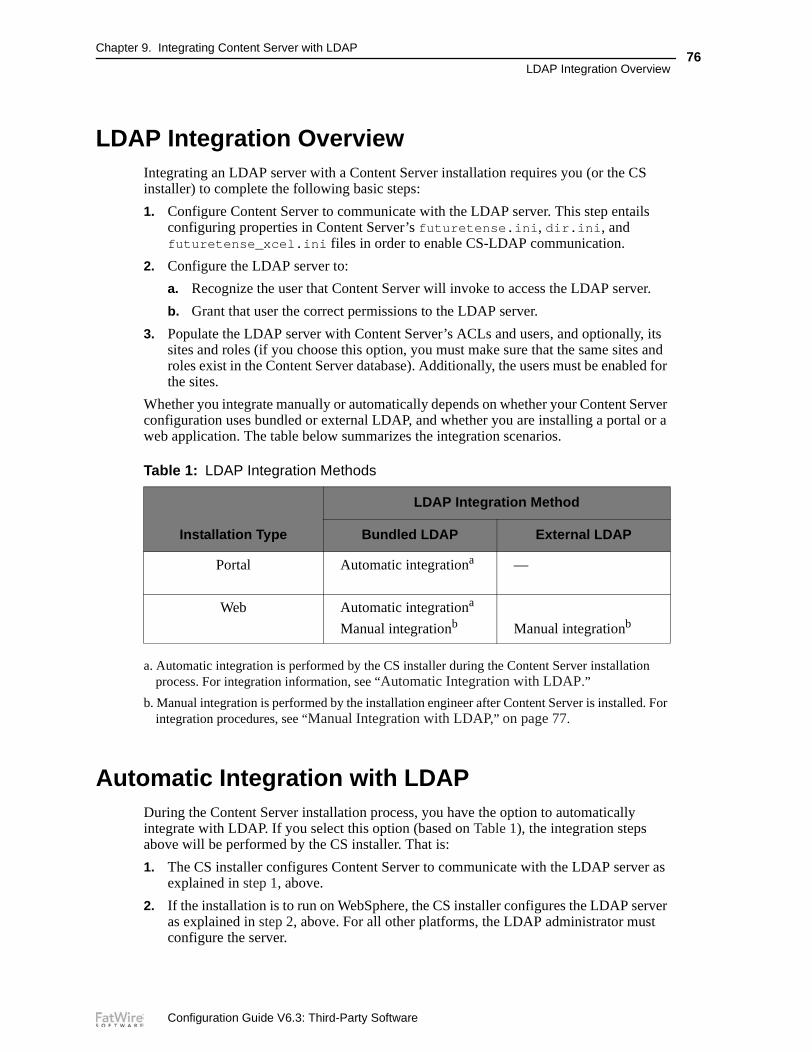
LDAP Integration OverviewIntegrating an LDAP server with a Content Server installation requires you (or the CS installer) to complete the following basic steps:
1. Configure Content Server to communicate with the LDAP server. This step entails configuring properties in Content Server’s futuretense.ini, dir.ini, and futuretense_xcel.ini files in order to enable CS-LDAP communication.
2. Configure the LDAP server to:
a. Recognize the user that Content Server will invoke to access the LDAP server.
b. Grant that user the correct permissions to the LDAP server.
3. Populate the LDAP server with Content Server’s ACLs and users, and optionally, its sites and roles (if you choose this option, you must make sure that the same sites and roles exist in the Content Server database). Additionally, the users must be enabled for the sites.
Whether you integrate manually or automatically depends on whether your Content Server configuration uses bundled or external LDAP, and whether you are installing a portal or a web application. The table below summarizes the integration scenarios.
Automatic Integration with LDAPDuring the Content Server installation process, you have the option to automatically integrate with LDAP. If you select this option (based on Table 1), the integration steps above will be performed by the CS installer. That is:
1. The CS installer configures Content Server to communicate with the LDAP server as explained in step 1, above.
2. If the installation is to run on WebSphere, the CS installer configures the LDAP server as explained in step 2, above. For all other platforms, the LDAP administrator must configure the server.
Table 1: LDAP Integration Methods
Installation Type
LDAP Integration Method
Bundled LDAP External LDAP
Portal Automatic integrationa
a. Automatic integration is performed by the CS installer during the Content Server installation process. For integration information, see “Automatic Integration with LDAP.”
—
Web Automatic integrationa
Manual integrationb
b. Manual integration is performed by the installation engineer after Content Server is installed. For integration procedures, see “Manual Integration with LDAP,” on page 77.
Manual integrationb
Configuration Guide V6.3: Third-Party Software
Chapter 9. Integrating Content Server with LDAP
Manual Integration with LDAP77
3. The CS installer populates the LDAP server with the following information (as explained in step 3, above):
- Content Server’s default ACLs and roles.
- Sample sites that you might have chosen to install in Content Server, and users of the sample sites. The CS installer also enables the users for the sample sites.
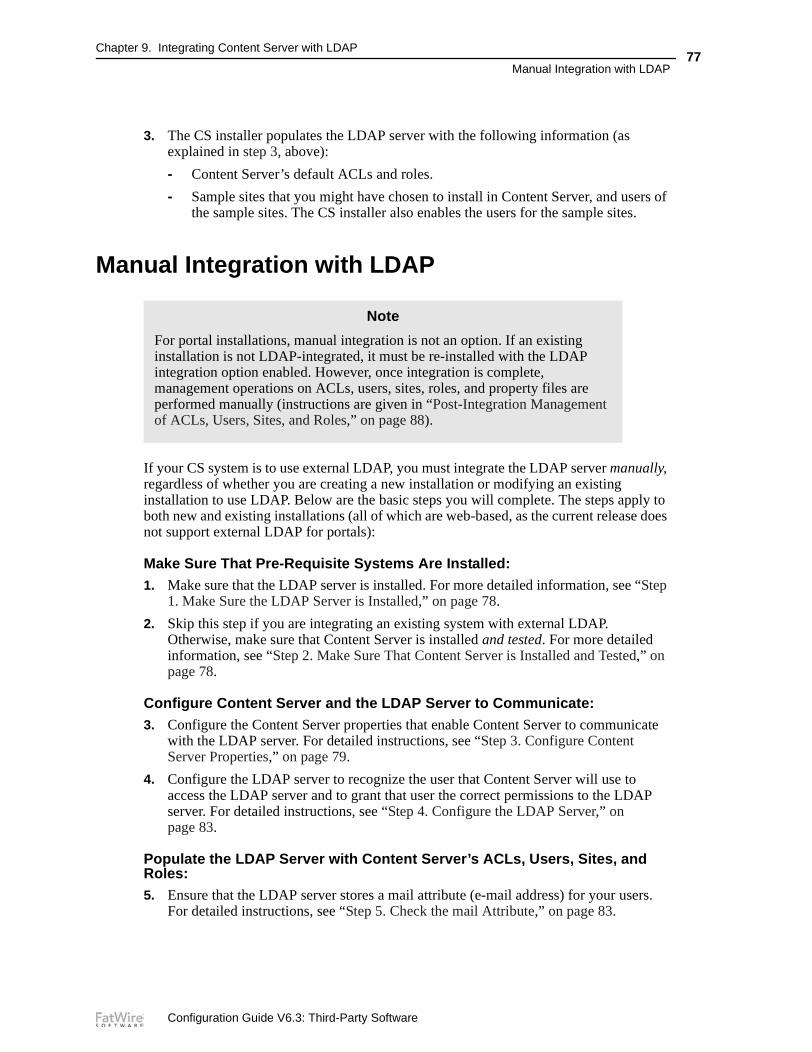
Manual Integration with LDAP
If your CS system is to use external LDAP, you must integrate the LDAP server manually, regardless of whether you are creating a new installation or modifying an existing installation to use LDAP. Below are the basic steps you will complete. The steps apply to both new and existing installations (all of which are web-based, as the current release does not support external LDAP for portals):
Make Sure That Pre-Requisite Systems Are Installed:1. Make sure that the LDAP server is installed. For more detailed information, see “Step
1. Make Sure the LDAP Server is Installed,” on page 78.
2. Skip this step if you are integrating an existing system with external LDAP. Otherwise, make sure that Content Server is installed and tested. For more detailed information, see “Step 2. Make Sure That Content Server is Installed and Tested,” on page 78.
Configure Content Server and the LDAP Server to Communicate:3. Configure the Content Server properties that enable Content Server to communicate
with the LDAP server. For detailed instructions, see “Step 3. Configure Content Server Properties,” on page 79.
4. Configure the LDAP server to recognize the user that Content Server will use to access the LDAP server and to grant that user the correct permissions to the LDAP server. For detailed instructions, see “Step 4. Configure the LDAP Server,” on page 83.
Populate the LDAP Server with Content Server’s ACLs, Users, Sites, and Roles:5. Ensure that the LDAP server stores a mail attribute (e-mail address) for your users.
For detailed instructions, see “Step 5. Check the mail Attribute,” on page 83.
Note
For portal installations, manual integration is not an option. If an existing installation is not LDAP-integrated, it must be re-installed with the LDAP integration option enabled. However, once integration is complete, management operations on ACLs, users, sites, roles, and property files are performed manually (instructions are given in “Post-Integration Management of ACLs, Users, Sites, and Roles,” on page 88).
Configuration Guide V6.3: Third-Party Software

Chapter 9. Integrating Content Server with LDAP
Manual Integration with LDAP78
6. Use the LDAP interface to create LDAP user groups whose names exactly match the Content Server system ACLs. For installations using web services, include the corresponding ACLs. For detailed instructions, see “Step 6. Create LDAP User Groups (Content Server ACLs),” on page 83.
7. Use the LDAP interface to create users and to assign users to the groups. For detailed instructions, see “Step 7. Create Required Users and Their Group Memberships,” on page 84.
8. (Optional) If you plan to use LDAP attribute mapping for sites and roles, create the appropriate sites and roles in LDAP. For detailed instructions, see “Step 8. (Optional) Create Sites and Roles in the LDAP Server,” on page 85.
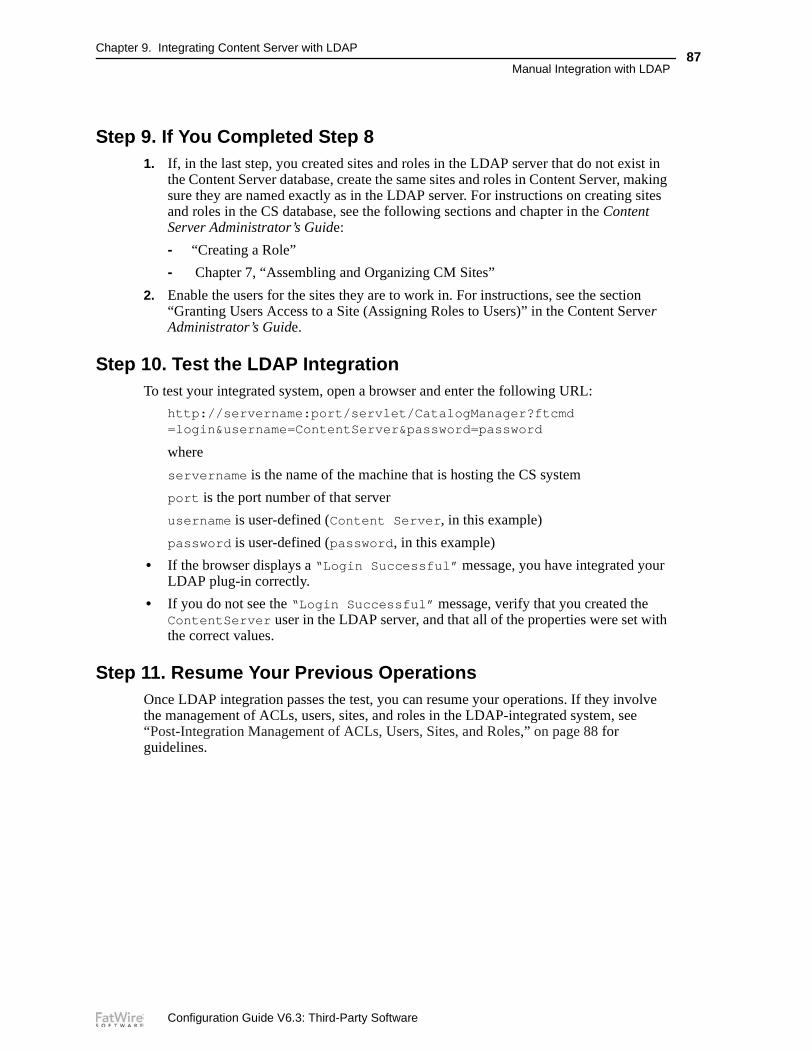
If You Completed Step 8:9. Make sure that the sites and roles you created in step 8 also exist in the CS database.
For detailed instructions, see “Step 9. If You Completed Step 8,” on page 87.
Test the Configuration:10. Test the configuration. For detailed instructions, see “Step 10. Test the LDAP
Integration,” on page 87.
Resume Your Previous Operations:11. Once LDAP integration passes the test, you can resume your operations. If they
involve managing ACLs, users, sites, and roles in the LDAP-integrated system, see “Post-Integration Management of ACLs, Users, Sites, and Roles,” on page 88 for guidelines.
Step 1. Make Sure the LDAP Server is Installed Content Server can be integrated with LDAP servers that support the LDAP-2 protocol or any other protocol (although, in the latter case, FatWire does not support write operations from the Content Server interface to the LDAP server). The currently supported LDAP servers are listed at the following URL:
http://www.fatwire.com/Support/csxxx.html
where xxx represents the Content Server version number (for example, 630). Check that one of the listed LDAP servers is installed.
Step 2. Make Sure That Content Server is Installed and TestedBefore you can begin integrating with LDAP, you need to make sure that Content Server has been installed and tested on a supported configuration. The currently supported configurations are listed at the URL that is given directly above, in Step 1 of this procedure.
Note
The steps below are detailed versions of the steps that are given on page 77.
Configuration Guide V6.3: Third-Party Software

Chapter 9. Integrating Content Server with LDAP
Manual Integration with LDAP79
Step 3. Configure Content Server PropertiesConfigure the following property files in order for Content Server to communicate with the LDAP server:
• futuretense.ini
• dir.ini
• futuretense_xcel.ini, if you will be managing sites and roles directly in the LDAP server (unlike ACLs and users, sites and roles need not be managed in the LDAP server).
Set Property Values in futuretense.ini1. Start the Property Editor and open futuretense.ini.
2. Select the Authentication tab.
3. Set the following values for the following properties:
4. Select File > Save to save the values.
5. Select File > Close.
6. Continue to the next procedure.
Set Property Values in the dir.ini File1. Open dir.ini in the Property Editor.
2. Select the Attribute Names tab and set the following values for the following properties:
Property (In futuretense.ini) Value
cs.manageproperty dir.ini
cs.manageUser com.openmarket.directory.jndi.auth.JNDILogin
Property (in dir.ini) Value
cn iPlanet: cn
Active Directory: cn
loginattribute iPlanet: uid
Active Directory: cn
password iPlanet: userPassword
Active Directory: password
uniquemember iPlanet: uniquemember
Active Directory: member
Configuration Guide V6.3: Third-Party Software
Chapter 9. Integrating Content Server with LDAP
Manual Integration with LDAP80
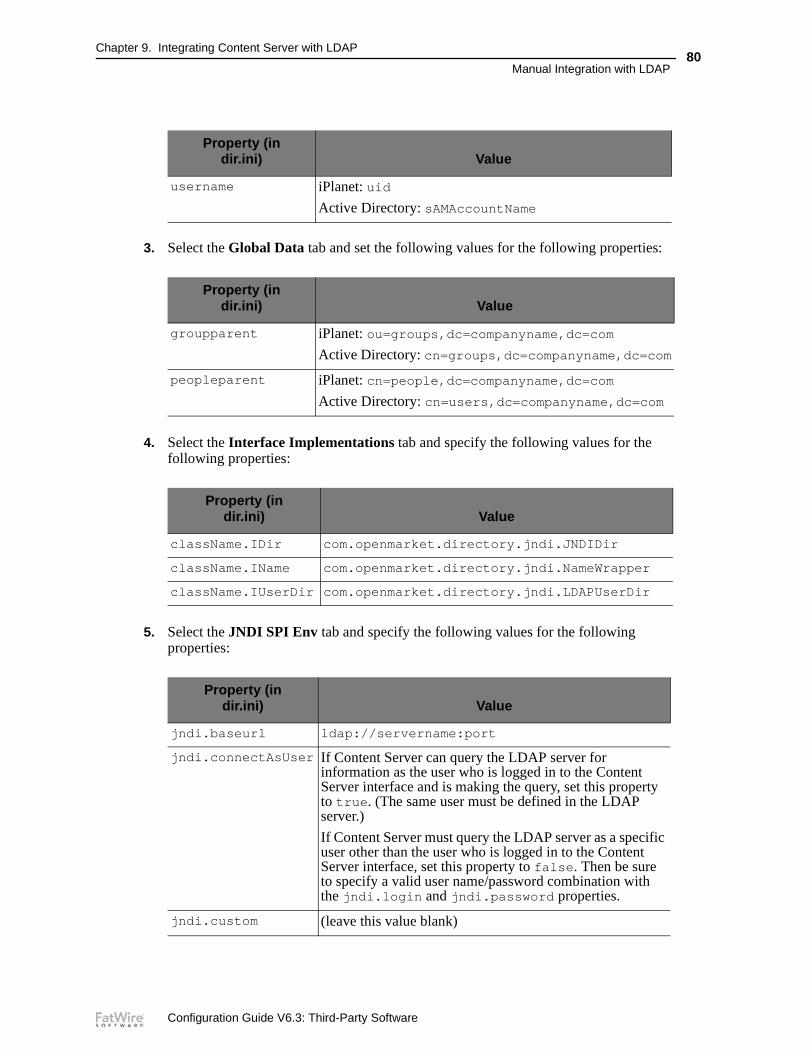
3. Select the Global Data tab and set the following values for the following properties:
4. Select the Interface Implementations tab and specify the following values for the following properties:
5. Select the JNDI SPI Env tab and specify the following values for the following properties:
username iPlanet: uid
Active Directory: sAMAccountName
Property (in dir.ini) Value
groupparent iPlanet: ou=groups,dc=companyname,dc=com
Active Directory: cn=groups,dc=companyname,dc=com
peopleparent iPlanet: cn=people,dc=companyname,dc=com
Active Directory: cn=users,dc=companyname,dc=com
Property (in dir.ini) Value
className.IDir com.openmarket.directory.jndi.JNDIDir
className.IName com.openmarket.directory.jndi.NameWrapper
className.IUserDir com.openmarket.directory.jndi.LDAPUserDir
Property (in dir.ini) Value
jndi.baseurl ldap://servername:port
jndi.connectAsUser If Content Server can query the LDAP server for information as the user who is logged in to the Content Server interface and is making the query, set this property to true. (The same user must be defined in the LDAP server.)
If Content Server must query the LDAP server as a specific user other than the user who is logged in to the Content Server interface, set this property to false. Then be sure to specify a valid user name/password combination with the jndi.login and jndi.password properties.
jndi.custom (leave this value blank)
Property (in dir.ini) Value
Configuration Guide V6.3: Third-Party Software
Chapter 9. Integrating Content Server with LDAP
Manual Integration with LDAP81
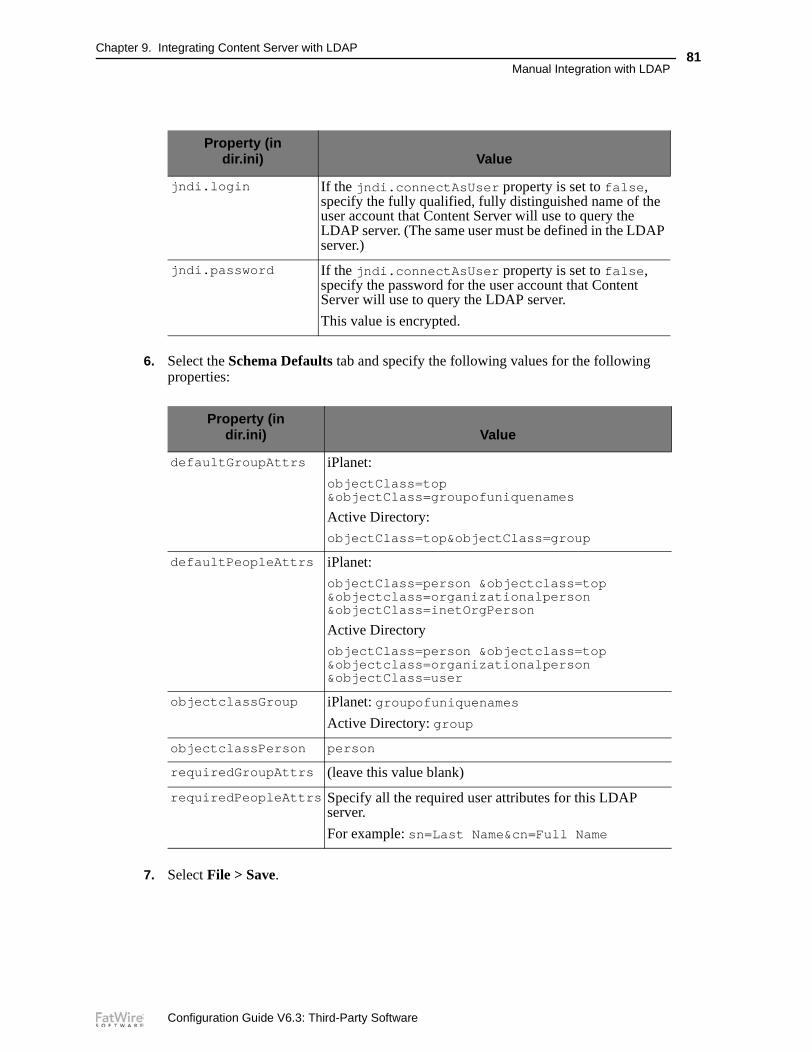
6. Select the Schema Defaults tab and specify the following values for the following properties:
7. Select File > Save.
jndi.login If the jndi.connectAsUser property is set to false, specify the fully qualified, fully distinguished name of the user account that Content Server will use to query the LDAP server. (The same user must be defined in the LDAP server.)
jndi.password If the jndi.connectAsUser property is set to false, specify the password for the user account that Content Server will use to query the LDAP server.
This value is encrypted.
Property (in dir.ini) Value
defaultGroupAttrs iPlanet:
objectClass=top &objectClass=groupofuniquenames
Active Directory:
objectClass=top&objectClass=group
defaultPeopleAttrs iPlanet:
objectClass=person &objectclass=top &objectclass=organizationalperson&objectClass=inetOrgPerson
Active Directory
objectClass=person &objectclass=top &objectclass=organizationalperson&objectClass=user
objectclassGroup iPlanet: groupofuniquenames
Active Directory: group
objectclassPerson person
requiredGroupAttrs (leave this value blank)
requiredPeopleAttrs Specify all the required user attributes for this LDAP server.
For example: sn=Last Name&cn=Full Name
Property (in dir.ini) Value
Configuration Guide V6.3: Third-Party Software
Chapter 9. Integrating Content Server with LDAP
Manual Integration with LDAP82
8. Select File > Close.
Set Property Values in the futuretense_xcel.ini File
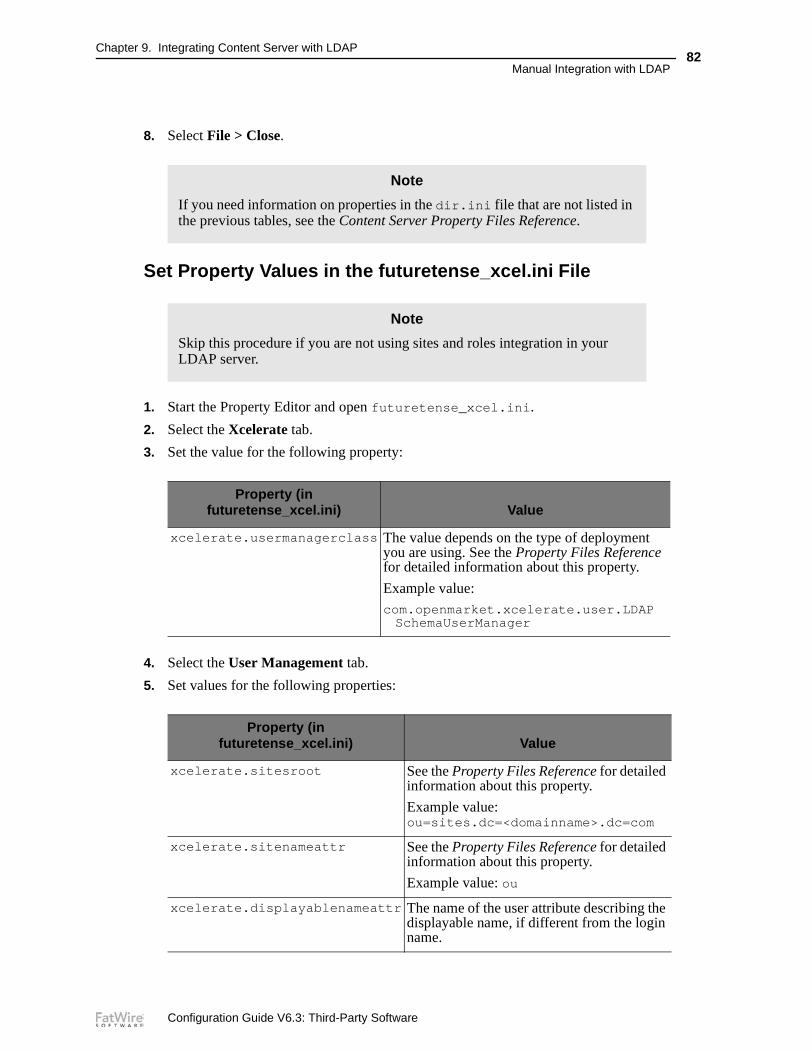
1. Start the Property Editor and open futuretense_xcel.ini.
2. Select the Xcelerate tab.
3. Set the value for the following property:
4. Select the User Management tab.
5. Set values for the following properties:
Note
If you need information on properties in the dir.ini file that are not listed in the previous tables, see the Content Server Property Files Reference.
Note
Skip this procedure if you are not using sites and roles integration in your LDAP server.
Property (in futuretense_xcel.ini) Value
xcelerate.usermanagerclass The value depends on the type of deployment you are using. See the Property Files Reference for detailed information about this property.
Example value:
com.openmarket.xcelerate.user.LDAPSchemaUserManager
Property (in futuretense_xcel.ini) Value
xcelerate.sitesroot See the Property Files Reference for detailed information about this property.
Example value:ou=sites.dc=<domainname>.dc=com
xcelerate.sitenameattr See the Property Files Reference for detailed information about this property.
Example value: ou
xcelerate.displayablenameattr The name of the user attribute describing the displayable name, if different from the login name.
Configuration Guide V6.3: Third-Party Software
Chapter 9. Integrating Content Server with LDAP
Manual Integration with LDAP83
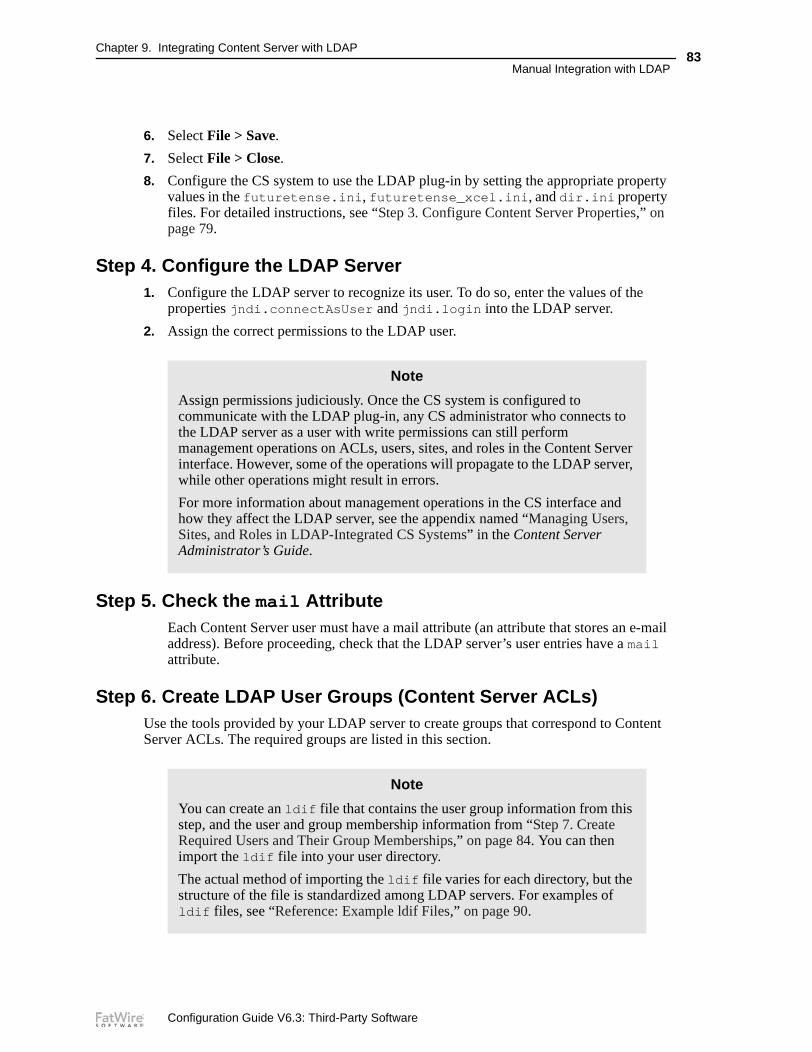
6. Select File > Save.
7. Select File > Close.
8. Configure the CS system to use the LDAP plug-in by setting the appropriate property values in the futuretense.ini, futuretense_xcel.ini, and dir.ini property files. For detailed instructions, see “Step 3. Configure Content Server Properties,” on page 79.
Step 4. Configure the LDAP Server1. Configure the LDAP server to recognize its user. To do so, enter the values of the
properties jndi.connectAsUser and jndi.login into the LDAP server.
2. Assign the correct permissions to the LDAP user.
Step 5. Check the mail AttributeEach Content Server user must have a mail attribute (an attribute that stores an e-mail address). Before proceeding, check that the LDAP server’s user entries have a mail attribute.
Step 6. Create LDAP User Groups (Content Server ACLs)Use the tools provided by your LDAP server to create groups that correspond to Content Server ACLs. The required groups are listed in this section.
Note
Assign permissions judiciously. Once the CS system is configured to communicate with the LDAP plug-in, any CS administrator who connects to the LDAP server as a user with write permissions can still perform management operations on ACLs, users, sites, and roles in the Content Server interface. However, some of the operations will propagate to the LDAP server, while other operations might result in errors.
For more information about management operations in the CS interface and how they affect the LDAP server, see the appendix named “Managing Users, Sites, and Roles in LDAP-Integrated CS Systems” in the Content Server Administrator’s Guide.
Note
You can create an ldif file that contains the user group information from this step, and the user and group membership information from “Step 7. Create Required Users and Their Group Memberships,” on page 84. You can then import the ldif file into your user directory.
The actual method of importing the ldif file varies for each directory, but the structure of the file is standardized among LDAP servers. For examples of ldif files, see “Reference: Example ldif Files,” on page 90.
Configuration Guide V6.3: Third-Party Software

Chapter 9. Integrating Content Server with LDAP
Manual Integration with LDAP84
Default ALCs (Required for All Installations)The following list presents the Content Server system default ACLs. You must create groups in the LDAP server whose names exactly match the ACL names below. For information about the access privileges that these ACLs/groups grant, see the “System Defaults” appendix in the Content Server Administrator’s Guide.
Web Services ACLsIf you are using web services, you must create groups for the following ACLs, making sure that the group names exactly match the ACL names:
• WSAdmin
• WSEditor
• WSUser
For information about the access privileges that these ACLs/groups grant, see the “System Defaults” appendix in the Content Server Administrator’s Guide.
Custom ACLsIf any custom ACLs have been created in Content Server since its installation, you must create groups in the LDAP server whose names exactly match the names of the custom ACLs.
Step 7. Create Required Users and Their Group MembershipsRequired users include Content Server’s default users, sample site users for any sample sites that you will be using, and custom users who are enabled for active sites. Follow instructions in the rest of this step to create the required users and their group memberships.
Default UsersFollowing is a list of the Content Server and CS-Direct default users. You must re-create the default users in the LDAP server according to the following rules:
• When re-creating default users, you may assign them your choice of names. (Note that the names in the table on page 85 are required by the CS installation process, but not the LDAP server, to populate the Content Server database.)
• Browser • TableEditor
• ContentEditor • TableReader
• ContentReader • UserEditor
• ElementEditor • UserReader
• ElementReader • Visitor
• PageEditor • VisitorAdmin
• PageReader • xceladmin
• RemoteClient • xceleditor
• SiteGod
Configuration Guide V6.3: Third-Party Software

Chapter 9. Integrating Content Server with LDAP
Manual Integration with LDAP85
• Make sure that permissions of the re-created users exactly match the permissions of the users as they are defined in the Content Server database.
• Make the users members of the following groups:
To determine which group memberships to grant your additional system users (that is, the actual content providers who will be using this CS system), see the descriptions of the ACLs in the “System Defaults” appendix of the Content Server Administrator’s Guide.
Specific details will vary, depending on the structure of your local directory.
Sample Site UsersFatWire recommends that you do not install the sample sites on your CS management or delivery systems. However, if you do install any of the sample sites and intend to use them, be sure that you create the appropriate sample site users in the LDAP server.
Custom UsersIf you are modifying an existing installation, you must re-create in the LDAP server all active users, i.e., users who are enabled for Content Server’s active sites.
Step 8. (Optional) Create Sites and Roles in the LDAP ServerIf you plan to use LDAP attribute mapping to manage your site names and role names in your LDAP server, make sure that you arrange the sites and roles in hierarchical order (for an example see Figure 1, on page 86”).
User Group Memberships
ContentServer
(the user that is created in the database during the installation of Content Server)
Browser, ContentEditor, ElementReader, ElementEditor, PageReader, PageEditor, SiteGod, TableEditor, TableReader, UserEditor, UserReader
fwadmin Browser, ElementEditor, PageEditor, RemoteClient, TableEditor, UserEditor, UserReader, Visitor, VisitorAdmin, xceladmin, xceleditor
Note
Portal installations use flat-schema LDAP for managing sites and roles. If the portal installations were to also use external LDAP, you would complete the steps in this section, but would not create an organizational unit for sites. Instead, you would place the sites and roles at the same level in the LDAP server. Users who are interested in knowing more about LDAP schema can refer to the appendix “Managing Users, Sites, and Roles in LDAP-Integrated CS Systems” in the Content Server Administrator’s Guide.
Configuration Guide V6.3: Third-Party Software

Chapter 9. Integrating Content Server with LDAP
Manual Integration with LDAP86
Complete the following steps for hierarchical-schema LDAP:
1. Create an organizational unit for sites.
a. Under the site unit, create an entry for each of your site names. Note that each name must exactly match the name of the site as you will enter it in the Content Server interface, including spaces, underscores, and so on.
b. For each site, create a group for each of the appropriate role names. Be sure to add the system default role named GeneralAdmin to each site.
When you assign any of the system default roles to your sites, be sure that the string exactly matches the names listed here:
- GeneralAdmin
- SiteAdmin
- WorkFlowAdmin
2. For each group, add the appropriate user/members.
Figure 1: LDAP Hierarchies
Note
If you are modifying an existing installation to use LDAP, re-create Content Server’s active sites and roles in the LDAP server, making sure to name them exactly as in the Content Server interface.
1a. site
1b. groups (roles) for the site
1. organizational unit for sites
2. users are members of the groups (roles) in 1b, above
(the list of users includes the names of users who access applications (in addition to Content Server) when they are integrated with the LDAP server)
Configuration Guide V6.3: Third-Party Software
Chapter 9. Integrating Content Server with LDAP
Manual Integration with LDAP87
Step 9. If You Completed Step 81. If, in the last step, you created sites and roles in the LDAP server that do not exist in
the Content Server database, create the same sites and roles in Content Server, making sure they are named exactly as in the LDAP server. For instructions on creating sites and roles in the CS database, see the following sections and chapter in the Content Server Administrator’s Guide:
- “Creating a Role”
- Chapter 7, “Assembling and Organizing CM Sites”
2. Enable the users for the sites they are to work in. For instructions, see the section “Granting Users Access to a Site (Assigning Roles to Users)” in the Content Server Administrator’s Guide.
Step 10. Test the LDAP IntegrationTo test your integrated system, open a browser and enter the following URL:
http://servername:port/servlet/CatalogManager?ftcmd=login&username=ContentServer&password=password
where
servername is the name of the machine that is hosting the CS system
port is the port number of that server
username is user-defined (Content Server, in this example)
password is user-defined (password, in this example)
• If the browser displays a “Login Successful” message, you have integrated your LDAP plug-in correctly.
• If you do not see the “Login Successful” message, verify that you created the ContentServer user in the LDAP server, and that all of the properties were set with the correct values.
Step 11. Resume Your Previous OperationsOnce LDAP integration passes the test, you can resume your operations. If they involve the management of ACLs, users, sites, and roles in the LDAP-integrated system, see “Post-Integration Management of ACLs, Users, Sites, and Roles,” on page 88 for guidelines.
Configuration Guide V6.3: Third-Party Software
Chapter 9. Integrating Content Server with LDAP
Post-Integration Management of ACLs, Users, Sites, and Roles88
Post-Integration Management of ACLs, Users, Sites, and Roles
Once your Content Server system is integrated with LDAP, you are likely to be making changes to custom ACLs and their users, to sites and roles, and to the LDAP configuration. This section offers guidelines for managing these constructs directly in the LDAP server.
ACL and User ManagementAccess Control Lists, or ACLs, are named lists of database operation permissions such as read, write, create, and so on. Because just about everything in Content Server and the CS content applications is represented as a row in a database table, user management on any of your CS systems starts with ACLs.
When using LDAP to manage and authenticate the users of the Content Server system, complete the following steps in the given order:
1. If you are creating ACLs:
a. Create the ACLs in the LDAP server.
b. Re-create the ACLs in the Content Server database, using the Content Server interface. Make sure that the names exactly match the names in the LDAP server.
2. Create the user accounts with LDAP instead of the Content Server interface:
a. Create LDAP user groups whose names exactly match the Content Server system default ACLs and any other ACLs that are necessary to implement the design of your system.
b. Make sure that each user’s mail attribute exists in the LDAP server.
3. Using the LDAP interface, assign users to the LDAP user groups.
Content Server assumes that a user who belongs to an LDAP user group also has the Content Server ACL with the corresponding name. For example, a user who belongs to the xceladmin LDAP group has all the access rights granted by the xceladmin ACL.
Site and Role ManagementWhen using LDAP to manage Content Server ACLs and users, you can use the LDAP server to manage sites and roles, as well. In the LDAP interface, you create the sites and roles, and assign the roles to users. Ensure that the same sites and roles exist in the Content Server database, and they are named exactly as their LDAP counterparts.
Also, take into account the type of installation you are managing:
• If you are managing the sites and roles of an LDAP-integrated installation that is web-based, you must use hierarchical-schema LDAP. Follow instructions in:
- “Step 8. (Optional) Create Sites and Roles in the LDAP Server,” on page 85 and
Note
This section applies to all LDAP-integrated systems, regardless of how they were integrated: with bundled LDAP, external LDAP, as web-based systems, or portals.
Configuration Guide V6.3: Third-Party Software
Chapter 9. Integrating Content Server with LDAP
Post-Integration Management of ACLs, Users, Sites, and Roles89
- “Step 9. If You Completed Step 8,” on page 87
• If you are managing the sites and/or roles of an LDAP-integrated installation that is portal-based, you must use flat schema LDAP. Follow instructions in:
- “Step 8. (Optional) Create Sites and Roles in the LDAP Server,” on page 85, but with the following change: Do not create an organizational unit for sites. Place the sites and roles at the same level in the LDAP server.
- “Step 9. If You Completed Step 8,” on page 87
LDAP Configuration ManagementIf you need to modify CS-LDAP communications (portal or web-based), change the values of the Content Server properties that specify LDAP configuration. Follow instructions in:
• “Step 3. Configure Content Server Properties,” on page 79 and
• “Step 4. Configure the LDAP Server,” on page 83.
Note
In LDAP-integrated systems, you have the option to manage sites and roles exclusively in the Content Server database, using the Content Server interface. This option bypasses the LDAP server for site and role management operations, as long as the following properties, in futuretense_xcel.ini, are set as shown below:
xcelerate.usermanagerclass=com.openmarket.xcelerate.user.usermanager
xcelerate.rolemanagerclass=com.openmarket.xcelerate.roles.rolemanager
For more information about site and role management operations in the Content Server interface, see the appendix “Managing Users, Sites, and Roles in LDAP-Integrated CS Systems” in the Content Server Administrator’s Guide
If you intend to use the Content Server interface to manage sites and roles, see the following sections and chapters in the Content Server Administrator’s Guide:
• “Creating a Role”
• Chapter 7, “Assembling and Organizing CM Sites”
• “Granting Users Access to a Site (Assigning Roles to Users)”
Configuration Guide V6.3: Third-Party Software

Chapter 9. Integrating Content Server with LDAP
Reference: Example ldif Files90
Reference: Example ldif FilesFollowing are example iPlanet Directory Server ldif files that reflect the users and groups for the sample sites. Note that Active Directory ldif files will vary from these sample files.
The first file (ldif Example 1 (iPlanet Directory Server): Users) creates both the system default users as well as the example users from the sample sites. The second file (ldif Example 2 (iPlanet Directory Server): Groups) creates groups that match the system default ACLs and assigns them to the appropriate users.
ldif Example 1 (iPlanet Directory Server): Users1 version: 123 # entry-id: 14 dn: ou=people,dc=FatWire,dc=com5 ou: People6 objectClass: top7 objectClass: organizationalunit8 creatorsName: cn=directory manager9 modifiersName: cn=directory manager10 createTimestamp: 20021001153255Z11 modifyTimestamp: 20021001153255Z12 nsUniqueId: f2b52281-1dd111b2-80ce8bff-8cf3a98d1314 # entry-id: 315 dn: uid=DefaultReader,ou=people,dc=FatWire,dc=com16 givenName: Default17 sn: Reader18 objectClass: top19 objectClass: person20 objectClass: organizationalPerson21 objectClass: inetorgperson22 uid: DefaultReader23 cn: Default Reader24 userPassword: {SSHA}UhFRHlAVSIA+RafcjtK/
Yihz1jq4OrIXexNqaQ==25 mail: [email protected] creatorsName: cn=directory manager27 modifiersName: cn=directory manager28 createTimestamp: 20021001153259Z29 modifyTimestamp: 20021001153259Z30 nsUniqueId: f2b52283-1dd111b2-80ce8bff-8cf3a98d3132 # entry-id: 433 dn: uid=admin,ou=people,dc=FatWire,dc=com34 givenName: xcel35 sn: admin36 objectClass: top37 objectClass: person38 objectClass: organizationalPerson39 objectClass: inetorgperson
Configuration Guide V6.3: Third-Party Software

Chapter 9. Integrating Content Server with LDAP
Reference: Example ldif Files91
40 uid: admin41 cn: admin42 userPassword: {SSHA}JbN/
zyGZORP4Wgl+pMvEjOu40bbpVPwMJ2wjUw==43 mail: [email protected] creatorsName: cn=directory manager45 modifiersName: cn=directory manager46 createTimestamp: 20021001153259Z47 modifyTimestamp: 20021001153259Z48 nsUniqueId: f2b52284-1dd111b2-80ce8bff-8cf3a98d4950 # entry-id: 551 dn: uid=editor,ou=people,dc=FatWire,dc=com52 givenName: e53 sn: ditor54 objectClass: top55 objectClass: person56 objectClass: organizationalPerson57 objectClass: inetorgperson58 uid: editor59 cn: e ditor60 userPassword:
{SSHA}+nnnA5eMwzOHZXv2wssi7UV1ladaJ+gtzXbkGA==61 mail: [email protected] creatorsName: cn=directory manager63 modifiersName: cn=directory manager64 createTimestamp: 20021001153259Z65 modifyTimestamp: 20021001153259Z66 nsUniqueId: f2b52285-1dd111b2-80ce8bff-8cf3a98d6768 # entry-id: 669 dn: uid=user_author,ou=people,dc=FatWire,dc=com70 givenName: user71 sn: author72 objectClass: top73 objectClass: person74 objectClass: organizationalPerson75 objectClass: inetorgperson76 uid: user_author77 cn: user author78 userPassword: {SSHA}ZUHls9BJq/
RZGwP7XqQb3t7OmeoRZboqcjAzZw==79 mail: [email protected] creatorsName: cn=directory manager81 modifiersName: cn=directory manager82 createTimestamp: 20021001153259Z83 modifyTimestamp: 20021001153259Z84 nsUniqueId: f2b52286-1dd111b2-80ce8bff-8cf3a98d8586 # entry-id: 787 dn: uid=user_editor,ou=people,dc=FatWire,dc=com88 givenName: user
Configuration Guide V6.3: Third-Party Software

Chapter 9. Integrating Content Server with LDAP
Reference: Example ldif Files92
89 sn: editor90 objectClass: top91 objectClass: person92 objectClass: organizationalPerson93 objectClass: inetorgperson94 uid: user_editor95 cn: user editor96 userPassword:
{SSHA}mAGUJkOI0dzHLTzty6KIUe8ZhAzLEygin3ZVCg==97 mail: [email protected] creatorsName: cn=directory manager99 modifiersName: cn=directory manager100 createTimestamp: 20021001153259Z101 modifyTimestamp: 20021001153259Z102 nsUniqueId: f2b52287-1dd111b2-80ce8bff-8cf3a98d103104 # entry-id: 8105 dn: uid=user_approver,ou=people,dc=FatWire,dc=com106 givenName: user107 sn: approver108 objectClass: top109 objectClass: person110 objectClass: organizationalPerson111 objectClass: inetorgperson112 uid: user_approver113 cn: user approver114 userPassword:
{SSHA}y9yvUTef78VQ3mHXoWvyuCsZDr8BXKN3uG18Cw==115 mail: [email protected] creatorsName: cn=directory manager117 modifiersName: cn=directory manager118 createTimestamp: 20021001153259Z119 modifyTimestamp: 20021001153259Z120 nsUniqueId: f2b52288-1dd111b2-80ce8bff-8cf3a98d121122 # entry-id: 9123 dn: uid=user_checker,ou=people,dc=FatWire,dc=com124 givenName: user125 sn: checker126 objectClass: top127 objectClass: person128 objectClass: organizationalPerson129 objectClass: inetorgperson130 uid: user_checker131 cn: user checker132 userPassword: {SSHA}G1KCrgHMdXDfpr/
fRwJf2FcUU+SdXGNCHnGvdA==133 mail: [email protected] creatorsName: cn=directory manager135 modifiersName: cn=directory manager136 createTimestamp: 20021001153300Z137 modifyTimestamp: 20021001153300Z
Configuration Guide V6.3: Third-Party Software
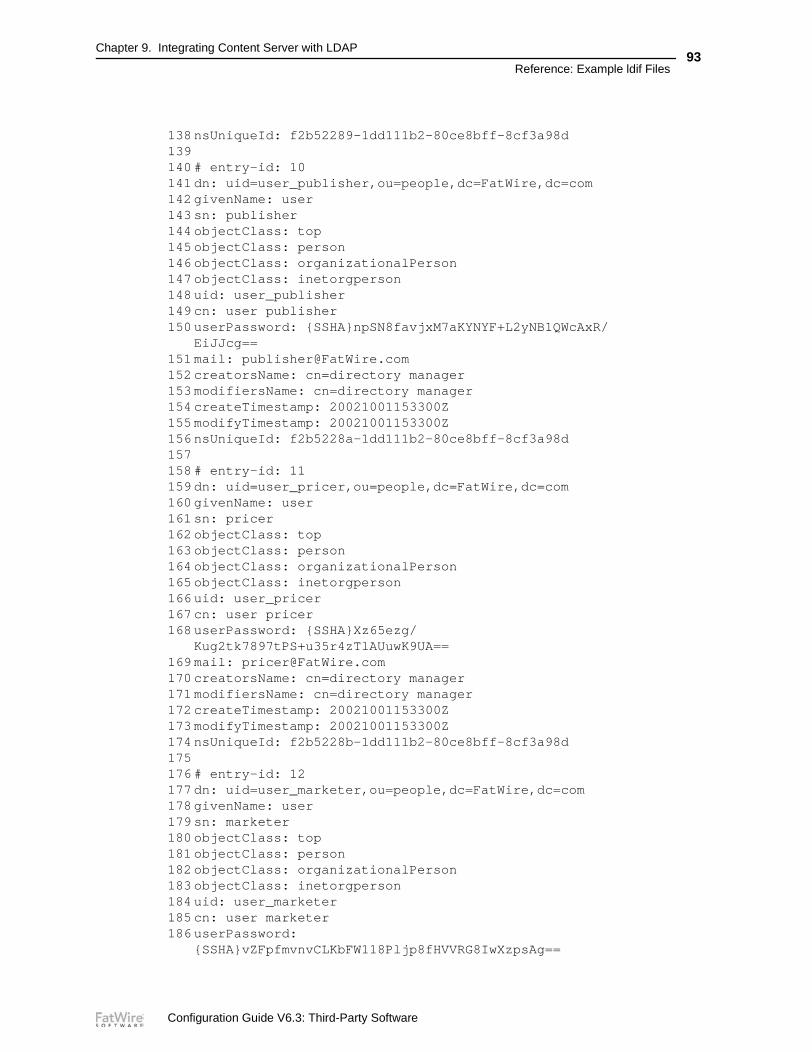
Chapter 9. Integrating Content Server with LDAP
Reference: Example ldif Files93
138 nsUniqueId: f2b52289-1dd111b2-80ce8bff-8cf3a98d139140 # entry-id: 10141 dn: uid=user_publisher,ou=people,dc=FatWire,dc=com142 givenName: user143 sn: publisher144 objectClass: top145 objectClass: person146 objectClass: organizationalPerson147 objectClass: inetorgperson148 uid: user_publisher149 cn: user publisher150 userPassword: {SSHA}npSN8favjxM7aKYNYF+L2yNB1QWcAxR/
EiJJcg==151 mail: [email protected] creatorsName: cn=directory manager153 modifiersName: cn=directory manager154 createTimestamp: 20021001153300Z155 modifyTimestamp: 20021001153300Z156 nsUniqueId: f2b5228a-1dd111b2-80ce8bff-8cf3a98d157158 # entry-id: 11159 dn: uid=user_pricer,ou=people,dc=FatWire,dc=com160 givenName: user161 sn: pricer162 objectClass: top163 objectClass: person164 objectClass: organizationalPerson165 objectClass: inetorgperson166 uid: user_pricer167 cn: user pricer168 userPassword: {SSHA}Xz65ezg/
Kug2tk7897tPS+u35r4zTlAUuwK9UA==169 mail: [email protected] creatorsName: cn=directory manager171 modifiersName: cn=directory manager172 createTimestamp: 20021001153300Z173 modifyTimestamp: 20021001153300Z174 nsUniqueId: f2b5228b-1dd111b2-80ce8bff-8cf3a98d175176 # entry-id: 12177 dn: uid=user_marketer,ou=people,dc=FatWire,dc=com178 givenName: user179 sn: marketer180 objectClass: top181 objectClass: person182 objectClass: organizationalPerson183 objectClass: inetorgperson184 uid: user_marketer185 cn: user marketer186 userPassword:
{SSHA}vZFpfmvnvCLKbFW118Pljp8fHVVRG8IwXzpsAg==
Configuration Guide V6.3: Third-Party Software

Chapter 9. Integrating Content Server with LDAP
Reference: Example ldif Files94
187 mail: [email protected] creatorsName: cn=directory manager189 modifiersName: cn=directory manager190 createTimestamp: 20021001153300Z191 modifyTimestamp: 20021001153300Z192 nsUniqueId: f2b5228c-1dd111b2-80ce8bff-8cf3a98d193194 # entry-id: 13195 dn: uid=user_analyst,ou=people,dc=FatWire,dc=com196 givenName: user197 sn: analyst198 objectClass: top199 objectClass: person200 objectClass: organizationalPerson201 objectClass: inetorgperson202 uid: user_analyst203 cn: user analyst204 userPassword:
{SSHA}b508MLDI9plb9xHLPvzTDZFUD0pmLYQaIEahZA==205 mail: [email protected] creatorsName: cn=directory manager207 modifiersName: cn=directory manager208 createTimestamp: 20021001153300Z209 modifyTimestamp: 20021001153300Z210 nsUniqueId: f2b5228d-1dd111b2-80ce8bff-8cf3a98d211212 # entry-id: 14213 dn: uid=user_expert,ou=people,dc=FatWire,dc=com214 givenName: user215 sn: expert216 objectClass: top217 objectClass: person218 objectClass: organizationalPerson219 objectClass: inetorgperson220 uid: user_expert221 cn: user expert222 userPassword: {SSHA}IIEk2beA/
EezlQNdaCTrTVPMCuSBIoENhGfIOg==223 mail: [email protected] creatorsName: cn=directory manager225 modifiersName: cn=directory manager226 createTimestamp: 20021001153300Z227 modifyTimestamp: 20021001153300Z228 nsUniqueId: f2b5228e-1dd111b2-80ce8bff-8cf3a98d229230 # entry-id: 15231 dn: uid=mirroruser,ou=people,dc=FatWire,dc=com232 givenName: mirror233 sn: user234 objectClass: top235 objectClass: person236 objectClass: organizationalPerson
Configuration Guide V6.3: Third-Party Software
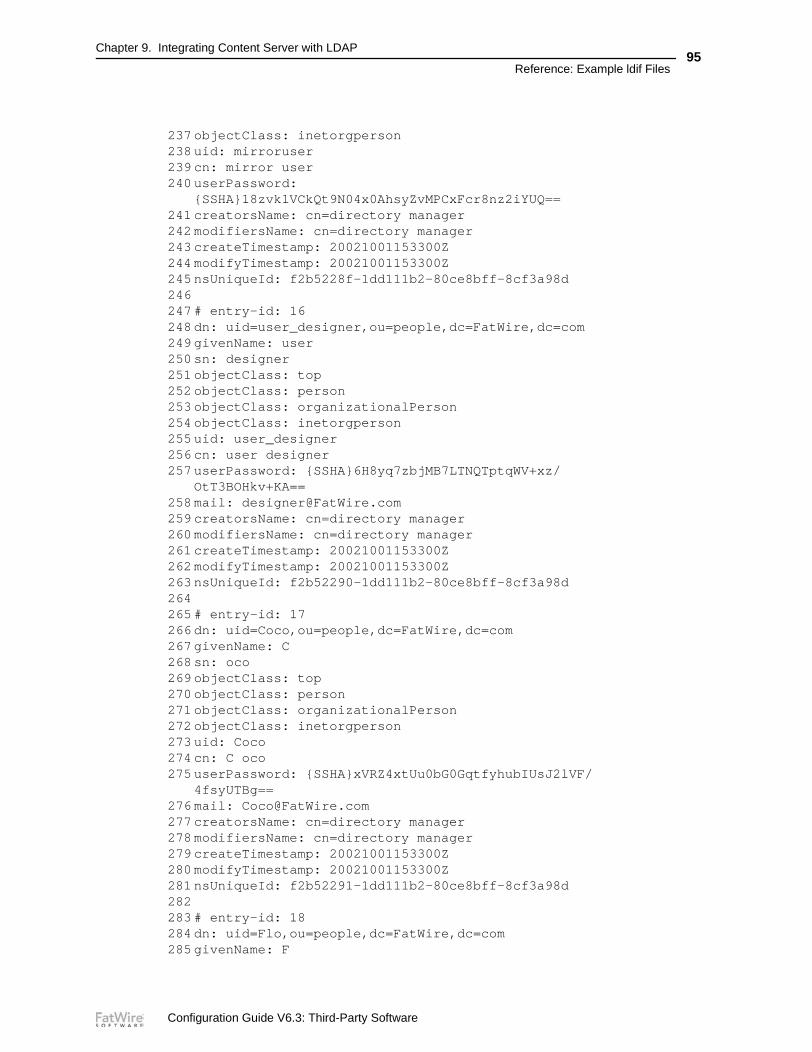
Chapter 9. Integrating Content Server with LDAP
Reference: Example ldif Files95
237 objectClass: inetorgperson238 uid: mirroruser239 cn: mirror user240 userPassword:
{SSHA}18zvk1VCkQt9N04x0AhsyZvMPCxFcr8nz2iYUQ==241 creatorsName: cn=directory manager242 modifiersName: cn=directory manager243 createTimestamp: 20021001153300Z244 modifyTimestamp: 20021001153300Z245 nsUniqueId: f2b5228f-1dd111b2-80ce8bff-8cf3a98d246247 # entry-id: 16248 dn: uid=user_designer,ou=people,dc=FatWire,dc=com249 givenName: user250 sn: designer251 objectClass: top252 objectClass: person253 objectClass: organizationalPerson254 objectClass: inetorgperson255 uid: user_designer256 cn: user designer257 userPassword: {SSHA}6H8yq7zbjMB7LTNQTptqWV+xz/
OtT3BOHkv+KA==258 mail: [email protected] creatorsName: cn=directory manager260 modifiersName: cn=directory manager261 createTimestamp: 20021001153300Z262 modifyTimestamp: 20021001153300Z263 nsUniqueId: f2b52290-1dd111b2-80ce8bff-8cf3a98d264265 # entry-id: 17266 dn: uid=Coco,ou=people,dc=FatWire,dc=com267 givenName: C268 sn: oco269 objectClass: top270 objectClass: person271 objectClass: organizationalPerson272 objectClass: inetorgperson273 uid: Coco274 cn: C oco275 userPassword: {SSHA}xVRZ4xtUu0bG0GqtfyhubIUsJ2lVF/
4fsyUTBg==276 mail: [email protected] creatorsName: cn=directory manager278 modifiersName: cn=directory manager279 createTimestamp: 20021001153300Z280 modifyTimestamp: 20021001153300Z281 nsUniqueId: f2b52291-1dd111b2-80ce8bff-8cf3a98d282283 # entry-id: 18284 dn: uid=Flo,ou=people,dc=FatWire,dc=com285 givenName: F
Configuration Guide V6.3: Third-Party Software

Chapter 9. Integrating Content Server with LDAP
Reference: Example ldif Files96
286 sn: lo287 objectClass: top288 objectClass: person289 objectClass: organizationalPerson290 objectClass: inetorgperson291 uid: Flo292 cn: F lo293 userPassword: {SSHA}E0j8hDF7ZxNkoHSsiNnR5M45BY/
cXe4IT0j2Iw==294 mail: [email protected] creatorsName: cn=directory manager296 modifiersName: cn=directory manager297 createTimestamp: 20021001153300Z298 modifyTimestamp: 20021001153300Z299 nsUniqueId: f2b52292-1dd111b2-80ce8bff-8cf3a98d300301 # entry-id: 19302 dn: uid=Moe,ou=people,dc=FatWire,dc=com303 givenName: M304 sn: oe305 objectClass: top306 objectClass: person307 objectClass: organizationalPerson308 objectClass: inetorgperson309 uid: Moe310 cn: M oe311 userPassword: {SSHA}Q08M/HspZdMaKTQgrxRQvjtSD4/
6BtMGHjMQSA==312 mail: [email protected] creatorsName: cn=directory manager314 modifiersName: cn=directory manager315 createTimestamp: 20021001153300Z316 modifyTimestamp: 20021001153300Z317 nsUniqueId: f2b52293-1dd111b2-80ce8bff-8cf3a98d318319 # entry-id: 20320 dn: uid=Bobo,ou=people,dc=FatWire,dc=com321 givenName: B322 sn: obo323 objectClass: top324 objectClass: person325 objectClass: organizationalPerson326 objectClass: inetorgperson327 uid: Bobo328 cn: B obo329 userPassword: {SSHA}9ipG+/
34B08KZwf4SY2f+z2LBs7nTKhkEgX4KQ==330 mail: [email protected] creatorsName: cn=directory manager332 modifiersName: cn=directory manager333 createTimestamp: 20021001153300Z334 modifyTimestamp: 20021001153300Z
Configuration Guide V6.3: Third-Party Software
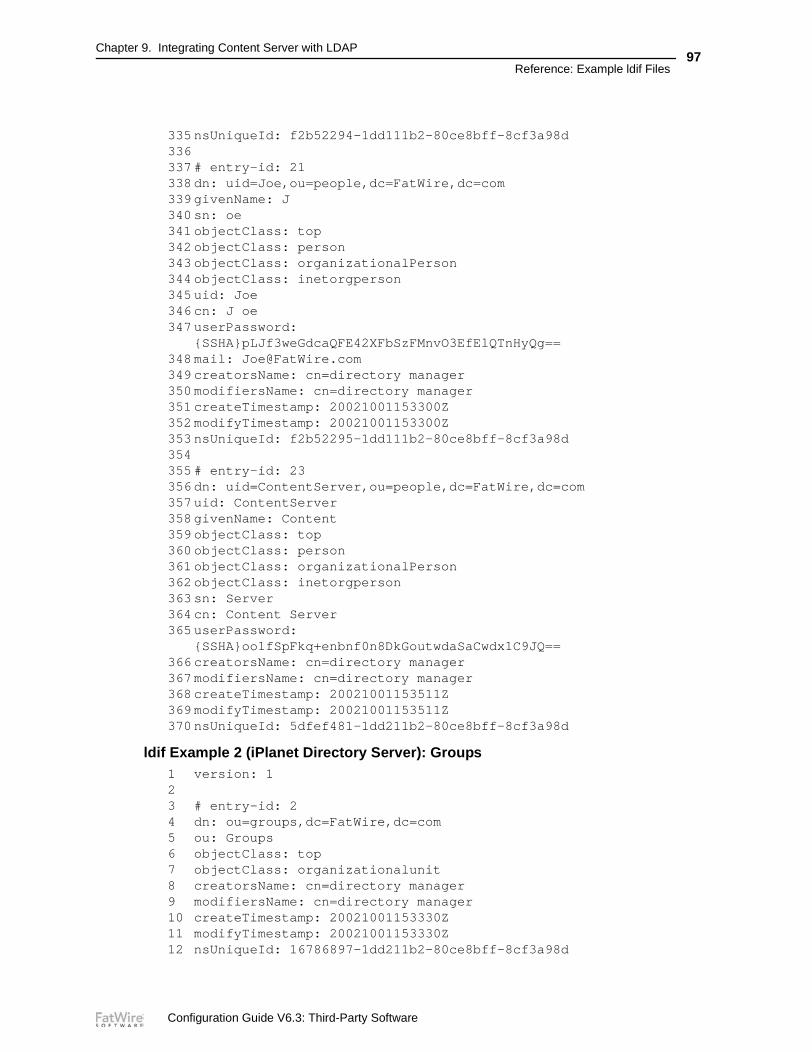
Chapter 9. Integrating Content Server with LDAP
Reference: Example ldif Files97
335 nsUniqueId: f2b52294-1dd111b2-80ce8bff-8cf3a98d336337 # entry-id: 21338 dn: uid=Joe,ou=people,dc=FatWire,dc=com339 givenName: J340 sn: oe341 objectClass: top342 objectClass: person343 objectClass: organizationalPerson344 objectClass: inetorgperson345 uid: Joe346 cn: J oe347 userPassword:
{SSHA}pLJf3weGdcaQFE42XFbSzFMnvO3EfElQTnHyQg==348 mail: [email protected] creatorsName: cn=directory manager350 modifiersName: cn=directory manager351 createTimestamp: 20021001153300Z352 modifyTimestamp: 20021001153300Z353 nsUniqueId: f2b52295-1dd111b2-80ce8bff-8cf3a98d354355 # entry-id: 23356 dn: uid=ContentServer,ou=people,dc=FatWire,dc=com357 uid: ContentServer358 givenName: Content359 objectClass: top360 objectClass: person361 objectClass: organizationalPerson362 objectClass: inetorgperson363 sn: Server364 cn: Content Server365 userPassword:
{SSHA}oo1fSpFkq+enbnf0n8DkGoutwdaSaCwdx1C9JQ==366 creatorsName: cn=directory manager367 modifiersName: cn=directory manager368 createTimestamp: 20021001153511Z369 modifyTimestamp: 20021001153511Z370 nsUniqueId: 5dfef481-1dd211b2-80ce8bff-8cf3a98d
ldif Example 2 (iPlanet Directory Server): Groups1 version: 123 # entry-id: 24 dn: ou=groups,dc=FatWire,dc=com5 ou: Groups6 objectClass: top7 objectClass: organizationalunit8 creatorsName: cn=directory manager9 modifiersName: cn=directory manager10 createTimestamp: 20021001153330Z11 modifyTimestamp: 20021001153330Z12 nsUniqueId: 16786897-1dd211b2-80ce8bff-8cf3a98d
Configuration Guide V6.3: Third-Party Software

Chapter 9. Integrating Content Server with LDAP
Reference: Example ldif Files98
1314 # entry-id: 315 dn: cn=Browser,ou=groups,dc=FatWire,dc=com16 objectClass: top17 objectClass: groupofuniquenames18 uniqueMember: uid=DefaultReader,ou=people,dc=FatWire,dc=com19 uniqueMember: uid=mirroruser,ou=people,dc=FatWire,dc=com20 uniqueMember: uid=user_analyst,ou=people,dc=FatWire,dc=com21 uniqueMember: uid=user_author,ou=people,dc=FatWire,dc=com22 uniqueMember: uid=user_approver,ou=people,dc=FatWire,dc=com23 uniqueMember: uid=user_checker,ou=people,dc=FatWire,dc=com24 uniqueMember: uid=user_editor,ou=people,dc=FatWire,dc=com25 uniqueMember: uid=user_expert,ou=people,dc=FatWire,dc=com26 uniqueMember: uid=user_marketer,ou=people,dc=FatWire,dc=com27 uniqueMember: uid=user_pricer,ou=people,dc=FatWire,dc=com28 uniqueMember:
uid=user_publisher,ou=people,dc=FatWire,dc=com29 uniqueMember: uid=admin,ou=people,dc=FatWire,dc=com30 uniqueMember: uid=editor,ou=people,dc=FatWire,dc=com31 uniqueMember: uid=user_designer,ou=people,dc=FatWire,dc=com32 uniqueMember: uid=Bobo,ou=people,dc=FatWire,dc=com33 uniqueMember: uid=Coco,ou=people,dc=FatWire,dc=com34 uniqueMember: uid=Flo,ou=people,dc=FatWire,dc=com35 uniqueMember: uid=Joe,ou=people,dc=FatWire,dc=com36 uniqueMember: uid=Moe,ou=people,dc=FatWire,dc=com37 uniqueMember: uid=ContentServer,ou=people,dc=FatWire,dc=com38 cn: Browser39 creatorsName: cn=directory manager40 modifiersName: cn=directory manager41 createTimestamp: 20021001153330Z42 modifyTimestamp: 20021001153712Z43 nsUniqueId: 16786898-1dd211b2-80ce8bff-8cf3a98d4445 # entry-id: 446 dn: cn=SiteGod,ou=groups,dc=FatWire,dc=com47 objectClass: top48 objectClass: groupofuniquenames49 cn: SiteGod50 creatorsName: cn=directory manager51 modifiersName: cn=directory manager52 createTimestamp: 20021001153331Z53 modifyTimestamp: 20021001153734Z54 nsUniqueId: 16786899-1dd211b2-80ce8bff-8cf3a98d55 uniqueMember: uid=ContentServer,ou=people,dc=FatWire,dc=com5657 # entry-id: 558 dn: cn=ContentEditor,ou=groups,dc=FatWire,dc=com59 objectClass: top60 objectClass: groupofuniquenames61 cn: ContentEditor62 creatorsName: cn=directory manager63 modifiersName: cn=directory manager
Configuration Guide V6.3: Third-Party Software

Chapter 9. Integrating Content Server with LDAP
Reference: Example ldif Files99
64 createTimestamp: 20021001153331Z65 modifyTimestamp: 20021001153851Z66 nsUniqueId: 1678689a-1dd211b2-80ce8bff-8cf3a98d67 uniqueMember: uid=ContentServer,ou=people,dc=FatWire,dc=com6869 # entry-id: 670 dn: cn=ElementReader,ou=groups,dc=FatWire,dc=com71 objectClass: top72 objectClass: groupofuniquenames73 uniqueMember: uid=user_approver,ou=people,dc=FatWire,dc=com74 uniqueMember: uid=user_pricer,ou=people,dc=FatWire,dc=com75 uniqueMember: uid=user_editor,ou=people,dc=FatWire,dc=com76 uniqueMember: uid=user_marketer,ou=people,dc=FatWire,dc=com77 uniqueMember: uid=user_analyst,ou=people,dc=FatWire,dc=com78 uniqueMember: uid=user_author,ou=people,dc=FatWire,dc=com79 uniqueMember: uid=user_expert,ou=people,dc=FatWire,dc=com80 uniqueMember: uid=user_checker,ou=people,dc=FatWire,dc=com81 uniqueMember: uid=Bobo,ou=people,dc=FatWire,dc=com82 uniqueMember: uid=Coco,ou=people,dc=FatWire,dc=com83 uniqueMember: uid=Flo,ou=people,dc=FatWire,dc=com84 uniqueMember: uid=Joe,ou=people,dc=FatWire,dc=com85 uniqueMember: uid=Moe,ou=people,dc=FatWire,dc=com86 uniqueMember: uid=ContentServer,ou=people,dc=FatWire,dc=com87 cn: ElementReader88 creatorsName: cn=directory manager89 modifiersName: cn=directory manager90 createTimestamp: 20021001153331Z91 modifyTimestamp: 20021001153909Z92 nsUniqueId: 1678689b-1dd211b2-80ce8bff-8cf3a98d9394 # entry-id: 795 dn: cn=ElementEditor,ou=groups,dc=FatWire,dc=com96 objectClass: top97 objectClass: groupofuniquenames98 uniqueMember: uid=admin,ou=people,dc=FatWire,dc=com99 uniqueMember: uid=editor,ou=people,dc=FatWire,dc=com100 uniqueMember: uid=mirroruser,ou=people,dc=FatWire,dc=com101 uniqueMember: uid=user_designer,ou=people,dc=FatWire,dc=com102 uniqueMember: uid=Coco,ou=people,dc=FatWire,dc=com103 uniqueMember: uid=ContentServer,ou=people,dc=FatWire,dc=com104 cn: ElementEditor105 creatorsName: cn=directory manager106 modifiersName: cn=directory manager107 createTimestamp: 20021001153331Z108 modifyTimestamp: 20021001153925Z109 nsUniqueId: 1678689c-1dd211b2-80ce8bff-8cf3a98d110111 # entry-id: 8112 dn: cn=PageReader,ou=groups,dc=FatWire,dc=com113 objectClass: top114 objectClass: groupofuniquenames115 uniqueMember: uid=user_approver,ou=people,dc=FatWire,dc=com
Configuration Guide V6.3: Third-Party Software
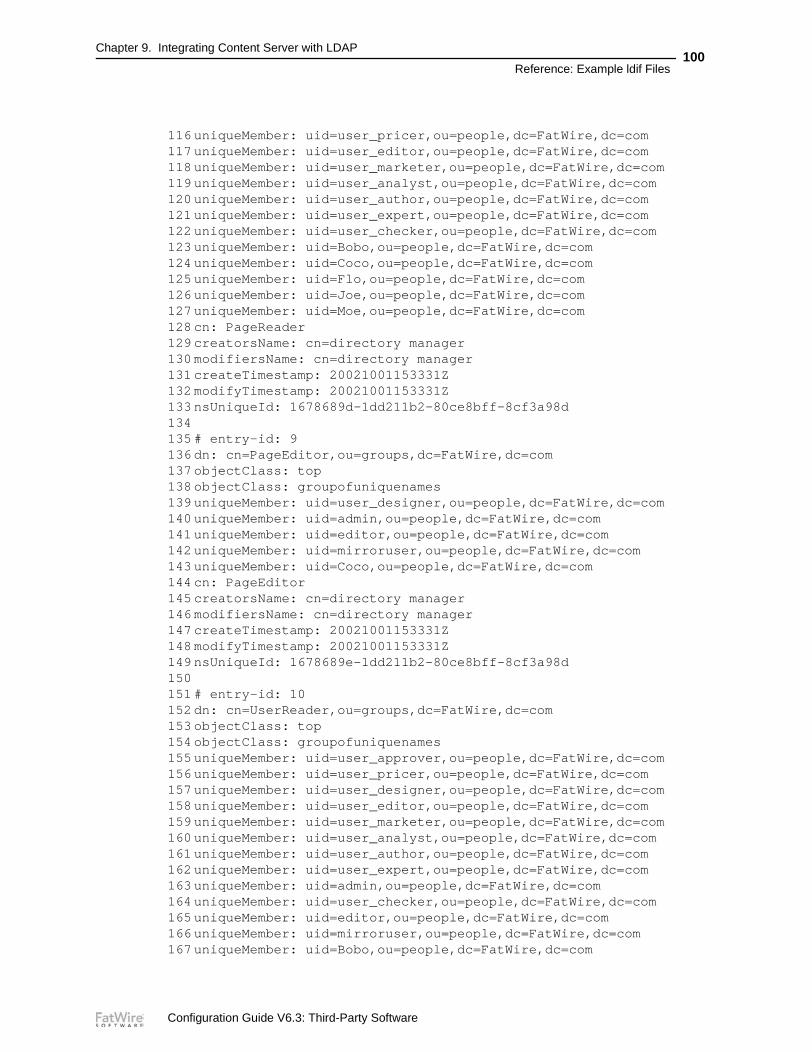
Chapter 9. Integrating Content Server with LDAP
Reference: Example ldif Files100
116 uniqueMember: uid=user_pricer,ou=people,dc=FatWire,dc=com117 uniqueMember: uid=user_editor,ou=people,dc=FatWire,dc=com118 uniqueMember: uid=user_marketer,ou=people,dc=FatWire,dc=com119 uniqueMember: uid=user_analyst,ou=people,dc=FatWire,dc=com120 uniqueMember: uid=user_author,ou=people,dc=FatWire,dc=com121 uniqueMember: uid=user_expert,ou=people,dc=FatWire,dc=com122 uniqueMember: uid=user_checker,ou=people,dc=FatWire,dc=com123 uniqueMember: uid=Bobo,ou=people,dc=FatWire,dc=com124 uniqueMember: uid=Coco,ou=people,dc=FatWire,dc=com125 uniqueMember: uid=Flo,ou=people,dc=FatWire,dc=com126 uniqueMember: uid=Joe,ou=people,dc=FatWire,dc=com127 uniqueMember: uid=Moe,ou=people,dc=FatWire,dc=com128 cn: PageReader129 creatorsName: cn=directory manager130 modifiersName: cn=directory manager131 createTimestamp: 20021001153331Z132 modifyTimestamp: 20021001153331Z133 nsUniqueId: 1678689d-1dd211b2-80ce8bff-8cf3a98d134135 # entry-id: 9136 dn: cn=PageEditor,ou=groups,dc=FatWire,dc=com137 objectClass: top138 objectClass: groupofuniquenames139 uniqueMember: uid=user_designer,ou=people,dc=FatWire,dc=com140 uniqueMember: uid=admin,ou=people,dc=FatWire,dc=com141 uniqueMember: uid=editor,ou=people,dc=FatWire,dc=com142 uniqueMember: uid=mirroruser,ou=people,dc=FatWire,dc=com143 uniqueMember: uid=Coco,ou=people,dc=FatWire,dc=com144 cn: PageEditor145 creatorsName: cn=directory manager146 modifiersName: cn=directory manager147 createTimestamp: 20021001153331Z148 modifyTimestamp: 20021001153331Z149 nsUniqueId: 1678689e-1dd211b2-80ce8bff-8cf3a98d150151 # entry-id: 10152 dn: cn=UserReader,ou=groups,dc=FatWire,dc=com153 objectClass: top154 objectClass: groupofuniquenames155 uniqueMember: uid=user_approver,ou=people,dc=FatWire,dc=com156 uniqueMember: uid=user_pricer,ou=people,dc=FatWire,dc=com157 uniqueMember: uid=user_designer,ou=people,dc=FatWire,dc=com158 uniqueMember: uid=user_editor,ou=people,dc=FatWire,dc=com159 uniqueMember: uid=user_marketer,ou=people,dc=FatWire,dc=com160 uniqueMember: uid=user_analyst,ou=people,dc=FatWire,dc=com161 uniqueMember: uid=user_author,ou=people,dc=FatWire,dc=com162 uniqueMember: uid=user_expert,ou=people,dc=FatWire,dc=com163 uniqueMember: uid=admin,ou=people,dc=FatWire,dc=com164 uniqueMember: uid=user_checker,ou=people,dc=FatWire,dc=com165 uniqueMember: uid=editor,ou=people,dc=FatWire,dc=com166 uniqueMember: uid=mirroruser,ou=people,dc=FatWire,dc=com167 uniqueMember: uid=Bobo,ou=people,dc=FatWire,dc=com
Configuration Guide V6.3: Third-Party Software

Chapter 9. Integrating Content Server with LDAP
Reference: Example ldif Files101
168 uniqueMember: uid=Coco,ou=people,dc=FatWire,dc=com169 uniqueMember: uid=Flo,ou=people,dc=FatWire,dc=com170 uniqueMember: uid=Joe,ou=people,dc=FatWire,dc=com171 uniqueMember: uid=Moe,ou=people,dc=FatWire,dc=com172 uniqueMember: uid=ContentServer,ou=people,dc=FatWire,dc=com173 cn: UserReader174 creatorsName: cn=directory manager175 modifiersName: cn=directory manager176 createTimestamp: 20021001153332Z177 modifyTimestamp: 20021001153956Z178 nsUniqueId: 1678689f-1dd211b2-80ce8bff-8cf3a98d179180 # entry-id: 11181 dn: cn=UserEditor,ou=groups,dc=FatWire,dc=com182 objectClass: top183 objectClass: groupofuniquenames184 uniqueMember: uid=admin,ou=people,dc=FatWire,dc=com185 uniqueMember: uid=Bobo,ou=people,dc=FatWire,dc=com186 uniqueMember: uid=ContentServer,ou=people,dc=FatWire,dc=com187 cn: UserEditor188 creatorsName: cn=directory manager189 modifiersName: cn=directory manager190 createTimestamp: 20021001153332Z191 modifyTimestamp: 20021001154010Z192 nsUniqueId: 167868a0-1dd211b2-80ce8bff-8cf3a98d193194 # entry-id: 12195 dn: cn=TableEditor,ou=groups,dc=FatWire,dc=com196 objectClass: top197 objectClass: groupofuniquenames198 uniqueMember: uid=user_designer,ou=people,dc=FatWire,dc=com199 uniqueMember: uid=admin,ou=people,dc=FatWire,dc=com200 uniqueMember: uid=mirroruser,ou=people,dc=FatWire,dc=com201 uniqueMember: uid=Coco,ou=people,dc=FatWire,dc=com202 uniqueMember: uid=ContentServer,ou=people,dc=FatWire,dc=com203 cn: TableEditor204 creatorsName: cn=directory manager205 modifiersName: cn=directory manager206 createTimestamp: 20021001153332Z207 modifyTimestamp: 20021001154024Z208 nsUniqueId: 167868a1-1dd211b2-80ce8bff-8cf3a98d209210 # entry-id: 13211 dn: cn=Visitor,ou=groups,dc=FatWire,dc=com212 objectClass: top213 objectClass: groupofuniquenames214 uniqueMember: uid=user_approver,ou=people,dc=FatWire,dc=com215 uniqueMember: uid=user_pricer,ou=people,dc=FatWire,dc=com216 uniqueMember: uid=DefaultReader,ou=people,dc=FatWire,dc=com217 uniqueMember: uid=user_designer,ou=people,dc=FatWire,dc=com218 uniqueMember: uid=user_editor,ou=people,dc=FatWire,dc=com219 uniqueMember: uid=user_marketer,ou=people,dc=FatWire,dc=com
Configuration Guide V6.3: Third-Party Software

Chapter 9. Integrating Content Server with LDAP
Reference: Example ldif Files102
220 uniqueMember: uid=user_analyst,ou=people,dc=FatWire,dc=com221 uniqueMember: uid=user_author,ou=people,dc=FatWire,dc=com222 uniqueMember: uid=user_expert,ou=people,dc=FatWire,dc=com223 uniqueMember: uid=admin,ou=people,dc=FatWire,dc=com224 uniqueMember: uid=editor,ou=people,dc=FatWire,dc=com225 uniqueMember: uid=user_checker,ou=people,dc=FatWire,dc=com226 uniqueMember: uid=mirroruser,ou=people,dc=FatWire,dc=com227 cn: Visitor228 creatorsName: cn=directory manager229 modifiersName: cn=directory manager230 createTimestamp: 20021001153332Z231 modifyTimestamp: 20021001153332Z232 nsUniqueId: 167868a2-1dd211b2-80ce8bff-8cf3a98d233234 # entry-id: 14235 dn: cn=VisitorAdmin,ou=groups,dc=FatWire,dc=com236 objectClass: top237 objectClass: groupofuniquenames238 uniqueMember: uid=mirroruser,ou=people,dc=FatWire,dc=com239 uniqueMember: uid=user_designer,ou=people,dc=FatWire,dc=com240 uniqueMember: uid=admin,ou=people,dc=FatWire,dc=com241 cn: VisitorAdmin242 creatorsName: cn=directory manager243 modifiersName: cn=directory manager244 createTimestamp: 20021001153332Z245 modifyTimestamp: 20021001153332Z246 nsUniqueId: 167868a3-1dd211b2-80ce8bff-8cf3a98d247248 # entry-id: 15249 dn: cn=RemoteClient,ou=groups,dc=FatWire,dc=com250 objectClass: top251 objectClass: groupofuniquenames252 uniqueMember: uid=user_analyst,ou=people,dc=FatWire,dc=com253 uniqueMember: uid=user_approver,ou=people,dc=FatWire,dc=com254 uniqueMember: uid=user_author,ou=people,dc=FatWire,dc=com255 uniqueMember: uid=user_checker,ou=people,dc=FatWire,dc=com256 uniqueMember: uid=user_designer,ou=people,dc=FatWire,dc=com257 uniqueMember: uid=user_editor,ou=people,dc=FatWire,dc=com258 uniqueMember: uid=user_expert,ou=people,dc=FatWire,dc=com259 uniqueMember: uid=user_marketer,ou=people,dc=FatWire,dc=com260 uniqueMember: uid=user_pricer,ou=people,dc=FatWire,dc=com261 uniqueMember: uid=admin,ou=people,dc=FatWire,dc=com262 cn: RemoteClient263 creatorsName: cn=directory manager264 modifiersName: cn=directory manager265 createTimestamp: 20021001153332Z266 modifyTimestamp: 20021001153332Z267 nsUniqueId: 167868a4-1dd211b2-80ce8bff-8cf3a98d268269 # entry-id: 16270 dn: cn=xceladmin,ou=groups,dc=FatWire,dc=com271 objectClass: top
Configuration Guide V6.3: Third-Party Software

Chapter 9. Integrating Content Server with LDAP
Reference: Example ldif Files103
272 objectClass: groupofuniquenames273 uniqueMember: uid=mirroruser,ou=people,dc=FatWire,dc=com274 uniqueMember: uid=admin,ou=people,dc=FatWire,dc=com275 uniqueMember: uid=Bobo,ou=people,dc=FatWire,dc=com276 uniqueMember: uid=Coco,ou=people,dc=FatWire,dc=com277 cn: xceladmin278 creatorsName: cn=directory manager279 modifiersName: cn=directory manager280 createTimestamp: 20021001153332Z281 modifyTimestamp: 20021001153332Z282 nsUniqueId: 167868a5-1dd211b2-80ce8bff-8cf3a98d283284 # entry-id: 17285 dn: cn=xceleditor,ou=groups,dc=FatWire,dc=com286 objectClass: top287 objectClass: groupofuniquenames288 uniqueMember: uid=mirroruser,ou=people,dc=FatWire,dc=com289 uniqueMember: uid=user_analyst,ou=people,dc=FatWire,dc=com290 uniqueMember: uid=user_approver,ou=people,dc=FatWire,dc=com291 uniqueMember: uid=user_author,ou=people,dc=FatWire,dc=com292 uniqueMember: uid=user_checker,ou=people,dc=FatWire,dc=com293 uniqueMember: uid=user_designer,ou=people,dc=FatWire,dc=com294 uniqueMember: uid=user_editor,ou=people,dc=FatWire,dc=com295 uniqueMember: uid=user_expert,ou=people,dc=FatWire,dc=com296 uniqueMember: uid=user_marketer,ou=people,dc=FatWire,dc=com297 uniqueMember: uid=user_pricer,ou=people,dc=FatWire,dc=com298 uniqueMember: uid=editor,ou=people,dc=FatWire,dc=com299 uniqueMember: uid=Bobo,ou=people,dc=FatWire,dc=com300 uniqueMember: uid=Coco,ou=people,dc=FatWire,dc=com301 uniqueMember: uid=Flo,ou=people,dc=FatWire,dc=com302 uniqueMember: uid=Joe,ou=people,dc=FatWire,dc=com303 uniqueMember: uid=Moe,ou=people,dc=FatWire,dc=com304 cn: xceleditor305 creatorsName: cn=directory manager306 modifiersName: cn=directory manager307 createTimestamp: 20021001153332Z308 modifyTimestamp: 20021001153332Z309 nsUniqueId: 167868a6-1dd211b2-80ce8bff-8cf3a98d
Configuration Guide V6.3: Third-Party Software

Chapter 9. Integrating Content Server with LDAP
Reference: Example ldif Files104
Configuration Guide V6.3: Third-Party Software