constructing a microscope - brunelleschi.imss.fi.it a microscope i. preliminary information: optical...
TRANSCRIPT

Constructing a microscopeI. PRELIMINARY INFORMATION: OPTICAL PRINCIPLE
In its basic configuration, the microscope consists of two lenses: the objective and the eyepiece (Figure 1). The objective is a converging lens, of short focal length (typically, less than 40 mm and up to a few mm); the eyepiece is also a converging lens, with focal length typically ranging between 50 and 15 mm.
Figure 1. Optical diagram of a microscope in the basic configuration.

The objective forms a magnified, upside-down image, called “intermediate image”. The eyepiece is positioned on the optical axis in such a way that its front focal point is on the intermediate image. The eyepiece thus functions as a magnifying lens, with which the eye observes the intermediate image. Building a microscope with the configuration shown in Figure 1 is relatively easy; it is however necessary to have two suitable lenses available. One possibility is that of using salvaged lenses, such as the ones found in disposable cameras, which have a focal length of around 35 mm. These lenses can be used for both the objective and the eyepiece. The mechanical and optical components of a camera of this kind are shown in Figure 2.
Figure 2. Salvaging the lens from a disposable camera of the currently used type.
Presuming that we have two lenses of this type, we will describe the construction of a microscope with magnifying power of around 20 times, made of simple, inexpensive materials. In conclusion, the construction of a slightly more evolved version, containing an additional lens to extend the field of observation, will also be described.

II. MATERIALS REQUIRED
Figure 3. Materials required for constructing a microscope..
2 lenses, focal length 35 mm (taken from disposable cameras)
2 washers, diameter 17 mm
1 black cardboard disk, diameter 17 mm, with central hole, diameter 4 mm
1 plastic tube, length 165 mm, inside diameter 18 mm (can be made from a sheathing tube, outside diameter 20 mm, cut to the correct length)
1 sheet of opaque black paper, dimensions 160mm x 56mm
1 wooden board, dimensions 140mm x 140mm x 10mm (to made the objectholder)
1 strip of wood, dimensions 150mm x 30mm x 10mm (to make the pillar)
1 strip of wood, dimensions 100mm x 30mm x 10mm (to attach to the pillar)4 wood screws, length 20 mm
1 sheet of pliable plaster, 140mm x 50 mm
2 balls of malleable plastic rubber (of the “Blu tack” type used to attach notices to bulletin boards, in place of thumb tacks)

III. ASSEMBLY
1. Roll the sheet of black paper and insert it into the plastic tube (it serves to “blacken” the inside of the tube, and absorb the parasitic light).
2. Place the disk of black cardboard on a washer, and put a lens on it (this will be the objective). Roll a ball of plastic rubber into a “sausage” and apply it in a ring around the lens.
3. Press the tube against the washer with the lens, so as to join the parts. Remove the excess plastic rubber.
4. Place the second lens on the second washer, and surround it with a ring of plastic rubber. Press the other end of the tube against the washer with the lens. This lens will be the eyepiece.
5. Fasten a strip of wood to the objectholder with two screws from below. Fix the second strip of wood to the first, laterally with two screws, without tightening them fully.
6. Fold the sheet of plastic in two, and insert the free ends between the two strips of wood. Insert the microscope tube into the fold in the sheet of plastic, and tighten the fastening screws on the second strip of wood.
Figure 4. Assembled microscope. The object used here as specimen is a dried leaf.
And here you have a microscope! To focus it, gently slide the body-tube up and down in its seat. Various specimens such as leaves, dust, insects, and so on, can be observed.
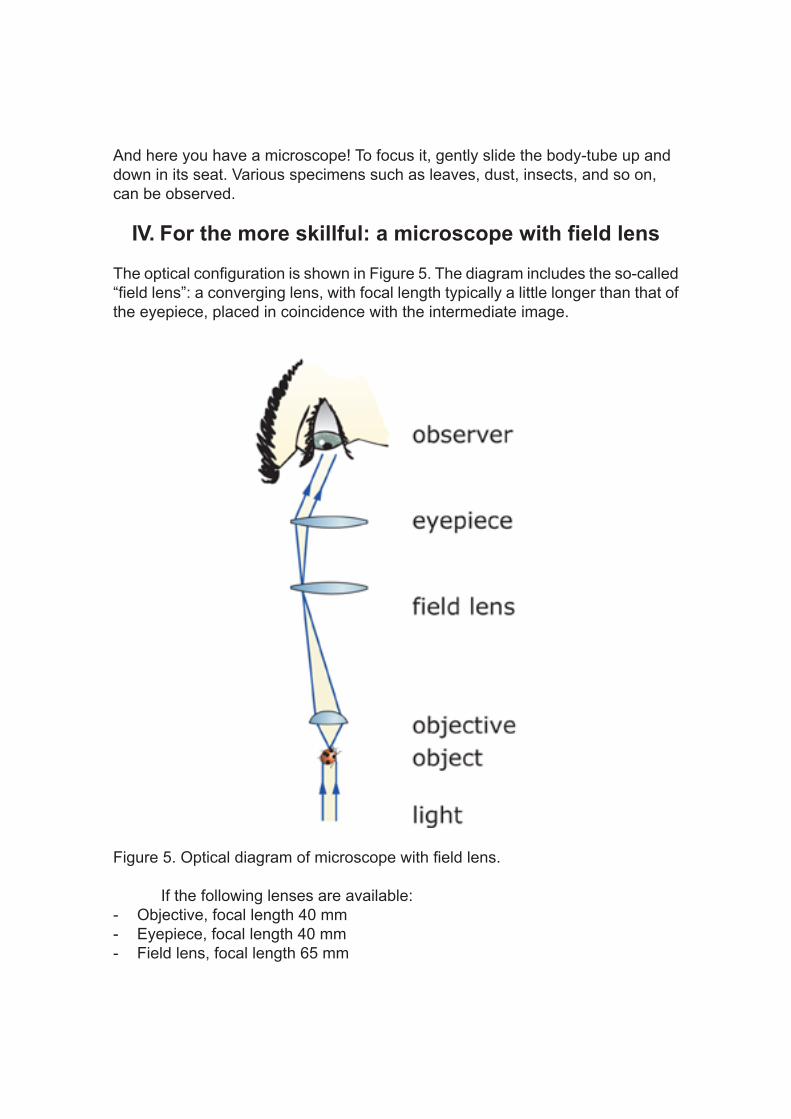
IV. For the more skillful: a microscope with field lens
The optical configuration is shown in Figure 5. The diagram includes the so-called “field lens”: a converging lens, with focal length typically a little longer than that of the eyepiece, placed in coincidence with the intermediate image.
Figure 5. Optical diagram of microscope with field lens.
If the following lenses are available:- Objective, focal length 40 mm- Eyepiece, focal length 40 mm- Field lens, focal length 65 mm

You can make a body-tube with 3 sections, having the following lengths:- 170 mm (objective to be mounted at the first end),- 40 mm (field lens to be mounted at the first end, and eyepiece at the second
end),- 18 mm (a simple extension of the body-tube, as aid to finding the right
position for the eye).
The 3 sections are joined together by wrapping adhesive tape once or twice around the outside of the tube.
To make a mechanism for adjusting the focus, use a pillar with two slits cut in it and with an upper bar. Insert in the slits two thin sheets of flexible material (such as Vetronite, of the type used to make printed circuits), with a hole for the microscope’s body-tube. The hole should be sized to allow the tube to slide with friction, in order to perform coarse focusing. Fine focusing can be obtained with a setscrew, fixed to the upper bar.
Figure 6. Microscope with field lens. Its assembly includes a screw for adjusting the focus.
Have fun making your microscope and then using it!