connectivity quick start guide - mazda uk · pdf filequick start guide mzd-connect. 2 the mzd...
TRANSCRIPT

1
CONNECTIVITY QUICK START GUIDE
MZD-CONNECT

2
The MZD-Connect system is divided into five sections as displayed on the Home screen. The Home screen can be accessed at any time by pressing the Home button.
APPLICATIONS• Fuel Economy Monitor including i-stop status and i-ELOOP status (where fitted)• View service and maintenance information• View vehicle warnings.
ENTERTAINMENT• AM/FM/DAB (where fitted) radio, CD/MP3, USB, AUX and Bluetooth® audio• Aha™ and Stitcher™ apps for internet radio, Facebook and Twitter*• Listen to a connected device such as an iPod® or USB storage device.
*With compatible mobile device. Data usage and costs will vary. Please visit the Find a Phone, Pair a Phone
section of mazda.co.uk/mzd-connect for more information regarding device compatibility.
CONTROLLING THE SYSTEMThere are three ways to control the system:
1. Using the 7” colour touch-screen2. Using the Multimedia Commander3. Using the steering wheel-mounted controls or voice control system.
USING THE COLOUR TOUCH-SCREENThe touch-screen can be used when the vehicle is stationary or travelling below 5mph. The screen accepts touch, tap, slide and swipe motions and can control the entire infotainment and connectivity system. For example you can swipe the screen to scroll through a long list of contacts or slide the screen to tune in a radio station.
Please note:
Please note:
Please do not use any sharp objects such as a pen or key to interact with the touch-screen. These could
damage or pierce the screen and may cause a malfunction of the system.
The touch-screen is disabled above
5mph for safety reasons.
1 2 3
MZD-CONNECT INFOTAINMENT SYSTEM

3
COMMUNICATION• Easily make and receive phone calls*• Receive texts and reply with programmable pre-defined responses*• Access previous call history or contact information*.
NAVIGATION (WHERE FITTED)• Choice of routes – fastest, shortest, most economical, and easiest• 3 years free map updates• Point of interest search.
SETTINGS• Easily adjust audio, vehicle and other settings • Adjust the Active Driving Display (where fitted).
VOICE CONTROLTo use voice control, press the TALK button located on the steering wheel and say a command after the beep. The system can be interrupted by pressing the TALK button again and speaking after the beep.
At any time, simply say “Tutorial” or “Help” for more information.
The system responds to a large number of commands that perform simple operations, such as calling a contact in your phone book. For example “Call Matt at home” would dial the contact Matt on their home telephone number.
COMMON COMMANDS
Go to (and one of the following) Other common commands:
For more information on any of the topics
covered in this guide as well as detailed
how-to guides for most functions please visit
mazda.co.uk/mzd-connect
For more information regarding voice control and to view or download a list of voice commands please visit
mazda.co.uk/mzd-connect
• Main Menu• Entertainment• Communication• Navigation• Settings• Texts• Contacts• Call History.
• Help• Cancel• Go Back or Previous• Next or Skip• Select (and line number);
e.g. Select Four or Select Line Four• Turn Display Off• Go to CD.
TALK BUTTON
4
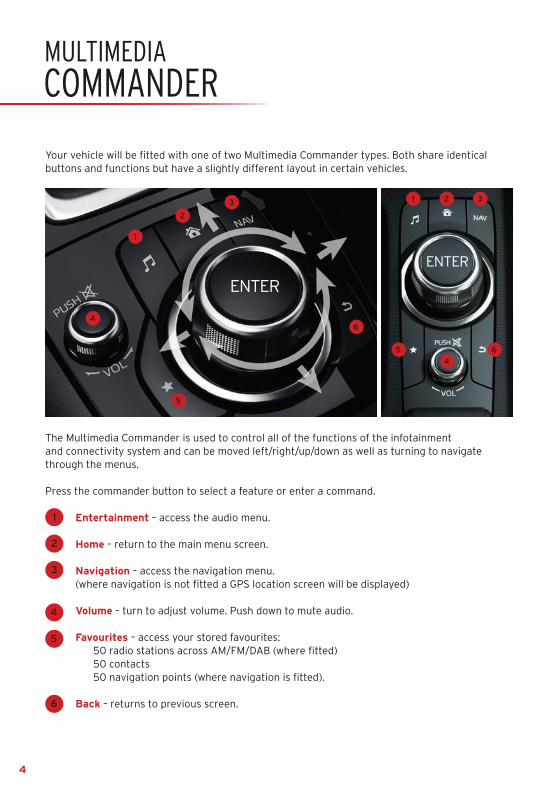
The Multimedia Commander is used to control all of the functions of the infotainment and connectivity system and can be moved left/right/up/down as well as turning to navigate through the menus.
Press the commander button to select a feature or enter a command.
Entertainment – access the audio menu.
Home – return to the main menu screen.
Navigation – access the navigation menu. (where navigation is not fitted a GPS location screen will be displayed)
Volume – turn to adjust volume. Push down to mute audio.
Favourites – access your stored favourites: 50 radio stations across AM/FM/DAB (where fitted) 50 contacts 50 navigation points (where navigation is fitted).
Back – returns to previous screen.
Your vehicle will be fitted with one of two Multimedia Commander types. Both share identical buttons and functions but have a slightly different layout in certain vehicles.
MULTIMEDIA
COMMANDER
1
2
3
4
5
6
3 3
2
2
1
1
4
5
5
6
4
6
ENTER
ENTER
MULTIMEDIA COMMANDER

5
BLUETOOTH®
PAIRING YOUR BLUETOOTH® PHONE OR AUDIO DEVICE1. Turn on Bluetooth® on your phone or audio device and
ensure it is visible to other devices
2. Select Communication from the Home screen
3. If no phone is currently connected to the system it will automatically prompt to connect a device. Select Connect
4. Ensure Bluetooth® is turned ON at the top of the menu
5. Select Add New Device
6. On your phone or audio device, perform a search for Bluetooth® devices
7. Select “Mazda” from the device list on your phone or audio device
8. If required, enter the pairing code shown on the vehicle display, or simply confirm that the code shown matches the one shown on the display by pressing Yes or OK
9. Press Yes on the car’s screen to confirm
10. Phone or device is now connected.
STEERING WHEEL-MOUNTED BLUETOOTH® CONTROLS
MAKING/RECEIVING A TELEPHONE CALL1. To make a call, either use the TALK button and say a command such as “Call Matt at home”,
access the Communication menu, or you could access one of your favourite contacts from the Favourites menu (see next page)
2. To make a call via the Communication menu, select Contacts and scroll to the desired contact
3. Select the contact and desired telephone number if more than one number is available
4. To end a call, press the End Call button on the screen or steering wheel.
Please note:
Phones compatible with sharing contacts, call history or text messaging may require permission to be
given on the phone for these functions. This will depend on the mobile device. Please refer to your phone’s
instruction manual for information.
To enable text message notifications when using an iPhone®, please ensure that Show Notifications is set
to On within the Bluetooth® settings for the Mazda connection on your phone.
To make or accept a call.
To end or reject a call.
TALK button. Use to input a voice control command. Press again to skip voice guidance and speak next command.
For more information regarding
Bluetooth®, including a list of
compatible devices, please visit the
Find a Phone, Pair a Phone section
of mazda.co.uk/mzd-connect
BLUETOOTH®

6
FAVOURITES
SETTING UP YOUR FAVOURITE RADIO STATIONS1. Select Entertainment from the Home screen
2. Select the desired radio band - AM/FM/DAB (where fitted) - from the Entertainment menu
3. Using the List, Scan or Tune function, find the desired radio station
4. Press and hold the Favourites button to add current radio station to your favourites
5. Radio station is now saved and can be accessed at any time by pressing the Favourites button.
SETTING UP YOUR FAVOURITE CONTACTS1. Ensure a compatible mobile device is connected via Bluetooth®
2. Press the Favourites button on the Multimedia Commander
3. Select Communication Favourites by moving the commander to the right, or if using the touch-screen, by selecting the Communication button within the favourites menu
4. Select Add/Edit Communication Favourites
5. Select Add New Contact
6. Select desired contact from list
7. Contact is now saved and can be quickly accessed at any time by pressing the Favourites button
8. You can also add favourite contacts by pressing and holding the favourites button whilst a contact is selected in the Communication menu.
SETTING UP YOUR FAVOURITE NAVIGATION POINTSRefer to the navigation pages in this guide for detailed instructions regarding your Mazda navigation system (where fitted).
FAVOURITES BUTTON
FAVOURITES
7
CONNECTING TO INTERNET APPLICATIONS
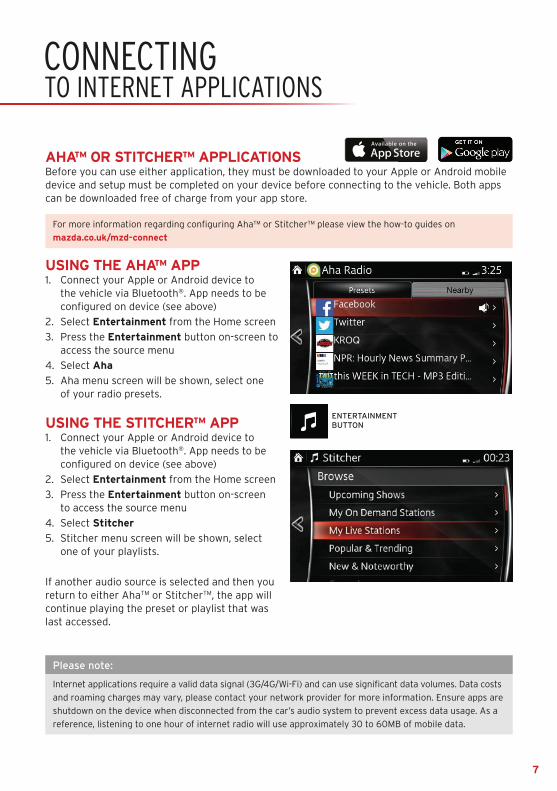
AHA™ OR STITCHER™ APPLICATIONSBefore you can use either application, they must be downloaded to your Apple or Android mobile device and setup must be completed on your device before connecting to the vehicle. Both apps can be downloaded free of charge from your app store.
USING THE AHA™ APP1. Connect your Apple or Android device to
the vehicle via Bluetooth®. App needs to be configured on device (see above)
2. Select Entertainment from the Home screen
3. Press the Entertainment button on-screen to access the source menu
4. Select Aha
5. Aha menu screen will be shown, select one of your radio presets.
USING THE STITCHER™ APP1. Connect your Apple or Android device to
the vehicle via Bluetooth®. App needs to be configured on device (see above)
2. Select Entertainment from the Home screen
3. Press the Entertainment button on-screen to access the source menu
4. Select Stitcher
5. Stitcher menu screen will be shown, select one of your playlists.
If another audio source is selected and then you return to either AhaTM or StitcherTM, the app will continue playing the preset or playlist that was last accessed.
Please note:
Internet applications require a valid data signal (3G/4G/Wi-Fi) and can use significant data volumes. Data costs
and roaming charges may vary, please contact your network provider for more information. Ensure apps are
shutdown on the device when disconnected from the car’s audio system to prevent excess data usage. As a
reference, listening to one hour of internet radio will use approximately 30 to 60MB of mobile data.
ENTERTAINMENT BUTTON
For more information regarding configuring Aha™ or Stitcher™ please view the how-to guides on
mazda.co.uk/mzd-connect
CONNECTINGTO INTERNET APPLICATIONS

8
NAVIGATION SYSTEM
SETTING UP YOUR NAVIGATION SYSTEMYour navigation system is ready to use straight away, however to ensure the best possible experience we recommend that you update your SD card to ensure you have the latest software and map data.
The navigation system comes with three years free map updates which commences after the navigation has been used for approximately 63 miles (100km).
UPDATING YOUR MAPS - REGISTRATION AND MAZDA TOOLBOX1. On your personal computer navigate to
mazda.co.uk/mzd-connect/navigation
2. Towards the top of the screen, click Register and follow the on-screen instructions to set up an account. You can subscribe to the newsletter to be kept up to date with future map updates
3. Once you have registered you will be sent an email to verify your email address. Please click the link in this email to confirm your account
4. Navigate back to mazda.co.uk/mzd-connect/navigation and login to the site using your chosen username and password by clicking Login at the top of the page
5. Select the MZD-Connect system by clicking Choose
6. Click Download Toolbox to the left of the page and then click Download to download the Mazda Toolbox
7. Once the Mazda Toolbox application is downloaded please launch the file and follow the on-screen instructions to install the Mazda Toolbox
8. Mazda Toolbox should now start and ask you to insert your SD card.
UPDATING YOUR MAPS - REMOVING THE SD CARD FROM THE CAR1. To remove your SD card, ensure the car’s ignition is OFF
2. Depending on your vehicle, the SD card slot will be located in your centre console in front of your gear knob, or within the front armrest storage box. Lift the flap covering the SD card slot
3. Gently push the SD card in, remove your finger and the SD card can then be pulled out.
Please note:
The SD card slot is only for genuine Mazda Navigation map SD cards. Do not insert any other SD cards into
the vehicle as it may cause damage to the vehicle and/or the SD card.
NAVIGATION SYSTEM

9
UPDATING YOUR MAPS - DOWNLOADING AND INSTALLING MAP DATA1. With the Mazda Toolbox application running, insert your Mazda Navigation SD card into your
computer’s SD card slot or SD card reader
2. You may be asked if you are happy to share anonymous GPS logs and usage information. Please confirm or deny this request
3. The application will then ask you to backup the data held on the SD card. This will ensure you are able to restore your navigation data in the event of data corruption
4. Once the backup is complete, click Home and login using the username and password that you registered previously
5. You may now be shown the main screen, to view available updates, click Updates on the left-hand menu. If no updates are available Device will be shown rather than Updates. Click on this to confirm your SD card data is up-to-date
6. If updates are available, click Install to download and install updates to the SD card
7. After confirmation the update has completed, the system will then inform you that your device is up-to-date. You can then remove the SD card from your computer and install back into the car.
UPDATING YOUR MAPS - INSTALLING THE SD CARD INTO THE CAR1. Ensure the car’s ignition is OFF
2. Lift the flap covering the SD card slot
3. Gently push the SD card in, and when it clicks and remains in place, cover it with the flap
4. Turn the car’s ignition on and press the NAV button to load the SD card.
SETTING YOUR HOME LOCATIONMZD-Connect navigation allows you set a Home location which can be easily navigated to.
1. Press the NAV button, open the bottom menu and select New Destination
2. Select Navigate Home. The first time you do this, you will need to input your home location
3. Enter the Town or Postcode and a house number if required and press Select Town Centre
4. Your home location will be shown. To confirm, select Set as Home. Now whenever you select Navigate Home, you will be directed to this address.
CHANGING YOUR HOME LOCATION1. Press the NAV button and then the Favourites button
2. Select Home and press and hold the main commander button for about 3 seconds. You will then be shown two options; Edit Home or Delete Home. Select the appropriate option.
Please note:
Please note:
Ensure you have enough disk space to backup your SD card data and download any available map updates.
When installing the SD card into the car, ensure the lock switch on the SD card is in the unlocked position.

10
NAVIGATION SYSTEM
NAVIGATION SCREEN OPTIONS
ICON FUNCTION PURPOSE
Show Menu Bar To open the bottom menu bar
Hide Menu Bar To close the bottom menu bar
New DestinationTo enter an address or favourite destination, or select a place of interest or location on the map
Navigation InformationTo switch to the navigation information screen displaying items such as traffic and GPS reception levels
Cancel To cancel an existing way point or route
Places Nearby To find places nearby
Route OptionsTo display the route details and full length of route. Edit or cancel, pick alternatives or avoid parts of the route
View ModeTo change the map mode (2D north up, 2D heading up, 3D)
Settings Adjust navigation settings
VOICE GUIDANCETo repeat the last navigation instruction, press the NAV button on the Multimedia Commander.
To mute voice guidance and any speed or warning alerts, ensure that the guidance volume is set to zero within the Guidance Settings menu found in the navigation Settings menu.
NAVIGATION SYSTEM

11
SETTING A ROUTE1. Push the NAV button on the commander or touch-screen
2. Open the bottom menu and select New Destination
3. Select Find Address
4. Select Town to input a town or postcode
5. Enter the Street Name and/or House Number if required. If a house number is entered, select the button on the bottom right of the screen to confirm
6. If you do not enter a house number, you can navigate to the centre of the street by selecting Select Street, or Select Town Centre to navigate to the centre of the town or postcode
7. Select Navigate To
8. The route display screen will show for 10 seconds before navigation begins unless you move to another option on the screen, in which case, press Start to begin navigation.
ALTERNATIVE ROUTESAfter selecting Navigate To, there will be an option for Route Alternative which can be seen by scrolling down slightly. By default the fastest route is selected, however there are other routes available;
– Fastest Route (selected by default)– Shortest Route– Most Economical Route– Easiest Route.
Once a choice of route has been made, press back to view the route screen and press Start to begin navigation
SETTING UP YOUR FAVOURITE DESTINATIONS1. Press the Favourites button
2. Select Navigation Favourites by moving the commander to the right or if using the touch-screen by selecting the Navigation button within the favourites menu
3. Select Add/Edit Navigation Favourites
4. If a route is set, you can Add Current Destination as a favourite, otherwise you can only select Add Current Location or Address From Contact to add an address from a contact in your phonebook (when a compatible phone is connected via Bluetooth®)
5. Navigation point is now saved and can be quickly accessed at any time by pressing the Favourites button.
6. You can also add favourite locations by pressing and holding the favourites button whilst at the desired location within the navigation menu.
Please note:
Town is pre-populated based on your current location. Edit if you wish to search for a street address in
another town. Postcodes can also be entered here.
TO ENTER A NEWDESTINATION

12
NAVIGATION SYSTEM
FIND PLACESSearch for points of interest such as airports or railway stations using the Find Places function.
1. Push the NAV button on the commander or touch-screen
2. Open the bottom menu and select New Destination
3. Select Find Places
4. Select Filter By Name to enter the name of a location if known, e.g. “Heathrow Airport” or to select a category of interest select Set Category. You can combine a name and category to be more specific in your search
5. Select the area you wish to search. Around Here is the default, or you can select In a Town, or if a route is already set, Along Route or Around Destination
6. Select Search
7. Select a desired location from the results to navigate to this point.
HISTORIC SPEED OVERVIEWThe system holds historic traffic information which can be accessed at any time. Historic speed data is also used when planning a route to take into account normal road conditions on your route at that time.
1. Push the NAV button on the commander or touch-screen
2. Open the bottom menu and select Information by pressing the i button on the bottom menu
3. Select Traffic
4. Select Historical Speed Overview.
You will then be shown a map of your current location with road speed depicted using a colour code. Green is a clear route, and red is a congested road. You can also view historical traffic at a certain time of the day for any day of the week by altering the settings using the bottom menu.
SMART HISTORYThe navigation system builds up a historical record of your previous journeys and can suggest destinations based on the time and day, previous routes and previous locations. For example if you travel to Manchester every Monday morning, Manchester will be top of the list of Smart History on a Monday morning. To access Smart History;
1. Push the NAV button on the commander or touch-screen
2. Open the bottom menu and select New Destination
3. Select History.
You are then able to view Smart History as well as chronological history, select a previous location and navigate to the location.
INFORMATION BUTTON
NAVIGATION SYSTEM
13
NAVIGATION
CONNECTED SERVICES
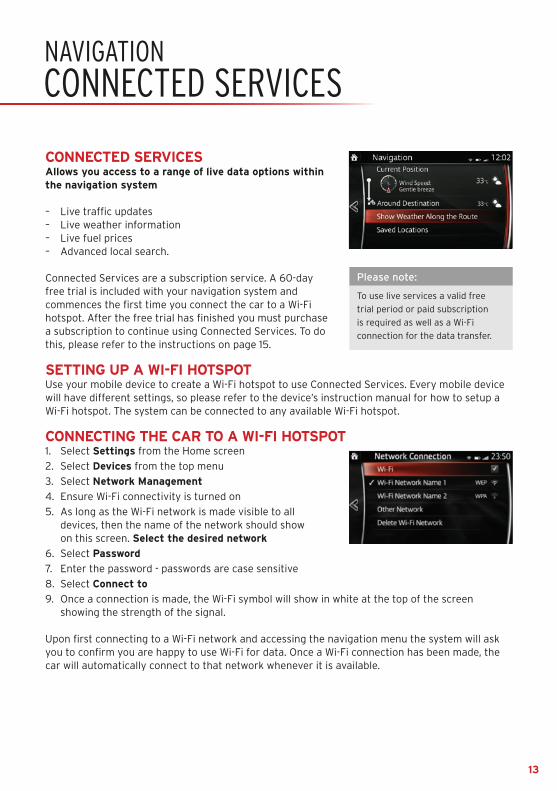
CONNECTED SERVICESAllows you access to a range of live data options within the navigation system
– Live traffic updates– Live weather information– Live fuel prices– Advanced local search.
Connected Services are a subscription service. A 60-day free trial is included with your navigation system and commences the first time you connect the car to a Wi-Fi hotspot. After the free trial has finished you must purchase a subscription to continue using Connected Services. To do this, please refer to the instructions on page 15.
SETTING UP A WI-FI HOTSPOTUse your mobile device to create a Wi-Fi hotspot to use Connected Services. Every mobile device will have different settings, so please refer to the device’s instruction manual for how to setup a Wi-Fi hotspot. The system can be connected to any available Wi-Fi hotspot.
CONNECTING THE CAR TO A WI-FI HOTSPOT1. Select Settings from the Home screen
2. Select Devices from the top menu
3. Select Network Management
4. Ensure Wi-Fi connectivity is turned on
5. As long as the Wi-Fi network is made visible to all devices, then the name of the network should show on this screen. Select the desired network
6. Select Password
7. Enter the password - passwords are case sensitive
8. Select Connect to
9. Once a connection is made, the Wi-Fi symbol will show in white at the top of the screen showing the strength of the signal.
Upon first connecting to a Wi-Fi network and accessing the navigation menu the system will ask you to confirm you are happy to use Wi-Fi for data. Once a Wi-Fi connection has been made, the car will automatically connect to that network whenever it is available.
Please note:
To use live services a valid free
trial period or paid subscription
is required as well as a Wi-Fi
connection for the data transfer.
NAVIGATION CONNECTED SERVICES

14
NAVIGATION CONNECTED SERVICES
ADVANCED LOCAL SEARCHWorks in a similar way to Find Places (see previous pages) but allows you to search from a much larger live database of local businesses and points of interest, also providing you the opportunity to telephone or navigate to their location.
1. Select New Destination from the bottom menu
2. Select Local Search
3. Search for any local business or point of interest, such as “Climbing Wall”, for example
4. Select the desired point from the list of results and navigate to the location.
ACTIVATING LIVE TRAFFIC UPDATESTo use the live traffic function, it needs to be activated within the traffic settings:
1. Select Navigation from the Home screen or push the NAV button
2. Open the bottom menu and select Settings
3. Select Connected Settings
4. Ensure Online Traffic is selected
5. Go back to navigation settings
6. Select Traffic Settings and ensure Online Traffic is selected.
Live traffic will then be visible when setting a route or navigating to a destination. You can also view current traffic conditions by pressing the i button on the navigation bottom menu and selecting Traffic. Select Current Traffic Overview to view the traffic conditions around you or along a set route.
When live traffic is active and a route is set, detours can be offered if there is traffic along the route. If an alternative route becomes available, a notification will show on-screen asking if you wish to re-route around the incident and the time this could save you. To adjust the detour notification sensitivity or automatically accept detours, adjust the options within the traffic settings menu.
INFORMATION BUTTON
Please note:
Connected Services uses your mobile data via Wi-Fi connection with your mobile device. Connected Services
uses approximately 30MB of data per month based on usage of six hours per day, five days per week. A
valid data signal (3G/4G) and free trial period or paid subscription are required for Connected Services. Data
usage and costs may vary, please contact your network provider for more information. Connected Services
may not operate in areas of low signal strength.
NAVIGATION CONNECTED SERVICES

15
Please note:
In petrol models, only Midgrade Gasoline (Premium Unleaded) and Normal Gasoline (Standard Unleaded)
fuel prices are available in the UK. If neither of these are selected, no fuel prices will be shown.
ACTIVATING LIVE WEATHER UPDATES1. Select Navigation from the Home screen or push the
NAV button2. Open the bottom menu and select Settings3. Select Connected Settings4. Ensure Auto Download Weather is selected.
Live weather will now be visible when setting a route or by accessing the Weather option within the navigation information menu by pressing the i button on the navigation bottom menu and selecting Weather. You will then have the option to search for weather along your route, at your destination or in a specific town.
ACTIVATING LIVE FUEL PRICES1. Select Navigation from the Home screen or push the NAV button2. Open the bottom menu and select Settings3. Select Connected Settings4. In the Download Fuel Types section select up to two fuel types.
Fuel prices will now be accessible within the navigation information menu by pressing the i button on the navigation bottom menu and then selecting Fuel Prices. You will then have the option to search along your route, around your destination or in a specific town.
PURCHASING A CONNECTED SERVICES SUBSCRIPTIONAfter the 60-day free trial has ended, a subscription will be required to continue using Connected Services:
1. Ensure you have registered at mazda.co.uk/mzd-connect/navigation and downloaded the Mazda Toolbox application as per the instructions on page 8 of this guide
2. With the Mazda Toolbox application running, insert your SD card into your computer’s SD card slot or SD card reader
3. Click Shop on the left-hand menu4. Connected Services subscription options will be shown. Select the desired subscription by
clicking the respective icon and then Add to cart5. Click Go to Checkout to confirm, then Checkout and then Verify Your Order to enter or
confirm your billing address6. Click Payment to select your payment method and enter your payment details7. Once payment has been made, your subscription is added to your SD card and you should see
a screen stating “Your device is up to date”. You can then remove the SD card from your computer and install back into the car.
To view your purchase, click Home on the left-hand menu and then Transaction History
16
ACTIVE DRIVING DISPLAY WHERE FITTED
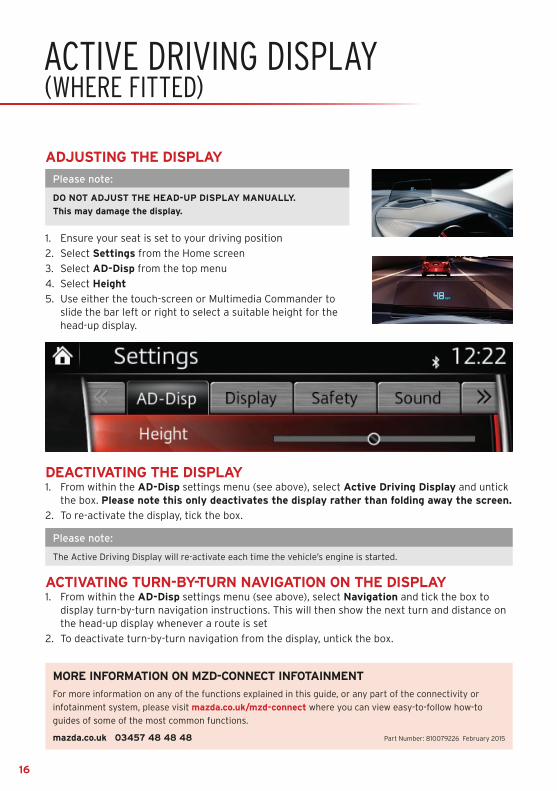
ADJUSTING THE DISPLAY
1. Ensure your seat is set to your driving position
2. Select Settings from the Home screen
3. Select AD-Disp from the top menu
4. Select Height
5. Use either the touch-screen or Multimedia Commander to slide the bar left or right to select a suitable height for the head-up display.
DEACTIVATING THE DISPLAY1. From within the AD-Disp settings menu (see above), select Active Driving Display and untick
the box. Please note this only deactivates the display rather than folding away the screen.
2. To re-activate the display, tick the box.
ACTIVATING TURN-BY-TURN NAVIGATION ON THE DISPLAY1. From within the AD-Disp settings menu (see above), select Navigation and tick the box to
display turn-by-turn navigation instructions. This will then show the next turn and distance on the head-up display whenever a route is set
2. To deactivate turn-by-turn navigation from the display, untick the box.
Please note:
DO NOT ADJUST THE HEAD-UP DISPLAY MANUALLY.
This may damage the display.
MORE INFORMATION ON MZD-CONNECT INFOTAINMENT
For more information on any of the functions explained in this guide, or any part of the connectivity or
infotainment system, please visit mazda.co.uk/mzd-connect where you can view easy-to-follow how-to
guides of some of the most common functions.
mazda.co.uk 03457 48 48 48 Part Number: 810079226 February 2015
Please note:
The Active Driving Display will re-activate each time the vehicle’s engine is started.
ACTIVE DRIVING DISPLAY(WHERE FITTED)