congratulations on your purchase of rotarion
TRANSCRIPT


Congratulations on your purchase of ROTARION HAND CONTROL! ROTARION HAND CONTROL is designed and manufactured to be used for daytime terrestrial observation and for nighttime astronomical observation to control your ROTARION locally near your telescope without a computer. ROTARION is a unique device, patented in the European Union and the United States, to be used with any telescope with a 2" focuser and four of your favorite 1.25" eyepieces. ROTARION makes the eyepiece change easy. Automatic, quick, and precise, without touching the telescope therefore avoiding disturbances in the positioning or misalignment of the optical axis between eyepieces. No more searching in the dark for your next eyepiece! The automatic eyepiece change allows you to adjust the correct magnification on your telescope by increasing or decreasing the focal length of the eyepiece used, the "zoom effect". Re-locate lost objects out of the field of view and due to improper alignment or poor tracking of the telescope. Quickly change to your largest eyepiece in mm to maximize visual field and re-locate. All with a simple Click! For the first time you can change the power or magnification of your telescope with just a simple click, connecting your ROTARION locally to your ROTARION HAND CONTROL without a computer, ideal for use in the field.

Moreover, the ROTARION HAND CONTROL is fully compatible with the ROTARION AUTOFOCUS. You can focus automatically when the eyepiece change is commanded and fine focus with the ROTARION HAND CONTROL focus keys. ROTARION HAND CONTROL is a device of the highest quality, designed and manufactured in BARCELONA with the latest state-of-the-art techniques and the best materials and components from The U.S.A., Japan, and Germany. First, read this instruction manual thoroughly and then follow the instructions step-by-step. If you follow the instructions correctly, even if the reading is initially laborious, the use of ROTARION HAND CONTROL is very simple and easy. All this to offer you many hours of enjoyment observation, and satisfaction with your telescope. Maximum quality, universal, versatile, and easy to use, ROTARION continues our corporate mission:
AstronSCIENTIFIC Astronomy Made Easy

In the Box
• ROTARION HAND CONTROL
• Serial Cable RJ12 (1.5m)
• User Manual
System Requirements It is necessary to have a ROTARION EyepieceWheel to use
the ROTARION HAND CONTROL.
The ROTARION HAND CONTROL is specifically designed to
control the ROTARION EyepieceWheel.
You can also optionally control the ROTARION AUTOFOCUS
connected to the ROTARION EyepieceWheel.

Index
A-Introduction B-Characteristics C-Connecting the ROTARION HAND
CONTROL to your ROTARION • LCD Display
• MENU [M], [OK] Key
• LENS keys [LEFT] and [RIGHT]
• ROTARION EyepieceWheel Reset Key
• FOCUS keys [IN] and [OUT]
• FOCUS [STOP] Key
D-Menu 1. EdLine 2. BackLit 3. Contr. 4. BTooth 5. Focus Config 6. Exit
E-Focus Config (SubMenu) • NumSteps
• Backlash
• MinSpeed
• MaxSpeed
• Power Moving
• Power Stopped
• Max Position
• MotorType
• Wiring
• ResetPos
• T.Offset
• Training
F-Setup G-Ready for Observation H-Additional Product Information I-Warranty

A-INTRODUCTION The AstronSCIENTIFIC’s ROTARION HAND CONTROL is a hand-held terminal that allows you to control the ROTARION EyepieceWheel eyepiece exchanger and the ROTARION AUTOFOCUS without using a computer. Now you can quick change of eyepieces and focus automatically. All with one click.
B-CHARACTERISTICS
• Connects directly to the ROTARION EyepieceWheel automatic eyepiece exchanger.
• Receives power from the ROTARION EyepieceWheel.
• 2-line, 8-character red LCD display.
• Controls the ROTARION EyepieceWheel.
• Controls the ROTARION AUTOFOCUS connected to the ROTARION EyepieceWheel
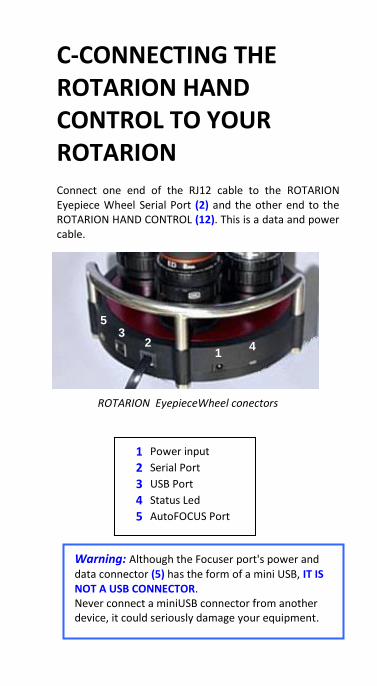
C-CONNECTING THE ROTARION HAND CONTROL TO YOUR ROTARION Connect one end of the RJ12 cable to the ROTARION Eyepiece Wheel Serial Port (2) and the other end to the ROTARION HAND CONTROL (12). This is a data and power cable.
ROTARION EyepieceWheel conectors
5
4
3
2 1
1 Power input
2 Serial Port
3 USB Port
4 Status Led
5 AutoFOCUS Port
Warning: Although the Focuser port's power and data connector (5) has the form of a mini USB, IT IS NOT A USB CONNECTOR. Never connect a miniUSB connector from another device, it could seriously damage your equipment.

ROTARION HAND CONTROL
ROTARION Hand Control
6 LCD Display 6a Eyepiece name & num
7 MENU [M], [OK] key
6b FOCUS Current Position
8 Eyepiece key [LEFT]
9 Eyepiece key [RIGHT]
10 FOCUS [IN] key 11 FOCUS [OUT] key
12 Serial Port
6
7
8
10
12
9
11
1-Name#1 P:30000
6a 6b

LCD Display (6) During normal operation, the position and name of the selected eyepiece (6a) are displayed in the first line. In the second line the Current Position of the focusing motor is displayed (6b).
MENU [M], [OK] key (7) This button has dual functionality, depending on the type of pulsation:
• [normal press] turns the display on / off (if not in the setup menu). It also acts as a [OK] button when necessary.
• [long press] the Setup Menu is accessed.
LENS Keys [LEFT] and [RIGHT] (8) and (9) Move the ROTARION EyepieceWheel to a forward / backward position sequentially. CAUTION! MOVING PARTS!
ROTARION EyepieceWheel Reset Key Press the [LEFT] + [RIGHT] keys and a Reset to ROTARION EyepieceWheel is performed; rotates 2 turns during which it performs a calibration and determines the number of available positions. When the process is finished, it stops at position 1, ready for use. CAUTION! MOVING PARTS!
FOCUS Keys [IN] and [OUT] (10) and (11)
MENU
1-Name#1 P:30000
6a 6b

Move the motor of the focuser in the corresponding direction. When you press [IN] or [OUT] with [normal pres], the motor moves a fixed number of steps, which can be programmed from: MENU - 5.Focus Config - NumSteps. When you press [IN] or [OUT] with [Long press], the motor moves continuously accelerating from the minimum speed to the maximum speed, until the button is released. Both speeds can be programmed from MENU - 5.Focus Config - MinSpeed/MaxSpeed. Usually with the [IN] button you should move the position of the focuser inwards and move it towards the outside with the [OUT] button. If the feedrate does not match the direction of rotation of the focuser, you can activate the Reverse function (41) with the REMOTE CONTROL software.
FOCUS [STOP] Key Press the [IN] + [OUT] buttons to STOP the focuser motor advance. Use it only when you need to stop the focuser movement, or when you do not want to reach the final focus position. You must consider that if you press it, you must do a Resetting the Focuser (see section H.3 of the ROTARION AUTOFOCUS Instruction Manual).
CAUTION: The ROTARION AUTOFOCUS does not have the ability to detect when the focuser has reached the IN or OUT mechanical ends. Damage can occur if you try to go beyond the mechanical limits of the focuser. Find out the focusing mechanism of your telescope and decide if this will be a problem.

D-MENU Press [M] with [long press] to access MENU Using the [LEFT] or [RIGHT] buttons, the following menus can be accessed in sequence:
MENU - 1.EdLine - 2.BackLi - 3.Contr. - 4.BTooth - 5.Focus - 6.Exit
To exit, select the 6-Exit or MENU option and press [M]. They are described in detail below.
1. EdLine The Line Editing allows us to edit the name of the eyepieces installed in each position of the ROTARION EyepieceWheel.
1.1 Line selection. When pressing [M], you enter the line selection, where you can choose to which position you want to change the name of the eyepiece. The position number is flashing.
Line selection (position) activated You can select any position using the [LEFT] or [RIGHT] keys.
pressing [RIGHT] select next
1.2 Character selection. Once the position is chosen, press [M] to enter the character selection. The first editable character is displayed in blinking mode
pressing [M] you activate character selection
Select the character position sequentially by pressing [M] and to change the character by pressing [LEFT] or [RIGHT].
1-Name#1
MENU
2-Name#2
2-Name#2
2-Name#2
1.EdLine

pressing [M] selects next character pressing [RIGHT] you change the character
If you press [LEFT] or [RIGHT] with [long press], the feed is automatic. 1.3 Exit. To exit the character edition and return to the line selection, press [M] with [Long press].
pressing [M] with [lp] you go to line selection
To exit the line edition, press [M] with [long press]. You return to Edition MENU
pressing [M] with [lp]you go to EDITION MENU
To exit the MENU, use the [LEFT] or [RIGHT] buttons to select 6-Exit or MENU and press [M].
2. BackLit Backlite, allows to adjust the brightness of the screen. Pressing [M] shows the current brightness level. Pressing [LEFT] or [RIGHT] changes the brightness in 15 levels. To exit, press [M]. You return to the MENU. To exit the MENU, use the [LEFT] or [RIGHT] buttons to select 6-Exit or MENU and press [M].
3. Contr. Contrast, allows you to adjust the contrast of the screen. Pressing [M] shows the current contrast level. Pressing [LEFT] or [RIGHT] switches the contrast to 15 levels.
2-Nbme#2
2-Nbme#2
Baclkit BL: 14
Contrast CRT: 6
1.EdLine
2.BackLi
3.Contr.

To exit, press [M]. You return to the MENU. To exit the MENU, use the [LEFT] or [RIGHT] buttons to select 6-Exit or MENU and press [M] .
4. BTooth Bluetooth, allows you to access the Bluetooth MENU. Pressing [M] shows the power status of the Bluetooth module. Pressing [LEFT] or [RIGHT] changes the power status between ON and OFF (on or off the Bluetooth module). To exit, press [M]. You return to the MENU. To exit the MENU, use the [LEFT] or [RIGHT] buttons to select 6-Exit or MENU and press [M].
5. Focus Config Focuser Settings. By means of this SubMenu you access the configuration of the parameters of the Focuser. See SubMenu “Focus Config." below. It is necessary that the ROTARION AUTOFOCUS is connected to the ROTARION EyepieceWheel.
6. Exit Exit. Press [M] to exit MENU and return to the main screen.
B.Tooth Powr:OFF 6
5.Focus Config
4.BTooth
6.Exit

E-FOCUS CONFIG (SubMenu). It allows access to the configurable parameters of the AUTOFOCUS. Pressing [M] accesses the AutoFOCUS Submenu with the following options: NumSteps - Backlash - MinSpeed - MaxSpeed - PowerMov - Pow.Stop - MaxPos - MotorTyp - Wiring - ResetPos - T.Offset - Training - Exit
Use the [LEFT] / [RIGHT] buttons to change the value. To return, press [M]. To Exit, press [M] with [Long press].
NumSteps Number of Steps. Specifies the number of steps that the focuser motor will advance each time you perform a [normal press] of the focus [IN] or [OUT] buttons of the focuser. Range 1..100 steps
Backlash Backlash Is a slack in the focusing mechanism that appears during movement. That is, depending on the load of the focuser and after moving in one direction, reversing the direction of rotation may have to move a substantial distance before the focuser actually begins to move. To compensate it, the AUTOFOCUS can add additional steps to the distance each time the direction of rotation is reversed. The default value is 0.
5.Focus Config
FocusCnf NumSteps
FocusCnf Backlash

MinSpeed Minimum Speed. Specifies the minimum speed at which the motor will move, in milliseconds / step. Range 1..99 ms / step
MaxSpeed Maximum Speed. Specifies the maximum speed at which the motor will move, in milliseconds / step. Range 1..99 ms / step
In steppers motors, the motion starts at Min.Speed and is incremented to Max.Speed. In DC motors, there is no speed increase by ramp. Min and Max Speed values are the same.
Power Moving Is the % of the total power (PWM) that is applied to the motor when it is moving. Range 0..100%
Note: As the speed is expressed in ms / step, the value for the minimum speed must be greater than the value for the maximum speed
FocusCnf MinSpeed
FocusCnf MaxSpeed
FocusCnf PowerMov

Power Stopped Is the % of the total power (PWM) that is applied to the motor when it is stationary. Range 0..100% In a stepper motor, the stopping power allows the engine to maintain a certain torque when it is at rest. If the motor has a gearbox, you can leave it at 0%; In this way you avoid the heating of the motor. In a DC motor, no power is applied while at rest because it would move. However, it is used to brake the engine and stop it in the shortest possible time (shorter distance). Default is 0% for stepper motors and 100% for DC motors
Max Position Maximum Position. Specifies the maximum limit for the Current Position value. If this value is reached, the motor stops. Use the [LEFT] / [RIGHT] buttons to change the value in jumps by one. Use the [IN] / [OUT] buttons to change the value in jumps by one thousand. Range 1000..60000 The value of Max Position must be greater than the Current Position. If it is smaller, the warning message "MaxPos Too Low!" appears. On the other hand, the minimum limit for the current position is "0", not being able to take negative values.
FocusCnf Pow.Stop
FocusCnf MaxPos
MaxPos < 60000
MaxPos Too Low! 60000

MotorType You should find out what type and model of motor is in your focuser. Use the [LEFT] / [RIGHT] buttons to select the motor type of your focuser. Types of motor: DC (direct current), Stepper (step by step).
Wiring Motor Model. Use the [LEFT] / [RIGHT] buttons to select the motor "model", depending on the MotorType selected in the previous section. If it does not match any on of the list, choose one that is compatible. When selecting the motor model, an automatic preset of the Speed and Power parameters is made. It is possible to change these values to suit the type of motor and / or telescope.
Type of motor DC: Orion-TeleVue, JMI Type of motor Stepper: Moonlite, FeatherTouch
Note: Remember that if you have changed the Speed or Power parameters for one engine and you select another one, default parameters are loaded. If you then re-select the engine you had previously, the default values for that engine are loaded. The previously changed values are not recovered and you must re-enter them.
FocusCnf MotorTyp
FocusCnf Wiring
MotorTyp Stepper
Wiring FeatherT

ResetPos (Position Reset) A Reset of the Current Position of the Focus is made. The reference value used to make the reset is selected sequentially using the [LEFT] or [RIGHT] buttons. ResetPos: EP1,NEAR - EP1,FAR - EP1,VFAR - 30000
To the question “Are You Sure? Yes”, Accept. ResetPos Reference values:
EP1 NEAR: position for near object in Eyepiece1 EP1 FAR: position for far object in Eyepiece1 EP1 VFAR: position for very far object in Eyepiece1 30000: Intermediate position of telescope travel 0: extreme IN position of the telescope When a ResetPos is done at 30000, the Max Position
value is automatically modified to 60000.
T.Offset (Training Offset) In this SubMenu are the position values of the focuser for each of the eyepieces EP1 to EP4, and for 3 focusing distances. Using the [LEFT] / [RIGHT] buttons, you can display the values in sequential mode and press [M] to change the value.
T.Offset: N1-N2-N3-N4-F1-F2-F3-F4-V1-V2-V3-V4
For each eyepiece 3 different focusing distances are stored:
Note: You should normally have the Eyepiece1 selected and the object in focus before making a Position Reset.
ResetPos EP1,NEAR
T.Offset N1 100
FocusCnf ResetPos
FocusCnf T.Offset

N1,N2,N3,N4: NEAR, for nearby objects
F1,F2,F3,F4: FAR, for distant objects
V1,V2,V3,V4: VERY FAR, for very distant objects By means of the Training Procedure, all the positioning values of the focuser are configured.
Training In this SubMenu you can activate the TRAINING. The Training Procedure consists of adjusting the focus for 3 objects, with focus distances: NEAR, FAR and VERY FAR, and for each of the eyepieces. Using the [LEFT / RIGHT] buttons select ON to start the Training. If you want to abort the Training procedure at any time, select OFF. To the question “Are You Sure? Yes”, Accept. See the Training Procedure in the ROTARION AUTOFOCUS Instruction Manual. There it is explained together with the software ROTARION REMOTE CONTROL software included in the ROTARION.
Exit Press [M] to exit MENU and return to the main screen.
FocusCnf Training
Training OFF
FocusCnf Exit

F-SETUP
1. Motor Type Choosing the appropriate motor type of the focuser using the menu MENU - 5. Focus Config - MotorTyp
2. Motor Model Choose the appropriate engine model from the menu MENU - 5. Focus Config - Wiring It is now necessary to set the focus coordinates for each eyepiece. To do this, follow the procedure below:
3. TRAINING Procedure See the Training Procedure in the ROTARION AUTOFOCUS Instruction Manual. There it is comprehensively explained, both for the ROTARION HAND CONTROL and the ROTARION REMOTE CONTROL software for Windows PC/computer.
G-READY FOR OBSERVATION Once the TRAINING is completed you have the equipment ready for observation. Refer to the ROTARION and ROTARION AUTOFOCUS Instruction Manuals to learn more about sky observations and with the ROTARION PHOTO learn more about camera astro-imaging.
H-ADDITIONAL PRODUCT INFORMATION
Please read the following instructions and information.
Product Compliance Information
The AstronSCIENTIFIC S.L. corporation with address at Marti i Julia 6-8, Barcelona 08834 Spain E.U. has certified this product with the IEC 61010-1 Norm for Safety requirements for electrical equipment for measurement, control, and laboratory use in compliance with the Bureau Veritas Consumer Products Services Germany GmbH corporation based at Türkheim, Germany. If the equipment is used in a manner not specified by the manufacturer, the protection provided by the equipment may be impaired.
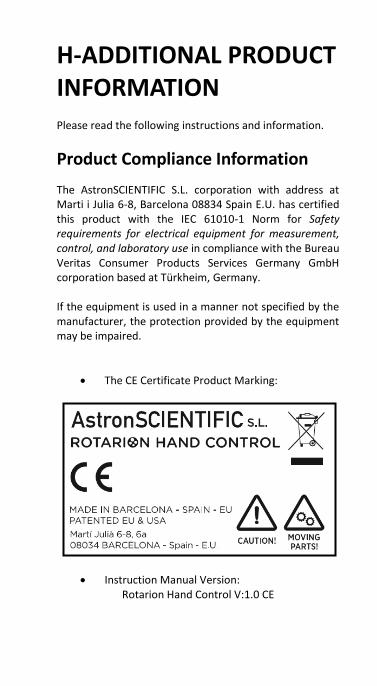
• The CE Certificate Product Marking:
• Instruction Manual Version: Rotarion Hand Control V:1.0 CE

Service, Maintenance, Cleaning,
Disposal, Serial Number, and Dealer:
Car adapter fuse:
• 4 Amp 12V 6.3x32mm, fast acting.
• To replace it, unscrew the tip and replace.
Operating environmental conditions:
• Max. 2000m. / 0-40 oC / 32-104 Fahrenheit and
80% humidity.
Degree of Protection IEC 60529:
• Not applicable.
The Power Supply:
• Input: 100-240Vac; 50/60Hz; 0,55A
Output: 12Vdc; 2A; Limited Power Source
• Disconnect the Power Supply unit from the
ROTARION. The Power Supply unit must be
freely accessible and must not be covered nor
obstructed for disconnecting the ROTARION
when needed.
• Only use the supplied Power Supply unit.
• Please compare the rating plate of the Power
supply unit with the local mains voltage and
frequency.
Maintenance technical data:
• Maintenance free.
Cleaning:
• Use a soft cloth without liquids.
Disposal:
•

• Equipment with this symbol shall not be
disposed of together with household or
commercial waste.
• Please find out about separate disposal at your
regional offices.
• The directive 2012/19/EU on waste electrical
and electronical equipment (WEEE) is applicable
in the European Union member states.
Serial Number: __________________________________ Dealer: ________________________________________ Date: __________________________________________

I-WARRANTY The warranty is extended to all countries where this
product is distributed by AstronSCIENTIFIC S.L. or by a
distributor assigned by it. This warranty is subject to the
legal provisions of each country.
Warranty period
The Warranty period is 2 years from the date of the sales
invoice issued by AstronSCIENTIFIC S.L. Or by the
distributor authorized by AstronSCIENTIFIC S.L.
Warranty Coverage
The conformity of the product is warranted according to
the use for which it is intended.
Within the warranty period, we will remedy any defect in
the operation of the product due to its manufacture,
whether repairing, replacing parts or providing a new
product, provided that the option chosen is feasible and
not economically disproportionate according to the
criteria of AstronSCIENTIFIC S.L.
For any of the three options, repair, replacement of parts
or exchange for a new product, the consumer must go to
the authorized distributor of AstronSCIENTIFIC S.L. where
the product was purchased.
Warranty Nullity
This warranty will not be valid in the following cases:
Misuse, improper use, neglect, accident or deterioration of
the product due to failure to comply with the warnings and
restrictions contained in this Instruction Manual or in the
operating instructions provided by AstronSCIENTIFIC S.L.

External agents such as water or other harmful chemicals,
obstructive or corrosive.
Likewise, faults or malfunctions caused by incorrect
voltages and electrical installations will not be covered by
this guarantee.
This warranty does not cover any product that has been
altered or repaired by any person other than
AstronSCIENTIFIC S.L. repair personnel, or any product
whose serial number, model number or identification has
been removed, defective or altered.
AstronSCIENTIFIC S.L. Shall not be liable for any indirect,
special, incidental or consequential damages related to the
sale or use of the product.