configuring management access - cisco.com · 37-5 cisco asa 5500 series configuration guide using...
TRANSCRIPT
Cisco ASA
C H A P T E R 37
Configuring Management AccessThis chapter describes how to access the ASA for system management through Telnet, SSH, and HTTPS (using ASDM), how to authenticate and authorize users, how to create login banners, and how to customize CLI parameters.
This chapter includes the following sections:
• Configuring ASA Access for ASDM, Telnet, or SSH, page 37-1
• Configuring CLI Parameters, page 37-6
• Configuring ICMP Access, page 37-10
• Configuring Management Access Over a VPN Tunnel, page 37-12
• Configuring AAA for System Administrators, page 37-13
• Feature History for Management Access, page 37-33
Note To access the ASA interface for management access, you do not also need an access list allowing the host IP address. You only need to configure management access according to the sections in this chapter.
Configuring ASA Access for ASDM, Telnet, or SSHThis section describes how to allow clients to access the ASA using ASDM, Telnet, or SSH and includes the following topics:
• Licensing Requirements for ASA Access for ASDM, Telnet, or SSH, page 37-2
• Guidelines and Limitations, page 37-2
• Configuring Telnet Access, page 37-3
• Using a Telnet Client, page 37-4
• Configuring SSH Access, page 37-4
• Using an SSH Client, page 37-5
• Configuring HTTPS Access for ASDM, page 37-6
37-1 5500 Series Configuration Guide using the CLI

Chapter 37 Configuring Management Access Configuring ASA Access for ASDM, Telnet, or SSH
Licensing Requirements for ASA Access for ASDM, Telnet, or SSH
The following table shows the licensing requirements for this feature:
Guidelines and Limitations
This section includes the guidelines and limitations for this feature.
Context Mode Guidelines
Supported in single and multiple context mode.
Firewall Mode Guidelines
Supported in routed and transparent firewall mode.
IPv6 Guidelines
Supports IPv6.
Additional Guidelines
• You cannot use Telnet to the lowest security interface unless you use Telnet inside a VPN tunnel.
• Management access to an interface other than the one from which you entered the ASA is not supported. For example, if your management host is located on the outside interface, you can only initiate a management connection directly to the outside interface. The only exception to this rule is through a VPN connection. See the “Configuring Management Access Over a VPN Tunnel” section on page 37-12.
• The ASA allows:
– A maximum of 5 concurrent Telnet connections per context, if available, with a maximum of 100 connections divided among all contexts.
– A maximum of 5 concurrent SSH connections per context, if available, with a maximum of 100 connections divided among all contexts.
– A maximum of 5 concurrent ASDM instances per context, if available, with a maximum of 32 ASDM instances among all contexts.
• The ASA supports the SSH remote shell functionality provided in SSH Versions 1 and 2 and supports DES and 3DES ciphers.
• XML management over SSL and SSH is not supported.
• (8.4 and later) The SSH default username is no longer supported. You can no longer connect to the ASA using SSH with the pix or asa username and the login password. To use SSH, you must configure AAA authentication using the aaa authentication ssh console LOCAL command; then define a local user by entering the username command. If you want to use a AAA server for authentication instead of the local database, we recommend also configuring local authentication as a backup method.
Model License Requirement
All models Base License.
37-2Cisco ASA 5500 Series Configuration Guide using the CLI

Chapter 37 Configuring Management Access Configuring ASA Access for ASDM, Telnet, or SSH
Configuring Telnet Access
To identify the client IP addresses allowed to connect to the ASA using Telnet, perform the following steps.
Detailed Steps
Examples
The following example shows how to let a host on the inside interface with an address of 192.168.1.2 access the ASA:
hostname(config)# telnet 192.168.1.2 255.255.255.255 inside
The following example shows how to allow all users on the 192.168.3.0 network to access the ASA on the inside interface:
hostname(config)# telnet 192.168.3.0 255.255.255.0 inside
Command Purpose
Step 1 telnet source_IP_address mask source_interface
Example:hostname(config)# telnet 192.168.1.2 255.255.255.255 inside
For each address or subnet, identifies the IP addresses from which the ASA accepts connections.
If there is only one interface, you can configure Telnet to access that interface as long as the interface has a security level of 100.
Step 2 telnet timeout minutes
Example:hostname(config)# telnet timeout 30
Sets the duration for how long a Telnet session can be idle before the ASA disconnects the session.
Set the timeout from 1 to 1440 minutes. The default is 5 minutes. The default duration is too short in most cases and should be increased until all pre-production testing and troubleshooting have been completed.
37-3Cisco ASA 5500 Series Configuration Guide using the CLI

Chapter 37 Configuring Management Access Configuring ASA Access for ASDM, Telnet, or SSH
Using a Telnet Client
To gain access to the ASA CLI using Telnet, enter the login password set by the password command. If you configure Telnet authentication (see the “Configuring Authentication for CLI and ASDM Access” section on page 37-19), then enter the username and password defined by the AAA server or local database.
Configuring SSH Access
To identify the client IP addresses and define a user allowed to connect to the ASA using SSH, perform the following steps.
Detailed Steps
Command Purpose
Step 1 crypto key generate rsa modulus modulus_size
Example:hostname(config)# crypto key generate rsa modulus 1024
Generates an RSA key pair, which is required for SSH.
The modulus value (in bits) is 512, 768, 1024, or 2048. The larger the key modulus size you specify, the longer it takes to generate an RSA key pair. We recommend a value of 1024.
Step 2 write memory
Example:hostname(config)# write memory
Saves the RSA keys to persistent flash memory.
Step 3 aaa authentication ssh console LOCAL Enables local authentication for SSH access. You can alternatively configure authentication using a AAA server. See the “Configuring Authentication for CLI and ASDM Access” section on page 37-19 for more information.
Step 4 username username password password Creates a user in the local database that can be used for SSH access.
Step 5 ssh source_IP_address mask source_interface
Example:hostname(config)# ssh 192.168.3.0 255.255.255.0 inside
For each address or subnet, identifies the IP addresses from which the ASA accepts connections, and the interface on which you can SSH. Unlike Telnet, you can SSH on the lowest security level interface.
Step 6 (Optional)
ssh timeout minutes
Example:hostname(config)# ssh timeout 30
Sets the duration for how long an SSH session can be idle before the ASA disconnects the session.
Set the timeout from 1 to 60 minutes. The default is 5 minutes. The default duration is too short in most cases, and should be increased until all pre-production testing and troubleshooting have been completed.
37-4Cisco ASA 5500 Series Configuration Guide using the CLI

Chapter 37 Configuring Management Access Configuring ASA Access for ASDM, Telnet, or SSH
Examples
The following example shows how to generate RSA keys and let a host on the inside interface with an address of 192.168.1.2 access the ASA:
hostname(config)# crypto key generate rsa modulus 1024hostname(config)# write memoryhostname(config)# aaa authentication ssh console LOCALWARNING: local database is empty! Use 'username' command to define local users.hostname(config)# username exampleuser1 password examplepassword1hostname(config)# ssh 192.168.1.2 255.255.255.255 insidehostname(config)# ssh timeout 30
The following example shows how to allow all users on the 192.168.3.0 network to access the ASA on the inside interface:
hostname(config)# ssh 192.168.3.0 255.255.255.0 inside
Using an SSH Client
In the SSH client on your management host, enter the username and password that you configured in the “Configuring SSH Access” section on page 37-4. When starting an SSH session, a dot (.) displays on the ASA console before the following SSH user authentication prompt appears:
hostname(config)# .
The display of the dot does not affect the functionality of SSH. The dot appears at the console when generating a server key or decrypting a message using private keys during SSH key exchange before user authentication occurs. These tasks can take up to two minutes or longer. The dot is a progress indicator that verifies that the ASA is busy and has not hung.
Note If more than one SSH configuration session exists and the configuration operation is carried through any file operations (such as copy, tftp, config net, context mode config file), even if it is a single CLI, it will be blocked with the response "Command Ignored, configuration in progress...". If the CLI is directly entered through a command prompt, it is not blocked.
Step 7 (Optional)
ssh version version_number
Example:hostname(config)# ssh version 2
Limits access to SSH version 1 or 2. By default, SSH allows both versions 1 and 2.
Step 8 ssh key-exchange {dh-group1 | dhgroup14}
Example:hostname(config)# ssh key-exchange dh-group14
Specifies that either the Diffie-Hellman Group 1 or Diffie-Hellman Group 14 follows and should be used for key exchange. Diffie-Hellman Group 1 is the default if no value is specified.
Command Purpose
37-5Cisco ASA 5500 Series Configuration Guide using the CLI
Chapter 37 Configuring Management Access Configuring CLI Parameters
Configuring HTTPS Access for ASDM
To use ASDM, you need to enable the HTTPS server, and allow HTTPS connections to the ASA. HTTPS access is enabled as part of the factory default configuration or when you use the setup command. This section describes how to manually configure ASDM access.
To configure HTTPS access for ASDM, perform the following steps:
Detailed Steps
Examples
The following example shows how to enable the HTTPS server and let a host on the inside interface with an address of 192.168.1.2 access ASDM:
hostname(config)# http server enablehostname(config)# http 192.168.1.2 255.255.255.255 inside
The following example shows how to allow all users on the 192.168.3.0 network to access ASDM on the inside interface:
hostname(config)# http 192.168.3.0 255.255.255.0 inside
Configuring CLI ParametersThis section includes the following topics:
• Licensing Requirements for CLI Parameters, page 37-7
• Guidelines and Limitations, page 37-7
• Configuring a Login Banner, page 37-7
• Customizing a CLI Prompt, page 37-8
• Changing the Console Timeout, page 37-9
Command Purpose
Step 1 http source_IP_address mask source_interface
Example:hostname(config)# http 192.168.1.2 255.255.255.255 inside
For each address or subnet, identifies the IP addresses from which the ASA accepts HTTPS connections.
Step 2 http server enable [port]
Example:hostname(config)# http server enable 443
Enables the HTTPS server.
By default, the port is 443. If you change the port number, be sure to include it in the ASDM access URL. For example, if you change the port number to 444, enter the following:
https://10.1.1.1:444
37-6Cisco ASA 5500 Series Configuration Guide using the CLI
Chapter 37 Configuring Management Access Configuring CLI Parameters
Licensing Requirements for CLI Parameters
The following table shows the licensing requirements for this feature:
Guidelines and Limitations
This section includes the guidelines and limitations for this feature.
Context Mode Guidelines
Supported in single and multiple context mode.
Firewall Mode Guidelines
Supported in routed and transparent firewall mode.
Configuring a Login Banner
You can configure a message to display when a user connects to the ASA, before a user logs in, or before a user enters privileged EXEC mode.
Restrictions
After a banner is added, Telnet or SSH sessions to ASA may close if:
• There is not enough system memory available to process the banner message(s).
• A TCP write error occurs when trying to display banner message(s).
Guidelines
• From a security perspective, it is important that your banner discourage unauthorized access. Do not use the words “welcome” or “please,” as they appear to invite intruders in. The following banner sets the correct tone for unauthorized access:
You have logged in to a secure device. If you are not authorized to access this device, log out immediately or risk possible criminal consequences.
• See RFC 2196 for guidelines about banner messages.
Model License Requirement
All models Base License.
37-7Cisco ASA 5500 Series Configuration Guide using the CLI

Chapter 37 Configuring Management Access Configuring CLI Parameters
To configure a login banner, perform the following steps:
Detailed Steps
Examples
The following example shows how to add a message-of-the-day banner:
hostname(config)# banner motd Welcome to $(hostname).hostname(config)# banner motd Contact me at [email protected] for anyhostname(config)# banner motd issues.
Customizing a CLI Prompt
The CLI Prompt pane lets you customize the prompt used during CLI sessions. By default, the prompt shows the hostname of the ASA. In multiple context mode, the prompt also displays the context name. You can display the following items in the CLI prompt:
Command Purpose
banner {exec | login | motd} text
Example:hostname(config)# banner motd Welcome to $(hostname).
Adds a banner to display at one of three times: when a user first connects (message-of-the-day (motd)), when a user logs in (login), and when a user accesses privileged EXEC mode (exec). When a user connects to the ASA, the message-of-the-day banner appears first, followed by the login banner and prompts. After the user successfully logs in to the ASA, the exec banner appears.
To add more than one line, precede each line by the banner command.
For the banner text:
• Spaces are allowed, but tabs cannot be entered using the CLI.
• There are no limits for banner length other than those for RAM and flash memory.
• You can dynamically add the hostname or domain name of the ASA by including the strings $(hostname) and $(domain).
• If you configure a banner in the system configuration, you can use that banner text within a context by using the $(system) string in the context configuration.
context (Multiple mode only) Displays the name of the current context.
domain Displays the domain name.
hostname Displays the hostname.
37-8Cisco ASA 5500 Series Configuration Guide using the CLI
Chapter 37 Configuring Management Access Configuring CLI Parameters
Detailed Steps
To customize the CLI prompt, enter the following command:
Changing the Console Timeout
The console timeout sets how long a connection can remain in privileged EXEC mode or configuration mode; when the timeout is reached, the session drops into user EXEC mode. By default, the session does not time out. This setting does not affect how long you can remain connected to the console port, which never times out.
To change the console timeout, enter the following command:
priority Displays the failover priority as pri (primary) or sec (secondary).
state Displays the traffic-passing state of the unit. The following values appear for the state:
• act—Failover is enabled, and the unit is actively passing traffic.
• stby— Failover is enabled, and the unit is not passing traffic and is in a standby, failed, or another nonactive state.
• actNoFailover—Failover is not enabled, and the unit is actively passing traffic.
• stbyNoFailover—Failover is not enabled, and the unit is not passing traffic. This condition might occur when there is an interface failure above the threshold on the standby unit.
Command Purpose
prompt {[hostname] [context] [domain] [slot] [state] [priority]}
Example:hostname(config)# firewall transparent
Customizes the CLI prompt.
Command Purpose
console timeout number
Example:hostname(config)# console timeout 0
Specifies the idle time in minutes (0 through 60) after which the privileged session ends. The default timeout is 0, which means the session does not time out.
Model License Requirement
All models Base License.
37-9Cisco ASA 5500 Series Configuration Guide using the CLI
Chapter 37 Configuring Management Access Configuring ICMP Access
Configuring ICMP Access By default, you can send ICMP packets to any ASA interface using either IPv4 or IPv6. This section tells how to limit ICMP management access to the ASA. You can protect the ASA from attacks by limiting the addresses of hosts and networks that are allowed to have ICMP access to the ASA.
Note For allowing ICMP traffic through the ASA, see Chapter 32, “Configuring Access Rules.”
This section includes the following topics:
• Information About ICMP Access, page 37-10
• Licensing Requirements for ICMP Access, page 37-10
• Guidelines and Limitations, page 37-10
• Default Settings, page 37-11
• Configuring ICMP Access, page 37-11
Information About ICMP Access
ICMP in IPv6 functions the same as ICMP in IPv4. ICMPv6 generates error messages, such as ICMP destination unreachable messages and informational messages like ICMP echo request and reply messages. Additionally ICMP packets in IPv6 are used in the IPv6 neighbor discovery process and path MTU discovery.
We recommend that you always grant permission for the ICMP unreachable message type (type 3). Denying ICMP unreachable messages disables ICMP path MTU discovery, which can halt IPsec and PPTP traffic. See RFC 1195 and RFC 1435 for details about path MTU discovery.
If you configure ICMP rules, then the ASA uses a first match to the ICMP traffic followed by an implicit deny all entry. That is, if the first matched entry is a permit entry, the ICMP packet continues to be processed. If the first matched entry is a deny entry or an entry is not matched, the ASA discards the ICMP packet and generates a syslog message. An exception is when an ICMP rule is not configured; in that case, a permit statement is assumed.
Licensing Requirements for ICMP Access
The following table shows the licensing requirements for this feature:
Guidelines and Limitations
This section includes the guidelines and limitations for this feature.
Context Mode Guidelines
Supported in single and multiple context mode.
Model License Requirement
All models Base License.
37-10Cisco ASA 5500 Series Configuration Guide using the CLI

Chapter 37 Configuring Management Access Configuring ICMP Access
Firewall Mode Guidelines
Supported in routed and transparent firewall mode.
IPv6 Guidelines
Supports IPv6.
Additional Guidelines
• The ASA does not respond to ICMP echo requests directed to a broadcast address.
• The ASA only responds to ICMP traffic sent to the interface that traffic comes in on; you cannot send ICMP traffic through an interface to a far interface.
Default Settings
By default, you can send ICMP packets to any ASA interface using either IPv4 or IPv6.
Configuring ICMP Access
To configure ICMP access rules, enter one of the following commands:
Detailed Steps
Examples
The following example shows how to allow all hosts except the one at 10.1.1.15 to use ICMP to the inside interface:
hostname(config)# icmp deny host 10.1.1.15 insidehostname(config)# icmp permit any inside
Command Purpose
(For IPv4)
icmp {permit | deny} {host ip_address | ip_address mask | any} [icmp_type] interface_name
Example:hostname(config)# icmp deny host 10.1.1.15 inside
Creates an IPv4 ICMP access rule. If you do not specify an icmp_type, all types are identified. You can enter the number or the name. To control ping, specify echo-reply (0) (ASA-to-host) or echo (8) (host-to-ASA). See the “ICMP Types” section on page B-15 for a list of ICMP types.
(For IPv6)
ipv6 icmp {permit | deny} {ipv6-prefix/prefix-length | any | host ipv6-address} [icmp-type] interface_name
Example:hostname(config)# icmp permit host fe80::20d:88ff:feee:6a82 outside
Creates an IPv6 ICMP access rule. If you do not specify an icmp_type, all types are identified. You can enter the number or the name. To control ping, specify echo-reply (0) (ASA-to-host) or echo (8) (host-to-ASA). See the“ICMP Types” section on page B-15 for a list of ICMP types.
37-11Cisco ASA 5500 Series Configuration Guide using the CLI
Chapter 37 Configuring Management Access Configuring Management Access Over a VPN Tunnel
The following example shows how to allow the host at 10.1.1.15 to use only ping to the inside interface, enter the following command:
hostname(config)# icmp permit host 10.1.1.15 inside
The following example shows how to deny all ping requests and permit all packet-too-big messages (to support path MTU discovery) at the outside interface:
hostname(config)# ipv6 icmp deny any echo-reply outsidehostname(config)# ipv6 icmp permit any packet-too-big outside
The following example shows how to permit host 2000:0:0:4::2 or hosts on prefix 2001::/64 to ping the outside interface:
hostname(config)# ipv6 icmp permit host 2000:0:0:4::2 echo-reply outsidehostname(config)# ipv6 icmp permit 2001::/64 echo-reply outsidehostname(config)# ipv6 icmp permit any packet-too-big outside
Configuring Management Access Over a VPN TunnelIf your VPN tunnel terminates on one interface, but you want to manage the ASA by accessing a different interface, you can identify that interface as a management-access interface. For example, if you enter the ASA from the outside interface, this feature lets you connect to the inside interface using ASDM, SSH, Telnet, or SNMP; or you can ping the inside interface when entering from the outside interface. Management access is available via the following VPN tunnel types: IPsec clients, IPsec site-to-site, and the AnyConnect SSL VPN client.
This section includes the following topics:
• Licensing Requirements for a Management Interface, page 37-12
• Guidelines and Limitations, page 37-12
• Configuring a Management Interface, page 37-13
Licensing Requirements for a Management Interface
The following table shows the licensing requirements for this feature:
Guidelines and Limitations
This section includes the guidelines and limitations for this feature.
Context Mode Guidelines
Supported in single mode.
Firewall Mode Guidelines
Supported in routed mode.
Model License Requirement
All models Base License.
37-12Cisco ASA 5500 Series Configuration Guide using the CLI

Chapter 37 Configuring Management Access Configuring AAA for System Administrators
IPv6 Guidelines
Supports IPv6.
Additional Guidelines
You can define only one management access interface.
Note For the configurations that follow, 192.168.10.0/24 is the VPN pool for AnyConnect or IPsec VPN clients. Each configuration allows VPN client users to connect to ASDM or SSH to the ASA using the management interface IP address.
To allow only VPN client users access to ASDM or HTTP (and deny access to all other users), enter the following commands:
hostname(config)# http server enablehostname(config)# http 192.168.10.0 255.255.255.0 management_interface
To allow only VPN client users access to the ASA using SSH (and deny access to all other users), enter the following command:
hostname(config)# ssh 192.168.10.0 255.255.255.0 management_interface
Configuring a Management Interface
To configure the management interface, enter the following command:
Configuring AAA for System AdministratorsThis section describes how to enable authentication and command authorization for system administrators. Before you configure AAA for system administrators, first configure the local database or AAA server according to procedures listed in Chapter 35, “Configuring AAA Servers and the Local Database.”
This section includes the following topics:
• Information About AAA for System Administrators, page 37-14
• Licensing Requirements for AAA for System Administrators, page 37-17
• Prerequisites, page 37-17
• Guidelines and Limitations, page 37-18
• Default Settings, page 37-18
• Configuring Authentication for CLI and ASDM Access, page 37-19
• Configuring Authentication to Access Privileged EXEC Mode (the enable Command), page 37-19
Command Purpose
management access management_interface
Example:hostname(config)# management access inside
The management_interface specifies the name of the management interface that you want to access when entering the ASA from another interface.
37-13Cisco ASA 5500 Series Configuration Guide using the CLI
Chapter 37 Configuring Management Access Configuring AAA for System Administrators
• Limiting User CLI and ASDM Access with Management Authorization, page 37-21
• Configuring Command Authorization, page 37-22
• Configuring Management Access Accounting, page 37-30
• Viewing the Currently Logged-In User, page 37-30
• Recovering from a Lockout, page 37-31
• Setting a Management Session Quota, page 37-32
Information About AAA for System Administrators
This section describes AAA for system administrators and includes the following topics:
• Information About Management Authentication, page 37-14
• Information About Command Authorization, page 37-15
Information About Management Authentication
This section describes authentication for management access and includes the following topics:
• Comparing CLI Access with and without Authentication, page 37-14
• Comparing ASDM Access with and without Authentication, page 37-15
Comparing CLI Access with and without Authentication
How you log into the ASA depends on whether or not you enable authentication:
• If you do not enable any authentication for Telnet, you do not enter a username; you enter the login password (set with the password command). For SSH, you enter the username and the login password. You access user EXEC mode.
• If you enable Telnet or SSH authentication according to this section, you enter the username and password as defined on the AAA server or local user database. You access user EXEC mode.
To enter privileged EXEC mode after logging in, enter the enable command. How enable works depends on whether you enable authentication:
• If you do not configure enable authentication, enter the system enable password when you enter the enable command (set by the enable password command). However, if you do not use enable authentication, after you enter the enable command, you are no longer logged in as a particular user. To maintain your username, use enable authentication.
• If you configure enable authentication (see the Configuring Authentication to Access Privileged EXEC Mode (the enable Command), page 37-19), the ASA prompts you for your username and password again. This feature is particularly useful when you perform command authorization, in which usernames are important in determining the commands that a user can enter.
For enable authentication using the local database, you can use the login command instead of the enable command. login maintains the username but requires no configuration to turn on authentication. See the “Authenticating Users with the login Command” section on page 37-20 for more information.
37-14Cisco ASA 5500 Series Configuration Guide using the CLI
Chapter 37 Configuring Management Access Configuring AAA for System Administrators
Comparing ASDM Access with and without Authentication
By default, you can log into ASDM with a blank username and the enable password set by the enable password command. Note that if you enter a username and password at the login screen (instead of leaving the username blank), ASDM checks the local database for a match.
If you configure HTTP authentication, you can no longer use ASDM with a blank username and the enable password.
Information About Command Authorization
This section describes command authorization and includes the following topics:
• Supported Command Authorization Methods, page 37-15
• About Preserving User Credentials, page 37-15
• Security Contexts and Command Authorization, page 37-16
Supported Command Authorization Methods
You can use one of two command authorization methods:
• Local privilege levels—Configure the command privilege levels on the ASA. When a local, RADIUS, or LDAP (if you map LDAP attributes to RADIUS attributes) user authenticates for CLI access, the ASA places that user in the privilege level that is defined by the local database, RADIUS, or LDAP server. The user can access commands at the assigned privilege level and below. Note that all users access user EXEC mode when they first log in (commands at level 0 or 1). The user needs to authenticate again with the enable command to access privileged EXEC mode (commands at level 2 or higher), or they can log in with the login command (local database only).
Note You can use local command authorization without any users in the local database and without CLI or enable authentication. Instead, when you enter the enable command, you enter the system enable password, and the ASA places you in level 15. You can then create enable passwords for every level, so that when you enter enable n (2 to 15), the ASA places you in level n. These levels are not used unless you enable local command authorization (see the “Configuring Local Command Authorization” section on page 37-23). (See the command reference for more information about the enable command.)
• TACACS+ server privilege levels—On the TACACS+ server, configure the commands that a user or group can use after authenticating for CLI access. Every command that a user enters at the CLI is validated with the TACACS+ server.
About Preserving User Credentials
When a user logs into the ASA, that user is required to provide a username and password for authentication. The ASA retains these session credentials in case further authentication is needed later in the session.
When the following configurations are in place, a user needs only to authenticate with the local server for login. Subsequent serial authorization uses the saved credentials. The user is also prompted for the privilege level 15 password. When exiting privileged mode, the user is authenticated again. User credentials are not retained in privileged mode.
• The local server is configured to authenticate user access.
37-15Cisco ASA 5500 Series Configuration Guide using the CLI

Chapter 37 Configuring Management Access Configuring AAA for System Administrators
• Privilege level 15 command access is configured to require a password.
• The user account is configured for serial-only authorization (no access to console or ASDM).
• The user account is configured for privilege level 15 command access.
The following table shows how credentials are used in this case by the ASA.
Security Contexts and Command Authorization
The following are important points to consider when implementing command authorization with multiple security contexts:
• AAA settings are discrete per context, not shared among contexts.
When configuring command authorization, you must configure each security context separately. This configuration provides you the opportunity to enforce different command authorizations for different security contexts.
When switching between security contexts, administrators should be aware that the commands permitted for the username specified when they login may be different in the new context session or that command authorization may not be configured at all in the new context. Failure to understand that command authorizations may differ between security contexts could confuse an administrator. This behavior is further complicated by the next point.
• New context sessions started with the changeto command always use the default enable_15 username as the administrator identity, regardless of which username was used in the previous context session. This behavior can lead to confusion if command authorization is not configured for the enable_15 user or if authorizations are different for the enable_15 user than for the user in the previous context session.
This behavior also affects command accounting, which is useful only if you can accurately associate each command that is issued with a particular administrator. Because all administrators with permission to use the changeto command can use the enable_15 username in other contexts, command accounting records may not readily identify who was logged in as the enable_15 username. If you use different accounting servers for each context, tracking who was using the enable_15 username requires correlating the data from several servers.
When configuring command authorization, consider the following:
• An administrator with permission to use the changeto command effectively has permission to use all commands permitted to the enable_15 user in each of the other contexts.
• If you intend to authorize commands differently per context, ensure that in each context the enable_15 username is denied use of commands that are also denied to administrators who are permitted use of the changeto command.
When switching between security contexts, administrators can exit privileged EXEC mode and enter the enable command again to use the username that they need.
Credentials required
Username and Password Authentication
Serial Authorization
Privileged Mode Command Authorization
Privileged Mode Exit Authorization
Username Yes No No Yes
Password Yes No No Yes
Privileged Mode Password
No No Yes No
37-16Cisco ASA 5500 Series Configuration Guide using the CLI

Chapter 37 Configuring Management Access Configuring AAA for System Administrators
Note The system execution space does not support AAA commands; therefore, command authorization is not available in the system execution space.
Licensing Requirements for AAA for System Administrators
The following table shows the licensing requirements for this feature:
Prerequisites
Depending on the feature, you can use the following:
• AAA server—See the “Configuring AAA Server Groups” section on page 35-11.
• Local Database—See the “Adding a User Account to the Local Database” section on page 35-20.
Prerequisites for Management Authentication
Before the ASA can authenticate a Telnet, SSH, or HTTP user, you must identify the IP addresses that are allowed to communicate with the ASA. For more information, see the “Configuring ASA Access for ASDM, Telnet, or SSH” section on page 37-1.
Prerequisites for Local Command Authorization
• Configure enable authentication. (See the “Configuring Authentication for CLI and ASDM Access” section on page 37-19.) enable authentication is essential for maintaining the username after the user accesses the enable command.
Alternatively, you can use the login command (which is the same as the enable command with authentication; for the local database only), which requires no configuration. We do not recommend this option because it is not as secure as enable authentication.
You can also use CLI authentication, but it is not required.
• See the following prerequisites for each user type:
– Local database users—Configure each user in the local database at a privilege level from 0 to 15.
– RADIUS users—Configure the user with Cisco VSA CVPN3000-Privilege-Level with a value between 0 and 15.
– LDAP users—Configure the user with a privilege level between 0 and 15, and then map the LDAP attribute to Cisco VSA CVPN3000-Privilege-Level according to the “Configuring LDAP Attribute Maps” section on page 35-18.
Prerequisites for TACACS+ Command Authorization
• Configure CLI authentication (see the “Configuring Authentication for CLI and ASDM Access” section on page 37-19).
Model License Requirement
All models Base License.
37-17Cisco ASA 5500 Series Configuration Guide using the CLI

Chapter 37 Configuring Management Access Configuring AAA for System Administrators
• Configure enable authentication (see the “Configuring Authentication to Access Privileged EXEC Mode (the enable Command)” section on page 37-19).
Prerequisites for Managament Accounting
• Configure CLI authentication (see the “Configuring Authentication for CLI and ASDM Access” section on page 37-19).
• Configure enable authentication (see the “Configuring Authentication to Access Privileged EXEC Mode (the enable Command)” section on page 37-19).
Guidelines and Limitations
This section includes the guidelines and limitations for this feature.
Context Mode Guidelines
Supported in single and multiple context mode.
Firewall Mode Guidelines
Supported in routed and transparent firewall mode.
IPv6 Guidelines
Supports IPv6.
Default Settings
By default, the following commands are assigned to privilege level 0. All other commands are assigned to privilege level 15.
• show checksum
• show curpriv
• enable
• help
• show history
• login
• logout
• pager
• show pager
• clear pager
• quit
• show version
If you move any configure mode commands to a lower level than 15, be sure to move the configure command to that level as well, otherwise, the user will not be able to enter configuration mode.
To view all privilege levels, see the “Viewing Local Command Privilege Levels” section on page 37-26.
37-18Cisco ASA 5500 Series Configuration Guide using the CLI
Chapter 37 Configuring Management Access Configuring AAA for System Administrators
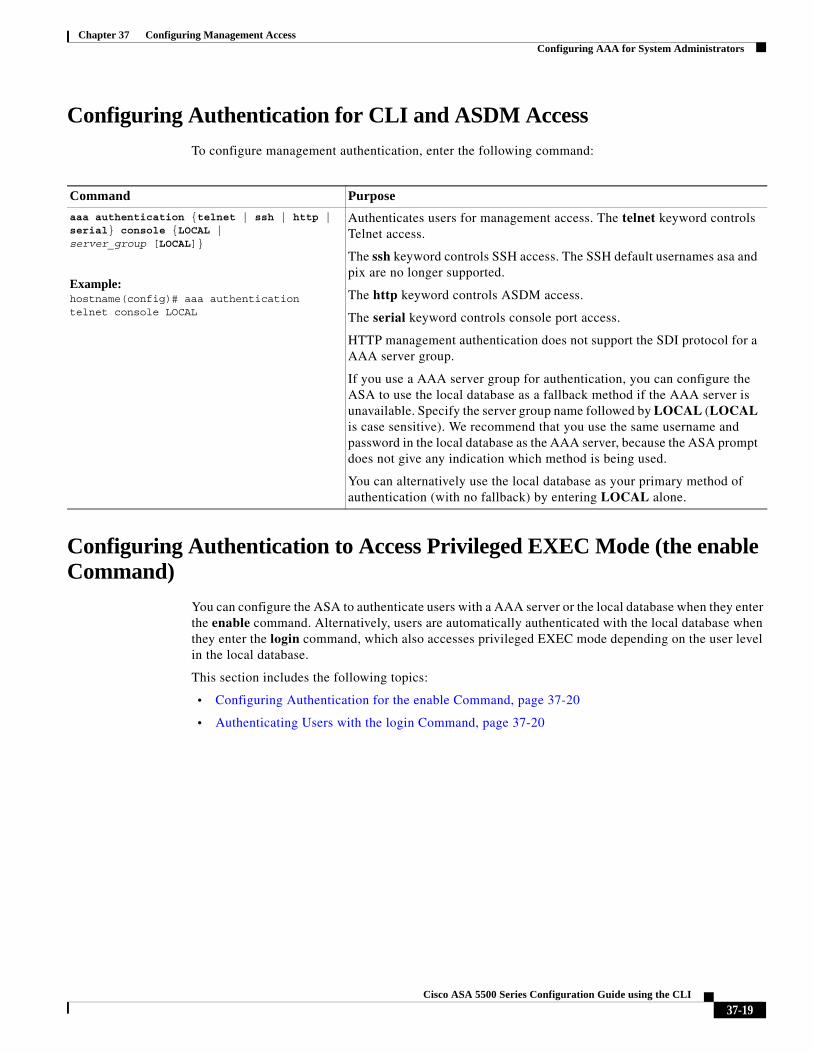
Configuring Authentication for CLI and ASDM Access
To configure management authentication, enter the following command:
Configuring Authentication to Access Privileged EXEC Mode (the enable Command)
You can configure the ASA to authenticate users with a AAA server or the local database when they enter the enable command. Alternatively, users are automatically authenticated with the local database when they enter the login command, which also accesses privileged EXEC mode depending on the user level in the local database.
This section includes the following topics:
• Configuring Authentication for the enable Command, page 37-20
• Authenticating Users with the login Command, page 37-20
Command Purpose
aaa authentication {telnet | ssh | http | serial} console {LOCAL | server_group [LOCAL]}
Example:hostname(config)# aaa authentication telnet console LOCAL
Authenticates users for management access. The telnet keyword controls Telnet access.
The ssh keyword controls SSH access. The SSH default usernames asa and pix are no longer supported.
The http keyword controls ASDM access.
The serial keyword controls console port access.
HTTP management authentication does not support the SDI protocol for a AAA server group.
If you use a AAA server group for authentication, you can configure the ASA to use the local database as a fallback method if the AAA server is unavailable. Specify the server group name followed by LOCAL (LOCAL is case sensitive). We recommend that you use the same username and password in the local database as the AAA server, because the ASA prompt does not give any indication which method is being used.
You can alternatively use the local database as your primary method of authentication (with no fallback) by entering LOCAL alone.
37-19Cisco ASA 5500 Series Configuration Guide using the CLI
Chapter 37 Configuring Management Access Configuring AAA for System Administrators
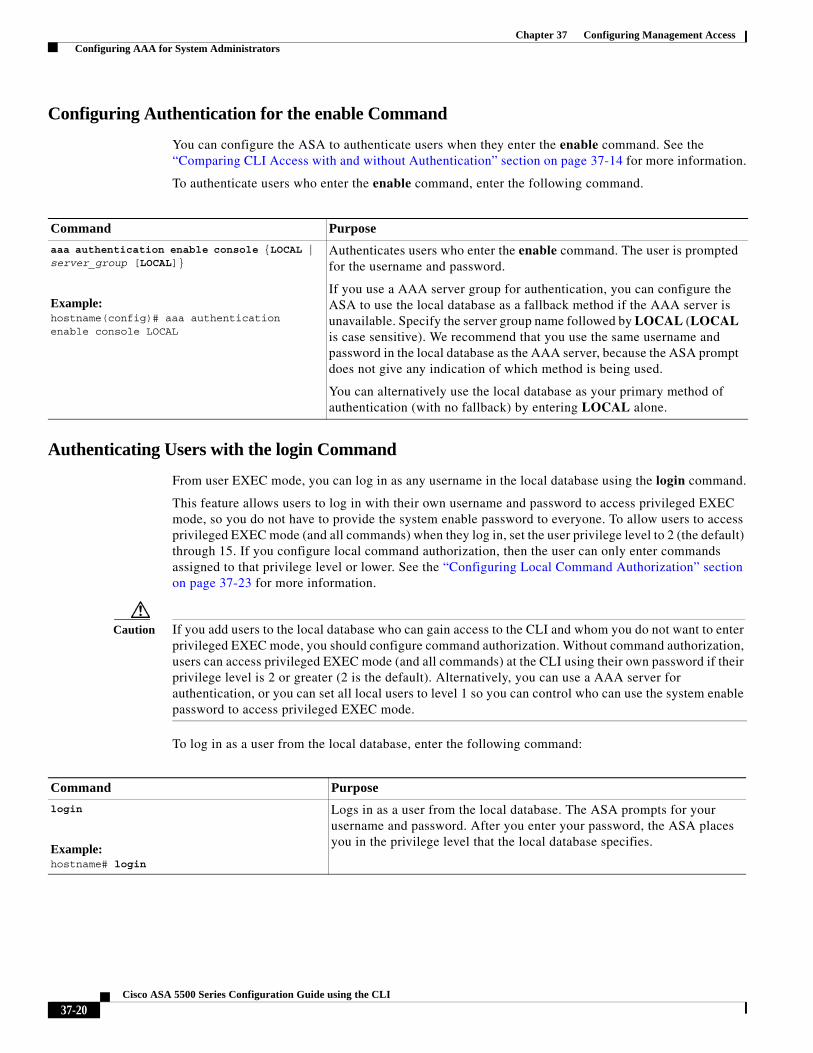
Configuring Authentication for the enable Command
You can configure the ASA to authenticate users when they enter the enable command. See the “Comparing CLI Access with and without Authentication” section on page 37-14 for more information.
To authenticate users who enter the enable command, enter the following command.
Authenticating Users with the login Command
From user EXEC mode, you can log in as any username in the local database using the login command.
This feature allows users to log in with their own username and password to access privileged EXEC mode, so you do not have to provide the system enable password to everyone. To allow users to access privileged EXEC mode (and all commands) when they log in, set the user privilege level to 2 (the default) through 15. If you configure local command authorization, then the user can only enter commands assigned to that privilege level or lower. See the “Configuring Local Command Authorization” section on page 37-23 for more information.
Caution If you add users to the local database who can gain access to the CLI and whom you do not want to enter privileged EXEC mode, you should configure command authorization. Without command authorization, users can access privileged EXEC mode (and all commands) at the CLI using their own password if their privilege level is 2 or greater (2 is the default). Alternatively, you can use a AAA server for authentication, or you can set all local users to level 1 so you can control who can use the system enable password to access privileged EXEC mode.
To log in as a user from the local database, enter the following command:
Command Purpose
aaa authentication enable console {LOCAL | server_group [LOCAL]}
Example:hostname(config)# aaa authentication enable console LOCAL
Authenticates users who enter the enable command. The user is prompted for the username and password.
If you use a AAA server group for authentication, you can configure the ASA to use the local database as a fallback method if the AAA server is unavailable. Specify the server group name followed by LOCAL (LOCAL is case sensitive). We recommend that you use the same username and password in the local database as the AAA server, because the ASA prompt does not give any indication of which method is being used.
You can alternatively use the local database as your primary method of authentication (with no fallback) by entering LOCAL alone.
Command Purpose
login
Example:hostname# login
Logs in as a user from the local database. The ASA prompts for your username and password. After you enter your password, the ASA places you in the privilege level that the local database specifies.
37-20Cisco ASA 5500 Series Configuration Guide using the CLI
Chapter 37 Configuring Management Access Configuring AAA for System Administrators
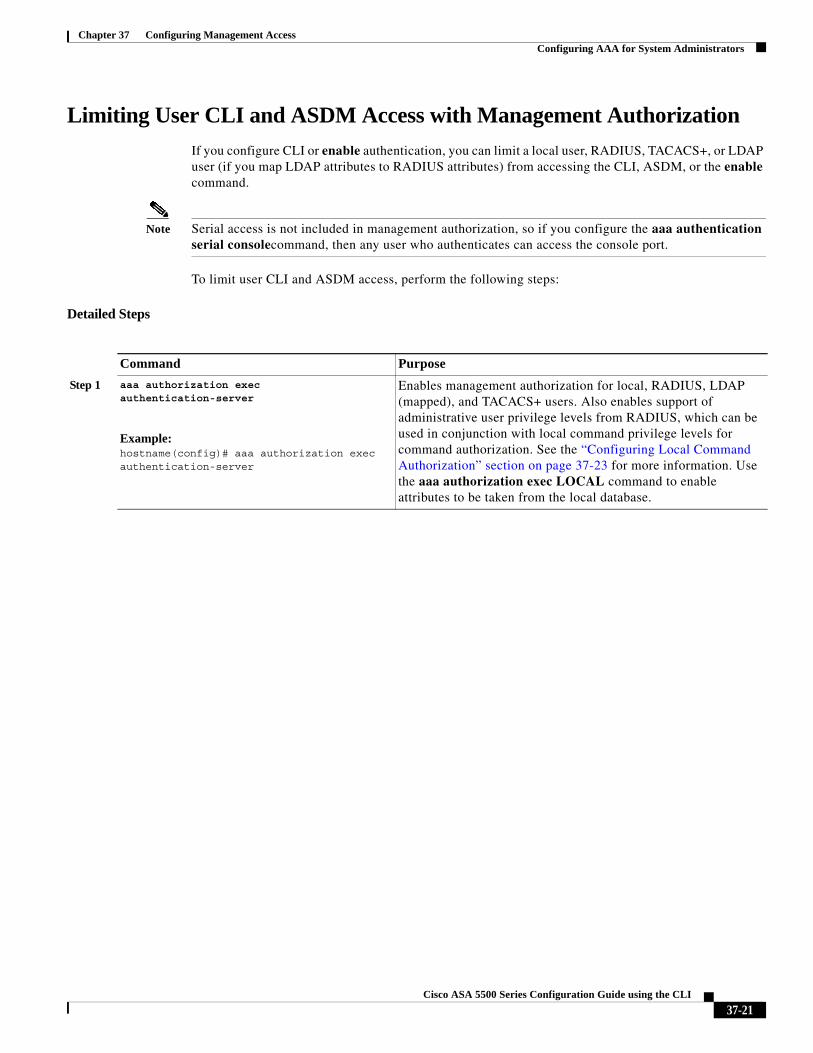
Limiting User CLI and ASDM Access with Management Authorization
If you configure CLI or enable authentication, you can limit a local user, RADIUS, TACACS+, or LDAP user (if you map LDAP attributes to RADIUS attributes) from accessing the CLI, ASDM, or the enable command.
Note Serial access is not included in management authorization, so if you configure the aaa authentication serial consolecommand, then any user who authenticates can access the console port.
To limit user CLI and ASDM access, perform the following steps:
Detailed Steps
Command Purpose
Step 1 aaa authorization exec authentication-server
Example:hostname(config)# aaa authorization exec authentication-server
Enables management authorization for local, RADIUS, LDAP (mapped), and TACACS+ users. Also enables support of administrative user privilege levels from RADIUS, which can be used in conjunction with local command privilege levels for command authorization. See the “Configuring Local Command Authorization” section on page 37-23 for more information. Use the aaa authorization exec LOCAL command to enable attributes to be taken from the local database.
37-21Cisco ASA 5500 Series Configuration Guide using the CLI
Chapter 37 Configuring Management Access Configuring AAA for System Administrators
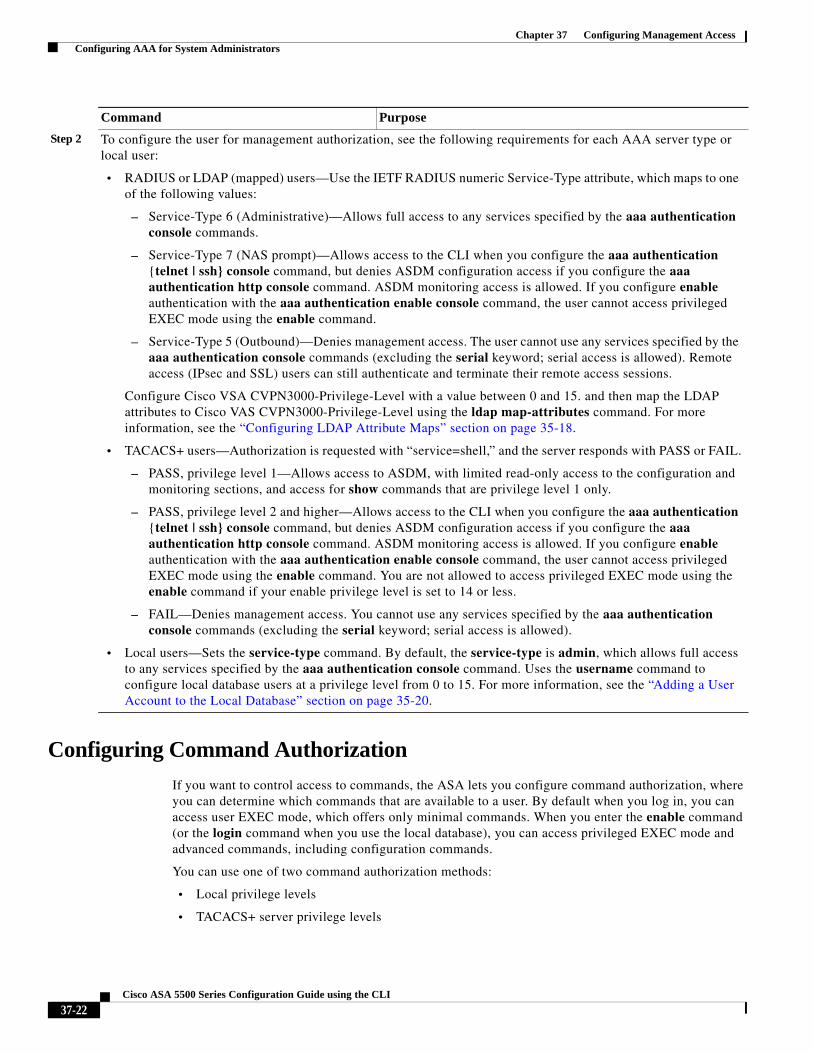
Configuring Command Authorization
If you want to control access to commands, the ASA lets you configure command authorization, where you can determine which commands that are available to a user. By default when you log in, you can access user EXEC mode, which offers only minimal commands. When you enter the enable command (or the login command when you use the local database), you can access privileged EXEC mode and advanced commands, including configuration commands.
You can use one of two command authorization methods:
• Local privilege levels
• TACACS+ server privilege levels
Step 2 To configure the user for management authorization, see the following requirements for each AAA server type or local user:
• RADIUS or LDAP (mapped) users—Use the IETF RADIUS numeric Service-Type attribute, which maps to one of the following values: – Service-Type 6 (Administrative)—Allows full access to any services specified by the aaa authentication
console commands.
– Service-Type 7 (NAS prompt)—Allows access to the CLI when you configure the aaa authentication {telnet | ssh} console command, but denies ASDM configuration access if you configure the aaa authentication http console command. ASDM monitoring access is allowed. If you configure enable authentication with the aaa authentication enable console command, the user cannot access privileged EXEC mode using the enable command.
– Service-Type 5 (Outbound)—Denies management access. The user cannot use any services specified by the aaa authentication console commands (excluding the serial keyword; serial access is allowed). Remote access (IPsec and SSL) users can still authenticate and terminate their remote access sessions.
Configure Cisco VSA CVPN3000-Privilege-Level with a value between 0 and 15. and then map the LDAP attributes to Cisco VAS CVPN3000-Privilege-Level using the ldap map-attributes command. For more information, see the “Configuring LDAP Attribute Maps” section on page 35-18.
• TACACS+ users—Authorization is requested with “service=shell,” and the server responds with PASS or FAIL.
– PASS, privilege level 1—Allows access to ASDM, with limited read-only access to the configuration and monitoring sections, and access for show commands that are privilege level 1 only.
– PASS, privilege level 2 and higher—Allows access to the CLI when you configure the aaa authentication {telnet | ssh} console command, but denies ASDM configuration access if you configure the aaa authentication http console command. ASDM monitoring access is allowed. If you configure enable authentication with the aaa authentication enable console command, the user cannot access privileged EXEC mode using the enable command. You are not allowed to access privileged EXEC mode using the enable command if your enable privilege level is set to 14 or less.
– FAIL—Denies management access. You cannot use any services specified by the aaa authentication console commands (excluding the serial keyword; serial access is allowed).
• Local users—Sets the service-type command. By default, the service-type is admin, which allows full access to any services specified by the aaa authentication console command. Uses the username command to configure local database users at a privilege level from 0 to 15. For more information, see the “Adding a User Account to the Local Database” section on page 35-20.
Command Purpose
37-22Cisco ASA 5500 Series Configuration Guide using the CLI

Chapter 37 Configuring Management Access Configuring AAA for System Administrators
For more information about command authorization, see the “Information About Command Authorization” section on page 37-15.
This section includes the following topics:
• Configuring Local Command Authorization, page 37-23
• Viewing Local Command Privilege Levels, page 37-26
• Configuring Commands on the TACACS+ Server, page 37-26
• Configuring TACACS+ Command Authorization, page 37-29
Configuring Local Command Authorization
Local command authorization lets you assign commands to one of 16 privilege levels (0 to 15). By default, each command is assigned either to privilege level 0 or 15. You can define each user to be at a specific privilege level, and each user can enter any command at the assigned privilege level or below. The ASA supports user privilege levels defined in the local database, a RADIUS server, or an LDAP server (if you map LDAP attributes to RADIUS attributes. See the “Configuring LDAP Attribute Maps” section on page 35-18.)
37-23Cisco ASA 5500 Series Configuration Guide using the CLI

Chapter 37 Configuring Management Access Configuring AAA for System Administrators
To configure local command authorization, perform the following steps:
Detailed Steps
Command Purpose
Step 1 privilege [show | clear | cmd] level level [mode {enable | cmd}] command command
Example:hostname(config)# privilege show level 5 command filter
Assigns a command to a privilege level.
Repeat this command for each command that you want to reassign.
The options in this command are the following:
• show | clear | cmd—These optional keywords let you set the privilege only for the show, clear, or configure form of the command. The configure form of the command is typically the form that causes a configuration change, either as the unmodified command (without the show or clear prefix) or as the no form. If you do not use one of these keywords, all forms of the command are affected.
• level level—A level between 0 and 15.
• mode {enable | configure}—If a command can be entered in user EXEC or privileged EXEC mode as well as configuration mode, and the command performs different actions in each mode, you can set the privilege level for these modes separately:
– enable—Specifies both user EXEC mode and privileged EXEC mode.
– configure—Specifies configuration mode, accessed using the configure terminal command.
• command command—The command you are configuring. You can only configure the privilege level of the main command. For example, you can configure the level of all aaa commands, but not the level of the aaa authentication command and the aaa authorization command separately.
Step 2 aaa authorization exec authentication-server
Example:hostname(config)# aaa authorization exec authentication-server
Supports administrative user privilege levels from RADIUS.
Enforces user-specific access levels for users who authenticate for management access (see the aaa authentication console LOCAL command).
Without this command, the ASA only supports privilege levels for local database users and defaults all other types of users to level 15.
This command also enables management authorization for local, RADIUS, LDAP (mapped), and TACACS+ users.
Use the aaa authorization exec LOCAL command to enable attributes to be taken from the local database. See the “Limiting User CLI and ASDM Access with Management Authorization” section on page 37-21 for information about configuring a user on a AAA server to accommodate management authorization.
37-24Cisco ASA 5500 Series Configuration Guide using the CLI

Chapter 37 Configuring Management Access Configuring AAA for System Administrators
Examples
The filter command has the following forms:
• filter (represented by the configure option)
• show running-config filter
• clear configure filter
You can set the privilege level separately for each form, or set the same privilege level for all forms by omitting this option. The following example shows how to set each form separately:
hostname(config)# privilege show level 5 command filterhostname(config)# privilege clear level 10 command filterhostname(config)# privilege cmd level 10 command filter
Alternatively, the following example shows how to set all filter commands to the same level:
hostname(config)# privilege level 5 command filter
The show privilege command separates the forms in the display.
The following example shows the use of the mode keyword. The enable command must be entered from user EXEC mode, while the enable password command, which is accessible in configuration mode, requires the highest privilege level:
hostname(config)# privilege cmd level 0 mode enable command enablehostname(config)# privilege cmd level 15 mode cmd command enablehostname(config)# privilege show level 15 mode cmd command enable
The following example shows an additional command, the configure command, which uses the mode keyword:
hostname(config)# privilege show level 5 mode cmd command configurehostname(config)# privilege clear level 15 mode cmd command configurehostname(config)# privilege cmd level 15 mode cmd command configurehostname(config)# privilege cmd level 15 mode enable command configure
Note This last line is for the configure terminal command.
Step 3 aaa authorization command LOCAL
Example:hostname(config)# aaa authorization command LOCAL
Enables the use of local command privilege levels, which can be checked with the privilege level of users in the local database, RADIUS server, or LDAP server (with mapped attributes).
When you set command privilege levels, command authorization does not occur unless you configure command authorization with this command.
Command Purpose
37-25Cisco ASA 5500 Series Configuration Guide using the CLI
Chapter 37 Configuring Management Access Configuring AAA for System Administrators
Viewing Local Command Privilege Levels
The following commandslet you view privilege levels for commands.
Examples
For the show running-config all privilege all command, the ASA displays the current assignment of each CLI command to a privilege level. The following is sample output from this command:
hostname(config)# show running-config all privilege allprivilege show level 15 command aaaprivilege clear level 15 command aaaprivilege configure level 15 command aaaprivilege show level 15 command aaa-serverprivilege clear level 15 command aaa-serverprivilege configure level 15 command aaa-serverprivilege show level 15 command access-groupprivilege clear level 15 command access-groupprivilege configure level 15 command access-groupprivilege show level 15 command access-listprivilege clear level 15 command access-listprivilege configure level 15 command access-listprivilege show level 15 command activation-keyprivilege configure level 15 command activation-key....
The following example displays the command assignments for privilege level 10:
hostname(config)# show running-config privilege level 10privilege show level 10 command aaa
The following example displays the command assignments for the access-list command:
hostname(config)# show running-config privilege command access-listprivilege show level 15 command access-listprivilege clear level 15 command access-listprivilege configure level 15 command access-list
Configuring Commands on the TACACS+ Server
You can configure commands on a Cisco Secure Access Control Server (ACS) TACACS+ server as a shared profile component, for a group, or for individual users. For third-party TACACS+ servers, see your server documentation for more information about command authorization support.
See the following guidelines for configuring commands in Cisco Secure ACS Version 3.1; many of these guidelines also apply to third-party servers:
• The ASA sends the commands to be authorized as shell commands, so configure the commands on the TACACS+ server as shell commands.
Command Purpose
show running-config all privilege all Shows all commands.
show running-config privilege level level Shows commands for a specific level. The level is an integer between 0 and 15.
show running-config privilege command command
Shows the level of a specific command.
37-26Cisco ASA 5500 Series Configuration Guide using the CLI
Chapter 37 Configuring Management Access Configuring AAA for System Administrators
Note Cisco Secure ACS might include a command type called “pix-shell.” Do not use this type for ASA command authorization.
• The first word of the command is considered to be the main command. All additional words are considered to be arguments, which need to be preceded by permit or deny.
For example, to allow the show running-configuration aaa-server command, add show running-configuration to the command field, and type permit aaa-server in the arguments field.
• You can permit all arguments of a command that you do not explicitly deny by checking the Permit Unmatched Args check box.
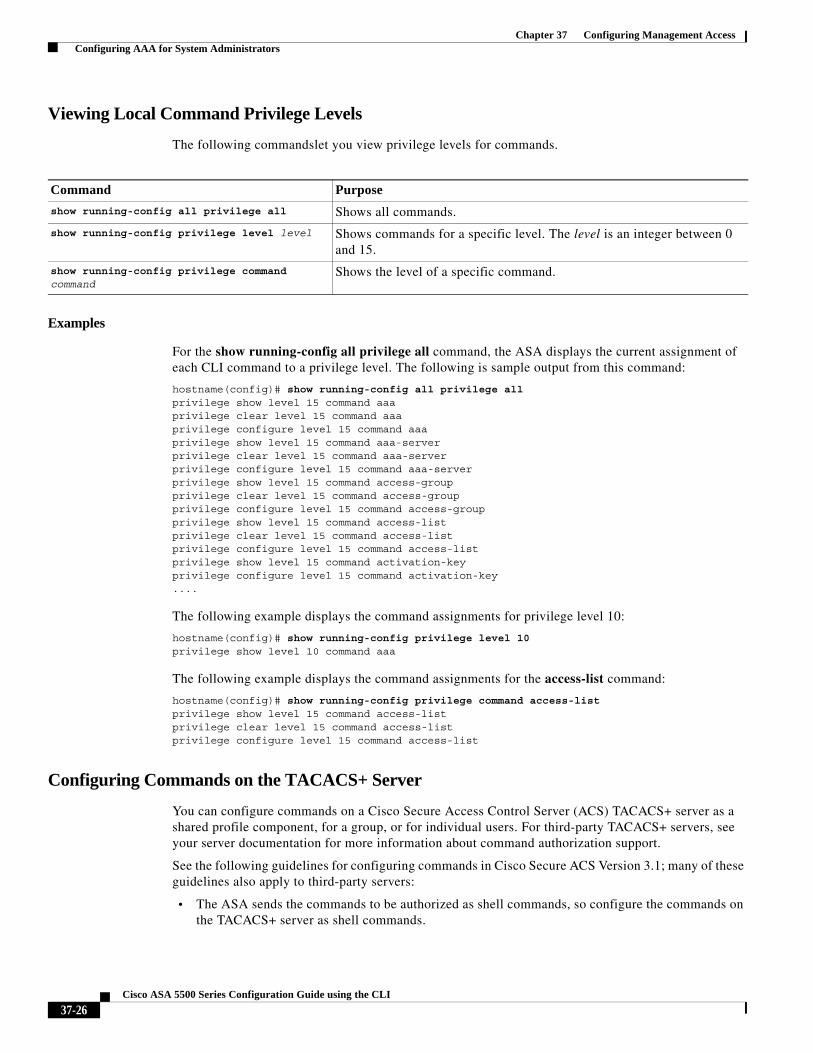
For example, you can configure just the show command, and then all the show commands are allowed. We recommend using this method so that you do not have to anticipate every variant of a command, including abbreviations and ?, which shows CLI usage (see Figure 37-1).
Figure 37-1 Permitting All Related Commands
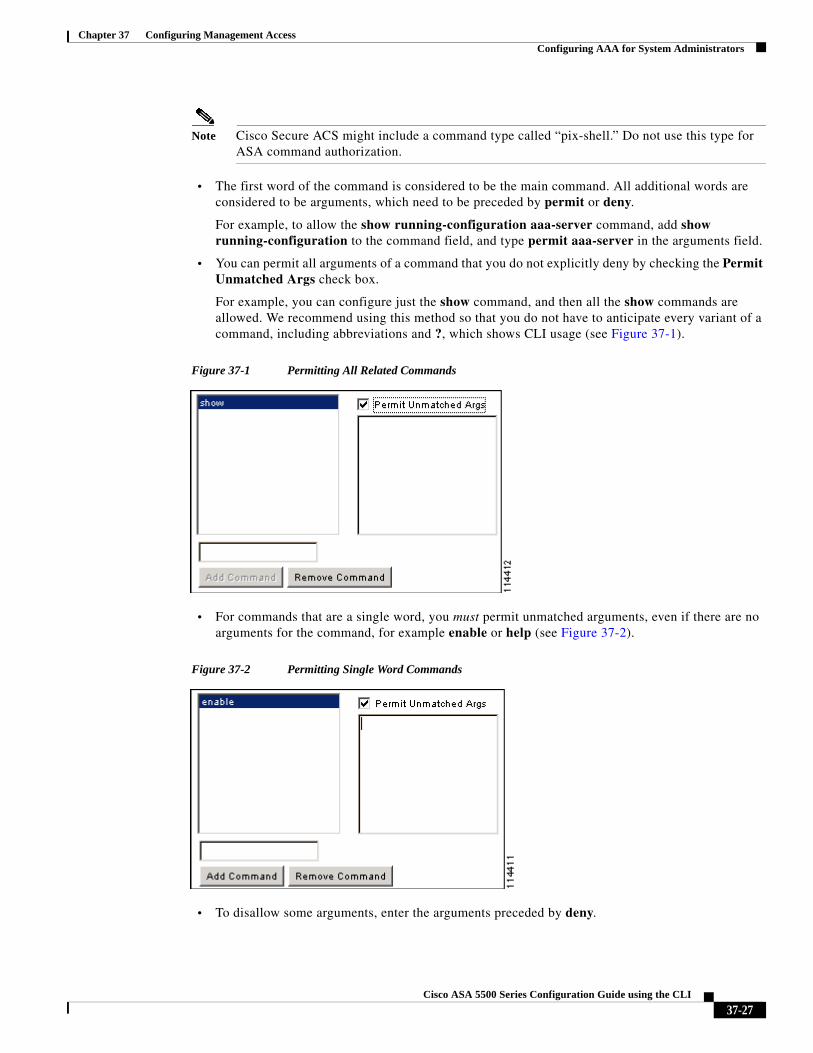
• For commands that are a single word, you must permit unmatched arguments, even if there are no arguments for the command, for example enable or help (see Figure 37-2).
Figure 37-2 Permitting Single Word Commands
• To disallow some arguments, enter the arguments preceded by deny.
37-27Cisco ASA 5500 Series Configuration Guide using the CLI
Chapter 37 Configuring Management Access Configuring AAA for System Administrators
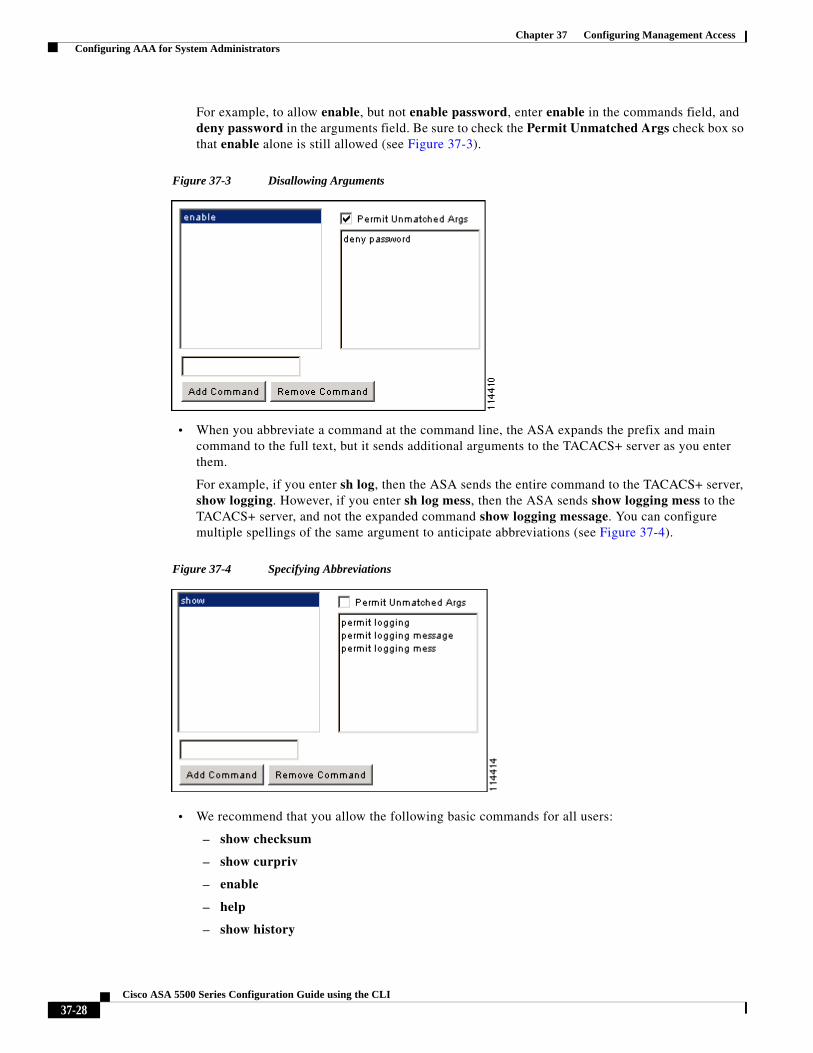
For example, to allow enable, but not enable password, enter enable in the commands field, and deny password in the arguments field. Be sure to check the Permit Unmatched Args check box so that enable alone is still allowed (see Figure 37-3).
Figure 37-3 Disallowing Arguments
• When you abbreviate a command at the command line, the ASA expands the prefix and main command to the full text, but it sends additional arguments to the TACACS+ server as you enter them.
For example, if you enter sh log, then the ASA sends the entire command to the TACACS+ server, show logging. However, if you enter sh log mess, then the ASA sends show logging mess to the TACACS+ server, and not the expanded command show logging message. You can configure multiple spellings of the same argument to anticipate abbreviations (see Figure 37-4).
Figure 37-4 Specifying Abbreviations
• We recommend that you allow the following basic commands for all users:
– show checksum
– show curpriv
– enable
– help
– show history
37-28Cisco ASA 5500 Series Configuration Guide using the CLI

Chapter 37 Configuring Management Access Configuring AAA for System Administrators
– login
– logout
– pager
– show pager
– clear pager
– quit
– show version
Configuring TACACS+ Command Authorization
If you enable TACACS+ command authorization, and a user enters a command at the CLI, the ASA sends the command and username to the TACACS+ server to determine if the command is authorized.
Before you enable TACACS+ command authorization, be sure that you are logged into the ASA as a user that is defined on the TACACS+ server, and that you have the necessary command authorization to continue configuring the ASA. For example, you should log in as an admin user with all commands authorized. Otherwise, you could become unintentionally locked out.
Do not save your configuration until you are sure that it works the way you want. If you get locked out because of a mistake, you can usually recover access by restarting the ASA. If you still get locked out, see the “Recovering from a Lockout” section on page 37-31.
Be sure that your TACACS+ system is completely stable and reliable. The necessary level of reliability typically requires that you have a fully redundant TACACS+ server system and fully redundant connectivity to the ASA. For example, in your TACACS+ server pool, include one server connected to interface 1, and another to interface 2. You can also configure local command authorization as a fallback method if the TACACS+ server is unavailable. In this case, you need to configure local users and command privilege levels according to procedures listed in the “Configuring Command Authorization” section on page 37-22.
To configure TACACS+ command authorization, enter the following command:
Detailed Steps
Command Purpose
aaa authorization command tacacs+_server_group [LOCAL]
Example:hostname(config)# aaa authorization command group_1 LOCAL
Performs command authorization using a TACACS+ server.
You can configure the ASA to use the local database as a fallback method if the TACACS+ server is unavailable. To enable fallback, specify the server group name followed by LOCAL (LOCAL is case sensitive). We recommend that you use the same username and password in the local database as the TACACS+ server because the ASA prompt does not give any indication which method is being used. Be sure to configure users in the local database (see the “Adding a User Account to the Local Database” section on page 35-20) and command privilege levels (see the “Configuring Local Command Authorization” section on page 37-23).
37-29Cisco ASA 5500 Series Configuration Guide using the CLI

Chapter 37 Configuring Management Access Configuring AAA for System Administrators
Configuring Management Access Accounting
You can send accounting messages to the TACACS+ accounting server when you enter any command other than show commands at the CLI. You can configure accounting when users log in, when they enter the enable command, or when they issue commands.
For command accounting, you can only use TACACS+ servers.
To configure management access and enable command accounting, perform the following steps:
Detailed Steps
Viewing the Currently Logged-In User
To view the current logged-in user, enter the following command:
hostname# show curpriv
The following is sample output from the show curpriv command:
hostname# show curprivUsername: adminCurrent privilege level: 15Current Mode/s: P_PRIV
Table 37-1 describes the show curpriv command output.
Command Purpose
Step 1 aaa accounting {serial | telnet | ssh | enable} console server-tag
Example:hostname(config)# aaa accounting telnet console group_1
Enables support for AAA accounting for administrative access.
Valid server group protocols are RADIUS and TACACS+.
Step 2 aaa accounting command [privilege level] server-tag
Example:hostname(config)# aaa accounting command privilege 15 group_1
Enables command accounting. Only TACACS+ servers support command accounting.
Where privilege level is the minimum privilege level and server-tag is the name of the TACACS+ server group to which the ASA should send command accounting messages.
Table 37-1 show curpriv Command Output Description
Field Description
Username Username. If you are logged in as the default user, the name is enable_1 (user EXEC) or enable_15 (privileged EXEC).
37-30Cisco ASA 5500 Series Configuration Guide using the CLI
Chapter 37 Configuring Management Access Configuring AAA for System Administrators
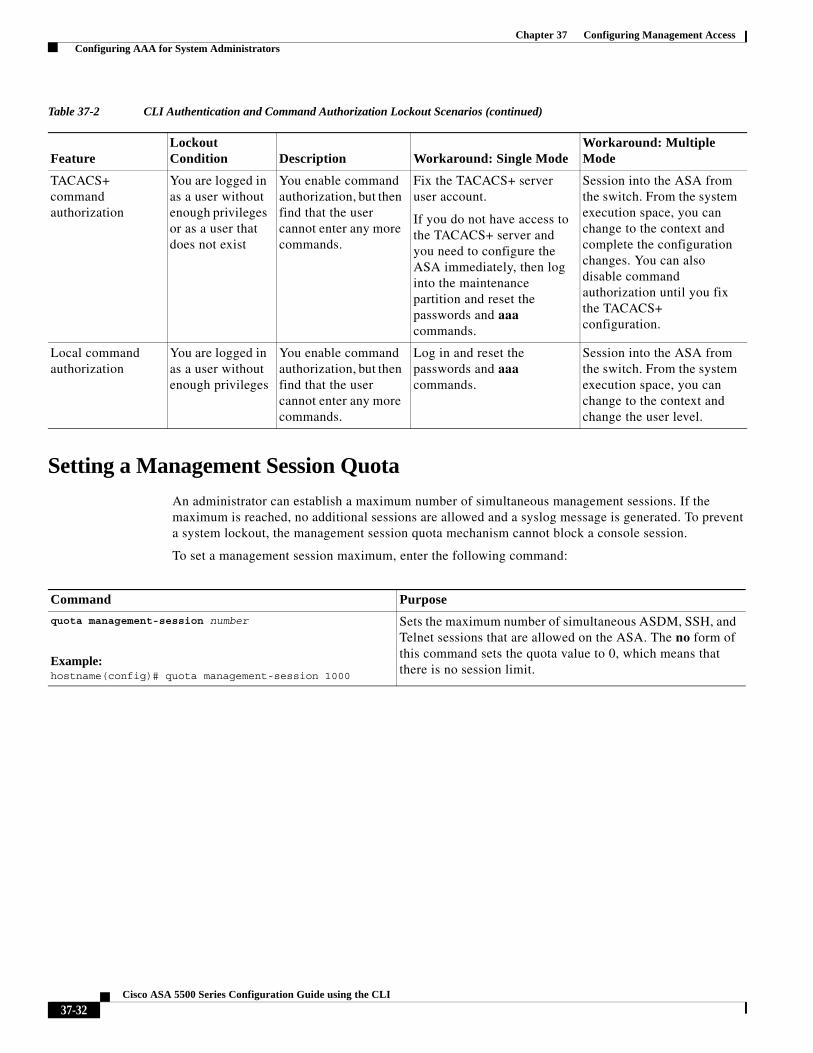
Recovering from a Lockout
In some circumstances, when you turn on command authorization or CLI authentication, you can be locked out of the ASA CLI. You can usually recover access by restarting the ASA. However, if you already saved your configuration, you might be locked out. Table 37-2 lists the common lockout conditions and how you might recover from them.
Current privilege level Levels range from 0 to 15. Unless you configure local command authorization and assign commands to intermediate privilege levels, levels 0 and 15 are the only levels that are used.
Current Mode/s The available access modes are the following:
• P_UNPR—User EXEC mode (levels 0 and 1)
• P_PRIV—Privileged EXEC mode (levels 2 to 15)
• P_CONF—Configuration mode
Table 37-1 show curpriv Command Output Description (continued)
Field Description
Table 37-2 CLI Authentication and Command Authorization Lockout Scenarios
FeatureLockout Condition Description Workaround: Single Mode
Workaround: Multiple Mode
Local CLI authentication
No users in the local database
If you have no users in the local database, you cannot log in, and you cannot add any users.
Log in and reset the passwords and aaa commands.
Session into the ASA from the switch. From the system execution space, you can change to the context and add a user.
TACACS+ command authorization
TACACS+ CLI authentication
RADIUS CLI authentication
Server down or unreachable and you do not have the fallback method configured
If the server is unreachable, then you cannot log in or enter any commands.
1. Log in and reset the passwords and AAA commands.
2. Configure the local database as a fallback method so you do not get locked out when the server is down.
1. If the server is unreachable because the network configuration is incorrect on the ASA, session into the ASA from the switch. From the system execution space, you can change to the context and reconfigure your network settings.
2. Configure the local database as a fallback method so you do not get locked out when the server is down.
37-31Cisco ASA 5500 Series Configuration Guide using the CLI
Chapter 37 Configuring Management Access Configuring AAA for System Administrators
Setting a Management Session Quota
An administrator can establish a maximum number of simultaneous management sessions. If the maximum is reached, no additional sessions are allowed and a syslog message is generated. To prevent a system lockout, the management session quota mechanism cannot block a console session.
To set a management session maximum, enter the following command:
TACACS+ command authorization
You are logged in as a user without enough privileges or as a user that does not exist
You enable command authorization, but then find that the user cannot enter any more commands.
Fix the TACACS+ server user account.
If you do not have access to the TACACS+ server and you need to configure the ASA immediately, then log into the maintenance partition and reset the passwords and aaa commands.
Session into the ASA from the switch. From the system execution space, you can change to the context and complete the configuration changes. You can also disable command authorization until you fix the TACACS+ configuration.
Local command authorization
You are logged in as a user without enough privileges
You enable command authorization, but then find that the user cannot enter any more commands.
Log in and reset the passwords and aaa commands.
Session into the ASA from the switch. From the system execution space, you can change to the context and change the user level.
Table 37-2 CLI Authentication and Command Authorization Lockout Scenarios (continued)
FeatureLockout Condition Description Workaround: Single Mode
Workaround: Multiple Mode
Command Purpose
quota management-session number
Example:hostname(config)# quota management-session 1000
Sets the maximum number of simultaneous ASDM, SSH, and Telnet sessions that are allowed on the ASA. The no form of this command sets the quota value to 0, which means that there is no session limit.
37-32Cisco ASA 5500 Series Configuration Guide using the CLI
Chapter 37 Configuring Management Access Feature History for Management Access
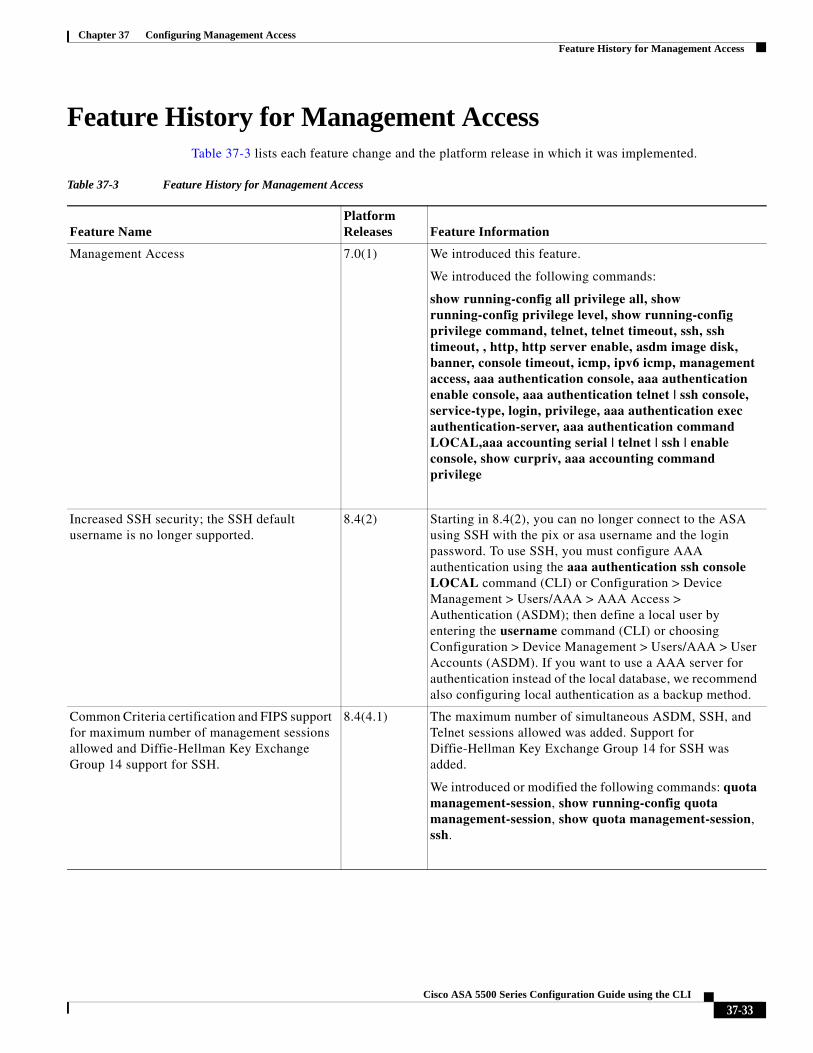
Feature History for Management AccessTable 37-3 lists each feature change and the platform release in which it was implemented.
Table 37-3 Feature History for Management Access
Feature NamePlatform Releases Feature Information
Management Access 7.0(1) We introduced this feature.
We introduced the following commands:
show running-config all privilege all, show running-config privilege level, show running-config privilege command, telnet, telnet timeout, ssh, ssh timeout, , http, http server enable, asdm image disk, banner, console timeout, icmp, ipv6 icmp, management access, aaa authentication console, aaa authentication enable console, aaa authentication telnet | ssh console, service-type, login, privilege, aaa authentication exec authentication-server, aaa authentication command LOCAL,aaa accounting serial | telnet | ssh | enable console, show curpriv, aaa accounting command privilege
Increased SSH security; the SSH default username is no longer supported.
8.4(2) Starting in 8.4(2), you can no longer connect to the ASA using SSH with the pix or asa username and the login password. To use SSH, you must configure AAA authentication using the aaa authentication ssh console LOCAL command (CLI) or Configuration > Device Management > Users/AAA > AAA Access > Authentication (ASDM); then define a local user by entering the username command (CLI) or choosing Configuration > Device Management > Users/AAA > User Accounts (ASDM). If you want to use a AAA server for authentication instead of the local database, we recommend also configuring local authentication as a backup method.
Common Criteria certification and FIPS support for maximum number of management sessions allowed and Diffie-Hellman Key Exchange Group 14 support for SSH.
8.4(4.1) The maximum number of simultaneous ASDM, SSH, and Telnet sessions allowed was added. Support for Diffie-Hellman Key Exchange Group 14 for SSH was added.
We introduced or modified the following commands: quota management-session, show running-config quota management-session, show quota management-session, ssh.
37-33Cisco ASA 5500 Series Configuration Guide using the CLI

Chapter 37 Configuring Management Access Feature History for Management Access
37-34Cisco ASA 5500 Series Configuration Guide using the CLI