configure pop-ups _ learn arcgis
DESCRIPTION
arcgis onlineTRANSCRIPT

12/01/2016 Configure popups | Learn ArcGIS
https://learn.arcgis.com/en/projects/getstartedwitharcgisonline/lessons/configurepopups/ 1/13
Configure popupsIn the previous lesson, you worked with many different layer properties. An
important layer property that you haven't worked with is pop‐up
configuration. In the first lesson, the pop‐ups for the Volcanoes and Lava
Flow Hazard Zones layers were prepared for you. In this lesson, you'll see
how those configurations were done. You'll start, however, by working on
the pop‐ups for the Emergency Shelters layer.
Configure emergency shelter popups
If necessary, sign in to your ArcGIS organization account.
Go to your My Content page and open your Hawaii Island Lava
Flow Hazard Zones map in the map viewer.
Click a shelter to open its pop‐up.
The basic configuration of a pop‐up is just what you see: a list of

12/01/2016 Configure popups | Learn ArcGIS
https://learn.arcgis.com/en/projects/getstartedwitharcgisonline/lessons/configurepopups/ 2/13
fields and values. The information should be familiar to you
because it comes straight from the CSV file ﴾except for the FID
field, a software‐added identification code﴿. Most pop‐ups are
essentially stylized views of a table of attributes associated with a
layer.
In this case, the default configuration has a few minor problems.
For example, the shelter name appears twice: first as the pop‐up
title, and again in the list of fields. Also, it's probably unnecessary
to show the state name—anyone using the map will know that this
is Hawaii. It's definitely unnecessary to show the FID field.
Close the pop‐up.
In the Contents pane, point to the Emergency Shelters layer. Click
the More Options button and choose Configure Pop‐up.
The default pop‐up title is a field name, usually the NAME field, in
curly brackets. Field names in curly brackets work like variables:
when you click a shelter on the map, you see the name of that
particular shelter.
Under the Pop‐up Contents heading, the display is set to a list of
field attributes. This setting defines the list format that you saw in
the pop‐up.
Under the list of attributes, click Configure Attributes.

12/01/2016 Configure popups | Learn ArcGIS
https://learn.arcgis.com/en/projects/getstartedwitharcgisonline/lessons/configurepopups/ 3/13
In the Configure Attributes window, attributes are listed by their
display status ﴾on or off﴿, field name, and field alias.
In the Display column, uncheck the box for the {NAME} field.
Uncheck the Display boxes for the {STATE} and {FID} fields as well.
﴾You need to scroll down slightly to see {FID}.﴿
Click OK.
At the bottom of the Configure Pop‐up pane, click Save Pop‐up.
Click an emergency shelter on the map to see its new pop‐up.

12/01/2016 Configure popups | Learn ArcGIS
https://learn.arcgis.com/en/projects/getstartedwitharcgisonline/lessons/configurepopups/ 4/13
Explore popups for other layers
You'll look again at pop‐ups for the other layers in the map.
The fields that you unchecked in the Configure Attributes window
no longer display in the pop‐up.
The pop‐up configuration has been saved
only to this map. To make it the default
configuration, you would open the
properties of the Emergency Shelters layer
and choose Save Layer. The layer would
then have this configuration whenever it
was added to a map.
Close the pop‐up.
Tip
Click a lava flow hazard zone on the map to open its pop‐up.

12/01/2016 Configure popups | Learn ArcGIS
https://learn.arcgis.com/en/projects/getstartedwitharcgisonline/lessons/configurepopups/ 5/13
The pop‐ups for this layer are configured just as they were in the
map you explored in the first lesson. The layer owner has saved
this configuration as a default property of the layer. You don't
need to do anything with it.
Click a highway.
Pop‐ups for the Highways layer have been turned off. You can
open pop‐ups for lava flow hazard zones underneath highways,
but not for highways themselves.
In the Contents pane, point to the Highways layer. Click the More
Options button and choose Enable Pop‐up.
Click a highway again.
12/01/2016 Configure popups | Learn ArcGIS
https://learn.arcgis.com/en/projects/getstartedwitharcgisonline/lessons/configurepopups/ 6/13
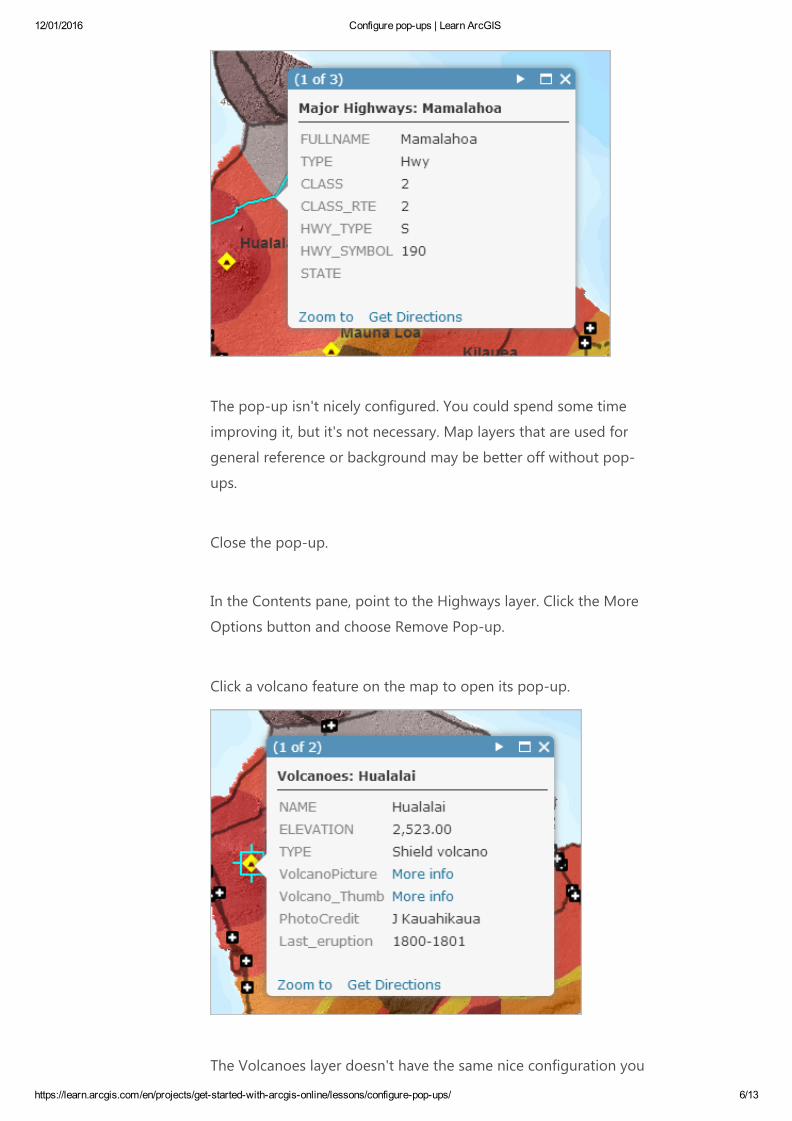
The pop‐up isn't nicely configured. You could spend some time
improving it, but it's not necessary. Map layers that are used for
general reference or background may be better off without pop‐
ups.
Close the pop‐up.
In the Contents pane, point to the Highways layer. Click the More
Options button and choose Remove Pop‐up.
Click a volcano feature on the map to open its pop‐up.
The Volcanoes layer doesn't have the same nice configuration you

12/01/2016 Configure popups | Learn ArcGIS
https://learn.arcgis.com/en/projects/getstartedwitharcgisonline/lessons/configurepopups/ 7/13
saw in the first lesson. That configuration was saved in the map,
but it was not saved as a default property of the layer. So now you
see the more typical list of fields and values. It will take some
effort on your part to make the pop‐up look good again.
With the Emergency Shelters layer, you saw that the information in
the pop‐up came directly from the CSV file. The same is true for
other layers: their pop‐ups are formatted presentations of table
data.
In the Contents pane, point to the Volcanoes layer and click the
Show Table button.
The information in the table matches the information in the pop‐
up.
In the table, two of the fields have URLs as values. URLs enable
pop‐ups to display images and other web resources. In the default
pop‐up configuration, these URLs are represented by More info
links.
Close the pop‐up.
Close the table by clicking the X in the upper right corner.

12/01/2016 Configure popups | Learn ArcGIS
https://learn.arcgis.com/en/projects/getstartedwitharcgisonline/lessons/configurepopups/ 8/13
Configure volcano popups
Configuring pop‐ups is the process of specifying which information from
a layer's table is shown in the pop‐up and how that information is
displayed. Part of this process involves formatting attribute names and
values. Part of it involves choosing a pop‐up style: information can
appear in a list, for example, or in a customized paragraph form. The final
part involves enhancing the pop‐up with images, charts, and links.
In the Contents pane, point to the Volcanoes layer. Click the More
Options button and choose Configure Pop‐up.
In the Pop‐up Title box, delete the text up to the {NAME} field.
The title will now show only the volcano name, not the layer name
as well.
Under Pop‐up Contents, keep the display set to a list of field
attributes. Below the list of attributes, click Configure Attributes.
In the Configure Attributes window, uncheck the Display boxes for
the following fields:
{NAME}

12/01/2016 Configure popups | Learn ArcGIS
https://learn.arcgis.com/en/projects/getstartedwitharcgisonline/lessons/configurepopups/ 9/13
The {NAME} field doesn't need to be displayed because it's already
used in the pop‐up title. The other three fields will be used in the
Pop‐up Media section. Only the {ELEVATION}, {TYPE}, and
{Last_eruption} fields should be checked to display.
{VolcanoPicture}
{VolcanoThumb}
{PhotoCredit}
In the Field Alias column, click ELEVATION to make the text
editable. Replace it with Elevation ﴾m﴿.
On the right side of the window, change the Format to 0 decimal
places.
An alias is a display name that replaces the field name in the pop‐
up. By default, the alias and field names match, but you can
change the alias to something more informative or familiar. In this
example, the parenthetical "m" means that the values are in
meters. ﴾This may not be self‐explanatory, and you can use a more
descriptive alias if you want.﴿

12/01/2016 Configure popups | Learn ArcGIS
https://learn.arcgis.com/en/projects/getstartedwitharcgisonline/lessons/configurepopups/ 10/13
In the Field Alias column, click TYPE. Replace it with Type and
press Enter.
Again in the Field Alias column, scroll down and click
Last_eruption. Replace it with Last eruption and press Enter.
Changing case and replacing underscores with spaces are small
improvements to the pop‐up display.
Click OK.
Now you'll configure the thumbnail image to display in the pop‐
up window and link to the large captioned image.
In the Configure Pop‐up pane, under Pop‐up Media, click Add and
choose Image.
In the Configure Image window, delete the default title ﴾Image 1﴿.

12/01/2016 Configure popups | Learn ArcGIS
https://learn.arcgis.com/en/projects/getstartedwitharcgisonline/lessons/configurepopups/ 11/13
Type Photo: in its place, and press the spacebar.
When you use the Add Field Name
button, the list shows both the field name
and its alias. When these are the same, as
they are by default, you see entries such
as "PhotoCredit {PhotoCredit}."
To the right of the Title box, click the Add Field Name button. In
the list of fields, scroll down and choose PhotoCredit
{PhotoCredit}.
Remember that field names work like variables. In the media part
of each pop‐up, the correct photographer's name will appear.
Note
In the Caption box, type Click image to learn more.
To the right of the URL box, click the Add Field Name button. In
the list of fields, scroll down and choose Volcano_Thumb
{Volcano_Thumb}.
The URL box must contain paths to images that are stored on a
publicly‐accessible server, such as your account on a photo‐
sharing site. These images will be displayed in the pop‐up and,
when clicked, will open the items referenced in the Link box.

12/01/2016 Configure popups | Learn ArcGIS
https://learn.arcgis.com/en/projects/getstartedwitharcgisonline/lessons/configurepopups/ 12/13
To the right of the Link box, click the Add Field Name button.
Scroll down and choose VolcanoPicture {VolcanoPicture}.
Unlike the URL box, the Link box doesn't have to reference images,
although it does in this case. It can go to web pages, PDFs, or any
resource with a URL.
Click OK.
At the bottom of the Configure Pop‐up pane, click Save Pop‐up.
Click a volcano on the map.

12/01/2016 Configure popups | Learn ArcGIS
https://learn.arcgis.com/en/projects/getstartedwitharcgisonline/lessons/configurepopups/ 13/13
Your map is complete. In the next lesson, you'll publish it as a web
mapping app. A web app allows you to customize the appearance and
functionality of your map to create an elegant user experience.
The pop‐up reflects your configuration. ﴾Some text formatting,
along with the horizontal separator lines, is applied automatically.﴿
Click the thumbnail image to test the link, and then close the
browser tab or window with the large picture.
Open pop‐ups for some other volcanoes.
When you’re finished, close any browser tabs or windows with
large volcano pictures. Close the open pop‐up on the map.
On the ribbon, click the Bookmarks button and click the Island of
Hawaii bookmark. ﴾Or click the Default extent button on the map
navigator.﴿
Save the map.