concealed vertical rod exit device installation instructions
TRANSCRIPT
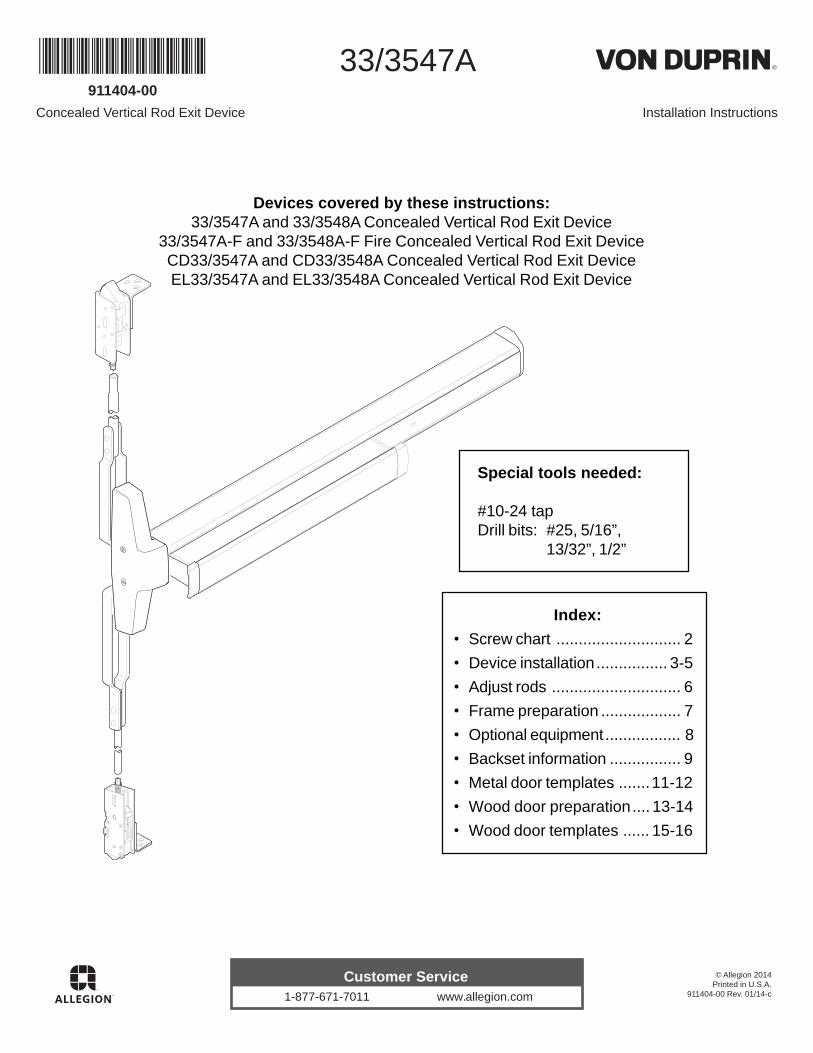
911404-00
© Allegion 2014Printed in U.S.A.
911404-00 Rev. 01/14-c
Concealed Vertical Rod Exit Device Installation Instructions
33/3547A
Customer Service1-877-671-7011 www.allegion.com
Devices covered by these instructions:33/3547A and 33/3548A Concealed Vertical Rod Exit Device
33/3547A-F and 33/3548A-F Fire Concealed Vertical Rod Exit DeviceCD33/3547A and CD33/3548A Concealed Vertical Rod Exit DeviceEL33/3547A and EL33/3548A Concealed Vertical Rod Exit Device
Index:Screw chart ............................ 2Device installation................ 3-5Adjust rods ............................. 6Frame preparation .................. 7Optional equipment................. 8Backset information ................ 9Metal door templates. .......11-12Wood door preparation.... 13-14Wood door templates ...... 15-16
Special tools needed:
#10-24 tapDrill bits: #25, 5/16”,
13/32”, 1/2”

2
1/4-20 x 1”
1/4-20 x 1-1/2”
Trim mount or sex bolts:
(2-1/4” door)
(1-3/4” door)
C #10-16 X 3/8” Thread cutting End cap
#10-24 X 3/4”
#10-24 X 1-1/8”
BSurface mount or
Sex bolts (2-1/4” door)
Sex bolts (1-3/4” door)
A
E
F
G
H
D
SCREW CHART
Bracket to latch#10-32 X 1/4”
* #10-24 X 1/2” Bracket to door
#10-24 X 1/2” 338 Strike
#10-24 X 1-1/2” Ratchet release
#10-32 X 3/8” Socket head Rod attachment
#8-18 x 3/8” Thread cutting Center case cover
I
J
K
Rod length adjustmentRod adjusting screw
#8-32 X 5/16” Retaining clip
* #10 X 1” Wood screw Bracket to door*Used with external tooth lock washer

3
Drill & tap
1/8" pilot drill (wood door)
1-9/32"
7/8"7/8"
7/16"
CL
CL
1-9/32"1-3/4"
2-1/4" Latchcase
Latch case
CL Latch case
2-1/4"
1-3/4" 1-9/32"
1-11/16"
7/8"7/8"
7/16"
CL Latchcase
Drill & tap
1/8" pilot drill (wood door)
of door
of door
1 2Draw horizontal and verticaldevice center lines ( ).CL
RHR shown(LHR opposite)
3Latch cases
(drill top and bottom of door)
Fire device (metal door)
Panic device (metal door)Panic and fire (wood door)
CLLatch
Drill 1/2” dia. hole(inside face of door)
Reinforcingrequired
Prepare top and bottom of doorfor latch mounting brackets.
Place paper device templateon door and prepare door.
See “Backset information” on page 9
4 Drill ratchet release holein door.
11/16” 1/2” Stop height13/16” 5/8” Stop height15/16” 3/4” Stop height
Once hung, door should have1/4” undercut (gap) at bottom
of door to finished floor
Paper templateMetal - pg. 11 & 12
Wood - pg. 15 & 16
Prepare mounting holes andcut-outs per template
See trim instructionsfor pull side door
preparation.
RHR shown(LHR opposite)
39-9/
16”
To bo
ttom
of do
or
CL
CL
For wood doors - See pages 13 & 14 forspecial door preparation instructions.
CL
CL

4
Cut device to length.Measure to determinelength to cut device.
Cut devicesquare and
remove all burrs
Note: Device mustbe cut square forproper end cap fit
Tape
Cover plate(flush to pushbar)
Pushbar
Anti-rattle clip(remove while cutting)
Prepare device for cutting
Cut device square
1-3/16” minimum clearance(with end cap removed)
”61/5
If 5/8” diameter wire access holehas been predrilled in door, cutdevice 5/16” from center of hole.
Note
dengila eciveDgnitnuom htiw
seloh
Assemble rods and latchesand adjust length.
Follow white and brown instructioncards on rods to set initial rod length
Install rods as shown.
NOTE: Fire devices on metal doors usebrackets on both sides of latches
Top latch & rod Bottom latch & rod
E D
F L-bracketsCAUTION:
L-brackets mustbe installed in
orientation shown
Shims used whenrequired for alignment
Fine tune thetotal lengthby threadinglatches in orout of rods
Measuretop
length
Measurebottomlength
Subtract1-9/16”
Total rod length(with latch bolt
extended)
Total rod length(with latch bolt
extended)
Subtract1-9/16”
CL CL
Rods are shipped with L-bracket attached. Insert rods with L-bracket pointing toward lock stile. Rotate rod until L-bracket protrudes through door cutout. If this is not possible, remove L-bracket and re-insert rod, then re-attach L-brackets.
5
7
6
8

5
Stop
9/16"
1-1/8"
3/8"
1/8"
Latch case
5/8"
StrikeC
1/4" 1"
2-3/4"
L
Install bottom strike orprepare threshold.
Install top strike andratchet release.
338 Top strike
See “Frame Preparation” onpage 7 for cut-out and holes
Ratchet release
Strike
Shim(if needed) Spacer
(use when framehas no door stop)
385-A Bottom strike
Threshold application
Flat thresholdapplication
I
JSee “Frame Preparation”
on page 7 for holes
Note: Thresholds are not tobe used with 38/3947-F
Roundededge
385-A strike has two pieces.Grout bottom piece into floorand attach top piece to bottomwith screw through slot.
CL
Remove material as necessary to accommodate latch bolt throw
5/8"
3/32"R max.
1-1/8"
Secure device to door andmount door to frame.
B
A
#425 Sex bolts(required)
#325 Sexbolts
or trim
lauqe eciveDot thgieh fo mottob
no rood dne hcae Bo
ttom
of d
oor
Mark and prepare 2mounting bracket holes
1/4” drill inside13/32” drill outside
Install tailpiece guide andattach rods to center case.
Place device over L- brackets and install adjustingscrews, then install retainers and locking screws
GH
Adjustingscrews
Lockingscrews
Retainers
Rotate tailpieceguide to match
tailpiece
*Tailpiece
Tailpieceguide
Cut tailpieceif needed
1/8”
Doo
rsu
rface
* Tailpiece is attached totrim or cylinder dependingon application
9
11
10
12

6
C
K
Install bottom adjusting screw through bottomrod and install bottom retaining clip and lockingscrew (Figure 2).
With top latch bolt still retracted, adjust bottomrod so latch bolt clears floor and bottom strike.
Close door and check bottom latch bolt for dead locking.
After bottom rod is fully adjusted per steps11 and 12, turn bottom locking screw in againstflat on adjusting screw. Do not over-tighten.
ADJUST RODSOpen door and release toplatch bolt as shown (Figure 1).
Remove bottom lockingscrew and retaining clip(Figure 2).
Disconnect bottom verticalrod by removing bottomadjusting screw.
Loosen top locking screw.
Rotate top adjustingscrew clockwise until toplatch bolt is fully extended(Figure 1).
Depress pushbar and release.
Make sure top latch bolt staysretracted as shown.
1.
2.
3.
4.
5.
6.
7.
8.
9.
10.
11.
12.
13.
Check device operation by opening and closingdoor several times from the outside.
Redo adjustment procedure if :
- Top latchbolt is not held retracted- Bottom latchbolt does not clear
floor and bottom strike
14.
15.
Bottomlatch bolt
(clears floorand strike)
Figure 3
Figure 4
Top latch boltShown fullyextended
Figure 1
Latch bolt retracted(flush with latch case)
Figure 2
Bottomadjusting
screw
Toplockingscrew
Topadjusting
screw
Bottomlockingscrew
Check top latch bolt for deadlocking(latch bolt should not push in).
Turn top locking screw in against flat onadjusting screw. Do not over-tighten.
Install end cap and center case covers.
Bottomretaining
clip
Remove protectivefilm from pushbar

7
CL
338 Top strike
Ratchet release
7/16”
1-1/8”
9/16”
#25 Drill#10-24 tap,
2 places
Latch case
Plunger must go thruhole in door.
Adjust so plungerreleases latch bolt
when door is closed.
Reinforcingrequired
Plunger
15/16”
Bevelededge
6” min.
1” min.
1/8”
Edge of stop1-5/16”
21/32”
13/32”
15/16”1-7/8”
Beveled edgeShould face this
direction in relationto doors
13/16”
13/32”1/4” dia.
82° csk. x 3/8”dia. in frame
Double door application
Latch bolt LHR doorLatch bolt RHR door
CLCLCL
FRAME PREPARATION
1-5/8”
Doors swing outthis direction

8
OPTIONAL EQUIPMENT
1. Remove mortise cylinder cam andreinstall in reverse (Figure 1).
2. Insert key and rotate cam to installthe cylinder to the cover plate (Figure 2).
3. Remove key to slide cover plate inposition in the mechanism case.
Std. mortisecylinder
Mortisecylinder
cam
Std. mortisecylinder
Mortisecylinder
camCD function conversion
Figure 1
Figure 2
Std. mortisecylinder
CylindercollarDogging
plate cover
Offset towardpushbar
Cylinderlocating washer
Cylinderlock nut
Mechanismcase
Turn cylinder key clockwise approx. 1/8turn for standard dogging
Dogging procedure
Depress pushbar
CD (CYLINDER DOGGING)

9
Doorstile
Backset
CL of device
CL of latch
2” Door stile
1-3/16” Device backset
CL of device
1/8” offset
CL of latch
For 2” stile doors ONLY! Latch C isoffset 1/8” from Device C as shown
BACKSET INFORMATIONNOTE: For 2” stile doors see bottom half of page
LL
SPECIAL INSTRUCTIONS FOR 2” STILE DOORS
Backset
Beveled edge door Rounded edge door
Backset
Min. stile Min. stile
Two verticalrod devices
(panic)
Single door(panic)
Fireapplications
Backset Min. stile Application
1-3/16”1-1/2”1-7/8”2-1/2”1-1/2”1-7/8”2-1/2”
2-3/4”
2-1/8”- 2-3/4”2-3/4”- 3-3/4”
3-3/4”- 5”5” to flush
2-1/2”- 3-3/4”3-3/4”- 5”5” to flush
3-5/8” to flush
Backset TableDoor type
Wood
Metal
1-5/16” AllNA
Backset is measured from outer edge of door as shown. Minimum stile is lessglass stop (rectangular glass stop is recommended for stiles less than 2-1/8”)
CL CL

10
This page intentionally
left blank

11X
X
Cut-outsdevice side
only
3-1/8”
3-1/8”
5/16” drill inside13/32” drill outside
Trim
Sex
bol
ts
For 3347A-F on hollowmetal doors #7 drill,
1/4-20 tap if no outsidetrim or sex bolts
are used.
CLDevice1/8” Radius
1/4”Radius
7/8”
19/32”
7/8”
1-3/4”
1-3/8”
1/4”
2-7/8”
2-7/8”
13/32”
13/16”
1-3/8”
5/16” drill inside1/2” drill outside
BacksetSee “BacksetInformation”on page 9
CLof device
METAL DOOR RHR33/3547A Device template
RHR
Line X-X is a reference line fortrim and exit device alignment.
Line X-X shown here shouldcorrespond to line X-X in thetrim installation instructions

12
METAL DOOR LHR33/3547A Device template
LHR
X
X
Cut-outsdevice side
only
3-1/8”
3-1/8”
5/16” drill inside13/32” drill outside
Trim
Sex
bol
ts
For 3347A-F on hollowmetal doors #7 drill,
1/4-20 tap if no outsidetrim or sex bolts
are used.
CLof device
CLof device
1/8” Radius
1/4”Radius
7/8”
19/32”
7/8”
1-3/4”
1-3/8”
1/4”
2-7/8”
2-7/8”
13/32”
13/16”
1-3/8”
5/16” drill inside1/2” drill outside
BacksetSee “BacksetInformation”on page 9
Line X-X is a reference line fortrim and exit device alignment.
Line X-X shown here shouldcorrespond to line X-X in thetrim installation instructions

13
WOOD DOOR PREPARATION - DOOR ROUTING
3-1/4”Minimum
2” Minimum
1/4”4”
1/2” Maximumthickness blocking
shown this viewonly. Not provided
by Von Duprin.
4”1/4”
3-1/4”Minimum
2” Minimum
C DeviceL
C of routingL
2-1/4” door
1-3/4” door
13/16”2 Places
39-13/16”To finished
floor
1-5/16”Backset
11/16” Reference top & bottom
1-7/16” Minimum top & bottomNOTE:Required door undercut is 1/4” fromfinished floor (panic and fire) or 1/8”from threshold (panic only)
Inside face oflock stile
NOTES:1. Mounting holes to be prepared at installation on door.2. Trim or control application may require additional preparation,
see trim or control instruction sheet.3. Door edging should be installed after device installation.
13/32”
2-7/8”
7/8” To routingLC
1”
LHR SHOWN(RHR OPPOSITE)
C Device and latchL
C Device and latchL
2-7/8”
7/8”
7/8” Slot thruinside face
only
1/8” Radius19/32”
1/4”
X
X

14
Blocking Blocking
Door wrap
Note: If not using door wrap, the blocking can be installed after device is installed.
WOOD DOOR PREPARATION - DOOR BLOCKING AND WRAP
A. Install door blocking. See page 13 for door blocking dimensions.
Note: Required on fire doors only, not supplied by Von Duprin (See door manufacturer’s requirements)
B. Install door wrap if needed. Door wrap is required for Fire rated (F) devices.

15
RHR
X
X
3-1/8”
3-1/8”
13/32” drill thru
Trim
Sex
bol
tsof device
CLof device
2-7/8”
1/4”
1/2” drill thru
A
2-7/8”19/32”
7/8”
7/8”
13/32”
13/16”
1/8” radius
Cut-outdevice side
only
A = 1-5/16” Backset as shownto outer edge of door
1-5/16”Backset
Beveled edge door Rounded edge door
1-5/16”Backset
WOOD DOOR RHR33/3547A Device
Template
Line X-X is a reference line fortrim and exit device alignment.
Line X-X shown here shouldcorrespond to line X-X in thetrim installation instructions
CL
CL CL
CL

16
LHR
X
X
3-1/8”
3-1/8”
13/32” drill thru
Trim
Sex
bol
tsof device
CLof device
2-7/8”
1/4”1/2” drill thru
A
2-7/8”19/32”
7/8”
7/8”
13/32”
13/16”
1/8” radius
Cut-outdevice side
only
A = 1-5/16” Backset as shownto outer edge of door
1-5/16”Backset
Beveled edge door Rounded edge door
1-5/16”Backset
WOOD DOOR LHR33/3547A Device
Template
Line X-X is a reference line fortrim and exit device alignment.
Line X-X shown here shouldcorrespond to line X-X in thetrim installation instructions
CL
CL CL
CL