compressor user guide - help.apple.com
TRANSCRIPT

Compressor User Guide

2Compressor User Guide
Contents
What’s new 4
Compressor 4.6 4
Compressor 4.5.3 4
Compressor 4.5 5
Compressor 4.4.7 6
Compressor 4.4.5 6
Compressor 4.4.4 7
Compressor 4.4.2 7
Compressor 4.4.1 8
Compressor 4.4 8
Compressor basics 9
What is Compressor? 9
Compressor workflow 10
Compressor interface 11
Simple transcoding 16
Intro to simple transcoding 16
Transcode files 17
Transcode incompatible media 22
Preview jobs 23
Built-in destinations 25
Built-in settings 26
Built-in locations 27
Watch folders 28
Work with watch folders 28
Add a watch folder 29
Activate a watch folder 30
Access watch folder settings and properties 30
Add and remove transcode settings from watch folders 31

3Compressor User Guide
Advanced adjustments 32
Intro to advanced adjustments 32
Work with settings 32
Work with destinations 84
Work with locations 86
Work with jobs 89
Work with batches 101
Advanced tasks 102
Import an image sequence 102
Work with surround sound files 104
Work with 360-degree video 108
Work with captions 112
Create iTunes Store packages 123
Create IMF packages 135
Modify frame size 140
Modify playback speed 144
Modify audio tracks 148
Add video and audio effects 149
Work with metadata 154
Add descriptive audio 156
Set a poster frame 157
Add markers 157
Transcode time ranges 161
Modify starting timecode 162
Import other video files 163
Work smarter 164
Compressor preferences 164
Keyboard shortcuts 168
Wide color gamut and HDR 178
Create and use droplets 182
Create Compressor instances 183
Transcode Final Cut Pro and Motion projects 183
Use distributed processing 184
Glossary 192
Copyright 200

4Compressor User Guide
What’s new
What’s new in Compressor 4.6Compressor 4.6 introduces new features and enhancements, detailed below.
System requirementsThe minimum system requirement for Compressor 4.6 is macOS 11.5.1. To pass through metadata from Cinematic mode video, macOS Monterey 12 is required. For more information, go to the Final Cut Pro Tech Specs webpage, then click Compressor at the top of the page.
Canon RAWCompressor can now transcode Canon RAW video files. See Import Canon Cinema RAW Light video.
Watch FoldersThe Watch Folders feature lets Compressor automatically transcode any media files that you add to specially configured watch folders. See Work with watch folders.
Cinematic mode video pass-throughWhen you import Cinematic mode video clips on a Mac running macOS Monterey 12 or later, all the focus points and metadata can be preserved when transcoding to compatible formats. See QuickTime Movie settings.
What’s new in Compressor 4.5.3Compressor 4.5.3 introduces new features and enhancements, detailed below.
System requirementsThe recommended system requirement for Compressor 4.5.3 is macOS 11. The minimum system requirement is macOS 10.15.6. For more information, go to the Final Cut Pro Tech Specs webpage, then click Compressor at the top of the page.

5Compressor User Guide
Vertical and square videoCompressor can transcode video to and from all aspect ratios. See Modify a frame size in Compressor.
Descriptive audioCompressor can create accessible video content by adding descriptive audio tracks to describe the action in your video. See Add descriptive audio tracks in Compressor.
NotificationsCompressor will send notifications to Notification Center when a job succeeds, fails, or is canceled.
Indexed colorCompressor can create image sequences with new indexed color and dithering options. See Image Sequence settings in Compressor.
Starting timecodeCompressor can modify the starting timecode for transcoded media. See Modify starting timecode in Compressor.
What’s new in Compressor 4.5Compressor 4.5 introduces new features and enhancements, detailed below.
System requirementsThe recommended system requirement for Compressor 4.5 is macOS 11. The minimum system requirement is macOS 10.15.6. For more information, go to Final Cut Pro tech specs, then click Compressor at the top of the page.
Apple siliconCompressor now runs natively on Apple silicon and Intel-based Mac computers.
Searchable Compressor User GuideSearch the online Compressor User Guide by typing your query into the search field at the top of any page, then pressing Return.
Downloadable Compressor User Guide PDFSearch the Compressor User Guide as a PDF for offline access to help content. Click Download the PDF at the bottom of the Compressor User Guide Welcome page.

6Compressor User Guide
What’s new in Compressor 4.4.7Compressor 4.4.7 introduces the following new features:
Camera log conversionCompressor 4.4.7 includes support for converting from log to SDR and HDR color spaces by applying custom and built-in lookup tables (LUTs) for Panasonic, Sony, Canon, Blackmagic, Nikon, and ARRI log formats.
Custom LUT effectCompressor 4.4.7 includes support for applying third-party creative LUTs to add a custom look. See Video effects in Compressor.
Encoder Extensions SDKCompressor 4.4.7 includes support for the new Encoder Extensions SDK. See the Professional Video Applications Framework website.
Interoperable Master Format (IMF) package exportCompressor 4.4.7 now supports the creation and export of IMF packages. See Intro to IMF packages in Compressor.
What’s new in Compressor 4.4.5Compressor 4.4.5 introduces the following new features:
Metal-based processing engineCompressor 4.4.5 includes a new processing engine that improves playback and accelerates rendering, compositing, and exporting.
Optimized for Mac ProCompressor 4.4.5 is optimized for Mac Pro, using up to 28 CPU cores, multiple GPUs, and an Afterburner card. Afterburner enhances decode performance for ProRes files.
HDR in preview window Optimized for Pro Display XDRCompressor 4.4.5 now supports HDR display in the preview window when viewing on the Pro Display XDR and other supported displays.

7Compressor User Guide
Fragmented MP4 (fMP4) file support for HTTP live streamingCompressor 4.4.5 now has the option to output fragmented MP4 (fMP4) files when transcoding files to support HTTP live streaming (HLS). See “Prepare for HTTP Live Streaming” in Job action properties in Compressor.
Watermark enhancementsCompressor 4.4.5 now automatically scales watermarks based on the frame size of the source material. See Video effects in Compressor.
Text and timecode enhancementsCompressor 4.4.5 can now automatically choose the font size of text and timecode overlays based on the frame size of the source material. In addition, Compressor now supports additional formats when displaying timecode in transcoded files, including drop frame, non-drop frame, relative, and absolute timecode. See Video effects in Compressor.
What’s new in Compressor 4.4.4Compressor 4.4.4 introduces the following new features:
Identify incompatible mediaSome media formats will not be compatible with versions of macOS after macOS Mojave. Compressor 4.4.4 identifies those media files and settings. See Transcode incompatible media.
What’s new in Compressor 4.4.2Compressor 4.4.2 introduces the following new features:
64-bit architectureCompressor is now a 64-bit application, which supports larger frame sizes and takes advantage of all system memory.
Closed-caption enhancementsCompressor now supports SRT subtitles. See Intro to supporting captions in Compressor.
Automatic settings configurationCompressor now simplifies codec selection for MXF and QuickTime settings by analyzing other selected properties, such as dimensions and frame rate. See MXF settings in Compressor and QuickTime Movie settings in Compressor.

8Compressor User Guide
What’s new in Compressor 4.4.1Compressor 4.4.1 introduces the following new features:
Captions and subtitles editingImport, edit, and then embed closed captions and subtitles in video, in both standard transcoding jobs and in iTunes Store packages. See Intro to supporting captions in Compressor and Build iTunes Store packages using Compressor.
Descriptive audioAdd optional voice narration to iTunes Store packages to help visually impaired consumers understand what’s happening onscreen. See Build iTunes Store packages using Compressor.
Custom motion menus for Blu-ray and DVD discsAdd user-supplied motion menus (with optional audio) to Blu-ray and DVD discs. See Disc-burning job actions.
What’s new in Compressor 4.4Compressor 4.4 introduces new features and enhancements, detailed below.
360° video deliveryExport immersive 360° video in a wide range of formats and styles, saving the video to your Mac or sharing it on the web. See Intro to Compressor 360° video.
High-dynamic-range video• Deliver high-dynamic-range (HDR) video in HDR10 and hybrid log-gamma (HLG)
formats. See Intro to wide color gamut and HDR in Compressor.
• Create HDR packages for submission to the iTunes Store in Dolby Vision and HDR10 formats. See Submit HDR content to the iTunes Store in Compressor.
HEVC encodingEncode with the new HEVC format (High-Efficiency Video Coding, also known as H.265) for high-quality video with smaller file sizes. Several built-in settings in Compressor allow you to encode video files in the HEVC format, including Apple Devices settings in Compressor, MPEG-4 settings in Compressor, and QuickTime Movie settings in Compressor.
Enhanced MXF exportCreate MXF (Material eXchange Format) files using a variety of compression types, including AVC-Intra, D-10/IMX, Apple ProRes, and XDCAM HD. See MXF settings in Compressor.
9Compressor User Guide
Compressor basics
What is Compressor?
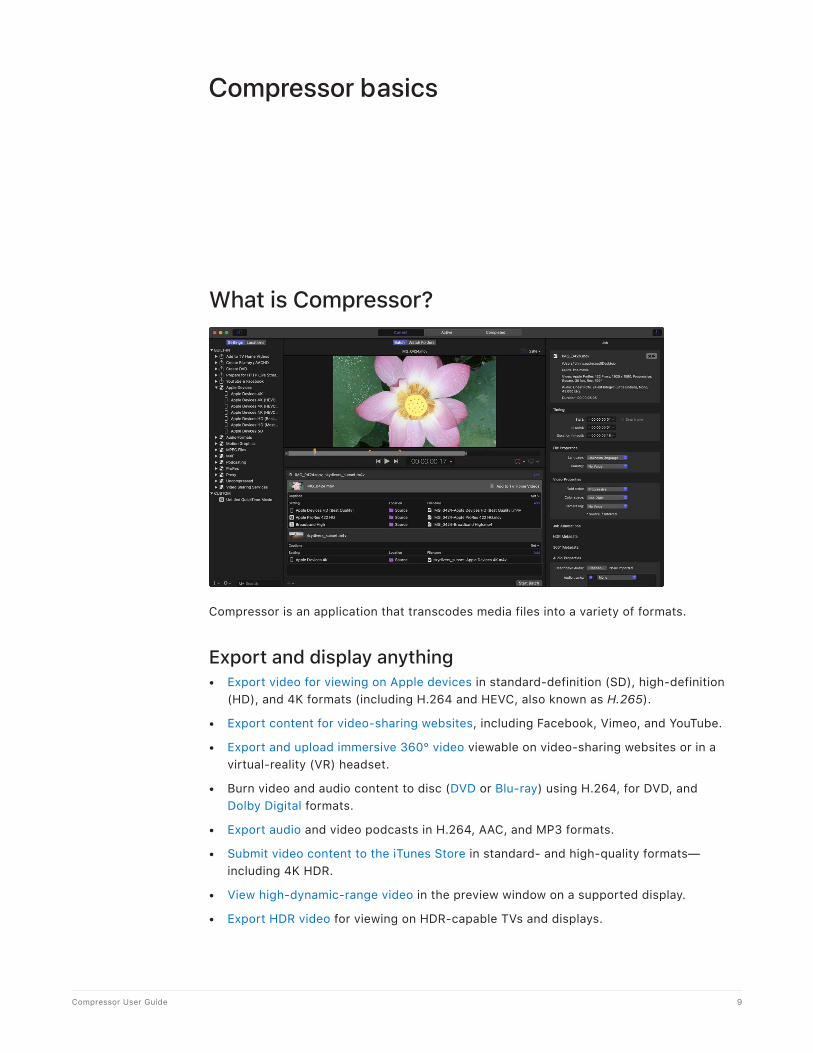
Compressor is an application that transcodes media files into a variety of formats.
Export and display anything• Export video for viewing on Apple devices in standard-definition (SD), high-definition
(HD), and 4K formats (including H.264 and HEVC, also known as H.265).
• Export content for video-sharing websites, including Facebook, Vimeo, and YouTube.
• Export and upload immersive 360° video viewable on video-sharing websites or in a virtual-reality (VR) headset.
• Burn video and audio content to disc (DVD or Blu-ray) using H.264, for DVD, and Dolby Digital formats.
• Export audio and video podcasts in H.264, AAC, and MP3 formats.
• Submit video content to the iTunes Store in standard- and high-quality formats—including 4K HDR.
• View high-dynamic-range video in the preview window on a supported display.
• Export HDR video for viewing on HDR-capable TVs and displays.

10Compressor User Guide
Leverage built-in settings and destinationsCompressor comes with built-in settings that you can use to transcode files into the most common media formats.
Compressor also provides preconfigured destinations that transcode files and then perform actions on the transcoded files. For example, if you transcode a source file using the built-in Add to TV Home Videos destination, the destination outputs a high-quality QuickTime movie file and then automatically adds the file to your Home Videos library on Apple TV.
Customize your output for efficiencyIn addition to transcoding source files, you can use Compressor to:
• Create custom settings and destinations. You can use a variety of formats to build custom settings and destinations tailored to your unique transcoding workflows. For example, you can create a custom setting with specific frame dimensions or with video and audio filters applied. And when you create a destination, you can apply a job action that is performed after the file is transcoded—such as sending an email message or running an Automator workflow.
• Create settings to transcode Final Cut Pro and Motion projects. You can create a custom setting in Compressor and then use it to transcode Final Cut Pro or Motion projects. For example, you can create a setting that outputs a file with the bit rate of your choice.
• Transcode files using a network of shared computers. If you need more processing power and shorter transcoding times, you can create a group of shared computers to distribute and speed the transcoding process.
• Create Compressor droplets. You can create a droplet to simplify your workflow. A droplet is a standalone application that lets you transcode media files in the Finder by simply dragging and dropping.
• Create Watch Folders. You can configure a watch folder in Compressor to transcode media files as soon as they are saved, exported, or moved to that folder.
Compressor workflowThe basic process of transcoding files in Compressor is described below.
Import your media into CompressorThe first step in the transcoding process is to add one or more media source files to Compressor. You can add media files from your computer or a connected storage device. Each media source file in Compressor is called a job. Each transcoding session, containing one or more jobs, is called a batch.

11Compressor User Guide
Apply transcoding instructionsAfter you add a source file, apply one or more transcoding instructions to it. Compressor provides a variety of preconfigured transcoding instructions called settings, which you can use to convert files to the most common media formats. If you want, you can modify the setting’s properties to meet your requirements.
Compressor also provides a number of preconfigured destinations, which combine settings and a post-transcoding action, such as burning a Blu-ray disc.
Choose an output locationDesignate a location on your computer or on a connected storage device where you want to save the transcoded media file. You can choose any of several preconfigured locations, including your computer desktop, your Movies folder, or a custom location.
Submit your media for transcodingAfter you assign settings or a destination and specify an output location in Compressor, click the Start Batch button to begin the transcoding process. You can monitor the progress of the transcoding in Active view. After transcoding is complete, you can see information about the settings or destinations you used in Completed view.
You can also automatically apply transcoding instructions to any media source files saved or moved into a specially configured watch folder. For detailed instructions on watch folders, see Work with watch folders in Compressor.
See Transcode files in Compressor to view a list of detailed instructions.
Compressor interfaceThe Compressor window has three views: Current, Active, and Completed. You can switch between these views by clicking a view button at the top of the window.
Current viewCurrent view is the default view in Compressor. It contains two panes: the Batch pane, where you can prepare and submit transcoding jobs in batches; and the Watch Folders pane, where you can set up watch folders and configure Compressor to automatically transcode files when they’re added to the folders.

12Compressor User Guide
• Batch pane: The Batch pane has two basic areas, one for previewing your media files and the other for displaying the transcoding batches to be processed in a given session.
• Preview area: A viewer with playback controls that shows how your media file will look and sound after transcoding. In this area you can also add metadata and markers to be included in the transcoded file.
• Batch area: A list under the preview area that displays the transcoding batches you add to Compressor. A batch is one or more transcoding jobs. A job is a source file to which you apply transcoding instructions. Each job in the batch area displays information about the source file, the job’s transcoding instructions (setting, output location, output filename, and any caption data that you’ve added), and post-transcoding actions (such as uploading the finished file to a video-sharing website).
• Watch Folders pane: The Watch Folders pane displays the list of watch folders you’ve added to Compressor, along with the transcoding jobs that each watch folder applies to the files added to them.

13Compressor User Guide
Important: If you use Compressor 4.5.4 or earlier, then open Compressor 4.6, the preview area may not appear in the Batch pane. This is because earlier versions of Compressor don’t support the watch folders feature. To display the preview area again, choose Window > Reset to Default Layout.
You can expand the Current view to display additional areas:
• Settings and Locations pane: Click the Settings & Locations button at the top-left corner of the Compressor window to expand this area, then click Settings or Locations to display the individual panes. The Settings pane provides quick access to all the built-in destinations and settings, as well as to any custom destinations or settings that you created. Likewise, the Locations pane provides quick access to all the built-in save locations, and to any custom save locations that you created. You apply settings, destinations, and locations to a job by dragging an item from these panes to the job in the batch area.
• Inspector pane: Click the Inspector button in the upper-right corner of the Compressor window to expand this area. The inspector pane has several views that change, depending on the item you’ve selected. When you select a batch (by clicking the background of the batch area), the Batch inspector appears, displaying basic information about the current batch. When you select a job in the batch area, the Job inspector appears; this area displays a summary of the source file’s transcoding format, an SDR or HDR badge that specifies whether the source file is a standard-dynamic-range or high-dynamic-range video, and controls for adding metadata and modifying job actions. When you select a specific transcoding instruction in the batch area (one of the rows under the job), the General, Video, and Audio inspectors appear. These three panes contain adjustable properties that you can use to customize the setting or destination. And if you add captions to a job, selecting the captions file in the batch area opens the Closed Captions inspector or Subtitles inspector.

14Compressor User Guide
Active viewIn Active view, the Compressor window displays status information about batches (and their constituent jobs) currently being transcoded. In this view, you can monitor progress bars as well as pause or cancel the transcoding process.
Completed viewIn Completed view in Compressor, you can view information about batches and jobs that have been successfully transcoded, as well as information about items that failed to transcode.
A list of batches is shown on the left side of the window. Click a disclosure triangle beside a batch to see its constituent jobs and output files. Select a batch, job, or output file in the list to see additional information in the inspector pane (on the right).

15Compressor User Guide
Errors & Warnings windowThe Errors & Warnings window in Compressor lists any errors or warnings that may prevent a batch from being properly processed. If you see an alert icon ( or ) in the batch area, there are one or more problems with the batch. Click the alert icon (or press Command-E) to open the Errors & Warnings window.
In the Errors & Warnings window, click an alert message to highlight the affected job in the batch area. Alerts showing a yellow yield sign are warnings that won’t prevent a batch from being started but may result in errors or unexpected results. Alerts showing a red stop sign are errors that must be fixed before a batch can be started.
Note: Some errors visible in the Errors & Warnings window don’t have a corresponding alert icon in the batch area.

16Compressor User Guide
Simple transcoding
Intro to simple transcoding in CompressorWhen you add a source file to Compressor and apply output instructions (all done in Current view), you create a transcoding job. You can submit a single job for transcoding, or add more source files (and output instructions), then submit a batch of jobs for transcoding.
Each job in a Compressor batch has several parts:
• Source file: The media file that you want to transcode.
• Setting: The transcoding instructions that specify how the file will be processed. Compressor provides a variety of built-in settings that you can use to output files in common media formats. Additionally, Compressor provides a number of preconfigured destinations—one or more settings combined with an automated job action that’s performed after transcoding. For example, if you use the built-in Add to TV Home Videos destination to transcode a source file, the destination outputs a high-quality QuickTime movie file and then applies the destination’s job action to add the file to your Home Videos library on Apple TV.
• Location: The place on your computer or a connected device where the transcoded file will be saved. You can use one of the built-in locations, or specify a new location.
• Filename: The title of the transcoded file. You can use the default filename (the name of the source file) or type a custom filename.
• Job action: A post-transcoding action you can add to a job—such as burning a DVD or copying a file to your Home Videos library on Apple TV. Each of the built-in destinations already contains a job action.
• Caption filename: A supplemental text file in the CEA-608 format or iTT format that you can optionally add to a job to create synchronized closed captions or subtitles. See Intro to supporting captions in Compressor.

17Compressor User Guide
In the example below, two jobs make up the batch:
The first Compressor job uses the built-in Create DVD destination to output a Dolby Digital audio file and an MPEG-2 video file. Because a CEA-608 closed-caption file has been added to the job, synchronized dialog captions are embedded in the MPEG-2 output file. The transcoded files are saved to the source folder (the folder where the source media is stored), and after the files are transcoded, they’re burned to a DVD (using the Create DVD job action).
The second Compressor job uses two built-in settings (Small and HD 1080p) to create a small QuickTime file and a high-definition (HD) QuickTime file. The output files are saved to the desktop. Because there’s no job action, the user must manually move or otherwise distribute each file.
Transcode files in CompressorThe easiest way to transcode media files in Compressor is to apply one or more built-in settings or a built-in destination.
Set up the first transcoding job in a batch1. In Compressor, click the Add File button in the batch area.
2. In the file window that appears, select a media file, then click Add.

18Compressor User Guide
3. In the settings window that appears, do the following:
a. Select one or more transcode settings or destinations from the list.
Tip: Shift-click to select consecutive settings; Command-click to select nonconsecutive settings.
The settings and destinations are grouped by category. For example, the Apple Devices setting group contains multiple settings for 4K, HD, and SD output formats. To choose a specific setting within a group of settings, click the disclosure triangle beside the setting group, then select one or more settings from that group.
Important: For destinations, always select the destination group name. If you instead click the disclosure triangle beside a destination group and then select an individual setting in that group, the destination’s job action won’t be used when Compressor processes the job.
b. Choose a save location from the pop-up menu.
4. When you’re satisfied with your setting and location choices, click OK.
The new job is displayed in the batch area. The job includes a thumbnail of the source file and the transcoding output instructions (setting, location, and filename). If you chose multiple settings, or a destination with multiple outputs, each output appears in a separate row. If you chose a destination, its job action appears in the upper-right corner of the job area.
Above the batch area, a viewer with playback controls shows how your media file will look and sound after transcoding. See Preview jobs in Compressor.
To begin transcoding the job, see Transcode a batch below.

19Compressor User Guide
Chain jobs in a batchYou can also chain jobs together, using the output of a job as the source for subsequent jobs in a batch. First, set up a job using the steps in “Set up the first transcoding job in a batch,” above.
1. In Compressor, Control-click the setting in your batch that you want to use as a source, then select New Job With Selected Output.
You can also add a set of image sequence files or surround sound files. See Import an image sequence in Compressor and Create a surround sound job in Compressor.
2. To add transcode settings to a job, click Add on the right side of the Setting/Location/Filename row in the batch area.
3. To continue chaining jobs, repeat step 1 above.

20Compressor User Guide
Add additional jobs to a batchOptionally, you can add additional source files (and transcode instructions) to a batch.
1. In Compressor, click the Add pop-up menu under the batch area, then choose Add File.
You can also add a set of image sequence files or surround sound files. See Import an image sequence in Compressor and Create a surround sound job in Compressor.
2. In the file window that appears, select one or more media files, then click Add.
Tip: Shift-click to select consecutive settings; Command-click to select nonconsecutive settings.
The batch area displays a new job for each source file you add.
3. To add transcode settings to a job, click Add on the right side of the Setting/Location/Filename row in the batch area.
4. In the settings window that appears, select one or more settings or destinations, choose a save location from the pop-up menu, then click OK.
The output instructions that you specified appear in the job. If you chose multiple settings or a destination with multiple outputs, each output appears in a separate row. If you chose a destination, its job action appears in the upper-right corner of the job area.
5. To change the name of a file to be output, double-click its name in the Filename column, then enter a new name.
Note: If you see an alert icon to the left of the filename, the filename assigned to that output row has already been used. Click the alert icon to view a description of the error. See Errors & Warnings window.
21Compressor User Guide
Add and remove transcode settingsIf you want to transcode a source file to multiple formats, you can add additional transcoding instructions to a job. You do this by adding one or more output rows. You can also remove output rows.
In Compressor, do one of the following:
• Add an output row: On the right side of the Setting/Location/Filename row of the job area, click Add, and in the window that appears, select one or more transcode settings, choose a location, then click OK.
• Remove an output row: Position the pointer over the output row that you want to remove, then click Remove (at the right end of the row).
Change the name of a file to be outputWhen you apply a setting to source file, Compressor assigns a default name to the output file: the source filename appended with the extension of the format used during transcoding (.mov or .mp4, for example). If you want, you can change that default name.
• In the Filename column of an output row, double-click the name of a file, then enter a new name.
Note: If you see an alert icon to the left of the filename, the filename assigned to that output row has already been used. Click the alert icon to view a description of the error. See Errors & Warnings window.
Transcode a batchAfter you’ve configured the jobs in your batch using the tasks above, you can transcode the batch.
• In Compressor, click the Start Batch button in the lower-right corner of the batch area and, if necessary, follow the instructions to complete the transcoding process.
The Compressor window switches to Active view, where you can monitor the transcoding process.
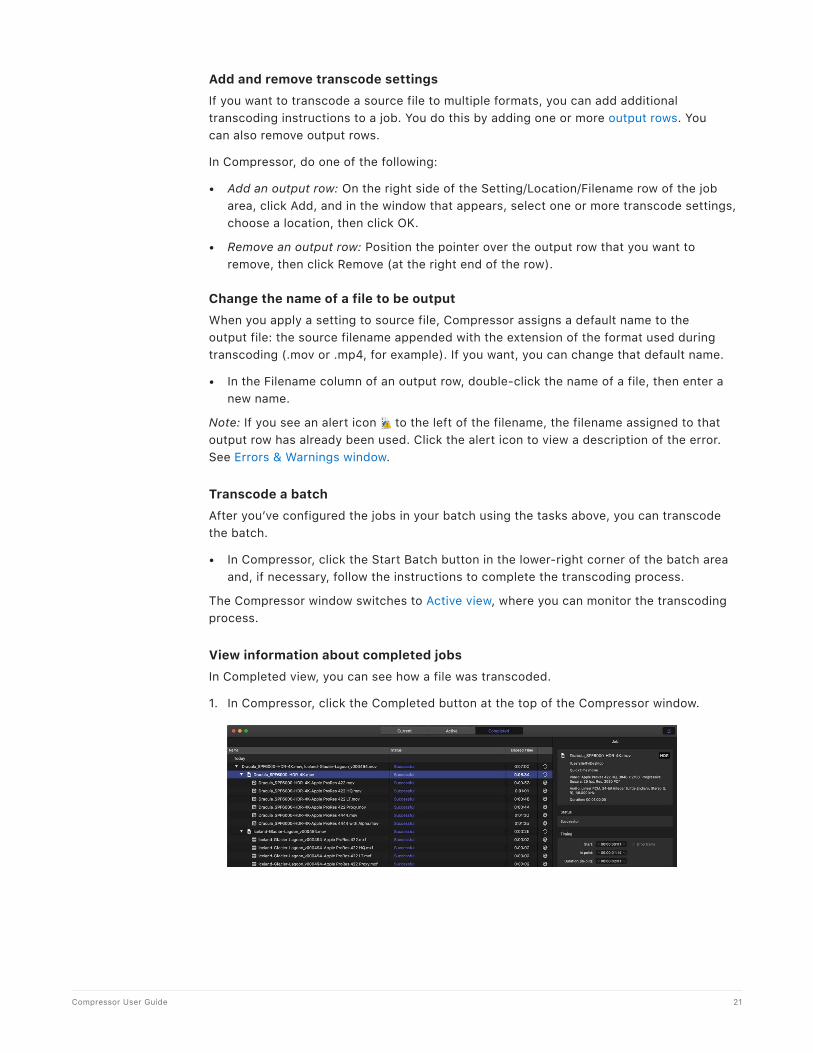
View information about completed jobsIn Completed view, you can see how a file was transcoded.
1. In Compressor, click the Completed button at the top of the Compressor window.

22Compressor User Guide
2. Select a batch, job, or transcoded file and, if necessary, click the Inspector button .
In the inspector (on the right), you can view information about the batch or job, or view the general, video, or audio properties for the setting used to transcode the file.
3. To view the output file, click the Show in Finder button .
If the Show in Finder button is not visible, click the disclosure triangles on the left side of the Completed view window.
Create a new job from a completed job• In Completed view in Compressor, click a job’s Reuse button .
All of the job’s information is copied to Current view, where you can modify the job’s setting properties and other information as necessary, then transcode the new job.
Transcode incompatible mediaAs part of the transition from 32-bit to 64-bit technology in macOS, macOS Mojave is the last version of macOS that includes support for video formats that rely on QuickTime 7. If you have media files that rely on QuickTime 7, you can use Compressor to transcode the files to a format compatible with versions of macOS after macOS Mojave.
Media files and settings that are incompatible with versions of macOS after macOS Mojave appear with an alert in the Job inspector.
Important: To ensure future compatibility, make sure to transcode the files before you upgrade to the next major version of macOS after macOS Mojave. After you upgrade, the option to transcode incompatible media will no longer be available.
For information about media formats affected by the transition to 64-bit technology, as well as media formats compatible with versions of macOS after macOS Mojave, see the Apple Support article About incompatible media in Final Cut Pro.

23Compressor User Guide
Preview jobs in CompressorBefore you process a job, you can preview what your transcoded files will look like. The preview area has a number of tools to help you visualize how your final output will appear.
Note: Property adjustments made in the video pane of the inspector to retiming, color space, and interlacing are not displayed in the preview area.
Change how the timecode is displayedYou can change how the timecode is displayed in the preview area.
1. In the Compressor batch area, select the output row for the job containing closed-caption data.
2. In the preview area, click the timecode pop-up menu, then select Timecode, Seconds, or Frames.
Preview how a transcoded file will look and sound1. In a job in the Compressor batch area, select the output row that includes the setting
you want to preview.
2. If the Comparison button in the preview area isn’t already selected (highlighted), click it to turn on comparison previewing.
3. Click the Play button .
The source file video plays on the left side of the preview area, and a preview of the transcoded file plays on the right side. The transcoded audio plays through your computer speakers (or through connected speakers).
24Compressor User Guide
Zoom in or out in the preview area In Compressor, do one of the following:
• Pinch open or closed on a trackpad.
• Double-tap with two fingers on a trackpad to toggle the zoom level between 100% and Zoom to Fit.
• Click the Zoom pop-up menu (in the upper-right corner of the preview area), then choose a zoom level.
• Press Shift-Z to resize the preview area to fit the current available window space.
Tip: To increase the available preview area space, resize the Compressor window, or drag the divider bar between the preview area and the batch area down.
View different areas of a zoomed-in preview areaWhen the preview area is zoomed to a level greater than 100%, you can’t view the entire image at once. However, you can scroll the preview area to see more of the image.
In Compressor, do one of the following:
• Swipe the trackpad using two fingers.
• Drag the inner box of the navigation control (in the upper-right corner of the zoomed-in preview area).
View caption text in the preview areaIf you’ve added captions to your job, you can view that text in the preview area.
1. In the Compressor batch area, select the output row for the job containing closed-caption data.
2. In the preview area, click the Captions button , then choose On.
3. To stop displaying closed captions, click the Caption button again, then choose Off.
For iTunes Store packages, choose audio tracks, view closed-caption text, or view subtitle textiTunes Store packages are special types of batches that can include closed-caption data, subtitles (in multiple languages), and alternative audio tracks. In the preview area, you can view any of that text and choose which audio track to hear.
1. In the Compressor batch area, select the Feature video.
2. In the preview area, click the "Show closed captions, subtitles, and audio language” button , then choose the audio track you want to hear and the subtitle text you want to display.
See Intro to iTunes Store packages in Compressor.

25Compressor User Guide
Built-in destinations in CompressorBuilt-in destinations, available in the Settings pane in Compressor, combine one or more settings and a post-encode job action, which automates tasks such as emailing, copying, and moving transcoded files.
Built-in destination Contains Use to
Add to TV Home Videos Settings: Apple Devices HD (Best Quality)
Job action: Add to TV Home Videos
Create an Apple device–compatible H.264 file, then automatically add the file to your Home Videos library on Apple TV.
Create Blu-ray Settings:
• Dolby Digital
• H.264 for Blu-ray
Job action: Create Blu-ray disc
Create an H.264 elementary stream and a Dolby Digital audio file, then automatically burn the files to a Blu-ray disc.
Create DVD Settings:
• Dolby Digital
• MPEG-2 for DVD
Job action: Create DVD
Create an MPEG-2 elementary stream and a Dolby Digital audio file, then automatically burn the files to a DVD.
Facebook & YouTube Settings: Up to 4K
Job action: Facebook & YouTube
Create a Facebook and YouTube–compatible H.264 file.
Prepare for HTTP Live Streaming Settings:
• Audio for HTTP Live Streaming
• Broadband High
• Broadband Low
• Cellular High
• Cellular Low
• Wi-Fi High
• Wi-Fi Low
Job action: Prepare for HTTP Live Streaming
Create a set of MPEG-4 files, then process your transcoded files and upload them to the server you specify. The files are compatible with a variety of devices, such as smartphones and media players.
You can also create a custom destination in Compressor either by duplicating an existing destination or by creating a new destination. For more information, see Create a custom destination in Compressor.

26Compressor User Guide
Built-in settings in CompressorUse the built-in settings in Compressor, grouped by category in the Settings pane, to convert any file from its source format to other commonly used formats.
Built-in setting group Contains Use to
Apple Devices • Apple Devices 4K
• Apple Devices 4K (HEVC 8-bit)
• Apple Devices 4K (HEVC 10-bit)
• Apple Devices 4K (HEVC 10-bit, HLG, Dolby Vision 8.4)
• Apple Devices HD (Best Quality)
• Apple Devices HD (Most Compatible)
• Apple Devices SD
Create Apple Device–compatible H.264 and HEVC files for distribution, including high-dynamic-range HEVC HDR10 and Dolby Vision 8.4 video (designed to optimize HDR content for Apple devices), streaming high-definition (HD) video, and standard-definition (SD) video.
Audio Formats • AAC
• AC3
• AIFF
• Apple Lossless
• CAF
• EC3
• FLAC
• MP3
• WAVE
Create audio files in the most commonly used formats.
Motion Graphics • Animated Image (Large)
• Animated Image (Small)
• Open EXR Image Sequence
• QuickTime Animation
• QuickTime ProRes with Alpha
• TIFF Image Sequence
Create files for use with motion graphics applications.
MPEG Files • MPEG-2 422 Program stream, 15 Mbps
• MPEG-2 Program stream, 15 Mbps
• MPEG-2 Transport stream, 15 Mbps
Create broadcast-quality, high-resolution, high bit rate video files.
Podcasting • AAC for Audio Podcasting
• H.264 for Video Podcasting
• MP3 for Audio Podcasting
Create files for audio and video podcasting.
ProRes • Apple ProRes 422
• Apple ProRes 422 HQ
• Apple ProRes 422 LT
• Apple ProRes 422 Proxy
• Apple ProRes 4444
• Apple ProRes 4444 with Alpha
• Apple ProRes 4444 XQ
• Apple ProRes 4444 XQ with Alpha
Create high-quality, high-performance files for use with Final Cut Pro and post-production workflows.

27Compressor User Guide
Built-in setting group Contains Use to
Proxy • H264 Proxy eighth size
• H264 Proxy half size
• H264 Proxy quarter size
• ProRes Proxy eighth size
• ProRes Proxy half size
• ProRes Proxy quarter size
Create proxy files for use with Final Cut Pro and post-production workflows.
Uncompressed • Uncompressed 10-bit 4:2:2
• Uncompressed 8-bit 4:2:2
Create uncompressed 10-bit and 8-bit 4:2:2 QuickTime movies.
Video Sharing Services • 4K
• HD 720p
• HD 1080p
• Large 540p
• SD 480p
• Small
Create QuickTime files for video-sharing websites like Vimeo. Includes 4K, HD, SD, and other settings.
You can also customize a built-in setting in Compressor or create your own custom setting from scratch. For example, you can create a custom setting either to convert progressive video to interlaced video or to convert 29.97-fps video to 23.98 fps video. Before you create a custom setting, view the related built-in settings to see if any of those meet your needs. If one does, or if it comes close, duplicate that setting, then modify any properties that you need to change. The advantage of duplicating a setting, rather than creating a new setting from scratch, is that many of the properties are already configured, and so you’ll need to make fewer adjustments to the setting. See Create custom settings in Compressor.
Built-in locations in CompressorUse the following built-in locations in Compressor, available in the Locations pane, to specify the save location of a transcoded file.
Built-in location Use to
Desktop Save the transcoded file to the user’s desktop.
Movies Save the transcoded file to the user’s Movies folder.
Source Save the transcoded file to the same location as the source media file.
You can also create a custom location, either by duplicating an existing location or by creating a new location. When you create a custom location, you can also specify a filename format for transcoded files. See Work with locations in Compressor.

28Compressor User Guide
Watch folders
Work with watch folders in CompressorCompressor can automatically transcode media files added to a watch folder. You set up a watch folder with the settings you want. Then, when media files or folders of image sequences are added to the watch folder, Compressor automatically applies the configured properties to the media in the folder, and saves the processed files to the location you choose.
Configuring a watch folder on a connected volume allows you to save or export files directly from an application into the watch folder, where they’re automatically transcoded by Compressor. This saves you time by not requiring you to manually transcode files. Watch folders are compatible with Compressor computer groups, which can be extremely useful if you’re transcoding large files and want to preserve your computer’s processing power.
You configure watch folders in the Watch Folders area:
After Compressor has transcoded the files in a watch folder, the resulting completed processing can be seen in Completed view.

29Compressor User Guide
View the Watch Folders area• Click Watch Folders at the top of the Current view in the Compressor window (or press
Control-Shift-1).
When you switch to the Watch Folders area, the inspector shows you how many watch folders you have, and any transcode jobs (outputs) that you’ve assigned to each folder.
Note: You don’t need to be viewing the Watch Folders area for Compressor to transcode files in watch folders. Watch folders continue to process files even if Compressor is running in the background or you’re viewing another part of the Compressor window. If you’re viewing the batch area, a spinning folder icon indicates when a watch folder is currently processing files.
Add a watch folder in Compressor1. In the Watch Folders area of Compressor, do one of the following:
• Click Add in the top right-corner.
• Click the Add Watch Folder button in the middle of the pane.
Note: This button appears only if there are no watch folders.
• Choose File > Add Watch Folder (or press Command-I).
2. Select a folder in the dialog, and click Add.
Tip: You can also drag a folder directly into the Watch Folders area.
3. In the Built-in Settings window, choose one or more transcode settings.
4. Click the Location pop-up menu, then choose a location for your watch folder’s output folder (where the processed files will be saved). You can choose one of the following:
• Automatic: Processed files are saved to a specially created folder named “[Watch folder name]-Output” on the same directory level as the watch folder.
• Desktop: Processed files are saved to the Desktop folder.
• Movies: Processed files are saved to the Movies folder.
• Other: You can choose another location.
WARNING: A watch folder’s output folder cannot be inside, or the same folder as, a watch folder. If you choose a location inside a watch folder, or a watch folder itself, a red warning icon appears to the right of the watch folder name, and you can’t activate the watch folder.

30Compressor User Guide
Activate a watch folder in CompressorWatch folders need to be activated to monitor and process files.
In the Watch Folders area of Compressor, do one of the following:
• Click the checkbox to the left of the watch folder name.
• Select the watch folder, then click the Status pop-up menu in the Inspector and choose Activated.
Important: A watch folder must have at least one setting applied to it to be activated. A watch folder can’t be activated if its output folder is the same as the watch folder itself. If the watch folder and output folder are the same, or the output folder is inside a watch folder, a red warning icon appears to the right of the watch folder name, the Status pop-up menu in the inspector is dimmed, and an error appears in the Errors & Warnings window.
Access watch folder settings and properties in CompressorYou can access watch folder settings and properties in the inspector pane.
Watch folder settings• Status: Activate or deactivate the watch folder. When a watch folder is active, you can
no longer modify any of its properties.
• Name: Change the name of the watch folder in the Compressor UI. This doesn’t change the name of the folder in the Finder, but it affects the name of the automatically created output folder if you choose Automatic for the output location for your watch folder.
• Location: Click Select to choose a new location for your watch folder. The current location of the watch folder is displayed below the Select button.
• Process using: If you’ve configured computer groups in Shared Computers preferences, you can select one of your groups here. The default is This Computer. For information on setting up computer groups, see Transcode batches with multiple computers using Compressor.
• When activating a Watch Folder, start processing files already present: By default, Compressor ignores files that are already in a watch folder before it is activated. This way, you can leave files in the watch folder without the files being transcoded multiple times. However, if you dragged or saved files into a watch folder and want them to be processed when you activate the folder, select this checkbox.

31Compressor User Guide
Action settings• When done: Choose what job action Compressor applies to the processed files. The
default is Save only, which saves the transcoded files to the watch folder’s output folder. When you select Save only, a checkbox lets you choose to save captions to disk along with the transcoded files.
In addition to Save only, the pop-up menu offers all the standard job actions available in Compressor. For a complete list of job actions and their properties, see Job action properties in Compressor.
Show watch folder properties• In the Watch Folders area of Compressor, select a watch folder.
The inspector shows the properties for the selected watch folder.
Add and remove transcode settings from watch folders in CompressorWhen adding a watch folder, you chose one or more transcode settings. In the Watch Folders area, you can add and remove transcode settings manually the same way you add and remove transcode settings in the batch area.
Add transcode settingsIn Compressor, do one of the following:
• In the Watch Folders area, click Add on the right side of the Setting/Location/Filename row for the watch folder you want to change. In the window that appears, select one or more transcode settings, choose a location, then click OK.
• In the Settings pane, select one or more timecode settings, then drag them to a watch folder.
Remove transcode settingsIn Compressor, do one of the following:
• Select the setting you want to remove, then click Remove (at the right end of the row).
• Select the setting you want to remove, then press Delete.

32Compressor User Guide
Advanced adjustments
Intro to advanced adjustments in CompressorFor basic transcoding jobs, you can use the built-in settings and destinations that come with Compressor. However, if you have complex or custom transcoding specifications, you can make adjustments to the built-in settings and destinations in a number of ways:
• For a custom transcoding job that you will use only once, apply a built-in setting or destination and then modify its properties in the inspector. See View and modify a setting’s properties in Compressor and View destination properties in Compressor.
• For a custom transcoding job that you will use more than once, create a custom setting or destination (by duplicating and modifying a built-in setting or destination). See Create custom settings in Compressor and Create a custom destination in Compressor.
You can also customize the various other components of a Compressor batch, including save locations, job properties, job actions, and batch properties.
Work with settings
View and modify a setting’s properties in CompressorA setting is a group of preconfigured transcoding instructions that you apply to a source media file. When you select a built-in setting in the Settings pane in Compressor, or an applied setting in the batch area, its properties are shown in the inspector. General properties are displayed in the General inspector, and video and audio properties are displayed in the Video inspector and the Audio inspector.

33Compressor User Guide
View a setting’s general, video, and audio properties1. In Compressor, select a setting by doing one of the following:
• For a setting that has not been applied, click a built-in setting in the Settings pane. (If the Settings pane is hidden, click the Settings & Locations button in the upper-left corner of the Compressor window, then click Settings at the top of the pane.)
• For a setting that has already been applied to a source file, select the output row of a job in the batch area.
2. If necessary, click the Inspector button in the upper-right corner of the Compressor window to reveal the inspector pane.
The inspector pane is divided into three subpanes: General, Video, and Audio. At the top of each subpane is a summary of the transcoding instructions of the selected setting, including the name of the setting, the transcoding format, and the estimated size of the output file.
3. To view general, video, or audio properties of the selected setting, click General, Video, or Audio at the top of the inspector pane.
Every setting has a General inspector that displays basic properties, including setting name, description, output extension, and so on. Video settings have a Video inspector and, if the transcoding format encodes audio, an Audio inspector. Audio settings have an Audio inspector, but no Video inspector.
To learn more about a setting’s properties, see Formats and settings in Compressor.

34Compressor User Guide
Modify an applied setting’s propertiesAfter you apply a setting to a source file, you can modify its properties in the inspector.
1. In Compressor, select the output row of a job in the batch area.
The properties of the selected setting are displayed in the inspector. If the inspector is not visible, click the Inspector button in the upper-right corner of the Compressor window.
2. To view general, video, or audio properties, click General, Video, or Audio in the inspector.
3. To modify a property, adjust its control in the inspector.
To learn more about a setting’s properties, see Formats and settings in Compressor.
The type of setting you modify determines whether or not the setting will be saved:
• If you modify the properties of a custom setting, the changes are saved automatically.
• If you modify the properties of a built-in setting, the changes are not saved.
In this case, if you want to save your changes, you can create a custom setting. See Create custom settings in Compressor.

35Compressor User Guide
Create custom settings in CompressorYou can create your own custom settings, either based on an existing built-in or custom setting, or from scratch. You can also create groups of settings, rename a custom setting, or delete a custom setting.
Create a custom setting by duplicating an existing settingTo save a modified setting for future use, you must create a custom setting. The easiest way to do this is to duplicate a built-in setting and then modify its properties in the inspector.
1. In the Settings pane in Compressor (press Shift-Command-1 if it’s hidden), select the setting you want to duplicate.
To reveal individual settings in a setting category, click the disclosure triangle next to the category name.
2. Choose Duplicate from the Action pop-up menu at the bottom of the pane.
A copy of the setting (appended with the word, “copy”) appears in the Custom area of the Settings pane.
3. To modify the properties of your new custom setting, adjust the controls in the General, Video, and Audio inspectors.
If the inspector is hidden, click the Inspector button in the upper-right corner of the Compressor window.
For example, you can change a setting’s frame controls or add a video or audio effect to the output file. To learn more about a setting’s properties, see Formats and settings in Compressor.
Create a custom setting from scratchYou can also create a custom setting without duplicating a built-in setting. Because it’s easy to accidentally introduce transcoding errors, this method is recommended for advanced users only.
1. In the Settings pane in Compressor (press Shift-Command-1 if it’s hidden), click the Add pop-up menu , then choose New Setting.
2. In the dialog that appears, choose a transcoding format from the pop-up menu, enter a name and description for the setting, then click OK.
The new setting appears in the Custom area of the Settings pane.
3. To modify the properties of your new custom setting, adjust the controls in the General, Video, and Audio inspectors.
If the inspector is hidden, click the Inspector button in the upper-right corner of the Compressor window. For example, you can change a setting’s frame controls or add a video or audio effect to the output file.
To learn more about a setting’s properties, see Formats and settings in Compressor.

36Compressor User Guide
Create a group of custom settingsIf you want to organize your custom settings, you can create a setting group. For example, if you want to quickly add several settings at the same time, you can apply a setting group to a job.
1. In the Settings pane in Compressor (press Shift-Command-1 if it’s hidden), click the Add pop-up menu , then choose New Group.
2. In the dialog that appears, type a name for the group and click OK.
The group appears in the Custom area of the Settings pane and is selected by default.
3. Drag custom settings from the Custom area of the Settings pane into your new group.
You can add only custom settings to a custom group. If you want to add a built-in setting to the group, you must duplicate the setting (as described in Create a custom setting by duplicating an existing setting above), then add the duplicated setting to your group.
Save and share custom settingsYou can save a custom setting as a file and share it with colleagues or move it from one system to another.
• Drag a setting from the Settings pane in Compressor to the desktop.
The setting will be saved as a file, which can then be moved, copied, emailed or otherwise transferred to another user’s Mac. The recipient just needs to drag the file into the Custom folder of the Settings pane in Compressor.
Tip: You can even drag the custom setting directly to (and from) the body of an email message in Mail.
Rename a custom settingDo one of the following:
• In the Settings pane in Compressor, double-click a custom setting, type a new name, then press Return.
• Select a custom setting in the Settings pane, then, in the General inspector, type a new name in the Name field. (If the inspector is hidden, press Command-4.)
Delete a custom setting• In the Settings pane in Compressor, select a custom setting, then press Delete.
37Compressor User Guide
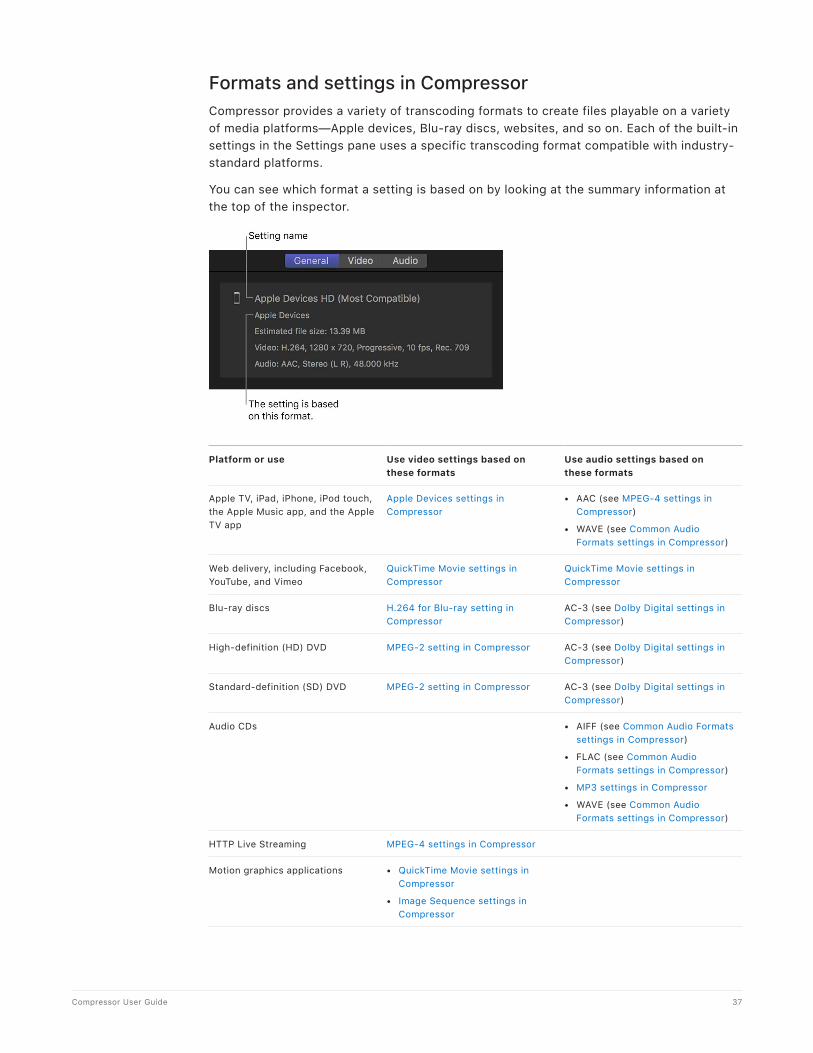
Formats and settings in CompressorCompressor provides a variety of transcoding formats to create files playable on a variety of media platforms—Apple devices, Blu-ray discs, websites, and so on. Each of the built-in settings in the Settings pane uses a specific transcoding format compatible with industry-standard platforms.
You can see which format a setting is based on by looking at the summary information at the top of the inspector.
Platform or use Use video settings based on these formats
Use audio settings based on these formats
Apple TV, iPad, iPhone, iPod touch, the Apple Music app, and the Apple TV app
Apple Devices settings in Compressor
• AAC (see MPEG-4 settings in Compressor)
• WAVE (see Common Audio Formats settings in Compressor)
Web delivery, including Facebook, YouTube, and Vimeo
QuickTime Movie settings in Compressor
QuickTime Movie settings in Compressor
Blu-ray discs H.264 for Blu-ray setting in Compressor
AC-3 (see Dolby Digital settings in Compressor)
High-definition (HD) DVD MPEG-2 setting in Compressor AC-3 (see Dolby Digital settings in Compressor)
Standard-definition (SD) DVD MPEG-2 setting in Compressor AC-3 (see Dolby Digital settings in Compressor)
Audio CDs • AIFF (see Common Audio Formats settings in Compressor)
• FLAC (see Common Audio Formats settings in Compressor)
• MP3 settings in Compressor
• WAVE (see Common Audio Formats settings in Compressor)
HTTP Live Streaming MPEG-4 settings in Compressor
Motion graphics applications • QuickTime Movie settings in Compressor
• Image Sequence settings in Compressor

38Compressor User Guide
Properties of settings
Apple Devices settings in Compressor
The built-in settings in Compressor based on the Apple Devices format offer a choice of two codecs: H.264 and HEVC (High-Efficiency Video Coding, also known as H.265). Two of the Apple Devices settings—Apple Devices 4K (HEVC 8-bit) and Apple Devices 4K (HEVC 10-bit)—automatically apply the HEVC codec to your output file.
The other Apple Devices settings use H.264 as the default codec, but you can change the codec to HEVC in the Video inspector if your computer is running macOS 10.13 or later. HEVC is a recently established compression standard that supports larger frame sizes (including 8K), HDR10, and Dolby Vision 8.4 metadata for high-dynamic-range video. Dolby Vision 8.4 is a format designed to optimize HDR content for Apple devices. HEVC playback requires a recent-generation Apple device running macOS 10.13 or later, iOS 11 or later, iPadOS 13 or later, or tvOS 11 or later.
Note: You can also create custom settings in Compressor that use the Apple Devices transcoding format. However, keep in mind that the built-in Apple Devices settings (in the Settings pane) analyze your source media and assign optimal properties to ensure the best possible transcoding results.
The properties of Apple Devices settings are located in the General, Video, and Audio inspectors (described below).
Setting summaryDisplays the setting name and transcoding format, as well as an estimated output file size. When you add a setting to a job or change the setting’s properties, Compressor automatically updates this summary.
General properties• Name: Displays the name of the setting.
• Description: Displays the description of the setting.
• Extension: Displays the extension of the output file (.m4v).
• Allow job segmenting: If you’ve set up distributed processing, select this checkbox to have Compressor process the output file using your shared computer group. See Transcode batches with multiple computers using Compressor.
• Default location: Choose an item from the pop-up menu to set the default save location for transcoded files.
• Format: Use this pop-up menu to specify whether the output includes video and audio, video only, or audio only.
• Optimize for network use: Select this checkbox to create a file that will start playing after only a small portion of the file has been downloaded from the network.

39Compressor User Guide
RetimingSets the processing algorithm used to adjust the frame rate during transcoding. Select one of the following options:
• Set to percent of source using: Modifies the output clip’s speed by a percentage of the source clip’s speed. Enter a value in the percentage field or choose a preset value from the adjacent pop-up menu (with a down arrow).
• Set to: Sets the duration of the clip. Enter a timecode duration in the field or click the arrows to increase or decrease the time.
• So source frames play at [frame rate] fps: Nondestructively changes the playback speed of the clip without discarding frames or creating new frames. This property has no effect unless the “Frame rate” value in the Video inspector is different from the source file’s frame rate. For example, if you add a 10-second source file with a frame rate of 24 fps to Compressor, set the “Frame rate” property in the Video inspector to 25 fps, and then select “So source frames play at 25 fps” in the General inspector, the resulting duration of the transcoded clip (at 25 fps) will be 9 seconds and 15 frames.
For more information, see Retime video and audio using Compressor.
CaptionsThis area in Compressor contains a single property, the “Embed closed captions” checkbox. Select the checkbox if you’ve added CEA-608 closed captions to a job and you want the captions inserted into the output video file. See Intro to supporting captions in Compressor.
MetadataSpecifies how metadata is embedded in the transcode. See Work with metadata annotations in Compressor.
• Use Job Annotations: Includes the metadata from the Job Annotations listed in the Job Inspector. This is the default setting.
• Pass through source file metadata: Passes the existing metadata from the source file to the transcode. Ignores Job Annotations listed in the Job Inspector.
• Remove all metadata and annotations: Passes no metadata to the source file.
• Include metadata from the source file that cannot be displayed as a job annotation: Available when Use Job Annotations is selected. Includes the metadata from the Job Annotations listed in the Job Inspector and passes the existing metadata from the source file to the transcode.
Video properties• Frame size: Use the pop-up menu in Compressor to set an automatically calculated
frame size (resolution) range for the output file. See Intro to modifying frame size in Compressor.
• Pixel aspect ratio: For settings that use the H.264 codec or HEVC codec, the pixel aspect ratio is automatically set to Square.
• Frame rate: Use this pop-up menu to set the playback rate (the number of images displayed per second) for the output file. See Retiming options in Compressor.

40Compressor User Guide
• Field order: For settings that use the H.264 codec or HEVC codec, the field order is automatically set to Progressive (complete frames are scanned).
• Color space: Use this pop-up menu to convert the source media to a new range of colors reproducible on specific display devices. Options include standard color gamuts (viewable on all display devices, including legacy devices such as standard-definition and high-definition TVs and computer displays), wide color gamuts (for displays capable reproducing a wider range of colors, including most 4K TVs and newer Mac, iOS, and iPadOS devices), and wide color gamuts with high dynamic range (HDR). The default option is Automatic, which allows Compressor to choose the best color space based on the applied setting. See Intro to wide color gamut and HDR in Compressor.
• RAW to log: Use this pop-up menu to select how ProRes RAW conversion is done. Choose Automatic to allow Compressor to choose the conversion method. You can also choose a manual setting to override the default. This option is available only if the source is ProRes RAW.
• Camera LUT: Use this pop-up menu to select the camera lookup table (LUT) applied to the source. Select a custom LUT to transform your video from one color space to another. This setting is enabled if the source is ProRes RAW and if “RAW to log” is set to a value other than None. This setting is also enabled if “Camera log” in video properties in the Job inspector is set to a value other than None.
• Codec: Choose one of two available transcoding formats, H.264 or HEVC.
• Encoder type: Use this pop-up menu to set the type of encoder. This pop-up menu is enabled when Codec is set to HEVC. Choose from two options:
• Faster (standard quality): Encodes the output file using a faster codec, with standard quality.
• Slower (higher quality): Encodes the output file using a slower codec, with higher quality.
Important: Not all options are available on all hardware.
• Profile: Use this pop-up menu to set the quality of compression used in the output file. When Codec is set to H.264, this setting defaults to High. When Codec is set to HEVC, choose one of two options to set the color depth (the number of bits used to represent color in each color channel—red, green, and blue) of the output file:
• 8-Bit Color: Provides a good balance between picture quality and file size. (This option is available only on recent Mac computers that support hardware encoding of HEVC.)
• 10-Bit Color: Provides better picture quality but with larger file sizes. (Because this option uses software encoding, performance may be significantly slower than 8-bit hardware encoding.)
• Multi-pass: Select this checkbox to turn on multi-pass encoding that uses additional analysis of video frames to produce a high-quality output file. Multi-pass is available when Codec is set to H.264 on an Intel-based Mac, and when Codec is set to H.264 or HEVC on a Mac with Apple silicon that’s running macOS Monterey 12 or later and has “Encoder type” set to “Faster (standard quality).” For faster (single-pass) transcoding, turn off this feature by deselecting the checkbox.

41Compressor User Guide
• Include Dolby Vision 8.4 metadata: Select this checkbox to have Compressor include Dolby Vision 8.4 metadata in the output file. Dolby Vision 8.4 is a format designed to optimize HDR content for Apple devices. If this checkbox is selected, “Color space” is set to Rec. 2020 HLG, Codec is set to HEVC, and Profile is set to 10-Bit Color.
• Bit rate: Select the Automatic checkbox to have Compressor calculate the appropriate bit rate for the output file, based on the frame size of the source file and device compatibility. If the checkbox is not selected, you can set the bit rate by dragging the slider or entering a value in the text field.
• Frame sync: Select the Automatic checkbox to have Compressor calculate the key frame interval rate.
Note: When Frame sync is enabled, the value in the seconds field defaults to zero (.0), but the actual value is determined during the encoding process.
If the checkbox is not selected, you can drag the slider or enter a value in the text field to set the key frame interval (number of frames) at which you want key frames created in your output file.
• Encode for: When Codec is set to H.264, select either “Best quality” (to have the file play back on newer devices) or “More devices” (to encode at a lower quality that’s compatible with more devices). When Codec is set to HEVC, this setting defaults to “Best quality.”
• Cinematic: This pop-up menu is available on macOS Monterey 12 or later. It allows you to specify how to handle metadata in video that was recorded in Cinematic mode (on iPhone models that support Cinematic mode video). There are three options:
• Ignore: Ignores any Cinematic mode metadata in the source file. If the source file contains no Cinematic mode metadata, Ignore is selected and the menu is dimmed.
• Pass-through: When the “Enable video pass-through” checkbox is selected, Cinematic mode metadata passes through unmodified to the destination file, and the menu is dimmed and unavailable.
• Render: When Cinematic mode metadata is present and the “Enable video pass-through” checkbox is not selected, you may choose to render the Cinematic mode video to the destination file.
Note: If you’re running macOS 11 or earlier, the Cinematic pop-up menu is unavailable. If the source file contains Cinematic mode metadata and the “Enable video pass-through” checkbox isn’t selected, the warning “Cinematic mode video can only be rendered when running under macOS 12.0 or later” is displayed in the Errors & Warnings window.
• 360° metadata: Use this pop-up menu to choose the type of 360° metadata, if any, included in the output file:
• Automatic: Compressor chooses the metadata format based on the properties in the Job inspector and the transcode setting you applied. The format chosen is listed to the right of the pop-up menu.
• None: No 360° metadata is attached to your output file.

42Compressor User Guide
• Spherical Video V1: The 360° metadata format most commonly used by sharing sites, including YouTube and Vimeo.
• Spherical Video V2: A less common, but more up-to-date, 360° metadata format used by YouTube and Vimeo.
For more information, see View 360° video metadata using Compressor.
• Compatible with: This list shows devices that will play the transcoded file (compatible device types are marked with a green circle that contains a checkmark ). When you change the setting’s properties (frame size, frame rate, codec, and so on), the compatibility list is automatically updated.
Cropping and paddingCustomize the final cropping, sizing, and aspect ratio in Compressor using the Cropping & Padding properties. Cropping removes video content from an image. Padding scales the image to a smaller size while retaining the output image’s frame size.
• Cropping: Use this pop-up menu to set the dimensions of the output image. The custom option allows you to enter your own image dimensions in the fields; other options use predetermined sizes. The Letterbox Area of Source menu item detects image edges and automatically enters crop values to match them. This is useful if you want to remove a source file’s letterbox area, by cropping out the black bars above and below the widescreen image.
• Padding: Use this pop-up menu to set the scaling of the output image while retaining the output image’s frame size. The custom option allows you to enter your own scaling dimensions in the fields; other options use predetermined dimensions.
For more information about these properties, see Intro to modifying frame size in Compressor.
QualityThe following properties in Compressor provide instructions for image analysis, including frame resizing, clip retiming, and deinterlacing:
• Resize filter: This pop-up menu sets the resizing method. There are several options:
• Nearest Pixel (Fastest): Samples the nearest neighboring pixel when resizing an image. This option provides the fastest processing time, but it is more likely to show aliasing artifacts and jagged edges.
• Linear: Adjacent pixel values are averaged using a linear distribution of weights. Produces fewer aliasing artifacts than Nearest Pixel, with a small increase in processing time.
• Gaussian: Adjacent pixel values are averaged using a gaussian distribution of weights. This provides a medium trade-off between processing time and output quality.
• Lanczos 2: Adjacent pixel values are averaged using a truncated sinc function. This option is slower than Gaussian but provides sharper results.
• Lanczos 3: Similar to Lanczos 2 but averages more pixel values. This option is slower than Lanczos 2 but may produce better results.
43Compressor User Guide
• Bicubic: Adjacent pixel values are averaged using a bicubic function. The processing time and output are most similar to Lanczos 2 and Lanczos 3.
• Anti-aliased (Best): Provides the highest output quality, but can take substantially longer to process.
• Retiming Quality: This pop-up menu sets the retiming method. There are four options:
• Fast (Nearest Frame): Linearly interpolates frames using nearest neighbor frames.
• Good (Frame Blending): Blends neighboring frames using a filter to produce good-quality interpolation.
• Best (Motion Compensated): Uses optical flow to interpolate using areas of movement between neighboring frames to produce high-quality output.
• Reverse Telecine: Removes the extra fields added during the telecine process to convert the film’s 24 fps to NTSC’s 29.97 fps. Choosing this item disables all the other Quality controls. See Use reverse telecine in Compressor.
• Adaptive details: Select this checkbox to use advanced image analysis to distinguish between noise and edge areas during output.
• Anti-aliasing level: Sets the softness level in the output image. Double-click the value and then manually enter a new value or drag the slider to the right to increase softness. This property improves the quality of conversions when you’re scaling media up. For example, when transcoding SD video to HD, anti-aliasing smooths jagged edges that might appear in the image.
• Details level: Sets the amount of detail in the output image. Double-click the value and then manually enter a new value or drag the slider to set the value. This sharpening control lets you add detail back to an image being enlarged. Unlike other sharpening operations, the “Details level” property distinguishes between noise and feature details, and generally doesn’t increase unwanted grain. Increasing this value may introduce jagged edges, however, which can be eliminated by increasing the “Anti-aliasing level” slider.
• Dithering: When selected, adds a certain type of noise to images to prevent large-scale distracting patterns such as color banding. If your image has excessive noise after rendering, deselect this checkbox.
Video effectsFor a list of available video effects and instructions on how to add a video effect to a setting, see Add and remove effects in Compressor.
Audio properties• Channel layout: Use the pop-up menu to set the audio channel layout.
• Sample rate: Use this pop-up menu to set the number of times per second that music waveforms (samples) are captured digitally. The higher the sample rate, the higher the audio quality and the larger the file size.
• Quality: Use this pop-up menu to select the quality of the audio output.
• Bit rate: Use this pop-up menu to set the bit rate to use for the encoded audio.

44Compressor User Guide
• Bit rate strategy: Use this pop-up menu to select the strategy used to encode the audio. There are four options:
• Constant bit rate: Uses the value set in “Bit rate” to determine the bit rate for the encoded audio.
• Average bit rate: Uses the value set in “Bit rate” to determine the target average bit rate for the encoded audio. This option provides a more consistent bit rate than variable bit rate.
• Variable bit rate constrained: Uses the value set in “Bit rate” to determine the maximum bit rate for the encoded audio.
• Variable bit rate: Encodes the audio using a variable bit rate determined by Compressor.
• Include Dolby 5.1 Audio Track: Select the checkbox to add surround sound as a Dolby Digital audio track for playback on Apple TV.
Audio effectsFor a list of available audio effects and instructions on how to add an audio effect to a setting, see Add and remove effects in Compressor.
Common Audio Formats settings in Compressor
Four built-in settings in Compressor use the Common Audio Formats transcoding format: AIFF File (Audio Interchange File Format), CAF File (Apple Core Audio Format), FLAC File (Free Lossless Audio Codec), and WAVE File (Waveform Audio File Format).
Note: You can also create custom settings that use the Common Audio Formats transcoding format. However, the built-in settings (in the Settings pane) analyze your source media and assign optimal properties to ensure the best possible transcoding results.
The properties of built-in and custom settings that use this transcoding format are located in the General inspector and Audio inspector (described below).
Setting summaryDisplays the setting name and transcoding format, as well as an estimated output file size. When you add a setting to a job or change the setting’s properties, this summary is automatically updated.
General properties• Name: Displays the name of the setting.
• Description: Displays the description of the setting.
• Extension: Displays the extension of the output file (.aiff, .caf, .flac, or .wav).
Tip: To output a file with a different extension, change the value in the “File type” pop-up menu, described below.
• Allow job segmenting: This checkbox is dimmed because job segmenting is not available for settings that output only an audio file.

45Compressor User Guide
• Default location: Choose an item from the pop-up menu to set the default save location for transcoded files.
• File type: Choose a file type from the pop-up menu (AIFF, CAF, FLAC, or WAVE).
RetimingSets the processing algorithm used to adjust the frame rate during transcoding. Select one of the following options:
• Set to percent of source using: Modifies the output clip’s speed by a percentage of the source clip’s speed. Enter a value in the percentage field or choose a preset value from the adjacent pop-up menu (with a down arrow).
• Set to: Sets the duration of the clip. Enter a timecode duration in the field or click the arrows to increase or decrease the time.
• So source frames play at [frame rate] fps: Nondestructively changes the playback speed of the clip without discarding frames or creating new frames. This property has no effect unless the “Frame rate” value in the Video inspector is different from the source file’s frame rate. For example, if you add a 10-second source file with a frame rate of 24 fps to Compressor, set the “Frame rate” property in the Video inspector to 25 fps, and then select “So source frames play at 25 fps” in the General inspector, the resulting duration of the transcoded clip (at 25 fps) will be 9 seconds and 15 frames.
For more information, see Retime video and audio using Compressor.
Audio properties• Channel layout: Use this pop-up menu to manually set the type of audio channel
layout. For more information about audio channel layouts, including the surround sound channel layout, see Audio channel layouts in Compressor.
• Sample rate: Use this pop-up menu to set the number of times per second that music waveforms (samples) are captured digitally. The higher the sample rate, the higher the audio quality and the larger the file size.
• Sample size: Use this pop-up menu to manually set the sample size of the audio signal.
• Format: Use this pop-up menu to set the format of the audio output.
• Quality: Use this pop-up menu to select the quality of the audio output.
• Bit rate: Use this pop-up menu to set the bit rate for the encoded audio.
• Bit rate strategy: Use this pop-up menu to select the strategy used to encode the audio. There are four options:
• Constant bit rate: Uses the value set in “Bit rate” to determine the bit rate for the encoded audio.
• Average bit rate: Uses the value set in “Bit rate” to determine the target average bit rate for the encoded audio. This option provides a more consistent bit rate than variable bit rate.
• Variable bit rate constrained: Uses the value set in “Bit rate” to determine the maximum bit rate for the encoded audio.
• Variable bit rate: Encodes the audio using a variable bit rate determined by Compressor.
46Compressor User Guide
• Compression: Use this pop-up menu to manually set the amount of compression the FLAC encoder uses to encode the audio signal. This setting is only available for FLAC file types.
Audio effectsFor a list of available audio effects and instructions on how to add an audio effect to a setting, see Add and remove effects in Compressor.
Dolby Digital settings in Compressor
The built-in Dolby Digital settings in Compressor (in the Create Blu-ray and Create DVD destinations, as well as in the built-in AC-3 and EC-3 audio settings) use the Dolby Digital transcoding format. This format encodes Dolby Digital (AC-3) and Dolby Digital Plus (EC-3) audio files that contain multiple audio channels, including 5.1 surround sound.
Note: You can also create custom settings that use the Dolby Digital transcoding format. However, the built-in Dolby Digital settings (in the Settings pane) analyze your source media and assign optimal properties to ensure the best possible transcoding results.
The properties of built-in and custom settings that use this transcoding format are located in the General inspector and Audio inspector (described below).
Setting summaryDisplays the setting name and transcoding format, as well as an estimated output file size. When you add a setting to a job or change the setting’s properties, this summary is automatically updated.
General properties• Name: Displays the name of the setting.
• Description: Displays the description of the setting.
• Extension: Displays the extension of the output file (.ac3 or .ec3).
• Allow job segmenting: This checkbox is dimmed because job segmenting is not available for settings that output only an audio file.
• Default location: Choose an item from the pop-up menu to set the default save location for transcoded files.
• File type: Choose a file type from the pop-up menu (Dolby Digital or Dolby Digital Plus, an enhanced version of the Dolby Digital audio compression technology).
RetimingSets the processing algorithm used to adjust the frame rate during transcoding. Select one of the following options:
• Set to percent of source using: Modifies the output clip’s speed by a percentage of the source clip’s speed. Enter a value in the percentage field or choose a preset value from the adjacent pop-up menu (with a down arrow).
• Set to: Sets the duration of the clip. Enter a timecode duration in the field or click the arrows to increase or decrease the time.

47Compressor User Guide
• So source frames play at [frame rate] fps: Nondestructively changes the playback speed of the clip without discarding frames or creating new frames. This property has no effect unless the “Frame rate” value in the Video inspector is different from the source file’s frame rate. For example, if you add a 10-second source file with a frame rate of 24 fps to Compressor, set the “Frame rate” property in the Video inspector to 25 fps, and then select “So source frames play at 25 fps” in the General inspector, the resulting duration of the transcoded clip (at 25 fps) will be 9 seconds and 15 frames.
For more information, see Retime video and audio using Compressor.
Audio properties• Channel layout: Use this pop-up menu to manually set the type of audio channel
layout. For more information about audio channel layouts, including the surround sound channel layout, see Audio channel layouts in Compressor.
• Sample rate: Use this pop-up menu to set the number of times per second that music waveforms (samples) are captured digitally. The higher the sample rate, the higher the audio quality and the larger the file size.
Note: All files intended for video and audio DVD authoring must have a 48 kHz sample rate as required by the DVD specification.
• Target system: Use this pop-up menu to identify the system on which you are going to play the output file. Compressor limits options in other related properties to those appropriate for the target system.
• DVD Video: Choose this option if you’re encoding for use in a DVD video authoring application.
• DVD Audio: Choose this option if you’re encoding for use in a DVD audio authoring application.
• Generic AC-3: Choose this option to remove the target system setting limit (the most generic choice).
• Data rate: Use this pop-up menu to set the number of kilobits per second (kbps) required to deliver your audio file. Using a higher rate produces a higher-quality audio file.
Tip: For stereo encoding, rates of 192 kbps and 224 kbps are typical and will produce good results. For Dolby Digital 5.1 encoding, a rate of 384 kbps is recommended. For Dolby Digital Plus encoding, a rate of 192 kbps is recommended.
• Bit stream mode: Use this pop-up menu to define the audio service contained within the Dolby Digital or Dolby Digital Plus bitstream.
• Surround mode: When using a Mono or Stereo (L R) channel layout, this property tells the playback device whether the two-channel encoded bitstream contains a Dolby Surround (Lt/Rt) program that requires Dolby Pro Logic decoding. Choose an option from the pop-up menu:
• Not Indicated: Does not send the playback device information about whether the bitstream was encoded in Dolby Surround.
• Not Encoded: Tells the playback device that the bitstream contains information not encoded in Dolby Surround.
• Surround Encoded: Tells the playback device that the bitstream contains information encoded in Dolby Surround.

48Compressor User Guide
• Surround EX Mode: When using a 5.1 (L R C LFE Ls Rs), 5.0 (L R C Ls Rs), 4.1 (L R LFE Ls Rs), or 4.0 (L R Ls Rs) layout, this property tells the playback device whether the audio has been encoded in Dolby Digital Surround EX. Choose an option from the pop-up menu:
• Not Indicated: Does not send the playback device information about whether the bitstream was encoded in Dolby Digital Surround EX.
• Not Encoded: Tells the playback device that the bitstream was not encoded in Dolby Digital Surround EX.
• Surround Encoded: Tells the playback device that the bitstream was encoded in Dolby Digital Surround EX.
• Stereo downmix: Use this pop-up menu to set how to downmix a surround signal to a stereo signal. See Audio channel layouts in Compressor.
Important: The LFE signal may be discarded by the Dolby Digital downmix process.
• Lo/Ro center, Lo/Ro surround, Lt/Rt center, Lt/Rt surround (for surround sound output): Use these pop-up menus to set the decibel level at which the surround and center channels are downmixed. Properties are enabled or disabled based on the channel layout you choose.
• DRC line mode: Use this pop-up menu to set the dynamic range compression-processing mode. The default setting, Film Standard, is recommended for all use cases.
• DRC RF mode: Use this pop-up menu to set the dynamic range compression-processing mode for RF devices (TV sets, cable set top boxes, or other devices that have RF connections).
• LFE low-pass filter: Select this checkbox to apply a 120 Hz low-pass filter to the low-frequency effects (LFE) channel during output.
• DC filter: Select this checkbox to apply a DC (direct current) high-pass filter to all input channels. Although this filter provides a simple way to remove DC offsets, note that most mixed audio material is already free of DC offsets.
• Surround channels: 90 phase-shift: This checkbox, which applies a 90-degree phase shift to the surround channels, is selected by default. The shift in phase decorrelates the front and back channels and prevents the L and Ls signals from canceling each other out if a surround-compatible downmix is later applied to the decoded signal.
• Surround channels: 3dB attenuation: Select this checkbox to apply a 3 dB cut to the surround channels during output. This option is intended for multichannel output (like a film soundtrack) that is being transferred to a consumer home theater format. Cinema surround channels are mixed 3 dB “hot” (higher) relative to the front channels to account for cinema amplifier gains.
• Dialog normalization: Enter a value in the field to set the loudness of the program in your sound files relative to full modulation. The playback device uses this information to maintain similar loudness among different AC-3 streams. The goal is to give all AC-3–encoded audio files the same listening level, regardless of the source file.
Audio effectsFor a list of available audio effects and instructions on how to add an audio effect to a setting, see Add and remove effects in Compressor.

49Compressor User Guide
H.264 for Blu-ray setting in Compressor
The built-in H.264 for Blu-ray setting in Compressor (in the Create Blu-ray destination) uses the H.264 for Blu-ray transcoding format. This format encodes H.264 elementary stream files for Blu-ray and AVCHD DVD authoring.
Note: You can also create custom settings that use the H.264 for Blu-ray transcoding format. However, the built-in H.264 for Blu-ray setting (in the Settings pane) analyzes your source media and assigns optimal properties to ensure the best possible transcoding results.
The properties of built-in and custom settings that use this transcoding format are located in the General inspector and Video inspector (described below).
Note: The built-in H.264 for Blu-ray setting encodes only a video file. To encode the accompanying audio, use the Dolby Digital audio setting. The easiest way to do this is to apply the Create Blu-ray destination to your source file, which adds the appropriate video and audio settings to your job.
Setting summaryDisplays the setting name and transcoding format, as well as an estimated output file size. When you add a setting to a job or change the setting’s properties, this summary is automatically updated.
General properties• Name: Displays the name of the setting.
• Description: Displays the description of the setting.
• Extension: Displays the extension of the output file (.264).
• Allow job segmenting: This checkbox is dimmed because job segmenting is not available for this setting.
• Default location: Choose an item from the pop-up menu to set the default save location for transcoded files.
• Stream Usage: Use the pop-up menu to set whether the output file is transcoded for Blu-ray Disc or AVCHD.
RetimingSets the processing algorithm used to adjust the frame rate during transcoding. Select one of the following options:
• Set to percent of source using: Modifies the output clip’s speed by a percentage of the source clip’s speed. Enter a value in the percentage field or choose a preset value from the adjacent pop-up menu (with a down arrow).
• Set to: Sets the duration of the clip. Enter a timecode duration in the field or click the arrows to increase or decrease the time.

50Compressor User Guide
• So source frames play at [frame rate] fps: Nondestructively changes the playback speed of the clip without discarding frames or creating new frames. This property has no effect unless the “Frame rate” value in the Video inspector is different from the source file’s frame rate. For example, if you add a 10-second source file with a frame rate of 24 fps to Compressor, set the “Frame rate” property in the Video inspector to 25 fps, and then select “So source frames play at 25 fps” in the General inspector, the resulting duration of the transcoded clip (at 25 fps) will be 9 seconds and 15 frames.
For more information, see Retime video and audio using Compressor.
Video properties• Frame size: Use the pop-up menu to set the frame size (resolution) for the output file.
See Intro to modifying frame size in Compressor.
• Pixel aspect ratio: For settings that use the H.264 format, the pixel aspect ratio is automatically set to Square.
• Frame rate: Use this pop-up menu to set the playback rate (the number of images displayed per second) of the output file. See Retiming options in Compressor.
• Field order: For settings that use the H.264 format, the field order is automatically set to Progressive (complete frames are scanned).
• Color space: Use this pop-up menu to convert the source media to a new color space. The default setting is Automatic, which allows Compressor to choose the best color space based on the selected preset. You can also choose a manual setting to override the default.
• RAW to log: Use this pop-up menu to select how ProRes RAW conversion is done. Choose Automatic to allow Compressor to choose the conversion method. You can also choose a manual setting to override the default. This option is available only if the source is ProRes RAW.
• Camera LUT: Use this pop-up menu to select the camera lookup table (LUT) applied to the source. Select a custom LUT to transform your video from one color space to another. This setting is enabled if the source is ProRes RAW and if “RAW to log” is set to a value other than None. This setting is also enabled if “Camera log” in video properties in the Job inspector is set to a value other than None.
• Automatically select bit-rate: Select this checkbox to have Compressor automatically compute the best bit rate for the output file, based on the duration of the source file. If the checkbox is not selected, you can set the average and maximum bit rates by dragging the “Average bit rate” and “Maximum bit rate” sliders or entering values in the text fields.
• Multi-pass: Select this checkbox to turn on multi-pass encoding that uses additional analysis of video frames to produce a high-quality output file. Multi-pass is available when Codec is set to H.264 on an Intel-based Mac, and when Codec is set to H.264 or HEVC on a Mac with Apple silicon that’s running macOS Monterey 12 or later and has “Encoder type” set to “Faster (standard quality).” For faster (single-pass) transcoding, turn off this feature by deselecting the checkbox.

51Compressor User Guide
Cropping and paddingCustomize the final cropping, sizing, and aspect ratio using the Cropping & Padding properties. Cropping removes video content from an image. Padding scales the image to a smaller size while retaining the output image’s frame size. For more information about these properties, see Intro to modifying frame size in Compressor.
• Cropping: This pop-up menu sets the dimension of the output image. The custom option allows you to enter your own image dimensions in the fields; other options use predetermined sizes. The Letterbox Area of Source option detects image edges and automatically enters crop values to match them. This is useful if you want to crop out the letterbox area (the black bars above and below a widescreen image) of a source media file.
• Padding: This pop-up menu sets the scaling of the output image while retaining the output image’s frame size. The custom option allows you to enter your own scaling dimensions in the fields; other options use predetermined dimensions.
QualityThe following properties set the processing algorithm used by Compressor during the transcoding process. For more information about using these controls, see Retime video and audio using Compressor and Modify timing and frame rate in Compressor.
• Resize filter: This pop-up menu sets the resizing method. There are several options:
• Nearest Pixel (Fastest): Samples the nearest neighboring pixel when resizing an image. This option provides the fastest processing time, but it is more likely to show aliasing artifacts and jagged edges.
• Linear: Adjacent pixel values are averaged using a linear distribution of weights. Produces fewer aliasing artifacts than Nearest Pixel, with a small increase in processing time.
• Gaussian: Adjacent pixel values are averaged using a gaussian distribution of weights. This provides a medium trade-off between processing time and output quality.
• Lanczos 2: Adjacent pixel values are averaged using a truncated sinc function. This option is slower than Gaussian but provides sharper results.
• Lanczos 3: Similar to Lanczos 2 but averages more pixel values. This option is slower than Lanczos 2 but may produce better results.
• Bicubic: Adjacent pixel values are averaged using a bicubic function. The processing time and output are most similar to Lanczos 2 and Lanczos 3.
• Anti-aliased (Best): Provides the highest output quality, but can take substantially longer to process.

52Compressor User Guide
• Retiming Quality: This pop-up menu sets the retiming method. There are four options:
• Fast (Nearest Frame): Linearly interpolates frames using nearest neighbor frames.
• Good (Frame Blending): Blends neighboring frames using a filter to produce good-quality interpolation.
• Best (Motion Compensated): Uses optical flow to interpolate using areas of movement between neighboring frames to produce high-quality output.
• Reverse Telecine: Removes the extra fields added during the telecine process to convert the film’s 24 fps to NTSC’s 29.97 fps. Choosing this item disables all the other Quality controls. See Use reverse telecine in Compressor.
• Adaptive details: Select this checkbox to use advanced image analysis to distinguish between noise and edge areas during output.
• Anti-aliasing level: Sets the softness level in the output image. Double-click the value and then manually enter a new value or drag the slider to the right to increase softness. This property improves the quality of conversions when you’re scaling media up. For example, when transcoding SD video to HD, anti-aliasing smooths jagged edges that might appear in the image.
• Details level: Sets the amount of detail in the output image. Double-click the value and then manually enter a new value or drag the slider to set the value. This sharpening control lets you add detail back to an image being enlarged. Unlike other sharpening operations, the “Details level” property distinguishes between noise and feature details, and generally doesn’t increase unwanted grain. Increasing this value may introduce jagged edges, however, which can be eliminated by increasing the “Anti-aliasing level” slider.
• Dithering: When selected, adds a certain type of noise to images to prevent large-scale distracting patterns such as color banding. If your image has excessive noise after rendering, deselect this checkbox.
Video effectsFor a list of available video effects in Compressor, and instructions on how to add a video effect to a setting, see Add and remove effects in Compressor.
Image Sequence settings in Compressor
The built-in OpenEXR Image Sequence and TIFF Image Sequence settings in Compressor (in the Motion Graphics category) use the Image Sequence transcoding format. This format encodes a variety of image sequence file types used in motion graphics, including TIFF, OpenEXR, JPEG, PNG, animated PNG (APNG), animated GIF, and more.
Note: You can also create custom settings that use the Image Sequence transcoding format. However, the built-in image sequence settings (in the Settings pane) analyze your source media and assign optimal properties to ensure the best possible transcoding results.
The properties of built-in and custom settings that use this transcoding format are located in the General inspector and Video inspector (described below).

53Compressor User Guide
Setting summaryDisplays the setting name and transcoding format used by Compressor, as well as an estimated output file size. When you add a setting to a job or change the setting’s properties, this summary is automatically updated.
General properties• Name: Displays the name of the setting.
• Description: Displays the description of the setting.
• Extension: Displays the extension of the output file.
Tip: To output a file with a different extension, choose a different file type from the “Image type” pop-up menu.
• Allow job segmenting: If you’ve set up distributed processing, select this checkbox to have Compressor process the output file using your shared computer group. See Transcode batches with multiple computers using Compressor.
• Default location: Choose an item from the pop-up menu to set the default save location for transcoded files.
• Image type: Choose an image type from the pop-up menu to set an image type for the transcoded files:
• DPX
• GIF
• HEIF
• JPEG
• OpenEXR
• Photoshop (PSD)
• PNG (Portable Network Graphics)
• TARGA (Truevision Advanced Raster Graphics Adapter), also referred to as TGA
• TIFF (Tagged Image File Format)
• Color palette: Available when Image type is set to GIF or PNG. The color palette limits the colors used in the transcoded files. Select Not Indexed to use all available colors.
• Local: Uses a new color palette for each frame.
• Global: Uses a shared color palette across all frames. This method involves two passes. The first pass analyzes each of the frames, generating a common palette. The second pass encodes each frame using that common palette.
• Color dithering: Available when a color palette is set to a number of a colors. Dithering gives the illusion of a color not present in the color palette. For example, a pattern of yellow and blue can be used to give the impression that green appears in the image. Dithering can also create what appears to be a smooth gradient using a limited number of colors in the palette.
• None: No dithering is applied.
• Floyd-Steinberg: Uses the industry-standard Floyd-Steinberg dithering algorithm.
• Sierra2: Uses the Sierra two-line dithering algorithm. Depending on the source, Sierra2 may produce a smoother image.

54Compressor User Guide
• Animated: Available when Image type is set to GIF or PNG, exports a single, animated file containing all frames (rather than a collection of individual files for each frame).
• Playback: Available when Animated is selected. Playback specifies how many times the animated GIF or PNG loops during playback. Select Continuously, or enter the number of times you want the animated image to play. (Not all web browsers will recognize this option.)
• Create unique output directory: Available when Animated is not selected. Select this checkbox to create a folder to hold the output files; the files saved will be named “frame-0,” “frame-1,” “frame-2,” and so on.
• Add leading zeros to frame numbers: Available when Animated is not selected. Select this checkbox to have Compressor add leading zeros to output filenames (“filename-000000,” “filename-000001,” “filename-000002,” and so on).
RetimingSets the processing algorithm used to adjust the frame rate during transcoding. Select one of the following options:
• Set to percent of source using: Modifies the output clip’s speed by a percentage of the source clip’s speed. Enter a value in the percentage field or choose a preset value from the adjacent pop-up menu (with a down arrow).
• Set to: Sets the duration of the clip. Enter a timecode duration in the field or click the arrows to increase or decrease the time.
• So source frames play at [frame rate] fps: Nondestructively changes the playback speed of the clip without discarding frames or creating new frames. This property has no effect unless the “Frame rate” value in the Video inspector is different from the source file’s frame rate. For example, if you add a 10-second source file with a frame rate of 24 fps to Compressor, set the “Frame rate” property in the Video inspector to 25 fps, and then select “So source frames play at 25 fps” in the General inspector, the resulting duration of the transcoded clip (at 25 fps) will be 9 seconds and 15 frames.
For more information, see Retime video and audio using Compressor.
Video properties• Frame size: Use this pop-up menu to set the frame size (resolution) for the output file.
There are four categories to choose from:
• Automatic: Adjusts the output based on the size of the input, and can be constrained “up to” a maximum resolution.
• Percentage: Adjusts the output based on a percentage of the input’s size.
• Manual: Forces the output to a specific resolution.
• Constrained: Constrains the output to a specific aspect ratio.
• Pixel aspect ratio: Use this pop-up menu to set the pixel aspect ratio (the ratio between the encoded width and the display width).
• Frame rate: Use this pop-up menu to set the playback rate (the number of images displayed per second) for the output file. See Retiming options in Compressor.
55Compressor User Guide
• Field order: Use the pop-up menu to set the output scanning method (either the field dominance or a conversion to progressive scanning). There are four options:
• Automatic: Selects the most appropriate field order, based on the field order of the source and the capabilities of the selected codec.
• Progressive: The video is displayed in complete frames with all lines sampled at the same instant in time.
• Top First: The video is interlaced and displayed as two separate interleaved fields. The field containing the top line (even lines) is sampled at an earlier instant in time than the field containing the bottom line (odd lines). This field order is commonly used for high-definition video and standard-definition PAL video.
• Bottom First: The video is interlaced and displayed as two separate interleaved fields. The field containing the bottom line (odd lines) is sampled at an earlier instant in time than the field containing the top line (even lines). This field order is commonly used for standard-definition NTSC video.
• Color space: Use this pop-up menu to convert the source media to a new color space, including wide color gamut. Choose Automatic to allow Compressor to choose the best color space based on the selected preset. You can also choose a manual setting to override the default. For more information about wide color gamut, see Intro to wide color gamut and HDR in Compressor.
• RAW to log: Use this pop-up menu to select how ProRes RAW conversion is done. Choose Automatic to allow Compressor to choose the conversion method. You can also choose a manual setting to override the default. This option is available only if the source is ProRes RAW.
• Camera LUT: Use this pop-up menu to select the camera lookup table (LUT) applied to the source. Select a custom LUT to transform your video from one color space to another. This setting is enabled if the source is ProRes RAW and if “RAW to log” is set to a value other than None. This setting is also enabled if “Camera log” in video properties in the Job inspector is set to a value other than None.
• Scale image to preserve aspect ratio: Select this checkbox to scale the output files to use square pixels and maintain the original aspect ratio (which results in an increase or decrease in the number of horizontal and vertical pixels).
• Color depth: Use this pop-up menu to set the number of bits used to represent color in each color channel (red, green, and blue). Choose 8 or 16 (for better quality).
Cropping and paddingCustomize the final cropping, sizing, and aspect ratio using the Cropping & Padding properties in Compressor. Cropping removes video content from an image. Padding scales the image to a smaller size while retaining the output image’s frame size. For more information about these properties, see Intro to modifying frame size in Compressor.
• Cropping: This pop-up menu sets the dimension of the output image. The custom option allows you to enter your own image dimensions in the fields; other options use predetermined sizes. The Letterbox Area of Source option detects image edges and automatically enters crop values to match them. This is useful if you want to crop out the letterbox area (the black bars above and below a widescreen image) of a source media file.

56Compressor User Guide
• Padding: This pop-up menu sets the scaling of the output image while retaining the output image’s frame size. The custom option allows you to enter your own scaling dimensions in the fields; other options use predetermined dimensions.
QualityThe following properties determine how the video will be resized, retimed, and otherwise adjusted when transcoded in Compressor:
• Resize filter: This pop-up menu sets the resizing method. There are several options:
• Nearest Pixel (Fastest): Samples the nearest neighboring pixel when resizing an image. This option provides the fastest processing time, but it is more likely to show aliasing artifacts and jagged edges.
• Linear: Adjacent pixel values are averaged using a linear distribution of weights. Produces fewer aliasing artifacts than Nearest Pixel, with a small increase in processing time.
• Gaussian: Adjacent pixel values are averaged using a gaussian distribution of weights. This provides a medium trade-off between processing time and output quality.
• Lanczos 2: Adjacent pixel values are averaged using a truncated sinc function. This option is slower than Gaussian but provides sharper results.
• Lanczos 3: Similar to Lanczos 2 but averages more pixel values. This option is slower than Lanczos 2 but may produce better results.
• Bicubic: Adjacent pixel values are averaged using a bicubic function. The processing time and output are most similar to Lanczos 2 and Lanczos 3.
• Anti-aliased (Best): Provides the highest output quality, but can take substantially longer to process.
• Retiming Quality: This pop-up menu sets the retiming method. There are four options:
• Fast (Nearest Frame): Linearly interpolates frames using nearest neighbor frames.
• Good (Frame Blending): Blends neighboring frames using a filter to produce good-quality interpolation.
• Best (Motion Compensated): Uses optical flow to interpolate using areas of movement between neighboring frames to produce high-quality output.
• Reverse Telecine: Removes the extra fields added during the telecine process to convert the film’s 24 fps to NTSC’s 29.97 fps. Choosing this item disables all the other Quality controls. See Use reverse telecine in Compressor.
• Adaptive details: Select this checkbox to use advanced image analysis to distinguish between noise and edge areas during output.
• Anti-aliasing level: Sets the softness level in the output image. Double-click the value and then manually enter a new value or drag the slider to the right to increase softness. This property improves the quality of conversions when you’re scaling media up. For example, when transcoding SD video to HD, anti-aliasing smooths jagged edges that might appear in the image.

57Compressor User Guide
• Details level: Sets the amount of detail in the output image. Double-click the value and then manually enter a new value or drag the slider to set the value. This sharpening control lets you add detail back to an image being enlarged. Unlike other sharpening operations, the “Details level” property distinguishes between noise and feature details, and generally doesn’t increase unwanted grain. Increasing this value may introduce jagged edges, however, which can be eliminated by increasing the “Anti-aliasing level” slider.
• Dithering: When selected, adds a certain type of noise to images to prevent large-scale distracting patterns such as color banding. If your image has excessive noise after rendering, deselect this checkbox.
Video effectsFor a list of available video effects in Compressor, and instructions on how to add a video effect to a setting, see Add and remove effects in Compressor.
MP3 settings in Compressor
The built-in MP3 File and MP3 for Audio Podcasting settings in Compressor use the MP3 transcoding format. This format encodes MP3 files, which are often used for digital audio players. You can also create custom settings that use the MP3 transcoding format.
Note: You can also create custom settings that use the MP3 transcoding format. However, the built-in MP3 settings (in the Settings pane) analyze your source media and assign optimal properties to ensure the best possible transcoding results.
The properties of built-in and custom settings that use this transcoding format are located in the General inspector and Audio inspector (described below).
Setting summaryDisplays the setting name and transcoding format used by Compressor, as well as an estimated output file size. When you add a setting to a job or change the setting’s properties, this summary is automatically updated.
General properties• Name: Displays the name of the setting.
• Description: Displays the description of the setting.
• Extension: Displays the extension of the output file (.mp3).
• Allow job segmenting: This checkbox is dimmed because job segmenting is not available for settings that output only an audio file.
• Default location: Select an item from the pop-up menu to set the default save location for transcoded files.

58Compressor User Guide
RetimingSets the processing algorithm used to adjust the frame rate during transcoding. Select one of the following options:
• Set to percent of source using: Modifies the output clip’s speed by a percentage of the source clip’s speed. Enter a value in the percentage field or choose a preset value from the adjacent pop-up menu (with a down arrow).
• Set to: Sets the duration of the clip. Enter a timecode duration in the field or click the arrows to increase or decrease the time.
• So source frames play at [frame rate] fps: Nondestructively changes the playback speed of the clip without discarding frames or creating new frames. This property has no effect unless the “Frame rate” value in the Video inspector is different from the source file’s frame rate. For example, if you add a 10-second source file with a frame rate of 24 fps to Compressor, set the “Frame rate” property in the Video inspector to 25 fps, and then select “So source frames play at 25 fps” in the General inspector, the resulting duration of the transcoded clip (at 25 fps) will be 9 seconds and 15 frames.
For more information, see Retime video and audio using Compressor.
Audio properties• Channel layout: Use the pop-up menu to set the audio channel layout. See Audio
channel layouts in Compressor.
• Sample rate: Use this pop-up menu to set the number of times per second that music waveforms (samples) are captured digitally. The higher the sample rate, the higher the audio quality and the larger the file size.
• Data rate: Use the slider to set the number of kilobits per second (kbps) required to deliver your audio file. Using a higher rate will produce a higher-quality audio file.
• Use variable bit rate encoding: Select the checkbox to vary the number of bits used to store the music depending on the complexity of the music. Variable bit rate encoding can reduce the size of the output file.
• Joint stereo: Select the checkbox to have one channel carry the information that’s identical on both channels, and another channel carry unique information. At bit rates of 160 kbps and below, this setting can improve the sound quality of your converted audio.
• Smart encoding adjustments: Select the checkbox to have Compressor analyze the source file and the setting’s encoding properties to maximize the quality of the output file.
• Filter frequencies below 10 Hz: Select the checkbox to have Compressor remove inaudible frequencies from the source file and output a smaller and more efficient file without perceptible loss of quality.
Audio effectsFor a list of available audio effects in Compressor, and instructions on how to add an audio effect to a setting, see Add and remove effects in Compressor.

59Compressor User Guide
MPEG-2 setting in Compressor
The built-in MPEG Files settings in Compressor use the MPEG-2 transcoding format. (The MPEG-2 for DVD setting in the Create DVD destination also uses this format.) Use this format to encode MPEG-2 stream files for DVD and Blu-ray authoring.
Note: You can also create custom settings that use the MPEG-2 transcoding format. However, the built-in MPEG-2 settings (in the Settings pane) analyze your source media and assign optimal properties to ensure the best possible transcoding results.
The built-in MPEG-2 for DVD setting encodes only a video file. To encode the accompanying audio, use the Dolby Digital audio setting. The easiest way to do this is to apply the Create DVD destination to your source file, which adds both the MPEG-2 for DVD setting and the Dolby Digital setting to your job. For more information, see Dolby Digital settings in Compressor.
The properties of built-in and custom settings that use this transcoding format are located in the General, Video, and Audio inspectors (described below).
Setting summaryDisplays the setting name and transcoding format used by Compressor, as well as an estimated output file size. When you add a setting to a job or change the setting’s properties, this summary is automatically updated.
General properties• Name: Displays the name of the setting.
• Description: Displays the description of the setting.
• Extension: Displays the extension of the output file.
• Allow job segmenting: If you’ve set up distributed processing, select this checkbox to have Compressor process the output file using your shared computer group. See Transcode batches with multiple computers using Compressor.
• Default location: Select an item from the pop-up menu to set the default save location for transcoded files.
• Format: Use the pop-up menu to set the stream type for the output file. There are three options:
• Program Stream: This stream type contains only one MPEG-2 content channel and its associated audio. Program streams require an error-free delivery method and are primarily used for storage or processing within a computer.
• Elementary Stream: This stream type contains only one MPEG-2 content channel and no audio. When you select this option, you should also set the “Stream usage” property.
• Transport Stream: This stream type can contain several MPEG-2 content channels and associated audio. All the channels are multiplexed together, allowing the receiver to choose which to play back. Compressor supports creating single-channel transport streams that can also include associated audio. Transport streams can also recover from interruptions during playback, making them ideally suited for broadcast and streaming applications where noise or network congestion can lead to interruptions.

60Compressor User Guide
• Stream usage: Use this pop-up menu to specify the MPEG-2 transcoding output. Compressor modifies the available properties based on the option you choose:
• Generic: This option allows you complete access to all the MPEG-2 properties. This is the only option that supports the MPEG-2 640 x 480 video format in addition to the standard-definition (SD) and high-definition (HD) video formats. It’s also the only option that supports creating transport and program streams. It supports the complete bit rate range of 2.0 Mbps to 40.0 Mbps.
• DVD: This option restricts the encoding properties to those allowed by the SD DVD specification. These include the NTSC and PAL video formats and a bit rate range of 2.0 Mbps to 9.0 Mbps.
• Blu-ray: This option restricts the encoding properties to those allowed by Blu-ray video discs. These include the SD and HD video formats and a bit rate range of 10.0 Mbps to 40.0 Mbps.
• Add Apple metadata: Select this checkbox to have Compressor parse specific MPEG-2 authoring information during the transcoding process and provide it in the output file. The resulting file will be read faster by other applications.
• Include chapter markers only: Select this checkbox to include chapter markers, but not unnamed compression markers, in MPEG-2 output. When this checkbox is deselected, all markers are included in the output file. See Add markers using Compressor.
RetimingSets the processing algorithm used to adjust the frame rate during transcoding. Select one of the following options:
• Set to percent of source using: Modifies the output clip’s speed by a percentage of the source clip’s speed. Enter a value in the percentage field or choose a preset value from the adjacent pop-up menu (with a down arrow).
• Set to: Sets the duration of the clip. Enter a timecode duration in the field or click the arrows to increase or decrease the time.
• So source frames play at [frame rate] fps: Nondestructively changes the playback speed of the clip without discarding frames or creating new frames. This property has no effect unless the “Frame rate” value in the Video inspector is different from the source file’s frame rate. For example, if you add a 10-second source file with a frame rate of 24 fps to Compressor, set the “Frame rate” property in the Video inspector to 25 fps, and then select “So source frames play at 25 fps” in the General inspector, the resulting duration of the transcoded clip (at 25 fps) will be 9 seconds and 15 frames.
For more information, see Retime video and audio using Compressor.
CaptionsThis area contains a single property, the “Embed closed captions” checkbox. Select the checkbox if you’ve added CEA-608 closed captions to a job and you want Compressor to insert the captions into the output video file. See Intro to supporting captions in Compressor.

61Compressor User Guide
Video properties• Frame size: Use this pop-up menu to set the frame size (resolution) for the output file.
There are four categories to choose from:
• Automatic: Adjusts the output based on the size of the input, and can be constrained “up to” a maximum resolution.
• Percentage: Adjusts the output based on a percentage of the input’s size.
• Manual: Forces the output to a specific resolution.
• Constrained: Constrains the output to a specific aspect ratio.
• Pixel aspect ratio: Use this pop-up menu to set the pixel aspect ratio (the ratio between the encoded width and the display width).
• Frame rate: Use this pop-up menu to set the playback rate (the number of images displayed per second) for the output file. See Retiming options in Compressor.
• Field order: Use the pop-up menu to set the output scanning method (either the field dominance or a conversion to progressive scanning). There are four options:
• Automatic: Selects the most appropriate field order, based on the field order of the source and the capabilities of the selected codec.
• Progressive: The video is displayed in complete frames with all lines sampled at the same instant in time.
• Top First: The video is interlaced and displayed as two separate interleaved fields. The field containing the top line (even lines) is sampled at an earlier instant in time than the field containing the bottom line (odd lines). This field order is commonly used for high-definition video and standard-definition PAL video.
• Bottom First: The video is interlaced and displayed as two separate interleaved fields. The field containing the bottom line (odd lines) is sampled at an earlier instant in time than the field containing the top line (even lines). This field order is commonly used for standard-definition NTSC video.
• Color space: Use this pop-up menu to convert the source media to a new color space. Choose Automatic to allow Compressor to choose the best color space based on the selected preset. You can also choose a manual setting to override the default.
• RAW to log: Use this pop-up menu to select how ProRes RAW conversion is done. Choose Automatic to allow Compressor to choose the conversion method. You can also choose a manual setting to override the default. This option is available only if the source is ProRes RAW.
• Camera LUT: Use this pop-up menu to select the camera lookup table (LUT) applied to the source. Select a custom LUT to transform your video from one color space to another. This setting is enabled if the source is ProRes RAW and if “RAW to log” is set to a value other than None. This setting is also enabled if “Camera log” in video properties in the Job inspector is set to a value other than None.
• Anamorphic: This property applies only to standard-definition video. If the source video’s storage aspect ratio doesn’t match its display aspect ratio, you can correct the image so the output doesn’t appear squeezed or stretched. Choose Automatic from the pop-up menu to have Compressor scale the image based on the frame size, or choose 16:9 or 4:3 to scale the image to a specific aspect ratio.

62Compressor User Guide
• Encoding mode: Choose an option from the pop-up menu to set how Compressor encodes the output file: either faster and lower quality, or slower and better quality. Options include:
• Single Pass CBR: This is the fastest MPEG-2 encoding mode. It provides good quality, especially at bit rates between 5 and 9 Mbps.
• Single Pass VBR: This mode aims to maintain constant quality (at the expense of constant bit rate) for the transcoded video file. For most standard-definition (SD) media files at bit rates of 3.5 Mbps and above, this mode provides good to excellent quality and transcodes quickly.
• Single Pass VBR (Best): This mode provides the best possible quality output for SD video at bit rates of 3 to 3.5 Mbps and above.
• Two Pass VBR: This mode uses two passes—one pass to analyze the entire source video stream, and a second pass to compress the file. This mode takes longer and provides a better-quality file than the one-pass modes, and is recommended for source media files with a substantial difference between the most and the least complex scenes.
• Two Pass VBR (Best): This mode provides the best possible quality output, and outstanding quality at bit rates of 3 to 3.5 Mbps and above for HD and SD video.
• Motion estimation: This pop-up menu sets the amount of motion processing that will be performed on the file. There are three options:
• Good: The fastest processing setting. Use this setting when there is relatively low motion between frames. In general, use Good with the one-pass encoding modes.
• Better: Provides very good results even in the presence of complex interlaced motion. In general, use Better with Single Pass VBR (Best) and Two Pass VBR (Best).
• Best: The slowest processing setting. Use for the most complex motion and for interlaced source files. In general, use the Best mode to maximize quality when using Single Pass VBR (Best) or Two Pass VBR (Best).
• GOP structure: This property is available only when the “Frame rate” property is set manually (does not use Automatic).
Compressor provides three methods of grouping frames, or “pictures,” in encoded video: as I-frames (intra-frames), P-frames (predictive frames), and B-frames (bidirectional predictive frames). These are collectively called a group of pictures (GOP). The “GOP structure” pop-up menu includes several methods of arranging frames:
• IP: Use IP only if your media contains fast motion that isn’t encoded with sufficient quality using an IBBP or IBP structure.
• IBP: Use IBP only if your media contains fast motion that isn’t encoded with sufficient quality using an IBBP structure.
• IBBP: Recommended for the majority of MPEG-2 encoding situations.
Note: For most MPEG-2 encoding situations intended for use on a DVD, choose IBBP as the GOP structure setting, and a GOP size of 15 for NTSC, or 12 for PAL.
63Compressor User Guide
• GOP size: This property is available when the “Frame rate” property is set manually (does not use Automatic).
This slider specifies how many frames are contained within a GOP (group of pictures). The values available in the slider are determined by the GOP structure property (described above). The maximum GOP size you can choose within Compressor is 15 frames (NTSC) or 12 frames (PAL and 720p). The minimum GOP size for all video formats is 6 frames (closed GOP) or 7 frames (open GOP).
• Automatically select bit rate: Select this checkbox to have Compressor automatically compute the best bit rate for the output file, based on the duration of the source file. To manually adjust the bit rate, deselect the checkbox and drag the “Average bit rate” and “Maximum bit rate” sliders (or enter values in the adjacent fields).
• YUV 422 color encoding: This property appears in most built-in settings that output MPEG-2 files. Select this checkbox to use YUV 422 color encoding for superior chroma quality.
Cropping and paddingCustomize the final cropping, sizing, and aspect ratio using the Cropping & Padding properties in Compressor. Cropping removes video content from an image. Padding scales the image to a smaller size while retaining the output image’s frame size. For more information about these properties, see Intro to modifying frame size in Compressor.
• Cropping: This pop-up menu sets the dimension of the output image. The custom option allows you to enter your own image dimensions in the fields; other options use predetermined sizes. The Letterbox Area of Source option detects image edges and automatically enters crop values to match them. This is useful if you want to crop out the letterbox area (the black bars above and below a widescreen image) of a source media file.
• Padding: This pop-up menu sets the scaling of the output image while retaining the output image’s frame size. The custom option allows you to enter your own scaling dimensions in the fields; other options use predetermined dimensions.
QualityThe following properties determine how Compressor resizes, retimes, and otherwise adjusts the video when transcoded:
• Resize filter: This pop-up menu sets the resizing method. There are several options:
• Nearest Pixel (Fastest): Samples the nearest neighboring pixel when resizing an image. This option provides the fastest processing time, but it is more likely to show aliasing artifacts and jagged edges.
• Linear: Adjacent pixel values are averaged using a linear distribution of weights. Produces fewer aliasing artifacts than Nearest Pixel, with a small increase in processing time.
• Gaussian: Adjacent pixel values are averaged using a gaussian distribution of weights. This provides a medium trade-off between processing time and output quality.
• Lanczos 2: Adjacent pixel values are averaged using a truncated sinc function. This option is slower than Gaussian but provides sharper results.

64Compressor User Guide
• Lanczos 3: Similar to Lanczos 2 but averages more pixel values. This option is slower than Lanczos 2 but may produce better results.
• Bicubic: Adjacent pixel values are averaged using a bicubic function. The processing time and output are most similar to Lanczos 2 and Lanczos 3.
• Anti-aliased (Best): Provides the highest output quality, but can take substantially longer to process.
• Retiming Quality: This pop-up menu sets the retiming method. There are four options:
• Fast (Nearest Frame): Linearly interpolates frames using nearest neighbor frames.
• Good (Frame Blending): Blends neighboring frames using a filter to produce good-quality interpolation.
• Best (Motion Compensated): Uses optical flow to interpolate using areas of movement between neighboring frames to produce high-quality output.
• Reverse Telecine: Removes the extra fields added during the telecine process to convert the film’s 24 fps to NTSC’s 29.97 fps. Choosing this item disables all the other Quality controls. See Use reverse telecine in Compressor.
• Adaptive details: Select this checkbox to use advanced image analysis to distinguish between noise and edge areas during output.
• Anti-aliasing level: Sets the softness level in the output image. Double-click the value and then manually enter a new value or drag the slider to the right to increase softness. This property improves the quality of conversions when you’re scaling media up. For example, when transcoding SD video to HD, anti-aliasing smooths jagged edges that might appear in the image.
• Details level: Sets the amount of detail in the output image. Double-click the value and then manually enter a new value or drag the slider to set the value. This sharpening control lets you add detail back to an image being enlarged. Unlike other sharpening operations, the “Details level” property distinguishes between noise and feature details, and generally doesn’t increase unwanted grain. Increasing this value may introduce jagged edges, however, which can be eliminated by increasing the “Anti-aliasing level” slider.
• Dithering: When selected, adds a certain type of noise to images to prevent large-scale distracting patterns such as color banding. If your image has excessive noise after rendering, deselect this checkbox.
Video effectsFor a list of available video effects in Compressor, and instructions on how to add a video effect to a setting, see Add and remove effects in Compressor.
MPEG-4 settings in Compressor
In Compressor, the Prepare for HTTP Live Streaming destination and the AAC setting (for audio output) use the MPEG-4 transcoding format. The MPEG-4 format is widely compatible with many different platforms and is often used for distribution on the Internet. You can also use this format to create files for audio podcasting and digital music playback. (To learn more about HTTP Live Streaming, see HTTP Live Streaming and other related documents, available in Apple Developer Documentation.)

65Compressor User Guide
Settings based on the MPEG-4 format offer a choice of two encoders: H.264 and HEVC (High-Efficiency Video Coding, also known as H.265). When you add an MPEG-4-based setting to a job, Compressor chooses the H.264 format as the default codec. You can change the codec to HEVC in the Video inspector if your computer is running macOS 10.13 or later. HEVC is a recently established compression standard that supports larger frame sizes (including 8K) and HDR10 metadata for high-dynamic-range video. HEVC playback requires a recent-generation Apple device running macOS 10.13 or later, iOS 11 or later, iPadOS 13 or later, or tvOS 11 or later.
Note: You can also create custom settings that use the MPEG-4 transcoding format. However, the built-in settings (in the Settings pane) analyze your source media and assign optimal properties to ensure the best possible transcoding results.
The properties of built-in and custom settings that use this transcoding format are located in the General, Video, and Audio inspectors (described below).
Setting summaryDisplays the setting name and transcoding format used by Compressor, as well as an estimated output file size. When you add a setting to a job or change the setting’s properties, this summary is automatically updated.
General properties• Name: Displays the name of the setting.
• Description: Displays the description of the setting.
• Extension: Displays the extension of the output file (.mp4 or .m4a).
• Allow job segmenting: If you’ve set up distributed processing, select this checkbox to have Compressor process the output file using your shared computer group. See Transcode batches with multiple computers using Compressor.
Note: Job segmenting is not available when outputting an MPEG-4 audio file or when the Multi-pass checkbox is selected in the Video inspector.
• Default location: Choose an item from the pop-up menu to set the default save location for transcoded files.
• Format: Use this pop-up menu to specify whether the output includes video and audio, video only, or audio only. For podcasting and digital music playback, choose audio only. If format is set to Audio, audio-only files are created with the .m4a extension, and you can choose Apple Lossless or AAC output. If format is set to Audio and Video or Video, files are created with the .m4v extension.
• Optimize for network use: Select this checkbox to create a file that will start playing after only a small portion of the file has been downloaded from the network.
• Enhanced podcast: Select this checkbox to have Compressor embed podcasting information (annotations, markers, and artwork) into the output media file. See Work with metadata annotations in Compressor and Add markers using Compressor.

66Compressor User Guide
RetimingSets the processing algorithm used to adjust the frame rate during transcoding. Select one of the following options:
• Set to percent of source using: Modifies the output clip’s speed by a percentage of the source clip’s speed. Enter a value in the percentage field or choose a preset value from the adjacent pop-up menu (with a down arrow).
• Set to: Sets the duration of the clip. Enter a timecode duration in the field or click the arrows to increase or decrease the time.
• So source frames play at [frame rate] fps: Nondestructively changes the playback speed of the clip without discarding frames or creating new frames. This property has no effect unless the “Frame rate” value in the Video inspector is different from the source file’s frame rate. For example, if you add a 10-second source file with a frame rate of 24 fps to Compressor, set the “Frame rate” property in the Video inspector to 25 fps, and then select “So source frames play at 25 fps” in the General inspector, the resulting duration of the transcoded clip (at 25 fps) will be 9 seconds and 15 frames.
For more information, see Retime video and audio using Compressor.
CaptionsThis area contains a single property, the “Embed closed captions” checkbox. Select the checkbox if you’ve added CEA-608 closed captions to a job and you want Compressor to insert the captions into the output video file. See Intro to supporting captions in Compressor.
MetadataSpecifies how metadata is embedded in the transcode. See Work with metadata annotations in Compressor.
• Use Job Annotations: Includes the metadata from the Job Annotations listed in the Job Inspector. This is the default setting.
• Pass through source file metadata: Passes the existing metadata from the source file to the transcode. Ignores Job Annotations listed in the Job Inspector.
• Remove all metadata and annotations: Passes no metadata to the source file.
• Include metadata from the source file that cannot be displayed as a job annotation: Available when Use Job Annotations is selected. Includes the metadata from the Job Annotations listed in the Job Inspector and passes the existing metadata from the source file to the transcode.
Video propertiesSome video properties are enabled only for codecs that support them. If a video property is disabled in Compressor, it’s not supported by the selected codec.
• Frame size: Use this pop-up menu to set the frame size (resolution) for the output file. There are four categories to choose from:
• Automatic: Adjusts the output based on the size of the input, and can be constrained “up to” a maximum resolution.
• Percentage: Adjusts the output based on a percentage of the input’s size.

67Compressor User Guide
• Manual: Forces the output to a specific resolution.
• Constrained: Constrains the output to a specific aspect ratio.
• Pixel aspect ratio: Use this pop-up menu to set the pixel aspect ratio (the ratio between the encoded width and the display width).
• Frame rate: Use this pop-up menu to set the playback rate (the number of images displayed per second) for the output file. See Retiming options in Compressor.
• Field order: Use the pop-up menu to set the output scanning method (either the field dominance or a conversion to progressive scanning). There are four options:
• Automatic: Selects the most appropriate field order, based on the field order of the source and the capabilities of the selected codec.
• Progressive: The video is displayed in complete frames with all lines sampled at the same instant in time.
• Top First: The video is interlaced and displayed as two separate interleaved fields. The field containing the top line (even lines) is sampled at an earlier instant in time than the field containing the bottom line (odd lines). This field order is commonly used for high-definition video and standard-definition PAL video.
• Bottom First: The video is interlaced and displayed as two separate interleaved fields. The field containing the bottom line (odd lines) is sampled at an earlier instant in time than the field containing the top line (even lines). This field order is commonly used for standard-definition NTSC video.
• Color space: Use this pop-up menu to convert the source media to a new color space, including wide color gamut. Choose Automatic to allow Compressor to choose the best color space based on the selected preset. You can also choose a manual setting to override the default. For more information about wide color gamut, see Intro to wide color gamut and HDR in Compressor.
• RAW to log: Use this pop-up menu to select how ProRes RAW conversion is done. Choose Automatic to allow Compressor to choose the conversion method. You can also choose a manual setting to override the default. This option is available only if the source is ProRes RAW.
• Camera LUT: Use this pop-up menu to select the camera lookup table (LUT) applied to the source. Select a custom LUT to transform your video from one color space to another. This setting is enabled if the source is ProRes RAW and if “RAW to log” is set to a value other than None. This setting is also enabled if “Camera log” in video properties in the Job inspector is set to a value other than None.
• Codec: Choose one of two available transcoding formats, H.264 or HEVC.
• Encoder type: Use this pop-up menu to set the type of encoder. This pop-up menu is enabled when Codec is set to HEVC. Choose from two options:
• Faster (standard quality): Encodes the output file using a faster codec, with standard quality.
• Slower (higher quality): Encodes the output file using a slower codec, with higher quality.
Important: Not all options are available on all hardware.

68Compressor User Guide
• Profile: Use this pop-up menu to set the quality of compression used in the output file. When Codec is set to H.264, this pop-up menu offers three options:
• High: Provides high-quality output, which may not be compatible with older H.264 playback devices.
• Main: Similar to the Baseline profile, with additional support for standard-definition (SD) video requirements.
• Baseline: Primarily for video conferencing and mobile applications.
When Codec is set to HEVC, the Profile pop-up menu sets the color depth of the output file (the number of bits used to represent color in each color channel—red, green, and blue). There are two options:
• 8-Bit Color: Provides a good balance between picture quality and file size. (This option is available only on recent Mac computers that support hardware encoding of HEVC.)
• 10-Bit Color: Provides better picture quality but with larger file sizes. (Because this option uses software encoding, performance may be significantly slower than 8-bit hardware encoding.)
• Entropy mode: When Codec is set to H.264, use this pop-up menu to set the entropy mode to CABAC (which provides higher-quality output) or CAVLC (which is faster and more compatible for playback on older devices).
• Key frame interval: Enter a value in the text field to set the key frame interval (number of frames) at which you want key frames created in your output file. Alternatively, you can select Automatic to have Compressor choose the key frame interval rate (the displayed value is 0 with Automatic on; the actual value is determined during the encoding process).
• Quality: Use this slider to set the quality level of your output. Select from least (smaller file size) to best (larger file size).
• Multi-pass: Select this checkbox to turn on multi-pass encoding that uses additional analysis of video frames to produce a high-quality output file. Multi-pass is available when Codec is set to H.264 on an Intel-based Mac, and when Codec is set to H.264 or HEVC on a Mac with Apple silicon that’s running macOS Monterey 12 or later and has “Encoder type” set to “Faster (standard quality).” For faster (single-pass) transcoding, turn off this feature by deselecting the checkbox.
• Include Dolby Vision 8.4 metadata: Select this checkbox to have Compressor include Dolby Vision 8.4 metadata in the output file. Dolby Vision 8.4 is a format designed to optimize HDR content for Apple devices. If this checkbox is selected, “Color space” is set to Rec. 2020 HLG, Codec is set to HEVC, and Profile is set to 10-Bit Color.
• Allow frame reordering: Select this checkbox to potentially provide a better-quality output file by allowing Compressor to reorder video frames during transcoding. This option is available only when Codec is set to H.264 or HEVC.
Important: If you select “Allow frame reordering,” your output file may be more efficiently compressed but may not be compatible with decoders on older hardware.

69Compressor User Guide
• 360° metadata: Use this pop-up menu to choose the type of 360° metadata, if any, included in the output file.
• Automatic: Compressor chooses the metadata format based on the properties in the Job inspector and the transcode setting you applied. The format chosen is listed to the right of the pop-up menu.
• None: No 360° metadata is attached to your output file.
• Spherical Video V1: The 360° metadata format most commonly used by sharing sites, including YouTube and Vimeo.
• Spherical Video V2: A less common, but more up-to-date, 360° metadata format used by YouTube and Vimeo.
For more information, see View 360° video metadata using Compressor.
Cropping and paddingCustomize the final cropping, sizing, and aspect ratio using the Cropping & Padding properties in Compressor. Cropping removes video content from an image. Padding scales the image to a smaller size while retaining the output image’s frame size. For more information about these properties, see Intro to modifying frame size in Compressor.
• Cropping: This pop-up menu sets the dimension of the output image. The custom option allows you to enter your own image dimensions in the fields; other options use predetermined sizes. The Letterbox Area of Source option detects image edges and automatically enters crop values to match them. This is useful if you want to crop out the letterbox area (the black bars above and below a widescreen image) of a source media file.
• Padding: This pop-up menu sets the scaling of the output image while retaining the output image’s frame size. The custom option allows you to enter your own scaling dimensions in the fields; other options use predetermined dimensions.
QualityThe following properties determine how Compressor resizes, retimes, and otherwise adjusts the video when transcoded:
• Resize filter: This pop-up menu sets the resizing method. There are several options:
• Nearest Pixel (Fastest): Samples the nearest neighboring pixel when resizing an image. This option provides the fastest processing time, but it is more likely to show aliasing artifacts and jagged edges.
• Linear: Adjacent pixel values are averaged using a linear distribution of weights. Produces fewer aliasing artifacts than Nearest Pixel, with a small increase in processing time.
• Gaussian: Adjacent pixel values are averaged using a gaussian distribution of weights. This provides a medium trade-off between processing time and output quality.
• Lanczos 2: Adjacent pixel values are averaged using a truncated sinc function. This option is slower than Gaussian but provides sharper results.
• Lanczos 3: Similar to Lanczos 2 but averages more pixel values. This option is slower than Lanczos 2 but may produce better results.

70Compressor User Guide
• Bicubic: Adjacent pixel values are averaged using a bicubic function. The processing time and output are most similar to Lanczos 2 and Lanczos 3.
• Anti-aliased (Best): Provides the highest output quality, but can take substantially longer to process.
• Retiming Quality: This pop-up menu sets the retiming method. There are four options:
• Fast (Nearest Frame): Linearly interpolates frames using nearest neighbor frames.
• Good (Frame Blending): Blends neighboring frames using a filter to produce good-quality interpolation.
• Best (Motion Compensated): Uses optical flow to interpolate using areas of movement between neighboring frames to produce high-quality output.
• Reverse Telecine: Removes the extra fields added during the telecine process to convert the film’s 24 fps to NTSC’s 29.97 fps. Choosing this item disables all the other Quality controls. See Use reverse telecine in Compressor.
• Adaptive details: Select this checkbox to use advanced image analysis to distinguish between noise and edge areas during output.
• Anti-aliasing level: Sets the softness level in the output image. Double-click the value and then manually enter a new value or drag the slider to the right to increase softness. This property improves the quality of conversions when you’re scaling media up. For example, when transcoding SD video to HD, anti-aliasing smooths jagged edges that might appear in the image.
• Details level: Sets the amount of detail in the output image. Double-click the value and then manually enter a new value or drag the slider to set the value. This sharpening control lets you add detail back to an image being enlarged. Unlike other sharpening operations, the “Details level” property distinguishes between noise and feature details, and generally doesn’t increase unwanted grain. Increasing this value may introduce jagged edges, however, which can be eliminated by increasing the “Anti-aliasing level” slider.
• Dithering: When selected, adds a certain type of noise to images to prevent large-scale distracting patterns such as color banding. If your image has excessive noise after rendering, deselect this checkbox.
Video effectsFor a list of available video effects in Compressor, and instructions on how to add a video effect to a setting, see Add and remove effects in Compressor.
Audio properties• Channel layout: Use the pop-up menu to set the audio channel layout.
• Sample rate: Use this pop-up menu to set the number of times per second that music waveforms (samples) are captured digitally. The higher the sample rate, the higher the audio quality and the larger the file size.
• Quality: Use this pop-up menu to select the quality of the audio output.
• Bit rate: Use this pop-up menu to set the bit rate for the encoded audio.

71Compressor User Guide
• Bit rate strategy: Use this pop-up menu to select the strategy used to encode the audio. There are four options:
• Constant bit rate: Uses the value set in “Bit rate” to determine the bit rate for the encoded audio.
• Average bit rate: Uses the value set in “Bit rate” to determine the target average bit rate for the encoded audio. This option provides a more consistent bit rate than variable bit rate.
• Variable bit rate constrained: Uses the value set in “Bit rate” to determine the maximum bit rate for the encoded audio.
• Variable bit rate: Encodes the audio using a variable bit rate determined by Compressor.
• Data rate: Use the slider to set the number of kilobits per second (kbps) required to deliver your audio file. Using a higher rate will produce a higher-quality audio file.
Audio effectsFor a list of available audio effects in Compressor, and instructions on how to add an audio effect to a setting, see Add and remove effects in Compressor.
MXF settings in Compressor
The MXF settings in Compressor appear in the Custom area of the Settings pane after you install Pro Video Formats for Final Cut Pro, Motion, and Compressor.
MXF (Material eXchange Format) is a metadata “wrapper” or “container” that (like QuickTime) holds video or audio media. The metadata describes the enclosed media’s attributes, including compression type, frame rate, frame size, creation date, and custom data created by a camera operator, assistant, or archivist.
The MFX settings offer several compression types, including AVC-Intra, D-10/IMX, Apple ProRes, and XDCAM HD.
Note: You can also create custom settings that use the MXF transcoding format.
The properties of MXF settings are located in the General, Video, and Audio inspectors (described below).
Setting summaryDisplays the setting name and transcoding format used by Compressor, and an estimated output file size. When you add a setting to a job or change the setting’s properties, this summary is automatically updated.
General properties• Name: Displays the name of the setting.
• Description: Displays the description of the setting.
• Extension: Displays the extension of the output file (.mxf).
• Allow job segmenting: If you’ve set up distributed processing, select this checkbox to have Compressor process the output file using your shared computer group. See Transcode batches with multiple computers using Compressor.

72Compressor User Guide
• Default location: Choose an item from the pop-up menu to set the default save location for transcoded files.
• Format: Use this pop-up menu to specify whether the output includes video and audio, or video only.
RetimingSets the processing algorithm used to adjust the frame rate during transcoding. Select one of the following options:
• Set to percent of source using: Modifies the output clip’s speed by a percentage of the source clip’s speed. Enter a value in the percentage field or choose a preset value from the adjacent pop-up menu (with a down arrow).
• Set to: Sets the duration of the clip. Enter a timecode duration in the field or click the arrows to increase or decrease the time.
• So source frames play at [frame rate] fps: Nondestructively changes the playback speed of the clip without discarding frames or creating new frames. This property has no effect unless the “Frame rate” value in the Video inspector is different from the source file’s frame rate. For example, if you add a 10-second source file with a frame rate of 24 fps to Compressor, set the “Frame rate” property in the Video inspector to 25 fps, and then select “So source frames play at 25 fps” in the General inspector, the resulting duration of the transcoded clip (at 25 fps) will be 9 seconds and 15 frames.
For more information, see Retime video and audio using Compressor.
Video properties• Frame size: Use the pop-up menu to set an automatically calculated frame size
(resolution) for the output file. (Available options vary, depending on other settings in the Video Properties area.) See Intro to modifying frame size in Compressor.
• Pixel aspect ratio: Displays the ratio between the encoded width and the display width.
• Frame rate: Use this pop-up menu to set the playback rate (the number of images displayed per second) for the output file. See Retiming options in Compressor.
• Field order: Displays how frames are scanned (progressive, top first, or bottom first), based on the resolution option chosen in the Format pop-up menu (described below).
• Color space: Use this pop-up menu to convert the source media to a new color space. To have Compressor choose the best color space based on the applied setting, Choose Automatic. (Depending on the compression method you choose, you may be able to transcode the video to wide color gamut. See Intro to wide color gamut and HDR in Compressor.)
• RAW to log: Use this pop-up menu to select how ProRes RAW conversion is done. Choose Automatic to allow Compressor to choose the conversion method. You can also choose a manual setting to override the default. This option is available only if the source is ProRes RAW.
• Camera LUT: Use this pop-up menu to select the camera lookup table (LUT) applied to the source. Select a custom LUT to transform your video from one color space to another. This setting is enabled if the source is ProRes RAW and if “RAW to log” is set to a value other than None. This setting is also enabled if “Camera log” in video properties in the Job inspector is set to a value other than None.
• Codec: Use this pop-up menu to choose a transcoding method.

73Compressor User Guide
• Start timecode: Use this pop-up menu to set a forced timecode start point for the output file. The Automatic option uses the default timecode of the source file (typically, 00:00:00:00). Other options set the timecode start to 1 hour or 10 hours.
• Drop frame: Available when “Frame rate” is set to 29.97 fps or 59.94 fps and “Start timecode” is set to 00:00:00:00, 01:00:00:00 or 10:00:00:00. Select this checkbox to force the timecode to stay in sync with real-time duration during playback.
Cropping and paddingCustomize the final cropping, sizing, and aspect ratio using the Cropping & Padding properties in Compressor. Cropping removes video content from an image. Padding scales the image to a smaller size while retaining the output image’s frame size. For more information about these properties, see Intro to modifying frame size in Compressor.
• Cropping: Use this pop-up menu to set the dimension of the output image. The custom option allows you to enter your own image dimensions in the fields; other options use predetermined sizes. The Letterbox Area of Source menu item detects image edges and automatically enters crop values to match them. This is useful if you want to crop out the letterbox area (the black bars above and below a widescreen image) of a source media file.
• Padding: Use this pop-up menu to set the scaling of the output image while retaining the output image’s frame size. The custom option allows you to enter your own scaling dimensions in the fields; other options use predetermined dimensions.
QualityThe following properties provide instructions for image analysis used by Compressor, including frame resizing, clip retiming, and deinterlacing:
• Resize filter: This pop-up menu sets the resizing method. There are several options:
• Nearest Pixel (Fastest): Samples the nearest neighboring pixel when resizing an image. This option provides the fastest processing time, but it is more likely to show aliasing artifacts and jagged edges.
• Linear: Adjacent pixel values are averaged using a linear distribution of weights. This option produces fewer aliasing artifacts than Nearest Pixel, with a small increase in processing time.
• Gaussian: Adjacent pixel values are averaged using a Gaussian distribution of weights. This option provides a medium trade-off between processing time and output quality.
• Lanczos 2: Adjacent pixel values are averaged using a truncated sinc function. This option is slower than Gaussian but provides sharper results.
• Lanczos 3: Similar to Lanczos 2 but averages more pixel values. This option is slower than Lanczos 2 but may produce better results.
• Bicubic: Adjacent pixel values are averaged using a bicubic function. The processing time and output are most similar to Lanczos 2 and Lanczos 3.
• Anti-aliased (Best): Provides the highest output quality, but can take substantially longer to process.

74Compressor User Guide
• Retiming Quality: This pop-up menu sets the retiming method. There are four options:
• Fast (Nearest Frame): Interpolates frames linearly using nearest neighbor frames.
• Good (Frame Blending): Blends neighboring frames using a filter to produce good-quality interpolation.
• Best (Motion Compensated): Uses optical flow to interpolate using areas of movement between neighboring frames to produce high-quality output.
• Reverse Telecine: Removes the extra fields added during the telecine process to convert the film’s 24 fps to NTSC’s 29.97 fps. Choosing this item disables all the other Quality controls. See Use reverse telecine in Compressor.
• Adaptive details: Select this checkbox to use advanced image analysis to distinguish between noise and edge areas during output.
• Anti-aliasing level: Sets the softness level in the output image. To increase softness, double-click the value and then manually enter a new value, or drag the slider to the right. This property improves the quality of conversions when you’re scaling media up. For example, when transcoding SD video to HD, anti-aliasing smooths jagged edges that might appear in the image.
• Details level: Sets the sharpness of detail in the output image. You can use this control to add detail back to an image being enlarged. Double-click the value and then manually enter a new value, or drag the slider to set the value. Unlike other sharpening operations, the “Details level” property distinguishes between noise and feature details, and generally doesn’t increase unwanted grain. Increasing this value may introduce jagged edges, however, which can be eliminated by increasing the “Anti-aliasing level” slider.
• Dithering: When selected, adds a certain type of noise to images to prevent large-scale distracting patterns such as color banding. If your image has excessive noise after rendering, deselect this checkbox.
Video effectsFor a list of available video effects in Compressor, and instructions on how to add a video effect to a setting, see Add and remove effects in Compressor.
Audio properties• Channel layout: Use this pop-up menu to set the audio channel layout.
• Sample rate: The number of times per second that music waveforms (samples) are captured digitally. The higher the sample rate, the higher the audio quality and the larger the file size. For all MFX settings, this value is locked at 48 kHz.
• Sample size: Use this pop-up menu to set the sample size of the audio signal.
• Channels as: Use this pop-up menu to set the distribution of audio channels. There are two options:
• Mono tracks: The exported file uses a separate track for each audio channel.
• Multitrack: The exported file combines all audio channels into a single track.
Note: Not all compression settings provide both options.

75Compressor User Guide
Audio effectsFor a list of available audio effects in Compressor, and for instructions on how to add an audio effect to a setting, see Add and remove effects in Compressor.
QuickTime Export Components setting in Compressor
In Compressor, QuickTime Export Components is a custom setting that you can manually add to the Settings pane and then apply to jobs in the batch area. Use this transcoding format to output files in codecs playable on third-party operating systems and devices such as mobile phones. You can transcode files using third-party plug-ins that you’ve installed on your system.
The properties of settings that use this transcoding format are located in the General and Video inspectors (described below).
Setting summaryDisplays the setting name and transcoding format used by Compressor, as well as an estimated output file size. When you add a setting to a job or change the setting’s properties, this summary is automatically updated.
General propertiesThese properties cannot be modified and may be unusable in future versions of macOS.
• Name: Displays the name of the setting.
• Description: Displays the description of the setting.
• Extension: Displays the extension of the output file, based on the setting chosen in the “Encoder type” pop-up menu, described below.
• Allow job segmenting: This option is not available for the default encoder types that are included with Compressor. It may be available for other encoders.
• Default location: Select an item from the pop-up menu to set the default save location for transcoded files.
Video propertiesThe properties in this area of the Video inspector are based on the file format assigned to the setting. You can change the file format in the General inspector; for more information, see the Settings property in “General properties,” above.
• Frame size: For settings that use the QuickTime Export Component format, this property is automatically set to Automatic.
• Pixel aspect ratio: For settings that use the QuickTime Export Component format, this property is automatically set to Square.
• Frame rate: Use this pop-up menu to set the playback rate (the number of images displayed per second) for the output file. See Retiming options in Compressor.
• Field order: For settings that use the QuickTime Export Component format, the field order is set automatically.

76Compressor User Guide
• Color space: Use this pop-up menu to convert the source media to a new color space. Choose Automatic to allow Compressor to choose the best color space based on the selected preset. You can also choose a manual setting to override the default. See Transcode a video file to a different color space.
• RAW to log: Use this pop-up menu to select how ProRes RAW conversion is done. Choose Automatic to allow Compressor to choose the conversion method. You can also choose a manual setting to override the default. This option is available only if the source is ProRes RAW.
• Camera LUT: Use this pop-up menu to select the camera lookup table (LUT) applied to the source. Select a custom LUT to transform your video from one color space to another. This setting is enabled if the source is ProRes RAW and if “RAW to log” is set to a value other than None. This setting is also enabled if “Camera log” in video properties in the Job inspector is set to a value other than None.
Cropping and PaddingCustomize the final cropping, sizing, and aspect ratio using the Cropping & Padding properties in Compressor. Cropping removes video content from an image. Padding scales the image to a smaller size while retaining the output image’s frame size. For more information about these properties, see Intro to modifying frame size in Compressor.
• Cropping: This pop-up menu sets the dimension of the output image. The custom option allows you to enter your own image dimensions in the fields; other options use predetermined sizes. The Letterbox Area of Source option detects image edges and automatically enters crop values to match them. This is useful if you want to crop out the letterbox area (the black bars above and below a widescreen image) of a source media file.
• Padding: For settings that use the QuickTime Export Component format, the Padding property is not available.
Video effectsFor a list of available video effects in Compressor, and instructions on how to add a video effect to a setting, see Add and remove effects in Compressor.
QuickTime Movie settings in Compressor
In Compressor, many of the built-in settings in the Settings pane, including the YouTube & Facebook, ProRes, and Proxy settings, use the QuickTime Movie format. This format encodes video files for many uses, including a proxy workflow in Final Cut Pro. See Create optimized and proxy files in Final Cut Pro.
Settings based on the QuickTime Movie format offer a variety of encoders, including H.264 and HEVC (High-Efficiency Video Coding, also known as H.265). When you add a QuickTime Movie-based setting to a job, Compressor chooses the appropriate codec. You can change the codec in the Video inspector. (To transcode using HEVC, your computer must be running macOS 10.13 or later; HEVC playback requires a recent-generation Apple device running macOS 10.13 or later, iOS 11 or later, iPadOS 13 or later, or tvOS 11 or later.)
Note: You can also create custom settings that use the QuickTime Movie transcoding format, including settings that use the HEVC encoder. However, the built-in settings analyze your source media and assign optimal properties to ensure the best possible transcoding results.

77Compressor User Guide
The properties of built-in and custom settings that use this format are located in the General, Video, and Audio inspectors (described below).
Setting summaryDisplays the setting name and transcoding format used by Compressor, as well as an estimated output file size. When you add a setting to a job or change the setting’s properties, this summary is automatically updated.
General properties• Name: Displays the name of the setting.
• Description: Displays the description of the setting.
• Extension: Displays the extension of the output file (.mov).
• Allow job segmenting: If you’ve set up distributed processing, select this checkbox to have Compressor process the output file using your shared computer group. See Transcode batches with multiple computers using Compressor.
• Default location: Select an item from the pop-up menu to set the default save location for transcoded files.
• Format: Use the pop-up menu to set whether the output includes video and audio, video only, or audio only.
• Optimize for network use: Select this checkbox to create a file that will start playing after only a small portion of the file has been downloaded from the network.
RetimingSets the processing algorithm used to adjust the frame rate during transcoding. Select one of the following options:
• Set to percent of source using: Modifies the output clip’s speed by a percentage of the source clip’s speed. Enter a value in the percentage field or choose a preset value from the adjacent pop-up menu (with a down arrow).
• Set to: Sets the duration of the clip. Enter a timecode duration in the field or click the arrows to increase or decrease the time.
• So source frames play at [frame rate] fps: Nondestructively changes the playback speed of the clip without discarding frames or creating new frames. This property has no effect unless the “Frame rate” value in the Video inspector is different from the source file’s frame rate. For example, if you add a 10-second source file with a frame rate of 24 fps to Compressor, set the “Frame rate” property in the Video inspector to 25 fps, and then select “So source frames play at 25 fps” in the General inspector, the resulting duration of the transcoded clip (at 25 fps) will be 9 seconds and 15 frames.
For more information, see Retime video and audio using Compressor.
CaptionsThe captions area contains a single property, the “Embed CEA-608 captions” checkbox. Select the checkbox if you’ve added CEA-608 closed captions to a job and you want the captions inserted into the output video file. See Intro to supporting captions in Compressor.

78Compressor User Guide
MetadataSpecifies how metadata is embedded in the transcode. See Work with metadata annotations in Compressor.
• Use Job Annotations: Includes the metadata from the Job Annotations listed in the Job inspector. This is the default setting.
• Pass through source file metadata: Passes the existing metadata from the source file to the transcode. Ignores Job Annotations listed in the Job inspector.
• Remove all metadata and annotations: Passes no metadata to the source file.
• Include metadata from the source file that cannot be displayed as a job annotation: Available when Use Job Annotations is selected. Includes the metadata from the Job Annotations listed in the Job inspector and passes the existing metadata from the source file to the transcode.
Video properties• Enable video pass-through: Select this checkbox to copy the source video unmodified
to the destination file. When this checkbox is selected, all the other settings in the video properties area are disabled.
• Frame size: Use this pop-up menu to set the frame size (resolution) for the output file. See Intro to modifying frame size in Compressor. There are four categories to choose from:
• Automatic: Adjusts the output based on the size of the input, and can be constrained “up to” a maximum resolution.
• Percentage: Adjusts the output based on a percentage of the input’s size.
• Manual: Forces the output to a specific resolution.
• Constrained: Constrains the output to a specific aspect ratio.
• Pixel aspect ratio: Use this pop-up menu to set the pixel aspect ratio (the ratio between the encoded width and the display width).
Note: This property can be set when “Frame size” is set to a manual or constrained setting.
• Frame rate: Use this pop-up menu to set the playback rate (the number of images displayed per second) for the output file. See Retiming options in Compressor.
• Field order: Use this pop-up menu to set the output scanning method (either the field dominance or a conversion to progressive scanning). There are four options:
• Automatic: Selects the most appropriate field order, based on the field order of the source and the capabilities of the selected codec.
• Progressive: The video is displayed in complete frames with all lines sampled at the same instant in time.
• Top First: The video is interlaced and displayed as two separate interleaved fields. The field containing the top line (even lines) is sampled at an earlier instant in time than the field containing the bottom line (odd lines). This field order is commonly used for high-definition video and standard-definition PAL video.
79Compressor User Guide
• Bottom First: The video is interlaced and displayed as two separate interleaved fields. The field containing the bottom line (odd lines) is sampled at an earlier instant in time than the field containing the top line (even lines). This field order is commonly used for standard-definition NTSC video.
Note: If you use a QuickTime movie preset based on the H.264 format (such as any of the presets in the Video Sharing Services settings), the “Field order” pop-up menu is disabled and automatically set to Progressive (complete frames are scanned). To set the field order to an interlaced option, disable Multi-pass in the Inspector.
• Color space: Use this pop-up menu to convert the source media to a new color space. Choose Automatic to allow Compressor to choose the best color space based on the selected preset. Choose “Same as Source” to use the color space of the source file. You can also choose a manual setting to override the default. See Transcode a video file to a different color space.
• RAW to log: Use this pop-up menu to select how ProRes RAW conversion is done. Choose Automatic to allow Compressor to choose the conversion method. You can also choose a manual setting to override the default. This option is available only if the source is ProRes RAW.
• Camera LUT: Use this pop-up menu to select the camera lookup table (LUT) applied to the source. Select a custom LUT to transform your video from one color space to another. This setting is enabled if the source is ProRes RAW and if “RAW to log” is set to a value other than None. This setting is also enabled if “Camera log” in video properties in the Job inspector is set to a value other than None.
• 360° metadata: Use this pop-up menu to choose the type of 360° metadata, if any, included in the output file.
• Automatic: Compressor chooses the metadata format based on the properties in the Job inspector and the transcode setting you applied. The format chosen is listed to the right of the pop-up menu.
• None: No 360° metadata is attached to your output file.
• Spherical Video V1: The 360° metadata format most commonly used by sharing sites, including YouTube and Vimeo.
• Spherical Video V2: A less common but more up-to-date 360° metadata format used by YouTube and Vimeo.
For more information, see View 360° video metadata using Compressor.
• Codec: Use this pop-up menu to set the type of video compression.
When QuickTime settings are set to H.264 or HEVC, a few additional controls are enabled:
• Encoder type: Use this pop-up menu to set the type of encoder. This pop-up menu is enabled when Codec is set to HEVC. Choose from two options:
• Faster (standard quality): Encodes the output file using a faster codec, with standard quality.
• Slower (higher quality): Encodes the output file using a slower codec, with higher quality.
Important: Not all options are available on all hardware.

80Compressor User Guide
• Profile: Use this pop-up menu to set the quality of compression used in the output file . When QuickTime settings are set to H.264, this pop-up menu offers three options:
• High: Provides high-quality output that may not be compatible with older H.264 playback devices.
• Main: Similar to the Baseline profile, with additional support for standard-definition (SD) video requirements.
• Baseline: Primarily for video conferencing and mobile applications.
When QuickTime settings are set to HEVC, the Profile pop-up menu sets the color depth of the output file (the number of bits used to represent color in each color channel—red, green, and blue). There are two options:
• 8-Bit Color: Provides a good balance between picture quality and file size. (This option is available only on recent Mac computers that support hardware encoding of HEVC.)
• 10-Bit Color: Provides better picture quality but with larger file sizes. (Because this option uses software encoding, performance may be significantly slower than 8-bit hardware encoding.)
Note: HEVC encoding requires a computer running MacOS 10.13 or later.
• Entropy mode: When Codec is set to H.264, use this pop-up menu to set the entropy mode to CABAC (which provides higher-quality output), or CAVLC (which is faster and more compatible for playback on older devices).
• Data rate: This pop-up menu allows you to choose a data rate for your video based on any of four options:
• Custom: Setting data rate to Custom enables a value field that limits your video signal to a set number of kilobits per second (kbps). Higher rates allow higher-quality video but generate larger files that are slower to download or transmit.
• Computer playback: Creates a larger file with higher quality.
• Web publishing: Creates a smaller file (of lower quality) suitable for hosting on a website.
• Proxies: Creates a smaller file suitable for a proxy workflow. Available only for H.264 and HEVC encoding.
• Automatic: Attempts to identify and apply the lowest possible data rate while maintaining maximum visual quality.
Important: When you set a data rate, you override other codec quality properties because the codec compresses the file as much as it needs to based on its data-rate limit.
• Key frame interval: Enter a value in the text field to set the key frame interval (number of frames) at which you want key frames created in your output file. Alternatively, you can select Automatic to have Compressor choose the key frame interval rate (the displayed value is 0 with Automatic on; the actual value is determined during the encoding process).

81Compressor User Guide
• Quality: When Codec is set to Animation, HEVC, or Photo-JPEG, this slider controls one of the following options:
• Animation or Photo-JPEG: Use the slider to set the quality level of your output. Select from least (smaller file size) to best (larger file size).
• HEVC: Use the slider to set the quality level of the alpha channel of your output. Select from least (smaller file size) to best (larger file size).
• Multi-pass: Select this checkbox to turn on multi-pass encoding that uses additional analysis of video frames to produce a high-quality output file. Multi-pass is available when Codec is set to H.264 on an Intel-based Mac, and when Codec is set to H.264 or HEVC on a Mac with Apple silicon that’s running macOS Monterey 12 or later and has “Encoder type” set to “Faster (standard quality).” For faster (single-pass) transcoding, turn off this feature by deselecting the checkbox.
• Include Dolby Vision 8.4 metadata: Select this checkbox to have Compressor include Dolby Vision 8.4 metadata in the output file. Dolby Vision 8.4 is a format designed to optimize HDR content for Apple devices. If this checkbox is selected, “Color space” is set to Rec. 2020 HLG, Codec is set to HEVC, and Profile is set to 10-Bit Color.
• Frame Reordering: Select this checkbox to potentially provide a better-quality output file by allowing Compressor to reorder video frames during transcoding. This option is only available when Codec is set to H.264 or HEVC.
Important: If you select “Allow frame reordering,” your output file may be more efficiently compressed but may not be compatible with decoders on older hardware.
• Preserve Alpha: Select this checkbox to preserve any alpha channel information in your source and pass the alpha to the output. This checkbox is enabled when Codec is set to ProRes 4444 or Animation. If your computer is running macOS 10.15 or later, this checkbox is also enabled when Codec is set to HEVC. When Preserve Alpha is turned on, the Quality slider is enabled.
• Add clean aperture information: Select this checkbox to define clean picture edges in the output file. This property adds information to the output file to define how many pixels to hide, ensuring that no artifacts appear along the edges. When you play the output file in QuickTime Player, the pixel aspect ratio will be slightly altered. This process doesn’t affect the actual number of pixels in the output file—it only controls whether information is added to the file that a player can use to hide the edges of the picture.
• Cinematic: This pop-up menu is available on macOS Monterey 12 or later. It allows you to specify how to handle metadata in video that was recorded in Cinematic mode (on iPhone models that support Cinematic mode video). There are three options:
• Ignore: Ignores any Cinematic mode metadata in the source file. If the source file contains no Cinematic mode metadata, Ignore is selected and the menu is dimmed.
• Pass-through: When the “Enable video pass-through” checkbox is selected, Cinematic mode metadata passes through unmodified to the destination file, and the menu is dimmed and unavailable.

82Compressor User Guide
• Render: When Cinematic mode metadata is present and the “Enable video pass-through” checkbox is not selected, you may choose to render the Cinematic mode video to the destination file.
Note: If you’re running macOS 11 or earlier, the Cinematic pop-up menu is unavailable. If the source file contains Cinematic mode metadata and the “Enable video pass-through” checkbox isn’t selected, the warning “Cinematic mode video can only be rendered when running under macOS 12.0 or later” is displayed in the Errors & Warnings window.
Cropping and PaddingCustomize the final cropping, sizing, and aspect ratio using the Cropping & Padding properties in Compressor. Cropping removes video content from an image. Padding scales the image to a smaller size while retaining the output image’s frame size. For more information about these properties, see Intro to modifying frame size in Compressor.
• Cropping: This pop-up menu sets the dimension of the output image. The custom option allows you to enter your own image dimensions in the fields; other options use predetermined sizes. The Letterbox Area of Source option detects image edges and automatically enters crop values to match them. This is useful if you want to crop out the letterbox area (the black bars above and below a widescreen image) of a source media file.
• Padding: This pop-up menu sets the scaling of the output image while retaining the output image’s frame size. The custom option allows you to enter your own scaling dimensions in the fields; other options use predetermined dimensions.
QualityThe following properties determine how Compressor resizes, retimes, and otherwise adjusts the video when transcoded:
• Resize filter: This pop-up menu sets the resizing method. There are several options:
• Nearest Pixel (Fastest): Samples the nearest neighboring pixel when resizing an image. This option provides the fastest processing time, but it is more likely to show aliasing artifacts and jagged edges.
• Linear: Adjacent pixel values are averaged using a linear distribution of weights. Produces fewer aliasing artifacts than Nearest Pixel, with a small increase in processing time.
• Gaussian: Adjacent pixel values are averaged using a gaussian distribution of weights. This provides a medium trade-off between processing time and output quality.
• Lanczos 2: Adjacent pixel values are averaged using a truncated sinc function. This option is slower than Gaussian but provides sharper results.
• Lanczos 3: Similar to Lanczos 2 but averages more pixel values. This option is slower than Lanczos 2 but may produce better results.
• Bicubic: Adjacent pixel values are averaged using a bicubic function. The processing time and output are most similar to Lanczos 2 and Lanczos 3.
• Anti-aliased (Best): Provides the highest output quality, but can take substantially longer to process.

83Compressor User Guide
• Retiming Quality: This pop-up menu sets the retiming method. There are four options:
• Fast (Nearest Frame): Linearly interpolates frames using nearest neighbor frames.
• Good (Frame Blending): Blends neighboring frames using a filter to produce good-quality interpolation.
• Best (Motion Compensated): Uses optical flow to interpolate using areas of movement between neighboring frames to produce high-quality output.
• Reverse Telecine: Removes the extra fields added during the telecine process to convert the film’s 24 fps to NTSC’s 29.97 fps. Choosing this item disables all the other Quality controls. See Use reverse telecine in Compressor.
• Adaptive details: Select this checkbox to use advanced image analysis to distinguish between noise and edge areas during output.
• Anti-aliasing level: Sets the softness level in the output image. Double-click the value and then manually enter a new value or drag the slider to the right to increase softness. This property improves the quality of conversions when you’re scaling media up. For example, when transcoding SD video to HD, anti-aliasing smooths jagged edges that might appear in the image.
• Details level: Sets the amount of detail in the output image. Double-click the value and then manually enter a new value or drag the slider to set the value. This sharpening control lets you add detail back to an image being enlarged. Unlike other sharpening operations, the “Details level” property distinguishes between noise and feature details, and generally doesn’t increase unwanted grain. Increasing this value may introduce jagged edges, however, which can be eliminated by increasing the “Anti-aliasing level” slider.
• Dithering: When selected, adds a certain type of noise to images to prevent large-scale distracting patterns such as color banding. If your image has excessive noise after rendering, deselect this checkbox.
Video effectsFor a list of available video effects in Compressor, and instructions on how to add a video effect to a setting, see Add and remove effects in Compressor.
Audio properties• Enable audio pass-through: Select this checkbox to copy the source audio unmodified
to the destination file. When this checkbox is selected, all the other settings in the Audio Properties area are disabled.
• Channel layout: Use the pop-up menu to set the audio channel layout. See Audio channel layouts in Compressor.
• Sample rate: Use this pop-up menu to set the number of times per second that music waveforms (samples) are captured digitally. The higher the sample rate, the higher the audio quality and the larger the file size.
• Sample size: Use the pop-up menu to manually set the sample size of the audio signal.
• Codec: You can add an audio codec that you’ve installed on your system to customize the Compressor setting. To manually change the codec used in your setting, use this pop-up menu. After you click OK and close the window, the setting’s audio properties are updated to show your changes.

84Compressor User Guide
• Sample format: If you have selected Linear PCM as an audio codec, use this pop-up menu to select whether to output your audio in Big Endian or Little Endian format.
• Quality: If you have selected AAC, FLAC, MPEG-4 HE AAC, MPEG-4 HE AAC V2, or Opus as an audio codec, use this pop-up menu to select the quality of the audio output.
• Bit rate: If you have selected AAC as an audio codec, use this pop-up menu to set the bit rate for the encoded audio.
• Bit rate strategy: If you have selected AAC, FLAC, MPEG-4 HE AAC, MPEG-4 HE AAC V2, or Opus as an audio codec, use this pop-up menu to select the strategy used to encode the audio. There are four options:
• Constant bit rate: Uses the value set in “Bit rate” to determine the bit rate for the encoded audio.
• Average bit rate: Uses the value set in “Bit rate” to determine the target average bit rate for the encoded audio. This option provides a more consistent bit rate than variable bit rate.
• Variable bit rate constrained: Uses the value set in “Bit rate” to determine the maximum bit rate for the encoded audio.
• Variable bit rate: Encodes the audio using a variable bit rate determined by Compressor.
• Include Lt Rt downmix track: Select this checkbox (available only when “Channel layout” is set to more than two tracks) to add an additional stereo track to the transcoded file that includes a stereo-mix version of the audio with the encoded surround information included.
Audio effectsFor a list of available audio effects in Compressor, and instructions on how to add an audio effect to a setting, see Add and remove effects in Compressor.
Work with destinations
View destination properties in CompressorA destination in Compressor consists of one or more settings combined with an automated job action that’s performed after transcoding. For example, if you apply the built-in Add to TV Home Videos destination to a source file, Compressor uses the setting to create a QuickTime movie file and then runs a job action that copies the file to your Home Videos library on Apple TV.
When you select a destination in the Settings pane, its properties are shown in the Destination inspector.

85Compressor User Guide
View a destination’s properties1. In Compressor, if the Settings pane or inspector pane is hidden, do the following:
• To reveal the Settings pane, press Shift-Command-1.
• To reveal the inspector pane, click the Inspector button in the upper-right corner of the Compressor window.
2. Select a destination in the Settings pane.
The Destination inspector appears (in the inspector pane on the right side of the Compressor window), displaying the destination name and description, properties of settings, and job properties.
Modify a destination’s properties• In Compressor, in the Destination inspector, adjust any of the available controls,
including its action property.
Create a custom destination in CompressorYou can create a custom destination from scratch, or by duplicating an existing destination. Later, if you no longer need a custom destination, you can delete it.
Create a custom destination1. In Compressor, click the Add pop-up menu at the bottom of the Settings pane, then
choose New Destination.
2. In the dialog that appears, do the following:
a. Select one or more transcode settings or a destination from the list.
To quickly locate an item, type a few letters of the item’s name in the search field.
b. Click the “Job action” pop-up menu, then choose an option.
c. Optionally, you can enter a name and a description in the relevant fields.
d. Click OK.
The new destination appears in the Custom area of the Settings pane and is selected by default. The Destination inspector is displayed in the inspector pane.
3. Fill in the job action properties in the Action area.
For example, if you choose the Add to Apple TV Home Videos job action, you can enter a title for the movie. Because you’re modifying a custom destination, the properties that you provide for the job action will be saved for future use.
You can also modify the properties of the setting that the destination uses. See View and modify a setting’s properties in Compressor.

86Compressor User Guide
Create a custom destination by duplicating an existing destinationYou can also duplicate an existing destination and then modify its setting properties or its job action properties.
1. In the Settings pane in Compressor, select the destination that you want to duplicate, then click the Action pop-up menu at the bottom of the pane and choose Duplicate.
The new destination appears in the Custom area of the Settings pane and is selected by default. The Destination inspector is displayed in the inspector pane.
2. To modify the properties of the destination, do any of the following in the Destination inspector:
• Select text in the Name field or Description field, then type a new name or description.
• Fill in the job action properties in the Action area. Because you’re modifying a custom destination, the properties that you provide for the job action will be saved for future use.
For information about job action properties, see Job action properties in Compressor.
Delete a custom destination• In Compressor, select a custom destination in the Settings pane, then press Delete.
Work with locations in CompressorA location in Compressor specifies where the transcoded file is saved after transcoding. You can use one of the built-in locations provided in Compressor, or create a custom location. Locations are shown in the Locations pane.
When you select a location in the Locations pane, its properties are shown in the Location inspector.

87Compressor User Guide
View a location’s properties1. In the Locations pane in Compressor, select a location.
If the Locations pane is hidden, press Shift-Command-2.
2. If necessary, click the Inspector button to reveal the Location inspector.
The selected location’s properties are displayed in the Location inspector.
Create a custom location1. In Compressor, click the Add button at the bottom of the Locations pane.
If the Locations pane is hidden, press Shift-Command-2.
2. In the window that appears, select a location on your computer or on a connected device, then click Choose.
The new location appears in the Custom area of Locations pane and is selected by default. The Location inspector is displayed in the inspector pane.
3. To modify the properties of the location, do any of the following in the Location inspector:
• Type a new name in the Name field.
• Drag or add naming tokens in the “Filename format” field. For instructions on how modify the filename format, see the next task.
• If you decide to change the save location, click the Choose Location button, specify a new location, then click Choose.
Set a custom location’s filename formatWhen you add a setting to a job, Compressor automatically assigns an output filename based on the filename format provided in the Location inspector. You can change the filename that Compressor assigns at any time. You can also modify the filename format that’s used for locations you’ve created. Then, each time you use the custom location, your custom filename format will be used for the output file’s name.

88Compressor User Guide
Note: You can’t modify any part of a built-in location; however, you can duplicate a built-in location and set its filename format as you choose. See the previous task for instructions on creating a custom location.
1. In the Locations pane on the left side of the Compressor window, select a location.
If the Locations pane is hidden, press Shift-Command-2.
2. If necessary, click the Inspector button to reveal the Location inspector.
The “Filename format” field in the Location inspector displays naming tokens that determine the output filename.
3. To modify the filename format, do any the following:
• Move existing tokens: Drag tokens to reorder them. Or click a token to select it, press Command-X to cut the token, click to select a new location in the field, then press Command-V to paste the token in the new location.
• Add a token: Click a location in the field to specify where you want to place a new token, then choose a token from the pop-up menu.
• Add text: Click a location in the field to specify where you want to place a new token, then type the text.
As you change the output filename instructions, the sample filename (shown below the “Filename format” field) is updated.
Delete a custom locationNote: You can’t delete a built-in location.
• In the Locations pane in Compressor, select a custom location and then press Delete.
If the Location’s pane is hidden, press Shift-Command-2.

89Compressor User Guide
Work with jobs
Intro to jobs in CompressorWhen you add a source file to Compressor and apply settings or destinations, you create a transcoding job. Jobs are displayed in the batch area of the Compressor window. When you select a job in the batch area, its properties are shown in the Job inspector. In the Job inspector, you can:
• View or modify job properties, including metadata tags
• Add or modify a job action to be performed after transcoding
The properties that appear in the Job inspector vary depending on the type of source file in the job. In addition, each job action has a set of unique properties.
View and modify job properties in CompressorAfter you select a job in the batch area, the Job inspector displays that job’s properties.
View a job’s properties1. Select the job in the Compressor batch area.
Tip: To select a job, rather than one of its output rows, click the source filename at the top of the job.
2. If necessary, click the Inspector button to reveal the inspector pane.
The selected job’s properties are displayed in the Job inspector.
Modify a job’s properties• In the Job inspector in Compressor, adjust any of the available controls, including field
order type (progressive or interlaced), color space, and metadata tags.
Additional job properties vary depending on the type of source file in the job. See Standard media job properties in Compressor, Image sequence job properties in Compressor, and Surround sound job properties in Compressor.
Add metadata to a job• In Compressor, you can add metadata to a standard, image sequence, or surround
sound job in the form of job annotations and closed-caption files. For instructions, see Work with metadata annotations in Compressor.
Delete a job• Click a job in the Compressor batch area to select it, then press Delete.
Job properties
Standard media job properties in Compressor
The properties of a job in Compressor containing a standard media file are described below. The job’s properties are displayed in the Job inspector.

90Compressor User Guide
Job summaryDisplays the source file’s name, location, video and audio encoding information, and duration. If the source is a standard-dynamic-range video file, an SDR badge appears in the upper-right corner of the summary area; if the source is a high-dynamic-range video file, an HDR badge appears in the upper-right corner. For more information about HDR and SDR files, see Intro to wide color gamut and HDR in Compressor.
TimingProvides the timecode for the Start point, In point, and duration of the output file. See Modify starting timecode in Compressor.
File propertiesThe following properties are available in the File Properties area of the Job inspector:
• Language: Use the pop-up menu to set the default language for the selected job.
• Country: After you’ve set a language, use the pop-up menu to set the country for the selected job.
Note: Language and country settings are used only for certain types of jobs, such as Create Blu-Ray and Create DVD, and for uploading to some file-sharing services.
Video propertiesWhen you add a source file, Compressor detects its video properties and displays them in this area. If you think the source video properties are incorrect, you can modify them here. However, in most cases you should not change these values.
The following properties are available in the Video Properties area of the Job inspector:
• Field order: If you think Compressor incorrectly interpreted the order of video fields in the source file, use this pop-up menu to choose a different field order. This property defines how Compressor interprets the field order of the source file; it does not convert the field order to another option upon output. To convert from one field order to another, use the “Field order” pop-up menu in the Video pane for a selected setting in a batch. There are three field order options:
• Progressive: All lines are sampled at the same instant in time.
91Compressor User Guide
• Top First: The field containing the top line (even lines) is sampled at an earlier instant in time than the field containing the bottom line (odd lines). Top-first field order is commonly used for high-definition video and standard-definition PAL video.
• Bottom First: The field containing the bottom line (odd lines) is sampled at an earlier instant in time than the field containing the top line (even lines). Bottom-first field order is commonly used for standard-definition NTSC video.
• Color space: Use this pop-up menu to choose a color space to apply to the source clip in the job. This property defines how Compressor interprets the color data in the source clip; it doesn’t convert the clip you output to another color space. To convert from one color space to another upon output, use the “Color space” pop-up menu in the Video pane for each specific setting in the batch.
Note: If the source file is tagged with a color space (such as Rec. 709), Compressor adds an asterisk (*) to the item in the pop-up menu. If the source file is untagged or tagged with an unrecognized color space, Compressor chooses the most likely color space and adds a dagger (†) to the item in the pop-up menu.
• RAW to log: Use this pop-up menu to select how ProRes RAW conversion is done. Choose Automatic to allow Compressor to choose the conversion method. You can also choose a manual setting to override the default. This option is available only if the source is ProRes RAW.
• Camera LUT: Use this pop-up menu to select the camera lookup table (LUT) applied to the source. Select a custom LUT to transform your video from one color space to another. This setting is enabled if the source is ProRes RAW and if “RAW to log” is set to a value other than None. This setting is also enabled if “Camera log” in video properties in the Job inspector is set to a value other than None.
Job annotationThe Job Annotation area of the Job inspector in Compressor contains the Field pop-up menu, which lets you include annotation metadata in your output file. See Work with metadata annotations in Compressor.
HDR metadataIf a high-dynamic-range source file has HDR metadata, the values are shown in the HDR Metadata area of the Job inspector. After you apply a transcode setting to the source file, Compressor passes this metadata to the export file. When a user plays the exported video on a TV or display that supports HDR, the device detects the metadata and automatically adjusts its color levels. You can modify those values in the following fields (if these fields are not visible, move the pointer to the right of the HDR Metadata heading in the Job inspector, then click Show):
• Include HDR metadata: To include HDR metadata in your output file, select this checkbox. (If Compressor detects HDR metadata in the source file, it automatically checks this box.)
• Primaries: Use this pop-up menu to select a standard preset color space, or choose Custom to set your own chromaticity coordinate values.
• Red, Green, Blue, White point: Displays chromaticity coordinates (an x value and a y value) for each of the three primary colors and for the white point of the targeted display (an HDR-capable device).

92Compressor User Guide
• White Point: Use this pop-up menu to select a standard preset white point, or choose Custom to set your own.
• Luminance: Displays the minimum and maximum luminance of the targeted display in nits (candelas per square meter).
• MaxCLL: Displays the value, in nits, of the brightest pixel in the video file (Maximum Content Light Level).
• MaxFALL: Displays the value, in nits, of the maximum average light level for any single frame in the video file (Maximum Frame Average Light Level).
For more information about working in HDR color space, see Change video color space in Compressor. (HDR transcoding in Compressor requires macOS 10.13 or later.)
360° metadataThe following properties are available in the 360° Metadata area of the Job inspector in Compressor (if these properties are not visible, move the pointer to the right of the 360° Metadata heading in the Job inspector, then click Show):
• Include 360° metadata: To include 360° video metadata in your output file, select this checkbox. (If Compressor detects 360° video metadata in your source file, it automatically checks this box.)
• Stereoscopic mode: Use this pop-up menu to identify the 360° video file as monoscopic (2D) or stereoscopic (3D). There are three options:
• Monoscopic: Use this option for standard (2D) video.
• Over/Under: Use this option for stereoscopic (3D) video that displays the left-eye and right-eye images vertically.
• Side by Side: Use this option for stereoscopic (3D) video that displays the left-eye and right-eye images horizontally.
• Source software: This field identifies the software tool used to add metadata to the source file. If the source file has no metadata and you use Compressor to add it, this field displays “Apple CompressorKit.”
• Orientation: Displays the coordinates—Tilt (X), Pan (Y), and Roll (Z), in degrees—of the source video’s view origin (the initial angle that viewers will see in a VR headset before they turn their heads). Enter new coordinates to change the initial orientation.
• Projection mode: Sets the type of spatial mapping used to store the 360° video. There are two options:
• Equirectangular: The most common form of spatial mapping for 360° video, this mode squeezes and distorts the spherical data like a flat map of the spherical earth.
• Cubic: A less common form of spatial mapping (used in the Spherical Video V2 metadata standard), this mode represents the spherical data as an unfolded cube with six faces.

93Compressor User Guide
• Pixel bounds: When “Projection mode” is set to Equirectangular, this property becomes available, allowing you to modify the boundaries of the equirectangular frame. Most of the time, there’s no need to change these values. However, if you need to alter the dimensions of 360° video from its 2:1 aspect ratio to a more conventional aspect ratio (16:9, for example), you can do so using these controls. Enter values in the Left and Top fields to crop a specific number of pixels from the left edge and top edge of the image. Enter new values in the Width and Height fields to change the dimensions of the equirectangular frame.
• Layout and Padding: When “Projection mode” is set to Cubic, these fields become available, allowing you to adjust the six faces of the unfolded cube. Most of the time, there’s no need to change these values. The integer value in the Layout field specifies the order of the six unfolded cube faces (the default value of 0 specifies the face order used in the Spherical Video V2 metadata standard: right, left, up, down, front, back). The value in the Padding field specifies the width (in pixels) of borders around the edges of each cube face.
For information about working with 360° metadata, see View 360° video metadata using Compressor.
Audio propertiesThe Audio Properties area in Compressor lists each of the audio tracks in the source clip. Each track is displayed with an activation checkbox to include or exclude the audio track from the job.
• Descriptive Audio: Click choose and select a file that contains descriptive audio tracks. The audio tracks from the file are extracted and listed in the audio tracks. Audio tracks with descriptive audio are indicated with . Descriptive audio tracks are embedded in QuickTime movies, Apple Devices, and MPEG-4 formats.
Use the pop-up menu to define how Compressor interprets the individual audio channels in each track.
• Audio tracks: Use the pop-up menu to define how Compressor interprets the individual audio channels in each track.
The contents of the pop-up menu are dependent on the number of channels in the track. For example, if there are two channels, the pop-up menu includes two-channel options such as Stereo (L R), 2 Discrete Channels, Binaural, and so on. If there are six channels in the audio track, the pop-up menu includes six-channel options such as 5.1 (L, R, C, LFE, Ls, Rs), and so on.
ActionThe following properties are available in the Action area of the Job inspector in Compressor:
• When done: Use this pop-up menu to assign an automated job action to be performed after transcoding. See Job action properties in Compressor.
• Save captions to disk: A checkbox available for transcode settings that support captions. Select the checkbox to save a separate captions text file to your computer when you transcode a job that has captions. When you export video with captions for YouTube or Vimeo, selecting this checkbox combines the caption file with the video. See Export captions in Compressor.

94Compressor User Guide
Image sequence job properties in Compressor
The properties of a Compressor job containing an image sequence media file are described below. The job’s properties are displayed in the Job inspector.
Note: To learn how to import a set of image sequence files, see Import an image sequence in Compressor.
Job summary Displays the name, location, file information, and duration of the source file.
TimingProvides the timecode for the Start point, In point, and duration of the image sequence output file.
Image sequence propertiesThe following properties are available in the Image Sequence Properties area of the Job inspector:
• Frame Rate: Choose a frame rate for the image sequence file from the pop-up menu, or type a custom value in the text field.
• Audio File: Add an audio file to the image sequence job file by clicking the Choose button, selecting a file, and clicking Open.
Video propertiesThe following properties are available in the Video Properties area of the Job inspector:
• Field order: Use the pop-up menu to set the order in which video fields are transcoded. There are three options:
• Progressive: All lines sampled at the same instant in time.
• Top First: The field containing the top line (even lines) is sampled at an earlier instant in time than the field containing the bottom line (odd lines). Top-first field order is commonly used for high-definition video and standard-definition PAL video.
• Bottom First: The field containing the bottom line (odd lines) is sampled at an earlier instant in time than the field containing the top line (even lines). Bottom-first field order is commonly used for standard-definition NTSC video.
• Color space: Use the pop-up menu to select a color space to apply to the source clip in the job. This defines how Compressor interprets the color data in the clip. It doesn’t convert the clip to another color space. To convert from one color space to another, change the “Color space” pop-up menu in the Video pane for each specific setting in the batch.
Note: If the source file is tagged with a color space (such as Rec. 709), Compressor adds an asterisk (*) to the item in the pop-up menu. If the source file is untagged or tagged with an unrecognized color space, Compressor chooses the most likely color space and adds a dagger (†) to the item in the pop-up menu.

95Compressor User Guide
• RAW to log: Use this pop-up menu to select how ProRes RAW conversion is done. Choose Automatic to allow Compressor to choose the conversion method. You can also choose a manual setting to override the default. This option is available only if the source is ProRes RAW.
• Camera LUT: Use this pop-up menu to select the camera lookup table (LUT) applied to the source. Select a custom LUT to transform your video from one color space to another. This setting is enabled if the source is ProRes RAW and if “RAW to log” is set to a value other than None. This setting is also enabled if “Camera log” in video properties in the Job inspector is set to a value other than None.
Image sequence filesDisplays the image sequence files, in order.
Job annotationThe Job Annotation area of the Job inspector in Compressor contains the Field pop-up menu, which lets you include annotation metadata in your output file. See Work with metadata annotations in Compressor.
ActionThe following properties are available in the Action area of the Job inspector:
• When done: Use this pop-up menu to assign an automated job action to be performed after transcoding. See Job action properties in Compressor.
• Save captions to disk: Available for transcode settings that support captions. Select this checkbox to save a separate captions text file to your computer when you transcode a job that has captions. See Export captions in Compressor.
Surround sound job properties in Compressor
The properties of a Compressor job containing surround sound files are described below. The job’s properties are displayed in the Job inspector.
Note: To learn how to import a set of surround sound files, see Create a surround sound job in Compressor.
Job summaryDisplays the name, location, video and audio encoding information, and duration of the source file.
TimingProvides the timecode for the Start point, In point, and duration of the source file.

96Compressor User Guide
Surround sound propertiesDisplays the names of the files assigned to surround sound channels.
You can modify these file assignments using the following controls in the Surround Sound Properties area:
• Remove button: Click a Remove button to remove a file assigned to a channel.
• Channel icon: Click the channel icon (a speaker icon or subwoofer icon) to assign a different file to a channel.
• Add Video: Click the Add Video button to assign a video file to the surround sound source audio file. (If a video file has already been assigned, its filename replaces the Add Video button, as shown in the image above.)
• Clear All: Click the Clear All button to clear all the audio files assigned to the audio channels and to remove the video file assigned to the surround sound source file.
Job annotationThe Job Annotation area of the Job inspector in Compressor contains the Field pop-up menu, which lets you include annotation metadata in your output file. See Work with metadata annotations in Compressor.
ActionThe following properties are available in the Action area of the Job inspector in Compressor:
• When done: Use this pop-up menu to assign an automated job action to be performed after transcoding. See Job action properties in Compressor.
• Save captions to disk: Available for transcode settings that support captions. Select this checkbox to save a separate captions text file to your computer when you transcode a job that has captions. See Export captions in Compressor.

97Compressor User Guide
Work with job actions
Add and modify job actions using Compressor
A job action is an automated action performed on a media file after it’s transcoded, usually for the purpose of sending your video out into the world. For example, Compressor can automatically upload the finished file to a video-sharing site like Vimeo. Or Compressor can add the finished file to an email message and send it to a recipient of your choosing, including yourself.
Job actions usually need to be configured to work properly. For example, you must give a DVD a name and a menu style.
If a job contains a job action, a gear icon is shown in the top-right corner of the job (in the batch area).
You can add a job action to a job, as well as modify a job action’s properties, in the Job inspector.
Note: A job action is included in each of the built-in destinations provided with Compressor. For more information, see View destination properties in Compressor.
Add a job action to a job1. Select a job in the Compressor batch area.
2. If necessary, click the Inspector button to reveal the inspector pane.
3. In the Action area (at the bottom of the Job inspector), click the “When done” pop-up menu, then choose a job action.
Additional properties may appear, depending on the job action you select. Add the appropriate information to any additional fields.
For information about the properties of each job action, see Job action properties in Compressor.
Fix a job action that has an alert iconIf a job action displays an alert icon , there’s an issue with the source file or the action properties. For example, you may need to provide your Vimeo account name and password in the job action’s properties; without that information, Compressor can’t upload the transcoded file to your Vimeo account.
1. In Compressor, click the alert icon.
The Errors & Warnings window opens, displaying alert messages.
Alert messages are highlighted based on the selection in the batch area.

98Compressor User Guide
2. Select the job in the batch area, then, if necessary, click the Inspector button to reveal the inspector pane.
3. Modify the properties relevant to the alert message.
When the icon disappears or when the alert message disappears from the Errors & Warnings window, the issue is fixed.
Remove a job action1. Select the job in the Compressor batch area.
2. If necessary, click the Inspector button to reveal the inspector pane.
3. In the Action area of the Job inspector, click the “When done” pop-up menu and choose Save Only.
Job action properties in Compressor
Compressor comes with a set of job actions that are used in destinations as well as in jobs. The job action assigned to a destination or job performs an automated action after transcoding—usually copying the transcoded file to a new location.
The properties of job actions available in Compressor are described below.
Add to TV Home Videos• Title: Displays the title of the file as you want it to appear in your Home Videos library
on Apple TV. You can type a title in the text field.
Disc-burning job actionsThe “Create Blu-ray disc” and “Create DVD” job actions in Compressor include the following properties:
• Output device: This pop-up menu specifies the device that the output files will be formatted for. You can choose Hard Drive to create a disk image (.img) file or folder that you can burn to DVD media at a later time using the Disk Utility application (available in the macOS Utilities folder).
Note: The items in this menu are determined by your system’s available options. For example, when no Blu-ray or DVD drive is detected, only the Hard Drive option is available.
• Layers: This pop-up menu sets the type of disc that will be created. There are three options:
• Automatic: Detects the inserted disc’s type. For Automatic to work, you must insert the disc before clicking Burn. Additionally, Automatic always creates a single-layer disk image when Hard Drive is selected as the output device.
• Single-layer: Creates output for a single-layer disc. You can use this option to treat a dual-layer disc as a single-layer disc.
• Dual-layer: Creates output for a dual-layer disc. When you choose Hard Drive as your output device, the “Dual-layer” option creates a disk image in dual-layer disc format. Choosing “Dual-layer” when using a single-layer disc may result in an error while burning the disc, depending on the project’s length.

99Compressor User Guide
• Build type: The create DVD job action builds a VIDEO_TS folder; the Create Blu-Ray job action builds a BDMV folder. These folders contain files correctly formatted for the type of disc selected. You can set how you want to save that data by choosing an option from the “Build type” pop-up menu:
• Disc: Available when Output device is set to a compatible device, burns the folder to a disc.
• File: Available when Output device is set to Hard Drive, embeds the folder into a disc image file which is formatted correctly to mount or burn to a disc later.
• Folder: Available when Output device is set to Hard Drive, leaves the folder as is; the media can then be played or later burned to a disc.
• Disc template: This pop-up menu sets the menu template.
• Title: Type the disc title in the text field. This title will be displayed on the disc menus.
• Volume Name: Type the name that will appear when the disc is mounted on a computer. Only uppercase characters and certain punctuation marks are permitted in the name. Typically volume names are limited to 30 characters.
• When disc loads: This pop-up menu sets what happens when you play the disc: Show Menu or Play Movie.
• Use chapter marker text as subtitle: Select this checkbox to include chapter marker text as subtitles on the output disc. An additional Subtitles button will be added to the disc main menu to control whether the subtitles are displayed or not. For more information about chapter markers, see Add markers using Compressor.
• Include Loop Movie button: Select this checkbox to add a Loop Movie button to the disc main menu. This allows movie playback to optionally loop endlessly without user intervention.
• Background: Click the Add button to select a graphic image or movie to use for the disc’s menu background. This image or movie will be used instead of the template menu background and can include audio.
• Logo: Click the Add button to select a logo graphic image that will be displayed in the upper-right corner of the disc menus. This image will appear on top of the menu background.
• Title: Click the Add button to select a title graphic image that will be displayed in the center of the main menu of the disc. This image will appear on top of the menu background.
Open with Application• Open with: This pop-up menu sets the default application for opening the transcoded
file (for example, Music or QuickTime Player).

100Compressor User Guide
Prepare for HTTP Live StreamingThe Prepare for HTTP Live Streaming job action processes the transcoded files using the instructions you provide via the properties below and then uploads the processed files to the server you specify. To learn more about HTTP Live Streaming, see the HTTP Live Streaming Overview and other related documents, available in the Mac Developer Library.
• Destination for Live Stream assets: Click the Choose button to assign a save location for the live streaming assets.
• Output type: This pop-up menu sets the format output for this job action. There are two options:
• MPEG-2 TS: Sets the output format to MPEG-2 transport stream.
• Fragmented MP4: Sets the output format to fragmented MP4 (fMP4). This option is only available if you are running macOS 10.14 or later.
• Segment duration: Enter a minimum number of seconds per segment for the segment duration.
Because the segment’s length determines when the web server can switch between the various video formats while streaming to a device with varying network connection speeds, a shorter segment duration allows the server to respond more quickly to changing connection speeds. In most situations, it’s recommended that you leave the segment duration at 10 seconds.
• Create Read Me file with sample HTML: Select this checkbox to create a sample HTML file for hosting the HTTP live-streaming content.
Run Automator WorkflowThe Automator Workflow job action applies an Automator workflow to an output file after transcoding.
• Workflow: Click the Choose button to set the Automator workflow that the job action triggers.
Send EmailThe Send Email job action sends an email with an attachment of the transcoded file from the macOS Mail app.
• To: Enter recipient’s email addresses in this field.
• Subject and Message: Enter relevant text in these fields.
For information about adding or modifying a job action in a job, see View and modify job properties in Compressor. For information about choosing a job action that’s part of a destination, see View destination properties in Compressor.

101Compressor User Guide
Work with batches in CompressorA batch contains one or more jobs to be submitted to Compressor for transcoding. When you select a batch, its properties are shown in the Batch inspector.
View batch properties• In Compressor, click the source file names at the top of the batch area.
If necessary, click the Inspector button to reveal the inspector pane.
The batch properties are displayed in the Batch inspector:
• Name: Identifies the batch in Active and Completed views.
• Jobs: Displays the number of jobs in the batch.
• Outputs: Displays the number of files that will be output when transcoding the batch.
Change the batch name• In the Batch inspector in Compressor, type a new name in the Name field, then
press Return.

102Compressor User Guide
Advanced tasks
Import an image sequence in CompressorYou can import a sequence of still images into Compressor as an image sequence source file. Each image in the image sequence represents a single video frame.
Import a set of image sequence files1. In Compressor, do one of the following:
• At the bottom of the batch area, click the Add pop-up menu , choose Add Image Sequence, select a folder of image sequence files, then click Add.
• Drag all of the image sequence files (not a folder that contains the files) from the Finder into the batch area.
A new source media file appears in a job in the batch area of the Compressor window.
2. Click the Add Outputs button under the source media file, then choose a transcode setting and save location in the dialog that appears.
The job now contains a source file made of sequential images and output instructions (a setting, a save location, and an output filename).
3. To view additional information about the job in the Job inspector, select the job in the batch area.
The Job inspector appears on the right side of the Compressor window. (If the inspector pane is hidden, click the Inspector button in the upper-right corner of the Compressor window.)

103Compressor User Guide
The Job inspector displays information about the image sequence source file, including the location of the files, the size and frame information, and the duration of the sequence. Further down in the Job inspector is a list of the individual image files that make up the sequence.
4. If necessary, you can specify field order, frame rate, and color space for the source file, or click the Choose button to add an audio file to the image sequence source file.
You can work with the image sequence source file as you would any other source file, adding more settings or a destination to the job before transcoding. See Intro to simple transcoding in Compressor.
You can also use Compressor to output an image sequence. See Image Sequence settings in Compressor.

104Compressor User Guide
Work with surround sound files
Create a surround sound job in CompressorThere are two methods you can use in Compressor to add audio files to a batch to create a surround sound job:
• Manually assign audio files to surround sound channels.
• Append audio filenames with channel identifier codes and have Compressor automatically map the filenames to the correct surround sound channels.
Each method creates a source file in a job to which you can add a setting that supports surround sound audio outputs, such as a Dolby Digital setting or an AIFF setting.
After creating the surround sound source file, you assign output information to the job (one or more settings or a destination and a location and name for the transcoded file), then transcode the batch containing the job.
Create a surround sound source file by manually assigning channels1. In Compressor, do one of the following:
• At the bottom of the batch area, click the Add pop-up menu , then choose Add Surround Sound Group.
• Choose File > Add Surround Sound Group.
The channel assignment dialog opens.
2. To assign a source audio file to each channel, do one of the following:
• Drag the source audio file from the Finder to the icon for a specific channel.
• Click the icon for a specific channel, select a source audio file intended for that channel, then click Open.
3. To include a video file, click the Add Video button, select a video file, then click Open.

105Compressor User Guide
4. When you’re done setting up the surround sound group, click Add.
A new surround sound source media file appears in a job in the batch area.
5. To view additional information about the surround sound source file in the Job inspector, select the job in the batch area.
The Job inspector appears on the right side of the Compressor window. (If the inspector pane is hidden, click the Inspector button in the upper-right corner of the Compressor window.)

106Compressor User Guide
Create a surround sound source file using channel identifier codesYou can add channel identifier codes to the filenames of surround sound files in the Finder, then add the files in Compressor.
1. In the Finder, append the filename of each audio file with the appropriate channel identifier code:
• -L: Left front channel
• -R: Right front channel
• -C: Center front channel
• -Ls: Left surround channel
• -Rs: Right surround channel
• -S: Center surround channel
• -LFE: Low-frequency effects channel (subwoofer, LFE)
For example, if the audio file for your left front channel is named “final audio_left.aiff,” name the file “final audio_left-L.aiff.”
Note: Compressor will recognize source files with or without a file extension (.aiff or .wav, for example).
2. Drag all of the renamed source audio files (not the folder of files) to the batch area in Compressor.
A new job appears in the batch area, and the Job inspector displays the audio channels that have been assigned based on their channel codes. (If the Job inspector is not visible, make sure the job is selected in batch area and the Inspector button is highlighted. If you need to reassign a channel, you can do so by clicking the channel’s icon in the Job inspector.
You can optionally include a video file in the surround sound source file by clicking the Add Video button in the Job inspector, selecting a video file, and clicking Open.
Modify a surround sound source file1. In the Compressor batch area, select a job that contains a surround sound source file.
2. In the Surround Sound Properties area of the Job inspector, do either of the following:
• Assign a different file to a channel: Click the channel’s icon, select a different file, then click Open.
• Remove a file from a channel: Click the Remove button .
Audio channel layouts in CompressorMost of the audio settings in Compressor provide mono and stereo (left and right) channel configuration; some provide additional channel output options, including surround (5.1) channel configuration. Several of Compressor’s settings offer multiple audio channel configurations:
• QuickTime Movie settings: QuickTime Movie settings include additional audio channel layouts, including 3.0, 4.0, and 5.1.
• Dolby Digital audio settings: Dolby Digital (AC-3) settings include even more audio channel layouts, including 3.0, 3.1, 4.0, 4.1, and 5.1.

107Compressor User Guide
The illustration below shows the available audio channel layouts.
The channel codes describe the location of the channel:
• L: Left front channel
• R: Right front channel
• C: Center front channel
• Ls: Left surround channel
• Rs: Right surround channel
• Cs: Center surround channel
• LFE: Low-frequency effects channel (subwoofer, LFE)
Note: It’s important to understand that Compressor can’t convert stereo audio files into 5.1 surround sound channels. If you want to output a 5.1 surround sound audio file, you must first create the six channels of audio required and then import those surround sound files into Compressor. Then you can use Compressor to output the surround sound source media file. See Create a surround sound job in Compressor.

108Compressor User Guide
After you import a surround sound source file, you can transcode that file into any of the channel layouts above.
Compressor analyzes audio files during import to determine the source file’s channels. When you apply a transcode setting to the source file, Compressor automatically adjusts the channel layout of the setting to provide logical results. For many settings, you can choose Automatic from the “Channel layout” pop-up menu (in the Audio inspector) to have Compressor determine the logical channel layout based on the source file.
Compressor also maps channels intelligently during output. For example:
• If you assign a mono channel layout to a stereo source file: The output file will be automatically downmixed.
• If you assign a surround channel layout to a stereo source file: The output file will have only left and right channels—mapped to the left front (L) and right front (R) channels of the source file—while the other channels are unassigned.
• If you assign a left front or left rear surround channel to a stereo source file: Compressor maps the source file to the left channel (and ignores the right channel).
Work with 360-degree video
Intro to Compressor 360° video
Compressor offers tools that let you prepare existing 360° video content (such as content edited in Final Cut Pro) for export and distribution to sharing sites like YouTube and Vimeo.
360° video (sometimes called spherical video) is footage captured by special cameras that point lenses in all directions to create a panoramic sphere of video. A viewer can watch 360° video in any of several ways:
• Through a virtual-reality (VR) headset: This hardware device displays video on a face-mounted screen that’s updated dynamically to show different parts of a scene as the viewer turns their head. Some VR headsets can also display stereoscopic (3D) 360° video, enhancing the immersive experience.

109Compressor User Guide
• In a rectangular window: This viewing method is used on a smart phone, tablet, or computer. The viewer scrolls the window to see different parts of the scene.
• On a standard display: This viewing method, with the audience unable to control viewing angles, is similar to watching conventional video, with the added benefit of giving the filmmaker more options for angle choices during editing.
For 360° video content, Compressor acts as a finishing tool that lets you:
• Add or modify the 360° video metadata used by VR headsets and other presentation devices to display the video in the correct spatial format (including monoscopic or stereoscopic mode)
• Export the finished video as a media file ready for distribution, or upload it to a 360° video sharing website such as YouTube or Vimeo
Note: Compressor is not an editing tool for 360° video. To “stitch” the separate camera views together, you must use the 360° camera manufacturer’s software. To assemble a sequence, you must use a 360° video-capable application like Final Cut Pro. See Final Cut Pro User Guide.
360º image © 2015 Jaunt, Inc.
View 360° video metadata using CompressorFor 360° video to display correctly on viewing devices and on sharing websites, the movie file must contain special display instructions called spatial metadata. Compressor handles that metadata in two ways:
• On import: When you add a 360° video source file to Compressor, the app detects any spatial metadata present in the file and displays that information in the Job inspector. If the source video has no 360° metadata or if that metadata is incorrect, you can assign it yourself in the Job inspector.
• On export: After you apply a transcode setting to the source file, Compressor assigns the correct metadata format for the export file. If necessary, you can modify this assignment in the Video inspector.
View or modify the source clip’s 360° metadataAfter you add a 360° video source file to Compressor, make sure its metadata is correct.
1. In the Compressor batch area, select the source file.
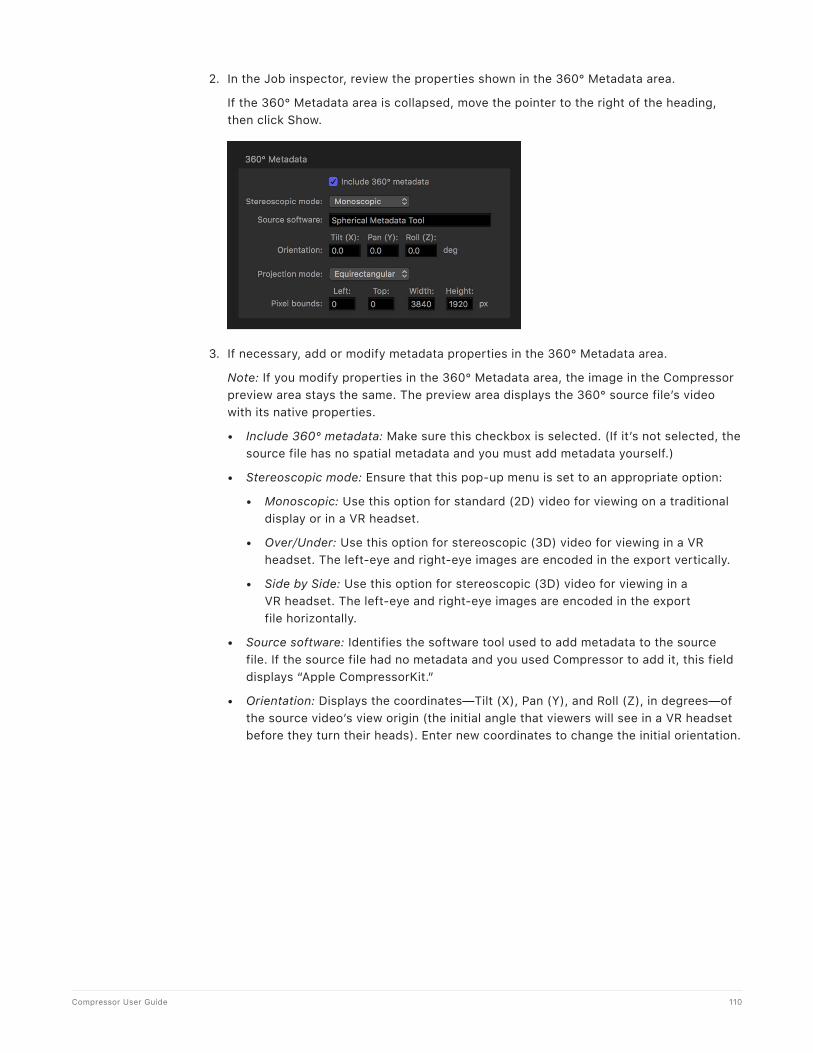
110Compressor User Guide
2. In the Job inspector, review the properties shown in the 360° Metadata area.
If the 360° Metadata area is collapsed, move the pointer to the right of the heading, then click Show.
3. If necessary, add or modify metadata properties in the 360° Metadata area.
Note: If you modify properties in the 360° Metadata area, the image in the Compressor preview area stays the same. The preview area displays the 360° source file’s video with its native properties.
• Include 360° metadata: Make sure this checkbox is selected. (If it’s not selected, the source file has no spatial metadata and you must add metadata yourself.)
• Stereoscopic mode: Ensure that this pop-up menu is set to an appropriate option:
• Monoscopic: Use this option for standard (2D) video for viewing on a traditional display or in a VR headset.
• Over/Under: Use this option for stereoscopic (3D) video for viewing in a VR headset. The left-eye and right-eye images are encoded in the export vertically.
• Side by Side: Use this option for stereoscopic (3D) video for viewing in a VR headset. The left-eye and right-eye images are encoded in the export file horizontally.
• Source software: Identifies the software tool used to add metadata to the source file. If the source file had no metadata and you used Compressor to add it, this field displays “Apple CompressorKit.”
• Orientation: Displays the coordinates—Tilt (X), Pan (Y), and Roll (Z), in degrees—of the source video’s view origin (the initial angle that viewers will see in a VR headset before they turn their heads). Enter new coordinates to change the initial orientation.

111Compressor User Guide
• Projection mode: Sets the type of spatial mapping used to store the 360° video. There are two options:
• Equirectangular: The most common form of spatial mapping for 360° video, this option squeezes and distorts the spherical data like a flat map of the world represents the surface of the spherical earth.
• Cubic: A less common form of spatial mapping, this option represents the spherical data as an unfolded cube with six faces.
• Pixel bounds: When “Projection mode” is set to Equirectangular, this property becomes available, allowing you to modify the boundaries of the equirectangular frame. Most of the time, there’s no need to change these values. However, if you need to alter the dimensions of 360° video from its 2:1 aspect ratio to a more conventional aspect ratio (16:9, for example), you can do so using these controls. Enter values in the Left and Top fields to crop a specific number of pixels from the left edge and top edge of the image. Enter new values in the Width and Height fields to change the dimensions of the equirectangular frame.
• Layout and Padding: When “Projection mode” is set to Cubic, these fields become available, allowing you to adjust the six faces of the unfolded cube. Most of the time, there’s no need to change these values. The integer value in the Layout field specifies the order of the six unfolded cube faces (the default value of 0 specifies the face order used in the Spherical Video V2 metadata standard: right, left, up, down, front, back). The value in the Padding field specifies the width (in pixels) of borders around the edges of each cube face.
Include 360° metadata in the output fileAfter you apply a transcode setting to the 360° video source file, make sure the setting uses the correct metadata format for the output destination you’ve chosen (YouTube, Vimeo, or another publishing platform). In most cases, Compressor automatically chooses the correct metadata format for the job, based on the values entered in the Job inspector and the transcode setting you applied. However, you can modify that choice, if necessary.
1. In the Compressor batch area, select an applied setting.

112Compressor User Guide
2. In the Video inspector, click the “360° metadata” pop-up menu (in the Video Properties area) and choose an option:
• Automatic: Compressor chooses the metadata format based on the properties in the Job inspector and the transcode setting you applied. The format chosen is listed to the right of the pop-up menu.
• None: No 360° metadata is attached to your output file.
• Spherical Video V1: The 360° metadata format most commonly used by sharing sites, including YouTube and Vimeo.
• Spherical Video V2: A less common but more up-to-date 360° metadata format used by YouTube and Vimeo.
3. Click Start Batch to export your file and its 360° metadata.
If you applied a YouTube or Vimeo destination to the source file, the metadata will be parsed by the sharing website so that your 360° video displays correctly.
360º image © 2015 Jaunt, Inc.
Work with captions
Intro to supporting captions in Compressor
Captions are lines of text superimposed over a video program and synchronized to the program’s video and audio. Compressor lets you combine captions with video (and optionally edit them) in either of two industry-standard caption formats:
• CEA-608 closed captions: Originally developed for people who are deaf or hard of hearing, CEA-608 closed captions (also known as Line 21 text) are frequently used on televisions in loud environments (such as bars and airports). CEA-608 closed captions, which use the .scc filename extension, offer numerous formatting options. Viewers can turn closed captions on or off while watching television shows, movies, web videos, and other programs. In Compressor, CEA-608 captions are compatible with iTunes Store packages and many transcode settings.

113Compressor User Guide
• iTT (iTunes Timed Text) subtitles: The caption format for subtitles in iTunes Store content and in YouTube and Vimeo videos, iTT subtitles can be used to deliver foreign-language translations or a transcript of dialog, narration, or audio descriptions to people who are deaf or hard of hearing. iTT subtitles, which use the .itt filename extension, offer more limited formatting options than CEA-608 captions. In Compressor, you can specify whether to let viewers turn iTT subtitles on or off (for example, for full foreign-language translations) or force subtitles to appear onscreen (for example, for specific characters in a movie who speak a different language). In Compressor, iTT subtitles are compatible with iTunes Store packages, but are of limited use in other transcode settings because iTT subtitles can’t be directly embedded into a video file.
• SRT (SubRip Text) subtitles: SRT subtitles can be used to deliver foreign-language translations or a transcript of dialog, narration, or audio descriptions to people who are deaf or hard of hearing. SRT subtitles, which use the .srt filename extension, offer more limited formatting options than CEA-608 captions. In Compressor, you can specify whether to let viewers turn SRT subtitles on or off (for example, for full foreign-language translations) or force subtitles to appear onscreen (for example, for specific characters in a movie who speak a different language).
In Compressor, many built-in settings and destinations support captions, including Apple Devices (in both the H.264 and HEVC codecs), ProRes, Create DVD, and other settings that use the QuickTime Movie, MPEG-2, and MPEG-4 formats.
This section covers working with captions in a standard batch in Compressor, including how to import, edit, and export captions.
You can also add captions to an iTunes Store package. See Intro to iTunes Store packages in Compressor.
Note: Compressor is not a captions-authoring tool. To create CEA-608 closed captions, iTT subtitles, or SRT subtitles from scratch, use Final Cut Pro or a third-party captions-authoring app to output a .scc text file, a .itt text file, or a .srt text file, then import the captions file into Compressor.
Import and preview captions in CompressorIn a standard transcoding job in Compressor, you can add a single set of CEA-608 closed captions, iTT subtitles, or SRT subtitles by adding a .scc file, a .itt file, or a .srt file to the job. If a source video file already has embedded CEA-608 closed captions, when you add the source file to a batch, Compressor extracts the .scc data for you.
Note: In an iTunes Store package, you can add multiple CEA-608 closed caption sets and multiple iTT subtitle sets (in several different languages, for example). For information about adding closed captions and subtitles to iTunes Store packages, see Build iTunes Store packages using Compressor.
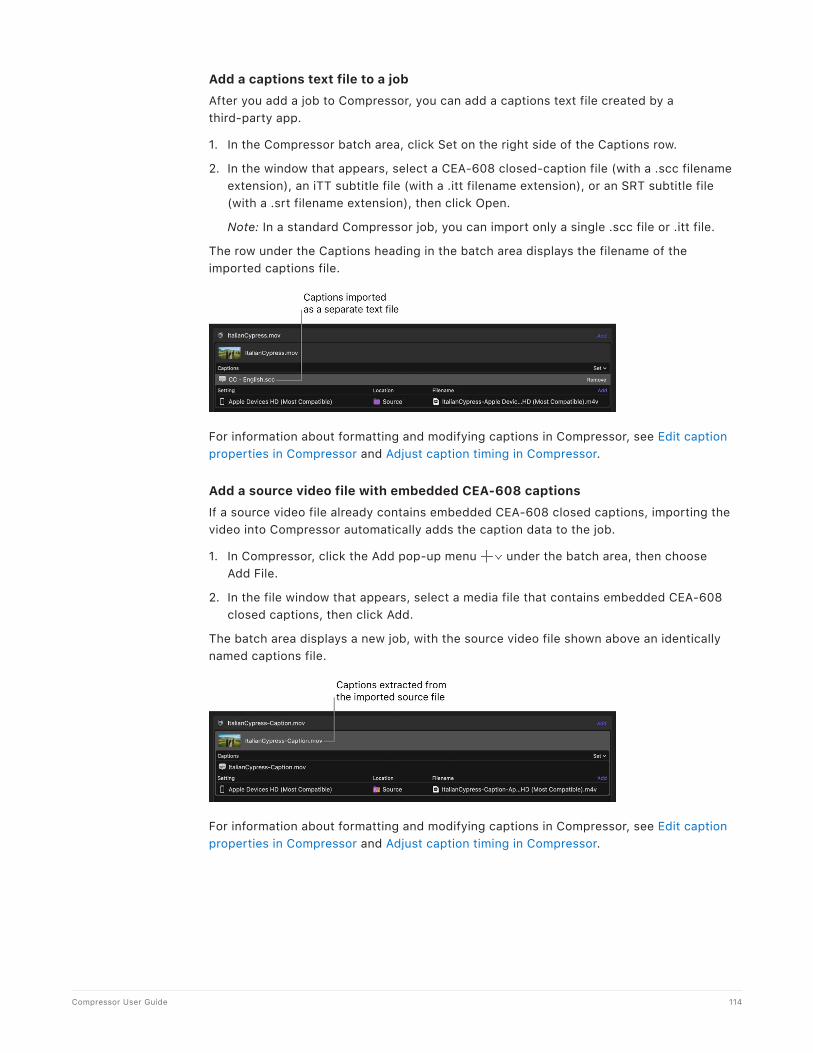
114Compressor User Guide
Add a captions text file to a jobAfter you add a job to Compressor, you can add a captions text file created by a third-party app.
1. In the Compressor batch area, click Set on the right side of the Captions row.
2. In the window that appears, select a CEA-608 closed-caption file (with a .scc filename extension), an iTT subtitle file (with a .itt filename extension), or an SRT subtitle file (with a .srt filename extension), then click Open.
Note: In a standard Compressor job, you can import only a single .scc file or .itt file.
The row under the Captions heading in the batch area displays the filename of the imported captions file.
For information about formatting and modifying captions in Compressor, see Edit caption properties in Compressor and Adjust caption timing in Compressor.
Add a source video file with embedded CEA-608 captionsIf a source video file already contains embedded CEA-608 closed captions, importing the video into Compressor automatically adds the caption data to the job.
1. In Compressor, click the Add pop-up menu under the batch area, then choose Add File.
2. In the file window that appears, select a media file that contains embedded CEA-608 closed captions, then click Add.
The batch area displays a new job, with the source video file shown above an identically named captions file.
For information about formatting and modifying captions in Compressor, see Edit caption properties in Compressor and Adjust caption timing in Compressor.

115Compressor User Guide
Replace or delete the captions text file in a jobIn the Compressor batch area, do one of the following:
• Replace a captions text file: Click Set on the right side of the Captions heading row, then select a different captions file.
The new file appears in the row under the Captions heading.
• Delete a captions text file: Move the pointer over the row containing the captions filename, then click Remove on the right side of the row.
View caption properties in the Closed Captions inspector or Subtitles inspector• In the Compressor batch area, select the captions filename (in the row under the
Captions heading).
The Closed Captions inspector appears if the file you selected is a CEA-608 closed-caption file. The Subtitles inspector appears if the file you selected is an iTT subtitles file.
Note: If the inspector pane still isn’t visible, click the Inspector button in the upper-right corner of the Compressor window.
The inspector contains controls for setting language properties, editing and formatting caption text, adjusting caption timing, and more. See Edit caption properties in Compressor and Adjust caption timing in Compressor.
View captions in the preview areaYou can preview the appearance and timing of captions in Compressor in the preview area. And you can navigate from caption to caption in the Closed Captions inspector or Subtitles inspector.
1. In the Compressor batch area, select the captions filename (in the row under the Captions heading).
2. In the preview area, click the Captions button to toggle captions on.
Captions will now be visible in the preview area. The Captions button turns blue when captions are on.
3. To view captions in the preview area, do any of the following:
• Click the Play button to watch the captions appear in real time.
• Drag the playhead to move from caption to caption in the video.
• At the bottom of the Closed Captions inspector or Subtitles inspector (if the inspector isn’t visible, click the captions filename in the batch area), click a caption row in the list.
The playhead moves to the timecode start point of the caption you selected, and the caption appears in the preview area.
To stop displaying captions in the preview option, click the Captions button again. The Captions button turns white when captions are off.

116Compressor User Guide
View caption error warningsWhen a set of captions has timing conflicts or other formatting errors, Compressor highlights the problem captions in red in the Closed Captions inspector or Subtitles inspector.
1. In the Compressor batch area, select the captions filename (in the row under the Captions heading).
2. In the Captions inspector or Subtitles inspector, click the warning button at the top of the Captions list or Subtitles list.
The warning button is highlighted, and captions without errors are temporarily removed from the list.
3. Click the error icon to the left of a red caption in the list.
The Errors & Warnings window appears, showing all errors in the job.
Edit caption properties in CompressorYou can edit caption content, placement, formatting, and timing in the Closed Captions inspector (for jobs that contain CEA-608 closed captions) or Subtitles inspector (for jobs that contain iTT subtitles or SRT subtitles). Because CEA-608, iTT, and SRT captions have different specs, each Compressor inspector contains slightly different controls.
Specify the caption language propertiesBefore transcoding, you need to specify the language and country of the captions. For iTT subtitles, you must also choose a subtitle type (or “purpose”).
1. In the Closed Captions inspector or Subtitles inspector in Compressor, choose options from the Language pop-up menu and Country pop-up menu.
Tip: You must choose a language before you can choose a country. If you don’t choose a language and country, your transcoding job won’t process.

117Compressor User Guide
2. For iTT subtitles only: In the Subtitles inspector, click the Purpose pop-up menu and choose a subtitle type:
• Translation (Full): Use for a full translation of all words spoken in the video (in the language you chose in step 1). During playback, viewers can turn these subtitles on or off.
• Forced: Use when a person in the video speaks a language different from the main language of the video—for example, for a French speaker in an otherwise English-language film. Forced subtitles can’t be turned off because they’re necessary to understand the content of the video.
• Deaf and Hard of Hearing (SDH): Use for a full translation of all the words spoken in the video, as well as for song lyrics and sound effects (owl hooting, scream in distance, and so on). During playback, viewers can turn subtitles for the deaf or hard of hearing (SDH) on or off.
Choose an animation style (CEA-608 closed captions only)The CEA-608 format allows for several different styles of caption animation.
1. In the Captions list at the bottom of the Closed Captions inspector in Compressor, select one or more captions.
Each line in the list, which represents a single caption, displays the caption’s timecode start point, end point, and text.
2. In the Formatting area of the Closed Captions inspector, click the Caption Style pop-up menu, then choose an option:
• Pop-On: The caption appears suddenly on the screen at the caption’s timecode start point. If multiple captions overlap in time, they’re stacked vertically onscreen, with each new caption appearing beneath the previous caption.
• Paint-On: The caption appears letter by letter from left to right, beginning at at the caption’s timecode start point. If multiple captions overlap in time, they’re stacked vertically onscreen, with each new caption "painting on” beneath the previous caption.
• Roll-Up: The caption appears letter by letter from left to right (like Paint-On). Additionally, if multiple captions overlap in time, newly appearing captions push older captions up line by line. When you choose Roll-up, an additional pop-up menu appears, letting you choose how many caption lines can appear onscreen at a time: 2, 3, or 4 lines.
Note: Modifying the caption animation style may introduce position or timing errors. Captions with timing errors are highlighted in red in the Captions list. For more information about caption timing, see Adjust caption timing in Compressor.

118Compressor User Guide
Edit caption content and placement1. In Compressor, in the Captions list or Subtitles list (at the bottom of the Closed
Captions inspector or Subtitles inspector), click the caption you want to modify.
The playhead in the preview area jumps to the timecode start position of the caption you selected, and the caption text appears in the Caption Text field in the inspector, ready to edit.
Note: The caption should also appear superimposed over the video in the preview area. If the caption isn’t visible in the preview area, click the Captions button , and make sure On is checkmarked in the list. If the caption still isn’t visible in the preview area, try dragging the playhead a few frames to the right (if the caption style is animated—Paint-On, for example—the caption may require several frames to appear onscreen).
2. Click in the Caption Text field, then edit the text.
Onscreen, each CEA-608 closed caption appears on a single line, and each line is limited to 32 characters.
Each iTT subtitle can span dozens of characters—from the left margin of the frame to the right margin—but each subtitle is limited to two lines.
Note: There are no text placement controls for SRT subtitles. SRT subtitles are always centered horizontally, and additional lines of text beyond the first are stacked vertically.
3. To modify the position of the caption in the video frame, click a Text Placement arrow (under the Caption Text field).
The caption is repositioned in the video frame.

119Compressor User Guide
WARNING: CEA-608 captions that overlap spatially and temporally may create position and timing errors.
Modify text color and styleThe formatting controls in the Closed Captions inspector or Subtitles inspector let you change the color and font style of caption text. CEA-608 closed captions have additional formatting controls that let you choose text background colors.
1. In the Captions list or Subtitles list in Compressor (at the bottom of the Closed Captions inspector or Subtitles inspector), click the caption you want to modify.
2. In the Caption Text field, select the text characters you want to modify.
3. In the Formatting area, select a font style (bold, italic, or underscore) from the Format row.
4. In the Formatting area, do any of the following:
• For CEA-608 closed captions: Select a color swatch from the Text Color row, select a color swatch from the Text Background row, then select an opacity swatch from Background Opacity row.
Tip: If you don’t want a text background color, select the leftmost opacity swatch (0 percent opacity). However, if you opt for a background color, make sure there’s ample contrast between the text color and the background color.
• For iTT and SRT subtitles: Click the Text Color well, then select a new color in the Colors window.
The modified caption is updated in the preview area.
Add a new captionYou can also add new captions to an existing captions file.
1. In the Compressor preview area, drag the playhead to a point in your video where you want to insert a new caption.
2. Click the “Add a caption” button near the bottom of the Closed Captions inspector or Subtitles inspector.
3. Enter caption text in the window that appears, then click OK.
The new caption with a default duration of two seconds appears in the preview window at the timecode start point.
WARNING: Adding a new caption with too many characters may introduce position errors. And adding a caption that overlaps spatially or temporally with an existing caption may introduce position or timing errors. Captions with errors are highlighted in red in the Captions list or Subtitles list. For more information about caption timing, see Adjust caption timing in Compressor.
Delete a caption• In the Captions list or Subtitles list in Compressor (at the bottom of the Closed Captions
inspector or Subtitles inspector), click a caption, then press Delete.

120Compressor User Guide
Adjust caption timing in CompressorWhen you add captions to a job in Compressor, the timecode values in the imported captions file (an iTT file or an SRT file) are synchronized to the timecode in the video source file. (If you want to see the timecode values in an iTT or SRT file, try opening the file in the macOS TextEdit app.)
In Compressor you can modify the timing of captions and fix timing errors by adjusting a caption’s timecode start point, end point, or duration.
Change a caption’s start point, end point, or duration1. In the Captions list or Subtitles list in Compressor (at the bottom of the Closed Captions
inspector or Subtitles inspector), click the caption you want to modify.
The playhead in the preview area jumps to the timecode start position of the caption you selected, and the caption’s timing information appears in the Caption Start, Caption End, and Caption Duration fields in the inspector.
2. To modify the caption’s start point or end point, do any of the following:
• Adjust the start point or end point in single-frame increments: Click the down arrow or up arrow on either side of the Caption Start or Caption End field.
• Change the start point or end point in larger increments: Position the pointer over the hours, minutes, seconds, or frames area of timecode in the Caption Start or Caption End field, then drag left or right.
• Change the start point or end point to a precise value: Select the hours, minutes, seconds, or frames area of timecode in the Caption Start or Caption End field, enter a new two-digit number, then press return.
Changing the start point also modifies the end point (the caption moves to an earlier or later position in time, but its duration remains the same).
Changing the end point also modifies the duration of the caption (the start point remains the same, but the end point changes, which shortens or lengthens the caption’s duration).

121Compressor User Guide
3. To modify the duration of a caption, do any of the following:
• Modify the caption duration in single-frame increments: Click the down arrow or up arrow on either side of the Caption Duration field.
• Modify the caption duration in larger increments: Position the pointer over the hours, minutes, seconds, or frames area of timecode in the Caption Duration field, then drag left or right.
• Modify the caption duration by a precise value: Select the hours, minutes, seconds, or frames area of timecode in the Caption Duration field, enter a new two-digit number, then press return.
Changing a caption’s duration also modifies its end point.
WARNING: Modifying start points and end points may introduce timing errors (such as captions that overlap in time or captions that extend beyond the duration of video). Captions with errors are highlighted in red in the Captions list or Subtitles list at the bottom of the inspector. Captions that extend beyond the duration of video in a job are dimmed in the list. If you don’t fix timing errors, your transcoding job will fail.
Modify the timing of multiple captions at the same time1. In the Captions list or Subtitles list in Compressor (at the bottom of the Closed Captions
inspector or Subtitles inspector), select multiple captions.
Tip: Shift-click or Command-click to select multiple captions.
If the selected captions have different timecode values, the Caption Start, Caption End, and Caption Duration fields in the inspector display dashes.
2. To modify the caption start points or end points of the selected captions proportionally, do any of the following:
• Adjust the start points or end points in single-frame increments: Click the down arrow or up arrow on either side of the Caption Start or Caption End field.
• Change the start points or end points in larger increments: Position the pointer over the hours, minutes, seconds, or frames area of timecode in the Caption Start or Caption End field, then drag left or right.
The affected timecodes of all selected captions are modified by equal amounts.
3. To modify the caption durations proportionally, do any of the following:
• Modify the caption durations in single-frame increments: Click the down arrow or up arrow on either side of the Caption Duration field.
• Modify the caption durations in larger increments: Position the pointer over the hours, minutes, seconds, or frames area of timecode in the Caption Duration field, then drag left or right.
The affected timecodes of all selected captions are modified by equal amounts.

122Compressor User Guide
WARNING: Modifying caption durations may introduce timing errors (such as captions that overlap in time or captions that extend beyond the duration of video). Captions with errors are highlighted in red in the Captions list or Subtitles list at the bottom of the inspector. Captions that extend beyond the duration of video in a job are dimmed in the list. If you don’t fix timing errors, your transcoding job will fail.
Adjust the global timing of captions (CEA-608 closed captions only)Occasionally, an imported set of closed captions may be out of sync with the source video by a few seconds throughout the program. The CEA-608 format lets you offset all captions forward or backward in time to manually restore sync.
• In the Closed Captions inspector in Compressor, do any of the following in the Offset field:
• Adjust the offset in single-frame increments: Click the down arrow or up arrow.
• Modify the offset in larger increments: Drag left or right over the hours, minutes, seconds, or frames area of timecode.
• Modify the offset by a precise value: Select the hours, minutes, seconds, or frames area of timecode, enter a new two-digit number, then press return.
Tip: To check the new sync, play back the video in the preview area.
Export captions in CompressorAfter you import captions into a job (optionally editing text properties and adjusting timing), you’re ready to export the video and captions. In a standard Compressor batch, the transcode setting and captions format you choose determines how Compressor outputs the job:
• When you use a standard transcode setting (Apple Devices or MPEG Files, for example) to combine a video with CEA-608 closed captions, Compressor can embed the captions directly into the output video file. Optionally, you can have Compressor save a separate captions text file (in the .scc filename format) to your computer.
• When you use a standard transcode setting to combine video with iTT subtitles or SRT subtitles, Compressor saves the video file (without embedded captions) and a separate captions text file (in the .itt or .srt filename format) to your computer.
Note: iTT subtitles and SRT subtitles can’t be embedded in a video file, so it’s not recommended that you use this format unless you’re creating an iTunes Store package.
Transcode video and captions using standard transcode settingsTo export video and captions using any of the Apple Devices settings, or settings based on the QuickTime Movie, MPEG-2, or MPEG-4 formats, do the following:
1. If you want to embed CEA-608 captions in the output video, click the output row in the Compressor batch area (under the Setting heading), then in the General inspector, make sure “Embed closed captions” is selected.
Note: You can’t embed iTT subtitles or SRT subtitles into output video.
2. If you want to output a separate captions file (in the CEA-608, iTT, or SRT format), click the video source filename in the batch inspector, then select “Save captions to disk” at the bottom of the Job inspector.
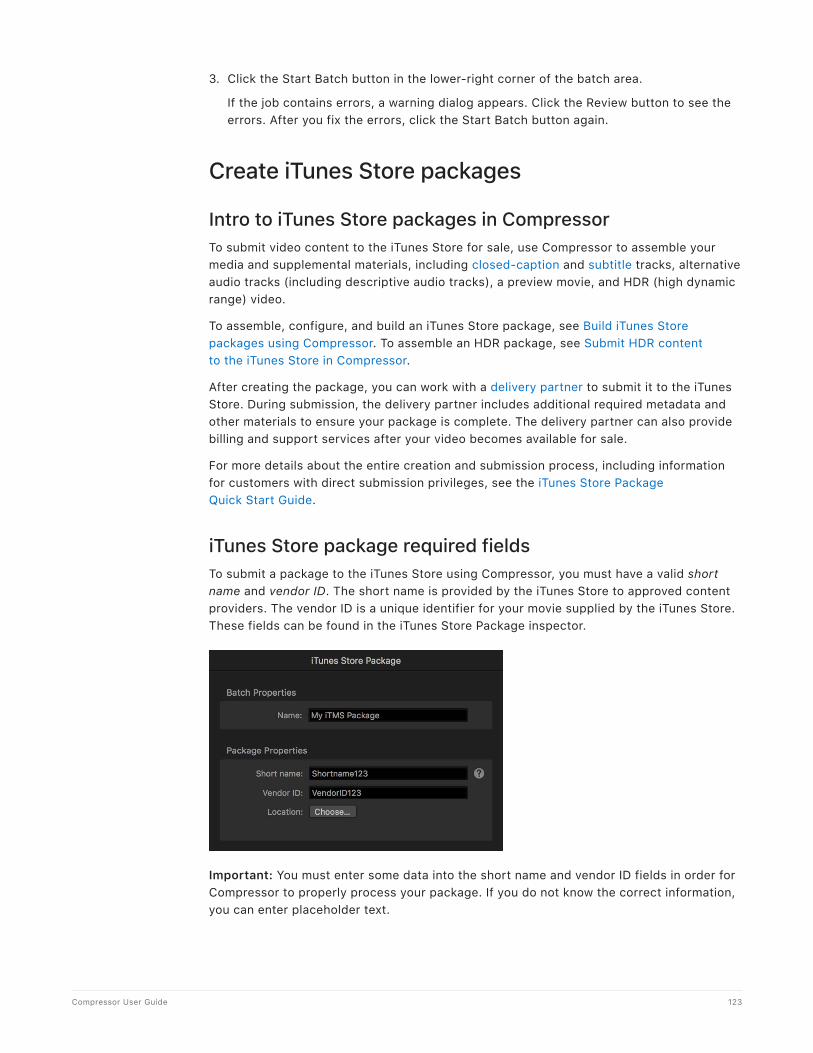
123Compressor User Guide
3. Click the Start Batch button in the lower-right corner of the batch area.
If the job contains errors, a warning dialog appears. Click the Review button to see the errors. After you fix the errors, click the Start Batch button again.
Create iTunes Store packages
Intro to iTunes Store packages in CompressorTo submit video content to the iTunes Store for sale, use Compressor to assemble your media and supplemental materials, including closed-caption and subtitle tracks, alternative audio tracks (including descriptive audio tracks), a preview movie, and HDR (high dynamic range) video.
To assemble, configure, and build an iTunes Store package, see Build iTunes Store packages using Compressor. To assemble an HDR package, see Submit HDR content to the iTunes Store in Compressor.
After creating the package, you can work with a delivery partner to submit it to the iTunes Store. During submission, the delivery partner includes additional required metadata and other materials to ensure your package is complete. The delivery partner can also provide billing and support services after your video becomes available for sale.
For more details about the entire creation and submission process, including information for customers with direct submission privileges, see the iTunes Store Package Quick Start Guide.
iTunes Store package required fieldsTo submit a package to the iTunes Store using Compressor, you must have a valid short name and vendor ID. The short name is provided by the iTunes Store to approved content providers. The vendor ID is a unique identifier for your movie supplied by the iTunes Store. These fields can be found in the iTunes Store Package inspector.
Important: You must enter some data into the short name and vendor ID fields in order for Compressor to properly process your package. If you do not know the correct information, you can enter placeholder text.

124Compressor User Guide
If you use a delivery partner to submit the package to the iTunes Store, your delivery partner can edit your Compressor-generated package to add a valid vendor ID and short name. If you deliver the package to the iTunes Store yourself (acting as your own content provider), you must obtain a vendor ID and short name from the iTunes Store and include that data in your package.
Build iTunes Store packages using CompressorThere are a number of steps required to successfully create, configure, and build an iTunes Store package. Before you begin, make sure you have all the components you need, including video files, audio files, subtitles, preview video clips, and so on, and that each component is in the correct format for inclusion in the package.
Create an iTunes Store package1. In Compressor, choose File > New iTunes Store Package.
An iTunes Store package job appears in the batch area. (The batch area can contain only one iTunes Store package job at a time.)
2. To add the primary video of your submission, do one of the following:
• Drag a video file from the Finder onto the Feature row.
• Click Set on the right side of the Feature row and select a video file from the dialog that appears, then click Open.
An output row containing the selected video file is added to the job.
3. To modify video or audio properties of the primary video, select the video in the batch area, open the Video or Audio inspector, then adjust the property values.
You can pick a frame size up to 4K (4096 x 2304 pixels). For more information about the available video and audio properties, see QuickTime Movie settings in Compressor.

125Compressor User Guide
4. To add supplemental files, do one of the following:
• Drag a file from the Finder onto the Subtitles, Closed Captions, or Alternative Audio row.
• Click Add on the right side of the corresponding row, select a file from the dialog that appears, then click Open.
Important: Subtitle files must have the .itt or .srt filename extension, and closed-caption files must have the .scc filename extension.
You can add multiple files in each category (for example, to include subtitles or closed captions for multiple languages). Shift-click or Command-click to select multiple files. A supplemental file row is created for each file you add.
5. To add a short preview video, do one of the following:
• Drag a video file from the Finder onto the Previews row.
• Click Add on the right side of the Previews row, select a video file from the dialog that appears, then click Open.
Compressor adds a row containing the selected video file to the job.
Configure an iTunes Store packageAfter you create an iTunes Store package and add media, you need to add identifying production data in the inspector.
1. In the Compressor batch area, click the top bar of the iTunes Store Package item.
The iTunes Store Package inspector appears. (If the inspector is not visible, click the Inspector button in the upper-right corner of the Compressor window.)
2. In the iTunes Store Package inspector, enter a name for the project in the Name field.
Note: This name will be used only to represent the job in the Active or Completed views within Compressor.
3. In the Package Properties section of the inspector, enter a short name that corresponds to the party who will ultimately submit the package to the iTunes Store.
The short name is generated and supplied by the iTunes Store and is used for internal identification. If you do not have an account with an assigned short name, enter placeholder text here, and your delivery partner will add the correct information to the package before submitting it to the iTunes Store.
4. Enter a Vendor ID.
The Vendor ID is a unique identifier for the movie you are submitting to the iTunes Store. This ID is used for tracking your assets and sales reporting.
If you do not know your vendor ID, you can enter any placeholder text here and your delivery partner add a valid vendor ID to the package before submission to the iTunes Store.
Important: The vendor ID can contain only alphanumeric characters and underscore marks; it can’t contain spaces, dashes, ampersands, other punctuation, or symbols. The vendor identifier is case-sensitive and must not start with an underscore. If a Vendor ID is numeric, it’s treated as a string, not numbers (for example, a vendor identifier of 000000000123456 is not the same as 123456). Vendor IDs must be at least six ASCII characters in length but not longer than 100 ASCII characters.

126Compressor User Guide
5. Click Choose, then select the location on your computer where you want to save the package.
Important: The iTunes Store requires specific video and audio settings in your package submission. Therefore, unless you know exactly what settings to change and why, it’s not advisable to make changes to the Video and Audio inspectors for the Feature or Preview items in your iTunes Store Package job.
Configure subtitles, closed captions, and alternative audio tracksAfter you add subtitle files, closed-caption files, or alternative audio tracks to a job, you must configure those elements to ensure that they’re labeled with the correct language and other settings.
1. In the Compressor batch area, select a row under the Subtitles heading.
The Subtitles inspector appears. (If the inspector is not visible, click the Inspector button in the upper-right corner of the Compressor window.)
2. In the Subtitles inspector, choose options from the Language pop-up menu, the Country pop-up menu, and the Purpose pop-up menu.
Tip: You must choose a language before you can choose a country.
There are three available options in the Purpose pop-up menu:
• Translation (Full): Outputs a full translation of all words spoken in the film using the language of the intended territory. During playback, viewers can turn these subtitles on or off (unlike burned-in subtitles).
• Forced: Use when a person in the video speaks a language different from the main language of the video—for example, for a French speaker in an otherwise English-language film. Forced subtitles can’t be turned off because they’re necessary to understand the content of the video.
• Deaf and Hard of Hearing (SDH): Use for a full translation of all the words spoken in the video, as well as song lyrics and sound effects (owl hooting, scream in distance, and so on). During playback, viewers can turn subtitles for the deaf or hard of hearing (SDH) on or off.
Tip: In the Subtitles inspector, you can also edit subtitle text, color, and placement and adjust subtitle timing.
3. In the batch area, select a row under the Closed Captions heading.
4. In the Closed Captions inspector, choose options from the Language pop-up menu and the Country pop-up menu.
You must choose a language before you can choose a country.
Tip: In the Closed Captions inspector, you can also edit subtitle text, color, animation, and placement and adjust subtitle timing.
5. In the batch area, select a row under the Alternative Audio heading.

127Compressor User Guide
6. In the Job inspector, do the following:
• Choose options from the Language pop-up menu and Country pop-up menu matching the language of the alternative audio track.
You must choose a language before you can choose a country.
• If the alternative audio track is descriptive audio, select the “Descriptive audio” checkbox (in the Alternative Audio Properties area).
You can add multiple descriptive audio tracks (for example, in multiple languages).
Tip: You can view subtitles and closed captions or monitor one of the alternative audio tracks in the preview area by clicking the “Choose closed captions, subtitles, and audio language" button and then choosing an option. See Preview jobs in Compressor.
Add chapter markers to the feature videoiTunes Store videos must include chapters so that viewers can jump directly to specific sections of the movie. If your source video file already has chapter markers, those will be used. If your source video file doesn’t have chapter markers, you can add them in Compressor.
1. In the Compressor batch area, select the Feature row item or Preview row item.
2. In the preview area, navigate to the frame where you want to begin the chapter.
3. Click the “Modify marker settings” pop-up menu, then choose Chapter.
4. Click the Add Marker button (or press M).
The inspector is updated to show the Marker inspector.
5. In the Marker inspector, enter a name for the marker.
6. Click the Image pop-up menu, then choose Frame or File to assign a preview image associated with the chapter marker.
Important: Chapter markers must have an image associated with them (and not a black frame) to be compliant with iTunes Store submission requirements.
7. Repeat steps 2–5 to add additional chapter markers as required.
For more information about chapter markers, see Add markers using Compressor.
Build an iTunes Store packageAfter your package is properly loaded and configured, you can build the package.
• In the Compressor batch area, click the Start Batch button.
Compressor transcodes all the files, combining them into a single package file (saved in the location specified in the iTunes Store Package inspector).
Important: Compressor can’t directly submit the package to the iTunes Store. See About submitting to the iTunes Store in Compressor.
Correct or augment an iTunes Store packageYou can add or update components in a completed iTunes Store package using Compressor. For example, if you want to add another subtitle file to a completed package, you can append the new file to the package. As long as the data in the package properties matches that in the original package, Compressor automatically combines the items and ensures that the package is correctly configured and ready for uploading.

128Compressor User Guide
1. In Compressor, choose File > New iTunes Store Package.
An iTunes Store package is added to the batch area.
2. In the batch area, click the top bar of the iTunes Store Package item.
3. In the iTunes Store Package inspector (if the inspector is not visible, click the Inspector button ), enter a name and set the package properties to precisely match the values in the package you want to augment or change.
4. In the batch area, add the new or modified subtitle files, closed-caption files, or alternate audio files.
Note: If you create a package with no feature video, the preview area displays a missing media warning. Because you’re deliberately generating a package without video, this is not an error, so you can safely ignore this warning.
5. In the iTunes Store Package inspector, click Choose, then select the same location where the original package was saved.
6. At the bottom of the batch area, click the Start Batch button.
The existing package is updated to include the new or changed elements from the new batch.
Note: You can’t remove elements from a package after it has been created. If you want to remove an element from an existing package, you must create a new package from scratch. For example, if you created a package with French, German, and Italian subtitles but want to modify the package to include only French and Italian subtitles, you must delete the old package from your disk, then build a new package with all desired elements included.
Work with video with burned-in text in CompressorIf your feature video contains text already rendered into the video (sometimes called burned-in or baked-in titles), it’s important to identify the language and intent of those titles before submitting your package to the iTunes Store.
In general, you should avoid using burned-in text, which can confuse viewers when the text doesn’t match the language they’re expecting (other than opening titles or ending credits).
Furthermore, burned-in titles can conflict with subtitles or closed-caption text added to the video during playback. If both text elements appear at the same time and in the same place on the screen, the titles may overlap, and neither will be legible.
However, burned-in text is sometimes unavoidable. For example, traditional subtitles might already be burned into your video. Or you might need to include forced narratives, onscreen text that identifies a scene’s location or time (“Brooklyn, 1959” or “Later that night…”). Or you might require translation dialog that doesn’t match the primary language used in a film (known as foreign dialog translation).
In these cases, you must identify the text as subtitles or forced narratives and then specify the language and country.
129Compressor User Guide
Set the language and country of burned-in text1. In the Compressor batch area, select the Feature row item.
2. In the Job inspector, scroll down to Feature Video Properties, then deselect Textless.
3. For burned-in subtitles, choose a Language option and then a Country option in the “Burned subtitles” area.
4. For burned-in forced narratives, choose a Language option and then a Country option in the “Burned forced narratives” area.
Set the India Health WarningIf your project contains health warning text as required by Indian law, you must indicate that the warning is present in your iTunes Store package.
1. In the Compressor batch area, select the Feature row item.
2. In the Job inspector, scroll down to Feature Video Properties, then deselect Textless.
3. Select the “India health warning” checkbox.
Designate the feature video as textlessIf your Feature video doesn’t contain any titles, it should be marked as Textless. This setting is selected by default.
1. In the Compressor batch area, select the Feature row item.
2. In the Job inspector, scroll down to Feature Video Properties, then select Textless (if it’s not already selected).
Submit HDR content to the iTunes Store in CompressorYou can use Compressor to prepare HDR (high dynamic range) content packages for submission to the iTunes Store. Users with HDR-capable devices—Apple TV 4K connected to an HDR-compatible television, recent iOS and iPadOS devices, or recent Mac computers—can purchase or rent HDR content in high-definition or 4K resolution. The iTunes Store plays the highest-quality version compatible with a user’s device.
You submit an HDR package in either of two standard HDR formats: HDR10 or Dolby Vision. Both formats combine wide color gamut with the perceptual quantizer, a mathematical transfer function that converts stored color values in the video file to high-dynamic-range levels of contrast onscreen, approximating the sensitivity of human eyes. (For more information, see Intro to wide color gamut and HDR in Compressor.)
When you submit an HDR video to the iTunes Store, you must also include a standard-dynamic-range version of the video, unless the SDR version is already available in the iTunes Store and you’re submitting a supplemental HDR upgrade package, or you’re using iTunes to create the SDR delivery from the HDR source and Dolby Vision metadata. Your HDR video must include HDR metadata.
For complete information about HDR delivery requirements, see the iTunes Video and Audio Asset Guide.

130Compressor User Guide
Build a combined SDR/HDR packageIf you’re submitting new video content, you must include both an SDR version and an HDR version in the iTunes Store package. The SDR version is considered the “master,” defining the video duration, frame rate, and frame size; the SDR master also provides the audio track. The HDR version provides only the higher-resolution video (and doesn’t require an audio track).
Note: If you’re submitting a supplemental HDR upgrade to SDR video already available in the iTunes Store, or you’re using iTunes to create the SDR delivery using an HDR source and Dolby Vision metadata, go to the next task, Build a combined SDR/HDR package from an HDR-only source.
1. In Compressor, choose File > New iTunes Store Package.
An iTunes Store Package job appears in the batch area.
2. To add the SDR feature video to the package, do one of the following:
• Drag an SDR video file from the Finder onto the Feature row.
• Click Set on the right side of the Feature row, select an SDR video file, then click Open.
An output row containing the selected video file (and an SDR badge) is added to the job.
3. To add the HDR feature video to the package, do one of the following:
• Drag an HDR video file from the Finder onto the Feature row.
• Click Set on the right side of the Feature row, select an HDR video file, then click Open.
An output row containing the selected video file (and an HDR badge) is added to the job.

131Compressor User Guide
Separate summaries for both the SDR and HDR source files appear in the Job inspector.
4. In the Job inspector, review the SDR Video Properties and HDR Video Properties areas to ensure that Compressor has correctly detected the native color space of each file.
If a source file has metadata identifying its native color space, Compressor adds an asterisk next to the option shown in the SDR or HDR “Color space” pop-up menu. If a source file is untagged or tagged with an unrecognized color space, Compressor assigns a color space based on its assessment of the media and then adds a dagger (†) next to the item the pop-up menu. You can override Compressor’s choices by choosing a different option from either pop-up menu.
Note: Changing these properties doesn’t convert the exported files to a different color space. To transcode to a different color space, see the next step.

132Compressor User Guide
5. If you want to modify the color space of either video for the iTunes Store package, open the Video inspector and choose new options from the following pop-up menus:
• SDR color space: Choose a different SDR color space.
• HDR color space: Choose either Rec. 2020 PQ or P3 D65 PQ. Either option is compatible with the two HDR formats supported by the iTunes Store—Dolby Vision and HDR10.
6. Set the HDR format:
• HDR10: By default, iTunes Store packages transcode HDR video to the HDR10 format, so no further modifications are required.
• Dolby Vision: Open the Job inspector, then in the Dolby Vision Metadata area, click Choose, navigate to an XML file formatted using the Dolby Vision metadata specifications, and click Open. When you attach a Dolby Vision metadata file, Compressor transcodes your iTunes Store package to a format compatible with both HDR10 and Dolby Vision. When a user rents or purchases HDR content, the iTunes Store plays the highest-quality version compatible with the user’s display device.
Note: Dolby Vision submissions must be mastered at a Dolby Vision–certified facility. See the Dolby Vision website.
7. In the Video inspector, click Choose in the “QuickTime settings” area, then choose either Apple ProRes 4444 or Apple ProRes 4444 XQ from the pop-up menu.
HDR package submissions to the iTunes Store must use the Apple ProRes 4444 or Apple ProRes 4444 XQ codec. If you choose a different codec, your package submission will fail.
8. Complete your iTunes Store package by configuring package settings; adding subtitles, closed captions, alternative audio tracks, and chapter markers; and then building the package.
Important: Compressor can’t directly submit the package to the iTunes Store. See About submitting to the iTunes Store in Compressor.

133Compressor User Guide
Build a supplemental HDR upgrade to an already available SDR videoIf the SDR version of your feature video is already available in the iTunes Store, you can submit the HDR version by itself as a supplemental upgrade package.
1. In Compressor, choose File > New iTunes Store Package.
An iTunes Store Package job appears in the batch area.
2. Do one of the following:
• Drag an HDR video file from the Finder onto the Feature row.
• Click Set on the right side of the Feature row, select an HDR video file, then click Open.
An output row containing the selected video file (and an HDR badge) is added to the job.
3. If you want to modify the color space of the video for the iTunes Store package, open the Video inspector, click the “HDR color space” pop-up menu, then choose either Rec. 2020 PQ or P3 D65 PQ.
Either option is compatible with the two HDR formats supported by the iTunes Store—Dolby Vision and HDR10.
4. Set the HDR format:
• HDR10: By default, iTunes Store packages transcode HDR video to the HDR10 format, so no further modifications are required.
• Dolby Vision: Open the Job inspector, then in the Dolby Vision Metadata area, click Choose, navigate to an XML file formatted using the Dolby Vision metadata specifications, and click Open. When you attach a Dolby Vision metadata file, Compressor transcodes your iTunes Store package to a format compatible with both HDR10 and Dolby Vision. When a user rents or purchases HDR content, the iTunes Store plays the highest-quality version compatible with the user’s display device.
Note: Dolby Vision submissions must be mastered at a Dolby Vision–certified facility. See the Dolby Vision website.
5. In the Video inspector, click Choose in the “QuickTime settings” area, then choose either Apple ProRes 4444 or Apple ProRes 4444 XQ from the pop-up menu.
HDR package submissions to the iTunes Store must use the Apple ProRes 4444 or Apple ProRes 4444 XQ codec. If you choose a different codec, your package submission may fail.
6. Complete your iTunes Store package by configuring package settings; adding subtitles, closed captions, alternative audio tracks, and chapter markers; and then building the package.
Important: Compressor can’t directly submit the package to the iTunes Store. See About submitting to the iTunes Store in Compressor.

134Compressor User Guide
Build a combined SDR/HDR package from an HDR-only sourceIf the you have an HDR video file and Dolby Vision metadata, you can build a combined SDR/HDR package.
1. In Compressor, choose File > New iTunes Store Package.
An iTunes Store Package job appears in the batch area.
2. Do one of the following:
• Drag an HDR video file from the Finder onto the Feature row.
• Click Set on the right side of the Feature row, select an HDR video file, then click Open.
An output row containing the selected video file (and an HDR badge) is added to the job.
3. If you want to modify the color space of the video for the iTunes Store package, open the Video inspector, click the “HDR color space” pop-up menu, then choose either Rec. 2020 PQ or P3 D65 PQ.
4. Open the Job inspector, then in the Dolby Vision Metadata area, click Choose, navigate to an XML file formatted using the Dolby Vision metadata specifications, then click Open.
When you attach a Dolby Vision metadata file, your iTunes Store package transcodes to SDR, and a format compatible with both HDR10 and Dolby Vision. When a user rents or purchases HDR content, the iTunes Store plays the highest-quality version compatible with the user’s display device.
Note: Dolby Vision submissions must be mastered at a Dolby Vision–certified facility. See the Dolby Vision website.
5. Select the “Use iTunes to create SDR delivery from HDR source and Dolby Vision metadata” checkbox.
6. In the Video inspector, click Choose in the “QuickTime settings” area, then choose either Apple ProRes 4444 or Apple ProRes 4444 XQ from the pop-up menu.
HDR package submissions to the iTunes Store must use the Apple ProRes 4444 or Apple ProRes 4444 XQ codec. If you choose a different codec, your package submission may fail.
7. Complete your iTunes Store package by configuring package settings; adding subtitles, closed captions, alternative audio tracks, and chapter markers; and then building the package.
Important: Compressor can’t directly submit the package to the iTunes Store. See About submitting to the iTunes Store in Compressor.

135Compressor User Guide
About submitting to the iTunes Store in CompressorCompressor can’t directly submit a package to the iTunes Store. Most content creators work with an Apple-approved delivery partner to submit their work to the iTunes Store. For a list of approved delivery partners, see iTunes Store delivery partners.
Additionally, a complete iTunes Store package consists of both assets and metadata. Compressor generates a package without some essential metadata such as the title, synopsis, cast and crew lists, and so on. That data must be submitted via iTunes Connect by an authorized user (usually the delivery partner).
For details about the submission process, see Create an iTunes Store Package with Compressor: Quick Start Guide.
Create IMF packages
Intro to IMF packages in CompressorTo create an Interoperable Master Format (IMF) package, use Compressor to assemble your audio and video.
For more details, see this Apple Support article.
IMF package required fieldsA valid IMF package must include valid values for package name and content title, an audio language must be selected, and Multichannel Audio Description fields are required. You must also select a location for the output. These and additional fields can be found in the IMF Package inspector. If you don’t know the correct information, you can enter placeholder text.

136Compressor User Guide
Build IMF packages using CompressorThere are a number of steps required to successfully create, configure, and build a simple IMF (Interoperable Master Format) package using Compressor. Before you begin, make sure you have all the components you need, including video files and audio files, and make sure each component is in the correct format for inclusion in the package.
Create an IMF package1. In Compressor, choose File > New IMF Package.
An IMF package job appears in the batch area. (The batch area can contain only one IMF package job at a time.)
2. To add the video to your package, do one of the following:
• Drag a video file from the Finder onto the Video row.
• Click Set on the right side of the Video row and select a video file from the dialog that appears, then click Open.
An output row containing the selected video file is added to the job.
Note: You can’t remove video elements from a package after it has been created. If you want to remove a video element from an existing package, you must create a new package from scratch.
3. To modify video or audio properties, select the video or audio in the batch area, open the Video or Audio inspector, then adjust the property values.
You can pick a frame size up to 4K (4096 x 2160 pixels). For more information about available video and audio properties, see Formats and settings in Compressor.
4. To add the audio to your package, do one of the following:
• Drag an audio file from the Finder onto the Audio row.
• Click Set on the right side of the Audio row and select an audio file from the dialog that appears, then click Open.
An output row containing the selected audio file is added to the job.
5. To remove an audio element from a package, click Remove on the right side of the Audio row.
137Compressor User Guide
6. To modify audio properties, select the audio in the batch area, open the Job or Audio inspector, then adjust the property values.
Important: To create a valid IMF package, you must select a language for the audio in the Job inspector.
Configure an IMF packageAfter you create an IMF package and add media, you must add identifying production data in the inspector.
1. In the Compressor batch area, click the top bar of the IMF Package item.
The IMF inspector appears. (If the inspector is not visible, click the Inspector button in the upper-right corner of the Compressor window.)
2. In the IMF Package inspector, enter a name for the batch in the Name field.
Note: This name will be used only to represent the job in the Active or Completed views within Compressor.
3. In the Package Properties section of the inspector, enter a name for the package.
4. Enter a title and the content originator for the package.
5. Click Choose, then select the location on your computer where you want to save the package.
You must select a location in order to proceed with the job.
6. To turn on job segmenting, select the “Allow job segmenting” checkbox.
Build an IMF packageAfter your package is properly loaded and configured, you can build the package.
• In the Compressor batch area, click the Start Batch button.
Compressor transcodes all the files, combining them into a single package file (saved in the location specified in the IMF Package inspector).
Prepare an IMF package containing HDR contentYou can use Compressor to prepare IMF packages that include HDR (high dynamic range) video.
You can create an HDR package in either of two standard HDR formats: HDR10 or Dolby Vision. Both formats combine wide color gamut with the perceptual quantizer, a mathematical transfer function that converts stored color values in the video file to high-dynamic-range levels of contrast onscreen, approximating the sensitivity of human eyes. (For more information, see Intro to wide color gamut and HDR in Compressor.)
Build a package with HDR content1. In Compressor, choose File > New IMF Package.
An IMF Package job appears in the batch area.

138Compressor User Guide
2. To add the HDR feature video to the package, do one of the following:
• Drag an HDR video file from the Finder onto the row.
• Click Set on the right side of the Video row, select an HDR video file, then click Open.
An output row containing the selected video file (and an HDR badge) is added to the job.
3. In the Job inspector, review the HDR Video Properties areas to ensure that Compressor has correctly detected the native color space and the camera LUT used by the source file.
If a source file has metadata identifying its native color space, Compressor adds an asterisk next to the option shown in the HDR “Color space” pop-up menu. If a source file is untagged or tagged with an unrecognized color space, Compressor assigns a color space based on its assessment of the media and then adds a dagger (†) next to the item the pop-up menu. To override the Compressor selection, choose a different option from either pop-up menu. You can also choose a camera log format.
Note: Changing these properties doesn’t convert the exported files to a different color space. To transcode to a different color space, see the next step.

139Compressor User Guide
4. If you want to modify the color space of the video for the IMF package, open the Video inspector and choose new options from the following pop-up menu:
• HDR color space: Choose either Rec. 2020 PQ, Rec. 2020 HLG or P3 D65 PQ. Either option is compatible with both Dolby Vision and HDR10.
5. Complete your IMF package by configuring package settings and then building the package.
Important: To create a valid IMF package, you must select a language for the audio in the Job inspector, and you must also provide values for all Multichannel Audio Description fields in the Audio inspector.

140Compressor User Guide
Modify frame size
Intro to modifying frame size in CompressorAlthough many of the built-in settings in Compressor contain properties that set the frame size and aspect ratio of your output video file, you can customize the final frame dimensions using the cropping and padding properties in the Video inspector.
Cropping removes video content from an image. If the output file has a different aspect ratio than the output frame size, black borders appear along the top and bottom or left and right sides of the transcoded file. If the cropped image matches the output frame size, the image will still be cropped, but no black borders will be seen.
Padding doesn’t remove any of the source image. Instead, padding adds black to the image to fit it into a different-size frame. This can be useful for transcoding files that are stored with incorrect pixel aspect ratios, such as widescreen DV files that appear squished. You can also use the padding controls to shrink an image and deliberately add black borders around the outside of the image.
Modify a frame size in CompressorThere are multiple ways you can customize the frame size of a source clip during transcoding. That’s because the cropping and padding controls allow you a great degree of flexibility and versatility.

141Compressor User Guide
Crop the source imageTo remove part of the original source image, use the cropping controls in the Video inspector. Depending on the “Frame size” setting (in the Video Properties section of the Video inspector), cropping may or may not reveal black borders around the edges of your clips.
1. In Compressor, do one of the following:
• In the batch area, click an output row to select a setting that’s been applied to a job. With this method, the modifications you make will be used for outputting only that job.
• In the Settings pane, select a custom setting from the Custom group. (If the Settings pane is hidden, press Shift-Command-1.) With this method, the modifications you make will be saved to the custom setting for future use.
2. In the inspector pane, click Video to open the Video inspector.
If the inspector pane is not visible, click the Inspector button in the upper-right corner of the Compressor window.
3. In the Cropping & Padding section of the Video inspector, do one of the following:
• In the Cropping property, manually type a number in the Top, Bottom, Left, and Right fields to crop the source image by that many pixels.
• Click the Cropping pop-up menu, then choose a preset aspect ratio.
Note: If the aspect ratio you choose doesn’t match the aspect ratio selected in the “Frame size” pop-up menu (in the Video Properties section), you may see black bars around the edges of your picture after the file is transcoded.
• Click the Cropping pop-up menu, then choose Letterbox Area of Source. This instructs Compressor to detect the black edges around the image in your source file and automatically enter crop values to match them. This option is useful if you want to remove the letterbox area (the black bars above and below a widescreen image) of a source media file.
• In the preview area, click the Comparison button and position the pointer over the edges of the frame until the pointer changes to a Crop pointer, then drag inward from the edge to crop the image.
Note: Cropped edges are visible only on the output side of the preview area (the right side); the source media side of the preview area (the left side) doesn’t display the crop effect.

142Compressor User Guide
Pad the source image1. In Compressor, do one of the following:
• In the batch area, click an output row to select a setting that’s been applied to a job. With this method, the modifications you make will be used for outputting only that job.
• In the Settings pane, select a custom setting from the Custom group. (If the Settings pane is hidden, press Shift-Command-1.) With this method, the modifications you make will be saved to the custom setting for future use.
2. In the inspector pane, click Video to open the Video inspector.
If the inspector pane is not visible, click the Inspector button in the upper-right corner of the Compressor window.
3. In the Cropping & Padding section of the Video inspector, do one of the following:
• In the Padding property, manually type a number in the Top, Bottom, Left, and Right fields to pad the source image by that many pixels.
• Click the Padding pop-up menu, then choose a preset aspect ratio.
Note: If the aspect ratio you choose doesn’t match the aspect ratio selected in the “Frame size” pop-up menu (in the Video Properties section), the image may appear squished or squeezed after the file is transcoded.
• Click the Padding pop-up menu, then choose Preserve Source Aspect Ratio. This ensures that the source clip remains at its native aspect ratio. If the “Frame size” pop-up menu (in the Video Properties section) is set to a different aspect ratio, black borders will be added to the transcoded output file.
Conform to a frame size in CompressorYou can use Compressor to conform your source video to frame sizes for editing or distribution. For example, you may have video from an iPhone that was shot in vertical format and you’re creating horizontal video, or you want to create square video for social media distribution.

143Compressor User Guide
Conform video to a frame sizeWhen you set a frame size in the Video inspector, the frame fills until it reaches the lowest bound of the frame size you specified. For example, if you set a source video that's a 720 x 1280 vertical frame to transcode to a horizontal frame that’s 1280 x 720 (with no additional cropping or padding), the result is a video that’s 480 x 720. To create a video with an exact frame size, constrain the frame size and crop or pad the video.
1. In Compressor, do one of the following:
• In the batch area, click an output row to select a setting that’s been applied to a job. With this method, the modifications you make will be used for outputting only that job.
• In the Settings pane, select a custom setting from the Custom group. (If the Settings pane is hidden, press Shift-Command-1.) With this method, the modifications you make are saved to the custom setting for future use.
2. In the inspector pane, click Video to open the Video inspector.
If the inspector pane is not visible, click the Inspector button in the upper-right corner of the Compressor window.
3. In the Video Properties section of the Video inspector, choose an aspect ration from the Constrained section of the Frame size pop-up menu.
4. Type the dimensions of the conforming video frame.
5. In the Cropping & Padding section of the Video inspector do one of the following:
• Fill the frame: Choose Custom from the Cropping and Padding pop-up menus, then type “0” in all the fields. Compressor will stretch your source video to fill the frame.
• Crop the frame: Choose a preset that matches your frame size from the Cropping pop-up menu. Compressor will be crop to the center of your video to fill the frame. To reposition the crop, choose Custom from the Cropping pop-up menu, then drag the crop box in the Viewer.
• Pad the frame: Choose Preserve Source Aspect Ration from the Padding pop-up menu. Compressor will pad your source video to fill the frame.
Tip: Set duration points to export a single frame until you find the settings for your destination.

144Compressor User Guide
Modify playback speed
Retiming options in CompressorThere are two ways to use Compressor to modify the rate at which a transcoded file plays back. You can apply speed effects to slow down or speed up playback, or you can change the frame rate of the transcoded file (which may or may not have an effect on playback speed). If you do change the frame rate of the output file, there are special options for working with interlaced footage, including deinterlacing and reverse telecine.
The controls that make speed modifications are located in the General inspector and in the Video inspector.
Retime video and audio using CompressorTo retime video using Compressor, you make changes to properties in both the General inspector and the Video inspector. (You can create some effects by modifying properties in only one of the inspectors.)
The Retiming section in the General inspector allows you to define a new speed setting for the clip. You can specify a percentage, such as 50% to create a slow-motion effect, or 200% to create a fast-motion effect. You can identify a precise number of frames and allow the software to calculate the percentage for you; or you can instruct Compressor to renumber the current frames into a different frame rate in order to convert a file from one frame rate to another without adding or deleting any frames.
In the Video Properties section of the Video inspector, you can set a specific frame rate for the transcoded file. By default, this property is set to Automatic, which applies the frame rate of the source file to the output file.
If the source media file contains audio, retiming modifies the audio speed as well, thereby keeping audio and video in sync. Compressor also automatically corrects the pitch so the audio doesn’t sound artificially high or low.
Important: If you modify retiming properties in a setting that uses the QuickTime Movie format and choose “Copy audio tracks from source” in the Audio inspector, the audio speed is not changed. Consequently, audio in the output file will not maintain sync with the video.
In the Quality section of the Video inspector you can set the retiming quality to specify the processing method used when you make changes to other settings that modify the speed or frame rate of a clip.
Modify timing and frame rate in CompressorIn Compressor, you can modify the duration of a transcoded file by adjusting controls in the General inspector. You can modify the frame rate of a transcoded file by adjusting controls in the Video inspector.

145Compressor User Guide
Choose a new duration for a transcoded file1. In Compressor, do one of the following:
• In the batch area, click an output row to select a setting in a job. With this method, the modifications you make will be used for outputting only that job.
• In the Settings pane, select a custom setting from the Custom group. (If the Settings pane is hidden, press Shift-Command-1.) With this method, the modifications you make will be saved to the custom setting for future use.
2. In the inspector pane, click General to open the General inspector.
If the inspector pane is not visible, click the Inspector button in the upper-right corner of the Compressor window.
3. In the Retiming section of the General inspector, modify the “Set duration to” property in one of the following ways:
• Enter a specific percentage of the source footage in the percentage field, or choose a preset percentage from the pop-up menu (with a down arrow).
Note: Choosing a setting from this pop-up menu doesn’t change the frame rate of the output file. If you want to create a file at a frame rate other than the source’s original rate, you must change the setting in the Video inspector.
• Click to select the button next to the timecode field and enter a specific duration for the outgoing file. (The percentage field above will automatically update.)
Note: This option is available only when you’re modifying a setting that’s part of a job.
• Click to select “So source frames play at [frame rate] fps.”
Note: The frame rate used in this option is the value set in the “Frame rate” property in the Video inspector.
Change the frame rate for a transcoded file1. Select an output row in a job in the Compressor batch area, or select a custom setting
in the Settings pane.
2. In the Video inspector, do one of the following:
• Click the “Frame rate” pop-up menu, then choose an option.
Automatic, the default setting, matches the frame rate of the transcoded file to that of the source file. You can also choose any of several commonly used frame rates, including 23.976 fps, 24 fps, and so on.
• Type a custom frame rate into the field to the right of the “Frame rate” pop-up menu.
Note: Some formats (such as Apple Devices settings) do not permit custom frame rates.
Note: Frame rate conversion can have a subtle or dramatic effect depending on how big a difference there is between the original and new frame rates, and also depending on the specific nature of the footage being converted. Footage with a lot of movement yields a much more visible change than footage with little movement in the frame. Frame rate conversion may also add visible artifacts in the transcoded file; from stuttering (sometimes called “juddery”) playback, to repeated frames, ghost images, or other unnatural-looking elements. These effects can be somewhat mitigated by adjusting the “Retiming quality” property in the Quality section of the Video inspector.

146Compressor User Guide
3. Click the “Field order” pop-up menu, then choose a progressive or interlaced frame rate.
If the current setting doesn’t allow field order modification, this control remains dimmed. If you want to convert a file with an interlaced format into a progressive format, see Use deinterlacing in Compressor.
Note: The properties in the Retiming section of the General inspector are always affected by the “Frame rate” property, as well as the “Retiming quality” property in the Video inspector.
Use deinterlacing in CompressorVideo to be played on traditional NTSC or PAL televisions is encoded using an interlaced frame rate. Each frame is actually made up of two half-frames called fields. Each field contains half the frame lines; the odd (or upper) field contains lines 1, 3, 5, 7, 9 and so on, and the even (or lower) field contains lines 2, 4, 6, 8, 10, and so on. When the video is played back, the TV displays the fields in an alternating pattern, which creates an effective illusion of smooth movement. Viewing interlaced video on a computer screen that displays both fields simultaneously may reveal a combing effect.
You can deinterlace, or remove the fields from an interlaced video clip, by converting it to a progressive frame rate. The video settings provided in Compressor contain a “Field order” pop-up menu in the Video inspector that you can use to turn interlacing on or off for the transcoded file. For more information, see the topic that covers the format you’re using for transcoding, for example, QuickTime Movie settings in Compressor or MPEG-2 setting in Compressor.

147Compressor User Guide
Use reverse telecine in CompressorTelecine is the process of converting motion picture film to the NTSC video format used in broadcast television. The most common telecine approach to converting film’s standard 24 fps frame rate to NTSC video’s 29.97 fps frame rate is to perform a 3:2 pulldown (also known as a 2:3:2:3 pulldown). If you alternate recording two fields of one film frame and then three fields of the next, the 24 frames in 1 second of film end up filling the 30 frames in 1 second of video.
As shown above, the 3:2 pattern repeats after four film frames.
For editing and effects purposes, it’s often desirable to remove the extra fields and restore the video to its original 24 fps rate. This process is known as reverse telecine. An additional benefit of restoring the original is that it’s easier to convert this to PAL, the European broadcast standard, which uses a 25 fps frame rate.
The lower frame rate also has the advantage of requiring fewer frames per second of video, leading to smaller file sizes. The reverse telecine feature in Compressor makes it easy to do this conversion.
When using the reverse telecine feature in Compressor, consider these issues:
• Because of the unpredictable nature of the processing when reversing the telecine, segmented encoding doesn’t work as efficiently as it does when reverse telecine is not being used.
• If you pause the transcoding process, the transcode must start from the beginning when you restart it.

148Compressor User Guide
When film is telecined to NTSC video, it has a constant cadence. This means that the 3:2 pattern is consistent and uninterrupted. It’s relatively easy to remove the telecine from a constant-cadence clip because you need only determine the pattern once.
If you take these telecined clips and edit them as NTSC video, the result is a final video file that has a broken cadence with an inconsistent 3:2 pattern. It’s much more difficult to remove the telecine from such a clip because you have to constantly verify the cadence to make sure you don’t inadvertently choose incorrect fields when creating the 23.98 fps video.
The reverse telecine feature in Compressor automatically detects broken cadences and adjusts processing as needed.
Perform a reverse telecine frame rate conversion1. In Compressor, do one of the following:
• In the batch area, click an output row to select a setting in a job. With this method, the modifications you make will be used for outputting only that job.
• In the Settings pane, select a custom setting from the Custom area. (If the Settings pane is hidden, press Shift-Command-1.) With this method, the modifications you make will be saved to the custom setting for future use.
2. In the inspector pane, click Video to open the Video inspector.
If the inspector pane is not visible, click the Inspector button in the upper-right corner of the Compressor window.
3. In the Video Properties section of the Video inspector, click the “Frame rate” pop-up menu, then choose 29.97.
4. In the Quality section of the Video inspector, click the “Retiming quality” pop-up menu, then choose Reverse Telecine.
5. If you’re modifying the setting of a specific job, click Start Batch to begin transcoding.
If you’re modifying a custom setting, there are no additional steps to take.
View and modify audio tracks in CompressorQuickTime movies can contain multiple audio tracks, and those tracks can be configured in multiple ways. In Compressor you can view these tracks, enable or disable them, and reconfigure them into alternative formats, if necessary, to ensure they are correct in your transcoded output files.
For example, a QuickTime movie might have an audio track with two channels erroneously configured as a stereo pair. In Compressor, you can modify the track so the channels are treated as two discrete mono channels, or as a specialized format such as 1.1 (center and low-frequency effects).

149Compressor User Guide
Change the format of a source audio track1. In the Compressor batch area, click the job containing the source file you want
to modify.
2. In the Audio Tracks section of the Job inspector, click the pop-up menu corresponding to the audio track you want to modify, then choose a configuration style.
Depending on how many channels are in the audio track, different options appear in the pop-up menu. For example, a track with two channels can be configured as Stereo, Dual mono, 1.1, and so on. A track with one channel can be configured as Left, Right, Center, Left Surround, Right Surround, and so on.
3. Repeat step 2 as necessary for any other tracks.
Disable a source audio track1. In the Compressor batch area, click the job containing the source file you want
to modify.
2. In the Audio Tracks section of the Job inspector, deselect the checkbox to the left of the audio channel you want to disable.
The track is turned off and will not be included in any transcoded files created by that batch.
Tip: iTunes Store packages have specific audio requirements. You can use the methods described above to ensure that your audio is properly assigned for a successful submission to the iTunes Store.
Add video and audio effects
Add and remove effects in CompressorCompressor provides a variety of video and audio effects that you can use to improve the quality of the video and audio in the transcoded file. Video effects modify specific visual aspects of your source media, such as brightness and contrast, color, noise levels, and interlacing. Audio effects modify sound aspects in your source media, such as dynamic range, peaking, and equalizer effects.
Because effects are processed one by one by Compressor during transcoding—starting with the first item in the list—it’s important that you add the effects in the order you want them applied. For example, it’s sensible to add a text overlay effect last in your list of effects so that its text color isn’t modified by other effects.
To add an effect to an output file, you add the effect to a setting and then use that setting to output your source file. You can view both the source file and a preview of the transcoded file in the preview area.
You can also assign a custom or creative lookup table (LUT) to give your video a specific look.
Important: As with other properties you add to a setting, effects you add to a built-in setting are not saved for future use. If you want to save the effects you apply to a setting, you must create a custom setting by duplicating the built-in setting that contains the effects. See Create custom settings in Compressor.

150Compressor User Guide
Add a video or audio effect1. In Compressor, do one of the following:
• In the batch area, click an output row to select a setting that is part of a job.
• In the Settings pane, select a custom setting from the Custom area. (If the Settings pane is hidden, press Shift-Command-1.)
2. In the Video inspector or Audio inspector, click the Add Video Effect pop-up menu or the Add Audio Effect pop-up menu, then choose an option.
If the inspector pane is not visible, click the Inspector button in the upper-right corner of the Compressor window.
After you choose an effect from the pop-up menu, its adjustable properties appear at the bottom of the inspector. For detailed information about these properties, see Video effects in Compressor and Audio effects in Compressor. You can apply multiple video and audio effects. When you add an effect, a checkmark appears beside the effect name in the pop-up menu.
3. Preview effects that you’ve added to a setting by clicking the Play button in the preview area.
Because effects may interact in unexpected ways, be sure to preview the transcoded file each time you add an effect.
Note: Depending on your system, the source media file type and the number of effects in the job, the preview area showing the filter settings may update at a lower frame rate than the source frame rate.
Turn an effect off or onAfter adding an effect to a setting, you can turn its properties off or on. This can be useful when previewing an effect.
• In Compressor, click the activation checkbox next to the effect properties.
Remove an effect from a setting• In Compressor, click the Add Video Effect pop-up menu (at the bottom of the Video
inspector) or the Add Audio Effect pop-up menu (at the bottom of the Audio inspector), then choose a checkmarked item.
The effect’s properties are removed from the list below the pop-up menu.
Video effects in CompressorThe Add Video Effect pop-up menu in the Video inspector contains the following effects:
• Black/White Restore: Compresses the solid black and white areas (luminance) in the video, such as backgrounds. This effect can restore nearly black colors to pure black and restore nearly white colors to pure white without affecting colors in the rest of the image. Drag the sliders to set the black and white values between 0 and 100.
• Brightness and Contrast: Brightens or darkens the overall color and luminance of the video. For example, use this effect to counteract the darkening to video that some QuickTime codecs can cause. It’s recommended that you avoid extreme settings, because they can make colors look washed-out. Drag the sliders to set brightness and contrast values between –100 and 100.
151Compressor User Guide
• Color Correct Highlights, Color Correct Midtowns, Color Correct Shadows: Corrects white balance inaccuracies and creates color effects on the bright, midtone, or dark areas of the video. Drag the sliders to set red, green, and blue values between –100 and 100.
• Fade In/Out: Adds a dissolve and a matte color at the beginning and end of the clip. This effect has the following properties:
• Fade in duration/Fade out duration: Enter a time (use a decimal to specify tenths of seconds) in the text field to set the duration of the fade-in and fade-out effects.
• Fade in opacity/Fade out opacity: Drag the sliders to set the opacity of the clip’s video at the first and last frames. A value of 0.0 sets the clip video to be completely covered by the matte color; a value of 0.5 sets the clip to be 50 percent covered by the matte color; and so on.
• Fade color: Click the color well to set the fade-in and fade-out color.
• Custom LUT: Applies a custom lookup table (LUT) to the video. This effect can be used to give your video a specific look. This effect contains the following properties:
• LUT file: Click the Select button to specify a LUT file to use for the effect.
• Color space: Use this pop-up menu to select the target color space for the video.
• Gamma Correction: Controls the range of brightness in an image. This effect can be used to remove detail from an underexposed clip or to reduce the saturation of an overexposed clip. Drag the slider to set gamma values between 0.1 and 4.0.
Note: Computers using different operating systems have different monitor settings. For cross-platform viewing, correcting the gamma will improve the image for all platforms.
• Noise Removal: Reduces random flecks of noise in the video file, including noise introduced by codecs. This effect allows you to blur areas of low contrast while leaving high-contrast edges sharp, creating results that are imperceptible to the human eye but that improve the final compression of the transcoded file. The effect’s properties include:
• Apply to: Use this pop-up menu to set the channels from which noise is filtered. Choose “All channels” to filter noise from all channels including the alpha channel. Choose “Chroma channels” to filter noise from the two chroma channels (U and V) in YUV.
• Iterations: Choose the number of noise-smoothing passes (between 1 and 4) from this pop-up menu. For instance, if you choose 2 passes, the noise-removal algorithm is applied to the media file twice. The file resulting from the of first pass is used for the second pass, and so on, so that the more times a pass is performed, the fuzzier the image becomes.
• Algorithm: Choose a noise-smoothing algorithm from this pop-up menu. Choose Average to modify each pixel’s color by taking an average of pixels around it, including its own color value. Choose Replace to modify each pixel’s color by taking an average of pixels around it, while ignoring its own color value. Choose Merge to modify each pixel’s color by taking a weighted average of surrounding pixels and itself (with the pixel’s own color value given greater weight).
• Sharpen Edge: Sets the contrast around object edges. This effect can counteract the softening caused by noise removal or blurred source material and increase the perception of sharpness in the video. However, note that too much of this effect can make video look grainy. Drag the slider to set sharpening between 0.0 and 100.0.

152Compressor User Guide
• Text Overlay: Superimposes text onto the image. The Text Overlay effect contains the following properties:
• Position: Choose a position for the text overlay from the pop-up menu, such as Center, Lower Left, Lower Left–Title Safe, and so on.
• Alpha: Drag the slider to set the text opacity between 0 (completely transparent) and 1 (completely opaque).
• Overlay text: Type text in this field.
• Text color: Click the color well to set the text color.
• Font: Click the Select button to set the font, style, and size.
• Automatic font size: Select this checkbox to have Compressor automatically choose the size of the font based on the frame size of the source material.
• Timecode Generator: Superimposes the clip’s timecode onto the video. The Timecode Generator effect contains the following properties:
• Position: Choose a position for the timecode overlay from the pop-up menu, such as Center, Lower Left, Lower Left–Title Safe, and so on.
• Alpha: Drag the slider to set the text opacity between 0 (completely transparent) and 1 (completely opaque).
• Label: Optionally, type text that you want to appear to the left of the timecode number.
• Start timecode at 00:00:00:00: Select this checkbox to have the timecode start at zero. When the checkbox is not selected, the timecode starts at the video’s timecode.
• Text color: Click the color well to set the text color.
• Font: Click the Select button to set the font, style, and size.
• Automatic font size: Select this checkbox to have Compressor automatically choose the size of the font based on the frame size of the source material.
• Watermark: Superimposes a still image or a movie file onto the video. Compressor automatically resizes the watermark based on the frame size of the source material. You can make changes to the scale in the settings below. This effect contains the following properties:
• Position: Choose a position for the watermark from the pop-up menu, such as Center, Lower Left, Lower Left–Title Safe, and so on.
• Scale by: Drag the slider to set the watermark image’s scaling between 1 (actual size) and 10 (10 times the actual size).
• Alpha: Drag the slider between 0 (completely transparent) and 1 (completely opaque) to adjust the watermark’s opacity.
• Repeat: If you are using a video clip for the watermark image, select this checkbox to loop the playback of the watermark clip throughout the duration of the source file.
• Watermark: Click the Select button to specify a still image or video file to use for the watermark.

153Compressor User Guide
Audio effects in CompressorThe Add Audio Effect pop-up menu in the Audio inspector contains the following effects:
Note: Audio effects are not available in some settings when the “Copy audio tracks from source” checkbox is selected in the Audio inspector.
• Apple: AUGraphicEQ: Configures a wide variety of frequencies throughout the audible frequency range. Click the Options button to open the graphic equalizer window, then choose either a 31-band version or a 10-band version from the pop-up menu at the bottom.
Adjust frequencies by doing any of the following:
• Drag a slider to adjust the level of a frequency band.
• Select a frequency slider and then type a number in the dB field (in the lower-right corner of the graphic equalizer window).
• Click the Flatten EQ button to set all bands to a 0.0 dB value.
• Drag to select multiple bands and then adjust the group.
• Hold down the Control key while dragging across the bands to “draw” an equalization curve.
• Dynamic Range: Controls a clip’s audio levels by enhancing the quieter parts and lowering the louder parts. This is also referred to as audio level compression. The Dynamic Range effect contains the following properties:
• Soften above: Drag the slider to set the level at which audio is reduced (softened) to the level set by the “Overall gain” control (described below).
• Noise threshold: Drag the slider to set the level at which the effect is applied. Audio at and above the noise threshold is dynamically boosted to the level set by the “Overall gain” control (described below), and audio below the noise threshold is not modified.
• Overall gain: Drag the slider to set the average level of the dynamically compressed audio.

154Compressor User Guide
• Fade In/Out: Adds an audio fade-in effect at the beginning of the clip and a fade-out at the end of the clip. The Fade In/Fade Out filter contains the following properties:
• Fade in duration: Enter a value in the text field or move the slider to set the length of the fade in seconds.
• Fade out duration: Enter a value in the text field or move the slider to set the length of the fade out in seconds.
• Fade in gain: Drag the slider to set the value between –100.0 (silence) and 0.0 (the audio’s volume) to define the audio volume at which to start the fade in.
• Fade out gain: Drag the slider to set the value between –100.0 (silence) and 0.0 (the audio’s volume) to define the audio volume at which to end the fade out.
• Peak Limiter: Sets the level of the loudest audio allowed in the clip. Drag the Gain slider to set the level above which louder peaks are reduced.
Work with metadata annotations in CompressorYou can embed metadata into files transcoded using the Apple Devices, Apple ProRes, MP3, MPEG-4, and QuickTime settings. Use metadata to annotate a media file with information that’s important for your workflow or for the person viewing your output file. You can add any of the annotation fields provided in Compressor, import metadata that’s used in another media file (like a QuickTime movie), or pass through existing metadata.
Manually add annotations to a media file1. In the Compressor batch area, select the job that contains the media file you want
to annotate.
Tip: To select the job, rather than an output row under the job, click the source filename at the top of the job area.
2. In the Job Annotations area of the Job inspector, click the Fields pop-up menu, choose an annotation type, then enter text in the field that appears.
3. Repeat step 2 for each annotation type you want to add.
The annotations you added are shown in fields below the pop-up menu.
Note: If you see the message “Some source file annotations cannot be displayed,” your job contains metadata—lyrics, for example—that Compressor cannot display. See Modify pass-through metadata.
Import annotations from an external fileYou can import metadata annotations into Compressor from an external QuickTime movie or from an XML dictionary property list, a text file used in macOS, iOS, and iPadOS programming frameworks to store metadata categories and values (keys and strings). For detailed information about XML property lists, see the Apple Developer document What Is a Property List?
1. In the Compressor batch area, select the job that contains the media file you want to annotate.
Tip: To select the job, rather than an output row under the job, click the source filename at the top of the job area.

155Compressor User Guide
2. In the Job Annotations area of the Job inspector, click the Fields pop-up menu, choose Import, select a QuickTime movie or XML property list file that contains annotations, then click Open.
Metadata values in the QuickTime movie or XML file that correspond to the metadata categories in Compressor are added to the fields below the pop-up menu, overwriting any existing metadata values.
Compressor recognizes the following metadata categories in QuickTime movie files and XML property list files:
com.apple.quicktime.album
com.apple.quicktime.artist
com.apple.quicktime.author
com.apple.quicktime.comment
com.apple.quicktime.copyright
com.apple.quicktime.creationdate
com.apple.quicktime.description
com.apple.quicktime.director
com.apple.quicktime.displayname
com.apple.quicktime.genre
com.apple.quicktime.information
com.apple.quicktime.keywords
com.apple.quicktime.location.ISO6709
com.apple.quicktime.producer
com.apple.quicktime.publisher
com.apple.proapps.reel
com.apple.quicktime.software
com.apple.quicktime.title
com.apple.quicktime.collection.user
com.apple.quicktime.rating.user
com.apple.quicktime.year
Note: If you see the message “Some source file annotations cannot be displayed,” your job contains metadata—lyrics, for example—that Compressor cannot display. See Modify pass-through metadata.
Modify pass-through metadataYou can choose how to handle metadata in your trancodes.
1. In the Compressor batch area, select an applied setting.
2. In the General inspector, choose an option:
• Use Job Annotations: Includes the metadata from the Job Annotations listed in the Job Inspector. This is the default setting.
• Pass through source file metadata: Passes the existing metadata from the source file to the transcode. Ignores Job Annotations listed in the Job Inspector.

156Compressor User Guide
• Remove all metadata and annotations: Passes no metadata to the source file.
• Include metadata from the source file that cannot be displayed as a job annotation: Available when Use Job Annotations is selected. Includes the metadata from the Job Annotations listed in the Job Inspector and passes the existing metadata from the source file to the transcode.
3. Click Start Batch to export your file.
View annotations after transcodingAfter Compressor transcodes a media file that has metadata, there are several ways to see the annotations:
• In the Finder, select the transcoded media file, choose File > Get Info, then in the info window click the disclosure triangle next to More Info.
• Open the media file in QuickTime Player, then choose Window > Show Movie Inspector.
QuickTime Player displays several (but not all) categories of Compressor metadata at the top of the inspector.
• After importing the media file into Final Cut Pro, select the clip and open the Info inspector.
• In third-party apps and utilities, see the product documentation for details about viewing metadata.
Add descriptive audio tracks in CompressorYou can create video content for people who are blind or low vision by adding descriptive audio tracks. Descriptive audio tracks narrate important visual details that can’t be understood from the main soundtrack alone. Compressor can extract the descriptive audio tracks from audio files like WAVs or AIFFs, or from video files like MOVs. You can embed descriptive auto tracks, like language tracks, in the QuickTime Movies, Apple Devices, and MPEG-4 formats. For more information about descriptive audio, see the American Council of the Blind’s Audio Description Project website.
Add descriptive audio tracks1. In the Compressor batch area, select the job that contains the source file that you want
to add descriptive audio tracks to.
2. In the Audio Properties area of the Job inspector, click Choose, and select a file containing descriptive audio tracks, then click Open.
The audio tracks from the file are extracted and listed in with the other audio tracks. Audio tracks with descriptive audio are indicated with .
Remove descriptive audio tracks1. In the Compressor batch area, select the job that contains the source file that you want
to add descriptive audio tracks to.
2. In the Audio Properties area of the Job inspector, click the clear button to remove all descriptive audio tracks.

157Compressor User Guide
Set a poster frame in CompressorThe poster frame is a still image that represents a video or audio media file or a podcast chapter.
Note: When viewing the output file in Apple TV Home Videos, if no poster frame is set, Apple TV Home Videos automatically uses the frame 10 seconds from the movie’s first frame as the poster frame.
Set the poster frame for a job1. In the Compressor batch area, select the job that contains the source file that you want
to set a poster frame in.
Tip: To select the job, rather than an output row under the job, click the source filename at the top of the job area.
2. In the preview area, position the timeline playhead at the frame you want to be the poster frame.
3. In the preview area, click the Marker pop-up menu, then choose Set Poster Frame.
A poster frame marker appears in the timeline.
Go to the poster frame• In the Compressor preview area, click the Marker pop-up menu, then choose Go to
Poster Frame.
Remove the poster frame • In the preview area, click the Marker pop-up menu, then choose Clear Poster Frame.
Add markers using CompressorA marker flags a specific timing location in a source file. You can use Compressor to append a marker with editing notes or other descriptive information. Additionally, when you output the source file to an H.264, MPEG-2, or MPEG-4 video format, each marker forces the creation of an I-frame. Added I-frames improve compression quality, but can increase overall file size. Compressor can create the following types of markers:
• Chapter markers: Generate named index points and thumbnail images for DVDs, QuickTime movies, or video podcasts. You can also assign a URL to a chapter marker to have that URL appear during playback of a podcast. Chapter markers are also included in submissions to the iTunes Store as part of an iTunes Store package. Chapter markers appear orange in the Compressor preview area.
• Compression markers: Generate an I-frame, but do not generate thumbnails, chapter-track entries, or other metadata. Add them to a video if a section appears to have lower image quality than the surrounding frames. Compression markers appear blue in the Compressor preview area.

158Compressor User Guide
• Edit markers: Function identically to compression markers. They are commonly used by compression artists to force an I-frame at an edit point to ensure higher image quality at that moment in the video. Edit markers appear red in the Compressor preview area.
• Podcast markers: Like chapter markers, podcast markers can have artwork and a URL assigned to them. Podcast markers are usually used to provide a slideshow (with URLs) for users to view when playing audio podcasts. However, podcast marker names do not appear in the slideshow, and users can’t navigate to a podcast marker in the transcoded file. Podcast markers appear purple in the Compressor preview area.
Markers can be output when using settings based on the following formats:
• H.264 for Apple Devices (see Apple Devices settings in Compressor)
• MPEG-2 (see MPEG-2 setting in Compressor)
• MPEG-4, when configured for audio podcasting (see MPEG-4 settings in Compressor)
• QuickTime Movie (see QuickTime Movie settings in Compressor)
Important: Although you can set and configure markers for all jobs, only jobs that use the output file formats listed above will output a file that includes markers.
Add a marker to a media file1. In the Compressor batch area, select the job that contains the source file to which you
want to add markers.
Tip: To select the job, rather than an output row under the job, click the source filename at the top of the job area.
2. In the preview area, identify where to place the marker by doing one of the following:
• Drag the playhead to where you want to add a marker.
• Enter a timecode value in the playhead timecode field.
3. To add a marker, click the Add Marker button (or press M).
An orange chapter marker appears in the source file’s timeline in the preview area.
4. To change the marker type, click the Type pop-up menu in the Marker inspector, then choose a different marker type.
Note: If the Marker inspector is not visible, make sure the marker is selected in the preview area and the Inspector button in the upper-right corner of the Compressor window is highlighted.

159Compressor User Guide
Change the default marker typeWhen you add a new marker, it’s automatically set as a chapter marker. You can change this default so new markers are always added as one of the other types of markers.
• Click the “Modify marker settings” pop-up menu in the Compressor preview area and choose an item in the Default Marker submenu.
Specify properties for chapter and podcast markersYou can specify the properties of a chapter or podcast marker in the Marker inspector.
Note: A podcast can have both chapter markers and podcast markers. The only difference is that a viewer can navigate directly to a chapter marker but can’t navigate to a podcast marker.
1. Select a job in the Compressor batch area, then select a marker in the preview area.
2. In the Marker inspector, click the Type pop-up menu, then choose either Chapter or Podcast.
3. Enter a name for the marker in the Name field.
During playback of a transcoded file, chapter marker names are displayed on Apple playback devices, in QuickTime Player, and in DVD menus. Podcast marker names are not displayed.
4. Enter a web address in the URL field.
When viewing the transcoded file, you can click the URL to open a web browser and view a website.
5. Select an image to be displayed at the marker point by choosing an option from the Image pop-up menu:
• Frame: Uses the frame on which the marker is placed as the display image. To use a different frame in the source file, enter a different timecode value in the viewer that appears at the bottom of the Marker inspector.
• File: Uses an image file that you select via the window that appears. To change the image file after you’ve already added it to the Marker inspector, click Choose, then select a different image file.
Add markers using a chapter marker listYou can use Compressor to create a list of timecode points (using values that match the timecode on the track’s video clip) and then import that list to create chapter markers.

160Compressor User Guide
The file containing the list of timecode points must follow these rules:
• The list of timecode values must be a plain text file. For best results, create the list with TextEdit and save the files using the .chp or .txt extension.
• Each marker must be on a new line that starts with a timecode value in the format 00:00:00:00.
• After the timecode value, you can include a name for the marker. You can use a space or tab character to separate the timecode value from the marker name.
• Any lines that do not begin with a timecode value are ignored. This makes it easy for you to add comments to the list.
• The timecode values do not have to be listed in chronological order.
After creating the list, you import it into Compressor:
1. In the Compressor batch area, select the job that you want to add markers to.
2. In the preview area, click the “Modify marker settings” pop-up menu, then choose Import Chapter List.
3. In the window that appears, select the chapter marker file and click Open.
The markers are added to the source file as chapter markers. You can view them in the preview area.
You can manually change the markers to podcast or compression markers. You can also add URLs and artwork to them as needed. For more information, see the previous tasks.
Hide markersYou can set Compressor to show or hide the different types of markers.
• Click the “Modify marker settings” pop-up menu, then choose Hide Chapter/Podcast Markers, Hide Compression Markers, or Hide Edit/Cut Markers.
To reveal a type of markers, select the same item in the pop-up menu.
Remove markers1. Select a job in the Compressor batch area, and then select a marker in the preview area.
You can also select markers by clicking the Next button or Previous button in the preview area.
2. Do one of the following:
• Remove all markers in the source file: Click the “Modify marker settings” pop-up menu, then choose Remove All Markers.
• Remove one marker: Select a marker by clicking it or clicking the Next button or Previous button in the preview area. Then click the Marker button .

161Compressor User Guide
Transcode time ranges in CompressorYou can limit transcoding to specific time ranges in a media file by setting In and Out points.
Transcode a portion of a source file1. In the Compressor batch area, select the job that contains the source file that you want
to transcode.
2. In the preview area, do one of the following to mark In and Out points:
• Drag the In point to where you want the transcoding to begin, then drag the Out point to where you want the transcoding to end.
• Press the Play button (or press the Space bar) to preview the media file. When the playhead reaches the location where you want to place an In point, press I. When the playhead reaches the location where you want to place an Out point, press O.
Note: You can view the duration of the portion of the source file in the Job inspector.
Only the portion of the source file that you identified will be transcoded when you submit the batch.
Transcode multiple portions of a source fileTo transcode multiple portions of the same clip, you create a job for each portion of the source file you want to transcode.
1. In the Compressor batch area, select the job that contains the source file you want to transcode.
2. In the preview area, set a portion of the source file to be transcoded by doing the following:
• Drag the In point to where you want the transcoding to begin, then drag the Out point to where you want the transcoding to end.
• Press the Play button (or press the Space bar) to play the source file. When the playhead reaches the location where you want to place an In point, press I. When the playhead reaches the location where you want to place an Out point, press O.

162Compressor User Guide
3. Duplicate the job by doing the following:
a. Control-click the job you used in step 1, then choose Edit > Copy from the shortcut menu.
b. Select an empty part of the batch area to deselect the job you just copied, then Control-click the batch area and choose Edit > Paste from the shortcut menu.
The duplicate job is pasted into the batch area.
4. Designate a different portion of the source file to be transcoded by following the instructions in steps 1 and 2.
Modify starting timecode in CompressorYou can modify a job’s starting timecode in the timing area of the Job inspector. Modifying the starting timecode automatically adjusts the job’s In point to match the new start time.
Modify a job’s starting timecode1. Select the job in the Compressor batch area.
Tip: To select a job, rather than one of its output rows, click the source filename at the top of the job.
2. If necessary, click the Inspector button to reveal the inspector pane.
The selected job’s properties are displayed in the Job inspector.
3. Enter the timecode’s starting value in the Start field.
You can drag up or down on a timecode unit, or click on a unit and press the up or down arrow keys to change only that unit.
4. To use drop-frame timecode, select Drop frame.

163Compressor User Guide
Import Canon Cinema RAW Light videoCompressor can import camera RAW video files in Canon format; however some additional steps may be required before import. The format requires installation of a vendor-specific plug-in. To learn which cameras work with Final Cut Pro, see the Apple Support article Cameras supported by Final Cut Pro.
Import Canon Cinema RAW Light filesYou can import and work with Canon Cinema RAW Light files in Final Cut Pro when you install additional software from Canon.
1. From the Canon website, download the appropriate Canon plug-in for Final Cut Pro, then install the software on your Mac.
2. Import the media into Compressor.
For more information about importing media, see Intro to simple transcoding in Compressor.
Note: Canon Cinema RAW Light files have the filename extension .crm.
164Compressor User Guide
Work smarter
Compressor preferences
Intro to Compressor preferencesYou can modify Compressor preference settings to customize your workflow.
Open Compressor preferences• Choose Compressor > Preferences (or press Command-Comma), then click a button at
the top of the window to open a pane.
There are four panes in the preferences window:
• Use the General pane to set basic application preferences.
• Use the My Computer pane to allow other computers to use your computer to process batches.
• Use the Shared Computers pane to set up groups of shared computers for distributed processing.
• Use the Advanced pane to adjust additional distributed processing settings.
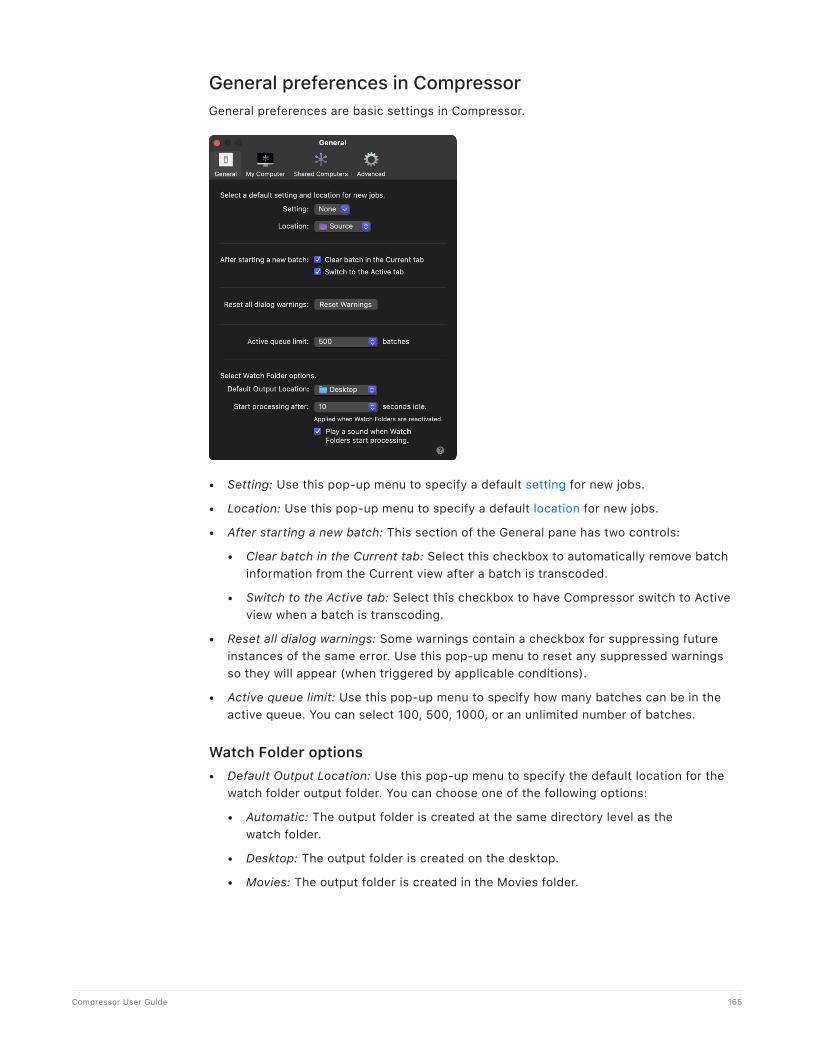
165Compressor User Guide
General preferences in CompressorGeneral preferences are basic settings in Compressor.
• Setting: Use this pop-up menu to specify a default setting for new jobs.
• Location: Use this pop-up menu to specify a default location for new jobs.
• After starting a new batch: This section of the General pane has two controls:
• Clear batch in the Current tab: Select this checkbox to automatically remove batch information from the Current view after a batch is transcoded.
• Switch to the Active tab: Select this checkbox to have Compressor switch to Active view when a batch is transcoding.
• Reset all dialog warnings: Some warnings contain a checkbox for suppressing future instances of the same error. Use this pop-up menu to reset any suppressed warnings so they will appear (when triggered by applicable conditions).
• Active queue limit: Use this pop-up menu to specify how many batches can be in the active queue. You can select 100, 500, 1000, or an unlimited number of batches.
Watch Folder options• Default Output Location: Use this pop-up menu to specify the default location for the
watch folder output folder. You can choose one of the following options:
• Automatic: The output folder is created at the same directory level as the watch folder.
• Desktop: The output folder is created on the desktop.
• Movies: The output folder is created in the Movies folder.
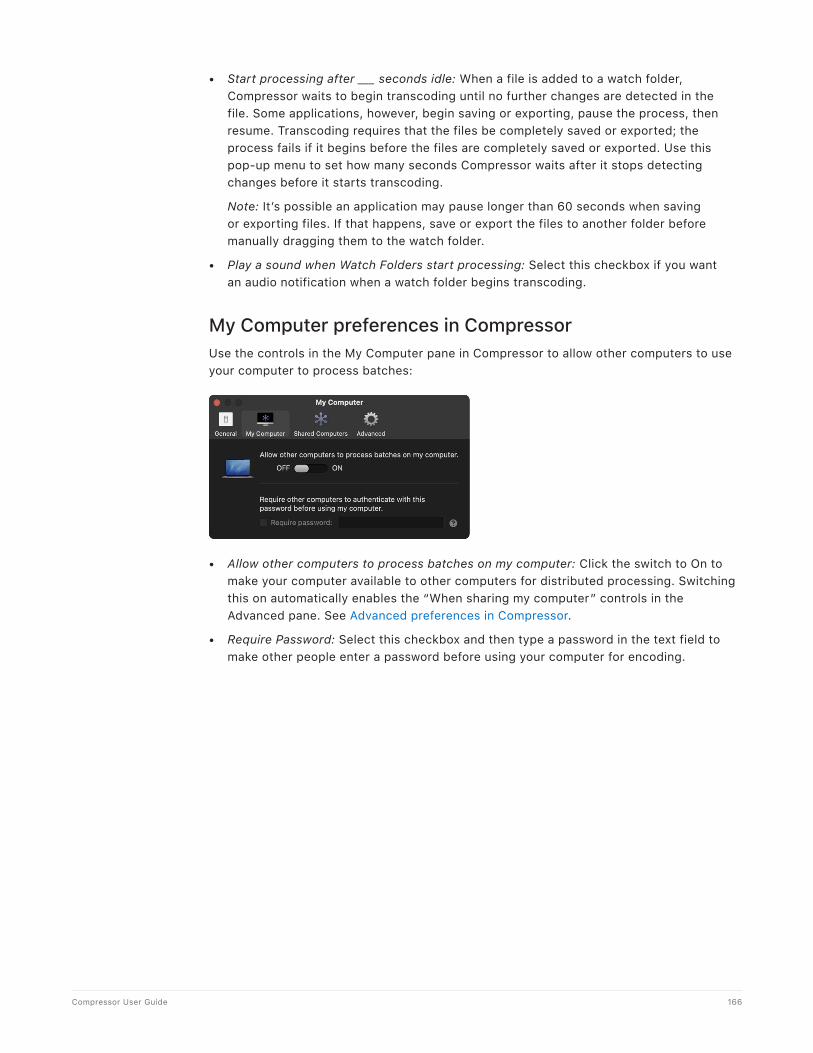
166Compressor User Guide
• Start processing after ___ seconds idle: When a file is added to a watch folder, Compressor waits to begin transcoding until no further changes are detected in the file. Some applications, however, begin saving or exporting, pause the process, then resume. Transcoding requires that the files be completely saved or exported; the process fails if it begins before the files are completely saved or exported. Use this pop-up menu to set how many seconds Compressor waits after it stops detecting changes before it starts transcoding.
Note: It’s possible an application may pause longer than 60 seconds when saving or exporting files. If that happens, save or export the files to another folder before manually dragging them to the watch folder.
• Play a sound when Watch Folders start processing: Select this checkbox if you want an audio notification when a watch folder begins transcoding.
My Computer preferences in CompressorUse the controls in the My Computer pane in Compressor to allow other computers to use your computer to process batches:
• Allow other computers to process batches on my computer: Click the switch to On to make your computer available to other computers for distributed processing. Switching this on automatically enables the “When sharing my computer” controls in the Advanced pane. See Advanced preferences in Compressor.
• Require Password: Select this checkbox and then type a password in the text field to make other people enter a password before using your computer for encoding.

167Compressor User Guide
Shared Computers preferences in CompressorUse the controls in the Shared Computers pane in Compressor to create groups of shared computers for distributed processing. See Transcode batches with multiple computers using Compressor.
Advanced preferences in CompressorUse Advanced preferences in Compressor to adjust additional settings for distributed processing. These advanced settings are intended for network administrators and other users with networking experience.
See Transcode batches with multiple computers using Compressor.
168Compressor User Guide
• Enable additional Compressor instances: This checkbox activates additional instances of the Compressor application, which can potentially speed transcoding. After selecting the checkbox, you can choose the number of additional instances from the pop-up menu. See Create additional instances of Compressor.
Note: If your system doesn’t have enough memory or processor cores, this option is dimmed and not available.
• Use GPU to process Final Cut Pro content sent to Compressor: This checkbox instructs Compressor to use the computer’s graphics processing engine to display or transcode a Final Cut Pro project sent to Compressor for processing. If you’re running both Compressor and Final Cut Pro at the same time, enabling this setting may degrade Final Cut Pro performance. See Final Cut ProFinal Cut Pro.
• Use network interfaces: When you’ve allowed others to share your computer, you can restrict distributed processing activity to the network interface that you specify in the pop-up menu.
• Enable Port Range: When you’ve allowed others to share your computer, you can select this checkbox to set the ports on which distributed processing is run. After selecting the checkbox, enter the number at which you want to start the port range and the number of ports you want the range to contain.
• Reset Queue: Click to reset the queue of Compressor jobs. After you click this button, you can choose to reset the queue and cancel all pending jobs, or reset the queue and then restart any pending jobs.
• Update Droplets: Click to update all droplets on the local computer to be compatible with the current version of Compressor. Outdated droplets that are not updated may not function properly. After droplets are updated, they’ll no longer work on computers using older versions of Compressor. See Create and use droplets in Compressor.
Keyboard shortcuts
Built-in keyboard shortcuts in CompressorYou can use keyboard shortcuts to quickly accomplish many tasks in Compressor. To use a keyboard shortcut, press all the keys in the shortcut at the same time.
Keyboard shortcuts for common commands are listed in the table below.
Compressor general keyboard shortcuts
Action Shortcut
Add a file Command-I
Add a set of image sequence files Option-Command-I
Add a set of surround sound files Control-Command-I
Navigate up the list of jobs (in the batch area) Up Arrow
Navigate down the list of jobs (in the batch area) Down Arrow
Play/Pause the video Space Bar

169Compressor User Guide
Action Shortcut
Play the video in reverse J
Stop playback K
Play the video L
Set the In point I
Set the Out point O
Add a marker M
Add a caption Option-C
Go to the previous marker or In/Out point Control-Semicolon (;)
Go to the next marker or In/Out point Control-Apostrophe (’)
Start transcoding the batch Command-B
Compressor window keyboard shortcuts
Action Shortcut
Show the Current view Command-1
Show the Active view Command-2
Show the Completed view Command-3
Show or hide the inspector pane Command-4
Show or hide the Settings and Locations pane Command-5
Show Settings Shift-Command-1
Show Locations Shift-Command-2
Show the Network Encoding Monitor Command-E
Show the Compressor preferences window Command-Comma (,)
Minimize the Compressor window Command-M
Close the Compressor window Command-W
Quit Compressor Command-Q
Note: You can set the window layout back to its default state by choosing Window > Revert to Original Window Layout.

170Compressor User Guide
Customize keyboard shortcuts
View keyboard shortcuts in the Compressor Command Editor
Compressor provides a wide variety of menu commands and keyboard shortcuts that let you control almost every aspect of your transcoding workflow. You can use the Command Editor to modify existing shortcuts, create new shortcuts, and save multiple sets of keyboard shortcuts that you can export for others to use. You can also import a set of shortcuts that someone else created. And if you’re more familiar with keyboard shortcuts from other applications, you can use the Command Editor to substitute those shortcuts in place of the default set for Compressor.
The Command Editor provides a set of keyboard shortcuts for Compressor in English, Japanese, French, and German. The language shown is determined by your computer’s operating system. To learn how to change the language used by Compressor, see Mac Help, available from the Help menu when the Finder is active.
View keyboard shortcuts1. Choose Compressor > Commands > Customize.
The Command Editor appears.
2. Do any of the following:
• View keyboard shortcuts by command group: Select one of the command groups in the lower-left corner of the Command Editor.
The commands in the selected group (and their keyboard shortcuts) appear in the center list. When you select a command in the center list, a description appears in the Command Detail list in the lower-right corner of the Command Editor.

171Compressor User Guide
• View commands associated with a specific key: Click a key on the virtual keyboard.
The commands mapped to that key appear (along with the necessary modifier keys, if any—Control, Option, Shift, and Command) in the Key Detail list in the lower-right corner of the Command Editor.
When you hold down any modifier buttons on the keyboard, the key colors update in the Command Editor. Key colors correspond with command classifications; for example, playback commands, such as Play/Pause (Space bar), are purple. The Command Groups window on the left side of the Command List contains a clickable color key for reference.
• Search for a keyboard shortcut: Enter a command name, key name, or descriptive keywords in the search field in the upper-right corner of the Command Editor.
As you type, commands that match the search term appear in Command List at the bottom of the Command Editor.
Tip: To show the keys that correspond with the items in the Command List, click the Keyboard Highlight button to the left of the search field.
Modify keyboard shortcuts in the Compressor Command Editor
You can customize keyboard shortcuts for Compressor in the Command Editor. If you want to add a few custom commands to the default set in Compressor, you can duplicate the default set and assign keyboard shortcuts to some of the unassigned commands. You can also create a new set that contains only your commands.
Duplicate a command set1. Choose Compressor > Commands > Customize.
The Command Editor appears.
2. Click the pop-up menu in the top-left corner of the Command Editor, then choose a command set to duplicate.
The command set you selected should have a checkmark to the left of its name in the pop-up menu.
3. In the same pop-up menu, choose Duplicate.
4. In the dialog that appears, type a name for the command set, then click OK.
The duplicate set is added to the Commands submenu of the Compressor menu and to the pop-up menu in the Command Editor.
Delete a command set1. Choose Compressor > Commands > Customize.
The Command Editor appears.
2. Click the pop-up menu in the top-left corner of the Command Editor, then choose a command set to delete.
The command set you selected should have a checkmark to the left of its name in the pop-up menu.

172Compressor User Guide
3. In the same pop-up menu, choose Delete.
4. In the dialog that appears, click Delete.
The command set is removed.
Export and import command sets in Compressor
You can export a command set to create a backup or to share the set with another user. Exported command sets are saved in a file that can be imported back into Compressor at a later time. You can also import a command set.
Export a command set1. Choose Compressor > Commands > Customize.
The Command Editor appears.
2. Click the pop-up menu in the top-left corner of the Command Editor, then choose a command set to export.
The command set you selected should have a checkmark to the left of its name in the pop-up menu.
3. In the same pop-up menu, choose Export.
4. Type a name for the command set in the Save As field, navigate to the location where you want to save the exported set, then click Save.
The file is saved in the location you chose, with the filename extension .commandset.
Import a command set1. Choose Compressor > Commands > Import.
2. In the window that appears, navigate to the location where you’ve stored a command set file, select it, and click Open.
If you’re already using a command set with the same name, a window appears and asks you to rename the command set.
The new command set is added to the Commands submenu of the Compressor menu and to the pop-up menu in the Command Editor.
View shortcuts for a different command setIn Compressor, if your system has multiple command sets, you can easily switch between them.
Do one of the following:
• Choose Compressor > Commands, then choose a command set from the submenu.
The Command Editor window appears, showing the command set you chose.
• If you’ve already opened the Command Editor, click the pop-up menu at the top-left corner of the window, then choose a command set.

173Compressor User Guide
Touch Bar shortcuts in CompressorIf your MacBook Pro has a Touch Bar, you can use familiar gestures like swipe and tap to perform common tasks in Compressor. The controls visible in the Touch Bar change depending on which windows, views, or states are active in the app. See How to use the Touch Bar on your MacBook Pro.
The tables below show the Touch Bar controls in Compressor grouped by different app states.
Empty batch
When you first launch Compressor, or when you have no items in the batch area, the Touch Bar shows the Add Item button:
Item Name Description
Add Item Opens controls in the Touch Bar for adding media files to your batch. See Add item.
Add item
After you tap the Add Item button, the following buttons appear in the Touch Bar:
Item Name Description
Close Returns you to the previous Touch Bar screen.
Add File Opens a dialog to select a file to add as a new job.
Add Image Sequence Opens a dialog to select a sequence of images to add as a new job.
Add Surround Group Opens a dialog to select the files needed for a new surround group.
See Import your media into Compressor.
Item selected in a job
When you have an item selected in a job in the batch area in Compressor, the following controls appear in the Touch Bar:

174Compressor User Guide
Item Name Description
Add Item Opens controls in the Touch Bar for adding media files to your batch. See Add item.
Add Outputs Opens a dialog to add settings to your job.
Add Poster Frame Adds a poster frame at the current playhead position. See Set a poster frame in Compressor.
Add Marker Adds a default marker at the current playhead position. (If a marker is already present at the current frame, that marker is deleted.) Touch and hold to display controls for adding a marker different from the default type. See Add nondefault markers.
Preview Navigation Available when the batch contains media, opens preview controls in the Touch Bar. See Preview navigation.
Add nondefault markers
When you touch and hold the Add Marker button , additional buttons appear in the Touch Bar; tap one to add a marker different from the default marker type.
Item Name Description
Chapter Marker Adds a chapter marker, and sets the default marker type to Chapter. (However, if a marker is already present at the current frame, that marker is deleted.)
Compression Marker Adds a compression marker, and sets the default marker type to Compression. (However, if a marker is already present at the current frame, that marker is deleted.)
Edit Marker Adds an edit marker, and sets the default marker type to Edit. (However, if a marker is already present at the current frame, that marker is deleted.)
Podcast Marker Adds a podcast marker, and sets the default marker type to Podcast. (However, if a marker is already present at the current frame, that marker is deleted.)
See Add markers using Compressor.

175Compressor User Guide
Preview navigation
When you tap the Preview Navigation button , the following controls appear in the Touch Bar:
Item Name Description
Close Returns you to the previous Touch Bar screen.
Preview Navigation bar Displays a timeline for the selected media. Poster frames, markers, and the current playhead position are indicated with icons.
Add Poster Frame Adds a poster frame at the current playhead position. See Set a poster frame in Compressor.
Add Marker Adds a default marker at the current playhead position. (If a marker is already present at the current frame, that marker is deleted.) See Add a marker to a media file.
Item selected in the Settings pane
When you select a setting or destination in the Settings pane, the following buttons appear in the Touch Bar:
Item Name Description
New Setting Opens controls in the Touch Bar for adding custom settings, destinations, or groups to the Settings pane. See New setting.
Add to Batch Adds the currently selected setting or destination to all jobs in the batch area.
Add to Selected Adds the currently selected setting or destination to selected jobs in the batch area. (This button appears in the Touch Bar only when one or more jobs are selected in the batch area.)
Save as Droplet Saves the currently selected setting or destination to a droplet. See Create and use droplets in Compressor.

176Compressor User Guide
New setting
When you tap the New Setting button, the following controls appear in the Touch Bar:
Item Name Description
Close Returns you to the previous Touch Bar screen.
Add Setting Opens a dialog to add a new custom setting to the Settings pane.
Add Destination Opens a dialog to add a new custom destination to the Settings pane.
Add Group Opens a dialog to add a new folder in the Settings pane.
See Apply transcoding instructions.
iTunes Store Package
When you add an iTunes Store package to the batch area, the following controls appear in the Touch Bar:
Item Name Description
Add iTMS Files Opens Touch Bar controls for adding iTMS (iTunes Media Store) files. See iTMS files options.
Add Poster Frame Available when your iTunes Store package contains media. Adds a poster frame at the current playhead position. See Set a poster frame in Compressor.
Add Marker Available when your iTunes Store package contains media. Adds a default marker at the current playhead position. (If a marker is already present at the current frame, that marker is deleted.) Touch and hold to display controls for adding a marker different from the default type. See Add nondefault markers.
Display Preview Available when your iTunes Store package contains media. Opens preview controls in the Touch Bar. See Preview navigation.
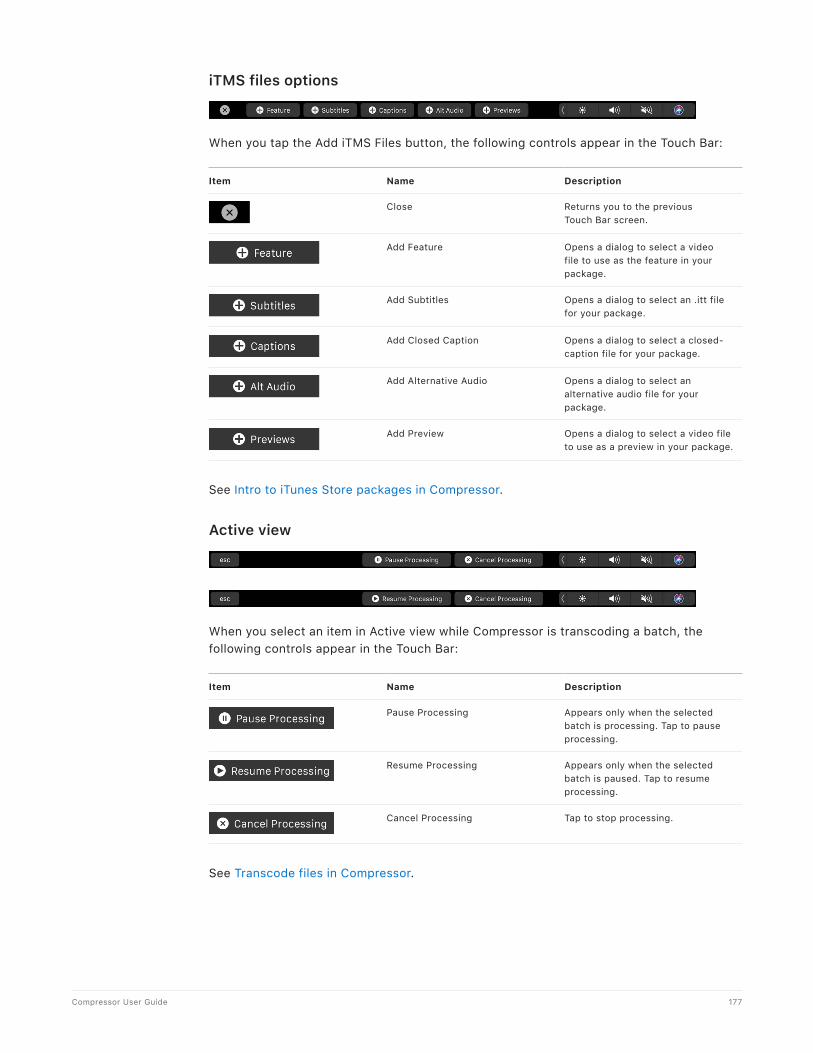
177Compressor User Guide
iTMS files options
When you tap the Add iTMS Files button, the following controls appear in the Touch Bar:
Item Name Description
Close Returns you to the previous Touch Bar screen.
Add Feature Opens a dialog to select a video file to use as the feature in your package.
Add Subtitles Opens a dialog to select an .itt file for your package.
Add Closed Caption Opens a dialog to select a closed-caption file for your package.
Add Alternative Audio Opens a dialog to select an alternative audio file for your package.
Add Preview Opens a dialog to select a video file to use as a preview in your package.
See Intro to iTunes Store packages in Compressor.
Active view
When you select an item in Active view while Compressor is transcoding a batch, the following controls appear in the Touch Bar:
Item Name Description
Pause Processing Appears only when the selected batch is processing. Tap to pause processing.
Resume Processing Appears only when the selected batch is paused. Tap to resume processing.
Cancel Processing Tap to stop processing.
See Transcode files in Compressor.

178Compressor User Guide
Completed view
When you select an item in Completed view in Compressor, the following controls appear in the Touch Bar:
Item Name Description
Reuse Adds the currently selected item (in Completed view) to the batch area as a new, unprocessed batch.
Show in Finder Displays a Finder window with all exported files highlighted.
See Transcode files in Compressor.
Wide color gamut and HDR
Intro to wide color gamut and HDR in CompressorNo image device is capable of capturing and reproducing the full spectrum of colors and levels of brightness visible to the human eye. Consequently, image devices record, edit, display, or output a subset of those colors and luminances. This range of reproducible color is known as the device’s color space or color gamut. See HDR and Wide Color Gamut in Final Cut Pro.
Standard-gamut versus wide-gamut colorTraditional computer monitors and HDTVs support a limited color space that’s based on a decades-old industry standard called Rec. 709. Rec. 709 devices (and the video content created for display on them) have standard-gamut color, the constrained color palette you see whenever you view a broadcast HDTV show, DVD, or Blu-ray disc.
A more recent generation of displays—including 4K televisions and computer displays, newer Mac, iOS, and iPadOS devices, and Apple TV 4K—can render a much wider palette of colors. These wide-gamut color devices display hues that are more vivid and lifelike (in addition to all the hues that standard-gamut devices can display). Accordingly, the video industry has adopted a wide-gamut color standard called Rec. 2020. Although most currently available wide-gamut devices support only a subset of the colors contained in the full Rec. 2020 specification, future imaging devices should be able to render more and more of those hues.

179Compressor User Guide
High dynamic range (HDR)Additionally, some newer imaging devices can display extra levels of brightness in each color component (red, green, and blue) in a way that more closely reproduces how the human eye perceives contrast. These high-dynamic-range (HDR) displays have a much larger luminance range and typically process video at 10 bits per color component rather than at 8 bits. The larger luminance range and additional color data let HDR displays render more discrete steps from the minimum to maximum brightness value in each color, creating more realistic color transitions and revealing more detail in both shadows and highlights. Compressor lets you view HDR video in the preview window on a supported display.
Devices that combine wide-gamut color with 10-bit HDR capability can produce vibrant hues with nuanced shading, lending more realism and immediacy to an image, revealing more detail, and reducing artifacts like gradient “banding” (often seen in images of the sky as it transitions from lighter to darker areas.)
Several streaming content providers offer wide-color HDR video, including the iTunes Store, Netflix, and Amazon Video. The Ultra HD Blu-ray disc format also supports wide-color HDR video.
Wide-gamut color and HDR in CompressorWhen you add a video file to Compressor for transcoding, the app identifies the source video’s native color space (and displays an SDR or HDR badge in the Job inspector). After you apply a transcode setting to the source file, you can modify that color space in the file you output. Depending on the transcode setting you apply, Compressor offers several common color space options—from standard gamut, to wide gamut, to wide-gamut HDR. For details, see Change video color space in Compressor.
Transcoding a standard-gamut video to a wide-gamut color space won’t improve the video’s appearance; the output video will look identical to the original because the wide-gamut color space is a superset of the standard-gamut color space, and the colors won’t be changed. Likewise, transcoding an 8-bit video to 10-bit HDR won’t change the video’s appearance because Compressor can’t create additional resolution that wasn’t there to begin with.

180Compressor User Guide
However, transcoding a wide-gamut video to a standard-gamut color space may result in a more faded-looking, drab image (because the wide-gamut colors will be discarded). And transcoding a 10-bit video to 8-bit color will result in reduced resolution and potential banding in areas of the image with color gradients.
Change video color space in CompressorWhen you add a source video to Compressor, the app identifies the file’s native color space and displays a badge (either SDR or HDR) in the Job inspector’s summary area.
Some transcode settings let you change that color space in the output video. Settings with 10-bit color allow you to choose a wide-gamut HDR color space for the output file.
Note: Although Compressor doesn’t display HDR or wide-gamut color in the preview area, files are encoded correctly upon export.
Review or override the native color space assigned by Compressor1. After you add a source file to a batch in Compressor, open the Job inspector and review
the option shown in the “Color space” pop-up menu.
If the source file has metadata identifying its native color space, Compressor adds an asterisk next to the color space shown in the pop-up menu. If the source file is untagged or tagged with an unrecognized color space, Compressor assigns a color space based on its assessment of the media and then adds a dagger (†) next to the item the pop-up menu.
2. If you think Compressor inaccurately interpreted the color data in the source file, change the assigned color space by choosing a different option from the pop-up menu.
Note: Changing this property to another option doesn’t convert the exported file to a different color space. To transcode to a different color space, see "Transcode a video file to a different color space,” next.
Transcode a video file to a different color spaceSome transcode settings let you change the color space in the output video.
Note: If you transcode a standard-gamut source file to a wide-gamut color space, you won’t improve the video’s appearance. Similarly, if you transcode an 8-bit, standard-dynamic-range file using a 10-bit HDR option, you won’t change the video’s appearance (because Compressor can’t create additional resolution that wasn’t there to begin with).

181Compressor User Guide
1. After you add a source file to a batch and assign a transcode setting in Compressor, open the Video inspector.
If you assigned a transcode setting that allows you to modify the output file’s color space, a “Color space” pop-up menu appears in the Video inspector. (This pop-up menu is different from the “Color space” pop-up menu in the Job inspector, described in the previous task.)
2. To change the color space of the output file, click the “Color space” pop-up menu and choose a different option.
Depending on the transcode setting you applied, there are several choices; if you applied a transcode setting that supports 10-bit color (an Apple ProRes setting or the HEVC setting with 10-bit color), HDR options appear in the pop-up menu:
• Automatic: The color space assigned by Compressor (in the “Color space” pop-up menu in the Job inspector).
• Rec. 601 (NTSC): An older, standard-gamut color space designed for interlaced analog video signals in North America and Japan.
• Rec. 601 (PAL): An older, standard-gamut color space designed for interlaced analog video signals in Europe.
• Rec. 709: The standard-gamut, 8-bit color space used by high-definition TV displays, the Blu-ray Disc format, and most TV broadcasters.
• Rec. 2020: A wide-gamut color space developed for future consumer display devices but useful today for mastering (to future-proof your projects) and for 4K and 8K TV projects. Even though no currently available consumer TVs can display the entire Rec. 2020 palette, wide-color-gamut displays can display a subset of those colors.
• Rec. 2020 PQ: The Rec. 2020 color space using the perceptual quantizer (PQ), a mathematical transfer function that converts image signal values in a video file to absolute light levels on an HDR-capable display. Designed to approximate the sensitivity of human eyes, PQ allows for better levels of contrast at all light levels. Use this option to output files in the HDR10 format.
• Rec. 2020 HLG: The Rec. 2020 color space using hybrid log-gamma, a mathematical transfer function that converts image signal values in a video file to scene-relative light levels. HLG, which was developed by the BBC and the NHK (Japan Broadcasting Corporation), requires no metadata and is also compatible with SDR displays.
• P3 D65 PQ: Combines the Display P3 color space (the wide color gamut used by newer Apple devices and by wide-gamut 4K TVs) with the perceptual quantizer (PQ) function to convert color and luminosity values to high-dynamic-range levels of contrast.
• sRGB (IEC 61966-2-1):The industry-standard color space for computer displays, similar to Rec. 709 and used in nearly all standard-gamut displays currently on the market. This standard is also used for most digital still images in formats such as JPEG, GIF, PNG, TIFF, BMP, and so on.
3. After you set the output color space and adjust any other desired settings, transcode the batch.

182Compressor User Guide
Create and use droplets in CompressorYou can save one or more settings or a destination as a standalone application called a droplet. Using the droplet, you can easily transcode files by dragging them to the droplet icon in the Finder.
Create a droplet1. In the Settings pane in Compressor, select one or more settings, setting groups, or a
destination that you want to save as a droplet.
Note: You can Shift-click or Command-click to add multiple settings or setting groups.
If you selected more than one setting, a destination that contains two or more settings, or a group of settings, every setting in your selection will be included in the droplet. For example, if you submit two source media files to a Droplet containing three settings, Compressor creates six different output media files.
2. Click the Action pop-up menu , then choose Save as Droplet.
3. In the window that appears, do the following:
• Enter a name for the droplet in the Save As field.
• Click the Where pop-up menu, then choose a location for the droplet.
• Click the Location pop-up menu, then choose a save location for the droplet.
4. Click Save.
Your newly created droplet appears as an icon in the location you chose in the Where menu.
Transcode files using a droplet1. In the Finder, drag one or more media files onto the droplet you created in Compressor.
When you release the mouse button, the Droplet window opens.
2. In the Droplet window, do either or both of the following:
• Click the Location pop-up menu, then choose a new save location.
• Click the Process On pop-up menu, then choose a computer or group of computers.
3. Click Start Batch.
The transcoded file appears in the location you specified.
If you want to view the processing status of your source media files, open Compressor and click Active at the top of the Compressor window (or press Command-2). To view completed jobs, click Completed at the top of the Compressor window (or press Command-3).

183Compressor User Guide
Create additional instances of CompressorYou can increase the processing power of a single computer, and thus reduce the time it takes to process batches, by enabling one or more additional instances of the Compressor application. Enabling additional instances of Compressor doesn’t install multiple copies; instead, it creates additional services that can be accessed by Compressor.
The number of available Compressor instances is determined by your computer’s cores and memory. After meeting the minimum system requirement (four cores and 2 GB of memory), you can add one additional instance for every additional four cores and 2 GB of memory.
Important: If you don’t have enough cores or memory, the “Enable additional Compressor instances” checkbox in the Advanced preferences pane is dimmed.
Enable instances of Compressor1. Choose Compressor > Preferences (or press Command-Comma).
2. Click Advanced.
3. Select the “Enable additional Compressor instances” checkbox, then choose a number of instances from the pop-up menu.
It’s recommended that you first disable all the additional instances, transcode several test batches, then, if performance is slow, increase the number of instances to use more of your computer’s resources.
Note: If the computer has a hardware encoder, and if you enable multiple instances of Compressor, the time it takes to process a batch can potentially increase, because the hardware encoder can only be used with single-pass, nonsegmented jobs. If you find that processing time has increased significantly, or if a job fails, turn off additional Compressor instances by deselecting the “Enable additional Compressor instances” checkbox. Some Mac configurations using HEVC encoding require a single instance of Compressor.
Transcode Final Cut Pro and Motion projects in CompressorIf you have Final Cut Pro 10.2 or later, or Motion 5.2 or later, installed on the same computer as Compressor 4.2 or later, you can send sequences or clips from Final Cut Pro or Motion directly to Compressor for transcoding. To export using Compressor or Motion, you must have a compatible version of Compressor or Motion installed. Compressor and Motion must be purchased separately.
If you send multiple projects or clips from Final Cut Pro 10.2 or later using the Send to Compressor command, multiple jobs appear in a batch in Compressor.
Important: You cannot mix projects and clips in a batch share. Your selection must be projects only or clips only.

184Compressor User Guide
Transcode a Final Cut Pro or Motion project using CompressorDo one of the following:
• Send a project from Final Cut Pro to Compressor: Select the project and choose File > Send to Compressor.
Note: You can configure Compressor to use the GPU of your computer to process Final Cut Pro content sent to Compressor in the Advanced preferences in Compressor pane of Compressor preferences.
• Send a project from Motion to Compressor: Open the project and choose Share > Send to Compressor.
You can also drag a Motion project file to the batch area in Compressor.
Note: Distributed processing can’t be used for jobs sent to Compressor from Final Cut Pro or Motion.
See the Final Cut Pro User Guide and the Motion User Guide.
After the Final Cut Pro or Motion file appears in Compressor as a source file in a job, you can add a setting and other information to the job’s output rows and then transcode the batch.
Use distributed processing
Transcode batches with multiple computers using CompressorTranscoding a series of large files on one desktop computer can be processor-intensive and time-consuming. Distributed processing decreases the time it takes to transcode a batch by distributing the work among two or more computers. After you set up a distributed processing system, Compressor sends portions of your batch to each of the available computers in your group of shared computers. When the transcoding is complete, the output files appear in the location you specified when setting up the batch.
The simplest distributed processing system uses two computers. A more complex system can include many computers.
To set up distributed processing, you turn on access to your computer and then create a set of shared computers. If you can’t find a computer on your network, you can manually add it to the computer list.
Distributed processing can’t be used for jobs sent to Compressor from Final Cut Pro or Motion.
Important: Before you begin, verify that all the computers to be used for distributed processing have the same version of Compressor installed.

185Compressor User Guide
Make a computer available to other computers on your networkIf you want to use a Mac on your network for distributed processing, Compressor must be open and batch processing must be enabled. To have Compressor open automatically when you log into your Mac, add Compressor to your list of login items. If your computer is running macOS 10.15 or later, using distributed processing may require you to grant network access. See this Apple Support article.
1. Choose Compressor > Preferences (or press Command-Comma).
2. Select My Computer.
3. If necessary, turn on “Allow other computers to process batches on my computer.”
4. To control access to your computer, select the Require Password checkbox and enter a password in the text field.
The password is required by other computers to use your computer for transcoding.
5. To add Compressor to your list of login items, do the following:
a. In the macOS Finder, choose Apple menu > System Preferences.
b. Click Users & Groups, then click Login Items.
c. At the bottom of the list of login items, click the Add button , navigate to Compressor, then click Add.
Create a group of shared computersYou can create a group of shared computers to use to transcode your batches.
1. Choose Compressor > Preferences (or press Command-Comma).
2. Select Shared Computers.
3. At the bottom of the list of shared computers (on the left), click the Add button .
A new “Untitled” group is added to the list.
4. Double-click the “Untitled” group to select it, type a new name for the group, then press Return.
5. In the list of available computers (on the right), select the checkbox next to each computer that you want to add to the set.
If a computer doesn’t appear in your list of computers, you can add it to the list using the computer’s IP address (described in the next task).
If you’re using an Xsan storage area network, be sure to turn automatic file sharing off. See Manually configure file sharing using Compressor.
If you need to remove a group of shared computers, select the group and click the Remove button .
Manually add a computer to a group of shared computersIf a computer doesn’t appear in your list of available computers, you can add it manually.
1. In the Shared Computers pane of Compressor Preferences, select the shared computer group (in the list on the left) to which you want to add a computer.
2. Click the Add button at the bottom of the list of networked computers (on the right).

186Compressor User Guide
3. In the window that appears, enter the computer’s host name or IP address, and click Add.
The new computer appears in the selected shared computer group.
To temporarily disable the computer that you manually added to the group, deselect the computer’s checkbox.
To remove the computer that you manually added to the group, select the computer (in the list on the right) and then click the Remove button .
Configure SMB for use with automatic file sharingTo use the automatic file sharing features of Compressor, SMB file sharing must be turned on, guests must be allowed access to shared folders, and a helper tool must be installed.
1. In the macOS Finder, choose Apple menu > System Preferences.
2. Click Sharing.
3. In the Sharing preferences pane, select the File Sharing checkbox on the left to turn on file sharing.
To confirm that SMB sharing is on, click the Options button and verify that the “Share files and folders using SMB” checkbox is selected.
4. In System Preferences, click Users & Groups.
To modify preferences, you may have to click the Unlock button and enter your password.
5. Choose Guest User and select the “Allow guests to connect to shared folders” checkbox to turn it on.
Transcode a batch using a group of shared computersAfter you’ve created a shared computer group and added computers to the group, you can configure and submit a batch of jobs for transcoding as you normally would.
1. In Compressor, before clicking the Start Batch button, click the “Process on” pop-up menu and choose the group of computers that you want to use to process your batch.
2. Click Start Batch.
If this is the first time you’ve started a job using distributed processing or you’ve recently updated Compressor, you may receive a prompt to install a helper tool. If so, enter your password and click Install Helper.
View the progress or history of a batch that was transcoded by a group of shared computersAfter submitting a batch to be transcoded by a group of shared computers, you can find information about the transcoding status.
• In Compressor, open any of the following views:
• Active view: After you submit a batch, the Compressor window automatically switches to Active view to show the progress of the transcode.
• Completed view: Click the Completed button at the top of the Compressor window. After a batch is transcoded, information about the job, including the settings and job action used to transcode the source file, is displayed here.

187Compressor User Guide
• Network Encoding Monitor: Choose Window > Network Encoding Monitor (or press Command-E). The Network Encoding Monitor displays information about how your computer is being shared, including processor usage, batch processing information, disk space usage, and data activity.
• Logs window: Click the Open All Logs button in the Network Encoding Monitor to display the Logs window. You can use the log information displayed here for troubleshooting distributed processing issues. You can save this information to a file and process it with XML tools and UNIX scripts.
Important: The log file is deleted when you close the Logs window.
Manually configure file sharing using CompressorCompressor automatically manages the file sharing required for distributed processing. However, if you want to use your own file sharing system (such as a dedicated file server, Xsan, or NAS), you can turn off automatic file sharing, then manually configure file sharing and manually mount the shared volumes.
For example, if you have a file server or SAN (a storage area network such as Xsan), you can use it to hold your source files and any files transcoded from those source files. This allows you to provide a file sharing strategy that best suits your environment.
Important: When you turn off automatic file sharing with the intention of submitting to a shared group of computers, you must use the common shared volume (or volumes) on all of the computers for the location of the source files and for the location of the transcoded files. If you don’t do this, computers in your shared computer group will not be able to read or write the files needed for your batch.
Turn off automatic file sharing1. Choose Compressor > Preferences (or press Command-Comma), then click Shared
Computers at the top of the window.
2. In the Shared Computers pane, click the “Enable automatic file sharing” checkbox to deselect it.
Manually configure SMB file sharingImportant: If you’ve already set up your own file sharing system, you can skip this task and go to the next one.
1. In the macOS Finder, choose Apple menu > System Preferences.
2. Click Sharing.
3. In the Sharing preferences pane, select the File Sharing checkbox on the left to turn on file sharing.
You can confirm that SMB sharing is on by clicking the Options button and verifying that the “Share files and folders using SMB” checkbox is selected.
4. Below Shared Folders, click the Add button to add folders that you want to share.

188Compressor User Guide
Manually mount the SMB volume you enabledFor each computer in your shared computer group, or for any computer you wish to have access to the shared volume, do the following:
1. In the macOS Finder, choose Go > Connect to Server.
2. In the window that appears, enter the server address for the SMB volume that you want to mount, then click Connect.
For example, you could enter “smb://MySuperServer.”
3. In the window that appears, select an authentication method, enter appropriate credentials to access the shared volume, and click Connect.
4. In the window that appears, select the volume that you want to mount and click OK.
If you are using one computer for submitting Compressor batches and another computer for file sharing, be sure to mount the shared volume on the computer you’re using to submit Compressor batches. See Work with batches in Compressor.
Use the command line to submit Compressor jobs
Intro to shell commands in Compressor
If you’re accustomed to doing your work from Terminal shells, you can run the Compressor application from the command line using the Compressor command. There are a number of command-line options for submitting jobs.
In the command-line descriptions in this section, angle brackets < > indicate a mandatory argument in a command, and brackets [ ] indicate an optional argument.
Job command syntax in Compressor
Below is a synopsis of the Compressor command for submitting a job to a cluster. The Compressor command is located in <PATH>/Compressor.app/Contents/MacOS.
Important: The command below must be executed on one line.
Compressor [-computergroup <name>] [-batchname <name>]
[-priority <value>] -jobpath <file>[?frameRate=<frame rate>
|?audio=<file>|?frameRate=<frame rate>\&audio=<file>]
-settingpath <setting> -locationpath <file>
[-info <xml>] [-scc <file>] [-startoffset <hh:mm:ss:ff>]
[-in <hh:mm:ss:ff> [-out <hh:mm:ss:ff> [-annotations <file>]
[-chapters <file>]
Compressor -checkstream <file>
Compressor -findletterbox <file>
Compressor -help

189Compressor User Guide
Compressor [-resetBackgroundProcessing [cancelJobs]]
[-sharing <on|off>] [[-requiresPassword <password>]
| [-noPassword]] [-instances <value>]
[-networkInterface <bsd name>] [-portRange <starting port>
<count>]
These three arguments are the minimum required to submit a batch:
Compressor -jobpath <path> -settingpath <path> -locationpath <path>
Common command options used with Compressor
This table shows the most used command options for submitting jobs in Compressor:
Submission command option Description
-computergroup <name> Specifies the name of the group of shared computers.
-batchname <name> Specifies the name of the batch.
-priority <value> Specifies the priority level for a job.
-jobpath <url> Specifies the location of the source file.
-settingpath <url> Specifies the location of the settings for the job.
-locationpath <url> Specifies the destination file URL for the job.
-relabelaudiotracks <layout[1] layout[2]... layout[N]>]
Relabels audio channel layouts. Unless -locationpath is specified, the relabeled audio tracks overwrite the ones in the original source file. All other parameters are ignored.
-relabelcolorspace <primaries> <transfer> <matrix>
Relabels the color space of a QuickTime movie file. Use -jobpath <url> to locate the source file. Unless -locationpath is specified, the relabeled file overwrites the original source file. All other parameters are ignored.
Supported values for color primaries: ITU_R_709_2 (1), EBU_3213 (5), SMPTE_C (6), ITU_R_2020 (9), DCI_P3 (11), P3_D65 (12), P22 (22)
Supported values for transfer functions: ITU_R_709_2 (1), SMPTE_240M_1995 (7), Linear (8), IEC_sRGB (13), SMPTE_ST_2084_PQ (16), SMPTE_ST_428_1 (17), ITU_R_2100_HLG (18)
Supported matrix values: ITU_R_709_2 (1), ITU_R_601_4 (6), SMPTE_240M_1995 (7), ITU_R_2020 (9)
See ISO/IEC standard 23091-2 for more information.
-renametrackswithlayouts Renames tracks with new audio channel layouts.
-help Displays all Compressor command-line options.

190Compressor User Guide
This table shows command options for configuring shared computers to use with Compressor:
Submission command option Description
-resetBackgroundProcessing [cancelJobs] Resets background processing and optionally cancels queued jobs.
-requiresPassword [password] Requires a password to share this computer.
-noPassword Turns off the password requirement.
-sharing <on | off> Turns sharing of this computer on or off.
-instances <number> Enables additional Compressor instances.
-networkInterface <bsdname> Specifies which network interface is used. If “all” is specified as a <bsdname>, all available network interfaces are used.
-portRange <startNumber> <count> Specifies the starting port range and the number of ports to use.
Compressor command code examples
The following are examples of code used for submitting common Compressor commands.
Important: If you’re using an image sequence as a source file, you must use a URL for the path in -jobpath.
Submit a jobThe following command submits a Compressor job.
Important: The command below must be executed on one line.
/Applications/Compressor.app/Contents/MacOS/Compressor
-batchname "My First Batch" -jobpath ~/Movies/
MySource.mov -settingpath ~/Library/Application\
Support/Compressor/Settings/Apple\ Devices\ HD\ \
(Custom\).cmprstng -locationpath ~/Movies/MyOutput.m4v
What this command does:
• Identifies where Compressor is located
• Assigns the batch name “My First Batch” (The quotation marks are used because of the spaces.)
• Finds the file “MySource.mov” for the job at ~/Movies
• Uses the “Apple Devices HD (Custom)” setting at ~/Library/Application\ Support/Compressor/Settings (The “\” character is used to retain the space in “Application Support.”)
• Writes the output file, “MyOutput.m4v,” to the ~/Movies folder

191Compressor User Guide
Submit a batch to a group of shared computersThe following command submits a batch to a group of computers already configured for sharing in Compressor.
Important: The command below must be executed on one line.
/Applications/Compressor.app/Contents/MacOS/Compressor
-computergroup "Superfast Computers"
-batchname "My First Batch" -jobpath ~/Movies/
MySource.mov -settingpath ~/Library/Application\
Support/Compressor/Settings/Apple\ Devices\ HD\ \
(Custom\).cmprstng -locationpath ~/Movies/MyOutput.m4v
What this command does:
• Identifies where Compressor is located
• Sends the job to the group of shared computers named “Superfast Computers”
• Assigns the batch name, “My First Batch”
• Finds the file “MySource.mov” for the job at ~/Movies
• Uses the “Apple Devices HD (Custom)” setting at ~/Library/Application\ Support/Compressor/Settings (The “\” character is used in this case to retain the space in “Application Support.”)
• Writes the output file, named “MyOutput.m4v,” to the ~/Movies folder
Configure a shared computerThe following command configures a computer to allow other computers to process Compressor batches on it.
Important: The command below must be executed on one line.
/Applications/Compressor.app/Contents/MacOS/Compressor
-sharing on -instances 1 -networkInterface en0
-portRange 30000 1000
What this command does:
• Identifies where Compressor is located
• Turns on sharing
• Enables one extra Compressor instance
• Sets processing to occur on a specific network interface
• Sets network communication to a predefined port range

192Compressor User Guide
Glossary
AAC (Advanced Audio Coding) Also called MPEG-4 Audio. A standard way of compressing and encoding digital audio. AAC-encoded files rival the quality of audio CDs and generally sound as good as or better than MP3 files encoded at the same or even a higher bit rate.
AC-3 (Audio Codec 3, Advanced Codec 3, Acoustic Coder 3) A Dolby Digital compressed audio format often used for encoding surround sound.
AIFF (Audio Interchange File Format) A cross-platform audio file format developed by Apple. Like WAV files, AIFF files contain “chunks” of information such as the Sound Data Chunk, which contains the actual sample data, and the Common Chunk, which contains sample rate and bit depth information.
ALAC (Apple Lossless Audio Codec) A lossless audio codec developed by Apple. ALAC supports up to eight channels of audio, with a maximum sample depth of 32 bits and a maximum sample rate of 384 kHz.
alternative audio Translated dialog tracks, commentary, or audio descriptions (for the visually impaired) included in an iTunes Store package.
Apple ProRes Apple ProRes codecs provide an unparalleled combination of multistream, real-time editing performance, impressive image quality, and reduced storage rates. Apple ProRes codecs take full advantage of multicore processing and feature fast, reduced-resolution decoding modes. All Apple ProRes codecs support any frame size (including SD, HD, 2K, and 4K) at full resolution. The data rates vary based on codec type, image content, frame size, and frame rate.
Apple ProRes includes the following formats:
• Apple ProRes 4444 XQ: The highest-quality version of Apple ProRes for 4:4:4:4 image sources (including alpha channels), with a very high data rate to preserve the detail in high-dynamic-range imagery generated by today’s highest-quality digital image sensors. Apple ProRes 4444 XQ preserves dynamic ranges several times greater than the dynamic range of Rec 709 imagery—even against the rigors of extreme visual effects processing, in which tone-scale blacks or highlights are stretched significantly. Like standard Apple ProRes 4444, this codec supports up to 12 bits per image channel and up to 16 bits for the alpha channel. Apple ProRes 4444 XQ features a target data rate of approximately 500 Mbps for 4:4:4 sources at 1920 x 1080 and 29.97 fps.

193Compressor User Guide
• Apple ProRes 4444: An extremely high-quality version of Apple ProRes for 4:4:4:4 image sources (including alpha channels). This codec features full-resolution, mastering-quality 4:4:4:4 RGBA color and visual fidelity that is perceptually indistinguishable from the original material. Apple ProRes 4444 is a high-quality solution for storing and exchanging motion graphics and composites, with excellent multigeneration performance and a mathematically lossless alpha channel up to 16 bits. This codec features a remarkably low data rate compared to uncompressed 4:4:4 HD, with a target data rate of approximately 330 Mbps for 4:4:4 sources at 1920 x 1080 and 29.97 fps. It also offers direct encoding of, and decoding to, both RGB and Y’CBCR pixel formats.
• Apple ProRes 422 HQ: A higher-data-rate version of Apple ProRes 422 that preserves visual quality at the same high level as Apple ProRes 4444, but for 4:2:2 image sources. With widespread adoption across the video post-production industry, Apple ProRes 422 HQ offers visually lossless preservation of the highest-quality professional HD video that a single-link HD-SDI signal can carry. This codec supports full-width, 4:2:2 video sources at 10-bit pixel depths, while remaining visually lossless through many generations of decoding and reencoding. The target data rate of Apple ProRes 422 HQ is approximately 220 Mbps at 1920 x 1080 and 29.97 fps.
• Apple ProRes 422: A high-quality compressed codec offering nearly all the benefits of Apple ProRes 422 HQ, but at 66 percent of the data rate for even better multistream, real-time editing performance. The target data rate of Apple ProRes 422 is approximately 147 Mbps at 1920 x 1080 and 29.97 fps.
• Apple ProRes 422 LT: A more highly compressed codec than Apple ProRes 422, with roughly 70 percent of the data rate and 30 percent smaller file sizes. This codec is perfect for environments where storage capacity and data rate are at a premium. The target data rate of Apple ProRes 422 LT is approximately 102 Mbps at 1920 x 1080 and 29.97 fps.
• Apple ProRes 422 Proxy: An even more highly compressed codec than Apple ProRes 422 LT, intended for use in offline workflows that require low data rates but full-resolution video. The target data rate of Apple ProRes 422 Proxy is approximately 45 Mbps at 1920 x 1080 and 29.97 fps.
• Apple ProRes RAW: The Apple ProRes RAW and Apple ProRes RAW HQ codecs preserve all of the camera sensor’s pristine raw data to deliver extraordinarily high-quality images. ProRes RAW brings to raw video the same great performance, quality, and ease of use that ProRes has brought to conventional video, in a format ideal for HDR content creation. Being able to use the raw image sensor data directly in Final Cut Pro during post-production gives you more control over the processing of the image, including demosaicing, linear-to-log conversions, and custom LUTs.
Note: Apple ProRes 4444 and Apple ProRes 4444 XQ are ideal for the exchange of motion graphics media because they are virtually lossless, and are the only Apple ProRes codecs that support alpha channels.
AVCHD A high-definition (HD) video format that uses Advanced Video Coding (AVC) compression (also known as MPEG-4 part 10 or H.264). Many Blu-ray players can play red laser discs with AVCHD format content, making this a common way to distribute short HD video projects using a standard red laser disc.

194Compressor User Guide
batch In Compressor, one or more jobs to be processed. All jobs contained within the batch (shown in the batch area of the Compressor window) are submitted collectively when you begin the transcoding process. There are two types of batches in Compressor: standard batches, used for most transcoding jobs, and iTunes Store packages, a special workflow for submitting content to the iTunes Store.
bit rate The number of bits per second in the transmission of a digital video or audio signal. The higher you set the bit rate, the better the quality of the output file. However, higher bit rates require larger file sizes.
CAF (Core Audio Format) Apple’s Core Audio Format is a flexible file format for storing and manipulating digital audio data. CAF provides high performance and flexibility, and is scalable to future ultra high-resolution audio recording, editing, and playback.
captions In Compressor, onscreen text synchronized to the audio or video of a video program. Compressor supports three industry-standard caption formats: CEA-608 closed captions, iTT (iTunes Timed Text) subtitles, and SRT (SubRip Text) subtitles.
CEA-608 closed captions An industry-standard format for delivering onscreen text synchronized to the audio or video of a video program. Originally developed for people who are deaf or hard of hearing, CEA-608 closed captions (also known as Line 21 text) are frequently used on televisions in loud environments (such as bars and airports). CEA-608 closed captions, which use the .scc filename extension, offer numerous formatting options. Viewers can turn closed captions on or off while watching television shows, movies, web videos, and other programs. In Compressor, CEA-608 closed captions are compatible with iTunes Store packages and many transcode settings.
codec Short for COmpression/DECompression. A software component used to translate video or audio from its current form to a different, digitally compressed form. A codec encodes a data stream or signal for transmission, storage or encryption, or decodes it for playback or editing. A similar term, encoder, is used to describe hardware that performs the same activity.
color space The range of colors available for an image, sometimes called gamut. A wider gamut allows for more possible color values and permits more accurate representation of color.
delivery partner A content aggregator or encoding house certified by the iTunes Store and authorized to submit iTunes Store packages to the store for sale. These partners ensure your content is properly configured and formatted to meet the stringent submission requirements of the iTunes Store. They can also provide billing and support services after your video becomes available for sale.
descriptive audio An alternative audio track in an iTunes Store package that includes voice narration to help visually impaired consumers understand what’s happening onscreen. Descriptive audio narration is usually delivered during the natural pauses in dialog or between critical sound elements. An iTunes Store package can contain multiple descriptive audio tracks (in multiple languages, for example).
destination In Compressor, a group of one or more transcode settings plus a post-transcoding action. If you use a destination to transcode a file, one or more new files are created to the setting’s specifications and then an action is automatically performed on the transcoded file. For example, the Add to TV Home Videos destination creates a file optimized for viewing on Apple TV. After the file is processed, the Add to TV Home Videos action automatically copies the output file to your Home Videos library on Apple TV.

195Compressor User Guide
display aspect ratio The ratio between an image’s width and height. For example, standard-definition (SD) video typically has an aspect ratio of 4:3. High-definition (HD) video typically has an aspect ratio of 16:9. If SD video is played on an HD display, the image is either stretched, or is appended with black borders on left and right sides (pillarboxing). If HD video is played on an SD display, the image will be squeezed or black borders will appear at the top and bottom (letterboxing).
distributed processing A method of transcoding that accelerates processing of Compressor batches by distributing the work among multiple computer processors. A system can distribute parts of a batch to multiple instances of the Compressor application on a single computer, or to two or more networked computers (each running one or more instances of Compressor).
droplet A lightweight, standalone app created by Compressor to apply specific settings or destinations to media files. You can drag and drop media files onto the droplet icon in the Finder to begin transcoding.
Dolby Digital See AC-3.
Dolby Digital Enhanced See E-AC-3.
E-AC-3 A Dolby Digital compressed audio format often used for encoding surround sound. E-AC-3 supports up to fifteen channels of audio.
encoder See codec.
file format The output format used to transcode your source media file. Also called a transcoding format.
FLAC (Free Lossless Audio Codec) A lossless audio format that supports up to 8 channels of audio and up to 32 bit sample depth.
H.264 A video compression standard in widespread use for recording, distribution, and Internet streaming of high-definition (HD) video. Also known as MPEG-4 Part 10 or AVC (Advanced Video Coding).
HDR (high dynamic range) Video stored in a format that processes higher levels of luminance (brightness) per color component to provide significant improvements in contrast, detail, and light levels over standard-dynamic-range (SDR) video. HDR can represent luminances as high as 10,000 nits (candelas per square meter) with a dynamic range of 14 stops or more, creating more realistic color transitions and revealing more detail in both shadows and highlights. HDR video is typically combined with wide-gamut color spaces such as Rec. 2020 or P3 D65 to deliver video any of several formats, including HDR10, Dolby Vision, and HLG (hybrid log-gamma).
HEVC High-Efficiency Video Coding (also known as H.265), a recently established compression standard designed to reduce file size while retaining a high-quality image. HEVC also supports larger frame sizes (including 8K) and HDR10 metadata for high-dynamic-range video. The Apple Devices transcode setting in Compressor includes two built-in options for HEVC output. You can also customize the MPEG-4 and QuickTime Movie settings to use the HEVC encoder. HEVC encoding in Compressor requires macOS 10.13 or later. HEVC playback requires a recent-generation Apple device running macOS 10.13 or later, iOS 11 or later, iPadOS 13 or later, or tvOS 11 or later.

196Compressor User Guide
HLG (hybrid log-gamma) A mathematical HDR transfer function that converts image signal values in a video file to scene-relative light levels. HLG, which was developed by the BBC and the NHK (Japan Broadcasting Corporation), requires no metadata and is also compatible with SDR displays. In Compressor, HLG is used with the Rec. 2020 color space to create video files in the hybrid log-gamma HDR standard.
i-frame (intra-coded picture) One type of frame used to define the GOP (Group of Pictures) pattern used during MPEG-2 or H.264 encoding. A GOP pattern can also include P-frames (predictive coded picture) and B-frames (bipredicitive coded picture)
interlaced video Video to be played on traditional NTSC or PAL televisions is stored using an interlaced frame rate. Each frame is actually made up of two half-frames called fields. Each field contains half the frame lines; the odd (or upper) field contains lines 1, 3, 5, 7, 9 and so on, and the even (or lower) field contains lines 2, 4, 6, 8, 10, and so on. When the video is played back, the TV displays the fields in an alternating pattern, which creates an effective illusion of smooth movement. Viewing interlaced video on a computer screen that displays both fields simultaneously may reveal a combing effect. Progressive video frame rates store the video in a series of whole frames instead these two-fields. You can remove the fields from an interlaced video clip by converting it to a progressive frame rate.
iTT (iTunes Timed Text) subtitles An industry-standard format for delivering onscreen text synchronized to the audio or video of a video program. iTT subtitles can be used to deliver foreign-language translations or a transcript of dialog, narration, or audio descriptions to people who are deaf or hard of hearing. iTT subtitles, which use the .itt filename extension, offer more limited formatting options than CEA-608 captions. In Compressor, you can specify whether to let viewers turn iTT subtitles on or off (for example, for full foreign-language translations) or force subtitles to appear onscreen (for example, for specific characters in a movie who speak a different language). In Compressor, iTT subtitles are compatible with iTunes Store packages and many transcode settings.
iTunes Store package Publishers who submit videos to the iTunes Store must deliver their content in a carefully prescribed format called an iTunes Store package. Compressor can create these packages, provided you have all the requisite components (video files, audio files, subtitle files, closed-caption files, and so on).
job In Compressor, the source media file and output instructions (one or more output rows, each containing a setting, location, and file name), ready to be transcoded.
job action In Compressor, an action that is performed on a media file after it is transcoded. For example, a job action can add a transcoded file to your Home Videos library on Apple TV or run an Automator workflow.
keyframe interval A keyframe is a frame that stores a complete image. Keyframes provide the entire image in the video stream; after that image is provided, incremental changes between related frames are stored (not the entire image). Thus, when the image in the video changes dramatically, for example, when switching between images, a keyframe must be created to mark the location of change. It’s recommended that you allow Compressor to determine the key frame interval for your output file; however, you can also set the key frame interval manually.
location In Compressor, the location where your transcoded media file is saved. You can either use the default location (the same folder the source media file is in) or choose a custom location.
197Compressor User Guide
lower third A television industry term for a graphic placed in the lower area of the screen, usually to convey details about subjects or products. A common use of lower thirds is to identify individuals on the screen with their names and job titles.
marker A marker flags a specific timing location in a source file. You can append a marker with editing notes or other descriptive information. Additionally, when you output the source file to an H.264, MPEG-2, or MPEG-4 video format, each marker forces the creation of an I-frame. Added I-frames improve compression quality, but can increase overall file size. Compressor can create the following types of markers:
• Chapter markers: Generate named index points and thumbnail images for DVDs, QuickTime movies, or video podcasts. You can also assign a URL to a chapter marker to have that URL appear during playback of a podcast. Chapter markers are also included in submissions to the iTunes Store as part of an iTunes Store package. Chapter markers appear orange in the Compressor preview area.
• Compression markers: Generate an I-frame, but do not generate thumbnails, chapter-track entries, or other metadata. Add them to a video if a section appears to have lower image quality than the surrounding frames. Compression markers appear blue in the Compressor preview area.
• Edit markers: Function identically to compression markers. They are commonly used by compression artists to force an I-frame at an edit point to ensure higher image quality at that moment in the video. Edit markers appear red in the Compressor preview area.
• Podcast markers: Like chapter markers, podcast markers can have artwork and a URL assigned to them. Podcast markers are usually used to provide a slideshow (with URLs) for users to view when playing audio podcasts. However, podcast marker names do not appear in the slideshow, and users cannot navigate to a podcast marker in the transcoded file. Podcast markers appear purple in the Compressor preview area.
matrix stereo A stereo downmix of a surround track for playback on a device with only two speakers; matrix stereo can also be decoded to play the full surround mix on a surround-capable playback device.
MP3 Refers to the MPEG-1 or MPEG-2 Audio Layer 3 compression standard and file format. Like AAC, MP3 uses perceptual audio coding and psychoacoustic compression to remove superfluous information that the human ear doesn’t hear.
nit A unit of measure describing the luminance (light intensity) of a video display. One nit is equal to one candela per square meter.
output row In Compressor, an output row in a job contains the instructions used for transcoding a source media file. An output row includes a setting (shown on the left) that specifies properties defining how to transcode the source media file, a location (shown in the middle) where the transcoded file will be saved, and a filename (shown on the right) for the transcoded file.
P3 D65 Also known as Display P3, a wide-gamut color space based on the DCI-P3 color standard developed for digital movie projection. P3 D65 is the display color space of recent Apple devices, including the iMac (with Retina 4K or 5K display), MacBook Pro, and iPad Pro.

198Compressor User Guide
PQ (perceptual quantizer) A mathematical transfer function that converts image signal values in a video file to absolute light levels on an HDR-capable display. Designed to approximate the sensitivity of human eyes, PQ allows for better levels of contrast at all light levels. In Compressor, PQ is used with the Rec. 2020 and P3 D65 wide-gamut color spaces to create video files in the industry-standard HDR formats, HDR10 and Dolby Vision.
preview area In Compressor, the area where you can play your source file and preview your output file. After you apply effects or change the properties of the setting that will transcode your source file, you can compare the “before” and “after” versions by clicking the Comparison button (under the timeline). The screen is divided by a vertical white line, with the source file shown on the left and the preview of the transcoded file shown on the right.
QuickTime The cross-platform multimedia technology that allows macOS and Windows applications to capture and play back video, audio, and still-image files.
Rec. 709 The standard-gamut 8-bit color space used by high-definition TV displays, the Blu-ray Disc format, and most TV broadcasters. Also known as ITU-R Recommendation BT.709.
Rec. 2020 A wide-gamut color space developed for future consumer display devices but useful today for mastering (to future-proof your projects) and for 4K and 8K TV projects. Even though no currently available consumer TVs or computer monitors can display the entire Rec. 2020 palette, wide-color-gamut displays can show a subset of those colors. Also known as ITU-R Recommendation BT.2020.
resolution Image resolution refers to the frame size of the video. Image resolution is expressed in terms of the width and height (the frame size) of the image in pixels. Higher-resolution images contain more detail but also create larger files that take longer to download. Your electronic devices (computer, iPhone, iPad, iPod, and so on) also have screen resolution. Resolution is expressed in terms of the width and height of the image in pixels (for example, 640 x 360 pixels).
When you add a setting to a source media file, Compressor determines appropriate resolution sizes you can use, based on the image sizes used in the movie and on the setting that you’re using to output the file.
sample rate The number of times per second that music waveforms (samples) are captured digitally. The higher the sample rate, the higher the quality and the larger the file size.
sample size The number of bits in each audio sample; determines the potential dynamic range of the sound.
SDR (standard dynamic range) The conventional technique for processing luminance (levels of brightness) and color values in images, developed in the mid-1900s, with an upper luminance limit of 100 nits (candelas per square meter) and a dynamic range of 6–10 stops.
setting In Compressor, a group of preconfigured properties that you can apply to a source media file. Settings are used to transcode files into commonly used audio and video formats for Apple devices, podcasting, Internet streaming, post-production, and so on. Each setting includes adjustable properties like output file format, retiming instructions, and optional effects.

199Compressor User Guide
source media file In Compressor, the original media file to be converted to a new file format. One source file is required for each job.
SRT (SubRip Text subtitles) An industry-standard format for delivering onscreen text synchronized to the audio or video of a video program. SRT subtitles can be used to deliver foreign-language translations or a transcript of dialog, narration, or audio descriptions to people who are deaf or hard of hearing. SRT subtitles, which use the .srt filename extension, offer more limited formatting options than CEA-608 captions. In Compressor, you can specify whether to let viewers turn SRT subtitles on or off (for example, for full foreign-language translations) or force subtitles to appear onscreen (for example, for specific characters in a movie who speak a different language). In Compressor, many built-in settings and destinations support SRT subtitles, including Apple Devices (in both the H.264 and HEVC codecs), ProRes, Create DVD, and other settings that use the QuickTime Movie, MPEG-2, and MPEG-4 formats.
storage aspect ratio (SAR) The ratio between an image’s width and height when it is stored. Storage aspect ratio can differ from display aspect ratio (DAR) resulting in a file that must be stretched or squeezed during playback to appear correct. This disparity can allow a camera format limited to 4:3 recording to successfully record a widescreen image by “squeezing” the image during recording. If the image is unsqueezed during playback it will display correctly in its widescreen aspect ratio. This is called an anamorphic image.
transcoding The process of converting files from their original format to a different format. Closely related terms include compression, which specifically refers to data reduction, and encoding, a term that is essentially synonymous with transcoding, but doesn’t emphasize the conversion aspect.
uncompressed 8-bit and 10-bit 4:2:2 Video formats used to store 8-bit or 10-bit 4:2:2 Y’CBCR video without employing data compression. Bypassing compression reduces the computer’s processing load but increases the data rate considerably. A large-capacity RAID storage system is typically required to work effectively with uncompressed video. In many cases, Apple ProRes is a better choice.
The data rate of uncompressed 4:2:2 video varies according to frame size and frame rate. For example, at a frame size of 1920 x 1080 and a frame rate of 29.97 fps, the data rate is 1.0 Gbps for uncompressed 8-bit 4:2:2 video and 1.3 Gbps for uncompressed 10-bit 4:2:2 video.
WAVE (or WAV) An audio file format most commonly used for storing uncompressed linear pulse code modulation (LPCM) audio data.
wide color gamut A video color space capable of reproducing a broader palette of colors than traditional standard-gamut color spaces. Recent display devices—including 4K televisions and computer monitors, newer Mac, iOS, and iPadOS devices, and Apple TV 4K (when connected to a wide-gamut television)—can render more vivid and lifelike hues (in addition to all the hues that standard-gamut devices can display). Accordingly, the video industry has adopted a wide-gamut color standard called Rec. 2020. Although most currently available wide-gamut devices support only a subset of the colors contained in the full Rec. 2020 specification, future imaging devices should be able to render more and more of those hues.

200Compressor User Guide
Apple Inc.© 2021 Apple Inc. All rights reserved.
Use of the “keyboard” Apple logo (Shift-Option-K) for commercial purposes without the prior written consent of Apple may constitute trademark infringement and unfair competition in violation of federal and state laws.
Apple, the Apple logo, Apple Music, Apple TV, Final Cut, Final Cut Pro, Finder, iMac, iPad, iPadOS, iPad Pro, iPhone, iPod, iPod touch, iTunes, Mac, MacBook Pro, Motion, QuickTime, Retina, tvOS, and Xsan are trademarks of Apple Inc., registered in the U.S. and other countries.
Touch Bar is a trademark of Apple Inc.
iTunes Store is a service mark of Apple Inc., registered in the U.S. and other countries.
AppleOne Apple Park WayCupertino, CA 95014apple.com
Adobe and Photoshop are trademarks or registered trademarks of Adobe Systems Incorporated in the U.S. and/or other countries.
Dolby, Dolby Vision, Pro Logic, and the double-D symbol are trademarks of Dolby Laboratories.
IOS is a trademark or registered trademark of Cisco in the U.S. and other countries and is used under license.
UNIX is a registered trademark of The Open Group.
The YouTube logo is a trademark of Google LLC.
Vimeo is a trademark of Vimeo LLC.
Other company and product names mentioned herein may be trademarks of their respective companies.
Some images in this manual were acquired from Getty Images, Inc. All rights reserved.
Some 360° video images in this manual were acquired from Jaunt, Inc. All rights reserved.
Every effort has been made to ensure that the information in this manual is accurate. Apple is not responsible for printing or clerical errors.
Some apps are not available in all areas. App availability is subject to change.
028-00474