component wizard - nxp
TRANSCRIPT

Component Wizard
User Manual
version 1.55Copyright 2010 Freescale Semiconductor, Inc.
PROCESSOR EXPERT is trademark of Freescale Semiconductor, Inc.
- 1 -
- 2 -
CONTENTS1. Introduction 4
2. Basic Terms 52.1. Inheritance 7
2.1.1. Inheritance scheme 82.1.2. Options of Methods Inheritance 92.1.3. Options of Events Inheritance 11
3. Versions 12
4. How to work with Component Wizard 134.1. How to create a Template ? 134.2. How to create an Interface ? 144.3. Modifying interfaces 144.4. Interface Application 164.5. Inheriting from a component 164.6. Problems with inherintance 174.7. Sharing a component 194.8. Editing drivers 204.9. Component Creation 214.10. Distributing component 23
5. User Interface 245.1. Component Wizard Menu 25
5.1.1. Options 265.1.2. Properties 305.1.3. Component manager 31
5.1.3.1. Deleting components 325.1.3.2. Exporting / Importing a component 33
5.1.4. Inheritance Wizard 355.1.5. Save Interface Dialog 365.1.6. Save Template Dialog 375.1.7. Revisions 385.1.8. Create Component 39
5.1.8.1. Import ANSIC example 415.2. Startup menu 475.3. Common page 48
5.3.1. Component category 495.4. Properties page 51
5.4.1. Property List 545.4.1.1. Feature link 63
5.4.2. Fast Inheriting 635.5. Global properties page 655.6. Component Property type page 675.7. Methods page 695.8. Events page 715.9. User types page 745.10. Constants 765.11. Drivers Page 77
5.11.1. Driver Processing 795.11.2. Macroprocessor 80
5.11.2.1. Macroprocessor Denotation 81

- 3 -
5.11.2.2. Macroprocessor Commands 835.11.2.3. Predefined Macros and Directives 875.11.2.4. Predefined global macros 885.11.2.5. Predefined local macros 905.11.2.6. Macros Defined From a Property 91
5.11.3. TST file 935.11.4. CHG file 945.11.5. Edit code 965.11.6. Driver editor 97
5.12. Documentation page 1005.12.1. Help styles 102
5.13. Interface info page 1045.14. Methods page 1055.15. Events page 1075.16. Templates page 110
6. Component Viewer 112
7. Tutorial Courses 1147.1. Tutorial, Course 1 114
7.1.1. Tutorial, Course 1, Step 1: Specification of Component Function 1157.1.2. Tutorial, Course 1, Step 2 - Component Creation 1157.1.3. Tutorial, Course 1, Step 3 - Design of Properties 1177.1.4. Tutorial, Course 1, Step 4 - Design of Methods 1197.1.5. Tutorial, Course 1, Step 5 - Creating Driver 1207.1.6. Tutorial, Course 1, Step 6 - Editing Driver 1227.1.7. Tutorial, Course 1, Step 7 - Generating Help 1237.1.8. Tutorial, Course 1, Last Step - Installing Component 124
7.2. Tutorial, Course 2 1257.3. Tutorial, Course 3 128
7.3.1. Tutorial, Course 3, Step 1: Specification of Component Function 1297.3.2. Tutorial, Course 3, Step 2 - Component Creation 1307.3.3. Tutorial, Course 3, Step 3 - Inherited component selection 1317.3.4. Tutorial, Course 3, Step 4 - Interface Creation 1317.3.5. Tutorial, Course 3, Step 5 - Template Creation 1337.3.6. Tutorial, Course 3, Step 6 - Inheriting cycle 1337.3.7. Tutorial, Course 3, Step 7 - Inheriting again 1347.3.8. Tutorial, Course 3, Step 8 - Configuring component template 1357.3.9. Tutorial, Course 3, Step 9 - Design of Methods 1367.3.10. Tutorial, Course 3, Step 10 - Design of Events 1387.3.11. Tutorial, Course 3, Step 11 - Code writing 1407.3.12. Tutorial, Course 3, Last step - Generating help, Installing component 142
7.4. Tutorial, Course 4 1427.4.1. Tutorial, Course 4, Step 1: Specification of Component Function 1437.4.2. Tutorial, Course 4, Step 2 - Component Creation 1447.4.3. Tutorial, Course 4, Step 3 - Design of Properties, Inheriting 1457.4.4. Tutorial, Course 4, Step 4 - Template and Interface Setting 1487.4.5. Tutorial, Course 4, Step 5 - Design of Methods 1517.4.6. Tutorial, Course 4, Step 6 - Design of Events 1537.4.7. Tutorial, Course 4, Step 7 - Code writing 1547.4.8. Tutorial, Course 4, Last step - Generating help, Installing component 156
8. Component Wizard - Command line parameters 158
9. Revision List 159

1. IntroductionComponent Wizard is a tool dedicated to the edition of Embedded Components.
It provides a graphical interface for the composition of new components, and generates component files.
Benefits
Using Component Wizard, the user can create new components very quickly and easily, with the guarantee that
there will be no errors in the generated files. The user only needs to determine Properties, Methods and Events
and make the necessary implementation of methods and events. Component Wizard generates the declaration
files such as header files in C or definition files in Modula, as well as the structure of the source code.
Consequently, only the contents of methods and events remains to be written.
Component Wizard facilitates the reusability of existing Components, and helps edit the source code (quick
location, editor, ...).
Quick Links
Basic• terms
Available• versions of Component Wizard
'How• To...' guides
User• interface description
Tutorial• courses
- 4 -
Introduction

2. Basic TermsThis chapter explains the basic terms used within Component Wizard and Processor Expert applications.
Component
A component is an object with defined function. A component can be accessed by a properties, methods and
events.
Properties can be changed in design-time only. Properties define the
component• initialization state
component• settings and features supported in runtime
component• connection to the CPU (only for hardware components)
Using methods you can set the component state and read the component results.
If you select any event in the component you must specify the name of the procedure - event handler. This
procedure will be called by a component driver when something important happens in the system (for example
hardware interrupt or some error, etc.)
A driver of a component contains the implementation of the component's methods and calling of the
component's events.
A Software component is the component with no direct access to hardware in the driver code. Access to
hardware (initialization and control) can be done using inheritance of any hardware component.
A Pure software component is the component with no access to hardware at all (doesn't even inherit any
hardware component).
Driver
A driver contains source codes of all methods and events of a component. Every component (except the CPU
driver) has a driver associated with it. After creation of a new component, user has to write the code of all its
new (not inherited) methods into the driver of the component. The code is written in special macro-language.
For• details on macroprocessor see chapter 5.11.2 Macroprocessor.
For• further details on drivers see the chapter 5.11 Drivers Page.
To• discover how to edit the code of methods and events in driver see the chapter 4.8 Editing drivers.
Inheritance
Inheritance allows to use and/or redefine methods and events of another component. This simplifies and
speeds-up a process of creation of the new embedded components and allows user to develop a platform
independent components by inheriting the platform independent components included in Processor Expert. For
details on inheritance see chapter 2.1 Inheritance.
- 5 -
Basic Terms

Template
A Template holds the state of component's properties, methods and events settings.
A template can additionally contain:
default• value of each property, method (selected/unselected) and event (selected/unselected)
read-only• feature: if user can change the value of the property, method, event
Every template contains association to a component that the template was created for (or from). This association
allows to use a template as a "component representative". Like a component, the template can be added to user's
project. The template acts like an ordinary component with the only exception - it is already initialized.
Note: in Components Wizard you cannot select hardware dependent value of the component (for example pin or
serial channel). These templates can be edited in Processor Expert.
There are two types of templates:
Local• templates - These templates can be used only by local interfaces that are stored in the same directory
as the template (the directory of a component which is using that interface)
Global• Template - These templates are visible for all interfaces. These templates are stored in the special
directory Processor Expert base directory\templts . A change in this template has an influence to all
interfaces that use it.
Interface
Inheritance is important for the components inheritance. See 2.1 Inheritance for details. To inherit functionality
of other component in a new component, an interface has to be specified. Interface is a list of methods and
events that must be implemented by the ancestor (inherited) component. If a component implements any
interface (so it is suitable for inheritance), it can be registered into this interface. If the component is registered in
any interface it is offered to user in Processor Expert.
Note: If you specify any interface, be sure that all methods and events from the interface will be implemented by
inherited component. You can call inherited methods from the driver and you must implement all inherited
events in your driver.
Often, specific initial settings of the ancestor component instance are required so a template can be registered in
interface instead of a component. Registration of components or templates into the interface can is done in
Component Wizard during the interface creation/modification.
There are two types of interfaces:
Local• interfaces - These interfaces can be used only by components where these interfaces are stored (the
interface is stored with a component in the same directory).
Global• interfaces - These interfaces are visible for all components. These interfaces are stored in directory
Processor Expert base directory\components which is the base directory for all components. A change in
this interface has an influence to all components which use this.
- 6 -
Basic Terms

2.1. InheritanceIn order to create hardware-independent components, it is necessary to implement them for every processor you
may use. Without the inheritance process, this would mean a lot of fastidious coding.
The basic hardware components provided within Processor Expert cover the entire functionality of processors
and are hardware independent (In fact they are hardware dependent but you have drivers for all CPUs supported
in your version of Processor Expert). By inheriting from these components, you don't need anymore to deal with
the low-level part of your components. Writing the high-level part of the algorithm, using inherited
hardware-independent methods and events of components, will keep the new component hardware independent.
Component Wizard allows to pre-configure the basic components you want to use (by creating templates), and
select the methods and events to inherit (by creating interfaces).
Your own components, can also be used for further inheritance by another components, providing a high level of
re-usability to your work.
For further details see chapter 4.5 Inheriting from a component.
Comparison with object oriented languages:
In PE, the inheritance is implemented in quite different way than in most object oriented languages. Of course, a
component (descendant) can inherit another component (ancestor) - but the background of the inheritance
process is slightly different from what would an C++ or Object Pascal programmer expect. The main difference
is that a descendant (newly created) component can replace his ancestor component with another one and this
can be done any time after the new component was created. In standard object oriented languages, the ancestor
object is declared in the definition of a new object, and from that moment it can not be changed.
How the ancestor component can be selected ?
When a component is inherited and it's interface is created or specified, there is still no binding between it (the
ancestor) and the descendant component - the interface is only a list of methods and events. To create a binding,
the component must be registered into the interface. Then, usually during the component setup in Component
Inspector window, the Processor Expert will allow user to choose any component that supports (is registered for)
the desired interface to be the ancestor component.
How are the Templates and Interfaces used in the Inheritance process ?
A component template represents a real component. This representation is used in the inheritance mechanism in
the following way:
Because user usually wants the inherited component to be already initialized (in a project, he wants to set only
some properties of the descendant), the template for that component must be registered instead of the component
itself in the interface.
For easier understanding of inheritance and bindings between templates and interfaces see chapter 2.1.1
Inheritance scheme.
Details for practical use of inheritance:
Interfaces•
Interface selection is done in Component Wizard (component design-time)
Interface specifies the methods and events needed by a new component, which is using this interface
Templates•
- 7 -
Basic Terms

Template selection is done in Processor Expert (component "run"-time, usage of the component)
Template settings should be CPU independent, because Component Wizard cannot set CPU-dependent
properties.
Template is the group of initialization values of the component for selected interface
There is a possibility to disable editing of value of any property, method or event for chosen interface.
This can be done by setting the property, method or event to "Read Only" in the template.
Options of Methods and Events Inheritance
According to the MethodsScope/Evenscope feature in interface, the Methods/Events can be inherited as Private,
Override or Published. The Private methods and events are intended for a use within the descendant component
only. Methods and Events selected as Override or Published automatically appear in the descendant
component. See the description of individual options in chapters 2.1.2 Options of Methods Inheritance and 2.1.3
Options of Events Inheritance.
2.1.1. Inheritance scheme
This example shows a component (descendant) inheriting two other components via selected interface and
template (registered for this interface).
Figure 2.1 - Inheritance Scheme
- 8 -
Basic Terms

2.1.2. Options of Methods Inheritance
This chapter explains possible ways of inheriting methods from an ancestor component. Lets assume that a
chosen ancestor component has a method M. The inheritance process requires an interface to be created (see
chapter 4.2 How to create an Interface ? for details). There are the following options (values of MethodScope)
that are available for the ancestor's method M in the interface (please see also a corresponding part of the picture
below):
Private• - The method M does not appear in the descendant's methods list (in the component inspector of the
descendant component) and should be called only from the code of the descendant component. This option is
suitable when we want to only use the component without publishing it's methods to user.
Override• - The method M appears in the descendant methods list (in the component inspector of the
descendant component) but user can write his/her own code to change it's function (and also call the original
method M of the ancestor if is is reasonable).
Published• - The method M behaves like the native method of the descendant component. This approach
doesn't mean any overhead, the method is generated as a macro calling the ancestor's method.
- 9 -
Basic Terms

- 10 -
Basic Terms

2.1.3. Options of Events Inheritance
This chapter explains possible ways of inheriting events from an ancestor component. Lets assume that a chosen
ancestor component has an event E. The inheritance process requires an interface to be created (see chapter 4.2
How to create an Interface ? for details). There are the following options (values of EventScope) that are
available for the ancestor's event E in the interface (please see also a corresponding part of the picture below):
Private• - The event E does not appear in the descendant component events list and should be used for
internal processing of the events from the ancestor component.
Override• - The event E appears in the descendant component events list and component author can write
his/her own code before and/or after calling the user's event handling routine.
Published• - The event E appears in the descendant component events list and the event behaves like the
native event of the descendant component. User's event handling routine is called directly.
- 11 -
Basic Terms

3. VersionsThere are two versions of Component Wizard:
Basic• Component Wizard
Professional• Component Wizard
Basic version
The basic version of Component Wizard is designed for the creation of software components, i.e. hardware
independent. These components are written in high-level programming languages (MODULA, ANSI C, ...). You
can create pure software components (associated to other software modules), such as component for computing
Fast Fourier Transform, or you may create software components which are indirectly dealing with hardware,
using inheritance. You can, for example, create a component for controlling EEPROM by inheriting methods
and events from the input/output hardware components and using them in your code. As input/output
components are written for all processors of Processor Expert's database, your EEPROM control component is
hardware independent and you may use it with each processor of Processor Expert's database.
In this version you cannot change existing hardware components (for example input/output components, timers,
etc). You may only inherit from them by creating templates and interfaces.
You have a smaller choice of properties (properties which you don't need are hidden) and some pages of
Component Wizard are not available.
Professional version
The Professional version of Component Wizard is designed for creating software and hardware components.
This is the full version of Component Wizard.
- 12 -
Versions

4. How to work with Component WizardThe following sub-chapters show the usual tasks the Component Wizard is used for.
How• to create a component ?
How• to create a component from existing ANSIC source ?
How• to create a template ?
How• to create an interface ?
How• to modify an existing interface (add/remove methods)?
How• to apply an interface to a component ?
How• to use inheritance ?
How• to share component ?
How• to edit drivers ?
How• to distribute component ?
How• to create simple component without inheritance? See tutorial, course no. 1
See also
Details• about driver syntax and Processor Expert macroprocessor
4.1. How to create a Template ?In order to create a template, you must have a component loaded in Component Wizard. Then, you can modify
the settings of the properties, methods and events, and save the new settings as a template (File - Convert To -Template).
One Bit I/O Component Template Example
We will make a template of the component allows only the output direction (a simple One Bit Output). For steps
of creation of this component please see the chapter 4.9 Component Creation.
At• first we load the One Bit I/O component into the Component Wizard (Menu File | Open | Component).
Then, we go into the Property page, and we modify the settings of the Direction property.
We• change the main Direction setting on the left side window; we set it to output. After selecting the
Direction property on the left side window, we can see its settings displayed on the right side window.
The• ReadOnly setting need to be switched to True (so that Direction cannot be modified in the Processor
expert environment).
Now,• we can save these settings in a template (Menu File - Create Template) that we call One Bit Output.
- 13 -
How to work with Component Wizard

4.2. How to create an Interface ?An interface can be created from a component currently loaded in Component wizard (Menu File - CreateInterface), or may also be created as an empty interface (Menu File - New Interface), following a process close
to that of the creation of a component. In both cases, the creation of an interface require to have created at least
one template. We will illustrate the creation of an interface from a component, using the example developed in
the section How to create a Component? We will make an interface for the ouput facility.
Example
Creation of an interface from the One bit I/O Component
In order to create an interface, we need a template.
So• we first create a template from the One Bit I/O component, following the procedure described in the
section 'How to create a template ?'.
Then• we can create an interface (Menu File - Create Interface) and open it. Go into the Templates page, in
order to select and add the One Bit Output template to the interface.
The• right side window displays the list of existing templates. We select the One Bit Output template and
click on the left arrow button in order to add the template to the interface.
Then,• we go into the Methods page, in order to delete the useless methods: GetVal, GetDir and SetDir .To
delete the methods, you need to select them and push on the Delete Method button.
Finally,• we save the interface as OneBitOutput (File Menu - Save/Save Interface As).
4.3. Modifying interfaces
Adding or removing method/event into/from an interface
Example:
You have an interface with component registered via template. The interface has defined list of methods and
events which registered component supports. But the component has more methods than the interface uses and
you want to use them as well (e.g. those methods or events were added after the interface was created).
There are two ways:
Difficult• - open interface and add methods in pages Methods and Events with their parameters, types and
hints,... this solutions expects you know the correct syntax of those methods and it is not effective.
Easy• and fast - you can use the fact, that those methods are already specified by the component which is
registered into this interface or other component. With using the View component utility you can easily drag
and drop feature and drag them from component into the interface.
Steps:
Opena. existing interface - menu File - Open - Interface. The open dialog appears, select the interface
and confirm it by button OK.
Openb. existing component into the view component utility - menu Tools View component On/Off. If
the View component utility has not been used yet, the open dialog appears, select the component and
confirm it by button OK or use local menu described here.
- 14 -
How to work with Component Wizard

Switchc. to the page methods in both - View component utility and opened interface.
Dragd. & drop desired methods.
Figure 4.1 - Modifying interfaces
Switche. to the page events in both - View component utility and opened interface.
Dragf. & drop desired events.
Figure 4.2 - Modifying interfaces
Saveg. the interface - menu File - Save.
See also
Common problems with inheritance
- 15 -
How to work with Component Wizard

4.4. Interface Application
How to apply an interface to a component ?
You can make a component inherit the methods and events of one or more component(s) by the mean of
interfaces. There are two ways to apply an interface to a component. You can create a component from an
interface currently loaded in Component wizard (Menu File - Create Component ), or you can create a new
component (Menu File - New Component) and apply later the interface.
We will illustrate this last process by the example of the creation of a Two Bit Output component, using the
interface defined in the section How to create an interface ?
Example
Creation of a Two Bit Output Component using an Interface
Let• us start from a new component (Menu File - New Component).
To• apply an interface, we need to go into the Properties page and add the two properties corresponding to the
two output pins.
In• order to add the first property, we click on the Add Down button. A menu appears where we can select
the type of the first property. The property needs to be of the Inherited component (interface) type.
Then,• we modify the setting InterfaceName on the right side window.
In• the setting menu, we need to select OneBitOutput , the name of the interface to be applied. Finally, we
repeat the procedure for the second property.
From now, the component can inherit the methods and events specified in the interface and apply them to each
of the two output pins. We need finally to define the methods for the Two Bits Output (PutVal, SetVal, NegVal
and ClrVal). The advantage is that we can use the One Bit Output Methods when we write the code for the Two
Bit Methods (see section How to edit drivers ?).
4.5. Inheriting from a component
Procedure for inheriting
You may let the Inheritance Wizard guide you through the inheritance process. If you want to inherit component
into the existing component, you can use the fast inheriting.
The next steps should be followed by advanced users only:
(for more details on inheritance and bindings between templates and interfaces see chapters 2.1 Inheritance and
2.1.1 Inheritance scheme.
Open1. the component from which you want to inherit.
Create2. a new template (dialog Save template appears) and modify eventually its settings.
Create3. an interface (dialog Save interface appears) from this component
Open4. this interface and insert the previously created template
Delete5. the methods and events which you do not need for your new component.
Save6. the interface
Open7. your new component
In8. the properties page add an inherited component (interface) property.
- 16 -
How to work with Component Wizard

In9. feature InterfaceName, select the name of the created interface
Now10. you have inherited from the first component. Learn here how to use the inherited methods and events.
Setting of an enabled Speed mode for inherited components
All inherited components have disabled (read only) settings of an enabled speed modes. This setting is
performed in the main (root) component. If the main component doesn't have these items for this settings, the
implicit values for all modes are "Enabled". You can copy this properties from existing component (e.g. from
inherited component which is time dependent). These properties are usualy if group "Speed modes". You can
copy them by using Component Viewer utility by drag & drop this group.
See also
Common problems with inheritance
4.6. Problems with inherintanceIf you inherit some component and you have difficulties in the Processor Expert when this (or similar) error
occurs in the inherited component:
Method is required by the interface, but is disabled by component settings
or by template.
You have probably conflict with the settlings in the interface and by settings in the CHG file.
Typical situation is when you want to inherit some method/event, but the component itself disables this
method/event because of its settings.
Example 1: You have turned off some property detecting some interrupts, so the component disables generating
of some events, but you have these events in the interface as ALWAYS REQUIRED (default value) i.e. interface
says that the inherited (ancestor) component must have this method and must be generated.
Example 2: You have AsynchroSerial component and you define the input buffer as 0 (zero). So the component
disables the method RecvBlock, but you have this method in your interface as ALWAYS REQUIRED (default
value) - i.e. - see previous Example 1.
There are several solutions: The method/event with the error:
- 17 -
How to work with Component Wizard

Situation Solution
I don't use the method/event in my
descendant component.Open1. the interface for the inherited component
e.g. from descendant component using popup
menu on the "Inherited component" property in
page Properties
Delete2. this method/event
Save3. the interface
Open4. the descendant component and save if it is
needed.
I use the method/event but only if it is
generated (i know when it is and when it
isn't and I have correct condition in my
driver). The Method/Event scope is "
Private", i.e. this method cannot be
inherited again.
Open1. the interface for the inherited component
e.g. from descendant component using popup
menu on the "Inherited component" property in
page Properties
Select2. this method/event
Select3. the feature Mode and select
OWNER_MUST_EXIST.
Save4. the interface
Open5. the descendant component and save if it is
needed.
I use the method/event but only if it is
generated (i know when it is and when it
isn't and I have correct condition in my
driver). The Method/Event scope is "
Published" or "Override" i.e. this method
can be inherited again.
Open1. the interface for the inherited component
e.g. from descendant component using popup
menu on the "Inherited component" property in
page Properties
Select2. this method/event
Select3. the feature Mode and select
"SAME_AS_OWNER".
Save4. the interface
Open5. the descendant component and save if it is
needed.
- 18 -
How to work with Component Wizard

4.7. Sharing a component
Procedure for sharing a component
Sharing components is similar to inheriting components. But the difference between inheriting and sharing is:
Every• component using inheritance will have their own inherited components: i.e. if you have got twoinstances of component LCDDisplay, which inherits two BitIO (input/output component), there will be
allocated four BitIOs!
Component• using sharing components has the access to methods and properties of a component, which can
be shared by another component (or not). Example is a component uses components which want to have a
shifted access to serial line. This serial line can be only one, but the number of components sharing it can be
more than one. Access is done by methods define in the interface.
If you want to share a component , you can use the fast inheriting/sharing.
The next steps should be followed by advanced users only:
(for more details of inheritance and bindings between templates and interfaces see the inheritance scheme.
Open1. the component from which you want to inherit.
Create2. a new template (dialog Save template appears) and modify eventually its settings.
Create3. an interface (dialog Save interface appears) from this component
Open4. this interface and insert the previously created template
Delete5. the methods which you do not need for your new component.
Delete6. ALL events. Shared component cannot have the events in the interface. The implementation of
these events is made in the Processor Expert for the shared component.
Save7. the interface
Open8. your new component
In9. the properties page add an Link to component property.
In10. feature InterfaceName, select the name of the created interface
Now11. you have inherited component from the first component. Learn here how to use the shared methods.
Setting of an enabled Speed mode for inherited components
All inherited components have disabled (read only) settings of an enabled speed modes. This setting is
performed in the main (root) component. If the main component doesn't have these items for this settings, the
implicit values for all modes are "Enabled". You can copy this properties from existing component (e.g. from
inherited component which is time dependent). These properties are usualy if group "Speed modes". You can
copy them by using Component Viewer utility by drag & drop this group.
See also
Common problems with inheritance
- 19 -
How to work with Component Wizard

4.8. Editing driversAfter having defined a component (properties, methods, and events), it's necessary to implement the methods
and events in at least one language section of one driver. We will illustrate the creation of a language section of a
driver, using the example of the Two Bits Output component presented in the section How to apply an interface
to a component ?.
See also detailed information about driver syntax.
Example
Switch1. to the Drivers page . When the component is saved first time, the Component wizard offers to
create a new driver for the user. If you have confirmed that and there is the sw/TwoBitOutput.drv in the
List of drivers for component, please follow to the next step. Otherwise, click on Add driver button. In the
list of drivers for Component. The name sw/TwoBitOutput.drv appears in the list.
Now,2. double-click on Edit code of method/event in the right-bottom corner. A list of methods and events
for the component appears.
Figure 4.3 - Editing drivers
See 5.11.5 Edit code for details.
Select3. the PutVal method and click "Edit". It opens the body of the method and we may now make the
implementation.
As4. explained in the How to apply an interface ? example section, the TwoBitOutput component inherited
twice from the BitIO component. That means that we have two "Inherited" properties in the Properties
page. We change their Symbol feature to Pin0 and Pin1.
Inherited methods are named with the following convention:
inherited.name_of_the_inherited_property.name_of_the_method( parameters );For example, our two inherited PutVal methods are called inherited.Pin0.PutVal and inherited.Pin1.PutVal
.
Remark: In the Component Wizard Editor, you must not make changes in method header (name of the method or
name and types of parameters). You may do such changes only in Component Wizard.
- 20 -
How to work with Component Wizard

Figure 4.4 - Editor window
Hint: If you write the left paranthesis by the name of function/procedure, hint with the list of parameters of
function/procedure is displayed.
4.9. Component CreationThere are several ways to create a new component. You can create a component
from• scratch (menu File - New Component),
existing• component (Menu File - Open - Component) that you modify,
create• component from existing ANSI-C source. See 5.1.8 Create Component for details.
from• an interface (menu File - Conver To - Component, when the interface is currently loaded). In this case
the component gets methods and events from the interface.
The• Inheritance Wizard may also help you to create a component inheriting from other components. See
5.1.4 Inheritance Wizard for details.
The specification of a component is decomposed in 9 pages in Professional Component Wizard and in 6 pages in
Basic Component Wizard. In order to describe the procedure, we will use the example of the creation of a
component corresponding to a simple one bit output.
Installation to Processor Expert
Updating changes of a component in Processor Expert:If you are editing a component in Component Wizard while working in Processor Expert on a project including
this component, you may update the component in your project by following these steps:
Save1. the component in Component Wizard
Save2. and reopen the current project in Processor Expert
Now is the component in Processor Expert updated.
- 21 -
How to work with Component Wizard

Example
One bit Input/Output ComponentIn the Common page, we put a hint like General 1- bit input/output in the Short Hint edit item, and we put our
names in the Author edit item (the default Version number 1.0 is correct, since we are creating the component).
We then click on the Open... button next to the Icon edit item. A standard File Open menu appears, and we go
into the component's directory. There, we select our icon file, BitIO.bmp , that we had previously stored in the
component's directory. Notice that the icon file must be stored to the same directory as that of the component,
using the appropriate format (see the section Icon in the Common Page Help).
In the Properties page , we add the necessary properties by clicking on the Add Down button. Every time, a
menu appears where we can select the right property type.
Here is the list of the properties we add, with their associated type:
Pin• for I/O [Pin/Port]
Pull• Mode [Pull Resistor]
Direction• [Direction Input/Output/Input-Output]
Initialization• [Group of Items]
Initialization is a group of properties. We can start adding properties to this group by clicking on the Add toGroup button. Then, we can use the Add Down button again inside the group to add the next properties of the
group.
So we add the following properties to the group:
Init• Direction [Boolean yes/no]
Init• Value [Boolean yes/no]
For every property, we can modify the default settings, which appear on the right side window. These settings
determine the features of the property item within the Processor Expert environment. After selecting a property
on the left side window, the list of settings appear on the opposite window and we can modify some features,
such as ItemName and Hint.In our case, the TypeSpecName setting of the Pull Mode, Direction, InitValue and Init Direction properties
must be set to TypePull, TypeDir, TypeOneZero and TypeInputOutput, respectively.
In fact, at this moment the TypeOneZero type doesn't exist yet. We must create it in the Property types page.
So, in the Property types page, we click on the AddBoolEnum button in order to create an Enumeration of only
two items.
In the Name edit item, we write TypeOneZero and we change the default name of the items into 1 and 0 in the
List window.
In the Methods page, we can add the names of the necessary methods (PutVal, GetVal, GetDir, SetDir, SetVal,
NegVal, ClrVal). To that purpose, we have to click on the Add method button and type the name of the method.
The right side window displays the properties of the method, that is currently selected in the opposite window.
We have there to add a parameter Value to the properties of the PutVal and GetVal methods. So we need to click
on the Add Parameter button, and then change the Parameter-Name setting into Value.
There are no events, so we don't need to consider the Events page.
Now, the Component structure is complete and we can save it (Menu File - Save).
- 22 -
How to work with Component Wizard

See also
How to create simple component without inheritence? See tutorial, course no.1
4.10. Distributing componentIt is possible to export the component as a one file which holds all the files which the component consists of. See
the Exporting/Importing component page for details.
- 23 -
How to work with Component Wizard

5. User InterfaceThe Component Wizard application user interface consists of the pull-down menu and the page tabs that users
could switch using the mouse.
Menu
Main menu of the application. See the chapter Main Menu description.
Icons
- opens a new empty component
- opens a list of components and loads the selected component
- saves the currently opened component/template/interface
- creates a new interface. See 2.1 Inheritance for details.
- opens the list of revisions. See 5.1.7 Revisions for details.
- shows the component in the component viewer.
- opens the Component Manager. See 5.1.3 Component manager for details.
- opens the options dialog. See 5.1.1 Options for details.
- opens the Component Wizard help chapter related to the currently active page.
- opens Component Wizard help contents page.
Pages•
Component/Template
Common• page
Properties• page
Global• properties page (Professional Component Wizard only)
Property• types page
Methods• page
Events• page
User• types page
Drivers• page
Help• page
Interface
Interface• info page
Methods• page
Events• page
Templates• page
- 24 -
User Interface

5.1. Component Wizard Menu
Description of Main menu items
File
New•
Component - starts the creation of a new component
Component using Inheritance Wizard - starts the creation of a component by using the Inheritance
Wizard.
Interface - starts the creation of a new interface
Open•
Component - loads a component
Interface - loads an interface
Template - loads a template
Save• - saves the currently opened object. If changes have been made, a dialog listing the changed files can be
shown. For more details please see the Confirm all file changes option in the chapter 5.1.1 Options.
Save• As - saves the currently opened object with the new name
Import•
Create component from ANSIC module - converts existing ANSI C source into the component.
Displays open dialog for *.c and *.h sources for conversion. See here for more information.
Import components from package... - displays open dialog for selecting component package. Then
appears import dialog.
Export•
Export component to package - exports the current component into the package. Dialog for exporting
components appears. For more details see here.
Convert• To
Component - creates a component from the current interface
Interface - creates an interface from the current component. See here for more information.
Template - creates a template from the current component. See here for more information.
Open• Recent - allows to open previously edited objects.
Exit• - closes the application
Edit
Undo• (change description) - restores the state of the item (specified in the brackets) to the state before the
change.
Note: The Undo / Redo functions are available only for property, methods and events changes.
Redo• (change description) - restores again the state of the item (specified in the brackets) to the state after
the change.
Edit• driver abstract - opens editor windows with a short description of the component. This text is used for
component comment (section Abstract:) in the driver and in the text help file. Editing is enabled if at least
- 25 -
User Interface

one language section exists. This file is independent on selected language and compiler, it is common for all
implementations. See 5.11 Drivers Page for details.
Edit• driver settings - plain text file with macros reading components settings. The text resulting from
preprocessing of this file is generated as a comment to component header file, component implementation
file and project text help file.
Edit• chg file - Opens editor window with the CHG file. See 5.11.4 CHG file for details.
Edit• external file - allows to open any text file into the Component Wizard editor.
Component• revisions - opens the Revisions window allowing to view/edit the component history
Tools
Options• - opens the Options window for setting Component Wizard preferences and default values
Properties• configuration - opens the Properties window for renaming or deleting available properties
Always• on Top - makes Component Wizard's window stay on top of all windows
View• component On/Off - starts the Component viewer and displays the load component dialog
Delete• Backups - erases backup files
Component• Manager - opens the Component Manager window for managing components, templates,
interfaces and includes.
Help
Contents• - opens this help file
Help• - opens this help file - shows help for active page in Component Wizard.
About• - displays the About box
5.1.1. Options
This dialog window allows to customize behaviour of the Component Wizard. It can be invoked using the
command Tools - Options
Preferences page
Figure 5.1 - Preferences
- 26 -
User Interface

Open• last work on start - last edited file is automatically opened when Component Wizard is started
Wizard• Always on top - makes Component Wizard's window stay on top of all windows
Regenerate• all includes - all includes are regenerated, regardless of their header line. (Usually, includes are
regenerated only if the header line of the includes has not been removed by the user)
Show• startup menu - when Component Wizard is launched, a startup menu proposes to start directly with
Inheritance Wizard or not.
Ask• to add revision on save - if this option is enabled, after each save command the Component Wizard
shows a dialog allowing to add a new revision information.
Pre-fill• revision text - If this option is enabled, the Component Wizard shows offers a revision description
text based on the changes made.
Bool• group change warning - If enabled, a warning is shown when the value of Expanded feature of
Boolean group is changed by the user. This helps the user to avoid to forget to set it back.
Select• last property's symbol - after loading a component, selects the property with the same ymbol as the
last property selected before the component has been loaded.
History• - maximal number of history items in menu File - Reopen
Create• backups of drivers a backup file is made (when saving the component) for each driver modified
after opening the component. The backup file contains the initial state of the driver (before the component
modification).
Confirm• all file changes - if enabled, after the save command is invoked, a dialog summarizing changes
within all files that are about to be updated. The user can select files and check the changes using the button
Show changes and individually select/unselect which files should really be written.
Figure 5.2 - Confirm changes dialog
- 27 -
User Interface

Default values page
Figure 5.3 - Default values
Common• - Global types - default setting of the Global types check box of the Common page
Drivers• - Auto save project - default setting of the Auto save project check box of the Drivers page
Drivers• - Software Component - default setting of the Software Components check box of the Drivers page
Properties• - Details - default setting of the Detail on/off check box of the Properties page
Open• files read only - default value for opening components, templates and interfaces. If you want to open
them in read only mode almost every time, check this. You can explicitly open files in read only mode or not
in the open dialogs.
Help• - Detailed help - default setting of the Detailed help check box of the Help page
Help• - Auto save help - default setting of the Auto save help check box of the Help page
Default• return type - default return type of methods. When you add new method, it will have set this
return type.
Default• return hint - default text of the return hint of methods. When you add new method, it will have set
this text in return hint.
Display page
Figure 5.4 - Display
- 28 -
User Interface

Wizard• interface - level of component edition:
Basic - presents only the important pages and information
Professional - presents all pages and input objects (Professional Component Wizard only)
Features• in one window - presentation style for the Properties page features.
Highlight• inherited methods - show inherited methods or events with a different color in Methods and
Events pages for component and Interface methods and Interface events pages for interface.
Published methods - select color for published methods
Override - select color for overridden methods
Editor page
Figure 5.5 - Editor
Align• text "%>" and the rest... - Align Macroprocessor comment at specified column - only visual
enhancement - code is more readable with aligned comments. When you type %>, the cursor will be moved
with the comment to the specified column.
Column - Column position for macroprocessor comment
Fix the comment at this column - if checked, anything you write before the %> won't cause moving the
comment to the left or to the right.
Align only %>> comments - align only "%>>" comments (i.e. do not align e.g. "%> 40")
Editor• tab stops - number of spaces when TAB key is pressed.
Show• modified lines after the last load/save - if enabled, the editor shows changed lines/letters with different
color.
- 29 -
User Interface

Remove• trail spaces - when the document is saved, possible spaces after the end of every line are removed.
Show• line numbers - enables/disables line numbers display besides every line.
Show• real line numbers - show a real line numbers, even if only a part of the file is edited.
Highlight• methods boundary - highlights beginning of the method definition/implementation.
Change• font - change the font in the internal editor. In the bow below is visible your selected font.
Default• font - change the font in the internal editor to the default settings.
5.1.2. Properties
This dialog window lists the properties you can add to the Properties page of a component. Is is invoked using
the Tools - Properties config menu command.
Property names can be changed (click the Rename button after selecting a property), and unnecessary properties
may be deleted (click on Delete). The default state (all properties and their default names) may be restored by
clicking the Default button.
Figure 5.6 - Properties dialog
- 30 -
User Interface

5.1.3. Component manager
The Component manager allows to easily manage available components, templates, interfaces and includes.
Figure 5.7 - Component Manager with the components page active
General common buttons:
Refresh• - refreshes the Component manager (the current state of files on disc)
Close• - closes the Component manager
Components page
Buttons:
Delete• - opens a window displaying the list of files used by this component. You may then select the files
you wish to delete. You can delete only one component at a time.
Export• component - opens a window where you can package the selected component. You can select one or
more components.
Import• component - opens a dialog window for loading a new component from a package
Interface page
Buttons:
Delete• - removes the selected Interfaces from your disk.
Select• unused - selects Interfaces which are not associated with any existing component
Unselect• all - cancels the selection
Remark: There are hints over each interface. If the interface contains some errors (interface is marked with red
letter "E") they are displayed in hint too.
- 31 -
User Interface

Templates page
Buttons:
Delete• - removes the selected Templates from your disk.
Select• bad - selects Templates which are not associated with any existing component
Select• unused - selects Templates which are not used by any interfaces
Unselect• all - cancels the selection
Includes page
Description:With often manipulating components (copying, deleting, importing, etc.) there may be unused includes on th
disk. To find them, click button Find unused. It displays includes on disk which are no longer referenced from
drivers. It also shows (in lower window) those drivers which want some includes which are not available on
disk.
Buttons:
Delete• - removes selected include files from your disk
Find• unused - Search in all drivers on your disk for used includes and displays unused include files. Also
displays references to non existing includes.
Select• all - selects all include files
Unselect• all - cancels the selection
Include• is used if its name begins like name of some driver - If it is checked, Component Manager
assumes, that includes which have the same beginning of their names like the name of some driver are used.
It is recommended to check this button.
5.1.3.1. Deleting components
Figure 5.8 - Deleting window
This window appears when you request to delete a component with the Component manager. This window lists
all the files used by the component you have selected in the Component manager. You can then select the files
- 32 -
User Interface
you wish to delete. Initially, Component wizard automatically selects the files which you may safely delete.
Meaning of buttons:
Cancel• - cancels the deletion and shuts this window
Select• All - selects all listed files
Unselect• All - cancels the selection
Delete• - deletes all selected files
5.1.3.2. Exporting / Importing a component
This function allows to export/import one file (package) with all component files for one or more components.
When you wish to distribute a component (or several components), you may use this approach instead of
distributing manually the numerous files related to the component. You can also add your own files into the
package and you can add a comment about this package which will be displayed to the user when he/she will
import your component. This package is automatically compressed to save space on your disk.
The export function is accessible using :
Component• Manager where you specify the list of components you want to add into a package and click the
Export component button.
Component• Wizard main menu File - Export - Export component to package
Remark: Exporting components package is suitable for creating backups of components too.
The import function is accessible using :
Component• Manager after click on the Import component button.
Component• Wizard main menu File - Import - Import components from package...
- 33 -
User Interface
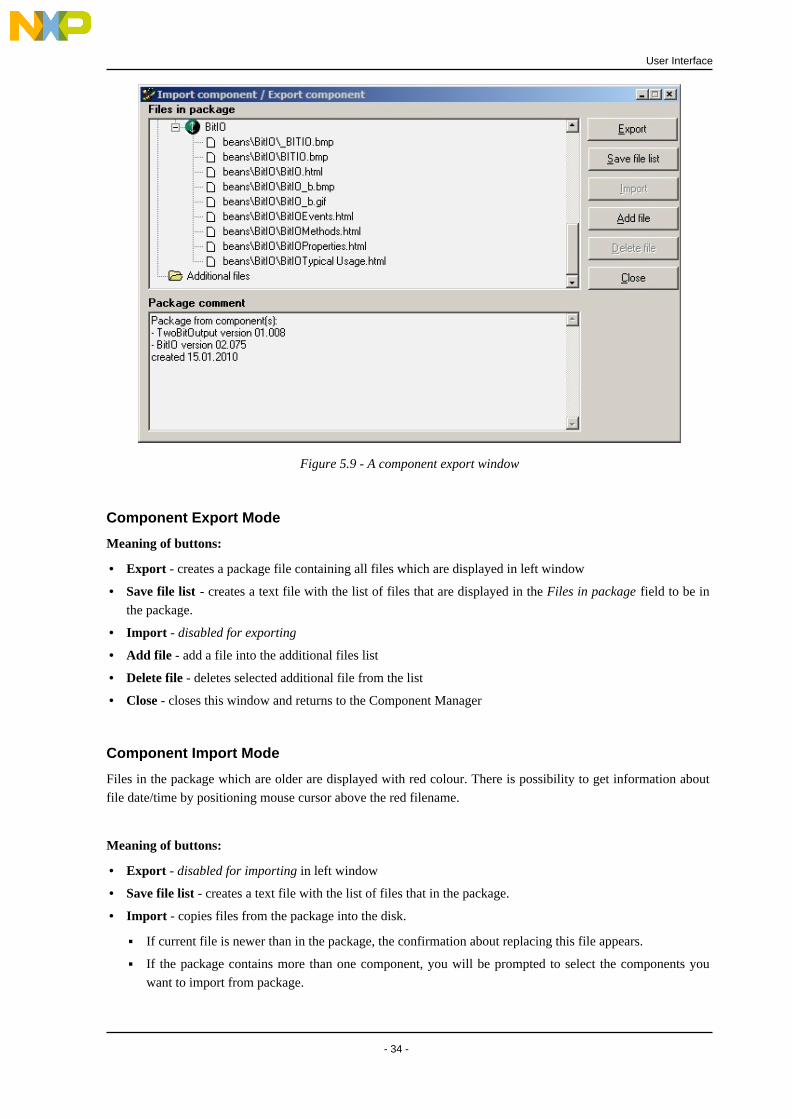
Figure 5.9 - A component export window
Component Export Mode
Meaning of buttons:
Export• - creates a package file containing all files which are displayed in left window
Save• file list - creates a text file with the list of files that are displayed in the Files in package field to be in
the package.
Import• - disabled for exporting
Add• file - add a file into the additional files list
Delete• file - deletes selected additional file from the list
Close• - closes this window and returns to the Component Manager
Component Import Mode
Files in the package which are older are displayed with red colour. There is possibility to get information about
file date/time by positioning mouse cursor above the red filename.
Meaning of buttons:
Export• - disabled for importing in left window
Save• file list - creates a text file with the list of files that in the package.
Import• - copies files from the package into the disk.
If current file is newer than in the package, the confirmation about replacing this file appears.
If the package contains more than one component, you will be prompted to select the components you
want to import from package.
- 34 -
User Interface

Add• file - disabled for importing
Delete• file - disabled for importing
Close• - closes this window and returns to the Component Manager
5.1.4. Inheritance Wizard
The Inheritance Wizard is designed for easy creation of new components that inherit functionality from other
components. It guides the user through the whole inheritance process.
For details on inheritance see chapter 2.1 Inheritance . The functionality of the Inheritance Wizard is
demonstrated in tutorial 7.3 Tutorial, Course 3.
Figure 5.10 - Inheritance Wizard Window
- 35 -
User Interface
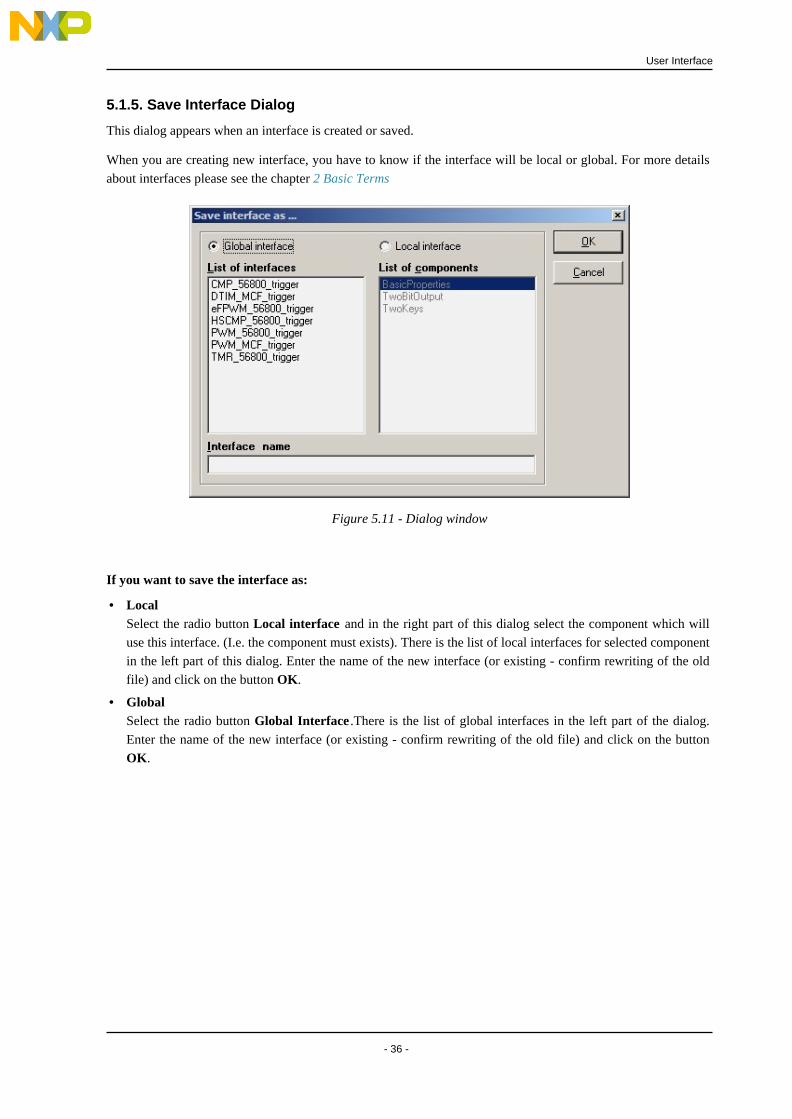
5.1.5. Save Interface Dialog
This dialog appears when an interface is created or saved.
When you are creating new interface, you have to know if the interface will be local or global. For more details
about interfaces please see the chapter 2 Basic Terms
Figure 5.11 - Dialog window
If you want to save the interface as:
Local• Select the radio button Local interface and in the right part of this dialog select the component which will
use this interface. (I.e. the component must exists). There is the list of local interfaces for selected component
in the left part of this dialog. Enter the name of the new interface (or existing - confirm rewriting of the old
file) and click on the button OK.
Global• Select the radio button Global Interface .There is the list of global interfaces in the left part of the dialog.
Enter the name of the new interface (or existing - confirm rewriting of the old file) and click on the button
OK.
- 36 -
User Interface

5.1.6. Save Template Dialog
This dialog window appears when the template is created or saved. When you are creating a template from a
component, you have to know if the template will be local or global. For more details about templates look to
Basic terms - chapter Templates.
Figure 5.12 - Dialog window
If you want to save the template as:
Local• Select the radio button Local template and in the right part of this dialog select the component where you
want to store this template. (I.e. the component must exists). There is the list of local templates for selected
component in the left part of this dialog. Enter the name of the new template (or existing - confirm rewriting
of the old file) and click on the button OK.
Global• Select the radio button Global Template .There is the list of global templates in the left part of the dialog.
Enter the name of the new template (or existing - confirm rewriting of the old file) and click on the button
OK.
- 37 -
User Interface

5.1.7. Revisions
Revisions are intended for logging changes during the development of a component, ie. the bugs, change of
functionality, new features, etc.
Figure 5.13 - Revision window
Meaning of buttons:
Delete• - deletes selected revision. Only new revisions can be deleted. Once the revision is saved together
with the component, it cannot be modified.
Edit• - edit selected revision. Only new revisions cad be modified. Like button Delete . Displays dialog
described in Add/Edit revision chapter.
Add• revision - displays dialog for adding new revision. See Add/Edit revision chapter. it is not possible to
delete it.
Close• - closes window with revisions. To remember changes in revisions save the component.
Add/Edit Revision Dialog
This dialog is common for adding new revisions and for editing already existing revisions.
Meaning of fields:
Author• - who made the change
Verify• - who checked that the change is correct
Comment• - Notes about the revision
Date• - date of the revision
Change• level - it tells how serious the change is.
There are six levels of component change:
0 - Fatal change - total change of component functionality
- 38 -
User Interface

1 - Changes of a method/event - new methods, method renamed, new or deleted method/event
parameters, modified parameters, etc.
2 - Property added/removed - new, deleted or modified properties
3 - Property types. init. value - changes in property types or initialization values
4 - User Types, CHG file change - changes in User types or in CHG file
5 - Changes in hints or comments - only the minor changes (hints of methods, events, parameters,
properties and etc.)
Meaning of buttons:
OK• - applies changes in new/edited revision
Cancel• - cancels the changes in new/edited revision
5.1.8. Create Component
Description
Component Wizard allows to import *.c and *.h module and automatically convert it to the component. The
code is analyzed:
exported1. methods (extern methods defined in header file) are inserted into the component (page Methods)
text2. from *.c and *.h is modified:
exported methods and variables are renamed to names used in normally generated drivers:
method- MethodName is renamed into %'ModuleName'%.%MethodName
variable- var is renamed into %'ModuleName'%.var
all occurrences of renamed methods (callings) are renamed too
exported methods become conditional generated methods
include "H module" in C file is commented. This include will be generated automatically, depending
on the name of the component.
the3. result is inserted into the driver with macroprocessor language.
user4. definitions of types (by typedef) from header file are inserted into the User types page.
After this component is ready for modifications, like:
define• methods description
adding• properties
adding• methods
adding• events
creating• HTML help
etc..•
For an example of importing ANSIC source see here.
- 39 -
User Interface

Requirements
Requirements on imported code :
ANSI-C1. compatible
Limited2. length of identifiers of functions to 32 characters
All3. methods are defined in one module *.C and exists correct header file *.h. Name of the C and H module
must be the same.
Macros4. can be used only for constants definitions
No5. interrupts may be defined in the code
No6. pragmas (#pragma) may be used in the code
Conditional7. macros like #if, #ifdef, etc. can be used only inside of the body of the methods or just only
outside of the methods. It is not allowed this construction:
#ifdef XXX
void myFunc(void)
#else
int myFunc(int par)
#endif
{ ... }
This construction is allowed:
#ifdef XXX
/* this function is NOT in the header *.h */
int localFun(int par)
{
/* code */
return ...;
}
#endif
/* this function can be exported in the header *.h */
void myFunc(int par)
{
#ifdef XXX
int variable=myFunc(par);
#else
int variable=0;
#endif
}
Return8. types of methods and types of theirs parameters must be types supported by Component Wizard or
must be defined in the H module.
macro9. #include "header_name" can contain only ANSI standard libraries:
assert.h
complex.h
ctype.h
errno.h
fenv.h
float.h
- 40 -
User Interface
inttypes.h
iso646.h
limits.h
locale.h
math.h
setjmp.h
signal.h
stdarg.h
stdbool.h
stddef.h
stdint.h
stdio.h
stdlib.h
string.h
tgmath.h
time.h
wchar.h
wctype.h
If other user libraries are used, they must be in the path of the imported module. The user is also
responsible for setting right paths for these libraries in the Processor Expert project.
5.1.8.1. Import ANSIC example
Description
Here is a simple example of converting ANSIC source into the component. Bellow you can see:
H• source - importc.h
C• source - importc.c
generated• driver (modified H source and C source). The name of the component is Complex (this name is
used for macros %include).
This driver was generated by these steps:
run Component Wizard, or if it is running, choose File - New Component
choose menu File - Import - Create component from ANSI C module
browse for file importc.c
choose menu File - Save Component As. Type Complex.
The following screenshot from page Methods after the import shows two methods created from the functions.
- 41 -
User Interface

Figure 5.14 - Methods page
Example Header File 'importc.h'
/* complex number - declare it */
#ifndef __Comp
#define __Comp
typedef struct {
float Re;
float Im;
} Comp, *CompPtr;
#endif
/* return real part of complex number */
float realPart( Comp num );
/* add two complex numbers */
void addComplex( Comp one, Comp two, Comp* result );
/* global variable */
extern Comp globalComp;
- 42 -
User Interface

Example C File 'importc.c'
#include "importc.h"
/* global variable */
Comp globalComp;
/* return real part of complex number */
float realPart( Comp num ) {
return num.Re;
}
/* add two complex numbers */
void addComplex( Comp one, Comp two, Comp* result ) {
result->Re = one.Re + two.Re;
result->Im = one.Im + two.Im;
return;
}
Generated driver
Remark: Original lines are marked bold.
%-Driver generated by the Component Wizard
%-
%- WARNING !
%-
%- Do not make changes to these lines (if you make some changes,
%- you damage this driver)
%- which begins with:
%-
%- %-STARTUSERTYPES
%- %-ENDUSRTYPES
%- /* END %ModuleName. */
%- /* MODULE %ModuleName. */
%- %-INTERNAL_METHOD_BEG
%- %-INTERNAL_METHOD_END
%- %-INHERITED_EVENT_BEGIN
%- %-INHERITED_EVENT_END
%- %-BW_METHOD_BEGIN
%- %-BW_METHOD_END
%- %-BW_DEFINITION_START
%- %-BW_DEFINITION_END
%- %-BW_IMPLEMENT_START
%- %-BW_IMPLEMENT_END
%- %-BW_EVENT_DEFINITION_START
%- %-BW_EVENT_DEFINITION_END
%- %-BW_EVENT_IMPLEMENT_START
%- %-BW_EVENT_IMPLEMENT_END
- 43 -
User Interface

%-
%-
%- These lines are not comments, but they are necessary for Component Wizard
%- If you change these lines, Component Wizard will not be responsible for loosing or
%- damaging your code!
%-
%-
%- readyCPU ...
%- readyDEVICE ...
%-
%define DriverAuthor Author
%define DriverVersion 01.00
%define DriverDate 22.01.2002
%if Language='ANSIC'
%-
%-
%INTERFACE
%define! Settings Common\ComplexSettings.Inc
%define! Abstract Common\ComplexAbstract.Inc
%include Common\Header.h
#ifndef __%ModuleName
#define __%ModuleName
%ifdef SharedModules
/*Include shared modules, which are used for whole project*/
%for var from IncludeSharedModules
#include "%'var'.h"
%endfor
%endif
/* Include inherited components */
%ifdef InhrSymbolList
%for var from InhrSymbolList
#include "%@%[email protected]"
%endfor
%else
%for var from ModuleList
#include "%'var'.h"
%endfor
%endif
#include "%ProcessorModule.h"
%-STARTUSERTYPES - Do not modify lines between %-STARTUSERTYPES and %-ENDUSRTYPES
%-ENDUSRTYPES
/* MODULE %ModuleName. */
%-STARTUSERTYPES - Do not modify lines between %-STARTUSERTYPES and %-ENDUSRTYPES
- 44 -
User Interface

%-ENDUSRTYPES
%-BW_DEFINITION_START
/* complex number - declare it */
#ifndef __Comp
#define __Comp
typedef struct {
float Re;
float Im;
} Comp, *CompPtr;
#endif
/* return real part of complex number */
%-BW_METHOD_BEGIN realPart
%ifdef realPart
float %'ModuleName'%.%realPart( Comp num );
%define! Parnum
%define! RetVal
%include Common\ComplexrealPart.Inc
%endif realPart
%-BW_METHOD_END realPart
/* add two complex numbers */
%-BW_METHOD_BEGIN addComplex
%ifdef addComplex
void %'ModuleName'%.%addComplex( Comp one, Comp two, Comp* result );
%define! Parresult
%define! Partwo
%define! Parone
%include Common\ComplexaddComplex.Inc
%endif addComplex
%-BW_METHOD_END addComplex
/* global variable */
extern Comp %'ModuleName'%.globalComp;
%-BW_DEFINITION_END
/* END %ModuleName. */
#endif /* ifndef __%ModuleName */
%include Common\Header.End
%-
%-BW_EVENT_DEFINITION_START
%-BW_EVENT_DEFINITION_END
%IMPLEMENTATION
%define! Settings Common\ComplexSettings.Inc
%define! Abstract Common\ComplexAbstract.Inc
%include Common\Header.C
- 45 -
User Interface

/* MODULE %ModuleName. */
%for var from EventModules
#include "%var.h"
%endfor
#include "%'ModuleName'.h"
%-BW_IMPLEMENT_START
/* #include "importc.h" BW has commented this line */
/* global variable */
Comp %'ModuleName'%.globalComp;
/* return real part of complex number */
%-BW_METHOD_BEGIN realPart
%ifdef realPart
%define! Parnum
%define! RetVal
%include Common\ComplexrealPart.Inc
float %'ModuleName'%.%realPart( Comp num ) {
return num.Re;
}
%endif realPart
%-BW_METHOD_END realPart
/* add two complex numbers */
%-BW_METHOD_BEGIN addComplex
%ifdef addComplex
%define! Parresult
%define! Partwo
%define! Parone
%include Common\ComplexaddComplex.Inc
void %'ModuleName'%.%addComplex( Comp one, Comp two, Comp* result ) {
result->Re = one.Re + two.Re;
result->Im = one.Im + two.Im;
return;
}
%endif addComplex
%-BW_METHOD_END addComplex
%-BW_IMPLEMENT_END
/* END %ModuleName. */
%include Common\Header.End
%-
%-
%-BW_EVENT_IMPLEMENT_START
%-BW_EVENT_IMPLEMENT_END
%INITIALIZATION
/* ### %DeviceType "%DeviceName" init code ... */
- 46 -
User Interface

%CODE_BEGIN
%CODE_END
%-
%else %- Language (& Compiler)
%error^ This component is not implemented in selected language & compiler !
%endif %- Language (& Compiler)
%-
%DEBUG
%ALL_SYMBOLS
%-
5.2. Startup menuThis window opens if it is enabled in Options. The default state is enabled.
It serves as a startup menu - what you want to do. You may choose from:
Start• with Inheritance Wizard - opens the Inheritance Wizard which is used for inheriting components. For
more details look here.
Open• classic Component Wizard - opens the Component Wizard which is used for editing and creating
components, interfaces and templates. Details of all available pages and functions of the Component Wizard
are described here. If this startup menu is disabled, this is selected as a default choice.
Figure 5.15 - Startup menu window
- 47 -
User Interface

5.3. Common page
Figure 5.16 - Common Page Picture
Description
Short• hint - short description of the component, which is used as hint in Processor Expert
Author• - author's name, which will appear in the source code header
Version• - version number of the component. To indicate a beta version, use format 00.9X. With every saving
the Component Wizard automatically increases the version.
Icon• - file name of the icon which will represent the component in the Processor Expert environment. The
file must be stored in the same directory as that of the component. The icons must have ".BMP" as extension.
All icons must be in 16x16 pixels/16 colors format. If you want to specify a 256 colors icon for the 256 color
version of Processor Expert, put the bitmap file of the icon into the directory of the component. The name of
icon file must be the name of the 16 colors icon, preceded by the underscore sign. For example, if the 16
colors icon is named "BitIO.bmp", the 256 colors icon must be named "_BitIO.bmp".
Shortcut• - This field is optional - when it is filled, this text is used for creating name of the component in the
Processor Expert project.
Component• category - This field describes the category of the component Software (SW), Hardware (HW),
etc. Processor Expert sorts components by categories and displays them in its component selector. This fild is
read only, to change category click button Change, dialog Select component category with tree of categories
appears.
One• instance of component in PE project only - This field is optional - when checked this component can
be inserted only once in Processor Expert project.
If you want one instance of some set of components, every component from this set must have identical
message, which is below the checkbox. If the message is empty it affects instances from this component only.
Component's• level - This field is optional and it describes the level of the component:
- 48 -
User Interface

High Level Component - The basic set of components designed carefully to provide functionality of most
microcontrollers on the market.
Low Level Component - The components dependent on the peripheral structure to allow user to benefit
from the non-standard features of a peripheral.
Peripheral Initialization Component - The lowest level of abstraction. These components cover all
features of the peripherals and were designed for initialization of these peripherals.
This information is also displayed in documentation when selected.
See also
Interface info page
5.3.1. Component category
Figure 5.17 - Component category dialog window
Description
Component• category treeEvery component can be sorted into some logic groups accordingly of the function. For example component
fast Fourier belongs to SW-Math, component for encapsulating some display device belongs to HW-Display.
Select the right category in the tree and click OK.
Thi dialog window is accessible from page Common.
Category• order - The component can be shown in several categories. As the component has to be at least in
one category, the Main category is mandatory. Other categories are optional.
Remove• category - if checked, after the dialog is confirmed by OK button, the category selected in Category
order field is cleared.
Component• is especially for this CPU producer - each category in the tree can be divided into subgroups
described by CPU producer. If the component is available for one only CPU producer, select it here. If not,
select < none >
- 49 -
User Interface

Remark: Processor Expert sorts components by their category and creates logical groups in the Component
selector.
Component Categories
Current categories are:
HW•
Sensor
Display
Communication
Converter
ADC-
DAC-
Memory
Keypad/Keyboard
Port I/O
Peripherals
SW•
Virtual peripheral
OS configuration
Security
En/Decryption
(De)compression
Browser
Resource management
DSP
Controlling
Communication
Tutorials and demonstrations
Data
Math
Internal• peripherals
Port I/O
Interrupts
Timer
Communication
Measurement
Converter
ADC-
DAC-
- 50 -
User Interface

Memory
CPU producers
Current possible CPU producers:
<• none > - i.e. no CPU producer
Atmel•
Fujitsu•
Freescale•
Toshiba•
National• Semiconductor
5.4. Properties page
Figure 5.18 - Page Picture
- 51 -
User Interface

Description
On this page, you can view, create and modify the properties of the component.
The panel on the left contains the list of the properties and the features of the currently selected property are
displayed on the right side. These features influence the behaviour of the property in Processor Expert
environment. You can change the amount of shown features from basic ones (Basic) to complete list (Expert) by
switching the drop-down selector in the bottom right corner of the window.
Remark: Each component must have the property Component name, which allows within the Processor Expert
environment to delete the component or move it to another position.
Creating Properties
The basic commonly used properties can be added by clicking one of the icons at the top of the left panel. For
description, see the hint available when mouse is placed at icon.
You can also add properties above (Add Up button) or below the selected property (Add Down button).
If the selected property is a group of properties, you can add a property to this group by pushing the Add toGroup button.
Properties Management
The selected property can be deleted by clicking the Delete button or by pressing the Delete key on the
keyboard. If the selected property is a group of properties, all the properties in the group will be deleted too.
Search button allows to find a property, by giving the content of its symbol item.
Restore groups button restores the expanded/collapsed state of all groups into the state as the component was
loaded.
For easier manipulation of the properties, there are also copy and move functions available:
Moving : To move a property, simply drag and drop it (with left mouse button) inside the left window (list of
properties).
If you are moving to a property which belongs to a group, the moved property will be dropped in the same
group. To move an item to an empty group, hold "Shift" key down.
Copying: To copy a property, simply drag and drop it (with left mouse button) while holding "Ctrl" key down.
If you are copying to a property which belongs to a group, the copied property will be dropped in the same
group. To copy an item to an empty group, hold "Shift" and "Ctrl" keys at the same time.
It is also possible to use the drag and drop facilities of the View Component utility.
Mouse Operations And Context Menus
It is possible to use context menus for the manipulation of properties.
Simple right click
Clicking the right mouse button opens the context menu for Adding and Deleting a property.
Meaning of the menu items:
- 52 -
User Interface

Items•
Add Up
Add Down
Add To Group
Delete
have the same meaning as the buttons in the properties page.
Duplicate• - duplicates the selected property (It will create new property of the same type as the selected and
Create• as new property - it will save the settings of the selected property and it will be new virtual
property. Next time you will add new property item, this property will be in the list of all properties. ( For
example you can create an Integer number property, set the minimal and maximal value to 0 to 255 and store
it as Integer number - Byte. Next time when you add property Integer number - Byte, this property will have
set the minimal and maximal value). it will copy the settings (features) of the existing property into the new
property).
Add• item from ListItemFromFile - creates a property which is defined in file which was created by the
previous action - Create item of ListItemFromFile.
Create• item of ListItemFromFile - you can save the settings of the property into the file. This file can be
used by property List of items (item is defined in file). The link to the file is by the feature ItemsFile. Save it
into the directory where the component is.
Submenu• List of items defined in file - if the selected property is List of items (item is defined in file) this
submenu is enabled:
Create new item description - you can create the *.item file. First of all file dialog appears for
specifying the target file name and after that edit modal window appears, the same like this page
Properties. There you can edit the type of the item (i.e. properties) for selected List of items (item is
defined in file) property.
Edit item description - you can edit the *.item file. If feature ItemsFile is set this menu is enabled and
modal window appears, the same like this page Properties. There you can edit the type of the item (i.e.
properties) for selected List of items (item is defined in file) property.
For more details see List of properties and property List of items (item is defined in file)
(TListItemFromFile).
Submenu• Inherited item/Link to component - if the selected property is Inherited component (interface) or
Link to component (it is used for sharing components), this submenu is enabled:
Inherit component (fast) - you can quickly inherit a component (create Interface and Template) in a few
seconds. If you select this menu item, dialog for fast inheriting appears.
Open interface - if the property has assigned some interface, you may easily open it and edit it. Save the
changes in the component first.
Drag and drop with right mouse button
When you drag and drop with the right mouse button, a context menu for Copying and Moving appears.
Meaning of the menu items:
Copy• Up - it copies the source property before the destination property
Copy• Down - it copies the source property below the destination property
Copy• To Group - if the destination property if Group property, it copies the source property into this group
- 53 -
User Interface

of properties.
Move• Up - it moves the source property before the destination property
Move• Down - it moves the source property below the destination property
Move• To Group - if the destination property if Group property, it moves the source property into this group
of properties.
Assign• - it copies the settings of the features of the selected property to the destination property (if a feature
is in source property and it isn't in destination property, this feature is skipped)
Properties and macros
Every property generates macro from its featureSymbol and some properties have detailed information which
are defined as macros too. For more details see page Macros defined from property.
See also
List of properties
5.4.1. Property List
There is a full list of component properties and properties features. Feature is "property of the property", settings
of one feature of the property. Features influences behaviour of the property in Processor Expert.
List of properties and features is different for Basic and for Professional version.
See also which macros are defined from properties.
Properties in Basic version
List of properties in Basic version
Address in CPU address space - input of any address from the CPU address space. Feature FixedSize
defines size of the requested address range or number of the allocated bit if addrONEBIT is selected in
AddrType. Processor Expert checks if selected address is inside target CPU address space and type of the
memory at the specified address corresponds the component requests. See example in component
BasicProperties
Feature name Description Templ.
AddrType Address Type: EXTERNAL - address in external address space,
INTERNAL - address in internal address space (internal memory), RAM,
ROM, FLASH, EEPROM - memory type, FIRMWARE - address in internal
memory for firmware, IO - I/O space for controll registers, CODE - address
only in code memory, DATA - address only in data memory,
ONETYPEONLY - address rnage must be selected only in one memory
type, ALLOCATE - address range is allocted, e.g. exclusivelly used (cannot
be shared for example with compiler), ONEBIT - only one bit (see feature
SizeOrBitNum), MULTIBITS - several bits (see feature NumOfBits)
No
EnabledRadix supported number system: binaty, octal, decadic, hex No
FixedSize fixed memory size in addresable units; the value is valid only if feature
"SizeOrBitNum" is not assigned
No
Hint item's description, simple HTML formating is supported (see Component
Wizard user documentation for details)
No
- 54 -
User Interface

ItemLevel item's view level: BASIC, ADVANCED, EXPERT, HIDDEN Yes
ItemName item's name displayed in first column No
MaxValue maximal value, value is valid only if >=MinValue otherwise it is ignored No
MinValue minimal value, always valid No
ReadOnly determines if the item's value is only for reading Yes
Symbol identifier, unique item's identification in the list No
Value item's value Yes
ValueRadix selected number system for items value (see also feature EnableRadix) Yes
Group - boolean (expanded/not expanded) - group of items, possible values are "Enabled" or "Disabled".
You can change TypeSpecName to change these two possible values. You can edit new type in Property
types page.
See example in component BasicProperties
Feature name Description Templ.
DefineSymbol determines way how the item value will be defined for macroprocessor:
either value yes/no, or defined/undefined symbol or text value of the item
No
Expanded determines if the group is expanded No
Hint item's description, simple HTML formating is supported (see Component
Wizard user documentation for details)
No
ItemLevel item's view level: BASIC, ADVANCED, EXPERT, HIDDEN Yes
ItemName item's name displayed in first column No
ReadOnly determines if the item's value is only for reading Yes
Symbol identifier, unique item's identification in the list No
TypeChangeAble determines if the item's type (see feature TypeSpecName) may be changed
in CHG script
No
TypeSpecName name of the item's type, type contains additional informations for the item, it
is supported for items {TEnumItem}, {TBoolItem}, {TBoolGrupItem},
{TEnumGrupItem}
No
Value item's value (group is enabled/disabled) Yes
Boolean yes / no - input of boolean value, possible values are "yes" or "no". You can change
TypeSpecName to change these possible values. You can edit new type in Property types page. See example
in component BasicProperties
Feature name Description Templ.
GetTextValueIndex determines if the item define index otherwise text value. This feature is
ignored if the item's type contains user defined symbols for each item. If this
feature is TRUE for boolean item, symbol is defined/undefined according to
item's value.
No
Hint item's description, simple HTML formating is supported (see Component
Wizard user documentation for details)
No
- 55 -
User Interface

ItemLevel item's view level: BASIC, ADVANCED, EXPERT, HIDDEN Yes
ItemName item's name displayed in first column No
ReadOnly determines if the item's value is only for reading Yes
Symbol identifier, unique item's identification in the list No
TypeChangeAble determines if the item's type (see feature TypeSpecName) may be changed
in CHG script
No
TypeSpecName name of the item's type, type contains additional informations for the item, it
is supported for items {TEnumItem}, {TBoolItem}, {TBoolGrupItem},
{TEnumGrupItem}
No
Value item's value Yes
External bitmap file - external bitmap file, supported format: "BMP". You can restrict number of colors in
selected file by setting up the feature BitmapFormat. See example in component BasicProperties
Feature name Description Templ.
BitmapFormat determines required picture format: - Any - no limitations, - BW -
black&white, - Color - color, - Col16 - 16 colors, - Col256 - 256- colors
No
FileDefine determines way how the item defines its value: NONE, BINARY, TEXT No
Filter determines filter for file selection No
Hint item's description, simple HTML formating is supported (see Component
Wizard user documentation for details)
No
ItemLevel item's view level: BASIC, ADVANCED, EXPERT, HIDDEN Yes
ItemName item's name displayed in first column No
ReadOnly determines if the item's value is only for reading Yes
Symbol identifier, unique item's identification in the list No
Value item's value Yes
Date - input of date. You can specify possible date range using features MinDateValue and MaxDateValue.
Date is displayed/editable in format specified in Regional setting of your Windows Operating System (short
date format). See example in component BasicProperties
Feature name Description Templ.
Hint item's description, simple HTML formating is supported (see Component
Wizard user documentation for details)
No
ItemLevel item's view level: BASIC, ADVANCED, EXPERT, HIDDEN Yes
ItemName item's name displayed in first column No
MaxDateValue the newest supported date in Windows format No
MinDateValue the oldest supported date in Windows format No
ReadOnly determines if the item's value is only for reading Yes
Symbol identifier, unique item's identification in the list No
Text item's initial value Yes
- 56 -
User Interface

Directory - selection of directory on the disk. See example in component BasicProperties
Feature name Description Templ.
ExcludeTrailBackSlash format of the value No
Hint item's description, simple HTML formating is supported (see Component
Wizard user documentation for details)
No
ItemLevel item's view level: BASIC, ADVANCED, EXPERT, HIDDEN Yes
ItemName item's name displayed in first column No
ReadOnly determines if the item's value is only for reading Yes
Symbol identifier, unique item's identification in the list No
Value item's value Yes
Enumeration - selection of one of predefined values. You can edit type (list of items) in Property types
page. You can choose type of the item in TypeSpecName. See example in component BasicProperties
Feature name Description Templ.
GetTextValueIndex determines if the item define index otherwise text value. This feature is
ignored if the item's type contains user defined symbols for each item. If this
feature is TRUE for boolean item, symbol is defined/undefined according to
item's value.
No
Hint item's description, simple HTML formating is supported (see Component
Wizard user documentation for details)
No
Index index of items value Yes
ItemLevel item's view level: BASIC, ADVANCED, EXPERT, HIDDEN Yes
ItemName item's name displayed in first column No
ItemsCount number of items in the popup list No
ReadOnly determines if the item's value is only for reading Yes
Symbol identifier, unique item's identification in the list No
TypeChangeAble determines if the item's type (see feature TypeSpecName) may be changed
in CHG script
No
TypeSpecName name of the item's type, type contains additional informations for the item, it
is supported for items {TEnumItem}, {TBoolItem}, {TBoolGrupItem},
{TEnumGrupItem}
No
External file - external file. See example in component BasicProperties
Feature name Description Templ.
FileDefine determines way how the item defines its value: NONE, BINARY, TEXT No
Filter determines filter for file selection No
Hint item's description, simple HTML formating is supported (see Component
Wizard user documentation for details)
No
- 57 -
User Interface

ItemLevel item's view level: BASIC, ADVANCED, EXPERT, HIDDEN Yes
ItemName item's name displayed in first column No
ReadOnly determines if the item's value is only for reading Yes
Symbol identifier, unique item's identification in the list No
Value item's value Yes
Group of items - simple group of items. Feature Expanded defines the group default setting (expanded/not
expanded). See example in component BasicProperties
Feature name Description Templ.
Expanded determines if the group is expanded No
Hint item's description, simple HTML formating is supported (see Component
Wizard user documentation for details)
No
ItemLevel item's view level: BASIC, ADVANCED, EXPERT, HIDDEN Yes
ItemName item's name displayed in first column No
ReadOnly determines if the item's value is only for reading Yes
Symbol identifier, unique item's identification in the list No
Text item's initial value No
Inherited component (interface) - link to inherited component. The inherited component is described by
interface specified by feature InterfaceName.
Feature name Description Templ.
Hint item's description, simple HTML formating is supported (see Component
Wizard user documentation for details)
No
Index index of items value Yes
InterfaceName name of interface No
ItemLevel item's view level: BASIC, ADVANCED, EXPERT, HIDDEN Yes
ItemName item's name displayed in first column No
ReadOnly determines if the item's value is only for reading Yes
ShowInheritedMethodsEventsInPrjTree
display all methods and events of inherited component in the project tree No
Symbol identifier, unique item's identification in the list No
Value Yes
Link to component - link to shared component. The shared component is described by interface specified
by feature InterfaceName
Feature name Description Templ.
Hint item's description, simple HTML formating is supported (see Component
Wizard user documentation for details)
No
- 58 -
User Interface

InterfaceName name of interface No
ItemLevel item's view level: BASIC, ADVANCED, EXPERT, HIDDEN Yes
ItemName item's name displayed in first column No
ReadOnly determines if the item's value is only for reading Yes
SortStyle setting for sorting of values in popup list (criteria are listed from lowest to
highest priority): - ALPHA - alphabetically, -
DONT_PUT_DOWN_INTERNAL_SIGNALS - internal signals shout NOT
be placed at the end of the list, - USED - used peripherals should be at the
end of the list, - EICON - values with exclamation mark, that is not possible
to use, at the end
No
Symbol identifier, unique item's identification in the list No
Integer number - signed - input of signed integer value. Input value can be written in enhanced format
supported in version 2.34 or higher: {format}:{number}, where {format} is H for hexadecimal numbers, D for decimal
numbers, O for octal numbers and B for binary numbers and {number} is value is specified format. For example:
H:F0, D:240 and B:1111111100000000 are the same values.See example in component BasicProperties
Feature name Description Templ.
EnabledRadix supported number system: binaty, octal, decadic, hex No
Hint item's description, simple HTML formating is supported (see Component
Wizard user documentation for details)
No
ItemLevel item's view level: BASIC, ADVANCED, EXPERT, HIDDEN Yes
ItemName item's name displayed in first column No
MaxValue maximal value, value is valid only if >=MinValue otherwise it is ignored No
MinValue minimal value, always valid No
ReadOnly determines if the item's value is only for reading Yes
Symbol identifier, unique item's identification in the list No
Value item's value Yes
ValueRadix selected number system for items value (see also feature EnableRadix) Yes
List of items - input of several items of the same type. Type of the item is defined in the ItemsType feature
(see below). User can modify number of these items. See example in component BasicProperties
Feature name Description Templ.
Expanded determines if the group is expanded No
Hint item's description, simple HTML formating is supported (see Component
Wizard user documentation for details)
No
ItemLevel item's view level: BASIC, ADVANCED, EXPERT, HIDDEN Yes
ItemName item's name displayed in first column No
ItemsName prefix of names of list items No
ItemsSymb prefix of symbols of list items (item has no meaning for values inside group) No
- 59 -
User Interface
ItemsType type of list item No
ItemsTypeSpecName setting for list item feature TypeSpecName No
MaxItems max number of items in the list No
MinItems min number of items in the list No
ReadOnly determines if the item's value is only for reading Yes
Symbol identifier, unique item's identification in the list No
Text item's initial value No
List of items (item is defined in a file) - input of several items of the same type. Type of the item is
defined in external file (*.item). The file may be created and modified using the commands from properties
popup menu. User can modify number of these items.
Remark:The *.item file can contain only one property in the root. If you need more properties in each item
record, you have to create property Group of items in the root and all properties you need put into this
group.
Feature name Description Templ.
Expanded determines if the group is expanded No
Hint item's description, simple HTML formating is supported (see Component
Wizard user documentation for details)
No
ItemLevel item's view level: BASIC, ADVANCED, EXPERT, HIDDEN Yes
ItemName item's name displayed in first column No
ItemsFile relative path and file name, that contains definition of the list item No
ItemsName prefix of names of list items No
ItemsSymb prefix of symbols of list items (item has no meaning for values inside group) No
MaxItems max number of items in the list No
MinItems min number of items in the list No
ReadOnly determines if the item's value is only for reading Yes
Symbol identifier, unique item's identification in the list No
Text item's initial value No
Real number - input of real number value.
Feature name Description Templ.
Hint item's description, simple HTML formating is supported (see Component
Wizard user documentation for details)
No
ItemLevel item's view level: BASIC, ADVANCED, EXPERT, HIDDEN Yes
ItemName item's name displayed in first column No
MaxValue max items' value No
MinValue min item's value No
ReadOnly determines if the item's value is only for reading Yes
Symbol identifier, unique item's identification in the list No
- 60 -
User Interface

Value item's value Yes
Speed mode setting (Enable/Disable) - speed mode enabled/disabled - necessary for components which
inherit from time- dependent hardware components. It is better to drag&drop group of these items from any time-dependent Processor
Expert component than edit this item manually.See example in component BasicProperties
Feature name Description Templ.
GetTextValueIndex determines if the item define index otherwise text value. This feature is
ignored if the item's type contains user defined symbols for each item. If this
feature is TRUE for boolean item, symbol is defined/undefined according to
item's value.
No
Hint item's description, simple HTML formating is supported (see Component
Wizard user documentation for details)
No
ItemLevel item's view level: BASIC, ADVANCED, EXPERT, HIDDEN Yes
ItemName item's name displayed in first column No
ReadOnly determines if the item's value is only for reading Yes
Symbol identifier, unique item's identification in the list No
TypeChangeAble determines if the item's type (see feature TypeSpecName) may be changed
in CHG script
No
TypeSpecName name of the item's type, type contains additional informations for the item, it
is supported for items {TEnumItem}, {TBoolItem}, {TBoolGrupItem},
{TEnumGrupItem}
No
Value item's value Yes
String - input of string. See example in component BasicProperties
Feature name Description Templ.
Hint item's description, simple HTML formating is supported (see Component
Wizard user documentation for details)
No
ItemLevel item's view level: BASIC, ADVANCED, EXPERT, HIDDEN Yes
ItemName item's name displayed in first column No
MaxLength max string length No
MinLength min string length No
ReadOnly determines if the item's value is only for reading Yes
Symbol identifier, unique item's identification in the list No
Value item's value Yes
String list - input of text with multiple lines. See example in component BasicProperties
Feature name Description Templ.
AcceptNonPrintChars determines if non-printable characters are supported by the item No
- 61 -
User Interface

DefineList determines if the list of list of characters (i.e. list of lines, each line is list of
characters) is defined (as macro symbol with suffix List).
No
ExternEditorEnabled determines if it is supported external editor for item's value No
Hint item's description, simple HTML formating is supported (see Component
Wizard user documentation for details)
No
ItemLevel item's view level: BASIC, ADVANCED, EXPERT, HIDDEN Yes
ItemName item's name displayed in first column No
ReadOnly determines if the item's value is only for reading Yes
StringList item's value Yes
Symbol identifier, unique item's identification in the list No
Time - input of time. You can specify allowed time range using features MinTimeValue and MaxTimeValue
. See example in component BasicProperties
Feature name Description Templ.
Hint item's description, simple HTML formating is supported (see Component
Wizard user documentation for details)
No
ItemLevel item's view level: BASIC, ADVANCED, EXPERT, HIDDEN Yes
ItemName item's name displayed in first column No
MaxTimeValue the newest supported time No
MinTimeValue the oldest supported time No
ReadOnly determines if the item's value is only for reading Yes
Symbol identifier, unique item's identification in the list No
Text item's initial value No
Legend:Feature marked as bold are compulsory. It has no default value and has to be configured.
Feature name - name of the feature
Description - description of the feature
Templt. - if the feature is shown in templates
Example
There is complete component BasicProperties in this version of Component Wizard. This component contains all
properties provided in Basic version of Component Wizard.
- 62 -
User Interface
5.4.1.1. Feature link
Component Wizard - Links (Professional Component Wizard only)
Description
Some property features need to be linked to a specific property. For example, the direction feature of a Pin(Pin/Port) property needs to be linked to a Direction property. Thus, when you create a Pin property, you need
to create also a Direction property. In the direction feature of the Pin property, you will then select the symbol
of the Direction property.
The features of many properties can be linked to the same property. For example, the direction feature of 8 Pinproperties can be linked to the same Direction property. As a consequence, they will all have the same direction.
Some links are already available within Processor Expert. For example for the direction feature of a PinProperty, you can select _PE_OutputDir (output only) or _PE_InputDir (input only). In this case, you do not
need to create a Direction property. These links are listed in the next paragraph.
Available Links
_PE_OutputDir• : Direction property fixed to output
Type=TDrctItem
Symbol=_PE_OutputDir
_PE_InputDir• : Direction property fixed to input
Type=TDrctItem
Symbol=_PE_InputDir
_PE_False• : Boolean property fixed to false
Type=TBoolItem
Symbol=_PE_False
5.4.2. Fast Inheriting
If you want to inherit/share components into a new component, you should use the Inheritance Wizard . For
details on inhteritance see chapter 2.1 Inheritance . Fast inheriting offers a simplified and quick method of
inheriting/sharing a component.
Switch1. to page Properties
Add2. new property Inherited component (interface) for inheriting a component or property Link tocomponent to share a component.
Click3. with the right mouse button on this property and the context menu will appear.
Select4. the submenu Inherited item and then click on the menu item Inherit component (fast)
The5. dialog appears (see bellow) - select the component you want to inherit and fill the edit line (name of
the interface and template)
Click6. the button Inherit
- 63 -
User Interface

Dialog Description
Figure 5.19 - Fast inheriting dialog
Meaning of the buttons:
Inherit• - creates an interface and template, modifies the property inherited component and closes this
window.
Cancel• - cancels the fast inheriting - closes this window.
Create• and register template into the interface - if checked the template is created and registered. If not,
the component is registered directly into the interface. If you want to later set/change the properties of the
inherited component or set some methods/events as read only, etc. create the template.
Inheriting• details - you can specify for what the component will be used and what changes in the inherited
component you will do:
Onlya. all inherited methods and events - the component will be used only for calling already existing
methods.
Onlyb. use some of inherited methods and events - the component will be used only for calling already
existing methods but inherite all methods is not necessary. See inheriting details picture for more
details. This dialog appears after click on button OK.
Redefinec. some methods - the component will be inherited for changing behaviour and/or extending its
functionality for another inheriting. See inheriting details picture for more details. This dialog appears
after click on button OK.
Edit line Name of the interface and template - Enter the file name (without extension) of the interface and the
template. If the collision of the names occurs, then similar names will be used.
- 64 -
User Interface
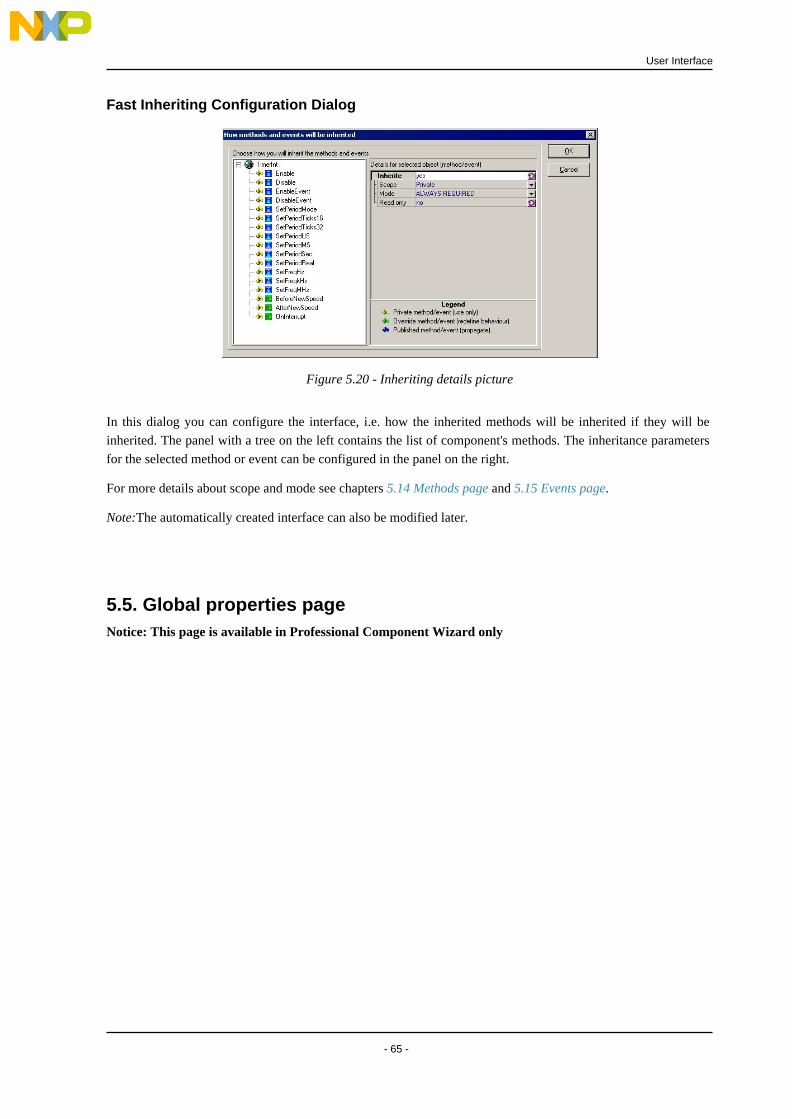
Fast Inheriting Configuration Dialog
Figure 5.20 - Inheriting details picture
In this dialog you can configure the interface, i.e. how the inherited methods will be inherited if they will be
inherited. The panel with a tree on the left contains the list of component's methods. The inheritance parameters
for the selected method or event can be configured in the panel on the right.
For more details about scope and mode see chapters 5.14 Methods page and 5.15 Events page.
Note:The automatically created interface can also be modified later.
5.5. Global properties pageNotice: This page is available in Professional Component Wizard only
- 65 -
User Interface

Figure 5.21 - Page Picture
Description
On this page, you can create the global properties of the component.
Difference between "properties" and "global properties":Global properties are not visible within the Processor Expert environment. You may create as global properties
the properties that are used as links for the features of other properties and that do not require to be visible for the
user. As a result, you increase the readability of your properties page within Component Wizard.
Let's give an example. The Direction feature of a Pin (Pin/Port) property needs to be linked to a Direction(Direction Input/Output/Input-Output) property. If the direction of the pin is not to be modified within Processor
Expert, and thus, has to be invisible, you may create the Direction property into the Global properties page.
Remark: in fact, this is not a typical example, because some links (input only and output only) for the direction
feature of Pin properties are already included into Processor Expert, and you might not have to create a
Direction property.
Remark: It is also possible to create invisible properties into the properties page, by setting the feature Visible to
False. The advantage of creating them into the Global Properties page is that you separate the visible properties
from the others and get subsequently a clearer overview.
In the rest of the description, for simplification, global properties will just be called properties.
The created properties are listed on the left side and the features of the selected property are displayed on the
other side. These features are the features of the property edit item in the Processor Expert environment. You
may visualize only the essential features by unchecking the Details on/off check box.
You can add properties above ( Add Up button) or below the selected property ( Add Down button). If the
- 66 -
User Interface

selected property is a group of properties, you can add a property to this group by pushing the Add to Groupbutton.
The selected property can be deleted by clicking the Delete button or by pressing the Delete key of the keyboard.
If the selected property is a group of properties, all the properties of the group will be deleted too. Search allows
to find a property, by giving the content of its symbol item.
For easier manipulation of the properties, there are also copying and moving facilities.
Moving : To move a property, simply drag and drop it (with left mouse button) inside the left window (list of
properties).
If you are moving to a property which belongs to a group, the moved property will be dropped in the same
group. To move an item to an empty group, hold "Shift" key down.
Copying: To copy a property, simply drag and drop it (with left mouse button) holding "Ctrl" key down.
If you are copying to a property which belongs to a group, the copied property will be dropped in the same
group. To copy an item to an empty group, hold "Shift" and "Ctrl" keys at the same time.
It is also possible to use the drag and drop facilities of the View Component utility.
Remark: It is possible to use context menus for the manipulation of properties. Clicking the right mouse button
opens the context menu for Adding and Deleting a property. And when you drag and drop with the right mouse
button, a context menu for Copying and Moving appears.
5.6. Component Property type page
Figure 5.22 - Property types page
- 67 -
User Interface
Description
In this page, you can create your own enumerate types.
You can use the buttons or the context menu in order to add and delete enumeration types/items.
There are two types of enumerate types :
Enumeration• of 1 or more item(s) - Add Enum button
Enumeration• of 2 items only. It is used for boolean based properties. - Add Bool button
These two types are used by the properties of the Enumerate type.
Every item for enumeration have these subitems:
Item• name - compulsory - fill in the name of the item - it is displayed in Processor Expert
Item• value - optional - The Enumeration property in a Macroprocessor language defines its value from the
Item value if defined otherwise from the Item name.
Remark: All Item value must be empty or defined at a time for current property type. It's not allowed to have
some Item values defined and the others not!
Item• hint - optional - hint for this item - this text will be displayed in processor expert as a context help.
Changing the order of the items:You can change the order using the drag and drop function on the left grayed column (the column with the
indexes). Drag the desired row and drop at the new position.
Remark: If you are currently using a created type in the "Properties" page, you cannot delete it.
Types are global - this check box determines whether the user types will be local or global. If the box is
checked, the types will be global and other components share this file and the file is located in the directory "
Beans\*.tps". If you want to keep these types hidden from other components, make the file local. The file is then
located in the same directory as that of the component.
User enumerate type file - name of the file, which will contain the global enumeration types. By default, it is
the name of the component. The created file will have the extension ".TPS", which is automatically added to the
input name.
Remark: To use already created global types check "Types are global" and select the wished user types after
clicking Open button. These types will be loaded automatically.
Context menus
It is possible to use context menus for the manipulation of property types.
Simple right click
Clicking the right mouse button (in the list box List of enumeration types for properties) opens the context menu
for Adding and Deleting a property type.
Add• Enum - add Enumeration of 1 or more item(s) - the same action as Add Enum button
Add• Boolean Enum - add Enumeration of 2 items only - the same action as Add Bool button
Delete• Enum - delete selected enumeration - the same action as Delete type button
- 68 -
User Interface

5.7. Methods page
Figure 5.23 - Methods page
Description
On this page, you can create and configure the methods of the component. The created methods are listed on the
left side and properties of the selected method are displayed on the other side.
A method has the following properties :
Meaning of buttons:
Details• - shows or hides details for selected method. Necessary features to set are always visible.
Add• - adds new method
Delete• - deletes selected method
Add• parameter - adds new parameter to selected method
Delete• parameter - deletes selected parameter for current method
Properties of selected method :
Symbol• - name of the method (the same name as in the left window)
Method_Name• - the same as Symbol (it is a synonym)
Hint• - hint displayed in the Processor Expert environment and method description of the help file. See Help
Page.
- 69 -
User Interface

IsInAssembler• - if the method is implemented in assembler
IsInDefinition• module - if it is in the definition module (when the method is not public)
PublicMethod• - if the included method is public
ReadOnly• - if the method is in Processor Expert read only, i.e. the Value cannot be changed (generate code
or don't generate code)
ReturnHint• - hint for the return type, displayed in the Processor Expert environment (default value you may
set in Options - Default values page)
ReturnType• - type of the returned value. (void means that the method has no return value) (default value
you may set in Options - Default values page)
Selected• - generation source code into the driver (in Processor Expert Code design). There are four
possibilities:
selYES - Method will be generated, it can be changed in Processor Expert (sets ReadOnly to false and
Value to true)
selNO - Method will not be generated, it can be changed in Processor Expert (sets ReadOnly to false and
Value to false)
selNEVER - Method will not be generated, it cannot be changed in Processor Expert (sets ReadOnly to
true and Value to false)
selALWAYS - Method will be always generated, it cannot be changed in Processor Expert (sets
ReadOnly to true and Value to true)
Value• - if the method is included in the component (it will be generated into the driver or not - in Processor
Expert Code design)
all• other method properties which are not described here, are described in properties' features.
UserMethodName• - If you want to display another name in the Processor Expert. It is recommended for
advanced users only!
Properties of each parameter :
Name• - name of the parameter displayed and used in Processor Expert
Type• - type of the parameter (selected from the list)
Passing• - how the parameter is passed to the method
Hint• - hint for the parameter displayed in the Processor expert environment and parameter description in
help files. See Help Page.
You can use the buttons to add and delete methods/parameters.
It is also possible here to use the drag and drop facilities of the View Component utility.
If you have filled the driver and language sections of the Drivers page, Component Wizard can automatically
find a method in the driver by right clicking on the method (in the left window). A context menu appears, where
you can select either the definition, implementation or the help part of the selected driver and language. Using
double-click (left mouse button), you may automatically go to the implementation part of the selected driver.
Before editing drivers, you have to save the component (You can check the Autosave check box in the Drivers
page).
- 70 -
User Interface
Context menus
Clicking with the right mouse button on the method opens the context menu for working with selected method:
Meaning of the menu items:
Go• to Definition module - if a driver is already created and selected in page Drivers , you can edit the
definition of the method in the driver. (for experienced users)
Go• to INTERFACE module - this command is available for events only.
Go• to Implementation module - if a driver is already created and selected in page Drivers, you can edit the
implementation of the method in the driver.
Edit• include - if a driver is already created, you can edit the include for selected method
Go• to Help page - opens the help page with the method selected. See 5.12 Documentation page for details.
Include• all - sets the property "Value" to "yes" for all methods
Exclude• all - sets the property "value" to "no" for all methods
Add• - creates a new method
Delete• - deletes the methods from the component
Duplicate• - duplicates the method (hints, parameters, ...)
Clicking with the right mouse button on the method's parameter will open the following context menu:
Move• Up - the parameter is moved to be closer to the beginning.
Move• Down - the parameter is moved to be closer to the end.
Delete• - removes the parameter definition.
5.8. Events page
- 71 -
User Interface

Figure 5.24 - Events page
Description
On this page, you can create the events of the component.
The created events are listed on the left side and properties of the selected event are displayed on the other side.
An event has the following properties :
Meaning of buttons:
Details• - shows or hides details for selected event. Necessary features to set are always visible.
Add• - adds new event
Delete• - deletes selected event
Add• parameter - adds new parameter to selected event
Delete• parameter - deletes selected parameter for current event
Properties of selected event :
Symbol• - name of the event (the same name as in the left window)
HasPriority• - if the event has priority. If true, event has subitem Priority (in the left window)
Hint• - hint displayed in the Processor Expert environment and event description of the help file. See Help
Page.
IsInAssembler• - if the event is implemented in assembler
ReadOnly• - if the event is in Processor Expert read only, i.e. the Value cannot be changed (generate code or
don't generate code)
- 72 -
User Interface
Selected• - generation source code into the driver (in Processor Expert Code design). There are four
possibilities:
selYES - Event will be generated, it can be changed in Processor Expert (sets ReadOnly to false and
Value to true)
selNO - Event will not be generated, it can be changed in Processor Expert (sets ReadOnly to false and
Value to false)
selNEVER - Event will not be generated, it cannot be changed in Processor Expert (sets ReadOnly to
true and Value to false)
selALWAYS - Event will be always generated, it cannot be changed in Processor Expert (sets ReadOnly
to true and Value to true)
Value• - if the event is included in the component (it will be generated into the driver or not - in Processor
Expert Code design)
all• other event properties which are not described here, are described in properties' features.
Properties of selected Priority:
MainPriority• - Link to the Priority property in the page Properties . In the Basic version of Component
Wizard this property is not available.
all• other properties which are not described here, are described in properties' features.
Properties of each parameter :
Name• - name of the parameter displayed and used in Processor Expert
Type• - type of the parameter (selected from the list)
Passing• - type of passing parameter to the method
Hint• - hint for the parameter displayed in the Processor expert environment and parameter description in
help files. See Help Page.
You can use the buttons to add and delete events/parameters.
It is also possible here to use the drag and drop facilities of the View Component utility.
If you have filled the driver and language sections of the Drivers page, Component Wizard can automatically
find a event in the driver by right clicking on the event (in the left window). You can select either the definition,
implementation or the help part of the selected driver and language. Using double-click (left mouse button), you
may automatically go to the implementation part of the selected driver. Before editing drivers, you have to save
the component (You can check the Autosave check box in the Drivers page).
Context menus
Clicking with the right mouse button at event opens the context menu for working with selected event:
Meaning of the menu items:
Go• to INTERFACE module - if a driver is already created and selected in page Drivers, you can edit the
definition of the event in the driver. (for experienced users)
Go• to Implementation module - if a driver is already created and selected in page Drivers, you can edit the
implementation of the event in the driver.
Edit• include - if a driver is already created, you can edit the include for selected event
- 73 -
User Interface
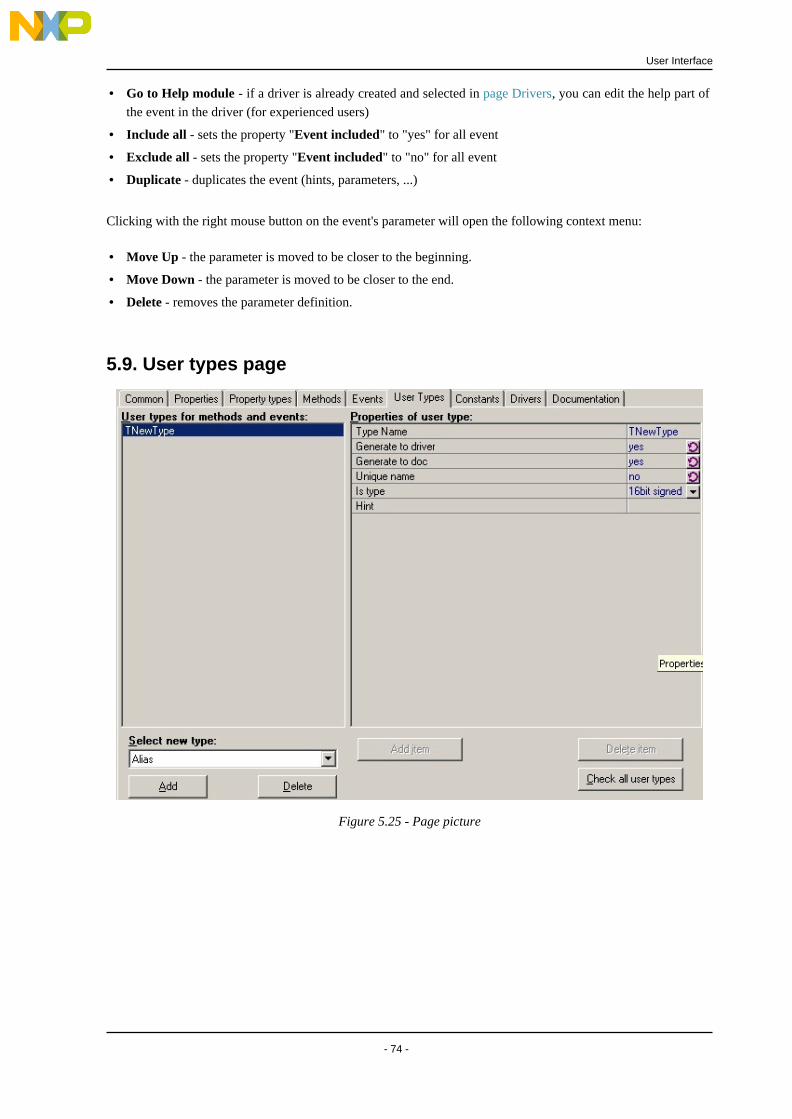
Go• to Help module - if a driver is already created and selected in page Drivers, you can edit the help part of
the event in the driver (for experienced users)
Include• all - sets the property "Event included" to "yes" for all event
Exclude• all - sets the property "Event included" to "no" for all event
Duplicate• - duplicates the event (hints, parameters, ...)
Clicking with the right mouse button on the event's parameter will open the following context menu:
Move• Up - the parameter is moved to be closer to the beginning.
Move• Down - the parameter is moved to be closer to the end.
Delete• - removes the parameter definition.
5.9. User types page
Figure 5.25 - Page picture
- 74 -
User Interface

Description
For advanced components, you may need to create your own types in this page.
List of types you can create:
Aliases•
Arrays•
Records•
Pointers•
Enums•
User• definitions
Properties of selected type:(these properties are common to every user type)
Type• Name - type name as it will be stored in the types list (for Parameter Type feature in Methods page
and Events page, and for parameters type and return types of functions).
Generate• to driver - if the declaration is generated in the drivers
Unique• name - if set to 'yes', the type will have the unique name, which will consist of the name of the of the
component and the Type Name . Two instances of one type of the component will have two different
declarations of this type.
Example: Our component is MyBean. This component has one user type MyType which has selected option
Unique name to 'yes'. We have two instances in Processor Expert MB1 and MB2 . After Generation code
there will be declared two user types:
MB1_MyType
MB2_MyType
Remark: this property has no influence on type User definition
Hint• - description of the selected type. It is used in help files. See Help page
Properties of type Alias:
Is• type - Alias type is the same type as selected type
Properties of type Array:
Low• index - Low index of the array. The size of array is (high-low+1).
High• index - High index of the array. The size of array is (high-low+1).
Of• type - Type of array
Properties of type Record:
Item• Name - Name of the variable in the record
Item• Type - Type of variable
Is• pointer to type - is the variable pointer to Item Type
Item• Hint - Description of the variable. It is used in help files. See Help page
Note: The order of the items of the record can be changed using drag&drop on -Item line.
- 75 -
User Interface
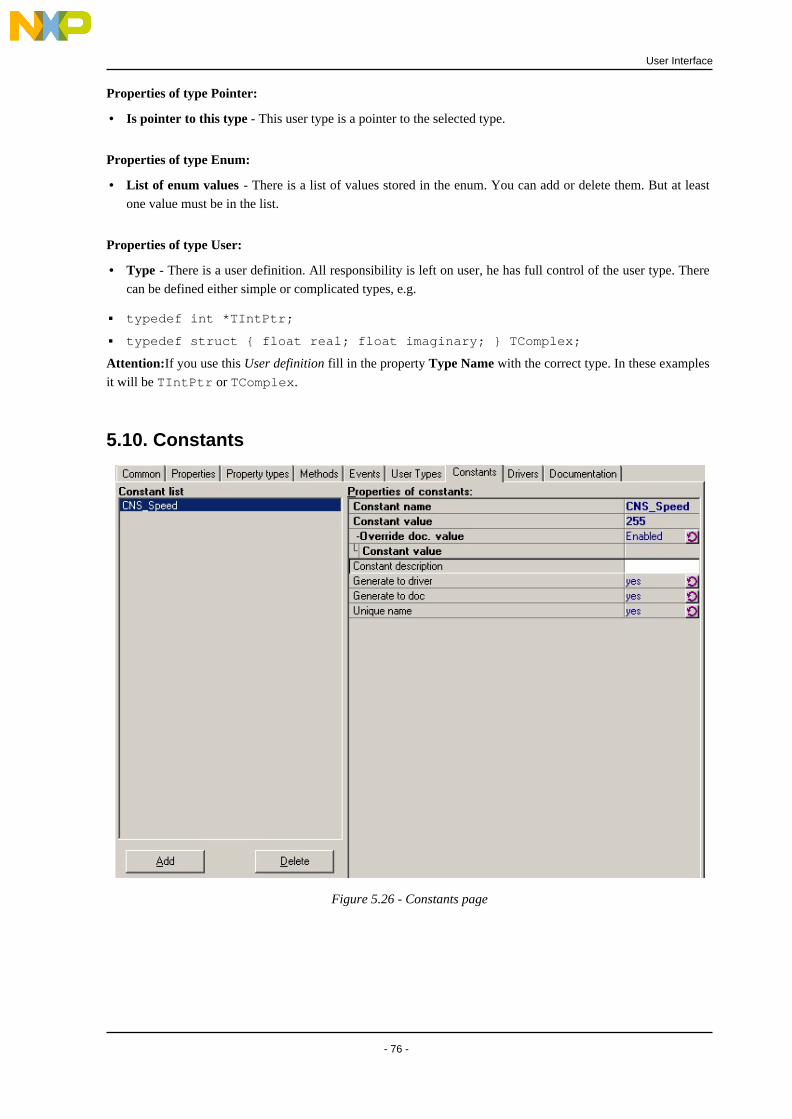
Properties of type Pointer:
Is• pointer to this type - This user type is a pointer to the selected type.
Properties of type Enum:
List• of enum values - There is a list of values stored in the enum. You can add or delete them. But at least
one value must be in the list.
Properties of type User:
Type• - There is a user definition. All responsibility is left on user, he has full control of the user type. There
can be defined either simple or complicated types, e.g.
typedef int *TIntPtr;
typedef struct { float real; float imaginary; } TComplex;
Attention:If you use this User definition fill in the property Type Name with the correct type. In these examples
it will be TIntPtr or TComplex.
5.10. Constants
Figure 5.26 - Constants page
- 76 -
User Interface

Description
In this page, the user can define a constants that will be available to the user of the component and will be
documented in the documentation.
The left panel contains a list of the constants and the right contains a value and other properties of the currently
selected constant in the left panel.
Constants can be added or removed by pressing the button Add / Delete.
Each constant has the following properties:
Constant• name - speficifies a indentifies that will be used in the generated code.
Constant• value - a value that will be assigned to the constant.
Override• doc. value - a value of the constant that will be used in the documentation instead of the value
defined in the property Constant value.
Constant• description - a text used for the documentation.
Generate• to driver - if the constant will be placed in the generated into the driver automatically.
Generate• to doc - enables generation of the constant into the documentation.
Unique• name - enables generation of the constant with unique name. If there will be more instances of one
component, each will contain a different constant name (usually there will be a prefix of the component
name).
5.11. Drivers Page
- 77 -
User Interface
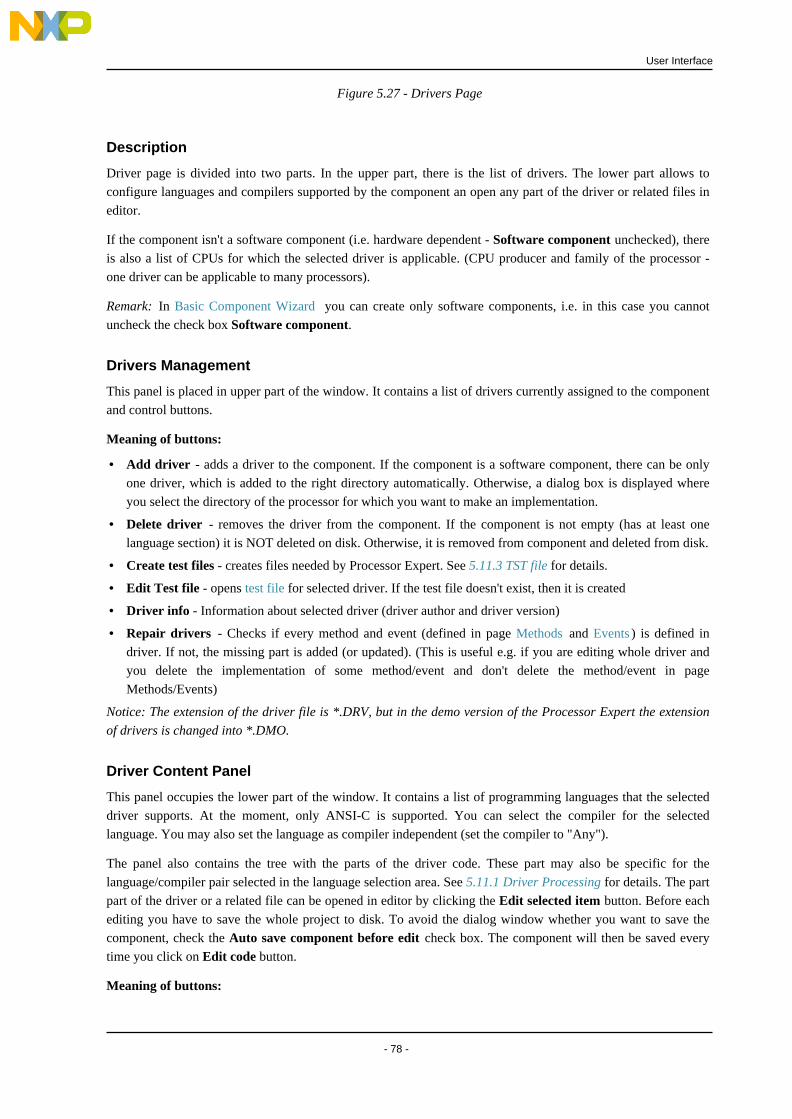
Figure 5.27 - Drivers Page
Description
Driver page is divided into two parts. In the upper part, there is the list of drivers. The lower part allows to
configure languages and compilers supported by the component an open any part of the driver or related files in
editor.
If the component isn't a software component (i.e. hardware dependent - Software component unchecked), there
is also a list of CPUs for which the selected driver is applicable. (CPU producer and family of the processor -
one driver can be applicable to many processors).
Remark: In Basic Component Wizard you can create only software components, i.e. in this case you cannot
uncheck the check box Software component.
Drivers Management
This panel is placed in upper part of the window. It contains a list of drivers currently assigned to the component
and control buttons.
Meaning of buttons:
Add• driver - adds a driver to the component. If the component is a software component, there can be only
one driver, which is added to the right directory automatically. Otherwise, a dialog box is displayed where
you select the directory of the processor for which you want to make an implementation.
Delete• driver - removes the driver from the component. If the component is not empty (has at least one
language section) it is NOT deleted on disk. Otherwise, it is removed from component and deleted from disk.
Create• test files - creates files needed by Processor Expert. See 5.11.3 TST file for details.
Edit• Test file - opens test file for selected driver. If the test file doesn't exist, then it is created
Driver• info - Information about selected driver (driver author and driver version)
Repair• drivers - Checks if every method and event (defined in page Methods and Events ) is defined in
driver. If not, the missing part is added (or updated). (This is useful e.g. if you are editing whole driver and
you delete the implementation of some method/event and don't delete the method/event in page
Methods/Events)
Notice: The extension of the driver file is *.DRV, but in the demo version of the Processor Expert the extension
of drivers is changed into *.DMO.
Driver Content Panel
This panel occupies the lower part of the window. It contains a list of programming languages that the selected
driver supports. At the moment, only ANSI-C is supported. You can select the compiler for the selected
language. You may also set the language as compiler independent (set the compiler to "Any").
The panel also contains the tree with the parts of the driver code. These part may also be specific for the
language/compiler pair selected in the language selection area. See 5.11.1 Driver Processing for details. The part
part of the driver or a related file can be opened in editor by clicking the Edit selected item button. Before each
editing you have to save the whole project to disk. To avoid the dialog window whether you want to save the
component, check the Auto save component before edit check box. The component will then be saved every
time you click on Edit code button.
Meaning of buttons:
- 78 -
User Interface

Add• section - displays a window where you can choose the language and compiler for the section. It will add
the corresponding language section to the driver.
Delete• section - removes the selected language section from driver.
Edit• selected item - opens selected item for the selected language and compiler in the editor. If a driver part
is edited, a window appears (see details in chapter 5.11.5 Edit code) allowing you to select the method or
event you want to edit. After selecting one method or event, you enter the Component Wizard Editor, where
you may make the implementation. 4.8 Editing drivers
See also
Detail information about drivers, macroprocessor, TST file and CHG file
How to - Editing drivers
How to - Editing method/event code
5.11.1. Driver Processing
Driver, sections
Every component has a least one driver. The drivers consists of sections. Sections is component implementation
for one compiler and language. Sections consist of subsections. Text or code is generated into file specified by
subsection name or parameters. See 5.11.2.2 Macroprocessor Commands for details.
Macroprocessor
The text of the component driver is processed by Processor Expert macroprocessor . This is special
macroprocessor designed for this kind of component drivers. The output from the component driver can be
generated to several files. See 5.11.2.2 Macroprocessor Commands for details.
Commands
If the line starts with character % as a first non-space character on the line, macroprocessor consider following
word as a command. See complete list of supported commands.
Predefined macros
There are some predefined macros by Processor Expert. See topics:
list• of globals macros
list• of local macros
macros• defined from a property
list• of special macros and directives
Testing of component setting
You can write a script files TST file and CHG file for testing of component setting.
SRC file
Driver or TST file are included to the Processor Expert from SRC file. SRC file is located in directory
ProcessorExpert\Drivers\ and has the same name as the component. If there are more drivers for one component,
SRC file contains conditional translation which choose the right driver.
- 79 -
User Interface

See also
Drivers page
List of macroprocessor commands
Predefined local macros, global macros and special macros
Macros defined from a property
TST file and CHG file
5.11.2. Macroprocessor
Description
The text of the component driver is processed by Processor Expert macroprocessor. This is special
macroprocessor designed for this kind of component drivers. The macroprocessor supports:
conditional• translation - see list of commands.
includes• - see list of commands.
evaluation• of simple expressions - see list of commands.
lists• - see list of commands.
for• cycles - see list of commands.
error• output - see list of commands.
global• macros - the same for all components in project, defined by Processor Expert
local• macros
Local macros are defined by Processor Expert and contain setting of the component in Processor Expert.
This macros cannot be changed by a driver.
New local macros can be defined and modified by a driver.
generating• to several part - see commands - subsections.
Macro
is an identifier which holds any value. Identifier of a macro can contain characters: a..z, A..Z, 0..9, _ and cannot
start with a digit. The value can be string, number of list. If macro's value is a number or a string, the macro
identifier can be directly replaced by its value in the driver text.
%{def_name}, %'{def_name}', %~{def_name}~ will be replaced by its value.
Example
%define MyMacro local_value
MyMacro=%MyMacro
MyMacro=%'MyMacro'_3333
after processing by macroprocessor the result will be
MyMacro=local_value
MyMacro=local_value_3333
There are several types of macros:
global• - defined by Processor Expert, the same for all components during code generation, cannot be changed
by driver. Driver can define new global macro but cannot modify them.
- 80 -
User Interface

local• - two types:
defined by Processor Expert for each component, cannot be changed by a driver. Some of them are
defined for each component and the others depends on component's properties, methods and events.
defined by driver and can be changed by a driver.
special• macros and directives
Command
starts with character % as a first non-space character on line. The commands ends at the end of line. See list of
supported commands.
See also
Details about drivers
List of macroprocessor commands
Predefined local macros, global macros and special macros
Macros defined from a property
5.11.2.1. Macroprocessor Denotation
This chapter describes the denotation used in description of macroprocessor.
Basic Denotation
{• def_name} - name of a macro, case-sensitive identifier, can contain characters: a..z, A..Z, 0..9, _
and cannot start with a number
{• text} - text to the end of line
{• number} - decimal number
{• string} - string inside quotation marks, ""
{• def_list} - name of a macro which contains list of items
{• filename} - name of external file with relative path
{• eventname} - name of any event of the component
Operator
{operator} is
=• assignment (the same as command%define!)
+=• addition
-=• substraction
/=• division
\=• integer division (integer operation)
%=• modulo (integer operation)
*=• multiplication
|=• bit or (integer operation)
&=• bit and (integer operation)
~=• bit xor (integer operation)
>=• bit shift to the right (integer operation)
- 81 -
User Interface

<=• bit shift to the left (integer operation)
^=• power of
$=• round, returns closest integer number
.=• truncate
@=• exponent,(8@=2 returns 3)
Condition
{condition} is
{• condvalue} is {def_name} or {string} or element from list (see macro %[)
{• condition} is
defined({def_name}) condition is true if macro {def_name} is defined
ndefined(<def_name>) condition is true if macro {def_name} is not defined
{condvalue} = {condvalue} string compare
{condvalue} <> {condvalue} string compare
{condvalue} != {condvalue} string compare
{condvalue} > {condvalue} string compare
{condvalue} < {condvalue} string compare
{condvalue} >= {condvalue} string compare
{condvalue} <= {condvalue} string compare
{condvalue} >N {condvalue}
{condvalue} <N {condvalue}
{condvalue} >=N {condvalue}
{condvalue} <=N {condvalue}
if- N is number 1..9 then string are formatted to length N characters - there are inserted spaces to the
begin of string or end of string is cuted. Strings are compared after the formatting.
if- N is number 0 then strings are formatted to the same length - to the begin of shorter string are
inserted spaces. Strings are compared after the formatting.
if- N is decimal point then strings are converted to real number and these numbers are compared.
{condvalue} =^ {condvalue} string compare, {condvalue} are converted to uppercase before
compare.
{condition} | {condition} logical or, {condition} can not contain & operator. If the first {
condition} is true then the result is true.
{condition} & {condition} logical and, {condition} can not contain | operator. If the first {
condition} is false then the result is false.
for_last condition is true if the actual for variable is the last from list
{string} in {def_list} condition is true when {string} is element of list {def_list}. {def_list}
is name of variable.
- 82 -
User Interface

See also
Component driver
List of macroprocessor commands
Macroprocessor
5.11.2.2. Macroprocessor Commands
Macroprocessor command starts with character % as first non-space character on line. Then follows
command-identifier and parameters. The rest of line is ignored and can be used as a comment.
Here is complete description of commands supported in basic version of Component Wizard. Commands are
divided into several groups according to its function.
Conditional translation
%ifdef• {def_name} conditional translation. Following lines are generated to output only if macro {
def_name} is defined. This command must be finished by command %endif, %else or %elif.
%ifndef• {def_name} conditional translation. Following lines are generated to output only if macro {
def_name} is not defined. This command must be finished by command %endif, %else or %elif.
%if• {condition} conditional translation. Following lines are generated to output only if condition {
condition} is true. This command must be finished by command %endif, %else or %elif.
%elif• {condition} conditional translation. Following lines are generated to output only if condition {
condition} is true. This command must be finished by command %endif, %else or %elif.
%else• conditional translation. Following lines are generated to output only if all previous conditions of
%if commands were false. This command must be finished by command %endif.
%endif• ends conditional translation.
Example
%ifndef Macro1
%ifdef Macro1Value
%error Macro1Value is defined without Macro1
%else
%error Macro1 is not defined
%endif
%elif Macro1='yes'
%define Macro1Value 1
%elif Macro1='no'
%define Macro1Value 0
%else
%error Unrecognized value in Macro1
%endif
- 83 -
User Interface
Macros definition
%define• {def_name} [{text}] this command defines a new local macro called {def_name} with
value { text }. The macro will exist only during processing of current driver. The command raise error if
macro already exists with another value. Macro can be defined also without value.
%define!• {def_name} {text} this command is same as the previous one, but is macro already
exists it is redefined without any error.
%define_prj• {def_name} {text} defines new global macro with value {text}. This macro will be
defined to the end of generation of all drivers.
%undef• {def_name} removes macro definition. This command raise error if macro {def_name} does
not exits.
%undef!• {def_name} removes macro definition. If macro does not exist, it does nothing.
Example
%define MyFirstMacroDefinition Value
%define! MyFirstMacroDefinition Value redefinition
%undef MyFirstMacroDefinition
%undef! MyFirstMacroDefinition
Including external file
%include• {filename} includes file { filename} to the current position of text. { filename} must be
with relative path from directory ProcessorExpert\Drivers\.
%include• {filename} ({par1},{par2},..) is the same as simple %include command and
additionally parameters are accessible using macros %1, %2, .. . Parameter par? is defined as all
characters between separators (,,,).
Example
%include SubProg.prg (Value)
Contents of ProcessorExpert\Drivers\SubProg.prg
%if MyMacro!=%1
%define! MyMacro %1
%endif
Comments and text formatting
%+[{• string1}[{string2}]]{text} appends {string2}{text} to the end of previous generated line.
But if the new line would be too long it produces a new line: {string1}{text}. {strings} are not required and
they must be closed with quotation marks.
%>{• number} set the current output position of the text to column {number}. At least one space will be
inserted.
%-• comment to the end of line
Example
%- Comment: This is assembler formatting
%>20 ADD A,20
%>20 SUB A,B
- 84 -
User Interface

Errors
All following messages will be displayed in Processor Expert Error window.
%error• {text} produces error message {text}.
%error!{• text} the same as %error and the error message will contain file name and line number.
%error^{• text} the same as %error and generation is stopped for current driver.
%warning• {text} produces warning message If there exists a TST file for current component the
warning from the driver will not be displayed.
%hint• {text} produces hint. If there exists a TST file for current component the hint from driver will
not be displayed.
Example
%error I'm sorry but this driver is not finished yet.
%warning This configuration is not useful.
%error! Internal error in the driver. Please contact your distributor.
Lists
Macroprocessor supports macros with list as a value. You can have several items in a list.
%add• {def_list} {text} add item {text} to the list {def_list}. If the list is not defined then will be
created. Item cannot be empty string. There is duplicate checking, if the item is already in the list, this
command does NOT add a new one. List {def_list} is a global macro for while project. But you can not
modify lists defined by Processor Expert.
%append• {def_list} {text} add item {test} th the list {def_list}. If the list is not defined then will
be created. Item cannot be empty string. There is not duplicate checking, if the item is already in the list, this
command add a new one. List {def_list} is a global macro for while project. But you can not modify lists
defined by Processor Expert.
%apploc• {def_list} {text} the same as %append , but the macro is local - defined only for
current driver.
%addloc• {def_list} {text} the same as add , but the macro is local - defined only for current
driver.
%for• {def_name} from {def_list}
{block of text}
%endfor {block of text} is several lines of text. This block will be generated for each value in the list {
def_list} and during each generation the macro {def_name} will have value of one item from list. Macro {
def_value} cannot be defined before this command and will not be defines after the end of command.
You can use notation: [{number}..{number}] instead {def_list} macro.
%for• {def_name} fromdown {def_list}
{block of text}
%endfor the same as command for ... from ... , but the items from the list are selected from the last item to
the first one.
Example
%apploc MyFirstList Item1
%apploc MyFirstList Item2
%apploc MyFirstList Item2
- 85 -
User Interface
%for i from MyFirstList
Report: List Item is "%i"
%endfor
%for i from [0..7]
%i
%endfor
Expressions
Evaluation of expressions is done in real numbers. For integer operations the value is rounded to 32-bit signed
integer.
%:{• def_name}{operator}{number}[;{text}] text is ignored. Expression is evaluated and the
result is assigned to macro def_name
%:{• def_name}?={number},{number1}:{number_1},{number2}:{number_2}, .. ;
converts value number using table: if number is equal to number1 then the result is number_1, if number is
equal to number2 then result is number_2 etc. The result is assigned to macro def_name. Error is reported to
Processor Expert Error window if the value is not found in the table.
Example
%:a=0
%:a+=1
%:b?=%a,0:3.1415,1:6.2830
Subsections
%INITIALIZATION• - component initialization code, this code will be inserted into CPU initialization
procedure
%INTERFACE• - component header file, this file must contain interface of all selected methods
%IMPLEMENTATION• - component implementation file, this file must contain implementation of all
selected methods
%INTERFACE• {eventname} - interface of selected event, this part will be inserted into interface of
events module
%IMPLEMENTATION• {eventname} - implementation of selected event, this part will be inserted into
events implementation module
%FILE• [{dir}]{filename} - text from this subsection will be saved to the specified file
See also
Macroprocessor
Denotation of description of macroprocessor
Component driver
Predefined local macros, global macros and special macros
Macros defined from a property
- 86 -
User Interface

5.11.2.3. Predefined Macros and Directives
To replace a macro by its value, write the name of macro after character %. Each line of the driver is processed
from the right side to the left side and all macros are replaced.
Special macros and directives
%%• - character %
%{• def_name}, %'{def_name}', %~{def_name}~ - is replaced by def_value.
%for_index,%'for_index'• is replaced by index of actual variable of for-cycle from range: 1..number
of items in the list.
%for_index_0• is replaced by index of actual variable of for-cycle from range: 0..number of items in the
list-1.
%list_size({• def_list}) - number of items in the list.
%str_length({• string}) - string length, number of characters in the string
%str_length({• def_name}) - string length, number of characters of the macro value. Macro cannot be
a list.
%short_path({• value}) - convert path to short path for MS-DOS 16-bit application. value must be
macro or string between brackets. Path should exist on the disk.
%[{• index},{def_list}] - returns item from the list def_list with index equal to index. Index of first
items is 1. Result is empty string if the requested index if out of range. def_list must be defined.
%;• is replaced by sequence of characters which defined comment to the end of line. See also global macro
%CommentLine.
%.• is replaced by separator of module name and method name. The separator is defined according to
selected language, usually it is character _ (underscore).
%{• is replaced by sequence of characters which begins a multi-line comment.
%}• is replaced by sequence of characters which ends a multi-line comment.
%#{• srcf}{dstf}[-]{number} - contents signed 32-bit integer number from srcf to dstf format.
Supported formats of srcf:
nothing - decimal number
2 - binary number
Supported formats of dstf:
h - selected format of high level language
a - selected format of assembler - data
aa - selected format of assembler - address
ab - selected format of assembler - binary data
%#b{• number} - converts 8-bit number (0..256) from decimal to hexadecimal format (without prefix or
suffix)
%#w{• number} - converts 16-bit number (0..65535) from decimal to hexadecimal format (without prefix or
suffix)
%#l{• number} - converts 32-bit number from decimal to hexadecimal format (without prefix or suffix)
- 87 -
User Interface

Access to inherited items
%@{• inhr_property}@{def_name} - value of macro def_name from inherited component pointed by
property inhr_property.
%[@{• inhr_property }@{ index },{ def_list }] - returns item from the list from inherited
component, with item's index equal to index.
inhr_property is a symbol of property for inheritance.
See also
Component driver
Macroprocessor
List of macroprocessor commands
Predefined local macros and global macros
Macros defined from a property
Denotation
5.11.2.4. Predefined global macros
Global macros are macros defined by Processor Expert for the whole project. They are the same for all
components in the project and they are not changed during code generation.
Language, compiler, version
Language• - identification of selected target language: MODULA, ANSIC, JAVA, ASM.
Compiler• - identification of selected target compiler.
CommentLine• - is defined if there is sequence of characters which starts comment to the end of line for
selected target language. Value of the macro is this sequence.
PEversion• - version of Processor Expert, format XX.XX.
TimeStamp• - date and time of code generation.
CPU, interrupt vector table
CPUvariant• - selected target CPU type (from CPU properties).
CPUtype• - type of the target CPU component.
CPUfamily• - target CPU family.
CPUproducer• - producer of the target CPU.
InterruptTableType• - type of the interrupt vector table.
InterruptVectorType• - type of the interrupt vector.
- 88 -
User Interface

Clock, speed modes
Xtal_kHz• - frequency of Xtal of the CPU, integer number.
HighClock_kHz• - clock frequency in front of system prescaler in high speed mode, integer number.
LowClock_kHz• - clock frequency in front of system prescaler in low speed mode, integer number.
SlowClock_kHz• - clock frequency in front of system prescaler in slow speed mode, integer number.
CPUsystem_ticks• - number of ticks behind system prescaler, list of three values for every speed mode.
CPUrunSpeedModeNum• - number of supported speed modes in the target CPU.
SetHighSpeedMode• - defined if high speed mode is supported in the target CPU (high speed mode must be supported).
SetLowSpeedMode• - defined if low speed mode is supported in the target CPU.
SetSleepMode• - defined if slow speed mode is supported in the target CPU.
names• of all common prescalers - initialization value, names depend on the CPU description database.
Modules
ProjectName• - name of the project.
ProjectModule• - name of the main module.
ProcessorModule• - name of the PCU module.
ProcessorName• - name of the CPU component.
ModuleList• - list of all component modules in the project (without CPU module).
EventModuleList• - list of all event modules in the project.
ExternalModules• - list of all external programs in the project.
ExternalModuleExts• - list of corresponding extensions of external programs.
ExternalModuleDir• - list of corresponding directories of external programs.
ExternalModuleRelDir• - list of corresponding relative directories of external programs.
DriverExtension• - extension of driver filename, DRV or DMO or TST.
Directories
Dir_Project• - directory of the current project.
DirRel_Events,• DirRel_Binary relative path from project-directory to drivers-directory and
binary-directory.
DirRel_EventToBinary• - relative path from code-directory to binary-directory.
Dir_Drivers,• Dir_Events, Dir_Binary - absolute path for drivers, event modules and binary files. You
should always use relative paths.
Dir_Compiler• - absolute path of external compiler is it is defined as external tool.
- 89 -
User Interface

Registers
Register• ?? List - list of all names of 8-, 16- and 32-bit CPU control registers, dependent on the CPU
description database.
Reg• ??AddrList - list of all addresses of 8-, 16- and 32-bit CPU control register, dependent on the CPU
description database.
?????• Addr/Reg - address and register name of system and common prescalers, dependent on the CPU
description database.
See also
Component driver
Macroprocessor
List of macroprocessor commands
Predefined global macros and special macros
Macros defined from a property
5.11.2.5. Predefined local macros
Local macros are macros defined by Processor Expert individually for each component. Component can define
its own local macros. These macros can be also changed in the driver. Other components have no access to
macros defined by other components.
Each driver should define following macros:
DriverVersion• - version of the driver, format XX.XX
DriverAuthor• - name of author of the driver
DriverDate• - date of last modification of the driver, format: DD.MM.YYYY
There are local macros defined for every component dependent on list of component's properties, methods and
events. Macros defined by Processor Expert cannot be changed by driver. Other components have no access to
macros of another component with exception of inheritance.
List of macros defined for each component:
DeviceType• - type of the component.
DeviceName• - name of the component.
ModuleName• - name of the component driver. It must be identifier.
Comment• - user comment to the component. List of strings. It is if user do not enter any text.
runHighSpeed• defined if component is supported in high speed mode.
runLowSpeed• defined if component is supported in low speed mode
runSleep• defined if component is supported in slow speed mode
runSpeedMode• list of supported speed modes, three values: Yes/No.
runSpeedModeNum• number of supported speed modes.
method• - For each method of the component which must be implemented in the driver (User requests ti\o use the method
in his code), the name of the method is defined as a macro. Value of the macro is same as the name.
method• _Hint - hint for the corresponding method.
event• - For each event user requests to handle in his code, the name of event is defined as a macro. Value of
- 90 -
User Interface

the macro is name of event handler function.
event• Prior - event priority. It is defined only if the event support priority.
event• Module - event module of corresponding event.
event• _Hint - hint for the event
MethodList• - list of requested methods
MethodHints• - list of corresponding hints for the requested methods
EventList• - list of requested events
EventModules• - list of corresponding event modules
See also
Component driver
Macroprocessor
List of macroprocessor commands
Predefined local macros and special macros
Macros defined from a property
5.11.2.6. Macros Defined From a Property
Every property must have defined unique symbol in the component (it should not begin with the character
underscore '_ '). This symbol is name of macro defined for the component driver in the Processor Expert. The
value of the macro is value of the property set in Processor Expert Component Inspector.
Note: Integer values are always defined as decimal numbers.
Some properties have detailed information defined as macros. The name of the macro is completed from the
name of the property (feature Symbol) and the suffix. The suffix depends on the type of the property. The
following properties have defined the detailed information:
List• of itemssuffixes:
NumItems - the number of the items in list
MaxItem - the maximal index of the item (i.e. NumItems-1)
Date• suffixes:
Day - the day of the date stored in property (range from 1 to 31)
Month - the month of the date stored in property (range from 1 to 12)
MonthLong - the name of the month (language depends on the current country which is set in windows)
MonthShort - the name of the month (language depends on the current country which is set in windows)
- short version
Year - the year of the date stored in property (format is XXXX)
DayOfWeek - the day in the week (range from 0-monday to 6-sunday)
DayOfWeekLong - the name of the day (language depends on the current country which is set in
windows)
DayOfWeekShort - the name of the day (language depends on the current country which is set in
windows) - short version
- 91 -
User Interface

Time• suffixes:
Hour - the hour of the time stored in property
Min - the minute of the time stored in property
Sec - the second of the time stored in property
String• listMacro without suffix - the list of lines of the text. If user do not enter any text, macro is not defined.
suffixes:
Len - list of corresponding lengths of lines in the string-list (number of characters on each line).
Lines - the number of the lines in the string-list.
List - list of lines, every line is defined as a list of characters (This macro is available if the feature
DefineList is set to value True)
External• filesuffixes:
FileName - only the name of the file (without the path)
ShortPath - the whole name of the file (with the path) for DOS applications
Value - binary values in a file (depends on th settings of the feature FileDefine)
ValueList - binary values in a file (depends on th settings of the feature FileDefine)
External• bitmap filesuffixes:
Width - width of the picture
Height - height of the picture
Size - the size of the picture (the number of the occupied bytes in a memory)
Directory• suffixes:
_(one character underscore) - the directory ends with '\'
__(two characters underscore) - the directory doesn't end with '\'
Address• in CPU address spacesuffixes:
_External - "yes" if any address from selected address range is inside external memory, "no" otherwise.
_Internal - "yes" if any address from selected address range is inside internal memory, "no" otherwise.
_RAM - "yes" if any address from selected address range is inside RAM, "no" otherwise.
_ROM - "yes" if any address from selected address range is inside ROM, "no" otherwise.
_FLASH - "yes" if any address from selected address range is inside FLASH, "no" otherwise.
_EEPROM - "yes" if any address from selected address range is inside EEPROM, "no" otherwise.
- 92 -
User Interface

Example
There is complete component BasicProperties in this version of Component Wizard. This component contains all
properties provided in Basic version of Component Wizard.
See also
Component driver
Macroprocessor
List of macroprocessor commands
Predefined local macros, global macros and special macros
5.11.3. TST file
TST file is a script which describes implementation-dependent tests of the component setting. It is run from
Processor Expert only if the component is set-up correctly. Component modules won't be generated if any error
is reported from the TST file.
The TST file is stored in the same directory as the driver, the file-name is also the same and the file-extension is
TST. You can edit TST file directly in Component Wizard, see Drivers page.
The list of macros defined for the TST file is the same as macros for the driver. You can use all macroprocessor
commands (See details in chapter 5.11.2.2 Macroprocessor Commands ) in the TST file as in the component
driver. Messages from the TST script are reported using the commands %error, %warning, %hint to
Processor Expert Error window. The TST script cannot define any global macros accessible from other TST files
or drivers.
Warning: If you write any TST file for your component, any warning and hint will NOT be generated from the
driver. All warnings and hints should be generated from the TST file.
Example
%if Property1="MASTER"
%error Sorry - this feature is not implemented yet.
%endif
%-
%if Property2="0"
%hint Define buffer for better performance.
%endif
There is complete component BasicProperties in this version of Component Wizard. This component contains
example of TST file and CHG file.
- 93 -
User Interface

See also
Component driver
CHG file
Macroprocessor commands
5.11.4. CHG file
CHG file is a script for testing of component settings and control the component behaviour in the Component
Inspector window in Processor Expert.
This file should implement implementation-independent tests and report errors if the component setting is
incorrect (component function is not defined for this component settings). For example, the CHG file can
generate error if the buffer size if lower than 16 bytes.
CHG file is placed in the same directory as the component (ProcessorExpert\Beans\[BeanName]\), the file-name
is the same as the component name and the file-extension is CHG. You can edit CHG file directly in Component
Wizard, see Drivers page. The CHG script is run from Processor Expert every time user change the component
setting even if the setting is not correct. There may miss any macros because of incorrect setting, you should test
if macro is defined before its usage. You should never use global macros in the CHG files.
You can generate error messages using commands: %error, %warning, %hint or you can change or read
the value of any property/method/event using special commands %set and %get. These command can be used
only in CHG files.
Set Command
Syntax:
%set {Symbol} {FeatureSymbol} {Value}
Description:
{• Symbol} is a symbol of any property, method or event
{• FeatureSymbol} is a symbol from following list
{• Value} is a new value for the feature. Value is text to the end of line.
List of FeatureSymbols:
ReadOnly• - you can enable/disable changing of value of any property.
{Symbol} must be symbol of any property.
{Value} must be yes or no.
Selection• - you can enable/disable changing of selection of any method or event, e.g. if method will be
generated to the driver and if event will be called from the driver.
{Symbol} must be symbol of any method or event.
{Value} must be
always(the method/event must be selected) or
never(the method/event cannot be selected) or
enable(you can change selection).
Value• - you can change value of any property.
{Symbol} must be symbol of any property.
{Value} must be value for the property (the same as you can enter in the Processor Expert Component
- 94 -
User Interface

Inspector). Integer value can be expressed in enhanced format, see Property Signed integer number for
details.
MinValue,• MaxValue - you can change the minimal and maximal possible value of the property.
{Symbol} must be symbol of property of type: integer number, real number or list of items.
{Value} must be decimal number.
Warning: If you change any value of the property, the macros are NOT changed to the end of CHG file. You
can read the value of any property using %get command.
Get Command
Syntax:
%get({Symbol},{FeatureSymbol})
List of known symbols is the same as for %set command. Result is value of selected feature.
Example
%if defined(Property1) & Property1="MASTER"
%error Sorry - this feature is not implemented yet.
%endif
%-
%if defined(OutputBufferSize) & OutputBufferSize="0"
%set SendData Selection never
%else
%set SendData Selection enable
%endif
There is complete component BasicProperties in this version of Component Wizard. This component contains
example of CHG file and TST file.
Configuring Methods and Events of Inherited and Shared Components
For OPTIONALLY REQUIRED methods/events (see the description of the mode property and its values in the
chapter 5.14 Methods page or 5.15 Events page) it is possible to use the following commands in the descendant
component:
%set• @{InhrSymbol}@{Symbol} Selection always - The generation of the method/event will
be enabled without a possibility to enable it by the Processor Expert user. It is necessary for example if the
descendant needs the method/event.
%set• @{InhrSymbol}@{Symbol} Selection enable - This option can be used to enable the
method/event if the descendant doesn't need the method/event.
%set• @{InhrSymbol}@{Symbol} Selection never - The generation of the method/event will
be disabled without a possibility to enable it by the Processor Expert user. This command is available forinherited components only.
Description of the symbols:
- {InhrSymbol} is a symbol of the inherited component (interface) property.
- {Symbol} is a name of the method/event.
- 95 -
User Interface

See also
Component driver
TST file
Macroprocessor commands
5.11.5. Edit code
Figure 5.28 - Selection of the code to edit
Tree structure:
Methods• - methods defined by the component
Events• - events defined by the component
Inherited• events - serve inherited events here
Driver• parts - Drivers from Component Wizard 1.14 have some parts of the driver marked with special
Component Wizard keywords. It allows you to insert your own includes, global variables into the driver with
editing necessary part of the driver only.
Initialization - Initialization of the driver. Write a code here for driver initialization. This code will be
generated into the initialization method of the CPU component which is executed at the beginning of the
"main" routine.
User types - here in this section you can write your own user types which cannot be made by Component
Wizard (page User Types)
Header includes - there you can write includes for you libraries. These part will be in the header file
generated bellow includes generated by Component Wizard. Also here you can import/export global
variables into/from your module.
Module includes - there you can write includes for you libraries. These part will be in the module
generated bellow includes generated by Component Wizard.
Static variables - Do you need global variables if your module? Write them here.
- 96 -
User Interface

Meaning of buttons:
Edit• - displays source code for selected method/event or selected part of the driver only.
Edit• whole section - displays source code for selected driver, the cursor is set to the selected method/event
or selected part.
Read• only - driver will be open in read only mode
Edit• whole section - you will see the whole language section.
See also
Detail information about drivers, macroprocessor, TST file and CHG file
How to - Editing drivers
5.11.6. Driver editor
See also
Drivers page
How to - Editing drivers
Detail information about drivers, macroprocessor, TST file and CHG file
Figure 5.29 - Editor picture
Description
Built-in editor serves for editing implementation of methods, events, includes, HTML help files and other files
generated by Component Wizard.
Editor has these enhanced features:
syntax• highlight for selected language (if editing driver) and for macroprocessor language, e.g. when editing
CHG files.
simple• syntax highlight when editing html files
10• bookmarks accessible by context menu or by shortcuts Ctrl+Shift+Number (where Number is from 0 to
9) to set the bookmark and Ctrl+Number to goto the bookmark.
Toolbar description:
• - Save the file to disc
• - Undo the previous action
• - Redo the previous action
- 97 -
User Interface

• - Copy the selected text into the clipboard
• - Cut the selected text into the clipboard
• - Paste the text from the clipboard into the editor where the cursor is
• - Print the entire text in the editor
• - Paste the name of the macro/method/event or inherited method/event into the editor. For more details
see Auto complete chapter. Accessible also usng short cut Ctrl+SPACE
• - Find the text in the editor
• - Replace the text in the editor
• - Displays help for Macroprocessor language.
Statusbar description:
Line• and column position - There is information about the line (with prefix L:) and column (with prefix C:)
where the cursor is. If you are editing only part of the driver, there is also information about line number in
the brackets in respect of beginning of the file.
Write• mode - displays actual mode - insert or overwrite mode.
Context menus
The context menu is available using the right button mouse click and offers the following commands:
Edit•
Undo - restores the text to the state before the last change made by the user.
Redo - restores the text back to the state after the last change made by the user.
Cut - cuts the select text into the clipboard.
Copy - copies the select text into the clipboard.
Paste - places the text from the clipboard at the cursor position.
Cut - cuts the select text into the clipboard.
Delete - removes selected text.
Select All - cuts the select text into the clipboard.
Delete line - removes the line with the cursor.
Search•
Find... - invokes a "find" dialog that allows to find specified phrase in the text.
Find next - continues to search next occurrence of searched phrase
Replace - invokes a "replace" dialog allowing to find and replace a specified phrase.
Bookmark• - serves for setting bookmarks in the text. The line with the bookmark is marked with the small
circle with the number of the bookmark on left side of the editor window.
Set/Clear - sets the select bookmark on the line with cursor
Goto - goes to the line with selected bookmark
Use• component method/event - the same as in the "flash" toolbar button - Paste the name of the
macro/method/event or inherited method/event into the editor. For more details see Auto complete chapter.
Accessible also usng short cut Ctrl+SPACE
Open• file... - allows to open any file into the editor.
- 98 -
User Interface

Auto complete
Auto complete
For easy writing drivers the Auto complete function has been integrated into the Editor driver.
Advantages:
Fast• typing - you don't have to type long macro names, just write the first part of macro and press
Ctrl+SPACE
Case• sensitive - Programming languages (e.g. ANSI C) and Macroprocessor are case sensitive. No you don't
have to remember the exact macro names. With this you can avoid keying mistakes and errors reported by
compiler.
Hints• - each macro defined from property, method or event displays context help when you roll over it.
Auto complete function is accessible using short cut Ctrl+SPACE . Only what you have to do is write the
beginning of the macro e.g. %S and press Ctrl+SPACE. Editor will offer the list of macros which starts with %S.
See picture bellow.
Figure 5.30 - Editor window
Hot keys
List of hot keys:
Ctrl+PgUp• - go to the first line on the screen.
Ctrl+PgDn• - go to the last line on the screen.
Home,• End, PgUp, PgDn, arrows - cursor movement (Shift marks a block).
Ctrl+left/right• - move cursor to the beginning of the word left/right to the current position.
Ctrl+Home• - go to the beginning of file.
Ctrl+End• - go to the end of file.
Ctrl+C,Ctrl+Ins• - copy.
Ctrl+V,Shift+Ins• - paste.
Ctrl+X,Shift+Del• - cut.
- 99 -
User Interface

Ctrl+Del• - delete.
Alt+left/right• - indent/unindent selected block.
Ctrl+Alt+left/right• - indent/unindent macroprocessor inside selected block.
Ctrl+K+I• - indent selected block.
Ctrl+K+U• - unindent selected block.
Alt+P• - search backward for the first similar word like the word at the cursor and replace the word at the
cursor with the found.
Alt+N• - search forward for the first similar word like the word at the cursor and replace the word at the
cursor with the found.
5.12. Documentation page
Figure 5.31 - Properties sub-page
- 100 -
User Interface
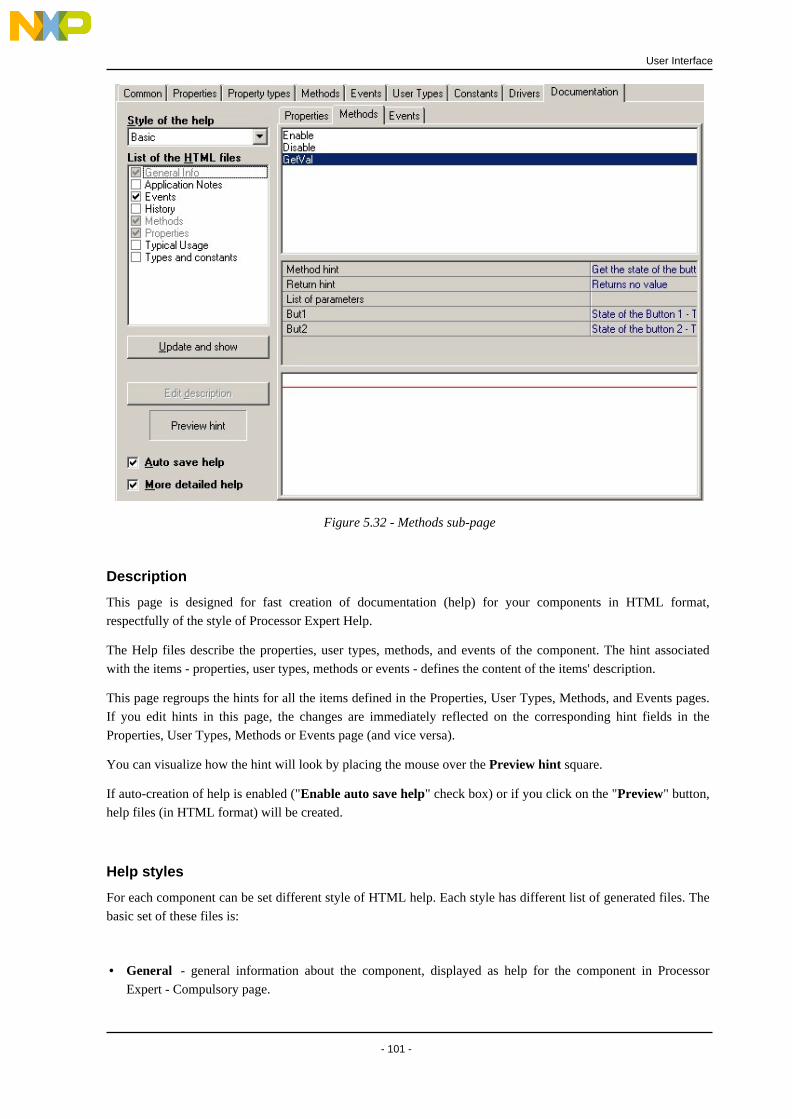
Figure 5.32 - Methods sub-page
Description
This page is designed for fast creation of documentation (help) for your components in HTML format,
respectfully of the style of Processor Expert Help.
The Help files describe the properties, user types, methods, and events of the component. The hint associated
with the items - properties, user types, methods or events - defines the content of the items' description.
This page regroups the hints for all the items defined in the Properties, User Types, Methods, and Events pages.
If you edit hints in this page, the changes are immediately reflected on the corresponding hint fields in the
Properties, User Types, Methods or Events page (and vice versa).
You can visualize how the hint will look by placing the mouse over the Preview hint square.
If auto-creation of help is enabled ("Enable auto save help" check box) or if you click on the "Preview" button,
help files (in HTML format) will be created.
Help styles
For each component can be set different style of HTML help. Each style has different list of generated files. The
basic set of these files is:
General• - general information about the component, displayed as help for the component in Processor
Expert - Compulsory page.
- 101 -
User Interface

Methods• - list of methods and their description (hints) - Compulsory page.
Events• - list of events and their description (hints)
Properties• - list of properties of the component and their description (hints) - Compulsory page.
UserTypes• - list of user types of the component and their description (hints)
Typical• usage - typical usage of the component (to edit this page select this file and press button Editcomponent description)
History• - list of revisions of the component
You can choose predefined style or check/uncheck the desired file in the List of the HTML files. Some of these
are compulsory, you cannot uncheck them (those check boxes are grayed).
Creating own styles
To create you own or customize the styles, please see the chapter 5.12.1 Help styles see here for more
information.
Editing help files
You can edit the file selected in "List of the HTML files" by clicking the "Edit html code" button. You may
also edit this files manually (without the editor), but normally it is not necessary. If you want to edit these files
manually, please don't change the lines marked "DON'T CHANGE THIS LINE".
The "General" file includes a description of the component. To avoid editing the whole file, there is a "Editcomponent description" check box . The description is then inserted into the file.
Other settings
If more detailed Help is checked, the help files contain more details, such as the description of parameters, etc...
If Enable auto save help is checked, every time you save the component, the Component Wizard regenerates
the help files. Subsequently, manual changes to the help files are lost. The Type of the help files roll down
menu selects the template used for the help creation. In this version, only the Basic template is available.
Context menu
Using the context menu in the text field area (in the bottom part of these three pages) it's possible change text
formatting or simply paste hypertext references to the component's properties, methods or events in the edited
text.
5.12.1. Help styles
Editing/creating Documentation styles
Description
Every component can have different style of the generated help. Some styles are predefined and other can be
easily created.
Creating/editing and deleting styles is accessible on the Documentation Page in context menu on the combo box
Style of the help or List box List of the HTML files:
- 102 -
User Interface

Save• as new style - current style - (set files) saves as new style - dialog for creating style appears - see
paragraph Creating/Editing help style
Delete• style - delete current style.
Edit• style - edit current style - you can edit description and the order of the generated files.
Creating/Editing help style
Figure 5.34 - Creating/Editing help style
Controls:
Style• name - name of the style (There cannot be two styles with the same name)
Description• - notes about the style (optional)
Files• order - if you want to change the order of the generated files, select the file and move it up or down
using buttons Up and Down.
External• links - html code for external links to files or web pages. The links will appear in the left menu
column of the documentation. (e.g. <a href="http://www.google.com">Google</a>)
- 103 -
User Interface

5.13. Interface info page
See also
Common page
Figure 5.35 - Page Picture
Description
Short hint - short description of the interface which is used as hint in Processor Expert
Author - author's name which will appear in the source code header
Version - interface's version number. To indicate a beta version use format 00.9X
- 104 -
User Interface

5.14. Methods page
Interface Methods page
See also
How• to create an interface ?
How• to modify an existing interface (add/remove methods)?
How• to apply an interface to a component ?
Figure 5.36 - Page Picture
Description
On this page, you can create the methods of the interface.
The created methods are listed on the left side and properties of the selected method are displayed on the other
side. A method has the following properties :
Hint:For adding new methods and events into the interface, the best and the fastest way is:
Select• Interface Templates Page
Use• popup menu on registered template/component and open it in Component Viewer.
Go• back to this (Interface methods or events) page.
Drag• and drop desired methods/events from Component View into the opened interface.
- 105 -
User Interface

If you have difficulties with inheriting see Common problems with inheritance.
Properties of selected method :
Symbol• - name of the method (the same name as in the left window)
Hint• - hint displayed in the Processor Expert environment and method description of the help file. See Help
Page.
IsInAssembler• - if the method is implemented in assembler
IsInDefinition• module - if it is in the definition module (when the method is not public)
PublicMethod• - if the included method is public
ReadOnly• - if the method is in Processor Expert read only, i.e. the Value cannot be changed (generate code
or don't generate code)
ReturnHint• - hint for the return type, displayed in the Processor Expert environment (default value you may
set in Options - Default values page)
ReturnType• - type of the returned value. (void means that the method has no return value) (default value
you may set in Options - Default values page)
Selected• - generation source code into the driver (in Processor Expert Code design). There are four
possibilities:
selYES - Method will be generated, it can be changed in Processor Expert (sets ReadOnly to false and
Value to true)
selNO - Method will not be generated, it can be changed in Processor Expert (sets ReadOnly to false and
Value to false)
selNEVER - Method will not be generated, it cannot be changed in Processor Expert (sets ReadOnly to
true and Value to false)
selALWAYS - Method will not generated, it cannot be changed in Processor Expert (sets ReadOnly to
true and Value to true)
Mode• - There are seven values:
ALWAYS_REQUIRED - ALWAYS REQUIRED - Method/event must be in the ancestor and is always
generated.
REQUIRED_IF_EXIST - REQUIRED IF EXIST - Method/event is generated if it exists in the ancestor.
OPTIONAL_MUST_EXIST - OPTIONALLY REQUIRED, BUT MUST EXIST - Method/event must
exist in descendant, it may not be set for generating (code design), but it can be changed in the CHG file
of the descendant component. See 5.11.4 CHG file for details.
Remark: The method cannot be published, i.e. - feature MethodScope cannot be mePUBLISHED.
OPTIONAL_IF_EXIST - OPTIONALLY REQUIRED, MAY NOT EXIST - Method/event may not
exist, but if it exists it may not be set for generating (code design), but it can be changed in the CHG file
of the descendant. See 5.11.4 CHG file for details.
Remark: The method cannot be published, i.e. - feature MethodScope cannot be mePUBLISHED.
OWNER_MUST_EXIST - MAY NOT EXIST, GENERATE IF OWNER - Method/event may not
exist, if exists it will be generated if will be generated method/event with the same name in the
descendant.
OWNER_IF_EXIST - MUST EXIST, GENERATE IF OWNER - Method/event must exist, it will be
generated only if descendant has method/event with the same name.
- 106 -
User Interface

SAME_AS_OWNER - The method may not exist in ancestor component and is generated if it is
required in descendant component and ancestor component can generate it. The settings of descendant
component method is updated automatically.
UNDEFINED - Reserved
MethodScope• - scope of the method - the visibility and reimplementation of the method.
PRIVATE - the method is implemented in an ancestor and descendant can call it. This method is not
visible in the descendant (in the page Methods).
PUBLISHED - the method is implemented in an ancestor. It is also visible in the descendant (the same
like if it was method of the descendant), but is read only, i.e. you cannot change its name, parameters,
etc. The descendant generates only macro which calls the ancestor.
OVERRIDE - combination of previous two ones, i.e. method is implemented in an ancestor but
descendant overrides this implementation.
all• other method properties which are not described here, are described in the chapter properties' features.
Properties of each parameter :
Name• - name of the parameter displayed and used in Processor Expert
Type• - type of the parameter (selected from the list)
Passing• - how the parameter is passed to the method
Hint• - hint for the parameter displayed in the Processor expert environment
You can use the buttons to add and to delete methods/parameters.
It is also possible here to use the drag and drop facilities of the View Component utility.
If you have filled the driver and language sections of the Drivers page, Component Wizard can automatically
find a method in the driver by right clicking on the method (in the left window). A context menu appears, where
you can select either the definition, implementation or the help part of the selected driver and language. Using
double-click (left mouse button), you may automatically go to the implementation part of the selected driver.
Before editing drivers, you have to save the component (You can check the Autosave check box in the Drivers
page).
5.15. Events page
See also
How• to create an interface ?
How• to modify an existing interface (add/remove methods)?
How• to apply an interface to a component ?
- 107 -
User Interface

Figure 5.37 - Page Picture
Description
On this page, you can create the events of the interface.
The created events are listed on the left side and properties of the selected event are displayed on the other side.
An event has the following properties :
Hint:For adding new methods and events into the interface, the best and the fastest way is:
Select• Interface Templates Page
Use• popup menu on registered template/component and open it in Component Viewer.
Go• back to this (Interface methods or events) page.
Drag• and drop desired methods/events from Component View into the opened interface.
If you have difficulties with inheriting see Common problems with inheritance.
Properties of selected event :
Symbol• - name of the event (the same name as in the left window)
HasPriority• - if the event has priority. If true, event has subitem Priority (in the left window)
Hint• - hint displayed in the Processor Expert environment and event description of the help file. See Help
Page.
IsInAssembler• - if the event is implemented in assembler
ReadOnly• - if the event is in Processor Expert read only, ie. the Value cannot be changed (generate code or
- 108 -
User Interface

don't generate code)
Selected• - generation source code into the driver (in Processor Expert Code design). There are four
possibilities:
selYES - Event will be generated, it can be changed in Processor Expert (sets ReadOnly to false and
Value to true)
selNO - Event will not be generated, it can be changed in Processor Expert (sets ReadOnly to false and
Value to false)
selNEVER - Event will not be generated, it cannot be changed in Processor Expert (sets ReadOnly to
true and Value to false)
selALWAYS - Event will not generated, it cannot be changed in Processor Expert (sets ReadOnly to true
and Value to true)
Mode• - There are seven values:
ALWAYS_REQUIRED - ALWAYS REQUIRED - Method/event must be in the ancestor and is always
generated.
REQUIRED_IF_EXIST - REQUIRED IF EXIST - Method/event is generated if it exists in the ancestor.
OPTIONAL_MUST_EXIST - OPTIONALLY REQUIRED, BUT MUST EXIST - Method/event must
exist in descendant, it may not be set for generating (code design), but it can be changed in the CHG file
of the descendant. See 5.11.4 CHG file for details.
Remark: The method cannot be published, i.e. - feature MethodScope cannot be mePUBLISHED.
OPTIONAL_IF_EXIST - OPTIONALLY REQUIRED, MAY NOT EXIST - Method/event may not
exist, but if it exists it may not be set for generating (code design), but it can be changed in the CHG file
of the descendant. See 5.11.4 CHG file for details.
Remark: The method cannot be published, i.e. - feature MethodScope cannot be mePUBLISHED.
OWNER_MUST_EXIST - MAY NOT EXIST, GENERATE IF OWNER - Method/event may not
exist, if exists it will be generated if will be generated method/event with the same name in the
descendant.
OWNER_IF_EXIST - MUST EXIST, GENERATE IF OWNER - Method/event must exist, it will be
generated only if descendant has method/event with the same name.
SAME_AS_OWNER - The event may not exist in ancestor component and is generated if it is required
in descendant component and ancestor component can generate it. The settings of descendant component
event is updated automatically.
UNDEFINED - Reserved
EventScope• - scope of the event - the visibility and reimplementation of the event.
PRIVATE - the event is called from ancestor and descendant must handle it. Event is not visible in the
descendant (in the page Events).
PUBLISHED - the event is called from ancestor and descendant must handle it. It is also visible in the
descendant (the same like if it was event of the descendant), but is read only, i.e. you cannot change its
name, parameters, etc. Setting event ih the decendant automaticaly sets event in the ancestor and vice
versa.
OVERRIDE - the event is called from ancestor and handled in descendant and he can call this event
again (to its descendant). It is also visible in the descendant (the same like if it was event of the
descendant), but is read only, i.e. you cannot change its name, parameters, etc.
all• other event properties which are not described here, are described in properties' features.
- 109 -
User Interface
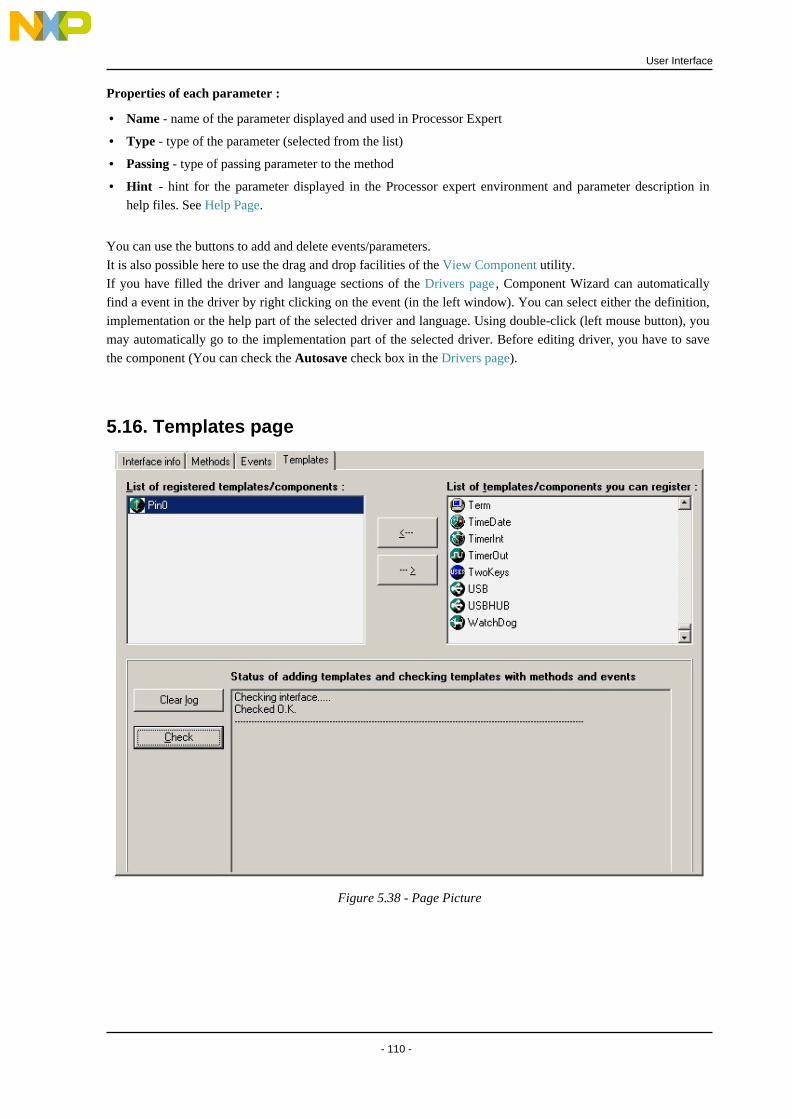
Properties of each parameter :
Name• - name of the parameter displayed and used in Processor Expert
Type• - type of the parameter (selected from the list)
Passing• - type of passing parameter to the method
Hint• - hint for the parameter displayed in the Processor expert environment and parameter description in
help files. See Help Page.
You can use the buttons to add and delete events/parameters.
It is also possible here to use the drag and drop facilities of the View Component utility.
If you have filled the driver and language sections of the Drivers page, Component Wizard can automatically
find a event in the driver by right clicking on the event (in the left window). You can select either the definition,
implementation or the help part of the selected driver and language. Using double-click (left mouse button), you
may automatically go to the implementation part of the selected driver. Before editing driver, you have to save
the component (You can check the Autosave check box in the Drivers page).
5.16. Templates page
Figure 5.38 - Page Picture
- 110 -
User Interface

Description
In the upper part of the tab, there are two windows containing a list of accessible templates and all components.
The left list is the list of templates and components, that the interface contains. The right list is the list of all
possible templates and components you can add (register). Before adding a template or a component, the
Component Wizard checks automatically, whether the template or component can be used in the interface. If it
can be used, it is added, otherwise it is not added and some explanations are displayed in the lower window.
The Check button is used for checking if the interface is correctly created.
In order to be valid, the methods of the interface should be common to all the templates of the interface.
Context menus
It is possible to use context menus for the manipulation of the registered templates/components. Clicking the
right mouse button opens the context menu for working with selected template:
Meaning of the menu items:
Set• as default - set selected template/component as the default template/component
Open• template - opens the selected template in Component Wizard. If the interface is not saved, dialog for
saving appears.
Open• source component in Component Viewer - opens the registered component in Component Viewer
e.g. for drag and drop methods and events into the interface.
- 111 -
User Interface
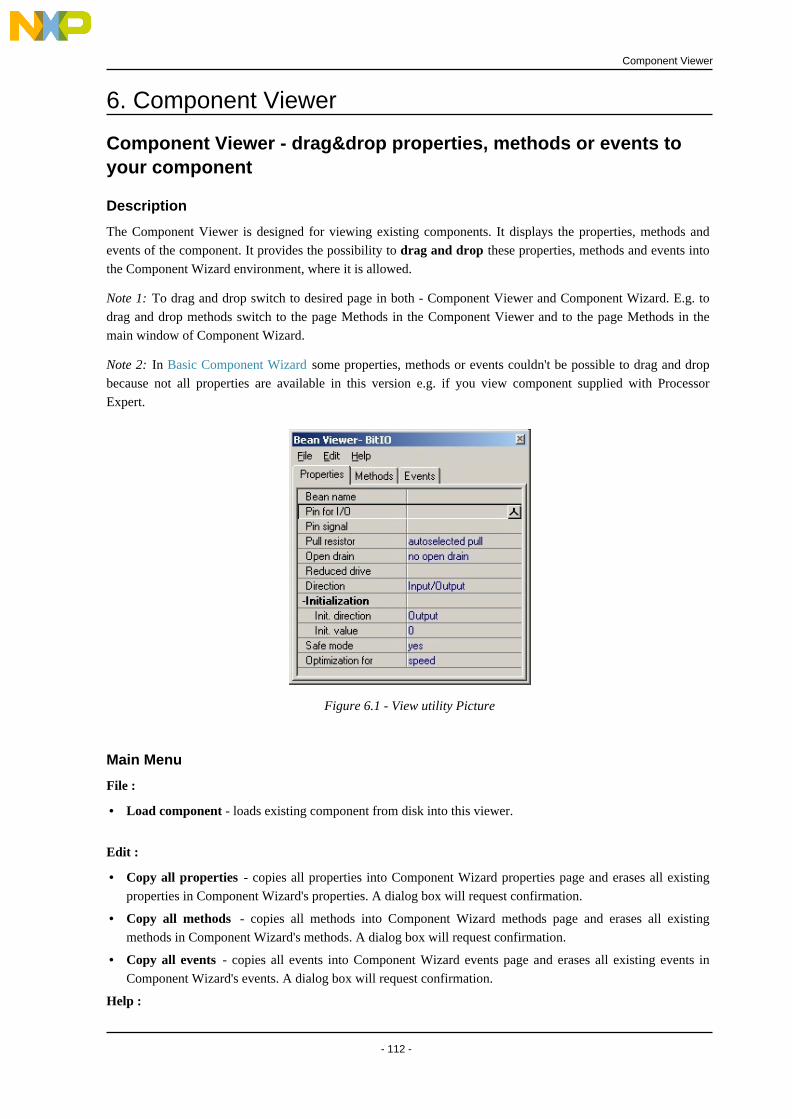
6. Component Viewer
Component Viewer - drag&drop properties, methods or events toyour component
Description
The Component Viewer is designed for viewing existing components. It displays the properties, methods and
events of the component. It provides the possibility to drag and drop these properties, methods and events into
the Component Wizard environment, where it is allowed.
Note 1: To drag and drop switch to desired page in both - Component Viewer and Component Wizard. E.g. to
drag and drop methods switch to the page Methods in the Component Viewer and to the page Methods in the
main window of Component Wizard.
Note 2: In Basic Component Wizard some properties, methods or events couldn't be possible to drag and drop
because not all properties are available in this version e.g. if you view component supplied with Processor
Expert.
Figure 6.1 - View utility Picture
Main Menu
File :
Load• component - loads existing component from disk into this viewer.
Edit :
Copy• all properties - copies all properties into Component Wizard properties page and erases all existing
properties in Component Wizard's properties. A dialog box will request confirmation.
Copy• all methods - copies all methods into Component Wizard methods page and erases all existing
methods in Component Wizard's methods. A dialog box will request confirmation.
Copy• all events - copies all events into Component Wizard events page and erases all existing events in
Component Wizard's events. A dialog box will request confirmation.
Help :
- 112 -
Component Viewer

Help• - Displays this page.
- 113 -
Component Viewer

7. Tutorial Courses
List of tutorial courses
See alsoComponent Wizard Introduction
Tutorial courses
List of tutorial courses
How1. to create my first component - two-digit 8-segment LED display
Usage2. of basic properties - ready to use example
Usage3. of Inheritance Wizard for inheritance
Usage4. of inheritance without Inheritance Wizard
7.1. Tutorial, Course 1
My First Component, two-digit 8-segment LED display
Contents
In this course you will create a simple two-digit 8-segment LED display component without inheritance. You
will learn step-by-step:
how• to edit general component information (Common page)
how• to design properties and methods of the component
how• to create and edit driver of the component
how• to create HTML help
The course is divided into the following steps:
Definition1. of Component Function
Component2. Creation
Design3. of Properties
Design4. of Methods
Creating5. driver
Editing6. driver
Generating7. help
Component8. Installation
- 114 -
Tutorial Courses

Example Ready to use
You can see complete example of the software component BWcourse1_S2D with driver prepared in accordance
with this course.
This component is not installed in the Processor Expert.
Links
First step >> | List of Tutorial Courses | Component Wizard Introduction
7.1.1. Tutorial, Course 1, Step 1: Specification of Component Function
Simple two-digit 8-segment LED display
Contents
Definition of component function - two-digit 8-segment display
Description
This component shall encapsulate simple two-digit 8-segment LED display. The display is connected to the
external bus of the CPU and chip-select of the display is implemented in the external hardware. The display has
only one 16- bit control register accessible using external bus. This register holds information which segments of
the display are light on. The address of control register will be set up in the component properties. Also
initialization value of the control register will be set as a component's property.
Component will have one method to change the display contents and no events. Help for the component will be
generated automatically by Component Wizard.
Links
Next step >> | Contents of This Course | List of Tutorial Courses | Component Wizard Introduction
7.1.2. Tutorial, Course 1, Step 2 - Component Creation
Component Wizard - New component, Common page
Contents
In this step you can learn how to ...
Start• up Component Wizard
Create• a new component
Fill• up the basic information about the component
Save• the component to the disk
- 115 -
Tutorial Courses

Description
Any inherited component will be not needed for accessing the hardware. The access of the display control
register will be written directly in ANSI-C language inside component driver.
Run1. Component Wizard from Windows "Start" menu (if you are using standalone version) or using
CodeWarrior menu command Processor Expert - Tools - Component Wizard . Select Component
Wizard in the introductory dialog (do not use Inheritance Wizard because you do not need inheritance in
this example).
Choose2. File | New | Component from Component Wizard main menu.
Select3. Common page in the Component Wizard workspace
Fill4. in following items:
Short hint - simple component description, Two-digit 8-segment display
Author - your name
Version - version of the component, 01.000
Shortcut - short component name (max. 4 characters), S2D
If you have a icon of the new component (16x16 pixels, BMP format, 16 colors), you can specify the
file name.
Choose5. File - Save from Component Wizard main menu to save the component to the disk. Write file
name of the component: S2D . File name is always the same as the component name. Choose 'no' on
question dialog 'Do you want to create a software driver?'. If you successfully save the component, the
new component name appears in the Component Wizard window title.
Figure 7.1 - Content of the Common page
- 116 -
Tutorial Courses

Links
<< Previous step | Next step >> | Contents of This Course | List of Tutorial Courses | Component Wizard
Introduction
7.1.3. Tutorial, Course 1, Step 3 - Design of Properties
Tutorial, Course 1, Step 3 - Design of Properties
Contents
Design of component's properties
Description
The new display component shall have the following properties:
Component• name - this is the default property and can not be changed or removed. It must be present in
every component.
Address• of display control register
Display• initialization value
To define these properties follow the steps:
Select1. Properties page in the component workspace. There is an already defined the default
property - Component name. This property can not be modified or removed.
Press2. button Add down to add new property. The dialog box with list of all available types appears.
Choose requested type of the new property.
Select the type Address in CPU address space.
You3. can change features of this property in the right side of the Component Wizard workspace.
Select Advanced in the drop-down list in the right-bottom corner of the Component Wizard workspace to
see the optional features needed in following steps.
Fill in the following features:
FixedSize - size of address range, write 2 (because of 16-bit width control register)
ItemName - name of the property, write the value Address of control register
Symbol - name of macro with value of the property, this macro you can use in the component driver,
value: ADDR. See description of macroprocessor for details.
Hint - description of the property, Address of display control register in
external CPU address space
ValueRadix - select the 16, default value will be displayed as hexadecimal number.
AddrType - type of the address. Unfold the group by clicking the '+' and type the value True for flags
addrEXTERNAL and addrALLOCATE.
This property will required address from external address space of the CPU, 2 byte width. Address range
will be protected from usage by other components.
Press4. the icon Integer number - signed ( ) to add a new property of the type 'signed integer number'.
Fill5. in the following features:
- 117 -
Tutorial Courses

ItemName - Initialization value
Symbol - INIT
Hint - Initialization value of the display control register
EnabledRadix - set flags: radix2, radix10, radix16 to True
MaxValue - H:FFFF (H introduces hexadecimal number)
ValueRadix - 16
Other6. features should stay without any change.
Figure 7.2 - Properties page after adding the properties
Links
<< Previous step | Next step >> | Contents of This Course | List of Tutorial Courses | Component Wizard
Introduction
- 118 -
Tutorial Courses

7.1.4. Tutorial, Course 1, Step 4 - Design of Methods
Design of Component's Methods
Contents
Design of the component's methods. The method will allow the user to control the operation during runtime.
Description
The component will be controlled by one method. This method (DisplayValue) will set the display content using
a direct write to the display control register. The methods will have one parameter - a 16-bit value for the control
register.
To define the method, follow these steps:
Select1. the page Methods in the Component Wizard workspace
Click2. on the button Add to add a new method to the component
Enable3. detailed options by checking the Details check-box.
Set4. up the following method's properties:
Symbol - DisplayValue
Hint - Displays value on the LED display
ReturnType - void
ReturnHint - Returns no value
Click5. on the button Add parameter to add a new parameter to the selected method
Set6. up the following parameter's features:
Name - Value
Type - 16-bit unsigned
Passing - Value
Hint - Value to display
- 119 -
Tutorial Courses

Figure 7.3 - Methods tab after adding the method
Links
<< Previous step | Next step >> | Contents of This Course | List of Tutorial Courses | Component Wizard
Introduction
7.1.5. Tutorial, Course 1, Step 5 - Creating Driver
Creating Component's Driver
Contents
Creationg a simple component driver.
Description
The component is now prepared for the creation of the driver. Component driver is the source file/script from
which is generated:
interface• of all generated component methods (header file)
implementation• of all component methods (implementation file)
part• of CPU initialization (optionally)
part• of project text help file
interface• and implementation of all component events
Please follow these steps:
- 120 -
Tutorial Courses

Select1. the Drivers page on the Component Wizard workspace and click on the button Add driver.
Note: software component can have only one driver (in the directory ProcessorExpert\Drivers\SW\).
The2. Add language section dialog pops up. Specify language and compiler of the new section: language =
ANSI-C, compiler = any. Click OK, skip the Revision update and the section is prepared for editing and
writing the implementations of component's methods.
Figure 7.4 - Drivers page after adding a driver
Links
<< Previous step | Next step >> | Contents of This Course | List of Tutorial Courses | Component Wizard
Introduction
- 121 -
Tutorial Courses

7.1.6. Tutorial, Course 1, Step 6 - Editing Driver
Editing Component's Driver
Contents
How to edit the component's driver
Description
The component's driver can be modified in Component Wizard internal editor. You can edit implementation of
one method or whole section of one language/compiler.
The section with empty method skeletons was generated by Component Wizard. The following parts shall be
edited only:
Implementation• of method DisplayValue
Initialization• of the component
Steps
Select1. the item Edit code of a method/event in the bottom-right part of the window and click the button
Edit selected item. A dialog with the driver part selection appear.
Select2. the method DisplayValue method and click the Edit button. The skeleton of the DisplayValue
method's code will be displayed in the internal code editor.
Fill3. in the implementation of method DisplayValue: (added code is displayed as a bold.)
void %'ModuleName'_DisplayValue(word Value)
{
(*(word*)%#h%'ADDR'UL) = Value;
}
where
%'ADDR' is value of Address property of the component. The value is represented as a value of a
macro named as a feature Symbol of property.
%#h is a numbers formatting directive. User can choose formatting of numbers in Processor Expert.
UL is C directive for integer numbers, it defines that number is unsigned long.
(word*) is typecast to the pointer to word.
Value is parameter of the method.
The method writes the value to the display control register (at address specified in the component
properties).
Select4. File - Save to save file and close the window.
Click5. the button Edit selected item again.
Select6. the part Driver parts / Initialization and click the Edit button.
Write7. the implementation line of component initialization at the place marked by comment /* Write code
here ... */:
(*(word*)%#h%'ADDR'UL) = %INIT;
- 122 -
Tutorial Courses
where
%INIT is initialization value of control register specified in the component properties.
The initialization value is written to the display control register in the component initialization.
Close the editor window and confirm the question 'Accept changes ?' by selecting Yes.
Links
<< Previous step | Next step >> | Contents of This Course | List of Tutorial Courses | Component Wizard
Introduction
7.1.7. Tutorial, Course 1, Step 7 - Generating Help
Generating Documentation For the Component
Description
The html documentation can be automatically generated from the Component Wizard. Help files contain all
information about the component created in previous steps.
The documentation has usually four pages:
General• info - general component information, description of component function.
Properties• - description of all properties.
Methods• - list of all methods.
Events• - list of all events.
Description of properties, methods and events is generated from the hints. Besides that, the user should briefly
describe on the General Info page how the component works and how it's intended to be used.
Steps
Select1. page Documentation on the Component Wizard workspace
Select2. Style of the help: Basic.
Check3. options: More detailed help and Auto save help.
Select4. the General info from the list of HTML files
Click5. on Edit description button to edit the component description in the General Info pages.
Write6. the text file in the editor.
Close7. the internal editor and click on Update and show button
Generated8. help file will be opened in default html viewer
- 123 -
Tutorial Courses

Figure 7.5 - Picture of the help page
<< Previous step | Last step >> | Contents of This Course | List of Tutorial Courses | Component Wizard
Introduction
7.1.8. Tutorial, Course 1, Last Step - Installing Component
A new Component in Processor Expert
Contents
Where to find the new component in Processor Expert.
Description
The new component is prepared for usage in Processor Expert. It appears in the component selector window.
The component can be used for code generation in Processor Expert. It supports languages (and compilers)
specified in the page Drivers.
Do not forget to save the last component state before switching to Processor Expert.
- 124 -
Tutorial Courses
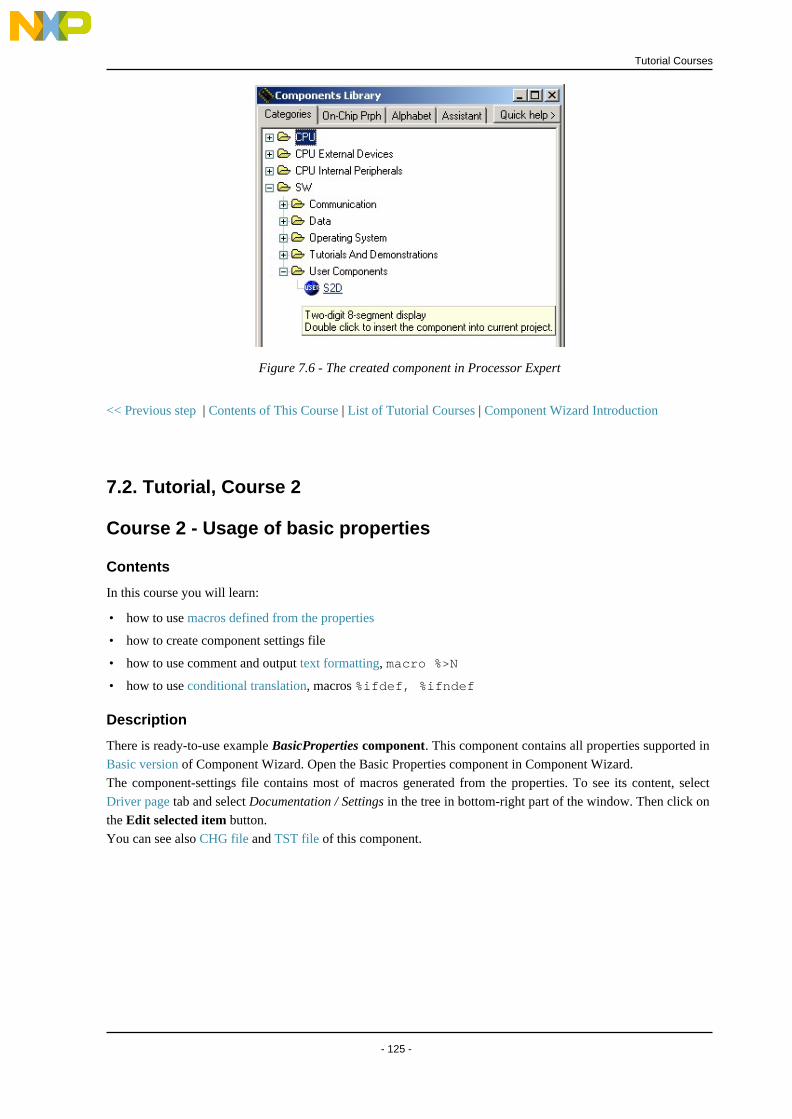
Figure 7.6 - The created component in Processor Expert
<< Previous step | Contents of This Course | List of Tutorial Courses | Component Wizard Introduction
7.2. Tutorial, Course 2
Course 2 - Usage of basic properties
Contents
In this course you will learn:
how• to use macros defined from the properties
how• to create component settings file
how• to use comment and output text formatting, macro %>N
how• to use conditional translation, macros %ifdef, %ifndef
Description
There is ready-to-use example BasicProperties component. This component contains all properties supported in
Basic version of Component Wizard. Open the Basic Properties component in Component Wizard.
The component-settings file contains most of macros generated from the properties. To see its content, select
Driver page tab and select Documentation / Settings in the tree in bottom-right part of the window. Then click on
the Edit selected item button.
You can see also CHG file and TST file of this component.
- 125 -
Tutorial Courses

Contents of the Component Settings file
This file is included into Component driver several times. The text from this file is generated as a comment to
component header file, component implementation file and project text help file.
%-Address in CPU address space
%;**%>12Address in CPU address space
%;**%>17Address%>40: %#h%ADDR
%;**%>17Address is external%>40: %ADDR_External
%;**%>17Address is internal%>40: %ADDR_Internal
%;**%>17Address is in RAM%>40: %ADDR_RAM
%;**%>17Address is in ROM%>40: %ADDR_ROM
%;**%>17Address is in FLASH%>40: %ADDR_FLASH
%;**%>17Address is in EEPROM%>40: %ADDR_EEPROM
%-
%-Boolean group
%ifndef BOOLGROUP
%;**%>12Boolean group%>40: macro is not defined
%elif BOOLGROUP=''
%;**%>12Boolean group%>40: macro is defined
%else
%;**%>12Boolean group%>40: %BOOLGROUP
%endif
%-
%-Boolean yes/no
%ifndef BOOL
%;**%>12Boolean yes/no%>40: macro is not defined
%elif BOOL=''
%;**%>12Boolean yes/no%>40: macro is defined
%else
%;**%>12Boolean yes/no%>40: %BOOL
%endif
%-
%-Date
%;**%>12Date:
%;**%>17Day%>40: %DATEDay
%;**%>17Month%>40: %DATEMonth
%;**%>17Month long%>40: %DATEMonthLong
%;**%>17Month short%>40: %DATEMonthShort
%;**%>17Year%>40: %DATEYear
%;**%>17Day of week%>40: %DATEDayOfWeek
%;**%>17Day of week long%>40: %DATEDayOfWeekLong
%;**%>17Day of week short%>40: %DATEDayOfWeekShort
%-
%-Directory
%;**%>12Directory:
%;**%>17Input value%>40: "%DIR"
%;**%>17Absolute path\%>40: "%DIR_"
%;**%>17Absolute path%>40: "%DIR__"
- 126 -
Tutorial Courses

%-
%-Enumeration (color)
%;**%>12Enumeration%>40: %ENUM
%-
%-External bitmap file
%;**%>12External bitmap file
%;**%>17Input%>40: %BITMAP
%;**%>17Extension%>40: %BITMAPFileExt
%;**%>17File name%>40: %BITMAPFileName
%;**%>17Absolute file%>40: %BITMAPFilePath
%;**%>17Short path%>40: %BITMAPShortPath
%;**%>17Height%>40: %BITMAPHeight
%;**%>17Width%>40: %BITMAPWidth
%;**%>17Size%>40: %BITMAPSize
%-
%-External file
%;**%>12External file
%;**%>17Input%>40: %FILE
%;**%>17Extension%>40: %FILEFileExt
%;**%>17Name%>40: %FILEFileName
%;**%>17Absolute file%>40: %FILEFilePath
%;**%>17Absolute short%>40: %FILEShortPath
%-
%-Group of items
%;**%>12Group of items%>40: no macros
%-
%-Integer - signed
%;**%>12Integer - signed%>40: %INT
%-
%-Integer - unsigned
%;**%>12integer - unsigned%>40: %WORD
%-
%-List of items
%;**%>12List of items
%;**%>17Number of items%>40: %LISTNumItems
%;**%>17Maximal index%>40: %LISTMaxItem
%for i from [0..%LISTMaxItem]
%;**%>17Real%i%>40: %REAL%i
%endfor
%-
%-String
%;**%>12String%>40: %STRING
%-
%-String list
%;**%>12String list
%;**%>17Number of lines%>40: %STRLISTLines
%-
%-Time
%;**%>12Time
- 127 -
Tutorial Courses

%;**%>17Hour%>40: %TIMEHour
%;**%>17Min%>40: %TIMEMin
%;**%>17Sec%>40: %TIMESec
%-
%-Speed modes
%;**%>12Speed modes
%;**%>17Number of speed modes%>40: %runSpeedModeNum
%;**%>17High speed mode%>40: %runHighSpeed
%;**%>17Low speed mode%>40: %runLowSpeed
%;**%>17Slow speed mode%>40: %runSleep
Links
List of Tutorial Courses | Component Wizard Introduction
7.3. Tutorial, Course 3
Course 3 - My first component with inheritance - keyboard
Description
There is description of creation of simple component with inheritance (using Inheritance Wizard) in this course.
The new component is keyboard with two keys.
The creation is done in following steps:
Definition1. of Component Function
Component2. Creation
Selection3. of the component for inheriting
Interface4. creation
Template5. settings
Inheriting6. cycle
Inheriting7. again
Configuring8. template
Design9. of methods
Design10. of events
Code11. writing
Generating12. help, Installing component
- 128 -
Tutorial Courses

Example Ready to use
You can see complete example of the software component TwoKeys with driver prepared in accordance with this
course.
Links
First step >> | List of Tutorial Courses | Component Wizard Introduction
7.3.1. Tutorial, Course 3, Step 1: Specification of Component Function
Simple two-key keyboard
Contents
Definition of component function - two-key keyboard
Description
This component should encapsulate simple two-key keyboard. The keyboard is connected to the 2 input pins and
to one external interrupt which informs about the key press. The information which key is pressed is read from
two pins.
For connecting the keyboard to the CPU we will use two types of components:
BitIO• - This component implements a one-bit input/output. It uses one bit/pin of a port
ExtInt• - This component implements an external interrupt. The interrupt is caused by a signal level/edge on a
pin.
Component will have three methods for enable and disable the keyboard event and one method for reading status
of the keys, and one event occuring when some key is pressed. The simple schema follows:
Help for the component will be generated automatically by Component Wizard.
- 129 -
Tutorial Courses

Links
Next step >> | Contents of This Course | List of Tutorial Courses | Component Wizard Introduction
7.3.2. Tutorial, Course 3, Step 2 - Component Creation
Tutorial, Course 3, Step 2 - Component Creation
Contents
In this step you can learn how to ...
Start• up Component Wizard
Create• a new component with Inheritance Wizard
Fill• up the basic information about the component - name of the component
Description
The component will inherit another component for that will provide a user-configurable CPU-independent
access to a hardware.
Run1. Component Wizard and select the Inheritance Wizard from startup menu. If the startup menu is turned
off or the Component Wizard is already running, select File | New | Component using InheritanceWizard from main menu.
Fill2. the item Enter the name of the new component - enter the name of the new component - TwoKeys.
(Note: If the edit line is empty or some component of this name exists, the button Next is disabled.)
Fill3. the description of the component: Two keys simple keyboard component.
- 130 -
Tutorial Courses
Click4. button Next for next page.
Links
<< Previous step | Next step >> | Contents of This Course | List of Tutorial Courses | Component Wizard
Introduction
7.3.3. Tutorial, Course 3, Step 3 - Inherited component selection
Tutorial, Course 3, Step 3 - selection of the inherited component
Contents
Inheriting components.
Description
Now we are ready to inherit three components - two input pins and one external interrupt. Let's start with the
first input pin for Button 1.
Select1. the component BitIO
Fill2. up the Description for the inherited component - enter the name for the first button (e.g. First
button).
Fill up the Identifier for the inherited component - enter Button1 - this name will be used as symbol
which we will use in driver (calling inherited methods).
Click3. button Next for the Inheritance type page.
Select4. Exclusive usage of component methods and event.
Click5. button Next for next page.
Answer 'No' on the question/message There are methods or events that exists only for specific CPUs.
Include them into the interface ?. We won't need such methods or events.
Links
<< Previous step | Next step >> | Contents of This Course | List of Tutorial Courses | Component Wizard
Introduction
7.3.4. Tutorial, Course 3, Step 4 - Interface Creation
Tutorial, Course 3, Step 4 - interface creation
Contents
In this step you can learn how to ...
Define• the interface (specify the list of inherited methods and events).
- 131 -
Tutorial Courses
Description
Now we have selected the component we are inheriting from. We have to specify methods and events of
inherited component we want to use in our new component. We will use only one method GetVal for reading
the state of the button.
Select1. the method GetVal
Keep2. other setting in default state and click the button Next to go to the next page.
Links
<< Previous step | Next step >> | Contents of This Course | List of Tutorial Courses | Component Wizard
Introduction
- 132 -
Tutorial Courses

7.3.5. Tutorial, Course 3, Step 5 - Template Creation
Tutorial, Course 3, Step 5 - template settings
Contents
In this step you can learn how to ...
Select• template options.
Description
Now we have defined the interface for which we will later create and set the template for inherited component.
The template allows to pre-configure state of properties, methods or events of the inherited component.
Select1. Create template option.
Click2. button Next for next page.
Links
<< Previous step | Next step >> | Contents of This Course | List of Tutorial Courses | Component Wizard
Introduction
7.3.6. Tutorial, Course 3, Step 6 - Inheriting cycle
Tutorial, Course 3, Step 6 - inheriting cycle
Contents
In this step you can learn how to ...
Inherit• other required components
Description
We have finished inheriting of one component. Now there are the next two components to inherit.
We1. will repeat the inheritance cycle - choose radio button Inherit another component.Click button Next for next page.
Now2. we are inheriting I/O pin for Button 2. This is the same like in Step 3, except the name of the second
inherited component.
Choose the component BitIO again
Fill3. in the Button2 as identifier of the inherited component and fill in its description (e.g. "Second button").
Click4. next to go to Inheritance type selection page.
Because5. the buttons will be identical, we will use the interface already created for the Button1.
Select Existing interface usage mode and click on the Next button.
Answer6. No on the 'There are methods... for specific CPU. Include them into the interface question.
Select7. TwoKeys\Button1 interface from the list of all suitable interfaces. Click the Next button.
- 133 -
Tutorial Courses
Links
<< Previous step | Next step >> | Contents of This Course | List of Tutorial Courses | Component Wizard
Introduction
7.3.7. Tutorial, Course 3, Step 7 - Inheriting again
Tutorial, Course 3, Step 7 - inherited third component - externalinterrupt
Contents
Inheriting another different component.
Description
We have finished with inheriting of two button components. The last inherited component will implement an
interrupt from the keyboard. For this purposes we can use the component External interrupt . For this
component we will create a new interface/template. From the component External interrupt we will use all
methods and events which it offers (Enable, Disable, GetVal, OnInterrupt).
Select1. radio button Inherit another component.Click button Next for next page.
Select2. the component ExtInt.Fill the description of the component: Keyboard interrupt and write InterruptPin as identifier.
Click button Next for next page.
Select3. Exclusive usage of component methods and events.
Click button Next for next page.
Answer4. 'No' to the question about CPU specific methods and events.
Enable5. all methods and events by double-clicking on them. Then click the Next buton.
Select6. Create template (...) option in Templace definition step.
Select7. Continue without another multiple inheritance... and click on the Next button.
Click8. on the Finish button. Now the component is ready and we are back in Component Wizard main
window.
Links
<< Previous step | Next step >> | Contents of This Course | List of Tutorial Courses | Component Wizard
Introduction
- 134 -
Tutorial Courses

7.3.8. Tutorial, Course 3, Step 8 - Configuring component template
Tutorial, Course 3, Step 8 - configuring the templates
Contents
Configuring the automatically created templates to match our needs.
Description
We have created the component that inherits three components - two ButIO and one ExtInt. There were
automatically created the templates for each interface (Button1 and InterruptPin) that will modify the default
values of inherited components.
Now we will configure these templates as it will be needed for the component driver. Because we are using the
IO pins for input only, we pre-set the inherited BitIO component for input only (we will disable the possibility to
change the IO pin to output). The used method GetVal of these components is necessary, so we enable this
method and we will remove the ability to disable it by the user - its state will be read only.
For the ExtInt component we will setup all methods to be always generated and preset the property Generate
interrupt.
Select1. the menu command File | Open | Template
Find2. the template TwoKeys\Button1 and click OK.
Switch3. to Properties tab (if it isn't already open). Select the property Direction and set its features (in the
right panel):
Feature Index to 0 (the Feature Text after this changes to Input)
Feature Read Only to True
Select4. the property Init. direction and set its features :
Feature Value to True(input only)
Feature Read Only to True
Switch5. to Methods tab. Select the method GetVal . Enable Details check-box in the right panel. Set its
feature ReadOnly to True.
Save6. the template using the main menu command File | Save .
Select7. the menu command File | Open | Template
Find8. the template TwoKeys\InterruptPin and click OK.
Switch9. to the Properties tab and select the Generate Interrupt on property. Set it's feature Read only to
True.
Switch10. to the Methods tab and for all methods select the features:
Feature Value to True.
Feature Read only to True.
- 135 -
Tutorial Courses

Figure 7.10 - Methods setup in the InterruptPin template
Save11. the template using the main menu command File | Save .
Links
<< Previous step | Next step >> | Contents of This Course | List of Tutorial Courses | Component Wizard
Introduction
7.3.9. Tutorial, Course 3, Step 9 - Design of Methods
Design of Component's Methods
Contents
Design of component's methods
Description
Now will return to the component TwoKeys. Component will offer to the user three methods and one event.
Methods are intended for enabling or disabling this component and for reading status of buttons. Event informs
about press or release of the buttons. We will create these three methods:
void• Enable(void) - enables interrupt (event) from buttons.
void• Disable(void) - disables interrupt (event) from buttons.
void• GetVal(bool *But1,bool *But2) - reads the buttons' states (pressed, not pressed).
Re-open1. the component TwoKeys using the menu command File | Open recent | Component TwoKeys.
Select2. the page Methods in the Component Wizard workspace
Click3. on the button Add to add a new method to the component
Set4. up the following method's properties (enable the detailed view by checking the Details check-box):
Symbol - Enable
Hint - This method enables the component
ReturnType - void
ReturnHint - Returns no value
Click5. on the button Add to add a another method to the component
Set6. up the following method's properties:
Symbol - Disable
- 136 -
Tutorial Courses

Hint - This method disables the component
ReturnType - void
ReturnHint - Returns no value
Click7. on the button Add to add a third new method to the component
Set8. up the following method's properties:
Symbol - GetVal
Hint - Get the button states
ReturnType - void
ReturnHint - Returns no value
Click9. on the button Add parameter to add a new parameter to the GetVal method
Set10. up the following parameter's features:
Name - But1
Type - Boolean
Passing - Address
Hint - State of the Button 1 - TRUE = pressed
Click11. on the button Add parameter again to add a second new parameter to the selected method
Set12. up the following parameter's features:
Name - But2
Type - Boolean
Passing - Address
Hint - State of the Button 2 - TRUE = pressed
- 137 -
Tutorial Courses
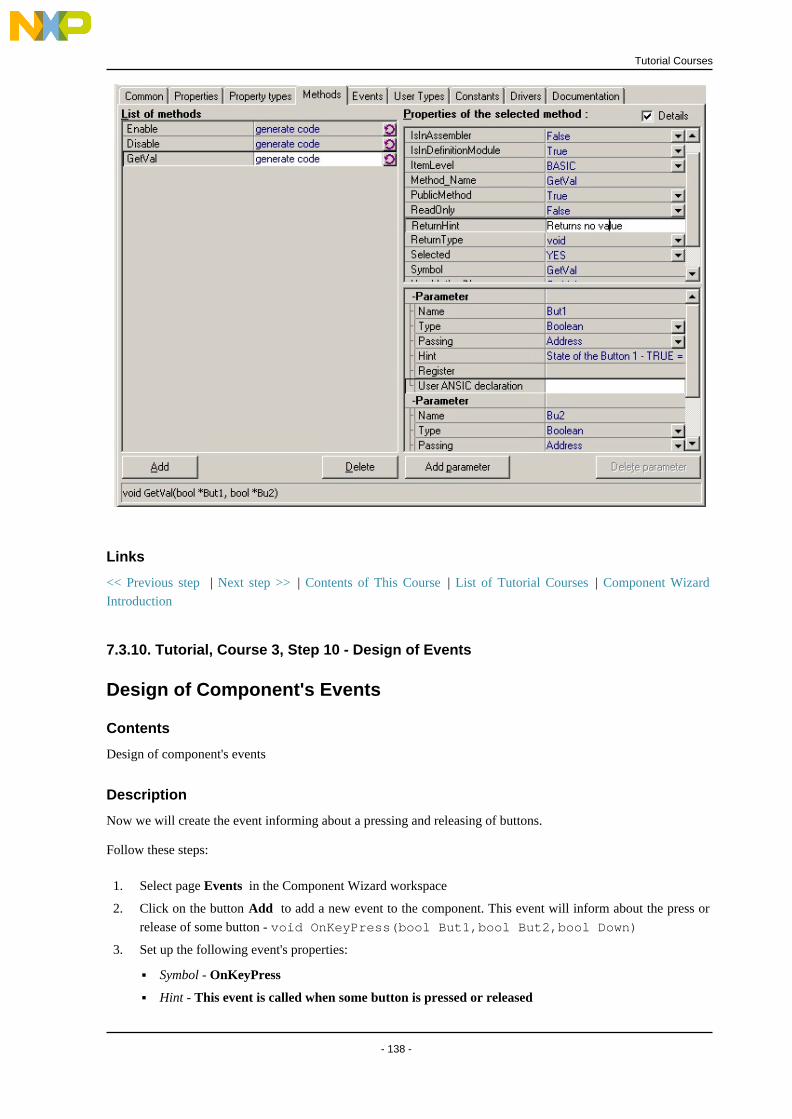
Links
<< Previous step | Next step >> | Contents of This Course | List of Tutorial Courses | Component Wizard
Introduction
7.3.10. Tutorial, Course 3, Step 10 - Design of Events
Design of Component's Events
Contents
Design of component's events
Description
Now we will create the event informing about a pressing and releasing of buttons.
Follow these steps:
Select1. page Events in the Component Wizard workspace
Click2. on the button Add to add a new event to the component. This event will inform about the press or
release of some button - void OnKeyPress(bool But1,bool But2,bool Down)
Set3. up the following event's properties:
Symbol - OnKeyPress
Hint - This event is called when some button is pressed or released
- 138 -
Tutorial Courses

Click4. on the button Add parameter to add a new parameter to the selected event
Set5. up the following parameter's features:
Name - But1
Type - Boolean
Passing - Value
Hint - State of the Button 1 - TRUE = pressed
Click6. on the button Add parameter again to add a second new parameter to the selected method
Set7. up the following parameter's features:
Name - But2
Type - Boolean
Passing - Value
Hint - State of the Button 2 - TRUE = pressed
Click8. on the button Add parameter again to add a third new parameter to the selected method
Set9. up the following parameter's features:
Name - Press
Type - Boolean
Passing - Value
Hint - Determines if the button is pressed (TRUE) or released (FALSE)
- 139 -
Tutorial Courses

Links
<< Previous step | Next step >> | Contents of This Course | List of Tutorial Courses | Component Wizard
Introduction
7.3.11. Tutorial, Course 3, Step 11 - Code writing
Implementing component's methods and events
Contents
Implementing of the component's methods and events. Here we will use the inherited method and implement
inherited events.
Description
The component is complete except the implementation. With using inheritance it is fast and easy.
To write code into the driver (created by Inheritance Wizard) select the Driver page on the Component Wizard
workspace.
Select Edit code of a method/event and click the Edit selected item button.
The list of implemented methods follows:Now select a method, click the Edit button and fill in the source code below (Changed code is displayed as a
- 140 -
Tutorial Courses

bold) and repeat this step for each method.
Implementation of method Enable
void %'ModuleName'_Enable(void)
{
inherited.InterruptPin.Enable();
}
Implementation of method Disable
void %'ModuleName'_Disable(void)
{
inherited.InterruptPin.Disable();
}
Implementation of method GetVal
void %'ModuleName'_GetVal(bool *But1,bool *But2)
{
*But1 = inherited.Button1.GetVal();
*But2 = inherited.Button2.GetVal();
}
Implementation of inherited event OnInterrupt
void inhrsym.InterruptPin.OnInterrupt(void)
{
bool But1, But2, press;
%'ModuleName'_GetVal( &But1, &But2 );
press = inherited.InterruptPin.GetVal();
%OnKeyPress( But1, But2, press );
}
Links
<< Previous step | Last step >> | Contents of This Course | List of Tutorial Courses | Component Wizard
Introduction
- 141 -
Tutorial Courses

7.3.12. Tutorial, Course 3, Last step - Generating help, Installing component
Tutorial, Course 3, Last step - Generating help, Installing component
Contents
Automatic• generation of component's html help and
Where• to find the component in Processor Expert and how to use it.
Description
Please follow according to the steps described in Tutorial 1, step 7 and Tutorial 1, Last step
Links
<< Previous step | Contents of This Course | List of Tutorial Courses | Component Wizard Introduction
7.4. Tutorial, Course 4
Course 4 - My first component with inheritance - keyboard
Description
There is description of creation of simple component with inheritance (without using Inheritance Wizard) in this
course.
The new component is keyboard with two keys.
The creation is done in following steps:
Definition1. of Component Function
Component2. Creation
Design3. of component's properties, inheriting
Template4. and Interface setting
Design5. of methods
Design6. of events
Code7. writing
Generating8. help, Installing component
ExampleReady to use
You can see complete example of the software component TwoKeys with driver prepared in accordance with this
course.
- 142 -
Tutorial Courses

Links
First step >> | List of Tutorial Courses | Component Wizard Introduction
7.4.1. Tutorial, Course 4, Step 1: Specification of Component Function
Simple two-key keyboard
Contents
Definition of component function - two-key keyboard
Description
This component should encapsulate simple two-key keyboard. The keyboard is connected to the 2 input pins and
to one external interrupt which informs about the key press. The information which key is pressed is read from
two pins.
For connecting the keyboard to the CPU we will use two types of components:
BitIO• - This component implements a one-bit input/output. It uses one bit/pin of a port
ExtInt• - This component implements an external interrupt. The interrupt is caused by a signal level/edge on a
pin.
Component will have three methods for enable and disable the keyboard event and one method for reading status
of the keys, and one event occurring when some key is pressed. The simple schema follow:
Help for the component will be generated automatically by Component Wizard.
Links
Next step >> | Contents of This Course | List of Tutorial Courses | Component Wizard Introduction
- 143 -
Tutorial Courses

7.4.2. Tutorial, Course 4, Step 2 - Component Creation
Tutorial, Course 4, Step 2 - Component Creation
Contents
In this step you can learn how to ...
Start• up Component Wizard
Create• a new component with Inheritance Wizard
Fill• up the basic information about the component - name of the component
Description
Inherited components will be needed for CPU independent accessing the hardware. The access to keyboard will
be written directly in ANSI-C language inside component driver.
Run1. Component Wizard and select Component Wizard - editing new/existing components from startup
menu. (iff the startup menu is not turned off).
Select2. File - New - Component from main menu.
Select3. Common page in the Component Wizard workspace if it's not already active.
Fill4. in following items:
Short hint - simple component description, Keyboard with two keys
Author - your name
Version - version of the component, 01.000
Shortcut - short component name (max. 4 characters), Key2
If you have a icon of the new component (16x16 pixels, BMP format, 16 colors), you can add it using
the Open.. button.
Choose5. File - Save from Component Wizard main menu to save the component to the disk. Write file
name of the component: TwoKeys. File name is always the same as the component name. Confirm the
dialog "Do you wan to also create SW driver?" by clicking on Yes button. If you successfully save it, the
new component name appears in the Component Wizard window title.
Picture
- 144 -
Tutorial Courses

Links
<< Previous step | Next step >> | Contents of This Course | List of Tutorial Courses | Component Wizard
Introduction
7.4.3. Tutorial, Course 4, Step 3 - Design of Properties, Inheriting
Tutorial, Course 4, Step 3, Design of component's properties,Inheriting
Contents
In this step you can learn how to ...
Create• inherited property
Inherit• a component
Fill• up the basic information about inherited property
- 145 -
Tutorial Courses
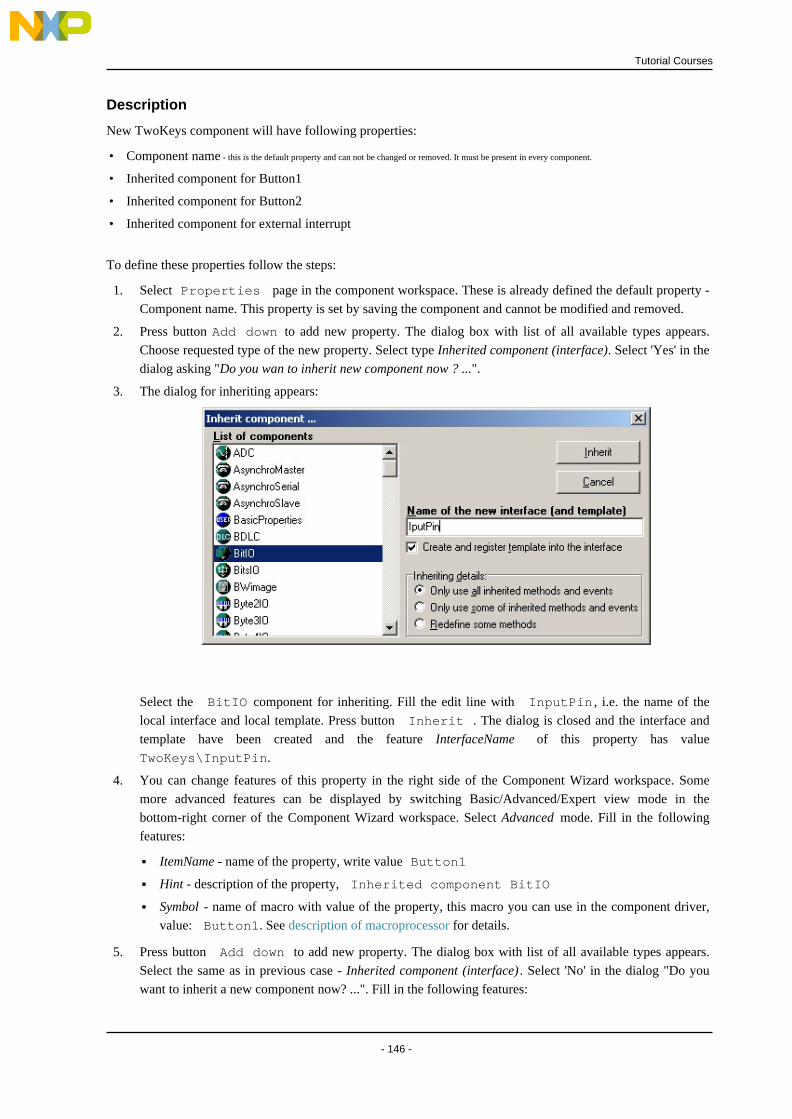
Description
New TwoKeys component will have following properties:
Component• name - this is the default property and can not be changed or removed. It must be present in every component.
Inherited• component for Button1
Inherited• component for Button2
Inherited• component for external interrupt
To define these properties follow the steps:
Select1. Properties page in the component workspace. These is already defined the default property -
Component name. This property is set by saving the component and cannot be modified and removed.
Press2. button Add down to add new property. The dialog box with list of all available types appears.
Choose requested type of the new property. Select type Inherited component (interface). Select 'Yes' in the
dialog asking "Do you wan to inherit new component now ? ...".
The3. dialog for inheriting appears:
Select the BitIO component for inheriting. Fill the edit line with InputPin , i.e. the name of the
local interface and local template. Press button Inherit . The dialog is closed and the interface and
template have been created and the feature InterfaceName of this property has value
TwoKeys\InputPin.
You4. can change features of this property in the right side of the Component Wizard workspace. Some
more advanced features can be displayed by switching Basic/Advanced/Expert view mode in the
bottom-right corner of the Component Wizard workspace. Select Advanced mode. Fill in the following
features:
ItemName - name of the property, write value Button1
Hint - description of the property, Inherited component BitIO
Symbol - name of macro with value of the property, this macro you can use in the component driver,
value: Button1. See description of macroprocessor for details.
Press5. button Add down to add new property. The dialog box with list of all available types appears.
Select the same as in previous case - Inherited component (interface) . Select 'No' in the dialog "Do you
want to inherit a new component now? ...". Fill in the following features:
- 146 -
Tutorial Courses

InterfaceName - name of the interface - select the already created interface, value:
TwoKeys\InputPin.
ItemName - name of the property, write value Button2
Hint - description of the property, Inherited component BitIO
Symbol - name of macro with value of the property, this macro you can use in the component driver,
value: Button2.
Press6. button Add down to add new property. In the dialog box with list of all available types appears,
select again the same Inherited component (interface) and select 'Yes' in the dialog "Do you want to inherit
a new component now? ...".
The7. dialog for inheriting appears:
Select the ExtInt component for inheriting. Fill the edit line with ExtInterrupt, i.e. the name of the
local interface and local template. Press button Inherit . The dialog is closed and the interface and
template have been created and the feature InterfaceName of this property has value
TwoKeys\ExtInterrupt.
Fill in the following features:
ItemName - name of the property, write value InterruptPin
Hint - description of the property, Inherited component ExtInt
Symbol - name of macro with value of the property, this macro you can use in the component driver,
value: InterruptPin.
Other8. features should stay without any change.
Picture
- 147 -
Tutorial Courses

Links
<< Previous step | Next step >> | Contents of This Course | List of Tutorial Courses | Component Wizard
Introduction
7.4.4. Tutorial, Course 4, Step 4 - Template and Interface Setting
Tutorial, Course 4, Step 4, Template and Interface Setting
Contents
In this step you can learn how to ...
Create• inherited property
Inherit• a component
Fill• up the basic information about inherited property
- 148 -
Tutorial Courses

Description
Now we have defined the interfaces and templates. We will set which methods/events will be generated into the
drivers and which not, i.e. which we want to use and which not. We will set also the state of some properties.
Because we are using the IO pin for input only, we set the inherited component for input only (we will disable
the possibility to change the IO pin to output). We need the used method GetVal , so we set to generate this
method always and we will set this state as read only.
To configure the interfaces and templates follow the steps:
Select1. property Button1 and click on this property with right mouse button. in the pop-up menu select
Inherited item/Link to component - Open interface The InputPin interface is opened.
Select2. Methods page in the component workspace. Because the pin for a key is for input only, delete
all methods except the GetVal method for reading of the status of the pin.
Save3. the interface by pressing Ctrl+S or using the command File - save
Select4. command File - Open - Template from Component Wizard main menu. Select the local template
TwoKeys\InputPin and open it by clicking on "OK" button.
Select5. Properties page in the template workspace.
Select the property Direction and set these features to:
Feature- Index to 0 (the Feature Text after this its value changes to Input)
- 149 -
Tutorial Courses

Feature- Read Only to True
Select the property Init. direction and set these features to:
Feature- Value to True (input only)
Feature- Read Only to True
Select6. Methods page in the template workspace.
Select7. method GetVal and set both Value and ReadOnly to true - the method will be always
generated. For all others method set the ReadOnly to false and the Value to false.
Save8. the template (File - Save).
Choose9. File - Open - Template from Component Wizard main menu. Select the local template
TwoKeys\ExtInterrupt and open it.
Select10. Properties page in the template workspace.
Select the property Generate interrupt on and set these features to:
Feature- Index to 0 (the value of this property after this changes to Rising or falling
edge)
Feature- Read Only to True
Select11. Methods page in the template workspace. For the Enable, Disable, GetVal methods set both the
- 150 -
Tutorial Courses

Read Only and the Value to true.
Save12. the template.
Links
<< Previous step | Next step >> | Contents of This Course | List of Tutorial Courses | Component Wizard
Introduction
7.4.5. Tutorial, Course 4, Step 5 - Design of Methods
Design of Component's Methods
Contents
Design of component's methods
Description
Now you are editing component TwoKeys. Component will be controlled by three methods and one event.
Methods are for enabling or disabling this component and for reading status of buttons. Event informs about
press or release of the buttons. We create these three methods:
void• Enable(void) - enables interrupt (event) from buttons.
void• Disable(void) - disables interrupt (event) from buttons.
void• GetVal(bool *But1,bool *But2) - reads the buttons' states (pressed, not pressed).
To define methods follow these steps:
Return1. to component editing by selecting File - Open recent - Component TwoKeys.
Select2. page Methods in the Component Wizard workspace
Click3. on the button Add to add a new method to the component
Set4. up the following method's properties:
Symbol - Enable
Hint - This method enables the component
ReturnType - void
ReturnHint - Returns no value
Click5. on the button Add to add a second new method to the component
Set6. up the following method's properties:
Symbol - Disable
Hint - This method disables the component
ReturnType - void
ReturnHint - Returns no value
Click7. on the button Add to add a third new method to the component
Set8. up the following method's properties:
Symbol - GetVal
Hint - get the button states
- 151 -
Tutorial Courses

ReturnType - void
ReturnHint - Returns no value
Click9. on the button Add parameter to add a new parameter to the selected method
Set10. up the following parameter's features:
Name - But1
Type - Boolean
Passing - Address
Hint - State of the Button 1 - TRUE = pressed
Click11. on the button Add parameter again to add a second new parameter to the selected method
Set12. up the following parameter's features:
Name - But2
Type - Boolean
Passing - Address
Hint - State of the Button 2 - TRUE = pressed
Picture
- 152 -
Tutorial Courses

Links
<< Previous step | Next step >> | Contents of This Course | List of Tutorial Courses | Component Wizard
Introduction
7.4.6. Tutorial, Course 4, Step 6 - Design of Events
Design of Component's Events
Contents
Design of component's events
Description
Now we create the event informing of pressing or releasing of the buttons.
To define methods follow these steps:
Select1. page Events in the Component Wizard workspace
Click2. on the button Add to add a new event to the component. This event will inform about the press or
release of some button - void OnKeyPress(bool But1,bool But2,bool Down)
Set3. up the following method's properties:
Symbol - OnKeyPress
Hint - This event is called when some button is pressed or released
Click4. on the button Add parameter to add a new parameter to the selected method
Set5. up the following parameter's features:
Name - But1
Type - Boolean
Passing - Value
Hint - State of the Button 1 - TRUE = pressed
Click6. on the button Add parameter again to add a second new parameter to the selected method
Set7. up the following parameter's features:
Name - But2
Type - Boolean
Passing - Value
Hint - State of the Button 2 - TRUE = pressed
Click8. on the button Add parameter again to add a second new parameter to the selected method
Set9. up the following parameter's features:
Name - Press
Type - Boolean
Passing - Value
Hint - Some button is pressed (TRUE) or released (FALSE)
- 153 -
Tutorial Courses

Picture
Links
<< Previous step | Next step >> | Contents of This Course | List of Tutorial Courses | Component Wizard
Introduction
7.4.7. Tutorial, Course 4, Step 7 - Code writing
Implementing of component's methods of Component's Events andevents
Contents
Implementing of the component's methods and events. Here you learn hot to call inherited method and
implement inherited events.
- 154 -
Tutorial Courses

Description
The component is complete except the implementation. With using inheritance it is fast and easy. To write code
into the driver (created by Inheritance Wizard) select Driver page on the Component Wizard workspace.
Click on the button Driver Info to specify driver information: driver version and name of the author.
Click on the button Edit code to edit code of methods. You can edit implementation of one method or
whole section. Uncheck option Whole section to one method only.
The list of implemented methods follows:Changed code is displayed as a bold.
Implementation of method Enable
void %'ModuleName'_Enable(void)
{
inherited.InterruptPin.Enable();
}
Implementation of method Disable
void %'ModuleName'_Disable(void)
{
inherited.InterruptPin.Disable();
}
Implementation of method GetVal
void %'ModuleName'_GetVal(bool *But1,bool *But2)
{
*But1 = inherited.Button1.GetVal();
*But2 = inherited.Button2.GetVal();
}
Implementation of inherited event OnInterrupt
void inhrsym.InterruptPin.OnInterrupt(void)
{
bool But1, But2, press;
%'ModuleName'_GetVal( &But1, &But2 );
press = inherited.InterruptPin.GetVal();
%OnKeyPress( But1, But2, press );
}
- 155 -
Tutorial Courses

Picture
Links
<< Previous step | Last step >> | Contents of This Course | List of Tutorial Courses | Component Wizard
Introduction
7.4.8. Tutorial, Course 4, Last step - Generating help, Installing component
Tutorial, Course 4, Last step - Generating help, Installing component
Contents
Automatic• generation of component's html help and
How• to install the component into Processor Expert and how to use it.
- 156 -
Tutorial Courses

Description
These steps are similar steps described in Tutorial 1, step 7 and Tutorial 1, Last step
Links
<< Previous step | Contents of This Course | List of Tutorial Courses | Component Wizard Introduction
- 157 -
Tutorial Courses

8. Component Wizard - Command line parameters
Running Component Wizard from command lineNote: Command line parameters are not available for CodeWarrior plug-in version of Component Wizard.
Description
Component Wizard accepts these parameters from command line:
BeanWizard.exe [/test driver_filename] [bean_filename] [/import headerfile]
[/userdir workingdirectory]
Parameters description:
/test• - creates test file for driver specified with full path.
bean_filename• - full path to component to be opened
/import• - imports a ANSI C module into component. For more information see here. Second parameter is
source of C module with full path
Remark: Parameters are case sensitive.
Examples
Open• component mybeanBeanWizard.exe c:\myData\beans\mybean\mybean.bean
Import• ANSI C module module.c located in the directory c:\users\myData\BeanWizard.exe /import c:\users\myData\module.c
Create• test file from the software driver mybean.drv located in the directory c:\programs\PE\drivers\sw\BeanWizard.exe /test c:\programs\PE\drivers\sw\mybean.drv
- 158 -
Component Wizard - Command line parameters

9. Revision List
Revisions of the Component Wizard help
History
27.4.2010• version 1.55
Updated 'Inheritance Scheme' diagram.
Updated List of properties table
18.9.2009• version 1.54
Updated main menu, editor, documentation and options chapters.
30.6.2009• version 1.53
Beans renamed to Components.
8.4.2009• version 1.52
Updated page footer
23.5.2008• version 1.51
Minor corrections
10.4.2008• version 1.50
Minor corrections
Removed component skeletons
Tutorial corrections
Options corrections
Import dialog updates
23.10.2007• version 1.49
Minor corrections
20.12.2006• version 1.48
The Component creator changed to Inheritance Wizard
Updated main menu
Added Constants page
Updated screens
5.10.2005• version 1.47
CHG file commands for inherited components moved to the CHG file chapter.
25.10.2005• version 1.46
Added Basic Terms/Inheritance chapter
Changed look of the pages
Updated descriptions and screenshots
08.10.2004• version 1.45
CHM Content file generation (!BWHelp.hhc) corrected.
- 159 -
Revision List

This help should be used with Component Wizard 1.17
01.10.2004• version 1.44
Minor changes in the help.
This help should be used with Component Wizard 1.17
07.05.2004• version 1.43
new feel&look of the help.
Minor changes (up-to-date screen-shots) in the help.
This help should be used with Component Wizard 1.17
01.12.2003• version 1.42
Minor changes (up-to-date screen-shots) in the help.
Font in the internal editor can be changed in menu Options - page Editor
New page Common problems with inheritance
This help should be used with Component Wizard 1.17
29.08.2003• version 1.41
Minor changes in the help.
Only one instance of a component in Processor Expert can be ensured in Common page
This help should be used with Component Wizard 1.16
29.08.2003• version 1.40
Minor changes in the help.
It's now easier to inherite components in page Properties using improved fast inheriting dialog
This help should be used with Component Wizard 1.16
28.04.2003• version 1.39
Minor changes in the help.
It's now easier to add new methods or vents into the interface via Component Viewer using context
menus in Interface templates page
This help should be used with Component Wizard 1.16
03.04.2003• version 1.38
List of properties - added links to the examples in the tutorial Course 2.
Link to this page added to the introduction page.
This help should be used with Component Wizard 1.16
28.03.2003• version 1.37
Dialog Options has a new page for setting of internal editor.
Main menu changed - Import beans from package has been added to menu File | Import.
Tutorial course 3 - screenshots updated to current version of Component Wizard.
This help should be used with Component Wizard 1.16
28.11.2002• version 1.36
Page Interface Templates changed. Now an interface can register components without creating templates
(until now only templates could have been registered)
This help should be used with Component Wizard 1.15
19.11.2002• version 1.35
- 160 -
Revision List

New page How to modify existing interface
List of hot keys in the driver editor.
Page Property types changed.
This help should be used with Component Wizard 1.14
15.10.2002• version 1.34
Improved Auto complete function
New page describing editing code of methods/events/driver parts. See edit code dialog
This help should be used with Component Wizard 1.14
12.09.2002• version 1.33
New - user help styles - see HTML Help styles
Graphical change in the page Help
Changes in the Component category
This help should be used with Component Wizard 1.14
31.07.2002• version 1.32
More details about Editing drivers
New page Driver editor
New page Command line
More information about interfaces in Component Manager page Interfaces
Minor changes in page Properties List
This help should be used with Component Wizard 1.13
25.07.2002• version 1.31
Added description of popup menu in the page Property types
This help should be used with Component Wizard 1.12
20.06.2002• version 1.30
New inheriting features in the interfaces - MethodScope for Methods and EventScope for Events
New highlighting of inherited methods and events in pages Methods and Events. It can be turned on/off
in the Options - page Display.
components, interfaces and templates can be opened in read only mode - see Options - page Default
values
Improved user type Record in the page User types
This help should be used with Component Wizard 1.12
03.06.2002• version 1.29
This page has been reorganized; the latest changes are on the top of this page.
Page List of properties - added new property List of items (item is defined in file).
Page Properties - new context menu for properties.
This help should be used with Component Wizard 1.11
01.03.2002• version 1.28Minor changes in the help. This help should be used with Component Wizard 1.10
11.01.2002• version 1.27
The component can be created from existing module written in ANSIC. See here for more information.
- 161 -
Revision List

New page How to share component - the difference between sharing and inheriting.
This help should be used with Component Wizard 1.09
20.12.2001• version 1.26
New User type (User definition).
Removed optional background from Component Wizard (page Options changed).
The graphic design of editing methods and events changed.
Page common changed, component has category classification.
This help should be used with Component Wizard 1.08
30.10.2001• version 1.25The User types and Importing/Exporting a component pages changed. This help should be used with
Component Wizard 1.07
25.07.2000• version 1.24New Tutorial 4 for inheritance process without Component Creator. Inheriting in an existing component.
This help should be used with Component Wizard 1.04
02.06.2000• version 1.23New Tutorial 3 for inheritance process with Component Creator This help should be used with Component
Wizard 1.04
26.05.2000• version 1.22More detailed description of inheritance process. This help should be used with Component Wizard 1.04
21.04.2000• version 1.21The User Types page is now available for Basic version of Component Wizard too. This help should be used
with Component Wizard 1.03
13.04.2000• version 1.2The Revisions page changed. This help should be used with Component Wizard 1.03
21.02.2000• version 1.1This help should be used with Component Wizard 1.03
- 162 -
Index

- 163 -
Index
INDEX% 87, 83%+ 83%- 83%> 83%add 83%addloc 83%append 83%apploc 83%define 83%define_prj 83%elif 83%else 83%endfor 83%endif 83%error 83%FILE 83%for 83%for_index 87%for_index_0 87%get 94%hint 83%if 83%ifdef 83%ifndef 83%IMPLEMENTATION 83%include 83%INITIALIZATION 83%INTERFACE 83%list_size 87%set 94%str_length 87%TEXTHELPFILE 83%undef 83%warning 83%[index,list] 87%{ 87%} 87access to macros of inherited components 87Basic Properties 125Basic version 12Boolean group 54Boolean yes / no 54commands 83Common Page 48Component 5Component creation 21component driver 79Component Manager 31Component properties 54Component Settings file 125Component Template 5Component Viewer 112Component Wizard Help 4Component Wizard versions 12Constants 76Course 1 of tutorial 114Course 2 125Course 4 of tutorial 142Deleting component 32details about drivers and macroprocessor 79Distributing component 23Documentation Page 100driver 79Driver Processing 79Drivers Page 77Editing driver 20Enumeration 54Events Page 71
Example of basic properties 125Exporting component 33Fast inheriting 63Features 54global macros 88Global Properties Page 65Group - boolean 54Group of items 54How to apply an interface to a component 16How to create interface 14How to create template 13How to delete a component 32How to edit driver 20How to use inheritance 16How to... 13Inheritance 5, 7Inheritance scheme 8Inheritance Wizard 35Inherited component 54inherited events 5inherited methods 5Inheriting component 16Inheriting Events 11Inheriting Methods 9Integer number 54Interface 5Interface application 16Interface creation 14Interface Events Page 107Interface Info Page 104Interface Methods Page 105Interface Templates Page 110Links 63List of components properties 54List of features 54List of Properties 54local macros 90macroprocessor 83Macroprocessor Commands 83Macroprocessor Denotation 81Macroprocessor features 80macroprocessor features 79Macroprocessor overview 80Macros 91Main Menu 25Methods Page 69Options 26Predefined Global Macros 88Predefined Local Macros 90predefined macros 87Predefined Macros and Directives 87Professional version 12Properties 54Properties config 30Properties of the properties 54Properties Page 51Property Macros 91Property Types Page 67Real number 54Registration into interface 5Revisions 38Revisions list 159Save Interface Dialog 36Save Template Dialog 37Settings file of a component 125Speed mode setting 54SRC file 79Startup Menu 47

- 164 -
Index
String 54Template 5Template creation 13Tutorial 125Tutorial - Course 1 114Tutorial - Course 4 142Tutorial, Course 1 114Tutorial, Course 1, Last Step 124Tutorial, Course 1, Step 2 115Tutorial, Course 1, Step 3 117Tutorial, Course 1, Step 4 119Tutorial, Course 1, Step 5 120Tutorial, Course 1, Step 6 122Tutorial, Course 1, Step 7 123Tutorial, Course 2 125Tutorial, Course 3, Step 1 129Tutorial, Course 3, Step 10 138Tutorial, Course 3, Step 11 140Tutorial, Course 3, Step 12 142Tutorial, Course 3, Step 2 130Tutorial, Course 3, Step 3 131Tutorial, Course 3, Step 4 131Tutorial, Course 3, Step 5 133Tutorial, Course 3, Step 6 133Tutorial, Course 3, Step 7 134Tutorial, Course 3, Step 8 135Tutorial, Course 3, Step 9 136Tutorial, Course 4 142Tutorial, Course 4, Step 1 143Tutorial, Course 4, Step 2 144Tutorial, Course 4, Step 3 145Tutorial, Course 4, Step 4 148Tutorial, Course 4, Step 5 151Tutorial, Course 4, Step 6 153Tutorial, Course 4, Step 7 154Tutorial, Course 4, Step 8 156Tutorials 114Two-digit 8-segment LED display 114User Interface 24User Types Page 74Versions 12View Component Utility 112

- 165 -
Index