complete guide to test automation -...
TRANSCRIPT

Complete Guide to Test Automation
Techniques, Practices, and Patterns for Building and Maintaining Effective Software Projects—Arnon Axelrod

Complete Guide to Test Automation
Techniques, Practices, and Patterns for Building and Maintaining Effective Software Projects
Arnon Axelrod

Complete Guide to Test Automation: Techniques, Practices, and Patterns for Building and Maintaining Effective Software Projects
ISBN-13 (pbk): 978-1-4842-3831-8 ISBN-13 (electronic): 978-1-4842-3832-5https://doi.org/10.1007/978-1-4842-3832-5
Library of Congress Control Number: 2018955901
Copyright © 2018 by Arnon Axelrod
This work is subject to copyright. All rights are reserved by the Publisher, whether the whole or part of the material is concerned, specifically the rights of translation, reprinting, reuse of illustrations, recitation, broadcasting, reproduction on microfilms or in any other physical way, and transmission or information storage and retrieval, electronic adaptation, computer software, or by similar or dissimilar methodology now known or hereafter developed.
Trademarked names, logos, and images may appear in this book. Rather than use a trademark symbol with every occurrence of a trademarked name, logo, or image we use the names, logos, and images only in an editorial fashion and to the benefit of the trademark owner, with no intention of infringement of the trademark.
The use in this publication of trade names, trademarks, service marks, and similar terms, even if they are not identified as such, is not to be taken as an expression of opinion as to whether or not they are subject to proprietary rights.
While the advice and information in this book are believed to be true and accurate at the date of publication, neither the authors nor the editors nor the publisher can accept any legal responsibility for any errors or omissions that may be made. The publisher makes no warranty, express or implied, with respect to the material contained herein.
Managing Director, Apress Media LLC: Welmoed SpahrAcquisitions Editor: Shiva RamachandranDevelopment Editor: Laura BerendsonCoordinating Editor: Rita Fernando
Cover designed by eStudioCalamar
Distributed to the book trade worldwide by Springer Science+Business Media New York, 233 Spring Street, 6th Floor, New York, NY 10013. Phone 1-800-SPRINGER, fax (201) 348-4505, e-mail [email protected], or visit www.springeronline.com. Apress Media, LLC is a California LLC and the sole member (owner) is Springer Science + Business Media Finance Inc (SSBM Finance Inc). SSBM Finance Inc is a Delaware corporation.
For information on translations, please e-mail [email protected], or visit http://www.apress.com/rights-permissions.
Apress titles may be purchased in bulk for academic, corporate, or promotional use. eBook versions and licenses are also available for most titles. For more information, reference our Print and eBook Bulk Sales web page at http://www.apress.com/bulk-sales.
Any source code or other supplementary material referenced by the author in this book is available to readers on GitHub via the book's product page, located at www.apress.com/9781484238318. For more detailed information, please visit http://www.apress.com/source-code.
Printed on acid-free paper
Arnon AxelrodMatan, Israel

In memory of my late grandparents Nathan and Lea Axelrod, pioneers of the Israeli cinema. Your memory is my inspiration.

v
About the Author ���������������������������������������������������������������������������������������������������xvii
About the Technical Reviewer ��������������������������������������������������������������������������������xix
Acknowledgments ��������������������������������������������������������������������������������������������������xxi
Introduction ����������������������������������������������������������������������������������������������������������xxiii
Table of Contents
Part I: The “Why” and the “What” ������������������������������������������������������������������ 1
Chapter 1: The Value of Test Automation ������������������������������������������������������������������ 3
Why Do We Need Test Automation? ���������������������������������������������������������������������������������������������� 3
From Waterfall to Agile Software Development ���������������������������������������������������������������������������� 4
The Cost of Software Complexity �������������������������������������������������������������������������������������������������� 6
Maintaining a Constant Cost ���������������������������������������������������������������������������������������������������� 7
Refactoring������������������������������������������������������������������������������������������������������������������������������������ 9
Continuous Improvement ������������������������������������������������������������������������������������������������������������ 10
Chapter 2: From Manual to Automated Testing ������������������������������������������������������ 13
First Attempt: Record and Playback �������������������������������������������������������������������������������������������� 13
Getting the Most Out of Test Automation������������������������������������������������������������������������������������� 16
Differences Between Manual and Automated Tests �������������������������������������������������������������������� 18
Exploratory Testing ���������������������������������������������������������������������������������������������������������������� 19
Considerations for Automated Testing ����������������������������������������������������������������������������������� 21
Chapter 3: People and Tools ����������������������������������������������������������������������������������� 31
Choosing the Right Tools ������������������������������������������������������������������������������������������������������������� 31
Who Should Write the Tests?������������������������������������������������������������������������������������������������������� 32
Promoting Manual Testers or Inexperienced Programmers to Automation Developers �������� 32
Splitting the Work Between Manual Testers and Automation Programmers ������������������������� 35
Using a Dedicated Automation Team ������������������������������������������������������������������������������������� 37

vi
Having Dedicated Automation Developer(s) Inside Each Team ���������������������������������������������� 38
Give the Developers the Ownership for the Automation �������������������������������������������������������� 39
The Variety of Tools ��������������������������������������������������������������������������������������������������������������������� 40
Classification of Tools ������������������������������������������������������������������������������������������������������������ 40
IDEs and Programming Language ����������������������������������������������������������������������������������������� 41
(Unit) Testing Frameworks ����������������������������������������������������������������������������������������������������� 45
BDD-Style Frameworks ��������������������������������������������������������������������������������������������������������� 46
SUT Interaction Technologies ������������������������������������������������������������������������������������������������ 48
Test Management Suites ������������������������������������������������������������������������������������������������������� 60
Build Tools and CI/CD Pipelines ��������������������������������������������������������������������������������������������� 60
Other Considerations for Choosing Tools ������������������������������������������������������������������������������� 61
Chapter 4: Reaching Full Coverage ������������������������������������������������������������������������� 63
How Do You Measure Coverage? ������������������������������������������������������������������������������������������������ 64
Percentage of Manual Test Cases Covered by Automation ���������������������������������������������������� 65
Percentage of Covered Features ������������������������������������������������������������������������������������������� 65
Percentage of Code Coverage ����������������������������������������������������������������������������������������������� 66
Gaining Value Before Reaching Full Coverage ���������������������������������������������������������������������������� 71
What Do We Do When We Have Full Coverage? �������������������������������������������������������������������������� 71
How Do We Get to 100% Coverage? ������������������������������������������������������������������������������������������� 72
Reversing the Wheel ������������������������������������������������������������������������������������������������������������������� 74
My Road Map to Successful Automation Project ������������������������������������������������������������������������ 77
When to Start Working on Progression ���������������������������������������������������������������������������������� 78
Prioritizing the Work to Fill the Regression Gap �������������������������������������������������������������������� 79
Chapter 5: Business Processes ������������������������������������������������������������������������������ 83
Running the Tests on a Regular Basis ����������������������������������������������������������������������������������������� 83
The Simplest Approach ���������������������������������������������������������������������������������������������������������� 84
Nightly Runs �������������������������������������������������������������������������������������������������������������������������� 85
Handling Bugs That Are Found by the Automation ���������������������������������������������������������������������� 86
Keep the Failing Tests ������������������������������������������������������������������������������������������������������������ 86
Exclude the Failing Tests ������������������������������������������������������������������������������������������������������� 88
Table of ConTenTs

vii
Creating Work-Arounds in the Test ���������������������������������������������������������������������������������������� 89
Treating All Automation Failures as Critical Bugs ������������������������������������������������������������������ 91
Continuous Integration ���������������������������������������������������������������������������������������������������������������� 92
Acceptance Test Driven Development (ATDD) ����������������������������������������������������������������������������� 93
Continuous Delivery and Continuous Deployment ���������������������������������������������������������������������� 94
Canary Releases �������������������������������������������������������������������������������������������������������������������� 95
Summary������������������������������������������������������������������������������������������������������������������������������������� 97
Chapter 6: Test Automation and Architecture��������������������������������������������������������� 99
Test Architecture Considerations ������������������������������������������������������������������������������������������������ 99
Understanding the SUT Architecture ����������������������������������������������������������������������������������������� 100
Back to Basics: What’s a Computer System? ���������������������������������������������������������������������� 100
What’s an Automated Test? ������������������������������������������������������������������������������������������������� 101
Real-World Computer Systems�������������������������������������������������������������������������������������������� 102
Alternatives and Considerations in a Layered Architecture ������������������������������������������������������ 106
The Relationships Between the Scope and the Test ������������������������������������������������������������ 107
Overview of the Layers �������������������������������������������������������������������������������������������������������� 109
The Alternative Test Scopes������������������������������������������������������������������������������������������������� 111
Real-World Architecture ������������������������������������������������������������������������������������������������������������ 130
Intended Architecture vs� the Actual One ���������������������������������������������������������������������������� 130
Common Variations �������������������������������������������������������������������������������������������������������������� 130
Combining Tests ������������������������������������������������������������������������������������������������������������������ 132
Summary of the Considerations ������������������������������������������������������������������������������������������ 135
Beyond the Layered Architecture ���������������������������������������������������������������������������������������� 139
Summary: Making Your Own Choice ����������������������������������������������������������������������������������������� 143
Chapter 7: Isolation and Test Environments ��������������������������������������������������������� 145
State ������������������������������������������������������������������������������������������������������������������������������������������ 145
Isolation Problems and Solutions ���������������������������������������������������������������������������������������������� 147
Problem 1 – Manual Tests and Automated Test Running in Different Times ����������������������� 147
Problem 2 – Manual Tests and Automated Tests Running Simultaneously ������������������������� 148
Problem 3 – Order Matters �������������������������������������������������������������������������������������������������� 149
Problem 4 – Automated Tests Running Simultaneously ������������������������������������������������������ 150
Table of ConTenTs

viii
Isolation Techniques ������������������������������������������������������������������������������������������������������������������ 150
Use Separate Accounts �������������������������������������������������������������������������������������������������������� 150
Separate Between Manual Testing and Test Automation Databases ����������������������������������� 151
Having Separate Environments for Each Team Member ����������������������������������������������������� 151
Resetting the Environment Before Each Test Cycle ������������������������������������������������������������� 153
Create Unique Data for Each Test ���������������������������������������������������������������������������������������� 157
Each Test Cleans Everything It Creates ������������������������������������������������������������������������������� 162
Read-Only Shared Data ������������������������������������������������������������������������������������������������������� 164
Summary����������������������������������������������������������������������������������������������������������������������������������� 165
Chapter 8: The Big Picture ������������������������������������������������������������������������������������ 167
The Relationships Between Software Architecture and Business Structure ����������������������������� 167
Conway’s Law ���������������������������������������������������������������������������������������������������������������������� 167
Horizontal Teams vs� Vertical Teams ������������������������������������������������������������������������������������ 168
The Relationships Between Software Architecture and Organizational Structure with Test Automation �������������������������������������������������������������������������������������������������������������������������������� 170
Dedicated Automation Team ������������������������������������������������������������������������������������������������ 170
Automation Developers Inside Horizontal Teams ���������������������������������������������������������������� 170
Automation Developers Inside Vertical Teams ��������������������������������������������������������������������� 171
Flexible Organizational Structure ���������������������������������������������������������������������������������������� 172
Having an Automation Expert ���������������������������������������������������������������������������������������������� 173
Summary����������������������������������������������������������������������������������������������������������������������������������� 173
Part II: The “How” ��������������������������������������������������������������������������������������� 175
Chapter 9: Preparing for the Tutorial �������������������������������������������������������������������� 177
Prerequisites and Presumptions ����������������������������������������������������������������������������������������������� 177
Applicability of the Process for Existing Test Automation Systems������������������������������������������� 178
Overview of the Process ����������������������������������������������������������������������������������������������������������� 179
Bottom Up vs� Top Down ������������������������������������������������������������������������������������������������������ 179
The Process ������������������������������������������������������������������������������������������������������������������������� 180
Getting to Know the SUT ����������������������������������������������������������������������������������������������������������� 181
Overview on MVCForum ������������������������������������������������������������������������������������������������������ 182
Table of ConTenTs

ix
Preparing the Environment for the Tutorial ������������������������������������������������������������������������������� 185
Install Visual Studio Community Edition ������������������������������������������������������������������������������ 186
Download and Install Chrome ���������������������������������������������������������������������������������������������� 186
Download and Install SQL Server Express ��������������������������������������������������������������������������� 186
Download and Build the Application ������������������������������������������������������������������������������������ 187
Install Resharper (Optional) ������������������������������������������������������������������������������������������������� 192
Using Git Through Visual Studio ������������������������������������������������������������������������������������������������ 193
Switching Between Branches ���������������������������������������������������������������������������������������������� 194
Summary����������������������������������������������������������������������������������������������������������������������������������� 198
Chapter 10: Designing the First Test Case ������������������������������������������������������������ 199
Choosing the First Test to Automate ����������������������������������������������������������������������������������������� 199
Choosing the First Test Case for MVCForum ������������������������������������������������������������������������ 204
The Scientific Method for Designing a Test Case ���������������������������������������������������������������������� 205
Designing the Steps of the Test ������������������������������������������������������������������������������������������� 205
Thinking in Terms of Objects and Entities ��������������������������������������������������������������������������� 208
Summary����������������������������������������������������������������������������������������������������������������������������������� 217
Chapter 11: Start Coding the First Test����������������������������������������������������������������� 219
Creating the Project ������������������������������������������������������������������������������������������������������������������ 219
Renaming the Class, Filename, and Test Method ���������������������������������������������������������������� 222
Write the Pseudo-code�������������������������������������������������������������������������������������������������������������� 224
Remarks About the Pseudo-code ���������������������������������������������������������������������������������������� 225
Getting the Code to Compile ����������������������������������������������������������������������������������������������������� 228
Declaring the LoggedInUser Class ��������������������������������������������������������������������������������������� 230
Declaring the MVCForum Property �������������������������������������������������������������������������������������� 230
Declaring the RegisterNewUserAndLogin Method ��������������������������������������������������������������� 232
Declaring the Rest of the Classes and Methods ������������������������������������������������������������������ 233
Model Code Review ������������������������������������������������������������������������������������������������������������������ 237
Summary����������������������������������������������������������������������������������������������������������������������������������� 238
Table of ConTenTs

x
Chapter 12: Completing the First Test ������������������������������������������������������������������ 239
Running the Test to Find What to Implement First �������������������������������������������������������������������� 239
Adding Selenium to the Project������������������������������������������������������������������������������������������������� 241
Running IISExpress �������������������������������������������������������������������������������������������������������������� 243
Implementing the MVCForumClient Constructor ����������������������������������������������������������������������� 244
Implementing RegisterNewUserAndLogin �������������������������������������������������������������������������������� 246
Asking the Developer to Add a Unique Automation Identifier ���������������������������������������������� 251
Implementing the Property Setters ������������������������������������������������������������������������������������� 254
Removing Duplication from the Property Setters ���������������������������������������������������������������� 257
Hitting the Isolation Problem ����������������������������������������������������������������������������������������������������� 260
Implementing CreateDiscussion and Analyzing the Failure ������������������������������������������������������ 264
Completing the Test ������������������������������������������������������������������������������������������������������������������ 269
Summary����������������������������������������������������������������������������������������������������������������������������������� 270
Chapter 13: Investigating Failures ����������������������������������������������������������������������� 271
Integrating with Latest Version of MVCForum ��������������������������������������������������������������������������� 271
Improving the Error Reporting��������������������������������������������������������������������������������������������������� 273
Avoid Debugging������������������������������������������������������������������������������������������������������������������ 277
Investigating the Root Cause ����������������������������������������������������������������������������������������������� 278
Resolving the Problem ��������������������������������������������������������������������������������������������������������� 279
More Issues… ��������������������������������������������������������������������������������������������������������������������� 280
Logging and Other Evidence Collection ������������������������������������������������������������������������������������ 287
Screen Capture �������������������������������������������������������������������������������������������������������������������� 287
Logging �������������������������������������������������������������������������������������������������������������������������������� 288
Nested Logging�������������������������������������������������������������������������������������������������������������������� 288
Visual Logging ��������������������������������������������������������������������������������������������������������������������� 290
Additional Logging and Diagnostics Options ����������������������������������������������������������������������� 290
Adding Nested Visual Logger to MVCForum Tests ��������������������������������������������������������������������� 293
Investigating Challenging Failures �������������������������������������������������������������������������������������������� 295
Failures That Happen Only On One Machine ����������������������������������������������������������������������� 296
Investigating Influencing Tests �������������������������������������������������������������������������������������������� 300
Investigating Flickering Tests ���������������������������������������������������������������������������������������������� 301
Summary����������������������������������������������������������������������������������������������������������������������������������� 308
Table of ConTenTs

xi
Chapter 14: Adding More Tests ����������������������������������������������������������������������������� 309
Writing the Next Tests ��������������������������������������������������������������������������������������������������������������� 309
Planning the Next Tests ������������������������������������������������������������������������������������������������������� 311
Adding the Test: Discussions Can Be Filtered by Category �������������������������������������������������� 312
Summary for Adding the Second Test ��������������������������������������������������������������������������������� 327
Making Additional Improvements ��������������������������������������������������������������������������������������������� 328
Creating More Comprehensible Identifiers �������������������������������������������������������������������������� 328
Arrange the Code in Folders ������������������������������������������������������������������������������������������������ 328
Extract a Base Class for Tests ��������������������������������������������������������������������������������������������� 329
Supporting Multiple Users and Browsers ��������������������������������������������������������������������������������� 330
Tips for Using Test Configuration Files �������������������������������������������������������������������������������� 330
Supporting Multiple Browsers ��������������������������������������������������������������������������������������������� 332
Additional Improvement Opportunities ������������������������������������������������������������������������������������� 334
Automatically Re-create the Database �������������������������������������������������������������������������������� 335
Cleanup ������������������������������������������������������������������������������������������������������������������������������� 336
Improve Performance ���������������������������������������������������������������������������������������������������������� 338
Adding More Tests ��������������������������������������������������������������������������������������������������������������������� 338
Data-Driven Tests (DDT) ������������������������������������������������������������������������������������������������������� 338
Summary����������������������������������������������������������������������������������������������������������������������������������� 341
Chapter 15: Continuous Integration ���������������������������������������������������������������������� 343
Is It Really Necessary? �������������������������������������������������������������������������������������������������������������� 344
Creating the Test Build Process ������������������������������������������������������������������������������������������������ 344
Scheduling the Test Build Process �������������������������������������������������������������������������������������� 346
Creating the Automatic Deployment Process ���������������������������������������������������������������������� 347
Adding the Tests to the Build ����������������������������������������������������������������������������������������������� 350
Changing the Development Processes and Culture ������������������������������������������������������������������ 352
Aiming for the “Holy Grail” �������������������������������������������������������������������������������������������������� 352
What It Takes to Change the Culture ����������������������������������������������������������������������������������� 353
Identifying the Starting Point ����������������������������������������������������������������������������������������������� 355
Table of ConTenTs

xii
Decreasing the Test Run Duration ��������������������������������������������������������������������������������������������� 363
Improve Isolation ����������������������������������������������������������������������������������������������������������������� 364
Perform Prerequisites Through API�������������������������������������������������������������������������������������� 364
Parallelization and Virtualization ����������������������������������������������������������������������������������������� 364
Run Only Sanity Tests in CI �������������������������������������������������������������������������������������������������� 365
Breaking the CI Pipeline to Stages �������������������������������������������������������������������������������������� 365
Write Mostly Integration and Unit Tests ������������������������������������������������������������������������������� 366
Run Tests Only for Relevant Components ���������������������������������������������������������������������������� 367
Optimizing Test Performance����������������������������������������������������������������������������������������������� 368
Covering a Broader Matrix �������������������������������������������������������������������������������������������������������� 368
Summary����������������������������������������������������������������������������������������������������������������������������������� 369
Chapter 16: Acceptance Test Driven Development ����������������������������������������������� 371
Overview on ATDD ��������������������������������������������������������������������������������������������������������������������� 371
Being More Agile ����������������������������������������������������������������������������������������������������������������������� 372
Technical Debt ��������������������������������������������������������������������������������������������������������������������� 372
What Makes a Team Agile? �������������������������������������������������������������������������������������������������� 372
Avoiding Technical Debt������������������������������������������������������������������������������������������������������� 373
The Process ������������������������������������������������������������������������������������������������������������������������������ 375
Create and Elaborate the User Story ����������������������������������������������������������������������������������� 375
Writing the Automated Tests ������������������������������������������������������������������������������������������������ 378
Deliver the Application and Get Feedback ��������������������������������������������������������������������������� 386
Using the Acceptance Tests as Documentation ������������������������������������������������������������������������ 387
Binding Steps Rather Than Tests ����������������������������������������������������������������������������������������� 388
The Trade-Offs Between Reusability, Granularity, and Readability �������������������������������������� 390
Introducing ATDD in an Existing Project ������������������������������������������������������������������������������������ 391
Start Without Automated Tests �������������������������������������������������������������������������������������������� 391
Implementing the Automation Retrospectively �������������������������������������������������������������������� 392
Start from Bug Fixes ������������������������������������������������������������������������������������������������������������ 393
Enriching Regression Coverage ������������������������������������������������������������������������������������������� 393
Summary����������������������������������������������������������������������������������������������������������������������������������� 394
Table of ConTenTs

xiii
Chapter 17: Unit Tests and TDD ���������������������������������������������������������������������������� 395
Learning Unit Tests and TDD ����������������������������������������������������������������������������������������������������� 395
The Mechanics of Writing a Unit Test ���������������������������������������������������������������������������������������� 396
Unit Test Framework Mechanics ����������������������������������������������������������������������������������������� 397
The Mechanics of Writing a Unit Test ���������������������������������������������������������������������������������� 400
Unit Tests and I/O ����������������������������������������������������������������������������������������������������������������� 403
The Mechanics of TDD �������������������������������������������������������������������������������������������������������������� 408
Red-Green-Refactor ������������������������������������������������������������������������������������������������������������ 409
Why Should We Write the Tests First? ��������������������������������������������������������������������������������� 412
The Real Challenges in Unit Testing and TDD ���������������������������������������������������������������������������� 413
Main Challenges with Unit Testing �������������������������������������������������������������������������������������� 413
Main Challenges with TDD ��������������������������������������������������������������������������������������������������� 414
More Specific Challenges ���������������������������������������������������������������������������������������������������� 414
Mastering Clean Code and the SOLID Principles ����������������������������������������������������������������� 418
Mastering Refactoring ��������������������������������������������������������������������������������������������������������� 421
The Biggest Challenge: What to Test?���������������������������������������������������������������������������������� 421
TDD the Way It Was Meant to Be ����������������������������������������������������������������������������������������������� 422
Outside-In vs� Inside-Out Approach ������������������������������������������������������������������������������������� 423
Summary����������������������������������������������������������������������������������������������������������������������������������� 424
Chapter 18: Other Types of Automated Tests �������������������������������������������������������� 425
Performance Tests �������������������������������������������������������������������������������������������������������������������� 425
Measuring Performance in Production ������������������������������������������������������������������������������������� 425
What Not to Do �������������������������������������������������������������������������������������������������������������������� 427
Defining the Expected Result ���������������������������������������������������������������������������������������������� 428
Reusing Code Between Functional and Performance Tests ������������������������������������������������ 429
Investigating Performance Bottlenecks ������������������������������������������������������������������������������� 429
Perceived Performance vs� Actual Performance ����������������������������������������������������������������� 429
Load Tests ��������������������������������������������������������������������������������������������������������������������������������� 430
How Load Tests Work����������������������������������������������������������������������������������������������������������� 430
Defining the Expected Result ���������������������������������������������������������������������������������������������� 431
Combining Performance with Load Tests ���������������������������������������������������������������������������� 433
Table of ConTenTs
xiv
Running Tests in Production������������������������������������������������������������������������������������������������������ 434
Testing Deployment ������������������������������������������������������������������������������������������������������������� 434
Testing the Health of the Production Environment �������������������������������������������������������������� 435
Which Tests to Run �������������������������������������������������������������������������������������������������������������� 435
Cleaning Up Test Data ���������������������������������������������������������������������������������������������������������� 436
Visual Testing ���������������������������������������������������������������������������������������������������������������������������� 436
The Visual Testing Workflow ������������������������������������������������������������������������������������������������ 437
Visual Testing and Cross-Browser/Cross-Platform Testing ������������������������������������������������� 437
Installation Tests ����������������������������������������������������������������������������������������������������������������������� 438
Approaches for Installation Tests ���������������������������������������������������������������������������������������� 438
Testing the Installation Through UI or Through Silent Install ����������������������������������������������� 440
Testing Uninstall ������������������������������������������������������������������������������������������������������������������ 440
Upgrade Tests ��������������������������������������������������������������������������������������������������������������������������� 441
Approaches for Upgrade Tests ��������������������������������������������������������������������������������������������� 441
Testing AI, Statistical, and Non-deterministic Algorithms ��������������������������������������������������������� 442
Approaches for Testing Statistical Algorithms ��������������������������������������������������������������������� 443
Testing Applications That Use Random Numbers ���������������������������������������������������������������� 446
Testing Business Intelligence (BI) Applications ������������������������������������������������������������������� 447
Summary����������������������������������������������������������������������������������������������������������������������������������� 448
Chapter 19: Where to Go from Here ���������������������������������������������������������������������� 449
Make Mistakes �������������������������������������������������������������������������������������������������������������������������� 449
Listen, Consult, and Take Advice ����������������������������������������������������������������������������������������������� 449
Understand and Align to Your Business’s Goals ������������������������������������������������������������������������ 450
Get to Know Your Tools �������������������������������������������������������������������������������������������������������������� 450
Improve Your Programming Skills ��������������������������������������������������������������������������������������������� 451
Improve Your QA Skills �������������������������������������������������������������������������������������������������������������� 452
Broaden Your Horizons �������������������������������������������������������������������������������������������������������������� 452
Share Your Knowledge �������������������������������������������������������������������������������������������������������������� 453
Share the Tools You Build ���������������������������������������������������������������������������������������������������� 453
Don’t Forget to Enjoy! ��������������������������������������������������������������������������������������������������������������� 453
Table of ConTenTs

xv
Appendix A: Real-World Examples ����������������������������������������������������������������������� 455
Example 1 – Water Meters Monitoring System ������������������������������������������������������������������������� 455
Simulating the Communication Server ������������������������������������������������������������������������������������� 458
Dealing with Google Maps �������������������������������������������������������������������������������������������������������� 459
Example 2 – Forex Trading System ������������������������������������������������������������������������������������������� 461
The Solution ������������������������������������������������������������������������������������������������������������������������������ 463
Instability Caused by CRM �������������������������������������������������������������������������������������������������������� 463
Isolating the Environments ������������������������������������������������������������������������������������������������������� 464
Testing the Mobile Application with Abstract Test Scope ���������������������������������������������������������� 465
Example 3 – Retail Store Management ������������������������������������������������������������������������������������� 466
Description of the Architecture ������������������������������������������������������������������������������������������������� 468
Minimal Deployment ����������������������������������������������������������������������������������������������������������������� 469
Organizational Structure ����������������������������������������������������������������������������������������������������������� 471
Test Automation Solutions��������������������������������������������������������������������������������������������������������� 471
Date/Time Simulator ����������������������������������������������������������������������������������������������������������������� 472
3-Tiers Tests ������������������������������������������������������������������������������������������������������������������������������ 473
End-to-End Tests ����������������������������������������������������������������������������������������������������������������������� 474
Appendix B: Cleanup Mechanism ������������������������������������������������������������������������� 475
Understanding Callbacks and Delegates ���������������������������������������������������������������������������������� 475
Building the Cleanup Mechanism ��������������������������������������������������������������������������������������������� 477
The Problem ������������������������������������������������������������������������������������������������������������������������������ 477
The Basic Solution �������������������������������������������������������������������������������������������������������������������� 478
Reusing the Cleanup Mechanism���������������������������������������������������������������������������������������������� 481
Handling Dependencies Between Cleanup Actions ������������������������������������������������������������������� 482
Handling Exceptions in Cleanup Actions ����������������������������������������������������������������������������������� 484
Summary����������������������������������������������������������������������������������������������������������������������������������� 486
Appendix C: Test Automation Essentials �������������������������������������������������������������� 487
Background ������������������������������������������������������������������������������������������������������������������������������� 487
Project Structure ����������������������������������������������������������������������������������������������������������������������� 488
Note About the Unit Tests and XML Comments ������������������������������������������������������������������������� 489
Table of ConTenTs

xvi
NuGet Packages ������������������������������������������������������������������������������������������������������������������������ 490
Features and Utilities ���������������������������������������������������������������������������������������������������������������� 490
TestAutomationEssentials�Common ������������������������������������������������������������������������������������������ 490
TestAutomationEssentials�MSTest �������������������������������������������������������������������������������������������� 493
TestAutomationEssentials�CodedUI ������������������������������������������������������������������������������������������� 494
TestAutomationEssentials�Selenium ����������������������������������������������������������������������������������������� 495
Contributing to the Project and Porting to Other Languages ���������������������������������������������������� 498
Appendix D: Tips and Practices for Programmer’s Productivity �������������������������� 499
Prefer Using the Keyboard �������������������������������������������������������������������������������������������������������� 499
Poka-Yoke ��������������������������������������������������������������������������������������������������������������������������������� 502
Avoid Nulls �������������������������������������������������������������������������������������������������������������������������������� 503
Avoid Catching Exceptions �������������������������������������������������������������������������������������������������������� 504
Choosing the Most Appropriate Locator ������������������������������������������������������������������������������������ 508
Hard-Coded Strings in Test Automation: Yea or Nay? ���������������������������������������������������������������� 511
Index ��������������������������������������������������������������������������������������������������������������������� 515
Table of ConTenTs

xvii
About the Author
Arnon Axelrod is a test automation expert, working as a
senior consultant, architect, trainer, and lead of the test
automation team at Sela Group. Arnon started programming
his ZX-Spectrum when he was 10 and hasn’t lost his passion
for programming ever since.
After Arnon graduated with his B.Sc. in Math and
Computer Sciences from Ben- Gurion University of the
Negev in 1999, Arnon started to work for Microsoft as
a Software Engineer in Test (SDET), where he was first
exposed to the domain of Test Automation. Since then
he has worked in several high-tech companies, mostly as a software engineer, until
he rediscovered test automation from a new perspective. After working by Agile
methodologies for several years, in 2010, while working at Retalix Ltd (later to be
acquired by NCR Corporation), Arnon realized that effective test automation, and more
specifically the Acceptance Test Driven Development (ATDD) technique, is crucial for
delivering high-quality software rapidly and sustainably over time. While at NCR, Arnon
established a test automation infrastructure that was used by over 100 developers and
was running over 4,000 acceptance tests in less than 20 minutes.
In 2015, Arnon joined Sela Group, where he works now, with a mission to spread
his knowledge to as many companies and individuals as possible, in order to help them
develop quality software more effectively through proper use of test automation.
In his spare time, Arnon likes sailing, playing the piano, and singing in a chorus.
Arnon lives in Matan, Israel, together with his lovely wife, Osnat, and their three boys:
Ori, Elad, and Aviv.
You can follow Arnon Axelrod on LinkedIn, read his blog at http://blogs.
microsoft.co.il/arnona/, or contact him directly at [email protected].

xix
About the Technical Reviewer
Bas Dijkstra is a testing and automation consultant and
trainer. He specializes in creating and implementing
automation strategies that support testing, starting with
helping to answer the “why?” of automation all the way to
writing effective automation solutions.
Bas delivers training on various subjects related to
automation. He also regularly publishes blog posts and
articles on various topics related to test automation, both on
his website (https://www.ontestautomation.com/), as well
as on other websites and in industry magazines.

xxi
Acknowledgments
First and foremost, to my wife Osnat – this book would not have been possible without
the great support I got from you, and I know it wasn’t easy! As much as I tried to not let
this work affect our personal lives, I did leave you lonely for many long evenings and left
you more of the house chores than I normally do. I don’t think that it will make up for
that, but I want to tell you one thing: I love you!
Next, I owe a big thank you to my direct manager and head of DevOps and
Automation division at Sela, Shmulik Segal, who also supported me in this work and
allowed me some precious time for working on this book, despite the fact that it had no
economic justification. Shmulik, besides supporting me on this book, I appreciate you
as a manager and as a person. You empower me to reach peaks in my career that I never
even thought I could. And you do all of that very pleasantly.
I also want to thank Sasha Goldshtein, ex-CTO of Sela (author of Pro .Net
Performance by Apress, 2012; and coauthor of Introducing Windows 7 for Developers by
Microsoft Press, 2011), who tried to dissuade me from writing this book, but apparently
failed. You were right at least about one thing: it took me much longer than I planned.
But nonetheless you helped and advised me a lot, including recommending me to
submit a book proposal to Apress.
Also, at Sela, I want to thank Zohar Lavy, who coordinates my schedule and helps
me with many administrative tasks – it’s a real pleasure working with you! To all the
administrative staff at Sela for all the important and hard work you do behind the
scenes; and to my skip managers and owners of Sela, David Basa, CEO; and Caro Segal,
president of the Sela College; as well as Ishai Ram, VP Global, for leading Sela and
making it such a great place to work at. And finally, for all of my talented coworkers – I
learn a lot from each and every one of you.
To Carl Franklin and Richard Campbell, hosts of the “.Net Rocks” podcast, for
expanding my horizons, making me laugh, and making my commute much more
enjoyable. Carl, thanks also for creating the “Music to code by” collection that helped me
stay focused while working on this book.

xxii
I must also thank all of the people that actually made this book take shape: first of all
to Bas Dijkstra, my excellent and highly professional technical reviewer for reading every
sentence thoroughly and providing his invaluable insights, feedback, and suggestions for
making this book better. Without you, this book would probably be a piece of crap…
And lastly for all of my editorial staff at Apress: Rita Fernando Kim, my
coordinating editor for managing the progress of this work, and for providing valuable
tips and advice for anything I asked or should have asked. To Laura C. Berendson,
development editor, for helping me shape and present my ideas in the best way
possible; Shivangi (Shiva) Ramachandran, editor, for managing this project; and for
Susan McDermott, senior editor, for accepting my book proposal and believing in me
in the first place. Thank you all!
aCknowledgmenTs

xxiii
Introduction
There are many great books about test automation, and particularly about best practices
of Test Automation. However, there’s no one size fits all. As I once heard someone saying:
“‘Best Practices’ is always contextual: even something as common as breathing may be
catastrophic if the context is free diving…”
Most of the books that I have read so far about test automation are aimed mainly
for developers, focusing mainly at unit tests or at developer-written end-to-end tests.
Some other books that I either read or know about deal with a specific test automation
technology, methodology, or are simply just too outdated. While I tend to agree that the idea
of developers writing the tests may be very effective in many situations, in reality it doesn’t
fit all organizations at all stages. Moreover, test automation is a tool that serves and affects
nearly all stakeholders of a software development organization, including testers, product
managers, software architects, DevOps people, and the managers of the projects, and not
only developers. As every software organization and project is different, trying to adopt
techniques, practices, and tools that don’t fit the team’s needs or skills can cause the failure of
the automation project and in some cases even the failure of the entire software project.
The goal of this book is to give a broad view on the subject of test automation in
order to allow the reader to make smart decisions upon his particular case, giving his
constraints and the benefits he wants to gain from having the test automation, but also
to provide detailed and hands-on guidance for building it effectively, at least for the
majority of cases.
Who Should Read This Book?As test automation affects nearly all stakeholders of software development organizations,
and as this book attempts to cover nearly all aspects of test automation, this book is for
everyone who’s involved in the process of software development and is interested in
knowing how to get more value out of test automation. This includes: QA managers, dev
managers, developers, testers, architects, product managers (AKA business analysts,
system analysts, or various other titles), DevOps people, and more. Ah, and of course test
automation developers whose main job is to develop automated tests…

xxiv
While most of the book is not too technical and is aimed at the broader audience,
Chapters 11–14 are very technical and aimed for people who write code and are
proficient with object-oriented programming (OOP). In particular – professional test
automation developers. The code in this section is written in C#, but the ideas and
concepts are transferrable to any object-oriented language. As C# and Java are very
similar, there shouldn’t be any problem for Java programmers to understand the code,
but I’m also sure that programmers of other languages can understand the code or at
least the main ideas behind it pretty easily.
In particular, I hope that many Dev and QA managers will read this book, as they
typically have the biggest effect on shaping the methodology and working processes
in their organization, which test automation should integrate with, and can help to
improve. Having said that, this book also contains useful tips and techniques for non-
managers for improving the methodology and working processes of their organization
even without any formal authority.
How This Book Is Organized?When I first sat down to start writing this book, I tried to think about the high-level
structure of the book, but I found this task very baffling because it seems that almost
any topic is related to many other topics. At that time, I couldn’t find a clear and logical
way to divide the content to high-level sections, so I ended up writing a “laundry list” of
topics I wanted to cover and just started writing by letting the knowledge spill from my
head down to the paper (or keyboard to be more precise…). Naturally I started from the
most basic and general stuff and slowly built upon that with more and more chapters
that are more advanced or specific. Because the topics are so interrelated, I often wrote
a forward reference to a topic I was yet to write, and of course references from more
advanced chapters to earlier ones. Eventually, like in a good Agile project (talking about
cross-references… see Chapter 1 for more about Agile), the high-level structure of the
book gradually started to emerge. At some point I realized that the book took a pretty
logical structure consisting of two parts: The first part answers more of the general
“Why” and the “What” questions, and the second one answers the more specific and
technical “How” questions.
Generally, I encourage most readers to read the entire book from cover to cover.
However, as this book aims at a broad audience, with different concerns, different
starting points, interests, needs, etc., you might prefer to focus on specific chapters
InTroduCTIon

xxv
and skim, or even skip, others, optionally jumping back and forth to other chapters
referred to from the chapter you’re reading if you feel you need to fill in the gaps. Finally,
keep this book within reach for later reference as the use of test automation in your
organization matures and faces new challenges.
Here’s an overview on each part and chapter in this book:
Part I: The “Why” and the “What”This part covers the subject of test automation from many different aspects, but more in
a “high-level” manner. This part is essential for those who don’t have much experience
with test automation and want to understand how it fits the big picture of software
development, and where to start. This part will also help you understand what you
can expect, as well as what you shouldn’t expect from test automation. It is especially
relevant for Dev or QA managers, as it discusses aspects like business structure, working
processes, architecture, and more. It will guide you through many decisions that you’ll
have to make (which many people don’t even consider!) and tell you what effect each
decision might have. Even if you’re not a manager and don’t think that you have any
influence over these things, I encourage you to read it in order to understand the
constraints and advantages in your current situation, and to be able to communicate it
better with your managers.
If you already have experience with test automation, this part can, and probably will,
expand your horizons about the subject and show you alternatives and consequences of
decisions you previously made less consciously.
Part II: The “How”After you’ve gained the high-level understanding about the domain of test automation,
it’s time to roll up our sleeves and start writing some tests and the required
infrastructure. After we write some tests, we’ll discuss how to take it forward and to use
the test automation most effectively in the development life cycle.
Conceptually, this part could be divided into two subparts (though this division
is not mentioned explicitly anywhere except for here): Chapters 9–14 are written as
a hands-on tutorial, in which we design and build a test automation system with few
tests (using Selenium) for an existing open source project, and Chapters 15–19 provide
guidance for using test automation in the most effective way, and how to get the most
out of it.
InTroduCTIon

xxvi
Most of the chapters in the first subpart of Part II are very technical, while in the
second subpart they are not. Therefore, the first subpart is more suited and relevant for
developers, particularly test automation developers, with OOP skills, while the second
subpart is relevant for everyone. For skilled programmers, I encourage you to follow
along the tutorial step by step and do each step yourself, in order to experience it better.
For non-programmers, I encourage you to skim over these more technical chapters
in order to get the main idea behind them, even if not for knowing exactly how to
implement it in your own project.
Here’s a complete description of the chapters:
Part I:
• Chapter 1: The Value of Test Automation – this chapter discusses
why test automation is needed and what its short-term and long-term
benefits are.
• Chapter 2: From Manual to Automated Testing – this chapter
discusses the differences between manual and automated testing and
starts to set realistic expectations for test automation, as it’s pretty
different from just faster manual tests.
• Chapter 3: People and Tools – this chapter discusses who should
write the tests and the automation infrastructure, and what the
consequences of the alternatives are. In addition, it discusses how to
choose the right tool according to these alternatives.
• Chapter 4: Reaching Full Coverage – this chapter sets realistic
expectations for the long-term road map of the automation project,
and shows how to start gaining precious value out of it long before
the automation replaces most of the manual regression tests.
• Chapter 5: Business Processes – this chapter discusses how test
automation is related to the business processes for developing
software, and provides overviews for topics that will be discussed in
greater depth toward the end of the book.
• Chapter 6: Test Automation and Architecture – this chapter
discusses how test automation is related to the architecture of the
tested system, and why it’s important to adopt them to one another.
InTroduCTIon

xxvii
• Chapter 7: Isolation and Test Environments – this chapter discusses
how to plan the automation and its execution environments
to ensure that the tests are reliable and are not affected by any
undesired effects.
• Chapter 8: The Big Picture – this chapter discusses the
interdependencies between all of the subjects discussed in the
previous chapters, mainly architecture, business structure, business
processes, and of course test automation. It also discusses how all of
these relate to business culture.
Part II:
• Chapter 9: Preparing for the Tutorial – this chapter describes
the process that I’m going through in the tutorial, which is also
applicable to most test automation projects. It also guides you how to
set up your machine for following along with the tutorial.
• Chapter 10: Designing the First Test Case – this chapter teaches
a specific technique for designing the test cases in a way that best
suites automated tests.
• Chapter 11: Start Coding the First Test – this chapter shows you how
to start writing the code for the first test. We start by writing a mere
skeleton of the test in a way that will lead us to design and create a
modular and reusable infrastructure. By the end of this chapter, our
test compiles but does not work yet.
• Chapter 12: Completing the First Test – in this chapter we complete
the work that we’ve started in the previous chapter. By the end of this
chapter, we have a working test and a well-designed infrastructure to
support it.
• Chapter 13: Investigating Failures – in this chapter we’ll practice
how to investigate and deal with a real test failure that occurred while
we’ve got a new build of the tested system, and how to create a report
that will help us investigate additional failures in the future.
InTroduCTIon

xxviii
• Chapter 14: Adding More Tests – in this chapter we’ll add one more
test, but also discuss how to go about adding more and more tests,
while expanding and improving the infrastructure to support them,
including support for cross-browser testing, support for multiple
environments, and more.
• Chapter 15: Continuous Integration – this chapter (which starts the
second subpart of Part II) discusses how to integrate the tests into a
Continuous Integration (CI) build. More than the technical aspects,
this chapter covers how to make it succeed as an organizational
tool and provides advice for non-managers for how to gradually
change the culture and processes of the organization for the best, by
leveraging the CI.
• Chapter 16: Acceptance Test Driven Development – this chapter
explains the benefits and how to implement the Acceptance Test
Driven Development (ATDD) methodology, which expands on CI to
encompass the entire development life cycle and help the team to
become really effective with Agile.
• Chapter 17: Unit Tests and TDD – this chapter discusses the
techniques that are traditionally attributed only to the application
developers: unit tests and Test Driven Development (TDD) but are, in
fact, an inseparable part of test automation.
• Chapter 18: Other Types of Automated Tests – this chapter
discusses additional types of test automation, including performance
and load testing, testing in production, Visual Testing, Installation
tests, Artificial Intelligence, and more.
• Chapter 19: Where to Go from Here – this chapter provides some
tips for how to continue to learn and improve in the domain of test
automation.
In addition to these chapters, there are four appendices:
• Appendix A: Real-world examples – this appendix is supplementary
to Chapter 6 (“Test Automation and Architecture”) and provides
four real-world examples of application architectures and their
corresponding automation solutions.
InTroduCTIon

xxix
• Appendix B: Cleanup mechanism – this appendix describes how
to build a cleanup mechanism, which is described in Chapter 7
(“Isolation and Test Environments”).
• Appendix C: The Test Automation Essentials project – this
appendix describes the Test Automation Essentials open source
project that I created, which contains many useful code utilities (in
C#) for test automation projects.
• Appendix D: Tips and practices for programmer’s productivity –
this appendix supplements Chapters 9–14 with tips for increasing
your productivity as a programmer. While these tips are relevant
for any developer, I find it especially useful for test automation
developers.
Happy reading!
InTroduCTIon

PART I
The “Why” and the “What”
As this book is titled Complete Guide to Test Automation, it covers both theory and
practice, both beginner and advanced topics, both methodological aspects and technical
details, and more. After all, I attempted to address as many possible questions about test
automation as feasible in one book.
The first part of the book tries to answer mainly the “Why” and the “What” questions,
leaving most of the “How” questions to the second part. We’ll start by answering why
do we need test automation and what test automation is all about (and also what it
isn’t). Then we’ll address many questions, dilemmas, and considerations (i.e., what
option should I choose, and why) about test automation, which are important to anyone
planning to start using test automation or improving an existing one. Finally, we’ll look
at the bigger picture and see how everything is related to the other.
Happy reading!
3© Arnon Axelrod 2018 A. Axelrod, Complete Guide to Test Automation, https://doi.org/10.1007/978-1-4842-3832-5_1
CHAPTER 1
The Value of Test AutomationAs this book is about test automation, it makes sense to start by defining what test
automation is. However, without proper context, the definition may not be clear enough
and may lead to more confusion than understanding. In fact, this topic is so broad and
diverse that it’s hard to come up with a definition that is accurate, covers all the various
types of test automation, and is also clear. My best shot for now would be something
like “Using software to help in testing of another software,” but then again – I’m not sure
how helpful it is. So instead of focusing on formal definitions, the first part of the book is
dedicated to examining this broad topic from multiple angles, and eventually it will be
crystal clear what test automation really is. And equally important – what it isn’t!
Why Do We Need Test Automation?When I ask my customers what they expect to get from test automation, the most
common answer is to reduce the time it takes to test the software before release. On the
one hand, while this is an important goal, it’s only the tip of the iceberg in terms of the
benefits that you can gain from test automation. In fact, reaching the goal of reducing
the manual test cycles usually takes a pretty long time to achieve. On the other hand,
you may start to see the other benefits sooner. But let’s first see why this basic goal of
reducing the time for a test cycle became so important in recent years.

4
From Waterfall to Agile Software DevelopmentEven though some companies used test automation decades ago, it wasn’t prevalent
until recent years. There are many reasons for this, but without a doubt, the transition
from the traditional Waterfall approach to the Agile approach contributed a lot to the
need for test automation. In the traditional waterfall approach, software projects were
perceived as a one-time thing, like building a bridge. First you plan and design, then
you build, and eventually you test and validate the quality of the end product, fixing any
minor issues that may arise. The assumption was that if the planning and engineering
were done correctly, then besides some minor programming mistakes that could be
easily fixed, everything should eventually work as planned. This approach requires us
to verify that the end result behaves according to the specification only once. It is only
when a test fails and a fix is made that the test should be performed again to verify the
fix. If each test is done only once or twice, then in most cases it’s much cheaper and
easier to do it manually than to automate it.
Over the years, it became clearer that in most cases the waterfall approach does
not fulfill its promise. Most software projects became so complex that it wasn’t feasible
to plan and close all the technical details in advance. Even in cases that it was feasible,
by the time it took to complete a software project (which has typically lasted a few
years), both the technology and the business needs have changed, making the software
less adequate than it was supposed to be. For those reasons, responding quickly to
customers’ feedback become much more valuable than sticking to the original plan.
Gradually, the majority of the software industry moved from one-time software projects,
going through releasing new versions of the same software once every few years, to rapid
delivery cycles. Today, some of the biggest companies on the Web deliver new features
and bug fixes many times a day and even a few times a minute!
Chapter 1 the Value of test automation

5
THE MANIFESTO FOR AGILE SOFTWARE DEVELOPMENT
in 2001, 17 thought leaders from the software industry formulated the Manifesto for Agile Software Development,1 which states the following:
We are uncovering better ways of developing software by doing it and helping others do it.
through this work we have come to value:
Individuals and interactions over processes and tools
Working software over comprehensive documentation
Customer collaboration over contract negotiation
Responding to change over following a plan
that is, while there is value in the items onthe right, we value the items on the left more.
Kent Beck
mike Beedle
arie van Bennekum
alistair Cockburn
Ward Cunningham
martin fowler
James Grenning
Jim highsmith
andrew hunt
ron Jeffries
Jon Kern
Brian marick
robert C. martin
steve mellor
Ken schwaber
Jeff sutherland
Dave thomas
© 2001, the above authors
this declaration may be freely copied in any form, but only in its entirety through this notice.
Clearly, not all companies and teams adopt these ideas, but almost everyone who’s
involved in software developed today prefers to deliver new versions of the software
more rapidly (and continue to deliver new versions over a long period of time), rather
than delivering only a few versions in long intervals. This also implies that the changes
between each release will be smaller than if you deliver a new version every few years.
Naturally, software companies in sectors that are more missions critical are less prone to
taking risks, and they will tend to keep releasing in pretty long cycles, but even many of
them start to see the value in delivering more often, at least internally to QA.
1 http://agilemanifesto.org/
Chapter 1 the Value of test automation

6
Testing each version manually can take a lot of time, and that’s an obvious reason
why test automation became so important. But there’s another important reason, too.
The Cost of Software ComplexityWith every new version of a software, new features are added. As new features are added,
the software becomes more complex, and when the software becomes more complex,
it becomes harder and harder to add new features to it without breaking anything. This
is especially true when there’s pressure to deliver the new versions rapidly and not
investing enough time to plan and to improve the quality of the code (as often happens
in a badly implemented Scrum2 methodology). Eventually, this causes the pace of
delivering new features to decline, which is what we wanted to avoid in the first place!
Some of this added complexity is unavoidable. It would have existed even if we
carefully planned and designed the entire software ahead. This is called inherent
complexity. But most of the time, most of the complexity in a software exists because
features were added quickly without proper design; lack of communication inside the
team; or due to a lack of knowledge, either about the underlying technology or about
the business needs. Theoretically, this complexity could be reduced if the software
was carefully planned in advance as a whole, but in reality, it is a natural part of every
software project. This type of complexity is often called accidental complexity.
Any complexity, be it inherent or accidental, comes with a cost. This cost is of course
part of the overall cost of developing a software, which is mainly affected by the number
of developers and testers, multiplied by the time it takes for them to deliver the software
(multiplied by their salaries, too, of course). Accordingly, when the complexity of a
piece of software grows, its cost increases because it takes more time to test everything,
and also it takes more time to fix (and retest) the found bugs. Accidental complexity in
particular also makes the software more fragile and harder to maintain, and therefore
requires even more time to test and more time to fix bugs.
2 Scrum is the most common methodology that is based on the Agile values.
Chapter 1 the Value of test automation
7
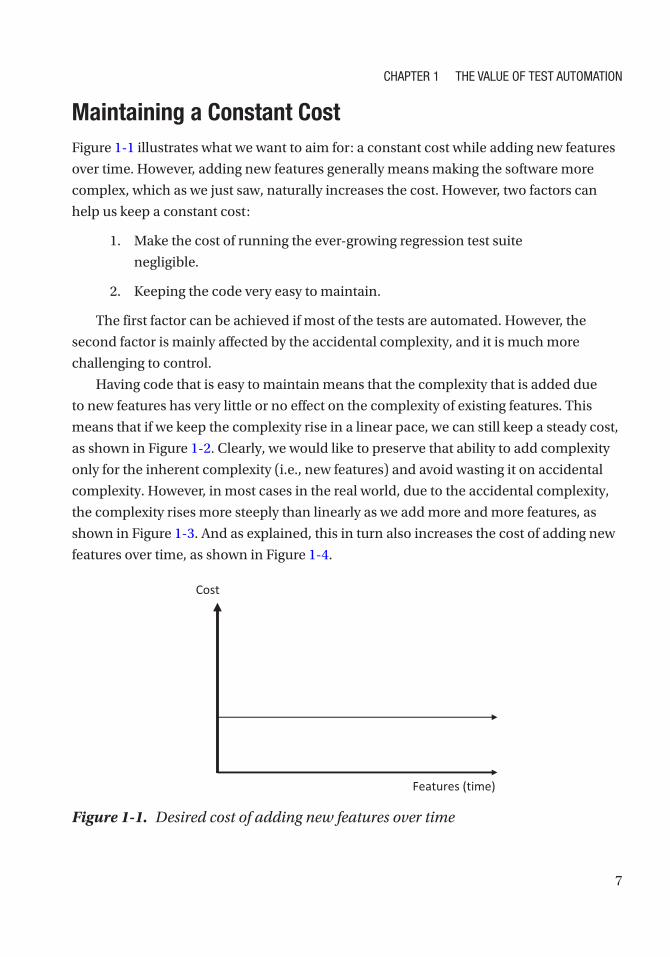
Maintaining a Constant CostFigure 1-1 illustrates what we want to aim for: a constant cost while adding new features
over time. However, adding new features generally means making the software more
complex, which as we just saw, naturally increases the cost. However, two factors can
help us keep a constant cost:
1. Make the cost of running the ever-growing regression test suite
negligible.
2. Keeping the code very easy to maintain.
The first factor can be achieved if most of the tests are automated. However, the
second factor is mainly affected by the accidental complexity, and it is much more
challenging to control.
Having code that is easy to maintain means that the complexity that is added due
to new features has very little or no effect on the complexity of existing features. This
means that if we keep the complexity rise in a linear pace, we can still keep a steady cost,
as shown in Figure 1-2. Clearly, we would like to preserve that ability to add complexity
only for the inherent complexity (i.e., new features) and avoid wasting it on accidental
complexity. However, in most cases in the real world, due to the accidental complexity,
the complexity rises more steeply than linearly as we add more and more features, as
shown in Figure 1-3. And as explained, this in turn also increases the cost of adding new
features over time, as shown in Figure 1-4.
Features (time)
Cost
Figure 1-1. Desired cost of adding new features over time
Chapter 1 the Value of test automation

8
Features (time)
Complexity
Figure 1-2. The desired rise in complexity when we add more features is linear
Features (time)
Complexity
Figure 1-3. The common case: complexity rises steeply due to the added accidental complexity
Chapter 1 the Value of test automation

9
In most cases, stopping everything and planning everything from scratch, in order
to reduce the accidental complexity is not practical. Even if it was, by the time the new
version (which is developed from scratch) would reach feature parity with the old
version, it will have its own accidental complexity…
RefactoringSo it seems that it’s not feasible to keep developing new features with a steady cost over
time, because accidental complexity is unavoidable. So are we doomed? Well… not
really. The solution for keeping accidental complexity under control is called refactoring.
Refactoring is the process of improving the design (or “internal structure”) of a piece of
software, without affecting its external behavior. In other words, it allows us to get rid of
accidental complexity. Refactoring can be done in small steps, improving the design bit
by bit without having to redesign the entire system. Martin Fowler’s book Refactoring:
Improving the Design of Existing Code3 provides specific techniques to make refactoring
Features (time)
Cost
Figure 1-4. The development cost in the common case: adding new features becomes more costly over time
3 Martin Fowler, Refactoring: Improving the Design of Existing Code (Addison-Wesley Professional, 1999).
Chapter 1 the Value of test automation

10
in a safe manner. Today, most popular Integrated Development Environments (IDEs4)
feature some automatic refactoring tools or have plug-ins that provide them.
But even with automatic refactoring tools, the developer can make a mistake, and
introduce new bugs in the process, breaking existing functionality. Therefore, refactoring
requires comprehensive regression testing, too. So in order to be able to keep a steady,
fast pace of delivering stable new versions containing new features over time, we must
be refactoring regularly. And in order to be able to refactor regularly, we need to test
very often. That’s the second important reason for having test automation. Figure 1-5
illustrates how refactoring helps keep the accidental complexity under control.
Features (time)
Complexity
Refactorings
Figure 1-5. Refactoring helps keep complexity under control
Continuous ImprovementThe thing that fascinates me the most about test automation is its relationships with
all other aspects in the development cycle. Besides quality and productivity, which are
obvious, test automation is also related to the architecture of the product, the business
processes, the organizational structure, and even the culture (see Figure 1-6). For me,
test automation is like a mirror into all of these things. All of these aspects have an effect
on the test automation. But you can also leverage the reflection of these effects in the test
automation to change and improve any of these aspects back.
4 IDE stands for Integrated Development Environment and refers to a software that consists mainly of a code editor, a compiler, and an integrated debugger. Microsoft Visual Studio, Eclipse, and IntelliJ are some of the most popular IDEs for C# and Java.
Chapter 1 the Value of test automation

11
In many cases, customers that already use test automation call me to help them
with some problems they experience. These problems often manifest themselves at the
technical level. However, when I come to them and help them analyze the root cause of
the problems, they often realize that their problems are actually related to one or more
of these other aspects. It’s not always easy to fix these problems, but at least it brings the
significance of these problems to their awareness, which is the first step to change.
Test Automa�on
Architecture
Working Prac�ces
Quality and Produc�vity
Business Structure
Business Culture
Documenta�on
Figure 1-6. Test automation is related to many other aspects of software development
I hope that by reading this book, you’ll be more perceptive to the effects that such
problems have on the test automation you’re building and be able to bring them to
the awareness of the relevant people in order to make the necessary improvements.
Of course, if your team has a culture of continuous improvement (e.g., perform
retrospective meetings and really act upon them), then it will be easier to do. But even if
not, remember that awareness is the key for making a change, and the test automation
will help you achieve this even if you’re a junior automation developer in a large and
bureaucratic company (see Chapter 17 for more information about how to gradually
change the culture of your organization to take more advantage of test automation).
Chapter 1 the Value of test automation

13© Arnon Axelrod 2018 A. Axelrod, Complete Guide to Test Automation, https://doi.org/10.1007/978-1-4842-3832-5_2
CHAPTER 2
From Manual to Automated TestingLet’s face it: we’re in the 21st century. There’s no reason why any repetitive task won’t
be fully automated, especially in a high-tech environment! But still, a large portion of
the manual tester’s job is performing regression tests,1 which is very repetitive. And
obviously, doing it manually is much slower and error prone compared to what the
computer can potentially do.
First Attempt: Record and PlaybackSo the first thought of anyone who wants to improve that process is to automate the
manual tester’s job. There are several ways to achieve that as we’ll discuss throughout
this book, but the most trivial one is simply to record the actions of the manual tester and
then play them over and over again. The most common way to do it is by recording the
user’s interactions with the UI, but it could also be recording network traffic like HTTP
requests or some other kind of data that is an indirect reflection of the user’s actions.
If it was that simple, then we wouldn’t need this book (and I probably had to find
another job…). But in practice, things are not so trivial. Even though a big part of
executing regression tests is highly repetitive, there is at least one very important part
that is not repetitive whatsoever, and this part constitutes the entire essence of executing
the tests. This non-repetitive part is the part of detecting the errors! While it’s simple
1 Regression tests are tests that verify that a functionality, which previously worked as expected, is still working as expected.

14
to record the actions that the manual tester does and replay them, it’s much trickier to
detect bugs in an automated manner.
One naïve approach to automatically detect bugs is to compare the image on the
screen to the expected image that was recorded. However, this approach has several
drawbacks. Some of these drawbacks are merely technical. For example, there could be
differences in screen resolution, differences in date and time that appear on the screen,
differences in any data that appear on the screen but is not relevant to the test, etc. Some
tools allow you to overcome these technical drawbacks by excluding the regions of the
screenshots that may have legitimate differences from the comparison. A similar problem
exists in the case of recording the HTTP network traffic, as some of the data may have
legitimate differences. But then again, there are tools that help you specify which parts
of the response to compare and which to exclude. But even if those technical drawbacks
can be addressed by tools, there’s still one big drawback that is inherent to the concept
of record and replay: every legitimate change in the application will be considered as a
failure, making it hard to distinguish between false positives and actual failures.
At this point you may think: “What’s the big deal? We execute regression tests to
ensure that everything keeps working as it did before!” So let me tell you this: if no one
touched the code2 of the system under test (or SUT in short), no regression would ever
occur, and there’s no point in spending time running either manual or automated tests.
On the other hand, no programmer is likely to change any code unless he intended to
make a change to the behavior of the application! Thus, there is a real value in executing
tests only when things change, and therefore whenever we execute tests, we should
expect that things have changed.
When we execute tests manually, we rarely think about these changes as an issue.
Often the changes are minor enough that if we use our judgment and common sense,
we can still relate the words that describe the test steps to the new behavior of the
application, even if they don’t exactly match anymore. We use this judgment and
common sense that is based on our domain knowledge, communication with other
team members, experience, etc., in order to assess whether a change is a bug or an
improvement. However, a machine lacks any of these skills, and therefore it treats
legitimate changes and bugs equally.
2 For that matter, “Code” refers to any artifact that is part of the system and can affect its behavior. For example, if the list of countries in a database is not something that a user can and should be able to alter, then you can consider it as part of the code of the application.
Chapter 2 From manual to automated testing

15
If the expected results of your tests are too general (as in “exactly the way it was”),
instead of reflecting only the specific information that is important to test, then your
tests will fail much too often due to legitimate changes, rather than on real bugs. In other
words, the ratio between false positives and real failures will be too high, which makes
them less reliable! Without clear and concise expected results, you’d probably run into
the following problems:
1. For every legitimate change in the application, you will keep
getting the same failures for subsequent runs of your test until
you’ll re-record or fix the test.
2. When re-recording a test over and over again, there’s a good
chance that you’ll have errors in the scenario you’re recording.
Obviously, there’s a chance that an error will exist in the first
recording and be fixed in the next one, but other techniques
(that will be discussed later on) are more suited for gradually
improving and solidifying the tests. Without the ability to solidify
and stabilize the tests, people will start to lose trust in the test
automation project as a whole.
3. Often a small change in the application affects many test
scenarios. Even if the effect of this change is very minor to a
human being, it causes many automatic tests to fail. For example,
fixing a typo in a button’s text, or even a removal of a redundant
space, can cause many tests to fail if they all look for that button’s
text and click it as part of their scenario.
4. Investigating the result only according to the difference between
the actual result and the expected result (whether it’s a screenshot
or other form of data that can be compared to the actual result)
may not provide enough information that is needed to understand
whether it’s a bug or a legitimate change. In case it’s a bug, it also
doesn’t provide enough information that can help understand
what led to it. See Chapter 13 for more information about
investigating failing tests.
The bottom line is that the effort you’ll need to make in order to investigate the
failures and to maintain the tests (re-record or fix them) will very likely go beyond the
cost of manually executing the tests.
Chapter 2 From manual to automated testing

16
Getting the Most Out of Test AutomationLet’s look at the other opposite: instead of looking at the goals of test automation from
the perspective of what we have today (manual tests) and how we can automate it, let’s
take a look at the desired, ideal outcome of what’s the best we can achieve using it.
Before we do so, let me clarify that while the picture I give here may be feasible to
a few teams, for most teams it’s not really practical as is. Nevertheless, it is feasible for
most teams to get close to this, and get most of the advantages, given the right guidance
and leadership (that can come from anyone, including yourself, even if you’re not a
manager!). Anyway, I want to give you an idea on what to aim for. In the rest of this book
we’ll talk about trade-offs and considerations that you’ll have to make in order to get
closer to the goal I’m about to suggest, but also be pragmatic and practical in what you’d
probably achieve. Keep in mind though, that if you’ll take it seriously, over a long enough
period of time you can gain more traction to these ideas, which will get you closer to this
goal. See Chapter 15 for more details and ideas of how to gradually change the culture of
your organization to better utilize test automation.
So now, calm down, close your eyes and start imagining… Oh wait, keep your eyes
open so you can continue to read…
Imagine that you have full coverage of automated regression tests that run altogether
in few minutes. Imagine also that your team fixed all of the known bugs and all the tests
are passing… Imagine also that every developer can run all of these tests on his own dev
machine whenever he desired!
If that would be the case, how would it change the way you use your test automation
when developing the next version, feature, or user story (see sidebar)? Would you still
run it only nightly and investigate the failures the next morning? When you’ll find a bug,
will you just report it in your bug tracking system and wait until the end of the quarterly
release cycle for the developers to fix it? I hope that your answer is “No”!
If the tests run so fast, then you can have them run automatically before every
check- in3 of every developer (which can be very frequent as well) and prevent the check-in
operation in case one or more tests failed. This ensures that everything that resides inside
the source-control repository always passes all the tests! This is the idea behind the
3 Check-in, also known as Commit, Push or Submit is the operation of applying the changes made by a developer on his local machine into a centralized source code repository that is shared by the entire development team. These repositories are managed by source-control systems such as Git, Microsoft Team Foundation Server, SVN, Mercurial, and more.
Chapter 2 From manual to automated testing
17
concept of Continuous Integration (CI). See Chapter 15 for more on that topic. In effect,
having full regression coverage that runs in CI prevents virtually all regression bugs from
creeping in! So if you had no bugs in the first place, this process will prevent regressions
from occurring too, allowing you to keep this state of zero known bugs virtually forever!
In the rare case of finding a new regression bug (manually, after the developer checked-
in the code), the bug can be first reproduced using a new automated test, and fixed
immediately, to keep having zero known bugs.
Moreover, it encourages the developers to improve the inner quality of the code
and the structure of the application, as they can freely refactor their code and still be
easily assured that they don’t break anything (see Chapter 1 about the importance of
refactoring). This inner quality is often translated into external quality as well, as simpler
code tends to have less bugs and is easier to maintain without introducing new bugs.
In addition, code that is easier to maintain also means higher productivity, as it allows
the developers to implement more and more features quickly, easily, and first and
foremost – safely.
And what about new features? I won’t get too much into details here (read more in
Chapter 16 about Acceptance Test Driven Development – ATDD), but the main idea is
that whenever a new feature is developed, its relevant tests are developed along with it
and only when all the tests pass and no bugs are found in it, this feature (or User Story) is
considered “Done.”
I can hear your skeptical voice now saying: “That’s really great… but it will never work
on my team…” So let me convince you that it can: if you’re applying these ideas from day
one, this approach is fairly feasible and even easy. But you probably don’t and indeed
when applying them (much) later, it’s more difficult to get there. However, in Chapter 4
I’ll show you how you can gradually come close and gain most of the benefits mentioned
above sooner. Also, in Chapter 15, I’ll explain how even your team can make it. In that
chapter I’ll give you specific guidelines on how to show fast ROI to every stakeholder
who might oppose and drive this change even if you’re not a manager.
USER STORIES
a User Story is a term used in agile software development, which describes a narrowly scoped
requested feature. instead of defining a comprehensive and detailed requirement document
at the beginning of a project and then implement it over a long period of time, as is customary
in Waterfall development, in agile the approach is to add small features to the software
Chapter 2 From manual to automated testing

18
incrementally. each such added small feature or change is a user story. in some cases, a user
story can also be a request to change or even remove an existing feature according to user
feedback, and not necessarily adding a feature.
user stories should be narrowly scoped, so that they’ll be developed quickly and be able to
get to the customer’s hands (or at least the product owner’s hands) early to get her feedback.
however, even though a user story should be narrowly scoped, it should still give some value to the end user. it often takes some practice and creativity to break down a big feature into
such user stories,4 but i very rarely found a feature that cannot be broken into user stories in
such a manner.
even though there’s nothing preventing one from describing a user story in great detail, the
focus should be more on the general idea and its value to the end user, allowing the team to
come up with their creative solutions for the problem.
it is common to define user stories using the following template or something similar:
As a <role>
In order to <goal>
I want <a high level description of the feature>
For example:
As a site administrator
In order to prevent a "Denial of Service" attack
I want to be able to control the maximum number of requests per seconds from
each client's IP
Differences Between Manual and Automated TestsNow that we understand that blindly mimicking the manual tester’s work is not enough,
and we also see that a successful implementation of test automation has some great
benefits that you can’t get from manual regression testing, we can conclude that manual
testing and automated testing are essentially different. So let’s dive deeper into the
differences between the two. These differences are especially important to keep in mind
when coming to implement existing manual test plans as automated tests.
4 See http://agileforall.com/new-story-splitting-resource/ for some guidelines for breaking down big user stories.
Chapter 2 From manual to automated testing

19
In general, executing manual tests can be divided into two types:
• Exploratory testing
• Planned testing
Different companies and teams have different policies (whether these policies are
strict and enforced, or only exist in practice) regarding who, when, and if planned tests
are created and executed. Some teams focus primarily on exploratory tests plus maybe
a few sanity scenarios that reside only in the head of the tester. This is more common in
small, start-up teams or in small software development teams that are part of a bigger
organization that is not software centric. On the other end of the spectrum, highly
bureaucratic teams rely mainly on highly documented, precise planned testing.
Exploratory TestingIn exploratory testing, the tester is free to explore the system in order to look for bugs that
were not thought of before. This type of testing has a big advantage when your goal is to
find as many bugs as possible. In many cases, even when a tester follows a planned test,
he’s free and even encouraged to look around and do a little exploratory testing along the
way of the planned tests.
Often people think that because automated tests can run fast and cover a lot in a
short time, then they can find more bugs quickly by either randomly or systematically
trying to cover many usages. If that’s what you thought, I’m sorry to disappoint you that
this is not the sweet spot of automated testing. In order to find bugs, the test should
have a notion of what’s expected and what’s not. While a manual tester has this notion
intuitively, a machine doesn’t. If you think that you can formalize these rules in a simple
way that can be automated, I encourage you to think again. In most cases these rules are
as complex as the SUT itself… Remember that the sweet spot of automated testing is not to find as many bugs as possible, but rather to provide fast feedback about whether the
system behaves in the way we expect, as defined in the tests.
Chapter 2 From manual to automated testing

20
On the other hand, there are cases where you can formalize some important (though
very generic) rules about the boundaries of the possible outcomes of the system and
create an automated test that goes over many possible inputs, either randomly or
sequentially, verifying that the outputs are indeed in the expected range. If you try to
write or modify such tests to verify some nontrivial rules, then you’ll quickly end up
complicating the test so much until the point that is difficult to analyze and to maintain.
So you may want to use this technique only to verify rules that are simple to define and
yet mission critical. In all other cases I would recommend simple tests that only verify
one or few specific examples. This technique is called property-based testing, and the
most prominent tool that supports it is QuickCheck, which was originally created in
the Haskel programming language but was later ported to a long list of other popular
languages, including Java, F# (which can be consumed by C# and other .Net languages),
Python, Ruby, JavaScript, C/C++, and more. Because this topic is only relevant at rare
cases, it is outside the scope of this book.
Another, probably more useful option, is to create semi-automated tests, or tools
for the manual testers, which will help them cover many cases quickly, but leave the
analysis of whether the results are as expected or not to the manual testers. I’ll leave
it to you to find when and where you can develop and use such a tool, as this is also
beyond the scope of this book. Therefore, from now on, if not specifically mentioned
otherwise, we’ll talk only about planned manual testing and automation of these
testing.
MONKEY TESTING – AUTOMATED EXPLORATORY TESTING
the term Monkey Testing refers to a practice of randomly hitting keys (or otherwise performing
operations without understanding their context), like monkeys, or more realistically, toddlers,
can do, and see if the program crashes or not. While this technique can be easily automated,
it’s usually not very effective for a few reasons:
1. You can only catch crashes (or errors that you explicitly look for), not any
other bug, because you can’t define the expected result for each action.
even if the program freezes (but does not crash), you probably won’t be able
to detect it, let alone determine if the application behaves in any sensible
manner or not.
Chapter 2 From manual to automated testing

21
2. Because the automation presses the keyboard and mouse blindly, the chances
that it will do something interesting is pretty low. For example, it can get stuck
for hours with a message box open until it will randomly press “enter,” “esc,”
or click exactly on the “oK” button. obviously, we can develop a bit smarter
“monkey” that instead of sending random keystrokes only clicks those available
buttons or menus. it will indeed resolve the message box problem specifically,
but any other form or dialog that has some input validation will likely cause the
same problem.
Considerations for Automated TestingNow that we understand that automated tests are not very adequate for exploratory
testing, let’s see how planned manual testing is different from automated testing. In the
following paragraphs, we’ll analyze the main differences between the two and how these
differences should affect our considerations when we come to plan an automated test as
opposed to planning a manual test.
Preciseness
Manual (planned) tests are written by humans, in order to be consumed (read and
executed) by humans. Not only that, but the consumers are usually other team members
that know the application and the business domain and share pretty much the same
pre- assumptions regarding the system and how it is used. I say here “other” team
members, which is the better case, even though in the vast majority of cases I have
encountered, mostly the tests cases are executed by the same person who wrote them.
In those case, these basic assumptions are never challenged and the test cases5 contain
only the details that the writer thought he would need to remind himself about what he
intended when writing the test case.
5 The term Test case may be somewhat overloaded. For me, a test case is one test scenario that is composed of specific steps (actions) and verifications. Usually test cases are organized in Test Suites. A Test Plan usually contain multiple test suites, in addition to other details regarding planning, resources, etc.
Chapter 2 From manual to automated testing

22
All of these assumptions that the test case writer makes cause the manual test
case to contain some vagueness. Humans usually don’t have a problem dealing with
some vagueness, but computers just can’t. When writing automated tests, vagueness
is simply not possible. Eventually the automated test (like any other computer code)
must be precise and detailed in order for the computer to be able to execute it. It is
very common that when converting manual tests to automated ones, many questions
arise even about nuances that seem minor. However, every question must be answered
in order to be able to automate the test, and that answer is baked into the code of the
test automation and will be used every time the test will run! In fact, these questions
often reveal more important and interesting bugs than the bugs that are found when
the automated tests run.
Maintainability
As mentioned in Chapter 1, it’s useless to execute tests on code that hasn’t changed,
and therefore you should expect the application to change almost every test cycle. This
means that test cases must be changed often to reflect the changes in the application.
However, in reality very rarely have I seen this happening with manual test cases. In most
cases, the changes in the application are minor and the person that executes the test
can pretty easily understand what has changed and how he should adopt what’s written
in the test case to the actual state. But as mentioned above, with test automation, every
small detail matters; therefore the automated tests must be updated to reflect every
change that may affect them. For example, suppose that our application has a “Save”
command in the “File” menu, and one of the steps in a test case specifies that we should
“click the ‘File’➤’Save’ menu.” If at some point the “Save” command is moved outside
the “File” menu onto a more visible toolbar button, then any sensible tester would
understand that the step should now refer to the toolbar button rather than the menu
item, even if the description of the step hasn’t changed. However, an automated test
would fail if it can’t find the “Save” menu item as written.
Now that we understand that tests need constant maintenance, the most important
question is how we can write the automated tests so that it’s easy and fast to make those
changes. Most of the chapters in Part II of this book deal exactly with this question.
Chapter 2 From manual to automated testing

23
Sensitivity to Change – Preciseness and Maintainability Put Together
From what I said above about preciseness, you probably think that automated test
scripts6 should, and even must, be full of very fine-grained details of every operation it
should perform. On the other hand, the more you rely on such specific details, the more
difficult it is to keep your test scripts up to date. So it seems that these constraints are in
odds, and there’s no way to achieve both of them.
Fortunately, preciseness does not necessarily mean bloating each script with all of
the fine-grained details. All the details must be defined somewhere, but not all of the
details must reside inside the scripts themselves. A test automation system is usually
more than just a plain collection of test scripts, but it can, and should be built in a
modular fashion, where some pieces contain the fine details, and the scripts are only a
composition of these pieces.
You can think of it like the plans (drawings) of a car. When designing a car, there’s
no single drawing that contains all the details of the car. The car is a complex object
that is composed of many smaller objects (chassis, body, engine, gear, steering system,
wheels, interior parts, etc.), and each of them is composed of even smaller parts. There’s
probably one drawing that shows the “full picture” of the car, but with less details, and
many smaller drawings that describe the details of each part. If all the details were in a
single detailed drawing, and an engineer that designs the seats want to make a change
(that doesn’t affect its external dimensions), the entire drawing should have been
updated!
Similarly, when composing automated tests, even though all the details must be
flushed out before the test can run, not all the details should reside in one place, but
rather be spread across several components (methods, classes, modules, etc.), which can
be changed or swapped out without affecting the others.
Handling Failures
The first time a manual planned test case is executed, we may encounter many
unexpected conditions that we haven’t thought of when we wrote the test case. If we’re
well organized, then we’ll probably fix the test case after that first time. When developing
6 I use the term “script” here to describe a single automated test case, whether it is written in code, a scripting language, a record-and-playback tool, or any other form.
Chapter 2 From manual to automated testing

24
an automated test, a similar process happens during the development of the automated
test, until the test passes at least once.
But after that stage, whether we’re talking about manual tests or automated tests,
unexpected conditions may still occur due to one of the following reasons:
1. A new bug in the product (regression).
2. A legitimate change (improvement) to the product that we weren’t
aware of.
3. Environmental problem. For example, a network failure, out of
memory, out of memory, etc.
4. An event in the product that the test was not designed to handle.
For example, suppose that the application shows a pop-up message
every day at 16:00, reminding the user to back up his work. An
automated test can pass consistently when it runs every other time,
but if it starts a little before 16:00, then the pop-up message can cause
it to fail. This is of course a simple example, but real applications have
sophisticated logic that sometimes makes it difficult to think of all the
conditions that can occur, and to address all of them appropriately in
the test case. We can say that these gaps in the design of the test case
are, in fact, errors in the test case itself. In case of automated tests, we
can in fact call these… bugs in the tests!
5. Someone did something with the system before or during the test,
which unintentionally affected the flow or result of the test. This
“someone” can be another manual tester that ran some tests; a user
or administrator that changes some settings; or another automated
test that performed such actions. For example, if one test changes
the password of a user that another test tries to log in with, then the
second test may fail. Another example is when two tests run against
the same server simultaneously and each of them tries to change
some data that the other uses. This class of problems are called
isolation problems and are somewhat similar to the previous kind
of problems, but at least in case of automated tests, they usually
indicate not only a bug in a particular test, but rather a problem in
the overall architecture of the test infrastructure. Chapters 6 and 7
deal with these issues in more details.
Chapter 2 From manual to automated testing

25
While all of these conditions might happen both when executing a manual test and
when running an automated test, the way they are handled is a key difference between
manual and automated tests. Humans (manual testers) often distinguish between these
types naturally and easily and know how to handle each of them accordingly. Even
in case of a product bug, after the tester files the bug, in most cases he can continue
executing the rest of the test case, maybe after performing some work-around or re-
do the last few steps. On the other hand, in the context of automation, by definition,
“unexpected” means that the computer doesn’t know how to handle it!
Important note test automation may be able to handle the third type of failure reasons to some degree, but this is a very delicate topic. if you can identify possible events that may occur during the test execution, you may be able to handle them in the code in a way that will work around them and handle them similarly to what a user (or a manual tester) would have done. however, this should be handled with care, as on one hand, the goal of these work-arounds are to make the tests more reliable; but on the other hand, it’s much harder to verify that the test itself handles all of these situations correctly, and therefore you may end up with the opposite effect: the tests would be less deterministic and eventually less reliable! even though in some cases these work-arounds are worthwhile, you should thoroughly consider the alternatives discussed in Chapters 6 and 7.
SHOULD WE RETRY FAILING TESTS?
i sometimes find that people built a retry mechanism into their testing framework, so that it
retries all of the failed test once or twice and only mark a test as failed if it has failed after
all of the retries. to me, by doing so they’re missing an important point. Failing tests tell you
something: either there's a problem with your test code or with your application under test.
even if it’s time consuming at first, those problems should be thoroughly investigated to find
their root cause and handled accordingly to prevent them from reoccuring. ignoring these
failures by blindly retrying the entire test will probably leave your automation unreliable and
potentially leave significant undeterministic bugs in the product, too! let alone the extra time it
takes to rerun those failed tests…
Chapter 2 From manual to automated testing

26
Length of a Test Case
The difference between the way that manual testers handle unexpected conditions
and the way automated tests do, has a vast impact on the way that automation should
be written: individual manual test cases are often somewhat lengthy and tend to cover
a complete feature with all of its nuances in one test case. It makes a lot of sense for
manual test cases to verify many smaller things “along the way” in order to save time
when executing the test case. If there’s a minor bug or something changed that affected
these sideway verifications, the manual tester can often skip it and continue with the rest
of the test case. However, if you automate such a lengthy test case as is, and it fails in one
of the first verifications, it doesn’t have the wisdom to decide whether it makes sense to
continue or not.
Some automation frameworks allow you to report the failure and continue
nevertheless. However, when a human tester encounters a failure, he usually decides
whether it makes sense to continue, go back a few steps (and exactly how many) or
completely abort the test execution, based on some understanding of the nature of the
problem. I find that deciding at runtime solely upon the importance of the verification
itself whether it makes sense to continue or not (without means to repeat or work around
some last few steps) is not very reliable and consequently has the potential of hurting the
reliability of the test automation as a whole! In particular, it’s almost impossible to assure
that the test behaves correctly in all of the possible failure conditions.
Other frameworks (including the vast majority of the unit-testing frameworks) take
the approach that any unexpected condition that the test encounters causes the entire
test case to fail and continue only to the next test case (rather than the next step). In my
opinion, this is the safest and most reliable way to go. However, this implies that tests must be short and should verify only one thing, otherwise, a minor failure can block
the more important parts of the test from executing. If you try to outsmart and make your
tests “smart” about possible failures, you’d only make the things worse, because now
you’ll have a full-blown logic in your test code that you have no reasonable way to verify!
This also means that almost every verification should have its own test case! It
may sound wasteful and cumbersome, but in the long run, you’ll realize that this is the
only way to keep your tests reliable and maintainable.
Chapter 2 From manual to automated testing

27
Dependencies Between Tests
Sometimes manual test cases are described with dependencies between them: execute
test X only after executing test Y. In automated tests, because a failure in one test
normally aborts that test and continues to the next one, we won’t want the failure to
affect the next tests. This means that we need to guarantee that every test starts from
an initial well-known state. In other words, dependencies between automated tests are
strongly discouraged. The exact details on the various options to enforce a clean start in
every test is covered in Chapter 7
Logging and Evidence Collection
How the automation recovers from unexpected conditions so it can continue to the next
test is one thing, but another important thing is what to do about these unexpected
conditions. In case of manual tests, if at the time of execution, the tester encounters an
unexpected condition and he believes that the problem lies in the application, then he
usually reports a bug immediately before proceeding to execute the rest of the test case
or skip to the next one. In the bug report, he usually describes what he has done that led
to the failure and maybe some other facts he finds relevant. When writing the report, he
should also try to investigate the nature of the bug by “playing around” to discover its
boundaries.
However, when an automated test encounters an unexpected condition, the story is
very different:
• As already discussed, automated tests treat any unexpected condition
as a failure without proper ability to articulate the nature of the
problem.
• Automated tests usually run unattended, and the investigation of the
failures is done after the fact. This means that the investigation of the
failure can only be done after some of the evidence was already lost
or corrupted!
If the test reproduces the same failure each time and in every environment, one
can run the test again on a different environment (e.g., his local machine if the failure
occurred in a CI or nightly build), or execute its steps manually and investigate the
failure this way. Even in this case, it would probably take some precious extra time.
Nonetheless, in case the failure does not happen all the time, then it’s highly important
Chapter 2 From manual to automated testing

28
to have logs, both of the test and of the application, as well as any other evidence that
may help investigate the problem. Such evidence can be screenshots or even a screen’s
video recording, DB snapshots, a web page HTML source, etc. Chapter 13 covers the
topic of investigating failing tests more deeply.
SHOULD THE TEST AUTOMATION SYSTEM REPORT BUGS AUTOMATICALLY?
even though i saw many attempts to connect test automation systems directly to the bug
reporting system, and open a bug automatically when a test fails, it doesn’t turn out to be a
very good idea. First of all, as mentioned, all unexpected conditions may cause automated
tests to fail, but not all of those failures are in fact bugs. But even if the bugs are assigned to a
tester to analyze them first, there are many cases that a single error causes many tests to fail,
causing extra overhead managing and tracking these piles of autogenerated bugs. For more
details about the recommended way that bugs discovered by automation should be treated,
see Chapters 5 and 15.
Trust
Mistrust between developers and manual testers is (unfortunately) pretty common:
testers blame developers from writing crappy code, developers blame testers for opening
bugs with too little or inaccurate information, etc. (and everybody blames product
managers for writing unclear requirements, but that’s another story… we’ll see how
ATDD helps with that, too, in Chapters 5 and 16). But eventually, everyone agrees that
the other role is necessary and important.
When it comes to test automation, both developers and testers, as well as their
managers, need to trust the machine. At first it may sound like a no-brainer: machines
always produce consistent results, better than humans do! So why would it be hard to
trust them? But as we discussed above, automated tests can fail due to a number of
reasons and not only bugs. In fact, in order for us to trust the automated tests, we have to
believe that:
• Tests fail only on real bugs.
• Tests don’t miss bugs.
Chapter 2 From manual to automated testing

29
As much as we’d want and try to make these claims true, we cannot guarantee them.
But with a good test automation suite, we can guarantee a softer version of these claims:
• Tests fail mostly on real bugs (and it’s easy to investigate and
determine the real cause).
• Tests don’t miss bugs that they were designed to catch.
If you design your automated tests so that they are short and simple, as you should,
then it’s pretty easy to prove the second claim. But the first one is more difficult to
achieve. This situation where the first claim is not met is manifested either when there
are many tests that fail for a long period of time even though the basic functionality that
is verified by these tests is working, or when tests frequently fail with an unexplained
reason. When that happens, stakeholders (especially managers) cease to trust the results
of the automated tests. When the results of the automated tests are ignored, and no
resources are given to solve these problems, then pretty quickly the tests will become
irrelevant and stale, collapsing all the investment that was put in building the test
automation system!
Unfortunately, there’s a large percentage of test automation projects that start with a
lot of excitement but after some time fail to fulfill their promise, and then these projects
die miserably. Hopefully, this book will help you avoid this destiny and lead you into the destiny of success!
Before diving deeper into the aspects of ensuring the success of the test automation
project, let me add to some of the practices already mentioned, and highlight some more
key practices that will help the automation project avoid the destiny of doom and rather
reach its successful destiny:
1. Every failure, first and foremost automation bugs, must be treated
and fixed ASAP! (more on that in Chapters 5 and 15).
2. Every failure should be investigated thoroughly to find its root
cause. “Covering” for errors may solve short-term problems but
may cause future problems that are harder to identify and fix
(more on that in Chapter 13).
3. Tests should be built in a way that ensures consistent results. If
the results depend on external conditions, when they fail the
tendency would be to blame these external conditions and to avoid
investigating the real cause (more on that in Chapters 6 and 7).
Chapter 2 From manual to automated testing

31© Arnon Axelrod 2018 A. Axelrod, Complete Guide to Test Automation, https://doi.org/10.1007/978-1-4842-3832-5_3
CHAPTER 3
People and ToolsAs a consultant, most customers that call me to help them start working with test
automation start with the questions: “Which tools are there?” and “which tools should
I use”? If you’re in that situation yourself, then you’re probably asking this question too.
The short answer to the first question is that there are a bazillion tools out there for test
automation. Oh, and there’s Selenium, too, of course, so there are bazillion and one.
And the short answer to the second question is the classical consultant’s answer: “It
depends.”
Choosing the Right ToolsNow in a more serious tone, even though there are indeed many tools, and almost every
day I hear about a new tool for test automation (each of them promises to be “the next
thing”), there are only few categories of tools serving different purposes. Some tools
cover more than one purpose, and in most cases, you’ll probably need a combination of
tools. In order to know which tools are right for you, there are bunch of questions that
you should answer first. While the question “which tool should I use” is a “how” type
of question, the questions you should start from are the “whys” and the “whats.” Once
you answer these questions, the choice of tools will be pretty trivial in most cases. I’ll
describe the categories of these tools and the questions that you should answer further
down this chapter. However, I encourage you to read at least the chapters in Part I of this
book before you actually make a decision, as these chapters will help you answer those
questions better.
While the rest of the chapters in Part I will help you answer most of the “why” and
the “what”questions, I want to dedicate this chapter to one important question that is
too often overseen, which is neither “why,” “what,” nor even “how,” but rather a “who”
question…

32
Who Should Write the Tests?Most of the time my customers already have an answer to this question, even though
they didn’t consider all the alternatives and their implications, simply because they’re
not aware of them! So let me describe the options and their implications. Note that
there’s no one right answer to this question, and every option has its pro’s and con’s, so
you have to make your own choice, as best fits your organization.
Note that even if you already have an automation team in place, I encourage you to still read this chapter, as you’ll gain a better understanding of the pro’s and con’s of
the situation you’re in, which will probably help you deal with them better. You may even
want to consider changing or trying to influence your managers to change the decision
in the long run.
Promoting Manual Testers or Inexperienced Programmers to Automation DevelopersSometimes manual testers with no or with very little programming skills hear about one
of the record-and-playback automation tools out there and get very excited. They come to
their boss and tell him that they can start building automated tests quickly and save a lot
of time and money! This enthusiasm is great, and as a manager you may want to harness
it, but please keep in mind what we already discussed in the beginning of Chapter 1:
record-and-playback tools are easy to begin with but does not hold water for long.
Many manual testers have some background in programming. Some of them
studied computer science or something similar in college or high school but ended up
in QA for several years. Others simply played here and there with programming and are
enthusiastic to write code. These people are often seen as great candidates for starting
your test automation endeavors. Taking someone that you already know and trust, which
has some basic programming skills, and already knows your system and the company
is very compelling. There’s no need to invest too much in training, and this opportunity
usually really motivates this person! At first, the QA manager would probably decide that
this person will dedicate only 20%–50% of the time to the test automation project and
continue to do manual testing at the rest.
Of course, every person is different and I’m generalizing here, so take my words here
with a grain of salt, and judge your own case for yourself. But in my generalized opinion,
while some of these people may be appropriate as test automation team members once it’s
Chapter 3 people and tools

33
properly established, they’re usually not the right persons to start building and establishing
the test automation system. If you’d let them, they’ll probably succeed at first, which will
contribute to the perception that it was the right choice. But over time, maintainability and
stability issues will start to occur and the project might begin to deteriorate.
At the early stages, the technical challenge of building automated tests that “do
the job” is usually not so high. Some tools make it easy even for people without any
programming background, but even writing automatic tests in code (e.g.. using
Selenium) does not require high programming skills just to make it work. These tests
would usually pass and may even find some interesting bugs.
However, after some time, some things might start to go not so well: the development
of the application doesn’t stand still. The application evolves, new features are added,
some existing features and UI screens change, and some parts are re-written. From
time to time, that inexperienced automation developer will find that some things in the
application changed and he’ll need to fix the automation accordingly. As long as these
are very specific and small changes, he’ll deal with it fine. But without proper planning
and design, and without appropriate debugging skills, when the number of tests
increase, some unintentional dependencies or assumptions can hide in the code of the
test automation, which make the tests more fragile and less reliable. In addition, at some
point the application developers will change something that may affect a big portion of
the tests. In order to fix that the automation developer will need to rewrite large chunks
of the tests. It will take a long time to fix, and regardless of whether the application works
correctly or not, the automation is completely broken for a long period of time, in which
time it doesn’t provide any value.
As a lesson learned, he might ask the developers (and also involve his manager for
that) to let him know in advance about every change that they’re about to do that might
affect the automation, so that he can prepare in advance. Unfortunately, this isn’t going
to work… Even with their best intentions, the developers are not aware enough or simply
don’t even know which changes that they make might affect the automation and which
won’t. On one hand they’re making so many changes all the time, and on the other hand,
they’re not familiar with what and how the automation does, that it’s really not practical
from their side to know what can affect the automation and what doesn’t.
Another problem that may probably happen if there’s no one around with proper
experience in test automation is that occasionally one or more tests will fail without a
clear reason. The automation developer may first blame the tool, the network, or just the
bad luck and try to run the test again. Alternatively, he may suspect that it’s a timing issue
and attempt to fix it by adding or increasing the delay between operations. Anyway, he
Chapter 3 people and tools

34
runs the test again and it passes, hurray! But soon, besides the fact that the tests would
be painfully slow due to the added delays, their overall stability will deteriorate and it’ll
become hard to tell the root cause of the failures. In this case, the entire value you are
supposed to gain from the test automation is diminishing, as neither the automation
developer nor the application developers can tell whether a failure is a bug in the product
or in the automation. Eventually, this also leads to losing trust in the test automation.
If the automation developer is supposed to work on the automation only partially
(e.g., 20%–50%) and keep doing manual tests the rest of the time, there are a few
additional problems that would probably occur.
First of all, devoting a specific percentage of your job to one activity and another
percentage to another activity is almost never practical. It’s very hard to devote specific
days of the week or long hour periods for one activity when you’re in the same office with
people that need your help in the other activity as well. And without dedicating specific
days or hours, it’s really hard to measure, both for you and for your manager, how much
you really dedicate to test automation vs. how much you dedicate to the manual tests,
which is always more urgent! In addition, specifically with test automation, writing the
tests is only part of the job. At the minimum, you should also investigate the results
and fix broken tests, and this takes time too. If you want to run the tests every night, the
results must be investigated every morning! If you don’t run the tests every night, then
too many changes can take place between one run and the other, and it’s harder to tell
why something broke. If you fix or change something in the automation, you’ll be able
to tell whether your changes are correct only a few days later – will you remember what
were you trying to fix, why and how? Probably not... It’s also harder to make use and
promote something that is not consistent. People (managers, developers, etc.) don’t
know whether to expect to get results from the automation or not, so they don’t look for
it, and therefore they don’t pay too much attention to it anyway. Once again, the result is
that people can’t rely on the test automation and eventually lose trust in it.
Conclusion people with some programming knowledge but no programming and automation experience may become effective test automation team members, but they need guidance! test automation is a craft (discipline) of its own, requiring specific skills. It takes time, effort, and dedication to become good at it and therefore isn’t something that can be done “on the side,” even if you're the best developer ever
Chapter 3 people and tools

35
Splitting the Work Between Manual Testers and Automation ProgrammersAnother common approach is that few experienced developers develop the
infrastructure and “building-blocks,” and a bigger group of non-programmers or junior
programmers use this infrastructure to create the automatic test scripts in a simpler
manner. This approach has a tight relationship with the chosen tool, which can either
be an off-the-shelf tool or a homegrown tool. Also, the kind of tool usually implies how
much of the work can be done without writing code vs. how much requires coding.
I know quite a few teams that took this approach and are very happy with it. It allows
you to involve all the original testers in the team in the automation project without
having to teach them programming. In addition, the reality is that testers that don’t write
code are usually cheaper than programmers, and this also makes financial sense.
Later in this chapter I’ll describe the categories of tools in more detail. And I will give
a few examples for tools that support this approach. Most of these tools trade the need for
writing code with the limitation to a specific way for interacting with the SUT. Examples
of such tools are Ranorex® and SmartBear SoapUI®. While Ranorex works excellent
with many UI technologies, it’s not designed for any other kind of test. Soap UI, on the
other hand, is dedicated only for testing systems by means of HTTP (and a few other)
network communications protocols. Most of these tools allow both recording (whether
of single steps or of an entire scenario) and/or manually composing and editing scripts,
through an intuitive GUI or a simplified scripting language, which does not require real
programming skills. They also typically provide some mechanisms that allow reuse of a
set of actions, even though these are generally less flexible than true object-oriented code
in that regard. These tools only require coding whenever you want to do something that
the tool was not designed to do specifically. These tools typically come as a complete
solution for managing the tests, executing them, creating reports, etc.
The ability to reuse composite actions and/or coded actions has another advantage
besides the fact that it reduces the amount of work and maintenance: for every reusable
component, you can give a descriptive name that describes what it does. This allows you
to build the tests in a way that reveals your intent much more clearly, making the tests
easier to maintain. In addition, you can use this technique to apply an approach called
Keyword Driven Testing (or KDT in short). In this approach, the test scripts are composed
only (or mostly) out of these reusable building blocks (or actions), each describing a
business action rather than a fine-grained technical action. For example, an online-
shopping scenario can be composed out of building blocks like “login,” “add to cart,” and
Chapter 3 people and tools

36
“checkout.” These building blocks can usually take arguments from the test script so that
they can be used with different values or slightly different ways in different places. Because
of the ability to use descriptive names, it makes the automated test scripts more readable
and also easier to write and maintain. So even if a nontechnical business person looks at
the test script, he can clearly see what it’s supposed to do, without having to go into all the
technical details of how these actions are performed. The names of the building blocks are
sometimes referred to as “keywords” and therefore the name of this technique.
For some reason, I encountered quite a few companies that developed complete,
sophisticated tools by themselves for this approach. Maybe the tools that were available
when they started weren’t appropriate.
Yet another variation on this is to write everything in code, but still spit the work
between coders and non-coders, such that the coders create the “building blocks” as
methods and the non-coders are only taught the bare minimum they need to know in
order to call these methods from the tests.
Even though the KDT approach inherently takes advantage of reusability, its main
drawback is the overhead and interdependency in the process of writing and maintaining
the test automation suite as a whole. While composing test scripts out of predefined
building blocks sounds very compelling, in reality the need to add or modify an existing
building block is pretty frequent, which means that you can rarely write a test script
without having to need a programmer to make a change or add a new building block first.
But before the programmer can create or update the building block, he needs to know how
you intend to use it, which you often know only when you start writing the test. In addition,
the non-coder can only investigate failures up to a certain point, but if the problem lies
inside the operation of a building block, then the programmer needs to continue the
investigation too. Because the programmers that write building blocks are usually fewer
than the number of testers that write the test scripts, these programmers become a
bottleneck and potentially delay the process of writing and maintaining the tests.
Another issue that often happens in these cases is that in order to avoid the need to
make changes to a building block, it’s designed to be too generic. This can take a form
of having too many parameters, or of having fewer parameters but that their values
encapsulate a lot of information (e.g., using a comma-separated list) that can affect the
behavior of the action in many ways. The use of such parameters may indeed minimize
the required number of different building blocks, but is also very error-prone, and the
person who writes the script should know the exact format of the data that the building
block expects. At the end of the day, these “solutions” to the bottleneck problem end up
making the test scripts more complex and confusing to write and maintain.
Chapter 3 people and tools

37
There’s another category of tools that also makes a separation between the test
scripts and their underlying implementation. Cucumber and SpecFlow are the common
examples of tools that belong to that category (we’ll talk more about in a later section).
The main differences between this category and the previous one, is that these tools
focus primarily on the readability of the tests, in order to use them primarily for
documentation. Usually these tools are not technology specific, that is, they can be
combined with other tools to provide abilities of UI automation, HTTP API (see sidebar
later in this chapter), communication, or any other means for interacting with the SUT,
though they require more coding than the tools in the first category. Because tools in this
category also provide separation between the test scripts that don’t require code writing
and the implementation part that is purely code (and probably also because most of the
tools are open source), many teams use them in order to apply a KDT approach, that is,
allow non-coders to write the test scenarios and programmers to write building blocks.
Unfortunately, while doing so they’re missing the point of these tools, which is much
more about making the scenarios readable as documentation, and less so to provide
reusability. Advocates of the BDD approach (see later in this chapter) even say that the
main purpose of these tools is to communicate the requirements in a verifiable way,
and don’t see testing as its main purpose. While there’s a sweet spot where reusability
and readability go together, if you’d try to stretch it too far to one direction, you’ll
compromise the other. In other words, the more you’d try to make the building blocks
more reusable, eventually you’ll compromise their readability and vice versa.
Using a Dedicated Automation TeamProbably the most common approach is to have a dedicated team (or one or two people
if it’s a small project) that is responsible for the test automation as a whole. The team
members normally all write code and they’re responsible for implementing the test
scripts, the infrastructure and reusable code, as well as maintaining it, investigating the
results, and improving the test automation system over time.
The big advantage of such a team is that they share knowledge and practices and
reuse code without any boundaries. This is especially important at the beginning, as
the infrastructure and practices are still being formed. Also, if the development teams
are divided along the architectural and technology boundaries, like “client team,”
“server team,” “DB team,” etc., then it makes more sense to have a separate dedicated
Chapter 3 people and tools

38
automation team that implemented end-to-end tests for the entire system. See Chapters
6 and 8 for more information about the relationships between test automation, business
structure, and architecture.
On the other side, because this team is cohesive, they usually don’t work very closely
with the other developers. One of the consequences of this situation is that this team
usually write tests after the features that they verify are done and pretty stable (after
manual testers tested it at least once). Typically, they receive existing test scenarios that
manual testers created beforehand and automate them, possibly after adapting them in
one way or another for automation. However, this phase gap between the application
developers and the automation developers yields some challenges:
1. If the code under test wasn’t written in a testable way, it could
be very difficult to automate it. In order to change this, the
application developer should be interrupted from his current
work and change the design of a feature he already implemented
and that was even tested manually, which would very rarely
happen…
2. Similar problems may occur if you find a bug at the time of
implementing the automated test. If the manual tester already
tested the feature, chances are that the bug you found is
not critical, but it may impede you from implementing the
automation properly. Again, the work of the application developer
must be interrupted in order to fix this, and until this happens, the
automation developer cannot continue working on that test.
Another drawback of this approach is that because the responsibility for investigating
the failures is primarily of the automation team rather than the development teams, it
may be very difficult to stabilize the tests. Every change that the application developers
makes can potentially cause one or more tests to fail, and they usually won’t care unless
you prove that it’s a bug. See Chapter 5 on the consequences of such business processes.
Having Dedicated Automation Developer(s) Inside Each TeamIn development organizations where teams are organized around features rather
than around technological or architectural boundaries, it often makes more sense to
have one or two automation developers as part of each feature team. This is especially
Chapter 3 people and tools

39
true if there’s an organizational intent to cover every new feature (or User Story) with
automated tests before declaring it done.
In this case, it’s recommended that all the automation developers will have some
formal means to share knowledge and code and ideas, and preferably there should be
some senior automation developer who does not belong to any particular team, but his
job is to provide guidance and supervise the work of the other automation developers
from a professional standpoint.
Obviously, this approach does not fit well when automating existing, older manual
test cases, as in this case there’s no real collaboration between the automation developer
and the application developer. If full coverage is still not in place, it can be useful to have
a few automation developers work on the old tests, while other automation developers
work inside the feature teams on new tests. See Chapter 4 on how to converge into full
coverage while ensuring that new features are always covered.
In small organizations or teams, there can be one or two automation developers that
work in conjunction with the application developers on the new features, while filling
any gaps in regression tests in the remaining time.
The biggest advantage of this approach is that it’s easy to keep the automation
“green” as it’s the responsibility of the entire team to deliver the new features with all
tests working. In addition, writing the tests along with the development of a feature aids
in ensuring that the application is testable.
Give the Developers the Ownership for the AutomationSome teams take the previous approach one step further and instead of having dedicated
automation developers inside each feature team, they decide that the application
developers will write and maintain the test automation. Traditionally developers do
this with unit-tests (see Chapter 17), but there’s no good reason why they can’t do
this with broader scoped tests too. In fact, the original advocates of the test-driven
development (TDD) approach (namely Kent Beck and Martin Fowler) claim that they
use the term “unit-tests” not only for a single class or method level tests but rather to test
of any scope.1
1 See the description of “sociable” tests at https://martinfowler.com/bliki/UnitTest.html. Other relevant references: https://martinfowler.com/articles/is-tdd-dead/ and http://www.se-radio.net/2010/09/episode-167-the-history-of-junit-and-the-future-of-testing-with-kent-beck/ (around minutes 22–26).
Chapter 3 people and tools

40
In my opinion this approach is excellent as long as all the developers (or at least a
few from each team) have the necessary skills for writing good tests. The same way that
some developers only specialize in “client” development and some only in “server”
development, there are also “full stack” developers, and developers can have or not have
the skills to write good tests.
In small organizations that have the adequate people, this can work out very well.
However, I wouldn’t easily recommend for a dev manager of a large organization to
adopt this approach across the board, as not all teams may have people with the proper
skills for that. My advice to that manager would be to find an expert (either external or
internal to the organization) that can train and accompany one team at a time into this
way of thinking and working. This is important because usually each team has different
challenges and constraints, and a “one size fits all” approach can be very dangerous,
leading to poor quality tests that are unreliable and harder to maintain. In addition, it is
important to promote knowledge sharing and transfer among the teams, both in order to
create consistent practices and to optimize the working processes, mainly through code
reviews and pair programming.
The Variety of ToolsAs already mentioned, I encourage you to choose the tool you need only after going
through all the chapters in Part I of this book. However, now that we clarified that one of
the most important considerations that affects the selection of the tools is how people
are going to use them, we can start overviewing the variety of tools out there. Note that in
most cases you’ll end up using a combination of tools, as different tools answer different
concerns, and together they provide the full solution. In many cases you’ll also find that
you need to build your own little tools (mainly for gluing other tools together),or forced
to use some legacy homemade tools that were previously developed in your company.
In the following sections, I’ll classify the tools into categories, give a few examples, and
discuss the considerations for choosing among them.
Classification of ToolsBefore we go any further, I have to disclaim a few things. First, this classification is not
conclusive or unquestionable, as many tools don’t fall exactly into one category. Other
people can classify the tools in a different manner. Even though some tools are similar,
Chapter 3 people and tools

41
each has its unique features and characteristics, and many tools cover more than one
concern and therefore can belong to more than one category. In general, most tools
that don’t require programming skills are more feature rich, while tools that require
programming skills are often more targeted at a specific and narrow goal but are allowed
to be combined with other tools easily.
Note that even though I’ll give some concrete examples of popular tools in some of
these categories, in no way does this aim to be a comprehensive list of all the tools in
each category. The examples are mainly based on my own experience and knowledge,
and I have no interest in promoting one tool over another. Finally and clearly, tools
and technologies come and go. I guess that the concrete examples and specific feature
descriptions will be outdated pretty soon after this book is published, but I also believe
that in general, the classification itself and the main concepts will remain pretty much
the same for a pretty long period.
IDEs2 and Programming LanguageWhether you choose to develop the automation by writing code or use a tool that is
better suited for non-programmers, the automation developer will do most of his work
inside an application that provides the main work environment. Using this tool, the
automation developer will create and maintain the tests and mostly any other artifact
that is part of the test automation system.
In case you’ve chosen to use tools that are better suited for non-programmers, these
tools typically consist of their own specialized environment that is easier to learn and
work with for non-programmers. So, in this case, there’s usually no choice regarding the
IDE, as it is simply the same application that provides the underlying technology that
enables the test automation creation, editing, and running. However, note that even
these tools usually either generate code in a general-purpose programming language
that the automation developer can modify, and/or allow programmers to extend the
automation by writing custom code modules. For that purpose, some of these tools
provide their own IDE, but most simply allow the developer to use an external, common
IDE (that are more programmer oriented) for editing these files.
2 IDE is an acronym for Integrated Development Environment. These are applications that allow developers to write, edit, compile, and debug their code; and carry many other actions that are related to the development of the code.
Chapter 3 people and tools

42
If you plan to write the automation mainly in code, then you must decide also on
the programming language. While most IDEs can work with multiple programming
languages, and also most programming languages can be written using different IDEs,
most programming languages have their own “natural” IDE. So, once you’ve chosen a
programming language, choosing an IDE is usually pretty straightforward.
When it comes to choosing a programming language, there are a few considerations
to take into account. First, while in most programming languages you can do pretty
much everything you want, some other tools (e.g., for UI automation) work only with a
specific programming language. For example, Microsoft’s Coded UI only works with
C# or VB.Net. You cannot write Coded UI tests in Java or Python. However, some tools,
like Selenium, for example, are either supported by many different languages or have
alternatives in other languages.
In case you’re not restricted by the technology and you can choose among many
programming languages, here are some considerations to take into account:
• First, it is highly recommended to use the same programming
language that the other developers in the team use. For unit testing,
this decision is obvious, both because it’s the most straightforward
way, and also because usually unit tests are written by the same
developers that write the code of the system. However, this is
recommended also for other types of automation tests. The main
reasons for this is knowledge transfer, collaboration, and reuse of
tools and utilities between the automation developer(s) and the
product developers. I encountered a few companies where the sole
automation developer chose to use a different language than the rest
of the team (probably because he was more familiar with it), and later
the company was “stuck” with that decision, having to go through
various hoops in order to integrate it with the build system or other
tools, sometimes after the original automation developer has already
left the company. Changing a programming language down the road is almost impossible!
• Popularity – in most cases it is better to choose a popular, well-
established language, than a niche one. Avoid choosing the “latest,
newest, and coolest” language that very few have real experience
with. (Also avoid choosing an anachronistic language for mostly the
same reasons.) There are several reasons for that:
Chapter 3 people and tools

43
• Choosing a popular language will make it easier for you to recruit
additional automation developers when necessary.
• It is easier to find help and tutorials on the internet, as well as
frontal training.
• It has many more and better tools and libraries to choose from.
As of writing this book, the most popular programming languages
are Java, C#, Python, and JavaScript. There’s also an extension
language to JavaScript called TypeScript, which is 100%
compatible with JavaScript but adds a lot of important language
features to it.
• Language features – while generally you can write any program
in any programming language, and most languages have similar
basic constructs (like “if” statements, variables, methods, etc.),
each language has its own unique features as well as its limitations.
These features and limitations can have a significant impact on the
readability, reusability, and maintainability of your code! Some
language features may come at the expense of other benefits that
other languages might have. In particular, most languages have
features that allow the programmers to limit themselves from
making mistakes! While these features sometimes confuse junior
programmers, it helps make the code much more reliable and robust
by helping you to prevent mistakes. See the sidebar below for few
examples of such language features.
LANGUAGE FEATURES COMPARISON
While this is not a comprehensive comparison between programming language features, it can
give you an idea of what features exist in different programming languages and their benefits.
note that “languages features” are not the same as features of the core libraries of the language.
While each language typically has its own set of core libraries that provide some basic services,
like mathematical operations, lists, and common data structures, printing, file operations, date/
time, etc., language features are more generic syntactic constructs that the compiler recognizes
and that you can use to structure your code, regardless of what it actually does.
Chapter 3 people and tools

44
• Strong typing vs. dynamic typing. strong typing means that the type of a variable
or parameter must be explicitly declared, so the compiler can validate its correct
usage right at compile time. In some languages, you can mix strong typing and
dynamic typing. Java has only strong typing, C#, in mainly a strongly typed
language but it also supports dynamic typing (via the dynamic keyword); python
and Javascript only support dynamic typing. typescript also supports strong typing.
• Encapsulation – the ability to control the scope in which a variable or a method
is accessible, usually by declaring members of a class as public or private. all
object-oriented languages including Java and C# have this feature. so does
typescript. Javascript achieves this in its own unique way of declaring nested
functions and declaring local variables in inner functions. python doesn’t have
this feature.
• Polymorphism or callback functions – While polymorphism is considered one of
the object-oriented tenants and callback functions are not, they enable more or
less the same benefits. simply put, it allows variables to reference data as well as functionality, and also to pass them to and from methods. this allows you to
easily extend the behavior of the code without having to modify its core logic.
all of the popular languages have at least one of these features. however, some
scripting languages, especially languages that were created for a very specific
purpose or tool, lack this ability.
• Lambdas and closures – this is the ability to define a method within another
method, and to reference the local variables of the outer method from the inner
method. lambdas typically allow you to do the same thing using a shortened
and more elegant syntax. C#, Javascript, and typescript fully support closures.
C#, typescript, and Javascript es6 also support the lambda syntax. Java and
python support the lambda syntax also, but their implementations of the closure
concept are somewhat limited.
• Multithreading – the ability to execute code in parallel. While writing robust and
reliable multithreading code is dead hard, and I encourage even experienced
developers to avoid it if they have a choice, you can still take advantage of
third-party libraries that use it. Java, C#, and python all support it, but Javascript
doesn’t. While Javascript has some mechanisms that allow concurrency (using
Chapter 3 people and tools

45
a concept called “promises”), it’s not truly multithreaded. For that reason, if
you use selenium from Javascript (WebdriverJs), your code becomes much
more complicated and cumbersome, as well as more difficult to debug, relative
to other languages. the async and await keywords, which are available in
typescript and in Javascript es2017, make the problem somewhat less painful,
but it still doesn’t make selenium code in Javascript or typescript as easy to
read and debug as in all other languages.
While python has become pretty popular lately for test automation, probably due to its
simplistic syntax and easy learning curve that helps non-developers get up to speed
quickly, I typically don’t recommend it due to the limitations mentioned above, though other
considerations described above may tip the scales toward it. My own favorite programming
language is C#, and that’s the main reason I used it for the examples in part II, but I admit that
it’s mainly a matter of habit after all…
(Unit) Testing FrameworksIf you’re writing the tests in code, you need a tool that will allow you to run the tests.
While you can write all the tests as one simple command-line program that performs
them in sequence and displays their results, a testing framework gives you an easy way
to write and run individual tests. Then, either from a command line or a GUI tool, they
allow you to see the list of tests, run them, and see which ones passed and which failed.
Typically, you can select which tests to run: all, specific ones, or filter by various traits.
In addition, these tools also give you means by which you can ensure that tests don’t
interfere with one another, by writing special methods that get executed before and
after each test, before and after a group of tests, and also before and after all the tests
altogether. Some frameworks allow you to specify dependencies between tests, even
though the benefit of such a feature is questionable, as it makes the tests serve two distinct
purposes: initialization and testing, which don’t go very well together and complicate
their maintainability. In addition, it prevents running the dependent tests in parallel.
Testing frameworks are typically designed primarily for unit tests, but they suit
just as well for integration or system tests. Therefore, don’t panic by the term “unit
test framework,” which is normally used to describe these tools. Examples of such
Chapter 3 people and tools

46
frameworks are: JUnit and TestNG for Java; MSTest, NUnit, xUnit for .Net; for Python
you have the built-in unittest framework and py.test; and for JavaScript the most
popular ones are Jasmine and Mocha.
All unit testing frameworks that I’m aware of are either part of an IDE or some a
language development toolkit or are free open source projects. So, you don’t have to
worry about their price…
Note Testing Framework is sometimes also called Test Harness.
Assertion Libraries
In most frameworks, a test is considered “passed” as long as it doesn’t throw an
exception (i.e., as long as no errors have occurred when they run). However, a best
practice is to perform some kind of verification at the end of the test, usually by
comparing the actual result of the tested operation to a specific expected result. For that
reason, most testing frameworks provide means to perform such verifications, using a
simple mechanism called assertions. A typical Assert allows you to compare the actual
result to an expected result, and to throw an exception in case the comparison failed,
which consequently fails the tests. While most testing frameworks come with their own
assertion methods, there are some dedicated assertion libraries that provide their own
benefits. Some provide more specific assertion methods, for example, for validating
HTTP response messages. Others are more extensible and allow you to define your own
assertions, usually in a very readable and “fluent” manner.
Note Many testing frameworks also provide mocking mechanisms as well, and there are many third-party mocking libraries too. however, as these mechanisms are useful only for pure unit-tests, I see no point discussing these here. see Chapter 17 for more details about these mechanisms.
BDD-Style FrameworksBehavior Driven Development (BDD) is a methodology that is derived from Test Driven
Development (TDD, see Chapter 17), but adds to it an emphasis on bridging the gap
between the natural language description of the behavior of a feature (which stands in
Chapter 3 people and tools

47
place of formal specifications), and the tests that verify that the feature indeed behaves
according to that description. For that reason, some call it Executable Specifications, or
Living Documentation. Another aspect of this methodology is that the tests are used
as the acceptance criteria of user stories, and therefore it is also called Acceptance Test
Driven Development (ATDD). This methodology is covered in depth in Chapter 16.
The way this is normally achieved is using tools that allow us to write tests using
sentences in natural language and map each sentence to a method that performs the
operation described by that sentence. These sentences, along with their corresponding
implementation methods, can be made reusable, which makes the documentation and
the tests more consistent.
Simply put, BDD supporting tools provide a means to translate human readable
specifications into executable code. The most popular BDD tool is Cucumber, which
was initially developed in Ruby, and later was ported to many other languages, including
Java and C# (where it is called SpecFlow). Cucumber uses a special language called
Gherkin that consists of very few keywords followed by natural language sentences.
Here’s an example of a scenario in Gherkin:
Scenario: Cash withdrawal charges commission
Given the commission for cash withdrawal is $1
And I have a bank account with balance of $50
When I withdraw $30
Then the ATM should push out $30
And the new balance should be $19
And the charged commission should be $1
In the above example, the emphasized words (“Scenario,” “Given,” “And,” “When,” and
“Then”) are the Gherkin language keywords, and all the rest is a natural language. The
methods are associated with these sentences using regular expressions, thus allowing you
to specify parameters, like the amount values that appear in italic at the example.
Most BDD frameworks generate code for a skeleton of a unit test behind the
scenes, using one of the existing unit-test frameworks, and using one of the popular
programming languages. The generated unit test skeleton calls into other methods
that you should implement, and each of them is associated with typically one natural
language sentence in the Gherkin scenario, in order to do the actual work.
Another popular tool in this category is the Robot Framework. While the Robot
Framework also supports Gherkin, it doesn’t require you to do so. The Robot Framework
comes with some built-in libraries for common actions, operations, and validations, and
Chapter 3 people and tools
48
has a greater set of external libraries for various ways of interacting with the SUT (see the
next section). And, of course, you can also write your own libraries in Python or Java.
Some other tools take a slightly different approach and try to provide means that
allow you to incorporate the documentation inside the code of the test itself. Examples of
such tools are RSpec for Ruby, Specturm for Java, MSpec for .Net, and also Jasmine and
Mocha for JavaScript, which are also testing frameworks.
SUT Interaction TechnologiesWhether you write the tests in code or another tool, the test must interact with the SUT
somehow in order to test it. The most obvious way to do that is by simulating the user’s
interaction with the UI. But this is not always the best option (see Chapter 6 for more
details about the pros and cons of testing through the UI). Sometimes you may prefer
to interact with the SUT using HTTP, TCP/IP, or some other communication protocol;
through the database; by creating, changing, or reading from files that the SUT uses;
invoking command-line commands, etc. You can do most of these from code using
standard APIs and libraries.
However, most UI technologies don’t provide an easy-to-use API for simulating
user actions, simply as the UI is intended to be used by the user, and not by another
application… They sometimes provide such an API, but these are usually very low level,
and not so easy to use directly from an automated test. In order to simulate user actions
from the UI, you usually need a dedicated tool that is appropriate for automating the
UI of that specific technology. The most well-known example of such tool is Selenium,
which automates web-based UIs.
If you plan to interact with the SUT over HTTP and willing to write the automation
in code, you can simply write your own code that sends requests and process responses
just like any other client. This will give you the maximal flexibility and also the “feel”
for what it takes to write a client application. However, because HTTP is a very popular
way to interact with the SUT, there is a bunch of tools and libraries that aim to make it
somewhat easier. Some of these tools are meant to be used from code (for example, Rest- Assured for Java), and some are stand-alone tools (for example, SoapUI by SmartBear).
There are some tools whose main goal is to help sending and/or monitoring requests
and see their responses through a UI, but also provide some means for creating macros
or automated tests. However, because test automation is not their main goal, they’re
usually not the best suite for a full-blown test automation system. Fiddler and Postman
are examples of such tools.
Chapter 3 people and tools

49
APPLICATION PROGRAMMING INTERFACE (API)
While most applications are designed to be controlled by users, through a user interface, some
applications and software components are designed to be controlled by other applications
(or software components). also, many applications can be controlled both by users and by
other applications. In order for an application to be controllable by other applications, it should
expose an application programming Interface (apI), which the other applications, which are the
clients or consumers of the apI, can use to control it. From a technology standpoint, apIs can
come in many different shapes or forms, but conceptually, all apIs define the set of operations
that the clients can invoke, along with their corresponding parameters, data structures, results
etc. apIs should usually be well documented in order to make it easy for developers of client
applications to use the apI correctly, and to know what to expect from each operation.
the technologies that facilitate applications to expose apIs can be categorized to these three
main types:
1. direct method calls – the application (or more typically a software component)
provides a set of methods (and classes, in most modern technologies) that the
client application can call directly, within the same process, similar to the way
that the client calls its own methods.
2. network communication protocol – the application defines a set of messages
that it can exchange with the client, and their exact format. the application
exposing the apI typically runs as a separate process and often on a separate
machine and can often serve multiple clients simultaneously. these days
http (or https to be more precise) is the most widely used base protocol
upon which many applications expose apIs. these apIs typically define the
format of the messages that it uses for requests and responses, according to
an architectural style called rest (which stands for representational state
transfer). they also typically use Json (Javascript object notation) as the
underlying syntax for the data structures and message formats. a somewhat
older style for http apIs, which is still in pretty common use, is soap (simple
object access protocol), which is based on the XMl (extensible Markup
language).
3. remote procedure Call (rpC) – this type of technologies is like a combination
of the first two. With rpC, the application defines the operations it exposes
through the apI as a set of methods (procedures) and classes, similar to the
Chapter 3 people and tools

50
way it’s done in the direct Method Call. however, as opposed to direct method
calls, rpC is used to call these methods from remote clients, in other processes
and machines. the underlying rpC technology generates stub methods that
the client can consume locally, which have the exact same signatures (method
names and parameters) like the methods on the server that exposes the
apI. these stub methods serialize the name (or other identifier) of the method
along with the values of its arguments into a message and sends it to the
server over a network communication protocol (e.g., http). then at the server
side, it parses the message and invokes the corresponding method along with
its arguments. Windows Communication Foundations (WCF) can be used in an
rpC fashion, Google provides the grpC technology, and many services that
expose rest apI also provide a language Binding for popular languages, which
is the like the client-side only portion of rpC.
these three categories are only the main ones. an application can expose an apI in other, less
standard, ways too: for example, by reading and writing from a shared file, database, or any
other mean that other applications can communicate with it.
apIs can be used for various purposes:
1. operating systems expose a rich set of apIs for its hosted applications. these
apIs can be used to work with files, processes, hardware, UI, etc.
2. reusable software components, or libraries, expose apIs that applications can
use. typically, this apI is the only way to use these libraries. such a library can
be used, for example, for complex math operations, or to control some specific
hardware device.
3. plug-ins – some applications can be extended by third-party software vendors
to provide more features for the application or integrate with other applications
using plug-ins. For example, a text editor can expose an apI that plug-ins can
use for various purposes, like spell checking, integration with source-Control
systems, integration with email applications, and more. sometimes the same
apI can be by the users to create macros, like Microsoft office applications do.
4. Web services exposes apIs (typically rest apIs) to allow other applications to
take advantage of it. For example, a weather forecasting website can expose an
apI that application vendors can use to integrate with it.
Chapter 3 people and tools

51
Record, Edit, Playback Tools vs. Code Libraries
Generally speaking, UI automation tools can be categorized either as “record & playback”
tools or as mere code libraries that you can call from code. But in reality, it’s more of
a continuum rather than just these two categories. On one side of the continuum, we
can find very “stupid” tools that record the mouse movements and clicks, and also the
keyboard keystrokes, save them, and then let you play them back. Elders like me might
remember the Macro Recorder tool that was included in Windows 3.1 back in the days…
Fortunately, this tool is no longer part of Windows and similar tools are no longer popular.
Needless to say, such naïve tools are very error prone, as they blindly replay the mouse
and keyboard actions, without any notion whether something has moved, changed, etc.
At the other end of the spectrum, the operating system provides low-level APIs that
let you interrogate the existing elements (or even pixels) that are displayed on the UI,
and send messages to those elements, as if they were sent from the mouse or keyboard.
But there are many tools in between: first of all, most tools that record mouse clicks,
don’t just record the X and Y of the clicks or movements, but they rather try to identify
the UI elements using one or more of their properties, preferably some kind of a unique
identifier. In addition, they either generate code in a popular programming language
that you can later edit, adopt, and maintain for your needs; or they generate a more high-
level script, which is more oriented toward non-programmer, and that you can edit using
a dedicated editor of the tool itself.
Note that almost all UI automation tools are either bundled with a tool that lets you
inspect the elements in the UI of your application, and their properties, or is designed
to be used in conjunction with an existing tool, usually supplied with an SDK of the
relevant OS, which does the same thing. Here’s a short description of some popular UI
automation tools.
Selenium
This is probably the most popular test automation tool and is mostly suited for UI
automation on web applications. Like all UI automation tools, Selenium allows us
to mimic mouse and keyboard actions on behalf of the user and retrieve data that is
displayed. Selenium has a few important advantages that make it so popular:
• It’s open source (and therefore free);
• It supports a very wide range of browsers;
• It’s available in many programming languages.
Chapter 3 people and tools

52
Selenium’s main drawback is that it’s designed primarily for browsers and has only a
limited support for other UI technologies through external extensions. In addition, it is
mainly designed to be used from code.
In order to allow the versatility of browser and also of programming languages, it is
composed of two parts, each of which is interchangeable. These parts are:
1. Language binding
2. Browser driver
The language binding is the code library that provide the classes and methods that
you can use from the code of your tests. Theses libraries are either compiled as in Java
and C#, or pure source code libraries as in Python or JavaScript. A different language
binding exists for every supported programming language.3 This part communicates
with the Browser driver using a dedicated JSON wire protocol.
The browser driver receives the requests from the language binding and invokes the
relevant operations on the browser. Each type of browser has its own browser driver.
However, because all drivers “understand” the same JSON wire protocol, the same test
can be used with a different driver and corresponding browser.
Note even though the language binding communicates with the driver over http, this communication has nothing to do with the communication that goes between the browser and the server of the web application.
Selenium’s language binding is not a testing framework but rather a mere code library. Therefore, you can use it from any type of application, even though it is most commonly used from one of the unit testing frameworks.
3 Some languages are compiled into byte-code that is run by a dedicated runtime engine. The Java Virtual Machine (JVM) and .Net Common Langauge Runtime (CLR) are the most known ones. Libraries that are compiled for these engines can be consumed by applications that are written in any language that can also be compiled for the same engine. So, for example, the WebDriver library for Java can be consumed by tests written in Scala and Groovy, and the C# (.Net) binding can be consumed by tests written in VB.Net and F#.
Chapter 3 people and tools
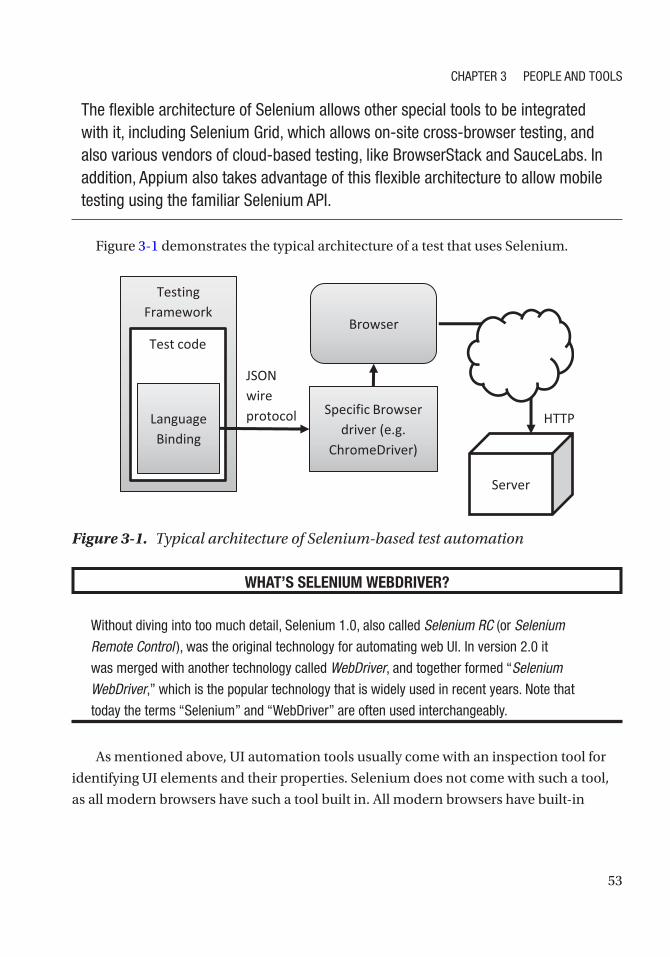
53
the flexible architecture of selenium allows other special tools to be integrated with it, including selenium Grid, which allows on-site cross-browser testing, and also various vendors of cloud-based testing, like Browserstack and saucelabs. In addition, appium also takes advantage of this flexible architecture to allow mobile testing using the familiar selenium apI.
Figure 3-1 demonstrates the typical architecture of a test that uses Selenium.
WHAT’S SELENIUM WEBDRIVER?
Without diving into too much detail, selenium 1.0, also called Selenium RC (or Selenium Remote Control ), was the original technology for automating web UI. In version 2.0 it
was merged with another technology called WebDriver, and together formed “Selenium WebDriver,” which is the popular technology that is widely used in recent years. note that
today the terms “selenium” and “Webdriver” are often used interchangeably.
As mentioned above, UI automation tools usually come with an inspection tool for
identifying UI elements and their properties. Selenium does not come with such a tool,
as all modern browsers have such a tool built in. All modern browsers have built-in
Testing Framework
Test code
Language Binding
Specific Browser driver (e.g.
ChromeDriver)
JSON wire protocol
Browser
Server
HTTP
Figure 3-1. Typical architecture of Selenium-based test automation
Chapter 3 people and tools

54
developer tools (usually opened by pressing F12). The developer tools include the DOM4
explorer, which allows you to identify the elements and their properties. Figure 3-2
shows the DOM explorer in Chrome.
Selenium IDE
Selenium also provides a dedicated plug-in for FireFox, called Selenium-IDE. This plug-
in allows recording test cases, and basic management and editing of these test cases
without writing code. It also allows exporting the tests to code in Ruby, Java, or C#, using
a variety of popular testing frameworks. While these features are nice, this tool is rarely
considered as a viable professional test automation tool. As of August 2017, Selenium
4 DOM is an acronym for Document Object Model. The DOM describes the tree of HTML elements and their properties at any given moment. Using JavaScript, the page itself can manipulate its DOM at runtime, making the page dynamic. Note that while the DOM can change, the HTML is the static description of the page as the server sent to the browser.
Figure 3-2. Chrome’s DOM Explorer
Chapter 3 people and tools

55
team has announced in their blog5 that Firefox 55 will no longer support the Selenium
IDE, and at least for now, it will no longer be developed or maintained. Figure 3-3 shows
the UI of Selenium IDE.
Appium
Appium is an extension to Selenium WebDriver, which allows UI automation for
mobile applications on Android, iOS, and also Windows 10 applications. For the latter,
it supports both Universal Windows Platform (UWP) and classic Win32 applications.
Like Selenium, Appium is designed to be used directly from code. Appium supports
both native mobile apps as well as mobile web apps and hybrid apps. As long as the
5 https://seleniumhq.wordpress.com/2017/08/09/firefox-55-and-selenium-ide/
Figure 3-3. Selenium IDE
Chapter 3 people and tools

56
application is similar on different platforms, the code of Appium tests can be reused
for these platforms. Appium can be used through the existing WebDriver APIs, but also
extends it with some mobile-specific capabilities, like touch gestures, orientation, and
rotation, etc. Appium can work both with real devices and with emulators.
Appium itself can run on Windows, Linux or Mac, and comes with its built-in
inspector tool for iOS and Android applications. Note that in order to use Appium to test
iOS applications it must run on a Mac where the iOS device (or emulator) is connected
to. However, you can have the test run on a different machine and connect to the
Appium service that runs on the Mac remotely. This consideration is also relevant when
you plan to run the tests on iOS as part of a nightly or CI build.
Ranorex
Ranorex is a complete UI automation tool, featuring an IDE, testing framework, runner,
reporting, and more. Ranorex allows recording of complete test cases, as well as more
atomic test steps, and editing them through an intuitive UI (without the need to write
or edit code). However, it does create C# code behind the scenes, and allows us to write
custom functions in C# as well, for operations that are not supported by the tool, like
operations on databases or other technologies that are not UI. Ranorex supports a wide
range of UI technologies, ranging from old, legacy technologies like PowerBuilder and
Microsoft Visual FoxPro, to the most modern ones, including Android and iOS native
and hybrid, and UWP.
One of the biggest advantages of Ranorex is that it allows a smooth transition from
simple recording of an entire test case to the most complex hand-coded test automation.
It does that by supplying means to easily modify and refactor recorded scripts, split
them into reusable modules, using variables to enable even greater reuse, and finally
also converting small pieces to code as needed. You can even use Ranorex as an API that
you can consume from any .Net language (e.g., C#) and combine it with another testing
framework of your choice.
Ranorex provides a built-in inspection tool, which also provide a nice abstraction
over different UI technologies. This tool works closely with the Object Repository
feature that allows you to manage all the UI elements in a hierarchical order. The Object
Repository uses a special variant of the XPath6 syntax, called RXPath and allows us to
edit it in a smart and interactive way.
6 https://www.w3schools.com/xml/xpath_intro.asp
Chapter 3 people and tools

57
While Ranorex has supported UI automation for browsers from the very beginning,
starting at version 7.0, Ranorex also supports Selenium WebDriver as a separate UI
technology, allowing to take advantage of the rich ecosystem of Selenium, including
Selenium Grid, and the various cloud testing vendors like SauceLabs and BrowserStack.
Microsoft Coded UI
Microsoft Coded UI is a set of technologies that provide UI automation, mainly for
Windows application and the variety of Microsoft’s UI technologies, including Win32,
Windows Presentation Foundations (WPF), Silverlight, Microsoft Store Apps, Universal
Windows Platform (UWP), etc. It also supports Web applications, but I find no significant
benefit using Coded UI over Selenium for this case. Probably the biggest advantage of
Coded UI is its integration with Visual Studio and Microsoft Team Foundation Server (TFS).
In fact, Microsoft Coded UI is part of Visual Studio Enterprise, and not a product on itself.
Similar to Ranorex, Coded UI allows you to work in a variety of styles, ranging
from pure recordings to pure code. Unfortunately, unlike Ranorex, it doesn’t provide a
smooth path between the different styles. The main reason for that is that the means it
provides for editing recordings without going into code are pretty limited. However, if
you need to automate Windows application in C# or VB.Net, and you’re willing to write
the automation in code, then this is a very viable alternative. Even though the API that
Coded UI provides is not very intuitive and friendly, it does provide pretty good control.
For that reason, I created a wrapper to Coded UI with a more convenient API, called
TestAutomationEssentials.CodedUI (see Appendix C), which is available on GitHub and
as a NuGet package.
Coded UI’s test framework is based on MSTest. When you create a new Coded UI
project from Visual Studio, it creates a skeleton of a test class, and a UIMap.uitest file.
The UIMap.uitest file stores the recordings and elements that you identify using the
built-in Coded UI Test Builder tool. The UIMap.uitest designer is shown in Figure 3-4.
Using the designer, you can edit and make some basic modifications to the recordings
and to the way elements are identified. In fact, behind the scenes this file is stored as an
XML file, and every edit made to it using the designer also generates a UIMap.Designer.cs (C#) file. Because the C# file is regenerated with every change to the designer, it’s
not safe to edit the C# file yourself. However, the designer lets you move complete
recordings to a separate file (UIMap.cs) so that it won’t be overridden by the designer.
Unfortunately, this operation is only one-way: from this moment on, you don’t see the
recording in the designer and can only edit it through C# code editor.
Chapter 3 people and tools

58
Note You can create multiple UIMap files in a single Coded UI test project, to make the maintenance of large Coded UI projects easier.
If you’re writing the test in code, then instead of the Coded UI Test Builder, you can
use the Inspect.exe tools that ships with the Windows SDK. This tool is a bit more fine-
grained and sometimes provides more detailed and accurate information about the
properties of UI elements.
Microsoft Visual Studio Test Professional and Coded UI
Another interesting use case that Microsoft provides is to record actions as part of a
manual test, using the Microsoft Visual Studio Test Professional (Also known as Microsoft
Test Manager, or MTM). Microsoft Visual Studio Test Professional allows you to record
steps of a manual test case, and replay then the next time you execute the test. Then,
if you create a Coded UI test project, it allows you to import these recordings into the
UIMap file, and continue to edit them from Visual Studio. However, this operation is
Figure 3-4. The UIMap.uitest designer
Chapter 3 people and tools

59
also unidirectional: while you can overwrite the recording with a new one and use it
to regenerate the recording in the UIMap, if you edit the recording thought the UIMap
designer, it won’t update the recording that Microsoft Visual Studio Test Professional is
using. Obviously, because you don’t have much control over the recording that Microsoft
Visual Studio Test Professional generates, in most cases it doesn’t make for a reliable and
viable tool for test automation, other than maybe saving some time to manual testers,
given that the recordings stays stable without any intervention. This however is a pretty
rare situation in most modern and dynamic applications.
Unified Functional Testing (UFT)
UFT, formerly known as QuickTest Professional (QTP), is probably the most veteran UI
automation tool in the market. QTP was first released by Mercury Interactive in May
1998, and was acquired by HP in 2006. HP changed its name to UFT in 2012. As it was
the first and dominant player in the market until recent years, it was a pretty expensive
product, and was mainly used by big companies that could afford it.
UFT allows to record and edit UI operations on many applications and UI
technologies including WPF, Java, SAP, Mainframe terminal emulators and many more.
It provides a “keyword view” where one can edit the recorded script in a grid-like view,
without having to write code. Behind the scenes UFT generates VBScript code, which
you can also edit directly in an “Expert view” and the changes are synchronized back to
the Keyword view.
In 2015 HP released a new, more modern product called LeanFT, which is more
oriented toward developers and professional automation developers, in which it allows
the tests to be written also in Java or C# using all of the common testing frameworks.
LeanFT also provide better integration with source-control systems, common build
systems, and a much more compelling price.
SoapUI
Unlike all the above mentioned tools, SoapUI by SmartBear is not a UI automation
tool, but rather a HTTP API automation tools. It supports record, edit and playback of
HTTP communications (REST or SOAP). There are two versions of SoapUI: the open-
source (free) version and the Pro version, which is also part of the ReadyAPI suite. The
Pro version adds many productivity enhancements, refactoring, additional protocols,
libraries and more.
Chapter 3 people and tools
60
SoapUI uses the Groovy programming language which is a dynamic language
compatible with Java. In addition to sending and receiving HTTP messages, SoapUI can
create mocks for web services (AKA Simulators, see Chapter 6 for more details), and is
suited also for Load testing (see chapter 18 for more information on Load testing).
Test Management SuitesThis category of tools is usually not specific to automated tests, but rather to testing
activities and testing processes in general. However, these tools often have some features
related to test automation and automated tests can be integrated and managed by them.
These tools typically allow managing suites of tests, scheduling of tests, test results
and provide reports, graphs and trends for management. Automated tests can usually
be attached or be related to a test case, and their results can be automatically reported
to these tools. These tools usually manage or closely integrate with another tools
that manages bugs and other Application Lifecycle Management (ALM) artifacts like
requirements, versions, milestones, etc. The most popular tools in this category are
Microsoft Visual Studio Test Professional (part of Microsoft TFS), and HP’s Quality
Center.
Build Tools and CI/CD PipelinesThis last category of tools is an entire domain in and on itself, and most of it is beyond
the scope of this book. However, these tools play a very important role with regard to
test automation. These tools are used to run the tests in a centralized way, usually after
compiling and deploying the product. Running the tests in a centralized way (as opposed
to running them on any developer machine) ensures that the tests passes on a clean
environment without any dependencies or presumptions that might be true only on
that specific developer’s machine. Typically automated tests run either on a scheduled
nightly build, or on a continuous integration (CI) build, which is trigged by every check-
in of every developer, possibly preventing broken code from entering the source-control
repository
Today, most of these tools allow to define a pipeline of a broader scope, which
sometimes include manual steps, in which a build advances in a pipeline through
various tests and possibly manual approval processes, until it is published to production.
This approach is known as Continuous Delivery (CD). The same approach, but without
Chapter 3 people and tools

61
manual approval steps is called Continuous Deployment. For more details about CI/CD
see Chapters 5 and 15.
The most popular tools today in this category are Jenkins, Microsoft Team
Foundation Server (and its online version Team Foundation Services), JetBrain’s
TeamCity and Atlassian’s Bamboo.
Other Considerations for Choosing ToolsObviously the first consideration for choosing an automation tool, is to ensure that it
can interact with our SUT. In addition, we already talked in the beginning of the chapter
about the importance of matching the tool to the skillset that you expect the automation
developer to have and how you’re going to use it in your organization. And finally, you
probably want that all of the tools that you choose play well together. Finally, there’s one
more important aspect that you should consider: pricing and licensing.
Allegedly, there’s not much to say about pricing, as we all prefer to pay less than
more… And I’m not going to tell you that cheap is eventually expensive or other similar
clichés, as this is not the point here. In fact, the most significant price you’re going to pay
for the test automation project derives from the quality of the work that the automation
developers will do, and much less from all the other factors. However, there’s one
important aspect for pricing and licensing that you might not consider at the beginning of
a test automation project, but later it can have a significant impact on the way you use it:
When you have only one, or a few people that develop the automation, the price of
the tools that they use doesn’t play a significant role. But as mentioned in Chapter 1,
the automation is best used if you give the developers the ability to run the tests before
checking-in their changes. If you want to get to that at some point, you’d want that all
of the developers will use the automation tool! For that reason, you should seriously
consider using cheap tools or at least tools whose licenses structure won’t restrict you
when time comes to use it widely.
Chapter 3 people and tools

63© Arnon Axelrod 2018 A. Axelrod, Complete Guide to Test Automation, https://doi.org/10.1007/978-1-4842-3832-5_4
CHAPTER 4
Reaching Full CoverageBefore getting into the more concrete and interesting stuff of good practices for building
a reliable and maintainable test automation, let me set the stage by discussing the goal
that many people aim for: reaching full coverage.
Often, people that don’t have any background about test automation think that
within a few weeks to a few months, it will be possible to automate all of their manual test
cases, covering the entire functionality of their relatively complex product. Obviously, the
complexity of each product is different, and in some cases it’s possible to reach this goal,
but usually, after starting to implement a few test cases, they realize that it takes much
longer to build a single automated test case than what they originally thought, and the
goal of reaching full coverage looks way farther than they originally thought. There are
many reasons that can cause the first tests to take a lot of time, including lack of skills,
investing more time in the foundations, but also because like any software, there are
many nitty-gritty details that must be flushed out in order to make it work. Clearly, it may
be faster if they use recording techniques, but as we’ve already discussed previously,
the price of this saved time will most probably be paid in the form of reliability and
maintainability of the tests. However, if the automation is built wisely, then the pace of
adding the first tests will probably be pretty slow, and even though after a while it will
usually accelerate significantly, the goal of reaching full coverage still looks pretty far
away than the original plan. In many projects, reaching full coverage can take years!
This gap in expectations can cause a lot of frustration for management, and they can
eventually cancel the entire automation project if they run out of budget or can’t justify it.
But the gap in expectations is not the only problem. During the long period it takes
to reach full coverage, the development team doesn’t stand still. They keep adding more
and more features, and more and more test cases that needs to be automated to cover
these new features too! So now the questions become: Does adding new automatic tests
take more time than adding new features to the product, or less? Obviously, this can vary
from feature to feature, but we need to look at the overall picture. In many cases, test

64
automation projects start with very few automation developers compared to the number
of product developers, so it looks reasonable that the automation pace will be slower.
Also, in many cases when a test automation project starts, the automation developers
belong to a different team than the product developers (often the automation developers
belong to the QA team, as opposed to the development team). But why does it matter at
all to compare their progress pace?
Here’s why: if the pace of adding new automatic tests is slower than the pace in
which the product developers add new features, it means that the gap just gets bigger
and bigger over time. So, if for example, you currently have 10% coverage (regardless
of how you measure it), then a year from now, even though the number of tests will
increase, their percentage will be lower than 10%, and every subsequent year it will go
further down. This means that the relative value of the test automation will decrease over
time instead of increase. Therefore, if we don’t consider closing this gap by putting more
people to beef up the automation efforts, then we should reconsider the efforts we put
into the test automation in the first place!
This seems like a huge investment that will only show its real fruits in a few years,
when that automation will be able to replace all of the manual regressions tests. The
good news is that later in this chapter I’ll show you how you can gain value from the
automation pretty much from the beginning of the project, while gradually and slowly
closing the gap. If you focus on providing this value in the beginning, it will be easier and
even obvious to justify the investment over time.
How Do You Measure Coverage?Anyway, if we want to reach 100% coverage, we must ask ourselves first, how do we
measure it? 100% of what? The three most common metrics that attempt to answer this
question are:
1. Percentage of manual test cases covered by automation
2. Percentage of covered features
3. Percentage of code coverage
Let’s analyze the true meaning of each of these metrics:
Chapter 4 reaChing Full Coverage

65
Percentage of Manual Test Cases Covered by AutomationIf you convert the manual tests to automated tests as is, then you may be able to say that
you reached 100% when done. However, in this metric, 50% doesn’t mean that 50% of the
work was done, as some tests may be much simpler and shorter than others. In addition,
as discussed in detail in Chapter 2, manual tests rarely fit automation as is and they need
to be broken into a few tests, changed, and occasionally merged in order to be converted
into properly maintainable and reliable automated tests. And, of course, some tests, like
tests that verify that the user experience is appropriate, are not adequate for automation
whatsoever, and should remain manual.
But besides all of that, there’s a big assumption here. In order to use this metric in the
first place, we have to assume that the manual test scenarios actually cover 100% of what
there is to cover. Especially in legacy applications, this is not always true. This brings us
to the second metric.
Percentage of Covered FeaturesWhether we’re talking about manual or automatic tests, how can we measure how much
of the functionality of the system, or features, they cover? Well, it depends on how you
count “features” and how do you measure a coverage of one feature. Suppose that you
have a list of features that were developed (e.g., in TFS, Jira, Excel, or any other way)
and a description of these features, and you also have a list of test cases that are related
to these features (probably managed using the same tool). In this case it’s easy to say
that any feature that doesn’t have any associated test, is not covered. However, does it
mean that those who have at least one associated test are covered? Probably not… The
case may be that one simple feature may have 10 comprehensive tests, but another very
complex feature may have only one minimalistic test…
In addition, these lists of features (however they are managed) rarely reflect the
true functionality accurately. They’re either written before the functionality was
implemented and document the intent of the customer or product manager, or they
were written a while after the fact in order to document what has been done. In the first
situation, it’s possible that during the implementation of the feature, decisions were
taken to change some things in the original plan due to conflicts or obstacles that were
encountered. Unless you’re in the medical business or other business with very strict
regulations, chances are that these decisions were made verbally and the document
wasn’t updated accordingly (maybe even the developer took the freedom to take
Chapter 4 reaChing Full Coverage

66
these decisions on his own). The second situation where the documentation is written
after the fact usually happens when the development has started without properly
managing any documentation, and one day someone decides that it’s needed. At that
point the documentation is written to explain how the system works. In this case the
documentation will probably reflect the real state of the system, but there’s no practical
way to ensure that it really covers everything that was developed! It’s possible that there
are some “hidden” features that the person who writes the documentation is not aware
of or simply forgot about, while real users may still use it.
So let’s look at a much more objective measurement: code coverage.
Percentage of Code CoverageAlmost any programming language or runtime technology today (.Net, JVM, etc.) has
tools that allow us to intercept some pieces of executable code (DLLs, JAR, EXE, etc.) to
detect at runtime whether each line or segment of code was executed or not. After you
instrument the executable code, you can run the tests and get a report about which, and
how many lines of code were executed and which weren’t. This technique is known as
code coverage and is a very objective and accurate measurement. Most people think that
code coverage is good only for unit tests, as they call the instrumented modules directly.
But most code coverage tools can be used for any type of test, even manual! Usually the
instrumented module does not care from where it is called and which process hosts it.
Measuring code coverage as a metric is great, but what’s more important is the
analysis of the uncovered areas. Generally speaking, when you discover a line or an area
in the code that is not covered, you should either add new tests to cover it, or delete that
code if you come to the conclusion that it’s not being used (AKA “dead code”). Getting
even close to 100% code coverage builds great confidence that the tested code is pretty
close to being bug free! Having a high-code coverage provides a comfortable ground for
refactoring and improving the inner code quality.
However, code coverage also has its drawbacks:
1. While this measurement is pretty accurate, and it’s easy to
see the coverage percentage, it’s more difficult to get the true
meaning about the uncovered areas. In order to understand what
functionality is covered and which isn’t, you must dive deeply into
the code. This is not something that managers can usually reason
about.
Chapter 4 reaChing Full Coverage

67
2. There are few techniques that code coverage tools use in order
to measure code coverage, and each measures slightly different
things: some simply detect whether a line of code was executed
or not. But sometimes a single line can contain several code
segments that each may be executed independently from the
others. Here’s a simple example for this:
if (x > 10) DoOneThing() else DoAnotherThing();
So another measurement technique counts control-flow branches
rather than lines. There are a few other techniques and nuances
that some tools use, but the bottom line is that there can be
slightly different meanings to the exact “Percentage of code
coverage” depending on the technique that the tool uses.
3. Suppose that we’ve managed to get to 100% code coverage, and all
tests pass. It’s still doesn’t mean that we have no bugs. Don’t get
me wrong: it’s a wonderful place to be in! The chances to find bugs
in this situation is wonderfully low, but still it’s not zero. The fact
that all lines were executed doesn’t mean that they were executed
in all possible sequences and paths. Listing 4-1 is a simplified
example of such case. As you can grasp from this example, Test1
and Test2 cover all lines (and branches) of ClassUnderTest
as they exercise both the “then” part of the “if” statement in
ClassUnderTest.Foo, and also the “return 1” statement that gets
executed if the “if” condition is not met. Also, both of these tests
should pass. However, if we’d add a test that calls Foo(1), then
a DivideByZeroException will be thrown. If this is not what the
user expects, then we have a bug although we have 100% code
coverage. Another, even simpler example, is that the tests exercise
100% of the code, but some of them don’t verify the right thing,
or don’t verify anything at all! (i.e., they assert the wrong thing, or
have no Assert statement at all).
Chapter 4 reaChing Full Coverage

68
Listing 4-1. Code with 100% code coverage that still has a bug in it
[TestClass]
public class Class1
{
[TestMethod]
public void Test1()
{
var result = ClassUnderTest.Foo(3);
Assert.AreEqual(50, result);
}
[TestMethod]
public void Test2()
{
var result = ClassUnderTest.Foo(-1);
Assert.AreEqual(1, result);
}
}
public class ClassUnderTest
{
public static int Foo(int x)
{
if (x > 0)
return 100 / (x - 1);
return 1;
}
}
4. Sometimes a programmer writes some lines of code that may be
executed only in extremely rare cases, usually external errors that
may be very hard to simulate in a lab environment. In addition,
there are cases (which are rare but do exist) that the code coverage
tool will consider a line of code as uncovered even though it’s not
reachable, yet cannot be deleted. For example, in Listing 4-2, some
Chapter 4 reaChing Full Coverage

69
tools will report the closing line in ClassUnderTest.Foo as well as
the closing brace of the try block in CheckIfFooThrewException
as uncovered. For these reasons it’s usually impractical to get to
100% code coverage.
Listing 4-2. Uncovered lines that cannot be deleted
[TestClass]
public class CodeCoverageTests
{
[TestMethod]
public void FooWithTrueDoesNotThrow()
{
bool exceptionThrown = CheckIfFooThrewException();
Assert.IsTrue(exceptionThrown);
}
private bool CheckIfFooThrewException()
{
bool exceptionThrown = false;
try
{
ClassUnderTest.Foo();
} // this line is not covered
catch
{
exceptionThrown = true;
}
return exceptionThrown;
}
}
public class ClassUnderTest
{
public static void Foo()
{
ThrowException();
} // this line is not covered
Chapter 4 reaChing Full Coverage

70
private static void ThrowException()
{
throw new Exception("Boom!");
}
}
CORRECTNESS PROVING
as the famous computer scientist edsger Dijkstra wrote back in 1970: “program testing can
be used to show the presence of bugs, but never to show their absence!”1 the reason for that
boils down to the notion that testing can only prove that specific examples work correctly, and
not that the program works correctly in all cases.
i recall from my Computer Sciences studies that we’ve been taught to prove the correctness
of algorithms or pieces of code. For example, we learned to prove that the Merge Sort
algorithm correctly sorts any array of any length, with any numbers as its elements (given
some assumptions). unlike testing, this proof holds true for any valid input! theoretically you
can prove the correctness of the entire code in your system, thus not having to use tests at all!
But clearly, for any real-world application, this is way impractical. Moreover, a proof is bound
to a specific implementation. Suppose that we’ve proven the correctness of one version of the
application, then any change we make to the code we must prove its correctness again (at
least for the module that has been changed), which is again, impractical.
To conclude: there’s no one right way to measure the coverage of the tests, and each
metric has its drawbacks. But if you add some common sense to any of these metrics,
you’ll be able to get a rough estimation about your progress in the journey to cover the
application with automated tests.
1 Dijkstra (1970). “Notes On Structured Programming” (EWD249), Section 3 (“On the Reliability of Mechanisms”).
Chapter 4 reaChing Full Coverage

71
Gaining Value Before Reaching Full CoverageSo by now we can agree that:
1. It will take long to close the gap and reach full coverage.
2. Even though it may take very long, it’s still important that we’ll be
minimizing the gap between new features and covered features
over time, and not increasing it.
In order to minimize this gap, you’d probably need more people writing tests, and
that costs money that probably your boss won’t be willing to pay. At least not yet. But
don’t worry: we can get high value from the automation long before closing the gap, and
if this value will be visible to your boss, convincing him to put more money on it will be
a no brainer. In order to understand what the value that we can gain while having only
a partial coverage, let’s first understand the full value that we will gain once we actually
reach the full coverage goal.
What Do We Do When We Have Full Coverage?Let’s suppose for a moment that we’ve got 100% coverage and all tests pass! What do
we do the morning after opening the champagne to celebrate the event (and after the
hangover wore off)?
If at this point we’ll declare the automation project “done” and lay off all of the
automation developers, then when new features will be added, the coverage percentage
will drop again below 100%, not because we have less automation, but because we now
have more features! So we’re not really done after all. Also, if one or more tests break due
to a change in the application, we want to ensure that the tests are immediately fixed.
What we really want to make sure the morning after we’ve reached 100% coverage of
passing tests is that we just keep this state. In fact, this is the ideal state that is described
in Chapter 2, in the section titled “Getting the Most Out of Test Automation.”
Keeping 100% coverage means that:
1. New tests must be developed for each new feature
2. Every change that breaks existing tests must be fixed ASAP
Chapter 4 reaChing Full Coverage

72
Also, in order to keep all the tests passing, when a test fails due to a real bug, then
this bug must also be fixed ASAP. And in this state, it’s pretty straightforward to do: after
all, this bug was caused by the most recent check-ins. At this stage, the developers have
the code fresh in their heads. Also, it will be ridiculous to declare that a user story is done
when it just broke something that previously worked. Therefore, it only makes sense to
simply fix it immediately.
Anyway, in terms of throughput, after we’ve reached 100% coverage, we must be able
to add tests faster than we’re adding new features in order to keep having 100% coverage.
If we should be able to add tests faster than adding features after we’ve reached 100%
coverage, let alone we must be able to do that long before!
How Do We Get to 100% Coverage?Let’s take one step backwards in time. Suppose that we started the automation project
a year ago, and at that time we had 100 test cases to cover (however we measure it).
Now, a year later, we’ve covered all of these 100 tests and all of them pass. Does it mean
that we now have 100% coverage? Only if 90% of the developers went on a year-long
vacation… (Sounds fun!), and the rest 10% stayed just to fix bugs (not fair!). What’s
more likely happened is that new features were added to the product throughout this
year, so now we have X more test cases to cover. If X is greater than 100 (let’s say 150),
then it will take us an additional 1.5 years to cover them too, but by the time we’ll do
it, we’ll have additional 225 uncovered tests… This is when the gap just gets bigger
and bigger. Figure 4-1 demonstrates this situation. If X is exactly 100 (i.e., exactly the
number of test cases that we’ve managed to automate last year), then next year we’ll
finish covering those new 100, having a total of 200 automated test cases, but then we’ll
probably have an additional 100, meaning that the gap remains constant. In this case we
can keep forever, like a pipeline, but we’ll never really get to 100% coverage. Figure 4-2
demonstrates this situation. So once again, if we want to get to 100% coverage, we must
develop and stabilize automated tests faster than new features are added, as shown in
Figure 4-3.
Chapter 4 reaChing Full Coverage

73
Project progression (time)
Features in the product
Covered features
Full coverage of initial features
Figure 4-1. Growing gap between features and coverage
Project progression (time)
Features in the product
Covered features
Full coverage of initial features
Figure 4-2. Constant gap between features and coverage
Chapter 4 reaChing Full Coverage
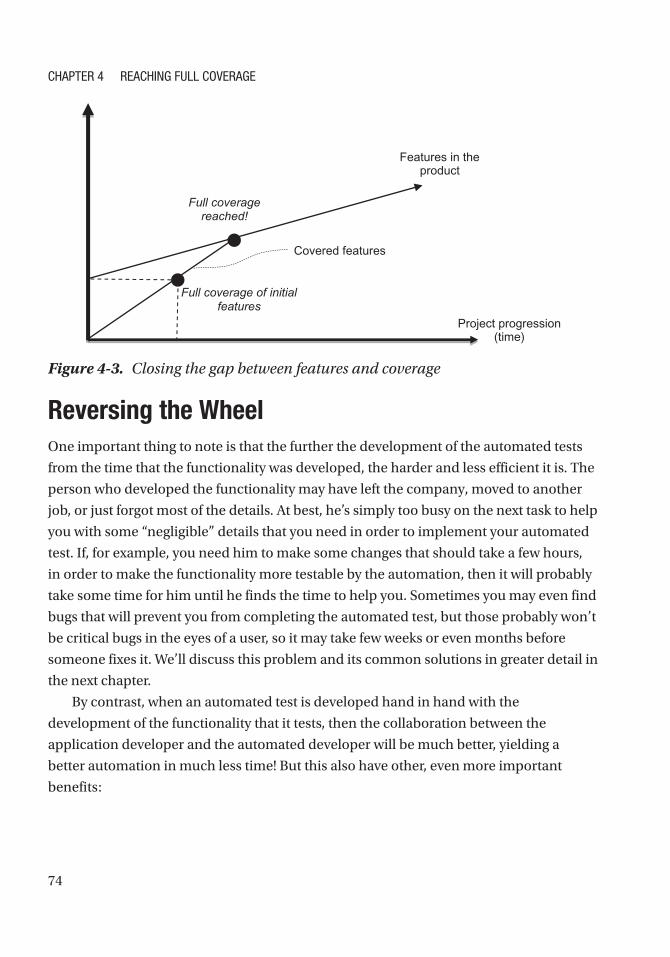
74
Reversing the WheelOne important thing to note is that the further the development of the automated tests
from the time that the functionality was developed, the harder and less efficient it is. The
person who developed the functionality may have left the company, moved to another
job, or just forgot most of the details. At best, he’s simply too busy on the next task to help
you with some “negligible” details that you need in order to implement your automated
test. If, for example, you need him to make some changes that should take a few hours,
in order to make the functionality more testable by the automation, then it will probably
take some time for him until he finds the time to help you. Sometimes you may even find
bugs that will prevent you from completing the automated test, but those probably won’t
be critical bugs in the eyes of a user, so it may take few weeks or even months before
someone fixes it. We’ll discuss this problem and its common solutions in greater detail in
the next chapter.
By contrast, when an automated test is developed hand in hand with the
development of the functionality that it tests, then the collaboration between the
application developer and the automated developer will be much better, yielding a
better automation in much less time! But this also have other, even more important
benefits:
Project progression (time)
Features in the product
Covered features
Full coverage of initial features
Full coveragereached!
Figure 4-3. Closing the gap between features and coverage
Chapter 4 reaChing Full Coverage

75
1. Because it’s much easier to test smaller and simpler components,
than monolithic, “spaghetti” code, designing for testability implies
design for modularity, extensibility, and reuse. Developing the
tests and the functionality together forces these design traits,
which eventually benefits the overall design of the system
2. Having to design and implement an automated test requires
that all of the relevant details will be well-defined and clear. This
often raises questions and issues about the expected behavior
of the feature and may find bugs even before the feature was
implemented!
3. Most bugs in the implementation of the new feature will be caught
and fixed by the application developer before he even checked-in
his code! While it is highly recommended that the manual tester
will still verify that the functionality behaves correctly at least once
(providing one more safety net to verify that the automated test
is correct!), the chances that he’ll find trivial bugs are very low,
which saves precious time and headache of the common ritual
of finding the bugs, reporting, investigating, triaging, fixing and
reverifying them. In fact, the manual tester can focus more on
exploratory testing that will probably find the less obvious bugs
Note obviously, developing the automated test together with the tested functionality may be even easier if the same developer implements the functionality and its automated test together. this makes the process even more efficient! of course, in this case there’s less control and feedback about the work of the developer, but this concern can be addressed by other techniques like pair- programming, code reviews, having the manual tester review the test case before the implementation of the automated test, etc. in general, the effectiveness of doing so depends mainly on the specific person/s involved and the organizational culture. See the previous chapter for a more detailed discussion about the pros and cons of the different organizational patterns.
Chapter 4 reaChing Full Coverage

76
So if it’s so much more efficient and valuable to develop the automated tests together
with the tested functionality, or at least close to it, why wait for full coverage to start
doing it?! Let’s get back for a moment to the case where the pace of developing a new
feature is exactly the same as the pace of adding new automated test cases (the case
depicted in Figure 4-2). Because we’ll always have a gap of 100 test cases, we can decide
at any point to skip the remaining 100 test cases and jump directly to the ones that are
now being developed. At this point on we’ll act exactly as we would act if we’ve reached
full coverage, except that we’ll always have 100 unautomated test cases that we’ll need
to test manually. But if the gap was constantly 100 test cases, then this would be the case
anyway! It’s just that instead of manually testing the last 100 test cases, now we’re always
testing the same 100 test cases manually and keep automating the new ones. But this is
better, because as explained above, developing the automated tests in conjunction with
the feature is much more efficient.
Note Developing and running tests prior, or in conjunction with the tested functionality is called progression testing, as opposed to regression testing, which is what we normally do when we develop and run the tests after the tested functionality is completed. Sometimes also referred to as acceptance tests, after these tests pass against the latest build, they join the suite of regression tests in the next builds and versions of the product.
If developing new automated test cases is faster than functionality anyway (like
depicted in Figure 4-3), then we can decide at any moment to start developing
progression tests, and complete the remaining regression tests later, in between the
development of the progression tests. Because we know we develop tests faster than we
develop product functionality, we can be assured that we’ll have enough time to close
the gap of the regression tests in between the development of the progression ones.
Theoretically, we should get to the point of full coverage in exactly the same time as if we
developed all the tests in a regression fashion, because we’re just changing the order that
we develop the tests! Moreover, because developing progression tests is more efficient
than regression, then we’ll probably even reach this point sooner! Figures 4-4 and 4-5
together demonstrate that the order of which the tests are being developed does not
change the actual time it takes to reach full coverage
Chapter 4 reaChing Full Coverage

77
My Road Map to Successful Automation ProjectSo if you’re following me up to this point, then we can conclude that it makes more
sense to start working on progression test automation before reaching full coverage on
regression. But now two questions arise:
1. What’s the right time to start working on progression tests?
2. How to prioritize the work on regression tests?
Project progression (time)
Features in the product
Covered features
100% coveragereached
Start of development
Start of test automation
development
Figure 4-4. Developing regression tests first
Project progression (time)
Features in the product
Covered features
100% coveragereached
Start of development
Start of test automation
development
Regression tests Progression tests
Figure 4-5. Developing progression tests first
Chapter 4 reaChing Full Coverage

78
When to Start Working on ProgressionFrom what I told you so far, you’d probably think that I encourage you to start working
on progression from day one, before even starting developing regression tests. Well,
it may be possible, but in practice that’s not what I usually do, or recommend. At the
beginning of a new test automation project, the investment is higher than the return. You
need to build a lot of infrastructure in order to make the first tests work, which would
probably take more time than it would take to implement the functionality of the user
story. This is true especially if the user story is only a small improvement over an existing
feature. In this case you would still need to build most of the infrastructure needed to
test the entire scenario, even though the user story is only about that small improvement.
Therefore, my recommendation is to start with a sanity suite of tests, which verifies the
basic functionality of the system and its main features. Building this suite will help you
build and stabilize the infrastructure of the main features in the application. During that
period, you’ll also gain some experience and insights about test automation in general
and about test automation in the context of your specific application. In addition, you
should use this time to integrate the automated tests into the CI tools and development
processes. See Chapter 15 for more details on how to integrate the tests into the CI
process.
While developing the sanity suite, constantly make sure that all the tests pass, (as
long as there’s no bug in the application that influence your tests). If needed, make
changes to your tests and/or infrastructure to adopt to any changes to the product. In
case a test fails due to a bug in the application, strive to get it fixed as quickly as possible
and don’t settle just on opening a bug. If you don’t get a buy-in for that at this point, just
send daily reports about the failing tests and their corresponding bugs, but emphasize
the time it takes you to routinely investigate the same failure day after day. In addition,
make sure that the tests work on any machine, as you’d soon want to give the developers
the option to run the tests on their machines. You should ensure that it’s easy to diagnose
failures and of course strive to keep your tests easy to maintain. See Part II on writing
maintainable tests and infrastructure, Chapter 13 on diagnosing failures, and Chapter 15
for some tips on stabilizing the tests.
The moment the sanity suite is ready, is part of the CI, and is stable, you’re ready to
start working on progression. If there are still tests that fail due to known product bugs,
then these bugs should be fixed first. Obviously, you need the buy-in for that move from
relevant stakeholders in the organization (especially dev leads and dev manager), and
it has to be done in appropriate timing and not arbitrarily. Especially if the release cycle
Chapter 4 reaChing Full Coverage

79
is still only every few months, it’s important to find the right timing, to avoid stressful
periods in which managers are less tolerant to experiments and failures. If you’re the
development manager then it’s simply your call. If not, you’d probably need to do some
groundwork before getting the consent of the development team leaders. One simpler
sell can be to start by developing test for every bug that is being fixed, and only later
proceed to actual progression tests. See Chapter 15 on how to gradually change the
culture to support developing tests in conjunction with development.
Once you start developing tests for new user stories, the development of the tests
should be done very closely with the developers who implement the user story, and
the user story should only be considered as “done” only when all the tests (including
the new ones) pass. See Chapter 16 on the ATDD methodology which emphasizes
implementing the tests even before the tested functionality.
Prioritizing the Work to Fill the Regression GapFrom that point on, it’s pretty easy to keep the tests stable. The sanity suite ensures
that if a developer broke something critical, then it is fixed ASAP, before manual testers
takes the version for a spin. The progression tests (which gradually become regression)
ensures that the newly developed features continue to work.
Now you need to continue thinking about the rest of the regression tests. And there’s
a lot… So how do we decide which ones to automated first? My general advice here is
to prioritize according to their value and the risk from not testing them often. Here are
some guidelines:
1. First and foremost, you should focus on the features that bring
the most value to the business and to the customers. Finding and
preventing bugs in these features directly affects the revenue of
the product! However, this guideline alone is not enough. You
should weigh it against the next guidelines in order to decide on
the priority of covering this feature.
2. If a component or a feature is planned to be replaced soon, having
its entire behavior changed, then it’s not worth to create tests for
it at this point. Just wait until the new behavior will be developed,
and then develop the new tests along with it.
Chapter 4 reaChing Full Coverage

80
3. If a feature is very stable and there are no plans to touch it soon,
then it’s also not very cost effective to cover it with automation.
There’s a very small risk that something will somehow affect it.
This is especially true for legacy components, which even though
may be very critical in the system, no one dares to touch their
code. Looking for something with a higher risk will yield a higher
value sooner.
4. If a feature is completed and works correctly, but there’s a plan to
replace its underlying technology, or to do a massive refactoring
to its internal structure, then this is a great candidate for covering
with test automation. The tests should not be changed when the
underlying technology or internal structure change, and should
continue to pass afterward, ensuring that the exiting behavior was
preserved.
5. Similar to the above, improving the performance of a feature
usually involves a change to the internal structure while
preserving the external functionality. Similarly, in this case, the
tests should continue to pass after the changes just like they were
passing before.
6. Consider to prefer covering a feature that breaks a lot. However,
note that a feature that breaks a lot is a sign for a problematic
design. For this reason, this feature has a high potential to be a
candidate either for refactoring (in which case the automation
will be very valuable), or for a complete rewrite (in which the
automation will probably need to be rewritten too…).
In addition to covering existing features, for every bug found not by the automation,
before this bug is being fixed, an automated test should be written to reproduce it. Only
when an automatic test successfully reproduces the bug, the bug should be fixed. This
way we ensure that no bug will ever hit us twice.
If you follow these guidelines, you manage the risk and your progress in an efficient
way. You can easily keep your automation results green and catch most of the trivial
bugs very early. On top of that, you gradually cover more and more areas of regression
tests. As discussed in Chapter 2, test automation won’t replace the manual testers
completely, but the first condition to stop performing the tedious manual regression
Chapter 4 reaChing Full Coverage

81
tests on a feature is that the test automation of that feature can be trusted! As long as
the automation is not reliable, it cannot replace the manual tests whatsoever. If you try
to get to 100% regression before putting it in CI, you’d probably have a very hard time
stabilizing the tests and gain trust in them. The described road map makes it easy to
keep the tests stable from the start, and therefore make them much more trustworthy.
Because of this, you can gradually reduce the manual regression testing efforts of
covered features, freeing the manual testers to perform more valuable exploratory
testing.
Chapter 4 reaChing Full Coverage

83© Arnon Axelrod 2018 A. Axelrod, Complete Guide to Test Automation, https://doi.org/10.1007/978-1-4842-3832-5_5
CHAPTER 5
Business ProcessesAs you probably realized from the previous chapters, a test automation project can’t
stand on its own. Its life cycle is tightly related to the life cycle of the application that
it tests. Like any software project, its existence is only relevant if someone uses it;
otherwise it’s worthless. In the case of test automation, the “user” is actually the entire
development team. It may seem like the main user is the QA manager or Dev manager,
but in fact, they’re not using it themselves for their own good. They may require the
fancy reports and tell you what they want you to do (and sometimes even how…), but
as we discussed in Chapter 1, one of the principle advantages of test automation is
that it helps the team detect and fix the bugs more quickly. But for this to happen, the
team needs to learn how to use it effectively, which usually requires some sort of work
processes. The processes can be less strict if the team is small and everyone simply
understands the value behind such processes. But whether these processes are strictly
enforced by management or the team understands their value, these processes need to
be followed in order to allow proper collaboration and to get the maximal value from the
automation.
Running the Tests on a Regular BasisAs mentioned before, if you only run the tests rarely on a code base that developers
work on, many tests will likely fail due to simple changes in the product. In this case, it
will take a long time to investigate the failures to determine which faults are bugs in the
application, and which are caused by valid changes. Moreover, when many tests fail due
to valid changes, it creates the impression that the results, and the test automation as a
whole, are unreliable.
Therefore, the first thing that you should care about is that the tests will run regularly,
and failures that occur as a result of legitimate changes are handled ASAP.

84
The Simplest ApproachEven before setting up a formal build process that runs the tests automatically and
reports the results, as soon as you have a few tests that are ready, you should run all of
the completed tests at least once a day to ensure that they’re stable. If you get a new
build from developers more rarely than once a day, then you should expect less failures
between those builds. However, tests can still fail due to the following:
• A bug in the test;
• An environmental issue, like issues related to network, hardware, the
operating system, and other infrastructure.
• A bug in the product that does not reproduce consistently.
Whatever the fault is, you should investigate and handle it quickly and thoroughly
to ensure that the automation is stable and reliable (See Chapter 13 for more details
on investigating failure tests). If fixing the issues is beyond your reach (i.e., a bug in the
product or an environmental issue) and you cannot push to fix these issues quickly
and/or thoroughly, then at least report this issue and emphasize its importance to the
automation stability. See later in this chapter more specific guidelines and practices to
handle these cases from a process perspective.
However, if you get a build more often than once a day (or in case you still don’t have
an automatic build process, you can get the developers’ changes by syncing and building
it locally on your machine), then in addition to the above-mentioned reasons for failures,
failures can also occur due to:
• A regression bug in the product: that is, a developer checked-in
code that has a bug in a flow that worked before and should not have
changed.
• A legit change in the product that changed the behavior that one or
more tests expect: i.e., the tests became outdated due to this change.
Once again, these failures should be investigated and handled ASAP. In case of a legit
change, you must update your tests to reflect the change.
Chapter 5 Business proCesses

85
Nightly RunsRunning the tests yourself on your local machine once a day is nice, but it is more error
prone:
• You need to remember to run the tests every day.
• You may be in the middle of some changes or developing a new test,
and your code may not compile or work correctly.
• You may have specific conditions in your local machine that may not
be the same on others.
Therefore, we should automate the process of running the tests daily too. A very
common approach is to run the tests every night automatically using an automated build
process. The main reason to run it at night is to maximize the time for investigating the
failures before the next run, especially if the total length of the run is a few hours. Similar
to the previous approach, someone has to investigate the failures the next morning and
handle them appropriately. Fixing any issues that are caused by the automation and
any issues caused by valid changes to the product should be done by the automation
developer ASAP. For product bugs, at the minimum you have to open a bug report in
your bug tracking system (e.g., TFS, Jira).
QA or Dev managers often request getting an automatic report of the nightly tests
results. While this is pretty common, these managers rarely have something meaningful
and useful to do with them, because failure information tends to be too technical, and
only after some investigation one can get an idea of the fault, its severity, and the means
to fix it. By contrast, a manual report, created after investigating the results and reaching
some more meaningful conclusions is much more valuable for them. See Chapter 15 for
more information about this topic.
Instead of running the tests only once every night, given that the entire test run
doesn’t take too long, you can make the automated tests run on every check-in, which
makes the CI build much more valuable. Even though it seems like a very small change
from a nightly run (and technically speaking, that’s true), in order for it to be effective,
it also requires some important changes to the work processes. I’ll explain the required
changes to the work processes later in this chapter, after building the ground for it with
some more common concerns and approaches.
Chapter 5 Business proCesses

86
Handling Bugs That Are Found by the AutomationTraditionally, when a tester encounters a bug, he reports it in the team’s bug tracking
system (e.g., TFS or Jira) and leaves it there until someone decides that its priority is high
enough in order to fix it. After it’s fixed, he only has to verify that it’s fixed. Due to the
differences between manual tests and test automation (which were discussed in Chapter
2), this is fine for tests that are found in manual tests, but not as much for automated
ones. I’ll explain why.
One of the major problems of test automation that is mostly overlooked is that of the
medium severity bugs. It is so overlooked that most people don’t see it as a problem
at all. But in my opinion, it impairs building trust in the automation, wastes precious
time, and overall hurts the value of the automation. Why am I clinging just to medium
severity bugs? Aren’t high severity bugs more severe? The thing is that high severity bugs
are usually fixed very quickly. By the following nightly run, they’ll probably be fixed.
However, when medium severity bugs cause automated tests to fail, it may take weeks,
months, and sometimes forever until they’ll be fixed. During this time there are three
common approaches to deal with in regard to the automated tests. Each one of them has
its drawbacks though…
Keep the Failing TestsThe first option, which is the most common one, is to keep the tests that fail due to the
known bugs failing until they’re fixed. The upside of doing so is that the test results seem
to reflect the true picture about the quality of the software. However, there are a few
downsides to it as well:
• It forces that someone (usually the automation developer) will
reinvestigate the same failure again and again every morning. The
fact that a particular test failed both yesterday and today doesn’t
necessarily mean that it fails for the same cause. If a test has five steps
in it, and yesterday it failed on step 3, it could be that today there’s
another bug (or even a legitimate change) that causes step 1 or 2 to
fail. If you don’t investigate each failure over and over again each
morning, then you might miss a bug! When such bugs add up, the
time it takes to investigate all the failures each morning can become
a trouble and can erode from the time supposed to be dedicated for
writing more tests.
Chapter 5 Business proCesses

87
Note if the time it takes to investigate all the failures exceeds one working day, then there’s no point running the next nightly run, as you become the bottleneck of the process! however, if this situation happens frequently, it can hint to many other significant problems, like bad reports, unstable environments, inadequate design, bad time management, and more…
• Unless all of those bugs are fixed, which is pretty unlikely, the overall
result of each test run will always be “failed.” In most cases, there’s
more than one bug that cause tests to fail, and for quite some people
I talked to, having around 10%–20% failing tests was considered a
normal state. In this case, it’s very difficult to notice a new bug from
the old ones. The difference between 11 failing tests and 10 failing
tests is much less noticeable than the difference between 1 failing test
and 0 failing tests!
• Often, the bug causes the test to fail not on its final verification
(assertion), which is the main purpose of that test, but rather in one
of the prior steps. This means that the test doesn’t even test what it’s
supposed to, but nevertheless you can’t use this test until the bug
is fixed. If a manual tester would perform the test, he’d probably be
able to bypass the bug and continue to check the main thing, but the
automated tests simply can’t do that automatically. This means that
the automation can miss additional bugs this way, which you won’t
be able to find until the first one was fixed.
• When the original bug is finally fixed, the test may still fail on
legitimate changes that took place while the bug was active. Because
it may have been a long period of time, it may be difficult to analyze
the failure and find how to fix it, rather than it would have been if
those changes were identified as soon as they were done. For this
reason, often it’s said that a code that doesn’t get executed for a long
time “rots.”
• On top of the previous problems, often the same bug causes more
than one tests to fail. On one hand, if it causes too many tests to fail,
then you’d probably manage to get its priority high enough to be fixed
Chapter 5 Business proCesses

88
quickly. On the other hand, if it causes only a few tests to fail, then
it might still be ignored for a long period. This means that all of the
above drawbacks should be multiplied not only for every bug, but for
every test that this bug affects, which may be a few times more.
Exclude the Failing TestsThe second approach is to exclude tests that fail due to known bugs from the regular test
runs until these bugs are fixed. This will allow you to notice new bugs more easily and
relieve the need to reinvestigate all the results each day. Anyway, the bugs are managed
in the bug tracking system so you don’t have to worry about it every day. However, this
approach still suffers from some of the drawbacks of the previous approach, plus a few of
its own:
• Similar to the first approach, if the bug causes the test to fail at one of
the middle steps, as opposed to the final verification of the test, you
may be missing bugs.
• Also similar to the first approach, if the bug hits more than one test,
then you’re actually giving up on all of these tests.
• While in the first approach it was hard to notice if the reason of the
failure changed between yesterday and today (e.g., yesterday it failed
on step 3 and today on step 2), in this approach you can’t even see
it because the test doesn’t run at all, which means that you can miss
even more bugs!
• While in the first approach the steps that follow the failing step could
rot, in this approach the entire test can rot.
• On the practical side, it’s difficult to track which tests are excluded
and due to which bug, and to remember to include them back
after the bug is fixed. Automating this process may be possible, but
because the test can “rot,” returning it automatically to the test run
without first ensuring that the test passes is not recommended. In
addition, I don’t know of any commercial bug tracking tool that does
this out of the box.
Chapter 5 Business proCesses

89
Creating Work-Arounds in the TestThe third approach is relevant mainly when a bug affects an intermediate step in the test,
and not the entire essence of the test. It is usually used only if a single low-priority bug
affects many tests. In this approach a work-around is performed in the test in order to
allow it to continue its execution and verify the main essence of the test.
This approach resolves many of the previous issues:
• The overall result is passed so it’s easy to notice and investigate new
failures.
• It maintains the main essence of each test and lowers the chances to
miss bugs.
• If the problem affects many tests, and the automation is designed
properly, then the work-around should be in one place.
• It prevents any of the code from rotting.
But obviously, it has its own downsides as well:
• It hides the fact that there’s a problem! There’s probably at least one
test (or there should be) whose essence is to verify the problematic
step. If the work-around is applied globally, then this test will pass
only due to the work-around without actually testing what it’s
supposed to.
• Work-arounds typically make the code of the automation more
complicated and more difficult to maintain.
• If managing excluded tests and remembering to return them to the
cycle is difficult, then tracking the work-arounds and remembering to
remove them when the bug is fixed is nearly impossible!
• Tests that fail due to bugs in the functionality that they directly
verify, are normally considered valuable. But usually tests that fail
due to medium- or low-severity bugs in a step that only sets up the
preconditions for the test, is perceived as a false positive. In this case
the most natural solution would be to create a work-around instead
of “wasting” the time involved in opening and managing bugs that do
not affect the sheer essence of the tests. This causes many bugs to be
completely ignored.
Chapter 5 Business proCesses

90
AN OPTIMAL APPROACH?
i once tried to come up with an optimal approach that addresses most of the downsides of the
three approaches described above, which are supposed to work like this:
• When opening a bug that affects automated tests, it should be associated
with the failing tests, together with a substring of the failure message or
stack-trace, which serves as a “differential diagnosis” for this particular
failure. in subsequent runs, this substring will be used to automatically identify
whether the test failed on the same problem and on a different one. For
example, if the failure manifests itself with a message such as: “error: the file
temp\152243423\Data.info cannot be found”, (where 152243423 is a number
that can change at each run), then the substring “Data.info cannot be found”
would probably be a valid differential diagnosis for the failure, while “error”,
“152243423” or the complete message won’t serve that purpose well because
they are either too generic or too specific to the particular occurrence.
• at the end of each run a report is automatically generated. the report generator
queries the bugs tracking system and also the substrings that are associated
with those bugs. if it identifies the corresponding substring in the error message,
then it marks this test in yellow instead of in red to indicate that it’s a known
bug. this way it’s easy to different regressions (red) from known bugs (yellow).
• in addition, if a test that is associated with a bug, passes, then it is marked in a
different color (blue) to indicate that the bug should probably be closed.
note: this technique can even be improved by using regular expressions instead of substrings,
though it also makes it more difficult to use.
anyway, i’m not aware of any commercial product that help you do that. i once managed to
implement something similar (tailor made for the customer), but unfortunately most people
didn’t understand how to use it properly. Maybe it was only a matter of training…
anyway, i still believe that treating any automation bug as a critical bug would be a better
approach, as i’ll describe shortly.
Chapter 5 Business proCesses

91
Treating All Automation Failures as Critical BugsWhile each of the above approaches has its benefits and for each of them there are cases
where it’s most appropriate, due to the mentioned drawbacks, I generally recommend
on a fourth approach. This fourth approach is to treat each bug that cause automated
tests to fail as a critical bug, even if the effect on the final user is only medium or low.
This means that each such bug must be fixed until the next test cycle (e.g., next nightly
run). This is the only way to keep the automation suite clearly and promptly alert us when new regression bugs are introduced (without compromising the coverage). At
first, it may look like a very extreme and expensive approach, but if we’ll look at it from a
different angle, you’ll see that it’s very realistic:
• Given that all tests passed on the few previous runs, a new failure
can only be related to a recent change. Because there should only be
a limited set of changes between each run, it should be very easy to
identify which change caused it.
• It’s much easier and quicker to fix changes that were made recently
than it is to fix bugs related to old changes. If they’re going to be fixed
at some point anyway, it’s much cheaper to fix them soon.
• The time wasted by investigating the same failures again and again,
or to filter the known failures from the new ones, is also costly.
• In the worst case, reverting only the latest changes will surely fix
the problem. Most users would probably be more annoyed if an
existing feature that they know and love suddenly stops working as
they expect, than if the delivery of a new feature would be slightly
delayed. But frankly, this should very rarely happen – in most cases
the developers will be able to fix the bug quickly.
Running the tests every night and engaging the developers and management to keep
all the tests green by fixing every issue at the same day is great. This really allows us to
improve the quality of the product, increase the coverage, and encourage refactoring to
allow the system to be maintainable over a long period of time.
But running it only every 24 hours is also not the best option. 24 hours can mean
many check-ins, especially if it’s a large team. In addition, 24 hours after a developer
checked in a change, he’s usually already immersed on a completely different task.
Doing the context switch back to the previous change can be time consuming and
Chapter 5 Business proCesses
92
confusing, especially over weekends, where “24 hours” are actually 72 hours… And this is
before we mention what happens when the developer who is responsible for the broken
test is just went on a week-long vacation…
Continuous IntegrationMost developers are familiar with the term “Continuous Integration” (or CI in short). As
already mentioned in Chapter 2, this term means that before every check-in the code is
automatically being built and that the automatic tests verify it. Only if everything passes,
then the changes are being checked in. The process that builds the code and runs the
tests typically runs on one or more dedicated build servers, and not on the developer’s
machine. This allows a centralized control over this process, and also frees up the
developer’s machine to do other stuff while the process runs.
SMALL VARIATIONS ON CI
While nowadays the above description of a Ci is the most typical one, there are other
variations to this. these variations were more common in the past, though they are still pretty
common these days too. as they are also simpler, sometimes they are used in smaller teams.
1. instead of having the build and tests run before the changes enter the main
source control repository, they are being run after. Because this way it’s not
possible to prevent the check-in, the build process (which includes the build
and the tests together) only reports whether the process passed or failed.
often these results are also being sent automatically to the relevant people via
email, especially the developer who performed the check-in. the recommended
practice is that whenever a build fails, that developer should fix the failure as
fast as possible before anyone else is allowed to check in other changes.
2. the second variation is usually used when the team is very small, or when no
one has the skills to install and configure a build server. While this variation
is generally less preferred as it relies more on self-discipline rather than on
tools, it still holds the essence and the idea behind Ci. in this variation, every
developer is responsible for getting the latest sources, builds and runs the tests
locally, and only if everything passes he proceeds to check in.
Chapter 5 Business proCesses

93
Moving from a nightly run to CI may be somewhat challenging. But eventually the
benefits outcomes those challenges. See Chapter 15 for more information about how to
make this transition properly.
Acceptance Test Driven Development (ATDD)While CI answers the questions about who, when and how should run the tests, it
doesn’t answer the questions about who, when, and how should write the tests. In
Chapter 3 we already covered the question “who should implement the tests.” Also,
in Chapters 2 and 4 we discussed why it’s better to write the tests alongside the
development and not later. Finally, in Chapter 16 we’ll discuss this topic in much greater
depth. But as this topic is related to business processes, I must at least give you an
overview about it here.
Acceptance Test Driven Development (ATDD), which has a few small variations
known as Behavior Driven Development (BDD) and Specification by Example (SbE) is a
methodology that is based on the following concepts:
1. For each User Story, the team defines together with the product
owner one or few scenarios that will demonstrate its intended use
after it will be implemented. These scenarios become both the
acceptance criteria of the user story, as well as the flows of the tests
that will verify the implementation.
2. The tests are implemented before the product code. Implementing
the tests may surface additional questions and gaps in the
definition of the user story. It also forces the team to start planning
the product code in a testable manner. Obviously, the tests cannot
pass at this stage (if they do, it indicates a problem in the test!).
3. The developers implement the code in order to make the tests
pass. They shouldn’t develop any functionality that is beyond the
scope of the tests. They must run all of the existing tests also to
make sure that they didn’t break anything.
4. Only when the tests pass, the user story is considered “done,” and
it can be demonstrated to the product owner, customer, or even
pushed to production.
Chapter 5 Business proCesses

94
Among the benefits of this technique is that it ensures that testers and automation
developers are involved at the earliest stage possible, allowing them to really influence
the quality of the product. In addition, if this process is followed since the beginning
of the project, then it means that the tests cover all the defined functionality (that is
relevant to be tested by automation), and all of them pass! As mentioned before, it allows
the developers to refactor the product code as often and as much as they feel like, as
they can easily ensure that they didn’t break anything. As a result, it increases the inner
quality of the code and allows adding new features faster and safely.
When introducing this approach in the middle of a project, many of its benefits are
less obvious, but it’s still valuable at least in the long run. See Chapter 16 for guidelines
that will help you introduce it in the middle of a project.
Continuous Delivery and Continuous DeploymentThe subject of Continuous Integration that was discussed earlier is not complete without
expanding the subject to continuous delivery and continuous deployment.
Until about 10 years ago, delivering a new version of most commercial software was
a huge effort. It involved manufacturing of physical CD ROM discs, with an elegant case
and printed graphics, and often a printed user manual. Adding a new feature in the last
moment before shipment could mean that all of the printed material and CDs themselves
had to be reprinted. Not to mention the supply chain management overhead…
Today, most commercial software can be downloaded from the Internet, with
the user manual being a bunch of HTML pages or another downloadable PDF file.
This, together with automated tests, removes most of the obstacles of shipping new
changes very rapidly. Naturally, web applications are even easier to update. Most
internal software projects are also web applications or are updatable via a centralized
deployment and distribution system.
However, in order to really make the deployment process seamless, it needs to be
automated as well. Having manual steps in the deployment process both increases the
risk for mistakes and takes longer to complete. If you plan your test automation to be run
in isolated environments, as you should probably do also for CI, then it also forces you to
automate the deployment process, which can then be used to more easily automate the
process of deploying new versions to production. See Chapter 7 for more information
about isolation, and Chapter 15 for integrating the tests into the CI. Automating the
entire deployment process is called Continuous Deployment.
Chapter 5 Business proCesses

95
While technically it’s possible to automate the entire process, many companies
prefer to keep the final decision about what goes into production and when, as a manual
business decision. In this case they usually want the new version to first be deployed
to a production-like environment in order to perform additional manual tests and
validations. So, in this case, the entire process is automated, but the final step requires a
manual intervention. This is called Continuous Delivery.
Continuous Deployment is more suitable for companies that provide SaaS1 and
other Web applications that are not mission critical (like Facebook, for example). These
companies can accommodate having small glitches here and there for a small portion of
their users, as long as these can be fixed very fast. But mission-critical applications, like
medical applications, which cannot bare even the smallest glitch, or domains in which
applying a fix can take a long time, like in avionic embedded systems, are most likely to
choose a Continues Delivery approach.
Another approach that has started in the largest web companies, but gradually make
its way to the mainstream, is that individual features are validated in production. Each
feature is first deployed only in a small scale, and gradually as it proves to be valuable
and reliable, it is delivered to all the customers. This approach is called Canary Release
or Gradual Rollout.
Canary ReleasesHighly scalable and highly available web applications (e.g., Facebook, Twitter, Google,
etc., but even smaller companies) are distributed by nature and cannot be deployed all
at once in the first place. Because there are many servers (often referred to as Nodes)
running the same application behind a load balancer, each of them must be updatable
independently of the others. If the application is not mission critical, it can be deployed
first only to one node, and route only a small portion of the traffic to it, even before it’s
thoroughly tested. This newly updated node should be highly monitored to see if there
are any problems or anomalies that can indicate that there’s some problem. If something
does go wrong, then this node can be taken down until the bug is fixed. If everything
goes well, then it’s possible to continue to gradually deploy the new version to more and
more nodes. In fact, as this approach is normally applied when the nodes are virtual
machines (VM) or containers (which are, in essence, super lightweight and modular
1 SaaS stands for Software as a Service. These are applications (typically Web or mobile applications) that their operators charge for their usage.
Chapter 5 Business proCesses

96
VMs), then instead of updating existing VMs, new VMs are gradually created and
connected to the load balancer, and old ones are gradually destroyed.
In addition, instead of using just the load balancer to randomly choose the clients
that will get the new version, it’s possible to provide one URL to regular public clients,
another URL to beta customers, and yet another URL for internal users. Each URL is
directed to a different load balancer. When a new version is first deployed to a new VM,
this new VM is first added to the load balancer of the internal users. When confidence
is built around these changes (may be after running some manual tests as well), it is
removed from the first load balancer and added to the second one that serves the beta
customers. If after some beta period no special problems are revealed, then it can be
moved further on to the load balancer that serves the public customers.
In order to be able to deploy individual features separately, the architecture of the
application should be made of many, very small components that interact with one
another, usually asynchronously. This kind of architecture is called Micro-Services
architecture.2 See the next chapter about the relationships between test automation and
the architecture of the SUT.
A/B Testing
Another related concept that is often used in large-scale web application providers
is called A/B Testing. “A/B Testing” is a term borrowed from marketing and business
intelligence, where you give a group of potential customers one variant of a product
(variant “A”), and another group a variant of the same product that only differs in one
property (variant “B”). Then the marketing data is analyzed to determine whether this
property increases the sales of the product or not.
A similar idea can be applied to web applications: In order to validate whether one
variant of a feature is better than another, the two variants are being developed, and
deployed to different sets of nodes. These two variants are monitored and compared
in order to analyze which one of them the users use more often, and whether it have
a positive impact on some business KPIs. In case of ecommerce or SaaS sites, this is
usually translated directly to increased revenue!
2 For an in-depth description of micro-services architecture, I recommend to read Martin Fowler’s article at: https://martinfowler.com/articles/microservices.html
Chapter 5 Business proCesses

97
SummaryAs you can see, test automation does not stand on its own. Its value comes from the
way it is being used. If it only supports testing in the traditional way, then its value is
pretty limited. But if is used as part of the entire development and the overall business
processes, then it can even directly impact revenue. Remember that A/B testing
cannot be achieved without Continuous Delivery or at least Continuous Deployment,
Continuous Delivery cannot be achieved without Continuous Integration, and
Continuous Integration cannot be achieved without Test Automation.
Chapter 5 Business proCesses

99© Arnon Axelrod 2018 A. Axelrod, Complete Guide to Test Automation, https://doi.org/10.1007/978-1-4842-3832-5_6
CHAPTER 6
Test Automation and ArchitectureBecause the vast majority of manual tests is done through the UI, and on a complete
system that attempts to mimic the production environment as much as possible, it
is often assumed that this is also the right approach for automated tests. However, as
we already discussed in Chapter 2, there are different considerations for manual tests
and for automated ones. In this chapter we’ll discuss some strategic considerations
about the architecture of the test automation. As we’ll see, the considerations about the
architecture of the test automation are tightly related to the architecture of the SUT.
Test Architecture ConsiderationsLike any other software project, test automation should also have some kind of
architecture. The architecture of a software system typically conveys the high-level
decisions that affect the entire system and are more difficult to change down the road.
For a test automation system, these decisions usually affect how tests are written, how
they are being run, what they can and cannot do, etc. However, the architecture of
the test automation should also take into account the architecture of the SUT. These
architectural decisions also affect the isolation of the tests as will be described in the next
chapter, which in turn have a very high impact on their reliability. Here are some high-
level considerations that you may want to take into account when architecting the test
automation solution:
1. Who should write the test and what skills do they have?
2. Who should run the tests and when?

100
3. Which parts of the SUT we want to test? (Or – which parts of the
tests are more important for us to test?)
4. Which parts of the SUT can we test reliably?
5. How long the tests would run?
6. How easy it will be to write new tests?
7. How easy it will be to maintain existing tests?
8. How easy it will to investigate failing tests?
We already discussed the first two considerations in previous chapters. In this
chapter we’ll focus mainly on considerations 3–5, and the rest will be covered by later
chapters.
Understanding the SUT ArchitectureMost people facing the question “which components of the SUT you want to be tested,”
simply answer “everything.” But, in most cases, testing the entire system end to end may
cause the tests to be unreliable, hard to maintain, and sometimes not even feasible.
Therefore, we must first understand the architecture of the SUT in order to make the
appropriate decision.
Back to Basics: What’s a Computer System?In order to understand the architecture of the SUT and its impact on test automation,
let’s first get back to the first lesson in computer sciences, and answer the question:
“What’s a computer system?” The answer is typically described as a system that gets
some kind of inputs, processes them, and spits out output, as shown in Figure 6-1.
Chapter 6 test automation and arChiteCture

101
One important attribute that this description implies and is true for every given
computer system, is that the outputs yielded from the system depend only on the
sequence of inputs provided to it. Even when the computer yields random numbers,
these numbers are only pseudo-random and the computer uses the system’s clock, which
is an input device, to compute them.
Note some people think that machine learning (mL) and other “artificial intelligence” (ai) technologies, which have become more popular lately, does not adhere to the above claim as they mimic the human way of thinking that is non-deterministic. Well, the truth is there’s no magic behind any of these technologies. the main thing that differentiates them is that they depend on high volumes of inputs, and a complex processing of those inputs, but the principle is the same. as mentioned, algorithms that use random numbers actually use pseudo-random sequences that depend on the system’s clock, which is also an input.
What’s an Automated Test?While in Chapter 1 we gave a generic definition of an automated test, considering the
above definition of a computer system, we can define an automated (functional) test as
a computer program that sends inputs to another computer system (the SUT); compares
the output sequence, or part of it, to some predefined expected result; and outputs the
result of that comparison. Figure 6-2 shows that description of an automated test.
ProcessingInputs Outputs
Figure 6-1. A generic explanation of a computer system
Chapter 6 test automation and arChiteCture
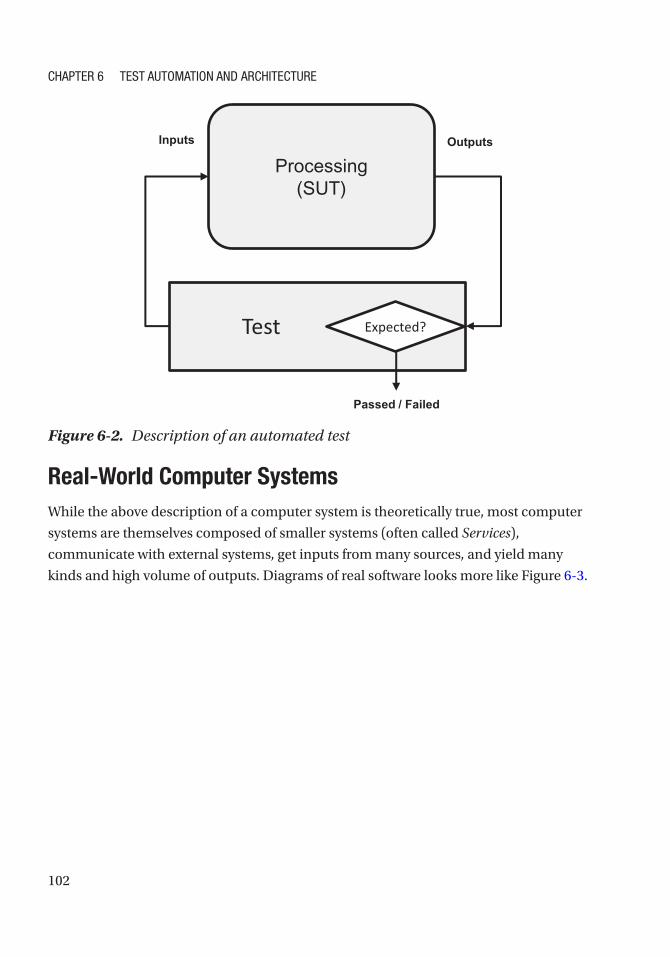
102
Real-World Computer SystemsWhile the above description of a computer system is theoretically true, most computer
systems are themselves composed of smaller systems (often called Services),
communicate with external systems, get inputs from many sources, and yield many
kinds and high volume of outputs. Diagrams of real software looks more like Figure 6-3.
Processing (SUT)
OutputsInputs
TestExpected?
Passed / Failed
Test
Figure 6-2. Description of an automated test
Chapter 6 test automation and arChiteCture

103
Moreover, very few systems today are really “stand-alone,” or “black box,” having
no dependency on any other system. Rather most systems depend on some external
services or component that we don’t have full control over their development and/or
behavior. This imposes a real challenge: on one hand, our customers shouldn’t care that
we depend on third-party services; but on the other hand, problems in these services
are not under the control of our development team. Therefore, it’s difficult to draw a
clear line between where our system ends and other’s start, and to our concern: What
components or services we care to test?
For manual testers this is a lesser concern. Manual testers interact with the system
through the UI, like the end users, and validate that what they see makes sense. If the
manual testers encounter a clear warning that some external service is not available
and that he should try again later, he can verify that this service is indeed unavailable
right now and he won’t report a bug for it. Furthermore, even if the service is up, often
Figure 6-3. Typical software arcitecture diagram
Chapter 6 test automation and arChiteCture

104
the outputs of our system depend on inputs that it receives from that external service,
and the tester can determine whether they’re correct or not, although he can’t predict
in advance what these outputs should be. But as we already know, for test automation,
make sense is not an option, as we must be able to define a deterministic expected result.
In order to do so, we must control all the inputs of the system that may affect the outputs that we want to verify, including inputs from those external systems that we
depend upon! This brings us back to the basic definitions given above of a computer
system and of the automated test, but now we need to apply it to the real-world, complex
system.
While in the basic definition we talked about a single sequence of inputs, in real
systems this sequence is composed of many different independent input sources that
we usually think of as different sequences, or streams. The same goes for the output:
a typical system generates many kinds and sequences of outputs for different targets.
Moreover, the inputs and outputs are often so tightly related that it’s hard to think about
them as distinguishable from each other. For example, when you move the mouse, you
generate inputs, but as a result, in a complete synchronization with your moves, the
computer moves the cursor on the screen – which is the output it generates (in fact,
it only changes the color values of individual pixels, which gives the illusion that the
cursor “moves”). A similar thing happens when you type text in a textbox: your key
presses generate inputs, and as an immediate result, the system outputs the glyph of
the appropriate letter to the correct location on the screen! But keyboard, mouse, and
screen are not the only sources of inputs and outputs (I/O) that a computer system
has. Most system uses disk storage (in the form of files or database records), network
communication, etc. Some systems interact with a specific hardware and perform
additional, unique I/Os for that. Another important input that many systems depend
upon is the system’s clock.
While looking at the I/O in that low-level form helped us understand how the
theoretical view of a computer system applies to a real-world system, it’s still not very
helpful in order to reason about the architecture of the SUT and to plan our automation
accordingly. But if we’ll look at a block diagram like the one in Figure 6-3 and draw a line
between the components that compose our system, and systems, services, and sources
that we consider as external to our SUT, we can reason about which inputs to the SUT
can affect which of its outputs. Figure 6-4 shows an example of how we can draw such a
line. Lacking a standard term for that, I like to call the selection of components that we
consider part of the SUT, the “Test Scope.”
Chapter 6 test automation and arChiteCture

105
If we would have control over all of these input sources, then we can define tests with
deterministic expected results. Controlling inputs received from external systems may
not look feasible to you right now, but later in this chapter I’ll explain how we can at least
mimic those inputs. Of course, that input source may also include files, external devices,
and user interactions. The bottom line is that the test must control whatever we consider
as inputs to the SUT and that may affect the output that we want to verify.
Note that storage means, like files and databases, are usually something that systems
use internally for their own use, but some systems use them as means to communicate
with other systems. For example, if your application writes data to a database that can be
later used by another system to create reports, then you can consider this database as an
output target. Vice versa, if your system is the reporting service, it should create reports
according to data that an external system writes to the database, then you should treat
Figure 6-4. Drawing a line between the SUT and external sources defines our “Test Scope”
Chapter 6 test automation and arChiteCture

106
the database as an input source that the test should control. In general, if your system
uses a database or files only internally, then you should not bother with that at all, and
you should consider it part of the Test Scope. However, because it’s usually not feasible
to start with a clean database in every test (or at all!) and the existing data may still affect
the outputs, then you should consider the isolation techniques described in Chapter 7.
Alternatives and Considerations in a Layered ArchitectureEvery system is different and has a different architecture. As mentioned before, most
modern systems are composed of services that communicate between them (micro-
services architecture), but even so, it may be helpful to talk about a more traditional
and simpler layered client/server architecture first, and the considerations for
choosing the appropriate components to include in the Test Scope. After all, most of
these considerations also apply to the more modern systems, and hey, there are many
traditional systems still out there. In this example we’re talking about a stand-alone
business application, without any relevant dependencies on external systems. Still, there
are many alternatives and considerations that we’ll discuss shortly, and the pros and
cons of each. Many of these alternatives and considerations are still relevant in a micro-
service architecture or to most other system architectures out there. Figure 6-5 shows the
typical layered architecture that we’re about to discuss.
Chapter 6 test automation and arChiteCture

107
The Relationships Between the Scope and the TestBefore I’ll describe the purpose of each layer and the alternatives of choosing the test
scope, I want to clarify the relationships between the test scope and the tested scenarios.
In fact, in most cases, the test scope, which defines the tested components included in
the SUT, can be independent of the scenario, which defines the purpose and the steps
of a particular test. In other words, you can implement almost any scenario (test) with
any test scope. This is true as long as the component that implements the core logic
that is verified by the test is included in the test scope, which is usually the Business
Logic layer. In addition, in order to be able to use any test scope with any scenario, the
scenario should be planned and described in high-level business terms, instead of using
full and precise technical details, like exactly which buttons to click to complete some
UI
View Model
Client Logic
Server Proxy
Service Layer
Business Logic
DAL
ORM
DB
Figure 6-5. A typical layered architecture
Chapter 6 test automation and arChiteCture
108
business activity. Note that even though describing test scenarios for automation with
as much details as possible may sound like a good idea, it actually leads to tests that are
harder to maintain (this will be discussed in more detail in Part II). So, test scenarios
that are described in the level of detail that lends themselves best for test automation
makes them both easier to maintain and be scope independent. Here’s an example of
a scenario for an e-commence bookstore website, which is described using high-level
business terms:
1. As the administrator, add the following books to the catalog and
assign them to the “Test Automation” category:
• Growing Object-Oriented Software Guided by Tests, by Steve
Freeman and Nat Pryce: $54.99
• xUnit Test Patterns, by Gerard Meszaros: $74.99
• The Complete Guide to Test Automation, by Arnon Axelrod: $39.99
• Specification by Example, by Gojko Adzic: $49.99
2. As the administrator, define a promotion that states if the
customer buys 3 books from the “Test Automation” category, he
gets a $10 discount
3. As the end user, add the following books to the cart:
• Growing Object-Oriented Software Guided by Tests
• xUnit Test Patterns
• The Complete Guide to Test Automation
4. Verify that a $10 discount is given and that the total amount to pay
is $154.97 (74.99 + 49.99 + 39.99 -10)
Note that this description does not specify all of the clicks and keyboard entries
needed to add the book to the catalog, create the promotion, or add the books to the
shopping cart. Therefore, now I can implement this test using an end-to-end test scope,
for example, using Selenium, to exercise the relevant actions on the browser (which is
connected to the entire back end and database) and verify the expected result also on
the browser, or I can choose a smaller test scope like sending requests directly to the
server to complete these business activities, and even up to a unit test that tests a single
class that contains the promotion’s logic. There are more options in between, of course,
Chapter 6 test automation and arChiteCture

109
each with its pros and cons as we’ll discuss shortly. In addition, we’ll discuss how you
can mix and match different test scopes to take advantage of more than one option, and
also the price of doing that too.
While in the above typical example, the scenario can be implemented using different
scopes, sometimes you want a test to verify details that are specific to one layer. For
example, if you want to verify that a certain button is disabled after the user completed a
transaction, you must include the UI layer in the test. Similarly, if you want to verify that
data that the user enters is persisted after the system is restarted, then you must include
both the UI and the database in the test scope. But some tests really require only one
layer, like when you want to verify that a Save button is disabled if the user didn’t fill in
some mandatory field, which requires only the View Model layer.
Overview of the LayersOur stereotypical application is a classic three-tier architecture: the top tier is a rich
client application (i.e., Windows application), which communicates with the server via
some proprietary HTTP-based protocol. The middle tier is the “heart” of the system
where the main business logic resides. The bottom tier is a relational (SQL) database
that mainly stores and retrieve the data, but also contains some stored procedures
that perform complex queries in order to improve performance. Each tier is a separate
process and can potentially be deployed on a different machine. However, each tier by
itself is composed from its own internal components (e.g., DLLs, JARs, etc,. according to
the technology used) as the following.
The Client Tier
The client tier is composed of the following layers:
1. UI Layer – this layer is responsible for the graphical layout
and appearance of the UI. It’s mainly produced either with a
WYSIWYG1 editor or kind of a declarative markup, like HTML,
XML, or XAML. If it contains code, it should be very simple and
only handle the UI layout and appearance.
1 WYSIWYG stands for What you see is what you get. This means that when you edit something you see the result immediately. MS-Word is a great example: as you type you see how the document will look like when printed.
Chapter 6 test automation and arChiteCture

110
2. View Model – this layer is responsible for providing the data that
should be displayed in the UI layer and dispatch user events (e.g.,
clicking a button) to the relevant objects in the Client Logic layer.
3. Client logic – this layer is responsible for the logic and the flow
of the client application. Unlike the “Business Logic” layer in the
server, this layer doesn’t handle the business logic per se, but
rather the logic of transitioning between screens, and ties together
the communication with the server with the UI behavior. For
example, when a button is clicked in the UI and the View Model
passes it to the Client Logic layer, the Client Logic layer can switch
to a view that lets the user specify more details. On that view,
when the user clicks “OK,” the Client Logic asks the Server Proxy
to send the information to the server. According to the response
from the server, this layer can decide which view to show.
4. Server Proxy – this layer is a technical layer that provide a
convenient API that the Client Logic can consume (in the form
of objects and methods) and simply packs the parameters of
these methods as a request message to the server. The data in the
response is then translated back to objects that those methods
return. Some technologies provide this layer as an “out-of-the-
box” component, with only some configuration or very little code.
The Server (Middle) Tier
The server, middle tier is composed of:
1. Service layer – this is the counterpart of the Server Proxy layer in
the client. It transforms the messages that the client sends into
events that call methods in code.
2. Business Logic layer – this is the “brain” of the system. All of the
hard-core logic and calculations are done in this layer. When this
layer needs to retrieve or store some data in the database, it uses
the Data Access Layer (DAL) to do it.
Chapter 6 test automation and arChiteCture

111
3. Data Access Layer (DAL) – this layer provides the business logic
layer with a convenient API to access the database. While the
Object Relational Mapping (ORM) layer underneath it handles
all of the heavy lifting automatically, sometimes there’s a need
to provide an API that is more natural, simple, and abstract (i.e.,
technology agnostic) for the BL tier to consume.
4. Object Relational Mapping layer – this is usually a third-party
technology that translates from objects and properties to SQL
statements that read and write data to/from relational tables.
Usually it’s based mostly on configuration and doesn’t involve
custom code.
The Database Tier
The database tier in our example does not contain a lot of logic, except of a few stored
procedures to increase performance. But even besides the stored procedures, and even
though the database engine itself is a commercial product, it still contains some artifacts
that the development team produces: the schema (structure) of the tables, indexes,
views, constraints, etc.
The Alternative Test ScopesOK. Now that we understand the architecture, let’s see what options we have for the test
scope for the automation and what are the consequences of each of these options.
End-to-End Test Scope
The first and most obvious option for a test scope in a system that doesn’t have external
dependencies, is end to end. Figure 6-6 shows this option. The biggest advantage of
this option is that it’s most similar to what the users do, and it does not compromise the
testing of any component or integration between components. However, these tests are
naturally slower, harder to stabilize, and maintain due to frequent changes in the SUT
and make failure investigation harder.
Chapter 6 test automation and arChiteCture

112
In this approach the tests interact only with the UI, but the tests usually perform
actions that exercise all of the tiers and layers.
UI
View Model
Client Logic
Server Proxy
Service Layer
Business Logic
DAL
ORM
DB
Figure 6-6. End-to-end test scope
Chapter 6 test automation and arChiteCture

113
CLARIFYING THE “END-TO-END” AMBIGUITY
When some people say “end-to-end” tests, they mean very long-winding scenarios, usually
mimicking a complex real-world user scenario. For example, such a test for an e-commerce
site could start from user registration, searching for different items in the catalog, adding
many items to the shopping cart, removing some of them, changing the quantity of some
products in the cart, going to the checkout process, splitting the payment to two different
payment methods, using a coupon, finishing the transaction, etc. While these scenarios have
some value of validating that such scenarios are working correctly, they lend themselves
poorly for test automation because their maintenance usually becomes arduous. if the
program is evolving (and as discussed in Chapter 2 – if it doesn’t, then there’s probably not a
lot of value in test automation anyway), then these scenarios would need to change constantly
and they will often fail on legitimate changes. the investigation of these failures will take
pretty long because the scenario is complex. there may be some value in having a few of
these that run only after all the other tests have passed, but relying mostly on this kind of tests
is not recommended.
By contrast, when other people, including me, say “end-to-end” tests, or “end-to-end test
scope” to be more precise, we mean that the tests interact with the complete system as a
whole “black box” and not with only part of it. in other words, the test scope includes all of the
layers and components of the system. however, it doesn’t mean that the scenarios should be
long and winding. For example, the scenario can be as simple as a user adding only one item
to the shopping cart, but it’s still done on a complete system.
One-Way End to End (UI to DB or DB to UI)
In this approach, shown in Figure 6-7, the test scope is also the entire system and
technically it’s the same as the previous option. But unlike the previous option, here the
test interacts both with the UI and the database, and not only the UI. It has more or less
the same advantages and disadvantages of the end-to-end option, but there are a few
important differences. First, when you manipulate or check data through the database,
you’re not testing the system as the use would use it. This has two caveats: first you can
miss bugs that the user may encounter; and second, your tests may fail due to problems
Chapter 6 test automation and arChiteCture

114
that are not real bugs. However, it is often faster and simpler to use the database rather
than to mimic all of the user actions that are required to create or verify the data.
Note that the chances for failing due to problems that are not real bugs are not
necessarily higher than if you do everything from the UI, but there’s still a significant
difference between these cases: if the UI changes it’s probably directly related to
a change in requirements. But the database is an implementation detail that the
developers can change on their own will. Entering or retrieving the data directly to or
from the database often bypasses validations and business rules that the server should
enforce, which may bring the system to states that it was not designed for and that would
never happen in production.
Another risk that you want to consider when relying on the database is that you take
a dependency on one more technology that may change as a whole. When your tests
interact with the SUT through the UI, if the UI technology is replaced at some point
(e.g., from Windows Forms to WPF), you’ll have a tremendous amount of work refitting
the tests to the new UI technology. When your tests interact with the SUT both through
the UI and through the database, you double the risk, as both the UI technology as well
as the database’s technology may be replaced one day. Even though these occasions
are rare, if you plan the test automation to be long lived, then it can definitely happen
in a range of few years. For example, these days many teams replace their database
engines from a relational (SQL) database like MS-SQL Server or Oracle, to some “noSQL”
alternatives, like MongoDB, or other, more scalable solutions.
However, there are some cases in which this approach is clearly advantageous over
end to end:
• Some systems are designed such that customers can interact with
the DB directly and/or write applications that interact with the DB
directly. In this case it’s important to validate that what the customers
can do works the way it should.
• Other systems use an existing database that another application
manages. This other application can be considered “third party” even
if it’s developed by another team within the same company, as long
as their development efforts of the two teams are independent from
Chapter 6 test automation and arChiteCture

115
one another and their release schedules are not synchronized. In this
case it may make sense to interact with the database directly instead
of with the third-party application
• Speed: it may be much faster to create data directly in the database
rather than through the UI. If the purpose of most tests is to work with
existing data that already exist in the database, rather than to test the
ability to create it, but you still prefer not to rely on shared data (see
the next chapter about isolation), then it will probably be much faster
to create it in the database directly. Note that you also have a choice
to create the data by calling into the server (through the Server Proxy
layer or by sending a HTTP request, or using any other layer) instead
of using the database directly.
• Reliability and maintainability: despite what I wrote above about the
database schema being an implementation detail, in cases where
the schema is not likely to change anytime soon, but the UI does,
then using the database may be more reliable and easy to maintain,
especially if the schema of the database, or at least the parts that we
need to interact with, is simple enough.
Chapter 6 test automation and arChiteCture

116
UI
View Model
Client Logic
Server Proxy
Service Layer
Business Logic
DAL
ORM
DB
Figure 6-7. One-way end-to-end test scope
Chapter 6 test automation and arChiteCture

117
Server Only (Round-Trip)
This approach, shown in Figure 6-8, is also very common and has some great advantages
over an end-to-end test scope. Among its advantages are improved speed and reliability.
It is especially appropriate in the following situations:
• The client is only a thin layer over the server.
• The client is changing much more often than the API or protocol in
which the client and server communicates.
• The server exposes a public API that customers can use directly (see
sidebar titled “API, Backward Compatibility, and Test Automation
Maintenance”).
• The system has many types of client applications (e.g., for different
operating systems, web, mobile, etc.), and there’s no point in
choosing one over the other. In this case server tests can be combined
with separate client only tests (see below) for each client and also few
simple end-to-end tests for each client.
In this approach, instead of manipulating and verifying results on the client, the
test communicates directly with the server using the same protocol that the client
applications use to communicate with the server (most commonly http/https). The
fact that the test does not manipulate the UI does not mean that each test should verify
just one request/response pair, and in fact mostly all scenarios can describe actual user
scenarios, as already mentioned above.
Chapter 6 test automation and arChiteCture

118
API, BACKWARD COMPATIBILITY, AND TEST AUTOMATION MAINTENANCE
When the application under test exposes a public api, which is exposed to customers or
third-party vendors, it makes the lives of the automation developers much easier than usual,
as they need to care less about maintainability. if customers or third-party vendors are
using the public api of your application, they probably expect your company to maintain and
provide backward compatibility of that api between versions. that ensures that every test that
passed in one version of the software continues to work exactly the same in newer versions;
UI
View Model
Client Logic
Server Proxy
Service Layer
Business Logic
DAL
ORM
DB
Figure 6-8. Server-only test scope
Chapter 6 test automation and arChiteCture

119
otherwise it’s a compatibility breaking bug. in other words, the test code of a previously
working test should rarely need to change.
For example, suppose that your team develops a blogs engine website. in addition to allowing
users to publish new blog posts through the website’s ui, it allows developers to write
applications that communicate with the website and publish new posts using a rest api. so,
for example, a customer may develop his own tool that reads the weather from several other
websites, calculates its own average forecast, and uses the api of your blogs engine to publish
that forecast automatically. another customer may use the api to be notified of new posts and
to send them automatically by email to relevant recipients according to categories and tags
associated with each post.
maintaining backward compatibility means that those applications that the customer wrote
and that use the api of the first version must continue to work seamlessly and exactly the
same in newer versions of the blog’s engine website, without having to change anything
in these applications. new features and functionality could be added to the blog’s engine
website, but nothing should be removed, and there should be no breaking changes. note
that just keeping the structure of the messages (or public interfaces of classes and methods)
intact, is not enough for keeping compatibility. it also requires that the external behavior remains the same.
For example, suppose that at some point the product manager requires that each new
blogpost has a short abstract that describes what the post is about in order to show in the
list of blogposts, and in order to attract the readers to look into the posts that interest them.
he also wants to enforce that the abstracts are at least 100 characters long in order to make
the writers fill in something relevant. as long as it applies only to blogposts that are created
manually through the website, there’s no problem with that requirement. however, if we
enforce this new constraint also in the api, then our customers that use these apis will be very
annoyed, because now the software that they wrote (e.g., the weather forecast publisher) will
no longer work! Clearly, changing their software is not a simple thing, it takes time and money,
and if the developer that wrote it left the company then the problem may be even worse… a
possible solution for this example is either not to enforce this rule for api-generated blogposts,
or to automatically create a placeholder for the abstract that states that this is an automatic
blogpost.
Continuing our example, another requirement that the product manager requested is that
automatic posts that are generated by api will have the prefix “auto:” appended to their
title. on the surface, it seems that the api should not be affected by this new feature and
Chapter 6 test automation and arChiteCture

120
there’s no problem of backward compatibility. the client will still be able to use the same api
message for creating a new blogpost. it can also use the same api message for retrieving all
the blogposts filtered by date as it did before. however, if a client application creates a new
blogpost, and then searches for the blogposts it created by exact matching of their titles,
then now the client’s application may fail to find these blogposts because their titles are now
prefixed with “auto” and no longer match exactly what the application has created. that’s
why it’s important (and much trickier!) to ensure that we keep backward compatibility for
the behavior and not only the structure of the api messages. But if we have to do it for our
customers, then the automation developers can enjoy it too.
Breaking Changes
While in theory 100% of the tests that passed in one version should continue to work in newer
versions, reality is always more complicated. if you’re working for one of the big companies
that has millions of customers that use the api, then breaking backward compatibility is
a big deal, and sometimes even bugs are intentionally kept in newer versions just for the
chance that fixing it will break existing client’s software (this is especially true for vendors
of compilers and related technologies that are used as the foundation technology for many
applications). But if your team’s product has only a handful of customers that use the api, then
it may be acceptable to break compatibility here and there in order to fix bugs or make some
improvements that the clients may appreciate.
one area that bugs are usually treated in higher priority than backward compatibility is
security. this means that if your application had a security breach, and the only feasible fix
requires to break the backward compatibility of the api, then it’s normally worth paying that
price. But then again, creative solutions appropriate for the specific problem at hand may be
found to solve the bug without breaking compatibility or at least minimizes the risk for old
clients and solving it completely for clients that are willing to update their code.
Server-Only Test Scope (One Way)
This is simply an intersection between the one-way end-to-end approach and the
round-trip server-only approach. Like the server-only approach, the test interacts with
the server through its API, but like the one-way end-to-end approach, it also interacts
directly with the database to enter data as input to the SUT, or check the data written by
the SUT. The considerations for this approach are basically the same as of the one- way
Chapter 6 test automation and arChiteCture

121
approach and the server-only approach combined. For example, this approach can be
useful to test that the server writes the relevant data to the database on an “update”
request, or to inject prerequisite data for a scenario that is implemented though the
public server’s API. Figure 6-9 shows the architecture of this approach.
UI
View Model
Client Logic
Server Proxy
Service Layer
Business Logic
DAL
ORM
DB
Figure 6-9. Server-only one way
Chapter 6 test automation and arChiteCture

122
WHAT EXACTLY ARE INTEGRATION TESTS?
even though the term “integration tests” is used very broadly, there’s no one concise definition
for this term. the closest thing i can think of is something like: every test scope which is bigger than a unit test (or component test) on one hand, and smaller than an end- to- end test on the other hand. in many cases when people say “integration tests,” they refer to the
“server-only” approach, but not always. some even use this term to describe tests that cover
the integration between multiple complete systems (like a few end-to-end scopes of different
systems combined!) Generally speaking, integration tests are any kind of test that test the
integration between two or more components.
Client-Only Test Scope
In some situations, the more important part to test is the client, rather than the server.
For example:
• In an application where most of the logic resides in the client, and the
server is only used sparingly.
• When the server is a legacy or third-party system that is not going to
change, while a new, sophisticated client is under development.
• When the server contains complex algorithms that their results
are difficult to predict and control: especially algorithms that use
random numbers, or servers whose behavior depends on events and
conditions that are difficult to control. In this case you may want
to test the server separately from the client, and isolate the server’s
complexity from the client’s test scope (i.e., treat the server like an
external system).
• When the client is just one of many other clients, and the server is
tested separately (see “Server only” above). In this case each client
will be tested separately as well as the server, and only few simple
end-to-end tests for each client should be written to validate the
integration.
Chapter 6 test automation and arChiteCture

123
In these cases, it may be beneficial to isolate the server completely from the tests, in
order to make the tests faster, more reliable, and easier to deploy. However, in order to do
that, we must create a simulator for the server. The simulator should mimic the protocol
that the server uses, but the test infrastructure should control the exact content that is
emits to the client. In addition, the test can verify what the client sends to it. Simulators
are explained and covered later in this chapter. Figure 6-10 shows this option.
UI
View Model
Client Logic
Server Proxy
Service Layer
Business Logic
DAL
ORM
DB
Simulator
Figure 6-10. Client-only test scope
Chapter 6 test automation and arChiteCture

124
Under-the-Skin Test Scope
Sometimes testing through the UI is not feasible, because the UI’s technology doesn’t
provide a good automation interface or is simply not reliable enough for automation. If
you still want to have a test scope that is closest to end to end as possible, you can test
the application “under the skin,” as shown in Figure 6-11. This approach is very similar
to the end-to-end approach, but instead of really mimicking the mouse movements and
keyboard strokes, the automation detours the actual UI layer and talks directly to code
underneath it, namely the View Model layer.
UI
View Model
Client Logic
Server Proxy
Service Layer
Business Logic
DAL
ORM
DB
Figure 6-11. “Under-the-skin” test scope
Chapter 6 test automation and arChiteCture

125
While this approach may seem very logical, it poses some series challenges. If these
challenges can be addressed, then it can be a valid approach, but you’d better try to
tackle these challenges at the very beginning to assess the feasibility and the associated
costs of potential solutions, as these challenges may become showstoppers for using this
test scope. Note that in most cases these challenges involve some refactoring of the client
application. These challenges are:
1. First and foremost, the view layer should be easily separable from
the other layers. If one of the MV* patterns2 is applied properly,
then this should be pretty easy. But often the actual architecture
drifts a bit (or more…) from the planned architecture. In this case
you should first assess whether it’s feasible to refactor the code
back to the planned MV* architecture.
2. Initialization – Each program that starts executes a method called
“main.” This method typically loads all the resources that the
application needs, and eventually opens the main window. At
this point, the process stays idle waiting for input (mainly mouse
and keyboard events), and as these occur, the application invokes
the relevant code to handle the relevant event. After the event
is handled, the application returns to its idle state, waiting for
further events. Only when the user closes the application window,
or chooses to exit in some other way, then the application returns
to the end of the “main” method and exits. However, tests behave
somewhat differently. The testing framework (e.g., JUnit, NUnit,
MSTest, etc.) implements the “main” method for you and lets you
define different tests, each of which is like its own little program.
In addition, these frameworks allow you to run code before all the
tests and after all of the tests. If we’d simply call the SUT’s “main”
method from the framework’s initialization code or from one of
the tests, then it will show the UI and wait for user input. Until
a real user won’t close the window, the call to the main method
won’t return, and the test won’t be able to continue! (Most
frameworks will raise a timeout error after some period of time,
2 MV* refer to any of the following design patterns: MVC (Model-View-Controller), MVP (Model-View-Presenter) or MVVM (Model-View-View Model).
Chapter 6 test automation and arChiteCture

126
failing the test.) Therefore, we must create our own initialization
code that from one hand initializes all the relevant resources (e.g.,
opens a connection to the server), but on the other hand doesn’t
actually show the UI, or at least doesn’t enter the loop that waits
for user input. Writing that initialization method and separating
the initialization of the view from the initialization of the other
component may require a massive refactoring, depending on the
actual design and complexity of the system. Here too, if the actual
architecture follows a well-structured MV* pattern, then this
should be easier.
3. Dialogs and popup messages – Yet again, if the separation of
concerns of the MV* architecture is strictly kept, then this should
be much easier. But dialogs and popup messages often make
it more complicated to implement the pattern correctly, and
therefore provide a significant challenge for the automation. If
at some situation the application needs to display a message
to the user or needs to ask the user for additional input, then it
might open a message box or a modal dialog box. If this code is
called from the test, then the dialog will actually appear while the
test runs (!) and will never continue past the line that opens the
dialog unless a real user will close it. If the pattern is implemented
correctly, then the event handler should not open the dialog
directly. Instead it should use an abstract factory object to do that.
If the test can replace this factory with a different factory that will
return fake dialog objects, then this problem is solved. These fake
dialog objects will not be real dialogs with UI, but rather just pure
Chapter 6 test automation and arChiteCture

127
objects that implement the same interface as the dialog, and will
return immediately with the “input” that the test provides to the
application in place of the user.
Note that this approach means that most of the client code is loaded into the
memory space of the test process.
Pure Logic Test Scope
While this is not a very popular approach, I think that it’s interesting to mention, at least
in order to encourage you to think “out of the box.” If the business logic is spread over
both the client and the server (or other components) and you want to test them together,
but you also want the tests to be fast and be able to run without any special deployment
and configuration, then this approach may be relevant to you.
In this approach, we take only the components that contain the business logic, and
glue them together, bypassing and mocking all of the more technical layers, as shown
in Figure 6-12. Mocking3 is conceptually very similar to simulating, but instead of
communicating with the SUT over a communication channel, it communicates with it
using direct method calls, usually by implementing an interface. Mocking is used mainly
in unit testing, but it is useful in this approach too.
3 Some purists would say (according to Gerard Meszaros book “xUnit Test Patterns”, and mentioned in Martin Fowler’s blog at https://martinfowler.com/bliki/TestDouble.html) that this is not the correct definition of Mocking, but rather the definition of a Test Double or more specifically of Fake. Test Double is a generic term, which includes Dummies, Fakes, Stubs, Spies and Mocks. However, even though according to this terminology, “mock” is a very specific use of Test Double, it is the most widely used term, even in its more generic meaning.
Chapter 6 test automation and arChiteCture

128
In this option, the test communicates directly with the View Model layer, similarly
to the “under-the-skin” approach. However, instead of having the client and the server
communicate over a real communication channel, through the Server Proxy in the
client and the Service Layer in the server, we connect the two together using a mock
that behaves like a simple bridge: it directs any call from the client directly to a method
call in the server and returns the results accordingly, on the same process and thread.
Finally, we mock the Data Access Layer (DAL) to simulate any communication with the
database. Usually we’ll mimic the database behavior by storing and retrieving the data in
and from memory instead of the real database.
UI
View Model
Client Logic
Server Proxy
Service Layer
Business Logic
DAL
ORM
DB
Communica�on mock (bridge)
DAL Mock
Figure 6-12. Pure Logic test scope
Chapter 6 test automation and arChiteCture

129
Component Tests
Component tests are tests that test a single component (e.g., the Business Logic
component, or the DAL component) separated from the rest of the system. A component
is usually a single DLL or jar file. It may have external dependencies, like files, database,
etc. But in most cases if the component under test depends on another component that
is part of the developed application, then the test will provide mock objects that simulate
the dependent component.
Note that if you create separate tests for each component in a layered architecture,
then except for the Business Logic layer, most tests won’t reflect scenarios from a user
perspective, but rather a more technical usage of its API. While this may not be the most
interesting thing to verify from the end-user perspective, it may be very interesting from
an architectural and design perspective. Besides verifying the correctness of the code, a
Component test also ensures that the tested functionality is indeed implemented in the
intended component, and it helps ensure that the intended design is kept. If component
tests are implemented in an early stage of the development, the act of designing the
tests also helps shape the design of the components and the APIs to be easier to use and
maintain.
This is especially beneficial for components that should be reusable in different
applications. This is true for reusable components that are used in multiple applications
developed by the same company, for internal optimization purposes, but it is even
more important and beneficial for components that the company develops and should
be reused by its customers. For example, an application that is used to control some
electronic device that the company manufactures may contain a component that
communicates with that device. This component, besides being used by the application
itself, can be exposed to customers that want to interact with the device from their
own applications. As writing the tests against the component is similar to using it from
another client, writing these tests in an early stage of development helps shape the API of
the component to be easy to use.
Unit Tests
While Component tests test a single component, unit tests test an even smaller piece,
which is usually a single class or even a method. Unit tests are considered to test
the smallest testable functionality. Because these tests are so tightly coupled to the
implementation, typically the developers who write the product code also write the unit
Chapter 6 test automation and arChiteCture

130
test that verifies the code that they’ve written. In Chapter 17 we’ll talk in more detail
about unit tests as well as about the test-driven development (TDD) methodology that
helps writing these tests effectively.
Real-World ArchitectureWhile the above-mentioned layered architecture is still pretty common in many
traditional business applications, every application is different and today most systems
are more complicated than this. After we’ll discuss few patterns I’ll present a few real-
world examples of application architectures and the chosen automation architecture.
Intended Architecture vs. the Actual OneMost projects start with a pretty looking architecture diagram (e.g., like the above-
mentioned layered architecture), but very often after some mileage, the actual
architecture becomes less clear and pretty as the diagrams, and some components
begin to “grab” responsibilities that should have been of another component, making
the actual architecture messier. In these situations, some of the above alternatives may
not be very relevant or may be more difficult to implement. It is very common that
when starting to develop automated tests late in the process of a software project, to
hit obstacles that are caused by such differences. Trying to overcome these obstacles
usually makes the test code more complicated, difficult to maintain, and less reliable.
However, compromises often have to be made between these drawbacks and the price
of refactoring the code to eliminate them. Because you usually hit these obstacles
when you implement the tests, then it means that you still probably don’t have enough
coverage to refactor the code safely…
Common VariationsBefore we’ll talk about more complex architectures, let’s talk about some common
variations to the described layered architecture:
1. Today most business applications are web based, possibly with
a mobile (smartphone) client rather than a classical Windows
application. The technologies for the web-based clients also
vary, mainly on how much of the logic is done on the client (the
Chapter 6 test automation and arChiteCture
131
browser) and how much on the server. With mobile applications,
there are a few common variations in the technologies and
concepts of the UI: whether the app uses the UI of the OS directly
(“native”); a web UI (adopted to the mobile user); or hybrid, which
is a mainly a web browser embedded inside a native app.
2. Many applications support more than one type of client. They may
have a desktop application, a website, and a mobile app, which
mostly do the same things, but each one of them is more suited
to the technology and form factor of the machine that they run
on. This brings an interesting challenge to test automation: Do we
want to implement each scenario using each technology? Later in
this chapter we’ll discuss this situation.
3. Because browsers can handle the rendering of the UI, and also
the communication with the web server for us, it’s pretty common
for traditional web applications that the web server serves mostly
static HTML pages to the browser and handles most of the “client
logic” and the “business logic” at the same tier, and maybe even
in the same component (as one monolithic layer). For example,
if the user clicks a column header in a grid to sort by that column,
the browser sends a request to the server, which serves a new
page with the new sort order. Many traditional but more complex
systems split the web server and put the “UI logic” in a Web Server
tier that communicates with a different tier (server or “service”)
that contains the business logic and/or the access to the database.
In most modern web applications, however, the client side
contains complex JavaScript code that contains the client’s logic.
Usually this JavaScript code itself is componentized and uses
one of the many JavaScript frameworks or libraries, with Angular
and React being the most notable ones these days. From the test
automation perspective, this can be useful for client- side unit or
component tests, but it can also be used by invoking JavaScript
functions from Selenium in broader test scopes.
Chapter 6 test automation and arChiteCture

132
4. Sometimes the application has two or more different types
of clients for different personas. For example, a main client
application for the end user and another website client
application for the administrator and/or executives.
5. Many modern applications take a service-oriented architecture
(SOA) or even a micro- service approach, in which almost every
component is a separate service that resides in a separate process
and can be deployed to different machines to allow for better
scalability.
6. On the other side of the spectrum, many older systems contain
most of the business logic as stored procedures inside the
database layer instead of with a separate tier.
7. Some (mostly modern) applications have two separate databases:
one for fast handling of transactions, and another one that is
more optimized for querying. After the data is written to the
transactional DB, it’s also transferred via some asynchronous
queue mechanism to a service that transforms the data to the
structure, which is more suitable for querying, and saves it
there. This architectural pattern is called “Command and Query
Responsibility Segregation” or CQRS for short. Some applications
may have even more databases for different purposes, and even
use different database technologies to best match the needs of
each of them (e.g., relational “SQL” database, document database,
graph database, etc.).
Combining TestsEven though you can choose only one test scope and use if for all of your tests, there are
at least two ways in which you can combine more than one approach.
Mix and Match
Because each option for a test scope has its own pros and cons, often the most efficient
strategy is to create a mixture. It can be decided which portion of the tests should be
implemented using which scope, or what are the criteria for choosing one scope over
Chapter 6 test automation and arChiteCture

133
another for each test. For example, it can be decided that one representative scenario from
each feature will be implemented as end to end, while all other tests will be server only. In
addition, we can decide that developers should write unit tests to cover the business logic
for every new functionality that they write. Mike Cohn’s Test Pyramid4 is a classic example
of such a mixture, though there are many other valid approaches, and I suggest that you
consider for yourself what makes sense and working best for you. In fact, while I believe
that under some optimal conditions the end result should be similar to the Test Pyramid,
I discourage aiming for it by deciding on percentages for each test scope. Just choose the
most appropriate scope for each test according to the pros and cons of each scope, and let
the percentages be whatever they be, even if it doesn’t form a “pyramid.”
A better approach, in my opinion, is to let the team choose the right scope for each test.
While it’s certainly not confined to it, I find it especially appropriate when using the ATDD
methodology (see Chapter 16), as it also encourages the team to collaborate on the tests and
define them according to their business value. While I strongly recommend this approach,
it has its drawback backs too: using too many kinds of test scopes can become difficult to
manage and maintain. In addition, there’s no one clear rule to decide which test scope is
best suited for each test, so there can be disputes. See the summary of considerations below
for some guidelines that will help you decide on the right scope for each test.
Abstract Test Scopes
Because test scopes are independent of the scenarios, sometimes it’s desirable to reuse
the test scenarios and be able to run those using different scopes. For example, a smaller
scope for fast feedback, and a larger scope to verify the integration with all layers. The
main idea is that relevant business actions that the test performs are implemented in
a layer that can be injected to the test class or overridden by derived classes. In this
case, this business layer serves as an adapter between the test and the SUT. This way
the test itself remains the same, but we can provide different implementations of the
relevant actions to support the desired test scopes. Figure 6-13 shows how the test can
use different adapters to interact with the application using different test scopes. Listing
6-1 shows a pseudo-code for such a test. In this listing, the InitializeSut method
instantiates the chosen adapter, which is then used throughout the test (using the _sut
member) to perform different actions through that adapter.
4 Mike Cohn, Succeeding with Agile: Software Development Using Scrum (Boston, Massachusetts, United States: Addison-Wesley Professional, 2009)
Chapter 6 test automation and arChiteCture

134
Listing 6-1. Abstract Test Scope
[TestClass]
public class PromotionTests
{
private IApplication _sut;
[TestInitialize]
public void TestInitialize()
{
/* The following line reads a value from the configuration file
determines whether it should return an object that uses Selenium to
implement an end-to-end test scope, or another object that uses
HTTP do talk directly to the server. */
_sut = InitializeSUT("Configuration.xml");
}
[TestMethod]
public void DiscountIsGivenForCategoryPromotion()
{
var category = _sut.Admin.CreateCategory("Test Automation");
var book1 = category.Add(
"Growing Object-Oriented Software Guided by Tests", 54.99);
var book2 = category.Add("xUnit Test Patterns", 74.99);
var book3 = category.Add(
"The Complete Guide to Test Automation", 99.99);
var book4 = category.Add("Specification by Example", 49.99);
_sut.Admin.CreateCategoryPromotion(category, 10);
var shoppingCart = _sut.User.ShoppingCart;
shoppingCart.Add(book1);
shoppingCart.Add(book2);
shoppingCart.Add(book3);
Assert.AreEqual(10, shoppingCart.Discount);
Chapter 6 test automation and arChiteCture

135
Assert.AreEqual(book1.Price + book2.Price + book3.Price - 10,
shoppingCart.Total);
}
}
Summary of the ConsiderationsNow we covered many alternatives and how we can combine them, but when you’d need
to really choose the right one for you, you may still be perplexed. In order to help you
choose, here’s a summary of the considerations.
UI
View Model
Client Logic
Server Proxy
Service Layer
Business Logic
DAL
ORM
DB
UI
View Model
Client Logic
Server Proxy
Service Layer
Business Logic
DAL
ORM
DB
UI
View Model
Client Logic
Server Proxy
Service Layer
Business Logic
DAL
ORM
DB
UI Adapter View-Model Adapter
Server Adapter
Test
Figure 6-13. Abstract test scope
Chapter 6 test automation and arChiteCture

136
Goal
Before we start designing our test automation we must have a clear picture of our goal:
What are the most important scenarios that we plan to cover, and why? According to this
goal, we must ensure to include all of the important components that participate in these
scenarios. For example, if you choose that your test scope will be “client only,” maybe
due to some technical challenges, but your goal is to test the business logic, then you’ll
surely miss your goal.
Feasibility
If your application uses a UI technology that doesn’t have a corresponding reliable
and affordable UI automation technology, then it will probably rule out the option for
automating through the UI. But this is true not only for UI – it can be true also if your
application receives inputs from other sources that you cannot control directly. This can
be some physical device, an external service, etc.
Importance vs. Risk
Even if you can include a component in your test scope, it doesn’t mean that you
should. While most other considerations are about the “price” or the risk of including
a component in the test scope, this consideration is about the other side of the
equation. This consideration is about the question: “How important is it to include this
component?” or “What’s the risk of not including this component?” For example, if the
UI layer is very thin, does not contain any logic, and is being edited using a WYSIWYG
editor, then the chances that there will be a bug in the UI that the test automation
will detect is much lower than the chances that the UI will be changed intentionally,
in which case you’ll just have to update your test anytime it happens. Obviously, this
consideration is also not specific to UI. The same goes for every component that doesn’t
have much logic in it or is already tested and is not being changed anymore.
Speed
If the tests are planned to run only at night, then this may not be a significant factor,
unless the entire run starts to slip from the night hours to the morning. However, if you
plan to run the test in CI or expect the developers to run the tests before they check in
their changes, then you can’t expect them to wait a few hours for the tests to complete.
Chapter 6 test automation and arChiteCture

137
In addition to the feedback cycle that the automation provides to application
developers, the tests speeds directly impact the feedback cycle of the automation
developers, which translates to their productivity and the quality of their work. While you
develop, debug, fix, or refactor a particular test, the time it takes to run that particular
test can make a huge difference because it can easily become the most significant
portion of the time that you spend doing these things. While developing, debugging, and
fixing are usually necessary, and you’ll do them one way or another, if running a single
test takes too long, it may be so frustrating that you’d avoid refactoring the test code –
which will eventually make it unmaintainable.
There are many techniques that can make your tests runs faster, and they are
detailed in Chapter 15. As a general rule – UI automation, communications between
machines, and accessing large amounts of data can have a big impact on the speed of
your tests. Pure unit tests are almost always many folds faster than end-to-end tests
(though they have their drawbacks and limitations too, of course).
While the test speed is important, don’t overrate its importance. Other
considerations may be more significant than this. In addition, don’t assume anything
about the speed of the tests before measuring! Sometime a properly designed end-to-
end or integration tests can be pretty fast if you don’t rely on large amounts of data, and
maybe the server also resides on the same machine.
What’s Likely to Change?
Any change in the interface between the test and the SUT means that you need to
update the tests – whether this interface is the UI, API, DB schema, etc. Some of these
interfaces change more often than other, creating more maintenance costs for the tests.
In fact, there are two types of such changes: gradual, constant changes; or one-time
replacement. If the interface changes gradually and constantly, then you need to update
your tests constantly as well. However, if the entire interface is being replaced, then in
this case you’ll need to re-create large portions of the test automation from scratch, or
maybe even rewrite everything! For example, in many cases the UI may change often.
This is a gradual, constant change. However, if it some point the entire UI technology
is replaced completely, then you need to rewrite all the code of the automation that
interact directly with the UI. The same can happen to the API, though it’s much less
likely if this is a public API in which the company is obligated to maintain for backward
compatibility.
Chapter 6 test automation and arChiteCture

138
While this is a very important consideration, the unfortunate thing is that often you
cannot predict the future. Maybe today an internal API changes more often than the
UI, but at one point the entire UI technology will be completely replaced. Likewise, the
opposite can happen just as well, and you usually can’t predict what the future holds.
However, even though you can’t predict the future, sticking the test scenarios to
business functionality, and creating a modular infrastructure that abstracts all of the
technology-specific details inside replaceable modules, is the best bet (See the first few
chapters in Part II for more details). Finally, you can often make pretty good bets about
what’s likely to be replaced and what’s not, and also what changes gradually more often.
Limited Resources
If you design your test automation to use some expensive or limited resource, then
this may limit your ability to expand the usage of your tests. Such a resource may be
hardware equipment, software licenses, or some paid service. If for example, in order
to run the tests, you need expensive software to be installed on that machine, then
probably you’ll have a hard time justifying to management that all developers should
run the tests before check-in. If the license is required only in order to develop the test,
then you’ll be able to ask the developers to run the tests before check-in, but they won’t
be able to fix or create new tests – which of course relates to the discussion in Chapter 3
about people and tools.
Extensibility and Customizability
If your application is customizable, it means that regular users can change its default
behavior without having to know how to write code. These changes are usually pretty
limited related to what the user can achieve using extensibility, but still adds a level of
complexity to your test matrix. In most cases the application comes preset to a default
configuration that the user can change (customize). Note that these customizations,
including the default configuration are in fact inputs of the system. Therefore, you
probably don’t want to use the default configuration in your tests, but rather have the
tests take advantage of the customizability to make things easier to test. For example, if
the user can customize a form by adding fields to it, or remove some of the default fields,
then you may want the test to customize the application to include only a small subset of
the fields in most tests, but create fields of different kinds in other tests that are dedicated
to testing the customizability feature itself.
Chapter 6 test automation and arChiteCture

139
If your application is designed to be extensible, this means that customers can
develop their own extensions that will either replace or add to the default behavior of
the application. In this case too, the application is likely provided with some default
extensions, but you should not rely on their existence for your tests. You should separate
testing the code functionality from the extensions, as these default extensions may
or may not be used by the customer. In addition, it can be useful to create a special
extension for the needs of the test for various purposes, but mainly to test that the
extensibility entry points are called when they should.
Beyond the Layered ArchitectureThe discussion about the different alternatives of testing a layered architecture should
have helped you get the idea of the possibilities to architect the tests for that classic
architecture. However, as mentioned in the beginning of the chapter (and depicted by
Figure 6-3), many systems are more complicated than this, or simply, different. While
the number of possible architectures is infinite, the basic ingredients of the layered
architecture exists in virtually all architectures: big systems are made out of smaller
subsystems that communicate with one another. These subsystems often store and
retrieve data and are typically built from smaller components. Lastly, most systems
have some form of a user interface. Because we’ve already encountered all of those
ingredients in the layered architecture, you should be able to apply most of the ideas
and considerations to the architecture of any system that you need to plan your test
automation for.
You may want to take a look at Appendix A to get some ideas for how to apply these
ideas in real-world applications, but before you do that, there’s one more concept that
we only mentioned above briefly and we still need to cover in more detail – simulators.
As the layered architecture described above was of a stand-alone application that don’t
have dependencies on any other systems, we didn’t need simulators, but in most real-
world systems, as you can see in the appendix, simulators are an essential pattern that
you likely need to use too.
Chapter 6 test automation and arChiteCture

140
Simulators
In the context of test automation, a simulator is a component that is developed
specifically for the purposes of the tests to simulate another component that the
SUT depends upon and interacts with it, but we don’t want to test that component.
Simulators have several benefits:
• Because the test controls it, it can simulate situations that may be
very difficult to produce in other ways.
• It helps us make our tests more reliable, because we avoid many
unexpected situations that we can’t anticipate. Usually, we would
prefer to simulate third-party services that we can’t control.
• It can be used also to verify that the SUT sends the correct messages
to the simulated component.
• In case that the service we want to simulate is a limited resource, the
simulator helps us test earlier and more often (which shortens the
feedback cycle). Examples for such limited resources can be a legacy
Mainframe system, a paid service or some kind of physical device.
For example, suppose our system communicates with a third party or a legacy service
that predicts the weather by communicating with some sensors, and our system makes
some decisions upon the predicted weather. If we’d try to test the system end to end, it
will be very difficult to verify that our system makes the appropriate decisions if we can’t
control the predicted weather. We can try to control the predicted weather by physically
controlling the heat, moisture, and wind in the sensors’ area, but that would be very
difficult and expensive to do, especially if we need many test environments. In addition,
it will be difficult to assess how the physical parameters that we control should affect the
predicted weather. But if we simulate the weather prediction service altogether, we can
have the test tell it directly to predict a stormy weather or calm weather so that’s what our
system will see, and then we can easily test our system to see if it made the appropriate
decision according to the kind of weather that we told the simulated service to report.
This means that a simulator generally has two interfaces: The first one
communicates with the SUT just as if it was the real service. The second one is the
interface that allows the test to control what the simulator reports to the SUT and/
or to retrieve information about the messages that the SUT sends to the service. Note
that when you develop such a simulator, while you can design the interface with the
Chapter 6 test automation and arChiteCture
141
test any way you like, you must keep the interface with the SUT exactly like of the real
service. However, you can and should sterilize what the simulator sends to the SUT to
the necessary minimum in order to make it easier to control and maintain. Also, you
should consider whether you want the simulator to reside inside the process of the tests
or in a separate process. If you decide to implement it as part of the test process, then the
test can interact with the simulator by directly accessing shared data in memory (e.g., a
static list of objects) If you decide to go for a separate process, you need to have another
communication channel between the tests and the simulator to allow the tests to control
the simulator. Continuing the previous example, the test should use this channel to tell
the simulator to “predict” stormy weather. Whether you implement the simulator in the
same process as the test or a separate one, you may have to take care to synchronize
access to data (whether it’s in the test process’s memory or in that of the separate
simulator process) to avoid race conditions5 if the SUT interacts with the simulator
asynchronously from the test.
There are two common misconceptions about simulators. The first one is that
they should replay real-world data. For some people it sounds easier to record the
communication traffic and let the simulator replay it. However, replaying messages “as
is” usually isn’t going to work, as some parts of the message either depend on date and
time, on order, on data received in the request (which the simulated service responds
to), on uniqueness, etc. Attempting to make the simulator manipulate the messages
accordingly will just complicate it, make it less reliable and more difficult to maintain.
It also makes it much more difficult to specify the expected result deterministically and
also prevents you from testing rare edge cases that the recording didn’t capture simply
because they’re rare and may be missing from the recording.
The second misconception is that the simulator should be stand-alone. A stand-
alone simulator is one which always replies with the same response, or has some
internal logic to always reply with an “appropriate” response, but cannot be controlled
by the test. While there are some uses for this, the main caveat of a stand-alone simulator
is that you don’t really have control over the inputs that the simulator provides to the
SUT and cannot simulate all the cases you need. In addition, over time it leads the code
of the simulator to be complicated and possibly buggy because its internal logic will just
get more and more complicated, while actually trying to duplicate the behavior of the
5 A Race-condition is a case where the state of a system is dependent on the sequence or timing of asynchronous events. It becomes a bug if it brings the system to a state that the programmer did not anticipate or handle correctly.
Chapter 6 test automation and arChiteCture
142
original service in order to reply with the “correct” response to all possible permutations
of the request.
The preferred approach I usually recommend is to make the simulator as thin as
possible and allow the test to control it directly. In addition, if you also want to verify the
messages that the SUT sends to the simulator, then you should also add a feature to the
simulator to retrieve the data that was sent to it, so you can investigate it in the test.
OVERCOMING THE PSYCHOLOGICAL BARIER
For some reason, in most of the cases that i suggested to a customer to implement a
simulator, the initial response was that even though it’s a cool idea, it’s not realistic, at least not
in the near future. this answer usually came from test managers, but sometimes also from dev
managers. i guess that this reaction comes because it’s a big mind-shift from manual testing,
and it seems much more complicated and risky because of that. however, in most cases when
i persistently asked what it would take to build the simulator, explained its benefits and the
risks of instability in case we won’t have it, it turned out to be much simpler than everyone
would have initially thought. in most of these cases there was one relevant developer who had
either written the service or the component that talks to it, which once i found and talked to
him, he gave me all the technical details that i needed in order to build the simulator.
in some cases, though, i had to reverse engineer the protocol, which was more time
consuming, but still certainly doable. note that when you follow the procedure of writing one
test at a time, as will be described in part 2, then you don’t need to reverse engineer and
implement the entire protocol at once, but rather only the minimum that is necessary for
the particular test. once you write one test with the simulator and everyone can see that it’s
working, no one will stop you!
Simulating Date and Time
Many systems execute batch jobs or raise some events on particular date or time
intervals or at particular dates and times. In these cases, many scenarios are often
not feasible to test effectively without some kinds of work-arounds. Tampering with
the system’s clock is not recommended because it affect all processes on the machine
(especially if you run Outlook). Sometimes it’s possible to tamper with the data in the
database to cause the event we want sooner, but that’s not always an option and may
cause data integrity issues.
Chapter 6 test automation and arChiteCture

143
As the date and time are inputs to the system like any other inputs, if we want to
control it in the test we need to simulate it. However, the date and time are usually not
provided from a “service” but rather directly from the operating system. While it’s not
feasible to mock the operating system itself, the trick is to create an abstraction layer
between the operating system’s clock and the application. If the system employs a
dependency injection (DI) mechanism, then it may already have such an abstraction
layer. If not, then the code of the application should be refactored to introduce this layer.
If there are many places in the code that access the system’s clock, then it can be a risky
refactoring, but if not, then it’s not that hard. Then you can implement two classes that
implement this abstraction: one uses the real system’s clock – this is the class that is
used in production; and another one is the simulator (or mock) that the test can control.
You should either create a special build target (in addition to the standard “debug” and
“release”) that uses the date/time simulator or have some kind of mechanism to inject
that class at runtime.
Note that no system is designed to handle a case where the time moves backward,
so the simulator should only allow the test to jump the simulated time forward. It’s also
important to mention that if a few subsystems or services rely on the system’s clock, then
it’s important that all of them will use same simulator in order to be synchronized with
one another. See the third example in Appendix A for a real-world application of this
solution.
Summary: Making Your Own ChoiceNow that you’re familiar with the main techniques and approaches for architecting how
the test automation can interact with the SUT, and the considerations for each of them,
you may want to take a look at Appendix A to see some real-world examples. With or
without reading Appendix A, you should have all the tools you need in order to plan the
architecture for the test automation of your system. Note, however, that when you’ll try to
apply this knowledge for the first time, you may still be confused. This is because there’s
usually more than just one right way. Few alternatives may be valid, even though each
has different pros and cons. Eventually, after considering all the options, you should
choose what you believe to be the best for you and for your organization and go with it!
Over time, you’ll learn and adjust, or maybe even decide to change direction, but at least
you’ve gained valuable experience.
Chapter 6 test automation and arChiteCture

145© Arnon Axelrod 2018 A. Axelrod, Complete Guide to Test Automation, https://doi.org/10.1007/978-1-4842-3832-5_7
CHAPTER 7
Isolation and Test EnvironmentsIn the previous chapter about architecture, we mentioned that for every computer
system, the outputs yielded from the system depend only on the sequence of inputs
provided to it. According to this claim, we said that we must control all the inputs in
order to determine what the output should be in a particular test. However, this claim
also implies that we need to re-initialize the system before each test!
In order to understand what it means, let’s start from a very simple example: if we
test the Calculator application on Windows and press “1”, “+”, “1”, and “=” we expect to
see an output of “2” in the result window, right? However, this is true only if the initial
state is just after starting the application or after pressing the “C” button, which clears
the current calculation. If we already pressed some keys before we started our tests, for
example, already pressed “1”, then the result will be “12” (the first “1” we press in the test
will join the initial “1” that was there before the test to form an “11”, and then the “+”, “1”,
and “=” will change it to “12”).
StateWhile Calculator is a simple application and we can pretty quickly restart it before
each test, this is not always practical for other applications. But fortunately, the above-
mentioned claim is too strict, and the following softened version of it is still true: “the
outputs yielded from the system depend on the sequence of inputs provided to it, and its initial state.” Another, more common way to phrase it is that “The output of a computer
system is completely determined by its inputs and its current state.” This means that in
order for the tests to be reliable, we must have full control, not only on the inputs, but
also on the state of the application. Even though the internal state of an application is

146
mostly controlled directly by the application itself and not by the test, the test can bring it
to most desired states by starting from an earlier state and applying the necessary inputs.
In our calculator example, instead of having to restart the calculator before each test, it
suffices that we press the “C” button in order for the test to be correct in all cases.
Note that state is anything that the system remembers, in any kind of memory. This
includes (though not limited to):
1. The CPU registers. Among others, this includes the Instruction
Pointer register that tells the CPU the address of the next
command to execute.
2. The RAM. Normally the variables and data that a program stores at
runtime, which are not saved to disk is stored in this memory.
3. Local hard drives. The data stored in hard drives is typically either
in the form of files and folder (the file system), or in the form of a
database (which typically uses the file system underneath). The
Windows Registry is another form of data that is stored on the
hard drive.
4. In case of a virtual machine (VM), both the host and the guest
machines have their own CPU registers, RAM, and local hard
drives. Obviously, the guest machine only uses the resources
provided by its host, but to most purposes these look and behave
like two distinct machines.
5. Remote hard drives. Similar to the local hard drives, but these
drives are connected to another computer on the network. These
drives are typically accessed either through a network file system
or through a database service over the network.
6. The state of remote machines and services, including cloud
services. These days most computer systems consume cloud
services or services from remote machines. If we treat these
services as part of our system, then the state of these systems
should also be considered as part of the state of our application.
For example, if our application uses a cloud-based indexing
service, then the state of this service can affect the outputs of our
system.
Chapter 7 IsolatIon and test envIronments

147
7. The browser’s cache and cookies. While these are in fact stored in
RAM and/or local hard drives, in web applications these have a
special significance, as the web application accesses them, and is
affected by them, in a different fashion than regular RAM and hard
drives.
Hypothetically, any external change to any piece of information stored in these
locations can affect the state of the application and interfere with the results of the tests.
Luckily, most of these storage forms are controlled and managed by pieces of software
that limit the access that a program has to these storage, to only the portions assigned to
it or specifically permitted. In addition, the more the application is modular, the more we
can consider the state of each module separately and guarantee that a certain output can
only be affected by the state of certain subsystems. We can even take advantage of these
limits and guarantees to make our test automation system more reliable and predictable
by having better control over the state of the system. Harnessing these guarantees to our
needs is called isolation.
In contrast, when these guarantees are not harnessed appropriately, then this can
often cause serious problems to the test automation and hurt its reliability. I like to say
that these problems are caused by lack of isolation.
Isolation Problems and SolutionsLet’s first consider some common problems that are caused by lack of isolation and then
we’ll talk about relevant isolation techniques that can solve these problems. After that, we’ll
discuss some other advantageous “side effects” that we can gain from using proper isolation.
Problem 1 – Manual Tests and Automated Test Running in Different TimesConsider an e-commerce application that sells audio equipment. Kathy is one of the
most veteran automation developers in the team. One of the first tests that she has
written was a sanity test that tries to add the product “earphones,” which is known to
cost $100, to the shopping cart; and the “Microphone” product, which is known to cost
$50, and verifies that the total price of the cart is $150. This test was very stable and was
running as part of the nightly sanity suite in the QA environment for a long time, and
only failed when there was a major problem or bug.
Chapter 7 IsolatIon and test envIronments
148
One morning, the QA manager asked John, a manual tester, to verify that when the
administrator changes the price of products, existing invoices keep showing the original
price. John performed the test and happily reported to his boss that the application
worked correctly (or maybe he wasn’t so happy, because he feels more satisfied when he
finds bugs?).
Anyway, the next morning when Kathy examined the results of the automated
nightly sanity suite, she was surprised to see that this old and reliable test failed. Further
investigation showed that the actual total of the cart was $170 instead of the expected
$150. A deeper investigation revealed that someone changed the price of “Earphones” to
$120. You probably realize by now who is this someone…
Such stories are pretty common. Usually when the automation project is young
and there are not so many tests, the frequency of such events is pretty low and can
be fixed very specifically when they occur. However, when the automation grows and
there are many tests that rely on a large variety of existing data from a shared database,
the frequency of such events goes up and can adversely affect the reliability of the
automation results.
Problem 2 – Manual Tests and Automated Tests Running SimultaneouslyOne other test that Kathy wrote verifies that when a customer completes an order with
three earphones, the inventory is updated accordingly. More specifically, when the
test starts, it first reads the number of earphones in the inventory; then it performs the
transaction of buying three earphones, and eventually it reads the inventory level once
again and verifies that it was reduced by three relatively to the original read.
This test worked perfectly fine at nightly runs, but occasionally when this test ran
during the day, and especially in pressured times before releases, this test failed. The
reason is that John (and other manual testers) performed additional transactions during
the day and occasionally bought earphones exactly between the time the test started and
the time it ended. The automatic test fails because it expects the updated inventory to be
exactly three below what it was at the beginning, but because of the other transactions
that the manual testers did in parallel, it drops even more.
Chapter 7 IsolatIon and test envIronments

149
Problem 3 – Order MattersAs the result of the previous experiences, Kathy implemented some isolation
mechanism: instead of using existing products from the database (like “earphones” and
“microphone”), the test automation infrastructure has created special products (“test1,”
“test2,” etc.) before any test was run, and delete it after the last test completes. The tests
now only use these products instead of the real ones.
One day a new automation developer named Bob has joined Kathy’s automation
team. The first task that the QA manager assigned to him was to automate the test that
John used to perform, which verifies that when the administrator changes the price
of products, existing invoices keep showing the original price (the same test that was
mentioned in problem #1).
Bob successfully implemented this test and ran it few times to make sure that it’s
stable. In addition, the QA manager warned him that there could be a conflict with the
sanity test as was mentioned in problem #1, so he ran this test a few times, too, and made
sure that it also continued to work properly.
For some nights both of these tests were running without any problem. One day,
Kathy noticed that the name of the test that Bob wrote was not very descriptive so
she changed it. To everyone’s surprise, the next night the sanity test failed. Like in the
previous case, the test failed because the actual result was $170 instead of $120. When
Kathy ran the test again separately, it still passed. All manual tests looked fine too. Kathy
was baffled, and finally decided that it was probably a one-time thing (maybe a bug that
was already fixed this morning?) and that the failure couldn’t be reproduced.
To her even bigger surprise, the next night the test failed again! Feeling more baffled,
she decided to investigate more thoroughly. Eventually she found out that changing the
name of the test caused the order of the tests to change and make Bob’s test run before
the sanity test, while before the name was changed it ran after the sanity test, and that
Bob’s test was modifying the price of “test1,” which the sanity test also used, similarly to
what happened when John ran this test manually.
However, Bob still didn’t understand why it didn’t fail when he ran the two tests just
after he wrote them. So, he turned to Kathy to help him understand what he did wrong
then. After he explained to her how he ran the tests, she told him that the isolation
mechanism that she implemented re-creates the test data whenever a suite of test starts
to run. Bob indeed ran his test before the sanity test, but he ran them separately (as
opposed to running them together as one suite), which caused the infrastructure to
re- create the data between them and therefore “hide” the problem.
Chapter 7 IsolatIon and test envIronments

150
Problem 4 – Automated Tests Running SimultaneouslyAfter the automated test suite grew, and the time it took to run all them was too long,
Kathy decided to split the tests into four groups and run each group on a different
machine in parallel. The runtime indeed decreased significantly, but occasionally tests
that used to be very stable before were failing with an unclear reason. Running the test
again separately didn’t reproduce the failure. Especially the inventory test that was
mentioned previously was failing from time to time, even though the tests were running
at night when no one interacted with the system manually.
Obviously, the reason for the failures is very similar to the reason of problem #2, but
instead of manual testers interfering with the automation, this time different automated
tests that ran in parallel interfere with each other.
Isolation TechniquesTheoretically speaking, the best isolation will be achieved if for each test case we’ll
start from a “virgin” environment, on which the application was never installed. The
initialization of the test will install all the relevant components of the application, start
them, and only then execute the test. In real life, however, this is very rarely feasible.
So, let’s examine some techniques that are more feasible. Some of these techniques are
complementary to each other and can be used together.
Use Separate AccountsIf the application provides a service to individual users or customers and has a notion
of “accounts” that should not see one another’s data, then this is a “low hanging fruit”
when it comes to isolation. First, you can create one account that is dedicated to the
test automation system so manual testers won’t intervene. Then you can (and should)
even assign a different account for each automation developer and test execution
environment (e.g., the where the nightly tests are run) to eliminate collisions between
tests running by different developers simultaneously.
Chapter 7 IsolatIon and test envIronments

151
Separate Between Manual Testing and Test Automation DatabasesMany teams have a limited number of environments that serve different phases of the
development cycle. Typically, these are called Dev, Test (or QA), Pre-prod (AKA Staging
or Acceptance), and Prod (for production), though different teams have some slight
variations in the number, names, and purposes of the environment. Each of these
environments typically includes its own copy of the database.
If your team uses such environments, the next recommended isolation technique
after using separate accounts is to create just one new environment with its own copy
of the database, just for the automation. This technique becomes most valuable when
creating an automated build that runs the tests. The build should first create or update
the automation environment, and then run all the tests on it. This also requires us to
automate the deployment of the environment (if we still haven’t). The good news is that
once you cracked all the intricacies of creating this automatic deployment script, then
you can use it to create or update any other environment (e.g., Test, Prod) on demand,
much more easily and safely than when the deployment was manual! See Chapter 15 for
more information about it.
If this environment is only used for running centralized test cycles and its usage
is managed and synchronized by the build system (or even manually if the number of
people using it is very small), then this isolation technique ensures that the automation
has full control over the environment. and it eliminates almost all excuses for
unexplained failures.
Having Separate Environments for Each Team MemberThe assumption of the previous technique that only one user can use the environment at
a time may be appropriate if the number of people having to use it simultaneously (e.g.,
automation team members) is small and the time it takes to run a cycle is also short. But
that assumption may very quickly become incorrect, and that environment that we’ve
created becomes a bottleneck. While automation developers add new tests or change
existing ones, they need to run them in order to verify and sometimes debug them in
order to test the tests themselves. If there’s only a single test automation environment,
then they’ll probably test and debug them in another, non-sterile environment. But first,
the environments may differ, which means that what they test won’t necessarily reflect
Chapter 7 IsolatIon and test envIronments

152
what will happen in the “formal,” centralized cycle; and second, they may dismiss any
nonobvious failure as caused by the non-sterile nature of the environment.
For these reasons, the next logical step is to create multiple automation
environments, and even have a separate environment for each automation developer.
But what about application developers? If we want to encourage (or enforce) them to run
some tests before check-in, then they also need a separated environment.
Usually the largest obstacle for doing that is that the system is too big to put on
every developer’s machine (and clearly, it’s too expensive to have another dedicated
machine for each developer). But in most cases, even if in production the system uses
several dedicated servers, it’s not that big of a deal to put them all on one machine. The
only thing that is usually really big is the database. But as a matter of fact, in most cases
the automation does not need all the data in there. You can keep only a bare minimum
portion of the data that the automated tests actually use (see the next technique that
complements this approach).
Some people are concerned that such minimized environments don’t reflect the
load and the scale of the real system. Well, that’s true, but that’s not the sweet spot of
functional automated tests anyway. Load tests, which are covered in Chapter 18, require
their own dedicated environment that may have a lot of data, and should be more similar
to actual topology of the production environment. However, the load environment, as
well as the load tests themselves, should be completely separate and different from the
regular functional tests and their environments.
Another concern that is often raised is that each environment we add adds more
maintenance and management costs. This is indeed the case when some of the
deployment steps are done manually. Updating the database schema is often performed
as a manual step, which is very risky. If you skipped the previous technique, then now
you’ll be required to fully automate the deployment process too! Once the process
is completely automated, it takes very minimal effort to spin up a new environment,
especially if you’re using VMs or containers (see below).
Running Tests in Parallel
It you overcame the challenges of creating many separated environments, you can
leverage this to create few environments for the main test cycles (e.g., CI or nightly
builds) and split the tests among these environments. Each portion of the tests will run
on a different environment in parallel with the others, and therefore the total time of the
test run will be reduced significantly. Just make sure that the total time of each portion is
Chapter 7 IsolatIon and test envIronments
153
close enough to the total time of all the rest, and the total time of the entire test cycle will
be divided by the number of environments.
Resetting the Environment Before Each Test CycleWhile usually the theoretic approach mentioned above of starting from a clean
environment for every test case is not feasible, it is often feasible to do it once before
each test cycle (e.g., before the nightly or CI runs). The true meaning of “clean the
environment” may vary, but in general it means somehow reverting the state of the
environment to some well-known initial state.
This can be achieved in several ways, depending on the architecture and the
technologies used by the application. Here are a few examples:
• Restoring the database from a known “baseline” backup;
• Deleting any files that the application creates during its run, or
replacing them with their original versions;
• Given that the application has an install/uninstall program, use this
program to uninstall and reinstall the application.
One question that often arises when thinking about these solutions is whether
resetting the state should be done before the tests or after? In most cases the preferred
answer is before. This ensures that the environment will start fresh even if the previous
cycle was aborted in some way before reaching the cleanup phase. In addition, if tests
fail and you need to investigate, keeping the environment intact may help you get more
information (e.g., log files, DB entries, etc.) about the cause of the failure.
Another common and very powerful technique for resetting the environment before
each test cycle is to use Virtual Machines or Containers, possibly using a cloud service.
Database Backup and Restore
Given that the application is using a single database, and that you already have a
separate environment for the automation, or even multiple separate environments, you
might want to consider starting each test cycle, or even each test suite from a clean slate,
by restoring the database from a backup that was prepared in advance. Each time that a
test cycle runs, it first restores the database from this backup.
Chapter 7 IsolatIon and test envIronments

154
In case you need to update the schema or the data in the backup file due to changes
to the product and/or to the tests, you must re-create that backup. In order to do so,
restore the previous backup, apply the needed changes, and then re-create the backup.
It would be valuable to keep these backups in the source-control system so that they’d
be synchronized with the changes of the SUT. However, one disadvantage of storing
backup files in source control is that backup files are typically binary and source-control
tools typically can’t store deltas for binary files, so they need to keep the full file for
each and every change. It also means that you can’t compare different versions of the
file. Therefore, a better approach you should consider is to store scripts that re-create
the database instead of a database backup per se. Accordingly, instead of restoring the
database from the backup file, the tests infrastructure will run that script in order to
create the clean environment.
Transaction Rollback
Another isolation technique that involves a database and falls into the category of
resetting the environment is to start each test by starting a new database transaction and
ending it (whether successfully or not) with rolling back the transaction. This ensures
that every change that was made by the test to the database is undone.
This approach is more suitable for component tests than for end-to-end tests,
because it requires that the SUT will use the same transaction that the test started. In
addition, it is typically more adequate as a technique to isolate between individual tests
rather than between test cycles, as the rollback time is pretty short.
If you’re using it for a component test, the component under test should be able to
take an existing database connection through which it communicates with the database,
typically through its constructor, so the test should open the connection, begin a new
transaction, and give the connection to the component. When the test completes, it
rolls back the transaction or simply closes the connection without committing the
transaction, which abandons it and practically rolls it back.
With an end-to-end test this is generally only possible if the application provides
some kind of a hook or “back door” to start a new transaction and to roll back it, only
to solve this particular problem, which might introduce a significant security hole.
Other disadvantages of this approach in end-to-end tests is that it implies a high degree
of coupling and presumptions between the test and implementation details of the
SUT. For example, the type, name, etc., of the database are implementation details and
not some specified requirements. Even though the type or instance of the database
Chapter 7 IsolatIon and test envIronments

155
is not something that changes often, sometimes a re-architecture of a feature still
involves such a change (e.g., taking a few tables out from a relational database into a
“NoSQL” database), in which case the changes to the tests would be huge. Moreover,
the intervention of the test in the database transactions might cause the SUT to behave
differently under test than it would be in production, which makes it less reliable. This
can happen if the SUT assumes that a transaction was committed, which is true in
production, but the test rolled it back.
Use Virtual Machines (VMs), Containers, and the Cloud
In case you’re not familiar with VMs, here’s a quick recap: A VM is like a computer
hosted within another computer. To be more precise, it’s an operating system (OS) that
is hosted inside another OS. The host OS allocates some of its resources, like CPU time,
memory, disk space, network bandwidth, etc., to the VM, while the VM is not “aware”
that’s it’s being hosted and it behaves like a complete, normal OS. As a user, you can
interact with the VM either through a special application in the host or via remote
desktop. But in many cases VMs are used to run services that only other applications
interact with, or that can be accessed through a browser. One host can host multiple
VMs, and there are often dedicated, powerful machines whose sole purpose is to host
multiple VMs.
Containers are like a very lightweight VM. A typical VM takes quite a lot of resources,
and the time to turn it on is similar to the time it takes to any normal OS to load (which
is typically a few minutes on most Windows versions). With containers however, the
host typically shares parts of itself and its resources with the container (as opposed to
allocate the resources) and therefore uses less of them. This imposes some restrictions
and limitations on the container, which cannot be any arbitrary OS as in the case of VMs.
Therefore, a container is much more limited and does not have a GUI, but it loads almost
instantly and uses much less resources like memory, disk space, etc.; provides greater
flexibility and manageability; and still provides similar isolation to those of VMs.
There are two main features that make VMs and containers interesting for our
isolation needs:
• Snapshots: because the “hard disk” of the VM is not a real hard disk
and merely a file on the host, it’s possible to save special backups
(which are called snapshots) of the VM and restore them later. In fact,
a snapshot can even contain the state of the memory of the VM and
not only its hard disk so it can be taken while the VM is “powered
Chapter 7 IsolatIon and test envIronments

156
on” and be restored exactly to the same state. Also, the virtualization
technology usually allows us to save only the differences from the
base image of the VM so it doesn’t take so much space and takes less
time to create and restore. The test automation can use this feature
to restore the system to a snapshot that was taken in advance and
contains the predefined initial state for our tests.
• Templates: similarly, an image of a VM can be cloned to create
multiple instances of the same VM. It’s a bit more complicated
than just copying the image, because in order to prevent network
collisions and ambiguities, each VM must have a different name,
IP address, MAC address, etc. But luckily the host can take care of
managing these differences and therefore it’s still possible. The ability
to create multiple instances of VMs from the same image makes it
easy to scale out applications (see the next sidebar). Similarly, for
test automation purposes, it can be used to create multiple similar
environments that can test in parallel with proper isolation.
Some of the major Internet players, like Google, Microsoft, and Amazon maintain
some huge datacenters around the world and rent compute resources from them, mainly
in the form of VMs and containers, to anyone who wants them. This type of service
is known as the cloud. Its main benefit over using your own VMs is the flexibility to
increase or decrease the resources you consume, while you just pay for what you use.
They also free you from the responsibility for maintaining the expensive hardware. There
are many other benefits and options for using the cloud, but that’s beyond the scope of
our discussion.
The bottom line is that snapshots and templates of VMs and containers are a great
way to achieve isolation, parallelism, and help you create and manage large numbers of
environments.
SCALING UP VS. SCALING OUT
traditionally, the hardware that was used to run a heavy-loaded server application was a
single “heavy-duty” computer. mission critical servers often used a pair of adjacent machines
called a cluster, one denoted to be the primary and the other secondary, so that if the primary
had a failure, the secondary would take over instantly to continue serving requests seamlessly,
while the primary could be fixed. If the load on the server increased over time, usually adding
Chapter 7 IsolatIon and test envIronments

157
more memory or a faster CpU would be the solution applied to the problem. this is known as
scaling up the hardware. the problem was that the hardware for these high-end heavy-duty
machines were very expensive and therefore it was a big deal to upgrade such a machine.
In addition, even though the failover provided some redundancy, it’s still very limited, as the
two machines were physically close to each other and any physical disaster would probably
hit both of them. there were solutions to this problem but they were also very expensive and
complicated.
In the “dot com boom” era, companies started to leverage a large number of normal pCs
to provide redundancy and scalability. the application should be architected properly to
support it, but if it does it allows these companies to add more compute resources by simply
deploying the application on yet another machine. this is known as scaling out. this allows us
to add more computers much quicker than it takes to order and install expensive specialized
hardware. In recent years, with the advances in the area of vms and the cloud, it has become
even more popular and today it is mostly considered bad practice to design a “monolithic”
system that does not support scaling out.
Create Unique Data for Each TestMost of the isolation techniques we’ve mentioned so far deal with isolation between
environments and between test cycles. But what about isolation between tests in the
same cycle and environment? Recall problem #3 discussed earlier in this chapter.
As it’s usually not feasible to create a complete isolation between individual tests
in the same cycle and in the same environment (except for unit tests), it’s possible to
reduce the chances of collisions by applying some relevant design techniques. The
common to all of these techniques is that they avoid or prevent sharing mutable data
between tests.
One such technique to avoid sharing data between tests is simply to create a unique
set of data for each test. If each test creates and uses the data it needs to change or
access, one test cannot affect other test’s data. Note that when I say that the test creates
data, I don’t mean that it accesses and inserts data directly into the database, but rather
that the test invokes operations on the SUT that creates the data. For example, if the
test has to change a price of a product, then it should first create the product through
the application and not directly through the database. This ensures that the data is
consistent and valid.
Chapter 7 IsolatIon and test envIronments

158
For optimization reasons it’s not always appropriate to create everything through
the UI though. If the application exposes an API to create this data, then you should
probably use that anyway. If not, then consider reusing the DAL components of the SUT
to create the data. Only inject the data directly to the database as a last resort, both to
avoid possible inconsistencies, and also to reduce the coupling between the tests and the
database schema, which is usually an implementation detail of the SUT.
The catch in the concept of creating the data you need in the test is to determine
which data can be shared and which shouldn’t. It’s pretty obvious that transient data that
only the test changes should be created. But consider the following case (continuing the
problematic scenarios of Kathy, John, and Bob): A new feature was developed that allows
the manager to define promotions that gives a discount for any product out of a group
of products that participate in the promotion. For example: buying either a speaker,
earphone, or microphone gives a 10% discount. Bob writes a test that creates such a
promotion, and associates it with the existing “earphone,” “speakers,” and “microphone”
products in the test DB. The data related to the product themselves is not changed, only
referred to by the new promotion that he created. When Bob runs his new test it passes,
but at the nightly build Kathy’s famous sanity test fails because the expected total was
now 10% lower than expected. Note that superficially, Bob followed the guideline and
created a new promotion, which is the only entity he actually changed. But even though
the product entities themselves didn’t change, they were affected by the new promotion
entity.
So, it’s not enough for each test to create only the data it changes. It should also create
any data that it uses. However, beware not to take this rule too far either: most applications
use a set of data that very rarely change, often called reference data. For example: the list of
countries and currencies. In the mentioned example, the prices of the products use some
default currency that is defined somewhere in the database. Creating a separate currency
for each individual test is probably an overkill. There’s some gray area between such
reference data and data that rarely change. The list of products also changes pretty rarely,
but as we saw, we better create a new product for each test nonetheless.
There are a couple of rules of thumb that can help you decide whether a piece of
information should be created by each test or can be seen as reference data:
• Do many of the tests use this type of data directly? In our example,
on the one hand, the notion of which products the customer buys
is key to many tests; therefore it should probably be created for
each test. On the other hand, if the entity is mostly used indirectly,
like the currency in the above example, then it can probably be
Chapter 7 IsolatIon and test envIronments

159
shared among most tests. However, tests that use or verify certain
characteristics that are closely related to the notion of a currency
should probably add their own currency entity for their particular
use.
• Can most of the tests work correctly if there was only one default
instance of the type of entity in the database? Even though the
real database would probably define 196 countries or so, the vast
majority of our tests can work with a single, default country. So, we
can keep that single record in the reference database and use it for
any purpose that does not specifically need a special property of a
country. Here again, if the test needs to interact more closely with the
country entity, then it should probably create a new one. However,
it’s probably not adequate to refer to one specific product in the tests
DB as a “default product” because each product is unique and many
tests need more than one.
The outcome of these rules is that you should probably have a very thin database,
containing only one entity of the reference data tables, and no data at all in all other
tables. This also has the advantage that creating a new environment is much faster and
leaner (i.e., requires less storage space, and therefore faster to copy or re-create).
I also prefer to use dummy reference data, which is intentionally different from
the real data (e.g., “Dummy country1”, “Dummy country2”, instead of the real list of
countries). This way I discover whether there are other assumptions in the system about
the actual values. If everything works correctly with the dummy data, I leave it as is. But if
I encounter a dependency on real values, I question whether it is really necessary or not.
If it is, I replace the dummy data with the real one, but if not, I’ll open a bug and push to
remove the unnecessary dependency. While the value of removing such dependencies is
not immediately apparent, it makes the code of the SUT more reusable and maintainable
in the long run.
Defining this minimal set of data can be a big challenge, as often the database
schema and the necessary data that the application requires in order to function
properly are poorly documented, and often no one really knows all the details. The
solution may take some time but is not very complicated. If you’ll do it, then in the
process you’ll gain back the invaluable knowledge about the real prerequisites and
structure of your application – a knowledge that was lost along the way of developing
the application and will probably be valuable again in the future. This knowledge will be
Chapter 7 IsolatIon and test envIronments

160
very valuable once some relevant parts of the system need to be refactored or rewritten.
In addition, using a minimal set of data rather than a full-blown database often has a
nice side effect that makes the system, and correspondingly the tests, run faster.
Essentially the solution is to reverse engineer and debug the system. Simply start
with one sanity test that does not rely on existing data (that you aware of), and try to
run it against an environment with an empty database. The test would probably fail. At
first, chances are that the failure would be that the system won’t even start! Whatever the
failure is, you should find the missing data that caused the failure, fix it, and then try to
run the test again. To find the missing data, try invoking or even debugging the operation
that failed both against a full database and against the new thin one, and compare the
results. Continue this process until all of the failures in the test have been fixed, and the
test passes. After you’ve done it for the first test, the next one would probably go much
faster.
The details, however, may be somewhat different according to the type of
application:
• If the application is a shelve product, and assuming that you create
the data either through the UI or through a public API, then in any
failure the application should provide a clear error message to the
user. If it does, add the missing data as part of the code of the test. If
it doesn’t, you should debug the system until you find the root cause.
Then, either fix the error message yourself, or if you’re not allowed
to change the source code, ask a developer to do so or open a bug. If
you can fix the code yourself, it’s best, because you can verify that the
error message is clear before you add the missing data.
• If the application is a Software as a Service (SaaS) and you’re using a
separate account for the tests as suggested in the first technique, then
every account should be considered the same as a shelve product.
However, there’s probably some reference data that is common to
all accounts (e.g., countries, currency, etc.) that only administrators,
marketing people, or any internal personnel can modify. In case that
such data is missing, giving a nice error message is only nice to have,
but not critical, as the end user should never encounter this error.
However, it’s still recommended to provide a clear error message
in the log at least. Anyway, because the missing reference data is
Chapter 7 IsolatIon and test envIronments

161
common to most of the tests, then instead of creating it as part of
each test, either create it at the beginning of the test suite, or add it
directly to a snapshot database (as described above in the technique
“Resetting the Environment for Each Test Cycle”).
• If the application is a website (either public or internal application),
but does not use accounts and does not require registration, then
all of the data and configuration are probably common to all users.
This is probably the hardest case. In this case you have to decide
what data is true reference data that should never change, and which
data should be considered as input. In some cases, it’s not that
difficult because anything that is editable by any user (including an
admin) is something that the test should create, and data that can
only be changed by someone in the development team should be
included in the snapshot of the database that the automation uses
as a starting point. However, in other cases the distinction is not that
clear. In today’s DevOps approach (and also in some less mature
organizations), there’s no clear distinction between the development
team, administrators, and businesspeople. Accordingly, internal tools
are developed to aid the relevant people to add or update different
parts of the data. For some parts of the data, a corresponding tool is
created at the beginning of the project as a one-time thing to enter
the data into the database. As internal tools, they’re often quite
“hacky” and it’s unclear whether this data should really be editable.
In addition, some parts of the data may not come from a user, but
rather from external systems. Similarly, the data could have been
imported from the external system once at the beginning of the
project, and it’s not expected to change any time in the future. In
these vague cases, just choose what data to treat as a reference data
and which to not, according to your own judgment, but try to write
the tests in a way that will be easy to maintain if one day you decide
to change that decision.
• In complex, monolithic, and poorly documented systems, the
approach of starting from an empty database and find what’s missing
may not pay off. If this is the case, try to do it on a test-by-test basis or
at least feature by feature. Instead of starting with an empty database,
Chapter 7 IsolatIon and test envIronments

162
start with the existing (full) one, but identify what relevant data your
tests rely on. Make sure that your test creates that data that it needs
instead of relying on existing ones. Over time, review which data is
probably not needed and delete it (after creating a backup). If the
tests keep working correctly, it means that this data was indeed
no longer relevant. However, if tests fail due to this missing data,
either fix the failing tests to stop relying on that data, restore the old
database from the backup, or add the missing data that the tests
or the system need. Gradually, you can delete irrelevant data from
specific tables and make your test database smaller and leaner.
Each Test Cleans Everything It CreatesHaving each test create the data it needs resolves most of the conflicts. However, there
are cases where a test needs to change some global state, or that an entity that one test
creates might affect other tests even though they don’t use it directly. For example, one
test can create a promotion that gives a 10% discount for every sale above $100, or a
different promotion that gives a discount for every sale that occurs on Fridays between
5:00 and 6:00 p.m. (Happy Hour), while another test can create a sale with total of
more than $100 or that coincidentally occur on Friday 5:24 p.m. without being aware
of the existence of the promotions that the first test has created. Therefore, it’s also
recommended that each test will delete or roll back the changes it made.
Most common unit testing frameworks (e.g., JUnit, NUnit, MSTest, etc.) provide
a way to define special methods that run before each test in a test class, and methods
that run after each test method. For example, JUnit uses the @Before and @After
annotations to identify these methods. (See Chapter 3 for a description of unit testing
frameworks). In different frameworks these have different names, like SetUp/TearDown,
TestInitialize/TestCleanup etc. For the matter of clarity, I’ll refer to them as Initialize
and Cleanup methods. The main purpose of these cleanup methods is to provide a
common way to perform the cleanup of the tests. However, it turns out that the way they
work does not lends itself very well for many cases and writing really robust cleanup
code is very difficult.
Chapter 7 IsolatIon and test envIronments
163
There are several reasons for that:
1. A test class can contain more than one test. Even though the tests
in the same class should be related, it’s not always true that they
all require the exact same cleanup.
2. Generally, these Cleanup methods run only if the corresponding
Initialize method succeeded (didn’t throw an exception), but
regardless of whether the test passed or not. In most cases it
makes sense because if you failed to initialize something, there’s
no need to clean it up. On the other hand, if the test failed, then
you still need to clean up. However, often the Initialize method
creates more than one entity that needs to be cleaned up, and
it’s probable that the creation of the first entity succeeds and the
second one would fail. In this case, the cleanup method won’t
be called and the first entity will remain and won’t be cleaned up
properly.
3. Often the test itself creates an entity. Seemingly there’s no
problem with that as the cleanup code can still delete it. However,
the test may fail before or while creating the entity, which can
cause the Cleanup method to fail too when it tries to delete the
entity that wasn’t created.
4. A test (or the Initialize method) may create two entities that
one depends on the other. For example, a test can create a new
customer and create an order from that customer. If in the
Cleanup method we’ll try to delete the Customer before cancelling
and deleting the Order we’ll get an exception.
5. Combining 3 and 4 together (i.e., the test creates multiple entities
with relationships between them), makes writing a cleanup
code that works correctly in all failure situations very difficult. In
addition, it’s very difficult to simulate such failures, which makes
testing the Cleanup code almost impossible!
The solution is to keep a list of commands to be executed on cleanup. Whenever
the tests perform an action that requires some cleanup, it also adds the appropriate
cleanup command to the list. Adding the command to the list does not invoke it at this
Chapter 7 IsolatIon and test envIronments

164
point. Only when the test completes, either passing or failing, all of these commands
are executed in reverse order (to address issue #4). Naturally, when a test fails, it jumps
directly to the cleanup code, skipping the rest of the test. This ensures that only the
actions that were actually performed are cleaned up (issue #3). Appendix B contains
detailed implementation and explanation on how to implement such mechanism. In
addition, Test Automation Essentials (See Appendix C) have a full implementation of this
mechanism too.
Read-Only Shared DataLastly, it’s worth mentioning that if the application is using a database but uses it only
to read data that was produced by another system, then this data is not to be treated as
state, but rather as input. Therefore, you don’t really need to isolate instances that use
the same data!
In many cases, though, it implies that the SUT is not really the entire system, and
that you should probably test the integration between the system that produces the data
together and the system that consumes it. However, you may choose to have few system
tests that exercise the subsystem that produces the data as well the one that consumes it,
but keep most tests separated for each subsystem, which is totally fine. See Chapter 6 for
the options and considerations of fitting the tests to the architecture of the SUT.
In many of these cases, people tend to use a copy of an existing production database
and use it for the tests. But before you’re going down that route, you should consider the
following questions:
• Is the data you’re using diverse enough and represent all the cases
that you want to test? If for example, the data is taken from a single
customer while different customers may use the system a bit
differently, then you may not be able to cover all the cases you need
for the other customers.
• Is it possible that the schema or the meaning of some data will
change in future versions? If that’s possible, then when it happens,
you’ll need to take a different copy of the database, which would
most probably have different data in it. This will make all of the
expected results, and many other assumptions of your tests no longer
valid! In some cases, that may be a disaster for the test automation, as
you’ll need to write almost everything from scratch…
Chapter 7 IsolatIon and test envIronments

165
• Is it easy to understand the relationship between what a test does and
its expected results? In other words, if you’re writing a new test, can
you tell the expected results without looking at the actual output of
the system? If not, how can you tell that what the system does today
is correct? You’d probably say that what’s there today has been so for
many years and no one complained so far, and therefore it can be
considered as correct. I totally agree with that, but if any of the logic
that relies on this data will intentionally change in the future, it will
be very difficult to say whether the new logic is correct or not either
(and if this logic is not to be touched, then there’s a low value testing
it anyway).
The alternative to using a copy of production data would be to create a synthetic
instance of the database, which contains data you specifically put in it for the tests.
In fact, the process of creating this synthetic data is identical to the process of reverse
engineering and debugging described earlier under the topic “Create Unique Data for
Each Test” for creating the minimal set of reference data.
SummaryIn order to ensure reliability and consistency, the architecture of the test automation
should control not only the inputs of the chosen test scope, but also its state. In this
chapter we discussed various isolation techniques for controlling the state of the SUT and
to avoid inconsistent results in the tests. Besides making the tests more reliable, some of
these techniques have the nice side effect of allowing us to run the tests in parallel, gain a
better understanding of the true behavior of the system, and make the tests run faster.
Chapter 7 IsolatIon and test envIronments
167© Arnon Axelrod 2018 A. Axelrod, Complete Guide to Test Automation, https://doi.org/10.1007/978-1-4842-3832-5_8
CHAPTER 8
The Big PictureIn Chapter 5 we’ve talked about the relationships between test automation and business
processes. In Chapter 6 we’ve talked about the relationships between test automation
and the software architecture. In this chapter we’ll look at the bigger picture and discuss
the strong correlation between business structure and architecture, and between
business processes and culture. And of course, we’ll also discuss how test automation is
connected to all of these as well and how everything is related.
The Relationships Between Software Architecture and Business StructureBack in 1967 the computer scientist Melvin Conway published a paper titled “How Do
Committees Invent?”1 In the third-to-last paragraph of this paper he stated an adage that
later became famously known as Conway’s law.
Conway’s LawConway’s law states that “organizations which design systems [...] are constrained to
produce designs which are copies of the communication structures of these organizations.”
While this law isn’t restricted to software, it is the most obvious and well known in this
field.
This observation implies that the business structure, culture, and also informal
communication patters are reflected in the architecture of the system and vice versa.
People in the same team usually communicate more frequently, and the pieces of
their work (e.g., lines of code) are more intertwined with one another, producing a
well-defined module. When the module they produce should interface with a module
1 http://www.melconway.com/research/committees.html

168
that another team produces, people from the two teams must communicate with each
other in order to define this interface. But this is not restricted to formal structure: if two
people in the same team or in different teams don’t communicate well with each other,
the integration between their pieces of code will very likely be clunky; solitary developers
may create code that only they understand; close friends in different teams may create
“hacky” interfaces that only they understand, etc.
Conway’s law works both ways: on one hand, if an architect comes up with the
desired architecture, but a manager decides to organize the teams in a way that does
not correspond to that architecture, the software that will be built eventually will more
likely have an actual architecture that corresponds to the actual business structure rather
than the architecture that the architect first envisioned. On the other hand, if a major
restructuring of the software is planned, a smart manager can harness Conway’s law to
that goal and reorganize the teams accordingly.
Horizontal Teams vs. Vertical TeamsTraditionally, most business systems were designed in a layered architecture. Typically,
the highest layer is the UI, below that the business logic, below that is a data-access
layer (DAL) that communicates with the database, and below all is the database itself.
Accordingly, each of these layers was usually developed by a separate team. The benefit
of that approach is that any of these layers typically requires a different set of skills and
tools and so it made sense to put all developers with similar skills alongside one another
in the same team to promote sharing of knowledge and practices.
The downside of this approach is that almost every feature depends on all of
these layers. As long as everything is well designed upfront, it’s not a big issue. But
if the customer requests to make the smallest change, add the simplest feature, or
if a bug is found, it almost always requires that all of the teams will participate in
the implementation of the change. In addition, because the chain of dependencies,
usually higher-layer teams would not be able to start working until the lower layer team
completes their work. This makes such rigid architecture and business structure very
resistant to change requests, bug fixes, and new features…
This notion brought many large projects to adopt an architecture and business
structure that correspond to “vertical” features rather than on technical layers. In this
approach, each team consists of people with different skills and expertise (i.e., UI,
database, business logic, etc.), but all are dedicated to the same feature or business
domain. Furthermore, some teams consist mainly of people with versatile skills,
Chapter 8 the Big piCture

169
commonly known as “full stack developers.” In addition to different developer expertise,
in most cases this organizational structure also includes dedicated testers and product
managers as part of each team. Probably the most influential book that advocates this
approach is Eric Evan’s Domain Driven Design – Tackling Complexity in the Heart of
Software.2The downside of this approach is exactly the upside of the layered approach
(knowledge sharing between people with the same expertise) but in most cases its
upside, which makes the software more maintainable and accommodating for changes,
clearly outweighs its downside. Figure 8-1 shows the vertical vs. horizontal division.
In practice, many complex projects have their own unique architecture and team
structure, but you can pretty clearly identify the correlation between the organizational
structure and the system’s architecture and identify where the lines that divide the
responsibilities between teams are vertical and where they are horizontal. For example,
in one of the largest projects I’ve worked on, the organization was divided unto one
client team (it was supposed to be a “thin client,” hence only one team) and many server
teams, dedicated to different business domains. The testing team was a horizontal one,
covering the cross-feature scenarios.
2 Evans, Eric (2004). Domain-Driven Design: Tackling Complexity in the Heart of Software. Addison-Wesley. ISBN 978-032-112521-7. Retrieved August 12, 2012.
Feature Feature Feature
Database
Server
Client
Figure 8-1. Vertical vs. Horizontal division
Chapter 8 the Big piCture

170
The Relationships Between Software Architecture and Organizational Structure with Test AutomationNaturally, team members communicate more often and freely with their teammates
than with members of other teams. But composing, implementing, and maintaining
automated tests also require a great deal of communication with developers on various
teams. This also has some implications on the relationships between the organizational
structure and the structure of the test automation.
Dedicated Automation TeamIf there is one dedicated automation team, it will most likely be somewhat disconnected
from the development team. On one hand this is good, because it means that they’ll have
complete responsibility over the automation, and that like in a layered architecture and
organizational structure, it enhances the knowledge sharing and practices among the
automation developers. In addition, because the automation team is responsible for the
automation of the entire application, they’ll more likely create an automation suite that
covers the entire application as a whole, like the End-to-End scope described in Chapter 6.
On the other hand, the automation team will less likely get a prompt collaboration
from the development team, which is critical in order to keep a stable and robust
automation (See the section in Chapter 5 titled “Handling Bugs That Are Found by
the Automation”). In this structure, it will probably be pretty difficult to integrate the
automated tests into the continuous integration process (see Chapter 15), as it will be
difficult to convince both the application developers and the automation developers that
the application developers should fix failures that happen in the automation.
Automation Developers Inside Horizontal TeamsTypically, if automation developers are members of horizontal teams, or the members
of the horizontal teams develop the automation, they will lean toward implementing
automated tests that cover only their own layer. They don’t want to be bothered by
failures that are not their fault. Clearly, this will only ingrain the effects of Conway’s law,
and will likely cause more integration problems between the teams. These problems can
manifest themselves as bugs, as delays in the project schedule, as personal or inter- team
conflicts, etc.
Chapter 8 the Big piCture

171
Blame vs. Collaboration Culture
This phenomenon is not limited to horizontal teams, as it might apply to any teams
that depend on one another and which the communication between them is lacking,
but because horizontal teams are inherently dependent on the teams that develop the
lower layers, this is very common in this situation. The essence of this phenomenon is
that when something goes wrong, the teams start to blame each other for the failure.
I was once asked by one such team (let’s call them team “A”) to develop tests for the
components developed by another team (team “B”) so that when something doesn’t
work, team A will be able to prove that the faults are of team B… I politely refused,
explaining that it’s not effective to write tests for another team, because automated tests
require constant maintenance. Instead I suggested that they’d write integration tests that
cover both the code of team A and of team B together. That way they’ll get much higher
value out of it. Instead of being “right,” they’ll be able to ensure that the software that
they give their customers is working correctly. In case it doesn’t, they should be able to
investigate and analyze the root-cause quickly enough (see Chapter 13 for techniques
to investigate and analyze failing tests) and if the blame is indeed in team B, then they
should be able to prove it using the evidence that they collect in their tests anyway. In
addition, this will encourage team A to cooperate with team B in order to make the tests
work, and will foster trust between the teams, as they’ll be able to communicate about
facts and proofs rather than on assumptions and subjective terms.
In general, any technique, tool, and practice that provide transparency and
encourage collaboration can have an impact, usually positive, on the culture of the
organization. Source-control systems, CI builds, automated testing, and production
monitoring are all tools and techniques that provide this kind of transparency and
have some impact on the culture. I say that the impact is “usually positive,” because
unfortunately every such tool can also be abused or used in an incorrect fashion that
achieves the opposite results. Chapter 15 contains some tips for leveraging the test
automation to gradually change the culture to the more collaborative direction.
Automation Developers Inside Vertical TeamsGenerally speaking, given the trade-offs mentioned above, the most effective
organizational structure in most cases with regard to test automation is probably
when the automation developers are members of vertical development teams, or the
developers in vertical teams write the tests themselves. Pay attention though: even
Chapter 8 the Big piCture

172
when the teams and architecture are divided vertically, there are still dependencies and
interactions between the vertical modules/teams, and many scenarios should involve
more than one module.
Another potential problems in this structure is that there tends to be more
duplication between infrastructure pieces of each module, as they’re being developed
separately by each team. This is true both for the application code as well as for the
automation’s code.
But despite these problems, tests that such teams produce typically cover complete
scenarios, and because each team is responsible for its tests, it also makes them more
reliable. In addition, because the automation developers and the application developers
work together, their collaboration is better, and the application developers are much
more likely get the most value out of the automation.
Flexible Organizational StructureSome large teams adopt a flexible approach in which smaller teams are formed
dynamically to adopt to the needs of the user stories at hand. Dan North gave a
fascinating talk3 in the “Scaling Agile for the Enterprise 2016” congress in Brussels,
Belgium, about a method he calls Delivery mapping, which helps form these teams
efficiently. Using this or other similar techniques, the structure of the teams constantly
changes to reflect and adjust to the user stories and goals that the bigger team works
toward. Each feature or user story is assigned to an ad hoc team, sometimes called a
feature crew or a squad.
This approach is very challenging in and on itself but helps focus each such feature
crew on the task in hand, and if automation is developed by each such feature crew for
the functionality it develops, it encourages each automated test to be written in a way
that involves the relevant modules that need to be changed for that feature. This is again,
pretty challenging, but if done successfully, the automated tests that will be developed
for each feature are most likely use the most appropriate test scope for that particular
feature. The ATDD methodology described in Chapter 16 lends itself very well to this
approach.
3 https://www.youtube.com/watch?v=EzWmqlBENMM
Chapter 8 the Big piCture

173
Having an Automation ExpertRegardless of the structure of the teams and modules, people tend to make choices
(often unconsciously) regarding the structure of the automated tests that they design and
implement, based on what’s easy and what incurs the least friction in the process. Many
times, these choices are suboptimal with regard to the ROI of the test (how much value
it will give vs. how maintainable and reliable it will be). But if you have someone whose
automated tests are his passion, and he has a broad perspective and experience about this
subject, then he’d be likely to make better decisions for the test automation. If this person is
really enthusiastic about this subject, he naturally becomes the “go-to” person that people
come to in order to get advice. In large teams, it worth it that this person has his own role of
“test automation expert” and not be part of any particular team. This way this person can
keep the overall view of the test automation and lead it to be successful. Day to day, this
person can improve the infrastructure of the tests, review others’ tests, perform trainings,
and advise each team how to build the automation that best suits their needs.
SummaryDifferent organizations have different structures, different cultures, different constraints,
and different strengths. These attributes are reflected in the architecture of the system
and also are highly correlated to the business processes.
Test automation is tightly related to all of these in both directions: it is affected by
these attributes, but it also affects them back! If you look at the big picture through
the lens of test automation, you’ll probably succeed not only in creating the best test
automation for your current organization, but also to leverage it to improve your
organization as well!
Creating a stable, reliable, and valuable test automation requires collaboration
of people from different teams and disciplines, and in return, provides clarity and
transparency about defects and breaking changes. The improved collaboration is a
hidden “side effect” of test automation but is also one of its biggest advantages!
A person who facilitates communications is a leader. Naturally, managers are more
equipped for that, but an automation expert or any enthusiast automation developer
that envisions how to leverage test automation for that purpose can leave a significant
mark on his organization and become a leader. See Chapter 15 for more information on
how to gradually change the culture of your organization even without authority and
how to become that leader.
Chapter 8 the Big piCture

PART II
The “How”
In Part I we discussed a lot of theory and gave a broad overview of the world of test
automation, explaining what it is and what it isn’t. We covered its important aspects from
a pretty high-level point of view, giving you the tools to make strategic decisions about
the test automation for your project.
In this part, we’ll talk more technically about how to design and implement the test
automation infrastructure as well as individual tests, and how to leverage it as part of the
overall software development life cycle. In the next few chapters, I’ll walk you through a
hands-on tutorial in which we’ll build a test automation project for a real application.

177© Arnon Axelrod 2018 A. Axelrod, Complete Guide to Test Automation, https://doi.org/10.1007/978-1-4842-3832-5_9
CHAPTER 9
Preparing for the TutorialYou probably noticed that that the concern of maintainability was raised over and over
again in Part I, but I still haven’t really explained how to achieve it. We also haven’t
discussed how to start planning and building a new test automation solution from
scratch. The following few chapters act as a tutorial in which we’ll start building a test
automation solution for a real application. This chapter serves a few purposes:
1. Provides an overview of the process and approach we’re about
to take in the next chapters. This process is good not only for this
tutorial but for any test automation project.
2. Provides a short overview of the application that we’re about to
write tests for.
3. Provides a step-by-step guide for installing the prerequisites
needed for the rest of this tutorial
Prerequisites and PresumptionsIn Chapter 3 we discussed the relationships between the skills of the automation
developer and the tools that match those skills. We concluded that writing the
automation using a general-purpose, object-oriented programming language will give us
the most flexibility and if we’ll use it wisely, we’re less likely to hit maintenance problems
over the long run.
For these reasons, in this tutorial we’ll create the automation in code. More
specifically, we’ll use C# as the programming language. Note that if you’re more
familiar with Java, or even Python, I believe that you’ll be able to follow along even
if you won’t understand every nuance of the language, as most of the principles are
the same no matter what object-oriented language you use. If you don’t have any
178
object-oriented programming background and you plan to build your automation
using one of the tools that don’t require programming at all, then I still encourage you
to read and try to get as much as you can from the tutorial, as many of the concepts I
describe can be applied also to many tools that don’t require you to code. Note that in
the tutorial I’ll do my best to provide step-by-step instructions, starting from how to
set up the development environment, so you can follow along even without any prior
knowledge. In case a step is not clear enough, you’ll most likely be able to find the
missing information on the web, or ask a question in the book’s forum at http://www.
TheCompleteGuideToTestAutomation.com.
In addition to choosing C# as the programming language, we’ll use Selenium
WebDriver as the underlying UI automation technology, since the SUT is a web
application, and Selenium is the most popular and straightforward choice for
implementing web-based, UI automation in code. As the system does not have any tests,
and was not written with testability in mind, we’ll start from few system tests that will
comprise the sanity suite. In fact, in this tutorial we won’t go beyond these few sanity
system tests, but the main ideas remain very much the same for other test scopes. Once
again, don’t worry if you’re not familiar with Selenium or if your project is not a web
application. As mentioned, most of the ideas and concepts remain the same even for
tests that don’t interact with the UI whatsoever.
Applicability of the Process for Existing Test Automation SystemsThe process I’ll use in this tutorial, and which I’ll describe shortly, guides how to write
maintainable automated tests and their infrastructure. While it works best and assumes
you start from a clean test automation project, you can apply most of its ideas in an
existing project as well. Applying these ideas to an existing test automation system
may lead you to make some compromises and trade-offs, and you may not get all the
benefits of that approach at first, but if you’ll choose to, you’ll be able to gradually shift
your existing automation to follow the ideas and techniques described in the tutorial in
order to enjoy the benefits of improved maintainability and reliability that the process
provides. Obviously, if at some point you’ll have to write a new automation system, then
you’ll be able to apply all the ideas from the very beginning.
Chapter 9 preparing for the tutorial

179
Overview of the ProcessThe tutorial is based on a practical process that I’ve been following myself for many years
and have also trained many people to do the same. In the next few chapters I’ll walk you
through this process hand in hand so you’ll get a clear picture of how to do it. However,
before I’ll lead you through this journey, I want to “show you the map” of this journey
by giving you an overview of the process. But even before that, I need to give some little
background about two general approaches in software development, to set the stage for
the overview.
Bottom Up vs. Top DownMaintainable test automation projects contain, besides the test methods themselves, a
lot of infrastructure code. This infrastructure code contains common code that you don’t
want to repeat. Some people refer to it as “helper” classes and methods or “plumbing”
code, but in fact, this part of the code often becomes much larger than the test methods
themselves.
A common practice in a traditional, more “waterfall-ish” approach is to design and
implement the entire infrastructure of a software system, that is, the lower layers, before
starting to implement the upper layers. This approach is called bottom up. Just like any
other software project, this approach can be applied to test automation too: design
and implement the infrastructure and only then start implementing test cases. This is
especially common when different people implement the infrastructure and others
implement the test cases. However, as described in Chapter 3, this approach has its
drawbacks when it comes to maintainability. For those reasons I mostly prefer that the
entire automation code will be developed and maintained by the same people.
When the same people write the tests and the infrastructure code, I prefer to take the
opposite, top-down approach. It may be counterintuitive at first, but I prefer to design
and implement one test case before implementing the infrastructure that it needs. Not
only do I implement the infrastructure after I implement the test, but I also implement
only the infrastructure that the first test needs, and nothing more! After I do that with the
first test, I continue doing the same with all other test cases: I design and implement the
Chapter 9 preparing for the tutorial

180
next test case first and then add the missing infrastructure that the new test needs. This
process ensures a few things:
• Because the code of the test is written first, it allows me to write it in a
way that is most readable and easy to understand.
• Because it is developed according to true needs and not according to
speculations, the infrastructure is useful and easy to use.
• Anytime that the entire test suite runs, the entire infrastructure is
exercised and tested too. If there’s a bug in the infrastructure code, it’s
revealed very early, and it’s easy to fix.
The ProcessNow that I explained why I prefer to take a top-down approach, here’s a more detailed
description of the process that we’re going to go through in this tutorial, and which I
recommend to follow also regardless of the tutorial itself. In the next few chapters I’ll go
even deeper to explain and detail additional guidelines for each of these steps.
1. Design the first test case.
2. Write a skeleton of the first test case in “pseudo-code.” That is,
write the code in your actual programming language, but assume
that you have all the infrastructure code that you need, even
though you don’t. Obviously, the code won’t even compile…
3. Create the minimal necessary infrastructure code to make the first
test compile, and then also implement it until it runs correctly and
the test passes (assuming it should pass).
4. Design another test case.
5. Write the skeleton of the new test case in pseudo-code. This time,
if you need an infrastructure code that already exists and you can
use as is, simply use it. There can be two possible situations here:
Chapter 9 preparing for the tutorial

181
a. If all the infrastructure that you need to support this test
already exists, then this test should compile and run correctly.
If this is the case, then you’re done with that test case and you
can continue to the next one. This, however, should happen
pretty rarely, especially in the first tests.
b. If you need additional infrastructure code that doesn’t exist
yet (or it doesn’t fit as is), assume it exists. The code won’t
compile.
6. Add the necessary infrastructure to the make the new test and
all the existing tests, compile. and run correctly. Either while
doing so, or after all the tests run correctly, refactor the code to
remove any duplication and to improve the structure of your code.
Remember: your test automation code has nearly 100% code coverage, so if you run all the tests, you can be sure that the refactoring didn’t break anything!
7. Go back to step 4.
In addition, when you encounter any technical obstacles or frictions that hinder the
flow of your work, change the infrastructure code to remove these obstacles and friction
points. Here are a few examples:
• While you investigate failing tests, make sure that you have all the
necessary information to aid you investigating it faster.
• When you encounter unexpected results due to isolation issues,
improve the isolation.
• If you want to give other people your tests to run, make it as easy as
possible for them to get started.
Getting to Know the SUTThe tutorial will use the MVCForum open source project. MVCForum is a fully
featured responsive and themable discussion board/forum with features similar to
StackOverflow, written in C# using the ASP.NET MVC 5 framework. The home page
of the project can be found at http://www.mvcforum.com and its latest source code at
Chapter 9 preparing for the tutorial

182
https://github.com/YodasMyDad/mvcforum. However, because the project may evolve
from the time of writing this book, I cloned the GitHub repository so that the tutorial
should always be usable.
Overview on MVCForumThe application is pretty feature rich. Here are just some of the most important ones:
• Theme Engine
• Community Badge System
• Multi Lingual
• Private Messaging
• Likes, Mark as Solution, Favorites
On the main GitHub page1 of the project you can find the full list.
Anyway, the easiest way to get an idea about this application is to go to the support
forum at https://support.mvcforum.com/ that is managed using the application
itself (note that this site is not under my control, and the version it uses might be more
advanced, or the site might even be down). Assuming that the site hasn’t changed much,
you should see a website similar to the one shown in Figure 9-1.
1 The version that we use in the tutorial is at https://github.com/arnonax/mvcforum. The most up-to-date version is at https://github.com/YodasMyDad/mvcforum, but pay attention as I cannot guarantee that it will stay compatible with the book.
Chapter 9 preparing for the tutorial
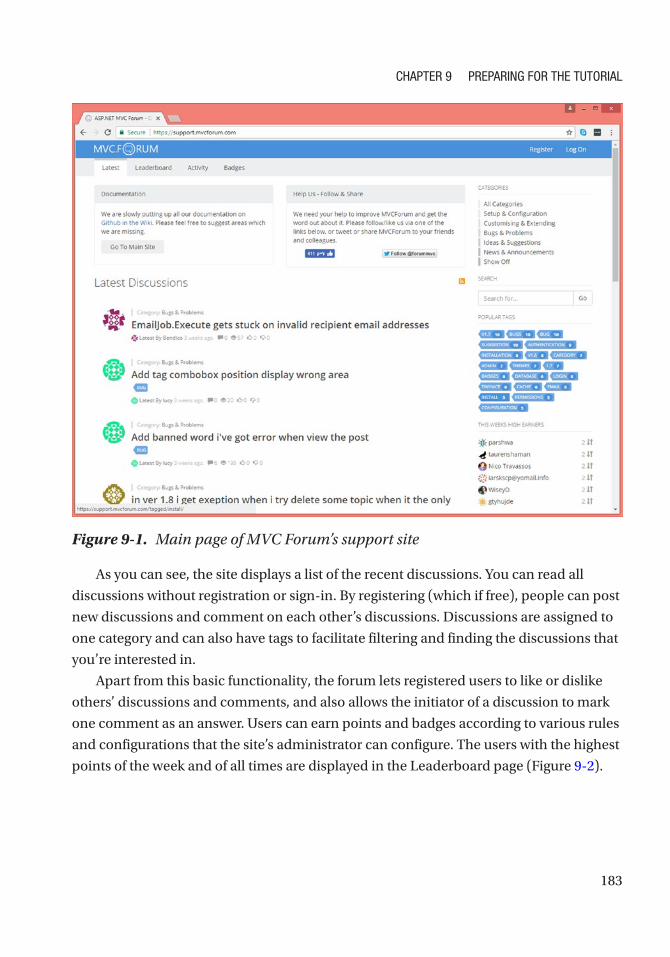
183
As you can see, the site displays a list of the recent discussions. You can read all
discussions without registration or sign-in. By registering (which if free), people can post
new discussions and comment on each other’s discussions. Discussions are assigned to
one category and can also have tags to facilitate filtering and finding the discussions that
you’re interested in.
Apart from this basic functionality, the forum lets registered users to like or dislike
others’ discussions and comments, and also allows the initiator of a discussion to mark
one comment as an answer. Users can earn points and badges according to various rules
and configurations that the site’s administrator can configure. The users with the highest
points of the week and of all times are displayed in the Leaderboard page (Figure 9-2).
Figure 9-1. Main page of MVC Forum’s support site
Chapter 9 preparing for the tutorial

184
Most of the features of the site are highly customizable by the administrator, which is
a special user with additional rights. When the administrator logs in, a special menu item
leads him to the Admin page, where he can see and change all of the customizations and
configurations of the site, as shown in Figure 9-3.
Figure 9-2. The Leaderboard page
Chapter 9 preparing for the tutorial

185
Preparing the Environment for the TutorialBefore we can start the tutorial, we have a few administrative tasks to care about, namely
to install and prepare our working environment. The installation procedure was tested
on Windows 10 Professional but should probably work the same for any version of
Windows from 7 and on. If you’re using a fresh installation of Windows 10, you’ll need
at least 25GB of free disk space for all of the installations. This includes installing Visual
Studio and SQL Server Express edition and more. Note that the mentioned versions of
some of the applications may become obsolete and unavailable in the future. In this
case, try to use the newer versions. If things don’t go well, search the web for a solution
or visit https://www.TheCompleteGuideToTestAutomation.com where a solution may
already be posted. If not, post a question on the website and I’ll do my best to help you.
Figure 9-3. Admin configuration page
Chapter 9 preparing for the tutorial

186
Install Visual Studio Community EditionWe’ll use Visual Studio as our IDE for writing the test code in C# and for running test
tests from. In case you don’t have Visual Studio installed, you need to install it if you
want to really follow along this tutorial. As of the time of writing this, the latest version
of Visual Studio is 2017. Visual Studio 2017 has a fully featured edition that individuals
can use free of charge.2 As of the time of writing, you can download it from https://
www.visualstudio.com/vs/community/, and follow the installation instructions. When
you’re prompted to select workloads, select the following:
• .Net Desktop Development
• ASP.Net and Web Development
And click Install. Note that if you install Visual Studio without these workloads, or
already have Visual Studio installed and you’re not sure whether these workloads are
installed or not, then the first time you open the solution of MVCForum in Visual Studio
(as will be described soon), you’ll be prompted to install the missing workloads.
Download and Install ChromeWe’ll use Chrome through Selenium as the browser through which we interact with the
SUT. We’ll also use Chrome’s Developer Tools to identify the elements we need when we
implement the test cases. If Chrome is not already installed, download and install it from
https://www.google.com/chrome/. Follow the instructions on the screen to complete
the installation.
Download and Install SQL Server ExpressSQL Server is required by the application to store its information. If you don’t have any
edition of SQL Server installed, download and install SQL Server Express. As of writing
these lines, SQL Server Express 2017 is available from https://www.microsoft.com/en-
us/sql-server/sql-server-editions-express.
2 For definitive legal information, please consult Microsoft’s Visual Studio website.
Chapter 9 preparing for the tutorial

187
Important the installation wizard may fail if it is not being run with administrator privileges. therefore, after downloading, don’t run the installation directly! instead, open the file location, right-click the file, and select “Run as Administrator.”
1. When the installation wizard starts, select Basic as the installation
type.
2. Follow the further instructions in the wizard to complete the
installation.
3. Click “Install SSMS” to install SQL Server Management Studio.
This will redirect you to download another installation wizard
from Microsoft’s website. Download and run the file, then follow
its own installation wizard.
4. Click Close to close the main installation wizard, and approve that
you want to exit.
Download and Build the ApplicationWhile the GitHub page of the application mentions several options to install the
application, we’re going to download the Git repository and compile the code though
Visual Studio. In order to do that:
1. Go to https://github.com/arnonax/mvcforum, click on the
“Clone or Download” button, and select “Open Visual Studio,” as
shown in Figure 9-4.
Chapter 9 preparing for the tutorial

188
2. Visual Studio should be opened (if it wasn’t already), showing the
Team Explorer pane as shown in Figure 9-5. (If for some reason
it doesn’t, you can open the Team Explorer pane from the menu
View ➤ Team Explorer.) The URL for the GitHub repository
should be filled in automatically. You can also leave the default
path for your local repository, or choose a different location, for
example: C:\TheCompleteGuideToTestAutomation\MVCForum as
shown in the figure. Click Clone to complete the operation.
Figure 9-4. Downloading the repository
Chapter 9 preparing for the tutorial

189
3. From the Solution Explorer pane (View ➤ Solution Explorer if it
does not appear), double-click on the MVCForum.sln file to open
the solution and its contained projects.
4. If you haven’t installed the necessary workloads yet, you’ll be
prompted with a dialog titled “Install Missing Features.”. If this is
the case, click Install.
a. When the Workloads window appears, select the .Net Desktop Development and ASP.Net and Web Development
workloads, and click Modify in order to install them. Note that
you’ll be prompted to close Visual Studio to continue.
b. When the update is done, open MVCForum.sln again.
Figure 9-5. Cloning the GitHub repository to your local machine
Chapter 9 preparing for the tutorial

190
5. If you’re prompted with the dialog titled Project Target Framework Not Installed, keep the first option (starting with
“Change the target to…”) selected and click OK.
6. From the main menu bar of Visual Studio, select Build ➤ Build Solution. Make sure that in the output pane you see:
========= Build: 19 succeeded, 0 failed, 0 up-to-date, 0 skipped =========
Note if the Output pane is not displayed, from the main menu bar select View ➤ Output. also make sure that in the top of the output pane, the item “Build” is selected in the “Show output from:” combo-box.
7. In order to open the application using Chrome, select “Google Chrome” from the toolbar as shown in Figure 9-6. Then Press F5
to run the application.
8. If a warning titled “Just My Code Warning” appears, select the last
option “Continue Debugging (Don’t Ask Again).”
9. The first time you run the application it may take a moment, and
then you’ll see the application open up in Chrome as shown in
Figure 9-7.
Figure 9-6. Run using Google Chrome
Chapter 9 preparing for the tutorial

191
Congratulations! You now have a complete working environment to start the tutorial.
Figure 9-7. MVCForum as seen when run locally for the first time
Chapter 9 preparing for the tutorial

192
Note in case you got any trouble completing one of the above steps, please consult the documentation of the relevant product, and search the web or the book’s website for help.
Install Resharper (Optional)Resharper is a third-party commercial productivity add-on to Visual Studio, delivered
by JetBrains. Personally. I use this add-on every day and I can’t live without it… In the
tutorial I’ll show you how I use it, but also tell you how you can achieve the same things
without it. Note that this product has a very flexible evaluation program: it is a 30-day
trial, but you can easily freeze the countdown in days that you don’t use it!
You can download Resharper from https://www.jetbrains.com/resharper/
download/. After downloading, run the installation application:
1. In the first page you’ll be able to choose additional JetBrains’
products to install. In addition, if you have more than one version
of Visual Studio installed, you can choose the versions you want to
install Resharper on.
2. Accept the License Agreement and then click Install. After the
installation completes, click Exit to close the installation wizard.
3. The next time you’ll open Visual Studio, you’ll be prompted to
accept JetBrain’s Privacy Policy. Scroll all the way down to
enable the “I Accept” button, and click it.
4. Click OK on the next page (Data Sharing Options).
5. In the License Summary page, click the Start Evaluation button
if you want to start the 30-day evaluation period immediately.
Then click OK to close the Wizard.
Chapter 9 preparing for the tutorial

193
Note if you don’t start the evaluation period when prompted after the installation, you can start it by choosing Resharper ➤ Why Resharper is Disabled from the main menu bar of Visual Studio, click the Start Evaluation button, and OK to close the dialog.
You can also pause the evaluation period by going to Resharper ➤ Help ➤ License Information, click the Pause Evaluation button and OK to close the dialog. note that resharper counts partial days as whole days. also, if you keep another instance of Visual Studio open, then the evaluation period continues.
1. After starting the evaluation you’ll be prompted to Select Resharper Ultimate Shortcuts Scheme. I suggest that you select
the first option (Visual Studio), unless you’re more used to using
IntelliJ IDEA.
Tip in my opinion the most efficient way to use resharper is using keyboard shortcuts rather than the mouse. for this reason, i recommend downloading and printing the Default Keymap poster and keeping it beside your keyboard, or hang it on the wall in front of you. i highly recommend that you practice working with the keyboard rather than with the mouse as much as possible. See appendix D for more tips for working effectively with the keyboard.
Using Git Through Visual StudioWhile the tutorial guides you step by step and shows you most of the code that you need
to write, in some cases it won’t be practical to show everything. In addition, you may
want to look at my code and compare to yours in case something went wrong. For these
reasons I tried to keep a clean and ordered revision history of all the steps of the tutorial
inside the Git repository. I also put tags on any code listing and important milestones so
you can find them more easily. Because Git is a distributed source-control system, once
you cloned the repo (Git repository) to your machine (as explained previously in this
chapter), you have your own copy of the entire history right on your local machine.
Chapter 9 preparing for the tutorial

194
If you’re familiar with Git you can work with it using your preferred tool (e.g., Git
bash, Git Extensions, SourceTree, etc.). But if you don’t, here’s a brief explanation of how
to use Git directly from within Visual Studio.
Most Git operations in Visual Studio are done through the Team Explorer pane,
which as mentioned before, can be opened from View ➤ Team Explorer. The Team Explorer has several views in it. Figure 9-8 shows the Home view in the Team Explorer pane.
From the Home view you can easily navigate to the other views (Changes, Branches,
Sync, Tags, and Settings). While these buttons appear only on the Home view, you can
also switch between the views from any other view using the combo-box right beneath
the toolbar of the pane (where it reads “Home | MvcForum” in the figure).
Switching Between BranchesThe GitHub repository contains several branches, and most of them are inherited from
the original repository. However, the Tutorial branch is the one I created myself, which
contains all of the revisions shown in the tutorial. You can refer to the revisions in this
branch if you want to see more details and better understand the changes described in
the tutorial.
Figure 9-8. The Home view in the Team Explorer pane
Chapter 9 preparing for the tutorial

195
By default, the local repository contains only the master branch, which reflects the
starting point of the tutorial. To switch to the Tutorial branch for the first time, do the
following:
1. In the Team Explorer pane, switch to the Branches view.
2. Expand the remotes/origin folder to see the list of branches in the
remote repository. The view should look like Figure 9-9.
3. Right-click on the Tutorial (remote) branch, and select Checkout.
The Tutorial branch should be added to the main list of (local)
branches, near the master branch.
To switch between the local branches, double-click the branch that you want to
switch to (e.g., master or Tutorial). Note that switching to the Tutorial branch will bring
you to the final state of the tutorial. In addition, if you’ve made changes to one of the files
in the solution, then you won’t be able to switch to another branch unless you either
commit or undo your changes. Obviously if you want to retain your changes you should
Figure 9-9. List the remote repositories
Chapter 9 preparing for the tutorial

196
commit them, and if not, then you should undo. Also note that when you switch to
another branch, it always checks out the latest revision in that branch. I advise that you
create your own branch and commit your changes to it (by selecting New Branch from
the Branches view), though you can feel free to commit your changes to the master
branch. Remember that this is your local copy of the repository (and you can’t push your
changes back to GitHub because you don’t have the proper permissions) so don’t be
afraid to commit your changes.
In order to view your changes and either commit or undo them, switch to the
Changes view. Figure 9-10 shows the Changes view.
Figure 9-10. Team Explorer, Changes view
Before you decide whether you want to commit or revert your changes, you can
compare each changed file with its original state. To do that, right-click on the relevant
file and select Compare with Unmodified… or just double-click it. To commit your
changes, you must enter a commit message in the yellow textbox, and click the Commit All button. If instead you want to revert one or more files, you can select them or their
common containing folder, right-click. and select Undo Changes…To view the revision history of a branch, from the Branches view. right-click on the
desired branch and select View History… The history view is usually opened in the main
documents area and looks like in Figure 9-11.
Chapter 9 preparing for the tutorial

197
In this image you can see the tags (at the right side of some of the revisions) that can
help you find the relevant revision more easily. Hovering with the mouse over a tag also
shows the description associated with it. Double-click a revision to display its changed
files in Team Explorer. From there you can compare each file with its previous revision
or open it, to see how it looked in that revision. Unfortunately, you cannot check out the
entire revision directly from Visual Studio in order to debug or investigate the entire code
structure, but you can do it from the command line as follows:
1. From the Team Explorer pane, either from the Changes or the
Branches view, select Actions ➤ Open Command Prompt.
2. In the command prompt that opens, type: git checkout ID,
where ID is the value displayed in the ID column of the history
window. For example, type: git checkout ca2a6f05 to check out
the revision titled “Added TestEnvironment configuration file”.
Alternatively, in order to check out a tagged revision, type git
checkout tags/tag-name, where tag-name is the name of the tag,
for example, type git checkout tag/Listing 14-16 to check out
the revision titled “Support Firefox and Edge”.
Figure 9-11. The History window
Chapter 9 preparing for the tutorial

198
3. Switch back to Visual Studio and you’ll see a dialog titled “File Modification Detected.” Click on the Reload Solution button.
Now you should be able to see and debug the code on the revision
you checked out.
SummaryIn this chapter I explained the course of action that we’re about to take in the next
chapters for writing the first tests and building the infrastructure code to support them,
and guided you on how to prepare the environment so you can follow along the tutorial.
I strongly encourage you to really follow and actually do everything in the tutorial on
your machine, and not just read through it. Actually doing it, tackling the real problems,
and experiencing the workflow is the best way to really understand the power of this
process. So, let’s get started!
Chapter 9 preparing for the tutorial
199© Arnon Axelrod 2018 A. Axelrod, Complete Guide to Test Automation, https://doi.org/10.1007/978-1-4842-3832-5_10
CHAPTER 10
Designing the First Test CaseIn this chapter I’ll explain how to approach designing the first test case, which is the first
step in our process. Most of the technique is also relevant for any subsequent test case,
but first we should consider how to choose the first test case.
Choosing the First Test to AutomateThe question “which test to start from” may be stunning. You probably have tens, if
not hundreds or even thousands of test cases that you would like to automate. They’re
probably divided into features, screens, subsystems, or whatever your company used to
categorize all of them. If the system is complex and compound from several distinct and
mostly independent subsystems, then this question is even more challenging.
However, sometimes when I come to a customer who asks me to help them start to
build test automation, they already have ideas as to what the first tests should be, or even
chose the first test cases to automate beforehand. The obvious choice, which is correct
in most cases, is to start from the sanity tests. Most customers have a well-known and
established set of tests that are considered “sanity,” which they execute (manually) pretty
often. But the criteria of how these tests were chosen to comprise the sanity suite are not
always so clear, and the definition of what a sanity suite should contain can vary from
one company or team to another. Unfortunately, from my experience, in many cases, a
substantial part of these sanity tests is not suited for automation at all.

200
Therefore, in most cases, after I look at the description of the manual test cases in the
customer’s sanity suite, I put those aside, and ask a few questions that help me choose
the most important tests to start with. The questions I ask are along these lines:
• Who are the main customers and users of the system?
• What’s the main value that the system provides to these
customers/users?
• What are the outputs that provide this value?
• What are the necessary inputs that are needed to produce these
outputs?
Sometimes it helps to refine those questions by asking the following leading
questions too:
• What harm will be done if the system stops working?
• How does this system help the organization earn more money or save
money?
• Among the outputs of the system, if one of them stops working for a
while in production without anyone from the dev or support noticing
it (hypothetically), which one will cause the most harm? Which user
will likely to notice it first, when and how?
• What was the first and most important feature that was the incentive
for starting developing the system at the first place? What did the
users do before this system existed?
The purpose of all of these questions is to answer the one important question,
which is:
“What’s the most important thing that the application is doing?”
Or in words that are more relevant to our discussion:
“What’s the most important thing that we should test?”
Note that the answer to these questions always encompasses an output, which is a
result of some important and unique functionality and that can be verified.
Chapter 10 Designing the First test Case

201
Unfortunately, many tests that people consider as “sanity” do not answer these
questions. Here are some examples of tests that are not very appropriate as first tests, or
even as automated tests whatsoever:
• Tests that does not specify a concrete and specific expected result.
For example: “Pressing the ‘Submit order’ button should succeed.”
Even if this button does the most important thing in the application,
if we can’t specify what the expected outcome should be, there’ no
point in testing it.
• Relying on a “success” message as a proof that an operation
succeeded. For example: “Perform a purchase and verify that a
‘success’ message appears.” Even though the expected result is
specified very clearly, it does not really prove that the system did the
important thing it should have. In other words, it doesn’t prove that
the system provides the value that it should. Displaying a success
message is important for the user’s experience, but it’s much less
important than some other outcome, which is the essence of the
functionality. Ask yourself: If the system will display the message
even though it won’t do anything else, does it have any value? In the
above example, verifying that a purchase succeeded may involve
navigating into “my purchases” page and verifying that the purchase,
along with all of its details, are there. Of even better, verify that the
seller sees the order!
• Tests that verify that a user can log in. Login is never the real purpose
of a system. It’s just something that the user has to do in order to be
identified when doing other important stuff using the system. No
one would build a system just for the sake of allowing users to log in,
just as no user will ever want to use a system whose most important
feature is that it allows him to log in. The fact that this is the first step
in many tests doesn’t make it appropriate as the first test! Later in
the automation project, you may want to test some security or user
management features. Only in this context it will be appropriate to
write tests that cover the login process as the tested feature itself, and
not just as a step to reach another goal.
Chapter 10 Designing the First test Case

202
• Tests that verify the layout of windows or pages. Problems in the
layout of pages, like cropped text, unaligned controls, bad colors,
etc., are pretty easy to detect by a human tester. However, besides
the fact that this is rarely the most important feature of a system,
machines cannot easily detect such problems. Even using tools that
help detecting these, every small change to the layout will require
maintenance.
• Test that verify that when a page appears, certain buttons and fields
are disabled, and others are enabled. This is a little better than just
testing layout, but it’s still not the purpose that systems are built for.
Also, each button or field that can be disabled must also be enabled
in some other case, which means that the more important thing to
verify is that the field becomes enabled or disabled according to the
relevant conditions. Testing all buttons and fields on a page for their
enabled/disabled state doesn’t tell us much and may easily break if
any of the relevant condition changes.
• Tests that verify that the user can fill in all the details in a form. Like
in the other cases, there’s no value in a system that allows the user to
enter data if this data is not being used anywhere. The data should
either affect other features, be transferred to another system that
uses it, or at the very minimum be stored and retrieved again by the
user at a later time. Most probably, the highest value from this data is
obtained when it’s used by the system to affect some other automatic
operation. Storing and retrieving data is nothing special to a specific
application (unless you’re part of a team that develops a database
engine, which you probably aren’t). Therefore, it’s often worth having
a separate test for each value in a form, only to verify that it affects the
appropriate functionality in the way that it should.
Chapter 10 Designing the First test Case

203
DOES IT ALWAYS PAY OFF TESTING THE MOST IMPORTANT FEATURE?
it could be that the most important functionality of a system is so stable that the priority of
testing it is not so high anymore. if that’s the case, there could be two options:
1. We haven’t chosen the right system to test. if the components of the system
that implement the critical scenario are not going to be touched anytime soon,
then we probably don’t test the relevant components, and we need to think
again about what system (or subsystem) we want to test.
2. the main scenario is pretty stable, but the components that it uses are being
touched in order to add or change other features. in this case, even though
that the chances for regressions may be pretty low, i still think that it’s worth
starting from that scenario for two reasons:
a. even though the chances may be low, it’s still possible that this highly
important scenario would break. it’s better to catch this case sooner (by the
automation) than later (by manual testers or in production).
b. probably most other features and scenarios are a variation, or somehow
related to that critical scenario. starting from this test will help us build the
infrastructure that will be reusable by most other tests.
Once we’ve identified what’s the most important output that we want to test, we
need to plan how we’re going to test it. For that, we need to answer a very simple
question (though the answer is not always that trivial…), which is:
“What are the necessary inputs that affect the output that we want to test?”
Note the word “necessary.” Many inputs can probably affect the output in one way
or another, but we want to start from the simplest scenario that shows the value of the
system. Other tests that we’ll write later may verify the affect that other inputs have on
the same output, or also other outputs. The default way to answer this question should
be to ask the product owner. However, because the product owner usually thinks about
how the product is actually being used in production, often the answer she’ll give you is
that everything is necessary and that it’s impossible to isolate only few inputs in order to
get the result you need. Therefore, often I find that the best way to answer this question is
simply by experimenting or by looking at the code of the SUT. The developers can often
guide you where to look and shorten the process.
Chapter 10 Designing the First test Case

204
From those two important questions we can start building a scenario, which may
raise other questions about how to perform certain operations, or how to implement
them as part of the automation. In general, the scenario should involve controlling the
inputs of the SUT in a way that will affect the important output and verify that the output
that we want to verify was indeed affected in the way that we expect. You may want to
refer back to Chapter 6 at this point to consider the most appropriate architecture for the
test, and how the test should interact with the SUT. Note that if you don’t have control
over the relevant inputs because they’re being received from an external system, or if
the important outputs are only visible through an external system, then you may want to
consider creating a simulator for these external systems.
Choosing the First Test Case for MVCForumBack to our hands-on tutorial, as our SUT is a forum application, its main value comes
from its ability to publish questions to a wide audience and allow other people to
respond. Note that the scoring and badging rules are an important differentiating feature
(as it motivates the users to use the site to the benefit of all) and therefore should also be
considered as one of the first tests, but they still only support the main purpose, which is
to allow public discussions, and they have no value of their own sake without it.
So, what’s the most important output of the system then? In order to provide the
value that we identified above, the most important output of the system is the messages
that other people post. Note that if each user can only see his own messages, then the
system doesn’t provide the basic value we expect it to. Therefore, we should verify that
any user (even an unregistered, anonymous one) can see messages that other users
post. We should also verify that one user can answer or comment on another user’s
discussion; otherwise this would just be a bulletin board, and not a discussion forum.
However, in order to keep the tests small and easy to maintain, we should create a
separate test for each of these verifications.
And what about the inputs? In our example the answer is trivial. These are also the
messages and comments that users write. However, when we’ll design the test case in
more detail, you’ll see that we’ll need to provide more inputs in order to complete the
scenario.
Chapter 10 Designing the First test Case

205
The Scientific Method for Designing a Test CaseScientific facts do not become “scientific facts” only because scientists decided so. In
fact, never is any scientific claim really proven! On the contrary: the scientific method
motivates scientists to refute other’s theories. In order to do that, they need to perform
an empirical test that shows an example that is not consistent with the claims of that
theory. It is sufficient to find one such counterexample in order to refute one’s theory!
However, as more scientists perform such empirical tests but still no one finds a
counterexample, this theory becomes more established and accepted as being “true.”
Likewise, when you come to design a test case, you should think about this test
case as a scientific claim. The claim is a sentence that can be either true or false. This
claim is what we’ll try to refute in the test, so the first thing that you have to do when
designing a test case is to phrase that claim. At this point, I open my favorite text editor
and write down this phrase. I usually add a line of “=”s below it to mark it as the title of
the test. Note that this method is useful for all test cases, not only automated, but it’s
especially important for automated tests because the expected must not be subject to
interpretation.
For our MVCForum application, we can phrase the claim for our first scenario as
shown in Listing 10-1.
Listing 10-1. The claim of the first test
When a registered user starts a discussion, other, anonymous users can see
it
===========================================================================
Now, after we defined what is it that we want to test, we have to define how we’re
going to test it, such that if the test fails, it will refute the claim.
Designing the Steps of the TestContinuing our scientific method analogy, we design the steps of the test as the steps
of a scientific experiment. For a scientific experiment, we want to isolate any irrelevant
parameters and “noise” that may affect the outcome, which is not relevant to the claim
that we want to try and refute.
Chapter 10 Designing the First test Case

206
We also want to make the experiment as simple and as short as possible, so it is clear
to everyone reading it how they can reproduce it.
There’s one small difference between a scientific experiment and an automated test
though. A scientific experiment doesn’t need any maintenance as the laws of physics
won’t change anytime soon… However, we write automated tests for systems that
continuously evolve, and therefore we must ensure that our tests are maintainable.
This difference is reflected in the level of detail in which we describe the scenario.
While eventually when we’ll write the code, we’ll have to fill in all of the details to make
the scenario work, when we’re designing the test as an experiment, we leave only the
minimal necessary details that aid in understanding the flow of the test. We’ll leave all
other fine-grained details to be implementation details that are of less importance to
the essence of the experiment. In the code, we’ll put these details in lower-level reusable
components that we’ll create or use default values for things that we may need to change
in other tests or in the future.
Continuing our MVCForum example, the complete test case can be written as an
experiment as shown in Listing 10-2.
Listing 10-2. Adding the steps to the first test
When a registered user starts a discussion, other, anonymous users can see
it
===========================================================================
Login as a registered user
Start a discussion titled "Hi!" and body "dummy body"
Enter the site as an anonymous user (from another browser)
Verify that a discussion titled "Hi!" appears
Open that discussion
Verify that the body of the discussion is "dummy body"
Notes:
• You may have noticed that in the first line we have a presumption
here, which is that we have a well-known registered user. While in
reality, or in a standard testing environment this is always almost the
case, we can’t just use any arbitrary user, due to isolation concerns.
So now we need start thinking about the isolation technique
regarding the registered users (see Chapter 7 for more information).
Chapter 10 Designing the First test Case

207
If in the vast majority of tests we would need only one registered
user, I’d say that we should create one such user as a prerequisite in
the automation environment. However, because the application is
a discussion board, I assume that there will be many tests that need
more than one registered user. So maybe we should create two then?
But what if we’ll need more? Also, any activity of a registered user
may be seen by other users, so our environment may become dirty
and some tests may have unpredictable results… There’s no one
right way here, but at least for now, my choice is to encapsulate the
registration of a user inside the “Login as a registered user” activity
itself. This means, that each time the test will run, a new user will
be registered. Moreover, if we’ll reuse this step in other tests, each
time this step will be performed a new user will be registered. While
the description of the operation may be a bit misleading as it hides
the fact that it also registers a new user, it makes this operation
completely atomic and autonomic, and therefore reusable, and it still
fulfills its promise: it logs in using some registered user. You may also
worry about the amount of users that we’ll create during a test run,
but I don’t suppose that it’s a real issue because the system should
support it. We’ll probably start from a new empty database every run
to improve isolation anyway, so it’s really not that big of a deal.
• I used hard-coded texts “Hi!” and “Dummy body.” However, when
implement it, I’ll probably replace “Hi!” with some random string
because we’ll need to identify the message by its title, and even if
we’ll run the test multiple times (or different tests that all use the
same string), we’ll always be able to identify the one we created.
Regarding the body though, we can keep “Dummy body” because we
don’t have to search by this value.
• You may think that it’s better to use longer and more sophisticated
message bodies, for example, ones that contain bold and underlined
text, and to see that they appear correctly. However, this is not the
purpose of this test and should be verified in different tests, as we
don’t want this basic test to fail on that kind of issue.
Chapter 10 Designing the First test Case

208
• If you’d try to perform this scenario manually right after installing
the application, you’ll see that the newly registered user can’t
create a new discussion. This is because by default there’s only one
category called “Example Category,” which only the administrator
has permissions to create new discussions in. In addition, when
creating a new discussion, the user must assign the discussion to a
category. Therefore, we can either add the required permissions for
the “Example Category” or add another category that will be used as
the default category for all tests that don’t need a specific category,
and give all registered users the necessary permissions to create new
discussions in this category. While the second option is cleaner, the
first option is simpler, so let’s start with it. We’ll write the code in such
a way that it will be easy to change this decision later on. Anyway, this
should be a prerequisite of the test and not part of the test itself. Later
we’ll have to decide how we’re going to implement it: by performing
these changes through the UI (using the administrator user) before
the first test runs, by making changes to the database, using a backup
file, etc.
Thinking in Terms of Objects and EntitiesIn principle, the next step in our workflow should be to translate these steps into code.
But in order to translate it to code that is easy to maintain, and enhance reusability,
we want that code to adhere to proper object-oriented design principles. And in order
to make it easier for you to translate these steps to object-oriented code, I recommend
doing one extra thing before jumping into the code: near each line, write a noun that
constitutes the “object” or an “entity” that makes the context for the operation described
by that line. This context is better described in business, or real-world terms rather than
technical ones, because these terms make sense to more people and will also be more
likely to remain correct for a longer period of time, after the system may undergo serious
architectural or technical changes. Note that there’s no deterministic formula for coming
up with these contexts (or objects), and even when I demonstrate writing the same test
twice to different people, I often end up with different ways to describe the steps and
their corresponding objects. It takes some experience in order to sense what are the right
abstractions that make more sense and will lead to a better designed code.
Chapter 10 Designing the First test Case

209
In many cases, including in our example, the context for the first operation will be
simply the application itself (the SUT). The context for other operations are often the
result of a previous one. Later when we’ll translate this to code, it will mean that one
method returns an object, and the next line invokes another method on that object.
Also, sometimes the best way to describe the context of a line is using a few nouns (two
or three, not more!) the first is the broader context, and next are more specific ones. This
translates into entities containing other entities, or objects referring to other objects in
the code.
For our example, we can write these contexts as shown in Listing 10-3.
Listing 10-3. Adding the context of each step
When a registered user starts a discussion, other, anonymous users can see
it
===========================================================================
Login as a registered user
// MVCForum (the application)
Start a discussion titled "Hi!" and body "dummy body"
// Logged-in user
Enter the site as an anonymous user (from another browser)
// MVCForum (new instance)
Verify that a discussion titled "Hi!" appears
// MVCForum.LatestDisucssions.Top (*)
Open that discussion
// Discussion header
Verify that the body of the discussion is "dummy body"
// Discussion
Notes (*) When we first designed the test, we didn’t say where exactly we should look for the discussion to appear. technically we can look either at the list of latest discussions (that appear on the main page), or go to the category of the discussion and list all discussions in it. theoretically, both of these are unique features that may change independently of the main functionality that we verify in the test. in order to resolve this, instead of specifying MVCForum.LatestDiscussions,
Chapter 10 Designing the First test Case

210
we could specify MVCForum.AllDisucussions. We can implement this list using lazy loading (i.e., only fetch an item when we try to access it, going through all the pages if there’s more than one page), in order to avoid fetching all of the data into memory at once. however, being pragmatic, it’s reasonable to assume that there will always be a way to get the list of all discussions ordered from the latest to the oldest, so in case this feature will change, we’ll just replace the implementation.
in addition, we can only be certain that the discussion will be the latest (top) one if there’s no one else but us to use the same environment. We’ll take care of it later as part of our isolation solution. (see Chapter 7 about isolation techniques.)
Notice how the “Logged-in user” context of the second operation is the result of
the first “Login as a registered user,” the “Discussion header” is of the discussion we
identified in the previous step, and the “Discussion” itself is the result of opening the
discussion from the “Discussion header.”
Modeling the Application
We often say that these objects and the relationships between them model the
application and the real-world world entities that are represented by it. We also say that
these objects and relationships constitute a model (as a noun, rather than a verb) that
represent that application and the real-world entities. For example, we can model the
sentence “a customer adds a product to an order,” using Customer, Product, and Order
classes. These classes will likely have the methods shown in Listing 10-4.
Listing 10-4. Modeling example
class Customer
{
public IList<Order> Orders { get { /*...*/ } }
public Order CreateOrder()
{
//...
}
Chapter 10 Designing the First test Case

211
//...
}
class Order
{
public IList<Product> Products { get { /*...*/ } }
public void AddProduct(Product product)
{
//...
}
public void Submit()
{
//...
}
//...
}
class Product
{
public string Description { get { /*...*/ } }
public decimal Price { get { /*...*/ } }
//...
}
The Page Object Pattern
One common and much-known pattern for modeling the SUT in an object-oriented way
is the Page Object Pattern. This pattern applies only to user interface test automation
and describes either complete or parts of a web page or window, exposing methods that
reflect the operations that the user can perform on that UI area.
I find the Page Object pattern very compelling for people because it’s very easy to
understand, easy to implement, and frees the automation developer from thinking too
creatively about modeling his business domain. I use this pattern too, but I don’t stick
to it very religiously, as I see it as only one of many options to model an application.
Here are some drawbacks that you should be aware of when you model the application
primarily using page objects:
Chapter 10 Designing the First test Case

212
• Because it’s only relevant to UI, it can’t model features that are not UI
centric.
• If the UI changes drastically, even if the business logic remains pretty
much unchanged, then very large portions of the automation should
be rewritten.
• If you’ll want to change some operations later to be performed
through a lower layer (e.g., through API), then not only your
implementation will have to change but also your model. In other
words, if you’ll use abstractions that represent business operations
and entities rather than UI pages, it’s more likely that such changes
will be local to the internal details of a specific class or method, while
if you only use page objects, then you’ll probably need to replace a
whole bunch of them together.
If you still decide to use the Page Object pattern as your primary abstraction, here are
some tips and recommended practices to make your code easier to maintain:
• Hide Selenium details inside the page object class. For example, if
you have a Submit button on the page, instead of having a public
property (or a getter method) that returns IWebElement for that
button, put a void Submit() method on the object that finds the
button and clicks it internally.
• Moreover, avoid exposing all fields as public properties (i.e., getters
and setters for the value of the field), and a method for each button.
Instead I prefer to expose methods that perform higher-level, more
conceptual business operations. For example, for a LoginPage class,
instead of exposing getters and setters for UserName and Password,
and method to click the Submit button, I prefer to have one method
Login, which takes the username and password as arguments, fills
those in, and click the Submit button altogether. Using higher-level
methods will make your test more readable and easier to maintain.
Even if the elements on the page change, only the code inside the
method will have to change, and not any code that calls it.
• When an operation leads the user to a different page, or displays a
new view, the method that performs the operation should return
the page object that represents that new view. This makes the code
Chapter 10 Designing the First test Case

213
more streamlined and easier to reuse. This is especially beneficial
due to auto-completion that most IDEs feature. For example, if after
the Login the user is directed to the main page, the Login method
from the previous example should return the MainPage object. So
eventually the method’s signature should look like this:
MainPage Login(string username, string password)
• Despite its name, “Page Object” should not correspond only to
whole pages. Instead, it’s recommended to decompose a page into
subpages or views, according to the logical layout of the page. For
example, a typical email application can have a MainPage object
containing properties for the toolbar, the folders tree, the list of
headers, and the preview pane. Each of these views should have its
own Page Object. This idea can even be repeated in a nested manner,
so that these views hold yet their own inner views. For example, the
preview pane can hold the header of the message (which is fixed),
and the body (which is scrollable). Figure 10-1 and code Listing 10-5
shows how this looks in the UI and in the code.
Figure 10-1. Nested PageObjects
Chapter 10 Designing the First test Case

214
Listing 10-5. Page Objects for a typical main application
class MainPage
{
// ...
public ToolbarView ToolBar { get { /*...*/ } }
public FoldersTreeView FoldersTree { get { /*...*/ } }
public HeadersListView HeadersList { get { /*...*/ } }
public PreviewPane PreviewPane { get { /*...*/ } }
}
class ToolbarView
{
//...
}
class FoldersTreeView
{
//...
}
class HeadersListView
{
//...
}
class PreviewPane
{
public MessageHeaderView MessageHeader { get { /*...*/ } }
public MessageBodyView MessageBody { get { /*...*/ } }
}
class MessageHeaderView
{
//...
}
Chapter 10 Designing the First test Case

215
class MessageBodyView
{
//...
}
• For views that appear in multiple places in the application, you
should use different instances of the same Page Object class. For
example, MVCForum features a rich text editor in various places in
the application: when creating a new discussion, when replying on
a discussion, and also in the admin console to enter a description
for a category. Another typical case is when you have tables, which
support sorting, grouping, and filtering, but appear in different places
with different columns and rows. In some cases, the rows themselves
can be much richer than just a line of values and can be seen like
having their own subview, in which case these rows can have their
own page object, and the table should expose a property that returns
a collection of these page objects that represent these row subviews.
The list of discussions in the MVCForum application is an example
of this, as each discussion header is a view that contains an icon,
the title, category, author, etc. In all of these cases you should use
different instances of the same Page Object class. This means that you should avoid using static members on these classes. Also, I
don’t recommend using singletons as even if you don’t think that
you’ll ever need more than one instance, you’ll be surprised how
often these assumptions turn to be wrong. And when you reach the
moment when this assumption is wrong, you’ll have a very hard time
changing it. Even for the main page, you may create two instances to
simulate two concurrent users!
• Sometimes there are views that appear in different places in the
application, but with slight differences. Or there are similar views
that part of them is fixed and other parts changes according to their
type. In these cases, consider using abstract classes containing the
fixed parts of regular properties, and the different parts as abstract
properties. Then create derived classes for each type. For example, in
the mail application, regular messages and meeting invitations have
Chapter 10 Designing the First test Case
216
a lot in common but are also different in some aspects, and therefore
their preview pane may look somewhat different. In the above
example, MessageBodyView may be an abstract base class, having
MailMessageBodyView and MeetingMessageBodyView as derived
classes.
Beyond the Page Object Pattern
As I already mentioned, I don’t stick to the Page Object pattern very religiously. Instead,
I use whatever abstraction I can find that best represents the business concepts
and operations that I want. I’m trying to think about reusability, clarity, and lack of
duplication when I model the application. As you’ll see in the next chapters, the act
of removing duplication, which I emphasize a lot, plays a big role in continuously
improving and sharpening the model over time, as I add more and more tests. Designing
and sharpening the model often raise important questions and misalignments between
the actual functionality and the desired one (in other words, bugs), and lead you to
better understand the product.
When you use more conceptual business entities rather than UI pages, in case you’d
want to change the scope of your tests from UI to API or some other scope someday
in the future, it will be much easier, as you won’t have to change the model – only the
implementation. The same is true even for enlarging the scope. That is, if right now
you’re using API testing and may want to allow UI testing in the future, then you’ll also
only need to change the implementation but not the model.
If the application is very well architected, then probably all of the important
functionality that we want to test in our first test or tests is encapsulated in the Business
Logic layer, which already models the business entities and their relevant operations. In
this case, my advice is to write these tests directly on the Business Logic layer as unit or
integration tests. However, in reality often the separation is not as strict as we’d like it to
be, and therefore we may prefer to write the tests as system tests. (See Chapter 6 for more
information about choosing the appropriate test scope.)
Often when I model the application using higher-level business entities, I still use the
Page Object model under the hood. That is, the tests use objects that represent business
entities, but these objects use Page Objects internally to interact with the application
through the UI and usually not used directly by the test methods.
Chapter 10 Designing the First test Case

217
As you can see, and will see even more clearly soon, the process of defining the
context for each operation leads us from the textual description of the test to an object-
oriented design that we can implement in the code. In the following chapter we’ll
continue the tutorial and finally start writing code!
SummaryIn this chapter we went from choosing the first sanity test to automate, through the
“scientific method” of defining the test case, to modeling the SUT in an object-oriented
approach, which will soon serve us as a design guideline for our test code. While we
haven’t written a single line of code yet, and although we only planned one single test,
we did some very important design work. Skipping this design or doing it carelessly will
later cause costly maintainability issues. Note though that doing it properly also requires
some practice and experience, so be patient, and try to learn from your experience.
Chapter 10 Designing the First test Case

219© Arnon Axelrod 2018 A. Axelrod, Complete Guide to Test Automation, https://doi.org/10.1007/978-1-4842-3832-5_11
CHAPTER 11
Start Coding the First TestFinally! After 10 chapters, we’re ready to write some code…
In this chapter we’ll build the skeleton for the first test that we designed in the
previous chapter, writing the code of the test itself and empty classes and methods that it
should use. We’ll end this chapter when the code compiles but does nothing. In the next
chapter we’ll continue to implement all the methods and won’t rest until the test passes.
Many parts of the code that we’ll write will also serve as an infrastructure that we’ll be
able to use in the next tests. As also mentioned in Chapter 9, we’ll use Visual Studio and
C#, and Selenium of course. So, let’s start!
Creating the ProjectIn order to write a test, we first need to create a new test project. In Visual Studio, a
project is always part of a solution. So technically we can create a new solution for the test
automation or add our project to the solution of the SUT. This question is relevant also to
the real world, and both ways are fine. If possible, I prefer to add the tests to the solution of
the SUT, so that developers can run the tests more easily. It also allows us to reuse certain
parts of the SUT in the tests. I know that it may sound awkward or even a bad idea to use
parts of the SUT for testing the SUT, but I rarely use the logic of the app, but reusing things
like constants and sometimes interfaces may be very handy and ensure that the test uses
the same values as the application itself. Testing that the values themselves are correct is
not very meaningful for automation, because anytime someone has to change a constant,
he would anyway need to change the same constant in the tests too…
So, let’s start by adding a new test project to the MVCForum solution:
1. Start Visual Studio, and open the MVCForum solution (MVCForum.
sln) from the location of the Git repository you downloaded in
Chapter 9. If you followed Chapter 9 step by step, then you’d
probably see MVCForum at the recently opened solutions.

220
2. Open Solution Explorer (View ➤ Solution Explorer), right-click
on the root element (Solution ‘MVCForum’), and select Add ➤ New Project…
3. Inside the Add New Project dialog, shown in Figure 11-1,
on the left pane, select Visual C# ➤Test (1), then select Unit Test Project (.Net Framework) in the middle pane (2). Type
“MVCForumAutomation” in the Name field at the bottom (3), and
click OK (4).
Note The “Unit Test Project (.Net Framework)” project type creates a test project that uses the MSTest unit-testing framework.
4. If you scroll down the Solution Explorer pane, you should see
the new project MVCForumAutomation added to the solution,
containing a UnitTest1.cs file. Double-click on this file to open in
the code editor. Figure 11-2 shows the new file as how it looks in
the text editor.
1
34
2
Figure 11-1. Adding a new Test Project
ChaPTer 11 STarT CodiNg The FirST TeST

221
Note if you’re using Visual Studio Community edition, you may not see the small gray text that appears above the class and method declarations (“0 references…”), as it’s a feature available only in Visual Studio Professional edition and up. also, if you’re not using resharper, you won’t see those green circles near lines 7 and 10.
This is an example file that Visual Studio adds to the project. We’ll change it very
soon, but let’s first look and try to understand the content of this file.
In an MSTest project, tests are methods decorated with the [TestMethod] attribute.
However, in order for MSTest to look for these attributes inside a class, the class must
also be decorated with a [TestClass] attribute. An MSTest project can contain many test
classes, and each test class can contain many test methods. Every test method can be run
independently from the others, but you can also choose to run all the tests in a class or
all the tests in the project. There are other filtering abilities, but that’s beyond our scope
of this book. There’s more to MSTest than that, but that’s all we need to know for now.
Figure 11-2. UnitTest1.cs
ChaPTer 11 STarT CodiNg The FirST TeST

222
In order to see how the test can run (even though it’s still empty), you should first
build the project. To do that, right-click on the MVCForumAutomation project and
select Build. Then you have to open the Test Explorer pane (if it’s not already open), by
selecting Test ➤ Windows ➤ Test Explorer. This pane displays a list of the tests available
in the solution, lets you run them, and see their results. After you’ve built the project,
you should see TestMethod1 appear in the Test Explorer pane. If you right-click on that
TestMethod1, and select Run Selected Tests, you should see that after few seconds its
icon near the test name has changed to a green V mark, marking that the test passed.
Note if you wonder why the test passed even though it’s empty, then the rule is very simple: a test always passes unless an exception is thrown from the test method. MSTest provides a class called Assert that exposes a few methods that perform verifications. each of these methods throws an exception in case the appropriate verification fails.
Tip in Visual Studio you have many ways to perform every action, like running a test method. i show you just one way, but you’re welcome to explore and find other ways.
Renaming the Class, Filename, and Test MethodIt’s not a good idea to keep the name UnitTest1, as this name tells us nothing. We need to
change both the name of the class and the name of the file. We’ll call the new test class
SanityTests, as we plan to put the sanity tests in it. When you rename the class, Visual
Studio allows you to change the filename to match the name of the class:
1. In the code editor, double-click on the class name (UnitTest1) to
select it.
2. Type SanityTests to replace the name of the class.
3. Press Ctrl+. (Ctrl and the period key together) to open Visual
Studio quick-actions menu and select Rename file to match type name.
ChaPTer 11 STarT CodiNg The FirST TeST

223
Tip There are many naming conventions for test classes and test methods, but there’s no one standard. For the name of the test method itself, my rule is that it should be similar to the claim we defined in the previous chapter (even though it may be a pretty long name). regarding the class names, i tend to have one file for all tests of a feature and name the class after the feature. however, because the first tests are usually very generic, and not specific to one feature, i simply call the first class SanityTests. it’s usually pretty easy to change these names later anyway.
Renaming the test method is straightforward. Simply edit it to be the name of
the test you want. The naming convention that I promote is to use the claim that
we defined when we planned the test, remove the spaces, and start new words in
capital (AKA PascalCase1). In our example, the name of the test method would be:
WhenARegisteredUserStartsADiscussionOtherAnonymousUsersCanSeeIt
So now, our test class, whose file name is now SanityTests.cs is as shown in Listing 11-1.
Listing 11-1. SanityTest.cs
using System;
using Microsoft.VisualStudio.TestTools.UnitTesting;
namespace MVCForumAutomation
{
[TestClass]
public class SanityTests
{
[TestMethod]
public void
WhenARegisteredUserStartsADiscussionOtherAnonymousUsersCanSeeIt()
{
}
}
}
1 https://blogs.msdn.microsoft.com/brada/2004/02/03/history-around-pascal-casing-and-camel-casing/
ChaPTer 11 STarT CodiNg The FirST TeST

224
Note The line break before the name of the test method is only due to the limited space in the book. in the code editor, it should be on the same line as the public void keywords preceding it.
Write the Pseudo-codeIn this step, we’re going to translate the text that we wrote in the previous chapter to a
valid C# syntax inside the code editor. Without going too deep into compilers theory
here, a valid syntax does not mean that the code compiles. In loose words, it only means
that the code “looks like” a valid C# syntax, even though some required definitions
and identifiers are missing. For this reason, I call it “Pseudo-code” at this stage, even
though I try not to change this code later on, but only add the missing declarations and
implementations. So eventually the pseudo-code will become the real code.
To make it easier to write the pseudo-code, instead of switching back and forth
between the text editor (where we wrote the textual description of the test) and Visual
Studio, I like to copy that text as a comment, write the code. and then delete the
comment. Note that the code should be self-describing, looking very similar to the
original text, so there’s no use in keeping this comment. Figure 11-3 shows what the code
looks like after writing the code but before removing the comment.
ChaPTer 11 STarT CodiNg The FirST TeST

225
Note i recommend you to look at Figure 11-3 in the e-book version of this book in order to see the syntax highlighting and the red color that resharper uses to indicate the missing definitions
Remarks About the Pseudo-codeAs you can see, the pseudo-code that we created is a valid C# syntax, even though it still
cannot compile because many definitions are missing. You can also see that the pseudo-
code reflects pretty well the text in the comment, employing the contexts that we defined
in the text as the objects in the code.
Figure 11-3. Writing the pseudo-code
ChaPTer 11 STarT CodiNg The FirST TeST

226
While writing the code, I had to make some additional design decisions. Some of
them are apparent from the code you see in Figure 11-3, but some are more implied.
Here are some of them:
• While in the textual steps I wrote “Login as a registered user,” in the
code I called it RegisterNewUserAndLogin to better reflect what it
does. If you try to register a new user in the application, you’ll notice
that when the registration succeeds, the user becomes logged in
automatically. Therefore, the RegisterNewUserAndLogin method is
actually one operation despite the ‘and’ in its name. Note that if this
behavior will change at some point, we will be able to change only
the internal implementation of this method and perform the same
thing as two distinct operations internally (register and log in), but
without having to change any test that calls it.
• When creating a discussion in the application, there are various
parameters that the user can specify. The most trivial way to
model this is by making each one of them a parameter of the
CreateDiscussion method. However, there are currently four
parameters excluding the body of the message, and most of them are
optional. In addition, as systems evolve, more and more parameters
are added to entities that the user can create. Having overloads with
so many parameters makes the method cumbersome and hard to
maintain. Therefore, I prefer to use the Test Data Builder2 pattern.
The With static property of the Discussion class will instantiate
and return a DiscussionBuilder object, with a method for each
parameter. The CreateDiscussion method should use this builder in
order to fill in the values in the form.
• The sentence “Enter the site as an anonymous user” is actually not
an operation that the user performs after navigating to the site, but
rather this is the state right after navigating to the site. Therefore, we
only need to create a new instance of a browser and navigate it to the
site. I decided to name this class MVCForumClient, as this is what it
actually represents. Note that the MVCForum identifier is not a name
2 Steve Freeman and Nat Pryce, Growing Object-Oriented Software Guided by Tests (Menlo Park, CA: Addison-Wesley Professional, 2009), p. 258.
ChaPTer 11 STarT CodiNg The FirST TeST

227
of a class but rather a property name in the test class. The MVCForum
property is actually also of type MVCForumClient, even though you
cannot see it yet from the pseudo-code.
• I considered using the Factory Method pattern3 to create the new
MVCForumClient instance for the anonymous user. I may still revise
this decision in the future, but for now I didn’t see any benefit from
doing it, without making the code more cumbersome.
• I declared two variables of type Discussion: createdDiscussion and
viewedDiscussion. The first one represents the discussion as the
registered user created it, and the second one represents what the
anonymous user sees. Even though they should actually be the same,
we cannot assume this in the test as this is what we want to verify, by
comparing their title and body.
• The Assert.AreEqual method is the most common method to
perform the verifications in tests. A similar class exists in virtually all
unit tests frameworks, but there can be slight differences between
them. In MSTest, the first argument is the expected result, the second
is the actual result, and the third is an optional message to display
when the assertion fails. Note that replacing between the first and the
second arguments won’t change the outcome of the verification, but
regardless of the third parameter, the error message always mentions
the expected and actual results using these arguments, so if you
replace them this message can be confusing.
THE VAR KEYWORD IN C#
in C#, the compiler can infer the type of a local variable according to the expression that you
use to initialize that variable (assuming you initialize it in the same line), which saves you
from specifying the type explicitly. in order to use it, you can replace the type to the left of the
variable name with the keyword var. For example, the following two lines are equivalent and
generate exactly the same runtime bytecode:
3 Erich Gamma, Richard Helm, Ralph Johnson, and John Vlissides, Design Patterns: Elements of Reusable Object-Oriented Software (Menlo Park, CA: Addison-Wesley Professional, 1994), p. 107.
ChaPTer 11 STarT CodiNg The FirST TeST

228
int i = 3; // explicit type declaration
var i = 3; // compiler inferred type declaration
Note that this does not make the variable dynamic, as the compiler determines the type at
compile time and it cannot change it later at runtime. This means that the variable is still
strongly-typed (aKa statically typed), and if you’ll try to call methods or access properties that
do not exist on this type, you’ll get compile-time errors and not only runtime errors as you
would if it was a dynamic type.
The use of this keyword is controversial, but it’s mostly a matter of taste. When this keyword
was first introduced in C# 3.0, i didn’t like it at first, but over time i got more and more used to
it, and today when i look at code that doesn’t use it, it looks very cumbersome to me.
When i write the pseudo-code of a test myself, i usually use the var keyword. But for the
sake of clarifying my intentions, in the above example i specified the types explicitly. But don’t
worry; i’ll change it back to var when we’ll be done.
Getting the Code to CompileOk, so we wrote the pseudo-code, but now what? It doesn’t even compile! And where’s
Selenium?! Ok, we need a bit more patience until we use Selenium, but let’s get the code
to compile first.
The important thing to keep in mind at this step is not to go and try to implement
everything. We should only focus on making the code compile and about creating the
model, which is the structure of the classes and method signatures, but without writing any code inside methods. Completing the model before starting to implement the
methods helps us validate that our model is complete (as far as our first test needs), and
that we didn’t forget anything important along the way. Also, as long as our code doesn’t
compile, we won’t be able to run our test and check if it actually works as we expect,
and we’re likely to write more code than we’ll need or be able to test quickly. We want
to take baby steps here to validate that every few lines of our test automation code does
exactly what we expect it to. Remember: if the quality of the test automation code will be poor, its reliability will be poor too! S,o let’s stick to the current step: only make the
code compile.
ChaPTer 11 STarT CodiNg The FirST TeST

229
Tip i find that using the keyboard rather than the mouse wherever possible significantly improves the productivity when writing, editing, or even just reading code, though it can take some time to get used to. appendix d contains useful tips for working effectively with the keyboard. accordingly, the following instructions use keyboard shortcuts wherever possible.
The methods and properties that we’ll create in order to make the code to compile
will all have a single statement: throw new NotImplementedException();. As you’ll see
later in the tutorial, these exceptions will guide us through the process and will ensure
that we don’t forget to implement anything.
If you’re using Resharper, you can use Alt+PgUp/Alt+PgDn to navigate between
the compilation errors and warning. You can also use Alt+Shift+PgUp/Alt+Shift+PgDn to navigate only between the errors. If you’re not using Resharper, simply traverse the
red squiggly lines, or open the Errors pane (View ➤ Error List) and use F8/Shift+F8 to
navigate between the errors.
Once the cursor is on an unrecognized class or method name, press Alt+Enter
(Reshaper) or Ctrl+. (without Resharper) to open the quick-actions menu, and select
(using the arrow keys and Enter) the option to create that class or method. Note that
Resharper gives you much more control when creating classes and methods. Especially
important is that when you create a method using Resharper, it brings your cursor to
edit the types and names of the method parameters and return values, while Visual
Studio without Resharper gives some default names and the types it can infer, and leave
it like that, which is not what you always want. In this case, you have to explicitly go to
the declaration of the method (using F12) and edit those manually. Both Resharper
and plain Visual Studio adds the throw new NotImplementedException(); statement
to methods that you create this way, but unfortunately they don’t do it by default for
properties, leaving them to return null, so we’ll have to do that manually.
Tip resharper allows you to change its default behavior to create a body with throw new NotImplementedException(); statements also for properties, through its options dialog. To do that, go to Resharper ➤ Options, choose Code Editing ➤ Members Generation from the left side navigation bar, and under the Generate property body style section select Accessor with default body.
ChaPTer 11 STarT CodiNg The FirST TeST

230
Whether you use Resharper or Visual Studio’s native quick-actions menu, when you
create a class you have an option to create it in its own file, or inside the current file. Even
though eventually every class should be in its own file, I find it more convenient to create
all the classes in the same file, at least until it compiles, or until the first test passes, and
only later move each class to its own file. Resharper allows you to do it for all classes in
the file in one shot, while using Visual Studio itself you have to do it one by one.
Declaring the LoggedInUser ClassThe first compilation error we see is that the type LoggedInUser is not defined. Put
the cursor on this identifier and press Alt+Enter (or Ctrl+.), and select Create type ‘LoggedInUser’ (or Create class ‘LoggedInUser’ without Resharper), as shown in
Figure 11-4.
Declaring the MVCForum PropertyThe next undeclared identifier is MVCForum. While the LoggedInUser identifier could
only mean a type (class) name due to its location in the syntax, there are few options
that can satisfy the compiler regarding the MVCForum identifier. The most obvious one
is also a class name, but then the method RegisterNewUserAndLogin must be static,
and that wasn’t my intent. My intent was that MVCForum will be a read-only property
or type MVCForumClient. If you’re using Resharper, select Create read-only property ‘MVCForum’ from the quick-actions menu; otherwise select Create property
Figure 11-4. Creating the LoggedInUser type using the context menu
ChaPTer 11 STarT CodiNg The FirST TeST
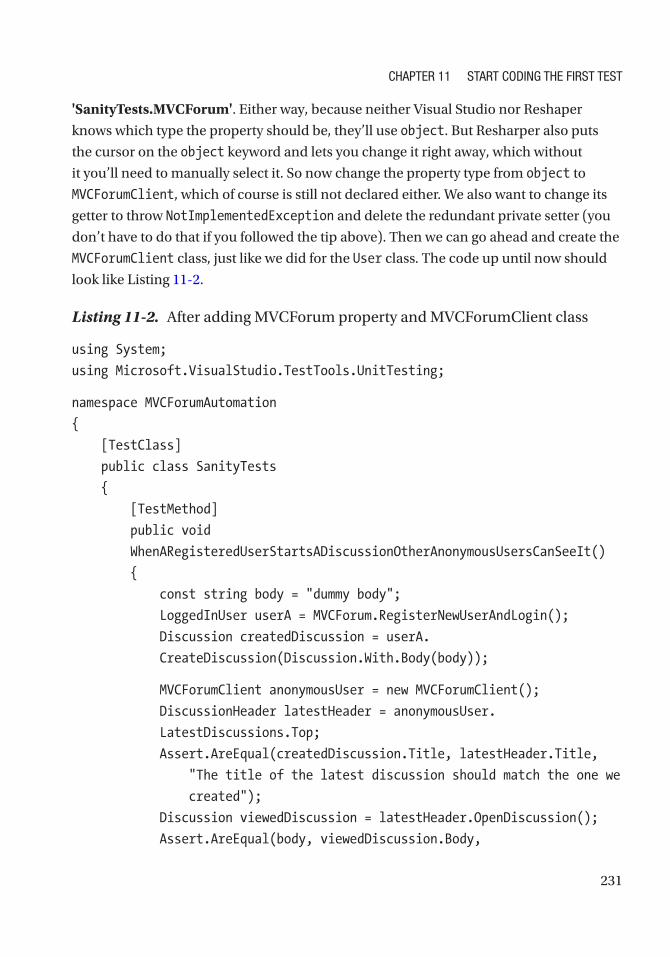
231
'SanityTests.MVCForum'. Either way, because neither Visual Studio nor Reshaper
knows which type the property should be, they’ll use object. But Resharper also puts
the cursor on the object keyword and lets you change it right away, which without
it you’ll need to manually select it. So now change the property type from object to
MVCForumClient, which of course is still not declared either. We also want to change its
getter to throw NotImplementedException and delete the redundant private setter (you
don’t have to do that if you followed the tip above). Then we can go ahead and create the
MVCForumClient class, just like we did for the User class. The code up until now should
look like Listing 11-2.
Listing 11-2. After adding MVCForum property and MVCForumClient class
using System;
using Microsoft.VisualStudio.TestTools.UnitTesting;
namespace MVCForumAutomation
{
[TestClass]
public class SanityTests
{
[TestMethod]
public void
WhenARegisteredUserStartsADiscussionOtherAnonymousUsersCanSeeIt()
{
const string body = "dummy body";
LoggedInUser userA = MVCForum.RegisterNewUserAndLogin();
Discussion createdDiscussion = userA.
CreateDiscussion(Discussion.With.Body(body));
MVCForumClient anonymousUser = new MVCForumClient();
DiscussionHeader latestHeader = anonymousUser.
LatestDiscussions.Top;
Assert.AreEqual(createdDiscussion.Title, latestHeader.Title,
"The title of the latest discussion should match the one we
created");
Discussion viewedDiscussion = latestHeader.OpenDiscussion();
Assert.AreEqual(body, viewedDiscussion.Body,
ChaPTer 11 STarT CodiNg The FirST TeST
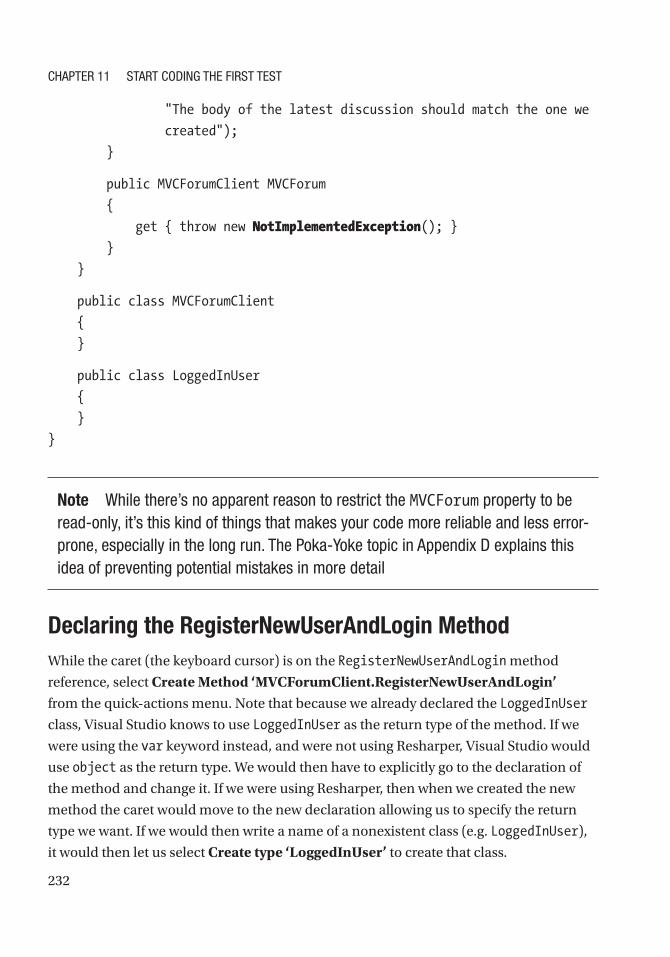
232
"The body of the latest discussion should match the one we
created");
}
public MVCForumClient MVCForum
{
get { throw new NotImplementedException(); }
}
}
public class MVCForumClient
{
}
public class LoggedInUser
{
}
}
Note While there’s no apparent reason to restrict the MVCForum property to be read-only, it’s this kind of things that makes your code more reliable and less error-prone, especially in the long run. The Poka-Yoke topic in appendix d explains this idea of preventing potential mistakes in more detail
Declaring the RegisterNewUserAndLogin MethodWhile the caret (the keyboard cursor) is on the RegisterNewUserAndLogin method
reference, select Create Method ‘MVCForumClient.RegisterNewUserAndLogin’ from the quick-actions menu. Note that because we already declared the LoggedInUser
class, Visual Studio knows to use LoggedInUser as the return type of the method. If we
were using the var keyword instead, and were not using Resharper, Visual Studio would
use object as the return type. We would then have to explicitly go to the declaration of
the method and change it. If we were using Resharper, then when we created the new
method the caret would move to the new declaration allowing us to specify the return
type we want. If we would then write a name of a nonexistent class (e.g. LoggedInUser),
it would then let us select Create type ‘LoggedInUser’ to create that class.
ChaPTer 11 STarT CodiNg The FirST TeST

233
In addition, pay attention that the body of the new method contains the statement
“throw new NotImplementedException();”. We’ll leave it like that for now because all
we want is the code to compile. Later you’ll see how we go about replacing it with the
actual implementation. Note that IDEs for other languages sometimes just leave an
empty body (or a return null; statement), which is unfortunate, because it will make it
harder for us later to find all the places that we need to implement. If you’re using one of
these IDEs, I suggest that you make yourself a habit to add a statement similar to throw
new NotImplementedException(); whenever you add a new method.
Declaring the Rest of the Classes and MethodsContinue going over the undeclared identifiers one by one, and create the classes and
methods as we did before. Here are some notes:
• The CreateDiscussion method has a complex expression as its
argument, which is still not defined either. For that reason, if we’ll
try to create the CreateDiscussion method first, the suggested
argument type will be object. However, if we define the identifiers in
the argument expression first, then CreateDiscussion will already
be created using the proper argument type. In general, it’s better to
define expressions inside parentheses before declaring the outer
expressions. In our case, we should do it in the following order:
a. Create the Discussion class
b. Create With as a read-only property and make it of type
DiscussionBuilder (as explained in the remarks about the
pseudo-code above), which is still not defined
c. Create the DiscussionBuilder class as a nested class inside
Discussion
d. Create the DiscussionBuilder.Body method (you should
do it from the original line). Change its return type to
DiscussionBuilder and the parameter’s name to body. Note
that in the Test Data Builder pattern, all methods return the
same instance (this) in order to make it easier to chain a few
calls together. This is why we return DiscussionBuilder from
a method declared inside the DiscussionBuilder class
ChaPTer 11 STarT CodiNg The FirST TeST

234
e. Finally, create the CreateDiscussion method. The suggested
argument type should already be DiscussionBuilder and the
returned type Discussion. You should only change the name
of the argument from the suggested name body to builder.
• LatestDiscussions property should be of a new class, which will
also be called LatestDiscussions.
• The properties Discussion.Title and DiscussionHeader.Title
should both be of type string.
When your code looks like Listing 11-3 the code should finally compile, and the
model of the application as far as our first test needs is complete! In order to compile
the code, select Build ➤ Build Solution. If the code actually compiles, you should see
a small message “Build Succeeded” at the status bar at the bottom of the screen. If the
compilation fails, then the Error List pane should appear (if not, select View ➤ Error List) showing you the compilation errors. Fix these and try again.
Note in the listing, some lines are broken due to lack of space. if you copy the code as is and put a line break inside a string value as it appears in the listing, you’ll get a compilation error Newline in constant, followed by some other syntax errors. rejoin the string to a single line to fix this.
Listing 11-3. SanityTests.cs when it compiles
using System;
using Microsoft.VisualStudio.TestTools.UnitTesting;
namespace MVCForumAutomation
{
[TestClass]
public class SanityTests
{
[TestMethod]
public void
WhenARegisteredUserStartsADiscussionOtherAnonymousUsersCanSeeIt()
{
ChaPTer 11 STarT CodiNg The FirST TeST

235
const string body = "dummy body";
LoggedInUser userA = MVCForum.RegisterNewUserAndLogin();
Discussion createdDiscussion = userA.
CreateDiscussion(Discussion.With.Body(body));
MVCForumClient anonymousUser = new MVCForumClient();
DiscussionHeader latestHeader = anonymousUser.
LatestDiscussions.Top;
Assert.AreEqual(createdDiscussion.Title, latestHeader.Title,
"The title of the latest discussion should match the one we
created");
Discussion viewedDiscussion = latestHeader.OpenDiscussion();
Assert.AreEqual(body, viewedDiscussion.Body,
"The body of the latest discussion should match the one we
created");
}
public MVCForumClient MVCForum
{
get { throw new NotImplementedException(); }
}
}
public class DiscussionHeader
{
public string Title
{
get { throw new NotImplementedException(); }
}
public Discussion OpenDiscussion()
{
throw new NotImplementedException();
}
}
public class Discussion
{
ChaPTer 11 STarT CodiNg The FirST TeST

236
public static DiscussionBuilder With
{
get { throw new NotImplementedException(); }
}
public string Title
{
get { throw new NotImplementedException(); }
}
public string Body
{
get { throw new NotImplementedException(); }
}
public class DiscussionBuilder
{
public DiscussionBuilder Body(string body)
{
throw new NotImplementedException();
}
}
}
public class MVCForumClient
{
public LoggedInUser RegisterNewUserAndLogin()
{
throw new NotImplementedException();
}
public LatestDiscussions LatestDiscussions
{
get { throw new NotImplementedException(); }
}
}
ChaPTer 11 STarT CodiNg The FirST TeST

237
public class LatestDiscussions
{
public DiscussionHeader Top
{
get { throw new NotImplementedException(); }
}
}
public class LoggedInUser
{
public Discussion CreateDiscussion(Discussion.DiscussionBuilder
builder)
{
throw new NotImplementedException();
}
}
}
Now it’s also a great time to split the file into separate files: one for each class,
using the quick-actions menu. If you’re using Resharper, you can right-click on the file
SanityTests.cs in the Solution Explorer pane, select Refactor ➤ Move Types Into Matching Files… and click Next in the dialog that pops up. Now you should have one
class per file. Make sure that the code still compiles after that change.
I’ll also use this opportunity to replace all explicit type names with the var keyword.
Model Code ReviewWhen more than one automation developer work on the project, after one has created all
the classes and methods that make a test compile, this is a great time for a code review.
Even though nothing was really implemented, the reviewer can examine:
1. Is the code of the test clear and readable?
2. Does the code of the test reflect the steps that prove or refute the
claim which is the name of the test?
3. Does the model (the classes and methods) represent reality and
the application correctly?
ChaPTer 11 STarT CodiNg The FirST TeST

238
4. If this is not the first test, are similar methods or classes already
exist, and should they be reused?
If the reviewer has important comments, it’s much easier to fix those at this stage
rather than after the entire test was implemented!
SummaryIn this chapter we wrote the code of the test method according to the way we’ve planned
it verbally in the previous chapter. While we’ve written a lot of code that actually
does nothing, we essentially created the skeleton (or the design) for the test and its
infrastructure code, in a way that is modular and reusable. In addition, because we tried
to stick to the way we’ve described the test verbally, the code of the test method came
up very readable. In the next chapter we’ll finally implement the methods so the test will
actually do what it’s supposed to do.
ChaPTer 11 STarT CodiNg The FirST TeST

239© Arnon Axelrod 2018 A. Axelrod, Complete Guide to Test Automation, https://doi.org/10.1007/978-1-4842-3832-5_12
CHAPTER 12
Completing the First TestOK, so now that our code compiles, what do you think will be the next thing we should
do?
(Buzzer sound goes here) WRONG answer! I bet that you said, “start implementing
the methods” (at least this is what 99% of the people I ask this question say). What we’re
about to do now will probably sound very silly to you at first: We’re going to run the test!
But wait, we can’t! It can’t possibly work! The computer will blow up! Well, you’re
right, it won’t work. But it won’t blow up the computer either (I know you didn’t really
mean it…). So, what will happen? The test will fail of course, because every exception
causes the test to fail and we have many throw new NotImplementedException();
statements. The point is that when we run the test and it will fail, we’ll know exactly
what’s the first method that it tries to run, and this is the first method that we need to
implement.
If we’ll stick to this process of implementing one method at a time and running the
test to see where it fails next, we’ll be able to test every new method that we write and
verify that it works correctly and reliably. If it doesn’t, the test will fail on something
that we have already implemented and we should go back and fix it. This way we are
constantly improving and fortifying the reliability of our code. In addition, it’s also a
great way to make sure that out tests are repeatable without having to reset test data,
environments, etc. This is of great importance when we’ll later want to make them part
of a CI/CD process (see Chapter 15).
Running the Test to Find What to Implement FirstSo. as we said, we’ll first run the test in order to see what the first failure is. Continuing
where we left off in the previous chapter, in order to run the test, open the Test Explorer
pane (if not already open), by selecting Test ➤ Windows ➤ Test Explorer. Then right-
click on the test’s name and select Run Selected Tests. You should see that the test failed

240
by the red X near the test name. At the bottom of the Test Explorer pane. you should
see the details of the failure, including the error message and the stack-trace that shows
the chain of method calls in which the exception was thrown. By default. this lower part
is pretty small, but you can enlarge it by dragging the splitter. After the failure the Test
Explorer should look like Figure 12-1.
The error message says: “Message: Test method MVCForumAutomation. SanityTests.WhenARegisteredUserStartsADiscussionOtherAnonymousUsersCanSeeIt threw exception:
System.NotImplementedException: The method or operation is not implemented.”
Figure 12-1. Test Explorer showing the first failure
Chapter 12 Completing the First test

241
Note according to your operating system’s locale, parts of the message may be phrased in your system’s language.
While the error message may look a bit daunting, it’s actually not that complicated.
Because the name of the test, which is long by itself, is also shown in its full form that
includes the namespace and the class name, this takes up most of the error message… So
in order to understand the message we can simplify it as: “Message: Test method <test
method name> threw exception: System.NotImplementedException: The method or operation is not implemented.” Oh, this makes much more sense now! The good
thing about NotImplementedException is that the top line on the stack-trace tells you
exactly where the unimplemented method is. If you hover over the link in the stack-trace,
you should see a tooltip stating the exact file path and line number. If you click the link,
you’ll be taken to that exact place, which is the body of the MVCForum property getter.
Implementing the property getter is very straight-forward. Simply initialize the property
to a new instance of MVCForumClient as follows:
public MVCForumClient MVCForum { get; } = new MVCForumClient();
And now what do we do? This time I hope you had it correct: run the test
again! Note that when we run the test again, Visual Studio automatically saves our
changes and re-compiles our code, so when the test runs it includes our recent
changes. Now the NotImplementedException is thrown from the MVCForumClient.
RegisterNewUserAndLogin method. However, we have to go back a little bit first, because
the website should be opened in the constructor of MVCForumClient and only then we
should implement RegisterNewUserAndLogin.
Adding Selenium to the ProjectIn order to implement the constructor of MVCForumClient to open the MVCForum
website, we should start using Selenium WebDriver. We’ll then use it for all of the
following methods that should interact with the website, of course.
Chapter 12 Completing the First test

242
Note While selenium is a very popular test automation tool, teaching selenium is not the focus of this book. i’ll explain only the bare minimum so that you understand the tutorial. there are tons of other resources about selenium WebDriver on the web, or you can read Selenium WebDriver Recipes in C# (second edition) by Zhimin Zhan.1
Adding Selenium to a project in Visual Studio is very easy:
1. In Test Explorer, right-click on the MVCForumAutomation
project and select Manage NuGet Packages… The NuGet Package
Manager window will be opened.
2. Click on Browse (at the top of the window).
3. Type “Selenium” inside the Search box, and press Enter. Note
that for some reason Visual Studio won’t show any results until
you’ve typed in the entire word. You should see results similar to
those shown in Figure 12-2.
1 Zhimin Zhan, Selenium WebDriver Recipes in C#: Second Edition (New York: Apress, 2015).
Chapter 12 Completing the First test
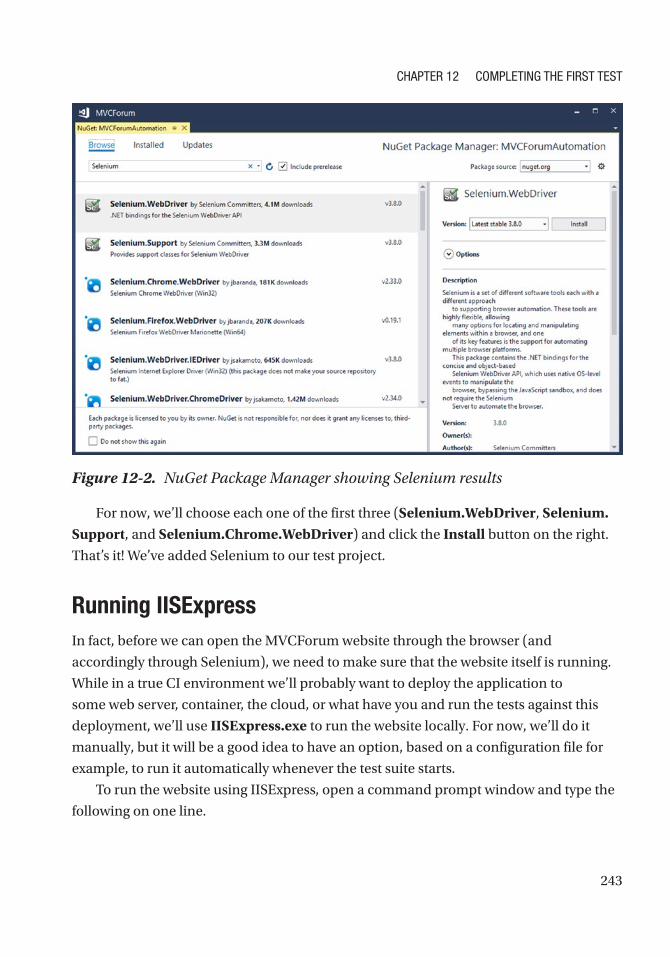
243
For now, we’ll choose each one of the first three (Selenium.WebDriver, Selenium.Support, and Selenium.Chrome.WebDriver) and click the Install button on the right.
That’s it! We’ve added Selenium to our test project.
Running IISExpressIn fact, before we can open the MVCForum website through the browser (and
accordingly through Selenium), we need to make sure that the website itself is running.
While in a true CI environment we’ll probably want to deploy the application to
some web server, container, the cloud, or what have you and run the tests against this
deployment, we’ll use IISExpress.exe to run the website locally. For now, we’ll do it
manually, but it will be a good idea to have an option, based on a configuration file for
example, to run it automatically whenever the test suite starts.
To run the website using IISExpress, open a command prompt window and type the
following on one line.
Figure 12-2. NuGet Package Manager showing Selenium results
Chapter 12 Completing the First test

244
"%ProgramFiles(x86)%\IIS Express\iisexpress.exe" /path:C:\
TheCompleteGuideToTestAutomation\MVCForum\MVCForum.Website\
If you’ve downloaded the Git repository to a different location, replace
TheCompleteGuideToTestAutomation with the path to the location you’re using.
Given that IISExpress started successfully, you can now open a browser and navigate
to http://localhost:8080 and see that the MVCForum is up. If you want to stop
IISExpress you can press ‘Q’ at the command window running IISExpress. This will stop
the website and you won’t be able to access the site from the browser.
Implementing the MVCForumClient ConstructorInside the MVCForumClient class, add a constructor as shown in Listing 12-1. Press
Ctrl+. and select Import type ‘OpenQA.Selenium.Chrome.ChromeDriver’ (or
Alt+Enter if you’re using Resharper) to add the appropriate using statement at the
beginning of the file.
Listing 12-1. The MVCForumClient constructor
public MVCForumClient()
{
var webDriver = new ChromeDriver();
}
The line inside the constructor only tells Selenium to open a Chrome browser. Let’s
run the test again and see if it’s working.
Obviously, the test still fails on the same NotImplementedException in
MVCForumClient.RegisterNewUserAndLogin because we haven’t implemented it yet.
But what has changed, is that now a new, empty Chrome browser window gets opened
when we run the test. However, this window isn’t closed when the test ends, which is
pretty annoying, especially when you run the test multiple times. So, let’s now fix this
before we continue further.
In order to close the browser when the test ends, we can use the object’s finalizer
method, which the .Net Garbage Collector calls whenever the object is not needed
anymore.
Chapter 12 Completing the First test

245
Note the garbage Collector calls the finalizer method asynchronously, which means that the browser may be left open for a few extra seconds more than what we need. one way to tackle it is to use the AddCleanupAction method from the Test Automation Essentials library. see appendix B for more information about this library. But for now, i won’t use it so that i keep things simple for the tutorial.
In order to close the browser, we need to call the Quit method on the ChromeDriver
object we’ve created. But because we want to call it from the finalizer, we must first
convert the local webDriver variable into a member. Because I’d like to adhere to the
default naming convention that Resharper suggests, I’ll add an underscore to the name
of the field, making it _webDriver.
Note that if you’re using Resharper, you can change the local variable to a field
automatically. Put the caret on the name of the local variable, press Ctrl+Shift+R to
open the Refactor This context menu, and select Introduce Field… In the dialog that
comes up, change the name to _webDriver, check Make field readonly and click Next.Eventually, after adding the field and the finalizer, the constructor we’ve created in
Listing 12-1 should be replaced with the code in Listing 12-2.
Listing 12-2. MVCForumClient constructor and finalizer
private readonly ChromeDriver _webDriver;
public MVCForumClient()
{
_webDriver = new ChromeDriver();
}
~MVCForumClient()
{
_webDriver.Quit();
}
If you’ll rerun the test, you’ll notice that now the browser opens and then closes
automatically.
Chapter 12 Completing the First test

246
There’s one more thing that we need to do in the constructor though: navigate to the
website of the MVCForum application. Because we’re currently running it locally using
IISExpress, we need to navigate to http://localhost:8080. We do this by setting the Url
property as shown in Listing 12-3.
Listing 12-3. Navigating to the local MVCForum website
public MVCForumClient()
{
_webDriver = new ChromeDriver();
_webDriver.Url = "http://localhost:8080";
}
Note that this constructor currently encapsulates two important hard-coded details:
the type of the browser that we use (Chrome) and the URL of the website. We’ll probably
want to allow running the tests on different browsers and against different environments
(URLs) so we should extract these details to an external configuration file. However,
because of the way I write the code, which ensures that I don’t duplicate such details,
I prefer to defer implementing the mechanism that reads from a configuration file to a
later time when I’ll really need it. When I’ll really need it, it will be pretty easy to change
(because it’s only in one place), and then I’ll also be able and motivated to test that it
actually works in all the relevant environments. For the meantime, I’ll change the type
of _webDriver to the IWebDriver interface, which is common to all browsers, so I won’t
accidentally rely on Chrome specific features (see the Poka-Yoke topic in Appendix
D). Don’t forget to add the appropriate using statement to use the OpenQA.Selenium
namespace. I’ll also add a comment to remind me and others that I intend to change this
in the future, and we’ll actually change this in Chapter 14.
If you run the test now, it will still fail on the same thing, but you’ll be able to see that
the browser now navigates to our website before it gets closed.
Implementing RegisterNewUserAndLoginSo now we’re ready to focus on and implement the RegisterNewUserAndLogin method.
Typically registering a new user is a pretty long process. While here there’s one page
with very few details that the user must fill in, it’s still not exactly an atomic operation.
Therefore, we won’t implement the entire process of registering a user in a single
method. Instead, we’ll use the same top-down technique that we used to write the test,
Chapter 12 Completing the First test

247
but now for implementing the RegisterNewUserAndLogin method. So first we’ll replace
the throw new NotImplementedException(); statement with the code in Listing 12-4,
which make our code non-compilable again.
Listing 12-4. Implementing MVCForumClient.RegisterNewUserAndLogin
public LoggedInUser RegisterNewUserAndLogin()
{
var username = Guid.NewGuid().ToString();
const string password = "123456";
const string email = "[email protected]";
var registrationPage = GoToRegistrationPage();
registrationPage.UserName = username;
registrationPage.Password = password;
registrationPage.ConfirmPassword = password;
registrationPage.Email = email;
registrationPage.Register();
return new LoggedInUser();
}
Remarks:
• Because we want the username to be unique, we initialize the
username variable to a new GUID. Note that sometimes it worth
creating a special class for generating random strings and values
according to various constraints, like length, allowed characters, etc.,
but right now we can do without it.
• The password and email addresses don’t have to be unique, and they
don’t even have to be realistic. As long as it satisfies the requirements
for the registration we’re good to go.
• The GotoRegistrationPage method that we yet to define will click
the Register link and return an actual Page Object representing
the registration page. We’ll name this Page Object class
RegistrationPage (See Chapter 10 for more details about the Page
Object pattern).
Chapter 12 Completing the First test

248
• All of the property setters of RegistrationPage will enter text into
the corresponding fields. The Register method will click the Register
button.
• Currently we return a new LoggedInUser object, without providing
anything in its constructor. We’ll probably have to initialize it with
the username in the pretty near future, but we’ll do it only after the
process we’re following will force us to do so.
As you probably guessed, now we have to make our code compile again by creating
the missing methods, properties, and classes, similar to how we created the classes and
methods in the previous chapter, though now we should choose to create new classes
already in new files. Specifically, we need to create the GoToRegistrationPage method
whose return type is RegistrationPage, and the RegistrationPage class itself with all
the members that we call. Listing 12-5 shows the RegistrationPage class definition
(we’ll add it in a new file). Note that we still don’t implement the body of any of the new
methods, and keep the throw new NotImplementedException(); statement.
Listing 12-5. The RegistrationPage class definition
namespace MVCForumAutomation
{
internal class RegistrationPage
{
public string Username
{
get { throw new System.NotImplementedException(); }
set { throw new System.NotImplementedException(); }
}
public string Password
{
get { throw new System.NotImplementedException(); }
set { throw new System.NotImplementedException(); }
}
Chapter 12 Completing the First test

249
public string ConfirmPassword
{
get { throw new System.NotImplementedException(); }
set { throw new System.NotImplementedException(); }
}
public string Email
{
get { throw new System.NotImplementedException(); }
set { throw new System.NotImplementedException(); }
}
public void Register()
{
throw new System.NotImplementedException();
}
}
}
Now let’s run the test again. Unsurprisingly the test now fails on the
NotImplementedException inside MVCForumClient.GoToRegistrationPage. So, let’s
implement it.
In order to get to the registration page, we need to click on the Register link at the
top right part of the page (near the Log On link). Figure 12-3 shows the main page
containing the Register link.
Chapter 12 Completing the First test

250
In order to click it, we first need to tell Selenium how to find it. Selenium can identify
elements using different characteristics of the element, called locators in Selenium’s
jargon. There are various types of locators (see following note box), but the most
important rule is that the locator should match only the element (or elements) we’re
looking for, and not others. The sidebar contains more tips for choosing the best locator.
All of the locators are matched against the DOM2 of the page.
In order to see the DOM of the page and find the best locator for the Register, first
open Chrome and navigate to the website (http://localhost:8080), then right-click on
the Register link and select Inspect from the context menu. This will open the Developer Tools pane (which you can also open and close by pressing F12), which shows you the
2 DOM stands for Document Object Model and is the tree data-structure that represents the HTML elements on the web page. Unlike the source HTML of a page, the DOM can be manipulated and changed at runtime using JavaScript.
Figure 12-3. The MainPage containing the Register link
Chapter 12 Completing the First test

251
tree of elements in the DOM and highlights the element of the Register link. This is
shown in Figure 12-4.
Tip appendix D contains an explanation on the various selenium locators and tips for how to choose the most appropriate one.
Asking the Developer to Add a Unique Automation IdentifierWhile we can identify the Register link using its link text (“Register”) it’s not
recommended, especially because the site is multi-lingual, and the same element may
appear with a text in another language. Even if it wasn’t a multi-lingual site, we prefer not
Figure 12-4. Inspecting the Register element using the Developer Tool
Chapter 12 Completing the First test

252
to rely on a specific spelling and wording, because if it will change, then our test will fail
until we change our code too. However, there’s no other locator that uniquely identifies
that element and is also a better fit.
In such cases, the recommended approach is to add the id attribute. If you have
access to the source code of the SUT, then you can change it yourself. If not, you should
ask a developer to add it for you. It’s really a one-minute task that should have no side
effect, so there shouldn’t be any objection. If you encounter an objection, explain the
importance of it to the reliability of the tests, or involve your manager if needed. If it
takes time, you can use the LinkText locator in the meantime, and later replace it to Id.
Another variation on this approach is instead of adding an id attribute, you can
add a unique class name, just for the sake of the test automation. You can prefix this
class name with “auto-” for, example, to clearly emphasize that it’s being used by the
automation. As elements can have multiple classes, this approach is safer as it ensures
that this class name will be used only for the automation and won’t be changed for any
other reason.
In the tutorial, we have access to the full source code of the SUT, so we’ll add the
class “auto-register” ourselves:
1. In the Solution Explorer pane, type _Layout.cshtml in the search
box.
2. Double-click the _Layout.cshtml file in Solution Explorer to open
it in the editor.
3. Go to line 86, and add the class name declaration in the <a> tag,
as follows:
<li><a class="auto-register" href="@Url.Action("Register", "Members")">
@Html.LanguageString("Layout.Nav.Register")</a></li>
4. Save the file and build the solution.
5. Go to the Chrome browser, and press F5 to refresh the page. You
should now see the new class name in the Developer Tools.
Chapter 12 Completing the First test

253
Note Don’t forget to clear the search box in the solution explorer pane in order to see the entire solution.
Now we’re ready to implement MVCForumClient.GoToRegistrationPage as shown in
Listing 12-6.
Listing 12-6. GoToRegistrationPage implemented
private RegistrationPage GoToRegistrationPage()
{
var registerLink = _webDriver.FindElement(By.ClassName("auto-
register"));
registerLink.Click();
return new RegistrationPage(_webDriver);
}
Also create the RegisterPage constructor that accepts the webDriver argument. You
can use Resharper or Visual Studio quick-fix menu to create the constructor for you, but
make sure to declare the _webDriver field as readonly, as shows in Listing 12-7.
Listing 12-7. RegistrationPage constructor and the _webDriver field
internal class RegistrationPage
{
private readonly IWebDriver _webDriver;
public RegistrationPage(IWebDriver webDriver)
{
_webDriver = webDriver;
}
...
}
Chapter 12 Completing the First test

254
Note strictly following our process, i had to write the simplest thing that passes our current exception, and therefore i had no reason to pass webDriver to the constructor of RegistrationPage at this stage. however, because the RegistrationPage class is a page object, which will surely need the webDriver object in order to access the elements on that page, then i allowed myself to take this little shortcut here and create the webDriver parameter right now.
Implementing the Property SettersAfter implementing the GoToRegistrationPage method, we fail on the setter of
RegistrationPage.Username. If we’ll identify this element using the Developer Tools,
we’ll see that it has an id attribute with the value UserName. So, we can implement this
setter as shown in Listing 12-8.
Listing 12-8. RegistrationPage.Username
public string Username
{
get { throw new System.NotImplementedException(); }
set
{
var usernameInput = _webDriver.FindElement(By.Id("UserName"));
usernameInput.SendKeys(value);
}
}
Continuing the process, we’ll fail on the Password, ConfirmPassword, and Email
property setters and implement them accordingly, similar to the way we implemented
the Username property, one at a time. At this point RegistrationPage.cs should look like
Listing 12-9.
Chapter 12 Completing the First test

255
Listing 12-9. RegistrationPage.cs after implementing all properties
using OpenQA.Selenium;
namespace MVCForumAutomation
{
internal class RegistrationPage
{
private readonly IWebDriver _webDriver;
public RegistrationPage(IWebDriver webDriver)
{
_webDriver = webDriver;
}
public string Username
{
get { throw new System.NotImplementedException(); }
set
{
var usernameInput = _webDriver.FindElement(By.
Id("UserName"));
usernameInput.SendKeys(value);
}
}
public string Password
{
get { throw new System.NotImplementedException(); }
set
{
var passwordInput = _webDriver.FindElement(By.
Id("Password"));
passwordInput.SendKeys(value);
}
}
Chapter 12 Completing the First test

256
public string ConfirmPassword
{
get { throw new System.NotImplementedException(); }
set
{
var confirmPasswordInput = _webDriver.FindElement(By.
Id("ConfirmPassword"));
confirmPasswordInput.SendKeys(value);
}
}
public string Email
{
get { throw new System.NotImplementedException(); }
set
{
var emailInput = _webDriver.FindElement(By.Id("Email"));
emailInput.SendKeys(value);
}
}
public void Register()
{
throw new System.NotImplementedException();
}
}
}
Note if you wonder whether it’s a good practice or not to put the string literals of the locators directly in the body of the properties, please refer to the topic about hard-coded strings in appendix D for a comprehensive discussion about it.
Chapter 12 Completing the First test

257
Removing Duplication from the Property SettersNow our test fails on the unimplemented Register method. But before we’ll implement
it, notice how similar all the property setters we’ve just implemented! This is a clear
example of duplicated code. It’s true that these are pretty small methods, there are only
four of them and they’re all in the same class, but still – it’s a duplication that can be
eliminated by refactoring. As we go along and remove such duplications, we make our
code more generic, extensible, and overall – easier to maintain. While it’s reasonable
that this duplication will repeat itself in other page objects too, I’m cautious from over-
generalizing, and therefore I’ll only remove the duplication in this class for now. If later
we’ll see that other classes need this behavior too, then we’ll remove that duplication
and make our code even more generic. But now, let’s stay focused on removing the
duplication between the setters inside the RegistrationPage class. We’ll do it by
introducing a new private method FillInputElement that will contain the common
code and receive the id of the element and the value to enter. We’ll use this method in all
of the property setters instead of their current bodies.
Tip Using resharper, you can take the Username setter, for example, and apply the following refactorings: Extract Method, Introduce Parameter on the "Username" string literal, Change signature to replace the order of the parameters, and Rename to change the name of the usernameInput variable to just input (because now our method is not specific to the username input element). then you can replace the implementations of all other setters with calls to the newly created method. resharper can also help you reorder the properties and methods inside the class easily and safely. note that doing this sequence of small manipulations to the code reduces the chance that we’ll do something wrong dramatically.
After this refactoring, RegistrationPage.cs should look like Listing 12-10.
Chapter 12 Completing the First test

258
Listing 12-10. RegistrationPage.cs after removing the duplication
using OpenQA.Selenium;
namespace MVCForumAutomation
{
internal class RegistrationPage
{
private readonly IWebDriver _webDriver;
public RegistrationPage(IWebDriver webDriver)
{
_webDriver = webDriver;
}
public string Username
{
get { throw new System.NotImplementedException(); }
set { FillInputElement("UserName", value); }
}
public string Password
{
get { throw new System.NotImplementedException(); }
set
{
FillInputElement("Password", value);
}
}
public string ConfirmPassword
{
get { throw new System.NotImplementedException(); }
set
{
FillInputElement("ConfirmPassword", value);
}
}
Chapter 12 Completing the First test

259
public string Email
{
get { throw new System.NotImplementedException(); }
set
{
FillInputElement("Email", value);
}
}
public void Register()
{
throw new System.NotImplementedException();
}
private void FillInputElement(string id, string value)
{
var input = _webDriver.FindElement(By.Id(id));
input.SendKeys(value);
}
}
}
Let’s run the test once more to verify that our refactoring didn’t break anything.
The test still fails on the Register method, so apparently, we’re OK. So now we can
implement the Register method as shown in Listing 12-11.
Listing 12-11. RegistrationPage.Register
public void Register()
{
var form = _webDriver.FindElement(By.ClassName(
"form-register"));
form.Submit();
}
Chapter 12 Completing the First test

260
Note Clicking a button element that has a style="submit" attribute, inside a form element, has exactly the same effect as calling Submit on the form element. in this case it was a bit easier to locate the form element than the button, therefore i chose this way.
After we run the test again, it will fail on the line in the test following the call to
RegisterNewUserAndLogin, which means that we’ve completed this method for now. We
may need to get back to it to pass something into the constructor of the LoggedInUser
object that it returns, but for now we’ll continue to follow the failure messages.
Hitting the Isolation ProblemWhen we continue the process, we’ll need to implement the getter of Discussion.
With and Discussion.DiscussionBuilder.Body. After that we’ll fail on LoggedInUser.
CreateDiscussion. However, if you haven’t changes anything through the admin page,
then when you’ll open the application and manually register a new user, you’ll notice
that the user doesn’t see a Create Discussion button at all. In fact, we already noticed
it in Chapter 10 when we planned the test scenario, and decided that our first attempt
would be to add permission to everyone to create new discussions (topics) in the
“Example Category.” Figure 12-5 shows the admin page for editing the permissions, with
the Create Topics permission checked for the “Example Category.”
Chapter 12 Completing the First test

261
Performing the actions to change this permission is not part of the test itself, so we’ll
do in the test initialization method. Once again, we’ll write the initialization method
top down: starting from pseudo-code, creating the methods and classes, and then
implementing the methods one at a time when we see where we fail next. Listing 12-12
shows the TestInitialize method in the SanityTests test class.
Listing 12-12. SanityTests.TestInitialize
[TestInitialize]
public void TestInitialize()
{
var adminUser = MVCForum.LoginAsAdmin();
var adminPage = adminUser.GoToAdminPage();
var permissions = adminPage.GetPermissionsFor(TestDefaults.
StandardMembersRole);
Figure 12-5. Admin page for changing permissions
Chapter 12 Completing the First test
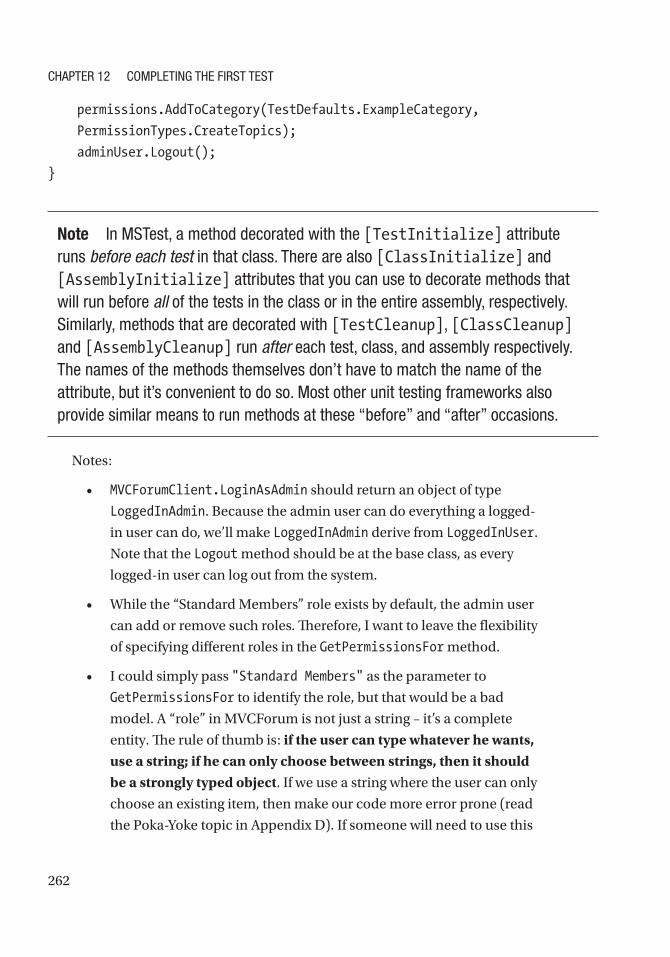
262
permissions.AddToCategory(TestDefaults.ExampleCategory,
PermissionTypes.CreateTopics);
adminUser.Logout();
}
Note in mstest, a method decorated with the [TestInitialize] attribute runs before each test in that class. there are also [ClassInitialize] and [AssemblyInitialize] attributes that you can use to decorate methods that will run before all of the tests in the class or in the entire assembly, respectively. similarly, methods that are decorated with [TestCleanup], [ClassCleanup] and [AssemblyCleanup] run after each test, class, and assembly respectively. the names of the methods themselves don’t have to match the name of the attribute, but it’s convenient to do so. most other unit testing frameworks also provide similar means to run methods at these “before” and “after” occasions.
Notes:
• MVCForumClient.LoginAsAdmin should return an object of type
LoggedInAdmin. Because the admin user can do everything a logged-
in user can do, we’ll make LoggedInAdmin derive from LoggedInUser.
Note that the Logout method should be at the base class, as every
logged-in user can log out from the system.
• While the “Standard Members” role exists by default, the admin user
can add or remove such roles. Therefore, I want to leave the flexibility
of specifying different roles in the GetPermissionsFor method.
• I could simply pass "Standard Members" as the parameter to
GetPermissionsFor to identify the role, but that would be a bad
model. A “role” in MVCForum is not just a string – it’s a complete
entity. The rule of thumb is: if the user can type whatever he wants, use a string; if he can only choose between strings, then it should be a strongly typed object. If we use a string where the user can only
choose an existing item, then make our code more error prone (read
the Poka-Yoke topic in Appendix D). If someone will need to use this
Chapter 12 Completing the First test

263
method later on and he’ll be able to pass any arbitrary string, there’s
a bigger chance that the method will fail at runtime than if he has to
pass a strongly typed object.
• Because we still want to rely on some default entities that exist in the
system, but we don’t want to create a tight coupling to them, I defined
a TestDefaults property of a class with the same name to hold those
default entities. If at some point the defaults in the application will
change, or I’ll want to use different defaults for the tests, this class
should be the only place I should change. If I won’t use such a class,
then when such a change occurs, I will have to change in many places
in the code-base of the tests.
• Everything I said about the “Standard Members” role is also true for
the “Example Category” category.
• The list of permission types is a fixed (i.e., it’s predefined in the
system and the admin user can’t change this list). Therefore, I chose
to model PermissionTypes as an enum, in order to restrict ourselves
only to members of that list and avoid potential mistakes.
Continuing our process, we first create the classes and methods that make our code
compile, then, as usual, run the test to see where it fails and implement that method.
Skipping most of the details (as I hope you get the idea by now), when I implement
MVCForumClient.LoginAsAdmin, I noticed a duplication between the RegistrationPage
and the LoginPage classes where both need the FillInputElement method that we’ve
implemented in the RegistrationPage class. In order to remove this duplication, I
extracted a base class called FormPage that contains this method, and changed the
LoginPage class to also derive from it. Note that both RegistrationPage and LoginPage
classes has Username and Password properties, which correspond to Username and
Password input fields. However, in my opinion even though these properties and their
implementations are completely identical, this is not a true duplication! That’s because
there’s no direct relationships between these fields. On each of these forms they serve
a different purpose: on the Registration form, their purpose is to let the user choose his
username and password, while in the LogIn form, their purpose is to let the user specify
what he has previously chosen.
Chapter 12 Completing the First test

264
Another important change that is worth mentioning, is that I added the default
admin username and password to TestDefaults, and had to pass it to MVCForumClient
in the constructor, so it can use it on the LoginAsAdmin method. Consequently,
I had to pass it also to the instance that we create inside the test (change the line
“var anonymousUser = new MVCForumClient();” to “var anonymousUser = new
MVCForumClient(TestDefaults);”). But because this litters the test code with
implementation details, I extracted the instantiation to a separate method called
OpenNewMVCForumClient, so eventually the line became: “var anonymousUser =
OpenNewMVCForumClient();”, which conveys the essence of this line more clearly.
Note When you run the application for the first time, you’ll see a single discussion titled “Read me”. if you open it, you can see that the default admin user name and password appear there and that they are “admin” and “password” respectively. the administrator is encouraged to change the username and password before going live. Because we only use this site locally and don’t have real and important information in the application’s database, then we can keep these credentials for now.
You can see the complete source code where TestInitialize is complete
by checking out the Git revision tagged TestInitializeCompleted, or online at
https://github.com/arnonax/mvcforum/tree/TestInitializeCompleted/
MVCForumAutomation.
Implementing CreateDiscussion and Analyzing the FailureNow that TestInitialize is working as expected, let’s implement LoggedInUser.
CreateDiscussion. The implementation is shown in Listing 12- 13.
Chapter 12 Completing the First test

265
Listing 12-13. LoggedInUser.CreateDiscussion
public Discussion CreateDiscussion(Discussion.DiscussionBuilder builder)
{
var newDiscussionButton = WebDriver.FindElement(By.ClassName("createtop
icbutton"));
newDiscussionButton.Click();
var createDisucssionPage = new CreateDiscussionPage(WebDriver);
builder.Fill(createDisucssionPage);
createDisucssionPage.CreateDiscussion();
return new Discussion(WebDriver);
}
Notice how we use the Test Data Builder pattern here: we simply call the Fill method
of the builder, which should do all the work of filling in all the relevant values. The
CreateDiscussion method itself should not change to support additional parameters.
When we run the test though, we get a failure: Message: Test method MVCForumAutomation.SanityTests.WhenARegisteredUserStartsADiscussionOtherAnonymousUsersCanSeeIt threw exception: OpenQA.Selenium.NoSuchElementException: no such element: Unable to locate element: {“method”:“class name”,“selector”:“createtopicbutton”} , and the
stack-trace is pointing as expected at the FindElement call in the method we’ve just
implemented. Reverifying the class name of the button assures that it’s the correct one.
In order to analyze what’s going on, we have two options:
1. Put a breakpoint on the relevant line and debug the test.
2. Add relevant diagnostic information to the test result.
While the tendency of most people is for the first option, I generally prefer to try the
second option first, and only if it doesn’t help fall back to debugging. The reason I prefer
the second option is that diagnostic information that I add to the test can serve me to
investigate future failures as well. In particular, when a test fails during a CI or nightly
build and cannot be reproduced on the environment of the automation developer, then
debugging won’t help, while diagnostic information would. See the next chapter for
more information about investigating failures.
So, the most basic diagnostic information that can help us identify this problem
is a screenshot of the page at the moment of the failure. On the one hand, if we see
Chapter 12 Completing the First test

266
the button in the screenshot, then it means that there’s a problem in the way we try
to find it. If, on the other hand, we won’t see the button, then we’ll have to continue
investigating further, but the screenshot will probably provide us with more hints
regarding the problem. Listings 12- 14 and 12-15 show the code we add to SantiyTests.cs
and MVCForumClient.cs respectively in order to take the screenshot. Note that most of
the code we add to SanityTests.cs is specific to MSTest, but you can do similar things in
other unit testing frameworks too.
Listing 12-14. SanityTests.cs – adding screenshot on failure
public TestContext TestContext { get; set; }
[TestCleanup]
public void TestCleanup()
{
if (TestContext.CurrentTestOutcome != UnitTestOutcome.Passed)
{
var screenshotFilename = $"Screenshot.{TestContext.TestName}.jpg";
MVCForum.TakeScreenshot(screenshotFilename);
TestContext.AddResultFile(screenshotFilename);
}
}
Listing 12-15. MVCForumClient.cs – adding screenshot on failure
public void TakeScreenshot(string screenshotFilename)
{
_webDriver.TakeScreenshot().SaveAsFile(screenshotFilename);
}
Now let’s run the test again and see what happens. Obviously, the test till fails with
the same error message, but now Test Explorer shows us another link named Output as
shown in Figure 12-6.
Chapter 12 Completing the First test

267
Clicking on the Output link opens a special document window in Visual Studio,
containing pretty much the same information as the lower pane of Test Explorer, but
with an additional section titled Attachments, containing the link to our screenshot.
Clicking on the link open the screenshot shown in Figure 12-7, which tells the whole
story…
Figure 12-6. Test Explorer shows the Output link
Chapter 12 Completing the First test

268
Apparently, the problem was that we were stuck in the Registration page after
clicking Register and didn’t even get to the main page where the New Discussion
button should appear. As the screenshot tells us, the reason we failed to complete the
registration is because not only the username should be unique, but also the email
address.
In order to fix this, we’ll create a random email address on each run too, replacing
the line in MVCForumClient.RegisterNewUserAndLogin:const string email = "abc@
def.com";
with:
var email = $"abc@{Guid.NewGuid()}.com";
Figure 12-7. The failure screenshot
Chapter 12 Completing the First test

269
Completing the TestNow this issue is behind us, and we also have a simple mechanism that will take a
screenshot on every failure. So now we can continue our cycle of running – fixing –
refactoring until the test passes. After about nine additional cycles like this, the test
suddenly passes! Figure 12-8 shows what success looks like.
Figure 12-8. The first test passes
To see the final code of the test check-out the Git revision tagged
FirstTestCompleted or online at https://github.com/arnonax/mvcforum/tree/
FirstTestCompleted. You can also see the individual steps that lead us here by
looking at the revisions history at https://github.com/arnonax/mvcforum/commits/
FirstTestCompleted or through Visual Studio (see Chapter 9 for details).
Chapter 12 Completing the First test

270
SummaryDuring the process we’ve created many classes and many more methods. It may seem
a lot for just one test, but all of these classes and methods were written in a way that is
reusable, so we’re likely be able to use them in other tests too. Also, all of the code that
we wrote was executed and tested and proven to work repeatedly and reliably. There
is still some work that we need to do in order to support running the tests on different
machines or environments, support multiple browsers, and add more logging to help us
investigate failures, but most of what we’ve done so far can stay with us for long, and be
very easy to maintain. In the next chapter we’ll improve the code to help us investigate
failures more easily, and in Chapter 14, we’ll add more tests and improve some of the
things that we’ve postponed.
Chapter 12 Completing the First test

271© Arnon Axelrod 2018 A. Axelrod, Complete Guide to Test Automation, https://doi.org/10.1007/978-1-4842-3832-5_13
CHAPTER 13
Investigating FailuresHere’s a true story: In the previous chapter we completed our first test, and it passed
consistently. My original intent was to continue showing you more tests, then write a
chapter about investigating failures. However, reality struck and changed my plans.
After I completed writing the previous chapter, I wanted to send the author of
MVCForum, Lee Messenger, a pull-request1 with the tests I created, as the project didn’t
have any tests before. But before I could send the pull-request, I had to first pull his latest
changes and merge them into my repository. However, after I did that, the test stopped
working.
Note that this situation happens all the time in the real world. Whenever a developer
makes changes to the application, there’s a chance that some tests will stop working.
For that reason, integrating and running the tests often ensures that those changes
between every run are small and it’s easy to find out what has changed. Naturally, good
maintainability, both of the application, but more so of the tests, ensures that fixing these
issues is as easy as possible.
This experience inspired me to focus this chapter on this concrete example rather
than on explaining about failure investigation only theoretically.
Integrating with Latest Version of MVCForumWhen I ran our single test after integrating with the latest version of MVCForum, I saw
the failure shown in Figure 13-1.
1 A pull-request is an operation in GitHub that is used to send source code contributions to an open source project owned by another user. It is called “pull-request” because the contribution isn’t automatically pushed to the owner’s repository, but rather a message is sent to him asking him to pull the changes from the contributor’s repository. This way the owner has control over the contributions and can accept or reject them.

272
As mentioned briefly in Chapter 10, in order to ensure isolation and consistency, I
intend to clean the database before each test run. As this should be done only per run
and not per test, I prefer to do it using a batch file or some other kind of script, external
to the test code. In the meantime, in order to ensure that everything indeed works
consistently, I occasionally re-created the database manually before running the test.
The mentioned failure that happened after integrating the latest changes only happened
after re-creating the database. To re-create the database, stop IISExpress, delete the
MVCForum database from Microsoft SQL Server Management Studio, create a new
database named MVCForum, and restart IISExpress. The next time you browse to the
website, all of the tables and default data will be created automatically.
Figure 13-1. The first failure after integrating the latest version of MVCForum
Chapter 13 InvestIgatIng FaIlures

273
As we can understand from this failure message and stack-trace, we failed to find the
“My Tools” menu in order to navigate to the Admin page. Let’s click the Output link and
look at the screenshot to see whether this menu appears or not. The screenshot is shown
in Figure 13-2.
From the screenshot we can understand that we actually failed to log in.
Improving the Error ReportingSeeing the problem from the screenshot is cool, but the first indication that we got was
that the My Tools menu is not found which wasn’t very indicative of the real problem. So
before we’ll fix and even investigate the root cause any further, let’s fix the error message
to be more indicative if a similar problem will happen again in the future.
Figure 13-2. The screenshot of the failure
Chapter 13 InvestIgatIng FaIlures

274
In order to do that, after clicking the Log On button, we’ll check that there’s no red
error message, and if there is, we’ll fail the test immediately and provide all the relevant
information at the failure message.
In order to identify the error message bar, we can either try to reproduce the problem
manually or run the test through the debugger and break after clicking the Log On
button. There’s another option that I’ll use later in this chapter, which is to save the page
to a file and open it offline. However, I want to keep things simple for now so we’ll leave it
for later.
The method that actually performs the login, and is most appropriate for that check
is the private method MVCForumClient.LoginAs<TLoggedInUser>. Listings 13-1 and 13-2
show the changes we made to this method and to the LoginPage class respectively in
order to improve the error message. Of course, we implement one method at a time as
we did before.
Listing 13-1. MVCForumClient.LoginAs improved validation
private TLoggedInUser LoginAs<TLoggedInUser>(string username, string
password, Func<TLoggedInUser> createLoggedInUser)
where TLoggedInUser : LoggedInUser
{
var loginPage = GoToLoginPage();
loginPage.Username = username;
loginPage.Password = password;
loginPage.LogOn();
var loginErrorMessage = loginPage.GetErrorMessageIfExists();
Assert.IsNull(loginErrorMessage, $"Login failed for user:{username} and
password:{password}. Error message: {loginErrorMessage}");
return createLoggedInUser();
}
Chapter 13 InvestIgatIng FaIlures

275
Listing 13-2. LoginPage.GetErrorMessageIfExists
/// <returns>
/// The error message displayed on the Login Page, or null if no error is
displayed
/// </returns>
public string GetErrorMessageIfExists()
{
var errorMessageElement = WebDriver.TryFindElement(
By.ClassName("validation-summary-errors"));
return errorMessageElement?.Text;
}
Notes:
1. Because I generally tend to avoid null as valid values (see
Appendix D for more details), I added the XML comment that
clearly states that it can return null if no error appears. Visual
Studio displays these XML comments as tooltips whenever you
hover over the name of the method.
2. The TryFindElement method is not yet declared. I’ll declare it as
an extension method2 to make the code more readable, and the
idea is that it will return an element if found, or null if not.
Listing 13-3 shows the implementation of TryFindElement.
2 Extension methods are a C# language feature, which allow us to associate methods to existing classes or interfaces, as if they were instance members of these classes or of all classes implementing those interfaces. These methods are in fact simple static methods, but they make the code more elegant. The idea is that the object on which the extension method acts upon (in our case, WebDriver), is passed to the first parameter, which is specifically annotated with the keyword this in the method declaration (as you can see in Listing 13-3). You can read more about C# extension methods at https://docs.microsoft.com/en-us/dotnet/csharp/programming-guide/classes-and-structs/extension-methods or simply search the web for “C# extension methods.”
Chapter 13 InvestIgatIng FaIlures

276
Listing 13-3. SeleniumExtensions.cs containing the TryFindElement extension
method
using System.Linq;
using OpenQA.Selenium;
namespace MVCForumAutomation
{
public static class SeleniumExtensions
{
/// <summary>
/// Tries to find the element using the specified locator
/// </summary>
/// <param name="context">The context in which to find the
element. This is typically an object implementing <see
cref="IWebDriver"/> or <see cref="IWebElement"/></param>
/// <param name="locator">The locator (<see cref="By"/>) to use for
finding the element</param>
/// <returns>An <see cref="IWebElement"/> representing the element
if found, or null if the element could not be found</returns>
public static IWebElement TryFindElement(
this ISearchContext context, By locator)
{
var matchineElements = context.FindElements(locator);
return matchineElements.FirstOrDefault();
}
}
}
Note the first parameter of the method, context, which is annotated with the this keyword, is the object to which this extension method is applied. I declared its type as ISearchContext, which both IWebDriver and IWebElement derive from, so that it will be applicable for all objects that implement any of them.
Chapter 13 InvestIgatIng FaIlures

277
Now when we run the test, we see the error message: Assert.IsNull failed. LogOn fail for user:admin and password:password. Error message: The user or password provided is incorrect.
As you can see, this error message is much more accurate than the one we got
originally, and we can also see the username and password that we attempted to use. So
we know that we failed to log in using the default admin username and password… but
why?
Avoid DebuggingThe instinct of many developers (be it product developers or automation developers)
when they encounter a bug is to start debugging. Indeed, today’s IDEs provide very rich
debugging experience, and it can give you very deep insights about what’s going on.
However, there are a couple of drawbacks to debugging:
1. You can only debug a failure that reproduces consistently in
your environment. Debugging other environments is possible
but usually much more cumbersome, and debugging through
a scenario that fails inconsistently is a total waste of time. In the
context of test automation, it means that failures that happen
only on the build environment will be difficult to debug, and
flickering tests (tests that fail inconsistently) will be much harder
to diagnose.
2. After you end a debugging session, most of the information and
knowledge that you gained during the session is lost. If you or
someone else will have to debug a similar problem in the future,
he’ll need to go over the entire debug session all over again, trying
to understand what you’ve just learned.
For these reasons, I prefer to avoid debugging in most cases. Instead, I constantly
improve my error reporting, logging, and other diagnostic data collection, so gradually
it becomes easier and easier to investigate failures. At first, the investment may be a bit
higher than debugging, but in the long run it pays off big time.
Chapter 13 InvestIgatIng FaIlures

278
Investigating the Root CauseAs you recall from the previous chapter, we found that the default administrator’s
username and password are “admin” and “password,” from the Read Me topic (that is
created automatically on the first run). So let’s look at the Read Me topic again and see if
something has changed. Figure 13-3 shows the new Read Me topic.
As you can see, the password is now (r=)76tn and not password as it was.
Apparently this is not just a new default password as before, but rather a generated
one (if you’ll try it yourself you should see a different password). Digging in the code of
MVCForum and talking to the developer, it turns out that in order to improve the security
when people deploy the real application in production, the default password has
changed to some randomly generated one rather than “password.” The new password is
generated when the database is created.
Figure 13-3. The updated Read Me topic
Chapter 13 InvestIgatIng FaIlures

279
Resolving the ProblemOf course that we don’t want to use (r=)76tn as it will change the next time we’ll
re- create the database. So, in order to make our test future proof, we must somehow
know the generated default administrator password. Obviously, the password is
not stored in the database as plain text, so the only way to get it is exactly as a real
administrator user would get it: by reading it from the Read Me topic!
Now the question is how to find and open the Read Me topic in a consistent manner.
There are a few alternatives, each with its own potential problems, but we’ll stick to
the simplest one now. We may change it later, if we’ll have a good reason. We already
know how to get the top topic from the Latest Discussions list. But because tests will
add more topics on top of it, we need to get the bottommost one instead. Taking the
bottommost one can be tricky if there’s more than one page, but we’ll ignore it for now.
Later we’ll decide whether to enhance its implementation to go to the last page or move
this initialization to [AssemblyInitialize] so it always run on a clean environment and
avoid this complexity altogether. We may even decide to start the tests by restoring the
database from a backup in which these permissions are already given.
In addition, we’ll need to find the password itself within the entire message body,
but that’s pretty easy as we can use Selenium to find the second bold element within the
body of the message. Listing 13-4 shows the updated TestInitialize method and the
new GetAdminPassword method that it calls.
Listing 13-4. Take admin password from the Read Me discussion
[TestInitialize]
public void TestInitialize()
{
var adminPassword = GetAdminPassword();
var adminUser = MVCForum.LoginAsAdmin(adminPassword);
var adminPage = adminUser.GoToAdminPage();
var permissions = adminPage.GetPermissionsFor(TestDefaults.
StandardMembers);
permissions.AddToCategory(TestDefaults.ExampleCategory,
PermissionTypes.CreateTopics);
adminUser.Logout();
}
Chapter 13 InvestIgatIng FaIlures

280
private string GetAdminPassword()
{
var readMeHeader = MVCForum.LatestDiscussions.Bottom;
var readmeTopic = readMeHeader.OpenDiscussion();
var body = readmeTopic.BodyElement;
var password = body.FindElement(By.XPath(".//strong[2]"));
return password.Text;
}
Note In Chapter 10, the first tip I gave for using the page Object pattern correctly was not to expose the elements of the page as public properties. the Discussion.BodyElement property seemingly breaks this rule. But this case is special because the body can contain almost any arbitrary htMl, which IWebelement represents most naturally. therefore this can be considered as an exception to that rule.
More Issues…After implementing the missing methods and properties and removing duplication with
existing ones, we still fail but with a different message:
Message: Initialization method MVCForumAutomation.SanityTests.TestInitialize threw exception. OpenQA.Selenium.NoSuchElementException: no such element: Unable to locate element: {“method”:“class name”, “selector”:“postcontent”}
From the screenshot, stack-trace, and the code, we can conclude that the Read Me discussion didn’t open. This should have happened in DiscussionHeader.
OpenDiscussion, but unfortunately the root cause wasn’t very apparent. So let’s fix that too.
We should change DiscussionHeader.OpenDiscussion to fail if it couldn’t complete
its task successfully. In fact, we should even fail the constructor of Discussion (which
is called by DiscussionHeader.OpenDiscussion) if a discussion is not displayed.
Moreover, as the Discussion class is practically a page object, if we can identify an
element that is the container of the discussion view (i.e., it contains everything related
to the discussion, but not the menus and all surrounding elements), we should use it
as the root element for the page object. This root should be used as the context for all
Chapter 13 InvestIgatIng FaIlures

281
FindElement calls instead of IWebDriver. We can then fail the construction if we can’t
find that container. Listing 13-5 shows part of the Discussion class after the changes.
Listing 13-5. Fail the constructor of Discussion if a discussion is not open
public class Discussion
{
private readonly IWebElement _container;
public Discussion(IWebDriver webDriver)
{
_container = webDriver.TryFindElement(By.ClassName("topicshow"));
Assert.IsNotNull(_container, "Failed to open discussion");
}
public string Title
{
get
{
var titleElement = _container.FindElement(By.CssSelector(
".topicheading h1"));
return titleElement.Text;
}
}
...
}
Note that before the change we had IWebDriver _webDriver member and we now
replaced it with IWebElement _container.
Note I don’t consider the use of Assert in this class as an assertion of the test, but rather simply as a convenient way to throw an exception. some frameworks however, for example, Junit, report failures due to asserts differently than failures due to exceptions, in which case it is not recommended to mix between the two.
Chapter 13 InvestIgatIng FaIlures
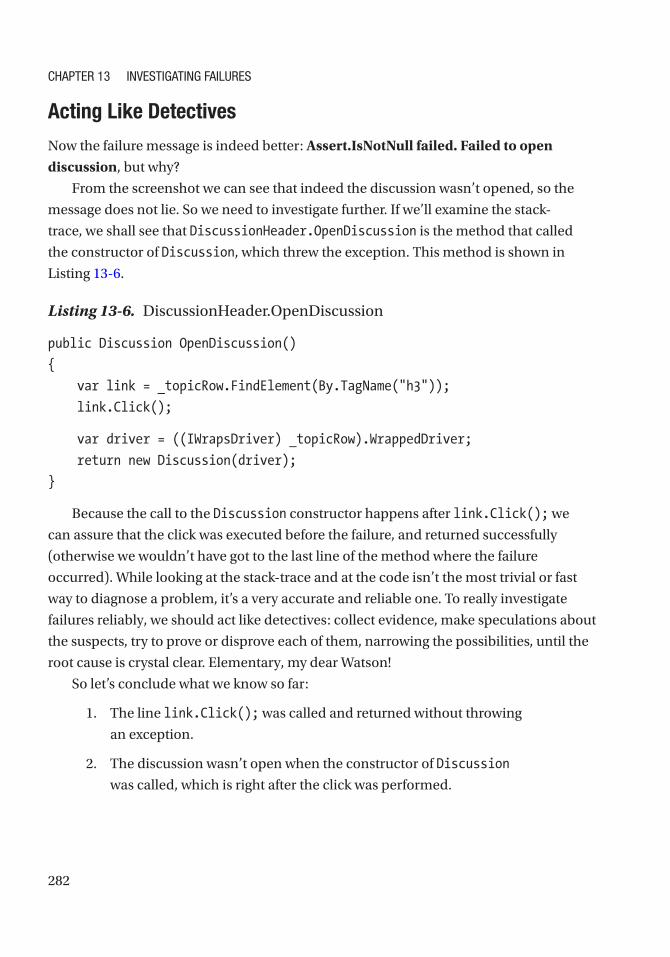
282
Acting Like Detectives
Now the failure message is indeed better: Assert.IsNotNull failed. Failed to open discussion, but why?
From the screenshot we can see that indeed the discussion wasn’t opened, so the
message does not lie. So we need to investigate further. If we’ll examine the stack-
trace, we shall see that DiscussionHeader.OpenDiscussion is the method that called
the constructor of Discussion, which threw the exception. This method is shown in
Listing 13-6.
Listing 13-6. DiscussionHeader.OpenDiscussion
public Discussion OpenDiscussion()
{
var link = _topicRow.FindElement(By.TagName("h3"));
link.Click();
var driver = ((IWrapsDriver) _topicRow).WrappedDriver;
return new Discussion(driver);
}
Because the call to the Discussion constructor happens after link.Click(); we
can assure that the click was executed before the failure, and returned successfully
(otherwise we wouldn’t have got to the last line of the method where the failure
occurred). While looking at the stack-trace and at the code isn’t the most trivial or fast
way to diagnose a problem, it’s a very accurate and reliable one. To really investigate
failures reliably, we should act like detectives: collect evidence, make speculations about
the suspects, try to prove or disprove each of them, narrowing the possibilities, until the
root cause is crystal clear. Elementary, my dear Watson!
So let’s conclude what we know so far:
1. The line link.Click(); was called and returned without throwing
an exception.
2. The discussion wasn’t open when the constructor of Discussion
was called, which is right after the click was performed.
Chapter 13 InvestIgatIng FaIlures

283
Because Selenium is pretty reliable, we can safely assume that Selenium performed
the click action on the element referenced by the link variable. So who are the suspects,
then?
1. There’s a real bug in the SUT, and when clicking the link the
discussion isn’t opened.
2. It’s a timing issue. That is, the discussion page didn’t open fast
enough, and if we had waited a little longer, it would succeed.
3. We clicked on the wrong element.
Manually performing the operation pretty much denies the first option. The second
option is the usual suspect of many test automation developers. While in many cases it is
indeed guilty, it’s also too often an innocent suspect as I’ll explained later in the chapter,
but we can easily deny it by adding a delay of, let’s say 10 seconds (by adding a Thread.
Sleep(10000); statement), after the link.Click(); line. After we denied that suspicion,
it’s important that we delete the delay!
So our only remaining suspect is that we clicked the wrong element. From the code
we see that we identify the link using its tag name h3 inside the element referred to by
_topicRow. If we inspect the code (by using Find All References from the context menu,
or Inspect ➤ Value Origin if you have Resharper) we can also see that the _topicRow
member is identified using the class-name topicrow. Using the Developer Tool in the
browser, we can search for the element using the selector “.topicrow h3” (which is a
CSS selector expression meaning an h3 tag inside an element with class topicrow. See
Appendix D for a deeper discussion about the different locators, including CSS Selector),
as shown in Figure 13-4.
Chapter 13 InvestIgatIng FaIlures

284
Note You have to press Ctrl+F in order to open the search box inside the Developer tools in Chrome.
As we can see, this element is found and is unique (as you can see from the “1 of
1” indication at the right of the search box), but we can see that it also contains an “a”
element, which is the link itself and that takes only a small part of its parent. Closing the
Developer Tools and trying to click on the area highlighted in Figure 13-4 (which is no
longer highlighted when you close the Developer Tools), but not on the Read Me title
itself, does not open the discussion.
One thing still looks strange though. This method hasn’t changed since we used it in
the first test and before we integrated the latest changes of MVCForum. So why it didn’t
fail before? If you’ll take the time to revert to the previous version and investigate, you’ll
find out that the titles of the topics that we clicked in the tests were GUIDs, which are
Figure 13-4. Finding the link to the discussion
Chapter 13 InvestIgatIng FaIlures

285
longer than the Read Me title. These long links crossed the center of the h3 element area,
and therefore clicking the h3 element did actually click the link. But because the Read Me title is short, clicking on the middle of the h3 element doesn’t click the link.
Now that we convicted the criminal (which is me, as the author of this code…), we
can fix it very easily. Simply replace the locator of link from By.TagName("h3") to By.
CssSelector("h3 a").
Taking More Screenshots
After fixing the locator, the story doesn’t end… Now the test fails on OpenQA.Selenium.NoSuchElementException: no such element: Unable to locate element: {“method”:“class name”, “selector”:“createtopicbutton”}. Looking at the screenshot
(Figure 13-5) and the stack-trace, we can conclude that the registration processes
completed successfully this time. So we made some progress after all.
But also apparent from the error message and the screenshot is that the Create Discussion button is not there. As you recall, we had a similar problem in the previous
chapter, which was solved by adding the Create Topic permission to the Standard Members group. So maybe we have a problem with that permission again.
Figure 13-5. Registration completed successfully
Chapter 13 InvestIgatIng FaIlures

286
In order to investigate whether we’ve added the permissions successfully or not, it
would be great if we had a screenshot for every click, with the clicked element clearly
marked. Developing such a mechanism can take some time, so let’s write this idea to
ourselves on a sticky note and get back to it after we’ll fix the test. For now, we can take
two more screenshots: one before adding the permission and one after. We can use the
TakeScreenshot method that we already added to MVCForumClient, and call it before
and after the call to RolePermissionsPage.AddToCategory from the TestInitialize
method. As always, we refactor to remove duplication of adding the screenshot to the
test results. We do that by adding on event MVCForumClient.OnSceenshotTaken and
handling it in SanityTests to add the file to the test results. You can find the code at tag
AddingScreenshot in the history of the Git repository.
When we run the test, the two screenshots are added to the output of the test. Both of
the screenshots are identical and look like Figure 13-6.
We see that the third permission is checked, but hey! The third permission is no
longer the Create Topics permission, but rather a new Create Tags permission that
didn’t exist before… Apparently this is a new permission that the developer added before
we pulled the latest changes, and the code at AddToCategory relied on the index of the
permission (casted to int from the PermissionTypes enum) because there was no other
way to identify the correct checkbox. Adding an Id attribute or auto-* class, like we did
Figure 13-6. Screenshot before and after adding Create Topic permission
Chapter 13 InvestIgatIng FaIlures

287
in the previous chapter, was also not practical because the list of permissions is created
dynamically at runtime.
We can fix it by adding the new CreateTags permission to the PermissionTypes
enum in the right position. This is not an ideal solution, but consulting with the
developer we concluded that this is the best we can do for now. For a better solution. the
developer will need to make significant changes that are not expected to be completed in
the near future.
Finally the test passes again!
Logging and Other Evidence CollectionWhile we could investigate most things using screenshots, error messages, and the code,
other problems require more information in order to be identified quickly.
Screen CaptureCapturing and recording the screen video is very helpful at times. You can see exactly
what happened during the test. You can see all the flow of the test; go back and forth;
and most importantly, you can spot things like error messages, even from other
applications or from the OS, that you didn’t expect.
Like everything in test automation and in life in general, screen capturing has its
drawbacks too. First, it takes quite a lot of disk space, which also depends on the quality
of the video that you need. For most cases you don’t need a very high video quality,
unless your application is rich in animations and graphics. You can also delete the
recording if the test passed to preserve disk space. However, it still takes much more
space than text and screenshots.
In addition, because the test typically go pretty fast, it can be hard to track what
exactly the automation tries to do at any given moment in the video. This is especially
true with Selenium and UI automation technologies that don’t actually move the mouse
cursor. If you don’t see the mouse move, you can hardly know which button was clicked.
So it can be pretty difficult to understand from the video alone what’s happening.
In order to capture video, typically we need to use an external application that does
that. The test’s infrastructure should start it whenever a test starts and stops it when it
ends, possibly deleting the file if the test passed. Obviously, other than that, neither the
Chapter 13 InvestIgatIng FaIlures

288
tests themselves nor any other code in the test project should be changed in order to take
advantage of screen capturing.
In visual studio enterprise you can easily turn on video recording for test runs through a *.runsettings or *.testsettings file. You can find more details at https://docs.microsoft.com/en-us/visualstudio/test/configure-unit- tests-by-using-a-dot-runsettings-file.
LoggingAnother technique to track what happens during a test is logging. Logging can be
as simple as writing text to the standard console output, but it can be much more
sophisticated than that as we’ll discuss shortly. Unlike screen capturing, logging requires
adding dedicated lines of code wherever you want something to be written to the log.
There are many logging libraries out there for pretty much all relevant programming
languages, and most of them are open source. These libraries typically allow you
to configure one or more destinations to which the log entries will be written. Such
destinations can be console output, files, database, etc. They also let you specify the
desired format for each entry, which can automatically include the date/time, thread
Id, method name, and more with each log entry. Also, typically, these libraries support
several severity levels (like Debug, Info, Warning, Error, etc.), which you have to specify
when writing each log entry. By changing the configuration, these levels can be used to
filter the types of log entries you’re interested in.
Nested LoggingOne of the challenges with logs is how to decide what to write to the log, and using
which severity. On one hand, if you’ll write too few entries, you may miss important
information when you come to diagnose a problem. On the other hand, if you write
too much, it becomes very difficult to see the forest for the trees, and find what you’re
looking for. There are several remedies to that, but one that I found to works for me the
best, and which I used for a very long time now, is to create the log in a nested manner.
That is, the logger uses indentation to write lower-level details nested inside higher-level
ones. Listing 13-7 shows an example of a nested log.
Chapter 13 InvestIgatIng FaIlures

289
Listing 13-7. Example of a nested log.
Adding a Category
Opening Admin page
Clicking on 'My Tools'
Clicking on 'Admin'
[Done: Opening Admin Page]
Opening Categories page
Clicking on 'Categories'
[Done: Opening Categories page]
Creating new category
Clicking 'Create New'
Typing 'Test category' in 'Category Name'
Clicking 'Create'
[Done: Creating new category]
Click 'Main Site'
[Done: Adding a Category]
The logger keeps track of the indentation level based on special StartSection and
EndSection methods that you can call. In C# the using statement and IDisposable
pattern can be used to automatically end a section when exiting a block of code, so
you don’t have to call EndSection explicitly. Any log entry that is written between a
StartSection and an EndSection is written with higher indentation than entries outside
of this section. This way, when you read the log you always have all the details, but
you can easily distinguish the high level entries from the lower-level ones, while easily
correlate those low-level entries with the higher level one that initiated them.
Note the using statement in C# is a compiler feature (aKa “syntactic sugar”), which is equivalent to the try/finally construct, though instead of defining the content of the finally clause directly, it takes an expression of type IDisposable at the beginning and calls its IDisposable.Dispose method in the implicit finally clause. Java 8 have a similar feature called try-with- resource, which uses the AutoClosable interface. You can read more on the using statement at https://docs.microsoft.com/en-us/dotnet/csharp/language-reference/keywords/using-statement
Chapter 13 InvestIgatIng FaIlures

290
TestAutomationEssentials.Common (see Appendix B for more details) provides
such a mechanism. By default, Test Automation Essentials writes the logs to the console
output, but you can easily redirect it to any other destination.
Visual LoggingWhile regular loggers only support text, some loggers also support images, usually by
writing the entries to an HTML file. When doing UI automation, a log that also contains
screenshots is much easier to analyze than one that only contains text. ExtentsReport is
a popular tool that allows you write test logs that include images. It has an open source,
“community” edition, and a more feature-rich “professional” payed version.
Some UI automation tools, like Coded UI for example, automatically takes
screenshots on every click and keyboard entry, and also highlights the relevant
element. This makes it even better for analysis and easier to use from the coding
side. As ExtentReport is a separate technology from Selenium, it does not have
this capability built in. However, it’s possible to combine them together, using the
EventFiringWebDriver class (in the Selenium.Support library), and a few other little
tricks, and make it work for Selenium tests too! Obviously, combining the nested logging
concept with the visual logging one, makes the best of all worlds. Later on, we’ll build
this logger and add it to the project.
Additional Logging and Diagnostics OptionsAside from the logging options mentioned above, there are other possible things that
you can use to ease the analysis of failures. Some of these are specific to Selenium,
some are more appropriate for API testing, and some are generic. Use whatever fits your
application and what helps you investigate failures. You can incorporate many of these
things into the more generic logging options too.
Here are some Selenium specific things that you can use:
• IWebDriver.PageSource – this property returns the HTML of the
current page as a string. For drivers of some browsers, this property
returns the original HTML as it was when the page was first loaded,
but others, including Chrome, return the HTML that represents
the current state of the DOM (which could be different that the
original HTML due to manipulations that were done to it using
Chapter 13 InvestIgatIng FaIlures

291
JavaScript). If you save this string to a file with an .html extension,
then you can open this file in the browser after the test has finished
and see more or less how the page looked like when you saved
the file. Unfortunately, because it saves only the HTML without
external CSS and JavaScript files, usually the page doesn’t look
right. However you can usually still get the important information
out of the page, and also examine it with the Developer Tools in
the browser, which can help a lot in case an element was not found
(NoSuchElementException is thrown). Even if opening it in the
browser doesn’t work well, you can always open it in a text editor
(preferably one that can color-code HTML elements, jump to the
closing tags, etc. like Notepad++ for example).
• IWebDriver.Manage().Logs – this property can be used to get the
logs from various sources related to Selenium. The most relevant
one in my experience is the Browser log type, where you can see a
message that the application’s JavaScript code writes to the browser’s
console (by calling console.log(…)), and other errors that the
browser itself writes when exceptions or communication problems
happen.
• Using the EventFiringWebDriver class you can intercept all of the
important method calls to IWebDriver and IWebElement, including
Click, SendKeys, GoToUrl, and more. This class fires events whenever
each of these methods is being called, and you can subscribe to these
events to automatically log all of these operations automatically. This
saves you from remembering to add a log entry on every click, makes
your code cleaner, and the log more consistent.
Here are a few other ideas that are not specific to Selenium:
• Log HTTP traffic – while this can be used also for Selenium tests, it’s
especially relevant to API testing. You can either use an external tool
like Fiddler or even log all the requests just before they’re being sent
to the server, and the responses just as they arrive. You can often
also get similar logs from the side of the web server that hosts the
application like Microsoft Internet Information Services (IIS).
Chapter 13 InvestIgatIng FaIlures

292
• Application Log – the logs of the application itself can also be very
valuable for investigating test failures. You can either intercept the
logs by redirecting them to the test, or simply copy the log files when
the test run completes to the test results directory. When you use the
logs to investigate failures, make sure to correlate the exact time of
every entry in the test’s log with the time of the corresponding entries
from the application’s log. This way you can reason about the root
cause of the failure much more accurately than just skimming the log
for errors and anomalies. Note that there can be a slight gap between
clocks of different computers, but this gap should be pretty constant
over the course of a test run, so if you find related entries in both logs,
you can have a pretty accurate notion of this gap, and then correlate
all other entries very accurately.
• System and middleware log – the Windows Event Viewer and similar
mechanisms in other operating systems as well as middleware
infrastructure can also be used to explain some global failures. These
failures usually don’t indicate a bug in the SUT but rather some kind
of an “environmental” problem. While in most cases these logs don’t
provide much information that is related to the failures in your tests,
the few cases where they do can save you a lot of time looking for the
problem in the wrong place. My advice is to include these logs only
if you suspect an environmental problem that you cannot identify in
other means. Examples of such issues can be low disk space, network
disconnections, security issues, etc. When you do find and identify
such a problem, I encourage you to either implement some specific
work-around in the infrastructure code of the tests, or add some code
to automatically identify the situation and report it clearly in the test
failure. It is advisable to write this code before you actually solve the
problem (e.g., free up some disk space), so you can test this specific
code. Only after you see that the failure message is clear or that
the work-around works, solve the real problem and verify that the
message doesn’t appear anymore.
Chapter 13 InvestIgatIng FaIlures

293
Adding Nested Visual Logger to MVCForum TestsAs our test already passes, we can get back to implement the visual logger we wrote on
the sticky note sooner, and let’s make it nested too. You can find the complete solution at
the VisualLogger tag in the Git repository, but here are some highlights and remarks:
• We use the ExtentReports NuGet library as the basis of our visual
logger.
• We use the TestAutomationEssentials.Common NuGet library
for the nesting feature, but we also override its default behavior,
which is to write to the standard output, with our own behavior that
writes to the ExtentsReport log. We encapsulate this behavior in
the new VisualLogger class. We then use only the Logger class of
Test Automation Essentials for writing log entries from everywhere
we need, and its StartSection method to start a new nesting level.
As mentioned above, StartSection implements IDisposable so
it can be used in conjunction with the using statement, which
automatically calls Dispose when it completes, consequently
ends the last nesting level. Listing 13-8 shows the use of Logger.
StartSection and Logger.WriteLine in the SanityTests.
GetAdminPassword method.
Listing 13-8. Use of Logger in SanityTests.GetAdminPassword
private string GetAdminPassword()
{
using (Logger.StartSection(
"Getting Admin password from 'Read Me' topic"))
{
var readMeHeader = MVCForum.LatestDiscussions.Bottom;
var readmeTopic = readMeHeader.OpenDiscussion();
var body = readmeTopic.BodyElement;
var password = body.FindElement(By.XPath(".//strong[2]"));
var adminPassword = password.Text;
Chapter 13 InvestIgatIng FaIlures

294
Logger.WriteLine($"Admin password='{adminPassword}'");
return adminPassword;
}
}
• We overrode ExtentReport’s default rendering of messages in order
for the indented nested log entries to appear correctly.
• We use the EventFiringWebDriver class (from the Selenium.Support library) for intercepting all calls to IWebDriver.Click,
IWebDriver.SendKeys, and setting the IWebDriver.URL property, in
order to automatically write these events to the log and also to take a
screenshot at each of these events
• On the screenshots we take for the click events, we add a red
rectangle that highlights the element we’re about to click (using the
IWebElement.Location and IWebElement.Size properties). When
you look at the look, it makes it obvious what element was clicked.
Pretty cool, isn’t it?
Figure 13-7 shows part of the output of the nested visual logger. You can see that the
Opening Admin Page entry and its [Done:…] counterpart are less indented than the
entries between them. You can also see the automatic logging of every click event. On
the screen you will see a red rectangle around the My Tools menu in the first screenshot
and another red rectangle around the Admin menu item in the second. Note that in the
real report, you can click the minified screenshot to open them in their full size.
Chapter 13 InvestIgatIng FaIlures

295
I encourage you to look at the VisualLogger class in order to see how it’s
implemented. You may also find it useful to look at individual commits in the revision
history (preceding the VisualLogger tag) in order to understand each feature separately.
Investigating Challenging FailuresThe failures we encountered so far were failures that happened consistently on our
machine. Such failures are usually fairly easy to investigate. However, there are cases
where failures are inconsistent and therefore harder to investigate. In all of these cases
Figure 13-7. Output of the nested visual logger
Chapter 13 InvestIgatIng FaIlures

296
the first things you should look into are the failure message, log, screenshots and all of
the evidence available to you. Often these pieces of evidence are enough to conclude the
cause of the failure. If not, then you can, and should, add more pieces of evidence (e.g.,
log entries) to help you find the root cause the next time your run the test. However, you
can’t always know what evidence will lead you to the root cause, and taking a trial-and-
error approach can take a lot of time and become pretty frustrating. Following are some
typical examples of such cases and tips for handling them effectively.
Failures That Happen Only On One MachineSometimes a test passes on one machine but consistently fails on one or few other
machines or environments. Typically, the automation developer that developed the test
made sure that the test passes (or works correctly) on his machine before checking in his
code, so it passes on his machine. Problems may arise either when another developer
tries to run the test, or when the test runs on the build machine. These are some
differences between these two scenarios but for the most part they’re the same. At least
in the beginning of the investigation, you must have access to the machine where the
test fails. Usually after getting to some preliminary conclusions, you can reproduce the
problem on another machine, or even on your machine to continue the investigation.
The first thing that you should verify is that the versions, both of the tests and of
the SUT, on both machines are the same. If they’re not, then there’s no point in the
comparison. Try to copy the test executables from the machine in which the test
passes to the one in which it fails and see if it still fails. If it doesn’t you may still want to
investigate what’s the difference between the versions, but that’s a different story. If it still
fails, the difference might be the versions of the SUT.
If the SUT is a locally installed application, then either copy the application from the
machine where the test passes to the one where it fails, or reinstall the same version that
is installed where the test passes. If the test accesses the SUT remotely (e.g., through the
browser or over HTTP), then it suffices to redirect the failing machine to the SUT that the
passing machine uses.
If both versions match, our strategy for continuing to investigate the failure should be
based on the “lion in the desert” search algorithm (a generalization of the binary search
algorithm). Hey, don’t panic, I’m not asking you to implement the algorithm, just to act
according to its course of action. The idea is to break every problem into two smaller
Chapter 13 InvestIgatIng FaIlures

297
ones, find which one is relevant, and continue to break it down into smaller and smaller
problems until you find the root cause. To be more specific: identify one difference
between the environments that you suspect to affect the difference in the results, then
try to eliminate this difference, by changing one side to match the other. If the results are
still different (and the failure message is still the same), look for another key difference
and repeat. If the side that you changed now yields the same result as the other one, then
it means that the difference that we eliminated is significant to the problem. However,
even if we could solve the immediate issue this way, we shouldn’t stop here! We must
understand the root cause and take actions to prevent this situation from reoccurring, or
at least alerting and providing guidelines to overcome the problem.
For example, we might suspect a difference between the databases of the two
environments. So first we can try to change the connection string of our environment
(where the test passed) to the database of the failed environment. If the test still passes
on our machine, using the other database, it means that the problem is not related to the
database, and we need to look for another difference. If it fails, it means that the problem
is in the database indeed, but we still don’t know exactly what. It could be a difference in
the data, in the schema, or even in the version of the database engine. Let’s say that you
noticed that the schema version of the failed environment is newer than the one in our
environment. So we can update the schema of our environment (after backing up the
database and after restoring the connection string to its original one) and examine the
result. If it fails, then we can conclude that the new schema version causes the test to fail,
though we still need to find exactly why. If it passes, then it’s not a schema problem, and
we can continue to compare and match the other differences. We continue this process
until we nail down the root cause. Figure 13-8 outlines the decision tree of this example.
Chapter 13 InvestIgatIng FaIlures

298
One important thing to note when going through this process is that the error
message and the relevant symptoms are the same. If at some point you get a different
error, you should first try to understand if the new error happens before or after the point
of the original failure. If the new failure happens after the point at which it has originally
failed, it means that the original failure didn’t happen this time! You may still have to
narrow the problem further down as explained above, but in the meantime you should
treat the new failure as if the test passed. After you’ve completed narrowing down the
original problem and resolve it, start over the entire investigation, this time with the new
failure.
However, if the new failure happens before the point at which it has originally failed,
or at the same point, but with a different error message, then it probably means that
there’s more than one difference in the environments that affects the outcome. In this
case, try focusing on the new failure first, and then get back to the original one. When
Figure 13-8. Decision tree for diagnosing a failure that occurs only on one machine
Chapter 13 InvestIgatIng FaIlures

299
things start to get too complex, I found that writing down a manual log file (using a
text editor or word processor), of the things that you try and their results, gives me an
a better feeling of orientation around the problem than just performing random trial
and error. This log especially helps you if you continue to work on the problem the day
after. It also helps if you need to explain to other people what the problem that you’re
trying to solve is, and what are your intermediate conclusions. As with the nested logger,
I tend to write this manual log also in a nested manner. For example, if I want to try out
some experiment in order to diagnose the original problem, and while I try I encounter
another problem that is related only to the experiment itself, then I try to solve the inner
problem first, and then continue with the original experiment I had in mind. In this case
I log the stuff related to the problems in the experiment itself nested within the other
stuff that is related to the original problem and other stuff that I tried.
Running from the IDE vs. Running from Command Line
One common difference between running the tests on your development machine
and running them on the build server is that in your development machine you might
be running the tests from within the IDE while on the build server it runs from the
command line.
Sometimes there are slight differences between the runner that is used by the IDE
and the command-line runner. In order to investigate it, look at the logs of the build and
try to find the exact command line that was invoked during the build. If you’ll try to run
the exact command on your local machine you may encounter differences in paths or
other environmental differences that won’t allow you to run the tests. So you have to find
and eliminate those differences first. If you succeed running the test on your machine
and it fails with the same error as in the build, then the problem is probably related
to the difference between the command-line runner and the IDE runner. You should
continue to investigate and nail down the cause for the different behavior between the
IDE and the command-line runners, but at least you can now do this investigation all on
your local machine.
If you can’t reproduce it through the command line on your machine, then the
problem is probably not related to this difference. You can try to run an IDE on the build
machine if possible just to verify that this is indeed the case. Then try to find another
suspicious difference.
Chapter 13 InvestIgatIng FaIlures

300
Narrow Down the Code
When you try to narrow down the problem, it’s often useful to narrow down the code
that’s related to the problem. You can comment-out lines of code that does not seem to
be related to the problem or perform temporary shortcuts to bypass long or complex
operations. This will make each experiment run faster, and also narrow down the scope
of the problem. Obviously, you should not check-in these changes, but rather just copy
the test executables (DLL, JAR …) to the other machine. Sometimes it’s even worth
creating a completely new test project and copying to it only the minimal code that
reproduces the problem. This way you eliminate a lot of “noise” and help you focus on
investigating the root cause. At the end of the process you’d most probably find the exact
line of code that behaves differently on the two environments, and it would be pretty
easy to understand what’s going on.
Investigating Influencing TestsSometimes tests pass consistently when run on their own, or as part of a small group of
tests, but also consistently fail when run as part of a complete test suite. In most cases
it means that there’s an inadvertent influence of one test on another. It also implies
a problem in the isolation strategy. Look back at Chapter 7 for concrete isolation
techniques that can help you solve the problem.
But before you run and apply any of those techniques, you should first have a clear
picture of the root cause. As always, first try to look at the log and the evidences and try
to understand from them what could be the problem. If you suspect something, try to
create a simpler reproduction of the problem and check if you get the same result. If you
do, it should usually be easy to come up with a solution.
However, if you don’t have an idea what could be the problem, then you can play the
“Lion in the Desert” game again, but in a slightly different fashion this time: Suppose that
when we run the entire suite, test #28 always fails, even though it passes if run alone. In
this case, you should create a new test suite that contains only tests 1–14 and also test
#28. If test #28 now passes it means that the influencing test is between 15 and 27. After
you verify that it’s true, split the remaining test cases to two again, and now take only tests
15–21 (half of 15–27) and test #28. Continue this process until you remain with exactly one
test that when run together with test #28 reproduces the error. Let’s say that we remained
with tests #16 and #28. Now we can continue to narrow down the root cause by removing
unrelated stuff from tests #16 until we find the exact operation in it that affect test #28.
Chapter 13 InvestIgatIng FaIlures

301
While it may sound a very long course to take, it’s not as much as you’d think.
Because we cut the number of tests in half at each cycle, then if we sum up the number
of tests that we run during this search, we’ll get exactly the number of tests preceding the
one that failed (28 tests in our example). In reality you would usually also have an idea of
which tests might be related to the problem and which aren’t, so you can minimize the
scope even further.
Investigating Flickering TestsFlickering tests are tests that sometimes fail and sometimes pass, even if run on the
same build and on the same environment, with no immediately apparent reason.
Whether the failures happen pretty often or pretty rarely, this phenomenon is one of the
most disturbing situations for anyone who cares about the results of the test automation,
as it destabilizes their reliability. Sometimes the flickering is not bound to one or few
specific tests, but each time a different test may fail. Investigating these cases is usually
also very frustrating because it’s almost impossible to know if you really fixed the
problem or you were just lucky this time. Thankfully, there are a few useful techniques
to handle these cases. Before we’ll get to these techniques, let’s first examine a few
common anti- patterns3 and understand their drawbacks.
Anti-patterns for Handling Flickering Tests
The following techniques are applied quite often in attempt to handle flickering tests.
However, even though they’re pretty common, I consider them as anti-patterns, and
they have significant drawbacks. I’m listing those here in order for you to be aware and
beware of their consequences.
Retry All of the Failed Tests
One common anti-pattern when flickering tests becomes a big issue is to run all of the
failed tests gain, usually two or three times, and only if a test fails all of the times, then it
is reported as failed, and even if it passed only once, consider it as passed.
3 An Anti-Pattern is a common solution to a problem, that albeit being common, its effectiveness is questionable and often counterproductive.
Chapter 13 InvestIgatIng FaIlures

302
There are a few drawbacks to this approach:
• It assumes that the failures are mainly the fault of the automation and
not real bugs. While this is sometimes true, many times it’s not. If it
is the fault of the automation, then you’re just hiding and deferring
the problem rather than trying to investigate and resolve it. If the fault
is in the SUT, it means that there’s a bug that you don’t report. Note
that “environmental” problems are usually isolation problems that
are the fault of the automation. Like any other faults, they should be
identified and fixed rather than being swept under the rug.
• When an automation developer develops a new test or maintains an
existing one, he should normally run the test a few times in order to
debug, diagnose, and eventually to ensure that it works correctly. If a
test that passes only once out of three retries is considered OK, then
when the test fails at any of these activities (debug, diagnose, etc.,) it
confuses the automation developer as he can’t distinguish between
failures that are the fault of his recent changes and faults that were
considered OK before. If he needs to run and debug everything three
times, then it lengthens his work considerably.
• Because issues are deferred and swept under the rug, then in the long
run, more and more issues cause more and more tests to become
flickering and in a higher frequency. This makes the three retries
insufficient, and the natural reaction is to increase the number of
retries, which only makes things worse…
Using Fixed Delays (Thread.Sleep)
A typical cause of flickering tests is timing. As in most cases, the SUT is running in a
different process than the test, it also means that it is running on a different thread. This
implies that whenever you perform an option on the SUT (e.g., click a button, sending a
HTTP request, etc.), the operation completes on a thread in the SUT while the thread of
the test continues in parallel.
This doesn’t mean that operations cannot be synchronized, however, by waiting for
some kind of an acknowledgment from the SUT that the operation completed. In fact,
Selenium always waits for the browser to complete its operation before the method
returns, and so are many HTTP/REST libraries, which wait for the HTTP response to
Chapter 13 InvestIgatIng FaIlures

303
be received before continuing. But still, the notion of what’s considered a “complete
operation” is debatable. For example, if the browser sends an asynchronous HTTP call
to the server (known as AJAX or XHR), and displays a wait spinner, then Selenium will
return as if the operation has completed, even though in most cases the user considers
the operation as complete only when the asynchronous call returns and the result is
displayed on the UI. A similar situation occurs when a REST API returns a “200 OK”
response after it pushed a message to a queue, which another service should process
asynchronously. In these situations you should explicitly tell the test to wait until the
operation completes, which usually depends on the specific scenario.
Knowing what to wait and how is often challenging, and therefore some automation
developers choose the easy way of waiting for a fixed period of time, using a the Thread.
Sleep method. While this solution often resolves the problem in the short term, it has
serious drawbacks:
• Suppose that 50% of the times the operation completes in 3 seconds
or less. Then it’s not suffice to wait for 3 seconds, as in the other 50%
of the times the operation won’t complete yet. Theoretically, you can
never reach 100%, but it’s OK to put some threshold above which
the time is considered unacceptable and the test should indeed
fail, reporting that the operation didn’t complete in an acceptable
period. However, the closer you want to get to 100%, the time you
have to wait increases more rapidly. This means that if you want the
operation to succeed 99% of the times, you might need to wait 10
seconds. Figure 13-9 shows a Gamma Distribution graph of the time
an operation may take. This means that in 50% of the cases you’re
waiting 7 seconds more than you really need!
Chapter 13 InvestIgatIng FaIlures

304
• When you’re just waiting for a fixed period of time, when that time
elapses, you typically don’t know whether the operation really
completed or not. If you don’t check that, then your test may fail
only later on. When investigating the failure, this distracts you from
the root cause. As you should already understand, the time and ease
of investigating failures are crucial to the reliability and the overall
value of the test automation. If you do check whether the operation
completed successfully after the delay, then it should be very easy to
convert the fixed delay to wait for the operation to complete.
TIMING ISSUES AND SELENIUM
unlike what many automation developers believe, each method call in selenium returns only
when the operation has completed on the browser in a completely deterministic fashion.
In many cases it means there’s no need for any delays or waits. however, the question is
how you define “the operation has completes.” In order to answer this question, we need to
understand how the browser works.
0
0.2
0.4
0.6
0.8
1
1.20
0.8
1.6
2.4
3.2 4
4.8
5.6
6.4
7.2 8
8.8
9.6
10.4
11.2 12
12.8
13.6
14.4
15.2 16
16.8
17.6
18.4
19.2
Prob
abili
ty
Seconds (X)
Probability of the time it takes for an operation to complete
Probability for operation to complete in exactly X seconds
Probability of operation to complete in X seconds or less
Figure 13-9. Gamma Distribution for completing an example operation
Chapter 13 InvestIgatIng FaIlures

305
In the browser, every page (browser’s tab or window) is capable of running Javascript
code, and also perform some other internal operations only on a single thread. however,
asynchronous operations can still take place while the page is idle, waiting for input from
the user or from the server. For example, aJaX calls (also known as Xhr or Xmlhttprequest)
are performed asynchronously, but when they return, the callback function that handles their
results is executed again on the same thread, only if it’s idle. If it’s not, then the callback will
remain in a queue until the thread is idle and then the callback will be executed. asynchronous
operations can also be performed in Javascript using the setTimeout function.
Because selenium communicates with the web page, then its calls are also synchronized
with this thread. this means that if the Javascript code that is executed on a click event
is synchronous (does not initiate aJaX calls or use setTimeout), it is guaranteed that the
Click method that you call through selenium will not return until the Javascript event handler
has completed its execution. Only if the handler initiates an asynchronous operation explicitly
(using aJaX or setTimeout), then the method may return before the operation is completed.
some Javascript frameworks, like angularJs and KnockoutJs, as well as some homegrown
architectures, make more use of asynchronous operations, and therefore are more susceptible
to timing issues than websites that don’t use them.
selenium provides two main mechanism for waiting for asynchronous operations to complete,
often referred to as implicit wait and explicit wait. Implicit wait is a timeout value that you
can set via the IWebDriver.Manage().Timeouts().ImplicitWait property, and
affects how long selenium will wait to find an element if it hasn’t existed yet before throwing
a NoSuchElementException. It is important to note that implicit wait only applies when
calling FindElement, and it does not affect any other operations like Click, for example.
FindElements (the plural form) is also affected by this value, but it waits only wait until
at least one if found. It could be that this is what you expect, but there are cases in which
a list is filled asynchronously and then this method may return before all the elements are
populated. explicit wait is a more generic mechanism that lets you wait for various predefined
conditions or define your own. You apply explicit Wait by instantiating a WebDriverWait
class (from the Selenium.Support library), specifying the timeout value, and calling the
Until method, specifying the expected condition. the predefined conditions are defined
in the ExpectedConditions class and contain conditions like ElementIsVisible,
Chapter 13 InvestIgatIng FaIlures

306
ElementToBeClickable, TextToBePresentInElement and many more, as well as to
define your own. here are two examples:
var wait = new WebDriverWait(webDriver, TimeSpan.FromSeconds(30));
// Using predefined condition:
var button = webDriver.FindElement(By.Id("approveButton"));
wait.Until(ExpectedConditions.ElementToBeClickable(button));
button.Click();
// Use a custom condition to wait for a file to be created:
wait.Until(drv => File.Exists(path));
var text = File.ReadAllText(path);
Note WebDriverJs, the Javascript version of selenium WebDriver, does return before the operation completes and lets you to use callbacks, known as promises to be notified when the operation has completed. this is because Javascript itself is single threaded and must free the main thread in order to allow it to process the response when the operation completes.
Properly Waiting for an Operation to Complete
The alternative to fixed delays is to wait for an event or a condition to be met, which
indicates that the operation is completed either successfully or not. Try to think how
the user knows that an operation has completed. For example, while a loader spinner
appears, it indicates the user that the data is not ready yet, but when it disappears it
should indicate that it is. If you’re not using UI automation but any type of API, then you
should think how client systems should be indicated that the operation is completed.
When you’re waiting for an event or condition, you should always set a timeout, such
that if the condition is not met in that period, the operation should fail. This is to prevent
a situation in which the test hangs indefinitely. You can set this timeout pretty high,
as in most cases the test won’t wait for that long, only when the condition is not met
(which can either be a bug in the SUT or in the test). The timeout should be high enough
to avoid failing the test unnecessarily, but not above a time that the most patient user
would reasonably wait for the result.
Even though implementing a mechanism that polls for a condition until it becomes
true, or a timeout occurs, is not rocket science, you should rarely develop it yourself.
There are many existing libraries that already do that for you. If you’re using Selenium
Chapter 13 InvestIgatIng FaIlures
307
you have the WebDriverWait class, TestAutomationEssentials.Common also has a Wait
class, and I’m sure that there are plenty of similar implementations out there for any
language you use.
Note some testing frameworks, including Mstest, have a default timeout for a test to complete, which is usually very high, like 30 minutes or so. Other frameworks don’t have a built-in default, but let you specify your own default timeout that applies to all tests. In addition, most frameworks let you specify a timeout value for specific tests that overrides that default, but you should very rarely use that. this means that implementing your own loop that waits for a condition, without taking care to fail the test on a proper timeout, even if it won’t hang the test forever, due to the default timeout, it will still take a very long time (e.g., 30 minutes) until it fails. If there is more than one test that will fail for the same reason, then each of these will take 30 minutes…
Properly Handling and Investigating Flickering Tests
Sometimes there’s a tendency to blame the test automation for flickering tests. However,
it’s important to realize and communicate that such failures can be the fault of real
bugs just as well. In fact, in my experience it’s even more likely, because most systems
are asynchronous in nature, which is more prone to random timing issues and race
conditions, while test automation is typically single threaded, and therefore more
immune from these problems. Having said that, it can also be a matter of an improper
isolation, or some other reason. Therefore unless you investigate the root cause, you
cannot know where the fault is.
Shortly I’ll describe a method for investigating flickering tests. However, if this
investigation still takes too long, then you should somehow separate or mark these tests
distinctly from other tests, so that other people can know that it’s under investigation
and understand that the failure is probably not a regression. This is important in order to
preserve the perceived reliability of the test automation. Not communicating these cases
clearly leaves the impression that the entire test suite is unreliable.
However, you don’t want to stop these tests from running regularly, as you want to
collect as much data about their failures, in order to be able to investigate it properly. On
the contrary, you want to run these tests even more often!
Chapter 13 InvestIgatIng FaIlures

308
If a test fails on a flickering issue 10% of the time, it is very difficult to investigate.
Somewhat counterintuitively, we should prefer that tests will fail more often, as this
way it is easier to reproduce and investigate. In order to increase the probability for
encountering the failure, we can run the test in a loop, let’s say 50 times. This increases
the chances that the test will fail to above 99%! (=100%–90%50), which practically
means that we can reproduce the failure any time. Then we can start adding diagnostic
information, and play the lion in the desert game until we pinpoint the problem.
One particular useful technique to narrow down the scope of the problem, and also
to make the investigation process more efficient, is to create a separate test that performs
the suspicious operation in a loop and gradually trying to remove code or operations
that seem to not be related to the problem, or narrowing the loop only to the suspicious
part, performing all the preconditions only once. This shortens the time it takes to run
the looping test. If at some point the problem cease to occur, then you know that the last
operation that you removed from the loop is related to the issue. If this operation is not
atomic (can be broken into smaller operations), then you should add it back, and narrow
down the loop to perform only some of the suspicious suboperations. If the operation
cannot be broken down any further, then you can come to the relevant developer with
the narrowed-down loop that reproduces the problem with high probability, and let him
continue the investigation from there.
SummaryIn order to keep the test automation reliable and trustworthy, it’s highly important to
investigate each problem thoroughly and find the root cause. We also want to ensure
that the investigation is fast and precise, so we can react quickly. For that, we should
add any information to the test result that can help us investigate and understand what
happened. This can come in the form of clear error messages, logs, screenshots, and
more.
Some cases are more challenging to investigate, but a systematic approach of
eliminating possible factors, as opposed to randomly guessing and trying things without
aiming for clear conclusions, can help investigate the root cause of these cases too. Even
flickering tests, which most people feel puzzled by, can be systematically investigated by
narrowing down the problem domain and looping through it to significantly increase the
probability of reproducing it.
Chapter 13 InvestIgatIng FaIlures

309© Arnon Axelrod 2018 A. Axelrod, Complete Guide to Test Automation, https://doi.org/10.1007/978-1-4842-3832-5_14
CHAPTER 14
Adding More TestsIn Chapters 10 to 12 we created the first test and its supporting infrastructure. Now it’s
time to add more tests while enhancing the infrastructure that supports these tests to
make it more maintainable. In addition, we’ll support running the tests by multiple
developers simultaneously and support cross-browser testing.
Writing the Next TestsWe’ll add more tests very similarly to the way we wrote the first test:
• Plan the test as a claim and an experiment that proves or refutes it.
• Translate the experiment steps into classes and methods, and
make the code compile, even though the methods are not really
implemented yet (they just throw NotImplementedException).
• Run the test, and implement the first method that throws
NotImplementedException.
• Repeat the last step until the test passes.
There’s one difference between the first test and the next ones though: While in the
first test none of the classes and methods existed, in the next ones, some of them may
already exist. In fact, there can be three cases for each step of the test:
1. The class and method already exist and can be used as is.
2. The class or method does not exist. We need to create it exactly as
we did in the first test.
3. A similar class and method exists, but it’s not exactly what we
need in the new test. Most commonly, we need to provide
additional or different arguments to the method.

310
The last case is where things become more interesting. We have few alternatives to
handle this case:
1. Create a new method (usually an overload, that is, a method with
the same name but with different parameters) and duplicate its
code.
2. Modify the original method to accept more parameters. In
languages that do not support optional arguments, it means
adding more arguments to the calls in existing tests.
3. Create an overload with the new parameters, but remove the
duplication either by calling the overload with the additional
parameters from the overload with the fewer ones, providing
defaults for the additional parameters, or by extracting the
common code to a private method or base class, which both of the
public overloads call.
4. Refactor the method to accept a builder object, in which you can
specify values for any parameter.
Clearly, the first option is not ideal for maintainability. You can do it only if you
commit to removing the duplication after you completed the test.
The second option is also not advisable for two reasons:
1. If in the first test we didn’t think we should specify a value, then
it’s probably not really relevant for proving the claim of the test.
Adding this argument makes the test more cluttered with “noise”
and less readable and distracts the reader of the code from the
essence of the test. In the book Clean Code,1 Robert C. Martin
(AKA Uncle Bob) claims that almost no method should have
more than one or two parameters. While he doesn’t talk about
tests in this context, but about any calling method in general, his
reasoning for that is pretty much the same.
1 Robert C. Martin, Clean Code: A Handbook of Agile Software Craftsmanship (New Jersey, United States: Prentice Hall, 2008), p. 40.
Chapter 14 adding More tests

311
2. You can claim that the first reason is void if you’re using optional
arguments, as you can pass only the ones that you’re interested
in. However, from the side of the method itself, having many
parameters implies that the method is probably long and
complicated, and it has many if statements and in general is
difficult to maintain. Depending on the language, usually optional
arguments also have other limitations. In addition, often some
parameters make no sense in combination with others, or to the
contrary, must be specified with others. Having all of them as a
flat list of optional parameters contradicts the Poka-Yoke (prevent
mistakes) principle, described in Appendix D.
Therefore, I suggest using the second option with an optional parameter, only if you
don’t see a need for more than two arguments ever. To avoid the limitations of optional
arguments, or to support different data types for the arguments, the third3 option
(overloads) is better, but still, only if you don’t need more than two arguments, or rarely
three. Otherwise, I prefer the fourth option of using the builder pattern. This is especially
relevant for methods that create business entities. Most entities that you can create in a
business application have many parameters, but typically only one or two are important
for each particular test. All the rest should either be left empty if they’re not mandatory,
or use some default or random value if they are mandatory. Random values should
generally be used only if the value should be unique. The data builder pattern described
in Chapter 12 makes it possible to create an object to which you can assign all of the
arguments, and it builds the entity through a composition of methods rather than one big
method that has to take all the parameters into account. This makes it easier to maintain.
Planning the Next TestsFor the first test my advice was to find the scenario that demonstrates the value of the
system. This also helped us model and build the major blocks of the infrastructure.
In general, as described in Chapter 4, choosing the next suite of tests to automate
depends on their value and on risk analysis at any given point in time. But just after
implementing the first test, when we need to choose the next few tests among all of the
tests that have similar business value, I prefer to cover tests that will guide me to enrich
the infrastructure and make developing additional tests more easily. However, there’s
a trade-off: on one hand, if we add tests for a feature with a very small overlap with
Chapter 14 adding More tests
312
the previous ones, it will force us to expand the model and build more infrastructure
to support this test. On the other hand, if we add tests that exercise more or less the
same path as the first one, but with slight changes, we’ll probably have to make small
adjustments to the model that we already created. When changing the model to support
the new tests and refactoring to remove duplication, we should end up with better
abstractions and more robust model and infrastructure.
There’s no right answer to this trade-off, and usually it’s better to implement few
tests of each kind. Note that if you’re going all the way with the first approach and add
tests for a completely different feature (or even a completely different system), you may
need to build a completely different infrastructure. There’s nothing wrong with that, but
it’s usually preferable to stay more focused on building the infrastructure for one project
before proceeding to another one.
For our tutorial, the next test I choose to add is a test that verifies the ability to filter
the discussions by categories. Additional tests that I also considered as appropriate
for the first few include testing the badges, which is a differentiator feature for this
application, and the votes feature. However, implementing these tests is beyond the
scope of this tutorial. Note that all of these tests introduce new concepts from one hand
but also make use of existing functionality that we already created in the first test.
After covering the main flows of each feature, you can start to cover specific features
more deeply. In this case, most of the tests will be more similar to one another with only
small changes between them.
Adding the Test: Discussions Can Be Filtered by CategoryIn order to test this functionality, we need to have more than one category. We also don’t
want to use the default “Example Category” because it will be difficult to define what
we expect to see in it, as it will be used by all tests that are not concerned with a specific
category. Therefore, we’ll create two new unique categories, just for this test. Then we’ll
create a discussion, assign it to one of these categories, and verify that we only see the
discussion in that category and not in the other one, which should be empty. Listing 14-1
contains the textual plan for the test.
Listing 14-1. Discussions can be filtered by category
Discussions can be filtered by category
=======================================
Create 2 new categories: A and B
Chapter 14 adding More tests

313
Create a new discussion “discussion1” and assign it to category A
List discussions in category A
Verify that “discussion1” appears in the list
List discussions in category B
Verify that the list is empty
As we did for the first test, now we have to define the contexts for each step in order
to help us create an object-oriented model of the application in code. Listing 14-2 shows
the contexts that we’ll use to perform each step.
Listing 14-2. Discussions can be filtered by category – with contexts
Discussions can be filtered by category
=======================================
Create 2 new categories: A and B // MVCForum.AdminConsole
Create a new discussion “discussion1” and assign it to category A
// a logged-in user
List discussions in category A // MVCForum.Categories
Verify that “discussion1” appears in the list // CategoryView.Discussions
List discussions in category B // MVCForum.Categories
Verify that the list is empty // CategoryView.Discussions
Notes:
• In the first line we create two categories. However, in the code it
makes more sense to map it to two lines.
• When we create the categories we’ll automatically add Create
Topic permissions to them in order to make them usable. This is
an implementation detail that is mandatory in order for the test to
succeed, but still it’s not relevant for the essence of the test.
• The AdminConsole property will automatically log us in as “admin”
and navigate to the Admin console. Note that we already have this
functionality in the TestInitialize method, broken into smaller
steps, so we should refactor the existing code to remove this
duplication and reuse the functionality. In addition, we’ll rename
the AdminPage class we created previously to AdminConsole, to better
describe its essence, as it’s not a mere single page.
Chapter 14 adding More tests

314
• As in the first test, we won’t actually use hard-coded strings
like “discussion1,” but rather create unique strings. We use
“discussion1” in the text just to make it clear that we refer to the
same discussion at all the relevant places. In the code we have
variable names for that instead.
• In the second line, we wrote “a logged-in user” without
preceding it with a Login step. This is because in this test, the
question which user we’re using is not very interesting, as long
as it’s a registered member. In the code we’ll probably still call
RegisterNewUserAndLoging() to create that user. Note that because
this application is based on collaborations between users, I don’t see
fit to define a “default user” for the tests, which is something that I
do in many other applications that are less collaboration-centric. We
may still want to define such “default user” in the future if we’ll have
many tests that are agnostic to the user, but we first have to see a clear
need for that.
• There’s one important entity that hides “between the lines,” but we’ll
definitely need it in the code. This is the Category entity of course.
We’ll instantiate this object when we create the category in the first
step and pass it as an argument both when we create the discussion
and to a Select method on the MVCForum.Categories property. The
object itself will hold only the name of the category, but it’s still worth
creating a class for, for the sake of strong-typing and Poka-Yoke.
Listing 14-3 shows the skeleton of the new test method that we’ve added to
SanityTests.cs. This is of course not compilable yet.
Listing 14-3. DiscussionsCanBeFilteredByCategory test method skeleton
[TestMethod]
public void DiscussionsCanBeFilteredByCategory()
{
var adminConsole = MVCForum.AdminConsole;
var categoryA = adminConsole.CreateCategory();
var categoryB = adminConsole.CreateCategory();
var user = MVCForum.RegisterNewUserAndLogin();
Chapter 14 adding More tests

315
var discussion = user.CreateDiscussion(DiscussionWith.
Category(categoryA));
var categoryView = MVCForum.Categories.Select(categoryA);
Assert.AreEqual(1, categoryView.Discussions.Count,
$"1 discussion is expected in categoryA ({categoryA.Name})");
Assert.AreEqual(discussion, categoryView.Discussions.
Single(), $"The single discussion in categoryA ({categoryA.
Name}) is expected to be the same category that we've created
('{discussion.Title}");
categoryView = MVCForum.Categories.Select(categoryB);
Assert.AreEqual(0, categoryView.Discussions.Count,
$"No discussions expected in categoryB ({categoryB.Name}");
}
As you can see, some of the classes and methods we already have, some are
completely new, and some others exist but will require some modifications, most
notably CreateDiscussion should be changed to support the Category parameter that is
added through the builder.
Note CategoryView.Discussions would be a collection of DiscussionHeader objects, just like we have in the LatestDiscussions list. however, this means that in the second Assert statement, we compare a Discussion object to a DiscussionHeader object. in order to make it work, i intend to extract a common base class from these two classes that will hold only the title of the discussion (which is its unique identifier) and implement Equals such that it compares the title’s own title with the other object’s title, regardless of the concrete type. Comparing a unique identifier of an entity is sufficient for the general use, and it makes the code cleaner.
From here you know the drill: create new classes and methods until the code
compiles. Then run the test and fix any NotImplementedException, until the test passes.
Chapter 14 adding More tests

316
Here’s the list of classes, methods, and properties that we have to add in order to
make the code compile:
• public AdminConsole MVCForum.AdminConsole { get; }
Note We renamed AdminPage to AdminConsole, so this is in fact an existing class
• public Category AdminConsole.CreateCategory()
• public DiscussionBuilder Discussion.Category(Category
category)
• public CategoriesList MVCForum.Categories { get; }
• public class CategoriesList
• public CategoryView Select(Category category)
• public class CategoryView
• public IReadOnlyCollection<DiscussionHeader>
Discussions
Note We still didn’t extract the common base class out of Discussion and DiscussionHeader. We’ll do it when we’ll need to make the Assert succeed.
Remove Duplication Between MVCForum.AdminConsole and AddCreateTopicPermissionToStandardMembers
When we run the test after we’ve made it compile, the first NotImplementedException
that we encounter is MVCForum.AdminConsole. As mentioned before, we already
have the logic of logging in as admin and navigating to the Admin console
in AddCreateTopicPermissionToStandardMembers method, which is called
from TestInitialize. Listing 14-4 shows the current implementation of
AddCreateTopicPermissionToStandardMembers. The bold lines are those that we want
to extract to the MVCForum.AdminConsole property.
Chapter 14 adding More tests

317
Note While i added the visual logger to the project in the previous chapter, i also extracted the code that existed in TestInitialize to the AddCreateTopicPermissionToStandardMembers method in order to separate it from the initialization of the logger itself.
Listing 14-4. AddCreateTopicPermissionToStandardMembers
private void AddCreateTopicPermissionToStandardMembers()
{
using (Logger.StartSection(
"Adding 'Create Topic' permission to Standard members"))
{
var adminPassword = GetAdminPassword();
var adminUser = MVCForum.LoginAsAdmin(adminPassword);
var adminConsole = adminUser.GoToAdminConsole();
var permissions = adminConsole.GetPermissionsFor(
TestDefaults.StandardMembers);
permissions.AddToCategory(TestDefaults.ExampleCategory,
PermissionTypes.CreateTopics);
adminUser.Logout();
}
}
Trying to extract the accented lines into their own method reveals that we need
this method to return two values: the adminConsole, which is obvious; but also the
adminUser, which we use at the end of the method to call Logout() on. Returning two
values from a method is not a good practice. But the harder question that it raises, is
when do we log out the administrator in the new test?
Looking at our test code again, obviously we must log out the administrator before
RegisterNewUserAndLogin! In order to avoid adding too much noise to the test code,
with all of these login and logout operations, we can change the AdminConsole property
to an OpenAdminConsole method, make the AdminConsole class implement IDisposable,
and use a using clause around the creation of the categories, so that the administrator
will automatically log out when the scope of the using clause ends. It’s still a bit noisier
than it was, but it’s a lesser evil. Listing 14-5 shows the changes to the test method.
Chapter 14 adding More tests

318
Listing 14-5. DiscussionsCanBeFilteredByCategory with automatic admin logout
[TestMethod]
public void DiscussionsCanBeFilteredByCategory()
{
Category categoryA, categoryB;
using (var adminConsole = MVCForum.OpenAdminConsole())
{
categoryA = adminConsole.CreateCategory();
categoryB = adminConsole.CreateCategory();
}
var user = MVCForum.RegisterNewUserAndLogin();
...
}
After these changes, let’s run the test again. We’ll see that it fails on
OpenAdminConsole as expected. So now we need to implement it, but we
already saw that we can’t just perform an Extract Method refactoring on
these lines. So, let’s start by duplicating these lines from SanityTests.
AddCreateTopicPermissionToStandardMembers to MVCForumClient.OpenAdminConsole,
and later we’ll refactor to remove the duplication.
However, if we copy these lines as is, it doesn’t work either. GetAdminPassword
and MVCForum are members of SanityTests and not of MVCForumClient. Regarding
MVCForum, that’s a piece of cake to solve, as we just need to use the current instance
(this) instead. Regarding GetAdminPassword, we have to move this method ourselves.
If you’re using Resharper, when your cursor is on the GetAdminPassword method name,
press Ctrl+Shift+R to open the Refactor this context menu, and select Move Instance Method. In the dialog select the MVCForum property, click Next twice (the second time
you approve to change the access modifier of the method from private to public,
so it remains accessible to AddCreateTopicPermissionToStandardMembers. After we
remove the duplication, we’ll set it back to private inside MVCForumClient), and voila!
The method has moved to MVCForumClient. If you don’t use Resharper, then you can
manually cut and paste the code and make the necessary changes; there are not that
much. Listing 14-6 shows OpenAdminConsole as it is now.
Chapter 14 adding More tests

319
Listing 14-6. First implementation of MVCForumClient.OpenAdminConsole
public AdminConsole OpenAdminConsole()
{
var adminPassword = GetAdminPassword();
var adminUser = LoginAsAdmin(adminPassword);
var adminConsole = adminUser.GoToAdminConsole();
return adminConsole;
}
The next time we run the test we fail on AdminConsole.Dispose. This is where we
need to log out the administrator. However, AdminConsole doesn’t have a reference to
the logged-in administrator, so we need to add it in the constructor. Fortunately, the
constructor of AdminConsole is only called from the LoggedInAdmin class, so we can just
pass “this” as an argument. Listing 14-7 shows AdminConsole’s constructor and the
Dispose method.
Listing 14-7. AdminConsole’s constructor and Dispose
public AdminConsole(
IWebDriver webDriver, LoggedInAdmin loggedInAdmin)
{
_webDriver = webDriver;
_loggedInAdmin = loggedInAdmin;
}
public void Dispose()
{
_loggedInAdmin.Logout();
}
If we run again we’ll fail on the AdminConsole.CreateCategory method, which
means that OpenAdminConsole and its Dispose counterpart work. But now we have
duplicate code that we must eliminate! Fortunately, now it’s pretty easy and it also
simplifies AddCreateTopicPermissionToStandardMembers. Listing 14-8 shows
AddCreateTopicPermissionToStandardMembers after removing the duplication.
Chapter 14 adding More tests

320
Listing 14-8. AddCreateTopicPermissionToStandardMembers after removing
the duplication
private void AddCreateTopicPermissionToStandardMembers()
{
using (Logger.StartSection(
"Adding 'Create Topic' permission to Standard members"))
{
using (var adminConsole = MVCForum.OpenAdminConsole())
{
var permissions = adminConsole.GetPermissionsFor(
TestDefaults.StandardMembers);
permissions.AddToCategory(TestDefaults.ExampleCategory,
PermissionTypes.CreateTopics);
}
}
}
Now we can also change GetAdminPassword back to private, as we use it only from
within OpenAdminConsole, which is on the same class (MVCForumClient).
There’s one more thing that bothers me regarding OpenAdminConsole: it looks
very redundant that we look for the Read Me topic in order to get the administrator’s
password, each time we want to open the Admin console. If we did it once, we can
store the password for the next times. We can achieve this by promoting the local
adminPassword variable to a field and changing it from string to Lazy<string>,2
specifying GetAdminPassword as the value factory. Listing 14-9 shows the relevant
changes in MVCForumClient.
Listing 14-9. Perform GetAdminPassword only once
private readonly Lazy<string> _adminPassword;
public MVCForumClient(TestDefaults testDefaults)
{
2 The Lazy<T> class in .Net is a generic class that can wrap any object that we want to initialize only on its first use. In its constructor it gets a delegate for a factory method, which creates the object on the first time it’s being used.
Chapter 14 adding More tests

321
_adminPassword = new Lazy<string>(GetAdminPassword);
...
}
public AdminConsole OpenAdminConsole()
{
var adminUser = LoginAsAdmin(_adminPassword.Value);
var adminConsole = adminUser.GoToAdminConsole();
return adminConsole;
}
Reusing Existing Code
Now we can proceed to implement AdminConsole.CreateCategory using our usual top-
down process. Similar to when we implement the second test, also when we implement
a new method we have the three possible cases for the methods that it calls: we may
need to call a method that already exists; we may need to call a method that don’t yet
exist whatsoever, and we need to create it; or we have a similar method but not exactly
what we need, in which case we need to modify existing code to meet our new needs and
remove duplication. Listing 14-10 shows how AdminConsole.CreateCategory uses the
GetPermissionsFor and AddToCategory methods that we already implemented for the
previous test.
Listing 14-10. AdminConsole.CreateCategory uses existing methods
public Category CreateCategory()
{
var categoryName = Guid.NewGuid().ToString();
var categoriesPage = OpenCategoriesPage();
var category = categoriesPage.Create(categoryName);
GetPermissionsFor(_testDefaults.StandardMembers)
.AddToCategory(category, PermissionTypes.CreateTopics);
return category;
}
Chapter 14 adding More tests

322
Trading Off Duplications
When we reach the failure on CategoryView.Discussions and try to implement it, we
realize that it’s very similar to the LatestDiscussions class that we already have. It’s
true that in LatestDiscussions we only needed the top and bottom elements, while in
CategoryView we need to return the list of elements, but in essence they’re very similar.
Both of them represent lists of discussion headers, and in fact, the structure of their
contained DOM elements is nearly identical. So, let’s try to remove this duplication.
Listing 14- 11 shows the LatestDiscussions class as it is now.
Listing 14-11. Original LastestDiscussions class
public class LatestDiscussions
{
private readonly IWebDriver _webDriver;
public LatestDiscussions(IWebDriver webDriver)
{
_webDriver = webDriver;
}
public DiscussionHeader Top
{
get
{
var topicRows = GetAllTopicRows();
return new DiscussionHeader(topicRows.First(), _webDriver);
}
}
public DiscussionHeader Bottom
{
get
{
var topicRows = GetAllTopicRows();
return new DiscussionHeader(topicRows.Last(), _webDriver);
}
}
Chapter 14 adding More tests
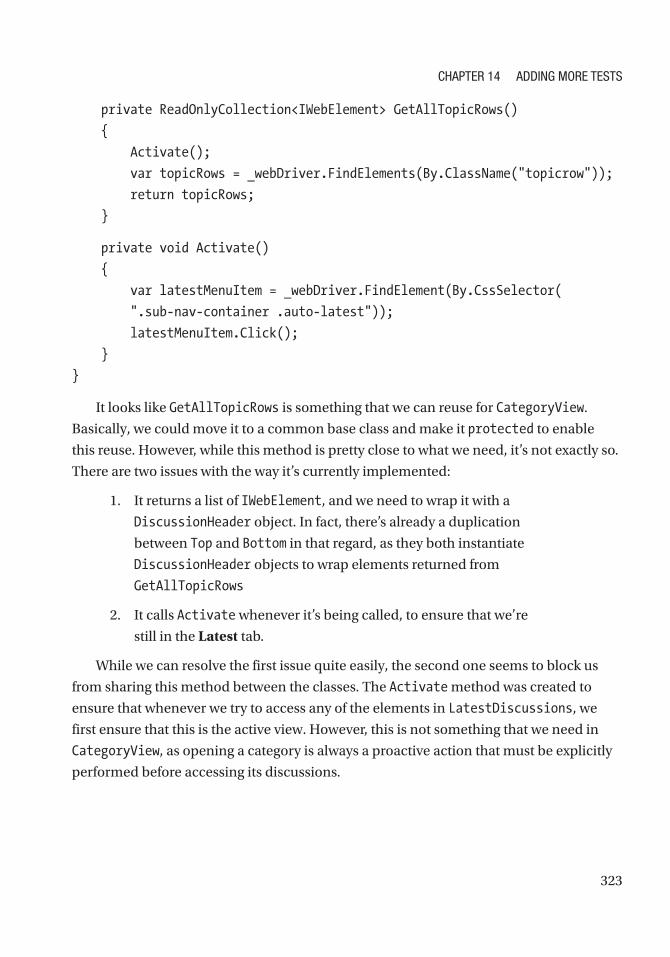
323
private ReadOnlyCollection<IWebElement> GetAllTopicRows()
{
Activate();
var topicRows = _webDriver.FindElements(By.ClassName("topicrow"));
return topicRows;
}
private void Activate()
{
var latestMenuItem = _webDriver.FindElement(By.CssSelector(
".sub-nav-container .auto-latest"));
latestMenuItem.Click();
}
}
It looks like GetAllTopicRows is something that we can reuse for CategoryView.
Basically, we could move it to a common base class and make it protected to enable
this reuse. However, while this method is pretty close to what we need, it’s not exactly so.
There are two issues with the way it’s currently implemented:
1. It returns a list of IWebElement, and we need to wrap it with a
DiscussionHeader object. In fact, there’s already a duplication
between Top and Bottom in that regard, as they both instantiate
DiscussionHeader objects to wrap elements returned from
GetAllTopicRows
2. It calls Activate whenever it’s being called, to ensure that we’re
still in the Latest tab.
While we can resolve the first issue quite easily, the second one seems to block us
from sharing this method between the classes. The Activate method was created to
ensure that whenever we try to access any of the elements in LatestDiscussions, we
first ensure that this is the active view. However, this is not something that we need in
CategoryView, as opening a category is always a proactive action that must be explicitly
performed before accessing its discussions.
Chapter 14 adding More tests

324
One way to tackle this difference is to make Activate virtual and implement it
only in LatestDiscussions, while leaving it empty in CategoryView. However, this
doesn’t look right because it’s not that we never have to activate the category view,
but it just doesn’t seem to be the responsibility of the CategoryView class itself to do it
automatically every time.
So, what we can do is to take the call to Activate out of GetAllTopics and put in the
beginning of the Top and Bottom properties. This looks more logical, even though now
we duplicated the call GetAllTopics in both of these methods. However, now we can
extract GetAllTopics to a base class and reuse it between the LatestDiscussions and
the CategoryView classes, removing the duplication between these classes. So, we add a
bit of duplication in one place to remove a bigger duplication in another.
Looking at it a bit deeper and examining the usages of Top and Bottom, we can
conclude that it’s safe to ensure that we’re in the right tab only in the constructor of
LatestDiscussions instead of at each and every relevant member, so we can remove
this duplication eventually too.
Eventually, let’s rename GetAllTopicRows to GetAllDiscussionHeaders as it no
longer returns just the row elements, but rather full DiscussionHeader objects. Listing
14-12 shows the LatestDiscussions class after making the above changes, and before
extracting GetAllDiscussionHeaders to a common base class.
Listing 14-12. LatestDiscussions.GetAllDiscussionHeaders ready to be extracted
to a common base class
public class LatestDiscussions
{
private readonly IWebDriver _webDriver;
public LatestDiscussions(IWebDriver webDriver)
{
_webDriver = webDriver;
Activate();
}
public DiscussionHeader Top
{
get { return GetAllDiscussionHeaders().First(); }
}
Chapter 14 adding More tests

325
public DiscussionHeader Bottom
{
get { return GetAllDiscussionHeaders().Last(); }
}
private IReadOnlyCollection<DiscussionHeader> GetAllDiscussionHeaders()
{
var topicRows = _webDriver.FindElements(By.ClassName("topicrow"));
return topicRows.Select(row =>
new DiscussionHeader(row, _webDriver)).ToList();
}
private void Activate()
{
var latestMenuItem = _webDriver.FindElement(By.CssSelector(
".sub-nav-container .auto-latest"));
latestMenuItem.Click();
}
}
After this refactoring it’s important to run also the first test in order to make sure that
we didn’t break it with our changes.
Now we need to extract the GetAllDiscussionHeaders method to a common base
class. If you’re using Resharper you can do it automatically by standing on the method
name, pressing Ctrl+Shift+R, and choosinh Extract Superclass. If you don’t, you’ll
have to create the base class and move the method manually. We also need to move
the _webDriver member to the base class and make it protected so it can be accessed
both from the base class and from the derived classes. We’ll call the new base class
DiscussionsList and make CategoriesView derive from it. Listing 14-13 shows the
implementation of CategoriesView deriving from the new DiscussionsList class.
Listing 14-13. CategoriesView implemented by deriving from DiscussionsList
public class CategoryView : DiscussionsList
{
public CategoryView(IWebDriver webDriver)
Chapter 14 adding More tests
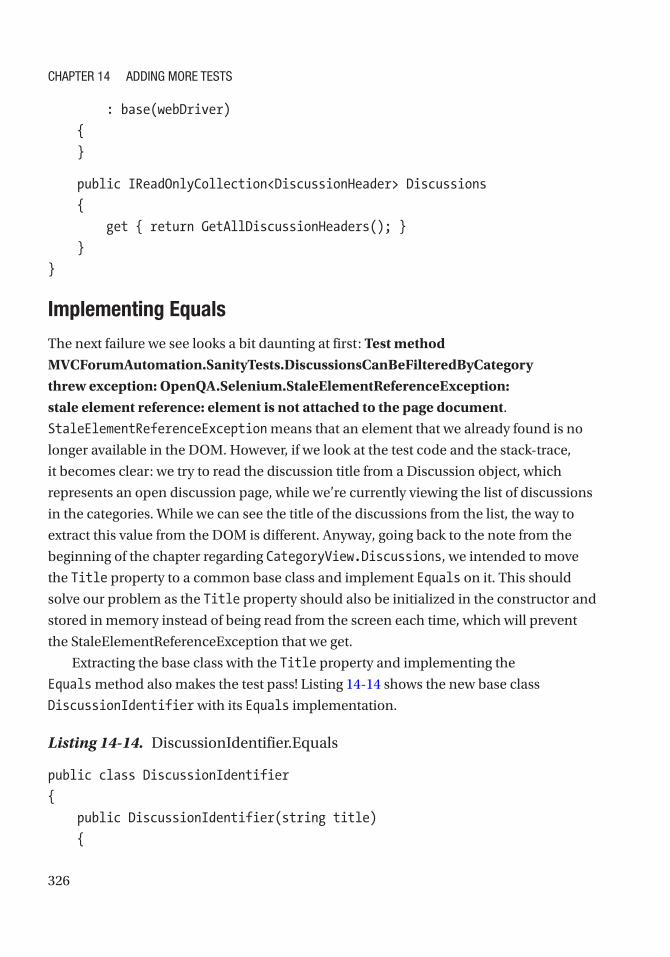
326
: base(webDriver)
{
}
public IReadOnlyCollection<DiscussionHeader> Discussions
{
get { return GetAllDiscussionHeaders(); }
}
}
Implementing Equals
The next failure we see looks a bit daunting at first: Test method MVCForumAutomation.SanityTests.DiscussionsCanBeFilteredByCategory threw exception: OpenQA.Selenium.StaleElementReferenceException: stale element reference: element is not attached to the page document.
StaleElementReferenceException means that an element that we already found is no
longer available in the DOM. However, if we look at the test code and the stack-trace,
it becomes clear: we try to read the discussion title from a Discussion object, which
represents an open discussion page, while we’re currently viewing the list of discussions
in the categories. While we can see the title of the discussions from the list, the way to
extract this value from the DOM is different. Anyway, going back to the note from the
beginning of the chapter regarding CategoryView.Discussions, we intended to move
the Title property to a common base class and implement Equals on it. This should
solve our problem as the Title property should also be initialized in the constructor and
stored in memory instead of being read from the screen each time, which will prevent
the StaleElementReferenceException that we get.
Extracting the base class with the Title property and implementing the
Equals method also makes the test pass! Listing 14-14 shows the new base class
DiscussionIdentifier with its Equals implementation.
Listing 14-14. DiscussionIdentifier.Equals
public class DiscussionIdentifier
{
public DiscussionIdentifier(string title)
{
Chapter 14 adding More tests

327
Title = title;
}
public string Title { get; }
public override bool Equals(object obj)
{
if (obj == null)
return false;
var other = obj as DiscussionIdentifier;
return other != null && Equals(other);
}
protected bool Equals(DiscussionIdentifier other)
{
return string.Equals(Title, other.Title);
}
public override int GetHashCode()
{
return Title.GetHashCode();
}
}
Now that this test passes, we should verify that the first test still passes too.
Fortunately, it does.
Summary for Adding the Second TestDuring the implementation of the second test, we’ve created more classes and methods
but also used some existing ones. The most challenging situations were when we
had a similar implementation in a different place and had to refactor to remove the
duplication. In a few of the cases, we ended up creating class hierarchies to achieve this.
As you can see, writing well-maintainable automation is not a simple programming task
that every beginner can easily do. On the contrary, it requires advanced programming
and design skills.
Chapter 14 adding More tests

328
Making Additional ImprovementsAfter we’ve completed the test, it’s a good time to improve things that were not directly
related to making the test pass.
Creating More Comprehensible IdentifiersFor example, one thing that annoyed me when I developed the last test, but wasn’t
important enough to stop and change, is that it was difficult to distinguish between
identifiers of different types of entities, because we use GUIDs for all of them. This
especially annoys me when reading the log or error messages. If we’ll just add a prefix
with the entity type to each GUID, it will make our life much easier.
As always, instead of duplicating this logic, let’s create a special class and method to
do that. Let’s name them UniqueIdetifier and For respectively, so when we use it, it
will read:
var discussionId = UniqueIdentifier.For("Discussion");
Now we only need to find all references of Guid.NewGuid and replace them with this
method call. Listing 14-15 shows the UniqueIdentifier class.
Listing 14-15. UniqueIdentifier
public static class UniqueIdentifier
{
public static string For(string entityType)
{
return $"{entityType}-{Guid.NewGuid()}";
}
}
Arrange the Code in FoldersIf you look at the Solution Explorer, you’ll see that all of the classes that we’ve created
were created as one long list of 28 code files, and this is after implementing only 2 tests…
This makes finding and understanding the code base for newcomers a daunting task.
If you know the name of a class or even part of it, it’s not a big problem to find it (you
Chapter 14 adding More tests

329
can use the Search box in the Solution Explorer pane, or press Ctrl+T in Resharper to
quickly find any symbol). However, if you don’t know exactly what class to look for, or
just want to understand the high-level structure of the code, it’s very difficult to do that
when all the files are in a one long, flat list.
If we were trying to do this in advance, we wouldn’t know yet which kind of classes
we’ll need. But now we can look at the classes and try to search for common categories
of classes. We can then create a folder for each of these categories and move the relevant
classes to that folder. The two most trivial categories are Tests and PageObjects. Sure,
currently we have only one test class, but soon we’ll have many. I can also identify a
category for Entities, such as Category, Role and PermissionTypes, and a fourth one for
all of the generic infrastructure code, like the VisualLogger, SeleniumExtensions and
UniqueIdentifier. We’ll call this folder Infrastructure. Note that some classes don’t
fall nicely into one of these category folders, and that’s OK. Either put them in one of
them, or even leave them outside at the root. For example, FormPage is a base class for
any form-based Page Object, so it can either be under the PageObjects folder or under
the Infrastructure folder. TestDefaults is also related to Infrastructure, but it’s also very
specific to MVCForum, so it may be better suited in Entities. I’ll just leave that one out of
any of these folders and keep it directly on the root folder of the project.
Extract a Base Class for TestsOne more improvement along those lines is to extract a common base class for all the
tests. In fact, right now it may not seem necessary, as we only have two test methods that
reside in a single test class. However, even at this stage we can identify that SanityTests
has two distinct responsibilities: first, it is a container for test methods; and second,
it contains a lot of infrastructure code that is related to MSTest, and mainly deal with
the initialization and cleanup of the tests. So that’s a good enough reason to extract
all of the infrastructure stuff in this class into its own MVCForumTestBase class, which
SanityTests will derive from. Obviously, when we’ll have more test classes, they should
all derive from MVCForumTestBase in order to avoid duplication. In order to maintain
a consistent folder structure, we’ll put the new class inside the Infrastructure folder.
In addition, we must decorate the base class with [TestClass] too in order for the
[AssemblyInitialize] and [TestInitialize] attributes to take effect. The Git tag
ExtractBaseClass contains this change.
Chapter 14 adding More tests

330
Supporting Multiple Users and BrowsersCurrently the tests run great on our machine, but in order to gain more value out of
them, we must allow other developers to run them too, before they check in their
changes. Allowing others to run the test may also reveal some hidden assumptions that
are true only for our machine. We need to fix those. Soon, we’ll also want to run the tests
in a CI or nightly build, which also runs the tests on another machine (see Chapter 15
for more details about CI). If we solve the problem for other users, adding the tests to the
build will be much easier.
In fact, we didn’t use any hard-coded paths, so it shouldn’t be too hard to support
other environment. However, when we try to run it on another’s developer’s machine
we see that his web server doesn’t use port 8080 as ours do, but rather 8090. Other
developers may use https instead of http, with a certificate issued to a specific domain
name, which prevents users from using localhost or an IP address as the hostname. We
can support all of these scenarios if we extract the entire URL to a configuration file.
Tips for Using Test Configuration FilesAs you see, configuration files are often necessary in order to allow different users of the
automation (developers) to run the tests, or in order to support different environments.
However, it’s important to keep these configuration files short and simple; otherwise
using them becomes its own mess. Here are some tips for using these configuration files:
• Because we want the tests to be consistent and repeatable as
possible, we want to include as little detail as we can that may be
different between environments. Therefore, avoid adding any values
in there except of those that you expect that people will really need
to change. Typically, a URL, path to an executable, etc., are the only
really important things. Sometimes a username and password for
the default user are also convenient if the system doesn’t start from
barebones on every run. However, having Ids of many entities that
different tests use is not a best use of a configuration file. Isolation
techniques that create the data are usually better and save the need
to configure many entities in an external file.
Chapter 14 adding More tests

331
• Keep in mind that these files are meant to be used by people, and
not only by the software. This means that it should be easy to use and
configure as possible, so whenever someone wants to run the tests on
a new machine or environment, he should be able to do it as easily
as possible. In addition to having as few as needed entries, creating
an XSD (XML Schema Definition) file that describe the structure
of the configuration file helps a lot in composing and editing these
files. Most modern IDEs (including Visual Studio and Eclipse)
provide auto-completion of elements in an XML file that has an XSD
associated with it. An XSD file can also be used to add annotations
and restrict the user from providing wrong values.
• Another thing that makes configuration easier is to have default
values for most keys. Having default values saves the effort of
thinking and deciding what to configure for anything that is not
obvious. However, as the developer who chooses the default values,
you’re responsible for coming up with default values that are actually
the correct ones for most of the users. Default values are especially
important if you want to introduce a new configuration key after
people already have existing configuration files. In this case, the
default value should usually cause the system to behave in the same
manner that it did before introducing the new key. Adding a key
without a default value in this situation forces everyone to go and add
the configuration key with the correct value.
• If you can’t find a proper default value and you believe that every user
should explicitly set this value, then in the code that reads this value,
you should first check if it exists or not, and if it doesn’t, provide a
clear message specifying exactly which key to add and how to choose
its value. This way, on the first time that users run the tests after
you’ve added the mandatory key you inform them exactly what they
need to do in order to proceed successfully. The same rule applies for
the first time you introduce the existence of the configuration file as
a whole: first, check if the file exists; and if it doesn’t, provide a clear
message describing how to create it. A good practice is to provide a
template or an example file and instruct the user how to modify it for
his needs.
Chapter 14 adding More tests

332
• Finally, as the content of the configuration files should be different
for every developer, it shouldn’t be put in source control. As
suggested above, you can put a template or an example file and clear
instructions on how to create it, so the first time a user runs the test
he’s instructed how to create the file. Note that for build environments,
you should make sure to copy the file with the correct value from a
predefined location as part of the build process, or somehow create it
in another manner, before running the tests. If you’re using Git, you
should add this file to the .gitignore file (most other source control
systems have similar ways to ignore changes in a file).
To simplify reading and parsing the XML from the configuration file, I used the
TestAutomationEssentails.Common library. For more information about the Test
Automation Essentials libraries, see Appendix B.
Supporting Multiple BrowsersOccasionally websites behave somewhat different on different browsers, so it’s important
to run the tests on multiple browsers. Selenium allows us to run the same tests on
multiple browsers, with a very small change to our code base.
In the central build, usually we’ll want to run the tests on all of the browsers in
parallel. However, even before we have a build, we’ll benefit if we could manually
choose to run the tests on a particular browser, by specifying the browser type in the
configuration file. When we create the build, we’ll simply use the same capability and
invoke the tests several times, using different configuration files, once for each browser.
In order to tell the tests which browser to use, we’ll use the same configuration file
that we’ve created in the previous step. We’ll add a new key BrowserType, to this file
(and the corresponding XSD file) that tells which browser to use. Currently we’ll support
Chrome, which is also the default, Firefox and Edge. Listing 14-16 shows the change to
the constructor of MVCForumClient and the new CreateDriver method that instantiates
the correct implementation of IWebDriver according to the configuration file.
Chapter 14 adding More tests

333
Listing 14-16. Instantiating the correct IWebDriver object according to
configuration
public MVCForumClient(TestDefaults testDefaults, TestEnvironment
environment)
{
_adminPassword = new Lazy<string>(GetAdminPassword);
_testDefaults = testDefaults;
var parentDriver = CreateDriver(environment);
var eventFiringDriver = new EventFiringWebDriver(parentDriver);
VisualLogger.RegisterWebDriverEvents(eventFiringDriver);
_webDriver = eventFiringDriver;
_webDriver.Url = environment.URL;
}
private static IWebDriver CreateDriver(TestEnvironment environment)
{
switch (environment.BrowserType)
{
case TestEnvironment.BrowserTypes.Edge:
return new EdgeDriver();
case TestEnvironment.BrowserTypes.Firefox:
return new FirefoxDriver();
case TestEnvironment.BrowserTypes.Chrome:
return new ChromeDriver();
default:
throw new NotSupportedException($"Browser {environment.
BrowserType} is not supported");
}
}
Chapter 14 adding More tests

334
The first time you run a test after these changes, you’ll see an error message:
Assert.Fail failed. Configuration file TestEnvironment.xml not found. In order to create one, copy the file TestEnvironment.Template.xml from the project folder to TestEnvironment.xml (in the same folder), edit it according to the contained instructions and rebuild the project. If you follow these instructions, the test should
pass. If you open TestEnvironment.xml in Visual Studio, you should have auto-
completion support that guides you for the valid keys and values that you can specify.
Don’t forget to rebuild the project or solution in order for these changes to take effect.
You can see all of the changes made to support the configuration file in the Git commit
tagged Listing 14-16 and its preceding one.
Note an alternative solution for cross-browser testing is to use selenium grid or one of the test cloud providers like Browserstack and souceLabs, which host selenium grid on their servers and give you access to a wide range of browsers and operating systems. From the point of view of the code, there’s not much difference between the solution i showed above and selenium grid, but selenium grid also gives you some means to manage the different environments, and the cloud providers also give you a broader range of browsers and operating systems. however, the details for using selenium grid are beyond the scope of this book.
Additional Improvement OpportunitiesAfter we have few working tests, we can experiment with additional improvements.
Constantly running the tests tells us whether the improvements that we just did didn’t
break anything. You don’t have to implement or even experiment with all of these
improvements all at once. You can create a backlog of improvement ideas and interleave
them with the development of additional tests. When prioritizing these tasks, especially
if you need to report to your manager about your progress, think how much time it will
save you in writing, debugging, maintaining, and diagnosing the tests, and how it can
affect the reliability of the tests. Don’t wait for your manager to tell you to make these
improvements – either convince why they’re important and how much time it will save,
or just do them along the way if they’re small enough.
Chapter 14 adding More tests

335
Automatically Re-create the DatabaseCurrently we assume that we’re running on a virgin database. As I mentioned before,
occasionally I delete and re-create the database in order to ensure this assumption.
While doing it only occasionally and manually doesn’t take too much time, if other
people use the tests and they’re not minded to this need, they might work against a
dirty database, which at some point may cause their tests to fail without a clear reason,
eventually hurting the reliability of the automation. In addition, when we integrate the
tests in a build process, we’ll have to do that anyway. There are few alternatives to tackle
this problem, as usual, each with its pro’s and con’s. I leave it to you to experiment and
consider the best approach. Here are a few alternatives that I can think of:
• Write code in [AssemblyInitialize] that automatically re-
creates the database. While this only take a couple of seconds,
when you’re working on a new test or debugging an existing one,
rapidly running the test again and again, this initialization time can
become disturbing. In addition, in order to re-create the database,
you must specify additional parameters, like the name of the
database, username, and password for the database, etc., in the
TestEnvironment.xml file. While these details exist in the web.config
file of the application itself, the test doesn’t have access to it directly,
so at the minimum, we need to specify the path to the web.config file
and parse the connection string from there.
• In order to save the time of re-creating the database on each run
while debugging, we can add a new Boolean key RecreateDatabase,
in the TestEnvironment.xml file that determines whether to re-create
the database in AssemblyInitialize or not.
• Because we normally want to re-create the database only once in
a while, adding this Boolean flag to TestEnvironment.xml is not
very convenient either, because after we’ll set it to true, we’d most
likely want to change it back to false before the next run, but we
need to remember to do that each time… Instead, we can extract
the functionality of re-creating the database to an external program,
batch file or script (e.g., PowerShell on Windows or Bash on Linux),
and run it whenever we want. In the central build we’ll run this script
before each run, of course. This script also has to take parameters
Chapter 14 adding More tests

336
or a configuration file containing the name and credentials for the
database, but you rarely have a reason to change it, and it can be kept
separated from the TestEnvironment.xml data.
CleanupIf we re-create the database at every run or every few runs, we probably don’t have a
reason to clean up every entity that we create, like category or discussion. However, in
other situations where re-creating the database isn’t feasible for whatever reason, you
might want to clean up these entities in order to avoid “littering” the database with a lot
or “junk” data created by the test automation. These cases also usually imply that part
of the data in the database was not created by the test automation. For example, legacy
systems often rely not only on the schema of the database but also on specific data, but
these dependencies are not documented well enough and no one really knows which
feature relies on which data. Therefore, re-creating only the schema is not enough but
it’s also infeasible to create an empty database and only add the minimum necessary
data, because we simply don’t know what it is. Therefore, in these cases we must use a
copy of a real database (typically the existing “test” environment), and it’s not feasible to
re-create it from scratch.
There are generally two approaches to clean the data that the automation creates,
and you can also combine the two if needed, as described in the following topics.
Cleaning All Entities Created by Test Automation in a Batch Process
You can create a batch file or program that cleans up all of the entities that the
automation creates and run it on a scheduled basis, or before the test run starts. In order
to do that, you must somehow distinguish between entities that the test automation
created to other data that it shouldn’t touch. If certain types of entities are created only
by the test automation, then this is not an issue, but if the database contains entities from
the same kind where some of them are created by the automation and some not, then we
must distinguish between them somehow to prevent this program from deleting entities
that it should not. This can usually be done by adding a known prefix or postfix to the Id
or name (e.g., title) of the entity.
Chapter 14 adding More tests

337
If the environment may be used by different automation users simultaneously
(including the build process), one important challenge that you should address if you
choose this approach, is not to delete entities of tests that are currently running. If you
don’t address this issue, tests may fail unexpectedly, and it will be very hard to diagnose
why. If the entities have a built-in field that contain the time of their creation, you can
use it to filter the entities that were created recently and may already be in use, e.g. in the
last 24 hours. If there’s no such creation time field, then you may add it to the Id or name,
though it may be difficult and inefficient to filter it out directly from SQL.
Yet another option, though a bit more complicated, is to create a separate table that
the test will write to whenever it creates an entity. This table will contain the Id of the
entity and its creation timestamp. Whenever the test creates an entity, it writes the Id and
type of the entity along with the timestamp to this table. The batch process can join this
table with the actual entity table and easily filter the records that may still be in use.
Cleanup When the Test Finishes
The second option is to create a cleanup mechanism like the one mentioned in
Chapter 7 and described in Appendix B, which cleans every entity that the test creates
when the test finishes. In this case you don’t have to use any special Id or name to
distinguish between entities created by the automation and other entities, because each
cleanup action deletes only the one specific entity that was created, and of course that
you don’t have an issue with deleting entities that are in use, because you delete the
entities exactly when they’re no longer in use.
One drawback of this approach though is that when the test run stops abruptly, the
cleanup mechanism won’t kick in, and the entities that were created during the last test
won’t be cleaned. This is particularly relevant when you debug the tests in the IDE and
stop the debugger, because stopping the debugger is like killing the test process abruptly,
without running any cleanup code. For this reason, it may be worthwhile to combine the
two approaches.
Note You might want to apply this mechanism as an isolation technique between individual tests while applying a more robust isolation technique before each run, like re-creating the entire database. this can be useful especially if you have many tests and limited resources.
Chapter 14 adding More tests

338
Improve PerformanceCurrently each of the tests that we wrote takes between 30–60 seconds each on my
machine. That’s not a whole lot for an end-to-end test, but still it’s not very fast.
Considering that we’re going to have hundreds of tests, this starts to become a significant
burden. From the test log we can see that a significant portion of the time is taken in
the TestInitialize method and in creating entities like users and categories. Doing
these operations from the UI does not add a lot of value if any to the tests. We can try to
perform these operations directly through the database, or through the DAL. Obviously,
doing so introduces another dependency for the test automation as we should
consider whether it is worth it or not, but it’s a viable option. Another thing to take into
consideration is whether the Admin UI changes more often than the DAL or database
schema. These considerations are described in greater detail in Chapter 6.
Adding More TestsGoing forward, the more tests you add, more of the infrastructure should be in place. If
you pay attention to removing duplication, your code should be easy to maintain, and it
should be easy to adopt them almost to any feature or implementation change. Typically,
after completing the sanity suite (which is usually in the order of few dozen tests),
additional tests should be pretty similar to existing ones, with only minor variations. In
most cases you’ll still need to add a little bit of infrastructure code to support the new
cases, but it should be pretty trivial. However, from time to time you’ll need to cover an
entirely new feature that was not covered by the sanity suite before, and you may need to
create new test infrastructure code to support it.
Data-Driven Tests (DDT)While most new tests still require us to add a bit of infrastructure code, there are cases
where the tests differ only in values that are passed to some of the methods, or used as
the expected result in the Assert statement. In these cases, the entire test method logic is
a duplication, and the way to remove this duplication is to use a feature that most testing
frameworks support, which is called Data-Driven Tests (DDT). Different frameworks
implement this feature differently, but the idea is the same: you define the test method
once, and you provide the data for the test from an external table. This external table can
Chapter 14 adding More tests

339
be in the form of attributes (annotations in Java) above the test method, or an external
data source, like a CSV file, Excel file, a database table, etc.). When the test runs, the
framework treats it as a series of tests and runs the test method once for each row in the
table. This makes each row in the table a separate test case.
For example, suppose that when a new user registers to our SUT’s website, he needs
to choose his password. When he types the password, the system indicates whether the
password is valid or not, and if it is, it indicates its strength. So, in total, for any given
password the system indicates whether it is Invalid, Poor, Medium, or Good. In order to
test these rules and conditions, we can give a table that contains two columns: the given
password and the expected indication. Each row is a test case that verifies the indication
for a given password. The test method navigates to the registration form, types in the
password, and verifies that the indication is as expected. Listing 14-17 shows an example
for this test method using MSTest.
Listing 14-17. Data-driven test example
[TestMethod]
[DataRow("", PasswordStrength.Invalid)]
[DataRow("abc", PasswordStrength.Invalid)]
[DataRow("abcdefg1", PasswordStrength.Poor)]
[DataRow("abc123@$#", PasswordStrength.Medium)]
[DataRow("$g62D*&a244dfle*)]", PasswordStrength.Good)]
public void PasswordValidation(string password,
PasswordStrength expectedInidication)
{
var homePage = WebSite.NavigateToHomepage();
var registrationPage = homePage.EnterRegistrationPage();
registrationPage.Username = GenerateRandomUserName();
registrationPage.Password = password;
Assert.AreEqual(expectedInidication, registrationPage.
PasswordStrength);
}
Chapter 14 adding More tests

340
Anti-patterns in DDT
While DDT is very useful for removing duplication between similar tests, there are a few
common anti-patterns that people use DDT for:
• Some people abuse DDT in the excuse of allowing testers to add
more scenarios without writing code. They do that by adding many
parameters (columns) to the data and complicate the logic of the test
method to support all the possible combinations. The unfortunate
outcome of that attempt is poor maintainability of both the test
method (the code) and of the data, which inevitably contains a lot of
duplicate values in each column and multiple rows.
• Sometimes people use DDT, especially with an external data source
by using a large set of real-world data, in order to verify that there are
no regressions. While this sounds like a good idea, whenever the logic
is changed by design, you would probably need to update the entire
dataset. The most convenient and feasible way to update the entire
dataset is simply to take the new results and use them to be the new
expected results. But the moment you do that, you lose the safety net
that you were expecting from this test, as you don’t have a way to tell
whether the new results are correct or not. Speaking more generally,
the reasons this is an anti-pattern are that much of this “test cases”
(rows) actually verify the same thing, and that you can’t tell what the
“claim” is for each row.
• DDT often aims to exercise a single unit (e.g., class, method,
component, etc.) with different parameters. Doing that as a system
test or at any scope beyond the unit where this logic is implemented
makes the test slower, less reliable, harder to run, harder to maintain,
etc. In fact, the above example does exactly that and should better be
written as a unit test that directly calls the method that evaluates the
strength of the password.
Chapter 14 adding More tests

341
SummaryAfter completing one test, we can add more and more tests in the same manner, though
we can now reuse relevant pieces of code that already exist. Some pieces we can use as
is, but others we have to refactor in order to reuse without adding more noisy details to
the existing tests.
In addition, after we have one or more tests, we can make additional improvement
to the infrastructure. We use the tests that we wrote in order to verify that our changes
work correctly. We simply run them in any of the conditions that we want to verify
and see if they pass correctly. One critical improvement is to support running the tests
simultaneously from different machines. This is necessary in order to allow developers
to run the tests after every change they make, which provides the most significant value
of the test automation.
Finally, don’t wait for anyone to tell you to improve the infrastructure of the test
automation. Take ownership and do whatever it takes to do the right thing, while
communicating the value that it provides.
Chapter 14 adding More tests

343© Arnon Axelrod 2018 A. Axelrod, Complete Guide to Test Automation, https://doi.org/10.1007/978-1-4842-3832-5_15
CHAPTER 15
Continuous IntegrationNow that we have at least one test, and we made it possible to run the tests from more
than one machine, it’s time to integrate the tests into an automatic build process,
preferably a continuous integration (CI) build. This build process can be extended to
also deploy the built version to the Test or Stage environments (continues delivery). The
process may even be configured to deploy directly to production to create a complete
continuous deployment pipeline. In this chapter, we’ll focus mainly on the continuous
integration part as this is where the automated tests usually run.
Note Sometimes CI is considered to run only unit tests, while a continuous delivery process deploys the new version on the Test environment, and then runs the integration and system tests against it. However, continuously deploying every build to the Test environment while testers may be performing manual tests is not always desired. In addition, as discussed in Chapter 7, due to isolation concerns, I advocate using different environments for the manual tests and the automatic ones. If you do that, the distinction between CI and CD becomes somewhat blurred. Therefore, I prefer to refer to any build process that runs automated tests and provides fast feedback to developers as CI and use the term CD (continuous delivery) to refer to the process whose purpose is to ensure that the same version that was tested throughout the CI pipeline (and beyond) is deployed correctly and safely to each environment, and eventually to production. In that sense, the automated tests are mainly part of the CI rather the CD pipeline.

344
Is It Really Necessary?Having a source-control system combined with a build server ensures that everyone is
working on consistent versions of the source and prevents the infamous saying, “but it
works on my machine!” If developers only synchronize (check out) with versions whose
builds passed, then everything should work on everyone’s machines.
Most development organizations today don’t get started developing real production
code before having a build server in place. Setting up a build server these days is pretty
simple and cheap, so there’s no good reason not to do it early on. Only a few years ago
it wasn’t that easy, and also today there are cases where teams don’t yet have a build
server, or don’t have the knowledge and capacity to establish a proper build process in
the near future, possibly due to technical challenges that are specific to their project. In
these cases, if the team is small, it is possible to start using and getting value from the
test automation even before having a build process in place. It takes a bit of discipline
and cooperation, but if you make sure that the tests can run on different machines, then
every team member can still run the tests on his own machine before checking in the
code. This by itself allows you to harvest most of the value of the test automation, even
without having a build server and an automated build process.
However, people make mistakes, and when they’re under pressure, they tend to
cut corners and can avoid running the tests, even if they’re usually disciplined and
cooperative. This become more noticeable as the team grows beyond two or three
people and also as the length of running the entire test suite rises.
Creating the Test Build ProcessThe exact technical details of how to create a test build process depend on the
technology of the build management system, be it Jenkins, TFS, TeamCity, etc., and
on the specific structure of the SUT and the tests and is beyond the scope of this book.
However, the idea, which will be explained soon is more or less the same. Thankfully,
these days most tools are pretty easy to use, and there are many resources online if you
need to learn how to use them in general or how to do something more specific.
All of these technologies allow us to define a process that is composed of concrete
actions. These actions typically run in sequence, but some of them can be parallelized as
necessary according to the process definition. The build process can also be distributed
among several dedicated machines (agents), also according to the process definition.
CHapTer 15 ConTInuouS InTegraTIon

345
A typical build process that is designed to run automated tests includes the following
steps:
1. Retrieve the most recent sources of the application and of the tests
from the source- control system.
2. Compile the application and the test executables.
3. If unit tests exist (that don’t need any special prerequisites), they
are typically run right after compiling the project.
4. Deploy the compiled application on one or more existing
environments. These environments can either be existing ones,
like a typical “Test” environment, or be a new environment that
is created automatically by the build process. Using containers
technology makes this option much more applicable.
5. Prepare the test environment for the test automation. This step
depends on the isolation strategy but can include things like
deleting old test data and/or creating new data, configuring the
application according to the test’s needs, setting up simulators,
etc.
6. (Optional) deploy the compiled test executables to one or more
test execution environments (agents) where they’ll run. In simple
cases, the tests can run directly from the build agent so there’s no
need to deploy them to another machine.
7. Run the tests against the deployed environments.
8. Gather the results and generate a report. Depending on the
integration between the testing framework technology and the
build management system, the report may be integrated and
displayed as part of the build outcome, or simply be added as a
file to the build outputs. In addition, if one or more tests failed, the
build is usually marked as failed. This report can also be sent by
email or other means to relevant people.
CHapTer 15 ConTInuouS InTegraTIon

346
Scheduling the Test Build ProcessIf the entire process is in the realm of 15–30 minutes or less (depending on your team’s
willingness to wait for feedback), and given that the tests are stable, then it’s worthwhile
keeping it as one consolidated process and running it in a CI mode, which means that
the build is triggered automatically upon every check-in. However, if it takes longer or
tests are not stable, this can significantly hinder the productivity of the development
team. In these cases, it’s common to split the build process into two: the first one
performs only the first three steps as a CI build process; and another separate build
process runs all the rest, which includes the automated tests (excluding unit tests).
Below are descriptions of typical options for scheduling the second part. Later in this
chapter we’ll discuss techniques for stabilizing the test suite and shorten its duration, so
it will be more feasible to run everything in the CI process.
Running the Tests on Demand
One approach for scheduling the second part of the process, which is more common
when the tests are less reliable and also when the test automation is considered to be
owned solely by the QA team, is to run the tests on demand. This “demand” is usually
before or in parallel with a manual testing cycle, typically before a release or milestone,
but may also be when a quick fix or a risky change needs to be tested more thoroughly.
The upside of this approach is that it takes less time for the automation developer to
investigate the failing tests, as he needs to do this only once in a while. However, its
downside is that due to the exact same reason, stabilizing the tests gets harder and
harder. As there can be many changes to the SUT between every two runs, many tests
can fail on legit application changes, which can make the investigation of a single run
longer and also be less effective.
Nightly Builds
The next approach, which is probably the most common for system tests, is to run the
tests every night. In this case the build is scheduled to run automatically at a specific
hour every night. Compared to the previous approach, this approach requires that
someone, typically an automation developer, will investigate the results every morning,
fixing the tests as needed and reporting the relevant bugs to the developers.
Similar to the previous approach, in this approach too, the developers rarely look
at the test results themselves, but only at bugs that they report. Please refer back to
CHapTer 15 ConTInuouS InTegraTIon

347
the topic “Handling Bugs That Are Found by the Automation” in Chapter 5 for a more
complete discussion on the approaches for treating these bugs, and their corresponding
consequences. Note that with nightly builds, the developers get feedback about their
changes about one whole day after they checked in, which is enough to require a
significant context switch from new work that they already started. This is in contrast to
CI where the feedback comes after a few minutes.
Right After the CI Build
The third approach is to run the tests, still as a separate build, but right after the CI build
(which does not run the system tests) has finished successfully. As mentioned before, the
idea is that failing tests won’t fail the “main” CI build.
In fact, this approach is pretty useless, because on one hand, an automation
developer probably won’t keep pace with investigating the results; and on the other
hand, developers would probably not bother to do that either, because as far as they’re
concerned, the CI build itself passed. It may only be useful as a transition state before
adding the tests into the main CI build. This can help people gain more confidence and
visibility while the automation developers and DevOps people, which maintain the build
processes, make sure that the process works fluently. Once this build is proven to be
stable, there’s no reason to keep it separate from the CI build.
Running the Tests as Part of the CI
If we really want to take full advantage of the test automation and the fast feedback loop
it can provide, we need to run the tests as part of the CI build itself. From a technical
point of view, running the build on every check-in instead of nightly, is only a matter
of flipping a switch. However, from a process point of view, we can only do that if the
tests are highly reliable and fast enough, otherwise it will either block developers from
checking in valid changes or be completely ignored and useless. For this reason, the
process of adding the tests to the CI build is something that should be done thoughtfully.
Creating the Automatic Deployment ProcessCreating the first part of the CI build, which only compiles and runs unit tests, is
usually pretty easy, and most development teams do it without any problem. However,
especially if there are no unit tests, it makes a very small difference: it only ensures that
developers don’t check in code that doesn’t compile, but nothing more than that.
CHapTer 15 ConTInuouS InTegraTIon
348
If only that first part of the CI build is implemented, deploying the application is
probably a manual and error-prone process. Often teams in this situation create nightly
builds that only run the tests on an existing, manually deployed environment. The problem
in these cases is that it’s hard to tell the exact version of the source code that was compiled
and used in the deployment. This lack of traceability brings significant challenges when
investigating failing tests, most notably the challenge of reliability and trust.
Therefore, it’s critical to deploy the application automatically as part of the build
process and run the tests on the deployed version. For web applications or services,
deploying the application generally means at least copying the executables to an existing
environment. For desktop or installed server applications, it usually means running an
installation wizard on a VM after reverting it to a clean snapshot, or creating a new one.
For web applications and services, containers can be leveraged and used to deploy the
application on a new environment each time, instead of updating an existing one. This
also ensures better isolation for the tests.
Updating the Database Schema
While ideally we should deploy a completely new and clean environment every time,
it’s not always feasible, as creating a new instance of the database each time may be
complicated and expensive, typically due to tight coupling between the application logic
and some data in the database. This is true especially for centralized applications like
web applications or internal business critical apps. However, even without creating a
new instance of the database, from time to time the schema of the database and even
static data has to be changed along with corresponding changes to the application code
in order for the application to work correctly.
While deploying a new version of the executables to a Test or Staging environments
and to the Production environment is basically the same, deploying database changes to
production is much more sensitive, as we can’t afford to lose any existing data, and we
also want the application to be able to use the existing data without any problems after
deploying the new version. But in order to ensure that we can do it safely to production,
we should first ensure that we can do it safely in the Test and Staging environments. This
means that we should build it to be an integral part of the normal deployment process
that we use for the Test environment too. As Martin Fowler says in his blog:1 if it hurts, do
it more often!
1 https://martinfowler.com/bliki/FrequencyReducesDifficulty.html
CHapTer 15 ConTInuouS InTegraTIon

349
Relational databases are especially challenging to update, as their structure is
much stricter. Because this challenge can sometimes be a pretty hard one, often it
is left as a manual operation. While not ideal, if the database schema changes much
more rarely than the code and you’re facing this challenge, don’t let it hold you from
building the rest of the process. Create the process as if the database schema never
changes, and update it manually at the rare occasions when it does. Later on, consider
automating this process too.
The exact solutions to this challenge are beyond the scope of this book. Refactoring
Databases: Evolutionary Database Design2 by Scott Ambler and Pramod Sadalage
is an excellent book that covers this topic and provides great techniques for making
changes to the database in small steps and a safe manner. But here are a couple high-
level approaches to keep the source code, database schema, and deployed application
synchronized:
1. Use SQL change scripts: for every change to the schema and/
or the data, create an SQL script that will make that change. Run
these scripts by order as part of the deployment process (first to
the test environment and later to production).
2. Use tools that compare databases and create change scripts
automatically: Some tools can compare the desired schema with
the existing one and create those change scripts automatically.
While it is easier, you have to be careful and review the scripts it
creates, as it doesn’t always know what you intend to do with the
data. If needed, you can make the appropriate changes manually.
Make a New Build Process First
If you already have a CI build that is in regular use, but doesn’t run tests or run only
unit tests, don’t touch it just yet. Make all of your experiments with deployment and
running the tests in a new, separate build process. Only at the end, when tests are
running stably on the new build, either disable the original build and enable the new
one to replace it, or if it’s simpler, copy the necessary parts from the new build to the
existing one.
2 Scott J Ambler, Pramod J. Sadalage, Refactoring Databases: Evolutionary Database Design (Menlo Park, CA: Addison-Wesley, 2006).
CHapTer 15 ConTInuouS InTegraTIon

350
When you believe that your process sets everything up to create the environment for
the tests, try to access the environment manually (e.g., using a browser, remote desktop,
or whatever means that is appropriate for the SUT). If you can’t access it as planned, go
back and fix whatever that needs to be fixed in the build process, and run it again until
you can. Most often, the problems are related to configuration files, file system paths,
permissions, environment variables, etc.
Adding the Tests to the BuildAfter you managed to prepare the environment automatically through the build process
and you can use it manually, you have to add two build steps:
1. First you need a step to compile the test executables. This step
should come at the beginning of the build process, because if
the compilation step fails, there’s no point in proceeding. If you
already have a compilation step for the SUT, it may only be a
matter of adding a parameter to compile the tests. Sometimes you
don’t even need that if your test code is in the same folder in the
source-control repository.
2. Then you need a step to execute the tests against the deployed
environment.
Note In case the source files of the test automation reside in a different source-control repository or different location than those of the SuT, and therefore weren’t retrieved already, then you should retrieve the sources of the test automation too before compiling them.
Most popular build systems have dedicated plug-ins to run tests written in the most
popular testing frameworks. If you’re not sure whether your build system supports
your testing framework, or just don’t know how to integrate them – the web is your
friend. Simply search for the name of your build system and the name of your testing
framework, and you’ll most likely find all the details that you need. If you’re using a rare
combination of build system and testing framework that don’t have a special plug-in,
you should be able to run the tests from the command line. Any build system supports
executing an external command-line process. Incorporating the test results may be
CHapTer 15 ConTInuouS InTegraTIon

351
more challenging if there’s no dedicated support, but in most cases the results are
either written to the console and/or to a file that you can add to the output of the build.
Usually testing frameworks also provide exit code that indicates whether all the tests
passed successfully or there was a failure or other problem. While this is not enough
for understanding what exactly went wrong, it can be used by the build process to
determine how (or if ) to proceed.
Running the Tests on the Build Server Itself or Remotely
Depending on the type of application, and also on resource utilization, you may run the
tests either on the build server itself, or on another dedicated machine. For example, UI
automation tests for a desktop application must run on a machine on which the build
process installs the desktop application, which is typically not the same machine that
runs the build process itself. This means that the machine on which the application
is installed should also be configured to run the tests. Consult the build process
documentation (or the web…) on how to configure a remote machine to run tests as
part of the build process. The same idea applies for applications that require special
hardware or software. One common example for such case is that you need a Mac with
a connected iOS device to run tests on a physical iOS device. Selenium tests can either
run on the same build server, as it only opens a browser that connects to the application,
which is deployed somewhere else, or on another build machine.
Experiment with One Test First
If you have many tests and running all of them takes a significant time so far (compared
to the overall build process time), first configure the build to run only one test, until
you see that it works as expected and stably. While you’re testing and stabilizing that
build, you’ll probably have to run it many times, and the longer the build itself takes,
the longer it will take you to stabilize. This test must be one that you already verified to
be stable on different machines and environments. As with deploying the application,
when integrating the tests, you may also need to deal with issues such as configuration
files, file system paths, permissions, environment variables, etc. While you try to make
this work, instead of running the entire build process, which includes redeploying
the application anew, you can try to run the tests from the command line of the build
machine (e.g., using Remote Desktop or Windows, or ssh on Linux). In most cases
you’ll be able to see the exact command that invokes the tests in the logs of the build
process. Copy this command to the command line of the build agent, and you may see
CHapTer 15 ConTInuouS InTegraTIon

352
more clearly what the problem is. You can try to run the same command on your local
computer and see the differences. Note though that there may differences in paths and/
or environment variables, both between the actual build execution and when running
it from the command line of the build server, and also between running it on the build
server and locally on your machine. While bridging these differences can be dull work,
usually it involves no special technical challenge. Printing some log messages can help
you with that.
Completing the Build Process
Congratulations! You have one test that passes the complete build process cycle! This is
really a significant milestone as it proves that the entire process works end to end. Now
you have to add the rest of the tests.
If you know that the entire test suite is stable (or there’s simply not that many more
tests), you may add all of them all at once. Otherwise, especially if you intend to use the build
process as a CI build, add only the ones that you know to be stable, and leave the rest to a
nightly build or handle their issues locally first before adding them to the build. If the build
is not intended to be used as a CI build, you may add all of the tests at once whatsoever, but
make sure to start a stabilization process right away, to prevent the failing tests to “rot.”
Changing the Development Processes and CultureCreating a CI process (or even a CI/CD pipeline) as described so far is a technical task. But
on its own it doesn’t give much value. Its real value comes from incorporating it into the
development process and culture. As mentioned in the beginning of the chapter, the process
and culture can be changed to take advantage of automated tests even before the automated
CI process is ready. While having it makes the change a lot easier, changing business
processes and all the more so, changing business culture, is still the real challenge.
Aiming for the “Holy Grail”If you refer back to the topic “Getting the Most Out of Test Automation” in Chapter 2,
you’ll recall that the Holy Grail we aim for, is to have a fully automated pipeline, and
business processes that prevent bugs from creeping in. In my opinion, this is what we
should be aiming for, though it can be a very long journey. It could be that your goal
is not there yet and is much more modest, but anyway, every goal that gets reached is
CHapTer 15 ConTInuouS InTegraTIon

353
only the baseline for the next goal, so it doesn’t really matter if your goal is different. The
important thing is that you’d have an idea of what are the benefits you can gain from test
automation and then aim for that.
What It Takes to Change the CultureIntroducing new business processes is always a big challenge, as naturally most people
are reluctant to changes. A cultural change is even much more challenging, as it requires
to change people’s presumptions, values, and beliefs. However, attempting to change
business processes without causing people to believe that it will help them, will likely
cause more friction and resistance than good and is doomed to fail.
Changing the culture can sound like a huge thing that’s beyond the ability of most
mere mortals. But in fact, a culture is like the center of gravity of all the personalities
of the people in the group. The smaller the group is, the bigger the influence each
individual has on the overall culture. Also, a culture, like people personalities, has
countless aspects, and each individual has stronger affect and influence on some aspects
and weaker ones on other aspects. People that have a significant effect even on one
particular aspect, are often considered “leaders” in that area. Most people that have a
weaker effect on a subject usually just follow a leader. But different people can be leaders
in different aspects or areas and followers in other aspects.
For test automation to be used successfully, it usually takes only one leader. And
there’s no excuse that this leader won’t be you! You don’t have to be a manager or a very
charismatic person. If you took the time to read this book, it already a sign that you care
a lot about getting the most out of test automation, most probably way beyond anybody
else in your team, including your manager. You must surely care to learn and broaden
your knowledge on this topic much more than them. Continue this way and it won’t take
long until you become the expert at least among your teammates. Once you’re the “go
to” person in the subject of test automation, your influence will increase and more and
more people will listen to you. It probably won’t happen overnight, and it might take a
pretty long time until you’re able to reach the Holy Grail that you’re aiming for.
Even more realistically, you’ll probably never really reach that Holy Grail. That
may sound very disappointing, but the point is to keep striving for it, and gradually
influencing other people to get closer and closer to it. Most probably the Holy Grail itself
will change and evolve over time, so even if at some point you’ll reach your original Holy
Grail, by the time you’ll reach it you’ll be aiming for something new. So be prepared for a
long ride but a very satisfactory one!
CHapTer 15 ConTInuouS InTegraTIon

354
Convincing and influencing people can be done in many ways, which mostly
depend on your strengths and choices. Some people are better convincing while
talking to people informally. Others do it better by writing documents or gathering
a formal meeting and giving a presentation. But probably the most effective way
to convince people is by showing and giving them a concrete value or solving a
problem they have. Just like in the Agile methodology (and philosophy), giving value
in small chunks is the way to go. This way you see what’s working and what’s not. You
can and should listen to people and understand what bothers them the most and try
to solve the next problem accordingly. The key to success here is to communicate
the value of each change with your manager and colleagues and also the course of
action that you plan to take. In most cases, you should coordinate anything that you
plan to do with your manager beforehand. If you show him the potential value and
how small the cost is, he probably won’t object to the change. However, there are
cases where your manager may not see the immediate value, though others will.
For example, a QA manager may not see the immediate value that developers can
gain from using the test automation. In these cases, you may slowly and quietly try
to show the value to few key people who can see it (e.g., developers) and have them
come to their manager to ask for your help. In turn, their manager will come to your
manager and ask him to allow you to help them. If necessary, their manager can
even involve their common higher manager to convince your manager to cooperate.
Once your manager will get positive feedback about you and your work from his
peers and managers, he’ll see the value too.
Lastly, another very important mean for changing a culture is information.
Information has a very strong influence on most people’s beliefs, as it shows them an
objective truth (or at least one aspect of it). Lack of information leads to speculations,
biased assumptions, and even personal conflicts, while more information leads to
transparency and cooperation. Information can be in the form of data, but also of
knowledge. In the sense of data, this is where the CI process and tools, as well as the
source-control system and other development life-cycle tools help make a difference.
They provide transparency and data regarding the state of a version, bug density,
help rationalize the root cause of problems, etc. However, beware that every metric
can have severe side effects if it is used too widely or aggressively to measure people’s
performance. People will naturally strive to maximize the metric they’re being measured
upon but may neglect many other important aspects of their work along the way, which
can sometimes be completely disastrous.
CHapTer 15 ConTInuouS InTegraTIon

355
In the sense of knowledge, code reviews, courses, books, blogs, and even informal
conversations are what helps make the difference. Gaining and transferring the
knowledge regarding test automation in your team is your main tool to make a
difference!
Identifying the Starting PointBack to the ground, making a change to the processes and culture depends on the
current situation and the most bothersome problem that you try to solve. Following are a
few common situations that you may found yourself in, and the possible course you can
take to change it. As pointed out earlier, don’t try to fix everything at once. Tackle each
issue one at a time, in a way that provides the most value in the smallest effort.
Not Having an Automated Build
As mentioned in the beginning of the chapter, a team can take good advantage of the test
automation without an automatic build. However, in the situation described there, the
assumption was that the team is small, collaborative, and understands how to get the
most value from test automation. But if you’re a single automation developer that works
as part of a QA team far away from the developers, then chances are that the potential
value the team gets from test automation is far from being realized.
If you don’t get buy-in for creating an automated build that runs the tests (even
though with today tools there’s really no good excuse for that), you can simply create
a scheduled task on your machine (e.g., using Windows Task Scheduler) to run all of
the tests each night. With a few lines of script, you can make the results be sent to the
relevant people automatically by mail. But even without that, sending the results yourself
every morning is a good starting point. As I’ll describe in the next topic, you should also
elaborate on the results in your own words.
Expectations Gap
Very often, test automation developers either report to a nontechnical manager,
or a manager who’s just too busy to get into all of the details and intricacies of the
test automation project. These managers often have a hard time seeing the bigger
picture and the status of the project, which causes frustration and gaps between their
expectations and the actual state of the project.
CHapTer 15 ConTInuouS InTegraTIon

356
One of the main reasons to this is that the results of the test automation and
consequently the value that they provide are pretty opaque. The reports tell how
many and which tests passed or failed, but the failure message is too technical for
these managers to understand. Even if you have a visual log and everything that helps
you investigate the results quickly, it’s still not something that your manager would
probably look into for each failure. Assuming you’re given the time to investigate and
fix the tests as needed, often your manager doesn’t get into the technical details and
has a hard time understanding what exactly you’re spending your time on. (If you’re
not given the time to investigate and fix, refer to the topic “Having Many Unstable
Tests” later on.) Because there can be other reasons for failures that are not bugs,
managers sometimes only see a high cost of developing and maintaining the tests, but
very little value in the sense of bugs that are found by the automation. They simply
don’t have the means to estimate whether it’s reasonable or not, and where the root
causes lie in order to try and improve it.
Assuming that you’re already investigating the results every morning, continue to do
that, but also write a report in your own words, and send it to your manager, and possibly
also to relevant peers. The report can either be in the form of a table, or a more flexible,
textual format – whatever you feel suits and best conveys the information.
For each failed test, investigate and try to come to a conclusion whether the
failure is due to (a) a bug in the application, (b) a change in the product, (c) an
environmental issue, or (d) an unexpected condition in the test (i.e., a bug in the
test). For each of these cases, describe the problem in one or few sentences, which
are not too technical but are also clear enough and not vague. In addition, describe
what you have done and/or think that should be done in order to solve or mitigate
that problem. For known bugs, clearly distinguish between them and new bugs. If
you can’t completely identify the root cause of a failure and determine whether it’s
a bug or a different problem, describe what you have investigated so far and your
interim conclusions. In addition, describe what diagnostics you have added or think
should be added (if you need more time or help from other people for that), in order
to help you investigate the problem next time. Again, write only the relevant details
in a concise but understandable way.
When you investigate failures, one of the common first steps is to try and reproduce
the problem on your local machine both by running the same automated tests, and by
trying to reproduce it manually. The results of these investigations are often interesting
to mention directly, as it tells a lot about the nature of the problem.
CHapTer 15 ConTInuouS InTegraTIon

357
Finally, group identical issues together in the report, so that the focus is on the
problems and their solutions, and not on the tests themselves. This is also your opportunity to highlight issues that needs to be fixed, including more general and long-term ones that impede your work, and push toward additional process and cultural improvements. This report will be much more valuable to your manager than
any automatic report he may have asked for, and I’m sure he’ll appreciate it.
Having Many Unstable Tests
Let’s make it clear: unstable tests are useless! With unstable tests you can’t determine
whether the tested scenario works correctly or not, and whether a failure is caused by
a bug or some other reason. This only adds noise to the process and wastes time rather
than helping anyone in any way. That’s why tests must be stable at all times. For the sake
of our discussion, unstable tests are not necessarily flickering tests. Even tests that pass
on one machine and fail on another, or simply tests that fail consistently, but no one
had the time to investigate the root cause and fix it, should be considered unstable, even
though they’re not flickering.
While this is not desired, too often I saw situations where the automated test
suites became unstable, having many unexplained failing tests. These situations
usually come about from ignorance, mainly of managers who don’t understand the
maintenance demands of test automation and are more concerned about covering
more scenarios rather than stabilizing existing ones (probably because they committed
to a certain deadline to their own manager). If you report to such a manager, try to
communicate the uselessness and cost associated with these unstable tests to your
manager, and if needed also to his manager too. Assert that stabilizing tests must be a
constant and high priority effort.
As always, information, both in the form of data and knowledge are your best
tools. In the sense of knowledge, communicating the cost and value of unstable tests,
as well as the differences between manual and automated tests in that regard, is the
important thing. In the sense of data, the test run results from the build is the basic
source of information. However, if there are many failures, chances are that you’re not
given enough time to thoroughly investigate and fix the issues, and as time goes by, the
problem only gets worse. Because it gets worse, you’ll need even more time to investigate
and stabilize the tests and chances are your manager will want to postpone it until after
some arbitrary milestone (that will probably be postponed too).
CHapTer 15 ConTInuouS InTegraTIon

358
While you should coordinate with your manager the solution I’m about to suggest,
it is so cost-effective, that it’s pretty unlikely that your manager will object it. Instead of
trying to stabilize all the tests at once, start from the tests that are already pretty stable.
Even if most of the tests are unstable, almost always there are a few tests that pass
almost regularly. If there are not, then start with the test you’re writing now, and as soon
as it works, consider it as stable. Make a list of these relatively stable tests, even if the
list is very short. Each morning, instead of investigating the failures in all of the tests,
only focus on the tests in that list. Because the list contains the tests that are relatively
stable, they should usually pass, so the time you invest in investigation and fixing is
very minimal. However, when some of them fail nonetheless, investigate these failures
thoroughly and fix them to make them stable again. Report to your manager every day
about the status of the tests in that list, just like I described in the previous topic. Slowly,
when all of the tests in the list pass, add to the list one or a few more tests that you notice
to be pretty stable lately too, or select one test that fails regularly with the same message,
and try to investigate and fix it. It is likely that some of your fixes, either of tests in the
list of stable tests, or fixes to tests that used to fail regularly, would have fixed other tests
too. Apply the ideas mentioned in Chapter 13 for investigating and stabilizing the tests.
Gradually expand the list of stable tests until all of the tests are stable.
Even if eventually there are a few “stubborn” tests that are difficult to stabilize, they
remain the exception rather than the norm, and they are also clearly distinguished
from the rest, so it’s easy to notice regressions. For these few problematic tests, you may
postpone treating them to a less stressed period, or even completely delete them if you
realize that their intended value is not so clear and questionable in the first place.
Notice how the gradual approach helps you avoid having to invest too much time
investigating many failures, while still making constant progress toward a stable test
suite. This gradual approach is a much easier sell to your manager, as the time needed
for investigation and fixing becomes much less intimidating, and the value he’ll see from
it is much more immediate. Communicating the progress of the stabilization progress to
your manager ensures that he’s aware of this progress and sees your contribution to the
success of the test automation journey.
Inheriting a Legacy Test Suite
In companies, over time, people come and go, and test automation developers are no
exception. When the test automation changes hands, especially if it was developed,
maintained, or even led by a single person, it’s common that the new automation
CHapTer 15 ConTInuouS InTegraTIon

359
developer that inherits the test automation has a hard time maintaining it. Because the
new automation developer is less familiar with the code of the test automation, he may
not be aware of decisions and reasons that led to the way the automation is written,
and simply because no two developers have a common coding style and skills, he’ll feel
uncomfortable maintaining the tests and will probably even consider the automation
that he inherited like a piece of crap that must be replaced (BTW, this is true almost
for all developers inheriting someone else’s code, not only automation developers).
Moreover, while many of these reasons are subjective, it’s often true that during the time
the automation was developed and maintained, the SUT has changed, technologies
have changed, and the knowledge of the automation developer has changed. Even with
best intents, there are probably traces of the old technologies and implicit knowledge
spread all over the code, making it harder to maintain. It could also be that the tests are
objectively unstable or difficult to maintain due to bad coding skills or lack of isolation.
Before throwing everything away and starting from scratch, answer the following
questions:
1. Is it possible to understand the intent of each test, or at least
of some of them? If at least some of the test names, steps or
descriptions are understandable (maybe even by domain experts
or relevant developers), or the relationships between the test
methods and manually written test case are maintained, then
chances are that you can still stabilize and get value out of them.
2. Can you point at some isolation or architectural problem that
hinders the reliability of the tests? If so, is it possible to change
the infrastructure code to fix it, or will most of the tests should be
changed in order to fix it?
If the tests are unreliable due to an isolation or architectural issues that you can
clearly point to, but are hard to fix, then chances are that there’s probably no reason to
keep maintaining these tests. However, even if the tests are unreliable, but it’s possible
to understand the intent of the tests, then you can apply the technique of gradually
stabilizing the tests, which I described in the previous section.
If you can’t point at an inherit problem with the isolation or architecture, but the
intent of the tests is not understandable, you can continue to run the tests, but when a
test fails, only invest a reasonable time in the investigation. If you can easily fix it, then
go for it, and if you can also change the name or description of the test method to better
explain its intent, the better. If you think that the test is too long and verifies too many
CHapTer 15 ConTInuouS InTegraTIon

360
things, then you can also break it down to shorter tests that together cover the same
functionality of the original one. However, failing tests that are both hard to maintain and
also their intention is unclear, are really worthless. If the developers of the feature and
the product owner (PO) also think like you, then you can probably delete these tests.
Now the question is what to do about new tests. The first impulse of most
developers is to write a new infrastructure that will be easier to maintain. The
thing is you have to balance between the cost of using and maintaining code which
you feel less comfortable with, and the cost of developing all of the infrastructure
anew. In many cases, you can reuse only the parts of the infrastructure that make
more sense to you and write other parts anew. Especially if you take the approach
described in Chapters 10 to 12, and the previous automation wasn’t written using
this approach, chances are that you’ll want to write some of the infrastructure
yourself. But still, if there is usable code in the old infrastructure that you can reuse,
then go ahead and use it.
Eventually, if you do decide to write a new automation system from scratch, consider
running the new tests side by side with the old ones, at least until a proper coverage and
trust was gained in the new system.
Chasing After the Application Developers
The last problem and improvement technique I want to mention has many different
symptoms:
1. Automation developers feel that their work isn’t getting enough
management attention,
2. Bugs whose priority are not high enough to be fixed immediately,
but that affect the test automation are postponed, making the
automation less reliable.
3. Necessary changes to the SUT to make it more testable are not
given enough priority.
4. The automation often fails on legit changes of the SUT, because
the automation developer hasn’t been prepared in advance for
the changes. The automation developer feels that he has to chase
after the application developers in order to understand what has
changed and why.
CHapTer 15 ConTInuouS InTegraTIon

361
All of these symptoms are typically an outcome of the belief that the automation
is part of the QA team’s responsibility, and that application developers shouldn’t be
concerned too much about it. This belief is usually bound also to another belief that
the main communication channel between the QA and development teams is the bug
tracking system. Almost always in these situations the tests are being run only on nightly
builds and not in a CI.
This is where changing the culture takes the most significant place. In order to
solve these problems, the responsibility for running and maintaining the tests should
eventually be moved to the hands of the developers, or at least they should be closely
involved with the test automation efforts. In fact, it should be a team responsibility, but
the developers should definitely be actively involved. The challenge of course is how to
make this transition…
The interesting thing I found over and over again, is that while most developers don’t
like to test their changes and new features thoroughly, or write tests for their code, they
are willing to be able to run the automated tests themselves. If you give them automated
tests that have already been written, and which they can run in a click of button,
they’ll feel much more confident that their changes didn’t cause any significant harm.
Eventually, developers don’t like it when bugs are found in their code, as it creates more
work for them (and also beats their ego…).
The trick to make it work is to talk to developers, preferably unofficially at first, and
tell them what your automation does and how it works. Then, suggest to show them
how they can run one, few or all tests (depending on the overall time it takes). Chances
are that at least a few of them will get excited by the possibility. In my experience, these
are usually the more senior developers, technical leads, and even team leads, though it
greatly depends on the people themselves. When you find a developer who’s willing to
run the tests, on his own will at first, offer your help in any problem he might encounter,
and be very willing to actually provide this help. Try to do this “trick” with as many
developers you can, focusing on these senior, tech leads and hand-on team leads. Most
probably every now and then a developer will encounter a failure and call you to help
him. When it happens, show him how you investigate the failure and find the root cause
together. If the cause is a bug that the developer just introduced, that would be a great
win in many respects. Let him fix the bug, and then make sure that the test passes. If
the cause is a legit change in the SUT, show him how you fix the test (assuming the fix is
quick, which in most cases it should if you kept the rule of avoiding duplication). Run the
test again to make sure that the fix was successful. This way you gradually transfer the
CHapTer 15 ConTInuouS InTegraTIon

362
knowledge and responsibility to the developer, while the developer sees the value that
the fast feedback that he gets from the automation gives him.
After some period of doing the above practice and a number of cooperating
developers, when a test fails in the nightly build, try to identify the developer who
checked in the code that failed the test, by looking at the build details and the source-
control history of the last day. Note that the fact that the test failed in the nightly build
indicates that this developer hasn’t run that test before he checked in his changes.
Assuming that this developer already knows how to run the tests, and that this test is one
of the tests that you’d expect him to run, come to that developer directly, and show him
that if he’d run the tests before checking in his changes, then he would have caught that
bug before he checked in the code. You can take note each time this happens, and after
some time, communicate with the team (as well as with your manager) the time that
would have been saved if the tests were run by the developers before check-in. Needless
to say, you should do it politely and practically, and suggest it as a process improvement
and not blame the developers for not doing it. The point is to use the data to provide
transparency, and to show the value in changing the process.
Eventually, someone will already suggest to add the tests (or a subset of them) to the
CI build, in order to prevent such regressions from reoccurring. Obviously, you shouldn’t
only wait for that someone to suggest it but be preaching for it all along. By preaching,
you prepare the ground for that moment of consensus in which you can make it work
without major objections.
Note according to my experience and observations, most developers don’t like to develop tests for their code, mostly due to lack of experience and knowledge of how to do it right. after they gain some experience and get better at it, it becomes obvious to them that they should do it as an inseparable part of their work. naturally, some people get it more quickly while others struggle more. However, at the beginning, many developers perceive writing automated tests as having a very low technical challenge, which makes them feel that it’s not the best use of their busy time. as a result, they think that this should be done by someone else, namely a tester. The common excuse that they’re too busy writing code and don’t have time for also writing tests, is perceived as true by most people. But the truth is that the same amount of work is divided by the same amount of
CHapTer 15 ConTInuouS InTegraTIon

363
people, be it application developers or automation developers, whether everyone does both types of tasks, or each only does his own thing. needless to say that the bigger the communication overhead is, the more time consuming it is, and the time spent on finding, investigating and fixing bugs is a huge cost that is saved when each change of code is immediately covered by relevant automated tests. In the next chapter we’ll cover increasing the collaboration between the application developers and automation developers even further.
Decreasing the Test Run DurationBefore you expect developers to run the tests and/or adding the test to the CI build,
you should ensure that the entire test run don’t take too long; otherwise you’ll never
get their cooperation to use it regularly. Some people say that the entire test run
should take no more than few minutes or even seconds, but most developers accept
waiting up to 30 minutes to get a valuable feedback on their changes. There are two
main reasons for that:
1. Even though the developer can continue to work on other things
while the build runs as a result of his check-in, only when it
finishes is when he truly has the peace of mind to work on the
new stuff. This is because if the build fails, then he needs to do a
context switch back to fix it.
2. Depending on the size of the team and rate of check-ins, the
longer the build takes, the more check-ins are likely to be
merged into a single build, and the more likely it is to fail due to
integration conflicts.
This is the main reason why unit tests are more commonly used in CI builds than
full system tests. However, in many cases the option to run tests that are more than
pure unit tests is often rejected prematurely. There are a few techniques that can
help keep the CI speed under control even while enjoying the safety of the broader
automated tests.
CHapTer 15 ConTInuouS InTegraTIon

364
Improve IsolationWhile the main purpose of isolation (which is described in greater detail in Chapter
7) is to improve the reliability of the tests, it can also affect their performance. A
shared database with a lot of data makes the application run slower. The amount of
simultaneous connected users can lead to locking, which slows that system down, and
the amount of data can affect the performance of queries that the application performs
as part of the tests. However, if each test environment has its own small database, then
you remove the bottleneck and also make the tests more reliable. In addition, if you put
the database and the application server together on the same machine, then you also
eliminate the overhead of communicating over the network, which is likely to affect the
performance of the tests significantly too.
Besides isolating the database, you should isolate the test environment from any
external dependencies (e.g., external web services, external hardware, etc.). These
external dependencies should either be simulated (as described in Chapter 6) or be
cloned and used separately for each environment. By doing that you remove the latency
and the load on these services, which consequently also improve the performance.
Perform Prerequisites Through APICreating the prerequisite data of tests through the UI usually takes long; may make the tests
less reliable, harder to maintain, and don’t serve the purpose of the tests. Consider doing it
directly through API or even directly to the database. APIs are designed to be used by code,
while UI isn’t. See Chapter 6 for the trade-offs between the different test scopes.
Parallelization and VirtualizationIf you already optimized for isolation, then running multiple tests in parallel is
straightforward. The level of isolation and the exact architecture dictates whether you
need different threads, different process, different machines, or completely different
environments to run the tests safely in parallel. Containers, whether used locally or on the
cloud, especially with an orchestration tool like Kubernetes, greatly help creating multiple
environments that can be used to run tests in parallel well isolated from each other.
While containers and VMs are excellent for this purpose, if your application doesn’t lend
itself well to this technology, or even if you don’t have the knowledge and time to learn
how to use it, don’t let it hold you back from finding other ways. I used to create isolated
environments for running tests in parallel long before I first heard about containers…
CHapTer 15 ConTInuouS InTegraTIon

365
Once you solve the parallelization problems, you can scale out more and more by
adding more hardware. While it may be somewhat more costly in terms of hardware or
cloud resources, in terms of reducing the overall test time, parallelization gives an order
or magnitude of improvement!
Run Only Sanity Tests in CIWhile improving isolation and parallelizing brings the most value out of the
performance improvements, it’s not always the easiest thing to do. If you already have
many tests that run on a nightly build and take hours, and the isolation requirements
are too complex, it may seem that using these tests in a CI build is impractical. Well, it’s
true that it’s impractical to run the entire test suite, but a small subset that don’t take
more than 30 minutes can still make a big difference. The obvious (and mostly correct)
choice for this subset is the sanity suite. The sanity suite should cover most features,
but just a bit of each of them, and not all permutations and edge cases. While it doesn’t
provide the most value out of the entire test suite, at least it catches major breaks early.
These major breaks are bugs that prevent the application from starting or to perform
one of the important use cases of the system. Such failures can waste a lot of time for
testers and other developers that are trying to get the latest changes. Moreover, adding
the sanity suite to the CI helps start the cultural shift toward a greater involvement of the
developers in the quality and test automation aspects.
Actually, the highest direct benefit of this approach is for you: the developers will
have to help you keep the tests stable and adopt the tests to their changes before they
even break the build. Having a stable “always green” sanity suite running in the CI build
greatly helps stabilizing and make the full nightly build green too. If a bug is caught at the
nightly build, the developers will be much more cooperative in fixing this too, because
they already familiar with the test automation in general.
Breaking the CI Pipeline to StagesInstead of waiting for the nightly build to run all the non-sanity tests, it’s also possible
to create a chain of builds, each triggering the next one on successful completion. Some
stages can trigger multiple other builds to run in parallel also. For example, the first build
only compiles and run unit tests (which are very fast and don’t require deployment). If
it completes successfully, it triggers the next build that deploys the application and runs
the sanity suite. If that one completes successfully, then it triggers yet another build that
CHapTer 15 ConTInuouS InTegraTIon

366
execute the rest of the tests which may take, let’s say, three hours. In addition, it can
also trigger two more builds in parallel on separate environments: one that executes
long-running load tests and one which tests installations and upgrades. If one of the
first builds fail, it doesn’t trigger the next ones. Finally, there should be an indication
for the overall status of the version and a notification if the whole process completed
successfully or not. Obviously, this entire process can be easily extended to create a
Continuous Deployment pipeline.
In fact, because the overall duration of the entire process is much longer than the
average gap between check-ins, if the pipeline is based on the idea that each build
triggers the next one, the result will be a queue overflow. Instead, in order to avoid this,
the common practice is that each of these builds run continuously in a loop, taking
the results of the latest successful build that precedes it. If there’s no new preceding
successful build, then the current build just waits until there is.
The idea of creating a chain of builds has the advantage of providing the fastest
feedback possible about every suite of tests. The drawback, however, is that it makes the
work process somewhat more complicated, as developers should look at the results of
all of these builds in order to determine whether they can check in their changes or not.
Let alone that failures in one of the longer builds may also take longer to fix, which can
block all developers if the process is that strict. Common sense and practices that fits the
specific organization should be applied in these cases to determine who can check- n
what whenever one of these builds fail.
Write Mostly Integration and Unit TestsAs described in Chapter 6, the decision about the scope of the tests (e.g., end-to-end,
integration, or unit tests), has many considerations, performance being one of them. The
general rule is that the smaller the test scope is, the faster the tests are. Therefore, after
taking all considerations into account, it may be a good idea to run only a few end-to-
end tests (e.g., the sanity suite), and leave all the rest as integration tests. Obviously, the
smaller that the test scope gets, they do a lesser job of testing the integration between
the components, so you have to find the right balance between that risk, the speed of the
tests, their reliability, and their maintainability. But all in all, putting most of the weight
on integration tests is often a good balance, which makes it possible to run thousands of
tests in a few minutes. Again, Chapter 6 has much more details about the considerations
and options in that regard.
CHapTer 15 ConTInuouS InTegraTIon

367
Run Tests Only for Relevant ComponentsA good architecture is one in which different components (or micro-services for
that matter) have different and distinct responsibilities. If these responsibilities also
correlate to different business features, then it makes sense to write most of the tests
as component (or service) tests, and only use end-to-end tests to test a few cross-
feature related functionalities. Unlike typical integration tests, where the scope is
narrowed by skipping layers, these component tests may exercise all of the layers
(though not necessarily), but test and rely only on a single component that contains
all of the functionality of the feature at hand. These tests can use simulators or
mocks to mimic the interaction with other components, but these should be pretty
rare, as the integration between the components should typically be tested in a
higher scope.
If the architecture is indeed that modular and the modularity is aligned with
the business features, then it makes sense that most tests only need to exercise one
component, and only the fewer tests that need to verify cross-feature scenarios need
the bigger scopes. In this case it also makes sense to have different builds for each
component, each running only the tests that are relevant to that component. Because
the components are naturally mostly independent from each other, then the risk that
a change in one component will cause a problem in another is pretty low. This way if a
developer makes changes to one component, then he doesn’t have to care about all of
the tests, but rather only the tests of that component. Accordingly, the builds of each
component are also faster. The few tests for the cross-feature scenarios can then be run
at a separate build in the CI pipeline.
Today, with the growing trend toward a micro-service and modular architecture, this
becomes more and more prevalent. However, the fact that a system is composed from
multiple services does not guarantee that the services are indeed independent from
the perspective of business features. If most user stories (which should give real value
to a customer or end user) involve changing more than one service, then it’s probably
an indication that the services are not independent enough for that purpose. While this
sounds pretty logical and straightforward, in reality it’s hard to say that the architecture
of most systems actually allows most user stories to give value by changing only one
component or service.
CHapTer 15 ConTInuouS InTegraTIon
368
Optimizing Test PerformanceEven though optimizing the speed of the tests themselves (and their underlying
infrastructure) may sound like the first thing to consider, I wouldn’t recommend you
to put too much focus on that before considering the above approaches. In fact, in
the context of most software development nowadays, it’s considered a bad practice to
optimize every bit of performance while writing the code, because it often complicates
the development and testing, and eventually comes to the expense of maintainability.
Back in 1974, Donald Knuth, one of the founding fathers of computer sciences, referred
to this phenomenon as “premature optimization” and even stated that “premature
optimization is the root of all evil.”3 The recommended approach is to write the code in
the most readable and maintainable way first, and only after measuring and profiling
the performance, identify the bottlenecks and optimize them. Without profiling and
measurements, you’ll very likely be wasting a lot of time optimizing negligible things.
The same rule applies to test automation as well.
If after profiling the application you found a “guilty” piece of code that needs to be
optimized, you may need to compromise the structure and maintainability of the code in
order to fix it. However, in other cases, a reasoned decision can be made to compromise
isolation in order to improve the performance of all the tests. For example, if every test
opens the application anew and logs in, you may find that if you keep the application open
and the user logged in, and only returning to the main screen at the beginning of every
test, saves a lot of time. While you increase the risk for instability, you can consider some
remedies to overcome this risk. For example, in case of a test failure, or tests that perform
log out, reopen or log in to the application nevertheless. Reiterating the first point, consider
these options only as a last resort and after measuring the time it will save.
Covering a Broader MatrixOne of the biggest benefits of test automation is that it can be run on different
environments. For example, making sure that the application works correctly on various
operating systems and versions, various browsers, different types of databases, different
hardware, etc. These days, mobile applications often need to be tested on multiple
devices, where services like PerfectoMobile, Xamarin Test Cloud, SauceLabs, and others
play an important role.
3 http://pplab.snu.ac.kr/courses/adv_pl05/papers/p261-knuth.pdf
CHapTer 15 ConTInuouS InTegraTIon

369
A pure CI pipeline (without CD) typically runs the tests only on one configuration
that acts as a reference. As most of the code in the application shouldn’t be affected
by the type of OS, browser, etc., this is sufficient to give fast but valuable feedback to
developers whether they checked in something that broke an existing behavior. Having
one reference configuration makes it a lot easier to reproduce, debug, and analyze most
regressions caught by the CI process.
The rest of the matrix can be run after the CI has completed, as it will probably take
longer and/or be more expensive in terms of resources. It can even be running nightly or
even weekly only, if the rate of defects it detects is pretty low and the release cycle allows
it (e.g., in life-saving applications). Because most of the regressions and problems are
detected in the CI process, and the tests are stabilized using it, then problems occurring
at the broad matrix run are most probably limited to problems that are actually related
to the specific configuration where the test failed. This makes the investigation much
easier, and the overall process much easier to stabilize.
A mistake that many teams do is to run the entire matrix nightly without having a
reference configuration on which the tests are stabilized and defects are handled more
rigorously and more often. This makes it very hard to distinguish between unstable tests
and configuration-specific problems.
SummaryIn order for a test automation suite to be effective, we need to run it regularly and
as often as possible. Technically, creating the build process is pretty straightforward
using the most popular build tools, but the real challenge is how to use it properly. The
main reason that this is more challenging is that it requires many people to adopt new
processes and even a new mindset.
The common belief that such changes can happen only if it comes from
management is false. While it can be easier for a manager to lead these changes, it
doesn’t have to. Everyone with the right passion and just enough knowledge can lead
this change. The trick is to improve one thing at a time, demonstrating immediate value,
and to be persistent striving toward your goals.
In order to get the cooperation of developers, the main value that they need to get
from this is fast feedback for their changes. In order to be able to provide them with that
value, the tests should not take too long to run. A bunch of techniques and ideas were
provided in the chapter to help you optimize the length of the test run to fit well in the CI
process.
CHapTer 15 ConTInuouS InTegraTIon

371© Arnon Axelrod 2018 A. Axelrod, Complete Guide to Test Automation, https://doi.org/10.1007/978-1-4842-3832-5_16
CHAPTER 16
Acceptance Test Driven DevelopmentHaving a good CI/CD pipeline helps a lot in providing fast feedback to the development
team about regressions. This is an important part of being agile but is far from enough.
For a team to be agile, it needs to be able to respond to customer feedback quickly and
do so constantly for the entire life span of the product. In this chapter we’ll discuss the
Acceptance Test Driven Development (ATDD) methodology (which was introduced
briefly in Chapter 5) and see how it helps the team to be much more agile.
Note Kanban (one of the Agile methodologies) advocates the use of a metric called Lead Time. This metric measures the time it takes for a user story to advance from inception to realization (use in production). Minimizing this time is arguably the most desired outcome of agility, as it shortens the feedback cycle with the customers, but it should also be kept low over time. While this metric is mainly used in Kanban, shortening the feedback loop is an important goal of any Agile methodology. ATDD helps achieve that.
Overview on ATDDAs described in Chapter 5, ATDD, which is also known (arguably with some nuances) as
Behavior Driven Development (BDD) and Specification by Example (SbE) is a methodology
that complements Agile. In this methodology, for each user story, the team defines
together with the product owner the acceptance criteria in a form of few representing
scenarios. These scenarios are used both as documentation and as the basis of automated
tests. These tests can be implemented even before implementing the application code
to support that user story. When the application passes the newly developed acceptance

372
tests, as well as all existing tests, the user story can be considered done. Later in the chapter
we’ll describe the process much more deeply, but for now, that’s the gist of it.
Being More AgileBefore discussing what makes a team agile, let’s clarify the term “Technical Debt” as it’s a
key concept to understand for this discussion.
Technical DebtThe term Technical Debt, coined by Ward Cunningham in a short report he wrote in
1992,1 is a metaphor that describes the idea that taking shortcuts today, incur more work,
in the context of programming and software development, in the future. The further we
postpone fixing these shortcuts, the more work it becomes, similar to the interest that a
monetary debt gains.
Technical debt has no strict and universally accepted definition. In the paper
that Ward Cunningham wrote, he talks about the technical debt in the context of the
maintainability of the code. However, you can think of it more broadly like anything that
we postpone and takes more time and effort later. In that sense, writing code that is not
testable is also a technical debt, as it will take us more time to test, or even cost us more if
not tested properly and bugs are found in production.
But probably the most prevalent form of technical debt is bugs. The further we
postpone finding and fixing them, the more it costs to fix them.
What Makes a Team Agile?As mentioned above, for a team to be agile and minimize lead time, it needs to be able to
respond to customers’ and other stakeholders’ feedback quickly and do so continuously for
the entire life span of the product. For this to happen, a couple of conditions have to be met:
1. The team must avoid technical debt as much as possible. A team
that works on a new project may feel as they’re really agile because
they release features and respond to feedback quickly, but this
feeling is false if at the same time they incur a lot of technical debt.
1 http://c2.com/doc/oopsla92.html
ChApTer 16 ACCepTAnCe TesT Driven DevelopMenT

373
As time goes by, this technical debt slows them down and they can
no longer continue to be really agile anymore (even if they’re keep
following all of the “Agile” methodology ceremonies).
2. The entire team, and I mean here the entire team in the sense that
encompasses everyone that brings value to the company through
the developed product, starting from the salespeople, through the
product managers, developers, testers, operations and up to the
customer support, needs to be aligned and work collaboratively
toward the same business goals, which may change frequently.
Of course, that there’s much more to agility than ATDD, and in some cases a team
can be very agile and meet the above conditions without implementing ATDD, but as
you’ll see throughout this chapter, implementing ATDD correctly usually makes a big
difference in that sense.
“DOING” AGILE VS. BEING AGILE
The term “Agile” (with the capital ‘A’), is the family of methodologies that was influenced by
the Agile Manifesto and its 12 principles, with scrum being the most popular one, followed
by Kanban and eXtreme programming (Xp). Any methodology (not just Agile) provides a
set of guidelines for what and how things should be done. in recent years, the adoption of
the Agile methodologies was very rapid, and today most companies adopt at least some of
the guidelines of these methodologies. Unfortunately, often companies in our industry that
implement these methodologies, even those who try to implement one completely “by the
book,”, focus too much on the guidelines and practices and often miss the ideas and values
behind them. it’s often said that these companies are doing Agile but are not themselves agile.
Avoiding Technical DebtIn order for a team to stay agile for a very long time, they should avoid having technical
debt. This means that every new feature and every change should be deployed to
production and be treated equally to a major version, including all of the important
aspects of the release life cycle, leaving no open ends like testing, security, monitoring,
etc. for later.
ChApTer 16 ACCepTAnCe TesT Driven DevelopMenT

374
Of course, it’s impossible to develop every new complex feature in its entirety in a very
short cycle. The thing is that almost all complex features can be decomposed into many
smaller features, and the trick is to spit the complex features into these smaller ones in a way
that each of them still gives some value to the end user. For example, a report generator can
be a feature of a business application. However, instead of implementing the entire report
generator as one piece, it can be split to multiple user stories, each supporting only one type
of report or a more advanced way of customizing an existing one. As explained in Chapter
2, this is the concept of a user story. There are many techniques to split big features into
small user stories and is also something that requires a different mindset (and sometimes
creativity) than the common practice of writing a complete specification for an entire feature
as a whole. (You can think of it as dividing the development and the design “vertically” rather
than “horizontally.”) If you want to learn more about these techniques, I recommend the
book Fifty Quick Ideas to Improve Your User Stories2 by Gojko Adzic and David Evans (2014).
While decomposing features may look also like just another form of technical debt
(because we may release before we’ve completed the entire feature), as long as the
smaller user stories each have a value on their own, it’s not a technical debt because
whatever was developed remains completely useful at least to some users, even if the
plans have changed and the originally planned “big” feature will never be completed.
For our purposes, the main implications of avoiding technical debt are:
1. The code and the design must be kept clean continuously. We
can’t plan on having the time to clean it later.
2. There’s very little room for misunderstandings and
miscommunications about the requirement. Such
misunderstandings mean that work should be redone. Note that a
feature developed according to requirements may still turn out to
have a bad impact on the user, which may still require rework (in
the form of another user story), but at least we gained invaluable
knowledge and understanding about our actual customer needs.
3. New features should be delivered when they’re already tested and
as bug-free as possible.
These implications pose nontrivial challenges, but we’ll soon see how ATDD helps
us deal with them better.
2 Gojko Adzic and David Evans, Fifty Quick Ideas to Improve Your User Stories (Neuri Consulting LLP, 2014).
ChApTer 16 ACCepTAnCe TesT Driven DevelopMenT

375
The ProcessHere’s the high-level description of the process, followed by a detailed explanation of
each step:
1. The team, including the product owner, create and elaborate the
user story collaboratively, defining one or few scenarios as the
acceptance criteria for the user story.
2. Write a failing test for each scenario defined in the acceptance criteria.
3. Write the application code to make the new tests pass, and make
sure that all of the existing tests still pass too.
4. Deliver the application and get feedback.
Create and Elaborate the User StoryMany teams treat User Stories as mini features, which the product owner should specify in
a detailed manner, so the developers know exactly what to develop. However, I subscribe
to another school of thought, which claims that user stories should only convey a need,
while the solutions themselves and their elaborated specifications should be done
collaboratively by the (inclusive) development team. In the first chapter of Fifty Quick
Ideas to Improve Your User Stories, authors Gojko Adzic and David Evans put it this way:
“To make things crystal clear, if a team passively receives documents in a hand-over, […], that’s not really working with user stories. Organizations with such a process won’t get the full benefits of iterative delivery,”
and in the second chapter they state that
“[…] user stories are discussion reminders that have served their purpose after a conversation.”3
It’s a team responsibility, including and primarily of the product owner, to identify
the customer needs that once met, will bring the highest value to those customers (and
therefore will be willing to pay for respectively). This is also how the user stories should
be prioritized. These needs are typically formalized as user stories in the format:
As a [role]In order to [solve a problem, fulfill a need or provide more value]I want [the proposed solution]
3 Adzic and Evans, Fifty Quick Ideas to Improve Your User Stories.
ChApTer 16 ACCepTAnCe TesT Driven DevelopMenT

376
Or some variation of it. Gojko and David even go further to suggest that whoever
formalizes the user story (which is usually the product owner), should only specify the
“who” and the “why” (the first two sentences), because the proposed solution should
be the result of a team discussion. At most, the product owner should come up with a
suggested solution, but the final decision should be the team’s.
Coming Up with a Solution
When the need is understood and prioritized, the team should have a meeting
in which they suggest solutions collaboratively. It’s important to note that at this
context, the problem is how to satisfy the customer’s need, and not how to implement
an already specified behavior. Accordingly, the solution should only specify the behavior that affects the user, and not the technical and implementation details. The team should seek the most effective solution to the problem, which
can be delivered quickly, but at the same time provides the highest possible value
to the customer (by solving the main problem or need). Further improvements to
the solution can be split to other user stories that solve smaller problems that the
chosen solution didn’t address. However, these user stories should be weighted and
prioritized against all other user stories.
It is recommended that the participants in this conversation include all the
relevant people who are going to work on this user story, but if not feasible, at least
the product owner, one developer who’s going to actually implement the solution,
and either a tester or an automation developer. Each of these roles typically brings a
different angle to the table:
• The product owner, as the representative of the business or customer,
has the best understanding about the need of the customer and can
ultimately decide which solution brings the most value.
• The developer usually knows best what solution is the most feasible
and how costly a solution may be. He can think of the possible
designs for each proposed solution and estimate (even if very
roughly) how complicated they are, and how will they affect the
maintainability of the code going forward. Note that while this is not
a design meeting, different solutions can have implications on the
design that can have different effects on the delivery times as well as
on the long-term maintainability.
ChApTer 16 ACCepTAnCe TesT Driven DevelopMenT

377
• The tester or test automation developer should think how the
suggested solutions can be tested and how long it will take to test them.
In addition, testers tend to have a broader view of the product and can
often foresee potential problems and conflicts with other features that
both the developers and the product owner may be blind to.
Defining the Acceptance Criteria
Once the team reaches consensus about the chosen solution, they continue to
collaboratively define its acceptance criteria. This acceptance criteria can serve a few
purposes:
1. As the guidance to the developers about what they should
develop. In other words, it serves as a lightweight specification for
the user story.
2. As acceptance tests for the developed feature or changes (this is
where the name “Acceptance Test Driven Development” comes
from). Most of these acceptance tests can then be automated
(more on that later).
3. As a scenario for a demo that can be shown to customers and
stakeholders, and of course to the product owner.
4. As a documentation for the intended behavior of the developed
feature.
Defining the acceptance criteria collaboratively as examples of usage scenarios and
their expected outcomes have the following advantages:
1. It helps envision the solution from the eyes of the user, and how it
solves the problem at hand. Contrast this with how people often
talk about traditional specifications, where they tend to be caught
up on details and miss the big picture.
2. It ensures that everyone has a shared understanding of the solution.
When people talk, they happen to use generic and ambiguous
terms, making all sorts of assumptions that they believe to be
common to all participants, but are often not. However, when
talking about concrete examples and concrete expected outcomes,
these assumptions and ambiguities are often exposed.
ChApTer 16 ACCepTAnCe TesT Driven DevelopMenT

378
3. It helps to flush out issues with the suggested solution. Because
free text specifications, and even more so freestyle conversations,
are prone to ambiguities and presumptions, then even if everyone
understands the same thing, it could be that they all miss an
important detail or issue with the suggested solution. Here again,
writing down concrete examples helps flushing out these issues.
4. It bounds the scope of the solution. Every idea can be interpreted
and implemented in many ways, from the most minimal and even
“quick and dirty” ones, to the most comprehensive and even overly
complicated. Flushing the ambiguities and issues help draw the
bounds of the minimal viable solution. For example, if a user story
talks about the need for a text editor, one may imagine something
as simple as like Notepad, while another may envision a full-blown
word processor, like Word. The usage scenario implies what’s the
minimal solution that addresses the immediate need. Further
improvements should be extracted to additional user stories.
Some user stories are not about adding new functionality, but rather about changing
or removing existing ones. In such cases, we have to identify the existing scenarios (tests)
that need to be changed, and modify them accordingly, and also remove the unneeded
ones. These modified scenarios become the acceptance criteria of the user story, and we
should treat them as new tests for the rest of the process.
Writing the Automated TestsAt this point, the acceptance tests can be implemented as automatic tests. While writing
the acceptance criteria as usage examples helped flush most of the ambiguities and
vagueness, it can still have some of those, because they’re still written in a natural
language after all. Implementing the tests in code leaves much less room for ambiguity,
as all technical details affecting the test, and accordingly the user, should be defined in
order for the test to run. The process of implementing the code of the test can reveal any
last hidden issues and ambiguities.
If the team uses different types of automated tests (e.g., system, integration, and unit
tests), then they should first decide what’s the most appropriate type for each test. Once
it’s been decided, the appropriate test or tests should be developed. If different people
write the automated tests and the application code, then in fact the automated tests can
ChApTer 16 ACCepTAnCe TesT Driven DevelopMenT

379
be written in parallel to the application code and don’t need to come before. However,
they have to work closely together to flush out the details that will allow the test to
interact correctly with the SUT. Both developers should aim to agree about these details
as soon as possible to avoid unnecessary rework down the line.
If the same developer writes both the application code and the tests, or a pair (or
more) of developers writes both the tests and the code together (in a pair-programming
or mob-programming fashion; see sidebar), then it’s highly recommended that the
tests will be written first. This ensures that the SUT will be written in a way that ensures
testability and reveal any last-minute ambiguities.
If there’s more than one test, then the team can decide whether all of the tests
should be developed prior to start working on the application code, or if for each test
the necessary application code should be written before proceeding to write the next
test. Each of these approaches has their pros and cons, but in general the answer to
this question is highly contextual. Writing all of the tests first help flush all potential
issues, though writing the code can also reveal some limitations that will force to make
adjustments to the tests. In most cases the recommended way is to implement the code
for the simplest test and gradually proceed to the more complex ones. This gives us faster
feedback that we’re on track, and helps the developers evolve their design as needed. It
also prevents developers from developing unnecessary code and keep it simple.
It’s also possible to develop the skeleton for all of the tests first (as we did in Chapter
11), then develop the code to make the first one pass, then proceed to the next one until
all of the tests pass.
PAIR-PROGRAMMING AND MOB-PROGRAMMING
one of the more controversial concepts of the eXtreme-programming methodology, is that all
(or most) code, both of the application and of the tests, is written in pairs. one programmer is
“driving” the keyboard and mouse, and the other one looks over his shoulder and reviews his
work at real time, tracing errors, and suggests better ways to write the code. These two roles
should be switched from time to time. Also, it’s recommended that the partners of different
pairs will switch from time to time to foster better team collaboration and knowledge transfer.
The benefits of this approach are faster feedback and better and faster knowledge transfer
and alignment across the team. in fact, if a team attempts to have a mandatory code review
process, then they should seriously consider encouraging pair-programming. Most teams that i
met which attempt to enforce a code review process (without encouraging pair-programming)
either end up not really enforcing it, do it perfunctory, or really spending more time than it
ChApTer 16 ACCepTAnCe TesT Driven DevelopMenT
380
would take for the reviewer and reviewee to sit together and implement the whole thing
together. let alone that the knowledge transfer between them is much more valuable this way.
in addition, many people report that when they exercise pair-programming they’re much more
focused than working alone.
The main objection to this approach, of course, is that every feature costs almost double
to develop. in fact, most experts agree that pair-programming should be exercised when
appropriate and not as a mandatory practice. it’s most valuable when the skills of the two
partners complement each other, but when a task is too trivial or when the partners don’t get
along, then it’s probably not a good idea. Also, some people feel more comfortable doing pair-
programming, while some don’t.
An even more controversial idea takes this concept one step further and suggests that an
entire team should work collaboratively on all programming (and other) tasks. The idea is
pretty much the same as in pair-programming, with the advantage that all participants are
synchronized and participate in all decisions. As in pair-programming, there’s always one
“driver” (which switches routinely), and the others review and make suggestions at real
time. Unlike in pair-programming though, the reviewers can also use their laptops to look for
alternative solutions or to search for existing pieces of code that can be reused, making the
collaboration more effective. samuel Fare wrote a very nice blog post about it.4
Implementing Tests for a Nonexisting Feature
When some people first hear about the idea of writing the tests before the application
code, they’re often left puzzled, not understanding how it’s even possible to test
something that doesn’t exist. Well, obviously the test should fail if it’s supposed to verify
functionality that wasn’t implemented yet. In the case of writing unit tests first (which is
the classic TDD), the code wouldn’t even compile. In the case of UI automation or API
testing, there shouldn’t be any problem to write the test code to compile, but it will fail
at runtime. But I think that what really puzzles those people is the question: How can
I write the test if I don’t have all of the technical details that I need for it? The answer
is that, instead of deciding about these details when you (or someone else) writes the
application code and adapts the test to match these details, you do the opposite: you
decide (together with the application developer) about these details when you write the
test code, and then he writes the application code to match these details.
4 https://medium.com/comparethemarket/i-did-mob-programming-every-day-for-5-months-heres-what-i-learnt-b586fb8b67c
ChApTer 16 ACCepTAnCe TesT Driven DevelopMenT

381
As a simple example, suppose we’re about to develop a user story for adding a button
to calculate the square root of a number, in an online calculator application. One may
think that we can’t write the test before the code because need to know the id of the new
button, as well as the result of the calculation. Regarding the id, the answer is that you
can decide what the id should be when you write the test, and coordinate it with the
application developer, so he’d use the same id when he creates the button. Regarding the
expected result, first, it should be defined as part of the acceptance criteria. For example,
you should know in advance that the square root of 16 should be 4. But the question gets a
little more complicated when we want to test the result of the square root of 2, because now
we need to discuss precision and maybe rounding issues. If these questions are important
from a business perspective and were not addressed in the acceptance criteria, then we
must involve the product owner and possibly the rest of the team to decide what should
be the exact expected result and write both the test and the application code to follow the
decision. In case it doesn’t have an important business impact, we’re likely use whatever
the standard library of the programming frameworks provides (e.g., the .Net framework’s
Math.Sqrt function). In this case it’s indeed hard to know the exact result in advance (in
this simple example it is, but if the calculation is a bit more complex, then we may not).
So, either we write the test to allow for a marginal precision error, or we write the test with
an arbitrary precision, which will fail even after the application code is implemented
correctly, and then we’ll fix the test to match the exact number after you verified that it’s
indeed correct. This approach shouldn’t be the default, but as long as it’s done sensibly
(only the exact value is fixed in this case), then it’s still OK. Note that in this example, the
approach of tolerating a marginal error is preferred, because the test would be more robust
and less prone to failures due to minor implementation details.
Another challenge we might have is when the scenario has more than one step that
can’t work until the application code is complete. The problem is that we can’t verify the
correctness of the test until the application is ready, because the test will always fail on
the first incomplete step, and we won’t be able to exercise the rest of the steps that we’ve
implemented in the test code. There are a few ways to overcome this challenge:
1. Work closely with the application developer and plan the work
such that the first step should work first, and only then continue to
the next one, and so forth, until the whole test passes.
2. Work closely with the application developer, but instead of planning
to implement the first step completely, only implement a stub that
will allow the test to continue and fail on the final assertion.
ChApTer 16 ACCepTAnCe TesT Driven DevelopMenT

382
3. Use the debugger to jump over methods that are not working yet,
or comment out these lines temporarily, in order to get to the later
steps of the test.
Sometimes the first approach flows very naturally, but on others it’s not feasible
or can complicate the development of the feature too much. The third approach is
something that the automation developer can do for the sake of feeling confident about
his changes, but it’s not a good systematic approach for the problem. It’s also risky in
the sense that you may forget to uncomment the lines and keep the test passing without
really doing whatever it should do. Therefore, in general, if the first approach doesn’t fit,
then the second approach is the most recommended one. There are two common use
cases for the second approach that is worth mentioning specifically:
1. For UI applications and UI automation (including web UI and
Selenium), a preliminary, nonfunctioning UI can be created
first. Even though it shouldn’t be functioning at this stage, the
ids (or other identifying attributes) at least for the elements
that the test should use, should still be defined. This allows the
automation developer to write and run the test code, while the
developer can start implementing the functionality that makes
the test pass. Creating a preliminary UI first also makes the idea
of the final solution more tangible. The final style of the UI can be
polished later on, as long as the Ids and the functionality remain
unchanged.
2. For REST or SOAP services, or any other message exchange format
for that matter, the exact structure of the messages should be
defined first. This allows both the automation and the application
developers to start working on their code. Moreover, creating the
service to accept any message and respond with a predefined
message that satisfies the test needs, except of the final assert, lets
the automation developer proceed with the implementation of
the test without having to wait for the full implementation from
the application side. The application developer can then proceed
developing the functionality of the service, including validating
the request and building the response according to the actual
functionality. When the developer completed his work, the test
should pass.
ChApTer 16 ACCepTAnCe TesT Driven DevelopMenT

383
Implementing the Code to Make the Test Pass
Note As this topic is oriented more toward application developers, i use second person (you) to refer to the application developer.
Once the acceptance criteria are implemented as one or more automated tests,
your job as a programmer is very straightforward and clear. No more vague and
ambiguous requirements. The scope of the task is crystal clear: make the new tests
pass, and don’t fail existing tests. If the project is developed with ATDD from its start,
or you reached a high-enough coverage of functional tests, then it really should be
that easy. If the test coverage is not that high, then in addition to “make the new tests
pass, and don’t fail existing tests,” you must try not to break anything that works, even
though you don’t have tests for them.
Obviously, because tests are always only specific examples, and not the rule itself,
one may take my advice too far and make all the tests pass by returning the specific
values expected in the tests. Clearly you shouldn’t do that. Actually, even if you do, you’d
“get caught for bluffing” in the next step in the process. However, you should really be
focused on the scenarios defined in the acceptance criteria, and don’t try to address
all sorts of nontrivial edge cases. If you identify such edge cases that are not trivial to
handle, communicate them with the product owner and relevant team members, but as
long as it doesn’t invalidate the original solution, the simplest solution should be used
for now, and the solution that addresses these rare cases should be added to the product
backlog to be handled as an additional user story.
For other edge cases that are fairly trivial, even if they were not covered specifically in
acceptance tests, handle them appropriately. However, these cases can usually be covered
by unit tests, so it’s recommended that you write unit tests for them, so that this behavior
will also be covered and documented (in the form of unit tests). This will help you ensure
that you really didn’t break anything if you do a major refactoring or rewrite of the code.
Refactoring the Code as Needed
If you have coverage of acceptance tests for each user story from the beginning of the
project, then you are really free to modify the structure of the code however you like.
The tests give you a very robust safety net on which you can rely on, making all sorts of
experiments and changes. The adage “if it ain’t broke, don’t fix it” is no longer relevant!
ChApTer 16 ACCepTAnCe TesT Driven DevelopMenT

384
You can and should improve anything that you don’t like in the way the code is written,
as long as you make sure that all the tests pass. Moreover, because Agile allows and
even encourages clients to change the requirements every so often, yesterday’s design
assumptions may no longer be valid today, so the design has to change to accommodate
for these changes in requirements.
If you’re starting with ATDD on a brownfield project, then refactoring may not
come as easy, because you don’t have that safety net of full acceptance test coverage
(and nearly full code coverage). Later in this chapter I’ll explain how to mitigate this
challenge.
You should always strive to make the refactoring in small steps, where after each
such step you can run the tests and make sure that everything that worked before
continues to work (i.e., all the tests except of the acceptance test of the new user story,
in case you haven’t finished it yet). It takes some practice, planning, and mind shifting
to do a major refactoring this way instead of rewriting big portions of code at once. But
doing so reduces the risk of getting into a “rabbit hole” of changes that can take you a
few days or even weeks to get out of, and get the code to work correctly again. I usually
start by adding a // TODO: comment with the intention of my refactoring, and then
plan how to do it in small steps. While the refactoring is not complete, I may create
temporary duplications and detours in the code in order to keep the code working (and
passing the tests), but I also add comments near these duplications and detours, so if
I have to jump to another task and in the future either me or someone else looks at it,
he can understand why this duplications and detours exists and how to continue the
refactoring. When I complete the refactoring, hopefully before I check in the changes,
I should be able to safely remove all of these duplications and detours along with their
corresponding comments. At this point, the code should look like what I intended,
which should be shorter and cleaner. Obviously, I should make sure that all of the tests
continue to pass.
It’s important to note that you should avoid starting a refactoring journey while
your code is not compiling or some tests are temporarily broken. First bring your code
to compile and these tests to pass, and only then start the refactoring. Often the best
timing to start refactoring is either before or after (or simply – in between) working on
implementing a user story. Though sometimes you notice the need for the refactoring
while in the works, and implementing the user story without the refactoring will take
longer.
ChApTer 16 ACCepTAnCe TesT Driven DevelopMenT

385
Identifying Conflicting Requirements
Given that the tests are fast enough, whenever your code compiles and you expect the
existing tests to pass, run them (if they’re too slow, consider running only a relevant
subset as often as you can). If you expect them to pass and they don’t, it could be due to
one of the following reasons:
1. You introduced a bug. Given that you expected the test to pass,
it means that your implementation (or design) is incorrect. In
this case, you should fix the bug (fixing the design if necessary),
and you’d better do that right on, even before completing
implementing the new user story. Anyway, as long as you
can think of a way to fix the bug, then you should do it before
considering the user story “done.” This is in fact where the value of
test automation really shines – you prevent the bugs from creeping
in, even before you checked in any code. If you can’t think of a way
to implement the new user story without introducing a regression
in another functionality that was previously working, then it
probably means that the new requested functionality conflicts the
existing one, and it’s not a mere implementation bug, but rather a
problem with the solution that was chosen for the user story.
2. You changed some technical details that the automated tests rely
on. For example, you removed a class name that your Selenium
tests relies on, from an HTML element. In this case you should
fix the test code to make it pass. Note that if the code of the
tests is well structured, then the changes should not be in the
test methods per se, but only in the infrastructure code. If a test
method should be changed, it might mean that the scenario itself,
as accepted between the product owner and the team when it was
written, is changed, and this means that it’s no longer a technical
detail. If you think that these changes are indeed technical
details, but they still require you to change test methods, then
it’s probably an indication that the test methods are lacking an
abstraction and should be refactored. Just make sure that you
don’t change the meaning of the tested scenarios (consider asking
someone for a review on that to make sure).
ChApTer 16 ACCepTAnCe TesT Driven DevelopMenT

386
3. The current user story conflicts with some previous requested
behavior. In large and complex projects, sometimes different
requirements may conflict each other, without anyone noticing
it, until some user who expects and relies on the old functionality
complains. In even worse cases, like in a consumer facing
websites, the affected users may simply move to a competitor’s
website without even complaining… One of the big strengths of
ATDD and BDD is that they allow you to detect these conflicts
very soon. When you detect such a conflict, you should involve
the product owner and the team immediately in order to find a
solution that can satisfy both the old requirement and the new
one. If business metrics (or even estimations) shows that the
old functionality is not worth maintaining, then the broken test,
as well as the code of the obsolete feature can be removed, and
you can continue to develop the new user story as planned. But
otherwise, either the acceptance criteria for the new user story
has to change, the existing test and its tested functionality have to
change, or in some extreme cases the new user story even has to
be completely cancelled.
Deliver the Application and Get FeedbackOnce the new acceptance tests, as well as all existing tests, pass, the user story can be
considered “done.” But this doesn’t mean yet that everything is perfect and there are no
additional hidden bugs. Even if no bugs can be found, we still don’t know if the solution
we’ve implemented is usable and actually solves the actual problem that the user story
was supposed to solve. In order to find that out, we need to put the software in the hands
of people that can provide feedback.
In projects that implement continuous deployment, having the changes checked
in and passing all the tests implies that the functionality is automatically delivered at
least to some portion of the users. It’s usually preferred that these users are first internal
people or beta testers that are expected to provide more constructive feedback in case
of problems. But even without that, actual usage and logging information should be
measured and monitored to find out if the users actually use the new functionality and
whether they experience problems with it.
ChApTer 16 ACCepTAnCe TesT Driven DevelopMenT

387
In more conservative projects (mainly in conservative and critical industries like
medical and avionics), with longer release cycles, the new functionality should first be
exposed to people internal to the project, like manual testers, but also to the product
owner and other domain experts. These people should try to use the new functionality
and provide feedback to the development team. Small bugs can be reported directly to
the developers, which can fix them immediately. More complex usability or business
issues, including edge cases that were not covered by the original user story, should go
through the product owner first for prioritization. Issues that require more time and
planning, and do not pose a threat on the value of the user story, should be added to the
product backlog as new user stories.
As the main scenarios were already tested automatically as part of the acceptance
criteria of the user story, the chance for finding critical bugs by manual exploratory testing
is much lower, and even if one is found, chances are it should be easy to fix. In addition,
for UI-related changes, because automatic tests cannot actually measure usability, it’s
advisable that a manual tester, or even the product owner have a look and see that the look
and feel is acceptable and there are no usability bugs (like, for example, unreadable font
size or color, truncated texts, etc.). If there are regression tests that don’t lend themselves
to automation, then they should be run by the tester if these tests are relevant for the user
story. Other than that, the manual tester should mainly perform exploratory tests, to try
and find out potential issues that didn’t emerge in the elaboration phase of the user story.
Again, small bugs can be fixed immediately, and more complex ones should usually be
treated as separate user stories as long as they don’t threaten the value of the user story.
If a demo meeting is customary at the end of each sprint, the same acceptance
scenarios can be used for the demo. The demo meeting is also a great place to get
feedback from stakeholders, and it’s ok to try out new scenarios together with the
stakeholders in order to explore the edges of the solution, and identify additional needs
and ideas for improvements that should be added to the product backlog in the form of
new user stories.
Using the Acceptance Tests as DocumentationIf the textual description of the acceptance tests is kept and somehow linked to the
automated tests, then these descriptions can be used as documentation for the
functionality (or behavior) of the system. What’s special about this documentation
is that it’s always up to date! For this reason, it’s often called “living documentation.”
ChApTer 16 ACCepTAnCe TesT Driven DevelopMenT

388
Whenever an existing functionality is changed, either it is done consciously as part of
the elaboration of a new user story, in which case the description of the test should
have been changed to reflect this change of functionality; or it should be revealed
unintentionally when the developer runs the test, as described above (under the
“Identifying Conflicting Requirements” topic). As mentioned, the team then decides
together with the product owner about the expected change, and the description of the
test should be updated accordingly.
While small inaccuracies may still creep in the descriptions of the tests, all
in all it’s much easier to keep these descriptions up to date than it is for a formal
documentation document. While scenarios are very valuable as examples in the context
of documentation, it’s not always enough, so obviously it’s recommended to combine,
and bind them with more traditional documentation, mainly if this documentation is
also valuable for customers.
Binding Steps Rather Than TestsBinding the textual descriptions of the acceptance scenarios to the automated tests is
very valuable by itself, but there’s still a little room for vagueness and inconsistencies
between the descriptions and the tests. In order to minimize these vagueness and
inconsistencies even further, some tools make it possible to bind sentences to test steps.
The most popular tools in this category are those that use the Gherkin syntax, like
Cucumber and SpecFlow. There are other tools like the Robot Framework that use a freer
style language, but the idea is pretty much the same. When you write tests using these
tools, instead of writing test methods in which the entire test is implemented, the tests
themselves are written as sentences in a special text file, with minimal syntactic rules,
and each sentence is bound to a method that implements this particular step. A step
can be reused by multiple tests, helping to minimize the code and reduce duplication.
In addition, a step method can be bound to multiple sentences to allow for different
formulations of the sentence in different contexts. The step methods are typically
bound to the sentences using Attributes (in C#) or Annotations (in Java), containing
the sentence string or a regular expression that the sentence should match. A regular
expression is especially useful for methods that accept parameters. Each parameter
should be matched by a group in the regular expression, which makes these methods
more generic and allows better reuse.
ChApTer 16 ACCepTAnCe TesT Driven DevelopMenT

389
The Gherkin Syntax
In Cucumber, and its port to other languages (including SpecFlow, which is its .Net
version), you compose the tests and the sentences that describe their steps, in files with
.feature extension. While these files contain text in natural language, they still have a
well-defined structure and few keywords. This structure is described by the Gherkin
syntax.5
Each feature file in Gherkin language starts with the Feature: keyword, followed
by a free text description of the feature, which can span multiple lines (all lines except
the first one should be indented). In addition, each feature file can contain multiple
scenarios. Each scenario is denoted by the Scenario: keyword, followed by the title of
the scenario on the same line. The following lines (which should be indented) should
all start with one of these keywords: Given, When, Then, And. and But, each followed by a
plain text sentence that describes the step. As far as Cucumber is concerned, all of these
five keywords are pretty much the same, but the idea is to use them to structure the test
in three main parts:
• Given – describes the preconditions for the scenario, or what should
be done in order to bring the system to the desired state before
invoking the operation we want to test.
• When – describes the operation that we want to test.
• Then – describes the expected result.
The And and the But keywords are used as conjunctions and semantically continue
the meaning of the previous sentence. Technically though, all of the five keywords can
come in any order; however, the order of the sentences in the scenarios determines the
order of the steps in the execution of the test. The Gherkin language has some more to it,
but that’s the main idea. Listing 16-1 shows an example of a feature file.
Listing 16-1. Example of a Gherkin feature file
Feature: ATM
As a bank manager,
In order to increase my income from commissions
I want to allow my customers to withdraw cash from ATMs
5 For a full documentation of the Gherkin syntax, go to https://docs.cucumber.io/gherkin/
ChApTer 16 ACCepTAnCe TesT Driven DevelopMenT

390
Scenario: Cash withdrawal charges commission
Given the commission is $1
When I withdraw $50
Then the charged commission should be $1
In order to bind the first sentence to a method, the method should have a signature
and an attribute as shown in Listing 16-2.
Listing 16-2. Method template for the first sentence
[Given(@"the commission is \$(.*)")]
public void GivenTheCommissionIs(decimal commission)
{
/* implement here the code that sets the commission to the given value */
}
Similar methods should be created for the other sentences in order for the test to run
successfully.
The Trade-Offs Between Reusability, Granularity, and ReadabilityBinding steps instead of tests to their textual descriptions helps to ensure that the test
indeed performs the described steps. However, there can still be a gap between the
description of an individual step and its implementation (i.e., the textual representation
of a step can say one thing, but the implementation of its bound method does another
thing). In fact, even when the test is written completely in code, we can have similar
problems, where the name of a method doesn’t necessarily match what it actually does
(in good, clean code this shouldn’t happen, but in reality it might). So, if we want to take
it to the extreme, that is, write the test method in a way that leaves as little ambiguity as
possible, then we must describe every little detail specifically in the test method itself.
But this of course limits its reusability and even its readability.
By contrast, if we want our tests to be as readable as possible, then we might want
to formulate similar sentences a bit differently according to its context in the overall
sentence (looking at the entire scenario as one long sentence here). As mentioned above,
it is possible to bind more than one sentence to a step method, so technically this can be
ChApTer 16 ACCepTAnCe TesT Driven DevelopMenT

391
done without hurting reusability. However, without looking at the code, one cannot be
sure that the two formulations are actually bound to the same operation, which makes
more room for ambiguity.
On yet another hand, if you want to emphasize reusability (in the sense of the
sentences themselves, not only the code), and to avoid ambiguity, then the sentences
may sound awkward at times and therefore less readable.
Bottom line: there’s no one right answer, but usually if you don’t try to maximize any
of these traits too extremely, and simply use the Gherkin language naturally, you’d be
fine most of the time. Just be aware that occasionally you’ll have to make these trade-
offs. Having said that, in my opinion, while associating complete scenario descriptions
to test methods rather than binding sentences to step methods leave some more room
for ambiguity, it also has a slight advantage in terms of maintainability. To do this, the
test descriptions can reside in a test management system, like TFS, MicroFocus Quality
Center, and alike, and their IDs can be specified at the test method level using an
attribute or an annotation. I usually tend toward the later approach, but it’s definitely not
clear-cut.
Introducing ATDD in an Existing ProjectBecause ATDD is not a trivial mind shift, as well as a cultural shift, and because its value
in existing projects is somewhat lower than in greenfield projects (due to the lower code
coverage), it’s often not a very easy sell. Here are a few tips that can help you introduce
this idea to your team (in addition to the more general tips from Chapter 15 about
changing the culture and incorporating better usage of test automation in the team,
which are mostly relevant here too).
Start Without Automated TestsEven if you don’t have any automated tests in place yet whatsoever, you can start making
use of the practice of defining the acceptance criteria as a team. At first (and maybe for a
long period of time), you won’t have automatic tests out of it, but the manual regression
tests will be more valuable as they’ll be testing the value that the use stories should provide
to the customers or to the business. Doing only that practice have other benefits too:
• It ensures that the testers are involved at an early stage and can have
a real impact about the solution and its quality.
ChApTer 16 ACCepTAnCe TesT Driven DevelopMenT

392
• It improves the communication between developers, testers, and
the product owner and promotes a shared understanding of the
requirements and the scope of the user stories. It even fosters an
attitude of shared ownership and responsibility.
• It leads the team to think about testability before implementing. This
makes it possible to test more scenarios easier, even if only manually
at first. The need to describe the acceptance criteria unambiguously
also drives building simulators for manual testing, which later may be
used also by the test automation.
Implementing the Automation RetrospectivelyContinuing the previous course, if you do have test automation in the project, but it’s not
yet mature and stable enough to be used in CI, then you may still need to implement the
automatic tests in retrospect and allow user stories to be marked as “done” before having
automated tests for them. However, implementing the automation no later than the next
sprint (iteration) can be a significant step forward. This is especially relevant when the
test automation is developed by a separate and independent team.
The benefits mentioned above for manual tests apply also to the automated tests
written in retrospect. When the automation developers will come to implement the
tests for a functionality that was defined with clear acceptance criteria, they’ll be able
to use the same acceptance criteria as the scenarios for their tests. Because the team
should have already thought about testability when they defined the acceptance criteria,
it should make these scenarios better suited for automation than scenarios that were
designed without testability in mind.
One step further down that path could be to involve one member of the test automation
team (preferably a senior) in the elaboration meetings. Not only it will allow the automation
team to prepare for the changes in advance, but it will also give a chance for that member to
provide further inputs about the testability and the clarity of the expected results.
From this state to fully implementing the ATDD process, it should be mainly a matter
of following the advice I gave in the previous chapter about stabilizing the tests and
transitioning the responsibility for them more toward the developers. Once the tests are
stable and fast, and an automation developer participates in the elaboration meetings,
nothing should stop the automation developer from implementing the tests for the new
user stories immediately and not wait for the next sprint.
ChApTer 16 ACCepTAnCe TesT Driven DevelopMenT

393
Start from Bug FixesA different approach, which developers often engage with more easily, is to start by
writing tests for bugs before fixing them. While it’s a different direction than the previous
approach, it doesn’t contradict it, and you can definitely apply them both concurrently.
However, this approach works best if there’s already an infrastructure for test automation
in place, and at least few stable tests that run CI or nightly.
Defining tests for scenarios that weren’t implemented yet is a big mind shift. But with
bugs, the expected behavior should already be specified in the bug description or at least
be commonly known. For that reason, I find that many developers are able to adopt it
somewhat more easily.
The idea is to enforce developers to write automated tests that reproduce each bug
before fixing it. (Unlike most of my advice, in this case, mainly in large organizations,
it may have to be enforced by managers at the beginning, because the benefits for the
developers may not be immediately obvious.) The test should first fail because of the
bug and the developer should be able to see that the failure matches the actual result
in the bug report. After he investigates and fixes the bug, he can use the test to ensure
that it now passes, which means that he fixed the bug correctly. In addition, while the
developer debugs and investigates the bug, he can use the automated test to do it more
quickly. When the bug is fixed and the test passes, the developer should check in the
test code together with the bug fix, and the new test should be added to the CI or nightly
build.
Over time, the developers should feel more comfortable writing and relying on
the test automation, which puts the team in a better position to adopt the ATDD
methodology completely.
Enriching Regression CoverageBecause the benefits of ATDD are smaller on a brownfield project with little or no
coverage to support safe refactoring, we should consider how to enrich the coverage of
regression scenarios to reduce this deficiency.
On large, monolithic projects, reaching high coverage may not be feasible in a timely
manner. The strategy to overcome it is to create “islands” of high coverage. In these
islands, refactoring could be done more safely than outside of them. It’s recommended
to plan and prioritize to cover these islands according to the needs for refactoring. These
islands can be aligned to a structural component (class, DLL, etc.) or to a business
ChApTer 16 ACCepTAnCe TesT Driven DevelopMenT

394
feature, which may span multiple components. Ideally, the structural components
and the business features themselves should be aligned, but unfortunately with legacy
monolithic projects it’s rarely the case, and you’ll have to assess how these islands
should look like so they’ll reduce most of the risk involved in refactoring.
Another way to enrich the coverage in a somewhat less planned manner, but which
generally provides good value, is to plan where to enrich the coverage as part of each
user story. In other words, in addition to defining the scenarios for the acceptance
criteria for a user story, the team decides how to enrich the coverage of existing
functionality around the area of the change as to reduce the risk of breaking anything.
SummaryTo me, the highest value of test automation is reached when the automated tests are
used to cover the scenarios that bring business value and improve collaboration and
agility by reducing the lead time and keeping it low over time. One of the important
enablers for agility is refactoring, which requires high test coverage in order to be done
safely. ATDD (which as mentioned above, is basically the same as BDD, Specification by
Example, and other related names), provides the methodological framework to provide
these values.
The main challenge with this methodology is that it requires a significant mind shift
and a cultural change. Hopefully this and the previous chapters gave you some tools to
meet this challenge.
ChApTer 16 ACCepTAnCe TesT Driven DevelopMenT

395© Arnon Axelrod 2018 A. Axelrod, Complete Guide to Test Automation, https://doi.org/10.1007/978-1-4842-3832-5_17
CHAPTER 17
Unit Tests and TDDWhile both acceptance-test-driven development (ATDD) and test-driven development
(TDD) are methodologies that advocate writing the tests before the code, ATDD (or BDD)
is usually considered to lend itself better to bigger test scopes and to scenarios that describe
how the users use the system, while TDD is considered to lend itself more specifically to unit
tests, which uses the smallest test scope (of a single class or even a method), and therefore
tests more technical details. For that reason, unit tests and TDD are considered practices that
are done directly by the same developer that implements the code under test (CUT1). While
toward the end of this chapter we’ll question the distinction between TDD and ATDD, we
first need to understand more about unit tests and TDD in general.
Learning Unit Tests and TDDWhile almost everyone agrees that developers should write unit tests for the code they
write, during my career I saw many more developers avoiding or struggling with it than
those who do it properly, let alone doing it the TDD way. Even among those who write
unit tests or even do TDD, there are often strong debates around the most effective
way to do it. An excellent example for such a debate is the series of video recorded
conversations titled “Is TDD Dead?”2 on Martin Fowler’s blog. So, let’s face it: the reason
that people struggle with it means that it’s not an easy thing to master. There are many
excellent books on unit testing and TDD, but even these are not enough. A lot of real-
world practice and experience but also continuous learning (controlled practice like
katas, reading blogs, watching screencasts, attending workshops, and conferences,
etc.) are required in order to master it, and probably the journey never ends. Speaking
1 CUT can either mean “code under test” or “class under test.” I use this acronym interchangeably whenever the difference is not important or the meaning is clear from the context. Otherwise I’ll use the explicit term.
2 https://martinfowler.com/articles/is-tdd-dead/

396
for myself, it took me several years from the first time I heard about TDD and tried to
apply it, until I really felt that I got it. Even since then I keep learning and improving this
skill. In fact, my perspective about unit tests and TDD and how it relates to other test
automation as well as to some coding practices have changed many times along the way,
and probably will continue to change.
KATAS
Kata is a Japanese word, borrowed from the martial arts domain, which means choreographed
patterns of movements that one does as a practice in order to improve their skills in the
martial art. In the context of software, these are exercises that programmers can practice
in order to improve their programming skills. The goal of a kata is not just to implement
something that works, but also to emphasize different aspects and practices of how you write
the code. For example, a kata can be something like developing the calculation engine for the
score of a bowling game but emphasize aspects like TDD, functional programming, avoiding
‘if’ statements, and even things like avoiding using the mouse. Some people do the same kata
over and over again to improve their skills. You can find many Katas on the web.
Note that learning the technical details required to write unit tests is very easy and
straightforward. Even learning the concept of TDD is very easy. But the hard thing is to
apply these techniques in the real world. I like to compare learning TDD with learning to
play the piano. You can learn pretty quickly how to read notes and play each of them on
the piano including flats and sharps. You may also master all of the special symbols and
can play staccato, legato, forte, piano, and even use the sustain pedal. But knowing all of
these details doesn’t even bring you close to be able to play Chopin’s music, let alone call
yourself a pianist. For this you need to practice, practice, and practice some more. The
same goes for TDD. Therefore, in this chapter I’ll only teach you how to “read the notes”
but also talk about the “challenges of playing the piano for real” and the role of the piano
(i.e., unit tests) in the symphony called “Software development.”
The Mechanics of Writing a Unit TestLet’s start by describing the mechanics of the unit test framework, and then we’ll learn
how to use it to write unit test, but in a technical fashion at first.
ChapTer 17 UnIT TeSTS anD TDD

397
Unit Test Framework MechanicsWe already used a unit test framework (MSTest) when we created the test project in
Chapter 11. The unit test framework is actually a very simple technology but is still very
useful.3 There are many unit testing frameworks for many languages and runtimes,
like NUnit and xUnit.Net for the .Net Framework, JUnit and TestNg for Java, PyTest for
Python, etc., but the basics of all of them are pretty much the same.
While in a regular console application, you have only one method as an entry
point, which is the “Main” method that is called when the program starts, a unit testing
project lets you create as many entry point methods as you like and invoke any of them
separately, all of them sequentially, or any subset of them at your will. The idea is that
each unit test has its own entry point. As we saw in Chapter 11, in MSTest you create
such a method by decorating it with the [TestMethod] attribute. Other frameworks have
different ways to denote a test method, but the idea is similar. This allows the framework
to discover the test methods in the project in order to list them, so you can choose which
ones to run, and then to run them. MSTest also requires that we decorate each class that
contains test methods with a [TestClass] attribute, to let it know whether to look for test
methods in it or not. Note that some other frameworks don’t have a similar requirement.
When Visual Studio runs the tests, it also shows a pass/failed status for each of them
at the Test Explorer pane. The way it determines whether the test passed or failed is very
simple: if the test completed without throwing an exception it passes; otherwise (if it did
throw an exception), then it fails. This means that an empty test method always passes.
Asserts
Because tests should verify some outputs of the SUT (or CUT) against some expected
result, it means that every test method should contain at least one statement similar to
this: if (expected != actual) throw new Exception("...");
In order to make this repetitive code a bit more elegant and signify the special intent
of these lines in the test, MSTest, as well as most common unit testing frameworks,
provide the Assert class, which we already used in Chapter 11 as well.
The Assert class in MSTest, as well as most of its cousins at the other frameworks,
also provides methods for directly failing the test (Assert.Fail), for failing the test if a
condition is expected to be false but it isn’t (Assert.IsFalse) or expected to be null,
3 As Martin Fowler said about the JUnit framework: “Never in the field of software development was so much owed by so many to so few lines of code.”
ChapTer 17 UnIT TeSTS anD TDD

398
(Assert.IsNull) and a few other similar methods. MSTest also provides more specialized
assert classes for strings (StringAssert) and collections (CollectionAssert). There
are also third-party assertion libraries for different frameworks that provide additional
assertion methods often using a fluent and extensible API.
Test Execution Life Cycle
Having multiple entry points (test methods) in the same project or even in the same
class allows us to share code easily between these methods. However, because often
multiple tests need to perform the same initialization sequence, it would be helpful if
we would also have a way to eliminate the code duplication of invoking this sequence
from each test method (even if you put all of the initialization sequence in one shared
method, you’d still need to call it from each test). In addition, there could be cases where
we’d want to initialize something only once, regardless of whether you run only a single
test, multiple tests, or all of the tests in the project. The same goes for cleanup (AKA tear-
down) code – both per test and per execution.
Fortunately, all of the standard testing frameworks let us do these things, and in
pretty similar manners. In an MSTest project we can decorate a method in a test class
with the [TestInitialize] attribute to tell the framework to run it before each test
method in that class, and with [TestCleanup] to tell it to run after each test method. In
addition, we can use the [ClassInitialize] and [ClassCleanup] attributes to tell the
framework to run these methods once before and after all test methods in that class, and
[AssemblyInitialize] and [AssemblyCleanup] to run once before and after all of the
methods in the entire project (.Net Assembly).
Note The various cleanup methods are invoked regardless of whether the tests passed or failed. In most cases this is desirable, but it also entails some nontrivial cases. appendix B describes a mechanism that you can build to overcome most of these cases, and appendix C describes the Test automation essentials utilities library that I developed for .net that already includes an implementation for this mechanism.
To summarize the execution order of these methods, let’s suppose we have three test
classes: ClassA, ClassB, and ClassC with test methods A1, A2, and A3 in ClassA; B1, B2,
and B3 in ClassB; and C1 and C2 in ClassC; and we choose to run only tests A1, A2, A3,
and B1. The execution order will be as follows:
ChapTer 17 UnIT TeSTS anD TDD

399
AssemblyInitialize
ClassA.ClassInitialize
ClassA.TestInitialize
ClassA.A1
ClassA.TestCleanup
ClassA.TestInitialize
ClassA.A2
ClassA.TestCleanup
ClassA.TestInitialize
ClassA.A3
ClassA.TestCleanup
ClassA.ClassCleanup*
ClassB.ClassInitialize
ClassB.TestInitialize
ClassB.B1
ClassB.TestCleanup
ClassB.ClassCleanup*
AssemblyCleanup
Notes:
1. In MSTest, the ClassCleanup methods are not guaranteed to run
exactly in this order, but rather it’s only guaranteed that they run
not before all test methods and TestCleanup methods in that class
have completed, but also before AssemblyCleanup is called. In
fact, the framework actually calls all of the TestCleanup methods
just before it calls AssemblyCleanup.
2. As you can see, ClassC.ClassInitialize and ClassC.ClassCleanup
haven’t been called whatsoever because we didn’t include any test
method from that class in the execution. If we had chosen to run all of
the tests, then these methods would have been called.
3. All of the *Initialize and *Cleanup methods are optional and
you don’t have to implement them if you don’t need to.
MSTest has many more features to offer, and so do all other frameworks (though
those features may be totally different). However, these features are more specific and
are less important to most cases and therefore are beyond the scope of this book.
ChapTer 17 UnIT TeSTS anD TDD

400
The Mechanics of Writing a Unit TestThe unit testing framework does not limit or even provide much guidance for how to
write a unit test. It will simply execute any piece of code that you’ll write inside the test
methods (and inside the initialization and cleanup methods in the appropriate order),
will mark the test methods as “passed” if they don’t throw an exception and as “failed” if
they do. From the unit test framework standpoint, whatever you do inside these methods
is your own business.
But in order to really write a unit test, we need to call one or few methods on a class
inside the SUT and verify its result. In order to do that, our test project must reference the
project (or a compiled class library), which is the component of the SUT that contains
the class or classes that we want to test. If the method(s) that we want to test is non-
static, then we must instantiate an object from that class first, and then call the methods.
Calling the methods of the SUT directly from the test is one of the important properties
that distinguish unit tests from integration and systems tests, which use a network
protocol or UI automation technology to interact with the SUT. Because it’s common
that multiple tests in the same test class need to instantiate an object from the same
class at the beginning of the test, the instantiation is usually done in the TestInitialize
method (though if different tests need to instantiate the object with different constructor
arguments, then there’s no point in doing that). Note that you can only instantiate
public classes and call public methods this way. These are techniques to call internal
or even private methods of the SUT from unit tests, but that’s usually discouraged as
these are considered to be technical details that are more likely to change (though this is
sometimes also a topic of debate).
Finally, a test should also verify some expected result, typically using one of the
Assert methods. The simplest result that a unit test can verify is the return value of the
tested method. But some methods have no return value (they’re declared as returning
void), or we simply want to verify something else. In these cases, we should understand
what this method affects and how we can observe that. For example, a method can
change the value of a property or to change the internal state of the object in a way that
affects the result of some other method. In this last case we must call the other method
and verify its result in order to test that the first one changes the internal state of the
object as expected. We’ll soon look at a more concrete example.
ChapTer 17 UnIT TeSTS anD TDD

401
Structuring the Test: Arrange – Act – Assert (AAA)
A typical structure of a unit test consists of three parts: Arrange, Act, and Assert. In
fact, these parts are very similar to the Given, When, and Then terms described in the
previous chapter. As their names imply: Arrange is where we prepare the prerequisites
for the test, including creating the instance of the tested class; Act is where we call the
method or the sequence of methods that we want to test; and Assert is where we call
the Assert methods to verify the result. If the Arrange is common to few tests, it can be
moved to the TestInitialize method to avoid the duplication. Sometimes also the Act
part is sharable and can also be moved to the TestInitialize method, leaving only
Asserts in the test methods, for verifying different and independent outcomes of the
same operation, but this is much less common.
Example – Simple Calculator
Suppose that we’re developing a simple, standard calculator. In the project we’ve
implemented a class named CalculatorEngine, which manages the state of the
calculator after every button click and provides the value to be displayed (this class
doesn’t handle the UI itself, it is only being used by the UI layer as described). Listing 17-1
shows the public members of this class.
Listing 17-1. CalculatorEngine class
public class CalculatorEngine
{
public enum Digit { Zero, One, Two, Three, Four, Five,
Six, Seven, Eight, Nine };
public enum Operator { Plus, Minus, Multiply, Divide}
public void ProcessDigit(Digit digit);
public void ProcessOperator(Operator op);
public void ProcessDecimalPoint();
public void ProcessEquals();
publi void Clear();
public double DisplayedValue { get; }
}
ChapTer 17 UnIT TeSTS anD TDD

402
Listing 17-2 shows a test class with a few test methods that test this class:
Listing 17-2. Unit tests for the CalculatorEngine class
[TestClass]
public class CalculatorEngineTests
{
private CalculatorEngine _calculator;
[TestInitialize]
public void TestInitialize()
{
// Arrange
_calculator = new CalculatorEngine();
}
[TestMethod]
public void CalculatorCanAcceptMultipleDigitNumbers()
{
// Act
_calculator.ProcessDigit(Digit.Eight);
_calculator.ProcessDigit(Digit.Five);
_calculator.ProcessDigit(Digit.Two);
// Assert
Assert.AreEqual(852, _calculator.DisplayedValue);
}
[TestMethod]
public void CalculatorCanAcceptDecimalFraction()
{
// Act
_calculator.ProcessDigit(Digit.Four);
_calculator.ProcessDecimalPoint();
_calculator.ProcessDigit(Digit.Seven);
// Assert
Assert.AreEqual(4.7, _calculator.DisplayedValue);
}
ChapTer 17 UnIT TeSTS anD TDD

403
[TestMethod]
public void CalculatorCanMultiplyNumbers()
{
// Act
_calculator.ProcessDigit(Digit.One);
_calculator.ProcessDigit(Digit.Four);
_calculator.ProcessOperator(Operator.Multiply);
_calculator.ProcessDigit(Digit.Three);
// Assert
Assert.AreEqual(42, _calculator.DisplayedValue);
}
}
Unit Tests and I/OUp to here, things look pretty simple. But the above example is a very simplistic one. The
class that we’ve tested is completely self-contained, with no dependencies on any other
class and more importantly, it does not perform any I/O by itself. If we had to create a
UI for it, the UI layer would simply call the methods in the CalculatorEngine class and
update the display according to the value of the DisplayedValue property, but the class
itself wouldn’t have to know anything about the UI. However, most classes in the real
world are not self-contained. They depend on many other classes, and usually do some
kind of I/O, whether it’s UI, database, file system, networking, etc., either directly or
indirectly through other classes it depends upon.
The thing is, testing I/O in unit tests is usually discouraged for a few good reasons:
1. Unit tests are meant to be very fast. Almost all I/O operations are
an order of magnitude slower than pure CPU and memory access
operations.
2. Unit tests should be able to run anywhere, anytime. Performing
I/O usually requires prerequisites that are not necessarily
available on every machine.
3. Even if the prerequisites are available, the test code should take
care about synchronization and isolation, which makes it much
more complicated and slow, and may also be somewhat less
reliable.
ChapTer 17 UnIT TeSTS anD TDD

404
4. Often I/O uses some limited resource, which prevents the tests
from running in parallel. Pure unit tests (which don’t perform I/O)
can be safely run in parallel and is only limited by the CPU and
memory of the machine. Some frameworks and IDEs (including
Visual Studio 2017 and above) make it possible to run the tests
in the background, while you’re coding. Doing it with tests that
perform I/O is not likely to work correctly in that fashion.
Mocks
Suppose that our CalculatorEngine class also needs to write the performed calculations
to a log file that the user can then open in a standard text editor, how would we test that?
One way would be to read the file at the end of the test and verify its content. But that
wouldn’t be such a good idea for the reasons mentioned above. If writing to the file is
done directly from the CalculatorEngine class itself, then we don’t have any other way,
unless we’ll refactor the code (which we’ll cover later). For now, let’s suppose that our
CalculatorEngine class only calls another class, LogWriter, that actually writes the
content to the log. In other words, CalculatorEngine tells it what to write (the arithmetic
expression performed, e.g., “12+3=15”), and the LogWriter class only appends that line
as is to the log. In addition, let’s suppose that the CalculatorEngine does not reference
the LogWriter class directly but only through an interface ILogWritter that LogWriter
implements, and that the CalculatorEngine accepts this reference in its constructor. All
of these assumptions may sound very cumbersome, and you may wonder why we need
to complicate things so much just in order to write a line to a file, but you’ll soon see
why. Listing 17-3 shows the relevant declarations and pieces of code that clarify these
details and the relationships between the CalculatorEngine and the LogWriter classes.
Listing 17-3. The interaction between CalculatorEngine and LogWriter
public interface ILogWriter
{
void WriteToLog(string line);
}
ChapTer 17 UnIT TeSTS anD TDD

405
public class CalculatorEngine
{
private readonly ILogWriter _logWriter;
public CalculatorEngine(ILogWriter logWriter)
{
_logWriter = logWriter;
}
// ...
public void ProcessEquals()
{
// ...
expression = ...
_logWriter.WriteToLog(expression);
}
}
class LogWriter : ILogWriter
{
private string _filePath;
// ...
public void WriteToLog(string line)
{
// Perform the actual I/O (append the line to the file)
File.AppendAllLines(_filePath, new[] { line });
}
}
Given this design, we can now create another implementation of the ILogWriter
interface that we’ll use only in the test (it will be part of the test project) and will allow us
to test that our calculator writes the right messages to the log, without actually writing
anything to any file. Listing 17-4 shows this class. As the name of this class implies, this is
what’s typically called a Mock object.
ChapTer 17 UnIT TeSTS anD TDD

406
Listing 17-4. MockLogWriter
class MockLogWriter : ILogWriter
{
public string LineWritten { get; private set; }
public void WriteToLog(string line)
{
LineWritten = line;
}
}
Now we can write a test, that although won’t actually verify that the expressions
are written to the file, it will test something very close to it: it will verify that
CalculatorEngine sends the correct expression to the LogWriter class (which should
in turn write it to the file). Listing 17-5 shows what this test looks like. Note that because
we’ve added a constructor argument to CalculatorEngine, we also had to change our
TestInitialize method to pass this parameter. We’ll use the new MockLogWriter class
as the value for this argument.
Listing 17-5. Testing that CalculatorEngine sends the correct expression to
the log
[TestClass]
public class CalculatorEngineTests
{
private CalculatorEngine _calculator;
private MockLogWriter _mockWriter;
[TestInitialize]
public void TestInitialize()
{
// Arrange
_mockWriter = new MockLogWriter();
_calculator = new CalculatorEngine(_mockWriter);
}
ChapTer 17 UnIT TeSTS anD TDD

407
// ...
[TestMethod]
public void CalculatorWritesTheExpressionToTheLog()
{
// Act
_calculator.ProcessDigit(Digit.Two);
_calculator.ProcessOperator(Operator.Plus);
_calculator.ProcessDigit(Digit.Three);
_calculator.ProcessEquals();
// Assert
Assert.AreEqual("2+3=5", _mockWriter.LineWritten) ;
}
}
Mocking Frameworks
In a real-world application code, often the interactions between classes are way more
complex than in this example (though if it’s way too complex, it may probably indicate a
design problem). In these cases, implementing the mock objects as we did can become
complicated and error prone. To tackle this problem there are plenty frameworks
out there that let you create mock objects more easily, without having to declare and
implement a special class for them. Listing 17-6 shows the previous test but using the
Moq4 mocking framework, instead of the handwritten MockLogWriter class.
Listing 17-6. Using the Moq framework instead of the MockLogWriter class
[TestClass]
public class CalculatorEngineTests
{
private CalculatorEngine _calculator;
private Mock<ILogWriter> _mockWriter;
[TestInitialize]
public void TestInitialize()
4 https://github.com/moq/moq4
ChapTer 17 UnIT TeSTS anD TDD

408
{
// Arrange
_mockWriter = new Mock<ILogWriter>();
_calculator = new CalculatorEngine(_mockWriter.Object);
}
[TestMethod]
public void CalculatorWritesTheExpressionToTheLog()
{
// Act
_calculator.ProcessDigit(Digit.Two);
_calculator.ProcessOperator(Operator.Plus);
_calculator.ProcessDigit(Digit.Three);
_calculator.ProcessEquals();
// Assert
_mockWriter.Verify(
writer => writer.WriteToLog("2+3=5"), Times.Once);
}
Mocking External Dependencies
In addition to mocking dependencies that perform I/O, we usually want to isolate
also third-paryt libraries, classes from other layers, and even collaborating classes
from the same component, in order to test the specific behavior of a single class. The
collaborating classes may affect the outcomes of the CUT in ways that we cannot easily
control from the test, or without creating a maintainability overhead. In these cases, we
can also create mocks for these dependencies of the CUT, even if they don’t perform
I/O, to be able to have better control over the expected result and the maintainability
of the test.
The Mechanics of TDDBy now, you know all of the “mechanics” of how unit tests work and the technical aspects
of writing unit tests. Before we’ll get into the discussion about the challenges of applying
these techniques in the real world, let’s understand also the mechanics of the TDD
method.
ChapTer 17 UnIT TeSTS anD TDD

409
Red-Green-RefactorThe way TDD is typically described is as a cycle of the following three steps:
1. Red - write the simplest test that fails or don’t even compile.
2. Green - write the simplest code that make this test and all other
tests pass.
3. Refactor – refactor (change the implementation details of)
the code and “clean” any “litter” that you left in the code in the
previous step. Make sure that all tests still pass.
You already saw in Chapter 11 how it looks like to write a code for something that
doesn’t exist yet. The only difference is that in Chapter 11 we used the test code to drive
the creation of the infrastructure code for the system tests of the MVCClient application,
which itself was already fully implemented, while in TDD we use this technique to create
and implement the actual code of the application.
This technique may also look similar to the ATDD process we discussed in the
previous chapter. There are significant commonalities indeed, but while in ATDD we
write acceptance tests for user stories in a cycle that normally takes a few days, TDD
guides us in the more granular journey of implementing the code, in cycles of mere
minutes.
What “Refactor” Really Means?
I believe that one of the reasons that people often struggle with TDD is the fuzziness
around the “refactor” step. In the book Test-Driven Development by Example5by Kent
Beck, he clarifies that this step means “refactor to remove duplication. According to Beck
and the examples in that book, a duplication can be anything from a “magic number”
that appears twice in the code, to entire code components that repeat themselves with
small variations. In fact, duplication can even mean pieces of code that looks completely
different but have the same purpose. For example, if we’ve implemented and used
two different sorting algorithms in our code for no particular reason, then this is a
duplication and we should remove one of them. By contrast, code that may look the
same but is used for different purposes (and may evolve in different directions over time)
is not a duplication.
5 Kent Beck, Test-Driven Development: By Example (Menlo Park, CA: Addison-Wesley, 2002).
ChapTer 17 UnIT TeSTS anD TDD

410
Also, in the examples he gives, Beck clarifies a very important aspect of this step
that many people miss: duplication should be removed not only from the CUT, but
also from the test code, and even duplication between the test code and the CUT.
When I read that book, realizing the last sentence was a moment of revelation for me!
Duplication between the test code and the CUT indicates that there is coupling, or
hidden knowledge, between the CUT and its clients, which violates the basic principle of
object-oriented programming: encapsulation. It can also indicate that the class violates
the Single Responsibility Principle (SRP) or simply that the test is not well defined, if the
test has to calculate the expected result in a similar manner to the calculation that the
CUT itself should do. Either way, that duplication should be removed.
Beck also emphasizes that the code, both of the test and of the CUT should “reveal
its intent.” On the face of it, this is another way to say that the code should be readable.
But the word “intent” implies that the code should reveal what the code should do
rather than how. This is especially relevant to method names, but it also implies that
most method implementations should include as little technical details as possible.
This leads to very short and concise methods, which call few other methods with
intent-revealing names, or only hide one specific technical detail. These aspects of
design: no duplication, clear names, and short methods all have a vast impact on the
maintainability of the code.
Lastly, a very important notion to understand about refactoring, especially in
the context of TDD, is that it should be done in tiny little transformations, which
each of them keep the code working and all the tests pass. Automatic refactoring
transformations like those that exist in most modern IDEs and their plug-ins (e.g.,
Resharper), like “Extract method,” “Introduce variable,” “Extract base class, etc., help
a lot with that, but even without it, you can do most refactoring transformations pretty
safely in small and safe steps. It may require some change of a mindset, practice, and
creativity, but it’s almost always possible. The general rule of thumb is that instead of
simply changing everything to how you want it to be, you first create the new stuff, then
route the old stuff to use the new one, and only then remove the old one. It may mean
that you have to create duplication in the interim, but you remove it afterwards. For
example, suppose that you have a class CustomerDataWriter with a method WriteData
that writes some data about customers to a file, accepting the filename as a parameter,
and you notice that whenever this method is called multiple times on the same object
instance, the same filename should always be used. Therefore, you decide to move the
ChapTer 17 UnIT TeSTS anD TDD

411
filename parameter to the constructor of the class, store it in a field, and remove it from
the method. Here’s a way to go about this refactoring, without ever breaking existing
code:
1. Create a new constructor overload that accepts the filename
parameter and saves it to a new _filename field. Also call the
original constructor from the new one (in case it existed and
wasn’t empty). Because no code calls this constructor yet, all tests
should still pass.
2. Find all references to the old constructor and change them to call
the new constructor overload providing the appropriate filename
argument. (You should know the value of this argument from the
calls to WriteData invoked on that object.) All tests should still
pass, because the new field is still not in use. You can even change
these references one by one and everything would work. Notice
that you now created a bit of duplication, because now the same
parameter is passed both to the constructor and to the method,
but this is only temporary.
3. After you changed all of the references from the old constructor
to the new one, you can copy the content of the old constructor
into the new one instead of calling it, and delete the old one (this
transformation is called inlining). All test should still pass because
the old constructor is not called anymore, and the new one does
exactly what the old one did.
4. Create an overload of the WriteData method, without the filename
parameter, and call the old overload with the value of the new
_filename field as the argument. All tests should pass because the
new overload is not called yet.
5. Find all the references of the old overload of WriteData, and one
by one remove their argument, to actually call the new overload.
Because we already changed the calls to the constructor to pass
the filename and store it in the _filename field, and the new
overload of WriteData calls the old one using this field’s value,
then the behavior should not change and all tests should still pass.
ChapTer 17 UnIT TeSTS anD TDD

412
6. Once all references to the old overload of WriteData, which has
the filename parameter, have been migrated to the new one
(which doesn’t have the parameter), you can inline the body of the
old overload into the new one, and remove the old one. Because
no one uses the old overload anymore, all tests should still pass.
We now reached the destination of our refactoring maneuver: we
pass the filename only on the constructor and we don’t have to
pass it in every call to the WriteData method anymore. Obviously,
the behavior remains the same.
Note that steps 2 and 5 result in changing some test code, if this test code calls the
class that we’re refactoring. But that’s not a problem, as we already mentioned that we
should remove duplication from the test code as well as from the production code.
Jumping Back and Forth Between the Steps
While in theory these three steps (red-green-refactor) should be done in a nice clean
loop, I often find it practical to do some refactoring between any of the steps, and even
in the midst of the each of them. However, when I do so, I first make sure that the code
compiles and that all the tests, except the new one, pass. I never leave the tests broken or
implement new functionality before writing a test for it first though.
Why Should We Write the Tests First?Starting to implement a feature by writing the test first is counterintuitive for most
people, so why should we do it anyway?
• The code is written with testability in mind. Because the unit tests
should test the smallest possible unit and avoid calling methods that
perform I/O, most unit tests need to use mocks, and for that the CUT
needs to reference its dependencies through interfaces. The way
most of us write our code normally does not do that and therefore is
not unit testable.
• Thinking about the tests first drives us to think and design the API of
the CUT in way that is easy to use. Often when people write the code
first, the resulting API is bound to the implementation rather than
being a nice and clean interface that hides all of the technical details.
ChapTer 17 UnIT TeSTS anD TDD

413
• Making sure that the test we write fails at first, and passes after we
implement the CUT, ensures that we’ve written the test properly
(which is the answer I like to give to the common question: “should
we write tests for our tests?”). If for example, we forgot to write the
Assert statement, or asserted on the wrong thing, then the test may
pass before we implemented the CUT, which tells us that we did
something wrong.
• Developers are usually pressed to complete and deliver their work as
soon as possible. When we write the test after the fact, we’d probably
be pressed to complete it quickly and may cut some corners.
Especially if we didn’t write our code in a unit-testable manner but
already tested the functionality manually, we’d probably feel that it
won’t be effective to refactor the code and write the “right” unit tests
for it at this point. When we write the tests first, we’ll be less pressed
to cut these corners, because they drive development rather than
come as an afterthought, and also the tests prevent us from cutting
corners when implementing the CUT.
The Real Challenges in Unit Testing and TDDBy now, in addition to knowing all of the mechanics that you need in order to write unit
tests, you also know the mechanics of doing TDD. I also explained to you the motivation
for writing the tests first. But as mentioned earlier, this only allows you to “read notes”
but not to “play Chopin” or master the practice of TDD for that matter. While you won’t
be able to master TDD by reading this book alone, I’ll first explain the reason why this is
so challenging, but then also give you some tips on how to get there somewhat faster.
Main Challenges with Unit TestingMost software systems, at least those that are important enough for writing tests for, are
built from large amounts of classes and methods with many interdependencies. Many of
these classes also perform I/O, depend on third-party libraries, and often make various
assumptions regarding one another (which are probably correct in most cases, otherwise
they would be bugs...). The way that most programmers write software, including
experienced and talented ones, typically does not adhere to the testability requirements of
ChapTer 17 UnIT TeSTS anD TDD

414
unit tests. Almost any class and method that was not written with unit tests in mind needs
some decent refactoring effort before you can write unit tests for it. But refactoring without
the coverage of (unit) tests is also dangerous of course. Thankfully, Michael Feathers’s
excellent book Working Effectively with Legacy Code6 provides a wealth of hands-on
techniques and practices for doing small refactoring transformations safely for the sake of
making “legacy” code (i.e., code without testing) testable. However, besides reading that
book, it also takes practice to know what technique you should apply when. Below are
the most common challenges in my opinion when working with legacy code, and how to
refactor them. Naturally, Feathers’s book cover these techniques much more in depth.
Main Challenges with TDDWhile TDD promises to solve many of these challenges, it also imposes some challenges
of its own:
• It’s a very big mind shift to think about tests for each class and
method before implementing it.
• It’s very rare to start working on a truly greenfield project. That means
that virtually all code is “legacy” and was not designed with unit tests
in mind, which brings us back to the drawbacks of writing tests after
the fact. In fact, most greenfield projects start as a quick and dirty
POC (Proof of Concept) that gradually evolves into a real software
project. So. you really have very tiny chances to start a greenfield
project using TDD.
A common idea to resolve the second challenge, is to do it only for new features
added to an existing system. Generally. this is a good idea, and I strongly advocate it, but
it’s also not that simple, because the new code should usually integrate into the existing
code too, and this usually still requires us to refactor the existing code.
More Specific ChallengesBehind the above-mentioned challenges lie many, more specific, technical challenges. Here
are just some them, which I found to be the most prevalent ones, and some hints regarding
the way to resolve them. If you’re not a programmer, you may want to skip this topic.
6 Michael Feathers, Working Effectively with Legacy Code (Englewood Cliffs, NJ: Prentice Hall, 2004).
ChapTer 17 UnIT TeSTS anD TDD

415
Big Classes and Methods
Often the important classes and methods, which are good candidates for unit testing,
are pretty big. When the project was young, these classes were probably pretty small,
but over time, more and more behavior was added to them and made them bigger. Such
a big class or method often do a lot of things, which makes testing just one aspect of it
very hard (this is often referred to as the “God Object” anti-pattern, and a violation of
the Single Responsibility Principle). In order to resolve this, you need to break the big
method or class into smaller methods and classes. The “Extract method” automatic
refactoring, which exists in most modern IDEs, helps a lot in that. But you need to think
about how to split the big method to smaller ones, and you’re likely need to perform
more refactoring than just “Extract method” in order to safely get to the result you want.
I/O
As we saw in the previous example, in order to isolate the I/O operations in our code, we
need to refactor it and abstract it behind an interface, so we can mock it in our unit tests.
In order to isolate these operations, we should first extract them into their own methods,
and then take all related methods that perform I/O and extract them into their own class.
We then need to extract an interface from that class and pass it through the constructor
of the CUT that stores its reference to a field. The result should be similar to what we saw
in Listing 17-3.
While the test always passes the mock to the constructor, we should also fix the
production code that uses this class to work with the actual I/O class. You can do that by
leaving the default constructor (or the existing constructor that does not accept the new
interface as a parameter), and change it to call the new one that does take the interface
parameter. The constructor with the old signature (without the parameter) should
instantiate the new concrete class that actually performs the I/O, and should pass it as an
argument to the new constructor overload.
Alternatively (or later on), especially if the CUT is instantiated in the production
code only at one place, you can remove the old constructor, instantiate the new I/O
class before you call the constructor of the CUT, and pass the new instance of the I/O
class to it.
ChapTer 17 UnIT TeSTS anD TDD

416
Singletons
Singleton is a pattern described in the classic book Design Patterns: Elements of Reusable
Object-Oriented Software7 (AKA known as the “Gang of Four” or “GOF” book) back in
1994, as a way to restrict the instantiation of a class to just one object instance. However,
these days it’s usually considered to be an anti-pattern.8 Nevertheless, it’s still pretty
prevalent in many application’s code bases. In Chapter 9 I briefly mentioned that
Singletons prevent reuse, but I didn’t mention there that they also prevent testability,
especially of unit tests.
Whenever you write a unit test for a class or method that use a singleton, the internal
state of this singleton is preserved between different unit tests, which breaks isolation.
This means that you need to use the initialization and cleanup methods of the test to
somehow make sure that they reset to a well-known state before each test. But the more
severe problem is that often a code base that contains Singletons contains many of them,
and many of those are interdependent. These interdependencies are a fertile ground for
hidden assumptions that “all developers in the team know” (except those who don’t…).
Besides the high potential for bugs in such code bases, the code tends to be a tightly
coupled spaghetti of dependencies and hidden assumptions, which makes the code very
resistant to unit testing.
But if we only have one or two singletons that we want to isolate using mocks, we
can usually resolve that pretty easily. First, extract an interface out of the methods of the
singleton that the CUT uses. Then, in the CUT (which uses the singleton), create a field
from the type of this interface, and initialize it in the constructor, like we did in the case
of an I/O dependency. Now, wherever the CUT calls a member of the Singleton, replace
it with a call to interface using the new field. If you don’t have any hidden assumptions
about interdependencies with other singleton objects, then you’re good to go.
Note that if you have classes that use mutable static fields, and don’t implement the
singleton pattern, then your situation is even worse. But you can first refactor the class
that use these fields to use a singleton internally, (assuming they’re private or are used
only inside that class), then refactor the CUT to use the singleton instead of the static
methods, and then apply the previously described refactoring. In case these fields are
7 Erich Gamma, Richard Helm, Ralph Johnson, and John Vlissides, Design Patterns: Elements of Reusable Object-Oriented Software (Menlo Park, CA: Addison-Wesley Professional, 1994), p. 124.
8 In the Software-Engineering Radio podcast, episode 215, around minute 56 onward, the authors of the GOF book themselves discuss the problems with the Singleton pattern (http://www.se-radio.net/2014/11/episode-215-gang-of-four-20-years-later/).
ChapTer 17 UnIT TeSTS anD TDD

417
also public and are manipulated from other classes, then it’s a much more complicated
problem, because the code that manipulate them can be spread all over the code base.
In this case you should first find all the usage of these static fields and then move and
group the logic that manipulates them into the class where the field is declared. Only
then you can make it private and continue as described above.
Instantiating a Dependent Object from the CUT
Every object needs to be instantiated by using the new operator and the object’s
constructor before it can be used. This is basic, and we do that all the time. But the
thing is, if we instantiate a concrete class (i.e., not an interface) inside the CUT, we can’t
isolate it in the test using a mock object. Because the CUT explicitly specifies which class
to instantiate, the test doesn’t have a chance to inject the mock object. For example,
suppose that some business logic class instantiates an object from the DAL (Data Access
Layer) that retrieves some data from the database, which it needs to process, and we
want to isolate this class in order to test the business logic class alone. Suppose that
this DAL object opens a connection to the database inside its constructor and closes
it on Dispose. In order to keep the connection to the database short, the DAL object is
instantiated only when needed, inside the relevant Business Logic (BL) method, and
then disposed right after retrieving the relevant data from the database. Currently we
don’t have a way to pass the mock object to the method, and refactoring the class and
passing the DAL object in the constructor is also not an option because we don’t want
the connection opened before we actually need to retrieve the data.
In order to resolve it, we should use the Factory design pattern. The Factory pattern
consists of an object that has a method that instantiates and returns another object. This
method is declared to return an interface that the created object should implement,
instead of the concrete class of that object. In order to mock the dependent object, we
need to extract an interface both from the DAL object and from the factory object that
creates it. Then we should inject the factory to the CUT as an interface through the
constructor and use this factory interface inside the BL method to instantiate the class.
Listing 17-7 shows a pseudo-code that can give you an idea for what this would look like.
Note that in the test we need to create a mock factory object that returns our DAL mock
object, and pass this factory to the constructor of the BL class.
ChapTer 17 UnIT TeSTS anD TDD

418
Listing 17-7. Pseudo-code for using a factory
public interface IDataProviderFactory
{
IDataProvider CreateInstance();
}
public interface IDataProvider
{
Data RetrieveData();
void CloseConnection();
}
public class BusinessLogicClass
{
private readonly IDataProviderFactory _dataProviderFactory;
public BusinessLogicClass(IDataProviderFactory dataProviderFactory)
{
_dataProviderFactory = dataProviderFactory;
}
public void DoSomethingImportant()
{
// ...
var dataProvider = _dataProviderFactory.CreateInstance();
var data = dataProvider.RetrieveData();
dataProvider.CloseConnection();
// ... use data
}
}
Mastering Clean Code and the SOLID PrinciplesAs you can see, unit tests (whether written using TDD or not), require that almost no
class should have a direct dependency on another concrete class. This makes these
classes small and independent, and therefore modular and reusable, also often referred
ChapTer 17 UnIT TeSTS anD TDD

419
to as loosely coupled. One of the biggest benefits of TDD is exactly that: it leads you to
write good, modular object-oriented code that tends to be easy to maintain. Because
of this, it is often said that TDD actually stands for Test Driven Design rather than Test
Driven Development.
However, because in most cases legacy code is a fact that we need to live with, it’s
not enough to let the tests guide us toward this design. We need to know how to write
loosely coupled code regardless of TDD. In addition, some people “succeed” to write
badly designed code using TDD too, ending not only with code that is hard to maintain,
but also with many unit tests that bind the CUT to that bad design and make it even
harder to change. While the “remove duplication” rule can prevent most of these cases,
identifying duplication is also a practice that one needs to master. Some duplications are
easy to spot, but others are more elusive.
Uncle Bob (Robert Martin) defined five principles that provide guidance for loosely
coupled design, known by their acronym SOLID (see sidebar). These principles make
it somewhat simpler to understand how to write loosely coupled code, but then again,
mastering these principles is not trivial either.
THE SOLID PRINCIPLES
robert C. Martin, widely known as Uncle Bob, introduced in the early 2000s (in various
documents9), the following five principles that deal with managing dependencies between
classes in an object-oriented design, practically making these classes loosely coupled from
each other. These five principles are:
• Single Responsibility Principle (SRP) – A class should have one, and
only one, reason to change. In my words: classes should be small and
focus on just one thing. Any auxiliary behaviors should be extracted
to other collaborating classes.
• Open/Close Principle (OCP) – You should be able to extend a
classes behavior, without modifying it. Extending a behavior of a class
without modifying it can be done by overriding virtual methods, or
by depending only on interfaces that the client can supply, usually
9 In his website, http://butunclebob.com/ArticleS.UncleBob.PrinciplesOfOod, there are links to the major documents where these principles originally appeared.
ChapTer 17 UnIT TeSTS anD TDD

420
through the constructor. The behavior can then be extended by
providing other classes that implement the required interface and
that extend the original behavior. Another way to implement this
principle is using events: the class fires events, and the collaborators
can register to these events to extend the original behavior.
• Liskov Substitution Principle (LSP) – Derived classes must be
substitutable for their base classes. In my words: neither the base class
nor its clients should be aware of any specific detail of derived classes
or even their existence. This means that adding or changing derived
classes should work without changing the base class or its clients. In
addition, when you access an object through an interface, you should
not rely on specific implementation details that you may know about
the classes that implement it.
• Interface Segregation Principle (ISP) – Make fine grained interfaces
that are client specific. In my words: if a class is designed to be used
by two (or more) different clients for different purposes, the class
should expose separate interfaces, one for each of these clients. For
example, a buffered memory stream object may expose separate
interfaces for a reader and for a writer, as the reader doesn’t need the
functionality of the writer and vice versa.
• Dependency Inversion Principle (DIP) – Depend on abstraction, not on
concretions. This means that the class in question should not reference
other concrete classes, but rather only interfaces that those classes
should expose. For example, for a BL class, instead of referencing a DAL
class directly, it should only reference and use an interface that the DAL
class exposes. This makes both of these classes depend on the interface,
but none of them depends on the other, and therefore can be changed,
extended, or replaced independently from the other.
Uncle Bob’s website (mentioned in the footnote) has links to full documents describing each of
these principles in detail. also, in 2011 I wrote a series of blog posts10 about the relationships
between these principles and TDD.
10 http://blogs.microsoft.co.il/arnona/2011/08/26/tdd-and-the-solid-principles- part-1-introduction/
ChapTer 17 UnIT TeSTS anD TDD

421
Mastering RefactoringEven if you master the SOLID principles and can spot the most elusive duplications,
it’s still not enough. In order to master TDD and unit testing, you also need to master
refactoring. As mentioned above, refactoring is best done as a series of small and
safe steps that leave the code working. Martin Fowler has written a whole book about
this topic, called Refactoring: Improve the Design of Existing Code,11 but in order to be
effective, you should also master the available refactoring tools that your IDE provides. In
addition, once you master these techniques, you may come up with your own refactoring
techniques and may even be able to extend your IDE to perform these transformations
automatically, like the built-in ones.
The Biggest Challenge: What to Test?The challenges we’ve discussed up until now are pretty technical. But probably the
biggest challenge for doing TDD is to decide what we should test. If we really test each
and every class separately, abstracting it from all of its collaborating classes through
interfaces (and using mocks in the tests), then we might end up with loads of tests, but
many of them will be very technical and not directly related to a user scenario. While
TDD and unit tests promise to drive a design in which the classes are loosely coupled
and easy to maintain, these technical tests (e.g., tests that verify that specific arguments
were supplied to a specific method on a specific interface, or tests for a class that
handles a low-level data structure) end up being tightly coupled to the details of the
many interfaces that are created to satisfy the testability of these classes. When you want
to refactor the interactions between a few classes, you’ll need to change the interfaces
between them (and probably some of their implementations). Consequently, you’ll also
have to change most of the tests of classes that implement them or mock them. You may
then find out that these fine-grained unit tests not only are not helping you but even
hinder your maintainability!
This means that it’s not always effective to write unit tests with a test scope of a
single class, and sometimes it’s better to test a few classes together. The question then
becomes: How can I decide? The short answer is that it’s mainly a matter of practice and
experience. But below you’ll find some guidelines that will hopefully help you through.
11 Martin Fowler, Kent Beck, John Brant, William Opdyke, and Don Roberts, Refactoring: Improving the Design of Existing Code (Menlo Park, CA: Addison-Wesley Professional, 1999).
ChapTer 17 UnIT TeSTS anD TDD

422
While all of these challenges may look daunting, mastering all of the above-
mentioned challenges, makes you a better programmer, even without TDD. But TDD
also becomes arguably the most powerful tool in your tool belt, as it leads you to write
cleaner, more maintainable code, which you can also easily verify to do what you expect.
TDD the Way It Was Meant to BeIn fact, no formal definition of unit tests that I’m aware of, especially by the Extreme
Programming (XP) thought leaders like Kent Beck and Martin Fowler, says that a
unit tests (or any test done in a TDD fashion) must be of a single method or class, but
somehow this has become the common notion. As Martin Fowler tells in his blogpost
titled UnitTest12 and also in the “Is TDD Dead?” series mentioned earlier, ever since
they first came up with this idea of unit testing and TDD, they were not concerned so
much about isolating every class, and mostly tested the collaboration among a bunch of
classes. They only used test doubles (mocks) from time to time when it was awkward to
test it with the real collaborators.
Note Martin Fowler refers to tests of a single class that use mocks for all other classes as Solitary Tests and the advocates of this style of tests as “mockist style xunit testers,” while to tests that include few classes together as Sociable Tests, and to their advocates as “classic style xunit testers.”
In fact, when you remove the restriction that a unit test can only test one class, you
find that TDD with “sociable” unit tests is very similar to ATDD, except maybe for the
following nuances:
1. In TDD, usually the person that writes the tests is the same
developer that implements the code. However, TDD advocates
usually also advocate pair programming, so in fact you can say
that the two persons that write the tests are the same persons that
implement the code together.
12 https://martinfowler.com/bliki/UnitTest.html
ChapTer 17 UnIT TeSTS anD TDD

423
2. The tendency is to choose somewhat smaller scopes than you’d
likely to choose in ATDD, and the emphasis on faster tests and
tighter feedback loop is stronger.
Outside-In vs. Inside-Out ApproachThe second nuance is also related to another kind of style that different practitioners
have: the “outside-in” approach claims that you should start from broader-scoped tests
that cover the scenario closer to the user’s perspective, and fill in more details using
more fine-grained (smaller-scoped) unit tests. The broader-scoped test may keep failing
until all of the smaller-scoped tests pass.
The “Inside-out” approach claims that you should start from a narrow-scoped unit
test, which covers the essence (business logic) of the scenario, and then write more tests
that stretche the scope more widely until the entire user scenario is implemented. In
fact, you can refactor the narrow-scoped test code, extract all calls to the SUT to virtual
methods in the test class, and then derive a new test class for the broader-scoped test
and override these virtual methods to invoke the same behavior from a broader scope
(e.g., through REST API, and even through Selenium). This is actually an implementation
of the Abstract Test Scope pattern described in Chapter 6.
In my experience, most features should start from a user story whose behavior
is relatively simple and straightforward, and mostly only moves some data from
one place to another, possibly performing some pretty simple manipulations on
that data, while later user stories mostly thicken the internal business logic of that
feature, which gradually makes it more complex. In these cases, there’s not much
justification to start with a narrow-scoped unit test, as the CUT will be pretty simple
(especially if there’s not much manipulation of data). The larger-scoped test is
justified as it can show that the data flows correctly throughout the system. As later
user stories dealing with the same feature make the internal business logic more
complex, and as we already have tests that verify the data flow, then we can focus our
efforts on covering that business logic using smaller-scoped unit tests. If we do it this
way, we’d typically end up with many unit tests and fewer integration and system
tests, which adheres to the test pyramid paradigm. But that does not mean that it’s
always like that, and you shouldn’t aim to form a pyramid but rather choose the
appropriate scope mainly on a case-by-case basis.
ChapTer 17 UnIT TeSTS anD TDD

424
SummaryIf we don’t write our code with Unit Testing in mind, then chances are that it won’t be
unit testable as is. In order to make it unit testable, we need to refactor it and extract the
external dependencies and I/O operations outside from the CUT to external classes and
reference them through interfaces. Doing it properly requires some skills that we need to
master. Doing TDD helps direct us in the right way but does not solve all of the problems,
and practice and experience are needed in order to master it. But once you master these
techniques and TDD itself, it will improve the maintainability of your code greatly and
make you a better programmer. When you do it properly, you’ll probably realize that
TDD and ATDD are pretty much the same thing after all.
ChapTer 17 UnIT TeSTS anD TDD
425© Arnon Axelrod 2018 A. Axelrod, Complete Guide to Test Automation, https://doi.org/10.1007/978-1-4842-3832-5_18
CHAPTER 18
Other Types of Automated TestsAll of the chapters so far have dealt only with functional tests. But there are a few other
types of automated tests, and this chapter covers the most common ones.
Performance TestsThe purpose of performance tests is to measure the time it takes for the system to
complete various operations. Usually the reason to test it is that the performance of
the system greatly affects the user experience, and sometimes it even maps directly to
revenue, as in the case of e-commerce websites that have numerous competitors, which
users can easily switch to if they have a bad experience.
Note Some people confuse Performance Testing with Load Testing, which tests how the system handles many concurrent users. While these types of tests are somewhat related, they serve different purposes and use different techniques. Load testing is discussed later in this chapter.
Measuring Performance in ProductionMost web applications, especially those hosted in the cloud, can use the canary releases
paradigm (mentioned in Chapter 5), where each release is first distributed only to a
small portion of the users (can be a distinct group of users like opted-in Beta testers, or
it can be just arbitrary users selected randomly by a load balancer) , and gradually takes

426
over the older release. In this case, you can avoid having extensive performance tests, as
you can measure the actual performance of the users directly. In business applications,
sometimes you can first distribute the application only as a pilot for one team, on which
you can measure the performance and gradually improve it, before you extend the
distribution to the entire organization.
Note that in web and client/server applications, the time an operation takes is
combined from the time the client processes the user action and prepares the message
to send to the server, the time it takes the message to be sent from the client to the server,
the time it takes the server to process and handle the request and prepare the response,
the time it takes the response to be sent back to the client, and the time it takes the client
to process the response and render the result on the screen. This description is even
pretty simplistic, as there can be multiple messages sent between the parties and some
intervals may be overlap or be completely parallel. In addition, these intervals can be
broken down to more granular ones. Figure 18-1 shows the timing intervals of a simple
client/server operation.
If you want to collect performance statistics of actual user operations in production,
and the client-side processing time may be significant enough to measure, then you have
to instrument the client to measure and collect this data and send it back to the server.
There are many sophisticated monitoring tools these days that allow you to analyze,
query, and drill down the performance both of the client side as well as of the server
side. You can find not only which operations take long time, but also the exact scenarios
in which it happens, and how frequently.
Figure 18-1. Timing intervals of a client/server operation
ChaPTer 18 OTher TyPeS Of auTOmaTed TeSTS

427
But not all applications lend themselves well to canary releases, as some applications
must be performant on their first release or may not have so many users to gather
statistics on. For example, medical applications that should pass the FDA certification
before going to production don’t have the privilege to make these rounds of measuring
the performance in production and fixes the bottlenecks before going live. Another
example where measuring performance using tests can still be very important is in
applications that should be used mainly in rare emergency situations. In most cases
where canary releases are not feasible, regular dedicated performance tests are needed
before going to production.
What Not to DoA common misconception about measuring performance is that you can leverage the
existing functional tests to measure the performance of the operations it performs.
Indeed, technically this is possible, and sometimes even very easy, especially for HTTP
API-based tests, where the time between each request to its response can be measured
automatically and seamlessly and saved to a database. While indeed this way you gather
a lot of performance data, it doesn’t help you much in making reasoned decisions about
the performance of the system. In addition, when the measurement is not as transparent
to the tests as with HTTP API-based tests, mixing between testing functionality and
testing performance often makes the test code more complex and less maintainable.
The main reason that measuring performance as part of functional tests is not so
valuable is that functional tests often run in isolated, sterile environments that don’t
reflect the real production environment. But in order to not just gather data, but really
test, you need to define an expected result – just like in functional tests. The difference
though is in the way you define the expected result.
Note that often people think that they can still leverage the performance data
measured by the functional tests and define the expected result (regarding the
performance) as the threshold on the percentage of degradation in performance
related to a previous build or version. In other words, the tests will warn them when the
performance of each operation was significantly worse than in the previous build. There
are a couple of main caveats for this idea:
1. There can be many factors that affect the measured time of
an operation. Without considering all of these factors in the
tests, there can be many false positives, which makes this data
unreliable.
ChaPTer 18 OTher TyPeS Of auTOmaTed TeSTS

428
2. The tests themselves can be changed to do things differently, in
order to improve the reliability or the maintainability of their
functional aspects, without taking into consideration the effect
on the performance measurements. Taking these effects into the
considerations can conflict with the maintainability and reliability
of the functional tests so that’s not the solution.
Defining the Expected ResultIn order to define the expected result, you should first decide what’s the operation that
you care to measure the most and in which scenario. Note that the same operation, like
check-out from an e-commerce site, can go faster or slower according to the number and
the type of items in the shopping cart and other similar factors.
After defining the operation that you want to measure and the scenario in which it’s
being used, you should define the environmental conditions under which the test should
run: on which hardware profile (number of CPU cores, memory, type of hard drive, etc.),
networking profile, size of the database, etc. While using the exact environments as in
production is best in terms of the accuracy of the measurement, it’s not always feasible.
This can be because the hardware used in the production environment is too expensive
to be duplicated just for testing performance, or because the application is intended to
be installed on customers’ hardware (be it a server, a desktop, or a mobile application)
that can have a wide variety of hardware profiles and capabilities that you don’t have
control over. In these cases, you may even want to have multiple environments to
measure performance on some of these different hardware profiles.
Note that Virtual Machines (VMs) usually share physical resources with other VMs
on the same host. This often adds significant “noise” to the measurement, as another VM
can suddenly make use of a lot of resources, leaving to the tested application only a small
portion and thus affect its performance. Therefore, it’s preferable to configure the VM
with minimal allocated resources that can’t be shared with other VMs.
Lastly, the thresholds of the expected performance should be defined. Unlike
functional tests where you run each test once and determine whether it passed or failed,
with performance tests you typically have to run the same test a few times, or make a loop
inside your test that invokes the tested operation, and gather a few results. If you visualize
the performance results on a graph (e.g., using Excel), you should see something similar to
a bell curve (actually a gamma distribution as described in Chapter 13, but you don’t have
to care too much about the mathematics of that). The expected results should be defined in
ChaPTer 18 OTher TyPeS Of auTOmaTed TeSTS

429
terms of the thresholds in which some high enough percentage of the results don’t exceed a
specified duration. For example, you can define that if at least 90% of the results were under
five seconds, then the test should pass. You can also calculate the mean or the median, but
these are usually less important. By the way, this is how typically service-level agreements
(SLAs) are defined. If your company obligates to a specific SLA regarding the performance of
the application, then you should simply use these numbers. If not, you can define together
with your product owner (and your team) these thresholds and make them your internal
“SLAs,” upon which you decide whether it’s appropriate to release or not. In case you have a
continuous delivery (CD) pipeline, you can make this test a part of its gates.
Reusing Code Between Functional and Performance TestsWhile I advised against using the same tests both for functional and performance tests,
I do advise you to reuse their common code. In fact, as performance tests typically
perform operations that are used also in functional tests, then it makes a lot of sense to
reuse the relevant common parts.
Investigating Performance BottlenecksThere are a whole lot of books on this topic alone, but as an introduction to this topic,
it’s worth mentioning that there are profiling tools that allow you to analyze and drill
down how much time each method call has taken, how long the database transaction
took (and why), what was the network latency, etc. Sometimes analyzing these results
can be straightforward, but other times it can be pretty complex. But anyway, beware
of premature optimization! Recall Donald Knuth’s quote from Chapter 15: “premature
optimization is the root of all evil.” Don’t assume you know where the bottleneck is until
you measured and performed a root cause analysis.
Perceived Performance vs. Actual PerformanceIt’s important to note in the context of performance, experts often distinguish between
actual performance and perceived performance. While the actual performance is
easier to measure, the perceived performance is what’s important in the context of user
experience. For example, if the application takes five seconds to retrieve a bunch of
data, and then it shows it to the user all at once, it can seem longer than if it takes seven
seconds, but the most important data is presented after two seconds, and only the rest of
the details appear after additional five seconds.
ChaPTer 18 OTher TyPeS Of auTOmaTed TeSTS
430
Load TestsWhile load tests are related to performance tests (and many people get confused
between them for that reason), it measures a completely different thing. Load
tests measure how much hardware resources the server uses for a given amount of
concurrent users. The test can simulate the maximal amount of expected users if it’s
not too high, or only a percentage of it, which can then be used to extrapolate in order to
assess whether the production environment has sufficient resources to handle the full
load, or how many resources (e.g., number of servers) are needed to handle full load.
Note that testing only a percentage of the maximal load and extrapolating the results
is less accurate, but sometimes is the only feasible way. Load tests should also ensure
that there’s no single bottleneck that adding more hardware resources cannot solve, for
example, due to bad architecture. Note that load tests are only relevant for servers, as
clients don’t need to handle multiple concurrent users.
Like in performance tests, this type of test becomes less relevant in the cloud era,
as resources can be dynamically spun up or down according to real-time production
monitoring measurements of the utilization of the resources. However, there are still
scenarios where these tests are important, mainly:
• When going live cannot be done incrementally, as the site must go up
for a particular event.
• When not using the cloud or even a private cloud, or when using
special hardware resources. This is especially relevant for older,
“monolithic” applications.
• In fact, in the first case, the load tests can be done as a one-time
effort, without having to add the load tests to the CI/CD pipeline. But
the ideas are pretty much the same.
How Load Tests WorkThere are various tools for load testing, with different features and advantages (most
known are JMeter, SmartBear’s LoadUI Pro and LoadComplete, Visual Studio Load
and Performance, LoadRunner and Gatling), but the basic idea is the same. You either
record or write tests that send requests to the server, and the load-testing tool simulates
many concurrent users running in parallel, by running the tests from different threads or
processes on the same machine.
ChaPTer 18 OTher TyPeS Of auTOmaTed TeSTS

431
Note that the test machine itself should be pretty powerful itself in order to run so
many threads or processes, and beyond a certain number of concurrent simulated users
(according to the power of the test machine), you may have to use more than one test
machine (agent) in order to simulate the desired load. These days it’s also common
to run these test agents from the cloud, to simulate load from different geographical
regions. Note that the tested application itself doesn’t have to run on the cloud in order
to use the cloud for running the load test agents. Another thing to note is that there’s
no point in running the client application, as it will only take resources from the test
machine without generating more load. Therefore, it is better that the test sends the
requests and receive responses directly and not through the client (e.g., with Selenium).
However, sometimes the costs of writing and maintaining separate tests for the server
side just for the sake of load testing are not justifiable, and reusing client-side functional
tests, or at least their infrastructure, is nonetheless the preferred choice.
Defining the Expected ResultAs always, before implementing any kind of automated tests, we first need to define our
expected results. The expected result of load tests is typically defined to be that the server
can handle the maximal expected number of concurrent users successfully. But there’s a
lot more to it:
• What’s the most common operation that these users perform?
• What other operations users are expected to perform and what’s
their distribution in a given moment? For example, we can say that
in an e-commerce website we expect that in a given moment, 60% of
the users are searching and browsing for products, 25% perform the
checkout process, 10% are new users that are currently registering to
the site, and another 5% are sending “contact us” requests.
• How long a typical user waits between one operation and the other?
• What is the expected response time for each request?
• What percentage of error responses or timeouts is acceptable? The
desirable answer to this question is always 0 obviously, but this
is very rarely achievable. Therefore, it’s important to define this
threshold realistically
• Etc.
ChaPTer 18 OTher TyPeS Of auTOmaTed TeSTS

432
Note that all of these parameters are about the users or the interaction of the
server with the client, but similarly to performance tests, we should also define the
characteristics of the server (or servers) that should handle the load. Generally speaking,
the success criteria for a load test is that the server continues to operate and serve users
in the expected response time and percentage of errors.
Defining the Thresholds
Because it’s not always feasible (or simply too expensive) to have a load test environment
that allows for the actual maximal load that is expected in production, typically the
load is tested on a smaller, less powerful environment with a proportionally lower load.
Moreover, we want to run the test for a period of time (usually a few hours) to make sure
that the system’s resource utilization is stabilizing and not increasing, under a constant
load. Memory leaks, which is a term that describes the situation that memory usage
increases over time with for no justifiable reason, is the most common type of bug that
cause an increase in resource utilization. But it can happen with other resources too
(disk, network, CPU, and more). For these reasons, we usually don’t settle only for the
criteria mentioned above, but also want to measure the resource utilization, like CPU,
memory, and other health metrics, over time, and make sure that they remain under a
certain threshold. Some of the load testing tools have these metrics built in, but normally
the production, and production-like environments where the tested application runs,
should employ health and diagnostics monitoring tools anyway.
Because the load test agents themselves are stressed when running the tests, it’s
important to monitor their health metrics too. If we see that they are nearing their limits,
we should consider adding more agents or more hardware resources to the existing ones,
to prevent the agents themselves from crashing.
Creating the Tests and Their Environments
In order to know what these thresholds should be, we need to first measure those at
least once as a reference. As mentioned above, sometimes we only want to run load tests
once in order to measure these things. But even then, if you’ll try to run the test for the
first time with all of the criteria mentioned above and with the maximum load, you’re
likely to fail pretty fast. There can be many factors that limit the scale that the test tries to
reach, and you need to identify and remove those limits first. For example, if the test was
created by recording the network traffic, or it uses Selenium, the test may cause requests
ChaPTer 18 OTher TyPeS Of auTOmaTed TeSTS

433
to be sent to third-party services. These requests are needed by the real application (for
example, the website needs to retrieve fonts from Google Fonts), but because they are
sent from the same machine (the load test agent) many times in a very short period,
these third-party services may identify these requests as a denial-of-service (Dos) attack
and block further requests that will cause the tests to fail. Similar issues can be caused
by firewalls and other security mechanisms in the organization, by bugs in the tests, by
limitations of the test or production environment, etc. Therefore, we would usually try to
run the tests first for a small number of users, and for a short period of time, and as we
identify and fix these issues, we can add more and more users and lengthen the time of
the test. Sometimes during this process, a bottleneck in the SUT’s is identified, which is
in fact a bug that prevents scalability, and needs to be fixed.
If it’s desired to add the load tests to the CI/CD pipeline, then after the first time
the test has passed and the environment is prepared, it’s possible to rerun the same
test cycle against new builds. However, if you first run the test against the production
or a preproduction environment that you may want to use for other purposes, then you
need to construct a dedicated environment for the load tests first. This environment can
be less powerful than the production environment, but in that case the thresholds and
expected load should be adjusted proportionally. Note that like functional tests, these
tests will need maintenance as the application evolves.
Combining Performance with Load TestsWhen you first reach the desired load, it’s useful to open a browser and try to use the
website manually, to experience the impact of that load on the perceived performance.
But if you want to add the load tests to the CI/CD pipeline, then it can be useful to
run the performance tests alongside the load tests, in order to make sure that the
performance characteristics are still within the expected threshold even when the
system is loaded.
The performance of an operation in a client/server (including web) application is
combined from the processing time on the client + communication time + processing
time on the server. It’s important to understand that the client-side processing is not
affected whatsoever from the server load, and the communication time also shouldn’t
be affected as long as the server’s bandwidth is not saturated, in which case the load test
should fail. Therefore, if you can reliably infer from the architecture of your application
that it’s performance is affected mostly from the client-side processing, then there’s
ChaPTer 18 OTher TyPeS Of auTOmaTed TeSTS

434
no point in running the performance tests under load, but if you know or suspect that
the time an operation takes is mostly affected by to the server-side processing, then
there’s a lot of value doing so. If the client-side processing is negligible or is constant
and not expected to change over time due to future developments, then it suffices to run
performance tests as server-side only tests.
Running Tests in ProductionUntil a few years ago when someone suggested to me to run tests in production, I would
ask: What’s the point? If the tests pass in CI, why would they fail on production? But over
time I realized that there are some good reasons to do that.
Testing DeploymentIn theory, your CI/CD pipeline should be fully automated and reliable and should
prevent you from deploying a build that destined to fail. But reality is always more
complex. Even if the CI/CD pipeline is fully automated, new features may require new
dependencies, the pipeline’s scripts themselves may have changed, and database
schema updates is always a tricky part that can be error prone. In addition, in systems
that compound from several services that are deployed independently, or systems
that need to interact with other systems, it could be that the version of one of the other
services or systems that were used in the test environment is not the same as the one
currently in production. This could happen for several reasons:
• The test environment has a newer version of a related service that
was not yet deployed to production.
• The test environment used the same version of a related service that
was in production when the tests ran, but then a newer version (that
was tested on another environment) was deployed to production
before our system was.
• An external service was updated. Even though such external services
should normally maintain backward compatibility, we may run into
an edge case in which compatibility was broken.
ChaPTer 18 OTher TyPeS Of auTOmaTed TeSTS

435
Therefore. running a few tests just after deploying a new build can give us confidence
that the system is functioning properly and that nothing was broken during the
deployment
Testing the Health of the Production EnvironmentThe second reason for running tests in production is to monitor the health of the
application and of the production environment. There are many monitoring and
diagnostic tools these days that give the DevOps (or just Ops) guys a pretty clear picture
about the health of the system in production. While these tools are invaluable, they are
not aware of the expected functional behavior of your system. You can usually customize
them to measure some parameters that indicate it, but it may not be as reliable and as
easy as running a test that performs a selected and known business scenario routinely
and reports in case it failed.
Which Tests to RunIf you’re about to start planning a new automation test suite and considering to use
them in production, I advise not to mix these concerns. For CI you should first consider
the isolation aspects that may not fit so well in production, like the use of simulators
or controlling the configuration of the system. However, for production tests, you must
ensure that the tests don’t do any harm to real data or invoke business processes that you
don’t want them to invoke because they may have unwanted consequences in real life,
like ordering more goods from suppliers.
Having said that, sometimes existing functional tests’ isolation requirements make
them suitable for production too as is. But you would probably want to select only few of
them specifically and make sure that they’re safe for production. If you’re not sure, want
to be on the safe side, or you know that the isolation requirements of your functional
tests don’t fit the production environment, then you should write a dedicated suite of
tests for that purpose. Clearly you can reuse some of the infrastructure of the tests.
Like in performance tests, we’d probably don’t want to send an alert to the DevOps
guy whenever a test failed once. Unlike in CI, where we should run the tests in a sterile
environment, here we probably want to give the test another try or two in case of a failure
and only then send the alert.
ChaPTer 18 OTher TyPeS Of auTOmaTed TeSTS

436
Cleaning Up Test DataMost tests create some data when they run. It may not be much in terms of storage, but
because these tests run periodically, this data can affect statistics and reports about
users. One way to do clean up this data is using the cleanup mechanism described in
Appendix B. Otherwise, it’s better to create a batch job that deletes this data once a day
or few days. But in order to delete that data easily, we must distinguish it from other
real-user’s data. We can decide on a known pattern, like prefix everything with “AUTO,”
but we also need to know from which tables to delete the data. In other words, it may be
feasible but you need to give some proper thinking to make it right.
One more thing to pay attention to is to ensure that when the job that deletes the
data runs, it doesn’t delete the data of a test that is currently running; otherwise this test
will probably fail. This can be achieved either by synchronizing this job with the job that
runs the tests: after the test has completed, pause the test’s job, run the job that deletes
the data, and then resume the tests job. Alternatively, you can make the job to delete
only data whose date is yesterday or older to ensure that you don’t affect any test that is
currently running.
Visual TestingVisual testing grabs a lot of attention lately. In general, visual testing is a way to test the
actual image presented on the screen, much like the user sees it, against a previously
saved template. While Selenium and other UI automation tools test the application from
the UI layer, they don’t verify that the UI appears correctly. The colors, sizes, shapes, etc.,
of the elements are not tested, even though they have a significant effect on the usability
and user experience. Obviously, the reason that these UI automation tools don’t rely on
the exact location, size, colors, etc., is that these things can change more frequently and
thus fail the test. But sometimes verifying the appearance of the UI can be very valuable,
in addition to regular functional tests.
Currently the dominant product in this area is Applitools Eyes. The Sikuli open
source project uses visual object recognition, but it uses it more as a way to identify
elements rather than strictly for visual testing. Another new tool in this area is
Chromatic, though it also takes a different approach that is based on comparing the look
of individual components and is specifically tailored for the React framework.
ChaPTer 18 OTher TyPeS Of auTOmaTed TeSTS

437
Note Because strict pixel-by-pixel image comparison is very error prone due to issues like aliasing and resolution, these tools use smarter image comparison techniques that can compensate for these limitations.
The Visual Testing WorkflowVisual testing provides an API that you can integrate with your functional tests to take
screenshots in relevant moments in the test, either of the entire page or of a specific
element. The first time your run the tests, these images are saved as a reference.
The following times you run the tests, it compares the screenshots with their
corresponding reference images and reports the differences. It also marks the exact
locations of the differences on the image. For each of these differences, you can then
choose to exclude their region from the next comparison, to update the reference image,
or, if the difference is a bug, then you can choose to keep the original reference image as
is (and fix the bug in your application).
Note that the amount of attention and maintenance that this workflow requires
varies (examining the differences and updating the baseline), mainly according to the
frequency of UI changes, and the number of screenshots that the tests take. Though
as we already know from Chapter 2, if it doesn’t change then there’s probably not
much value in testing it. I believe that in the future these tools will be smart enough
to recognize the same type of change in many places, so when you choose what to
do regarding one difference, the tool will suggest to you to do the same for all similar
differences, reducing the maintenance costs significantly. Though I believe that even
then, occasionally an all-encompassing change to the appearance of the page (which
can be done by a pretty small change in CSS) may affect all of the reference images, and
they all should be taken anew.
Visual Testing and Cross-Browser/Cross-Platform TestingOne area where visual testing really shines is cross-browser and cross-platform testing.
Today the sheer number of browsers, operating systems, and moreover, mobile
devices, is tremendous. Performing manual visual testing on the entire matrix of tests
and platforms in short release cycles is far from feasible. While applications that are
ChaPTer 18 OTher TyPeS Of auTOmaTed TeSTS

438
designed to be cross-browser and cross-platform should look the same everywhere, they
don’t always do. These different browsers and operating systems have each a different
rendering engine that can have an effect on the outcome. Sometimes small variations are
expected, but other times these small variations in the rendering engines are multiplied
and amplified to cause a real bug. Thankfully, Applitools Eyes and similar tools allows
you to control the level of accepted variations, which can overcome the legitimate
differences between browsers from one hand, but still catch more severe rendering
problems on the other hand.
Installation TestsSome applications that are designed to be installed on the customer’s machine have a
complex dedicated installation program. While the need for such installation programs
is gradually going down (as most applications today can be installed simply by copying
a folder or extracting a Zip file), there are still applications that require them. These are
typically client or server applications that interact with special hardware or software and
need to install device drivers, or they require complex configuration processes in order
to operate.
Approaches for Installation TestsYou can look at these installation programs as separate programs that you need to test
on their own. The problem is that the output and the purpose of the installation program
do not stand on its own (i.e., no one uses the installation program for any other purpose
other than to use the installed application). There are a few approaches to testing
installation programs.
Testing the Direct Outcome
The direct outcome of an installation program is that the relevant files are copied
or extracted to their correct locations, and that certain configurations are saved in a
configuration file, the Registry, or alike. Accordingly, you can write a test that invokes
the installation program and then verifies that the correct files and settings are written to
their correct locations.
ChaPTer 18 OTher TyPeS Of auTOmaTed TeSTS

439
There’s an important drawback to this approach though: maintaining the list of
required files and settings can be cumbersome and error prone and make the test very
fragile. The fact that the test passed does not mean that the application is installed
correctly. It could be that all of the expected files were copied and settings were written,
but the application cannot start because it requires another new file or setting that the
test was not aware of. Similarly, the test may fail because a file is missing, but that file is
not really needed anymore.
Installing the Application Before Running All Tests
The second approach is to install the application once on the test environment before
running the tests. The preferred way to do that is to use a VM with a clean snapshot.
Before the test run starts, it reverts the VM to that clean snapshot, runs the installation
program, and then starts to run the tests. If the installation was not successful, probably
all of the tests, or at least most of them, would fail. The failure would typically be pretty
fast because the application won’t even start, but you can also condition the run of
most of the tests on the success of the first few sanity tests. If all or most of the tests have
passed, it probably means that the installation was successful.
The drawback of this approach is that it only verifies one positive scenario of the
installation program. It does not verify all of parameters and their combinations, error
conditions (e.g., out of disk space), different platforms, and the existence or inexistence
of prerequisites, etc.
Testing That the Application Can Run Correctly After Every Installation
The last approach treats testing the installation application like testing any other
application, but in order to verify that the installation was successful, it runs one sanity
functional test. Some more specific tests of the installation program may need to also run
a more specific functional test as a verification. For example, if the installation program
lets you configure a mail server that it uses to send reports, you may want the installation
test to run a functional test that verifies that the report is sent (and received) by email.
Naturally, negative tests should not run any functional test but need to verify that the
correct error message is displayed, and possibly that the installation folder does not exist
after the installation has failed.
ChaPTer 18 OTher TyPeS Of auTOmaTed TeSTS

440
This approach allows to test the installation program with different parameters and
preconditions. Like in the previous approach, you should also use a VMs with a clean
snapshot for these tests, but in addition, you can use different VMs to test the installation
on different operating systems and use snapshots for testing different preconditions. You
may even need several groups of VMs to test different network topologies, like having the
database and server on different machines.
While this approach is theoretically preferred, it’s the most complex and expensive
to write, and takes the most time and compute resources to run. Of course, you can
also mix and match the different approaches in order to optimize the balance between
reducing the risk and reducing the costs.
Testing the Installation Through UI or Through Silent InstallMost installation programs allow us to run them interactively, with the typical
installation wizard, but also to run them with no UI, where the parameter values
are specified as command-line arguments or through a dedicated file. Running the
installation silently requires no UI automation technology, which is typically faster and
easier to maintain. But sometimes you may want to test the installation UI too, in which
case you must use UI automation.
Testing UninstallUsually the same program that is used to install an application is also used for uninstall.
Testing the uninstall feature is pretty similar to testing the installation, though you
should obviously first install the application before you can uninstall it. The expected
result of uninstall should usually be that all files were deleted, but it can get somewhat
more complicated than that. Sometimes files that the user created or even changed (e.g.,
configuration files) need to remain. And sometimes files are locked and will only be
removed after restarting the system. In order to test the last scenario properly (though
other scenarios may also require it), the test should be run from a machine other than
the installation machine, in order to be able to restart it, and check that all the files were
deleted after restart.
ChaPTer 18 OTher TyPeS Of auTOmaTed TeSTS

441
Upgrade TestsIf installation tests sound complicated, then upgrade tests are much more. There are two
additional dimensions to the test matrix over for upgrade tests over installation tests:
1. The source version – upgrades are not always performed from
the latest version. Users can skip one, two. or more versions when
they upgrade. In addition, each major version can have few minor
versions and even a few Beta versions.
2. User data – while the user was working with the old version, he
probably created some data (in the form of files, database records,
etc.). He may also change some configuration data to customize
the system to his preferences. When he upgrades, he would
probably expect to be able to use his data with the new version
and preserve the configuration values, given that they’re still
relevant in the new version.
Approaches for Upgrade TestsSimilar to the installation tests, upgrade tests can be tested using the following
approaches.
Testing the Direct Outcome
Similar to the corresponding approach for installation, after installing the old version
and optionally creating or changing some data, the test should run the upgrade program,
and verify that the new files were copied. Similarly, if new configuration entries should
have been added, then this should be verified as well. It’s possible also to test that the
data that was created or changed after installing the old version is still intact (or has
transformed to a newer format as necessary).
Upgrade the Application Before Running All the Tests
Similar to the corresponding approach for installation, we perform the upgrade only
once before running all the tests. We can either explicitly install an older version, run
some functional tests in order to create some data, then upgrade, and then run the
functional tests again; or we can preserve the environment from the previous build
ChaPTer 18 OTher TyPeS Of auTOmaTed TeSTS

442
or version, and directly upgrade and run the tests. Note that if we upgrade from the
previous build, and some tests (or the installation itself) failed, then the environment is
no longer clean, and we may not know if failures that we experience after the upgrade
are trailing errors or new ones. In addition to the downsides of the corresponding
installation approach, testing upgrade this way pretty much misses the point of testing
the upgrade of the data. Because functional tests typically create the data they need (for
isolation purposes), then they never verify that data that was created in the previous
version is still usable.
Explicit Upgrade Tests
This is also similar to the “Testing that the application can run correctly after every
installation” approach, but here it’s not enough to run a sanity test in order to verify that
the new version is installed correctly. Most tests need to create or change some data
before the upgrade and run a more specific test after the upgrade to verify that the data is
still usable. In addition, while in the installation tests we could reuse existing functional
tests, here we probably can’t, because we need that the test that runs after the upgrade
will verify the data that was created by another test that was run before the upgrade.
To sum up the upgrade tests topic: the test matrix and the complexity of
implementing these tests properly is huge. Therefore, trade-offs must be made according
to risk and cost analysis in order to decide what to test.
Testing AI, Statistical, and Non-deterministic AlgorithmsThese days the term AI (Artificial Intelligence) starts to become very popular, if not to say
the next buzzword. The term “AI” itself is very loaded with many philosophical meanings
and implications, which makes it too broad for any effective discussion. A somewhat
more specific term is “machine learning,” which means that the machine can “learn
by itself” without being specifically programmed to solve a specific task, by looking at
previous examples or by looking for patterns in the data. One particular technique for
machine learning that started to gain a lot of traction lately is “deep learning.” Deep
Learning is based on a technique called Artificial Neural Networks (ANN) that was well
known for several decades and was pretty widely used in areas like handwriting and
speech recognition. But Deep Learning also takes advantage of tremendous compute
ChaPTer 18 OTher TyPeS Of auTOmaTed TeSTS

443
power and access to vast amounts of data available on the Internet, which makes it
capable of solving new problems that were not considered to be solvable by computers
before. A canonical example for this technology are the computer vision offerings of the
big cloud vendors (Mainly Microsoft Azure, Google Cloud Platform, and AWS) that can
recognize the content of any arbitrary image and tell you what’s seen in it. The common
thing about all of the “AI” and deep learning techniques is that they heavily rely on
statistics.
There are seemingly two main challenges with testing algorithms that are based on
statistics:
1. You need a lot of data in order to get a meaningful result.
2. The exact results may vary with small changes (and
improvements) to the algorithm.
In addition, some of these algorithms make use of random numbers, which makes
them nondeterministic.
Approaches for Testing Statistical AlgorithmsFollowing are few approaches to consider when testing an application that makes use of
statistical algorithms. As always, you can mix between them as appropriate.
Mocking the Algorithm Altogether
Most systems that make use of statistical algorithms contain the algorithm in one
specific component. While this component typically contains the core value of the
product, it is usually wrapped with a lot of other components that contain normal
application code and business logic. When we want to test that business logic we’d often
hit a challenge trying to define the expected result, if that result relies on the outcome of
the algorithm.
For that reason, it’s often wise to mock the component that contains the algorithm
altogether when we want to test the result of the business logic of the application. Note
that the mock doesn’t have to simulate the logical behavior of the algorithm, and it can
even return absurd results. For example, suppose that our application allows the user to
upload a few images and to specify a name of an object to look for in those images, and
the application tells the user how many of the images contain the specified object. For
example, the user might upload four images, three of them containing a cat
ChaPTer 18 OTher TyPeS Of auTOmaTed TeSTS

444
(with possible other objects in the image), and one of a car, and specifies the term “cat”
as the object to look for in the images. The user should then get the result “3” because
only three images contain a cat. Let’s assume that the algorithm we’re using accepts only
one image at a time and returns a list of objects that it recognizes in the image. The mock
should not care what’s actually in the image and therefore you can feed it with the same
1x1 black pixel image all the time, and only tell it to return different results each time it’s
called. In the test, we can specify the results that the mock should return to be [cat, table]
the first time it’s called, [cat] the second time, [bottle, cat] the third time, and [car] the
fourth time. This way we can test the business logic of our application without having to
use the real algorithm whatsoever and be affected by its fuzzy results.
Obviously, in this approach we don’t test the algorithm itself, only the code that
surrounds it, but in many cases, this is what we actually need.
Using Absurdly Trivial Results
If you do want to test the application end to end, including the algorithm, but don’t
want the fuzziness of its results to affect the reliability of your tests, you can use absurdly
trivial cases. Following the previous example, instead of using a mock, and instead of
using a “cat” as the search term, you can use a “black rectangle” search term and provide
it with simple images drawn in MS-Paint that contain a black rectangle and optionally
other geometrical shapes in different colors over a white background. Recognizing these
shapes should be a lot “easier” for the algorithm and there shouldn’t be any surprises
as to the results of the algorithm. (If you’ll use real cat images, small changes in the
algorithm or its training data may result in identifying one of the cats according to its
breed and return “Ragdoll” instead of “cat,” for example.)
Using Thresholds
Most “deep learning” algorithms, as well as other statistical algorithms classify their
inputs to a set of possible outputs, returning one concrete result. But other algorithms
return one or more values, like percentages, estimations of quantities, date and time,
etc. Small changes in these algorithms or the use of random values may produce slightly
different results at each test run. Whether you want to test the algorithm itself or the end-
to- end application, you should consider defining the expected result as a range. In some
cases, this range can be the same for all cases, but in others it should be different for each
case. For example, suppose that the previous computer vision algorithm also produces
the certainty level of its results, and we also want to test that. Then for a black rectangle
ChaPTer 18 OTher TyPeS Of auTOmaTed TeSTS

445
over a white background we can assume that the certainty level should be very high (e.g.
99%), and we can use a narrow range (e.g. 98%–100%) for our tests. But for a specific
image of a cat which is not very clear, where the confidence level that we get is 65%, we’d
probably also want to use a wider range as the expected confidence level, of let’s say,
50%–90% to allow for future changes in the algorithm.
The thresholds can be used for other results that are not percentages. For example,
we may use an algorithm that attempts to predict the number of participants in a
particular event. Suppose that under certain circumstances it currently predicts that
120 people will attend the event. If we’ll determine the expected result to be exactly 120,
then small changes in the algorithm will likely fail our test. So, we can use a range of
110–150 to be safe. You should consult with the product owner about the range, because
sometimes either the upper bound or the lower bound should not be too far from the
current result, while the other bound can vary more.
Using Test Sets or Regression Data
When you want to test the algorithm itself, you normally need a volume of data, along
with their expected results. Machine learning algorithms are typically categorized into
supervised learning and unsupervised learning (and sometimes also semi-supervised,
but that’s beyond our scope). With supervised learning, the algorithm is fed with a set
of training data, which contains both the input data and the expected outcome of the
algorithm (often referred to as “labeled data”). For example, for handwriting recognition,
the labeled data can contain a big set of images of handwritten letters along with the
actual letter (character). The common practice is to split the available labeled data into
three parts:
• Training set – this set of data is used by the algorithm to “learn” the
patterns.
• Validation set – this set of data is used by the algorithm engineer
(AKA data scientist) to validate the accuracy of the algorithm and
fine-tune its parameters to improve its results.
• Test Set – this set of data is used to verify the final effectiveness of
the algorithm. The reason that this step is important is to avoid a
phenomenon called overfitting, where the algorithm can identify the
data in the training and validation sets very accurately, but identifies
any other input data much poorly
ChaPTer 18 OTher TyPeS Of auTOmaTed TeSTS

446
The last part can be implemented as a data-driven test (DDT), or as a single test that
loops over the data and invokes the algorithm. This test can constitute the regression test
for the algorithm. Note, however, that in many cases it is not expected that 100% of the
rows in the test set will actually pass. A threshold should be put on the number, or the
percentage, of failures to determine the success criteria of the algorithm.
For unsupervised learning, and for algorithms that are not classification algorithms,
you’d probably won’t have a predefined test data. In these cases, you can probably take
some historical data, feed the algorithm with it, and save its results as a reference (i.e.,
expected results) for future test runs. As mentioned above, you should also take some
reasonable thresholds either for each result, or a fixed threshold for all results, and use
that data for a data-driven test. Given that your current algorithm does its job pretty
well and that your thresholds are appropriate, then this data can make a good use of
regression testing for the algorithm.
Testing Applications That Use Random NumbersRegardless of AI, applications use random numbers for various purposes. Obviously,
games are the most common example, but some business applications use them too.
There are few approaches to tackle the challenge of testing these applications.
Mock the Random Generator
In most cases, using a mock for the random generator is the best approach, as it gives
the test full control over the “randomly” generated values. If you want to use this
mock outside of a unit or component tests, then you need to have a way to inject that
mock into the process of the SUT. This can be done by means of dependency injection
mechanisms, a dedicated configuration flag, and so on. In fact, this is similar to how we
go about simulating the system’s data/time as described in Chapter 6.
Use a Known Seed
Random generators use a special algorithm to generate a sequence of numbers that
has a more-or-less uniform distribution. In order for the sequence to be different each
time, they normally use the number of milliseconds or system ticks since the computer
has started or of the current date/time as the initial value for this sequence. This initial
value is called the seed, and you can typically provide it directly to the random generator,
instead of using the system’s clock. Providing the same seed in different invocations of
the application causes the exact same sequence to be generated.
ChaPTer 18 OTher TyPeS Of auTOmaTed TeSTS

447
Therefore, you can add a “hidden” option in your application to provide this seed
value from a configuration file or any other external source and use it in the tests in order
to ensure consistent and deterministic results.
Even though this approach also requires a change in the SUT, this change is usually
much simpler. However, it doesn’t actually give you control over the generated values,
which you may need to simulate some edge cases, as it only ensures that the sequence is
consistent. Moreover, small changes in the application code, including refactoring which
should not affect the behavior of the application, may nonetheless cause the application
to produce different results with the same seed. For example, if a game needs to initialize
the player to a random location on the screen, it should draw two random values: one for
the X coordinate and the other for the Y coordinate of the player. If the application draws
the X value first and then the Y value, or the other way around, it does not matter from
the user standpoint (because both of them are random), but if this order is changed, it
will fail the test if it relies on the seed to produce the same location each time.
Testing Business Intelligence (BI) ApplicationsThe term Business Intelligence (BI) is used to describe technologies and applications
that help the organization analyze data stored in its systems, in order to provide business
information and insights about it for the sake of helping decision makers make better
business decisions. While this is a wide topic, which sometimes also involves machine
learning, in many cases it’s comprised mainly from a bunch of ETL processes and
corresponding reports. ETL, which stands for Extract, Transform and Load basically
mean to take data from one place (Extract), transform it to better suit the format we
need, and/or extract the relevant information, and the load it to another database, from
which it can be queried more easily. While normally these ETL processes and reports
work on large volumes of data, mostly they don’t use complex statistical algorithms
to produce their results. Therefore, in order to test these ETL processes, or the BI
application altogether, you can usually treat is as testing any other application and use
small amounts of data, dedicated precisely for the needs of each test. The database can
be reverted to a clean backup before each test and filled only with the relevant data by
each test according to its needs.
For example, if a report should show the percentage of employees that work in the
company, classified by their seniority, in ranges of 0–1, 1–3, 3–5, 5–10, 10–20 and 20+
years, you can generate between 1 and 3 employee records for each of these categories
(which total as about 10 records altogether), and verify the results accordingly.
ChaPTer 18 OTher TyPeS Of auTOmaTed TeSTS

448
While most BI applications are pretty complex, performing many transformations
and allowing the user to slice the data in the reports in various manners, you can usually
test each of these features separately as you would normally do with regular applications.
SummaryIn this chapter we saw different uses of test automation other than the normal functional
tests. For each of these uses, we discussed the challenges that they pose. For each of
these challenges, we saw one or few ways to tackle them. But this is only a sample.
There are many other unique uses for test automation and reality imposes many
more challenges on any unique use. Eventually you’ll be left on your own to find the
appropriate solution for your unique problems. I hope though that you gained some
ideas and insights that will help you face any such challenge to come.
ChaPTer 18 OTher TyPeS Of auTOmaTed TeSTS

449© Arnon Axelrod 2018 A. Axelrod, Complete Guide to Test Automation, https://doi.org/10.1007/978-1-4842-3832-5_19
CHAPTER 19
Where to Go from HereFirst, I want to thank you for reading this book to its end! But your journey for learning
about test automation doesn’t end here, rather it has only started. Actually, it will also
probably never end. Here are some general tips for the journey.
Make MistakesAs with all important things in life, so it is with test automation: there’s no one right way,
and even if there is, you may not know what it is. But if you’re afraid to make mistakes,
you’ll go nowhere. Mistakes and failures are invaluable learning resources. Over time,
you’ll learn from your mistakes and be able to improve. You’ll probably make new
mistakes but hopefully won’t repeat the same ones that you made before.
One important tip in that regard, is that if you can do a quick experiment that will
tell you whether you’re in the right direction or not, then do it! It’s much better to fail fast
than to stick to a mistake for a long time.
Listen, Consult, and Take AdviceBecause there’s no one right way for most things, you can learn a lot from the mistakes,
experiences, or even the ideas of others. Consult the people whose opinions you value
the most, but also listen carefully for those who you usually don’t. Even if you don’t
accept their opinion, at least you’ll understand their different point of view better, which
can be very valuable too.
Also, don’t afraid to ask for help, ask for review, or to ask questions. Remember: the
only stupid question is the one you don’t ask. Reviews (code reviews, design reviews, or
even reviewing ideas) are an invaluable way to learn, which cannot be overrated. And
finally try to get help whenever you need it. You may find help on the web, including

450
on this book’s website (www.TheCompleteGuideToTestAutomation.com), but sometimes,
if you feel that you lack enough knowledge in a specific domain, you should probably
look to hire someone to help you, whether it’s a part-time consultant or a full-time
employee. Obviously, you’re always welcome to hire me as a consultant as well (you can
contact me through LinkedIn at https://www.linkedin.com/in/arnonaxelrod/).
Having said that, I’d recommend that at least for specific technical questions, you
should first try to find the answers yourself before asking someone, either by reading the
docs, searching the web, or even better – by experimenting. When you find the answer
for yourself, you’re more likely to remember the answer and get a better understanding
of the issue.
Understand and Align to Your Business’s GoalsAt the end of the day, test automation is just a means to an end. If used properly, this tool
usually helps the organization to release stable versions much more rapidly and do that
for a long time. But each organization has different goals and ways to reach those goals;
and at different phases, the organization may have different goals or strategies to achieve
them. Understanding your organization’s needs and goals should guide you when you
plan, develop, or use test automation, to best serve your current organization’s goals.
Get to Know Your ToolsNo matter how you’ve built your automation solution, you’re using a set of tools. For
example, Selenium, MSTest, Visual Studio, and C# may be your primary tools. For the
tools you’re using the most, try to get to know them in depth and expand your knowledge
about them. Often people use a tool for a long period of time, but they only know and
use a small portion of its capabilities and features. Knowing the tool that you’re using
on a regular basis deeply usually can make you much more efficient! The primary way
to learn a tool in depth is to read its docs. Another useful way to learn more about tools
is simply by exploring their features. You can explore features of a code library (like
Selenium and MSTest) by using code-completion and inline tooltips, explore IDEs by
traversing its menus, etc. Whenever you encounter something that you didn’t know
about, take some time to experiment with it or at least to read more about it. For open
source projects, you can even clone their repositories and look inside their code.
Chapter 19 Where to Go from here

451
In addition, you can subscribe to relevant topics on StackOverflow1 to get a feed of
questions specific for the tools you’re using the most. Reading other people’s questions, with
or without their answers, exposes you to different features and problems that you were not
aware of. Trying to answer some of these questions presses you to check your answer and to
formulate it in a clear way, which strengthens your understanding of it (as the old saying goes:
teaching is the best way to learn). If you also take the time to research some of these questions
that you don’t know the answer to, you’ll probably learn something completely new.
Gaining knowledge about your tool not only makes you more productive but will
eventually make you the go-to person about this tool, which will make you even better
at it. Moreover, when you know one tool in depth, you have a better understanding
on how it works. When you come to learn another tool that works in a similar manner
(e.g., another test automation framework, another UI automation technology, another
programming language, etc.), you’ll quickly identify the similarities and differences
compared to the tool you already know and you’ll learn the new tool very fast. The more
tools you’ll know, the quicker you’ll learn new ones.
Improve Your Programming SkillsAs stressed enough throughout this book, test automation is primarily programing.
Therefore, treat yourself as a software developer. Get to know your programming language
and IDE in depth; ask for code reviews; take some programming tasks; learn new
programming languages and paradigms (e.g., functional programming, actor model, etc.); go
to developer’s conferences, etc. See Appendix D for some tips and practices to improve your
productivity as a programmer, like working effectively with the keyboard, understanding
some language features, writing error-proof code, handling exceptions properly, etc.
Throughout this book I reference few other books and paradigms about
programming that I believe that every programmer should master, such as Clean Code,
the SOLID principles, Design Patterns, Refactoring, and TDD.
I even believe that in order to be a good test automation developer, you should
spend a couple of years as an application developer. Not only will you improve your
programming skills, but you’ll also have a better understanding of the developer’s
work and the challenges they’re facing, both from the technical standpoint, but also
from aspects like organizational processes and workflows. When you return to develop
automated tests, you’ll have a whole new perspective on it.
1 www.stackoverflow.com
Chapter 19 Where to Go from here

452
Improve Your QA SkillsWhile I mostly stress that automation is programming, it is definitely also about QA.
Analytical and critical thinking are key to test planning and failure investigation.
But first and foremost, you should be primarily focused on quality, and not on the
test automation per se. Remember that test automation is just a tool, that testing
goes way beyond automation, and that QA goes way beyond testing. Try to acquire
a broader view on the tested application, its users, and the development life cycle,
in order to be able to assess where the real risks are and the ways to mitigate these
risks most effectively. Try to define what quality really means for your organization
and for the users, and try to find ways to measure these things effectively, in order to
make a real change.
Similar to improving your programming skills, you should also improve your
QA skills by reading about different and new QA paradigms, talk to people, listen to
podcasts, and go to conferences. Clearly, spending a couple of years as a tester will help
you know their challenges, standpoints, and the way they think better. But instead of
spending a couple of years in each role, probably the best way is to spend a couple of
years in a team where everyone does everything (dev, testing, DevOps, etc.) or at least a
multidisciplinary team that works in a tight collaboration.
Broaden Your HorizonsIn our day-to-day work we’re only being exposed to a specific problem domain,
specific organizational structure, processes, architecture, etc. If you really want to be
a professional, you should know more about what happens in other places, domains,
technologies, and so on. A great way to gain this knowledge is by going to conferences
and local meetups (AKA User Groups), but also to read and participate in forums and
groups on social media, reading blogs, listening to podcasts and similar things. Reading
books is also an excellent way to expand your knowledge and also to deepen it in the
areas you’re already familiar with.
Once every few years, looking for and taking new opportunities inside your
organization, or outside – if you don’t find what you’re looking for inside – can also
broaden your horizons a great deal.
Chapter 19 Where to Go from here

453
Share Your KnowledgeFinally, whenever you gain some knowledge about something, even if you think that it’s
not much and that probably most others already know it, share it nonetheless. You’ll be
surprised how much value this knowledge can be to others. Today it’s very easy to share
your knowledge though LinkedIn, or to open a blog. Writing down something to explain
it makes you understand it even better. Getting comments from the community will
give you ideas for improvement and can pretty quickly make you a domain expert in a
particular area.
Beyond writing a blog, you can share your knowledge by speaking at conferences
and meetups. Local meetups are typically more suitable for less experienced speakers,
which makes it a great way to start. But it can also give you invaluable experience and
confidence for later speaking at conferences.
Sharing your knowledge with the community (whether it is blogs, meetups,
conferences, or any other way) makes you a known personality among your colleagues
and potential future employers or customers, and it can give your career a significant
boost. Even if your blog remains pretty anonymous, pointing potentials employers to it
can give you a big advantage even before the interview process, over similar candidates
that don’t write blogs.
Share the Tools You BuildOne way to share your knowledge in a very helpful way is by sharing reusable code and tools
that you developed, as an open source project (or as a tool that you can download or use
online). If this code or tool is indeed useful for other people, they’ll probably appreciate it
much more than if you only shared your plain knowledge. Also, managing a successful open
source project has all the benefits for your career as sharing knowledge does.
This is what I did with the Test Automation Essentials project (described in Appendix
C). I simply took everything I built that can be reusable by other projects and shared it on
GitHub.
Don’t Forget to Enjoy!Take whatever advice you feel like from this chapter and from this book in general, but
most importantly – don’t forget to enjoy whatever you do! Oh, and wear sunscreen!
Chapter 19 Where to Go from here

455© Arnon Axelrod 2018 A. Axelrod, Complete Guide to Test Automation, https://doi.org/10.1007/978-1-4842-3832-5
APPENDIX A
Real-World ExamplesIn Chapter 6, we’ve discussed how to design the test automation to fit the architecture
of the specific application. This appendix describes three examples based on real-world
applications that I was involved in designing test automation solutions for.
Note that these examples are only based on real-world cases. Some details have
been changed for clarity purposes, to protect Intellectual Property, and for anonymity
purposes. A couple of ideas that are presented here did not come to full fruition in the
real projects, mainly due to priority changes, internal politics, etc., but the technical
feasibility of all of them were at least proven.
Example 1 – Water Meters Monitoring SystemOne of my clients develops electronic water meters and a system for controlling and
monitoring the meters in towns and districts. The meters themselves, including the
electronics and the embedded software, are developed and tested separately from the
control and monitoring system for the towns and districts.
They called me to help them build a test automation infrastructure for the control
and monitoring system. This system is a website that can display information about the
meters and their statuses over a Google Maps widget, in addition to more standard ways
like tables, forms. and charts. The system has the architecture depicted in Figure A-1.

456
Here’s a description of the components and the interactions between them:
• The Web Client is the HTML pages along with JavaScript and CSS
files that the browser uses in order to show the UI and interact with
the user. Like any other website, these HTML pages and related files,
as well as the data to display are retrieved from the Web Server on the
server side. The main page also displays a Google Map widget and
uses the Google Maps JavaScript API to add markers in the locations
of the meters on the map.
• The server side contains the following components:
• The Web Server is the server side of the website, which provides
the HTML, JavaScript, and CSS files to the clients’ browsers, as
well as Web API that provides the data that needs to be displayed.
The Web Server mainly retrieves the data and receives events on
important updates from the Data Layer. In addition, it can send
commands to the meters, also through the Data Layer.
Web Client
Server
Web Server Data Aggregator
Data Layer
DB
Communication Server (3rd party)
Cellular network
Figure A-1. Architecture diagram for water meters monitoring system
Appendix A ReAl-WoRld exAmples

457
• The Data Layer manages the access to the data and provides
relevant notifications to the layers above it about updates of data.
The Web Server uses the Data Layer to retrieve data from the
database, get notifications and send commands, while the Data
Aggregator uses it to store and update data in the database and
receive commands to send to the meters.
• The Data Aggregator component receives a stream of near real-
time data from all of the meters throughout the district, through
the Communication Server. It aggregates it and transforms it to
the structure that the Data Layer requires. In addition, it sends
commands to the meters according to requests from the Data
Layer. Before sending a command, the Data Aggregator first
translates it from the internal data structures of the application to
the protocol that the meters can understand.
• The Communication Server, which was developed for my client
by a subcontractor, behaves like a specialized router between the
application and the meters. The Communication Server itself doesn’t
read or change the content of the messages but only dispatches them
to and from the right meter, through a cellular network.
• Finally, the meters themselves are the physical electro-mechanic
devices that measure the water flow, alert on problems, and accept
commands like open or close the tap. These devices are equipped
with a cellular antenna to communicate with the Communication
Server. Even though these devices also have software in them, this
software is developed in a completely separate group in the company
and in different cadence. Therefore, for the purpose of testing the
Control and Monitoring system, the software on these devices can
also be considered as 3rd party, and not an integral part of the system.
When I was called to help the QA team establish a framework for their automated
tests, I asked them what was important for them to test. The initial response was: “end
to end.” However, when we dove deeper, it turned out that what they really care about
are the UI and server pieces, which are all the software that they build themselves in that
group, while the Communication Server and the Meters themselves are of less interest as
they were considered stable and reliable.
Appendix A ReAl-WoRld exAmples

458
Simulating the Communication ServerThen I asked them how they performed their manual tests today, and it turned out that
they’re using a database that is a copy of one of their clients and performs all of the
tests through the Web Client’s UI. Only at our meeting they realized that they’re not
testing the Data Aggregator component at all, even though a big part of the logic is there.
When we discussed how we should approach it from a test automation perspective,
we came to the conclusion that we need to create a simulator for the meters and the
Communication Server. This is the only way we can also test the Data Aggregator
component and also is necessary in order to create reliable tests that cannot affect one
another.
At first it seemed like an unrealistic mission, because the QA team and their manager
were stressing that on one hand, because only the developers have the knowledge of
the protocol, then they’re the ones that should develop the simulator; but, on the other
hand, the developers are too busy and will have no time for that in the foreseeable future.
But then I suggested that the developers will only provide the documents of the protocol
and a little bit of knowledge transfer, and that the automation developers will actually
develop the simulator. So, the QA manager called the relevant developer and asked him
if he can help us with that, and he promptly agreed! It turned out that they have a very
detailed document of the protocol, and for any unclear or outdated details he was happy
to assist us. Figure A-2 shows the final architecture of the test automation.
Appendix A ReAl-WoRld exAmples
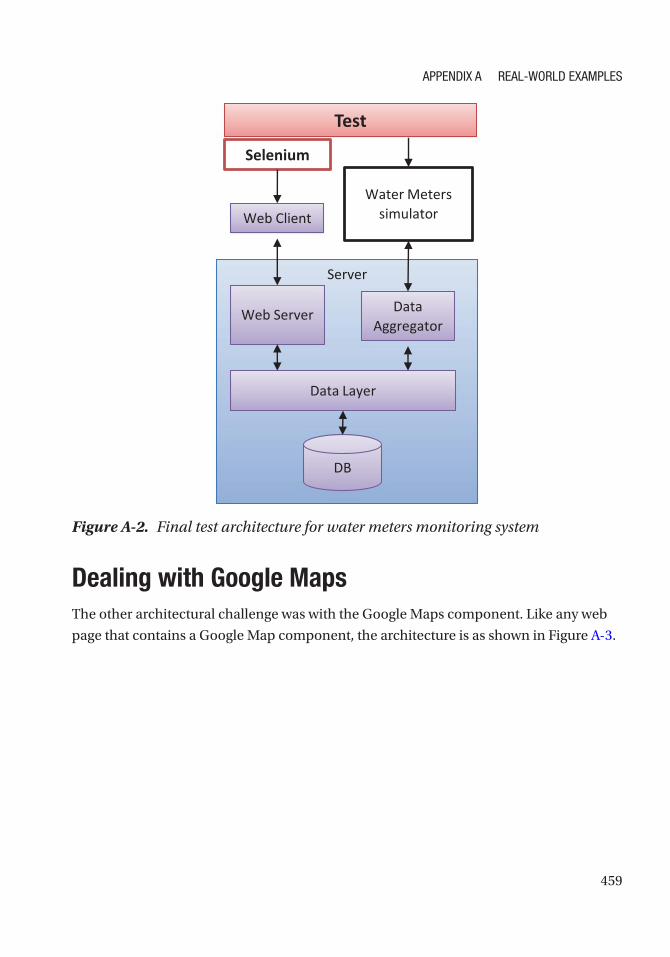
459
Web Client
Server
Web Server Data Aggregator
Data Layer
DB
Water Meters simulator
Test
Selenium
Figure A-2. Final test architecture for water meters monitoring system
Dealing with Google MapsThe other architectural challenge was with the Google Maps component. Like any web
page that contains a Google Map component, the architecture is as shown in Figure A-3.
Appendix A ReAl-WoRld exAmples

460
As Selenium was the obvious choice for our UI automation technology, when it
comes to a graphical component like Google Maps, it isn’t trivial to work with. Google
Maps is based on an HTML 5 SVG (Structured Vector Graphics) element, which contains
all the raw data that represents lines and shapes required to display the map. While
Selenium has access to this data, it’s unfeasible to reason about it and to identify the
meaning of what the user sees. However, Google Maps also uses a JavaScript API behind
the scenes that provides more meaningful information and operations. Selenium on its
part can send any JavaScript code that we’ll give it to be executed directly in the browser
and get the result back, so we can use Selenium to query and manipulate the JavaScript
API of Google Maps, and thus we can get a meaningful notion of what the user sees.
Figure A-4 shows the architecture of the solution with regard to the Google Maps
component.
Web Client
Google Maps JavaScript API
Google Maps REST services
Internet
Web Server
Internet
Figure A-3. Web Client architecture with Google Maps
Appendix A ReAl-WoRld exAmples
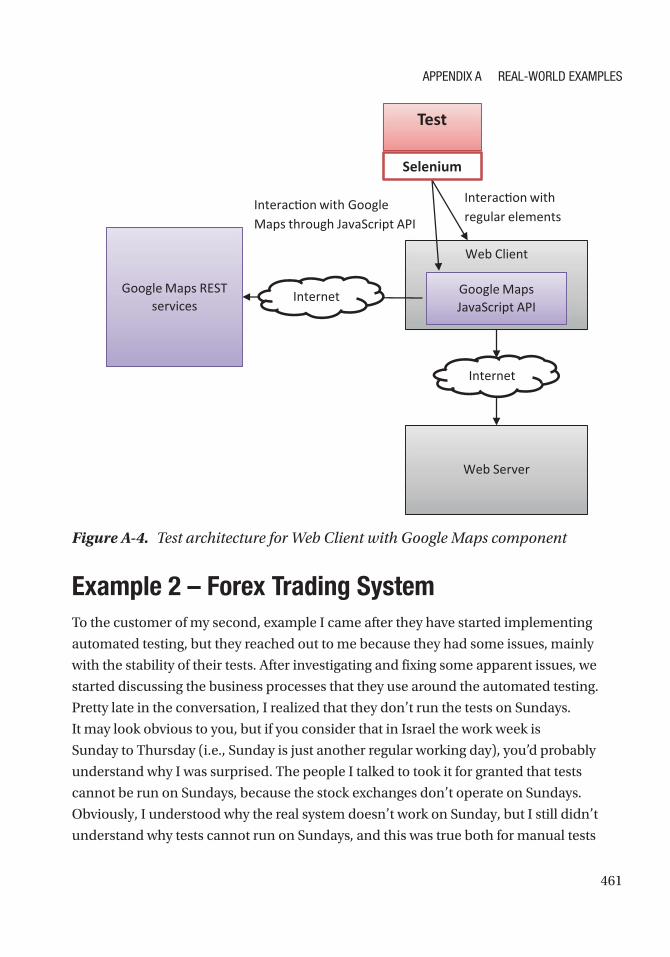
461
Example 2 – Forex Trading SystemTo the customer of my second, example I came after they have started implementing
automated testing, but they reached out to me because they had some issues, mainly
with the stability of their tests. After investigating and fixing some apparent issues, we
started discussing the business processes that they use around the automated testing.
Pretty late in the conversation, I realized that they don’t run the tests on Sundays.
It may look obvious to you, but if you consider that in Israel the work week is
Sunday to Thursday (i.e., Sunday is just another regular working day), you’d probably
understand why I was surprised. The people I talked to took it for granted that tests
cannot be run on Sundays, because the stock exchanges don’t operate on Sundays.
Obviously, I understood why the real system doesn’t work on Sunday, but I still didn’t
understand why tests cannot run on Sundays, and this was true both for manual tests
Interac�on with regular elements
Interac�on with Google Maps through JavaScript API
Web Client
Google Maps JavaScript API
Google Maps REST services
Internet
Web Server
Test
Selenium
Internet
Figure A-4. Test architecture for Web Client with Google Maps component
Appendix A ReAl-WoRld exAmples

462
as well as the automated tests. Eventually I realized that they depend on a third-party
service that provides the real-time data from various stock exchanges throughout the
world, and most of the features of the application are unavailable when there’s no trade.
This is all fine as far as the production system is concerned, but it turned out that the
same service is used in the testing environment too, and that’s what prevented them from
testing on Sundays.
While this service by itself was pretty stable, the dependency on that service also
implied that the tests had some awkward dependencies on specific, real stock symbols,
and from time to time the stocks that the tests used had to be replaced due to changes of
some properties of these stocks in the real market. The tests didn’t only depend on the
existence of particular stock, but also on their properties. Even though the existence of
the stock almost never changed, their properties did change from time to time, requiring
them to change the tests accordingly or to choose another stock for the test. In addition,
there were certain situations where specific stocks were temporarily unavailable due
to real trading constraints. Obviously, the test didn’t have any control over that, and
altogether, this was a significant part of what made the tests unstable.
Furthermore, it turned out that the most basic functionality of the system cannot be
validated, because the test had no control over the most important input of the system,
which is the data that is received from this trading service. For example, they couldn’t
predetermine the loss or profit of a trading transaction, because they couldn’t tell how
the stock would behave.
After that conversation I realized I must have a better understanding of the
architecture of their system and so I asked them to show me an architecture diagram.
The architecture diagram that they showed me was similar to the one in Figure A-5.
Appendix A ReAl-WoRld exAmples

463
The SolutionDue to the conclusions from that discussion, we decided to implement a simulator for
the Trading Server (and its proxy). This allowed us to have better control of what’s going
on in the tests and to simulate scenarios (including the very basic ones!) that we couldn’t
test before. Obviously, it made the tests more reliable and allowed the tests to run at any
time, including Sundays.
Instability Caused by CRMAnother component that affected the stability of the tests was the CRM application.
The main system was connected to a Microsoft Dynamic CRM system that stored
the information about their users. The Microsoft Dynamic CRM application was also
extended and tailored to their needs (the “CRM Components” in the diagram). The team
that worked on this part of the system was separated from the team that worked on the
main Web Server, but the testing environment of the main Web Server was configured to
work with the same testing environment of the CRM team. Due to technical constraints,
the CRM Components developers used their testing environment not only for testing per
UI (web)
Web server
DB
Trading proxy (3rd. party)
Trading server
Stock Exchange
Stock Exchange
Stock Exchange
CRM DB
Microso� Dynamic CRM
CRM Components
Figure A-5. Forex trading system architecture
Appendix A ReAl-WoRld exAmples

464
se, but also for debugging during development. This meant that the CRM application
was mostly unstable. As a result, whenever the main Web Server had to use the CRM
component, it was communicating with the unstable CRM application that, in turn,
made the tests of the Web Server unreliable too.
Isolating the EnvironmentsBecause the CRM components are tightly coupled (by design) to Microsoft Dynamic
CRM, and because the goal was to test the system end to end, including the CRM
Components, we’ve decided not to simulate the CRM as done for the Trading service.
Instead, in order to stabilize the tests, we’ve decided to detach the test environment of
the Web Server from the test/dev environment of the CRM Components, and instead
to create another CRM installation inside the normal test environment. An automated
build (that runs nightly but can also be triggered on demand) was created to build the
code in the source control, and upon success, deploy both the Web Server and the
CRM Components to the test environment. This allowed the developers of the CRM
Components to debug their code on their original environment, and only after they
verified their changes, check in the code to the source control system, thus leaving the
test environment clean and stable enough to run the automated tests. Figure A-6 shows
the final architecture of the test environment.
Appendix A ReAl-WoRld exAmples

465
Testing the Mobile Application with Abstract Test ScopeIn addition to the normal web application, they started to develop a new mobile
application. The mobile application has basically provided the same functionality, but
the UI was organized differently to fit to the smaller form factor of a smartphone. The
UI technology that was used for the mobile application was of a hybrid application,
meaning that it’s like a web browser embedded inside a shell of a native application. That
means that technically we could use Selenium also to test the mobile application, but
because the UI was organized differently, then we couldn’t reuse the existing tests as is.
Test Environment
UI (web)
Web server
DB
Trading Server
Simulator
CRM DB
Microso� Dynamic CRM
CRM Components
Automated tests
Selenium
CRM Component’s Dev environment
CRM DB
Microsoft Dynamic CRM
CRM Components
Figure A-6. Final architecture of test environment
Appendix A ReAl-WoRld exAmples

466
Therefore, in order to support testing both the regular web application and the
mobile one, we decided to refactor the test code to use the Abstract Test Scope pattern
that was described in Chapter 6: The test methods themselves shouldn’t need to
change, but we extracted a set of interfaces for every class and method that represented
a business functionality (that uses the regular web application), and created a new set
of classes that implemented these interfaces, but using the mobile application. We’ve
also added a setting to a configuration file that determined whether we should use
the normal web application or the mobile one, and according to that setting, the test
automation instantiated the appropriate classes.
Example 3 – Retail Store ManagementOur third example is of a client/server application for managing retail stores. Unlike the
first two examples, which are central web sites with a single deployment, the application
in this example is an off-the-shelf product that retailers can buy, install, and run on
their own hardware. Because this software was an off-the-shelf product, and because
it was a major and important software that the retailers used to run their businesses,
it was important that it would be highly customizable and extensible. In addition, we
supported several different deployment options to fit retailers of different sizes and
needs. Figure A-7 shows the architecture for a full deployment of the system.
Appendix A ReAl-WoRld exAmples

467
Mgmtweb server
Headquarters BLweb server
DSS
HQ DB
Mgmtweb server
Store BLserver
DSS
Store DB
Client
Local BL server
Local DB
DSS
Store
physical site
Cash register machine
Figure A-7. Architecture of the application in full depoloyment
Appendix A ReAl-WoRld exAmples

468
Description of the ArchitectureWhile this architecture may look daunting at first, many of its components are simply
different instances of other identical components. Let me first explain the high-level
architecture described in the diagram, and then I’ll explain each component.
In a full deployment configuration, which is suitable for a large chain retail store,
the application is deployed on all cash register machines, a store server for each store
(branch) in the chain, and a central server in the headquarters. As shown in the diagram,
different components of the store server and the headquarters server may be deployed
on separate machines. In addition, for redundancy purposes there can be more than one
instance of the central headquarters server, but that’s beyond the scope of the diagram.
In particular, each deployment instance consists of at least:
• A Business Logic (BL) server – this is a REST/HTTP server that
contain all of the business logic. In the full deployment option,
each cash register contains its own local server and database for
the sake of scalability and availability in case of a network failure.
All of the BL servers, including the central servers of the stores and
the headquarters. are essentially identical. The REST API was also
intended to be used by advanced customers so that they can develop
adopters to other systems or even create their own UIs.
• A database – the database contains all of the data that the server
needs. Among other things, each instance contains the data of all
products that are available in the store and their prices, and all the
data of the sales transactions that are related to that machine: cash
registers normally store the transactions that were handled at that
same register during the same day, the store DB stores a copy of the
transactions that were handled by all the cash registers in that store
(branch), and the headquarter DB stores a copy of the transactions of
the entire chain. In the Headquarters and Store servers, the database
can be deployed on separate machines.
Appendix A ReAl-WoRld exAmples

469
• Data Synchronization Service (DSS) – this component is responsible
to synchronize the data between the different servers. Generally,
most data changes (e.g., updates to products and prices) are
transferred from the higher tiers (Headquarters, Store) to the lower
tiers (cash registers), while sales transaction logs are transferred
upwards. The DSS has dedicated business logic that allows it to
decide which data it should transfer to which other server and
which it shouldn’t. For example, some products and prices can be
applicable only to some stores and not the others.
Because that in the full deployment configuration the BL server is deployed both on
the cash registers, at the store levels and at the headquarters, it was also called a “3-tiers”
deployment.
In addition to the components that exist in every instance, the cash register
machines have a dedicated UI client application that the cashiers use. This component is
mostly a thin UI layer that talks to the local server that is installed on the same machine.
Lastly, the Management web server can also be deployed and connect to Store
and Headquarters servers. This server provides a web interface for managing all data,
including products and prices and also viewing and querying sales transaction logs and
some analytical dashboards.
Minimal DeploymentAs mentioned above, the application supports different deployment configurations
according to the size and the needs of the particular customer (store). So above I
explained the most complex configuration, and now I want to describe the simplest one.
The most minimal deployment consists of only one BL server, a database, and one
client, all on one single machine, which is the cash register. Typically, one Management
server will also be present, but even that’s not obligatory as instead the data can be
transferred from a third-party management system using the REST API. Figure A-8 shows
the minimal deployment configuration.
Appendix A ReAl-WoRld exAmples

470
The internal structure of the Server and Cash Register applications were very similar
to the typical client/server architecture mentioned at the beginning of Chapter 6.
However, it’s important to note a few things:
1. The Service Layer was used as the public REST API. Customers
used this API mainly for integrating this system with other systems
and automating business processes.
2. The Business Logic layer was also exposed as a .Net API, mainly
to allow customers to extend, customize, and override the
default behavior of the system. This layer was made out of many
components, some of which had interdependencies.
3. Each data entity (e.g., Product, Price, Sales, Customers, Cashiers,
and many more) that had to be transferred to other servers
using the DSS, had implemented an interface for serializing and
de-serializing itself as XML. We’ll talk about its consequences a
little later.
Client
BL server
DB
Cash register machine
Figure A-8. Minimal deployment configuration of the application
Appendix A ReAl-WoRld exAmples

471
Organizational StructureIn order to understand the considerations for the different test automation solutions,
it’s also important to understand the organizational structure (in Chapter 8 we’ve
discussed the relationships between the organizational structure, architecture, and test
automation). The application was developed by a group of about 200 people: about half
of them are developers, others being mainly testers and product managers. There was a
dedicated team for the Management web application, another team for the Cash Register
client, and yet another one for the DSS. The BL server was developed by a few other
teams, more or less corresponding to the different components in the Business Logic
layer, but each of them was also responsible for the corresponding parts in the Service
and Data Access layers. The project was managed using a Scrum methodology.
Test Automation SolutionsBecause the Business Logic layer was exposed as a public API it was important (and
natural) to write most of the tests as component tests. For each component, its tests
would mock the other components. In addition, these tests were mocking the DAL, while
other tests would test the DAL of each component separately. Naturally, as these tests
were very light and fast, they were being run as part of the CI build (see Chapter 15). This
build compiled and ran all of the tests of all the components together.
However, because of the interdependencies between the components, and
because the Service Layer also exposed a public REST API, it became important to test
the integration of the entire server as a whole on a regular basis. For this reason, an
infrastructure for integration tests was also created. The general guideline was that for
each User Story the teams should write at least one integration test in addition to the few
component tests that they were doing anyway. These integration tests were testing the
entire server and database as one unit, by communicating with it only through the REST
API. The infrastructure of these tests created a dedicated empty DB before all the tests
started to run for isolation purposes (see Chapter 7 about isolation) and used this DB
throughout the tests. This allowed developers to run these tests on their local machines
before check-in. These tests were also added to the CI build by installing the new version
of the server on a dedicated test machine and running all the tests there.
Appendix A ReAl-WoRld exAmples

472
While these tests were slower than the component tests, they were still pretty fast.
While tens of component tests were executed in a second, most integration tests took
between 0.5 seconds to 1 second. At the beginning it wasn’t an issue, but when the
number of tests raised to thousands, it took 30–40 minutes to run all the tests, and that
started to become an obstacle. Even though it doesn’t sound much, when developers
were under pressure to release a new feature, they often skipped running all the
tests before check-in, and then, mostly due to a conflict with a change of some other
developer, the build failed. At that moment no one (of 100 developers!) was allowed to
check- n their changes until the build was fixed. This was a huge bottleneck and time
waster. Add to that the build itself took even longer due to the overhead of compilation
and running the component tests (which was summed up to about 50 minutes) and
you’ll see how frustrating it could be.
The solution was to allow the tests to run in parallel. On developers’ machines
the tests were split between 4 threads (which was the number of cores on each dev
machine). In the build, we split the tests to 10 different machines, each running 4
threads! That allowed us to reduce the local run time to about 10 minutes and the overall
build time, including the compilation and component tests, to about 15 minutes! Of
course, that each thread had to work with a separate instance of the application and
with a separate instance of the database. Because the tests always started with an empty
database – it wasn’t a big issue.
Date/Time SimulatorThere was a bunch of features that were dependent on dates and times. Fortunately,
mainly due to the extensibility requirements, the system incorporated a dependency
injection (DI) mechanism. In addition, partly thanks to the component tests, but also
thanks to a proper architectural decision that was made early on, all uses of the System.
DateTime class in .Net were abstracted behind an interface that a singleton object has
implemented. This allowed us to develop a date/time simulator component that was
injected into the system using the DI mechanism and control it from the tests through
a specifically created REST end point. Figure A-9 shows the architecture of integration
tests including the Date/Time simulator.
Appendix A ReAl-WoRld exAmples

473
3-Tiers TestsThe Management web application, Cash Register client and DSS teams were writing
unit tests but no higher scope tests. However, manual testers often found bugs that were
happening only in a full (3-tiers) deployment. This was mainly because of the special
serialization and de-serialization code that should have been implemented separately
for each entity and was not being used in the single-tier integration tests nor in the
component tests.
Service Layer
Date/Time Provider
BL
DAL
DB
Real System
Service Layer
Mock Date/Time Provider
BL
DAL
DB
Test Environment
Test
Rest
Rest
Figure A-9. Architecture of the integration tests including Date/Time simluator
Appendix A ReAl-WoRld exAmples

474
Luckily, the infrastructure of the integration tests distinguished between REST
requests that normally come from the Cash Register and requests that normally come
from the Management application. This allowed us to make a pretty small change in
the infrastructure of the tests to allow them to run in a 3-tiers configuration. Instead of
directing all of the requests to the same URL, the requests that normally come from the
Management application were directed to the HQ server, and the requests that normally
come from the Cash Register were directed to the server of the cash register. Because the
3-tiers were configured and connected through the DSS, this allowed the existing tests
to run in this configuration and thus test the DSS and all of the serialization and de-
serialization code seamlessly, without having to change the tests! This can be considered
as a form of an abstract test scope, as described previously, but even without having to
implement two separate sets of classes for each configuration.
In fact, the change was a little more complicated than just directing the requests to
different URLs, because it was necessary to wait for the data to propagate to the other
tiers. For that, we used special monitoring API of the DSS that allowed us to know when
the data has completed to propagate, so we could wait just the necessary amount of time
and not more. However, because these tests were much slower (about 1 minute per test,
as opposed to 1 second…), it didn’t make sense to run them in the CI, so we created a
different build process that ran nightly.
End-to-End TestsRegarding the Management application and the Cash Register client application,
even though they were covered by unit tests, it wasn’t enough to make sure that
they’re working correctly along with the server. Occasionally there were discrepancies
between the content of the requests that the clients were sending to what the server has
expected, or similarly between the responses that the server sent and what the client was
expecting. Therefore, at some point we decided that we cannot avoid automatic end-to-
end tests. These tests were using Microsoft Coded UI for the Cash Register client, and
Selenium to interact with the Management web application and were also running in
a dedicated nightly build process. In most cases, a dedicated team (reporting to the QA
manager) were writing these tests. Because the integration tests were already testing the
3-tiers deployment, it was enough for the end-to-end tests to test a single server but with
the combination of the Management server and the Cash Register client. So, a single
server gave us the missing coverage that we needed.
Appendix A ReAl-WoRld exAmples

475© Arnon Axelrod 2018 A. Axelrod, Complete Guide to Test Automation, https://doi.org/10.1007/978-1-4842-3832-5
APPENDIX B
Cleanup MechanismAs explained in Chapter 7, writing robust test cleanup code is not trivial and can be
error prone, though it’s possible to create a mechanism that solves the majority of these
problems. This appendix explains how to create such a mechanism step by step and
the recommended way to use it. Note that this mechanism already exists built in the
Test Automation Essentials project (see Appendix C), so at least for MSTest you can use
it almost out of the box, while for other frameworks for .Net (e.g., NUnit or xUnit), you
should adopt the mechanism to the framework yourself. For any other language outside
the .Net framework (like Java, Python, JavaScript, etc.), you should be able to implement
a similar mechanism according to the explanations in this appendix.
Understanding Callbacks and DelegatesThe cleanup mechanism is based on a programming concept called Callback. Different
programming languages implement callbacks in a different ways and syntaxes, but
all general-purpose languages have some way to implement it. A callback is a way to
reference a function or method and keep it for a later use. In C# this is achieved through
delegates, in Java through an interface with a single method (typically Consumer or
Function), in JavaScript and Python you can simply assign a function to a variable
without calling it (i.e., without the parenthesis after the function name). After you store
a reference to a function in a variable, you can call the function through the variable.
This allows you to assign different functions to the variable according to different
circumstances and then call the chosen function simply by calling what the variable
references. Some languages have a short syntax for declaring short inline anonymous
functions, often called Lambdas, so you don’t have to create and declare a whole new
method if you just want to store a reference to that simple method in the callback
variable.

476
In c#, the predefined delegate type System.Action is defined as follows:
public delegate void Action();
This definition means that a variable of type Action can reference any method that
takes no argument and doesn’t return a value (i.e., return void) as a callback.
Listing B-1 shows an example of delegates and lambda expressions in C# that use the
Action delegate type.
Listing B-1. Example of the concept of Callbacks using Delegates and Lambdas in C#
private static void Foo()
{
Console.WriteLine("Foo");
}
public static void Main()
{
// The following line doesn't call Foo, just stores the callback for
// later use.
Action x = Foo;
// do other stuff...
// The following line actually calls Foo
x();
// Assign a lambda expression (anonymous inline method) to x for later
// use. The empty parenthesis mean that it takes no arguments, and the
// code between the { } is the body of the method.
x = () => { Console.WriteLine("This is a lambda expression"); };
// do more stuff...
// Now the following line calls the body of the lambda expression.
x();
}
Appendix B CleAnup MeChAnisM

477
Building the Cleanup MechanismLet’s get back to our cleanup problem. I’ll describe the full solution step by step, in
order to explain the need of each nuance of the final solution. But before discussing the
solution, let’s recall what’s the problem is that we’re trying to solve.
The ProblemIf, for example, the test performs five operations that should be undone (e.g., creates
entities that should be deleted), and the fourth operation fails, then we want only the
first three to be undone, because the fourth and fifth operations didn’t actually happen.
Let’s take a more concrete example: suppose we’re building an e-commerce website,
and we want to test that when buying three items and adding a coupon, the system will
give the user the appropriate price reduction. In order to test this scenario, we should
first add three products to the catalog and also define the coupon details. Listing B-2
shows the original test method. The first four statements perform the operations that
we’ll want to clean up when the test ends.
Listing B-2. The original test method, without the cleanup code
[TestMethod]
public void CouponGivesPriceReduction()
{
var usbCable = AddProductToCatalog("USB Cable", price: 3);
var adapter = AddProductToCatalog("Car AC to USB adapter", price: 7);
var phoneHolder =
AddProductToCatalog("SmartPhone car holder", price: 20);
var coupon = DefineCouponDetails("12345", percentsReduction: 20);
var shoppingCart = CreateShoppingCart();
shoppingCart.AddItem(usbCable);
shoppingCart.AddItem(adapter);
shoppingCart.AddItem(coupon);
var totalBeforeCoupon = shoppingCart.GetTotal();
Assert.AreEqual(30, totalBeforeCoupon,
"Total before coupon added should be 30 (3+7+20)");
Appendix B CleAnup MeChAnisM

478
shoppingCart.AddCoupon(coupon);
// Expect 20% reduction
decimal expectedTotalAfterCoupon = totalBeforeCoupon * (1 - 20 / 100);
var totalAfterCoupon = shoppingCart.GetTotal();
Assert.AreEqual(expectedTotalAfterCoupon, totalAfterCoupon,
"Total after coupon");
}
The Basic SolutionIn order to leave the environment clean, we need to delete the products we added to
the catalog and the coupon definition. But as we said, if one of the operations failed,
we don’t want to perform its cleanup code or the cleanup code of the operations
that didn’t happen yet. Therefore, the basic solution is to manage a list of callbacks
(Action delegates) that each does an atomic cleanup operation. Immediately after
successfully performing an atomic operation that creates an entity or changes the state
of the environment, we should add to that list a delegate of a method (or lambda) that
undoes that operation. In the cleanup method of the testing framework, we’ll loop over
the list of delegates and invoke them one by one. As we’re using MSTest, we’ll do it in
the method that is decorated with the [TestCleanup] attribute (virtually all other unit
testing frameworks for any language have a similar method). Let’s first define the generic
cleanup mechanism inside our test class, as shown in Listing B-3.
Listing B-3. Basic cleanup mechanism
private readonly List<Action> _cleanupActions = new List<Action>();
private void AddCleanupAction(Action cleanupAction)
{
_cleanupActions.Add(cleanupAction);
}
[TestCleanup]
public void Cleanup()
{
foreach (var action in _cleanupActions)
{
Appendix B CleAnup MeChAnisM

479
action();
}
}
Now we can use it inside of our test method as shown in listing B-4.
Listing B-4. Using the cleanup mechanism inside the test method
[TestMethod]
public void CouponGivesPriceReduction()
{
var usbCable = AddProductToCatalog("USB Cable", price: 3);
AddCleanupAction(() => RemoveProductFromCatalog(usbCable));
var adapter = AddProductToCatalog("Car AC to USB adapter", price: 7);
AddCleanupAction(() => RemoveProductFromCatalog(adapter));
var phoneHolder =
AddProductToCatalog("SmartPhone car holder", price: 20);
AddCleanupAction(() => RemoveProductFromCatalog(phoneHolder));
var coupon = DefineCouponDetails("12345", percentsReduction: 20);
AddCleanupAction(() => RemoveCouponDefinition(coupon));
var shoppingCart = CreateShoppingCart();
shoppingCart.AddItem(usbCable);
shoppingCart.AddItem(adapter);
shoppingCart.AddItem(coupon);
var totalBeforeCoupon = shoppingCart.GetTotal();
Assert.AreEqual(30, totalBeforeCoupon,
"Total before coupon added should be 30 (3+7+20)");
shoppingCart.AddCoupon(coupon);
// Expect 20% reduction
decimal expectedTotalAfterCoupon = totalBeforeCoupon * (1 - 20 / 100);
var totalAfterCoupon = shoppingCart.GetTotal();
Assert.AreEqual(expectedTotalAfterCoupon, totalAfterCoupon,
"Total after coupon");
}
Appendix B CleAnup MeChAnisM

480
If, for example, adding the “phone holder” product (the third3 statement) fails, then
the only cleanup action that we’ve added so far is for removing the “USB cable”(in the
second statement), and therefore this is the only cleanup action that will be called by
the Cleanup method. Note that the AddCleanupAction method-calls in the test code
don’t call the RemoveProductFromCatalog and the RemoveCouponDefinition methods.
AddCleanupAction only adds a reference to these methods to the _cleanupActions list,
which is used to invoke them only in the Cleanup method.
However, there are two problems with this cleanup approach:
1. The test method is now cluttered with a lot of technical code,
which makes it much less readable.
2. Whenever we want to call AddProductToCatalog or
DefineCouponDetails, we need to remember to add the
appropriate cleanup action. This is very error prone and
introduces duplication because each call to AddProductToCatalog
or DefineCouponDetails should be followed by a call to
AddCleanupAction with the corresponding cleanup callback
method.
Gladly, the solution to both of these problems is very simple: Just move each call
to AddCleanupAction to inside the appropriate method that creates the entity that we
need to clean. In our case, we should move these calls to AddProductToCatalog and
DefineCouponDetails. Listing B-5 shows how to add the call to AddCleanupAction to
AddProductToCatalog:
Listing B-5. Adding the call to AddCleanupAction to AddProductToCatalog
private Product AddProductToCatalog(string name, decimal price)
{
Product product = ... /* original code of AddProductToCatalog comes
here (e.g. send HTTP request or add the data directly to the database,
as appropriate, and returning a new instance of an object that
represents the new product) */
AddCleanupAction(() => RemoveProductFromCatalog(product));
return product;
}
Appendix B CleAnup MeChAnisM

481
Now we can revert the test method back to exactly how it was in Listing B-2, but still
have the cleanup code execute appropriately when the test completes.
Reusing the Cleanup MechanismBecause we probably need this mechanism in most or even all of our test classes, it
makes sense to extract this behavior to a common base class. Listing B-6 shows the
cleanup mechanism in the base class.
Listing B-6. Moving the cleanup mechanism to a common base class
[TestClass]
public abstract class TestBase
{
private List<Action> _cleanupActions = new List<Action>();
public void AddCleanupAction(Action cleanupAction)
{
_cleanupActions.Add(cleanupAction);
}
[TestCleanup]
public void Cleanup()
{
foreach (var action in _cleanupActions)
{
action();
}
}
}
And make all test classes derive from TestBase.
Appendix B CleAnup MeChAnisM

482
Handling Dependencies Between Cleanup ActionsThat’s all nice and fine, as long as the changes we’re doing to the environment are
independent from one another. Let’s modify our example a little: suppose we want to
support a different type of coupon, one that is associated with a specific product, and
grants a discount only if that particular product is purchased n times. In this scenario,
we have to define a coupon that refers to a particular product, and therefore the product
must be created first, and when we define the coupon we specify the previously created
product to be associated with it. If the application enforces referential integrity between
the coupon definition and the product, then it should throw an error if you would try
to delete the product while there’s still a coupon definition associated with it. The test
code in Listing B-7 shows this scenario. Notice how the usbCable object is passed as
an argument to DefineCouponDetailsForProduct, which associates it with the new
coupon. Assuming that DefineCouponDetailsForProduct adds a cleanup action for
deleting this coupon, this code would throw an error in the Cleanup method, saying
that “Product ‘USB Cable’ can’t be deleted because there are active coupon definitions
associated with it.” Note that the exact line that throws the exception is not shown in the
listing, but we can conclude that it should be thrown from RemoveProductFromCatalog
(shown earlier in Listing B-5), which is called implicitly from the Cleanup method
(shown in Listing B-6) using the delegate, because it would be called before the delegate
that deletes the coupon is called.
Listing B-7. A test method that should fail due to the order of cleanup actions
[TestMethod]
public void CouponGivesPriceReduction()
{
var usbCable = AddProductToCatalog("USB Cable", price: 3);
var coupon = DefineCouponDetailsForProduct("12345", usbCable,
minimumCount: 4, percentsReduction: 20);
var shoppingCart = CreateShoppingCart();
shoppingCart.AddItem(usbCable, count: 4);
var totalBeforeCoupon = shoppingCart.GetTotal();
Assert.AreEqual(3 * 4, totalBeforeCoupon,
"Total before coupon added should be 12 ($3 * 4)");
Appendix B CleAnup MeChAnisM

483
shoppingCart.AddCoupon(coupon);
// Expect 20% reduction
decimal expectedTotalAfterCoupon = totalBeforeCoupon * (1 - 20 / 100);
var totalAfterCoupon = shoppingCart.GetTotal();
Assert.AreEqual(expectedTotalAfterCoupon, totalAfterCoupon,
"Total after coupon");
}
Fortunately, the solution to this problem is also pretty simple: we just need to call the cleanup methods in the reverse order to which they were added. It may look like
this solution is accidental and specific to our case, but if you think about it, whenever
we create a dependency between entities, we either first create the independent
entity (i.e., the entity upon which the other entity depends), and only then create the
dependent entity, or we create both entities independently (in any order), and only then
create the dependency between them, as a separate operation. In the first case, which
is like we saw in the example, deleting the entities in reverse order first removes the
dependent entity (which also eliminates the dependency itself) and then deletes the first
(independent) entity, which we don’t have any dependency on already. In the second
case, when we create the dependency between the entities, we should add the cleanup
action that removes this dependency (without deleting any of the entities). When
the cleanup actions will be called in reverse order, then the dependency itself will be
removed first, and only then the entities will be deleted. Listing B-8 shows a very simple
implementation of this solution.
Listing B-8. Reversing the order of cleanup actions to resolve dependencies
[TestCleanup]
public void Cleanup()
{
_cleanupActions.Reverse();
foreach (var action in _cleanupActions)
{
action();
}
}
Now the cleanup will be done in the right order, and no exception will occur.
Appendix B CleAnup MeChAnisM

484
Note You can obviously implement the cleanup mechanism using a stack instead of a list, and avoid calling Reverse. This will probably be slightly more efficient, but it’s pretty much negligible.
Handling Exceptions in Cleanup ActionsThe basic idea of the cleanup mechanism is to perform exactly the relevant cleanup
actions, no matter if the test failed or not, and if it failed, no matter in which line.
However, what happens if one of the cleanup actions themselves fails? Unfortunately,
nothing can be 100% safe, and the cleanup actions may throw exceptions too. In some
cases, for example, if the test changes a global setting that affects all tests, and the
cleanup action that should have reverted this setting to its original state, have failed, then
it may cause the rest of the tests to fail because of it. But in most cases, it’s not, and it’s
safe to continue to run the other tests. In addition, sometimes a failure in one cleanup
action may cause other cleanup actions to fail as well. But nonetheless, because we can’t
be sure, then it’s still worthwhile trying to call the other cleanup actions anyway.
In any case of failure, we must report all of the details of the exception in order to
be able to investigate and fix the root cause (as described in Chapter 13). In case an
exception is thrown out from the Cleanup method, the unit testing framework will report
it automatically as part of the test results. But because we want to continue running the
other cleanup actions, then we need to catch each exception. Therefore, we need to
collect all of the exceptions that were thrown from cleanup actions and throw them only
at the end of the Cleanup method, wrapped together using an AggregateException if
there’s more than one. If there was only one exception, then we can throw that particular
exception as is. Listing B-9 shows the Cleanup method with the proper exception
handling.
Appendix B CleAnup MeChAnisM

485
Listing B-9. Cleanup method with proper exception handling
[TestCleanup]
public void Cleanup()
{
_cleanupActions.Reverse();
var exceptions = new List<Exception>();
foreach (var action in _cleanupActions)
{
try
{
action();
}
catch (Exception ex)
{
exceptions.Add(ex);
}
}
if (exceptions.Count == 1)
throw exceptions.Single();
if (exceptions.Count > 1)
throw new AggregateException(
"Multiple exceptions occurred in Cleanup.", exceptions);
}
Note in .net, it’s recommended to use a list of ExceptionDispathInfo class instead of list of Exception, in order to preserve their original stack-traces. i didn’t use it here in order to keep the example simpler. You can look at the implementation of this mechanism in the Test Automation essentials, project on Github to see how ExceptionDispathInfo is used. see Appendix C for more details about the Test Automation essentials project.
Appendix B CleAnup MeChAnisM

486
SummaryAs described in Chapter 7, one technique to help achieve isolation is to clean everything
that the test created when it’s finished. But we also discussed the reasons why it’s
difficult to write cleanup code that would work correctly in all situations. The cleanup
mechanism described here ensures that the exact relevant cleanup actions are called
whether the test passed or failed, regardless of the exact line in which the test failed.
It also ensures that cleaning up entities that depend on one another are cleaned in the
right order to avoid data integrity problems and exceptions. Finally, we made sure that
any exception that might occur inside a cleanup action does not prevent other cleanup
actions to run, and that all of the exception details are reported so that we can investigate
and fix the root cause.
Appendix B CleAnup MeChAnisM

487© Arnon Axelrod 2018 A. Axelrod, Complete Guide to Test Automation, https://doi.org/10.1007/978-1-4842-3832-5
APPENDIX C
Test Automation EssentialsThis appendix describes the Test Automation Essentials open source project that I
created, which contains various useful utilities for developing test automation in C#.
BackgroundWhen I started to work as a consultant and had to establish the infrastructure for test
automation for multiple clients, I noticed that many things that I had implemented
for one client was useful to other clients as well. As you probably realized by now,
I hate writing duplicate code, so I looked for a way to share this code between my
clients. Because naturally my clients don’t share the same source control repository, I
determined to make it an open source project, hosted on GitHub, for the benefit of all.
Over time, whenever I wrote something that I though could be beneficial for other clients
or other people in general, I added it to the project. The source code of the project can be
found at https://github.com/arnonax/TestEssentials.
Most of the public classes and methods in these libraries have pretty extensive
XML comments (similar to JavaDoc comments in Java), which Visual Studio displays as
tooltips when you hover over them, in order to make it easy to use. Gradually I’m trying
to cover with XML comments the rest of the classes and methods that I still haven’t.

488
Project StructureBecause my clients and the projects I was involved in use different test automation
technologies, I divided the project into small and modular libraries, so that anyone can
use only the libraries that fits his needs and the technologies he’s using.
Accordingly, the solution consists of several C# projects:
• TestAutomationEssentials.Common – this project contains very
generic and reusable utilities. It has no dependency on any specific
technology (except for the .Net Framework itself) or library, and
therefore can be used in any project. In fact, many of the utilities in
this project are not even specific to test automation and can serve any
.Net project. Most other projects in the solution have a dependency
on this project.
• TestAutomationEssentials.MSTest – this project provides utilities
that are useful for projects written using MSTest version 1, which has
been in use up until Visual Studio 2015.
• TestAutomationEssentials.MSTestV2 – this project provides
functionality identical to TestAutomationEssentials.MSTest,
but for MSTest V2 (MSTest version 2), which is used since Visual
Studio 2017, or as a NuGet package for projects created using
Visual Studio 2015. In fact. this project does not contain any
C# source files of its own, but rather links all the source files of
TestAutomationEssentials.MSTest. Therefore. these projects are
essentially always identical, except for the version of MSTest they
reference.
• TestAutomationEssentials.CodedUI – this project provides utilities
for Coded UI (Microsoft’s UI Automation framework) based projects.
• TestAutomationEssentials.Selenium – this project provides utilities
that are useful for projects that use Selenium.
Appendix C TesT AuTomATion essenTiAls

489
In addition to these five projects that provide utilities that are useful for any project,
the solution contains also the following projects that are used only internally:
• TestAutomationEssentials.UnitTests – contains unit tests (and some
integration tests) for the TestAutomationEssentials.Common and
TestAutomationEssentials.MSTest projects.
• TestAutomationEssentials.MSTestV2UnitTests – contains unit and
integration tests for the TestAutomationEssentials.MSTestV2 project.
• TestAutomationEssentials.TrxParser – an internal project that is is
used by the unit test projects.
Tip looking at the unit tests can sometimes help you understand some of the utilities better. in addition, you may find it interesting to look at and debug the tests in TestBaseTest (and its base class) and try to understand how they work. As these tests test the integration of the TestBase class in TestAutomationEssentials.MSTest with the msTest framework itself, they generate test code on the fly, compile it, and run the compiled code using msTest – all within the test itself. pretty complicated and tricky, but cool…
Note About the Unit Tests and XML CommentsMost of the code in this project was first written as part of real projects, and only then
was extracted from these projects into Test Automation Essentials. As the original
projects were all test projects, the code was covered (indirectly) by the tests of my client’s
application. When I moved the relevant code to Test Automation Essentials, I tried to
retrofit unit tests for most of it to ensure that I don’t break compatibility whenever I
change something. However, that takes some time and in some cases it’s not trivial.
For that reason, by now I mainly covered with tests only the Common and MSTest (and
MSTestV2) projects, but I’m working on covering the Selenium project as well.
I do a similar thing with the XML Comments, though it’s typically easier and faster to
do than writing unit tests.
Appendix C TesT AuTomATion essenTiAls

490
NuGet PackagesIn order to use these utilities, you don’t need to get the source code from GitHub (even
though you can do that as well), but rather use these libraries as NuGet packages (similar
to the way we’ve added the Selenium WebDriver library to the project in Chapter 12).
There are five libraries available, one for each project, which you can easily add to your
project and start using what you need.
Features and UtilitiesFollowing is the description of the main features and utilities contained in each of these
libraries.
TestAutomationEssentials.CommonThis library contains various small but very useful utility methods (mainly extension
methods that were mentioned in Chapter 13), plus a few bigger features:
1. Support for configuration files. This was explained and was used
in Chapter 14.
2. A Logger class that implements the concept of nested logging,
described in Chapter 13.
3. A generic implementation of the Cleanup mechanism described
in Appendix B.
4. A Wait class (pretty similar to WebDriverWait in Selenium) that
provides a few methods for waiting until a given condition occurs.
Here’s a more detailed explanation of the more interesting classes and methods in
this library.
ExtensionMethods Class
This class contains many general-purpose extension methods, which can make your
code a bit simpler and easier to read. Listing C-1 demonstrates a few usage examples.
Appendix C TesT AuTomATion essenTiAls
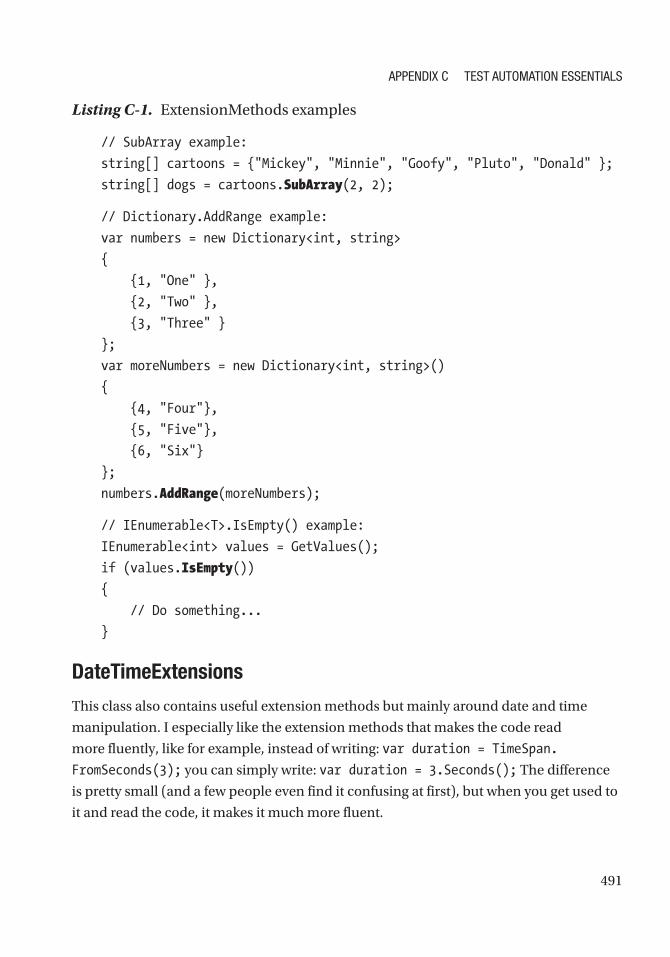
491
Listing C-1. ExtensionMethods examples
// SubArray example:
string[] cartoons = {"Mickey", "Minnie", "Goofy", "Pluto", "Donald" };
string[] dogs = cartoons.SubArray(2, 2);
// Dictionary.AddRange example:
var numbers = new Dictionary<int, string>
{
{1, "One" },
{2, "Two" },
{3, "Three" }
};
var moreNumbers = new Dictionary<int, string>()
{
{4, "Four"},
{5, "Five"},
{6, "Six"}
};
numbers.AddRange(moreNumbers);
// IEnumerable<T>.IsEmpty() example:
IEnumerable<int> values = GetValues();
if (values.IsEmpty())
{
// Do something...
}
DateTimeExtensions
This class also contains useful extension methods but mainly around date and time
manipulation. I especially like the extension methods that makes the code read
more fluently, like for example, instead of writing: var duration = TimeSpan.
FromSeconds(3); you can simply write: var duration = 3.Seconds(); The difference
is pretty small (and a few people even find it confusing at first), but when you get used to
it and read the code, it makes it much more fluent.
Appendix C TesT AuTomATion essenTiAls
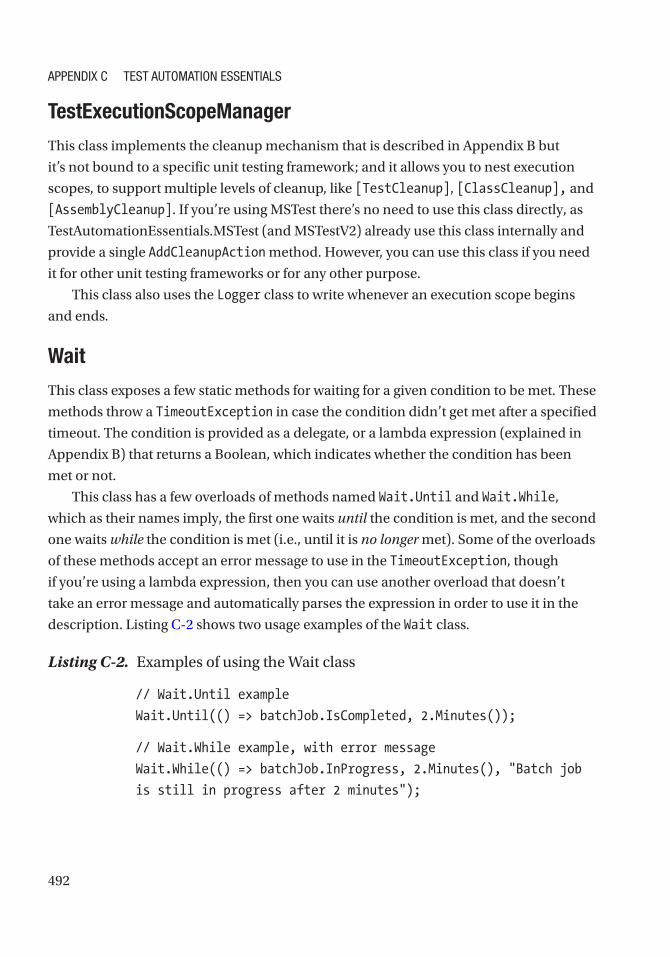
492
TestExecutionScopeManager
This class implements the cleanup mechanism that is described in Appendix B but
it’s not bound to a specific unit testing framework; and it allows you to nest execution
scopes, to support multiple levels of cleanup, like [TestCleanup], [ClassCleanup], and
[AssemblyCleanup]. If you’re using MSTest there’s no need to use this class directly, as
TestAutomationEssentials.MSTest (and MSTestV2) already use this class internally and
provide a single AddCleanupAction method. However, you can use this class if you need
it for other unit testing frameworks or for any other purpose.
This class also uses the Logger class to write whenever an execution scope begins
and ends.
Wait
This class exposes a few static methods for waiting for a given condition to be met. These
methods throw a TimeoutException in case the condition didn’t get met after a specified
timeout. The condition is provided as a delegate, or a lambda expression (explained in
Appendix B) that returns a Boolean, which indicates whether the condition has been
met or not.
This class has a few overloads of methods named Wait.Until and Wait.While,
which as their names imply, the first one waits until the condition is met, and the second
one waits while the condition is met (i.e., until it is no longer met). Some of the overloads
of these methods accept an error message to use in the TimeoutException, though
if you’re using a lambda expression, then you can use another overload that doesn’t
take an error message and automatically parses the expression in order to use it in the
description. Listing C-2 shows two usage examples of the Wait class.
Listing C-2. Examples of using the Wait class
// Wait.Until example
Wait.Until(() => batchJob.IsCompleted, 2.Minutes());
// Wait.While example, with error message
Wait.While(() => batchJob.InProgress, 2.Minutes(), "Batch job
is still in progress after 2 minutes");
Appendix C TesT AuTomATion essenTiAls

493
In addition to the Until and While methods, there are also If and IfNot methods.
These methods correspond to the While and Until methods respectively but do not
throw a TimeoutException when the specified period elapses. Instead they simply
continue normally. This can be useful in cases that you want to wait for something
to occur but may as well miss it. For example, let’s consider the case where clicking a
button starts an operation that may take fa ew seconds, during which a “please wait”
message should appear, and we want to wait until the operation completes. But the
same operation may also be very fast at times, in which case the message appears only
for a blink of an eye, and the test may miss it altogether. So, in order to prevent the test
from failing if the operation was very fast, you can use the Wait.IfNot to first wait for the
message to appear, providing a short timeout (e.g., 1 second), followed by a Wait.Until
to wait for the message to disappear, with a longer timeout (e.g., 1 minute). If the test
missed the message because it was too fast, then the Wait.IfNot will wait in vain for the
message to appear, but only for 1 second and without failing, and then the Wait.Until
will return immediately because the message no longer appears.
TestAutomationEssentials.MSTestThe most significant class that this library provides is the TestBase class. This class is
designed to be used as the base class for all of your tests. In case you already have a class
hierarchy of tests, simply derive the lowest ones (your own test base classes) from this
class.
This class adapts the MSTest specific initialization and cleanup methods to the
TestExecutionScopeManager class from TestAutomationEssentials.Common. In addition,
it exposes a virtual method that you can override and which is called only when the test
fails (OnTestFailure), something that MSTest does not provide out of the box. This is very
useful for adding any information that can help you investigate and diagnose the failures.
In fact, if you import the namespace TestAutomationEssentials.MSTest.UI,
then you’ll get a slightly different implementation of TestBase whose default
implementation of OnTestFailure takes a screenshot upon a failure (the screenshot is of
the entire desktop, not of a browser page as it in Selenium).
Appendix C TesT AuTomATion essenTiAls

494
LoggerAssert
In addition to the TestBase class, this library also contains few other utility classes.
One of them is the LoggerAssert class, which writes a message to the log whenever the
assertion is evaluated, whether it passes or fails. While generally there should only be no
more than a couple of asserts at the end of each test, there are cases where few asserts
in the middle of the test may still be useful (e.g., inside a loop, which is also generally
discouraged in a test, but there are exceptions…). In these cases, it’s useful to see in the
log the assertions that passed, and not only the one that failed. Note that in order to use
it properly, you should phrase the messages as expectations, (e.g., “x should be 3”) and
not as error messages (“x was not 3”), because these messages would appear in the log
also in case of success.
TestAutomationEssentials.CodedUIThe primary goal of this library is to make working with Coded UI, through code and
without UIMaps (see Chapter 3) much easier. TestAutomationEssentials.CodedUI
exposes an API that resembles the one of Selenium WebDriver. Listing C-3 shows a usage
example.
Listing C-3. Example of using TestAutomationEssentials.CodedUI
var customerDetailsPanel =
mainWindow.Find<WinPane>(By.AutomationId("CustomerDetails"));
var customerNameTextBox =
customerDetailsPanel.Find<WinText>(By.Name("CustomerName"));
var text = customerNameTextBox.DisplayText;
In addition, it provides few useful extension methods lik: myControl.RightClick(),
myControl.DragTo(otherControl), and the very useful method myControl.
IsVisible(), which for some reason Coded UI does not provide out of the box.
Appendix C TesT AuTomATion essenTiAls

495
TestAutomationEssentials.SeleniumThis library wraps Selenium WebDriver to make the use of Selenium somewhat easier in
most cases and much easier in more specific ones.
Note Currently this library is a bit too “opinionated,” which makes it hard to add it retroactively to existing projects. i’m considering changing or at least softening some of these constraints, but i have no specific details about it yet. stay tuned…
WaitForElement
To use most of the features of this library, you need to create an instance of the Browser
class, which wraps your IWebDriver object. Using this object (and though other classes
that derive from ElementsContainer, more or that later), you can find elements using
the WaitForElement method. This method is similar to the familiar FindElement method
of Selenium, but with two main differences:
1. It always waits for the element to appear (and not just to exist).
You can specify the timeout or use the default of 30 seconds.
2. It takes a description argument, which is used for automatically
logging click operations, typing, etc. Providing a descriptive name
in this argument helps make the log very readable.
Browser.WaitForElement returns a BrowserElement object, which on one hand
implements Selenium’s IWebElement interface, but on the other hand, it also derives from
ElementsContainer, which means that you can use WaitForElement to look for child
elements inside of it, with the same benefits over the standard FindElement method.
Handling Frames and Windows
In my opinion, the case in which this library is most compelling is for web applications
that use multiple windows or iframes (which is a web page displayed within another
web page). Normally with Selenium you need to use driver.SwitchTo().Window() and
driver.SwitchTo().Frame() to use other windows or frames, but the annoying thing
is that if you want to use an element you already found in one context (i.e., a window
or a frame, including the main page), you can’t use that element after you switched to
Appendix C TesT AuTomATion essenTiAls

496
another context, unless you switch back to the original one. If you don’t do that, you’ll get
a StaleElementReferenceException (see Chapter 14), but managing the active context
can be cumbersome and complicate your code. Listing C-4 demonstrates this problem.
Listing C-4. The problem with SwitchTo
// Navigate to a website that contains an iframe
webDriver.Url = "http://www.some-site.com/outer.html";
// find an element on the outer page
var outerButton = webDriver.FindElement(By.Id("outerButton"));
// switch to the inner frame
webDriver.SwitchTo().Frame("frame1");
// find an element on the inner frame
var innerButton = webDriver.FindElement(By.Id("innerButton"));
// clicking the inner button works normally
innerButton.Click();
// (See next comment)
//webDriver.SwitchTo().DefaultContent();
// Clicking the button on the outer page now would throw a
// StaleElementReferenceException because the outer page is not the current
// context. You must uncomment the above statement, which switches back to
// the outer page, in order to avoid the exception
outerButton.Click();
Note that in this example the problem doesn’t look so severe, but in more complex
situations, managing the current context can make the code very cumbersome and error
prone.
The Solution of Test Automation Essentials to the SwitchTo Problem
The classes that derive from ElementsContainer (including Browser and
BrowserElement) contain a method GetFrame that finds a frame and returns a
corresponding Frame object (which is part of the TestAutomationEssentials.Selenium
library). The Frame class also derives from ElementsContainer, so you can look for
nested frames within the frame that this object represents (i.e., to find an iframe
Appendix C TesT AuTomATion essenTiAls

497
within another iframe). In addition, Browser has an OpenWindow method that invokes
an operation that you provide to it (e.g. ,clicking a button), which should result in
a new window being opened and returns a BrowserWindow object that represents
the new window. As you might have guessed, BrowserWindow also derives from
ElementsContainer. The cool thing is that Test Automation Essentials manages the
current context for you, so you don’t have to worry about it. Whenever you want to use
an element that you found on any window or frame, you should be able to do that, even
if it’s not on the active context (though given that this element still exists of course). Test
Automation Essentials will take care of switching for that context for you. Listing C-5
shows how the previous example would look with Test Automation Essentials.
Listing C-5. Working with Frames using Test Automation Essentials
// create an instance of Browser that wraps our webDriver object
var browser = new Browser(webDriver, "Site with iframe");
// Navigate to a website that contains an iframe
browser.Url = @"http://www.some-site.com/outer.html";
// find an element on the outer page
var outerButton = browser.WaitForElement(By.Id("outerButton"), "Outer
button");
// Find the inner frame
var frame = browser.GetFrame("frame1", "inner frame");
// find an element on the inner frame
var innerButton = frame.WaitForElement(By.Id("innerButton"), "Inner
button");
// clicking the inner button works normally
innerButton.Click();
// Clicking the outer button now works seamlessly!
outerButton.Click();
Appendix C TesT AuTomATion essenTiAls

498
Contributing to the Project and Porting to Other LanguagesThe nice thing about open source projects is that anyone can help improve it and
influence its direction. Because of the nature of this project, I mostly added to it things
that I needed, and therefore there could be many things that should have been right
there but are not. Likewise, while this project is very modular, it doesn’t have a very clear
boundary for what should be included in it and what shouldn’t. So, any good idea that
can benefit others can be included in it. Obviously, like any other software, this project
can also have bugs that need to be fixed. Therefore, you can contribute to this project by
many different means.
It is always advisable that before you go on and send a pull-request (see Chapter 13),
you discuss it first by posting an issue though GitHub, or by contacting me directly.
Note that posting an issue is not necessarily a bug report, as it can also be an idea for
improvement or a request for a new feature. If you do send a pull-request, please make
sure that it has clear XML comments for its public API; and at least for the Common and
MSTest libraries, I expect nearly everything to be covered by unit or integration tests.
I also consider porting some of the stuff to other programming languages, mainly
Java, but maybe also Python or any other language that I see a need for. I’ll probably do
it when I’ll have a real and significant test automation project that needs it, but you’re
welcome to add it too. Note that some things, especially in the Common library are
relevant specifically to C#, though other utilities may be useful for other languages.
Appendix C TesT AuTomATion essenTiAls

499© Arnon Axelrod 2018 A. Axelrod, Complete Guide to Test Automation, https://doi.org/10.1007/978-1-4842-3832-5
APPENDIX D
Tips and Practices for Programmer’s ProductivityAs a consultant who has worked with many test automation developers, I found that
many of them are thirsty for tips and practices for working more effectively and for
improving their programming skills. In this appendix, I gathered some of these tips and
practices that I believe will be valuable to most people.
Some of these tips are relevant to all programmers, not just test automation
developers, and some are more specific to test automation and even to Selenium.
Prefer Using the KeyboardIf you want to work more efficiently when working with code, I suggest that you get
used to using the keyboard, much more than the mouse. It takes some time to get used
to it, but once you do, you’ll be much more productive when writing and reading code!
Here are some tips that can help you get used to it. Most of these tips assume that you’re
using Microsoft Windows. If you’re using Mac, Linux, or any other operating system,
there are probably equivalent shortcuts, but they may be different. Searching the web for
equivalent shortcuts in these operating systems will likely yield the desired results.
1. As it’s difficult to change habits, you must put some constraints on
yourself at first in order to get used to use the keyboard instead of
the mouse. Therefore, I suggest that you deliberately put the mouse
farther away from you. Only grab it when you don’t find how to
achieve your task with the keyboard, and then put it back away.

500
2. Pressing the Alt key, highlights shortcuts for menus and buttons,
by adding an underline under the letter of shortcut. To activate the
shortcut, press Alt + the highlighted letter. For example, to open
the File menu in virtually all applications, press Alt+F.
3. After the menu is open, you’ll see the shortcuts of the menu items.
When the menu is open, you can simply press the highlighted
letter, even without pressing Alt. For example, after pressing Alt+F
to open the File menu, press O to activate the Open… menu item.
4. Once the menu is open, you can navigate the submenus using
the arrows. Press Enter to select the menu item. The arrow keys
are useful also for navigating most tree controls. For example, to
expand a folder in File Explorer, you can press the right arrow.
5. Many menu items also have additional shortcut keys displayed
next to them, usually with the Ctrl key + some other key. These
shortcuts can be invoked directly, without first opening the menu.
For example, to open a new file, directly press Ctrl+O.
6. Most UI controls (elements) in most applications are capable of
being “focused,” which means that they’re the first control to receive
the keyboard input. There’s only one focused control at any given
moment. The concept of “focus” is most noticeable with textboxes,
but other controls, like buttons, checkboxes, drop-down lists, etc.,
can also have the focus, allowing you to interact with them using the
keyboard. Use the Tab key to move the focus between elements on
a window. Use Shift+Tab to move in the opposite order. Press Enter
or the Space Bar to press the focused button. Use the Space Bar
also to toggle checkboxes, or select items in a multiselect list-boxes.
Press Esc to click the “Cancel” button on dialogs.
7. Most keyboards have a Context Menu key (typically located
between the right Alt and Ctrl keys), which is similar to a
right-click with the mouse. Note though that when you use the
mouse, right-clicking opens the context menu that corresponds to
the location where the mouse cursor is, while pressing the Context
Menu key on the keyboard opens the context menu where the
keyboard focus currently is.
Appendix d Tips And prAcTices for progrAmmer’s producTiviTy

501
8. Use Alt+Tab and Alt+Shift+Tab to switch between open windows
back and forth. In many applications, including Visual Studio, you
can use Ctrl+Tab and Ctrl+Shift+Tab to switch between open
documents. Keep the Alt (or Ctrl) key pressed to see the list of the
open applications or documents.
9. In a text editor or textbox, use Ctrl+→ and Ctrl+← to move the
caret (the text entry cursor) whole words at once. Use the Home
and End keys to move to the beginning and end of a line. Use
Ctrl+Home and Ctrl+End to move to the beginning and end of
the document.
10. Use Shift+→, Shift+←, or Shift + any of the navigation
combinations described above to select the text between its
current location and the location where the navigation keys will
take you to. For example, Shift+Ctrl+→ will select the next word.
11. Press Shift+Del and Shift+Backspace to delete the next or
previous word (or from the middle of a word to its end or its
beginning).
12. Search the web for a list of shortcuts for your favorite IDE or other
applications that you work with often. Print these and put it in
from of you. Also search the web for specific keyboard shortcuts
for actions that you can’t find the shortcut to. If you’re using
Resharper, I highly recommend you to search for “Resharper
Default Keymap PDF” on the web, print it, and put it near your
keyboard. From time to time examine this document to find useful
shortcuts and try to use them often until you start using them
naturally. You’ll also likely learn addition features of Resharper
(or of your IDE) when you examine this list.
13. The keyboard mappings for many applications, especially
programming IDEs are customizable. So, you can assign direct
keyboard shortcuts to actions that you use often and that don’t
have ones by default.
Appendix d Tips And prAcTices for progrAmmer’s producTiviTy
502
Poka-YokeIn Chapter 11 I declared MVCForum as a read-only property and not as a regular property
(with public setter). Declaring a property as read-only is more restrictive than declaring
it as read/write, and therefore may seem like an inferior option. Well the thing is that I
don’t want that anyone to ever change this property from outside of the class. (Note that
changing the value of a reference-type, means replacing the reference with a reference
to another object, and not making changes to the existing object.) Similarly, there are
many other design decisions that a programmer can make to restrict or allow the usage
of some code construct, and some programmers mistakenly think that the more you
allow – the better. So why should I prefer to restrict? To answer that question, I’ll tell you
what “poka-yoke” is and why it’s so important.
Poka-yoke is a Japanese term that means “mistake-proofing” or “inadvertent error
prevention.” The term is part of the Lean manufacturing philosophy developed by
Toyota in the middle of the 20th century. A poka-yoke is any mechanism that helps an
equipment operator to avoid (yokeru) mistakes (poka), as it turns out that preventing
mistakes is often much easier and cheaper than inspecting and fixing defects later on.
While originally the term and the idea were used in industrial manufacturing, it holds
very true for software design as well.
There are countless examples of language features and techniques in software
design that enable poka-yoke. In fact, the first principle of object-oriented design –
encapsulation – is one. Encapsulation is what allows you to specify whether a member of
a class will be private, so only other methods of the same class would be able to access,
or public if the member is planned to be used by methods in other classes too. Using
strong typing (i.e., having to specify the exact type explicitly) is a very strong Poka-yoke
mechanism in the languages that support it (e.g., C# and Java). In addition to this, using
strongly typed collections that take advantage of the Generics language feature are more
error preventing than collections of objects. Another technique to avoid mistakes is to
avoid using null as a valid value, as I’ll explain shortly.
While using poka-yoke sometimes limits flexibility, I strongly prefer to allow
flexibility only in places and manners that I explicitly choose, and not by default. This is
the reason I preferred to make the MVCForum property read-only.
Appendix d Tips And prAcTices for progrAmmer’s producTiviTy

503
Avoid NullsMost object-oriented languages allow object variables (be it local, field, static, etc.) to
have a special value of null, indicating that it references no actual object. This is usually
also the default value of an uninitialized object variable. However, probably the most
common unexpected exceptions (which actually represent a problem in the code, or
better put: bugs) is NullReferenceException in .Net (and NullPointerException in
Java), which is caused by the use of null values. Especially if you treat nulls as valid
values, these bugs can be difficult to investigate, because their cause is often in a
different place from where the exception itself is thrown. Not only that, but the cause is
that the assignment of a real object didn’t happen! Investigating why something didn’t
happen is much harder than investigating why something did happen… Note that if you
avoid using nulls as a general rule, but you get a NullReferenceException nevertheless,
then it’s usually very easy to find the variable that you forgot to initialize.
For these reasons, many modern languages (especially functional languages, like F#
and Scala) intentionally prevent the use of nulls by default. In some of these languages,
you can still use nulls, but only if you explicitly declare the variable to allow it.
Because most of us are still using “regular” object-oriented languages (C#, Java,
Python, Ruby, etc.), the compiler doesn’t hold us from using nulls. However, with a
little self-discipline, we can avoid it ourselves. Simply initialize every variable right
when it’s declared (or in the constructor), and avoid assigning null or returning a null
from a method. If you get a value from “outside” that may be null, (somewhere that
you don’t have control over, like arguments in a public API, or a return value from a
third-party method), then you should check it for null as soon as possible and handle
it appropriately. This can be done by throwing an exception if you can’t handle it, or
“translating” it to a different object that represents an empty object (AKA the “null object
pattern.” A simple example is an empty list rather than null).
Adhering to these rules will help you avoid many potential bugs!
Appendix d Tips And prAcTices for progrAmmer’s producTiviTy

504
Avoid Catching ExceptionsMost beginner and intermediate developers use try/catch blocks much too extensively,
because they think that this makes their code more robust and reliable. Well, it’s true
that when you catch an exception, you prevent it from propagating to your caller (and if
your code is the “main” method or a test method, then you prevent the exception from
crashing your application or failing the test), but that only gives the illusion that the code
is more robust. The reason is that if something went wrong and without knowing exactly
what and why, and you just ignore it, you’d very likely be hit by a ricochet of that problem
later on. If you ignore all exceptions, the program will never crash, but it also may won’t
do whatever it’s expected to do! Catching an exception just in order to ignore it (i.e.,
using an empty catch clause) is often called “swallowing exceptions,” and in 99% of the
cases, it’s a very bad idea…
Moreover, if you swallow an exception, it will make your life much harder when
you come to debug or diagnose a problem. This is even worse if it happens only
occasionally in production! Therefore, the most naïve approach to this problem is
simply to write the exception to a log file. This is significantly better than swallowing
the exception completely, and in some cases it’s a good idea, but in general, as far as
the user (either the end user or the caller of a method) is concerned, this has the same
effect of swallowing the exception, because you normally won’t look at the log until a
user experiences and reports a problem. If you decide to write an exception to the log,
make sure to log all of the information about the exception, including the stack-trace and
original exception if it’s different from the one that got caught (InnerException in .Net or
getCause() in Java). In .Net, it’s best to use the ToString() method because the string it
returns already contains all of the relevant information.
So how should you handle exceptions? In most cases, the correct answer is “you
shouldn’t”! For exceptions that you expect to happen at times (e.g., “file not found” when
the application tries to read from a file that the user might have deleted or renamed),
you better avoid the condition by checking for it in advance and handle it appropriately
(e.g., check if the file exists, and if not, advise the user what to do). For general exceptions
that you can’t predict and you can’t specify why they may happen, or in case you have
nothing to do about it (like “out of memory”), let them propagate down the stack. If
you let the program crash immediately (or let the test fail due to the exception), you
automatically get most of the information that you need in order to investigate the root
cause. If you do it properly, then you’d most likely find the fault and fix it quickly.
Appendix d Tips And prAcTices for progrAmmer’s producTiviTy

505
Clearly, if it was always such a bad idea, the try/catch construct wouldn’t make it
into all modern languages. So, when does it make sense to catch exceptions? There are a
few cases:
• You’re able to specify exactly what could go wrong, and handle
it gracefully, but you can only do it after the fact. In many cases,
runtime conditions may change during the operation (e.g., the file is
deleted while you try to write to it). At other cases you do have a way
to check for the condition before starting the operation, but it simply
doesn’t pay off, for example, due to performance (i.e., checking if
you can do something that takes a long time may require that the
check itself take the same time by itself). Other cases may be due to
technical limitations (e.g., you don’t have an API that can tell you in
advance if the operation is about to succeed or fail).
• In these cases, you should catch the most specific type of exception,
and narrow the scope of the try block to only the specific operation
that you expect to throw that exception. This way you avoid catching
exceptions that you don’t expect and only catch those you do. The
catch block should perform the specific handling that is expected to
resolve the issue or advise the user or the caller of the method how to
resolve it.
• Adding a global error handling that presents all unexpected
failures to the user in a special way and/or attaches additional
information to the exception. For example, some teams prefer to use
a proprietary reporting mechanism for test results and want all the
failure information to be written to it, along with the exact date and
time. In addition, you may want to add some system information or
specific information about the SUT.
• In this case you should have only one try/catch block, but in
contrast to the previous case, in this case the try block should
encompass the entire program (or test case) and you should catch all
exceptions. In this case, make sure to report all the information you
have about the exception to allow efficient investigation.
Appendix d Tips And prAcTices for progrAmmer’s producTiviTy

506
• You should also think about a fallback exception handling, in a case
where an exception occurred inside your normal exception handling
code. For example, if you fail to write to a custom report, you should
still fall back to writing the failure to the console, or to the normal
exception handling that the testing framework provides. Usually the
handling should simply be throwing a new exception containing the
information of both the original exception and the information about
the secondary exception that happened inside the exception handler.
This way you’ll be able to investigate both the reason for the original
failure, and also the problem in the exception handler. Obviously, the
secondary exception handler should be much simpler than the first
one, so the chances that it fails should be very small.
• You have valuable information to add to the exception that may be
useful for the investigation. For example, you have a complex method
that performs multiple operations on the database, calls external
REST services, etc. In such a method a lot of things can go wrong,
but the native exceptions that may be thrown may be too low level
to be useful and won’t tell you how to reproduce the error. In this
case you can catch all exceptions (or a more specific but still general
exception) and re-throw a new exception that wraps the original
exception but adds information about the parameters that the
method received, or some internal state of the current object.
• You should very rarely write such handlers in advance. In most cases,
you should first let the exceptions handled normally, and only if
you see that you’re missing some important information that you
need in order to find the fault, then you need to add the additional
information to the exception for the sake of the next time. Needless to
say, you should keep all the information about the original exception,
especially its stack-trace.
• You perform an operation on a large number of rows (or other form
of data that contain independent entities), and you don’t want a
failure in one row to stop the process and prevent it from doing the
operation on other rows. In such case you should wrap the operation
for a single row in a try block, and inside the catch block, add the
Appendix d Tips And prAcTices for progrAmmer’s producTiviTy

507
exception to a list. When the loop completes, you should throw an
exception that contains all of the caught exceptions (.Net has an
AggregateException class just for that), or report the failures to the
user by other means.
One common use of exception handling is for retrying the failed operation. This
is a valid reason to use try/catch, and it falls into the first category above. However, it’s
important to note that you understand exactly why and on what you retry. For example,
if you try to read from a file and the file does not exist, retrying won’t help without a
human intervention! If you catch too broad exceptions and retry the entire operation,
you create two new problems:
1. You’re wasting a lot of time retrying something that has no chance
to succeed.
2. You’re very likely to miss other problems (including bugs in
the SUT!) and lose valuable knowledge and information about
the nature of these problems. As mentioned above, you’ll have
a harder time investigating the problem, and it may cause
secondary problems that will just confuse you.
Occasionally I hear about test automation projects that introduced a mechanism that
automatically retires a failing test. In my opinion this is a smell for a bad architecture,
lack of isolation, or simply a poor test design. Implementing an automatic retry of tests implies that you trust the tests less than you trust the SUT, and you assume that most
failures will be caused by the test (or its environment) and not by the SUT. An automatic
test should be predictable and repeatable. If it fails, you should be able to investigate and
fix the problem as fast as possible.
Until now we only discussed when to catch exceptions but haven’t mentioned when
to throw your own exception. This one is simpler – always throw an exception from
methods if you detect a condition that prevents the method from doing whatever it was
intended to do. When you do that, make sure to provide all the relevant information that
can help whoever needs to understand what happened. Note that in object-oriented
languages (that support exceptions), you should never return an error code or a Boolean
to indicate success or failure. This is what exceptions are for!
Appendix d Tips And prAcTices for progrAmmer’s producTiviTy

508
In addition, avoid throwing an exception for the purpose of normal program
flow. Exceptions should only be used to indicate some kind of problem! If in order to
understand the normal program flow, one should follow the throw and try/catch
constructs, then you’re probably doing it wrong. The most obvious case that you should
avoid is throwing an exception that you catch inside the same method.
Choosing the Most Appropriate LocatorThe following tips are specific to Selenium. However, the main ideas and tips are relevant
to all UI automation and may also be applicable for other cases in which the test needs to
identify a piece of data from the application, like retrieving values from JSON, XML, or a
database.
Selenium finds elements by matching a string value to a specified locator type.
Selenium supports the following locators:
1. Id – identifies elements whose id attribute matches the specified
value. According to the HTML standard, if this attribute exists,
its value must be unique across all elements in the page. So,
theoretically, if an element has an id attribute, it should ensure
that we can uniquely identify it using this locator. However, this
requirement is not being enforced by browsers and sometimes
pages contain more than one element with the same id
2. Name – identifies elements using their name attribute. The name
attribute should uniquely identify an element within an HTML
form
3. LinkText – identifies elements by matching their inner text to the
specified value
4. PartialLinkText – same as LinkText, but also matches elements
in which their text contains the specified value, even if the value is
only a substring of the link text
5. TagName – identifies elements whose tag name matches the
specified value. Tag names are rarely unique, but in case they are,
this locator can be used
Appendix d Tips And prAcTices for progrAmmer’s producTiviTy

509
6. ClassName – identifies the element using any of its class names.
The class attribute of an HTML element can contain zero or more
names of CSS classes, separated by a whitespace. This locator can
take only one class name and only find element(s) that have this
class
7. XPath – identifies elements according to the XPath specification.1
The XPath specification provides a special query syntax to locate
elements within an XML or HTML documents
8. CSS Selector – identifies elements according to the CSS selector
pattern.2 CSS Selectors were originally used to identify elements in
a CSS document in order to apply a given style to them. However,
the jQuery JavaScript library also makes use of this syntax to
identify elements.
If you want to find a single element, you must use a locator and value that matches
only that one particular element. If a locator matches more than one element, Selenium
returns the first one, but this is not necessarily the one you want. Anyway, while the
locator you use must identify the element uniquely, this is not enough: in order to keep
the tests reliable and easy to maintain, we must also ensure that the locator that we choose will always identify the relevant element, or at least which is least likely to be changed.
Id and Name are considered the best locators if they exist, because they uniquely
identify the elements (or at least should). This is indeed true in the majority of cases.
However, some frameworks, or even proprietary JavaScript code, sometimes generate
these ids at runtime, randomly or sequentially. While they ensure uniqueness, these
values are most likely to change between runs if they’re generated randomly. If they’re
generated sequentially, then they’ll probably change only if elements are added or
removed, either at runtime or due to a change in the code. So, my advice is to use an
id or name locator only if its value is a meaningful name that is related to the business
functionality of the element that you’re looking for. In other words, use it only if its value
was apparently chosen by a human. For example, if the id of an element is submitButton,
then this makes a perfect locator. However, if the id of an element is button342, then this
would probably mean that this is a bad locator!
1 https://www.w3schools.com/xml/xpath_syntax.asp2 https://www.w3schools.com/cssref/css_selectors.asp
Appendix d Tips And prAcTices for progrAmmer’s producTiviTy

510
The same rule also applies to class names: if the class name is meaningful and is
related to the element that you want to find, then it’s great to use it. But if the class name
has nothing to do with the meaning of the element, then avoid it if you have a better way.
While the XPath and CSS Selector locators have the most complex syntax, they
provide the most flexibility. These locators allow you to specify a combination of
characteristics of the element itself as well of its ancestors and even siblings, all as one
string. Chrome can generate these strings for your and copy them to the clipboard,
directly from the context menu of the element in the Develop Tools. You can then use
these strings with your Selenium code to identify the element you want with it. While
this sounds very compelling, and indeed many Selenium automation developers use
it, it’s often not a good idea whatsoever. Chrome attempts to find the best locator using
a heuristic that searches for the simplest combination of characteristics that is also
unique. However, this heuristic cannot predict what’s likely to change in the future or
even in the next time the page will be loaded and may even suggest a locator that is
currently unique, but in another run won’t be. Locators that are less likely to change are
locators that contain strings that represent the real meaning of the element. For example,
if a button has a button-login class name on it, even though class names need not be
unique, its name suggests that it identifies a Login button. Therefore, you should learn
the CSS Selector and XPath syntax and use your own judgment when combining the
most appropriate pattern to use.
The last (but not least) tip is to limit the scope of the search to only a specific
container. In other words, you should first identify a unique element that contains the
element you’re looking for, and then identify the element you’re looking for inside of
it. The famous FindElement method in Selenium works both on the IWebDriver object
as well as on any IWebElement object, so you can use it to identify an element within
another element. You can have as many levels of such nesting, and the typical approach
is to use a Page Object for each such container that the end user can identify. The
advantage of identifying elements only within their containers is that you only have to
worry about the uniqueness of the elements within the container and not among all
elements on the page, and in addition it removes the duplication from the locators of all
the elements that reside in the same container. While this duplication is usually only of a
substring (e.g., the start of an XPath expression), if it will need to change it will need to be
changed for all of the elements inside this container.
Appendix d Tips And prAcTices for progrAmmer’s producTiviTy

511
Hard-Coded Strings in Test Automation: Yea or Nay?Many developers treat hard-coded strings as a bad practice. There are some good
reasons for it but also some misconceptions around it. In fact, in most cases you cannot
avoid completely the use of string literals (AKA string constants, or hard-coded strings)
in the code. For example, even if you want to keep these strings in an external file, you’d
probably need to have the name of the file somewhere in your code. But then again, one
can keep this limited set of constants in one source file, in order to keep it separated from
the actual logic of the application. However, it is important to understand why and when
it is a bad practice to use string literals mangling inside the source code, and when it is
acceptable or even a good thing.
There are several reasons why hard-coded strings are considered bad practice:
1. Separation of concerns – strings are mostly used for some kind of
human interaction, while the algorithm itself is not. The wording
or spelling of a string that should be displayed to the user may
need to change separately from the algorithm.
2. Localization (Internationalization) – applications that are
localizable (i.e., applications that are designed to support multiple
languages and cultures), or even may need to be localizable in the
future should extract any string that the user may be exposed to,
to some external resource that can be easily switched (either at
runtime or at compile time).
3. Configuration – in many cases, global string values that are not
intended for user interaction (at least not directly), tend to have
different values for different environments or configurations.
A database connection string is a good example. Hard-coding
these strings make the code inflexible and won’t be able to run on
different environments.
4. Duplication – if you need to use the same string in multiple places
in the code and you don’t put it in a common place, then you
introduce a duplication. If at any point you need to change this
string, you would now need to change it in all places.
5. Length – sometimes strings can get quite long. and if they’re
mingled with the algorithm, they hinder the readability of the code.
Appendix d Tips And prAcTices for progrAmmer’s producTiviTy

512
Those reasons take some developers to the conclusion that all strings literals should
be extracted from the code into a separate file. The most common claim I hear for that,
is that it allows them to change these values without re-compiling them. However, re-
compiling is an issue only for an end user who doesn’t have access to the source code
and development environment or is not proficient in the programming language and is
afraid to change something that he doesn’t understand.
Let’s consider three common usages for string literals in test automation, and let’s
analyze where it makes the most sense to put them:
1. Environment information – Depending on your isolation
strategy (see Chapter 7), some of this information may be
different for every environment that you want to support
running the automation on, though some values may be fixed
for all environments (or there’s only one environment you’re
supporting). Even though re-compiling is not a big deal in test
automation, you’d probably want to keep the information that
varies from one environment to another in a configuration file, or
at least in a separate source file. This will help you manage their
changes separately from the source files in your source-control
system. As a rule of thumb, these configuration files should be
kept small with very few, easy-to-understand values; otherwise it
will soon become a nightmare to maintain by itself.
The “fixed” values however are anything that is common to all
environments and should not change for a predictable reason in
the foreseeable future. It doesn’t mean that it can’t change in the
future, but for now there’s no reason to assume that it will happen
soon – for example, a URL of a third-party service provider. In my
opinion, it’s fine that such data will be kept directly in the code,
as long as it appears only at a single place and close to its usage,
for example, as a named constant. If this URL will change at some
point in the future, it shouldn’t be difficult to find the place in the
code where it’s defined and change it. By contrast, if you put that
value in a configuration file and you need to change it after couple
of years, you probably won’t remember that it’s there anyway,
and you’ll have to debug or analyze the code in order to find
where the value comes from in order to know where to change.
Appendix d Tips And prAcTices for progrAmmer’s producTiviTy

513
Therefore, if the value will be read from a configuration file, it will
be less obvious to find it than if it is directly in the code. If you
have multiple instances of this configuration file (e.g., for different
environments) hanging around, probably not under source
control, then even when you know what to change, you still need
do it for every instance of this configuration file. After all, because
you can never know what would change and when, you’d probably
have lots and lots of such configuration values that will just be
more difficult to manage and maintain. Bottom line: keep
things simple!
2. Locator values (Ids, XPath, CSS Selectors, etc.) – Whether you’re
doing UI automation (e.g., using Selenium) or REST API tests (or
maybe some other kinds of tests), you need to refer to elements
on the screen or in the response message. In order to do this,
you need to specify the id, name, XPath, etc., of these elements.
Some people think that putting these strings in an external
configuration file makes their code more maintainable. Frankly,
I may be able to see how it makes the “code” more maintainable,
but the maintenance of these files often becomes a headache in
and on itself. If more than one automation developer works on
the project, such a big file that contains all of these elements soon
becomes a merge hell. In fact, such files don’t solve anything,
but rather move the maintainability problem from one place to
another, which is less appropriate for it. Keeping the locators with
their string literals close to their usages is much easier to maintain
than having all of the locators defined in one place while their
usages are spread across the entire code base. Encapsulating the
details inside the class or the method that use it is the solution to
make your code more maintainable, and the Page Object pattern
is the most common way to encapsulate the locators inside a class.
Appendix d Tips And prAcTices for progrAmmer’s producTiviTy

514
3. Input values – Tests typically have to type in or otherwise pass
strings as inputs to the SUT (like entering the discussion heading
in Chapter 11). Some people like to keep these values in a separate
file to give them flexibility over the values of these strings. If you’re
creating a data-driven test, then that’s fine. But if you don’t intend
to run the same test with different values, which you specifically
define to verify different cases, then there’s probably not a good
reason to extract it from the code. The need to extract such values
to an external file is often a symptom for a design that depends on
specific data that exists in the database. So, if at some point the
data will change, then you won’t have to change the code, only the
external file. But again, this is just moving the maintenance problem
from one place to another. This file becomes a contention point and
will be harder to maintain than if the test used its own data.
4. Expected results – Similar to input values, the expected results are
values that we expect as outputs from the SUT. The exact same
considerations that apply to the input values apply also to the
expected results.
5. SQL statements or JavaScript snippets – Sometimes you
need to invoke an SQL statements, a JavaScript command, or
something along these lines from the test code. If these scripts
are long, putting them in separate files will indeed improve
the maintainability of the code. However, for sparse one-liner
statements, embedding them directly in the code, close to their
usage, and not duplicated, improves encapsulation and makes the
code easier to understand and to follow.
All in all, in the majority of cases, strings used in test automation code better be in
the code, as long as they’re not duplicated and appear close to their usage in the code,
rather than in an external file. Use external configuration files only for values that have to
be different for different environments.
Appendix d Tips And prAcTices for progrAmmer’s producTiviTy

515© Arnon Axelrod 2018 A. Axelrod, Complete Guide to Test Automation, https://doi.org/10.1007/978-1-4842-3832-5
Index
AA/B testing, 96Abstract class, 215Abstractions, 56, 143, 208, 212, 216, 312,
385, 420Abstract test scope, 133–135, 423,
465–466, 474Acceptance criteria, 47, 93, 371, 375,
377–378, 381, 383, 386, 387, 391, 392, 394
Acceptance Test Driven Development (ATDD), 28, 47, 79, 93–94, 133, 172, 371–395, 409, 422, 423
Acceptance tests, 47, 76, 377, 378, 383, 384, 386–388, 409
Actor model, 451Adzic, G., 108, 374, 375AggregateException, 484, 507Agile, 4–6, 17, 172, 354, 371–373, 384AJAX, 303, 305
See also XmlHttpRequest (XHR)Algorithms, 70, 101, 122, 296, 409,
442–447, 511Amazon Web Services (AWS), 443Android, 55, 56AngularJS, 131, 305Annotations, 162, 331, 339, 388, 391Anti-patterns, 301, 340, 415, 416Appium, 53, 55–56
Application Lifecycle Management
(ALM), 60
Application Programming Interface (API),
37, 48–51, 53, 56, 57, 59, 110, 111,
117–121, 129, 137, 138, 158, 160, 212,
216, 290, 291, 303, 306, 364, 380, 398,
412, 423, 427, 437, 456, 460, 468–471,
474, 494, 498, 503, 505, 513
Applitools Eyes, 436, 438
Architecture, 10, 24, 38, 53, 96, 99–143,
153, 155, 164, 167–173, 204, 305,
359, 364, 367, 430, 433, 452, 455,
456, 458–473, 507
Arrange-Act-Assert (AAA), 401
Artificial Intelligence (AI), 101, 442–443
Artificial Neural Networks (ANN), 442
AssemblyCleanup attribute, 262, 398,
399, 492
AssemblyInitialize attribute, 262, 279, 329,
335, 395
Assertion, 46, 47, 87, 222, 227, 281, 315,
316, 338, 357, 381, 382, 397–398,
400, 401, 413, 494
Async and await, 45
Attributes, 101, 221, 252, 254, 260, 262,
286, 329, 339, 382, 388, 390, 391,
397, 398, 478, 508, 509
Auto-completion, 213, 331, 334
Availability, see High availability

516
BBackward compatibility, 117–120, 137, 434Bamboo, 61Base class, 216, 262, 263, 310, 315, 316,
323–326, 329, 410, 420, 481, 489, 493Bash, 194, 335Batch jobs, 142, 436Beck, K., 5, 39, 409, 410, 421, 422Behavior Driven Development (BDD),
see Acceptance Test Driven Development (ATDD)
Beta testing, 386, 425Beta version, 441Black box, 103, 113Blogs, 55, 119, 348, 355, 380, 395, 420,
452, 453Bottom up, 179–180Branches, Git, 195Breaking changes, 119, 120Brownfield project, 384, 393Browser, 51–54, 57, 108, 131, 147, 155, 186,
226, 243–246, 252, 283, 290, 291, 296, 302–305, 309, 330–334, 350, 351, 368, 369, 433, 437–438, 456, 460, 465, 493, 496, 497, 508
BrowserStack, 53, 57, 334Bug tracking system, 16, 85, 86, 88, 361Build, 60–61, 187–192, 344–352, 355, 453,
477–485Build environment, 277, 332Building blocks, 35–37Build process, 84, 85, 92, 332, 335, 337,
343–352, 474Build server, 92, 299, 344, 351, 352Business Logic (BL) layer, 107, 109–111,
127, 129, 131–133, 136, 168, 212, 216, 417, 423, 443, 444, 468–471
Business processes, 10, 38, 83–97, 167, 352, 353, 435, 461, 470
Business structure, see Organizational structure
CC#, 10, 20, 42–45, 47, 52, 54, 56, 57, 59, 177,
178, 181, 186, 219, 224, 225, 227–228, 242, 275, 289, 388, 450, 475, 476, 487, 488, 498, 502, 503
Callback, 44, 305, 306, 475–476, 478, 480Canary releases, 95–96, 425, 427Career, 395, 453Check-in, 16, 60, 72, 85, 91, 92, 136, 138,
152, 300, 330, 346, 347, 362, 363, 366, 384, 393, 464, 471, 472
Check-out, 197, 269, 344, 428Chromatic, 436Chrome, 54, 186, 190, 244–246, 250, 252,
284, 290, 332, 510Claim, 29, 101, 145, 205, 223, 237, 309–311,
340, 375, 423, 512ClassCleanup attribute, 262, 398, 399, 492ClassInitialize attribute, 262, 398, 399Clean code, 310, 390, 418–420, 451Cleanup method, 153, 162–164, 329, 336,
337, 398–400, 416, 436, 475–485, 490, 492, 493
Client logic, 110, 131Client-only test scope, 122–123Client/server, 426, 433, 466, 470Client-side, 50, 131, 426, 431, 433, 434Client tier, 109–110Closures, 44Cloud, 53, 57, 146, 153, 155–157, 243, 334,
364, 365, 368, 425, 430, 431, 433Code completion, 450
Index

517
Code coverage, 64, 66–70, 181, 384, 391Coded UI, see Microsoft Coded UICode quality, 66Code reuse, 321, 429Code review, 40, 75, 237–238, 355, 379,
449, 451Code rots, 87, 88, 352CollectionAssert class, 398Command and Query Responsibility
Segregation (CQRS), 132Command line, 45, 48, 197, 299,
350–352, 440Compilers, 10, 43, 44, 120, 224, 227, 228,
230, 289, 503Complexity, 4, 6–11, 19, 23, 36, 50, 56, 63,
65, 101, 104, 109, 113, 122, 126, 130, 131, 138, 161, 169, 199, 233, 279, 299, 300, 365, 374, 379, 381, 386, 387, 407, 423, 427, 429, 434, 438, 440, 442, 447, 448, 469, 496, 506, 510
accidental complexity, 6–10inherent complexity, 6, 7
Component tests, 122, 129, 131, 154, 367, 446, 471–473
Computer vision, 443, 444Concurrency, 44Conferences, 395, 451–453Configuration, 110, 111, 127, 138, 161,
183–185, 197, 243, 246, 288, 330–334, 336, 350, 351, 369, 435, 438, 440, 441, 446, 447, 466, 468–470, 474, 490, 511–514
Connection string, 297, 335, 511Constructor, 154, 241, 244–246, 248, 253,
254, 260, 264, 280–282, 319, 320, 324, 326, 332, 400, 404, 406, 411, 412, 415–417, 420, 503
Containers, 95, 152, 153, 155–157, 243, 280, 281, 329, 345, 348, 364, 510
Continuous delivery (CD), 60–61, 94–95, 239, 343, 352, 369, 371, 429, 430, 433, 434
Continuous deployment, 61, 94–95, 343, 366, 386
Continuous improvement, 10–11Continuous integration (CI), 17, 27, 56,
60–61, 78, 81, 85, 92–94, 136, 152, 153, 171, 239, 243, 265, 330, 343, 346–349, 352, 354, 361–363, 365–367, 369, 371, 392, 393, 430, 433–435, 471, 474
Conway’s law, 167–168, 170Cookies, 147Correctness proving, 70Coupling, 129, 154, 158, 263, 277, 335, 348,
349, 372, 410, 416, 419, 421, 427, 451, 452, 455, 464, 494, 512
Coverage, 16, 17, 39, 63–81, 91, 130, 181, 360, 383, 384, 391, 393–394, 414, 474
CPU, 146, 155, 157, 403, 404, 428, 432Cross-browser testing, 53, 309, 334,
437–438Cross-platform, 437–438CSS, 291, 437, 456, 509CSS Selector, 283, 509, 510, 513Cucumber, 37, 47, 388, 389Culture, 10, 11, 16, 75, 79, 167, 171,
352–355, 357, 361, 365, 391, 511
Cunningham, W., 5, 372Customization, 138, 184, 374, 435, 441,
466, 470, 501
Index

518
DData Access Layer (DAL), 110, 111, 128,
129, 158, 168, 338, 417, 420, 471Database, 48, 50, 56, 104–106, 108–111,
113–115, 120, 121, 128, 129, 131, 132, 142, 146, 148, 149, 151–155, 157–162, 164, 165, 168, 169, 202, 207, 208, 264, 272, 278, 279, 288, 297, 335–339, 348–349, 364, 368, 403, 417, 427–429, 434, 440, 441, 447, 457, 458, 468, 469, 471, 472, 506, 508, 511, 514
backup and restore, 153–154refactoring, 349schema, 115, 152, 158, 159, 338,
348–349, 434Data-driven test (DDT), 338–340, 446, 514Data Layer, 456, 457Date and time, 14, 101, 104, 141–143, 444,
446, 491, 505Date/time simulator, 142–143, 472–473Dead code, 66Debugging, 10, 33, 41, 45, 137, 143, 151,
160, 165, 197, 198, 265, 274, 277, 288, 302, 334, 335, 337, 369, 382, 393, 464, 489, 504, 512
Deep learning, 442–444Delegate, 320, 475–476, 478, 482, 492Delivery mapping, 172Denial of Service (DoS) attack, 433Dependency injection (DI), 143, 472Dependency Inversion Principle (DIP), 420Deployment process, 60, 94–96, 109, 123,
127, 132, 151, 152, 157, 243, 278, 343, 345, 347–351, 365, 366, 373, 386, 434–435, 465, 466, 468–470, 473, 474
Design, 75, 179, 199–217, 376, 419
Design Patterns, 125, 227, 416, 451Desktop application, 131, 351Developer Tool (Browser), 54, 186, 250,
252, 254, 284, 291, 510Development life-cycle, 354DevOps, 161, 347, 435, 452Diagnosing failures, 78Dialog window, 126–127, 193, 237, 245,
318, 500Differential diagnosis, 90Dijkstra, E., 70DLL, 66, 109, 129, 300, 393Document Object Model (DOM), 54, 250,
251, 290, 322, 326Documentation, 17, 19, 37, 47–49, 54, 65,
66, 109, 132, 159, 161, 192, 196, 250, 267, 336, 351, 354, 371, 375, 377, 383, 387–389, 419–420, 458, 501, 509
Domain Driven Design, 169Dummy data, 159Duplication, 172, 181, 216, 257–260, 263,
280, 286, 310, 312, 313, 316–327, 329, 338, 340, 361, 384, 388, 398, 401, 409–412, 419, 421, 480, 510, 511
Dynamic typing, 44, 228
EEclipse, 10, 331Edge cases, 141, 365, 383, 387, 434, 447Encapsulation, 44, 410, 502, 514End-to-end test scope, 38, 100, 108,
111–117, 120, 122, 124, 133, 137, 140, 154, 170, 338, 352, 366, 367, 444, 457, 464, 474
Entry point, 139, 397, 398Environments, 145–165, 178, 185–193,
432–433, 435–436, 464–465
Index

519
Environment variables, 350–352Error handling, 505Error messages, 90, 160, 227, 240, 241, 266,
273, 274, 277, 285, 287, 298, 328, 334, 439, 492, 494
Error reporting, 273–277ETL, see Extract, Transform and Load (ETL)Evan, E., 169Evans, D., 374, 375EventFiringWebDriver class, Selenium,
290, 291, 294Evidences, 27–28, 171, 282, 287–292,
296, 300Excel, 65, 339, 428Exception, 46, 163, 222, 229, 239–241,
280–282, 291, 326, 358, 397, 400, 451, 482–485, 494, 503–508
Executable Specifications, 47Exit code, 351Experiment, 79, 203, 205, 206, 299, 300,
309, 334, 335, 349, 351–352, 383, 449, 450
Explicit wait, 305Exploratory testing, 19–21, 75, 81, 387Extensibility, 46, 49, 75, 138–139, 257, 398,
466, 472Extensible Markup Language (XML), 49,
57, 109, 275, 331, 332, 470, 487, 489, 498, 508, 509
Extension methods, 275, 276, 490, 491, 494
ExtentsReport tool, 290, 293Extract base class, 410Extract method, 257, 318, 410, 415Extract Superclass, 325Extract, Transform and Load (ETL), 447eXtreme Programming (XP), 373, 379, 422
FFacebook, 95Factory design pattern, 417Factory method pattern, 227Failure investigation, 111, 271, 452Fake, 126, 127Fast feedback, see Feedback cycleFeathers, M., 414Feature crew, 172Feature files, 389–390Feedback cycle, 137, 140, 347, 371, 423Fiddler, 48, 291File system, 146, 350, 351, 403Firewall, 433Fixed delays, 33–34, 283, 302, 304Flaky tests, see Flickering testsFlickering tests, 277, 301–308, 357Folders, 146, 195, 196, 213, 328–329, 334,
350, 438, 439, 500Form factor, 131, 465Fowler, M., 9, 39, 348, 395, 421, 422Full stack developers, 40, 169Functional programming, 396, 451
GGamma distribution, 303, 304, 428Generics, 20, 36, 43, 90, 101, 127, 223, 257,
290, 305, 320, 329, 377, 388, 478, 488, 490, 502
Gherkin syntax, 47, 388–391Git, 16, 187, 193–198, 219, 244, 264, 269,
286, 293, 329, 332, 334GitHub, 57, 182, 187–189, 194, 196, 271,
453, 485, 487, 490, 498.gitignore file, 332Git tags, 329
Index
520
Given, When, Then keywords, 389God Object, 415Google Cloud Platform, 443Google Maps, 455, 456, 459–461Granularity, 390–391Greenfield projects, 391, 414Groovy, 52, 60gRPC, 50
HHand-writing recognition, 442Hard-coded strings, 256, 314, 511–514Hard-coded values, 207, 314Hard drive, hard disk, 146, 147, 428Hardware, 50, 84, 104, 138, 156, 157,
351, 364, 365, 368, 430, 432, 438, 466
Hardware profile, 428High availability, 95Horizontal teams, 168–171HP (Hewlett Packard), 59, 60HTML, 28, 54, 94, 109, 131, 250, 290, 291,
385, 456, 460, 508, 509HTTP, 13, 14, 35, 37, 46, 48–50, 52, 59,
60, 109, 115, 291, 296, 302, 303, 427, 468
HTTP API, 37, 49, 59, 427, 456See also REST API
HTTP request, 13, 18, 48–49, 108, 110, 115, 117, 121, 131, 141, 142, 156, 291, 302, 305, 382, 426, 427, 430–433, 474
HTTP response, 14, 46, 48, 49, 110, 117, 141, 142, 291, 302, 303, 306, 382, 426, 427, 431–432, 474, 513
HTTPS, 49Hybrid mobile applications, 56
Iiframe, 495–497IISExpress, 243–244, 246, 272Image comparison, 437Implicit wait, 305Influencing tests, 300–301Infrastructure, 24, 35, 37, 78, 84, 123, 138,
149, 154, 172, 173, 203, 219, 287, 292, 309, 311, 312, 329, 338, 360, 368, 393, 431, 435, 455, 471, 474, 487
Infrastructure code, 179–181, 292, 329, 338, 359, 385, 409
Initialization, 45, 125–126, 150, 162, 163, 227, 241, 247, 248, 261, 279, 280, 317, 320, 326, 329, 335, 398, 400, 416, 447, 493, 503
Inlining, 411, 412, 450, 475Inputs, 21, 70, 100–102, 104–106, 120,
125–127, 136, 138, 141, 143, 145, 146, 161, 164, 200, 203, 204, 257, 263, 305, 392, 444, 445, 462, 500, 514
Inputs and outputs (I/O), 104, 403–404, 408, 412, 413, 415, 416
Inside-out approach, 423Inspect.exe, 58Inspection tool, 53, 56Installation program, 438–440Installation tests, 438–442Integrated Development Environments
(IDEs), 10, 41, 42, 46, 54–56, 186, 299, 337, 421, 451, 501
Integration tests, 122, 137, 171, 216, 366, 367, 471–474, 489, 498
Interface Segregation Principle (ISP), 420Internationalization, see Localization
(Internationalization)Introduce variable, 410
Index

521
Investigating failures, 84, 265, 271–308iOS, 55, 56, 351Isolation, 24, 94, 99, 106, 115, 122, 123,
145–165, 181, 203, 205–207, 210, 260–264, 272, 300, 302, 307, 330, 337, 343, 345, 348, 359, 364, 365, 368, 403, 408, 415–417, 422, 427, 435, 442, 464–465, 471, 507, 512
Is TDD Dead?, 395, 422
JJAR file, 66, 129, 300Jasmine, 46, 48Java, 10, 20, 42–44, 46–48, 52, 54, 59, 60,
177, 289, 339, 388, 397, 475, 487, 498, 502–504
JavaDoc, 487JavaScript, 20, 43–46, 48, 49, 52, 54, 131, 250,
291, 305, 306, 456, 460, 475, 509, 514JavaScript Object Notation (JSON),
49, 52, 508Java Virtual Machine (JVM), 52, 66Jenkins, 61, 344JetBrains, 192Jira, 65, 85, 86JMeter, 430JSON wire protocol, 52JUnit, 46, 125, 162, 281, 397
KKanban, 371, 373Katas, 395, 396Keyboard, 21, 51, 104, 108, 124, 125, 193,
229, 232, 290, 379, 451, 499–501Keyboard shortcuts, 193, 229, 501Keyword Driven Testing (KDT), 35–37
KnockoutJS, 305Knuth, D., 368, 429Kubernetes, 364
LLabeled data, 445Lambda, 44, 475, 476, 478, 492Lambda expression, 476, 492Layer, 107, 109–113, 115, 124, 125,
127–129, 131–133, 136, 143, 168, 170, 179, 212, 216, 367, 401, 408, 413, 417, 436, 456, 457, 469–471
Layered architecture, 106–107, 129, 130, 139, 168, 170
Lazy<T> class (C#), 320Lead time, 371, 372Lean, 170, 502LeanFT, 59Legacy, 40, 56, 65, 80, 122, 140, 336,
358–360, 394Legacy code, 414, 419Limited resources, 138, 140, 337, 404Linux, 56, 335, 351, 499Lion in the desert, 296, 300, 308Liskov Substitution Principle (LSP), 420Living documentation, 47, 387–388Load balancer, 95, 96, 425LoadRunner, 430Load testing, 60, 425, 430–432Localization (Internationalization), 511Log file, 153, 292, 299, 404, 504LoggerAssert, 494Logging, 24, 27–28, 153, 160, 184, 201, 207,
226, 262, 273, 277, 287–294, 296, 299, 300, 308, 313, 316, 317, 319, 328, 338, 351, 352, 356, 368, 386, 404–407, 469, 490, 494, 495, 504
Index
522
Look and feel, 387Loose coupling, 419, 421
MMac, 56, 351, 499Machine learning, 101, 442, 445, 447Macro Recorder, 51Mainframe, 59, 140“Main” method, 125, 397, 504Maintainability, 6, 7, 15, 17, 20, 22, 23, 26,
33, 35, 36, 39–41, 43, 45, 51, 63, 65, 78, 89, 91, 100, 108, 111, 115, 118, 129, 130, 133, 137, 141, 156, 159, 161, 169, 173, 177–179, 204, 206, 208, 212, 226, 257, 271, 309–311, 327, 329, 338, 340, 347, 359, 360, 364, 366, 368, 372, 376, 391, 408, 410, 419, 421, 422, 427, 428, 434, 440, 509, 512–514
Manifesto, Agile, 5–6, 373Martin, R.C., 310, 419Medical applications, 95, 427Meetups, 452, 453Melvin Conway, see Conway’s lawMessage box, see Dialog windowMethod overloads, 310, 492Method parameters, see ParametersMetric, 64–66, 70, 354, 371, 386, 432Metric, coverage, 64–70MicroFocus Quality Center, 391Micro-Services architecture, 96, 106, 367Microsoft Azure, 443Microsoft Coded UI, 42, 57–59, 290, 474,
488, 494Microsoft Dynamic CRM, 463–465Microsoft Store Apps, 57
Microsoft Team Foundation Server (TFS), 57, 60, 61, 65, 85, 86, 344, 391
Microsoft Test Manager (MTM), see Microsoft Visual Studio Test Professional
Microsoft Visual FoxPro, 56Microsoft Visual Studio Test Professional, 60Middle tier, see Server tierMission-critical, 95Mix and match, 109, 132–133, 440Mobile, 53, 55, 56, 117, 130, 131, 368, 428,
437, 465–466Mob-programming, 379–380Mocha, 46, 48Mocking frameworks, 407–408Mock objects, 128, 129, 143, 405, 407, 415,
417, 421, 443, 444, 446, 471, 473Model, 109, 110, 118, 124, 128, 135,
210–212, 216, 226, 228, 234, 237–238, 262, 263, 311–313, 451
Model View Controller (MVC), 181, 183Model View Presenter (MVP), 125Model-View View-Model (MVVM), 125Modularity, 75, 367MongoDB, 114Monitoring, 48, 171, 373, 426, 430, 432,
435, 455–457, 459, 474Monkey testing, 20–21Monolithic, 75, 131, 157, 161, 393, 394, 430Moq, 407–408MSpec, 48MS-SQL Server, 114MSTest, 46, 57, 125, 162, 221, 227, 266, 329,
339, 397–399, 450, 475, 478, 488, 489, 492–494, 498
Multithreading, 44MV*, 125, 126
Index

523
NNaming conventions, 223, 245Nested logging, 288–290, 294, 299, 490.Net, 20, 46, 48, 52, 56, 66, 186, 189, 220,
244, 320, 381, 389, 397, 398, 470, 472, 475, 485, 488, 503, 504, 507
Networking, 13, 14, 24, 33, 35, 49, 50, 84, 104, 146, 155, 156, 292, 364, 400, 403, 428, 429, 432, 440, 442, 457, 468
Nightly build, 27, 60, 152, 158, 265, 330, 346–348, 352, 361, 362, 365, 393, 474
Nightly run, 85–87, 91, 93, 148Non-deterministic algorithms, 442–443North, D., 172noSQL, 114, 155NotImplementedException, 229, 231,
233, 239, 241, 244, 247–249, 309, 315, 316
NuGet, 57, 242, 243, 293, 488, 490Null object pattern, 503NullPointerException, see
NullReferenceExceptionNullReferenceException, 503NUnit, 46, 125, 162, 397, 475
OObject-Oriented design, see Object-
oriented programmingObject-oriented programming,
177–178, 410Object Relational Mapping (ORM), 111One-way end to end test scope,
113–116, 120Open/Close Principle (OCP), 419–420
Open source, 37, 46, 51, 59, 181, 271, 288, 290, 436, 450, 453, 487, 498
Operating system (OS), 50, 51, 84, 117, 143, 155, 241, 292, 334, 368, 437, 438, 440, 499
Optimization, 129, 158, 368, 429See also Test speed
Optional arguments, 310, 311Oracle, 114Organizational structure, 10, 38, 167–173Output, 20, 100–102, 104–106, 145–147,
190, 200, 203, 204, 266, 267, 273, 286, 288, 290, 293–295, 345, 351, 397, 438, 444, 514
Output pane, Visual Studio, 190Outside-in, 423Overfitting, 445Overload, 21, 226, 310, 311, 411, 412,
415, 492
PPage Object pattern, 211–217, 247,
280, 513Pair-programming, 40, 75, 379–380, 422Parallel test execution, 150, 364, 472Parameters, 36, 44, 47, 49, 50, 110, 140, 205,
226, 227, 229, 233, 254, 257, 262, 265, 275, 276, 310, 311, 315, 335–336, 340, 350, 388, 406, 410–412, 415, 432, 435, 439, 440, 445, 506
Patterns, 75, 108, 125, 126, 130, 132, 139, 211–216, 226, 227, 233, 247, 265, 280, 289, 301–306, 311, 340, 396, 415–417, 423, 436, 442, 445, 451, 466, 503, 509, 510, 513
Perceived performance, 429, 433PerfectoMobile services, 368
Index

524
Performance, 80, 109, 111, 338, 354, 364–366, 368, 505
Performance tests, 425–430, 432–435Planned testing, 19, 21, 23Plug-ins, 10, 50, 54, 350, 410Podcasts, 416, 452Poka-Yoke, 232, 246, 262, 311, 314, 502Polling, 306Polymorphism, 44Popup messages, see Dialog windowPostman, 48PowerBuilder, 56PowerShell, 335Preconditions, 89, 308, 389, 440Premature optimization, 368, 429Private and public class members, see
EncapsulationProcess, 49–50, 66, 109, 125, 127–128, 132,
141, 142, 302, 337, 350, 351, 364, 430–431, 446
See also Business processes; Top-down
Product backlog, 383, 387Productivity, 10, 17, 59, 137, 192, 229, 346,
451, 499–514Product owner (PO), 18, 93, 203, 360, 371,
375–377, 381, 383, 385–388, 392, 429, 445
Profiling, 368, 429Programming language, 20, 41–45, 47, 51,
52, 60, 66, 177, 178, 180, 288, 451, 475, 498, 512
Progression testing, 76, 77, 79Property-based testing, 20Protocol, 35, 48–50, 52, 59, 109, 117, 123,
142, 400, 457, 458Pseudo-code, 133, 180, 224–228, 233, 261,
417, 418
Pull-request, 271, 498Pure Logic test
scope, 127–128PyTest framework, 46, 397Python, 20, 42–46, 48, 52, 177, 397, 475,
498, 503
QQuality Center, 60, 391Queue, 132, 303, 305, 366QuickCheck, 20QuickTest Professional (QTP), see Unified
Functional Testing (UFT)
RRace conditions, 141, 307RAM, 146, 147Random values, 101, 122, 207, 247, 268,
278, 311, 443–447See also Non-deterministic algorithms
Ranorex, 35, 56–57React framework, 131, 436Readability, 36, 37, 43, 46, 47, 180, 212,
237, 275, 310, 368, 390–391, 410, 480, 495, 511
ReadyAPI, 59Record and
playback, 13–16, 32Re-create the database, 154, 272, 279,
335–336Red-green-refactor, 409, 412Refactoring, 9–10, 17, 56, 59, 66, 80, 91,
94, 125, 126, 130, 137, 143, 160, 181, 237, 245, 257, 259, 269, 286, 310, 312, 313, 318, 325, 327, 349, 383–385, 393, 394, 404, 409–417, 421, 423, 447, 451, 466
Index

525
Reference data, 44, 158–161, 165, 348Registry, see Windows RegistryRegression (bugs), 14, 17, 24, 84, 90, 91,
203, 340, 358, 362, 369, 371, 385Regression tests, 7, 10, 13, 14, 16–18, 39,
64, 76–81, 387, 391, 393, 445–446Regular expression, 47, 90, 388Reliability, 26, 63, 99, 115, 117, 147, 148,
178, 228, 239, 252, 301, 304, 307, 334, 335, 348, 359, 364, 366, 428, 444
Remote desktop, 155, 350, 351Remote Procedure Call (RPC), 49–50Remove duplication, 216, 257–260, 280,
286, 310, 312, 316–321, 327, 338, 340, 409, 412, 419
See also DuplicationRendering engine, 438Repeatability, 239, 330, 507Report, 16, 26–28, 35, 60, 66, 69, 78, 83–87,
90, 92, 103, 105, 140, 281, 292, 294, 302, 334, 345, 346, 355–358, 372, 380, 393, 435–437, 439, 447–448, 484, 498, 504–507
Reproducing failures, 308, 356Request, see HTTP requestRequirements, 17, 28, 37, 60, 114, 119, 154,
247, 365, 374, 383, 385–386, 388, 392, 397, 413, 435, 472, 508
Resharper, 192–193, 221, 225, 229–232, 237, 244, 245, 253, 257, 283, 318, 325, 329, 410, 501
Response, see HTTP responseREST API, 49, 50, 59, 119, 302, 303, 382, 423,
460, 461, 468–472, 474, 506, 513See also HTTP API
Rest-Assured, 48Retrospective, 11, 392
Retry, 25, 301–302, 507Reusability, 35–37, 42, 43, 47, 50, 56, 75,
129, 133, 159, 203, 206–208, 213, 216, 219, 238, 313, 323, 324, 360, 380, 388, 390–391, 416, 418, 429, 435, 442, 453, 465, 488
Revision history, 193, 196, 269, 295Rich client, 109Robot Framework, 47, 388Root cause, 11, 25, 29, 34, 160, 171, 273,
278, 280, 282, 292, 296, 297, 300, 304, 307, 354, 356, 357, 361, 429, 484, 504
Round-trip, 117, 120RSpec, 48Ruby, 20, 47, 48, 54, 503
SSanity tests, 19, 78, 79, 147–149, 158, 160,
178, 199–201, 222, 223, 231, 234, 237, 240, 261, 265, 266, 280, 286, 293, 314, 318, 326, 329, 338, 365, 366, 439, 442
SAP, 59SauceLabs, 53, 57, 368Scalability, 132, 156–157, 365, 433, 468Scenario, 15, 19, 35, 37, 38, 47, 65, 78, 93,
107–109, 113, 117, 121, 129, 131, 133, 136, 138, 142, 158, 169, 172, 203–206, 208, 260, 277, 296, 303, 311, 330, 340, 357, 367, 371, 375, 377, 378, 381, 383, 385, 387–395, 421, 423, 426, 428, 430, 435, 439, 440, 463, 477, 482
Scientific method, 205–217Screen capture, 287–288
Index
526
Screenshots, 14, 15, 28, 265–269, 273, 280, 282, 285–287, 290, 294, 296, 437, 493
Scrum, 6, 373, 471Selenium, 31, 33, 42, 45, 48, 51–58, 108,
131, 178, 186, 212, 219, 228, 241–244, 246, 250, 251, 265, 276–277, 279, 280, 283, 285, 287, 290, 291, 294, 302–306, 326, 329, 332, 334, 351, 382, 385, 423, 431, 432, 436, 450, 459–461, 465, 474, 488–490, 493–497, 499, 508–510, 513
FindElement method, 265, 276, 281, 305, 495, 510
IWebDriver interface, 246, 276, 281, 291, 332, 333, 495, 510
IWebDriver.PageSource property, 290–291
IWebElement interface, 212, 276, 280, 291, 323, 495, 510
locators, 250, 251, 508–509NoSuchElementException, 265, 280,
285, 291, 305StaleElementReferenceException,
326, 496WebDriverWait class, 305, 307, 490
Selenium Grid, 53, 57, 334Selenium IDE, 54–55Server-only test scope, 118, 120–122Server Proxy, 107, 110, 112, 115, 116, 118,
121, 123, 124, 128, 135Service Layer, 107, 110, 112, 116, 118, 121,
123, 124, 128, 135, 470, 471, 473Service-level agreements (SLAs), 429Service-oriented architecture (SOA), 132Services, 43, 50, 56, 60, 61, 96, 102–107, 110,
112, 116, 118, 121, 123, 124, 128, 131, 132, 135, 136, 138, 140–143,
146, 150, 153, 155, 156, 160, 291, 303, 348, 364, 367, 368, 382, 429, 433, 434, 460–462, 464, 469–471, 473, 506, 512
setTimeout JavaScript function, 305Sikuli, 436Silent install, 440Silverlight, 57Simple Object Access Protocol (SOAP), 49,
59, 382Simulators, 60, 123, 139–143, 204, 345,
367, 392, 435, 458, 459, 463, 465, 472–473
Single Responsibility Principle (SRP), 410, 415, 419
Singleton, 215, 416–417, 472Skeleton, 47, 57, 180, 219, 314, 379Skills, 14, 32–35, 40, 41, 61, 63, 92, 99, 168,
177, 327, 359, 380, 396, 451, 452, 499SmartBear, 35, 48, 59, 430Snapshot, 28, 155–156, 161, 348, 439, 440SoapUI, 35, 48, 59–60Social media, 452Software as a Service (SaaS), 95, 96, 160SOLID principles, 418–421, 451Solution Explorer pane, Visual Studio,
189, 220, 237, 252, 253, 328, 329SouceLabs, 334Source-control, 16, 50, 59, 60, 92, 154, 171,
193, 332, 344, 345, 350, 354, 362, 464, 487, 512, 513
SpecFlow, 37, 47, 388, 389Specification by Example
(SbE), 93, 108, 371See also Acceptance Test Driven
Development (ATDD)Speech recognition, 442
Index

527
Speed, see Test speedSprint (iteration), 387, 392Spy, 127SQL, 109, 111, 114, 132, 185–187, 272, 337,
349, 514SQL change scripts, 349SQL Server Express, 185–187Squad, 172
See also Feature crewssh, 351Stability, see ReliabilityStackOverflow, 181, 451Stack-trace, 90, 240, 241, 265, 273, 280,
282, 285, 326, 485, 504, 506State, 27, 114, 125, 141, 145–147, 153,
155–156, 162, 164–165, 226, 290, 389, 400, 401, 416, 478, 484, 506
Static data, see Reference dataStatic members, 141, 215, 226, 230, 275,
400, 416–417, 492, 503Static typing, see Strong typingStatistical algorithms, 443–447Stored procedures, 109, 111, 132StringAssert class, 298Strong typing, 44, 314, 502Structured Vector Graphics (SVG), 460Stub, 50, 381Supervised learning, 445, 446Swallowing exceptions, 504Syntax highlighting, 225System under test (SUT), 14, 19, 35, 37,
48–61, 96, 99–107, 111, 114, 120, 125, 127, 133, 137, 140–143, 154, 155, 157–159, 164, 178, 181–186, 203, 204, 209, 211, 219, 252, 283, 292, 296, 302, 306, 339, 344, 346, 350, 359–361, 379, 397, 400, 423, 433, 446, 447, 505, 507, 514
System’s clock, see Date and timeSystem tests, 400
See also End-to-end test scope
TTeamCity, 61, 344Team Explorer pane, Visual Studio,
188, 194–197Team Foundation Server (TFS), 57, 60, 61,
65, 85, 86, 344, 391Technical Debt, 372–374Testability, 75, 178, 379, 392, 412, 413,
416, 421Test Automation Essentials, 57, 164, 245,
290, 293, 307, 332, 398, 453, 475, 485, 487–498
Test cases, 21–27, 39, 54, 56, 58, 60, 63–65, 72, 75–76, 150, 153, 179–181, 186, 199–217, 300, 339, 340, 359, 505
Test class, 57, 133, 162, 163, 221–223, 227, 261, 262, 329, 398, 400, 402, 423, 478, 481
TestClass attribute, 221, 329, 397TestCleanup attribute, 162, 262, 266,
398–399, 478, 492Test cloud providers, 334Test Data Builder pattern, 233, 265Test double, 422Test Driven Development (TDD), 39, 46,
130, 380, 395–424Test Explorer pane, Visual Studio, 222,
239, 240, 242, 266, 267, 397Test harness, see Testing frameworksTesting frameworks, 25, 26, 45–46, 48,
52–54, 56, 59, 125, 162, 220, 262, 266, 307, 338, 345, 350, 351, 397, 398, 400, 478, 484, 492, 506
Index

528
TestInitialize attribute, 134, 162, 261–264, 279, 286, 313, 316, 317, 329, 338, 398–402, 406
Test management system, 391Test matrix, 138, 441, 442Test method, 162, 179, 216, 221–224, 240,
241, 265, 314–315, 317, 326, 329, 338–340, 359, 385, 388, 390, 391, 397–403, 466, 477–483, 504
TestMethod attribute, 221, 397TestNG, 46, 397Test Pyramid, 133, 423Test run duration, see Test speedTest scope, 104–109, 111–136, 172, 178,
216, 364, 366, 395, 421, 423, 465–466, 474
Test set, 445–446Test speed, 115, 117, 136–137, 363,
366, 368Third-party, 44, 46, 50, 103, 111, 114, 115,
118, 122, 147, 192, 398, 413, 433, 457, 462, 469, 503, 512
Thread, 128, 288, 302, 305–307, 364, 430–431, 472
See also MultithreadingThread.Sleep method, see Fixed delaysThreshold, 303, 427–429, 431–433,
444–446Tier, 109–112, 131, 132, 469, 473–474Tight coupling, 129, 416, 421, 464Timeout, 125, 305–307, 431, 492, 493, 495TODO comments, 384Top-down, 179–180, 246, 261, 321Training set, 445Transaction rollback, 154–155Transparency, 171, 173, 354, 362Trust, 15, 28–29, 32, 34, 81, 86, 171, 348,
360, 507
Try/catch, 504, 505, 507, 508TypeScript, 43–45
UUI automation, 37, 42, 51, 53, 55–57, 59,
136, 137, 178, 287, 290, 306, 351, 380, 382, 400, 436, 440, 451, 460, 488, 508, 513
UI layer, 109, 110, 124, 136, 401, 403, 436, 469
UIMap, 57–59, 494Uncle Bob (Robert Martin), see
Martin, R.C.Under-the-skin test scope, 124–127Unified Functional Testing (UFT), 59Unit testing framework, 26, 42, 45–47, 52,
127, 162, 220, 262, 266, 395–400, 413–422, 478, 484, 492
Universal Windows Platform (UWP), 55–57
Unsupervised learning, 445, 446Upgrade tests, 441–442URL, 96, 188, 246, 330, 474, 512Usability, 36, 37, 43, 208, 216, 387,
390–391, 436User experience, 65, 425, 429, 436, 504User Groups, see MeetupsUser Interface (UI), 13, 33, 35, 48–59, 99,
103, 109–119, 124–126, 131, 136–139, 158, 160, 168, 178, 208, 211–213, 216, 303, 338, 364, 382, 387, 400, 401, 403, 436–437, 440, 456–458, 465, 469, 500, 508
User Story, 16–18, 39, 47, 72, 78, 79, 93, 172, 367, 371, 372, 374–378, 381, 383–388, 392, 394, 409, 423, 471
Using statement, C#, 289
Index

529
VValidation set, 445var keyword, 227–228, 232, 237VB.Net, 42, 57VBScript, 59Versions, 4–6, 9, 10, 16, 70, 76, 79, 94–96,
118–120, 153, 182, 271–273, 284, 296, 297, 343, 344, 348, 354, 366, 368, 373, 427, 434, 441, 442, 450, 471
Vertical teams, 168–169Video, see Screen captureView Model layer, 107, 109, 110, 112, 116,
118, 121, 123, 124, 128, 135Virtualization, 156, 364–365Virtual Machines (VMs), 95, 96, 146, 153,
155–157, 348, 428, 439Virtual Machine snapshot, see SnapshotVirtual Machine template, 156Visual logging, 290, 293–295, 317, 356Visual Studio, 10, 57–60, 185–190, 192–198,
219, 221, 222, 224, 229–232, 241, 242, 253, 267, 269, 275, 288, 331, 334, 397, 404, 430, 450, 487, 488, 501
Visual Studio Load and Performance, 430Visual Studio quick-actions menu, 222Visual Studio solution, 219Visual testing, 436–438
WWaits, 16, 76, 79, 125, 126, 136, 239, 283,
302–307, 334, 346, 362, 363, 365, 366, 382, 392, 431, 474, 490, 492–493, 495
Waterfall, 4–6, 17–18Web, 4, 28, 48, 50–53, 55, 57, 60, 94–96,
117, 130, 131, 147, 178, 185, 186,
192, 211, 242, 243, 250, 275, 291, 305, 330, 335, 348, 350, 364, 382, 396, 425, 426, 433, 449–450, 456–461, 463–466, 469, 471, 473, 474, 495, 499, 501
Web API, see HTTP APIWeb Client, 456, 458, 460, 461Web.config, 335WebDriver, see SeleniumWebDriverJS, 45, 306Web server, 131, 243, 291, 330, 456, 457,
463, 464, 469What you see if what you get (WYSIWYG),
109, 136Win32, 55, 57Windows, 50, 51, 55–58, 109, 130, 145, 146,
155, 185, 202, 292, 335, 351, 355, 495–496, 499, 501
Windows Communication Foundations (WCF), 50
Windows Event Viewer, 292Windows Presentation Foundations
(WPF), 57, 59, 114Windows Registry, 146, 438Work-arounds, 25, 89–90, 142
X, Y, ZXamarin Test Cloud, 368XAML, 109XML, see Extensible Markup Language
(XML)XML comments, 275, 487, 489, 498XmlHttpRequest (XHR), 303, 305
See also AJAXXML Schema Definition (XSD), 331, 332XPath, 56, 509, 510, 513xUnit.Net, 46, 397, 475
Index