compass® connect for android via usb - northwoods compass® · the confirmation message appears 3....
TRANSCRIPT
®
User Guide
5.13
Compass® Connectfor Android via USB


Copyright © 2014 Northwoods Consulting Partners, Inc. All rights reserved. Page i
ABOUT NORTHWOODS CONSULTING PARTNERSNorthwoods Consulting Partners, Inc., founded in 1999, is a privately‐held software development and
services company headquartered in Dublin, Ohio. Our Compass Software product suite is created solely to serve the needs of human services agencies nationwide.
With proven technology, and a focus on industry knowledge and our clients, we create business solutions that provide proper application of products and services with tangible and measurable results.
COPYRIGHT AND TRADEMARKS NOTICE
Copyright © 2014 Northwoods Consulting Partners, Inc. All rights reserved.
Northwoods, the Northwoods Bear Logo, “Revolutionizing the Delivery of Human Services,” and Compass are all registered trademarks and service marks of Northwoods Consulting Partners, Inc. Rather than repeat the trademark and service mark attributions throughout this document, Northwoods hereby asserts its rights for all of its products and services.
iPad is a registered trademark of Apple, Inc. All other trademarks and service marks are the property of their respective owners. Unless stated to the contrary, no association with any other company or product is intended nor inferred.
DISCLAIMER
Northwoods Consulting Partners has made reasonable effort to ensure the accuracy of this manual. Information in this document is subject to change. If you should discover any discrepancies, please notify us immediately.
CONTACT INFORMATION
Northwoods Consulting Partners
Address:5815 Wall StreetDublin, Ohio 43017
Phone:(614) 781-7800
Web:teamnorthwoods.com
Northwoods Support Center
Phone:(614) 545-0999
Email:[email protected]


Copyright © 2014 Northwoods Consulting Partners, Inc. All rights reserved. Page iii
Compass Pilot . . . . . . . . . . . . . . . . . . . . . . . . . . . . . . . . . . . . . . . . . . . . . . . . . . . . . . . . . . . . . . . . . 1
Launching Compass Pilot . . . . . . . . . . . . . . . . . . . . . . . . . . . . . . . . . . . . . . . . . . . . . . . . . . . . . . 1
Navigating the Compass Pilot Interface . . . . . . . . . . . . . . . . . . . . . . . . . . . . . . . . . . . . . . . . . . 2
Opening, Detaching, and Reattaching a Module . . . . . . . . . . . . . . . . . . . . . . . . . . . . . . . . . . . 6To open a module in the stage . . . . . . . . . . . . . . . . . . . . . . . . . . . . . . . . . . . . . . . . . . . . . 6To open a module in a detached window . . . . . . . . . . . . . . . . . . . . . . . . . . . . . . . . . . . . 6To reattach a module to the stage. . . . . . . . . . . . . . . . . . . . . . . . . . . . . . . . . . . . . . . . . . 6
Using the File Menu . . . . . . . . . . . . . . . . . . . . . . . . . . . . . . . . . . . . . . . . . . . . . . . . . . . . . . . . . . 6To log out of Compass Pilot . . . . . . . . . . . . . . . . . . . . . . . . . . . . . . . . . . . . . . . . . . . . . . . 6To exit Compass Pilot . . . . . . . . . . . . . . . . . . . . . . . . . . . . . . . . . . . . . . . . . . . . . . . . . . . . 6
Using the Tools Menu. . . . . . . . . . . . . . . . . . . . . . . . . . . . . . . . . . . . . . . . . . . . . . . . . . . . . . . . . 7Managing Your Usernames and Passwords. . . . . . . . . . . . . . . . . . . . . . . . . . . . . . . . . . . 7
To change credentials . . . . . . . . . . . . . . . . . . . . . . . . . . . . . . . . . . . . . . . . . . . . . . . 7Managing Your Recipient Pools . . . . . . . . . . . . . . . . . . . . . . . . . . . . . . . . . . . . . . . . . . . . 7
To edit recipient pool tick lists . . . . . . . . . . . . . . . . . . . . . . . . . . . . . . . . . . . . . . . . 8To add members to the tick list . . . . . . . . . . . . . . . . . . . . . . . . . . . . . . . . . . . 8To order the members in the tick list . . . . . . . . . . . . . . . . . . . . . . . . . . . . . . 9To remove members from the tick list . . . . . . . . . . . . . . . . . . . . . . . . . . . . . 9
To view assignment history . . . . . . . . . . . . . . . . . . . . . . . . . . . . . . . . . . . . . . . . . . . 9To export assignment history . . . . . . . . . . . . . . . . . . . . . . . . . . . . . . . . . . . . . . . . 10
Managing Your Settings . . . . . . . . . . . . . . . . . . . . . . . . . . . . . . . . . . . . . . . . . . . . . . . . . 10To add task types to My Selected Tasks. . . . . . . . . . . . . . . . . . . . . . . . . . . . . . . . 12To order task types in My Selected Tasks . . . . . . . . . . . . . . . . . . . . . . . . . . . . . . 12To remove task types from My Selected Tasks . . . . . . . . . . . . . . . . . . . . . . . . . . 12
Managing Your Theme . . . . . . . . . . . . . . . . . . . . . . . . . . . . . . . . . . . . . . . . . . . . . . . . . . 12To manage your theme . . . . . . . . . . . . . . . . . . . . . . . . . . . . . . . . . . . . . . . . . . . . . 12
Taking a Screen Capture . . . . . . . . . . . . . . . . . . . . . . . . . . . . . . . . . . . . . . . . . . . . . . . . . 12To take a screen capture . . . . . . . . . . . . . . . . . . . . . . . . . . . . . . . . . . . . . . . . . . . . 12
Using Administration Options . . . . . . . . . . . . . . . . . . . . . . . . . . . . . . . . . . . . . . . . . . . . 13
Using the Help Menu . . . . . . . . . . . . . . . . . . . . . . . . . . . . . . . . . . . . . . . . . . . . . . . . . . . . . . . . 13Viewing Information About Your Pilot Installation . . . . . . . . . . . . . . . . . . . . . . . . . . . . 13Accessing Online Help . . . . . . . . . . . . . . . . . . . . . . . . . . . . . . . . . . . . . . . . . . . . . . . . . . . 13
Using Smart Search . . . . . . . . . . . . . . . . . . . . . . . . . . . . . . . . . . . . . . . . . . . . . . . . . . . . . . . . . . 13To perform a smart search using the attached panel. . . . . . . . . . . . . . . . . . . . . . . . . . 14To perform a smart search using the detached window . . . . . . . . . . . . . . . . . . . . . . . 14
Compass Connect for Android via USB . . . . . . . . . . . . . . . . . . . . . . . . . . . . . . . . . . . . . . . . . . . . 15
Sync and Reconciliation Overview. . . . . . . . . . . . . . . . . . . . . . . . . . . . . . . . . . . . . . . . . . . . . . 15
Syncing your Tablet. . . . . . . . . . . . . . . . . . . . . . . . . . . . . . . . . . . . . . . . . . . . . . . . . . . . . . . . . . 15To sync your tablet . . . . . . . . . . . . . . . . . . . . . . . . . . . . . . . . . . . . . . . . . . . . . . . . . . . . . 15To manage your password . . . . . . . . . . . . . . . . . . . . . . . . . . . . . . . . . . . . . . . . . . . . . . . 15
Reconciling Case and Member Data . . . . . . . . . . . . . . . . . . . . . . . . . . . . . . . . . . . . . . . . . . . . 16To reconcile by using an existing case . . . . . . . . . . . . . . . . . . . . . . . . . . . . . . . . . . . . . . 16To reconcile by creating a new case . . . . . . . . . . . . . . . . . . . . . . . . . . . . . . . . . . . . . . . 17

Copyright © 2014 Northwoods Consulting Partners, Inc. All rights reserved. Page iv
To reconcile by using an existing member . . . . . . . . . . . . . . . . . . . . . . . . . . . . . . . . . . 17To reconcile by creating a new member . . . . . . . . . . . . . . . . . . . . . . . . . . . . . . . . . . . . 18
Copyright © 2014 Northwoods Consulting Partners, Inc. All rights reserved. Page 1
Compass Pilot
COMPASS PILOT
Compass Pilot increases agency‐wide productivity by automating routine agency tasks from a single application.
With Compass Pilot installed on the desktop, case and client data that is collected at any point in the system is immediately available to all workers and processes that need it. For the agency, this results in dramatic increases in productivity and service levels throughout the organization. For agency workers, it means that all of the time and energy they used to spend on paperwork can now be directed toward the most important aspect of their jobs—their clients.
Launching Compass Pilot1. Double click the Pilot icon on your desktop.
The Compass Pilot Login window appears.
2. Type your username and password.
OR
2. To log in using Windows authentication, ensure the Use Windows® Authentication box is selected. Installations with Windows authentication use your Windows username and password to log you in to Pilot. This option must be enabled by your system administrator.
3. Click OK.
Compass Pilot opens.

Copyright © 2014 Northwoods Consulting Partners, Inc. All rights reserved. Page 2
Compass Pilot
Navigating the Compass Pilot InterfaceThe following image is a sample of the Pilot interface with Compass Documents loaded.
Fig. 1 Compass Pilot interface (Compass Documents loaded)
The interface is divided into the following components: driver panel, stage, auxiliary panel, menu bar and toolbar, status bar, and collapsible splitters.

Copyright © 2014 Northwoods Consulting Partners, Inc. All rights reserved. Page 3
Compass Pilot
• Driver panel ‐ The driver panel contains the main navigation in Pilot. It allows you to load modules and navigate while inside each module.
Fig. 2 Driver panel
• Stage ‐ The stage is the main section of Pilot and is the main work area for all modules.
Fig. 3 Stage

Copyright © 2014 Northwoods Consulting Partners, Inc. All rights reserved. Page 4
Compass Pilot
• Auxiliary panel ‐ The auxiliary panel contains additional information, such as image previews. It is collapsed by default in some modules.
Fig. 4 Auxiliary panel
• Menu bar and toolbar ‐ The menu bar and toolbar are located at the top of the screen.
• The menu bar consists of the File, Tools, and Help menus, as well as additional menus that vary with each module. Additionally, options in the File menu can vary by module.
• The toolbar contains the smart search feature as well as module‐specific icons. For more information on smart search, see “Using Smart Search” on page 13. For more information on the module‐specific toolbar icons that are available within each module, see the respective user guide.
Fig. 5 Menu Bar and Toolbar

Copyright © 2014 Northwoods Consulting Partners, Inc. All rights reserved. Page 5
Compass Pilot
• Status bar ‐ The status bar displays the current profile in use in Capture, Forms, and Documents. Additionally, a form’s loading status (such as “Loading form...” or “Done”) is displayed next to the profile. This bar also displays an envelope icon at the bottom right if there are unread tasks that takes you to the list of unread tasks when clicked.
Fig. 6 Status bar
• Collapsible splitters ‐ Collapsible splitters are located in various places on the Pilot interface, allowing you to collapse and resize panels as desired.
Fig. 7 Collapsible splitters
Copyright © 2014 Northwoods Consulting Partners, Inc. All rights reserved. Page 6
Compass Pilot
Opening, Detaching, and Reattaching a ModuleModules opened from the driver panel can appear in the stage or be detached and opened as a separate window. Detaching a module allows you to open and work in more than one module concurrently.
To open a module in the stageOpening a module in the stage allows you to use a single module at a time. Opening a different module loads that module in the stage but does not clear search results or content from the first module; all information is still available when you return to the first module.
1. In the driver panel, click the desired module.
The module opens in the stage.
To open a module in a detached windowOpening a module in a separate window allows you to use multiple modules concurrently.
1. In the driver panel, right click the desired module.
2. Click Detach <module>.
The selected module opens in a new window.
To reattach a module to the stageReattaching a module loads it in the stage. No content will be cleared when reattaching the window.
1. Click the X in the top right corner of the detached window.
The module is reattached to the stage. Any module already open in the stage is replaced by the reattached module; content is not cleared from the first module and will be available when you return to that module.
Using the File MenuThe File menu allows you to log out of Pilot and exit Pilot. Additional options may be available depending on the active module.
To log out of Compass Pilot1. Click File.
2. Click Log Out.
The Confirmation message appears
3. Click Yes.
You are logged out of Pilot and returned to the Compass Pilot Login window.
To exit Compass Pilot1. Click File.
2. Click Exit.
The Confirmation message appears

Copyright © 2014 Northwoods Consulting Partners, Inc. All rights reserved. Page 7
Compass Pilot
3. Click Yes.
You are logged out of Pilot and Pilot closes.
Using the Tools MenuThe Tools menu contains the following items. Depending on permissions, you may not have access to all of these items.
• Manage My Usernames/Passwords
• Manage My Recipient Pools
• My Settings
• Themes
• Screen Capture
• Administration
Managing Your Usernames and PasswordsThe Manage My Usernames/Passwords menu item (located in the Tools menu) allows you to manage your Pilot, CoPilot, and Box passwords. With appropriate permissions, you will also be able to edit your Autofill Web Service and DMS passwords.
You cannot edit your Pilot, Box, or CoPilot usernames.
To change credentialsTo change Box credentials, see the Connect for iPad® via Box user guide.
1. Click Tools.
2. Click Manage My Usernames/Passwords.
The Authentication Manager window opens.
3. In the Select a credential type list, select the desired credential type.
4. Optional ‐ In the Username field, enter the desired username.
5. Click Change Password.
The Password field is enabled.
6. In the Password field, enter the desired password.
7. Repeat steps 1‐4 as desired.
8. When finished, click Save.
Managing Your Recipient PoolsThe Manage My Recipient Pools menu item (located in the Tools menu) allows you to manage pools of which you are a manager. This option is only visible to users designated as recipient pool managers.
Recipient pools are not available to users with FileNet or in implementation where FileNet workflow is set as the tasking engine.

Copyright © 2014 Northwoods Consulting Partners, Inc. All rights reserved. Page 8
Compass Pilot
To edit recipient pool tick listsThe Manage Recipient Pool window displays all members of a pool and the pool’s tick list order. In the Tick List Order section, a green arrow points to the member who is the next to be selected at the time the list was opened for editing. The Refresh button allows you to view who will be selected next as agency operations continue. This opens another window that displays the same list that was saved when you began editing the tick list; the green arrow will be displayed next to the person who will be selected next at the time this window was opened.
Pools are locked when they are being edited to ensure they cannot be changed or deleted by another user.
1. Click Tools.
2. Click Manage My Recipient Pools.
The Recipient Pool Management window opens.
3. In the Recipient Pool Name list, select the desired recipient pool.
4. Click Edit.
The Manage Recipient Pool window opens, allowing you to edit the pool’s tick list. To add members to the tick list, see “To add members to the tick list” on page 8. To set order of members in the tick list, see “To order the members in the tick list” on page 9. To remove members from the tick list, see “To remove members from the tick list” on page 9.
Fig. 8 Manage Recipient Pool
To add members to the tick listYou can add a member to the Tick List Order list multiple times to increase the frequency of their assignment in the rotation.
1. In the Recipient Pool Members list, select the members you want to add to the tick list.

Copyright © 2014 Northwoods Consulting Partners, Inc. All rights reserved. Page 9
Compass Pilot
2. Drag and drop the members in the Tick List Order list.
The selected members appear in the list.
3. Click Save.
The Select Next Suggestion window opens. This window allows you to select the next person to be suggested by the pool. It displays the name of the caseworker last assigned and the time of the last assignment, which is updated every 15 seconds.
4. Select the user who you want the pool to suggest next.
5. Click Save and Close.
To order the members in the tick listThe order of members in this list controls the order in which users are recommended by the pool.
1. In the Tick List Order list, select the member you want to move.
2. Drag and drop the member’s name to position the member in the list rotation.
3. Click Save.
The Select Next Suggestion window opens. This window allows you to select the next person to be suggested by the pool. It displays the name of the caseworker last assigned and the time of the last assignment, which is updated every 15 seconds.
4. Select the user who you want the pool to suggest next.
5. Click Save and Close.
To remove members from the tick list1. In the Tick List Order list, select the members you want to remove from the tick list.
2. Drag and drop the members in the Recipient Pool Members list.
The selected members are removed from the Tick List Order list.
3. Click Save.
The Select Next Suggestion window opens. This window allows you to select the next person to be suggested by the pool. It displays the name of the caseworker last assigned and the time of the last assignment, which is updated every 15 seconds.
4. Select the user who you want the pool to suggest next.
5. Click Save and Close.
To view assignment historyThe Recipient Pool Assignment History window displays assignment history for the selected pool.
1. Click Tools.
2. Click Manage My Recipient Pools.
The Recipient Pool Management window opens.
3. In the Recipient Pool Name list, select the desired recipient pool.
4. Click Edit.
The Manage Recipient Pool window opens.
5. Click Show Assignment History.
The Recipient Pool Assignment History window opens and displays the assignment history for that pool.

Copyright © 2014 Northwoods Consulting Partners, Inc. All rights reserved. Page 10
Compass Pilot
6. Optional ‐ Change the date range in the Assignment Range section to alter the range of the information displayed.
To export assignment historyThe assignment history of a recipient pool can be exported to a .csv file saved outside of Pilot.
1. Click Tools.
2. Click Manage My Recipient Pools.
The Recipient Pool Management window opens.
3. In the Recipient Pool Name list, select the desired recipient pool.
4. Click Edit.
The Manage Recipient Pool window opens.
5. Click Show Assignment History.
The Recipient Pool Assignment History window opens and displays the assignment history for that pool.
6. Optional ‐ Change the date range in the Assignment Range section to alter the range of information displayed.
7. Click Export To CSV File.
The Save As window opens.
8. Navigate to the desired location and click Save.
The File Saved confirmation message appears.
9. Click OK.
Managing Your SettingsThe My Settings menu item (located in the Tools menu) allows you to select which modules load automatically when you sign in to Pilot, the printer that is used to print labels, which task types appear at the top of your task type lists, and which task types generate notifications for you.

Copyright © 2014 Northwoods Consulting Partners, Inc. All rights reserved. Page 11
Compass Pilot
Fig. 9 My Settings window
• General tab
• Automatically Launch these Modules on Pilot Start ‐ This section allows you to select which modules you want to automatically load when you log in to Pilot. Selected modules are loaded in the stage and must be manually detached, if desired.
• Label Printer ‐ This drop‐down list allows you to select which printer will be used when printing labels from Pilot.
• Task Favorites ‐ This section allows you to select which task types you want to be displayed at the top of tasks type lists and the order you’d like those task types displayed. This affects any place in Pilot where you can select a task type. For information on how to work with this list, see “To add task types to My Selected Tasks” on page 12, “To order task types in My Selected Tasks” on page 12, and “To remove task types from My Selected Tasks” on page 12.
• Notifications tab
• Task Notifications ‐ This section allows you to select the task types for which you will receive a notification. Balloon or toast messages will only appear for the task types you’ve selected on this tab.
Notifications are not supported in installations with FileNet.

Copyright © 2014 Northwoods Consulting Partners, Inc. All rights reserved. Page 12
Compass Pilot
To add task types to My Selected Tasks1. In the AvailableTaskTypes list, select the task types you want to add to your selected tasks list.
2. Click the right‐facing arrow.
The selected task types are moved to the My Selected Tasks list.
3. Click Save.
To order task types in My Selected TasksThe order of task types in this list controls the order in which task types are displayed at the top of task type selection lists.
1. In the My Selected Tasks list, select the task types you want to move.
2. Use the up and down arrows to position the task types in the list.
3. Click Save.
To remove task types from My Selected Tasks1. In the My Selected Tasks list, select the task types you want to remove from your selected tasks
list.
2. Click the left‐facing arrow.
The selected task types are moved to the AvailableTaskTypes list.
3. Click Save.
Managing Your ThemeThe Themes menu item (located in the Tools menu) allows you to change the color of Compass Pilot. Currently, two colors—Emerald and Sky Blue—are supported.
To manage your theme1. Click Tools.
2. Hover over Theme.
3. Click the desired color.
Taking a Screen CaptureThe Screen Capture menu item (located in the Tools menu) allows you to take an image of your screen. The image can then be pasted into an application such as Word or Paint.
To take a screen capture1. Click Tools.
2. Hover over Screen Capture.
3. Click Take Screenshot.
The image is saved to your computer’s clipboard and can be pasted into an application such as Word or Paint.
Copyright © 2014 Northwoods Consulting Partners, Inc. All rights reserved. Page 13
Compass Pilot
Using Administration OptionsYour system administrator has access to the options in the Administration menu (located in the Tools menu.) Depending on your permissions, you may have the ability to access to some or none of these menu items. For more information, contact your system administrator or see the Compass Pilot administrator guide.
Using the Help MenuThe Help menu contains information about your installation of Pilot as well as a link to the product documentation.
Viewing Information About Your Pilot InstallationThe About menu item (located in the Help menu) allows you to view information about your installation of Compass Pilot.
• The About tab of the About window displays the version numbers of all installed Pilot modules.
• The Advanced tab of the About window displays the statuses of the Windows Communication Foundation (WCF) services that deliver documents and information to users’ machines. This tab is permission‐based and may not be available to all users.
Accessing Online HelpThe Online Help menu item (located in the Help menu) allows you to view documentation about the product. Clicking this link launches a website that contains the documentation for your version of Pilot.
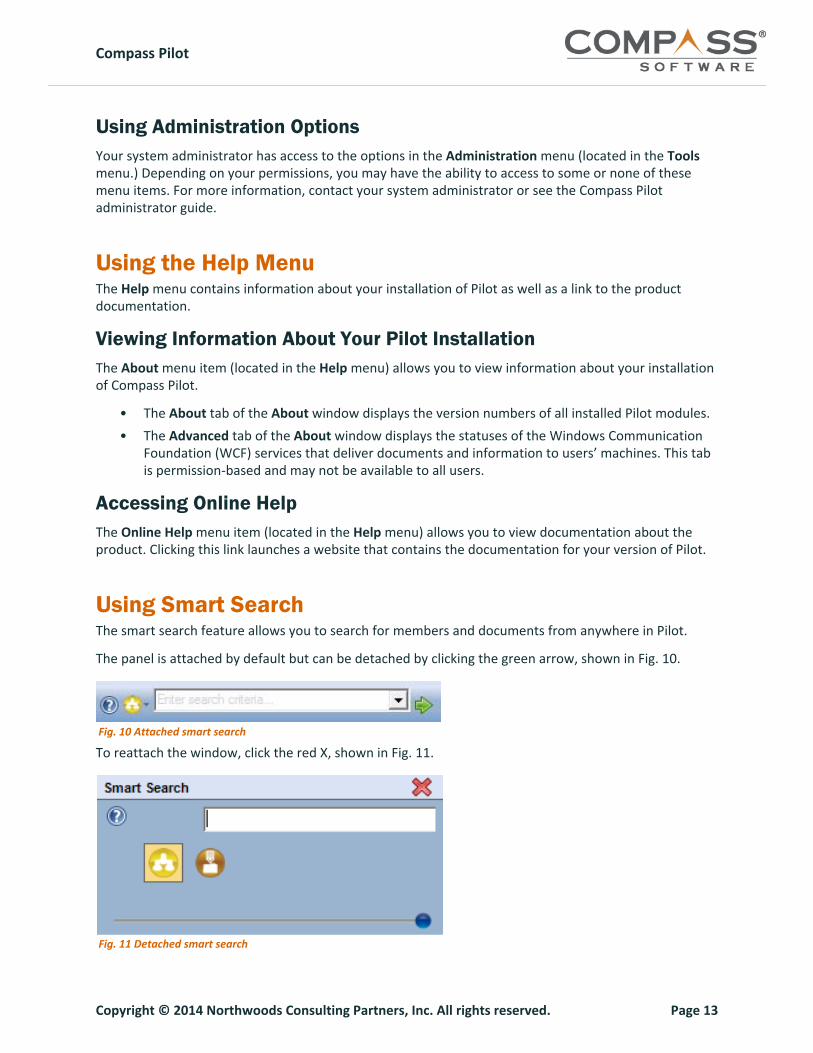
Using Smart SearchThe smart search feature allows you to search for members and documents from anywhere in Pilot.
The panel is attached by default but can be detached by clicking the green arrow, shown in Fig. 10.
Fig. 10 Attached smart search
To reattach the window, click the red X, shown in Fig. 11.
Fig. 11 Detached smart search

Copyright © 2014 Northwoods Consulting Partners, Inc. All rights reserved. Page 14
Compass Pilot
To perform a smart search using the attached panel1. To attach the detached smart search window, click the red X at the top right corner.
2. In the drop‐down list next to the Enter search criteria... field, select either People or Documents to search for members or documents, respectively.
3. In the Enter search criteria... field, type the text on which you want to search.
4. On the keyboard, press Enter.
The search results are loaded in the corresponding module.
To perform a smart search using the detached window1. To detach the attached smart search pane, click the green arrow to the right of the Enter search
criteria... field.
2. Optional ‐ To change the opacity of the window, slide the blue slider to the left to decrease the opacity or to the right to increase the opacity.
3. Select either the Documents icon or the People icon to search the desired module.
4. In the text field, type the text on which you want to search.
5. On the keyboard, press Enter.
The search results are loaded in their corresponding module.

Copyright © 2014 Northwoods Consulting Partners, Inc. All rights reserved. Page 15
Compass Connect for Android via USB
COMPASS CONNECT FOR ANDROID VIA USBCompass Connect for Android via USB manages and transfers information between Compass Pilot and Compass CoPilot. During the sync and reconciliation process, the tablet communicates with People, Forms, and Documents to submit and/or match the information you gathered on the tablet.
Sync and Reconciliation OverviewWhen you sync your tablet, you are transferring information from Compass People, Forms, and Documents to your tablet. You are also transferring newly added information from your tablet back to People and Documents.
If the information on your tablet does not match the information already in the system, you will be required to perform a reconciliation. Reconciliation matches the information you gathered on your tablet with the information in Compass People. During reconciliation, you will be prompted to search for existing cases or members or to create new cases or members.
If you enter complete information on the tablet before you sync, new cases and members will be created or matched automatically without reconciliation. For instance, if you enter both the state case number and local case number on your tablet, you will not be prompted to perform reconciliation for that case, and the case will be automatically added. Similarly, if you enter all the information required by People for new members (SSN, date of birth, first name, last name, and either a physical address or mailing address), you will not be prompted to perform reconciliation for that member, and the member will be automatically added. If, however, you do not enter complete case or member information on the tablet, you will be prompted to enter additional information about your cases and members as you sync.
Syncing your TabletOnce you’ve gathered information on your tablet, you need to transfer the information back to People, Forms, and Documents. Information will not be viewable in Pilot until you sync.
To sync your tablet1. Using your tablet’s USB cord, connect your tablet to your computer.
2. Click the Connect button in the Driver Panel.
3. In the Connect Type drop‐down list, select the connect type you wish to use.
4. Click Start.
If this is your first time syncing the tablet, you are required to configure your password before you can sync. For more instructions, see “To manage your password” on page 15.
To manage your password1. Click Tools.
2. Click Manage My Usernames/Passwords.
The Authentication Manager window appears.
3. Click CoPilot.

Copyright © 2014 Northwoods Consulting Partners, Inc. All rights reserved. Page 16
Compass Connect for Android via USB
4. Click Change Password.
5. Type your password.
6. Click Save.
If this is your first time syncing your tablet, click Start to begin the sync again.
Reconciling Case and Member DataReconciliation matches the information you gathered on your tablet with case and member information in People. On the left, you will see a summary of the cases, members, and documents that you are syncing from your tablet. The cases, members, or documents that are currently being synced or reconciled will be highlighted in the list.
Fig. 12 Sync and reconciliation summary
Based on the information you already entered on the tablet, you may be prompted to perform a reconciliation. During reconciliation, you will be prompted to search for existing cases or members or to create new cases or members.
To reconcile by using an existing case1. Click Search for Existing.
The window expands, displaying any matches with the data you entered.
2. Select the case you wish to use.
3. Click Use Existing.
Copyright © 2014 Northwoods Consulting Partners, Inc. All rights reserved. Page 17
Compass Connect for Android via USB
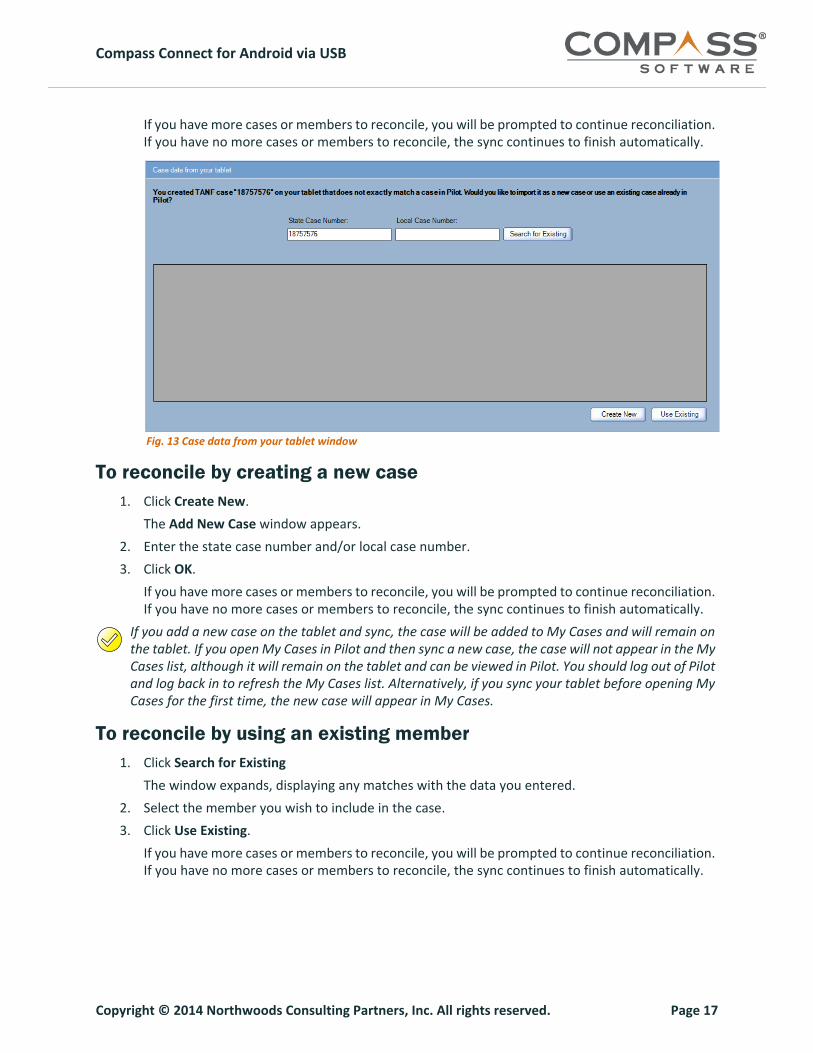
If you have more cases or members to reconcile, you will be prompted to continue reconciliation. If you have no more cases or members to reconcile, the sync continues to finish automatically.
Fig. 13 Case data from your tablet window
To reconcile by creating a new case1. Click Create New.
The Add New Case window appears.
2. Enter the state case number and/or local case number.
3. Click OK.
If you have more cases or members to reconcile, you will be prompted to continue reconciliation. If you have no more cases or members to reconcile, the sync continues to finish automatically.
If you add a new case on the tablet and sync, the case will be added to My Cases and will remain on the tablet. If you open My Cases in Pilot and then sync a new case, the case will not appear in the My Cases list, although it will remain on the tablet and can be viewed in Pilot. You should log out of Pilot and log back in to refresh the My Cases list. Alternatively, if you sync your tablet before opening My Cases for the first time, the new case will appear in My Cases.
To reconcile by using an existing member1. Click Search for Existing
The window expands, displaying any matches with the data you entered.
2. Select the member you wish to include in the case.
3. Click Use Existing.
If you have more cases or members to reconcile, you will be prompted to continue reconciliation. If you have no more cases or members to reconcile, the sync continues to finish automatically.

Copyright © 2014 Northwoods Consulting Partners, Inc. All rights reserved. Page 18
Compass Connect for Android via USB
Fig. 14 Member data from your tablet window
To reconcile by creating a new member1. Click Create New.
The Add New Member window appears.
2. Enter the member’s information. You are required to provide the SSN, first name, last name, birth date, and either a physical address or mailing address.
3. Click OK.
If you have more cases or members to reconcile, you will be prompted to continue reconciliation. If you have no more cases or members to reconcile, the sync continues to finish automatically.