communication of fbs-plc de com. cbxx (menoscbeh...their required communication application software...
TRANSCRIPT

Luis María Drago 1951 Of. 13 - Parque Industrial Burzaco - Buenos Aires - ArgentinaTel.: 5235-9383 /4327-2471 - www.altusarg.com.ar - [email protected]
Communication of FBs-PLC

Communication of FBs-PLC
The FBs-PLC main unit has been built in the communication port0 with optional USB or RS232 interface. If additional
communication boards (CB) have been purchased, then it can increase to 2~3 communication interfaces (depending on
the model of CB). If it is still not enough, communication modules can be added to expand the number of communication
interfaces to 5 (PORT0~PORT4). There are three types of communication interfaces, RS232 、RS485 or Ethernet, to
choose from in both CB and CM. Among them, Port 0 is a permanent interface for FATEK communications interface,
which is controlled by the CPU of the PLC, using FATEK “Standard communication driver” to manage the communication
transactions of the Port, i.e. “FATEK communication protocol”. Any access to the Port must comply with the format of
“FATEK communication protocol” to get responses from the PLC. This includes starting character, station no., command
code, body, error check code, ending characters, etc.; for more details please refer to “Appendix 2: FATEK communication
protocol”. WinProladder and numerous HMI and SCADA soft wares are equipped with communication drivers complying
with this communication protocol, therefore where t he parameters on hardware interface and communications are
consistent, communication connection can be established by just connecting the communication Port with the “Standard
Interface”. If the communication driver with complying comm unication protocol is not available, besides writing its own
commands complying with “FATEK communication protocol” to communicate with PLC, the commonly used industrial
ModBus RTU protocol can also be used to establish a connection with FBs-PLC. The factory setting and the PLC system
initialization on Port 1 ~ Port 4 default to FATEK standard communication interface; though in order to meet the extensive
application and requirements of communication connection, Port 1 ~ Port 4 provides FATEK standard communication
interface, as well as providing easy communication commands that support powerful functions to allow users to compile
their required communication application software through the Ladder diagram program, and easily achieve the aim of
system integration and distributed monitoring. Further detail will be explained in subsequent chapters.
11.1 Functions and applications of FBs-PLC communication ports
Besides the hardware interface distinction of USB, RS 232,RS485 or Ethernet among the 5 COM ports of FBs-PLC,
there are also 3 software interface types in terms of software interfaces. The table below shows the software interface
types that can be congured on the 5 COM ports of FBs-PLC:
Communication Port Available types
Software Interface Port0 Port1 Port2 Port4 Port5 Notes
Standard Interface
Port controlled by CPU, using FATEK ”Standard communication driver” or ModBus RTU communication driver, but Port0 does not support ModBus RTU communication protocol.
Dedicated Modem interface
Port controlled by CPU, using the Modem driver + FATEK ”Standard communication driver” or ModBus RTU communication driver.
Ladder diagram program controlled interface
Port controlled by users (Ladder diagramprogram )
Interface type conguration method -
Register congure
PLC Auto congure
PLC Auto congure
PLC Auto congure
• Standard Interface : Port0 ~ Port4 can all be congured into this type of interface (Port0 can only be this type of interface
and only provides FATEK standard communication driver). Under this interface type, the Port is
controlled by the standard communication driver of FBs-PLC (using FATEK communication protocol
or ModBus RTU communication protocol), hence called “standard interface”. To communication
with the “Standard Interface”, the connection can only be established by complying with FATEK
FB-PLC communication protocol or M odBus RTU communication protocol.
※ Port0 doesn’t support ModBus RTU communication protocol.

• Dedicated Modem Interface : Only Port1 can select this interface type. Under this interface type, Port1 is controlled by
the built-in “MODEM driver” of FBs-PLC, in ch arge of telephone reception or dialing tasks,
and then hand the connection over to FATEK standard communication driver after the
connection is established, subsequent operation is the same as the “Standard interface”
above.
• Ladder diagram Program controlled interface : Port1 ~ Port4 can all select this interface type. Under this interface type,
the Port will be controlled by the user’s Ladder diagram program
instructions, such as FUN94, FUN150, FUN151, etc., hence users can
gain control of the Port through the Ladder program.
The following sections will detail the functions and applications of the 5 Ports on FBs-PLC under each of the 3 dierent software interfaces.
* Port0 ~ Port4 communication parameter are default to :
Baud Rate: 9600 bps Data Length: 7 Bits Parity : Even Stop Bit: 1 Bit
11.1.1 Communication port 0 : USB or RS232 interface
Functional specication
• USB interface complies with standard functional specication of USB1.1
• RS232 interface functional specication complies with the EIA RS232 standard, with 5 types of communication
speeds 9600, 19200, 38400, 57600 and 115200 congurable .
Basic usage
• Besides providing the standard RS232 interface, models with USB interface are also provided since more and more
notebook computers are using USB port to replace COM ports due to light weight and thickness considerations.
• The main purpose of Port0 is to provide a communication interface for program editing, so generally speaking it would
be in passive receiving mode.
Extended usage
Besides program editing, it can also connect to HMI, SCADA equipped with FATEK communication driver.
Through conversion of interface signal into RS485 signal, connections can be made with RS485 interface
peripherals, such as computers, WinProladder, HMI, SCADA, etc. or become a Slave of the FATEK CPU Link
network.
11.1.2 Communication port1 ~port4 : RS232 or RS485 interface
Functional specication
• RS232 interface functional specication complies with the EIA RS232C standard, communication parameters are
adjustable up to highest communication rate of 921.6Kbps. Factory setting and system initialization communication
parameter is congured to the default communication parameter.
• RS485 interface functional specication complies with EIA RS485 standard.

Basic usage
There are 3 types of software interface are selectable as follows :
Standard interface :
Connectable to peripherals with RS232 or RS485 interface, such as computer, WinProladder, HMI, SCADA, etc.
Port1 dedicated modem interface :
It can actively or passively connect to remote computers or conduct auto information gathering, warning, anomaly
reporting or dial B.B. call for remote servicing via MODEM.
Ladder diagram Program controlled interface :
User can control Port1~Port4 through the ladder diagram instructions, such as FUN94 (ASCWR) command to take
control of Port1 and connect to printers with RS232 hardware interface for Chinese/English report printing; FUN151
(CLINK) command takes control of Port1~Port4 to establish connection with FATEK CPU Link or peripherals with
RS232 or RS485 interfaces; FUN150 (MBUS) command can turn Port1~Port4 into a master of ModBus RTU
communication protocol for connecting Slaves with this communication protocol.
Port2 can provide FATEK high speed CPU Link function.
Extended usage
• Under Standard interface, act as the Slave for multi-drop FATEK RS485 or point to point RS232 CPU LINK network.
• Under Ladder diagram program controlled interface types, Port1~Port4 has the following functions:
Use MD0 mode of FUN151 (CLINK) instruction to act as the master for FATEK CPU Link network.
Use MD1 mode of FUN151 (CLINK) instruction to actively connect to intelligent peripherals equipped with this
communication interface, such as other brands’ PLC, servo driver, temperature controller, inverter, message
display, etc.
Use MD2 mode of FUN151 (CLINK) instruction for connection to receive the intelligent peripherals equipped with
this communication interface, such as card readers, bar code readers, weighing scales, etc.
Port2 can utilize MD3 mode of FUN151 (CLINK) instruction to act as the master for FATEK high speed CPU Link
network.
Use FUN150 (MBus) instruction to act as the Master for ModBus RTU communication protocol to connect to
peripherals with this communication protocol.
11.1.3 Ethernet interface
Functional specication
• Comply with IEEE802.3 standard to provide 10Base T interface.
Basic usage
• Provide intranet or internet connectivity within the plant. It can connect to WinProladder, HMI, SCADA with Ethernet
network interface and FATEK communications driver or ModBus driver.

Extended usage
• It can coordinate with MD0 mode of FUN151(CLINK) instruction to provide remote data acquisition through the
Ethernet network between the PLC’s. ( ﹡Client Mode).
Note : For details on Client Mode of FBs-PLC network interface, please refer to the explanations in section 11.8.5.2.
11.2 How to use FBs-PLC communication functions
Refer to the diagram in Section 2.2 “Combination of PLC and Peripheral Systems” in the “Hardware Manual” for the
connection of FBs-PLC to the host computer, intelligent peripherals, and other PLCs.
Among Port0~Port4, only Port 2 provides real-time response function (real-time: data is processed immediately
when received or sent without being aected by scan time.) and communicates with binary code (two times ASCII code).
Other ports use ASCII code for communication in the standard mode and data will not be processed until the scan is
complete and housekeeping is active. Thus, there will have the service delay because of the scan time. Port2 should be
provided for each PLC to share data with each other via “FATEK high-speed CPU Link” (i.e., the MD3 mode of FUN151
(CLINK) ) to meet the real time monitor requirements. Port0, Port1, Port3, Port4 should be used for intelligent peripherals,
HMI, SCADA, and other non-real-time control applications for data collection and monitoring.
11.3 Hardware wiring notications for RS485 interface
In the FBs-PLC communication interfaces, RS232 provides only point to point connection function while RS485
provides connection for multiple stations. Its wiring distance should conform to the restriction specied in the EIA standard.
The principle that connection distance should be as short as possible and the station should be far away from high
noise sources must be observed for hardware wiring. RS232 is for point to point connection with a shorter connection
distance and the standard cable sold in the market or provided by FATEK is applicable. However, for high-speed RS485
network, communication quality is aected and operation might be seriously interfered with if the problems, such as high
baud rate, long connection distance, high signal attenuation, multiple stations, bad grounding, high noise, terminating
impedance mapping, and topology, are not solved appropri ately. Please read the notes of hardware wiring for RS485
network at the end of this section carefully.
Limits on the number of stations
Though the number of FBs-PLC stations can be set up to 254, 16 stations are the maximum for hardware driving for
RS485 interface. If more than 16 stations are required, a RS485 amplier (FBs-CM5R) must be used. 16 additional
stations can be assigned to one amplier up to the max. 254 stations.
FB S -PLC
#1 #2
Max. 16 stationof PLC
FB S -PLC FB S -PLC FB S -PLC FB S -PLC FB S -PLC FB S -PLC
FB S -CM5R FB S -CM5R
Max. 16 stationof PLC
#16 #17 #18 #32
Max. 254 station of PLC
584SR584SR584SR
#254

Limit on distance
The following diagram shows the relationship between the baud rate and transmission distance of RS485 standard
interface.
10K
4K
1K
100
40
4040 100K 1M 10M
Baud Rate (bps)
()feet
Transmission D
istance
Cable
Use the shielded twisted pair cables for connection. Cable quality is an important factor to transmission signal. W hen
the baud rate is high, low quality twisted pair (e.g., PVC twisted pair cables) will cause extremely high signal attenuation
and considerably shorten the transmission distance. Its noise immunity is poorer. In a circumstance where the baud rate
and noise is high, and the distance is long, use high quality tw isted pair cables (such as Belden 9841 polyethylene twisted
pair cables), Its dielectric loss can be 1000 times lesser than that of PVC twisted pair cable. But in a circumstance where
the baud rate and noise are low, PVC twisted pair cable is an acceptable and economical alternative. If the transmission
distance is too long to raise signal attenuation, use a RS485 amplier (FBs-CM5R) to amplify signal.
Topology
Topology is a graph structure of transmission connection. The topology of RS485 must be in a Bus structure. All
cables must be connected from the rst station to the second station, from the second station to the third station, …… to
the last station. As shown in the following diagrams, both star and ring connections are not allowed. If FBs-CM5H is used,
RS485 can be set to star connection, but ring connection is still not allowed.
RS485D D D D D DFF FG_+G_+ G_+RS485 RS485
the shorterthe better
the shorterthe better
BUS connection

D+
FB S -CM5H
GND2
CH2+
GND4
CH4+
CH3+ CH3-
G_+
RS485
DD FG_+G_+
RS485 RS485
D D F FD D
FG
GND3
RS-485 網路搭配FB S -CM5H即可配成星狀連結
RS485D D F_+ G
FG GND1
CH1+24+
IN 24-
CH1-
F
RS485D D+ _ G
RS485FG
D D+ _
G_+ G_+
RS485 RS485
D D F
FG
CH4-
FD DG_+
RS485
DD F
CH2- FG
D+
RS485D F_ G
RS485G_D F
FG
RS485D D+ _
RS485
GD D F_+
D+
D+
D+
環狀連接(不允許)
F G
RS485
_+D
D
星狀連接(不允許)RS485G+
D D_ F
D F_ RS485G
G
RS485
F
D +D _
D FRS485_ G
G RS485D_ FG+ RS485D_D F
Ring connection
Star connection
RS485 network can collocate with FBs-CM5H to be Star connection

FG grounding
Though RS485 network can be connected with two cables, the connection is easily aected by noise. To improve
communication quality, the ground potential dierence (common mode voltage) between two stations should not exceed
the max. allowable common mode voltage of the R485 transmission IC. 7V shall not be exceeded when FBs-PLC IC is
used; otherwise, RS485 may not operate normally.
D D FG_+
D D FG_+
Ecom 7V
Place A Place B
No matter how the ground potential is, we recommend using a twisted pair cable covered with shielding. The FG of
each station is connected with the ground wire covered with shielding (similar to the above-mentioned ”topology”) to clear
common mode voltage and provides the shortest circuit for signal transmission to improve the anti-noise c apacity.
Terminating impedance
Dierent transmission cables have dierent characteristic impedance (the characteristic impedance of a twisted pair
cable is approximately 120 Ω). When the signal is transmitted to the terminating resistor of a cable, reection and waveform
distortion (either sinking or protruding) will be caused if t he terminating impedance is dierent from its characteristic
impedance. This distortion is not obvious when the cable is short but it will be more serious with longer cables. Finally,
PLCs cannot transmit correctly and a terminating resistor should be installed to solve this problem. A 120 Ω terminating
resistor has been installed inside the FBs-PLC. When a terminating resistor is required to be added, open the cover and
toggle the DIP switch to the “ON” position (DIP switch is set to “OFF” position by the factory). Terminating resistors can
only be added to each PLC on the utmost left and right ends of the Bus. All the DIP switches between both end should be
on the position “OFF”, or the driving power of RS485 may become insucient. The diagram below shows the setting and
application of terminating resistors:
SW
DD+
F
SW
DD+
F
SW
DD+
F
SW
DD+
F
NT ON
12
NT ON
12
NT ON
12
NT ON
12
(The end of left
station)
(The end of right station)
Should open PLC's cover, adjust to "ON" for m ost left and right PLC units.
adjust to "O FF"
Should open the cove r, ad just to “ON” for most left and ri ght PLC units.

Strategies against noise
When wiring for RS485 network is implemented based on the described materials and rules or a 120 Ω terminating
resistor is added, most noise situations are eliminated. However, if noise cannot be eliminated, it means that there are
strong noise sources near the RS485 network. Besides keeping cables far away from noise sources (e.g., electromagnetic
valves, inverters, servo drivers, or other power units), the most eective way to solve the problem is to use noise
suppression components. Refer to the description in Section 7.5 in the “Hardware Manual” for noise suppression of
electromagnetic valves, relays and other devices with inductive load. The diagram below shows the noise suppression
approaches for inverters, servo drivers, and other high-noise power units (i.e., add X capacitance or Y capacitance or X+Y
capacitance).
C
C
C
CC
C
R S RWT S T W
C
C
C C C
C
R S T
R
S
T
W
(Add X capacitor)
(Add Y capacitor)
(Add X+Y capacitor)
C = 0.22µf~0.47µf /AC630V
Caution
• Hardware wiring for communication network and addition and removal of communication stations
should be implemented with PLC disconnected. Don’t work especially when PLC is running, or
communication errors may occur to generate incorrect PLC output.
11.4 How to use FBs-PLC communication ports
The requirements for communication are that (1) hardware interfaces and mechanisms, (2) communication
parameters and (3) software interfaces (i.e. the protocol) of the receiver/ sender must be consistent. The same are
applicable to PLC. After the above three fundamentals are meet, PLC will communicate with other PLCs or peripherals.
The following will describe these three fundamentals.
11.4.1 Matching of hardware interfaces and mechanisms
In order to meet the interface requirement of variety peripherals, the FBs-PLC provides USB, RS232, RS485 and
Ethernet communication interfaces for choice. When install, care should be taken if the hardware interface is of the same
type. Incorrect connection of dierent type of communication interface may cause the permanent hardware failure. Also
please make sure that the signals of mating connector are all match. For example, TXD must connect to RXD, RTS (if any)
should be connected to CTS. The interface of USB, RS232 and RS485 are described at bellow (Ethernet is described at
section 1.8).
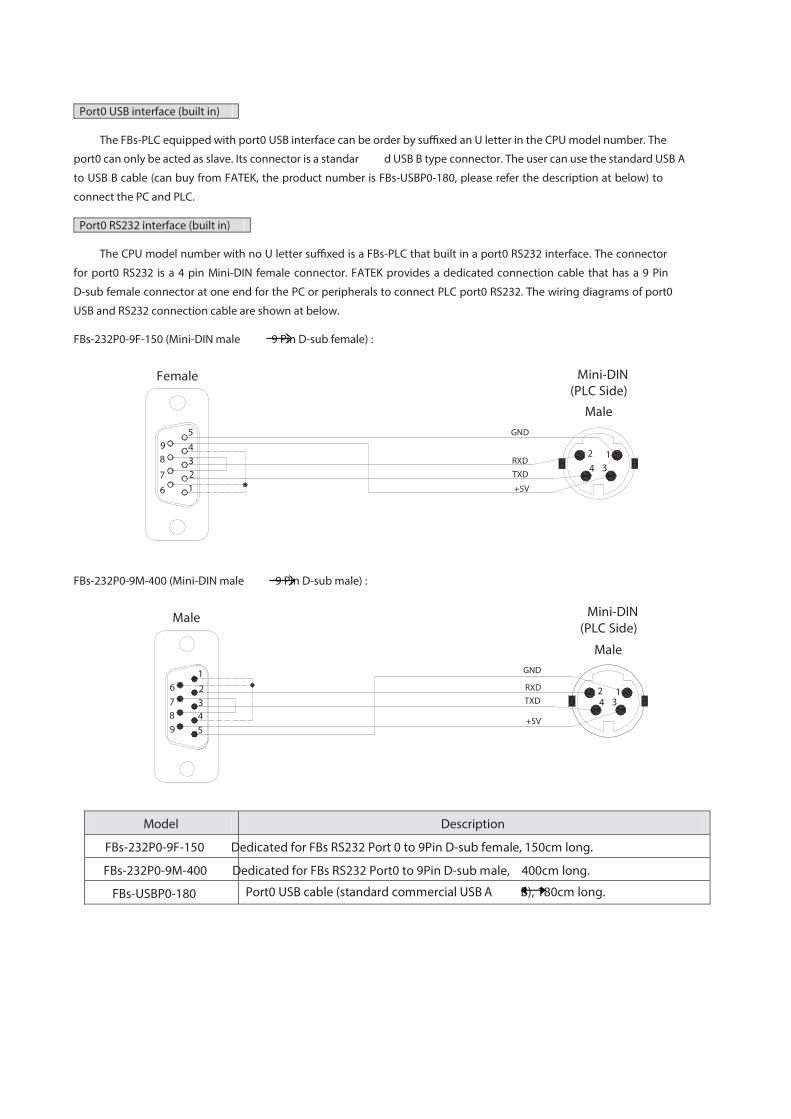
Port0 USB interface (built in)
The FBs-PLC equipped with port0 USB interface can be order by suxed an U letter in the CPU model number. The
port0 can only be acted as slave. Its connector is a standar d USB B type connector. The user can use the standard USB A
to USB B cable (can buy from FATEK, the product number is FBs-USBP0-180, please refer the description at below) to
connect the PC and PLC.
Port0 RS232 interface (built in)
The CPU model number with no U letter suxed is a FBs-PLC that built in a port0 RS232 interface. The connector
for port0 RS232 is a 4 pin Mini-DIN female connector. FATEK provides a dedicated connection cable that has a 9 Pin
D-sub female connector at one end for the PC or peripherals to connect PLC port0 RS232. The wiring diagrams of port0
USB and RS232 connection cable are shown at below.
FBs-232P0-9F-150 (Mini-DIN male 9 Pin D-sub female) :
GND
+5V
RXD12
34
98
76
54321
TXD
Female Mini-DIN(PLC Side)
Male
FBs-232P0-9M-400 (Mini-DIN male 9 Pin D-sub male) :
GND
+5V
RXD 1234
9876
54321
TXD
Male Mini-DIN(PLC Side)
Male
Model Description
FBs-232P0-9F-150 Dedicated for FBs RS232 Port 0 to 9Pin D-sub female, 150cm long.
FBs-232P0-9M-400 Dedicated for FBs RS232 Port0 to 9Pin D-sub male, 400cm long.
FBs-USBP0-180 Port0 USB cable (standard commercial USB A B), 180cm long.

F B s − 2 3 2 P 0 − 9 F − 1 5 0
(connector specication) (connection distance) unit/cm F: Female M: Male 9: 9Pin D-sub
P0 :Port0 (RS232) P0 :Port0 (USB)
232 :RS232
FBs-Series product
name
USB :USB1.1
Port1~Port4 RS232 interface (expandable)
The communication port of Port1~Port4 can be utilized by installed the RS232 communication board (or module).
Each communication board (or module) provides one or two standard RS232 9 Pin D-sub female connector(s). While
application, the user can buy a standard 9 pin RS232 cable dire ctly from computer store or follow the example diagram at
below to DIY the cable.
Signal Name
Pin
Connector Type TXD RXD RTS CTS SG DTR DSR
MALE 3 2 7 8 5 4 6 9Pin D-sub FEMALE 2 3 8 7 5 6 4
port1 、port2 usage only FBs PLC Non-usage
9P D-sub female 9P D-sub male RS232 communication cable :
9876
5432
198
76
54321
MaleFemale
( )
( )Port on the PLC
External Interface

9P D-sub male 9P D-sub male RS232 communication cable :
9876
5432
1
9876
5432
1
MaleMale
If you make RS232 cables by yourself and the denition of each pin is not clear, use a multimeter for measurement to
determine TXD and RXD.
9 Pin connector: The pin 5 is SG;
Measure the pin 2 (red probe) and the pin 5 (black probe) with a multimeter. If it is approximately
−9V, it means that the pin 2 is the transmission pin; If it is approximately 0V, it means that the pin 2 is the
receiving pin.
Measure the pin 3 (red probe) and the pin 5 (black probe) by a multimeter. If it is approximately
−9V, it means that the pin 3 is the transmission pin; If it is approximately 0V, it means that the pin 3 is the
receiveing pin.
Port1~Port4 RS485 interface (expandable)
The communication port of Port1~Port4 can be utilized by installed the RS485 communication board (or module).
Each communication board (or module) provides one or two standard RS485 3-pin European plug-able terminal block. The
pin assignment of connector(s) is show below.
+ (D+)
G (FG)
(D )
11.4.2 Selection and setting of communication protocols
Besides oering the FATEK protocol by default, Port1~Port4 can be set to ModBus (Slave) protocol. The following
shows the setting steps in the WinProladder :
Click the protocol: PLC
Setting
Protocol a port can be set to ModBus RTU or FATEK Protocol:

Besides, you also can setting the communication protocol through special register.
R4047 : Upper Byte = 55H, congure the communication port for ModBus RTU protocol.
= Other values, Port1 ~4 don’t support ModBus RTU protocol(The defaults are FATEK protocol)
Lower Byte : Port assignment for ModBus RTU protocol.
Format as below :
Upper Byte Lower Byte
55H b7 b6 b5 b4 b3 b2 b1 b0
b0, Reserved ;
b1=0, Port 1 acts as FATEK protocol.
=1, Port 1 acts as ModBus RTU protocol.
b2=0, Port 2 acts as FATEK protocol.
=1, Port 2 acts as ModBus RTU protocol.
b3=0, Port 3 acts as FATEK protocol.
=1, Port 3 acts as ModBus RTU protocol.
b4=0, Port 4 acts as FATEK protocol.
=1, Port 4 acts as ModBus RTU protocol.
b5 ~b7, Reserved
※ It allows to assign multiple ports for ModBus RTU protocol, where the corresponding bit must be 1.
For example :
R4047=5502H, Assign Port 1 as ModBus RTU protocol;
R4047=5504H, Assign Port 2 as ModBus RTU protocol;
R4047=5506H, Assign both Port 1 and Port 2 as ModBus RTU protocol;
Refer to : The rule for address mapping between ModBus and Fatek(Page12-40).

11.4.3 Settings for communication parameters
Communication parameters can be set up for each of the 5 FBs-PLC ports. When out of factory or communication
parameters of Port 0~Port 4 are set to the same parameters of Port 0 before shipment or after system initialization. (See
the table below.)
Baud Rate 9600 bps
Data Length 7 Bits
Parity Check Even
tiB 1 tiB potS
Default communication parameters
Port Register
Setup Default Value Default Baud Rate Other default Parameters
Port 0 R4050 5621H 9600 bps 7-bit Data, Even 、1-bit Stop
Port 1 R4146 5621H 9600 bps 7-bit Data, Even 、1-bit Stop
Port 2 R4158 5621H 9600 bps 7-bit Data, Even 、1-bit Stop
Port 2
(High-speed) R4161 5665H 153600 bps 8-bit Data, Even 、1-bit Stop
Port 3 R4043 5621H 9600 bps 7-bit Data, Even 、1-bit Stop
Port 4 R4044 5621H 9600 bps 7-bit Data, Even 、1-bit Stop
※ When a port is set to ModBus RTU protocol, data bit is always 8-bit. ※ Port 1~Port 4 also provides Baud Rate settings for user-dened (1125 bps~1152000 bps). ※ Port 0 can be changed the baud rate only the other parameters are always 7-bit Data, Even, 1-bit Stop.
Also, Port 0 supports FATEK communication protocol only.
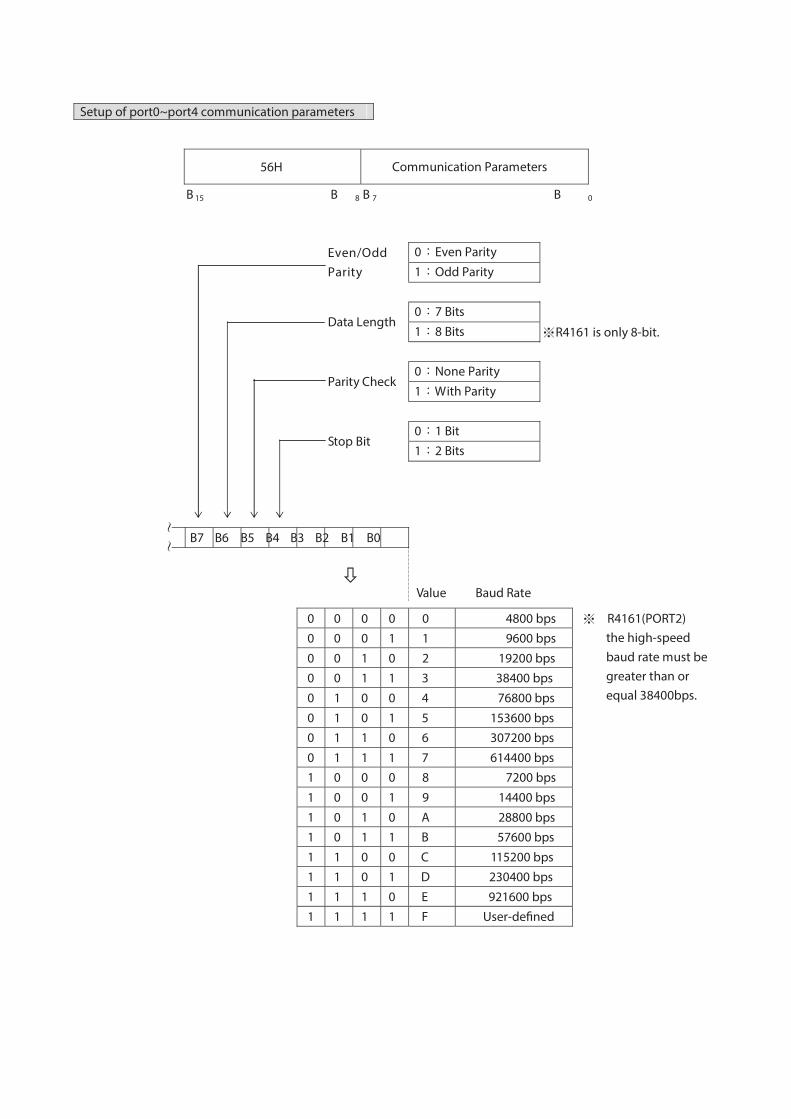
Setup of port0~port4 communication parameters
56H Communication Parameters
B 15 B 8 B 7 B 0
0:Even Parity Even/Odd Parity 1:Odd Parity
0:7 Bits
Data Length1:8 Bits ※R4161 is only 8-bit.
0:None Parity
Parity Check1:With Parity
0:1 Bit
Stop Bit 1:2 Bits
B7 B6 B5 B4 B3 B2 B1 B0
Value Baud Rate
0 0 0 0 0 4800 bps 0 0 0 1 1 9600 bps
0 0 1 0 2 19200 bps 0 0 1 1 3 38400 bps
0 1 0 0 4 76800 bps
0 1 0 1 5 153600 bps 0 1 1 0 6 307200 bps
0 1 1 1 7 614400 bps 1 0 0 0 8 7200 bps
1 0 0 1 9 14400 bps
1 0 1 0 A 28800 bps 1 0 1 1 B 57600 bps
1 1 0 0 C 115200 bps 1 1 0 1 D 230400 bps
1 1 1 0 E 921600 bps
1 1 1 1 F User-dened
※ R4161(PORT2) the high-speed baud rate must be greater than or equal 38400bps.

Port 1~Port 4 provides Baud Rate settings for user-dened (1125 bps~1152000 bps)
Formula
Baud_Rate_Div = ) Baud_Rate18432000
51 ( 1-( ~ 16383 )
Baud_Rate = ) 1 DivBaud_Rate_
18432000 (
+ spb 5211 ( ~ 1152000 bps )
Port Register Setup Formula
Port 1 D4000 D4000 = ) Baud_Rate18432000
( -1
Port 2 D4001 D4001 = ) Baud_Rate18432000
( -1
Port 3 D4002 D4002 = ) Baud_Rate18432000
( -1
Port 4 D4003 D4003 = ) Baud_Rate18432000
( -1
Example 1
If you want to set Port 1 Baud Rate to 1200 bps, then R4146 = 56XFH :
D4000 = ) 1200
18432000 ( - 1 = 15359
Example 2
If you want to set Port 2 Baud Rate to 256000 bps, then R4158 = 56XFH :
D4001 = ) 25600
18432000 ( - 1 = 71

Without station number checking for HMI or SCADA connecting
While PLC communicating with WinProladder or Handheld PP, it recognizes the FATEK's internal communication
protocol.
While PLC communicating with Man Machine Interface (MMI) or Supervising software (SCADA), it recognizes the
FATEK's external communication protocol.
Low byte of R4149 = 1, Port 0 without station number checking while FATEK's external communication protocol.
Low byte of R4155 = 1, Port 1 without station number checking while FATEK's external communication protocol.
High byte of R4155 = 1, Port 2 without station number checking while FATEK's external communication protocol.
Low byte of R4156 = 1, Port 3 without station number checking while FATEK's external communication protocol.
High byte of R4156 = 1, Port 4 without station number checking while FATEK's external communication protocol.
Reply delay time setting
As the PLC received a packet of addressed message and passed the error check, it would reply the message after
the reply delay time period.
Low byte of R4040 : Port 0 reply delay time setting (Unit in mS).
High byte of R4040 : Port 1 reply delay time setting (Unit in mS).
Low byte of R4041 : Port 2 reply delay time setting (Unit in mS).
High byte of R4041 : Port 3 reply delay time setting (Unit in mS).
Low byte of R4042 : Port 4 reply delay time setting (Unit in mS).
Transmission delay time setting
While the communication port being used as the master of FATEK CPU LINK (FUN151) or Modbus RTU (FUN150)
multidrop's network, it allows the user to set the transmission delay time to slow down the expiration of message frame.
High byte of R4147 : Port 1 transmission delay time setting (Unit in 10mS)
High byte of R4159 : Port 2 transmission delay time setting (Unit in 10mS)
High byte of R4045 : Port 3 transmission delay time setting (Unit in 10mS)
High byte of R4048 : Port 4 transmission delay time setting (Unit in 10mS)
Receive time-out span setting
While the communication port being used as the master of FATEK CPU LINK (FUN151) or Modbus RTU (FUN150)
multidrop's network, it allows the user to set the receive ti me-out span to detect whether the slave station on line or not.
Low byte of R4147 : Port 1 receive time-out span setting (Unit in 10mS).
Low byte of R4159 : Port 1 receive time-out span setting (Unit in 10mS).
Low byte of R4045 : Port 1 receive time-out span setting (Unit in 10mS).
Low byte of R4048 : Port 1 receive time-out span setting (Unit in 10mS).

11- 1 7
New message detection time interval setting
1. While the communication port being used as the master or slave of Modbus RTU protocol,the system will give the
default time interval to identify each packet of receiving message, if the default works not well, the user can set this time
interval through the high byte setting of R4148 and let M1956 be 1, to avoid the overlap of dierent packet of message
frame.
When M 1956=1 : High Byte of R4148 is used to set the new message detection time interval for Port 1 ~Port 4 (Unit in
mS)
2. While the communication port being used to communicate with the intelligent peripherals through the FUN151
convenient instruction, if the communication protocol without the end of text to separate each packet of message frame,
it needs message detection time interval to identify the dierent packet. High byte of R4148 is used for this setting.
High Byte of R4148 :New message detection time interval setting for Port 1 ~Port 4 (Unit in mS).
Without station number checking for FATEK's internal communication protocol
While PLC communicating with WinProladder or Handheld PP, it recognizes the FATEK's internal communication
protocol, the quick way to communicate with the PLC is to ke y in 255 as the station number for WinProladder to connect
with the unsured station number of target.
When the number 255 for WinProladder to connect with the PLC, the PLC will communicate with Winproladder even
the station number of PLC is 1 ~254.
Related internal relay
Port Port Ready Indicator Relay Finished Indicator Relay
1691M 0691M 1troP
3691M 2691M 2troP
7391M 6391M 3troP
9391M 8391M 4troP
11.4.4 Modem interface setting
High Byte of R4149 = 55H, Remote-Diagnosis/Remote-CPU-Link by way of Port 1 through Modem connection, it
supports user program controlled dial up function.
= AAH, Remote diagnosis by way of Port 1 through Modem connection, it supports Passive
receiving & Active dialing operation mode
= Other values, without above function

11- 1 8
11.5 Description and application of software interface type
11.5.1 Standard interface
The port with the standard interface is controlled by PLC CPU, and the communication transaction of the ports is
controlled by FATEK “Standard Communication Driver” or “ModBus Communication Driver”. All accesses to the port must
be executed in the format of “FATEK-PLC Protocol” or “ModB us Communication Driver”. FP-07C, WinProladder software
package, and many HMI and SCADA have communication drivers conforming to “FATEK-PLC Protocol”, so linkage is built
immediate when the “standard interface” port is connected and the hardware interface and communication parameters are
consistent. When no such conforming communication driver is available, additional commands that conform to the format
of “FATEK-PLC Protocol” or “ModBus Communication Driver” must be written for PLC communication.
11.5.2 Modem-specic interface
R4149 high byte = AAH means that Port 1 is set up to Modem-specic interface. Though CPU uses FATEK
“Standard Communication Driver” or “ModBus Communication Driver” to control the communication transaction of Port 1,
connection must be made via Modem. In other words, Port 1 is controlled by “Modem Driver” before communication starts,
no matter whether active dialup or passive reception connection is concerned, and no access is allowed to PLC. The
Modem Driver is only used for Modem connection and transfers the control of Port 1 to FATEK “Standard Communication
Driver” when Modem is connected successfully, and Port 1 becomes the “standard interface”. This section discusses the
operation of Modem active dialup connection and passive reception connection.
With the Modem-specic interface, the PLC allows Port 1 to dial up a remote Modem actively or receive messages
from a remote Modem passively depending on the setting of the internal phone number register (R4140~R4145). When
connection of both machines is successful, transmission or reception of data is executed via the phone cable.
A. Passive reception mode
When no “eective phone number” is stored in the internal phone number register of the PLC (see B below), it will
enter the passive reception mode and set up the Modem to the reception mode waiting for a remote Modem to dial up.
When both machines connect successfully and the inbound signal is correct, the PLC host exits the reception mode
immediately and runs into connection state. The remote Modem can fully control and access the PLC host. The PLC host
checks the content of the phone number register only at the moment when the power of the PLC host or Modem is turned
on (OFF ON). Therefore, any change to R4140~R4145 (e.g. save or removal of a phone number) is only eective when
the power of the PLC host or Modem is turned o and turned on again.
B. Active dialup mode
When an “eective phone number” is stored in the internal phone number register of the PLC host, it enters the
active dialup mode at the moment when the power of the PLC host and Modem is turned on. In this mode, Port 1 can
dialup a phone number in R4140~R4145 via Modem for connection to the remote Modem corresponding to this phone
number. When both machines connect successfully, the PLC host exits the dialup mode and runs into connection state.
The remote Modem can fully control and access the PLC host. If dialing fails, the PLC host executes the second dialing to
a maximum of three redials (about 3 minutes). If the third redial fails, the PLC host exits the active dialup mode and enters
the passive reception mode. It also sets up the Modem to the reception mode waiting for calls from a remote Modem.

11- 1 9
Only the phone number that is stored in the Modem phone num ber register in the following format will be identied as
eective by the PLC host. The phone number must be writt en hex-decimally. Only 0~9 and “E” are meaningful in the
hexadecimal digits. “A” stands for dialing delay and is usually used for international calls or extensions of an automatic
switchboard. (a “A” is about 2 seconds). “B” stands for “#” (for B.B.Call), and “C” stands form “*”. Among the eective digits ,
0~9 is used for phone numbers, while “E” stands for the end of a phone number. Since each register has 4 hexadecimal
digits, R4140~R4145 have 24 hexadecimal digits and maximum 23 digits, the end character “E” not counted, can be stored
in R4140~R4145. Phone numbers are stored in order from digit 0 of R4140 to digit 3 of R4145. For example, the phone
number 02-6237019 is stored in the following order:
Direction
R4145 R4144 R4143 R4142 R4141 R4140
χ χ χ χ χ χ χ χ χ χ χ χ χ χ E 9 1 0 7 3 2 6 2 0
Digit 3
Digit 3
End character
Digit 3
Digit 0
“χ”: Any value from 0 to F
2620H is stored in R4140, 1073H is stored in R4141,and XXE9H is stored in R4142. R4143~R4145 can be any value.
Please note that the last digit of the phone number must be followed by the end character “E”. The PLC host will ignore the
number (any value from 0 to F) behind “E”. Only the value 0~C is acceptable before “E”. Any other values will be regarded
as ineective.
If the telephone bill is paid by the service unit answering the call, no eect phone number should be stored in the
internal Modem phone number register of the PLC host, so that it will enter the reception mode when turned on and the
service unit will then call the client. If the phone bill is paid by the client, at least one eect phone number must be store d in
the internal Modem phone number register of the PLC host, so that it will enter the dialup mode at the moment when the
client turn on the power of the PLC host and Modem. Since the phone number of the service unit may change, the
WinProladder package provides a phone number Write and Callback command. In this case, the client is not able to call
the service unit with the old phone number. To solve this problem, the client may turn on the Modem and PLC host. W hen
the PLC host fails converts to the reception mode after three failed dials (about 3 minutes), the service unit calls the client
and imports its new phone number in the Modem phone number register of client’s PLC host and sends a callback
command. When receiving the callback command, the PLC host of the client enters the dialup mode immediately and calls
the service unit with the imported new number. This application requests the service unit to call the client and pay the bill.
However, the amount of the telephone bill is limited because it takes very short time for implementation of the Write and
Callback command.
When executing the “Write and Callback” command and connecting to the host of the client successfully,
WinProladder will take the old number back from the PLC host for reference (and for future use when write-back of the old
number is required) before it writes the new number and executes callback. When the connection is not required any more,
WinProladder will give a shutdown command automatically for disconnection.

11- 2 0
11.5.3 Ladder program control interface
This type of interface can be set up for Port1~Port4. T he ladder program that are used to control the ports are
FUN94 (ASCWR), FUN150 (M-BUS) and FUN151 (CLINK).
FUN94 (ASCWR) uses Port 1 as an output interface for ASCII les (transmission only) and sends messages to
printers, computers, and other devices that receive messages with ASCII code. The typical application of this command is
the connection to printers for Chinese/English reports. WinPro ladder provides the “ASCII File Editor” function. It converts
the data to be edited or printed to ASCII les and stores them in PLC. Production reports, material request reports, and
other reports are generated with the help of various dynamic data input during the operation of PLC. Refer to “ASCII File
Output Applications” for more information.
FUN150 (M-BUS) controls Port 1~Port 4 and uses them as masters on the ModBus network. The ports can connect
to ModBus peripherals (slaves) easily. Refer to the “Convenient instruction for ModBus RTU Master” below for more
information.
FUN151 (CLINK) controls Port 1~Port 4 and uses them for re source sharing among PLCs or connection to intelligent
peripherals. FUN151 provides four operation modes. Refer to the “FBs-PLC CLINK Applications” below for more
information.

11 - 2 1
11.6 Communication boards(CB)
The FBs-PLC main unit has been built in the communication port 0 , and it can increase the communication ports by
purchasing the optional communication board. In response to varying application and demand, 6 types of specication
have been designed to suit actual application of customers. In the model name of communication board and
communication module, CB signies Communication Board, CM signies Communication Module, 2 signies RS232
interface, 5 signies RS485 interface, E signies Ethernet interface. The specication and appearance of every
communication board is as follows:
Model/Item Specication
FBs-CB2 1 × RS232 COM Port (Port 2), with TX 、RX indicators.
FBs-CB22 2 × RS232 COM Port (Port 1+Port 2), with TX 、RX indicators.
FBs-CB5 1 × RS485 COM Port (Port 2), with TX 、RX indicators.
FBs-CB55 2 × RS485 COM Port (Port 1+Port 2), with TX 、RX indicators.
FBs-CB25 1 × RS232 COM Port (Port 1) + 1 x RS485 COM Port (Port 2), with TX 、RX indicators.
FBs-CBE 1 × Ethernet COM Port (Port 2), with Link 、TX 、RX indicators.
Mechanical DB-9F Standard Plug RS232 specication
Electrical EIA RS232 Standard Specication
Mechanical 3-PIN European style movable terminal platform RS485 specication
Electrical EIA RS485 Standard Specication, built-in the terminator with the DIP switch setting.
1 × RS232 COM Port 〔FBs-CB2 〕
PORT1PORT2
TX
RX
TX
RX
CONTROLLERPROGRAMMABLE
CTS(in) 72 TxD(out)
5 GNDRTS(out) 8
3 RxD(in)
RS232 Pin assignment of the connector
1 × RS485 COM Port 〔FBs-CB5 〕
PROGRAMMABLE CONTROLLER
PORT2 PORT1
TX
RXRX
TX
12
ONT N
+
G(FG)
RS485
Pin assignment of the connector
DB-9F

11 - 2 2
2 × RS232 COM Port 〔FBs-CB22 〕
PORT1PORT2
RX
TX
PROGRAMMABLE CONTROLLER
TX
RX
5 GND
3 RxD(in)2 TxD(out)
CTS(in) 7RTS(out) 8
RS232 Pin assignment of the connector
2 × RS485 COM Port 〔FBs-CB55 〕
PROGRAMMABLE CONTROLLER
PORT2 PORT1
TX
RXRX
TX
12
ONT N
+
G(FG)
RS485
Pin assignment of the connector
1 × RS232 +1 × RS485 COM Port
〔FBs-CB25 〕
PORT1
RX
PORT2
TX
PROGRAMMABLE CONTROLLER
TX
RX
12
ONT N
+
G(FG)
RS485
5 GND
3 RxD(in)2 TxD(out)CTS(in) 7
RTS(out) 8
RS232 Pin assignment of the connector
1 × Ethernet COM Port 〔FBs-CBE 〕
LINK
CONTROLLERPROGRAMMABLE
RXTX
ETHERNET
1 8
Pin assignment of the connector
Signal RJ-45 Pin
TX+ 1
TX- 2
RX+ 3
RX- 6
DB-9F
DB-9F

11 - 2 3
11.7 Communication modules (CM)
For 3 communication ports application, we need the optional communication board, and we also need the extra
communication module for 5 communication ports requirement. The naming system for CM is as described above. CM
means communication module, 2 means RS232 interface, 5 means RS485 interface, E means Ethernet interface. The
specications and appearance of each CM is as follows:
Model / Item Specications
FBs-CM22 2 × RS232 COM Port (Port 3+Port 4), with TX 、RX indicators.
FBs-CM55 2 × RS485 COM Port (Port 3+Port 4), with TX 、RX indicators.
FBs-CM25 1 × RS232 COM Port (Port 3) + 1 × RS485 COM Port (Port 4), with TX,RX indicators.
FBs-CM25E 1 × RS232 COM Port (Port 3) + 1 × RS485 COM Port (Port 4)
With Ethernet interface, with RUN, Link, TX, RX indicators.
FBs-CM55E 1 × RS485 COM Port (Port 3) + 1 × RS485 COM Port (Port 4)
With Ethernet interface, with RUN 、Link、TX 、RX indicators.
FBs-CM25C General purpose RS232 RS485 converter, with RX indicators.
FBs-CM5R General purpose RS485 amplier, with RX indicators.
FBs-CM5H General purpose 4-port RS485 Hub, with ACT, COLLISION indicators.
Mechanical DB-9F Standard Plug RS232 specication Electrical EIA RS232 Standard Specication
Mechanical 3-PIN European style movable terminal RS485
specication Electrical EIA RS485 Standard Specication, built-in the terminator with the DIP switch setting.
Mechanical 4-PIN European style movable terminal Ethernet specication Electrical 10BaseT ,IEEE 802.3 standard
* MA main unit does not support expansion of communication modules, therefore it can only have up to three COM Ports
2 × RS232 COM Port
FBs-CM22
PORT3 (RS232)
RX
TX
PORT4 (RS232)
RX
TX
5 GND
3 RxD(in)2 TxD(out)
RS232 Pin assignment of the connector
〔FBs-CM22 〕
DB-9F

11 - 2 4
2 × RS485 COM Port
FBs-CM55
+
G
+
G
PORT3 (RS485)
PORT4 (RS485)
TX
RX
T N
TX
RX
T N
12
ONT N
+
G(FG)
RS485
Pin assignment of the connector
RS232 +RS485 COM Port
FBs-CM25
PORT3 (RS232)
RX
TX
PORT4 (RS485)
G
T
+
RX
N
TX
12
ONT N
+
G(FG)
RS485
5 GND
3 RxD(in)2 TxD(out)
RS232 Pin assignment of the connector
2 × RS485 COM Port + Ethernet
FBs-CM55E
PORT4 (RS485)
G
PORT3 (RS485)
G
T
+
N
RX
TX
T N
1
ETHERN
ET
TX
+
2
TX
RX
RX
3
6
RUN
LNK
Ethernet
3RX+
6RX
2TX
1TX+
12
ONT N
+
G(FG)
RS485
Pin assignment of the connector
RS232 + RS485 + Ethernet
Ethernet
3RX+
6RX
2TX
1TX+
12
ONT N
+
G(FG)
RS485
5 GND
3 RxD(in)2 TxD(out)
RS232 Pin assignment of the connector
〔FBs-CM25 〕
〔FBs-CM55E 〕
〔FBs-CM55 〕
FBs-CM25E
PORT4 (RS485)
ETHERN
ET
G
PORT3 (RS232)
RX
TX
NT
1 TX
+
2
TX
RX
RX
3
6
RUN
LNK
〔FBs-CM25E 〕
DB-9F
DB-9F

11 - 2 5
RS232 RS485 Converter
FBs-CM25C
G
RX
RS232 to RS485Converter
T N
+
FG
RX
24V+
24V
POW
RS485
12
ONT N
+
G(FG)
5 GND
3 RxD(in)2 TxD(out)
RS232 Pin assignment of the connector
RS485 Repeater
N
N
Repeater
FBs-CM5R
G
G
T
+
RS485
T
+
FG
+24V
24V
RX
RX
POW
RS485
12
ONT N
+
G(FG)
Pin assignment of the connector
RS485 HUB
CH4 -CH4+GND3CH3+ CH3 - GND4
GND1
RS485 HUB4 ports
CH1+CH2 -CH2+
CH1 - GND2
FB S -CM5H
IN
11.7.1 4-port RS485 central hub (FBs-CM5H)
FBs-CM5H is the 4 ports RS485 central Hub. This module is not restricted to be used on FBs-PLC series products,
and it can be used by the wide range application of RS485 communication interface. This product can function as a
repeater, and it can support the star topology for wiring conn ection except the traditional RS485 bus topology. In addition,
the ports are designed with opto-electric insulations to pr otect the system from disrupted current generated by the
dierence in earth current. Another feature is the direction change control utilizes automation to adjust in accordance with
dierent data transfer rate and data format. Installation is easy and it can be directly xed onto DIN-Rail or xed with
screws. For details of the wiring method for FBs-CM5H, please refer to chapter 11.3 (RS485 COM Port hardware wiring
notes)
〔FBs-CM5C 〕
〔FBs-CM5R 〕
〔FBs-CM5H 〕
DB-9F

11 - 2 6
Indicators
Indicator Name Functional Description
POW Power indicators. This indicator will light up when there is external power source.
ACTIVE
Four LED indicators represent the activities of the four ports. The ports with indicators on are active ports, and the others are passive ports. Messages on active port will appear on passive port.
COLLISION
Four LED indicators represent the signal collis ion status for the four ports. The ports with indicator on mean the signal transmitted online and the signal to be transmitted on the ports are inconsistent, which also mean there are other devices transmitting signal on the bus causing conicts.
Setting for terminator
Port No. Switch Terminator ON Terminator OFF
1WS 1HC
2WS 2HC
3WS 3HC
4WS 4HC
Switch 1,2 are ON
Switch 1 & 2 are OFF
Warning
• The DIP switch for terminator setting must be used with the 2 bits together (both “ON”, or both “OFF”), the two
bits can not be inconsistent, otherwise it would cause bad or worsen communication.
Working mode settings
1.Symmetrical mode : Function of every port is the same. Signal received by any one port would transmit to the other
ports.
2.Asymmetrical mode : Port 1 is the master, and signals received by it will be transmitted to other ports, but signal
received by port 2~4 would only transmit to port 1.
JP2
Asymmetrical mode
JP2
Symmetrical Mode

11 - 2 7
11.7.2 Isolated RS485 repeater (FBs-CM5R)
FBs-CM5R is the universal RS485 repeater. This module is not restricted to be used in FBs-PLC series products
only, it can also be used in wide range of RS485 interface app lication. The feature of this product is the opto-electric
insulation design between the two RS485 ports, protecting system from disrupted current caused by dierence in
grounding potential. Installation is very convenient, just x it directly onto DIN-Rail or screw it on.
Setting for terminator
Terminator ON Terminator OFF
11.7.3 Isolated RS232/RS485 converter (FBs-CM25C)
FBs-CM25C is the interface signal converter between RS232 and RS485 network. This module is not limited to be
used on FBs-PLC series products, it can be used as the universal converter between RS232 and RS485 interface. The
feature of this product is the opto-electric insulation design between the two ports, protecting system from disrupted current
caused by dierence in grounding potential. Another feature is the direction change control utilizes automation to adjust in
accordance with dierent data transfer rate and data format. Inst allation is very convenient, just x it directly onto DIN-Ra il
or screw it on.
Setting for terminator
FFO rotanimreT NO rotanimreT
Switch 1,2 are ON
Switch 1,2 are OFF

11 - 2 8
11.8 FBs ethernet communication module and application
Network communication has far reaching applications and is helpful for the circulation of information. Though most of
the software systems are designed for commercial use, the CIM application in the manufacturing industry and the ongoing
development of the Internet speed the application of network communication in industries. In the circumstances, FATEK
develops a series of Ethernet/Serial Port Bridge Module as a cost ecient and eective FBs-PLC network connection
solution for customer.
The FBs-CBE module only provides connection of the Ethernet to FBs-PLC. Other modules (CM25E/CM55E)
provide two serial ports Port 3 and Port 4 for communication applications. Port 4 is only used in conjunction with RS485 for
Ethernet signal transformation, while Port 3 is used for other peripheral control purposes.
11.8.1 Specications
11.8.1.1 Connector specications
Module Port Signal Type Connector Type Power
Consumption*
Port3 RS232 DB9 female
Port4 RS485 European 3pin
connector FBs-CM25E
Ethernet 10BaseT European 4pin
connector
200mA
Port3 RS485 European 3pin
connector
Port4 RS485 European 3pin
connector FBs-CM55E
Ethernet 10BaseT European 4pin
connector
200mA
FBs-CBE Ethernet 10BaseT RJ45 150mA
﹡: CPU 5V power source 11.8.1.2 Ethernet specications
Feature Description
Network interface 10BaseT, IEEE 802.3
Transmission Protocol TCP, UDP, IP, ARP
Application Protocol FATEK/TCP/UDP, ModBus/TCP
Status indicator Link status indicator (LINK), transmission status indicator (TX),
receiving status indicator (RX)
Port4 (CM25E/CM55E) PLC port Port1 & Port2 (CBE)
9600,19200,38400,57600,115200,230400(CM25E/CM55E) PLC baud rate 115200(CBE)

11 - 2 9
Feature Description Security Use permitted IP for access control
Building tools Windows Network Building Software
Application modes Server and Client modes
Permitted IPs 10
Port mapping group size
18
TCP connections Max. 8 connection at a time (only for the Server mode)
11.8.2 Appearance
11.8.2.1 CM25E and CM55E appearance
FBs-CM25E
PORT4 (RS485)
ETHERN
ET
G
PORT3 (RS232)
RX
TX
NT
1 TX
+
2
TX
RX
RX
3
6
RUN
LNK
FBs-CM55E
PORT4 (RS485)
G
PORT3 (RS485)
G
T
+
N
RX
TX
T N
1
ETHER
NET
TX
+
2
TX
RX
RX
3
6
RUN
LNK
19
4
5
2
63
7
1
94
2
3
7
5
8
1 Ethernet connector : Instead of traditional RJ-45, European 4pin connector with excellent contact is used for the
vibration environment of the machine.
2 Port4 connector : For RS485 signal.
3 Port3 connector : For RS485 signal (FBs-CM55E) and RS232 signal (FBs-CM25E).
4 Ethernet status indicator :
LINK : ON indicates that normal connection.
RX : ON indicates that the module senses messages in the Ethernet.
TX : ON indicates that the module is sending messages to the Ethernet.

11 - 3 0
5 Port4 status indicator :
RX : ON indicates that Port 4 is receiving messages.
TX : ON indicates that the Port 4 is sending messages.
6 Port4 terminating resistor switch : This switch is used to control the connection of the terminating resistor in the
module to Port 4 RS485 interface. T means with terminating resistor. N means Without terminating resistor.
7 Port3 status indicator :
RX : ON indicates that Port 3 is receiving messages.
TX : ON indicates that the Port 3 is sending messages.
8 Port3 terminating resistor switch : This switch is used to control the connection of the terminating resistor in the
module to Port 3 RS485 interface. T means With terminating resistor. N means Without terminating resistor.
9 Module status indicator (RUN) : Quick ashing indicates normal operation. Slow ashing indicates active setup.
11.8.2.2 CBE appearance
LINK
CONTROLLERPROGRAMMABLE
RXTX
ETHERNET
1 Ethernet connector: Standard RJ45 connector.
2 Ethernet status indicator:
LINK: ON indicates normal connection.
RX: ON indicates that the module senses messages in the Ethernet.
TX: ON indicates that the module is sending messages to the Ethernet.

11 - 3 1
11.8.3 Serial connector function
Port3 connector
The signal level of Port3 connector is of RS232(CM25E ) or RS485(CM55E). This port can be treated as a general
communication port of FBs-PLC module and used for peripheral applications.
Port4 connector
The signal level of Port4 connector is of RS485(CM55E). The main function of this port is to couple the Ethernet
signal to FBs-PLC module, this port also can be treated as a general communication port of FBs-PLC module and used for
peripheral applications. Whenever the FBs-CMX5E module receive a data packet from the Ethernet interface, the same
data packet also will appear at this port(Ethernet to serial port conversion). On the contrary, if a data packet is received at
this port and the destination is due for network (by lookup mapping table), it will also appear at Ethernet network. Because
the multi-drop characteristic of RS485 interface, install one FBs-CMX5E can provide more than one PLC to hook on
Ethernet.
11.8.4 The function of Ethernet serial converter
The operation principle of Ethernet serial converter is to take this module as interface and receive all the messages
from network that intend to the PLCs managed by this module then convert it to the serial signal that can be accepted by
PLC and transmit it thru port4. The operation is completely tr ansparent, in other words, The FBs-PLC cannot distinguish
the message is from local or network, the reply message is the same with normal RS232communication. When the
FBs-CMX5E or FBs-CBE module(for clarity it will be referred as Ethernet module in following context) receives the reply
message of PLC will pack the message into network data packet then send it to the network. It must emphasis here that
the network environment is complicated and not adequate for real time data transfer and can be use mainly for monitoring
but not for control. The main reason to use the network for factory communication is for its connectivity. The application,
which required to access one processor at same time by multiple clients, previous was dicult to implement by RS232 and
RS485 can now easily achieve by network solution.
11.8.5 Application architecture
Base on the dierent requirements of network application this module provides two operating modes –Server Mode
and Client Mode.
When operates at server mode, the Ethernet module will wait for the message coming from the network. After
decode the received message it will send the message thru serial port to the PLC main unit. The reply message from the
PLC will intercept by this module and packed into data packet then transmit to the network hence complete a server mode
transaction.
When operates at client mode, the Ethernet module will wait for the message coming from the serial port. If the
received message is for the PLC located at the remote site connected by network, the Ethernet module will pack the
message into data packet for network transmission and send it to network. After send the message to network the Ethernet
module will wait for the reply message coming from network, when it receives the reply message it will direct the message
to serial port for PLC hence complete a client mode transaction. The network connection of Ethernet module depicted in
the gures at following chapter, for clarity, will only be drawn by a direct link. Actually the network interface of the Ether net
module is 10BaseT, which should attach wi th Hub in order to connect with network.

11 - 3 2
11.8.5.1 Server mode
When operates at server mode, the direct connected single PLC or the stations connected by RS485 are all work at
slave mode, which will wait for command message passively and reply the command. Follows are example of server mode
application.
Single FBs-PLC connection
FBs-CM55E
PORT4 (RS485)
G
PORT3 (RS485)
G
T
+
N
RX
TX
T N
1
ETHERN
ET
TX
+
2
TX
RX
RX
3
6
RUN
LNK
O UT Y( )
Y 6Y 1A C 10 0 ~ 2 4 0 V
C 0 Y 0Y 4Y 2
C 2 Y 3
P O R T 0
Y 5C 4 C 6
0
84
2I
65
9
Y 8Y 7 Y 9
37
S I NKS R C E
( )IN X
X 8X 0
P R O G R A M M A B LE C O N TR O L LE R
2 4 V O U TS /S
R XT X
R U N
E R R
I2 I3
P O W
X 4X 2X 1 X 3
0
84
2I
I0965
X 6X 5 X 7
X 1 2
3
I I7
X 1 0X 9 X 1 1 X 1 3
I N
4 0 0m Am a x .
The example illustrate on above is the simplest server mode application. Work station A and work station B are
master that can send the command message actively to FBs-PLC, Upon receiving the command message, Ethernet
module will send the message thru the port4 to FBs-PLC. W hen there are more than one message intended to send to
FBs-PLC, the Ethernet module will save the additional me ssages into the message queue then send it to FBs-PLC in
orders (Must wait for the reply message before send the next command) therefore there will no conicts.
When work at this mode, there is no need to write any program in PLC for operation.
Multiple PLC connection
FBs-CM55E
PORT4 (RS485)
G
PORT3 (RS485)
G
T
+
N
RX
TX
T N
1
ETHERN
ET
TX
+
2
TX
RX
RX
3
6
RUN
LNK
O U T Y( )
Y 6Y 1A C 1 0 0 ~ 2 4 0 V
C 0 Y 0Y 4Y 2
C 2 Y 3
P O RT 0
Y 5C 4 C 6
0
84
2I
659
Y 8Y 7 Y 9
37
SI N KSR C E
( )IN X
X 8X 0
P R OG R A M M A B L E C O N T R O L L E R
2 4 V O U TS /S
R XT X
R U N
E R R
I2 I3
P O W
X 4X 2X 1 X 3
0
84
2I
I0965
X 6X 5 X 7
X 1 2
3
I I7
X 10X 9 X 1 1 X 13
IN
4 00m Am a x .
O U T Y( )
Y 6Y 1A C 1 0 0 ~ 2 4 0 V
C 0 Y 0Y 4Y 2
C 2 Y 3
PO RT 0
Y 5C 4 C 6
0
84
2I
659
Y 8Y 7 Y 9
37
SI N KSR C E
( )IN X
X 8X 0
P R O G R A M M A B L E C O N T R O L L E R
2 4 V O U TS /S
R XT X
R U N
E R R
I2 I3
P O W
X 4X 2X 1 X 3
0
84
2I
I0965
X 6X 5 X 7
X 1 2
3
I I7
X 10X 9 X 1 1 X 13
IN
4 00m Am a x .
11 - 3 3
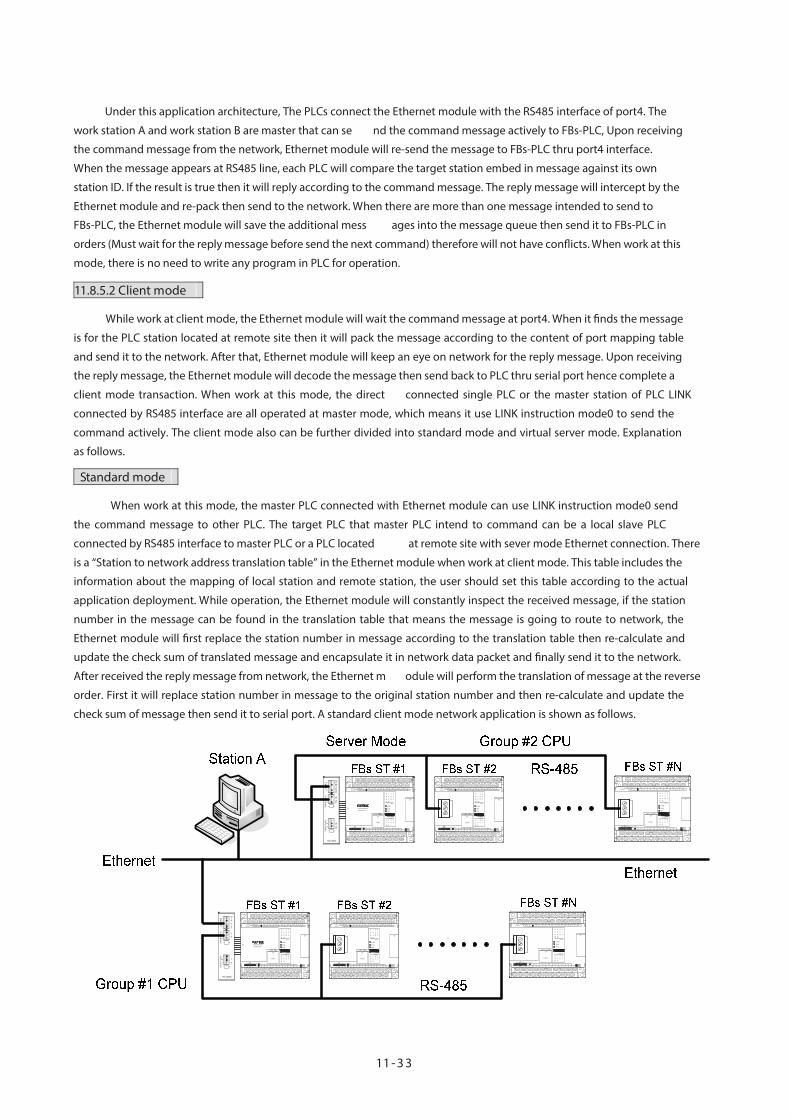
Under this application architecture, The PLCs connect the Ethernet module with the RS485 interface of port4. The
work station A and work station B are master that can se nd the command message actively to FBs-PLC, Upon receiving
the command message from the network, Ethernet module will re-send the message to FBs-PLC thru port4 interface.
When the message appears at RS485 line, each PLC will compare the target station embed in message against its own
station ID. If the result is true then it will reply according to the command message. The reply message will intercept by the
Ethernet module and re-pack then send to the network. When there are more than one message intended to send to
FBs-PLC, the Ethernet module will save the additional mess ages into the message queue then send it to FBs-PLC in
orders (Must wait for the reply message before send the next command) therefore will not have conicts. When work at this
mode, there is no need to write any program in PLC for operation.
11.8.5.2 Client mode
While work at client mode, the Ethernet module will wait the command message at port4. When it nds the message
is for the PLC station located at remote site then it will pack the message according to the content of port mapping table
and send it to the network. After that, Ethernet module will keep an eye on network for the reply message. Upon receiving
the reply message, the Ethernet module will decode the message then send back to PLC thru serial port hence complete a
client mode transaction. When work at this mode, the direct connected single PLC or the master station of PLC LINK
connected by RS485 interface are all operated at master mode, which means it use LINK instruction mode0 to send the
command actively. The client mode also can be further divided into standard mode and virtual server mode. Explanation
as follows.
Standard mode
When work at this mode, the master PLC connected with Ethernet module can use LINK instruction mode0 send
the command message to other PLC. The target PLC that master PLC intend to command can be a local slave PLC
connected by RS485 interface to master PLC or a PLC located at remote site with sever mode Ethernet connection. There
is a “Station to network address translation table” in the Ethernet module when work at client mode. This table includes the
information about the mapping of local station and remote station, the user should set this table according to the actual
application deployment. While operation, the Ethernet module will constantly inspect the received message, if the station
number in the message can be found in the translation table that means the message is going to route to network, the
Ethernet module will rst replace the station number in message according to the translation table then re-calculate and
update the check sum of translated message and encapsulate it in network data packet and nally send it to the network.
After received the reply message from network, the Ethernet m odule will perform the translation of message at the reverse
order. First it will replace station number in message to the original station number and then re-calculate and update the
check sum of message then send it to serial port. A standard client mode network application is shown as follows.
FBs-CM55E
PORT4 (RS485)
G
POR
T3 (RS485)
G
T
+
N
RX
TX
T N
1
ETHERN
ET
TX
+
2
TX
RX
RX
3
6
RUN
LNK
OUT Y( )
Y6Y1AC1 00~2 40V
C0 Y0Y4Y2
C2 Y3
PORT0
Y5C4 C6
0
84
2I
659
Y8Y7 Y9
37
SINKSRC E
( )IN X
X8X0
PROG RAMMABL E CO NTRO LL ER
24V OU TS/S
R XTX
RUN
E RR
I2 I3
P OW
X4X2X1 X3
0
84
2I
I0965
X6X5 X7
X12
3
I I7
X10X9 X11 X13
I N
400mAmax.
O UT Y( )
Y6Y1AC10 0~24 0V
C0 Y0Y4Y2
C2 Y3
POR T0
Y5C4 C6
0
84
2I
659
Y8Y7 Y9
37
SINKSR CE
( )I N X
X8X0
PR OG RAMMABLE CON TRO LLER
24V O UTS/S
RXTX
RUN
ERR
I2 I3
POW
X4X2X1 X3
0
84
2I
I0965
X6X5 X7
X12
3
I I7
X10X9 X11 X13
IN
400m Amax .
O U T Y( )
Y 6Y 1A C1 0 0 ~2 4 0 V
C 0 Y0Y4Y 2
C2 Y 3
P OR T 0
Y5C 4 C 6
0
84
2I
659
Y8Y7 Y9
37
SIN KSR C E
( )I N X
X8X0
P RO G RA M MA BL E C O N T RO L L ER
24 V O U TS /S
R XT X
RU N
E R R
I2 I3
P O W
X 4X2X1 X 3
0
84
2I
I0965
X6X5 X7
X1 2
3
I I7
X 10X 9 X1 1 X 13
I N
4 00m Am ax.
FBs-CM55E
PORT4 (R
S485)
G
PORT3 (RS485)
G
T
+
N
RX
TX
T N
1
ETHER
NET
TX
+
2
TX
RX
RX
3
6
RUN
LNK
OUT Y( )
Y6Y1AC100~240V
C0 Y0Y4Y2
C2 Y3
PORT0
Y5C4 C6
0
84
2I
659
Y8Y7 Y9
37
SINKSRC E
( )IN X
X8X0
PROG RAMMABL E CO NTRO LL ER
24V OU TS/S
R XTX
RUN
E RR
I2 I3
P OW
X4X2X1 X3
0
84
2I
I0965
X6X5 X7
X12
3
I I7
X10X9 X11 X13
I N
400mAmax.
OUT Y( )
Y6Y1AC100~240V
C0 Y0Y4Y2
C2 Y3
PORT0
Y5C4 C6
0
84
2I
659
Y8Y7 Y9
37
SINKSRC E
( )IN X
X8X0
PROG RAMMABL E CO NTRO LL ER
24V OU TS/S
R XTX
RUN
E RR
I2 I3
P OW
X4X2X1 X3
0
84
2I
I0965
X6X5 X7
X12
3
I I7
X10X9 X11 X13
I N
400mAmax.
O UT Y( )
Y6Y1AC 1 0 0~ 2 4 0V
C0 Y 0Y 4Y2
C 2 Y3
P O R T0
Y 5C 4 C 6
0
84
2I
659
Y8Y7 Y9
37
SIN KSR C E
( )IN X
X 8X 0
PR O G R A MM AB L E C O N TR O L L ER
24V O U TS/S
R XTX
R UN
E R R
I2 I3
P O W
X4X2X 1 X3
0
84
2I
I0965
X 6X5 X 7
X1 2
3
I I7
X10X9 X1 1 X 13
I N
40 0m Am a x .

11 - 3 4
In the above gure, there are two groups of PLC. The PL Cs in each group are linked together by RS485 interface
and then attach to an Ethernet module for network accessibility. The station number 1 of group 1 is a master PLC, which
not only can access the other PLCs of same group but also can access the PLCs of group 2 with the help of two Ethernet
modules bridging. The Ethernet module attached to group 2 PLC is congured as server mode, which means all the PLCs
covered by this module are work as slave PLC and wait for the command passively. It must emphasis that the PLCs under
standard client mode Ethernet module can’t access by other mast er devices thru network communication. The role of this
kind of Ethernet module is very similar to Fire Wall. Only the messages from inside or the corresponding reply messages
can be accepted by Ethernet module, other messages will be bl ocked. The security of client mode operation is very high.
Based on the reason described above, the workstation A can only access the PLCs of group 2. It’s noted that, from the
view point of master PLC, the station number of station #2 of group 2 is not 2, otherwise it can’t distinguish it from the loca l
station of #2. This can be overcame by the introduction of translation table.
Virtual server mode
Though high security is the key feature of standard client mode, can’t accessed by other devices thru network is
also a drawback. To take the balance between the security and connectivity, the Ethernet module provides a virtual server
mode to meet the both end. While working at this mode, the Ethernet module emulates a PLC with station number of 255.
There are only R0~R1999 can be accessed of this virtual PLC. When the command message is for station 255, the
Ethernet module will interpret the message and act upon that message; this is true for all the messages whether it comes
from serial port or from network. The Ethernet module act as a medium, the status of PLCs can store in it for outside world
access. The outside world can put the command status in it for PL Cs access. The virtual server mode is an option for client
working mode, which means while act as virtual server the master PLC still can access the slave PLCs that attached to
network.
11.8.6 Hardware installation
DIP switch setting ………… Termination resistor installation(FBs-CM25E/CM55E)
In order to meet the termination requirement of RS485 network, all Ethernet modules equip with a set of built-in
termination resistor to ease the eld installation. The termination function can be setup by the DIP switch seen from the
front cover as follow.
T N
When both switches are at T position, it means termi nation resistor is in eective. When at N position means no
termination resistor attached by this module. When implementation, there are only two modules that located at opposite far
side need to terminated. Excessive termination will over load the whole network thus must be avoided.
Password protection setup
When the password has been entered (enabled), the user will be requested to enter a matched password each time
when perform the conguration via conguration utility ‘ether_cfg.e xe’. In other words, in case the user forget the password
then he/she no longer can modify the module’s conguration. To prevent this situation from occuring, there also provides a
jumper to disable the password protection temporary. This jumper can be accessed only when the module’s plastic cover
is removed. The relative location of jumper is depicted at follow :

11 - 3 5
Password Protection
No Password Protection
When the jumper cap of JP1 is at upper position (linked by white line), the password protection is disabled. The
jumper cap should put in the lower position when under normal operation.
Cable wiring
Serial Port Connectors : Please refer Appendix A, B for the Port3, Port4 signal description.
Network Connect : The connector type of FBs-CM25E/55E is Euro 4pi n plug connector while FBs-CBE board is RJ-45.
Please use the CAT5 UTP (un-shielded twisted pair) cable for network connection. The best
recommendation is using the CAT5 STP(shielded twisted pair) cable
The wiring of cable to network connector is listed as below :
Signal Line Color European Pins RJ-45 Pins Direction
TX+ White orange 3 1 External PLC
TX- Orange 4 2 External PLC
RX+ White green 1 3 External PLC
RX- Green 2 6 External PLC
11.8.7 Software setup
There is a accompany software ”Ether_cfg.exe” to aid th e conguration of Ethernet module. This software is a
windows-based software and has following functions :
1. Basic module Information setup : Includes IP (Network address), gateway, netmask, baud rate, operating mode,
module name, module description.
2. Security setup : Setup authorized IP. With this function, only the command message issue by the host with authorized
IP can be accepted by Ethernet module. Hence can prevent the unintended access and keep the
system secure. There are 10 set of IP group ca n be set. Each group can contain one or more
consecutive IPs.
3. Local station to remote station mapping :
The operating of FBs-PLC networking is purely transp arent. When access the remote slave PLC by executing the
LINK instruction of mode0 and with the help of Ethernet module, the master PLC does not know the remote PLC is
connected by network. In other words, the maximum number of slave station is still 254. When Ethernet module work at
client mode, in order to translate the local station into remote station, must rst setup the translation table. Considering t he
convenience for variety application, there are three methods can be used to setup the network conguration.

11 - 3 6
4. Setup by local area network :
This is the most convenient method for network cong uration. When operating, the conguration software will scan
all the Ethernet modules attached to the network. All the scanned Ethernet modules will be shown in the table on the
screen with the regarded basic information. The user can pi ck the Ethernet module to be editing directly from the screen.
Considering the security, we can set the password to prevent the unintended access.
5. Setup by internet :
With this method can setup the network conguration thru Internet. Most often is used to setup the station mapping or
authorized IP. While use this method, can only setup one Ethernet module at a time and must specify the IP address of
Ethernet module to be edited. Considering the security, can set password to prevent the unintended access.
LAN conguration
Step 1 : Use the network cable to connect the Ethernet module and Hub.
Step 2 : Connect the PC to network and execute the software - Ether_cfg.exe. Use the mouse click the ’Intranet’ option in
the ’Conguration Channel’ group box, then the screen changes to
Internet setup
Step 1 : Connect the Ethernet module and Hub with twisted Ethernet cable.
Step 2 : Connect the PC to network and execute the network conguration software - ether_cfg.exe. Use the mouse point
to the ’Internet’ option buttons within the ’Conguration Channel’ group box and click it then the screen will be
shown as below
Click the ’Scan Map’ button then start
the scanning of Ethernet module. All
the modules detected will be shown in
the table.

11 - 3 7
At this time can input the remote IP address of the Ethernet module desired for conguration. After click the ‘Get Map’
button, it will start to connect Ethernet module. When the c onnection is established will show the information regard the
connected Ethernet module in the table at the middle of window.
Common data setup
Whenever the connection is established, it will show the information regard the connected Ethernet module in the
table at the middle of window, no matter what the connection method is selected.
At that time, can double click the line where the de sired Ethernet module is located or single click the line and
click ’Properties..’ button to perform the conguration. If pa ssword not setting or correct password were entered will show
the screen as below
Follows are the description of each eld shown in above :
1.Firmware Version : Denotes the software version of Ethernet module for conguration.
2.IP Address : IP address of Ethernet module for conguration.
3.Subnet Mask : Subnet mask of Ethernet module for conguration.
4.GateWay : The IP address of gateway for Ethernet module for conguration.
5.Host Name : For documentation, can be used to distinguish Ethernet module. At most can consist of 11 characters . 6.Comment : For documentation, can be used to distinguish Ethernet module. At most can consist of 21 characters.
7.Operation mode : Client or server mode selection.
8.Protocol : There are two communication protocols were supported in this module. Modbus/TCP or Fatek .
Modbus/TCP can be choosed only when the operation mode is set to Server mode while the Fatek mode
can be used in both modes.

11 - 3 8
9.Baud Rate(CM25E/CM55E) : Communication speed between Ethernet module and PLC with 9600 、19200 、38400 、
57600 、115200 、230400 bps six options.
10.Remote Cong. Enabled : For security, when this option is checked will allow the conguration thru the Internet. It
must be checked when intent to congure the network conguration according to the
method described in section5.3.4. It’s strongly recommended to set the password when
enable the remote conguration to prevent the leakage of security hole. Please leave this
option un-checked if remote conguration is not necessary.
11.Import/Export button : Can use the Export function to save entire setup data of Ethernet module to le or use the
Import function to retrieve the setup data stored in le to ease the editing job of conguration.
※ The contents enclose in the box at below can be skipped for the beginner.
Advance Setup : Advanced Setup: This setting can only need to be performed when at server mode,
click ’Advance Setup’ button to start setup and the screen will be shown :
Message Time Out : The time-out time for PLC, the default setting is 300ms. Ethernet module will wait for the
same amount time of this eld before the PLC can reply the command message.
Transaction delay : The minimal delay time for Ethernet module to send the next command message after it
receives a reply message from PLC. The default setting is 0ms. This setting is used for
the applications that connect multiple PLCs with diverse scan time by RS485.
Security setup
For security of Ethernet module operation, besides the disable/enable control of remote conguration, also provides
following measures to work with
Password protection : Continues from last screen, click the ’Password’ tab to set the password. The screen changes to
Please input the new password at ’New Password’ and ’Conrm Password’ edit eld and click the ’Change’ button to
complete the setting of new password. Please click the ’Remove’ button if password protection is not necessary.

11 - 3 9
The setting of access right : Use the setting of authorized IP to prevent the illegal access of data. After click the ’Access
Control’ tab, the screen changes to
Move the cursor to the ‘Grant IP’ table and click the right mouse button then the screen will appear a pop-up menu as
shown below :
……
… … … Click ’Add’ to add one set of authorized IP. Click ’Del’ to delete a set of authorized IP. Click ‘Edit’ to
modify an existed authorized IP data. After click the ’Add’ function the screen changes to
With this dialog to dene a set of consecutive authorized IP addresses. Please input the rst IP address of the
consecutive IP addresses in the ’Grant IP’ eld and in put the size of IP addresses in ‘Group Size’ led Port mapping setup
This setting can only need to perform when Ethernet module is work at client mode. When the working mode is set to
client mode the basic conguration data page changes to

11 - 4 0
It has an additional ‘Port Mapping’ tab when compare with server mode, after click the ‘Port Mapping’ tab the screen
changes to
Move the cursor to the table locating in the center of window then click the right mouse button then the screen
appears a pop-up menu as shown below :
… … … Click ’Add’ to add one station mapping data. Click ’Del’ to delete a station mapping data. Click ‘Edit’ to
modify an existed station mapping data. After click the ’Add’ command the screen changes to
Following are the description of each eld shown in above :

11 - 4 1
1.Local Station: The station number of local PLC.
2.Remote Station: The station number of remote PLC.
3.Remote IP: The IP address of Ethernet module connected by the remote PLC.
4.Group Size: With execute this dialog once can dene a group of station mapping, for example, if we want to map the
local PLC station number 20~29 to remote PLC station10~19 and the IP Address of remote Ethernet
module is 192.168.1.3 then can set the Local Station to 20, Remote Station to 10, Group Size to 10,
Remote IP to 192.168.1.3. The Ethernet module can provide at most 19 groups of station mapping.
Service port setup
The Ethernet module when work either in TCP or UDP server mode should be assigned a service port number for
client access. The default port number for FBs series Ethernet module is port 500. If the user want to change the port
number can click the ‘MISC’ tab and change the Major port eld to desire port number. Second port eld provides the UDP
working mode the opportunity to have dual service port number , one is port 500 the other is port number appear in Major
port eld.
Update conguration
When nish the editing of conguration data, please click the ’OK’ button of the “adaptor’s properties” window to
update the Ethernet module. When nish the update and without error, the screen will change to main window and ready
for conguration of another Ethernet module.
11.8.8 Procedures to change the conguration
Now summarize the procedures to change the network conguration at below.
Step 1: Select a connection method. (LAN or Internet)
Step 2: Edit the basic data of the module.
Step 3: Set the password protection (optional).
Step 4: Setup the authorized IP (optional).
Step 5: Setup the mapping of local and remote station and IP address (Only client mode required).

11 - 4 2
11.8.9 Pin assignments and protocols
RS232 port pin assignments
Signal Pins Direction
RX 2 External PLC
TX 3 External PLC
GND 5
RS485 port pin assignments
FATEK TCP/UDP communication protocol
The communication protocol of FATEK TCP/UDP embeds the FATEK serial communication message in the TCP or
UDP data packet. The port number used to convey the FATEK TCP/UDP message is congurable (default is 500.)
ModBus/TCP communication protocol
The document of communication protocol of Modbus/TCP can be referenced at the web site http://www.modbus.org .
The port number used to convey the Modbus/TCP message is 502.